Panasonic of North America SB-NE5 Wireless Speaker System User Manual
Panasonic Corporation of North America Wireless Speaker System
Contents
- 1. Short Term Confidentiality_User Manual[SC-NE3] -1
- 2. Short Term Confidentiality_User Manual[SC-NE3] -2
- 3. Short Term Confidentiality_User Manual[SC-NE5] -1
- 4. Short Term Confidentiality_User Manual[SC-NE5] -2
Short Term Confidentiality_User Manual[SC-NE3] -1
VQT4U49
until
2013/1/17
ENGLISHESPAÑOL
Owner’s Manual
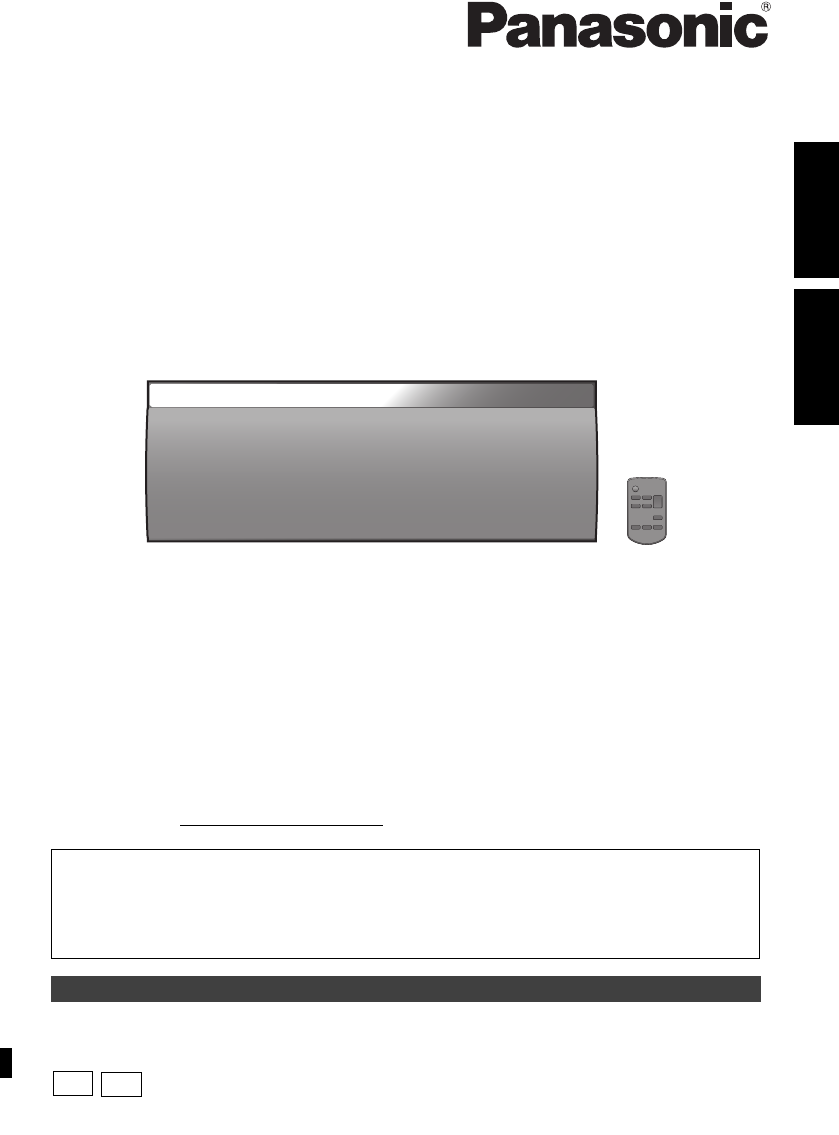
Wireless Speaker System
Model No. SC-NE3
Thank you for purchasing this product.
Please read these instructions carefully before using this product, and save this manual for future
use.
If you have any questions, contact:
U.S.A. and Puerto Rico: 1-800-211-PANA (7262)
Canada: 1-800-561-5505
Register online at www.panasonic.com/register (U.S. customers only)
Included Installation Instructions (l2, 3 and 18, 19)
The installation work should be done by a qualified installation specialist.
Before commencing work, carefully read these installation instructions and the operating
instructions to ensure that installation is performed correctly.
(Please keep these instructions. You may need them when maintaining or moving this unit.)
La referencia rápida en español se puede encontrar en la página 20.
P
PC
SC-NE3_PPC~VQT4U49.book 1 ページ 2013年1月9日 水曜日 午後9時7分
2
VQT4U49
IMPORTANT SAFETY INSTRUCTIONS
Read these operating instructions carefully before using the unit. Follow the safety instructions on the unit and the applicable safety
instructions listed below. Keep these operating instructions handy for future reference.
1 Read these instructions.
2 Keep these instructions.
3 Heed all warnings.
4 Follow all instructions.
5 Do not use this apparatus near water.
6 Clean only with dry cloth.
7 Do not block any ventilation openings. Install in
accordance with the manufacturer’s instructions.
8 Do not install near any heat sources such as radiators,
heat registers, stoves, or other apparatus (including
amplifiers) that produce heat.
9 Do not defeat the safety purpose of the polarized or
grounding-type plug. A polarized plug has two blades with
one wider than the other. A grounding-type plug has two
blades and a third grounding prong. The wide blade or the
third prong are provided for your safety. If the provided
plug does not fit into your outlet, consult an electrician for
replacement of the obsolete outlet.
10 Protect the power cord from being walked on or pinched
particularly at plugs, convenience receptacles, and the
point where they exit from the apparatus.
11 Only use attachments/accessories specified by the
manufacturer.
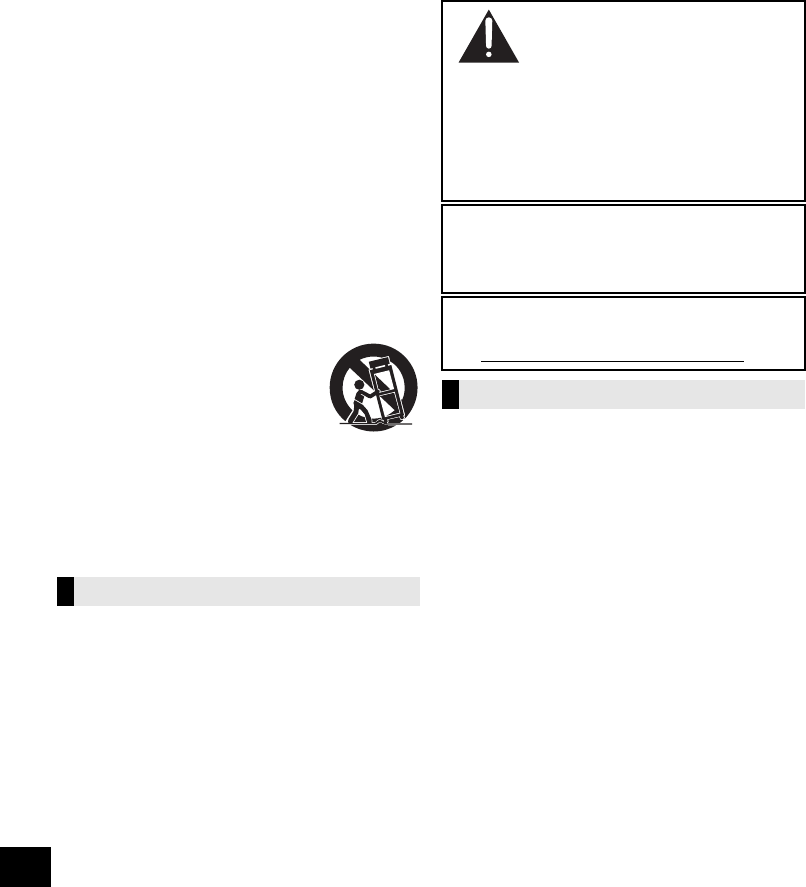
12 Use only with the cart, stand, tripod,
bracket, or table specified by the
manufacturer, or sold with the
apparatus. When a cart is used, use
caution when moving the cart/apparatus
combination to avoid injury from
tip-over.
13 Unplug this apparatus during lightning storms or when
unused for long periods of time.
14 Refer all servicing to qualified service personnel. Servicing
is required when the apparatus has been damaged in any
way, such as power-supply cord or plug is damaged, liquid
has been spilled or objects have fallen into the apparatus,
the apparatus has been exposed to rain or moisture, does
not operate normally, or has been dropped.
Unit
≥To reduce the risk of fire, electric shock or product damage,
– Do not expose this unit to rain, moisture, dripping or
splashing.
– Do not place objects filled with liquids, such as vases, on
this unit.
– Use only the recommended accessories.
– Do not remove covers.
– Do not repair this unit by yourself. Refer servicing to
qualified service personnel.
AC power supply cord
≥The power plug is the disconnecting device.
Install this unit so that the power plug can be unplugged from
the socket outlet immediately.
Button-type battery (Lithium battery)
≥Risk of fire, explosion and burns. Do not disassemble, heat
above 60 oC (140 oF) or incinerate.
Unit
≥Do not place sources of naked flames, such as lighted
candles, on this unit.
Placement
≥To reduce the risk of fire, electric shock or product damage,
– Do not install or place this unit in a bookcase, built-in
cabinet or in another confined space. Ensure this unit is
well ventilated.
– Do not obstruct this unit’s ventilation openings with
newspapers, tablecloths, curtains, and similar items.
Button-type battery (Lithium battery)
≥Danger of explosion if battery is incorrectly replaced.
Replace only with the type recommended by the
manufacturer.
≥Keep out of reach of children.
≥Insert with poles aligned.
≥Mishandling of batteries can cause electrolyte leakage and
may cause a fire.
– Remove batteries if you do not intend to use the remote
control for a long period of time. Store in a cool, dark
place.
– Do not heat or expose to flame.
– Do not leave the battery(ies) in a car exposed to direct
sunlight for a long period of time with doors and windows
closed.
– Do not touch the terminals (i and j) with metal objects.
– Do not recharge, disassemble, remodel, heat or throw into fire.
≥When disposing the batteries, please contact your local
authorities or dealer and ask for the correct method of
disposal.
WARNING
DO NOT INGEST BATTERY,
CHEMICAL BURN HAZARD
This product contains a coin/button cell battery. If the coin/
button cell battery is swallowed, it can cause severe
internal burns in just 2 hours and can lead to death.
Keep new and used batteries away from children. If the
battery compartment does not close securely, stop using
the product and keep it away from children.
If you think batteries might have been swallowed or placed
inside any part of the body, seek immediate medical attention.
If any electrolyte should come into contact with your hands
or clothes, wash it off thoroughly with water.
If any electrolyte should come into contact with your eyes,
never rub the eyes. Rinse eyes thoroughly with water, and
then consult a doctor.
<For USA-California only>
This product contains a CR Coin Cell Lithium Battery which
contains Perchlorate Material
s
special handling may apply.
See www.dtsc.ca.gov/hazardouswaste/perchlorate.
CAUTION
SC-NE3_PPC~VQT4U49.book 2 ページ 2013年1月9日 水曜日 午後9時7分

3
VQT4U49
ENGLISH
-If you see this symbol-
Table of contents
IMPORTANT SAFETY INSTRUCTIONS............2
Accessories.......................................................4
Unit care.............................................................4
About Bluetooth®..............................................4
Control reference guide....................................5
Connections ......................................................6
Network settings ...............................................7
Using AirPlay with this unit’s speakers ........10
Playing back music files on
the DLNA server.............................................. 11
Bluetooth® operations ....................................12
Sound adjustment...........................................13
Others...............................................................13
Troubleshooting .............................................. 15
Specifications..................................................17
Licenses...........................................................17
Attaching the unit to a wall (optional) ........... 18
Spanish Quick Reference /
Referencia rápida en español ........................ 20
Limited Warranty (ONLY FOR U.S.A. AND
PUERTO RICO) ................................................ 21
Limited Warranty (ONLY FOR CANADA)....... 22
Product Identification Marking is located on the bottom of
the unit.
AndroidTM, Google PlayTM, Google ChromeTM browser are
trademarks or registered trademarks of Google Inc.
Information on Disposal in other Countries
outside the European Union
This symbol is only valid in the
European Union.
If you wish to discard this
product, please contact your local
authorities or dealer and ask for
the correct method of disposal.
The lightning flash with arrowhead symbol, within an
equilateral triangle, is intended to alert the user to the
presence of uninsulated “dangerous voltage” within
the product’s enclosure that may be of sufficient
magnitude to constitute a risk of electric shock to persons.
CAUTION
CAUTION : TO REDUCE THE RISK OF ELECTRIC
SHOCK, DO NOT REMOVE SCREWS.
NO USER-SERVICEABLE PARTS
INSIDE.
REFER SERVICING TO QUALIFIED
SERVICE PERSONNEL.
The exclamation point within an equilateral triangle is
intended to alert the user to the presence of important
operating and maintenance (servicing) instructions in
the literature accompanying the appliance.
RISK
OF
ELECTRIC
SHOCK
DO
NOT
OPEN
About descriptions in this Owner’s Manual
≥
Pages to be referred to are indicated as
“
l±±
”.
≥Unless otherwise indicated, operations are
described using the remote control.
SC-NE3_PPC~VQT4U49.book 3 ページ 2013年1月9日 水曜日 午後9時7分
4
VQT4U49
Accessories
Unit care
Pull out the AC power plug from the outlet before
maintenance.
∫Clean this unit with a soft, dry cloth
≥When dirt is heavy, wring a cloth moistened in water tightly to
wipe the dirt, and then wipe it with a dry cloth.
≥Never use alcohol, paint thinner or benzine to clean this unit.
≥Before using chemically treated cloth, carefully read the
instructions that came with the cloth.
∫To dispose or transfer this unit
The unit may keep the user settings information in
the unit. If you discard this unit either by disposal or
transfer, then follow the procedure to return all the
settings to the factory presets to delete the user
settings.
(l15, “To return all settings to the factory preset”)
≥The operation history may be recorded in the
memory of this unit.
About Bluetooth®
∫Frequency band used
≥This unit uses the 2.4 GHz frequency band.
∫Certification of this device
≥This system conforms to frequency restrictions
and has received certification based on
frequency laws. Thus, a wireless permit is not
necessary.
≥The actions below are punishable by law in some
countries:
– Taking apart or modifying the unit.
– Removing specification indications.
∫Restrictions of use
≥Wireless transmission and/or usage with all
Bluetooth® equipped devices is not guaranteed.
≥All devices must conform to standards set by
Bluetooth SIG, Inc.
≥Depending on the specifications and settings of a
device, it can fail to connect or some operations
can be different.
≥This system supports Bluetooth® security
features. But depending on the operating
environment and/or settings, this security is
possibly not sufficient. Transmit data wirelessly to
this system with caution.
≥This system cannot transmit data to a Bluetooth®
device.
∫Range of use
≥Use this device at a maximum range of 10 m
(33 ft). The range can decrease depending on
the environment, obstacles or interference.
∫Interference from other devices
≥This unit may not function properly and troubles
such as noise and sound jumps may arise due to
radio wave interference if this unit is located too
close to other Bluetooth® devices or the devices
that use the 2.4 GHz band.
≥This unit may not function properly if radio waves
from a nearby broadcasting station, etc. is too
strong.
∫Intended usage
≥This unit is for normal, general use only.
≥Do not use this system near an equipment or in
an environment that is sensitive to radio
frequency interference (example: airports,
hospitals, laboratories, etc).
Check the supplied accessories before using this
unit.
∏1 Remote control (with a battery)
(N2QAYC000091)
∏1 AC power supply cord
(K2CB2CB00022)
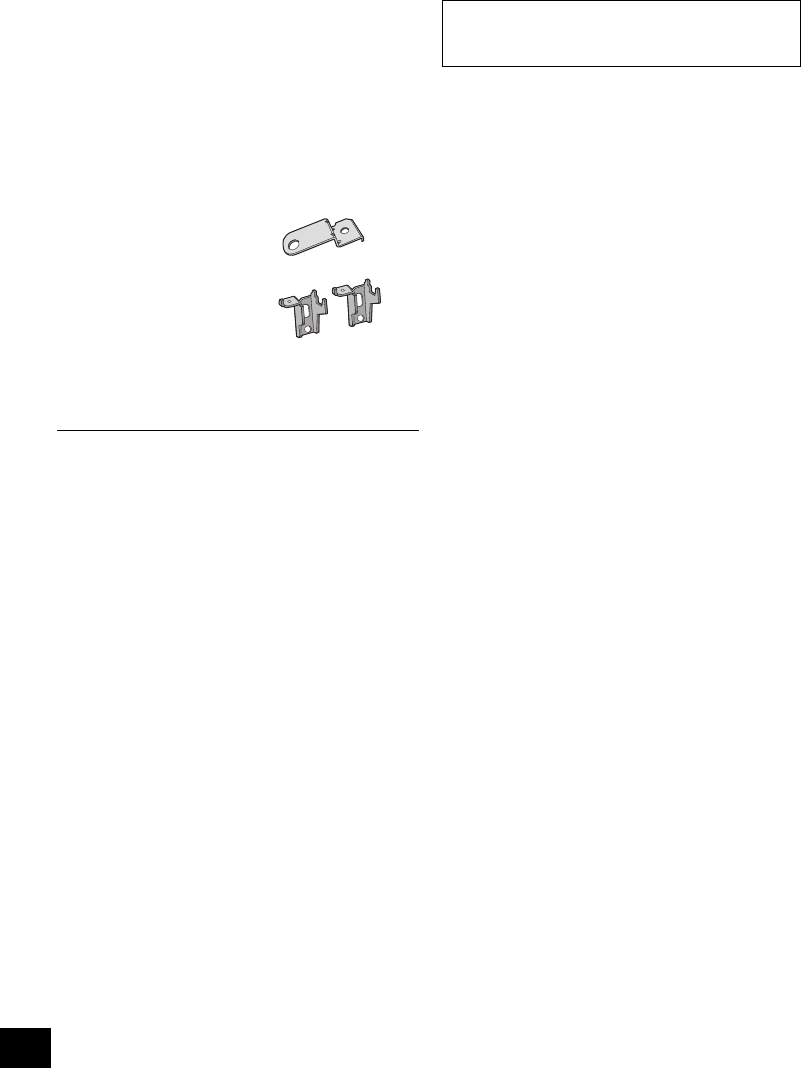
Wall mounting accessories
∏1 Screw
(XTB3+8JFJK-J)
∏1 Safety holder
(RGQ0660-K)
∏2 Wall mount brackets
(RMQX1082-S)
(ONLY FOR CANADA)
The enclosed Canadian French label sheet corresponds to the
English display on the top of the unit.
≥Do not use AC power supply cord with other equipment.
≥Product numbers provided in this Owner’s Manual are
correct as of February 2013. These may be subject to
change.
Panasonic bears no responsibility for data
and/or information that is compromised
during a wireless transmission.
SC-NE3_PPC~VQT4U49.book 4 ページ 2013年1月9日 水曜日 午後9時7分
5
VQT4U49
ENGLISH
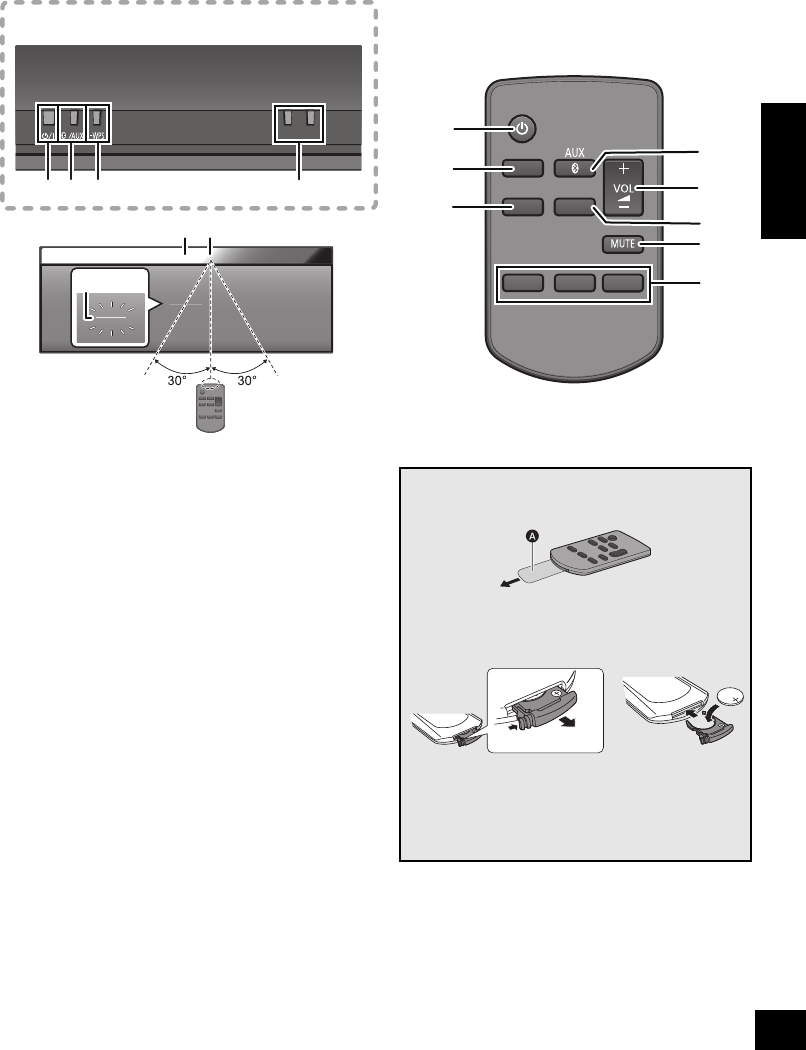
Control reference guide
1 Standby/on switch [Í/I] ([Í])
Press to switch the unit from on to standby mode or vice
versa.
In standby mode, the unit is still consuming a small amount
of power.
2 Enter sound menu
3 Enter setup menu
4 Select Bluetooth®/AUX
5 Adjust the volume (0 (min) to 50 (max))
6 Enter the Bluetooth® menu/
Change the sound input level of the external
device (l6)
7 Mute the sound
Mutes the sound. Press again to cancel.
“MUTE” is also canceled when the volume is adjusted or the
unit is turned off.
8 Selection/OK
9 WPS pairing button (l8)
10 Display
11 Remote control signal sensor
Distance: Within approx. 7 m (23 ft) directly in front.
≥To avoid interference, please do not put any objects in
front of signal sensor.
12 Wi-Fi® status indicator
∫Before using for the first time
Remove the insulation sheet A .
∫To replace a button-type battery
Battery type: CR2025 (Lithium battery)
1 2
≥Set the button-type battery with its (i) mark
facing upward.
≥Keep the button-type battery out of reach of
children to prevent swallowing.
−
VOLUME
+
1495
10 11
12
Top view
SOUND
SETUP
PLAY MENU
OK
1
4
2
5
6
7
8
3
SC-NE3_PPC~VQT4U49.book 5 ページ 2013年1月9日 水曜日 午後9時7分
6
VQT4U49
Connections
≥These speakers do not have magnetic shielding. Do not place them near a television, personal computer or other devices easily
influenced by magnetism.
≥When this unit is turned on for the first time after purchase, a message prompting you to connect a Bluetooth® device
(“PAIRING”) is displayed. (l12)
∫To select the sound input level of the external device
1While in “AUX” mode, press [PLAY MENU] repeatedly to select “INPUT LEVEL” and then press [OK].
2Press [3,4] to select “NORMAL” or “HIGH”.
≥The default setting is “NORMAL”.
≥Switch the equalizer off or turn the volume of the external device down to reduce the input signal. High level of input signal will
distort the sound.
≥For details, refer to the instruction manual of the other equipment.
≥The cables and the devices are not supplied.
Additional Connection
モヤチリワ
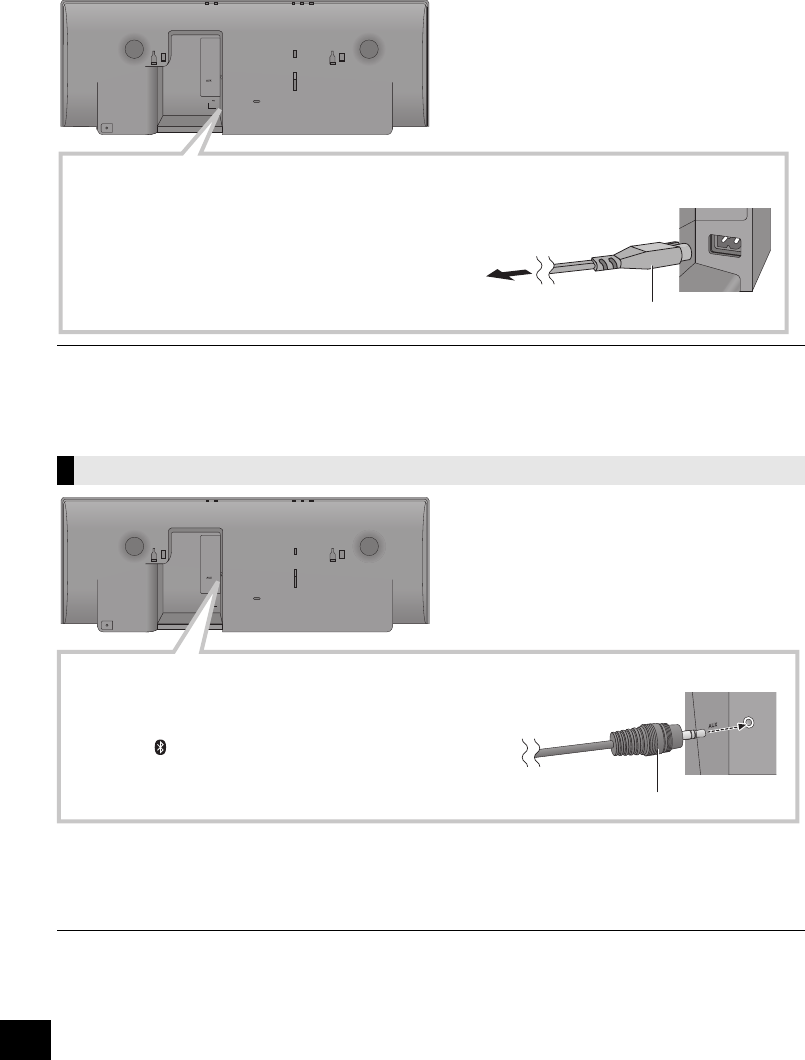
Connect the AC power supply cord.
To a household AC outlet
AC Power supply cord (supplied)
This unit consumes a small amount of AC power (l17) even when turned off.
≥In the interest of power conservation, if you will not be using this unit for an extended period of
time, unplug it from the household AC outlet.
モヤチリワ
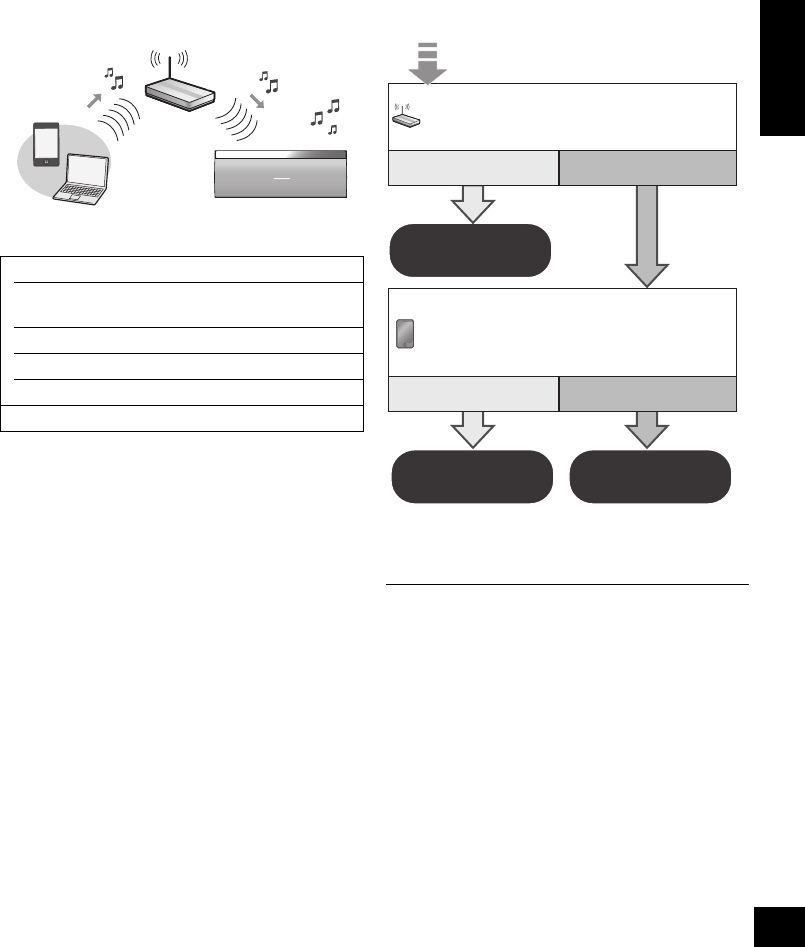
Connect an external music device (for AUX mode).
1Plug the audio cable (not supplied) into the AUX jack.
Plug type: ‰3.5 mm (1/8q) stereo
2Press [ , AUX] to select “AUX” and start playback on
the connected device.
Audio cable (not supplied)
SC-NE3_PPC~VQT4U49.book 6 ページ 2013年1月9日 水曜日 午後9時7分
7
VQT4U49
ENGLISH
Network settings
You can wirelessly stream music from an iOS
device (iPhone, iPod, iPad), an Android device or a
Mac/PC to this unit’s speakers by using the AirPlay
or DLNA feature.
To use these features, this unit must join the same
2.4 GHz wireless network as the AirPlay
compatible device or the DLNA compatible device.
≥It is also possible to use AirPlay without a wireless network
router. (l10, “Directly streaming to this unit (AirPlay)”)
∫Compatible AirPlay devices
(as of February 2013)
Preparation
≥Place this unit close to the wireless network
router.
1Turn this unit on.
2Follow the chart below to choose the network
setting method.
≥If you want to apply the advanced setting,
or you want to perform wireless setting with
your Mac/PC, try “Method 3” on page 8.
≥To cancel this setting in the middle, press [Í] to turn off the
unit.
≥Simultaneous use with other 2.4 GHz devices, such as
microwaves, cordless telephones, etc., may result in
connection interruptions.
≥For up to date compatibility information on your wireless
network router refer to
http://panasonic.jp/support/global/cs/
(This site is in English only.)
iOS 4.3.3 or later
iPod touch
3rd, 4th, and 5th generation
iPhone 5 / iPhone 4S / iPhone 4 / iPhone 3GS
iPad (3rd, and 4th generation) / iPad 2 / iPad
iPad mini
iTunes 10.2.2 or later (Mac / PC)
Does your wireless network router
support WPS?
Yes
l8,
“Method 1”
l8,
“Method 2”
l8,
“Method 3”
No / Do not know
Yes No
Are you using an iPod touch/iPhone/iPad,
or an Android device?
SC-NE3_PPC~VQT4U49.book 7 ページ 2013年1月9日 水曜日 午後9時7分
8
VQT4U49
∫Using the WPS Push Button
Configuration (PBC)
1Press and hold [– WPS] on the unit.
{. “WPS” flashes on the display.
(The Wi-Fi status indicator blinks blue.)
≥Complete step 2 within 2 mins.
2After “WPS” is indicated, press the WPS button
on the wireless network router.
3The unit’s settings are completed when
“SUCCESS” is displayed and the Wi-Fi status
indicator stops blinking and lights in blue.
4
Press [OK] on the remote control to exit the setting.
≥To use the WPS PIN code, refer to the notes on page 9.
You can make the wireless network settings with the app,
“Panasonic Stereo System Network Setup” (for free).
If you’re using an Android device, download the app
at the Google Play Store. If you’re using an iPod
touch/iPhone/iPad, download it at the App Store.
Preparation
≥Connect your
smartphone
to your home wireless
network.
≥
Check the password for your home wireless network.
1
Press
[SETUP]
on the remote control repeatedly
to select “
NET SETUP
” and then press
[OK]
.
{. “SETTING” is indicated on the display.
(The Wi-Fi status indicator blinks purple.)
2
Start “
Panasonic Stereo System Network Setup
”
on your smartphone and follow the indications.
∫Note for the iOS version
After step 2
1 Enter the password for the home wireless
network to which the iOS device is connected.
2 When a message instructing you to connect the
iOS device to this unit is displayed, press the
home button to close the app.
3 On the Wi-Fi network selection screen in
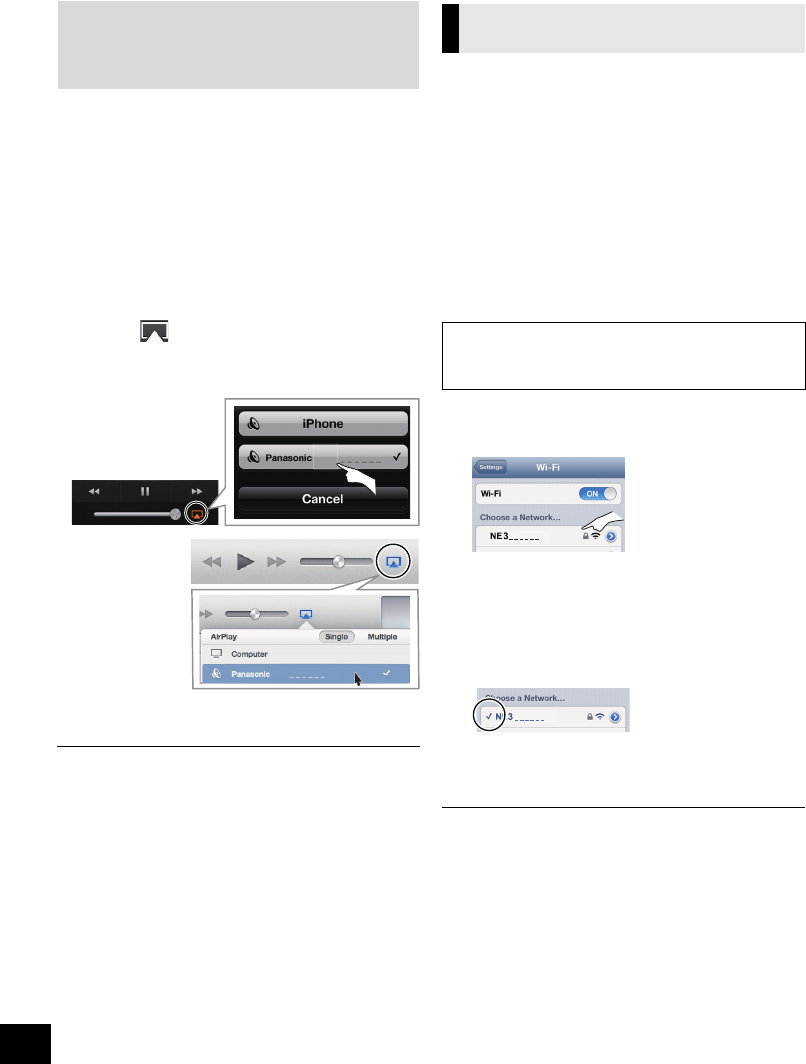
“Settings”, select “00 Setup _ _ _ _ _ _”.
≥“ _ ” stands for a digit that is unique to each set.
4 When a message indicating the completion of the
connection to this unit is displayed, restart the app.
5 When a message indicating the completion of the
Wi-Fi setup of this unit is displayed, close the
app, and then check the operation of AirPlay, etc.
≥“Panasonic Stereo System Network Setup” for Mac OS is
also available at the App Store.
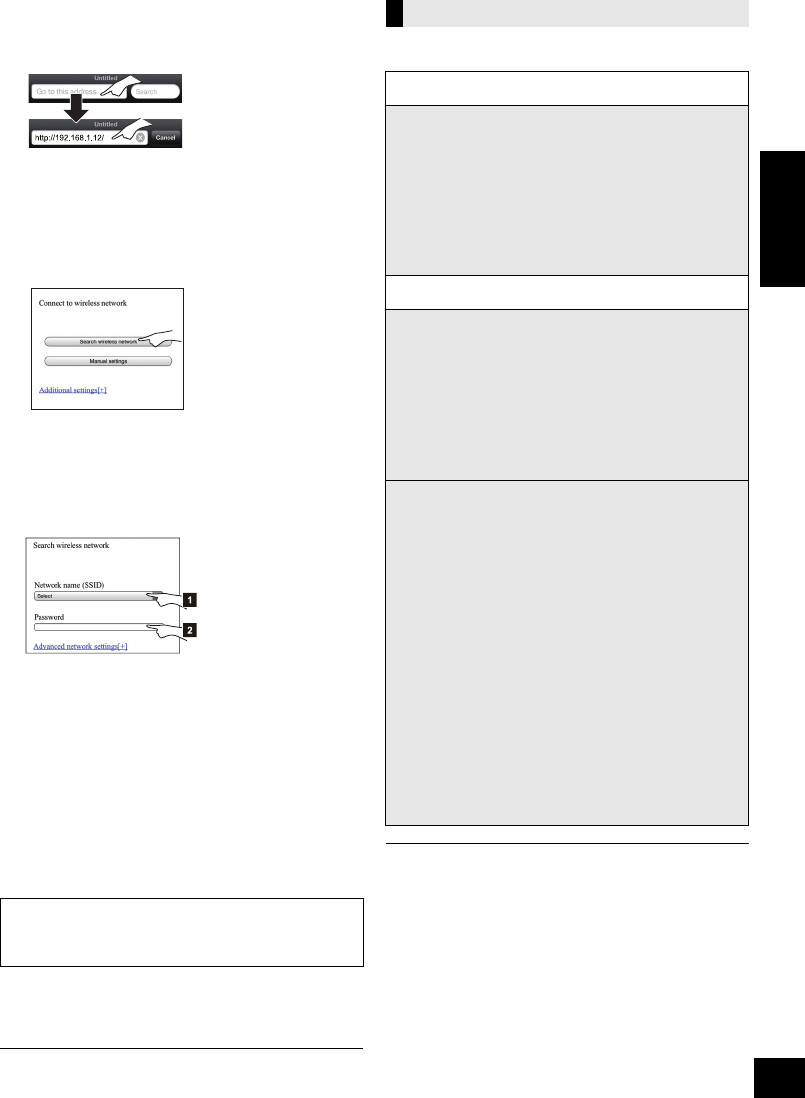
With this method, you will access this unit’s
wireless network settings from the Internet browser
of your compatible device.
≥
The following explanations are based on an iPhone.
1
Press
[SETUP]
on the remote control repeatedly
to select “
NET SETUP
” and then press
[OK]
.
{. “SETTING” is indicated on the display.
(The Wi-Fi status indicator blinks purple.)
2After “SETTING” is indicated, connect your
compatible device to this unit’s wireless
network named “00 Setup _ _ _ _ _ _”.
≥“ _ ” stands for a digit that is unique to each set.
≥Make sure that DHCP is enabled for the network setting
on your compatible device.
Method 1
If your wireless network router supports WPS
(Wi-Fi Protected SetupTM).
The WPS identifier mark
WPS Push Button
Configuration (PBC)
compatible wireless network
router may have this mark.
“FAIL” may be displayed if the connection was not
made within the set time limit. Try the setting
again. If “FAIL” is still displayed, try other methods.
Method 2
Setting the network connection with the
smartphone app
Method 3
Setting the network connection from an Internet browser.
SC-NE3_PPC~VQT4U49.book 8 ページ 2013年1月9日 水曜日 午後9時7分
9
VQT4U49
ENGLISH
3Start the Internet browser on your compatible
device and type “http://192.168.1.12/” into the
URL address field and display the page.
{. This unit’s setup window is displayed.
≥Examples of Internet browsers
iOS device/Mac : Safari
Android device : Google Chrome browser
PC : Windows Internet Explorer
4Select “Search wireless network”.
5Select and input the details.
≥Check your home wireless network name
(Network name (SSID)) and password for
this network. This can often be found on the
wireless network router itself.
6Select “JOIN” to apply the settings.
≥In the pop-up screen, select “OK” to continue.
– Select “Cancel” to return to the setup window.
7The unit’s settings are completed when
“SUCCESS” is displayed and the Wi-Fi status
indicator stops blinking and lights in blue.
8Make sure to connect your compatible device
back to your home wireless network.
*1: If you have set your wireless network to be invisible, select
“BACK” and refer to “Alternative settings”.
≥The below settings are the alternative or additional settings
for “Method 3”. (l8)
≥Enable Java and Cookies in your browser settings.
≥This unit can also be set using the WPS PIN code.
Replace step 2 of “Method 1” with the following steps.
(Before starting, refer to the wireless network router’s
operating instructions for details on how to enter the PIN
code.)
1 While “WPS” is flashing press and hold [– WPS] again
to display the 8 digit PIN code.
{. Wi-Fi status indicator blinks purple.
2 Enter the PIN code into the wireless network router.
[1] Select your home wireless network
name.*1
[2] Type the password.
If “FAIL” is displayed press [OK], check the
wireless network password and other settings
and start again from step 1.
Advanced network settings
Alternative settings
Instead of steps 4 and 5
Select “Manual settings”.
1 Type your home wireless network name
into the “Network name (SSID)” field.
2 Select the encryption method from the
“Security system” drop down list.
3 Type the password into the “Password” field
and then select “JOIN”.
Additional settings
If your home wireless network has been
configured to use specific IP Addresses, Subnet
Mask, Default Gateway, Primary DNS, etc.
Before step 6
Select “Advanced network settings”.
{. Input the required addresses into each field and select
“JOIN”.
≥To change the settings back to DHCP, select “ON” from the
“DHCP” drop down list.
If you want to change the name of this unit that is
displayed as the AirPlay speakers or DLNA
renderer.
Before step 4
Select “Additional settings”.
1 Select “Edit STEREO SYSTEM name”.
2 Type a new name into the
“STEREO SYSTEM name” field.
{. Only ASCII characters can be used.
3 Select “OK”.
4 If this unit is already connected to your home
wireless network:
jSelect “Additional settings” and then
select “Exit”.
If this unit is not connected to your home
wireless network:
jContinue to step 4 of “Method 3”.
SC-NE3_PPC~VQT4U49.book 9 ページ 2013年1月9日 水曜日 午後9時7分
10
VQT4U49
Using AirPlay with this unit’s speakers
1Turn the unit on.
≥Check that the Wi-Fi status indicator lights in
blue.
≥If it doesn’t light in blue, check the wireless
network settings. (l7)
2iOS device: Start the “Music” (or iPod) app.
Mac/PC: Start “iTunes”.
≥If the Music app on your iOS device is used, select the
audio file you want to play.
3Select “Panasonic NE3 _ _ _ _ _ _”*1, 2 from the
AirPlay icon.
{. Check the volume settings before starting the playback.
(When AirPlay is used for the first time, the volume may
be output at the maximum setting.)
4Start play.
≥The playback will start with a slight delay.
≥This unit can be set to turn on automatically when this unit is
selected as the output speakers. (l13)
≥Playback of other audio sources will stop and AirPlay output
will have priority.
≥Volume changes on the iOS device or iTunes will be applied
to this unit. (Refer to the iTunes Help for the required settings
in iTunes.)
≥With some iOS and iTunes versions, it may not be possible
to restart the AirPlay playback if the selector is changed
(e.g., “AUX”) or the unit is turned off, during the AirPlay
playback.
In this case, select a different device from the AirPlay icon of
the Music App or iTunes and then re-select this unit as the
output speakers.
≥AirPlay will not work when playing back videos on iTunes.
*1: “ _ ” stands for a digit that is unique to each set.
*2: The name that is displayed for this unit can be changed
from the “Edit STEREO SYSTEM name” settings.
(l9, “Advanced network settings”)
With this function set to “ON”, you can stream
music from the iOS device or
Mac / PC (iTunes 10.2.2 or later) to this unit without
the need of a wireless network router.
≥Previous network settings will be deleted when
this function is set to “ON”.
≥
The following explanations are based on an iPhone.
1
Press [SETUP] repeatedly to select “D.CONNECT”.
2
Press [
3
,
4
] to select “ON” and then press [OK].
3Press [3,4] to select “OK? YES” and then
press [OK].
4Connect your iPhone to this unit’s wireless
network named “NE3 _ _ _ _ _ _”*2.
5Enter the password that is indicated on this
unit’s display.
6Once the iPhone is connected to this unit’s
wireless network, the setup is competed.
7Continue to step 2 of “Using AirPlay with this
unit’s speakers”.
≥This setting is reset to “OFF” when other network settings are
performed. (l7)
≥When “D.CONNECT” is set to “ON”, this unit will not be
connected to the Internet. It is not possible to update the
software or check the Wi-Fi signal strength.
≥When AirPlay is not being used, disconnect the AirPlay
compatible device from this network.
≥When using a computer on this network, make sure that all
the shared files are encrypted.
≥This feature is only compatible with the “Open System”
authentication method. It is not compatible with “Shared Key”
authentication method.
*1: “ _ ” stands for a digit.
*2: “ _ ” stands for a digit that is unique to each set.
Preparation
≥Complete the network settings. (l7)
≥Connect the iOS device or Mac/PC to the same
home wireless network as this unit.
NE3
e.g., iPhone iOS 6.0.1
NE3
e.g., iTunes 11.0
Directly streaming to this unit
(AirPlay)
“PW _ _ _ _ _ _”*1 is displayed.
The 5 digits after “PW” is the password for this
network.
SC-NE3_PPC~VQT4U49.book 10 ページ 2013年1月9日 水曜日 午後9時7分

11
VQT4U49
ENGLISH
The first time “D.CONNECT” is set to “ON”, a
password for this unit’s wireless network is
randomly created and memorized in this unit.
≥This password is memorized until it is changed.
1 While “D.CONNECT” is set to “ON”:
Press [SETUP] repeatedly to select
“D.CONNECT”.
2Press [
3
,
4
] to select “ON” and then press [OK].
3 The current password is displayed.
≥The 5 digits after “PW” is the password for
this network.
4 Press any button to exit.
1 While “D.CONNECT” is set to “OFF”:
Press [SETUP] repeatedly to select
“D.CONNECT”.
2Press [3,4] to select “CHANGE PW” and
then press [OK].
3Press [3,4] to select “OK? YES” and then
press [OK].
4 The new password is displayed.
≥The 5 digits after “PW” is the new password
for this network.
5 Press any button to exit.
∫Note about changing the password
After changing this unit’s wireless network
password, if you are not prompted to change the
password on the other devices, the following
changes are required.
iOS device (iPod touch/iPhone/iPad)*1:
≥Before choosing this unit’s network,
1 Select [ ] located beside this unit’s wireless
network name.
2 Select “Forget this Network” and then select
“Forget”.
3 Select this unit’s wireless network and enter the
new password.
Mac/PC:
≥If the computer has memorized the old password, be
sure to change the memorized password for this
unit’s wireless network to the new one.
≥Refer to the devices’s operating instructions for details.
*1: Steps are based on iOS 6.0.1.
Playing back music files on the
DLNA server
You can share music files stored in the DLNA Certified
media server (PC with Windows 7 installed,
smartphone, etc.) connected to your home wireless
network, and enjoy the contents with this unit’s
speaker.
1Turn the unit on.
≥Check that the Wi-Fi status indicator lights in
blue.
≥If it doesn’t light in blue, check the wireless
network settings. (l7)
2Operate the DMC compatible device and
connect to this unit.
≥The device name of this unit will be displayed
as “Panasonic NE3 _ _ _ _ _ _”*1, 2.
≥For details on how to use DMC compatible
devices, refer to the operating instructions of the
devices or the software.
∫Support format of DLNA client
File formats that are not supported by your DLNA
server cannot be played.
≥Depending on the contents and the connected equipment,
playback may not be possible.
*1: “ _ ” stands for a digit that is unique to each set.
*2: The name that is displayed for this unit can be changed
from the “Edit STEREO SYSTEM name” settings.
(l9, “Advanced network settings”)
Display the password
Change the password
Preparation
≥Complete the network settings. (l7)
≥Connect your device with DMC (Digital Media
Controller) compatible software installed to the
same home wireless network as this unit.
≥Add the contents and folder to the libraries of the
Windows Media® Player or the smartphone, etc.
– Playlist of Windows Media® Player can play back
only the contents that are stored in the libraries.
Audio codec Example of file extension
MP3 .mp3
WAV .wav
SC-NE3_PPC~VQT4U49.book 11 ページ 2013年1月9日 水曜日 午後9時7分

12
VQT4U49
Bluetooth® operations
By using the Bluetooth® connection, you can listen to the sound from the Bluetooth® audio device from this
unit wirelessly.
≥Refer to the operating instructions of the Bluetooth® device for details.
Preparation
≥Turn on the Bluetooth® feature of the device and
place the device near this unit.
≥If this unit is already connected to a Bluetooth®
device, disconnect it.
1Press [ , AUX] to select “BLUETOOTH”.
≥If “PAIRING” is indicated on the display, go to step 3.
2Press [PLAY MENU] to select “NEW DEV.” and
then press [OK].
{. “PAIRING” is indicated on the display.
3Select “SC-NE3” from the Bluetooth® device’s
Bluetooth® menu.
4Start play on the Bluetooth® device.
≥If prompted for the passkey, input “0000”.
≥You can register up to 8 devices with this unit. If a 9th device
is paired, the device that has not been used for the longest
time will be replaced.
Preparation
≥Turn on the Bluetooth® feature of the device and
place the device near this unit.
≥If this unit is already connected to a Bluetooth®
device, disconnect it.
1Press [ , AUX] to select “BLUETOOTH”.
{. “READY” is indicated on the display.
2Select “SC-NE3” from the Bluetooth® device’s
Bluetooth® menu.
{. The name of the connected device is indicated on the
display for 2 seconds.
3Start play on the Bluetooth® device.
≥This unit can only be connected to one device at a time.
≥When “BLUETOOTH” is selected as the source, this unit will
automatically try and connect to the last connected
Bluetooth® device.
≥The Bluetooth® device will be disconnected if “AUX” is
selected as an audio source.
You can change the transmission speed to prioritize
transmission quality or sound quality.
Preparation
≥Press [ , AUX] to select “BLUETOOTH”.
≥If a Bluetooth® device is already connected,
disconnect it.
1Press [PLAY MENU] repeatedly to select
“LINK MODE”.
2Press [3,4] to select the mode and then
press [OK].
MODE 1: Emphasis on connectivity
MODE 2: Emphasis on sound quality
≥The default setting is “MODE 1”.
If the sound input level of the Bluetooth®
transmission is too low, change the input level
setting.
Preparation
≥Connect a Bluetooth® device.
1Press [PLAY MENU] repeatedly to select
“INPUT LEVEL”.
2Press [3,4] to select the level and then press
[OK].
“LEVEL 0” ,. “LEVEL +1” ,. “LEVEL +2”
^----------------------------------------------------J
≥Select “LEVEL 0” if the sound is distorted.
≥The default setting is “LEVEL 0”.
1While a Bluetooth® device is connected:
Press [PLAY MENU] to select
“DISCONNECT?”.
2Press [3,4] to select “OK? YES” and then
press [OK].
Pairing Bluetooth® devices
Connecting a paired Bluetooth®
device
Bluetooth® transmission mode
Bluetooth® input level
Disconnecting a Bluetooth®
device
SC-NE3_PPC~VQT4U49.book 12 ページ 2013年1月9日 水曜日 午後9時7分