Panasonic of North America SB-NE5 Wireless Speaker System User Manual
Panasonic Corporation of North America Wireless Speaker System
Contents
- 1. Short Term Confidentiality_User Manual[SC-NE3] -1
- 2. Short Term Confidentiality_User Manual[SC-NE3] -2
- 3. Short Term Confidentiality_User Manual[SC-NE5] -1
- 4. Short Term Confidentiality_User Manual[SC-NE5] -2
Short Term Confidentiality_User Manual[SC-NE3] -2

13
VQT4U49
Sound adjustment
The following sound effects can be added to the
audio output.
1Press [SOUND] repeatedly to select the effect.
2Press [3,4] to select the setting and then
press [OK].
≥You may experience a reduction in sound quality when these
effects are used with some sources. If this occurs, turn the
sound effects off.
Others
The sleep timer can turn the unit off after a set time.
1Press [SETUP] to select “SLEEP”.
2Press [3,4] to set the time (in minutes) and
then press [OK].
“SLEEP 30” ,. “SLEEP 60” ,. “SLEEP 90” ,. “SLEEP 120”
^---------------------. “OFF” (Cancel) (----------------------J
≥The remaining time is indicated on the unit’s display
except when other operations are performed.
The brightness of this unit’s display can be
changed.
1Press [SETUP] repeatedly to select “DIMMER”.
2Press [3,4] to select “ON” and then press
[OK].
≥To cancel the dimmer, select “OFF” in step 2.
As a factory preset, this unit will always turn off
automatically if there is no sound output and no
operation for approx. 30 minutes.
To cancel this function
1Press [SETUP] repeatedly to select
“AUTO OFF”.
2Press [3,4] to select “OFF” and then press
[OK].
≥To turn automatic standby on, select “ON” in step 2.
≥When connected to a Bluetooth® device, the automatic
standby function does not work.
To check the Wi-Fi signal strength where the unit is
located.
Preparation
Connect this unit to the wireless network. (l7)
1Press [SETUP] repeatedly to select
“SIG.LEVEL” and then press [OK].
≥The unit’s display shows “LEVEL ”.
(“ ” stands for a number.)
2Press [OK] to exit this display mode.
≥It is recommended to have a signal strength of “3”. Change
the position or angle of your wireless network router or the
unit if the indication is “2” or “1” and see if the connection
improves.
≥If “LEVEL 0” is displayed, this unit cannot establish a link with
the wireless network router. (l16)
≥This function does not work when “D.CONNECT” is set to
“ON”.
This unit can turn on automatically from standby
mode when this unit is selected as the AirPlay
speakers.
Preparation
Connect this unit to the wireless network. (l7)
1Press [SETUP] repeatedly to select
“NET STNBY” and then press [OK].
2Press [3,4] to select “ON” and then press [OK].
≥To cancel this function, select “OFF” in step 2.
≥The factory preset is “OFF”. If this function is set to “ON” the
standby power consumption will increase.
Direct-Vocal
Surround
(D.SURROUND)
“LEVEL 1”, “LEVEL 2” or
“OFF”.
≥The factory preset is “OFF”.
Preset EQ
(PRESET EQ)
“HEAVY” (heavy), “SOFT”
(soft), “CLEAR” (clear),
“VOCAL” (vocal) or “FLAT”
(flat/off).
≥The factory preset is “HEAVY”.
Bass (BASS) or
Treble (TREBLE)
Adjust the level (j4 to i4).
Dynamic Bass
(D.BASS)
“ON D.BASS” or
“OFF D.BASS”.
≥The factory preset is
“ON D.BASS”.
Sleep timer
Display brightness
Automatic standby
Wi-Fi® signal strength
Network standby
SC-NE3_PPC~VQT4U49.book 13 ページ 2013年1月9日 水曜日 午後9時7分

14
VQT4U49
Occasionally, Panasonic may release updated
software for this unit that may add or improve the
way a feature operates. These updates are
available free of charge.
Preparation
≥Turn the unit on.
≥Connect this unit to the wireless network. (l7)
– Make sure that the wireless network is
connected to the Internet.
– If “D.CONNECT” is set to “ON”, change the
setting to “OFF” and connect this unit to a
wireless network that is connected to the
Internet.
1Press [SETUP] repeatedly to select
“SW UPDATE” and then press [OK].
2Press [3,4] to select “UPDATE? Y” and then
press [OK] to start the update.
3When the update has finished successfully,
“SUCCESS” is displayed.
4Disconnect the AC power supply cord and
reconnect it after 3 minutes.
≥Downloading will require several minutes. It may take
longer or may not work properly depending on the
connection environment.
≥If you do not want to update the unit, select “UPDATE? N”
and then press [OK] in step 2.
≥If there are no updates, “NO NEED” is displayed after step 2.
∫Checking the software version
1 Press [SETUP] repeatedly to select “SW VER.” and then
press [OK].
{. The version of the installed software is displayed.
2 Press [OK] to exit.
Display the name for the connected wireless
network (SSID).
1Press and hold [– WPS] on the unit and [OK]
on the remote control until the unit's display
shows the SSID.
2Press [OK] to exit.
≥If “NOCONNECT” is displayed this unit is not connected to a
wireless network.
≥All letters are displayed as capital letters, and characters that
cannot be displayed are replaced with “¢”.
To check the unit’s IP address or the Wi-Fi MAC
address.
1Press and hold [– WPS] on the unit and [4] on
the remote control until the unit’s display shows
the IP address.
{. The IP address is partially displayed.
≥To display the MAC address on the unit, repeat the
steps above by replacing [4] with [3].
2Press [3,4] on the remote control to show the
rest of the IP address.
≥To exit the setting, wait 20 sec.
≥The “ – ” displayed on the top or bottom left of the display
indicate the first and last units respectively.
When other Panasonic equipment responds to the
supplied remote control, change the remote control
code.
1Press [ , AUX] to select “AUX”.
2While pressing and holding [ / AUX] on the
unit, press and hold [SOUND] on the remote
control until the unit’s display shows
“REMOTE 2”.
3Press and hold [OK] and [SOUND] on the
remote control for at least 4 seconds.
≥To change the mode back to “REMOTE 1”, repeat the steps
above but replace the button pressed on the remote control
from [SOUND] to [ , AUX].
Software update
DO NOT DISCONNECT the AC power supply
cord while one of the following messages is
displayed.
– “LINKING”, “UPDATING” or “%”
(“ ” stands for a number.)
≥During the update process, no other operations can be
performed.
Wireless network name (SSID)
IP/MAC Address
Changing the unit and remote
control code
SC-NE3_PPC~VQT4U49.book 14 ページ 2013年1月9日 水曜日 午後9時7分

15
VQT4U49
Troubleshooting
Before requesting service, make the following
checks. If you are in doubt about some of the check
points, or if the solutions indicated in the following
guide do not solve the problem, refer to “Customer
Services Directory (United States and Puerto Rico)”
on page 21 if you reside in the U.S.A. or Puerto
Rico, or refer to “Limited Warranty (ONLY FOR
CANADA)” on page 22 if you reside in Canada.
Do you have the latest software installed?
≥Occasionally, Panasonic may release updated software for
this unit that may add or improve the way a feature operates.
(l14)
Humming heard during play.
≥An AC power supply cord or fluorescent light is near the
cords. Keep other appliances and cords away from this unit’s
cables.
Cannot connect to the network.
≥Confirm the network connection and settings. (l7)
≥Your wireless network might be set to be invisible. In this
case select “Manual settings” in “Method 3”. (l9)
≥This unit cannot join a wireless network using WEP security
settings with the WPS methods (“Method 1”). Use “Method 3”
to join the wireless network. (l8)
≥Make sure that the multicast function on the wireless network
router is set to on (enabled).
≥When “D.CONNECT” is used, if the password for
"D.CONNECT" has been changed connect the other device
to this unit using the new password. (l10)
Cannot connect to the unit.
≥Display the wireless network name that this unit is connected
to and make sure that the device is connected to the same
network. (l7, 14)
≥If “NET STNBY” is set to “OFF”, the AirPlay compatible
device cannot be connected when this unit is off.
≥Turn off the Wi-Fi setting on the AirPlay compatible device,
set “NET STNBY” to “OFF” (l13) and then turn this unit off
and on. Reconnect the compatible device to the Wi-Fi
network and then select this unit as the AirPlay speakers
again.
My wireless network router is WPS PBC
compatible, but the pairing does not work.
≥If the network is set to be invisible, the push button
configuration does not work. In this case, either make the
wireless network visible while you set up the network for this
unit or use “Method 2” or “Method 3”. (l8)
Playback does not start.
The sound is interrupted.
≥Simultaneous use with other 2.4 GHz devices, such as
microwaves, cordless telephones, etc., may result in
connection interruptions.
Increase the distance between this unit and these devices.
≥Do not place this unit inside a metal cabinet, for it might block
the Wi-Fi signal.
≥Place this unit closer to the wireless network router.
≥If “D.CONNECT” is set to “ON”, place the AirPlay compatible
device closer to this unit.
≥If several wireless devices are simultaneously using the
same wireless network as this unit, try turning off the other
devices or reducing their wireless network usage.
≥If the playback stops, check the playback status on the iOS
device or iTunes.
≥If play does not start (even though the Wi-Fi status indicator
lights in blue and the AirPlay icon is displayed), restart
the wireless network router, turn the Wi-Fi connection on the
iOS device or Mac/PC off and on, and then make sure that
your home wireless network is selected.
≥If the AirPlay icon is not displayed even if Wi-Fi status
indicator lights in blue, try restarting the wireless network
router.
≥With some iOS and iTunes versions, it may not be possible
to restart the AirPlay playback if the selector is changed
(e.g., “AUX”) or the unit is turned off, during the AirPlay
playback.
In this case, select a different device from the AirPlay icon of
the Music App or iTunes and then re-select this unit as the
output speakers. (l10)
To return all settings to the factory preset
When the following situations occur, reset the
memory:
≥There is no response when buttons are pressed.
≥You want to clear and reset the memory contents.
1Disconnect the AC power supply cord. (Wait
for at least 3 minutes before proceeding to
step 2.)
2While pressing and holding down [Í/I] on the
unit, reconnect the AC power supply cord.
≥Keep holding down [Í/I] until “--------”
appears on the display.
3Release [Í/I].
≥All the settings are returned to the factory preset. You will
need to reset the memory items.
Common problems
AirPlay operations
SC-NE3_PPC~VQT4U49.book 15 ページ 2013年1月9日 水曜日 午後9時7分

16
VQT4U49
Pairing cannot be done.
≥Check the Bluetooth® device condition.
The device cannot be connected.
≥The pairing of the device was unsuccessful or the registration
has been replaced. Try pairing the device again.
≥This unit might be connected to a different device.
Disconnect the other device and try pairing the device again.
The device is connected but audio cannot be
heard through this unit.
≥For some built-in Bluetooth® devices, you have to set the
audio output to “SC-NE3” manually. Read the operating
instructions for the device for details.
The sound is interrupted.
≥The device is out of the 10 m (33 ft) communication range.
Bring the Bluetooth® device closer to this unit.
≥Remove any obstacle between this unit and the device.
≥Other devices that use the 2.4 GHz frequency band (wireless
router, microwaves, cordless phones, etc.) are interfering.
Bring the Bluetooth® device closer to this unit and distance it
from the other devices.
≥Select “MODE 1” for stable communication. (l12)
The remote control doesn’t work properly.
≥The remote control and this unit are using a different code.
(lright, “REMOTE ”)
≥Is the battery depleted or is the battery inserted incorrectly?
(l5)
The following messages or service numbers
may appear on the unit’s display.
“AUTO OFF”
≥The unit has been left unused for about 30 minutes and will
shut down within a minute. Press any button to cancel it.
“DL ERROR”
≥The software download has failed. Press any button to exit.
Please try again later.
≥The server cannot be found. Press any button to exit. Make
sure that the wireless network is connected to the Internet.
“DIMMER”
≥Appears 10 seconds after the volume is turned to “0”.
“ERROR”
≥Incorrect operation is performed. Read the instructions and
try again.
“F ” (“ ” stands for a number.)
≥There is a problem with this unit.
Note down the displayed number, disconnect the AC power
supply cord and consult your dealer.
“FAIL”
≥Updating or setting has failed. Read the instructions and try
again.
“LEVEL 0”
≥There is no link between this unit and the wireless network
router.
Try the following operations:
– Check that the wireless network router is turned on.
– Turn this unit off and on again.
– Reset the wireless network settings. (l7)
If the problem persists, consult your dealer.
“LEVEL j”
≥When “D.CONNECT” is set to “ON” the Wi-Fi signal strength
cannot be checked. To check the Wi-Fi signal strength from
the wireless network router, set “D.CONNECT” to “OFF”.
(l10)
“NOCONNECT”
≥This unit is not connected to the network.
Check the network connection. (l7)
“REMOTE ” (“ ” stands for a number.)
≥The remote control and this unit are using different codes.
Change the code on the remote control.
– When “REMOTE 1” is displayed, press and hold [OK] and
[ , AUX] for more than 4 seconds.
– When “REMOTE 2” is displayed, press and hold [OK] and
[SOUND] for more than 4 seconds.
Bluetooth®
Remote control
Messages
SC-NE3_PPC~VQT4U49.book 16 ページ 2013年1月9日 水曜日 午後9時7分
17
VQT4U49
Specifications
∫GENERAL
* Prospective communication distance
Measurement environment:
Temperature 25 oC (77 oF) / Height 1 m (3.3 ft)
Measure in “MODE 1”
≥Specifications are subject to change without notice.
Mass and dimensions are approximate.
≥
Total harmonic distortion is measured by a digital spectrum analyzer.
Licenses
Power consumption 14 W
Power consumption in standby mode
Approx. 0.1 W
Power consumption in standby mode
(With “NET STNBY” set to “ON”)
Approx. 4.0 W
Power supply AC 120 V, 60 Hz
Dimensions (WkHkD)
570 mm
k
206 mm
k
100 mm
(22
7
/
16
qk
8
1
/
8
qk
3
15
/
16
q
)
Mass (Weight) Approx. 2.8 kg(6.17 lbs)
Operating temperature range
0oCtor40 oC(r32 oF to r104 oF)
Operating humidity range
35 % to 80 % RH (no condensation)
∫AMPLIFIER SECTION
RMS Output Power Stereo mode
Front Ch (both ch driven)
20 W per channel (6 ≠),
1kHz,10%THD
Total RMS Stereo mode power 40 W
FTC Output Power Stereo mode
Front Ch (both ch driven)
15 W per channel (6 ≠),
20 Hz to 20 kHz, 1 % THD
Total FTC Stereo mode power 30 W
∫SPEAKER SECTION
Type 2 way, 2 speaker system (Bass reflex)
Speaker unit(s)
1. Woofer 8cm(31/8q)k1 per channel
2. Tweeter 2.5 cm (1q)k1 per channel
Impedance 6≠
Output sound pressure
83.5 dB/W (1 m (3.3 ft))
Frequency range 52 Hz to 25 kHz (s16 dB),
75 Hz to 22 kHz (s10 dB)
∫Wi-Fi/AirPlay SECTION
Wi-Fi
WLAN Standards IEEE802.11b/g
Frequency range 2.4 GHz band
Security WEP (64 bit/128 bit), WPATM, WPA2TM
WPS version Version 2.0 (WEP not support)
∫TERMINALS SECTION
AUX Terminal Stereo, ‰3.5 mm (1/8q) jack
∫BLUETOOTH SECTION
Version Bluetooth®Ver.2.1 +EDR
Output Class 2 (2.5 mW)
Communication distance About 10 m (33 ft)*
Communication method 2.4 GHz band FH-SS
Correspondence profile A2DP
AirPlay, the AirPlay logo, iPad, iPhone, iPod, and iPod touch are
trademarks of Apple Inc., registered in the U.S. and other
countries.
The Wi-Fi CERTIFIED Logo is a certification mark of the Wi-Fi
Alliance.
The Wi-Fi Protected Setup Mark is a mark of the Wi-Fi Alliance.
“Wi-Fi”, “Wi-Fi Protected Setup”, “WPA” and “WPA2” are marks
or registered marks of the Wi-Fi Alliance.
MPEG Layer-3 audio coding technology licensed from
Fraunhofer IIS and Thomson.
The Bluetooth® word mark and logos are owned by the
Bluetooth SIG, Inc. and any use of such marks by
Panasonic Corporation is under license. Other trademarks
and trade names are those of their respective owners.
Windows is a trademark or a registered trademark of Microsoft
Corporation in the United States and other countries.
SC-NE3_PPC~VQT4U49.book 17 ページ 2013年1月9日 水曜日 午後9時7分
18
VQT4U49
Attaching the unit to a wall (optional)
This unit can be wall mounted using the supplied wall mount brackets, etc. Make sure that the screw used
and the wall are strong enough to support the weight of at least 33 kg (72.8 lbs).
The screws and other items are not supplied as the type and size will vary with each installation.
≥Refer to step 2 of “Wall mount instructions” for details about the required screws.
≥Be sure to attach the fall prevention cord as a secondary safety measure.
∫Supplied accessories
≥1 Safety holder
≥1 Screw
≥2 Wall mount brackets
∫Additionally required accessories
(commercially available)
≥4 Wall mount bracket fixing screws
≥1 Safety holder fixing screw
≥1 Fall prevention cord*
≥1 Screw eye
* Use a cord that is capable of supporting over 33 kg (72.8 lbs)
(with a diameter of about 1.5 mm (1/16q)).
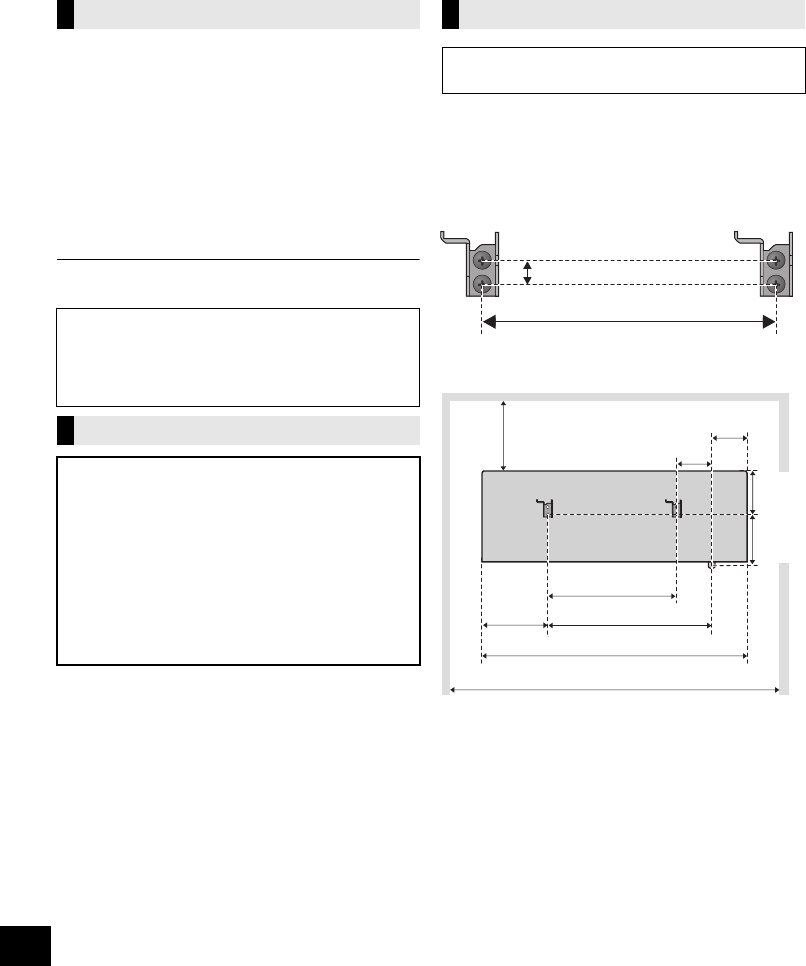
1Measure and mark the position of the wall
mount brackets (Both sides).
{. Use figures below to identify the screwing positions.
The position to attach the wall mount brackets
Space required
Installation accessories
≥Keep the safety holder out of reach of children to
prevent swallowing.
≥Keep the screws out of reach of children to prevent
swallowing.
≥Keep the wall mount brackets out of reach of children
to prevent swallowing.
Safety precautions
Professional installation is required.
The installation should never be done by any
other than a qualified installation specialist.
PANASONIC DISCLAIMS ANY PROPERTY
DAMAGE AND/OR SERIOUS INJURY,
INCLUDING DEATH RESULTING FROM
IMPROPER INSTALLATION OR INCORRECT
HANDLING.
≥Be sure to install this unit as indicated
within this Owner’s Manual.
Wall mount instructions
Before installation, turn the unit off and disconnect the
AC power supply cord from the AC outlet.
252 mm (9 29/32q)
12.5 mm (1/2q)
300 mm (11 13/16q)
319 mm (12 9/16q)
770 mm (30 5/16q)
83 mm
(3 9/32q)
252 mm (9 29/32q)
82 mm (3 7/32q)
169 mm
(6 21/32q)
570 mm (22 7/16q)
67 mm (2 5/8q)
122 mm
(4 13/16q)
SC-NE3_PPC~VQT4U49.book 18 ページ 2013年1月9日 水曜日 午後9時7分
19
VQT4U49
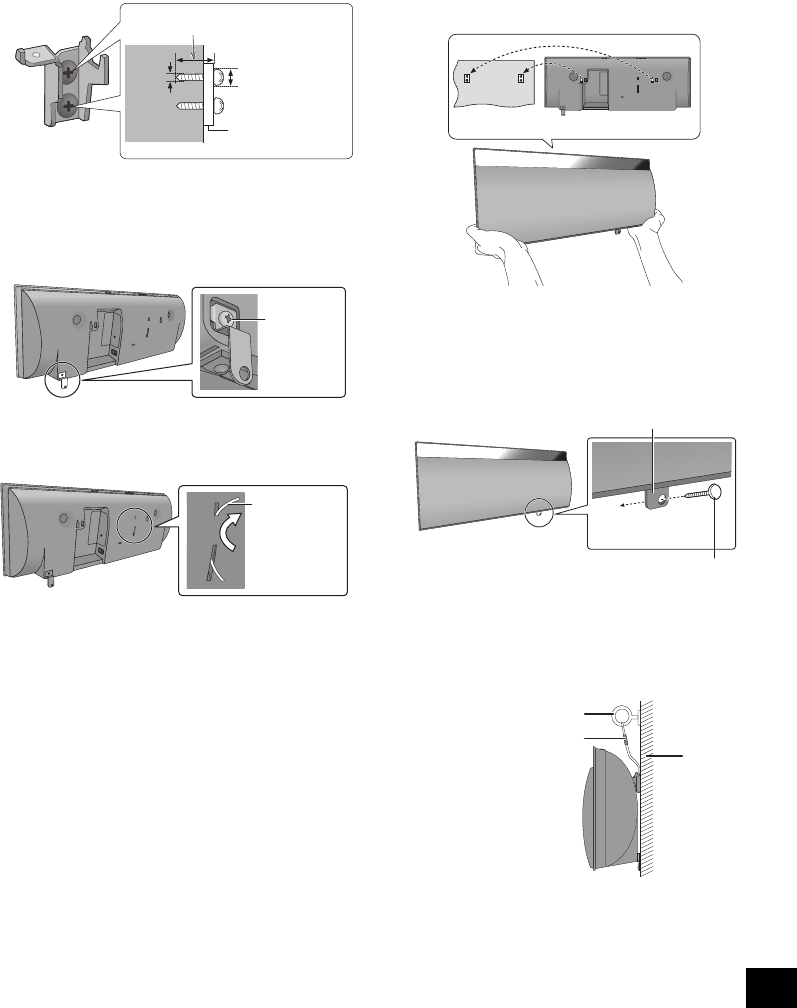
2Attach the wall mount bracket to the wall with
2 screws (not supplied). (Both sides)
≥Use a level to ensure both wall mount brackets are
level.
3Fix the safety holder onto the unit with the
screw (supplied).
{. Screw tightening torque: 50 N0cm (0.4 lbf0ft) to
70 N0cm (0.5 lbf0ft).
4Attach the fall prevention cord (not supplied) to
this unit.
5Hook the unit securely onto the wall mount
brackets with both hands.
≥Connect the AC power supply cord to the unit before
hanging the unit onto the wall. (l6)
≥After hanging the unit, release your hands carefully to
confirm the unit sits securely on the wall.
6Drive the safety holder fixing screw
(not supplied) to secure the safety holder onto
the wall.
≥Refer to step 2 for requirements before screwing.
7Attach the fall prevention cord (not supplied) to
the wall.
≥Make sure that the slack of the cord is minimal.
At least 30 mm (1 3/16q)
‰7.5 mm (19/64q) to
‰9.4 mm (3/8q)
‰4 mm
(5/32q)
Wall mount bracket
Screw
(supplied)
Cord
(not supplied)
Wall
Safety holder fixing screw
(not supplied)
Safety holder
Fixed to the wall
Cord (not supplied)
Screw eye (not supplied)
Wall
SC-NE3_PPC~VQT4U49.book 19 ページ 2013年1月9日 水曜日 午後9時7分
20
VQT4U49
Conexiones
∫Para seleccionar el nivel de entrada de
sonido del dispositivo externo
1Mientras está en modalidad “AUX”, pulse
[PLAY MENU] repetidamente para seleccionar
“INPUT LEVEL” y luego pulse [OK].
2Presione [3,4] para seleccionar “NORMAL” o
“HIGH”.
Operaciones Bluetooth®
Al usar la conexión Bluetooth®, puede escuchar el
sonido desde el dispositivo de audio Bluetooth® desde
este aparato, de forma inalámbrica.
≥Consulte las instrucciones de funcionamiento del
dispositivo Bluetooth® para obtener más detalles.
Preparación
≥Encienda la función Bluetooth® del dispositivo y
coloque el dispositivo cerca de este aparato.
≥Si este aparato ya está conectado a un dispositivo
Bluetooth®, desconéctelo.
1
Pulse [ , AUX] para seleccionar “BLUETOOTH”.
≥Si se indica “PAIRING” en la pantalla, vaya al paso 3.
2Presione [PLAY MENU] para seleccionar
“NEW DEV.” y luego presione [OK].
{. “PAIRING” se indica en la pantalla.
3Seleccione “SC-NE3” desde el menú Bluetooth®
del dispositivo Bluetooth®.
4Inicie la reproducción en el dispositivo Bluetooth®.
≥Si se le solicita la contraseña, ingrese “0000”.
≥Puede registrar hasta 8 dispositivos con este aparato. Si se
sincroniza un 9no dispositivo, se reemplazará el dispositivo
que no se usó por más tiempo.
Preparación
≥Encienda la función Bluetooth® del dispositivo y
coloque el dispositivo cerca de este aparato.
≥Si este aparato ya está conectado a un dispositivo
Bluetooth®, desconéctelo.
1Pulse [, AUX] para seleccionar “BLUETOOTH”.
{. “READY” se indica en la pantalla.
2Seleccione “SC-NE3” desde el menú Bluetooth®
del dispositivo Bluetooth®.
{. El nombre del dispositivo conectado se indica en la
pantalla durante 2 segundos.
3
Inicie la reproducción en el dispositivo Bluetooth
®
.
≥
Esta unidad se puede conectar solamente a un dispositivo por vez.
≥Cuando se selecciona “BLUETOOTH” como fuente, este
aparato intentará conectarse automáticamente con el último
dispositivo conectado Bluetooth®.
≥El dispositivo Bluetooth® se desconectará si se selecciona
“AUX” como fuente de audio.
1Mientras se conecta un dispositivo Bluetooth®:
Pulse [PLAY MENU] para seleccionar
“DISCONNECT?”.
2Presione [3,4] para seleccionar “OK? YES” y
luego presione [OK].
Spanish Quick Reference / Referencia rápida en español
Conexión Adicional
モヤチリワ
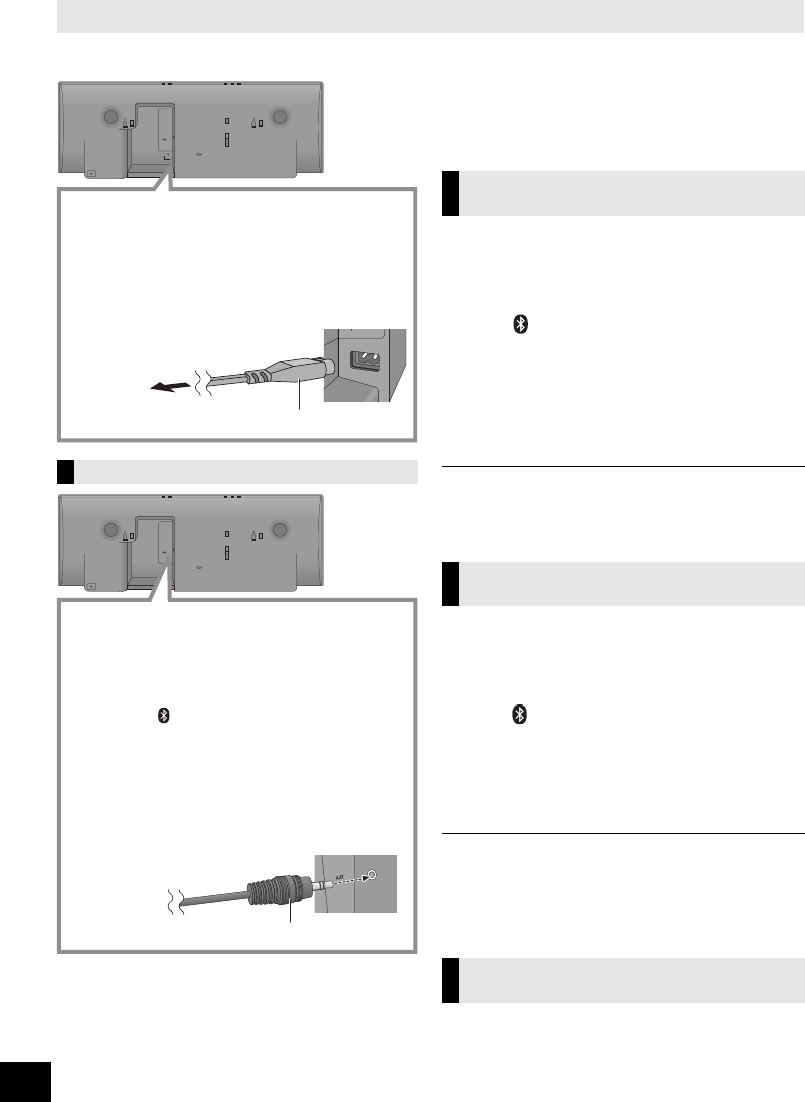
Conecte el cable de alimentación de CA.
A la toma doméstica de CA
Cable de suministro de energía CA (suministrado)
Esta unidad consume poca corriente CA incluso
cuando se encuentra apagada.
≥Para ahorrar energía, si no va a usar esta unidad
durante un período prolongado de tiempo, puede
desconectarla.
≥Consumo de energía en Standby (modo de espera):
Aprox. 0,1 W
モヤチリワ
Conecte un dispositivo externo de
música (para el modo AUX).
1Enchufe el cable de audio (no suministrado)
en el AUX conector.
≥Tipo de enchufe: ‰3,5 mm (1/8q) estéreo
2
Presione
[ , AUX] to
para seleccionar “AUX” y
comenzar a reproducir en el dispositivo conectado.
≥Desconecte el ecualizador o baje el volumen de
sonido del dispositivo externo para reducir la señal
de entrada. Un nivel alto de la señal de entrada
distorsionará el sonido.
≥Para mayores detalles, consulte el manual de
instrucciones del otro equipo.
≥No se proporcionan cables ni dispositivos.
Cable de audio (no suministrado)
Dispositivos Bluetooth® de
sincronización
Conexión de un dispositivo
Bluetooth® sincronizado
Desconexión del dispositivo
Bluetooth®
SC-NE3_PPC~VQT4U49.book 20 ページ 2013年1月9日 水曜日 午後9時7分
21
VQT4T91
ENGLISHESPAÑOL
Limited Warranty
(ONLY FOR U.S.A. AND PUERTO RICO)
Panasonic Consumer Marketing Company of North America,
Division of Panasonic Corporation of North America
One Panasonic Way, Secaucus, New Jersey 07094
Panasonic Products Limited Warranty
Limited Warranty Coverage
(For USA and Puerto Rico Only)
If your product does not work properly because of a defect in materials or
workmanship, Panasonic Consumer Marketing Company of North America
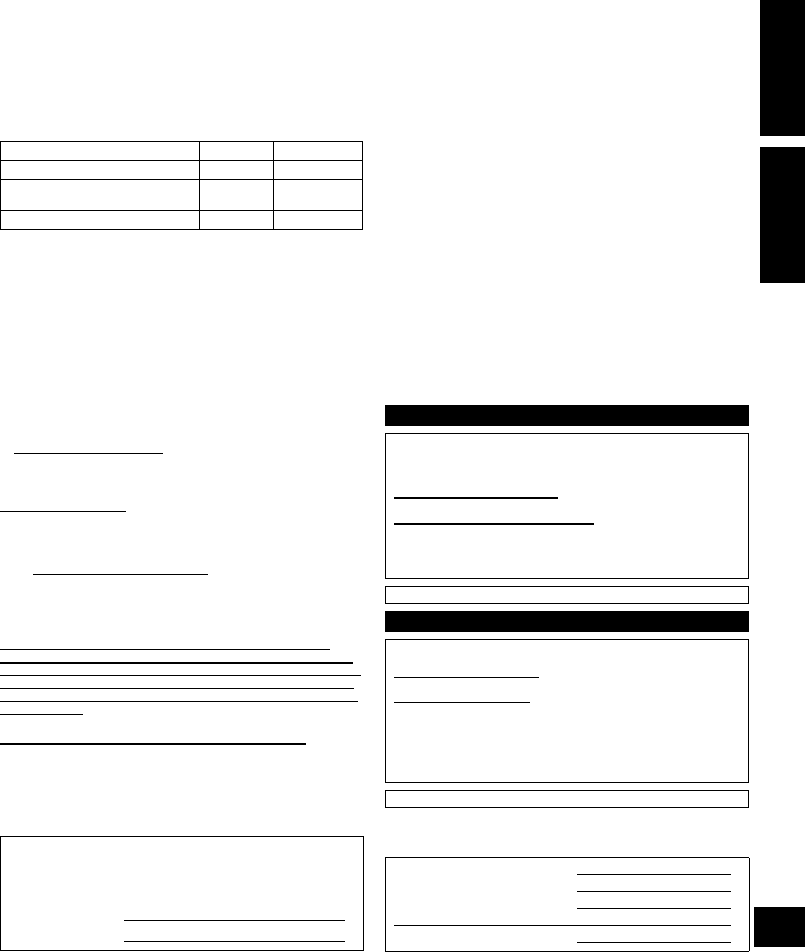
(referred to as “the warrantor”) will, for the length of the period indicated on
the chart below, which starts with the date of original purchase (“warranty
period”), at its option either (a) repair your product with new or refurbished
parts, (b) replace it with a new or a refurbished equivalent value product, or (c)
refund your purchase price. The decision to repair, replace or refund will be
made by the warrantor.
During the “Labor” warranty period there will be no charge for labor. During
the “Parts” warranty period, there will be no charge for parts. This Limited
Warranty excludes both parts and labor for non-rechargeable batteries,
antennas, and cosmetic parts (cabinet). This warranty only applies to products
purchased and serviced in the United States or Puerto Rico. This warranty is
extended only to the original purchaser of a new product which was not sold
“as is”.
Mail-In Service
For assistance in the U.S.A. and Puerto Rico in obtaining repairs, please ship
the product prepaid to:
Panasonic Exchange Center
4900 George McVay Drive
Suite B
McAllen, TX 78503
panacare@us.panasonic.com
Online Repair Request
To submit a new repair request and for quick repair status visit our Web Site at
www.panasonic.com/repair.
When shipping the unit, carefully pack, include all supplied accessories listed
in the Owner’s Manual, and send it prepaid, adequately insured and packed
well in a carton box. When shipping Lithium Ion batteries please visit our Web
Site at www.panasonic.com/BatteryHandling as Panasonic is committed to
providing the most up to date information. Include a letter detailing the
complaint, a return address and provide a daytime phone number where you
can be reached. A valid registered receipt is required under the Limited
Warranty.
IF REPAIR IS NEEDED DURING THE WARRANTY PERIOD, THE
PURCHASER WILL BE REQUIRED TO FURNISH A SALES RECEIPT/
PROOF OF PURCHASE INDICATING DATE OF PURCHASE, AMOUNT
PAID AND PLACE OF PURCHASE. CUSTOMER WILL BE CHARGED
FOR THE REPAIR OF ANY UNIT RECEIVED WITHOUT SUCH PROOF
OF PURCHASE.
Limited Warranty Limits And Exclusions
This warranty ONLY COVERS failures due to defects in materials or
workmanship, and DOES NOT COVER normal wear and tear or cosmetic
damage. The warranty ALSO DOES NOT COVER damages which occurred
in shipment, or failures which are caused by products not supplied by the
warrantor, or failures which result from accidents, misuse, abuse, neglect,
mishandling, misapplication, alteration, faulty installation,
set-up adjustments, misadjustment of consumer controls, improper
maintenance, power line surge, lightning damage, modification, introduction
of sand, humidity or liquids, commercial use such as hotel, office, restaurant,
or other business or rental use of the product, or service by anyone other than
a Factory Service Center or other Authorized Servicer, or damage that is
attributable to acts of God.
THERE ARE NO EXPRESS WARRANTIES EXCEPT AS LISTED UNDER
“LIMITED WARRANTY COVERAGE”.
THE WARRANTOR IS NOT LIABLE FOR INCIDENTAL OR
CONSEQUENTIAL DAMAGES RESULTING FROM THE USE OF THIS
PRODUCT, OR ARISING OUT OF ANY BREACH OF THIS WARRANTY.
(As examples, this excludes damages for lost time, travel to and from the
servicer, loss of or damage to media or images, data or other memory or
recorded content. The items listed are not exclusive, but for illustration only.)
ALL EXPRESS AND IMPLIED WARRANTIES, INCLUDING THE
WARRANTY OF MERCHANTABILITY, ARE LIMITED TO THE PERIOD
OF THE LIMITED WARRANTY.
Some states do not allow the exclusion or limitation of incidental or
consequential damages, or limitations on how long an implied warranty lasts,
so the exclusions may not apply to you.
This warranty gives you specific legal rights and you may also have other
rights which vary from state to state. If a problem with this product develops
during or after the warranty period, you may contact your dealer or Service
Center. If the problem is not handled to your satisfaction, then write to the
warrantor’s Consumer Affairs Department at the addresses listed for the
warrantor.
PARTS AND SERVICE, WHICH ARE NOT COVERED BY THIS LIMITED
WARRANTY, ARE YOUR RESPONSIBILITY.
As of October 2012
Product or Part Name Parts Labor
Wireless Speaker System 1 Year 1 Year
All included Accessories
(Except Non-Rechargeable Batteries) 90 Days Not Applicable
Only Non-Rechargeable Batteries 10 Days Not Applicable
Customer Services Directory (United States and Puerto Rico)
Obtain Product Information and Operating Assistance; locate your
nearest Dealer or Service Center; purchase Parts and
Accessories; or make Customer Service and Literature requests
by visiting our Web Site at:
http://www.panasonic.com/help
or, contact us via the web at:
http://www.panasonic.com/contactinfo
You may also contact us directly at:
1-800-211-PANA (7262)
Monday-Friday 9am-9pm,
Saturday-Sunday 10am-7pm EST
For hearing or speech impaired TTY users, TTY: 1-877-833-8855
Accessory Purchases (United States and Puerto Rico)
Purchase Parts, Accessories and Instruction Books online for all
Panasonic Products by visiting our Web Site at:
http://www.pstc.panasonic.com
Or, send your request by E-mail to:
npcparts@us.panasonic.com
You may also contact us directly at:
1-800-332-5368 (Phone) 1-800-237-9080 (Fax Only)
(Monday-Friday 9am-9pm EST)
Panasonic National Parts Center
20421 84th Ave S., Kent, WA 98032
(We accept Visa, MasterCard, Discover Card, American Express)
For hearing or speech impaired TTY users, TTY: 1-866-605-1277
The model number and serial number of this product can be
found on either the back or the bottom of the unit.
Please note them in the space provided below and keep for
future reference.
MODEL NUMBER SC-NE3
SERIAL NUMBER
User memo:
DATE OF PURCHASE
DEALER NAME
DEALER ADDRESS
TELEPHONE NUMBER
SC-NE3_PPC~VQT4U49.book 21 ページ 2013年1月9日 水曜日 午後9時7分

22
VQT4T91
Limited Warranty (
ONLY FOR
CANADA)
Panasonic Canada Inc.
5770 Ambler Drive, Mississauga, Ontario L4W 2T3
PANASONIC PRODUCT - LIMITED WARRANTY
EXCHANGE PROGRAM
Panasonic Canada Inc. warrants this product to be free from defects in material and workmanship under normal use and
for a period as stated below from the date of original purchase agrees to, at its option either (a) repair your product with
new or refurbished parts, (b) replace it with a new or a refurbished equivalent value product, or (c) refund your purchase
price. The decision to repair, replace or refund will be made by Panasonic Canada Inc.
This warranty is given only to the original purchaser, or the person for whom it was purchased as a gift, of a Panasonic
brand product mentioned above sold by an authorized Panasonic dealer in Canada and purchased and used in Canada,
which product was not sold “as is”, and which product was delivered to you in new condition in the original packaging.
IN ORDER TO BE ELIGIBLE TO RECEIVE WARRANTY SERVICE HEREUNDER, A PURCHASE RECEIPT OR
OTHER PROOF OF DATE OF ORIGINAL PURCHASE, SHOWING AMOUNT PAID AND PLACE OF PURCHASE IS
REQUIRED
LIMITATIONS AND EXCLUSIONS
This warranty ONLY COVERS failures due to defects in materials or workmanship, and DOES NOT COVER normal wear
and tear or cosmetic damage. The warranty ALSO DOES NOT COVER damages which occurred in shipment, or failures
which are caused by products not supplied by Panasonic Canada Inc., or failures which result from accidents, misuse,
abuse, neglect, mishandling, misapplication, alteration, faulty installation, set-up adjustments, misadjustment of consumer
controls, improper maintenance, power line surge, lightning damage, modification, introduction of sand, humidity or
liquids, commercial use such as hotel, office, restaurant, or other business or rental use of the product, or service by
anyone other than an Authorized Servicer, or damage that is attributable to acts of God.
Dry cell batteries are also excluded from coverage under this warranty.
THIS EXPRESS, LIMITED WARRANTY IS IN LIEU OF ALL OTHER WARRANTIES, EXPRESS OR IMPLIED,
INCLUDING ANY IMPLIED WARRANTIES OF MERCHANTABILITY AND FITNESS FOR A PARTICULAR PURPOSE. IN
NO EVENT WILL PANASONIC CANADA INC. BE LIABLE FOR ANY SPECIAL, INDIRECT OR CONSEQUENTIAL
DAMAGES RESULTING FROM THE USE OF THIS PRODUCT OR ARISING OUT OF ANY BREACH OF ANY
EXPRESS OR IMPLIED WARRANTY. (As examples, this warranty excludes damages for lost time, travel to and from the
Authorized Servicer, loss of or damage to media or images, data or other memory or recorded content. This list of items is
not exhaustive, but for illustration only.)
In certain instances, some jurisdictions do not allow the exclusion or limitation of incidental or consequential damages, or
the exclusion of implied warranties, so the above limitations and exclusions may not be applicable. This warranty gives
you specific legal rights and you may have other rights which vary depending on your province or territory.
CONTACT INFORMATION
Panasonic Portable / Clock Radio (without Tape, CD, MD)
Panasonic Audio Product
Panasonic DVD Product
Accessories including rechargeable batteries
One (1) year
One (1) year
One (1) year
Ninety (90) days
For product information and operation assistance, please contact:
Our Customer Care Centre: Telephone #:
Fax #:
Email link:
1-800-561-5505
(905) 238-2360
“Support # contact us # email” on www.panasonic.ca
For defective product exchange within the warranty period, please contact the original dealer or our Customer Care
Centre.
SC-NE3_PPC~VQT4U49.book 22 ページ 2013年1月9日 水曜日 午後9時7分

23
VQT4U49
SC-NE3_PPC~VQT4U49.book 23 ページ 2013年1月9日 水曜日 午後9時7分

THE FOLLOWING APPLIES ONLY IN THE U.S.A.
FCC Note:
This equipment has been tested and found to comply with the limits for a Class B digital device, pursuant to Part 15 of the
FCC Rules.
These limits are designed to provide reasonable protection against harmful interference in a residential installation. This
equipment generates, uses and can radiate radio frequency energy and, if not installed and used in accordance with the
instructions, may cause harmful interference to radio communications. However, there is no guarantee that interference will
not occur in a particular installation. If this equipment does cause harmful interference to radio or television reception,
which can be determined by turning the equipment off and on, the user is encouraged to try to correct the interference by
one or more of the following measures:
≥Reorient or relocate the receiving antenna.
≥Increase the separation between the equipment and receiver.
≥Connect the equipment into an outlet on a circuit different from that to which the receiver is connected.
≥Consult the dealer or an experienced radio/TV technician for help.
Any unauthorized changes or modifications to this equipment would void the user’s authority to operate this device.
This device complies with Part 15 of the FCC Rules. Operation is subject to the following two conditions:
(1) This device may not cause harmful interference, and
(2) this device must accept any interference received, including interference that may cause undesired operation.
Responsible Party:
Panasonic Corporation of North America
One Panasonic Way,
Secaucus, NJ 07094
Support Contact:
Panasonic Consumer Marketing Company of
North America
Telephone No.: 1-800-211-PANA (7262)
THE FOLLOWING APPLIES IN THE U.S.A. AND CANADA
This device complies with Part 15 of FCC Rules and RSS-Gen of IC Rules.
Operation is subject to the following two conditions:
(1) This device may not cause interference, and
(2) this device must accept any interference, including interference that may cause undesired operation of this device.
FCC ID: ACJ-SB-NE5
IC: 216A-SBNE5
This transmitter must not be co-located or operated in conjunction with any other antenna or transmitter.
This equipment complies with FCC/IC radiation exposure limits set forth for an uncontrolled environment and meets the
FCC radio frequency (RF) Exposure Guidelines in Supplement C to OET65 and RSS-102 of the IC radio frequency (RF)
Exposure rules. This equipment has very low levels of RF energy that is deemed to comply without maximum permissive
exposure evaluation (MPE). But it is desirable that it should be installed and operated keeping the radiator at least
20 cm (7 7/8q) or more away from person’s body (excluding extremities: hands, wrists, feet and ankles).
Panasonic Consumer Marketing
Company of North America,
Division of Panasonic Corporation of
North America
One Panasonic Way, Secaucus,
New Jersey 07094
http://www.panasonic.com
C Panasonic Corporation 2013
Printed in Malaysia
Panasonic Canada Inc.
5770 Ambler Drive
Mississauga, Ontario
L4W 2T3
www.panasonic.ca
VQT4U49
F0113BM0
pr
SC-NE3_PPC~VQT4U49.book 24 ページ 2013年1月9日 水曜日 午後9時7分