Pantech RAP Dual-Band CDMA PCS Phone with Bluetooth User Manual 1
Pantech Co., Ltd. Dual-Band CDMA PCS Phone with Bluetooth Users Manual 1
UserManual.wiki
>
Pantech
>
RAP User Manual
>
Users Manual 1
Contents
1.
Users Manual 1
2.
Users Manual 2
Users Manual 1
Navigation menu
Upload a User Manual
Namespaces
Wiki Guide
HTML
PDF
Info
Views
User Manual
Discussion / Help
Navigation
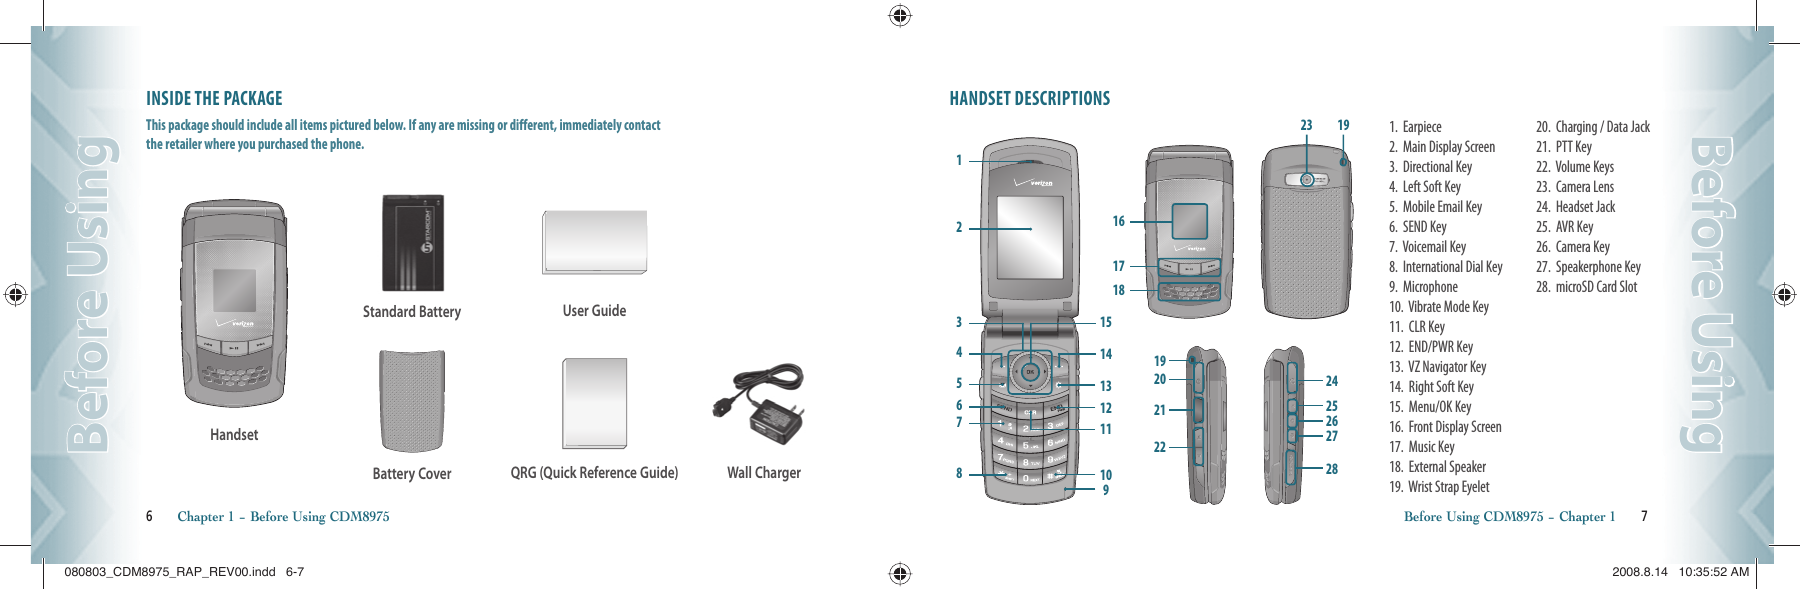
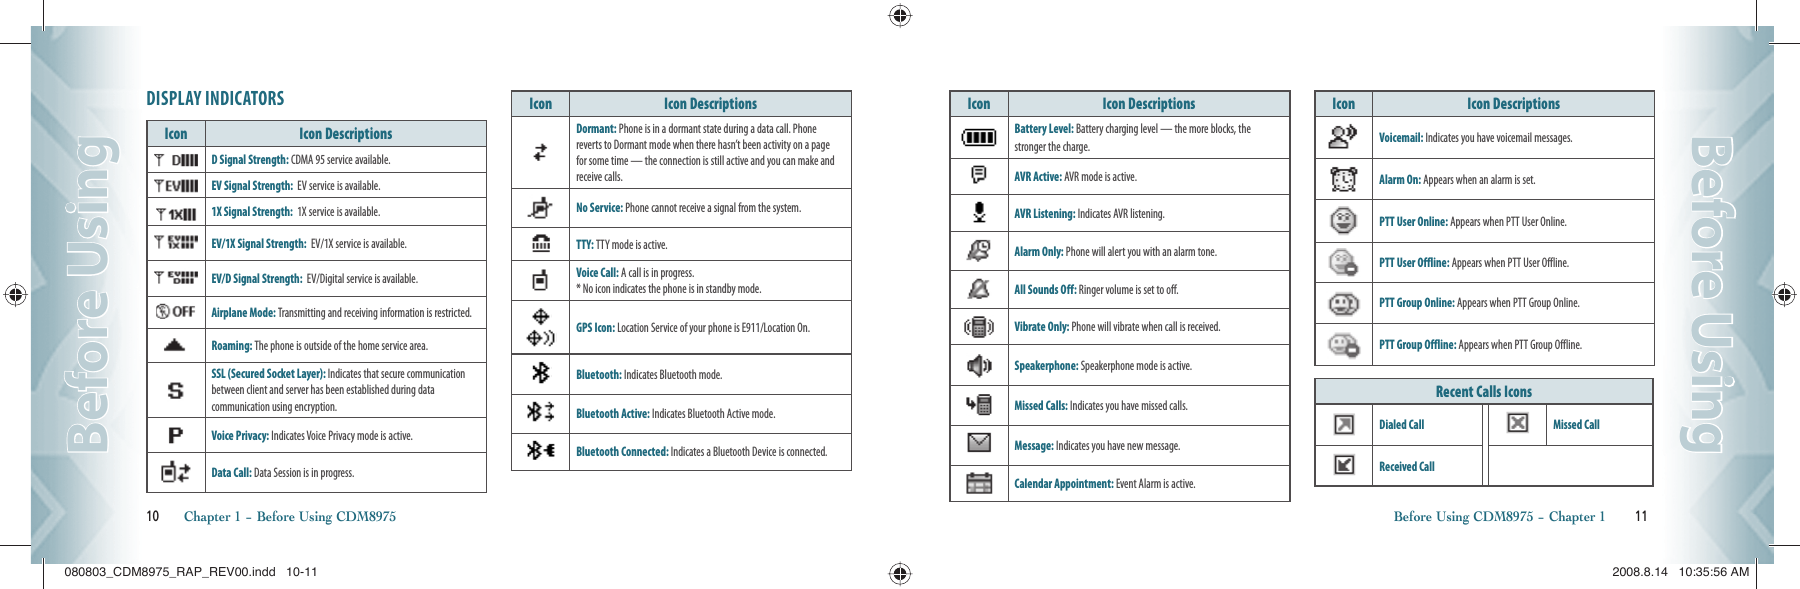
![8 Chapter 1 − Before Using CDM8975Before UsingBefore UsingBefore Using CDM8975 − Chapter 1 9Before UsingBefore UsingKEYS DESCRIPTIONSThe following list correlates to the previous page’s phone illustration. 1. Earpiece: The earpiece allows you to hear the other caller.2. Main Display Screen: Displays all the information needed to operate your phone.3. [ ] Directional Key: The Directional Key allows you to scroll through phone menu options and provides a shortcut to phone functions from standby mode. For more informa-tion on personalizing set shortcut keys, see ”Set Shortcuts” on page 76.4. [ ] Left Soft Key: Press to display the Message menu or access the function listed above the key.5. [ ] Mobile Email Key: A short / Long press Mobile Email key shall launch Mobile Email application screen when in idle mode.6. [ ] SEND Key: Press to make or receive a call. In standby mode, press to access your All Calls list.7. [ ] Voicemail Key: Press and hold to automatically dial your voicemail system.8. [ ] International Dial Key: Press and hold to enter a plus “+”. A “+” is reserved for international dialing.9. Microphone: Allows the other caller to hear you clearly when you are speaking to them.10. [ ] Vibrate Mode Key: Press and hold to place your device in Vibrate mode.11. [ ] CLR Key: When entering a phone number or text, press to delete a single space or character. Press and hold to delete entire words. Press this key once in a menu to go back one level. 12. [ ] END/PWR Key: Press to turn the phone on/off, end a call or browser session, and/or return to idle mode.13. [ ] VZ Navigator Key: A short / Long press VZ Navigator key shall launch VZ Navigator appli-cation screen when in idle mode.14. [ ] Right Soft Key: Press to display Contacts or to access the function listed above the key.15. [ ] Menu/OK Key: Allows you to access the menu screen. It also allows you to accept choices when navigating through a menu.16. Front Display Screen: This screen displays incoming calls, messages, signal, battery strength, time, day and date.17. [ ] Music Key: In idle mode, press to activate the Music player.18. External Speaker: PTT, Music, Ringtones, and Sounds are played through the speaker.19. Wrist Strap Eyelet: Accessory eyelet (optional straps and lanyards - purchased separately).20. Charging / Data Jack: Plug in the Wall Charger or USB Cable here.21. [ ] PTT Key: Press and hold to talk Push to Talk (PTT) when the phone is in PTT mode.22. [ ] Volume Keys: Allows you to adjust the master volume in standby mode or adjust the voice volume during a call.23. Camera Lens: The lens of your built-in camera.24. Headset Jack: Plug in the Headset Connector here to use a headset.25. [ ] AVR Key: In idle mode, press to activate VoiceSignal™. 26. [ ] Camera Key: Press to access Camera Viewfinder mode.27. [ ] Speakerphone Key: Press to turn Speakerphone On or Off.28. microSD Card Slot: Insert a microSDTM memory card here to increase memory capacity.080803_CDM8975_RAP_REV00.indd 8-9080803_CDM8975_RAP_REV00.indd 8-9 2008.8.14 10:35:54 AM2008.8.14 10:35:54 AM](https://usermanual.wiki/Pantech/RAP.Users-Manual-1/User-Guide-990735-Page-5.png)
![TURNING THE PHONE ON/OFFTURNING THE PHONE ON1. Press and hold the END Key until your display turns on and the tone sounds. • If “Enter Lock Code” appears on the display, enter your 4-digit lock code to unlock your phone. • The default lock code is the last 4 digits of your Mobile Telephone Number.TURNING THE PHONE OFF1. Press and hold the END Key until your display turns off. • Immediately change or recharge the battery when “BATTERY LOW” appears on the display. Memory may possibly be damaged if the phone turns off due to the battery completely draining. • Turn the phone off before removing or replacing the battery. If the phone is on, unsaved data may be lost.ACCESSING THE MENUYour phone can be customized via the menu. Each function can be accessed by scrolling with the Directional Key or by pressing the number that corresponds with the menu item.1. To access the menu in idle mode, press the OK Key [MENU].2. To scroll through the menu, press the Directional Key up, down, left or right.3. To return to the previous page, press the CLR Key . To exit the current menu and return to the idle mode, press the END Key .4. In idle mode, press the Left Soft Key [Message] to open the Messaging menu. Or, press the Right Soft Key [Contacts] to open your Contacts list. All directions in this manual are based on the Tab Main Menu Setting, and Classic Display Theme. If you have changed either of these settings, the directions may vary.16 Chapter 2 − Basic OperationBasic OperationBasic OperationMENU SUMMARYMain Menu 2ND DEPTH 3RD DEPTH MEDIA CENTER 1. Music & Tones2. Picture & Video3. Games4. Mobile Web5. Browse & Download6. Extras1. V CAST Music I Rhapsody2. Get New Ringtones3. My Ringtones4. My Music5. My Sounds6. Sync Music1. V CAST Videos2. Get New Pictures3. My Pictures4. My Videos5. Take Picture6. Record Video7. Online Album1. Get New Applications1. Get New Applications Mobile E-mail VZ Navigator1. Get New ApplicationsMain Menu 2ND DEPTH 3RD DEPTHMESSAGING 1. New Message2. Inbox3. Sent4. Drafts5. Voicemail6. Mobile IM7. Email8. Chat1. TXT Message2. Picture Message3. Video Message4. Voice Message1. Get New ApplicationsMobile IMMobile EmailMobile Web MailCONTACTS 1. New Contact2. New PTT Contact3. Contact List4. PTT Contact List5. Groups6. PTT Groups7. Speed Dials8. In Case of Emergency9. My Name Card(“New PTT Contact”, “PTT Contact List”, “PTT Groups” menu appears only when the “PTT Mode” is set “On”)Basic Operation − Chapter 2 17Basic OperationBasic Operation080803_CDM8975_RAP_REV00.indd 16-17080803_CDM8975_RAP_REV00.indd 16-17 2008.8.14 10:36:2 AM2008.8.14 10:36:2 AM](https://usermanual.wiki/Pantech/RAP.Users-Manual-1/User-Guide-990735-Page-9.png)
![Main Menu 2ND DEPTH 3RD DEPTHRECENT CALLS 1. Missed2. Received3. Dialed4. Blocked (“Blocked” appears only when Call Restriction is set)5. All6. View TimersSETTINGS & TOOLS1. My Verizon2. Tools3. Bluetooth Menu4. Sounds Settings1. Voice Commands2. Calculator3. Calendar4. Alarm Clock5. Stop Watch6. World Clock7. Notepad1. Add New Device1. Easy Set Up2. Call Sounds3. Alert Sounds4. Keypad Volume5. Service AlertsMain Menu 2ND DEPTH 3RD DEPTHSETTINGS & TOOLS5. Display Settings6. Phone Settings7. Call Settings6. Device Connect7. Power On/Off1. Easy Set Up2. Banner3. Backlight4. Wallpaper5. Display Themes6. Main Menu Settings7. Dial Fonts 8. Menu Font Size9. Clock Format1. Airplane Mode2. Set Shortcuts3. Voice Commands4. Language5. Location6. Security7. System Select8. NAM Selection1. Answer Options2. Auto Retry3. TTY Mode18 Chapter 2 − Basic OperationBasic OperationBasic OperationMain Menu 2ND DEPTH 3RD DEPTHSETTINGS & TOOLS8. Memory9. Phone Info0. Set Up Wizard4. One Touch Dial5. Voice Privacy6. DTMF Tones7. PTT Mode1. Save Options2. Phone Memory3. Card Memory1. My Number2. SW/HW Version3. Icon Glossary4. Software UpdateMAKING A CALL1. From standby mode enter the phone number (include the area code if needed). Press the SEND Key . • To erase one digit at a time press the CLR Key . • To erase the entire number, press and hold the CLR Key . • When you place or receive a call from phone numbers stored in your contact list with a contact name, the name will be displayed.2. To end a call, press the END Key . • If you activate the “AUTO RETRY” function, the phone will automatically re-dial the number (Refer to page 83). • You can also place calls using Voice-Activated Dialing. Please refer to page 90 for more details.ANSWERING CALLS1. When your phone rings or vibrates, press the SEND Key to answer the incoming call. (Depending on your phone’s settings, you may also answer incoming calls by opening the phone or by pressing any key.)2. To ignore incoming calls, press the Right Soft Key [Ignore].3. To end a call, press the END Key . In “Auto w/ Hands-free” a call is automatically answered after a preset number of ring tones (Refer to page 83).Basic Operation − Chapter 2 19Basic OperationBasic Operation080803_CDM8975_RAP_REV00.indd 18-19080803_CDM8975_RAP_REV00.indd 18-19 2008.8.14 10:36:4 AM2008.8.14 10:36:4 AM](https://usermanual.wiki/Pantech/RAP.Users-Manual-1/User-Guide-990735-Page-10.png)
![MISSED CALL NOTIFICATIONWhen an incoming call is not answered, the Missed Call icon appears on the display.TO DISPLAY THE MISSED CALL ENTRY FROM THE NOTIFICATION SCREEN:1. Highlight the entry “View Now” and press the OK Key .2. To dial the phone number, press the SEND Key .TO DISPLAY A MISSED CALL ENTRY FROM STANDBY MODE:1. From standby mode, press the OK Key [MENU], then press the Directional Key right once for the “RECENT CALLS” menu.2. Press “1. Missed”.3. Highlight the entry you wish to view, then press the OK Key [OPEN].4. To dial the phone number, press the SEND Key .WAIT/PAUSE FEATUREPauses are used for automated systems (i.e., voice mail or calling cards). Insert a pause after a phone number and then enter another group of numbers. The second set of numbers is dialed automatically after the pause. This feature is useful for dialing into systems that require a code.Wait (W) The phone stops dialing until you press the Left Soft Key [Release] to advance to the next number. 2-Sec Pause The phone waits 2 seconds before sending the next string of digits automatically.1. From standby mode enter the phone number.2. Press the Right Soft Key [Options].3. Press the Directional Key up or down to select pause type, then the OK Key [OK]. “2-Sec Pause/Wait”.4. Enter additional number(s) (pin number or credit card number).5. Press the SEND Key to dial or the Left Soft Key [Save].20 Chapter 2 − Basic OperationBasic OperationBasic OperationANSWERING A CALL1. If your phone is set to “Flip Open” for “Answer Options,” simply open the phone to answer a call. If your phone is set to “Any Key” for “Answer Options,” press any key to answer a call. If your phone is set to “Auto w/ Hands-free” for “Answer Options,” calls are answered automatically with a 5 second delay. (“Auto w/ Hands-free” is available only when connected to a headset or hands-free device.) For information on how to set your Answer Options, see page 83.2. To end the call, press the END Key .MAKING AN INTERNATIONAL CALL1. From standby mode, press and hold the * Key . The “+” required for international calls will be displayed.2. Enter the country code, area code, and phone number, then press the SEND Key .3. To end the call, press the END Key .3WAY CALLINGWith 3-Way Calling, you can talk to two people at the same time. When using this feature, the normal airtime rates will be applied for each of the two calls.1. From standby mode, enter the phone number you wish to call and then press the SEND Key .2. Once you have established the connection, enter the second phone number you wish to call and then press the SEND Key again.3. When you’re connected to the second party, press the SEND Key again to begin your 3-Way call. If one of the people you called hangs up during your call, you and the remaining caller stay connected. If you initiated the call and are the first to hang up, all three CALLS are disconnected.CALL WAITING FUNCTIONIf you are on a call and you receive another incoming call, you will hear two beeps and the caller’s phone number will appear on the display. With Call Waiting, you may put the active call on hold while you answer the other incoming call. To use Call Waiting:Basic Operation − Chapter 2 21Basic OperationBasic Operation080803_CDM8975_RAP_REV00.indd 20-21080803_CDM8975_RAP_REV00.indd 20-21 2008.8.14 10:36:4 AM2008.8.14 10:36:4 AM](https://usermanual.wiki/Pantech/RAP.Users-Manual-1/User-Guide-990735-Page-11.png)
![1. To answer another call while on the phone, press the SEND Key . This places the first call on hold. To switch back to the first caller, press the SEND Key again.CALLING A NUMBER FROM CONTACTS1. From standby mode, press the Right Soft Key [Contacts].2. Press the Directional Key up or down to select the Contact entry then press the OK Key [VIEW].3. Press the Directional Key up or down to select the phone number.4. Press the SEND Key to place the call. Pressing the Directional Key up or down to select the “Contact entry” and then pressing the Send Key will dial the Default Number of the Contact entry automatically. If multiple numbers are saved in the “Contact entry”, press the Directional Key up or down to select the “Contact entry” and then press the Directional Key left or right to select the number you want to dial. Then press the Send Key .ADJUSTING VOLUMETo adjust the master volume:1. From standby mode, press the Volume Keys up or down.2. Select one of the following options and press the OK Key [SET] to save it. • All Sounds Off • Alarm Only • Vibrate Only • Low / • Medium Low / • Medium / • Medium High / • High • Press the Volume Keys up or down to adjust Earpiece volume during a call. • To play a ringtone, press the Left Soft Key [Play].ADJUSTING THE CALL VOLUMEDuring a call, if you want to adjust the earpiece volume, press the Volume Keys up or down. Press the Volume Keys up to increase the volume level and the Volume Keys down to decrease the level. In Idle mode, you can also adjust the ringer volume by following the same steps.22 Chapter 2 − Basic OperationBasic OperationBasic OperationCALLER ID FUNCTIONCaller ID displays the number of the person calling when your phone rings. If the caller’s identity is stored in Contacts, the name appears on the screen. The caller ID is stored in the Recent Calls Menu.VIBRATE ON/OFF MODEVibrate Mode mutes key tones and activates an alert for an incoming call or message. To activate Vibrate Mode: 1. From the idle screen, press and hold the # Key .2. To return to a “Medium High” volume, from the idle screen press and hold the # Key again.SPEAKERPHONE MODEThe Speakerphone feature lets you hear audio through the speaker and talk without holding the phone.To activate the Speakerphone in idle mode or while on a call, press the Speakerphone Key . If you press the Speakerphone Key when you are not on a call, Speakerphone mode will be active for one minute, then turn itself off automatically.MUSIC PLAYERMusic Player is for playing MP3 files saved on the microSD card. To display the music list with the phone closed, press and hold , select a music file by pressing / , then press [PLAY]. Press [PAUSE] to stop the music player while it is playing with shell closed, if the shell is opened, press the END Key .AVAILABLE OPTIONS DURING A CALLDuring a phone call, you can access the following features by pressing the Right Soft Key [Options]:MESSAGINGTo access the Messaging Menu during a call:1. Press the Right Soft Key [Options], then press “1. Messaging”.CONTACT LISTTo view your Contact List during a call: 1. Press the Right Soft Key [Options], then press “2. Contact List”.Basic Operation − Chapter 2 23Basic OperationBasic Operation080803_CDM8975_RAP_REV00.indd 22-23080803_CDM8975_RAP_REV00.indd 22-23 2008.8.14 10:36:5 AM2008.8.14 10:36:5 AM](https://usermanual.wiki/Pantech/RAP.Users-Manual-1/User-Guide-990735-Page-12.png)
![RECENT CALLSTo view your Recent Calls list during a call: 1. Press the Right Soft Key [Options], then press “3. Recent Calls”.BLUETOOTH MENUTo access the Bluetooth Menu during a call: 1. Press the Right Soft Key [Options], then press “4. Bluetooth Menu”. If an Audio device is connected, “Audio To Phone/Audio To Device” is displayed in the options menu instead of “Bluetooth Menu”.MAIN MENU To access the Main Menu during a call: 1. Press the Right Soft Key [Options], then press “5. Main Menu”.2. Press the Directional Key up, down, left or right to scroll through the menu screens. NOTEPADTo compose and send notes during a call: 1. Press the Right Soft Key [Options], then press “6. Notepad”.MAKING AN EMERGENCY CALLThe 911 feature automatically places the phone in Emergency Call Mode when you dial the preprogrammed emergency number, 911. It also operates in Lock Mode and out of the service area.911 IN LOCK MODETo make an emergency call in Lock Mode:1. From standby mode, enter “911” and then press the SEND Key .2. The call connects.3. The phone maintains Emergency Mode for 5 minutes. When the call ends, the phone returns to Lock Mode.911 USING ANY AVAILABLE SYSTEMTo make an Emergency Call using any available system: 1. From standby mode, enter “911” and then press the SEND Key .2. The call connects.3. The phone will stay in Emergency Mode for 5 minutes. While the phone is in the Emergency Mode for 5 minutes, the phone can receive an incoming call from any available system or you can make outgoing calls even in the Emergency Callback Mode. 24 Chapter 2 − Basic OperationBasic OperationBasic OperationIn this case, making a call can automatically end the Emergency Callback Mode. The 911 call does not appear in the recent call list.Basic Operation − Chapter 2 25Basic OperationBasic Operation080803_CDM8975_RAP_REV00.indd 24-25080803_CDM8975_RAP_REV00.indd 24-25 2008.8.14 10:36:7 AM2008.8.14 10:36:7 AM](https://usermanual.wiki/Pantech/RAP.Users-Manual-1/User-Guide-990735-Page-13.png)
![PTT ON/OFF MODEYou can disable the PTT feature on your phone so that it will not be able to receive or send PTT calls or alerts. 1. From standby mode, press the OK Key [MENU], the Directional Key right twice for SETTINGS & TOOLS, and press 7. Call Settings, 7. PTT Mode.2. Press the Directional Key up or down to select “On/Off”, then press the OK Key [OK].PTT CALL TYPESYou can make two types of PTT calls:Barge Call A barge call automatically connects to the other party. The receiving party does not have the option to ignore the call. Alert Call An alert call sends the receiving party a tone indicating that someone wants to talk with them. The call recipient has the option to either answer or ignore the call.STORING A PTT NUMBER1. From standby mode, enter the PTT number you want to save.2. Press the Right Soft Key [Options].3. Press the Directional Key up or down to select “Save to Contacts”, then press the OK Key [OK].4. Press the Directional Key up or down to select “Add New PTT Contact”, then press the OK Key [OK].5. Enter a name for the phone number (up to 32 characters), then press the OK Key [SAVE].6. The phone will connect to the network and update Contact information. A confirmation message will appear on the display when the transaction is complete. MAKING A PTT CALLCALL FROM PTT CONTACT LIST BARGE1. From standby mode, press and hold the PTT Key to access your “PTT Contact List”.2. Press the Directional Key up or down to highlight the PTT Contact entry you wish to call.28 Chapter 3 − Push to TalkPush to TalkPush to Talk3. Press and hold the PTT Key . Listen for the “OK to Talk” tone. The message “Connected to” will appear on the display. Speak while pressing the PTT Key .4. Release PTT Key when finished speaking. This allows the called party to reply.5. Press the END Key to end the call.CALL FROM PTT CONTACT LIST ALERTYou can send an alert to any individual user with Verizon Wireless PTT service. The user may answer or ignore the alert: 1. From standby mode, press and hold the PTT Key to access your “PTT Contact List”.2. Press the Directional Key up or down to highlight the PTT Contact entry you wish to call.3. Press the Left Soft Key [Alert].4. Press and release the PTT Key to alert the selected individual. The “PTT Outgoing Alert” tone sounds, and “Alerting” appears on the display.5. If the called party answers the alert, “Listening“ appears on the display and you will hear the called party speaking. If the called party chooses to ignore the alert, or if the phone is unavailable to accept a PTT call, an “unavailable“ message will appear on your display.6. When the called party is finished speaking, you will hear the “Floor Available” tone and the “Connected” screen will appear on your display.7. Press to hold the PTT Key and talk.8. Release the PTT Key when finished speaking. This allows the called party to reply.9. Press the END Key to end the call.CALL FROM KEYPAD BARGE1. Enter the 10-digit wireless number of the Verizon Wireless PTT subscriber you wish to contact.2. Press and hold PTT Key . Listen for the “OK to Talk” tone. The message “Connected to” will appear on the display. Speak while pressing the PTT Key . If the wireless number you entered is included in your PTT contact list, the contact name will replace the wireless number entered on the display when the call is initiated.Push to Talk − Chapter 3 29Push to TalkPush to Talk080803_CDM8975_RAP_REV00.indd 28-29080803_CDM8975_RAP_REV00.indd 28-29 2008.8.14 10:36:9 AM2008.8.14 10:36:9 AM](https://usermanual.wiki/Pantech/RAP.Users-Manual-1/User-Guide-990735-Page-15.png)
![3. Release the PTT Key when finished speaking. This allows the called party to reply.4. Press the END Key to end the call.CALL FROM KEYPAD ALERTYou can send an alert to any individual user with Verizon Wireless PTT service. The user may answer or ignore the alert: 1. Enter the 10-digit wireless number of the Verizon Wireless PTT subscriber you wish to alert.2. Press the Left Soft Key [Alert].3. Press and release the PTT Key to alert the individual. The “PTT Outgoing Alert” tone sounds, and “Alerting” appears on the display. If the wireless number you entered is included in your PTT contact list, the contact name will replace the wireless number entered on the display when the alert is initiated.4. If the called party answers the alert, “Listening” appears on the display and you will hear the called party speaking. If the called party chooses to ignore the alert, or if the phone is unavailable to accept a PTT call, an “unavailable” message will appear on your display.5. When the called party is finished speaking, you will hear the “Floor Available” tone and the “Connected” screen will appear on your display.6. Press and hold the PTT Key to talk.7. Release the PTT Key to listen.8. Press the END Key to end the call.INCOMING PTT CALLINCOMING PTT BARGE1. When your phone receives a barge call, the “Barge” tone plays. You then hear the calling party speaking through the speakerphone. The calling party’s wireless number will appear on your display. If the calling party’s number is saved in your PTT Contact List the contact name will replace the wireless number on the display.2. Press and hold the PTT Key to talk.3. Release the PTT Key to let another party talk.4. Press the END Key to end the call.30 Chapter 3 − Push to TalkPush to TalkPush to TalkINCOMING PTT ALERT1. When your phone receives an alert, the “PTT Alert” tone plays. The message “Incoming Alert” is displayed with the phone number or contact name of the calling party. The PTT Alert tone repeats every 5 seconds until it is answered or ignored. If you do not answer an incoming alert within 20 seconds, the PTT call will be automatically disconnected.2. Answer or ignore the alert:To answer the alert, press and hold the PTT Key and begin talking. To ignore the alert, press the Right Soft Key [Ignore].3. Release the PTT Key to let another party talk.4. Press the END Key to end the call.PTT CONTACTSAllows you to view your PTT Contact list. The PTT Contact List contains all individual and group PTT contacts in a single list. 1. From standby mode, press the OK Key [MENU], and press 4. PTT Contact List. 2. Press the Directional Key up or down to scroll through your PTT Contact List.3. Press the Left Soft Key [Alert]. Press and release the PTT Key to alert.• By pressing the Right Soft Key [Options], you can choose from the following: 1. New PTT Contact: To add a New PTT Contact. 2. Copy to PTT Contacts: To copy to PTT Contact list. 3. Temp PTT Group 4. Erase: To delete a PTT contact. 5. Edit: To edit a PTT contact entry. 6. Call: To call the contact. 7. New TXT Message: To create a TXT message. 8. New Picture Message: To create a Picture message. 9. New Video Message: To create a Video message. 10. New Voice Message: To create a Voice message. 11. Sort: To sort your PTT Contact list.NEW PTT CONTACT1. From standby mode, press the OK Key [MENU], and press 2. New PTT Contact.2. Enter the name, then press the Directional Key down. To change the input mode, press the Left Soft Key [Abc].Push to Talk − Chapter 3 31Push to TalkPush to Talk080803_CDM8975_RAP_REV00.indd 30-31080803_CDM8975_RAP_REV00.indd 30-31 2008.8.14 10:36:10 AM2008.8.14 10:36:10 AM](https://usermanual.wiki/Pantech/RAP.Users-Manual-1/User-Guide-990735-Page-16.png)
![3. Enter the PTT number, then press the Directional Key down. 4. Select the PTT Group, press the Left Soft Key [Edit]. Press the Directional Key up or down to select the group, then press the OK Key [MARK]. Press the Left Soft Key [Done].5. Press the OK Key [SAVE]. The phone will connect to the network and update Contact information. A confirmation message will appear on the display when the transaction is complete.COPY TO PTT CONTACTS1. From standby mode, press the OK Key [MENU], and press 3. Contact List.2. Press the Directional Key up or down to highlight the existing Contact entry.3. Press the Right Soft Key [Options].4. Press ”3. Copy to PTT Contacts”.5. Press the OK Key [SAVE]. The phone will connect to the network and update Contact information. A confirmation message will appear on the display when the transaction is complete.ERASE PTT CONTACT1. From standby mode, press the OK Key [MENU], and press 4. PTT Contact List. 2. Press the Directional Key up or down to highlight the existing Contact entry.3. Press the Right Soft Key [Options].4. Press ”4. Erase”.5. Press the Directional Key up or down to select ”Yes”.6. Press the OK Key [OK]. The phone will connect to the network and update Contact information. A confirmation message will appear on the display when the transaction is complete.PTT GROUP1. From standby mode, press the OK Key [MENU], and press 6. PTT Group. 2. Press the Directional Key up or down to highlight the existing Contact entry.• By pressing the Right Soft Key [Options], you can choose from the following: 1. Rename: To add rename the group. 32 Chapter 3 − Push to TalkPush to TalkPush to Talk2. Erase: To delete a PTT group. 3. Add: To assign PTT phone number to group. 4. Sort: To sort your PTT group.TO ADD NEW PTT GROUP1. From standby mode, press the OK Key [MENU], and press 6. PTT Group.2. Press the Left Soft Key [New].3. Enter a new PTT group name, then press the OK Key [SAVE].TO ASSIGN PHONE NUMBER TO GROUP1. From standby mode, press the OK Key [MENU], and press 6. PTT Group.2. Press the Directional Key up or down to select the group where you want to add the contact, and then press the Right Soft Key [Options].3. Select “Add”.4. Your contact PTT entries will be displayed in alphabetical order. Press the Directional Key up or down to select the PTT contact you want to add then press the OK Key [OK].5. “UPDATE IN PROGRESS” will be displayed.TO CHANGE GROUP NAME1. From standby mode, press the OK Key [MENU], and press 6. PTT Group.2. Press the Directional Key up or down to select the group you want to rename then press the Right Soft Key [Options].3. Select “Rename”.4. Enter the new group name, then press the OK Key [SAVE].ERASE GROUP1. From standby mode, press the OK Key [MENU], and press 6. PTT Group.2. Press the Directional Key up or down to select the existing group name that you want to erase, and then press the Right Soft Key [Options].3. Select “Erase”. “ERASE PTT GROUP?” will appear on the screen.Push to Talk − Chapter 3 33Push to TalkPush to Talk080803_CDM8975_RAP_REV00.indd 32-33080803_CDM8975_RAP_REV00.indd 32-33 2008.8.14 10:36:11 AM2008.8.14 10:36:11 AM](https://usermanual.wiki/Pantech/RAP.Users-Manual-1/User-Guide-990735-Page-17.png)
![4. Press the OK Key [OK] to select “Yes”. A confirmation message appears.SORT GROUP1. From standby mode, press the OK Key [MENU], and press 6. PTT Group.2. Press the Right Soft Key [Options].3. Select “Sort”. 4. Press the Directional Key up or down to select “Alphabetical” or “Presence” to add then press the OK Key [OK].TEMP PTT GROUP1. From standby mode, press the OK Key [MENU], and press 4. PTT Contact List. 2. Press the Directional Key up or down to highlight the existing Contact entry.3. Press the Right Soft Key [Options].4. Press ”3. Temp PTT Group”.ADD PTT CONTACTS 1. Press “1. Add PTT Contacts”.2. Press the Directional Key up or down, then press the OK Key [MARK], or press the Right Soft Key [Mark All] to select Temp PTT Group members. Press the Left Soft Key [Done] to select PTT Contacts.3. The phone will connect to the network and update Contact information. A Confirmation message will appear on the display when the transaction is complete.ENTER NUMBER 1. Press “2. Enter Number”.2. Enter the phone numbers into the phone number field.3. Press the Directional Key up or down to highlight the next phone number fields and enter additional phone numbers if you need to add more PTT contacts.4. Press the OK Key [OK] to add selected PTT Contacts.34 Chapter 3 − Push to TalkPush to TalkPush to Talk5. The phone will connect to the network and update Contact information. A confirmation message will appear on the display when the transaction is complete.VIEW TEMP PTT GROUP MEMBERS 1. From standby mode, press the OK Key [MENU], and press 4. PTT Contact List. 2. Press the Directional Key up or down to highlight the existing Contact entry.3. Press the Right Soft Key [Options].4. Press ”3. Temp PTT Group”.5. Press the Directional Key up or down to highlight the existing Temp PTT Group members.6. Press the OK Key [VIEW] to display existing Temp PTT Group members.ERASE TEMP PTT GROUP MEMBERS 1. From standby mode, press the OK Key [MENU], and press 4. PTT Contact List. 2. Press the Directional Key up or down to highlight the existing Contact entry.3. Press the Right Soft Key [Options].4. Press ”3. Temp PTT Group”.5. Press the Left Soft Key [Erase].6. Press the Directional Key up or down, then press the OK Key [MARK], or press the Right Soft Key [Mark All] to select Temp PTT Group members. Press the Left Soft Key [Done] to erase selected Temp PTT Group Members.7. The phone will connect to the network and update Contact information. A confirmation message will appear on the display when the transaction is complete.Push to Talk − Chapter 3 35Push to TalkPush to Talk080803_CDM8975_RAP_REV00.indd 34-35080803_CDM8975_RAP_REV00.indd 34-35 2008.8.14 10:36:12 AM2008.8.14 10:36:12 AM](https://usermanual.wiki/Pantech/RAP.Users-Manual-1/User-Guide-990735-Page-18.png)
![STORING A PHONE NUMBERThe Contact List stores up to 500 entries.ADDING A NEW CONTACT 1. From standby mode, enter the phone number you want to save.2. Press the Left Soft Key [Save].3. Press the Directional Key up or down to select “Add New Contact”, then press the OK Key [OK].4. Press the Directional Key up or down to select the type of phone number you want to save, then press the OK Key [OK]. Mobile 1/Mobile 2/Home/Work/Fax Use Update Existing to add another phone number to a contact already stored in memory.5. Enter a name for the phone number (up to 32 characters), then press the OK Key [SAVE].6. “ CONTACT SAVED” displays, then the phone number reappears on the screen. Press the End Key to exit, or press the Send Key to call the number. ADDING A NEW CONTACT WHEN USING THE PTT MODE 1. From standby mode, enter the phone number you want to save.2. Press the Right Soft Key [Options].3. Press the Directional Key up or down to select “Save to Contacts”, then press the OK Key [OK].4. Press the Directional Key up or down to select “Add New Contact”, then press the OK Key [OK].5. Press the Directional Key up or down to select the type of phone number you want to save, then press the OK Key [OK]. Mobile 1/Mobile 2/Home/Work/Fax Use Update Existing to add another phone number to a contact already stored in memory.6. Enter a name for the phone number (up to 32 characters), then press the OK Key [SAVE].7. “ CONTACT SAVED” displays, then the phone number reappears on the screen. Press the End Key to exit, or press the Send Key to call the number. 38 Chapter 4 − Memory FunctionMemory FunctionMemory FunctionOPTIONS TO CUSTOMIZE YOUR CONTACTSOnce the basic phone number and name information is stored in your Contacts, you can edit and/or customize the entries.1. From standby mode, press the Right Soft Key [Contacts], then press the Directional Key up or down to highlight the Contact entry you want to edit.2. Press the Left Soft Key [Edit] to access the Edit Contact screen.3. Press the Directional Key up or down to highlight the information field you want to customize. Additional fields include: Name/Mobile 1/Home/Work/E-mail 1/Group/Picture/Ringtone/Mobile 2/Fax/E-mail 24. To change the data as necessary, then press the OK Key [SAVE] to save.ADDING OR CHANGING GROUPS To organize your Contacts into groups: 1. From standby mode, press the Right Soft Key [Contacts], then press the Directional Key up or down to highlight an entry.2. Press the Left Soft Key [Edit].3. Press the Directional Key up or down to highlight ”Group” then press the Left Soft Key [Set].4. Press the Directional Key up or down to select the Group, then press the OK Key [OK]. No Group/Family/Work5. Press the OK Key [SAVE] to save.CHANGING THE CALL RINGTONE To identify who is calling by setting different ringtones for different phone numbers in your Contacts:1. From standby mode, press the Right Soft Key [Contacts], then press the Directional Key up or down to highlight an entry.2. Press the Left Soft Key [Edit].3. Press the Directional Key up or down to highlight Default under ”Ringtone”, then press the Left Soft Key [Set].4. Press the Directional Key up or down to select the new ringtone, then press the OK Key [OK]. Press the Left Soft Key [Play] to listen to a highlighted ringtone before you press the OK Key [OK].Memory Function − Chapter 4 39Memory FunctionMemory Function080803_CDM8975_RAP_REV00.indd 38-39080803_CDM8975_RAP_REV00.indd 38-39 2008.8.14 10:36:15 AM2008.8.14 10:36:15 AM](https://usermanual.wiki/Pantech/RAP.Users-Manual-1/User-Guide-990735-Page-20.png)
![5. Press the OK Key [SAVE] to save.ADDING OR CHANGING THE PICTURE ID To select a picture or graphic to assign to a Caller ID:1. From standby mode, press the Right Soft Key [Contacts], then press the Directional Key up or down to highlight an entry.2. Press the Left Soft Key [Edit].3. Press the Directional Key up or down to highlight ”Picture”, then press the Left Soft Key [Set].4. Press the Directional Key up, down, left or right to select a picture, then press the OK Key [OK].5. When completed, press the OK Key [SAVE].ADDING OR CHANGING AN EMAIL ADDRESS To enter or add an Email address to a Contact entry:1. From standby mode, press the Right Soft Key [Contacts], then press the Directional Key up or down to highlight an entry.2. Press the Left Soft Key [Edit].3. Press the Directional Key up or down to highlight ”E-mail 1” or ”E-mail 2”.4. Enter an Email address, then press the OK Key [SAVE] to save.ADDING A SPEED DIAL ENTRY To add an entry to Speed Dial:1. From standby mode, press the Right Soft Key [Contacts], then press the Directional Key up or down to highlight an entry.2. Press the Left Soft Key [Edit].3. Press the Directional Key up or down to highlight the phone number you want to add to Speed Dial, then press the Right Soft Key [Options].4. Select ”1. Set Speed Dial”, then press the OK Key [OK].5. Press the Directional Key up or down to select a Speed Dial location, then press the OK Key [SET].6. Press the Directional Key up or down to select ”Yes” to save, then press the OK Key [OK].7. Press the OK Key [SAVE] to save.40 Chapter 4 − Memory FunctionMemory FunctionMemory FunctionEDITING CONTACTS ENTRIESADDING A PHONE NUMBER FROM STANDBY MODE 1. From standby mode, enter the phone number you want to save (up to 32 digits).2. Press the Left Soft Key [Save].3. Press the Directional Key up or down to highlight ”Update Existing”, then press the OK Key [OK].4. Press the Directional Key up or down to highlight the existing Contact entry, then press the OK Key [OK].5. Press the Directional Key up or down to highlight the phone number type, then press the OK Key [OK]. Mobile 1/Mobile 2/Home/Work/Fax6. If a phone number is already assigned to the item you selected, press the Directional Key up or down to select ”Yes” or ”No”, then press the OK Key [OK].7. “ CONTACT SAVED” displays, then the phone number reappears on the screen. Press the End Key to exit, or press the SEND Key to call the number. ADDING A PHONE NUMBER FROM THE CONTACT LIST SCREEN 1. From standby mode, press the Right Soft Key [Contacts]. Your Contacts display alphabetically.2. Press the Directional Key up or down to highlight the Contact entry you want to edit, then press the Left Soft Key [Edit].3. Press the Directional Key up or down to highlight the phone number field you want to add, enter the number, then press the OK Key [SAVE] to save. A confirmation message appears.DEFAULT NUMBERS The phone number saved when a Contact is created is the Default Number. If more than one number is saved in a Contact entry, another number can be set as the Default Number. The Default Number cannot be deleted. The entire Contact entry can be deleted or another number can be assigned as the Default Number allowing you to delete the original number and keep the Contact entry.CHANGING THE DEFAULT NUMBER 1. From standby mode, press the Right Soft Key [Contacts]. Your Contacts display alphabetically.Memory Function − Chapter 4 41Memory FunctionMemory Function080803_CDM8975_RAP_REV00.indd 40-41080803_CDM8975_RAP_REV00.indd 40-41 2008.8.14 10:36:17 AM2008.8.14 10:36:17 AM](https://usermanual.wiki/Pantech/RAP.Users-Manual-1/User-Guide-990735-Page-21.png)
![2. Press the Directional Key up or down to highlight the Contact entry you want to edit, then press the Left Soft Key [Edit].3. Press the Directional Key up or down to highlight the phone number you want to assign as the Default Number, then press the Right Soft Key [Options].4. Press the Directional Key up or down to highlight ”2. Set As Default”, then press the OK Key [OK].5. Press the Directional Key up or down to select ”Yes”.6. Press the OK Key [OK]. A confirmation message appears.7. Press the OK Key [SAVE] to save.EDITING STORED PHONE NUMBERS1. From standby mode, press the Right Soft Key [Contacts]. Your Contacts display alphabetically.2. Press the Directional Key up or down to highlight the Contact entry you want to edit, then press the Left Soft Key [Edit].3. Press the Directional Key up or down to highlight the phone number.4. Edit the phone number as necessary, then press the OK Key [SAVE].EDITING STORED NAMES1. From standby mode, press the Right Soft Key [Contacts]. Your Contacts display alphabetically.2. Press the Directional Key up or down to highlight the Contact entry you want to edit, then press the Left Soft Key [Edit].3. Edit the name as necessary, then press the OK Key [SAVE].DELETINGDELETING A PHONE NUMBER FROM A CONTACT 1. From standby mode, press the Right Soft Key [Contacts].2. Press the Directional Key up or down to highlight the Contact entry, then press the Left Soft Key [Edit].3. Press the Directional Key up or down to highlight the phone number to be deleted.4. Press and hold the Clear Key to delete the number.42 Chapter 4 − Memory FunctionMemory FunctionMemory Function5. Press the OK Key [SAVE]. A confirmation message appears.DELETING A CONTACT ENTRY 1. From standby mode, press the Right Soft Key [Contacts].2. Press the Directional Key up or down to highlight the Contact entry to be deleted.3. Press the Right Soft Key [Options].4. Press ”2. Erase”.5. Press the Directional Key up or down to select ”Yes”.6. Press the OK Key [OK]. A confirmation message appears.DELETING A SPEED DIAL 1. From standby mode, press the OK Key [MENU].2. Press the Directional Key up or down to highlight ”4. Speed Dials”, then press the OK Key [OK].3. Press the Directional Key up or down to highlight the Speed Dial number.4. Press the Right Soft Key [Remove].5. Press the Directional Key up or down to select ”Yes”.6. Press the OK Key [OK]. A confirmation message appears.Memory Function − Chapter 4 43Memory FunctionMemory Function080803_CDM8975_RAP_REV00.indd 42-43080803_CDM8975_RAP_REV00.indd 42-43 2008.8.14 10:36:18 AM2008.8.14 10:36:18 AM](https://usermanual.wiki/Pantech/RAP.Users-Manual-1/User-Guide-990735-Page-22.png)
![ENTERING LETTERS, NUMBERS & SYMBOLSThe input mode (Alpha editor) will automatically be activated when necessary to enter letters and numbers. As shown below, there are 5 available modes ; Standard input mode (Abc)/(ABC), Input mode (Word), Numeric mode (123) and Symbol mode (Symbols). The input mode indicator appears on the upper right of the display when letters and numbers are entered. Key Key Functions Abc: Press to change mode. [Word][Abc][ABC][123][Symbols]Next: Press to view the next matching word if the highlighted word is not the word you intended.Space: Press to accept a word and add a space.Caps Lock: Press to select a letter case of the standard text input or text input mode. [Abc], [ABC] and [abc] indicate the standard text input. [Word], [WORD] and [word] indicate the predictive text input.Clear: Press to delete a character to the left of the cursor.Send: Send the letters and numbers you enter.STANDARD INPUT MODEUse the digit keys to enter letters, numbers and characters.1. Enter letters using the key pad as follows:KEYPAD1 Time 2 Times 3 Times 4 Times 5 TimesPress Key ABC2APress Key DEF3DPress Key GHI 4GPress Key JKL5JPress Key MNO 6MPress Key PQRS7Press Key TUV8TPress Key WX Y Z 92. To change the input mode, press the Left Soft Key [Abc]. When entering special character such as . @ ? ! - , & : ’ / 1, press Key repeatedly.3. To enter a space, press Key. The cursor will automatically move to the next column. 44 Chapter 4 − Memory FunctionMemory FunctionMemory FunctionMemory Function − Chapter 4 45Memory FunctionMemory Function4. Repeat until letters are entered. There is a 160-letter limit.5. To delete one digit, press the Clear Key . To delete the entire entry, press and hold the Clear Key .6. To change from lowercase to uppercase, press Key. For Example:To enter the name “John”:Press [ ] J Press [ , , ] o Press [ , ] h Press [ , ] nWORD INPUT MODEThe input mode incorporates a built-in-dictionary to determine a word based on the entered characters. A word can be entered more quickly by pressing a key once per character.1. Select the Word mode by pressing Left Soft Key [Abc].2. Press a digit key once to enter the character you want and then enter all the characters to input the word you want.3. To view the next matching word, press Key.4. To accept the matching word, enter a space and then press Key. For Example:To enter “Hello bill” in the input mode.• After you enter the 1st letter, press Left Soft Key [Abc] to select input mode and to choose the lower case (Word). • Press , , , , and you will see “Hello” highlighted. Press to select it.• Press , , , until you see “bill” highlighted. NUMERIC MODEAllows you to enter numbers.1. Press Left Soft Key [Abc], scroll down to “123” then press the OK Key to change to Numeric Mode.2. To enter a number, press a digit key.SYMBOL MODEAllows you to enter symbols.1. Press Left Soft Key [Abc], scroll down to “Symbols” then press the OK Key to change to Symbol Mode.2. Select the symbol you want to enter by pressing the Directional Key up or down.3. Press the Directional Key up or down to view a different line of Symbols.080803_CDM8975_RAP_REV00.indd 44-45080803_CDM8975_RAP_REV00.indd 44-45 2008.8.14 10:36:20 AM2008.8.14 10:36:20 AM](https://usermanual.wiki/Pantech/RAP.Users-Manual-1/User-Guide-990735-Page-23.png)
![Entries can be retrieved by name or group.NEW CONTACT To add a new number to your Contacts List: Using this submenu, the number is saved as a new Contact. To save the number into an existing Contact, edit the Contact entry.1. From standby mode, press the OK Key [MENU], and press 1. New Contact.2. Enter the name, then press the Directional Key down. To change the input mode, press the Left Soft Key [Abc].3. Press the Directional Key down to enter information in other fields for the contact. Fields include: Mobile 1/Home/Work/E-mail 1/Group/Picture/Ringtone/ Mobile 2/Fax/E-mail 2 If entering information in a phone number field, press the Right Soft Key [Options] to select one of the following options: 1. Set Speed Dial/2. Set As Default/3. Add Pause4. Press the OK Key [SAVE]. For additional details on how to add a new contact, see page 38.NEW PTT CONTACT To add a new PTT number to your PTT Contacts List.1. From standby mode, press the OK Key [MENU], and press New PTT Contact.2. Enter the name, then press the Directional Key down. To change the input mode, press the Left Soft Key [Abc].3. Enter the PTT number, then press the Directional Key down. 4. Select the PTT Group, press the Left Soft Key [Edit]. Press the Directional Key up or down to select the group, then press the OK Key [MARK]. Press the Left Soft Key [Done]5. Press the OK Key [SAVE]. Connect to server and update Contact information. “New PTT Contact” menu appears only when the “PTT Mode” is set “On”.CONTACT LIST You can review all the entries stored in your Contact List or quickly find an entry by entering a name or its character string.1. From standby mode, press the OK Key [MENU], and press 2. Contact List. Or, press the Right Soft Key [Contacts]. 48 Chapter 5 − Menu FunctionContactsContactsThe list of names in your contacts is displayed alphabetically.2. Enter a name or part of a name in the Go To field at the bottom of the screen or press the Directional Key up or down to scroll through your Contact List.3. To edit the entry, press the Left Soft Key [Edit]. To view contact details, press the OK Key [VIEW].• By pressing the Right Soft Key [Options], you can choose from the following: 1. New Contact: To add a New Contact. 2. Erase: To delete a contact. 3. Copy to PTT Contacts: To copy to PTT Contact list. 4. New TXT Message: To create a TXT message. 5. New Picture Message: To create a Picture message. 6. New Video Message: To create a Video message. 7. New Voice Message: To create a Voice message. 8. Send by Bluetooth: To access Bluetooth Menu. 9. Set As ICE Contact: To set as emergency number. 10. Call: To call the contact. 11. Erase All Contacts: To delete all contact list. “Copy to PTT Contacts” option appears only when the “PTT Mode” is set “On”.4. To call the selected number, press the Right Soft Key [Options] and then select ”Call” or press the SEND Key .PTT CONTACT LIST You can review all the entries stored in your PTT Contact List or quickly find an entry by entering a name or its character string.1. From standby mode, press the OK Key [MENU], and press PTT Contact List. 2. Enter a name or part of a name in the Go To field at the bottom of the screen or press the Directional Key up or down to scroll through your PTT Contact List.3. Press the Left Soft Key [Alert]. Press and release the PTT Key to alert. To view PTT contact details, press the OK Key [VIEW].• By pressing the Right Soft Key [Options], you can choose from the following: 1. New PTT Contact: To add a New PTT Contact. 2. Copy to PTT Contacts: To copy to PTT Contact list. 3. Temp PTT Group 4. Erase: To delete a PTT contact. 5. Edit: To edit a PTT contact entry. 6. Call: To call the contact. 7. New TXT Message: To create a TXT message. 8. New Picture Message: To create a Picture message. 9. New Video Message: To create a Video message. 10. New Voice Message: To create a Voice message. 11. Sort: To sort your PTT Contact list. “PTT Contact List” menu appears only when the “PTT Mode” is set “On”.Menu Function − Chapter 5 49ContactsContacts080803_CDM8975_RAP_REV00.indd 48-49080803_CDM8975_RAP_REV00.indd 48-49 2008.8.14 10:36:24 AM2008.8.14 10:36:24 AM](https://usermanual.wiki/Pantech/RAP.Users-Manual-1/User-Guide-990735-Page-25.png)
![GROUPS Groups allows you to classify phone entries into groups with up to 10 numbers in each group. The default groups include No Group, Family and Work and they cannot be erased or renamed. TO ADD NEW GROUP1. From standby mode, press the OK Key [MENU], and press 3. Groups.2. Press the Left Soft Key [New].3. Enter a new group name, then press the OK Key [SAVE].TO ASSIGN PHONE NUMBER TO GROUP1. From standby mode, press the OK Key [MENU], and press 3. Groups.2. Press the Directional Key up or down to select the group where you want to add the contact, and then press the Right Soft Key [Options].3. Select “Add”.4. Your contact entries will be displayed in alphabetical order. Select the contact you want to add then press the OK Key [MARK].5. Press the Left Soft Key [Done]. “CONTACT ADDED TO [GROUP NAME]” will be displayed.TO CHANGE GROUP NAME1. From standby mode, press the OK Key [MENU], and press 3. Groups.2. Press the Directional Key up or down to select the group you want to rename then press the Right Soft Key [Options]. You can only change Group names that you added.3. Select “Rename”.4. Enter the new group name, then press the OK Key [SAVE].ERASE GROUP1. From standby mode, press the OK Key [MENU], and press 3. Groups.2. Press the Directional Key up or down to select the existing group name that you want to erase, and then press the Right Soft Key [Options]. You can only erase Group names that you added.50 Chapter 5 − Menu FunctionContactsContacts3. Select “Erase”. “ERASE GROUP?” will appear on the screen.4. Press the OK Key [OK] to select “Yes”. A confirmation message appears.TO SEND A TXT MESSAGE TO A GROUP1. From standby mode, press the OK Key [MENU], and press 3. Groups.2. Press the Directional Key up or down to select the group you want to send a message to then press the Right Soft Key [Options].3. Press “1. New TXT Message”.4. Input your message in the Text Field and then press the Right Soft Key [Options] to select “Quick Text”, “ Save As Draft”, “Add”, “ Edit Text Format”, “ Priority Level” and “Cancel Message”.5. To send the TXT message, press the OK Key [SEND] or press the SEND Key .TO SEND A PICTURE MESSAGE TO A GROUP1. From standby mode, press the OK Key [MENU], and press 3. Groups.2. Press the Directional Key up or down to select the group you want to send a message to then press the Right Soft Key [Options].3. Press “2. New Picture Message”.4. Under “Text:”, input your message and then press the Directional Key down.5. Under “Picture:”, press the Left Soft Key [My Pics] to select the picture you would like to send then press the OK Key [OK].6. Under “Sound:”, press the Left Soft Key [Sounds] to select the sound you would like to send then press the OK Key [OK].7. Under “Subject:”, input a subject and then press the Directional Key down.8. Under “Name Card:”, you can insert your name card. Press the Left Soft Key [Add] select “1. My Name Card” or “2. Contacts” then press the OK Key [OK]. Select the card you’d like to send then press the OK Key [OK]. 9. Press the Right Soft Key [Options] to select “Preview”, “ Save As Draft”, “Add Quick Text”, “Add Slide”, “ Priority Level”, “ Remove Picture”, “Remove Slide”, “ Remove Sound”, “ Remove Name Card” or “Cancel Menu Function − Chapter 5 51ContactsContacts080803_CDM8975_RAP_REV00.indd 50-51080803_CDM8975_RAP_REV00.indd 50-51 2008.8.14 10:36:25 AM2008.8.14 10:36:25 AM](https://usermanual.wiki/Pantech/RAP.Users-Manual-1/User-Guide-990735-Page-26.png)
![Message”. These options will vary depending on the message contents chosen.10. To send the Picture Message, press the OK Key [SEND] or press the SEND Key .TO SEND A VIDEO MESSAGE TO A GROUP1. From standby mode, press the OK Key [MENU], and press 3. Groups.2. Press the Directional Key up or down to select the group you want to send a message to then press the Right Soft Key [Options].3. Press “3. New Video Message”.4. Under “Text:”, input your message and then press the Directional Key down.5. Under “Video:”, press the Left Soft Key [Videos] to select the video clip you would like to send then press the OK Key [OK].6. Under “Subject:”, input a subject and then press the Directional Key down.7. Under “Name Card:”, you can insert your name card. Press the Left Soft Key [Add] select “1. My Name Card” or “2. Contacts” then press the OK Key [OK]. Select the card you’d like to send then press the OK Key [OK]. 8. Press the Right Soft Key [Options] to select “Preview”, “ Save As Draft”, “Add Quick Text”, “ Priority Level”, “ Remove Video”, “ Remove Name Card” or “Cancel Message”. These options will vary depending on the message contents chosen.9. To send the Video Message, press the OK Key [SEND] or press the SEND Key .TO SEND A VOICE MESSAGE TO A GROUP1. From standby mode, press the OK Key [MENU], and press 3. Groups.2. Press the Directional Key up or down to select the group you want to send a voice message to then press the Right Soft Key [Options].3. Press “4. New Voice Message”.52 Chapter 5 − Menu FunctionContactsContacts4. To record a new Voice Memo, press the OK Key [OK] to start recording, then press the OK Key [STOP] again to save the voice memo.5. Under “Voice:”, your recorded file name will appear. Press the Directional Key down.6. Under “Text:”, input your message and then press the Directional Key down.7. Under “Subject:”, input a subject and then press the Directional Key down.8. Under “Name Card:”, you can insert your name card. Press the Left Soft Key [Add], select “1. My Name Card” or “2. Contacts” then press the OK Key [OK]. Select the card you’d like to send then press the OK Key [OK]. 9. Press the Right Soft Key [Options] to select “Review”, “ Save As Draft”, “Add Quick Text”, “ Priority Level”, “ Remove Recording”, “ Remove Name Card” or “Cancel Message”. These options will vary depending on the message contents chosen.10. To send the Voice Message, press the OK Key [SEND] or press the SEND Key .PTT GROUPS PTT Groups allows you to classify phone entries into groups with up to 50 numbers in each group. The default groups include No Group, Company and they cannot be erased or renamed. TO ADD NEW PTT GROUP1. From standby mode, press the OK Key [MENU], and press PTT Groups.2. Press the Left Soft Key [New].3. Enter a new PTT group name, then press the OK Key [SAVE].TO ASSIGN PHONE NUMBER TO GROUP1. From standby mode, press the OK Key [MENU], and press PTT Groups.2. Press the Directional Key up or down to select the group where you want to add the contact, and then press the Right Soft Key [Options].3. Select “Add”.Menu Function − Chapter 5 53ContactsContacts080803_CDM8975_RAP_REV00.indd 52-53080803_CDM8975_RAP_REV00.indd 52-53 2008.8.14 10:36:27 AM2008.8.14 10:36:27 AM](https://usermanual.wiki/Pantech/RAP.Users-Manual-1/User-Guide-990735-Page-27.png)
![54 Chapter 5 − Menu FunctionContactsContacts99(#PMT) and 411 (Directory Assistance) are already assigned to Verizon Wireless Account Information.• #DATA: #DATA is a VZW Customer Service VRU number (Free call) that provides customers information about their Verizon Wireless billing balance.• #BAL: #BAL is a VZW Customer Service VRU number (Free call) that provides customers information about their Verizon Wireless billing balance.• #MIN: #MIN is a VZW Customer Service VRU number (Free call) that provides customers information about their Verizon Wireless usage.• #PMT: #PMT is a VZW Customer Service VRU number (Free call) that allows a user to make a bill payment, either with a payment option they have already set up, or using a new, one time payment option.• 411: 411 is a Directory Assistance number.1. From standby mode, press the OK Key [MENU], and press 4. Speed Dials.2. Press the Directional Key up or down to highlight the Speed Dial position, or enter the Speed Dial digit, then press the OK Key [SET].3. Press the Directional Key up or down to highlight the Contact then press the OK Key [OK].4. Press the Directional Key up or down to highlight the number you wish to select then press the OK Key [OK].5. Press the Directional Key up or down to select “Yes”.6. Press the OK Key [OK]. A confirmation message appears. “Unassigned” appears if the location is available.TO ERASE A SAVED SPEED DIAL1. From standby mode, press the OK Key [MENU], and press 4. Speed Dials.2. Press the Directional Key up or down to select the Speed Dial entry you want to erase.3. Press the Right Soft Key [Remove].4. Press the OK Key [OK] to select “Yes.”5. A confirmation window appears.IN CASE OF EMERGENCY Your phone has a special menu to organize your emergency contacts and personal information.TO ASSIGN EMERGENCY CONTACTSFollow the procedures below to register a Contact to be contacted in case of emergency, or to register a medical record number or other personal information. To register up to three different Contacts to ICE:Menu Function − Chapter 5 55ContactsContacts4. Your contact PTT entries will be displayed in alphabetical order. Press the Directional Key up or down to select the PTT contact you want to add then press the OK Key [OK].5. “UPDATE IN PROGRESS” will be displayed.TO CHANGE GROUP NAME1. From standby mode, press the OK Key [MENU], and press PTT Groups.2. Press the Directional Key up or down to select the group you want to rename then press the Right Soft Key [Options].3. Select “Rename”.4. Enter the new group name, then press the OK Key [SAVE].ERASE GROUP1. From standby mode, press the OK Key [MENU], and press PTT Groups.2. Press the Directional Key up or down to select the existing group name that you want to erase, and then press the Right Soft Key [Options].3. Select “Erase”. “ERASE PTT GROUP?” will appear on the screen.4. Press the OK Key [OK] to select “Yes”. A confirmation message appears.SORT GROUP1. From standby mode, press the OK Key [MENU], and press PTT Groups.2. Press the Right Soft Key [Options].3. Select “Sort”. 4. Press the Directional Key up or down to select “Alphabetical” or “Presence” to add then press the OK Key [OK]. “PTT Groups” menu appears only when the “PTT Mode” is set “On”.SPEED DIALS In idle mode, calls can be placed to numbers stored in speed dial by pressing & holding the location number on the key pad. For a 2-digit location number, press the first number and then press and hold the second number. For a 3-digit location number, press the first number, and second numbers and then press and hold the third number. Speed Dial 1 is assigned to Voice Mail and cannot be changed. Speed Dial entries 96(#DATA), 97(#BAL), 98(#MIN), 080803_CDM8975_RAP_REV00.indd 54-55080803_CDM8975_RAP_REV00.indd 54-55 2008.8.14 10:36:29 AM2008.8.14 10:36:29 AM](https://usermanual.wiki/Pantech/RAP.Users-Manual-1/User-Guide-990735-Page-28.png)
![56 Chapter 5 − Menu FunctionContactsContacts1. From standby mode, press the OK Key [MENU], and press 5. In Case of Emergency.2. Press the Directional Key up or down to select “Personal Info” and then press the OK Key [VIEW].3. Press the Directional Key up or down to select “Note 1”, “Note 2” or “Note 3” and then press the OK Key [ADD].4. Enter the information and then press the OK Key [SAVE].5. The information you enter now appears in place of “Note 1”, “Note 2” or “Note 3”. TO EDIT SAVED PERSONAL INFO1. From standby mode, press the OK Key [MENU], and press 5. In Case of Emergency.2. Press the Directional Key up or down to select “Personal Info” and then press the OK Key [VIEW].3. Select the Note you want to edit then press the OK Key [VIEW].4. Press the OK Key [EDIT]. Edit the Note then press the OK Key [SAVE].TO ERASE SAVED PERSONAL INFO1. From standby mode, press the OK Key [MENU], and press 5. In Case of Emergency.2. Press the Directional Key up or down to select “Personal Info” and then press the OK Key [VIEW].3. Select the Note you want to erase then press the Right Soft Key [Erase].4. Press the OK Key [OK] to select “Yes”. A confirmation window appears.MY NAME CARD A Name Card with the handset’s mobile number automatically appears. EDIT MY NAME CARD1. From standby mode, press the OK Key [MENU], and press 6. My Name Card.2. Press the Left Soft Key [Edit].3. Edit the “My Name Card” options then press the OK Key [SAVE] to save your changes.Menu Function − Chapter 5 57ContactsContacts1. From standby mode, press the OK Key [MENU], and press 5. In Case of Emergency.2. Press the Directional Key up or down to select “Contact 1”, “Contact 2”, or “Contact 3”, and then press the OK Key [ADD].3. When selecting from the Contacts List, press “1. From Contacts”, press the Directional Key up or down to select the Contact entry, and then press the OK Key [OK]. When adding a new Contact, press “2. New Contact”, enter the info, and then press the OK Key [SAVE].4. The Contact name will be displayed in place of “Contact 1”, “Contact 2”, or “Contact 3”.TO REASSIGN EMERGENCY CONTACTS1. From standby mode, press the OK Key [MENU], and press 5. In Case of Emergency.2. Select the contact you want to re-assign then press the Right Soft Key [Options].3. Select “1. Re-assign”, then select “1. From Contacts” to select a contact from your Contact List, or “2. New Contact” to enter a new contact.4. Press the OK Key [OK]. A confirmation window appears.TO ERASE ASSIGNED EMERGENCY CONTACTS1. From standby mode, press the OK Key [MENU], and press 5. In Case of Emergency.2. Select the contact you want to erase then press the Right Soft Key [Options].3. Select “2. Unassign”. 4. Press the OK Key [OK]. A confirmation window appears.TO CALL AN ASSIGNED EMERGENCY CONTACT1. From standby mode, press the OK Key [MENU], and press 5. In Case of Emergency.2. Select the contact you want to call then press the Left Soft Key [Call] or press the SEND Key .TO ADD PERSONAL INFOTo store a Medical Record Number or other information that may be useful in case of an emergency:080803_CDM8975_RAP_REV00.indd 56-57080803_CDM8975_RAP_REV00.indd 56-57 2008.8.14 10:36:30 AM2008.8.14 10:36:30 AM](https://usermanual.wiki/Pantech/RAP.Users-Manual-1/User-Guide-990735-Page-29.png)
![58 Chapter 5 − Menu FunctionContactsContactsRECENT CALLS The Recent Calls menu is a list of the last phone numbers or Contact entries for calls you placed, accepted, missed, or blocked. It is continually updated as new numbers are added to the beginning of the list and the oldest entries are removed from the bottom of the list.ACCESS AND OPTIONS1. From standby mode, press the OK Key [MENU].2. Press the Directional Key right once for “RECENT CALLS”.3. Select a submenu.1. Missed2. Received3. Dialed4. All 5. View TimersMISSED Displays information about the 90 most recently missed calls. Place a call to a missed call by simply pressing the SEND Key .1. From standby mode, press the OK Key [MENU], the Directional Key right once for RECENT CALLS, and press 1. Missed.2. Press the Directional Key up or down to highlight an entry, then:• Press the OK Key [OPEN] to view the entry.• Press the Send Key to place a call to the number.• Press the Right Soft Key [Options] to select:Save to Contacts: To store the phone number in your Contacts or PTT Contacts. Erase: To erase a call listing. Lock/Unlock: To lock or unlock a call listing.Erase All: To erase all Missed Call entries.View Timers: To display usage time.• Press the Left Soft Key [Message] to select:TXT Message: To send a TXT message to the contact.Picture Message: To send a Picture message to the contact.Video Message: To send a Video message to the contact.Voice Message: To send a Voice message to the contact. Menu Function − Chapter 5 59Recent CallsRecent CallsSEND MY NAME CARD1. From standby mode, press the OK Key [MENU], and press 6. My Name Card.2. Press the Right Soft Key [Send].3. Select “1. New Message”.4. Select “1. TXT Message”, “ 2. Picture Message”, “ 3. Video Message” or “4. Voice Message”.5. Enter the recipient’s contact information then press the OK Key [OK].6. Enter your message in the Text Field and then press the OK Key [SEND].SEND MY NAME CARD TO ANOTHER BLUETOOTH DEVICE1. From standby mode, press the OK Key [MENU], and press 6. My Name Card.2. Press the Right Soft Key [Send].3. Select “2. Send by Bluetooth”.4. Press “1. Add New Device” to connect to the other device.080803_CDM8975_RAP_REV00.indd 58-59080803_CDM8975_RAP_REV00.indd 58-59 2008.8.14 10:36:32 AM2008.8.14 10:36:32 AM](https://usermanual.wiki/Pantech/RAP.Users-Manual-1/User-Guide-990735-Page-30.png)