Pantech TX-60B Tri-Mode Dual Band (AMPS/CDMA/PCS-CDMA) Phone User Manual
Pantech Co., Ltd. Tri-Mode Dual Band (AMPS/CDMA/PCS-CDMA) Phone
Pantech >
Contents
- 1. User Manual
- 2. CRN 7826 revised page of user manual
- 3. Users manual
User Manual

![ACCESSING THE MENUCH2Your phone can be customized via the menu. Each function can beaccessed by scrolling with the Navigation key or by pressing thenumber that corresponds with the menu item.1To access the menu in the idle mode,press [MENU].2Use the Navigation key to scroll through themenu.3To return to the previous page, press [CLR].To exit the current menu and return to the idlemode, press . 4Press the Navigation key to enter a functionwhen its main page is displayed or press itsassigned number to have a direct access to thefunction.17CH2TURNING THE PHONE ON1Press and hold , until your “Power On” logo appears and the tone sounds.•To select a logo, refer to page 61 for more details.(Setting>Display>Animation setting) for more detail.•When “Password” appears on the display enter your 4-digit password to unlock your phone.•The default password is the last 4 digits of your phonenumber.16TURNING THE PHONE OFF1Press and hold until “Power Off” appears. •Immediately change or recharge the battery when “LowBattery Warning Power Off” appears on the display.Memory may possibly be damaged if the phone turns offdue to the battery completely draining.•Turn the phone off before removing or replacing thebattery. If the phone is on, data may be lost.Hotkey In idle mode, move the Navigation Key as follows to accessthese functions:• Upward movement – Contacts• Downward movement – SMS Message• Rightward movement – Schedule• Leftward movement – WEB Service.TURNING THE PHONE ON / OFFlWhen the key guard is activated, press 1, 2,3 to unlock the key guard. lTo search through the menu in numericalorder, press down or to the right.Contacts ( 1 / 9 )Recent Calls( 2 / 9 )Messaging ( 3 / 9 )Settings ( 6 / 9 )Tools ( 7 / 9 )Data Svc. ( 8 / 9 )Voice Svc. ( 9 / 9 )Get It Now ( 4 / 9 )Mobile Web ( 5 / 9 )NEW-TX-60B02-22 2003.2.24 9:43 AM 페이지16](https://usermanual.wiki/Pantech/TX-60B.User-Manual/User-Guide-312299-Page-9.png)

![BASIC FUNCTIONS BASIC FUNCTIONSCH2You can dial or save a phone number with pauses for use in theautomated systems where you need to enter a credit card number, asocial security number, and so on. This feature will be convenientwhen you are linked to ARS (Advanced Record System)PAUSE FEATURE1Enter a phone number, thenpress [PSE] to insert apause.2Press to dial or [STO] to store.Please refer to page 30 for more details about storing a phone number.23CH2SPEAKER PHONE1To activate the speaker phone when the phoneis in idle mode, answering mode, and callingmode press and hold .2The phone returns to normal (speaker phone off)after ending or call or when the phone is turnedoff and back on.22STO CLRPSEXXX-XXX-XXXXPANSWERING A CALL1To answer a call, press any key except Clear,End or the Navigation key.2To end the call, press .In Auto Answer Mode a call is automatically answered aftera preset number of ring tones. See page 75 for more details.Displays the caller’s name and phone number, if available, in thephone book.CALLER ID FUNCTIONThe caller ID is stored in the call history.lIn the Settings menu, you can selet either “AnyKey” or “Send Key” to answer a call. lf “SendKey” is selected, the phone can only beanswered by pressing . See page 75 formore information.NEW-TX-60B02-22 2003.2.24 9:44 AM 페이지22](https://usermanual.wiki/Pantech/TX-60B.User-Manual/User-Guide-312299-Page-12.png)
![BASIC FUNCTIONS BASIC FUNCTIONSCH2Notifies of another incoming call when you are on the phone bymaking a beep sound and displays the caller’s phone number on thescreen.Displays the number of voice memos recorded in the answeringmachine.CALL WAITING FUNCTION1To answer another call while on the phone,press . This places the first call on hold. Toswitch back to the first caller, press again.first call.25CH224VOICE MEMO DISPLAY1To play the recorded voicememos, press [PLAY].PLAY CLRStored 1 Memo09:00 PMSTO CLRPSESTO CLRPSEAdjust the volume of the ringer, key beep and speaker.ADJUSTING VOLUME1Press [MENU] and select one of the following.2Adjust volume and press [OK] to save it.Mutes key tones and activates the vibration mode to alert you of anincoming call or message.Locks phone allowing it to only be used after the password isentered.ETIQUETTE1To turn etiquette modeon/off, press and hold .Ringer – Controls the ringer volumeKey – Controls the keypad toneVoice Call – Controls the Speaker & earpiece volumelllMove the Navigation key upward or downward to adjustvolume of earpiece during a call.KEY GUARD1To lock the phone, pressand hold .2To unlock the phone, input thepassword.The default password is 1 2 3.noteEtiquette modeOnnoteEnterKeyguard modeOK CLRNEW-TX-60B02-22 2003.2.24 9:44 AM 페이지24](https://usermanual.wiki/Pantech/TX-60B.User-Manual/User-Guide-312299-Page-13.png)
![DURING A CALL DURING A CALLCH2The caller can not hear you and any sound from your side, while youcan hear his or her voice.To display menu options during a call, press .MUTE (UNMUTE)1Press [MENU] .Prevents the other end from hearing tones if any key is pressedduring a call.SILENT 1Press [MENU] .Automatically transmits your phone number to a pager during a callwithout manually entering the number.SEND MY PHONE #1To transmit your phone number during a call,press [MENU] and .27CH226To deactivate, press [MENU] .The phone will automatically un-mute inEmergency Call or Callback mode.llPress [MENU] to deactivate it.lSTO CLRPSESilentSend my phone#Call MenuMy ProfileMute1234Notifies you of your handset imformation.Please see page 77 for more details.HANDSET INFORMATION1Press [MENU] .Enables you to review and edit your profile that is entered through thephone book. Please see page 46 for more details.MY PROFILE1Press [MENU] .NEW-TX-60B02-22 2003.2.24 9:44 AM 페이지26](https://usermanual.wiki/Pantech/TX-60B.User-Manual/User-Guide-312299-Page-14.png)
![Press [EDIT] to display the Editor and enter a name. Follow instructions for entering text on page 31. To change the input mode, press [MODE]. Press [OK] to store the name.Input mode indicatorAbc : Abc mode123 : Number mode: T9 modeSymbol modeSTORING A PHONE NUMBERENTERING LETTERS, NUMBERS & SYMBOLSCH3The input mode (Alpha editor) will be automatically activated whennecessary to enter letters and numbers. As shown below, there are 4available modes ; Standard input mode (abc), T9 input mode (T9abc),Numeric mode (123), and Symbol mode.The following illustrates the function assigned to each key in theAlpha Editor.31CH.3The phonebook stores up to 300 entries.1Enter phone # andpress [STO].2Choose Add New Entry or Add Existing Entry.Press [OK] to select.The input mode indicator appears on the upper rightof the display when letters and numbers are entered.To select the desired input mode among the 4 modesbelow, press [MODE], then enter letters andnumbers.3The Phone # will appear next to a list of icons.The name of the icon is displayed above the list. Use the Navigation key to choose the type of # you’re adding, as indicated by the icon. Press [OK] to select.45Use the Navigation key to scroll through more optionsfor the entry (VAD, secret).6To store the entry, press “New entry is saved” will be displayed.30Case[ ]Next[ ]Space[ ]ShiftClearStoPress to change mode.[T9Abc][Abc][123][Symbol mode]Press to view the next matching word ifthe highlighted word is not the word youintended.Press to accept a word and add a space.Press to select a letter case of thestandard text input or T9 text input mode.[Abc], [ABC], and [abc] indicate thestandard text input.[T9Abc], [T9ABC], and [T9abc] indicatethe predictive text input.Press to delete a character to the left ofthe cursor.Store the letters and numbers you enter.KEY FUNCTIONGroup – Family, Friends, Work, EtcVoice dial – Home, Mobile, Office, UnassignedSet Secret – Yes, NolThe other fields are set to Numeric mode as a default.lOK CLRNo NameHomeSTOEDIT CLRNo NameNameSTO CLRMODEEditor12345XXX-XXX-XXXXNEW-TX-60B02-22 2003.2.24 9:44 AM 페이지30](https://usermanual.wiki/Pantech/TX-60B.User-Manual/User-Guide-312299-Page-16.png)
![ENTERING LETTERS, NUMBERS & SYMBOLS ENTERING LETTERS, NUMBERS & SYMBOLSCH3The T9 input mode incorporates a built-in-dictionary to determine aword based on the entered characters. A word can be entered morequickly by pressing a key once per character.T9 INPUT MODE1Select the T9Abc mode with [MODE].2Press a digit key once to enter the characteryou want and enter all the characters to inputthe word you want.3To view the next matching word, press .To enter a compound word.lenter the first part of the word and press [ ] to accept it.lenter the last part of the word and press [ ] to enter the word.Select Abc mode, by pressing [ ][MODE].When you select this mode, the Abc iconappears as a visual confirmation.- “Find the key that corresponds to theletter you want to enter.”- Press it as many times as needed for theletter to appear on the screen.- To enter the name “John”:Press [ ] JPress [ ] oPress [ ] hPress [ ] n33CH3Use the digit keys to enter letters, numbers and characters.STANDARD INPUT MODE1Enter letters using the keypad as follows:2To enter a space, press . After two seconds,the cursor will automatically move to the nextcolumn.3Repeat until letters are entered. There is a 16-letter limit.4To delete one digit, press . To delete theentire entry, press and hold .To change the input mode, press [MODE].32Keypad12ABC3DEF4GHI:9WXYZ1ADG:W.BEH:X@CFI:Y-234:Z1ADG:91 TimeRepetitions2 timesRepetitions3 timesRepetitions4 timesRepetitions5 times4To accept matching word and enter a space,press .5To change from lowercase to uppercase, press .To enter “phone book” in the T9 input mode.- Press [ ][MODE] to select the T9 inputmode and [ ] to choose the small lettercase (T9abc).- Press [ ] and you willsee “phone” highlighted. Press [ ] tosea the next matching word and [ ] toselect it.- Press [ ] and you will see“book” highlighted. Press [ ] to move tothe next matching word and [ ] to selectthe compound word and enter a space.STO CLRMODEAlpha EditorJohnSTO CLRMODEAlpha Editorphone bookNEW-TX-60B02-22 2003.2.24 9:44 AM 페이지32](https://usermanual.wiki/Pantech/TX-60B.User-Manual/User-Guide-312299-Page-17.png)
![ENTERING LETTERS, NUMBERS & SYMBOLS ENTERING LETTERS, NUMBERS & SYMBOLSCH3NUMERIC MODE1Press [MODE] until the “Symbol mode” appears.35CH3341Press [MODE] until thecurrent input mode changes tothe Numeric mode. 2To enter a number, press a digit key.Press [ ],Press [ ],Press [ ],2Press the number for the symbol you want toenter.lUse the Navigation key to view a different line ofsymbols.SYMBOL MODEEnters numbers. Allows you to enter symbols.STO CLRMODE12345Alpha EditorSTO CLRMODEAlpha Editor1 2 3 4 5 6 7 8 9 0! @ # % & < > -*STO CLRMODEAlpha Editor1 2 3 4 5 6 7 8 9 0_ + = : ” ’ ( ) / ~STO CLRMODEAlpha Editor1 2 3 4 5 6 7 8 9 0\ ? . , { } $ [ ] ^NEW-TX-60B02-22 2003.2.24 9:45 AM 페이지34](https://usermanual.wiki/Pantech/TX-60B.User-Manual/User-Guide-312299-Page-18.png)
![CH439CH438Stores up to 300 entries, each of which can be assigned to a group.Entries can be retrieved by name, phone number or group.Retrieves an entry by group, voice name, name and number, andcalls by simply pressing .FINDCONTACTS1Press [MENU] .2Enter a name or its characterstring and press the NavigationKey to display the names inalphabetical order. Please referto page 31 about using theAlpha Editor.3All matching entries will be displayed. Select anentry and either delete it by pressing [DEL]or view it by pressing the Navigation Key.4To call the selected number, press .BY NAMEIf the entry is set to secret, you will beasked for your password.If there is no match, “Cannot Find Name”will appear.CONTACTS1Press [MENU] .2To search through the menu,enter a part of the phonenumber and press theNavigation Key.3All matching entries will be displayed. Select anentry and either delete it by pressing [DEL] or view it by pressing the Navigation Key.4To call the selected number, press .BY NUMBERIf there is no match, “Cannot FindName” will appear.If the entry is set to secret, you will beasked for your password.FIND CLRMODEEditorOK CLREDITBy NameFIND CLROK CLREDITBy NumberSearch NameJohnSearch NumberXXXXEditorNEW-TX-60B02-22 2003.2.24 9:45 AM 페이지38](https://usermanual.wiki/Pantech/TX-60B.User-Manual/User-Guide-312299-Page-20.png)
![CH4CH440CONTACTS1Press [MENU] .2Select one of the following groups (Personal, Business,Etc., All) with Navigation key.3All group entries will be displayed. Select anentry and either delete it by pressing [DEL] or view it by pressing the Navigation Key.4To call a selected number, press .BY GROUPYou are to be asked about “Password”when the entry is set secret.CONTACTS12To add a new entry to thephone book, press [MENU] .Adds a new entry.ADD NEW CONTACTSEdits an existing one.EDIT CONTACTSTo enter a name or number, use the NavigationKey to select the phone book field.3To save the entry, press [STO]. To return to the previous page, press [CLR].1To edit a existing entry, press[MENU] .2Use the Navigation Key toselect a group.Personal, Business, Etc., All3Select an entry with the Navigation Key andpress it to view and edit the entry, or [DEL] to delete it.OK CLRBy GroupOK CLRPersonalOK CLRExisting GroupSTOEDIT CLRNo NameNameBusinessEtc.AllPersonalSESJohnJaneGemBusinessEtc.AllPersonal41NEW-TX-60B02-22 2003.2.24 9:45 AM 페이지40](https://usermanual.wiki/Pantech/TX-60B.User-Manual/User-Guide-312299-Page-21.png)
![CH443CH442CONTACTSEDIT GROUPAdds, changes and deletes groups.12To add a new group, press[MENU] .A maximum of seven groups is allowed.ADD NEW GROUPCHANGE GROUP NAMEInput a new group name.3Press [STO]to save it.12To change a new group, press[MENU] .Select an existing group name with the Navigationkey.3Input a new name.4Press [STO]to save it.CONTACTSCLEAR GROUP1To delete an existing group, press [MENU] .2Use the Navigation Key to select, then delete the group. Press again to confirm.3Press [OK] to delete it.4Press [OK] again to confirm it.OK CLRSelect GroupNameOK CLRSelect GroupFriendsFamilyWorkFriendsWorkEtc.FamilySTO CLRMODEEditorNEW-TX-60B02-22 2003.2.24 9:45 AM 페이지42](https://usermanual.wiki/Pantech/TX-60B.User-Manual/User-Guide-312299-Page-22.png)
![CH445CH444CONTACTSEDIT SMS GROUPAdds, changes and deletes a group.12To add a new group, press[MENU] .A maximum of 7 groups isallowed.ADD NEW GROUPCHANGE GROUP NAMEInput a new group name.3Press [STO]to save it.12To change a group name, press[MENU] .The 3 existing group appear - Family, Friend, Work.3Use the navigation key to select an existing groupname.4Input a new name.5Press [STO]to save it.6Press [OK] again to confirm it.CONTACTSEDIT EXISTING GROUP1To editing menu, press[MENU] .2The 3 existing group appear - Family, Friend, Work.3Use the navigation key to select an existing group.4To edit a group.5Press [STO]to save it.6Press [OK] again to confirm it.OK CNCLSENDSelect GroupNameFriendsFamilyWorkCLEAR GROUP1To clear a group name, press[MENU] .2The 3 existing group appear - Family, Friend, Work.3Use the navigation key to select an clearing group name.4Clear a group name.5Press [STO]to save it.6Press [OK] again to confirm it.STO CLRMODEEditorOK CNCLSENDSelect GroupNameFriendsFamilyWorkOK CNCLSENDSelect GroupNameFriendsFamilyWorkNEW-TX-60B02-22 2003.2.24 9:46 AM 페이지44](https://usermanual.wiki/Pantech/TX-60B.User-Manual/User-Guide-312299-Page-23.png)
![CH447CH446CONTACTSIn idle mode, calls can be placed to numbers stored in speed dial bypressing its location number on the keypad.SPEED DIAL1Press [MENU] .Saves your personal information.MY PROFILE1Press [MENU]to review and edit your personal information as follows. (Name, My Phone number, Birthday, Blood Type, Address, Home, E-Mail, Work Phone #, Memo, Set Secret)23Press [EDIT] to edit on item when selected.Press [STO] to confirm and save it.2To assign a phone number to alocation, select the location andpress the Navigation Key.3Locate the entry in the group where it is savedand press the Navigation Key.4Select the entry and press the Navigation Key;select the phone number and press theNavigation Key again.If a phone number is already assigned to the location, press [DEL] and the navigation key to delete.RECENT CALLSThe detail includes date, time, and phonenumber of outgoing calls.After the tenth outgoing call, the oldest call will automaticallybe erased from the history.Displays information about the ten most recently dialed numbers.Saves the numbers and places call by simply pressing .In idle mode, you can access Call History by pressing [MENU], .DIALED1To see a list of the 10 mostrecently dialed numbers, press [MENU] and . If the number is already stored in your phone book, only the name appears. If the number is not stored, only the phone number appears.2To view outgoing call details,press the Navigation Key.3Press [OK] again to save it or press [DEL] to delete it.“Phone # is already saved in phone book”or “Move tophone book save mode?”will appear.OK CLRDELSelect NumberOK CLREDITMy ProfileOK CLRDELDialedDEL OPTS CLRDEL04/10(Fri) 02:5101John911123abcdefkshJohn01020304JohnXX-XXX-XXXXXXXX/XX/XXA type123abcdefkshJohn01020304NEW-TX-60B02-22 2003.2.24 9:46 AM 페이지46](https://usermanual.wiki/Pantech/TX-60B.User-Manual/User-Guide-312299-Page-24.png)
![CH44948CH4RECENT CALLSDisplays information of the 10 most recently missed calls. Place a callto a missed call number by simply pressing . To see a list of the 10 most recently missed calls, press [MENU], and . If thenumber is already stored in your phone book,only the name appears. If the number is notstored, only the phone number appears.MISSED CALLS12To view missed call details,press the Navigation Key.3Press [OK] again to save it or press [DEL] to delete it.“Phone # is already saved in phone book” or “Move tophone book save mode?” will appear.Call details include date, time and phone number.After the tenth missed call, the oldest call will automaticallybe erased from the history.RECENT CALLSCall details include date, time and phone number.After the tenth incoming call, the oldest call willautomatically be erased from the history.Displays information of the 10 most recently answered calls. Savesthe numbers and places calls by simply pressing .RECEIVED1To see a list of the 10 mostrecently answered calls, press[MENU], and . Ifthe number is already stored inyour phone book, only thename appears. If the number isnot stored, only the phone number appears.2To view incoming call details,press the Navigation Key.3Press [OK] again to save it or press [DEL] to delete it.“Phone # is already saved in phone book” or “Move tophone book save mode?” will appear.OK CLRDELreceivedOPTS CLRDEL04/10(Fri) 02:5101ksh911123abcdefkshksh01020304NEW-TX-60B02-22 2003.2.24 9:46 AM 페이지48](https://usermanual.wiki/Pantech/TX-60B.User-Manual/User-Guide-312299-Page-25.png)
![CH451CH450RECENT CALLS50Checks the talk time and manages your calls within the limit you set.The four timers include:Displays talk time of last call.CALL TIMERS1Press [MENU] .2To return to the previouspage, press [CLR] .LAST CALLDisplays talk time of all calls made within Home area.HOME CALLS1Press [MENU]and the message“Not intended for billing purposes” appears for 5 seconds.2Use the Navigation Key to view the time of thefollowing items:3To reset the timer, press [RST]. To return to the previous page, press [CLR].- Voice, Data/FaxDisplays talk time of all incoming and outgoing calls, excluding webaccess calls.ALL CALLS1Press [MENU] and the message “Not intended for billing purposes” appears for 5 seconds.2Use the Navigation Key to viewthe time of the following items:3To return to the previous page, press [CLR] .- Voice- Data/FaxRECENT CALLSDisplays talk time of all incoming and outgoing calls, excluding webaccess calls.12Use the Navigation Key to view the time of the following items:Press [MENU] and the message“Not intended for billing purposes” appears for5 seconds.- Voice- Data/FaxLifetime can not be reset.CUMULATIVE CALLSDisplays talk time of roaming calls.ROAM CALLS1Press [MENU] and the message“Not intended for billing purposes” appears for 5 seconds.2Use the Navigation Key to view the time of thefollowing items:3To reset the timer, press [RST] . To return tothe previous page, press [CLR].- Voice, Data/FaxCLRCLRLast Call000Min/ 03SecVoice003 Calls000 Hours00 Mins09 SecsNEW-TX-60B02-22 2003.2.24 9:46 AM 페이지50](https://usermanual.wiki/Pantech/TX-60B.User-Manual/User-Guide-312299-Page-26.png)
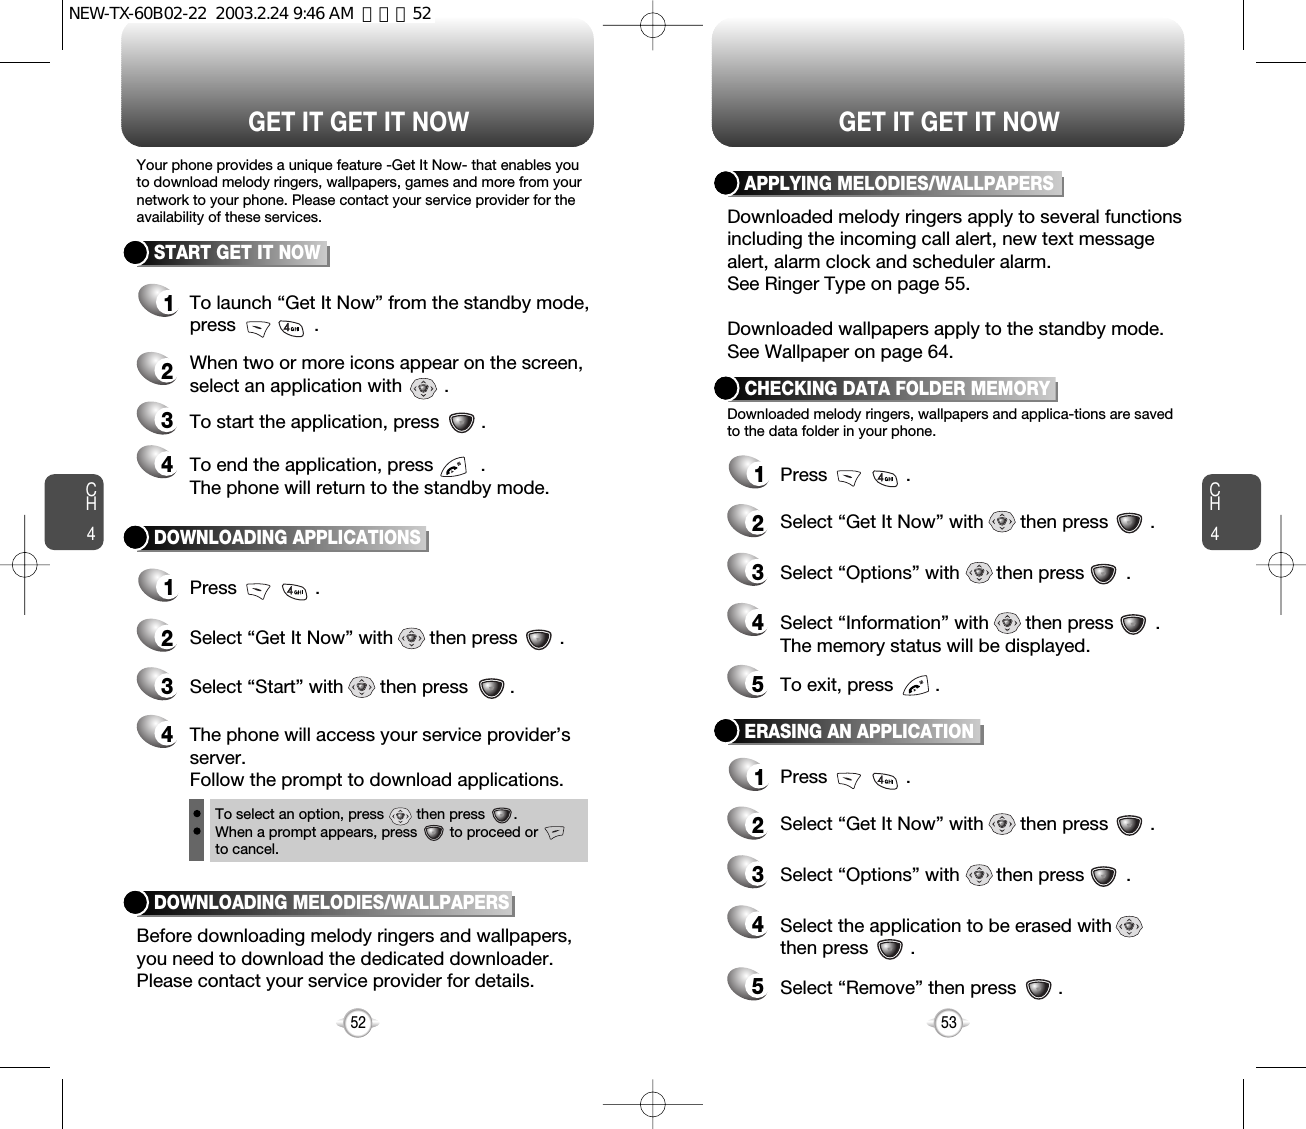
![MOBILE WEB SETTINGSCH455CH454You can use your phone to browse the Internet if you have obtainedphone Internet service from your service provider and if over-the airInternet access is available in your area.CONNECTING TO THE INTERNET1Press .2Follow the procedures for “Chapter 7 INTERNETBROWSER” on page 117.Sets Ringer Type, Ringer Mode, Volume, Alert, Roam Ringer andTone Length.To select a ringer type for incoming calls:Customizes your phone and optimizes performance through a varietyof settings.SOUNDS1Press [MENU] .2Select one of 12 available ringtypes.3To confirm, press [OK].RINGER TYPERINGER LIST1Press [MENU] .2Select “Setting” or “Sound List”then press [OK] to save it.MY DOWNLOADSSetting : To select “1 Step~5 Steps” with the Navigation key.Sound List : Press [ ] to select “Midi file 1~Midi file 5”.CLROKRinger TypebockeriniarambrahallcavalaryheartofwomanCLROKMy DownloadsSound ListSetting121Press [MENU] .2Select “Setting” or “Sound List”then press [OK] to save it.EMS DOWNLOADSCLROKEMS DownloadsSound ListSetting12NEW-TX-60B02-22 2003.2.24 9:46 AM 페이지54](https://usermanual.wiki/Pantech/TX-60B.User-Manual/User-Guide-312299-Page-28.png)
![SETTINGS SETTINGSCH457CH456Alerts you to incoming calls in the following modes:RINGER MODE3To confirm, press [OK].1Press [MENU] .2Select one of the followingoptions with the Navigation key.RingerVibrateRinger after Vibrate – The ringer soundsafter vibration.Silent – Mute the ringerControls the Ringer, Key and Voice Call volume.To adjust Ringer volume:VOLUMERINGER1Press [MENU] .2Adjust the ringer volume withthe Navigation key.3To save, press [OK].CLROKRinger ModeVibrateRingerRinger After V...SilentOK CLRAllows you to set an alert that sounds when any handset changesoccur.Sounds an alert every minute of a phone call.ALERTMINUTE ALERT1Press [MENU] .2Select “OFF” or “ON” with the Navigation key and press [OK]to save it.To adjust earpiece volume:VOICE CALL1Press [MENU] .2Adjust the earpiece volume withthe Navigation key.3To save, press [OK].To adjust keypad tone:KEY 1Press [MENU] .2Adjust the keypad tone with theNavigation key.3To save, press [OK].OK CLROK CLRCLROKMinute AlertOnOffNEW-TX-60B02-22 2003.2.24 9:47 AM 페이지56](https://usermanual.wiki/Pantech/TX-60B.User-Manual/User-Guide-312299-Page-29.png)
![CH459SETTINGSCH458SETTINGSSounds an alert when leaving a service area and entering a roamingservice area.ROAM ALERT1Press [MENU] .2Select “OFF” or “ON” with the Navigation key and press [OK]to save it.2Select “OFF” or “ON” with the Navigation key and press [OK]to save it.Notifies you that a call has been successfully placed.CONNECT ALERT1Press [MENU] .CLROKRoam AlertOnOffCLROKConnect AlertOnOffSounds an alert entering an area where calls cannot be made due toweak signal strength. The alert sounds in standby mode.FADE ALERT1Press [MENU] .2Select “OFF” or “ON” with theNavigation key and press[OK] to save it.Sounds an alert when you encounter low signal strength during a call.LOW SIGNAL ALERT1Press [MENU] .2Select “OFF” or “ON” with theNavigation key and press[OK] to save it.CLROKFade AlertOnOffCLROKLow Signal AlertOnOffNEW-TX-60B02-22 2003.2.24 9:47 AM 페이지58](https://usermanual.wiki/Pantech/TX-60B.User-Manual/User-Guide-312299-Page-30.png)
![CH461SETTINGSCH460SETTINGSSounds a different ringer when you are in a roaming service area.ROAM RINGER1Press [MENU] .2Select “Distinctive” or “Normal”with the Navigation key andpress [OK] to save it.To adjust tone length:TONE LENGTH1Press [MENU] .2Select “Normal” or “Long” with the Navigation key and press [OK] to save it.Distinctive – Sounds a differentringer typeNormal – Sounds the same ringertype as used in Homearea.llCLROKRoam RingerDistinctiveNormalCLROKTone LengthLongNormalAllows you to customize display.To select an LCD display:DISPLAY1Press [MENU] .2Select a display from theAnimation list by moving theNavigation Key up, down.3Press [OK] to save it.ANIMATION SETTINGIDLE DISPLAY3Press [OK] to save it.1Press [MENU] .2Select a display from the Animation list bymoving the Navigation Key up, down.3Press [OK] to save it.2Select a display from the Animation list bymoving the Navigation Key up, down.POWER ON DISPLAY1Press [MENU] .POWER OFF DISPLAYCLROKCute BearNEW-TX-60B02-22 2003.2.24 9:47 AM 페이지60](https://usermanual.wiki/Pantech/TX-60B.User-Manual/User-Guide-312299-Page-31.png)
![CH463SETTINGSCH462SETTINGSTo input a personal greeting:1Press [MENU] .2To edit the banner; press theNavigation Key.3Input your personal banner, using the AlphaEditor. (Refer to page 31).4To save, press [OK].MAIN DISPLAY SETTINGGREETING INPUTTo display a clock on the LCD:1Press [MENU] .2Select one of the followingoptions and press [OK] tosave it.IDLE CLOCKDigital ClockAnalog ClockGreeting ClcokAnimation + ClockllllCLREDITGreeting InputVERIZONCLROKIdle ClockAnalog ClockGreeting ClockDigital ClockAnimation+Clo...Backlights the display and keypad for easy viewing in dark places.Controls backlight and LCD contrast for a better view and moreefficient use.1Press [MENU] .2Select one of the followingoptions; 5 sec, 10 sec, 20 sec,Off.To save, press [OK].LCD SETTINGBACKLIGHTINGTo adjust the display contrast:1Press [MENU] .2Adjust the LCD contrast forbetter view.3To save, press [OK].CONTRASTOff : Turn the backlight off.5 sec, 10 sec, 20 sec : Backlight on for 5, 10, or 20 seconds respectively aftera touch of the keypad.llCLROKBacklighting10 Secs5 Secs20 SecsOffCLROKNEW-TX-60B02-22 2003.2.24 9:48 AM 페이지62](https://usermanual.wiki/Pantech/TX-60B.User-Manual/User-Guide-312299-Page-32.png)
![CH465SETTINGSCH464SETTINGSPrevents the unauthorized use of the handset and only allows accessto certain features to those who have the password.SECURITYWhen you attempt to make a restricted call, “This phone is restricted”appears on the screen.Prevents others from using your phone without permission. When locked, the menu can not be accessed without password.1Press and enter“Password”.2Press and select “Off”,“Lock Now” or “Power Up”.3To save, press [ok].RESTRICTAUTOMATIC LOCKOff – Do not lock the phoneLock Now – Lock the phone nowLock On Power Up – Lock the phone whenever itis turned on.lllThe default password is the last 4 digits of your phone number.CLROKSecurity Special #’sClear PhonebReset PhoneRestrict1234CLROKAutomatic LockLock NowLock On Power..Off1Press [MENU] .GRAPHIC SETTINGSCREEN SAVER1Press [MENU] .2Select parameters (DOWNLOAD IMAGE/EMS IMAGE)by using the navigation key, then press . WALL PAPERTIME SETTINGSelect one of the following options:Off/5Secs/10Secs/20Secs/30Secs.SCREEN SAVERSelect parameters (DOWNLOAD IMAGE/EMSIMAGE) by using the navigation key, then press .llCLROKScreen SaverScreen SaverTime Setting12CLROKWall PaperEMS ImageDownload Image12NEW-TX-60B02-22 2003.2.24 9:48 AM 페이지64](https://usermanual.wiki/Pantech/TX-60B.User-Manual/User-Guide-312299-Page-33.png)
![CH467SETTINGSCH466SETTINGSBlocks all incoming calls but allows outgoing calls to be placed.1Press [MENU] and enter “Password”.2Press and select “Allow”or “Restrict” with the Navigationkey.3To save, press [OK].RECEIVEDRestrict : Restricts incoming callsAllow : Allows incoming callsllBlocks all outgoing calls – except emergency calls – but allowsincoming calls to be placed.1Press [MENU] and enter “Password”.2Press and select “Allow”or “Restrict” with the Navigationkey.3To save, press [OK].DIALEDRestric t : Restricts outgoing callsAllow : Allows outgoing callsll3Press [OK] to save it.Restrict : Restrict an incoming callhistoryAllow : Allow an incoming callhistoryllBlocks access to, and protects data in your phonebook.1Press [MENU] and enter “Password”.2Press and select “Allow”or “Restrict” with the Navigationkey.3To save, press [OK].CONTACTSRestrict : Restrict access to thephonebookAllow : Allow access to thephonebook.ll1Press [MENU] and enter “Password”.2Press and select “Allow”or “Restrict” with the Navigationkey.RECEIVED CALL HISTORYRestricts access to the menu.1Press [MENU] and enter “Password”.2Press and select “Allow”or “Restrict” with the Navigationkey.3To save, press [OK].MENURestrict : Restrict access to the menuAllow : Allow access to the menull1Press [MENU] and enter “Password”.2Press and select “Allow”or “Restrict” with the Navigationkey.3Press [OK] to save it.DIALED CALL HISTORYRestrict : Restrict access to theoutgong call history.Allow : Allow access to the outgongcall history.llCLROKReceivedRestrictAllowCLROKDialedRestrictAllowCLROKReceivedCall HistoryRestrictAllowCLROKDialedCall HistoryRestrictAllowCLROKMenuRestrictAllowCLROKContactsRestrictAllowNEW-TX-60B02-22 2003.2.24 9:48 AM 페이지66](https://usermanual.wiki/Pantech/TX-60B.User-Manual/User-Guide-312299-Page-34.png)
![CH469SETTINGSCH468SETTINGSRestricts data calls from being placed.1Press [MENU] and enter“Password”.2Press and select “Allow”or “Restrict” with the Navigationkey.3To save, press [OK].DATA CALLRestrict : Restricts data callsAllow : Allows data callsllRestricts calling 900 dial service numbers.1Press and enter “Password”.2Press and select “Allow”or “Restrict” with the Navigationkey.3To save, press [OK].900 #’SRestrict : Restricts calls 900-dial servicesAllow : Allows 900-dial servicesllStores 3 phone numbers that can be called even in the lock mode.1Press [MENU] and enter “Password”.2Press and select a locationwith the Navigation key.3Press [OK] and input aphone number; press [OK]again to save.SPECIAL #’SRestricts long distance call.1Press and enter“Password”.2Press and select“Allow” or “Restrict” with theNavigation key.3To save, press [OK].LONG DISTANCE Restrict : Restricts calls long distance callAllow : Allows long distance callllA phone number over 7 digits is to be restricted.CLROKData CallRestrictAllowCLROK900#SRestrictAllowCLROKLong DistanceRestrictAllowCLROKSpecial #’sCLROKSecurity Clear PhonebReset2314RestrictSpecial #’sEmpty2Empty3Empty1123NEW-TX-60B02-22 2003.2.24 9:49 AM 페이지68](https://usermanual.wiki/Pantech/TX-60B.User-Manual/User-Guide-312299-Page-35.png)
![CLROKNew PasswordCH471SETTINGSCH470SETTINGSResets phone to default settings.RESET PHONEChanges your 4-digit password1Press [MENU] and enter “Password”.2Press .3Select “Yes” or “No” with the Navigation key.Press [OK].CHANGE PASSWORD1Press [MENU] and enter “Password”.2Press .3Enter a new password and press [OK]. 4Enter the new password againand press [OK].The default password is the last 4 digits of your phone number.When you select “Yes”, you will see “Wait amoment” on the display and the phone will return toidle mode.XXXXCLROKNew PasswordXXXXClears all phonebook entries.1Press [OK] andenter “Password”.2Press .3Select “Yes” or “No” with the Navigationkey. Press [OK].CLEAR PHONEBOOKCLROKClear PhonebookYesNoCLROKReset PhoneYesNoNEW-TX-60B02-22 2003.2.24 9:49 AM 페이지70](https://usermanual.wiki/Pantech/TX-60B.User-Manual/User-Guide-312299-Page-36.png)
![SETTINGS SETTINGSCH473CH472Displays the phone’s PRL (Preferred Roaming List).1Press [MENU] .12Press [MENU] .Select “Yes” or “No” thenpress [OK] to save it.Enables Auto NAM (Number Assignment Modules) or manually selects aNAM.Automatically switches phone to proper NAM when you have multipleNAM registrations.AUTO NAMTemporarily forces phone to use Analog mode – mode automaticallyends in 10 minutes.1Press [MENU] .2Select “No” or “Yes” with theNavigation key and press[OK] to activate it.Selects the Preferred System.SYSTEM1Press [MENU] .2Select one of the following options (Automatic B/Automatic B/Home only) with the Navigation key and press [OK].Auto A : Scan the radio channels based on theAutomatic A setting.Auto B : Scan the radio channels based on theAutomatic B setting.Home only : Only within your home area orhome affiliated area.12Press [MENU] .Select “NAM1” or “NAM2” thenpress [OK] to save it.Changes the NAM used by the phone when you have multipleregistrations.CHANGE NAMSET MODEFORCE ANALOGNAM SETTINGPRL IDCLROKSet ModeAutomatic AHome OnlyAutomatic BCLROKForce AnalogYesNoCLROKAuto NAMYesNoCLROKChange NAMNAM2-VERIZ...NAM1-VERIZ...CLROK1PRL ID00000ERI VERSIONNEW-TX-60B02-22 2003.2.24 9:49 AM 페이지72](https://usermanual.wiki/Pantech/TX-60B.User-Manual/User-Guide-312299-Page-37.png)
![CH475SETTINGSCH474SETTINGSEnables Verizon network system to locate your position and allowsthe use of some Verizon wireless applications.To determine whether or not the network system can detect yourposition:1Press [MENU] .2Select “Location On” or “911Only” with the Navigation key.3To save, press [OK].LOCATION911 Only - Your location will be hidden fromnetwork & application except 911Location On – Your location is now available tothe network.llTo select an answer mode:OTHERS1Press [MENU] .2Select “Any Key” or “Send Key”with the Navigation key.3To save, press [OK].ANSWER MODEAny Key – Press any key to answer an incoming callexcept , , and .Send Key – Press only to answer a call.llAutomatically retries a call up to 5 times after a set time interval.1Press [MENU].2Select a time interval option(Off, 3, 5, 7, 10 seconds) withthe Navigation key. To save,press [OK].AUTO RETRYRETRY TIME1Press [MENU] .2Select one of the options (1 time, 3 times, 5 times) withthe Navigation key. To save,press [OK].REPEATCLROKSettingLocation On911 Only CLROKAnswer ModeSend KeyAny KeyCLROKRetry Time3 Secs5 Secs7 SecsOffCLROKRepeat3 Times5 Times1 TimesNEW-TX-60B02-22 2003.2.24 9:49 AM 페이지74](https://usermanual.wiki/Pantech/TX-60B.User-Manual/User-Guide-312299-Page-38.png)
![CH477SETTINGSCH476SETTINGSAutomatically answers a call after a preset number of rings. An idealsetting for the hands-free car kit.1Press [MENU] .2Select on of the following withthe Navigation key.3To save, press [OK].AUTO ANSWER3To save, press [OK].Off/5/10/18 seconds.lThis function will not be active when you select Vibrate, Silent,Etiquette or Ringer after Vib as a ringer mode.“Enhanced” - Makes it more difficult to wire tap.lEnhances voice privacy and avoids tapping during a call.1Press [MENU] .2Select “Standard” or “Enhanced”with the Navigation key VOICE PRIVACY1Press [MENU] .2Select either English or Spanish.3To save, press [OK].LANGUAGESelects the language in which letters are displayed on screen.1Press [MENU] .2You are to see the version ofsoftware and hardware.S/W VERSIONTo display the version of your phone:On: Prevents accidentallypressing the keypadOff: Key guard offll1Press [MENU] .2Select “On” or “Off” with theNavigation key.3To save, press [OK].KEY GUARDTo unlock the key guard, press .3Press [OK].CLROKAuto Answer5 Secs10 Secs18 SecsOffCLROKVoice PrivacyEnhancedStandardCLROKKey GuardOffOnCLROKLanguageSpanishEnglishCLROKSoftware :Hardware :Version[Verizon Wireless]TX - 60BES01TO60VEDE01_1.161NEW-TX-60B02-22 2003.2.24 9:50 AM 페이지76](https://usermanual.wiki/Pantech/TX-60B.User-Manual/User-Guide-312299-Page-39.png)
![CH479SETTINGSCH478SETTINGSYour phone is able to operate with a TTY (Teletyperwriter) device inboth analog and digital modes. This feature is system dependent andmay not be available in all areas.TTY MODEOn: Speaker phone onOff: Speaker phone offll1Press [MENU] .2Select “On” or “Off” with theNavigation key.3To save, press [OK].SPEAKER MODECLROKSpeaker modeOnOff1Turn the TTY device off.2Connect the TTY device to the phone at theearphone-microphone jack.CONNECTING TO TTY DEVICE1Press [MENU] .2Select “ON” or “OFF” then press .“TTY” will appear on the display whenactivated.ACTIVATING/DEACTIVATING TTY MODEYou can make or answer calls in the same manneras ordinary calls.MAKING AND ANSWERING A CALLA TTY (also known as TDD or Text Telephone) is atelecommunications device that allows people whoare deaf or hard of hearing, or who have speech orlanguage disabilities, to communicate bytelephone. Connect the TTY device to the HeadsetJack of PCS Phone. Then type the message youwant to send on the TTY’s keyboard.CLROKTTY modeTTY + TALKTTY + HEARTTY OffTTY FullNEW-TX-60B02-22 2003.2.24 9:50 AM 페이지78](https://usermanual.wiki/Pantech/TX-60B.User-Manual/User-Guide-312299-Page-40.png)
![Press [OK] to save it or [CLR] to returnto the calendar.CH481TOOLSCH480TOOLSSets an event and reminds you of that event.SCHEDULETo display a calendar, press[MENU] .Move the Navigation key tochoose a date in the calendarand press [OK].1. To set a time for an event, press .Use left, right, up and down insteadof leftward, upward, rightward andleftward.Choose one of the following on the first line: On time, 10Min before, 30 Min before, 1 Hour before, No alarm.Use the Navigation Key to move to year, month, day, timeand input using the digit keys.To delete the existing one, press .Use the Navigation Key to choosean alarm frequency (Once, Daily,Weekly, Monthly, Yearly). To save,press [STO]. “Save Complete”will be displayed and the screen will return to the alarm list.2. To set a melody for the event, press .Select a melody with the Navigation Key.The date of the event will be marked on your calendar.To display alarm entries, press [MENU] .Select one of the entries withthe Navigation key.To set a new alarm, choose item 1, 2 or 3.To edit an existing alarm, selectthat alarm.Press [OK].1. To set a time, press from the Alarm Setting Menu.Use the Navigation key to scroll through the list of 10 ringtones and 30 melody tones. To set a melody, press [OK]2. To set a melody, press from the Alarm Setting Menu.Select one of the following: No use, 1 Time, After 3 minutes.3. To set a snooze, press from the Alarm Setting Menu.4. To set a pause, press from the Alarm Setting Menu.•Pause setting is available for existing alarms. It is not available for new entries.You can set up to 3 alarms.EVENTALARM3421123CLROKEvent SettingMelody SettingPause SettingTime Setting123CLRDEL OKAlarm[A]Item 2[A]Item 3[P]Item 1123CLROKAlarm SettingMelody SettingSnooze SettingTime Setting123Pause Setting4CLRSTOTime Setting04/16/2002PM 05:30meetingOnceNEW-TX-60B02-22 2003.2.24 9:50 AM 페이지80](https://usermanual.wiki/Pantech/TX-60B.User-Manual/User-Guide-312299-Page-41.png)
![CH483TOOLSCH482TOOLS1Press [MENU] .2To measure a time period.1. To start the stopwatch, press .2. To pause it, press .3. To resume it or [RST / CLR] to return tothe previous page, press .3To time up to six events at once:1. To start, press .2. To stop a time period and continue measuring another one, press [CONT].3. To stop the second and continue measuring a third one, press [CONT].4. To measure up to six time periods, repeat theabove steps.5. To stop, press . To review the results,press [VIEW].6. To return to the stopwatch, press or [CLR].7. To reset it, press [RST].Simultaneously times up to six different events. To operate thestopwatch:STOPWATCH1Press [MENU] .2Follow the instructions belowto calculate (8*6)/4-2.53To reset, press [RST].1Press [MENU] .2Select a city with the Navigationkey and press [OK].3The world map is to be displays with the city, its date and time.To access the calculator:CALCULATORNotifies you of the time in a specific preprogrammed city.WORLD CLOCKInput 8.Move the Navigation key leftward.Input 6 and press the Navigation key.Move it rightward.Input 4 and press the Navigation key.Move it downward.Input 2 and press the to input (.). Press 5, .Use the Navigation key to select another city.CLROKCLRRST OK CNCLVIEW STARTSTOPRECORD[0/6]Stopwatch0:00:00:00NEW-TX-60B02-22 2003.2.24 9:50 AM 페이지82](https://usermanual.wiki/Pantech/TX-60B.User-Manual/User-Guide-312299-Page-42.png)
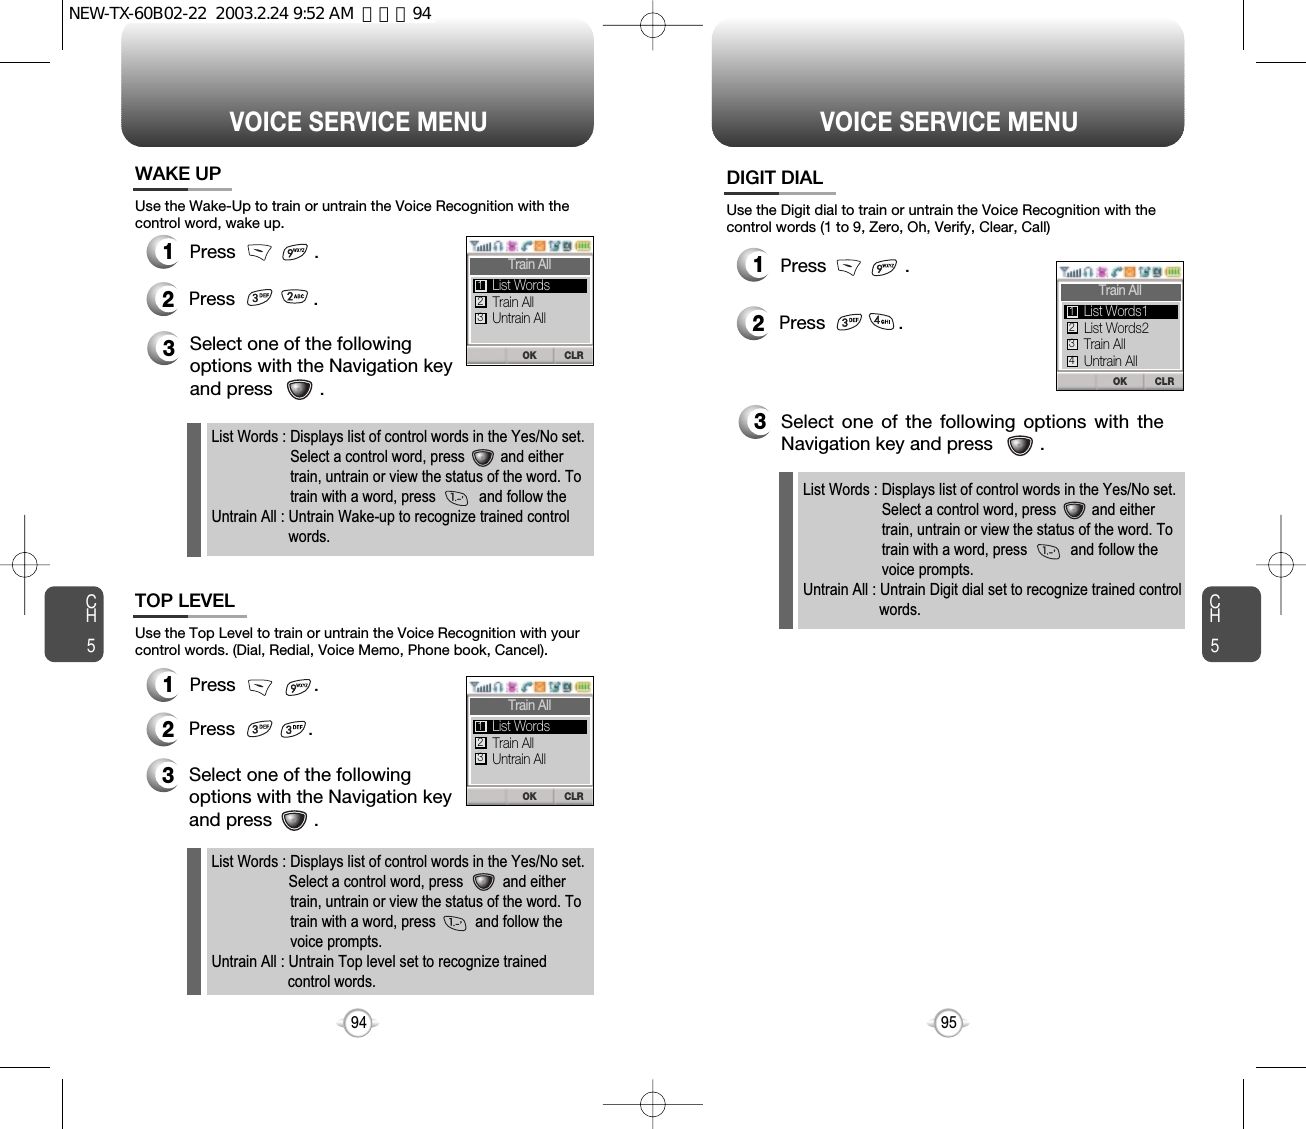
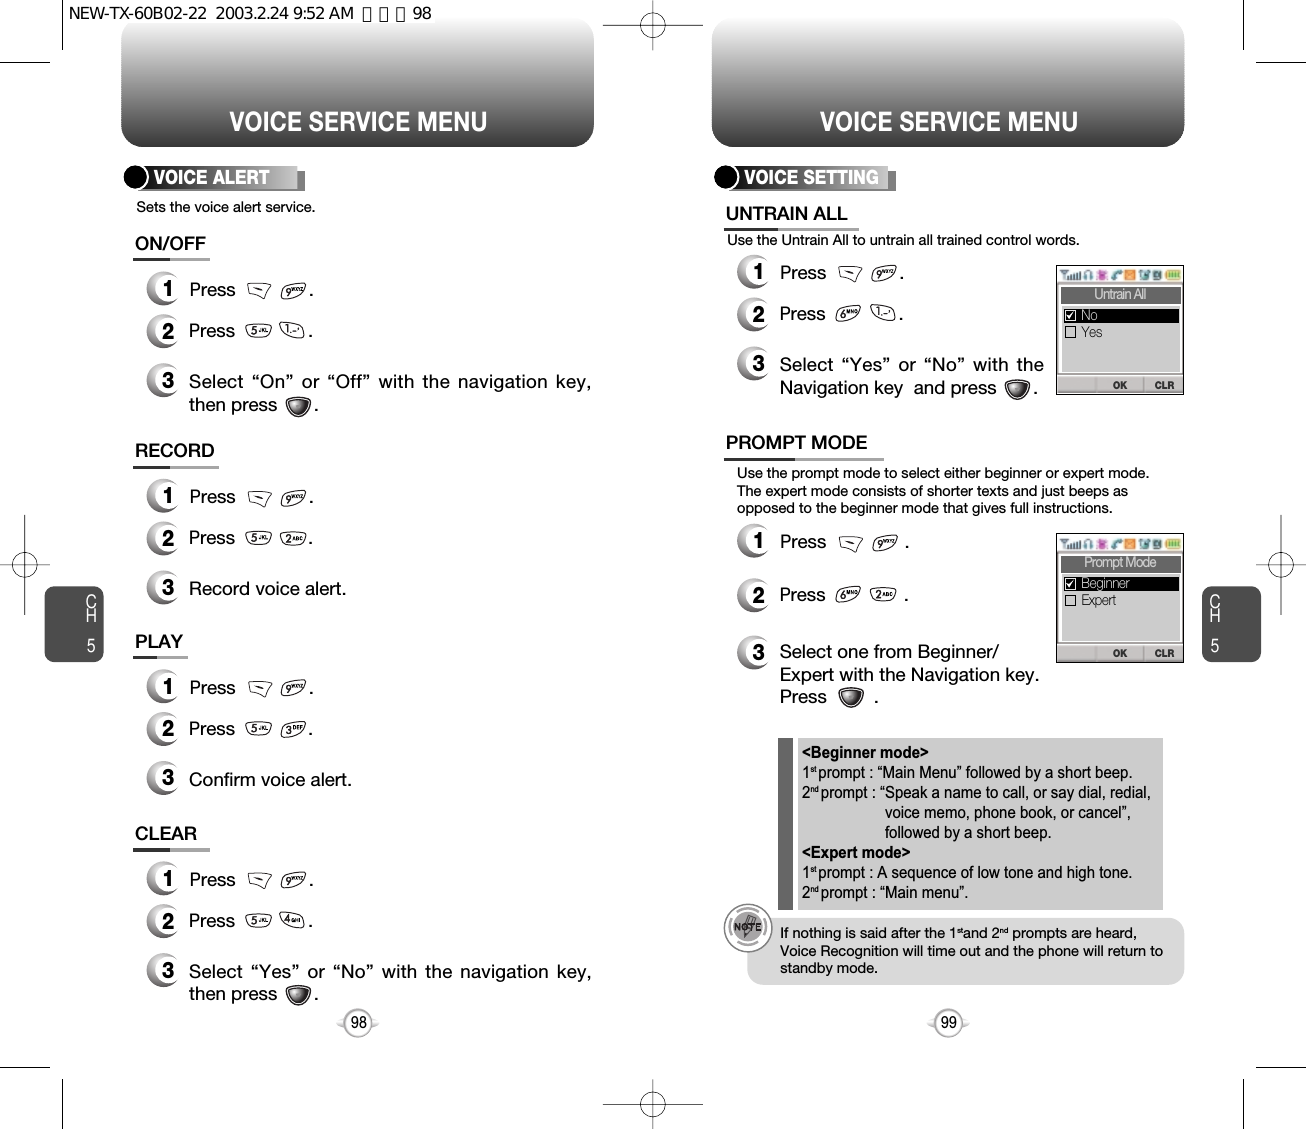
![VOICE SERVICEThis chapter addresses Voice Service, an advanced featurethat allows you to place calls using your voice. With VoiceMemo (VM) you can record voice messages and set theAnswering Machine. Topics include:VOICE RECOGNITION MODEVOICE SERVICE MENU Chapter 58584CH585DATA SVCCH4You are to choose a connection mode depending on the usage ofhandset.1Press [MENU] .2Select one of the followingconnection modes with theNavigation key.3Press [OK] to save.CONNECTIONVoice Call : To receive a voice callData Only : To receive data when connected to PC.Fax Only : To function as a fax when connected to PC.lllThis function is available only when the phone is connectedto data cable.Transfers data from to PC.You are to choose a connection mode depending on the usage ofhandset.1Press [MENU] .2Select one of the followingconnection modes with theNavigation key.3Press [OK] to save.DATA SPEED19200 bps115200 bps230400 bpslllCLROKConnectionData OnlyFax OnlyVoice CallCLROKData Speed115200 bps230400 bps19200 bpsNEW-TX-60B02-22 2003.2.24 9:51 AM 페이지84](https://usermanual.wiki/Pantech/TX-60B.User-Manual/User-Guide-312299-Page-43.png)
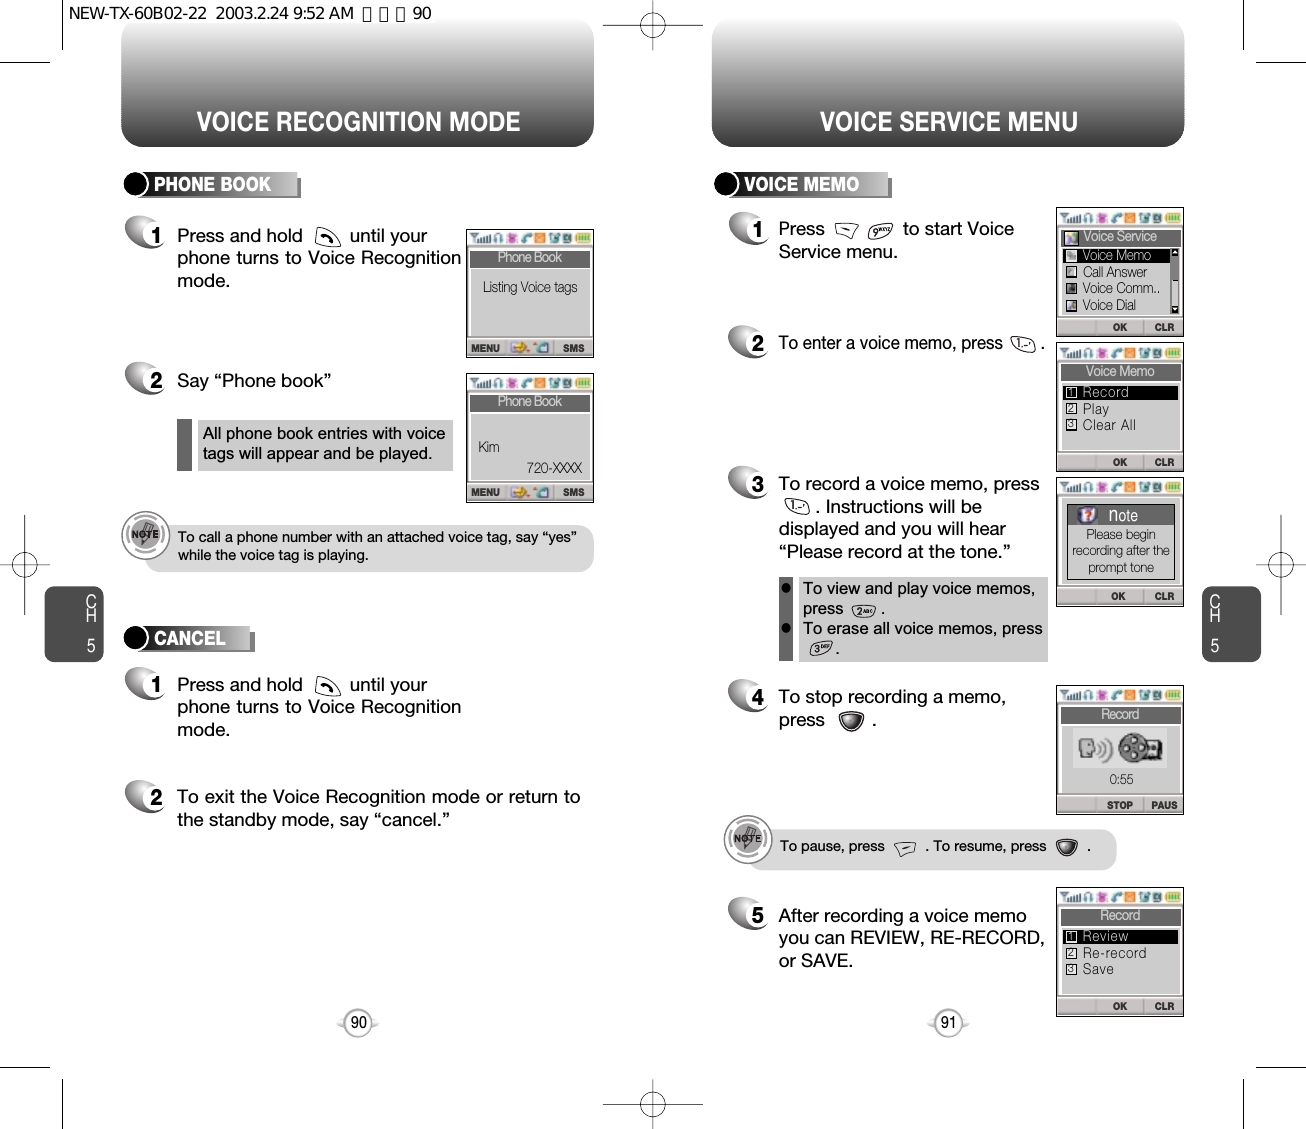
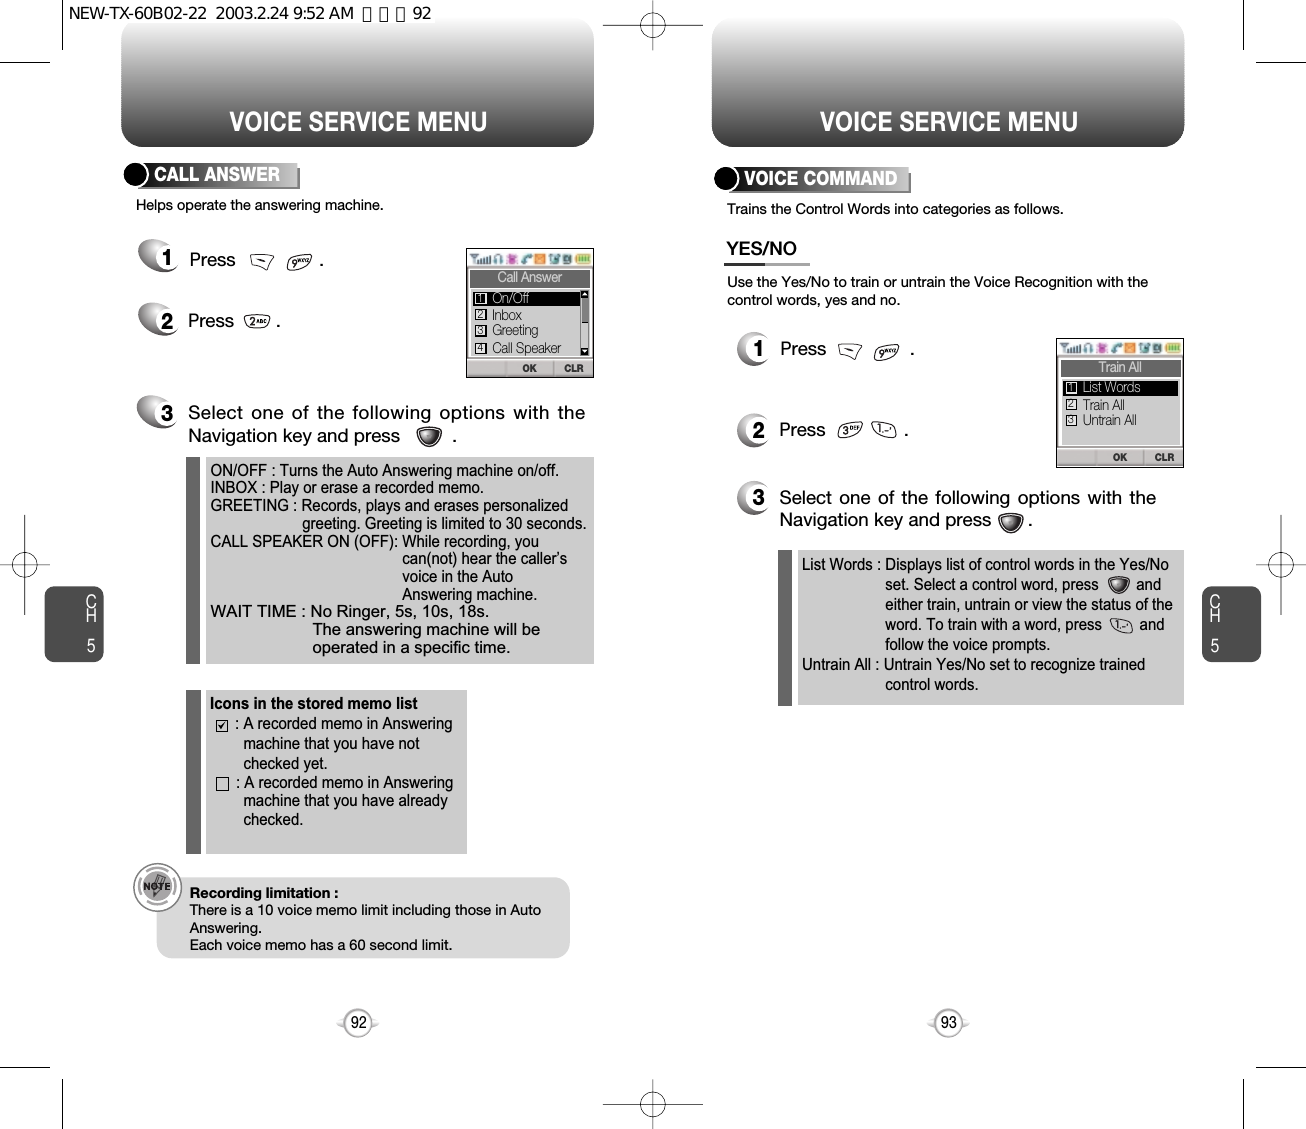
![To edit an existing voice tag, press .CH597VOICE SERVICE MENUCH596VOICE SERVICE MENU1To list phone book entries withattached voice tags, press.2Select one with the Navigationkey and press .3To play a voice tag, press .4VOICE DIAL1To erase all voice tags in thelist, press .2You will see “Removing allvoice tags proceed?”.NO : Delete all voice tags.YES : Delete all voice tags and phone book entries.CLR : Return to the previous page.EDIT : Retrain / Voice Setting / ClearPLAY : Voice tag play.1) Retrain - “Retrain Voice Name” displays. Press then say a name.2) Voice Setting - “Change” displays. Press ,select a phone number, then press again.3) Clear - “Removing voice names proceed”displays. Press and “All voice tagswere deleted successfully” appears.3Press and you will see amessage “Delete all taggedbook entries too?”1To add a voice tag to a phonebook entry, press .2Select one group with theNavigation key and press .3Select a phone number with the Navigation keyand press .4To add the voice tag, say the name.Lists, adds, or erases phone book entry voice tags.LISTADDCLEAR ALLCLRDEL OKSelect Name123abcdefkshJohn01020304CLREDIT PLAY[01] JohnXXXXXXXXXOK CLRSelect GroupNameFriendsFamilyWorkCLROKnoteRemovingall voice tagsProceed?CLRNO YESnoteDelete alltagged bookentries too?NEW-TX-60B02-22 2003.2.24 9:52 AM 페이지96](https://usermanual.wiki/Pantech/TX-60B.User-Manual/User-Guide-312299-Page-49.png)
![CH6103CH6102WHEN A NEW MESSAGE ARRIVES SEND MESSAGE1The following display appearswhen a new message arrives.1To access your voice mailbox, press or press . Displays the number of voice mails and accesses them by pressing .2To display the message, press [READ].1Press or press . 2Input a new phone number and press [OK].3Input a new text message and press [NEXT].If “Delivery Failed. Retry in 3mins?” Appears, press toselect Auto retry.You can look it up from the phonebook by pressing [PB].1. SEND1To send the text message, press .2. EDIT RECIPIENT1To change the recipient, press .2Input a new phone number, and press [OK].3Input a new text message, and press [OK].4To send, press .To send a new message:Edits the recipient’s information – select if a wrong number isentered.VOICE MAIL(Please refer to page 31 for more detailson entering letters and numbers.)CLRREADFr : OneSMS ARRIVED!: 02 : 22 CLRREADFr : OneVOICE MAIL: 02 : 22 3. EDIT MESSAGE1Press to change the text message.2Input a new text message, and press [OK].NEW-TX-60B02-22 2003.2.24 9:53 AM 페이지102](https://usermanual.wiki/Pantech/TX-60B.User-Manual/User-Guide-312299-Page-52.png)
![SEND MESSAGE SEND MESSAGECH6105CH61044. PRIORITY1To send an urgent message, press “PRIORITY”.2Select the priority (NORMAL/URGENT) by using thenavigation key, then press .5. CALL BACK1To change the call back number, press “CALL BACK”.2Input call back number, then press [OK].6. SAVE1To save the text message, press “SAVE”.7. DEFERRED DELIV.1Set the date for message to be delivered.2Select (IMMEDIATE/TIME & DATE) using thenavigation key, then press [OK].Marks messages as urgent.Allows you to input a specific call back number. Your phonenumber is the default.This allows you to save the message into ‘Outbox’ folder to use later.8. REQUEST READ ACK1Requesting response whether receiver read messageor not.9. INSERT SIGNATURE1Including user's signature in message.10. SAVE ENTERED TEXT1To make the text message to be saved to cannedmessage, press “SAVED ENTERED TEXT”.IMMEDIATE : Send message immediately.TIME &DATA : Send message at the time user wants to deliver.NEW-TX-60B02-22 2003.2.24 9:53 AM 페이지104](https://usermanual.wiki/Pantech/TX-60B.User-Manual/User-Guide-312299-Page-53.png)
![INBOX INBOXCH6107CH61064. SAVE1To save the text message in your phone, press “SAVE”.5. SAVE ADDRESS1To save the Callback number from the textmessage, press “SAVE ADDRESS”.6. LOCK & UNLOCK1To lock or unlock the text message, press “LOCK/UNLOCK”.2Select LOCK to lock the message or UNLOCK tounlock the message, then press [OK].2Press .2To save the call back number into a memorylocation, follow the procedures for STORINGPHONE NUMBERS on page 30.8. SAVE QUICK TEXT1Save the received message into canned message.9. REPLY WITH COPY1Reply to the received message with receivedphone no &contents.7. BLOCK SENDER1Block the all incomming messages from block list.1Press or press . 2Select a message and press [SEL] .The message is displayed.Press [OPTS].3: Urgent New Msg(not read): Urgent Read Msg: New Msg (not read): Old Msg (already read): Lock (already read and locked)1. REPLY1To reply to the text message, press .2Type your reply and press [OK].(See page 31 for more information on entering letters, numbers and characters.)2. ERASE1To erase the text message, press .2When you see “Delete Msg?” press [YES].Manages received text messages.3. FORWARD1To forward the text message, press “FORWARD”.2Input the phone number of the person you aresending the message, then press [OK].3Input any text message to go along with theforwarded message, then press [OK].-BLOCK : Enter the address to block-UNBLOCK : Enter the address to remove from block.-VIEW LIST OF BLOCKED ADDRESS :Display the blocked list on LCD.NEW-TX-60B02-22 2003.2.24 9:53 AM 페이지106](https://usermanual.wiki/Pantech/TX-60B.User-Manual/User-Guide-312299-Page-54.png)
![OUTBOX OUTBOXCH6109CH61085. SAVE1To save the outbox text message in theFiled Folder, press .7. STATE1To display the status of an outbox message,press .6. LOCK & UNLOCK1To lock or unlock the text message, press“LOCK/UNLOCK”.3. ERASE1To erase a text message, press .2When you see “Delete Msg?” press [YES].2Press .4. SAVE ADDRESS1To save the Callback number, press phonenumbers in text, the destination address from thetext message, press “SAVE ADDRESS”.2To save the Callback number into a memorylocation, follow the procedures for STORINGPHONE NUMBERS on page 30.2Select LOCK to lock the message or UNLOCKto unlock the message, then press .: Auto resend: Delivered: Fail: Not send: Read: SentCHECKING SENT TEXT MESSAGES1Press or press . Select a message with the Navigation key. Then, press [SEL].2The text message is displayed.Press [OPTS].31. RESEND1To resend a text message,press .Manages sent text messages or messages waiting to be sent.2. SEND TO1To send a message to another person, press .2Input the phone number and press .3Input a text message and press .NEW-TX-60B02-22 2003.2.24 9:53 AM 페이지108](https://usermanual.wiki/Pantech/TX-60B.User-Manual/User-Guide-312299-Page-55.png)
![Press .CH6111CH6110MY OBJECTFILED1Press or press . 2Select a text message with the navigation key.Press .Manages saved messages from the Inbox/Outbox.FILED MY OBJECT1Press or press . Select a text message with the Navigation key.Press [SEL].2The text message is displayed. Press [OPTS].3If the text message is savedfrom the “Inbox” menu, thisscreen will be displayed.4Select one by pressing .If the text message is savedfrom the “Outbox ” menu, this screen will be displayed.1. SOUND1Press .2. PICTURE1Press .3. ANIMATION1NEW-TX-60B02-22 2003.2.24 9:53 AM 페이지110](https://usermanual.wiki/Pantech/TX-60B.User-Manual/User-Guide-312299-Page-56.png)
![CH6113CH6112SETTINGSERASE ALLERASE MESSAGES1Press or press . 21. To erase all the inbox messages, press .3Select “Yes” or “No” with [YES] or [NO].2. To erase all the outbox messages, press .3. To erase the filed messages, press .4. To erase the my object, press .Erases all the messages from the Inbox, Outbox or Filed folder.Erases entire inbox or old inbox.Erases entire outbox or old outbox.SAVE SENT MESSAGES1Press or press . 2Press . Select one from No/Yes/Prompt with theNavigation key.Press [OK].DEFAULT CALL BACK NUMBER1Press or press . 2Press .Input a call back number.then press [OK].ALERT1Press or press . 2Press .Select one from the Ringer/Vibrate/ Silent/Ringer &Remind/Vibrate & Remind with the Navigation key.3Press [OK].Manages messaging features through various features.Saves every sent message.Edits a default call back number so that the recipient can call back orreply.Enables phone to alert you of an incoming message..The Ringer & Remind or Vibrate & Remind rings orvibrates every 2 minutes to remind you of anincoming message. They will be cleared when anykey is pressed.NEW-TX-60B02-22 2003.2.24 9:53 AM 페이지112](https://usermanual.wiki/Pantech/TX-60B.User-Manual/User-Guide-312299-Page-57.png)
![CH6115CH6114SETTINGSSETTINGSAUTO ERASE1Press or press . 2Press . Select “Disable” or “Old Inbox” withNavigation key.Automatically erases inbox/outbox messages when new messagesarrive.Make signature as user wants.3Press [OK].1. AUTO ERASE INBOX1Press or press . 2Press . Select “Disable” or “Old Outbox” withNavigation key.3Press [OK].2. AUTO ERASE OUTBOXENTRY MODE1Press or press . 2Then press .Select “T9 Mode”or “Alpha Mode” withthe Navigation key.3Press [OK].Sets an Entry Mode as a default.The T9 mode indicator will appear whenever the input mode isactivated if the T9 mode is the default.BLOCK OR UNBLOCK1Press or press . 2Then press .Select (Block/Unblock/View List of Blocked Address)with the Navigation key.READ ACK1Press or press . 2Then press .Select “Yes” or “No” with the Navigation key.SIGNATURE1Press or press . 2Then press .Select “Edit Signature” or “Insert Signature”with the Navigation key.EDIT SIGNATURE : Edit user's signature.INSERT SIGNATURE : Select whether the signature will be included into sending message.3Press [OK].3Press [OK].3Press [OK].NEW-TX-60B02-22 2003.2.24 9:53 AM 페이지114](https://usermanual.wiki/Pantech/TX-60B.User-Manual/User-Guide-312299-Page-58.png)
![WEB BROWSINGThis chapter addresses Internet services and web browsing.For more detailed information contact your service provider.START INTERNET BROWSERBROWSER MENUChapter 7CH7117CH6116SETTINGSRead the received message without entering inbox in SMS menu.DIRECT VIEW1Press or press . 2Then press .Select “Yes” or “No” with the Navigation key.YES : Set to read msg without entering inbox in SMS menu.NO : Set to read msg after entering inbox in SMS menu.3Press [OK].NEW-TX-60B02-22 2003.2.24 9:53 AM 페이지116](https://usermanual.wiki/Pantech/TX-60B.User-Manual/User-Guide-312299-Page-59.png)