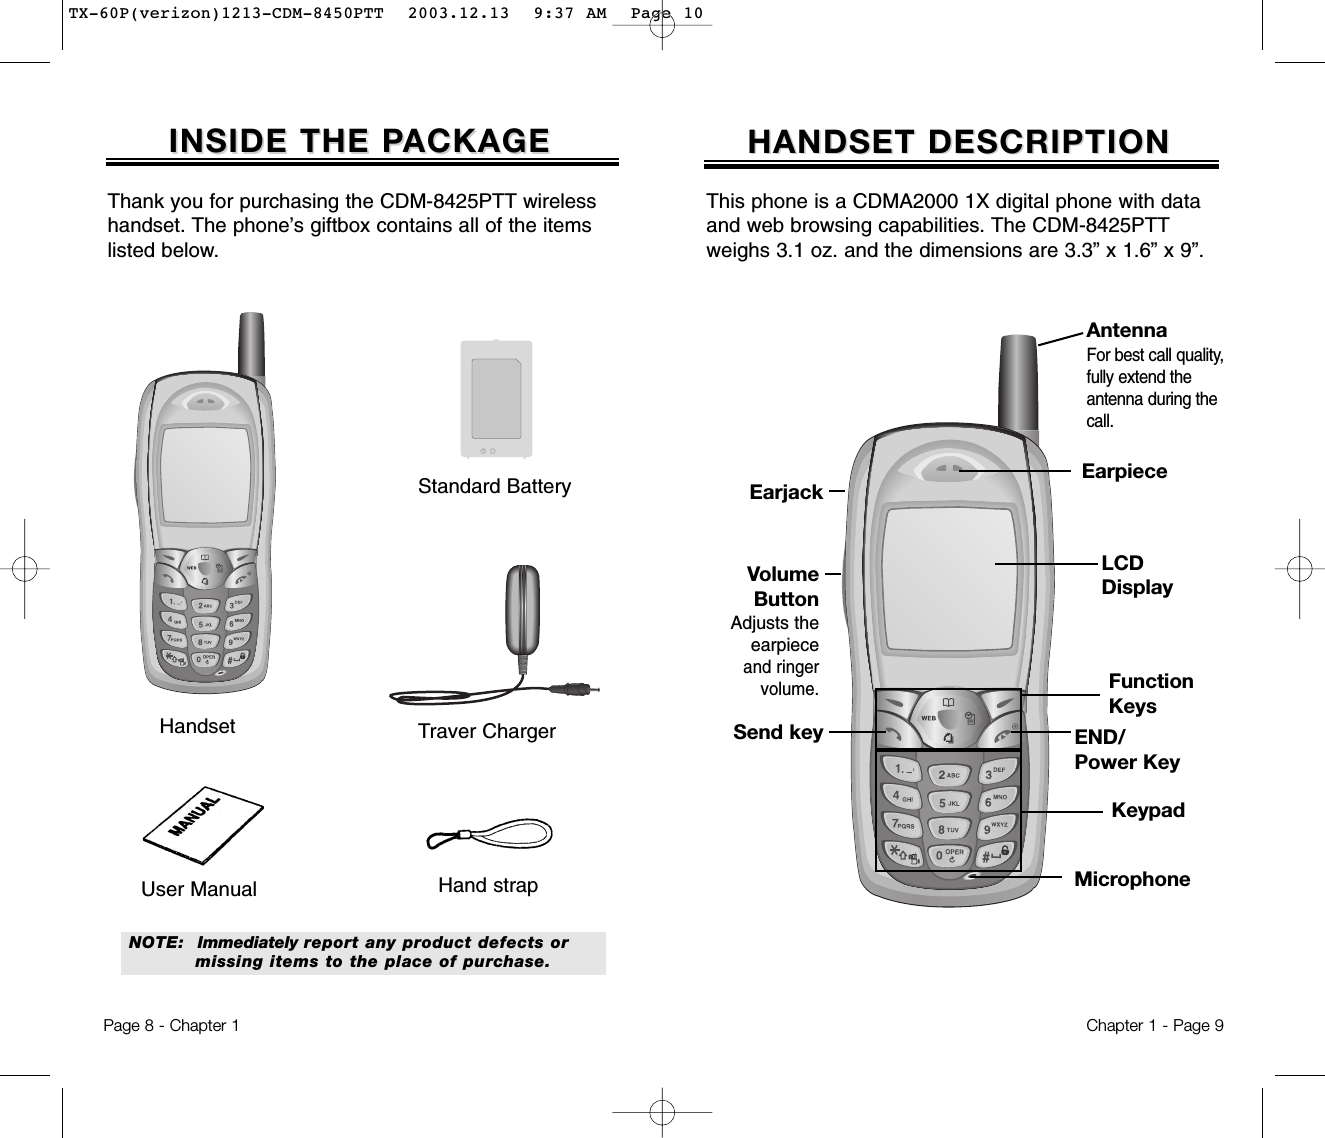
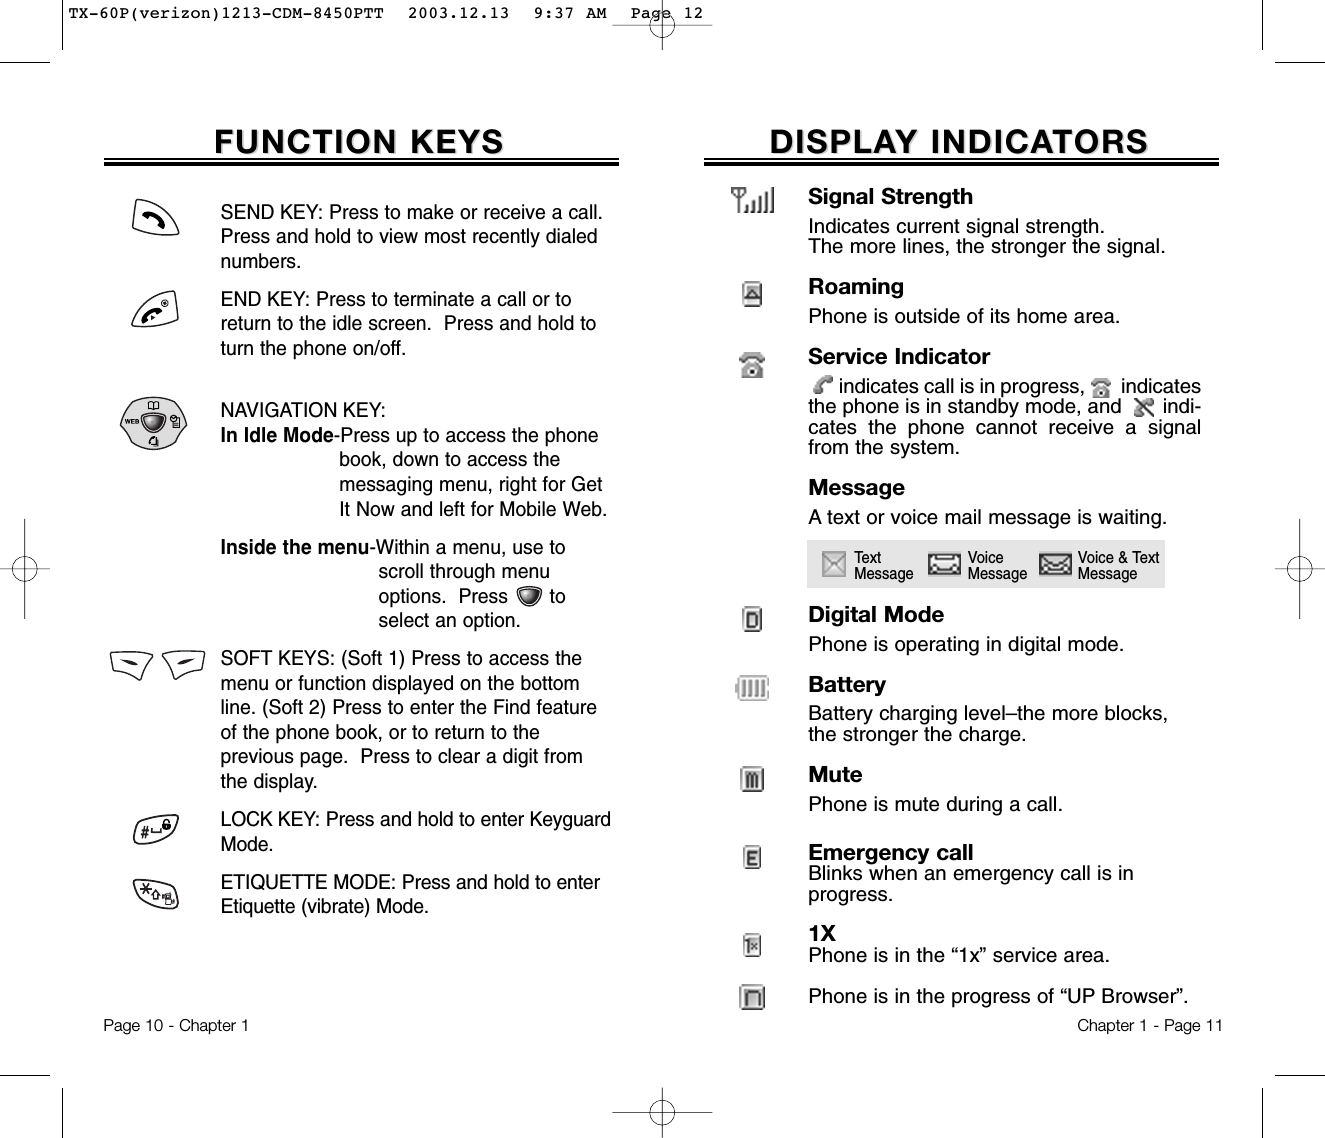
Pantech TX-60B Tri-Mode Dual Band (AMPS/CDMA/PCS-CDMA) Phone User Manual TX 60P verizon 1213 CDM 8450PTT
Pantech Co., Ltd. Tri-Mode Dual Band (AMPS/CDMA/PCS-CDMA) Phone TX 60P verizon 1213 CDM 8450PTT
Pantech >
Contents
- 1. User Manual
- 2. CRN 7826 revised page of user manual
- 3. Users manual
Users manual
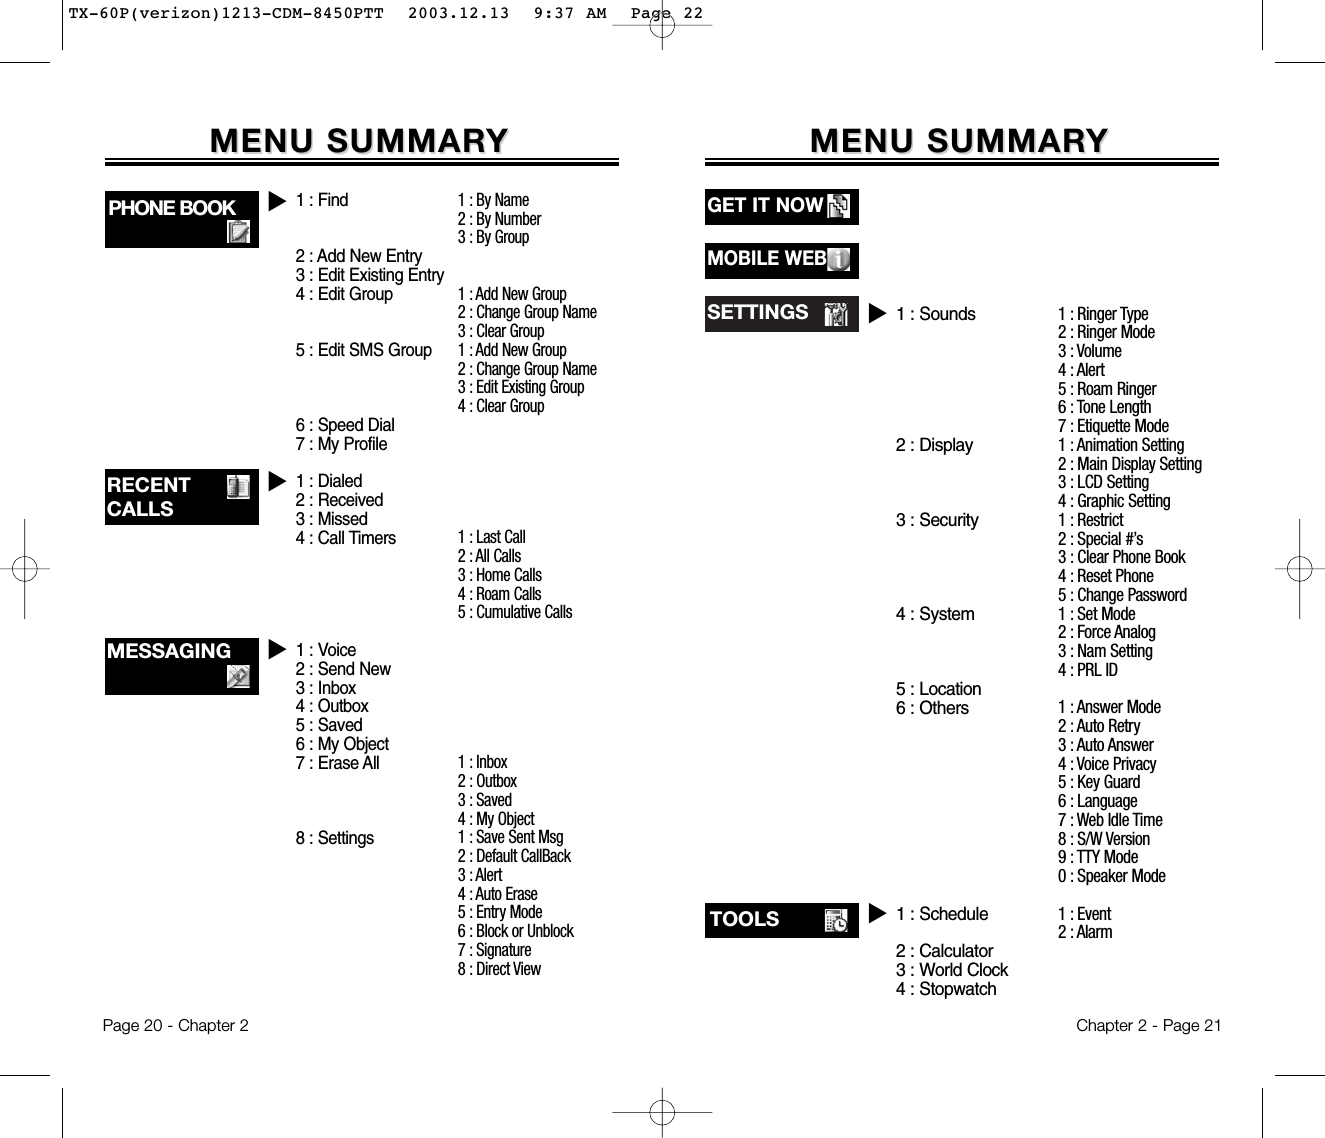
![TTABLE OF CONTENTS ABLE OF CONTENTS TTABLE OF CONTENTSABLE OF CONTENTSVoice Privacy.......................................................29Location...............................................................29Speaker Phone Mode .........................................30CHAPTER 3 MEMORY FUNCTION .......................31Storing Phone Numbers ......................................32Text Input Methods ..............................................33Entering Characters............................................33Alpha Mode [ABC] ..............................................33T9TM Predictive Text Mode [T9TMABC] .................34Numeric Mode [123] ...........................................36Symbol Mode [SYM] ...........................................36Speed Dialing .......................................................37One-Touch/Two-Touch Dialing............................37Phone Book ..........................................................38Find.....................................................................38Add New Entry....................................................40Edit Existing Entry...............................................40Edit Group...........................................................41Edit SMS Group..................................................42Speed Dial ..........................................................44My Profile............................................................45Recent Calls .........................................................46Dialed..................................................................46Received.............................................................47Missed.................................................................48Call Timers..........................................................49CHAPTER 4 SETTINGS ..........................................53Settings .................................................................54Sounds................................................................54Display ................................................................59System ................................................................63Location ..............................................................65Others .................................................................66Page 2 - Table of Contents Table of Contents - Page 3VS Menu ................................................................71Voice Memo ........................................................71Call Answer.........................................................72Voice Command .................................................73Voice Dial............................................................75Voice Alert...........................................................77Voice Setting.......................................................78VR Mode................................................................80Name ..................................................................80Dial......................................................................81Redial..................................................................81Voice Memo ........................................................82Phone Book ........................................................82Cancel.................................................................82PTT ........................................................................83PTT Contacts ......................................................83CHAPTER 5 SECURITY FEATURES......................85Security Features .................................................86Security ...............................................................86CHAPTER 6 SUPPLEMENTARY FUNCTIONS......93Schedule ...............................................................94Event...................................................................94Alarm...................................................................95Calculator..............................................................96World Clock ..........................................................97Stop Watch ...........................................................98CHAPTER 7 VOICE MAIL AND TEXT MESSAGES...99Two-Way SMS.....................................................100Message Indicators...........................................100Received Message Notification ........................100Checking Messages ..........................................101Checking Received Voice Mail Message..........101Checking Received Text Message....................101TX-60P(verizon)1213-CDM-8450PTT 2003.12.13 9:37 AM Page 4](https://usermanual.wiki/Pantech/TX-60B.Users-manual/User-Guide-388173-Page-3.png)

![USING THE MENUUSING THE MENUUSING THE MENU1. To access the menu from the idle screen, press [MENU].2. Use the Navigation Key to scroll through the menu.3. To return to the previous page, press [CLR].To exit the current menu and return to the idle screen, press . 4. To enter a function press or press the function’s assigned number.Chapter 2 - Page 19USING THE PHONEUSING THE PHONETURNING THE PHONE ON1. Press and hold , until your “Power On” logo appears and the melody begins to play.NOTE: 1.Immediately change or recharge the battery when “Low Battery Warning Power Off” appears on the display. Memory may possibly be damaged if the phone turns off due to the battery completely draining. 2. Turn the phone off before removing or replacing the battery. If the phone is on, data may be lost.NOTE: The default password is the last 4 digits of yourphone number.● To select a logo, refer to page 59 for more details. ● If “PASSWORD” appears, the phone is locked. To unlock, enter your 4-digit password.● HotkeyFrom the idle screen, move the Navigation Key as follows to access these functions:• Upward movement : Phone Book• Downward movement : Messaging• Rightward movement : Get It Now• Leftward movement : Mobile Web● When the key guard is activated, press 1, 2, 3 to unlockthe key guard. ● To search through the menu in numerical order, pressdown or to the right.TURNING THE PHONE OFF1. Press and hold until “Power Off” animation appears.Page 18 - Chapter 2TX-60P(verizon)1213-CDM-8450PTT 2003.12.13 9:37 AM Page 20](https://usermanual.wiki/Pantech/TX-60B.Users-manual/User-Guide-388173-Page-11.png)
![Chapter 2 - Page 23BASIC FUNCTIONSBASIC FUNCTIONSMAKING A CALL1. Enter a phone number. 2. Press . The indicator, , appears on the display.3. To end a call, press . “Press [OK] to save this number” will appear.(Refer to page 32 for more details about storing a phone number.)Page 22 - Chapter 2MENU SUMMARMENU SUMMARYYVOICE SVC.u1 : On/Off2 : Inbox3 : Call Speaker4 : Wait Time1 : Yes/No2 : Wake-Up3 : Top Level4 : Digit Dial1 : List2 : Add3 : Clear All1 : On/Off2 : Record3 : Play4 : Clear1 : Untrain All2 : Prompt Mode3 : Digit Mode4 : HFK Mode1 : Connection1: Voice Memo2: Call Answer3: Voice Command4: Voice Dial5: Voice Alert6: Voice Setting1: PTT Contacts● If “CALL FAILED” appears on the display or the line isbusy, press or . ● If you activate the “AUTO RETRY” function, the phone willautomatically retry for the number of times you haveselected. (refer to page 66)● If the phone number you’re calling is stored in the phonebook, the name and number will appear when the call isplaced.● To modify the phone number you have entered :• To erase one digit at a time, press .• To erase the entire number, press and hold .NOTE: Please refer to page 75 (Voice Service) for more details on using Voice Activated Dialing to place a call.PTTuDATA SVC. uTX-60P(verizon)1213-CDM-8450PTT 2003.12.13 9:37 AM Page 24](https://usermanual.wiki/Pantech/TX-60B.Users-manual/User-Guide-388173-Page-13.png)
![Chapter 2 - Page 25BASIC FUNCTIONSBASIC FUNCTIONSPage 24 - Chapter 2ANSWERING A CALL1. To answer a call, press any key except Clear, End or the Navigation Key.2. To end the call, press .● In the Settings menu, you can select either “Any Key” or“Send Key” to answer a call. lf “Send Key” is selected, thephone can only be answered by pressing . See page 66 for more information.NOTE: In Auto Answer Mode, a call is automatically answered after a preset number of ring tones. See page 67 for more details.NOTE: The caller ID is stored in the call history.Caller ID is a system dependent feature. Please contact your service provider for details.CALLER ID FUNCTIONIdentifies a caller by displaying that person’s phonenumber. If the caller’s name and number are storedin your phone book, the name and number will bedisplayed.BASIC FUNCTIONSBASIC FUNCTIONSPAUSE FEATUREYou can dial or save a phone number with pauses foruse in the automated systems where you need to entera credit card number, a PIN number, and so on. Thisfeature will be convenient when you are linked to ARS.(Advanced Record System).1. To insert a pause, enter the phone number then press [PSE]. 2. Press to dial or [STO] to store.Please refer to page 32 for more details about storing a phone number.SPEAKER PHONE1. To activate the speaker phone when the phone is on the idle screen, in the idle mode, in answering mode, and in calling mode, press and hold .2. The phone returns to normal (Speaker phone off) after ending or call or when the phone is turned off and back on.TX-60P(verizon)1213-CDM-8450PTT 2003.12.13 9:37 AM Page 26](https://usermanual.wiki/Pantech/TX-60B.Users-manual/User-Guide-388173-Page-14.png)
![ADJUSTING VOLUMEAdjusts the volume in two ways: by using the volumecontrol keys on the side of the handset, or by using themenu.1. Press [MENU] and select one of the following.2. Adjust volume and press [OK] to save it.ETIQUETTE MODEMutes key tones and activates the vibration mode toalert you of an incoming call or message.1. To turn etiquette mode on/off, press and hold .Chapter 2 - Page 27BASIC FUNCTIONSBASIC FUNCTIONSPage 26 - Chapter 2BASIC FUNCTIONSBASIC FUNCTIONSCALL WAITING FUNCTIONNotifies you of another incoming call when you are on thephone by sounding a beep and displaying the caller’sphone number on the screen.1. To answer another call while on the phone, press . This places the first call on hold. 2. To switch back to the first caller, press again.VOICE MEMO DISPLAYDisplays the number of voice memos recorded in theanswering machine.1. To play the recorded voice memos, press [PLAY].● Ringer : Controls the ringer volume.● Key : Controls the keypad tone volume.● Voice Call : Controls the Speaker & earpiece volume.● Speaker phone : Controls the speaker & earpiece volume in speaker phone mode.NOTE: Move the Navigation Key upward or downward to adjust volume of earpiece during a call.KEYGUARDLocks phone and prevents unauthorized use. Phone can only be used after inputting the password.1. To lock the phone, press and hold .2. To unlock the phone, input the password.The default password is 1 2 3.TX-60P(verizon)1213-CDM-8450PTT 2003.12.13 9:37 AM Page 28](https://usermanual.wiki/Pantech/TX-60B.Users-manual/User-Guide-388173-Page-15.png)
![Chapter 2 - Page 29FUNCTIONS DURING A CALLFUNCTIONS DURING A CALLSEND MY PHONE #Enables your phone number to be automatically transmitted to a pager. (Dependent on pager service.)1. To transmit your phone number during a call, press [MENU] and .MUTE (UNMUTE)Mutes the microphone while you are on a call so theother party cannot hear you if you speak.1. Press [MENU] .To display menu options during a call, press .These menu items are available while you are on a call.Page 28 - Chapter 2SCRATCHPAD Stores a new phone number during a call withoutthe calling party hearing the keypad tones.1. Press [MENU] .2. Enter a phone number, press then save thephone number in the phone book.FUNCTIONS DURING A CALLFUNCTIONS DURING A CALLMESSAGINGEnables you to send a message (SMS) during a call.1. Press [MENU] .MY PROFILEEnables you to review and edit your profile enteredthrough the phone book entry.Please see page 45 for more details.1. Press [MENU] .VOICE PRIVACYEnhances voice privacy during a call.1. Press [MENU] .● To deactivate, press [MENU] .● The phone will automatically un-mute in Emergency Callor Callback mode.● Press [MENU] to deactivate it.LOCATIONEnables the network to locate your current locationthrough Global Positioning System (GPS).1. Press [MENU] .TX-60P(verizon)1213-CDM-8450PTT 2003.12.13 9:37 AM Page 30](https://usermanual.wiki/Pantech/TX-60B.Users-manual/User-Guide-388173-Page-16.png)
![This chapter addresses numerous functions includingsaving phone numbers to the internal phone book,entering text and accessing call logs.Storing Phone NumbersText Input MethodsSpeed DialingPhone BookRecent CallsChapter 3MEMORY FUNCTIONChapter 3 - Page 31Page 30 - Chapter 2FUNCTIONS DURING A CALLFUNCTIONS DURING A CALLSPEAKER PHONE MODEActivates the speaker phone when you are on a call.The phone returns to normal (speaker phone off)after ending or call or when the phone is turned offand back on.1. Press [MENU] .TX-60P(verizon)1213-CDM-8450PTT 2003.12.13 9:37 AM Page 32](https://usermanual.wiki/Pantech/TX-60B.Users-manual/User-Guide-388173-Page-17.png)
![TEXT INPUT METHODSTEXT INPUT METHODSENTERING CHARACTERS For convenient entry of memory location names and textmessages, your phone offers several text input methods:Alpha mode : Enters words by repeatedly tapping the corresponding key until the desired character is displayed.T9TM mode : Tap each corresponding key only once and the phone predicts the word you are entering.Numeric mode : Only enters numbers.Symbol mode : Enters symbols like @, #, %.ALPHA MODE [ABC]Use the digit keys to enter letters, numbers and characters.Enter letters using the keypad as follows:Chapter 3 - Page 33STORING PHONE NUMBERSSTORING PHONE NUMBERSPage 32 - Chapter 3The phone book stores up to 300 entries, each with 5numbers.2. Choose Add New Entry or Add Existing Entry.Press [OK] to select.3. The Phone # will appear next to a list of icons.The name of the icon is displayed above the list. Use the Navigation Key to choose the type of # you’re adding, as indicated by the icon. Press [OK] to select.4. When the Editor is displayed, enter a name. Follow instructions for entering text on page 33. To change the input mode, press [MODE]. Press [OK] to store the name.5. Use the Navigation Key to scroll through more options for the entry (VAD, secret, etc.).6. To store the entry, press “New entry is saved” will be displayed.1. Enter phone # and press [STO].Group – Family, Friends, Work, EtcVoice dial – Home, Mobile, Office, UnassignedSet Secret – Yes, No● The other fields are set to Numeric mode as a default.NOTE:Alternative way to save a phone number to the phone book is listed on page 40 “Add New Entry”.● To enter a space, press . After two seconds, the cursor will automatically move to the next column.● Repeat until letters are entered. There is a 16-letter limit.● To delete one digit, press . To delete the entire entry,press and hold .● To change from lowercase to uppercase, press .Key Pad 1 Repetition1ADGJMPTW12ABC3DEF4GHI5JKL6MNO7PQRS8TUV9WXYZ.BEHKNQUX@CFILORVY-23456S8Z’...............7...92 Repetitions 3 Repetitions 4 Repetitions 5 RepetitionsTo change the input mode, press [MODE].TX-60P(verizon)1213-CDM-8450PTT 2003.12.13 9:37 AM Page 34](https://usermanual.wiki/Pantech/TX-60B.Users-manual/User-Guide-388173-Page-18.png)
![1. Press each key once for each letter of the word you are writing.●To write John with the English dictionary selected:1. Press 5 once - (for - k)2. Press 6 once - (for - km)3. Press 4 once - (for - log)4. Press 6 once - (for - john)2. Press until the correct word is displayed.3. To select the correct word and press .TEXT INPUT METHODSTEXT INPUT METHODSNOTE:The display shows for each keypressed.Chapter 3 - Page 35TEXT INPUT METHODSTEXT INPUT METHODSCasePress to change mode.[T9Abc][Abc][123][Symbol mode]Press to view the next matchingword if the highlighted word is notthe word you intended.Press to accept a word and add aspace.Press to select a letter case of thestandard text input or T9 textinput mode. [Abc], [ABC], and[abc] indicate the standard textinput. [T9Abc], [T9ABC], and[T9abc] indicate the predictive textinput.Press to delete a character to theleft of the cursor.Store the letters and numbers youenter.KEY FUNCTIONT9TM PREDICTIVE TEXT MODE [T9TMABC] To choose T9TM mode, press [MODE] then choose[T9TMABC]. This mode predicts the words you are entering using a built-in dictionary. With T9TM predictivetext input, you press each key only once for each letter.The chart below outlines how to use T9TM text input.Page 34 - Chapter 3NextSpaceShiftClearStoTX-60P(verizon)1213-CDM-8450PTT 2003.12.13 9:37 AM Page 36](https://usermanual.wiki/Pantech/TX-60B.Users-manual/User-Guide-388173-Page-19.png)
![SPEED DIALINGSPEED DIALINGONE-TOUCH/TWO-TOUCH DIALINGIdeal for frequently dialed numbers, this feature allowsphone book entries to be dialed via the keypad with onlyone or two key presses.ONE-TOUCH DIALING:1-9 : Press the corresponding memory number and hold for more than 1 second.TWO-TOUCH DIALING:10-20 : Press the first digit and second digits of the memory number short and long respectively.●If no phone number is stored in the locationentered, “There is no number” will appear on the screen.●If a phone number is stored in secret, you must enter the password to make a call.NOTE: See page 44 for information about saving a phone number in a speed dial location.Chapter 3 - Page 37NUMERIC MODE [123]Numeric mode allows you to add a number to yourentry/message. To select numeric mode, press ,[MODE] then select [123].TEXT INPUT METHODSTEXT INPUT METHODSSYMBOL MODE [SYM]Select symbol mode allows you to add various symbolsto your entry. Whether you are adding an e-mail addressto your phone book or sending an expressive message,symbols make these entries easier. To select symbol mode, press [MODE] then choose[SYM]. The symbols will appear on the display. The corresponding key number for that symbol will appear as well. You can press the key to select the symbol or use the Navigation key to highlight the symbol, then press . To move to the next screen of symbols press .Page 36 - Chapter 3TX-60P(verizon)1213-CDM-8450PTT 2003.12.13 9:37 AM Page 38](https://usermanual.wiki/Pantech/TX-60B.Users-manual/User-Guide-388173-Page-20.png)
![Chapter 3 - Page 39Page 38 - Chapter 3PHONE BOOKPHONE BOOKBY NUMBER1. Press [MENU] .2. To search through the menu, enter a part of the phone number and press .3. All matching entries will be displayed. Select an entry and either delete it by pressing [DEL] or view it by pressing .4. To call the selected number, press .FINDRetrieves an entry by group, name, or number.1. Press [FIND].2. All entries will appear in alphabetical order. “Search Name:” will appear at the top of the list.3. Type in a name or character string and press .4. All entries will be displayed.BY NAME1. Press [MENU] .2. Enter a name or its character string and press to display the names in alphabetical order. Please refer to page 33 about using the Alpha Editor.3. All matching entries will be displayed. Select an entry and either delete it by pressing [DEL]or view it by pressing .4. To call the selected number, press .PHONE BOOKPHONE BOOKStores up to 300 entries, each of which can be assignedto a group like Personal, Business, etc. Entries can beretrieved by name, phone number or group.● If there is no match, “Cannot Find Name” will appear.● If the entry is set to secret, you will be asked for your password.● If there is no match, “Cannot Find Name” will appear.● If the entry is set to secret, you will be asked for your password.BY GROUP1. Press [MENU] .2. Select one of the following groups (Personal, Business, Etc., All) with .3. All group entries will be displayed. Select an entry and either delete it by pressing [DEL] or view it by .4. To call a selected number, press .● You are to be asked about “Password” when the entry is setsecret.TX-60P(verizon)1213-CDM-8450PTT 2003.12.13 9:37 AM Page 40](https://usermanual.wiki/Pantech/TX-60B.Users-manual/User-Guide-388173-Page-21.png)
![Chapter 3 - Page 41Page 40 - Chapter 3PHONE BOOKPHONE BOOKEDIT GROUPAdds, changes and deletes groups.ADD NEW GROUP1. To add a new group, press [MENU] .A maximum of seven groups is allowed.2. Input a new group name.3. Press [STO] to save it.CHANGE GROUP NAME1. To change a new group, press [MENU] .2. Select an existing group name with the Navigation key.3. Input a new name.4. Press [STO] to save it.ADD NEW ENTRYAdds a new entry to the phone book.1. To add a new entry to the phone book, press [MENU] .2. Enter a name, then press .3. Press the Navigation Key until the phone number type is selected, then press [EDIT].4. Enter the phone number. Press .5. To save the entry, press [STO]. To return to the previous page, press [CLR].EDIT EXISTING ENTRYEdits an existing entry in the phone book.1. To edit a existing entry, press [MENU] .2. Use the Navigation Key to select a group.3. Select an entry and press to view and edit the entry, or [DEL] to delete it.PHONE BOOKPHONE BOOK● Personal, Business, Etc., All.TX-60P(verizon)1213-CDM-8450PTT 2003.12.13 9:37 AM Page 42](https://usermanual.wiki/Pantech/TX-60B.Users-manual/User-Guide-388173-Page-22.png)
![Chapter 3 - Page 43Page 42 - Chapter 3PHONE BOOKPHONE BOOKCHANGE GROUP NAME1. To change a group name, press [MENU] .2. Select an existing group name and press .3. Input a new name.4. Press [OK] to save it.EDIT EXISTING GROUP1. To editing menu, press [MENU] .2. The 3 existing group appear - Family, Friend, Work.3. Use the Navigation key to select an existing group.4. To edit a group.5. Press [OK] to save it.6. Press [OK] again to confirm it.CLEAR GROUP1. To delete an existing group, press [MENU] .2. Select the group to be deleted and press . “Clear [Group name]?” will be displayed.3. Press [OK] to delete it.EDIT SMS GROUPAdds, changes and deletes a group.ADD NEW GROUP1. To add a new group, press [MENU] .A maximum of seven groups is allowed.2. Input a new group name.3. Press [STO] to save it.PHONE BOOKPHONE BOOKTX-60P(verizon)1213-CDM-8450PTT 2003.12.13 9:37 AM Page 44](https://usermanual.wiki/Pantech/TX-60B.Users-manual/User-Guide-388173-Page-23.png)
![Chapter 3 - Page 45Page 44 - Chapter 3PHONE BOOKPHONE BOOKMY PROFILESaves your personal information.1. Press [MENU] to review and edit your personal information (Name, My Phone number,Birthday, Blood Type, Address, Home Number, E-Mail,Work Phone Number, Memo, Set Secret).2. Use the Navigation key to select the item to be edited then press .3. To confirm and save it. Press [STO]. TO CLEAR THE GROUP1. To clear a group name, press [MENU] .2. Select a group name and press .3. “Clear [Group Name]?” will be displayed.4. Press [OK] to delete the group.SPEED DIALLinks a phone number from the phone book to a locationnumber and enables you to call that number simply bypressing its location number from the idle mode.1. Press [MENU] .2. To assign a phone number to a location, select the location and press .3. Select the group where the phone number is saved and press .4. Select the entry and press , select the phone number and press again.PHONE BOOKPHONE BOOK● If a phone number is already assigned to the location, press [DEL] and the Navigation key to delete.NOTE:To edit a selected item of Blood type, press .TX-60P(verizon)1213-CDM-8450PTT 2003.12.13 9:37 AM Page 46](https://usermanual.wiki/Pantech/TX-60B.Users-manual/User-Guide-388173-Page-24.png)
![RECEIVEDDisplays information about the 10 most recentlyanswered calls. You can dial a selected number bysimply pressing .1. To see a list of the 10 most recently answered calls, press [MENU] . If the number is already stored in your phone book, only the name appears. If the number is not stored, only the phone number appears.2. To view incoming call details, press the .3. Press [OPTS] to save the number or press [DEL] to delete it.RECENT CALLSRECENT CALLSDIALEDDisplays information about the ten most recently dialednumbers. You can dial a selected numbers by simplypressing .1. To see a list of the 10 most recently dialed numbers, press [MENU] . If the number is already stored in your phone book, only the name appears. If the number is not stored, only the phone number appears.2. To view outgoing call details, press .3. Press [OPTS] to save the number or press [DEL] to delete it.Chapter 3 - Page 47RECENT CALLSRECENT CALLSThe CDM-8425PTT keeps a log of the 10 most recentlymissed, received (incoming) and dialed (outgoing)calls. Log information includes the phone number, the date and time of the call.This feature is not intended for billing purposes.Page 46 - Chapter 3In idle mode, you can access Recent Calls by pressing [MENU] .● Shortcut : From idle mode, press and hold to access the recently dialed call numbers.● “Phone # is already saved in phone book” or “Move to phonebook save mode?” will appear.●Call details include date, time and phone number.NOTE: After the tenth outgoing call, the oldest call will automatically be erased from the history.● “Phone # is already saved in phone book” or “Move to phonebook save mode?” will appear.NOTE: Call details include date, time and phone number.NOTE: After the tenth incoming call, the oldest call will automatically be erased from the history.TX-60P(verizon)1213-CDM-8450PTT 2003.12.13 9:37 AM Page 48](https://usermanual.wiki/Pantech/TX-60B.Users-manual/User-Guide-388173-Page-25.png)
![Chapter 3 - Page 49Page 48 - Chapter 3RECENT CALLSRECENT CALLSMISSEDDisplays information about the 10 most recently missedcalls. Place a call to a missed call number by simplypressing .1. To see a list of the 10 most recently missed calls, press [MENU] . If the number is already stored in your phone book, only the name appears. If the number is not stored, only the phone number appears.2. To view missed call details, press .3. Press [OPTS] to save the number or press [DEL] to delete it.RECENT CALLSRECENT CALLSCALL TIMERSChecks the talk time and manages your calls within the limityou set. The five timers include:LAST CALLTo display the total time of your last call:1. Press [MENU] .2. To return to the previous page, press [CLR].ALL CALLSTo display the total time of all calls:1. Press [MENU] and the message “Not intended for billing purposes” appears for 5 seconds.2. Use the Navigation Key to view the time of the following items:3. To resert the timer, press [RST].● “Phone # is already saved in phone book” or “Move to phonebook save mode?” will appear.NOTE: Call details include date, time and phone number.● Voice, Data/FaxNOTE: After the tenth missed call, the oldest call will automatically be erased from the history.TX-60P(verizon)1213-CDM-8450PTT 2003.12.13 9:37 AM Page 50](https://usermanual.wiki/Pantech/TX-60B.Users-manual/User-Guide-388173-Page-26.png)
![Chapter 3 - Page 51Page 50 - Chapter 3RECENT CALLSRECENT CALLSCUMULATIVE CALLSTo display talk time of cumulative calls:1. Press [MENU] and the message “Not intended for billing purposes” appears for 5 seconds.2. Use the Navigation Key to view the time of the following items:HOME CALLSTo display the total time of calls placed within yourhome area:1. Press [MENU] and the message “Not intended for billing purposes” appears for 5 seconds.2. Use the Navigation Key to view the time of the following items:3. To reset the timer, press [RST]. To return to the previous page, press [CLR].ROAM CALLSTo display the total time of calls placed outside yourhome area:1. Press [MENU] and the message “Not intended for billing purposes” appears for 5 seconds.2. Use the Navigation Key to view the time of the following items:3. To reset the timer, press [RST] . To return to the previous page, press [CLR].RECENT CALLSRECENT CALLS● Voice, Data/Fax● Voice, Data/Fax● Voice, Data/FaxNOTE: Cumulative ime can not be reset.TX-60P(verizon)1213-CDM-8450PTT 2003.12.13 9:37 AM Page 52](https://usermanual.wiki/Pantech/TX-60B.Users-manual/User-Guide-388173-Page-27.png)
![Chapter 4 - Page 55Page 54 - Chapter 4SOUNDSThis feature allows you to select sounds for Ringer type,Ringer Mode, Volume, Alert, Roam Ringer, Tone Lengthand Etiquette Mode.RINGER TYPESelects a ringer type to alert you of an incoming call.RINGER LIST1. Press [MENU] .2. Select a ringer type from the 9 melodies and 11 ringer types with the Navigation Key, then press [OK] to save it.MY DOWNLOADSMy Downloads stores Ringer Lists downloaded through“Get It Now”.1. Press [MENU] .2. To select a downloaded ringer type from “Get It Now” with the Navigation Key, then press [OK] to save it.ANIMATED RINGERAnimated Ringer stores Animated Ringer Lists downloaded through “Get It Now”.1. Press [MENU] .2. Select a downloaded animated ringer type from “Get It Now” with the Navigation Key, then press [OK] to save it.SETTINGSSETTINGSEMS DOWNLOADSEMS Ringer stores Ringer Lists downloaded throughEMS in SMS.1. Press [MENU] .2. Select a downloaded ringer type from “SMS” to “EMS” with the Navigation Key, then press [OK] to save it.RINGER MODEThis feature allows you to choose how you want to bealerted to an incoming call.1. Press [MENU] .2. Select one of the following options:3. To confirm, press [OK].VOLUMEControls the Ringer, Key and Voice Call volume.RINGERTo adjust the ringer volume.1. Press [MENU] .2. Adjust the ringer volume using the Navigation Key or the volume keys on the side of the phone.3. To save, press [OK].SETTINGSSETTINGS● Ringer : Phone plays ringer selected in Ringer List.● Vibrate : Phone vibrates only.● Ringer after Vibrate : The ringer sounds after vibration.● Silent : Mutes the ringer.TX-60P(verizon)1213-CDM-8450PTT 2003.12.13 9:37 AM Page 56](https://usermanual.wiki/Pantech/TX-60B.Users-manual/User-Guide-388173-Page-29.png)
![Page 56 - Chapter 4 Chapter 4 - Page 57SETTINGSSETTINGSKEY To adjust the keypad tone.1. Press [MENU] .2. Adjust the keypad tone using the Navigation Key or the volume keys on the side of the phone.3. To save, press [OK].VOICE CALLTo adjust the earpiece volume.1. Press [MENU] .2. Adjust the earpiece volume with the Navigation Key or the volume keys on the side of the phone.3. To save, press [OK].ALERTThis feature allows you to select alerts to sound whenthe phone performs certain functions. Alerts include:MINUTE ALERTTo set an alert to sound every minute of a phone call:1. Press [MENU] .2. Select “Off” or “On” then press [OK] to save it.SETTINGSSETTINGSROAM ALERTTo sounds an alert when leaving a service area andentering a roaming service area:1. Press [MENU] .2. Select “Off” or “On” then press [OK] to save it.CONNECT ALERTSounds an alert to notify you that a call has been successfully placed:1. Press [MENU] .2. Select “Off” or “On” and press [OK] to save it.FADE ALERTSounds an alert when entering an area where calls cannot be made due to weak signal strength. 1. Press [MENU] .2. Select “Off” or “On” and press [OK] to save it.LOW SIGNAL ALERTSounds an alert when you encounter low signalstrength. 1. Press [MENU] .2. Select “Off” or “On” and press [OK] to save it.NOTE: The alert sounds in standby mode or during a call.NOTE: The alert sounds in standby mode or during a call.TX-60P(verizon)1213-CDM-8450PTT 2003.12.13 9:37 AM Page 58](https://usermanual.wiki/Pantech/TX-60B.Users-manual/User-Guide-388173-Page-30.png)
![SETTINGSSETTINGSROAM RINGERIf you choose Distinctive you will have to select a ringertype.1. Press [MENU] .2. Select “Distinctive” or “Normal” and press [OK] to save it.TONE LENGTHTo adjust tone length:1. Press [MENU] .2. Select “Normal” or “Long” and press [OK] to save it.ETIQUETTE MODE1. Press [MENU] .2. Select “On” or “Off”.3. To save, press [OK]. Chapter 4 - Page 59Page 58 - Chapter 4SETTINGSSETTINGSDISPLAYCustomizes and personalizes the display.ANIMATION SETTINGSelects your favorite LCD display in the following modes:IDLE DISPLAY1. Press [MENU] .2. Select a display from the Animation list.3. Press [OK] to save it.POWER ON DISPLAY1. Press [MENU] .2. Select a display from the Animation list.3. Press [OK] to save it.POWER OFF DISPLAY1. Press [MENU] .2. Select a display from the Animation list.3. Press [OK] to save it.● Distinctive : Sounds a different ringer type.● Normal : Sounds the same ringer type as used in Home area.● On : Etiquette Mode on.● Off : Etiquette Mode off.Shortcut : To activate/deactivate etiquette mode, pressand hold .TX-60P(verizon)1213-CDM-8450PTT 2003.12.13 9:37 AM Page 60](https://usermanual.wiki/Pantech/TX-60B.Users-manual/User-Guide-388173-Page-31.png)
![SETTINGSSETTINGSMAIN DISPLAY SETTINGSelects your favorite LCD display for the followingmodes:GREETING INPUTTo input a personal greeting:1. Press [MENU] .2. To edit the banner, press .3. Input your personal banner, using the Alpha Editor. (Refer to page 33).4. To save, press [STO].IDLE CLOCKTo display a clock on the LCD:1. Press [MENU] .2. Select one of the following options and press [OK] to save it.Chapter 4 - Page 61Page 60 - Chapter 4SETTINGSSETTINGSLCD SETTINGControls backlight and LCD contrast for a better viewand more efficient use.BACKLIGHTINGBacklights the display and keypad for easy viewing in dark places.1. Press [MENU] .2. Select one of the following options: Off, 5 secs, 10 secs, 20 secs.To save, press [OK].CONTRASTThe LCD display contrast can be adjusted to 5 levels.1. Press [MENU] .2. Adjust the LCD contrast for better view.3. To save, press [OK].● Off : Turn the backlight off.● 5 secs, 10 secs, 20 secs : Backlight on for 5, 10, or 20 seconds respectively after a touch of the keypad.● Digital Clock● Analog Clock● Greeting Clock● Animation + ClockTX-60P(verizon)1213-CDM-8450PTT 2003.12.13 9:37 AM Page 62](https://usermanual.wiki/Pantech/TX-60B.Users-manual/User-Guide-388173-Page-32.png)
![GRAPHIC SETTINGSCREEN SAVER1. Press [MENU] .WALLPAPER1. Press [MENU] .2. Select parameters (Download Image/EMS Image), then press . SETTINGSSETTINGSChapter 4 - Page 63Page 62 - Chapter 4SETTINGSSETTINGSSYSTEMScans the channels so your phone can stay connectedto any available system.SET MODESelects the Preferred System.1. Press [MENU] .2. Select one of the following options (Automatic B/Automatic A/Home Only) and press . FORCE ANALOGTemporarily forces phone to use Analog mode – modeautomatically ends in 10 minutes.1. Press [MENU] .2. Select “No” or “Yes” then press [OK] to activate it.● TIME SETTING : Determines when the screen saver activates.Select one of the following options : Off / 5 Secs / 10 Secs / 20 Secs / 30 Secs.● SCREEN SAVERSelect parameters (DOWNLOAD IMAGE/EMS IMAGE) by using the Navigation Key, then press .● Automatic B : Scan the radio channels based on the Automatic B setting.● Automatic A : Scan the radio channels based on the Automatic A setting.● Home Only : Scan radio channelsonly within your home area or home affiliated area.TX-60P(verizon)1213-CDM-8450PTT 2003.12.13 9:37 AM Page 64](https://usermanual.wiki/Pantech/TX-60B.Users-manual/User-Guide-388173-Page-33.png)
![SETTINGSSETTINGSNAM SETTINGEnables Auto NAM (Number Assignment Modules) ormanually selects a NAM.AUTO NAMAutomatically switches phone to proper NAM when youhave multiple NAM registrations.1. Press [MENU] .2. Select “Yes” or “No” then press [OK] to save it. CHANGE NAMChanges the NAM used by the phone when you havemultiple registrations.1. Press [MENU] .2. Select “NAM1-VERIZON” or “NAM2-VERIZON” then press [OK] to save it. PRL IDDisplays the phone’s PRL (Preferred Roaming List).1. Press [MENU] .Chapter 4 - Page 65Page 64 - Chapter 4SETTINGSSETTINGSEnables Verizon network system to locate your positionand allows the use of some Verizon wireless applica-tions.LOCATIONTo determine whether or not the network system candetect your position:1. Press [MENU] .2. Select “911 Only” or “Location On”. 3. To save, press [OK].● 911 Only : Your location will be hidden from network & applications except 911.● Location On : Your location is now available to the network.TX-60P(verizon)1213-CDM-8450PTT 2003.12.13 9:37 AM Page 66](https://usermanual.wiki/Pantech/TX-60B.Users-manual/User-Guide-388173-Page-34.png)
![SETTINGSSETTINGSChapter 4 - Page 67Page 66 - Chapter 4SETTINGSSETTINGSOTHERSANSWER MODETo select an answer mode:1. Press [MENU] .2. Select “Any Key” or “Send Key”.3. To save, press [OK].AUTO RETRYAutomatically retries a call up to 5 times after a set timeinterval.RETRY TIME1. Press [MENU] .2. Select a time interval option to automatically retry a call (Off, 3, 5, 7, 10 seconds). To save, press [OK].REPEAT1. Press [MENU] .2. Select one of the options (1 time, 3 times, 5 times). To save, press [OK].● Any Key : Press any key to answer an incoming call except , , and .● Send Key : Press only to answer a call.AUTO ANSWERAutomatically answers a call after a preset number ofrings.1. Press [MENU] .2. Select on of the following:3. To save, press [OK].VOICE PRIVACYEnhances voice privacy and avoids tapping during a call.1. Press [MENU] .2. Select “Standard” or “Enhanced”. 3. To save, press [OK].● Off / 5 / 10 / 18 seconds.● “Enhanced” : Makes it more difficult to wire tap.NOTE: This function will not be active when you select Vibrate, Silent, Etiquette or Ringer after Vib as a ringer mode.TX-60P(verizon)1213-CDM-8450PTT 2003.12.13 9:37 AM Page 68](https://usermanual.wiki/Pantech/TX-60B.Users-manual/User-Guide-388173-Page-35.png)
![Chapter 4 - Page 69Page 68 - Chapter 4SETTINGSSETTINGS SETTINGSSETTINGSKEY GUARD1. Press [MENU] .2. Select “On” or “Off”.3. To save, press [OK].LANGUAGETo select the language in which letters and words. Are displayed on screen.1. Press [MENU] .2. Select either “English” or “Spanish”.3. To save, press [OK].WEB IDLE TIMEWhen connected to a network, this feature automatical-ly disconnects your phone from the network when thereis no key input for a period of time that you set. 1. Press [MENU] .2. Use the scroll key to set the web idle timer or press digit keys one by one to enter the time.3. To save, press [OK].TTY MODEYour phone is able to operate with a “TTY” (Teletypewriter)device in both analog and digital modes. This feature is system dependent and may not be available in all areas.CONNECTING TO TTY DEVICE1. Turn the “TTY” device off.2. Connect the “TTY” device to the phone at the earphone-microphone jack.ACTIVATING/DEACTIVATING TTY MODE1. Press [MENU] .2. Select one of the following options (TTY Full/ TTY+TALK/TTY+HEAR/TTY Off) then press .S/W VERSIONTo display the version of your phone:1. Press [MENU] .2. Your phone’s software and hardware version appearon the display.3. Press [OK].● On : Prevents accidentally pressing the keypad.● Off : Key guard off.● Timer length cannot exceed 3 digits.NOTE: To unlock the key guard, press .● A TTY (also known as TDD or Text Telephone) is atelecommunications device that allows people whoare deaf or hard of hearing, or who have speech orlanguage disabilities, to communicate by telephone.Connect the TTY device to the Headset Jack of PCSPhone. Then type the message you want to send onthe TTY’s keyboard.MAKING AND ANSWERING A CALLYou can make or answer calls in the same manner asordinary calls.TX-60P(verizon)1213-CDM-8450PTT 2003.12.13 9:37 AM Page 70](https://usermanual.wiki/Pantech/TX-60B.Users-manual/User-Guide-388173-Page-36.png)
![Chapter 4 - Page 71VS MENUVS MENU1. To start VS menu, press .2. To enter the voice memo menu, press .3. When you press to record a voice memo, instructions will appear and you will hear “Please record it at the tone”.4. To stop recording a memo, press .5. After recording a voice memo you can “Review”, “Re-record” or “Save”.VOICE MEMO1. To start VS menu, press .2. To enter the voice memo menu, press .3. To play the voice memo menu, press , select the desired voice memo, then press .RECORD VOICE MEMOPLAY VOICE MEMONOTE: Edit Key - Edits the voice memo title.CLR Key - Deletes the selected voice memo.1. To start VS menu, press .2. To enter the voice memo menu, press .3. To delete a voice memo, press .CLEAR ALLNOTE: To pause, press . To resume, press .Page 70 - Chapter 4SETTINGSSETTINGSSPEAKER MODE1. Press [MENU] .2. Select “On” or “Off”.3. To save, press [OK]. ● On : Speaker phone on.● Off : Speaker phone off.TX-60P(verizon)1213-CDM-8450PTT 2003.12.13 9:37 AM Page 72](https://usermanual.wiki/Pantech/TX-60B.Users-manual/User-Guide-388173-Page-37.png)
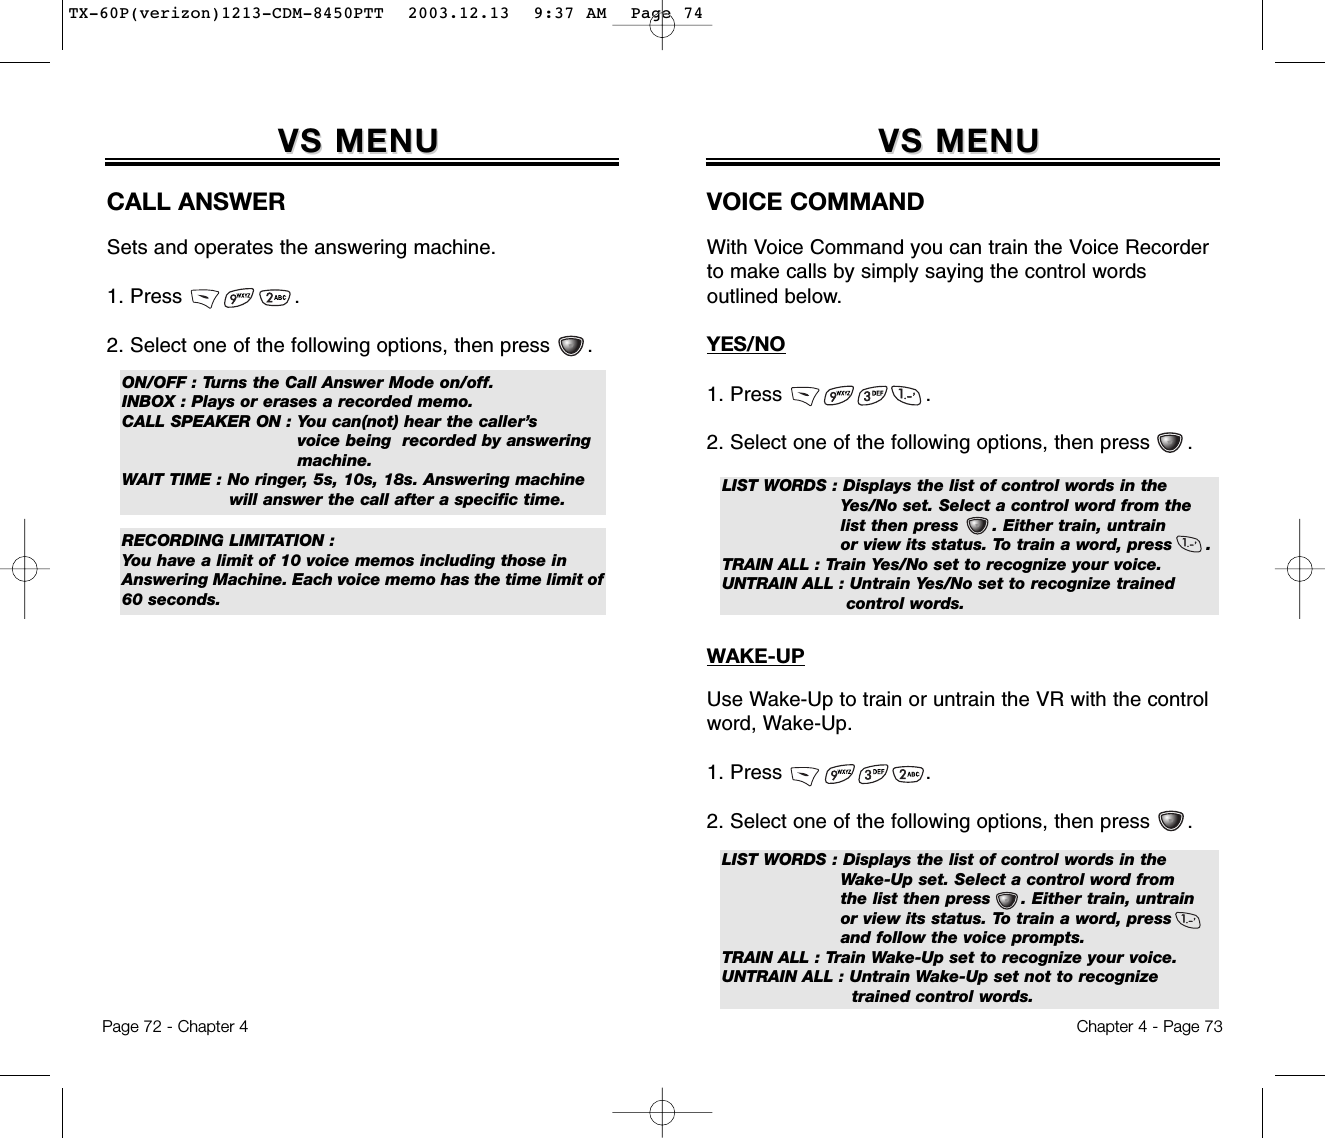
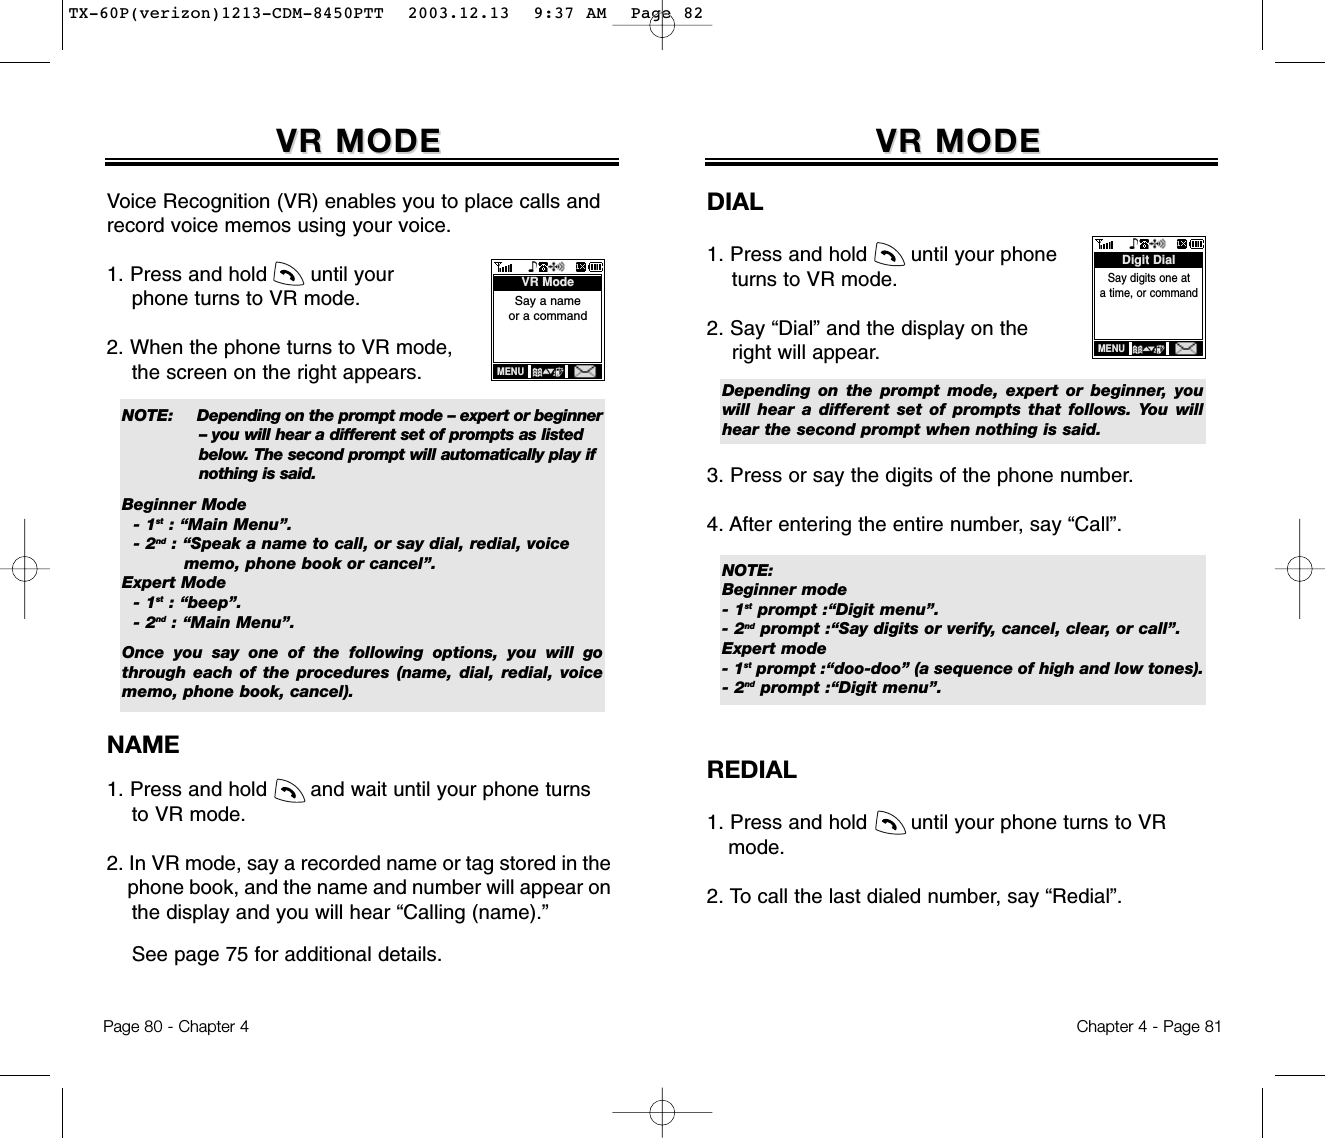
![Chapter 4 - Page 75VS MENUVS MENUVOICE DIALVoice tags allow you to make calls in VR Mode by simplysaying the person’s name. Using the VS Menu, you canlist, add or erase voice tags for phone book entries.ADD1. Press .2. To add a voice tag to phone book entry, press .3. Select a group, then press [OK].4. Select an entry, then press [OK].5. Select a phone number, then press [OK].6. “Enter voice tag?” will be displayed. Press , then say the name.LIST1. Press .2. To list phone book entries with attached voice tags, press .3. Select one of the entries, then press [OK].Page 74 - Chapter 4VS MENUVS MENUTOP LEVELUse Top Level to train or untrain the VR with your control words (Dial, Redial, Voice Memo, Phone Book,Cancel).1. Press .2. Select one of the following options, then press .LIST WORDS : Displays the list of control words in the top level set. Select a control word from the list then press . Either train, untrain or view its status. To train a word, press .TRAIN ALL : Train Top level set to recognize your voice.UNTRAIN ALL : Untrain Top level set not to recognize trained control words.DIGIT DIALUse Digit Dial to train or untrain the VR with the controlwords (1 to 9, Zero, Oh, Verify, Clear, Call).1. Press .2. Select one of the following options, then press .LIST WORDS 1, 2 : Displays the list of control words in the digit dial set. Select a control word from the list then press . Either train, untrain or view its status. To train a word, press and follow the voice prompts.TRAIN ALL : Train Digit Dial set to recognize your voice.UNTRAIN ALL : Untrain Digit dial set not to recognize trained control words.EDIT : Retrain / Voice Setting / Clear.PLAY : Play voice tag.TX-60P(verizon)1213-CDM-8450PTT 2003.12.13 9:37 AM Page 76](https://usermanual.wiki/Pantech/TX-60B.Users-manual/User-Guide-388173-Page-39.png)
![Chapter 4 - Page 77VS MENUVS MENUVOICE ALERTSets the voice alert service.ON/OFF1. Press .2. Select “On” or “Off”, then press .RECORD1. Press .2. Record voice alert.PLAY1. Press .2. Confirm voice alert.CLEAR1. Press .2. Select “Yes” or “No”, then press .Page 76 - Chapter 4VS MENUVS MENUCLEAR ALL1. Press .2. To erase all voice tags in the list, press .3. “Removing all voice tags proceed?” appears.4. Press [OK] and you will see the message, “Delete all tagged book entries too?”. Select No by pressing,Yes by pressing and CLR by pressing .5. “All voice tags were deleted successfully” will be displayed.OK : Proceed to erase all the voice tags.CLR : Return to the previous page.4. Press [PLAY] to play a voice tag or [EDIT] to edit an existing voice tag.5. If you select Edit, select one of the following options, then press [OK].1) Retrain: “Retrain Voice Name?” appears. Press , then say a name.2) Voice Setting: “Change?” appears. Press , select a phone number, then press again.3) Clear: “Removing Voice Names Proceed?” appears. Press .TX-60P(verizon)1213-CDM-8450PTT 2003.12.13 9:37 AM Page 78](https://usermanual.wiki/Pantech/TX-60B.Users-manual/User-Guide-388173-Page-40.png)
![SECURITY FEASECURITY FEATURESTURESChapter 5 - Page 87NOTE: The default password is the last 4 digits of your phone number.DIALEDTo block all outgoing calls except emergency calls frombeing placed, but allows incoming calls to be answered:1. Press [MENU] and enter “Password”.2. Press and select “Allow” or “Restrict”.3. To save, press [OK].● Restrict : Restrict to make a call.● Allow : Allow outgoing calls.RECEIVED CALL HISTORYThe Received Call History lists the most recent incoming calls,including phone numbers. To control access to the history:1. Press [MENU] and enter “Password”.2. Press and select “Allow” or “Restrict”.3. To save, press [OK].● Restrict : Restrict access to received call history.● Allow : Allow access to received call history.DIALED CALL HISTORYThe Dialed Call History lists the most recent outgoing calls,including phone numbers. To control access to the history:1. Press [MENU] and enter “Password”.2. Press and select “Allow” or “Restrict”.3. To save, press [OK].● Restrict : Restrict access to the dialed call history.● Allow : Allow access to the dialed call history.SECURITY FEASECURITY FEATURESTURESPage 86 - Chapter 5SECURITYPrevents the unauthorized use of the handset and onlyallows access to certain features to those who have thepassword.RESTRICTEnables you to restrict certain features with the password. Password must be entered to use restrictedfeatures.AUTOMATIC LOCKPrevents others from using your phone without permission. When locked, the menu can not be accessed without the password.1. Press [MENU] and enter “Password”.2. Press and select “Off”, “Lock Now” or “Power Up”.3. To save, press [OK].● Off : Do not lock the phone.● Lock Now : Lock the phone now.● Lock On Power Up : Lock the phone whenever it is turned on.NOTE: The default password is the last 4 digits of your phone number.TX-60P(verizon)1213-CDM-8450PTT 2003.12.13 9:37 AM Page 88](https://usermanual.wiki/Pantech/TX-60B.Users-manual/User-Guide-388173-Page-45.png)
![SECURITY FEASECURITY FEATURESTURESChapter 5 - Page 89900 #’STo restrict calling 900 dial service numbers:1. Press [MENU] and enter “Password”.2. Press and select “Allow” or “Restrict”.3. To save, press [OK].● Restrict : Restrict calls 900-dial services.● Allow : Allow 900-dial services.LONG DISTANCE By restricting long distance calls.1. Press [MENU] and enter “Password”.2. Press and select “Allow” or “Restrict”.3. To save, press [OK].● Restrict : Restrict calls long distance calls.● Allow : Allow long distance calls.NOTE: A phone number over 7 digits is to be restricted. NOTE: The default password is the last 4 digits of your phone number.SECURITY FEASECURITY FEATURESTURESPage 88 - Chapter 5MENUTo block access to the menu to prevent any changes:1. Press [MENU] and enter “Password”.2. Press and select “Allow” or “Restrict”.3. To save, press [OK].● Restrict : Restrict access to the menu.● Allow : Allow access to the menu.PHONE BOOKTo block access to, and protect data in your phone book.1. Press [MENU] and enter “Password”.2. Press and select “Allow” or “Restrict”.3. To save, press [OK].● Restrict : Restrict access to the phone book.● Allow : Allow access to the phone book.DATA CALLTo restrict data calls from being placed:1. Press [MENU] and enter “Password”.2. Press and select “Allow” or “Restrict”.3. To save, press [OK].● Restrict : Restrict data calls.● Allow : Allow data calls.NOTE: The default password is the last 4 digits of your phone number.Data Call Types : 1x express/qnc/fax/async data/get it now/ mobile webTX-60P(verizon)1213-CDM-8450PTT 2003.12.13 9:38 AM Page 90](https://usermanual.wiki/Pantech/TX-60B.Users-manual/User-Guide-388173-Page-46.png)
![SECURITY FEASECURITY FEATURESTURESChapter 5 - Page 91RESET PHONEResetting the phone restores it to the original default settings. Any changes you made to options or features will return to the factory settings. To reset the phone:1. Press [MENU] and enter “Password”.2. Press .3. Select “Yes” or “No”, then press [OK].CHANGE PASSWORDTo change your password:1. Press [MENU] and enter “Password”.2. Press .3. Enter a new password and press [OK].4. Enter the new password again and press [OK].● When you select “Yes”, you will see “Wait a moment” onthe display and the phone will return to idle mode.NOTE: The default password is the last 4 digits of your phone number.SPECIAL #’SSpecial #’s allows you to store 3 phone numbers thatcan be called even in the lock mode.1. Press [MENU] and enter “Password”.2. Press and select a location.3. Press [OK] and input a phone number; press [OK] again to save.CLEAR PHONE BOOKTo clear all phone book entries:1. Press [MENU] and enter “Password”.2. Press .3. Select “Yes” or “No”, then press [OK].SECURITY FEASECURITY FEATURESTURESPage 90 - Chapter 5NOTE: The default password is the last 4 digits of your phone number.TX-60P(verizon)1213-CDM-8450PTT 2003.12.13 9:38 AM Page 92](https://usermanual.wiki/Pantech/TX-60B.Users-manual/User-Guide-388173-Page-47.png)
![Chapter 6 - Page 95ALARMYou can set up to 3 alarms.1. To display alarm entries, press [MENU] .2. Select one of the entries. To set a new alarm, choose item 1, 2 or 3. To edit an existing alarm, select that alarm. Press . 3.1. To set a time, press from the Alarm Setting Menu. 3.2. To set a melody, press from the Alarm Setting Menu.3.3. To set a snooze, press from the Alarm Setting Menu. 3.4. To set a pause, press from the Alarm Setting Menu.SCHEDULESCHEDULE● To delete the existing one, press .● Use the Navigation Key to choose an alarm frequency(Once, Daily, Weekly, Monthly, Yearly). To save, press [STO]. “Save Complete” will be displayed and the screen will return to the alarm list.● Use the Navigation Key to scroll through the list of 10 ringtones and 30 melody tones. To set a melody, press [OK].● Select one of the following : No use, 1 Time, After 3 minutes.NOTE: Pause setting is available for existing alarms. It is not available for new entries.Page 94 - Chapter 6The schedule allows you to set an event and remindsyou of that event.EVENT1. To display a calendar, press [MENU] . 2. Select New Event.3. Move the Navigation Key to choose a date in the calendar and press [OK].4.1. To set a time for an event, press . Enter the event name then press [STO]. Press [STO] again to save the event.4.2. To set a melody for the event, press . Select a melody then press [OK].4.3. To set a message for the event, press .5. Press [OK] to save it or [CLR] to return to the calendar.6. “Save complete” appears. When you return to the calendar the day will be highlighted.SCHEDULESCHEDULE● Day to Day movement : Move the Navigation Key left and right.● Week to Week movement : Move the Navigation Key down and up.● Choose one of the following on the first line: On time, 10Min before, 30 Min before, 1 Hour before, No alarm.● Change the date and time in the second line by moving toyear, month, day, time input with the Navigation Key.● The date of the event will be marked on your calendar.● Use the Navigation Key to scroll through the list of 10 ringtones and 30 melody tones. To set a melody, press [OK]TX-60P(verizon)1213-CDM-8450PTT 2003.12.13 9:38 AM Page 96](https://usermanual.wiki/Pantech/TX-60B.Users-manual/User-Guide-388173-Page-49.png)
![WORLD CLOCKWORLD CLOCKWORLD CLOCKNotifies you of the time in a specific preprogrammed city.1. Press [MENU] . 2. Select a city, then press [OK].3. The world map appears with the city, its date andtime.Chapter 6 - Page 97● Use the Navigation Key to select another city.Page 96 - Chapter 6CALCULACALCULATORTORCALCULATORAllows you to use the CDM-8425PTT as a calculator to perform basic mathematic functions (addition, subtraction, multiplication, division).1. Press [MENU] . 2. Follow the instructions below to calculate (8*6)/4-2.5●Input 8.Move the Navigation Key leftward.Input 6 and press the Navigation Key.Move it rightward.Input 4 and press the Navigation Key.Move it downward.Input 2 and press the to input (.). Press 5, .3. To reset, press [RST].NOTE: 1. Up to 10 integer digits and up to 2 decimals can be displayed. If the calculated result has more than 10 digits, the result is displayed in 10 digit logarithm.2. There is no (-) sign. To express a negative number, use ‘0-value’.TX-60P(verizon)1213-CDM-8450PTT 2003.12.13 9:38 AM Page 98](https://usermanual.wiki/Pantech/TX-60B.Users-manual/User-Guide-388173-Page-50.png)
![This chapter addresses checking voice mail messages,as well as sending and receiving text messages.Two-Way SMSChecking MessagesSending Text MessagesInboxOutboxSavedMy ObjectErase AllSettingsChapter 7VOICE MAIL ANDTEXT MESSAGESChapter 7 - Page 99Page 98 - Chapter 6STOP WSTOP WAATCHTCHSTOP WATCHSimultaneously times up to six different events. To operate the stop watch:1. Press [MENU] . 2. To measure a time period.●To start the stop watch, press [START].●To pause it, press [STOP]. ●To resume, press [START]. To reset the counter, press [RST].3. To time up to six events at once:● To start, press [START].● To stop a time period and continue measuring another one, press [CONT].● To stop the second and continue measuring a third one, press [CONT].● To measure up to six time periods, To stop, press , repeat the above steps.● To stop, press . To review the results, press [VIEW].● To return to the stop watch, press or [CLR].● To reset it, press [RST].TX-60P(verizon)1213-CDM-8450PTT 2003.12.13 9:38 AM Page 100](https://usermanual.wiki/Pantech/TX-60B.Users-manual/User-Guide-388173-Page-51.png)
![CHECKING MESSAGESCHECKING MESSAGESCHECKING RECEIVED VOICE MAIL MESSAGE1. Press , then press or for Voice Mail.2. The number of voice mail messages currently waiting in your mailbox appears. To access your voice mailbox, press .CHECKING RECEIVED TEXT MESSAGE1. Press , then press or “Inbox”.2. Highlight the message you want to view and press [SEL]. The text message is displayed. 3. To view the Inbox message menu, press [OPTS]. From therethen you can reply, erase, forward, save, save address, lock & unlock the message.Chapter 7 - Page 101RECEIVED MESSAGE NOTIFICATIONWhen your phone receives a message, the screen displays the number of new text messages and voicemail messages.1. To display the received message, press the key .TWO-WTWO-WAAY SMSY SMSYour CDM-8425PTT features Two-Way Short MessageService (SMS). This feature sends and receives textmessages through your phone. Voice mail notificationis also supported.: Text Message: Voice + Text Mail Message: Voice Mail MessageMESSAGE INDICATORSThe following symbols indicate the status of messagereceived by your phone. These symbols appear forvoice mail and text messages.Page 100 - Chapter 7TX-60P(verizon)1213-CDM-8450PTT 2003.12.13 9:38 AM Page 102](https://usermanual.wiki/Pantech/TX-60B.Users-manual/User-Guide-388173-Page-52.png)
![PRIORITYMarks messages as urgent.1. To send an urgent message, press “Priority”.2. Select the priority (Normal/Urgent), then press [OK].CALL BACKAllows you to input a specific call back number. Your phone number is the default.1. To change the call back number, press “Call Back”.2. Input call back number, then press [OK].SAVEThis allows you to save the message into the ‘Outbox’folder to use later.1. To save the text message, press “Save”.SENDING TEXT MESSAGESSENDING TEXT MESSAGESChapter 7 - Page 103INSERT SIGNATURE1. To include your signature in message, press “Insert Signature”.2. Select (No/Yes), then press [OK].EDIT MESSAGE1. Press to change the text message. 2. Input a new text message, and press [OK].SENDING TEXT MESSAGESSENDING TEXT MESSAGESSENDING NEW TEXT MESSAGES1. Press then press or .2. Input a new phone number then press [OK]3. Input a new text message then press [NEXT].● You can look up a number in the phone book by pressing [PB].● If “Delivery Failed. Retry in 3 mins?” appears, press to select Auto retry.SEND1. To send the text message, press .EDIT RECIPIENTEdits the recipient’s information - select if a wrong number is entered.1. To change the recipient, press .2. Input a new phone number, and press [OK].3. Input a new text message, and press [OK].4. To send, press .Page 102 - Chapter 7TX-60P(verizon)1213-CDM-8450PTT 2003.12.13 9:38 AM Page 104](https://usermanual.wiki/Pantech/TX-60B.Users-manual/User-Guide-388173-Page-53.png)
![INBOX INBOX Chapter 7 - Page 105INBOX MENUThe Inbox Menu options help you manage received textmessages. To access the menu:1. Press then press or .2. Select a message then press [SEL] .The message is displayed.3. Press [OPTS].REPLY1. To reply to the text message, press .2. Type your reply and press [OK].ERASE1. To erase the text message, press . 2. When you see “Delete Msg?”, press [YES].: Urgent New Msg(not read): Urgent read Msg: New Msg (not read): Old Msg (already read): Lock (already read and locked)SAVE ENTERED TEXT1. To save a text message as a canned message, press “Save Entered Text”.SENDING TEXT MESSAGESSENDING TEXT MESSAGESPage 104 - Chapter 7TX-60P(verizon)1213-CDM-8450PTT 2003.12.13 9:38 AM Page 106](https://usermanual.wiki/Pantech/TX-60B.Users-manual/User-Guide-388173-Page-54.png)
![INBOX INBOX Chapter 7 - Page 107BLOCK SENDER1. Block all incoming messages from the block list,press .SAVE QUICK TEXT1. Save the received message into canned messagepress .REPLY WITH COPY1. Reply to the received message and include received phone number and contents, press .● BLOCK : Enter the address to block● UNBLOCK : Enter the address to remove from block.● VIEW LIST OF BLOCKED ADDRESS : Display the blocked list on LCD.IN YOUR PHONE1. To save the text message in your phone, press “Save”.2. Press .SAVE ADDRESS1. To save the Call back number from the text message,press “Save Address”.2. To save the call back number into a memory location, follow the procedures for “STORING PHONE NUMBERS” on page 32.LOCK & UNLOCK1. To lock or unlock the text message, press “Lock/Unlock”.2. Select “Lock” to lock the message or “Unlock” tounlock the message, then press [OK].INBOX INBOX FORWARD1. To forward the text message, press “Forward”.2. Input the phone number of the person you are sending the message, then press [OK].3. Input any text message to go along with the forwarded message, then press [OK].Page 106 - Chapter 7TX-60P(verizon)1213-CDM-8450PTT 2003.12.13 9:38 AM Page 108](https://usermanual.wiki/Pantech/TX-60B.Users-manual/User-Guide-388173-Page-55.png)
![OUTBOXOUTBOXChapter 7 - Page 109ERASE1. To erase a text message, press .2. When you see “Delete Msg?”, press [YES].SAVE ADDRESS1. To save the Call back number, press “Save Address”.2. Select the phone number and press [OK]. Follow the procedures for “Storing phone numbers” on page 32.SAVE1. To save the outbox text message in the Saved Folder, press .LOCK & UNLOCK1. To lock or unlock the text message, press“Lock/Unlock”.2. Select “Lock” to lock the message or “Unlock” to unlock the message, then press .STATE1. To display the status of an outbox message, press .OUTBOXOUTBOXOUTBOX MENUThe Outbox Menu options help you manage sent text mes-sages or messages waiting to be sent. To access the menu:1. Press then press or .2. Select a message and press [OK] .The message is displayed.3. Press [OPTS].RESEND1. To resend a text message, press .SEND TO1. To send a message to another person, press . 2. Input the phone number and press .3. Input a text message and press .Page 108 - Chapter 7: Auto resend: Delivered: Fail: Not send: Read: SentTX-60P(verizon)1213-CDM-8450PTT 2003.12.13 9:38 AM Page 110](https://usermanual.wiki/Pantech/TX-60B.Users-manual/User-Guide-388173-Page-56.png)
![MY OBJECTMY OBJECTChapter 7 - Page 111SAVEDManages saved messages from the Inbox/Outbox.1. Press then press or .2. Select a message and press [SEL].The message is displayed.3. Press [OPTS].4.1. If the text message is saved from the “Inbox” menu, this screen will be displayed.4.2. If the text message is saved from the “Outbox” menu, this screen will be displayed.5. Select one by pressing .SASAVEDVEDPage 110 - Chapter 7MY OBJECT1. Press then press or .2. Select a text message, then press [OK].SOUND1. To name, play or erase saved sound objects, press .2. Select “Name” to rename a sound with or “Play” to play a sound with .3. To erase a sound, press .GRAPHICS1. To name, play or erase saved graphic objects, press .2. Select “Name” to rename a graphic with or“View” to view a graphic with .3. To erase a graphic, press .ANIMATION1. To name, play or erase saved animation objects, press .2. Select “Name” to rename animation with or“View” to view animation with .3. To erase animation, press .TX-60P(verizon)1213-CDM-8450PTT 2003.12.13 9:38 AM Page 112](https://usermanual.wiki/Pantech/TX-60B.Users-manual/User-Guide-388173-Page-57.png)
![Chapter 7 - Page 113ERASE ALLERASE ALLERASE MESSAGESErases all the messages from the “Inbox”, “Outbox”,“Saved” or “My Object” folder.1. Press then press or .2.1. To erase all the inbox messages, press . 2.2. To erase all the outbox messages, press .2.3. To erase the saved messages, press . 2.4. To erase the my object, press .3. Select “Yes” by pressing .Select “No” by pressing .● Erases entire inbox or old inbox.● Erases entire outbox or old outbox.Page 112 - Chapter 7SETTINGSSETTINGSSETTINGS MENUManages messaging features through various features.1. Press then press or .“Settings”.SAVE SENT MESSAGESSaves every sent message.1. Press “Save Sent MSG”.2. Select “No”, “Yes”, or “Prompt”, then press [OK].DEFAULT CALL BACK NUMBEREdits a default call back number so that the recipient cancall back or reply.1. Press “Default Call Back”.2. Input a call back number, then press [OK].● If you select Prompt, each time you send a message youwill be asked if you want to save it.TX-60P(verizon)1213-CDM-8450PTT 2003.12.13 9:38 AM Page 114](https://usermanual.wiki/Pantech/TX-60B.Users-manual/User-Guide-388173-Page-58.png)
![Chapter 7 - Page 115SETTINGSSETTINGSALERTEnables phone to alert you of an incoming message.1. Press “Alert”.2. Select “Ringer”, “Vibrate”, “Silent”, “Ringer & Remind”, or “Vibrate & Remind”.3. Press [OK].AUTO ERASEAutomatically erases (Inbox/Outbox) messages whennew messages arrive.AUTO ERASE INBOX1. Press “Auto Erase Inbox”.2. Select “Disable” or “Old Inbox”.3. Press [OK].AUTO ERASE OUTBOX1. Press “Auto Erase Outbox”.2. Select “Disable” or “Old Outbox”.3. Press [OK].● The Ringer & Remind or Vibrate & Remind rings or vibrates every 2 minutes to remind you of an incoming message. They will be cleared when any key is pressed.Page 114 - Chapter 7SETTINGSSETTINGSENTRY MODESets an Entry Mode as a default.The T9 mode indicator will appear whenever the inputmode is activated if the T9 mode is the default.1. Press “ENTRY MODE”.2. Select “T9 Mode” or “Alpha Mode”.3. Press [OK].BLOCK OR UNBLOCK1. Press “Block” or “Unblock”.2. Select “Block”, “Unblock”, or “View List of Blocked Address”.3. Press [OK].TX-60P(verizon)1213-CDM-8450PTT 2003.12.13 9:38 AM Page 116](https://usermanual.wiki/Pantech/TX-60B.Users-manual/User-Guide-388173-Page-59.png)
![Chapter 8MAKING ANEMERGENCY CALLChapter 8 - Page 117Page 116 - Chapter 7SETTINGSSETTINGSSIGNATUREWith this feature you can create and save a signatureto include in messages.1. Press “Signature”.2. Select “Edit Signature” or “Insert Signature”.3. Press [OK].DIRECT VIEWRead the received message without entering inbox inSMS menu.1. Press “Direct View”.2. Select “Yes” or “No”.3. Press [OK].● EDIT SIGNATURE : Edit user's signature.● INSERT SIGNATURE : Select whether the signature will be included into sending message.● YES : Set to read msg without entering inbox in SMS menu.● NO : Set to read msg after entering inbox in SMS menu.TX-60P(verizon)1213-CDM-8450PTT 2003.12.13 9:38 AM Page 118](https://usermanual.wiki/Pantech/TX-60B.Users-manual/User-Guide-388173-Page-60.png)
![Safety Information for Wireless Handheld PhonesSafety Information for FCC RF ExposureSAR InformationFDA Consumer UpdateChapter 11SAFETY INFORMATIONChapter 11 - Page 131Page 130 - Chapter 10DADATTA SVCA SVCCONNECTIONTo select a connection mode based on the handset usage:1. Press [MENU] .2. Select one of the following connection modes:3. Press [OK] to save.NOTE:This function is available only when the phone is connected to a data cable.● Voice Call : To receive a voice call.● Data Only : To receive data when connected to PC.● Fax Only : To function as a fax when connected to PC.TX-60P(verizon)1213-CDM-8450PTT 2003.12.13 9:38 AM Page 132](https://usermanual.wiki/Pantech/TX-60B.Users-manual/User-Guide-388173-Page-67.png)