FortiGate I Student Guide Forti Gate Online V2
User Manual: Pdf
Open the PDF directly: View PDF ![]() .
.
Page Count: 556 [warning: Documents this large are best viewed by clicking the View PDF Link!]
- Virtual Lab Basics
- LAB 1–Introduction to FortiGate
- LAB 2–Logging and Monitoring
- LAB 3–Firewall Policies
- LAB 4–Network Address Translation (NAT)
- LAB 5–Firewall Authentication
- LAB 6–SSL VPN
- LAB 7–Basic IPsec VPN
- LAB 8–Explicit Web Proxy
- LAB 9–Antivirus
- LAB 10–Web Filtering
- LAB 11–Application Control
- Appendix A: Additional Resources
- Appendix B: Presentation Slides

FortiGate I
Student Guide
for FortiGate 5.4.1
DO NOT REPRINT
© FORTINET
FortiGate I Student Guide
for FortiGate 5.4.1
Last Updated: 4 August 2016
Fortinet®, FortiGate®, and FortiGuard® are registered trademarks of Fortinet, Inc., and other Fortinet
names herein may also be trademarks, registered or otherwise, of Fortinet. All other product or
company names may be trademarks of their respective owners. Copyright © 2002 - 2016 Fortinet, Inc.
All rights reserved. Contents and terms are subject to change by Fortinet without prior notice. No part
of this publication may be reproduced in any form or by any means or used to make any derivative
such as translation, transformation, or adaptation without permission from Fortinet, Inc., as stipulated
by the United States Copyright Act of 1976.s
DO NOT REPRINT
© FORTINET
Table of Contents
VIRTUAL LAB BASICS ...................................................................................5
LAB 1–INTRODUCTION TO FORTIGATE .........................................................15
1 Working With the Command Line Interface ........................................................................16
2 Configuration Backups ........................................................................................................18
3 Administrative Accounts ......................................................................................................22
LAB 2–LOGGING AND MONITORING ..............................................................25
1 Configuring Logging on FortiGate .......................................................................................27
2 Monitoring Logs Through Alert Email .................................................................................30
3 Viewing Logs in the FortiGate GUI .....................................................................................33
LAB 3–FIREWALL POLICIES .........................................................................35
1 Creating Firewall Address Objects and Firewall Policies ...................................................37
2 Reordering Firewall Policies and Firewall Policy Actions ...................................................40
3 Device Identification ............................................................................................................43
4 Policy Lookup ......................................................................................................................48
LAB 4–NETWORK ADDRESS TRANSLATION (NAT) .......................................51
1 Access Through VIPs .........................................................................................................53
2 Dynamic NAT with IP pools ................................................................................................57
3 Enabling Central NAT .........................................................................................................60
4 Configuring Central SNAT ..................................................................................................64
5 DNAT and VIPs ...................................................................................................................70
DO NOT REPRINT
© FORTINET
LAB 5–FIREWALL AUTHENTICATION .............................................................73
1 Remote Authentication ........................................................................................................75
2 Captive Portal ......................................................................................................................81
LAB 6–SSL VPN ........................................................................................85
1 Web-Only SSL VPN ............................................................................................................86
2 SSL VPN Tunnel Mode .......................................................................................................92
LAB 7–BASIC IPSEC VPN ...........................................................................95
1 Route-based IPsec VPN .....................................................................................................97
2 Policy-based IPsec VPN .....................................................................................................101
3 Testing and Monitoring the VPN .........................................................................................105
LAB 8–EXPLICIT WEB PROXY ......................................................................106
1 Configuring the Explicit Web Proxy ....................................................................................107
2 Using a PAC File .................................................................................................................113
LAB 9–ANTIVIRUS .......................................................................................118
1 Proxy-based Antivirus Scanning .........................................................................................120
2 Flow-based Antivirus Scanning ..........................................................................................124
LAB 10–WEB FILTERING .............................................................................128
1 FortiGuard Web Filtering.....................................................................................................130
2 Web Filtering Authentication ...............................................................................................137
3 Web Profile Overrides .........................................................................................................140
LAB 11–APPLICATION CONTROL .................................................................142
1 Creating an Application Control Profile ...............................................................................144
DO NOT REPRINT
© FORTINET
2 Limiting Traffic Using Traffic Shapers .................................................................................147
3 Configuring CASI ................................................................................................................150
APPENDIX A: ADDITIONAL RESOURCES ........................................................152
APPENDIX B: PRESENTATION SLIDES ............................................................153
1 Introduction to FortiGate .....................................................................................................154
2 Logging and Monitoring ......................................................................................................189
3 Firewall Policies ..................................................................................................................236
4 Network Address Translation (NAT) ...................................................................................271
5 Firewall Authentication ........................................................................................................302
6 SSL VPN .............................................................................................................................349
7 Basic IPsec VPN .................................................................................................................390
8 Explicit Proxy .......................................................................................................................419
9 Antivirus and Conserve Mode .............................................................................................450
10 Web Filtering ......................................................................................................................493
11 Application Control .............................................................................................................535
DO NOT REPRINT
© FORTINET

Virtual Lab Basics
FortiGate I Student Guide 5
Virtual Lab Basics
In this class, you will use a virtual lab for hands-on exercises. This section explains how to connect to
the lab and its virtual machines. It also shows the topology of the virtual machines in the lab.
Note: If your trainer asks you to use a different lab, such as devices physically located in
your classroom, please ignore this section. This applies only to the virtual lab accessed
through the Internet. If you do not know which lab to use, please ask your trainer.
DO NOT REPRINT
© FORTINET
Virtual Lab Basics
FortiGate I Student Guide 6
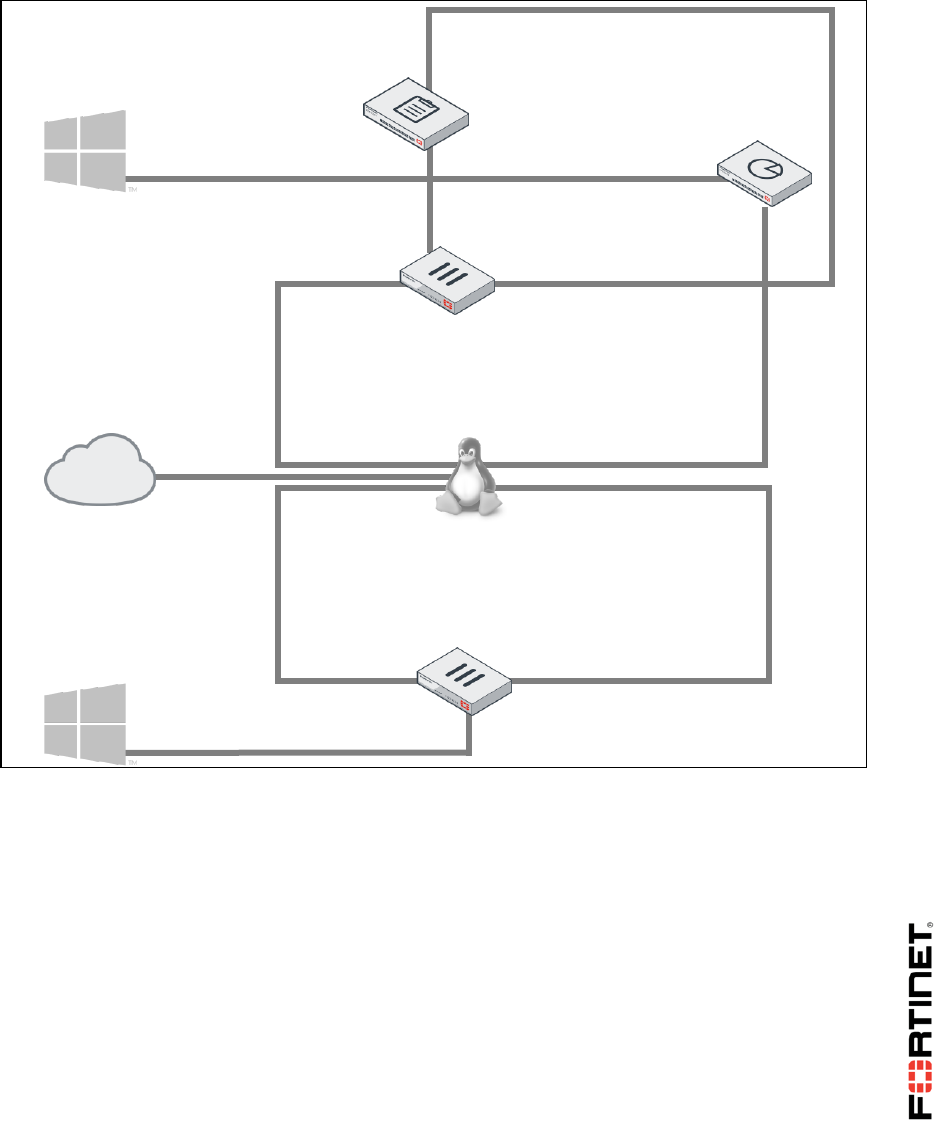
Network Topology
Logging In
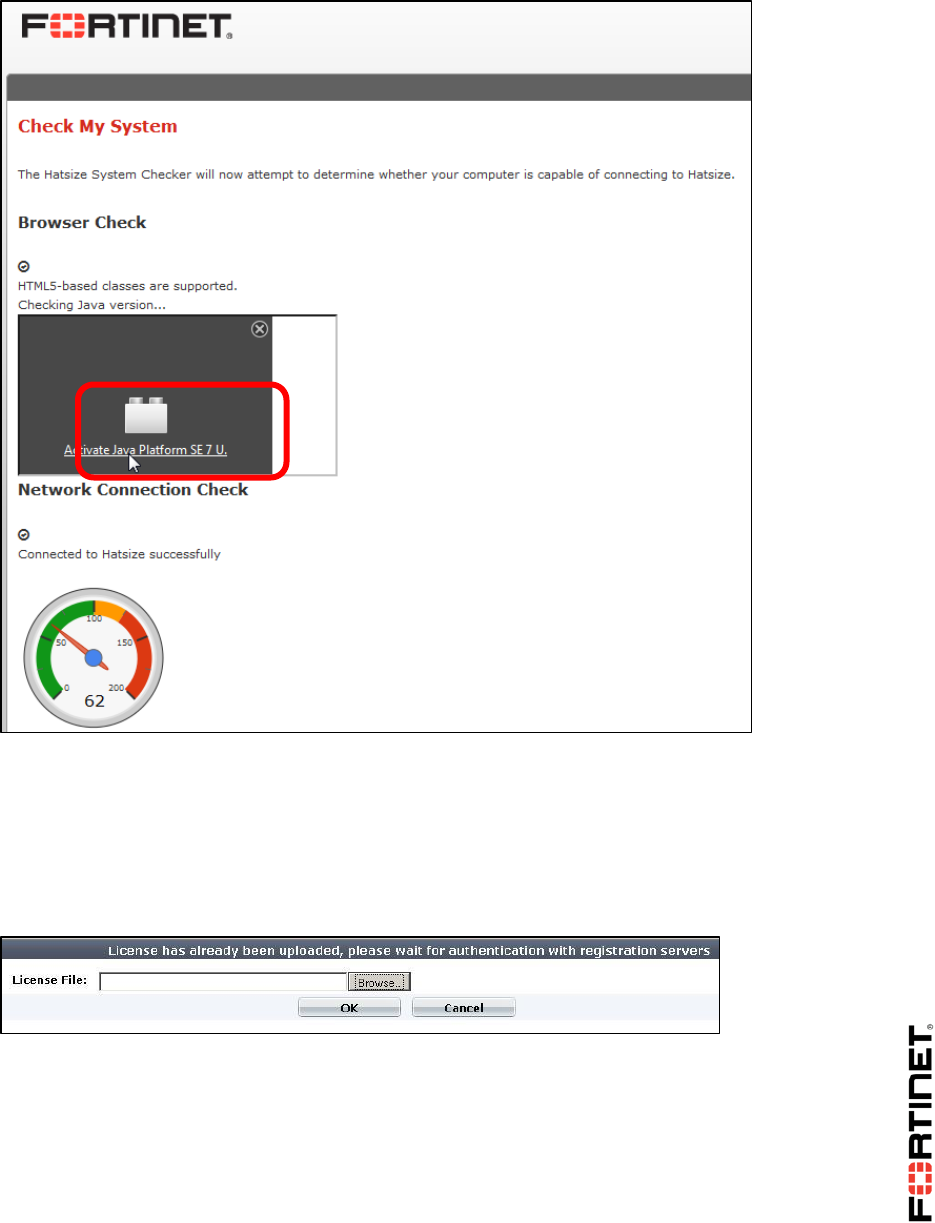
1. Run the System Checker. This will fully verify both:
compatibility with the virtual lab environment's software, and
that your computer can connect.
It can also diagnose problems with your Java Virtual Machine, firewall, or web proxy.
eth0
LOCAL-WINDOWS
10.0.1.10
port2
10.200.2.1/24
10.0.1.254/24
port3
LOCAL-FORTIGATE
port1
10.200.1.1/24
REMOTE-FORTIGATE
10.200.3.1/24
port4
REMOTE-WINDOWS
10.0.2.10
10.200.4.1/24
port5
port6
10.0.2.254/24
10.200.2.254
eth2
LINUX
10.200.1.254
eth1
eth4
10.200.4.254
eth3
10.200.3.254
FortiManager
port1
10.0.1.241
port3
10.200.1.210
port2
10.200.1.241
FortiAnalyzer
port1
10.0.1.210
DO NOT REPRINT
© FORTINET

Virtual Lab Basics
FortiGate I Student Guide 7
Use the URL for your location.
North America/South America:
https://remotelabs.training.fortinet.com/training/syscheck/?location=NAM-West
Europe/Middle East/Africa:
https://remotelabs.training.fortinet.com/training/syscheck/?location=Europe
Asia/Pacific:
https://remotelabs.training.fortinet.com/training/syscheck/?location=APAC
If a security confirmation dialog appears, click Run.
If your computer successfully connects to the virtual lab, the result messages for the browser and
network checks will each display a check mark icon. Continue to the next step.
If a browser test fails, this will affect your ability to access the virtual lab environment. If a
network test fails, this will affect the usability of the virtual lab environment. For solutions, either
click the Support Knowledge Base link or ask your trainer.
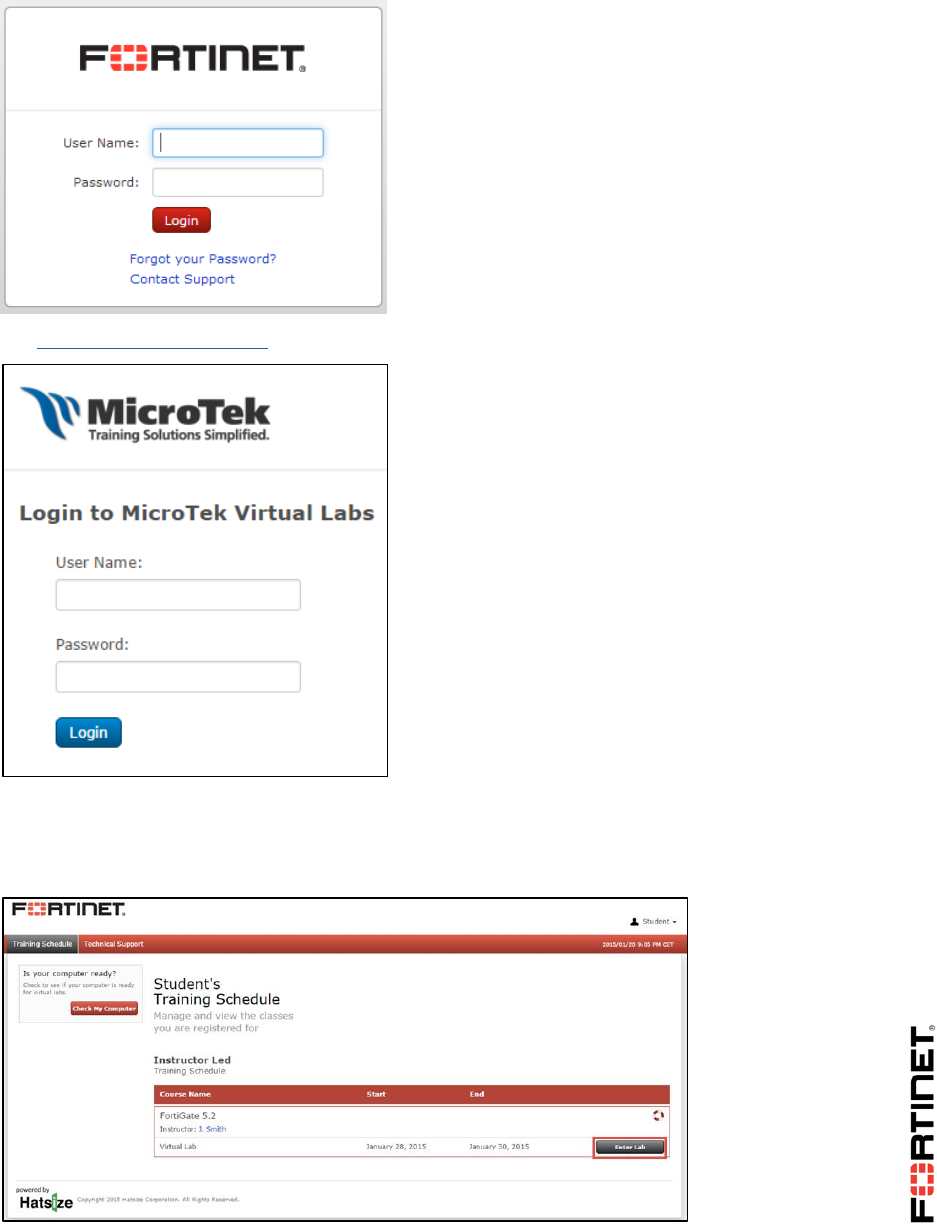
2. With the user name and password from your trainer, log into the URL for the virtual lab. Either:
https://remotelabs.training.fortinet.com/
DO NOT REPRINT
© FORTINET
Virtual Lab Basics
FortiGate I Student Guide 8
https://virtual.mclabs.com/
3. If prompted, select the time zone for your location, then click Update.
This ensures that your class schedule is accurate.
4. Click Enter Lab.
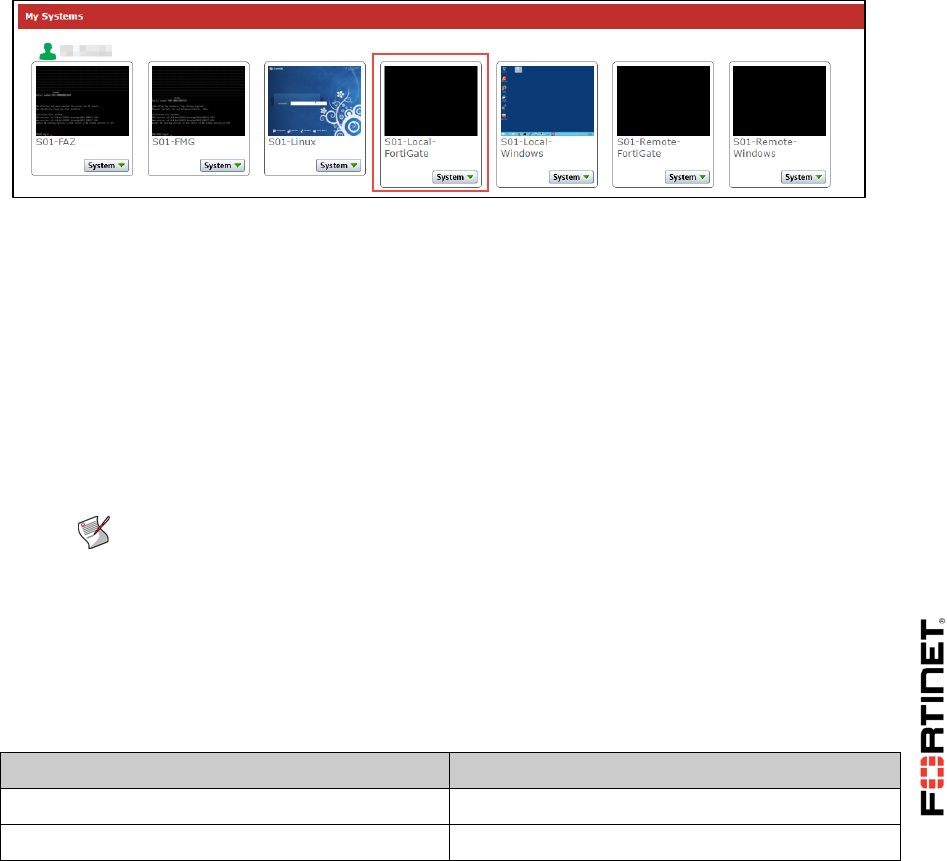
A list of virtual machines that exist in your virtual lab should appear.
DO NOT REPRINT
© FORTINET
Virtual Lab Basics
FortiGate I Student Guide 9
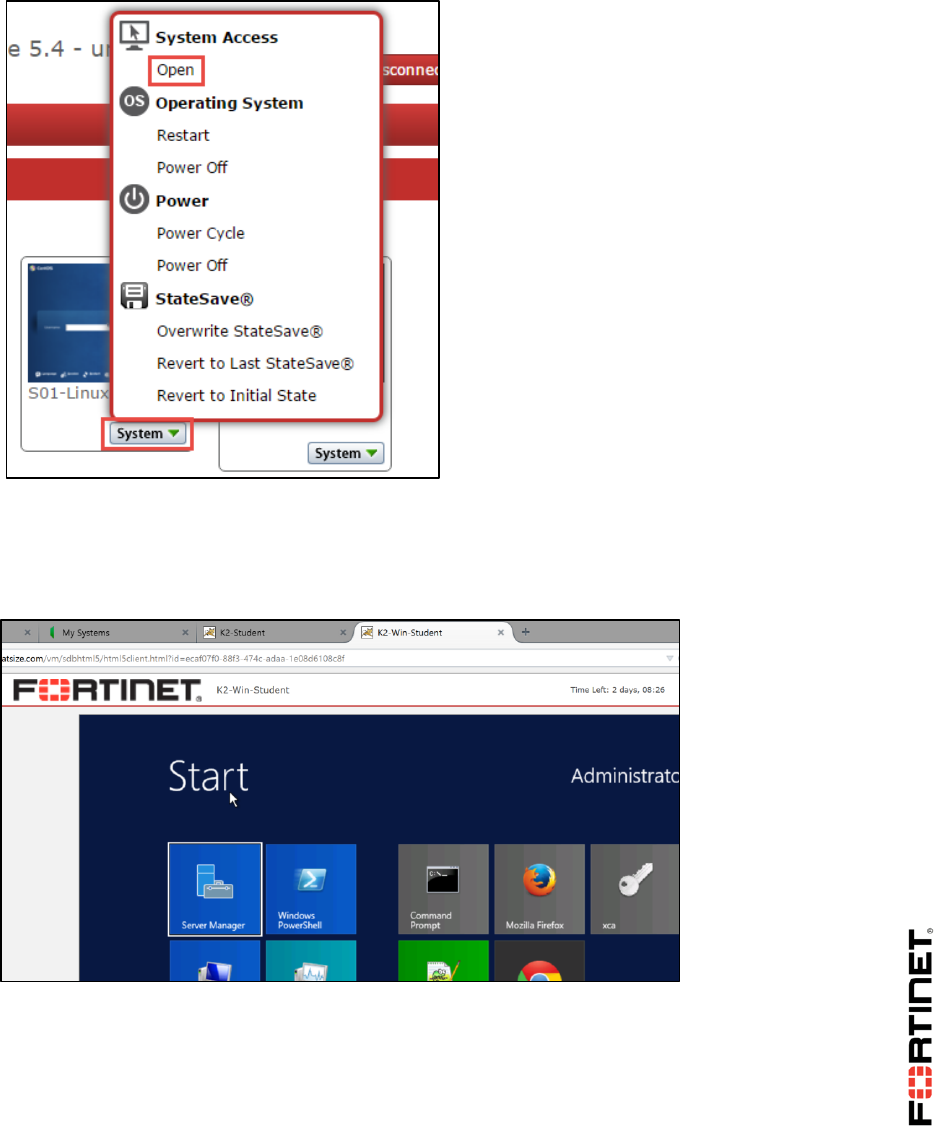
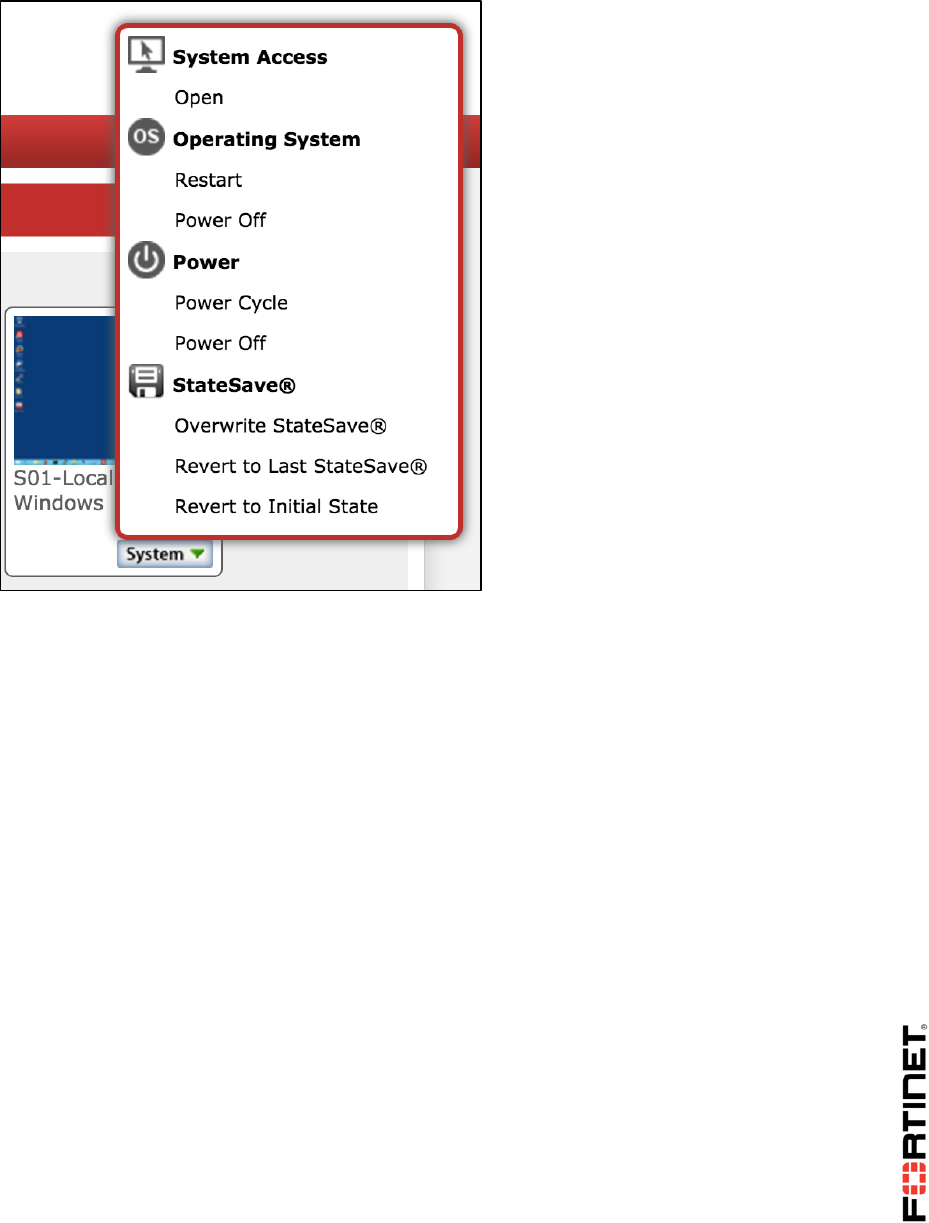
From this page, you can access the console or desktop of any of your virtual devices by either:
clicking on the device’s square, or
selecting System > Open.
5. Click Local-Windows VM to open a desktop connection to that virtual machine.
A new window should open within a few seconds. (Depending on your account’s preferences, the
window may be a Java applet. If that is the case, you may need change browser settings to allow
Java to run on this web site.)
Connections to Windows and Linux machines will use a remote desktop-like GUI. You should
automatically log in. After that, the desktop is displayed.
Connections to Fortinet's VM use the VM console port, which you can use to enter command
line interface (CLI) commands.
DO NOT REPRINT
© FORTINET
Virtual Lab Basics
FortiGate I Student Guide 10
Disconnections/Timeouts
If your computer’s connection with the virtual machine times out or if you are accidentally
disconnected, to regain access, return to the initial window/tab that contains your session’s list of VMs
and open the VM again.
If that does not succeed, see Troubleshooting Tips.
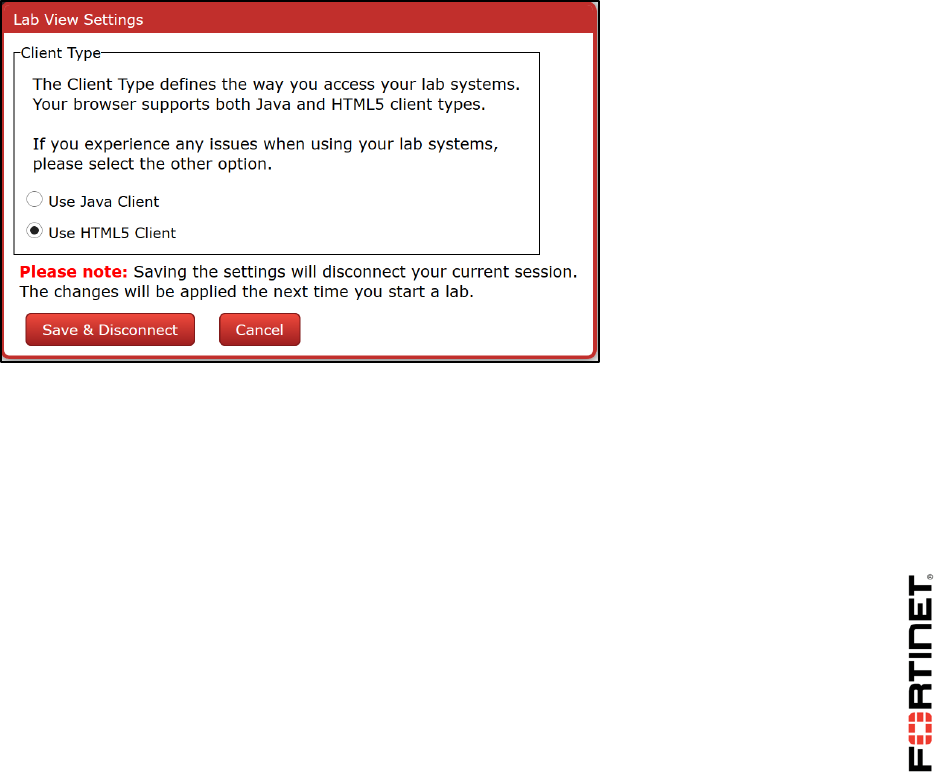
Using Java Instead of HTML5
When you open a VM, by default, your browser will use HTML5 to connect to your lab's VM.
Alternatively, you may be able to use Java instead. Your browser will download and use a Java
application to connect to the virtual lab’s VM. Not all browsers support the Java plug-in, so if you want
to use Java, Mozilla Firefox is recommended. This means that Java must be installed, updated, and
enabled in your browser. Once you have done that, in your virtual lab, click the Settings button, and
then select Use Java Client. Click Save & Disconnect, then log in again. (To use this preference,
your browser must allow cookies.)
When connecting to a VM, your browser should then open a display in a new applet window.
DO NOT REPRINT
© FORTINET
Virtual Lab Basics
FortiGate I Student Guide 11
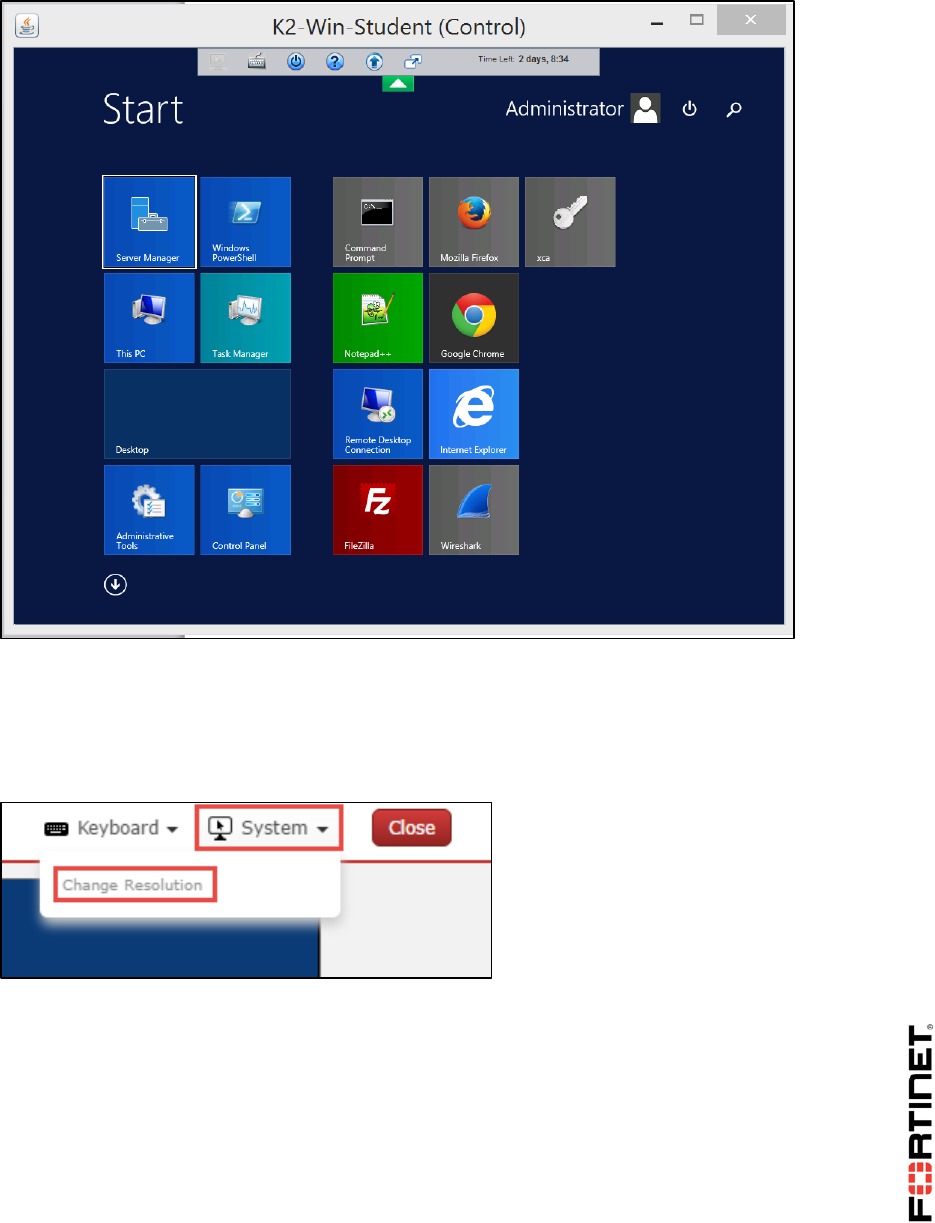
Screen Resolution
Some Fortinet devices' user interfaces require a minimum screen size.
In the HTML 5 client, to configure screen resolution, open the System menu.
DO NOT REPRINT
© FORTINET
Virtual Lab Basics
FortiGate I Student Guide 12
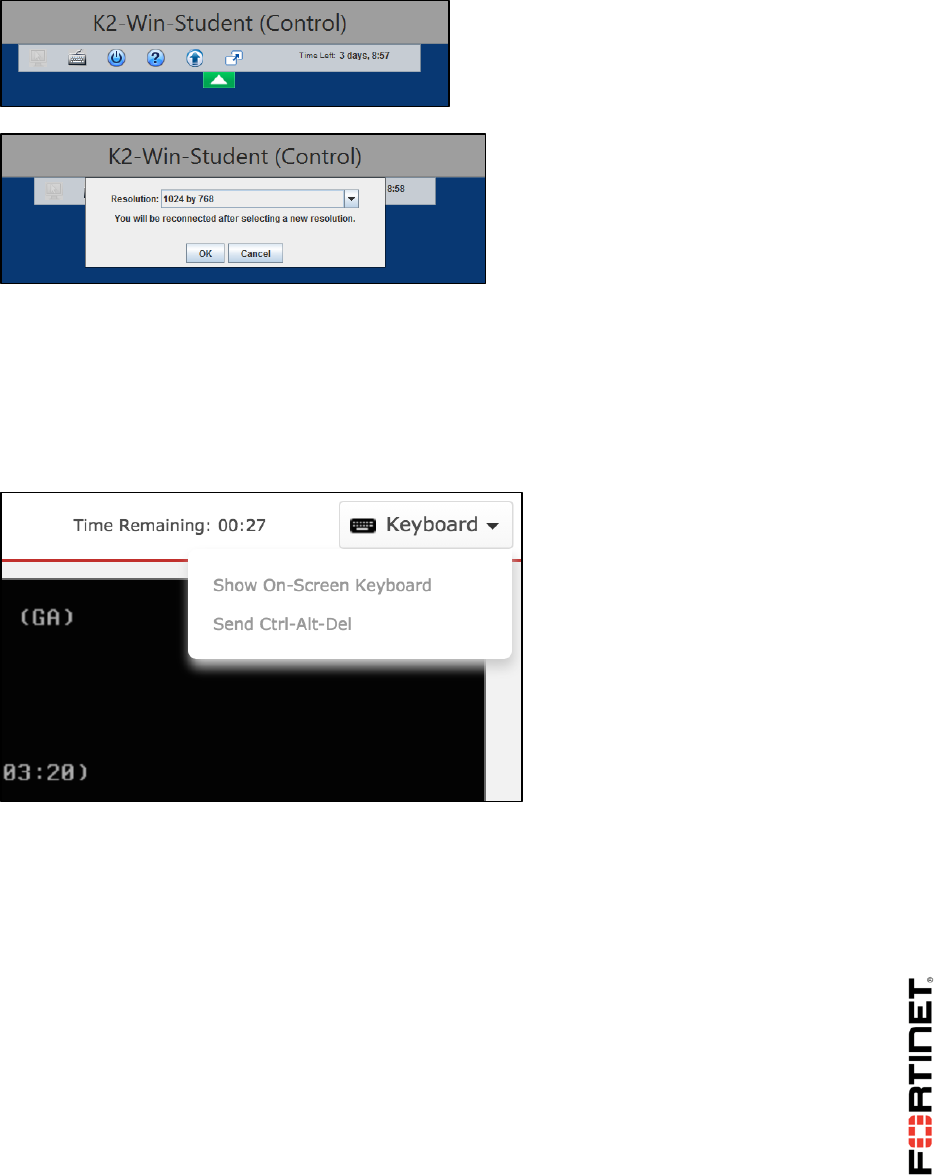
In the Java client, to configure the screen resolution, click the arrow at the top of the window.
International Keyboards
If characters in your language don’t display correctly, keyboard mappings may not be correct.
To solve this in the HTML 5 client, open the Keyboard menu at the top of the window. Choose to
display the on-screen keyboard.
Troubleshooting Tips
Do not connect to the virtual lab environment through Wi-Fi, 3G, VPN tunnels or other low-
bandwidth or high-latency connections. For best performance, use a stable broadband connection
such as a LAN.
If disconnected unexpectedly from any of the virtual machines (or from the virtual lab portal),
please attempt to reconnect. If unable to reconnect, please notify the instructor.
If you can't connect to a VM, on the VM's icon, click System > Power Cycle. This fixes most
problems by forcing VM startup and connection initiation. If that does not solve the problem, try
System > Revert to Initial State.
Note: Reverting to the VM's initial snapshot will undo all of your work. Try other solutions first.
DO NOT REPRINT
© FORTINET
Virtual Lab Basics
FortiGate I Student Guide 13
If the HTML 5 client does not work, try the Java client instead. Remembering this preference
requires that your browser allows cookies.
Do not disable or block Java applets if you want to use the Java client. Network firewalls can block
Java executables. Not all browsers/systems allow Java. In late 2015, Google Chrome removed
Java compatibility, so it cannot be used with the Java client. On Mac OS X since early 2014, to
improve security, Java has been disabled by default. In your browser, you must allow Java for this
web site. On Windows, if the Java applet is allowed and successfully downloads, but does not
appear to launch, you can open the Java console while troubleshooting. To do this, open the
Control Panel, click Java, and change the Java console setting to be Show console.
Note: JavaScript is not the same as Java.
DO NOT REPRINT
© FORTINET
Virtual Lab Basics
FortiGate I Student Guide 14
Prepare your computer's settings:
o Disable screen savers
o Change the power saving scheme so that your computer is always on, and does not go to
sleep or hibernate
If during the labs, particularly when reloading configuration files, you see a message similar to the
one shown below, the VM is waiting for a response from the FortiGuard server.
To retry immediately, go to the console and enter the CLI command:
execute update-now
DO NOT REPRINT
© FORTINET

LAB 1–Introduction to FortiGate
FortiGate I Student Guide 15
LAB 1–Introduction to FortiGate
This lab provides an introduction to FortiGate's administrative CLI and GUI. Additionally, the lab will
guide you through how to properly backup and restore a configuration file as well as create a new
administrator account and modify administrative access permissions.
Objectives
Access the FortiGate CLI.
Backup and restore configuration files.
Find the FortiGate model and FortiOS firmware build information inside a configuration file.
Create a new administrative user.
Restrict administrative access.
Time to Complete
Estimated: 25 minutes
DO NOT REPRINT
© FORTINET
LAB 1–Introduction to FortiGate
FortiGate I Student Guide 16
1 Working With the Command Line
Interface
You will start by accessing a FortiGate device using the command line interface (CLI.)
Exploring the CLI
The next steps will help you get familiar with the FortiGate CLI.
To explore the CLI
1. In the virtual lab portal, click the Local-FortiGate icon to open the FortiGate console.
(Alternatively, in the dropdown menu below the icon, click System > Open.)
2. At the login prompt, enter the username admin (all lower case) and leave the password blank.
3. Enter the following command:
get system status
This command displays basic status information about the FortiGate. The output includes the
FortiGate's serial number, operation mode, and so on. When the --More--prompt appears in the
CLI, press the spacebar to continue scrolling, press Enter to scroll one line at a time, or press Q to
exit.
4. Enter the following command:
get ?
Note: The ? character is not displayed on the screen.
This command shows all of the options that the CLI will accept after the get command.
Depending on the command, you may need to enter additional words to completely specify a
configuration option.
5. Press the Up Arrow key. This displays the previous get system status command. Try
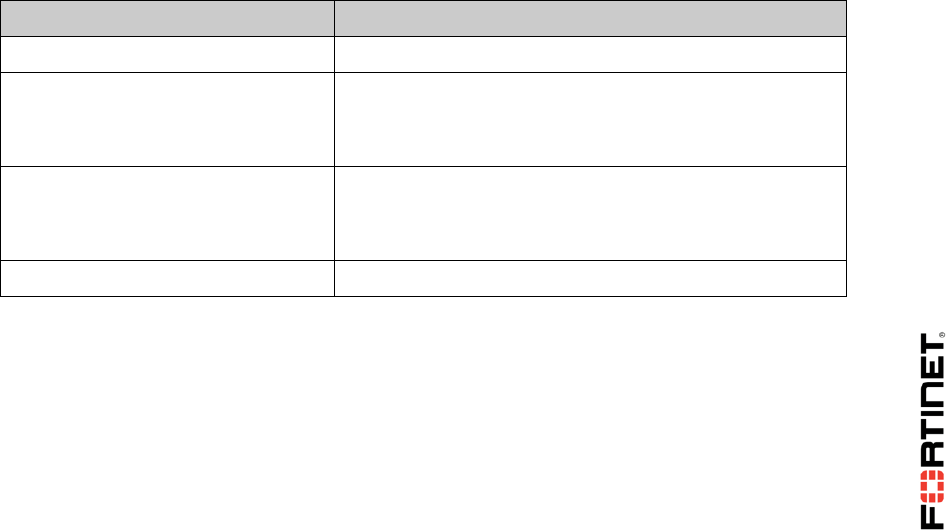
some of the other control key sequences that shown here:
Action
Command
Previous command
Up Arrow
Next command
Down Arrow
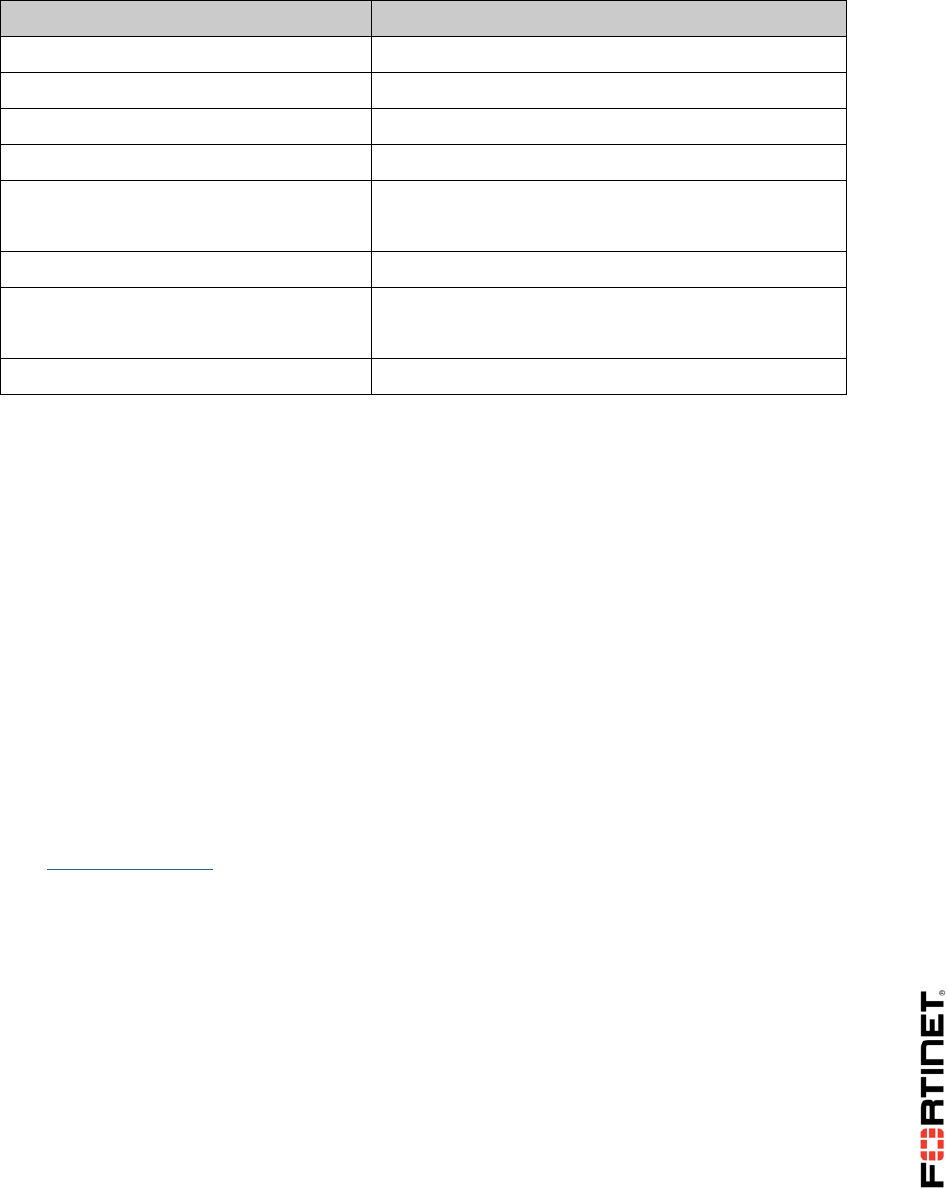
DO NOT REPRINT
© FORTINET

LAB 1–Introduction to FortiGate
FortiGate I Student Guide 17
Beginning of line
CTRL+A
End of line
CTRL+E
Back one word
CTRL+B
Forward one word
CTRL+F
Delete current character
CTRL+D
Clear screen
CTRL+L
Abort command and exit
CTRL+C
6. Enter the command:
execute ?
This lists all options that the CLI will accept next after the execute command.
7. Type exe then press the Tab key.
Notice that the CLI completes the current word.
8. Press the spacebar. After that, press the Tab key three times.
Each time that you press the Tab key, the CLI replaces the second word with the next possible
option for the execute command, in alphabetical order.
Note: Almost all commands can be abbreviated. In presentations and labs, many
of the commands that you see will be in abbreviated form.
Use this technique to reduce the number of keystrokes that are required to enter a
command. In this way, experts can often configure a FortiGate faster through the
CLI than the GUI.
If there are other commands that start with the same characters, your abbreviation
must be long enough to be specific, so that FortiGate can distinguish them.
Otherwise, the CLI will display an error message about ambiguous commands.
9. Enter the following CLI command to check the port3 interface configuration:
show system interface port3
10. Enter this command:
show full-configuration system interface port3
Stop and Think
Compare both outputs. How are they different?
The show full-configuration displays all the configuration settings for the interface.
The show command displays only those whose values are different than the default
values.
DO NOT REPRINT
© FORTINET

LAB 1–Introduction to FortiGate
FortiGate I Student Guide 18
2 Configuration Backups
During this lab exercise you will learn how to generate and restore clear-text and encrypted
configuration backups.
Restoring a Configuration From a Backup
In this procedure you will restore a configuration from a backup.
To restore a configuration from a backup
1. In the virtual lab portal, click the Local-Windows VM icon to open its VM. (Alternatively, in the
dropdown menu below the icon, go to System > Open.)
2. From the Local-Windows VM, open a browser and log in as admin to the Local-FortiGate GUI at
10.0.1.254.
Note: All the lab exercises were tested running Mozilla Firefox in Local-Windows VM
and Remote-Windows. As a result, to get consistent results, we recommend using
Firefox to access both the Internet and the FortiGate GUIs in this virtual environment.
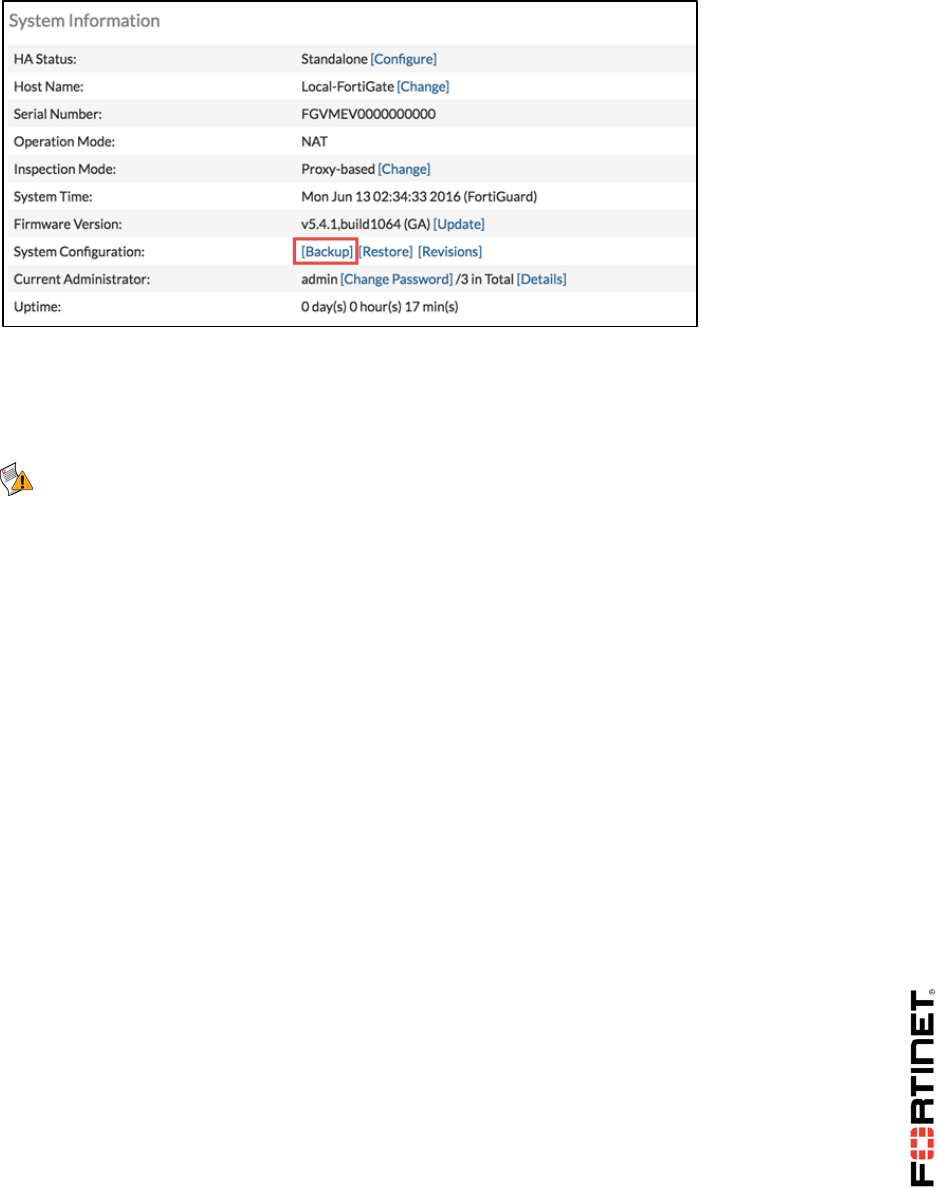
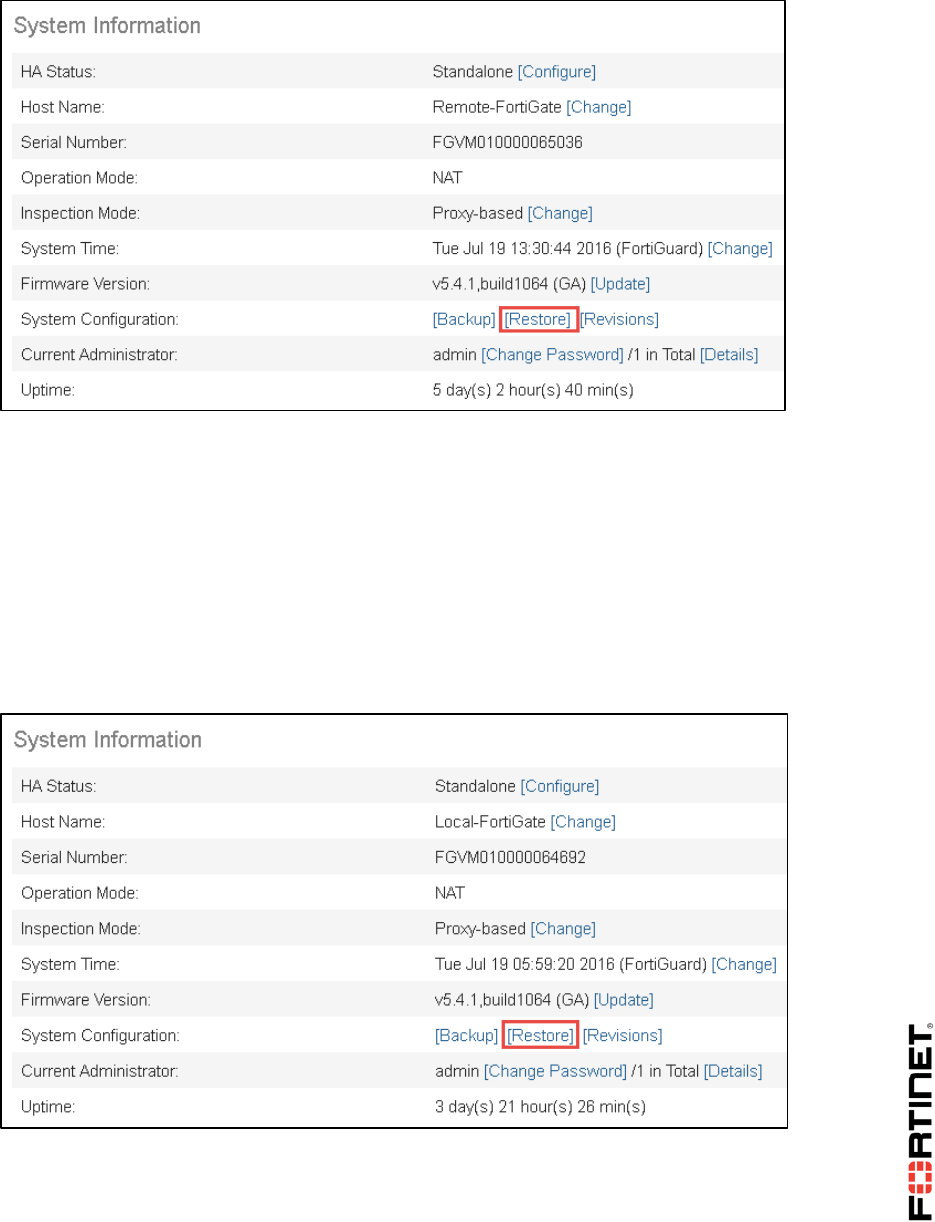
3. Go to the Dashboard. (It should be the first screen that appears when you log in.)
4. In the System Information widget, click Restore.
A dialog should appear where you can select which configuration backup file to restore.
5. Click Upload to select which backup file to restore.
DO NOT REPRINT
© FORTINET

LAB 1–Introduction to FortiGate
FortiGate I Student Guide 19
6. On your desktop, select the file named Resources\FortiGate-I\Introduction\local-initial.conf,
then click OK. Click OK again to confirm.
After your browser uploads the configuration, the FortiGate will automatically reboot.
7. Refresh the web page and log in again to the Local-FortiGate GUI.
8. Go to Network > Interfaces and verify that the network interface settings were restored.
9. Go to Network > Static Routes. Verify that the default route was restored.
Making Configuration Backups
You will create a file with the backup of the FortiGate's current configuration.
To make a configuration backup
1. In the Local-FortiGate GUI, go to the Dashboard.
DO NOT REPRINT
© FORTINET
LAB 1–Introduction to FortiGate
FortiGate I Student Guide 20
2. In the System Information widget, click Backup.
3. Enable Encryption.
4. Enter the password fortinet twice and click the OK.
5. Save the encrypted configuration file to the Downloads folder.
Caution: Always back up the configuration file before changing your device (even if the
change seems minor or unimportant). There is no undo. Restoring a backup will allow you to
quickly revert changes if you discover problems.
Restoring an Encrypted Configuration Backup
In this procedure you will restore the configuration backup that you created in the previous procedure.
To restore an encrypted configuration backup
1. In the Local-FortiGate GUI, got to the Dashboard.
2. From the System Information widget, click Restore.
3. Click Upload and select the file that you downloaded in the previous procedure.
4. Click OK.
Notice that, this time, you must enter the password fortinet.
Comparing Both Configuration Files
You will open both configuration files with Notepad++ and look at the differences.
To compare both configuration files.
1. Start Notepad++ by clicking its icon in the Windows task bar:
DO NOT REPRINT
© FORTINET

LAB 1–Introduction to FortiGate
FortiGate I Student Guide 21
2. Open the file with the encrypted configuration backup.
3. Start another instance of Notepad++ and open the initial file you restored:
Resources\FortiGate-I\Introduction\local-initial.conf
4. Compare the details in both.
Note: In both the clear-text and encrypted configuration files, the top acts as a
header, listing the firmware and model information that this configuration
belongs to.
DO NOT REPRINT
© FORTINET
LAB 1–Introduction to FortiGate
FortiGate I Student Guide 22
3 Administrative Accounts
FortiGate offers great flexibility for configuring administrator privileges. You can specify the IP
addresses administrators are allowed to connect from. This lab includes some procedures related to
working with administrative accounts.
Creating an Administrator Profile
In this procedure, you will create a new administrator profile with read-only access to most of the
configuration settings.
To configure an administrator profile
1. From the Local-FortiGate GUI, go to System > Admin Profiles.
2. Click Create New and create a new profile called Security_Admin_Profile.
3. Set Security Profile Configuration to Read-Write, but set all other permissions to Read Only.
4. Click OK to save the changes.
Creating an Administrator Account
In this procedure, you will create a new administrator account. The account will be assigned to the
administrator profile created in the previous procedure. This administrator will have only read-only
access to most of the configuration settings.
To create an administrator account
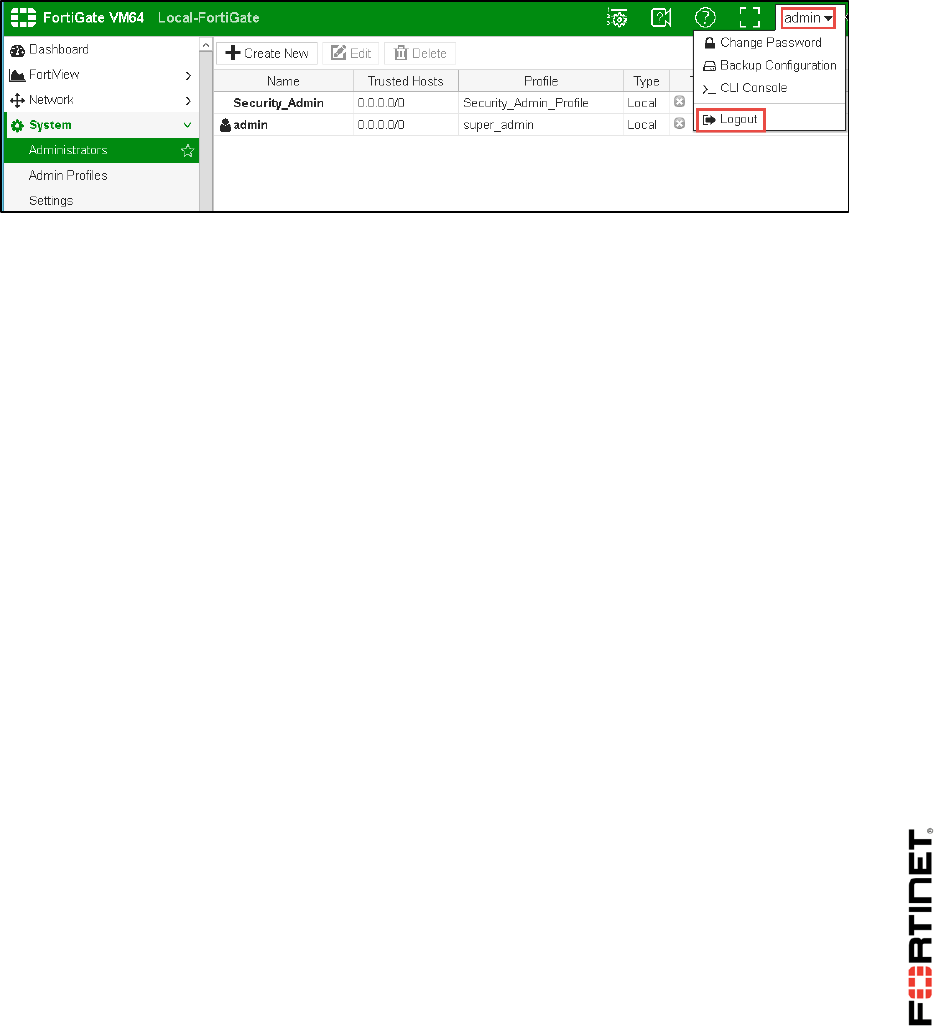
1. In the Local-FortiGate GUI, go to System > Administrators.
2. Click Create New to add a new administrator account. Configure the following settings:
Field
Value
User Name
Security_Admin
Password
fortinet
Confirm Password
fortinet
Type
Local User
Administrator Profile
Security_Admin_Profile
Note: Administrator names and passwords are case sensitive. You cannot include
characters such as < > ( ) # " in an administrator account name or password. Spaces are
allowed, but not as the first or last character.
3. Click OK to save the changes.
DO NOT REPRINT
© FORTINET
LAB 1–Introduction to FortiGate
FortiGate I Student Guide 23
Testing the New Administrator Account
In this procedure you will confirm that the new administrator account has read-write access to only the
security profiles configuration.
To test the new administrator account
1. In the Local-FortiGate GUI, log out of the admin account's GUI session.
2. Log in as Security_Admin with the password fortinet.
3. Test this administrator’s access: try to create or modify settings that are not allowed by the
account's profile.
You should see that this account can only configure security profiles and monitor FortiGuard
quotas (which are related to usage by security profiles).
Restricting Administrator Access
In this procedure you will restrict access to FortiGate administration. Only administrators connecting
from a trusted subnet will be able to access.
To restrict administrator access
1. In the Local-FortiGate GUI, log out of the Security_Admin account's GUI session.
2. Log in as admin.
3. Go to System > Administrators.
4. Edit the admin account.
5. Enable Restrict login to trusted hosts and set Trusted Host 1 to the address 10.0.2.0/24.
6. Click OK to save the changes.
Testing the Restricted Access
In this procedure you will confirm that administrators outside the subnet 10.0.2.0/24 cannot access
the FortiGate.
To test the restricted access
1. Log out of the admin account's GUI session.
2. Try to log in back using the admin account again. What is the result this time?
DO NOT REPRINT
© FORTINET

LAB 1–Introduction to FortiGate
FortiGate I Student Guide 24
Because you are trying to connect from the 10.0.1.10 address, you shouldn't be able to connect.
This is because you restricted logins to only the source IP addresses in the list of trusted hosts.
3. In the virtual lab portal, click the Local-FortiGate, icon. (Alternatively, in the dropdown menu
below its icon, go to System > Open.)
4. Enter the following CLI commands to add 10.0.1.0/24 as the second trusted IP subnet
(Trusted Host 2) of the admin account:
conf sys admin
edit admin
set trusthost2 10.0.1.0/24
end
5. Try to access its GUI again. Access should be restored.
DO NOT REPRINT
© FORTINET

LAB 2–Logging and Monitoring
FortiGate I Student Guide 25
LAB 2–Logging and Monitoring
In this lab, you will configure logging settings on the Local-FortiGate, configure alert email, and view
logs.
Objectives
Configure logging on FortiGate so FortiGate understands how to log traffic.
Configure threat weight.
Monitor logs through alert emails.
View logs in the Local-FortiGate GUI.
Time to Complete
Estimated: 15 minutes
Prerequisites
Before beginning this lab, you must restore a configuration file to FortiGate.
To restore the FortiGate configuration file
1. From the Local-Windows VM, open a browser and log in as admin to the Local-FortiGate GUI at
10.0.1.254.
2. Go to Dashboard, and from the System Information widget click Restore.
3. Select to restore from Local PC and click Upload.
DO NOT REPRINT
© FORTINET

LAB 2–Logging and Monitoring
FortiGate I Student Guide 26
4. Browse to Desktop > Resources > FortiGate-I > Logging and select local-logging.conf.
5. Click OK.
6. Click OK to reboot.
DO NOT REPRINT
© FORTINET

LAB 2–Logging and Monitoring
FortiGate I Student Guide 27
1 Configuring Logging on FortiGate
In order to record network activity, you must configure logging on FortiGate. In this exercise, you will
configure the logging settings, including threat weight, and then enable logging on a firewall policy.
Configuring Log Settings
Configuring log settings does not directly generate logs on FortiGate. Rather, log settings define how
logs are treated. For example, sending logs in real-time to FortiAnalyzer for storage, enabling local
traffic logging, or enabling historical FortiView.
In this exercise, you will enable disk logging so that information can appear in the FortiView
dashboards, enable Event logging, and set the GUI to display logs from disk.
To configure the log settings
1. From the Local-Windows VM, open a browser and log in as admin to the Local-FortiGate GUI at
10.0.1.254.
2. Go to Log & Report > Log Settings.
3. Under Local Log, ensure Disk is enabled.
If disk logging is disabled, only real-time logs will appear in the FortiView dashboards.
4. Under Log Settings, complete the following:
Ensure Local Traffic Log is disabled.
These logs record traffic directly to and from FortiGate and can quickly fill up your disk if not
properly managed and monitored. For the purposes of this lab, leave this setting disabled.
Ensure Event Logging is enabled and Enable All selected.
Event logs provide all of the system information generated by the FortiGate device (they are not
caused by traffic passing through firewall policies). However, it is good practice to track and
monitor events that occur on FortiGate.
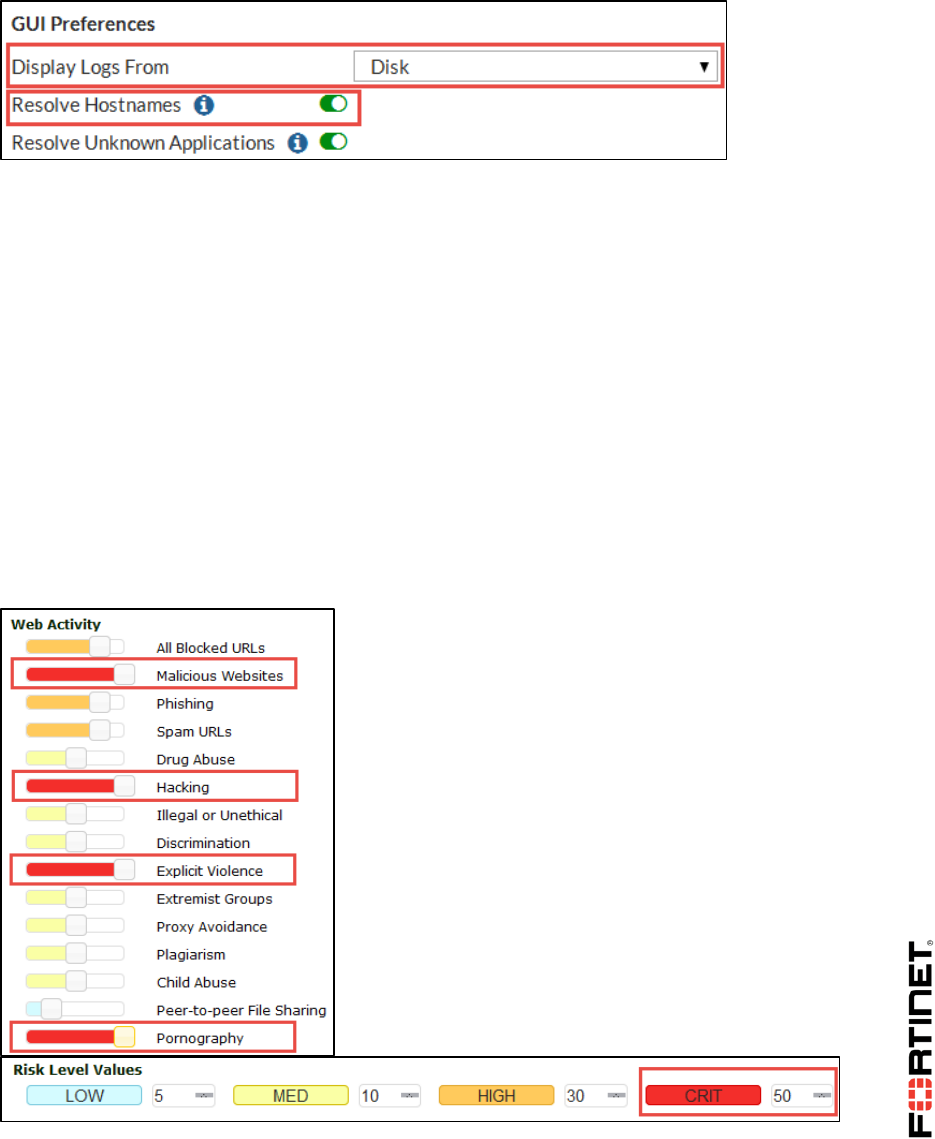
5. Under GUI Preferences, complete the following:
DO NOT REPRINT
© FORTINET
LAB 2–Logging and Monitoring
FortiGate I Student Guide 28
Ensure logs are set to display from Disk.
Ensure Resolve Hostnames is enabled. This requires FortiGate to perform reverse DNS
lookups for all the IPs and makes searching logs easier.
6. Click Apply.
Configuring Threat Weight
Threat weight allows you to set the risk values for low, medium, high, and critical levels and then apply
a threat weight to specific categories.
To configure threat weight
1. In the Local-FortiGate GUI, go to Log & Report > Threat Weight.
2. Under Web Activity, move the slider to the far right to indicate a Critical (50) risk level for the
following categories:
Malicious Websites
Hacking
Explicit Violence
Pornography
3. Click Apply.
DO NOT REPRINT
© FORTINET
LAB 2–Logging and Monitoring
FortiGate I Student Guide 29
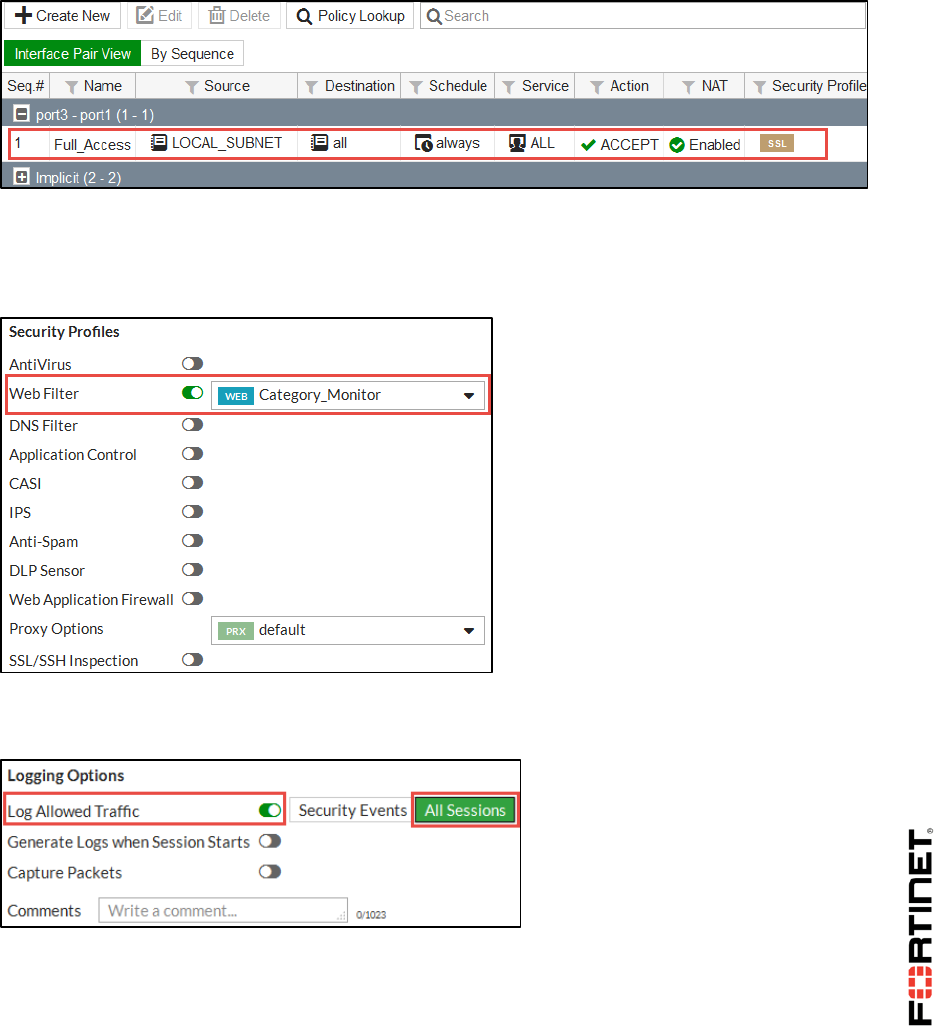
Enabling Logging on a Firewall Policy
Now that your log settings are configured, you must enable logging on your firewall policy. Only when
enabled on a firewall policy can a log message generate (based on configured log settings).
To enable logging on a firewall policy
1. In Local-FortiGate, go to Policy & Objects > IPv4 Policy and edit the Full_Access firewall policy.
2. Under Security Profiles, enable Web Filter and select Category_Monitor from the associated
drop-down list.
The Category_Monitor web filter was pre-configured for you and is set to block the following
categories: Potentially Liable, Adult/Mature Contents, and Security Risk.
3. Under Logging Options, enable Log Allowed Traffic and select All Sessions.
Remember, you will not get logs of any kind if Log Allowed Traffic is not enabled.
4. Click OK.
You've successfully enabled logging on your firewall policy. Later in this lab, you will test these
logging settings.
DO NOT REPRINT
© FORTINET
LAB 2–Logging and Monitoring
FortiGate I Student Guide 30
2 Monitoring Logs Through Alert Email
In this exercise, you will configure alert emails, run some traffic through the Local-FortiGate, and view
alert emails.
Configuring Alert Emails
Since you can’t always be physically at the FortiGate device, you can monitor events by setting up
alert email. Alert emails provide an efficient and direct method of notifying an administrator of events.
Note: An SMTP mail server is required for alert email to operate. Since configuring a mail
server is out of scope for this lab, it has been pre-configured for you. You can view the
email service configuration through the FortiGate GUI under System > Advanced.
To configure email alerts
1. From the Local-Windows VM, open a browser and log in as admin to the Local-FortiGate GUI at
10.0.1.254.
2. Go to Log & Report > Alert E-mail.
3. Compete the following:
Field
Value
Email from
FortiGate@training.lab
Email to
admin@training.lab
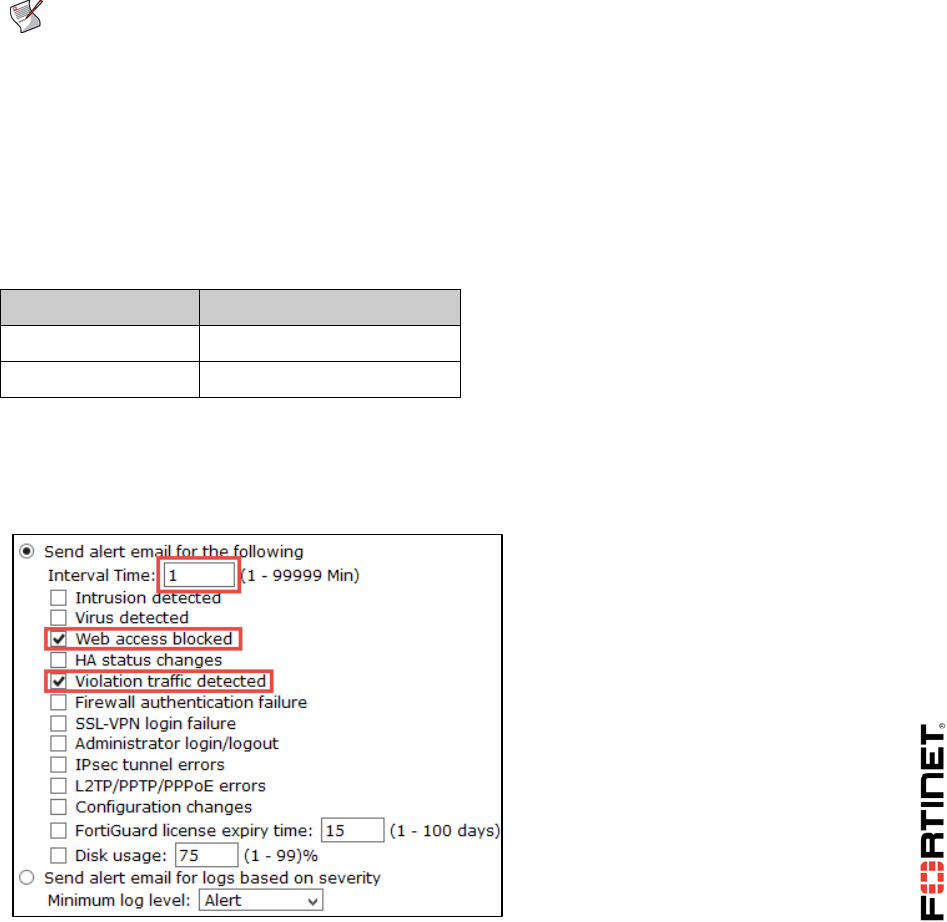
4. Enable Send alert email for the following and complete the following:
Enter an interval time of 1 minute
Select Web access blocked
Select Violation traffic detected
5. Click Apply.
DO NOT REPRINT
© FORTINET

LAB 2–Logging and Monitoring
FortiGate I Student Guide 31
Running Traffic Through Local-FortiGate
In order to generate multiple URL requests quickly so FortiGate can generate many different types of
logs, you will use the wget application to perform a spider crawl. A spider crawl ensures no content is
downloaded: only the URL is requested. This is enough to trigger content inspection.
Note: wget is a free, open source utility for accessing websites. You can use it to quickly
test your web filter settings in order to make sure you do not have any block messages
with critical websites within your infrastructure.
The pre-configured Web Filter security policy (Category_Monitor) that you enabled on your firewall
policy is set to block many of the URLs you will request. Since you also enabled logging on all
sessions in the firewall policy, FortiGate will generate web filter logs.
To run traffic through Local-FortiGate
1. From the Local-Windows VM desktop, open a Windows command prompt and type the following
command:
blacklist-urls
2. Minimize the command prompt window so the command continues to execute and continue to the
next procedure.
Viewing Alert Emails
Now that traffic is being sent through your FortiGate, you can check the admin@training.lab email to
see if any alerts have been generated based on that traffic. You configured the alert email to generate
an alert every 1 minute any time Web access is blocked and any time a violation in traffic is detected.
The log message that accompanies an alert provides more details about the traffic that caused the
alert.
To view your alert emails
1. From the Local-Windows VM desktop, open Mozilla Thunderbird.
2. Select the inbox of the admin@training.lab email account and click Get Messages.
You should see a message in the admin inbox with a subject of "Message meets Alert
condition". If no email appears in the inbox, wait 30 seconds and click Get Messages again.
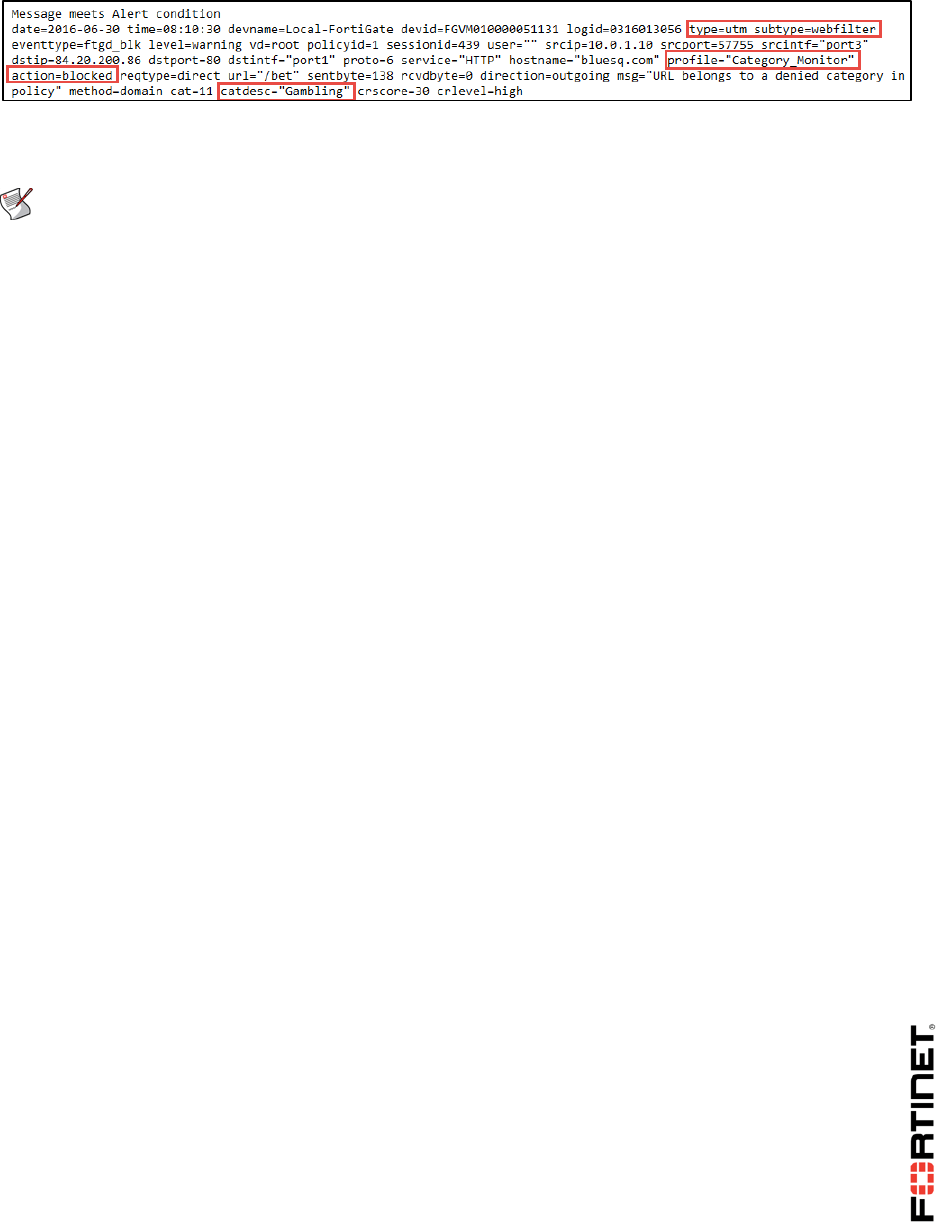
3. Open the email and review the log message.
As you can see in the example below (you may receive a different log email), the log message
header provides the type (utm) and subtype (webfilter) and the log message body provides
information about the Web Filter security profile that was applied to the traffic
(Category_Monitor), the action it took (blocked), and the category description of the traffic
(Gambling).
DO NOT REPRINT
© FORTINET
LAB 2–Logging and Monitoring
FortiGate I Student Guide 32
Search for this information in any of the subsequent logs messages that appear in your inbox so
you can better identify and understand your logs.
Note: To review more logs, click Get Messages in your admin inbox again. You
configured your alert email to send messages that meet the alert condition every 1 minute.
4. Close the Thunderbird email client when you are done.
DO NOT REPRINT
© FORTINET
LAB 2–Logging and Monitoring
FortiGate I Student Guide 33
3 Viewing Logs in the FortiGate GUI
In this exercise, you will view logs through both the Log & Report and FortiView menus of the
FortiGate GUI. You will also configure filter options to locate specific logs.
To view logs from Log & Report
1. From the Local-Windows VM, open a browser and log in as admin to the Local-FortiGate GUI at
10.0.1.254.
2. Go to Log & Report > Forward Traffic to view logs from the Forward Traffic page.
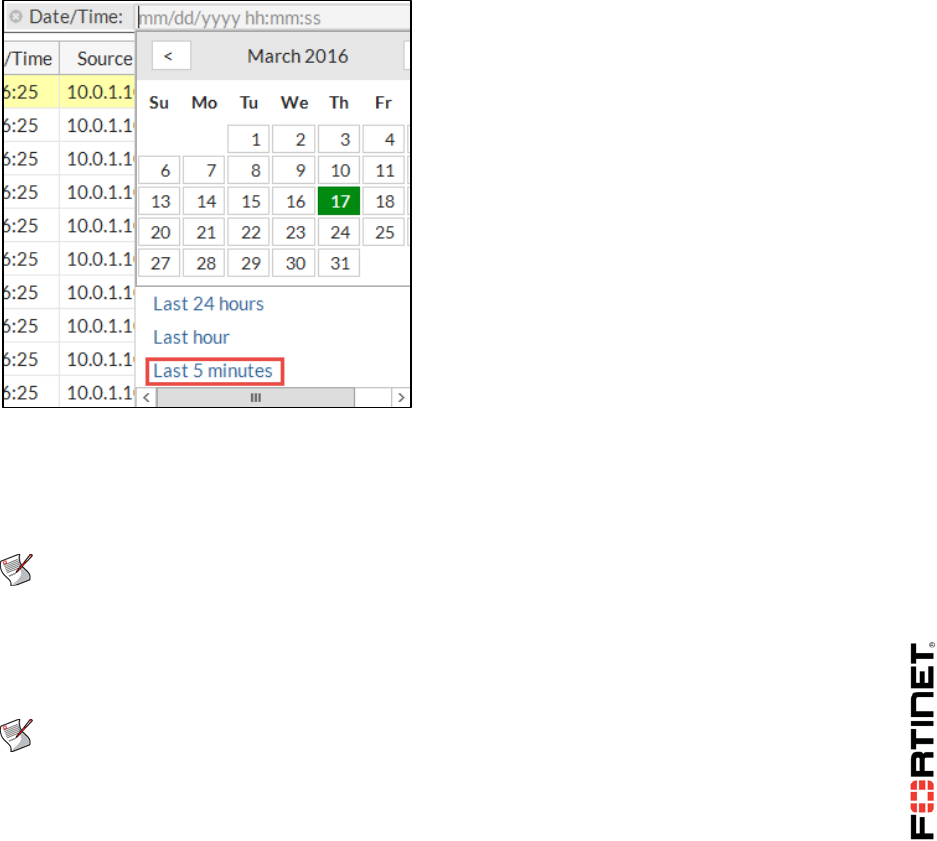
3. To narrow down the logs (results), click Add Filter from the search bar and add some filters. For
example:
Select Date/Time and click Last 5 minutes to see the most recent logs generated.
Select Security Action and Blocked to see all blocked traffic.
Select Threat Score and enter >=50 to see all Web activity at the Critical (50) risk level.
Remember you set Malicious Websites, Hacking, Explicit Violence, and Pornography to the critical
risk level.
Note: If the information on which you are filtering does not appear in the table, you may
need to add the related column to the table. To do so, right-click any column in the table
and select the column you want to add. For example, to view the Threat Score column,
add Threat Score. The table refreshes with the new column added.
4. Go to Log & Report > Web Filter to view the logs from the Web Filter page.
Note: The Web Filter logs section will not display if there are no web filtering logs.
FortiGate will show it after creating logs. If this menu item does not display, log out
from the FortiGate GUI and log in again to refresh it.
5. To narrow down the logs (results), click Add Filter from the search bar and add some filters.
For example:
DO NOT REPRINT
© FORTINET

LAB 2–Logging and Monitoring
FortiGate I Student Guide 34
Select Action and Blocked to see all blocked traffic.
Select Category Description and select a category. For example: Hacking.
6. Continue to the next procedure.
To view logs from FortiView
1. In the Local-FortiGate GUI, go to FortiView > Web Sites.
By default, the search settings are set to display logs being created now. If wget has stopped
running and no more logs are being created currently, the page will be blank. This is expected.
2. Use the search settings to display the Web activity in a different way. For example:
Select Categories and 1 hour to see the most accessed Web categories in the last hour.
Click the table icon ( ) and select Bubble Chart.
Use the Sort By drop-down list to display the information by Threat Score, Sessions, or
Bytes.
3. Close the Windows command prompt to stop running traffic through Local-FortiGate.
DO NOT REPRINT
© FORTINET

LAB 3–Firewall Policies
FortiGate I Student Guide 35
LAB 3–Firewall Policies
Objectives
Configure firewall objects and firewall policies.
Configure source match options available firewall policies.
Apply firewall service and schedule to firewall policy.
Configure firewall policy logging options.
Configure firewall policies based on device types.
Reorder firewall policies.
Read and understand logs.
Use policy lookup to find matching policy.
Time to Complete
Estimated: 35 minutes
Prerequisites
Before beginning this lab, you must restore a configuration file to the Local-FortiGate.
To restore the Local-FortiGate configuration file
1. On the Local-Windows VM, open a web browser and log in as admin to the Local-FortiGate GUI
at 10.0.1.254.
2. Go to Dashboard, and from the System Information widget click Restore.
DO NOT REPRINT
© FORTINET

LAB 3–Firewall Policies
FortiGate I Student Guide 36
3. Select to restore from Local PC and click Upload.
4. Browse to Desktop > Resources > FortiGate-I > Firewall-Policies and select local-
firewall-policy.conf.
5. Click OK.
6. Click OK to reboot.
DO NOT REPRINT
© FORTINET

LAB 3–Firewall Policies
FortiGate I Student Guide 37
1 Creating Firewall Address Objects and
Firewall Policies
In this exercise, you will configure firewall address objects. You will also configure IPv4 firewall policy
to which you will apply firewall address objects along with schedule, services and log options. Then
you will test the firewall policy by passing traffic through it and check the logs for your traffic.
At its core, FortiGate is a firewall, so almost everything that it does to your traffic is linked into your
firewall policies.
Creating Firewall Address Objects
FortiGate has many pre-configured well known address object in factory default configuration.
However if they don’t meet your organization needs you can configure more.
To create a firewall address object
1. From the Local-Windows VM, open a web browser and log in as admin to the Local-FortiGate
GUI at 10.0.1.254.
2. Go to Policy & Objects > Addresses.
3. Go to Create New > Address.
4. Configure the following settings:
Field
Value
Name
LOCAL_SUBNET
Type
IP/Netmask
Subnet / IP Range
10.0.1.0/24
Interface
any
5. Click OK.
Creating a Firewall Policy
First, you will disable the existing firewall policy. Then, you will create more specific firewall policy
using the firewall address object that you created in the previous procedure. You will also select
specific services and configure log settings.
To disable an existing firewall policy
1. In the Local-FortiGate GUI, go to Policy & Objects > IPv4 Policy.
2. Right-click on the Seq.# column for Full_Access firewall policy.
3. Select Status and click Disable.
To create a firewall policy
1. From the Policy & Objects > IPv4 Policy section, click Create New to add a new firewall policy.
DO NOT REPRINT
© FORTINET

LAB 3–Firewall Policies
FortiGate I Student Guide 38
2. Configure these settings:
Field
Value
Name
Internet_Access
Incoming Interface
port3
Outgoing Interface
port1
Source
LOCAL_SUBNET
Destination Address
all
Schedule
always
Service
HTTP, HTTPS, DNS, ALL_ICMP, SSH
(Tip: Type the name in the search box on right hand
side and click on services to add.)
Action
ACCEPT
NAT
Enable
Log Allowed Traffic
Enable and select All Sessions
Generate Logs when Session Starts
Enable
Enable this policy
Enable
3. Leave all other settings at their default and click OK to save the changes.
Note: When creating firewall policies, remember that FortiGate is a stateful firewall. As a
result, you only need to create one firewall policy that matches the direction of the traffic
that initiates the session.
Testing the Firewall Policy and Viewing Generated Logs
Now you have configured the firewall policy, you will test it by passing traffic through it and viewing the
generated logs.
To test and view logs for a firewall policy
1. From the Local-Windows VM, open a web browser and connect to various external web sites such
as www.fortinet.com, www.bbc.com.
2. In the Local-FortiGate GUI, go to Policy & Objects > IPv4 Policy.
3. Right-click on the Seq.# column of the Internet_Access policy.
4. Click Show Matching Logs.
DO NOT REPRINT
© FORTINET

LAB 3–Firewall Policies
FortiGate I Student Guide 39
5. Identify the log entries for your Internet browsing traffic.
With the current settings, you should have many log messages with Accept: session start in
Result column. These are the session start logs.
When sessions close, you will have a separate log entry for the amount of data sent and received.
Note: Logging session starts will generate twice the amount of log messages. You should
use this option only when this level of detail is absolutely necessary.
Note: When you click Show Matching Logs in the firewall policy, it adds Policy UUID filter
in forward traffic logs.
6. In the Forward Traffic logs, click X to remove the Policy UUID filter.
When you remove the Policy UUID filter, the logs shows unfiltered. We will use the logs in
upcoming labs.
7. Close all other browser tabs except Local-FortiGate GUI.
DO NOT REPRINT
© FORTINET

LAB 3–Firewall Policies
FortiGate I Student Guide 40
2 Reordering Firewall Policies and
Firewall Policy Actions
In the applicable interface pair’s section, FortiGate will look for a matching policy, beginning at the top.
So usually you should put more specific policies at the top; otherwise, more general policies will match
the traffic first, and your more granular policies will never be applied.
In this exercise, you will create a new firewall policy with more specific settings such as source,
destination, service and action set to deny. Then you will move this firewall policy above the existing
firewall policies and observe the behavior of firewall policy reordering.
Creating a Firewall Policy
You will create a new firewall policy to match a specific source, destination, service, and action set to
deny.
Note: The firewall address LINUX_ETH1 with IP/Netmask 10.200.1.254/32 is
preconfigured for you, and you will be using this address when you create the firewall
policy.
To create a firewall policy
1. On the Local-Windows VM, open a web browser and log in as admin to the Local-FortiGate GUI
at 10.0.1.254.
2. Go to Policy & Objects > IPv4 Policy and click Create New.
3. Configure these settings:
Field
Value
Name
Block_Ping
Incoming Interface
port3
Outgoing Interface
port1
Source
LOCAL_SUBNET
Destination Address
LINUX_ETH1
Schedule
always
Service
PING
(Tip: Type the name in the search box on right hand
side and click on services to add.)
Action
DENY
Log Violation Traffic
Enable
Enable this policy
Enable
4. Click OK to save the changes.
DO NOT REPRINT
© FORTINET
LAB 3–Firewall Policies
FortiGate I Student Guide 41
Adding Policy ID Column
The policy sequence number defines the order in which firewall policies match the traffic from top to
bottom. CLI commands use the policy ID instead of the policy sequence number. When policies are
moved, the policy sequence number changes accordingly, but the value that sticks with the firewall
policy is the policy ID.
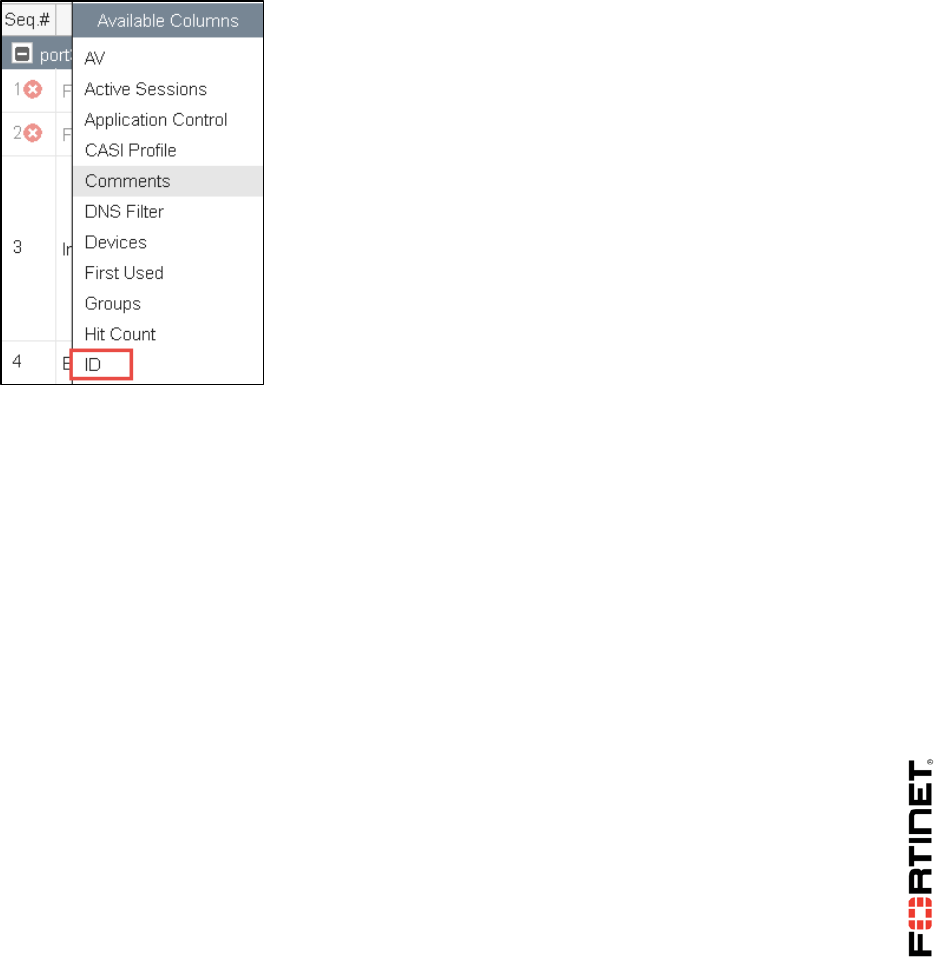
To add a policy ID Column
1. In to Policy & Objects > IPv4 Policy section, right-click on any of the column headings and select
ID from Available Columns.
2. Scroll to the bottom and click Apply to save the changes.
3. You can drag the ID column to where you want it positioned in the column list.
Testing the Reordering of a Firewall Policy
Now that your configuration is ready, you will test by moving the Block_Ping firewall policy above
Internet_Access firewall policy. The objective to confirm that after reordering the firewall policy, traffic
is matched to a more specific firewall policy, the policy ID remains same, and sequence number
changes.
To confirm traffic matches to a more granular firewall policy after reordering the firewall policy
1. From the Local-Windows VM, open a command prompt.
2. Ping the destination address (LINUX_ETH1) that you configured in the Block_Ping firewall
policy.
ping –t 10.200.1.254
If you have not changed the rule ordering, the ping should still work because it matches the
ACCEPT policy and not the DENY policy that you created. This demonstrates the behavior of
policy ordering. The Block_Ping policy was never checked, because the traffic matched the
policy at the top (Internet_Access).
3. Leave this window open and perform the next step.
DO NOT REPRINT
© FORTINET

LAB 3–Firewall Policies
FortiGate I Student Guide 42
4. In the Policy & Objects > IPv4 Policy section, notice the current Seq.# number and ID (policy ID)
for both of these firewall policies.
5. Click the Seq.# for the Block_Ping firewall policy.
6. Drag it above the Internet_Access firewall policy.
When you move up the Block_Ping policy, the Seq.# number changes, but ID (policy ID) remains
the same.
7. Return to the Local-Windows VM and look at the command prompt window that is still running the
continuous ping.
You should see that the traffic is now blocked and the replies appear as Request timed out.
This demonstrates the outcome of the policy reordering. After moving the more granular policy
above the general access policy, the traffic is matched to the more granular policy and, based on
the action DENY, the traffic stops processing.
8. Close the command prompt window.
DO NOT REPRINT
© FORTINET

LAB 3–Firewall Policies
FortiGate I Student Guide 43
3 Device Identification
FortiGate can match the traffic by device type by selecting the device in the source field. There are two
types of device identification:
Agentless device identification uses traffic from the device and devices indexed by their MAC
address.
Agent-based device identification uses FortiClient which send its unique FortiClient ID to
FortiGate.
In this lab, you will use the agentless device identification technique. You will add the device in the
source field to the existing firewall policy and observe the firewall policy source matching behavior.
Disabling Existing Firewall Policy
First, you will disable the Block_Ping firewall policy and your traffic will match to the Internet_Access
firewall policy.
To disable existing firewall policy
1. On the Local-Windows VM, open a web browser and log in as admin to the Local-FortiGate GUI
at 10.0.1.254.
2. Go to Policy & Objects > IPv4 Policy.
3. Right-click on the Seq.# column for Block_Ping firewall policy.
4. Select Status and click on Disable.
Configuring and Testing Device Identification
Now, you will run a continuous ping to an IP address. To test the firewall policy source matching
behavior, you will add a non-matching device, such as Linux PC, to the source field.
To configure and test device identification
1. On the Local-Windows VM, open a command prompt.
2. Run a continuous ping to 10.200.1.254. Enter:
ping –t 10.200.1.254
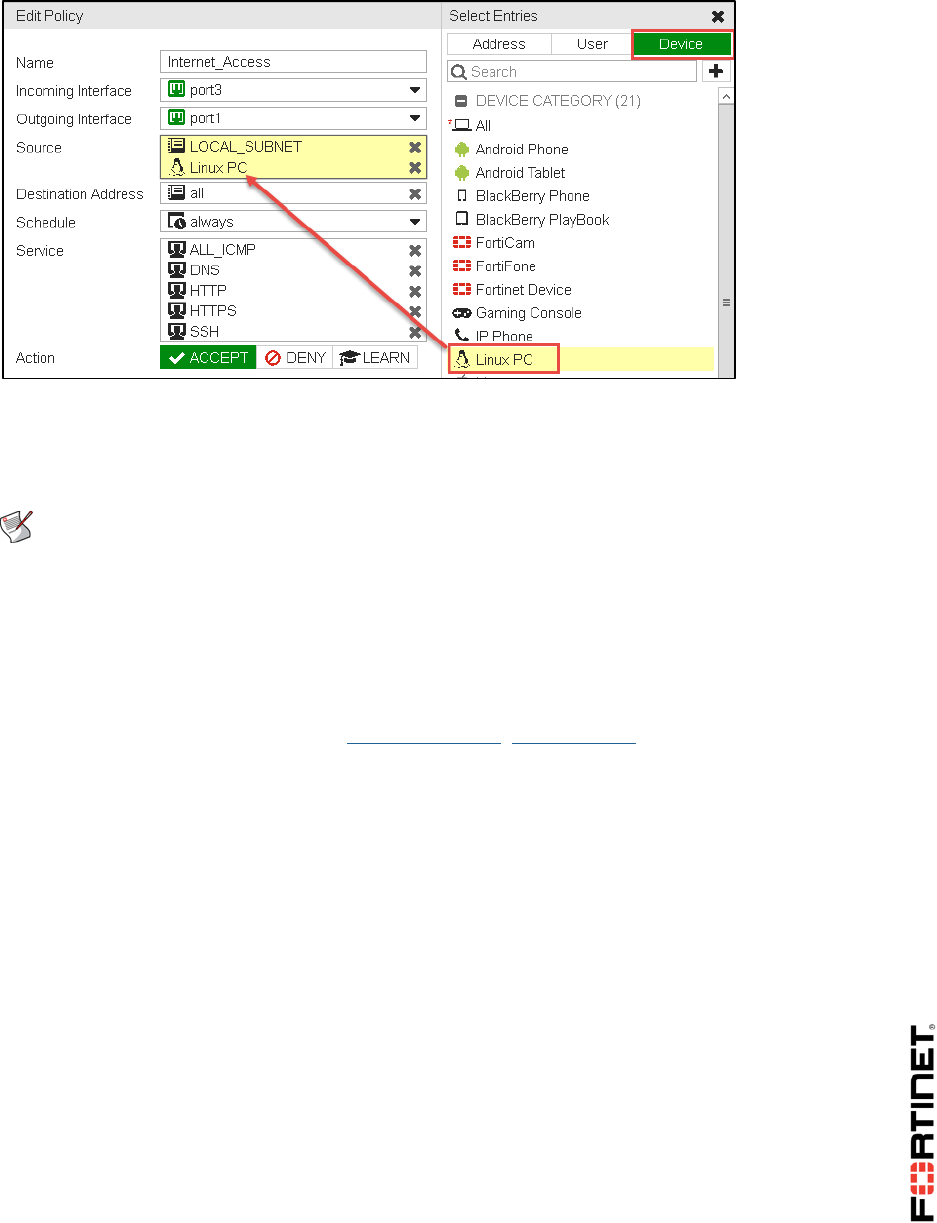
3. In the Policy & Objects > IPv4 Policy on the Local-FortiGate GUI, right click the Seq.# column
for Internet_Access firewall policy.
4. Click Edit.
5. Select Source.
6. On the right hand side, select Device.
7. Click Linux PC.
You are choosing a device type that doesn’t match your device (Windows).
DO NOT REPRINT
© FORTINET
LAB 3–Firewall Policies
FortiGate I Student Guide 44
8. Click OK.
FortiGate will notify you that this action enables device identification on the source interface.
9. Click OK.
Note: If you enable a source device type in the firewall policy, FortiGate enables device
detection on the source interface(s) of the policy,
10. Return to the command prompt on the Local-Windows VM, where you were running continuous
ping.
You should see that traffic is blocked.
11. On the Local-Windows VM, try browsing the Internet by opening web browsers and connecting to
various external web sites such as www.fortinet.com, www.bbc.com.
Confirm the firewall blocks this traffic.
The traffic is blocked because the source device type in the firewall policy is set to Linux-PC,
which does not match the Windows device from which the traffic is generated.
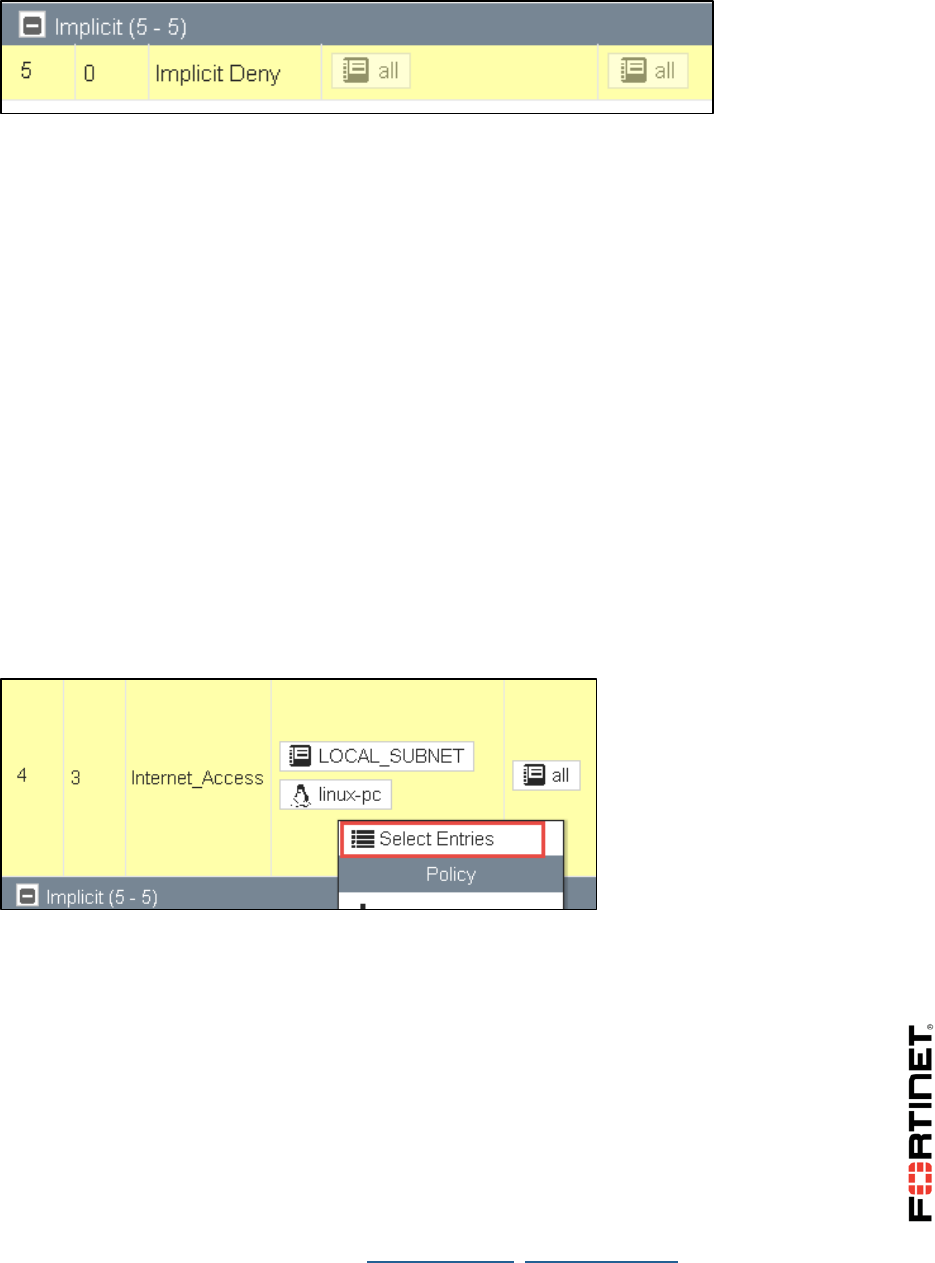
Modify the Implicit Deny Firewall Policy
FortiGate checks from top to bottom to find a firewall policy that matches the traffic. If none of the
firewall policies match the traffic, the default implicit deny firewall policy drops the traffic.
To confirm that the traffic is dropped by the implicit deny policy, you will enable logging on the
implicit firewall policy and then check the logs.
To enable logging on the implicit deny firewall policy
1. In Local-FortiGate GUI, go to Policy & Objects > IPv4 Policy.
2. Right click the Seq.# column for the Implicit Deny firewall policy.
DO NOT REPRINT
© FORTINET
LAB 3–Firewall Policies
FortiGate I Student Guide 45
3. Click Edit.
4. Enable Log Violation Traffic.
5. Click OK.
To confirm traffic is dropped by the implicit deny firewall policy
1. In Local-FortiGate GUI, go to Log & Report > Forward Traffic.
2. Confirm there are logging entries for the denied ping traffic.
Reconfiguring Device Identification
Now you will edit the Internet_Access firewall policy and add a Windows PC to match your Local-
Windows VM. You will see that the traffic will be allowed by this policy after you add a matching source
device.
To reconfiguring device identification
1. In the Local-FortiGate GUI, go to Policy & Objects > IPv4 Policy.
2. Right click on the Source column for the Internet_Access firewall policy.
3. Click Select Entries.
4. Click Device.
5. Click Windows PC to select it.
6. Click Linux PC to unselect it.
7. Click OK.
To confirm traffic is allowed by a firewall policy
1. On the Local-Windows VM, return to the continuous ping that you started previously.
You should see that traffic is allowed.
2. Close the command prompt window.
3. On the Local-Windows VM, try browsing the Internet by opening web browsers and connecting
to various external web sites such as www.yahoo.com, www.google.com.
DO NOT REPRINT
© FORTINET
LAB 3–Firewall Policies
FortiGate I Student Guide 46
Confirm that the firewall allows this traffic.
Viewing the Details of an Identified Device
Once a device is identified, FortiGate updates its list of devices and caches the list to the flash disk to
speed up detection. You can view the details of an identified device. These details include device type,
detection method, and IP address to name a few.
To view the details of identified device
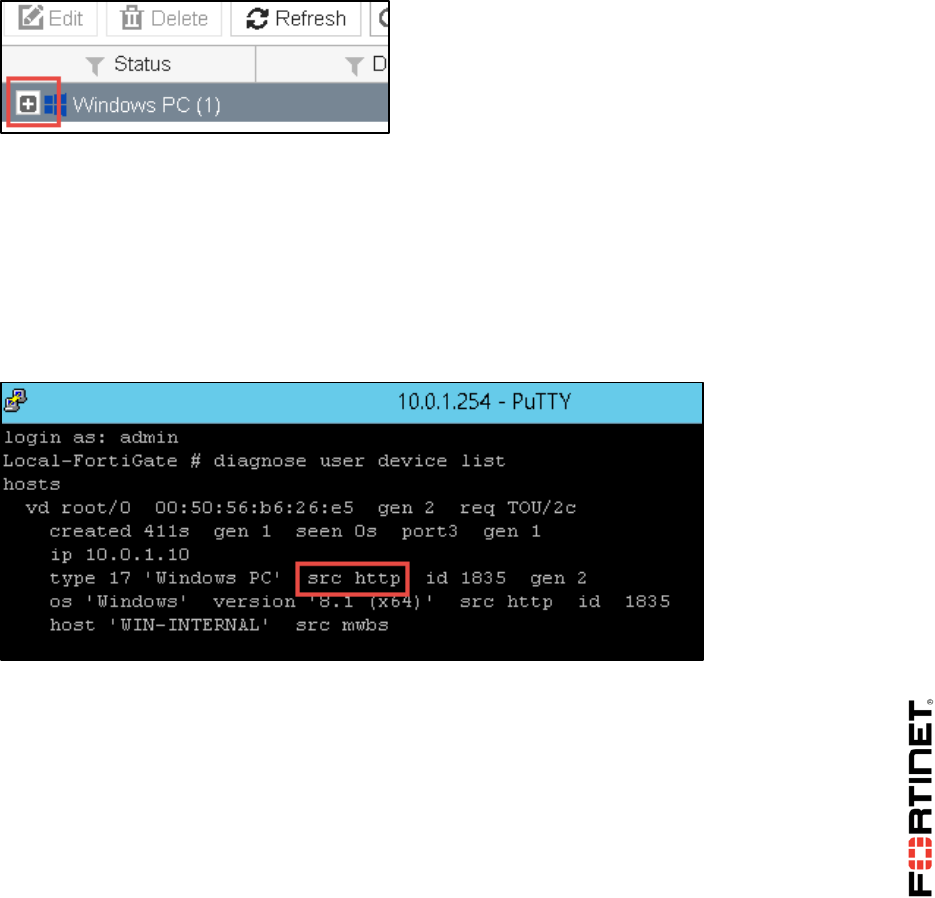
1. In the Local-FortiGate GUI, go to User & Device > Device Inventory.
2. Click the + sign to expand the list.
3. Review the details of your detected host device.
You can see device details, such as IP address, interface, status, and more.
4. In the Local-Windows VM, open PuTTY and connect to the LOCAL-FORTIGATE saved session
(connect over SSH).
5. Log in as admin and execute the following command to view detection method and other device
details:
diagnose user device list
Adding an Identified Device to the Configuration File
The identified device is cached on the FortiGate and is not added to the configuration file. You will
be adding the identified device to the configuration file by adding an alias to the device.
To add an identified device to the configuration file
1. In a LOCAL-FORTIGATE PuTTY session, run the following command to confirm that there are
no devices in the configuration file:
DO NOT REPRINT
© FORTINET

LAB 3–Firewall Policies
FortiGate I Student Guide 47
show user device
2. In the Local-FortiGate GUI, go to User & Device > Device Inventory.
3. Click on your device.
4. Click Edit.
5. Configure the following:
Field
Value
Alias
MyDevice
This creates a static device in the configuration file.
6. Click OK.
7. In the LOCAL-FORTIGATE PuTTY session, run the following command to confirm that the device
now appears in the configuration file as a permanent device:
show user device
8. In the Local-FortiGate GUI, go to User & Device > Custom Devices & Groups.
Note that your device is listed under Custom Devices.
Adding a Custom Device to the Firewall Policy
Now that you've added your device as a custom device, you'll add it to the firewall policy.
To add a custom device to the firewall policy
1. In the Local-FortiGate GUI, go to Policy & Objects > IPv4 Policy.
2. Right click the Source column for Internet_Access firewall policy.
3. Click Select Entries.
4. Click Device on the right hand side.
5. Click Windows PC to unselect it.
6. Under CUSTOM DEVICE, click MyDevice to select it.
7. Click OK.
To confirm traffic is allowed by the firewall policy
1. On the Local-Windows VM, try browsing the Internet by opening web browsers and connecting
to various external web sites such as www.yahoo.com, www.google.com.
Confirm that the firewall allows this traffic.
DO NOT REPRINT
© FORTINET

LAB 3–Firewall Policies
FortiGate I Student Guide 48
4 Policy Lookup
FortiGate can find a matching firewall policy based on the policy lookup input criteria. It is basically
creating packet flow over FortiGate without real traffic. From this packet flow, the FortiGate can extract
a policy ID and highlight it on the GUI policy configuration page.
In this lab, you will use the policy lookup feature to find matching firewall policy based on input criteria.
Enabling Existing Firewall Policies
As they were during the configuration and testing the of the firewall policies in the previous labs, most
of the configured firewall policies are currently disabled. Now, you will enable the existing firewall
policies.
To enable existing firewall policies
1. From the Local-Windows VM, open a web browser and log in as admin to the Local-FortiGate
GUI at 10.0.1.254.
2. Go to Policy & Objects > IPv4 Policy.
3. Right-click on the Seq.# column for the Fortinet firewall policy.
4. Select Status and click Enable.
5. Right-click the Seq.# column for the Full_Access firewall policy.
6. Select Status and click Enable.
Setting Up and Testing Policy Lookup Criteria
Now, you will set up the policy lookup criteria. FortiGate will search and highlight the matching firewall
policy based on your input criteria.
To set up and test policy lookup criteria
1. In the Policy & Objects > IPv4 Policy, click Policy Lookup.
2. Set the following:
Field
Value
Source Interface
port3
Protocol
TCP
Source
10.0.1.100
Source Port
Leave it blank
Destination
fortinet.com
Destination Port
443
3. Click Search.
The search will match the Full_Access policy, but not the more specific firewall policy,
Fortinet.
DO NOT REPRINT
© FORTINET

LAB 3–Firewall Policies
FortiGate I Student Guide 49
In the search criteria, the source address is set to 10.0.1.100. This source address is not a part
of firewall policy named Fortinet; therefore, the search does not match the Fortinet firewall policy.
Note: When the FortiGate is performing policy lookup, it does a series of checks on
ingress, stateful inspection, and egress for the matching firewall policy. It performs the
checks from top to bottom, before providing results for the matching policy.
4. Click Policy Lookup and change the Source to 10.0.1.10.
Make sure all the other settings match the settings you used in step 2.
5. Click Search.
This time the search matches policy named Fortinet, in which destination is set to FQDN.
Reordering the Firewall Policy
Now you will reorder the firewall policies. You will be moving the Block_Ping firewall policy above the
Full_Access policy.
To reorder the firewall policy
1. In Policy & Objects > IPv4 Policy, click the Seq.# column for the Block_Ping firewall policy.
2. Drag it above the Full_Access firewall policy.
3. The order of your firewall policies should look similar to this:
Retesting Policy Lookup After Reordering the Firewall
Policies
Now you will test the policy lookup feature after reordering the firewall policies.
DO NOT REPRINT
© FORTINET

LAB 3–Firewall Policies
FortiGate I Student Guide 50
To retest policy lookup after reordering firewall policies
1. In Policy & Objects > IPv4 Policy, click Policy Lookup.
2. Set the following for Policy Lookup:
Field
Value
Source Interface
port3
Protocol
ICMP
ICMP Type
8
ICMP Code
0
Source
10.0.1.100
Destination
10.200.1.254
3. Click Search.
The search will match the Full_Access policy, but not the more specific policy Block_Ping,
because it is disabled.
4. Right click the Seq.# column of the Block_Ping policy and set the Status to Enable.
5. Click Search.
This time the search matches more specific and enabled policy, Block_Ping.
DO NOT REPRINT
© FORTINET

LAB 4–Network Address Translation (NAT)
FortiGate I Student Guide 51
LAB 4–Network Address
Translation (NAT)
NAT is used to perform source NAT and destination NAT for the traffic passing through FortiGate.
There are two ways to configure source NAT (SNAT) and destination NAT (DNAT).
firewall policy NAT
central NAT
In this lab, you will configure and test firewall policy NAT for SNAT using IP pool, and for DNAT using
virtual IP (VIP).
You will also enable central NAT. You will configure and test SNAT using central SNAT policy and
DNAT using DNAT policy and VIPs.
Objectives
Configure destination NAT settings using a VIP.
Configure the source NAT settings using overload IP pools.
Enable central NAT.
Configure a central NAT policy for the source NAT.
Configure DNAT and VIPs for the destination NAT .
Time to Complete
Estimated: 50 minutes
Prerequisites
Before starting the procedures in this lab, you must restore a configuration file to each FortiGate.
Note: Make sure to restore the correct configuration in each FortiGate as following the steps below.
Failure to restore proper configuration in each FortiGate will prevent you from doing the lab exercise.
To restore the Remote-FortiGate configuration file
1. On the Local-Windows VM, open a web browser and log in as admin to the Remote-FortiGate
GUI at 10.200.3.1.
2. Go to Dashboard, and from the System Information widget click Restore.
DO NOT REPRINT
© FORTINET
LAB 4–Network Address Translation (NAT)
FortiGate I Student Guide 52
3. Select to restore from Local PC and click Upload.
4. Browse to Desktop > Resources > FortiGate-I > NAT and select remote-nat.conf.
5. Click OK.
6. Click OK to reboot.
To restore the Local-FortiGate configuration file
1. On the Local-Windows VM, open a new web browser and log in as admin to the Local-FortiGate
GUI at 10.0.1.254.
2. Go to Dashboard, and from the System Information widget click Restore.
3. Select to restore from Local PC and click Upload.
4. Browse to Desktop > Resources > FortiGate-I > NAT and select local-nat.conf.
5. Click OK.
6. Click OK to reboot.
DO NOT REPRINT
© FORTINET
LAB 4–Network Address Translation (NAT)
FortiGate I Student Guide 53
1 Access Through VIPs
VIP addresses are typically used to NAT external or public IP addresses to internal or private IP
addresses.
In this exercise, you will configure a VIP address for the Local-Windows VM. Then you will create an
egress-to-ingress firewall policy and apply a VIP address. This will allow Internet connections to the
Local-Windows VM. You will also verify the destination NAT and source NAT behavior using CLI
commands.
Creating a VIP
In FortiGate, a VIP is a destination NAT (DNAT) and can only be selected in a firewall policy’s
destination address field.
In this procedure, you will configure the VIP to map the Local-Windows VM (10.0.1.10) to
10.200.1.200, which is a part of the port1 subnet. You can refer to the diagram for the lab network
topology.
To create a VIP
1. From the Local-Windows VM, open a web browser and log in as admin to the Local-FortiGate
GUI at 10.0.1.254.
2. Go to Policy & Objects > Virtual IPs.
3. Click Create New and select Virtual IP.
4. Configure the following:
Field
Value
Name
VIP-INTERNAL-HOST
Interface
port1
(port1 is connected to the Internet with IP address
10.200.1.1/24.)
External IP Address/Range
10.200.1.200 - 10.200.1.200
(This is the IP address in the same range as the port1
subnet.)
Mapped IP Address/Range
10.0.1.10
5. Click OK.
Creating a Firewall Policy
You will configure a firewall policy using the VIP that you just created as the destination address.
To create a firewall policy
1. In Local-FortiGate GUI, go to Policy & Objects > IPv4 Policy.
2. Click Create New.
DO NOT REPRINT
© FORTINET
LAB 4–Network Address Translation (NAT)
FortiGate I Student Guide 54
3. Configure these settings:
Field
Value
Name
Web-Server-Access
Incoming Interface
port1
Outgoing Interface
port3
Source
all
Destination Address
VIP-INTERNAL-HOST
Tip: Listed under the Virtual IP section
Schedule
always
Service
HTTP, HTTPS
Tip: Use the search field to locate the services.
Action
ACCEPT
4. Under Firewall/Network Options, disable NAT.
5. Under Logging Options, enable Local Allowed Traffic and select All Sessions.
6. Click OK.
Testing the VIP Firewall Policy
Now that you've configured a firewall policy with the VIP address as the destination, you can test your
VIP by accessing it from the Remote-Windows VM, which is behind Remote-FortiGate. Traffic is
routed from the Remote-FortiGate to the Local-FortiGate by a Linux machine, which is acting as a
router between these two FortiGates. For more information, see the network topology diagram.
You will also test how the source address is NATed by the VIP when traffic is leaving from the Local-
Windows VM.
To test VIPs (DNAT)
1. From the Remote-Windows VM, open a web browser and access the following URL:
http://10.200.1.200
If the VIP operation is successful, a simple web page appears.
2. Go back to the Local-Windows VM, open PuTTY and connect to the LOCAL-FORTIGATE saved
session (connect over SSH).
3. Log in as admin and execute the following command to check the destination NAT entries in
the session table:
get system session list
Sample output:
Local-FortiGate# get system session list
PROTO EXPIRE SOURCE SOURCE-NAT DESTINATION DESTINATION-
NAT
DO NOT REPRINT
© FORTINET
LAB 4–Network Address Translation (NAT)
FortiGate I Student Guide 55
tcp 3594 10.200.3.1:49478 - 10.200.1.200:80 10.0.1.10:80
You will notice that the destination address 10.200.1.200 is translated to 10.0.1.10, which is the
mapping you configured in the VIP.
Testing Source NAT
As a result of the VIP (which is a static NAT), all NATed outgoing connections from the Local-Windows
VM (IP address 10.0.1.10) will use the VIP address to source NAT for the ingress-to-egress firewall
policy and not the egress interface IP address.
To test SNAT
1. Return to the PuTTY session the for the Local-FortiGate and execute the following command to
clear any existing sessions:
diagnose sys session clear
Note: The firewall is stateful, so any existing sessions will not use this new firewall policy
until they time out or are cleared for ingress-to-egress traffic.
This clears the session to the Local-FortiGate from the Local-Windows VM.
2. Close the PuTTY window.
3. In the Local-Windows VM, open a web browser tab and connect to a few websites. For example:
www.fortinet.com
www.yahoo.com
www.bbc.com
4. Go back to the Local-Windows VM, open a PuTTY window, and connect to the LOCAL-
FORTIGATE saved session (connect over SSH).
5. Log in as admin and execute the following command to view the session information:
get system session list
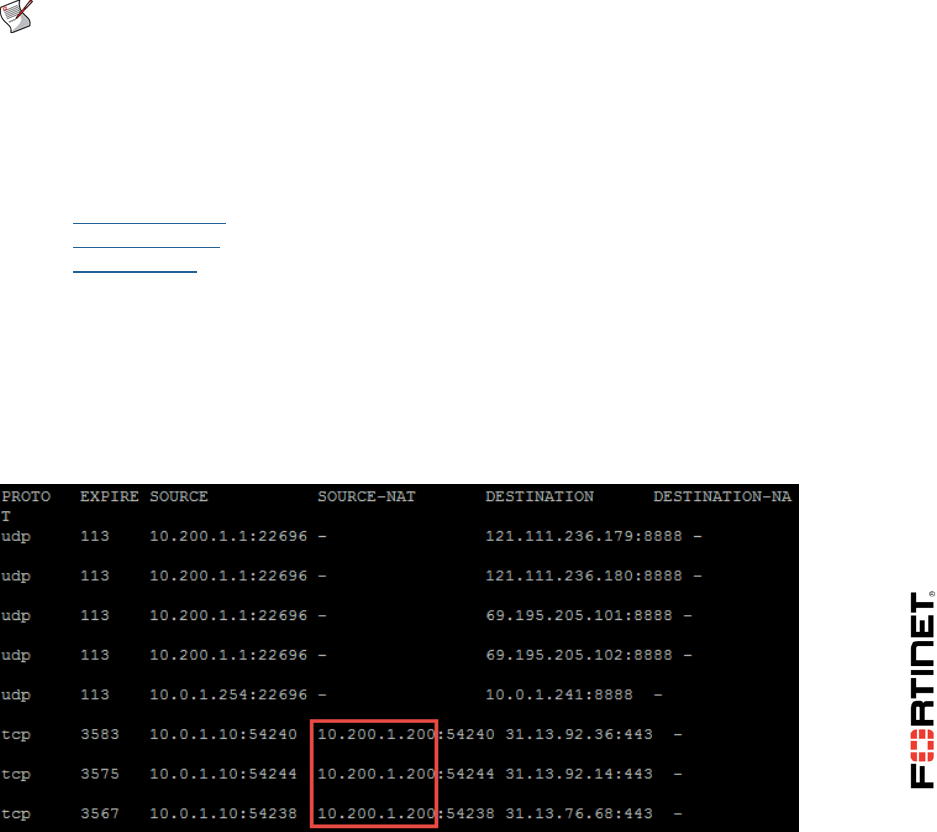
Sample output:
DO NOT REPRINT
© FORTINET

LAB 4–Network Address Translation (NAT)
FortiGate I Student Guide 56
Note that the outgoing connections from the Local-Windows VM are now being NATed with the
VIP address 10.200.1.200, instead of the firewall egress interface IP address (10.200.1.1).
This is a behavior of the SNAT VIP. That is, when you enable SNAT on a policy, a VIP static NAT
takes priority over the destination interface IP address.
6. Close PuTTY.
7. Close all browser windows except the Local-FortiGate.
DO NOT REPRINT
© FORTINET
LAB 4–Network Address Translation (NAT)
FortiGate I Student Guide 57
2 Dynamic NAT with IP pools
IP pools are used to translate the source address to an address from that pool, rather than the egress
interface address.
Currently, the Local-FortiGate translates the source IP address of all traffic generated from the Local-
Windows VM to 10.200.1.200 because of the SNAT translation in the VIP.
In this exercise, you will create an IP pool, apply it to ingress-to-egress firewall policy, and verify the
SNAT from CLI commands.
Creating an IP Pool
In this procedure, you will create an IP pool from the range of public IP addresses available on egress
port (port1).
To create an IP pool
1. From the Local-Windows VM, open a web browser and log in as admin to the Local-FortiGate
GUI at 10.0.1.254.
2. Go to Policy & Objects > IP Pools.
3. Click Create New and configure the following settings:
Field
Value
Name
INTERNAL-HOST-EXT-IP
Type
Overload
External IP Range/Subnet
10.200.1.100 - 10.200.1.100
4. Click OK.
Editing a Firewall Policy to Use the IP Pool
Now you will apply the IP pool to change the behavior from static NAT to dynamic NAT on ingress-to-
egress firewall policy.
To edit firewall policy
1. In the Local-FortiGate GUI, go to Policy & Objects > IPv4 Policy.
2. Right-click the Seq.# column for Full_Access firewall policy.
3. Click Edit.
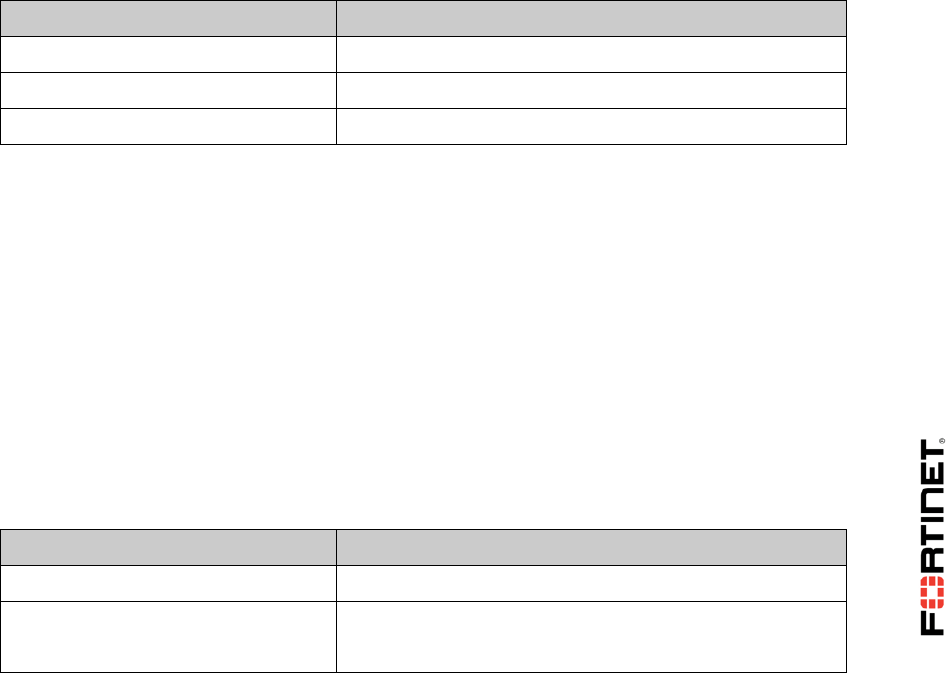
4. Under Firewall/Network Options, configure the following settings:
Field
Value
NAT
Enabled
IP Pool Configuration
Use Dynamic IP Pool
Click + and select INTERNAL-HOST-EXT-IP
DO NOT REPRINT
© FORTINET
LAB 4–Network Address Translation (NAT)
FortiGate I Student Guide 58
Your configuration will look similar to:
5. Click OK.
Testing Dynamic NAT with IP Pools
Now that your configuration is ready, you can test dynamic NAT with IP pools by browsing to a few
external sites on the Internet. If successful, you will see that the Local-Windows VM IP address
(10.0.1.10) is source NATed to the IP pool address of 10.200.1.100.
To test dynamic NAT with IP pools
1. In the Local-Windows VM, open PuTTY and connect to the LOCAL-FORTIGATE saved session
(connect over SSH).
2. Log in as admin and execute the following command to clear any existing sessions:
diagnose sys session clear
Note: The firewall is stateful, so any existing sessions will not use this updated firewall
policy until they time out or are cleared for ingress-to-egress traffic.
3. Close the PuTTY window.
4. In the Local-Windows VM, connect to a few websites. For example:
www.fortinet.com
www.yahoo.com
www.bbc.com
5. In the Local-Windows VM, open PuTTY and connect to the LOCAL-FORTIGATE saved
session (connect over SSH).
6. Log in as admin and execute the following command to verify the source NAT IP address that
those sessions are using:
get system session list
DO NOT REPRINT
© FORTINET
LAB 4–Network Address Translation (NAT)
FortiGate I Student Guide 59
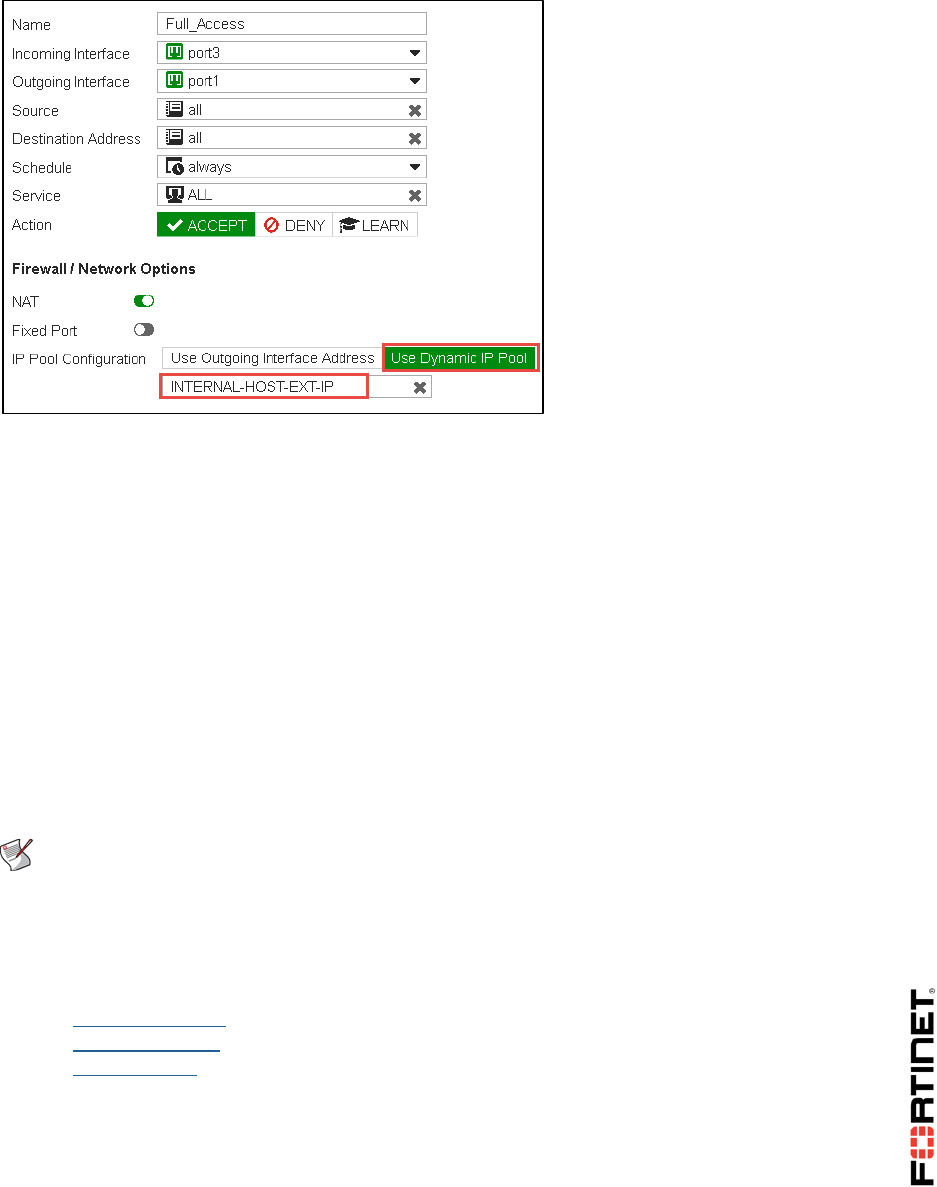
Sample output:
Notice that the source NAT address is now 10.200.1.100 as configured in the IP pool, and the
IP pool has overridden the static NAT VIP.
7. Close PuTTY.
8. Close all browser windows except Local-FortiGate.
DO NOT REPRINT
© FORTINET
LAB 4–Network Address Translation (NAT)
FortiGate I Student Guide 60
3 Enabling Central NAT
In central NAT, SNAT and DNAT configurations are per virtual domain (VDOM). The SNAT and DNAT
configurations are automatically applied to multiple firewall policies (according to the SNAT and DNAT
rules that you specify), as opposed to each firewall policy in the firewall policy NAT.
Enabling Central NAT
In this procedure, you will enable central NAT. Central NAT can only be enabled and disabled from the
CLI.
To enable central NAT
1. From the Local-Windows VM, open PuTTY and connect to the LOCAL-FORTIGATE saved
session (connect over SSH).
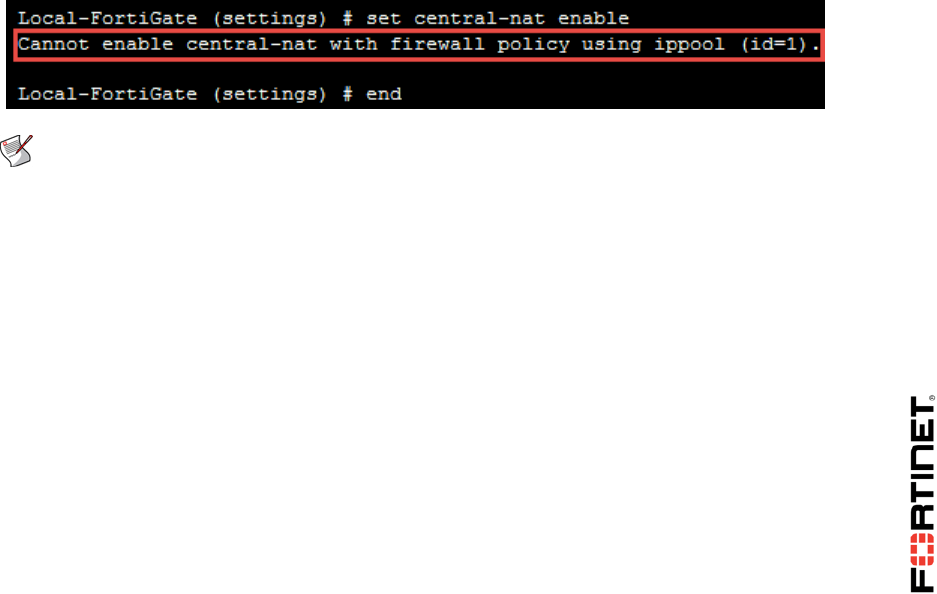
2. Log in as admin and try to configure the following:
config system settings
set central-nat enable
end
You will get a message similar to one below:
Note: When enabling central NAT, you must remove VIP and IP pool references from
the existing firewall policies first. The (id=N) is the firewall policy ID reference, not
Seq.#, on the GUI.
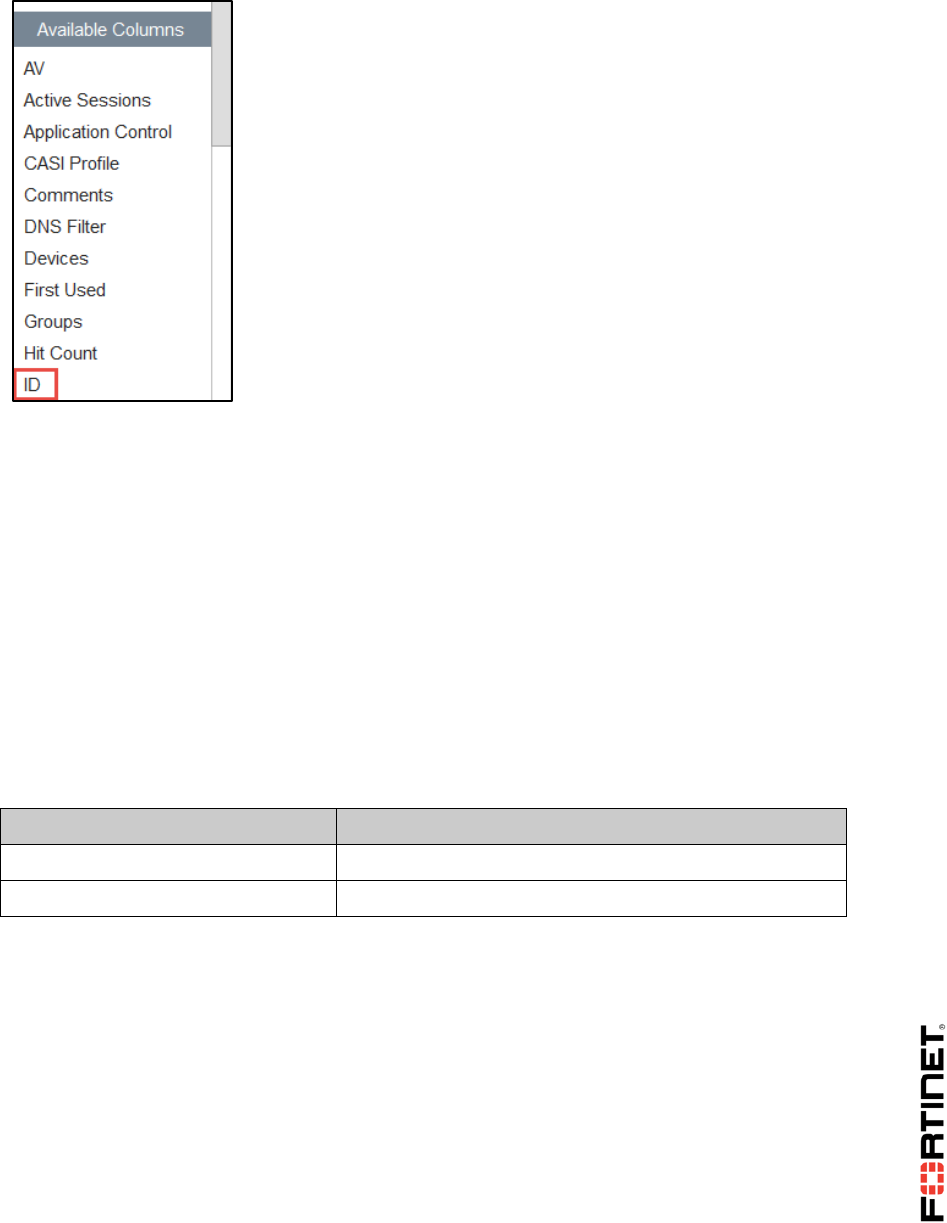
Adding a Policy ID Column
In this procedure, you will check that the ID column is displayed in the IPv4 Policy table, so you can
more easily determine which firewall policy is associated with which policy ID. In this instance, you
need to determine which policy is id=1, as per the CLI error message above.
To add the Policy ID column
1. From the Local-Windows VM, open a web browser and log in as admin to the Local-FortiGate
GUI at 10.0.1.254.
2. Go to Policy & Objects > IPv4 Policy.
3. Check if the ID column is already displayed. If it is not, right-click any of the column headings,
select ID under Available Columns and click Apply.
DO NOT REPRINT
© FORTINET
LAB 4–Network Address Translation (NAT)
FortiGate I Student Guide 61
Tip: You can drag the ID column to where you want it positioned in the column list.
You can now see that the Full_Access firewall policy is policy ID 1.
Modifying the Firewall Policy
In this procedure, you will remove the IP pool from the Full_Access firewall policy (policy ID 1), as
central NAT can only be enabled if none of the firewall policies have IP pool or VIP addresses
associated with them.
To modify the firewall policy
1. In the Local-FortiGate GUI, go to Policy & Objects > IPv4 Policy.
2. Right click Seq.# of the Full_Access firewall policy and select Edit.
3. Under Firewall/Network Options, modify the following settings:
Field
Value
NAT
Enabled
IP Pool Configuration
Use Outgoing Interface Address
4. Click OK.
Enabling Central NAT Again After Removing the IP
Pool
Now that you've removed the IP pool from the firewall policy, you can try to enable central NAT
again.
To try to enable central NAT
1. In the Local-Windows VM, go to the LOCAL-FORTIGATE PuTTY session you opened earlier.
DO NOT REPRINT
© FORTINET

LAB 4–Network Address Translation (NAT)
FortiGate I Student Guide 62
2. Try to enable central NAT again:
config system settings
set central-nat enable
end
This time you will get similar message for VIP firewall policy (id=2).
Since you already added the ID column to the IPv4 Policy page, it shows that policy ID 2 is the
firewall policy labeled Web-Server-Access.
Modifying the Firewall Policy
In this procedure, you will remove the VIP address from the Web-Server-Access firewall policy (policy
ID 2), because central NAT can only be enabled if none of the firewall policies have IP pool or VIP
addresses associated with them.
To modify the firewall policy
1. In the Local-FortiGate GUI, go to Policy & Objects > IPv4 Policy.
2. Right click on Seq.# of the Web-Server-Access firewall policy and click Edit.
3. Change the Destination Address to all.
4. Scroll to the bottom of the page and disable the policy.
5. Click OK.
Enabling Central NAT
Now that you have modified the firewall policies to remove the IP pool and VIP addresses, you can
finally enable central NAT.
To enable central NAT after removing IP pool and VIP address from firewall policies
1. In the Local-Windows VM, go to the LOCAL-FORTIGATE PuTTY session you opened earlier.
2. Enable central NAT:
config system settings
set central-nat enable
DO NOT REPRINT
© FORTINET
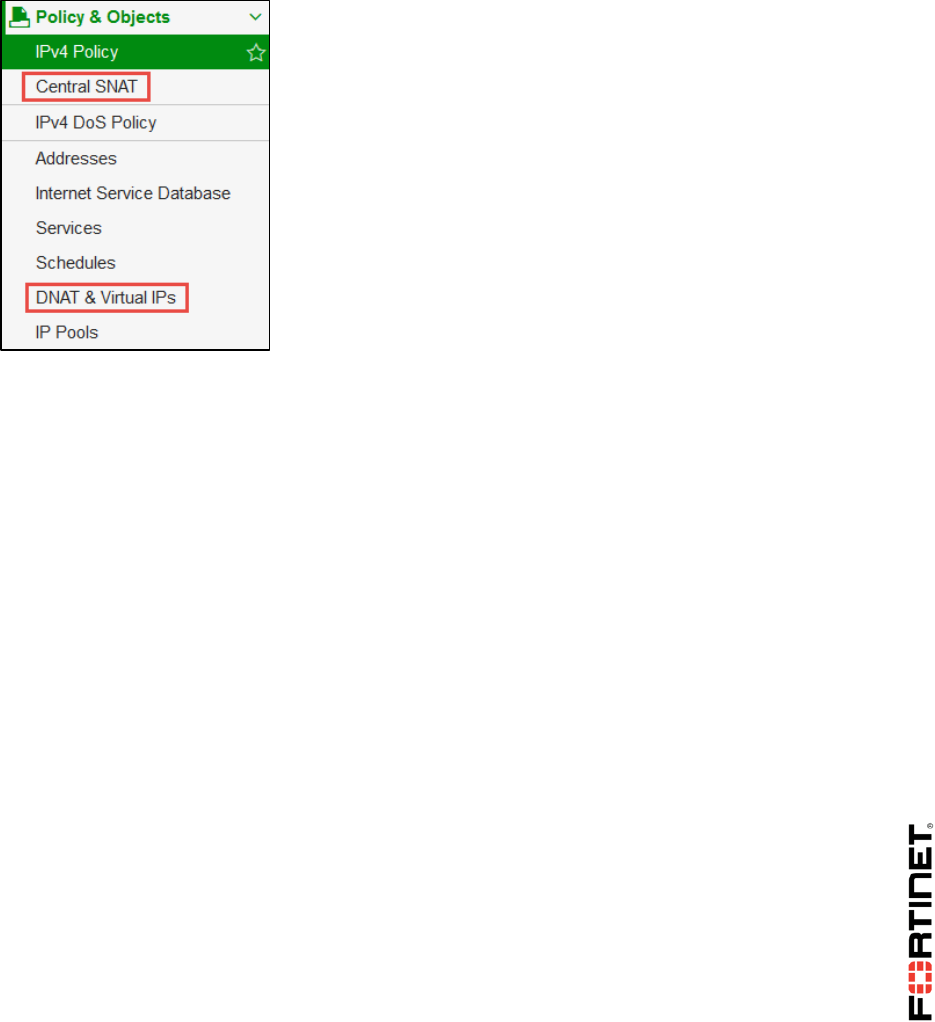
LAB 4–Network Address Translation (NAT)
FortiGate I Student Guide 63
end
3. In the Local-FortiGate GUI, refresh your browser for GUI changes to take effect.
4. Go to Policy & Objects > IPv4 Policy.
You will see two options in the left menu:
Central SNAT
DNAT & Virtual IPs
5. Close the PuTTY window.
DO NOT REPRINT
© FORTINET

LAB 4–Network Address Translation (NAT)
FortiGate I Student Guide 64
4 Configuring Central SNAT
A central SNAT policy is applied to multiple firewall policies, based on configured central rule. The
NAT on the firewall policy controls whether the central SNAT is used or not.
In this exercise, you will configure a central SNAT policy and test it.
Deleting DNAT and VIPs
When central NAT is enabled, existing VIPs take precedence over source NAT. As such, you need to
delete the VIP object you added in a previous exercise so you can test the source NAT.
To delete DNAT and VIPs
1. From the Local-Windows VM, open a web browser and log in as admin to the Local-FortiGate
GUI at 10.0.1.254.
2. Go to Policy & Objects > DNAT & Virtual IPs.
3. Right click VIP-INTERNAL-HOST and click Delete .
4. Click OK.
Testing SNAT Without an SNAT Policy
In this procedure, you will test the behavior of FortiGate when an SNAT policy is not configured.
To test SNAT Without an SNAT policy
1. In the Local-FortiGate GUI, go to Policy & Objects > IP Pools.
2. Review the settings of INTERNAL-HOST-EXT-IP.
3. In the Local-Windows VM, open PuTTY and connect to the LOCAL-FORTIGATE saved session
(connect over SSH).
4. Log in as admin and execute the following command to clear the existing sessions.
diagnose sys session clear
5. Close the PuTTY window.
6. In the Local-Windows VM, open a web browser and connect to a few websites. For example:
www.fortinet.com
www.yahoo.com
www.bbc.com
7. In the Local-Windows VM, open PuTTY and connect to the LOCAL-FORTIGATE saved
session (connect over SSH).
8. Log in as admin and execute the following command to verify the SNAT IP address that those
sessions are using:
get system session list
DO NOT REPRINT
© FORTINET
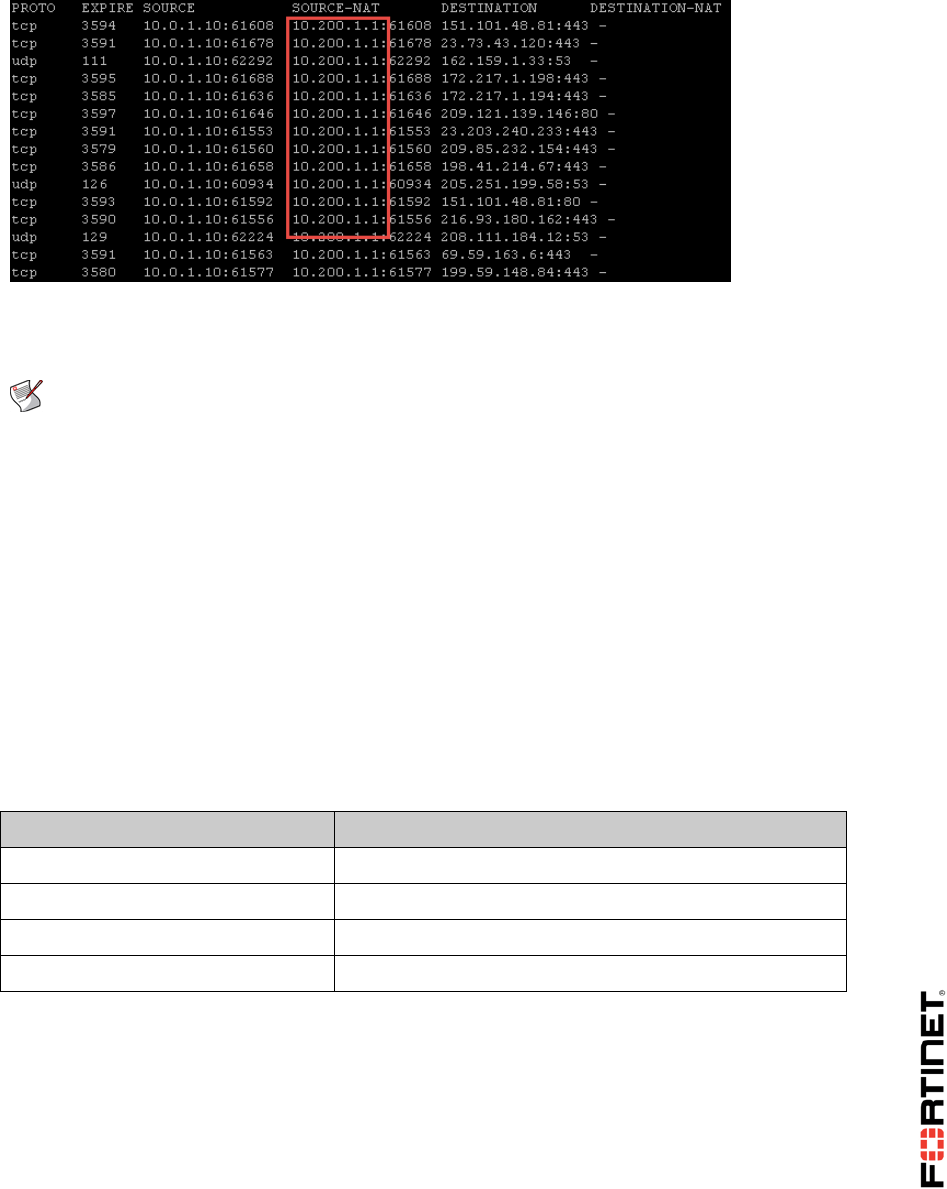
LAB 4–Network Address Translation (NAT)
FortiGate I Student Guide 65
Sample output:
Notice that the SNAT address is now 10.200.1.1, which is the egress interface IP (port1).
Note: If no central SNAT or matching central SNAT rule exists, FortiGate
automatically uses the outgoing interface IP address for the source NAT.
9. Close PuTTY.
10. Close all other browser tabs except the Local-FortiGate GUI.
Configuring Central SNAT Policy
In this procedure, you will configure a central SNAT policy using the IP pool previously created in the
last exercise.
To configure a central NAT policy
1. In the Local-FortiGate GUI, go to Policy & Objects > Central SNAT.
2. Click Create New and configure the following:
Field
Value
Source Address
all
Destination Address
all
Translated Address
INTERNAL-HOST-EXT-IP
Protocol
ANY
3. Leave all other settings at their defaults and click OK to save the changes.
Verifying that NAT is Enabled on the Firewall Policy
If NAT is enabled on the firewall policy, central SNAT is used. In this procedure, you will verify that
NAT is enabled on the firewall policy.
DO NOT REPRINT
© FORTINET

LAB 4–Network Address Translation (NAT)
FortiGate I Student Guide 66
To verify that NAT is enabled on firewall policy
1. In the Local-FortiGate GUI, go to Policy & Objects > IPv4 Policy.
2. Review the NAT column of the Full_Access policy to make sure NAT is enabled.
Note: There is no option for IP pools. In central SNAT, NAT on the firewall policy controls
if the central SNAT is used or not. If NAT is enabled on the firewall policy, central SNAT is
used.
Testing Central SNAT in the Presence of SNAT Policy
Now that your configuration is ready, you can test the behavior of the central SNAT policy.
To test central SNAT in presence of SNAT policy
1. In the Local-Windows VM, open PuTTY and connect to the LOCAL-FORTIGATE saved session
(connect over SSH).
2. Log in as admin and execute the following command to clear the existing sessions:
diagnose sys session clear
3. Close the PuTTY window.
4. In the Local-Windows VM, connect to a few websites. For example:
www.fortinet.com
www.yahoo.com
www.bbc.com
5. In the Local-Windows VM, open PuTTY and connect to the LOCAL-FORTIGATE saved session
(connect over SSH).
6. Log in as admin and execute the following command to verify the source NAT IP address that
those sessions are using:
get system session list
Sample output:
Notice that the source NAT address is now 10.200.1.100, which matches the central SNAT
policy.
DO NOT REPRINT
© FORTINET

LAB 4–Network Address Translation (NAT)
FortiGate I Student Guide 67
7. Close PuTTY.
8. Close all other browser tabs except Local-FortiGate GUI.
Creating a Second IP Pool
Now you will create a second IP Pool, which will be used later when creating a second central SNAT
policy.
To create a second IP Pool
1. In the Local-FortiGate GUI, go to Policy & Objects > IP Pools.
2. Click Create New and configure the following:
Field
Value
Name
SNAT-Pool
Type
Overload
External IP Range/Subnet
10.200.1.50 - 10.200.1.50
3. Click OK.
Creating a Second SNAT Policy
Now you will create a more granular SNAT policy by selecting a specific destination address and
protocol to match specific traffic.
To create second SNAT policy
1. In the Local-FortiGate GUI, go to Policy & Objects > Central SNAT.
2. Click Create New and configure the following:
Field
Value
Source Address
all
Destination Address
REMOTE_FORTIGATE
Translated Address
SNAT-Pool
Protocol
TCP
3. Click OK.
Reordering Central SNAT Policies
Now you will reorder the central NAT policies to put the more granular rule on top.
Similar to firewall policies, central SNAT policy is processed from top to bottom, and if a match is
found, the source address and source port translate based on that central SNAT policy.
DO NOT REPRINT
© FORTINET
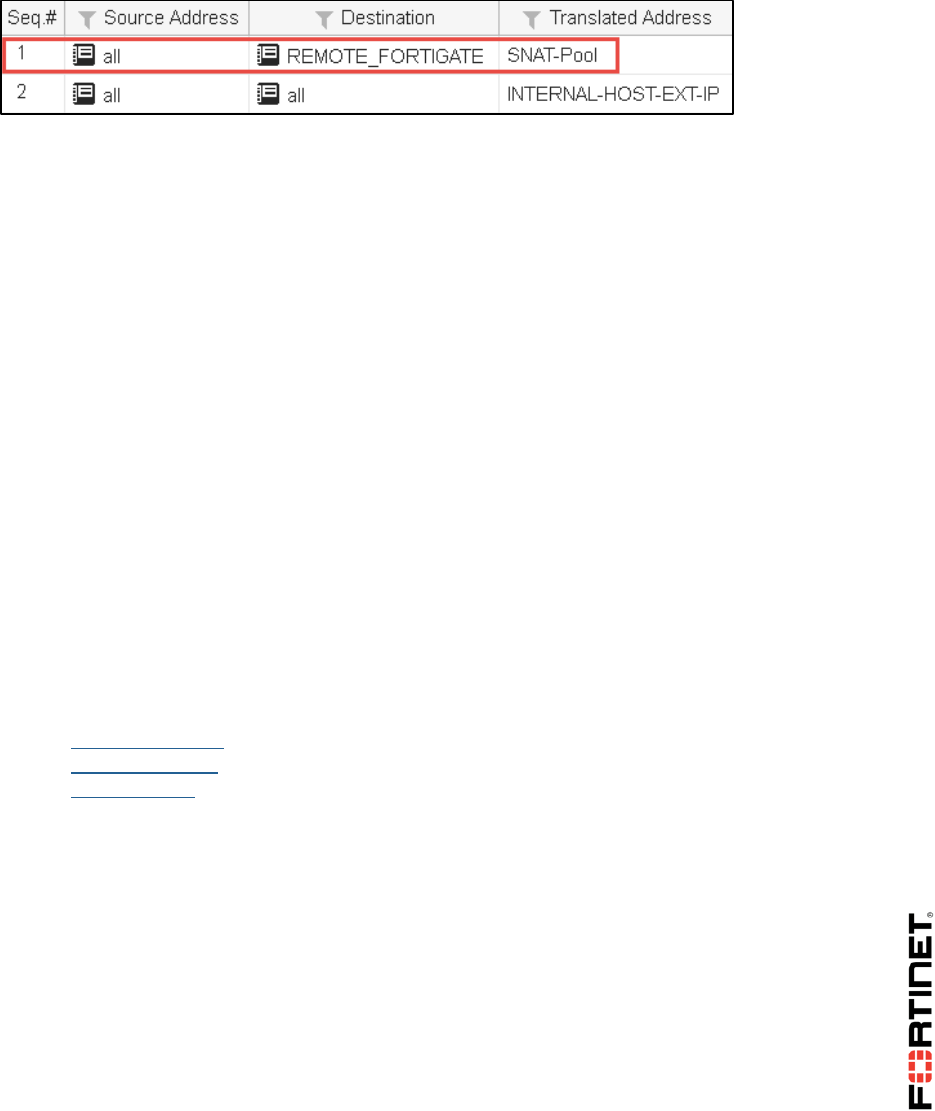
LAB 4–Network Address Translation (NAT)
FortiGate I Student Guide 68
To reorder central SNAT policies
1. In the Local-FortiGate GUI, go to Policy & Objects > Central SNAT.
2. Drag the newly created central SNAT policy above the previously created central SNAT policy.
Testing Central SNAT
Now that your configuration is ready, you can test the central SNAT configuration.
To test central SNAT
1. In the Local-Windows VM, open PuTTY and connect to the LOCAL-FORTIGATE saved session
(connect over SSH).
2. Log in as admin and execute the following command to clear the existing sessions:
diagnose sys session clear
3. Again open PuTTY and connect to the LOCAL-FORTIGATE saved session (connect over SSH).
4. Log in as admin.
5. From the Local-Windows VM, open a web browser and log in as admin to the Remote-FortiGate
GUI at 10.200.3.1.
6. In the Local-Windows VM, open a command prompt.
7. Run continuous ping to the Remote-FortiGate IP:
ping 10.200.3.1 -t
8. In the Local-Windows VM, connect to a few websites. For example:
www.fortinet.com
www.yahoo.com
www.bbc.com
9. In the Local-Windows VM, go back to PuTTY session and list the sessions by running following
CLI command:
get system session list
Notice that the TCP sessions to destination 10.200.3.1 are source-NATed 10.200.1.50,
as it matches the central SNAT policy.
Sample output:
DO NOT REPRINT
© FORTINET
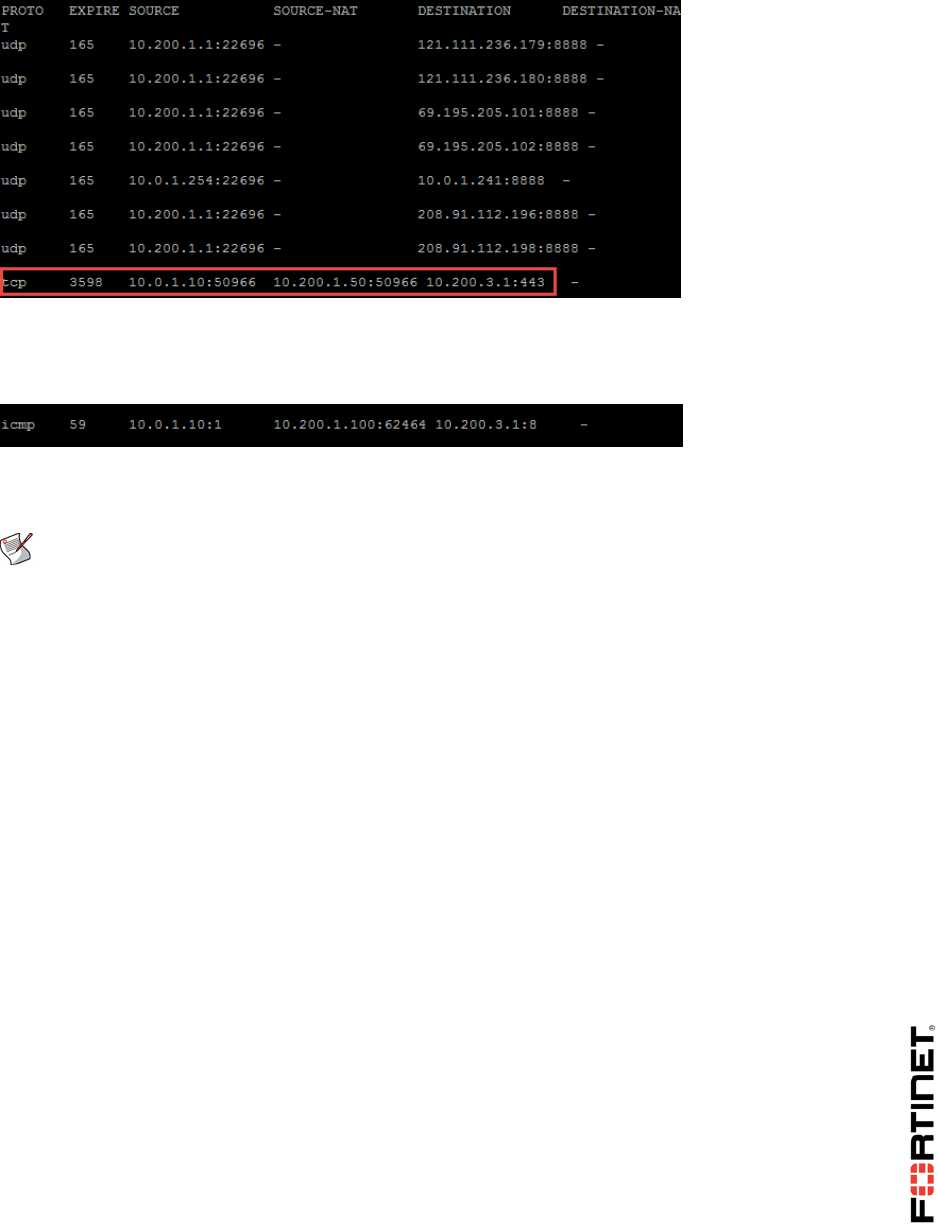
LAB 4–Network Address Translation (NAT)
FortiGate I Student Guide 69
ICMP sessions to destination 10.200.3.1 are source-NATed 10.200.1.100, which matches
the central SNAT policy at the bottom.
Sample output:
Also, other TCP sessions to different destinations are translated to 10.200.1.100 based on the
matching central SNAT policy at the bottom.
Note: A Central SNAT policy is processed from top to bottom, similar to firewall policies.
10. Close the command prompt and PuTTY.
11. Close all other browser tabs except the Local-FortiGate GUI.
DO NOT REPRINT
© FORTINET

LAB 4–Network Address Translation (NAT)
FortiGate I Student Guide 70
5 DNAT and VIPs
In firewall policy NAT, Virtual IPs is selected in the firewall policy as the destination address. In central
NAT, as soon as DNAT & Virtual IPs is configured, FortiGate automatically creates a rule in the
kernel to allow DNAT to occur and no additional configuration is required.
In this exercise, you will configure and test the behavior of central DNAT.
Creating DNAT and VIPs
In this procedure, you will configure DNAT and VIPs.
To create DNAT and VIPs
1. From the Local-Windows VM, open a web browser and log in as admin to the Local-FortiGate
GUI at 10.0.1.254.
2. Go to Policy & Objects > DNAT & Virtual IPs.
3. Click Create New and select DNAT & Virtual IP.
4. Configure the following settings:
Field
Value
Name
Central-DNAT
Interface
port1
Type
Static NAT (default setting)
External IP Address/Range
10.200.1.150 - 10.200.1.150
Mapped IP Address/Range
10.0.1.10
5. Click OK.
Verifying the Firewall Policy Settings
You will now verify the firewall policy settings for the egress-to-ingress firewall policy.
To verify the firewall policy settings
1. In the Local-FortiGate GUI, go to Policy & Objects > IPv4 Policy.
2. Right click Seq.# of the Web-Server-Access firewall policy and click Edit.
3. Review the settings of firewall policy.
4. Try to select the DNAT & Virtual IPs address in firewall destination address.
You will be not able to do so.
Note: VIPs previously created cannot be selected in a firewall policy as a destination
address. As soon as a VIP is created, FortiGate automatically creates a rule in the kernel
for DNAT to occur.
DO NOT REPRINT
© FORTINET

LAB 4–Network Address Translation (NAT)
FortiGate I Student Guide 71
5. Scroll to the bottom and enable the firewall policy
6. Click OK.
Testing DNAT and VIPs
In this procedure, you will test DNAT and V IPs by accessing the Local-Windows VM.
To test DNAT and VIPs
1. From the Remote-Windows, open a web browser and access the following URL:
http://10.200.1.150
If the VIP operation is successful a simple web page appears.
2. Go back to Local-Windows VM and open PuTTY and connect to the LOCAL-FORTIGATE saved
session (connect over SSH).
3. Log in as admin and execute the following command to check the destination NAT entries in the
session table:
get system session list
Sample output:
Local-FortiGate # get system session list
PROTO EXPIRE SOURCE SOURCE-NAT DESTINATION DESTINATION-NAT
tcp 3599 10.200.3.1:49183 - 10.200.1.150:80 10.0.1.10:80
4. In the Local-Windows VM, open a web browser and try to access few websites. For example:
www.fortinet.com
www.yahoo.com
www.bbc.com
5. Go back to PuTTY for LOCAL-FORTIGATE and verify the SNAT IP address those sessions
are using:
get system session list
Sample output:
DO NOT REPRINT
© FORTINET
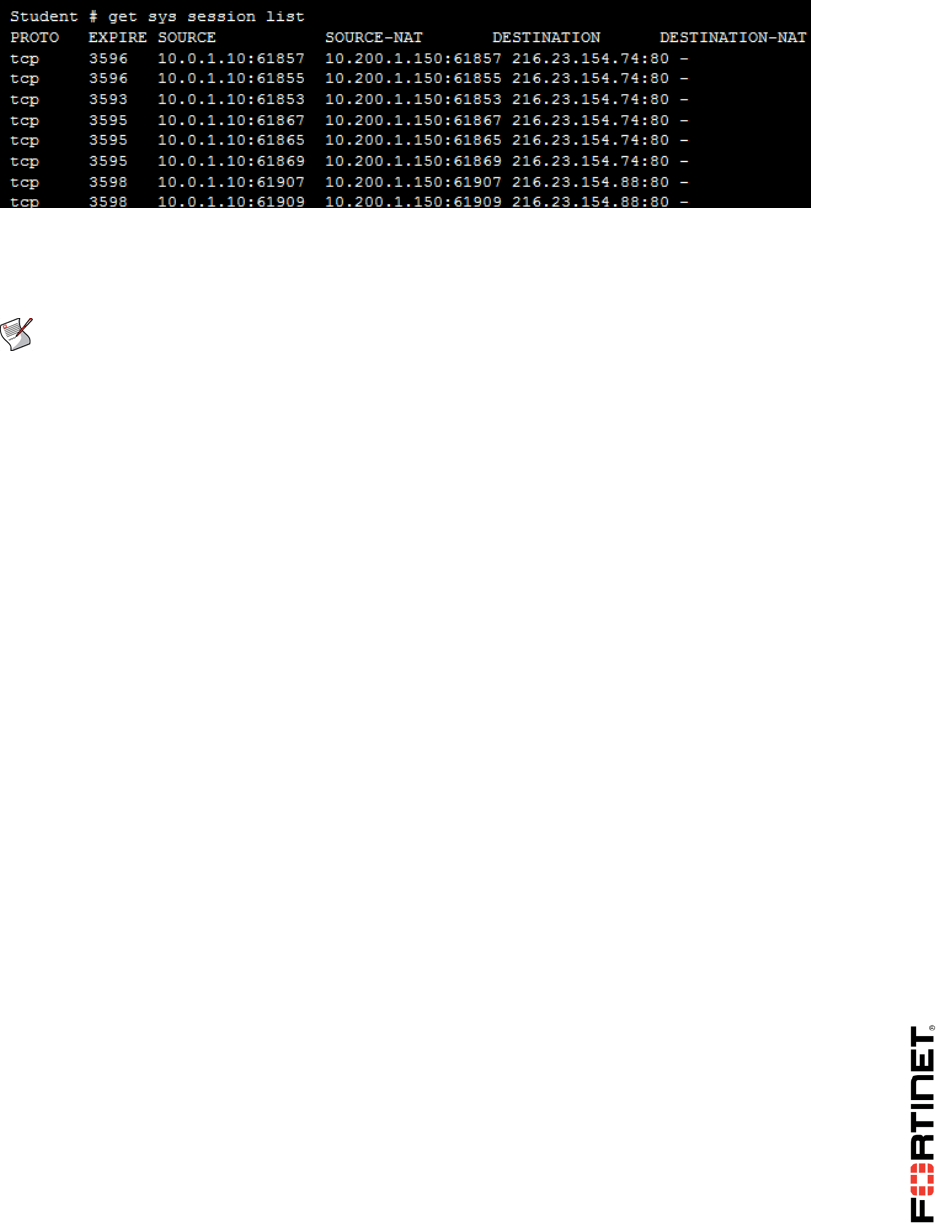
LAB 4–Network Address Translation (NAT)
FortiGate I Student Guide 72
Notice that the session originating from source IP 10.0.1.10 are source NATed to
10.200.1.150 (VIP) as opposed to the central SNAT policy pool IP of 10.200.1.100. This is
expected behavior in central NAT.
Note: If both the SNAT and DNAT are defined, the egress traffic will source NAT to
the DNAT/VIP address, as opposed to the configured source SNAT policy.
6. Close PuTTY.
7. Close all other browser tabs except Local-FortiGate GUI.
DO NOT REPRINT
© FORTINET
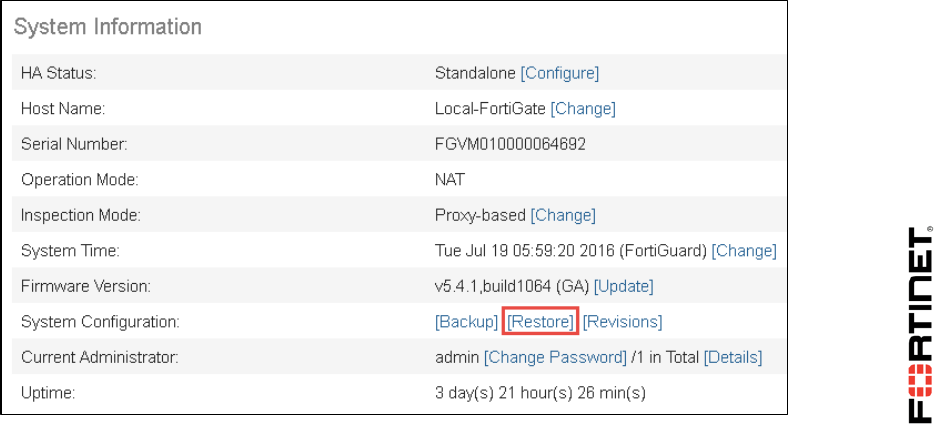
LAB 5–Firewall Authentication
FortiGate I Student Guide 73
LAB 5–Firewall Authentication
In this lab, you will configure FortiGate to communicate with a remote LDAP server for server-based
password authentication.
You will also configure captive portal, so that any user connecting to the network is prompted for their
login credentials (active authentication).
Objectives
Configure server-based password authentication with an LDAP server.
Configure captive portal so users connecting to your network are forced to authenticate.
Time to Complete
Estimated: 20 minutes
Prerequisites
Before beginning this lab, you must restore a configuration file to FortiGate.
To restore the FortiGate configuration file
1. From the Local-Windows VM, open a browser and log in as admin to the Local-FortiGate GUI at
10.0.1.254.
2. Go to Dashboard, and from the System Information widget click Restore.
3. Select to restore from Local PC and click Upload.
DO NOT REPRINT
© FORTINET

LAB 5–Firewall Authentication
FortiGate I Student Guide 74
4. Browse to Desktop > Resources > FortiGate-I > Firewall-Authentication and select local-
firewall-authentication.conf.
5. Click OK.
6. Click OK to reboot.
DO NOT REPRINT
© FORTINET

LAB 5–Firewall Authentication
FortiGate I Student Guide 75
1 Remote Authentication
In this exercise, you will configure an LDAP server on FortiGate for remote authentication, create a
remote authentication group for your remote users, and add that group as a source in a firewall policy.
Finally, you will authenticate over SSL-VPN as one of the remote users, and then monitor the login as
the administrator.
Configuring an LDAP Server on FortiGate
You can configure FortiGate to point to an LDAP server for server-based password authentication
using the pre-configured Active Directory service located on the Local-Windows VM. Active Directory
already has users available to use in this lab.
To configure an LDAP Server on FortiGate
1. From the Local-Windows VM, open a browser and log in as admin to the Local-FortiGate GUI at
10.0.1.254.
2. Go to User & Device > LDAP Servers and click Create New.
3. Complete the following:
Field
Value
Name
ADserver
Server IP/Name
10.0.1.10
This is the IP address of the Windows Server, Local-
Windows VM. For more information, see Network Topology.
Server Port
389
This is the default port for LDAP.
Common Name Identifier
cn
This is the attribute name used to find the user name. Active
Directory calls this cn.
Distinguished Name
ou=Training,dc=trainingAD,dc=training,dc=lab
This is the domain name for Active Directory on the Windows
Server. Active Directory has already been pre-configured,
with all users located in the Training organizational unit (ou).
Bind Type
Regular
User DN
cn=ADadmin,cn=users,dc=trainingAD,dc=training,dc=lab
We are using the credentials of an Active Directory user
called ADadmin to authenticate to Active Directory. ADadmin
is located in the Users organizational unit (ou).
Password
Training!
This is the password pre-configured for the ADadmin user.
You must use it to be able to bind.
4. Click Test.
DO NOT REPRINT
© FORTINET
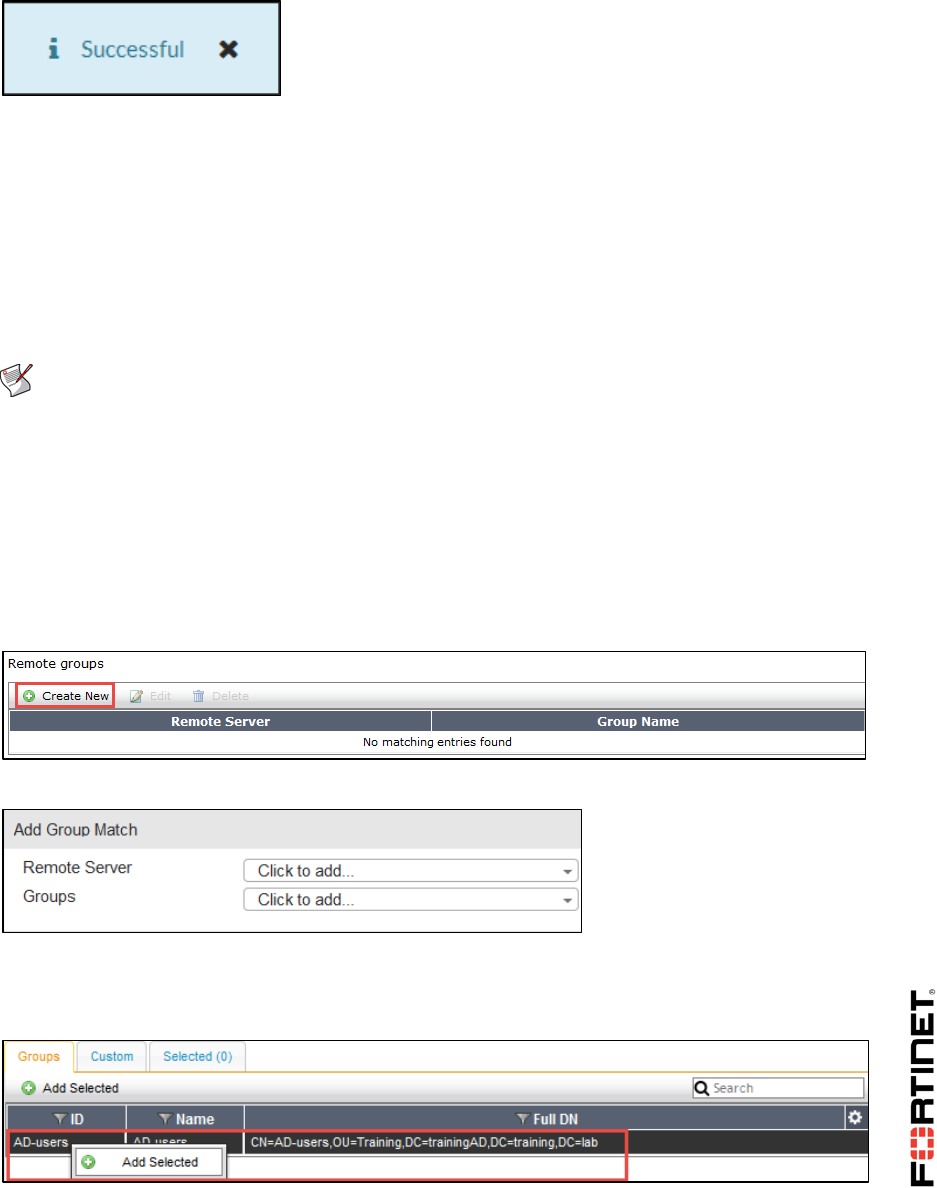
LAB 5–Firewall Authentication
FortiGate I Student Guide 76
You should receive an indication of a successful connection.
5. Click OK.
Assigning Remote Users to a Firewall Group
In this procedure, you will assign a user located on the LDAP server to a firewall user group called
Remote-users on FortiGate. This way, you can configure firewall policies to act on the firewall user
group.
Generally, groups are used to more effectively manage individuals that have a shared relationship.
Note: The Remote-users group was pre-configured for you. However, it needs to be
modified to add the users from the remote LDAP server you just configured in the last
procedure.
To assign a user to a user group
1. In the Local-FortiGate GUI, go to User & Device > User Groups and edit the Remote-users
group.
As you can see, it's currently configured as a firewall group.
2. To add users from the remote LDAP server, click Create New from the Remote groups table.
The Add Group Match dialog box appears.
3. From the Remote Server drop-down list, select ADserver.
4. From the LDAP Groups table, click AD-users under the Group tab in the main window and
click the Add Selected button that appears.
AD-users will appear disabled with a green checkmark, indicating it has been added.
DO NOT REPRINT
© FORTINET
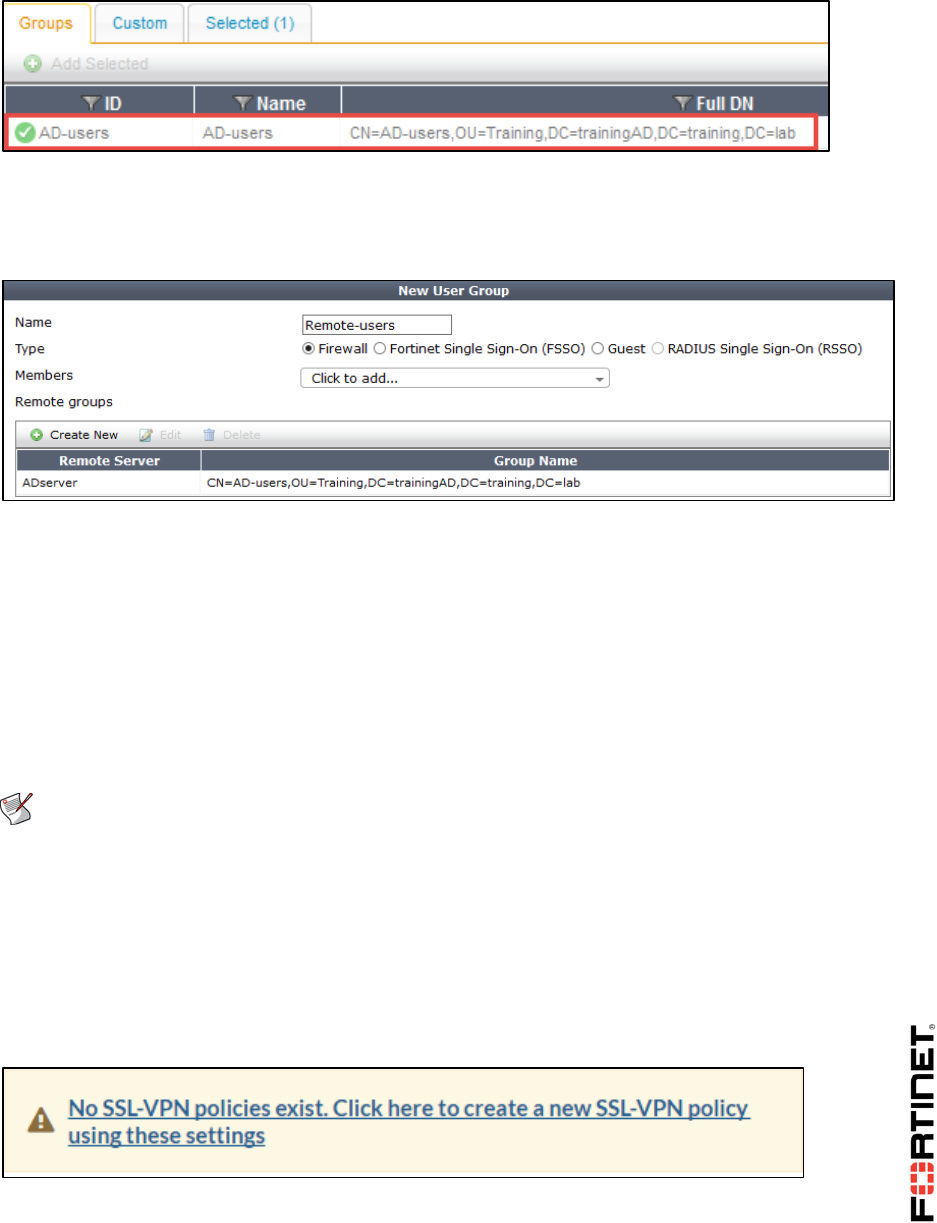
LAB 5–Firewall Authentication
FortiGate I Student Guide 77
5. Click OK.
The users in this Active Directory group are now included in your FortiGate Remote-users firewall
user group. Only users from the remote LDAP server that match this user group entry can
authenticate.
6. Click OK.
Adding the Remote User Group to your Firewall Policy
Now that the LDAP server is added to the Remote-user firewall user group, you can add the group to a
firewall policy. This allows you to control access to network resources, as policy decisions are made
on the group as a whole.
Since your remote user on your LDAP server will be authenticating over SSL-VPN, you will add the
group to an SSL-VPN firewall policy.
Note: Configuring SSL-VPN is out of scope for this lab. As such, the SSL-VPN settings
have been pre-configured for you. However, you still need to configure an SSL-VPN
firewall policy and add the Remote-user group to it.
To add the remote user group to your firewall policy
1. In the Local-FortiGate GUI, go to VPN > SSL-VPN Settings and click the warning message at the
top of the page.
Clicking this warning message will create a new SSL-VPN policy for you using these pre-
configured settings.
Complete the following:
DO NOT REPRINT
© FORTINET
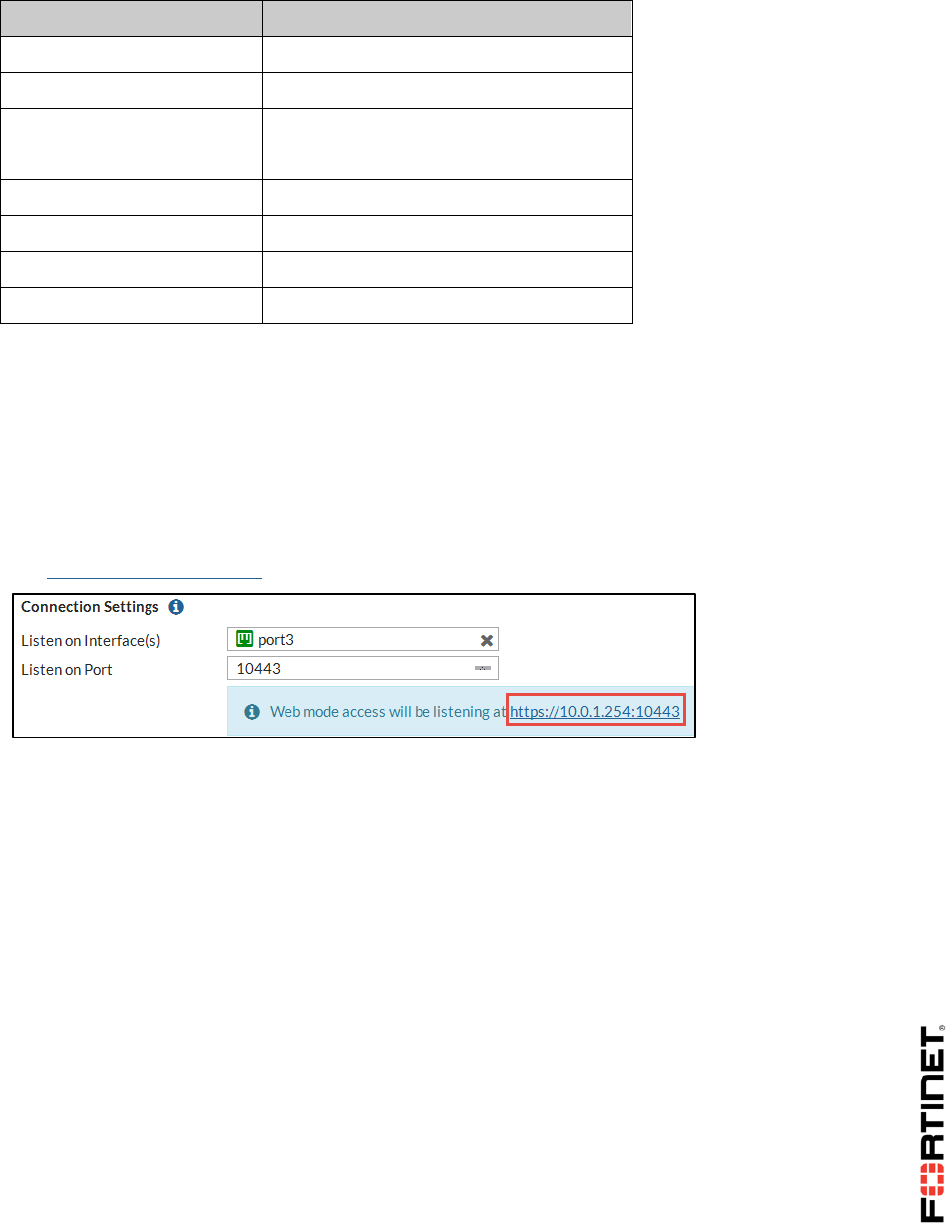
LAB 5–Firewall Authentication
FortiGate I Student Guide 78
Field
Value
Name
SSL-VPN
Outgoing Interface
port1
Source
LOCAL_SUBNET
Remote-users (located under User)
Destination Address
all
Schedule
always
Service
ALL
Action
ACCEPT
2. Under Security Profiles, enable Web Filter and select Category_Monitor.
This Web Filter was pre-configured for you and is set to block the following categories: Potentially
Liable, Adult/Mature Contents, and Security Risk.
3. Under Logging Options, enable Log Allowed Traffic and select All Sessions.
4. Click OK.
5. Click OK.
The SSL-VPN Settings page re-appears. Note that web mode access for SSL VPN is listening at
https://10.0.1.254:10443.
To test whether aduser1 will be able to successfully authenticate
1. Test to see whether aduser1 will be able to successfully authenticate:
A. Open PuTTY on Local-Windows VM and connect to the LOCAL-FORTIGATE saved session
(connect over SSH).
B. Log in as admin.
C. Type the following command:
diagnose test authserver ldap <LDAP server name> <LDAP user name>
<password>
Where:
<LDAP server name> is ADserver (case-sensitive)
<LDAP user name> is aduser1
<password> is Training!
You should see something like this for a successful authentication:
DO NOT REPRINT
© FORTINET

LAB 5–Firewall Authentication
FortiGate I Student Guide 79
2. Close PuTTY.
Authenticating and Monitoring
You will authenticate through the pre-configured SSL VPN as aduser1. This user is a member of the
Remote_users group on FortiGate.
You will then monitor the authentication.
To authenticate as a remote user
1. In the Local-Windows VM, open a new browser tab and go to https://10.0.1.254:10443.
This is the Web mode access for SSL VPN.
If you receive an error that indicates your connection is not secure, click Advanced and then
select Add Exception.
2. Log in as aduser1 with password Training!
The SSL VPN Web portal appears
3. Click Quick Connection and in the URL field, type www.google.com and click Launch.
The site launches successfully.
DO NOT REPRINT
© FORTINET
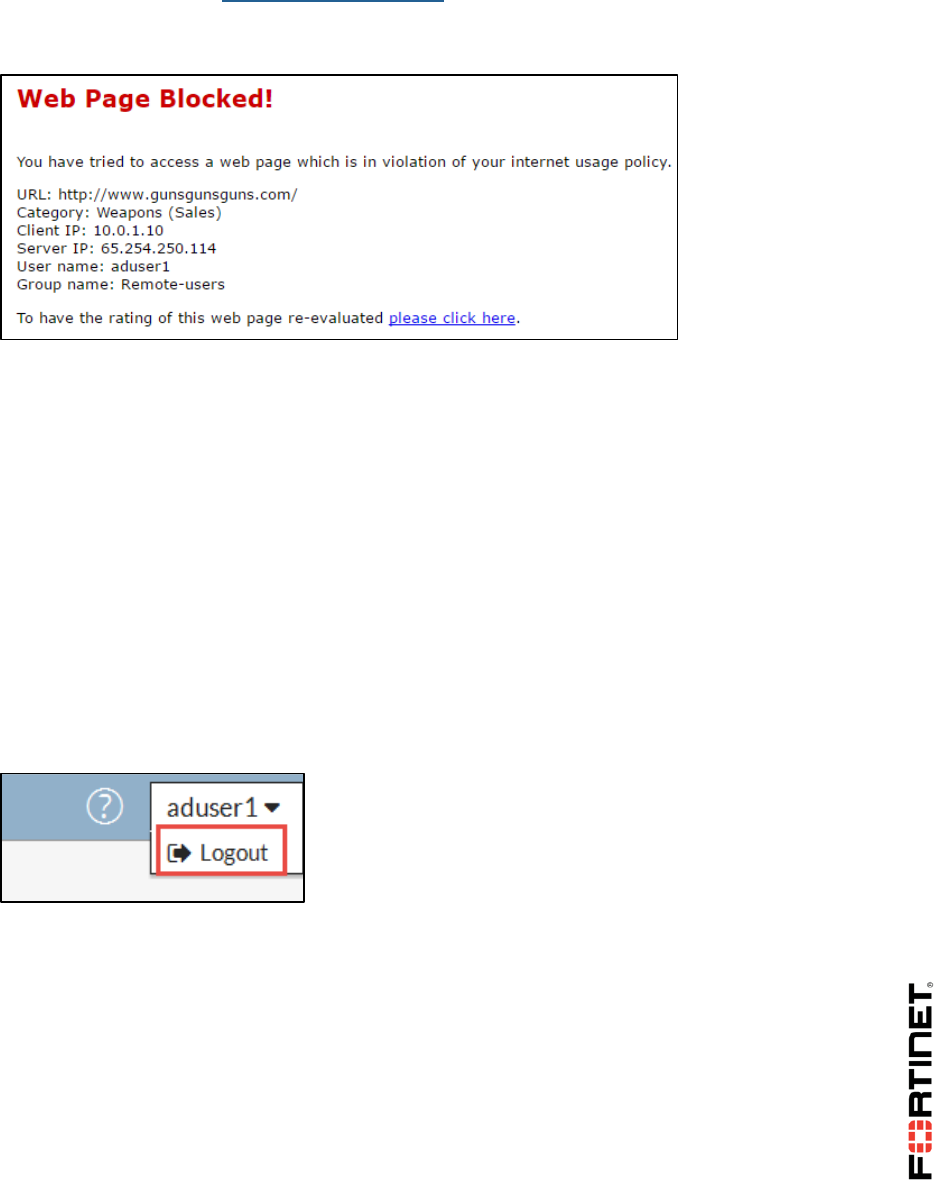
LAB 5–Firewall Authentication
FortiGate I Student Guide 80
4. Return to your browser tab with the SSL-VPN portal and click Quick Connection again. This time
in the URL field type www.gunsgunsguns.com and click Launch.
This URL is set to be blocked by the Web Filter security profile you enabled in the SSL VPN
firewall policy.
5. Remain logged into the SSL VPN portal and continue to the next procedure.
To monitor user authentications
1. Return to the browser tab where you are logged into Local-FortiGate as admin.
2. Monitor aduser1. You can view this particular login authentication from the following:
FortiView > VPN (filter on last 5 minutes and double-click the entry to view more details)
Monitor > SSL-VPN Monitor
3. View the activity of aduser1. You can check the following:
FortiView > All Sessions
Log & Report > Forward Traffic (Try filtering by user and any additional filters to get more
specific results.)
Log & Report > Web Filter (Try filtering by user and any additional filters to get more specific
results.)
4. Return to your browser tab where you are logged into the SSL VPN portal and log out.
You will notice back in the Local-FortiGate GUI (where you are logged in as admin) that Monitor
> SSL-VPN Monitor no longer shows the authentication, as the connection is not active.
However, FortiView > VPN retains the login information.
5. Close all your browser tabs except for the tab with the Local-FortiGate GUI.
DO NOT REPRINT
© FORTINET

LAB 5–Firewall Authentication
FortiGate I Student Guide 81
2 Captive Portal
In this exercise, you will configure captive portal and restrict access to a specific user group. Captive
portal is a convenient way to authenticate Web users on wired or WiFi networks through an HTML
form that requests a user name and password (active authentication).
This exercise involves creating a user group (and adding a user to it); enabling captive portal and
restricting access based on that group; and enabling the disclaimer message.
Finally, you will authenticate through captive portal and monitor the authentication.
Creating a User Group for Captive Portal
Since the goal is to enable captive portal based on a specific group, you must first create a user group
and then add a user to the group. For the purposes of this exercise, you will add the user student to
the group. Student is a local user on FortiGate that was pre-configured for you.
To create a user group for captive portal
1. From the Local-Windows VM, open a browser and log in as admin to the Local-FortiGate GUI at
10.0.1.254.
2. Go to User & Device > User Groups and click Create New.
3. Complete the following:
Field
Value
Name
CP-group
Type
Firewall
Members
student
4. Click OK.
Enabling Captive Portal
In this procedure, you will enable captive portal on a wired network.
To enable captive portal
1. In the Local-FortiGate GUI, go to Network > Interfaces and edit port3.
This port is your incoming traffic. For more information, see the Network Topology.
2. Complete the following under the Admission Control section:
Field
Value
Security Mode
Captive Portal
Authentication Portal
Local
User Access
Restricted to Groups
User Groups
CP-group
DO NOT REPRINT
© FORTINET

LAB 5–Firewall Authentication
FortiGate I Student Guide 82
3. Click OK.
Enabling the Disclaimer Message
In order to provide those logging in through captive portal with a disclaimer message, you must enable
disclaimers. Since we are enabling captive portal through a wired interface, disclaimers can only be
enabled through the CLI.
Note: If captive portal is enabled through WiFi, you can enable disclaimers through the
GUI (WiFi & Switch Controller > SSID). We are using a wired interface in this lab.
To enable the disclaimer message
1. Open PuTTY on the Local-Windows VM and connect to the LOCAL-FORTIGATE saved session
(connect over SSH).
2. Log in as admin.
3. Type the following command:
config firewall policy
edit 1
set disclaimer enable
end
4. Close PuTTY.
Authenticating and Monitoring
Now that captive portal is configured and the disclaimer enabled, you can test it by authenticating
through captive portal as the student user. You will then monitor the authentication as the admin user.
To authenticate through captive portal
1. In the Local-Windows VM, open a new browser tab and go to any website, such as www.bbc.com.
2. When prompted, log in with username student and password fortinet.
DO NOT REPRINT
© FORTINET

LAB 5–Firewall Authentication
FortiGate I Student Guide 83
The Terms and Disclaimer Agreement dialog appears.
3. Click Yes, I agree.
Once you agree to the terms, you are redirected to the website you originally requested.
4. Open additional browser tabs and access a few more websites through captive portal, for
example:
www.youtube.com
www.cnn.com
5. Leave all browser tabs open and continue to the next procedure.
DO NOT REPRINT
© FORTINET

LAB 5–Firewall Authentication
FortiGate I Student Guide 84
To monitor active captive portal authentications
1. In the Local-Windows VM, return to the browser tab where you are logged into the Local-FortiGate
GUI as admin.
2. Monitor the student user. You can view this particular login authentication from Monitor > Firewall
User Monitor.
Note: While the CLI config user setting dictates how long a user authenticating
through captive portal can remain authenticated, you can choose to manually de-
authenticate a captive portal user by selecting the user in the Firewall User Monitor list and
clicking De-authenticate. Once de-authenticated, the user disappears from the list, as it is
reserved for active users only.
3. Select student and click De-authenticate to manually end the user's session.
4. Click OK.
5. Close the browser.
DO NOT REPRINT
© FORTINET

LAB 6–SSL VPN
FortiGate I Student Guide 85
LAB 6–SSL VPN
In this lab, you will manage user groups and portals for an SSL VPN.
Objectives
Configure and connect to an SSL VPN
Enable authentication security
Configure a firewall policies for SSL VPN users access to private network resources
Time to Complete
Estimated: 25 minutes
Prerequisites
Before beginning this lab, you must restore configuration file to the Local-FortiGate.
To restore the Local-FortiGate configuration file
1. From the Local-Windows VM, open a browser and log in as admin to the Local-FortiGate GUI at
10.0.1.254.
2. Go to Dashboard, and from the System Information widget click Restore.
3. Click Upload, browse to Desktop > Resources > FortiGate-I > Introduction and select
local-ssl-vpn.conf.
4. Click OK.
5. Click OK.
DO NOT REPRINT
© FORTINET
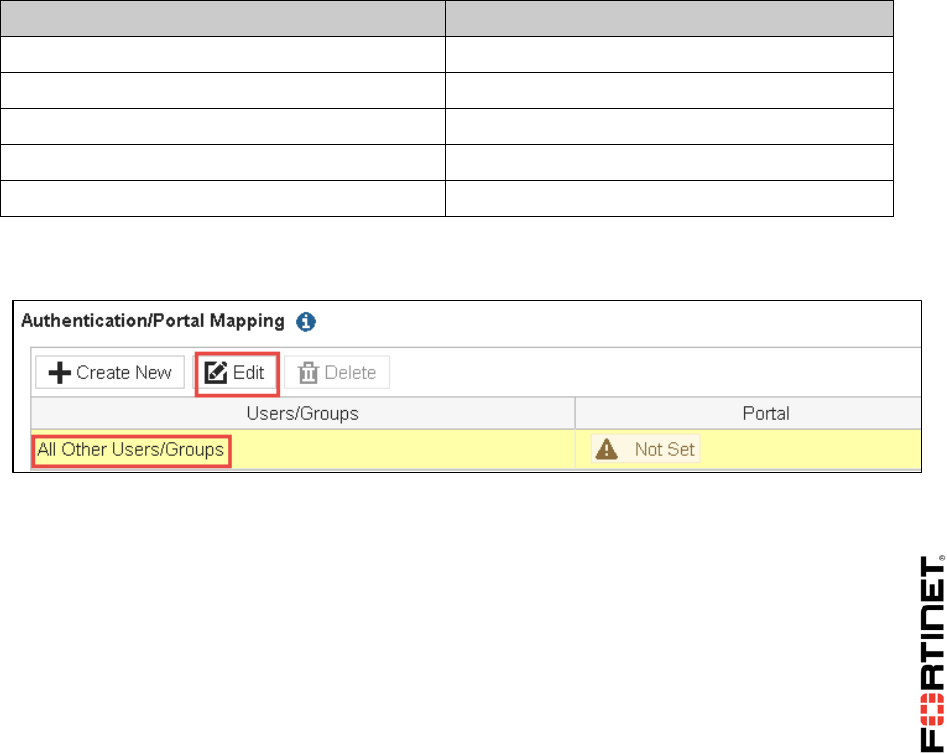
LAB 6–SSL VPN
FortiGate I Student Guide 86
1 Web-Only SSL VPN
FortiGate SSL VPN supports three operation modes: web-only, port forward and tunnel. During this
lab exercise you will test the web-only mode. The VPN in this lab will allow VPN users connecting from
the Remote-Windows VM to access the local subnet (10.0.1.0/24).
Configuring the SSL VPN Settings
This procedure configures the SSL VPN settings.
To configure the SSL VPN settings
1. From the Local-Windows VM, open a browser and log in as admin to the Local-FortiGate GUI at
10.0.1.254.
2. Go to VPN > SSL-VPN Settings.
3. Under the Connection Settings, configure the following values:
Field
Value
Listen on Interface(s)
port1
Listen on Port
10443
Restrict Access
Allow access from any host
Inactive For
3000 seconds
Server Certificate
Fortinet_Factory
4. Under the Tunnel Mode Client Settings, select Automatic assign addresses.
5. Under the Authentication/Portal Mapping, select All Other Users/Groups and click Edit:
6. Select the portal web-access from the drop-down list and click OK.
7. Click Apply to save all the changes.
8. Click OK to confirm the use of the built-in certificate.
Creating a Firewall Policy for SSL VPN
This procedure will create a firewall policy to allow traffic from SSL VPN users to the local subnet
(10.0.1.0/24).
DO NOT REPRINT
© FORTINET
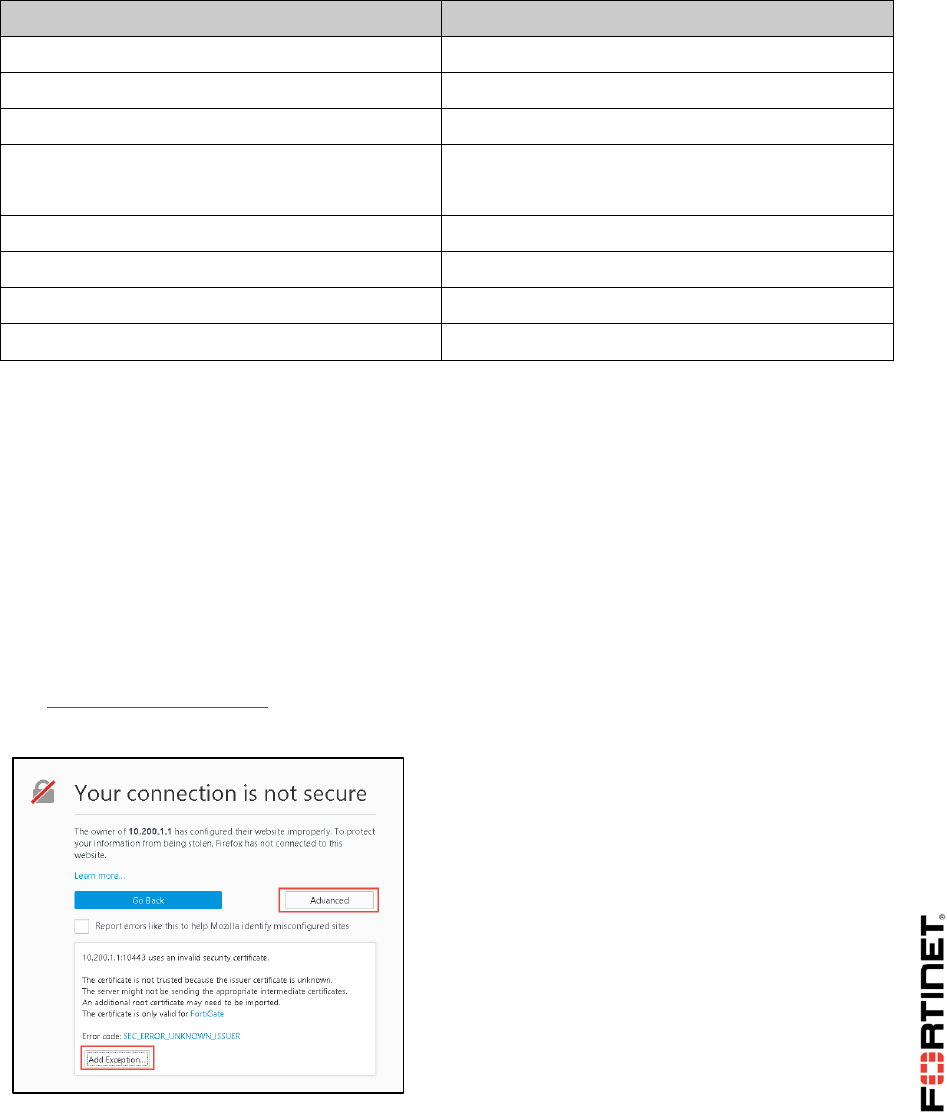
LAB 6–SSL VPN
FortiGate I Student Guide 87
To create a firewall policy for SSL VPN
1. In the Local-FortiGate, go to Policy & Objects > IPv4 Policy.
2. Click Create New and add the following firewall policy:
Field
Value
Name
SSL VPN Access
Incoming Interface
SSL-VPN tunnel interface
Outgoing Interface
port3
Source
SSLVPN_TUNNEL_ADDR1
SSL_VPN_USERS
Destination Address
LOCAL_SUBNET
Schedule
always
Service
ALL
Action
ACCEPT
3. Disable NAT and click OK.
4. Click OK to confirm the use of the built-in certificate.
Testing the SSL VPN
Now you will test the SSL VPN by connecting from the Remote-Windows VM.
To test the SSL VPN
1. Connect to the Remote-Windows VM.
2. Open Firefox and connect to:
https://10.200.1.1:10443/
3. To accept the security warning, click Advanced and select Add Exception.
4. Click Confirm Security Exception.
DO NOT REPRINT
© FORTINET
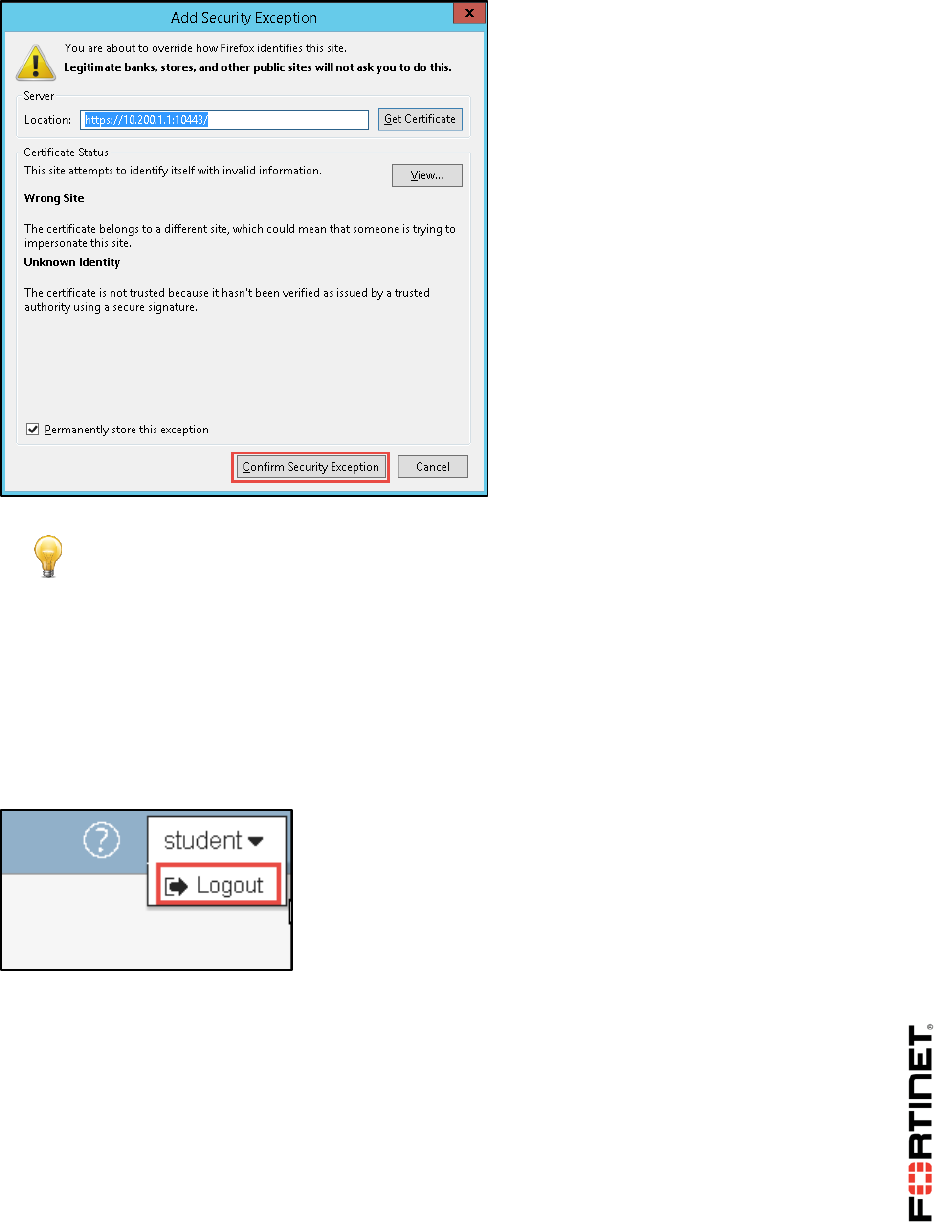
LAB 6–SSL VPN
FortiGate I Student Guide 88
Stop and Think
Why did you get this security warning?
For SSL connections, the FortiGate is using a built-in certificate, which is signed by a
certificate authority that the browser does not trust. In the Certificate Operations lesson of
the FortiGate II course, you can learn more about why this happens and how to fix it.
5. Log in as student with the password fortinet.
Notice that the web portal is using its default settings.
6. Log out:
Adding a Bookmark to the Portal
Using this procedure, you will add a bookmark to the portal.
To add a bookmark to the portal
1. Go back to the Local-Windows VM and connect to the Local-FortiGate GUI.
2. Go to VPN >SSL-VPN Portals.
3. Click the web-access row, and then click Edit.
DO NOT REPRINT
© FORTINET
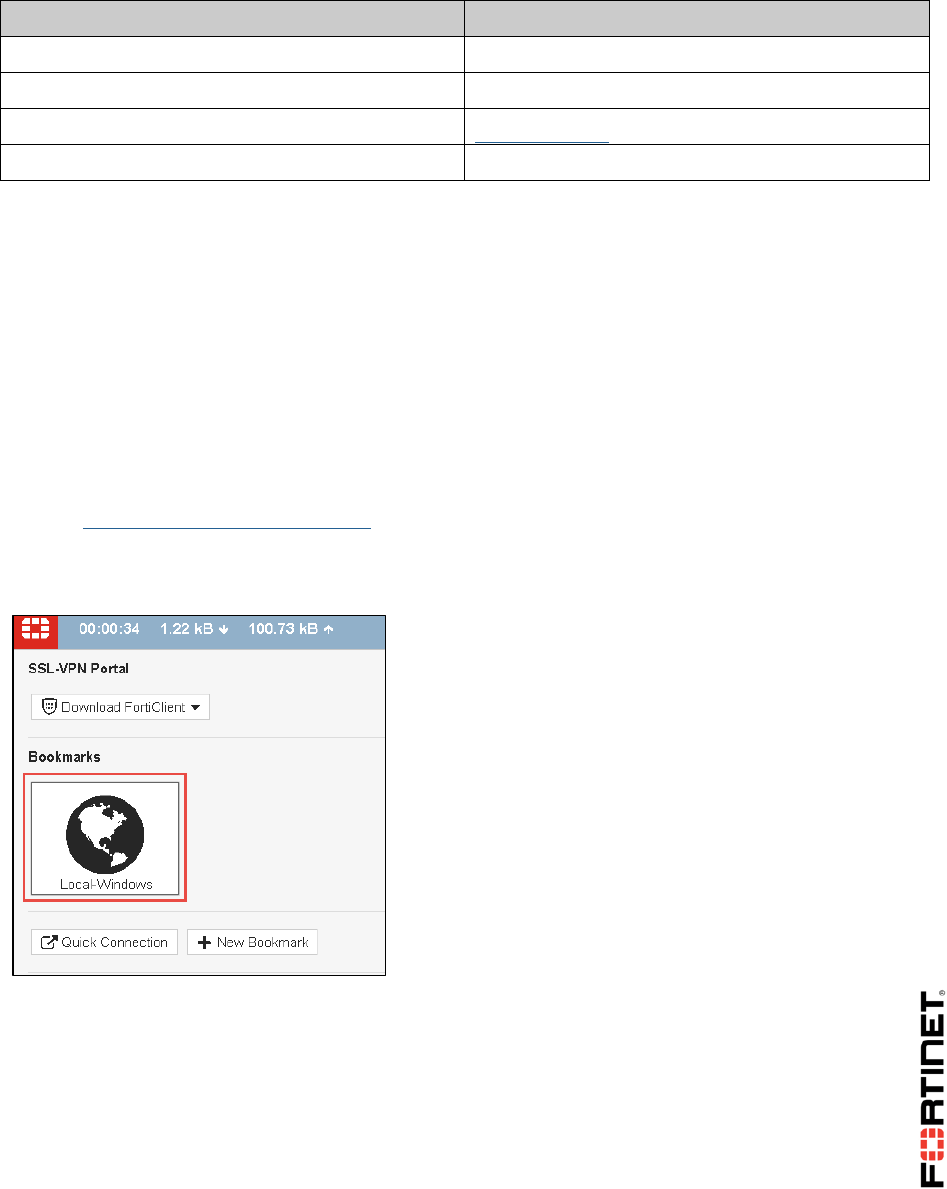
LAB 6–SSL VPN
FortiGate I Student Guide 89
4. In the Predefined Bookmarks section, click Create New. Configure these settings:
Field
Value
Name
Local-Windows VM
Type
HTTP/HTTPS
URL
http://10.0.1.10
Single Sign-On
Disabled
5. Click OK to close the bookmark.
6. Click OK again to save the portal's settings.
Testing the Bookmark
You will connect to the SSL VPN tunnel again from the Remote-Windows VM and confirm that you can
access 10.0.1.10 from the bookmark.
To test the bookmark
1. From the Remote-Windows VM, open Firefox and connect to the SSL VPN portal again:
https://10.200.1.1:10443
2. Log in using the account student with the password fortinet.
3. Click on the Local-Windows VM bookmark.
4. You will connect to the web server running in the Local-Windows VM (10.0.1.10).
DO NOT REPRINT
© FORTINET
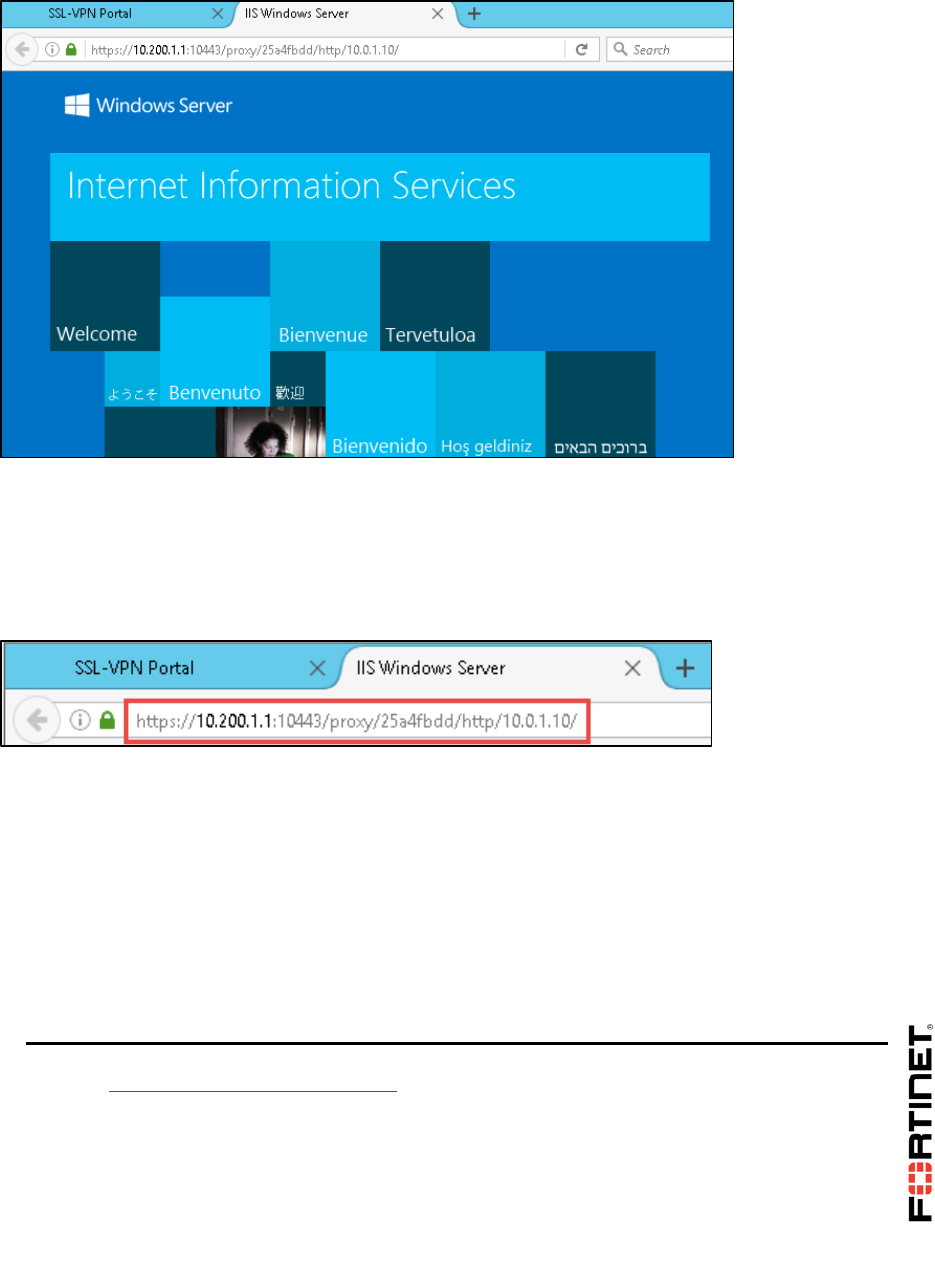
LAB 6–SSL VPN
FortiGate I Student Guide 90
Examining the Web-Only (Reverse HTTP Proxy)
Mechanism
Observe the URL in the address bar.
What does it mean?
To examine the reverse HTTP proxy mechanism
1. In the browser's address bar, notice the URL.
https://10.200.1.1:10443/proxy/..../http/10.0.1.10/
If you were on the local network while accessing the website, the address would be
http://10.0.1.10. But, since you are accessing it remotely, through FortiGate's HTTP proxy, the
URL is different.
Part of the URL
Description
https://10.200.1.1:10443
Indicates that the connection is SSL/TLS-
encrypted, and that the portal is on FortiGate's
port1 SSL VPN gateway.
/proxy/..../http/
Indicates that the connection is being handled by
FortiGate's HTTP reverse proxy.
10.0.1.10/
Indicates the destination IP address of the website
inside your private network, which you are
accessing through the VPN.
DO NOT REPRINT
© FORTINET
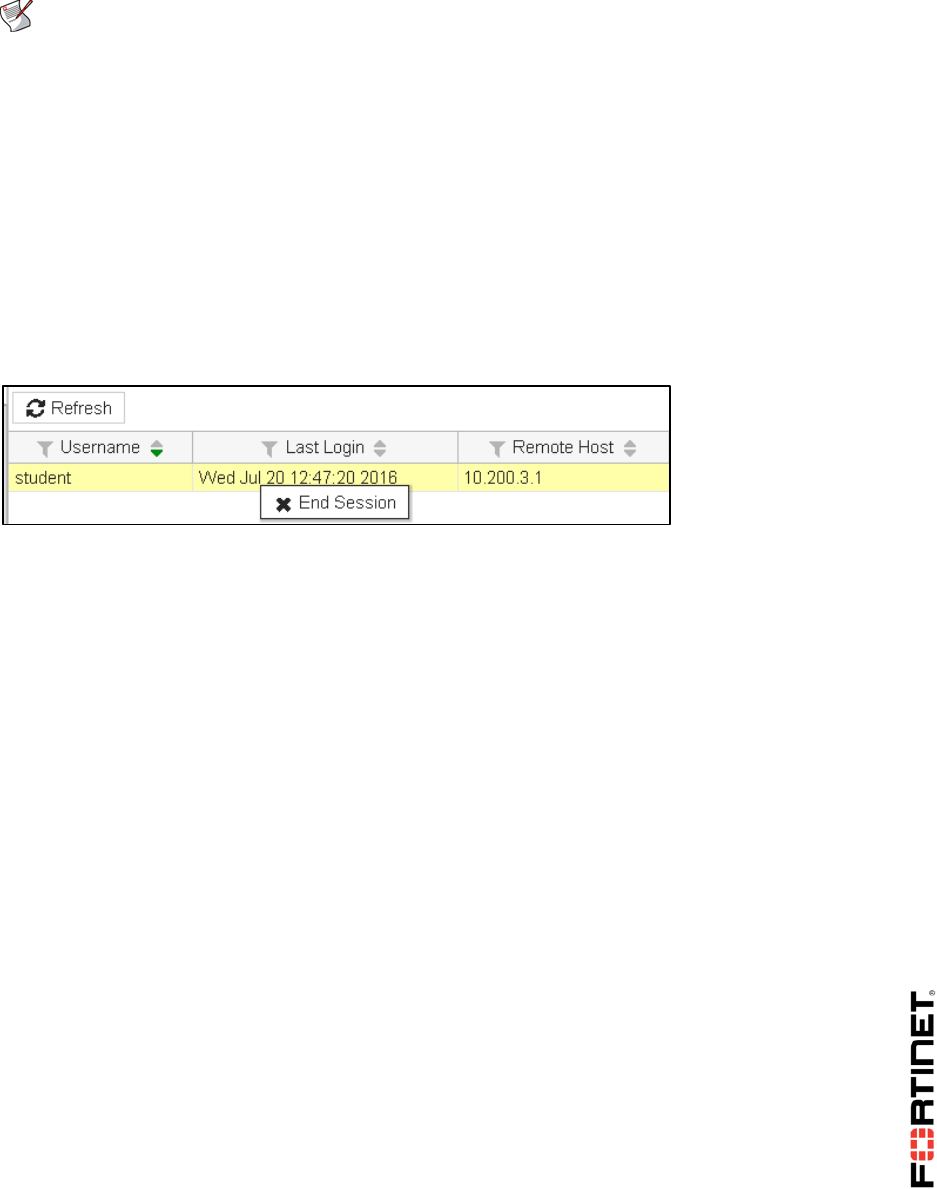
LAB 6–SSL VPN
FortiGate I Student Guide 91
Note: The FortiGate encrypts the connection to the browser. But the destination server's
IP address in the URL is displayed in clear text, not hidden from users. The secondary
connection, from FortiGate's HTTP proxy to the bookmarked website, is not encrypted.
Disconnecting an SSL VPN User
This procedure shows how to disconnect an SSL VPN user from the FortiGate GUI.
To disconnect an SSL VPN user
1. From the Local-Windows VM, connect back to the Local-FortiGate GUI.
2. Go to Monitor > SSL-VPN Monitor.
3. Right click on the user student and select End Session.
DO NOT REPRINT
© FORTINET
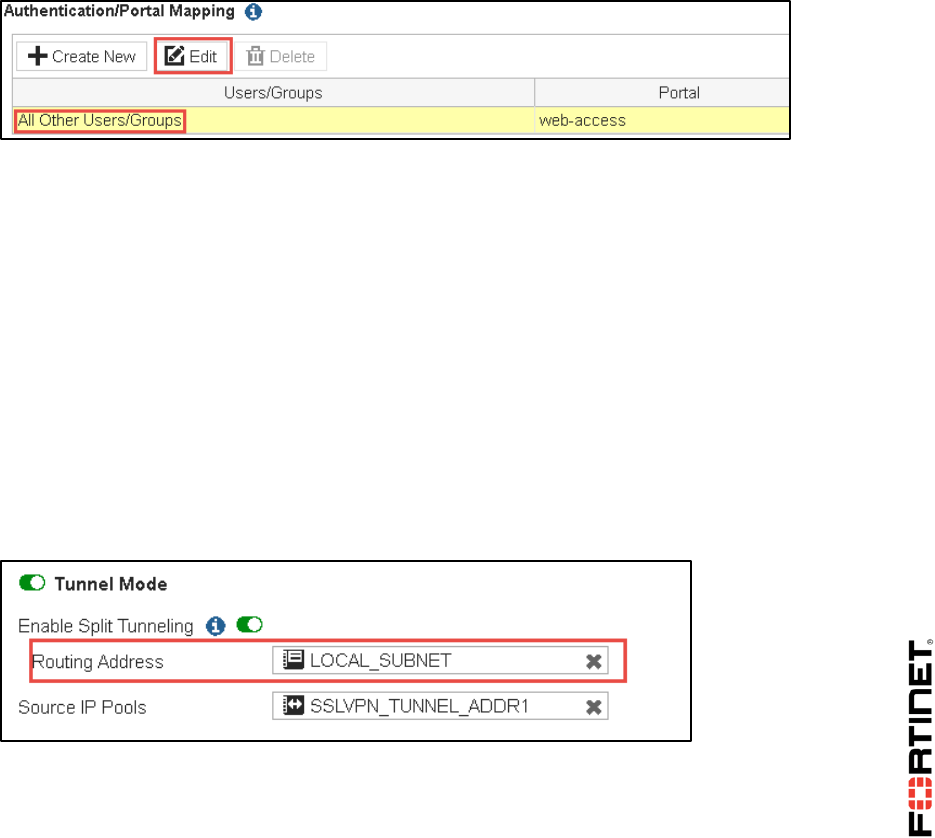
LAB 6–SSL VPN
FortiGate I Student Guide 92
2 SSL VPN Tunnel Mode
In this exercise, your will change the SSL VPN configuration to support tunnel mode.
Adding Tunnel Mode
The SSL VPN portal associated with each user group determines who has tunnel mode access. You
will change the SSL VPN configuration to use the portal full-access, which supports tunnel mode.
To add tunnel mode
1. In the Local-FortiGate GUI, go to VPN > SSL-VPN Settings.
2. Under the Authentication/Portal Mapping, select All Other Users/Groups and click Edit:
3. Select full-access and click OK.
4. Click Apply.
5. Click OK to confirm the use of the built-in certificate.
Configuring the Routing for Tunnel Mode
In tunnel mode, the FortiClient installs one or more routes in the SSL VPN client once the tunnel is
connected. In this way, traffic destined to the internal subnets is properly routed through the tunnel.
To configure the routing for tunnel mode
1. In the Local-FortiGate GUI, go to VPN > SSL-VPN Portal.
2. Select the full-access portal and click Edit.
3. Set the Routing Address to LOCAL_SUBNET:
4. Click OK.
DO NOT REPRINT
© FORTINET

LAB 6–SSL VPN
FortiGate I Student Guide 93
Configuring FortiClient for SSL VPN
Connecting SSL VPN tunnel mode requires FortiClient. You will use the FortiClient installed in the
Remote-Windows VM to test your configuration.
To configure FortiClient for SSL VPN
1. From the Remote-Windows VM, start FortiClient.
2. Click Configure VPN.
3. Select the SSL-VPLN tab and configure the following settings:
Field
Value
Connection Name
Local-FortiGate
Remote Gateway
10.200.1.1
Customize port
Enabled and 10443
4. Click Apply.
5. Click Close.
Testing the Tunnel Mode
You will connect using the student account to test the tunnel mode.
To test the tunnel mode
1. In the Remote-Windows VM. Open FortiClient and enter the username student with the
password fortinet.
DO NOT REPRINT
© FORTINET
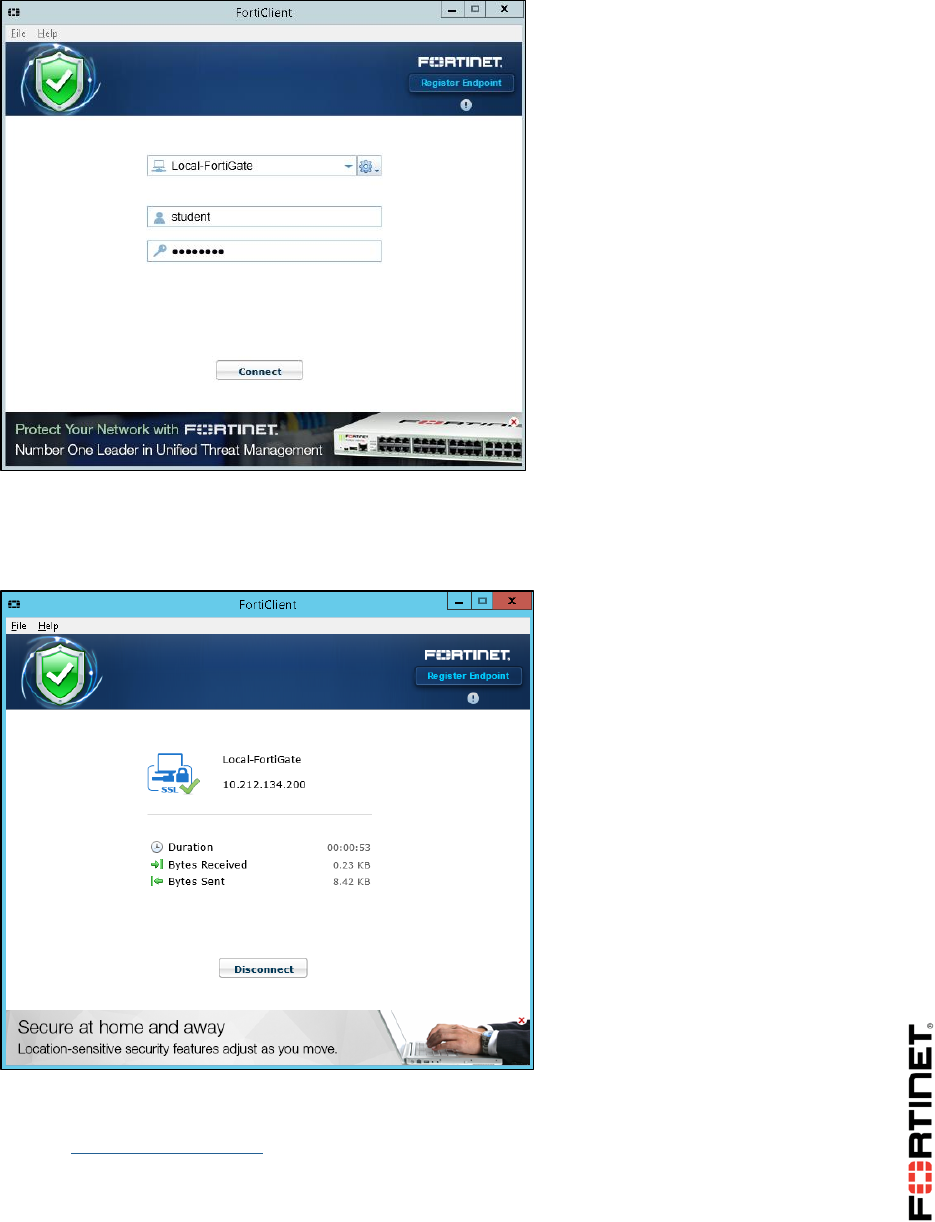
LAB 6–SSL VPN
FortiGate I Student Guide 94
2. Click Connect.
3. Click Yes to accept the certificate.
4. Wait a few seconds and open FortiClient again. You should observe that the tunnel is connected.
5. Open Firefox and access the URL:
http://10.0.1.10
Observe that you are now using the web server URL as if you were connected locally. You are
not using the reverse HTTP proxy as in the case of web-only mode. Your IP traffic is directly
encapsulated over HTTPS and sent through the tunnel.
6. Go back to FortiClient and click Disconnect.
DO NOT REPRINT
© FORTINET

LAB 7–Basic IPsec VPN
FortiGate I Student Guide 95
LAB 7–Basic IPsec VPN
In this lab, you will configure a point-to-point IPsec VPN between two FortiGate devices.
Objectives
Identify the phases of Internet Key Exchange (IKEv1).
Compare route-based to policy-based VPNs.
Deploy a site-to-site VPN between two FortiGates.
Monitor VPN tunnels.
Time to Complete
Estimated: 30 minutes
Prerequisites
Before beginning this lab, you must restore configuration files to the Local-FortiGate and Remote-
FortiGate.
To restore the Remote-FortiGate configuration file
1. From the Local-Windows VM, open a browser and log in as admin to the Remote-FortiGate GUI
at 10.200.3.1.
2. Go to Dashboard, and from the System Information widget click Restore.
3. Select to restore from Local PC and click Upload.
DO NOT REPRINT
© FORTINET
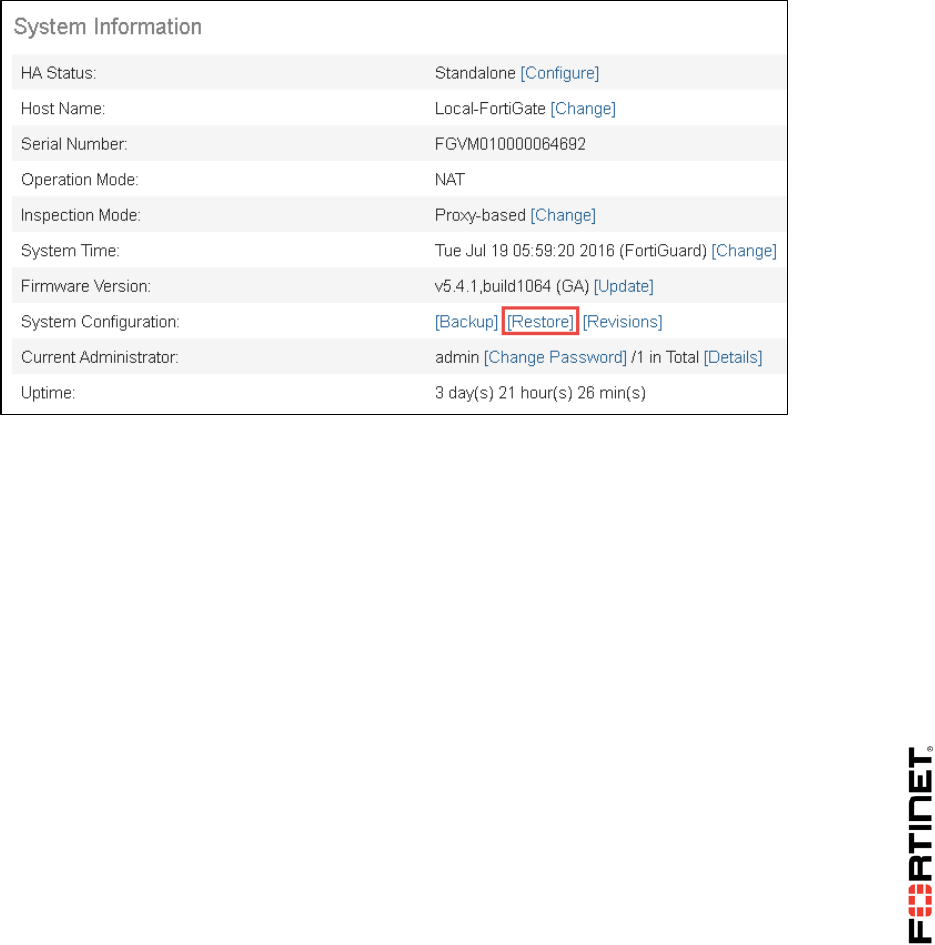
LAB 7–Basic IPsec VPN
FortiGate I Student Guide 96
4. Browse to Desktop > Resources > FortiGate-I > Introduction and select remote-
initial.conf.
5. Click OK.
6. Click OK to reboot.
To restore the Local-FortiGate configuration file
1. From the Local-Windows VM, open a browser and log in as admin to the Local-FortiGate GUI at
10.0.1.254.
2. Go to Dashboard, and from the System Information widget click Restore.
3. Select to restore from Local PC and click Upload.
4. Browse to Desktop > Resources > FortiGate-I > Introduction and select local-
initial.conf.
5. Click OK.
6. Click OK to reboot.
DO NOT REPRINT
© FORTINET
LAB 7–Basic IPsec VPN
FortiGate I Student Guide 97
1 Route-based IPsec VPN
During this lab you will configure an IPsec tunnel between the Local-FortiGate and the Remote-
FortiGate for communication between the Local-Windows VM and Remote-Windows.
Creating a VPN Using the VPN Wizard
You will configure the Local-FortiGate side using the VPN wizard, which creates the IPsec in route-
based mode.
To create a VPN using the VPN wizard
1. From the Local-Windows VM, open a browser and log in as admin to the Local-FortiGate GUI at
10.0.1.254.
2. Go to VPN > IPsec Tunnels.
3. Click Create New.
4. Configure the following settings:
Field
Value
Name
ToRemote
Template Type
Site to Site
Remote Device Type
FortiGate
NAT Configuration
No NAT between sites
5. Click Next .
6. Configure the following settings:
Field
Value
Remote Device
IP Address
IP Address
10.200.3.1
Outgoing interface
port1
Authentication Method
Pre-shared Key
Pre-shared Key
fortinet
7. Click Next.
8. Configure the following settings:
Field
Value
Local Interface
port3
Local Subnets
10.0.1.0/24
Remote Subnets
10.0.2.0/24
9. Click Create. You should see the following screen:
DO NOT REPRINT
© FORTINET

LAB 7–Basic IPsec VPN
FortiGate I Student Guide 98
10. Click Show Tunnel List. You will see the VPN you have just created:
Reviewing the Objects Created By the VPN Wizard
You will review what was created by the VPN wizard.
To review the objects created by the VPN wizard
1. In the Local-FortiGate GUI, go to VPN > IPsec Tunnels.
2. Select the VPN and click Edit. Observer the quick mode selectors that the wizard configured for
you:
DO NOT REPRINT
© FORTINET
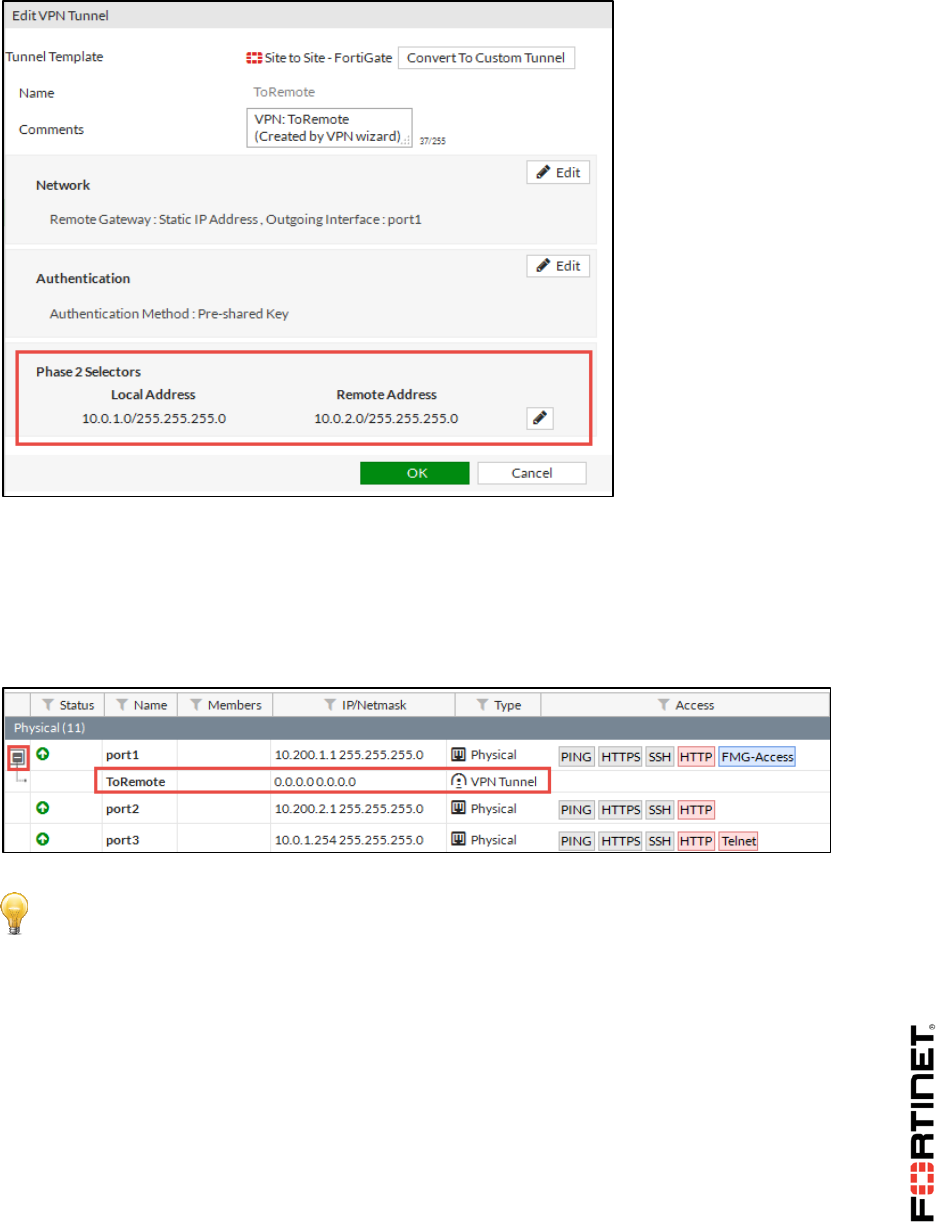
LAB 7–Basic IPsec VPN
FortiGate I Student Guide 99
You will need this information to configure the other FortiGate. The quick mode selectors in both
sides must mirror each other. In other words, the Local Address in one side must match the
Remote Address in the other side.
3. Go to Network > Interfaces.
4. Click on the plus sign added to port1. You will see a new virtual interface named ToRemote
(matching the phase 1 name).
Stop and Think
What does this virtual interface tell us about the VPN created by the wizard? Is it policy-
based or route-based?
Discussion
The wizard created the VPN using a route-based configuration. The FortiGate
automatically adds an IPsec virtual interface for each VPN configured as route-based. This
does not happen in a policy-based configuration.
A route-based VPN requires firewall policies and at least one route to the remote network. As
you will see, the wizard has created all these additional objects for you.
5. Go to Policy & Objects > Addresses and observe two new Firewall address objects:
ToRemote_local_subnet_1, and ToRemote_remote_subnet_1.
6. Go to Policy & Objects > IPv4 Policy and observe the new two firewall policies: one from
DO NOT REPRINT
© FORTINET

LAB 7–Basic IPsec VPN
FortiGate I Student Guide 100
port3 to ToRemote and another one from ToRemote to port3. You will see that the Action is
both cases is ACCEPT.
7. Go to Network > Static Routes and look at the static route added by the wizard.
You have completed the VPN configuration on the Local-FortiGate side. In the next exercise you will
do the configuration on the Remote-FortiGate side.
DO NOT REPRINT
© FORTINET

LAB 7–Basic IPsec VPN
FortiGate I Student Guide 101
2 Policy-based IPsec VPN
For learning purposes, you will do the configuration in both FortiGates differently. During this exercise
you will create the VPN on the Remote-FortiGate side without using the wizard and using a policy-
based configuration.
Un-hiding the Policy-based VPN Settings
Policy-based configuration is hidden from the GUI by default. You will un-hide it.
To un-hide the policy-based VPN settings
1. From the Local-Windows VM, open a browser and log in as admin to the Remote-FortiGate GUI at
10.200.3.1.
2. Go to System > Feature Select.
3. Enable Policy-based IPsec VPN.
4. Click Apply.
Creating a Policy-based VPN
You will create the phases 1 and 2.
To create a policy-based VPN
1. In the Remote-FortiGate GUI, go to VPN > IPsec Tunnels.
2. Click Create New.
3. Type the name ToLocal and select Custom as the template name.
4. Click Next.
5. Disable the setting Enable IPsec Interface Mode:
6. Configure the following settings:
Field
Value
Remote Gateway
Static IP Address
IP Address
10.200.1.1
Interface
port4
Mode Config
Disabled
NAT Transversal
Disabled
DO NOT REPRINT
© FORTINET

LAB 7–Basic IPsec VPN
FortiGate I Student Guide 102
Dead Peer Detection
On Idle
Method
Pre-shared Key
Pre-shared Key
fortinet
7. Leave the other parameters with its default values and scroll down the windows to display the
phase 2 settings. Click the pencil icon to edit the Phase 2 Selectors:
8. Enter 10.0.2.0/24 as the Local Address and 10.0.1.0/24 as the Remote Address:
9. Click OK.
Creating a Firewall Policy for Policy-based VPN
The last step is to create a firewall policy to allow traffic. In a policy-based configuration only one
policy is required to allow traffic initiated at either side. The policy is applied bi-directionally.
To create a firewall policy for policy-based VPN
1. In the Remote-FortiGate GUI, go to Policy & Objects > IPv4 Policy.
Note: Now the quick mode selectors in both sides mirror each other. If that is not the
case, the tunnel will not come up.
DO NOT REPRINT
© FORTINET

LAB 7–Basic IPsec VPN
FortiGate I Student Guide 103
2. Click Create New.
3. Configure the following settings:
Field
Value
Name
VPN traffic to Local
Incoming Interface
port6
Outgoing Interface
port4
Source
REMOTE_SUBNET
Destination Address
LOCAL_SUBNET
Schedule
always
Service
ALL
Action
IPsec
VPN Tunnel
ToLocal
Allow traffic to be initiated from the remote site
Enabled
4. Click OK.
Moving a Firewall Policy
The new policy was created below the firewall policy for Internet traffic. You will need to move it up for
the VPN traffic to match it.
To move a firewall policy
1. In the Remote-FortiGate GUI, go to Policy & Objects > IPv4 Policy.
2. Expand the list of firewall policies from port6 to port4:
3. Drag and drop the policy for VPN traffic to Local to the top:
Note: This is probably the first time you see the action IPsec for a firewall policy. In
previous exercises the available actions were Accept and Deny only. The action IPsec is
displayed in the GUI only when the policy-based VPN settings are not hidden.
DO NOT REPRINT
© FORTINET

LAB 7–Basic IPsec VPN
FortiGate I Student Guide 104
Stop and Think
In the previous exercise, the VPN wizard added a static route for the VPN traffic. Why
don't you need to add a static route in this case?
Discussion
The VPN wizard creates the IPsec using route-based configuration, which always requires
additional routes (usually static routes) to route the traffic through the IPsec virtual
interface. This is usually not required in policy-based configuration. What policy-based
configuration requires is the VPN traffic matching a firewall policy with the action IPsec. As
traffic from 10.0.2.0/24 to 10.0.1.0/24 matches the existing default route, and so the IPsec
firewall policy from port6 to port4, no additional routes are needed.
DO NOT REPRINT
© FORTINET
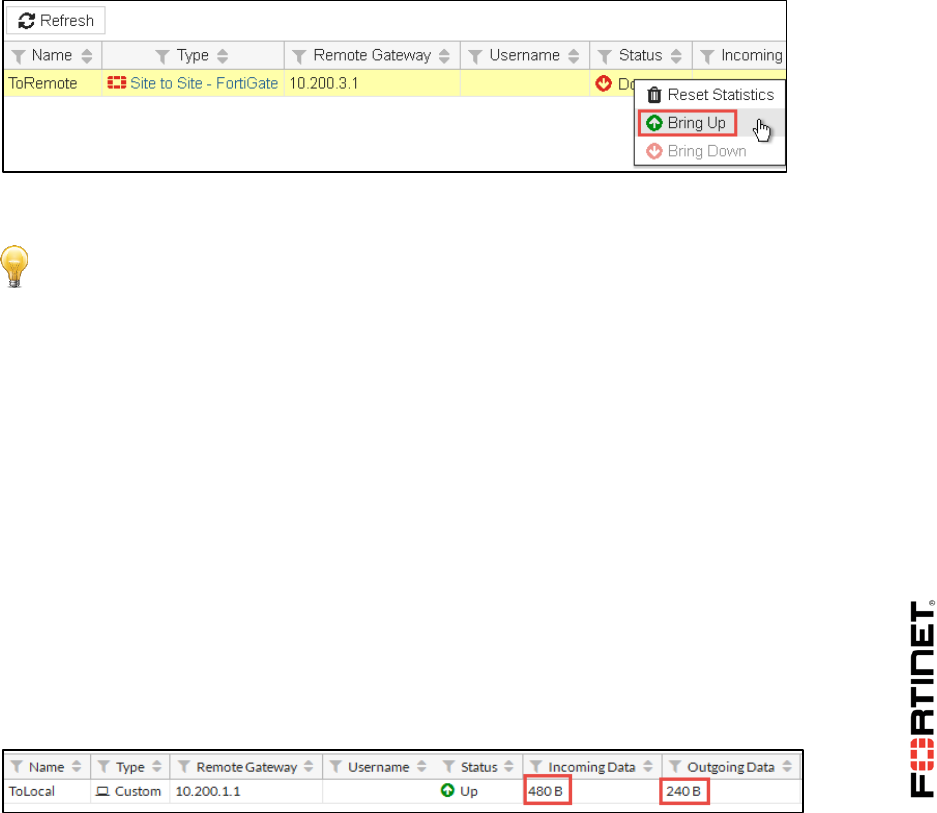
LAB 7–Basic IPsec VPN
FortiGate I Student Guide 105
3 Testing and Monitoring the VPN
You have finished the configuration in both FortiGates. The next step is to test the VPN.
Testing the VPN
You will test the VPN.
To test the VPN
1. From the Local-Windows VM, open a browser and log in as admin to the Local-FortiGate GUI at
10.0.1.254.
2. Go to Monitor > IPsec Monitor. Observe that the VPN is currently down.
3. Right click the VPN and select Bring Up:
The Status of the VPN will show the green up arrow, indicating that the tunnel is up.
Stop and Think
Do I always have to manually bring the tunnel after creating?
Discussion
No. With the current configuration, the tunnel will stay down until either you manually bring
it up or there is traffic that should be routed through the tunnel. As you are not generating
traffic between 10.0.1.0/24 and 10.0.2.0/24 yet, the tunnel was still down. If you had
generated the required traffic while the tunnel was down, it would have gone up
automatically.
4. Open a command prompt window in the Local-Windows VM and execute the following command
to ping Remote-Windows:
ping 10.0.2.10
The ping should work.
5. Go back to the Local-FortiGate GUI and go to Monitor > IPsec Monitor.
6. Click Refresh to refresh the screen. You will observer that counters for Incoming Data and
Outgoing Data have increased. This indicates that the traffic between 10.0.1.10 is 10.0.2.10 is
successfully being encrypted and routed through the tunnel:
Congratulations. You have successfully configured an IPsec VPN between two FortiGate devices.
DO NOT REPRINT
© FORTINET
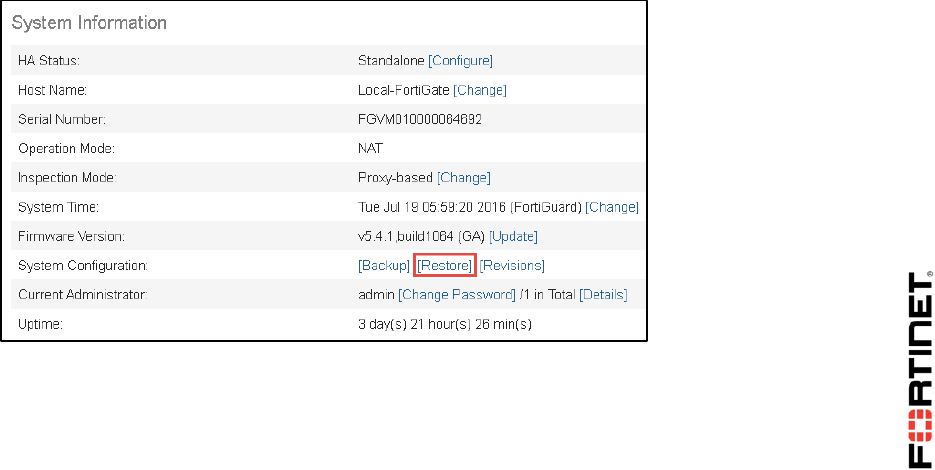
LAB 8–Explicit Web Proxy
FortiGate I Student Guide 106
LAB 8–Explicit Web Proxy
In this lab, you will learn how to configure FortiGate to be an explicit web proxy.
Objectives
Configure FortiGate to act as an explicit web proxy.
Use a PAC file to configure explicit proxy settings in web browsers.
Authenticate and monitor explicit web proxy users.
Time to Complete
Estimated: 30 minutes
Prerequisites
Before beginning this lab, you must restore a configuration file to the Local-FortiGate.
To restore the FortiGate configuration file
1. From the Local-Windows VM, open a browser and log in as admin to the Local-FortiGate GUI at
10.0.1.254.
2. Go to Dashboard, and from the System Information widget click Restore.
3. Select to restore from Local PC and click Upload.
4. Browse to Desktop > Resources > FortiGate-I > Explicit-Proxy and select local-
explicit-proxy.conf.
5. Click OK.
6. Click OK to reboot.
DO NOT REPRINT
© FORTINET

LAB 8–Explicit Web Proxy
FortiGate I Student Guide 107
1 Configuring the Explicit Web Proxy
During this exercise you will configure the FortiGate to be an explicit web proxy. You will also
configure the FortiGate to authenticate explicit web proxy users and allow Internet access to only one
user.
After that, you will manually configure Firefox with the proxy IP address and port.
Un-hiding the Explicit Web Proxy Setting
Explicit web proxy settings are hidden from the GUI by default. You will un-hide them.
To un-hide the explicit web proxy setting
1. From the Local-Windows VM, open a browser and log in as admin to the Local-FortiGate GUI at
10.0.1.254.
2. Go to System > Feature Select.
3. Under Security Features, enable Explicit Proxy.
4. Click Apply.
Enabling Explicit Web Proxy
You will enable explicit web proxy on the network setting.
To enable explicit web proxy
1. In the Local-FortiGate GUI, go to Network > Explicit Proxy.
2. Enable Explicit Web Proxy.
3. For HTTPS port, select Use HTTP Port.
4. Click Apply.
Enabling Explicit Web Proxy on an Interface
You will specify which internal interface the explicit web proxy will listen on.
To enable explicit web proxy on an interface
1. In the Local-FortiGate GUI, go to Network > Interfaces
2. Edit the interface port3.
3. Enable the option Enable Explicit Web Proxy
4. Click OK.
DO NOT REPRINT
© FORTINET
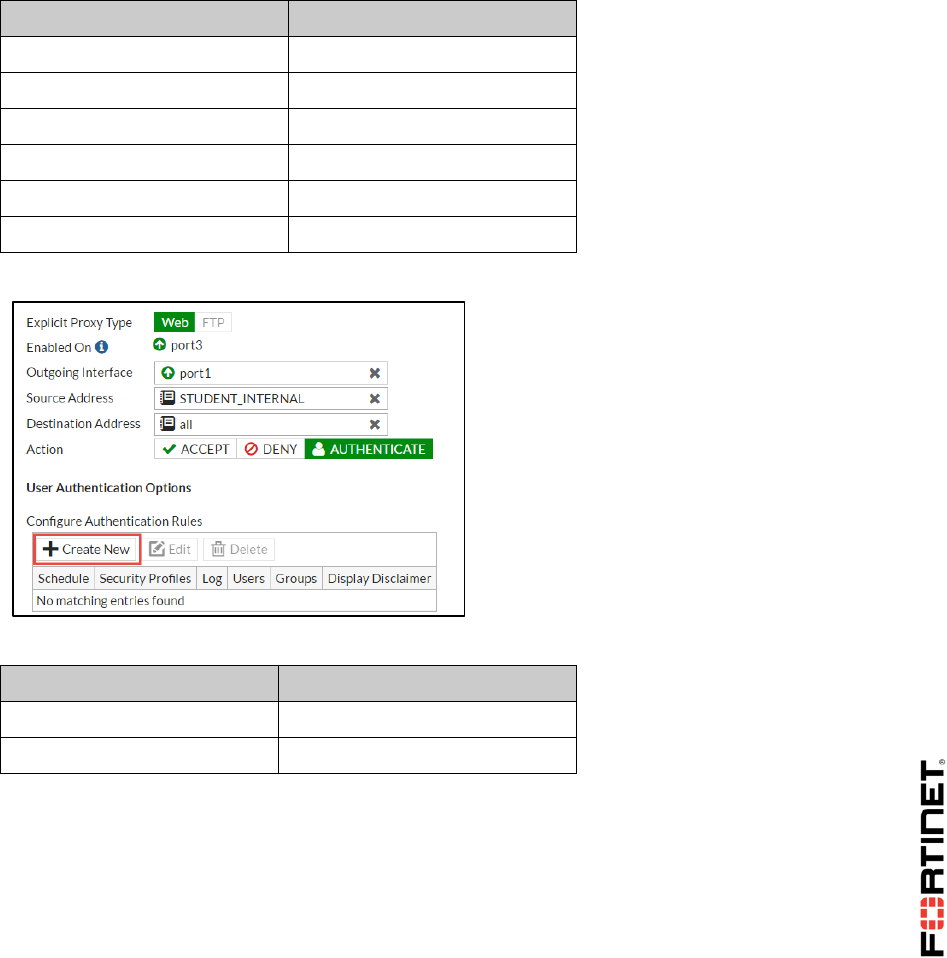
LAB 8–Explicit Web Proxy
FortiGate I Student Guide 108
Creating an Explicit Proxy Policy
You will create the policy to allow explicit proxy traffic to the Internet. Only the user student will be
allowed to browse the Internet through the proxy.
To create an explicit proxy policy
1. In the Local-FortiGate GUI, go to Policy & Objects > Explicit Proxy Policy.
2. Click Create New.
3. Configure these settings:
Field
Value
Explicit Proxy Type
Web
Enabled On
port3
Outgoing Interface
port1
Source Address
LOCAL_SUBNET
Destination Address
all
Action
AUTHENTICATE
4. Click Create New to add an authentication rule:
5. Configure the following settings:
Field
Value
Users/Groups
student
Schedule
always
6. Click OK.
7. Click OK.
Configuring Firefox for Explicit Web Proxy
You have configured the Local-FortiGate as an explicit web proxy. Now you will configure Firefox to
use it.
DO NOT REPRINT
© FORTINET
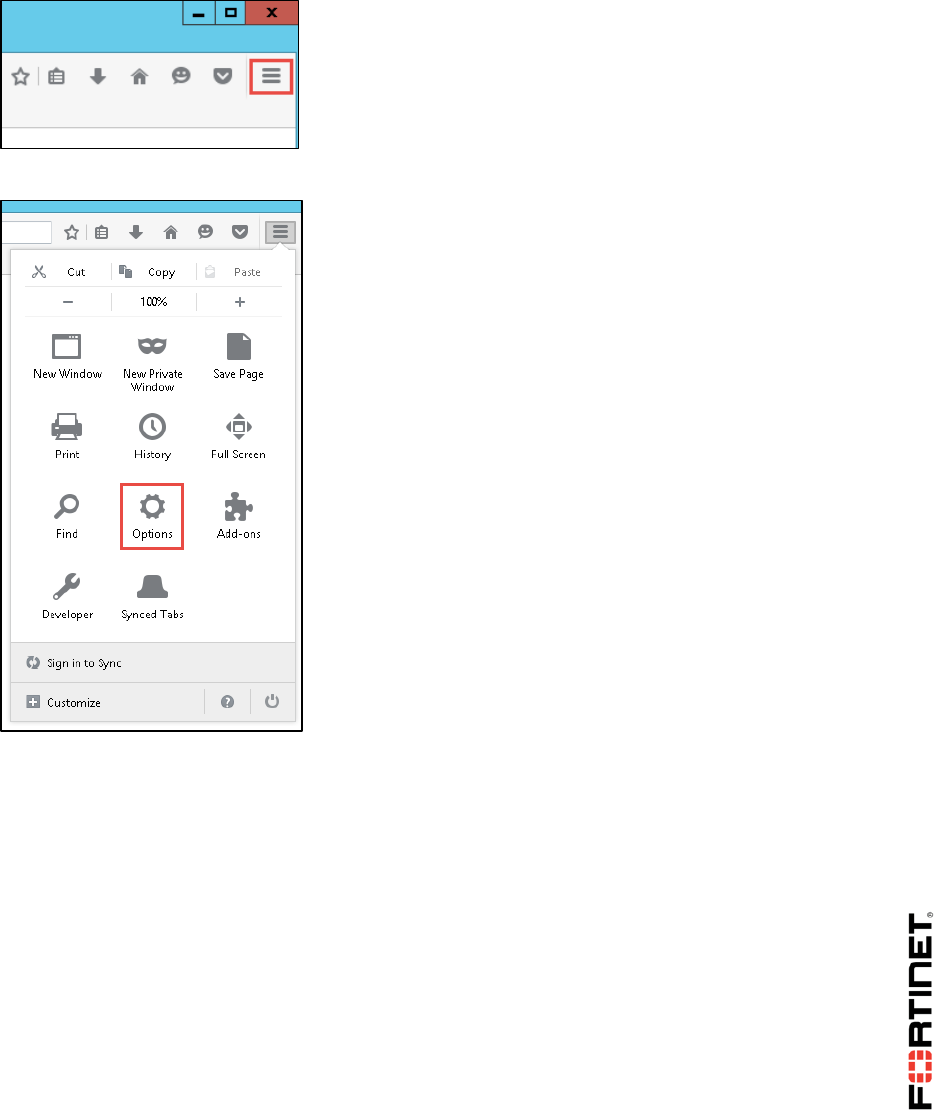
LAB 8–Explicit Web Proxy
FortiGate I Student Guide 109
To configure Firefox for explicit web proxy
1. On the Local-Windows VM, open Firefox.
2. Click the Open Menu icon on the top right corner:
3. Select Options:
4. Go to the Advanced > Network tab.
5. Click Settings:
DO NOT REPRINT
© FORTINET
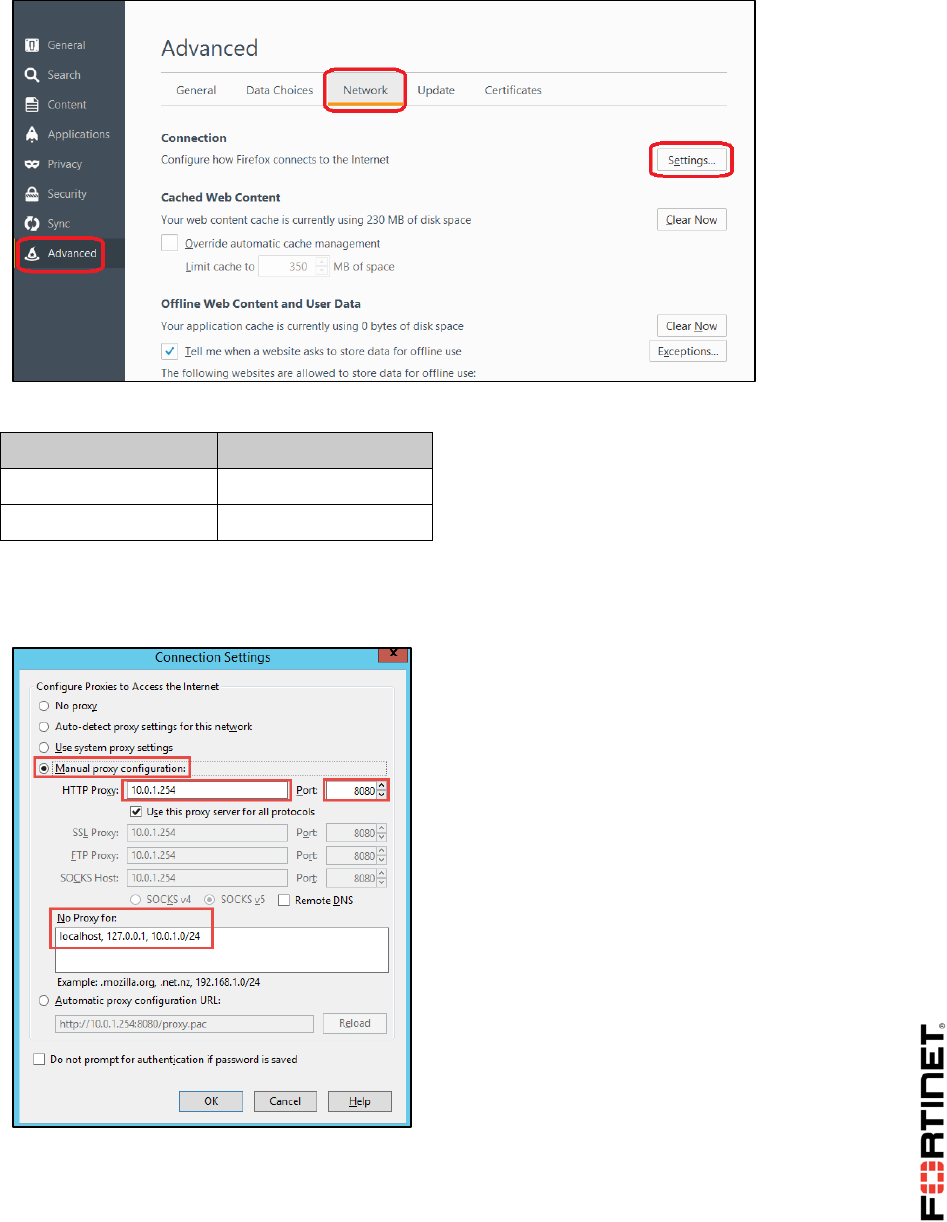
LAB 8–Explicit Web Proxy
FortiGate I Student Guide 110
6. Select Manual proxy configuration and enter:
Field
Value
HTTP Proxy
10.0.1.254
Port
8080
7. Enable the option Use this proxy server for all protocols.
8. Add the subnet 10.0.1.0/24 (separated by a comma) to the No Proxy for list. This list contains the
names, IP addresses and subnets of web sites that will be exempted from using the proxy:
9. Click OK.
10. Close Firefox and open it again.
DO NOT REPRINT
© FORTINET

LAB 8–Explicit Web Proxy
FortiGate I Student Guide 111
Testing the Explicit Web Proxy Configuration
You will test the explicit web proxy configuration.
To test the explicit web proxy configuration
1. From Local-Windows VM, open Firefox and browse to any HTTP web site, such as:
http://www.pearsonvue.com/fortinet/
http://cve.mitre.org
http://www.eicar.org
2. FortiGate will ask for authentication. Use these credentials:
Field
Value
User Name
student
Password
fortinet
After that, you should have Internet access through the explicit web proxy.
Listing the Active Explicit Web Proxy Users
You will execute a CLI command to display the list of active explicit web proxy users.
To list the active explicit web proxy users
1. In the Local-Windows VM, open PuTTY and connect to the LOCAL-FORTIGATE saved session
(connect over SSH).
2. Type the following CLI command to check the list of active web proxy users:
# diagnose wad user list
3. You can also check this list from the GUI, by going to Monitor > Firewall User Monitor.
Listing the Active Explicit Web Proxy Sessions
For each explicit web proxy connection to a web site, two TCP connections are usually created: one
from the client to the proxy, and another one from the proxy to the server.
You will run some debug commands to list the sessions established between the client and the
proxy; then the sessions established between the proxy and the servers.
To list the active explicit web proxy sessions between the client and the proxy
1. In the Local-Windows VM, open a few tabs in Firefox and generate some HTTP traffic, such
as:
http://www.pearsonvue.com/fortinet/
http://cve.mitre.org
DO NOT REPRINT
© FORTINET

LAB 8–Explicit Web Proxy
FortiGate I Student Guide 112
http://www.eicar.org
2. From the Local-FortiGate CLI, type these CLI commands while browsing some HTTP sites:
diagnose sys session filter clear
diagnose sys session filter dport 8080
diagnose sys session list
You can also use the grep command to display only the source and destination IP addresses and
ports for each session:
diagnose sys session list | grep hook=pre
Why is the source IP address of all those sessions 10.0.1.10?
Why is the destination IP address of all those sessions 10.0.1.254?
Why don’t we see any public IP address listed in those sessions?
To list the active explicit web proxy sessions between the proxy and the servers
1. In the Local-Windows VM, open a few tabs in Firefox and generate some HTTP traffic, such as:
http://www.pearsonvue.com/fortinet/
http://cve.mitre.org
http://www.eicar.org
2. From the Local-FortiGate CLI, type these CLI commands while browsing some HTTP sites:
diagnose sys session filter clear
diagnose sys session filter dport 80
diagnose sys session list | grep hook=out
Why is the source IP address of all these sessions 10.200.1.1?
Why don’t we see the IP address of Windows server (10.0.1.10)?
DO NOT REPRINT
© FORTINET
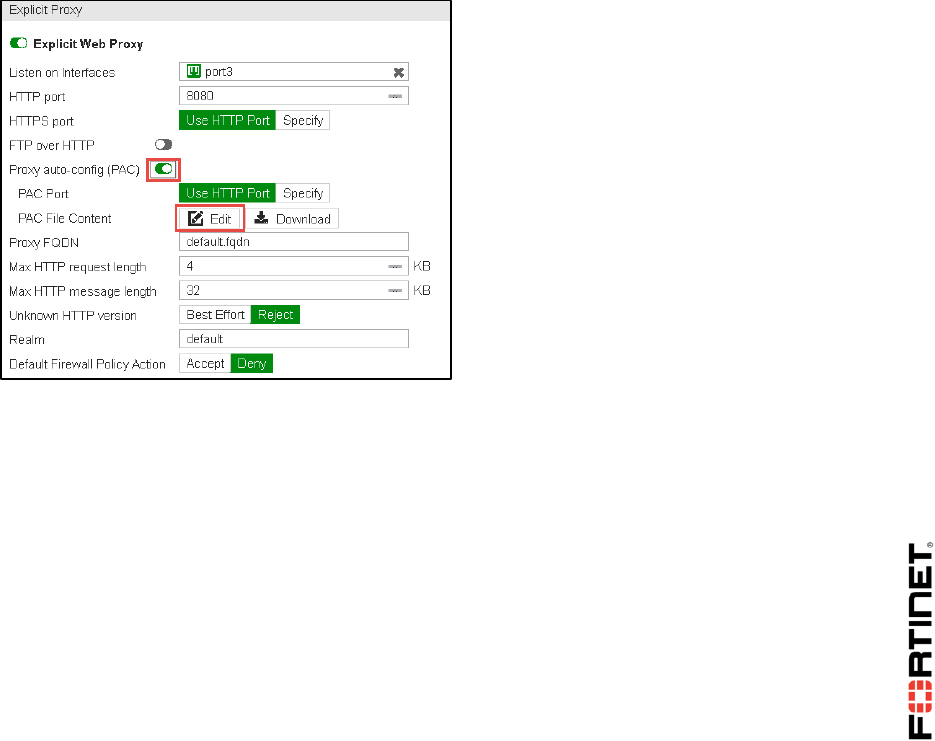
LAB 8–Explicit Web Proxy
FortiGate I Student Guide 113
2 Using a PAC File
During this exercise, you will configure a proxy auto-config (PAC) file. You will also configure the
browser to get the PAC file from the FortiGate and use it.
Configuring FortiGate to Provide the PAC File
You will configure FortiGate to host a PAC file and make it available for browsers to download it.
To configure FortiGate to provide the PAC file
1. From the Local-Windows VM, open a browser and log in as admin to the Local-FortiGate GUI at
10.0.1.254.
2. Go to Network > Explicit Proxy.
3. Enable the option Proxy auto-config (PAC).
4. Click the pencil icon to edit the PAC file:
5. Click Browse.
6. Select the file proxy.pac in the folder Resources\FortiGate-I\Explicit-Proxy.
7. Click Import
8. Click Apply.
9. Click Apply.
Checking the PAC File
You will open the PAC file from the Local-FortiGate GUI to review it.
To check the PAC file
1. In the FortiGate GUI, go to Network > Explicit Proxy.
DO NOT REPRINT
© FORTINET

LAB 8–Explicit Web Proxy
FortiGate I Student Guide 114
2. Click the pencil icon to look at the imported PAC file:
3. Click Cancel to close the PAC file.
Configuring Firefox to Download the PAC File
You will configure Firefox with the URL where the PAC file is hosted. Firefox will connect to the
specified URL to download and installed the PAC file.
To configure Firefox to download the PAC file
1. From the Local-Windows VM open Firefox.
2. Click the Open Menu icon on the top right corner:
3. Select Options.
4. Select the Advanced > Network tab
5. Click Settings.
6. Select the option Automatic proxy configuration URL then type:
http://10.0.1.254:8080/proxy.pac
Note: The second line in the PAC file specifies that the browser will not use a proxy to
reach the servers in the subnet 10.0.0.0/8. The next line configures the browser to use
the FortiGate proxy for any other subnet or URL.
DO NOT REPRINT
© FORTINET

LAB 8–Explicit Web Proxy
FortiGate I Student Guide 115
7. Click OK.
8. Close Firefox and open it again.
Testing the PAC file
You will generate some HTTP traffic from the Local-Windows VM to test the PAC file configuration.
To test the PAC file
1. In the Local-Windows VM, open a few tabs in Firefox and generate some HTTP traffic, such as:
http://www.pearsonvue.com/fortinet/
http://cve.mitre.org
http://www.eicar.org
If FortiGate asks you to authenticate, use the student account used previously (password
fortinet). The traffic will go through the FortiGate proxy.
2. You will connect to a web site in the subnet 10.0.0.0/8. The browser will not use the proxy and
will send the HTTP request directly to the server. Try to connect this server:
http://10.200.1.254
It's not working. There's something missing in the FortiGate configuration. Do you know what it
is?
DO NOT REPRINT
© FORTINET
LAB 8–Explicit Web Proxy
FortiGate I Student Guide 116
Allowing Traffic that Does Not Require Proxy
The PAC file instructs the browser to not use the proxy for reaching the servers in the subnet
10.0.0.0/8. So, this is traffic that requires a regular firewall policy to be allowed and there is none. You
will create the missing firewall policy. Before that, you will create an address object for the subnet
10.0.0.0/8. You will use this object as the destination address for the firewall policy.
To create an address object
1. From the Local-FortiGate GUI, go to Policy & Objects > Addresses.
2. Click Create New and select Address.
3. Configure the following settings:
Field
Value
Category
Address
Name
10_SUBNET
Type
IP/Netmask
Subnet / IP Range
10.0.0.0/8
Interface
any
4. Click OK.
To allow traffic that does not require proxy
1. From the Local-FortiGate GUI, go to Policy & Objects > IPv4 Policy.
2. Click Create New.
3. Configure the following settings:
Field
Value
Name
10 Subnet
Incoming Interface
port3
Outgoing Interface
port1
Source
LOCAL_SUBNET
Destination Address
10_SUBNET
Schedule
always
Service
ALL
Action
ACCEPT
NAT
Enabled
4. Click OK.
Testing the Traffic that Does not Require Proxy
You will test the firewall policy that allows traffic from Local-Windows VM that does not require
proxy.
DO NOT REPRINT
© FORTINET
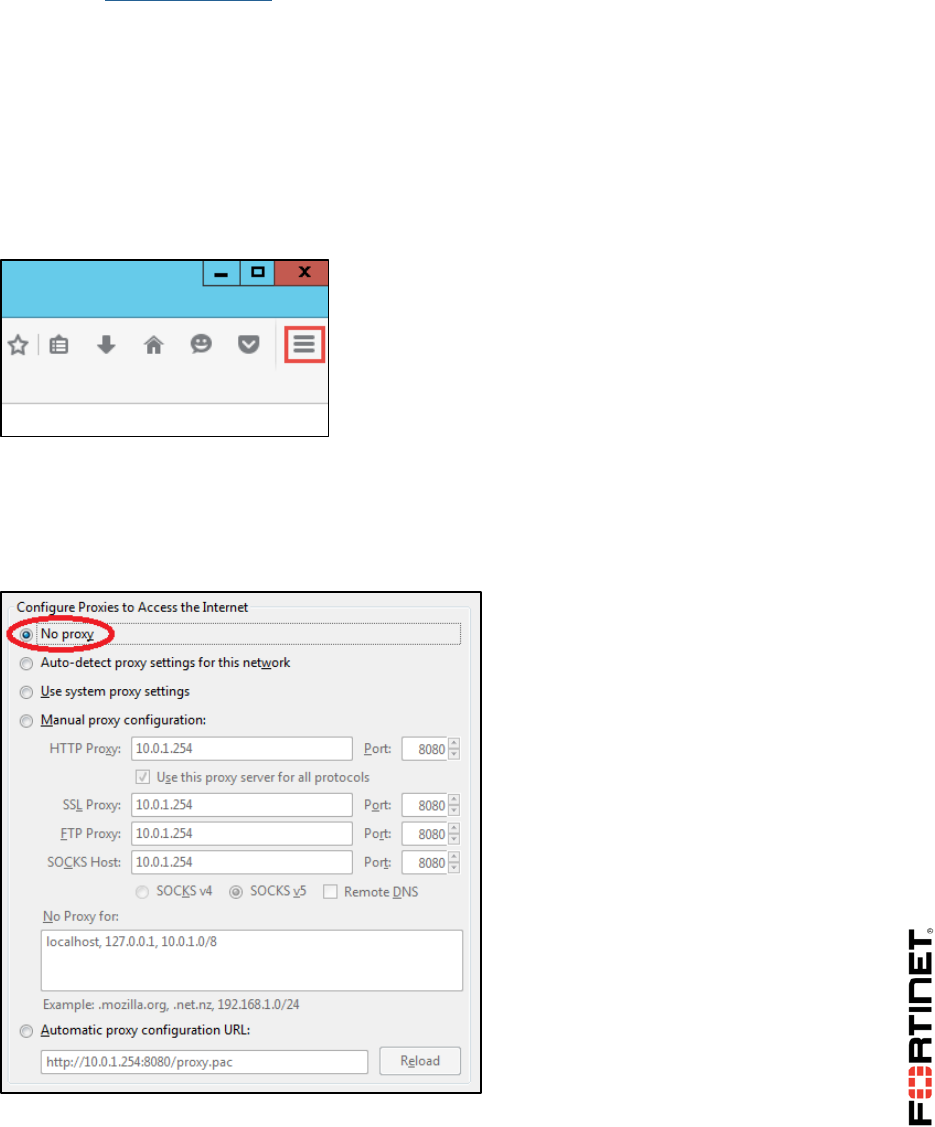
LAB 8–Explicit Web Proxy
FortiGate I Student Guide 117
To test the traffic that does not require proxy
1. From Local-Windows VM, open a Firefox window.
2. Access http://10.200.1.254 one more time. It will work now.
Disabling the Explicit Web Proxy in Firefox
To finish the lab exercise, you will disable the proxy in Firefox.
To disable the explicit web proxy in Firefox
1. From Local-Windows VM, open Firefox.
2. Click the Open Menu icon on the top right corner:
3. Click Options.
4. Select Advanced > Network.
5. Click Settings.
6. Select No proxy.
7. Click OK.
8. Close Firefox and open it again.
DO NOT REPRINT
© FORTINET
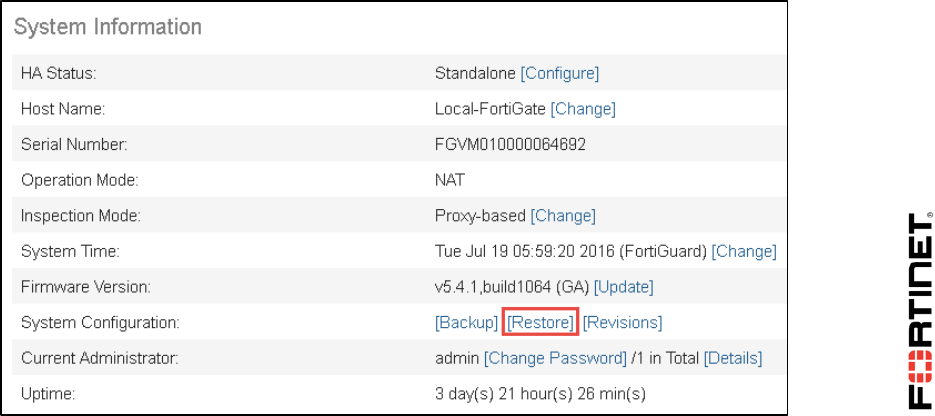
LAB 9–Antivirus
FortiGate I Student Guide 118
LAB 9–Antivirus
In this lab, you will configure, use, and monitor both proxy-based and flow-based antivirus scanning on
Local-FortiGate.
Objectives
Configure proxy-based and flow-based antivirus scanning.
Understand FortiGate antivirus scanning behavior.
Scan multiple protocols.
Read and understand antivirus logs.
Time to Complete
Estimated: 20 minutes
Prerequisites
Before beginning this lab, you must restore a configuration file to the FortiGate.
To restore the FortiGate configuration file
1. From the Local-Windows VM, open a web browser and log in as admin to the Local-FortiGate
GUI at 10.0.1.254.
2. Go to Dashboard, and from the System Information widget click Restore.
3. Select to restore from Local PC and click Upload.
DO NOT REPRINT
© FORTINET

LAB 9–Antivirus
FortiGate I Student Guide 119
4. Browse to Desktop > Resources > FortiGate-I > Antivirus and select local-
antivirus.conf.
5. Click OK.
6. Click OK to reboot.
DO NOT REPRINT
© FORTINET
LAB 9–Antivirus
FortiGate I Student Guide 120
1 Proxy-based Antivirus Scanning
In proxy-based scan, each protocol's proxy buffers the entire file (or waits for oversize limit) and scan
it. The client must wait for the scan to finish.
In this exercise, you will configure proxy-based antivirus scanning, including associated security
features (such as proxy options and deep-inspection) and apply it to the firewall policy. You will
observe the behavior antivirus scanning when deep-inspection is disabled or enabled. Finally, you will
view the logs and summary information for the antivirus activity.
Configuring Proxy-based Antivirus settings
The configuration file you uploaded at the beginning of this lab already has proxy-based antivirus
settings pre-configured for you. In this procedure, you will verify the settings, and enable the proxy-
based antivirus profile on your firewall policy.
To review Proxy-based Antivirus Profile
1. From the Local-Windows VM, open a web browser and log in as admin to the Local-FortiGate
GUI at 10.0.1.254.
2. Go to Dashboard > System Information widget.
You will notice that Inspection Mode is set to Proxy-based.
3. Go to Security Profiles > AntiVirus and select the default antivirus profile.
4. Verify that the Detect Viruses is set to Block and HTTP scanning is enabled under Inspected
Protocols.
This profile defines the behavior for virus scanning on the traffic that matches policies using that
profile.
Enabling the Antivirus Profile on a Firewall Policy
Now that your antivirus profile is configured, you must enable antivirus profile on your firewall policy.
When antivirus profile is enabled on a firewall policy, it can scan for viruses and can generate logs
(based on configured log settings).
To enable Antivirus Profile on a Firewall Policy
1. In the Local-FortiGate GUI, go to Policy& Objects > IPv4 Policy.
2. Right-click on the Seq.# column for AV_Scan firewall policy.
3. Click Edit.
4. Under Security Profiles, enable AntiVirus and select default from the associated drop-down
list.
DO NOT REPRINT
© FORTINET
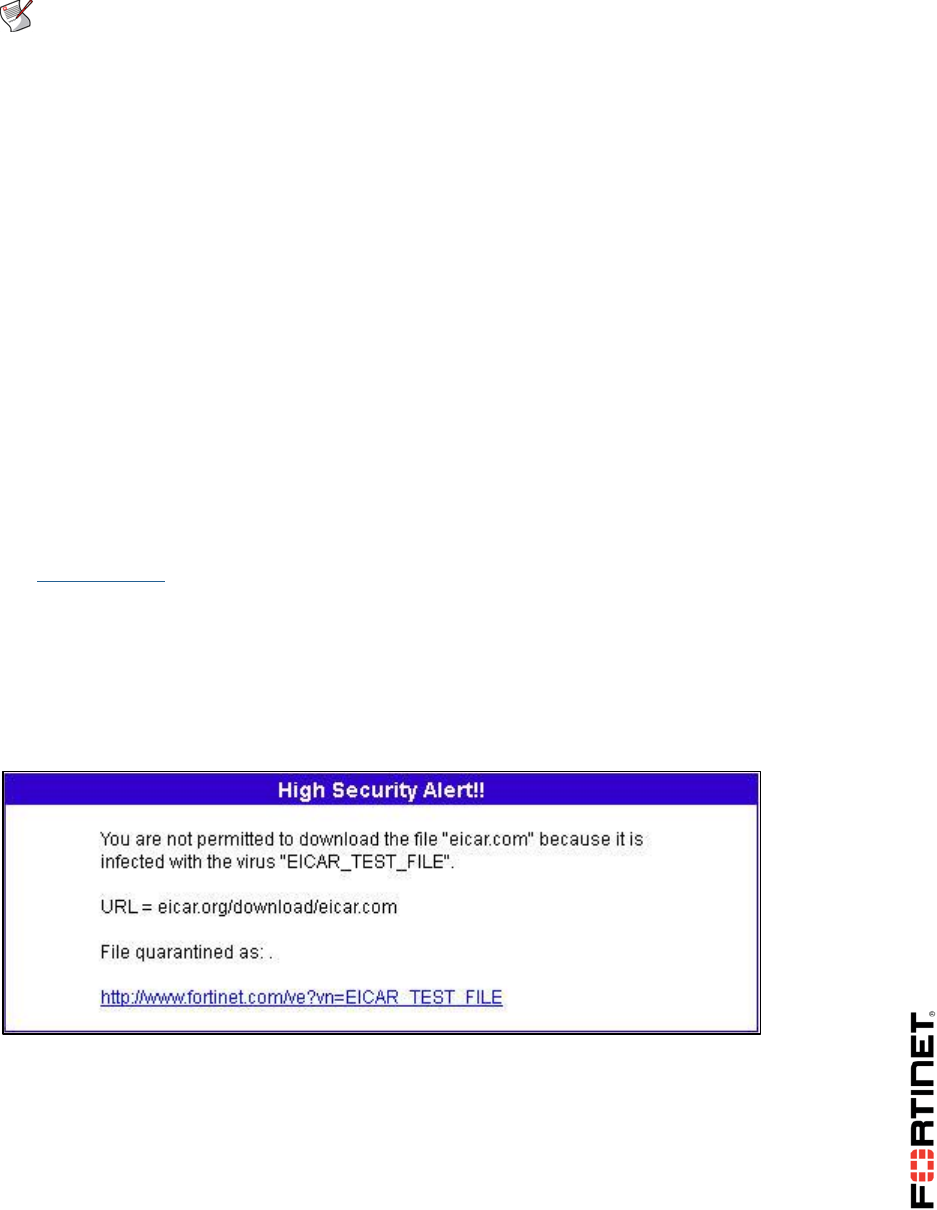
LAB 9–Antivirus
FortiGate I Student Guide 121
Note: When selecting an antivirus profile, Proxy Options is automatically enabled. You
cannot disable Proxy Options, but can select any pre-configured proxy options profile
from the associated drop-down list.
5. Leave all other settings at their defaults and click OK to save the changes.
6. Optionally, if you would like to see the default proxy options profile selected in the firewall policy,
go to Security Profiles > Proxy Options.
This profile determines how FortiGate’s proxies pick up protocols. For example, The HTTP
listening port is set to port 80.
Testing the Antivirus Configuration
In this procedure, you will download the EICAR file to your Local-Windows VM. The EICAR test file is
an industry-standard virus used to test antivirus detection with an undamaging test file. The file
contains the following characters:
X5O!P%@AP[4\PZX54(P^)7CC)7}$EICAR-STANDARD-ANTIVIRUS-TEST-FILE!$H+H*
To test the antivirus configuration
1. In the Local-Windows VM, launch a web browser and access the following web site:
http://eicar.org
2. On the EICAR web page, click DOWNLOAD ANTI MALWARE TESTFILE (located in the top
right-hand corner of the page) and then click the Download link that appears on the left.
3. Download the any of the EICAR sample files from the section Download area using the
standard protocol http.
FortiGate should block the download attempt, and insert a replacement message similar to the
following:
FortiGate shows the HTTP virus message when it blocks or quarantines infected files.
4. In the message that is displayed, click the link to view information about the detected virus on
the Fortinet Virus Encyclopedia.
Viewing the Antivirus Logs
The purpose of logs is to help you monitor your network traffic, locate problems, establish
DO NOT REPRINT
© FORTINET
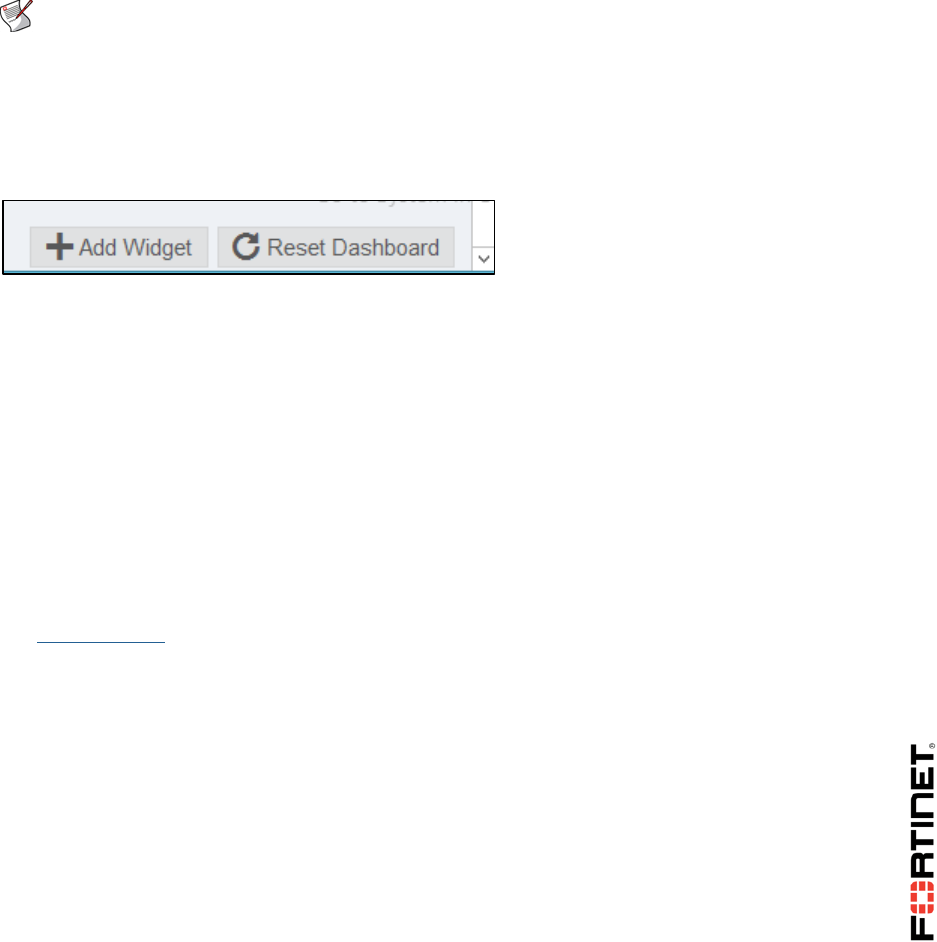
LAB 9–Antivirus
FortiGate I Student Guide 122
baselines, and make adjustments to network security, if necessary.
To view the antivirus logs
1. In the Local-FortiGate GUI, go to Log & Report > Forward Traffic.
2. Locate the antivirus log message and double click on it.
The Details tab shows forward traffic log information along with the action taken.
3. Click Security tab to view security log information which provides information more specific to
security event such as file name, Virus/Botnet and reference to name a few.
4. You can also view antivirus security logs under Log & Report > AntiVirus.
Note: The AntiVirus logs section will not display if there are no AV logs. FortiGate will
show it after creating logs. If this menu item does not display, log out from the
FortiGate GUI and log in again to refresh it.
5. Go to the Dashboard.
6. Add the Advanced Threat Protection Statistics widget to view the summary statistics of the
antivirus activity.
The Advanced Threat Protection Statistics widget provides statistics about the number of files
submitted and the results of those scans.
Enabling SSL Inspection on a Firewall Policy
So far you have tested the un-encrypted traffic for antivirus scanning. In order for the FortiGate to
inspect the encrypted traffic, deep inspection must be enabled on the firewall policy. By enabling this
feature, FortiGate will filter on traffic that is using the SSL encrypted protocol and is very similar to
man-in-the-middle (MITM) attack.
To test antivirus scanning without SSL Inspection enabled on firewall policy
1. In the Local-Windows VM, launch a web browser and access the following web site:
http://eicar.org
2. On the EICAR web page, click DOWNLOAD ANTI MALWARE TESTFILE and then click the
Download link that appears on the left.
3. This time, download the EICAR sample file from the Download area using the secure, SSL
enabled protocol https section.
Your download should succeed. FortiGate should not block the file, because we have not
enabled full SSL inspection.
To review SSL inspection profile
1. In the Local-FortiGate GUI, go to Security Profiles > SSL/SSH Inspection.
2. Select the deep-inspection profile from the dropdown on the right-hand side.
DO NOT REPRINT
© FORTINET
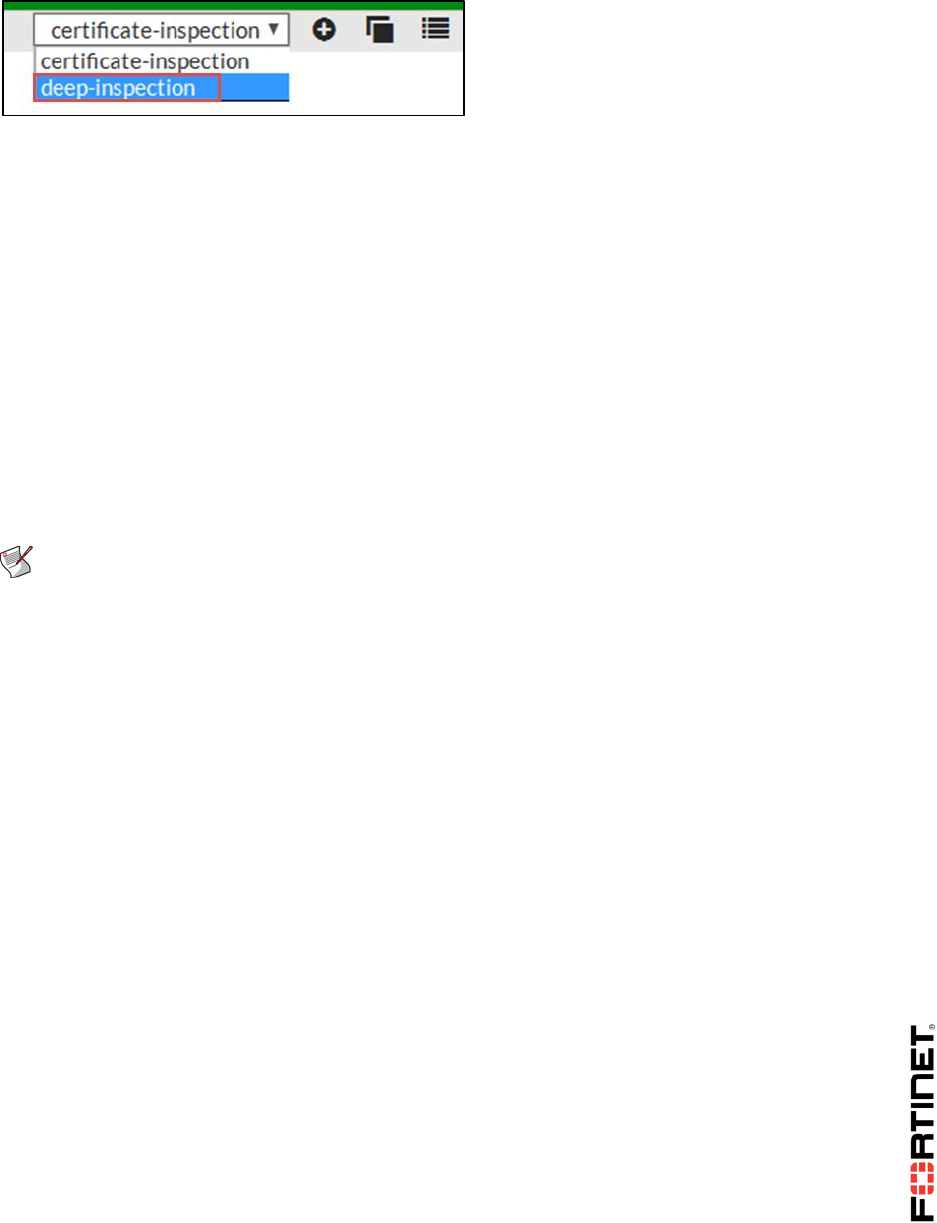
LAB 9–Antivirus
FortiGate I Student Guide 123
3. Review and verify the following:
Inspection Method is set to Full SSL Inspection.
Protocol Port Mappings have HTTPS enabled and set to port 443.
To enable SSL inspection profile on a firewall policy and test it
1. In the Local-FortiGate GUI, go to Policy& Objects > IPv4 Policy.
2. Right-click on Seq.# column for AV_Scan firewall policy.
3. Click Edit.
4. Under Security Profiles, enable SSL/SSH Inspection and select deep-inspection from the
associated drop-down list.
5. Leave all other settings at their defaults and click OK to save the changes.
6. Return to the EICAR web page and attempt to download the eicar.com file from the Download
area using the secure, SSL enabled protocol https section.
Note: If the FortiGate self-signed full inspection certificate is not installed on the browser,
end users will see a certificate warning. In this environment, FortiGate self-signed SSL
inspection certificate is installed on the browser.
7. This FortiGate should block the download and replace it with a message. If it doesn't, you may
need to clear your cache. In Firefox, go to History > Clear Recent History > Everything.
DO NOT REPRINT
© FORTINET
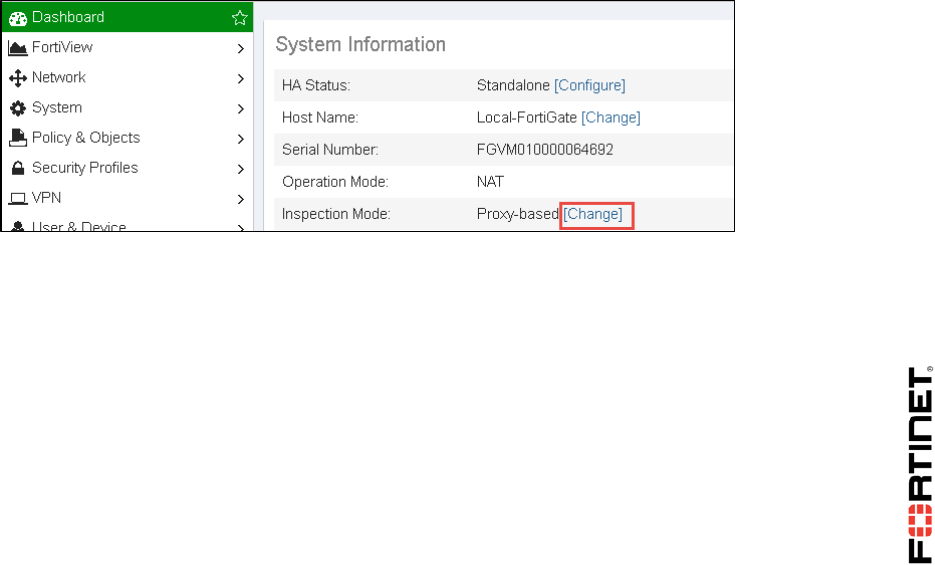
LAB 9–Antivirus
FortiGate I Student Guide 124
2 Flow-based Antivirus Scanning
Flow-based scanning has two modes:
Quick scan uses a compact antivirus database and performs faster scanning because it
doesn’t cache the file in memory.
Full scan uses the full antivirus database. It caches the file locally, but transmits it
simultaneously to end client. Everything is transmitted, except last packet. The last packet is
delayed and whole file is sent to AV engine for scanning.
In this exercise, you will change the FortiGate inspection mode to flow-based, which will convert
supported proxy-based profiles to flow-based and will remove any proxy-specific settings. You will test
the flow-based scanning using FTP protocol.
Switching FortiGate Inspection Mode
On the FortiGate, proxy-based inspection mode is enabled by default. You will be switching the
inspection mode from proxy-based to flow-based.
To switch FortiGate Inspection Mode
1. From the Local-Windows VM, open a web browser and log in as admin to the Local-FortiGate
GUI at 10.0.1.254.
2. Go to Dashboard > System Information widget.
3. Click [Change] in the Inspection Mode column to change from Proxy-based to Flow-based.
4. Select Flow-based, accept the warning message, and click OK to save the changes.
DO NOT REPRINT
© FORTINET
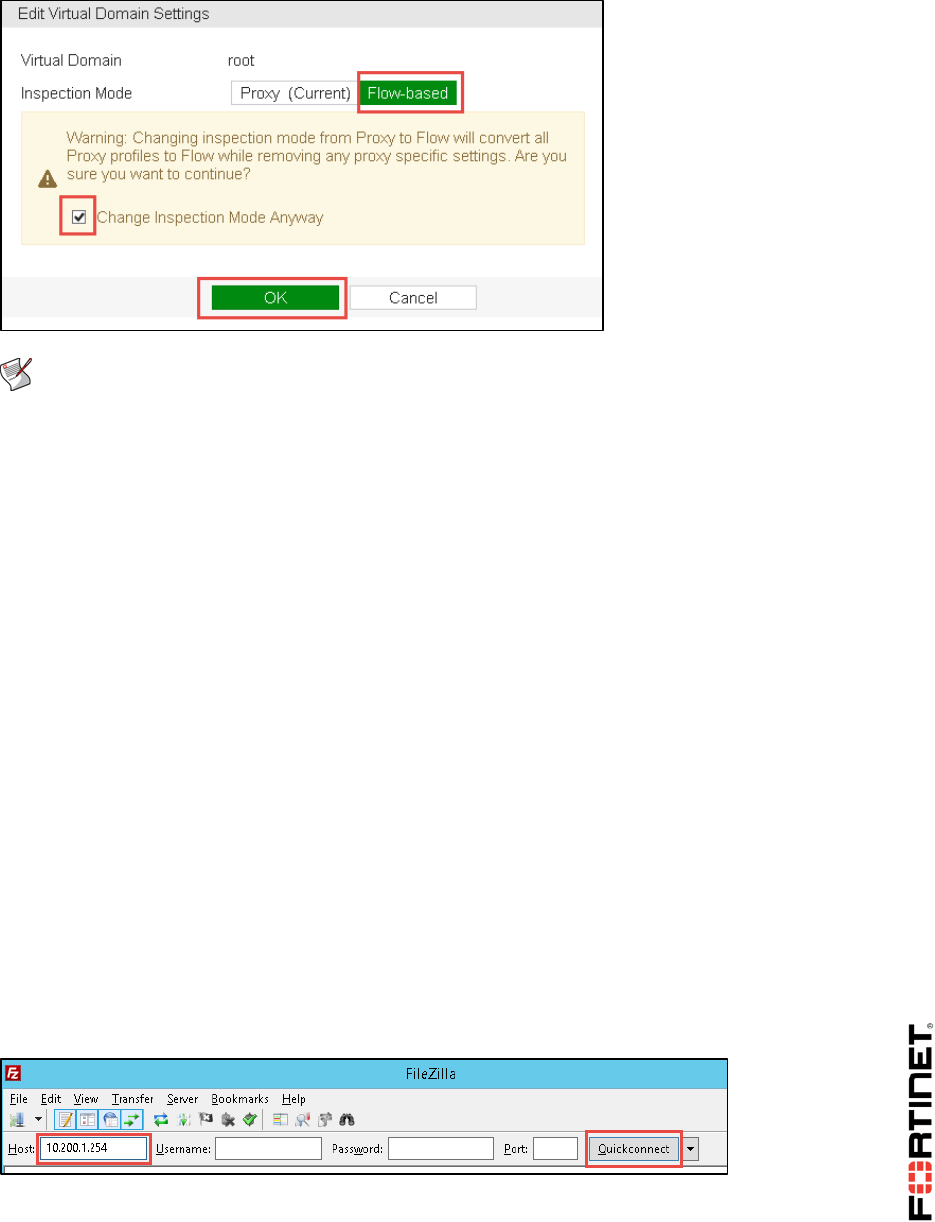
LAB 9–Antivirus
FortiGate I Student Guide 125
Note: Switching from one inspection mode to another will result in the conversion of
profiles and removal or addition of security features, based on the selected mode.
Reviewing the Flow-based Antivirus Profile
Now you've changed the inspection mode to flow-based, you will view the antivirus profile to see the
changes.
To review flow-based antivirus profile
1. In the Local-FortiGate GUI, go to Security Profiles > AntiVirus.
2. Review the default antivirus profile.
You will notice the default antivirus profile has switched from proxy-based profile to a full flow-
based profile. You will also see that Proxy Options have been removed from under Security
Profiles.
Testing the Flow-based Antivirus Profile
You will be now test the flow-based antivirus profile.
To test the antivirus configuration
1. From the Local-Windows VM, locate and open the FileZilla FTP client software.
2. Connect to 10.200.1.254. Leave the username and password blank to use anonymous FTP.
3. On the Remote side, click the pub folder.
DO NOT REPRINT
© FORTINET
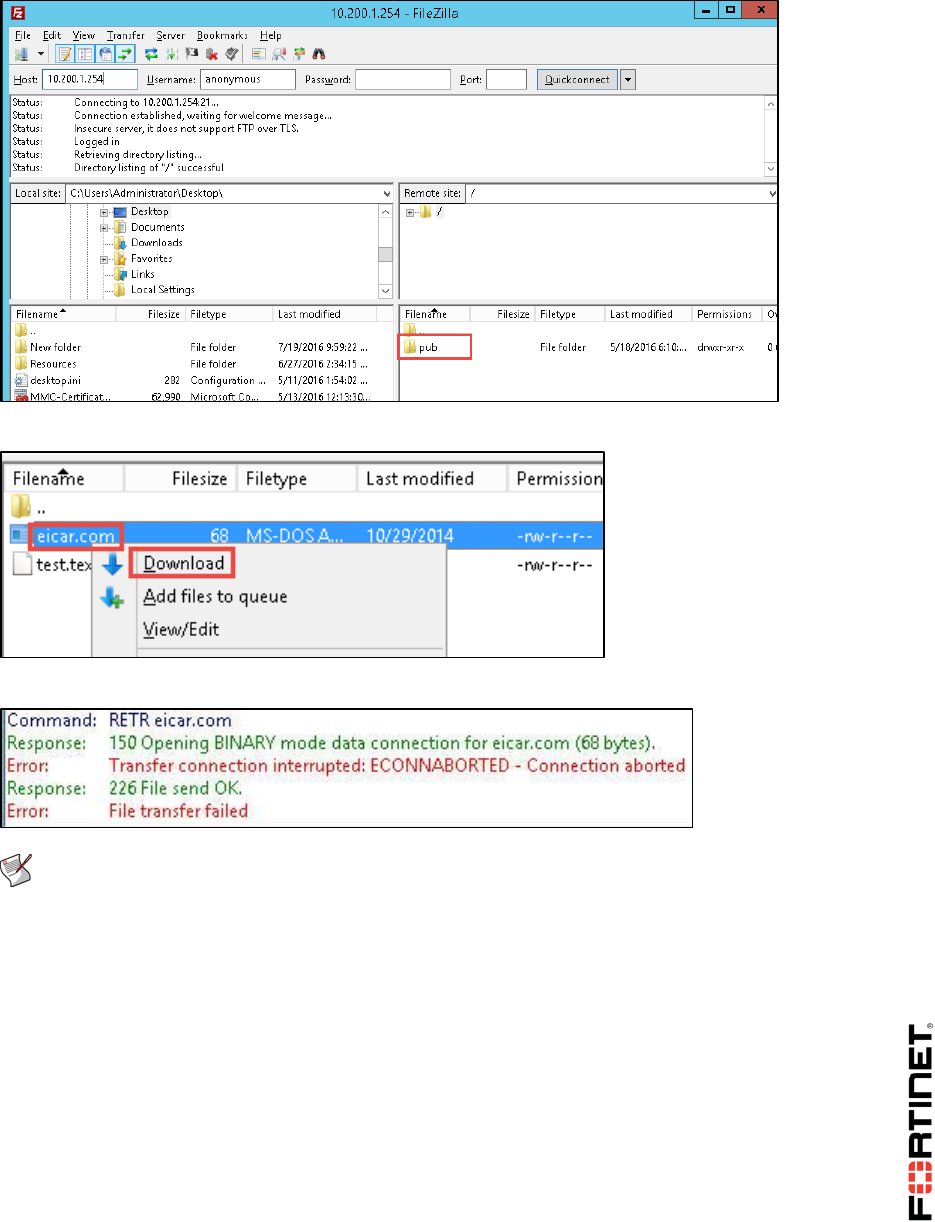
LAB 9–Antivirus
FortiGate I Student Guide 126
4. Right-click the eicar.com file and select Download.
The client should display an error message that the server aborted the connection.
Note: With flow-based virus scanning, data from the file has already been sent to the
client, so no immediate block message/page may appear.
Viewing the Antivirus Logs
Now you will check and confirm the logs for the testing you just performed.
To view the antivirus logs
1. In the Local-FortiGate GUI, go to Log & Report > Forward Traffic.
2. Locate the antivirus logs message. Double click the log entry to select it.
DO NOT REPRINT
© FORTINET

LAB 9–Antivirus
FortiGate I Student Guide 127
The Details tab shows forward traffic log information along with the action taken.
3. Click the Security tab to view security log information. This includes information more specific to
the security event such as file name, Virus/Botnet, and reference, to name a few.
4. You can also view antivirus security logs under Log & Report > AntiVirus.
DO NOT REPRINT
© FORTINET
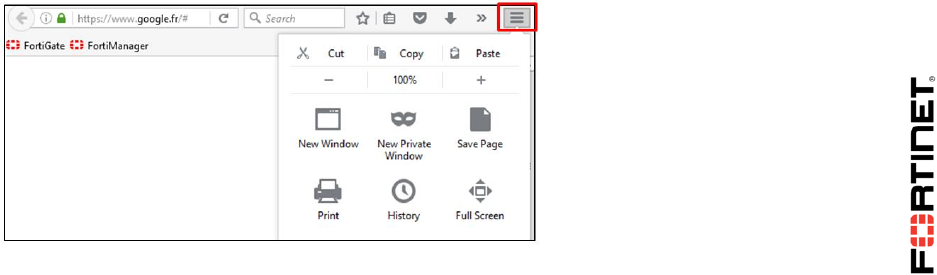
LAB 10–Web Filtering
FortiGate I Student Guide 128
LAB 10–Web Filtering
In this lab, you will configure one of the most used security profiles on FortiGate: web filter. This
includes configuring a FortiGuard category-based filter, applying the web filter profile on a firewall
policy, testing your configuration, and basic troubleshooting.
You will also apply overrides to FortiGuard website categories and perform overrides to the web
filtering profile. The web filtering overrides allow you to execute different actions, rather than the
configured actions on the web filter security profile.
Objectives
Configure web filtering on a FortiGate device.
Apply the FortiGuard category-based option for web filtering.
Troubleshoot the web filter.
Read and interpret web filter log entries.
Configure web rating overrides.
Configure web profile overrides.
Time to Complete
Estimated: 25 minutes
Prerequisites
Before beginning this lab, you must clear your web browser history/cache and restore a configuration
file to the Local-FortiGate.
To clear the web browser history
1. From the Local-Windows VM, open the browser and click the menu icon in the upper-right corner.
2. Go to History > Clear Recent History and select Everything as the time range to clear.
3. Click Clear Now.
DO NOT REPRINT
© FORTINET
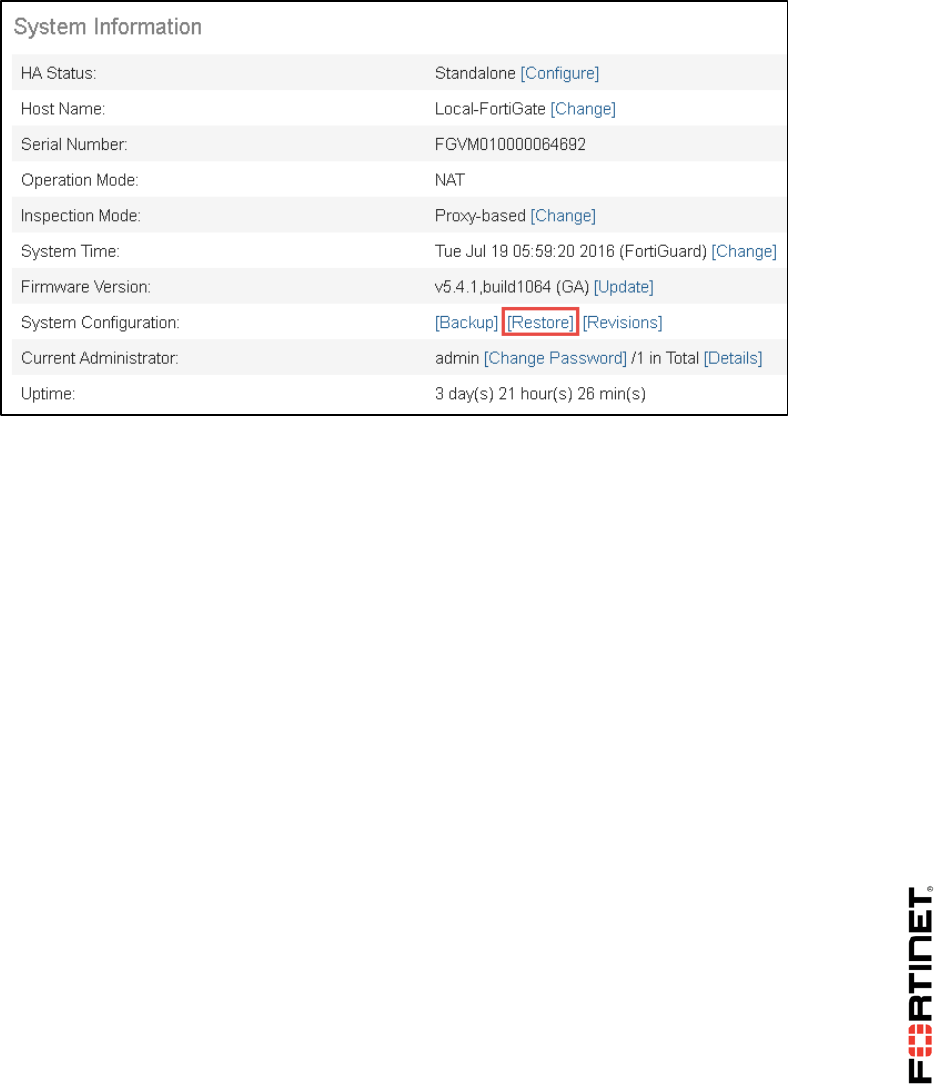
LAB 10–Web Filtering
FortiGate I Student Guide 129
To restore the FortiGate configuration file
1. From the Local-Windows VM, open a browser and log in as admin to the Local-FortiGate GUI at
10.0.1.254.
2. Go to Dashboard, and from the System Information widget click Restore.
3. Select to restore from Local PC and click Upload.
4. Browse to Desktop > Resources > FortiGate-I > Web-Filtering and select local-web-
filtering.conf.
5. Click OK.
6. Click OK to reboot.
DO NOT REPRINT
© FORTINET

LAB 10–Web Filtering
FortiGate I Student Guide 130
1 FortiGuard Web Filtering
In order to configure FortiGate for web filtering based on FortiGuard categories, you must ensure
FortiGate has a valid FortiGuard security subscription license. The license provides the web filtering
capabilities necessary to protect against inappropriate websites.
You must then configure a category-based web filter security profile on FortiGate and apply the
security profile on a firewall policy to inspect the HTTP traffic.
Finally you can test different actions taken by the FortiGate according to the website rating.
Reviewing the FortiGate settings
You will review the inspection mode and the license status according to the uploaded settings. You will
also list the FortiGuard distribution servers (FDS) that your FortiGate will use to send the web filtering
requests.
To review the restored settings on FortiGate
1. From the Local-Windows VM, open a browser and log in as admin to the Local-FortiGate GUI at
10.0.1.254.
2. Go to Dashboard, and from the License Information widget, confirm that the FortiGuard Web
Filtering service is licensed and active.
A green check mark should be displayed.
3. Open PuTTY from the Local-Windows VM, and connect to the LOCAL-FORTIGATE saved
session (connect over SSH).
4. Log in as admin and type the following command to check the status of the web filtering
service:
get webfilter status
The get webfilter status and diagnose debug rating commands show the list of
FortiGuard FDS that your FortiGate uses to send web filtering requests. In normal operations,
FortiGate only sends the rating requests to the server on the top of the list. Each server is
probed for round trip time (RTT) every two minutes.
DO NOT REPRINT
© FORTINET
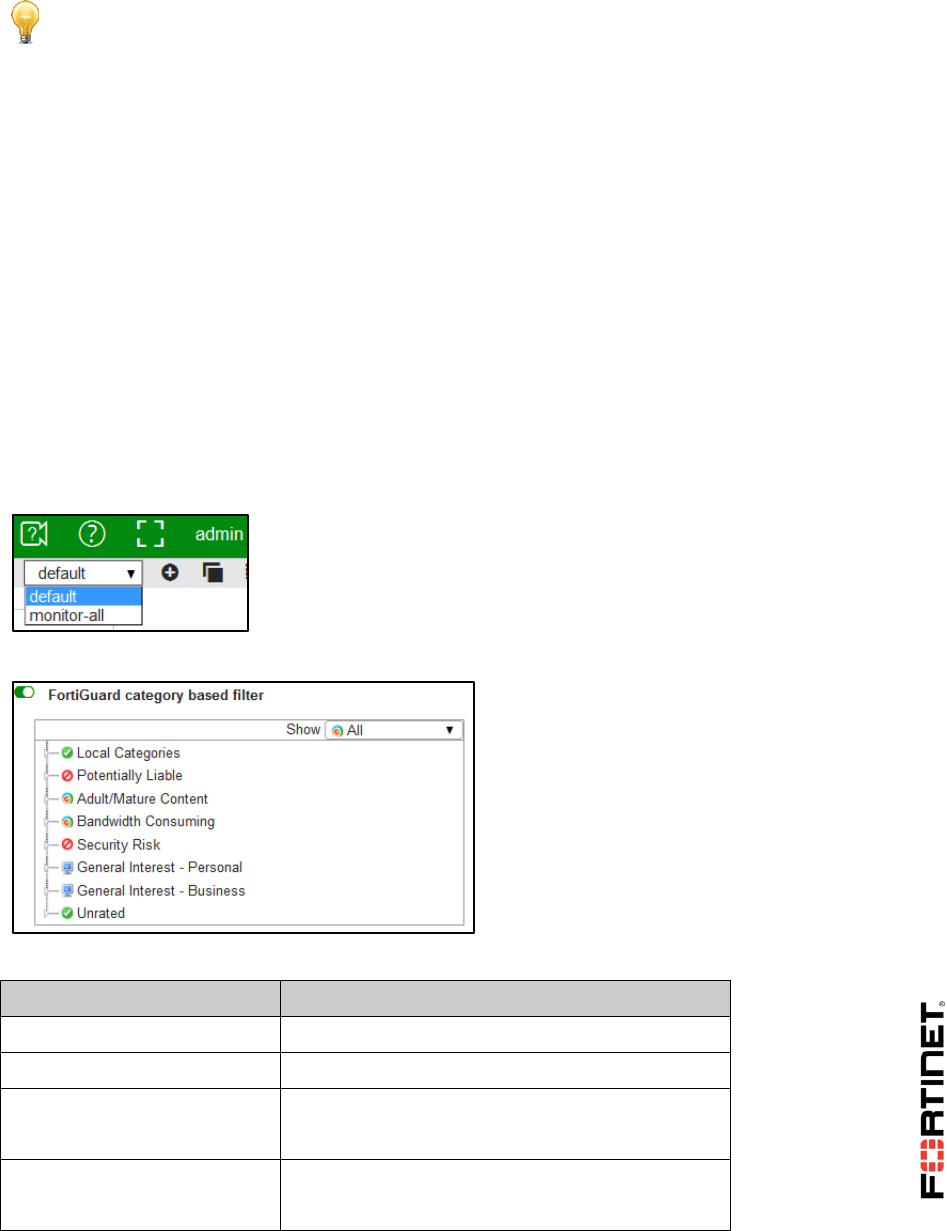
LAB 10–Web Filtering
FortiGate I Student Guide 131
Stop and Think
Why does only one IP address appear from my network in the server list?
Discussion
Your lab environment uses a FortiManager at 10.0.1.241, which has been configured
as a local FDS server. It contains a local copy of the FDS web rating database.
FortiGate sends the rating requests to FortiManager instead of the public FDS servers.
For this reason, the output of the above command lists only the FortiManager IP
address.
Configuring a FortiGuard Category-based Web Filter
You will observe the web filtering profile by default and configure the FortiGuard category-based filter.
To configure the web-filter security profile
1. In the Local-FortiGate GUI, go to Security Profiles > Web Filter.
2. From the upper-right drop-down list, ensure default is selected as your web filter profile:
3. Enable FortiGuard category based filter:
4. Review the preassigned actions for each category.
Category
Action
Local Categories
Allow
Potentially Liable
Block
Adult/Mature Content
Block: Other Adult Material and Pornography
Monitor : All other sub-categories
Bandwidth Consuming
Block: Streaming Media and Download
Warning: All other sub-categories
DO NOT REPRINT
© FORTINET

LAB 10–Web Filtering
FortiGate I Student Guide 132
Security Risk
Block
General Interest - Personal
Monitor
General Interest - Business
Monitor
Unrated
Allow
Expand General Interest - Business to view the sub-categories:
5. Right-click Search Engines and Portals and select Allow:
6. Click Apply.
Applying the Web Filter Profile on a Firewall Policy
Now that you have configured the web filter profile, you must enable this security profile on a firewall
policy in order to start inspecting web traffic.
You will also enable the logs to store and analyze the security events generated by the web traffic.
To apply a security profile on a firewall policy
1. In the Local-FortiGate GUI, go to Policy & Objects > IPv4 Policy and edit policy named
Internet_Access.
2. Under the Security Profiles section, enable Web Filter and select default.
Note that this action enables the Proxy Options profile.
DO NOT REPRINT
© FORTINET

LAB 10–Web Filtering
FortiGate I Student Guide 133
3. Under Logging Options, enable Log Allowed Traffic and select Security Events to enable the
UTM log:
4. Keep all other default settings and click OK.
Testing the Web Filter
For the purposes of this lab, you will review the website ratings and test the web filter security profile
you configured for each category.
To review the FortiGuard web filtering categories
1. In the Local-Windows VM, open a browser and go to http://www.fortiguard.com/webfilter.
2. Use the URL/IP Rating & Info tool and search for the following URL:
http://www.youtube.com
This is one of the websites you will use later to test your web filter.
As you can see, YouTube is listed in the Steaming Media and Download category.
DO NOT REPRINT
© FORTINET
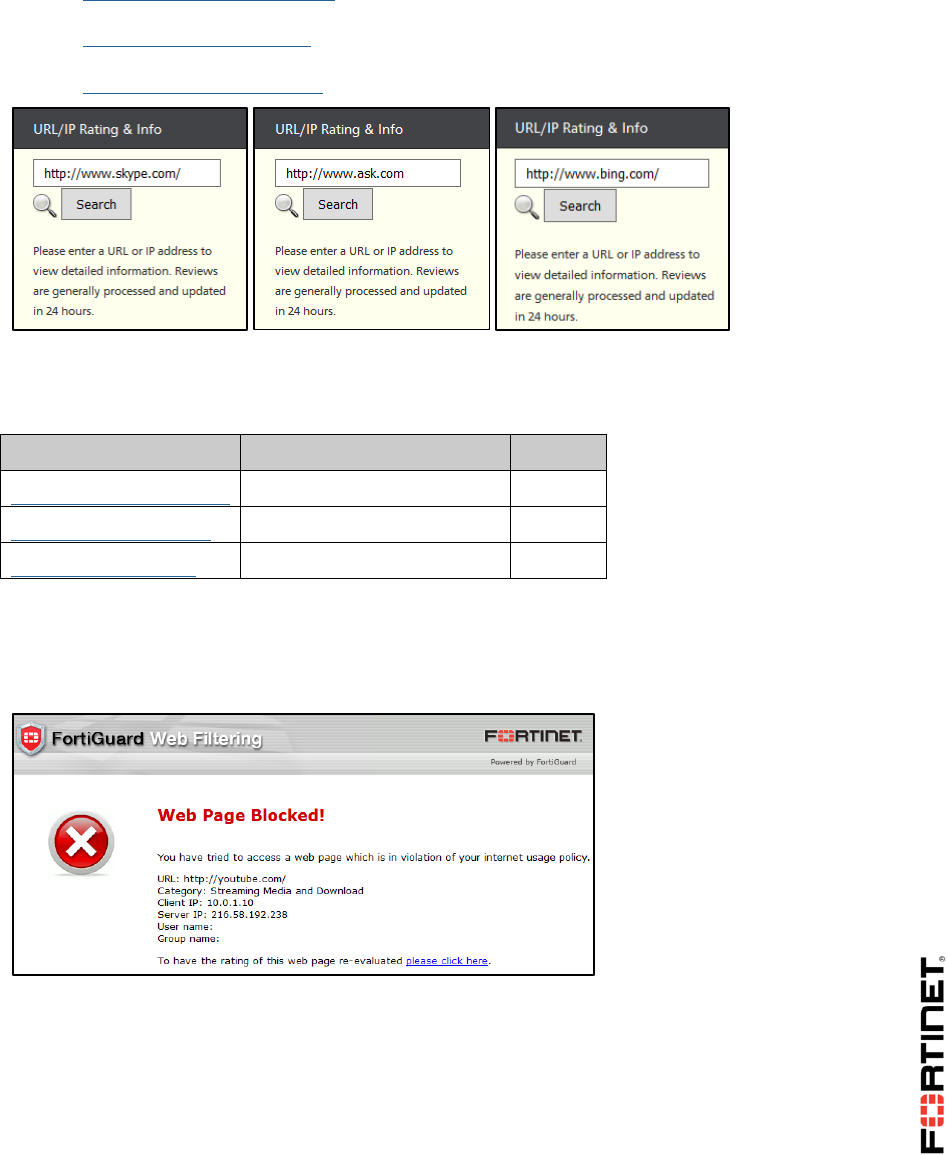
LAB 10–Web Filtering
FortiGate I Student Guide 134
3. Use the URL/IP Rating & Info tool again to find the rated category for the following websites:
http://www.skype.com/
http://www.ask.com/
http://www.bing.com/
You will test your web filter using these websites as well.
This table shows the category assigned to each URL as well as the action FortiGate will take
based on your web filter security profile:
Website
Category
Action
http://www.youtube.com/
Streaming Media category
Block
http://www.skype.com/
Internet Telephony
Warning
http://www.bing.com/
Search Engines and Portals
Allow
To test the web filter
1. In the Local-Windows VM, open a new browser tab and go to http://www.youtube.com.
A block page displays according to the predefined action for this website category.
2. Open a new browser tab and go to http://www.skype.com/.
A warning page displays according to the predefined action for this website category.
DO NOT REPRINT
© FORTINET

LAB 10–Web Filtering
FortiGate I Student Guide 135
3. Click Proceed to accept the warning and access the website.
4. Open a new browser tab and go to http://www.bing.com/.
This website appears, as it belongs to the Search Engines and Portals category which is set to
Allow.
Creating a Web Rating Override
In the procedure you will override the category for www.bing.com.
To create a web rating override
1. In the Local-FortiGate GUI, go to Security Profiles > Web Rating Overrides.
2. Click Create New and configure the following settings:
Field
Value
URL
www.bing.com
Category
Security Risk
Sub-Category
Malicious Websites
3. Click OK.
Testing the Web Rating Override
You will test the web rating override you created in the previous procedure. To confirm that the
FortiGate is taking the local override, you will enable the real time debug for the web filtering
process.
Real time debugs show what a process is doing in real time.
To troubleshoot the web filter
1. In the Local-Windows VM, open PuTTY and connect to the LOCAL-FORTIGATE saved
session (connect over SSH).
2. Log in as admin and type the following commands to enable the web filtering real time debug:
diagnose debug application urlfilter -1
DO NOT REPRINT
© FORTINET

LAB 10–Web Filtering
FortiGate I Student Guide 136
diagnose debug enable
3. Open a new browser tab, and try again to access the website www.bing.com.
4. Go back to your PuTTY CLI session and observe the output. It should be similar to the one below:
The diagnostic output indicates the URL matches a local rating instead of a FortiGuard rating.
So, http://www.bing.com/ is blocked, because you have overridden its category rating!
5. Type the following commands to stop the real time debug:
diagnose debug application urlfilter 0
diagnose debug disable
msg="received a request /tmp/.wad_202_0_0.url.socket, addr_len=31:
d=www.bing.com:80, id=183, vfname='root', vfid=0, profile='default',
type=0, client=10.0.1.10, url_source=1, url="/"
Url matches local rating
action=10(ftgd-block) wf-act=3(BLOCK) user="N/A" src=10.0.1.10
sport=53863 dst=204.79.197.200 dport=80 service="http" cat=26
cat_desc="Malicious Websites" hostname="www.bing.com" url="/"
DO NOT REPRINT
© FORTINET
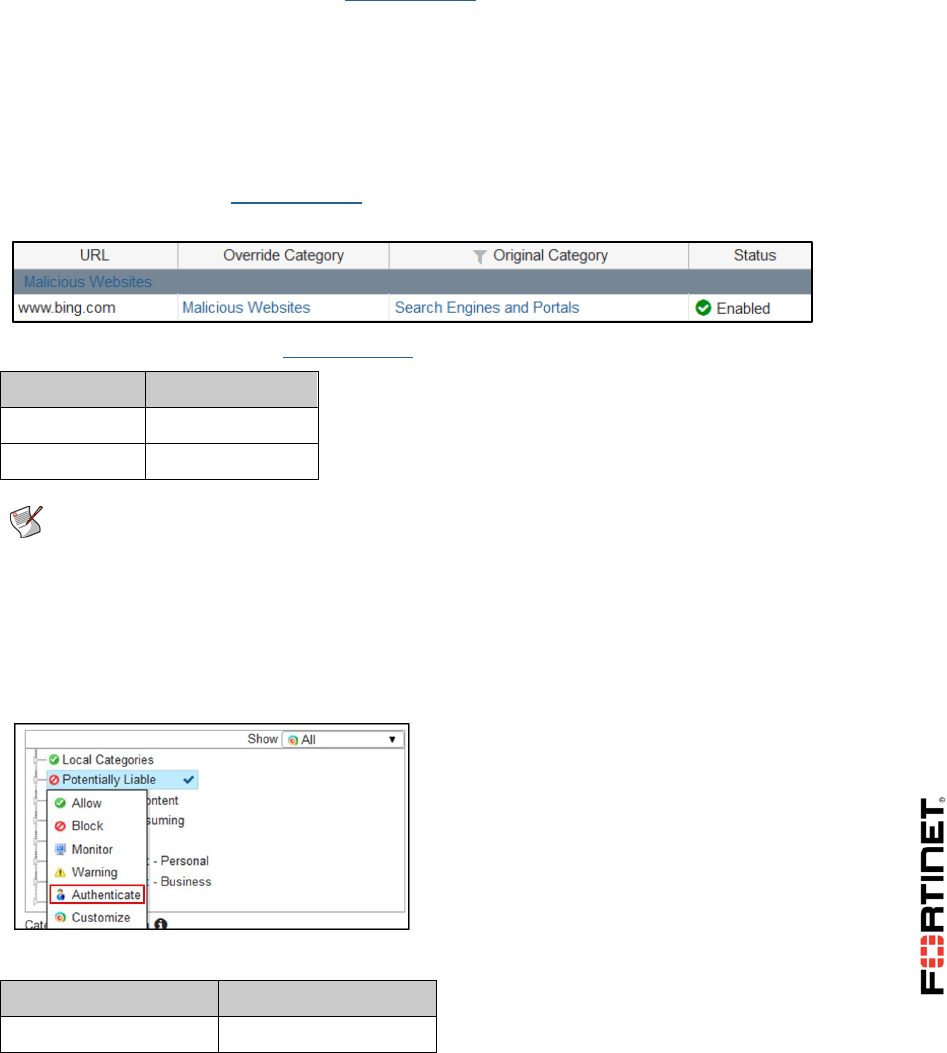
LAB 10–Web Filtering
FortiGate I Student Guide 137
2 Web Filtering Authentication
In this exercise, you will configure and test the authenticate action for web filtering categories.
Setting Up the Authenticate Action
You will first override the category for www.bing.com to Proxy Avoidance. After that, you will set the
action for this FortiGuard category to Authenticate.
To override the category
1. From the Local-Windows VM, open a browser and log in as admin to the Local-FortiGate GUI at
10.0.1.254.
2. Go to Security Profiles > Web Rating Overrides.
There is an entry for www.bing.com. The override category is set to Malicious Websites, which is
a Security Risk subcategory. Security Risk is set to Block by default.
3. Edit the rating override for www.bing.com and change the category and sub-category:
Field
Value
Category
Potentially Liable
Sub-Category
Proxy Avoidance
Note: The Potentially Liable category is set to Block, by default in your FortiGate.
4. Click OK.
To set up the authenticate action
1. In the Local-FortiGate GUI, go to Security Profiles > Web Filter.
2. Under FortiGuard categories, right-click Potentially Liable and select Authenticate.
3. The Edit Filter widget will appear. Use the following settings:
Field
Value
Warning Interval
5 minutes
DO NOT REPRINT
© FORTINET

LAB 10–Web Filtering
FortiGate I Student Guide 138
Selected User Groups
Override_Permissions
4. Click OK.
5. Click Apply.
Note: For the purpose of this lab, the Override_Permissions is a predefined user group.
To review the user groups, go to User & Devices > User Groups.
Defining Users and Groups
You will define a user in order to test the authenticate action.
To create an user
1. Go to User & Devices > User Definition.
2. Click Create New.
3. Select Local User as the User Type.
4. Click Next and configure the following settings:
Field
Value
User Name
student
Password
fortinet
5. Click Next.
6. Click Next.
7. Enable User Group and select Override_Permissions from the drop-down list.
8. Click Create.
The student user is created.
Testing the Authenticate Action
In section, you will test access to a website with the authenticate action and then analyze the logs
made by the security events.
To test the web rating override
1. Open a new browser tab, and try to access http://www.bing.com.
A web page blocked message appears. Note that it is a different message from the one that
appeared before:
DO NOT REPRINT
© FORTINET
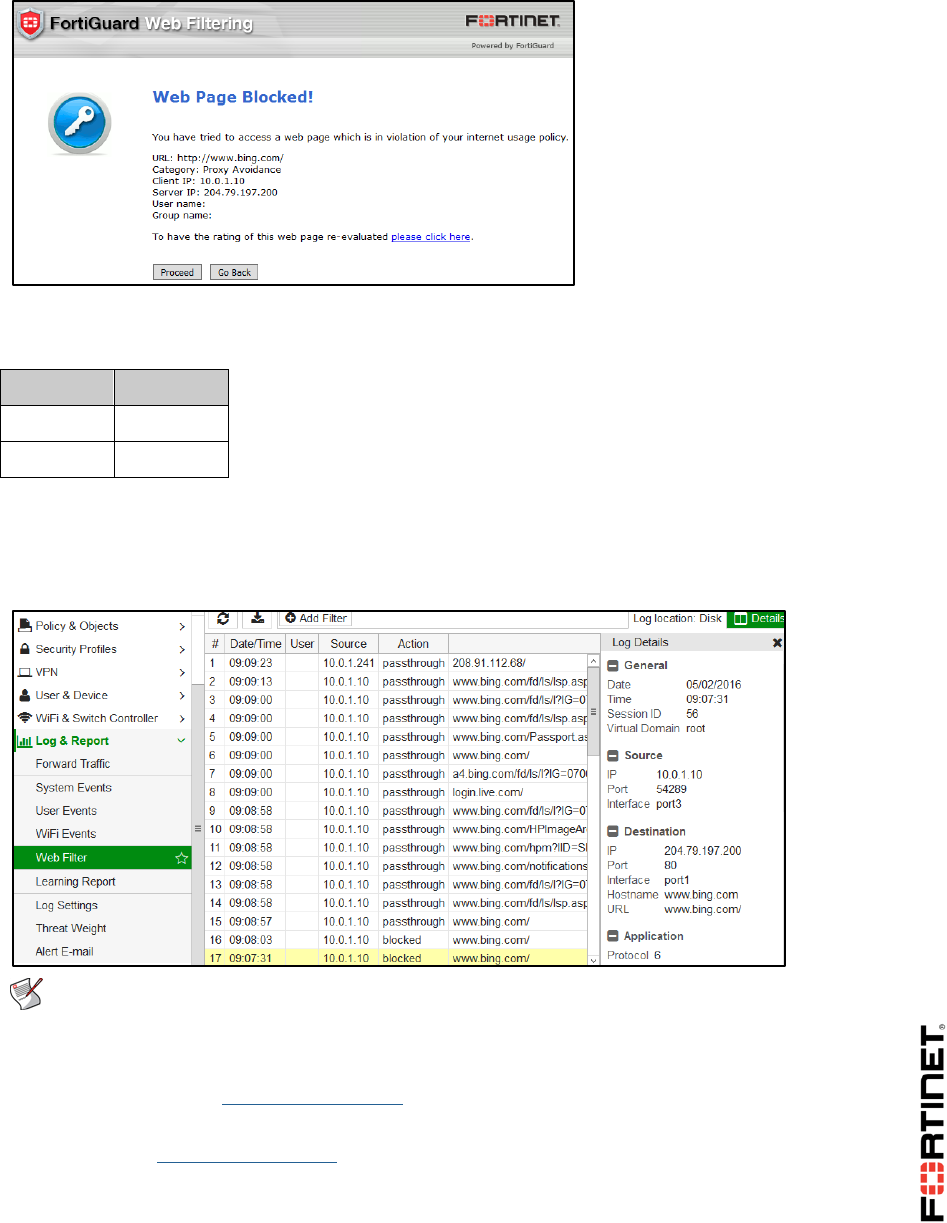
LAB 10–Web Filtering
FortiGate I Student Guide 139
2. Click Proceed.
3. Enter the following credentials:
Field
Value
Username
student
Password
fortinet
This website now displays correctly.
To review the web filter logs for web rating overrides
1. Return to the Local-FortiGate GUI and go to Log & Report > Web Filter.
Note: The Web Filter logs section will not display if there are no web filtering logs.
FortiGate will show it after creating logs. If this menu item does not display, log out
from the FortiGate GUI and log in again to refresh it.
According the logs, http://www.bing.com was initially blocked, but after clicking Proceed and
authenticating, the logs show a different action: passthrough.
Remember, http://www.bing.com is rated by FortiGuard as belonging to the Search Engines
and Portals category, where the action, by default, is set to Allow.
But for this website, you changed the category to Potentially Liable.
DO NOT REPRINT
© FORTINET
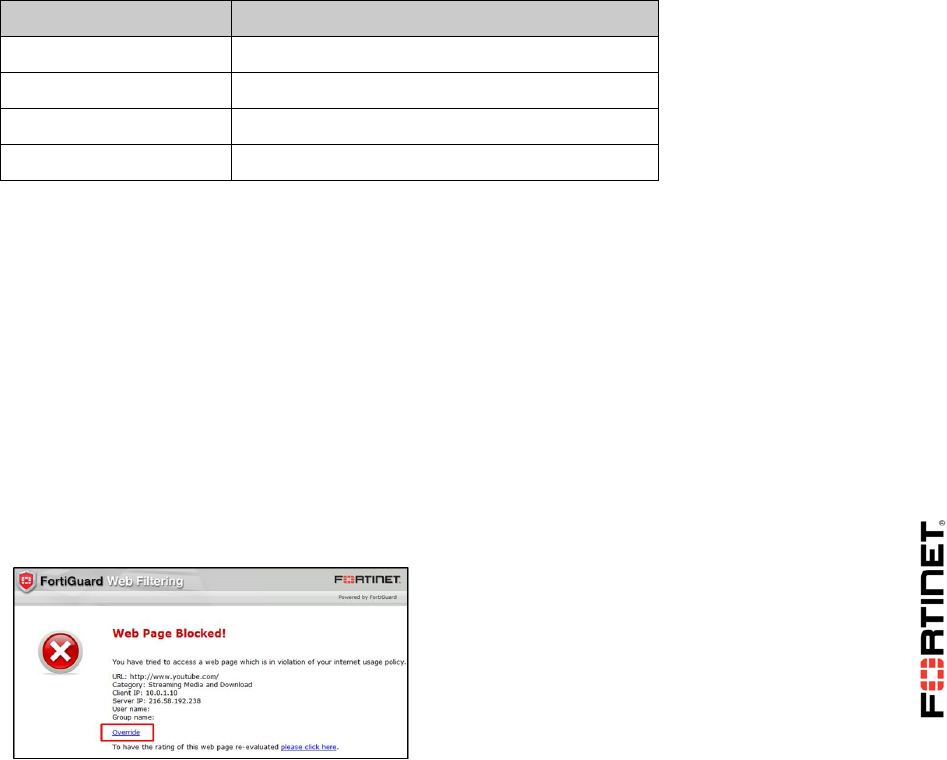
LAB 10–Web Filtering
FortiGate I Student Guide 140
3 Web Profile Overrides
After you have tested the web rating overrides, you will test web profile overrides.
The web profile overrides feature changes the rules applied to inspected traffic. It authorizes some
users, user groups, or predefined source IPs, to use a different web filter profile.
Configure Web Profile Overrides
In this procedure, you will allow users to override blocked categories. Those users must authenticate
in order to apply a different web filter profile.
To configure a Web Profile Override
1. From the Local-Windows VM, open a browser and log in as admin to the Local-FortiGate GUI at
10.0.1.254.
2. Go to Security Profiles > Web Filter.
3. Enable Allow users to override blocked categories and enter the following options:
Field
Value
Group that can override
Override_Permissions
Profile can switch to
monitor-all
Switch applies to
IP
Switch duration
Predefined 0 Day(s) | 0 Hour(s) | 15 Minute(s)
4. Click Apply to save the changes.
Testing the Web Profile Override
Finally, you will test the global access for a blocked category and authenticate to apply a new web
filter profile. You will also review the web filter logs to verify how actions change once the new web
profile is applied.
To test the web profile override
1. Open a new browser tab, and try to access www.youtube.com.
A block page appears according to the action for this website category. However, this block
message is different from the one that appeared in exercise 1. It includes an override link at the
bottom:
DO NOT REPRINT
© FORTINET
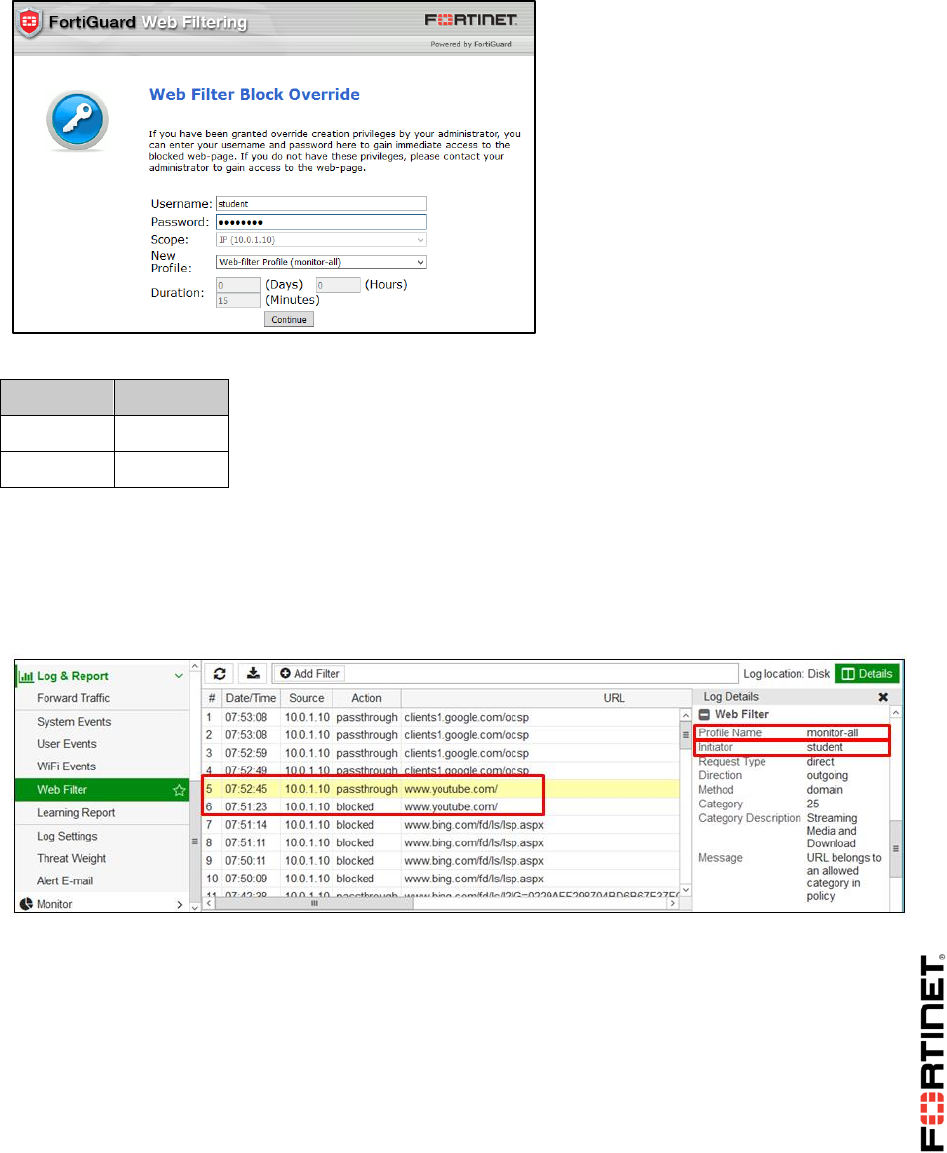
LAB 10–Web Filtering
FortiGate I Student Guide 141
2. Click Override.
A block override message appears:
3. Enter the following credentials and click Continue:
Field
Value
Username
student
Password
fortinet
FortiGate overrides the default profile and allows you to access the website.
To review the web filter logs for web profile overrides
1. From the Local-FortiGate GUI, go to Log & Report > Web Filter.
2. Compare the current passthrough entries with the older block logs.
3. Click Details at the upper-right corner. Notice the web profile used is different.
DO NOT REPRINT
© FORTINET
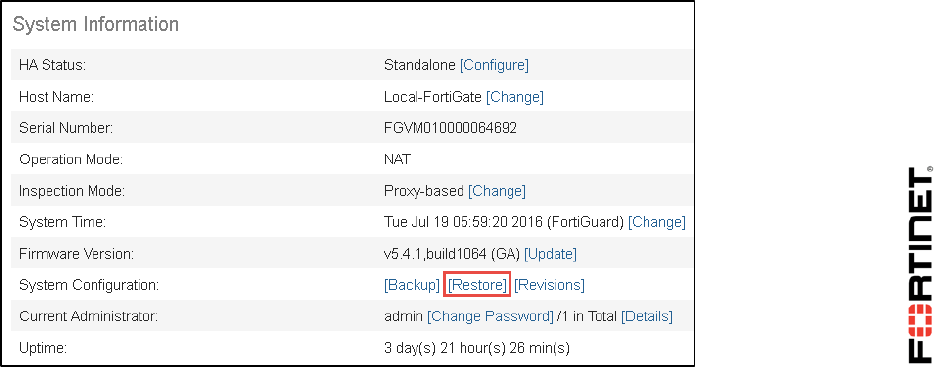
LAB 11–Application Control
FortiGate I Student Guide 142
LAB 11–Application Control
In this lab, you will configure and use the application control and cloud access security inspection
(CASI) to take appropriate action on an application. You will view logs and monitor from FortiView.
You will also use application control feature along with traffic shaping to limit the bandwidth of an
application.
Objectives
Configure application control.
Read and understand application control logs and applications from FortiView.
Configure and monitor traffic shaping for application control.
Configure CASI for granular control of applications.
Time to Complete
Estimated: 25 minutes
Prerequisites
Before beginning this lab, you must restore a configuration file to FortiGate.
To restore the FortiGate configuration file
1. From the Local-Windows VM, open a web browser and log in as admin to the Local-FortiGate
GUI at 10.0.1.254.
2. Go to Dashboard, and from the System Information widget click Restore.
3. From your local PC (Local-Windows VM), click Upload and go to Desktop > Resources >
DO NOT REPRINT
© FORTINET

LAB 11–Application Control
FortiGate I Student Guide 143
FortiGate-I > Application-Control and select local-application-control.conf.
4. Click OK.
5. Click OK.
DO NOT REPRINT
© FORTINET

LAB 11–Application Control
FortiGate I Student Guide 144
1 Creating an Application Control Profile
In this exercise, you will create an application control profile. The FortiGate matches the traffic in this
order:
1. application overrides
2. filter overrides
3. categories
You will also view the application control logs and applications from FortiView to confirm the
applications are logged correctly.
Configuring Application Overrides
The configuration file for this exercise already has the application control categories set to monitor
(except Unknown Applications). This allows the applications to pass, but also records a log message.
In this exercise, you will configure application overrides. The application overrides will take
precedence over application categories.
To configure application overrides
1. From the Local-Windows VM, open a browser and log in as admin to the Local-FortiGate GUI at
10.0.1.254.
2. Go to Security Profiles > Application Control.
3. Review the default application control sensor.
Verify that you are selecting the application sensor named default.
4. On the Edit Application Sensor page, click Add Signatures under Application Overrides to
add an application signature.
5. In the Add Signature page, click Add Filter.
6. Click Name and type dailymotion in the search field.
7. From populated list, click the Dailymotion application to select it.
8. Click Dailymotion:
9. Click Use Selected Signature at the bottom.
Your configuration should look like the following:
DO NOT REPRINT
© FORTINET

LAB 11–Application Control
FortiGate I Student Guide 145
The action for this should show as Block.
10. Click Apply at the bottom of the Edit Application Sensor page.
Verifying that an Application Control Profile is Applied
The configuration file for this exercise already has the default application control profile added to
firewall policy and you will be verifying that.
To verify that an application control profile is applied to a firewall policy
1. In the Local-FortiGate GUI, go to Policy & Objects > IPv4 Policy.
2. Right click the Seq.# column of the App_control firewall policy.
3. Click Edit.
4. Under the Security Profiles section, verify Application Control is turned on and the default
application control sensor is selected.
5. Click Cancel.
Testing the Application Control Profile
Now your configuration is complete. You will test the application control profile by going to the
application that you blocked in the application overrides configuration.
To test application control profile
1. In the Local-Windows VM, open a new web browser window and go to the following URL:
http://dailymotion.com.
You should observe that you cannot connect to this site. It times out.
2. In the Local-FortiGate GUI, go to the Security Profiles > Application Control.
3. Edit the default application sensor again.
4. Enable Replacement Messages for HTTP-based Applications at the bottom of the profile.
DO NOT REPRINT
© FORTINET

LAB 11–Application Control
FortiGate I Student Guide 146
5. Click Apply.
6. Go to the http://dailymotion.com website again.
Now FortiGate should display a block message.
Viewing Logs
Now you will view the logs for the test you just performed.
To view logs
1. In the Local-FortiGate GUI, go to Log & Report > Application Control.
Note: The Application Control logs section will not display if there are no application
control logs. FortiGate will show it after creating logs. If this menu item does not
display, log out from the FortiGate GUI and log in again to refresh it.
2. Search and view the log information for Dailymotion to confirm that this action was correctly
logged.
3. Double click on the log to view more details.
It will show you application sensor name, name, category, and the action taken by FortiGate.
4. Go to Log & Report > Forward Traffic and search and view the log information for Dailymotion.
You can see more details about this log such as NATed IP, Bytes sent/received, action, and
application.
DO NOT REPRINT
© FORTINET

LAB 11–Application Control
FortiGate I Student Guide 147
2 Limiting Traffic Using Traffic Shapers
You can limit the bandwidth consumption of an application category or specific application by
configuring a traffic shaping policy. You must ensure that the matching criteria aligns with the firewall
policy or policies to which you want to apply shaping
In this exercise, you will configure and apply traffic shaping to an application to limit its bandwidth
consumption.
Modifying Application Overrides Action
You will be modifying the application override for Dailymotion application to change the action from
Block to Monitor. Then you will apply traffic shaping in the next procedure.
To modify Application Overrides action
1. From the Local-Windows VM, open a browser and log in as admin to the Local-FortiGate GUI at
10.0.1.254.
2. Go to Security Profiles > Application Control.
3. Verify that you are selecting the application sensor named default.
4. Under Application Overrides, right-click Dailymotion and click Monitor.
This will change the action for Dailymotion from Block to Monitor.
5. Click Apply.
Note: In order for the traffic shaping, the signature must be allowed in application
control profile.
Configuring Traffic Shaper Policy
The traffic shaper is preconfigured for you. You will be configuring a traffic shaper policy using the pre-
configured traffic shaper to limit the bandwidth use for Dailymotion.
To configure Traffic Shaper Policy
1. In the Local-FortiGate GUI, go to Policy & Objects > Traffic Shapers.
2. For the DAILYMOTION_SHAPER traffic shaper look closely at the Max Bandwidth column.
You will notice that maximum amount of allowed bandwidth is very low.
3. Go to Policy & Objects > Traffic Shaping Policy and click Create New.
4. Configure the following.
Field
Value
Source
all
Destination
all
DO NOT REPRINT
© FORTINET

LAB 11–Application Control
FortiGate I Student Guide 148
Service
ALL
Application
Dailymotion
(Tip: Type the name in the search box on right hand
side and click on Dailymotion to add.)
Outgoing Interface
port1
(Tip: Remember this is FortiGate egress interface.)
Reverse Shaper
Enable and apply DAILYMOTION_SHAPER
Enable this policy:
Enable
Your configuration should look like this:
5. Click OK.
Note: The Shared Shaper option is to limit the bandwidth from ingress-to-egress,
useful for limiting uploading bandwidth. Reverse Shaper is to limit bandwidth from
egress-to-ingress, useful for limiting downloading/streaming bandwidth.
Note: You must ensure that the matching criteria align with the firewall policy or
policies to which you want to apply shaping.
Testing Traffic Shaping
Now that your configuration is complete, you test traffic shaping by playing a video on Dailymotion.
DO NOT REPRINT
© FORTINET

LAB 11–Application Control
FortiGate I Student Guide 149
To test traffic shaping
1. In the Local-Windows VM, open a web browser and go to the following URL:
http://dailymotion.com
2. Try to play any video.
You will notice access to this site is slow and video is taking long time to buffer and play.
Note: If your classroom is using a virtual lab, the underlying hardware is shared, and
so the amount of available bandwidth for Internet access varies by usage by other
simultaneous use. The traffic shaper is set to a very low value in order to make sure
that the difference in behavior is easily noticeable. In real networks, this setting
would be greater.
3. In the Local-FortiGate GUI, go to Policy & Objects > Traffic Shapers.
4. Review the DAILYMOTION_SHAPER for Bandwidth Utilization and Dropped Bytes columns.
You might need to refresh the FortiGate GUI to view the statistics on Traffic Shapers.
You will notice the bandwidth utilization by the Dailymotion application and FortiGate is dropping
the packets which are in excess from the configured bandwidth in the traffic shaper.
Note: Monitor statistics are current as of the time that you requested the GUI page, so
make sure to view them while a video is downloading. Also refresh the page few times
to get the results.
DO NOT REPRINT
© FORTINET

LAB 11–Application Control
FortiGate I Student Guide 150
3 Configuring CASI
The CASI profile allows fine-grained control over cloud applications such as YouTube, Dropbox, and
Netflix to name a few. As most of the cloud based applications uses SSL encryption, you must enable
deep inspection in the firewall policy.
In this exercise, you will allow granular control over cloud based applications.
Configuring a CASI Profile
You will be configuring a CASI profile.
To configure a CASI profile
1. On the Local-Windows VM, open a browser and log in as admin to the Local-FortiGate GUI at
10.0.1.254.
2. Go to Security Profiles > Cloud Access Security Inspection.
3. Review the default CASI profile on which all the applications action is set to monitor.
4. Under General.Interest, change the action to Block for Bing Search.
5. Click Apply at the bottom.
Optional configuration: If you have account on www.facebook.com or www.linkedin.com, follow
the steps below:
Under Social.Media click on + sign besides Facebook and change the action to Block for
Login.
Under Social.Media click on + sign besides LinkedIn and change the action to Block for
Login.
Click Apply at the bottom.
Enabling CASI and Verifying Deep Inspection is Enabled
on the Firewall Policy
As most of the cloud applications are HTTPS, so remember that for those, you will also need an
SSL/SSH inspection profile in the firewall policy.
Note: For CASI to work at all, man in the middle (MITM) must be correctly set up, without certificate
warnings. Firefox uses its own certificate store, whereas Chrome and IE use Microsoft’s.
In this environment, the FortiGate CA certificate for SSL inspection is preloaded into the Firefox
browser.
To enable CASI and verify deep inspection is enabled on firewall policy
1. In the Local-FortiGate GUI, go to Policy & Objects > IPv4 Policy.
2. Right click the Seq.# column of the App_control firewall policy and click Edit.
3. Under Security Profiles, enable CASI and select default from the associated drop-down list.
4. In the Security Profiles, verify that SSL/SSH Inspection is enabled and deep-inspection is
selected.
DO NOT REPRINT
© FORTINET

LAB 11–Application Control
FortiGate I Student Guide 151
5. Click OK.
Testing CASI
Now that your configuration is complete, you test CASI by going to the application that you configured.
To test CASI
1. In the Local-Windows VM, open a new web browser window and go to the following URL:
http://www.bing.com.
2. Try to search anything such as Fortinet, Youtube, or Facebook.
The page will be blocked.
Optional testing: If you have account on www.facebook.com or www.linkedin.com, you can open
a new web browser window and go to https://www.facebook.com or https://www.linkedin.com.
Try logging into your account. You will notice you are not able to login.
3. In the Local-FortiGate GUI, go to Log & Reports > Application Control.
Note: The Application Control logs section will not display if there are no application
control logs. FortiGate will show it after creating logs. If this menu item does not
display, log out from the FortiGate GUI and log in again to refresh it.
4. Search the logs for Bing, Facebook, or LinkedIn.
You will see similar logs as one below.
In this example, look at the Application User and Application Details columns.
For LinkedIn, login to LinkedIn is blocked, but access to the website is allowed in the log below.
For Bing search, it shows the search phrase.
DO NOT REPRINT
© FORTINET

Appendix A: Additional Resources
FortiGate I Student Guide 152
Appendix A: Additional
Resources
Training Services
http://www.fortinet.com/training
Technical Documentation
http://docs.fortinet.com
Knowledge Base
http://kb.fortinet.com
Forums
https://forum.fortinet.com/
Customer Service & Support
https://support.fortinet.com
FortiGuard Threat Research & Response
http://www.fortiguard.com
DO NOT REPRINT
© FORTINET

Appendix B: Presentation Slides
FortiGate I Student Guide 153
Appendix B: Presentation Slides
DO NOT REPRINT
© FORTINET
In this lesson, you will learn about FortiGate administration basics. This includes how – and where –
FortiGate fits into your existing network architecture.
Introduction to Fortinet
FortiGate I Student Guide
154
DO NOT REPRINT
© FORTINET
After completing this lesson, you should have the practical skills and knowledge of FortiGate
administration fundamentals required to do the following:
• log in to your FortiGate
• create administrator accounts
• configure basic network settings, and
• use your FortiGate’s GUI or CLI.
You’ll also be able to set up FortiGate to act as your local network’s DNS or DHCP server.
Lab exercises can help you to test and reinforce your skills.
Introduction to Fortinet
FortiGate I Student Guide
155
DO NOT REPRINT
© FORTINET
To start, let’s talk about how FortiGate is different from traditional firewalls or other vendors that you
may have worked with.
From the beginning, FortiGate has been synonymous with unified threat management (UTM): a
traditional firewall with specialized security devices, such as VPN gateways and IPS sensors bundled
into one device. FortiGate UTM proved popular with small-to-medium businesses (SMB) and
enterprises or campuses that have many branch offices. However, for managed security service
providers (MSSPs) and data centers looking for the best performance, Fortinet’s FortiASIC chips and
next-generation firewall features have been popular instead. How can FortiGate serve all of these
types of networks?
Introduction to Fortinet
FortiGate I Student Guide
156
DO NOT REPRINT
© FORTINET
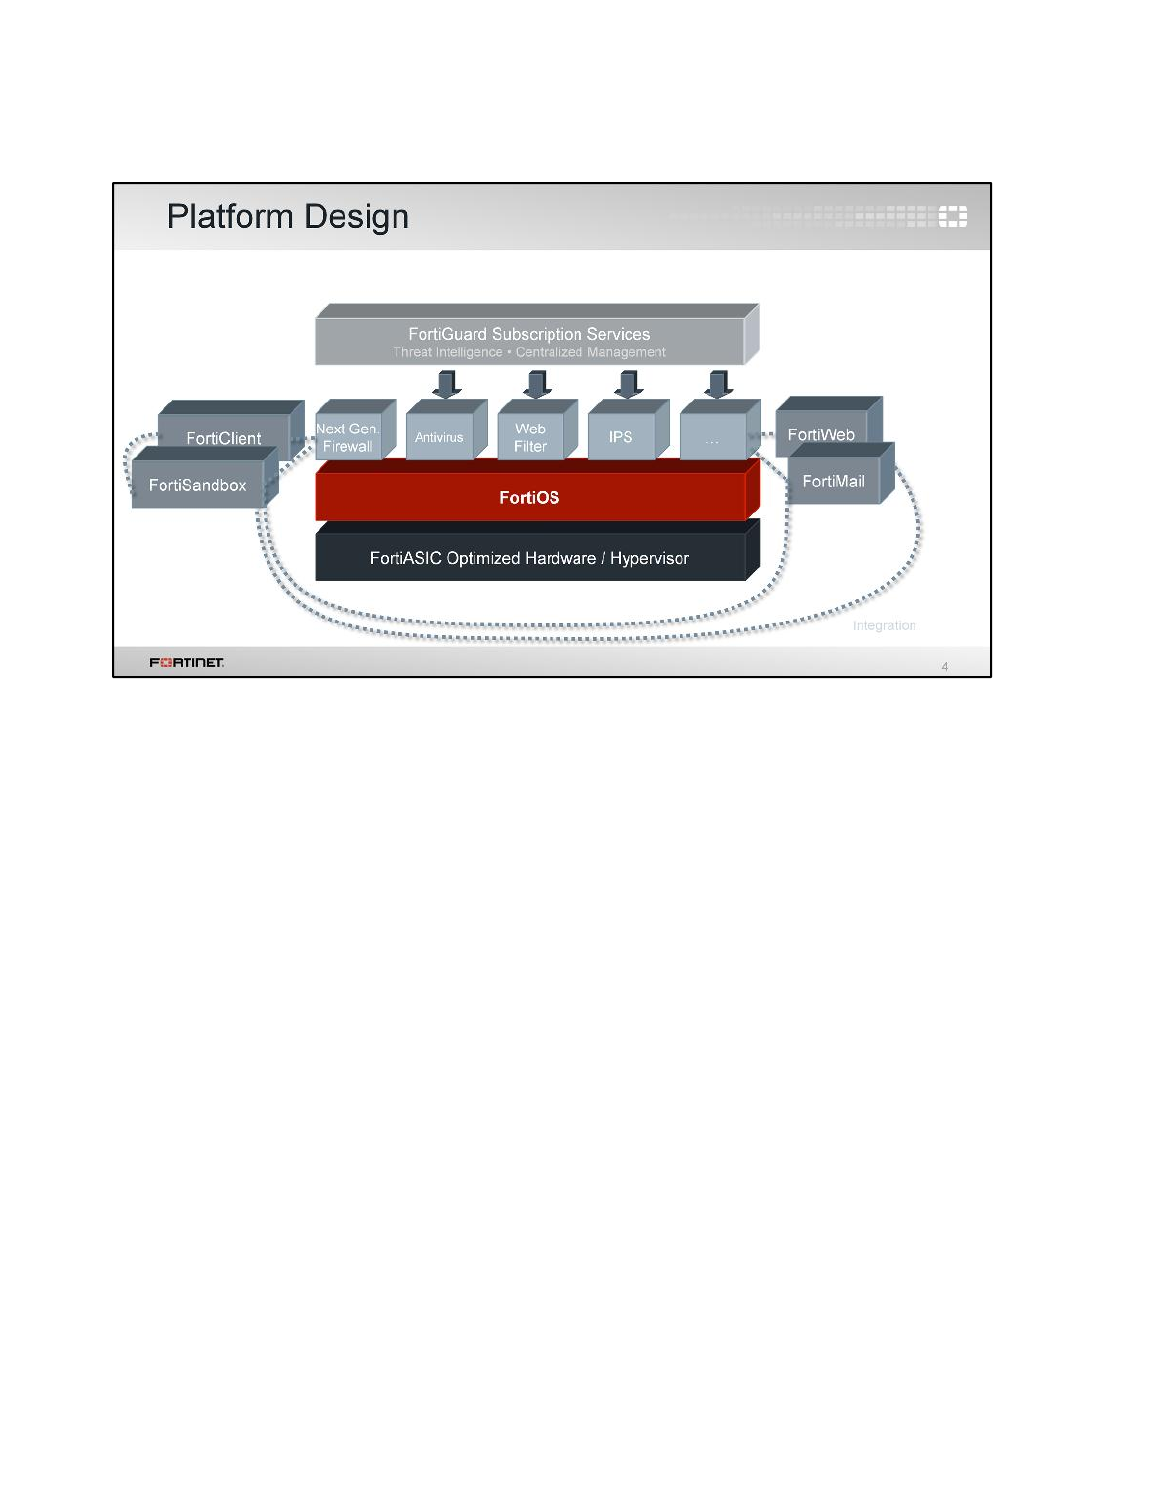
In this architecture diagram, you can see how FortiGate platforms add strength, without compromising
flexibility. Like separate, dedicated security devices, FortiGates are still internally modular. Plus:
•Devices add duplication. Sometimes, dedication doesn’t mean efficiency. If it’s overloaded, can
one device borrow free RAM from nine others? Do you want to configure policies, logging, and
routing on 10 separate devices? Does 10 times the duplication bring you 10 times the benefit, or is
it a hassle? For smaller to midsize businesses or enterprise branch offices, UTM is often a superior
solution compared to separate dedicated appliances.
•FortiGate hardware isn’t just off-the-shelf. It’s carrier-grade. Underneath, most FortiGate
models have one or more specialized circuits called ASICs that are engineered by Fortinet. For
example, a CP or NP chip handles cryptography and packet forwarding more efficiently. Compared
to a single-purpose device with only a CPU, FortiGate can have dramatically better performance.
This is especially critical for data centers and carriers where throughput is business critical.
(The exception? Virtualization platforms – VMware, Citrix Xen, Microsoft, or Oracle Virtual Box –
have general-purpose vCPUs. But, virtualization might be worthwhile due to other benefits, such as
distributed computing and cloud-based security.)
•FortiGate is flexible. If all you need is fast firewalling and antivirus, FortiGate won’t require you to
waste CPU, RAM, and electricity on other features. In each firewall policy, UTM and next-
generation firewall modules can be enabled or disabled. Also, you won’t pay more to add VPN seat
licenses later. What requires a subscription? Only ongoing FortiGuard subscription services.
•FortiGate cooperates. A preference for open standards instead of proprietary protocols means
less vendor lock-in and more choice for system integrators. And, as your network grows, FortiGate
can leverage other Fortinet products such as FortiSandbox and FortiWeb to distribute processing
for deeper security and optimal performance – a total security fabric approach.
Introduction to Fortinet
FortiGate I Student Guide
157
DO NOT REPRINT
© FORTINET
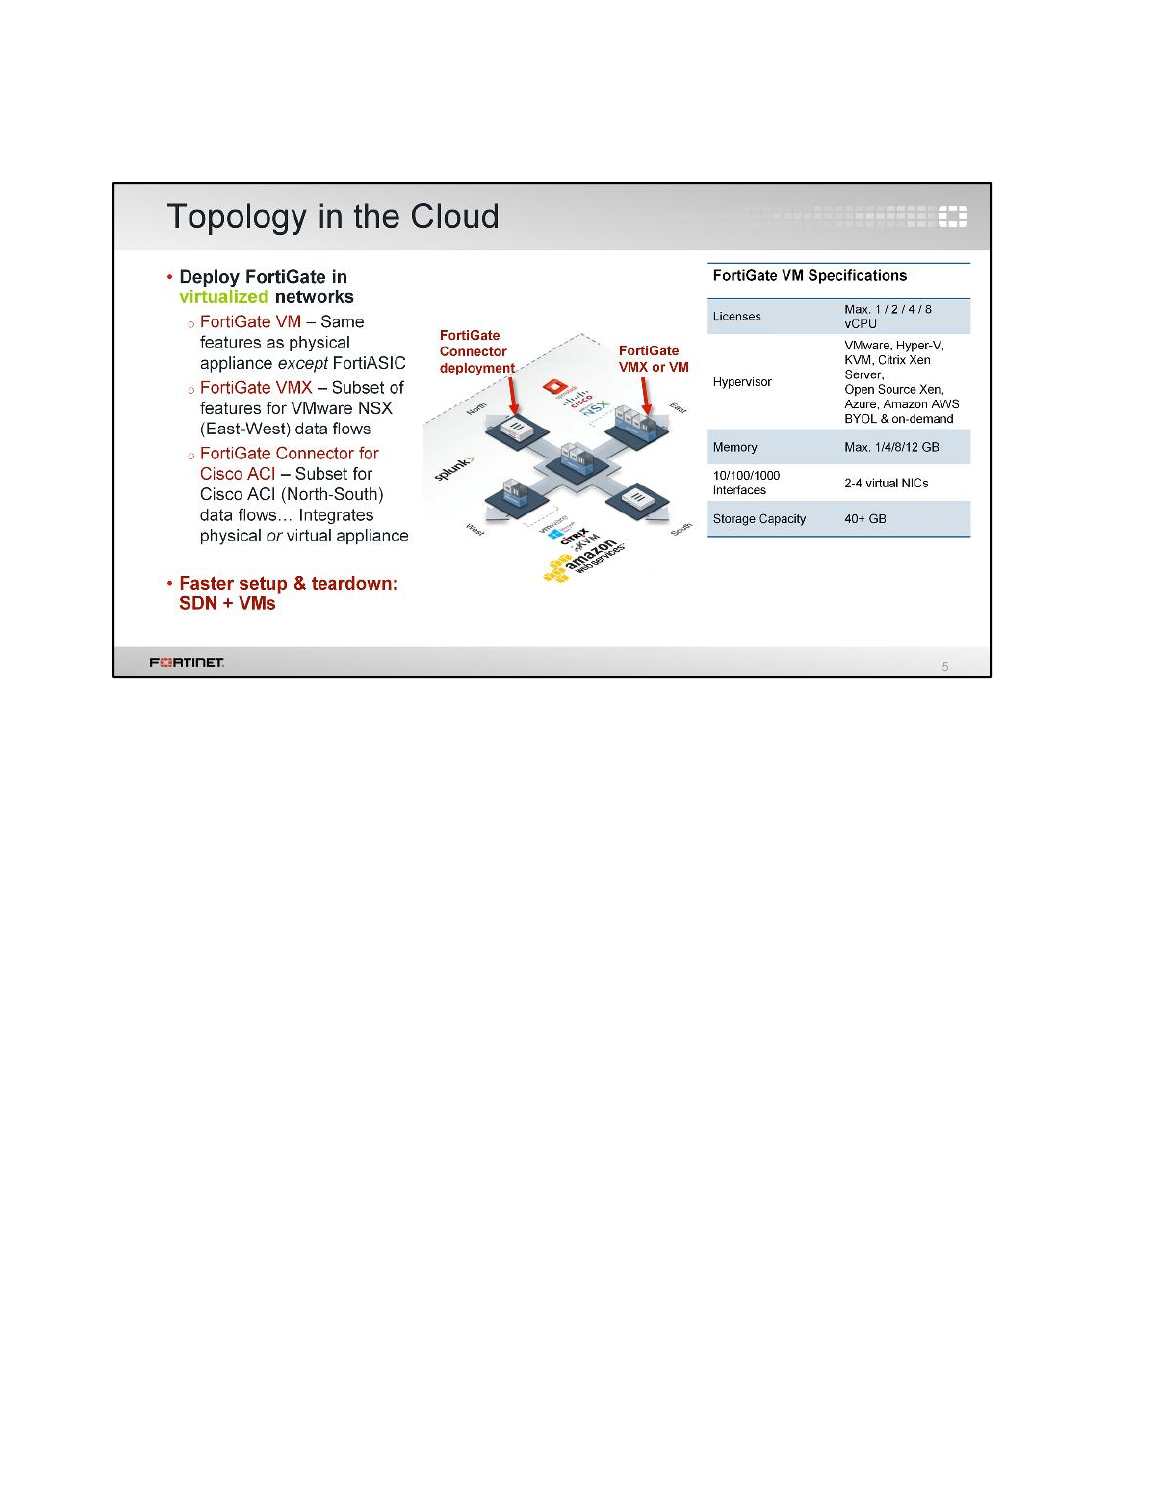
If you deploy FortiGates as virtualized appliances – not physical – that platform still will be familiar.
FortiGate virtual machines (VMs) have the same features as a physical FortiGate,except for
hardware acceleration.Why? First, hypervisors’ hardware abstraction layer software is made by
VMware, Xen, and other hypervisor manufacturers, not by Fortinet. Those other manufacturers don’t
make Fortinet’s proprietary FortiASIC chips. But there is another reason, too. The purpose of
hypervisors’ generic virtual CPUs and other virtual chips is to abstract the hardware details. That way,
all VM guest OSs can run on a common platform, no matter the different hardware where the
hypervisors are installed. Unlike vCPUs or vGPUs that use generic, non-optimal RAM and vCPUs for
abstraction, FortiASIC chips are (by definition) specialized optimized circuits. Therefore, a virtualized
ASIC chip would not have the same performance benefits as a physical ASIC chip.
If performance on equivalent hardware is less, you may wonder, why would anyone use a FortiGate
VM? In large scale networks that change rapidly and may have many tenants, equivalent processing
power and distribution may be achievable by using larger amounts of cheaper, general purpose
hardware. Also, trading some performance for other benefits may be worth it. The owner can benefit
strongly from faster network and appliance deployment and teardown.
FortiGate VMX and the FortiGate Connector for Cisco ACI extend this vision. They are a specialized
version of FortiOS and an API that allow you to orchestrate rapid network changes through standards,
such as OpenStack for software-defined networking (SDN). So:
• FortiGate VM is deployed as a guest VM on the hypervisor.
• FortiGate VMX is deployed inside a hypervisor’s vNetworks, between guest VMs.
• FortiGate Connector for Cisco ACI allows ACI to deploy physical or virtual FortiGate VMs for
North/South traffic.
Introduction to Fortinet
FortiGate I Student Guide
158
DO NOT REPRINT
© FORTINET
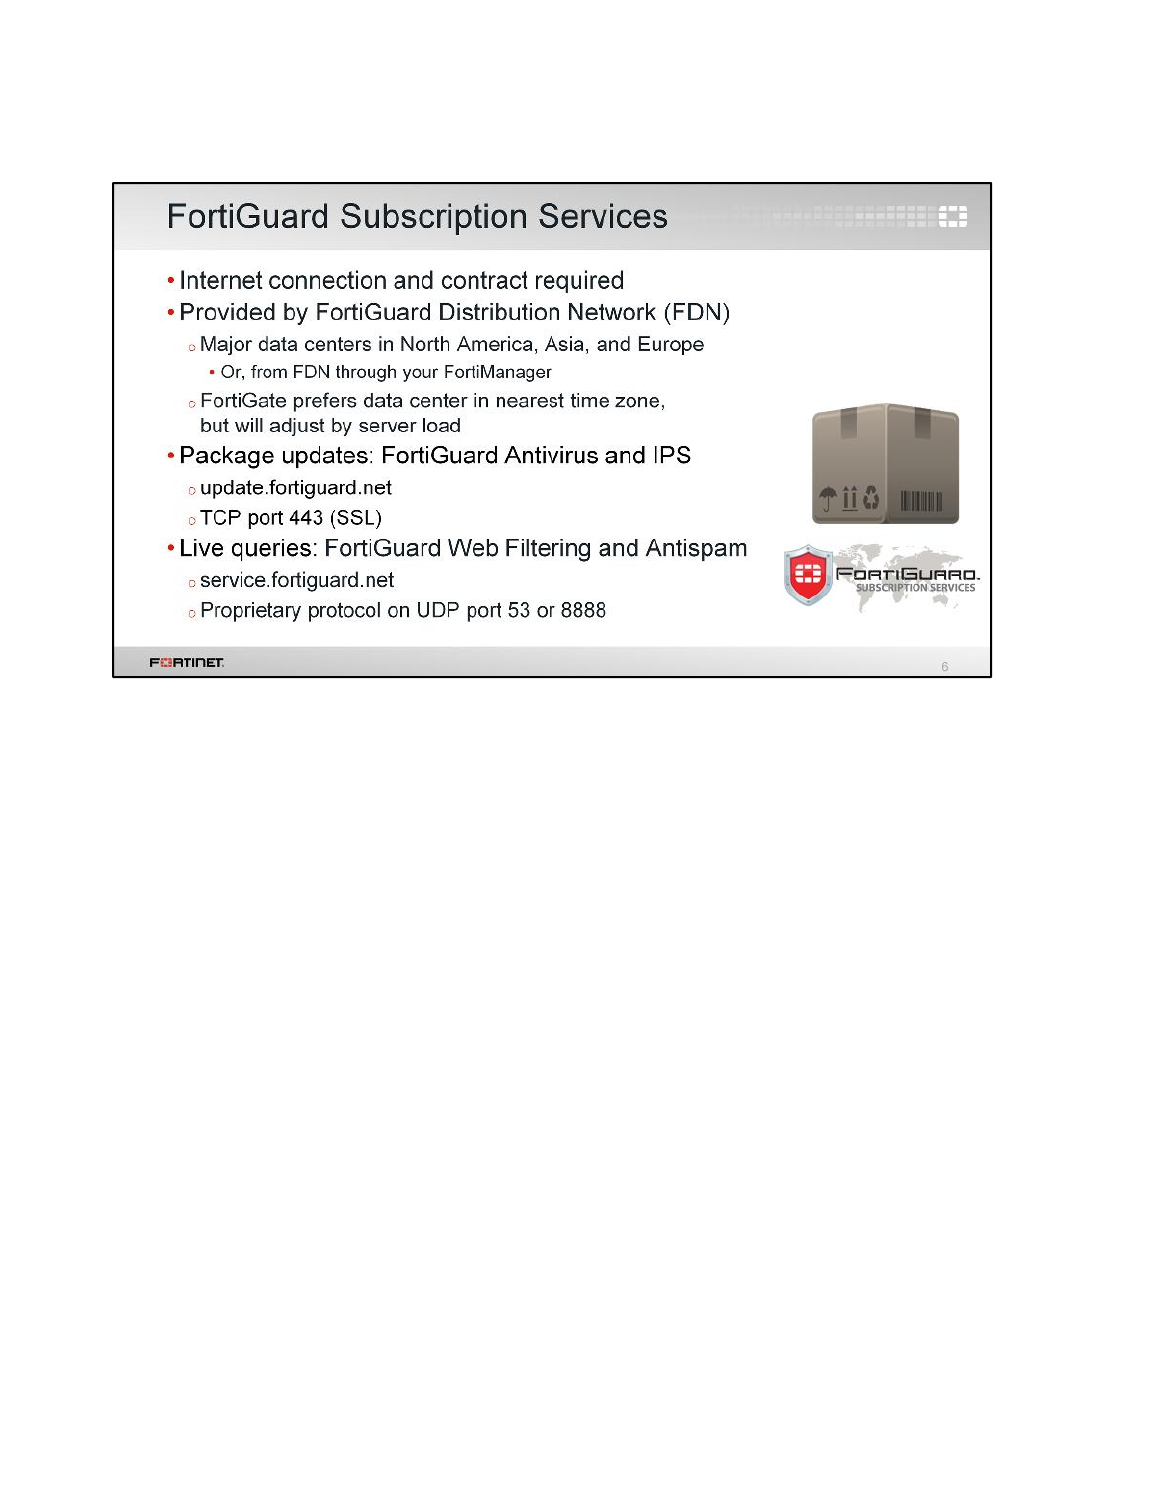
FortiGuard subscription services give your FortiGate access to 24 x 7 security updates powered by
Fortinet’s researchers. Your FortiGate uses FortiGuard in two ways:
• by periodically requesting packages that contain a new engine and many signatures, and
• by querying the FDN on an individual URL or host name.
Queries are real-time – that is, FortiGate asks the FDN every time it scans for spam or filtered
websites. Also, queries use UDP for transport – they are connectionless and the protocol is not
designed for fault tolerance, but for speed. So, they require that your FortiGate have a reliable Internet
connection.
Downloaded packages like antivirus and IPS, however, aren’t that frequent. They use TCP for reliable
transport. Their associated FortiGate features continue to function even if FortiGate does not have
reliable Internet connectivity. Keep in mind, though, that you should still avoid interruptions. If your
FortiGate must try repeatedly to download updates, it can’t detect new threats during that time.
Introduction to Fortinet
FortiGate I Student Guide
159
DO NOT REPRINT
© FORTINET

So now you’ve seen a simplified overview of the software architecture. What about the network
architecture? Where does FortiGate fit in?
When you deploy a FortiGate, you can choose on the dashboard between two modes: NAT or
transparent.
• In NAT mode, FortiGate forwards packets based on Layer 3, like a router. Each of its logical
network interfaces have an IP address.
• In transparent mode, FortiGate forwards packets at Layer 2, like a switch. So, except for the
management interface, its interfaces have no IP address.
Interfaces can be exceptions to the router vs. switch operation mode on an individual basis, however.
We’ll show these later.
Introduction to Fortinet
FortiGate I Student Guide
160
DO NOT REPRINT
© FORTINET
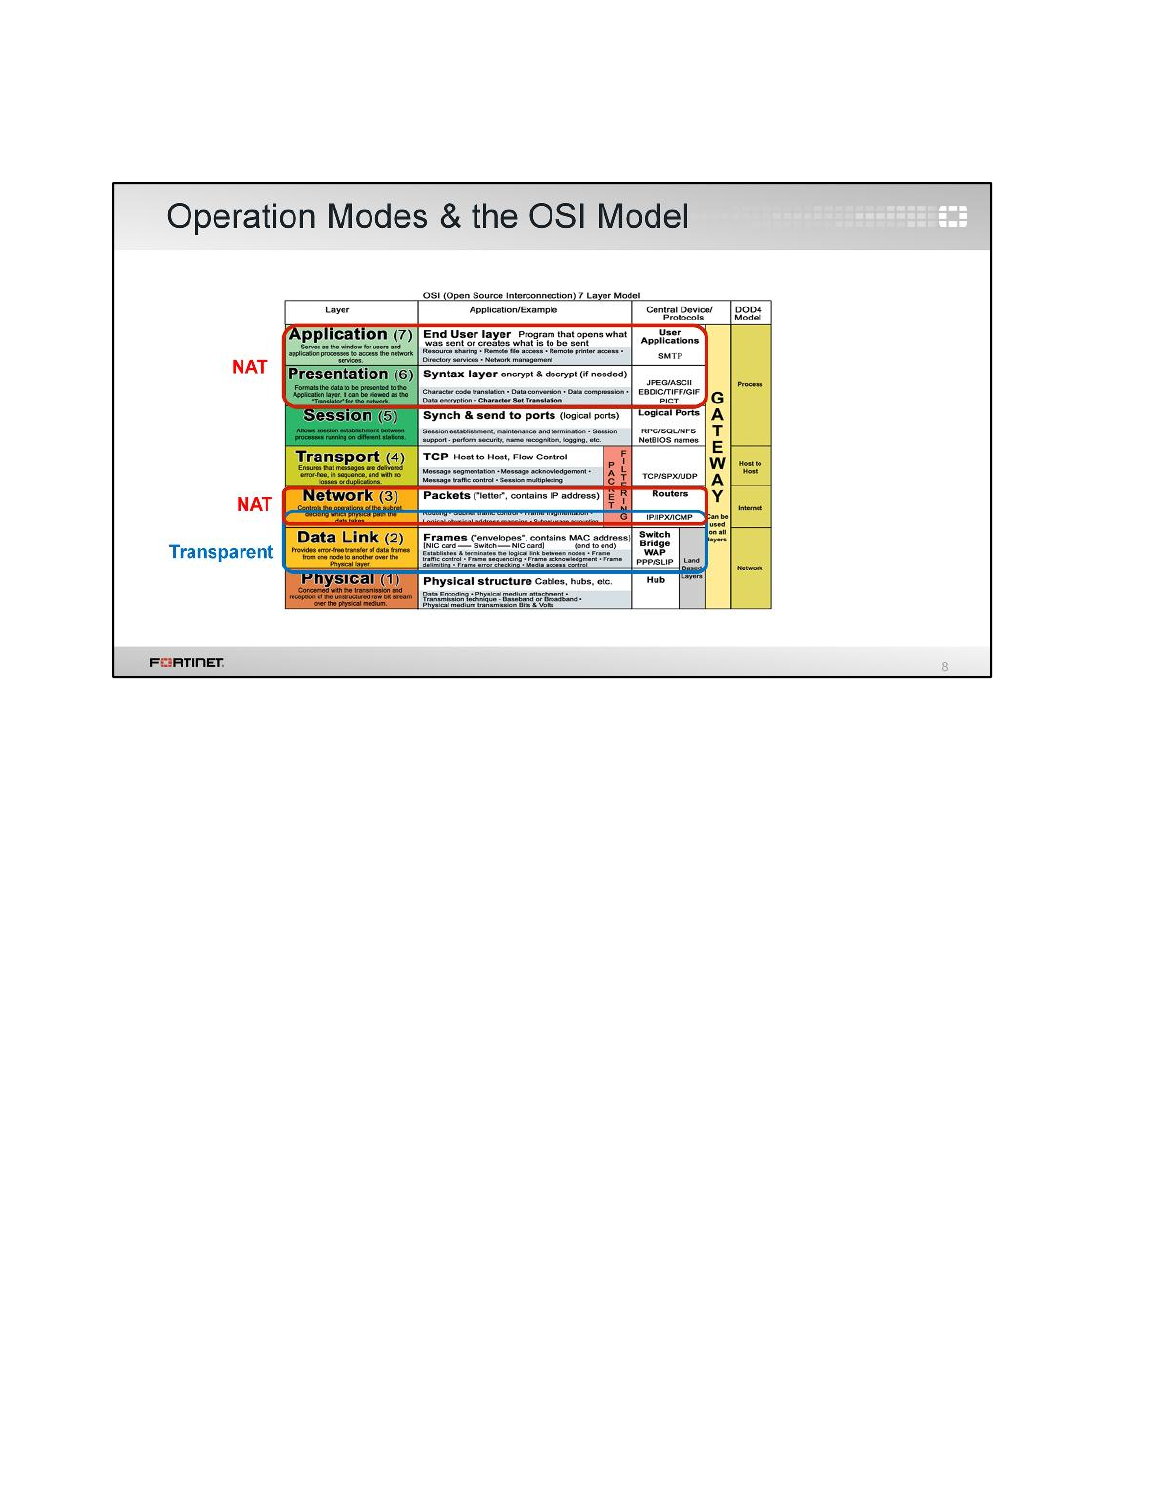
What does that mean for your traffic, in terms of the 7-layer OSI model? Which operation mode should
you choose?
NAT mode is the most common choice. In NAT mode, the destination address is the FortiGate’s
address. Typically, FortiGate will rewrite the destination address, and/or port number and source
address in the IP network layer, into the server’s private network address before forwarding the packet
– in other words, it will apply NAT and port forwarding. Depending on your presentation and
application layer protocols, it might also:
• Terminate SSL or TLS sessions so back-end servers don’t need to decrypt
• Modify the addresses in the application layer headers, such as the Host and X-Forwarded-For
addresses in the HTTP header
So, NAT mode works well for edge or gateway security, where you divide your private IPv4 network
from an external network such as guest Wi-Fi or the Internet.
In transparent mode, the destination address is the server’s address – not a FortiGate’s interface. As
a result, it usually doesn’t need to rewrite encapsulated layers – with the exception of TCP SYN-
related analysis. Only the MAC address in the frame is rewritten. So, in complex IP environments
such as MSSP or mobile phone carriers, this simplifies deployment. Only the management interface
needs an IP address. But because network-facing interfaces don’t have an IP address, you must verify
that your topology doesn’t have any loops at Layer 2 – Ethernet.
Introduction to Fortinet
FortiGate I Student Guide
161
DO NOT REPRINT
© FORTINET
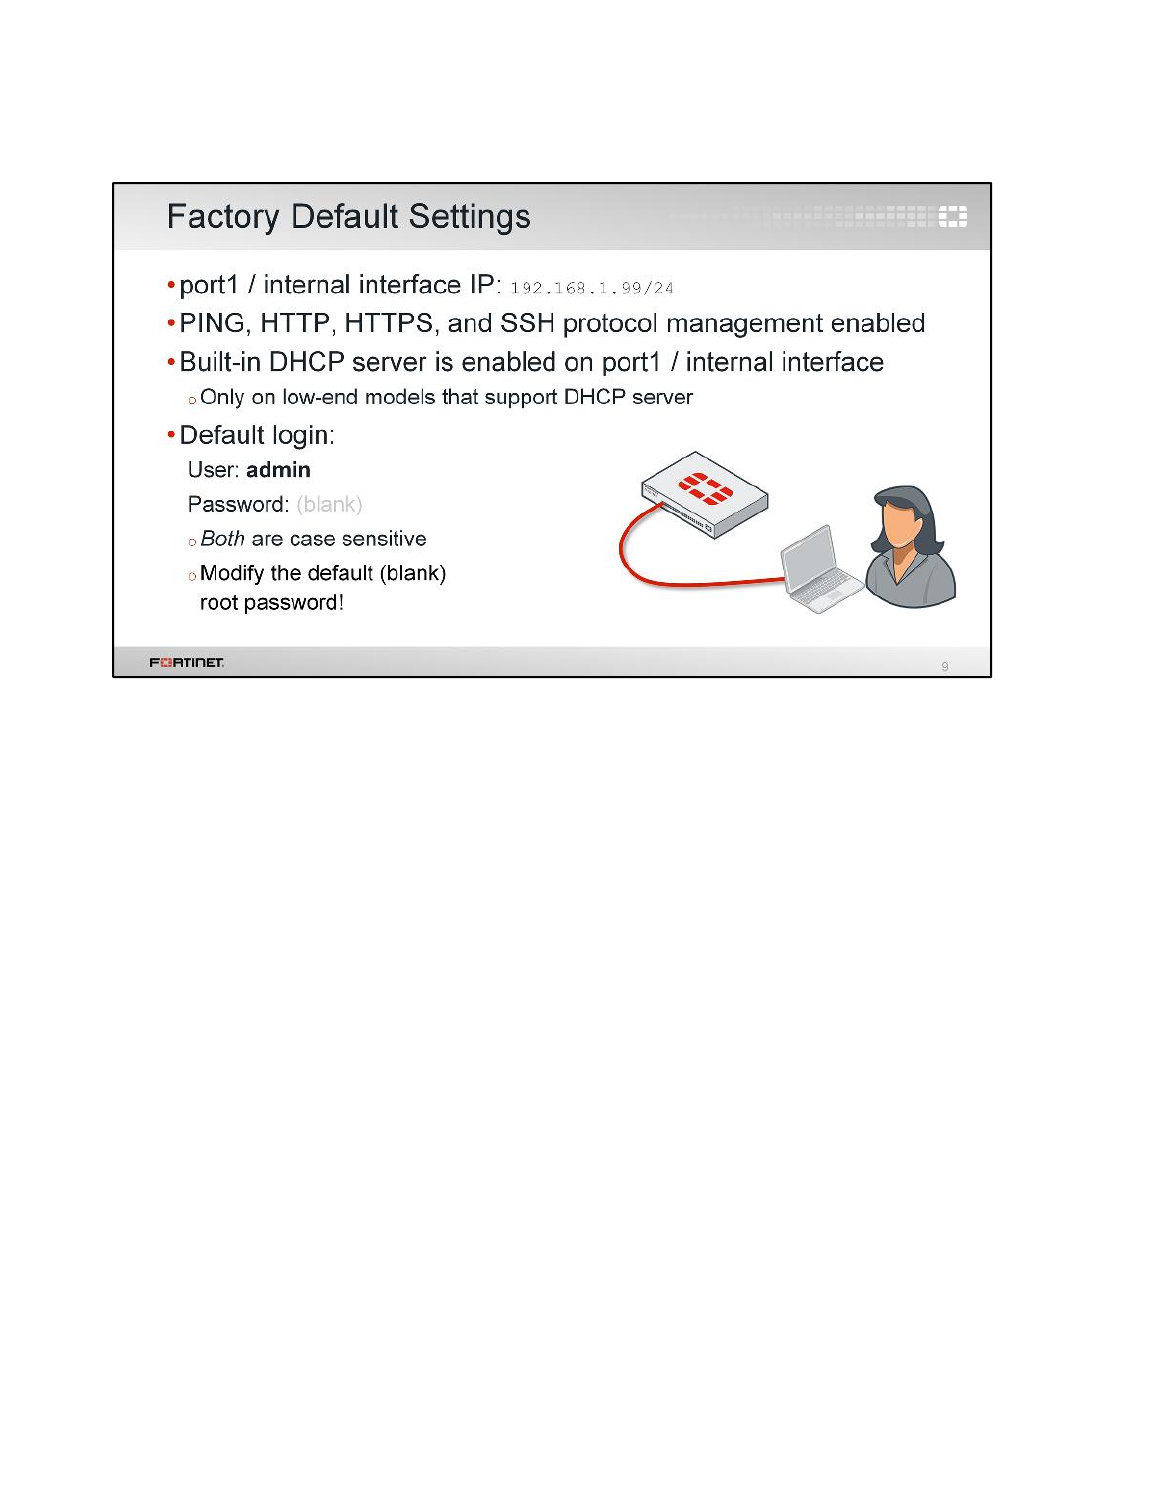
NAT mode is the default operation mode. What are the other default settings? Once you’ve removed
your FortiGate from its box, what do you do next?
Let’s take a look at how you set up a FortiGate.
Attach your computer’s network cable to port1 or the internal switch ports (depending on your model)
to begin setup. In most of the low-end models, there is a DHCP server on that interface, so, if your
computer’s network settings have DHCP enabled, your computer should automatically get an IP, and
you can begin setup quickly.
To access the GUI on FortiGate or FortiWifi, open a web browser and go to http://192.168.1.99.
Remember: the default login is publicly available knowledge. Never leave the default password blank!
Your network is only as secure as your FortiGate’s admin account. Before you connect your FortiGate
to your overall network, you should set a complex password. You should also restrict it so that
FortiGate allows administrative connections only from your local console or management subnet.
Introduction to Fortinet
FortiGate I Student Guide
162
DO NOT REPRINT
© FORTINET
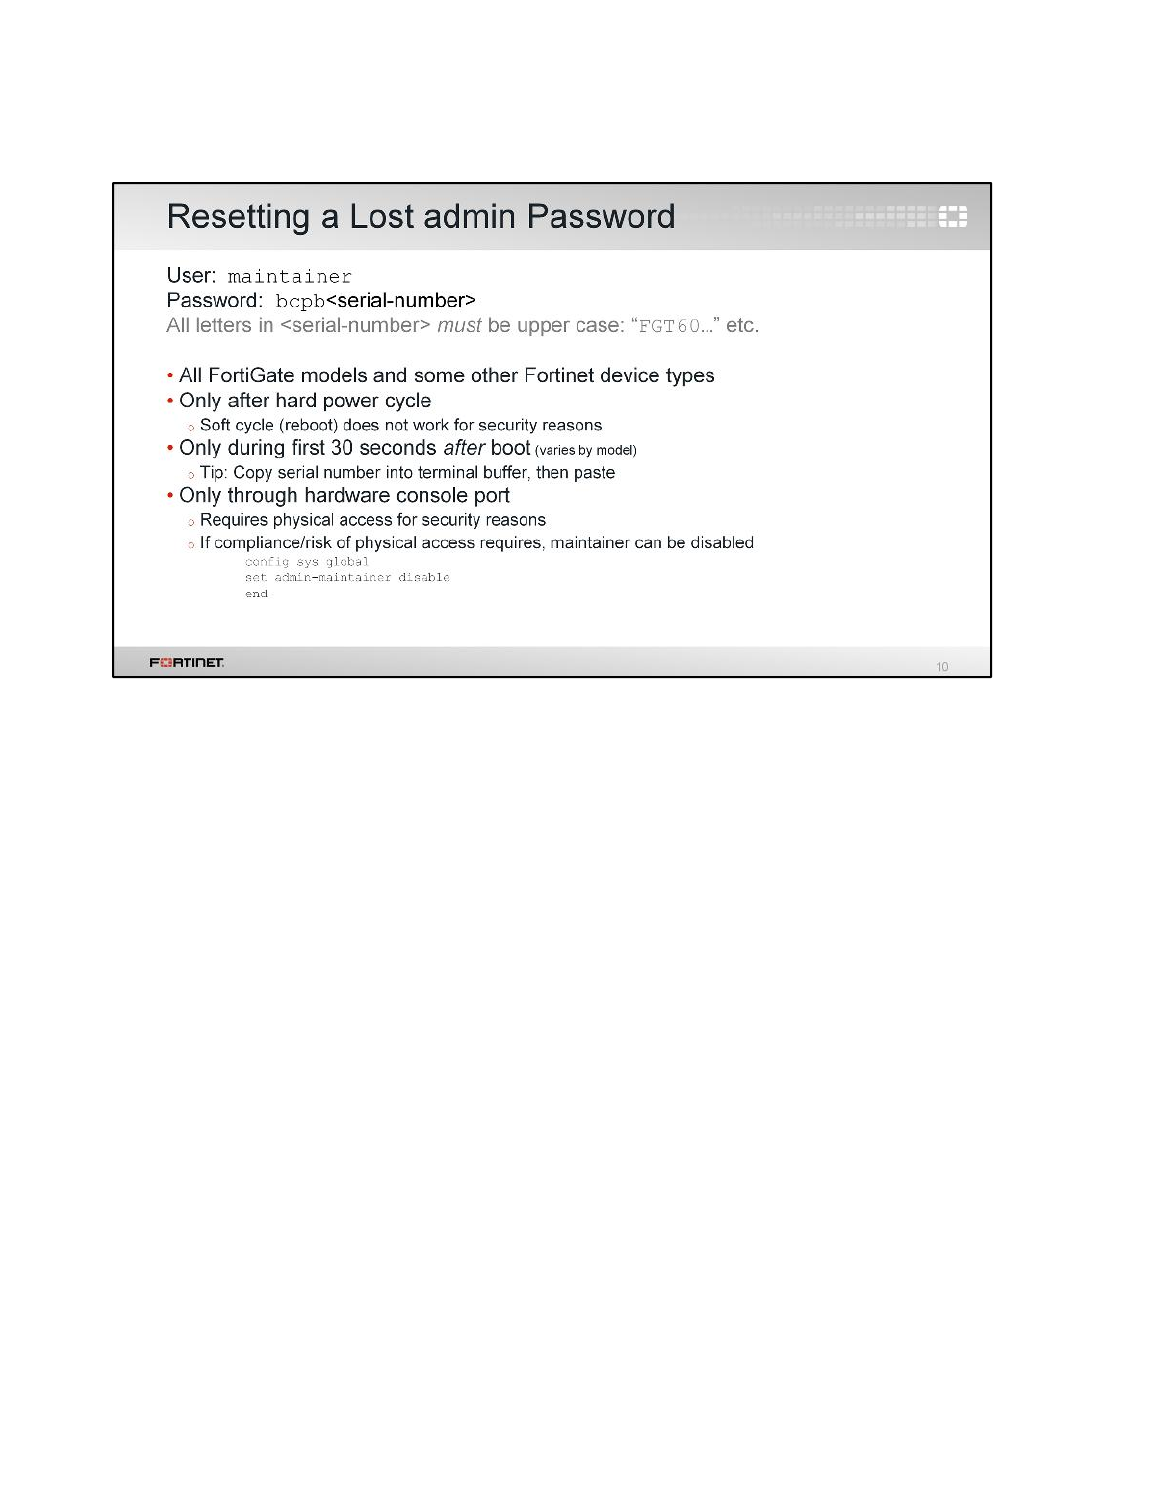
What happens if you forget the password for your admin account, or a hostile employee changes it?
This recovery method is available on all FortiGate devices and even some non-FortiGate devices like
FortiMail. It’s a temporary account, only available through the local console port, and only after a hard
reboot – disrupting power by unplugging or switching off the power, then restoring it. FortiGate must
be physically shut off, then turned back on – not simply rebooted through the CLI. That’s the difference
between a hard boot and a soft boot.
Even then, the maintainer login will only be available for login for about 30 seconds after boot
completes.
If you can’t ensure physical security, or have compliance requirements, you can disable the
maintainer account. Use caution: if you disable maintainer and then lose your admin password,
you cannot recover access to your FortiGate.
Introduction to Fortinet
FortiGate I Student Guide
163
DO NOT REPRINT
© FORTINET
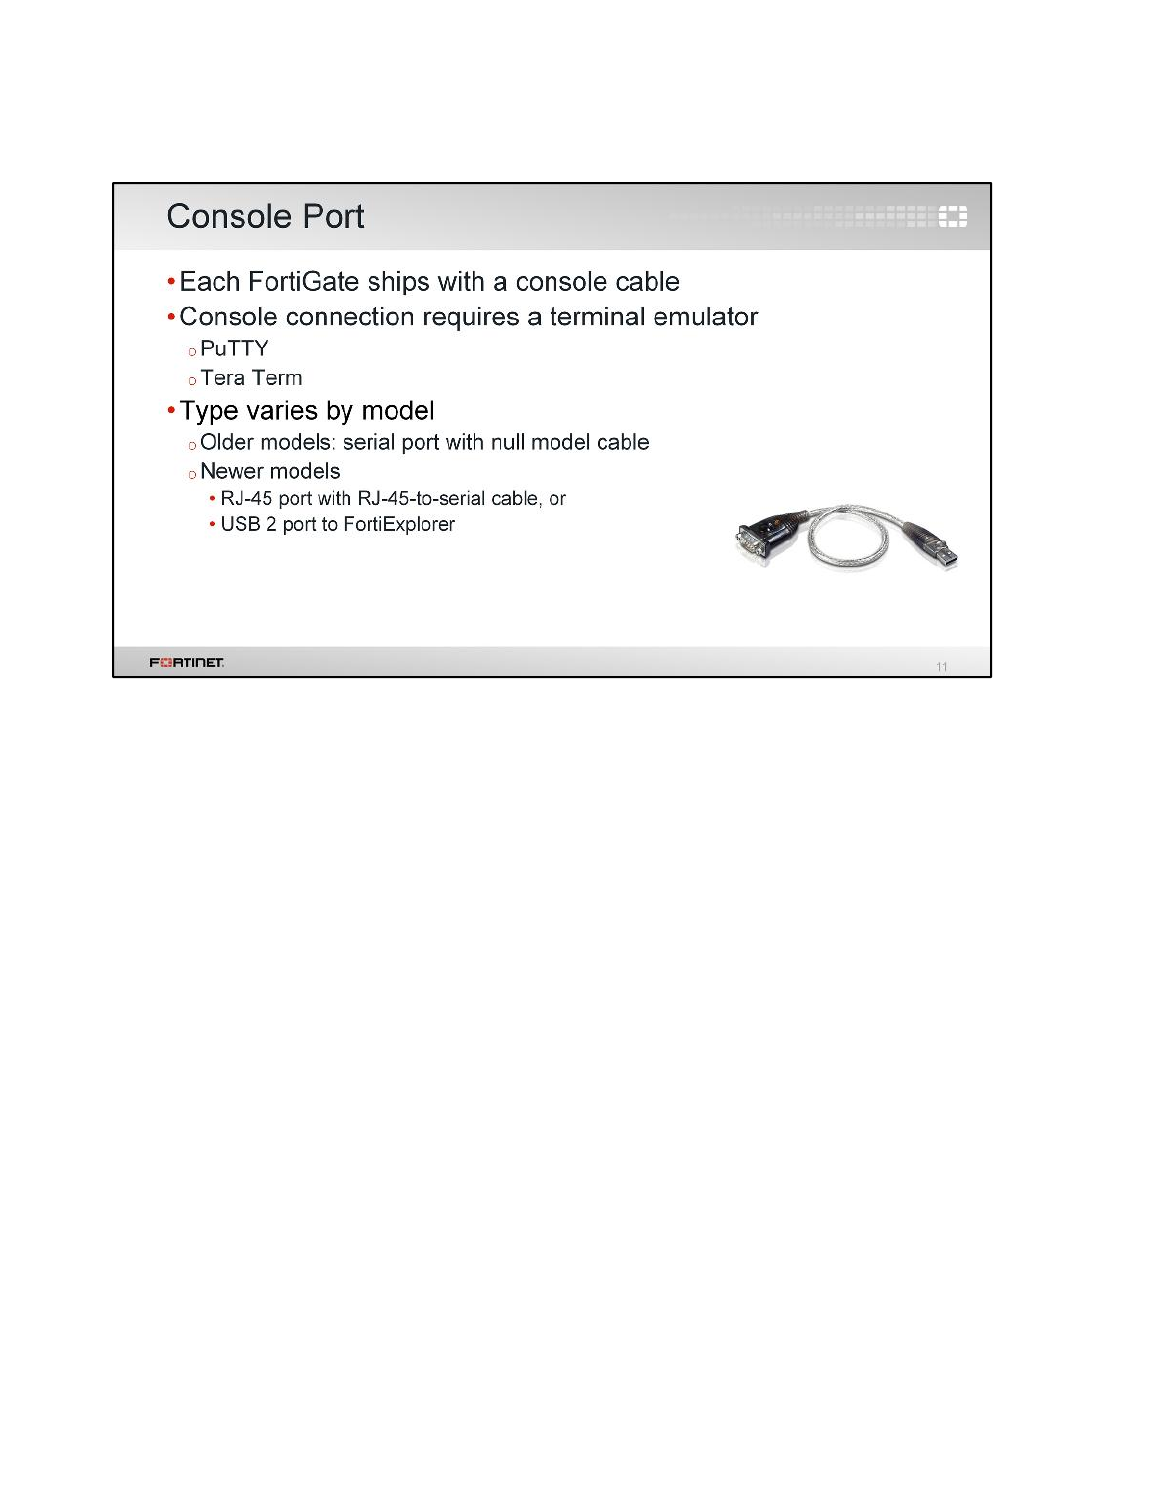
All FortiGate models have a console port. This provides CLI access without a network.
• On older models, it’s a serial port. A standard null modem cable can be used to connect the serial
port to your computer’s serial port.
• On newer models, it’s an RJ-45 port. Access by connecting an RJ-45-to-serial cable from your
computer’s serial port to the RJ-45 port on the FortiGate.
• In some newer models, the console port is a USB2 port. In that case, you’ll plug in the USB cable,
then open FortiExplorer.
Each device ships with its appropriate cable.
Serial ports on computers are becoming less common. If your computer has one, you can purchase a
USB-to-serial adapter.
Introduction to Fortinet
FortiGate I Student Guide
164
DO NOT REPRINT
© FORTINET
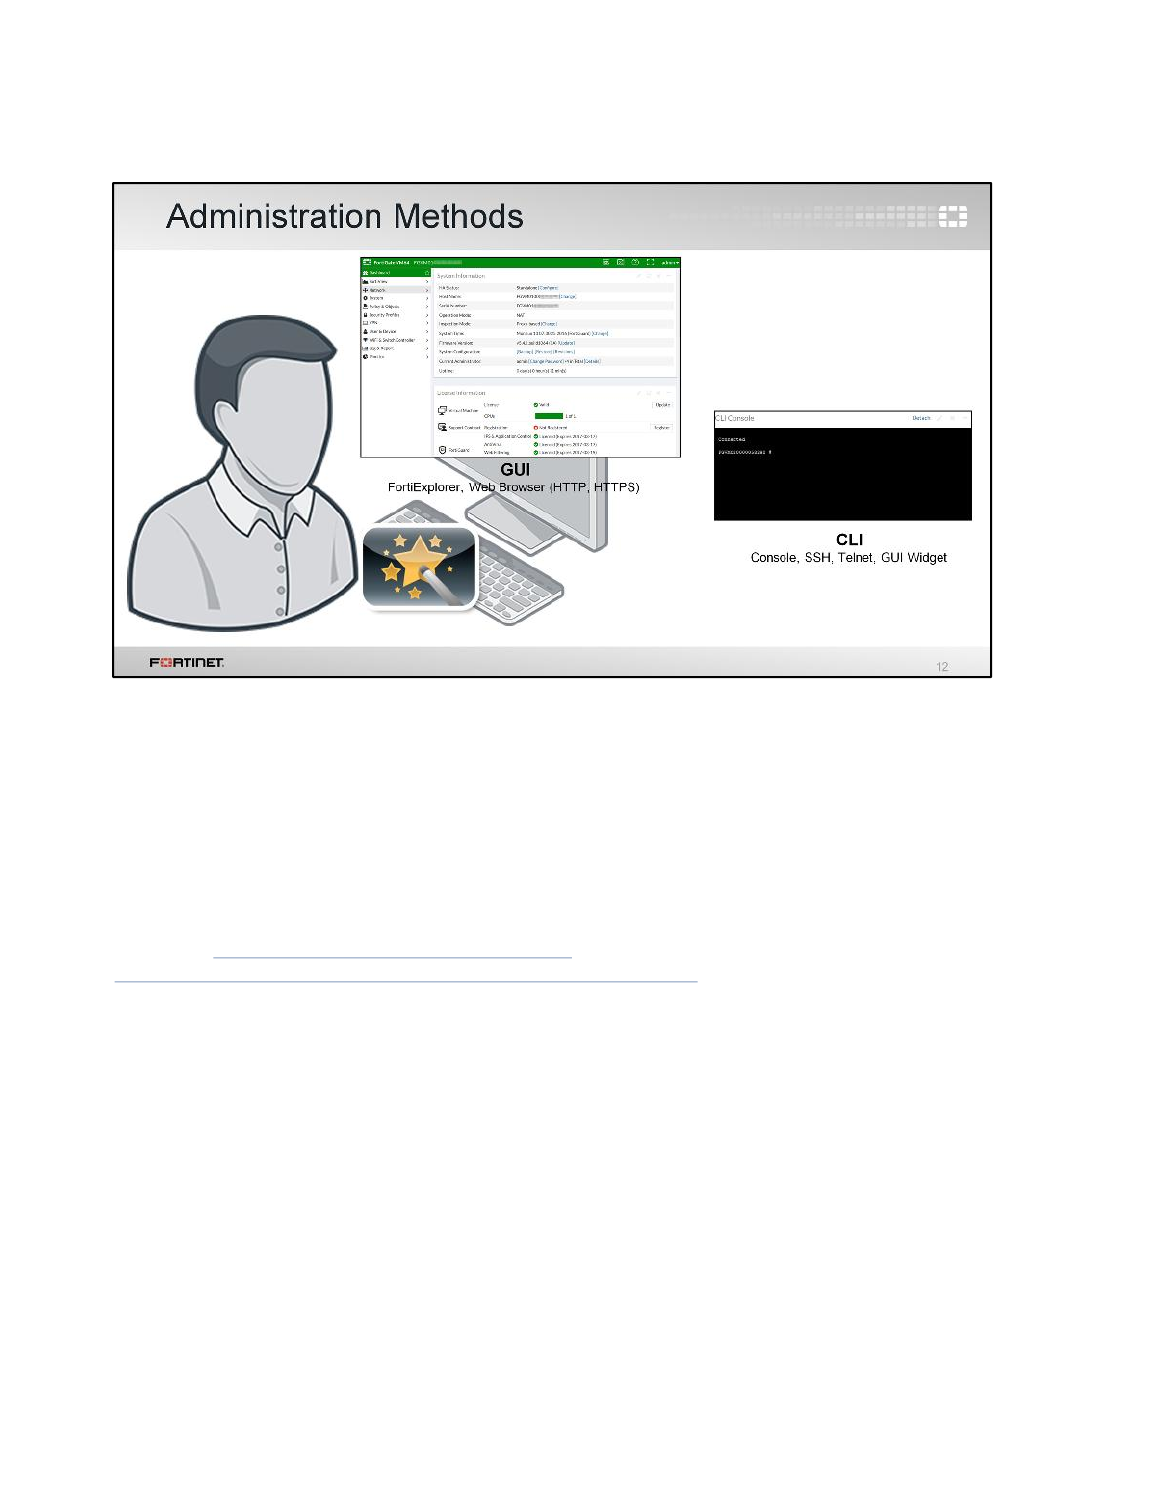
Most features are available in both the GUI and CLI, but there are a few exceptions. For example,
reports can’t be viewed in the CLI. Also, the rarely used advanced settings and diagnostic commands
for power users are usually not available in the GUI.
What if you don’t want to use the GUI?
There is also a CLI. As you become more familiar with FortiGate, and especially if you want to script
its configuration, you may want to use the CLI in addition to the GUI. You can access the CLI through
either the JavaScript widget in the GUI named CLI Console, or through a terminal emulator such as
Tera Term (http://ttssh2.sourceforge.jp/index.html.en) or PuTTY
(http://www.chiark.greenend.org.uk/~sgtatham/putty/download.html). Your terminal emulator can
connect through the network – SSH or telnet – or the local console port.
SNMP and some other administrative protocols are also supported, but they are read-only. They can’t
be used for basic setup. Let’s focus on setup now.
Introduction to Fortinet
FortiGate I Student Guide
165
DO NOT REPRINT
© FORTINET
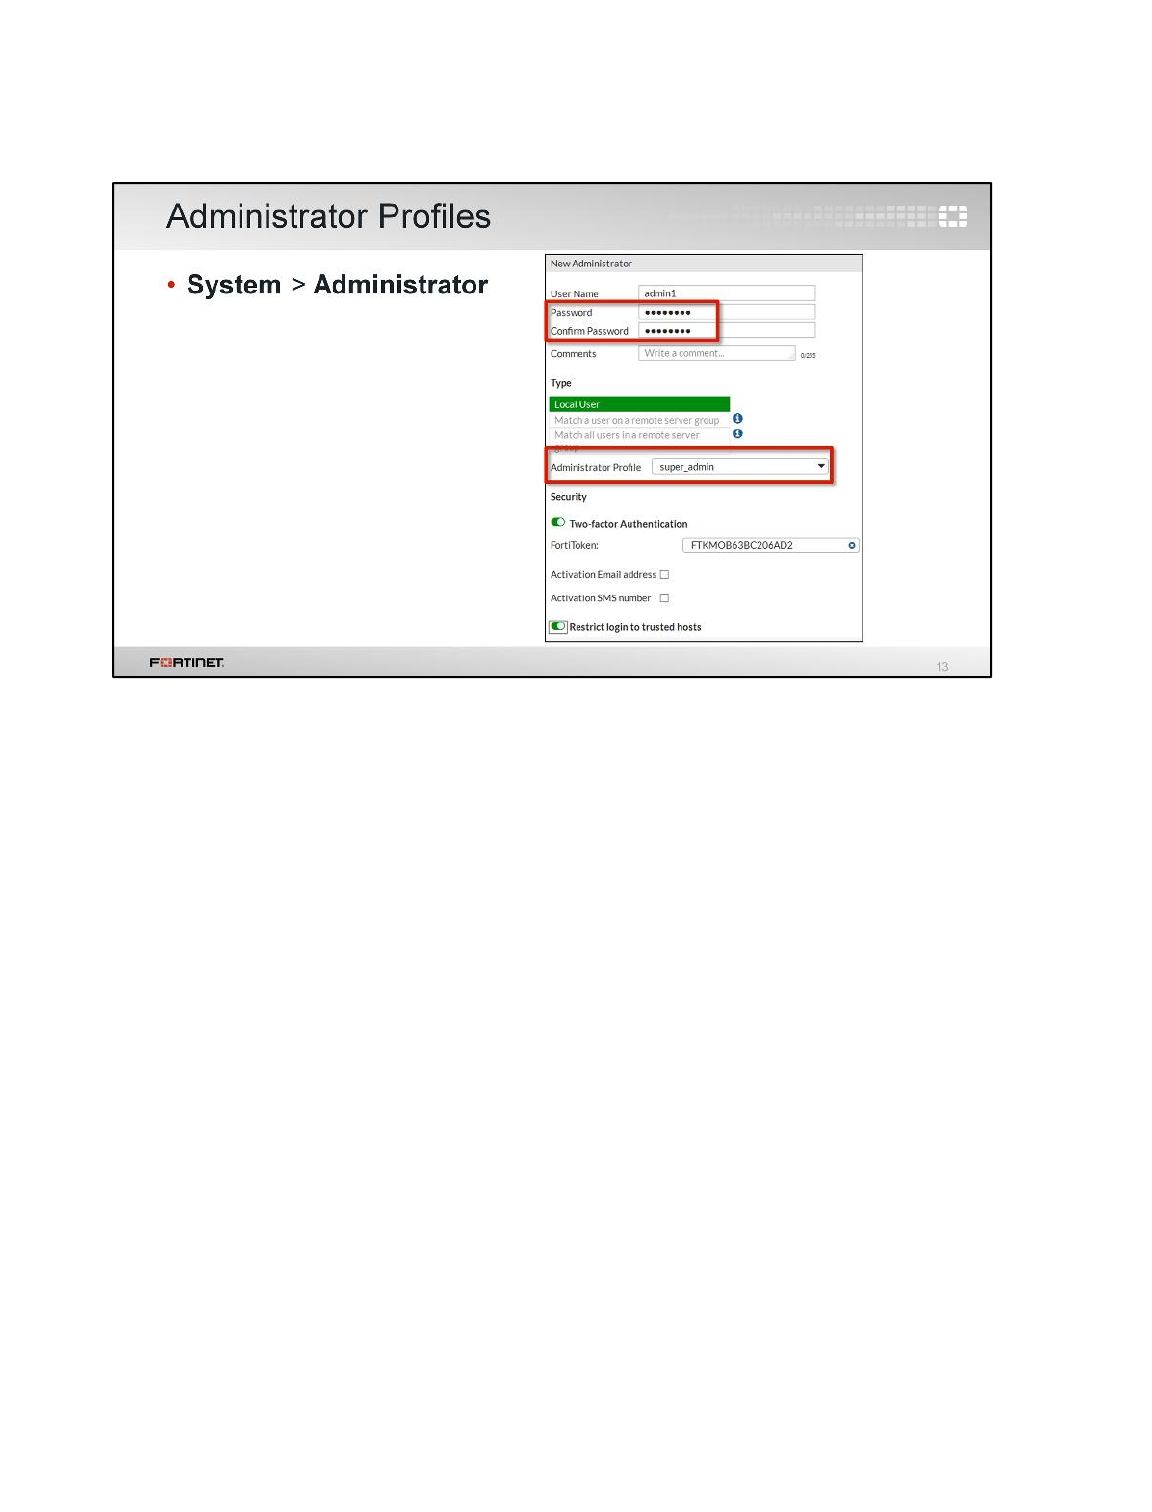
Whichever method you use, start by logging in as admin. Begin by creating accounts for other
administrators.
It’s not shown here, but instead of creating accounts on FortiGate itself, you could configure FortiGate
to query a remote authentication server. You could also require personal certificates authenticated
through your PKI certificate authority, instead of passwords.
Choose strong, complex passwords. For example, you could use multiple interleaved words with
varying capitalization, and randomly insert numbers and punctuation. Do not use short passwords, or
passwords that contain names, dates, or words that exist in any dictionary. These will be very weak
against brute force attacks. To audit the strength of your passwords, use tools such as L0phtcrack
(http://www.l0phtcrack.com/) or John the Ripper (http://www.openwall.com/john/). Risk of attackers
brute forcing your firewall is especially high if you connect the management port to the Internet.
In order to restrict access to specific features, you can assign permissions.
Introduction to Fortinet
FortiGate I Student Guide
166
DO NOT REPRINT
© FORTINET
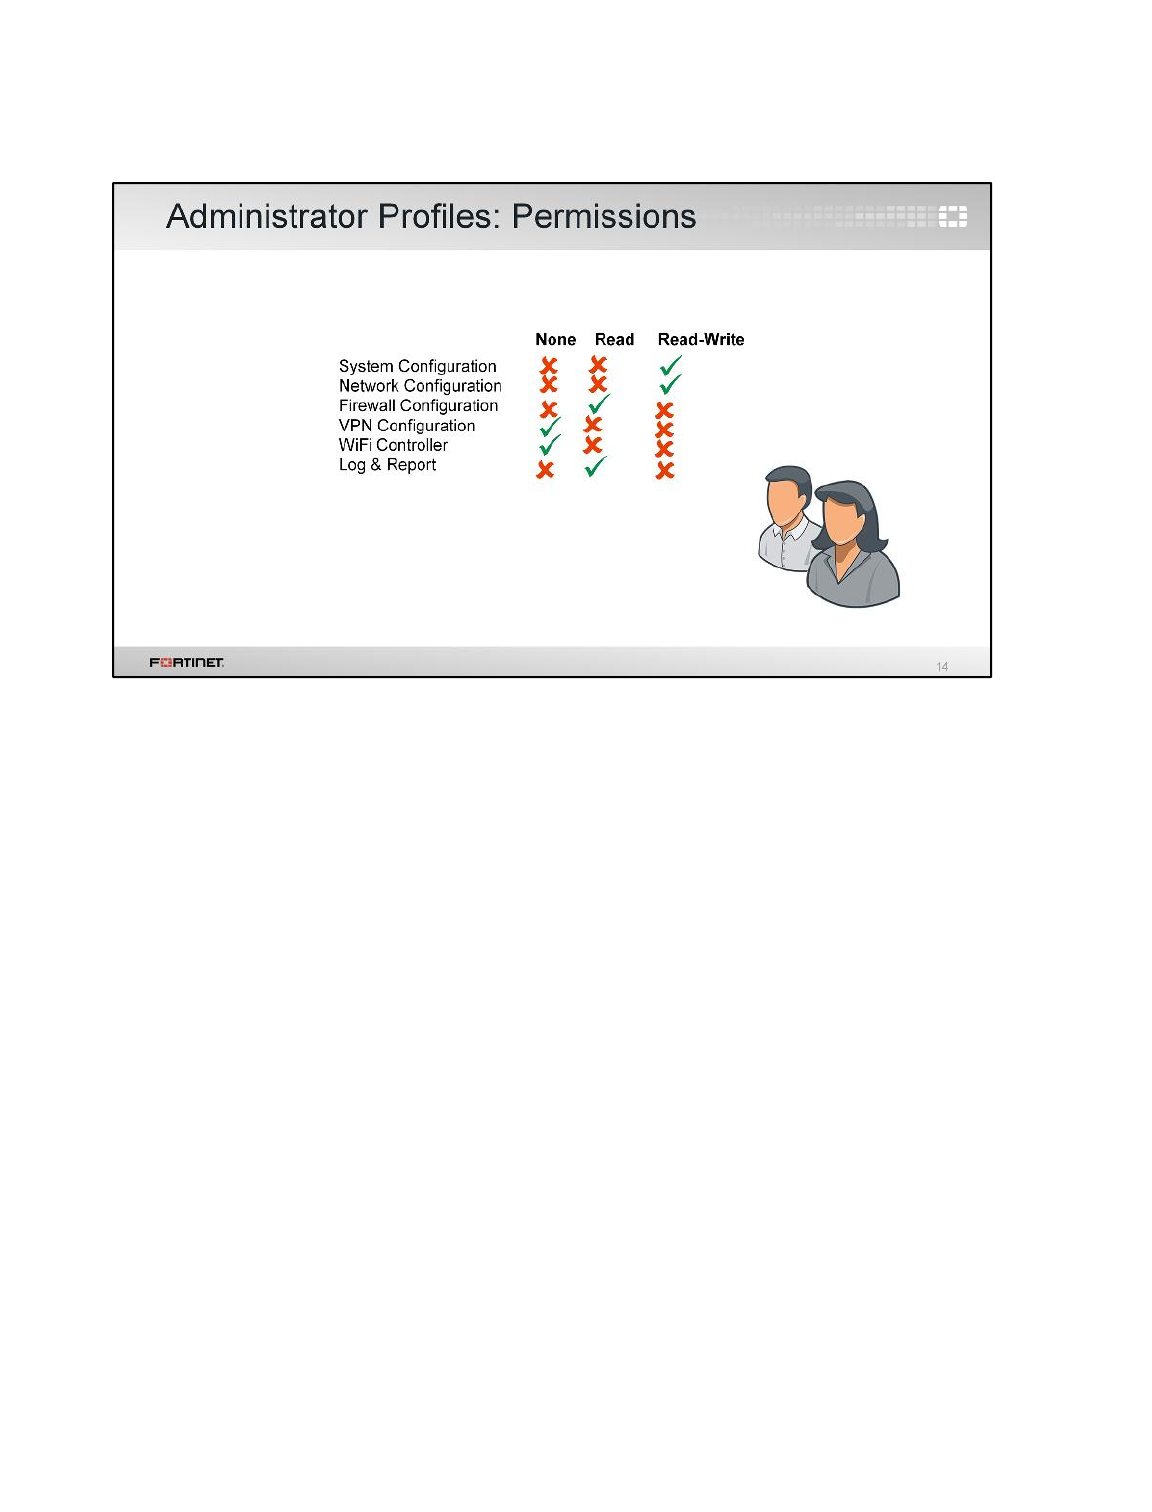
When assigning permissions in an admin profile, you can specify read-and-write, read-only, or no
access to each area.
By default, there is a special profile named super_admin, which is used by the account named admin.
It cannot be changed. It provides full access to everything, making the admin account similar to a root
superuser account.
The prof_admin is another default profile. It also provides full access, but unlike super_admin, it only
applies to its virtual domain – not the global settings of the FortiGate. Also, its permissions can be
changed.
You aren’t required to use a default profile. You could, for example, create a profile named
auditor_access with read-only permissions. Restricting a person’s permissions to those necessary for
his or her job is a good best practice, because even if that account is compromised, the compromise
is not complete. To do this, create administrative admin profiles, then select the appropriate profile
when configuring an account.
Introduction to Fortinet
FortiGate I Student Guide
167
DO NOT REPRINT
© FORTINET

What are the effects of admin profiles?
It’s actually more than just read or write access.
Depending on the type of admin profile that you assign, each administrator may not be able to access
the entire FortiGate. For example, you could configure an account that can only view log messages.
Administrators may not be able to access global settings outside their assigned virtual domain either.
Virtual domains (VDOMs) are a way of subdividing the resources and configurations on a single
FortiGate. VDOMs are explained in more detail in the FortiGate II: Virtual Domains lesson.
Administrators with a smaller scope of permissions cannot create, or even view, accounts with more
permissions. So, for example, an administrator using the prof_admin or a custom profile cannot see –
or reset the password of – accounts that use the super_admin profile.
Introduction to Fortinet
FortiGate I Student Guide
168
DO NOT REPRINT
© FORTINET

To further secure access to your network security, use two-factor authentication.
Two-factor authentication just means that instead of only using one method to verify your identity –
typically a password or personal certificate – you verify identity in two ways. In the example shown
here, two-factor authentication would mean a password plus an RSA randomly generated number
from a FortiToken that is synchronized with FortiGate.
Introduction to Fortinet
FortiGate I Student Guide
169
DO NOT REPRINT
© FORTINET
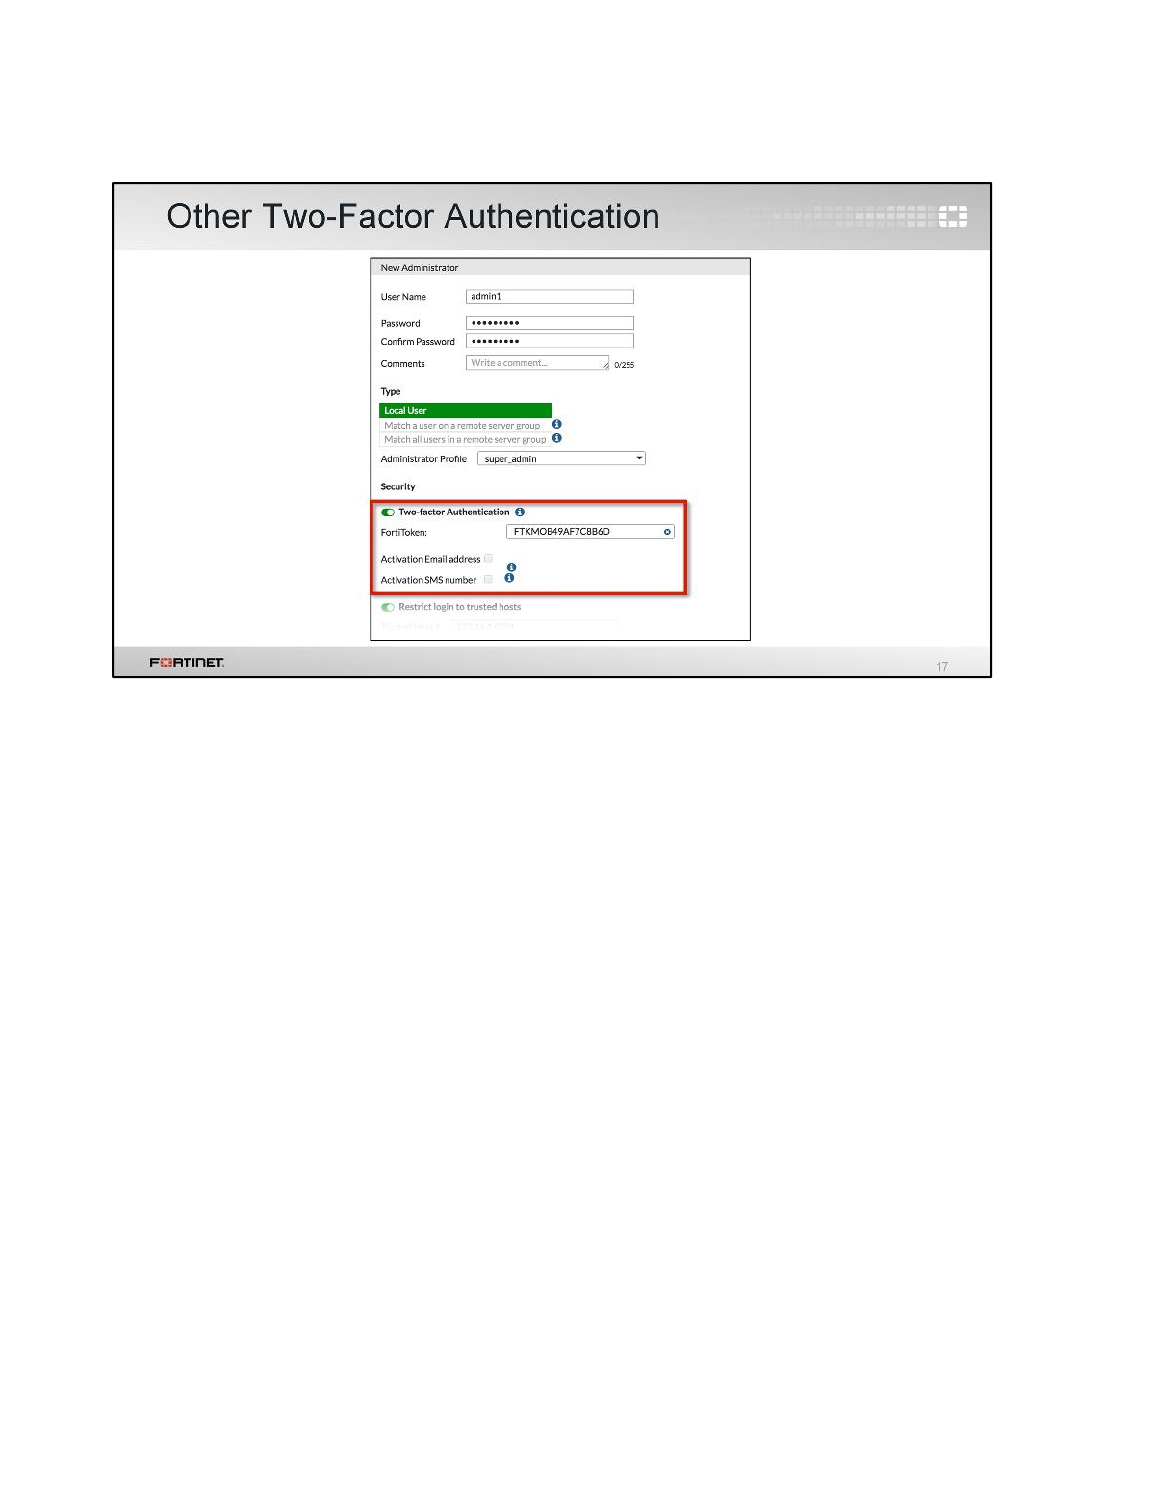
FortiToken is not the only option if you want to use two-factor authentication. Remember, two-factor
only means that you use two methods to verify a person’s identity.
Alternatively, instead of using FortiToken, FortiGate can send an email to the administrator’s address,
or send a text message as a form of authentication.
To be able to do this, you must first configure FortiGate with the settings of a mail server (so that it can
use it to send email), or an SMS server. The mail server can be configured under the Advanced page
in the GUI, or in the CLI. SMS settings, however, are CLI only.
Introduction to Fortinet
FortiGate I Student Guide
170
DO NOT REPRINT
© FORTINET

Another way to secure your FortiGate is to define which hosts or subnets are trusted sources of login
attempts.
Define all three, for all accounts.(If you leave any IPv4 address as 0.0.0.0/0, it means that
connections from any source IP will be allowed – obviously not what you want.) Notice that each
account can define its management host or subnet differently. This is especially useful if you will be
setting up VDOMs on your FortiGate, where the VDOM’s administrators may not even belong to the
same organization.
Now try to access FortiGate’s GUI or CLI from an external IP. Does it work? No. Your web browser or
terminal emulator won’t receive a response. Not even to a ping.
Unless you connect from the network administrators’ subnet, FortiGate won’t allow you to even try to
log in. So external brute force is impossible. So is discovery by ICMP.
Introduction to Fortinet
FortiGate I Student Guide
171
DO NOT REPRINT
© FORTINET

You may also want to customize the administrative protocols’ port numbers.
You can also choose whether to allow concurrent sessions. This can be used to prevent accidentally
overwriting settings, if you usually keep multiple browser tabs open, or accidentally leave a CLI
session open without saving the settings, then begin a GUI session and accidentally edit the same
settings differently.
For better security, use only secure protocols, and enforce password complexity and changes.
Introduction to Fortinet
FortiGate I Student Guide
172
DO NOT REPRINT
© FORTINET

We’ve defined the management subnet – that is, the trusted hosts – for each administrator account.
How do you enable or disable management protocols?
This is specific to each interface. For example, if your administrators connect to FortiGate only from
port1, you should disable all administrative access on all other ports. This prevents brute force
attempts and also insecure access.
Notice that some protocols like FortiTelemetry are not actually for administrative access, but, like GUI
and CLI access, they are protocols where the packets will have FortiGate as a destination IP – not
only use FortiGate as the next hop or bridge.
For better security, it’s always best to only use secure, encrypted methods of access. Some protocols
– such as telnet, ICMP, HTTP, and SNMP version 1 – don’t have encryption or even authentication.
So they should never be enabled on public, untrusted networks.
IPv4 and IPv6 protocols are separate. It’s possible, for example, to have both IPv4 and IPv6
addresses on an interface, but only respond to pings on IPv6. However, IPv6 is hidden in the GUI by
default. How do you show IPv6 settings?
Introduction to Fortinet
FortiGate I Student Guide
173
DO NOT REPRINT
© FORTINET

FortiGate has hundreds of features. If you don’t use all of them, hiding features that you don’t use
makes it easier to focus on your work.
Hiding a feature in the GUI does not disable it. It is still functional, and still can be configured through
the CLI.
Some advanced or less commonly used features, such as IPv6, are hidden by default.
To show hidden features, go to the Feature Select page.
Introduction to Fortinet
FortiGate I Student Guide
174
DO NOT REPRINT
© FORTINET

Link aggregation is when multiple physical interfaces are logically bound into a single channel. Link
aggregation increases bandwidth and provides redundancy between two network devices.
Introduction to Fortinet
FortiGate I Student Guide
175
DO NOT REPRINT
© FORTINET

Once you have administrator accounts, they can configure the network interfaces.
Remember, when the FortiGate device is in NAT mode, every interface that handles traffic must have
an IP address. There are two exceptions to this rule, which we will cover next. When in NAT mode,
the IP address allows packets with this interface to have a source and destination at the IP layer.
There are multiple ways to get an IP address:
• Manual
• Automatic, using either DHCP or PPPoE (PPPoE is configured through the CLI)
As we mentioned earlier, there are two exceptions to the IP address requirement: One-Arm Sniffer
and Dedicate to FortiSwitch interfaces. These interfaces aren’t assigned an address.
• When One-Arm Sniffer is selected as the addressing mode, it operates in promiscuous mode. As
a result, regardless of each packet’s destination address, FortiGate can inspect all traffic that
arrives. So, although the overall FortiGate is in NAT mode, acting as a router, the One-Arm Sniffer
interface does not act as a router. It receives traffic, but cannot send. There are more
considerations, which are in the FortiGate II Intrusion Prevention System lesson.
• When Dedicated to FortiSwitch is selected as the addressing mode, FortiGate automatically
assigns an IP address to this interface. The Dedicated to FortiSwitch is an interface setting that is
used to manage FortiSwitch from the FortiGate.
Introduction to Fortinet
FortiGate I Student Guide
176
DO NOT REPRINT
© FORTINET

How many times you have seen network issues caused by a DHCP server – not client – enabled on
the WAN interface?
Beginning in FortiOS 5.4.0, you can configure the interface’s role. Roles show only normal interface
settings for that part of a topology. Settings that do not apply to the current role are hidden. This
prevents accidental misconfiguration.
For example, when the role is configured as WAN ,there is no DHCP server, device detection, and
secondary IP address configuration available.Device detection is usually used to detect devices
internally on your LAN; that is, you won’t offer IP addresses to all hosts on the Internet, and so on.
If there is an unusual case, and you need to use an option that’s hidden by the current role, you can
always switch the role to Undefined. This displays all options.
To help you remember the use of each interface, you can give them aliases. For example, you could
call port3 lab_network. This can help to make your list of policies easier to comprehend.
Introduction to Fortinet
FortiGate I Student Guide
177
DO NOT REPRINT
© FORTINET

Wireless clients aren’t the only ones that can use FortiGate as their DHCP server.
For an interface (such as port3), select the Manual option, enter a static IP, and then enable the
DHCP Server option. Options for the built-in DHCP server will appear, including provisioning features,
such as DHCP options and MAC reservation. You can also block specific MAC addresses, as if there
were a Layer 2 firewall policy.
Introduction to Fortinet
FortiGate I Student Guide
178
DO NOT REPRINT
© FORTINET

For the built-in DHCP server, you can reserve specific IP addresses for devices with specific MAC
addresses. Those devices will always receive the same lease, unless the number of devices exceeds
the size of the IP pool.
Introduction to Fortinet
FortiGate I Student Guide
179
DO NOT REPRINT
© FORTINET

Like with DHCP, you can also configure FortiGate to act as your local DNS server. You can enable
and configure DNS separately, on each interface.
A local DNS server can improve performance for your FortiMail or other devices that use DNS queries
frequently. If your FortiGate offers DHCP to your local network, DHCP can be used to configure those
hosts to use FortiGate as both the gateway and DNS server.
FortiGate can answer DNS queries in one of three ways:
• by relaying all queries – that is, acting as a DNS relay instead of a DNS server,
• by relaying only the queries it can’t resolve to your ISP’s DNS server, or
• by returning a null response if it can’t resolve queries itself.
Beginning with FortiOS 5.4, you can configure all modes in the GUI, without using the CLI.
Introduction to Fortinet
FortiGate I Student Guide
180
DO NOT REPRINT
© FORTINET

If you choose the DNS forwarding option, you can control DNS queries within your own network,
without having to enter any DNS names in FortiGate’s DNS server.
Introduction to Fortinet
FortiGate I Student Guide
181
DO NOT REPRINT
© FORTINET

If you choose to have your DNS server resolve queries, or you choose a split DNS, you must set up a
DNS database on your FortiGate.
This defines the host names that FortiGate will resolve queries for. Use the zone file syntax outlined
by RFCs 1034 and 1035.
Introduction to Fortinet
FortiGate I Student Guide
182
DO NOT REPRINT
© FORTINET

Lastly, before you can integrate FortiGate into your network, FortiGate must have a default gateway.
If FortiGate gets its IP address through a dynamic method such as DHCP or PPPoE, then it will also
retrieve the default gateway.
Otherwise, you must configure a static route. Without this, FortiGate will not be able to respond to
packets outside the subnets directly attached to its own interfaces. It probably also won’t be able to
connect to FortiGuard for updates, and may not properly route traffic.
Routing details are covered in another lesson. For now, you should usually make sure that FortiGate
has a route that matches all packets (destination is 0.0.0.0/0), and forwards them through the
network interface that is connected to the Internet, to the IP address of the next router.
Routing completes the basic network settings that are required before you can configure firewall
policies.
Introduction to Fortinet
FortiGate I Student Guide
183
DO NOT REPRINT
© FORTINET

Now that FortiGate has basic network settings and administrative accounts, let’s look at how to back
up the configuration.
You can encrypt configuration files with a password, if necessary. Besides securing the privacy of your
configuration, it also has some effects you may not expect. Once encrypted, the configuration file
cannot be decrypted without the password and a FortiGate of the same model and firmware. This
means that if you send an encrypted configuration file to Fortinet Technical Support, even if you give
them the password, they still cannot load your configuration until they get access to the same model of
FortiGate. This can cause unnecessary delays when resolving your ticket.
Even if the configuration is not encrypted as a whole, each password is encrypted individually. So in
many cases, encrypting the entire configuration file may not be necessary.
If you enable virtual domains, subdividing the resources and configuration of your FortiGate, each
VDOM administrator can back up and restore their own configurations. You don’t have to back up the
entire FortiGate configuration.
Introduction to Fortinet
FortiGate I Student Guide
184
DO NOT REPRINT
© FORTINET

If you open the configuration file in a text editor, you’ll see that both encrypted and unencrypted
configuration files contain a clear text header that contains some basic information about the device.
The diagram shown here shows what information is included.
To restore an encrypted configuration, you must upload it to the same model of FortiGate, with the
same firmware version, then provide the password.
To restore an unencrypted configuration file, you are only required to match the FortiGate model. If the
firmware is different, FortiGate will attempt to upgrade the configuration, similar to how it uses upgrade
scripts on the existing configuration when upgrading firmware.
Usually, the configuration file only contains non-default settings, plus a few default, yet crucial,
settings. This minimizes the size of the backup, which could otherwise be several MB in size.
Introduction to Fortinet
FortiGate I Student Guide
185
DO NOT REPRINT
© FORTINET

Upgrading the firmware on a FortiGate is simple. The easiest method is to click the Update link on the
System Information widget on the dashboard, then choose a firmware file that you have downloaded
from support.fortinet.com.
If you want to make a clean install by overwriting both the existing firmware and its current
configuration, you can do this using the local console CLI, within the boot loader menu, while
FortiGate is rebooting. However, this is not the usual method.
Introduction to Fortinet
FortiGate I Student Guide
186
DO NOT REPRINT
© FORTINET

You can also downgrade the firmware. Since settings change in each firmware version, you should
have a configuration file in the syntax that is compatible with the firmware.
Remember to read the release notes. Sometimes a downgrade between firmware versions that
preserves the configuration is not possible, such as when the OS changed from 32-bit to 64-bit. In that
situation, the only way to downgrade is to format the disk, then reinstall.
Once you’ve determined the downgrade is possible, verify everything again, then start the downgrade.
After the downgrade completes, restore a configuration backup that is compatible with that version.
Why should you keep emergency firmware and physical access?
Old firmware versions don’t know how to convert future configurations. Also, when upgrading through
a path that is not supported by the configuration translation scripts, you might lose all settings except
basic access settings, such as administrator accounts and network interface IP addresses. Another
rare, but possible, scenario is that the firmware could be corrupted when you are uploading it. For all
of those reasons, you should always have local console access during an upgrade, in case of
emergency. However, in practice, if you read the release notes and have a reliable connection to the
GUI or CLI, it should not usually be necessary.
Introduction to Fortinet
FortiGate I Student Guide
187
DO NOT REPRINT
© FORTINET

To review, these are the topics that we just talked about.
We looked at how FortiGate can replace multiple single-purpose devices, yet increase power
efficiency and throughput. We explained the differences between FortiGuard services, and how those
are part of the UTM architecture. We showed how to configure administrator accounts, permissions,
and how to harden administrative access. We also explained how to choose the operation mode
based upon the behavior you need for each network interface, how to configure the network settings,
and finally how to back up the configuration and install firmware.
Introduction to Fortinet
FortiGate I Student Guide
188
DO NOT REPRINT
© FORTINET

In this lesson, we’ll examine logging and monitoring on the FortiGate.
Logging and Monitoring
FortiGate I Student Guide
189
DO NOT REPRINT
© FORTINET

After completing this lesson, you should have these practical skills that you can use to better secure
your network through logging and monitoring. This includes:
• Describing log types and subtypes
• Describing log severity levels
• Describing log format (header and body)
• Identifying log storage locations
• Configuring log settings
• Configuring remote logging
• Enabling logging on firewall policies
• Viewing, filtering, downloading, and exporting logs
• Monitoring your network
• Configuring alert email
• Configuring, running, and viewing reports
Logging and Monitoring
FortiGate I Student Guide
190
DO NOT REPRINT
© FORTINET

When traffic passes through FortiGate to your network, FortiGate scans the traffic and then takes
action based on the firewall policies in place. This activity is recorded and the information is contained
in a log message. The log message is stored in a log file that is then stored on a device capable of
storing logs, such as FortiGate or an external storage device.
The purpose of logs is to help you monitor your network traffic, locate problems, establish baselines,
and more. Logs provide you with a greater perspective of your network, allowing you to make
adjustments to your network security, if necessary.
Some organizations have legal requirements when it comes to logging, so it is important to be aware
of your organization’s policies during configuration.
Logging and Monitoring
FortiGate I Student Guide
191
DO NOT REPRINT
© FORTINET

In this section, we will briefly examine logs, including log types and subtypes, log severity levels, and
log message layout.
Logging and Monitoring
FortiGate I Student Guide
192
DO NOT REPRINT
© FORTINET

On FortiGate, there are three different types of logs: traffic logs, event logs, and security logs. Each
type is further divided into sub-types.
Traffic logs record traffic flow information, such as an HTTP/HTTPS request and its response, if any. It
contains subtypes named forward, local, and sniffer.
• Forward traffic logs contain information about traffic that FortiGate either accepted or rejected
according to a firewall policy.
• Local traffic logs contain information about traffic directly to and from the FortiGate’s management
IP addresses. They also include connections to the GUI and FortiGuard queries.
• Sniffer logs contain information related to packet capture.
Event logs record system and administrative events, such as adding or modifying configuration, or
daemon activities. It contains subtypes named endpoint control, high availability, system, user, router,
VPN, WAD, and wireless.
• System event logs contain information related to operations, such as automatic FortiGuard updates
and GUI logins.
• User logs contain logon and logoff events for firewall policies with user authentication.
• Router, VPN, WAD, and wireless subtypes include logs for those features. For example, VPN
contains IPsec and SSL VPN log entries.
Finally, security logs record logs for the security events such as virus attacks and intrusion attempts.
They contain log entries based on the security profile type (log type = utm), including Application
Control, Antivirus, DLP, Anti-Spam (Email Filter), Web Filter, Intrusion Protection, Anomaly (DoS-
policy), and WAF. Security logs and subtypes are only visible in the GUI menu if logs are created
within it—if no security logs exists, the log menu item does not appear.
Logging and Monitoring
FortiGate I Student Guide
193
DO NOT REPRINT
© FORTINET

It should be noted that, by default, events related to security appear in the Forward Traffic log in the
Log Details pane under the Security tab.This is for performance: fewer open file handles is less
CPU intensive for the operating system.
Logging and Monitoring
FortiGate I Student Guide
194
DO NOT REPRINT
© FORTINET

Each log entry includes a log level (or priority level) that ranges in order of importance from
emergency to information.
There is also a debug level, the lowest level. It puts diagnostic information into the event log. The
debug level is rarely used, unless you are actively investigating an issue with Fortinet Technical
Support. Generally, the lowest level you want to use is information, but even this level generates many
logs and could cause premature hard disk failure. Depending on the type of log and the needs of your
organization, you may want to log only notification levels or higher.
You and your organization’s policies dictate what must be logged.
Logging and Monitoring
FortiGate I Student Guide
195
DO NOT REPRINT
© FORTINET

Every log message has a standard layout comprised of two sections: a header and a body.
The header contains fields that are common to all log types, such as originating date and time, log
identifier, log category, severity level, and virtual domain (VDOM). The value of each field, however, is
specific to the log message. As you can see in the raw log entry example, the log type is UTM, the
subtype is webfilter, and the level is warning. The type and subtype of logs determine what fields
appear in the log body.
The body, therefore, describes the reason why the log was created and actions taken by FortiGate.
These fields vary by log type. In the above example, the policyid field indicates which firewall rule
matched the traffic, the scrip field indicates the source IP address, the dstip field indicates the
destination IP address, the hostname indicates the URL or IP of the host, the action field indicates
what FortiGate did when it found a policy that matched the traffic, and the msg fields indicates the
reason for the action taken. In this example, the action is blocked, which means that FortiGate
prevented this IP packet from passing, and the reason is because it belonged to a denied category in
the firewall policy.
If you log to a third-party device, such as a syslog server, knowing the log structure is crucial to
integration. For information on log structures and associated meanings, visit http://docs.fortinet.com.
Logging and Monitoring
FortiGate I Student Guide
196
DO NOT REPRINT
© FORTINET

This section explains log storage options on FortiGate.
Logging and Monitoring
FortiGate I Student Guide
197
DO NOT REPRINT
© FORTINET

You can choose to store logs in a variety of places, both on and off the FortiGate device. Locally,
FortiGate has its own memory and many devices have a built-in hard drive. Externally, you can store
logs on Syslog servers, FortiCloud, SNMP, or a FortiAnalyzer or FortiManager device.
Logging and Monitoring
FortiGate I Student Guide
198
DO NOT REPRINT
© FORTINET

FortiAnalyzer and FortiManager are external logging devices with which FortiGate can communicate.
You can place FortiAnalyzer or FortiManager in the same network as FortiGate, or outside of it.
In order for FortiGate to send logs to FortiAnalyzer or FortiManager, you must register FortiGate with
FortiAnalyzer or FortiManager. Once registered, the FortiAnalyzer or FortiManager can begin to
accept incoming logs from FortiGate.
FortiGate uses port 514 for log transmission. Optionally, you can encrypt communications using SSL
encrypted OFTP traffic, so when a log message is generated, it is safely transmitted across an
unsecure network.
Log messages are stored on disk and transmitted to FortiAnalyzer as plain text in LZ4 compressed
format. This reduces disk log size and reduces log transmission time and bandwidth usage.
Logging and Monitoring
FortiGate I Student Guide
199
DO NOT REPRINT
© FORTINET

So far, we’ve discussed FortiAnalyzer and FortiManager as interchangeable external logging devices
for FortiGate. While configuring FortiGate to send logs to FortiAnalyzer or FortiManager is identical —
they share a common hardware and software platform — FortiAnalyzer and FortiManager actually
have different capabilities that are worth noting. Both take log entries, but the primary purpose of
FortiManager is to centrally manage multiple FortiGate devices. As such, log volumes are limited to a
fixed amount per-day, which are less than FortiAnalyzer. On the other hand, the primary purpose of
FortiAnalyzer is to store and analyze logs, so the log limit is much higher (though the limit is model-
dependent).
At the most basic level, what you can do with the logs received on FortiManager is no different than
what you can do with logs received on FortiAnalyzer.
FortiGate has two methods for transmitting the log events: store and upload and real-time. The store
and upload option is only available to FortiGates with internal hard drives.
Logging and Monitoring
FortiGate I Student Guide
200
DO NOT REPRINT
© FORTINET

FortiCloud and Syslog are other external logging options you can use to store FortiGate logs.
FortiCloud is a Fortinet subscription-based, hosted security management and log retention service
that offers long-term storage of logs with reporting. If you have a smaller network, FortiCloud is usually
more feasible than buying a dedicated logging appliance.
Every FortiGate comes with a free one month trial of FortiCloud. Through the FortiGate GUI, you can
bind FortiCloud to your Fortinet Technical Support & Customer Service account, activate the trial, and
start sending logs. When disk usage is set to WAN optimization (wanopt), the store and upload option
for logging to FortiCloud is also removed.
Syslog is a logging server that is used as a central repository for networked devices. FortiGate can
send logs to a Syslog server.
Logging and Monitoring
FortiGate I Student Guide
201
DO NOT REPRINT
© FORTINET

Logging FortiGate activity requires certain configuration settings so that FortiGate can record the
activity. These settings are referred to as log settings. While you can configure logs through the CLI
using the config log command, this section focuses mainly on the GUI.
For effective logging, your FortiGate system date and time should be accurate. You can either
manually set the system date and time, or configure FortiGate to automatically keep its time correct by
synchronizing with a Network Time Protocol (NTP) server.
Logging and Monitoring
FortiGate I Student Guide
202
DO NOT REPRINT
© FORTINET

This chart illustrates the expected behavior when you enable different logging options.
The first column, Policy Log Setting, shows the log setting on the firewall policy: Log Allowed Traffic
(enable or disable), Security Events (enable or disable), or All Sessions (enable or disable). In the
associated example screenshot, Log Allowed Traffic is enabled and All Sessions is enabled.
The second column shows whether a security profile is enabled or disabled on the firewall policy. In
the associated example screenshot, an Antivirus security profile is enabled.
The last column shows the behavior. If you enable any profiles on your policy and logging is not
enabled, you will not get logs of any kind—even if the profile is configured to block the traffic. So, if
you apply a security profile, it’s important to consider the logging setting.
Logging and Monitoring
FortiGate I Student Guide
203
DO NOT REPRINT
© FORTINET

From the Log Settings page, you can enable local logging to disk, as well as enable local reports and
historical FortiView. A pie chart illustrates disk usage, informing you how much used space and free
space is available on your local disk. A historical disk usage chart is also available.
Disk logging must be enabled in order for information to appear in the FortiView dashboards (if
disabled, logs display in real-time only). You can also enable this setting through the CLI config
log disk setting command. Only certain FortiGate models support disk logging.
Note that logs older than seven (7) days, by default, are deleted from disk (log age is configurable). If
your log disk becomes full, event logs are deleted last.
You can back up local disk logs using the execute log backup CLI command.
Logging and Monitoring
FortiGate I Student Guide
204
DO NOT REPRINT
© FORTINET

You can configure remote logging to FortiAnalyzer or FortiManager through both the GUI and the CLI.
• GUI: From the Log Settings page, enable logging to FortiAnalyzer/FortiManager and enter the IP
address of the remote logging device.
• CLI: For both FortiAnalyzer and FortiManager, use the config log fortianalyzer setting
command. Even though FortiManager isn’t explicitly mentioned in the command, it is used for
FortiManager as well. Through the CLI, up to three separate devices for maximum failover
protection of log data can be added. The command for the three devices are not cumulative.
You must also specify how you want to upload your logs. You can choose to store logs to disk and
then upload to FortiAnalyzer or FortiManager later—in which case you need to specify a schedule (for
example, daily at 00:59)—or you can upload logs in real-time. Generating logs uses system
resources, so if FortiGate frequently creates and sends logs to multiple places, CPU and RAM usage
will increase.
You can encrypt communications using SSL-secured OFTP by enabling Encrypt Log Transmission.
Logging and Monitoring
FortiGate I Student Guide
205
DO NOT REPRINT
© FORTINET

You can configure remote logging to FortiCloud through the Log Settings page as well. But before
you can enable logging to FortiCloud, you must first activate your FortiCloud account. Once activated,
you can enable FortiCloud logging. You must add your FortiCloud account so FortiGate can
communicate with your FortiCloud account and set the upload option. If you want to store your logs to
disk first and then upload to FortiCloud, you must specify a schedule.
Logging and Monitoring
FortiGate I Student Guide
206
DO NOT REPRINT
© FORTINET

You can also configure remote logging to Syslog through the Log Settings page. You must add the
Syslog IP address or FQDN so FortiGate and Syslog can communicate.
From the CLI, you can configure up to four remote Syslog servers with the config log syslogd
command.
Logging and Monitoring
FortiGate I Student Guide
207
DO NOT REPRINT
© FORTINET

You can also choose which events you want to appear in the local traffic log and the event log.
Local traffic logs provide information about traffic directly to and from FortiGate. This option is disabled
by default due to the large number of logs they can generate.
Event logs provide all of the system information generated by the FortiGate device, such as
administrator logins, configuration changes made by administrators, user activity, and daily operations
of the device—they are not caused by traffic passing through firewall policies. For example, route-
based VPNs going up and down or routing protocol activity are not caused by traffic passing through a
firewall policy. One exception might be the user log, as it does record user logon/logoff events on
traffic that passes through policies.
The event logs you choose to enable depends on what features you are implementing and what
information you need to get out of the logs.
Logging and Monitoring
FortiGate I Student Guide
208
DO NOT REPRINT
© FORTINET

Additionally, you can configure how logs are displayed in the GUI.
For example, you can specify whether the GUI:
• displays logs from memory, disk, or FortiAnalyzer
• resolves IPs to host names. This requires FortiGate to perform reverse DNS lookups for all the IPs.
If your DNS server is not available or is slow to reply, this can impact your ability to look through
the logs as the requests will time out.
Logging and Monitoring
FortiGate I Student Guide
209
DO NOT REPRINT
© FORTINET

You can configure the threat weight definition through the Threat Weight page. This allows you to set
the risk values for low, medium, high, and critical levels, and then apply a threat weight to each
category-based item.
In the above example, malware has a threat weight of critical. You can adjust this threat weight based
on your organizational requirements. Once threat weight is configured, you can view all detected
threats from the Threats page.
Logging and Monitoring
FortiGate I Student Guide
210
DO NOT REPRINT
© FORTINET

Once all your logging settings are configured, you can enable logging on your firewall policies. Only
when enabled on a firewall policy can a log message generate (based on configured log settings).
Generally, if you configure your FortiGate to inspect traffic, you should also enable logging for that
security feature to help you track and debug your traffic flow. Except for violations that you consider to
be low in severity – web filtering, for example – you’ll want to know if your FortiGate is blocking
attacks. Most attacks don’t succeed in a security breach on the first try. A proactive approach, when
you notice a persistent attacker whose methods seem to be evolving, can avoid a security breach. To
get early warnings like this, enable logging for your security profiles.
To enable logging on security profiles, edit your firewall policy, enable the security profile, and select
your configured security profile from the associated drop-down list. Remember that you will not get
logs of any kind if Log Allowed Traffic isn’t enabled in the Logging Options section.
Logging and Monitoring
FortiGate I Student Guide
211
DO NOT REPRINT
© FORTINET

It’s important to remember that the more logs that get generated, the heavier the toll on your CPU and
memory resources. Storing logs for a period of time also requires disk space, as does accessing
them. So, before configuring logging, make sure it is worth the extra resources and that your system
can handle the influx.
Also important to note is logging behavior with security profiles. Security profiles create log events
when traffic is detected. Depending on the amount of traffic you have and logging settings that are
enabled, your traffic logs can swell and, ultimately, impact the performance of your firewall.
On remote logging devices, such as FortiAnalyzer and Syslog, you can enable performance statistic
logging on FortiGate from the CLI to occur every 1-15 minutes. This is not available for local disk
logging or FortiCloud.
Logging and Monitoring
FortiGate I Student Guide
212
DO NOT REPRINT
© FORTINET

In this section, we will examine how to view, filter, download, and export logs. While you can view and
manage logs though the CLI using the execute log filter and execute log display
commands, this section focuses on the GUI.
Logging and Monitoring
FortiGate I Student Guide
213
DO NOT REPRINT
© FORTINET

You can view your logs in the GUI under the Log & Report menu. The options that appear in this
menu depend on your configuration. Security logs appear only if security events exist.
Select the type of log you want to view, such as Forward Traffic. Logs then appear in a formatted
table view. To view the log details, select the log from the table. The log details then appear in the Log
Details pane to the right.
If archiving is enabled on security profiles that support it (such as DLP), archiving information appears
within the Log Details pane under the Archived Data section. Archived logs are also recorded when
using FortiAnalyzer or FortiCloud.
If you configured FortiGate to log to multiple locations and want to view logs from those locations, you
must specify the location from the Log Settings page. In this screenshot, the log location is set to
Disk, as that is the configured setting on the Log Settings page. If logging to a remote location, such
as Syslog, you must view logs through that device instead.
Logging and Monitoring
FortiGate I Student Guide
214
DO NOT REPRINT
© FORTINET

Depending on your configuration, your FortiGate might record a high volume of logs. This can make it
more difficult to locate a specific log or log type, especially during an investigation.
To navigate the logs more efficiently, you can set up log filters. The more information you specify in
the filter, the easier it is to find the precise log entry. Filters are configurable for each column of log
data in the display.
By default, the most common columns are shown and less common columns are hidden. Accordingly,
if filtering data based on a column that is hidden, be sure to add the column as a selected column. To
add columns, right-click any column field and from the pop-up menu that appears, select the column
from the Available Columns section.
Logging and Monitoring
FortiGate I Student Guide
215
DO NOT REPRINT
© FORTINET

There is also an option to apply a quick filter to logs. Right-click the column of a specific log message
and select one of the filter options that appear (options differ based on log type and column).
FortiGate also allows you to quickly quarantine the source address through the log viewer. Right-click
the log and select Quarantine Source Address from the dialog box that appears. You can set the
quarantine to Temporary or Permanent and subsequently manage the quarantine from the User
Quarantine page.
Logging and Monitoring
FortiGate I Student Guide
216
DO NOT REPRINT
© FORTINET

You can also access log messages generated by individual policies. Right-click the policy for which
you want to view all associated logs, and from the pop-up menu, select Show Matching Logs.
Logging and Monitoring
FortiGate I Student Guide
217
DO NOT REPRINT
© FORTINET

You can download raw (unformatted) logs by clicking the download icon on the associated log type
page (for example, System Event logs). You can filter the logs first if you want to download only a
subset of logs.
You can also download debug logs from the Advanced page. Debug log messages are only
generated if the log severity level is set to Debug. Customer Support may request debug logs to assist
with troubleshooting.
Logging and Monitoring
FortiGate I Student Guide
218
DO NOT REPRINT
© FORTINET

There are three methods for exporting logs: FTP, TFTP, and USB.
For USB, logs are exported as LZ4 compressed files. You can export to USB from both the CLI and
GUI.
When you insert a USB drive into the USB port of your FortiGate, the USB menu appears in the GUI.
The menu displays the amount of storage available on the USB disk as well as the log file size. Click
Copy to USB to copy the log file to the USB drive.
From the CLI, use the execute backup disk alllogs usb command to back up all logs to
USB. Or to back up just the traffic logs to USB, use the execute backup disk log usb
<log_type> command (where <log_type> is traffic, event, virus, webfilter, and so on).
Logging and Monitoring
FortiGate I Student Guide
219
DO NOT REPRINT
© FORTINET

Monitoring your FortiGate is critical for incident response. If you are monitoring your network
continuously, you may be able to stop an attack in progress, or, if a breach is successful, know where
reinforcement is needed. How the attack occurs may reveal weaknesses in your configuration or give
important clues about the attacker’s identity.
There are many ways you can monitor your network. You can monitor through the Alert Message
Console, the FortiView menu, the Monitor menu, alert email, and SNMP.
Logging and Monitoring
FortiGate I Student Guide
220
DO NOT REPRINT
© FORTINET

The Alert Message Console is a widget located on the dashboard of the GUI. You can configure the
widget to display alerts according to your preferences by clicking the pencil icon. For example, you
can configure which events you want to appear as alerts and the number of alerts displayed. These
alerts are not logging related alerts, but system related alerts.
When an alert appears in the Alert Message Console, it remains there until acknowledged. Once you
investigate the issue (and make adjustments if necessary), you can remove it from the list.
Logging and Monitoring
FortiGate I Student Guide
221
DO NOT REPRINT
© FORTINET

FortiView is a comprehensive monitoring system for your network that integrates real-time and
historical data into a single view on your FortiGate. It can log and monitor threats to networks, filter
data on multiple levels, keep track of administrative activity, and more.
Through the various pages under the FortiView menu, you can investigate traffic activity and employ
multiple filters to narrow your view over a specific timeframe (local storage is required to view logs 24
hours in the past). Note that some FortiGate models support a 7-day time display. This can only be
enabled through the CLI using the config log setting command.
Logging and Monitoring
FortiGate I Student Guide
222
DO NOT REPRINT
© FORTINET

Some of the areas you can monitor under the FortiView menu include:
•Sources: Allows you to view information about the sources of traffic on your FortiGate. You can
use this to investigate a spike in traffic, for example.
•Interfaces:Allows you to perform current and historical monitoring by interface, with the ability to
monitor bandwidth, in particular. You can use this to investigate traffic spikes associated with an IP
address, for example.
•Countries: Allows you to filter traffic according to source and destination countries. This includes
the option to view the country map visualization. You can use this to investigate international
source bandwidth usage for specific sources, for example.
•All Sessions: Allows you to view information about all FortiGate traffic. This console has the
greatest number of column filter options. You can use this to filter sessions by port number and
application type, for example.
•Applications: Allows you to view information about the applications being used on your network.
•Cloud Applications: Allows you to view information about the cloud-based applications being
used on your network.
•Web Sites: Allows you to view information about the top allowed and top blocked websites by
domain or FortiGuard categories. You can use this to investigate an instance of proxy avoidance,
for example.
•Threats: Allows you to view information about the top users involved in incidences as well as the
top threats in your network.
•Threat Map: Allows you to view risks coming from various international locations arriving at your
location, displayed through a map. You can use this to investigate various international threats.
Logging and Monitoring
FortiGate I Student Guide
223
DO NOT REPRINT
© FORTINET

You can also monitor various monitoring functions from the Monitor menu, such as routing, DCHP,
WAN link, FortiGuard quota, IPsec, SSL VPN, firewall users, user quarantine, FortiClient, WiFi, and
rogue AP.
For example, the Routing Monitor displays routing information that includes type, subtype, network,
gateway, interface, and up time.
Logging and Monitoring
FortiGate I Student Guide
224
DO NOT REPRINT
© FORTINET

Since you can’t always be physically at the device, you can monitor events by setting up alert email.
Alert emails provide an efficient and direct method of notifying an administrator of events.
Before you can configure alert email, you must have a SMTP server set up on FortiGate. Once
configured, the Alert E-Mail menu item appears.
You can configure alert emails from the Alert E-Mail page. You can trigger alert emails based on type
(such as any time an intrusion is detected or there is a firewall authentication failure) or on minimum
log severity level (such as all logs at the Alert level or above). You can configure up to three
recipients.
Logging and Monitoring
FortiGate I Student Guide
225
DO NOT REPRINT
© FORTINET

Simple Network Management Protocol (SNMP) enables you to monitor hardware on your network.
You can configure the hardware, such as the FortiGate SNMP agent, to report system information and
send traps (alarms or event messages) to SNMP managers. An SNMP manager, or host, is typically a
computer running an application that can read the incoming trap and event messages from the agent
and send out SNMP queries to the SNMP agents.
In order to configure FortiGate for SNMP monitoring, your SNMP manager needs the Management
Information Base (MIB) file. A MIB is a text file that describes a list of SNMP data objects and provides
information the SNMP manager needs to interpret the SNMP traps and events sent by the FortiGate
device SNMP agent.
The FortiGate SNMP implementation is read-only. SNMP v1, v2c, and v3-compliant SNMP managers
have read-only access to FortiGate system information through queries and can receive trap
messages from FortiGate.
You can download the MIB files from the System >SNMP page or from the Fortinet Technical
Support Web site (support.fortinet.com).
Logging and Monitoring
FortiGate I Student Guide
226
DO NOT REPRINT
© FORTINET

Reports provide a clear, concise overview of what is happening on your network based on log data,
without manually going through large amounts of logs. This section provides a brief overview of
FortiGate reports.
Logging and Monitoring
FortiGate I Student Guide
227
DO NOT REPRINT
© FORTINET

The FortiGate database that is used to store logs is also used to extract information for reports. The
log database uses Structured Query Language (SQL).
Reports are built from datasets, which are SQL statements that tell FortiGate what information to
extract from the database.
FortiGate also includes two default reports: Learning report and Local report.
Logging and Monitoring
FortiGate I Student Guide
228
DO NOT REPRINT
© FORTINET

When learning mode is enabled on a firewall policy, data across all traffic and security vectors is
captured and generated in the Cyber Threat Assessment Learning Report. The purpose of this
report is to allow users to easily implement a monitor then enforce process.
Data includes:
• Deployment methodology
• Executive summary
• Security and threat prevention, which includes high risk applications; application vulnerability
exploits; malware, botnets, and spyware/adware; and at-risk devices and hosts
• User productivity, which includes application usage and web usage
Logging and Monitoring
FortiGate I Student Guide
229
DO NOT REPRINT
© FORTINET

To enable learning reports, you must enable disk logging and ensure Policy Learning is enabled on
the Feature Select page.
You must also set Action to LEARN in the firewall policy. Once enabled, the policy automatically
applies default static profiles and passes traffic to security profiles for monitoring. It also enables
logging with full capabilities, which are tagged as Learning in the logs.
Learning reports are enabled per-VDOM.
Logging and Monitoring
FortiGate I Student Guide
230
DO NOT REPRINT
© FORTINET

You can select to view either the full report or report summary. They both provide the same data, but
the full report provides supplementary text-based explanations of the various report categories.
You can also specify the time period of the report. The report can provide data for the last 5 minutes, 1
hour, or 24 hours.
Logging and Monitoring
FortiGate I Student Guide
231
DO NOT REPRINT
© FORTINET

The FortiGate Security Report compiles security feature activity from various security-related logs,
such as virus and attack logs. You can run the report on demand, or on a daily or weekly basis as well
as choose to email the generated report.
Logging and Monitoring
FortiGate I Student Guide
232
DO NOT REPRINT
© FORTINET

FortiOS reports are configured from logs stored on the FortiGate hard drive. As such, you must enable
disk logging on the Log Settings page. You must also enable local reports in order to view and edit
reports.
If you do not see Local Reports in the GUI menu, go to the Feature Select page and enable Local
Reports.
Local reports are enabled per-VDOM.
Logging and Monitoring
FortiGate I Student Guide
233
DO NOT REPRINT
© FORTINET

You can configure report options, run reports on demand, and view reports from the Local Reports
page.
Report options include specifying a schedule to run a report (for example, daily or weekly at a specific
time of day), and specifying whether to email the generated reports. If you do not want to schedule
reports, you can choose to generate on demand instead. You can run on demand reports even if
scheduling is enabled by clicking Run Now.
You can view all generated reports from the Historical Reports table.
Logging and Monitoring
FortiGate I Student Guide
234
DO NOT REPRINT
© FORTINET

After this lesson, you should have the knowledge and skills required to:
• Describe log types and subtypes
• Describe log severity levels
• Describe log format (header and body)
• Identify log storage locations
• Configure log settings
• Configure remote logging
• Enable logging on firewall policies
• View, filter, download, and export logs
• Monitor your network
• Configure alert email
• Configure, run, and view reports
Logging and Monitoring
FortiGate I Student Guide
235
DO NOT REPRINT
© FORTINET

In this lesson, you will learn how to understand and apply the firewall policies to allow and deny traffic
passing through FortiGate. At its core, FortiGate is a firewall, so almost everything that it does to your
traffic is linked into your firewall policies.
Firewall Policies
FortiGate I Student Guide
236
DO NOT REPRINT
© FORTINET

After this lesson, you should be able to properly identify the different components used in a firewall
policy. You’ll be able to configure and test your firewall policies, arrange them to correctly match
traffic, and monitor traffic passing through them.
Firewall Policies
FortiGate I Student Guide
237
DO NOT REPRINT
© FORTINET

To begin, let’s talk about what firewall policies are.
Firewall policies define which traffic matches, and what FortiGate will do if it does.
Should the traffic be allowed? This is decided first based on simple criteria such as the source. Then,
if the policy itself does not block the traffic, FortiGate begins more computationally expensive security
profile inspection (often known as Unified Threat Management (UTM)), such as antivirus, application
control, and web-filtering, if you’ve chosen it in the policy. Those scans could block the traffic if, for
example, it contains a virus. Otherwise, the traffic is allowed.
Will NAT be applied? Authentication required? Firewall policies also determine that. Once processing
is finished, FortiGate forwards the packet towards its destination.
FortiGate looks for the matching firewall policy from ‘top to bottom’ and, if a match is found, the traffic
is processed based on that firewall policy. If no match is found, it is finally dropped by the default
Implicit Deny policy.
Firewall Policies
FortiGate I Student Guide
238
DO NOT REPRINT
© FORTINET

Each policy matches traffic and applies security by referring to objects that you’ve defined, such as
addresses and profiles.
What about other firewall policy types? Do IPv6 or virtual wire policies exist? Yes. And they use
slightly different objects that are relevant to their type. In this lesson, we are discussing IPv4 firewall
policies as they are the most common use case.
Firewall Policies
FortiGate I Student Guide
239
DO NOT REPRINT
© FORTINET

Now we know what a firewall policy is. In this section, you will learn how FortiGate matches traffic with
the firewall policies and takes appropriate action based on the matching policy.
Firewall Policies
FortiGate I Student Guide
240
DO NOT REPRINT
© FORTINET

When a packet arrives, how does FortiGate find a matching policy? Each policy has match criteria,
which you can define using the following objects:
• Ingress and egress
• Source and destination: IP address, device ID, or user
• Network service(s): IP protocol and port number
• Schedule: applies during configured times
• Action : accept or deny
Once FortiGate finds a matching policy, it applies the configured settings for packet processing. Is
antivirus scanning or web filtering applied? Will source NAT be applied?
For example, if you want to block incoming FTP to all but a few FTP servers, you would define the
addresses of your FTP servers, select those as the destination, and select FTP as the service. You
probably wouldn’t specify a source (often any location on the Internet is allowed) or schedule (usually
FTP servers are always available, day or night). Finally, you would set the Action setting to Accept.
This might be enough, but often you’ll want more thorough security.Here, the policy also
authenticates the user, scans for viruses, and logs blocked connection attempts.
Firewall Policies
FortiGate I Student Guide
241
DO NOT REPRINT
© FORTINET

To begin describing how FortiGate finds a policy for each packet, let’s start with the interface(s).
Packets arrive on an incoming, or ingress, interface. Routing determines the outgoing, or egress,
interface. In each policy, you must set a source and destination interface; even if one or both are set to
any. Both interfaces must match the policy’s interface criteria in order to be a successful match.
For example, if you configure policies between port3 (LAN) ingress and port1 (WAN) egress and a
packet arrives on port2, the packet would not match your policies and therefore be dropped due to the
implicit deny policy at the end of the list. Even if the policy is from port3 (LAN) ingress to any egress,
the packet would still be dropped because it did not match the incoming interface.
To simplify policy configuration, you can group interfaces into logical zones. For example, you could
group port4 to port7 as a DMZ zone. Zones can be created from the Interfaces page. However, you
should note that an interface in a zone cannot be referenced individually, and if you need to remove
the interface from the zone, you must remove all references to that interface (for example, firewall
policies, firewall addresses, and so on). If you think that you might need to reference interfaces
individually, you should set multiple source and destination interfaces in the firewall policy, instead of
using zones.
Firewall Policies
FortiGate I Student Guide
242
DO NOT REPRINT
© FORTINET

By default, you can only select a single interface as the incoming interface and a single interface as
the outgoing interface. This is because the option to select multiple interfaces, or any interface in a
firewall policy, is disabled from the GUI. However, you can enable the Multiple Interface Policies
under the Feature Select page to disable the single interface restriction.
You can also select multiple interfaces, or any interface, if you configure a firewall policy from the CLI,
regardless of the default GUI setting.
It is also worth mentioning that when any interface is chosen, you cannot select multiple interfaces for
that interface. In this example, because any is selected as the outgoing interface, you cannot add any
additional interfaces.
Firewall Policies
FortiGate I Student Guide
243
DO NOT REPRINT
© FORTINET

The next match criteria that FortiGate considers is the packet’s source.
In each firewall policy, you must select a source address object. Optionally, you can refine your
definition of the source address by also selecting a user, a group, or a specific device. If your
organization allows BYOD (Bring Your Own Device), than a combination of all three provides a much
more granular match, for increased security.
Note: In FortiOS 5.4, you can allow the subnet (IP/Netmask) to be visible in a static route
configuration, which can be used when configuring a static route.
When selecting a fully qualified domain name (FQDN) as the source address, it must be resolved by
DNS and cached in FortiGate. Make sure FortiGate is configured properly for DNS settings. If
FortiGate is not able to resolve a FQDN address, it will present with a warning message and a firewall
policy containing a FQDN may not function properly.
Firewall Policies
FortiGate I Student Guide
244
DO NOT REPRINT
© FORTINET

If a user is added as part of the source, it must be verified before allowing or denying access based on
the firewall policy. There are different ways a user can be authenticated. For a local user, the
username and password is configured locally on FortiGate. When a local user authenticates, it must
match the username and password configured on the FortiGate locally.
If it is a remote user (for example, LDAP or RADIUS), FortiGate receives the username and password
from the remote user and passes this information to the authentication server. The authentication
server verifies the user login credentials and updates FortiGate. Once FortiGate receives that
information, access to the network is granted based on the firewall policy.
A Fortinet Single Sign-On (FSSO) user authenticates by logging in with their username and password
that is configured on the domain controller and access is granted based on the group information on
FortiGate.
Firewall Policies
FortiGate I Student Guide
245
DO NOT REPRINT
© FORTINET

There are two device identification techniques: with an agent, and without.
Agentless uses traffic from the device. Devices are indexed by their MAC address and there are
various ways to identify devices:
• HTTP “User-Agent:” header
• TCP fingerprint
• MAC address OUI
• DHCP (option 60 class identifier, option 12 host_name)
• Microsoft Windows browser service (MWBS)
• SIP user agent
• Link Layer Discovery Protocol (LLDP)
• Simple Service Discovery Protocol (SSDP)
Note: FortiGate uses “first come, first served” to determine the device identity. For example, if a
device is detected by the HTTP user agent, FortiGate updates its device table with the detected MAC
address and scanning stops as soon as the type has been determined for that MAC address.
Agent-based uses FortiClient. FortiClient sends information to FortiGate, and the device is tracked by
its unique FortiClient UID.
Firewall Policies
FortiGate I Student Guide
246
DO NOT REPRINT
© FORTINET

If you enable Source Device Type in the firewall policy, FortiGate enables Device Detection and
Active Scanning on the source interface(s) of the policy. By default, FortiGate uses Device
Detection (passive scanning) which runs the scans based on the arrival of
traffic.
What is active scanning?
If passive detection fails to detect the device type for over five minutes, active scanning is triggered
and scans every three minutes. If active scanning fails to detect the device type, the next scan occurs
10 minutes later. If that scan fails, the next occurs 15 minutes later. FortiGate uses an (N+1)*5
minutes algorithm for scanning, where N is the number of scans that have been done. Active
scanning scans for device type, OS, and OS version.
Firewall Policies
FortiGate I Student Guide
247
DO NOT REPRINT
© FORTINET

The Device List shows the list of detected devices. It also shows the total number of devices
detected. You can right-click on any detected device to edit, delete, or view details in FortiView.The
details include session, destination, policies, and more.
You can also define static entries for device and/or device groups. By default, devices are grouped
into Custom Device Groups; however, if a predefined device group doesn’t match your
organizational needs, you can create a custom group.
Devices are indexed by MAC and identified from multiple sources. The CLI command diagnose
user device list shows a more detailed listing than the Device Inventory page, including the
detection method. In this worked example, devices are detected by source as TCP fingerprinting,
HTTP user agent, and FortiClient.
Detected devices are saved to FortiGate’s flash drive. Therefore, on restart, FortiGate knows that
devices have already been identified, and does not have to re-categorize each device.
The user displayed in the device information is just a tag; it cannot be used as a means of
identification for an authentication policy.
Firewall Policies
FortiGate I Student Guide
248
DO NOT REPRINT
© FORTINET

FortiGate can control FortiClient settings through the FortiClient profile and registration. In order for
FortiClient to register with FortiGate, FortiTelemetry must be enabled on the applicable interface.
There are other configuration settings worth mentioning, such as Enforce FortiTelemetry for all
FortiClients. If enabled, non-complaint devices are blocked and redirected to a web portal that
explains the non-compliance and provides a link to download FortiClient. You can exempt devices
from FortiClient enforcement using source and/or destination or services.
Once FortiClient is registered, it is added into the device list. FortiGate also pushes the FortiClient
profile to the registered FortiClient(s). You may configure the default FortiClient profile or add
additional profiles.
You can also view the FortiClient endpoint information from the FortiClient Monitor page.
You can run diagnose user device list or diagnose endpoint registration list to
view the FortiClient unique UID.
FortiClient devices have a unique id which can be used as an index for the device. The unique id is
used instead of the MAC address, because using MAC addresses can be problematic when a device
has multiple MAC addresses (such as servers or virtual machines), or when there is no Layer 2
visibility of the device.
The License Information widget on the FortiGate GUI dashboard shows the total number of
registered devices and the total number of devices available for registration. Windows and Mac OS X
FortiClient installers are also available from this dashboard widget.
Firewall Policies
FortiGate I Student Guide
249
DO NOT REPRINT
© FORTINET

FortiClient is the agent-based approach for source device type.
As shown in the previous slide, FortiClient enforcement is enabled on the interface(s). Firewall policies
with this source interface will force the user to download or register FortiClient with FortiGate. In
FortiOS 5.2, FortiClient enforcement was enabled on a policy-by-policy basis.
Firewall Policies
FortiGate I Student Guide
250
DO NOT REPRINT
© FORTINET

Here, all three source selectors identify the user group, device type, and specific subnet.
Remember, user and device are optional objects. They are used here to make the policy more
specific. If you wanted the policy to match more traffic, you would leave the user and device objects
undefined.
Firewall Policies
FortiGate I Student Guide
251
DO NOT REPRINT
© FORTINET

Like the packet’s source, FortiGate also checks the destination address for a match.
Address objects may be a host name, IP subnet, or range. If you enter a FQDN as the address object,
make sure that you’ve configured your FortiGate with DNS settings. FortiGate uses DNS to resolve
those FQDN host names to IP addresses, which are what actually appear in the IP header.
Geographic addresses, which are groups or ranges of addresses allocated to a country, can be
selected instead. These objects are updated via FortiGuard.
Why is there is no option to select user or devices? The user identification or device identification is
determined at the ingress interface, and packets are forwarded only to the egress interface once user
or device authentication is successful.
Firewall Policies
FortiGate I Student Guide
252
DO NOT REPRINT
© FORTINET

Schedules add a time element to the policy. For example, a policy allowing backup software may
activate at night, or a remote address may be allowed for testing purposes, and a schedule provides a
test window.
Schedules can be configured from the Schedules page and use a 24-hour time clock. There are a few
configuration settings worth mentioning:
Recurring: When configuring recurring schedules, if the stop time is set earlier than the start time, the
stop time will occur the next day. For example, if you select Sunday as the day, 10:00 as the start
time, and 09:00 as the stop time, the schedule will stop on Monday at 09:00. If the start and stop time
are identical, the schedule will run for 24 hours.
One-time: The start date and time must be earlier than stop date and time. You can also enable Pre-
expiration event log, which will generate an event log N number of days before the schedule expires,
where N can be from 1 to 100 days.
Firewall Policies
FortiGate I Student Guide
253
DO NOT REPRINT
© FORTINET

Another criterion that FortiGate uses to match policies is the packet’s service.
At the IP layer, protocol numbers (for example, TCP, UDP, SCTP, and so on) together with source
and destination ports, define each network service. Generally, only a destination port (that is, the
server’s listening port) is defined. Some legacy applications may use a specific source port, but in
most modern applications, the source port is randomly determined at transmission time, and therefore
is not a reliable way to define the service.
For example, the predefined service object named HTTP is TCP destination port 80 and the
predefined service object named HTTPS is TCP destination port 443. However, the source ports are
ephemeral and, therefore, not defined.
By default, services are grouped together to simplify administration, so you can view the services By
Category or Alphabetically. If the predefined services doesn’t meet your organizational needs, you
can create one or more new services, service groups, and categories.
Firewall Policies
FortiGate I Student Guide
254
DO NOT REPRINT
© FORTINET

So far we have learned about firewall policies matching criteria and the action that FortiGate can take.
In this section, you will learn how to configure firewall policies.
Firewall Policies
FortiGate I Student Guide
255
DO NOT REPRINT
© FORTINET

When you configure a new firewall policy from the GUI, you must specify a unique name for the
firewall policy because it is enabled by default (but optional in the CLI). This helps the administrator to
quickly identify the policy that they are looking for. However, you can make this feature optional in GUI
from the Feature Select page by enabling Allow Unnamed Policies under Additional Features.
Note: When upgrading from a previous FortiGate firmware version (for example, 5.2) or a policy
configured from the CLI, no policy names are assigned. However, if you modify an existing policy from
the GUI, you must specify a unique name.
The FortiGate flat GUI view allows you to select interfaces and other objects by clicking or dragging
and dropping on the list populated on the right-hand side.
There are many other options that you can configure from the firewall policy, such as firewall and
network options, security profiles, logging options, and enabling or disabling a policy.
When creating firewall objects or policies, a Universally Unique Identified (UUID) attribute is added so
that logs can record these UUID and improve functionality when integrating with FortiManager or
FortiAnalyzer.
When creating firewall policies, remember that FortiGate is a stateful firewall. As a result, you only
need to create one firewall policy that matches the direction of the traffic that initiates the session.
FortiGate will automatically remember the source-destination pair and allow replies.
Firewall Policies
FortiGate I Student Guide
256
DO NOT REPRINT
© FORTINET

One of the most important features that a firewall policy can apply is security profiles, such as IPS and
antivirus. A security profile inspects each packet in the traffic flow, where the session has already
been conditionally accepted by the firewall policy.
When inspecting traffic, FortiGate can use one of two methods: flow-based or proxy-based. Different
security features are supported by each type.
Firewall Policies
FortiGate I Student Guide
257
DO NOT REPRINT
© FORTINET

You can also enable learning mode on a firewall policy. When you set Action to LEARN, the firewall
policy automatically applies default static profiles and passes traffic to security profiles for monitoring.
It also enables logging with full capabilities, which are tagged as Learning in the logs.
You can view the comprehensive report that results from learning mode under the Learning Reports
page. This report uses all of the learning logs, across all traffic and security vectors, to generate a
complete summary report. This enables users to easily implement a monitor then enforce process.
Firewall Policies
FortiGate I Student Guide
258
DO NOT REPRINT
© FORTINET

If you enable Generate Logs when Session Starts, FortiGate will create a traffic log when the
session begins. But remember that increasing logging decreases performance, so use it only where
necessary.
If you have enabled logging in the policy, FortiGate will generate traffic logs once a firewall policy
closes an IP session.
During the session, if a security profile detects a violation, FortiGate will record the attack log
immediately. To reduce the amount of log messages generated and improve performance, you can
enable a session table entry of dropped traffic. This creates the denied session in the session table
and, if the session is denied, all packets of that session are also denied. This option is in the CLI, and
is called ses-denied-traffic.You can also set the duration for block sessions. This determines
how long a session will be kept in the session table by setting block-session-timer in the CLI. By
default, it is set to 30 seconds.
If the GUI option Generate Logs when Session Starts is not displayed, this means that your
FortiGate device does not have internal storage. This option is in the CLI, regardless of internal
storage, and is called set logtraffic-start enable.
Firewall Policies
FortiGate I Student Guide
259
DO NOT REPRINT
© FORTINET

Two types of traffic shapers can be configured: shared and per-IP.
A shared shaper applies a total bandwidth to all traffic using that shaper. The scope can be per-policy
or for all policies referencing that shaper. FortiGate can count the packet rates of ingress and egress
to police traffic.
In FortiOS 5.4, traffic shaping policies are created separately on the Traffic Shaping Policy page.
FortiGate allows you to create three types of traffic shaping policies:
• Shared policy shaping: Bandwidth management of security policies
• Per-IP shaping: Bandwidth management of user IP addresses
• Application control shaping: Bandwidth management by application
When creating traffic shaping policies, you must ensure that the Matching Criteria is the same as the
firewall policies you want to apply shaping to. Note that these apply equally to TCP and UDP, and
UDP protocols may not recover as gracefully from packet loss.
Firewall Policies
FortiGate I Student Guide
260
DO NOT REPRINT
© FORTINET

So far you have learned how to configure firewall policies. In this section, you will learn how to
manage and fine-tune settings for firewall policies.
Firewall Policies
FortiGate I Student Guide
261
DO NOT REPRINT
© FORTINET

Firewall policies appear in an organized list. It’s either organized in Interface Pair View, or By
Sequence.
Usually, it will appear in Interface Pair View. Each section contains policies for that ingress-egress
pair. Alternatively, you can view your policies as a single, comprehensive list by selecting By
Sequence at the top of the page.
In some cases, you won’t have a choice of which view is used.
If you use multiple source and destination interfaces or the any interface in a firewall policy, policies
cannot be separated into sections by interface pairs – some would be triplets or more. So instead,
policies are then always displayed in a single list (By Sequence).
To help you remember the use of each interface, you can give them aliases. For example, you could
call port3 Internal_network. This can help to make your list of policies easier to comprehend.
Firewall Policies
FortiGate I Student Guide
262
DO NOT REPRINT
© FORTINET

Firewall policies in the GUI are ordered primarily by the policy sequence number. Policy sequence
numbers define the order in which rules are processed. Policy IDs are identifiers. By default,
sequence numbers are displayed on the GUI. CLI commands, however, use policy ID.
Be careful not to accidentally modify the wrong policy. To avoid such errors, you can add the policy ID
to the GUI using the column settings.
Remember that we mentioned that only the first matching policy applies? Moving your policies into the
correct position is important.It affects which traffic is blocked or allowed. In the applicable interface
pair’s section, FortiGate will look for a matching policy, beginning at the top. So usually you should put
more specific policies at the top; otherwise, more general policies will match the traffic first, and your
more granular policies will never be applied.
Here, we’re moving a policy (sequence number 3, ID 8) that only matches syslog traffic above a more
general Full_Access (accept everything from everywhere)policy. Otherwise, FortiGate would always
apply the first matching policy – Full_Access– and never reach the Block_Syslog policy.
Notice that after moving this policy up, the sequence number changed from 3 to 2, but the policy ID 8
remained the same in the GUI. As the CLI only uses policy ID, before moving, policy ID 7 was on top,
and after the move, policy ID 8 is on the top.
As a best practice, always add the policy ID column in the GUI. While sequence number changes
when a policy is moved, the value that remains with a policy is the policy ID.
Firewall Policies
FortiGate I Student Guide
263
DO NOT REPRINT
© FORTINET

To reduce the total number of firewall policies in RAM and to simplify administration, you can group
service and address objects. Then you can reference that group in the firewall policy, instead of
selecting multiple objects each time or making multiple policies.
Here, we see four services that match the policy: HTTP, HTTPS, FTP, and DNS. DNS is usually used
by HTTP, as people remember domain names for web sites instead of their IP addresses. If you need
to make many policies for web and FTP traffic, then it makes sense to create a service object named
Web-FTP. That way, you don’t have to manually select all four services each time you make a policy.
Policies can reference the Web-FTP service group instead.
Also, if you notice, you can consolidate these two firewall policies, as they have the same source and
destination, except the services are different. You can consolidate source address as source group
and create a service group containing all the services for web, FTP, and email access.
When consolidating two firewall policies, the other settings in the firewall policy, such as logging and
security profiles, should match.
Firewall Policies
FortiGate I Student Guide
264
DO NOT REPRINT
© FORTINET

We’ve just shown several component objects that can be re-used as you make policies. What if you
want to delete an object?
If it’s being used, you can’t. First, you must reconfigure the objects that are currently using it. The GUI
provides a simple way to find out where in the FortiGate’s configuration an object is being referenced.
See the numbers in the Ref. column? They are the number of places where that object is being used.
The number is actually a link, so if you click it, you can see which objects use it.
In this example, address all is being used by an address group and two firewall policies. If you select
a firewall policy, you can use the Edit,View List, and View Properties tabs.
• Edit: It allows you to edit the selected object. In this example, it shows the edit page for the firewall
policy ID 3.
• View List: It allows you to view selected objects in its category. In this example, it will show you the
list of all the firewall policies.
• View Properties: It shows where the object is used in that configuration. In this example, address
object all is being used in the destination address and source address of that firewall policy.
Firewall Policies
FortiGate I Student Guide
265
DO NOT REPRINT
© FORTINET

You can right-click any firewall policy sequence to see different menu options to edit or modify the
policy. The options include enabling or disabling a firewall policy, inserting firewall policies (above or
below), copying and pasting policies, and cloning reverse (only if NAT is disabled on that policy).
Clicking Edit in CLI opens the CLI console for the firewall policy or object selected.
Right-clicking the objects provides you with options to add or remove an object of the same type,
modify an object, and show a reference for that object.
Firewall Policies
FortiGate I Student Guide
266
DO NOT REPRINT
© FORTINET

So far, we have learned about managing firewall policies. In this section, you will learn how to monitor
and find matching firewall policies using the policy lookup feature.
Firewall Policies
FortiGate I Student Guide
267
DO NOT REPRINT
© FORTINET

In FortiOS 5.4, you can find a matching firewall policy based on the policy lookup input criteria. It is
basically creating packet flow over FortiGate without real traffic, from which it can extract a policy ID
from flow trace and highlight it on the GUI policy configuration page.
Depending upon the protocol you select (for example, TCP, UDP, IP, ICMP, and so on), you need to
define other input criteria. For example, when you select TCP as the protocol, you need to define the
source address, source port (optional), destination port, and destination address. When you select
ICMP as the protocol, you need to define the ICMP type/code, source address, and destination
address.
When FortiGate is performing policy lookup, it performs a series of checks on ingress, stateful
inspection, and egress, for the matching firewall policy from top to bottom before providing results for
the matching policy.
Note: If the firewall policy status is set to disable, the policy lookup skips the disabled policy and
checks for the next matching policy in the list.
Firewall Policies
FortiGate I Student Guide
268
DO NOT REPRINT
© FORTINET

Based on the input criteria, after clicking Search, the trace result will be selected, and highlighted, on
the IPv4 Policy page.
Firewall Policies
FortiGate I Student Guide
269
DO NOT REPRINT
© FORTINET

To review, here’s all the topics we covered in this lesson:
• How packets match a firewall policy
• How FortiGate defines matching traffic
• Configuring firewall policies
• Reordering policies to match more granular policies first
• Using policy lookup to find matching policies
Firewall Policies
FortiGate I Student Guide
270
DO NOT REPRINT
© FORTINET

In this lesson, you will learn how Network Address Translation (NAT) is configured and used to do
source NAT and destination NAT for the traffic passing through FortiGate.
Network Address Translation (NAT)
FortiGate I Student Guide
271
DO NOT REPRINT
© FORTINET

After completing this lesson, you should have these practical skills that you can use to configure and
implement source NAT and destination NAT for traffic passing through the FortiGate.
This includes:
• Choosing between firewall policy NAT and central NAT
• Configuring firewall policy source NAT and destination NAT (Virtual IP)
• Configuring central NAT
• Using a SIP session helper for VoIP
• Understanding the session table on FortiGate
Network Address Translation (NAT)
FortiGate I Student Guide
272
DO NOT REPRINT
© FORTINET

In addition to security scans, firewall policies also determine what network address translation (NAT)
or port address translation (PAT) to apply to each packet.
NAT and PAT, also known as NAPT, translate internal, typically private, IP addresses to external,
typically public or Internet, IP addresses.
In FortiOS, NAT and traffic forwarding applies to the same firewall policy. However, diagnostics clearly
show NAT and forwarding as separate actions.
• The NAT option in a firewall policy, and IP pools, are source NAT.
• Virtual IPs are destination NAT.
Network Address Translation (NAT)
FortiGate I Student Guide
273
DO NOT REPRINT
© FORTINET

When you use firewall policy NAT mode, you must configure SNAT and DNAT for each firewall policy.
Central NAT configurations are per virtual domain (discussed later in the training), which means SNAT
and DNAT configurations automatically applies to multiple firewall policies, according to the SNAT and
DNAT rules that you specify, as opposed to each firewall policy in firewall policy NAT.
As a best practice, when you use central NAT, you should make sure to configure specific SNAT and
DNAT rules so that it will match only desired firewall policies in your configuration.
Both firewall policy NAT and central NAT produce the same results.
An example would be a small branch office, where you have fewer firewall policies. In this case, you
can use firewall policy NAT.
In the case of a managed service provider, central NAT can be used to do SNAT and DNAT for a
virtual domain containing a large number of firewall policies. You only have to configure central SNAT
and DNAT rules once, and they can be applied to multiple firewall policies.
Network Address Translation (NAT)
FortiGate I Student Guide
274
DO NOT REPRINT
© FORTINET

In this section, you will learn how to configure firewall policy NAT to perform source NAT and
destination NAT, and how it is applied to the traffic traversing through FortiGate.
Network Address Translation (NAT)
FortiGate I Student Guide
275
DO NOT REPRINT
© FORTINET

The source NAT option uses the egress interface address when NAT is enabled on the firewall policy.
This is a many-to-one NAT. In other words, port address translation (PAT) is used and connections
are tracked using the original source address and source port combinations as well as the allocated
source port. This is the same behavior as the overload IP pool type, discussed later.
Optionally, you may select a fixed port, in which case the source port translation is disabled. With fixed
port, if two or more connections require the same source port for a single IP address, only one
connection can establish.
In this example, a firewall policy from internal to wan1 (IP address 172.20.20.200) is created, and the
user initiates traffic from source 10.10.10.10:1025 destined for 192.168.10.10:80. As NAT is enabled
on the firewall policy, the source IP address is translated to egress interface IP with port translation.
Network Address Translation (NAT)
FortiGate I Student Guide
276
DO NOT REPRINT
© FORTINET

If you use an IP pool, the source address is translated to an address from that pool, rather than the
egress interface address. The larger the number of addresses in the pool, the greater the number of
connections that can be supported.
The default IP pool type is overload. In IP pool type overload, a many-to-one or few relationship and
port translation is used.
In this example, source IP 10.10.10.10 will be translated to an IP address from the IP pool
(172.20.20.2 – 172.20.20.10).
Network Address Translation (NAT)
FortiGate I Student Guide
277
DO NOT REPRINT
© FORTINET

In the one-to-one pool type, an internal IP address is mapped with an external address on a first-
come, first-served basis.
There is a single mapping of an internal address to an external address. Mappings are not fixed and if
there are no more addresses available, a connection will be refused.
Also, in one-to-one, port address translation is not required. In the example, you can see the same
source port is shown for both the ingress and egress address.
Network Address Translation (NAT)
FortiGate I Student Guide
278
DO NOT REPRINT
© FORTINET

In the fixed port range pool type, it provides an explicit relationship between internal IP address ranges
and external IP address ranges, and disables port address translation. It allows fixed mapping of
internal start IP / internal end IP range to external start IP / external end IP range.
This example uses a fixed port range IP pool.
The internal address range 10.0.1.10-10.0.1.11 maps to the external address range 10.200.1.7-
10.200.1.8.
Network Address Translation (NAT)
FortiGate I Student Guide
279
DO NOT REPRINT
© FORTINET

These two CLI outputs illustrate the behavior difference between the port block allocation type and the
default overload type.
Using hping, a rogue client generates many SYN packets per second. In the first example, the port
block allocation type limits the client to 64 connections for that IP pool. Other users will not be
impacted by the rogue client.
In the second example, the overload type imposes no limits, and the rogue client uses many more
connections in the session table. Other users will now be impacted.
Network Address Translation (NAT)
FortiGate I Student Guide
280
DO NOT REPRINT
© FORTINET

Virtual IPs (VIPs) are destination NAT objects. For sessions matching a VIP, the destination address
is translated: usually a public Internet address is translated to a server’s private network address. VIPs
are selected in the firewall policy’s Destination Address field.
The default VIP type is static NAT. This is a one-to-one mapping, which applies for incoming and
outgoing connections. That is, an outgoing policy with NAT enabled would use the VIP address
instead of the egress interface address. This behavior, however, can be overridden by use of an IP
pool.
The static NAT VIP can be restricted to forward only certain ports. For example, connections to the
external IP on port 8080 map to the internal IP on port 80.
From the CLI, you can select as the NAT type load-balance and server-load-balance. Plain
load balancing distributes connections from an external IP address to multiple internal addresses. The
later builds on that mechanism, using a virtual server and real servers, and provides session
persistence and server availability check mechanisms.
VIPs should be routable to the external facing (ingress) interface. FortiOS responds to ARP requests
for VIP and IP pool objects. ARP responses are configurable.
Network Address Translation (NAT)
FortiGate I Student Guide
281
DO NOT REPRINT
© FORTINET

(slide contains animation)
In this example, source IP address 192.168.10.10 is trying to access destination IP address
172.20.20.222 over port TCP 80.
(click)
Connections to the VIP 172.20.20.222 are NATed to the internal host 10.10.10.10.
Because this is static NAT, all NATed outgoing connections from 10.10.10.10 will use the VIP address
in the packet’s destination field, not the egress interface’s address.
Network Address Translation (NAT)
FortiGate I Student Guide
282
DO NOT REPRINT
© FORTINET

In FortiOS 5.2 and 5.4, traffic is permitted to fall through to the next policy; however, when you use
VIP firewall policies, there can be some exceptions.
When VIP(s) are configured, for incoming (WAN to LAN) connections, it will be first matched against
the VIP table.
In this worked example, a firewall policy from WAN to LAN is configured with a specific source and
the action is deny. There is second firewall policy that is allowing access to VIP (the destination
address). Even though the deny firewall policy is at the top of the list, the denied source is still allowed
by the second firewall policy to access VIP.
In order to block traffic from the denied source, you must enable set match-vip enable in the deny
firewall policy, which skips the VIP id checking. Alternatively, you can configure the destination
address as the virtual IP in the deny policy instead of all.
Network Address Translation (NAT)
FortiGate I Student Guide
283
DO NOT REPRINT
© FORTINET

In this section, you will learn how to configure central NAT to perform source NAT and destination
NAT.
Central SNAT and DNAT (VIP) is another method of defining source and destination NAT. This allows
network address translation with more granularity in terms of controlling IP address, protocol, and port
translation.
Network Address Translation (NAT)
FortiGate I Student Guide
284
DO NOT REPRINT
© FORTINET

Prior to FortiGate firmware version 5.4, central NAT could only be configured for source NAT. In
FortiGate firmware version 5.4, it allows you to configure both – central SNAT and DNAT (VIP).
By default, central NAT is disabled and can only be enabled from the CLI. Once central NAT is
enabled, you can configure these two options from the GUI:
Central SNAT: Source network address translation
DNAT & Virtual IPs: Destination network address translation
What happens if you try to enable central NAT, but there are still IP pool or VIPs configured in firewall
policies?
The CLI will not allow this and will present with a message referencing firewall policy ID with Virtual IP
or IP pool. You must remove Virtual IP or IP pool references from existing firewall policies in order to
enable central NAT.
Also, it’s worth mentioning that if central NAT is enabled in FortiGate firmware 5.2, the central-nat
table under system settings does not convert if you try to upgrade to FortiGate firmware 5.4. This
causes firewall policies with central NAT to use the outgoing interface IP address. You must
reconfigure the central SNAT policy after upgrading the FortiGate firmware to 5.4.
Network Address Translation (NAT)
FortiGate I Student Guide
285
DO NOT REPRINT
© FORTINET

Starting in FortiGate 5.4, a central SNAT policy is applied to a virtual domain (VDOM), and not to a
specific firewall policy. The NAT on the firewall policy controls whether the central SNAT is used or
not. If NAT is enabled on a firewall policy, central SNAT is used. (VDOM be discussed later in the
training.)
If the central SNAT policy criteria matches with the traffic based on multiple firewall policies, the
central SNAT policy will be applied to those firewall policies as long as NAT is enabled on those
firewall policies.
What happens if NAT is enabled on a firewall policy when there is no matching central SNAT policy or
no central SNAT policy configured? In this case, if no matching central SNAT rule exists, then
FortiGate will automatically use the outgoing interface IP address for the source NAT.
Similar to firewall policies, a central SNAT policy is processed from top to bottom and if a match is
found, source address and source port are translated based on that central SNAT policy.
You can have more granular control over traffic passing through firewall policies by defining matching
criteria in the central SNAT policy, based on:
• Source address
• Destination address
• Protocol
• Source port
Network Address Translation (NAT)
FortiGate I Student Guide
286
DO NOT REPRINT
© FORTINET

(slide contains animation)
In this example, the central SNAT policy translates the source IP address to the defined IP pool
address (172.20.20.10). However, the translation takes place only if the traffic matches all the
variables defined in the central SNAT policy, that is, traffic from the source IP address must be
destined for destination IP address (192.168.10.10) and TCP protocol. For illustration purposes, only
a single IP address is used for the destination, and the IP pool type is set to overload with a single IP
address.
(click)
The firewall policy is created from internal to wan1 with NAT enabled. Remember that the NAT option
on the firewall policy controls whether or not a central SNAT policy is used.
(click)
If the user tries any TCP-based sessions (for example http, https) to destination IP address
192.168.10.10, the source IP address will be translated to an IP pool address(s) defined in the central
NAT policy.
What if the user tries to send any ICMP or UDP-based traffic to 192.168.10.10? Will the source
address be translated to the IP pool defined in the central NAT policy?
(click)
As the central SNAT policy does not match, FortiGate will automatically use the outgoing interface IP
address (wan1) for the source NAT. What if the user tries TCP-based traffic to another destination IP
address, 192.168.10.20? Will the source address be translated to the IP pool defined in the central
NAT policy?
(click)
Again, the destination IP address of 192.168.10.20 does not match with the central NAT policy, so
FortiGate will use the outgoing interface IP address (wan1) for the source NAT.
Network Address Translation (NAT)
FortiGate I Student Guide
287
DO NOT REPRINT
© FORTINET

Traditionally in FortiGate, Virtual IPs are selected in the firewall policy as destination address.
Starting in FortiGate 5.4 firmware, you can configure DNAT & Virtual IPs for destination NAT, which is
also per VDOM. As soon as VIP is configured, FortiGate automatically creates a rule in the kernel to
allow destination NAT to occur and no additional configuration is required.
Do you lose the granularity of being able to define a firewall policy for a specific VIP and services?
No, you don’t, assuming you have several wan to internal policies, and multiple VIPs, and you want to
allow services for some VIPs and other services for other VIPs. You can define each firewall policy
with the destination address of the mapped IP of the VIP, and select the appropriate services to allow
or deny.
Note that if both central SNAT and central DNAT (VIP) are configured, the outgoing (internal to wan)
traffic will source NAT to the DNAT/VIP address, based on the central SNAT and DNAT (VIP)
configurations.
Network Address Translation (NAT)
FortiGate I Student Guide
288
DO NOT REPRINT
© FORTINET

(slide contains animation)
In this example, a DNAT & Virtual IPs rule is created to map external IP address 172.20.20.222 to
internal IP address 10.10.10.10. Remember, as soon as a Virtual IP is created, a rule is created in the
kernel to allow DNAT to occur.
(click)
Firewall policy from wan1 to internal is created with the destination address all or Mapped IP
Address/Range (10.10.10.10) of the VIP.
(click)
Source IP address 192.168.10.10 is trying to access destination IP address 172.20.20.222 over port
TCP 80. Connections to the VIP 172.20.20.222 are NATed to the internal host 10.10.10.10, without
any additional configuration.
Network Address Translation (NAT)
FortiGate I Student Guide
289
DO NOT REPRINT
© FORTINET

Central NAT can be disabled from the CLI by running set central-nat disable under the
config system setting. What happens to firewall policies that are using central SNAT and
DNAT rules, if central NAT is disabled?
The incoming to outgoing firewall policies may still work using the egress interface IP address.
However, the incoming to outgoing firewall policies will not use the IP pool addresses, which were
previously tied to the central SNAT policy. If you need to use the IP pool, you need to edit the firewall
policy to use IP pool.
Egress-to-ingress firewall policies that use DNAT & Virtual IP, will stop working because, in central
NAT, the destination address in the firewall policy is simply an address object, not an actual VIP.
Without the central-nat hook into the DNAT table, the address object will cause a forward policy check
failure – the traffic will be denied by policy ID 0.
You need to edit the egress-to-ingress firewall policies and select VIP as the destination address.
Network Address Translation (NAT)
FortiGate I Student Guide
290
DO NOT REPRINT
© FORTINET

In this section, you will learn how session helpers are used to analyse data in the packets of some
protocols and how to allow those protocols to pass traffic through FortiGate.
Network Address Translation (NAT)
FortiGate I Student Guide
291
DO NOT REPRINT
© FORTINET

Some application layer protocols are not fully independent of the lower layers, such as the network or
transport layer. The addresses may be repeated in the application layer, for example. If the session
helper detects such a pattern, it may change the application headers or create required secondary
connections.
A good example is where an application has both a control and a data or media channel, such as with
FTP. Firewalls will typically allow the control channel and rely on the session helpers to handle the
dynamic data or media transmission connections.
When more advanced application tracking and control is required, an Application Layer Gateway
(ALG) can be used. The VoIP profile is an example of an ALG.
Network Address Translation (NAT)
FortiGate I Student Guide
292
DO NOT REPRINT
© FORTINET

In this example, the media recipient address in the SIP SDP payload is modified to reflect the NATed
IP address.
(click)
Notice how, because firewall policies are stateful, a pinhole is opened to allow reply traffic,
(click)
even though you have not explicitly created a firewall policy to allow incoming traffic. This concept is
used with some other protocols too, such as NAT-T for IPsec.
Network Address Translation (NAT)
FortiGate I Student Guide
293
DO NOT REPRINT
© FORTINET

In this section, you will learn how a session table keeps track of the session information, which can be
helpful to understand the actions applied to the traffic, such as source NAT, destination NAT, and
routing, for example.
Network Address Translation (NAT)
FortiGate I Student Guide
294
DO NOT REPRINT
© FORTINET

You can view the All Sessions page from the GUI, but the CLI provides more information regarding
sessions in the session table.
Firewall performance of connections per session and maximum number of connections are indicated
by the session table. But keep in mind that if your FortiGate contains FortiASIC NP chips designed to
accelerate processing without loading the CPU, this may not be completely accurate. The session
table reflects what is known to, and processed by, the CPU.
Network Address Translation (NAT)
FortiGate I Student Guide
295
DO NOT REPRINT
© FORTINET

Each session on the FortiGate can idle for a finite time, which is defined by time to live (TTL). Once
the FortiGate detects the session is idle after some time of inactivity and TTL is reached, the session
is deleted from the session table.
Since the session table has a finite amount of RAM that it can use on your FortiGate, adjusting the
session TTL can improve performance. There are global default timers, session state timers, and
timers configurable in firewall objects.
Network Address Translation (NAT)
FortiGate I Student Guide
296
DO NOT REPRINT
© FORTINET

The diagnose sys session command tree provides many options to filter, clear, or show the list
of sessions. You can also list brief information about sessions by running the get system session
list CLI command.
Before looking at the session table, first build a filter. To look at our test connection, you can filter on
dst 10.200.1.254 and dport 80.
Network Address Translation (NAT)
FortiGate I Student Guide
297
DO NOT REPRINT
© FORTINET

In this example, you can see the session TTL, which reflects how long FortiGate can receive no
packets until it will remove the session from its table.
Here you can see the routing and NAT actions that apply to the traffic. The firewall policy ID is also
tracked.
The proto_state for TCP is taken from its state machine, which we’ll talk about next.
Network Address Translation (NAT)
FortiGate I Student Guide
298
DO NOT REPRINT
© FORTINET

In the previous slide, remember that the session table contained a number that indicated the
connection’s current TCP state. These are the states of the TCP state machine. They are single digit
values, but proto_state is always shown as two digits. This is because FortiGate is a stateful
firewall and keeps track of the original direction (client-side state) and the reply direction (server-side
state). If there are too many connections in the SYN state for long periods of time, this indicates a
SYN flood, which you can mitigate with DoS policies.
This table and flow graph correlate the second digit value with the different TCP session states. For
example, when the FortiGate receives the SYN packet, the second digit is 2. It goes to 3once the
SYN/ACK is received. After the three-way handshake, the state value changes to 1.
When a session is closed by both sides, FortiGate keeps it in the session table for a few seconds
more, to allow any out-of-order packets that could arrive after the FIN/ACK packet. This is the state
value 5.
Network Address Translation (NAT)
FortiGate I Student Guide
299
DO NOT REPRINT
© FORTINET

Although UDP is a message-oriented, stateless protocol – it doesn’t inherently require confirmed bi-
directional connections like TCP, so there is no connection state. However, FortiGate’s session table
does use the proto_state= field to track unidirectional UDP as state 0, and bidirectional UDP as
state 1.
When FortiGate receives the first packet, it creates the entry and sets the state to 0. If the destination
replies, FortiGate updates the state flag to 1for the remainder of the conversation.
Notably, ICMP, such as ping and traceroute, have no protocol state and it will always show
proto_state=00.
Network Address Translation (NAT)
FortiGate I Student Guide
300
DO NOT REPRINT
© FORTINET

To review, we discussed:
• Choosing between firewall policy NAT and central NAT
• Different types of IP pools configuration for source NAT
• Virtual IPs configuration for destination NAT
• Central SNAT policy configuration for source NAT
• DNAT & Virtual IPs
• Using a SIP session helper for VoIP
• How to interpret the session table
Network Address Translation (NAT)
FortiGate I Student Guide
301
DO NOT REPRINT
© FORTINET

In this lesson, we will show you how to use authentication on the firewall policies of a FortiGate.
Firewall Authentication
FortiGate I Student Guide
302
DO NOT REPRINT
© FORTINET

After completing this lesson, you should understand the mechanics of firewall authentication on
FortiGate and have the practical skills required to configure firewall authentication.
Firewall Authentication
FortiGate I Student Guide
303
DO NOT REPRINT
© FORTINET

Traditional firewalling grants network access by authenticating the source IP address and device. This
is inadequate and can pose a security risk, as the firewall cannot determine who is using the device to
which it is granting access.
FortiGate includes authentication of users and user groups. As a result, you can follow individuals
across multiple devices.
Where access is controlled by user or user group, users must authenticate by entering valid
credentials (such as user name and password). Once FortiGate validates the user, FortiGate applies
firewall policies and profiles to allow or deny access to specific network resources.
Firewall Authentication
FortiGate I Student Guide
304
DO NOT REPRINT
© FORTINET

In this section, we will examine the methods of firewall authentication available on FortiGate.
Firewall Authentication
FortiGate I Student Guide
305
DO NOT REPRINT
© FORTINET

FortiGate includes three types of firewall authentication:
• Local password authentication
• Server-based password authentication (also called remote password authentication)
• Two-factor authentication. This is a method of authentication that is enabled on top of an existing
method — it cannot be enabled without first configuring one of the other methods. It requires
something you know, such as a password, and something you have, such as a token or certificate.
Over the next few slides, we will cover each method of firewall authentication in more detail.
Firewall Authentication
FortiGate I Student Guide
306
DO NOT REPRINT
© FORTINET

The first and simplest method of authentication is local password authentication. User account
information (user name and password) is stored locally on the FortiGate device. This method works
well for a single-FortiGate installation.
Local accounts are created through the User Definition page where a wizard takes you through the
process. For local password authentication, select Local User as the user type and create a user
name and password. If desired, you can also add email and SMS information to the account, enable
two-factor authentication, and add the user to a pre-configured user group.
Once you create the user, you can add the user—or any pre-configured user group in which the user
is a member—to a firewall policy in order to authenticate. We will discuss user groups and firewall
policies later in this lesson.
Firewall Authentication
FortiGate I Student Guide
307
DO NOT REPRINT
© FORTINET

With server-based password authentication, a remote authentication server is used to authenticate
users. This method is desirable when multiple FortiGate devices need to authenticate the same users
or user groups, or when adding a FortiGate to a network that already contains an authentication
server.
When you use a remote authentication server to authenticate users, FortiGate sends the user’s
entered credentials to the remote authentication server. The remote authentication server responds by
indicating whether the credentials are valid or not. If valid, FortiGate consults its configuration to deal
with the traffic. Note that it is the remote authentication server — not FortiGate — that evaluates the
user credentials.
With this authentication method, FortiGate does not store all (or, in the case of some configurations,
any) of the user information locally.
Firewall Authentication
FortiGate I Student Guide
308
DO NOT REPRINT
© FORTINET

FortiGate provides support for many remote authentication servers, including POP3, RADIUS, LDAP,
and TACACS+.
POP3 is the only server that requires the email address as the login credential. All other remote
authentication servers use the user name. Some POP3 servers require the full email with domain
(user@example.com), others require the suffix only, while still others accept both formats. This is
determined by the configuration of the server itself and is not a setting on FortiGate. You can only
configure POP3 authentication though the CLI. Note that LDAP can be configured to validate with
email rather than the user name.
Firewall Authentication
FortiGate I Student Guide
309
DO NOT REPRINT
© FORTINET

You can configure FortiGate to use external authentication servers in two ways:
• Create user accounts on FortiGate. With this method, you must select the remote authentication
server type (RADIUS, TACACS+, LDAP), point FortiGate to your pre-configured remote
authentication server, and add the user to an appropriate group. Remember, POP3 is only
configurable through the CLI.
• Add the remote authentication server to user groups. With this method, you must create a user
group and add the pre-configured remote server to the group. Accordingly, any user who has an
account on the remote authentication server can authenticate. If you are using an LDAP server as
the remote authentication server, you can control access to specific LDAP groups as defined on
the LDAP server.
Similar to local password authentication, you must then add the pre-configured user group (in which
the user is a member) to a firewall policy in order to authenticate. We will discuss user groups and
firewall policies later in this lesson.
Firewall Authentication
FortiGate I Student Guide
310
DO NOT REPRINT
© FORTINET

The final firewall authentication method you can use is two-factor authentication.
Traditional user authentication requires your user name plus something you know, such as a
password. The weakness with this traditional method of authentication is that if someone obtains your
user name, they only need your password to compromise your account. Furthermore, since people
tend to use the same password across multiple accounts (some sites with more security vulnerabilities
than others), accounts are vulnerable to attack, regardless of password strength.
Two-factor authentication, on the other hand, requires something you know, such as a password, and
something you have, such as a token or certificate. This increases the complexity for an attacker to
compromise an account, as it puts less importance on often vulnerable passwords.
You can use two-factor authentication on FortiGate with both user and administrator accounts. Again,
the user (or user group to which the user belongs) is added to a firewall policy in order to authenticate.
Note that you cannot use two-factor authentication with explicit proxies.
Firewall Authentication
FortiGate I Student Guide
311
DO NOT REPRINT
© FORTINET

You can use one-time passwords (OTPs) as your second factor. OTPs are more secure than static
passwords because the passcode keeps changing at regular intervals and is only valid for a short
amount of time. Once you use the OTP it cannot be used again, so even if it is intercepted, it is
useless.
FortiGate can deliver OTPs through tokens, such as FortiToken 200 (hardware token) and FortiToken
Mobile (software token), as well as through email or SMS. If delivering over email or SMS, the user
account must contain that user contact information.
FortiTokens and OTPs through email and SMS are time-based. The FortiTokens, for example,
generate a new 6-digit password every 60 seconds (by default). An NTP server is highly
recommended to ensure the OTPs remain in sync.
Firewall Authentication
FortiGate I Student Guide
312
DO NOT REPRINT
© FORTINET

Tokens use a specific algorithm to generate a one-time password. The algorithm consists of:
• a seed, which is a unique, randomly-generated number that does not change in time, and
• the time, which is obtained from an internal, accurate, clock.
Both seed and time go through an algorithm that generates a one-time password (or passcode) on the
token. The passcode has a short life span, usually measured in seconds (60 seconds for a FortiToken
200, possibly more or less for other RSA key generators). Once the life span ends, a new passcode
generates.
With two-factor authentication using a token, the user must first log in with a static password followed
by the passcode generated by the token. A validation server (FortiGate) receives the user’s
credentials and validates the static password first. The validation server then proceeds to validate the
passcode. It does so by re-generating the same passcode using the seed and system time (which is
synchronized with the one on the token) and comparing it with the one received from the user. If the
static password is valid, and the one-time password matches, the user is successfully authenticated.
Again, both the token and the validation server must use the same seed and have synchronized
system clocks. As such, it is crucial that you configure the date and time properly on your FortiGate or
link it to an NTP server (recommended).
Firewall Authentication
FortiGate I Student Guide
313
DO NOT REPRINT
© FORTINET

You can add a FortiToken 200 or FortiToken Mobile to FortiGate through the FortiTokens page.
For the hard token, a serial number is used to provide FortiGate with details on the initial seed value. If
you have several hard tokens to add, you can import a text file, where one serial number is listed per
line.
For the soft token, an activation code is required. Note that each FortiGate (and FortiGate VM)
provides two free FortiToken Mobile activations. Any additional tokens must be purchased from
Fortinet.
You cannot register FortiTokens on more than one FortiGate. If you want to use the same FortiToken
for authentication on multiple FortiGate devices, you must use a central validation server, such as
FortiAuthenticator. In that case, FortiTokens are registered on FortiAuthenticator and FortiGate uses
FortiAuthenticator as its validation server.
Firewall Authentication
FortiGate I Student Guide
314
DO NOT REPRINT
© FORTINET

Once you have registered the FortiTokens with FortiGate, you can assign them to users to use as
their second factor authentication method. To assign a token, edit (or create) the user account and
select Enable Two-factor Authentication. From the drop-down list, select the registered token you
want to assign.
Firewall Authentication
FortiGate I Student Guide
315
DO NOT REPRINT
© FORTINET

You can also use X.509 digital certificates as your second factor, though FortiGate also accepts
certificates as a standalone authentication method. Users that authenticate with digital certificates are
known as PKI (Public Key Infrastructure) users.
To use certificates, you must first import the Certificate Authority (CA) certificate that is issuing your
user certificates into FortiGate. The user must also install their personal certificate in the personal
certificate store on their computer (if using the Firefox browser, users must install their user certificate
in the Firefox certificate repository). Then you can add the PKI user accounts to FortiGate.
You must add your first PKI user through the CLI using the config user peer command
(subsequent users can be added through the PKI page in the GUI). You can then include PKI users in
firewall user groups and add the group as a source in a firewall policy.
Certificate-based authentication is covered in more detail in the FortiGate II: Certificate Operations
lesson.
Firewall Authentication
FortiGate I Student Guide
316
DO NOT REPRINT
© FORTINET

All the authentication methods we’ve discussed—local password authentication, server-based
authentication, and two-factor authentication—use active authentication. Active authentication means
that users are prompted to manually enter their login credentials before being granted access.
But not all users authenticate the same way. Some users can be granted access transparently, as
user information is determined without ever asking the user to enter their login credentials. This is
known as passive authentication. Passive authentication occurs with the Single Sign-on method for
server-based password authentication: FSSO, RSSO, and NTLM. This is discussed in the FortiGate II:
FSSO lesson.
Firewall Authentication
FortiGate I Student Guide
317
DO NOT REPRINT
© FORTINET

This section discusses how you can configure FortiGate to point to an existing LDAP or RADIUS
server to use for server-based password authentication.
Firewall Authentication
FortiGate I Student Guide
318
DO NOT REPRINT
© FORTINET

Lightweight Directory Access Protocol (LDAP) is an application protocol for accessing and maintaining
distributed directory information services.
The LDAP protocol is used to maintain authentication data that may include departments, people,
groups of people, passwords, email addresses, and printers. LDAP consists of a data-representation
scheme, a set of defined operations, and a request and response network.
In the LDAP protocol, there are a number of operations a client can request, such as search, compare,
and add/delete an entry. Binding is the operation where the LDAP server authenticates the user. If the
user is successfully authenticated, binding allows the user access to the LDAP server based on that
user’s permissions.
Firewall Authentication
FortiGate I Student Guide
319
DO NOT REPRINT
© FORTINET

The root of the LDAP directory tree represents the organization itself, and is defined as a Domain
Component (DC). The DC is usually a DNS domain such as example.com (as the name contains a
dot, it is written as two parts separated by a comma: dc=example,dc=com). Additional entries,
known as objects, can be added to the hierarchy as needed. Objects are generally of two types:
containers and leafs.
Containers are objects that can include other objects, similar to a folder in a file system. Example
containers include:
• Country (represented as c)
• Organizational Unit (represented as ou)
• Organization (represented as o)
Leafs are objects at the end of a branch and have no subordinate objects. Example leafs include:
• user ID (represented as uid)
• common name (represented as cn)
Firewall Authentication
FortiGate I Student Guide
320
DO NOT REPRINT
© FORTINET

This is an example of a simple LDAP hierarchy.
The FortiGate device (acting as an LDAP client) requesting authentication must be configured to
address its request to the right part of the hierarchy where user records exist. This is called the
Distinguished Name (dn). In this example, the dn is ou=people,dc=example,dc=com.
The authentication request must also specify the particular user account entry. This can be either the
Common Name (cn) or, on a computer network, the user ID (uid), as that is the information users
use to log in. Note that if the object name includes a space, such as John Smith, you must enclose
the text with double-quotes. For example: cn=“John Smith”.
Firewall Authentication
FortiGate I Student Guide
321
DO NOT REPRINT
© FORTINET

You can configure FortiGate to point to an LDAP server for server-based password authentication
through the LDAP Servers page. The configuration depends heavily on the server’s schema and
security settings. Windows Active Directory is very common.
Common Name Identifier is the attribute name used to find the user name. Some schemas will call
this uid. Active Directory calls it sAMAccountName or sometimes cn.
Distinguished Name identifies the top of the tree to look in, which is generally the dc value. You
must use the correct X.500 or LDAP format.
Bind Type depends on the security settings of the LDAP server. Regular bind is required if searching
across multiple domains and requires the credentials of a user that is authorized perform LDAP
queries (for example, an LDAP administrator).
If you want to have a secure connection between FortiGate and the remote LDAP server, enable
Secure Connection and include the LDAP server protocol (LDAPS or STARTTLS) as well as the CA
certificate that verifies the server certificate.
Note that the Test button only tests whether the connection to the LDAP server is successful or not.
To test whether a user’s credentials can successfully authenticate, you must use the CLI.
Firewall Authentication
FortiGate I Student Guide
322
DO NOT REPRINT
© FORTINET

Use the diagnose test authserver command in the CLI to test whether a user’s credentials can
successfully authenticate. You want to ensure that authentication is successful prior to implementing it
on any of your firewall policies.
The response from the server reports success, failure, and group membership details.
Firewall Authentication
FortiGate I Student Guide
323
DO NOT REPRINT
© FORTINET

RADIUS is much different than LDAP, as there is no directory tree structure to consider. RADIUS is a
standard protocol that provides authentication, authorization, and accounting (AAA) services.
When a user is authenticating, the client (FortiGate) sends an Access-Request packet to the RADIUS
server. The reply from the server will be one of the following:
• Access-Accept, which means that the user credentials are OK
• Access-Reject, which means that the credentials are wrong, or
• Access-Challenge, which means that the server is requesting a secondary password ID, token, or
certificate. This is typically the reply from the server when using two-factor authentication.
Not all RADIUS clients support the RADIUS challenge method.
Firewall Authentication
FortiGate I Student Guide
324
DO NOT REPRINT
© FORTINET

You can configure FortiGate to point to a RADIUS server for server-based password authentication
through the RADIUS Servers page.
The Primary Server IP/Name is the IP address or FQDN of the RADIUS server.
The Primary Server Secret is the secret that was set up on the RADIUS server in order to allow
remote queries. Backup servers (with separate secrets) can be defined in case the primary server
fails.
Authentication Method refers to the authentication protocol that the RADIUS server supports.
Options include chap, pap (default), mschap, and mschap2.
Similar to LDAP configuration, the Test Connectivity button only tests whether the connection to the
RADIUS server is successful or not. To test whether a user’s credentials can successfully
authenticate, you must use the CLI.
Note that Fortinet has a Vendor-Specific Attributes (VSA) dictionary to identify the Fortinet-proprietary
RADIUS attributes. This will allow you to extend the basic functionality of RADIUS. You can obtain the
Fortinet VSA dictionary from the Fortinet Knowledge Base (kb.fortinet.com).
Firewall Authentication
FortiGate I Student Guide
325
DO NOT REPRINT
© FORTINET

Testing RADIUS is much the same as LDAP. Use the diagnose test authserver command in
the CLI to test whether a user’s credentials can successfully authenticate. Again, you should do this to
ensure authentication is successful prior to implementing it on any of your firewall policies.
Like LDAP, it reports success, failure, and group membership details depending on the server’s
response. Deeper troubleshooting requires server access.
Firewall Authentication
FortiGate I Student Guide
326
DO NOT REPRINT
© FORTINET

This section examines how to assign users to user groups, so you can configure firewall policies to act
on the user group.
Firewall Authentication
FortiGate I Student Guide
327
DO NOT REPRINT
© FORTINET

FortiGate allows administrators to assign users to groups. Generally, groups are used to more
effectively manage individuals that have some kind of shared relationship. You might want to group
employees by business area, such as Finance or HR, or by employee type, such as contractors or
guests.
Once you create user groups, you can add them to firewall policies. This allows you to control access
to network resources, as policy decisions are made on the group as a whole. You can define both
local and remote user groups on a FortiGate device. There are four user group types:
• Firewall
• Guest
• Fortinet Single Sign-On (FSSO)
• RADIUS Single Sign-On (RSSO)
The firewall user groups do not need to match any sort of group that may already exist on a server.
The firewall user groups exist solely to make configuration of firewall policies easier.
Most authentication types have the option to make decisions based on the individual user, rather than
just user groups.
Firewall Authentication
FortiGate I Student Guide
328
DO NOT REPRINT
© FORTINET

Guest user groups are different from firewall user groups in that they exclusively contain temporary
guest user accounts (the whole account, not just the password), and are most commonly used in
wireless networks. Guest accounts expire after a predetermined amount of time.
Administrators can manually create guest accounts or create many guest accounts at once using
randomly-generated user IDs and passwords. This reduces administrator workload for large events.
Once created, you can add accounts to the guest user group and associate the group to a firewall
policy.
You can create guest management administrators that only have access to create and manage guest
user accounts.
Firewall Authentication
FortiGate I Student Guide
329
DO NOT REPRINT
© FORTINET

You can configure user groups through the User Group page. You must specify the user group type
and add users to the group. Depending on the group you create, different configurations are required.
For the firewall user group, for example, members can consist of local users, PKI peer users, and
users from one or more remote authentication servers. If your remote authentication server is an
LDAP server, you can select specific LDAP groups to add to your user group as defined on the LDAP
server. Note that you can also select RADIUS groups, but this requires additional configuration on
your RADIUS server and FortiGate (see knowledge base article FD36464).
User groups simplify your configuration if you want to treat specific users in the same way. For
example, if you want to provide the entire Training department with access to the same network
resources. If you want to treat all users differently, you would need to add all users to firewall policies
separately.
Firewall Authentication
FortiGate I Student Guide
330
DO NOT REPRINT
© FORTINET

This section examines how you can use firewall policies for authentication.
Firewall Authentication
FortiGate I Student Guide
331
DO NOT REPRINT
© FORTINET

A firewall policy consists of access and inspection rules (compartmentalized sets of instructions) that
tell FortiGate how to handle traffic on the interface whose traffic they filter. After the user makes an
initial connection attempt, FortiGate checks the firewall policies to determine whether to accept or
deny the communication session. However, a firewall policy also includes a number of other
instructions, such as those dealing with authentication. You can use the source of a firewall policy for
this purpose. The source of a firewall policy must include the source address (IP address), but you
can also include the user, user group, and device type as well. In this way, any user, user group, or
device that is included in the source definition for the firewall policy can successfully authenticate.
User and user groups can consist of local firewall accounts, external server accounts, PKI users, and
FSSO users.
Firewall Authentication
FortiGate I Student Guide
332
DO NOT REPRINT
© FORTINET

A firewall policy also checks the service in order to transport the named protocols or group of
protocols. No service (with the exception of DNS) is allowed through the firewall policy prior to
successful user authentication. DNS is usually used by HTTP so that people can use domain names
for websites instead of their IP address. DNS is allowed because it is a base protocol and will most
likely be required to initially see proper authentication protocol traffic. Hostname resolution is almost
always a requirement for any protocol. However, the DNS service must still be defined as allowed
within the policy in order for it to pass.
In the following example, policy sequence 1 (Full_Access) allows users to use external DNS servers
in order to resolve host names, prior to successful authentication. DNS is also allowed if
authentication is unsuccessful, because users need to be able to try to authenticate again. Any service
that includes DNS would function the same way, like the default ALL service.
HTTP service is TCP port 80 and does not include DNS (UDP port 53).
Firewall Authentication
FortiGate I Student Guide
333
DO NOT REPRINT
© FORTINET

Aside from the DNS server, the firewall policy must specify the protocols allowed, such as HTTP,
HTTPS, FTP, and Telnet. If the firewall policy that has authentication enabled does not allow at least
one of the supported protocols for obtaining user credentials, the user will not be able to authenticate.
Protocols are required for all authentication methods that use active authentication (local password
authentication, server-based password authentication, and two-factor authentication). Active
authentication prompts the user for user credentials based on:
• the protocol of the traffic, and
• the firewall policy.
Passive authentication, on the other hand, determines the user identity behind the scenes and does
not require any specific services to be allowed within the policy.
Firewall Authentication
FortiGate I Student Guide
334
DO NOT REPRINT
© FORTINET

In this example, assuming active authentication is used, any initial traffic from LOCAL_SUBNET will
not match policy sequence 1 (Full_Access). Policy sequence 1 looks for both IP and user and user
group information (LOCAL_SUBNET and HR-group respectively), and since the user has not yet
authenticated, the user group aspect of the traffic does not match. Since the policy match is not
complete, FortiGate does not apply that firewall policy.
Next, FortiGate evaluates policy sequence 2 to see if the traffic matches. It matches all criteria, so
traffic is allowed with no need to authenticate.
When only active authentication is used, if all possible policies that could match the source IP have
authentication enabled, then the user will receive a login prompt (assuming they use an acceptable
login protocol). In other words, if policy sequence 2 also had authentication enabled, the users would
receive login prompts.
If passive authentication is used and it can successfully obtain user details, then traffic from
LOCAL_SUBNET with users that belong to HR-group will apply to policy sequence 1, even though
policy sequence 2 does not have authentication enabled.
Firewall Authentication
FortiGate I Student Guide
335
DO NOT REPRINT
© FORTINET

If you are using both active and passive authentication, and a user’s credentials can be determined
through passive means, the user will never receive a login prompt, regardless of the order of any
firewall policies. This is because there is no need for FortiGate to prompt the user for login credentials
when it can determine who the user is passively. When active and passive authentication methods are
combined, active authentication is intended to be used as a backup only when passive authentication
fails.
Firewall Authentication
FortiGate I Student Guide
336
DO NOT REPRINT
© FORTINET

In this section, we will examine authenticating through a captive portal.
Firewall Authentication
FortiGate I Student Guide
337
DO NOT REPRINT
© FORTINET

If you want all users connecting to the network to be prompted for their login credentials (active
authentication), you can enable captive portal. Captive portal is a convenient way to authenticate Web
users on wired or WiFi networks through an HTML form that requests a user name and password.
You can host a captive portal on a FortiGate device or an external authentication server.
Firewall Authentication
FortiGate I Student Guide
338
DO NOT REPRINT
© FORTINET

Captive portal, for both wired and WiFi networks, is enabled at the interface level — regardless of the
firewall policy that allows it or the port that it ultimately leaves by (authentication being enabled or
disabled on the policy is not a factor). This is true for any network interface, including WiFi and VLAN
interfaces. On the local network, the captive portal setting must be enabled on the incoming port.
You can configure captive portal from the Interfaces page. Select the required interface and under
Admission Control, select Captive Portal as the security mode. Note that if configuring captive
portal for a WiFi network, the WiFi SSID must first exist.
Captive portals are not compatible with interfaces in DHCP mode.
Firewall Authentication
FortiGate I Student Guide
339
DO NOT REPRINT
© FORTINET

Under Admission Control, you also have the option to restrict captive portal user access. Select
Restrict to Groups to control the access from the captive portal configuration. Select Allow all to
control the access in the firewall policy configuration.
Firewall Authentication
FortiGate I Student Guide
340
DO NOT REPRINT
© FORTINET

You can also configure a firewall policy to suppress captive portal for specific devices. This is useful
for devices that are unable to actively authenticate, such as printers and fax machines, but still need to
be allowed by the firewall policy. When suppressed, traffic that matches the source and destination
are not presented with the captive portal login page.
There are two ways you can bypass captive portal:
• through the GUI. You can enable captive portal exemptions through the GUI in the same place you
enabled captive portal (Network >Interfaces).
• through the CLI. You can enable captive portal exemptions through the security-exempt-list
setting. The captive-portal-exempt setting must also be enabled for each firewall policy and
only applies to traffic that matches that policy.
Firewall Authentication
FortiGate I Student Guide
341
DO NOT REPRINT
© FORTINET

Through the CLI command config firewall policy, you can enable a terms of service
disclaimer to be used in combination with captive portal authentication, if desired. A disclaimer is a
statement of the legal responsibilities of the user and the host organization that the user must agree to
before proceeding. With this configuration (disclaimer + authentication), the portal presents the
disclaimer page immediately after successful authentication. The user must accept the terms outlined
in the disclaimer in order to proceed to the URL requested.
Neither a security exemption list or a captive portal exemption on a firewall can bypass a disclaimer.
Firewall Authentication
FortiGate I Student Guide
342
DO NOT REPRINT
© FORTINET

FortiGate allows you to customize portal messages, which includes the login page and disclaimer
page. You can customize the messages from the Replacement Messages page.
The disclaimer page is in HTML, so you must have knowledge of HTML in order to customize the
message. The default layout is the Simple View, which hides most of the replacement messages.
Use Extended View to show all editable replacement messages.
Firewall Authentication
FortiGate I Student Guide
343
DO NOT REPRINT
© FORTINET

An authentication timeout is useful for security reasons, as it minimizes the risk of someone using the
IP of the legitimate authenticated user. It also ensures users do not authenticate and then stay in
memory indefinitely. If users stay in memory forever, it would eventually lead to memory exhaustion.
There are three options for timeout behavior:
•Idle – Looks at the packets from the host’s IP. If there are no packets generated by the host device
in the configured timeframe then the user is logged out.
•Hard – Time is an absolute value. Regardless of the user’s behavior, the timer starts as soon as
the user authenticates and expires after the configured value.
•New session – Even if traffic is being generated on existing communications channels, the
authentication expires if no new sessions are created through the firewall from the host device,
within the configured timeout value.
Choose the type of timeout that best suits the needs of authentication in your environment.
Firewall Authentication
FortiGate I Student Guide
344
DO NOT REPRINT
© FORTINET

In this last section, we will examine how to monitor authenticated users.
Firewall Authentication
FortiGate I Student Guide
345
DO NOT REPRINT
© FORTINET

You can monitor users who authenticate through your firewall policies through the Firewall User
Monitor page. It displays the user, user group, duration, IP address, traffic volume, and authentication
method.
It does not include administrators, as they are not authenticating through firewall policies that allow
traffic — they are logging directly into the FortiGate.
This page also allows you to de-authenticate a user, or multiple users, simultaneously.
Firewall Authentication
FortiGate I Student Guide
346
DO NOT REPRINT
© FORTINET

You can monitor failed firewall authentications from the Failed Authentication page. By double-
clicking any of the entries, a drill-down view appears. This displays more detailed information on that
user's authentication attempts, including the date and time of each login attempt, a message
explaining the reason each authentication failed (for example, a mismatched password), and the
source IP address.
This page is useful in determining whether or not your FortiGate is under a brute force attack. If you
see multiple failed login attempts from the same IP, you can (for example) add a local-in policy to
block that IP.
Firewall Authentication
FortiGate I Student Guide
347
DO NOT REPRINT
© FORTINET

In this lesson, we discussed:
• Firewall authentication
• Firewall authentication methods
• Remote authentication servers
• User configuration for local password authentication, server-based password authentication, and
two-factor authentication (tokens, certificates)
• Active and passive authentication
• Remote authentication server configuration (LDAP and RADIUS)
• User authentication
• Captive Portal and disclaimers configuration
• Firewall user monitoring
Firewall Authentication
FortiGate I Student Guide
348
DO NOT REPRINT
© FORTINET

In this lesson, you will learn how to use and configure SSL VPNs. SSL VPNs are an easy way of
providing access to your private network for remote users.
SSL VPN
FortiGate I Student Guide
349
DO NOT REPRINT
© FORTINET

After completing this lesson, you should have these practical skills required to configure an SSL VPN
for your organization. You should be able to:
• Describe the differences between SSL VPN and IPsec VPN
• Describe the differences between SSL VPN modes
• Configure SSL VPN options
• Configure firewall policies and authentication for SSL VPN
• Strengthen security for SSL VPN access
• Monitor SSL VPN connected users
SSL VPN
FortiGate I Student Guide
350
DO NOT REPRINT
© FORTINET

Before we show how to configure SSL VPN, let’s examine how the technology works. What is SSL
VPN? How is it different from other types of VPNs?
SSL VPN
FortiGate I Student Guide
351
DO NOT REPRINT
© FORTINET

A virtual private network (VPN) creates a tunnel that gives users or remote LANs secure access to
your private network, as if they were connected on your local LAN.
A VPN is often used when LANs are separated by an untrusted public network, such as the Internet.
As well as providing users with secure access to private networks while they are traveling, a VPN can
also interconnect branch office networks located across the Internet, and maybe even on the other
side of the world.
User data inside a VPN tunnel is encrypted for privacy. It cannot be read, even if it is intercepted by
unauthorized users. VPNs also use security methods to ensure that only authorized users can
establish a VPN and access the private network’s resources. They typically also provide tamper
proofing.
SSL VPN
FortiGate I Student Guide
352
DO NOT REPRINT
© FORTINET

(slide contains animations)
Most VPNs are SSL or IPsec VPNs. FortiOS supports both, as well as less common, weaker VPNs
such as PPTP. In this lesson, we will focus on SSL VPNs.
So how are SSL VPNs different from IPsec VPNs?
First, the protocols are different. SSL and TLS are commonly used to encapsulate and secure
ecommerce and online banking on the web (HTTP). SSL VPNs use a similar technique, but often with
non-HTTP protocols encapsulated. SSL is higher up on the network stack than IP, and, therefore,
usually require more bits – more bandwidth – for SSL VPN headers. In comparison, IPsec uses some
special protocols. The primary one is ESP, which encapsulates and encrypts UDP, RDP, HTTP, or
other protocols that are inside in the IPsec tunnel.
What else is different?
(click)
IPsec VPN is a standard. It can interoperate with multiple vendors, and supports peers that are
devices and gateways – not just user clients with FortiGate only, like SSL VPN does.
(click)
The client software is also different.
SSL VPN
FortiGate I Student Guide
353
DO NOT REPRINT
© FORTINET

In an SSL VPN,your web browser might be the only client software you need.Go to FortiGate’s SSL
VPN portal (an HTTPS web page), and then log in. Alternatively, you can install a plugin or FortiClient.
This increases the number of protocols that can be sent through the VPN tunnel.
Once you’ve logged in, the SSL VPN connects your computer to your private network. No user-
configured settings are required, and firewalls are typically configured to allow outgoing HTTP, so
technical support calls are less likely.Simplicity makes SSL VPN ideal for non-technical users, or
users who connect from public computers, such as those found in public libraries and Internet cafés.
In comparison, to use IPsec VPN, you’re usually required to install special client software, or have a
local gateway, such as a desktop model FortiGate, in order to connect to the remote gateway. You
might also need to configure firewalls between VPN peers to allow IPsec protocols. But, IPsec is a
standard protocol supported by most vendors, so a VPN session can be established not only between
two FortiGate devices, but also between different vendors’ devices, and between a gateway and
clients. It’s highly extensible and configurable. By comparison, SSL VPN can only be established
between a computer and a vendor-specific gateway, such as FortiGate.
In general, IPsec VPN is preferred when tunnels must be up continuously and interoperate with many
types of devices, while SSL VPN is preferred when people travel and need to connect to the office.
SSL VPN
FortiGate I Student Guide
354
DO NOT REPRINT
© FORTINET

There are three modes you can use to access an SSL VPN. Let’s examine them.
SSL VPN
FortiGate I Student Guide
355
DO NOT REPRINT
© FORTINET

Here are the three modes you can use to access SSL VPN. All of them can build an SSL VPN
connection, but they don’t all support the same features.
What are the differences?
Web-only access is the simplest access mode.Like you would with any other HTTPS website, you
simply log in to the SSL VPN portal web page on FortiGate. It acts like a server-side reverse proxy
that connects you with the applications on the private network. But this mechanism doesn’t work for
everything – just a few popular protocols, such as HTTP, FTP, and Windows shares.
Port forward access expands on the capabilities offered by web-only access. Instead of using only the
browser and FortiGate’s HTTP proxy, a Java applet is installed on the client’s computer that acts as a
local proxy. You or your users must configure the applications to send IP traffic to the local proxy
applet. Then, the applet can redirect the packets to the FortiGate’s SSL VPN gateway. You must also
configure bookmarks in the SSL VPN portal.
Tunnel mode supports the most protocols.However, it requires administrator/root privileges because
you need to install a VPN client, or, more specifically, a virtual network adapter. To begin tunneling
traffic using this virtual adapter, you must use FortiClient or its standalone fortissl VPN client
component.
Which should you choose? It depends on which applications you need to send through the VPN, the
technical knowledge of your users, and whether or not you have administrative permissions on their
computers.
SSL VPN
FortiGate I Student Guide
356
DO NOT REPRINT
© FORTINET

Web-only mode is used to connect to the FortiGate device from any browser, using HTTPS. Once
connected, users need credentials in order to pass an authentication check. Once authenticated,
users are presented with a portal that contains resources for them to access. Different users can have
different portals with different resources and access permissions.
The Bookmarks section contains links to all or some of the resources available for the user to access.
The Quick Connection widget allows users to type the URL or IP address of the server they want to
reach. A web-only SSL VPN user makes use of these two widgets to access the internal network. The
main advantage of web-only mode is that it does not usually require you to install extra software.
Web-only mode has two main disadvantages:
• First, all interaction with the internal network must be done from the browser exclusively (through
the Web portal). External network applications running on the user’s PC cannot send data across
the VPN.
• Second, a limited number of protocols are supported, such as HTTP/HTTPS, FTP, RDP,
SMB/CIFS, SSH, Telnet, VNC, and Ping.
SSL VPN
FortiGate I Student Guide
357
DO NOT REPRINT
© FORTINET

Tunnel mode SSL VPN requires the SSL VPN client (FortiClient) to connect to FortiGate. Users must
connect to FortiGate through FortiClient and successfully authenticate. When the user initiates a VPN
connection with FortiGate through the SSL VPN client, FortiGate establishes a tunnel with the client
and assigns the client a virtual IP address from a range of reserved addresses. The client uses the
assigned IP address as its source address for the duration of the connection. Inside the tunnel, traffic
is encapsulated with SSL/ TLS and sent to the other side. FortiGate receives the traffic and de-
encapsulates the IP packets, forwarding them to the private network as if they originated from inside
the network.
The main advantage of tunnel mode over web-only mode is that, once the VPN is established, any IP
network application running on the client can send traffic through the tunnel.
The main disadvantage is that tunnel mode requires the installation of a VPN software client, which
requires administrative privileges.
SSL VPN
FortiGate I Student Guide
358
DO NOT REPRINT
© FORTINET

Tunnel mode can operate in two different ways: with and without split tunneling enabled.
When split tunneling is disabled, all IP traffic generated by the client’s computer – including Internet
traffic – is routed across the SSL tunnel to FortiGate. This sets up FortiGate as the default gateway for
the host. You can use this method in order to apply UTM features to the traffic on those SSL VPN
clients, or to monitor or restrict Internet access. This adds more latency and increases bandwidth
usage.
When split tunneling is enabled, only traffic that is destined for the private network behind the remote
FortiGate is routed through the tunnel.
SSL VPN
FortiGate I Student Guide
359
DO NOT REPRINT
© FORTINET

There are two methods you can use to connect to an SSL VPN.
The first method is through a browser. The limitation is that the browser window or tab with the SSL
VPN portal must remain open in order to keep the SSL VPN up.
The second method is through a standalone SSL VPN client, which requires you to install an SSL
VPN client on the user’s PC. When the SSL VPN client is installed, a virtual network adapter called
fortissl is added to the user’s PC. This virtual adapter dynamically receives an IP address from
FortiGate each time a new VPN is established. All packets sent by the client use this virtual IP
address as the source address.
SSL VPN
FortiGate I Student Guide
360
DO NOT REPRINT
© FORTINET

Tunnel mode requires the installation of a virtual network adapter, which requires administrative level
access to accomplish. Because of this access requirement, tunnel mode is not always a feasible
option. For those situations where tunnel mode isn’t practical and web-only mode isn’t flexible enough,
there is a web-only extension called port forward mode.
Rather than use a virtual adapter to create a tunnel with an IP that is separate from the local IP, port
forward uses a Java applet to set up a local proxy that is accessed by connecting to the loopback
address.
SSL VPN
FortiGate I Student Guide
361
DO NOT REPRINT
© FORTINET

In this section, you will learn how to configure SSL VPN on a FortiGate and related components.
SSL VPN
FortiGate I Student Guide
362
DO NOT REPRINT
© FORTINET

To configure SSL VPN, you must take these steps:
1. Configure user accounts and groups.
2. Configure the portal.
3. Configure SSL VPN settings.
4. Create a firewall policy to accept and decrypt packets. This policy is also used to provide access
to internal networks.
5. Optionally, you can configure a firewall policy to route SSL VPN user traffic to the Internet and
apply security profiles. User traffic will go to the Internet through FortiGate where you can
monitor or restrict client access to the Internet.
Some steps can be configured in different order, but not always.
SSL VPN
FortiGate I Student Guide
363
DO NOT REPRINT
© FORTINET

The first step is to create the accounts and user groups for the SSL VPN clients.
All the FortiGate authentication methods, with the exception of remote password authentication using
the Fortinet Single Sign-On (FSSO) protocol, can be used for SSL VPN authentication. This includes
local password authentication and remote password authentication (using the LDAP, RADIUS, and
TACACS+ protocols).
You can also configure two-factor authentication with FortiToken for better security.
SSL VPN
FortiGate I Student Guide
364
DO NOT REPRINT
© FORTINET

The second step is to configure the portal. A portal is simply a web page that contains tools and
resource links for the users to access.
Options on the portal can be enabled or disabled to allow or deny access. You can configure options
such as tunnel mode, show login history, predefined bookmarks, and more. You can individually
configure and link each portal to a specific user or user group so they only have access to required
resources.
In tunnel mode, when you enable split tunneling you are required to select a Routing Address
setting,which usually specifies networks behind the FortiGate for the SSL-VPN users to access.
There are several different theme options that provide different color coding to the portals as well.
SSL VPN
FortiGate I Student Guide
365
DO NOT REPRINT
© FORTINET

This is a sample of an SSL VPN web-mode portal page after the user logs in.
It contains various widgets, based on the configuration of the portal. The Bookmarks,Your
Bookmarks, and Quick Connection widgets are for web-only mode. You can download a standalone
client from the Download FortiClient drop-down menu. This standalone client is used to connect to
SSL VPN in tunnel mode.
SSL VPN
FortiGate I Student Guide
366
DO NOT REPRINT
© FORTINET

The third step is to configure the general settings. First, we’ll talk about the connection settings, then
the tunnel mode client settings, and, finally, the authentication portal mapping settings.
Like other HTTPS websites, the SSL VPN portal presents a digital certificate when users are
connecting. By default, the presented certificate is self-signed, which triggers the browser to show a
certificate warning. To avoid the warning, you should use a digital certificate signed by a Certificate
Authority (CA) that is known to the browser. Alternatively, you can load the digital certificate into the
browser as a trusted authority.
By default, an inactive SSL VPN is disconnected after 300 seconds (5 minutes) of inactivity. You can
change this timeout through the Idle Logout setting in the GUI. Note that the idle logout is separate
from the authentication idle timeout that is discussed in the FortiGate I Firewall Authentication lesson.
Also by default, the port for the SSL VPN portal is 443. This means users need to connect to the IP
address of FortiGate and to port 443 (which is also the standard port for the administration HTTPS
protocol) using HTTPS. In the CLI, you can also enable https-redirect under config vpn ssl
settings, in which users that connect using HTTP (TCP port 80) will automatically get redirected to
HTTPS.
SSL VPN
FortiGate I Student Guide
367
DO NOT REPRINT
© FORTINET

In a default configuration, the SSL VPN login portal and the administrator login for HTTPS both use
port 443.
This is convenient because users do not need to specify the port in their browser. For example,
https://www.example.com/ automatically uses port 443 in any browser. This is considered a
valid setup on FortiGate because you generally don’t access the SSL VPN login through every
interface. Likewise you generally don’t enable administrative access on every interface of your
FortiGate. So even though the ports may overlap, the interfaces that each one uses to access may
not.
If the SSL VPN login portal and HTTPS admin access both use the same port, and are both enabled
on the same interface, only the SSL VPN login portal will appear. In order to have access to both on
the same interface, you need to change the port number for one of the services. This will affect the
port number for that service on all interfaces.
SSL VPN
FortiGate I Student Guide
368
DO NOT REPRINT
© FORTINET

Once you set up your SSL VPN connection settings, you can define your Tunnel Mode Client
Settings. When users connect, the tunnel is assigned an IP address. You can choose to use the
default range or create your own range. The IP range determines how many users can connect
concurrently.
DNS servers will only be effective if DNS traffic is sent over the VPN tunnel. Generally, this will only
be the case when split tunnel mode is disabled and all traffic is being sent from the client PC across
the tunnel.
SSL VPN
FortiGate I Student Guide
369
DO NOT REPRINT
© FORTINET

The last part of step three is to set up the authentication rules that map users to the appropriate portal
and realm. These settings allow different groups of users to access different portals and/or realms.
The default rule applies to the root realm and must be present, otherwise an error message appears
that prevents any setting changes from being saved.
In the above example, accountants and teachers have access only to their own realms. If they need
access to the root realm to see the global portal, you would need to add an additional authentication
rule.
SSL VPN
FortiGate I Student Guide
370
DO NOT REPRINT
© FORTINET

The fourth, and last mandatory step, involves creating firewall policies for login.
SSL VPN traffic on FortiGate uses a virtual interface called ssl.<vdom_name>. Each virtual domain
(VDOM) contains a different virtual interface based on its name. By default, if VDOMs are not enabled,
then the device operates with a single VDOM called root.
In order to activate and successfully log in to the SSL VPN, there must be a firewall policy from the
SSL VPN interface to the interface to which you want to allow access for the SSL VPN users,
including all of the users/groups that can log in as the source. Without a policy like this, no login portal
is presented to users.
If there are resources behind other interfaces that users need access to, then you need to create
additional policies that allow traffic from ssl.root to exit those interfaces.
SSL VPN
FortiGate I Student Guide
371
DO NOT REPRINT
© FORTINET

Any traffic from SSL VPN users – whether in web portal or tunnel mode – exits from the
ssl.<vdom_name> interface. Here is an example of firewall policies that are configured to allow
access to resources behind other interfaces that users need access to when connected through SSL
VPN.
SSL VPN
FortiGate I Student Guide
372
DO NOT REPRINT
© FORTINET

If split tunneling is disabled, you need to create an additional firewall policy from ssl.root to the egress
interface to allow clients to provide access to the Internet. On this firewall policy, you can also apply
security profiles to restrict user access to the Internet.
SSL VPN
FortiGate I Student Guide
373
DO NOT REPRINT
© FORTINET

In this section, you’ll learn how to configure realms and bookmarks.
SSL VPN
FortiGate I Student Guide
374
DO NOT REPRINT
© FORTINET

By default, all SSL VPN users will see the same bookmarks, configured by an administrator, and the
same theme.
SSL VPN
FortiGate I Student Guide
375
DO NOT REPRINT
© FORTINET

To add flexibility to your SSL VPN deployment, you may consider configuring SSL-VPN realms. The
realms are custom login pages, usually for user groups, such as your accounting team and your sales
team, but can be for individual users as well. With realms, users and user groups can access different
portals based on the URL they enter. This is unlike a default deployment, where SSL VPN login is
handled by going directly to the FortiGate’s IP address. With different portals, you can customize each
login page separately, as well as limit concurrent user logins separately.
Example of realms on a FortiGate:
https://192.168.1.1
https://192.168.1.1/Accounting
https://192.168.1.1/TechnicalSupport
https://192.168.1.1/Sales
SSL VPN
FortiGate I Student Guide
376
DO NOT REPRINT
© FORTINET

The SSL VPN bookmarks provides links to network resources. You can use the administrator-defined
bookmarks and you can also add your own personal bookmarks.
SSL VPN
FortiGate I Student Guide
377
DO NOT REPRINT
© FORTINET

From the CLI of FortiGate, you can create bookmarks for each user. These bookmarks will appear
even if the user bookmark option is disabled in the portal, because that option only effects the users’
ability to create and modify their own bookmarks – not administrator-defined ones.
Depending on the type of bookmark you want to create, you may need to configure additional
information that the application requires, such as URLs for websites and folders for FTP sites.
Only two types of bookmarks can be used with the port forwarding method (an extension of web-only
mode): citrix and portforward. Citrix is specific for connecting the client to the citrix server.
Portforward is a generic type of bookmark that you can customize to the traffic.
SSL VPN
FortiGate I Student Guide
378
DO NOT REPRINT
© FORTINET

When users log into to their individual portal, there is an option that allows them to create their own
bookmarks. An administrator must enable the User Bookmarks option on the SSL-VPN Portal page
to allow this.
Administrators can view and delete user-added bookmarks through the SSL-VPN Personal
Bookmarks page. This allows administrators to monitor and remove any unwanted bookmarks that
do not meet with corporate policy.
Note: If SSL-VPN Personal Bookmarks does not appear as a menu option, you can enable it on the
Feature Select page.
SSL VPN
FortiGate I Student Guide
379
DO NOT REPRINT
© FORTINET

Instead of just adding bookmarks for individual users, administrators can also add bookmarks for
everyone that uses each portal. This allows bookmarks to appear for all users who log in to that
particular portal. These bookmarks use the exact same configuration options that personal bookmarks
do, but can be configured from the GUI, rather than the CLI. Users cannot modify administrator-added
bookmarks, whether you have created them on a per-user or per-portal basis.
SSL VPN
FortiGate I Student Guide
380
DO NOT REPRINT
© FORTINET

In this section, you will learn how you can use additional options to restrict users connecting to SSL
VPN, which helps to ensure your internal network is secure and can limit the possibility of attacks and
viruses entering the network from an outside source.
SSL VPN
FortiGate I Student Guide
381
DO NOT REPRINT
© FORTINET

Since SSL VPNs are methods for people outside your network to connect to resources inside your
network, you must take appropriate measures to ensure the safety and security of the information in
your network. There are multiple options and settings available to help secure SSL VPN access.
In the following slides, we’ll cover client integrity checking and restricting host connection addresses.
SSL VPN
FortiGate I Student Guide
382
DO NOT REPRINT
© FORTINET

When a user connects to your network through SSL VPN, a portal is established between your
network and the user PC. The VPN session is secured natively in two ways: the connection is
encrypted and the user must log in with their credentials, such as a user name and password.
However, you can configure additional security checks to increase the security of the connection.
One method of increasing your security is through client integrity checking. Client integrity ensures
that the connecting computer is secure by checking whether specific security software, such as
antivirus or firewall software, is installed and running. This feature only supports Microsoft Windows
clients, as it accesses the Windows Security Center to perform its checks. Alternatively, you can
customize this feature to check the status of other applications by using their Globally Unique Identifier
(GUID). The GUID is a unique ID in the Windows Configuration Registry that identifies each Windows
application. Client integrity can also check the current software and signature versions for the antivirus
and firewall applications.
SSL VPN
FortiGate I Student Guide
383
DO NOT REPRINT
© FORTINET

The client integrity check is performed while the VPN is still establishing, just after user authentication
has finished. If the required software is not running on the client’s PC, the VPN connection attempt is
rejected, even with valid user credentials. Client integrity is enabled per web portal and only by using
CLI commands.
The list of recognized software, along with the associated registry key value is available through the
CLI. Software is split into three categories: antivirus (av), firewall (fw), and custom. Custom is used for
customized or proprietary software that an organization may require. Administrators can only
configure these settings through the CLI.
The disadvantage of enabling client integrity checking is that it can result in a lot of administrative
overhead. First, all users must have their security software updated in order to successfully establish a
connection. Second, software updates can result in a change to the registry key values, which can
also prevent a user from successfully connecting. As such, administrators must have in-depth
knowledge of the Windows operating system and subsequent registry behavior in order to properly
make extended use of, as well as maintain, this feature.
SSL VPN
FortiGate I Student Guide
384
DO NOT REPRINT
© FORTINET

The second method you can use to help secure SSL VPN access is restricting host connection
addresses. Setting up IP restriction rules can be very useful when considering proper security
configuration. Not all IPs need, or should be allowed, access to the login page. This method allows
you to set up rules to restrict access from specific IPs. One simple rule is to allow or disallow traffic
based on geographic IP addresses. From the CLI, you can configure the VPN SSL setting to disallow
specific IPs.
The default configuration is set to Limit access to specific hosts but the Hosts field is empty. You
must specify the IP address or network in the Hosts field. This will allow only those users to access
the login page. The Allow access from any host setting allows all IPs to connect.
SSL VPN
FortiGate I Student Guide
385
DO NOT REPRINT
© FORTINET

In this section, we’ll examine how to monitor SSL VPN users.
SSL VPN
FortiGate I Student Guide
386
DO NOT REPRINT
© FORTINET

You can monitor which SSL VPN users are connected from the SSL-VPN Monitor page. This shows
the names of all SSL VPN users that are currently connected to the FortiGate, their IP addresses
(both inside the tunnel and outside), and connection times.
When a user connects using tunnel model, the Active Connections column shows the IP address
assigned by FortiGate to the fortissl virtual adapter on the client’s computer. Otherwise, the user is
connected only to the web portal page.
SSL VPN
FortiGate I Student Guide
387
DO NOT REPRINT
© FORTINET

When an SSL VPN is disconnected, either by the user or through the SSL VPN idle setting, all
associated sessions in the FortiGate session table are deleted. This prevents reuse of authenticated
SSL VPN sessions (not yet expired) after the initial user terminates the tunnel.
The SSL VPN user idle setting is not associated with the firewall authentication timeout setting. It is a
separate idle option specifically for SSL VPN users. A remote user is considered idle when FortiGate
does not see any packets or activity from the user within the configured timeout period.
SSL VPN
FortiGate I Student Guide
388
DO NOT REPRINT
© FORTINET

In this lesson, we discussed:
• What SSL VPN is and how it operates
• Differences between SSL VPN and IPsec VPN
• Web-only mode, tunnel mode (including split tunneling), and port forwarding
• Methods of connecting to SSL VPN tunnels
• Configuring SSL VPN, including portals, bookmarks, and realms
• Securing SSL VPN access through client integrity checking and restricting host connection access
• Monitoring SSL VPN users
SSL VPN
FortiGate I Student Guide
389
DO NOT REPRINT
© FORTINET

In this lesson, we will show you how to set up a site-to-site IPsec VPN.
VPNs are heavily used in today’s IT infrastructure to join private corporate networks across the
Internet. IPsec is an RFC standard. So, whether you have FortiGate devices only or mix in another
vendor’s devices, the principles are essentially the same.
Basic IPsec VPN
FortiGate I Student Guide
390
DO NOT REPRINT
© FORTINET

After completing this lesson, you should have the practical skills that you need to set up a simple
IPsec tunnel between two locations. You will learn how to choose between configuring a policy-based
or route-based VPN as well as how to verify the status of each tunnel.
Basic IPsec VPN
FortiGate I Student Guide
391
DO NOT REPRINT
© FORTINET

First, let's take a look at some basic IPsec concepts.
Basic IPsec VPN
FortiGate I Student Guide
392
DO NOT REPRINT
© FORTINET

What is IPsec? When should you use it?
IPsec is a vendor-neutral standard set of protocols used to join two physically distinct LANs. The LANs
are joined as if they were a single logical network, despite being separated by the Internet.
In theory, IPsec does support null encryption – that is, you can make VPNs that don't encrypt traffic.
IPsec also supports null data integrity. But does that provide any advantages over plain traffic? No. No
one can trust traffic that may have had an attack injected by an attacker. Rarely do people want data
sent by an unknown person. Most people also want private network data, such as credit card
transactions and medical records, to remain private.
So, in reality, regardless of vendor, IPsec VPNs almost always have settings for three important
benefits:
•Authentication, to verify the identity of both ends,
•Data integrity, or HMAC, to prove that encapsulated data has not been tampered with as it
traverses a potentially hostile network, and
•Confidentiality, or encryption, to ensure that only the intended recipient can read the
message.
Basic IPsec VPN
FortiGate I Student Guide
393
DO NOT REPRINT
© FORTINET

If you’re passing your VPN through firewalls, it helps to know which protocols to allow.
Really, IPsec is a suite of separate protocols. It includes:
• Internet Key Exchange (IKE): IKE is used to authenticate peers, exchange keys, and negotiate the
encryption and checksums that will be used; essentially, it is the control channel
• Authentication Header (AH): AH contains the authentication header – the checksums that verify the
integrity of the data
• Encapsulation Security Payload (ESP): ESP is the encapsulated security payload – the encrypted
payload, essentially, the data channel
So, if you need to pass IPsec traffic through a firewall, remember: allowing just one protocol or port
number is usually not enough.
Note that the IPsec RFC mentions AH. However, AH does not offer encryption, an important benefit.
So it is not used by FortiGate. As a result, you don’t need to allow IP protocol 51.
To make a VPN, you must configure matching settings on both ends – whether the VPN is between
two FortiGates, a FortiGate and FortiClient, or a third-party device and a FortiGate. If the settings don’t
match, tunnel setup will fail.
Basic IPsec VPN
FortiGate I Student Guide
394
DO NOT REPRINT
© FORTINET

IPsec provides services at the IP (network) layer. During the tunnel establishment, both ends
negotiate the encryption and authentication algorithms to use.
After the tunnel has been negotiated and is up, data is encrypted and encapsulated into ESP packets.
Basic IPsec VPN
FortiGate I Student Guide
395
DO NOT REPRINT
© FORTINET

What’s encapsulated? It depends on the mode. IPsec can operate in two modes: transport mode, or
tunnel mode.
• Transport mode directly encapsulates and protects the fourth layer (transport) and above. The
original IP header is not protected and no additional IP header is added.
• Tunnel mode is a true tunnel. The whole IP packet is encapsulated and a new IP header is added
at the beginning. Once the IPsec packet reaches the remote LAN, and is unwrapped, the original
packet can continue on its journey.
Notice that after you remove the VPN-related headers, a transport mode packet can’t be transmitted
any further; it has no second IP header inside, so it’s not routable. For that reason, this mode is
usually used only for end-to-end (or client-to-client) VPNs.
Basic IPsec VPN
FortiGate I Student Guide
396
DO NOT REPRINT
© FORTINET

In order to create an IPsec tunnel, both devices must establish their security associations (SAs) and
secret keys, which are facilitated by the IKE protocol.
The IPsec architecture uses SAs as the basis for building security functions into IPsec. A SA is simply
the bundle of algorithms and parameters being used to encrypt and authenticate data travelling
through the tunnel. In normal two-way traffic, this exchange is secured by a pair of SAs, one for each
traffic direction. Essentially, both sides of the tunnel must agree on the security rules. If both sides
cannot agree on the rules for sending data and verifying each other’s identity, then the tunnel will not
be established.
IKE uses two distinct phases: phase 1 and phase 2.
Basic IPsec VPN
FortiGate I Student Guide
397
DO NOT REPRINT
© FORTINET

How does FortiGate bring up a VPN? Let’s begin by talking about IKE phase 1.
Basic IPsec VPN
FortiGate I Student Guide
398
DO NOT REPRINT
© FORTINET

Phase 1 is when each endpoint of the tunnel – the initiator and the responder – connects and begins
to set up the VPN.
When they first connect, the channel is not secure yet. An attacker in the middle could intercept
unencrypted keys. Neither end has a strong guarantee of the other’s identity, so how can they
exchange sensitive private keys?
They can’t. First, both ends have to create a temporary secure channel. They’ll use this to protect
strong authentication and negotiate the real keys for the tunnel later.
Basic IPsec VPN
FortiGate I Student Guide
399
DO NOT REPRINT
© FORTINET

Let’s look at how this works.
This is phase 1, where peers say hello and create an SA that defines a temporary secure channel.
The SA is called the IKE SA and is birectional.
Settings must agree. Otherwise the phase 1 will fail. (Each side wouldn’t be able to decrypt or
authenticate traffic from the other.)
At the end of phase 1, the negotiated IKE SA is used to negotiate the Diffie-Hellman keys that will be
used in phase 2.
Basic IPsec VPN
FortiGate I Student Guide
400
DO NOT REPRINT
© FORTINET

Diffie-Hellman uses the public key (that both ends know) plus a mathematical factor called a nonce in
order to generate a common private key.
This is crucial. With Diffie-Hellman, even if an attacker can listen in to the messages containing the
public keys, they cannot determine the secret key.
The new private key is used to calculate additional keys for symmetric encryption and authentication.
Basic IPsec VPN
FortiGate I Student Guide
401
DO NOT REPRINT
© FORTINET

The ESP protocol usually has problems crossing devices doing NAT. One of the reasons is that ESP
does not have port numbers, like TCP and UDP do, to differentiate traffic from one tunnel to another.
To solve this, NAT transversal (NAT-T) was added to the IPsec specifications. When NAT-T is
enabled on both ends, peers can detect any NAT device along the path. If NAT is found, then:
• Both phase 2 and remaining phase 1 packets change to UDP port 4500
• Both ends encapsulate ESP within UDP port 4500
So, if you have two FortiGates that are behind, for example, an ISP modem that has NAT, you will
probably need to enable this setting.
When NAT-T is set to Forced, UDP port 4500 is always used, even when there is no NAT device
along the path.
Basic IPsec VPN
FortiGate I Student Guide
402
DO NOT REPRINT
© FORTINET

Once details such as NAT-T and symmetric keys have been determined, your FortiGate is ready to
establish the final SAs that define the ESP channel.
It does this through IKE phase 2.
Basic IPsec VPN
FortiGate I Student Guide
403
DO NOT REPRINT
© FORTINET

Once phase 1 has established a somewhat secure channel and private keys, phase 2 begins.
Phase 2 negotiates security parameters for two IPsec SAs – not to be confused with the IKE SA. They
are the phase 2 SAs – not the phase 1 SA – that ESP uses to transmit data between LANs.
IKE phase 2 does not end once ESP begins. Phase 2 periodically renegotiates cryptography. This
maintains security. Also, if you enable perfect forward secrecy, each time phase 2 expires, FortiGate
will use Diffie-Hellman to recalculate new secret keys. In this way, new keys are not derived from
older keys, making it much harder for an attacker to crack the tunnel.
Each phase 1 can have multiple phase 2s. When would this happen?
For example, you may want to use different encryption keys for each subnet whose traffic is crossing
the tunnel. How does FortiGate select which phase 2 to use? By checking which quick mode selector
the traffic matches.
Basic IPsec VPN
FortiGate I Student Guide
404
DO NOT REPRINT
© FORTINET

During phase 2, we must configure a pair of settings called quick mode selectors. They identify and
direct traffic to the appropriate phase 2. In other words, it allows granular SAs.
Selectors behave similarly to a firewall policy. VPN traffic must match selectors in one of the phase 2
SAs. If it does not, the traffic is dropped.
When configuring selectors, specify the source and destination IP subnet that will match each phase
2. You can also specify the protocol number and source and destination ports for the allowed traffic. In
point-to-point VPNs, such as connecting a branch office FortiGate to a headquarter FortiGate, both
sides’ configuration must mirror each other.
Quick mode selector configuration for dial-up VPNs is different, and details are covered in the
Advanced IPsec lesson.
Basic IPsec VPN
FortiGate I Student Guide
405
DO NOT REPRINT
© FORTINET

Let’s talk about how to configure IPsec tunnels using the VPN wizard.
Basic IPsec VPN
FortiGate I Student Guide
406
DO NOT REPRINT
© FORTINET

Because encapsulation styles and other settings vary, and any mismatches cause VPNs to fail,
starting with FortiOS 5.2, there are VPN templates.
You can use these templates to simplify VPN setup – reducing the guesswork about what settings are
compatible between devices.
The VPN wizard uses these templates to make IPsec VPN creation easier for administrators.
Basic IPsec VPN
FortiGate I Student Guide
407
DO NOT REPRINT
© FORTINET

The VPN wizard is comprised of a three-step process. Administrators provide the VPN name, remote
IP, authentication method, interfaces, and subnets.
When the VPN wizard is completed, it automatically creates many of the required objects:
• Addresses and address groups
• Static routes
• Policies
• Phase 1 and phase 2 settings
Basic IPsec VPN
FortiGate I Student Guide
408
DO NOT REPRINT
© FORTINET

If you need detailed control of your VPN, such as for IKE version 2, you can still configure it manually.
Basic IPsec VPN
FortiGate I Student Guide
409
DO NOT REPRINT
© FORTINET

On FortiGate, there are two ways to manually configure an IPsec VPN. They define how to create the
firewall policies for VPN traffic: route-based configuration and policy-based configuration. (In our old
documentation, “route-based” used to be called “interface-based”.)
How do you know when to use policy-based or route-based?
Generally, try to use route-based. It offers more flexibility and control.
In comparison, transparent mode supports only policy-based VPNs.
Basic IPsec VPN
FortiGate I Student Guide
410
DO NOT REPRINT
© FORTINET

How are the two configuration modes different?
• In a route-based configuration, FortiGate automatically adds a virtual interface with the VPN name.
Two firewall policies with the action ACCEPT are usually required: one for sessions originating on
the local network, and another for sessions from the remote network. You also need to route the
VPN traffic to the virtual network interface. (Usually, you’ll use static routes.) This is the type of
VPN configuration created by the VPN wizard.
• In a policy-based configuration, only one firewall policy with the action IPSEC is usually required.
The policy is bidirectional. By default, the GUI hides the policy-based configuration settings.
Both sides of your VPN don’t need to be configured using the same mode.You can configure one
peer as route-based and the other as policy-based. But the phase 1 and phase 2 settings must match.
Basic IPsec VPN
FortiGate I Student Guide
411
DO NOT REPRINT
© FORTINET

If you are configuring a custom VPN, you can start from the wizard. Click Custom (no template).
Configure the remote FortiGate’s WAN IP address, and indicate which network interface on this local
FortiGate is the gateway that leads to it. FortiGate will use this to connect to the other end.
If your peers use pre-shared keys for the initial (IKE) authentication, both peers must be configured
with the same pre-shared key. For phase 1, choose which encryption and authentication to propose,
and so on. They must match, too. If peers can’t agree on IKE security, even phase 1 won’t be
established.
Basic IPsec VPN
FortiGate I Student Guide
412
DO NOT REPRINT
© FORTINET

Once phase 1 completes, phase 2 begins. This sets up the ESP tunnels that will be used for actual
data transfer. For each subnet on each end of the VPN, you can specify different levels of ESP
security. For example, connections to the Finance LAN might need larger key sizes and stronger
authentication. To do this, configure multiple phase 2 entries. For simplicity, here, we show only one
phase 2: the Local Address is our LAN, and the Remote Address is the remote LAN.
Remember that if traffic doesn’t match the quick mode selectors of any phase 2 SA, the IPsec engine
will drop the packet. Usually, it’s more intuitive to filter traffic with firewall policies. So if you don’t want
to use quick mode selector filtering, you can just create one phase 2 with the quick mode selectors set
to 0.0.0.0/0.
Basic IPsec VPN
FortiGate I Student Guide
413
DO NOT REPRINT
© FORTINET

If you used the wizard, it would have created routes and policies suitable for a route-based VPN. What
if you, for example, have a FortiGate in transparent mode? Transparent mode only supports policy-
based VPNs, which cannot be created with the wizard (the wizard only creates route-based VPNs.)
Remember, first, you must enable the GUI to show policy-based IPsec options. Configure your phases
as before, then create a policy. When policy-based VPN settings are visible, an additional firewall
policy Action setting is available. Choose IPsec. Then choose the policy-based VPN to use.
Basic IPsec VPN
FortiGate I Student Guide
414
DO NOT REPRINT
© FORTINET

With a route-based VPN, firewall policies are different.
• There are two policies usually, not one.
• The interface doesn’t match a WAN interface; it matches the virtual interface, which, in this
example, is named HQ-to-Branch.
The VPN wizard is the easiest way to make these. If you did that, you can skip this step.
But if you want to manually set up a VPN, use these as examples.
Basic IPsec VPN
FortiGate I Student Guide
415
DO NOT REPRINT
© FORTINET

In route-based VPN, you also need to route VPN traffic destined for the remote LAN to the IPsec
interface. If you used the wizard, this was created for you automatically.
To do this manually, usually you’ll add a static route.
You usually do not need this step when configuring a policy-based VPN, as traffic that does not belong
to any internal subnet is routed through the default gateway, which uses the WAN interface.
Basic IPsec VPN
FortiGate I Student Guide
416
DO NOT REPRINT
© FORTINET

In the GUI, there is a tool to monitor the status of your IPsec VPNs. Through this tool, you can see
how much traffic has passed through each tunnel. You can also start and stop individual tunnels, and
get additional details.
If the tunnel is up, there will be a green arrow appearing next to its name. If it is down or not in use,
then a red arrow is displayed.
Basic IPsec VPN
FortiGate I Student Guide
417
DO NOT REPRINT
© FORTINET

To review, these are the topics we’ve talked about. We presented an overview of the IPsec
technology, which includes phase 1, phase 2, Diffie-Hellman, and quick mode selectors. We also
showed the difference between policy-based and route-based configuration modes, how to configure a
point-to-point VPN, and how use the VPN monitor.
Basic IPsec VPN
FortiGate I Student Guide
418
DO NOT REPRINT
© FORTINET

In this lesson, you will learn how to configure FortiGate to act as an explicit web proxy.
Explicit Proxy
FortiGate I Student Guide
419
DO NOT REPRINT
© FORTINET

After completing this lesson, you will have the practical skills required to configure FortiGate to act as
an explicit web proxy. This covers how to use a PAC file and WPAD to configure explicit proxy
settings in web browsers, reduce WAN bandwidth using web cache, apply security policies to web
proxy traffic based on the HTTP headers, and authenticate and monitor explicit web proxy users.
Explicit Proxy
FortiGate I Student Guide
420
DO NOT REPRINT
© FORTINET

A web proxy receives or intercepts requests from a client to a server. If allowed, and if no cache is
available, the web proxy forwards the client’s request to the web server.
Two TCP connections are created: one from the client to the web proxy, and one from the web proxy
to the server.
Explicit Proxy
FortiGate I Student Guide
421
DO NOT REPRINT
© FORTINET

An implicit web proxy does not require any configuration changes to the client’s configuration. Clients
continue to use the web, just like they would without a web proxy.
Clients send requests to the web server’s IP address and port number. The web proxy intercepts the
client’s requests transparently; that is, at the IP layer. The destination address doesn’t change.
Does this mean that no configuration changes are required to use an implicit web proxy? Not
necessarily.
In most network configurations, both incoming and outgoing traffic is routed through FortiGate. As a
result, all web browsing traffic will be intercepted by the implicit web proxy. However, if a clients’ traffic
isn’t configured to be routed through FortiGate, you must reconfigure routing so that the packets will
be routed through FortiGate, where the implicit web proxy can intercept it.
Explicit Proxy
FortiGate I Student Guide
422
DO NOT REPRINT
© FORTINET

How is an explicit web proxy different from an implicit web proxy? When you use explicit web proxy,
you must configure clients to send the requests to the web proxy IP address and port number, not the
website’s servers.
Explicit Proxy
FortiGate I Student Guide
423
DO NOT REPRINT
© FORTINET

How do you configure users’ web browsers to use an explicit web proxy?
One way is to set up the proxy IP address and port manually (browser settings). In large networks you
can use an Active Directory login script or roaming profile, rather than configure each computer
individually.
Alternatively, you can configure browsers to use explicit proxies by installing a PAC file, or using the
web proxy auto-discovery protocol (WPAD).
Explicit Proxy
FortiGate I Student Guide
424
DO NOT REPRINT
© FORTINET

When you set up an explicit web proxy by configuring the web browser settings, you must provide the
proxy’s FQDN or IP address and TCP port number. You can specify only one proxy address at a time.
If you want to exempt specific destination IP addresses, subnets, and FQDNs from using the proxy,
you can add them to a list. For those destinations, the browser will send the requests directly to the
web servers.
Explicit Proxy
FortiGate I Student Guide
425
DO NOT REPRINT
© FORTINET

Another configuration method uses a standard explicit auto-configuration file, called a PAC file. A PAC
file contains instructions that tell the browser when to use a proxy and which proxy to use, depending
on the destination.
This configuration method supports the use of multiple web proxy servers.
To deploy the PAC file, first you must install it on an HTTP server that the clients can reach. (Your
FortiGate can act as the HTTP server for the PAC file.) Then, you must configure all browsers with the
PAC file’s URL. In larger networks, you usually won’t do this individually; instead, you will use your
domain to define the PAC file’s URL.
Explicit Proxy
FortiGate I Student Guide
426
DO NOT REPRINT
© FORTINET

What does a PAC file contain?
A PAC file is a JavaScript. It determines whether the request will be proxied, and what the addresses
for the proxies are.
In this example:
• The PAC file allows any connection to example.com to bypass the proxies.
• Connections to servers in the 10.0.0.0/24 subnet use the proxy named
fastproxy.example.com.
• All other requests are made through the proxy named proxy.example.com.
Explicit Proxy
FortiGate I Student Guide
427
DO NOT REPRINT
© FORTINET

Browsers use the web proxy auto-discovery protocol (WPAD) to determine the URL where the PAC
file is located.
WPAD can use two discovery methods: DNS-based and DHCP-based.
Most browsers try the DHCP server method first. If it fails, they try the DNS server method.
Explicit Proxy
FortiGate I Student Guide
428
DO NOT REPRINT
© FORTINET

(slide contains animation)
With the DHCP method, the browser sends a DHCPINFORM request to the DHCP server.
(click)
The DHCP server replies with the PAC file’s URL.
(click)
The browser downloads the PAC file, and accesses the Internet through the proxy.
Explicit Proxy
FortiGate I Student Guide
429
DO NOT REPRINT
© FORTINET

(slide contains animation)
The DNS method is very similar to the DHCP method. The differences are in the required PAC URL.
First, the browser queries the DNS server to resolve the FQDN wpad.<local-domain>.
(click)
The DNS server replies with the IP address of the web server where the PAC file is located. This
method always uses TCP port 80 and the PAC file name wpad.dat.
(click)
The browser downloads the PAC file, then accesses the web through the proxies indicated in the PAC
file.
Explicit Proxy
FortiGate I Student Guide
430
DO NOT REPRINT
© FORTINET

Usually, you will enable the proxy to cache responses from web servers.
A web cache stores responses from web servers. So, when a client repeats a request, FortiGate can
quickly send the cached content (response), instead of forwarding the request and waiting for the
response. This reduces WAN bandwidth usage, server load, and delay.
Web cache is supported in both implicit and explicit web proxy modes.
Explicit Proxy
FortiGate I Student Guide
431
DO NOT REPRINT
© FORTINET

If you’ve enabled caching, when the client makes a request, the proxy checks first if the requested
URL is already in memory.
If it is not, the proxy forwards the request to the server. When it responds, FortiGate stores the
response in memory – that is, it adds content to its cache. Additionally, the proxy forwards a copy of
the content to the client.
Explicit Proxy
FortiGate I Student Guide
432
DO NOT REPRINT
© FORTINET

What happens when a client repeats a request for a URL?
FortiGate will recognize that the URL has been requested before and forwards a copy of the content
from the cache to the client. Unless the content on the server has changed, the proxy does not need
to request it from the server again. From the client’s perspective, each response after the initial
request is faster.
Because dynamic URLs are not exactly the same, and their content may be personalized for each
client, they are usually not cached.
Explicit Proxy
FortiGate I Student Guide
433
DO NOT REPRINT
© FORTINET

Given that caching consumes system resources, do you want all users to be able to use the cache?
You can configure FortiGate’s HTTP proxy to allow access only to authenticated users that belong to
specific user groups. Authentication can be based on either source IP address or HTTP session.
How should you decide which to use?
IP-based authentication requires less RAM to remember the authenticated sessions. However, it
should only be used when each user has a different IP address (and there is no NAT device between
them and the FortiGate).
If you have multiple users sharing the same IP address, such as in the case of users behind NAT, use
HTTP session-based authentication instead. In this mode, each browser inserts an HTTP cookie in its
requests. The cookie identifies the user. This method requires slightly more RAM because FortiGate
must remember all session cookies.
Explicit Proxy
FortiGate I Student Guide
434
DO NOT REPRINT
© FORTINET

What does the traffic flow look like when a user authenticates with the explicit proxy, using HTTP
session-based authentication?
If a user connects and the request doesn’t have any associated authentication session, FortiGate
replies to the browser, requesting login credentials. The browser prompts the user to authenticate, and
remembers the authenticated state by storing a cookie.
If the same user makes more requests later, the browser automatically sends the same cookie again.
FortiGate identifies the user by this session cookie. The user does not need to authenticate for every
request, only the first time.
Explicit Proxy
FortiGate I Student Guide
435
DO NOT REPRINT
© FORTINET

These are the steps for configuring a FortiGate as an explicit web proxy. We will show the details of
each step next.
Explicit Proxy
FortiGate I Student Guide
436
DO NOT REPRINT
© FORTINET

By default, the explicit web proxy settings are hidden in the GUI. To show them, enable Explicit
Proxy on the Feature Select page.
Explicit Proxy
FortiGate I Student Guide
437
DO NOT REPRINT
© FORTINET

Once explicit proxy settings are visible in the GUI, you can enable and configure them.
You can configure the TCP port where the proxy is listening, edit and upload the PAC file, and choose
the default action that FortiGate takes for traffic that doesn’t match any explicit proxy policy.
We will talk about the explicit proxy policies later.
Explicit Proxy
FortiGate I Student Guide
438
DO NOT REPRINT
© FORTINET

After enabling the explicit web proxy globally, you must specify on which interfaces the proxy will listen
for connections.
Explicit Proxy
FortiGate I Student Guide
439
DO NOT REPRINT
© FORTINET

The next step is to create explicit proxy policies to specify which traffic and users are allowed to use
the proxy. Policies for explicit proxy are configured in a different configuration section than the regular
firewall policies.
Proxy traffic can be inspected: antivirus, web filtering, application control, IPS, DLP, and CASI
inspections are available.
When the proxy traffic matches an explicit proxy policy, FortiGate takes one of three possible actions:
accept the traffic, deny it, or request authentication before accepting it.
Explicit Proxy
FortiGate I Student Guide
440
DO NOT REPRINT
© FORTINET

If you select Authenticate as the action, you will be presented with the option to add authentication
rules. These rules specify which users and user groups are allowed, and what kind of inspection is
applied to each of them.
Explicit Proxy
FortiGate I Student Guide
441
DO NOT REPRINT
© FORTINET

Authentication for the explicit proxy behaves differently than it does for firewall policies.
With the explicit proxy, FortiGate will not fall through to try the next authentication rule. FortiGate
always applies the first policy that matches all criteria. It doesn’t evaluate any policy after the first
match, even for users that have not authenticated yet.
Explicit Proxy
FortiGate I Student Guide
442
DO NOT REPRINT
© FORTINET

In this example, the first proxy policy matches traffic from 10.0.1.0/24. It only allows users that belong
to the user group Students.
The second policy allows traffic – without authentication – only if the source address matches
10.0.0.0/8.
With this configuration, if traffic arrives from the 10.0.1.0/24 subnet, and that user has not
authenticated yet, then FortiGate prompts the user to authenticate. Traffic from that source IP address
always matches the first policy, and FortiGate does not continue to evaluate other policies in the list
after it finds a match. So, FortiGate never applies the second policy for that subnet – only for the rest
of 10.0.0.0/8.
Explicit Proxy
FortiGate I Student Guide
443
DO NOT REPRINT
© FORTINET

Like with firewall policies, when creating explicit proxy policies, you use firewall address objects to
specify the source and destination. There is one category of address objects that are used only for
explicit proxy: explicit proxy addresses.
Explicit proxy addresses offer more granularity when matching HTTP traffic. They can match HTTP
traffic based on the content of any HTTP field.
For example, the HTTP headers include a field named Host, which usually contains the FQDN of the
web server. With explicit proxy addresses, you can create policies that match the traffic based on this
destination FQDN, regardless of the destination IP address.
Another example is matching by URL pattern. Explicit proxy addresses can match traffic to URLs that
match a regex expression, regardless of the destination IP address.
Explicit Proxy
FortiGate I Student Guide
444
DO NOT REPRINT
© FORTINET

There are two groups of explicit proxy address types:
One group is for address types that are used as destination in explicit proxy policies. They can match
URL patterns, URL categories, and HTTP host names.
The other group is for address types that are used as a source in explicit proxy policies. They can
match HTTP methods, user agents, and other HTTP headers fields.
Explicit Proxy
FortiGate I Student Guide
445
DO NOT REPRINT
© FORTINET

In this example, the administrator created an explicit proxy policy to block any attempt from the
student_internal subnet to upload files to the Fortinet website. The administrator created two explicit
proxy addresses for this purpose:
• The POST_From_Students address matches any HTTP POST request coming from the
student_internal subnet.
• The Fortinet address matches any web connection to a host name that contains the text string
fortinet.com.
Explicit Proxy
FortiGate I Student Guide
446
DO NOT REPRINT
© FORTINET

If you are using the WPAD DNS method to configure the browser, you may need to edit the FortiGate
configuration to change the default file name and listening port number.
As we explained before, the DNS method always assumes that the PAC file is located at
http://<FortiGate_IP_Address>:80/wpad.dat.
So, if your clients use the DNS method, you must configure FortiGate to offer the PAC file named
wpad.dat, and to listen for requests for it on port 80.
Explicit Proxy
FortiGate I Student Guide
447
DO NOT REPRINT
© FORTINET

Once the web proxy is working, you can monitor which users are connected to it – that is, the proxy’s
session table. You can do this from the GUI, or from the CLI by using the command:
diagnose wad user list
Explicit Proxy
FortiGate I Student Guide
448
DO NOT REPRINT
© FORTINET

To review, these are the topics that we just talked about.
We discussed explicit web proxy concepts. We also showed how to configure and monitor a FortiGate
that is acting as an explicit web proxy, and how to configure web browsers to use the proxy.
Depending on your situation, we explained that some configuration choices require more RAM, or
specific port numbers.
Explicit Proxy
FortiGate I Student Guide
449
DO NOT REPRINT
© FORTINET

In this lesson, we will show you how to configure, use, and monitor antivirus scanning on a FortiGate.
Since antivirus scanning is one of the features that, depending on your configuration and chosen
signature database, can use significant RAM, we will also show you how to resolve conserve mode.
Antivirus and Conserve Mode
FortiGate I Student Guide
450
DO NOT REPRINT
© FORTINET

After completing this lesson, you should have these practical skills that you can use to configure
antivirus and optimize memory usage on your FortiGate.
Antivirus and Conserve Mode
FortiGate I Student Guide
451
DO NOT REPRINT
© FORTINET

Malicious software has evolved into many types. Although we often refer to all types of malicious
software as viruses, not every piece of unwanted software behaves like a virus. Malware is not always
self-replicating, and sometimes users willingly install it. To refer inclusively to viruses, worms, Trojans,
spyware, and all others, we now use the term malware.
Malware can be divided into two major types:
• Viruses: Usually installed without user’s consent and spread on their own from one computer to
another, generally through an exploit without the user’s knowledge.
• Grayware: May require some kind of user interaction. It convinces users that the benefit of
installing it outweighs the cost, such as browser toolbars that also track the user’s activity and
insert ads into web pages.
Antivirus and Conserve Mode
FortiGate I Student Guide
452
DO NOT REPRINT
© FORTINET

Regardless of how the virus spreads, once installed, a virus is somehow malicious. Some common
malware threats are:
• Trojans, such as Zeus, trick users into letting down their defenses and installing them. Once
installed, they can spy on user activities to steal sensitive data, such as bank account numbers and
passwords. Trojans can also set up a backdoor control on the target host providing access to
malicious users.
• Worms, such as Conficker and Code Red, spread by connecting to open ports on the network and
exploiting misconfigurations or other vulnerabilities.
• Spyware, such as Zango, collects information about the user’s computer without the user’s
knowledge.
• Ransomware, such as the CryptoLocker, holds the computer hostage, often encrypting critical user
data with a password or secret key, until payment of some kind is made.
• Rootkit enables administrative level access to the target computer without user knowledge or
consent.
• Key loggers record keystrokes and return them to a remote location – including sending
administrator logins and personal email addresses.
• Mass mailers transform computers into open relay mail servers for the botnet, often managed
through a remote command and control.
Are all viruses malicious? By definition, yes. But some academics have written beneficial worm-like
software. It spreads through the same exploits, but then cleans infections and/or patches the host. For
example, Creeper was followed by Reaper, which removed Creeper from infected systems.
Antivirus and Conserve Mode
FortiGate I Student Guide
453
DO NOT REPRINT
© FORTINET

Just as viruses have evolved many vectors for spreading, they also have evolved many techniques for
evading antivirus engines and manual analysis.
Viruses can encrypt their payloads, or change the code. As a result, when comparing a signature to
the binary sample, the two won’t be an exact, bit-by-bit match. So in order to detect the virus, the
engine must be able to either:
• match flexibly, or
• ignore the changeable parts of the code, and match only based on the polymorphic or metamorphic
engine.
Antivirus and Conserve Mode
FortiGate I Student Guide
454
DO NOT REPRINT
© FORTINET

Now you know some different ways that viruses spread and evade detection. In this section, you will
learn some of the methods that FortiGate uses to detect and block them.
Antivirus and Conserve Mode
FortiGate I Student Guide
455
DO NOT REPRINT
© FORTINET

An antivirus is a database of virus signatures to identify infections. During an antivirus scan, in order to
be detected as a virus, the virus must match a defined pattern called a signature.
Different vendors have different names for the same virus. Some vendors use patterns that detect one
virus for each pattern, while others use patterns that are more flexible and can catch multiple viruses
with a single pattern. The pattern that is used depends on the vendor’s engine.
What is standard is the attack vector designation. It’s at the beginning of the name. For example, if the
vector is W32, it represents 32-bit Windows. W64 represents 64-bit Windows and JS represents
JavaScript (which is cross-platform).
At the host level, a host-based antivirus software such as FortiClient helps. But host-based antivirus
cannot be installed on routers. Guest Wi-Fi networks and ISP customers also might not have antivirus
software installed.
So how can you protect them and your own network from these malware threats?
Antivirus and Conserve Mode
FortiGate I Student Guide
456
DO NOT REPRINT
© FORTINET

Just like viruses, which have many ways to avoid detection, FortiGate has many techniques that it can
use to detect them. They include:
• Antivirus Scan: The first, fastest, simplest way to detect malware is if it is an exact match for a
signature in the antivirus database.
• Grayware: It is not technically a virus. Remember, it is often bundled with innocuous software, but it
does have unwanted side effects, so it is categorized as malware. Often, grayware can be detected
this way, with a simple FortiGuard Grayware signature.
• Heuristics: They are based on probability, so they increase the possibility of false positives, but
they also can detect zero-day viruses – viruses that are new and unknown, and therefore no
signature exists yet. If your network is a frequent target, enabling heuristics may be worth the
performance cost because it can help you to detect a virus before the outbreak begins. By default,
when the antivirus scan’s heuristic engine detects a virus-like characteristic, it will log the file as
Suspicious – but will not block it. You can choose whether to block or allow suspicious files.
The grayware and heuristics are optional functions which must be enabled in the CLI.
• You can enable and disable grayware under the CLI command config antivirus setting.
• You can configure the action for the heuristic scan to pass/block/disable under the CLI command
config antivirus heuristic.
As these are done as separate steps, antivirus scanning must be enabled as well. If grayware and
heuristic are enabled, FortiGate applies the scan in the following order: Antivirus Scan > Grayware
Scan > Heuristics Scan.
Antivirus and Conserve Mode
FortiGate I Student Guide
457
DO NOT REPRINT
© FORTINET

What if heuristics is too uncertain? What if you need a more sophisticated, more certain way to detect
malware, and to find zero-day viruses?
You can integrate your antivirus scans with FortiSandbox. For environments that require more
certainty, FortiSandbox executes the file within a protected environment, then examines the effects of
the software to see if it is dangerous.
For example, let’s say you have two files. Both alter the system registry and are therefore suspicious.
One is a driver installation – its behavior is normal – but the second file installs a virus that connects to
a botnet command and control server. Sandboxing would reveal the difference, and can be configured
to receive supplementary signature database from Sandbox.
Antivirus and Conserve Mode
FortiGate I Student Guide
458
DO NOT REPRINT
© FORTINET

You can update your FortiGate’s antivirus database using push, schedule, or both methods. The
scheduled updates allow you to configure scheduled updates at regular intervals, such as hourly,
daily, or weekly. You can also enable Accept push updates, which allows you to add new definitions
as soon as released by FortiGuard. This is useful for high-security environments, as FortiGate will
receive urgent security updates as soon as they are released.
Regardless of which method you select, virus scanning must be enabled in at least one firewall policy.
Otherwise, FortiGate will not download any updates. Alternatively, you can download packages from
the Fortinet customer service and support website (requires subscription), and then manually upload
them to your FortiGate. You can verify the update status and signature versions from the FortiGuard
page on the GUI or you can run diagnose autoupdate status and diagnose autoupdate
versions from the CLI.
Multiple FortiGuard antivirus databases exist and can be configured under the CLI command config
antivirus setting. Support varies by FortiGate model.
• All FortiGate devices have the normal database, which only contains signatures for viruses
detected in recent months determined by the FortiGuard Global Security Research Team. It is the
smallest database, and, therefore, results in the fastest scans, but does not detect all known
viruses.
• Some models support the extended database, which detects viruses that are no longer active.
Vulnerable platforms are still common, and/or these viruses could be an issue later.
• The extreme database is intended for high-security environments and detects all known viruses,
including for legacy operating systems no longer widely used.
Antivirus and Conserve Mode
FortiGate I Student Guide
459
DO NOT REPRINT
© FORTINET

FortiGuard mobile security subscription is a separate subscription from antivirus subscription. You can
also click How to Subscribe to get the detailed instructions about the subscription. As more and more
organizations are allowing bring your own device (BYOD), mobile security subscription can ensure up-
to-date protection against the latest threats targeting mobile platforms. You can also view the list of
mobile threats covered by FortiGuard from https://fortiguard.com/avmobilethreats.
Antivirus and Conserve Mode
FortiGate I Student Guide
460
DO NOT REPRINT
© FORTINET

In this section, we will examine the FortiGate inspection modes, which includes:
• Flow-based
• Proxy-based
The inspection mode determines how FortiGate will scan the traffic for different security profile
features.
Antivirus and Conserve Mode
FortiGate I Student Guide
461
DO NOT REPRINT
© FORTINET

Let’s talk about proxy-based scanning first.
Proxy-based scanning typically refers to transparent proxy. It’s called transparent because at the IP
layer, FortiGate is not the destination address, yet FortiGate intercepts the traffic anyway.
In TCP connections, FortiGate’s proxy generates the SYN-ACK to the client and completes the three-
way handshake with the client before creating a second, new connection to the server. If the payload
is less than the oversize limit, the proxy buffers transmitted files or emails for inspection before
continuing transmission. The proxy analyzes and may change headers such as HTTP Host and URL
for web filtering. If a security profile decides to block the connection, the proxy can send a
replacement message to the client.
This adds latency to the overall transmission speed.
How are flow-based scans different?
There is no proxy. If you are familiar with the TCP flow analysis of Wireshark, then that is essentially
what the flow engine sees. Packets are analyzed and forwarded as they are received. Original traffic
is not altered. Therefore, advanced features that modify content, such as safe search enforcement,
are not supported.
Antivirus and Conserve Mode
FortiGate I Student Guide
462
DO NOT REPRINT
© FORTINET

FortiGate supports two types of scanning modes:
• Flow-based is optimized for performance and supports fewer security features.
• Proxy-based is optimized for user friendliness and supports more security profile features and
more configuration options for those individual features. For example, web profile overrides for web
filtering is only supported in proxy mode.
The default inspection mode is Proxy and can be toggled from the System Information widget on the
dashboard of the FortiGate GUI. If the virtual domain is enabled on FortiGate, you can toggle between
flow- and proxy-based inspection mode from Global >System >VDOM for each VDOM.
Antivirus and Conserve Mode
FortiGate I Student Guide
463
DO NOT REPRINT
© FORTINET

You can toggle between proxy-based and flow-based inspection, which will result in supported
security profiles and related configurations being converted to flow-based or proxy-based. Firewall
policies will display security profile and related settings based on the inspection mode selected.
Changing from proxy to flow back to proxy will not result in the original configurations and some of the
configuration elements will use default configuration settings.
Antivirus and Conserve Mode
FortiGate I Student Guide
464
DO NOT REPRINT
© FORTINET

In this section, you will learn how antivirus uses the inspection modes to scan and detect malware.
Antivirus and Conserve Mode
FortiGate I Student Guide
465
DO NOT REPRINT
© FORTINET

Each protocol’s proxy picks up a connection and buffers the entire file first (or waits until the oversize
limit is reached) before scanning. The client must wait for the scanning to finish. If the virus is
detected, the block replacement page is displayed immediately. As FortiGate has to buffer the whole
file and then do the scanning, it takes a long time to scan. Also from the client point of view, it has to
wait for the scanning to finish and might terminate the connection due to lack of data.
You can configure client comforting for HTTP and FTP from the config firewall profile-
protocol-options command tree. This allows the proxy to slowly transmit some data until it can
complete the buffer and finish the scan. This prevents a connection or session timeout. No block
replacement message appears in the first attempt, as FortiGate is transmitting the packets to the end
client.
Antivirus and Conserve Mode
FortiGate I Student Guide
466
DO NOT REPRINT
© FORTINET

With a proxy-based scan, the client sends a request and FortiGate starts buffering the whole file, then
sends it to the AV engine for scanning. If the file is clean (without any viruses), FortiGate starts
transmitting the file to the end client. If a virus is found, no packets are delivered to the end client and
the proxy sends the replacement block message to the end client.
Antivirus and Conserve Mode
FortiGate I Student Guide
467
DO NOT REPRINT
© FORTINET

The flow-based full antivirus scan mode uses the full antivirus database (the compact AVDB is a
subset of the full antivirus database) and the IPS engine to examine the network traffic. It doesn’t
analyze sessions in discrete protocol stages. The flow-based engine starts scanning with a raw
IP+TCP packet, not necessarily in order, and has to extract the payload to discover the viral payloads
regardless of surrounding protocol details. As the file is transmitted simultaneously, flow-based
scanning consumes more CPU cycles, but, depending on your model, some flow-based operations
may be performed by a specialized FortiASIC chip, further improving performance. The flow-based
scanning caches the copy of the packet locally on the FortiGate and also forwards the packet to the
end client at the same time. Once the last packet is received, FortiGate also caches that, but puts the
last packet on hold and has the whole file for scanning. The IPS engine checks for the rule match and
then sends to the AV engine for scanning.
There can be two scenarios if a virus is detected:
• If the scan detects a virus in the TCP session when it may have already forwarded packets to the
client, it resets the connection, but doesn’t insert the block replacement page. So the client may
think it is a network error and try again. The FortiGate IPS engine caches the URL and, during the
second attempt to download the same file, the block replacement page displays immediately
without engaging the antivirus engine. Even if the client has received most of the file in the first
attempt, the file will be truncated and the client will not be able to open a truncated file.
• If the virus is detected at the start of the stream, flow-based scanning can insert the block
replacement page at the first attempt.
Antivirus and Conserve Mode
FortiGate I Student Guide
468
DO NOT REPRINT
© FORTINET

As you can see, the client sends a request and starts receiving the packets immediately, but FortiGate
is also caching those packets simultaneously. When the last packet arrives, FortiGate caches it and
puts it on hold. Then it sends the whole cached file to the IPS engine where rule match is checked and
passed to the AV engine for scanning after that. If the AV scan does not detect any viruses and the
result comes back clean, the last cached packet is regenerated and delivered to the client. However, if
a virus is found, the last packet is dropped. Even if the client has received most of the file, the file will
be truncated and the client will be not able to open a truncated file.
Regardless of which mode you use, the scan techniques will give similar detection rates. How can you
choose between the scan engines? If performance is your top priority, then flow-based is more
appropriate. If security is your priority, proxy-based – with client comforting disabled – is more
appropriate.
Antivirus and Conserve Mode
FortiGate I Student Guide
469
DO NOT REPRINT
© FORTINET

The flow-based quick scan uses an IPS engine along with an embedded compact antivirus database
containing less signatures. The IPS engine examines the network traffic for viruses, worms, Trojans,
and malware, without the need to buffer the file being checked. It provides better performance, but
detection rate is lower.
The quick scan does have some limitations compared to full flow-based scan and proxy-based scan.
Quick scan cannot send files to FortiSandbox for inspection, cannot use advanced heuristics, and
cannot use mobile malware packages. Low-end FortiGate models don’t support flow-based quick
scan.
Antivirus and Conserve Mode
FortiGate I Student Guide
470
DO NOT REPRINT
© FORTINET

This table shows the comparison between all three antivirus scanning modes.
Antivirus and Conserve Mode
FortiGate I Student Guide
471
DO NOT REPRINT
© FORTINET

So what is the recommended buffer limit? It varies by model and configuration. You can adjust
oversize-limit for your unique network for optimal performance. A smaller buffer minimizes proxy
latency and (for both scanning modes) RAM usage, but that may allow viruses to pass through
undetected. With a buffer that’s too large, clients may notice transmission timeouts. You need to
balance the two.
If you aren’t sure how large of a buffer you need, you can temporarily enable oversize-log to see
if the large files come frequently and are important to allow.
Files that are too large for the maximum buffer size cannot be scanned. The default is to allow files to
pass. This is because large files are often harmless, and many networks have antivirus software
installed on endpoints, which minimizes unnecessary help desk calls. But, if you require a very secure
environment, or if your endpoints have no antivirus software, you can change this setting – on a per-
protocol basis from the CLI – so that FortiGate blocks oversized files.
If oversized files are blocked, then your endpoints are safe. You won’t need logs about oversize files
for forensics, so you may be able to improve performance slightly by disabling oversize-log.
Antivirus and Conserve Mode
FortiGate I Student Guide
472
DO NOT REPRINT
© FORTINET

Large files are often compressed. When compressed files go through scanning, the compression acts
like encryption: the signatures won't match. So, FortiGate must decompress the file in order to scan it.
Before decompressing a file, FortiGate must first identify the compression algorithm. Some archive
types can be correctly identified using only the header. Also, FortiGate must check whether the file is
password-protected. If the archive is protected with a password, FortiGate can’t decompress it, and,
therefore, can’t scan it.
FortiGate then decompresses files into RAM. Just like other large files, the RAM buffer has a
maximum size configured in uncompress-oversize-limit. Increasing this limit may decrease
performance, but it allows you to scan larger compressed files.
If an archive is nested – for example, if an attacker is trying to circumvent your scans by putting a ZIP
file inside the ZIP file – FortiGate will try to undo all layers of compression. By default, FortiGate will
attempt to decompress and scan up to 12 layers deep, but you can configure it to scan up to 200
layers deep. Often, you shouldn’t increase this setting as it increases RAM usage.
Antivirus and Conserve Mode
FortiGate I Student Guide
473
DO NOT REPRINT
© FORTINET

Full flow-based and proxy-based scanning buffers up to your specified file size limit. The default is 10
MB. It’s large enough for most files, except movies. If your FortiGate model has more RAM, you may
be able to increase this threshold.
Without a limit, very large files could exhaust the scan memory. So this threshold balances risk vs.
performance. Is this tradeoff unique to FortiGate, or to a specific model? No. Regardless of vendor or
model, you must make a choice. This is due to the difference between scans in theory, that have no
limits, and scans on real-world devices that have finite RAM. In order to detect 100% of malware
regardless of file size, a firewall would need infinitely large RAM – something that no device has in the
real world.
Most viruses are very small. This table shows a typical tradeoff. You can see that with the default 10
MB threshold, only 0.01% of viruses pass through.
Antivirus and Conserve Mode
FortiGate I Student Guide
474
DO NOT REPRINT
© FORTINET

The antivirus starts buffering the file and checks for the oversize and uncompressed oversize file
limits. If the buffer is full, the antivirus scan has a simple behavior: FortiGate will, depending on your
setting, either block or pass the file. The default action is to pass the large files bigger than buffer. This
is because FortiGate does not have the entire file and it would be impossible to determine whether or
not the file contains a virus.
If the file has been completely transmitted – that is, FortiGate reaches the byte that marks the end of
the file (EoF) – then FortiGate uses these scans in this order.
The virus scan is first, because the results have high certainty and the computations are fast.
Heuristics, which are less certain, are applied last.
If you consider all of these settings together, this is the complete decision tree that FortiGate uses for
antivirus scans.
Antivirus and Conserve Mode
FortiGate I Student Guide
475
DO NOT REPRINT
© FORTINET

In this section, you will learn how to configure an antivirus profile on FortiGate and related
components.
Antivirus and Conserve Mode
FortiGate I Student Guide
476
DO NOT REPRINT
© FORTINET

The antivirus profile can be configured from the AntiVirus page. The full flow-based and proxy-based
antivirus profiles provide the same inspection options, which include:
•Include Mobile Malware Protection: The mobile malware protection contains signatures for
mobile malware such as android devices. It is also worth mentioning that mobile malware
protection requires a separate license.
•Treat Windows Executables in Email Attachment as Viruses: By default, this option is enabled
and files (including compressed files) identified as Windows executables can be treated as viruses.
From the antivirus profile, you can define what FortiGate should do if it detects an infected file.
Once an antivirus profile is configured it is applied in the firewall policy.
But what about encrypted protocols? Encryption is a popular method for attackers to circumvent
security. As you would expect, FortiGate can scan encrypted protocols, which we will examine shortly.
Antivirus and Conserve Mode
FortiGate I Student Guide
477
DO NOT REPRINT
© FORTINET

Protocol options provides more granular control, allowing you to configure protocol port mappings,
common options, web, and email options to name a few.
It is also worth mentioning that in proxy-based VDOM, these settings can be configured from the
Proxy Options page in the GUI. The Proxy Options settings are not only applicable to proxy-based
VDOMs, but also to flow-based VDOMs and can be configured under config firewall
profile-protocol-options in the CLI.
Protocol options are used by antivirus and other security profiles, such as web filtering, DNS filtering,
and DLP sensor to name a few.
Once protocol options are configured, it is applied in the firewall policy.
Antivirus and Conserve Mode
FortiGate I Student Guide
478
DO NOT REPRINT
© FORTINET

To scan secure protocols, select an SSL/SSH inspection profile in the traffic’s matching firewall policy.
There are two levels of inspection:
• Certificate-only
• Full content inspection
Certificate-only inspection verifies the certificate and any unencrypted headers that are sent before
encryption begins. FortiGate doesn’t interrupt the handshake. So, when the certificate-only inspection
is applied, antivirus can’t scan contents and is effectively bypassed. When is certificate-only mode
effective? Only if you need to act on the certificate or URL of a website. In this case, the client sends
unencrypted headers before the encryption handshake occurs.
What if you want to scan the content inside the payload of the packet?
In full inspection level, FortiGate terminates the SSL/TLS handshake at its own interface, before it
reaches the server. When certificates and private keys are exchanged, it is with FortiGate and not the
server. Next, FortiGate starts a second connection with the server.
Because traffic is unencrypted while passing between its interfaces, FortiGate can inspect the
contents and look for matches with the antivirus signature database, before it re-encrypts the packet
and forwards it.
For these reasons, full inspection level is the best choice for making the antivirus scan effective.
Antivirus and Conserve Mode
FortiGate I Student Guide
479
DO NOT REPRINT
© FORTINET

The SSL/SSH profile allows to you configure the inspection method, protocol port mapping, and
exemption from SSL/SSH inspection.
If you set the inspection method to Full SSL Inspection, FortiGate validates the certificate, but also
decrypts the payloads for antivirus scanning. As this method uses an authorized man-in-the-middle
(MITM) attack, clients will detect the inspection. Users may need to either override the SSL validation
failure or install your certificate authority (CA) certificate.
Once the SSL/SSH profile is configured it is applied in the firewall policy.
Antivirus and Conserve Mode
FortiGate I Student Guide
480
DO NOT REPRINT
© FORTINET

For proxy-based scanning (with client comforting disabled), a block replacement page is immediately
displayed if a virus is detected. For flow-based scanning, if a virus is detected at the start of the
stream, the block replacement page is inserted at the first attempt. However, if the virus is detected
after transmitting a few packets, the block replacement page is not inserted. However, FortiGate
caches the URL and can insert the replacement page immediately on the second attempt.
Note that if deep inspection is enabled, all HTTPS-based applications will also provide this
replacement message.
The block page includes information about the:
• File name
• Virus name
• Web site host & URL
• Source & Destination IP
• User name and group (if authentication is enabled)
• Link to FortiGuard Encyclopedia – which provides analysis, recommended actions (if any), and
detection availability
You can go directly to the FortiGuard Encyclopedia website
(http://fortiguard.com/encyclopedia) to view information about other malware. You can
also scan and/or submit a sample of a suspected malware at
http://submission.fortinet.com.
Antivirus and Conserve Mode
FortiGate I Student Guide
481
DO NOT REPRINT
© FORTINET

You can find virus scanning statistics through the Advanced Threat Protection Statistics widget on
the dashboard.
If your FortiGate is submitting files for sandboxing, it keeps statistics about the number of files
submitted and the results of those scans. These statistics are separate from files that are scanned
locally on FortiGate.
Antivirus and Conserve Mode
FortiGate I Student Guide
482
DO NOT REPRINT
© FORTINET

If you have logging enabled, you can find details about them under the AntiVirus log page.
When the antivirus scan detects a virus, by default it creates a log about what virus was detected, as
well as the action, policy ID, antivirus profile name, and detection type. It also provides a link for more
information on the FortiGuard website.
You can also view log details under the Forward Traffic log page, where firewall policies record
activity. You’ll also find a summary of traffic where FortiGate applied an antivirus action. Again, this is
because antivirus is applied on a firewall policy.
Antivirus and Conserve Mode
FortiGate I Student Guide
483
DO NOT REPRINT
© FORTINET

In this section, you will learn about memory conserve mode.
Antivirus and Conserve Mode
FortiGate I Student Guide
484
DO NOT REPRINT
© FORTINET

If your FortiGate memory usage is high, you should examine the event log. Look for messages related
to conserve mode. Memory conserve mode occurs when FortiGate does not have enough RAM
available to handle traffic.
UTM inspection (especially proxy-based) increases memory usage beyond simple firewall policies. In
other words, when antivirus is enabled, FortiGate is more likely to use more memory, which can cause
FortiGate to go in to conserve mode. You can determine whether antivirus or any other process is
using too much memory by running the CLI command diagnose sys top.
There are two types of memory conserve mode: kernel and system.
Antivirus and Conserve Mode
FortiGate I Student Guide
485
DO NOT REPRINT
© FORTINET

Two margins or thresholds determine when FortiGate enters and exits the kernel conserve mode. For
all the latest FortiGate models (which have 64-bit CPUs) the margins for kernel conserve mode
depend on the total overall memory.
When a FortiGate is in kernel conserve mode, any proxy inspection is bypassed, and administrators
cannot perform configuration changes.
Antivirus and Conserve Mode
FortiGate I Student Guide
486
DO NOT REPRINT
© FORTINET

Like kernel conserve mode, two different thresholds determine when FortiGate enters and exits the
system conserve mode. The margins also depend on the total amount of overall memory.
Antivirus and Conserve Mode
FortiGate I Student Guide
487
DO NOT REPRINT
© FORTINET

The av-failopen is the CLI (only) setting that controls FortiGate’s behavior while it is in system
conserve mode.
Antivirus and Conserve Mode
FortiGate I Student Guide
488
DO NOT REPRINT
© FORTINET

This command is used to determine if a FortiGate device is currently in system conserve mode.
Antivirus and Conserve Mode
FortiGate I Student Guide
489
DO NOT REPRINT
© FORTINET

These are the entries generated in the event logs when a FortiGate enters kernel and system
conserve mode.
Antivirus and Conserve Mode
FortiGate I Student Guide
490
DO NOT REPRINT
© FORTINET

An option related to fail-open sessions is av-failopen-session. This setting kicks in not during a
high memory situation, but when a proxy on the FortiGate runs out of available sessions to process
the traffic.
If av-failopen-session is enabled, then FortiGate will act according to the av-failopen setting.
Otherwise, by default, it will block new sessions until proxy connections become available.
Antivirus and Conserve Mode
FortiGate I Student Guide
491
DO NOT REPRINT
© FORTINET

To review, here are the topics we covered in this lesson. We discussed:
• Malware terminology
• The different types of scanning that can be enabled on FortiGate
• Three types of antivirus database
• Sandboxing and how it can be used
• Blocking botnet connections
• The difference between proxy-based and flow-based virus scanning
• The different antivirus databases
• The behavior of oversized files
• The order of operations within the virus scanning engine
• How to handle an undetected piece of malware
• Virus scanning encrypted traffic
• How to read virus detection logs
• What memory conserve mode is
Antivirus and Conserve Mode
FortiGate I Student Guide
492
DO NOT REPRINT
© FORTINET

In this lesson, we will show you how to set up filters to control website access. This feature is
commonly used by network administrators.
Web Filtering
FortiGate I Student Guide
493
DO NOT REPRINT
© FORTINET

After completing this lesson, you should have these practical skills:
• Identify FortiGate web filtering mechanisms
• Choose an appropriate web filtering mode to manage and track web content
• Apply web or DNS filter profiles
• Create static URL or domain filters
• Override FortiGuard web filtering
• Apply filter exemptions and rating overrides
• Monitor logs for web filtering events
Accordingly, you will know how to select the appropriate URL filter method for blocking, monitoring,
exempting, or allowing websites.
Familiarity with website design and behavior, as well as the HTTP protocol, are useful to
understanding this lesson.
Lab exercises can help you to test and reinforce your skills.
Web Filtering
FortiGate I Student Guide
494
DO NOT REPRINT
© FORTINET

Web filtering helps to control, or track, the websites that people visit.
There are many reasons why network administrators apply web filtering, such as to:
• preserve employee productivity,
• prevent network congestion, where valuable bandwidth is used for non-business purposes,
• prevent loss or exposure of confidential information,
• decrease exposure to web-based threats,
• limit legal liability when employees access or download inappropriate or offensive material,
• prevent copyright infringement caused by employees downloading or distributing copyrighted
materials, and
• prevent children from viewing inappropriate material.
Web Filtering
FortiGate I Student Guide
495
DO NOT REPRINT
© FORTINET

There are two ways you can apply filtering to websites: web filtering and DNS filtering.
Let’s start by defining how FortiGate handles the URL filtering process.
Web Filtering
FortiGate I Student Guide
496
DO NOT REPRINT
© FORTINET

FortiGate website filters are also security profiles, which are customizable according to the selected
inspection mode. So, the first step before setting up any web filter is to configure the inspection mode.
Inspection mode is a system setting, customizable at the VDOM level.
When your FortiGate is set up to proxy inspection mode, a proxy options profile must also be defined.
This profile determines the protocols that your security profiles will use, for example, to inspect web or
DNS traffic.
Note that HTTPS inspection port numbers, and other settings related to the handling of SSL, are
defined separately in the SSL/SSH inspection profile.
Web Filtering
FortiGate I Student Guide
497
DO NOT REPRINT
© FORTINET

FortiGate’s inspection modes have different considerations to filter websites:
• Flow-based web filtering is achieved by analyzing the TCP flow of the traffic between the client and
the server. It provides less flexibility, and has less configuration options to inspect web traffic. It
intercepts at Layer 3 and works with the Layer 4 data.
• Proxy-based web filtering is achieved using a transparent proxy that intercepts traffic between the
client and the server. Proxy-based provides more flexibility to inspect web traffic because it
intercepts at Layer 7. It also has more configuration options. However, note that this option uses
more CPU resources.
Web Filtering
FortiGate I Student Guide
498
DO NOT REPRINT
© FORTINET

As mentioned, you can also inspect DNS traffic, but this option is limited only to proxy-based mode,
and is presented as a new security profile feature.
How does it work?
Rather than looking at the HTTP protocol, this option filters the DNS request that occurs prior to an
HTTP GET request. This has the advantage of being very lightweight, but at a cost, because it lacks
the precision of HTTP filtering.
Every protocol will generate DNS requests in order to resolve a host name, therefore this kind of
filtering will impact all of the higher level protocols that depend on DNS, not just web traffic. For
example, it could apply FortiGuard categories to DNS requests for FTP servers. Very few web filtering
features are possible beyond host name filtering, due to the amount of data available at the point of
inspection.
Web Filtering
FortiGate I Student Guide
499
DO NOT REPRINT
© FORTINET

(slide contains animation)
This example illustrates the difference between the traditional HTTP filter and filtering at the DNS
lookup process.
(click)
DNS filtering looks at the nameserver response, which typically occurs when you connect to a
website.
(click)
Web filtering looks for the HTTP 200 response, returned when you successfully access the website.
So, as shown, in HTTP the domain name and URL are separate pieces. The domain name might look
like this in the header: Host: www.acme.com, and the URL might look like this in the header:
/index.php?login=true.
If we filter by domain, sometimes it blocks too much. For example, the blogs on tumblr.com are
considered different content, because of all the different authors. In that case, you can be more
specific, and block by the URL part, tumblr.com/hacking, for example.
Remember the Host: header? That is what gets the DNS lookup before the HTTP request.
Obviously the URL is not in a DNS request.
Web Filtering
FortiGate I Student Guide
500
DO NOT REPRINT
© FORTINET

Let’s summarize the web inspection modes.
Proxy-based caches traffic, so it can cause a noticeable delay depending on the file size, oversize
limit, and connection speed. It does, however, support a greater number of web filtering features.
Flow-based has a higher throughput rate, compared to proxy-based, because it does not cache data
so there is no transmission delay.
DNS-based is very lightweight because it handles only the nameserver lookup, but suffers from
accuracy issues because it does not see the full URL.
Web Filtering
FortiGate I Student Guide
501
DO NOT REPRINT
© FORTINET

Now, let’s see how FortiGate applies DNS and web filtering by querying the FortiGuard categories.
Web Filtering
FortiGate I Student Guide
502
DO NOT REPRINT
© FORTINET

Rather than block or allow websites individually, FortiGuard category filtering looks at the category
that a website has been rated with. The action is taken based on that category, and not based on the
URL itself.
FortiGuard category filtering is a live service that requires an active contract, which validates
connections to the FortiGuard network. If the contract expires, there is a 7-day grace period to renew it
before the service cuts off. So, after the 7-day grace period, FortiGate will not be able to rate websites
and every visit will be treated as a rating error.
Also, FortiManager can be configured to act as a local FortiGuard server instead. For this it is
necessary to download the databases into FortiManager and configure your FortiGate to validate the
categories against FortiManager instead of FortiGuard.
Web Filtering
FortiGate I Student Guide
503
DO NOT REPRINT
© FORTINET

How does FortiGuard decide the categories?
Website categories are determined by both automatic and human methods. The FortiGuard team has
automatic web crawlers that look at various aspects of the website in order to come up with a rating.
There are also people who examine websites and look into rating requests to determine categories.
To review the complete list of categories and subcategories, go to
www.fortiguard.com/webfilter.
Web Filtering
FortiGate I Student Guide
504
DO NOT REPRINT
© FORTINET

So, how does it work?
FortiGate queries the FortiGuard Distribution Network (FDN)—or the FortiManager if it has been
configured to act as a local FortiGuard server—to determine the category of a requested webpage.
Hence, when users visit websites, FortiGate uses the FortiGuard live service to find out the category
for the URL and take a configured action for that category, such allow or block access. With this
feature you can perform bulk URL filtering without needing to individually define each website.
Also, to use the FortiGate’s DNS filter, you must use the FortiGuard DNS service for DNS lookups.
DNS lookup requests sent to the FortiGuard DNS service return with an IP address and a domain
rating that includes the FortiGuard category of the webpage.
You can enable the FortiGuard category filtering on the web filter or DNS filter profiles. Categories and
sub-categories are listed and the action to perform can be individually customized.
The available actions are: allow, block, monitor, warning, and authenticate. Warning and authenticate
are exclusively category-based actions. Let’s see how they work.
Web Filtering
FortiGate I Student Guide
505
DO NOT REPRINT
© FORTINET

The warning action is only available for proxy-based inspection. This action informs users that the
requested website is not allowed by the internet policies. However, it gives the choice to go to the
website or go back to the previous website.
The warning interval can be customized, so you can present this warning page at a specific time
during your configured period.
Web Filtering
FortiGate I Student Guide
506
DO NOT REPRINT
© FORTINET

The authenticate action is also a FortiGuard category-based action for proxy-based inspection. This
action blocks the requested websites, unless the user enters a successful passcode.
The interval of time to allow access with this category is customizable. So users are not prompted to
authenticate again if they access other websites in the same category, until the timer expires.
You can apply this action to define individual users that belong to any authentication group.
Web Filtering
FortiGate I Student Guide
507
DO NOT REPRINT
© FORTINET

There’s also another feature to customize quotas of time to access the categories set up to monitor,
warning, or authenticate in the web filter profile.
You can customize multiple quotas (timers). Each one can either be linked to a single category or
multiple categories. If the quota applies to multiple categories, the timer is shared among all the
categories instead of having a single timer for each individual category.
If the authentication action is not enabled, FortiGate automatically assigns the quotas for each source
IP as the monitor feature shows.
Let’s see how quotas work.
Web Filtering
FortiGate I Student Guide
508
DO NOT REPRINT
© FORTINET

As illustrated, the FortiGuard quota limits the time users spend on websites, based on category.
A quota cannot redirect you once the website is loaded in the browser. For example, if you have 45
seconds left on your quota, and you access a website from this category, it will likely finish loading
before the remaining 45 seconds. Then you can stay in that site, and it wont be blocked until the
browser is refreshed.
The reason for this is that the connection to the website is not generally a live stream. Once you
receive the information, the connection is closed.
Web Filtering
FortiGate I Student Guide
509
DO NOT REPRINT
© FORTINET

Some FortiGate features can’t provide direct feedback to users. For example, FortiGuard quota
doesn’t provide any feedback until users exceed the quota and refresh the browser, unless the
Fortinet bar is enabled.
The Fortinet bar injects a Java applet that communicates to FortiGate and gets additional information
from features that would otherwise provide no direct feedback.
The Fortinet bar provides a countdown for FortiGuard quotas. Other features that can’t block pages
(for example, application control) will show block events in the top bar.
Web Filtering
FortiGate I Student Guide
510
DO NOT REPRINT
© FORTINET

FortiGate can maintain a list of recent website’s rating responses in memory, so if the URL is already
known, FortiGate doesn’t send back a rating request.
Two ports are available to query the servers (FortiGuard or FortiManager): port 53 and port 8888. Port
53 is the default, since it is also the port used for DNS and almost guaranteed to be open. However,
any kind of inspection will reveal that this traffic is not DNS and prevent the service from working. In
this case, you can switch to the alternate port 8888, but this port is not guaranteed to be open in all
networks, so you will need to check beforehand.
Caching responses reduces the amount of time it takes to establish a rating for a website. Also,
memory lookup is much quicker than packets travelling on the Internet.
The timeout defaults to 15 seconds, but can be adjusted as high as 30 seconds if necessary.
Web Filtering
FortiGate I Student Guide
511
DO NOT REPRINT
© FORTINET

There is always the possibility for errors in ratings, or a scenario where you simply do not agree with
the rating given. So, you can use the web portal to contact the FortiGuard team to submit a website for
a new rating, or get it rated if it is not already in the database.
Web Filtering
FortiGate I Student Guide
512
DO NOT REPRINT
© FORTINET

Category filtering is not granular like static URL filtering. If you want to change any default FortiGuard
categories, FortiGate provides an override option.
Web Filtering
FortiGate I Student Guide
513
DO NOT REPRINT
© FORTINET

When using FortiGuard category filtering to allow or block access to a website, one option is to make
a web rating override and define the website into a different category. Web ratings are only for host
names—no URLs or wildcard characters are allowed.
If the contract expires, and the 7-day grace period passes, web rating overrides will be not be
effective. All website categories will still be considered rating errors.
Web Filtering
FortiGate I Student Guide
514
DO NOT REPRINT
© FORTINET

If you want to make an exception, for example, rather than unblock access to a potentially unwanted
category, just change the website to an allowed category. The reverse can also be performed, you can
block a website that belongs to an allowed category.
Remember that changing categories does not automatically result in a different action for the website.
This will depend on the settings within the web filter profile.
Web Filtering
FortiGate I Student Guide
515
DO NOT REPRINT
© FORTINET

If the predefined categories within FortiGuard are not suitable for the situation, you can add additional
customized categories.
These custom categories can be added and deleted as needed, so long as they are not in use.
Web Filtering
FortiGate I Student Guide
516
DO NOT REPRINT
© FORTINET

You can also override the filter profile. Web profile overrides change the rules that are used to inspect
traffic. It authorizes some users, user groups, or predefined source IPs, to use a different web filter
profile to inspect their traffic.
In the example shown here, the new profile applied to the user Student inspects all of their web traffic
from that point on, until the timer expires. To use this, an override authentication must be enabled.
Once the web profile override is enabled, the FortiGuard block page will show a link that users can
select to activate the override.
This feature is available only if FortiGate is set to perform proxy-based inspection.
Web Filtering
FortiGate I Student Guide
517
DO NOT REPRINT
© FORTINET

As you have noticed so far, web filtering only applies to the HTTP protocol. So, how does FortiGate
scan traffic over HTTPS?
FortiGate scans HTTPS sites through the SSL inspection profile settings. This security profile must to
be applied to the firewall policy too.
The SSL Certificate Inspection method reads only unencrypted data from the hello message,
whereas the Full SSL Inspection method will proxy SSL, allowing for full content inspection.
SSL and certificates are covered in more detail in the FortiGate II: Certificate Operations lesson.
Web Filtering
FortiGate I Student Guide
518
DO NOT REPRINT
© FORTINET

Let’s examine the DNS and web filter security profiles, which allow you to perform individual and local
filtering actions, rather than use the FortiGuard categories.
Web Filtering
FortiGate I Student Guide
519
DO NOT REPRINT
© FORTINET

Here’s a look at the new DNS filter profile. This security profile is only available when FortiGate is set
to perform proxy-based inspection.
The DNS filter includes various configuration settings. You can enable or disable the FortiGuard
category-based filter and the static domain filter. You also have the option to:
• block DNS requests to known botnet command and control,
• allow DNS requests when a rating error occurs from the FortiGuard web filter service, and
• redirect blocked requests to a specific portal (the Use FortiGuard Default setting is
recommended).
Once you have enabled and saved the settings you require, remember to apply this profile to your
firewall policy to activate the options. Any traffic being examined by the policy will have those
operations applied to it.
Web Filtering
FortiGate I Student Guide
520
DO NOT REPRINT
© FORTINET

You can configure DNS filtering to allow, block, or monitor access to web content through the static
domain filter. Entries in the domain list are checked against the visited websites. If a match is found,
the configured action is taken.
Patterns set to the type Simple are exact text matches. Patterns set to Wildcard allow for some
flexibility in the text pattern by allowing wildcard characters and partial matching to occur. Patterns set
to Reg Expression allow for the use of PCRE regular expressions.
With this feature you can prevent lots of HTTP requests from ever being made, because the initial
lookup fails. That’s the performance tradeoff.
Web Filtering
FortiGate I Student Guide
521
DO NOT REPRINT
© FORTINET

When you enable Block DNS request to known botnet C&C from your DNS filter profile, DNS
lookups are checked against the botnet command and control database. This database is dynamically
updated from FortiGuard and stored on FortiGate.
All matching DNS lookups are blocked. Matching uses a reverse prefix match, thus all subdomains
are also blocked.
This service requires an active web filtering license.
Web Filtering
FortiGate I Student Guide
522
DO NOT REPRINT
© FORTINET

Now let’s look at the web filter profile.
This security profile supports both proxy-based and flow-based inspection modes. However,
depending on the mode you select, the available settings are different. The flow-based inspection has
fewer available options.
In this example, FortiGate is set to perform a proxy-based inspection. The FortiGuard category-based
filter divides the websites based on categories and sub-categories by FortiGuard, as explained
previously. Other local options (which we’ll discuss over the next few slides) include:
•Search Engines
•Static URL Filter
•Rating Options
•Proxy Options
Once your filter is configured, apply this profile to your firewall policy so the filter is applied to your web
traffic.
Web Filtering
FortiGate I Student Guide
523
DO NOT REPRINT
© FORTINET

Search engines filtering provide two important features: safe search and YouTube EDU filtering.
• Safe search is an option that some browsers have to apply internal filters to the search results.
When you enable safe search for the supported search sites, code is appended to the URL to
enforce its use. For example, on a Google search it would mean adding the string &safe=active
to the URL in the search. So, even if it is not locally enabled in the browser, FortiGate will apply it to
the requests when it passes through. It supports safe search for Google, Yahoo, Bing, and Yandex.
• YouTube EDU filtering is a service offered by YouTube to educational institutions. Unlike normal
safe search, this does not append the URL, but adds an HTTP header into the packets. FortiGates
requires the YouTube ID provided when you created your account, as this identifies your institution
to YouTube when people visit. Within your YouTube EDU account, you can configure the filters and
settings in order to limit video access.
Web Filtering
FortiGate I Student Guide
524
DO NOT REPRINT
© FORTINET

(slide contains animations)
Static URL filtering is another web filter feature. Similar to static domain filter, configured URLs in the
URL filter are checked against the visited websites. If a match is found, the configured action is taken.
URL filtering has the same patterns as static domain filtering: simple, wildcard, and regular
expressions.
Let’s see an example of how it works.
(click)
When a user visits a website, FortiGate looks at the URL list for a matching entry. In this example, the
website matches the third entry in the table, which is set up as type Simple. This type means that the
match must be exact—there is no option for a partial match with this pattern. Also, the action is set up
to Block, thus FortiGate will display a block page message.
Web Filtering
FortiGate I Student Guide
525
DO NOT REPRINT
© FORTINET

You can also control web content in the web filter profile by blocking access to webpages containing
specific words or patterns. This helps to prevent access to pages with questionable material.
You can also add words, phrases, patterns, wildcards, and Perl regular expressions to match content
on webpages. This feature is configured per web filter profile, not at the global level. So it is possible
to add multiple web content filter lists and then select the best list for each web filter profile.
The system administrator can specify banned words and phrases and attach a numerical value, or
score, to the importance of those words and phrases. When the web content filter scan detects
banned content, it adds the scores of banned words and phrases in the page. If the sum is higher than
a threshold set in the web filter profile, FortiGate blocks the page.
The maximum number of web content patterns in a list is 5000.
Web Filtering
FortiGate I Student Guide
526
DO NOT REPRINT
© FORTINET

You can use the advanced web filtering settings to improve the web filter.
The rating options are:
1. If a rating error occurs from the FortiGuard Web Filter service, users will have full unfiltered
access to all websites (error-allow)
2. Rate URLs by domain and IP Address. This option sends both the URL and the IP address of the
requested site for checking, providing additional security against attempts to bypass the
FortiGuard system (rate-server-ip)
3. Block HTTP redirect to avoid websites designed to circumvent web filtering.
4. Rate images by URL. This option replaces blocked images with blanks, even if they are part of a
site in an allowed category (rate-image-urls)
Web Filtering
FortiGate I Student Guide
527
DO NOT REPRINT
© FORTINET

The advanced proxy option settings for web filtering are:
1. Block access to some Google accounts and services. You can include an exception list.
2. FortiGate displays its own replacement message for 400 and 500-series HTTP errors. If the
server error is allowed through, some sites can use these common error pages to circumvent web
filtering.
3. Filter Cookies, Java Applets, and ActiveX scripts from web traffic.
4. HTTP POST is the command used by your browser when you send information, so you can limit
users from sending information and files to websites. The allow option prevents a server time-out
when scanning or when other filtering processes are performed for outgoing traffic.
Web Filtering
FortiGate I Student Guide
528
DO NOT REPRINT
© FORTINET

Finally, let’s examine how to monitor the web filtering features and troubleshoot any issues.
Web Filtering
FortiGate I Student Guide
529
DO NOT REPRINT
© FORTINET

Remember that the web filtering profile has several features. So if you have enabled many of them,
the inspection order flows as follow:
1. The local static URL filter
2. FortiGuard category filtering (to determine a rating)
3. Advanced filters (such as safe search or removing Active X components)
For each step, if there is no match, FortiGate will move on to the next check enabled.
Web Filtering
FortiGate I Student Guide
530
DO NOT REPRINT
© FORTINET

You have configured your security profiles, but they are not performing web or DNS inspection. Why?
Check to see if you have applied the security profiles to your firewall policies.
Web Filtering
FortiGate I Student Guide
531
DO NOT REPRINT
© FORTINET

Category-based filtering requires a live connection.
You can verify the connection to FortiGuard servers by running the diagnose debug rating CLI
command. This displays a list of FortiGuard IP gateways you can connect to, including the following
information:
•Weight: Based on the difference in time zone between the FortiGate and this server (modified by
traffic)
•RTT: Return Trip Time
•Flags: D (IP returned from DNS), I (Contract server contacted), T (being timed), F (failed)
•TZ: Server time zone
•Curr Lost: Current number of consecutive lost packets (in a row, resets to 0when one packet
succeeds)
•Total Lost: Total number of lost packets
The list is of variable length depending on the FortiGuard Distribution Network, but it displays
approximately 10 IPs.
Web Filtering
FortiGate I Student Guide
532
DO NOT REPRINT
© FORTINET

Now let’s take a look at the web filter log and report feature.
This is an example of a log message. Access details include information about the FortiGuard quota
and category (if those are enabled), which web filter profile was used to inspect the traffic, the URL,
and more details about the event.
You can also view the raw log data by selecting the download raw log button at the top of the GUI.
The file downloaded is a plain text file in a syslog format.
Web Filtering
FortiGate I Student Guide
533
DO NOT REPRINT
© FORTINET

To review, these are the topics that we just talked about:
•Web and DNS filtering overview
•Static URL and domain filtering
•Forcing safe search
•FortiGuard category filter
•FortiGuard quotas
•Fortinet bar
•Website rating submissions
•FortiGuard and static filtering actions
•Website rating overrides
•Custom categories
•HTTP inspection order
•Web profile overrides
•Basic HTTPS scanning
Web Filtering
FortiGate I Student Guide
534
DO NOT REPRINT
© FORTINET

In this lesson, you will learn how to monitor and control network applications that may use standard or
non-standard protocols and ports – beyond simply blocking or allowing a protocol, port number, or IP
address.
Application Control
FortiGate I Student Guide
535
DO NOT REPRINT
© FORTINET

After completing this lesson, you should have these practical skills to apply application control, keep it
up-to-date, and monitor what applications are being used on your network.
Application Control
FortiGate I Student Guide
536
DO NOT REPRINT
© FORTINET

Application control detects applications – often, ones that consume more bandwidth – and allows you
to take appropriate actions related to application traffic, such as monitoring, blocking, or applying
traffic shaping.
A particular application, such as Google Talk, is identified by matching known patterns to the
application’s transmission patterns. So, obviously, an application can only be accurately identified if its
transmission pattern is unique somehow. However, not every application behaves in a unique way.
Many re-use pre-existing, standard protocols and communications methods. For example, many video
games such as World of Warcraft now use the BitTorrent protocol to distribute game patches.
Application control can be configured in proxy-based and flow-based virtual domains, but inspection is
always flow-based because it uses the IPS engine which is flow-based inspection. By comparison,
when applying web filtering and antivirus through an HTTP proxy, the proxy first parses HTTP and
removes the protocol, and then scans only the payload inside.
Why does FortiGate use a flow-based scan for application control?
Unlike other forms of security profiles, such as web filtering or antivirus, application control is not
applied by a proxy. It uses an IPS engine to analyze network traffic and detect application traffic, even
if the application is using standard or non-standard protocols and ports. It doesn’t operate using built-
in protocol states. It matches patterns in the entire byte stream of the packet, and then looks for
patterns.
Application Control
FortiGate I Student Guide
537
DO NOT REPRINT
© FORTINET

When HTTP and other protocols were designed, they were designed to be easy to trace. In that way,
administrators could easily give access to single servers behind NAT devices, such as routers and,
later, firewalls.
But when P2P applications were designed, they had to be able to work without assistance – or
cooperation – from network administrators. In order to achieve this, the designers made P2P
applications able to bypass firewalls and incredibly hard to detect. Port randomization, pinholes, and
changing encryption patterns are some of the techniques that P2P protocols use.
These techniques make P2P applications difficult to block using a firewall policy, and also make them
difficult to detect by proxy-based inspection.
Flow-based inspection using the IPS engine can analyze packets for pattern matching and then look
for patterns to detect P2P applications.
Application Control
FortiGate I Student Guide
538
DO NOT REPRINT
© FORTINET

Here is a traditional, client-server architecture. There may be many clients of popular sites, but often,
such as with an office file server, it’s just one client and one server.
Traditional downloads use a defined protocol over a standard port number. Whether it’s from a web or
FTP site, the download is from a single IP address, to a single IP address. So blocking this kind of
traffic is easy: you only need one firewall policy.
But it’s more difficult for peer-to-peer downloads. Why?
Application Control
FortiGate I Student Guide
539
DO NOT REPRINT
© FORTINET

P2P downloads divide each file among multiple (theoretically unlimited) peers. Each peer delivers part
of the file. While having many clients is a disadvantage in client-server architectures, it is an
advantage for P2P architecture because, as the number of peers increases to n, the file is delivered n
times faster.
Because popularity increases the speed of delivery – unlike traditional client-server architecture,
where popularity could effectively cause a denial of service attack on the server – some software,
such as BitTorrent distributions of Linux, and games distributing new patches, leverage this
advantage. Even if each client has little bandwidth, together, they can offer more bandwidth for the
download than many powerful servers.
Conversely, in order to download the file, the requesting peer can consume much more bandwidth per
second than it would from only a single server. Even if there is only one peer on your network, it can
consume unusually large amounts of bandwidth. As the protocols are usually evasive, and there will
be many sessions to many peers, they are difficult to completely block.
Application Control
FortiGate I Student Guide
540
DO NOT REPRINT
© FORTINET

Before you try to control applications, it’s important to understand the signatures used by application
control.
How does application control detect the newest applications and changes to application protocols?
Because application control uses an IPS engine, FortiGuard updates are crucial. You can configure
your FortiGate to automatically update its IPS & Application Control signature database under the
FortiGuard page. It also shows the current version of IPS definitions and engine. You can also
manually trigger the database update by clicking Update AV & IPS Definitions.
Application Control
FortiGate I Student Guide
541
DO NOT REPRINT
© FORTINET

You can view the latest application control database version from the FortiGuard website
http://www.fortiguard.com, or by clicking View Application Signatures in the application
control profile.
The application control database provides the details about application control signatures based on
category, technology, and risk to name a few.
When building an application control signature, the FortiGuard security research team evaluates the
application and assigns a risk level. The assigned risk level is based on the type of security risk. The
rating is Fortinet-specific, and not related to Common Vulnerability Scoring System (CVSS) or other
external systems. If you aren’t aware of the specific application, this information can help you to
decide if it would be wise to block an application or not.
On the FortiGuard website, you can read details about each signature’s related application. Let’s look
at an example.
In the slide, you can see an example article for Ultrasurf_9.6+. Ultrasurf_9.6+ is a web proxy, so it falls
in the proxy category. If there are any special requirements for scanning or blocking the application,
the article provides some advice. It is always wise to make test policies and use them to observe the
behavior first.
If there are new applications that you need to control, and the latest update includes definitions for
them, you can go to the FortiGuard website and submit a request to have the new applications added.
Application Control
FortiGate I Student Guide
542
DO NOT REPRINT
© FORTINET

Now you know what application control is and how it works. In this section, you will learn how to
configure an application control profile to match traffic with applications and take appropriate action.
Application Control
FortiGate I Student Guide
543
DO NOT REPRINT
© FORTINET

The application control profile consists of three different types of filters:
•Categories: It consist of applications that are grouped based on similarity. For example, all
applications that are capable of providing remote access are grouped in the Remote Access
category. You can view the signatures of all applications in a category or apply an action to the
category as a whole.
•Application Overrides: It provides the flexibility to control specific signatures and applications.
•Filter Overrides: It can be useful when a predefined category does not meet your requirements,
and you would like to block all the applications based on criteria that is not available in categories.
You can configure the categorization of applications based on behaviour, popularity, protocol, risk,
vendor, and/or the technology used by the applications, and take action based on that.
Application Control
FortiGate I Student Guide
544
DO NOT REPRINT
© FORTINET

The application control profile is configured from the Application Control page. You can configure
actions based on categories, application overrides, and filter overrides. You can also view the list of
application control signatures by clicking View Application Signatures.
Unknown Applications matches traffic that could not be matched to any application control signature
and identifies the traffic as Unknown Application in the logs. Whether or not traffic is identified as
Unknown Application depends on:
• how many rare applications your users have, and
• which IPS database version you are using.
Identifying traffic as unknown might cause many log entries—and frequent log entries decrease
performance.
If you choose to enable Allow and Log DNS Traffic, be aware that you should only do it for short
periods, such as during an investigation. So, depending on the application, and how often it queries
DNS servers, this can use significant system resources. Replacement Messages for HTTP-based
Applications allows you to replace blocked content with an explanation (for the user’s benefit). With
non-HTTP/HTTPS applications, however, you can only drop the packets or reset the TCP connection.
Once you’ve configured the application control profile, select the sensor in the firewall policy. Like any
other security profile, these settings are not global. FortiGate will only apply them to traffic governed
by the firewall policy where you’ve selected an application control profile. This allows granular control.
Application Control
FortiGate I Student Guide
545
DO NOT REPRINT
© FORTINET

The IPS engine examines the traffic stream for a signature match. Then, FortiGate scans packets for
matches in this specific order, for the application control profile:
1. Application Overrides: If you have configured any Application Overrides, the application
control profile considers those first. It looks for a matching override starting at the top of the list,
like firewall policies.
2. Filter Overrides: If no matching application override exists, then the application control profile
applies the action based on configured Filter Overrides.
3. Categories. Finally, the application control profile applies the action that you’ve configured for
applications in your selected Categories.
It is also worth mentioning that multiple overrides for the same signature cannot be created.
Application Control
FortiGate I Student Guide
546
DO NOT REPRINT
© FORTINET

For each filter in the application control profile, you must indicate an Action – what FortiGate does
when traffic matches.
•Allow – Simply passes the traffic and does not generate a log.
•Monitor – Passes the traffic, but also generates a log message.
•Block – Drops the detected traffic and generates a log message.
•Quarantine – Blocks the traffic from an attacker IP until expiration time has been reached. It also
generates a log message.
The View Signature only allows you to view signatures from a particular category and is not a
configurable action.
Which is the correct action to select?
If you’re not sure which action to choose, Monitor can be useful initially, while you study your network.
Once you have taken some time to study your network traffic, you can later fine-tune your filter
selection by choosing the most appropriate action. It also depends on the application. If an application
requires feedback to prevent instability or other unwanted behavior, then you might use Quarantine
instead of Block. Otherwise, the most efficient use of FortiGate resources to simply to block.
Application Control
FortiGate I Student Guide
547
DO NOT REPRINT
© FORTINET

In this example profile, application control blocks the Game and Video/Audio categories. For
applications in these categories, FortiGate responds with application control’s HTTP block message.
(It is slightly different than web filtering’s HTTP block message.) All other categories are set to
monitor, and are allowed to pass traffic.
In the section Application Overrides, you can see that some exceptions are specified. Instead of
being set to block, Battle.Net (Game) and Dailymotion (Video/Audio) are set to monitor. Because
application overrides are applied first in the scan, these two applications will be allowed, and will
generate logs.
Next, the scan will check for Filter Overrides. Because a filter override is configured to block
applications that use excessive bandwidth, it will block all applications using excessive bandwidth,
regardless of any categories that allow these applications.
Here is an example of how several UTM features could work together, overlap, or work as substitutes,
on the same traffic.
After the application control scan is done, FortiGate begins other scans, such as web filtering. This
scan could block Battle.Net and Dailymotion, but it would use its own block message. Also, web
filtering doesn’t check the list of application control overrides. So even if an application control override
allows an application, web filtering could still block it.
Similarly, static URL filtering has its own exempt action, which bypasses all subsequent security
checks. However, application control occurs before web filtering, so that web filtering exemption
cannot bypass application control.
Application Control
FortiGate I Student Guide
548
DO NOT REPRINT
© FORTINET

For HTTP-based applications, application control can provide feedback to the user about why their
application was blocked. This is called a block page, and it is similar to the one you can configure for
URLs that you block through FortiGuard web filtering.
It is also worth mentioning that, if deep inspection is enabled in the firewall policy, all HTTPS-based
applications will also provide this block page.
The block page contains this information:
• the signature that detected the application (in this case, BitTorrent)
• the signature’s category (P2P)
• the URL that was specifically blocked (in this case, the index page of bittorrent.com), since a
web page can be assembled from multiple URLs
• the client’s source IP (10.0.1.10)
• the server’s destination IP (20.x.x.x)
• user name (if authentication is enabled)
• the UUID of the policy governing the traffic
• the FortiGate’s host name
The last two pieces of information listed can help you to determine which FortiGate blocked the page,
even if you have a large network with many FortiGates securing different segments.
Application Control
FortiGate I Student Guide
549
DO NOT REPRINT
© FORTINET

If an application is necessary, but you need to prevent it from impacting bandwidth, then instead of
blocking it entirely, you can apply a rate limit to the application. For example, you can rate limit
applications used for storage or backup leaving enough bandwidth for more sensitive streaming
applications, such as video conferencing.
Applying traffic shaping to applications is very useful when you’re trying to limit traffic that uses the
same TCP or UDP port numbers as mission-critical applications. Some high-traffic web sites, such as
YouTube, can be throttled in this way.
Let’s examine the details of how throttling works. Not all URL requests to www.youtube.com are for
video. Your browser makes several HTTPS requests for:
• the web page itself
• images
• scripts and style sheets
• video
All of these items have separate URLs. If you analyze a site like YouTube, the web pages themselves
don’t use much bandwidth; it is the video content that uses the most bandwidth. But, since all content
is transported using the same protocol (HTTPS), and the URLs contain dynamically generated
alphanumeric strings, traditional firewall policies can't block or throttle the traffic by port number or
protocol, because they are the same. Using application control, you can rate limit only videos. Doing
this prevents users from saturating your network bandwidth while still allowing them to access the
other content on the site, such as for comments or sharing links.
Application Control
FortiGate I Student Guide
550
DO NOT REPRINT
© FORTINET

You can limit the bandwidth of an application category or specific application by configuring a traffic
shaping policy. Starting in FortiOS 5.4, you can also apply traffic shaping to FortiGuard web filter
categories.
You must ensure that the matching criteria aligns with the firewall policy or policies to which you want
to apply shaping. It does not have to match outright. For example, if the source in the firewall policy is
set to all (0.0.0.0/0.0.0.0), the source in the traffic shaping policy can be set to any source that is
included in all, for example, STUDENT_INTERNAL (10.0.1.0/24).
If the traffic shaping policy is not visible in the GUI, you can enable it through the Feature Select
page.
Note that the outgoing interface is usually the egress interface (WAN). The Shared Shaper is applied
to ingress-to-egress traffic, which is useful for restricting bandwidth for uploading. The Reverse
Shaper is also a shared shaper, but it is applied to traffic in the reverse direction (egress-to-ingress
traffic). This is useful for restricting bandwidth for downloading or streaming, because it limits the
bandwidth from the external interface to the internal interface.
There are two types of shapers that can be configured from the Traffic Shaping Policy page, and you
can apply them in the traffic shaping policy.
•Shared Shaper: A shared shaper applies a total bandwidth to all traffic using that shaper. The
scope can be per-policy or for all policies referencing that shaper.
•Per-IP Shaper: A per-IP shaper allows you to apply traffic shaping to all source IP addresses in the
security policy, and bandwidth is equally divided among the group.
Application Control
FortiGate I Student Guide
551
DO NOT REPRINT
© FORTINET

Starting in FortiOS 5.4, all cloud-based applications are grouped under a Cloud Access Security
Inspection (CASI) profile, which allows fine-grained control over cloud applications, such as YouTube,
Dropbox, and Netflix, to name a few.
You can configure a new CASI profile or edit an existing CASI profile under the Security Profiles
menu. However, if the CASI profile is not visible in the GUI, you can enable it from the Feature Select
page.
The CASI profile can be configured in proxy-based and flow-based virtual domains, but inspection is
always flow-based, because it uses an IPS engine (the same as the application control profile). Note
that it requires a subscription to FortiGuard IPS and Application Control.
Many applications are switching to HTTPS-only, so remember that for those, you will also need an
SSL/SSH inspection profile. When applying a CASI profile to a firewall policy, enable deep inspection
(full SSL/SSH inspection) in the firewall policy as CASI is basically doing deep inspection of cloud
applications.
For the selected cloud application, you can configure an individual action on each feature:
•Allow: Pass the traffic and do not log.
•Monitor: Pass the traffic and generate a log.
•Block: Block the traffic and generate a log.
Application Control
FortiGate I Student Guide
552
DO NOT REPRINT
© FORTINET

If you have logging enabled, you can use it to discover which applications are being used on your
network, and see details about them through the Log & Report menu.
In the example, application control detected a client attempting to access BitTorrent. The configured
action was to monitor the traffic. We know this because the Action field indicates pass, so we know
FortiGate didn’t block the traffic. But, the action wasn’t to simply allow the traffic without logging,
either, which we know because the log message exists.
You can view the details of the log message by clicking its log entry. The log entry provides detailed
information, such as the application category, application sensor name, action, and policy ID, to name
a few.
You can also view the details through the Forward Traffic logs. This is where firewall policies record
activity. You’ll also find a summary of the traffic to which FortiGate applied application control. Again,
this is because application control is applied by a firewall policy. To find out which policy applied
application control, you can review either the Policy ID or the Policy UUID fields of this log message.
What if you need to find out which application is using most of the bandwidth during certain hours of
the day?
Application Control
FortiGate I Student Guide
553
DO NOT REPRINT
© FORTINET

Under the FortiView menu, the Applications page provides details of each application, such as the
application name, category, and bandwidth. You can drilldown further to see more granular details by
right-clicking the application and clicking Drill Down to Details. This view provides information about
sources, destinations, policies, or sessions for that selected application.
Application Control
FortiGate I Student Guide
554
DO NOT REPRINT
© FORTINET

To review, we discussed the following topics:
• How application control identifies traffic
• Why some traffic, especially peer-to-peer, is hard to block without application control
• FortiGuard’s five-point rating system for application control signatures
• How to submit requests for additional applications
• How to configure an application control profile
• The order of operations for the application control and IPS engine processes
• When to shape traffic
• How to configure CASI
• How to read logs to discover which applications have been detected, and which action FortiGate
applied
Application Control
FortiGate I Student Guide
555
DO NOT REPRINT
© FORTINET
