Peavey Electronics XR-AT Audio mixer power amplifier User Manual UserMan
Peavey Electronics Corporation Audio mixer power amplifier UserMan
UserManual.wiki
>
Peavey Electronics
>
XR AT User Manual
UserMan
Navigation menu
Upload a User Manual
Namespaces
Wiki Guide
HTML
PDF
Info
Views
User Manual
Discussion / Help
Navigation

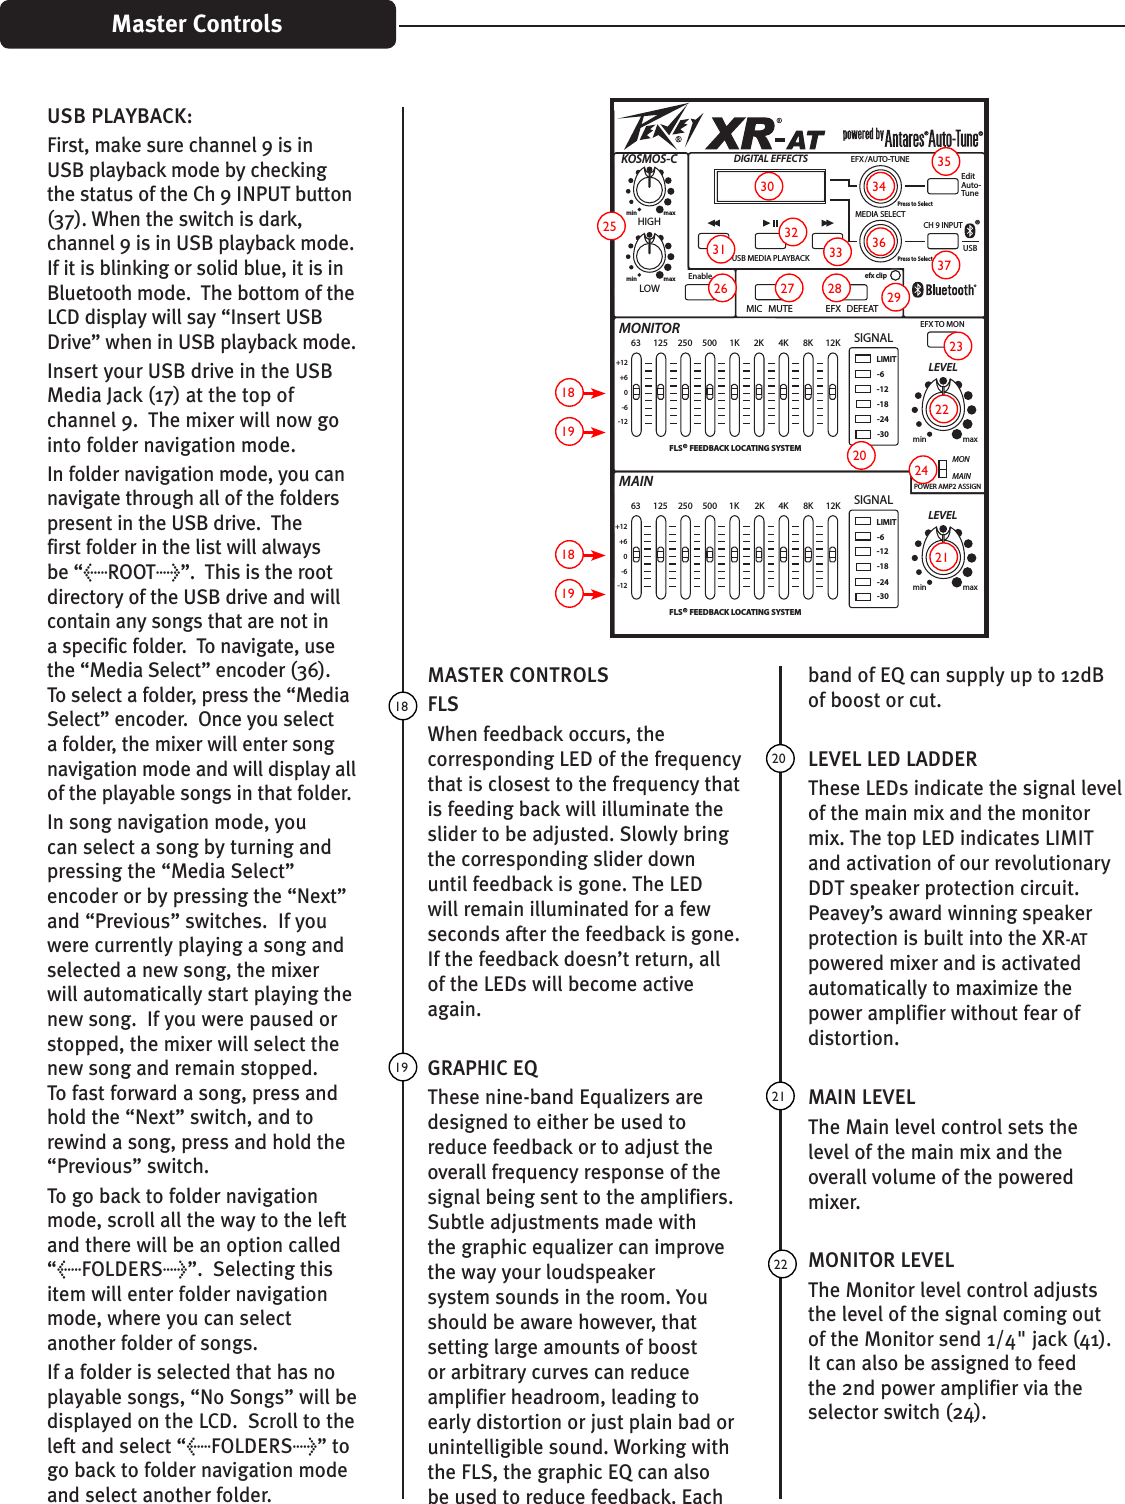
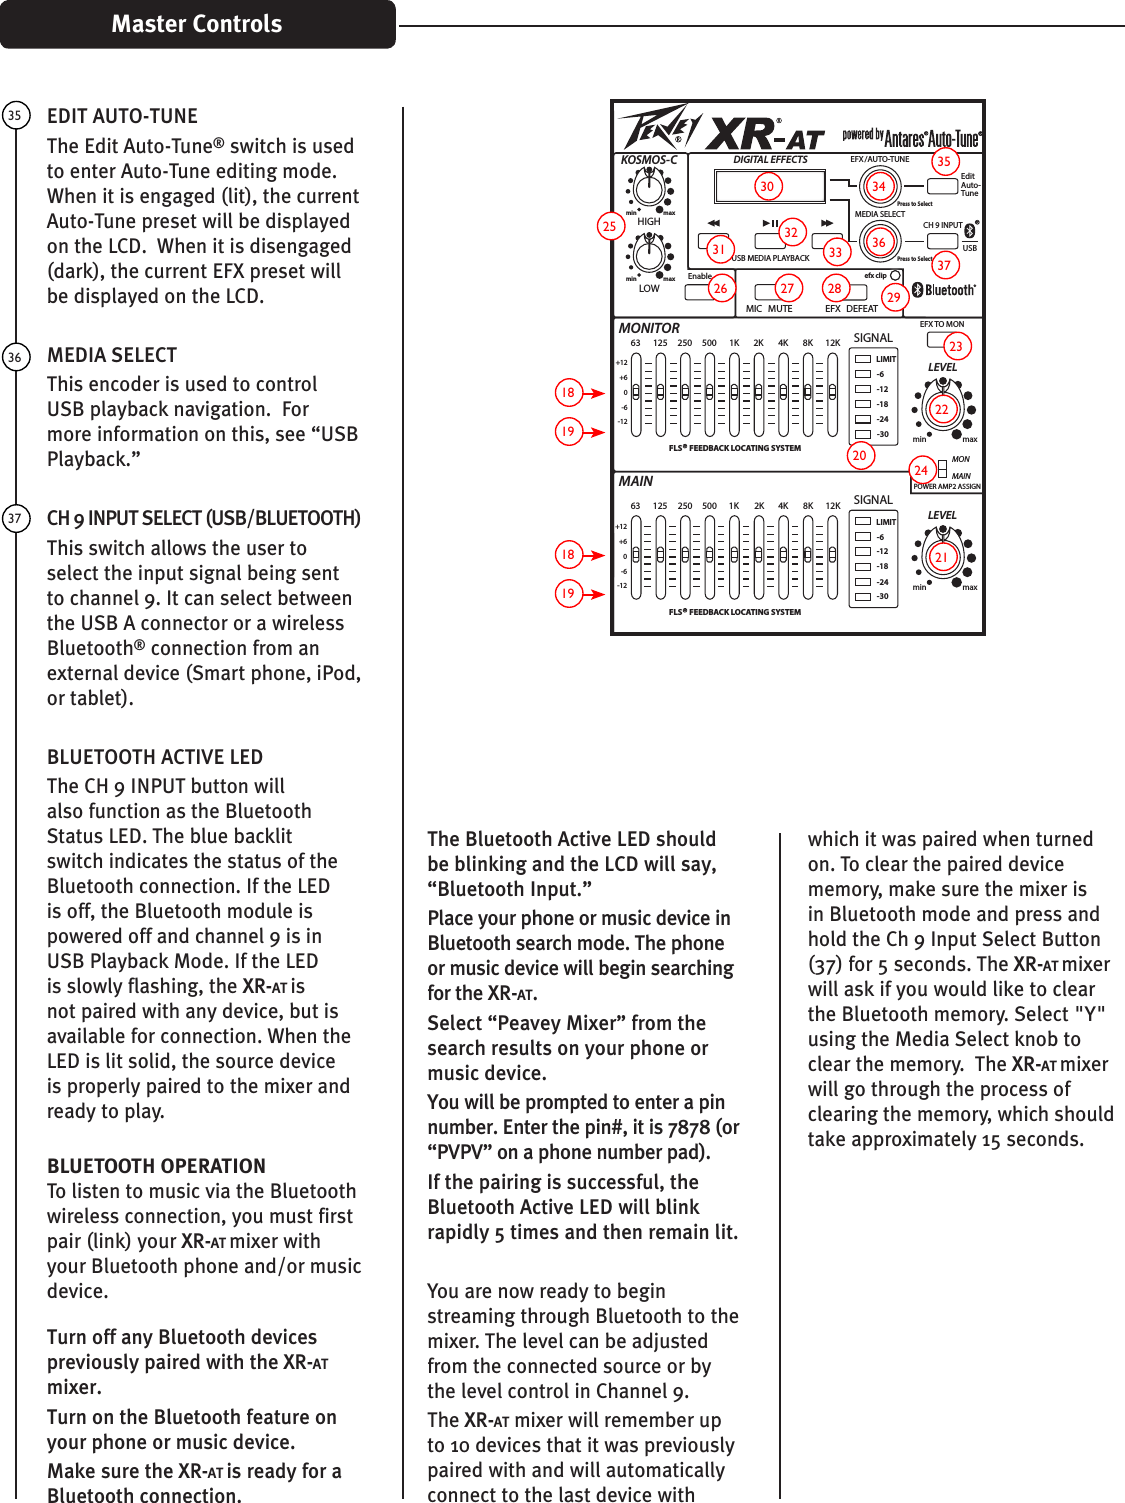
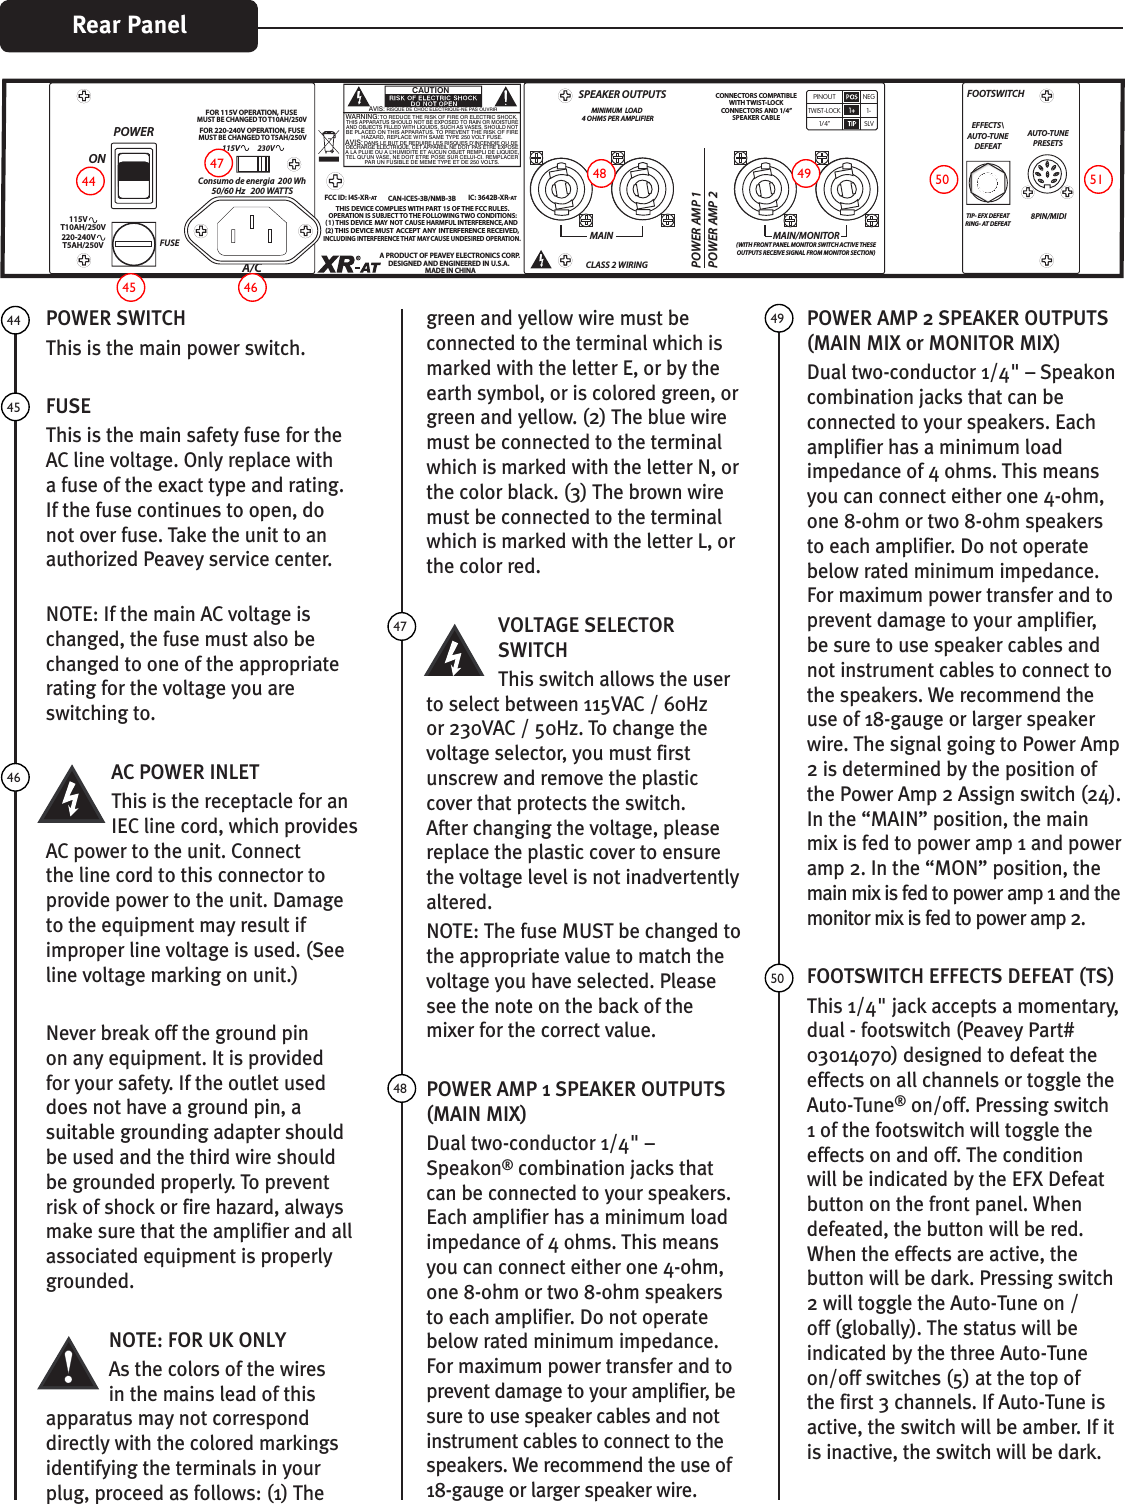
![EFX TO MONThis switch toggles the EFX return signal being sent to the monitors. When it is lit, the effects signal is being sent to the monitors.POWER AMP 2 ASSIGNThis switch allows the user to select the signal that is assigned to power amp 2 (49). The user can elect to send either the Main mix signal or the Monitor mix signal to the second internal power amplifier. This allows the user to run both power amps for mains or use power amp 1 for mains and power amp 2 for monitors.KOSMOS-CThe Kosmos®-C uses special circuitry to enrich the sound of your system. This is not just a simple bass boost. It provides “natural bass enhancement” by adding harmonically related bass signals that track the envelope of the original signal. The Kosmos-C high control can be used to add clarity to dull signals.KOSMOS ENABLEWhen lit, the Kosmos enhanced signal is added to the main mix. This allows you to compare the enhanced signal with the dry with the press of a button.MIC MUTEDepressing this button mutes the mic/line inputs in all 8 channels. The media input jacks (RCA and 3.5mm) on channel 8 and the USB/BT inputs on channel 9 are still “live”. This allows you to play break music, while muting all of the microphone inputs.EFX DEFEATThis button mutes the effects being sent to the main mix, allowing the user to listen to a dry signal at the main outputs. When muted, the switch will be red. This can also be activated with a momentary footswitch. See (50).EFX CLIPThis LED blinks red when the signal being sent to the effects section is too high and is causing distortion. Find the source of the hot signal by reducing the EFX send (13) on each channel until the LED is no longer lighting (blinking red).LCD DISPLAYThe top row of this LCD displays the currently selected EFX preset or Auto-Tune® preset and the bottom row displays the status of the media inputs of channel 9. If channel 9 is in USB Playback Mode, it can also be used for navigating the folders on the USB drive or displaying the current song playing.REW/PREVA short press will rewind to the beginning of the current song. Pressing this button twice will take you to the previous song on the USB drive. A long press will rewind through the current song; release to play when you reach the desired spot in the song.PLAY/PAUSEThe play/pause button toggles the current song between play and pause. When the > II is displayed, the song will be playing. When II is displayed, the song is paused. When [] is displayed, the song is stopped. FF/NEXTA short press will advance the media player to the next song on the USB drive. A long press will fast forward through the current song; release to play when you reach the desired spot in the song. EFX SELECT/AUTO-TUNE ADJUSTThe EFX Select/Auto-Tune Adjust knob is a dual function control. It can be used to navigate and select the desired effect preset. In the Auto-Tune edit mode, it can be used to select presets and navigate the Auto-Tune edit functions.Please see the "Operating the DSP" section for further information.Master Controls282324252930262731323334compAuto-TuneHIGHMID-MORPHLOWLOW MID HIGHLOW MID HIGHMONITOREFFECTS COMPRESSORCH. 1LEVELmin maxmin maxmin maxmin maxmin maxcompAuto-TuneCH. 2min maxmin maxmin maxmin maxmin maxhighmin maxclipsigclipsigcompAuto-TuneCH. 3min maxmin maxmin maxmin maxmin maxhighmin maxclipsigcompCH. 4min maxmin maxmin maxmin maxmin maxhighmin maxclipsigcompCH. 5min maxmin maxmin maxmin maxmin maxhighmin maxclipsigcompCH. 6min maxmin maxmin maxmin maxmin maxhighmin maxclipsigcompCH. 7min maxmin maxmin maxmin maxmin maxhighmin maxclipsigCH. 8min maxmin maxmin maxmin maxmin maxclipsigCH. 9min maxmin max min maxmin maxmin maxmin maxclipsigLEVELMAINmin max+12+60-6-1263 125 250 500 1K 2K 4K 8K 12KFLS FEEDBACK LOCATING SYSTEMmin maxhighLEVELMONITORmin max+12+60-6-1263 125 250 500 1K 2K 4K 8K 12KFLS FEEDBACK LOCATING SYSTEMSIGNALMONMAINPOWER AMP2 ASSIGNEFX TO MONEnableKOSMOS-Cmin maxmin maxUSBMIC LOWHIGHEFXEditAuto-TunePress to SelectPress to Selectefx clipEFX / AUTO-TUNEMEDIA SELECTCH 9 INPUTUSB MEDIA PLAYBACKDIGITAL EFFECTSMUTE DEFEATANALOGMEDIA CHANNELDIGITALMEDIACHANNELUSB MEDIA-6-12LIMIT-18-24-30SIGNAL-6-12LIMIT-18-24-30Auto-TuneAuto-TuneAuto-Tune18181919353430362827263132332529372322202421](https://usermanual.wiki/Peavey-Electronics/XR-AT/User-Guide-2619627-Page-7.png)