Philips Consumer Lifestyle CED380 Car radio User Manual CED380 55 UM EN
Philips Consumer Lifestyle Car radio CED380 55 UM EN
UserManual.wiki
>
Philips Consumer Lifestyle
>
CED380 User Manual
CED380_manual
Navigation menu
Upload a User Manual
Namespaces
Wiki Guide
HTML
PDF
Info
Views
User Manual
Discussion / Help
Navigation


![14 EN4 Get startedCaution Risk of car accidents! Never watch video or operate this system while driving.Prepare the remote controlPull the protective sheet out. » The remote control is ready for use.Replace the batteryCaution Risk of explosion! Keep batteries away from heat, Note Remove the battery if it is exhausted or if the remote control is not to be used for a long time. Batteries contain chemical substances, they should be disposed of properly. Perchlorate Material - special handling may apply. See www.dtsc.ca.gov/hazardouswaste/perchlorate. 1 Pull out the battery tray.2 Insert one CR2025 battery with correct polarity (+/-) as indicated.3 Insert the battery tray.Turn onPress . To turn off the system, press and hold for 3 seconds.Use the home menu1 Press on the front panel to access the home menu. 2 Tap an icon to access its interface. [RADIO]: Switch the source to FM/MW radio. [DISC]: Switch the source to disc. [USB]: Switch the source to USB storage device. [SDHC]: Switch the source to SD/SDHC card. [BT AUDIO]: Use the Bluetooth feature. [AV-IN 1]/[AV-IN 2]: Switch the source to the audio and video input that is transferred from an external audio/video player. [SET UP]: Access the [SETUP] menu. To return to the home menu, press on the front panel.](https://usermanual.wiki/Philips-Consumer-Lifestyle/CED380/User-Guide-1888664-Page-15.png)
![15ENAdjust system settings1 Tap on the home menu to access the [SETUP] menu. 2 Tap to access the [SYSTEM] menu. 3 Tap an item to adjust its setting.Select a radio regionYou can select a radio region that matches your location.Tap [Tuner Area] repeatedly to select a setting. [LATIN] (Latin America) [USA] (United States) [EURO] (Western Europe) [OIRT] (OIRT)Mute the button beepThe beep sound of buttons and icons is enabled by default.Tap [Beep Tone] to change the setting. [ON]: Enable the beep sound of buttons. [OFF]: Mute the beep sound of buttons.Set the date and time1 Tap [Date/Time]. 2 [YEAR], [MONTH], [DAY], [HOUR], [MINUTE], or [AM/PM] to select a variety.3 Tap / to set its value.Select an OSD languageTap [Language] repeatedly to select a language for on-screen display.Adjust the screen brightnessPress DIM repeatedly on the front panel.](https://usermanual.wiki/Philips-Consumer-Lifestyle/CED380/User-Guide-1888664-Page-16.png)
![16 EN5 Listen to radioSwitch to radio modeAfter boot-up, the system switches to radio mode automatically. To switch the source back to radio afterwards, tap [RADIO] on the home menu.Access the control interfaceTap the screen to display the control interface. Use the control interface : Tap to return to the home menu. : Tap to display the list of stored radio stations. To select a stored radio station, tap its sequence number. : Tap to display the radio menu. / : To tune to a radio station manually, tap it repeatedly or tap and hold it until the frequency of target station is displayed. / : To search for the previous or next strong station automatically, tap it. BAND: Tap repeatedly to select a radio band.Use the radio menu [Manual Store]To store a radio station manually,1) Tune to the radio station that you want to store.2) Access the radio menu, and then tap [Manual Store] to display the list of stored radio stations.3) Tap a sequence number to store the radio station.](https://usermanual.wiki/Philips-Consumer-Lifestyle/CED380/User-Guide-1888664-Page-17.png)
![17EN [Auto Store]: Tap it to start the automatic storage of available radio stations. [Local Seek]: Tap it to change the setting. [ON]: Search for radio stations with strong signals only. [OFF]: Search for radio stations with either strong signals or weak signals. [Area]: Tap it to switch to another radio region. [LATIN] (Latin America) [USA] (United States) [EURO] (Western Europe) [OIRT] (OIRT)](https://usermanual.wiki/Philips-Consumer-Lifestyle/CED380/User-Guide-1888664-Page-18.png)
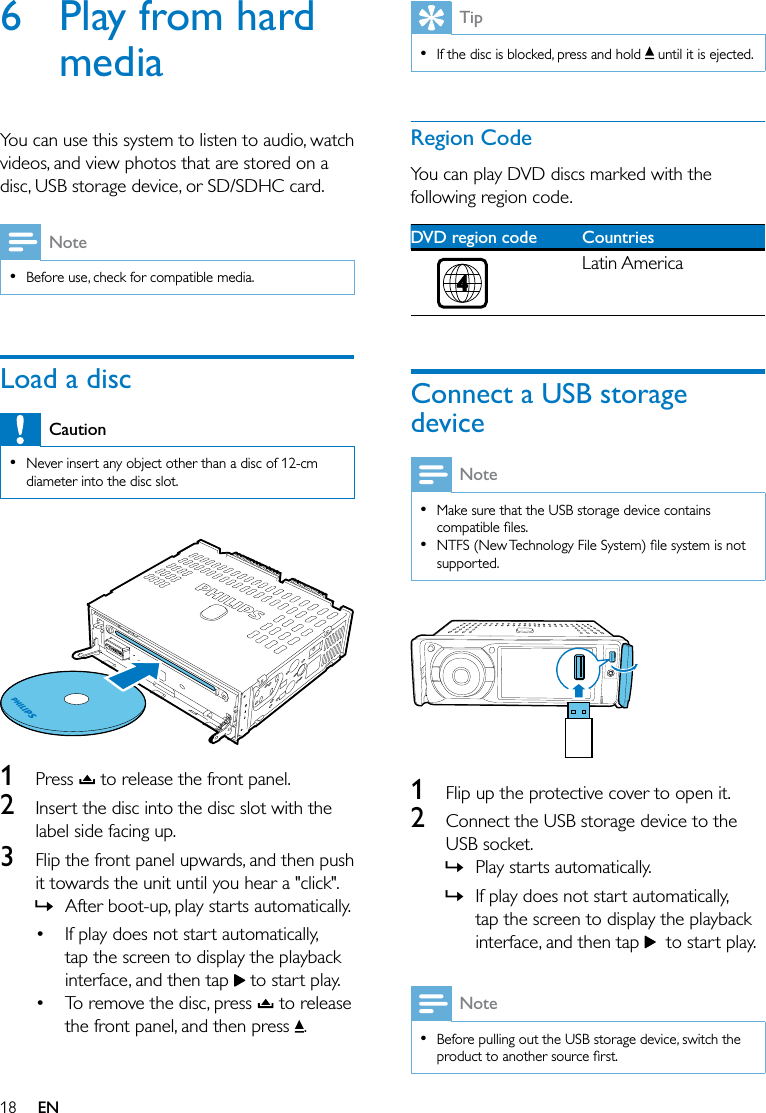
![19ENInsert an SD/SDHC cardNote Make sure that the SD/SDHC card contains compatible supported. 1 Detach the front panel.2 Insert the SD/SDHC card into the card slot until you hear a "click".3 Attach the front panel. » After boot-up, play starts automatically. » If play does not start automatically, tap the screen to display the playback interface, and then tap to start play.Remove the SD/SDHC card1 Detach the front panel.2 Press the card inwards until you hear a "click". » The card is disengaged.3 Pull out the SD/SDHC card.Control playDuring play, tap the screen to display the play interface, and then tap the icons on the interface to control play or change settings. / : Start, pause, or resume play. / : Tap repeatedly to select a speed for rewind or fast forward search. / : Skip to the previous or next : Display the information about the current media. : For a video DVD, tap to access the quick menu. [DVD Audio]: Tap repeatedly to select an audio language. [Subtitle]: Tap repeatedly to select a subtitle language. [Top Menu]: Return to the top menu. [Menu]: Return to the DVD menu. During playing audio, tap to access the interface for selecting a play mode.](https://usermanual.wiki/Philips-Consumer-Lifestyle/CED380/User-Guide-1888664-Page-20.png)
![20 EN[Repeat]: Tap repeatedly to select a repeat mode.[Random]: Tap repeatedly to switch between [ON] (play randomly) and [OFF] (play in sequence). During playing video or displaying photos, tap to access the interface for image settings. [Repeat]: Tap repeatedly to select a repeat mode.[Disc Audio]: Tap repeatedly to select an audio language or audio channel.[Video Setting]: Adjust the value of brightness, contrast, or color.1) Tap to access the Video Setting menu. 2)[BRIGHT], [CONTRAST], or [COLOR]. 3) Tap / to set its value. To restore the settings, tap [RESET].[Aspect Ratio]: Tap repeatedly to select a color system.[TV Signal]: Tap repeatedly to select a color system: [NTSC], [PAL], or [AUTO].[Slideshow]: Tap repeatedly to start or stop the photo slideshow: [ON] (display photos as a slideshow) or [OFF] (display the current photo as the screen background).[Goto]: Skip to a title, chapter, track, or time point.1) Tap [Goto] to display the interface. 2) Tap repeatedly to switch between [Enter Title Number], [Enter Chapter Number], [Enter Track Number], and [Enter Time].3) Tap numeric icons to enter the digits. To clear the last entry, tap X. To clear all entry, tap C.4) Tap 1 Press 2 [Music]: Display the list of audio tracks or folders. [Image]: Display the list of picture [Movie]or folders.3 Tap the name of a folder to display the list To view the previous or next page, tap / .4 ](https://usermanual.wiki/Philips-Consumer-Lifestyle/CED380/User-Guide-1888664-Page-21.png)
![21EN7 Use Bluetooth devicesWith this system, you can listen to audio from a player and make a call through Bluetooth.Pair a deviceNote Philips does not guarantee the compatibility with all Bluetooth devices. Before pairing a device with this system, read its user manual for Bluetooth compatibility. Make sure that Bluetooth function is enabled on your device, and your device is set as visible to all other Bluetooth devices. The operational range between this system and a Bluetooth device is approximately 8 meters (24 feet). Any obstacle between this system and a Bluetooth device can reduce the operational range. Keep away from any other electronic device that may cause interference.Access the Bluetooth menu1 Tap on the home menu to access the [SETUP] menu. 2 Tap on the [SETUP] menu to access the [BLUETOOTH] menu. Connect a device1 Access the [BLUETOOTH] menu. 2 Tap [New Pairing]. » The product starts searching for other Bluetooth devices.](https://usermanual.wiki/Philips-Consumer-Lifestyle/CED380/User-Guide-1888664-Page-22.png)
![22 EN3 In the device list, tap the name of your Bluetooth device. To view the previous or next page, tap / . » The paring starts, and then a pairing request from CED380 is displayed on your device.4 On your device, accept the pairing request from CED380, enter the default password '0000entry. » [Paired OK!] is displayed on this product.5 On your device, enable or permit the connection with CED380.Manage paired devices1 Access the [BLUETOOTH] menu. 2 Tap [Re-Connect ] to display the list of paired mobile phones. Tap [Re-Connect ] to display the list of paired audio players. To disconnect a device, tap its name and then tap (in red). To re-connect a device, tap its name and then tap (in green). To remove a device from the list, tap its name, tap , and then tap [Yes] on the prompt interface.Play audio from a connected deviceIf the connected Bluetooth device supports you can listen to tracks that are stored on the device through the system. If the device also system or with its remote control.1 Play a track on the connected device.2 On this product, tap on the home menu to display the music playback interface.3 Tap the screen to display the control interface. 4 Tap icons on the interface to control play. : Pause or resume play. / : Play the previous or next track.Note If the connected device does not support the AVRCP ](https://usermanual.wiki/Philips-Consumer-Lifestyle/CED380/User-Guide-1888664-Page-23.png)
![23ENMake a callNote Keep the Bluetooth connection active between the system and your mobile phone. By default, the conversation voice comes from the loudspeakers during a call.Call a numberYou can make phone calls with the product.1 Tap the screen to display the control interface. 2 Tap . » The keypad is displayed. To redial the last called number, tap .3 Tap number icons to enter the phone number. To clear the last digit, tap C. To return to the playback interface, tap .4 Tap to send the call. To end the call, tap . To enter numbers during the call, tap To mute the loudspeakers and use your mobile phone for the conversation, tap .Answer a callNote By default, all incoming calls are picked up automatically. You can disable the function of automatic answer. (see 'Disable the automatic answer' on page 22)1 When there is an incoming call, [Incoming Call?] is displayed on the screen. 2 Tap to answer the call. To reject or end the call, tap .](https://usermanual.wiki/Philips-Consumer-Lifestyle/CED380/User-Guide-1888664-Page-24.png)
![24 ENDisable the automatic answer1 Access the [BLUETOOTH] menu. 2 Tap [Auto Answer] to enable or disable the automatic answer of incoming calls. [ON]: Enable the automatic answer. [OFF]: Disable the automatic answer.](https://usermanual.wiki/Philips-Consumer-Lifestyle/CED380/User-Guide-1888664-Page-25.png)
![25EN8 Adjust soundWhen you listen to radio, enjoy music, or watch video, follow the instructions below to adjust sound.Adjust the volume levelRotate the volume ring on the left of the front panel.Mute soundPress on the front panel. To release the speakers from mute status, press again.Select a preset sound equalizer1 Press on the front panel. » The list of preset sound equalizers is displayed.2 Tap the name of a sound equalizer to select it.Set the sub-wooferPress and hold to enable or disable the audio output to the sub-woofer.Enable the maximum soundTap on the playback interface. (highlighted): The maximum sound is enabled. (in gray): The maximum sound is disabled.Enable the DBB sound effectWhen DBB (Dynamic Bass Boost) is enabled, low tones are enhanced electronically.Tap on the playback interface. (highlighted): DBB sound effect is enabled. (in gray): DBB sound effect is disabled.Adjust the fader/balance/bass/treble levelTo adjust the level of fader, balance, bass, or treble, do as follows.1 On the home menu, tap to access the [SETUP] menu. 2 On the [SETUP] menu, tap . » The " interface is displayed. 3 Tap F, R, L, and R to adjust the levels of fader and balance.](https://usermanual.wiki/Philips-Consumer-Lifestyle/CED380/User-Guide-1888664-Page-26.png)
![26 EN4 Tap to display the ##$" interface. 5 Tap to adjust the levels of bass and treble. To switch back to the BALANCE] interface, tap .](https://usermanual.wiki/Philips-Consumer-Lifestyle/CED380/User-Guide-1888664-Page-27.png)
![27EN9 OthersPlay external audio/video inputYou can connect an external audio/video player to this system. 1 Flip up the protective cover.2 Connect a composite AV cable to the audio and video input socket on the front panel, and the audio and video output sockets of the external player. 3 On the home menu, tap [AV-IN 1] to display the playback interface.4 Operate on the external player to start play (see the user manual of the external device).Tip If you connect this system to an external player through the VIDEO IN and AUDIO IN sockets on the rear panel, tap [AV-IN 2] to switch the source instead of [AV-IN 1].Reset the systemIf the system hangs up, reset it. 1 Detach the front panel.2 Press RESET with the tip of a ball-point pen or toothpick.Calibrate the screen1 Tap on the home menu to access the SETUP menu.2 Tap .3 Tap [Calibration].4 Follow the on-screen instructions to complete the calibration.Replace the fuseIf there is no power, check the fuse and replace it if it is damaged. 1 Detach the main unit from dashboard.2 Check the electric connection.3 Remove the damaged fuse from the rear panel.4 Insert a new fuse with the same ](https://usermanual.wiki/Philips-Consumer-Lifestyle/CED380/User-Guide-1888664-Page-28.png)
![28 ENTip If the fuse gets damaged immediately after it is replaced, an internal malfunction may occur. In this case, consult your Philips retailer.%&&Note Power supply must not be interrupted during the upgrade. restored to the factory default status.Register your product1 Go to www.philips.com/welcome.2 Click the link of "Register my product" (the exact wording of this link name may vary in different languages).3 Log in with your account on the prompt Web page. If you have no account for Club Philips, 4 Search your product with "CED380/55" as the keyword.5 Click the link of search result to access the Web page for registering your product.6 Fill in necessary information about this product to complete the registration. » With the registration, you can get information about software update and product support at this Web page or via your mailbox that is registered as the account for Club Philips.(&*1 On the home menu, tap to access the [SETUP] menu. 2 Tap . » displayed.Perform the upgrade1 on page 27)2 Go to www.philips.com/support.3 Log in with your account for Club Philips. » Support information about your registered product is displayed.4 Click the link of "Firmware Upgrade Readme File" (the exact wording of this link name may vary in different languages).5 Read and understand the instructions on 6 Follow the instructions to download the upgrade packet and complete the upgrade. If the upgrade fails, reboot this system, and then perform the upgrade again.](https://usermanual.wiki/Philips-Consumer-Lifestyle/CED380/User-Guide-1888664-Page-29.png)