Philips Consumer Lifestyle DS9800W Docking Speaker User Manual 527110 printLow

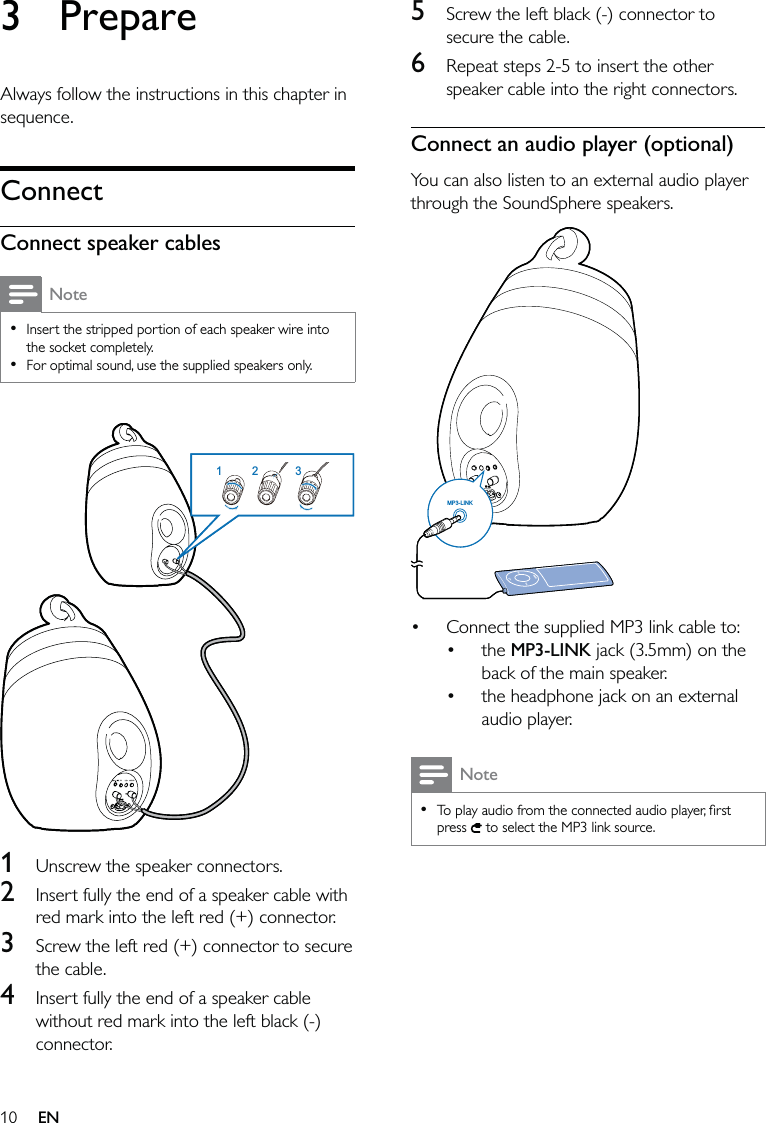
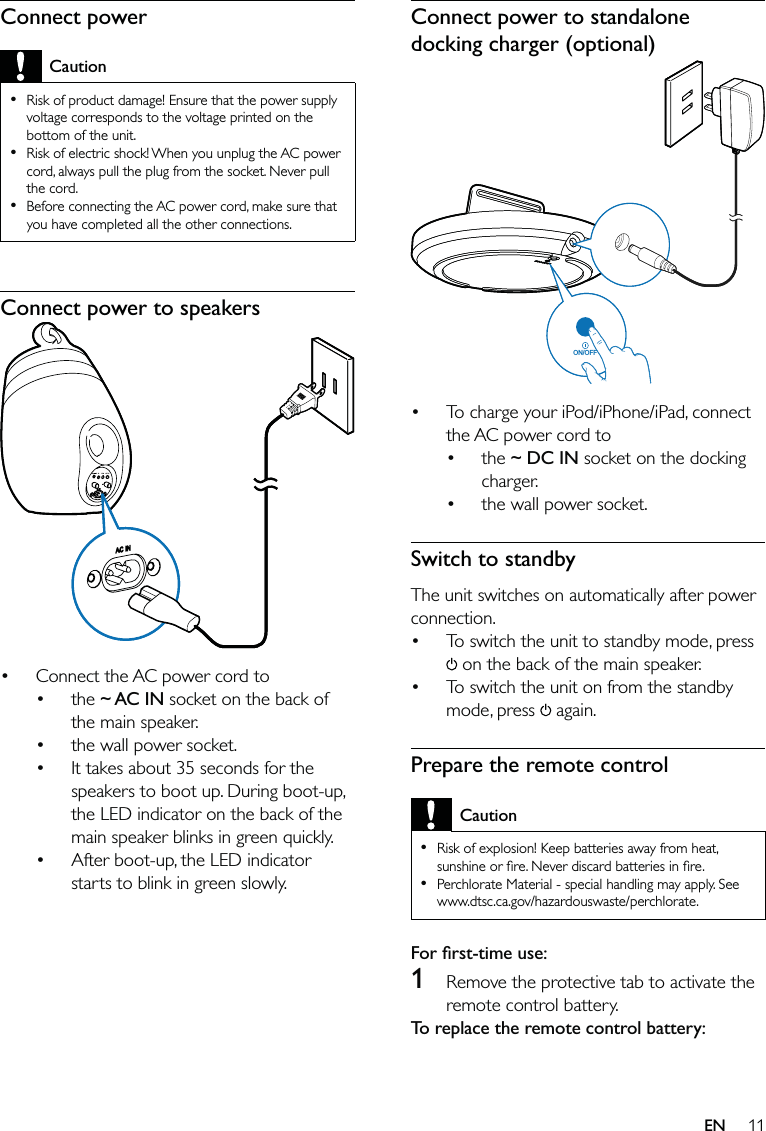
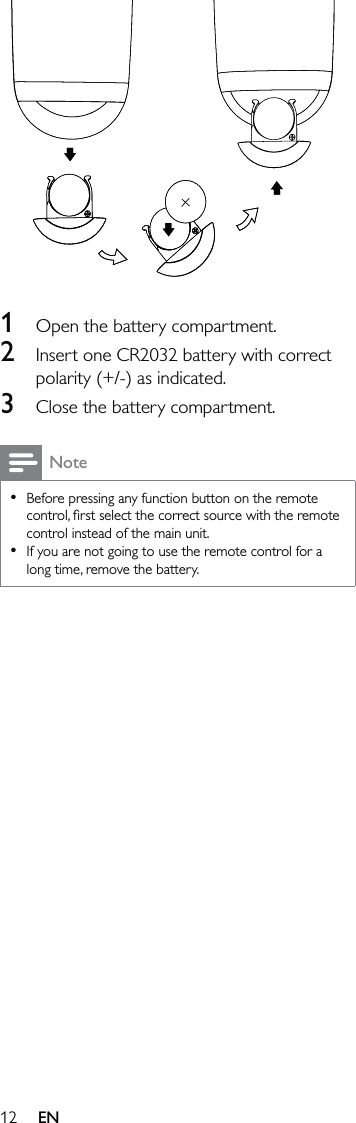
Philips Consumer Lifestyle Docking Speaker 527110 printLow
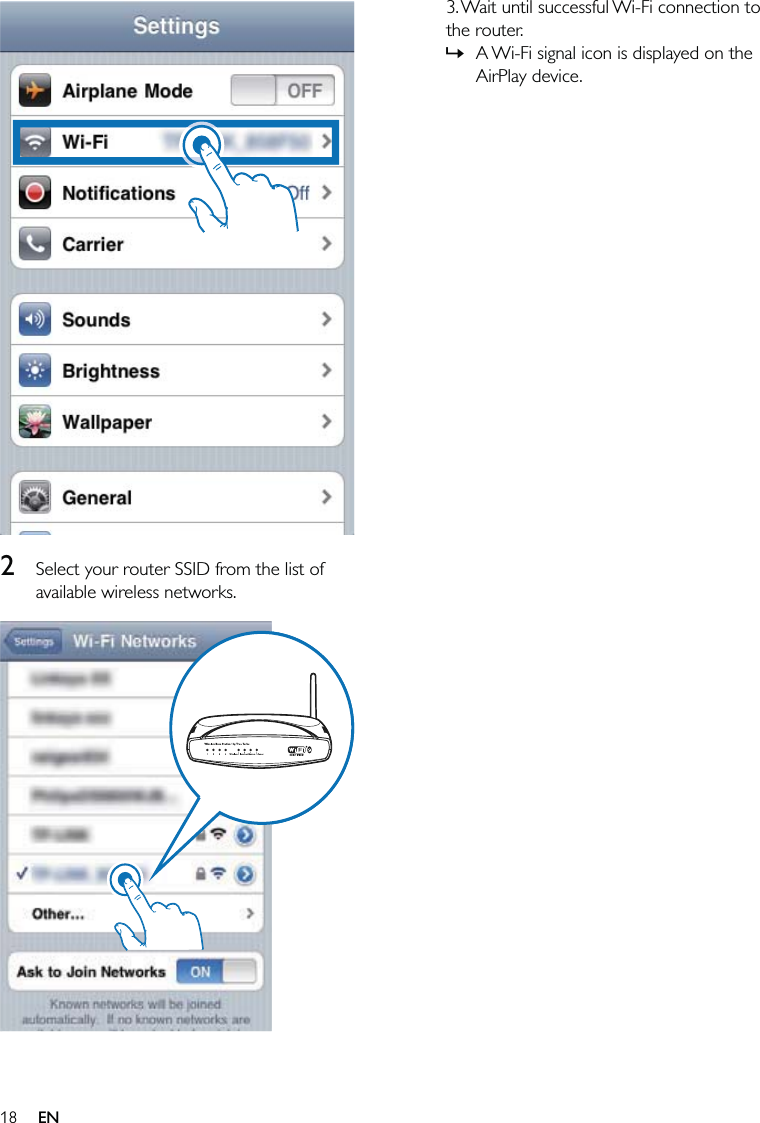
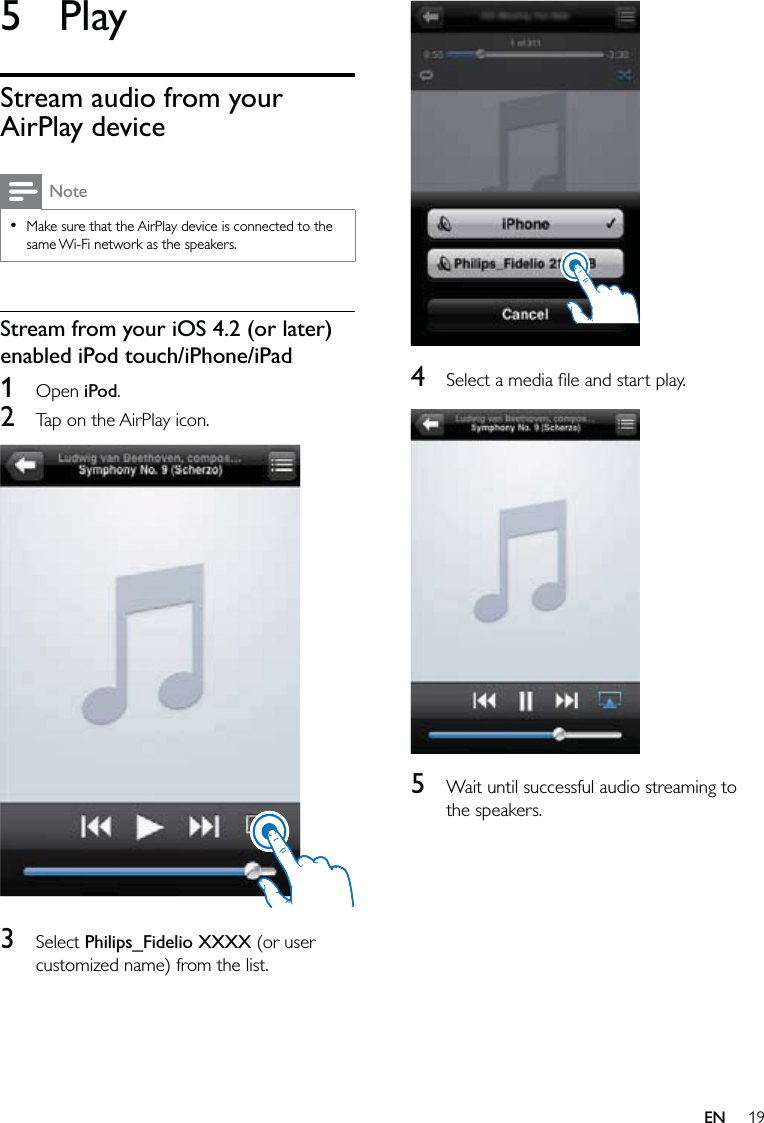
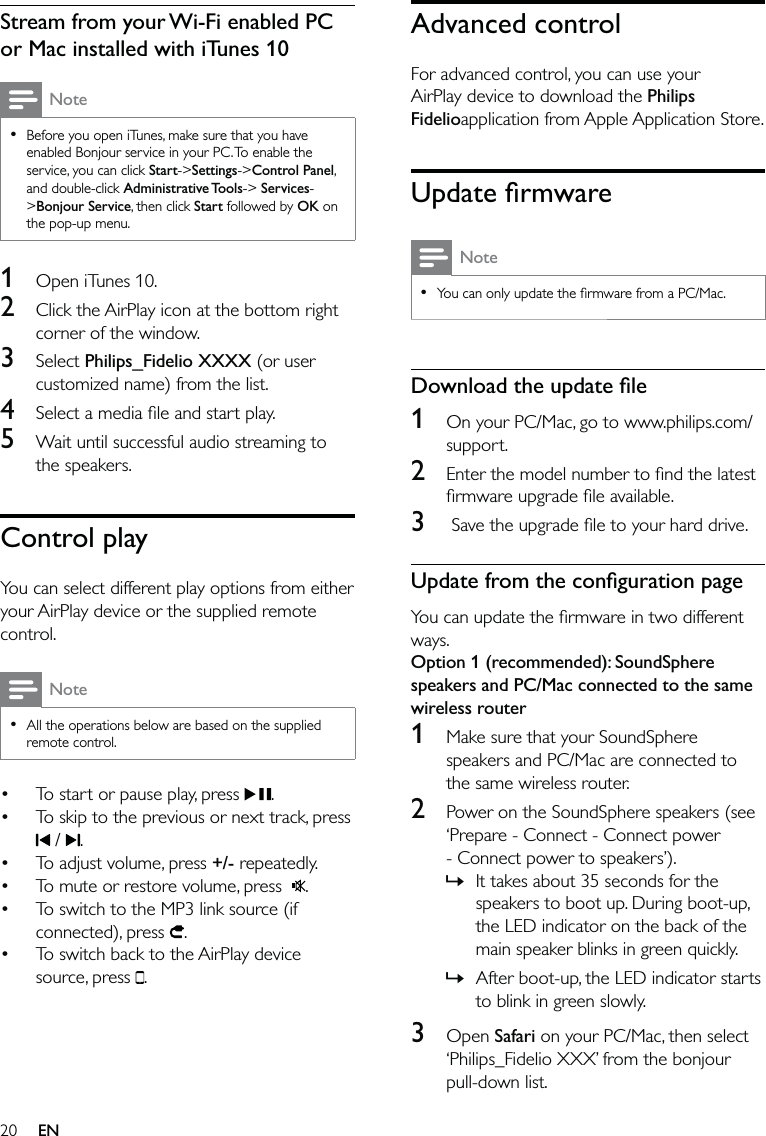
BOU-DS9800W & 135M-DS9800W User manual

Register your product and get support atwww.philips.com/welcome EN  User manual
3Contents1 Important  4Safety  4Notice  52  Your Docking Entertainment System  7Introduction  7What’s in the box  7What else you need  7Overview of the SoundSphere Speakers  8Overview of the remote control  8Overview of the docking charger  93 Prepare  10Connect  104  Set up a Wi-Fi network for AirPlay  13Connect speakers to a Wi-Fi network (router) 13Connect an AirPlay device to the same Wi-Fi network  175 Play  19Stream audio from your AirPlay device  19Control play  20Advanced control  20Update firmware  20Charge your iPod/iPhone/iPad with the standalone dock  216 Product information  23Specifications  237 Troubleshooting  24EN
4k  Only use attachments/accessories specified by the manufacturer.l  Use only with the cart, stand, tripod, bracket, or table specified by the manufacturer or sold with the apparatus. When a cart is used, use caution when moving the cart/apparatus combination to avoid injury from tip-over.  m  Unplug this apparatus during lightning storms or when unused for long periods of time. n  Refer all servicing to qualified service personnel. Servicing is required when the apparatus has been damaged in any way, such as power-supply cord or plug is damaged, liquid has been spilled or objects have fallen into the apparatus, the apparatus has been exposed to rain or moisture, does not operate normally, or has been dropped.o  Battery usage CAUTION – To prevent battery leakage which may result in bodily injury, property damage, or damage to the unit: Install all batteries correctly, + and - as marked on the unit. Remove batteries when the unit is not used for a long time.Perchlorate Material-special handling may apply. See www.dtsc.ca.gov/hazardouswaste/perchlorate.p  Apparatus shall not be exposed to dripping or splashing, keep it away from direct sunlight,naked flames or heat.•••1 ImportantSafetyImportant Safety Instructionsa  Read these instructions.b  Keep these instructions.c  Heed all warnings.d  Follow all instructions.e  Do not use this apparatus near water.f  Clean only with dry cloth.g  Do not block any ventilation openings. Install in accordance with the manufacturer’s instructions.h  Do not install near any heat sources such as radiators, heat registers, stoves, or other apparatus (including amplifiers) that produce heat. i  Do not defeat the safety purpose of the polarized or grounding-type plug. A polarized plug has two blades with one wider than the other. A grounding type plug has two blades and a third grounding prong. The wide blade or the third prong are provided for your safety. If the provided plug does not fit into your outlet, consult an electrician for replacement of the obsolete outlet. j  Protect the power cord from being walked on or pinched, particularly at plugs, convenience receptacles, and the point where they exit from the apparatus.  EN
6Your system consists of materials which can be recycled and reused if disassembled by a specialized company. Please observe the local regulations regarding the disposal of packaging materials, exhausted batteries and old equipment. “Made for iPod,” “Made for iPhone,” and “Made for iPad” mean that an electronic accessory has been designed to connect specifically to iPod, iPhone, or iPad, respectively, and has been certified by the developer to meet Apple performance standards. Apple is not responsible for the operation of this device or its compliance with safety and regulatory standards. Please note that the use of this accessory with iPod, iPhone, or iPad may affect wireless performance.AirPlay, iPod, and iPhone are trademarks of Apple Inc., registered in the U.S. and other countries. iPad is a trademark of Apple Inc.Class II equipment symbol:  CLASS II apparatus with double insulation, and no protective earth provided.NoteThe type plate is located on the bottom of the apparatus.•Disposal of your old product and batteriesYour product is designed and manufactured with high quality materials and components, which can be recycled and reused.Never dispose of your product with other household waste. Please inform yourself about the local rules on the separate collection of electrical and electronic products and batteries. The correct disposal of these products helps prevent potentially negative consequences on the environment and human health.Your product contains batteries, which cannot be disposed of with normal household waste.Please inform yourself about the local rules on separate collection of batteries. The correct disposal of batteries helps prevent potentially negative consequences on the environment and human health.Please visit www.recycle.philips.com for additional information on a recycling center in your area.Information about the use of batteries:CautionRisk of leakage: Only use the specified type of batteries. Do not mix new and used batteries. Do not mix different brands of batteries. Observe correct polarity. Remove batteries from products that are not in use for a longer period of time. Store batteries in a dry place.Risk of injury: Wear gloves when handling leaking batteries. Keep batteries out of reach of children and pets.Risk of explosion: Do not short circuit batteries. Do not expose batteries to excessive heat. Do not throw batteries into the fire. Do not damage or disassemble batteries. Do not recharge non-rechargeable batteries.•••Perchlorate Material - special handling may apply. See www.dtsc.ca.gov/hazardouswaste/perchlorate.Environmental informationAll unnecessary packaging has been omitted. We have tried to make the packaging easy to separate into three materials: cardboard (box), polystyrene foam (buffer) and polyethylene (bags, protective foam sheet.) EN
5WarningNever remove the casing of this apparatus. Never lubricate any part of this apparatus.Never place this apparatus on other electrical equipment.Keep this apparatus away from direct sunlight, naked flames or heat. Ensure that you always have easy access to the power cord, plug or adaptor to disconnect this apparatus from the power.For the WiFi SoundSphere speakers: Where the mains plug or an appliance coupler is used as the disconnect device, the disconnect device shall remain readily operable.For the standalone docking charger: Where the plug of the Direct Plug-in Adapter is used as the disconnect device, the disconnect device shall remain readily operable.•••••••Risk of overheating! Never install this apparatus in a confined space. Always leave a space of at least four inches around this apparatus for ventilation. Ensure curtains or other objects never cover the ventilation slots on this apparatus.EN
This equipment complies with FCC’s and IC’s RF radiation exposure limits set forth for an uncontrolled environment. The antenna(s) used for this transmitter must be installed and operated to provide a separation distance of at least 20 cm from all persons and must not be collocated or operating in conjunction with any other antenna or transmitter. Installers must ensure that 20cm separation distance will be maintained between the device (excluding its handset) and users.FCC rulesThis equipment has been tested and found to comply with the limits for a Class B digital device, pursuant to Part 15 of the FCC Rules. These limits are designed to provide reasonable protection against harmful interference in a residential installation. This equipment generates, uses and can radiate radio frequency energy and, if not installed and used in accordance with the instructions, may cause harmful interference to radio communications. However, there is no guarantee that interference will not occur in a particular installation. If this equipment does cause harmful interference to radio or television reception, which can be determined by turning the equipment off and on, the user is encouraged to try to correct the interference by one or more of the following measures:Reorient or relocate the receiving antenna.Increase the separation between the equipment and receiver.Connect the equipment into an outlet on a circuit different from that to which the receiver is connected.Consult the dealer or an experienced radio/TV technician for help.Canada: This Class B digital apparatus complies with Canadian ICES-003. ••••NoticeNotice of complianceModificationsThe user is cautioned that changes or modifications not expressly approved by the party responsible for compliance could void the user’s authority to operate the equipment.FCC & RSS compliance statementThis device complies with Part 15 of the FCC Rules and Industry Canada licence-exempt RSS standard(s). Operation is subject to the following two conditions:a  This device may not cause harmful interference, andb  This device must accept any interference received, including interference that may cause undesired operation.FCC Radiation Exposure StatementCetappareilnumériquedelaclasseBestconformeàlanormeNMB‐003duCanada. LeprésentappareilestconformeauxCNRd'IndustrieCanadaapplicablesauxappareilsradioexemptsdelicenceetlapartie15desRèglesFCC.L'exploitationestautoriséeauxdeuxconditionssuivantes:(1)l'appareilnedoitpasproduiredebrouillage,et(2)l'utilisateurdel'appareildoitacceptertoutbrouillageradioélectriquesubi,mêmesilebrouillageestsusceptibled'encompromettrelefonctionnement.  Cetappareilestconformeauxlimitesd’expositionaurayonnementRFstipuléesparlaFCCetl’ICpouruneutilisationdansunenvironnementnoncontrôlé.Lesantennesutiliséespourcetémetteurdoiventêtreinstalléesetdoiventfonctionneràaumoins20cmdedistancedesutilisateursetnedoiventpasêtreplacéesprèsd’autresantennesouémetteursoufonctionneravecceux‐ci.Lesinstallateursdoivents’assurerqu’unedistancede20cmséparel’appareil(àl’exceptionducombiné)desutilisateurs.
71 x AC power cord (for the speakers)1 x MP3 link cable (for the speakers)1 x standalone iPod/iPhone/iPad docking charger (for charge only)1 x AC power adapter (for the docking charger)User manualQuick start guideWhat else you needTo stream audio wirelessly by AirPlay, you need: A wireless router that is powered on and working properly. An AirPlay device (e.g., an iOS 4.2 (or later) enabled iPod touch/iPhone/iPad or Wi-Fi enabled PC or Mac installed with iTunes 10).••••••••2 Your Docking Entertainment SystemCongratulations on your purchase, and welcome to Philips! To fully benefit from the support that Philips offers, register your product at www.philips.com/welcome.If you contact Philips, you will be asked for the model and serial number of this apparatus. The model number and serial number are on the bottom of the apparatus. Write the numbers here: Model No. __________________________Serial No. ___________________________IntroductionWith this unit, you can:stream audio from your iOS 4.2 (or later) enabled device (e.g., an iPod touch/iPhone/iPad) wirelessly by AirPlay.stream audio from your Wi-Fi enabled PC or Mac installed with iTunes 10 wirelessly by AirPlay.play audio from other audio devices through the MP3 link socket.charge your iPod/iPhone/iPad through the supplied standalone docking charger.What’s in the boxCheck and identify the contents of your package:2 x SoundSphere speakers1 x speaker connection cable1 x remote control with battery (for the speakers)•••••••EN
8g IR sensorOverview of the remote control a Turn on/off the speakers.b Select the AirPlay device audio source.c +/-Adjust volume.d  Mute or restore volume.e  / Skip to the previous/next track.f Start or pause play.g Select the MP3 link audio source. •••••••gfbaedcgfbaedcOverview of the SoundSphere Speakers  a Turn on/off the speakers.(Press and hold) reset the speakers.b MP3-LINKSocket for an external audio player.c ~ AC INPower socket of the speakers.d  Speaker connectors (+/-)Connect the two speakers.e WiFi SETUPConnect the speakers to a Wi-Fi network. f LED indicatorShow the current status of the speakers.•••••••abcedfgabcedfgEN
9Overview of the docking charger a  ~ DC INPower socket of the docking charger. b ON/OFFSwitch on or off the LED light around the docking charger.c  iPod/iPhone/iPad dock connector••abcabcEN
105  Screw the left black (-) connector to secure the cable.6  Repeat steps 2-5 to insert the other speaker cable into the right connectors.Connect an audio player (optional)You can also listen to an external audio player through the SoundSphere speakers. Connect the supplied MP3 link cable to:the MP3-LINK jack (3.5mm) on the back of the main speaker.the headphone jack on an external audio player.NoteTo play audio from the connected audio player, first press   to select the MP3 link source.••••MP3-LINKMP3-LINK3 PrepareAlways follow the instructions in this chapter in sequence.ConnectConnect speaker cablesNoteInsert the stripped portion of each speaker wire into the socket completely.For optimal sound, use the supplied speakers only.•• 1  Unscrew the speaker connectors.2  Insert fully the end of a speaker cable with red mark into the left red (+) connector.3  Screw the left red (+) connector to secure the cable.4  Insert fully the end of a speaker cable without red mark into the left black (-) connector.213213EN
11Connect power to standalone docking charger (optional) To charge your iPod/iPhone/iPad, connect the AC power cord to the ~ DC IN socket on the docking charger.the wall power socket.Switch to standbyThe unit switches on automatically after power connection.To switch the unit to standby mode, press  on the back of the main speaker.To switch the unit on from the standby mode, press   again.Prepare the remote controlCautionRisk of explosion! Keep batteries away from heat, sunshine or fire. Never discard batteries in fire.Perchlorate Material - special handling may apply. See www.dtsc.ca.gov/hazardouswaste/perchlorate.••For first-time use: 1  Remove the protective tab to activate the remote control battery.To replace the remote control battery: •••••ON/OFFON/OFFConnect powerCautionRisk of product damage! Ensure that the power supply voltage corresponds to the voltage printed on the bottom of the unit.Risk of electric shock! When you unplug the AC power cord, always pull the plug from the socket. Never pull the cord.Before connecting the AC power cord, make sure that you have completed all the other connections.•••Connect power to speakers Connect the AC power cord to the ~ AC IN socket on the back of the main speaker.the wall power socket.It takes about 35 seconds for the speakers to boot up. During boot-up, the LED indicator on the back of the main speaker blinks in green quickly. After boot-up, the LED indicator starts to blink in green slowly.•••••EN
12  1  Open the battery compartment.2  Insert one CR2032 battery with correct polarity (+/-) as indicated.3  Close the battery compartment.NoteBefore pressing any function button on the remote control, first select the correct source with the remote control instead of the main unit.If you are not going to use the remote control for a long time, remove the battery.••EN
132  Make sure that the LED indicator on the back of the main speaker blinks in green slowly.3  Check the type of the wireless router you use.Connect speakers to a Wi-Fi network (router)Select a scenario below that matches your router type.NoteEach time when the speakers are powered on again, the speakers enter the latest configured Wi-Fi network automatically. In case of setup failure, repeat the steps, or press and hold   on the back of the main speaker and try again.••Scenario 1: Connect to a WPS-PBC router1 Press WiFi SETUP on the back of the main speaker.The LED indicator blinks in red, green and yellow alternately.   »WIFISETUPWIFISETUP4  Set up a Wi-Fi network for AirPlayNoteSome operations may vary as you use different types of wireless routers.You are recommended to change the SSID of your wireless router to ‘PhilipsFidelioAP’. In this way, the SoundSphere speakers can get connected to the router automatically after power-on. You can hear a beep after successful connection. Then, proceed to ‘Connect an AirPlay device to the same Wi-Fi network’ directly.••The SoundSphere speaker system is compatible with the following iPod/iPhone/iPad models:iPad 2iPadiPhone 4iPhone 3GSiPod touch (2nd, 3rd, and 4th generation)  Before setup of the Wi-Fi network, check the points below.1  Make sure that the wireless router is powered on and working properly. •••••EN
142 Select Settings -> Wi-Fi on your iPod touch/iPhone/iPad.Or enter the list of available wireless networks on your PC/Mac.  3 Select Philips_Fidelio_AirPlay from the list of available networks. •2  Press the WPS button on the wireless router.After a while, the LED indicator stops blinking and stays green, and the main speaker beeps. The speakers join the Wi-Fi network successfully.  TipTo change the name of the SoundSphere speakers for AirPlay, proceed with steps 2 to 7 in ‘Scenario 2: Connect to a non-WPS router’ below.For some wireless routers, you may need to hold the WPS button for WPS connection. See the user manuals of the specific routers for details.••Scenario 2: Connect to a non-WPS routerYou can connect the speakers to a non-WPS router throughan iOS 4.2 (or later) enabled iPod touch/iPhone/iPada Wi-Fi enabled PC or Mac installed with iTunes 101  Press and hold WiFi SETUP on the back of the main speaker for more than 5 seconds.The LED indicator blinks in green and yellow alternately.»»••»WPSWPSEN
15  7 Select the Network Configuration tab.  169.254.1.1169.254.1.1Network ConfigurationNetwork Configuration  4  Wait until successful Wi-Fi connection to the main speaker.A Wi-Fi signal icon is displayed on the iPod touch/iPhone/iPad.5 Open Safari on your iPod/iPhone/iPad.Or open the web browser on your PC or Mac.6 Type in 169.254.1.1 at the address bar to enter the DS9800W configuration page.»•Philips_Fidelio_AirplayPhilips_Fidelio_AirplayEN
16  11 Click Apply at the bottom of the page to apply your settings.A menu for confirmation of your set parameters pops up.»8  Change the name of the SoundSphere speakers in Airplay Device Name if you like.9  Select your router SSID from the pull-down list of Service Set ID (SSID).  10 Enter your network key if required (For some routers, you may also need to tick DHCP under Advance Setting.)EN
17  Connect an AirPlay device to the same Wi-Fi networkTo work together with the SoundSphere speakers, your AirPlay device is required to join the same Wi-Fi network as the speakers.1 Select Settings -> Wi-Fi on your iPod touch/iPhone/iPad.Or enter the list of available wireless networks on your PC/Mac.•  12 Click OK on the popup menu to confirm your settings.After a while, the LED indicator stops blinking and stays green, and the main speaker beeps. The speakers join the Wi-Fi network successfully.»»EN
183. Wait until successful Wi-Fi connection to the router.A Wi-Fi signal icon is displayed on the AirPlay device.»  2  Select your router SSID from the list of available wireless networks.  EN
19  4  Select a media file and start play.  5  Wait until successful audio streaming to the speakers.5 PlayStream audio from your AirPlay deviceNoteMake sure that the AirPlay device is connected to the same Wi-Fi network as the speakers.•Stream from your iOS 4.2 (or later) enabled iPod touch/iPhone/iPad1 Open iPod.2  Tap on the AirPlay icon.  3 Select Philips_Fidelio XXXX (or user customized name) from the list.EN
20Advanced controlFor advanced control, you can use your AirPlay device to download the Philips Fidelioapplication from Apple Application Store. Update firmwareNoteYou can only update the firmware from a PC/Mac.•Download the update file1  On your PC/Mac, go to www.philips.com/support.2  Enter the model number to find the latest firmware upgrade file available.3   Save the upgrade file to your hard drive.Update from the configuration pageYou can update the firmware in two different ways.Option 1 (recommended): SoundSphere speakers and PC/Mac connected to the same wireless router1  Make sure that your SoundSphere speakers and PC/Mac are connected to the same wireless router.2  Power on the SoundSphere speakers (see ‘Prepare - Connect - Connect power - Connect power to speakers’). It takes about 35 seconds for the speakers to boot up. During boot-up, the LED indicator on the back of the main speaker blinks in green quickly. After boot-up, the LED indicator starts to blink in green slowly.3 Open Safari on your PC/Mac, then select ‘Philips_Fidelio XXX’ from the bonjour pull-down list.»»Stream from your Wi-Fi enabled PC or Mac installed with iTunes 10NoteBefore you open iTunes, make sure that you have enabled Bonjour service in your PC. To enable the service, you can click Start->Settings->Control Panel, and double-click Administrative Tools-> Services->Bonjour Service, then click Start followed by OK on the pop-up menu.•1  Open iTunes 10. 2  Click the AirPlay icon at the bottom right corner of the window. 3 Select Philips_Fidelio XXXX (or user customized name) from the list. 4  Select a media file and start play.5  Wait until successful audio streaming to the speakers.Control playYou can select different play options from either your AirPlay device or the supplied remote control.NoteAll the operations below are based on the supplied remote control. •To start or pause play, press  .To skip to the previous or next track, press  /  .To adjust volume, press +/- repeatedly.To mute or restore volume, press   .To switch to the MP3 link source (if connected), press  .To switch back to the AirPlay device source, press  .••••••EN
21Charge your iPod/iPhone/iPad with the standalone dockYou can charge your iPod/iPhone/iPad through the supplied standalone docking charger.Compatible iPod/iPhone/iPadThe docking charger supports the following iPod, iPhone and iPad models. Made for iPad 2iPadiPhone 4iPhone 3GSiPhone 3GiPhone iPod classic iPod 5G iPod 4G iPod nano (1st, 2nd, 3rd, 4th, 5th, and 6th generation) iPod touch (1st, 2nd, 3rd, and 4th generation) iPod miniNoteiPod with color display, iPod classic, and iPod with video are not compatible with dock charging.•••••••••••••Or open the web browser on your PC/Mac, then type in the IP address of DS9800W (available at the router configuration page) at the address bar. The DS9800W configuration page is displayed.4 Select the Firmware Update tab, then follow the on-screen instruction to enter the next page.5 Click Browse to select the downloaded firmware update file, then click Open.6 Click Upload to upload the file, then compare the current and new file versions.7  After you make sure that the downloaded update file is the latest, click Ok to start firmware update.A progress bar is displayed.8  At completion of the update process, click Ok to confirm. Option 2: SoundSphere speakers connected to PC/Mac directly1  Repeat step 2 in the above.2  Press and hold WiFi SETUP on the back of the main speaker for more than 5 seconds.The LED indicator blinks in green and yellow alternately.3  Enter the list of available wireless networks on your PC/Mac. 4 Select Philips_Fidelio_AirPlay (or the user customized name) from the list of available networks.5 Open Safari on your PC/Mac, then select ‘Philips_Fidelio XXX’ from the bonjour pull-down list.Or open the web browser on your PC/Mac, then type in 169.254.1.1 at the address bar. The DS9800W configuration page is displayed.6  Repeat steps 4 to 8 in the above to finish firmware update.•»»»•»EN
22Load the iPod/iPhone/iPad  Place the iPod/iPhone/iPad in the docking charger.The docked iPod/iPhone/iPad begins to charge as soon as the docking charger is connected to AC power.To remove the iPod/iPhone/iPadPull the iPod/iPhone/iPad out of the docking charger.•••EN
23General informationAC power WiFi SoundSphere speakers: 100- 2 V~, 50Hz Standalone docking charger: Model: ASSA1A-050200Input: 100-240V~50/60Hz 0.45AOutput: 5.0V   2000mAOperation Power Consumption22 WEco Standby Power Consumption< 0.5 WDimensions - Main Unit265 in diameter x 410 mmWeight - With Packing - Main Unit14.5 kg12 kg6 Product informationNoteProduct information is subject to change without prior notice.•SpecificationsAmplifierRated Output Power 2X50 W RMSFrequency Response 20 - 20000 Hz, -3dBSignal to Noise Ratio > 90 dBAux Input (MP3 link) 1 V RMS 20 kohmSpeakersSpeaker Impedance 8 ohmSpeaker Driver 130 mm woofer + 19 mm tweeterSensitivity > 85 dB/m/WEN17
24Avoid using Wi-Fi channel which is using or much overlapped by the nearby Wi-Fi network.Keep away from potential sources of interference which may affect Wi-Fi signal, such as microwave ovens.If you fail to use your PC for Wi-Fi network setup, check whether your PC is using a Wi-Fi network. You cannot use Ethernet connection for AirPlay network setup. If the problem remains, it is strongly recommended to use iPod Touch/iPhone/iPad/Mac to do the first-time Wi-Fi setup as some PC settings may affect the Wi-Fi network setup.Make sure that the SSID name of your home router consists of normal characters or digits, with no space or special characters like %/#/* inserted.If you choose to rename the AirPlay device ‘Philips_Fidelio XXXX’ in the setting menu, do not use special characters or symbols.If you fail to get connected via WPS, make sure that you are using a WPS certified router. If the problem remains, do not use the default SSID name for your WPS router. The default SSID name may involve security protection that leads to connection failure. Use simple characters or digits only to rename your WPS router. Occasional breaking of AirPlay music streamingDo one or all of the following:Enable the Auto Channel Scan option (if available on the Wi-Fi router).Enable the Wireless Intelligent Stream Handling (WISH) option (if available on the Wi-Fi router).Enable the Quality of Service (QoS) option (if available on the Wi-Fi router).Turn off other home routers.No AirPlay icon on Apple AirPlay device or iTunes in my PCMake sure that the SoundSphere speakers have already joined the AirPlay network.•••••••••••7 TroubleshootingWarningNever remove the casing of this apparatus. •To keep the warranty valid, never try to repair the system yourself. If you encounter problems when using this apparatus, check the following points before requesting service. If the problem remains unsolved, go to the Philips web site (www.philips.com/welcome). When you contact Philips, ensure that the apparatus is nearby and the model number and serial number are available.No powerMake sure that the AC power plug of the device is connected properly.Make sure that there is power at the AC outlet.No soundAdjust the volume.Check the network connection. Set up the network again if needed (see ‘Set up a Wi-Fi network (router)’). No response from the SoundSphere speakersPress and hold   on the back of the main speaker to reset the device. Set up the network again (see ‘Set up a Wi-Fi network (router)’).Disconnect and reconnect the AC power plug, then switch on the device again.Wi-Fi network connection failedCheck if your Wi-Fi router is Wi-Fi certified. This device is only compatible with Wi-Fi certified routers.This device does not support WPS-Pin routers.This device does not support all WPS-PBC routers (see the user manual of your router).Enable SSID broadcast on the Wi-Fi router.••••••••••EN
25Before you open iTunes, make sure that you have enabled Bonjour service in your PC. Take Windows XP for example: to enable the service, you can click Start->Settings->Control Panel, and double-click Administrative Tools-> Services->Bonjour Service, then click Start followed by OK on the pop-up menu.If the problem remains, try to restart the SoundSphere speakers.AirPlay connection failed with Mac or PCDisable the firewalls software and security software, which may block ports that AirPlay uses to stream content.Check if your network speed is fast enough (in cases where multiple devices share the same router, the AirPlay performance may be affected). Turn off the other devices connected to your home router.In case of audio streaming break or disconnection when you use iPod Touch/iPhone/iPad/iMac/PC for AirPlay, restart your iPod Touch/iPhone/iPad, iTunes or DS9800W.Browsing Internet content like news, music, video and etc. via your home router may affect the AirPlay performance. In case of AirPlay break or disconnection, it is recommended to stop any Internet surfing or disconnect from the Internet.••••••EN
© 2011 Koninklijke Philips Electronics N.V.All rights reserved.Document order number: 000000000000

Navigation menu