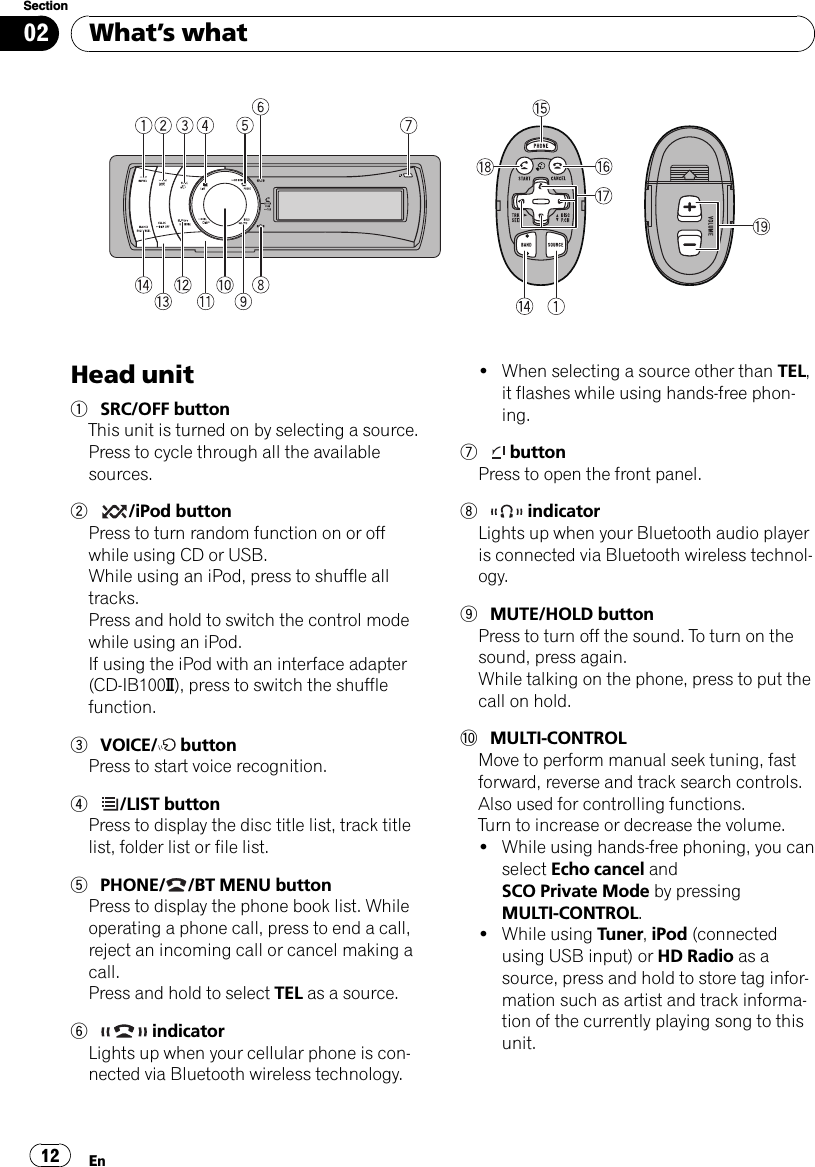
Pioneer K022 CD Receiver User Manual 1

Pioneer Corporation CD Receiver 1

Contents

User Manual 1

Operation ManualCD RECEIVERDEH-P710BTEnglish
Thank you for purchasing this PIONEER product.Please read through this manual before using the product for the first time, to en-sure proper use. After reading, please keep the manual in a safe and accessible placefor future reference.Before You StartInformation to User 6For Canadian model 6About this unit 6About this manual 7After-sales service for Pioneer products 8Visit our website 8Features 8Operating environment 9Protecting your unit from theft 9–Removing the front panel 9–Attaching the front panel 9Resetting the microprocessor 9About the demo mode 10Use and care of the remote control 10–Installing the battery 10–Removing the battery 10–Using the remote control 11What’s whatHead unit 12Steering remote control 13Basic OperationsPower ON/OFF 14–Turning the unit on 14–Turning the unit off 14Selecting a source 14Adjusting the volume 14TunerBasic Operations 15Storing and recalling broadcastfrequencies 15Using iTunes tagging 15–Storing the tag information to thisunit 15–Storing the tagged information to youriPod 16Introduction to advanced operations 16Storing the strongest broadcastfrequencies 16Tuning in strong signals 16Built-in CD PlayerBasic Operations 17Displaying text information on disc 18Selecting tracks from the track title list 18Selecting files from the file name list 18Introduction to advanced operations 19Selecting a repeat play range 19Playing tracks in random order 19Scanning folders and tracks 20Pausing playback 20Using advanced sound retriever 20Entering disc titles 20Playing songs on USB portable audioplayer/USB memoryBasic Operations 22Displaying text information of an audiofile 22Selecting files from the file name list 22Introduction to advanced operations 22–Function and operation 23Playing songs on iPodBasic Operations 24Browsing for a song 24–Searching songs by category 24–Searching songs by alphabet 25Displaying text information on iPod 25Introduction to advanced operations 25–Function and operation 25Playing songs in a random order(shuffle) 26Playing all songs in a random order (shuffleall) 26Playing songs related to the currently playingsong 26ContentsEn2
Operating this unit’s iPod function from youriPod 26Changing audiobook speed 27Using iTunes tagging 27–Storing the tag information to thisunit 27–Storing the tagged information to youriPod 27Using Bluetooth wireless technologyConnecting a Bluetooth device 29–Introduction to connectionoperations 29–Connecting a Bluetooth device 30–Disconnecting a Bluetooth device 31–Deleting a paired phone 31–Selecting a service 31–Connecting to a Bluetooth deviceautomatically 32–Displaying system version forrepair 32–Displaying BD (Bluetooth Device)address 32–Editing device name 32–Entering PIN code for Bluetoothwireless connection 33Bluetooth Audio 33–Basic Operations 34–Displaying text information onBluetooth audio player 34–Introduction to advancedoperations 34–Playing songs on a Bluetooth audioplayer 34–Stopping playback 34Bluetooth Telephone 34–Setting up for hands-free phoning 35–Making a phone call 35–Taking a phone call 36–Using the phone number list 36–Calling a number in the phonebook 37–Using the missed, received and dialedcall lists 37–Introduction to advancedoperations 38–Transferring entries to the phonebook 38–Setting automatic answering 39–Echo canceling 39–Adjusting the intended party’s listeningvolume 39–Switching the ring tone 39–Making a call by entering phonenumber 39–Setting the private mode 40–Selecting the incoming call screen 40Using voice recognition to operate thisunitUsing voice recognition to operate thisunit 41Using voice recognition to make a call 41Making a call to a phone number inmemory 42Making a call from dialed call list 42If you become unsure of an operation: 42Voice command list 43Audio AdjustmentsIntroduction of audio adjustments 44Using balance adjustment 44Using the equalizer 44–Recalling equalizer curves 45–Adjusting equalizer curves 45–Adjusting 7-band graphic equalizer 45Adjusting loudness 46Using subwoofer output 46–Adjusting subwoofer settings 46Boosting the bass 47En 3EnglishContents
Using the high pass filter 47Adjusting source levels 47Adjusting the voice guidance volume 48Initial SettingsAdjusting initial settings 49Selecting the language 49Setting the date 49Setting the clock 50Switching the warning tone 50Switching the auxiliary setting 50List TTS (Text to speech) Playback 50Switching the dimmer setting 50Adjusting the brightness 51Setting the rear output and subwoofercontroller 51Setting the internal power amplifier 51Switching the feature demo 52Switching the reverse mode 52Switching the ever scroll 52Activating the BT Audio source 52Resetting the Bluetooth wireless technologymodule 53Updating the software about Bluetoothconnection 53Other FunctionsUsing the AUX source 54–About AUX1 and AUX2 54–AUX1 source: 54–AUX2 source: 54–Selecting AUX as the source 54–Setting the AUX title 54Turning the clock display on or off 54Switching the display indication and buttonillumination 54Using the external unit 55–Selecting the external unit as thesource 55–Basic operation 55–Advanced operations 55Using different entertainment displays 55SMS (Short Message Service) ReceptionNotification Function 56Available accessoriesXM tuner 57–Listening to XM Satellite Radio 57–Switching the XM display 57–Storing and recalling broadcaststations 57–Switching the XM channel selectmode 57–Displaying the Radio ID 58SIRIUS Satellite Radio tuner 58–Listening to SIRIUS Satellite Radio 58–Switching the SIRIUS display 59–Storing and recalling broadcaststations 59–Introduction of advancedoperations 59–Selecting the SIRIUS channel selectmode 59–Using the Game Alert function 60–Displaying the Radio ID 61–Using Instant Replay function 61HD Radio™tuner 62–Basic Operations 62–Storing and recalling broadcastfrequencies 62–Switching the display 62–Using iTunes tagging 62–Introduction to advancedoperations 62–Switching the seek mode 63–Switching the reception mode 63Playing songs on iPod 63–Basic operation 63–Displaying text information oniPod 64ContentsEn4
–Browsing for a song 64–Introduction to advancedoperations 64–Playing songs in a random order(shuffle) 64Multi-CD Player 64–Basic Operations 64–Using CD TEXT functions 65–Introduction to advancedoperations 65–Using compression and bassemphasis 66–Using ITS playlists 66–Using disc title functions 68DVD Player 69–Basic Operations 69–Selecting a disc 69–Selecting a folder 69–Introduction to advancedoperations 69Additional InformationTroubleshooting 71Error messages 71Handling guideline of discs and player 73Dual Discs 73Compressed audio compatibility 74Handling guideline and supplementalinformation 74–Compressed audio files on thedisc 74–USB audio player/USB memory 74Example of a hierarchy 75–The sequence of audio files on thedisc 75–The sequence of audio files on USBmemory 75iPod compatibility 76About handling the iPod 76–About iPod settings 76Bluetooth profiles 76Copyright and trademark notice 77Specifications 78En 5EnglishContents
Information to UserFCC ID: AJDK022MODEL NO.: DEH-P710BTIC: 775E-K022This device complies with Part 15 of FCC Rulesand RSS-Gen of IC Rules. Operation is subjectto the following two conditions: (1) this devicemay not cause interference, and (2) this devicemust accept any interference, including inter-ference that may cause undesired operation ofthis device.MADE IN THAILANDThis equipment has been tested and found tocomply with the limits for a class B digital de-vice, pursuant to Part 15 of the FCC Rules.These limits are designed to provide reason-able protection against harmful interference ina residential installation.This equipment generates, uses and can radi-ate radio frequency energy and, if not installedand used in accordance with the instructions,may cause harmful interference to radio com-munications. However, there is no guaranteethat interference will not occur in a particularinstallation.If this equipment dose cause harmful interfer-ence to radio or television reception, whichcan be determined by turning the equipmentoff and on, the user is encouraged to try to cor-rect the interference by one or more of the fol-lowing measures:!Reorient or relocate the receiving antenna.!Increase the separation between the equip-ment and receiver.!Connect the equipment into an outlet on acircuit different from that to which the re-ceiver is connected.!Consult the dealer or an experienced radio/TV technician for help.Alteration or modifications carried out withoutappropriate authorization may invalidate theuser’s right to operate the equipment.!This transmitter must not be co-located or op-erated in conjunction with any other antennaor transmitter.!This equipment complies with FCC/IC radia-tion exposure limits set forth for uncontrolledequipment and meets the FCC/IC radio fre-quency (RF) Exposure Guidelines in Supple-ment C to OET65 and RSS-102 of the IC radiofrequency (RF) exposure rules. This equipmenthas very low levels of RF energy that it isdeemed to comply without testing of specificabsorption ratio (SAR).For Canadian modelThis Class B digital apparatus complies withCanadian ICES-003.About this unitThe tuner frequencies on this unit are allo-cated for use in North America. Use in otherareas may result in poor reception.WARNINGHandling the cord on this product or cords asso-ciated with accessories sold with the productmay expose you to chemicals listed on proposi-tion 65 known to the State of California and othergovernmental entities to cause cancer and birthdefects or other reproductive harm. Wash handsafter handling.Before You StartEn6Section01
CAUTION:USE OF CONTROL OR ADJUSTMENT ORPERFORMANCE OF PROCEDURESOTHER THAN THOSE SPECIFIED HEREINMAY RESULT IN HAZARDOUS RADIATIONEXPOSURE.CAUTION:THE USE OF OPTICAL INSTRUMENTSWITH THIS PRODUCT WILL INCREASEEYE HAZARD.CAUTION!Do not allow this unit to come into contactwith liquids. Electrical shock could result.Also, damage to this unit, smoke, and over-heating could result from contact with liquids.!Keep this manual handy as a reference for op-erating procedures and precautions.!Always keep the volume low enough so thatyou can hear sounds from outside the vehicle.!Protect this unit from moisture.!If the battery is disconnected or discharged,the preset memory will be erased and must bereprogrammed.Important (Serial number)The serial number is located on the bottom ofthis unit. For your own security and convenience,be sure to record this number on the enclosedwarranty card.About this manualThis unit features a number of sophisticatedfunctions ensuring superior reception and op-eration. All the functions have been designedfor the easiest possible use, but many are notself-explanatory. This operation manual willhelp you benefit fully from this unit’s potentialand to maximize your listening enjoyment.Before You StartEn 7EnglishSection01
We recommend that you familiarize yourselfwith the functions and their operation by read-ing through the manual before you beginusing this unit. It is especially important thatyou read and observe WARNINGs and CAU-TIONs in this manual.After-sales service forPioneer productsPlease contact the dealer or distributor fromwhere you purchased this unit for after-salesservice (including warranty conditions) or anyother information. In case the necessary infor-mation is not available, please contact thecompanies listed below:Please do not ship your unit to the companiesat the addresses listed below for repair withoutadvance contact.U.S.A.Pioneer Electronics (USA) Inc.CUSTOMER SUPPORT DIVISIONP.O. Box 1760Long Beach, CA 90801-1760800-421-1404CANADAPioneer Electronics of Canada, Inc.CUSTOMER SATISFACTION DEPARTMENT300 Allstate ParkwayMarkham, Ontario L3R 0P21-877-283-5901905-479-4411For warranty information please see the Lim-ited Warranty sheet included with this unit.Visit our websiteVisit us at the following site:http://www.pioneerelectronics.com1 Register your product. We will keep the detailsof your purchase on file to help you refer tothis information in the event of an insuranceclaim such as loss or theft.2 Receive updates on the latest products andtechnologies.3 Download owner’s manuals, order productcatalogues, research new products, andmuch more.4 Your feedback is important in our continual ef-fort to design and build the most advanced,consumer-focused product in the industry.FeaturesThis unit is compatible with a wide variety offile formats and media/storage devices.File format compatibility!WMA!MP3!AAC!WAVFor details about compatibility, refer to Com-pressed audio compatibility on page 74.Media/storage device compatibility!CD/CD-R/CD-RW!USB portable audio player/USB memoryMake inquiries to the manufacturer aboutyour USB portable audio player/USB memory.For details about the supported device, refer toSpecifications on page 78.iPod compatibilityThis unit can control and listen to songs on aniPod.For details about the supported iPod, refer toiPod compatibility on page 76.Hands-free phoningThis unit realizes effortless hands-free phoningwith Bluetooth wireless technology.Bluetooth audio player compatibilityWhen you use this unit with a Bluetooth audioplayer featuring Bluetooth wireless technol-ogy, you can control the Bluetooth audioplayer.Before You StartEn8Section01
CAUTION!Pioneer accepts no responsibility for data loston the USB memory/USB portable audioplayer even if that data is lost while using thisunit.!Pioneer accepts no responsibility for data loston the iPod even if that data is lost whileusing this unit.Operating environmentThis unit should be used within the tempera-ture ranges shown below.Operating temperature range: -10 °C to +60 °C(14 °F to 140 °F)EN300328 ETC test temperature: -20 °C and+55 °C (-4 °F and 131 °F)Protecting your unit fromtheftThe front panel can be detached to deter theft.!If the front panel is not detached from thehead unit within five seconds of turning offthe ignition, a warning tone sounds.!You can turn off the warning tone. Refer toSwitching the warning tone on page 50.Important!Handle gently when removing or attachingthe front panel.!Avoid subjecting the front panel to excessiveshock.!Keep the front panel out of direct sunlight andhigh temperatures.Removing the front panel1 Press to open the front panel.2 Grip the left side of the front panel andpull it gently outward.Take care not to grip it too tightly or to dropthe front panel and protect it from contactwith water or other fluids to prevent perma-nent damage.3 Put the front panel into the providedprotective case for safe keeping.Attaching the front panel%Reattach the front panel by holding itupright to the unit and clipping it securelyinto the mounting hooks.Resetting the microprocessorThe microprocessor must be reset under thefollowing conditions:!Prior to using this unit for the first timeafter installation!If the unit fails to operate properly!When strange or incorrect messages ap-pear on the display1 Remove the front panel.Refer to Removing the front panel on this page.Before You StartEn 9EnglishSection01
2 Press RESET with a pen tip or otherpointed instrument.RESET buttonAbout the demo modeThis unit features two demonstration modes.One is the reverse mode, the other is the fea-ture demo mode.ImportantThe red lead (ACC) of this unit should be con-nected to a terminal coupled with ignition switchon/off operations. If this is not done, the vehiclebattery may be drained.Reverse modeIf you do not perform an operation withinabout 30 seconds, screen indications start toreverse, and then continue reversing every 10seconds. Pressing buttonBAND/ESC/CANCEL when power to this unitis turned off while the ignition switch is set toACC or ON cancels the reverse mode. Pressbutton BAND/ESC/CANCEL again to start thereverse mode.Feature demo modeThe feature demo automatically starts whenpower to this unit is turned off while the igni-tion switch is set to ACC or ON. PressDISP/SCRL during feature demo operation tocancel the feature demo mode. PressDISP/SCRL again to start. Remember that ifthe feature demo continues operating whenthe car engine is turned off, it may drain bat-tery power.Use and care of the remotecontrolInstalling the batterySlide the tray on the back of the remote con-trol out and insert the battery with the plus (+)and minus (–) poles aligned properly.!When using for the first time, pull out thefilm protruding from the tray.WARNINGKeep the battery out of the reach of children.Should the battery be swallowed, consult a doc-tor immediately.Removing the batteryCAUTION!Use one CR2032 (3 V) lithium battery.!Remove the battery if the remote control is notused for a month or longer.!There is a danger of explosion if the battery isincorrectly replaced. Replace only with thesame or equivalent type.!Do not handle the battery with metallic tools.!Do not store the battery with metallic objects.Before You StartEn10Section01
!If the battery leaks, wipe the remote controlcompletely clean and install a new battery.!When disposing of used batteries, complywith governmental regulations or environmen-tal public institutions’rules that apply in yourcountry/area.!“Perchlorate Material –special handling mayapply.See www.dtsc.ca.gov/hazardouswaste/perchlorate. (Applicable to California, U.S.A.)”Using the remote controlThe remote control may not function properlyin direct sunlight.Important!Do not store the remote control in high tem-peratures or direct sunlight.!Do not let the remote control fall onto thefloor, where it may become jammed under thebrake or accelerator pedal.!If any of the following problems occur, imme-diately stop using the unit and consult thedealer from whom you purchased it.—Smoke is coming from the unit.—Abnormal odor is coming from the unit.—A foreign object has entered the unit.—Liquid has been spilled on or into the unit.If you continue to use this unit without findinga remedy, the unit may be damaged badly, re-sulting in a serious accident or fire.!Do not disassemble or modify this unit. To doso may cause a malfunction.!Do not operate this unit while manipulatingthe steering wheel as it might result in a trafficaccident.!If you need to operate this unit while driving,look ahead carefully to avoid being involved ina traffic accident.!Do not leave this steering remote control free(unattached). When stopping the car or turn-ing, the unit might drop on the floor. If the unitrolls under the brake pedal, it might preventthe driver from braking properly, causing ser-ious problems. Be sure to fix the steering re-mote control to the steering wheel.Before You StartEn 11EnglishSection01
Head unit1SRC/OFF buttonThis unit is turned on by selecting a source.Press to cycle through all the availablesources.2/iPod buttonPress to turn random function on or offwhile using CD or USB.While using an iPod, press to shuffle alltracks.Press and hold to switch the control modewhile using an iPod.If using the iPod with an interface adapter(CD-IB100N), press to switch the shufflefunction.3VOICE/ buttonPress to start voice recognition.4/LIST buttonPress to display the disc title list, track titlelist, folder list or file list.5PHONE/ /BT MENU buttonPress to display the phone book list. Whileoperating a phone call, press to end a call,reject an incoming call or cancel making acall.Press and hold to select TEL as a source.6indicatorLights up when your cellular phone is con-nected via Bluetooth wireless technology.!When selecting a source other than TEL,it flashes while using hands-free phon-ing.7buttonPress to open the front panel.8indicatorLights up when your Bluetooth audio playeris connected via Bluetooth wireless technol-ogy.9MUTE/HOLD buttonPress to turn off the sound. To turn on thesound, press again.While talking on the phone, press to put thecall on hold.aMULTI-CONTROLMove to perform manual seek tuning, fastforward, reverse and track search controls.Also used for controlling functions.Turn to increase or decrease the volume.!While using hands-free phoning, you canselect Echo cancel andSCO Private Mode by pressingMULTI-CONTROL.!While using Tuner,iPod (connectedusing USB input) or HD Radio as asource, press and hold to store tag infor-mation such as artist and track informa-tion of the currently playing song to thisunit.What’s whatEn12Section02
!While using SIRIUS as a source, pressand hold to tune to the station broadcast-ing the selected game if game alert is on.bDISP/SCRL buttonPress to select different displays.Press and hold to scroll through the text in-formation.cS.Rtrv/SAT MODE buttonPress to switch advanced sound retrieversettings.!When XM tuner or SIRIUS tuner is se-lected as the source, press to change thechannel select mode.!When SIRIUS tuner is selected as thesource, press and hold to perform the In-stant Replay mode.dCLOCK/DISP OFF buttonPress to change to the clock display.Press and hold to turn the display indicationand button illumination off or on.eBAND/ESC/CANCEL buttonPress to select among three FM bands andone AM band.Press to return to the ordinary display whenoperating the menu.Steering remote controlOperation is the same as when using the but-tons on the head unit.fPHONE buttonPress to select the phone as the source.While operating a phone source, press toend a call, reject an incoming call or cancelmaking a call.g/CANCEL buttonWhile operating the phone source, press toend a call or reject an incoming call.ha/b/c/dbuttonsPress to perform manual seek tuning, fastforward, reverse and track search controls.Also used for controlling functions.i/START buttonPress to start talking on the phone while op-erating a phone source.jVOLUME buttonsPress to increase or decrease the volume.What’s whatEn 13EnglishSection02
Power ON/OFFTurning the unit on%Press SRC/OFF to turn the unit on.Turning the unit off%Press SRC/OFF and hold until the unitturns off.Selecting a sourceYou can select a source you want to listen to.To switch to the built-in CD player, load a discin the unit. Refer to page 17.%Press SRC/OFF repeatedly to switch be-tween the following sources.XM tuner (XM tuner)—SIRIUS (SIRIUS tuner)—HD Radio (HD Radio tuner)—Tuner (tuner)—DVD (DVD player/multi-DVD player)—CD(built-in CD player)—Multi CD (multi-CDplayer)—iPod (iPod connected with the inter-face adapter)—USB1 (USB storage device 1)/iPod1 (iPod connected using USB input 1)—USB2 (USB storage device 2)/iPod2 (iPod con-nected using USB input 2)—External1 (exter-nal unit 1)—External2 (external unit 2)—AUX1 (auxiliary unit 1)—AUX2 (auxiliary unit2)—BT Audio (bluetooth audio)Notes!In the following cases, the sound source willnot change.—When no unit corresponding to the se-lected source is connected.—When there is no disc or magazine in theplayer.—When the iPod is not connected to thisunit with the interface adapter.—When AUX (auxiliary input) is set to off(refer to page 50).—When the BT Audio source is set to off(refer to Activating the BT Audio source onpage 52).—When an USB storage device or iPod is notconnected to the USB port of this unit,NO DEVICE is displayed.!If the HD Radio tuner is connected to thisunit, tuner source is skipped.!USB1/iPod1 and USB2/iPod2 are the sameoperations. However, sources are different de-pending on the terminal which has been con-nected to.!AUX1 is set to on by default. Turn off the AUX1when not in use (refer to Switching the auxili-ary setting on page 50).!Charging the portable audio player usingcar’s DC power source while connecting it toAUX input may generate noise. In this case,stop charging.!External unit refers to a Pioneer product (suchas ones available in the future) that, althoughincompatible as a source, enables control ofbasic functions with this unit. Two externalunits can be controlled with this unit. Whentwo external units are connected, the externalunit is automatically allocated to external unit1 or external unit 2 by this unit.!When this unit’s blue/white lead is connectedto the vehicle’s auto-antenna relay controlterminal, the vehicle’s antenna extends whenthis unit’s source is turned on. To retract theantenna, turn the source off.Adjusting the volume%Turn MULTI-CONTROL to adjust thesound level.Basic OperationsEn14Section03
Basic Operations5551111222244443331Band indicator25(stereo) indicatorAppears when the selected frequency is beingbroadcast in stereo.3LOC indicatorAppears when local seek tuning is on.4Preset number indicator5Signal level indicatorShows the radio wave strength.6Frequency indicator%Select a bandPress BAND/ESC/CANCEL.#Band can be selected from among FM1,FM2,FM3 or AM.%Manual tuning (step by step)Push MULTI-CONTROL left or right.%Seek tuningPush and hold MULTI-CONTROL left or right,and then release.#You can cancel seek tuning by pushingMULTI-CONTROL left or right.#While pushing and holding MULTI-CONTROLleft or right, you can skip stations. Seek tuningstarts as soon as you releaseMULTI-CONTROL.Storing and recallingbroadcast frequenciesYou can easily store up to six broadcast fre-quencies for later recall.!Six stations for each band can be stored inmemory.1 Press /LIST.Preset screen is displayed.2 Use MULTI-CONTROL to store the se-lected frequency in memory.Turn to change the preset number. Press andhold to store.3 Use MULTI-CONTROL to select the de-sired station.Turn to change the station. Press to select.#You can also change the station by pushingMULTI-CONTROL up or down.#To return to the ordinary display, pressBAND/ESC/CANCEL or /LIST.#If you do not operate the list within about 30seconds, the display automatically returns to theordinary display.Using iTunes taggingThis function can be operated with the followingiPod models.—iPod fifth generation—iPod nano third generation—iPod classicHowever, tag information can be stored in thisunit even while the other iPod models are used.It is possible to save the song’s information(tag) from broadcasting station to your iPod.The songs will show up in a playlist called“Tagged playlist”in iTunes the next time yousync your iPod. Then you can directly buy thesongs you want from iTunes Music Store.Storing the tag information tothis unit1 Tune in the broadcast station.2 Press and hold MULTI-CONTROL if TAGis indicated in the display while desiredsong is broadcasting.#While storing the tag data on this unit, TAGflashes.3 When completed, TAG Stored andare displayed.TunerEn 15EnglishSection04
Storing the tagged informationto your iPod1 Press SRC/OFF to select iPod1/iPod2.2 When Tags transfer is displayed, useMULTI-CONTROL to select Yes.#If you do not want to store tag informations toyour iPod, select No.#Tags transfer is displayed whenever you con-nected your iPod to this unit as long as thetagged information is stored in this unit.#While transferring the tag,Transferring to iPod is displayed. In this period,do not operate this unit.3 When completed, Transfer completed isdisplayed and tagged informations arestored on your iPod.NoteYou can also perform this operation in the menuthat appears by using MULTI-CONTROL whileusing iPod1/iPod2 as the source.Introduction to advancedoperations1 Press MULTI-CONTROL to display themain menu.2 Use MULTI-CONTROL to select Function.Turn to change the menu option. Press to se-lect.The function menu is displayed.3 Turn MULTI-CONTROL to select thefunction.BSM (best stations memory)—Local (localseek tuning)NoteTo return to the ordinary display, pressBAND/ESC/CANCEL.Storing the strongestbroadcast frequenciesBSM (best stations memory) lets you automa-tically store the six strongest broadcast fre-quencies.1 Display the function menu.Refer to Introduction to advanced operationson this page.2 Use MULTI-CONTROL to select BSM inthe function menu.3 Press MULTI-CONTROL to turn BSM on.The six strongest broadcast frequencies arestored in the order of their signal strength.#To cancel, press MULTI-CONTROL again.Tuning in strong signalsLocal seek tuning lets you tune in only thoseradio stations with sufficiently strong signalsfor good reception.1 Display the function menu.Refer to Introduction to advanced operationson this page.2 Use MULTI-CONTROL to select Local inthe function menu.3 Press MULTI-CONTROL to turn localseek tuning on.#To turn local seek tuning off, pressMULTI-CONTROL again.4 Push MULTI-CONTROL left or right toset the sensitivity.FM: Level 1—Level 2—Level 3—Level 4AM: Level 1—Level 2Larger setting number is higher level. Thehighest level setting allows reception of onlythe strongest stations, while lower settings letyou receive progressively weaker stations.TunerEn16Section04
Basic Operations44455511112223331WMA/MP3/AAC/WAV indicatorShows the type of audio file currently playingwhen the compressed audio is playing.2Folder number indicatorShows the folder number currently playingwhen the compressed audio is playing.3Track number indicator4Play time indicator5Bit rate/sampling frequency indicatorShows the bit rate or sampling frequency ofthe current track (file) when the compressedaudio is playing.!When playing back VBR (variable bitrate)-recorded files, VBR is displayed in-stead of bit rate value.!The sampling frequency shown in thedisplay may be abbreviated.%Open the front panelPress .Disc loading slot appears.Disc loading sloth(eject) button#When loading a disc, face the label side ofa disc up.#To avoid a malfunction, make sure that nometal objects come into contact with the term-inals when the front panel is open.%Eject a discPress h(eject).%Select a folderPush MULTI-CONTROL up or down.#You cannot select a folder that does not havea compressed audio file recorded in it.%Select a trackPush MULTI-CONTROL left or right.%Fast forward or reversePush and hold MULTI-CONTROL left or right.#When playing compressed audio, there is nosound on fast forward or reverse.%Return to root folderPress and hold BAND/ESC/CANCEL.#If folder 01 (ROOT) contains no files, playbackcommences with folder 02.%Switch between compressed audio andCD-DAPress BAND/ESC/CANCEL.#This operation is available only when playingCD-EXTRA or MIXED-MODE CDs.#If you have switched between compressedaudio and CD-DA, playback starts at the firsttrack on the disc.Notes!The built-in CD player can play back audio CDand compressed audio recorded on a CD-ROM. (Please see the following section forfiles that can be played back. Refer to page74)!Read the precautions for the player and discsin the following section. Refer to page 73.!A disc has already been inserted, pressSRC/OFF to select the built-in CD player.!There is sometimes a delay between startingup disc playback and the sound being issued.When being read, FORMAT READ is dis-played.!If an error message is displayed, refer to Errormessages on page 71.Built-in CD PlayerEn 17EnglishSection05
!Playback is carried out in order of file number.Folders are skipped if they contain no files. (Iffolder 01 (ROOT) contains no files, playbackcommences with folder 02.)!You can eject the CD by pressing and holdingh(eject) with eject position when the CDloading or ejecting cannot operate properly.Displaying textinformation on disc%Press DISP/SCRL to select the desiredtext information.!For title entered CDPlay time—: disc title and play time!For CD TEXT discsPlay time—: disc artist name and :track title—: disc artist name and :disc title—: disc title and : track title—: track artist name and : track title—: track title and play time—: tracktitle, : track artist name and : disc title!For WMA/MP3/AACPlay time—: folder name and : filename—: artist name and : track title—: artist name and : album title—:album title and : track title—: tracktitle and play time—: comment and playtime—: track title, : artist name and: album title!For WAVPlay time—: folder name and : filenameNotes!You can scroll to the left of the title by pressingand holding DISP/SCRL.!Audio CD that contains certain informationsuch as text and/or number is CD TEXT.!If the characters recorded on the audio file arenot compatible with this unit, those charac-ters will not be displayed.!If specific information is not recorded on adisc, title or name is not displayed.!The text information of some audio files maynot be correctly displayed.!Depending on the version of iTunes used towrite MP3 files onto a disc, comment informa-tion may not be correctly displayed.!Depending on the version of WindowsMedia™Player used to encode WMA files,album names and other text information maynot be correctly displayed.!When Ever Scroll is set to ON at the initial set-ting, text information scrolls continuously inthe display. Refer to Switching the ever scrollon page 52.Selecting tracks from thetrack title listTrack title list lets you see the list of track titleson a CD TEXT disc and select one of them toplay back.1 Press /LIST to switch to the track titlelist mode.2 Use MULTI-CONTROL to select the de-sired track title.Turn to change the track title. Press to play.#You can also change the track title by pushingMULTI-CONTROL up or down.#You can scroll to the left of the title by pressingand holding DISP/SCRL. To stop scrolling, pressDISP/SCRL.#To return to the ordinary display, pressBAND/ESC/CANCEL or /LIST.#If you do not operate the list within about 30seconds, the display automatically returns to theordinary display.Selecting files from the filename listFile name list lets you see the list of file names(or folder names) and select one of them toplayback.1 Press /LIST to switch to the file namelist mode.Names of files and folders appear in the dis-play.Built-in CD PlayerEn18Section05
2 Use MULTI-CONTROL to select the de-sired file name (or folder name).Turn to change the name of file or folder.—when a file is selected, press to play.—when a folder is selected, press to see a listof files (or folders) in the selected folder.—when a folder is selected, press and hold toplay a song in the selected folder.#You can also play the file by pushingMULTI-CONTROL right.#You can also play a song in the selected folderby pushing and holding MULTI-CONTROL right.#To return to the previous list (the folder onelevel higher), push MULTI-CONTROL left.#Number of the folders/files in the currently se-lected folder will be indicated on the right side ofthe display.#You can scroll to the left of the title by pressingand holding DISP/SCRL. To stop scrolling, pressDISP/SCRL.#To return to the ordinary display, pressBAND/ESC/CANCEL or /LIST.#If you do not operate the list within about 30seconds, the display automatically returns to theordinary display.Introduction to advancedoperations1 Press MULTI-CONTROL to display themain menu.2 Use MULTI-CONTROL to select Function.Turn to change the menu option. Press to se-lect.The function menu is displayed.3 Turn MULTI-CONTROL to select thefunction.Play mode (repeat play)—Random mode(random play)—Scan mode (scan play)—Pause (pause)—Sound Retriever (advancedsound retriever)—TitleInput "A" (disc titleinput)Notes!To return to the ordinary display, pressBAND/ESC/CANCEL.!If you do not operate functions except forTitleInput "A" within about 30 seconds, thedisplay automatically returns to the ordinarydisplay.!When playing a compressed audio disc or CDTEXT disc, you cannot switch to disc title inputdisplay.Selecting a repeat play range1 Display the function menu.Refer to Introduction to advanced operationson this page.2 Use MULTI-CONTROL to selectPlay mode in the function menu.3 Press MULTI-CONTROL to select the re-peat range.!Disc repeat –Repeat all tracks!Track repeat –Repeat the current track!Folder repeat –Repeat the current folder#If you select another folder during repeat play,the repeat play range changes to disc repeat.#Performing track search or fast forward/re-verse during Track repeat (track repeat) changesthe repeat play range to disc/folder.#When Folder repeat (folder repeat) is se-lected, it is not possible to play back a subfolderof that folder.Playing tracks in random orderTracks in a selected repeat range are played inrandom order.%Press /iPod to turn random play on.Tracks play in a random order.#To turn random play off, press /iPod again.Built-in CD PlayerEn 19EnglishSection05
NoteYou can also turn this function on or off in themenu that appears by usingMULTI-CONTROL.Scanning folders and tracksScan play searches the song within the se-lected repeat range.1 Display the function menu.Refer to Introduction to advanced operationson the previous page.2 Use MULTI-CONTROL to selectScan mode in the function menu.3 Press MULTI-CONTROL to turn scan playon.The first 10 seconds of each track is played.4 When you find the desired track pressMULTI-CONTROL to turn scan play off.#If the display has automatically returned tothe playback display, select Scan mode again byusing MULTI-CONTROL.#After scanning of a disc (folder) is finished,normal playback of the tracks begins.Pausing playback1 Display the function menu.Refer to Introduction to advanced operationson the previous page.2 Use MULTI-CONTROL to select Pause inthe function menu.3 Press MULTI-CONTROL to turn pauseon.Playback of the current track pauses.#To turn pause off, press MULTI-CONTROLagain.Using advanced soundretrieverAdvanced sound retriever function automati-cally enhances compressed audio and re-stores rich sound.%Press S.Rtrv/SAT MODE repeatedly toselect the desired setting.OFF (off)—1—2#2is more effective than 1.NoteYou can also perform this operation in the menuthat appears by using MULTI-CONTROL.Entering disc titlesUse the disc title input feature to store up to48 CD titles in the unit. Each title can be up to10 characters long.1 Display the function menu.Refer to Introduction to advanced operationson the previous page.2 Play the CD that you want to enter atitle for.3 Use MULTI-CONTROL to selectTitleInput "A" in the function menu.4 Press DISP/SCRL to select the desiredcharacter type.Press DISP/SCRL repeatedly to switch betweenthe following character types:Alphabet (upper case), numbers and symbols—Alphabet (lower case)—European letters,such as those with accents (e.g. á,à,ä,ç)—Numbers and symbols5 Push MULTI-CONTROL up or down toselect a letter of the alphabet.6 Push MULTI-CONTROL left or right tomove the cursor to the previous or nextcharacter position.Built-in CD PlayerEn20Section05
7 Move the cursor to the last position bypushing MULTI-CONTROL right after enter-ing the title.When you push MULTI-CONTROL right onemore time, the entered title is stored in mem-ory.8 Press BAND/ESC/CANCEL to return tothe playback display.Notes!Titles remain in memory, even after the disc isremoved from the unit, and are recalled whenthe disc is reinserted.!After data for 48 discs are stored in the mem-ory, data for a new disc overwrites the oldestone.!If you connect a multi-CD player, you caninput disc titles for up to 100 discs.!When a multi-CD player that does not supportdisc title functions is connected, you cannotenter disc titles in this unit.Built-in CD PlayerEn 21EnglishSection05
For details about the supported device, refer toSpecifications on page 78.Basic Operations44455511112223331WMA/MP3/AAC/WAV indicatorShows the type of file currently playing.2Folder number indicator3Track number indicator4Play time indicator5Bit rate/sampling frequency indicator!When playing back VBR (variable bitrate)-recorded files, VBR is displayed in-stead of bit rate value.!The sampling frequency shown in thedisplay may be abbreviated.%Select a folderPush MULTI-CONTROL up or down.%Fast forward or reversePush and hold MULTI-CONTROL left or right.%Select a trackPush MULTI-CONTROL left or right.%Return to root folderPress and hold BAND/ESC/CANCEL.Notes!Optimum performance of this unit may not beobtained depending on the connected USBstorage device.!If folder 01 (ROOT) contains no files, playbackcommences with folder 02.!When the USB portable audio player havingbattery charging function is connected to thisunit and the ignition switch is set to ACC orON, the battery is charged.!You can disconnect the USB storage deviceanytime you want to finish listening to it.!If you do not use an USB storage device, dis-connect it from this unit.!When the USB portable audio player/USBmemory is disconnected from this unit duringplayback, NO DEVICE is displayed.Displaying text informationof an audio fileThe operation is the same as that of the built-in CD player.Refer to Displaying text information on disc onpage 18.Selecting files from the filename listThe operation is the same as that of the built-in CD player.Refer to Selecting files from the file name liston page 18.Introduction to advancedoperations1 Press MULTI-CONTROL to display themain menu.2 Use MULTI-CONTROL to select Function.Turn to change the menu option. Press to se-lect.The function menu is displayed.3 Turn MULTI-CONTROL to select thefunction.Play mode (repeat play)—Random mode(random play)—Scan mode (scan play)—Pause (pause)—Sound Retriever (advancedsound retriever)Playing songs on USB portable audio player/USB memoryEn22Section06
Function and operationPlay mode,Random mode,Scan mode,Pause and Sound Retriever operations arebasically the same as that of the built-in CDplayer.Function name OperationPlay modeRefer to Selecting a repeat playrange on page 19.However, the repeat play rangesyou can select are different fromthat of the built-in CD player. Therepeat play ranges of the USBportable audio player/USB mem-ory are:!Track repeat –Repeat justthe current file!Folder repeat –Repeat thecurrent folder!All repeat –Repeat all filesRandom mode Refer to Playing tracks in randomorder on page 19.Scan mode Refer to Scanning folders andtracks on page 20.Pause Refer to Pausing playback on page20.Sound Retriever Refer to Using advanced sound re-triever on page 20.Notes!To return to the ordinary display, pressBAND/ESC/CANCEL.!If you select another folder during repeat play,the repeat play range changes to All repeat.!If you perform track search or fast forward/re-verse during Track repeat, the repeat playrange changes to Folder repeat.!When Folder repeat is selected, it is not pos-sible to play back a subfolder of that folder.!After file or folder scanning is finished, nor-mal playback of the files begins again.Playing songs on USB portable audio player/USB memoryEn 23EnglishSection06
For details about the supported iPod, refer toiPod compatibility on page 76.Basic Operations1112223334441iPod name2Song number indicator3Play time indicator4Song time (progress bar)%Fast forward or reversePush and hold MULTI-CONTROL left or right.%Select a track (chapter)Push MULTI-CONTROL left or right.Notes!When using an iPod, iPod Dock Connector toUSB Cable (CD-IU50) is required.!Read the precautions for iPod in the followingsection. Refer to page 76.!While iPod is connected to this unit, PIONEER(or (check mark)) is displayed on the iPod.!If an error message is displayed, refer to Errormessages on page 71.!When the ignition switch is set to ACC or ON,the iPod’s battery is charged while the iPod isconnected to this unit.!While the iPod is connected to this unit, theiPod cannot be turned on or off.!Before connecting the dock connector of thisunit to the iPod, disconnect the headphonesfrom the iPod.!The iPod is turned off about two minutes afterthe ignition switch is set to OFF.Browsing for a songSearching songs by categoryOperations to control an iPod with this unit isdesigned to be as close to the iPod as possibleto make operation and song search easy.!Depending on the number of files in theiPod, there may be a delay when displayinga list.!If the characters recorded on the iPod arenot compatible with this unit, those charac-ters are not displayed.1 Press /LIST.2 Use MULTI-CONTROL to select a cate-gory.Turn to change the category. Press to select.Playlists (playlists)—Artists (artists)—Albums (albums)—Songs (songs)—Podcasts(podcasts)—Genres (genres)—Composers(composers)—Audiobooks (audiobooks)List for the selected category is displayed.#You can start playback throughout the se-lected category by pressing and holdingMULTI-CONTROL. You can also perform this op-eration by pushing and holdingMULTI-CONTROL right.#You can also change the category by pushingMULTI-CONTROL up or down.#You can also select the category by pushingMULTI-CONTROL right.#To return to the previous category, pushMULTI-CONTROL left.#To return to the top tier of categories, pushand hold MULTI-CONTROL left.#You can scroll to the left of the title by pressingand holding DISP/SCRL. To stop scrolling, pressDISP/SCRL.#To return to the ordinary display, pressBAND/ESC/CANCEL.#If you do not operate the list within about 30seconds, the display automatically returns to theordinary display.3 Repeat step 2 to find a song you wantto listen to.Playing songs on iPodEn24Section07
Searching songs by alphabet1 Press /LIST.2 Use MULTI-CONTROL to select a cate-gory.Turn to change the category. Press to select.3 Press /LIST to switch to alphabetsearch mode.4 Turn MULTI-CONTROL to select a letterof the alphabet.5 Press MULTI-CONTROL to display the al-phabetical list.While searching, Searching flashes.#If alphabet search is aborted, NOT FOUND isdisplayed.Displaying textinformation on iPod%Press DISP/SCRL to select the desiredtext information.Play time—: artist name and : song title—: artist name and : album name—:album name and : song title—: song titleand play time—: song title, : artist nameand : album nameNotes!If the characters recorded on the iPod are notcompatible with this unit, those charactersare not displayed.!You can scroll the text information to the leftby pressing and holding DISP/SCRL.!When Ever Scroll is set to ON at the initial set-ting, text information scrolls continuously inthe display. Refer to Switching the ever scrollon page 52.Introduction to advancedoperations1 Press MULTI-CONTROL to display themain menu.2 Use MULTI-CONTROL to select Function.Turn to change the menu option. Press to se-lect.The function menu is displayed.3 Turn MULTI-CONTROL to select thefunction.Play mode (repeat play)—Shuffle mode(shuffle)—Shuffle all (shuffle all)—Link play(link play)—Control mode (control mode)—Pause (pause)—Audiobooks (audiobookspeed)—Tags transfer (iTunes tagging set-ting)—Sound Retriever (advanced sound re-triever)Function and operationPlay mode,Pause and Sound Retriever op-erations are basically the same as that of thebuilt-in CD player.Function name OperationPlay modeRefer to Selecting a repeat playrange on page 19.However, the repeat play rangesyou can select are different fromthat of the built-in CD player. Therepeat play ranges of the iPodare:!Repeat One –Repeat the cur-rent song!Repeat All –Repeat all songsin the selected listPause Refer to Pausing playback on page20.Sound Retriever Refer to Using advanced sound re-triever on page 20.Notes!To return to the ordinary display, pressBAND/ESC/CANCEL.!If you do not operate functions within about30 seconds, the display automatically returnsto the ordinary display.!When Control mode is set to iPod, onlyControl mode,Pause and Sound Retrievercan be operated.Playing songs on iPodEn 25EnglishSection07
Playing songs in a randomorder (shuffle)1 Display the function menu.Refer to Introduction to advanced operationson the previous page.2 Use MULTI-CONTROL to selectShuffle mode in the function menu.3 Press MULTI-CONTROL to select your fa-vorite setting.!Shuffle Songs –Play back songs in the se-lected list in random order.!Shuffle Albums –Play back songs from arandomly selected album in order.!Shuffle OFF –Cancel random play.Playing all songs in arandom order (shuffle all)%Press /iPod to turn shuffle all on.All songs on the iPod play randomly.#To turn shuffle all off, set Shuffle mode in theFunction menu to off.NoteYou can also turn this function on in the menuthat appears by using MULTI-CONTROL.Playing songs related tothe currently playing songSongs related to the currently playing songare played. You can play songs of the followinglists.—Album list of currently playing artist—Song list of currently playing album—Album list of currently playing genre!Depending on the number of files in theiPod, there may be a delay when displayinga list.1 Press and hold /LIST to switch to thelink play mode.2 Use MULTI-CONTROL to select the de-sired mode.Push MULTI-CONTROL left or right to changethe mode; press to select.!Artists –Plays the album of currently play-ing artist.!Albums –Plays the song of currently play-ing album.!Genres –Plays the album of currently play-ing genre.Searching flashes while searching the list andthen the playback of the list starts.#If the related albums/songs are not found,NOT FOUND is displayed.NoteYou can also turn this function on in the menuthat appears by using MULTI-CONTROL.Operating this unit’s iPodfunction from your iPodThis function cannot be operated with the fol-lowing iPod models.—iPod nano first generation—iPod fifth generationThis unit’s iPod function can be operated fromyour iPod. Sound can be heard from the car’sspeakers, and operation can be conductedfrom your iPod.!While this function is in use, even if theignition key is turned off, the iPod will notbe turned off. To turn off power, operate theiPod.1 Press /iPod and hold to switch thecontrol mode.Each pressing and holding /iPod switchesthe control mode as follows:!iPod –This unit’s iPod function can be op-erated from the connected iPod.!AUDIO –This unit’s iPod function can beoperated from this unit.Playing songs on iPodEn26Section07
2 When you select iPod, operate the con-nected iPod to select a song and play.#Switching the control mode to iPod pausessong playback. Operate the iPod to start play-back.#Even if the control mode is set to iPod, follow-ing functions are available from this unit.!Volume!Fast forward/reverse!Track up/down!Pausing!Switching the text informationNotes!You can also turn this function on or off in themenu that appears by usingMULTI-CONTROL.!Two iPod can be connected simultaneously tothis unit. Settings are common in iPod1 andiPod2.!When the control mode is set to iPod, opera-tions are limited as follows:—Functions other than Control mode (con-trol mode), Pause (pause) andSound Retriever (advanced sound retrie-ver) cannot be selected.—The volume can only be controlled fromthis unit.!Turning this function on pauses song play-back. Operate the iPod to start playback.Changing audiobook speedWhile listening to an audiobook on iPod, play-back speed can be changed.1 Display the function menu.Refer to Introduction to advanced operationson page 25.2 Use MULTI-CONTROL to selectAudiobooks in the function menu.3 Press MULTI-CONTROL to select your fa-vorite setting.Press MULTI-CONTROL repeatedly until thedesired setting appears in the display.!Faster –Playback faster than normal speed!Normal –Playback in normal speed!Slower –Playback slower than normalspeedUsing iTunes taggingThis function can be operated with the followingiPod models.—iPod fifth generation—iPod nano third generation—iPod classicHowever, tag information can be stored in thisunit even while the other iPod models are used.It is possible to save the song’s information(tag) from iPod connected to this unit to youriPod. The songs will show up in a playlistcalled “Tagged playlist”in iTunes the next timeyou sync your iPod. Then you can directly buythe songs you want from iTunes Music Store.Storing the tag information tothis unit1 Play songs on the iPod.2 Press and hold MULTI-CONTROL if TAGis indicated in the display while desiredsong is playing.#While storing the tag data on this unit, TAGflashes.3 When completed, TAG Stored andare displayed.Storing the tagged informationto your iPod1 Use MULTI-CONTROL to selectTags transfer in the function menu.2 Push MULTI-CONTROL left or right toselect Yes.#If you do not want to store tag informations toyour iPod, select No.Playing songs on iPodEn 27EnglishSection07
3 Press MULTI-CONTROL to start transfer-ring the tag to the iPod.#While transferring the tag,Transferring to iPod is displayed. In this period,do not operate this unit.4 When completed, Transfer completed isdisplayed and tagged informations arestored on your iPod.NoteYou can also perform this operation by selectingiPod1/iPod2 from other source. Refer to Storingthe tagged information to your iPod on page 16.Playing songs on iPodEn28Section07
Connecting a Bluetooth deviceBefore using the Bluetooth audio player andBluetooth telephone, you need to connectBluetooth device to this unit. Please read thefollowing section and connect correctly.If you use Bluetooth device with thisunit for the first time, read thefollowing section.!Using a Bluetooth device to initiate a con-nection on the next pageIf your Bluetooth device has alreadybeen paired, read the followingsection.!Connecting a paired Bluetooth device on thenext pageIf your Bluetooth device needs to bedisconnected from this unit, read thefollowing section.!Disconnecting a Bluetooth device on page31Also, you can use other convenientfunctions listed below. You can usethese functions when needed.!Deleting a paired phone on page 31!Selecting a service on page 31!Connecting to a Bluetooth device automati-cally on page 32!Displaying system version for repair on page32!Displaying BD (Bluetooth Device) addresson page 32!Editing device name on page 32!Entering PIN code for Bluetooth wirelessconnection on page 33Introduction to connectionoperations1 Select BT Audio or TEL as a source.To select BT Audio, press SRC/OFF.To select TEL, press and hold PHONE//BT MENU.2 Press MULTI-CONTROL to display themain menu.3 Use MULTI-CONTROL to selectConnection.Turn to change the menu option. Press to se-lect.The connection menu is displayed.4 Turn MULTI-CONTROL to select thefunction.Open device (open a connection to the de-vice)—Search device (search device)—DisconnectDevice (disconnect device)—Delete device (delete device)—Service (ser-vice setting)—Auto connect (automatic con-nection setting)—BT Version INFO (versioninformation)—Device INFO (device informa-tion)—Edit device name (editing the devicename)—Pin code input (pin code input)Notes!If a Bluetooth device is not connected to thisunit yet, DisconnectDevice function is notavailable.!If a Bluetooth device is not paired with thisunit yet, Delete device function is not avail-able.!To return to the ordinary display, pressBAND/ESC/CANCEL.!If you do not operate functions except forOpen device,Search device,DisconnectDevice,Edit device name nameand Pin code input within about 30 seconds,the display automatically returns to the ordin-ary display.!If you do not operate Open device andSearch device within 30 seconds after theBluetooth device is paired, the display auto-matically returns to the ordinary display.Using Bluetooth wireless technologyEn 29EnglishSection08
Connecting a Bluetooth deviceBefore you can use the devices featuring Blue-tooth wireless technology, you may need toenter the PIN code into this unit. If your devicerequires a PIN code to establish a connection,look for the code on the device or in its accom-panying documentation. Refer to Entering PINcode for Bluetooth wireless connection on page33.Using a Bluetooth device to initiate aconnection1 Display the connection menu.Refer to Introduction to connection operationson the previous page.2 Turn MULTI-CONTROL to selectOpen device.#If there is previous connection log in this unit,you can select the Bluetooth device fromSearch device.Refer to Connecting a paired Bluetooth device.3 Push MULTI-CONTROL up or down toselect the special device.#Bluetooth devices that are difficult to establishconnection is called special device. If your Blue-tooth device is listed in the special device, selectthe appropriate one.4 Press MULTI-CONTROL to open the con-nection.Ready will be displayed.#This unit is now on standby for connectionfrom Bluetooth device.#Push MULTI-CONTROL left or right to displaythe device name, BD address and PIN code ofthis unit.5 Use your Bluetooth device to establishconnection.Connection method is different depending onthe Bluetooth device. See the manual of yourBluetooth device to establish connection.While connecting, Connecting is displayed. Ifthe connection is established, Connected isdisplayed.#PIN code is set to 0000 as the default. Youcan change this code in the initial setting. Referto Entering PIN code for Bluetooth wireless con-nection on page 33.Connecting a paired Bluetooth device1 Display the connection menu.Refer to Introduction to connection operationson the previous page.2 Use MULTI-CONTROL to selectSearch device.3 Push MULTI-CONTROL up or down toselect the special device.#Bluetooth devices that are difficult to establishconnection is called special device. If your Blue-tooth device is listed in the special device, selectthe appropriate one.4 Press MULTI-CONTROL to start search-ing.While searching, Searching flashes. Whenavailable Bluetooth devices are found, devicename or BD address (if names cannot be ob-tained) is displayed.#To cancel searching, press MULTI-CONTROLagain.#If no device can be found, NOT FOUND is dis-played. In this case, check the status of Bluetoothdevice and search again.5 Push MULTI-CONTROL up or down toselect a device name you want to connect.#If only one device was found, this step cannotbe performed.#Push MULTI-CONTROL left or right to displaythe device name and BD address.6 Press MULTI-CONTROL to establish con-nection.While connecting, Pairing flashes. If the con-nection is established, Paired is displayed.#If the connection fails, ERROR is displayed. Inthis case, try again from the beginning.Using Bluetooth wireless technologyEn30Section08
#PIN code is set to 0000 as the default. Youcan change this code in the initial setting. Referto Entering PIN code for Bluetooth wireless con-nection on page 33.Disconnecting a Bluetooth deviceThis function can be operated only when theBluetooth wireless connection is being estab-lished.1 Display the connection menu.Refer to Introduction to connection operationson page 29.2 Use MULTI-CONTROL to selectDisconnectDevice.3 Push MULTI-CONTROL up or down toselect the special device.#If only one device was found, this step cannotbe performed.4 Press MULTI-CONTROL to disconnectthe Bluetooth wireless connection.While disconnecting, Disconnecting flashes.If the Bluetooth wireless connection is termi-nated, Disconnected is displayed.#If multiple Bluetooth devices have been con-nected and you wish to disconnect them, pressMULTI-CONTROL and then select the device. Inthis case, repeat operation from step 3.Deleting a paired phone1 Display the connection menu.Refer to Introduction to connection operationson page 29.2 Use MULTI-CONTROL to selectDelete device.3 Push MULTI-CONTROL up or down toselect the special device.#If only one device was found, this step cannotbe performed.#Push MULTI-CONTROL left to display the BDaddress.#If device name cannot be obtained, BD ad-dress is displayed.4 When the device name is being dis-played, push MULTI-CONTROL right to dis-play Delete YES.Deleting device is now on standby.#If you do not want to delete the device, pushMULTI-CONTROL left.5 Press MULTI-CONTROL to delete the de-vice.After the device is deleted, Deleted is dis-played.Selecting a serviceYou can choose a Bluetooth service fromphone service, AVRCP service or A2DP ser-vice.1 Display the connection menu.Refer to Introduction to connection operationson page 29.2 Use MULTI-CONTROL to select Service.3 Push MULTI-CONTROL up or down toselect the special device.#If only one device was found, this step cannotbe performed.#Push MULTI-CONTROL left or right to switchthe BD address and device name.#If device name cannot be obtained, BD ad-dress is displayed.4 Press MULTI-CONTROL to display theservice select screen.5 Push MULTI-CONTROL up or down toselect the service.Phone—AVRCP—A2DP#“*”is displayed on the connected service.#Profile that is not compatible with the con-nected device cannot be selected.6 Press MULTI-CONTROL to start or stopthe selected service.Using Bluetooth wireless technologyEn 31EnglishSection08
Connecting to a Bluetoothdevice automaticallyIt is possible to set the automatic connectionbetween your Bluetooth device and this unit. Ifthis function is set to on, connection betweenyour Bluetooth device and this unit will takeplace automatically as soon as the two devicesare less than a few meters apart.!Initially, this function is set to on.1 Display the connection menu.Refer to Introduction to connection operationson page 29.2 Use MULTI-CONTROL to selectAuto connect.3 Press MULTI-CONTROL to turn auto-matic connection on.If your Bluetooth device is ready for Bluetoothwireless connection, connection to this unit isautomatically established.#To turn automatic connection off, pressMULTI-CONTROL again.#If this function is turned off, device informa-tion of the previously connected Bluetooth audioplayer is deleted.Displaying system version forrepairShould this unit fails to operate properly andyou consult your dealer for repair, you may beasked to indicate the system versions of thisunit and of Bluetooth module. You can displaythe versions and confirm them.1 Display the connection menu.Refer to Introduction to connection operationson page 29.2 Use MULTI-CONTROL to selectBT Version INFO.The system (microprocessor) version of thisunit is displayed.3 Push MULTI-CONTROL left to switch tothe version of the Bluetooth module of thisunit.#Pushing MULTI-CONTROL right returns to thesystem version of this unit.Displaying BD (BluetoothDevice) addressThis unit displays the BD address of this unit.1 Display the connection menu.Refer to Introduction to connection operationson page 29.2 Use MULTI-CONTROL to selectDevice INFO in the function menu.3 Push MULTI-CONTROL left to switch tothe BD address.12-digit hexadecimal string is displayed.#Pushing MULTI-CONTROL right returns to thedevice name.Editing device nameYou can edit the device name.The device name is set to Pioneer BT Unit asdefault.1 Display the connection menu.Refer to Introduction to connection operationson page 29.2 Use MULTI-CONTROL to selectEdit device name.3 Edit the device name in the same wayas the title input of Built-in CD player.For details concerning operation, refer to En-tering disc titles on page 20.#Device name can be up to 32 characters long.Using Bluetooth wireless technologyEn32Section08
Entering PIN code for Bluetoothwireless connectionTo connect your Bluetooth device to this unitvia Bluetooth wireless technology, you need toenter PIN code on your Bluetooth device toverify the connection. The default code is0000, but you can change this in this function.!With some Bluetooth devices, you don’tneed to enter the PIN code.1 Display the connection menu.Refer to Introduction to connection operationson page 29.2 Use MULTI-CONTROL to selectPin code input in the initial setting menu.3 Push MULTI-CONTROL up or down toselect a number.#You can also press 0to 9on the remote con-trol to select a number.4 Push MULTI-CONTROL left or right tomove the cursor to the previous or next po-sition.5 After inputting PIN code (up to 16 di-gits), press MULTI-CONTROL to store in thisunit.#Pushing MULTI-CONTROL right in the confir-mation display returns you to the PIN code inputdisplay, and you can change the PIN code.#If an invalid character has been entered, sub-sequent characters are not displayed.#If an invalid character has been entered in thebeginning, PIN code cannot be stored in mem-ory.Bluetooth AudioImportant!Depending on the Bluetooth audio player con-nected to this unit, the operations availablewith this unit are limited to the following twolevels:—A2DP profile (Advanced Audio DistributionProfile): Only playing back songs on youraudio player is possible.—AVRCP profile (Audio/Video Remote Con-trol Profile): Playing back, pausing, select-ing songs, etc., are possible.!Since there are a number of Bluetooth audioplayers available on the market, operationswith your Bluetooth audio player using thisunit vary extensively. Refer to the instructionmanual that came with your Bluetooth audioplayer as well as this manual while operatingyour player on this unit.!Information about songs (e.g. the elapsedplaying time, song title, song index, etc.) can-not be displayed on this unit.!While you are listening to songs on your Blue-tooth audio player, refrain from using on yourcellular phone as much as possible. If you useyour cellular phone, the signal from your cel-lular phone may cause noise on the song play-back.!When you are talking on a cellular phone con-nected to this unit via Bluetooth wireless tech-nology, song playback from your Bluetoothaudio player connected to this unit is muted.!Even if you are listening to a song on yourBluetooth audio player and you switch to an-other source, song playback continues.Even though your audio player does not con-tain a Bluetooth module, you can still controlit from this unit via Bluetooth wireless technol-ogy using a Bluetooth adapter (sold sepa-rately).11Device nameShows the device name of the connectedBluetooth audio player (or Bluetooth adapter).Using Bluetooth wireless technologyEn 33EnglishSection08
Basic Operations%Fast forward or reversePush and hold MULTI-CONTROL left or right.%Select a trackPush MULTI-CONTROL left or right.%Starts playback, pauses or restartsPress BAND/ESC/CANCEL.Displaying text information onBluetooth audio playerThis function can be operated only when theBluetooth audio player is connected by AVRCP1.3.%Press DISP/SCRL to select the desiredtext information.: track title—: artist name—: albumtitleNoteYou can scroll to the left of the title by pressingand holding DISP/SCRL.Introduction to advancedoperations1 Press MULTI-CONTROL to display themain menu.2 Use MULTI-CONTROL to select Function.Turn to change the menu option. Press to se-lect.The function menu is displayed.3 Turn MULTI-CONTROL to select thefunction.Play (play)—Stop (stop)—Pause (pause)Notes!To return to the ordinary display, pressBAND/ESC/CANCEL.!If you do not operate functions within about30 seconds, the display automatically returnsto the ordinary display.Function and operationPause is the same as that of the built-in CDplayer.Function name OperationPause Refer to Pausing playback on page20.Playing songs on a Bluetoothaudio player1 Display the function menu.Refer to Introduction to advanced operationson this page.2 Use MULTI-CONTROL to select Play inthe function menu.3 Press MULTI-CONTROL to start play-back.Stopping playback1 Display the function menu.Refer to Introduction to advanced operationson this page.2 Use MULTI-CONTROL to select Stop inthe function menu.3 Press MULTI-CONTROL to stop theplayback.Bluetooth TelephoneImportant!Since this unit is on standby to connect withyour cellular phone via Bluetooth wirelesstechnology, using this unit without runningthe engine can result in battery drainage.Using Bluetooth wireless technologyEn34Section08
!Advanced operations that require your atten-tion such as dialing numbers on the monitor,using phone book, etc., are prohibited whileyou are driving. When you need to use theseadvanced operations, stop your vehicle in asafe place.55566677788811113332224441Device nameShows the device name of the cellular phone.2Signal level indicatorShows the signal strength of cellular phone.!The level shown on the indicator maydiffer from the actual signal level.!If the signal level is not available, this in-dicator is not displayed.3User number indicatorShows the registration number of the cellularphone.4Battery strength indicatorShows the battery strength of cellular phone.!The level shown on the indicator maydiffer from the actual battery strength.!If the battery strength is not available,nothing is displayed in the batterystrength indicator area.5Missed call notice indicationShows when an incoming call has been re-ceived and not answered.6Automatic answering indicatorShows AUTO when the automatic answeringfunction is on (for more details, refer to Settingautomatic answering on page 39).7Clock displayShows the time (if connected with a phone).8Calendar displayShows the day, month and year (if connectedwith a phone).Setting up for hands-free phoningBefore you can use the hands-free phoningfunction you must set up the unit for use withyour cellular phone. This entails establishing aBluetooth wireless connection between thisunit and your phone, pairing your phone withthis unit, and adjusting the volume level.1 Connecting and pairingFor detailed instructions on connecting yourphone to this unit via Bluetooth wireless tech-nology, see following section. Connecting aBluetooth device on page 29.2 Volume adjustmentAdjust the earpiece volume on your cellularphone for comfort. When adjusted, the volumelevel is recorded in this unit as the default set-ting.#Caller’s voice volume and ring volume mayvary depending on the type of cellular phone.#If the difference between the ring volume andcaller’s voice volume is big, overall volume levelmay become unstable.#Before disconnecting the cellular phone fromthis unit, make sure to adjust the volume to aproper level. If the volume is muted (zero level) onyour cellular phone, the volume level of your cel-lular phone remains muted even after the cellularphone is disconnected.Making a phone callDial a numberThe most basic way to make a call is to simplydial the number.For detailed instructions, refer to Making a callby entering phone number on page 39.Calling a number in the Phone Bookor the Call HistoryFor detailed instructions, refer to Calling anumber in the phone book on page 37 andUsing the missed, received and dialed call listson page 37.Using Bluetooth wireless technologyEn 35EnglishSection08
Voice recognitionIf your cellular phone features voice recogni-tion technology, you can make a call by voicecommands.!Operation varies depending on the type ofcellular phone. Refer to the instructionmanual that came with your cellular phonefor detailed instructions.1 Press BAND/ESC/CANCEL and hold untilVoice dial appears in the display.When Voice dial ON is displayed, voice recog-nition function is ready.#If your cellular phone does not feature voicerecognition function, No voice dial appears inthe display and operation is not possible.2 Pronounce the name of your contact.Taking a phone callAnswering or rejecting an incoming call%Answering an incoming callWhen a call comes in, pressMULTI-CONTROL.#You can also take a phone call by pressing /START on the remote control.%End a callPress PHONE//BT MENU.#You can also end the call by pressing /CANCEL on the remote control.%Rejecting an incoming callWhen a call comes in, press PHONE//BT MENU.#You can also reject an incoming call by press-ing /CANCEL on the remote control.NoteThe estimated call time appears in the display(this may differ slightly from the actual call time).Operating a call waiting%Answering a call waitingWhen a call comes in, pressMULTI-CONTROL.#You can also answer a call waiting by pressing/START on the remote control.%End all callsPress PHONE//BT MENU.#You can also end all calls by pressing /CANCEL on the remote control.%Switch between callers on holdPress MULTI-CONTROL.#You can also switch between callers on holdby pressing /START on the remote control.%Rejecting call waitingPress PHONE//BT MENU.#You can also reject call waiting by pressing/CANCEL on the remote control.Notes!To end the call, both you and your caller needto hang up the phone.!While in standby mode, you can recallPhone book by pushing MULTI-CONTROLdown.!While in standby mode, you can recallMissed calls by pushing MULTI-CONTROLup.!While in standby mode, you can recallDialed calls by pushing MULTI-CONTROLright.!While in standby mode, you can recallReceived calls by pushing MULTI-CONTROLleft.Using the phone number listImportant!Be sure to park your vehicle and apply theparking brake when operating the list.!List can be called up from all sources. Themethods to call up the list are different by thesource.Using Bluetooth wireless technologyEn36Section08
1 Press PHONE/ /BT MENU to switch tothe phone number list mode.#If TEL is selected as the source, press /LISTto switch to the phone number list mode.2 Use MULTI-CONTROL to select a cate-gory.Phone book (phone book list)—Missed calls(missed call list)—Dialed calls (dialed calllist)—Received calls (received call list)!For more detailed information aboutPhone book, see the following section.Calling a number in the phone book on thispage.!For more detailed information aboutMissed calls,Dialed calls andReceived calls, see the following section.Using the missed, received and dialed calllists on this page.#You can also recall Phone book by pushingMULTI-CONTROL down.#You can also recall Missed calls by pushingMULTI-CONTROL up.#You can also recall Dialed calls by pushingMULTI-CONTROL right.#You can also recall Received calls by pushingMULTI-CONTROL left.#If no phone numbers are stored in the se-lected list, NO NAME is displayed.Calling a number in the phonebookBefore using the phone book, you need to setup the phone book. To set up the phone book,see the following section. Transferring entriesto the phone book on the next page.After finding the number you want to call inthe phone book, you can select the entry andmake the call.1 Press PHONE/ /BT MENU to switch tothe phone number list mode.#If TEL is selected as the source, press /LISTto switch to the phone number list mode.2 Use MULTI-CONTROL to selectPhone book.Turn to change the menu option. Press to se-lect.3 Turn MULTI-CONTROL to select the firstletter of the name you are looking for.#You can also perform the same operation bypushing MULTI-CONTROL left or right.4 Press MULTI-CONTROL to display en-tries.The display shows the first three Phone Bookentries starting with that letter (e.g. “Ben”,“Brian”and “Burt”when “B”is selected).5 Turn MULTI-CONTROL to select a phonebook entry you want to call.#You can also perform the same operation bypushing MULTI-CONTROL up or down.6 Press MULTI-CONTROL to display thephone number list of the selected entry.#You can also display the phone number list ofthe selected entry by pushing MULTI-CONTROLright.#You can scroll literal information by pressingand holding DISP/SCRL. To stop scrolling, pressDISP/SCRL.#If several phone numbers are included in anentry, select one by turning MULTI-CONTROL.#If you want to go back and select anotherentry, push MULTI-CONTROL left.7 Press MULTI-CONTROL to make a call.8 To end the call, press PHONE/ /BT MENU.Using the missed, received anddialed call listsThe 80 most recent calls dialed, received, andmissed are stored in memory. You can browsethem and call numbers from these lists.Using Bluetooth wireless technologyEn 37EnglishSection08
1 Press PHONE/ /BT MENU to switch tothe phone number list mode.#If TEL is selected as the source, press /LISTto switch to the phone number list mode.2 Use MULTI-CONTROL to selectMissed calls, Dialed calls or Received calls.Turn to change the menu option. Press to se-lect.3 Turn MULTI-CONTROL to select a phonenumber.Turning MULTI-CONTROL to change thephone numbers stored in the list.#You can also change the phone number bypushing MULTI-CONTROL up or down.4 Press MULTI-CONTROL to display thedetailed list.Name, phone number and date are displayedin the detailed list.#You can also display the detailed list by push-ing MULTI-CONTROL right.#You can scroll literal information by pressingand holding DISP/SCRL. To stop scrolling, pressDISP/SCRL.#Turning MULTI-CONTROL switches to the pre-vious or next phone number displayed in the de-tailed list.#If you do not operate anything within about 30seconds, the list display is canceled automati-cally.5 Press MULTI-CONTROL to make a call.#While in the phone number list, press andhold MULTI-CONTROL to add or delete +to thephone number.6 To end the call, press .Introduction to advancedoperations1 Press MULTI-CONTROL to display themain menu.2 Use MULTI-CONTROL to select Function.The function menu is displayed.Turn to change the menu option. Press to se-lect.3 Turn MULTI-CONTROL to select thefunction.PH B Transfer (phone book transfer)—Auto answer (automatic answer setting)—Echo cancel (echo cancel)—Far end Volume(Adjust the intended party’s listening volume)—Ring tone (ring tone select)—Number dial(call by entering number)—SCO Private Mode (private mode)Notes!To return to the playback display, pressBAND/ESC/CANCEL.!If you do not operate functions other thanPH B Transfer, and Number dial within about30 seconds, the display automatically returnsto the ordinary display.!You can operate SCO Private Mode onlywhile talking on the phone.!If Bluetooth telephone is not connected to thisunit, Number dial cannot be operated.Transferring entries to thephone bookPhone books in your cellular phone can betransferred to this unit by using your cellularphone.!1 000 entries for each user (max. 5 devices)can be stored in the phone book. Each in-dependent entry can hold five phone num-bers and genres.1 Display the function menu.Refer to Introduction to advanced operationson this page.2 Use MULTI-CONTROL to selectPH B Transfer.3 Press MULTI-CONTROL to enter thephone book transfer standby mode.Using Bluetooth wireless technologyEn38Section08
4 Use the cellular phone to performphone book transfer.Perform phone book transfer using the cellu-lar phone. For detailed instructions, refer tothe instruction manual that came with yourcellular phone.When phone book transfer is completed,Data transferred is displayed.#The display indicates how many entries havebeen transferred and the total number to betransferred.Setting automatic answering1 Display the function menu.Refer to Introduction to advanced operationson the previous page.2 Use MULTI-CONTROL to selectAuto answer.3 Press MULTI-CONTROL to turn auto-matic answering on.#To turn automatic answering function off,press MULTI-CONTROL again.Echo canceling1 Display the function menu.Refer to Introduction to advanced operationson the previous page.2 Use MULTI-CONTROL to selectEcho cancel.3 Push MULTI-CONTROL left or right toselect the desired setting.Echo1—Echo2—Echo3#This function can be performed even whiletalking on the phone. In this case, pressMULTI-CONTROL to switch to Echo cancel.Adjusting the intended party’slistening volumeTo maintain the good speech quality, this unitcan adjust the intended party’s listening vo-lume. If the volume is not enough for intendedparty, adjust this function.1 Display the function menu.Refer to Introduction to advanced operationson the previous page.2 Use MULTI-CONTROL to selectFar end Volume.3 Push MULTI-CONTROL left or right toselect the desired setting.1—2—3—4—5#This function can be performed even whiletalking on the phone.#Settings can be stored for each device.Switching the ring toneYou can select whether to use this unit’s ringtone or not. If this function is set to on, ringtone from this unit will sound.1 Display the function menu.Refer to Introduction to advanced operationson the previous page.2 Use MULTI-CONTROL to selectRing tone.3 Press MULTI-CONTROL to turn ring toneon.To turn ring tone off, press MULTI-CONTROLagain.Making a call by enteringphone numberImportantBe sure to park your vehicle and apply the park-ing brake when performing this operation.1 Display the function menu.Refer to Introduction to advanced operationson the previous page.2 Use MULTI-CONTROL to selectNumber dial.Using Bluetooth wireless technologyEn 39EnglishSection08
3 Push MULTI-CONTROL up or down toselect a number.4 Push MULTI-CONTROL left or right tomove the cursor to the previous or next po-sition.#Up to 24 digits can be entered.5 When you finish entering the number,press MULTI-CONTROL.Call confirmation appears.6 Press MULTI-CONTROL again to make acall.7 To end the call, press PHONE/ /BT MENU.Setting the private modeDuring a conversation, you can switch to pri-vate mode (talking directly on your cellularphone).1 Display the function menu.Refer to Introduction to advanced operationson page 38.2 Use MULTI-CONTROL to selectSCO Private Mode.3 Press MULTI-CONTROL to turn privatemode on.To turn private mode off, pressMULTI-CONTROL again.Selecting the incoming call screenYou can assign one of screen movies to be dis-played for incoming calls. The selected movieappears on the right side of the screen whenyou receive a call.A different screen movie can be assigned foreach different user phone.1 Press MULTI-CONTROL to display themain menu.2 Use MULTI-CONTROL to selectRECEIVING MOVIE.Turn to change the menu option. Press to se-lect.3 Turn MULTI-CONTROL to select thescreen.Screen 1—Screen 2—Screen 3—Screen 44 Press MULTI-CONTROL to store thescreen movie.The screen movie is stored and the display re-verts.Using Bluetooth wireless technologyEn40Section08
ImportantIn this section, voice recognition operation is illu-strated in English. For about languages otherthan English, please refer to enclosed commandlist. Also, supported commands are shown in thelist.Using voice recognition tooperate this unitYou can use voice recognition to perform op-erations such as the following.!Input a phone number, and make a call.!Input a name stored in the memory andmake a call.!Input a name and type stored in the mem-ory, and make a call.!Make a call by redialing.!Access Help.!Perform voice recognition again.1 Press VOICE/ to start voice recogni-tion.The audio sound is muted, and a beep tonesounds.2 When you hear Voice Command,please. and a beep tone, say a voice com-mand.3 Perform the operation in accordancewith the voice guidance.Notes!To cancel voice recognition partway through,say cancel or abort or press SRC/OFF,BAND/ESC/CANCEL,or .!When you want to return to the state immedi-ately after voice recognition was started, sayRestart after you hear the beep tone to returnto the state of Step 2.!If a voice command is said incorrectly, anerror occurs and the unit waits for a voicecommand to be said. Say a correct voice com-mand.!If you are unsure of a voice command, sayHelp or What can I say? to play the helpvoice guidance.!Voice recognition is possible when any of thesources is selected, but a call can only bemade when a cellular phone is connected.Refer to page 29, and check whether a cellularphone is connected to this unit correctly. If avoice command is said when no cellularphone is connected, an error occurs and theunit waits for a voice command to be said.Connect a cellular phone and say a correctvoice command.!For a list of voice commands, refer to page 43.!When no voice command is said for 8 sec-onds after you hear the beep tone, voice re-cognition returns to ordinary display.Using voice recognition tomake a callYou can use voice recognition to make a call.This explanation uses the example of makinga call to 0123456789.1 Start voice recognition.Refer to Using voice recognition to operate thisunit on this page.2 Say Dial 0123456789.3 Say Dial.4 A call is made to the number read out.Notes!A phone number of up to 32 digits long canbe read out. If a phone number that exceeds32 digits is input, an error occurs and the unitwaits for a voice command to be said. Say acorrect voice command.!You can also input a phone number in parts.When inputting 01234 and 56789 separately,say the next part of the number (56789) afteryou hear 01234 complete the number other-wise say dial or correction.Using voice recognition to operate this unitEn 41EnglishSection09
!When you want to correct a phone number,say Correction and then say the correctphone number after you hear the beep tone.When you are inputting a phone number inparts, you can correct the part of the numberyou said last. If you input 55555 when youshould have input 56789, say Correctionwhen you hear 55555 complete the numberotherwise say dial or correction, and thensay the correct number.Making a call to a phonenumber in memoryYou can also use voice recognition to make acall to a phone number stored in the memory.This explanation uses the example of makinga call to the cellular phone of Sandy Jones.1 Start voice recognition.Refer to Using voice recognition to operate thisunit on the previous page.2 Say Call Sandy Jones.You will hear Where do you want to call<Sandy Jones> ? <home> <mobile>, andthen a beep tone.#In the case of when there is only one phonenumber corresponding to the registered name(Call Sandy Jones), say Dial to make the phonecall.3 Say mobile.4 If the read out name (Sandy Jones) andtype (mobile) are correct, say Yes after youhear the beep tone.5 A call is made to the number read out.Notes!Saying Call Sandy Jones mobile in Step 1 al-lows you to specify the name and type in onego.!If a type that is not registered is specifiedwhen a type is specified, an error occurs andthe unit waits for a voice command to be said.Say a correct voice command.Making a call from dialedcall listYou can use voice recognition to make a callto the phone number of the newest entry inDialed calls.1 Start voice recognition.Refer to Using voice recognition to operate thisunit on the previous page.2 Say Redial.3 Say Yes when you hear Redial. Say ‘yes’to proceed.4 The phone number is redialed.NoteIf you say the redial command when the numberof the newest entry in dialed call list was not noti-fied, an error occurs and the unit waits for a voicecommand to be said. Say a correct voicecommand.If you become unsure of anoperation:If you become unsure of a voice commandpartway through an operation, access thehelp.1 Start voice recognition.Refer to Using voice recognition to operate thisunit on the previous page.2 Say Help or What can I say?3 The help voice guidance plays, and thevoice commands you can use are dis-played.Using voice recognition to operate this unitEn42Section09
Voice command listCommand Type OperationDial <number>Use this when you wantto directly specify a phonenumber. A number of upto 32 digits can be readout.<number>Use this when you wantto specify a number toadd to the number speci-fied with Dial <number>.(You can also specify aphone number in parts.)Call <name> [+ <type>]Use this when you wantto specify a “name”in aregistered phonebookentry, or specify both a“name”and “type”in a re-gistered phonebook entry.<type>Use this when you wantto specify a “type”for a“name”in a registeredphonebook entry.RedialUse this when you wantto specify the newestnumber in the outgoingcall history.DialConfirm whether to makethe call when a call is spe-cified with a number. Say-ing Dial starts the calloperation.YesConfirm whether to makethe call when a call is spe-cified with other than anumber (name, type, etc.).Saying Yes starts the calloperation.Correction Correct the read outphone number.Help Obtain guidance on whatoperations are possiblewith the current voice re-cognition.What can I say?Restart Restores the voice recog-nition start state.cancelEnds voice recognition.abortUsing voice recognition to operate this unitEn 43EnglishSection09
Introduction of audioadjustments1111Audio displayShows the audio adjustment status.1 Press MULTI-CONTROL to display themain menu.2 Use MULTI-CONTROL to select AUDIO.Turn to change the menu option. Press to se-lect.The audio menu is displayed.3 Turn MULTI-CONTROL to select theaudio function.Turn MULTI-CONTROL to switch between theaudio functions in the following order.Fader (balance adjustment)—Powerful (gra-phic equalizer adjustment)—50Hz (7-bandgraphic equalizer adjustment)—Loudness(loudness)—SubWoofer1 (subwoofer on/offsetting)—SubWoofer2 (subwoofer setting)—Bass (bass boost)—HPF (high pass filter)—SLA (source level adjustment)—Guide VOL(voice guidance volume adjustment)#You can select the SubWoofer2 only whensubwoofer output is turned on in SubWoofer1.#When selecting FM as the source, you cannotswitch to SLA.#If TEL is selected as a source, only Fader (bal-ance adjustment) and Guide VOL (guidance vo-lume) can be operated.#To return to the display of each source, pressBAND/ESC/CANCEL.#If you do not operate functions except for50Hz within about 30 seconds, the display isautomatically returned to the ordinary display.Using balance adjustmentYou can change the fader/balance setting sothat it can provide the ideal listening environ-ment in all occupied seats.1 Display the audio menu.Refer to Introduction of audio adjustments onthis page.2 Use MULTI-CONTROL to select Fader inthe audio function menu.#If the balance setting has been previously ad-justed, Balance will be displayed.3 Push MULTI-CONTROL up or down toadjust front/rear speaker balance.Each time MULTI-CONTROL is pushed up ordown, the front/rear speaker balance movestowards the front or rear.Front 15 to Rear 15 is displayed as the front/rear speaker balance moves from front to rear.#F/R 0 is the proper setting when only twospeakers are used.#When the rear output setting is Rear SP :S/W,you cannot adjust front/rear speaker balance.Refer to Setting the rear output and subwoofercontroller on page 51.4 Push MULTI-CONTROL left or right toadjust left/right speaker balance.Each time MULTI-CONTROL is pushed left orright, the left/right speaker balance moves to-wards the left or right.Left 15 to Rear 15 is displayed as the left/rightspeaker balance moves from left to right.Using the equalizerThe equalizer lets you adjust the equalizationto match the car’s interior acoustic character-istics as desired.Audio AdjustmentsEn44Section10
Recalling equalizer curvesThere are seven stored equalizer curves whichyou can easily recall at any time. Here is a listof the equalizer curves.Display Equalizer curvePowerful PowerfulNatural NaturalVocal VocalCustom1 Custom 1Custom2 Custom 2Flat FlatSuperBass Super bass!Custom1 and Custom2 are adjusted equal-izer curves that you create. Adjustmentscan be made with a 7-band graphic equali-zer.!When Flat is selected, no supplement orcorrection is made to the sound. This isuseful to check the effect of the equalizercurves by switching alternatively betweenFlat and a set equalizer curve.1 Display the audio menu.Refer to Introduction of audio adjustments onthe previous page.2 Use MULTI-CONTROL to select the gra-phic equalizer adjustment.Powerful appears in the display.If the equalizer curve has been previously se-lected, the curve of that previously selectedwill be displayed instead of Powerful.3 Push MULTI-CONTROL left or right toselect an equalizer curve.Each time MULTI-CONTROL is pushed left orright, equalizer curves are selected in the fol-lowing order:Powerful—Natural—Vocal—Custom1—Custom2—Flat—SuperBassAdjusting equalizer curvesThe factory supplied equalizer curves, with theexception of Flat, can be adjusted to a fine de-gree (nuance control).1 Recall the equalizer curve you want toadjust.Refer to Recalling equalizer curves on thispage.2 Push MULTI-CONTROL up or down toadjust the equalizer curve.Each time MULTI-CONTROL is pushed up ordown, the equalizer curve increases or de-creases respectively.+6 to –4(or –6) is displayed as the equalizercurve is increased or decreased.#The actual range of the adjustments are differ-ent depending on which equalizer curve is se-lected.#The equalizer curve with all frequencies set to0cannot be adjusted.Adjusting 7-band graphic equalizerFor Custom1 and Custom2 equalizer curves,you can adjust the level of each band.!A separate Custom1 curve can be createdfor each source. (The built-in CD player andthe multi-CD player are set to the sameequalizer adjustment setting automati-cally.) If you make adjustments when acurve other than Custom2 is selected, theequalizer curve settings will be memorizedin Custom1.!ACustom2 curve can be created commonto all sources. If you make adjustmentswhen the Custom2 curve is selected, theCustom2 curve will be updated.1 Recall the equalizer curve you want toadjust.Refer to Recalling equalizer curves on thispage.Audio AdjustmentsEn 45EnglishSection10
2 Use MULTI-CONTROL to select 7-bandgraphic equalizer adjustment.Frequency and the level (e.g., 50Hz +4) ap-pears in the display.3 Push MULTI-CONTROL left or right toselect the equalizer band to adjust.Each time MULTI-CONTROL is pushed left orright, equalizer bands are selected in the fol-lowing order:50Hz—125Hz—315Hz—800Hz—2kHz—5kHz—12.5kHz4 Push MULTI-CONTROL up or down toadjust the level of the equalizer band.Each time MULTI-CONTROL is pushed up ordown, the level of the equalization band in-creases or decreases.+6 to –6is displayed as the level is increasedor decreased.#You can then select another band and adjustthe level.Adjusting loudnessLoudness compensates for deficiencies in thelow- and high-sound ranges at low volume.1 Display the audio menu.Refer to Introduction of audio adjustments onpage 44.2 Use MULTI-CONTROL to selectLoudness in the audio function menu.3 Press MULTI-CONTROL to turn loudnesson.Loudness level (e.g., Mid) appears in the dis-play.#To turn loudness off, press MULTI-CONTROLagain.4 Push MULTI-CONTROL left or right toselect a desired level.Each time MULTI-CONTROL is pushed left orright, level is selected in the following order:Low (low)—Mid (mid)—High (high)Using subwoofer outputThis unit is equipped with a subwoofer outputwhich can be turned on or off.1 Display the audio menu.Refer to Introduction of audio adjustments onpage 44.2 Use MULTI-CONTROL to selectSubWoofer1.3 Press MULTI-CONTROL to turn subwoo-fer output on.Normal appears in the display. Subwoofer out-put is now on.#To turn subwoofer output off, pressMULTI-CONTROL again.4 Push MULTI-CONTROL left or right toselect the phase of subwoofer output.Push MULTI-CONTROL left to select reversephase and Reverse appears in the display.Push MULTI-CONTROL right to select normalphase and Normal appears in the display.Adjusting subwoofer settingsWhen the subwoofer output is on, you can ad-just the cut-off frequency and the output levelof the subwoofer.Only frequencies lower than those in the se-lected range are outputted from the subwoo-fer.!When the subwoofer output is on, you canselect SubWoofer2.1 Display the audio menu.Refer to Introduction of audio adjustments onpage 44.2 Use MULTI-CONTROL to selectSubWoofer2.3 Push MULTI-CONTROL left or right toselect cut-off frequency.Each time MULTI-CONTROL is pushed left orright, cut-off frequencies are selected in thefollowing order:Audio AdjustmentsEn46Section10
50Hz—63Hz—80Hz—100Hz—125Hz4 Push MULTI-CONTROL up or down toadjust the output level of the subwoofer.Each time MULTI-CONTROL is pushed up ordown, subwoofer level increases or decreases.+6 to -24 is displayed as the level is increasedor decreased.Boosting the bassBass boost function boosts the bass level ofsound.1 Display the audio menu.Refer to Introduction of audio adjustments onpage 44.2 Use MULTI-CONTROL to select Bass.3 Push MULTI-CONTROL up or down toselect a desired level.0to +6 is displayed as the level is increased ordecreased.Using the high pass filterWhen you do not want low sounds from thesubwoofer output frequency range to playfrom the front or rear speakers, turn on theHPF (high pass filter). Only frequencies higherthan those in the selected range are outputfrom the front or rear speakers.1 Display the audio menu.Refer to Introduction of audio adjustments onpage 44.2 Use MULTI-CONTROL to select HPF.3 Press MULTI-CONTROL to turn highpass filter on.80Hz appears in the display. High pass filter isnow on.#If the high pass filter has been previously ad-justed, the frequency of that previously selectedwill be displayed instead of 80Hz.#To turn high pass filter off, pressMULTI-CONTROL again.4 Push MULTI-CONTROL left or right toselect cut-off frequency.Each time MULTI-CONTROL is pushed left orright, cut-off frequencies are selected in thefollowing order:50Hz—63Hz—80Hz—100Hz—125HzAdjusting source levelsSource level adjustment (SLA) lets you adjustthe volume level of each source to prevent ra-dical changes in volume when switching be-tween sources.!Settings are based on the FM volume level,which remains unchanged.1 Compare the FM volume level with thelevel of the source you wish to adjust.2 Display the audio menu.Refer to Introduction of audio adjustments onpage 44.3 Use MULTI-CONTROL to select SLA inthe audio function menu.4 Push MULTI-CONTROL up or down toadjust the source volume.SLA +4 to SLA –4is displayed as the sourcevolume is increased or decreased.Notes!The AM volume level can also be adjustedwith source level adjustments.!The built-in CD player and the multi-CD playerare set to the same source level adjustmentvolume automatically.!External unit 1 and external unit 2 are set tothe same source level adjustment volumeautomatically.Audio AdjustmentsEn 47EnglishSection10
Adjusting the voiceguidance volumeVolume of voice guidance and TTS (text tospeech) can be adjusted.1 Display the audio menu.Refer to Introduction of audio adjustments onpage 44.2 Use MULTI-CONTROL to selectGuide VOL.3 Push MULTI-CONTROL up or down toadjust the guidance volume.0to 62 is displayed as the guidance volume isincreased or decreased.Audio AdjustmentsEn48Section10
Adjusting initial settings111Using the initial settings, you can customizevarious system settings to achieve optimal per-formance from this unit.1Function display!Shows the function status.1 Press SRC/OFF and hold until the unitturns off.2 Press MULTI-CONTROL and hold untilthe initial setting menu appears in the dis-play.3 Turn MULTI-CONTROL to select one ofthe initial settings.Turn MULTI-CONTROL to switch between thefunctions in the following order.Language select (language selection)—Calendar (calendar)—Clock (clock)—Warning tone (warning tone)—AUX1 (auxili-ary input 1)—AUX2 (auxiliary input 2)—List guidance (voice guidance setting)—Dimmer (dimmer)—Brightness (brightness)—S/W control (rear output and subwoofercontroller)—Built-in AMP (power amp set-ting)—Demonstration (feature demo)—Reverse mode (reverse mode)—Ever-scroll(ever scroll)—BT AUDIO (BT audio setting)—BT Memory clear (clearing Bluetooth mem-ory)—Software update (software update)Use the following instructions to operate eachparticular setting.#To cancel initial settings, pressBAND/ESC/CANCEL.Selecting the languageFor your convenience, this unit equips multi-ple language guidance. You can select the lan-guage best suited to your first language.1 Display the initial setting menu.Refer to Adjusting initial settings on this page.2 Use MULTI-CONTROL to selectLanguage select in the initial setting menu.3 Press MULTI-CONTROL to select the lan-guage.Each press of MULTI-CONTROL selects lan-guages in the following order:English—Français—Español#Display guidance and voice guidance are setto the same language simultaneously.Setting the dateThe calendar display adjusted in this mode ap-pears when the telephone source is selectedor sources and the feature demo are off.1 Display the initial setting menu.Refer to Adjusting initial settings on this page.2 Use MULTI-CONTROL to select Calendarin the initial setting menu.Calendar appears in the display.3 Push MULTI-CONTROL left or right toselect the segment of the calendar displayyou wish to set.Pushing MULTI-CONTROL left or right will se-lect one segment of the calendar display:Day—Month—YearAs you select segments of the calendar dis-play the segment selected will blink.4 Push MULTI-CONTROL up or down toset the date.Pushing MULTI-CONTROL up will increasethe selected day, month or year. PushingMULTI-CONTROL down will decrease the se-lected day, month or year.Initial SettingsEn 49EnglishSection11
Setting the clockUse these instructions to set the clock.1 Display the initial setting menu.Refer to Adjusting initial settings on the pre-vious page.2 Use MULTI-CONTROL to select Clock inthe initial setting menu.3 Push MULTI-CONTROL left or right toselect the segment of the clock display youwish to set.Pushing MULTI-CONTROL left or right will se-lect one segment of the clock display:Hour—MinuteAs you select segments of the clock display,the selected segment blinks.#You can match the clock to a time signal bypressing MULTI-CONTROL.!If 00 to 29, the minutes are rounded down.(e.g., 10:18 becomes 10:00.)!If 30 to 59, the minutes are rounded up.(e.g., 10:36 becomes 11:00.)4 Push MULTI-CONTROL up or down toput a clock right.Switching the warning toneIf the front panel is not detached from thehead unit within four seconds of turning offthe ignition, a warning tone sounds. You canturn off the warning tone.1 Display the initial setting menu.Refer to Adjusting initial settings on the pre-vious page.2 Use MULTI-CONTROL to selectWarning tone in the initial setting menu.3 Press MULTI-CONTROL to turn warningtone on.#To turn warning tone off, pressMULTI-CONTROL again.Switching the auxiliary settingAuxiliary devices connected to this unit can beactivated individually. Set each AUX source toON when using. For more information aboutconnecting or using auxiliary devices, refer toUsing the AUX source on page 54.1 Display the initial setting menu.Refer to Adjusting initial settings on the pre-vious page.2 Use MULTI-CONTROL to select AUX1/AUX2.3 Press MULTI-CONTROL to turn AUX1/AUX2 on.#To turn AUX off, press MULTI-CONTROLagain.List TTS (Text to speech)PlaybackTTS playback can be performed for an item se-lected with the cursor in a list. If this is set toon, any item the cursor is on for 2 seconds orlonger is read out.1 Display the initial setting menu.Refer to Adjusting initial settings on the pre-vious page.2 Use MULTI-CONTROL to selectList guidance.3 Press MULTI-CONTROL to turnList guidance on.#To turn this function off, pressMULTI-CONTROL again.Switching the dimmer settingTo prevent the display from being too bright atnight, the display is automatically dimmedwhen the car’s headlights are turned on. Youcan turn the dimmer on or off.Initial SettingsEn50Section11
1 Display the initial setting menu.Refer to Adjusting initial settings on page 49.2 Use MULTI-CONTROL to select Dimmerin the initial setting menu.3 Press MULTI-CONTROL to turn dimmeron.#To turn dimmer off, press MULTI-CONTROLagain.Adjusting the brightnessYou can adjust the display brightness.1 Display the initial setting menu.Refer to Adjusting initial settings on page 49.2 Use MULTI-CONTROL to selectBrightness in the initial setting menu.3 Push MULTI-CONTROL left or right toadjust the brightness level.0to 15 is displayed as the level is increased ordecreased.#When dimmer is functioning, the brightnesslevel can be adjusted 0to 10.Setting the rear output andsubwoofer controllerThis unit’s rear output (rear speaker leads out-put and RCA rear output) can be used for full-range speaker (Rear SP :F.Range) or subwoo-fer (Rear SP :S/W) connection. If you switchthe rear output setting to Rear SP :S/W, youcan connect a rear speaker lead directly to asubwoofer without using an auxiliary amp.Initially, the unit is set for rear full-range speak-er connection (Rear SP :F.Range).1 Display the initial setting menu.Refer to Adjusting initial settings on page 49.2 Use MULTI-CONTROL to selectS/W control in the initial setting menu.3 Press MULTI-CONTROL to switch therear output setting.Pressing MULTI-CONTROL will switch be-tween Rear SP :F.Range (full-range speaker)and Rear SP :S/W (subwoofer) and that statuswill be displayed.#When no subwoofer is connected to the rearoutput, select Rear SP :F.Range (full-range speak-er).#When a subwoofer is connected to the rearoutput, select Rear SP :S/W (subwoofer).Notes!Even if you change this setting, there is nooutput unless you turn the subwoofer outputon (refer to Using subwoofer output on page46).!If you change this setting, subwoofer outputin the audio menu will return to the factorysettings.!Both rear speaker lead outputs and RCA rearoutput are switched simultaneously in thissetting.Setting the internal poweramplifierThis unit features high power amplifier. How-ever, in particular system, external amplifiersare used instead of internal amplifier. If youuse external amplifiers in order to establish amulti-amp system, and don’t use internal am-plifier, it is recommended to turn off the inter-nal amplifier. Turning off internal amplifierreduces the noise that comes from the beha-vior of internal amplifier.1 Display the initial setting menu.Refer to Adjusting initial settings on page 49.2 Use MULTI-CONTROL to selectBuilt-in AMP.Initial SettingsEn 51EnglishSection11
3 Press MULTI-CONTROL to turn the inter-nal power amplifier on.#To turn the internal power amplifier off, pressMULTI-CONTROL again.Switching the feature demoThe feature demo automatically starts whenpower to this unit is turned off while the igni-tion switch is set to ACC or ON.1 Display the initial setting menu.Refer to Adjusting initial settings on page 49.2 Use MULTI-CONTROL to selectDemonstration in the initial setting menu.3 Press MULTI-CONTROL to turn the fea-ture demo on.#To turn the feature demo off, pressMULTI-CONTROL again.Notes!Remember that if the feature demo continuesoperating when the car engine is turned off, itmay drain battery power.!You can also turn on or off feature demo bypressing DISP/SCRL while this unit is turnedoff. For more details, refer to About the demomode on page 10.Switching the reverse modeIf you do not perform an operation for about30 seconds, screen indications start to reverse,and continue reversing every 10 seconds.1 Display the initial setting menu.Refer to Adjusting initial settings on page 49.2 Use MULTI-CONTROL to selectReverse mode in the initial setting menu.3 Press MULTI-CONTROL to turn the re-verse mode on.#To turn the reverse mode off, pressMULTI-CONTROL again.NoteYou can also turn on or off reverse mode by press-ing BAND/ESC/CANCEL while this unit is turnedoff. For more details, refer to Reverse mode onpage 10.Switching the ever scrollWhen Ever Scroll is set to ON, recorded text in-formation scrolls continuously in the display.Set to OFF if you prefer the information toscroll just once.1 Display the initial setting menu.Refer to Adjusting initial settings on page 49.2 Use MULTI-CONTROL to selectEver-scroll in the initial setting menu.3 Press MULTI-CONTROL to turn the everscroll on.#To turn the Ever Scroll off, pressMULTI-CONTROL again.Activating the BT Audio sourceYou need to activate the BT Audio source inorder to use a Bluetooth audio player.This setting is set to on by default. If you donot use BT Audio, you can turn it off.1 Display the initial setting menu.Refer to Adjusting initial settings on page 49.2 Use MULTI-CONTROL to selectBT AUDIO in the initial setting menu.3 Press MULTI-CONTROL to turn theBT Audio source on.#To turn the BT Audio source off, pressMULTI-CONTROL again.Initial SettingsEn52Section11
Resetting the Bluetoothwireless technology moduleBluetooth telephone and Bluetooth Audiodata can be deleted. To protect personal infor-mation, we recommend deleting this data be-fore transferring the unit to other persons. Thefollowing settings will be deleted.!phone book entries on the Bluetooth tele-phone!preset numbers on the Bluetooth tele-phone!registration assignment of Bluetooth tele-phone!call history of Bluetooth telephone!history of the most recently connectedBluetooth audio1 Display the initial setting menu.Refer to Adjusting initial settings on page 49.2 Use MULTI-CONTROL to selectBT Memory clear.3 Push MULTI-CONTROL right to show aconfirmation display.Clear memory YES is displayed. Clearingmemory is now on standby.#If you do not want to reset phone memory,push MULTI-CONTROL left. The display reverts.4 Press MULTI-CONTROL to clear thememory.Cleared is displayed and the settings aredeleted.Updating the software aboutBluetooth connectionThis function is used to update this unit withthe latest software. For about software and up-dating, refer to our website.1 Display the initial setting menu.Refer to Adjusting initial settings on page 49.2 Use MULTI-CONTROL to selectSoftware update.3 Press MULTI-CONTROL to display thedata transfer mode.#To finish the updating, follow the on-screen in-structions.Initial SettingsEn 53EnglishSection11
Using the AUX sourceUp to two auxiliary devices such as VCR orportable devices (sold separately) can be con-nected to this unit. When connected, auxiliarydevices are automatically read as AUX sourcesand assigned to AUX1 or AUX2. The relation-ship between AUX1 and AUX2 sources is ex-plained below.About AUX1 and AUX2There are two methods to connect auxiliary de-vices to this unit.AUX1 source:When connecting auxiliary device using a stereomini plug cable%Insert the stereo mini plug into theinput jack on this unit.For more details, refer to the installation man-ual.This auxiliary device is automatically set toAUX1.AUX2 source:When connecting auxiliary device using an IP-BUS-RCA Interconnector (sold separately)%Use an IP-BUS-RCA Interconnector suchas the CD-RB20/CD-RB10 (sold separately)to connect this unit to auxiliary device fea-turing RCA output.For more details, refer to the IP-BUS-RCA Inter-connector owner’s manual.This auxiliary device is automatically set toAUX2.#You can only make this type of connection ifthe auxiliary device has RCA outputs.Selecting AUX as the source%Press SRC/OFF to select AUX as thesource.#If the auxiliary setting is not turned on, AUXcannot be selected. For more details, refer toSwitching the auxiliary setting on page 50.Setting the AUX titleThe title displayed for the AUX1 or AUX2source can be changed.1 After you have selected AUX as thesource, use MULTI-CONTROL and selectFunction to display TitleInput "A".2 Enter a title in the same way as thebuilt-in CD player.For details concerning operation, refer to En-tering disc titles on page 20.Turning the clock displayon or offYou can turn the clock display on or off.!Even when the sources and the featuredemo are off, the clock display appears onthe display.%Press CLOCK/DISP OFF to turn the clockdisplay on or off.Each press of CLOCK/DISP OFF turns theclock display on or off.#The clock display disappears temporarilywhen you perform other operations, but the clockdisplay appears again after 25 seconds.Switching the displayindication and buttonilluminationDisplay indication and button illumination canbe switched on or off.Other FunctionsEn54Section12
%Press and hold CLOCK/DISP OFF.Pressing and holding CLOCK/DISP OFFswitches the display indication and button illu-mination on or off.#While the display indication is turned off,CLOCK/DISP OFF button lights up.#Even if the display indication is turned off, op-eration can be conducted. If operation is con-ducted while the display indication is off, displaywill light up for a few seconds and then turn offagain.Using the external unitExternal unit refers to a Pioneer product (suchas ones available in the future) that, althoughincompatible as a source, enables control ofbasic functions with this unit. Two externalunits can be controlled with this unit. Whentwo external units are connected, the externalunit is automatically allocated to external unit1 or external unit 2 by this unit.Basic operations of the external unit are ex-plained below. Allocated functions are differ-ent depending on the connected external unit.For details concerning functions, refer to exter-nal unit’s owner’s manual.Selecting the external unit asthe source%Press SRC/OFF to select EXTERNAL asthe source.Basic operationFunctions allocated to the following opera-tions are different depending on the con-nected external unit. For details concerningfunctions, refer to the connected externalunit’s owner’s manual.%Press BAND/ESC/CANCEL.%Press and hold BAND/ESC/CANCEL.%Push MULTI-CONTROL left or right.%Push and hold MULTI-CONTROL left orright.%Push MULTI-CONTROL up or down.Advanced operations1 Press MULTI-CONTROL to display themain menu.2 Use MULTI-CONTROL to select Function.Turn to change the menu option. Press to se-lect.3 Turn MULTI-CONTROL to select thefunction.Function1 (function 1)—Function2 (function2)—Function3 (function 3)—Function4 (func-tion 4)—Auto/Manual (auto/manual)!You can also turn Function1 on or off bypressing PGM on the remote control.Notes!You can also select the function by pressingFUNCTION on the remote control.!To return to the ordinary display, pressBAND/ESC/CANCEL.Using differententertainment displaysYou can enjoy entertainment displays while lis-tening to each sound source.1 Press MULTI-CONTROL to display themain menu.2 Use MULTI-CONTROL to selectENTERTAINMENT.Turn to change the menu option. Press to se-lect.3 Use MULTI-CONTROL to change the dis-play.Turn to change the menu option. Press to se-lect.Other FunctionsEn 55EnglishSection12
BGV (background visual)—BGP-1 (back-ground picture 1)—BGP-2 (background pic-ture 2)—BGP-3 (background picture 3)—BGP-4 (background picture 4)—SIMPLE-1(simple display 1)—SIMPLE-2 (simple display2)—LEVEL METER (level meter)—VISUALIZER1 (visualizer 1)—VISUALIZER2 (vi-sualizer 2)—VISUALIZER3 (visualizer 3)—SPECTRUM ANALYZER 1 (spectrum analyzer1)—SPECTRUM ANALYZER 2 (spectrum ana-lyzer 2)—MOVIE 1 (movie 1)—MOVIE 2(movie 2)#To return to the playback display, pressBAND/ESC/CANCEL.SMS (Short MessageService) ReceptionNotification FunctionWhen an SMS is received by the connectedcellular phone, a message is displayed for 8seconds to notify you of the reception. A beeptone also sounds at that time.Notes!When an SMS is received while a menuscreen is displayed, the display of the menu iscancelled.!When an SMS is received while the featuredemo is on, the feature demo is cancelled andthen started again after the SMS receptionmessage has been displayed.Other FunctionsEn56Section12
XM tunerListening to XM Satellite RadioYou can use this unit to control an XM satellitedigital tuner (GEX-P920XM), which is soldseparately.For details concerning operation, refer to theXM tuner’s operation manuals. This sectionprovides information on XM operations withthis unit which differs from that described inthe XM tuner’s operation manual.!With this unit, you can operate two addi-tional functions: XM channel direct selec-tion and preset channel list.55511112223334441XM band indicator2XM channel number indicator3XM preset number indicator4XM channel select setting indicatorShows what channel select setting has beenselected. CH is displayed when CH NUMBERis selected, and CAT is displayed whenCATEGORY is selected.5XM text informationShows the text information of broadcastchannel.%Select an XM band.Press BAND/ESC/CANCEL.#Band can be selected from XM1,XM2 orXM3.%Select a channel.Push MULTI-CONTROL left or right.#If you push and hold MULTI-CONTROL left orright, you can increase or decrease channel num-ber continuously.#You can also perform tuning from a desiredchannel category. (Refer to Selecting a channel inthe channel category on the next page.)Switching the XM display%Press DISP/SCRL to switch the XM dis-play.#You can scroll the text information to the leftby pressing and holding DISP/SCRL.Storing and recalling broadcaststationsYou can easily store up to six broadcast sta-tions for later recall.!Six stations for each band can be stored inmemory.1 Press /LIST.Preset screen is displayed.2 Use MULTI-CONTROL to store the se-lected station in memory.Turn to change the preset number. Press andhold to store.The XM preset number you have selected willflash and then remain lit. The selected stationhas been stored in memory.3 Use MULTI-CONTROL to select the de-sired station.Turn to change the station; press to select.#You can also change the station by pushingMULTI-CONTROL up or down.#If you do not operate the list within about 30seconds, the display is automatically returned tothe ordinary display.Switching the XM channelselect modeYou have two methods for selecting a channel:by number and by category. When selectingby number, channels in any category can beselected. Select by category to narrow yoursearch down to only channels in a particularcategory.Available accessoriesEn 57EnglishSection13
%Press S.Rtrv/SAT MODE repeatedly toselect the desired channel select setting.CH NUMBER (channel number select setting)—CATEGORY (channel category selectsetting)#If you do not operate the function within about30 seconds, the display is automatically returnedto the channel display.NoteYou can also perform this operation in the menuthat appears by using MULTI-CONTROL.Selecting a channel in the channelcategory1 Select the channel select settings toCATEGORY.Refer to Switching the XM channel select modeon the previous page.2 Push MULTI-CONTROL up or down toselect the desired channel category.3 Push MULTI-CONTROL left or right toselect the desired channel in the selectedchannel category.Displaying the Radio IDChannel number select setting1 Select the channel select settings toCH NUMBER.Refer to Switching the XM channel select modeon the previous page.2 Push MULTI-CONTROL left or right toselect RADIO ID.#If you select another channel, display of the IDcode is canceled.#Display of the ID code repeats displayingRADIO ID and the ID code one after the other.SIRIUS Satellite Radio tunerListening to SIRIUS Satellite RadioYou can use this unit to control a SIRIUS Satel-lite Radio tuner, which is sold separately.When the SIRIUS tuner is used together withthis unit, some operations differ slightly fromthose described in the SIRIUS operation man-ual. This manual provides information onthese points. For all other information onusing the SIRIUS tuner, please refer to the SIR-IUS operation manual.55511112223334441SIRIUS band indicator2SIRIUS channel number indicator3SIRIUS preset number indicator4SIRIUS channel select setting indicatorShows what channel select setting has beenselected. CH is displayed when CH NUMBERis selected, and CAT is displayed whenCATEGORY is selected.I.R is displayed during the Instant Replaymode.5SIRIUS channel nameShows the channel name of broadcastchannel.%Select a SIRIUS band.Press BAND/ESC/CANCEL.#Band can be selected from SR1,SR2 or SR3.%Select a channel.Push MULTI-CONTROL left or right.#If you push and hold MULTI-CONTROL left orright, you can increase or decrease channel num-ber continuously.#You can also perform tuning from a desiredchannel category. (Refer to Selecting a channel inthe channel category on page 60.)Available accessoriesEn58Section13
NoteIt may take a few seconds before you can hearanything while this unit acquires and processesthe satellite signal when you change the sourceto SIRIUS tuner or select a channel.Switching the SIRIUS display%Press DISP/SCRL to switch the SIRIUSdisplay.Each press of DISP/SCRL changes the SIRIUSdisplay in the following order:Play time—Channel number—Channel name—Category name—Artist name—Song title/program title—Composer name#Play time is displayed during the Instant Re-play mode. Refer to Using Instant Replay functionon page 61.#Play time display indicates the time invertedfrom the live broadcast. Play time is displayed innegative number.Storing and recalling broadcaststationsYou can easily store up to six broadcast sta-tions for later recall.!Six stations for each band can be stored inmemory.1 Press /LIST.Preset screen is displayed.2 Use MULTI-CONTROL to store the se-lected station in memory.Turn to change the preset number. Press andhold to store.The SIRIUS preset number you have selectedwill flash and then remain lit. The selected sta-tion has been stored in memory.3 Use MULTI-CONTROL to select the de-sired station.Turn to change the station; press to select.#You can also change the station by pushingMULTI-CONTROL up or down.#If you do not operate the list within about 30seconds, the display is automatically returned tothe ordinary display.Introduction of advancedoperations1 Press MULTI-CONTROL to display themain menu.2 Use MULTI-CONTROL to select Function.The function selection menu is displayed.Turn to change the menu option. Press toselect.3 Turn MULTI-CONTROL to select thefunction.MODE (channel select mode setting)—GAME ALERT (game alert setting)—TEAM SETTING (team setting)—GAME INFO(game info)—Pause (pause)Notes!You can also select the function by pressingFUNCTION on the remote control.!To return to the ordinary display, pressBAND/ESC/CANCEL.!If you do not operate functions within about30 seconds, the display is automatically re-turned to the ordinary display.!During the Instant Replay mode, you can se-lect Pause (pause). Refer to Using Instant Re-play function on page 61.!Pause is the same as that of the built-in CDplayer. (Refer to Pausing playback on page 20.)Selecting the SIRIUS channelselect modeYou have two methods for selecting a channel:by number and by category. When selectingby number, channels in any category can beselected. Select by category to narrow yoursearch down to only channels in a particularcategory.Available accessoriesEn 59EnglishSection13
%Press S.Rtrv/SAT MODE repeatedly toselect the desired channel select setting.CH NUMBER (channel number select setting)—CATEGORY (channel category selectsetting)NoteYou can also perform this operation in the menuthat appears by using MULTI-CONTROL.Selecting a channel in the channelcategory1 Select the channel select settings toCATEGORY.Refer to Selecting the SIRIUS channel selectmode on the previous page.2 Push MULTI-CONTROL up or down toselect the desired channel category.3 Push MULTI-CONTROL left or right toselect the desired channel in the selectedchannel category.Using the Game Alert functionOnly when SIR-PNR2/SIR-PNR2C is connectedto this unit, you can operate this function.This system can alert you when games invol-ving your favorite teams are about to start. Touse this function you need in advance to setup a game alert for the teams.Selecting teams for Game Alert1 Display the function selection menu.Refer to Introduction of advanced operations onthe previous page.2 Use MULTI-CONTROL to selectTEAM SETTING in the function menu.3 Push MULTI-CONTROL left or right toselect a desired league.League names are switched in the display.4 Push MULTI-CONTROL up or down toselect a desired team.Teams in the selected category are switched inthe display.5 Press MULTI-CONTROL to store the se-lected team in memory.The game alert function will start on thatteam.#To turn the Game Alert off of the selectedteam, press MULTI-CONTROL again.#When you have already made 12 team selec-tions, FULL is displayed and additional team se-lection is not possible. In this case, first deletethe team selection and then try again.6 Repeat these steps for selecting otherteams.Up to 12 teams can be selected.Switching the Game Alert on or offOnce you made team selections, you need toturn the Game Alert function on.!The Game Alert function is on at the defaultsetting.1 Display the function selection menu.Refer to Introduction of advanced operations onthe previous page.2 Use MULTI-CONTROL to selectGAME ALERT in the function menu.3 Press MULTI-CONTROL to turn theGame Alert on.The Game Alert function is now on.#To turn the Game Alert function off, pressMULTI-CONTROL again.When the game of the selected teamstartsWhen a game of the selected team is about tostart (or is currently playing) on a different sta-tion, GAME ALERT is displayed. Press andhold MULTI-CONTROL to switch to that sta-tion, and you can listen to that game.Available accessoriesEn60Section13
!If you do not operate the function withinabout 10 seconds, the display is automati-cally returned.Displaying game informationIf games of your selected teams are currentlyplaying, you can display information of thegames and tune to the broadcast channel.You can display information of the gameswhile enjoying the sound from currently tun-ing station. You can also tune to the broadcastchannel when you wish to.1 Display the function selection menu.Refer to Introduction of advanced operations onpage 59.2 Use MULTI-CONTROL to selectGAME INFO in the function menu.The game information of your selected team isdisplayed.3 Push MULTI-CONTROL up or down toselect a game.The game is displayed, followed by more de-tailed game information.!Game score will be updated automatically.4 Press MULTI-CONTROL to switch to thatstation to listen to the game.Notes!If you have not made any team selections,NOT SET is displayed.!When games involving your favorite teams arenot currently playing, NO GAME is displayed.Displaying the Radio IDIf you select CH 000, the ID code is displayed.%Push MULTI-CONTROL left or right toselect CH 000.NoteTo select CH 000, set the channel select setting toCH NUMBER. About the channel select setting,refer to Selecting the SIRIUS channel select modeon page 59.Using Instant Replay functionFollowing functions can be operated duringthe Instant Replay mode.!To use this function, Pioneer SIRIUS bus in-terface (e.g. CD-SB10) is required.!To use this function, SIRIUS plug-and-playunit with Instant Replay Function is re-quired.!For details, refer to SIRIUS plug-and-playunit’s manuals.%Performing the Instant Replay modeWhen SIRIUS tuner is selected as the source,press and hold S.Rtrv/SAT MODE.#In the following conditions, tuner exits fromthe Instant Replay mode.—When BAND/ESC/CANCEL is pressed—When another source is selected%Select a trackPush MULTI-CONTROL left or right.%Fast forward or reversePush and hold MULTI-CONTROL left or rightfor about one second and release.Available accessoriesEn 61EnglishSection13
HD Radio™tunerBasic OperationsYou can use this unit to control an HD Radiotuner (e.g. GEX-P20HD), which is sold sepa-rately.For details concerning operation, refer to theHD Radio tuner’s operation manual.1 2 3 4651/ (signal reception status) indicatorWhen digital signal is received, is dis-played. Otherwise, is displayed.2Channel number3Band indicator4Preset number indicator5Title name6Frequency indicator%Select a bandPress BAND/ESC/CANCEL.#Band can be selected from among FM1,FM2,FM3 or AM.%Manual tuning (step by step)Push MULTI-CONTROL left or right.%Seek tuningPush and hold MULTI-CONTROL left or right,and then release.#You can cancel seek tuning by pushingMULTI-CONTROL left or right.Storing and recalling broadcastfrequenciesThe operation is the same as that of the tuner.(Refer to Storing and recalling broadcast fre-quencies on page 15.)Switching the displayDesired information can be displayed.%Press DISP/SCRL.Press DISP/SCRL repeatedly to switch betweenthe following settings:Station name—artist name—song title—pro-gram type#Only when the tuner has been tuned in to anHD Radio broadcasting, display can be changed.#When the tuner has been tuned in to an HDRadio broadcasting, default display is changedinto station name instead of frequency.Using iTunes taggingThis function is available for GEX-P20HD.The operation is the same as that of the tuner.Refer to Storing the tag information to this uniton page 15.Introduction to advancedoperations1 Press MULTI-CONTROL to display themain menu.2 Use MULTI-CONTROL to select Function.Turn to change the menu option. Press to se-lect.The function menu is displayed.3 Turn MULTI-CONTROL to select thefunction.BSM (best stations memory)—LOCAL (localseek tuning)—SEEK MODE (seek mode)—BLENDING (reception mode)Function and operationBSM and LOCAL operations are basically thesame as that of the tuner.Available accessoriesEn62Section13
Function name OperationBSM Refer to Storing the strongestbroadcast frequencies on page 16.LOCAL Refer to Tuning in strong signalson page 16.Notes!You can also select the function by pressingFUNCTION on the remote control.!To return to the playback display, pressBAND/ESC/CANCEL.Switching the seek modeThere are two method of seek tuning settings,one is HD (Digital broadcasting stations seek)and the other is ALL (normal seek).1 Use MULTI-CONTROL to selectSEEK MODE in the function menu.Refer to Introduction to advanced operationson the previous page.2 Press MULTI-CONTROL to select your fa-vorite setting.ALL—HDSwitching the reception modeIf a digital broadcast reception condition getspoor, this unit automatically switches to theanalog broadcast of the same frequency level.If this function is set to on, the tuner switchesbetween digital broadcast and analog broad-cast automatically. If this function is off, recep-tion will be conducted within an analogbroadcast.1 Use MULTI-CONTROL to selectBLENDING in the function menu.Refer to Introduction to advanced operationson the previous page.2 Press MULTI-CONTROL to select your fa-vorite setting.ON—OFFPlaying songs on iPodBasic operationYou can use this unit to control an interfaceadapter for iPod, which is sold separately.2223331111Song number indicator2Play time indicator3Song time (progress bar)%Fast forward or reversePush and hold MULTI-CONTROL left or right.%Select a trackPush MULTI-CONTROL left or right.Notes!Read the precautions for iPod in the followingsection. Refer to page 76.!While iPod is connected to this unit, PIONEER(or (check mark)) is displayed on the iPod.!If an error message is displayed, refer to Errormessages on page 71.!When the ignition switch is set to ACC or ON,the iPod’s battery is charged while the iPod isconnected to this unit.!While the iPod is connected to this unit, theiPod cannot be turned on or off.!Before connecting the dock connector of thisunit to the iPod, disconnect the headphonesfrom the iPod.!The iPod is turned off about two minutes afterthe ignition switch is set to OFF.Available accessoriesEn 63EnglishSection13
Displaying text information oniPod%Press DISP/SCRL to select the desiredtext information.Play time—: artist name and : song title—: artist name and : album name—:album name and : song title—: song titleand play time#If the characters recorded on the iPod are notcompatible with this unit, those characters arenot displayed.Notes!You can scroll the text information to the leftby pressing and holding DISP/SCRL.!When Ever Scroll is set to ON at the initial set-ting, text information scrolls continuously inthe display. Refer to Switching the ever scrollon page 52.Browsing for a songThe operation is the same as that of the iPodconnected to USB interface of this unit. (Referto Browsing for a song on page 24.)However, the selectable categories are slightlydifferent. Selectable categories arePlaylists (playlists)—Artists (artists)—Albums (albums)—Songs (songs)—Genres(genres)Introduction to advancedoperations1 Press MULTI-CONTROL to display themain menu.2 Use MULTI-CONTROL to select Function.Turn to change the menu option. Press to se-lect.The function menu is displayed.3 Turn MULTI-CONTROL to select thefunction.Play mode (repeat play)—Shuffle mode(shuffle)—Pause (pause)Function and operationPlay mode and Pause operations are basicallythe same as that of the built-in CD player.Function name OperationPlay modeRefer to Selecting a repeat playrange on page 19.However, the repeat play rangesyou can select are different fromthat of the built-in CD player. Therepeat play ranges of the iPod are:!Repeat One –Repeat the cur-rent song!Repeat All –Repeat all songsin the selected listPause Refer to Pausing playback on page20.Notes!To return to the ordinary display, pressBAND/ESC/CANCEL.!If you do not operate functions within about30 seconds, the display automatically returnsto the ordinary display.Playing songs in a randomorder (shuffle)%Press /iPod repeatedly to select thedesired setting.!Shuffle Songs –Play back songs in the se-lected list in random order.!Shuffle Albums –Play back songs from arandomly selected album in order.!Shuffle OFF –Cancel random play.#You can also turn this function on in the menuthat appears by using MULTI-CONTROL.Multi-CD PlayerBasic OperationsYou can use this unit to control a multi-CDplayer, which is sold separately.!Only functions described in this manual aresupported by 50-disc multi-CD players.Available accessoriesEn64Section13
!This unit is not designed to operate disc titlelist functions with a 50-disc multi-CD player.For information about the disc title list func-tions, refer to Selecting discs from the disctitle list on page 68.3331112221Disc number indicator2Track number indicator3Play time indicator%Select a discPush MULTI-CONTROL up or down.%Fast forward or reversePush and hold MULTI-CONTROL left or right.%Select a trackPush MULTI-CONTROL left or right.Notes!When multi-CD player completes preparatoryoperations, READY is displayed.!If an error message is displayed, refer to themulti-CD player owner’s manual.!If there are no discs in the multi-CD player ma-gazine, No disc is displayed.Using CD TEXT functionsYou can use these functions only with a CDTEXT compatible multi-CD player.The operation is the same as that of the built-in CD player.Refer to Displaying text information on disc onpage 18.Introduction to advancedoperationsYou can only use Compression (compressionand DBE) with a multi-CD player that supportsthem.1 Press MULTI-CONTROL to display themain menu.2 Use MULTI-CONTROL to select Function.Turn to change the menu option. Press to se-lect.The function menu is displayed.3 Turn MULTI-CONTROL to select thefunction.Play mode (repeat play)—Random mode(random play)—Scan mode (scan play)—Pause (pause)—Compression (compressionand DBE)—ITS play mode (ITS play)—ITS memo (ITS programming)—TitleInput "A" (disc title input)#If you do not operate functions other thanITS memo and TitleInput "A" within about 30seconds, the display automatically returns to theordinary display.#When playing a CD TEXT disc on a CD TEXTcompatible multi-CD player, you cannot switch toTitleInput "A". The disc title is already recordedon the CD TEXT disc.Function and operationPlay mode,Random mode,Scan mode,Pause and TitleInput "A" operations are basi-cally the same as that of the built-in CD player.Available accessoriesEn 65EnglishSection13
Function name OperationPlay modeRefer to Selecting a repeat playrange on page 19.However, the repeat play rangesyou can select are different fromthat of the built-in CD player. Therepeat play ranges of the multi-CDplayer are:!M-CD repeat –Repeat alldiscs in the multi-CD player!Track repeat –Repeat just thecurrent track!Disc repeat –Repeat the cur-rent discRandom mode Refer to Playing tracks in randomorder on page 19.Scan mode Refer to Scanning folders andtracks on page 20.Pause Refer to Pausing playback on page20.TitleInput "A" Refer to Entering disc titles onpage 20.Notes!To return to the playback display, pressBAND/ESC/CANCEL.!If you select other discs during repeat play,the repeat play range changes toM-CD repeat.!If you perform track search or fast forward/re-verse during Track repeat, the repeat playrange changes to Disc repeat.!After track or disc scanning is finished, nor-mal playback of the tracks begins again.Using compression and bassemphasisYou can only use these functions with a multi-CD player that supports them.COMP (compression) and DBE (dynamic bassemphasis) functions lets you adjust the soundplayback quality of the multi-CD player.1 Display the function menu.Refer to Introduction to advanced operationson the previous page.2 Use MULTI-CONTROL to selectCompression in the function menu.#If the multi-CD player does not supportCOMP/DBE, NO COMP is displayed when you at-tempt to select it.3 Press MULTI-CONTROL to select your fa-vorite setting.COMP OFF—COMP 1—COMP 2—COMP OFF—DBE 1—DBE 2Using ITS playlistsITS (instant track selection) lets you make aplaylist of favorite tracks from the multi-CDplayer magazine. After you have added your fa-vorite tracks to the playlist, you can turn on ITSplay and play just those selections.You can use ITS to enter and play back up to99 tracks per disc from up to 100 discs (withthe disc titles). (With multi-CD players sold be-fore the CDX-P1250 and CDX-P650, up to 24tracks can be stored in the playlist.)Creating a playlist with ITS programming1 Play a CD that you want to program.Push MULTI-CONTROL up or down to selectthe CD.2 Display the function menu.Refer to Introduction to advanced operationson the previous page.3 Use MULTI-CONTROL to selectITS memo in the function menu.4 Select the desired track by pushingMULTI-CONTROL left or right.5 Push MULTI-CONTROL up to store thecurrently playing track in the playlist.Memory complete is displayed and the cur-rently playing selection is added to your play-list.6 Press BAND/ESC/CANCEL to return tothe playback display.Available accessoriesEn66Section13
NoteAfter data for 100 discs is stored in memory, datafor a new disc will overwrite the oldest one.Playback from your ITS playlistITS play lets you listen to the tracks that youhave entered into your ITS playlist. When youturn on ITS play, tracks from your ITS playlistin the multi-CD player begin to play.1 Select the repeat range.Refer to Playing tracks in random order onpage 19.2 Display the function menu.Refer to Introduction to advanced operationson page 65.3 Use MULTI-CONTROL to selectITS play mode in the function menu.4 Press MULTI-CONTROL to turn ITS playon.ITS play appears in the display. Playback be-gins of those tracks from your playlist withinthe previously selected M-CD repeat orDisc repeat ranges.#If no tracks in the current range are pro-grammed for ITS play, then ITS empty is dis-played.#To turn ITS play off, press MULTI-CONTROLagain.Erasing a track from your ITS playlistYou can delete a track from your ITS playlist ifITS play is on.If ITS play is already on, skip to step 2. If ITSplay is off, use MULTI-CONTROL.1 Play the CD with the track you want todelete from your ITS playlist, and turn ITSplay on.Refer to Playback from your ITS playlist on thispage.2 Display the function menu.Refer to Introduction to advanced operationson page 65.3 Use MULTI-CONTROL to selectITS memo in the function menu.4 Select the desired track by pushingMULTI-CONTROL left or right.5 Push MULTI-CONTROL down to erasethe track from your ITS playlist.The currently playing selection is erased fromyour ITS playlist and playback of the next trackbegins.#If there are no tracks from your playlist in thecurrent range, ITS empty is displayed and nor-mal playback resumes.6 Press BAND/ESC/CANCEL to return tothe playback display.Erasing a CD from your ITS playlistYou can delete all tracks of a CD from your ITSplaylist if ITS play is off.1 Play the CD that you want to delete.Push MULTI-CONTROL up or down to selectthe CD.2 Display the function menu.Refer to Introduction to advanced operationson page 65.3 Use MULTI-CONTROL to selectITS memo in the function menu.4 Push MULTI-CONTROL down to eraseall tracks on the currently playing CD fromyour ITS playlist.All tracks on the currently playing CD are de-leted from your playlist and Memory deletedis displayed.5 Press BAND/ESC/CANCEL to return tothe playback display.Available accessoriesEn 67EnglishSection13
Using disc title functionsYou can input CD titles and display the titles.Then, you can easily search for and play a de-sired disc.Entering disc titlesUse the disc title input feature to store up to100 CD titles (with ITS playlist) into the multi-CD player. Each title can be up to 10 charac-ters long.For details concerning operation, refer to En-tering disc titles on page 20.!Titles remain in the memory even after thedisc is removed from the magazine, andare recalled when the disc is reinserted.!After data for 100 discs is stored in mem-ory, data for a new disc will overwrite theoldest one.Displaying disc titles%Press DISP/SCRL to select the desiredtext information.!For title entered CDPlay time—: disc title and play time!For CD TEXT discsPlay time—: disc artist name and :track title—: disc artist name and :disc title—: disc title and : track title—: track artist name and : track title—: track title and play timeSelecting discs from the disc title listDisc title list lets you see the list of disc titlesentered in the multi-CD player and select oneof them to play back.1 Press /LIST to switch to the disc titlelist mode during the playback display.2 Use MULTI-CONTROL to select the de-sired disc title.Turn to change the disc title. Press to play.#You can also change the disc title by pushingMULTI-CONTROL up or down.#When playing CD TEXT disc, pushMULTI-CONTROL right to see a list of the tracksin the selected disc. Push MULTI-CONTROL leftto return to the disc list.#You can scroll to the left of the title by pressingand holding DISP/SCRL. To stop scrolling, pressDISP/SCRL.#If no title is entered for a disc, No Title is dis-played.#No disc is displayed next to the disc numberwhen there is no disc in the magazine.#If you do not operate the list within about 30seconds, the display automatically returns to theordinary display.Available accessoriesEn68Section13
DVD PlayerBasic OperationsYou can use this unit to control a DVD player ormulti-DVD player, which is sold separately.For details concerning operation, refer to theDVD player’s or multi-DVD player’s operationmanual. This section provides information onDVD operations with this unit which differsfrom that described in the DVD player’sormulti-DVD player’s operation manual.55511113334442221DVD-V/VCD/CD/MP3/WMA indicatorShows the type of disc currently playing.2Disc number indicatorShows the number of the disc currently play-ing when using a multi-DVD player.3Title/Folder number indicatorShows the title (when playing DVD video) orfolder (when playing compressed audio) ofthe selection currently playing.4Chapter/track number indicatorShows the chapter (when playing DVD video)or track (when playing Video CD, CD or com-pressed audio) currently playing.5Play time indicator%Select a chapter/trackPush MULTI-CONTROL left or right.%Fast forward or reversePush and hold MULTI-CONTROL left or right.#When playing compressed audio, there is nosound on fast forward or reverse.%To skip back or forward to anotherchapter/track, push MULTI-CONTROL left orright.Selecting a disc!You can operate this function only when amulti-DVD player is connected to this unit.%Push MULTI-CONTROL up or down toselect the desired disc.Selecting a folder!You can operate this function only when aDVD player compatible with compressedaudio playback is connected to this unit.%Push MULTI-CONTROL up or down toselect a folder.Introduction to advancedoperations1 Press MULTI-CONTROL to display themain menu.2 Use MULTI-CONTROL to select Function.Turn to change the menu option. Press to se-lect.The function menu is displayed.3 Turn MULTI-CONTROL to select thefunction.During DVD video or Video CD playbackPlay mode (repeat play)—Pause (pause)During CD playbackPlay mode (repeat play)—Random mode(random play)—Scan mode (scan play)—Pause (pause)—ITS play mode (ITS play)—ITS memo (ITS input)—TitleInput "A" (disctitle input)During compressed audio playbackPlay mode (repeat play)—Random mode(random play)—Scan mode (scan play)—Pause (pause)#To return to the playback display, pressBAND/ESC/CANCEL.#If you do not operate functions except forITS memo and TitleInput "A" within about 30seconds, the display is automatically returned tothe ordinary display.Available accessoriesEn 69EnglishSection13
Function and operationPlay mode,Random mode,Scan mode,Pause and TitleInput "A" operations are basi-cally the same as that of the built-in CD player.Also, ITS play mode and ITS memo opera-tions are basically the same as that the multi-CD player.Function name OperationPlay modeRefer to Selecting a repeat playrange on page 19.But the repeat play range that youcan select is vary depending onthe type of disc or system. The re-peat play ranges of the DVDplayer/multi-DVD player are asbelow:During PBC playback of VideoCDs, this function cannot be oper-ated.!Disc repeat –Repeat the cur-rent disc!Folder repeat –Repeat thecurrent folder!Title repeat –Repeat just thecurrent title!Chapter repeat –Repeat justthe current chapter!Track repeat –Repeat the cur-rent trackRandom mode Refer to Playing tracks in randomorder on page 19.Scan mode Refer to Scanning folders andtracks on page 20.Pause Refer to Pausing playback on page20.ITS play mode Refer to Using ITS playlists onpage 66.ITS memo Refer to Using ITS playlists onpage 66.TitleInput "A" Refer to Entering disc titles onpage 20.Notes!If you select other discs during repeat play,the repeat play range changes to Disc repeat.!When playing back Video CD or CD, if you per-form track search or fast forward/reverse dur-ing Track repeat, the repeat play rangechanges to Disc repeat.!When playing back compressed audio, if youselect another folder during repeat play, therepeat play range changes to Disc repeat.!When playing back compressed audio, if youperform track search or fast forward/reverseduring Track repeat, the repeat play rangechanges to Folder repeat.!Multi-DVD player that has ITS functions anddisc title functions can also be connected tothis unit. In this case, ITS play mode,ITS memo and disc title input can be con-trolled.!The ITS function of a DVD player differsslightly from ITS playback with a multi-CDplayer. With multi-DVD player, ITS playback ap-plies only to the CD playing. For details, referto Using ITS playlists on page 66.Available accessoriesEn70Section13
TroubleshootingBluetooth audio/telephoneSymptom Cause ActionThe audio ofthe Bluetoothaudio source isnot playedback.A Bluetooth-con-nected cellularphone is cur-rently in a phonecall.The audio will beplayed back whenthe call is com-pleted.A Bluetooth-con-nected cellularphone is cur-rently in opera-tion.Do not operate thecellular phone atthis time.A call was madewith a Bluetooth-connected cellu-lar phone andthen immediatelyterminated. As aresult, communi-cation betweenthis unit and thecellular phonewas not termi-nated properly.Reconnect theBluetooth connec-tion between thisunit and the cellu-lar phone.Error messagesWhen you contact your dealer or your nearestPioneer Service Center, be sure to have theerror message recorded.Built-in CD PlayerMessage Cause ActionERROR-11, 12,17, 30Dirty disc Clean disc.Scratched disc Replace disc.ERROR-10, 11,12, 15, 17, 30,A0Electrical or me-chanicalTurn the ignitionswitch OFF andback ON, or switchto a differentsource, then backto the CD player.ERROR-15 The inserted discdoes not containany dataReplace disc.ERROR-22, 23The CD formatcannot be playedbackReplace disc.No audio The inserted discdoes not containany files that canbe played backReplace disc.TRK SKIPPED The inserted disccontains WMAfiles that are pro-tected by DRMReplace disc.PROTECT All the files onthe inserted discare secured byDRMReplace disc.USB audio player/USB memoryMessage Cause ActionNo audio No songs Transfer the audiofiles to the USBportable audioplayer/USB mem-ory and connect.USB memorywith security en-abled is con-nectedFollow the USBmemory instruc-tions to disable thesecurity.NO DEVICE The USB storagedevice or iPod isnot connected tothe USB port ofthis unit.Connect a compa-tible USB storagedevice.TRK SKIPPED The connectedUSB portableaudio player/USB memorycontains WMAfiles that are pro-tected byWindowsMedia™DRM 9/10Play an audio filenot protected byWindows MediaDRM 9/10.PROTECT All the files onthe connectedUSB portableaudio player/USB memory areprotected byWindows MediaDRM 9/10Transfer audio filesnot protected byWindows MediaDRM 9/10 to theUSB portableaudio player/USBmemory and con-nect.Additional InformationEn 71EnglishAppendix
NOT COMPA-TIBLEThe USB deviceconnected to isnot supported bythis unit.Connect a USBportable audioplayer or USBmemory that isUSB Mass StorageClass compliant.CHECK USB The USB connec-tor or USB cableis short-circuited.Confirm that theUSB connector orUSB cable is notcaught in some-thing or damaged.The connectedUSB portableaudio player/USB memoryconsumes morethan 500 mA(maximum allow-able current).Disconnect theUSB portableaudio player/USBmemory and donot use it. Turn theignition switch toOFF, then to ACCor ON and thenconnect the com-pliant USB porta-ble audio player/USB memory.ERROR-19 CommunicationfailurePerform one of thefollowing opera-tions.–Turn the ignitionswitch OFF andback ON.–Disconnect theUSB portableaudio player/USBmemory.–Change to a dif-ferent source.Then, return to theUSB portableaudio player/USBmemory.ERROR-23 USB device isnot formattedwith FAT16 orFAT32USB device shouldbe formatted withFAT16 or FAT32.iPodMessage Cause ActionERROR-19 CommunicationfailureDisconnect thecable from iPod.Once iPod mainmenu is displayed,connect the cableagain.Reset the iPod.iPod failure Disconnect thecable from iPod.Once iPod mainmenu is displayed,connect the cableagain.Reset the iPod.ERROR-16 Old version ofiPodUpdate the iPodversion.iPod failure Disconnect thecable from iPod.Once iPod mainmenu is displayed,connect the cableagain.Reset the iPod.ERROR-A1CHECK USBiPod is notcharged but op-erates correctlyCheck if the con-nection cable foriPod shorted out(e.g., not caught inmetal objects).After checking,turn the ignitionswitch OFF andback ON or discon-nect the iPod andconnect again.No Songs No songs Transfer the songsto iPod.STOP No songs in thecurrent listSelect a list thatcontains thesongs.NO DEVICE The USB storagedevice or iPod isnot connected tothe USB port ofthis unit.Connect a compa-tible iPod.Additional InformationEn72Appendix
iTunes taggingMessage Cause ActioniPod full Tagsnot trans-ferredMemory used fortag informationon the iPod isfull.Sync the iPod withiTunes and cleanup the tagged play-list.Memory fullTags notstoredThis unit’s flashmemory used fortemporary sto-rage area is full.Connect the iPodto this unit andtransfer this unit’stag information tothe iPod.Tag transferfailedThis unit’s tag in-formation cannottransfer to theiPod.Check the iPodand try again.Tag storefailedTag informationcannot be storedin this unit.Try again.ERROR-8D Built-in FLASHROM encoun-tered an errorTurn the ignitionOFF and ON.Handling guideline of discsand player!Use only discs featuring either of followingtwo logos.!Use only conventional, fully circular discs.Do not use shaped discs.!Use 12-cm or 8-cm CD. Do not use anadapter when playing 8-cm CDs.!Do not insert anything other than a CD intothe CD loading slot.!Do not use cracked, chipped, warped, orotherwise damaged discs as they may da-mage the player.!Unfinalized CD-R/CD-RW disc playback isnot possible.!Do not touch the recorded surface of thediscs.!Store discs in their cases when not in use.!Avoid leaving discs in excessively hot envir-onments including under direct sunlight.!Do not attach labels, write on or apply che-micals to the surface of the discs.!To clean a CD, wipe the disc with a softcloth outward from the center.!Condensation may temporarily impair theplayer’s performance. Leave it to adjust tothe warmer temperature for about onehour. Also, wipe any dump discs with a softcloth.!Playback of discs may not be possible be-cause of disc characteristics, disc format,recorded application, playback environ-ment, storage conditions, and so on.!Text information may not be correctly dis-played depending on the recorded environ-ment.!Road shocks may interrupt disc playback.!Read the precautions for discs beforeusing them.Dual Discs!Dual Discs are two-sided discs that have arecordable CD for audio on one side and arecordable DVD for video on the other.!Since the CD side of Dual Discs is not phy-sically compatible with the general CDstandard, it may not be possible to play theCD side with this unit.Additional InformationEn 73EnglishAppendix
!Frequent loading and ejecting of a DualDisc may result in scratches on the disc.Serious scratches can lead to playback pro-blems on this unit. In some cases, a DualDisc may become stuck in the disc loadingslot and will not eject. To prevent this, werecommend you refrain from using DualDisc with this unit.!Please refer to the information from thedisc manufacturer for more detailed infor-mation about Dual Discs.Compressed audiocompatibilityWMA!Compatible format: WMA encoded byWindows Media Player!File extension: .wma!Bit rate: 5 kbps to 320 kbps (CBR), VBR!Sampling frequency: 8 kHz to 48 kHz!Windows Media Audio 9 Professional, Loss-less, Voice: NoMP3!File extension: .mp3!Bit rate: 8 kbps to 320 kbps (CBR), VBR!Sampling frequency: 8 kHz to 48 kHz (32,44.1, 48 kHz for emphasis)!Compatible ID3 tag version: 1.0, 1.1, 2.2, 2.3(ID3 tag Version 2.x is given priority thanVersion 1.x.)!M3u playlist: No!MP3i (MP3 interactive), mp3 PRO: NoAAC!Compatible format: AAC encoded by iTunes!File extension: .m4a!Bit rate: 8 kbps to 320 kbps!Sampling frequency: 8 kHz to 44.1 kHz!Transmission rate: 16 kbps to 320 kbps!Apple Lossless: NoWAV!File extension: .wav!Compatible format: Linear PCM (LPCM),MS ADPCM!Quantization bits: 8 and 16 (LPCM), 4 (MSADPCM)!Sampling frequency: 16 kHz to 48 kHz(LPCM), 22.05 kHz to 44.1 kHz (MS AD-PCM)Handling guideline andsupplemental information!There may be a slight delay when startingplayback of audio files encoded with imagedata.!Only 32 characters from beginning can bedisplayed as a file name (including the fileextension) or a folder name.!The text information of some audio filesmay not be correctly displayed.!This unit may not operate correctly depend-ing on the application used to encodeWMA files.Compressed audio files on the disc!ISO 9660 Level 1 and 2 compliant. Romeoand Joliet file systems are both compatiblewith this player.!Multi-session playback is possible.!Compressed audio files are not compatiblewith packet write data transfer.!Regardless of the length of blank sectionbetween the songs of original recording,compressed audio discs play with a shortpause between songs.USB audio player/USB memoryCAUTIONPioneer accepts no responsibility for data lost onthe USB memory/USB portable audio player evenif that data is lost while using this unit.Additional InformationEn74Appendix
!This unit can play back files in the USB por-table audio player/USB memory that isUSB Mass Storage Class. However, copy-right protected files that are stored inabove-mentioned USB devices cannot beplayed back.!You cannot connect a USB portable audioplayer/USB memory to this unit via a USBhub.!Partitioned USB memory is not compatiblewith this unit.!Depending on the kind of USB portableaudio player/USB memory you use, thisunit may not recognize the USB audioplayer/USB memory or audio files may notbe played back properly.!Do not leave the USB portable audioplayer/USB memory in direct sunlight forextended amounts of time. Extended expo-sure to direct sunlight can result in USBportable audio player/USB memory mal-function due to the resulting high tempera-ture.!Do not leave the USB portable audioplayer/USB memory in high temperature.!Firmly secure the USB portable audioplayer/USB memory when driving. Do notlet the USB portable audio player/USBmemory fall onto the floor, where it may be-come jammed under the brake or accelera-tor pedal.!Depending on the USB devices connectedto this unit, it may generate noise in theradio.!There may be a slight delay when startingplayback of audio files on a USB portableaudio player/USB memory with numerousfolder hierarchies.!Do not connect anything other than theUSB portable audio player/USB memory.!Operations may vary depending on thekind of USB audio player and a USB mem-ory.Example of a hierarchy: Folder: Compressed audio file123456Level 1 Level 2 Level 3 Level 4The sequence of audio files onthe disc!This unit assigns folder numbers. The usercannot assign folder numbers.!Folder selection sequence or other opera-tion may be altered depending on the en-coding or writing software.!Up to 3 500 files on a DVD (-R/-RW) can beplayed back.!Up to 999 files on a CD (-R/-RW) can beplayed back.!Up to 700 folders on a disc can be playedback.The sequence of audio files onUSB memoryFor USB portable audio players, the sequence isdifferent from that of USB memory and de-pends on the player.!01 to 05 represent assigned folder num-bers. 1to 6represent the playback se-quence. The user cannot assign foldernumbers and specify the playback se-quence with this unit.!Playback sequence of the audio file is thesame as recorded sequence in the USB de-vice.Additional InformationEn 75EnglishAppendix
!To specify the playback sequence, the fol-lowing method is recommended.1 Create the file name including numbersthat specify the playback sequence (e.g.,001xxx.mp3 and 099yyy.mp3).2 Put those files into a folder.3 Record the folder containing files into theUSB device.However, depending on the system environ-ment, you cannot specify the file playbacksequence.!Up to 65 535 files on a USB portable audioplayer/USB memory can be played back.!Up to 6 000 folders on a USB portableaudio player/USB memory can be playedback.iPod compatibility!This unit supports only the following iPods.Supported iPod software versions areshown below. Older versions of iPod soft-ware may not be supported.—iPod nano first generation (software ver-sion 1.3.1)—iPod nano second generation (softwareversion 1.1.3)—iPod nano third generation (softwareversion 1.0.2)—iPod fifth generation (software version1.2.1)—iPod classic (software version 1.0.2)—iPod touch (software version 1.1.1)—iPhone 3G (software version 2.0)—iPhone (software version 2.0)!Depending on the generation or version ofthe iPod, some functions can not be oper-ated.!Operations may vary depending on the soft-ware version of iPod.!When using an iPod, iPod Dock Connectorto USB Cable (CD-IU50) is required. For de-tails, consult your dealer.!This unit can control previous generationsiPod models with a Pioneer iPod adapter(e.g. CD-IB100N).About handling the iPodCAUTION!Pioneer accepts no responsibility for data loston the iPod even if that data is lost whileusing this unit.!Do not leave the iPod in direct sunlight for ex-tended amounts of time. Extended exposureto direct sunlight can result in iPod malfunc-tion due to the resulting high temperature.!Do not leave the iPod in a high temperature.!Firmly secure the iPod when driving. Do notlet the iPod fall onto the floor, where it may be-come jammed under the brake or acceleratorpedal.For details, refer to the iPod’s manuals.About iPod settings!When an iPod is connected, this unitchanges the EQ (equalizer) setting of theiPod to Flat in order to optimize the acous-tics. When you disconnect the iPod, the EQreturns to the original setting.!You cannot set Repeat to off on the iPodwhen using this unit. Even if you set Repeatto off on the iPod, Repeat is automaticallychanged to All when connecting the iPodto this unit.Bluetooth profiles!In order to use Bluetooth wireless technol-ogy, devices must be able to interpret cer-tain profiles. This unit is compatible withthe following profiles.—A2DP (Advanced Audio DistributionProfile)—AVRCP (Audio/Video Remote ControlProfile)—GAP (Generic Access Profile)—SDP (Service Discovery Protocol)—OPP (Object Push Profile)—HFP (Hands Free Profile)—PBAP (Phone Book Access Profile)Additional InformationEn76Appendix
—SPP (Serial Port Profile)Copyright and trademarknoticeWMAWindows Media and the Windows logo are tra-demarks or registered trademarks of MicrosoftCorporation in the United States and/or othercountries.MP3Supply of this product only conveys a licensefor private, non-commercial use and does notconvey a license nor imply any right to usethis product in any commercial (i.e. revenue-generating) real time broadcasting (terrestrial,satellite, cable and/or any other media), broad-casting/streaming via internet, intranets and/or other networks or in other electronic con-tent distribution systems, such as pay-audio oraudio-on-demand applications. An indepen-dent license for such use is required. For de-tails, please visithttp://www.mp3licensing.com.BluetoothThe Bluetooth word mark and logos areowned by the Bluetooth SIG, Inc. and any useof such marks by Pioneer Corporation is underlicense. Other trademarks and trade namesare those of their respective owners.!Bluetooth is a short-range wireless radioconnectivity technology that is developedas a cable replacement for mobile phones,handheld PCs and other devices. Bluetoothoperates in 2.4 GHz frequency range andtransmits voice and data at speeds up to 1megabit per second. Bluetooth waslaunched by a special interest group (SIG)that comprises of Ericsson Inc., Intel Corp.,Nokia Corp., Toshiba and IBM in 1998, andit is currently developed by nearly 2 000companies worldwide.iPodiPod is a trademark of Apple Inc., registered inthe U.S. and other countries.iPhoneiPhone is a trademark of Apple Inc.iTunesiTunes is a trademark of Apple Inc., registeredin the U.S. and other countries.Additional InformationEn 77EnglishAppendix
SpecificationsGeneralPower source ............................. 14.4 V DC (10.8 V to 15.1 Vallowable)Grounding system ................... Negative typeMax. current consumption..................................................... 10.0 ADimensions (W × H × D):DINChassis ..................... 180 mm × 50 mm × 165mm(7 in. × 2 in. × 6-1/2 in.)Nose ........................... 188 mm × 58 mm × 18 mm(7-3/8 in.× 2-1/4 in.× 5/8 in.)DChassis ..................... 180 mm × 50 mm × 165mm(7 in.× 2 in.× 6-1/2 in.)Nose ........................... 170 mm × 45 mm × 18 mm(6-3/4 in.× 1-3/4 in.× 5/8 in.)Weight .......................................... 1.5 kg (2.9 lbs)AudioMaximum power output ....... 50 W × 450 W × 2/4 W+ 70 W × 1/2W(for subwoofer)Continuous power output ... 22 W × 4 (50 Hz to 15 000Hz, 5 % THD, 4 Wload, bothchannels driven)Load impedance ...................... 4 Wto 8 W×44Wto 8 W×2+2W×1Preout max output level ....... 4 VEqualizer (3-Band Parametric Equalizer):LowFrequency ................ 40/80/100/160 HzQ Factor .................... 0.35/0.59/0.95/1.15 (+6 dBwhen boosted)Gain ............................ ±12 dBMidFrequency ................ 200/500/1k/2k HzQ Factor .................... 0.35/0.59/0.95/1.15 (+6 dBwhen boosted)Gain ............................ ±12 dBHighFrequency ................ 3.15k/8k/10k/12.5k HzQ Factor .................... 0.35/0.59/0.95/1.15 (+6 dBwhen boosted)Gain ............................ ±12 dBHPF:Frequency .......................... 50/63/80/100/125 HzSlope .................................... –12 dB/octSubwoofer (mono):Frequency .......................... 50/63/80/100/125 HzSlope .................................... –18 dB/octGain ...................................... +6 dB to –24 dBPhase .................................. Normal/ReverseBass boost:Gain ...................................... +12 dB to 0 dBCD playerSystem .......................................... Compact disc audio systemUsable discs .............................. Compact discSignal-to-noise ratio ............... 94 dB (1 kHz) (IEC -A net-work)Number of channels .............. 2 (stereo)MP3 decoding format ........... MPEG-1 & 2 Audio Layer 3WMA decoding format ......... Ver. 7, 7.1, 8, 9, 10, 11 (2chaudio)(Windows Media Player)AAC decoding format ............ MPEG-4 AAC (iTunes®en-coded only) (.m4a)(Ver. 7.2 and earlier)WAV signal format .................. Linear PCM & MS ADPCM(Non-compressed)USBUSB standard specification..................................................... USB 2.0 full speedMaximum current supply .... 500 mAMaximum memory capacity..................................................... 250 GBFile system .................................. FAT16, FAT32MP3 decoding format ........... MPEG-1 & 2 Audio Layer 3WMA decoding format ......... Ver. 7, 7.1, 8, 9, 10, 11 (2chaudio)(Windows Media Player)AAC decoding format ............ MPEG-4 AAC (iTunes®en-coded only) (.m4a)(Ver. 7.2 and earlier)WAV signal format .................. Linear PCM & MS ADPCM(Non-compressed)FM tunerFrequency range ...................... 87.9 MHz to 107.9 MHzUsable sensitivity ..................... 8 dBf (0.7 µV/75 W, mono,S/N: 30 dB)Signal-to-noise ratio ............... 75 dB (IEC-A network)AM tunerFrequency range ...................... 530 kHz to 1 710 kHz (10kHz)Usable sensitivity ..................... 18 µV (S/N: 20 dB)Signal-to-noise ratio ............... 65 dB (IEC-A network)BluetoothVersion .......................................... Bluetooth 2.0 certifiedAdditional InformationEn78Appendix
Output power ............................ +4 dBm Max.(Power class 2)CEA2006 SpecificationsPower output ............................. 14 W RMS × 4 Channels (4Wand ≦1 % THD+N)S/N ratio ....................................... 91 dBA (reference: 1 W into4W)NoteSpecifications and the design are subject to mod-ifications without notice due to improvements.Additional InformationEn 79EnglishAppendix
PIONEER CORPORATION4-1, MEGURO 1-CHOME, MEGURO-KUTOKYO 153-8654, JAPANPIONEER ELECTRONICS (USA) INC.P.O. Box 1540, Long Beach, California 90801-1540, U.S.A.TEL: (800) 421-1404PIONEER EUROPE NVHaven 1087, Keetberglaan 1, B-9120 Melsele, Belgium/BelgiqueTEL: (0) 3/570.05.11PIONEER ELECTRONICS ASIACENTRE PTE. LTD.253 Alexandra Road, #04-01, Singapore 159936TEL: 65-6472-7555PIONEER ELECTRONICS AUSTRALIA PTY. LTD.178-184 Boundary Road, Braeside, Victoria 3195, AustraliaTEL: (03) 9586-6300PIONEER ELECTRONICS OF CANADA, INC.300 Allstate Parkway, Markham, Ontario L3R 0P2, CanadaTEL: 1-877-283-5901TEL: 905-479-4411PIONEER ELECTRONICS DE MEXICO, S.A. de C.V.Blvd.Manuel Avila Camacho 138 10 pisoCol.Lomas de Chapultepec, Mexico, D.F. 11000TEL: 55-9178-4270先鋒股份有限公司總公司:台北市中山北路二段44號13樓電話:(02) 2521-3588先鋒電子(香港)有限公司香港九龍尖沙嘴海港域世界商業中心9樓901-6室電話:(0852) 2848-6488Published by Pioneer Corporation.Copyright ©2008 by Pioneer Corporation.All rights reserved.Printed in Thailand<0G020187A/N> UC<KSNZX> <08K00000>

Navigation menu