Pioneer K026 Multi- Media AVN Navigation Server System with BT User Manual 3
Pioneer Corporation Multi- Media AVN Navigation Server System with BT 3
Pioneer >
Contents
- 1. User Manual 1
- 2. User Manual 2
- 3. User Manual 3
- 4. User Manual 4
- 5. User Manual 5
User Manual 3
![Making a call home easilyYou can call home without taking the time toenter the phone number if the phone numberhas been registered.1 Display the “Phone Menu”screen.2 Touch [Call Home].Dialing home starts.pIf you have not registered your home num-ber, a message appears. Touch [Yes]tostart registration.=For more details about “Set Home”,refer to How to use the navigation menuscreens on page 34.Calling a number in the“Contacts List”After finding the entry you want to call in the“Contacts List”screen, you can select thenumber and make the call.pBefore using this function, you need to setthe phone number from the phone book to“Contacts”.=For details, refer to Transferring the phonebook on page 84.1 Display the “Phone Menu”screen.2 Touch [Contacts].The “Contacts List”screen appears.3 Switch the page of the list to displaythe desired entry.If you touch an alphabet tab, you can jump tothe first page of the contacts whose namesstart with that letter.Alphabet tabsMakes the screen jump to the beginning ofthe page including the entry whose namesstart with any of selected alphabets.Touching [#ABCDE] also displays the page in-cluding the entry whose names start with pri-mary symbols or numbers.Touching [Others] displays the page includingentries that are not assigned to any of theother tabs.4 Touch the desired entry on the list tomake a call.!New translation required.#Touch [Search].The “Contacts Name Search”screen appears.New translation required.#Touch [Delete].The “Delete from Contacts”screen appears.New translation required.5 Touch to end the call.Making a phone call using thereceived call historyThe received call history saves 30 calls per re-gistered cellular phone. If the number of callsexceeds 30, the oldest entry will be deleted.1 Display the “Phone Menu”screen.2 Touch [Received Calls].The “Received Calls List”screen appears.3 Touch an entry on the list.Dialing starts.pTo cancel the call after the system startsdialing, touch .Using hands-free phoningEn 81Chapter12Using hands-free phoning](https://usermanual.wiki/Pioneer/K026.User-Manual-3/User-Guide-1123207-Page-1.png)
![#Touch [Detail].The “Detail Information”screen appears.You can check the details of the party before mak-ing a phone call.4 Touch to end the call.Making a phone call using thedialed number historyThe dialed number history saves 30 calls perregistered cellular phone. If the entries exceed30, the oldest one will be deleted.1 Display the “Phone Menu”screen.2 Touch [Dialled Calls].The “Dialed Calls List”screen appears.3 Touch an entry on the list.Dialing starts.pTo cancel the call after the system startsdialing, touch .#Touch [Detail].The “Detail Information”screen appears.You can check the details of the party before mak-ing a phone call.4 Touch to end the call.Making a phone call usingmissed call historyThe missed call history saves 30 calls per re-gistered cellular phone. If the number of callsexceeds 30, the oldest entry will be deleted.1 Display the “Phone Menu”screen.2 Touch [Missed Calls].The “Missed Calls List”screen appears.3 Touch an entry on the list.Dialing starts.pTo cancel the call after the system startsdialing, touch .#Touch [Detail].The “Detail Information”screen appears.Using hands-free phoningEn82Chapter12](https://usermanual.wiki/Pioneer/K026.User-Manual-3/User-Guide-1123207-Page-2.png)
![You can check the details of the party before mak-ing a phone call.4 Touch to end the call.Dialing GOOG-411CAUTIONLocal and/or long distance charges for making aphone call may apply.You can dial GOOG-411 to dial the free busi-ness listing service of Googleäwith onetouch.1 Touch [GOOG-411] on the “PhoneMenu”.=For details, refer to Displaying the PhoneMenu on page 80.Dialing GOOG-411 starts.2 You can now use the GOOG-411 phoneservice.For details about GOOG-411 service and avail-ability, contact Googleä.Dialing the entry in the“Address Book”You can make a call to the entry registered inthe “Address Book”.1 Display the “Destination Menu”screen.2 Touch [Address Book].The “Address Book List”screen appears.3 Touch next to the location that youwant to make a call.The “Address Book Edit”screen appears.4 Touch [Call] to make a call.To cancel the call after the system starts dial-ing, touch .5 Touch to end the call.Dialing a facility’s phone numberYou can make a call to facilities with phonenumber data.pYou cannot make a call to locations or POIsthat have no phone number data.1 Display the “Destination Menu”screen.2 Touch [POI].The “POI Search”screen appears.3 Search for the POI.The “POI List”screen appears.=For details concerning operations, refer toSearching for Points of Interest (POI) onpage 58.4 Touch .The “Detailed POI Information”screen ap-pears.5 Touch [Call] to make a call.To cancel the call after the system starts dial-ing, touch .6 Touch to end the call.Dialing from the mapYou can make a call by selecting the icon of aregistered location or a POI icon from the mapscreen.pYou cannot make a call to locations or POIsthat have no phone number data.1 Scroll the map, and place the cursor onan icon on the map.Using hands-free phoningEn 83Chapter12Using hands-free phoning](https://usermanual.wiki/Pioneer/K026.User-Manual-3/User-Guide-1123207-Page-3.png)
![2 Touch .The “Detailed POI Information”screen ap-pears.3 Touch [Call] to make a call.To cancel the call after the system starts dial-ing, touch .4 Touch to end the call.Receiving a phone callYou can perform hands-free answering byusing the navigation system.Answering an incoming callThe system informs you that it is receiving acall by displaying a message and producing aring sound once.If [Auto Answer Preference] is set to [Off],answer the call manually. Answering is avail-able if any screen is displayed, such as themap screen or the setting screen.pYou can set this navigation system to auto-matically answer incoming calls.=For details, refer to Answering a callautomatically on page 86.1 When a call comes in, the answeringoperation menu appears on the screen.pThe registered name appears if the phonenumber of the received call is already regis-tered in “Contacts”.pDepending on the caller ID service, thephone number of the received call may notbe displayed. “Unknown”appears instead.2 To answer an incoming call, touch.New translation required.#Touch [Vol -]or[Vol +].You can adjust volume when you are talking.#Touch to reject an incoming call.#New translation required.New translation required.3 Touch to end the call.The call ends.pIf the voice on the other end of the call istoo quiet to hear, you can adjust the volumeof the received voice.=For more details about “Phone Vo-lume”, refer to Setting the Volume forGuidance and Phone on page 96.pYou may hear a noise when you hang upthe phone.Rejecting an incoming callYou can reject an incoming call.=For details, refer to Registering your Blue-tooth devices on page 76.%When a call comes in, touch .The call is rejected.pThe rejected call is recorded in the missedcall history list.=For details, refer to Editing the device nameon page 86.Transferring the phone bookYou can transfer the numbers in a registereduser phone’s address book into the Contacts.Using hands-free phoningEn84Chapter12](https://usermanual.wiki/Pioneer/K026.User-Manual-3/User-Guide-1123207-Page-4.png)
![pDepending on the cellular phone, “PhoneBook”may be called a name such as “Con-tacts”,“Business card”or something else.pWith some cellular phones, it may not bepossible to transfer the entire phone bookat once. In this case, transfer addressesone at a time from your phone book usingyour cellular phone.pThe maximum 1 000 entries can be trans-ferred per cellular phone. If the entries ex-ceed 1 000, the extra entries will not betransferred. If more than one number is re-gistered for one person, such as work placeand home, each number is counted sepa-rately.pEach entry can hold up to 5 phone num-bers.pDepending on the cellular phone that isconnected to this navigation system viaBluetooth technology, this navigation sys-tem may not be able to display the phonebook correctly. (Some characters may begarbled.)pIf the phone book in the cellular phone con-tains image data, the phone book may notbe correctly transferred.pThe transferred data can not be edited onthe navigation system.1 Connect the cellular phone that has thephone book to transfer.=For details, refer to Connecting a registeredBluetooth device on page 79.2 Touch [Contacts Transfer] on the“Phone Menu”screen.3 Check that the following screen is dis-played, and operate your cellular phone totransfer the phone book entries.New translation required.4 Touch [No].Transfer starts. It may take time depending onhow many entries will be transferred.5 New translation required.Transfer ends.Setting the “BluetoothSettings”To set the “Bluetooth Settings”, display the“Bluetooth Settings”screen.1 Press the HOME button to display the“Top Menu”.2 Touch [Settings].The “Settings Menu”screen appears.3 Touch [Bluetooth Settings].The “Bluetooth Settings”screen appears.Using hands-free phoningEn 85Chapter12Using hands-free phoning](https://usermanual.wiki/Pioneer/K026.User-Manual-3/User-Guide-1123207-Page-5.png)
![Editing the device nameYou can change the device name to be dis-played on your cellular phone. (Default is[PIONEER NAVI].)1 Display the “Bluetooth Settings”screen.2 Touch [Device Name].The keyboard to enter the name appears.3 Touch to delete the current name,and enter the new name by using the key-board.4 Touch [OK].The name is changed.pUp to 16 characters can be entered for a de-vice name.Editing the passwordYou can change the password to be used forauthentication on your cellular phone. (De-fault is [1111].)pFour to eight characters can be entered fora password.1 Display the “Bluetooth Settings”screen.2 Touch [Password].The “Set Password”screen appears.3 Touch any key to enter the passwordyou want to set and then touch [OK].Stopping Bluetooth wavetransmissionYou can stop transmission of electric waves byturning off the Bluetooth function. If you donot use the Bluetooth wireless technology, werecommend selecting [Off].1 Display the “Bluetooth Settings”screen.2 Touch [Bluetooth On/Off].Touching [Bluetooth On/Off] switching be-tween [On] and [Off].Echo canceling and noise reductionWhen you are operating hands-free phoningin the vehicle, you may hear an undesirableecho. This function reduces the echo andnoise while you are using hands-free phoning,and maintains a certain sound quality.1 Display the “Bluetooth Settings”screen.2 Touch [Echo Cancel].Touching [Echo Cancel] switches between[On] and [Off].Answering a call automaticallyThe navigation system automatically answersincoming calls to the cellular phone, so youcan answer a call while driving without takingyour hands off the steering wheel.1 Display the “Bluetooth Settings”screen.2 Touch [Auto Answer Preference].The “Auto Answer Preference”screen ap-pears.Using hands-free phoningEn86Chapter12](https://usermanual.wiki/Pioneer/K026.User-Manual-3/User-Guide-1123207-Page-6.png)
![3 Touch the desired option.![Off]: No automatic response. Respondmanually![Immediately]: Answers immediately![After 3 seconds]: Answers after three sec-onds![After 6 seconds]: Answers after six sec-onds![After 10 seconds]: Answers after ten sec-ondsSetting the automatic rejectionfunctionIf this function is on, the navigation systemautomatically rejects all incoming calls.1 Display the “Bluetooth Settings”screen.2 Touch [Refuse All Calls].Touching [Refuse All Calls] switches between[On] and [Off].pIf both “Refuse All Calls”and “Auto An-swer Preference”are activated, “RefuseAll Calls”is prioritized and all incomingcalls are automatically rejected.pIf “Refuse All Calls”is set to [On], rejectedincoming calls will not be stored in themissed call list.Clearing memoryYou can clear the memory of each item thatcorresponds to the connected cellular phone:phone book, dialed/received/missed call his-tory list and preset dials.1 Display the “Bluetooth Settings”screen.2 Touch [Clear Memory].The “Clear Memory”screen appears.On this screen, you can select the followingitems:!Contacts:You can clear the registered phone book.!Received Calls List:You can clear the received call history list.!Dialed Calls List:You can clear the dialed call history list.!Missed Calls List:You can clear the missed call history list.#Touch [Clear All].It clears all the data that correspond to the con-nected cellular phone.3 Touch [OK].Data on the selected item is cleared from thisnavigation system’s memory.pIf you do not want to clear memory that youhave selected, touch [No].Updating the Bluetoothwireless technology softwareUpdate files will be available for download inthe future. You will be able to download the lat-est update from an appropriate website toyour PC.pBefore you download the files and installthe update, read through the instructionson the website. Follow the instructions onthe website for steps until [Firmware Up-date] becomes active.Using hands-free phoningEn 87Chapter12Using hands-free phoning](https://usermanual.wiki/Pioneer/K026.User-Manual-3/User-Guide-1123207-Page-7.png)
![1 Insert an SD memory card into the SDcard slot.=For more details of the operation, refer to In-serting and ejecting an SD memory card onpage 29.2 Display the “Bluetooth Settings”screen.3 Touch [Firmware Update].The current version is displayed.4 Touch [Firmware Update].Update starts.Notes for hands-free phoningGeneral notes!Connection to all cellular phones featuringBluetooth wireless technology is not guar-anteed.!The line-of-sight distance between this na-vigation system and your cellular phonemust be 10 meters or less when sendingand receiving voice and data via Bluetoothtechnology. However, the actual transmis-sion distance may be shorter than the esti-mated distance, depending on the usageenvironment.!With some cellular phones, the speakers ofthe system may not produce a ring sound.!If private mode is selected on the cellularphone, hands-free phoning may be dis-abled.Registration and connection!Cellular phone operations vary dependingon the type of cellular phone. Refer to theinstruction manual that came with your cel-lular phone for detailed instructions.!With cellular phones, phone book transfermay not work even though your phone ispaired with the navigation system. In thatcase, disconnect your phone, perform pair-ing again from your phone to the naviga-tion system, and then perform the phonebook transfer.Making and receiving calls!You may hear a noise in the following situa-tions:—When you answer the phone by usingthe button on the phone.—When the person on the other end ofline hangs up the phone.!If the person on the other end of the phonecall cannot hear the conversation due to anecho, decrease the volume level for hands-free phoning. This may reduce the echo.!With some cellular phones, even if youpress the accept button on the cellularphone when a call comes in, hands-freephoning may not be performed.!The registered name appears if the phonenumber of the received call is already regis-tered in the phone book. When one phonenumber is registered under differentnames, the name that comes first alphabe-tically is displayed.!If the phone number of the received call isnot registered in the phone book, thephone number of the received call appears.The received call history and the dialednumber history!Calls made or editing performed only onyour cellular phone will not be reflected tothe dialed number history or phone book inthe navigation system.!You cannot make a call to the entry of anunknown user (no phone number) in the re-ceived call history.!If calls are made by operating your cellularphone, no history data will be recorded inthe navigation system.Using hands-free phoningEn88Chapter12](https://usermanual.wiki/Pioneer/K026.User-Manual-3/User-Guide-1123207-Page-8.png)
![The options in the “NaviSettings”menuDisplaying the “Navi Settings”screen1 Press the HOME button to display the“Top Menu”.2 Touch [Settings].The “Settings Menu”screen appears.3 Touch [Navi Settings].The “Navi Settings”menu appears.Checking the connections of leadsCheck that leads are properly connected be-tween the navigation system and the vehicle.Please also check whether they are connectedin the correct positions.1 Display the “Navi Settings”screen.2 Touch [Connection Status].The “GPS Status”screen appears.1Speed PulseThe Speed Pulse value detected by the navi-gation system is shown. [0] is shown whilethe vehicle is stationary.2GPS AerialIndicates the connection status of the GPSantenna, the reception sensitivity, and fromhow many satellites the signal is received. Ifthe signal is received correctly, [OK] is dis-played. If reception is poor, [NOK] appears.In such case, please change the installationposition of the GPS antenna.Color Signal com-municationUsed in posi-tioningOrange Yes YesYellow Yes No3Hand brakeWhen the parking brake is applied, [On]isdisplayed. When the parking brake is re-leased, [Off] is displayed.4Power VoltageThe power voltage (reference value) pro-vided from the vehicle battery to the naviga-tion system is shown. If the voltage goesout of the range from 11 V to 15 V, checkthat power cable connection is correct.5IlluminationWhen the headlights or small lamps of a ve-hicle are on, [On] is displayed. When thesmall lamps of a vehicle are off, [Off] is dis-played. (If the orange/white lead is not con-nected, [Off] appears.)6Back SignalWhen the gear lever is shifted to “R”, thesignal switches to [High]or[Low]. (One ofthese is displayed depending on the vehi-cle.)Checking sensor learningstatus and driving statuspThe navigation system can automaticallyuse its sensor memory based on the outerdimensions of the tires.1 Display the “Navi Settings”screen.2 Touch [3D Calibration Status].The “3D Calibration Status”screen appears.Customizing preferencesEn90Chapter13](https://usermanual.wiki/Pioneer/K026.User-Manual-3/User-Guide-1123207-Page-10.png)
![1DistanceDriving distance is indicated.2Speed PulseTotal number of speed pulses is indicated.3Learning StatusCurrent driving mode is indicated.4Degree of learningSensor learning situations for distance(Distance), right turn (Right Turn), left turn(Left Turn) and 3D detection (3D Detec-tion) are indicated by the length of bars.pWhen tires have been changed orchains fitted, turning on the SpeedPulse allows the system to detect thefact that the tire diameter has changed,and automatically replaces the value forcalculating distance.pIf ND-PG1 is connected, the distancecalculation value cannot be replacedautomatically.5SpeedThe speed detected by the navigation sys-tem is indicated. (This indication may bedifferent from the actual speed of your vehi-cle, so please do not use this instead of thespeedometer.)6Acceleration or deceleration/RotationalspeedAcceleration or deceleration velocity of yourvehicle is indicated. Also, rotational speedwhen your vehicle turns to left or right isshown.7InclinationDegree of slope of the street that you arecurrently running is indicated.Clearing statusYou can delete the learned results stored in[Distance], [Speed Pulse]or[Learning Sta-tus].1 Touch [Distance] or [Speed Pulse].The following message appears.2 Touch [Yes].Clears the learned results stored in [Distance]or [Speed Pulse].3 Touch [Learning Status].The following message appears.4 Touch [All].Clears all learning statuses.pTouch [All] for the following cases:—After changing the installation positionof the navigation system—After changing the installation angle ofthe navigation system—After moving the navigation system toanother vehicle#Touch [Distance].Clears the learned results stored in [Distance].pWhen the distance accuracy is low, touch[Distance].Using the “Gas Mileage”functionInputting the fuel consumptioninformation for calculating the fuel costYou can estimate the fuel cost to your destina-tion by entering the fuel consumption informa-tion in the navigation system.1 Display the “Navi Settings”screen.2 Touch [Gas Mileage].The “Gas Mileage Setting”screen appears.Customizing preferencesEn 91Chapter13Customizing preferences](https://usermanual.wiki/Pioneer/K026.User-Manual-3/User-Guide-1123207-Page-11.png)
![3 Enter the fuel consumption informa-tion.Enter the following items:![Surface Road Gas Mileage]:Enter the fuel cost when you drive on the or-dinary road.pThe entering the fuel cost depends onthe setting of [Gas Unit].—When [Gas Unit] is set to [Liter].Enter how much fuel you need to tra-vel 100 kilometers (60 miles).—When [Gas Unit] is set to [Gallon].Enter how many kilometers (miles)you get to a gallon.![Freeway Gas Mileage]:Enter the fuel cost when you drive on thefreeway.pThe entering the fuel cost depends onthe setting of [Gas Unit].—When [Gas Unit] is set to [Liter].Enter how much fuel you need to tra-vel 100 kilometers (60 miles).—When [Gas Unit] is set to [Gallon].Enter how many kilometers (miles)you get to a gallon.![Gasl Price Per Unit]:Enter the fuel unit price.![Gas Unit]:Set the fuel unit.![Currency]:Set the unit of currency.When all the items are entered, inputting thefuel consumption information is complete.Entering the fueling informationWhen you enter the fueling information to thenavigation system, and export the data to SDmemory cards, you can check the fuel con-sumption information by using the utility pro-gram “NavGate FEEDS”which is availableseparately, on your PC.pUp to 24 sets of “Gas Mileage Manage-ment”entries can be stored. You can alsoexport the data, as described below.If the entries reach the maximum number,a new entry will overwrite the oldest one.Gas Mileage Management function only as-sists you to calculate your average mileagebased on the information you input. The func-tion does not receive data directly from the ve-hicle.1 Display the “Navi Settings”screen.2 Touch [Gas Mileage].The “Gas Mileage Setting”screen appears.3 Touch [Gas Price Calculation].The “Gas Price Calculation”screen appears.4 Enter the following settings:![Distance]:Enter the distance traveled since the pre-vious fueling.Customizing preferencesEn92Chapter13](https://usermanual.wiki/Pioneer/K026.User-Manual-3/User-Guide-1123207-Page-12.png)
![pThe distance is entered automaticallyonly when the distance traveled sincethe previous fueling is recorded.![Gas Pumped]:Enter the amount of fuel pumped.![Gas unit price]:Enter the fuel unit price.When all the items are entered, the fuel con-sumption is displayed next to “Gas Mileage”.5 Touch [OK].The “Gas Price Calculation”screen appears.And then touch [OK] to display the “Gas Mile-age Setting”screen.Exporting the data of “Gas MileageManagement”Exporting the “Gas Mileage Management”data to an SD memory card is possible.pThe data stored in this navigation systemwill be cleared as exporting it to the SDmemory card.1 Insert an SD memory card into the SDcard slot.=For more details of the operation, refer to In-serting and ejecting an SD memory card onpage 29.2 Display the “Destination Menu”screen.3 Touch [Gas Mileage].The “Gas Mileage Setting”screen appears.4 Touch [Export].After a message confirming whether to exportthe data appeared, exporting the data to theSD memory card starts.The “Gas Mileage Setting”screen appearswhen it is done.Recording your travel historyActivating the track logger enables you to re-cord your driving history (called “track log”below). You can review the travel history later.pIf an SD memory card is inserted into theSD card slot, the track logs will be stored inthe SD memory card.1 Insert an SD memory card into the SDcard slot.=For more details of the operation, refer to In-serting and ejecting an SD memory card onpage 29.2 Display the “Navi Settings”screen.3 Touch [Drive Log Settings].The “Drive Log Settings”screen appears.4 Touch [Drive Log Settings].Each time you touch the key changes that set-ting.![On]:You can export your track log to the SDcard.![Off] (default):You cannot export your track log to the SDcard.#Touch [Type].Each time you touch the key changes that set-ting.Customizing preferencesEn 93Chapter13Customizing preferences](https://usermanual.wiki/Pioneer/K026.User-Manual-3/User-Guide-1123207-Page-13.png)
![![Private] (default):Set the track log attribute to “Private”.![Business]:Set the track log attribute to “Business”.![Other]:Set the track log attribute to “Other”.pIf you travel while the setting is [On], thetrack logs are kept storing in the insertedSD memory card.Using the demonstration guidanceThis is a demonstration function for retailstores. After a route is set, touching this keystarts the simulation of route guidance.1 Display the “Navi Settings”screen.2 Touch [Demo Mode].Each time you touch the key changes that set-ting.![On]:Repeat demo drive.![Off] (default):Demo Mode is set off.3 Display the map screen.The demonstration guidance will begin.Registering your homeRegistering your home position saves timeand effort. Also, routes to home positions canbe calculated easily with a single touch of thekey from the “Destination Menu”. The regis-tered home position can also be modifiedlater.1 Display the “Navi Settings”screen.2 Touch [Set Home].The “Set Home”screen appears.3 Touch [Home].The “Select Search Method”screen appears.#Touch [Phone #].When you have already registered your home,you can edit your home number.4 Search for a location.After searching for a point, display it on amap, then touch [OK].The location is registered, and then the “Ad-dress Book Edit”screen appears.pFor details, refer to Searching for and select-ing a location on page 55.5 Touch [OK].The registration is completed.Correcting the current locationTouch the screen to adjust the current positionand direction of the vehicle displayed on themap.1 Display the “Navi Settings”screen.2 Touch [Modify Current Location].3 Scroll to the position where you wantto set, then touch [OK].Options on the “SystemSettings”menuDisplaying the “SystemSettings”screen1 Press the HOME button to display the“Top Menu”.Customizing preferencesEn94Chapter13](https://usermanual.wiki/Pioneer/K026.User-Manual-3/User-Guide-1123207-Page-14.png)
![2 Touch [Settings].The “Settings Menu”screen appears.3 Display the “Settings Menu”screen.4 Touch [System Settings].The “System Settings”screen appears.Customizing the regional settings1 Display the “System Settings”screen.2 Touch [Regional Settings].The “Regional Settings”screen appears.Selecting the languageYou can set the languages used on the pro-gram and voice guidance. Each language canbe set separately.1 Display the “Regional Settings”screen.2 Touch [Program language].The language list is displayed.3 Touch the desired language.After the language is selected, the screen re-turns to the previous screen.4 Touch [Voice language].The “Voice Language Selection”screen ap-pears.5 Touch the desired language.After the language is selected, the screen re-turns to the previous screen.6 Touch [OK] on the “Regional Settings”screen.The navigation system restarts.A message confirming whether to restart thenavigation system appears.Setting the time differenceAdjusts the systems clock. Set the time differ-ence (+,–) from the time originally set in yournavigation system.1 Display the “Regional Settings”screen.2 Touch [Time].The “Time Settings”screen appears.3 To set the time difference, touch [+] or[–].The time difference between the time origin-ally set in the navigation system (Pacific Stan-dard Time) and the current location of yourvehicle is shown. If necessary, adjust the timedifference. Touching [+]or[–] changes thetime difference display in one-hour incre-ments.The time difference can be set from –4to +9hours.4 Touch [Summer Time].If necessary, set to summer time.Customizing preferencesEn 95Chapter13Customizing preferences](https://usermanual.wiki/Pioneer/K026.User-Manual-3/User-Guide-1123207-Page-15.png)
![Summer time is off by default. Touch [Sum-mer Time] to change the time if you are in thesummer time period. This turns the displaybelow summer time [On].5 Touch [Time format].Each time you touch the key changes that set-ting.![24H]:Switching the display for 24 hours.![12H]:Switching the display for 12 hours with am/pm.Changing the unit between km and milesThis setting controls the unit of distance andspeed displayed on your navigation system.1 Display the “Regional Settings”screen.2 Touch [km / mile].Each time you touch the key changes that set-ting.![km] (default):Show distance in kilometers.![mile]:Show distance in miles.![Mile&Yard]:Show distance in miles and yards.Changing the virtual speed of the vehicleWhen calculating the expected time of arrivaland the number of hours to the destination,set the average speed for the freeway or ordin-ary roads using [+] and [–].1 Display the “Regional Settings”screen.2 Touch [Speed].The “Average Speed Settings”screen ap-pears.3 Touch [+] or [–] to set the speed.pThe estimated time of arrival is not necessa-rily estimated based on this speed value.4 Touch [OK].The settings are completed.Setting the Volume forGuidance and PhoneThe sound volume for the navigation can beset. You can separately set the volume of theroute guidance and the beep sound.1 Display the “System Settings”screen.2 Touch [Volume].The “Volume Settings”screen appears.3 Touch [Beep].Each time you touch the key changes that set-ting.![On] (default):A beep sounds.![Off]:Muting the beep sound.4 Touch [+] or [–] to set their volume.On this screen, you can operate the followingitems.Customizing preferencesEn96Chapter13](https://usermanual.wiki/Pioneer/K026.User-Manual-3/User-Guide-1123207-Page-16.png)
![![Guidance]This setting controls the guidance volumeof navigation.pWhen set to , guidance is output.When set to , no guidance is output.![Phone Ringtone]This setting controls the incoming ring tonevolume.![Phone Voice]This setting controls the incoming voice vo-lume.pPhone Ringtone and Phone Voice adjust-ments are related to the cellular phone fea-turing Bluetooth technology. Noadjustment is needed when the cellularphone featuring Bluetooth technology isnot connected.pVolume of the audio source is adjusted byVOL (+/–) button of the navigation system.5 To finish the setting, touch [OK].Changing the splash screenYou can change the splash screen to the otherimages stored in the navigation system.1 Display the “System Settings”screen.2 Touch [Splash Screen].The “Select Splash Screen”screen appears.3 Touch the image to use as the splashscreen from the list.The image is displayed on the screen.4 Touch [OK].The image is set as the splash screen, and thesystem returns to the “System Settings”menu.Changing to the splash screenstored in the SD memory cardYou can change the splash screen that ap-pears when the navigation system starts. Copyyour chosen image to the SD memory card,and select the image to import.pSplash screen images should be used with-in the following formats;—BMP or JPEG files—Allowable horizontal and vertical sizeare 1944 pixels x 2592 pixels or smaller—Allowable data size is 6 MB or smallerpProper compatibility with allowable files isnot guaranteed.pImported original images will be stored inthe built-in memory, but the ability to savethese images cannot be guaranteed com-pletely. If your original image data is de-leted, insert the SD memory card againand re-import the original image.1 Create a folder named “PC”on the top-most directory of the SD memory card, andthen create a folder named “Pictures”onthe “PC”.2 Store the picture files in “Pictures”.3 Insert an SD memory card into the SDcard slot.=For more details of the operation, refer to In-serting and ejecting an SD memory card onpage 29.4 Display the “System Settings”screen.5 Touch [Splash Screen].The “Select Splash Screen”screen appears.6 Touch [Import from SD].The “Splash Screen Selection(SD)”screen ap-pears.7 Touch the image to use as the splashscreen from the list.The image is displayed on the screen.8 Touch [OK].The image is set as the splash screen, and thesystem returns to the “System Settings”menu.Customizing preferencesEn 97Chapter13Customizing preferences](https://usermanual.wiki/Pioneer/K026.User-Manual-3/User-Guide-1123207-Page-17.png)
![Setting for rear view cameraThe following two functions are available. Therear view camera feature requires a separatelysold rear view camera (e.g. ND-BC2). (For de-tails, consult your dealer.)Rear view cameraThe navigation system features a function thatautomatically switches to the full-screen rearview camera image installed on your vehicle.When the shift lever is in the REVERSE (R) po-sition, the screen automatically switches tofull-screen rear view camera.Camera for Rear view mode[Rear View] can be displayed at all times (e.g.when monitoring an attached trailer, etc.) as asplit screen where map information is partiallydisplayed. Please be aware that with this set-ting, camera image is not resized to fit, andthat a portion of what is seen by the camera isnot viewable.CAUTIONPioneer recommends the use of a camera whichoutputs mirror reversed images, otherwise thescreen image may appear reversed.pImmediately verify whether the displaychanges to a rear view camera image whenthe shift lever is moved to REVERSE (R)from another position.pWhen the screen changes to full-screenrear view camera image during normaldriving, switch to the opposite setting in[Polarity].1 Display the “System Settings”screen.2 Touch [Back Camera].The “Back Camera Settings”screen appears.3 Touch [Camera] to turn it [On].pYou can only switch to “Rear View”if thissetting is [On].4 Touch [Battery] or [GND] next to“Polarity”to select the appropriate polaritysetting.!Battery —When the polarity of the con-nected lead is positive while the shift leveris in the REVERSE (R) position!GND —When the polarity of the connectedlead is negative while the shift lever is inthe REVERSE (R) positionAdjusting the responsepositions of the touch panel(touch panel calibration)If you feel that the touch panel keys on thescreen deviate from the actual positions thatrespond to your touch, adjust the response po-sitions of the touch panel screen.pDo not use a sharp pointed tool such as aballpoint pen or a mechanical pen, whichcould damage the screen.1 Display the “System Settings”screen.2 Touch [Screen Calibration].A message confirming whether to start the ca-libration appears.3 Gently touch the center of + mark dis-played on the screen.The target indicates the order.After you touch all marks, the adjusted posi-tion data is saved.pDo not turn off the engine while saving theadjusted position data.#Press the MODE button.Returns to the previous adjustment position.#Press and hold the MODE button.Cancels the adjustment.Setting the illumination colorThe illumination color can be selected from 11different colors. Furthermore, the illuminationcolor can switched between these 11 colors inorder.Customizing preferencesEn98Chapter13](https://usermanual.wiki/Pioneer/K026.User-Manual-3/User-Guide-1123207-Page-18.png)
![To set the illumination color, display the “Illu-mination Color”screen.1 Display the “System Settings”screen.2 Touch [Illumi Color].The “Illumination Color”screen appears.Selecting the color from the presetcolors1 Display the “Illumination Color”screen.2 Touch the color you want.Available options;!Colored keys —Selects the desired presetcolor!Memory 1/Memory 2/Memory 3 —Col-ors registered in the memory=For details, refer to Creating a user-de-fined color and storing it to memory onthis page.!Scan —Shifts between the eight defaultcolors in sequence gradually.Creating a user-defined color andstoring it to memoryYou can create a user-defined color and set itas the illumination color.1 Display the “Illumination Color”screen.2 Touch [Custom].The “Illumination Color”screen appears.pIf [Scan] is set, [Custom] cannot be se-lected.3 Touch [+] or [-] to adjust the values forRed, Green and Blue to create a favoritecolor.Watch the illumination of hardware keys whileadjusting the color.Each time you touch [+]or[-] increases or de-creases the value of the selected item. +31 to+00 is displayed as the value is increased ordecreased.pAn entry cannot be stored with all of the va-lues set to “+00”.4 Touch [Memory 1], [Memory 2] or[Memory 3] to store the illumination color.5 Touch [OK] to return to the previousscreen.Checking the version information1 Display the “System Settings”screen.2 Touch [Service Information].The “Service Information Screen”screen ap-pears.3 Check the version information.Replicating the settingsYou can import settings you have made on theutility program “NavGate FEEDS”which isavailable separately to the navigation system.Customizing preferencesEn 99Chapter13Customizing preferences](https://usermanual.wiki/Pioneer/K026.User-Manual-3/User-Guide-1123207-Page-19.png)
![1 Insert an SD memory card into the SDcard slot.=For more details of the operation, refer to In-serting and ejecting an SD memory card onpage 29.2 Press the HOME button to display the“Top Menu”.3 Touch [Settings].The “Settings Menu”screen appears.4 Touch [Setting Rplctr].A message confirming whether to update thesettings appears.5 Touch [Yes].Update starts.After updating the settings is finished, a mes-sage confirming whether to restart the naviga-tion system appears.6 Touch [OK].The navigation system restarts.Turning off the screenBy turning off the backlight of the LCD screen,you can turn off the screen display withoutturning off the voice guidance.%Touch [Screen Off] on the “System Set-tings”menu.=For details, refer to Display the “SettingsMenu”screen. on page 95.The screen is turned off.pTouch anywhere on the screen to turn itback on.Customizing preferencesEn100Chapter13](https://usermanual.wiki/Pioneer/K026.User-Manual-3/User-Guide-1123207-Page-20.png)
![You can listen to the radio by using the naviga-tion system. This section describes operationsfor radio (FM).%Touch [FM] on the “AV Source”menu todisplay the “FM”screen.=For details concerning operations, refer toScreen switching overview on page 34.Reading the screen1 2 43 65879a1Source iconShows which source has been selected.2Band indicatorShows which band the radio is tuned to: FM1to FM3.3Signal level indicator4Preset number indicatorShows what preset item has been selected.5Frequency indicator6Current time7LOCAL indicatorShows when local seek tuning is on.8STEREO indicatorShows that the frequency selected is beingbroadcast in stereo.Using the touch panel keys23411Display the “Function”menu=For details, refer to Using the“Function”menu on the next page.2Select a preset channel[c]or[d] can be used to switch preset chan-nels.3Perform manual tuningTo tune manually, touch [c]or[d] briefly. Thefrequencies move up or down one step at atime.Perform seek tuningTo perform seek tuning, touch and hold [c]or[d] for about one second and release. Thetuner will scan the frequencies until a broad-cast strong enough for good reception isfound.pYou can cancel seek tuning by touchingeither [c]or[d] briefly.pIf you touch and hold [c]or[d], youcan skip broadcasting frequencies.Seek tuning will start as soon as you re-lease the keys.pYou can also perform these operationsby using TRK (c/d) button.4Select an FM bandTouch [Band] repeatedly until the desired FMband is displayed, FM1,FM2 or FM3.pThis function is convenient for preparingdifferent preset lists for each band.Using the radio (FM)En 101Chapter14Using the radio (FM)](https://usermanual.wiki/Pioneer/K026.User-Manual-3/User-Guide-1123207-Page-21.png)
![Switching between thedetailed information displayand the preset list displayYou can switch the left side of the basic screenaccording to your preference.%Touch [Preset] (or [Detail]).Each touch of [Preset] (or [Detail]) changesthe detailed information display or preset listdisplay.Storing and recalling broadcastfrequenciesWith a touch of any of the preset tuning keys([P1]to[P6]), you can easily store up to sixbroadcast frequencies for later recall (alsowith the touch of a key).Preset tuning keys1 When you find a frequency that youwant to store in memory, touch and hold apreset tuning key [P1] to [P6] until the pre-set number (e.g., P. 1) is appears.The selected radio station has been stored inmemory.pUp to 18 FM stations, 6 for each of the threeFM bands, as well as 6 AM stations can bestored in memory.2 The next time you touch the same pre-set tuning key [P1] to [P6], the radio stationfrequencies are recalled from memory.pYou can also use [c] and [d] to recall radiostations assigned to preset tuning keys [P1]to [P6].Using the “Function”menu1 Touch [FM] on the “AV Source”menu todisplay the “FM”screen.=For details concerning operations, refer toScreen switching overview on page 34.2 Touch .1 21Storing the strongest broadcast fre-quencies=For details, refer to this page.2Tuning in strong signals=For details, refer to the next page.Storing the strongest broadcastfrequencies“BSM”(best stations memory) lets you auto-matically store the six strongest broadcast fre-quencies under the preset tuning keys [P1]to[P6] and, once stored there, you can tune in tothese frequencies with the touch of a key.1 Touch [BSM].Using the radio (FM)En102Chapter14](https://usermanual.wiki/Pioneer/K026.User-Manual-3/User-Guide-1123207-Page-22.png)
![2 Touch [Start] to start “BSM”.BSM begins to flash. While BSM is flashing,the six strongest broadcast frequencies will bestored under the preset tuning keys [P1]to[P6] in order of their signal strength. Whenthis is complete, BSM stops flashing.pTo cancel the storage process, touch[Stop].pStoring broadcast frequencies with BSMmay replace broadcast frequencies youhave already saved by using [P1]to[P6].Tuning in strong signalsLocal seek tuning allows you to tune in onlythose radio stations with sufficiently strongsignals for good reception.1 Touch [Local].2 Touch [On] to turn local seek tuning on.To turn local seek tuning off, touch [Off].3 Touch [cPrev] or [Nextd] to set the sen-sitivity.There are four levels of sensitivity for FM.Level: 1—2—3—4pThe level “4”setting allows reception of onlythe strongest stations, while lower settingslet you receive weaker stations.Using the radio (FM)En 103Chapter14Using the radio (FM)](https://usermanual.wiki/Pioneer/K026.User-Manual-3/User-Guide-1123207-Page-23.png)
![You can listen to the radio using this naviga-tion system. This section describes operationsfor radio (AM).%Touch [AM] on the “AV Source”menuto display the “AM”screen.=For details concerning operations, refer toScreen switching overview on page 34.Reading the screen1 432 651Source iconShows which source has been selected.2LOCAL indicatorShows when local seek tuning is on.3Signal level indicator4Preset number indicatorShows what preset item has been selected.5Frequency indicator6Current timeUsing the touch panel keys2311Display the “Function”menu=For details, refer to Using the“Function”menu on the next page.2Select a preset channelcor dcan be used to switch presets.3Perform manual tuningTo tune manually, touch [c]or[d] briefly. Thefrequencies move up or down one step at atime.Perform seek tuningTo perform seek tuning, touch and hold [c]or[d] for about one second and release. Thetuner will scan the frequencies until a broad-cast strong enough for good reception isfound.pYou can cancel seek tuning by touchingeither [c]or[d] briefly.pIf you touch and hold [c]or[d], youcan skip broadcasting frequencies.Seek tuning will start as soon as you re-lease the keys.pYou can also perform these operationsby using TRK (c/d) button.Switching between thedetailed information displayand the preset list displayYou can switch the left side of the basic screenaccording to your preference.%Touch [Preset] (or [Detail]).Each touch of [Preset] (or [Detail]) changesthe detailed information display or preset listdisplay.Using the radio (AM)En104Chapter15](https://usermanual.wiki/Pioneer/K026.User-Manual-3/User-Guide-1123207-Page-24.png)
![Storing and recalling broadcastfrequenciesWith a touch of any of the preset tuning keys([P1]to[P6]), you can easily store up to sixbroadcast frequencies for later recall (alsowith the touch of a key).Preset tuning keys1 When you find a frequency that youwant to store in memory, touch and hold apreset tuning key [P1] to [P6] until the pre-set number (e.g., P. 1) is appears.The selected radio station has been stored inmemory.2 The next time you touch the same pre-set tuning key [P1] to [P6], the radio stationfrequencies are recalled from memory.pYou can also use [c] and [d] to recall radiostations assigned to preset tuning keys [P1]to [P6].Using the “Function”menu1 Touch [AM] on the “AV Source”menuto display the “AM”screen.=For details concerning operations, refer toScreen switching overview on page 34.2 Touch .1 21Storing the strongest broadcast fre-quencies=For details, refer to this page.2Tuning in strong signals=For details, refer to this page.Storing the strongest broadcastfrequencies“BSM”(best stations memory) lets you auto-matically store the six strongest broadcast fre-quencies under the preset tuning keys [P1]to[P6] and, once stored there, you can tune in tothese frequencies with the touch of a key.%Touch [Start] to turn BSM on.BSM begins to flash. While BSM is flashing,the six strongest broadcast frequencies will bestored under the preset tuning keys [P1]to[P6] in order of their signal strength. Whenthis is complete, BSM stops flashing.pTo cancel the storage process, touch[Stop].pStoring broadcast frequencies with BSMmay replace broadcast frequencies youhave already saved by using [P1]to[P6].Tuning in strong signalsLocal seek tuning allows you to tune in onlythose radio stations with sufficiently strongsignals for good reception.1 Touch [On] to turn local seek tuning on.To turn local seek tuning off, touch [Off].2 Touch [cPrev] or [Nextd] to set the sen-sitivity.There are two levels of sensitivity for AM.Level: 1—2pThe level “2”setting allows reception of onlythe strongest stations, while lower settingslet you receive weaker stations.Using the radio (AM)En 105Chapter15Using the radio (AM)](https://usermanual.wiki/Pioneer/K026.User-Manual-3/User-Guide-1123207-Page-25.png)
![You can listen to the radio by using the naviga-tion system. This section describes operationsfor HD Radioä.pFor details concerning operation, refer tothe HD Radio tuner’s operation manual.%Touch [Digital Radio] on the “AVSource”menu to display the “DigitalRadio”screen.=For details concerning operations, refer toScreen switching overview on page 34.Reading the screen189a4b732 651Source iconShows which source has been selected.2Band indicatorShows which band the radio is tuned to: FM1,FM2, FM3 or AM.3Preset number indicatorShows what preset item has been selected.4Multicasting indicatorShows the number of multicast channels inthe current frequency.5Frequency indicator6Current time7Detailed information=For details, refer to Switching the displayon the next page.8Signal level indicator9Blending mode indicator=For details, refer to Switching the re-ception mode on page 108.aSignal type indicatorShows the type of signal currently being re-ceived. If a digital broadcasting is received,“D”appears. Otherwise, “A”appears.bSeek type indicator=For details, refer to Switching the seekmode on page 108.Using the touch panel keys12341Display the “Function”menu=For details, refer to Using the“Function”menu on the next page.2Select a preset channel[c]or[d] can be used to switch presets chan-nels.3Perform manual tuningTo tune manually, touch [c]or[d] briefly. Thefrequencies move up or down one step at atime.Perform seek tuningTo perform seek tuning, touch and hold [c]or[d] for about one second and release. Thetuner will scan the frequencies until a broad-cast strong enough for good reception isfound.pYou can cancel seek tuning by touchingeither [c]or[d] briefly.pIf you touch and hold [c]or[d], youcan skip broadcasting frequencies.Seek tuning will start as soon as you re-lease the keys.pYou can also perform these operationsby using TRK (c/d) button.4Select a bandTouch [Band] repeatedly until the desiredband is displayed: FM1,FM2,FM3 or AM.pThis function is convenient for preparingdifferent preset lists for each band.Using the HD Radio (Digital Radio)En106Chapter16](https://usermanual.wiki/Pioneer/K026.User-Manual-3/User-Guide-1123207-Page-26.png)
![Switching between thedetailed information displayand the preset list displayYou can switch the left side of the basic screenaccording to your preference.%Touch [List] (or [Detail]).Each touch of [List] (or [Detail]) changes thedetailed information display or preset list dis-play.Storing and recalling broadcastfrequenciesWith a touch of any of the preset tuning keys([P1]to[P6]), you can easily store up to sixbroadcast frequencies for later recall (alsowith the touch of a key).Preset tuning keys1 When you find a frequency that youwant to store in memory, touch and hold apreset tuning key [P1] to [P6] until the pre-set number (e.g., P. 1) stops flashing.The selected radio station has been stored inmemory.2 The next time you touch the same pre-set tuning key [P1] to [P6], the radio stationfrequencies are recalled from memory.pYou can also use [c] and [d] to recall radiostations assigned to preset tuning keys [P1]to [P6].Switching the displayDesired information can be displayed.%Touch [Disp].Touch [Disp] repeatedly to switch between thefollowing settings:Channel name —Artist name —Song title —Program typepOnly when the tuner has been tuned in toan HD Radio broadcasting, display can bechanged.pWhen the tuner has been tuned in to an HDRadio broadcasting, default display is chan-ged into station name instead of frequency.#Touch and hold [Disp].New translation required.Using the “Function”menu1 Touch [Digital Radio] on the “AVSource”menu to display the “DigitalRadio”screen.=For details concerning operations, refer toScreen switching overview on page 34.2 Touch [Func].1Storing the strongest broadcast fre-quencies=For details, refer to the next page.2Switching the seek mode=For details, refer to the next page.3Tuning in strong signals=For details, refer to the next page.Using the HD Radio (Digital Radio)En 107Chapter16Using the HD Radio (Digital Radio)](https://usermanual.wiki/Pioneer/K026.User-Manual-3/User-Guide-1123207-Page-27.png)
![4Switching the reception mode=For details, refer to this page.Storing the strongest broadcastfrequencies“BSM”(best stations memory) lets you auto-matically store the six strongest broadcast fre-quencies under the preset tuning keys [P1]to[P6] and, once stored there, you can tune in tothese frequencies with the touch of a key.%Touch [Start] to turn BSM on.BSM begins to flash. While BSM is flashing,the six strongest broadcast frequencies will bestored under the preset tuning keys [P1]to[P6] in order of their signal strength. Whenthis is complete, BSM stops flashing.pTo cancel the storage process, touch[Stop].pStoring broadcast frequencies with BSMmay replace broadcast frequencies youhave already saved by using [P1]to[P6].Switching the seek modeYou can select the method of seek tuning.%Touch [Seek] to select the desired set-ting.![All]:Seeks stations from both analog and digitalbroadcasting.![HD]:Seeks from digital broadcasting only.pIf you select “HD”on this setting while[Blending] is set to “Analog”, the settingon [Blending] turns to “Auto”automati-cally.Tuning in strong signalsLocal seek tuning allows you to tune in onlythose radio stations with sufficiently strongsignals for good reception.1 Touch [On] to turn local seek tuning on.To turn local seek tuning off, touch [Off].2 Touch [cPrev] or [Nextd] to set the sen-sitivity.There are four levels of sensitivity for FM andtwo levels for AM:FM: 1—2—3—4AM: 1—2pThe FM “4”(AM “2”) setting allows recep-tion of only the strongest stations, whilelower settings let you receive weaker sta-tions.Switching the reception modeIf a digital broadcast reception condition getspoor, the tuner automatically switches to theanalog broadcast of the same frequency levelin default. If you want to prevent a frequentautomatic switching, switch this setting to[Analog].%Touch [Blending] to switch the recep-tion mode.![Analog]:Receives analog broadcasting only.![Auto]:Automatically switches to the analog broad-cast of the same frequency level as the digi-tal broadcast.pIf you select “Analog”on this setting while[Seek] is set to “HD”, the setting on [Seek]turns to “All”automatically.Using the HD Radio (Digital Radio)En108Chapter16](https://usermanual.wiki/Pioneer/K026.User-Manual-3/User-Guide-1123207-Page-28.png)
![You can play a normal music CD using thebuilt-in drive of the navigation system. Thissection describes how.1 Insert the disc you want to play intodisc-loading slot.Playback starts from the first track of the CD.2 Touch [DISC] on the “AV Source”menuto display the “CD”screen.=For details concerning operations, refer toScreen switching overview on page 34.3 Use the touch panel keys on the screento control the disc.Reading the screen1 2 3 5476891Source iconShows which source has been selected.2Track number indicatorShows the number of the track currently play-ing.3Playback condition indicatorThe marks shown below appears and indi-cates the current playback condition.: Scan play: Random play: Repeat playIndicator MeaningDisc RepeatAll tracks in the current discare played repeatedly. This isthe default condition.Track Repeat The current track is playedrepeatedly.Disc Random All tracks in the current discare played in random order.Disc ScanThe beginning of each trackis played for about 10 sec-onds.=For more information, refer to Using the“Function”menu on page 132.4Play time indicatorShows the elapsed playing time within thecurrent track.5Current time6Song number indicatorNew translation required.7Track title indicatorShows the title of the track currently playing(when available).8Artist name indicatorShows the artist name currently playing(when available).9Album title indicatorShows the title of the album for the currenttrack (when available).Using the touch panel keysTouch panel keys253141Display the “Function”menu=For details, refer to Using the“Function”menu on the next page.2Switch the media file type played=For details, refer to Switch the mediafile type played on page 112.3Skip the track forward or backwardTouching [p] skips to the start of the nexttrack. Touching [o] once skips to the startof the current track. Touching it again will skipto the previous track.Fast reverse or forwardPlaying audio CDsEn 109Chapter17Playing audio CDs](https://usermanual.wiki/Pioneer/K026.User-Manual-3/User-Guide-1123207-Page-29.png)
![Touch and hold [o]or[p] to fast rewindor fast forward.pFast reverse is canceled when it reachesthe beginning of the first track on thedisc.pYou can also perform these operationsby using TRK (c/d) button.4Playback and PauseTouching [f] switches between “playback”and “pause”.5Shuffle AllAll of the songs in the disc can be played atrandom by touching only one key.pTo cancel random play, switch [Ran-dom]to[Off] on the “Function”menu.Selecting a track from the listThe list lets you see the list of track titles on adisc and select one of them to play.1 Touch [List].2 Touch the track you want to play.The track currently playing is highlighted.Touching or switches the selection to thenext or previous page in the list.pThe “–” mark is displayed if there is no cor-responding information.3 To return to the previous screen, touch[Detail].Using the “Function”menu1 Touch [DISC] on the “AV Source”menuto display the “CD”screen.=For details concerning operations, refer toScreen switching overview on page 34.2 Touch .1 2 3 41Repeating playEach touch of [Repeat] changes the settingas follows:!Disc —Repeats the current disc!Track —Repeats just the current trackpIf you perform track search or fast for-ward/rewind, repeat play is automati-cally canceled.2Play tracks in a random orderTouching [Random] switches between [On]and [Off].3Scan tracks of a CDTouching [Scan] switches between [On]and [Off]. Scan play lets you hear the first10 seconds of each track on the CD. Whenyou find the track you want, touch [Scan]toturn scan play off.pAfter scanning is finished, normal play-back of the tracks will begin again.4Using advanced sound retrieverAdvanced sound retriever function automa-tically enhances compressed audio and re-stores rich sound.Each touch of [Sound Retriever] changesthe setting as follows:!Mode 1 —Activates advanced soundretriever function.!Mode 2 —Activates advanced soundretriever function.!Off —Deactivates advanced sound re-triever function.pMODE 2 is more effective thanMODE 1.Playing audio CDsEn110Chapter17](https://usermanual.wiki/Pioneer/K026.User-Manual-3/User-Guide-1123207-Page-30.png)
![You can play a disc that contains compressedaudio files using the built-in drive of the navi-gation system. This section describes theseoperations.pIn the following description, the MP3,WMA, AAC files are collectively referred toas “Compressed audio file”.1 Insert the disc you want to play intodisc-loading slot.Playback starts from the first file of the ROM.2 Touch [DISC] on the “AV Source”menuto display the “ROM”screen.=For details concerning operations, refer toScreen switching overview on page 34.3 Use this ROM screen to play the disc.=For details, refer to Using the touch panelkeys on the next page.Reading the screen1 2 3 5 64 8a97bc1Source iconShows which source has been selected.2Folder number indicatorShows the folder number currently playing.3Folder name indicatorShows the folder name currently playing.4Track indicatorShows the track number currently playing.5Playback condition indicatorThe marks shown below appears and indi-cates the current playback condition.: Scan play: Random play: Repeat playIndicator MeaningDisc RepeatAll audio files in the disc areplayed repeatedly. This is thedefault condition.Folder Repeat The current folder is playedrepeatedly.Track Repeat The current file is played re-peatedly.Disc RandomAll audio files in the currentdisc are played in randomorder.Folder RandomAll audio files in the currentfolder are played in randomorder.Disc ScanThe beginning of each audiofile is played for about 10seconds.Folder ScanThe beginning of each file inthe current folder is playedfor about 10 seconds.=For more information, refer to Using the“Function”menu on page 132.6File type indicatorShows the type of audio file currently playing.7Play time indicatorShows the elapsed playing time within thecurrent track.8Current time9Track number indicatorNew translation required.aTrack title indicatorShows the title of the track currently playing(when available).pNew translation required.bArtist name indicatorShows the artist name currently playing(when available).cAlbum title indicatorShows the title of the album for the currenttrack (when available).Playing music files on ROMEn 111Chapter18Playing music files on ROM](https://usermanual.wiki/Pioneer/K026.User-Manual-3/User-Guide-1123207-Page-31.png)
![Using the touch panel keys253141Display the “Function”menu=For details, refer to Using the“Function”menu on this page.2Switch the media file type playedWhen playing a disc containing a mixture ofvarious media file types, you can switch be-tween media files types to play.Touch [Media] repeatedly to switch betweenthe following media file types:CD (audio data (CD-DA)) —ROM (com-pressed audio file) —DivX (DivX video files)pThis touch panel key appears only whenplaying a disc containing a mixture ofvarious media file types.3Skip the track forward or backwardTouching [p] skips to the start of the nexttrack. Touching [o] once skips to the startof the current track. Touching it again will skipto the previous track.Fast reverse or forwardTouch and hold [o]or[p] to fast rewindor fast forward.pFast rewind stops when it reaches thebeginning of the first file on the repeatrange.pIn the case of compressed audio files,there is no sound on fast rewind or for-ward.pYou can also perform these operationsby using TRK (c/d) button.4Playback and PauseTouching [f] switches between “playback”and “pause”.5Shuffle AllAll of the songs in the disc can be played atrandom by touching only one key.pIf the disc contains a mixture of variousmedia file types, all tracks within thecurrent part (“CD”or “ROM”) are playedrandomly.pTo cancel random play, switch [Ran-dom]to[Off] on the “Function”menu.Selecting a track from the listThe list lets you see the list of track titles orfolder names on a disc. Touch a folder on thelist to view its contents. You can play a trackon the list by touching it.1 Touch [List].Contents of the folder in which the currentlyplaying file is located are displayed.2 Touch the folder that you want to view.The track currently playing is highlighted.Touching or switches the selection to thenext or previous page in the list.Touching displays the content of the upperfolder (parent folder). If the uppermost folderis listed, cannot be used.3 Touch the track you want to play.pTo cancel the list screen, touch [Detail].Using the “Function”menu1 Touch [DISC] on the “AV Source”menuto display the “ROM”screen.=For details concerning operations, refer toScreen switching overview on page 34.Playing music files on ROMEn112Chapter18](https://usermanual.wiki/Pioneer/K026.User-Manual-3/User-Guide-1123207-Page-32.png)
![2 Touch .1 2 3 41Repeating playEach touch of [Repeat] changes the settingas follows:!Disc —Repeats all compressed audiofiles!Track —Repeats just the current track!Folder —Repeats the current folderpIf you select another folder during repeatplay, the repeat play range changes to[Disc].pIf you perform fast forward/rewind dur-ing [Track], the repeat play rangechanges to [Folder].pWhen [Folder] is selected, it is not pos-sible to play back a subfolder of thatfolder.pWhen playing discs with compressedaudio files and audio data (CD-DA), re-peat play is performed within the cur-rently playing data session even if [Disc]is selected.2Play tracks in a random orderTouching [Random] switches between [On]and [Off]. When using ROM, the tracks inthe current repeat play range are randomlyplayed.pIf you turn [Random]to[On] when therepeat play range is set to [Track], the re-peat play range changes to [Folder]automatically.3Scan folders and tracksScan play lets you hear the first 10 secondsof each track. Scan play is performed in thecurrent repeat play range.Touching [Scan] switches between [On]and [Off]. When you find the track youwant, touch [Scan] to turn scan play off.pAfter completion of track or folder scan-ning, normal playback of the tracks willbegin again.pIf you turn [Scan]to[On] when the re-peat play range is set to [Track], the re-peat play range changes to [Folder]automatically.pIf you turn [Scan]to[On] while the re-peat play range is set to [Disc], scanplay is performed for only the first tracksof each folder.4Using advanced sound retrieverAdvanced sound retriever function automa-tically enhances compressed audio and re-stores rich sound.Each touch of [Sound Retriever] changesthe setting as follows:!Mode 1 —Activates advanced soundretriever function.!Mode 2 —Activates advanced soundretriever function.!Off —Deactivates advanced sound re-triever function.pMODE 2 is more effective thanMODE 1.Playing music files on ROMEn 113Chapter18Playing music files on ROM](https://usermanual.wiki/Pioneer/K026.User-Manual-3/User-Guide-1123207-Page-33.png)
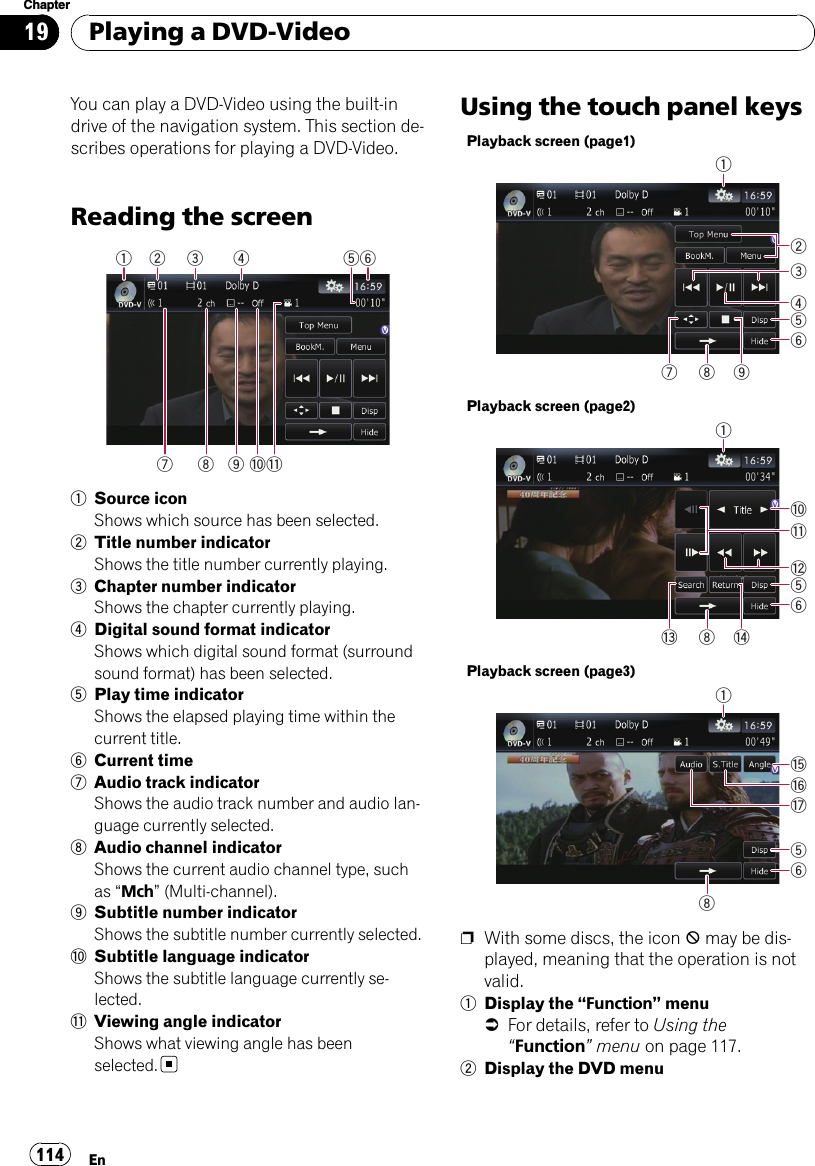
![You can display the menu by touching [Menu]or [Top Menu] while a disc is playing. Touch-ing either of these keys again lets you startplayback from the location selected from themenu. For details, refer to the instructions pro-vided with the disc.3Skip forward or backwardTouching [p] skips to the start of the nextchapter. Touching [o] once skips to thestart of the current chapter. Touching it againwill skip to the previous chapter.pYou can also perform these operationsby using the TRK (c/d) button.4Playback and PauseTouching [f] switches between “playback”and “pause”.5Switch the displayTouching [Disp] changes the indication on theinformation plate as follows:Disc information display —Repeat range andL/R select display6Hide the touch panel keysTouching [Hide] hides the touch panel keys.Touch anywhere on the LCD screen to displaythe touch panel keys again.7Display the DVD menu keypad=For details, refer to Using DVD menu bytouch panel keys on the next page.8Switch next page of touch panel keys9Stop playbackaSkip the title forward or backwardTouching [d] skips to the start of the next title.Touching [c] skips to the start of the previoustitle.bFrame-by-frame playback (or slow-motionplayback)=For details, refer to Frame-by-frame play-back on page 117.=For details, refer to Slow motion playbackon page 117.cFast reverse or forwardTouch [m]or[n] to perform fast reverse orforward.If you touch and hold [m]or[n] for fiveseconds, fast reverse/fast forward continueseven if you release either of these keys. To re-sume playback at a desired point, touch[f], [m]or[n] opposite to key pushedfor five seconds.dSearching for a desired scene and startingplayback from a specified timepFor details, refer to Searching for a speci-fic scene and starting playback from aspecified time on the next page.ePerform an operation (such as resuming)that is stored on the discWhen using a DVD that has a point recordedthat indicates where to return to, the DVD re-turns to the specified point and begins play-back from that point.fChange the viewing angle (Multi-angle)Each touch of [Angle] switches between view-ing angles.pDuring playback of a scene shot frommultiple angles, the angle icon isdisplayed. Turn the angle icon displayon or off using the “DVD/DivX® Setup”menu.=For details, refer to Setting the angle icondisplay on page 126.gChange the subtitle (Multi-subtitle)Each touch of [S.Title] switches between thesubtitle languages.hChange audio language and audio sys-tems (Multi-audio)Each touch of [Audio] switches betweenaudio languages and audio systems.pDTS audio cannot be output, so selectan audio setting other than DTS.pDisplay indications such as MPEG-Aand Mch indicate the audio system re-corded on the DVD. Depending on thesetting, playback may not use the sameaudio system as that indicated.Resuming playback (Bookmark)The Bookmark function lets you resume play-back from a selected scene the next time thedisc is loaded.Playing a DVD-VideoEn 115Chapter19Playing a DVD-Video](https://usermanual.wiki/Pioneer/K026.User-Manual-3/User-Guide-1123207-Page-35.png)
![%Touching [BookM.]:You can bookmark one point for each of up tofive discs. If you try to memorize another pointfor the same disc, the oldest bookmark will beoverwritten by the newest one.pTo clear the bookmark on a disc, touch andhold [BookM.].Searching for a specific sceneand starting playback from aspecified timeYou can search for the scene you want by spe-cifying a title or a chapter, and the time.pChapter search and time search are notpossible when disc playback has beenstopped.1 Touch [Search] and then touch [Title](title), [Chapter] (chapter), [Time] (time).2 Touch the keys to input the target num-ber or time and then touch [Enter].For titles, chapters!To select 3, touch [3] and [Enter] in order.!To select 10, touch [1] and [0] and [Enter]inorder.For time (time search)!To select 5 minutes 03 seconds, touch [5],[min], [0], [3] and [Enter] in order.!To select 71 minutes 00 seconds, touch [7],[1], [min], [0], [0] and [Enter] in order.!To select 100 minutes 05 seconds, touch[1], [0], [0], [5], [s] and [Enter] in order.pTo cancel an input number, touch [Clear].To cancel the input numbers, touch andhold [Clear].Direct number searchYou can use this function when you need toenter a numerical command during DVD play-back.1 Touch [10Key].2 Touch [0] to [9] to input the desirednumber.3 While the input number is displayed,touch [Enter].Operating the DVD menuYou can operate the DVD menu by touchingthe menu item on the screen directly.pThis function can be used when thekey is displayed on the lower right corner ofthe LCD screen.pThis function may not work properly withsome DVD disc content. In that case, usetouch panel keys to operate the DVD menu.pNew translation required.1 Touch the screen to display the touchpanel keys.2 Touch [Top Menu] or [Menu] to displaytouch panel keys to operate the DVDmenu.3 Touch the desired menu item.#Touch .New translation required.Using DVD menu by touchpanel keysIf items on the DVD menu appear, the touchpanel keys may overlay them. If so, select anitem using those touch panel keys.Playing a DVD-VideoEn116Chapter19](https://usermanual.wiki/Pioneer/K026.User-Manual-3/User-Guide-1123207-Page-36.png)
![1 Touch [a], [b], [c]or[d] to select thedesired menu item.pIf the touch panel keys for DVD menu selec-tion disappear, touching anywhere on thescreen, then touching displays themagain.2 Touch [Enter].Playback starts from the selected menu item.The way to display the menu differs dependingon the disc.#Touch [Position].Each touch of [Position] changes the display po-sition of touch panel keys.#Touch [Hide].New translation required.Frame-by-frame playbackThis lets you move ahead one frame at a timeduring playback.%Touch [r] during playback.Each time you touch [r], you move aheadone frame.To return to normal playback, touch [f].pWith some discs, images may be unclearduring frame-by-frame playback.Slow motion playbackThis lets you slow down playback speed.1 Touch and hold [r] until is dis-played during playback.The icon is displayed, and forward slowmotion playback begins.pTo return to normal playback, touch [f].2 Touch [q]or[r] to adjust playbackspeed during slow motion playback.Each time you touch [q]or[r] it changesthe speed in four steps in the following order:1/16 f1/8 f1/4 f1/2pThere is no sound during slow motion play-back.pWith some discs, images may be unclearduring slow motion playback.pReversed slow motion playback is not possi-ble.Using the “Function”menu1 Touch [DISC] on the “AV Source”menuto display the “DVD-V”screen.=For details concerning operations, refer toScreen switching overview on page 34.2 Touch the screen to display the touchpanel keys.3 Touch .1 2 31Repeating playEach touch of [Repeat] changes the settingas follows:!Disc —Plays throughout the currentdisc!Title —Repeats just the current title!Chapter —Repeats just the currentchapterpIf you perform chapter (title) search, fastforward/rewind or slow motion playback,the repeat play range changes to [Disc].pThis function is not available when discplayback has been stopped.Playing a DVD-VideoEn 117Chapter19Playing a DVD-Video](https://usermanual.wiki/Pioneer/K026.User-Manual-3/User-Guide-1123207-Page-37.png)
![2Selecting audio outputWhen playing DVDs recorded with LPCMaudio, you can switch the audio output.Touch [L/R Select] repeatedly until the de-sired audio output appears in the display.Each touch of [L/R Select] changes the set-tings as follows:!L+R —Left and right!L—Left!R—Right!Mix —Mixing left and rightpThis function is not available when discplayback has been stopped.3DVD setup adjustments=For details, refer to Displaying DVD/DivX® Setup menu on page 126.Playing a DVD-VideoEn118Chapter19](https://usermanual.wiki/Pioneer/K026.User-Manual-3/User-Guide-1123207-Page-38.png)
![You can play a DVD-VR (DVD Video RecordingFormat) disc using the built-in drive of the na-vigation system. This section describes opera-tions for DVD-VR discs.Reading the screen1 2 43 65879a1Source iconShows which source has been selected.2Title number indicatorShows the title number currently playing.3Chapter number indicatorShows the chapter currently playing.4Digital sound format indicatorShows which digital sound format (surroundsound format) has been selected.5Play time indicatorShows the elapsed playing time within thecurrent title.6Current time7Audio track indicatorShows the audio track number currently se-lected.8Audio channel indicatorShows the current audio channel type, suchas “Mch”(Multi-channel).9Play mode indicatorShows the current play mode.=For details, refer to Switch the play-back mode on page 121.aMixing condition indicatorShows the current mixing condition.Using the touch panel keysPlayback screen (page1)3678941a52Playback screen (page2)c67g9d1febpWith some discs, the icon 9may be dis-played, meaning that the operation is notvalid.1Display the “Function”menu=For details, refer to Using the“Function”menu on page 122.2cCM Back/CM Skip d=For details, refer to Using the short-time skip function on page 121.3Switch the playback mode=For details, refer to Switch the play-back mode on page 121.4Skip forward or backwardTouching [p] skips to the start of the nextchapter. Touching [o] once skips to thestart of the current chapter. Touching it againwill skip to the previous chapter.pYou can also perform these operationsby using the TRK (c/d) button.5Playback and PausePlaying a DVD-VR discEn 119Chapter20Playing a DVD-VR disc](https://usermanual.wiki/Pioneer/K026.User-Manual-3/User-Guide-1123207-Page-39.png)
![Touching [f] switches between “playback”and “pause”.6Switch the displayTouching [Disp] changes the information asfollows:Disc information display —Repeat range dis-play7Hide the touch panel keysTouching [Hide] hides the touch panel keys.Touch anywhere on the LCD screen to displaythe touch panel keys again.8Display the title listDisplays the title list recorded on the disc.9Switch next page of touch panel keysaStop playbackbChange audio tracks (Multi-audio)Each touch of [Audio] switches betweenaudio tracks.pDisplay indications such as MPEG-Aand Mch indicate the audio system re-corded on the DVD. Depending on thesetting, playback may not use the sameaudio system as that indicated.cSkip the title forward or backwardTouching [d] skips to the start of the next title.Touching [c] skips to the start of the previoustitle.dChange the subtitle (Multi-subtitle)Each touch of [S.Title] switches between thesubtitle languages.eFast reverse or forwardTouch [m]or[n] to perform fast reverse orforward.If you touch and hold [m]or[n] for fiveseconds, fast reverse/fast forward continueseven if you release either of these keys. To re-sume playback at a desired point, touch[f], [m]or[n] opposite to key pushedfor five seconds.fFrame-by-frame playback (or slow-motionplayback)=For details, refer to Frame-by-frame play-back on the next page.=For details, refer to Slow motion playbackon the next page.gSearching for a desired scene and startingplayback from a specified time=For details, refer to Searching for a speci-fic scene and starting playback from aspecified time on this page.Searching for a specific sceneand starting playback from aspecified timeYou can search for the scene you want by spe-cifying a title or a chapter, and the time.pChapter search and time search are notpossible when disc playback has beenstopped.1 Touch [Search] and then touch [Title](title), [Chapter] (chapter), [Time] (time).2 Touch the keys to input the target num-ber or time and then touch [Enter].For titles, chapters!To select 3, touch [3] and [Enter] in order.!To select 10, touch [1] and [0] and [Enter]inorder.For time (time search)!To select 5 minutes 03 seconds, touch [5],[min], [0], [3] and [Enter] in order.!To select 71 minutes 00 seconds, touch [7],[1], [min], [0], [0] and [Enter] in order.!To select 100 minutes 05 seconds, touch[1], [0], [0], [5], [s] and [Enter] in order.pTo cancel an input number, touch [Clear].To cancel the input numbers, touch andhold [Clear].Playing a DVD-VR discEn120Chapter20](https://usermanual.wiki/Pioneer/K026.User-Manual-3/User-Guide-1123207-Page-40.png)