Pioneer K026 Multi- Media AVN Navigation Server System with BT User Manual 1
Pioneer Corporation Multi- Media AVN Navigation Server System with BT 1
Pioneer >
Contents
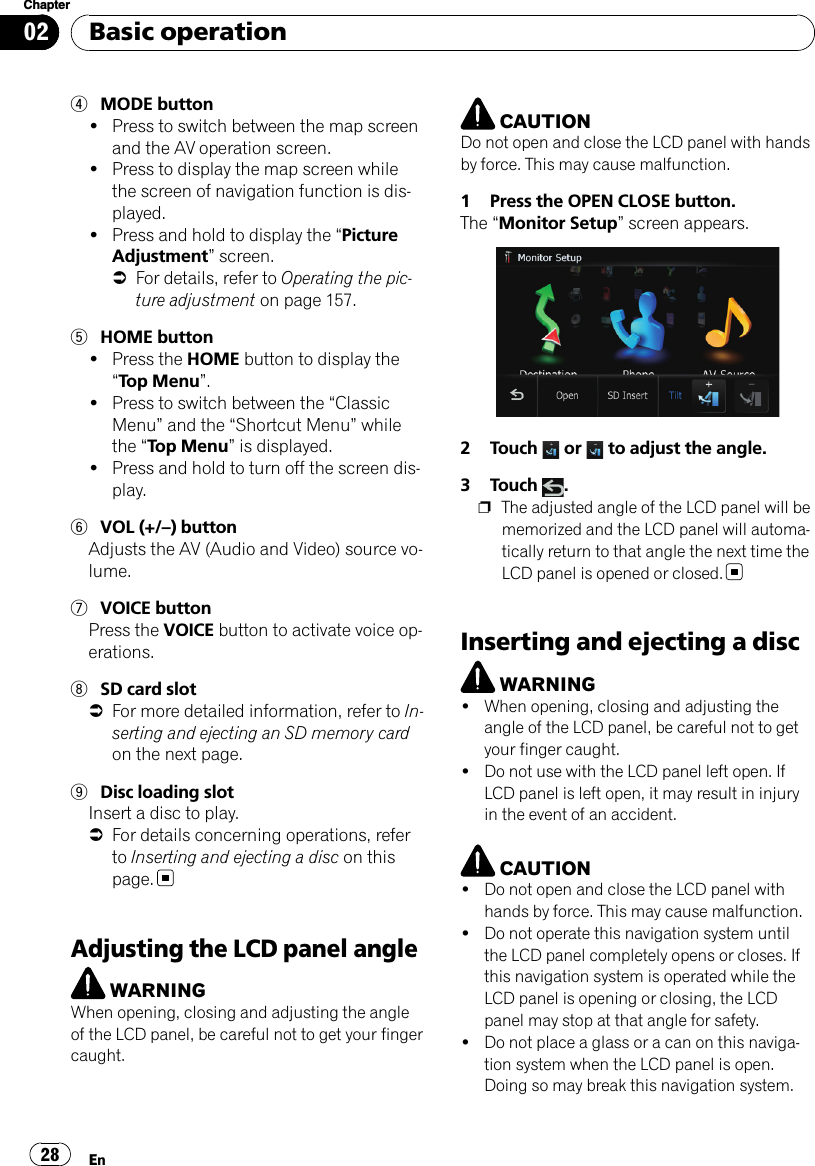
- 1. User Manual 1
- 2. User Manual 2
- 3. User Manual 3
- 4. User Manual 4
- 5. User Manual 5
User Manual 1


![After-sales service for Pioneer productsPlease contact the dealer or distributor fromwhich you purchased the product for after-sales service (including warranty conditions)or any other information. In case the necessaryinformation is not available, please contact thecompanies listed below.Please do not ship your product to the compa-nies at the addresses listed below for repairwithout making advance contact.!U.S.APioneer Electronics (USA) Inc.CUSTOMER SUPPORT DIVISIONP.O. Box 1760 Long Beach, CA 90801-1760800-421-1404!CANADAPioneer Electronics of Canada, Inc.CUSTOMER SATISFACTION DEPARTMENT300 Allstate Parkway Markham, OntarioL3R 0P21-877-283-5901905-479-4411For warranty information, please see the Lim-ited Warranty sheet included with your pro-duct.Visit Our Web siteVisit us at the following site:http://www.pioneerelectronics.comIn Canadahttp://www.pioneerelectronics.ca1 Register your product. We will keep the detailsof your purchase on file to help you refer tothis information in the event of an insuranceclaim such as loss or theft.2 Receive updates on the latest products andtechnologies.3 Download owner’s manuals, order productcatalogues, research new products, andmuch more.4 Receive notices of software upgrades andsoftware updates.Manual overviewHow to use this manualFinding the operation procedure forwhat you want to doWhen you have decided what you want to do,you can find the page you need from the“Contents”.Finding the operation procedure froma menu nameIf you want to check the meaning of an itemdisplayed on the screen, you will find the ne-cessary page from the “Display information”atthe end of the manual.GlossaryUse the glossary to find the meanings ofterms.TerminologyBefore moving on, take a few minutes to readthe following information about the conven-tions used in this manual. Familiarity withthese conventions will help you greatly as youlearn how to use your new equipment.!Buttons on your navigation system are de-scribed in ALL CAPITAL,BOLD lettering:e.g.)MENU button, MAP button.!Items in different menus, screen titles, andfunctional components are described inbold with double quotation marks “”:e.g.)“Destination Menu”screen or “AVSource”screen!Touch panel keys that are available on thescreen are described in bold in brackets [ ]:e.g.)[Destination], [Settings].!Extra information, alternatives and othernotes are presented in the following for-mat:e.g.)pIf the home location has not been storedyet, set the location first.IntroductionEn24Chapter01](https://usermanual.wiki/Pioneer/K026.User-Manual-1/User-Guide-1123205-Page-24.png)

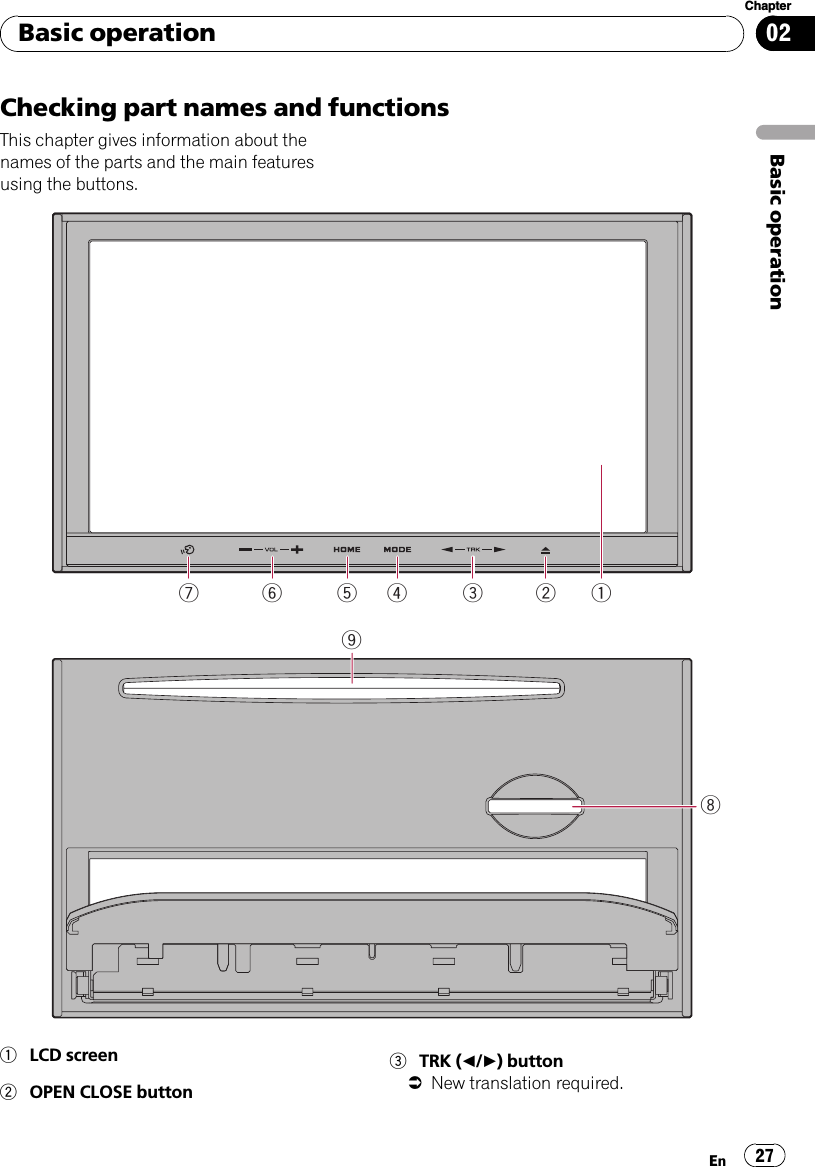
![Inserting a disc1 Press the OPEN CLOSE button.The “Monitor Setup”screen appears.2 Touch [Open].The LCD panel opens, and the disc loadingslot appears.3 Insert a disc into the disc loading slot.pDo not insert anything other than a discinto the disc loading slot.4 Press the OPEN CLOSE button.The LCD panel closes.Ejecting a disc1 Press the OPEN CLOSE button.The “Monitor Setup”screen appears.2 Touch [Disc Eject].The LCD panel opens, and the disc is ejected.3 Press the OPEN CLOSE button.The LCD panel closes.Inserting and ejecting anSD memory cardCAUTION!To prevent data loss and damage to the sto-rage device, never remove it from this naviga-tion system while data is being transferred.!If data loss or corruption occurs on the sto-rage device for any reason, it is usually notpossible to recover the data. Pioneer acceptsno liability for damages, costs or expensesarising from data loss or corruption.pThis system is not compatible with MultiMedia Card (MMC).pCompatibility with all SD memory cards isnot guaranteed.pThis unit may not achieve optimum perfor-mance with some SD memory cards.Inserting an SD memory card1 Press the OPEN CLOSE button.The “Monitor Setup”screen appears.2 Touch [SD Insert].The LCD panel opens, and the SD card slot ap-pears.3 Insert an SD memory card into the SDcard slot.Insert it with the contact surface facing to theleft and press the card until it clicks and com-pletely locks.Basic operationEn 29Chapter02Basic operation](https://usermanual.wiki/Pioneer/K026.User-Manual-1/User-Guide-1123205-Page-29.png)
![4 Press the OPEN CLOSE button.The LCD panel closes, and then the navigationsystem restarts.Ejecting an SD memory card1 Press the OPEN CLOSE button.The “Monitor Setup”screen appears.2 Touch [SD Eject].The following message appears.3 Touch [Yes].The navigation system restarts, and then theLCD panel opens.4 Press the SD memory card until it clicks.5 Pull out the SD memory card.6 Press the OPEN CLOSE button.The LCD panel closes, and then the navigationsystem restarts.Plugging and unplugging aUSB storage deviceCAUTION!To prevent data loss and damage to the sto-rage device, never remove it from this naviga-tion system while data is being transferred.!If data loss or corruption occurs on the sto-rage device for any reason, it is usually notpossible to recover the data. Pioneer acceptsno liability for damages, costs or expensesarising from data loss or corruption.Plugging in a USB storage device%Plug a USB storage device into the USBconnector.USB connectorUSB storage devicepCompatibility with all USB storage device isnot guaranteed.This navigation system may not achieve op-timum performance with some USB sto-rage devices.pConnection via USB hub is not possible.Basic operationEn30Chapter02](https://usermanual.wiki/Pioneer/K026.User-Manual-1/User-Guide-1123205-Page-30.png)
![2 Touch the language that you want touse on the screen.3 Touch the language that you want touse for the voice guidance.The navigation system will now restart.4 Read the disclaimer carefully, checkingits details, and then touch [OK] if youagree to the conditions.Regular startup%Start the engine to boot up the system.After a short pause, the navigation splashscreen comes on for a few seconds.pThe screen shown will differ depending onthe previous conditions.pWhen there is no route, the disclaimer ap-pears after the navigation system reboots.Read the disclaimer carefully, checking itsdetails, and then touch [OK] if you agree tothe conditions.pIf the anti-theft function is activated, youmust enter your password. After unlockingthe navigation system, the “Top Menu”ap-pears. If you enter the navigation screenfirst, the disclaimer screen will appear.Read the disclaimer carefully, checking itsdetails, and then touch [OK] if you agree tothe conditions.Basic operationEn32Chapter02](https://usermanual.wiki/Pioneer/K026.User-Manual-1/User-Guide-1123205-Page-32.png)
![Selecting the ShortcutpUp to 15 menu items can be registered inshortcuts.1 Press the HOME button repeatedly todisplay the “Shortcut Menu”screen.2 Touch [Shortcut].The Short-Cut Selection screen appears.Scroll bar3 New translation required.4 Touch [Navigation], [Phone], or [Audio/Video], and then touch and hold the iconthat you want to set to shortcut.5 Move the icon to the left side of thescreen, and then release it.New translation required.Canceling the Shortcut1 Touch and hold the icon that you wantto cancel the shortcut.2 Move the icon to the right side of thescreen, and then release it.Displaying the rear viewcamera imageRear view image is displayed on the left-handside of the screen, while the map of your sur-roundings is indicated on the right.=For details, refer to Setting for rear viewcamera on page 98.1 Press the HOME button to display the“Top Menu”.2 Touch [Settings].The “Settings Menu”screen appears.3 Touch [System Settings].The “System Settings”screen appears.4 Touch [Back Camera].The “Back Camera Settings”screen appears.5 Touch [On] next to “Camera”to acti-vate the camera setting.How to use the navigation menu screensEn36Chapter03](https://usermanual.wiki/Pioneer/K026.User-Manual-1/User-Guide-1123205-Page-36.png)
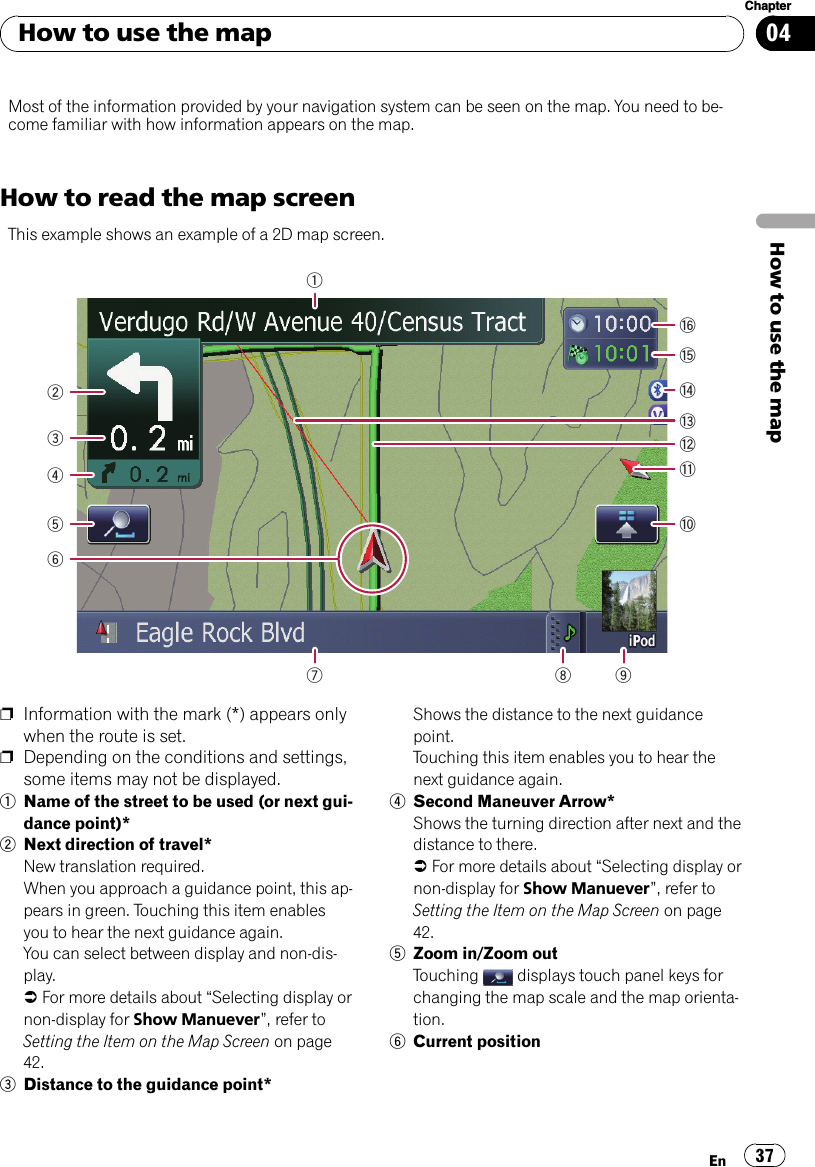
![Indicates the current location of your vehicle.The apex of the triangular mark indicates yourorientation and the display moves automati-cally as you drive.pThe apex of the triangular mark is theproper current position.7Street name (or city name) that your vehi-cle is traveling along=For details, refer to Setting the currentstreet name display on page 43.8Extension tab for the AV information barTouching this tab opens the AV informationbar and enables you to briefly view the currentstatus on the AV source. Touching it again re-tracts the bar.9Shortcut to the AV operation screenThe AV Source currently selected is shown.Touching the indicator displays the AV opera-tion screen of the current source directly.pIf you connect your iPod to this naviga-tion system, the artwork for the albumthat is playing appears.aQuick Access iconDisplays Quick Access menu.bMap orientation indicator!When “North up”is selected, is dis-played.!When “Heading up”is selected, isdisplayed.—The red arrow indicates north.cCurrent route*The route currently set is highlighted in brightcolor on the map. If a waypoint is set on theroute, the route after the next waypoint ishighlighted in another color.dDirection line*The direction towards your destination (nextwaypoint, or cursor) is indicated with astraight line.eBluetooth Connected iconThis icon shows whether the device featuringBluetooth technology is connected or not. Youcan select between display and non-display.=For more details about “Selecting dis-play or non-display for the BluetoothConnected icon”, refer to Setting theItem on the Map Screen on page 42.fMulti-Info windowEach touch of [Multi-Info window] changesthe display information.!Distance to the destination (or dis-tance to waypoint)*!Estimated time of arrival at your des-tination or waypoint*The estimated time of arrival is an idealvalue calculated based on the value setfor [Speed] and the actual drivingspeed. The estimated time of arrival isonly a reference value, and does notguarantee arrival at that time.!Travel time to your destination orwaypoint*gCurrent timeMeaning of guidance flags: DestinationThe checkered flag indicates yourdestination.: WaypointThe blue flags indicate your way-points.: Guidance pointThe next guidance point (next turn-ing point, etc.) is shown by a yel-low flag.Displaying the AV information barYou can check the current status on the se-lected AV source.%TouchAV information bar appears.#Touch the AV information bar.The AV information bar is retracted.How to use the mapEn38Chapter04](https://usermanual.wiki/Pioneer/K026.User-Manual-1/User-Guide-1123205-Page-38.png)
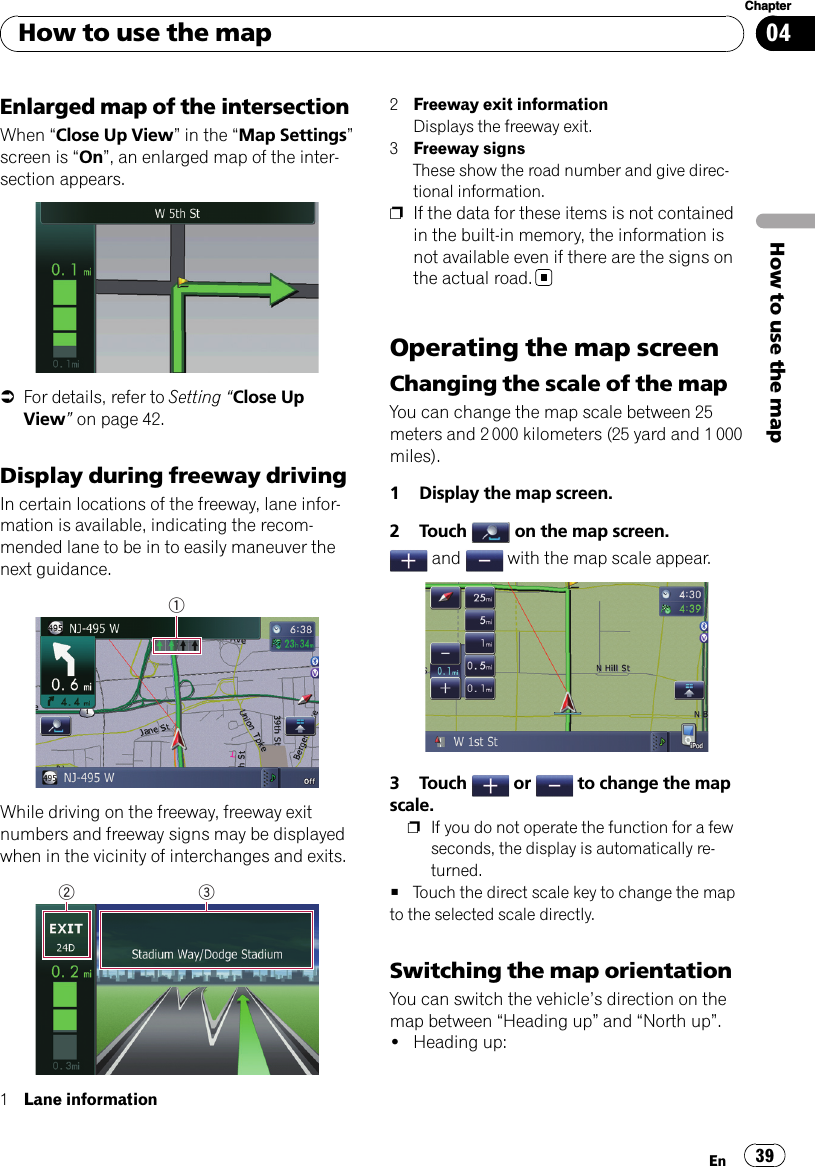
![The map display always shows the vehicle’sdirection as proceeding toward the top ofthe screen.!North up:The map display always has north at thetop of the screen.pThe map orientation is fixed at “North up”in the following situation.—When the map scale is 50 kilometers (25miles) or more.pThe map orientation is fixed at “Headingup”in the following situation.—When the 3D map screen is displayed.1 Display the map screen.2 Touch on the map screen.or appears.3 or appears.Each time you touch the key changes that set-ting.pIf you do not operate the function for a fewseconds, the display is automatically re-turned.Scrolling the mapNew translation required.1 Display the map screen.2 Touch and drag the map in the desireddirection to scroll.211Cursor2Distance from the current positionPositioning the cursor to the desired locationresults in a brief informational overview aboutthe location being displayed at the bottom ofscreen, with street name and other informa-tion for this location being shown. (The infor-mation shown varies depending on theposition.)pThe scrolling increment depends on yourdragging length.#Touch .The map returns to the current position.pPressing MODE button returns the map tothe current position.Quick Access“Quick Access”allow you to perform varioustasks, such as route calculation for the loca-tion indicated by the scroll cursor or register-ing a location in [Address Book], faster thanusing the navigation menu.You can customize “Quick Access”displayedon screen. The shortcuts described here areprepared as the default setting.=For more details about “Changing a short-cut”, refer to Selecting “Quick Access”on page47pItems marked with an asterisk (*) cannotbe removed from Shortcut menu.How to use the mapEn40Chapter04](https://usermanual.wiki/Pioneer/K026.User-Manual-1/User-Guide-1123205-Page-40.png)