Pioneer K026 Multi- Media AVN Navigation Server System with BT User Manual 5
Pioneer Corporation Multi- Media AVN Navigation Server System with BT 5
Pioneer >
Contents
- 1. User Manual 1
- 2. User Manual 2
- 3. User Manual 3
- 4. User Manual 4
- 5. User Manual 5
User Manual 5
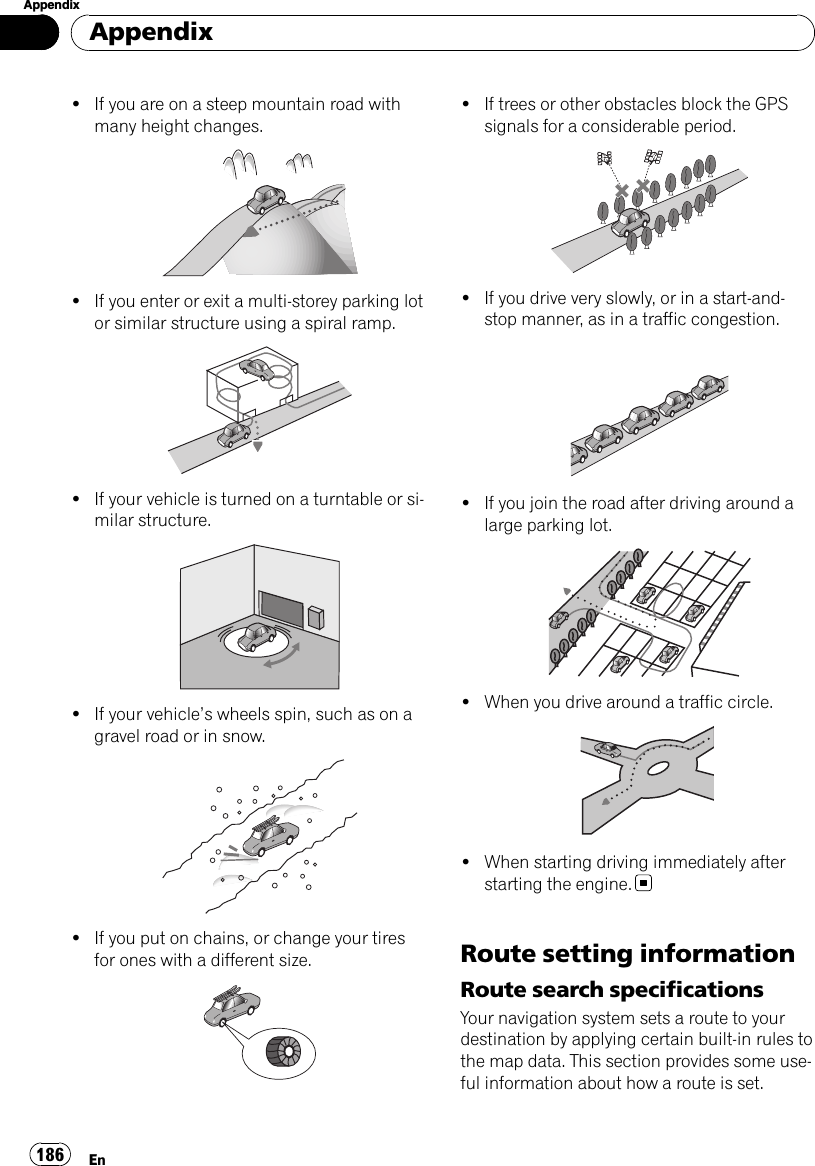
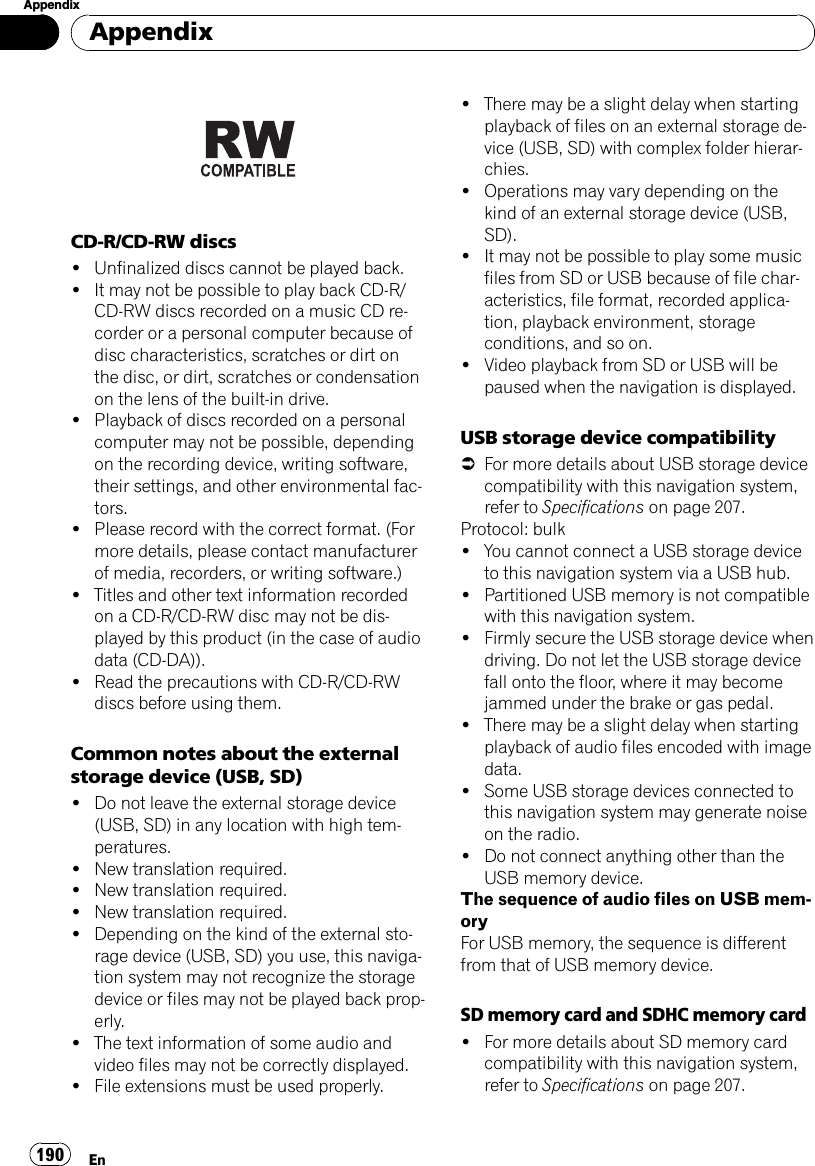
![Narrowing down a video with the list1 Touch the category you want.2 Touching or switches the selectionto the next or previous page in the list.3 Touch the item that you want to refine.Refine the item until the track title is displayedon the list.4 On the video list, touch the video youwant to play.pAfter you select the video using this func-tion, touching [Menu] displays the list pre-viously selected.Searching for applicable itemsalphabeticallyUsing the search control displays the pagewhich includes the first applicable option.pThis function is available for the alphabeti-cal list only.Search control1 Touch the category you want.2 Touch the item that you want to refine.3 Touch [c]or[d] to select the character.pAn article listed below and space at the be-ginning of the artist name will be ignoredand the next character will be taken into ac-count for searching.—“A”or “a”—“AN”,“An”,or“an”—“THE”,“The”,or“the”4 Touch the character key to display thepage which includes applicable options.5 On the video list, touch the video youwant to play.Using the “Function”menu1 Touch [iPod] on the “AV Source”menuto display the control screen for “iPod”.=For details concerning operations, refer toScreen switching overview on page 34.2 Touch .15623 41Setting repeat playThere are two repeat play types for play-back.Each touch of [Repeat] changes the settingas follows:!One —Repeats just the current track!All —Repeats all tracks in the selectedlist2Setting the shuffle play for musicThis function shuffles songs or albums andplays them in random order.Each touch of [Shuffle] changes the settingas follows:!Off —Does not shuffle.!Shuffle Songs —Plays back songs inrandom order within the selected listUsing an iPod (iPod)En140Chapter25](https://usermanual.wiki/Pioneer/K026.User-Manual-5/User-Guide-1123209-Page-1.png)
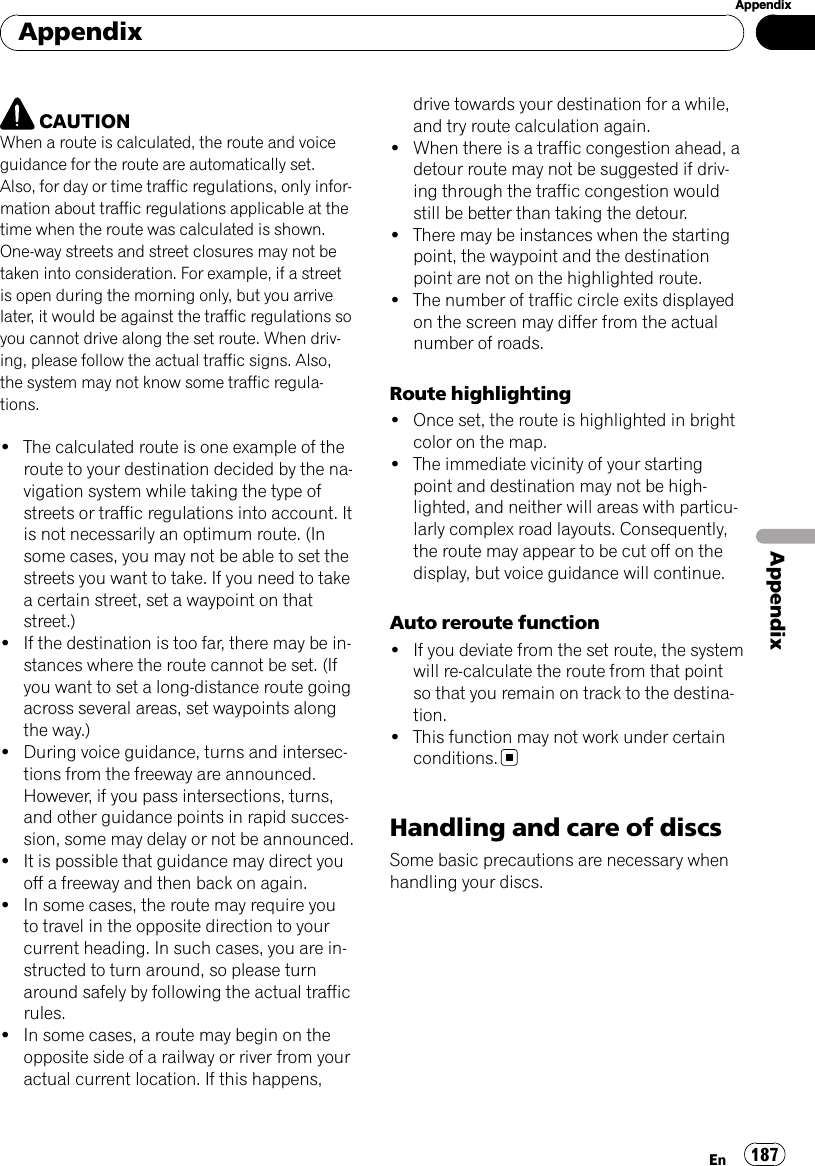
![!Shuffle Albums —Selects an albumrandomly, and then plays back all songsin that album in order3Setting the audiobook play speedWhile listening to an audiobook on iPod,playback speed can be changed.Each touch of [Audio Book] changes thesetting as follows:!Normal —Playback in normal speed!Slower —Playback slower than normalspeed!Faster —Playback faster than normalspeed4Playback video in wide screen modeIf the video is compatible with wide screenformat, set [Widescreen]to[On] in order toview the video image in the wide screen.Each touch of [Widescreen] changes thesetting as follows:!On —Outputs the wide-screen videofrom iPod!Off —Outputs the normal-sized videofrom iPodpDisplay size is changed after youchange “Widescreen”setting and selectthe video to play.pThis setting is available only during thevideo operation.5Setting iPod control modeWhile the control mode is set to iPod, youcan operate iPod function from the con-nected iPod.Each touch of [Change Control Mode]changes the setting as follows:!Navi —This navigation system’siPodfunction can be operated from this navi-gation system.!iPod —This navigation system’siPodfunction can be operated from the con-nected iPod.6Playing songs related to the currently play-ing songSongs related to the currently playing songare played. You can play songs of the follow-ing lists.!Artist list of currently playing genre!Album list of currently playing artist!Song list of currently playing albumpDepending on the number of files in theiPod, there may be a delay when display-ing a list.!Link Artist —Songs related to the cur-rently playing artist will be played.!Link Album —Songs related to the cur-rently playing album will be played.!Link Genre —Songs related to the cur-rently playing genre will be played.Using an iPod (iPod)En 141Chapter25Using an iPod (iPod)](https://usermanual.wiki/Pioneer/K026.User-Manual-5/User-Guide-1123209-Page-2.png)
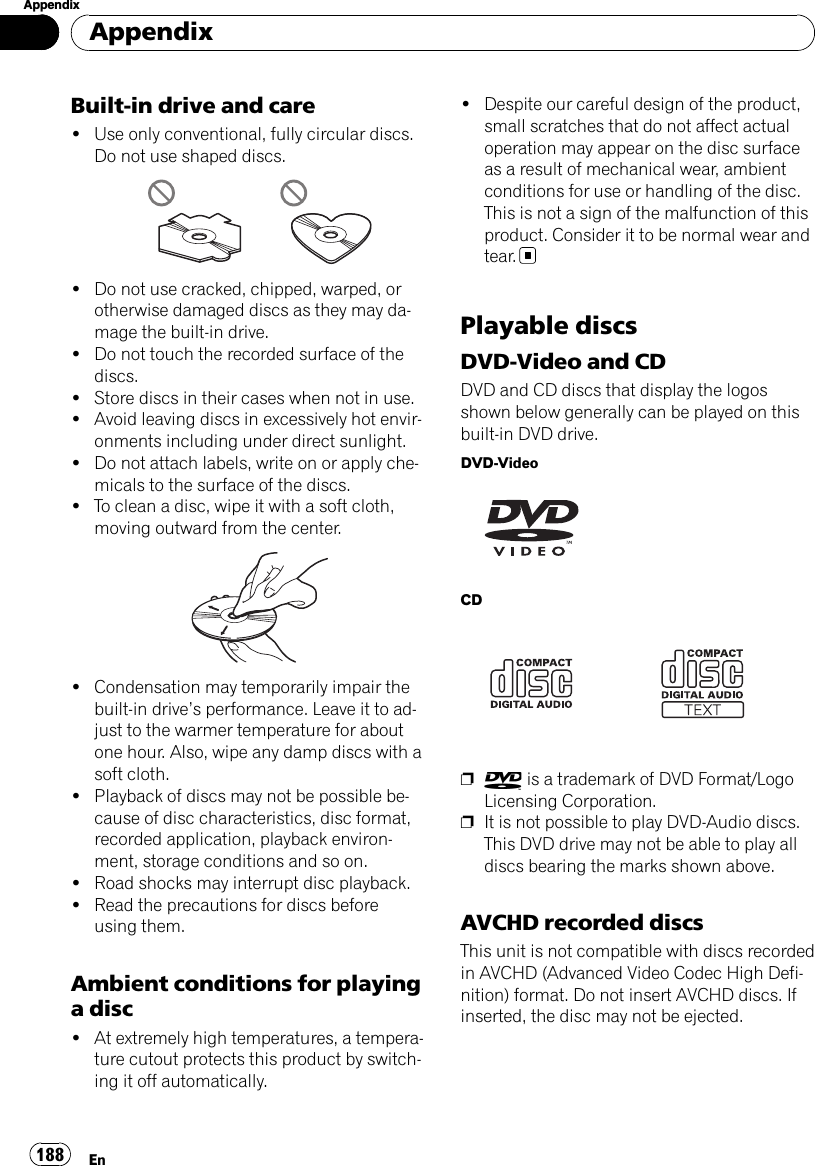
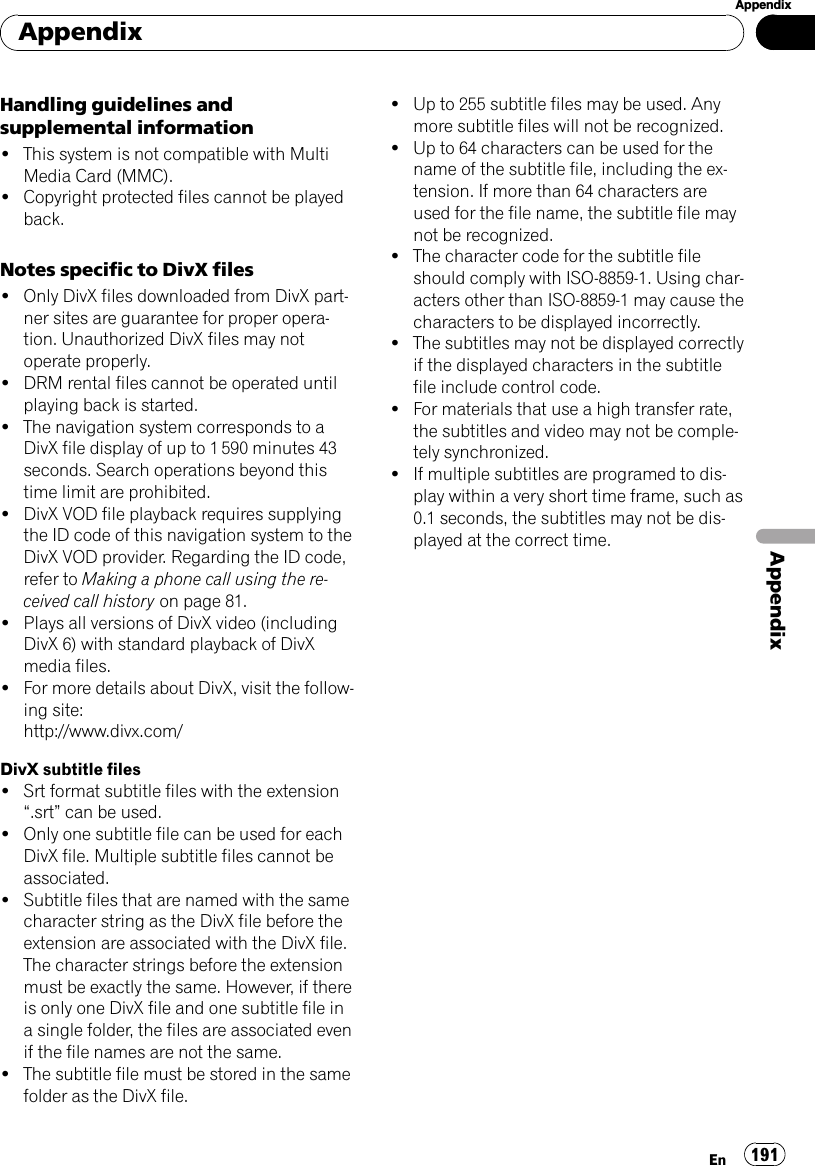
![You can control the Bluetooth audio playerfeaturing Bluetooth wireless technology.pBefore using the Bluetooth audio player,you need to register and connect the deviceto this navigation system.=For more details of the operation, referto Registering and connecting the Blue-tooth device on page 76.pDepending on the Bluetooth audio playerconnected to this navigation system, theavailable operations with this navigationsystem are limited to the following two le-vels:—A2DP profile (Advanced Audio Distribu-tion Profile): Only playing back songs onyour audio player is possible.—AVRCP profile (Audio/Video RemoteControl Profile): Playing back, pausing,selecting songs, etc., are possible.pSince there are a number of Bluetoothaudio players available on the market, op-erations with your Bluetooth audio playerusing this navigation system vary greatly inrange. Please refer to the instruction man-ual that came with your Bluetooth audioplayer as well as this manual while operat-ing your player on this navigation system.pWhile you are listening to songs on yourBluetooth audio player, please refrain fromoperating your cellular phone as much aspossible. If you try operating on your cellu-lar phone, the signal from your cellularphone may cause a noise on the song play-back.pEven if you switch to another source whilelistening to a song on your Bluetooth audioplayer, the playback of song continues toelapse.pDepending on the Bluetooth audio playeryou connected to this navigation system,operations on this navigation system tocontrol the player may differ from those ex-plained in this manual.%Touch [Bluetooth Audio] on the “AVSource”menu to display the“Bluetooth Audio”screen.=For details concerning operations, refer toScreen switching overview on page 34.Reading the screen1Source iconShows which source has been selected.2Track number indicator3Play time indicatorShows the elapsed playing time within thecurrent track.4Device name5Bluetooth connection status indicator6File number indicatorShows the file number currently playing.7Track title indicator*Shows the title of the track currently playing(when available).8Artist name indicator*Shows the artist name currently playing(when available).9Album title indicator*Shows the title of the album for the currenttrack (when available).aPlayback condition indicatorThe marks shown below appears and indi-cates the current playback condition.: Random play: Repeat playIndicator MeaningMedia Repeat All audio files in the currentBluetooth audio player areplayed repeatedly. This is thedefault condition.ALL REPEATRAMDOMUsing the Bluetooth audio playerEn142Chapter26](https://usermanual.wiki/Pioneer/K026.User-Manual-5/User-Guide-1123209-Page-3.png)
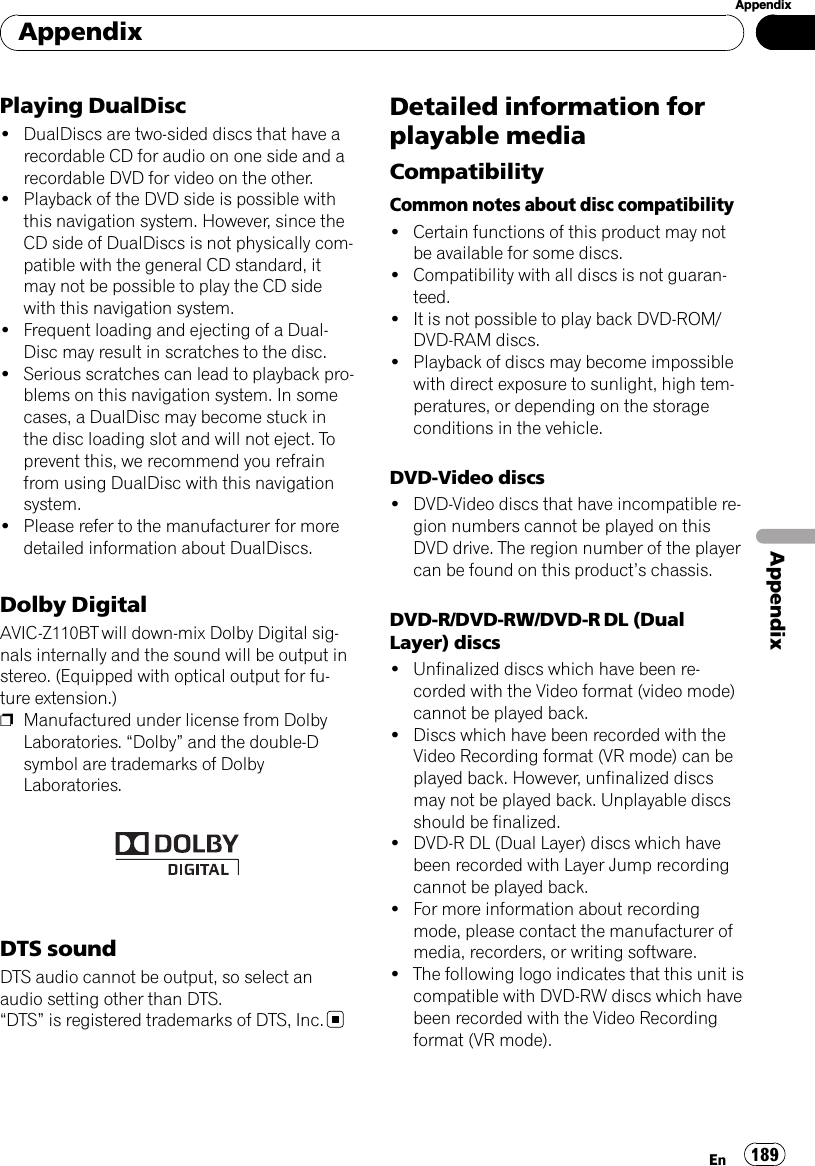
![Track RepeatThe current file is played re-peatedly.Track RepeatRandomMedia RandomAll audio files in the currentBluetooth audio player areplayed in random order.=For more information, refer to Using the“Function”menu on page 132.Using the touch panel keys3211Display the “Function”menu=For details, refer to Using the“Function”menu on page 132.2Connect the Bluetooth audio playerTouching [Connection] connects the Blue-tooth audio player manually.Using the “Function”menu1 Touch [Bluetooth Audio] on the “AVSource”menu to display the“Bluetooth Audio”screen.=For details concerning operations, refer toScreen switching overview on page 34.2 Touch .121Repeating playEach touch of [Repeat] changes the settingas follows:!All Repeat —Repeats all compressedaudio files in the Bluetooth audio player!Track Repeat —Repeats just the cur-rent track!Off —Does not repeat.pIf you skip the file forward or backwardwhen the repeat play range in “Track Re-peat”, the repeat play range changes to“All Repeat”.2Play tracks in a random orderRandom play lets you playback tracks inrandom order within the current repeatrange.Touching [Random] switches between “On”and “Off”.Using the Bluetooth audio playerEn 143Chapter26Using the Bluetooth audio player](https://usermanual.wiki/Pioneer/K026.User-Manual-5/User-Guide-1123209-Page-4.png)
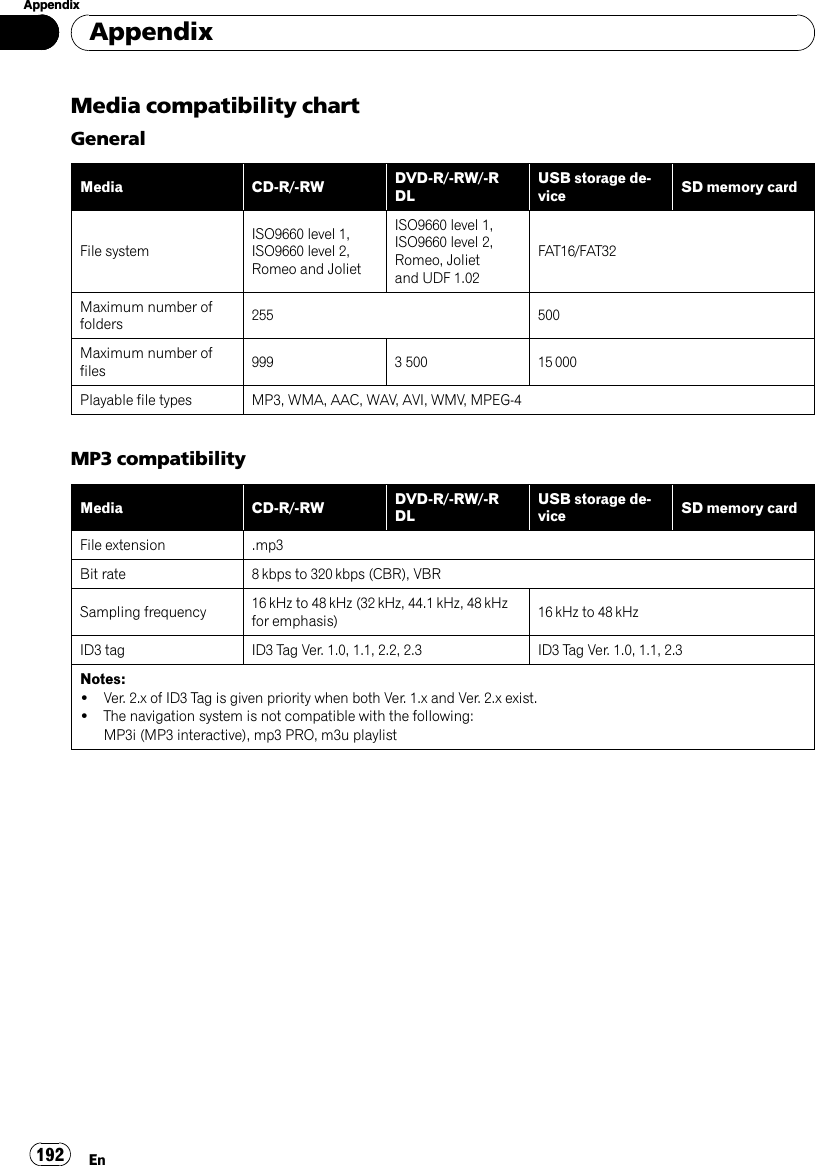
![You can use the navigation system to controlan XM satellite digital tuner, which is sold se-parately.For details concerning operation, refer to theXM tuner’s operation manuals. This sectionprovides information on XM operations withthe navigation system which differs from thatdescribed in the XM tuner’s operation man-ual.The following XM satellite digital tuner unitscannot be connected:GEX-P900XM, GEX-P910XMReading the screenALL CH MODECATEGORY MODEAbout the logo for channel nameOnly the logo data that is contained in the na-vigation system can be displayed for eachchannel. The logo of a newly established chan-nel that is not contained cannot be displayed.When no logo may be displayed, the followingsubstitute icon is displayed.Substitute iconpThe icon of each broadcast station is con-tained in the hard disk drive based on thedata provided by XM Satellite Radio as ofDecember 2008.pAny changes made by XM Satellite Radioin the lineup or icon of the broadcast sta-tion in the future may not be supported bythe navigation system, and may cause theunit to display incorrect icons.1Source iconShows which source has been selected.2XM band indicatorShows the XM band that has been selected.3Preset number indicatorShows what preset item has been selected.4XM channel number indicatorShows the XM channel number the tuner iscurrently tuned to.5Current time6XM channel categoryShows the category of broadcast channel.7XM channel select mode indicatorShows what channel select mode has beenselected. You can select a channel from allchannels in ALL CH MODE, and select achannel from selected category inCATEGORY MODE.8XM station name logopThe message “ON THE AIR”disappearsif the navigation system cannot receiveXM tuner reception for some reason.9XM station name indicatorShows the XM broadcast station name thetuner is currently tuned in.aDetail informationShows the detailed information of the broad-cast channel currently being received.Using the touch panel keys%Touch [XM] on the “AV Source”menuto display the “XM”screen.=For details concerning operations, refer toScreen switching overview on page 34.Using the XM tunerEn144Chapter27](https://usermanual.wiki/Pioneer/K026.User-Manual-5/User-Guide-1123209-Page-5.png)
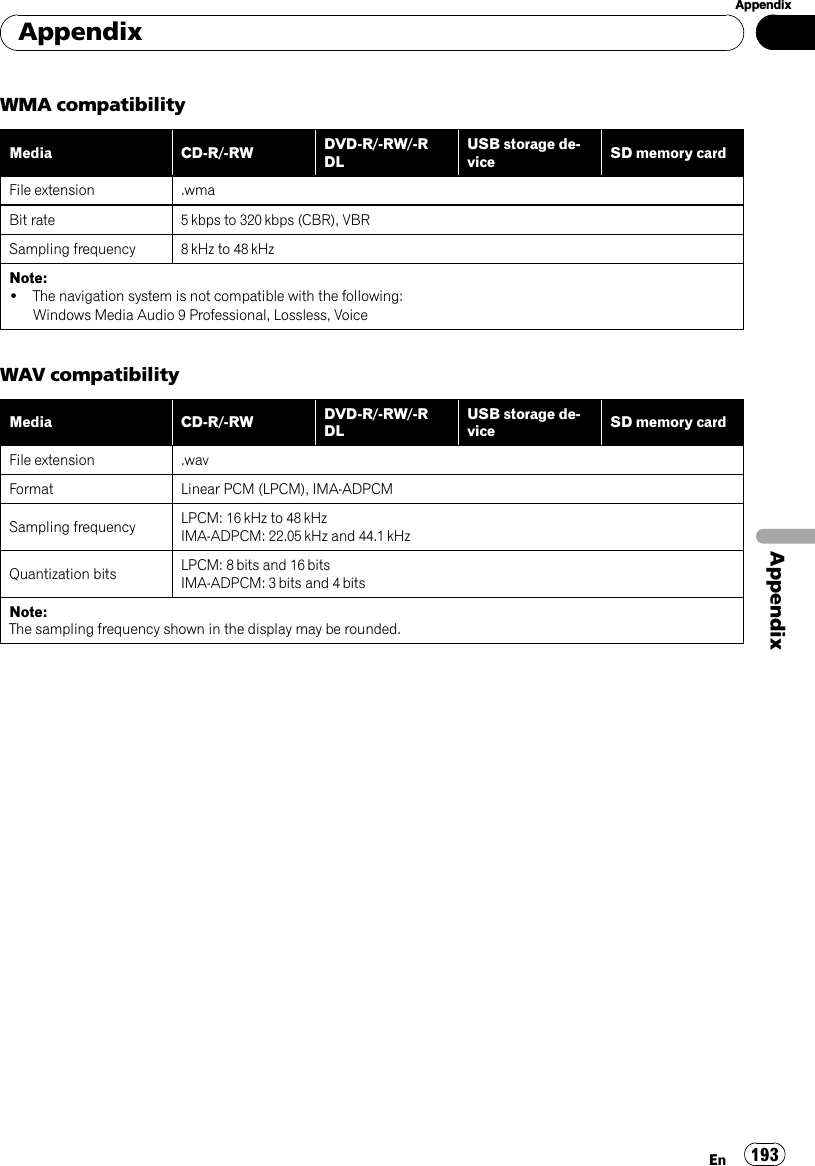
![ALL CH MODECATEGORY MODE1Memorize the current song=For details, refer to Memorizing the songon the next page.2Display the “Function”menu=For details, refer to Using the “Function”menu on page 147.3Recalling channels from the presetTouch to recall the preset channel.4Perform manual tuningThe channels move up or down one at atime.pIf you keep touching [c]or[d] you canskip the broadcasting channels.5Select an XM bandTouch [Band] repeatedly until the desiredXM band is displayed: XM 1,XM 2 orXM 3. This is useful for switching the presetitem.6Preset key for receiving the trafficaudio service=For details, refer to Using the direct trafficannouncement function on page 147.7Switching the XM channel select modeYou can switch the mode between the twomethods for selecting and listing the chan-nel.ALL CH MODE :You can select a channel from all channelswhen you operate this function.CATEGORY MODE:You can select a channel within a selectedcategory that you operate this function.8Selecting an XM channel directly=For details, refer to Selecting an XM chan-nel directly on this page.9Switching to the list displayYou can select the desired channel from thelist display.=For details, refer to Selecting a channelfrom the list on the next page.aSwitching the channel categoryTouch [c]or[d] to select the desired cate-gory.Selecting an XM channel directlyYou can select an XM channel directly by en-tering the desired channel number.1 Touch [Direct].2 Touch [0] to [9] to input the desiredchannel number.To cancel the input numbers, touch [Clear].3 While the input number is displayed,touch [Enter].The XM channel that was entered is selected.4 Touch .You return to the previous display.Displaying the Radio IDIf you select CH: 000, the Radio ID is dis-played.1 Touch [Direct].2 Input [000] and then touch [Enter].If you select another channel, display of theRadio ID is canceled.Using the XM tunerEn 145Chapter27Using the XM tuner](https://usermanual.wiki/Pioneer/K026.User-Manual-5/User-Guide-1123209-Page-6.png)
![Storing and recalling broadcaststationsWith a touch of any of the preset tuning keys([P1]to[P6]), you can easily store up to sixbroadcast channels for later recall (also withthe touch of a key).1 Select the channel that you want tostore in memory.2 Touch [Preset] to display the preset list.3 Keep touching a preset tuning key [P1]to [P6].The selected station has been stored in mem-ory.The next time you touch the same preset tun-ing key [P1]to[P6] the station is recalled frommemory.pUp to 18 stations, 6 for each of three XMbands can be stored in memory.pYou can also touch [c]or[d] to recall sta-tions assigned to preset tuning keys [P1]to[P6] in the detailed information display dur-ing the “ALL CH MODE”.Selecting a channel from the listThe list content can be switched so you cansearch for the track you want to listen to notonly by the channel name but also by the artistname or song title.pThe channel list shows all channels duringALL CH MODE, and the channels includedin the selected category duringCATEGORY MODE. To switch the channelmode, touch [Mode].1 Touch [List].XM channel list appears in the display.Each touch of [List] changes the screen as fol-lows:Detail information display or Preset listdisplay —CH name list (Channel name) —Song title list (Song title) —Artist name list(Artist name)2 Touch the desired channel that youwant to listen to.Touch or to switch to the next page or pre-vious page.pDuring CATEGORY MODE, touch [c]or[d] to switch to another category.pWhen the list switching operation is startedfrom the detailed information display, thepreset list appears in the end of the list se-lection.Using “My Mix”function“My Mix”function memorizes the song titleand artist name of the song currently being re-ceived. When the song that matches the mem-orized song title and artist name is beingbroadcast on a station other than the one youare listening to, you will be alerted, and youcan switch the station to listen to that song.pA track itself is NOT downloaded. ONLY thesong title and the artist name are memor-ized.Memorizing the songThe song title and artist name of the song youare listening to can be memorized to “My Mix”.%Touch [Memo].The song title and artist name of current songyou are listening to are memorized, and a con-firmation message appears.pThe song title and artist name of up to 12songs can be memorized. Trying to savemore than 12 songs will result in older onesbeing overwritten.Using the XM tunerEn146Chapter27](https://usermanual.wiki/Pioneer/K026.User-Manual-5/User-Guide-1123209-Page-7.png)
![pYou cannot memorize the song title or theartist name when “––––––––”is dis-played on the title information.pThis function is invalid for the channel“000”.pThe memorized title may not be displayedcorrectly depending on the conditions.pYou can customize the setting for the mem-orized songs later.=For more details concerning the opera-tion, refer to Setting the memorizedsongs on the next page.When the memorized song is broadcastA beep sounds, and a message is displayed.Touch [Yes] to switch to that station and listento that track.pIf the memorized song is not checked orwhen [Off] is selected on [Alert]on“MEMO Edit”screen, no alert will be pro-vided.=Refer to Setting the memorized songson the next page.pNotification may not be provided depend-ing on the status of the Navigation System.pIf there is even a slight difference betweenthe memorized title and the title of thesong being broadcast, no notification willbe provided even though they are the samesong.Using the direct trafficannouncement functionYou can listen to the memorized “Instant Traf-fic & Weather”channel by directly calling it upwith [TRAFFIC]. (Only one station can bememorized.)Memorizing an “Instant Traffic &Weather”channel1 Tune into “Instant Traffic & Weather”channel.2 Touch and hold [TRAFFIC] for two sec-onds or more.That “Instant Traffic & Weather”channel willbe memorized.pEven if you use the SiriusConnect universaltuner together, only one station can bememorized. The station memorized after-ward will overwrite the existing one.Tuning in to the memorized channel%Touch [TRAFFIC].pYou can also perform this operation bytouching [TRAFFIC] on the “AV Source”menu.pYou can even call up a “Instant Traffic &Weather”channel from a source other thanthe XM source.pTo cancel the announcement, touch [TRFCOff] on the screen.Using the “Function”menu1 Touch [XM] on the “AV Source”menuto display the “XM”screen.=For details concerning operations, refer toScreen switching overview on page 34.2 Touch [Func].1Setting the memorized songsUsing the XM tunerEn 147Chapter27Using the XM tuner](https://usermanual.wiki/Pioneer/K026.User-Manual-5/User-Guide-1123209-Page-8.png)
![Setting the memorized songsSelecting the songs to alertThe list of song titles memorized for the MyMixFunction (MyMix list) is displayed. You canchange the notification setting when the songis broadcast again. You can enable or disablenotification for each song.1 Touch [Memo Edit].2 Touch the song title that you want toexclude from the notification list.The check mark is removed, and the song titleis excluded from the notification list.Changing the alert settingYou can enable or disable alerts for all items atthe same time. This function is useful whenyou want to turn alerts off temporarily withoutchanging each memorized song.1 Touch [Memo Edit].2 Touch [Alert On] or [Alert Off].Touch to toggle the selection.Deleting the memorized songsYou can delete each one of the memorizedsongs from the song title list.1 Touch [Memo Edit].2 Touch and hold the song you want todelete.pTo delete all songs that are memorized,touch [Delete All].3 Touch [Yes].Using the XM tunerEn148Chapter27](https://usermanual.wiki/Pioneer/K026.User-Manual-5/User-Guide-1123209-Page-9.png)
![You can use the navigation system to control aPioneer Sirius satellite digital tuner, which issold separately.For details concerning operation, refer to theSIRIUS tuner’s operation manuals. This sec-tion provides information on SIRIUS opera-tions with navigation system which differsfrom that described in the SIRIUS tuner’s op-eration manual.pWhen you use the SiriusConnect universaltuner (sold separately) with this navigationsystem, Pioneer SIRIUS BUS INTERFACE isrequired. For details concerning operation,refer to the owner’s manual of Pioneer SIR-IUS BUS INTERFACE and SiriusConnectuniversal tuner.Reading the screenAll Ch ModeCategory Mode1Source iconShows which source has been selected.2SIRIUS band indicatorShows the SIRIUS band that has been se-lected.3Preset number indicatorShows what preset item has been selected.4SIRIUS channel number indicatorShows the SIRIUS channel number that thetuner is tuned to.5SIRIUS channel select mode indicatorShows what channel select mode has beenselected. You can select a channel from allchannels in All Ch Mode, and select a chan-nel from the selected category inCategory Mode.=For details, refer to Switch the SIRIUSchannel select mode on the next page.6SIRIUS station name logopThe message “ON THE AIR”disappearsif the navigation system cannot receiveSIRIUS tuner reception for some reason.7Variable information areaShows various information about the broad-cast channel currently being received.=For more details about the displayed in-formation, refer to Switch the SIRIUSdisplay on the next page.Using the touch panel keys%Touch [SIRIUS] on the “AV Source”menu to display the “SIRIUS”screen.=For details concerning operations, refer toScreen switching overview on page 34.All Ch ModeCategory Mode1Memorize the current songUsing the SIRIUS tunerEn 149Chapter28Using the SIRIUS tuner](https://usermanual.wiki/Pioneer/K026.User-Manual-5/User-Guide-1123209-Page-10.png)
![=For details, refer to Memorizing the songon the next page.2Switch the SIRIUS Instant replay mode=For details, refer to Using the “InstantReplay”function on page 152.3Recall equalizer curves=For details, refer to Recalling equalizercurves on page 164.4Display the “Function”menu=For details, refer to Using the “Function”menu on page 152.5Recalling channels from the presetTouch to recall the preset channel.Storing broadcast stationsYou can register the channel currentlybeing broadcast to the preset list.6Perform manual tuningThe channels move up or down one at atime.pIf you keep touching [c]or[d] you canskip the broadcasting channels.7Select a SIRIUS bandTouch [Band] repeatedly until the desiredSIRIUS band is displayed, SIRIUS 1,SIRIUS 2,orSIRIUS 3. This is useful forswitching the preset.8Display the map screen9Preset key for receiving the trafficaudio service=For details, refer to Using the direct trafficannouncement function on the nextpage.aSwitch the SIRIUS channel selectmodeYou can switch the mode between the twomethods for selecting and listing the chan-nel.All Ch Mode:You can select a channel from all channelswhen you operate this function.Category Mode:You can select a channel within a selectedcategory that you operate this function.bSelect a SIRIUS channel directly=For details, refer to Selecting a SIRIUSchannel directly on this page.cSwitch the SIRIUS displayEach touch of [Disp] changes the displayinformation.Channel number —Channel name —Channel category —Artist name/feature —Song/program title —ComposerdSwitch the channel categoryTouch [c]or[d] to select the desired cate-gory.Selecting a SIRIUS channel directlyYou can select a SIRIUS channel directly byentering the desired channel number.1 Touch [Direct].2 Touch [0] to [9] to input the desiredchannel number.To cancel the input numbers, touch [Clear].3 While the input number is displayed,touch [Enter].The SIRIUS channel that was entered se-lected.4 Touch .You return to the previous display.Display the Radio IDIf you select CH: 000, the Radio ID is dis-played.1 Touch [Direct].2 Input [000] and then touch [Enter].If you select another channel, display of theRadio ID is canceled.Storing and recalling broadcaststationsWith a touch of any of the preset tuning keys[P1]to[P6], you can easily store up to sixbroadcast stations for later recall (also withthe touch of a key).1 Select the channel that you want tostore in memory.2 Touch [Preset] to display the preset list.Using the SIRIUS tunerEn150Chapter28](https://usermanual.wiki/Pioneer/K026.User-Manual-5/User-Guide-1123209-Page-11.png)
![3 Keep touching a preset tuning key [P1]to [P6].The selected station has been stored in mem-ory.The next time you touch the same preset tun-ing key [P1]to[P6] the station is recalled frommemory.pUp to 18 stations, 6 for each of three SIRIUSbands can be stored in memory.pYou can also touch [c]or[d] to recall sta-tions assigned to preset tuning keys [P1]to[P6] in the detailed information display dur-ing “All Ch Mode”.Using “My Mix”functionThe MyMix function memorizes the song titleand artist name of the song currently being re-ceived. When a track that matches the memor-ized song title and artist name is beingbroadcast on a station other than the one youare listening to, you will be alerted, and youcan switch the station to listen to that song.pThe track itself is NOT downloaded; onlythe song title and the artist name are mem-orized.Memorizing the songThe song title and artist name of the song youare listening to can be memorized.%Touch [Memo].The song title and artist name of the song youare listening to are memorized, and a confir-mation message appears.pUp to 10 song titles and artist names can bememorized.pYou cannot memorize the song title or theartist name when “––––––––”is dis-played on the title information.pYou cannot memorize the song title or theartist name of channel “000”.pThe memorized title may not be displayedcorrectly.When the memorized song is broadcastA beep sounds, and a message is displayed.Touch [Yes] to switch to that station and listento that track.pIf the alert for the song is “Off”or [AlertOff] is selected, no notification will be pro-vided even when that song is broadcast.=For details, refer to Setting the memor-ized songs on the next page.pNotification may not be provided depend-ing on the situation of the Navigation Sys-tem.=For details, refer to Selecting the songsto alert on the next page.pIf there is even a slight difference betweenthe memorized title and the title of thetrack being broadcast, no notification willbe provided even though they are the samesong.Using the direct trafficannouncement functionYou can listen to a memorized traffic channelby directly calling it up with the [TRAFFIC](Only one station can be memorized).Memorizing an traffic channel1 Tune in to a traffic channel.2 Touch and hold [TRAFFIC] for two sec-onds or more.The traffic channel will be memorized.pEven if you use this with the XM satelliteradio tuner, only one station can be memor-ized. The station memorized afterward willoverwrite the existing one.pThe channels 000 can not be memorized.Tuning in to the memorized channel%Touch [TRAFFIC].pYou can also perform this operation bytouching [TRAFFIC] on the “AV Source”menu.pTo cancel a traffic announcement, touch[TRFC Off].Using the SIRIUS tunerEn 151Chapter28Using the SIRIUS tuner](https://usermanual.wiki/Pioneer/K026.User-Manual-5/User-Guide-1123209-Page-12.png)
![Using the “Instant Replay”functionThe “Instant Replay”function allows you toreplay the stored broadcast on the SIRIUStuner (if the tuner capable for this function).As soon as you tune to a channel, the SIRIUStuner automatically begins storing the broad-cast. It can store approximately up to 44 min-utes previous (depending on the selectedchannel and the memory capacity of con-nected tuner).1 Touch [Instant Replay] on the SIRIUSscreen to activate the “Instant Replay”mode.2 Touch keys for “Instant Replay”.[o]Return to the start of the currentsong or program. Touching againwill skip back to the previous songor program.[o] and hold Fast reverses.[p]Forwards play to the next song orprogram[p] and hold Fast-forwards.[f]Touching [f] switches betweenplayback and pause.pDuring “Instant Replay”mode, each touchof [Disp] changes the display informationas follows;Time position —Channel number —Chan-nel name —Channel category —Artistname/feature —Song/program title —ComposerpYou cannot replay the broadcast prior to thebeginning of stored data.Using the “Function”menu1 Touch [SIRIUS] on the “AV Source”menu to display the “SIRIUS”screen.=For details concerning operations, refer toScreen switching overview on page 34.2 Touch [Func].1Setting the memorized songs=For details, refer to this page.2Using the Game Alert function=For details, refer to the next page.3Displaying Game Information=For details, refer to the next page.Setting the memorized songsSelecting the songs to alertDisplay the song title list memorized for theMyMix Function (MyMix list). You can changethe setting of the notification when the song isbroadcast again. You can enable or disable no-tification for each song.1 Touch [Memo].2 Touch [cPrev] or [Next d] to select thedesired song.3 Touch [On/Off] to turn the setting on.When the alert for the song is activated, [ON]appears at the beginning of the selected title.pTouch [On/Off] again to turn the setting off.Using the SIRIUS tunerEn152Chapter28](https://usermanual.wiki/Pioneer/K026.User-Manual-5/User-Guide-1123209-Page-13.png)
![Changing the alert settingYou can enable or disable alerts for all items atthe same time. This function is useful whenyou want to turn alerts off temporarily withoutchanging each memorized song.1 Touch [Memo].2 Touch [Alert On] or [Alert Off].pTouch to toggle the selection.Deleting the memorized songsYou can delete each one of the memorizedtracks from the song title list.1 Touch [Memo].2 Touch [cPrev] or [Next d] to select thesong title that you want to delete.3 Touch [Delete] when the song youwant to delete is displayed.A message will appear asking you to confirmthe deletion.4 Touch [Yes].Using the Game Alert functionSelecting teams for Game AlertThis navigation system can alert you whengames involving your favorite sports teams areabout to start. To use this function you need tostore the teams you want to follow in advance.1 Touch [Game Alert].2 Touch [cPrev] or [Next d] to select theleague.3 Touch [cPrev] or [Next d] to select theteam.4 Touch [On/Off].The team displayed as [ON] is the alert target.pWhen the selected team is excluded fromthe alert target, the team is displayed as[OFF]. Up to 12 teams can be selected.When you have already made 12 team se-lections, “FULL”is displayed and additionalteam selection is not possible. In this case,first delete the team selection and then tryagain.5 Touch [Alert On].Changing the alert settingYou can enable or disable the alert for selecteditems. This function is useful when to want toturn the alert off temporarily without changingthe setting of each selected team.1 Touch [Game Alert].2 Touch [Alert On] or [Alert Off].pTouch to toggle the selection.When a game involving one of yourteams is broadcastA message is displayed. Touch [Jump]toswitch the station, and you can view the gameinformation. If you touch [Stay], the channeldoes not switch.pAlerts may not be provided depending onthe status of the navigation system.Displaying Game InformationAn alert will be displayed when a game withthe team you selected is about to start (or iscurrently under way). You can also displaygame information and changes to the broad-cast channel.Using the SIRIUS tunerEn 153Chapter28Using the SIRIUS tuner](https://usermanual.wiki/Pioneer/K026.User-Manual-5/User-Guide-1123209-Page-14.png)
![pThe Game Information function is availablewhen [Alert]is[On]in“Game Alert”.1 Touch [Game Info].2 Touch [Prev] or [Next] to view the gamescore information which is registered.pThe game score will be updated automati-cally.pTouch [Tune To] to switch to the channelthat broadcasts the displayed game.pIf you have not made any team selections,“Not Set”is displayed.pWhen no games involving your favoriteteams are currently being played“NO GAME”is displayed.Using the SIRIUS tunerEn154Chapter28](https://usermanual.wiki/Pioneer/K026.User-Manual-5/User-Guide-1123209-Page-15.png)
![You can display “video image”output by AV1Input or AV2 Input to the screen of the navi-gation system. For details of the connectionmethod, refer to “Installation Manual”.CAUTIONFor safety reasons, video images cannot beviewed while your vehicle is in motion. To viewvideo images, you must stop in a safe place andapply the parking brake.Using AV1You can display “video image”output by theequipment connected to “AV1 Input”.1 Touch [AV1 Input] on the “AV SystemSettings”menu.=For details, refer to Setting video input 1(AV1)on page 159.2 Touch [AV1] on the “AV Source”menu.The image is displayed on the screen.=For details concerning operations, refer toScreen switching overview on page 34.Using AV2You can display “video image”output by theequipment connected to “AV2 Input”.1 Touch [AV2 Input] on the “AV SystemSettings”menu.=For details, refer to Setting video input 2(AV2)on page 159.2 Touch [AV2] on the “AV Source”menu.The image is displayed on the screen.=For details concerning operations, refer toScreen switching overview on page 34.Using the touch panel keys%Touch the screen to display the touchpanel keys.1Hide the touch panel keysTouching [Hide] hides the touch panelkeys. Touch anywhere on the LCD screen todisplay the touch panel keys again.Using AV inputEn 155Chapter29Using AV input](https://usermanual.wiki/Pioneer/K026.User-Manual-5/User-Guide-1123209-Page-16.png)
![The term “external unit”refers to futurePioneer devices that are not currently plannedfor, or to devices that allow control of basicfunctions although they are not fully con-trolled by the navigation system. Two externalunits can be controlled by this navigation sys-tem. When two external units are connected,the navigation system allocates them as exter-nal unit 1 or external unit 2.For details of the connection method, refer to“Installation Manual”.For details concerning operation, refer to theexternal unit’s operation manual. This sectionprovides information on external unit opera-tions with the navigation system that differfrom those described in the external unit’s op-eration manual.pOperation varies depending on the externalunit connected. (In some cases, the exter-nal unit may not respond.)Reading the screen1Source iconShows which source has been selected.2External unit indicatorDisplays the information that is sent by con-nected external units.3Auto/Manual mode indicatorShows the current mode.4Current timeUsing the touch panel keys%Touch [EXT1] or [EXT2] on the “AVSource”menu to select the external unit.=For details concerning operations, refer toScreen switching overview on page 34.1Send a band commandTouch to send a band command to the ex-ternal unit.pOperation varies depending on the exter-nal unit connected. (In some cases, theexternal unit may not respond.)2Send an [a],[b],[c],or[d]commandTouch to operate the external unit.pOperation varies depending on the exter-nal unit connected. (In some cases,some functions may not be used untilyou touch and hold the key.)3Switching between automatic and man-ual functionYou can turn automatic and manual func-tion on or off.You can switch between Auto and Manualfunctions of the external unit connected.Initially, this function is set to Auto.pOperating commands set for Auto andManual operations vary depending onthe external unit connected.4Send a 1key to 6key commandThe external unit can be operated by trans-mitting the operating commands set to 1key —6key.pOperation varies depending on the exter-nal unit connected. (In some cases,some functions may not be used untilyou touch and hold the key.)5Use F1 —F4 to operate the external unitThe external unit can be operated by trans-mitting the operating commands set to F1—F4.pThe operating commands set to F1 —F4 vary depending on the external unit.pSome functions may not be used untilyou touch and hold the key.Using the external unit (EXT1,EXT2)En156Chapter30](https://usermanual.wiki/Pioneer/K026.User-Manual-5/User-Guide-1123209-Page-17.png)
![Selecting the video for“Rear display”You can choose either to show the sameimage as the front screen or to show the se-lected source on the “Rear display”.%Touch [Rear View] on the “AV Source”menu.Each touch of [Rear Screen] changes the set-tings as follows:!Mirror AV —The video on the front screenof the navigation unit is output to the “Reardisplay”!iPod —The video and sound of the iPodare output to the “Rear display”!Disc —The video and sound of the DVDsare output to the “Rear display”!AV1 —The video and sound of AV1 areoutput to the “Rear display”!AV2 —The video and sound of AV2 areoutput to the “Rear display”pWhen [Mirror AV] is selected, the followingrestrictions are applied to “Rear display”.—When selecting [Rear View] in the mapdisplay, nothing is displayed.—All sounds cannot be output for “Reardisplay”.pWhen Disc is selected, the following restric-tions are applied to “Rear display”.—When a CD or MP3/WMA/AAC disc isset in the built-in DVD drive, nothing isoutput.pWhen iPod is selected, the following restric-tions are applied to “Rear display”.—The “Video image”and sound are outputonly when the appropriate setting on[AV1 Input]is[iPod].pWhen AV is selected, the following restric-tions are applied to “Rear display”.—The “Video image”and sound are outputonly when AV1/AV2 has both video andsound.—The “Video image”and sound are outputonly when the appropriate setting on[AV1 Input]or[AV2 Input] are[Video].Operating the pictureadjustmentCAUTIONFor safety reasons, you cannot use some of thesenavigation functions while your vehicle is in mo-tion. To enable these functions, you must stop ina safe place and apply the parking brake. Refer to“Important Information for the user”(a separatemanual).You can adjust the picture for each source andrear view camera.1 Press and hold the MODE button.Press and hold to display the “Picture Adjust-ment”screen.!Brightness —Adjusts the black intensity!Contrast —Adjusts the contrast!Color —Adjusts the color saturation!Temp —Adjusts the tone of color (red isemphasized or green is emphasized)!Dimmer —Adjusts the brightness of dis-play![Camera]—Shows the picture adjustmentdisplay for the rear view camerapTouching [Source] while adjusting the rearview camera image returns you to the pre-vious screen.pThe adjustments of Brightness andContrast are stored separately when yourvehicle’s headlights are off (daytime) andwhen your vehicle’s headlights are on(nighttime). These are switched automati-cally depending on the vehicle’s headlightsare on or off.Other functionsEn 157Chapter31Other functions](https://usermanual.wiki/Pioneer/K026.User-Manual-5/User-Guide-1123209-Page-18.png)
![pYou cannot adjust Color and Temp for thesource without a video and navigation mapdisplay.pThe setting contents can be memorized se-parately for the following screen and the“Video image”.—AM/FM/CD/ROM/iPod(Music)/SD(audio)/USB(audio)/Bluetooth Audio/XM/SIRIUS/Digital Radio screen—AV1 and iPod(Video)—DVD-V,DVD-VR,DivXSD(Video) and USB(Video)—AV2 and EXT1,EXT2—Rear view camera image—Navigation map and menu screenpThe picture adjustment may not be avail-able with some rear view cameras.pBecause of the LCD screen characteristics,you may not be able to adjust the screen atlow temperatures.2 Touch [+] or [-] to adjust the desireditem.Each time you touch [+]or[-] increases or de-creases the level of the desired item.3 Touch to return to the previousscreen.Other functionsEn158Chapter31](https://usermanual.wiki/Pioneer/K026.User-Manual-5/User-Guide-1123209-Page-19.png)
![Options on the “AV SystemSettings”menuDisplaying the “AV SystemSettings”menu1 Press the HOME button to display the“Top Menu”.2 Touch [Settings].The “Settings Menu”screen appears.3 Touch [AV Settings].The “AV System Settings”menu appears.pYou can only adjust [Wide Mode] when se-lecting an AV source with video.pYou can only adjust the following itemswhen the AV source is “Off”;[Rear SP], [Auto PI] and [FM Step]Setting video input 1 (AV1)You can switch this setting according to theconnected component.pThis setting applies to RCA inputs(AUDIO INPUT and VIDEO INPUT) on theback of the system.%Touch [AV1 Input] on the “AV SystemSettings”menu.=For details, refer to Displaying the “AV Sys-tem Settings”menu on this page.Each touch of [AV1 Input] changes the set-ting as follows:!iPod —iPod connected with the USB Inter-face cable for iPod (CD-IU50V)!Video —External video component!Off —No video component is connectedSetting video input 2 (AV2)You can switch this setting according to theconnected component.pThis setting applies to mini-jack input.%Touch [AV2 Input] on the “AV SystemSettings”menu.=For details, refer to Displaying the “AV Sys-tem Settings”menu on this page.Each touch of [AV2 Input] changes the set-ting as follows:!Off —No video component is connected!EXT —Pioneer external unit connectedwith the RCA video cable!Video —External video componentpUse AV2 Input when connecting CD-V150M (sold separately) through the exter-nal video component.Switching the auto antennasettingIf the blue lead of the navigation system isconnected to the antenna control terminal ofthe vehicle, select either of the following set-tings.!Power —The antenna extends or turns onwhen the ignition switch is turned on. Theantenna is stored or turned off when theignition switch is turned off.!Radio —The antenna extends or turns ononly when the audio source is FM or AM.The antenna is stored or turned off whenthe AV source is switched to anothersource.Customizing preferencesEn 159Chapter32Customizing preferences](https://usermanual.wiki/Pioneer/K026.User-Manual-5/User-Guide-1123209-Page-20.png)
![%Touch [ANT CTRL] on the “AV SystemSettings”menu.=For details, refer to Displaying the “AV Sys-tem Settings”menu on the previous page.Touching [ANT CTRL] switches between[Radio] and [Power].pRegardless of whether [Radio]or[Power]is selected, turning off the ignition switchwill cause the antenna to automatically re-tract or turn off.Changing the wide screen mode%Touch [Wide Mode] on the “AV SystemSettings”menu.=For details, refer to Displaying the “AV Sys-tem Settings”menu on the previous page.Each touch of [Wide Mode] changes the set-ting as follows:!Full (full)A 4:3 picture is enlarged in the horizontaldirection only, enabling you to enjoy a 4:3TV picture (normal picture) without anyomissions.!Cinema (cinema)A picture is enlarged by the same propor-tion as Full or Zoom in the horizontal direc-tion and by an intermediate proportionbetween Full and Zoom in the vertical di-rection; ideal for a cinema-sized picture(wide screen picture) where captions lieoutside the frame.!Zoom (zoom)A 4:3 picture is enlarged in the same pro-portion both vertically and horizontally;ideal for a cinema-sized picture (widescreen picture).!Normal (normal)A 4:3 picture is displayed normally, givingyou no sense of disparity since its propor-tions are the same as that of the normalpicture.pDifferent settings can be stored for eachvideo source.pThe same setting is automatically appliedfor the following grouping.!DVD-V,DVD-VR,DivX!EXT1 and EXT2!AV1 and AV2!iPodpWhen video is viewed in a wide screenmode that does not match its original as-pect ratio, it may look strange.pRemember that use of this system for com-mercial or public viewing purposes mayconstitute an infringement on the author’srights protected by the Copyright Law.pThe navigation map and the rear view cam-era picture is always viewed at Full.Setting the rear outputThe navigation system’s rear output can beused for a full-range speaker or subwooferconnection. If you switch Rear SP to Sub. W,you can connect a rear speaker lead directly toa subwoofer without using an auxiliary amp.Initially, the navigation system is set for a rearfull-range speaker connection (Full).pBoth rear speaker leads output and RCArear output are switched simultaneously inthis setting. (When you use the productwithout RCA rear output, this setting onlyapplies to the rear speaker leads.)pRear SP can be set only when the source is[Off].1 Touch [Rear SP] on the “AV System Set-tings”menu.=For details, refer to Displaying the “AV Sys-tem Settings”menu on the previous page.2 Touch [Rear SP] to switch the rear out-put setting.When no subwoofer is connected to the rearoutput, select Full.When a subwoofer is connected to the rearoutput, select Sub. W.Customizing preferencesEn160Chapter32](https://usermanual.wiki/Pioneer/K026.User-Manual-5/User-Guide-1123209-Page-21.png)
![Switching the muting/attenuation timingYou can mute the AV source volume or attenu-ate the output signal. This setting is invalid forthe mute signal has been received from theMUTE lead connected to the navigation unit.(Even if this setting is [Off], the navigation sys-tem will mute or attenuate the audio sourcevolume when the signal is output via MUTElead.)%Touch [Mute] on the “AV System Set-tings”menu.Each touch of [Mute] changes the settings asfollows:!Guide/Tel/VR —The volume is muted or at-tenuated according to the following condi-tions—When the navigation outputs the gui-dance voice.—When you use a cellular phone via Blue-tooth technology (dialing, talking, in-coming call).—When the voice recognition mode is ac-tivated.!Tel/VR —The volume is muted or attenu-ated according to the following conditions—When you use a cellular phone via Blue-tooth technology (dialing, talking, in-coming call).—When the voice recognition mode is ac-tivated.!Off —The volume does not changepOperation returns to normal when the cor-respond action is ended.Switching the muting/attenuation levelYou can select the muting/attenuation level of[Mute]. This setting is also effective for a mutesignal that has been received from the MUTElead connected to the navigation unit.pThis menu is not available in the followingcases:—AV source is [Off]—During muting/attenuation%Touch [Mute Level] on the “AV SystemSettings”menu.Each touch of [Mute Level] changes the set-tings as follows:!ATT —The volume becomes 1/10!10dB —The volume becomes 1/3!Mute —The volume becomes 0pWhen you select [Mute], [Mute] is dis-played and no audio adjustments are possi-ble during the sound is turned off.pWhen you select [ATT]or[10dB], no audioadjustments, except volume control, arepossible during the sound is attenuated.pOperation returns to normal when the cor-respond action is ended.pEven when a mute signal has been receivedfrom MUTE lead connected to the naviga-tion unit, navigation voice guidance cannotbe attenuated or muted.Changing the voice output ofthe navigation guidanceYou can set the speaker to output the naviga-tion guidance and phone voice, etc.%Touch [Guidance/Tel SP] on the “AV Sys-tem Settings”menu.Each touch of [Guidance/Tel SP] changes thesettings as follows:!L+R SP —Uses both the front right and leftspeakers!Left SP —Uses only the front left speaker!Right SP —Uses only the front right speak-erAcquiring/Cataloging iPodmusic informationIf you always set the language other than “Eng-lish”on “Program language”, this setting isunnecessary.Customizing preferencesEn 161Chapter32Customizing preferences](https://usermanual.wiki/Pioneer/K026.User-Manual-5/User-Guide-1123209-Page-22.png)
![Unless [VR Catalog Mode] is turned off, thisnavigation system tries to acquire the informa-tion needed to operate iPod with voice com-mands. It may take a short period of time totransfer the information. Change the settingaccording to your usage.The navigation system starts acquiring/catalo-ging music information (1) when the iPod isconnected or when the system boots up whilethe iPod is connected and (2) when iPod is theselected and displayed AV Source, unless [VRCatalog Mode] is turned off.pIf you do not use iPod, this setting is un-necessary.pDuring transfer, iPod operations (such as[Shuffle], [Menu], or [Video]) are notavailable.pOnce the cataloging is completed, you candeactivate [VR Catalog Menu] until youupdate the content/data on iPod. If you up-date the iPod data, activate [VR CatalogMenu] again to transfer the music informa-tion and synchronize the music informationfor voice commands with the data on iPod.pAfter you select “Off”in [VR CatalogMode], the system doesn’t catalog thedata on the iPod. In such case, the pre-viously cataloged data are available asvoice commands.pOnce you start the cataloging process, onlya few basic voice commands can be usedfor iPod until the process has completelyfinished.pIf unreadable characters are included inthe data on your iPod, names or types maynot be available as voice commands.Important Notice regarding VoiceControl for iPodsVoice Control for iPods may be limited if cata-loging of iPod content is not completed. Cata-loging of iPod content only occurs when thesystem is in “AV Source”mode and the “iPod”is the selected and displayed “AV Source”screen. Cataloging of iPod content will notoccur if the system is off, if any other “AVSource”is selected (aside from iPod), or if thesystem is in any other mode (aside from “AVSource”mode) such as “Destination Menu”,“Contacts List”,“Settings Menu”,“PhoneMenu”or the map screen. If you wish to useVoice Control for all iPod content, it is recom-mended that you first connect your iPod, se-lect “iPod”as the AV source, and keep theiPod screen displayed until cataloging is com-pleted —cataloging of iPod content shouldonly take a few minutes, and will depend onthe size of the conent stored on your iPod. Amessage will be displayed when cataloging iscompleted.1 Touch [VR Catalog Menu] on the “AVSystem Settings”menu.=For details, refer to Displaying the “AV Sys-tem Settings”menu on page 159.2 Touch [On] or [Off] to activate or deacti-vate “VR Catalog Mode”.Displaying your DivX VODregistration codeIn order to play DivX VOD (video on demand)content on this navigation system, you firstneed to register the unit with your DivX VODcontent provider. You do this by generating aDivX VOD registration code, which you submitto your provider.pNew translation required.%Touch [DivX VOD] on the “AV SystemSettings”menu.Your 8-digit registration code is displayed.pMake a note of the code as you will need itwhen you register with a DivX VODprovider.Customizing preferencesEn162Chapter32](https://usermanual.wiki/Pioneer/K026.User-Manual-5/User-Guide-1123209-Page-23.png)
![The “AV Sound Settings”menu optionsDisplaying the “AV SoundSettings”menu1 Press the HOME button to display the“Top Menu”.2 Touch [Settings].The “Settings Menu”screen appears.3 Touch [AV Sound].The “AV Sound Settings”screen appears.pYou cannot make adjustments in the follow-ing situations:—AV source is [Off]—During muting/attenuationpYou cannot select [SLA] when the FM tuneris selected as the AV source.Using balance adjustmentYou can select a fader/balance setting thatprovides an ideal listening environment in alloccupied seats.1 Touch [FAD/BAL] on the “AV Sound Set-tings”menu.=For details, refer to Displaying the “AVSound Settings”menu on this page.When [Sub. W] is selected in [Rear SP],[Balance] will be displayed instead of[FAD/BAL] and front/rear speaker balancecannot be adjusted.=Refer to Setting the rear output on page 160.2 Touch [a]or[b] to adjust front/rearspeaker balance.Each time you touch [a]or[b], the front/rearspeaker balance moves towards the front orthe rear.“Front:15”to “Rear:15”is displayed as thefront/rear speaker balance moves from front torear.Setting “Front:”and “Rear:”to “0”is correctwhen using a two speaker system.3 Touch [c]or[d] to adjust left/rightspeaker balance.Each time you touch [c]or[d], the left/rightspeaker balance moves towards the left or theright.Left:15 to Right:15 is displayed as the left/right speaker balance moves from left to right.Customizing preferencesEn 163Chapter32Customizing preferences](https://usermanual.wiki/Pioneer/K026.User-Manual-5/User-Guide-1123209-Page-24.png)
![Using the equalizerThe equalizer lets you adjust equalization tomatch vehicle interior acoustic characteristicsas desired.Recalling equalizer curvesThere are seven stored equalizer curves thatyou can easily recall at any time. Here is a listof the equalizer curves:Equalizer curveSuper BassSuper Bass is a curve in which only low-pitchedsound is boosted.PowerfulPowerful is a curve in which low-pitched and high-pitched sounds are boosted.NaturalNatural is a curve in which low-pitched and high-pitched sounds are slightly boosted.VocalVocal is a curve in which the midrange, which is thehuman vocal range, is boosted.FlatFlat is a flat curve in which nothing is boosted.CustomCustom is an adjusted equalizer curve that you cre-ate. A separate custom curve can be created for eachsource.Custom2Custom2 is an adjusted equalizer curve that you cre-ate. If you select this curve, the effect is reflected allAV source.1 Touch [EQ] on the “AV Sound Settings”menu.=For details, refer to Displaying the “AVSound Settings”menu on the previouspage.2 Touch the equalizer you want.New translation required.New translation required.New translation required.!Super Bass!Powerful!Natural!Vocal1 Touch [EQ] on the “AV Sound Settings”menu.=For details, refer to Displaying the “AVSound Settings”menu on the previouspage.2 Touch [+] or [-] next to “Nuance”.3 Touch the equalizer you want.pNew translation required.pNew translation required.Adjusting the equalizer curvesYou can adjust the currently selected equalizercurve setting as desired. Adjustments can bemade with a 7-band graphic equalizer.The difference between “Custom”and“Custom2”!A separate Custom curve can be createdfor each source. If you make adjustmentswhen a curve Super Bass,Powerful,Natural,Vocal,Flat,orCustom is selected,the equalizer curve settings will be memor-ized in Custom.!ACustom2 curve can be created commonto all sources. If you make adjustmentswhen Custom2 curve is selected, the Cus-tom2 curve will be updated.!The adjusted Custom curve is memorizedfor each of the source selected, but onecurve is shared for the following sources.—CD,ROM,DVD-V,DVD-VR,DivXCustomizing preferencesEn164Chapter32](https://usermanual.wiki/Pioneer/K026.User-Manual-5/User-Guide-1123209-Page-25.png)
![—AM and FM—EXT1 and EXT2—AV1 and AV2—SD and USB!The different source volume level can beset between iPod and USB.!When [Flat] is selected, no supplement orcorrection is made to the sound. This isuseful to check the effect of the equalizercurves by switching alternatively between[Flat] and a set equalizer curve.1 Touch [EQ] on the “AV Sound Settings”menu.=For details, refer to Displaying the “AVSound Settings”menu on page 163.2 Touch the one of keys to select a curvethat you want to use as the basis of custo-mizing.3 Touch [Customize].4 Touch the frequency that you want toadjust the level.5 Touch [a]or[b] to adjust the level ofthe equalizer band.Each time you touch [a]or[b], the level ofthe equalization band increases or decreases.Adjusting loudnessLoudness compensates for deficiencies in thelow- and high-sound ranges at low volume.1 Touch [Loudness] on the “AV SoundSettings”menu.=For details, refer to Displaying the “AVSound Settings”menu on page 163.2 Touch [Loudness] to select the level youwant.Each time you touch [Loudness], the level isselected in the following order:Off —Low —Mid —HighUsing subwoofer outputThe navigation system is equipped with a sub-woofer output mechanism, which can beturned on or off.pOnly when “Sub Woofer”is [On], you canadjust “Phase”,“Level”and “Frequency”.1 Touch [Sub Woofer] on the “AV SoundSettings”menu.=For details, refer to Displaying the “AVSound Settings”menu on page 163.2 Touch [On] to turn subwoofer outputon.To turn subwoofer output off, touch [Off].3 Touch [Reverse] or [Normal] to selectthe phase of subwoofer output.4 Touch [+] or [-] next to “Level”to adjustthe output level.+6 to -24 is displayed as the level is increasedor decreased.5 Touch [c]or[d] next to “Frequency”toselect cut-off frequency.Each time you touch [c]or[d], cut-off fre-quencies are selected in the following order:50 Hz —63 Hz —80 Hz —100 Hz —125 HzOnly frequencies lower than those in the se-lected range are output from the subwoofer.Customizing preferencesEn 165Chapter32Customizing preferences](https://usermanual.wiki/Pioneer/K026.User-Manual-5/User-Guide-1123209-Page-26.png)
![Using the high pass filterWhen you do not want low sounds from thesubwoofer output frequency range to playfrom the front or rear speakers, activate HPF(high pass filter). Only frequencies higher thanthose in the selected range are output fromthe front or rear speakers.1 Touch [HPF] on the “AV Sound Settings”menu.=For details, refer to Displaying the “AVSound Settings”menu on page 163.2 Touch [HPF] to select cut-off frequency.Each time you touch [HPF] selects cut-off fre-quencies in the following order:Off —50 Hz —63 Hz —80 Hz —100 Hz —125 HzAdjusting source levelsSLA (source level adjustment) lets you adjustthe volume level of each source to prevent ra-dical changes in volume when switching be-tween sources.pSettings are based on the FM tuner volumelevel, which remains unchanged.1 Compare the FM tuner volume levelwith the level of the source you wish to ad-just.2 Touch [SLA] on the “AV Sound Settings”menu.=For details, refer to Displaying the “AVSound Settings”menu on page 163.3 Touch [+] or [-] to adjust the source vo-lume.SLA +4 to SLA -4 is displayed as the sourcevolume is increased or decreased.The following AV sources are set to the samesource level adjustment volume automatically.!DVD-V and DVD-VR!CD,ROM,DivX!EXT1 and EXT2!AV1 and AV2!SD and USBpThe different source volume level can be setbetween iPod and USB.Enhancing bass (Bass Booster)The “Bass Booster”enhances bass sounds,which can be muted by driving noise.1 Touch [Bass Booster] on the “AV SoundSettings”menu.=For details, refer to Displaying the “AVSound Settings”menu on page 163.2 Touch [+] or [-] to adjust the range from0to6.Setting the simulated sound stageYou can select the desired effect from varioussimulated sound stages, such as Music Studioor Dynamic Theater. You can also adjust a lis-tener positioning effect.Setting a stage that fits your image1 Touch [Staging] on the “AV Sound Set-tings”menu.2 Touch desired stage setting.p[Living Room] setting that emphasizesmid-range sound hardly has any effect nearthe maximum volume level.pWhen you set staging to an option otherthan [Off], the high pass filter (HPF) settingturns [Off].=For details, refer to Using the high pass filteron this page.Customizing preferencesEn166Chapter32](https://usermanual.wiki/Pioneer/K026.User-Manual-5/User-Guide-1123209-Page-27.png)
![Adjusting a position effectYou can select a listener position that youwant to make as the center of sound effects.1 Touch [Staging] on the “AV Sound Set-tings”menu.2 Touch [Position].3 Touch desired position.Customizing preferencesEn 167Chapter32Customizing preferences](https://usermanual.wiki/Pioneer/K026.User-Manual-5/User-Guide-1123209-Page-28.png)
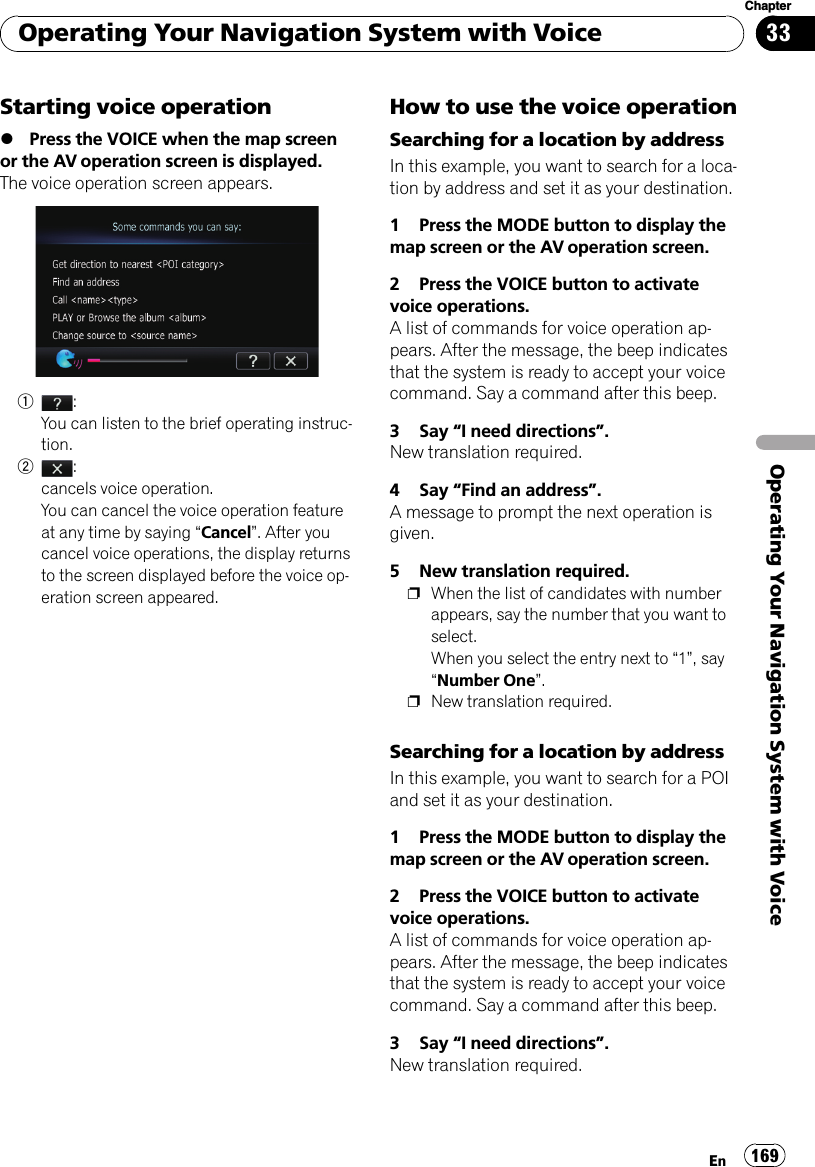
![To Ensure Safe DrivingCAUTIONFor your safety, avoid viewing the screen in thevoice operation as much as possible whiledriving.If you use voice operation, select [English]in[Program language]of“Language”. If you se-lect other languages, voice operation will notbe available.Basics of Voice OperationYour Pioneer navigation system uses the latestin voice recognition technology. You can usevoice commands to operate many of its func-tions. This chapter describes where you canuse voice commands, and also what com-mands the system accepts.Flow of voice operationYou can start voice operation any time evenwhen the map screen is displayed or audio isoperating. (Some operations are not available.)The basic steps of voice operations are as fol-lows.1 Switch the screen to map screen or AVoperation screen.2 Press the VOICE button to activatevoice operations.3 Speak a command into the microphoneafter the beep.4 When the command is recognized, thenavigation system displays next options onthe screen, and pronounces it in somecases.5 Repeat previous step as necessary.6 The requested operation will be carriedout.pThe voice operation may not be operable for aminute after the navigation system has bootedup.Operating Your Navigation System with VoiceEn168Chapter33](https://usermanual.wiki/Pioneer/K026.User-Manual-5/User-Guide-1123209-Page-29.png)
![Setting the anti-theft functionYou can set a password for the navigation sys-tem. If the back-up lead is cut after the pass-word is set, the navigation system prompts forthe password at the time of next boot up.Setting the password1 Press the MENU button to display the“Top Menu”.2 Touch [Settings].The “Settings Menu”screen appears.3 Touch Area1, followed by Area2, andthen touch and hold Area3.Area1 Area2 Area34 Touch [Set Password].The password setting screen appears.5 Enter the password you want to set.p5 to 16 characters can be entered for apassword.6 Touch [OK].7 Reenter the password to confirm thesetting.8 Touch [OK].Password protection is applied.pIf you want to change the password cur-rently set, enter the current password andthen enter the new one.Entering the passwordOn the password input screen, you must enterthe current password. If you enter an incorrectpassword three times, the screen is lockedand operations using touch panel keys are dis-abled.1 Enter the password.2 Touch [OK].The message “The unit has been locked be-cause an invalid password was enteredthree times. Turn ACC off and on, andenter your password.”appears if you enteredthe correct password and the navigation sys-tem is unlocking.Deleting the passwordThe current password can be deleted.1 With the map displayed, press theMENU button.2 Touch [Settings] on the “Top Menu”.3 Touch Area1, followed by Area2, andthen touch and hold Area3.4 Touch [Clear password].The password setting screen appears.5 Enter the current password.6 Touch [OK].7 Touch [Yes].The message for deletion appears and thenthe current password is deleted.Other functionsEn 175Chapter34Other functions](https://usermanual.wiki/Pioneer/K026.User-Manual-5/User-Guide-1123209-Page-36.png)
![Forgotten passwordsContact the nearest authorized Pioneer Ser-vice Station.Restoring the default settingResets various settings registered to the navi-gation system and restores them to the defaultor factory settings.pSome data remains. Read Returning the na-vigation system to the initial state beforeyou operate this function.1 Display the “Destination Menu”screen.2 Touch [Settings].The “Settings Menu”screen appears.3 Touch [Restore Factory Settings].The message confirming whether to restorethe settings appears.4 Touch [Yes].Returning the navigationsystem to the initial stateYou can return settings or recorded content tothe default or factory settings.pSome data remains. Read Returning the na-vigation system to the initial state beforeyou operate this function.1 Park your vehicle in a safe place, andturn off the engine. Turn the ignition keyback to “Acc off”. Then start the engineagain, and turn the power to the naviga-tion system back on.The splash screen appears.2 Press and hold the MODE button andthe TRK (c) button while splash screen ap-pears.The “Data/Setting Clear”screen appears.3 Touch [Delete user information].The message confirming whether to erase alluser data appears.And then touch [Yes] to erase all user data.#Touch [Reset].Various settings registered to the navigation sys-tem is reset to the default or factory settings.4 Touch [Yes].The recorded contents are cleared.Other functionsEn176Chapter34](https://usermanual.wiki/Pioneer/K026.User-Manual-5/User-Guide-1123209-Page-37.png)
![You cannot position your vehicleon the map without a significantpositioning error.The navigation system may not bemounted securely in your vehicle.Check that the navigation system is securelymounted and, if necessary, consult the dealerthat installed the system.The navigation system is installedwith an extreme angle exceedingthe installation angle limitations.Confirm the installation angle. (The naviga-tion system must be installed within the al-lowed installation angle. For details, refer to“Installation Manual”.)Indication of the position of your ve-hicle is misaligned after a U-turn orreversing.Check whether or not the reverse gear signalinput lead (violet) is connected properly. (Thenavigation system works properly without thelead connected, but positioning accuracy willbe adversely affected.)The map color does not switchautomatically between daytimeand nighttime.[Night mode] is set to [Day]. Check [Night mode] setting and make sure[Automatic] is selected. (Page 49)The orange/white lead is not con-nected.Check the connection.The screen is too bright. An improper value has been set on“Brightness”.Check the settings.The display is very dim. [Automatic] is selected in “Nightmode”.Check the setting of [Night mode] and select[Automatic]or[Day]. (Page 49)An improper value has been set on“Brightness”.Check the settings.No sounds of AV source are pro-duced.The volume level will not rise.The volume level is low. Adjust the volume level.The attenuator or mute is on. Turn the attenuator or mute off.A speaker lead is disconnected. Check the connection.The volume of navigation gui-dance and beeps cannot be ad-justed.Try to adjust them with VOL (+/–)button.Turn the volume up or down using [Volume]on the “Navi Settings”menu. (Page 96)The person on the other end ofthe phone call cannot hear theconversation due to an echo.The voice from the person on theother end of the phone call is outputfrom the speakers and then pickedup by the microphone again, creat-ing an echo.Use the following methods to reduce theecho:—Lower the volume on the receiver—Have both parties pause slightly beforespeakingThere’s no picture. The parking brake cord is not con-nected.Connect the parking brake cord, and applythe parking brake.The parking brake is not applied. Connect the parking brake cord, and applythe parking brake.The backlight of the LCD panel isturned off.Turn on the backlight. (Page 100)“Rear display”picture disap-pears.The source disc being listened to inthe navigation system has beenejected.Before ejecting the disc, switch the source.This problem may occur when certain con-nection methods are used.There is a problem with the “Reardisplay”, for example a faulty wiringconnection.Check the “Rear display”and its connection.An AV source that cannot output tothe rear display is selected.Select an appropriate AV source.AppendixEn178Appendix](https://usermanual.wiki/Pioneer/K026.User-Manual-5/User-Guide-1123209-Page-39.png)
![Nothing is displayed and thetouch panel keys cannot beused.The setting for the rear view camerais incorrect.Select the appropriate setting for the rearview camera.The shift lever was placed in [R]when the rear view camera was notconnected.Select the correct polarity setting for [BackCamera]. (Page 98)There is no response when thetouch panel key are touched, ora different key responds.The touch panel keys deviate fromthe actual positions that respond toyour touch for some reason.Perform touch panel calibration. (Page 98)The external storage device(USB, SD) cannot be used.The USB storage device has beenremoved immediately after pluggingit.Park your vehicle in a safe place, and turn offthe engine. Turn the ignition key back to “Accoff”. Then start the engine again, and turn thepower to the navigation system back on.Problems in the AV screenSymptom Cause Action (Reference)CD or DVD playback is not pos-sible.The disc is inserted upside down. Insert the disc with the label upward.The disc is dirty. Clean the disc.The disc is cracked or otherwise da-maged.Insert a normal, round disc.The files on the disc are an irregularfile format.Check the file format.The disc format cannot be playedback.Replace the disc.The loaded disc is a type this systemcannot play.Check what type of disc it is. (For more cau-tions about handling each type of media,refer to Page 189.)The screen is covered by a cau-tion message and the video can-not be shown.The parking brake lead is not con-nected or applied.Connect the parking brake lead correctly, andapply the parking brake.The parking brake interlock is acti-vated.Park your vehicle in a safe place and applythe parking brake.No video output from connectedequipments.No video output from connectediPod.[AV1 Input]or[AV2 Input] settingis incorrect.Correct the settings. (Page 155)The connection of the USB interfacecable for iPod is incorrect.Connect both the USB plug and the RCAcable side. (If only one of these connectionhas been made, the iPod will not work prop-erly.) (Page 31)The audio or video skips. The navigation system is not firmlysecured.Secure the navigation system firmly.No sounds are produced.The volume level will not rise.Cables are not connected correctly. Connect the cables correctly.The system is performing still, slowmotion, or frame-by-frame playbackwith DVD-Video.There is no sound during still, slow motion, orframe-by-frame playback with DVD-Video.The system is paused or performing,fast reverse or forward during thedisc playback.For the media other than music CD (CD-DA),there is no sound on fast reverse or forward.The icon 9is displayed, and op-eration is not possible.The operation is not compatiblewith the video configuration.This operation is not possible. (For example,the DVD playing does not feature that angle,audio system, subtitle language, etc.)AppendixEn 179AppendixAppendix](https://usermanual.wiki/Pioneer/K026.User-Manual-5/User-Guide-1123209-Page-40.png)
![The picture stops (pauses) andthe navigation system cannot beoperated.The reading of data is impossibleduring disc playback.After touching gonce, start playback oncemore.The picture is stretched, with in-correct aspect ratio.The aspect setting is incorrect forthe display.Select the appropriate setting for that image.(Page 160, Page 126)A parental lock message is dis-played and DVD playback is notpossible.Parental lock is on. Turn parental lock off or change the level.(Page 127)Parental lock for DVD playbackcannot be canceled.The code number is incorrect. Input the correct code number. (Page 127)Playback is not with the audiolanguage and subtitle languagesettings selected in [DVD/DivX® Setup].The DVD playing does not featuredialog or subtitles in the languageselected in [DVD/DivX® Setup].Switching to a selected language is not possi-ble if the language selected in [DVD/DivX®Setup] is not recorded on the disc.The picture is extremely unclear/distorted and dark during play-back.The disc features a signal to prohibitcopying. (Some discs may havethis.)Since the navigation system is compatiblewith the copy guard analogue copy protectsystem, the picture may suffer from horizon-tal stripes or other imperfections when a discwith that kind of protection signal is viewedon some displays. This does not mean the na-vigation system is malfunctioning.iPod cannot be operated. The iPod is frozen. !Reconnect the iPod with the USB interfacecable for iPod.!Update the iPod software version.An error has occurred. !Reconnect the iPod with the USB interfacecable for iPod.!Park your vehicle in a safe place, and turnoff the engine. Turn the ignition key back to“Acc off”. Then start the engine again, andturn the power to the navigation system backon.!Update the iPod software version.Problems with the phone screenSymptom Cause Action (Reference)Dialing is not possible becausethe touch panel keys for dialingare inactive.Your phone is out of range for ser-vice.Retry after re-entering the range for service.The connection between the cellularphone and the navigation systemcannot be established now.Perform the connection process.If the screen becomes frozen...Park your vehicle in a safe place, and turn offthe engine. Turn the ignition key back to “Accoff”. Then start the engine again, and turn thepower to the navigation system back on.AppendixEn180Appendix](https://usermanual.wiki/Pioneer/K026.User-Manual-5/User-Guide-1123209-Page-41.png)

![Display informationDestination MenuPage[Address Search][Return Home][POI][Gas Station][ATM][Coffee][Hotel][Spell Name][Near Me][Near Destination][Around City][AVIC FEEDS][Address Book][History][Cancel Route][MSN Direct][Coordinates][Route Overview]“Phone Menu”screenPage[Dial Pad][Call Home][Contacts][Contacts Transfer][Received Calls][Dialled Calls][Missed Calls][GOOG-411]AppendixEn200Appendix](https://usermanual.wiki/Pioneer/K026.User-Manual-5/User-Guide-1123209-Page-61.png)
![Settings MenuPage[Navi Settings][System Settings][AV Settings][AV Sound][Map Settings][Bluetooth Settings][Setting Rplctr]Navi SettingsPage[Connection Status][3D Calibration Status][Gas Mileage][Drive Log Settings][Demo Mode][Set Home][Modify Current Location]System Settings menuPage[Regional Settings][Program language], [Voice lan-guage][Time][km / mile][Speed][Volume][Splash Screen][Back Camera][Screen Calibration][Illumi Color][Service Information][Restore Factory Settings]AppendixEn 201AppendixAppendix](https://usermanual.wiki/Pioneer/K026.User-Manual-5/User-Guide-1123209-Page-62.png)
![Map Settings menuPage[Displayed Info][Close Up View][City Map][City Map Barrier][Show Traffic Incident][Bluetooth Connected][Current Street Name][Address Book Icon][3D Landmark][Show Manuever][MSN Direct][Quick Access Selection][Overlay POI][View Mode][Day/Night Display][AV Guide Mode][Road Color]AV System Settings menuPage[AV1 Input][AV2 Input][ANT CTRL][Wide Mode][Rear SP][Mute][Mute Level][Guidance/Tel SP][VR Catalog Menu][DivX VOD]AppendixEn202Appendix](https://usermanual.wiki/Pioneer/K026.User-Manual-5/User-Guide-1123209-Page-63.png)
[EQ][Loudness][Sub Woofer][HPF][SLA][Bass Booster][Staging]Bluetooth SettingsPage[Connection][Registration][Device Name][Password][Bluetooth On/Off][Echo Cancel][Auto Answer Preference][Refuse All Calls][Clear Memory][Firmware Update]AppendixEn 203AppendixAppendix](https://usermanual.wiki/Pioneer/K026.User-Manual-5/User-Guide-1123209-Page-64.png)