Pioneer K031 Multi-Media AVN Navigation Server System with BT User Manual User Manaul 1
Pioneer Corporation Multi-Media AVN Navigation Server System with BT User Manaul 1
UserManual.wiki
>
Pioneer
>
K031 User Manual
>
User Manaul 1
Contents
1.
User Manaul 1
2.
User Manual 2
3.
User Manaul 3
4.
User Manual 4
5.
User Manual 5
6.
User Manual 6
7.
User Manual 7
8.
User Manual 8
9.
User Manual 9
10.
User Manual 10
11.
User Manual 11
12.
User Manual 12
13.
User Manual 13
14.
User Manual 14
15.
User Manual 15
User Manaul 1
Navigation menu
Upload a User Manual
Namespaces
Wiki Guide
HTML
PDF
Info
Views
User Manual
Discussion / Help
Navigation
![Manual overviewBefore using this product, be sure to read Im-portant Information for the User (a separatemanual) which contains warnings, cautions,and other important information that youshould note.How to use this manualFinding the operation procedure forwhat you want to doWhen you have decided what you want to do,you can find the page you need from the Con-tents.Finding the operation procedure froma menu nameIf you want to check the meaning of an itemdisplayed on the screen, you will find the ne-cessary page from the Display information atthe end of the manual.GlossaryUse the glossary to find the meanings ofterms.Conventions used in this manualBefore moving on, take a few minutes to readthe following information about the conven-tions used in this manual. Familiarity withthese conventions will help you greatly as youlearn how to use your new equipment.!Buttons on your navigation system are de-scribed in ALL CAPITAL,BOLD lettering:e.g.)MENU button, MAP button.!Items in different menus, screen titles, andfunctional components are described inbold with double quotation marks “”:e.g.)“Destination Menu”screen or “AVSource”screen!Touch panel keys that are available on thescreen are described in bold in brackets [ ]:e.g.)[Destination], [Settings].!Extra information, alternatives and othernotes are presented in the following for-mat:e.g.)pIf the home location has not been storedyet, set the location first.!Descriptions of separate operations to beperformed on the same screen are indi-cated with #at the beginning of the de-scription:e.g.)#Touch [OK].!References are indicated like this:e.g.)=For details, refer to How to use the navi-gation menu screens on page 22.Terms used in this manual“Front Display”and “Rear Display”In this manual, the screen that is attached tothe body of this navigation unit will be referredto as the “Front Display”. Any additional op-tional screen that is purchased for use in con-junction with this navigation unit will bereferred to as the “Rear Display”.“Video image”“Video image”in this manual indicates mov-ing images of DVD-Video, DivX®, iPod, and anyequipment that is connected to this systemwith an RCA cable, such as general-purposeAV equipment.“External storage device (USB, SD)”The SD memory card, SDHC memory card, mi-croSD card, microSDHC card and USB mem-ory device are collectively referred to as the“external storage device (USB, SD)”. If it indi-cates the USB memory only, it is referred to asthe “USB storage device”.En 9Chapter01IntroductionIntroduction](https://usermanual.wiki/Pioneer/K031.User-Manaul-1/User-Guide-1235687-Page-9.png)
![Adjusting the LCD panel anglepThis function is available for AVIC-Z120BTonly.WARNINGWhen opening, closing and adjusting the angleof the LCD panel, be careful not to get your fin-gers caught.CAUTIONDo not open or close the LCD panel by force. Thismay cause malfunction.1 Press the hbutton.The “Monitor Setup”screen appears.2 Touch or to adjust the angle.3 Touch .pThe adjusted angle of the LCD panel will bememorized and the LCD panel will automa-tically return to that angle the next time theLCD panel is opened or closed.Inserting and ejecting a discInserting a disc (for AVIC-Z120BT)pThis section describes operations for AVIC-Z120BT.WARNING!When opening, closing and adjusting theangle of the LCD panel, be careful not to getyour fingers caught.!Do not use with the LCD panel left open. IfLCD panel is left open, it may result in injuryin the event of an accident.CAUTION!Do not open or close the LCD panel by force.This may cause malfunction.!Do not operate this navigation system untilthe LCD panel completely opens or closes. Ifthis navigation system is operated while theLCD panel is opening or closing, the LCDpanel may stop at that angle for safety.!Do not place a glass or a can on the openLCD panel. Doing so may break this naviga-tion system.!Do not insert anything other than a disc intothe disc loading slot.1 Press the hbutton.The “Monitor Setup”screen appears.2 Touch [Open].The LCD panel opens, and the disc loadingslot appears.3 Insert a disc into the disc loading slot.The disc is loaded, and the LCD panel closes.En14Chapter02 Basic operation](https://usermanual.wiki/Pioneer/K031.User-Manaul-1/User-Guide-1235687-Page-14.png)
![Ejecting a disc (for AVIC-Z120BT)pThis section describes operations for AVIC-Z120BT.1 Press the hbutton.The “Monitor Setup”screen appears.2 Touch [Disc Eject].The LCD panel opens, and the disc is ejected.3 Remove the disc, and press the hbut-ton.The LCD panel closes.Inserting a disc (for AVIC-X920BT)pThis section describes operations for AVIC-X920BT.%Insert a disc into the disc loading slot.pDo not insert anything other than a discinto the disc loading slot.Ejecting a disc (for AVIC-X920BT)pThis section describes operations for AVIC-X920BT.1 Press the hbutton.The touch panel keys for ejecting the mediaappear.2 Touch [Disc Eject].The disc is ejected.Inserting and ejecting anSD memory cardWARNINGEjecting an SD memory card during data transfercan damage the SD memory card. Be sure toeject the SD memory card by following the proce-dure described in this manual.CAUTIONIf data loss or corruption occurs on the storagedevice for any reason, it is usually not possible torecover the data. Pioneer accepts no liability fordamages, costs or expenses arising from dataloss or corruption.pThis system is not compatible with MultiMedia Card (MMC).pCompatibility with all SD memory cards isnot guaranteed.pThis unit may not achieve optimum perfor-mance with some SD memory cards.Inserting an SD memory card(for AVIC-Z120BT)pThis section describes operations for AVIC-Z120BT.En 15Chapter02Basic operationBasic operation](https://usermanual.wiki/Pioneer/K031.User-Manaul-1/User-Guide-1235687-Page-15.png)
![CAUTION!Do not press the hbutton when an SD mem-ory card is not fully inserted. Doing so may da-mage the card.!Do not press the hbutton before an SD mem-ory card has been completely removed. Doingso may damage the card.1 Press the hbutton.The “Monitor Setup”screen appears.2 Touch [SD Insert].The LCD panel opens, and the SD card slot ap-pears.3 Insert an SD memory card into the SDcard slot.Insert it with the label surface facing to the up-side and press the card until it clicks and com-pletely locks.4 Press the hbutton.The LCD panel closes.pIf data related to map data, such as custo-mized POI data, is stored on the SD mem-ory card, the navigation system restarts.Ejecting an SD memory card(for AVIC-Z120BT)pThis section describes operations for AVIC-Z120BT.1 Press the hbutton.The “Monitor Setup”screen appears.2 Touch [Eject SD].The LCD panel opens.pTouch [Yes] if the message indicating thatthe flap opens after the navigation systemrestarts appears.The navigation system restarts, and then theLCD panel opens.3 Press the middle of the SD memorycard gently until it clicks.En16Chapter02 Basic operation](https://usermanual.wiki/Pioneer/K031.User-Manaul-1/User-Guide-1235687-Page-16.png)
![4 Pull the SD memory card out straight.5 Press the hbutton.The LCD panel closes.pIf data related to map data, such as custo-mized POI data, is stored on the SD mem-ory card, the navigation system restarts.pWhen you eject the SD memory card bytouching [Eject SD], the model informationthat you are using will be automaticallystored into the SD memory card.The utility program AVIC FEEDS will usethis information to recognize the modelthat you use.Inserting an SD memory card(for AVIC-X920BT)pThis section describes operations for AVIC-X920BT.%Insert an SD memory card into the SDcard slot.Insert the SD memory card with the terminalcontacts facing down, and press the card untilit clicks and locks completely.pIf data related to map data, such as custo-mized POI data, is stored on the SD mem-ory card, the navigation system restarts.Ejecting an SD memory card(for AVIC-X920BT)pThis section describes operations for AVIC-X920BT.1 Press the hbutton.The touch panel keys for ejecting the mediaappear.2 Touch [Eject SD].A message prompting you to remove the SDmemory card appears.3 Press the middle of the SD memorycard gently until it clicks.4 Pull the SD memory card out straight.En 17Chapter02Basic operationBasic operation](https://usermanual.wiki/Pioneer/K031.User-Manaul-1/User-Guide-1235687-Page-17.png)
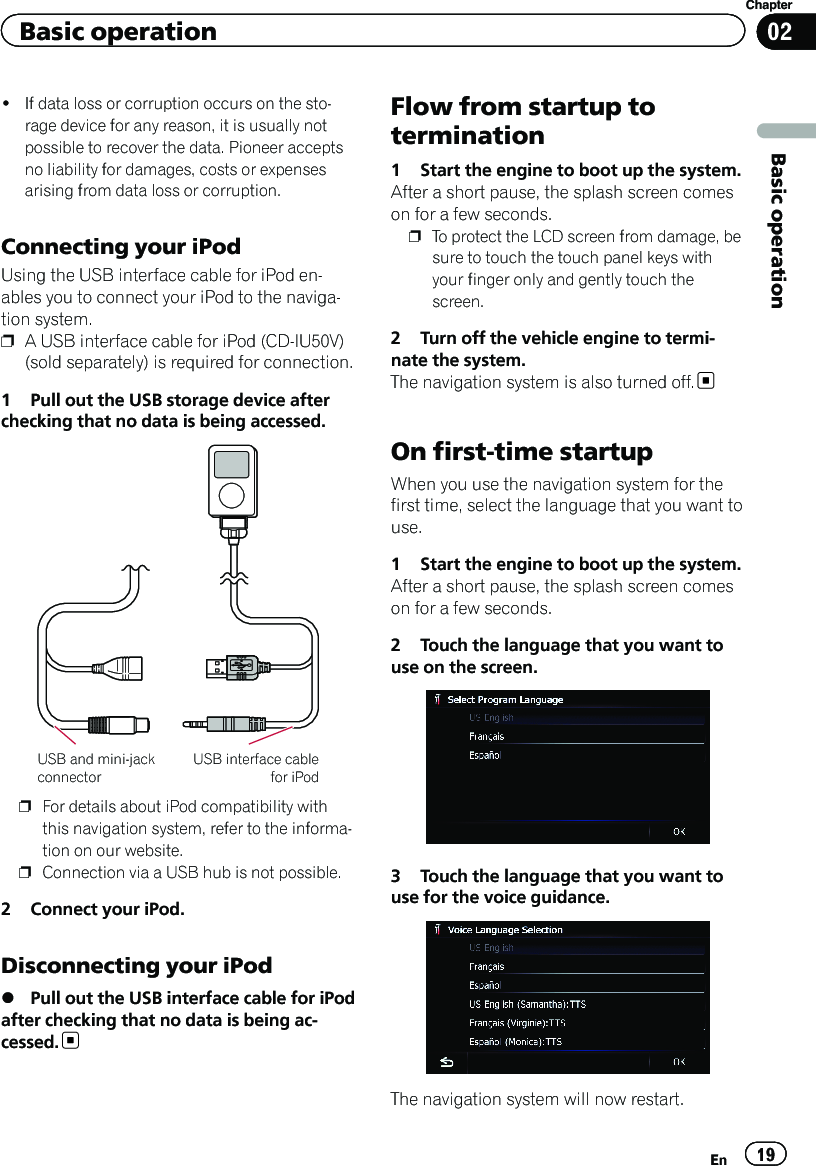
![When the data related to map data isstoredIf data related to map data, such as custo-mized POI data, is stored on the SD memorycard, operating procedures are slightly differ-ent.1 Press the hbutton and then touch[Eject SD].2 Touch [Yes].The navigation system restarts, and a messageprompting you to remove the SD memory cardappears.3 Eject the SD memory card while themessage is displayed.Eject the SD memory card before touching[OK].4 Touch [OK].The navigation system restarts.Plugging and unplugging aUSB storage deviceCAUTION!To prevent data loss and damage to the sto-rage device, never remove it from this naviga-tion system while data is being transferred.!If data loss or corruption occurs on the sto-rage device for any reason, it is usually notpossible to recover the data. Pioneer acceptsno liability for damages, costs or expensesarising from data loss or corruption.Plugging in a USB storage device%Plug a USB storage device into the USBconnector.USB connectorUSB storage devicepCompatibility with all USB storage devicesis not guaranteed.This navigation system may not achieve op-timum performance with some USB sto-rage devices.pConnection via a USB hub is not possible.Unplugging a USB storage device%Pull out the USB storage device afterchecking that no data is being accessed.Connecting anddisconnecting an iPodCAUTION!To prevent data loss and damage to the sto-rage device, never remove it from this naviga-tion system while data is being transferred.En18Chapter02 Basic operation](https://usermanual.wiki/Pioneer/K031.User-Manaul-1/User-Guide-1235687-Page-18.png)
![4 Read the disclaimer carefully, checkingits details, and then touch [OK] if youagree to the conditions.The map screen appears.Regular startup%Start the engine to boot up the system.After a short pause, the splash screen comeson for a few seconds.pThe screen shown will differ depending onthe previous conditions.pWhen there is no route, the disclaimer ap-pears after the navigation system reboots.Read the disclaimer carefully, checking itsdetails, and then touch [OK] if you agree tothe conditions.pIf the anti-theft function is activated, youmust enter your password.Read the disclaimer carefully, checking itsdetails, and then touch [OK] if you agree tothe conditions.En20Chapter02 Basic operation](https://usermanual.wiki/Pioneer/K031.User-Manaul-1/User-Guide-1235687-Page-20.png)