Pioneer K031 Multi-Media AVN Navigation Server System with BT User Manual 2
Pioneer Corporation Multi-Media AVN Navigation Server System with BT 2
UserManual.wiki
>
Pioneer
>
K031 User Manual
>
User Manual 2
Contents
1.
User Manaul 1
2.
User Manual 2
3.
User Manaul 3
4.
User Manual 4
5.
User Manual 5
6.
User Manual 6
7.
User Manual 7
8.
User Manual 8
9.
User Manual 9
10.
User Manual 10
11.
User Manual 11
12.
User Manual 12
13.
User Manual 13
14.
User Manual 14
15.
User Manual 15
User Manual 2
Navigation menu
Upload a User Manual
Namespaces
Wiki Guide
HTML
PDF
Info
Views
User Manual
Discussion / Help
Navigation

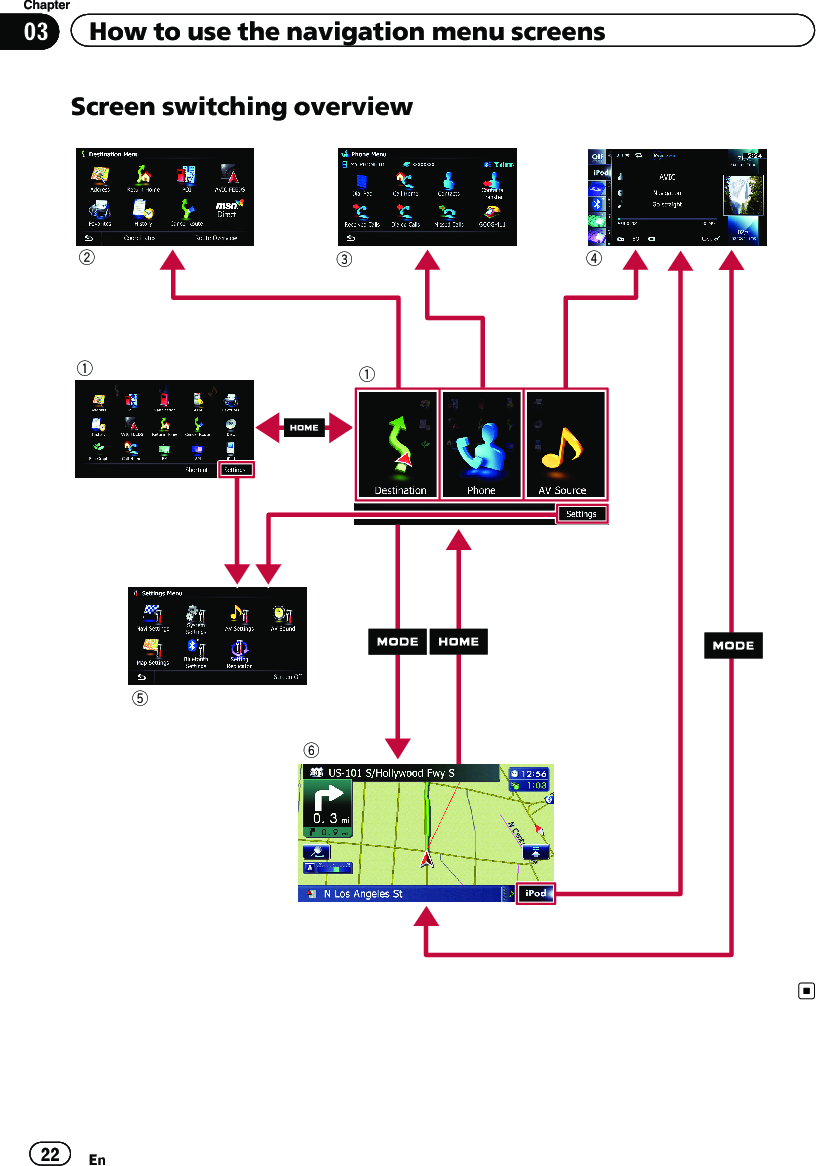
![What you can do on eachmenu1Top MenuPress the HOME button to display the “TopMenu”screen.This is the starting menu to access the desiredscreens and operate the various functions.There are two types of the “Top Menu”screen.Classic MenuShortcut MenupIn this manual, Classic Menu will be re-ferred to as “Top Menu”.2Destination MenuYou can search for your destination on thismenu. You can also check or cancel your setroute from this menu.3Phone MenuYou can access the screen that is related tohands-free phoning to see call histories andchange the settings on the Bluetooth wirelesstechnology connection.4AV operation screenThis is the screen that normally appears whenyou play the AV source.5Settings MenuYou can access the screen to customize set-tings.6Map screenPress the MODE button to display the naviga-tion map screen.Shortcut MenuRegistering your favorite menu items in short-cuts allows you to quickly jump to the regis-tered menu screen by a simple touch on theShortcut Menu screen.Selecting the shortcutpUp to 15 menu items can be registered inshortcuts.1 Press the HOME button repeatedly todisplay the “Shortcut Menu”screen.pWhen you use the navigation system for thefirst time or no items are set on shortcut, amessage will appear. Touch [Yes] to pro-ceed to next step.2 Touch [Shortcut].The Shortcut selection screen appears.3 Touch the tab on the right edge or scrollthe bar to display the icon that you wantto set to shortcut.Scroll bar4 Touch and hold the icon that you wantto add to shortcut.5 Move the icon to the left side of thescreen, and then release it.The selected item is added to shortcut.En 23Chapter03How to use the navigation menu screensHow to use the navigation menu screens](https://usermanual.wiki/Pioneer/K031.User-Manual-2/User-Guide-1235688-Page-3.png)
![Canceling the shortcut1 Touch and hold the icon that you wantto cancel the shortcut.2 Move the icon to the right side of thescreen, and then release it.Operating list screens (e.g.POI list)154231Screen title2Touching or on the scroll bar scrollsthrough the list and allows you to view the re-maining items.3Returns the previous screen.4Listed itemsTouching an item on the list allows you to nar-row down the options and proceed to the nextoperation.5If all of the characters cannot be displayedwithin the displayed area, touching the key tothe right of the item allows you to see remain-ing characters.Operating the on-screenkeyboard1435 76281Screen titleThe screen title appears.2Text boxDisplays the characters that are entered. Ifthere is no text in the box, an informativeguide with text appears.3KeyboardTouch the keys to enter the characters.4Returns the previous screen.5KeysSwitches the on-screen keyboard layout.6Sym.,Others,0-9You can enter other characters of alphabet.You can also enter text with marks such as [&]or [+] or numbers.Touch to toggle the selection.pWhen you use any of “A”,“Ä”,“Å”,“Æ”,the displayed result is the same.7OKConfirms the entry and allows you to proceedto the next step.8Deletes the input text one letter at a time, be-ginning at the end of the text. Continuing totouch the button deletes all of the text.En24Chapter03 How to use the navigation menu screens](https://usermanual.wiki/Pioneer/K031.User-Manual-2/User-Guide-1235688-Page-4.png)
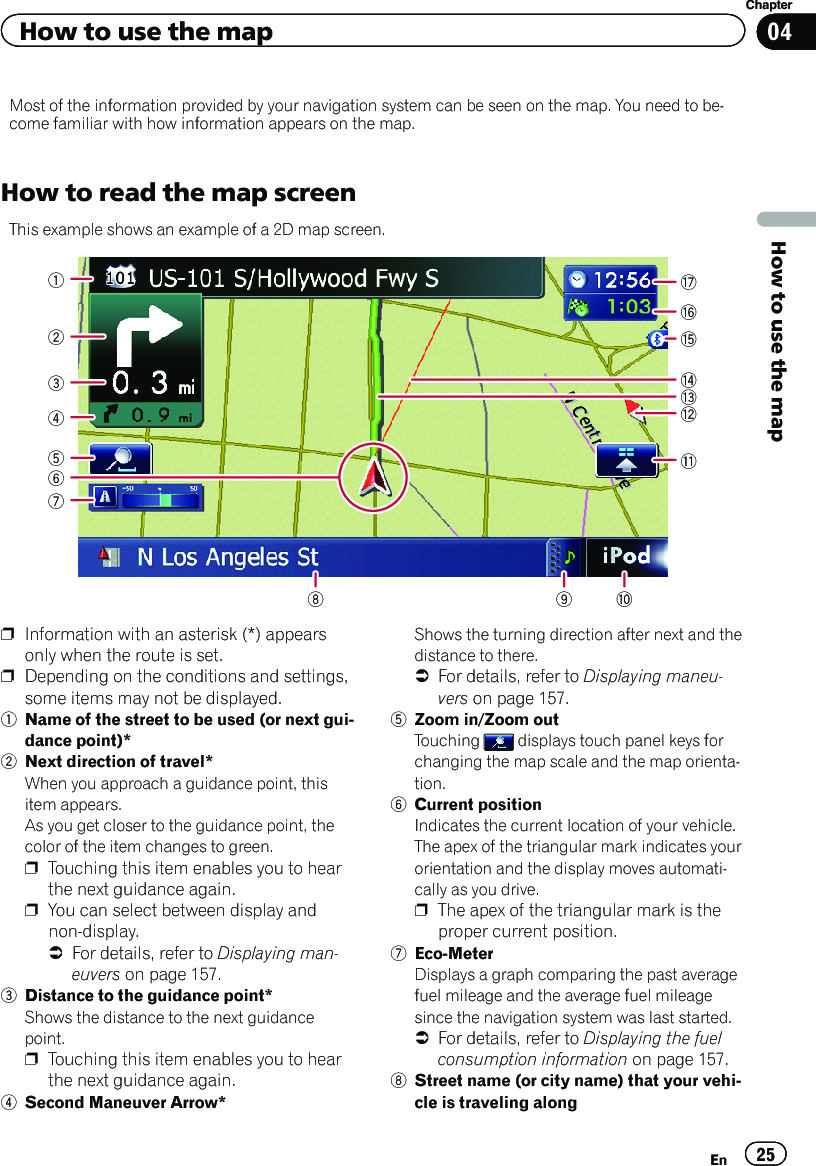
![=For details, refer to Setting the currentstreet name display on page 156.9Extension tab for the AV information barTouching this tab opens the AV informationbar and enables you to briefly view the currentstatus on the AV source. Touching it again re-tracts the bar.aShortcut to the AV operation screenThe AV source currently selected is shown.Touching the indicator displays the AV opera-tion screen of the current source directly.pIf you connect your iPod to this naviga-tion system, the artwork for the albumthat is playing appears.bQuick Access iconDisplays the “Quick Access”menu.=For details, refer to Setting the “QuickAccess”menu on page 28.cMap orientation indicator!When “North up”is selected, is dis-played.!When “Heading up”is selected, isdisplayed.pThe red arrow indicates north.dCurrent route*The route currently set is highlighted in coloron the map. If a waypoint is set on the route,the route after the next waypoint is high-lighted in another color.eDirection line*The direction towards your destination (nextwaypoint, or cursor) is indicated with astraight line.fBluetooth connection iconThis icon shows whether the device featuringBluetooth technology is connected or not. Youcan select between display and non-display.=For details, refer to Displaying the Blue-tooth connection icon on page 156.gMulti-Info windowEach touch of [Multi-Info window] changesthe display information.!Distance to the destination (or dis-tance to waypoint)*!Estimated time of arrival at your des-tination or waypoint*The estimated time of arrival is an idealvalue calculated based on the value setfor “Average Speed”and the actualdriving speed. The estimated time of ar-rival is only a reference value, and doesnot guarantee arrival at that time.!Travel time to your destination orwaypoint*hCurrent timeMeaning of guidance flagsDestinationThe checkered flag indicates yourdestination.WaypointThe blue flags indicate your way-points.Guidance pointThe next guidance point (next turn-ing point, etc.) is shown by a yel-low flag.Enlarged map of the intersectionWhen “Close Up View”in the “Map Settings”screen is “On”, an enlarged map of the inter-section appears.=For details, refer to Setting the auto-zoomdisplay on page 154.En26Chapter04 How to use the map](https://usermanual.wiki/Pioneer/K031.User-Manual-2/User-Guide-1235688-Page-6.png)
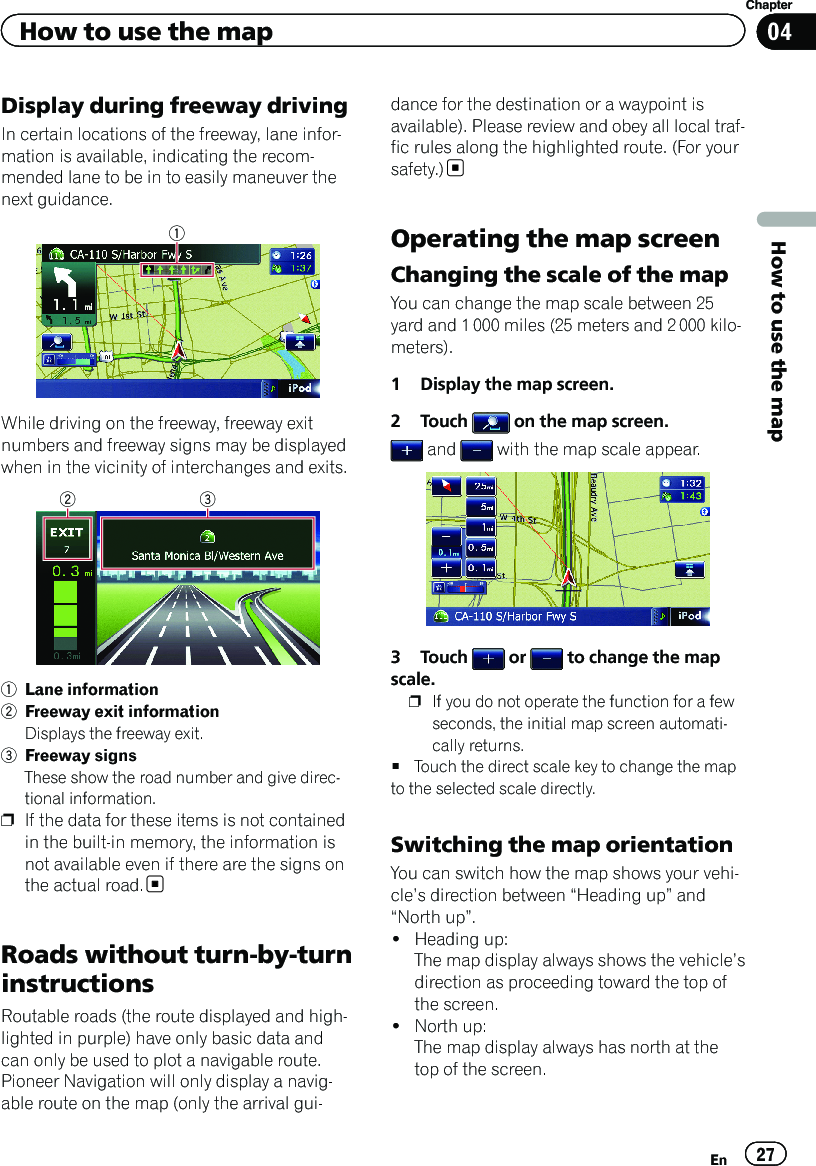
![pThe map orientation is fixed at “North up”when the map scale is 25 miles (50 kilo-meters) or more.pThe map orientation is fixed at “Headingup”when the 3D map screen is displayed.1 Display the map screen.2 Touch on the map screen.or appears.3 Touch or to switch the vehicle’sdirection.Each time you touch the key changes that set-ting.pIf you do not operate the function for a fewseconds, the initial map screen automati-cally returns.Scrolling the map to theposition you want to see1 Display the map screen.2 Touch and drag the map in the desireddirection to scroll.211Cursor2Distance from the current positionPositioning the cursor to the desired locationresults in a brief informational overview aboutthe location being displayed at the bottom ofscreen, with street name and other informa-tion for this location being shown. (The infor-mation shown varies depending on theposition.)pThe scrolling increment depends on yourdragging length.#Touch .The map returns to the current position.pPressing MODE button returns the map tothe current position.Setting the “Quick Access”menu“Quick Access”menu allows you to performvarious tasks, such as route calculation for thelocation indicated by the cursor or registeringa location in [Favorites], faster than using thenavigation menu.You can customize “Quick Access”displayedon screen. The “Quick Access”described hereare prepared as the default setting.=For details, refer to Selecting the “Quick Ac-cess”menu on page 160.pItems marked with an asterisk (*) cannotbe removed from the Quick Access menu.%When the map is displayed, touch .Quick Access menu:Route Options*Displayed when the map is not scrolled. Thisitem can be selected only during route gui-dance.You can modify the conditions for route calcu-lation and recalculate the current route.=For details, refer to Modifying the route cal-culation conditions on page 42.:Destination*En28Chapter04 How to use the map](https://usermanual.wiki/Pioneer/K031.User-Manual-2/User-Guide-1235688-Page-8.png)
![Displayed when the map is scrolled. Set theroute to the place specified with the cursor.:RegistrationRegister information on the location indicatedby the cursor to “Favorites”.=For details, refer to Registering a location byscroll mode on page 46.:Vicinity SearchFind POIs (Points Of Interest) in the vicinity ofthe cursor.=For details, refer to Searching for a nearbyPOI on page 37.:Overlay POIDisplays icons for surrounding facilities (POI)on the map.=For details, refer to Displaying POI on themap on page 157.:VolumeDisplays the “Volume Settings”screen.=For details, refer to Setting the Volume forGuidance and Phone on page 163.:ContactsDisplays the “Contacts List”screen.=For details, refer to Calling a number in the“Contacts List”on page 69.CloseHides the Quick Access menu.Switching the view modeVarious types of screen displays can be se-lected for navigation guidance.1 Display the “Map Settings”screen.=For details, refer to Displaying the “MapSettings”screen on page 154.2 Touch [View Mode].The “View Mode”screen appears.3 Touch the type that you want to set.You can select the following types:!2D View (default):Displays a normal map (2D map).!3D View:Displays a map with an antenna view (3Dmap).!Street View:Information on the next four guidancepoints closest to the current location ap-pear in order from top to bottom on the leftside of the screen. The following informa-tion is displayed.—Name of the next route to be taken bythe vehicle—Arrow indicating the direction of the ve-hicle—Distance to the guidance pointspThis mode is available when the route isset.!Rear View:Displays the rear view image on the leftside of the screen and the map on the rightside of the screen.En 29Chapter04How to use the mapHow to use the map](https://usermanual.wiki/Pioneer/K031.User-Manual-2/User-Guide-1235688-Page-9.png)
![pThis mode is available when [Camera]isset to “On”.=For details, refer to Setting for rearview camera on page 164.!Eco Graph:Displays a graph for eco-driving on the leftside of the screen and the map on the rightside of the screen.=For details, refer to Displaying “EcoGraph”on the next page.En30Chapter04 How to use the map](https://usermanual.wiki/Pioneer/K031.User-Manual-2/User-Guide-1235688-Page-10.png)