Pioneer K031 Multi-Media AVN Navigation Server System with BT User Manual 2
Pioneer Corporation Multi-Media AVN Navigation Server System with BT 2
Pioneer >
Contents
User Manual 2

En 21
Chapter
02
Basic operation
Basic operation
Screen switching overview
2
5
6
11
34
En
22
Chapter
03 How to use the navigation menu screens
What you can do on each
menu
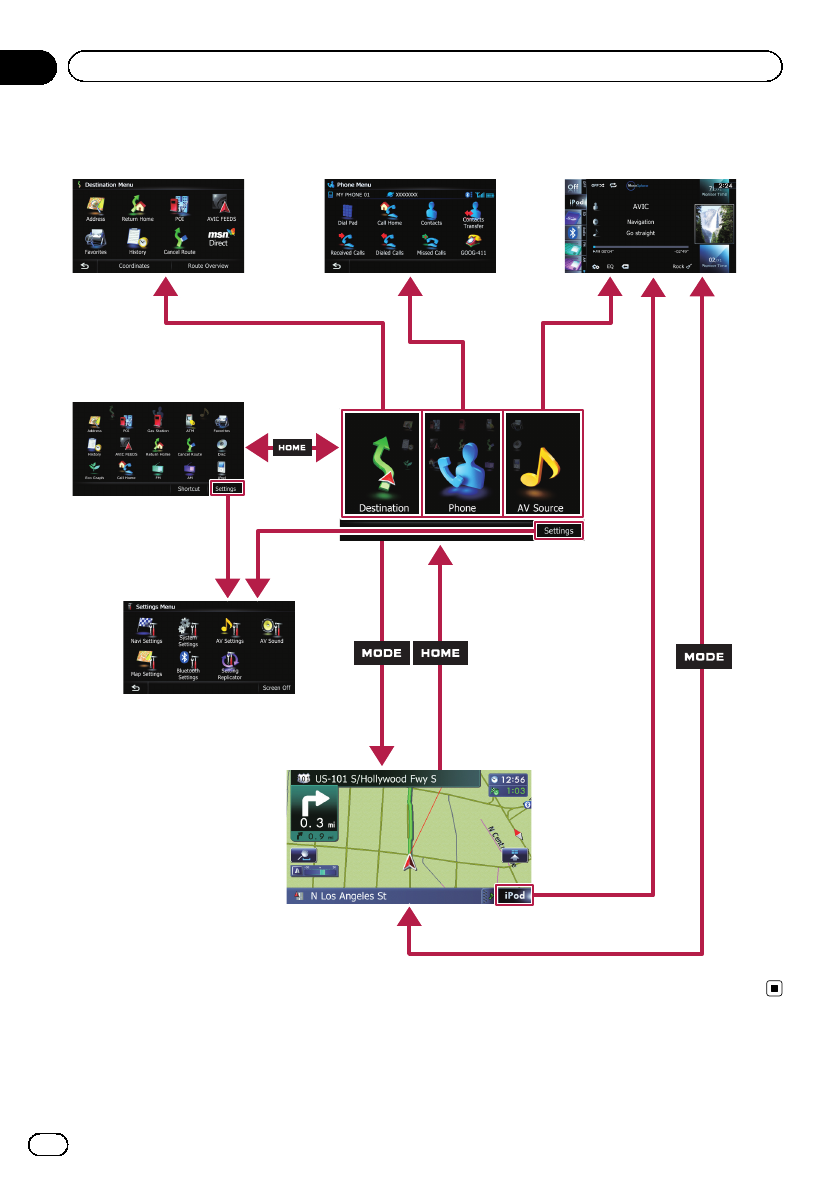
1Top Menu
Press the HOME button to display the “Top
Menu”screen.
This is the starting menu to access the desired
screens and operate the various functions.
There are two types of the “Top Menu”screen.
Classic Menu
Shortcut Menu
pIn this manual, Classic Menu will be re-
ferred to as “Top Menu”.
2Destination Menu
You can search for your destination on this
menu. You can also check or cancel your set
route from this menu.
3Phone Menu
You can access the screen that is related to
hands-free phoning to see call histories and
change the settings on the Bluetooth wireless
technology connection.
4AV operation screen
This is the screen that normally appears when
you play the AV source.
5Settings Menu
You can access the screen to customize set-
tings.
6Map screen
Press the MODE button to display the naviga-
tion map screen.
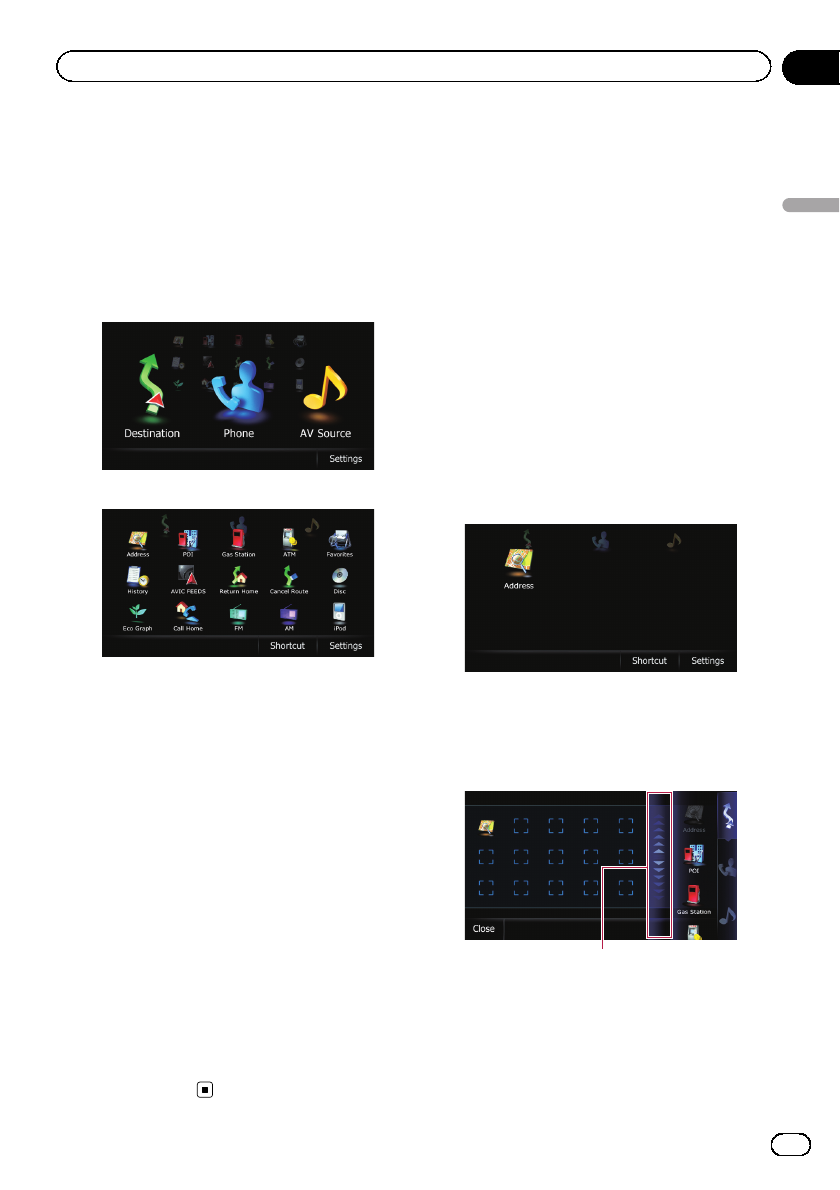
Shortcut Menu
Registering your favorite menu items in short-
cuts allows you to quickly jump to the regis-
tered menu screen by a simple touch on the
Shortcut Menu screen.
Selecting the shortcut
pUp to 15 menu items can be registered in
shortcuts.
1 Press the HOME button repeatedly to
display the “Shortcut Menu”screen.
pWhen you use the navigation system for the
first time or no items are set on shortcut, a
message will appear. Touch [Yes] to pro-
ceed to next step.
2 Touch [Shortcut].
The Shortcut selection screen appears.
3 Touch the tab on the right edge or scroll
the bar to display the icon that you want
to set to shortcut.
Scroll bar
4 Touch and hold the icon that you want
to add to shortcut.
5 Move the icon to the left side of the
screen, and then release it.
The selected item is added to shortcut.
En 23
Chapter
03
How to use the navigation menu screens
How to use the navigation menu screens
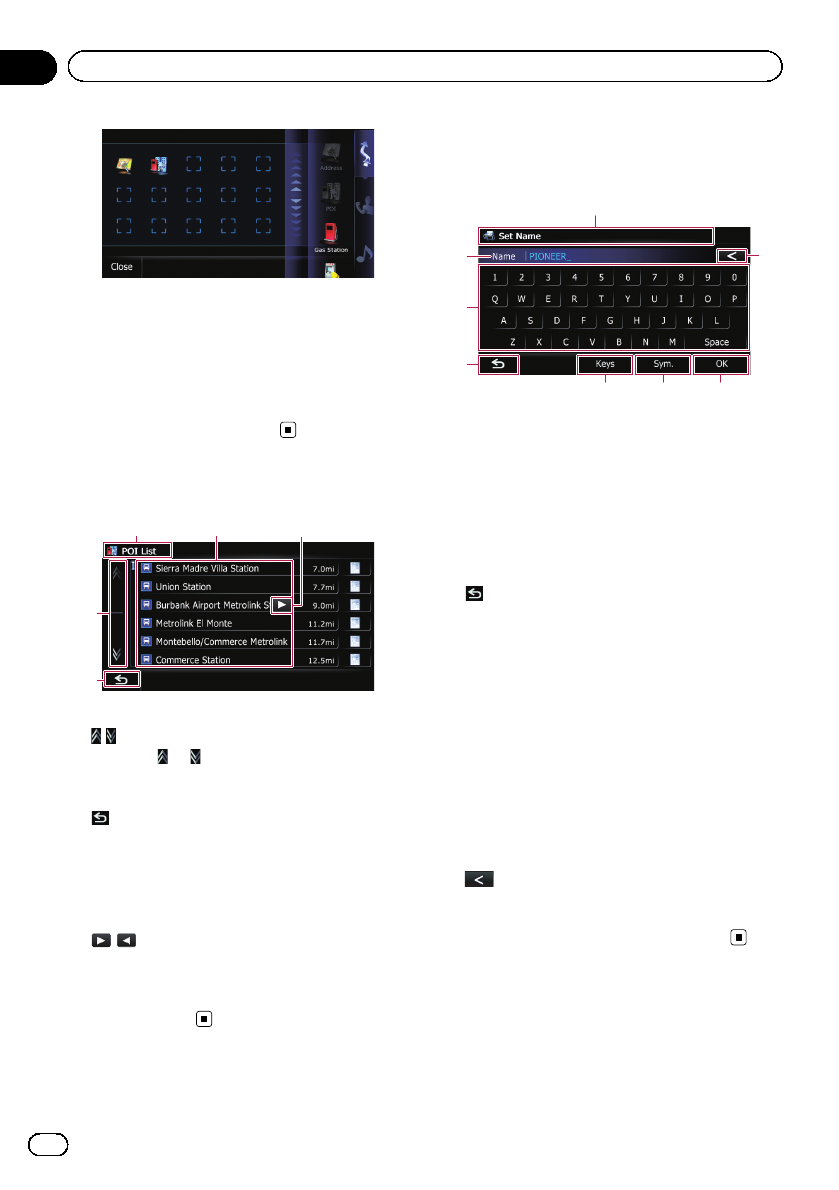
Canceling the shortcut
1 Touch and hold the icon that you want
to cancel the shortcut.
2 Move the icon to the right side of the
screen, and then release it.
Operating list screens (e.g.
POI list)
154
2
3
1Screen title
2
Touching or on the scroll bar scrolls
through the list and allows you to view the re-
maining items.
3
Returns the previous screen.
4Listed items
Touching an item on the list allows you to nar-
row down the options and proceed to the next
operation.
5
If all of the characters cannot be displayed
within the displayed area, touching the key to
the right of the item allows you to see remain-
ing characters.
Operating the on-screen
keyboard
1
4
3
5 76
28
1Screen title
The screen title appears.
2Text box
Displays the characters that are entered. If
there is no text in the box, an informative
guide with text appears.
3Keyboard
Touch the keys to enter the characters.
4
Returns the previous screen.
5Keys
Switches the on-screen keyboard layout.
6Sym.,Others,0-9
You can enter other characters of alphabet.
You can also enter text with marks such as [&]
or [+] or numbers.
Touch to toggle the selection.
pWhen you use any of “A”,“Ä”,“Å”,“Æ”,
the displayed result is the same.
7OK
Confirms the entry and allows you to proceed
to the next step.
8
Deletes the input text one letter at a time, be-
ginning at the end of the text. Continuing to
touch the button deletes all of the text.
En
24
Chapter
03 How to use the navigation menu screens
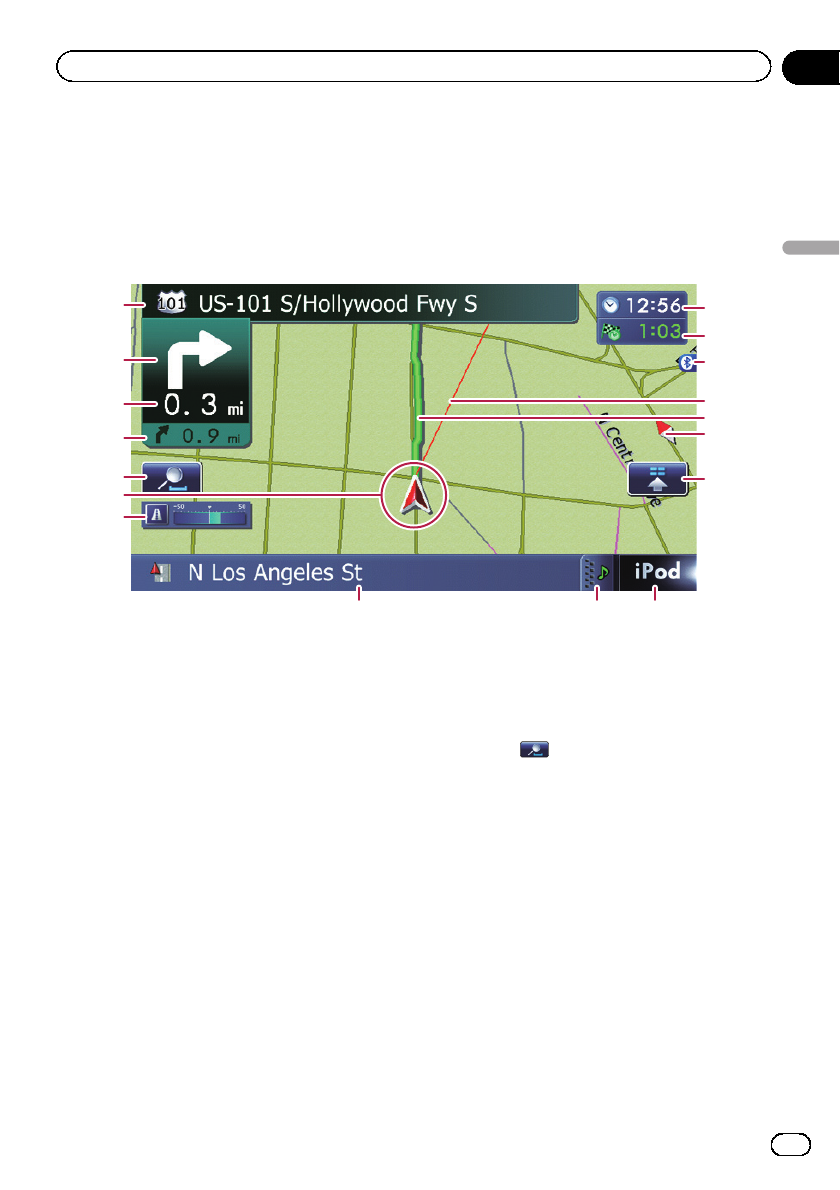
Most of the information provided by your navigation system can be seen on the map. You need to be-
come familiar with how information appears on the map.
How to read the map screen
This example shows an example of a 2D map screen.
1
89 a
b
2
3
4c
e
d
f
5
7
6
g
h
pInformation with an asterisk (*) appears
only when the route is set.
pDepending on the conditions and settings,
some items may not be displayed.
1Name of the street to be used (or next gui-
dance point)*
2Next direction of travel*
When you approach a guidance point, this
item appears.
As you get closer to the guidance point, the
color of the item changes to green.
pTouching this item enables you to hear
the next guidance again.
pYou can select between display and
non-display.
=For details, refer to Displaying man-
euvers on page 157.
3Distance to the guidance point*
Shows the distance to the next guidance
point.
pTouching this item enables you to hear
the next guidance again.
4Second Maneuver Arrow*
Shows the turning direction after next and the
distance to there.
=For details, refer to Displaying maneu-
vers on page 157.
5Zoom in/Zoom out
Touching displays touch panel keys for
changing the map scale and the map orienta-
tion.
6Current position
Indicates the current location of your vehicle.
The apex of the triangular mark indicates your
orientation and the display moves automati-
cally as you drive.
pThe apex of the triangular mark is the
proper current position.
7Eco-Meter
Displays a graph comparing the past average
fuel mileage and the average fuel mileage
since the navigation system was last started.
=For details, refer to Displaying the fuel
consumption information on page 157.
8Street name (or city name) that your vehi-
cle is traveling along
En 25
Chapter
04
How to use the map
How to use the map
=For details, refer to Setting the current
street name display on page 156.
9Extension tab for the AV information bar
Touching this tab opens the AV information
bar and enables you to briefly view the current
status on the AV source. Touching it again re-
tracts the bar.
aShortcut to the AV operation screen
The AV source currently selected is shown.
Touching the indicator displays the AV opera-
tion screen of the current source directly.
pIf you connect your iPod to this naviga-
tion system, the artwork for the album
that is playing appears.
bQuick Access icon
Displays the “Quick Access”menu.
=For details, refer to Setting the “Quick
Access”menu on page 28.
cMap orientation indicator
!When “North up”is selected, is dis-
played.
!When “Heading up”is selected, is
displayed.
pThe red arrow indicates north.
dCurrent route*
The route currently set is highlighted in color
on the map. If a waypoint is set on the route,
the route after the next waypoint is high-
lighted in another color.
eDirection line*
The direction towards your destination (next
waypoint, or cursor) is indicated with a
straight line.
fBluetooth connection icon
This icon shows whether the device featuring
Bluetooth technology is connected or not. You
can select between display and non-display.
=For details, refer to Displaying the Blue-
tooth connection icon on page 156.
gMulti-Info window
Each touch of [Multi-Info window] changes
the display information.
!Distance to the destination (or dis-
tance to waypoint)*
!Estimated time of arrival at your des-
tination or waypoint*
The estimated time of arrival is an ideal
value calculated based on the value set
for “Average Speed”and the actual
driving speed. The estimated time of ar-
rival is only a reference value, and does
not guarantee arrival at that time.
!Travel time to your destination or
waypoint*
hCurrent time
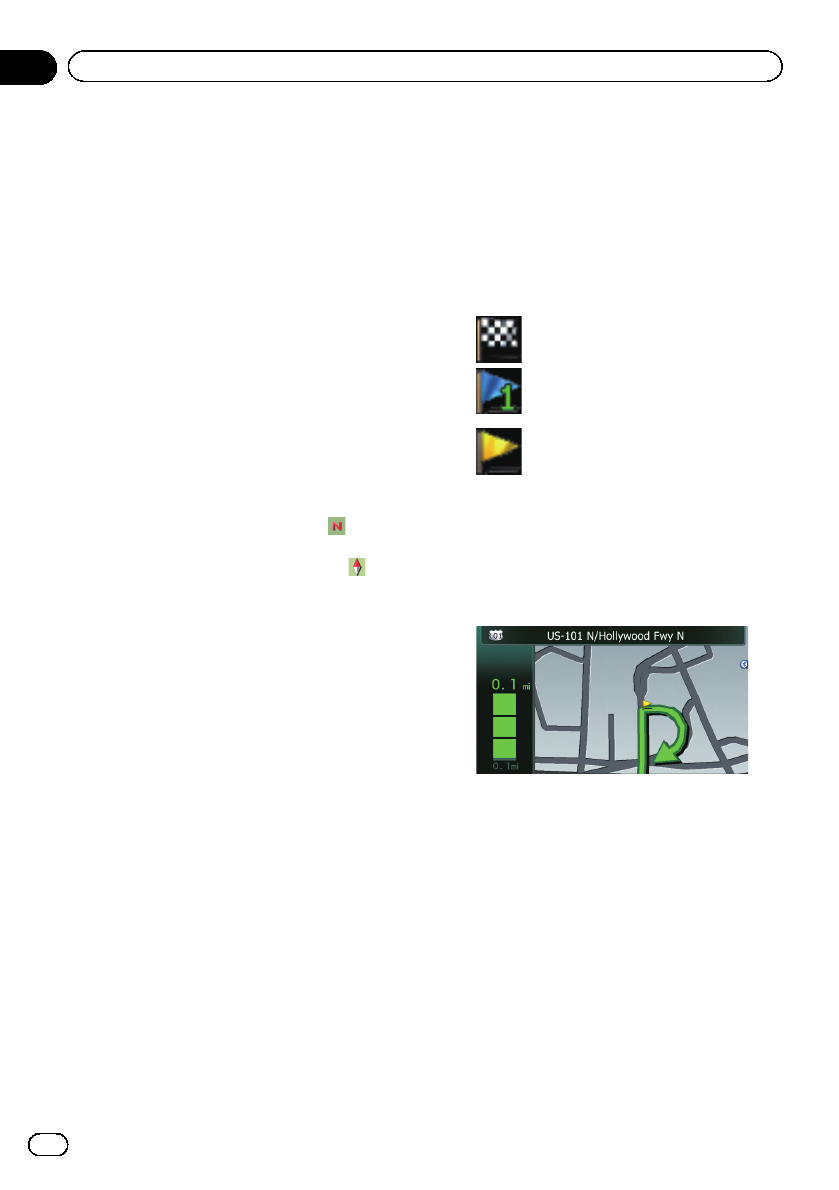
Meaning of guidance flags
Destination
The checkered flag indicates your
destination.
Waypoint
The blue flags indicate your way-
points.
Guidance point
The next guidance point (next turn-
ing point, etc.) is shown by a yel-
low flag.
Enlarged map of the intersection
When “Close Up View”in the “Map Settings”
screen is “On”, an enlarged map of the inter-
section appears.
=For details, refer to Setting the auto-zoom
display on page 154.
En
26
Chapter
04 How to use the map
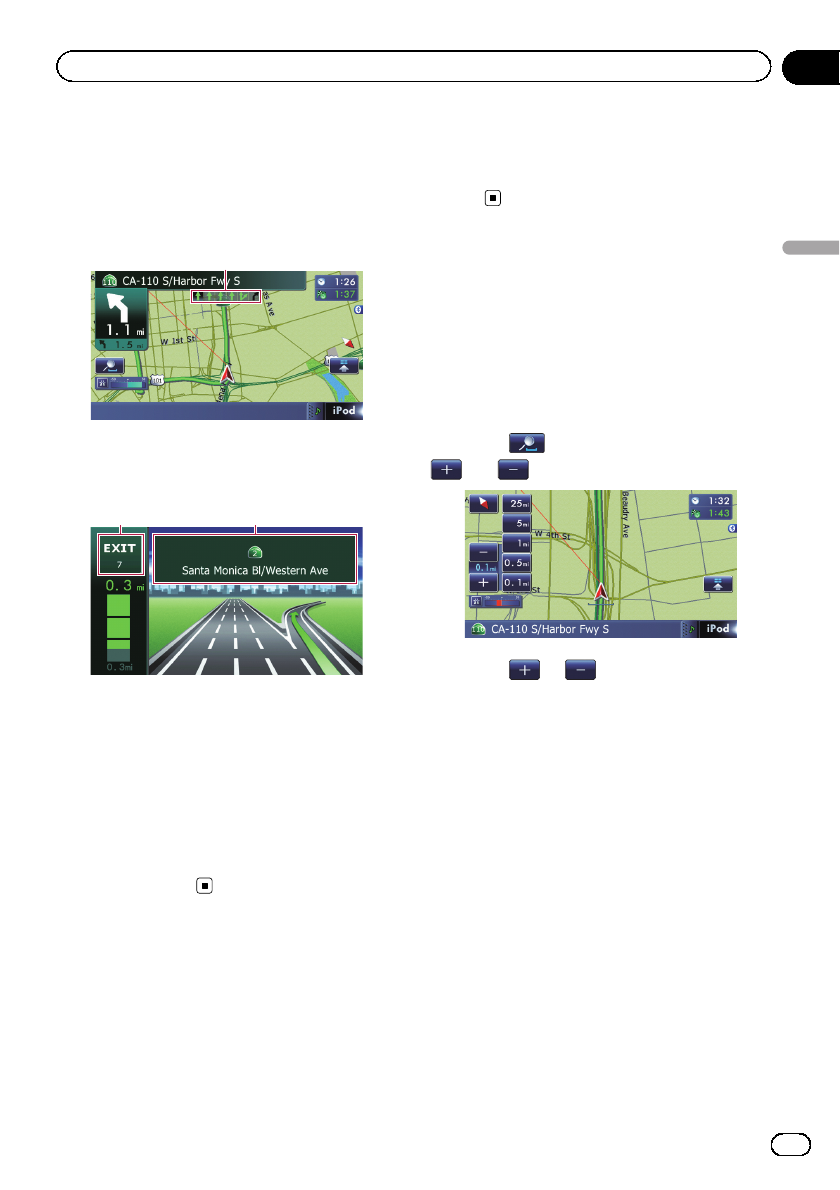
Display during freeway driving
In certain locations of the freeway, lane infor-
mation is available, indicating the recom-
mended lane to be in to easily maneuver the
next guidance.
1
While driving on the freeway, freeway exit
numbers and freeway signs may be displayed
when in the vicinity of interchanges and exits.
2 3
1Lane information
2Freeway exit information
Displays the freeway exit.
3Freeway signs
These show the road number and give direc-
tional information.
pIf the data for these items is not contained
in the built-in memory, the information is
not available even if there are the signs on
the actual road.
Roads without turn-by-turn
instructions
Routable roads (the route displayed and high-
lighted in purple) have only basic data and
can only be used to plot a navigable route.
Pioneer Navigation will only display a navig-
able route on the map (only the arrival gui-
dance for the destination or a waypoint is
available). Please review and obey all local traf-
fic rules along the highlighted route. (For your
safety.)
Operating the map screen
Changing the scale of the map
You can change the map scale between 25
yard and 1 000 miles (25 meters and 2 000 kilo-
meters).
1 Display the map screen.
2 Touch on the map screen.
and with the map scale appear.
3 Touch or to change the map
scale.
pIf you do not operate the function for a few
seconds, the initial map screen automati-
cally returns.
#Touch the direct scale key to change the map
to the selected scale directly.
Switching the map orientation
You can switch how the map shows your vehi-
cle’s direction between “Heading up”and
“North up”.
!Heading up:
The map display always shows the vehicle’s
direction as proceeding toward the top of
the screen.
!North up:
The map display always has north at the
top of the screen.
En 27
Chapter
04
How to use the map
How to use the map

pThe map orientation is fixed at “North up”
when the map scale is 25 miles (50 kilo-
meters) or more.
pThe map orientation is fixed at “Heading
up”when the 3D map screen is displayed.
1 Display the map screen.
2 Touch on the map screen.
or appears.
3 Touch or to switch the vehicle’s
direction.
Each time you touch the key changes that set-
ting.
pIf you do not operate the function for a few
seconds, the initial map screen automati-
cally returns.
Scrolling the map to the
position you want to see
1 Display the map screen.
2 Touch and drag the map in the desired
direction to scroll.
2
1
1Cursor
2Distance from the current position
Positioning the cursor to the desired location
results in a brief informational overview about
the location being displayed at the bottom of
screen, with street name and other informa-
tion for this location being shown. (The infor-
mation shown varies depending on the
position.)
pThe scrolling increment depends on your
dragging length.
#Touch .
The map returns to the current position.
pPressing MODE button returns the map to
the current position.
Setting the “Quick Access”menu
“Quick Access”menu allows you to perform
various tasks, such as route calculation for the
location indicated by the cursor or registering
a location in [Favorites], faster than using the
navigation menu.
You can customize “Quick Access”displayed
on screen. The “Quick Access”described here
are prepared as the default setting.
=For details, refer to Selecting the “Quick Ac-
cess”menu on page 160.
pItems marked with an asterisk (*) cannot
be removed from the Quick Access menu.
%When the map is displayed, touch .
Quick Access menu
:Route Options*
Displayed when the map is not scrolled. This
item can be selected only during route gui-
dance.
You can modify the conditions for route calcu-
lation and recalculate the current route.
=For details, refer to Modifying the route cal-
culation conditions on page 42.
:Destination*
En
28
Chapter
04 How to use the map
Displayed when the map is scrolled. Set the
route to the place specified with the cursor.
:Registration
Register information on the location indicated
by the cursor to “Favorites”.
=For details, refer to Registering a location by
scroll mode on page 46.
:Vicinity Search
Find POIs (Points Of Interest) in the vicinity of
the cursor.
=For details, refer to Searching for a nearby
POI on page 37.
:Overlay POI
Displays icons for surrounding facilities (POI)
on the map.
=For details, refer to Displaying POI on the
map on page 157.
:Volume
Displays the “Volume Settings”screen.
=For details, refer to Setting the Volume for
Guidance and Phone on page 163.
:Contacts
Displays the “Contacts List”screen.
=For details, refer to Calling a number in the
“Contacts List”on page 69.
Close
Hides the Quick Access menu.
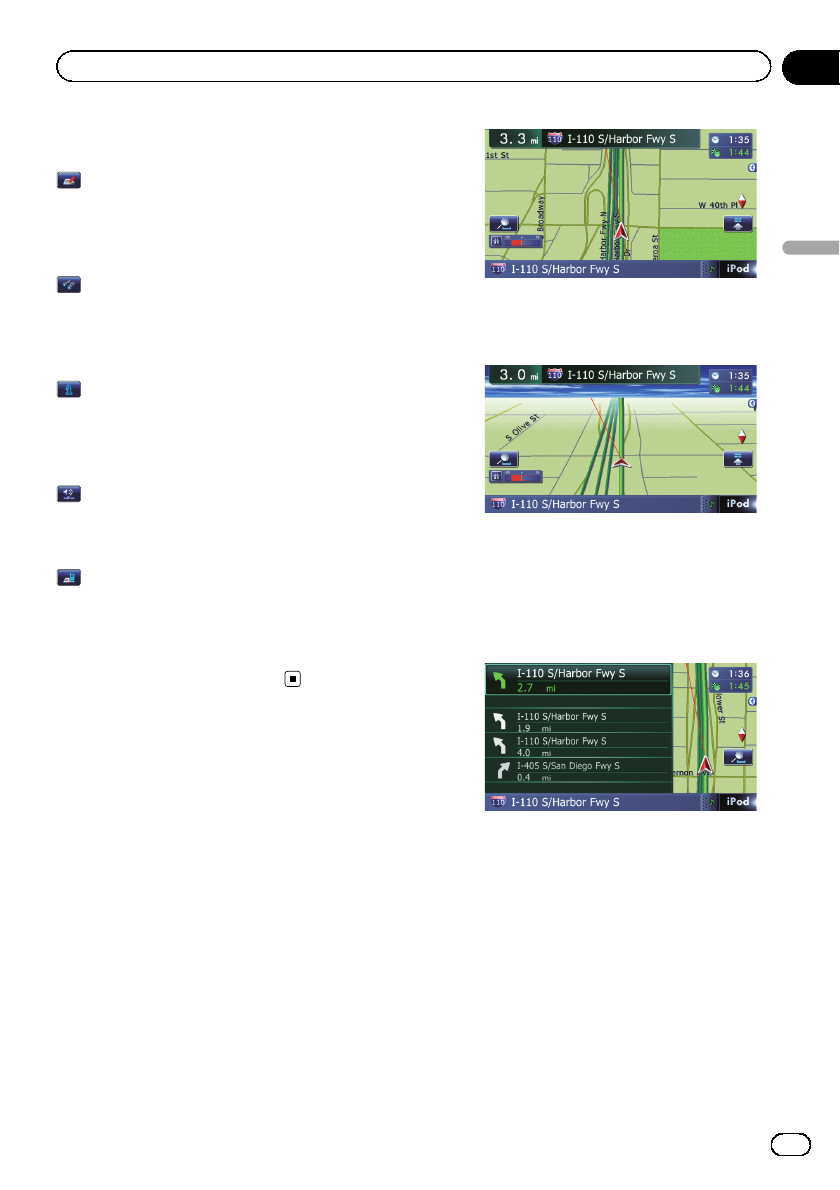
Switching the view mode
Various types of screen displays can be se-
lected for navigation guidance.
1 Display the “Map Settings”screen.
=For details, refer to Displaying the “Map
Settings”screen on page 154.
2 Touch [View Mode].
The “View Mode”screen appears.
3 Touch the type that you want to set.
You can select the following types:
!2D View (default):
Displays a normal map (2D map).
!3D View:
Displays a map with an antenna view (3D
map).
!Street View:
Information on the next four guidance
points closest to the current location ap-
pear in order from top to bottom on the left
side of the screen. The following informa-
tion is displayed.
—Name of the next route to be taken by
the vehicle
—Arrow indicating the direction of the ve-
hicle
—Distance to the guidance points
pThis mode is available when the route is
set.
!Rear View:
Displays the rear view image on the left
side of the screen and the map on the right
side of the screen.
En 29
Chapter
04
How to use the map
How to use the map
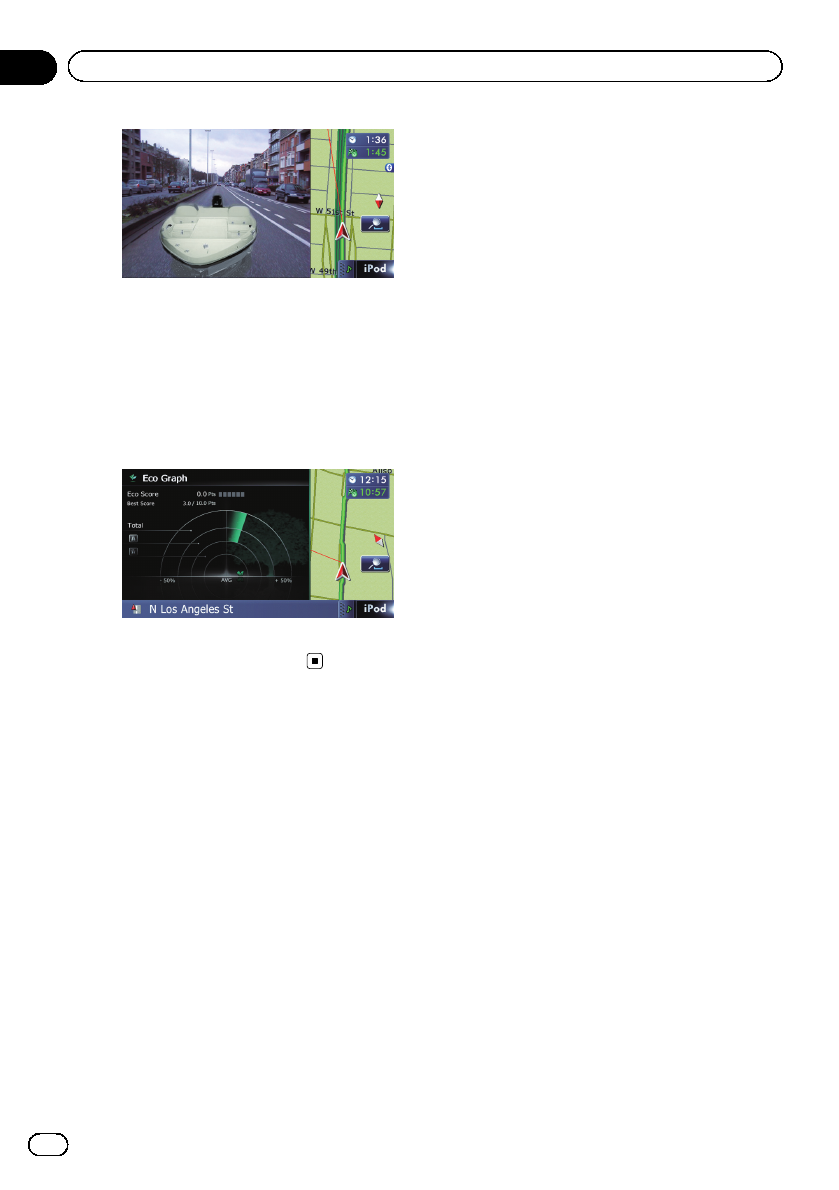
pThis mode is available when [Camera]is
set to “On”.
=For details, refer to Setting for rear
view camera on page 164.
!Eco Graph:
Displays a graph for eco-driving on the left
side of the screen and the map on the right
side of the screen.
=For details, refer to Displaying “Eco
Graph”on the next page.
En
30
Chapter
04 How to use the map