Pioneer K031 Multi-Media AVN Navigation Server System with BT User Manual 9
Pioneer Corporation Multi-Media AVN Navigation Server System with BT 9
Pioneer >
Contents
User Manual 9
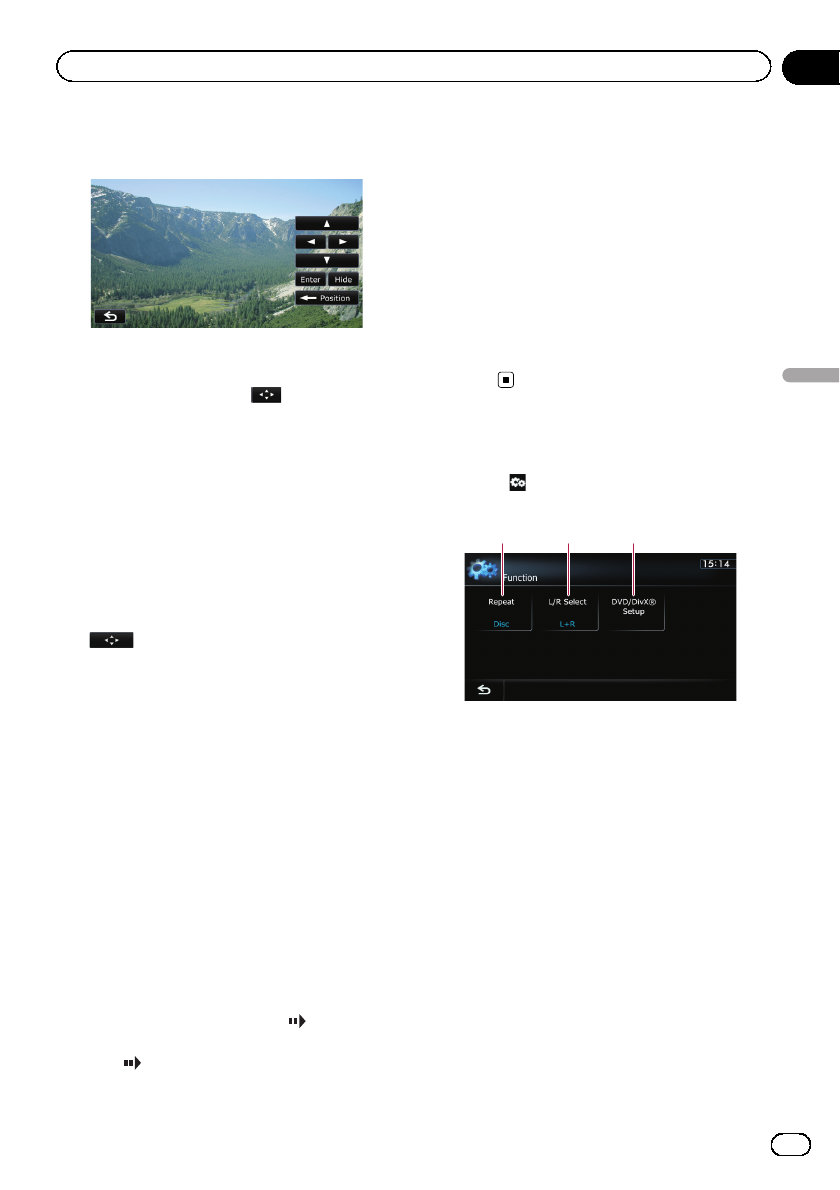
1 Touch [a], [b], [c]or[d] to select the
desired menu item.
pIf the touch panel keys for DVD menu selec-
tion disappear, touching anywhere on the
screen, then touching displays them
again.
2 Touch [Enter].
Playback starts from the selected menu item.
The way to display the menu differs depending
on the disc.
#Touch [Position].
Each touch of [Position] changes the display po-
sition of touch panel keys.
#Touch [Hide].
The touch panel keys are hidden.
And is displayed, so you can select a
menu item by touching the screen.
Frame-by-frame playback
This lets you move ahead one frame at a time
during pause.
%Touch [r] during pause.
Each time you touch [r], you move ahead
one frame.
pTo return to normal playback, touch [f].
pWith some discs, images may be unclear
during frame-by-frame playback.
Slow motion playback
This lets you slow down playback speed.
1 Touch and hold [r] until is dis-
played during playback.
The icon is displayed, and forward slow
motion playback begins.
pTo return to normal playback, touch [f].
2 Touch [q]or[r] to adjust playback
speed during slow motion playback.
Each time you touch [q]or[r] it changes
the speed in four steps in the following order:
1/16 f1/8 f1/4 f1/2
pThere is no sound during slow motion play-
back.
pWith some discs, images may be unclear
during slow motion playback.
pReversed slow motion playback is not possi-
ble.
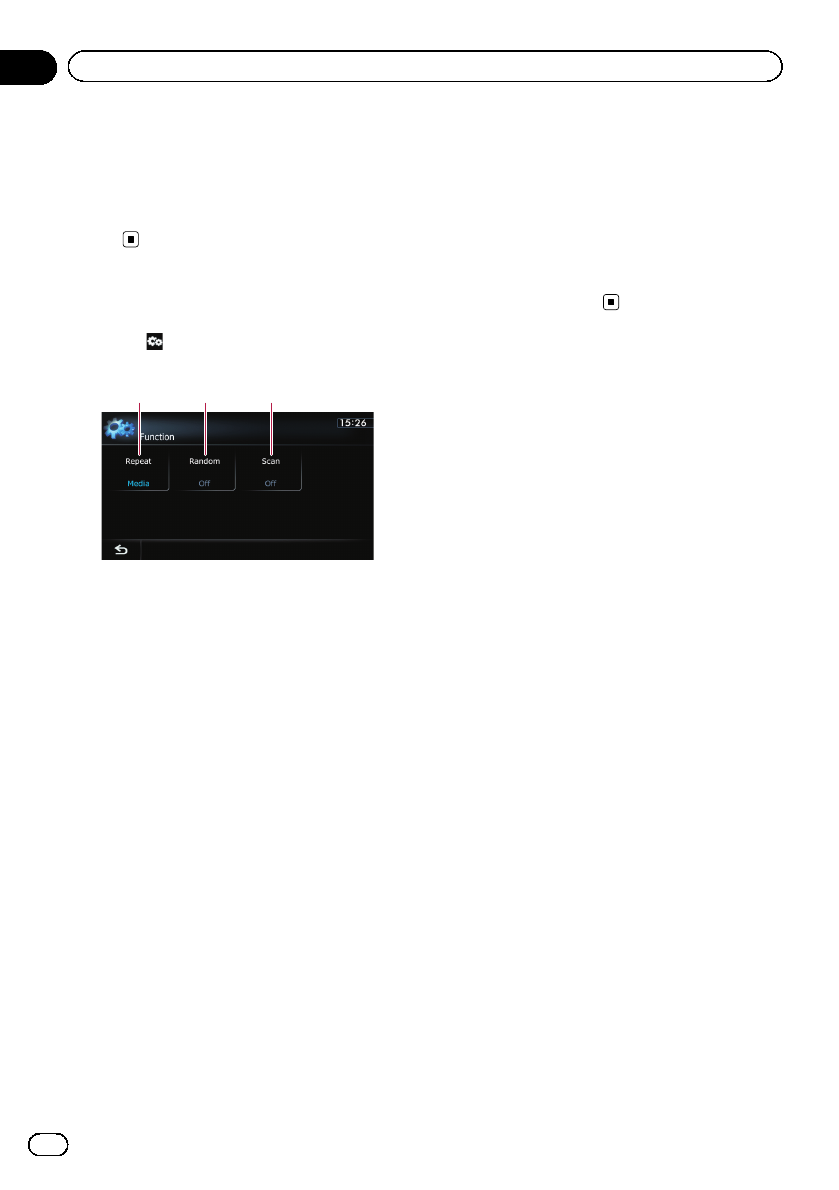
Using the “Function”menu
%Touch on the“DVD-V”screen.
The “Function”menu appears.
1 2 3
1Changes the repeat range
Each touch of [Repeat] changes the setting
as follows:
!Disc: Plays throughout the current disc.
!Chapter: Repeats just the current chap-
ter.
!Title: Repeats just the current title.
pIf you perform chapter (title) search, fast
forward, fast reverse or slow motion
playback, the repeat play range changes
to “Disc”.
pThis function is not available when disc
playback has been stopped.
2Selects audio output
When playing DVDs recorded with LPCM
audio, you can switch the audio output.
Touch [L/R Select] repeatedly until the de-
sired audio output appears on the display.
En 101
Chapter
19
Playing a DVD-Video
Playing a DVD-Video

Each touch of [L/R Select] changes the set-
tings as follows:
!L+R: Left and right
!L: Left
!R: Right
!Mix: Mixing left and right
pThis function is not available when disc
playback has been stopped.
3DVD setup adjustments
=For details, refer to Displaying DVD/
DivX® Setup menu on page 107.
En
102
Chapter
19 Playing a DVD-Video

You can play a DivX disc using the built-in
drive of the navigation system. This section de-
scribes those operations.
Starting procedure
1 Display the AV operation screen.
=For details of the operations, refer to Dis-
playing the AV operation screen on page 77.
2 Insert the disc you want to play into
disc-loading slot.
The source changes and then playback will
start.
=For details of the operation, refer to Insert-
ing and ejecting a disc on page 14.
pIf the disc is already set, tap [Disc] on the
left edge of the screen.
=For details, refer to Selecting a source on
page 77.
3 Use the touch panel keys on the screen
to control the disc.
=For details, refer to Using the touch panel
keys on the next page.
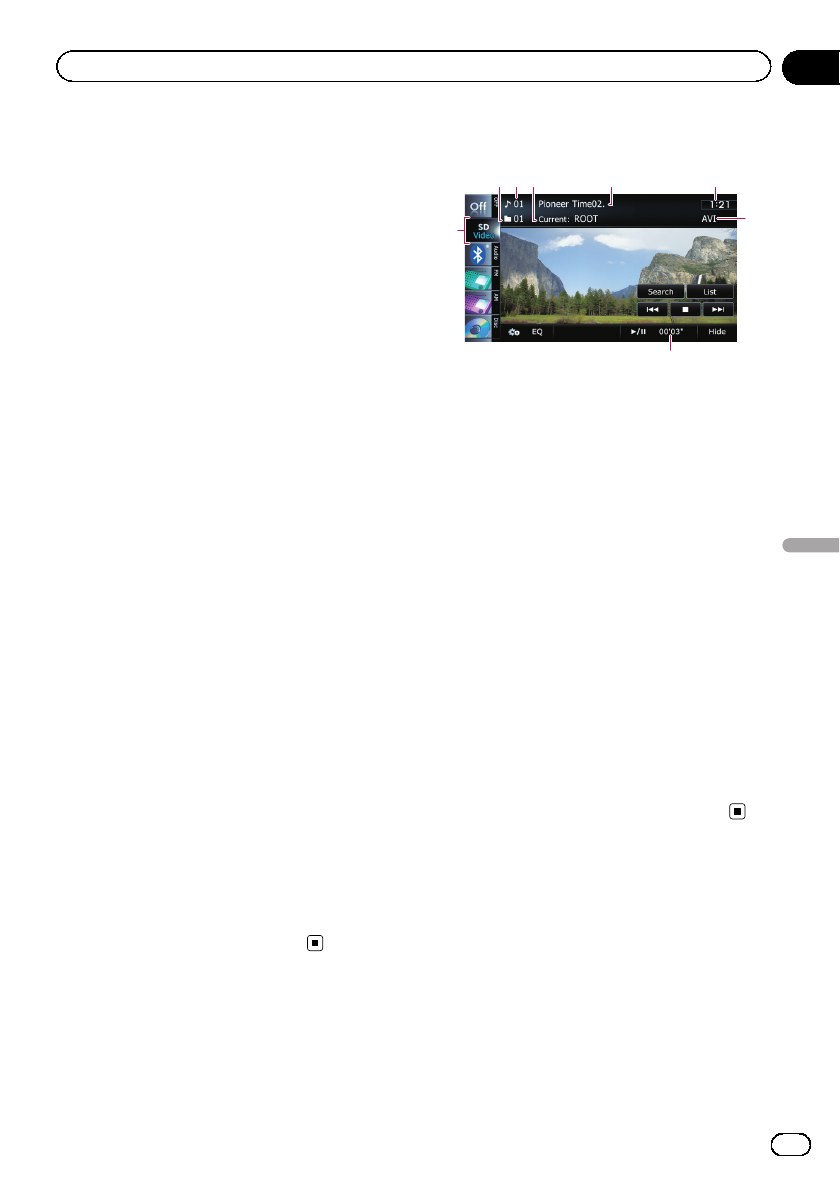
Reading the screen
a
152 3 4 67
9
8
1Folder number indicator
Shows the folder number currently playing.
2Audio track indicator
Shows the audio track number currently se-
lected.
3File number indicator
Shows the file number currently playing.
4Audio channel indicator
Shows the current audio channel type, such
as “Mch”(Multi-channel).
5Subtitle number indicator
Shows the subtitle number currently selected.
6Repeat range indicator
Shows which repeat range has been selected.
=For details, refer to Changes the repeat
range on page 106.
7Current time
8Digital sound format indicator
Shows the digital sound format (surround
sound format) currently selected.
9Play time indicator
Shows the elapsed playing time within the
current file.
aSource icon
Shows which source has been selected.
En 103
Chapter
20
Playing a DivX video
Playing a DivX video
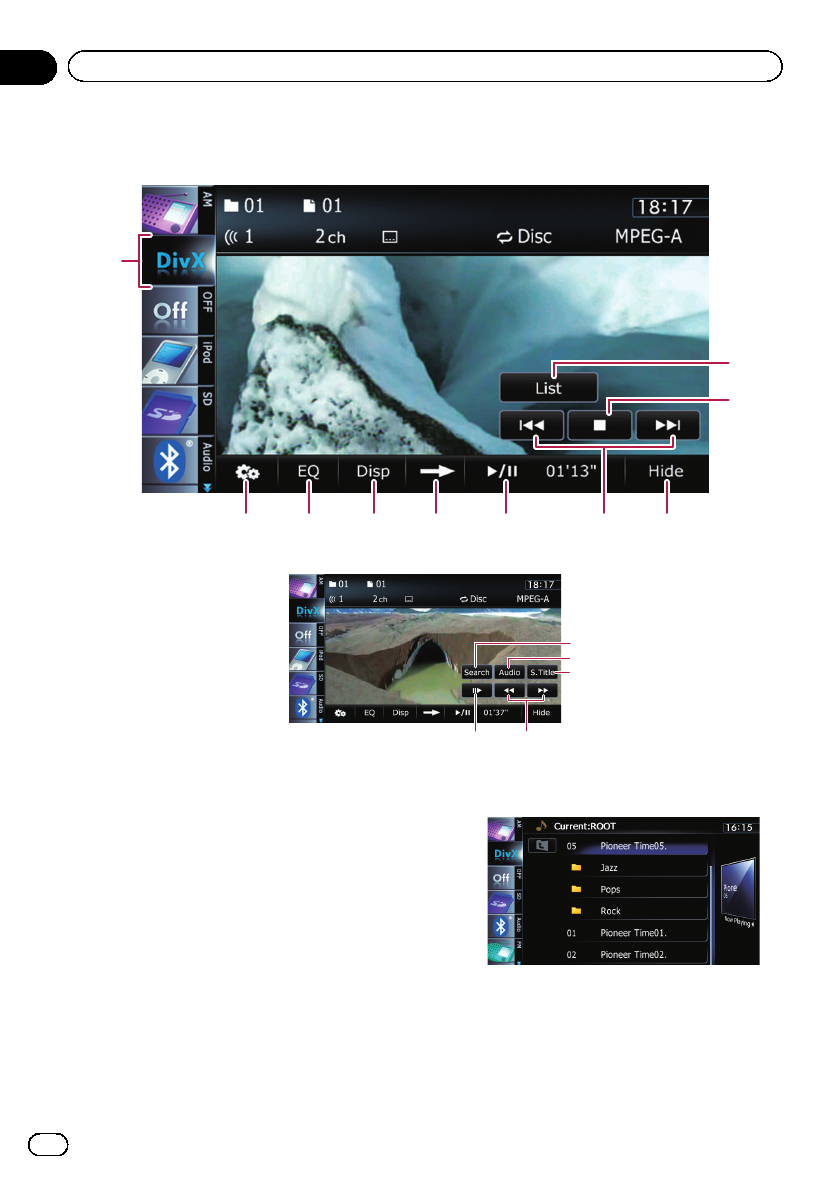
Using the touch panel keys
Playback screen (page 1)
a
3
2
1
4
56789
Playback screen (page 2)
b
c
d
ef
pWith some discs, the icon 9may be dis-
played, meaning that the operation is inva-
lid.
1Selects a file from the list
Touching the key displays the list which lets
you see the list of file names or folder names
on a disc.
pA dash (–) is displayed if there is no cor-
responding information.
Tapping a folder on the list shows its content.
You can play a file on the list by tapping it.
=For details, refer to Operating list screens
(e.g. iPod list screen) on page 77.
The contents of the folder in which the cur-
rently playing file is located are displayed.
En
104
Chapter
20 Playing a DivX video
Touching displays the content of the upper
folder (parent folder). If the uppermost folder
is listed, cannot be used.
2Stops playback
3Hides the touch panel keys and informa-
tion of the current video
Touching [Hide] shows only the current video.
To display the touch panel keys and informa-
tion of the current video, touch the screen.
4Skips forward or backward
Touching [p] skips to the start of the next
file. Touching [o] once skips to the start of
the current file. Touching it twice quickly will
skip to the previous file.
pYou can also perform these operations
by using the TRK button.
5Playback and Pause
Touching [f] switches between playback
and pause.
6Switches to the next page of touch panel
keys
7Switches the information
Touching [Disp] changes the content of the in-
formation panel as follows:
Disc information display —Current folder
name display —Current file name display
8Recalls equalizer curves
=For details, refer to Using the equalizer
on page 172.
9Displays the “Function”menu
=For details, refer to Using the
“Function”menu on the next page.
aSwitches the media file type played
When playing a disc containing a mixture of
various media file types, you can switch be-
tween media file types to play.
Tap the key repeatedly to switch between the
following media file types:
CD (audio data (CD-DA)) —ROM (com-
pressed audio file) —DivX (DivX video files)
bSearches for a desired scene and starts
playback from a specified time
=For details, refer to Starting playback
from a specified time on the next page.
cChanges audio tracks (Multi-audio)
Each touch of [Audio] switches between
audio tracks.
dChanges the subtitle (Multi-subtitle)
Each touch of [S.Title] switches between the
subtitle languages recorded on the disc.
eFast reverse or forward
Touch [m]or[n] to perform fast reverse or
forward.
If you touch and hold [m]or[n] for five
seconds, fast reverse/fast forward continues
even if you release either of these keys. To re-
sume playback at a desired point, touch
[f], [m]or[n] opposite to key pushed
for five seconds.
fFrame-by-frame playback (or slow-motion
playback)
=For details, refer to Frame-by-frame play-
back on this page.
=For details, refer to Slow motion playback
on this page.
Frame-by-frame playback
This lets you move ahead one frame at a time
during pause.
%Touch [r] during pause.
Each time you touch [r], you move ahead
one frame.
pTo return to normal playback, touch [f].
pWith some discs, images may be unclear
during frame-by-frame playback.
Slow motion playback
This lets you slow down playback speed.
%Touch and hold [r] until is dis-
played during playback.
The icon is displayed, and forward slow
motion playback begins.
pTo return to normal playback, touch [n]
or [m], etc.
pThere is no sound during slow motion play-
back.
pWith some discs, images may be unclear
during slow motion playback.
pReversed slow motion playback is not possi-
ble.
En 105
Chapter
20
Playing a DivX video
Playing a DivX video
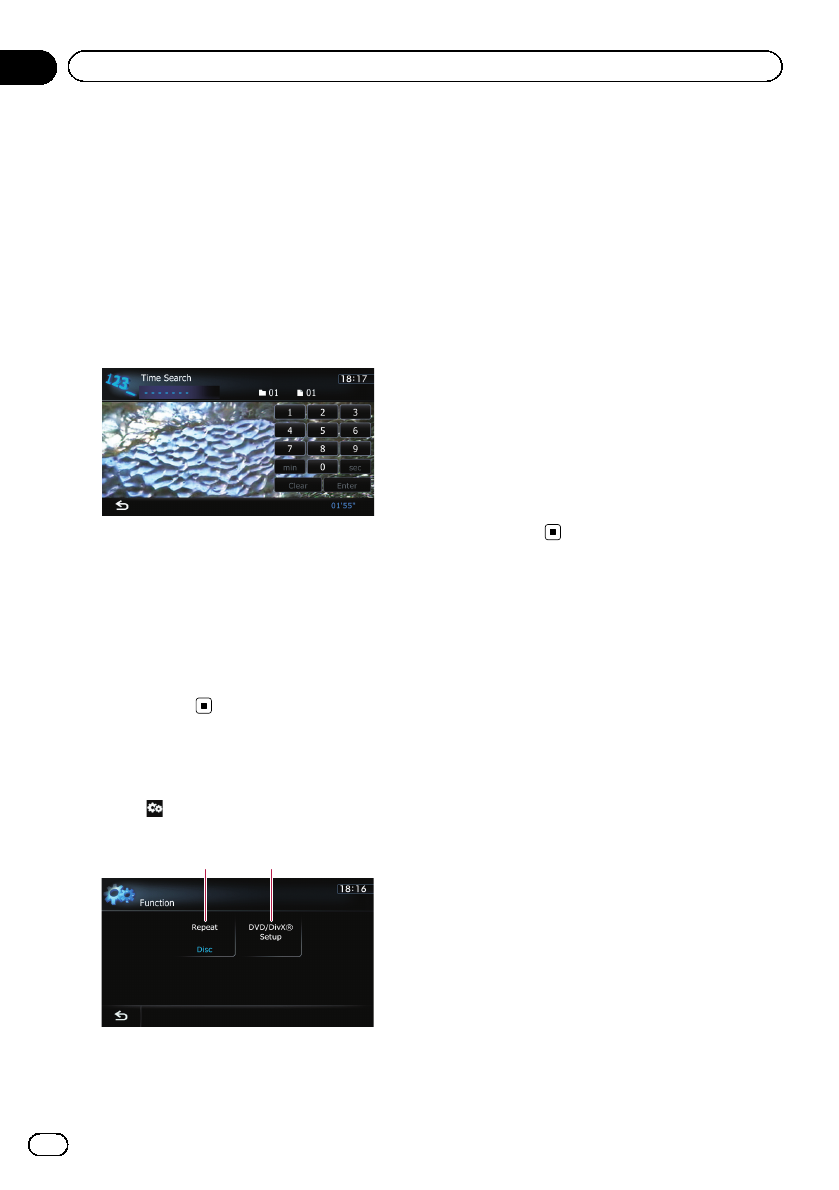
Starting playback from a
specified time
You can search for a desired scene by specify-
ing the time.
pTime search are not possible when disc
playback has been stopped.
1 Touch [Search].
2 Touch the keys to input the target num-
ber or time and then touch [Enter].
!To select 5 minutes 3 seconds, touch [5],
[min], [3], [sec] and [Enter] in order.
!To select 71 minutes 00 seconds, touch [7],
[1], [min] and [Enter] in order.
!To select 100 minutes 05 seconds, touch
[1], [0], [0], [5], [sec] and [Enter] in order.
pTo cancel an input number, touch [Clear].
To cancel the input numbers, touch and
hold [Clear].
Using the “Function”menu
%Touch on the “DivX”screen.
The “Function”menu appears.
1 2
1Changes the repeat range
Each touch of [Repeat] changes the setting
as follows:
!Disc: Plays throughout the current disc.
!File: Repeats just the current file.
!Folder: Repeats just the current folder.
pIf you select another folder during repeat
play, the repeat play range changes to
“Disc”.
pIf you perform fast reverse or fast for-
ward during “File”, the repeat play range
changes to “Folder”.
pWhen “Folder”is selected, it is not pos-
sible to playback a subfolder of that
folder.
pWhen playing discs with compressed
audio files and audio data (CD-DA), re-
peat play is performed within DivX vi-
deos even if “Disc”is selected.
2DVD setup adjustments
=For details, refer to Displaying DVD/
DivX® Setup menu on the next
page.
En
106
Chapter
20 Playing a DivX video
This chapter describes how to configure the
DVD-Video/DivX player.
Displaying DVD/DivX® Setup
menu
1 Play the disc that contains DVD-Video
or DivX.
2 Display the AV operation screen.
=For details of the operations, refer to Dis-
playing the AV operation screen on page 77.
3 Touch .
The “Function”menu appears.
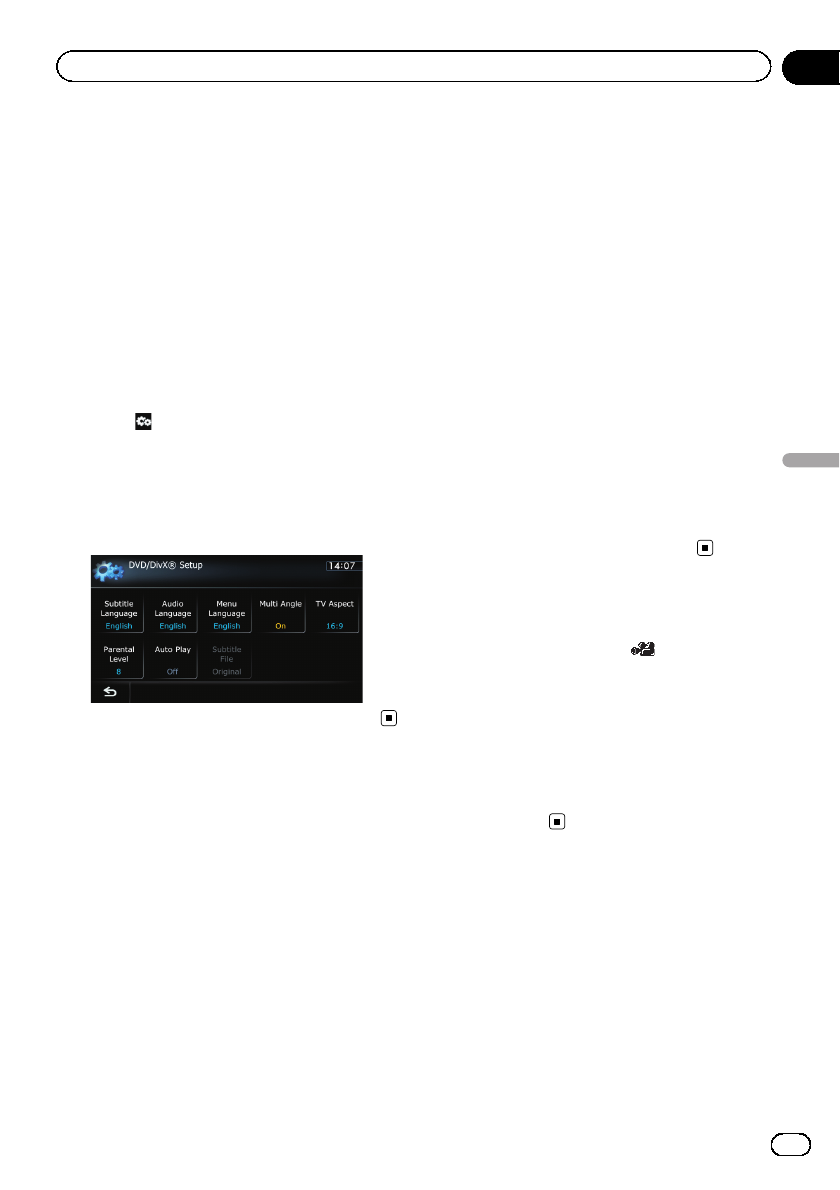
4 Touch [DVD/DivX® Setup].
The “DVD/DivX® Setup”screen appears.
5 Touch the desired function.
Setting the top-priority
languages
You can assign the top-priority language to the
top-priority subtitle, audio and menu in initial
playback. If the selected language is recorded
on the disc, subtitles, audio and menu are dis-
played or output in that language.
1 Display the “DVD/DivX® Setup”screen.
=For details, refer to Displaying DVD/DivX®
Setup menu on this page.
2 Touch [Subtitle Language], [Audio Lan-
guage] or [Menu Language].
Each language menu is displayed and the cur-
rently set language is selected.
3 Touch the desired language.
When you select “Others”, a language code
input display is shown. Input the four-digit
code of the desired language then touch
[Enter].
=For details, refer to Language code chart for
DVDs on page 110.
pIf the selected language is not recorded on
the disc, the default language specified on
the disc is output and displayed.
pYou can also switch the subtitle and audio
language by touching [S.Title]or[Audio]
during playback.
pEven if you use “S.Title”or “Audio”to
switch the subtitle or audio language, this
does not affect the settings here.
Setting the angle icon display
You can set the angle icon to display in
scenes where the angle can be switched.
1 Display the “DVD/DivX® Setup”screen.
=For details, refer to Displaying DVD/DivX®
Setup menu on this page.
2 Touch [Multi Angle].
Touching [Multi Angle] switches between
“On”and “Off”.
Setting the aspect ratio
There are two kinds of displays. A wide screen
display has a width-to-height ratio (TV aspect)
of 16:9, while a regular display has a TV aspect
of 4:3. If you use a regular rear display with a
TV aspect of 4:3, you can set the aspect ratio
suitable for your rear display. (We recommend
use of this function only when you want to fit it
to the rear display.)
En 107
Chapter
21
DVD-Video or DivX setup
DVD-Video or DivX setup
pWhen using a regular display, select either
“Letter Box”or “Panscan”. Selecting
“16:9”may result in an unnatural picture.
1 Display the “DVD/DivX® Setup”screen.
=For details, refer to Displaying DVD/DivX®
Setup menu on the previous page.
2 Touch [TV Aspect].
Each touch of [TV Aspect] changes the setting
as follows:
!16:9: Wide screen picture (16:9) is displayed
as it is (initial setting).
!Letter Box: The picture is in the shape of a
letter box with black bands at the top and
bottom of the screen.
!Panscan: The picture is cut short at the
right and left of the screen.
pWhen playing discs that do not have a pan-
scan system, the disc is played back with
“Letter Box”even if you select “Panscan”
setting. Confirm whether the disc package
bears the mark.
pSome discs do not enable changing of the
TV aspect. For details, refer to the disc’s in-
structions.
Setting the parental lock
Some DVD-Video discs let you use parental
lock to set restrictions so that children cannot
watch violent or adult-oriented scenes. You
can set the parental lock level in steps as de-
sired.
pWhen you set a parental lock level and then
play a disc featuring parental lock, code
number input indications may be dis-
played. In this case, playback will begin
when the correct code number is input.
Setting the code number and level
When you first use this function, register your
code number. If you do not register a code
number, parental lock will not operate.
1 Display the “DVD/DivX® Setup”screen.
=For details, refer to Displaying DVD/DivX®
Setup menu on the previous page.
2 Touch [Parental Level].
3 Touch [0] to [9] to input a four-digit
code number.
4 While the input number is displayed,
touch [Enter].
The code number is registered, and you can
now set the level.
5 Touch any of [1] to [8] to select the de-
sired level.
The parental lock level is set.
!Level 8: Playback of the entire disc is possi-
ble (initial setting).
!Level 7 to Level 2: Playback of discs for
children and non-adult oriented discs is
possible.
!Level 1: Only playback of discs for children
is possible.
pIf you want to change the parental level al-
ready set, enter the registered code number
and then select the parental level.
pWe recommend that you keep a record of
your code number in case you forget it.
pThe parental lock level is recorded on the
disc. You can confirm it by looking at the
disc package, the included literature or the
disc itself. You cannot use parental lock
with discs that do not feature a recorded
parental lock level.
pWith some discs, parental lock operates to
skip certain scenes only, after which normal
playback resumes. For details, refer to the
disc’s instructions.
pIf you forget the registered code number,
touch 10 times on the number input
screen. The registered code number is can-
celed, letting you register a new one.
En
108
Chapter
21 DVD-Video or DivX setup

Setting the auto play
When a DVD disc with DVD menu is inserted,
this unit will cancel the DVD menu automati-
cally and start playback from the first chapter
of the first title.
pThis function is available for DVD-Video.
pSome DVDs may not operate properly. If
this function is not fully operable, turn this
function off and start playback.
1 Display the “DVD/DivX® Setup”screen.
=For details, refer to Displaying DVD/DivX®
Setup menu on page 107.
2 Touch [Auto Play].
Touching [Auto Play] switches this setting be-
tween “On”and “Off”.
pWhen “Auto Play”is set to “On”, the repeat
range is automatically set to “Disc”.
Setting the subtitle file for
DivX
You can select whether to display DivX exter-
nal subtitles or not.
pIf no DivX external subtitle files exist, the
original DivX subtitles are displayed even
when “Custom”is selected.
1 Display the “DVD/DivX® Setup”screen.
=For details, refer to Displaying DVD/DivX®
Setup menu on page 107.
2 Touch [Subtitle File].
Touching [Subtitle File] switches this setting
between “Original”and “Custom”.
pUp to 42 characters can be displayed on
one line. If more than 42 characters are set,
the line breaks and the characters are dis-
played on the next line.
pUp to 126 characters can be displayed on
one screen. If more than 126 characters are
set, the excess characters will not be dis-
played.
pThe DivX subtitles will be displayed even
when the subtitle file setting is on if no cor-
responding subtitle files exist.
pUp to three lines can be displayed at
once.
En 109
Chapter
21
DVD-Video or DivX setup
DVD-Video or DivX setup

Language code chart for DVDs
Two-letter
code,
input code
Language
Two-letter
code,
input code
Language
Two-letter
code,
input code
Language
aa, 0101 Afar ia, 0901 Interlingua rn, 1814 Rundi
ab, 0102 Abkhazian ie, 0905 Interlingue ro, 1815 Romanian
af, 0106 Afrikaans ik, 0911 Inupiaq ru, 1821 Russian
am, 0113 Amharic in, 0914 Indonesian rw, 1823 Kinyarwanda
ar, 0118 Arabic is, 0919 Icelandic sa, 1901 Sanskrit
as, 0119 Assamese it, 0920 Italian sd, 1904 Sindhi
ay, 0125 Aymara ja, 1001 Japanese sg, 1907 Sango
az, 0126 Azerbaijani ji, 1009 Yiddish sh, 1908 Serbo-Croatian
ba, 0201 Bashkir jw, 1023 Javanese si, 1909 Sinhala
be, 0205 Belarusian ka, 1101 Georgian sk, 1911 Slovak
bg, 0207 Bulgarian kk, 1111 Kazakh sl, 1912 Slovenian
bh, 0208 Bihari kl, 1112 Kalaallisut sm, 1913 Samoan
bi, 0209 Bislama km, 1113 Central Khmer sn, 1914 Shona
bn, 0214 Bengali kn, 1114 Kannada so, 1915 Somali
bo, 0215 Tibetan ko, 1115 Korean sq, 1917 Albanian
br, 0218 Breton ks, 1119 Kashmiri sr, 1918 Serbian
ca, 0301 Catalan ku, 1121 Kurdish ss, 1919 Swati
co, 0315 Corsican ky, 1125 Kirghiz; Kyrgyz st, 1920 Sotho, Southern
cs, 0319 Czech la, 1201 Latin su, 1921 Sundanese
cy, 0325 Welsh ln, 1214 Lingala sv, 1922 Swedish
da, 0401 Danish lo, 1215 Lao sw, 1923 Swahili
de, 0405 German lt, 1220 Lithuanian ta, 2001 Tamil
dz, 0426 Dzongkha lv, 1222 Latvian te, 2005 Telugu
ee, 0505 Ewe mg, 1307 Malagasy tg, 2007 Tajik
el, 0512 Greek mi, 1309 Maori th, 2008 Thai
en, 0514 English mk, 1311 Macedonian ti, 2009 Tigrinya
eo, 0515 Esperanto ml, 1312 Malayalam tk, 2011 Turkmen
es, 0519 Spanish mn, 1314 Mongolian tl, 2012 Tagalog
et, 0520 Estonian mo, 1315 Moldavian tn, 2014 Tswana
eu, 0521 Basque mr, 1318 Marathi to, 2015 Tonga
fa, 0601 Persian ms, 1319 Malay tr, 2018 Turkish
fi, 0609 Finnish mt, 1320 Maltese ts, 2019 Tsonga
fj, 0610 Fijian my, 1325 Burmese tt, 2020 Tatar
fo, 0615 Faroese na, 1401 Nauru tw, 2023 Twi
fr, 0618 French ne, 1405 Nepali uk, 2111 Ukrainian
fy, 0625 Western Frisian nl, 1412 Dutch; Flemish ur, 2118 Urdu
ga, 0701 Irish no, 1415 Norwegian uz, 2126 Uzbek
gd, 0704 Gaelic oc, 1503 Occitan vi, 2209 Vietnamese
gl, 0712 Galician om, 1513 Oromo vo, 2215 Volapuk
gn, 0714 Guarani or, 1518 Oriya wo, 2315 Wolof
gu, 0721 Gujarati pa, 1601 Panjabi; Punjabi xh, 2408 Xhosa
ha, 0801 Hausa pl, 1612 Polish yo, 2515 Yoruba
hi, 0809 Hindi ps, 1619 Pushto; Pashto zh, 2608 Chinese
hr, 0818 Croatian pt, 1620 Portuguese zu, 2621 Zulu
hu, 0821 Hungarian qu, 1721 Quechua
hy, 0825 Armenian rm, 1813 Romansh
En
110
Chapter
21 DVD-Video or DivX setup

You can play the compressed audio files
stored in the external storage device (USB,
SD).
pIn the following description, the SD mem-
ory card and USB memory device are col-
lectively referred to as the “external storage
device (USB, SD)”. If it indicates the USB
memory device only, it is referred to as the
“USB storage device”.
Starting procedure
1 Display the AV operation screen.
=For details of the operations, refer to Dis-
playing the AV operation screen on page 77.
2 Insert the SD memory card into the SD
card slot or plug the USB storage device
into the USB connector.
=For details, refer to Plugging in a USB sto-
rage device on page 18.
=For details, refer to Inserting and ejecting an
SD memory card on page 15.
pPlayback is performed in order of folder
numbers. Folders are skipped if they con-
tain no playable files. If there are no play-
able files in folder 01 (root folder), playback
starts from folder 02.
3 Tap [USB] or [SD] on the left edge of
the screen to display the “USB”or “SD”
screen.
4 Use the touch panel keys on the screen
to control the external storage device
(USB, SD).
=For details, refer to Using the touch panel
keys (Music)on page 113.
Reading the screen
5
12
3
4
pThis unit may not achieve optimum perfor-
mance with some external storage devices.
pYou can playback the files on a USB sto-
rage device compliant with Mass Storage
Class. For details about the USB Class,
refer to the manual supplied with the USB
storage device.
1Playback condition indicator
Indicates the current playback condition.
!Scanning folders and files
Indicator: Meaning
Cancels the scan play.
Plays the first audio files of
each folder for about 10 sec-
onds when the repeat range
is set to “Media”.
Plays the beginning of each
audio file in the current folder
for about 10 seconds when
the repeat range is set to
“Folder”.
!Playing files in random order
Indicator: Meaning
Does not play files in random
order.
Plays all audio files in the cur-
rent repeat play range in ran-
dom order.
!Setting a repeat play range
En 111
Chapter
22
Playing music files (from USB or SD)
Playing music files (from USB or SD)
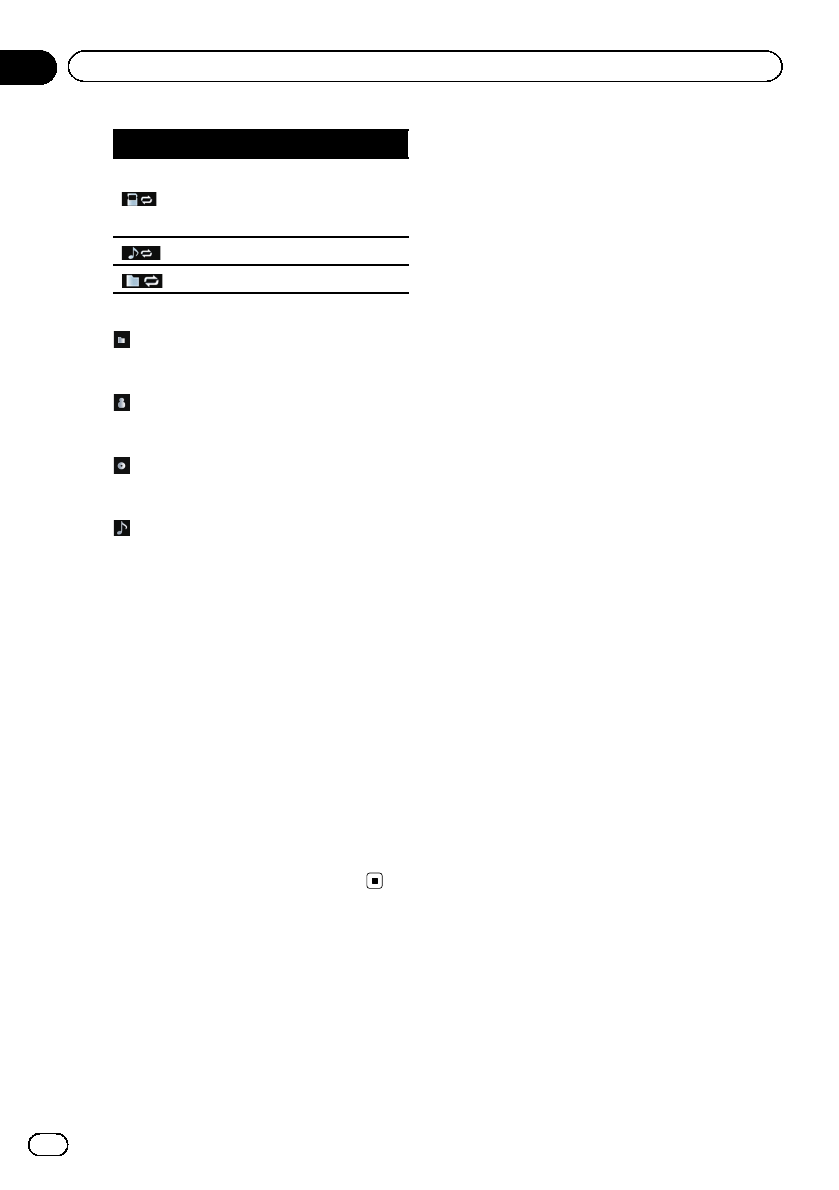
Indicator: Meaning
Repeats all compressed
audio files in the selected ex-
ternal storage device (USB,
SD).
Repeats just the current file.
Repeats the current folder.
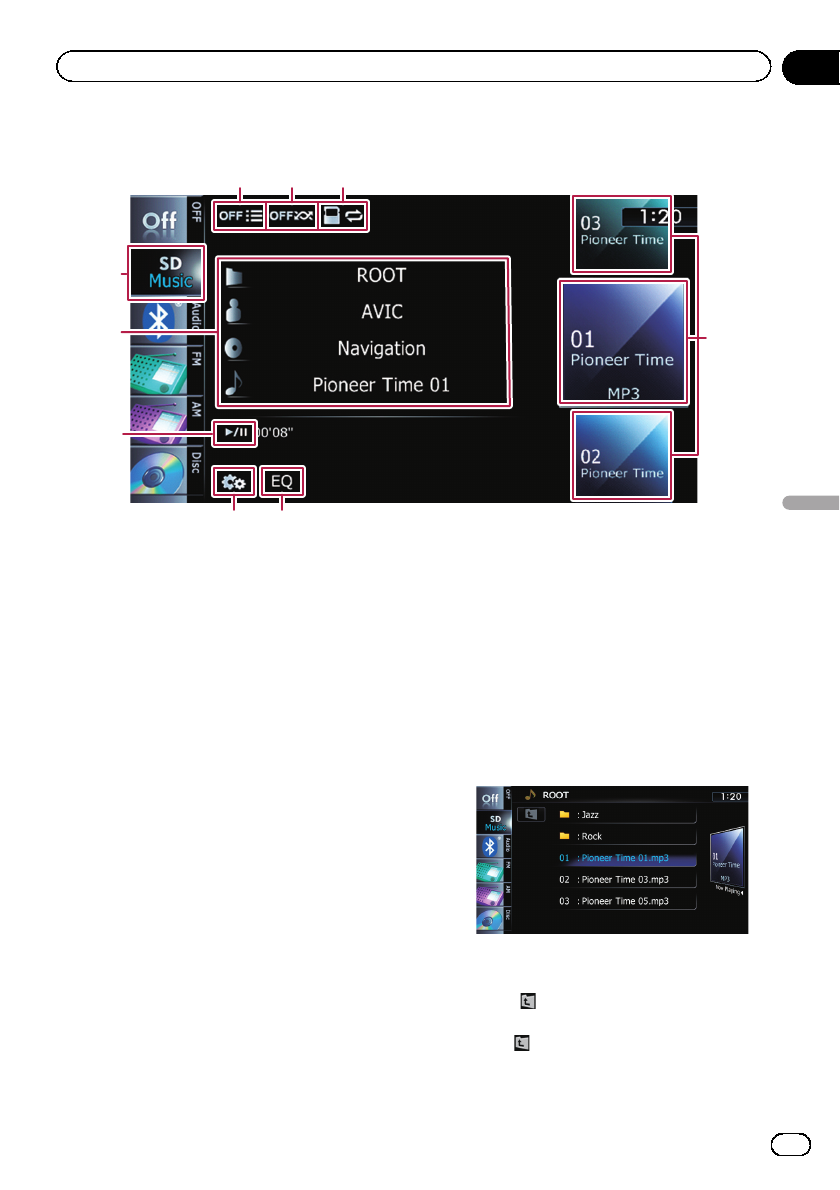
2Current file information
!:Folder name
Shows the folder name currently play-
ing.
!:Artist name
Shows the artist name currently playing
(when available).
!:Album title
Shows the title of the album for the cur-
rent file (when available).
!:Track title
Shows the title of the track currently
playing (when available).
pIf the title of a track is not available,
the file name appears.
!Play time
Shows the elapsed playing time within
the current file.
p“-------”is displayed if there is no corre-
sponding information.
3Current time
4File information
!File number indicator
!File name indicator
!File type indicator
Shows the type of audio file.
5Source icon
Shows which source has been selected.
En
112
Chapter
22 Playing music files (from USB or SD)
Using the touch panel keys (Music)
9
8
7
2
56
4
13
1Scans folders and files
Scan play is performed by touching only one
key.
=For details of the operation, refer to
Scans folders and files on the next
page.
2Plays files in random order
The files in the current repeat play range can
be played at random by touching only one key.
=For details of the operation, refer to
Plays files in random order on the
next page.
3Sets a repeat play range
The repeat play range can be changed by
touching only one key.
=For details, refer to Changes the repeat
range on the next page.
4Selects a file to play
Scrolling the keys up or down displays files,
and tapping a file starts playback.
Tapping the lower key during random play-
back skips to the next file. Tapping the upper
key jumps to the start of the current file.
5Recalls equalizer curves
=For details, refer to Using the equalizer
on page 172.
6Displays the “Function”menu
=For details, refer to Using the
“Function”menu on the next page.
7Playback and Pause
Touching [f] switches between playback
and pause.
8Selects a file from the list
Touching the key displays the list which lets
you see the list of track titles or folder names
on an external storage device (USB, SD).
Tapping a folder on the list shows its content.
You can play a file on the list by tapping it.
=For details, refer to Operating list screens
(e.g. iPod list screen) on page 77.
Touching displays the content of the upper
folder (parent folder). If the uppermost folder
is listed, cannot be used.
9Switches the operation screen
En 113
Chapter
22
Playing music files (from USB or SD)
Playing music files (from USB or SD)
Tapping this key switches between the screen
to operate music files and the screen to oper-
ate video files. This touch panel key is avail-
able only when there are both audio and video
files in the external storage device (USB,
SD).
Using the “Function”menu
%Touch on the “USB”or “SD”screen.
The “Function”menu appears.
123
1Changes the repeat range
Each touch of [Repeat] changes the setting
as follows:
!Media: Repeats all compressed audio
files in the selected external storage de-
vice (USB, SD).
!Track: Repeats just the current file.
!Folder: Repeats the current folder.
pIf you skip the file forward or backward
when the repeat play range in “Track”,
the repeat play range changes to
“Folder”.
2Plays files in random order
Random play lets you playback files in ran-
dom order within the current repeat range.
Each touch of [Random] turns it on or off.
pIf you turn the random play on when the
repeat play range is set to “Track”, the
repeat play range changes to “Folder”
automatically.
3Scans folders and files
Scan play lets you hear the first 10 seconds
of each file. Scan play is performed in the
current repeat play range.
Each touch of [Scan] turns it on or off.
When you find the track you want, touch
[Scan] to turn the scan play off.
pAfter all files or folders scanning are fin-
ished, normal playback will begin again.
pIf you turn the scan play on when the re-
peat play range is set to “Track”, the re-
peat play range changes to “Folder”
automatically.
En
114
Chapter
22 Playing music files (from USB or SD)
You can play the video files stored in the exter-
nal storage device (USB, SD).
pIn the following description, the SD mem-
ory card and USB memory device are col-
lectively referred to as the “external storage
device (USB, SD)”. If it indicates the USB
memory device only, it is referred to as the
“USB storage device”.
Starting procedure
1 Display the AV operation screen.
=For details of the operations, refer to Dis-
playing the AV operation screen on page 77.
2 Insert the SD memory card into the SD
card slot or plug the USB storage device
into the USB connector.
=For details, refer to Plugging in a USB sto-
rage device on page 18.
=For details, refer to Inserting and ejecting an
SD memory card on page 15.
pPlayback is performed in order of folder
numbers. Folders are skipped if they con-
tain no playable files. If there are no play-
able files in folder 01 (root folder), playback
starts from folder 02.
3 Tap [USB] or [SD] on the left edge of
the screen to display the “USB”or “SD”
screen.
4 Touch the screen to display the touch
panel keys.
5 Use the touch panel keys on the screen
to control the external storage device
(USB, SD).
=For details, refer to Using the touch panel
keys (Video)on the next page.
Reading the screen
8
7
41 2 3 5
6
pThis unit may not achieve optimum perfor-
mance with some external storage devices.
pYou can playback the files on a USB sto-
rage device compliant with Mass Storage
Class. For details about the USB Class,
refer to the manual supplied with the USB
storage device.
1Folder number indicator
2File number indicator
3Current folder name indicator
Shows the folder name currently playing.
4File name indicator
Shows the file name currently playing.
5Current time
6File type indicator
Shows the type of audio file currently playing.
7Play time indicator
Shows the elapsed playing time within the
current file.
8Source icon
Shows which source has been selected.
En 115
Chapter
23
Playing video files (from USB or SD)
Playing video files (from USB or SD)
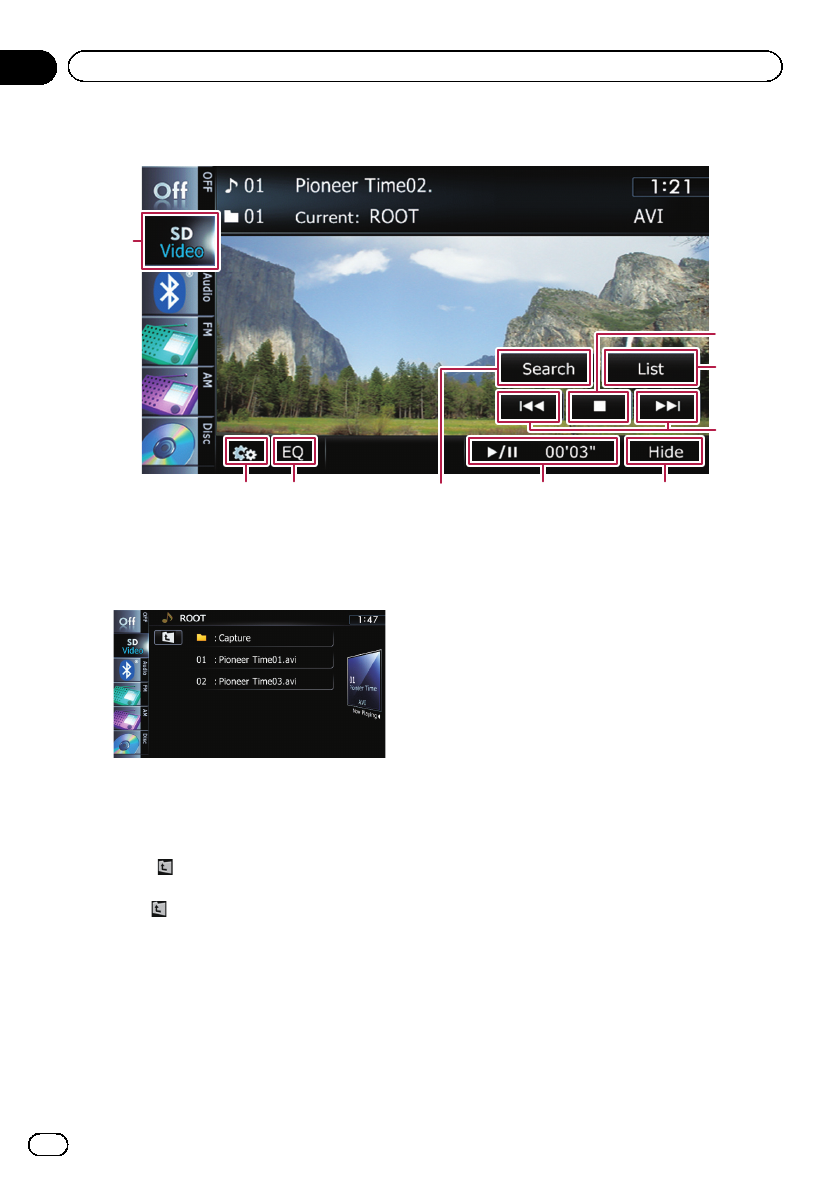
Using the touch panel keys (Video)
9
768
1
2
3
54
1Stops playback
2Selects a file from the list
You can select and play the title you want from
the list.
=For details, refer to Operating list screens
(e.g. iPod list screen) on page 77.
The contents of the folder in which the cur-
rently playing file is located are displayed.
Touching displays the content of the upper
folder (parent folder). If the uppermost folder
is listed, cannot be used.
3Skips forward or backward
Touching [p] skips to the start of the next
file. Touching [o] once skips to the start of
the current file. Touching it twice quickly will
skip to the previous file.
Fast reverse or forward
Touch and hold [o]or[p] to fast reverse
or fast forward.
pThere is no sound on fast reverse or for-
ward.
pYou can also perform these operations
by using the TRK button.
4Hides the touch panel keys and informa-
tion of the current video
Touching [Hide] shows only the current video.
To display the touch panel keys and informa-
tion of the current video, touch the screen.
5Playback and Pause
Touching [f] switches between playback
and pause.
6Searches for a desired scene and starts
playback from a specified time
=For details, refer to Searching for a speci-
fic scene and starting playback from a
specified time on the next page.
7Recalls equalizer curves
=For details, refer to Using the equalizer
on page 172.
8Displays the “Function”menu
=For details, refer to Using the
“Function”menu on the next page.
9Switches the operation screen
En
116
Chapter
23 Playing video files (from USB or SD)

Tapping this key switches between the screen
to operate music files and the screen to oper-
ate video files. This touch panel key is avail-
able only when there are both audio and video
files in the external storage device (USB, SD).
Searching for a specific scene
and starting playback from a
specified time
You can search for a desired scene by specify-
ing the time.
1 Touch [Search].
2 Touch the keys to input the target num-
ber or time and then touch [Enter].
!To select 5 minutes 3 seconds, touch [5],
[min], [3], [sec] and [Enter] in order.
!To select 71 minutes 00 seconds, touch [7],
[1], [min] and [Enter] in order.
!To select 100 minutes 05 seconds, touch
[1], [0], [0], [5], [sec] and [Enter] in order.
pTo cancel an input number, touch [Clear].
To cancel the input numbers, touch and
hold [Clear].
Using the “Function”menu
1 Tap [USB] or [SD] on the left edge of
the screen to display the “USB”or “SD”
screen.
=For details of the operations, refer to Dis-
playing the AV operation screen on page 77.
2 Touch the screen to display the touch
panel keys.
3 Touch .
The “Function”menu appears.
pIf the touch panel keys are not shown,
touch anywhere on the screen to display
them.
1 2
1Changes the repeat range
Each touch of [Repeat] changes the setting
as follows:
!Media: Repeats all video files in the se-
lected external storage device (USB,
SD).
!File: Repeats just the current file.
!Folder: Repeats the current folder.
pIf you skip the file forward or backward
when the repeat play range in “File”, the
repeat play range changes to “Folder”.
2Changes the screen size of video
If a video file is played, you can select the
display mode between normal and full
screen.
Each touch of [Video Output Setting]
changes the setting as follows:
!Normal: Enlarges the display size while
maintaining the aspect ratio.
!Full: Displays the image full-screen
although the aspect ratio may be af-
fected.
En 117
Chapter
23
Playing video files (from USB or SD)
Playing video files (from USB or SD)
Using the USB interface cable for iPod en-
ables you to connect your iPod to the naviga-
tion system.
pA USB interface cable for iPod (CD-IU50V)
(sold separately) is required for connection.
Starting procedure
1 Display the AV operation screen.
=For details of the operations, refer to Dis-
playing the AV operation screen on page 77.
2 Connect your iPod.
The source changes and then playback will
start.
=For details, refer to Connecting your iPod on
page 19.
pIf the iPod is already connected, tap [iPod]
on the left edge of the screen.
=For details, refer to Selecting a source on
page 77.
pNo video is output if iPod is selected as AV
source, check the setting in “AV1 Input”on
the “AV System Settings”menu.
=For details, refer to Setting video input 1
(AV1)on page 168.
3 Use the touch panel keys on the screen
to control your iPod.
=For details of the operation, refer to Using
the touch panel keys on page 120.
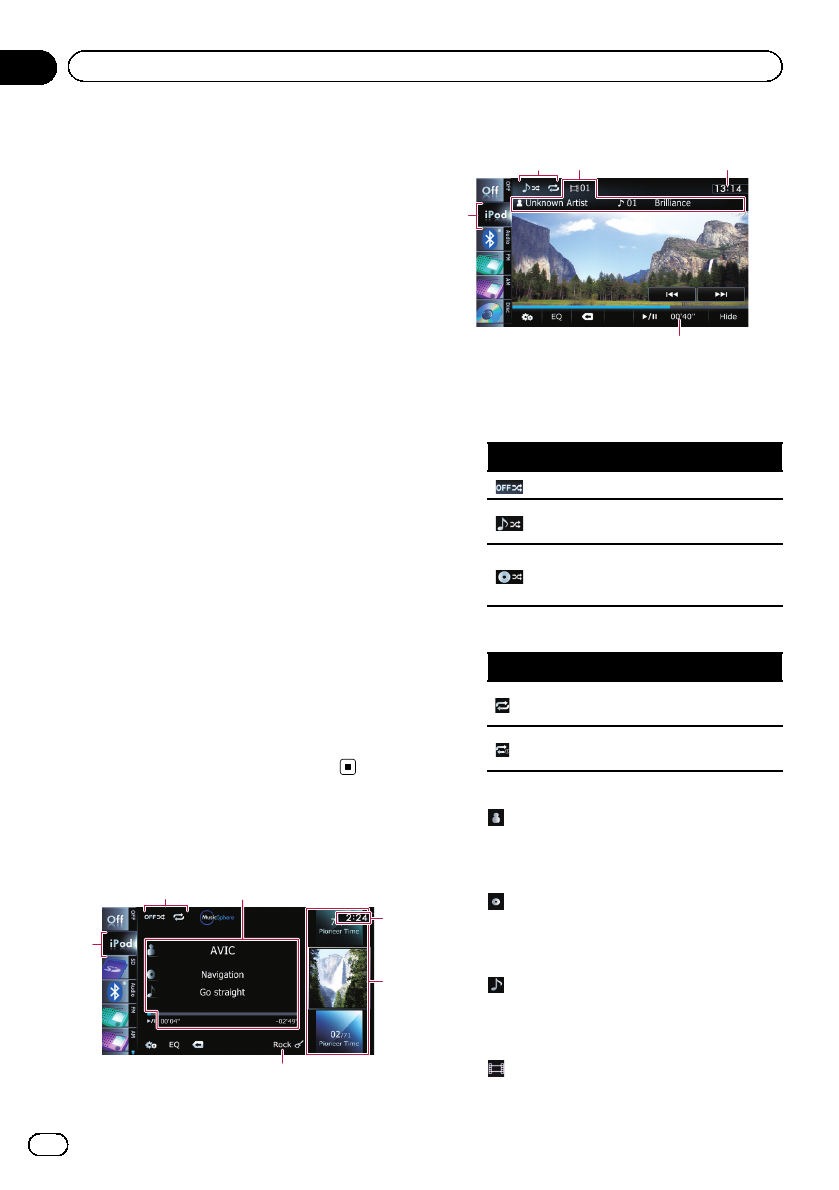
Reading the screen
Music
7
6
12
4
5
Video
7
3
13 4
1Playback condition indicator
Indicates the current playback condition.
!Setting the shuffle play for music
Indicator: Meaning
Cancels the shuffle play.
Plays back songs in random
order within the selected list.
Selects an album randomly,
and then plays back all songs
in that album in order.
!Setting a repeat play range
Indicator: Meaning
Repeats all songs in the se-
lected list.
Repeats just the current
song.
2Current song (episode) information
!:Artist name (podcast title)
Shows the artist name currently playing.
When a podcast is played, the podcast
title is displayed.
!:Album title (release date)
Shows the title of the album for the
song. When a podcast is played, the re-
lease date is displayed.
!:Song title (episode)
Shows the title of the current song.
When a podcast is played, the episode
is displayed.
!:Chapter number
En
118
Chapter
24 Using an iPod (iPod)
Shows the current chapter number and
total number of chapters when the file
with chapters played.
!Play time
Shows the elapsed playing time within
the current song (episode).
p“-------”is displayed if there is no corre-
sponding information.
3Current video information
!:Chapter number
Shows the current chapter number
when the video with chapters played.
!:Artist name (podcast title)
Shows the artist name currently playing.
When a podcast is played, the podcast
title is displayed.
!:File number indicator
Shows the number of the file currently
playing.
!File name indicator
Shows the file name currently playing.
!Play time indicator
Shows the elapsed playing time within
the current file.
4Current time
5Song (episode) information
!Song number indicator
Shows the number of the song and the
total number of songs in the selected
list.
!Song title (episode) indicator
!Album artwork
Album art of the current song is dis-
played if it is available.
6Genre indicator
Shows the genre of the current song.
7Source icon
Shows which source has been selected.
pIf characters recorded on the iPod are not
compatible with this navigation system,
they may turn into garbled characters.
En 119
Chapter
24
Using an iPod (iPod)
Using an iPod (iPod)
Using the touch panel keys
Music
d
b
c
a
9
2
78
4
1 3
6 5
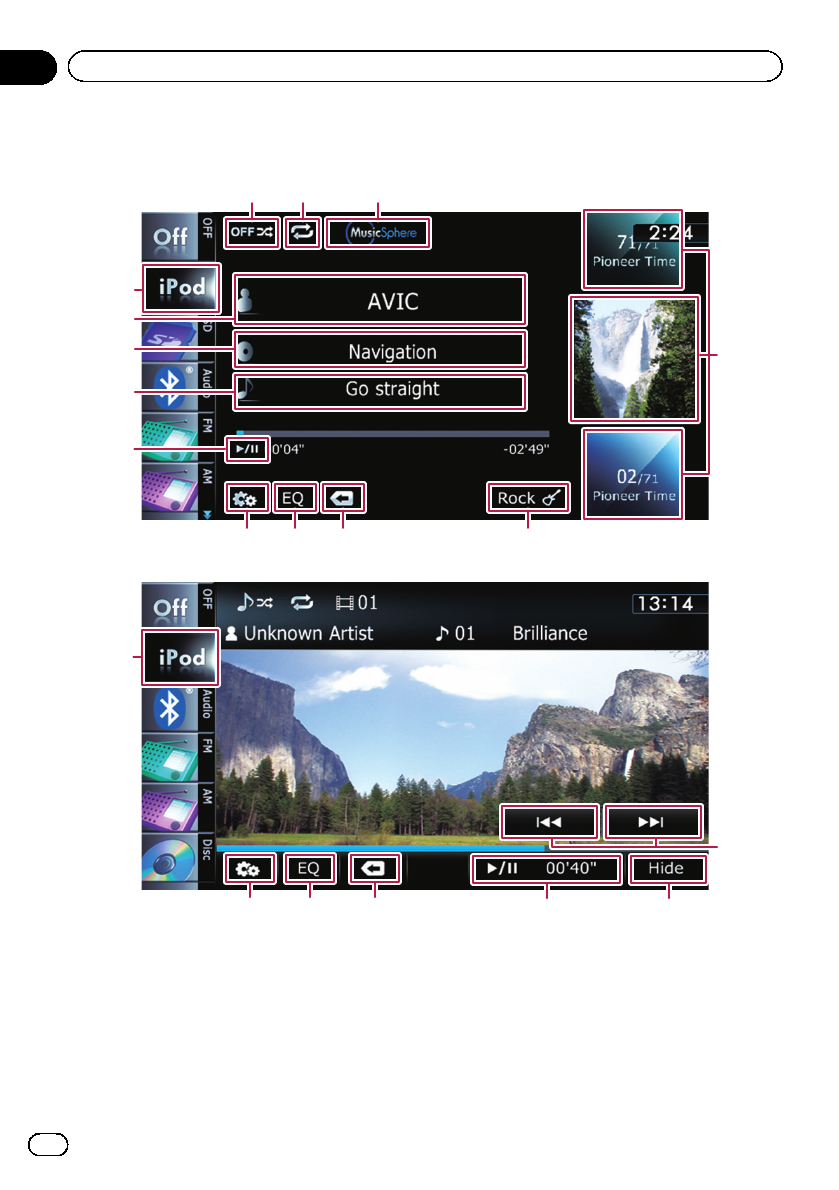
Video
d
78
e
g9f
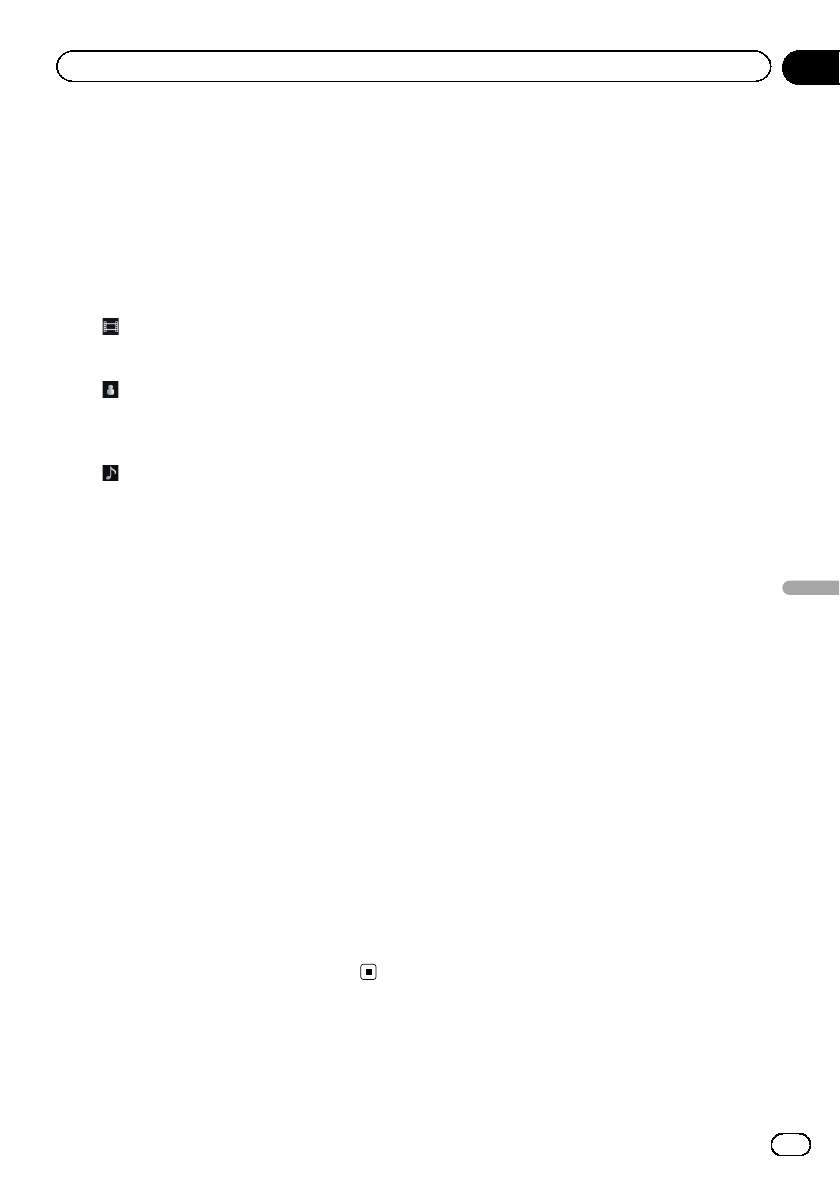
1Sets the shuffle play for music
The shuffle play setting can be changed by
touching only one key.
=For details, refer to Sets the shuffle
play for music on page 124.
2Sets a repeat play range
The repeat play range can be changed by
touching only one key.
=For details, refer to Sets repeat play on
page 124.
3Plays a playlist using MusicSphere
Touching the key displays the MusicSphere
screen, and a playlist created with the PC ap-
plication (MusicSphere) can be played.
=For details, refer to Playing Music-
Sphere on page 124.
En
120
Chapter
24 Using an iPod (iPod)