Pioneer K031 Multi-Media AVN Navigation Server System with BT User Manual 7
Pioneer Corporation Multi-Media AVN Navigation Server System with BT 7
Pioneer >
Contents
User Manual 7
Dialing from the map
You can make a call by selecting the icon of a
registered location or a POI icon from the map
screen.
pYou cannot make a call to locations or POIs
that have no phone number data.
1 Scroll the map, and place the cursor on
an icon on the map.
2 Touch .
The “Detailed POI Information”screen ap-
pears.
3 Touch [Call] to make a call.
To cancel the call after the system starts dial-
ing, touch .
4 Touch to end the call.
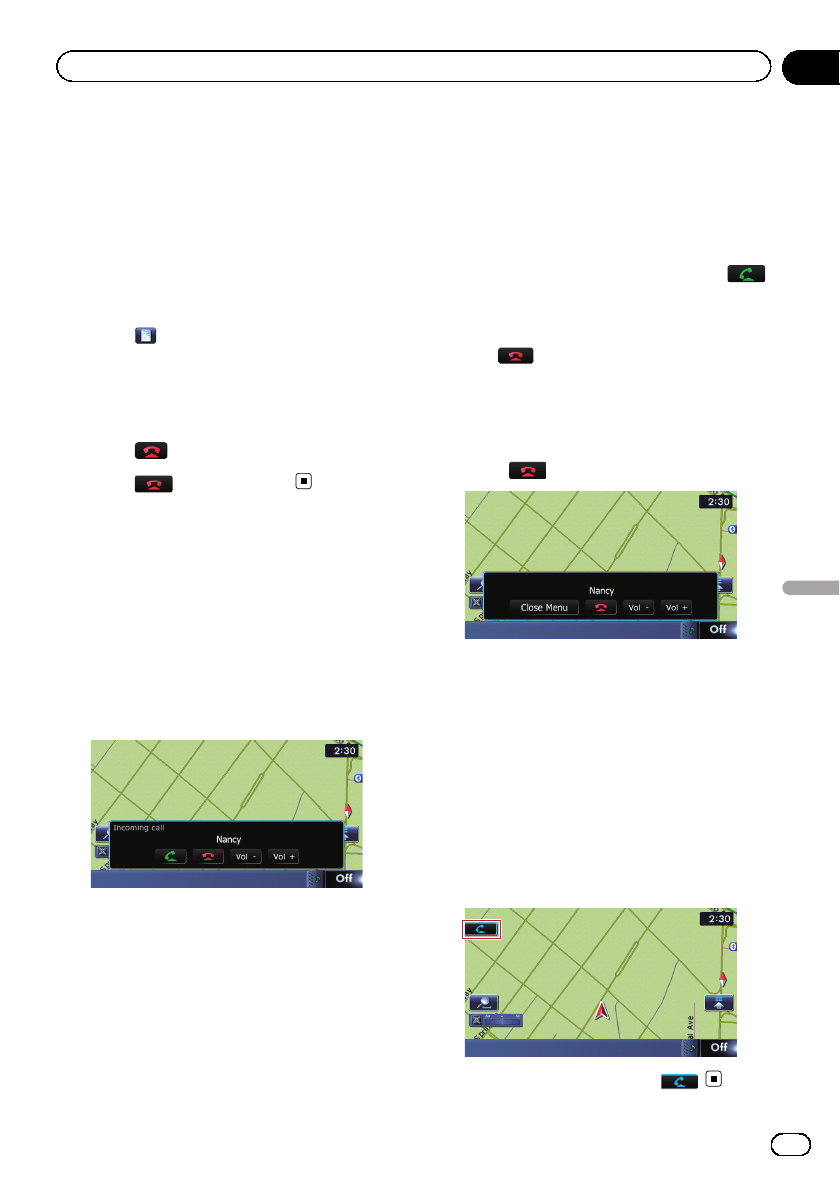
Receiving a phone call
You can perform hands-free answering by
using the navigation system.
Answering an incoming call
The system informs you that it is receiving a
call by displaying a message and producing a
ring sound.
If “Auto Answer Preference”is set to “Off”,
answer the call manually. Answering is avail-
able if any screen is displayed, such as the
map screen or the setting screen.
pYou can set this navigation system to auto-
matically answer incoming calls.
=For details, refer to Answering a call
automatically on page 74.
pThe registered name appears if the phone
number of the received call is already regis-
tered in “Contacts”.
pDepending on the caller ID service, the
phone number of the received call may not
be displayed. “Unknown”appears instead.
1 To answer an incoming call, touch .
The operation menu during a call appears.
#Touch [Vol –]or[Vol +].
You can adjust the ring tone volume.
#Touch to reject an incoming call.
pThe rejected call is recorded in the missed
call history list.
=For details, refer to Dialing from the history
on page 69.
2 Touch to end the call.
The call ends.
pIf the voice on the other end of the call is
too quiet to hear, you can adjust the volume
of the received voice.
=For details, refer to Setting the Volume
for Guidance and Phone on page 163.
pYou may hear a noise when you hang up
the phone.
#Touch [Vol –]or[Vol +].
You can adjust volume when you are talking.
#Touch [Close Menu].
The operation menu during call is minimized.
To display the menu again, touch .
En 71
Chapter
12
Using hands-free phoning
Using hands-free phoning
Transferring the phone book
You can transfer the phone book entries from
your cellular phone to the phone book of navi-
gation system.
pDepending on the cellular phone, Phone
Book may be called Contacts, Business
card or something else.
pWith some cellular phones, it may not be
possible to transfer the entire phone book
at once. In this case, transfer addresses
one at a time from your phone book using
your cellular phone.
pIf you connect the cellular phone featuring
auto-synchronization function, phone book
transfer or synchronization will be automa-
tically performed.
pA maximum of 1 000 entries can be trans-
ferred per cellular phone. If the entries ex-
ceed 1 000, the extra entries will not be
transferred. If more than one number is re-
gistered for one person, such as work place
and home, each number may be counted
separately.
pEach entry can hold up to 5 phone num-
bers.
pDepending on the cellular phone that is
connected to this navigation system via
Bluetooth technology, this navigation sys-
tem may not be able to display the phone
book correctly. (Some characters may be
garbled.)
pIf the phone book in the cellular phone con-
tains image data, the phone book may not
be correctly transferred.
pThe transferred data cannot be edited on
the navigation system.
1 Connect the cellular phone that has the
phone book to transfer.
=For details, refer to Connecting a registered
Bluetooth device on page 66.
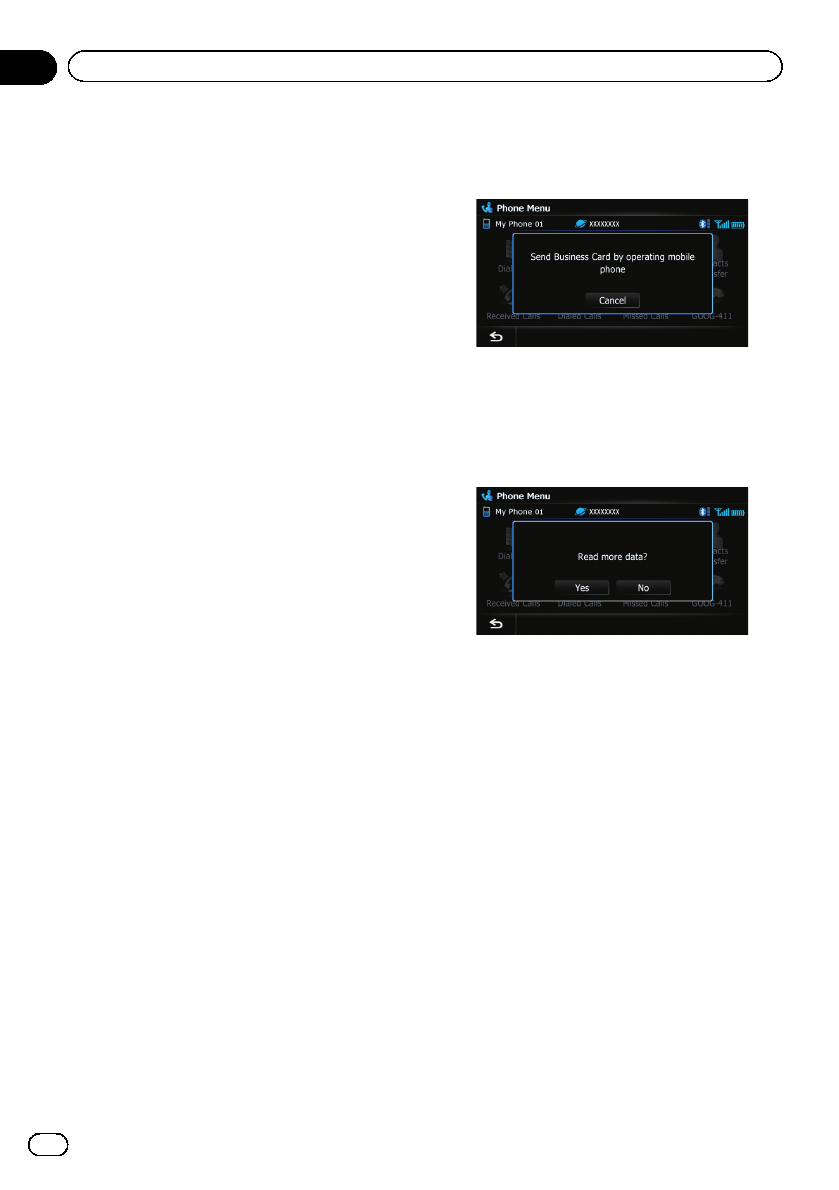
2 Touch [Contacts Transfer] on the
“Phone Menu”screen.
3 Check that the following screen is dis-
played, and operate your cellular phone to
transfer the phone book entries.
After transferring the data is finished, a mes-
sage asking whether you want to transfer
more data appears.
Touch [Yes] to continue the transfer.
4 Touch [No].
The transferred data is imported to the naviga-
tion system.
When the data is successfully imported, an
import complete message is displayed and the
“Contacts List”screen appears.
pIt may take time depending on how many
entries will be transferred.
En
72
Chapter
12 Using hands-free phoning
Deleting registered contacts
1 Display the “Phone Menu”screen.
=For details, refer to Displaying the Phone
Menu on page 68.
2 Touch [Contacts].
The “Contacts List”screen appears.
3 Touch [Delete].
The “Delete from Contacts”screen appears.
4 Touch the entry you want to delete.
A check mark appears next to the entry.
#Touch [All]or[None].
Selects or deselects all entries.
5 Touch [Delete].
The message confirming whether to delete the
entry appears.
6 Touch [Yes].
The entry is deleted.
#Touch [No].
Cancels the deletion.
Changing the phone settings
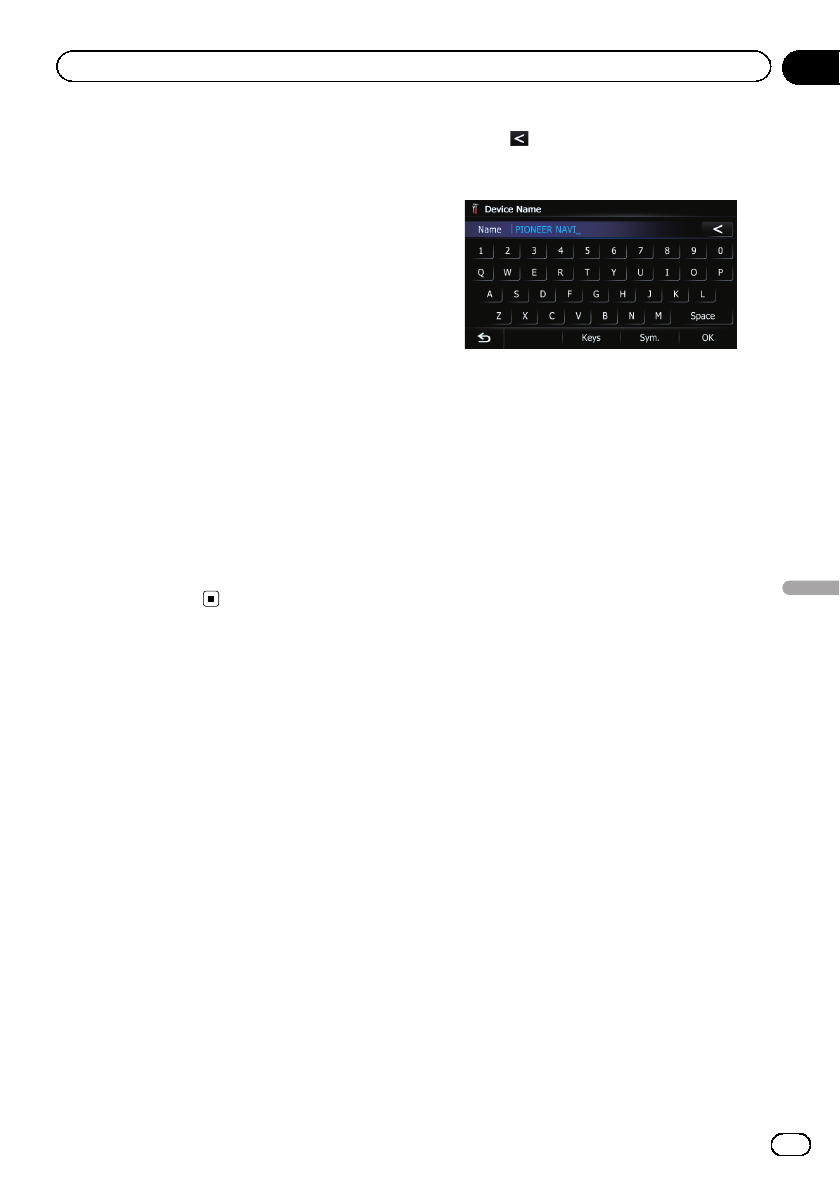
Editing the device name
You can change the device name to be dis-
played on your cellular phone. (Default is
“PIONEER NAVI”.)
1 Display the “Settings Menu”screen.
=For details of the operations, refer to Screen
switching overview on page 22.
2 Touch [Bluetooth Settings].
The “Bluetooth Settings”screen appears.
3 Touch [Device Name].
The keyboard to enter the name appears.
4 Touch to delete the current name,
and enter the new name by using the key-
board.
5 Touch [OK].
The name is changed.
pUp to 16 characters can be entered for a de-
vice name.
Editing the password
You can change the password to be used for
authentication on your cellular phone. (De-
fault is “1111”.)
pFour to eight characters can be entered for
a password.
1 Display the “Settings Menu”screen.
=For details of the operations, refer to Screen
switching overview on page 22.
2 Touch [Bluetooth Settings].
The “Bluetooth Settings”screen appears.
3 Touch [Password].
The “Set Password”screen appears.
4 Touch any key to enter the password
you want to set and then touch [OK].
Stopping Bluetooth wave
transmission
You can stop transmission of electric waves by
turning off the Bluetooth function. If you do
not use the Bluetooth wireless technology, we
recommend selecting “Off”.
En 73
Chapter
12
Using hands-free phoning
Using hands-free phoning
1 Display the “Settings Menu”screen.
=For details of the operations, refer to Screen
switching overview on page 22.
2 Touch [Bluetooth Settings].
The “Bluetooth Settings”screen appears.
3 Touch [Bluetooth On/Off].
Touching [Bluetooth On/Off] switches be-
tween “On”and “Off”.
Echo canceling and noise reduction
When you are operating hands-free phoning
in the vehicle, you may hear an undesirable
echo. This function reduces the echo and
noise while you are using hands-free phoning,
and maintains a certain sound quality.
1 Display the “Settings Menu”screen.
=For details of the operations, refer to Screen
switching overview on page 22.
2 Touch [Bluetooth Settings].
The “Bluetooth Settings”screen appears.
3 Touch [Echo Cancel].
Touching [Echo Cancel] switches between
“On”and “Off”.
Answering a call automatically
The navigation system automatically answers
incoming calls to the cellular phone, so you
can answer a call while driving without taking
your hands off the steering wheel.
1 Display the “Settings Menu”screen.
=For details of the operations, refer to Screen
switching overview on page 22.
2 Touch [Bluetooth Settings].
The “Bluetooth Settings”screen appears.
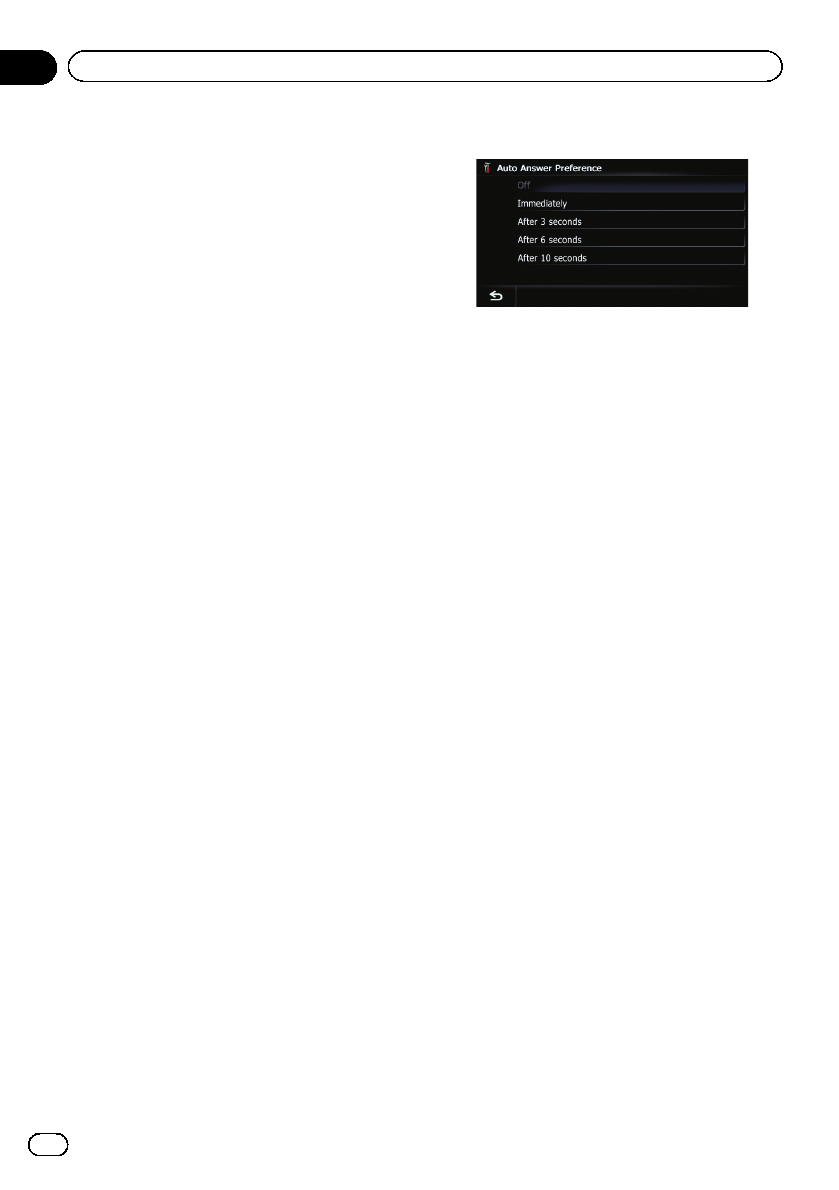
3 Touch [Auto Answer Preference].
The “Auto Answer Preference”screen ap-
pears.
4 Touch the desired option.
On this screen, you can select the following
items:
!Off:
No automatic response. Respond manually.
!Immediately:
Answers immediately.
!After 3 seconds:
Answers after three seconds.
!After 6 seconds:
Answers after six seconds.
!After 10 seconds:
Answers after ten seconds.
Setting the automatic rejection
function
If this function is on, the navigation system
automatically rejects all incoming calls.
1 Display the “Settings Menu”screen.
=For details of the operations, refer to Screen
switching overview on page 22.
2 Touch [Bluetooth Settings].
The “Bluetooth Settings”screen appears.
3 Touch [Refuse All Calls].
Touching [Refuse All Calls] switches between
“On”and “Off”.
pIf both “Refuse All Calls”and “Auto An-
swer Preference”are activated, “Refuse
All Calls”takes priority and all incoming
calls are automatically rejected.
pIf “Refuse All Calls”is set to “On”, rejected
incoming calls will not be stored in the
missed call list.
En
74
Chapter
12 Using hands-free phoning
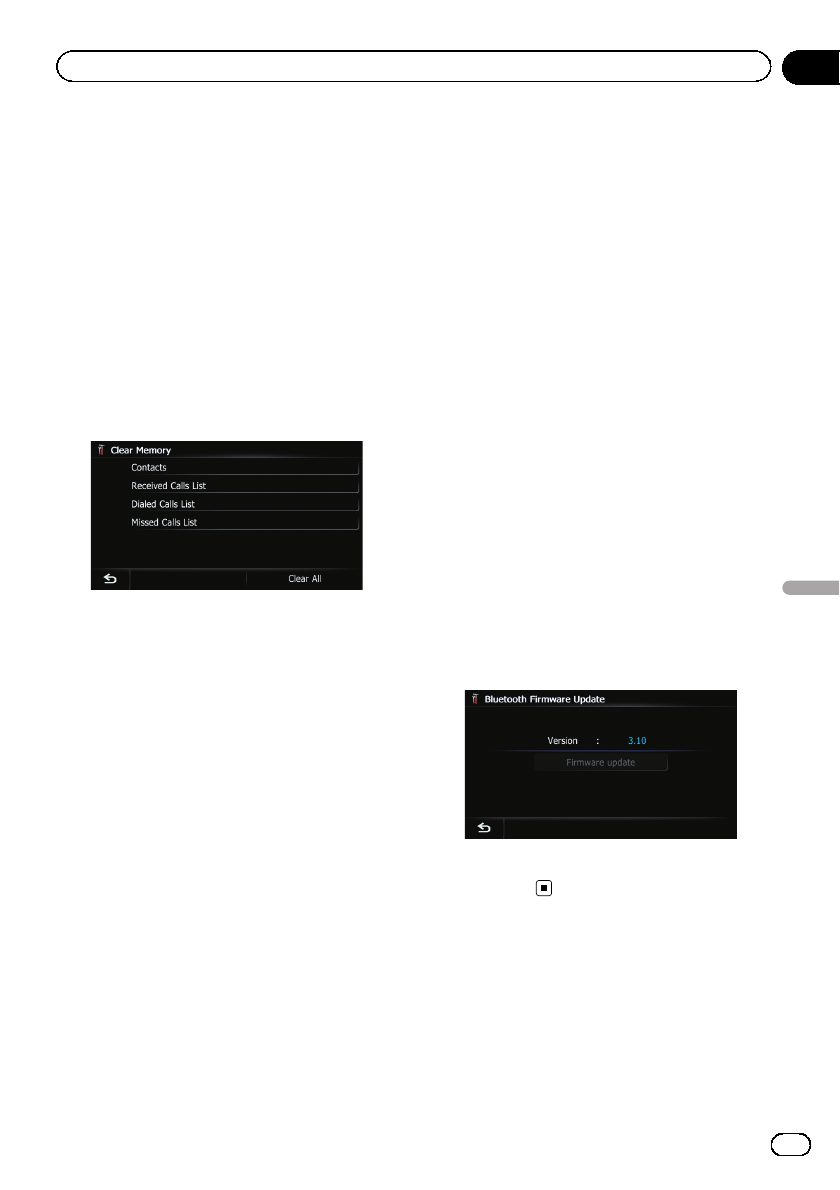
Clearing memory
You can clear the memory of each item that
corresponds to the connected cellular phone:
phone book, dialed/received/missed call his-
tory list and preset dials.
1 Display the “Settings Menu”screen.
=For details of the operations, refer to Screen
switching overview on page 22.
2 Touch [Bluetooth Settings].
The “Bluetooth Settings”screen appears.
3 Touch [Clear Memory].
The “Clear Memory”screen appears.
On this screen, you can select the following
items:
!Contacts:
You can clear the registered phone book.
!Received Calls List:
You can clear the received call history list.
!Dialed Calls List:
You can clear the dialed call history list.
!Missed Calls List:
You can clear the missed call history list.
#Touch [Clear All].
It clears all the data that correspond to the con-
nected cellular phone.
4 Touch [Yes].
Data on the selected item is cleared from this
navigation system’s memory.
pIf you do not want to clear the memory that
you have selected, touch [No].
Updating the Bluetooth
wireless technology software
Update files will be available for download in
the future. You will be able to download the lat-
est update from an appropriate website to
your PC.
pBefore you download the files and install
the update, read through the instructions
on the website. Follow the instructions on
the website for steps until [Firmware up-
date] becomes active.
1 Insert an SD memory card into the SD
card slot.
=For details of the operation, refer to Insert-
ing and ejecting an SD memory card on
page 15.
2 Display the “Settings Menu”screen.
=For details of the operations, refer to Screen
switching overview on page 22.
3 Touch [Bluetooth Settings].
The “Bluetooth Settings”screen appears.
4 Touch [Firmware update].
The current version is displayed.
5 Touch [Firmware update].
Update starts.
Notes for hands-free phoning
General notes
!Connection to all cellular phones featuring
Bluetooth wireless technology is not guar-
anteed.
En 75
Chapter
12
Using hands-free phoning
Using hands-free phoning

!The line-of-sight distance between this na-
vigation system and your cellular phone
must be 10 meters or less when sending
and receiving voice and data via Bluetooth
technology. However, the actual transmis-
sion distance may be shorter than the esti-
mated distance, depending on the usage
environment.
!With some cellular phones, the ring sound
may not be output from the speakers.
!If private mode is selected on the cellular
phone, hands-free phoning may be dis-
abled.
Registration and connection
!Cellular phone operations vary depending
on the type of cellular phone. Refer to the
instruction manual that came with your cel-
lular phone for detailed instructions.
!With cellular phones, phone book transfer
may not work even though your phone is
paired with the navigation system. In that
case, disconnect your phone, perform pair-
ing again from your phone to the naviga-
tion system, and then perform the phone
book transfer.
Making and receiving calls
!You may hear a noise in the following situa-
tions:
—When you answer the phone by using
the button on the phone.
—When the person on the other end of
line hangs up the phone.
!If the person on the other end of the phone
call cannot hear the conversation due to an
echo, decrease the volume level for hands-
free phoning. This may reduce the echo.
!With some cellular phones, even if you
press the accept button on the cellular
phone when a call comes in, hands-free
phoning may not be performed.
!The registered name appears if the phone
number of the received call is already regis-
tered in the phone book. When one phone
number is registered under different
names, the name that comes first in the
phone book is displayed.
!If the phone number of the received call is
not registered in the phone book, the
phone number of the received call appears.
The received call history and the dialed
number history
!Calls made or editing performed only on
your cellular phone will not be reflected to
the dialed number history or phone book in
the navigation system.
!You cannot make a call to the entry of an
unknown user (no phone number) in the re-
ceived call history.
!If calls are made by operating your cellular
phone, no history data will be recorded in
the navigation system.
Phone book transfers
!If there are more than 1 000 phone book en-
tries on your cellular phone, all entries may
not be downloaded completely.
!With some cellular phones, it may not be
possible to transfer all items in the phone
book at one time. In this case, transfer
items one by one from your cellular phone.
!Depending on the cellular phone, this navi-
gation system may not display the phone
book correctly. (Some characters may be
garbled, or first and last names may be re-
versed.)
!If the phone book in the cellular phone con-
tains image data, the phone book may not
be transferred correctly. (Image data can-
not be transferred from the cellular phone.)
!Depending on the cellular phone, phone
book transfer may not be available.
En
76
Chapter
12 Using hands-free phoning
This chapter describes the basic operations of
the AV source.
You can play or use the following sources with
the navigation system.
!TUNER (FM, AM)
!CD
!ROM (in MP3, AAC, WMA)
!DVD-Video
!DivX
!USB
!SD
The following sources can be played back or
used by connecting an auxiliary device.
!HD Radio (HD Radio tuner)
!iPod
!Pandora
!Bluetooth Audio
!XM Tuner
!SIRIUS Tuner
!AV input 1 (AV1)
!AV input 2 (AV2)
!External unit 1 (EXT1)
!External unit 2 (EXT2)
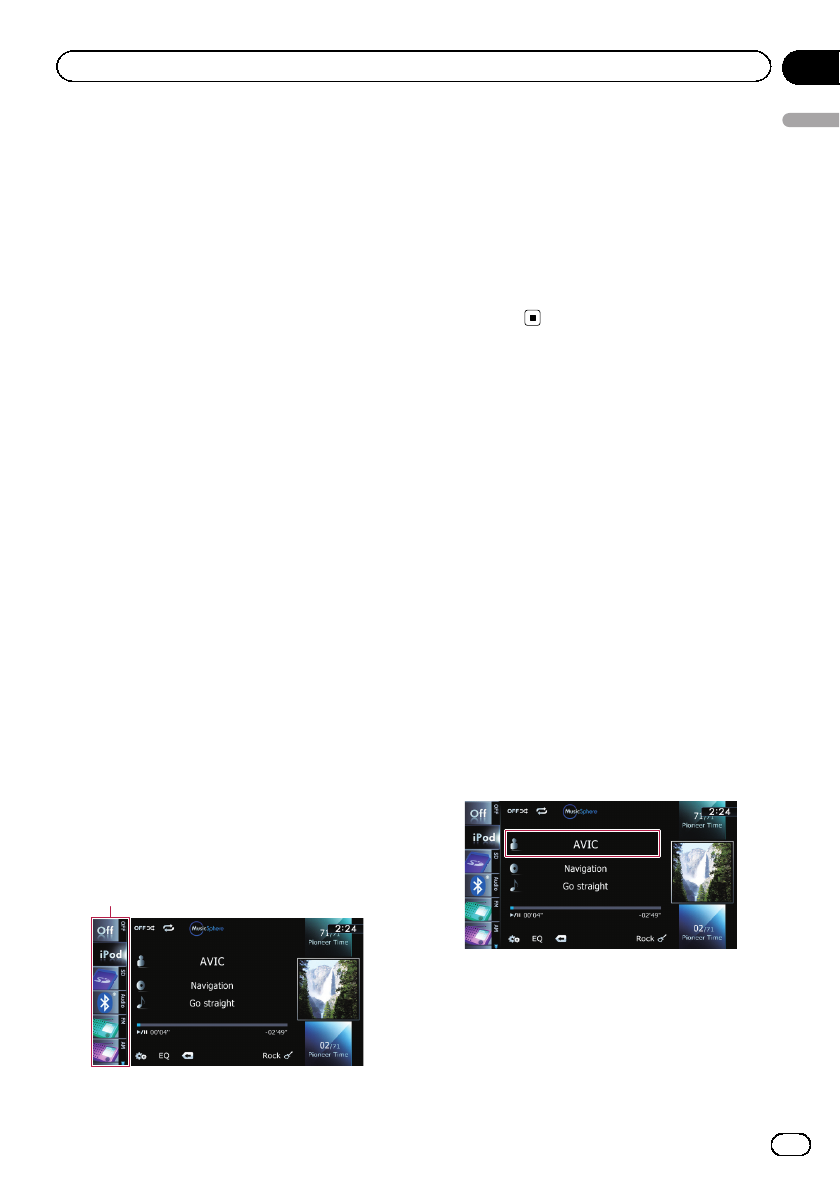
Displaying the AV
operation screen
%Press the MODE button when the map
screen is displayed.
pThe AV operation screen can also be dis-
played by touching [AV Source] on the
“Top Menu”.
Selecting a source
Source icon
1 Drag a source icon up or down.
The AV source icons scroll, and hidden icons
appear.
2 Tap the icon of the source you want to
select.
The operation screen of the selected source
appears.
pThe icon currently selected is high-
lighted.
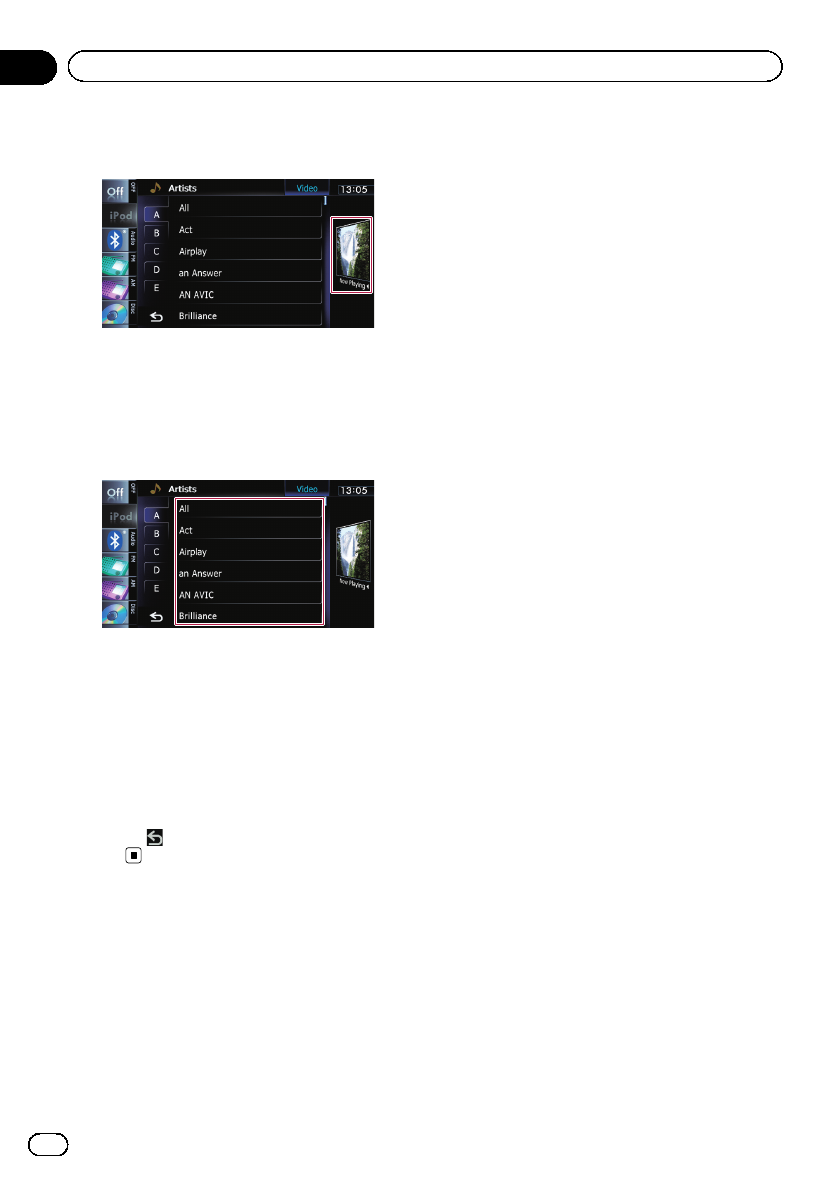
Operating list screens (e.g.
iPod list screen)
This describes the operations when a list
screen is displayed.
pFor displaying the list screen, refer to the
description of the corresponding source.
Switching between the AV
operation screen and the list
screen
The following example describes how to
switch between the AV operation screen and
the artist list screen of iPod.
1 Touch the appropriate key to display
the list that you want.
pFor displaying the list screen, refer to the
description of the corresponding source.
En 77
Chapter
13
Basic operations of the AV source
Basic operations of the AV source
2 Touch the key on the right edge of the
screen.
The AV operation screen returns.
Selecting an item
1 Scroll by dragging items up or down,
and display the item you want to select.
pFlicking a list item enables you to quickly
scroll through the list.
To stop scrolling, gently touch the list.
2 Tap the item.
pThe item currently selected is highlighted.
Returning to the previous display
%Touch to return to the previous
screen.
En
78
Chapter
13 Basic operations of the AV source
You can listen to the radio by using the naviga-
tion system. This section describes operations
for radio (FM).
Starting procedure
1 Display the AV operation screen.
=For details of the operations, refer to Dis-
playing the AV operation screen on page 77.
2 Tap [FM] on the left edge of the screen
to display the “FM”screen.
3 Use the touch panel keys on the screen
to control the radio.
=For details, refer to Using the touch panel
keys on the next page.
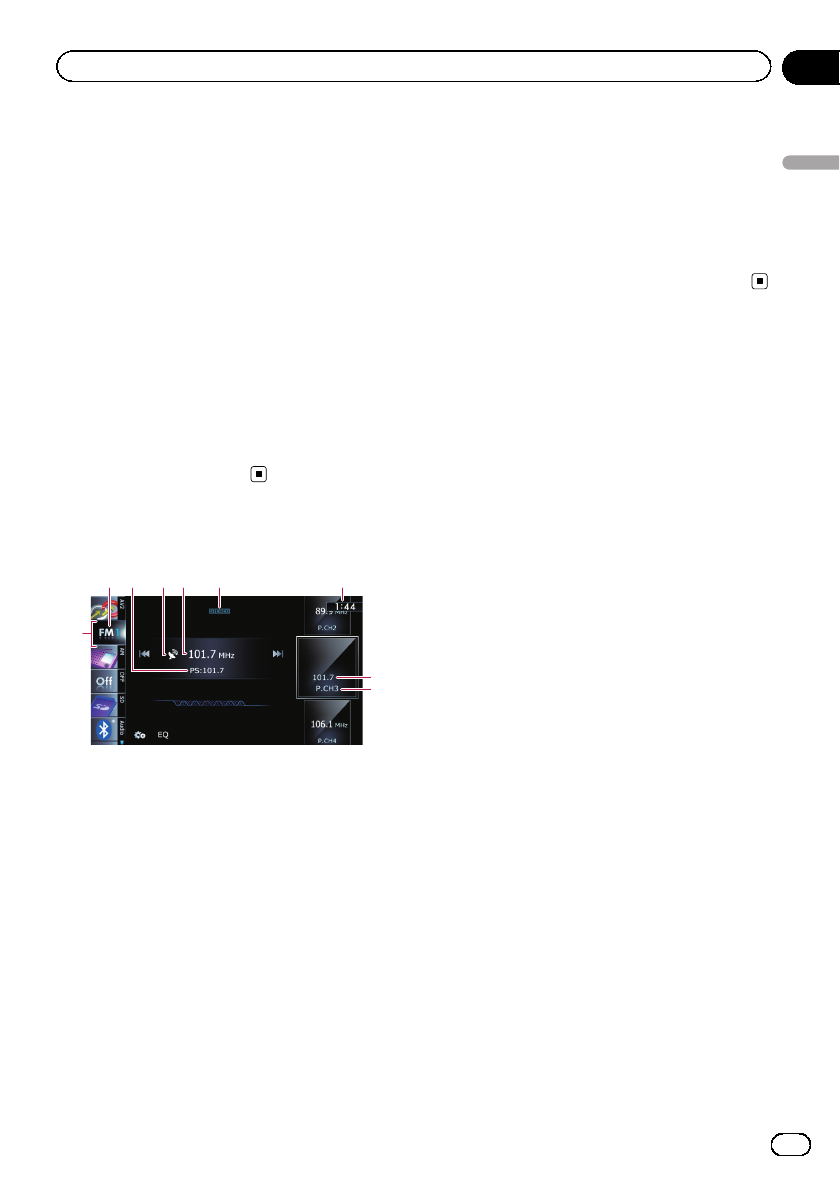
Reading the screen
1
23 6
54 7
8
9
1Source icon
Shows which source has been selected.
2Band indicator
Shows which band the radio is tuned to: FM1
to FM3.
3Program service name indicator
Shows the program service name (station
name) of the current station.
4Signal level indicator
5Frequency indicator
6STEREO indicator
Shows that the frequency selected is being
broadcast in stereo.
7Current time
8Program service name or frequency indi-
cator
Shows the frequency of the preset item. If the
program service name can be obtained, the
program service name is shown instead of the
frequency.
9Preset number indicator
Shows what preset item has been selected.
En 79
Chapter
14
Using the radio (FM)
Using the radio (FM)
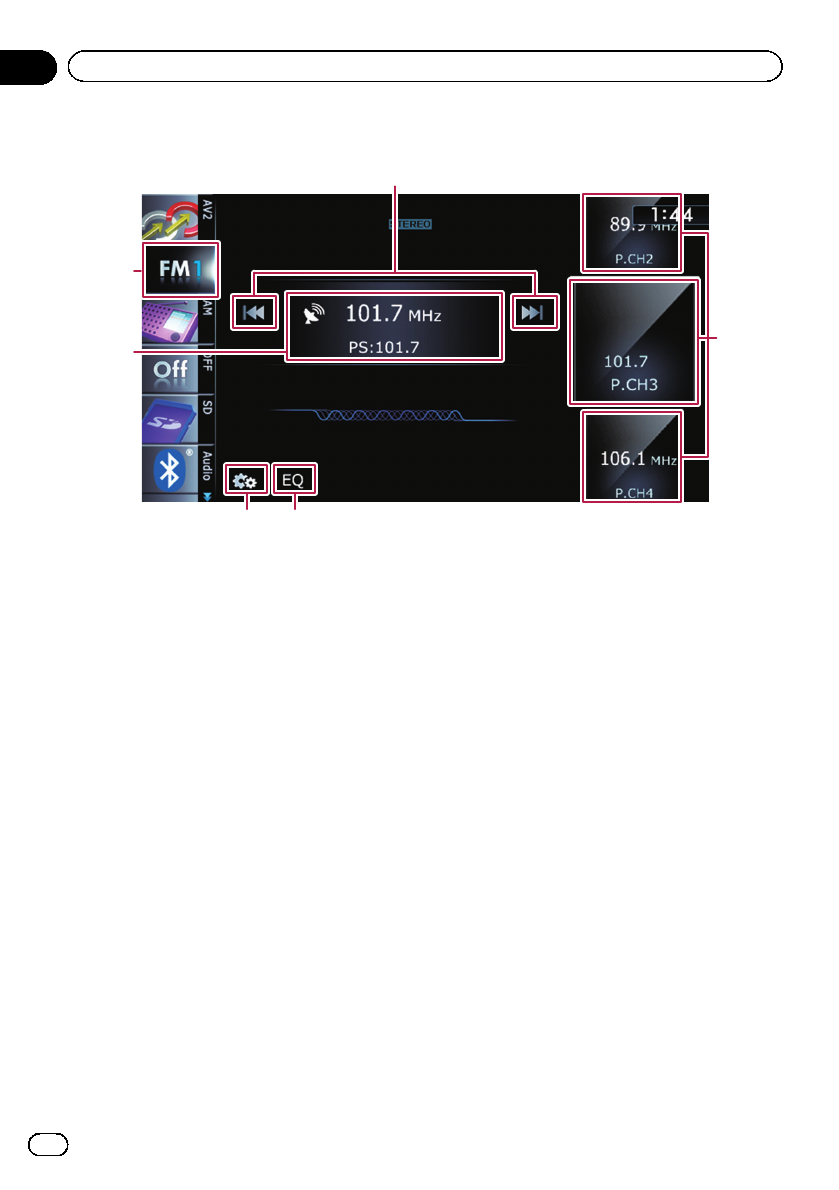
Using the touch panel keys
6
5
1
34
2
1Performs manual tuning
To tune manually, touch [o]or[p] briefly.
The frequencies move up or down one step at
a time.
Performs seek tuning
To perform seek tuning, touch and hold [o]
or [p] for about one second and release.
The tuner will scan frequencies until a broad-
cast strong enough for good reception is
found.
pYou can cancel seek tuning by touching
either [o]or[p] briefly.
pIf you touch and hold [o]or[p],
you can skip broadcasting frequencies.
Seek tuning will start as soon as you re-
lease the keys.
pYou can also perform these operations
by using the TRK button.
2Selects a preset channel
The keys can be used to switch preset chan-
nels.
Scroll by dragging the keys up or down to dis-
play the preset channel you want to select,
and tap the channel.
pThe lower key and the upper key appear
only when the preset channel is se-
lected.
3Recalls equalizer curves
=For details, refer to Using the equalizer
on page 172.
4Displays the “Function”menu
=For details, refer to Using the
“Function”menu on the next page.
5Switches between the AV operation
screen and the preset list display
You can switch the screen display according
to your preference.
=For details of the operation, refer to
Switching between the AV operation
screen and the list screen on page 77.
6Selects an FM band
Tapping the key repeatedly switches between
the following FM bands: FM1,FM2,orFM3.
pThis function is convenient for preparing
different preset lists for each band.
Storing and recalling broadcast
frequencies
With a tap of any of the preset tuning keys
(“P1”to “P6”), you can easily store up to six
broadcast frequencies for later recall (also
with the tap of a key).
En
80
Chapter
14 Using the radio (FM)