Pioneer K031 Multi-Media AVN Navigation Server System with BT User Manual 10
Pioneer Corporation Multi-Media AVN Navigation Server System with BT 10
Pioneer >
Contents
User Manual 10
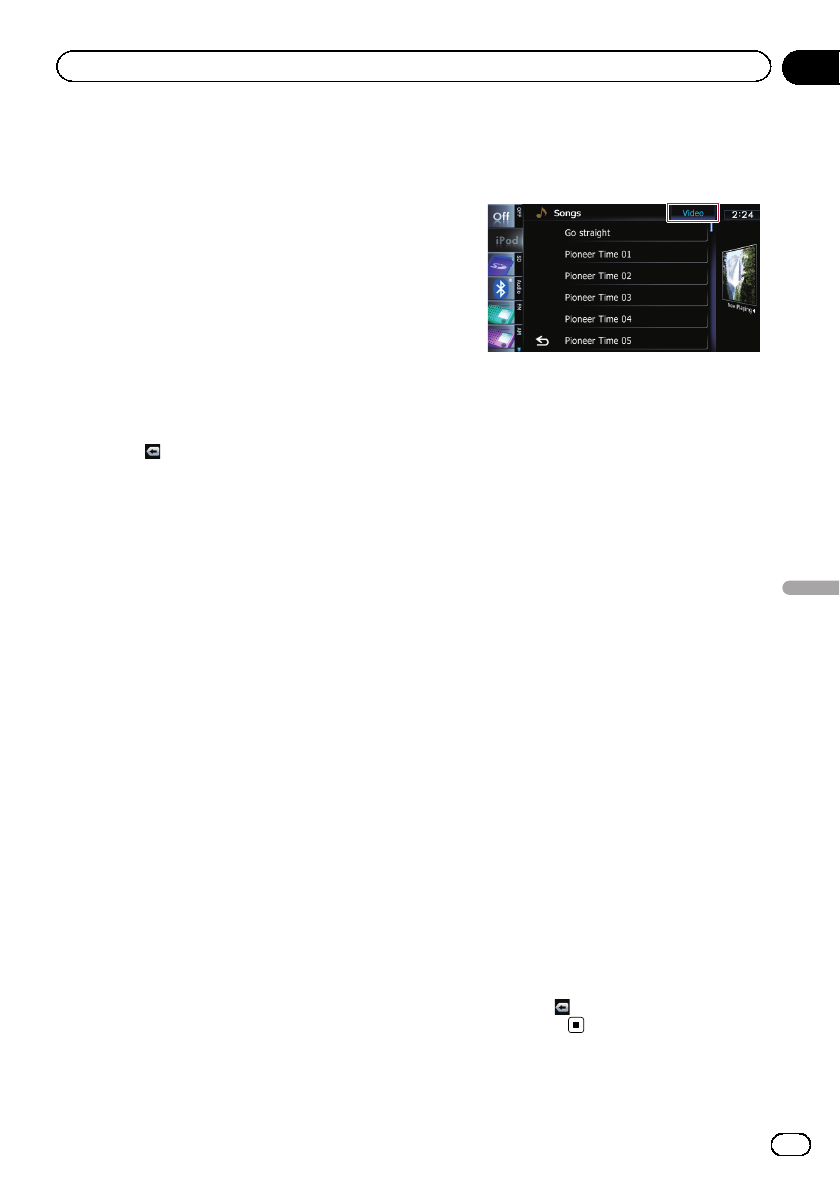
4Selects a song to play
Scrolling the keys up or down displays songs,
and tapping a song starts playback.
Tapping the lower key during shuffle playback
skips to the next song. Tapping the upper key
once skip to the start of the current song. Tap-
ping it again will skip to the previous song.
When the song with chapters played, chapter
can be skipped back and forward.
5Displays the genre list
6Displays the top category menu
Touching the key displays the top category for
song playback.
Displays the previous selected list
If you select the song from the list to play after
touching , touching the key displays the pre-
vious list.
7Recalls equalizer curves
=For details, refer to Using the equalizer
on page 172.
8Displays the “Function”menu
=For details, refer to Using the
“Function”menu on page 124.
9Playback and Pause
Touching [f] switches between playback
and pause.
aDisplays the song list
bDisplays the album list
cDisplays the artist list
dSwitches the operation screen
Tapping this key displays the touch panel key
([Video]or[Music]) to switch between the
screen to operate video files and the screen to
operate music files.
=For details of the operation, refer to
Starting the video playback on the next
page.
pThis touch panel key is available only
when there are both audio and video file
in your iPod.
pIf iPod fifth generation is connected, the
following settings are automatically
changed when the operation screen is
switched to the screen to operate video
files.
!“Repeat”is set to “All”.
!“Shuffle”is set to “Off”.
pTouching [Video]or[Music] on the list
screens enables you to perform the
equivalent operation.
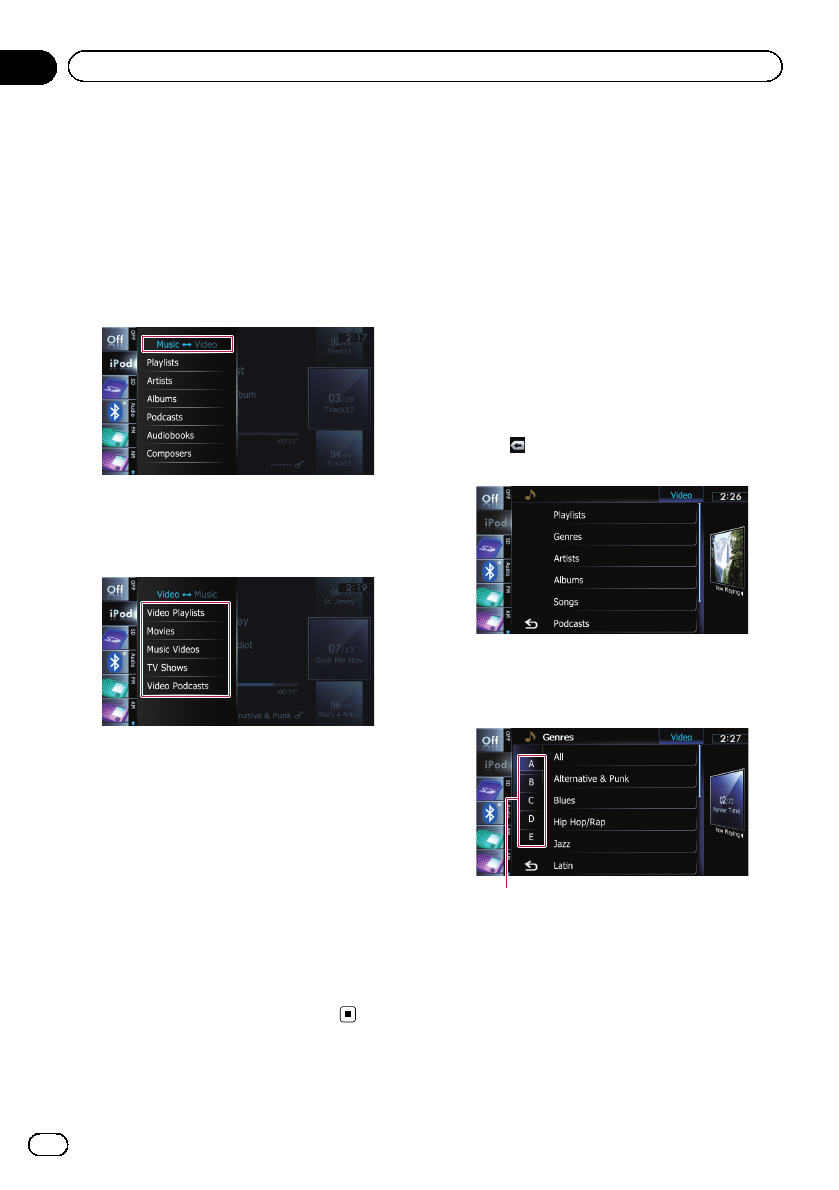
Displays the top category menu
Touching the key displays the top category
menu for song or video playback.
eSkips back or forward to another video
Touching [p] skips to the start of the next
video. Touching [o] once skips to the start
of the current video. Touching again will skip
to the previous video. When the video with
chapters played, chapter can be skipped back
and forward.
Fast reverse or forward
Touch and hold [o]or[p] to fast reverse
or fast forward.
If you touch and hold [o]or[p] for five
seconds, fast reverse/fast forward continues
even if you release either of these keys. To re-
sume playback at a desired point, touch
[f], [o]or[p].
pYou can also perform these operations
by using the TRK button.
fHides the touch panel keys and informa-
tion of the current video
Touching [Hide] shows only the current video.
To display the touch panel keys and informa-
tion of the current video, touch the screen.
gDisplays the top category menu for video
Touching the key displays the top category for
video playback.
Displays the previous selected list
If you select the video from the list to play
after touching , touching the key displays
the previous list.
En 121
Chapter
24
Using an iPod (iPod)
Using an iPod (iPod)
Starting the video playback
This navigation system can play video if an
iPod with video capabilities is connected.
1 Touch [iPod] on the left edge of the
screen to display the touch panel key to
switch to a video source.
2 Tap [Music].
A list of videos by category appears.
3 Tap one of the categories in that con-
tains the video you want to play.
4 Tap your desired item on the list to nar-
row down them until the video list ap-
pears.
=For details, refer to Narrowing down a song
or video with the list on this page.
5 On the video list, tap the video you
want to play.
Video playback will start.
6 Touch the screen to display the touch
panel keys.
=For details of the operation, refer to Using
the touch panel keys on page 120.
Narrowing down a song or
video with the list
Tapping an item on list allows you to search
for a song or video and play it in your iPod.
1 Display a list screen.
=For details, refer to Displays the genre list
on the previous page.
=For details, refer to Displays the song list
on the previous page.
=For details, refer to Displays the album
list on the previous page.
=For details, refer to Displays the artist list
on the previous page.
#Touch to display the top category menu
screen, and then tap the category you want.
2 Scroll by dragging tabs up or down to
display the character that you want to re-
fine.
Alphabet tabs
3 Tap the tab to select the character and
display the page which includes applicable
options.
pAn article listed below and space at the be-
ginning of the artist name will be ignored
and the next character will be taken into ac-
count for searching.
—“A”or “a”
En
122
Chapter
24 Using an iPod (iPod)

—“AN”,“An”,or“an”
—“THE”,“The”,or“the”
4 Scroll by dragging items up or down,
and display the item you want to select.
Refine the item until the song title (episode) is
displayed on the list.
pTapping [All] on the list includes all options
in the current list. For example, if you tap
[All] after tapping [Artists], you can pro-
ceed to the next screen with all artists in
the list selected.
pAfter you select Artists,Albums,or
Genres, go on to tap one of the list to start
playing the first song in the selected list
and display the next hierarchy.
5 On the song (episode) or video list, tap
the song (episode) or video you want to
play.
pAfter you select the song (episode) or video
using this function, touching displays
the list previously selected.
Operating the functions
from your iPod
You can control the functions by using iPod it-
self while iPod is connected to the navigation
system. Sound can be heard from the car’s
speakers, and operation can be conducted
from your iPod.
Even if “Change Control Mode”is set to
“iPod”, following functions are available from
this navigation system.
!Playback and Pause
!Fast reverse or forward
!Skip forward or backward
!Adjusting the volume
=For details, refer to Sets iPod control
mode on page 125.
En 123
Chapter
24
Using an iPod (iPod)
Using an iPod (iPod)
Playing MusicSphere
You can play playlists created with the PC ap-
plication (MusicSphere) using an exciting gra-
phic interface.
pPC application (MusicSphere) will be avail-
able on our website.
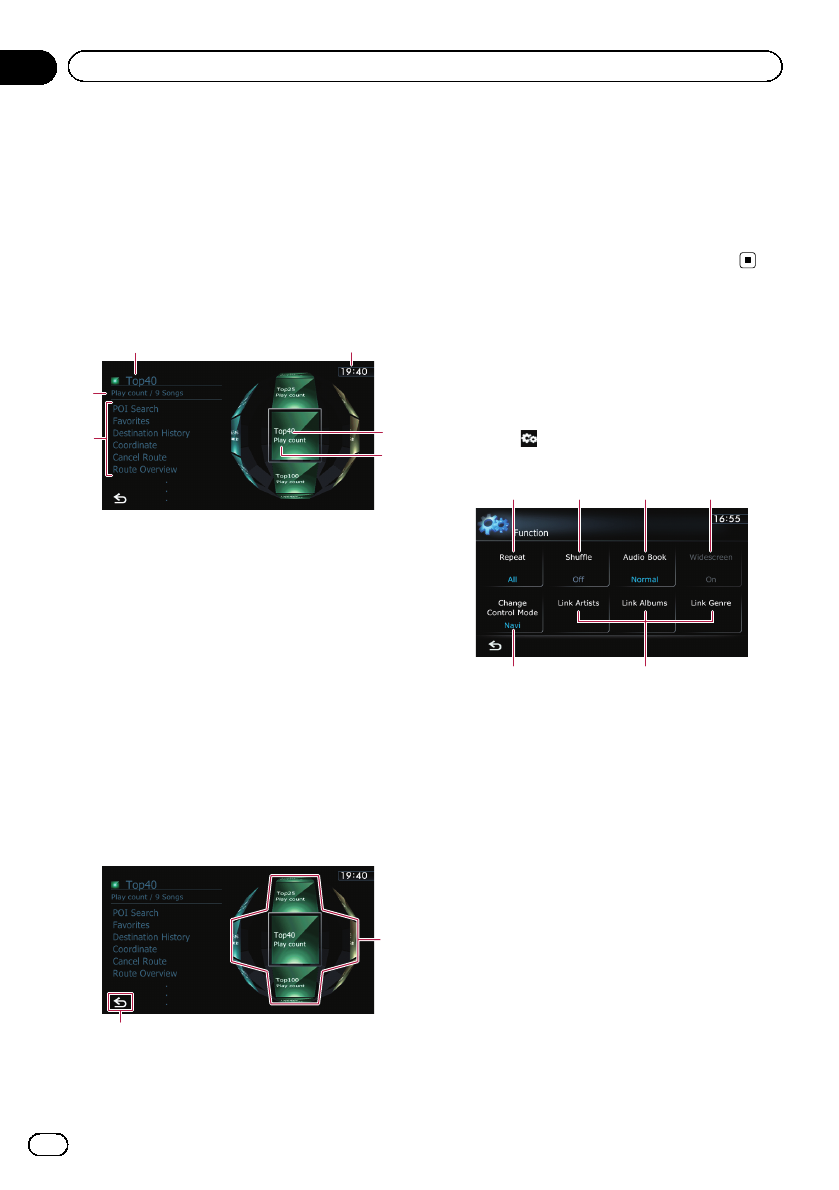
Reading the screen
5
4
12
1
3
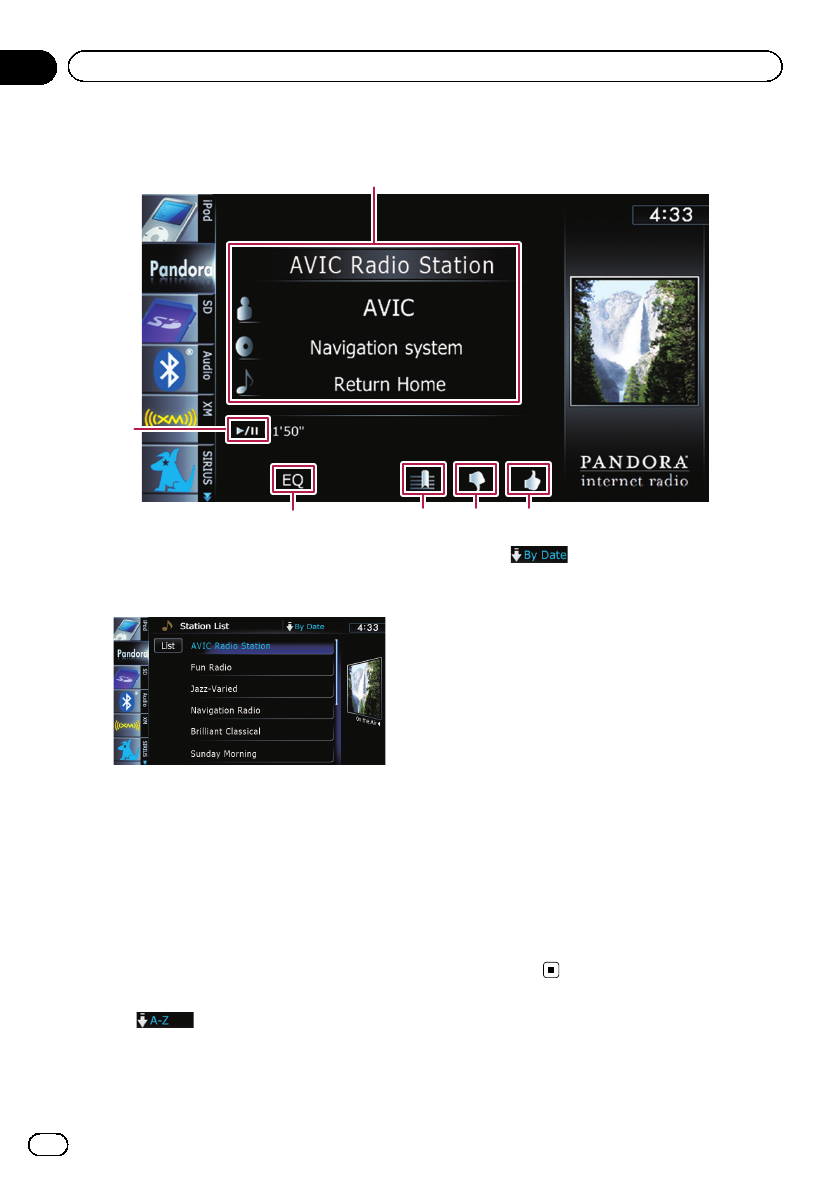
1Playlist name indicator
Shows the name of the playlist currently se-
lected.
2Current time
3Category name
Shows the category name in the playlist.
4Song title indicator
Shows six songs including the first song
played after selecting the playlist.
5Category name and total number of songs
Shows the category name and the total num-
ber of playable songs in the playlist currently
selected.
Using the touch panel keys
2
1
1Plays the playlist
Tapping a key moves the playlist to the center
of the screen, and tapping the center key
starts playback.
pTo change the playlist to be displayed,
rotate the sphere by dragging the keys
up, down, left, or right.
2Switches to the AV operation screen
Using the “Function”menu
pIf “Change Control Mode”is set to “iPod”,
only the setting of “Change Control
Mode”is available.
%Touch on the “iPod”screen.
The “Function”menu appears.
1 2 3 4
65
1Sets repeat play
There are two repeat play types for play-
back.
Each touch of [Repeat] changes the setting
as follows:
!All: Repeats all songs in the selected
list.
!One: Repeats just the current song.
2Sets the shuffle play for music
This function shuffles songs or albums and
plays them in random order.
Each touch of [Shuffle] changes the setting
as follows:
!Off: Does not shuffle.
!Songs: Plays back songs in random
order within the selected list.
!Albums: Selects an album randomly,
and then plays back all songs in that
album in order.
En
124
Chapter
24 Using an iPod (iPod)

3Sets the audiobook play speed
While listening to an audiobook on iPod,
playback speed can be changed.
Each touch of [Audio Book] changes the
setting as follows:
!Normal: Playback in normal speed
!Faster: Playback faster than normal
speed
!Slower: Playback slower than normal
speed
4Plays video in wide screen mode
If the video is compatible with wide screen
format, set “Widescreen”to “On”in order
to view the video image in the wide screen.
Each touch of [Widescreen] changes the
setting as follows:
!On: Outputs the wide-screen video from
iPod.
!Off: Outputs the normal-sized video
from iPod.
pDisplay size is changed after you
change “Widescreen”setting and select
the video to play.
pThis setting is available only during the
video operation.
5Plays songs related to the currently
playing song
You can play songs related to the currently
playing song, using of the following lists.
!Link Artists: Songs related to the cur-
rently playing artist will be played in the
album order.
!Link Albums: Songs related to the cur-
rently playing album will be played.
!Link Genre: Songs related to the cur-
rently playing genre will be played in the
artist order.
6Sets iPod control mode
While the control mode is set to “iPod”, you
can operate iPod function from the con-
nected iPod.
Each touch of [Change Control Mode]
changes the setting as follows:
!Navi: Allows you to control the iPod
functions from the navigation system.
!iPod: Allows you to control the iPod
functions from the connected iPod.
En 125
Chapter
24
Using an iPod (iPod)
Using an iPod (iPod)

IMPORTANT:
Requirements to access the Pandora music ser-
vice using the Pioneer navigation system:
!Apple iPhone (first generation), iPhone 3G, or
iPhone 3GS, with firmware version 3.0 or later.
!Latest version of the Pandora application for
the iPhone, downloaded to your device.
(Search Apple iTunes App Store for “Pan-
dora”).
!Current Pandora account (Free account and
paid accounts available from Pandora; create
a free account online at
http://www.pandora.com/register or through
the Pandora application for the iPhone).
!iPhone Data Plan.
Note: if the Data Plan for your iPhone does
not provide for unlimited data usage, addi-
tional charges from AT&T may apply for acces-
sing the Pandora service via AT&T’s 3G and/or
EDGE networks.
!Connection to the Internet via 3G, EDGE or
WiFi network.
!Optional Pioneer adapter cable connecting
your iPhone to the Pioneer navigation system.
Limitations:
!Access to the Pandora service will depend on
the availability of a cellular and/or WiFi net-
work for purposes of allowing your iPhone to
connect to the Internet.
!Pandora’s service is currently only available in
the U.S.
!Ability of the Pioneer navigation system to ac-
cess the Pandora service is subject to change
without notice and could be affected by any of
the following: compatibility issues with future
firmware versions of iPhones; compatibility is-
sues with future firmware versions of the Pan-
dora application for the iPhone; changes to
the Pandora music service by Pandora; dis-
continuation of the Pandora music service by
Pandora.
!Certain functionality of the Pandora service is
not available when accessing the service
through the Pioneer navigation system, in-
cluding, but not limited to, creating new sta-
tions, deleting stations, emailing current
stations, buying songs from iTunes, viewing
additional text information, logging in to Pan-
dora, and adjusting Cell Network Audio Qual-
ity.
Pandora Internet radio is a music service not af-
filiated with Pioneer. More information is avail-
able at http://www.pandora.com.
Pandora is a registered trademark of Pandora
Media, Inc.
You can play the Pandora by connecting your
iPod which was installed the Pandora applica-
tion.
Starting procedure
1 Display the AV operation screen.
=For details of the operations, refer to Dis-
playing the AV operation screen on page 77.
2 Connect your iPod.
The source changes and then playback will
start.
=For details, refer to Connecting your iPod on
page 19.
pIf the iPod is already connected, tap [Pan-
dora] on the left edge of the screen.
=For details of the operations, refer to Dis-
playing the AV operation screen on page 77.
pWhen an iPod is connected to the naviga-
tion system while the Pandora application
is running, the “Pandora”screen appears
after the “iPod”screen. Music may also be
played back in the “iPod”screen.
3 Start up the Pandora application in-
stalled on the iPod.
4 Tap [Pandora] on the left end of the
screen to display “Pandora”screen.
5 Use the touch panel keys on the screen
to control the Pandora.
=For details, refer to Using the touch panel
keys on page 128.
En
126
Chapter
25 Using Pandora®
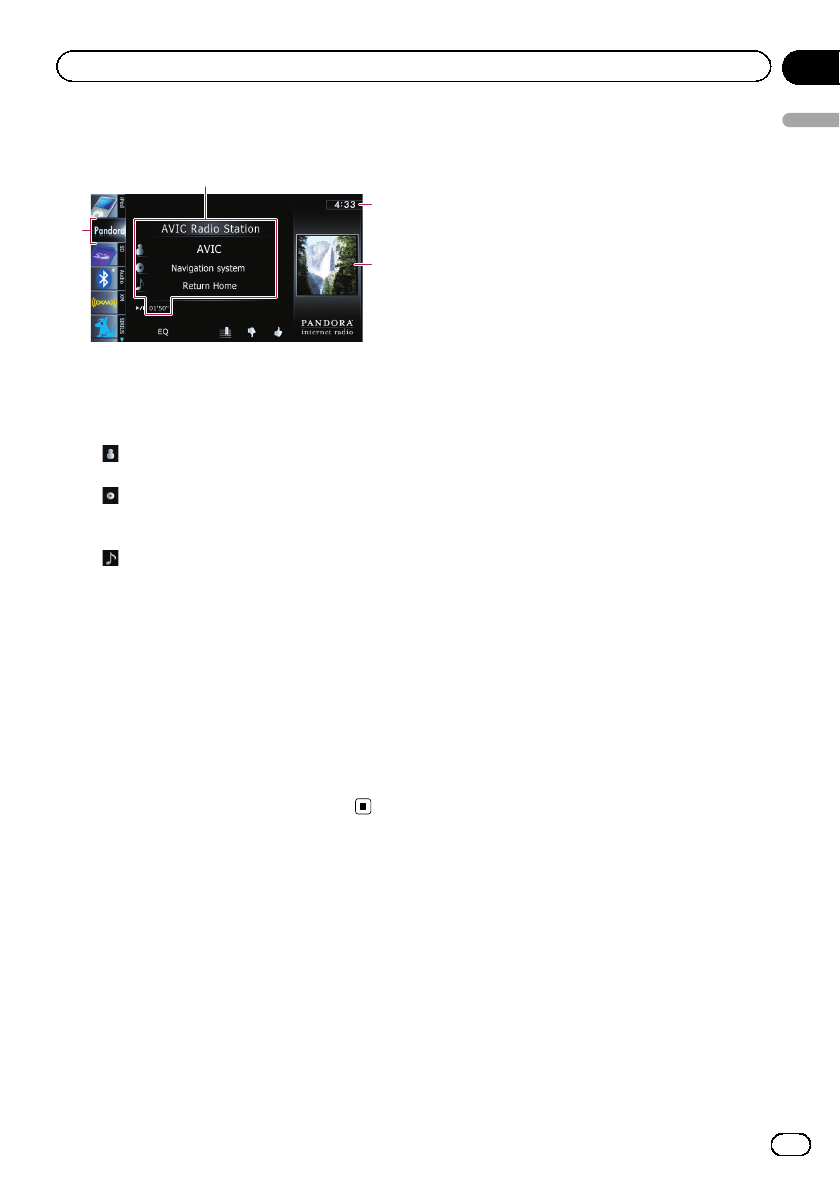
Reading the screen
4
1
2
3
1Current song information
!Station name indicator
Shows the Pandora station name the
tuner is currently tuned in.
!:Artist name
Shows the artist name currently playing.
!:Album title
Shows the title of the album for the cur-
rent song.
!:Song title
Shows the title of the current song.
!Play time indicator
Shows the elapsed playing time within
the current song.
p“-------”is displayed if there is no corre-
sponding information.
2Current time
3Album artwork
Album art of the current song is displayed if it
is available.
4Source icon
Shows which source has been selected.
En 127
Chapter
25
Using Pandora®
Using Pandora®
Using the touch panel keys
1
6
54 23
1Selects a Pandora station from the list
Touching the key displays the list of your Pan-
dora stations to select one of them to play.
=For details, refer to Operating list screens
(e.g. iPod list screen) on page 77.
Scroll by dragging items up or down, and dis-
play the item you want to select.
pTouching [QuickMix] plays only one
song at a time from shuffled several sta-
tions.
pEach time you touch [List] changes the
sort order.
Current order is indicated on the upper
right of the screen.
!:
You can sort the items in the list al-
phabetically.
!:
You can sort the items in the list in
order of dates the items were cre-
ated.
2Thumbs Up
Touching the key gives “Thumbs Up”to the
song currently playing.
3Thumbs Down
Touching the key gives “Thumbs Down”to the
song currently playing and skip to the next
song.
4Bookmark
Touching the key displays the screen which
lets you select the artist or song to add book-
marks.
5Recalls equalizer curves
=For details, refer to Using the equalizer
on page 172.
6Playback and Pause
Touching [f] switches between playback
and pause.
En
128
Chapter
25 Using Pandora®
You can control the Bluetooth audio player
featuring Bluetooth wireless technology.
pBefore using the Bluetooth audio player,
you need to register and connect the device
to this navigation system.
=For details, refer to Registering your Blue-
tooth devices on page 63.
pDepending on the Bluetooth audio player
connected to this navigation system, the
available operations with this navigation
system are limited to the following two le-
vels:
—A2DP profile (Advanced Audio Distribu-
tion Profile): Only playing back songs on
your audio player is possible.
—A2DP profile and AVRCP profile (Audio/
Video Remote Control Profile): Playing
back, pausing, selecting songs, etc., are
possible.
pSince there are a number of Bluetooth
audio players available on the market, op-
erations with your Bluetooth audio player
using this navigation system vary greatly in
range. Please refer to the instruction man-
ual that came with your Bluetooth audio
player as well as this manual while operat-
ing your player on this navigation system.
pWhile you are listening to songs on your
Bluetooth audio player, please refrain from
operating your cellular phone as much as
possible. If you try operating on your cellu-
lar phone, the signal from your cellular
phone may cause a noise on the song play-
back.
pEven if you switch to another source while
listening to a song on your Bluetooth audio
player, the playback of song continues to
elapse.
pDepending on the Bluetooth audio player
you connected to this navigation system,
operations on this navigation system to
control the player may differ from those ex-
plained in this manual.
pWhen you are talking on a cellular phone
connected to this unit via Bluetooth wire-
less technology, song playback from your
Bluetooth audio player connected to this
unit is paused.
Starting procedure
1 Display the AV operation screen.
=For details of the operations, refer to Dis-
playing the AV operation screen on page 77.
2 Tap [Audio] on the left edge of the
screen to display the “Audio”screen.
3 Use the touch panel keys on the screen
to control the Bluetooth audio player.
=For details, refer to Using the touch panel
keys on page 131.
Reading the screen
6
54
312
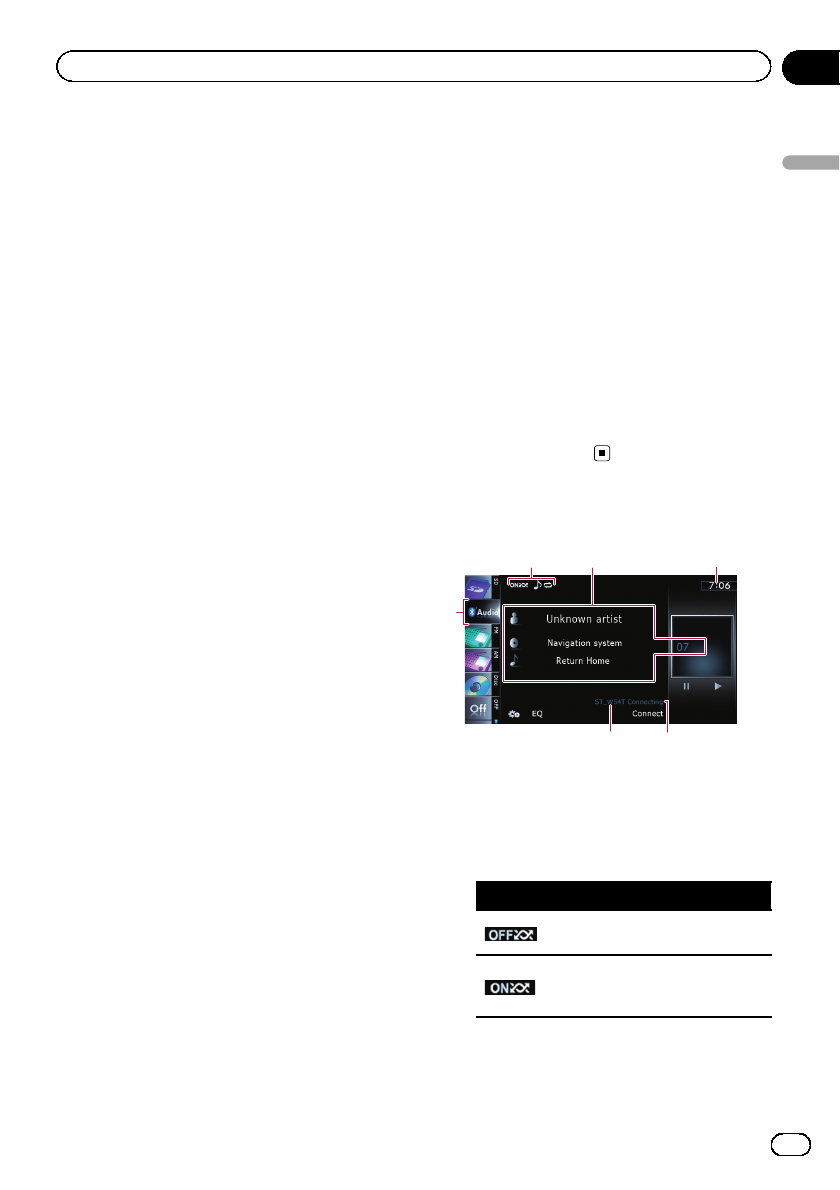
1Playback condition indicator
Indicates the current playback condition if the
connected Bluetooth audio player features
AVRCP 1.3.
!Playing files in random order
Indicator: Meaning
Does not play files in random
order.
Plays all audio files in the cur-
rent repeat play range in ran-
dom order.
!Setting a repeat play range
En 129
Chapter
26
Using the Bluetooth audio player
Using the Bluetooth audio player
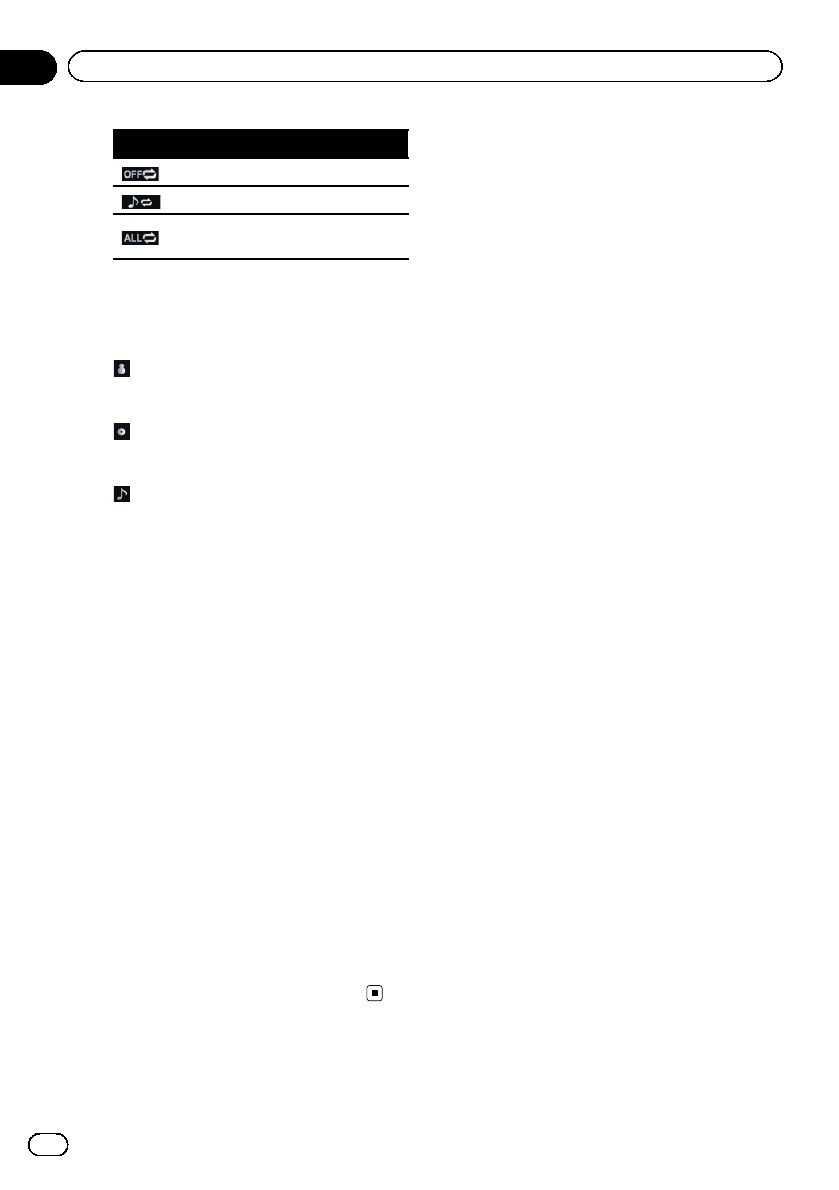
Indicator: Meaning
Does not repeat.
Repeats just the current file.
Repeats all audio files in the
Bluetooth audio player.
2Current file information
If the connected Bluetooth audio player fea-
tures AVRCP 1.3, the following file information
will be displayed.
!:Artist name
Shows the artist name currently playing
(when available).
!:Album title
Shows the title of the album for the cur-
rent file (when available).
!:Track title
Shows the title of the track currently
playing (when available).
!Play time indicator
Shows the elapsed playing time within
the current file.
!File number indicator
Shows the file number currently playing
(when available).
pIn the following cases, file information
will only be displayed after a file starts
or resumes playing:
—You connect the Bluetooth audio
player compatible with AVRCP1.3,
and operate the player to start play-
ing.
—You select another file when play-
back is paused.
3Current time
4Connection status indicator
Shows whether the device featuring Bluetooth
technology is connected or not.
5Device name indicator
6Source icon
Shows which source has been selected.
En
130
Chapter
26 Using the Bluetooth audio player
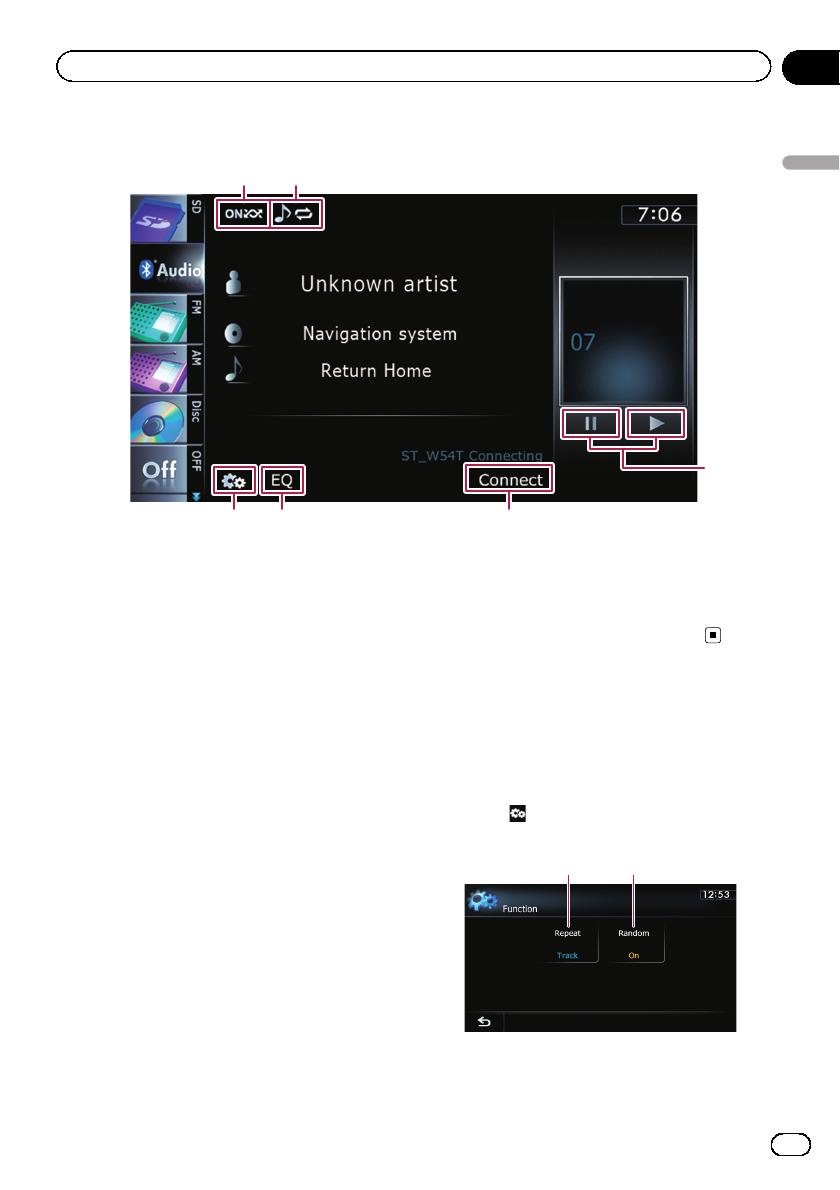
Using the touch panel keys
12
546
3
1Plays files in random order
All of the files within the repeat play range
can be played at random by touching only one
key.
pThis function is available only when the
connected Bluetooth audio player fea-
tures AVRCP 1.3.
=For details, refer to Plays files in ran-
dom order on the next page.
2Sets a repeat play range
The repeat play range can be changed by
touching only one key.
pThis function is available only when the
connected Bluetooth audio player fea-
tures AVRCP 1.3.
=For details, refer to Changes the repeat
range on this page.
3Playback and Pause
Touching [d]or[e] switches between play-
back and pause.
4Connects the Bluetooth audio player
Touching [Connect] displays the connection
standby screen and the navigation system
waits for the Bluetooth wireless connection re-
quest.
5Recalls equalizer curves
=For details, refer to Using the equalizer
on page 172.
6Displays the “Function”menu
=For details, refer to Using the
“Function”menu on this page.
Using the “Function”menu
pThis menu is available only when the con-
nected Bluetooth audio player features
AVRCP 1.3.
%Touch on the “Audio”screen.
The “Function”menu appears.
1 2
1Changes the repeat range
En 131
Chapter
26
Using the Bluetooth audio player
Using the Bluetooth audio player

Each touch of [Repeat] changes the setting
as follows:
!All Repeat: Repeats all audio files in the
Bluetooth audio player.
!Track Repeat: Repeats just the current
file.
!Off: Does not repeat.
pIf you skip the file forward or backward
when the repeat play range in “Track Re-
peat”, the repeat play range changes to
“All Repeat”.
2Plays files in random order
Random play lets you playback files in ran-
dom order within the current repeat range.
Each touch of [Random] turns it on or
off.
En
132
Chapter
26 Using the Bluetooth audio player
You can use the navigation system to control
an XM satellite digital tuner, which is sold se-
parately.
For details concerning operation, refer to the
XM tuner’s operation manuals. This section
provides information on XM operations with
the navigation system which differs from that
described in the XM tuner’s operation man-
ual.
The following XM satellite digital tuner units
cannot be connected:
GEX-P900XM, GEX-P910XM
Starting procedure
1 Display the AV operation screen.
=For details of the operations, refer to Dis-
playing the AV operation screen on page 77.
2 Tap [XM] on the left edge of the screen
to display the “XM”screen.
3 Use the touch panel keys on the screen
to control the XM tuner.
=For details, refer to Using the touch panel
keys on page 135.
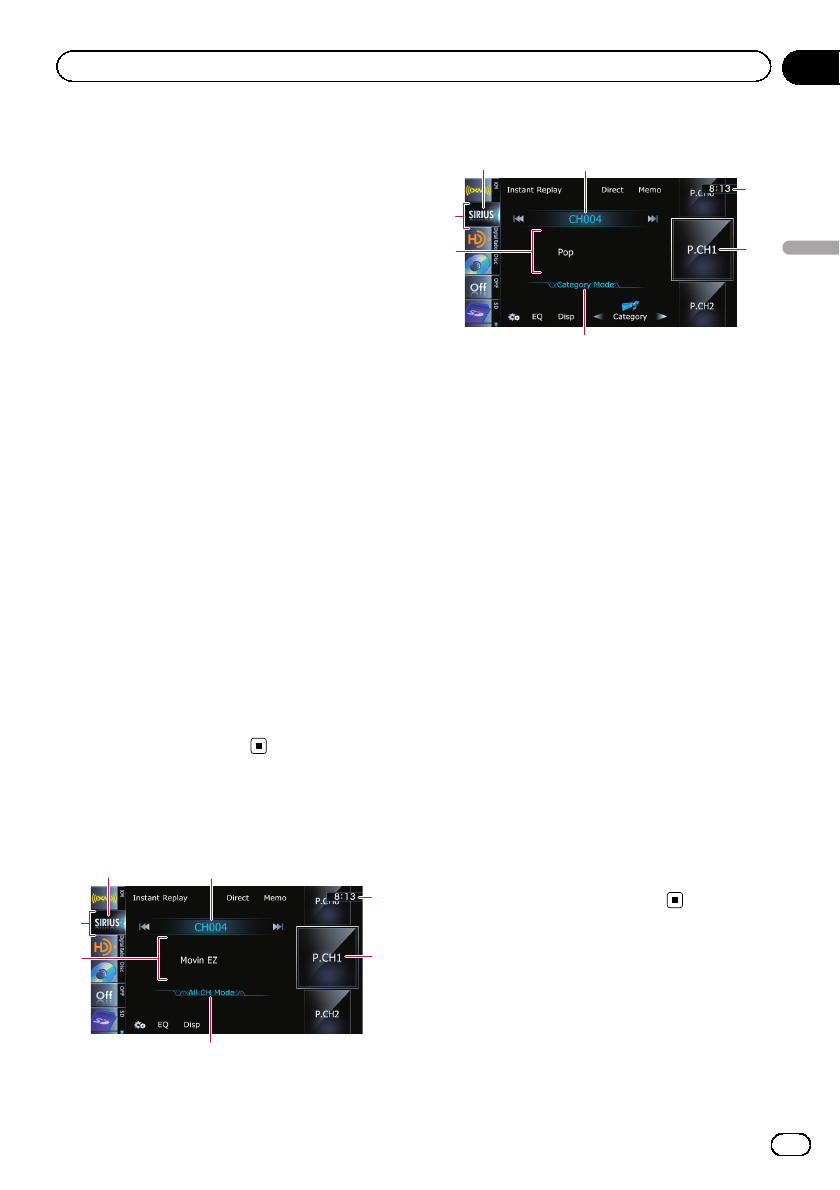
Reading the screen
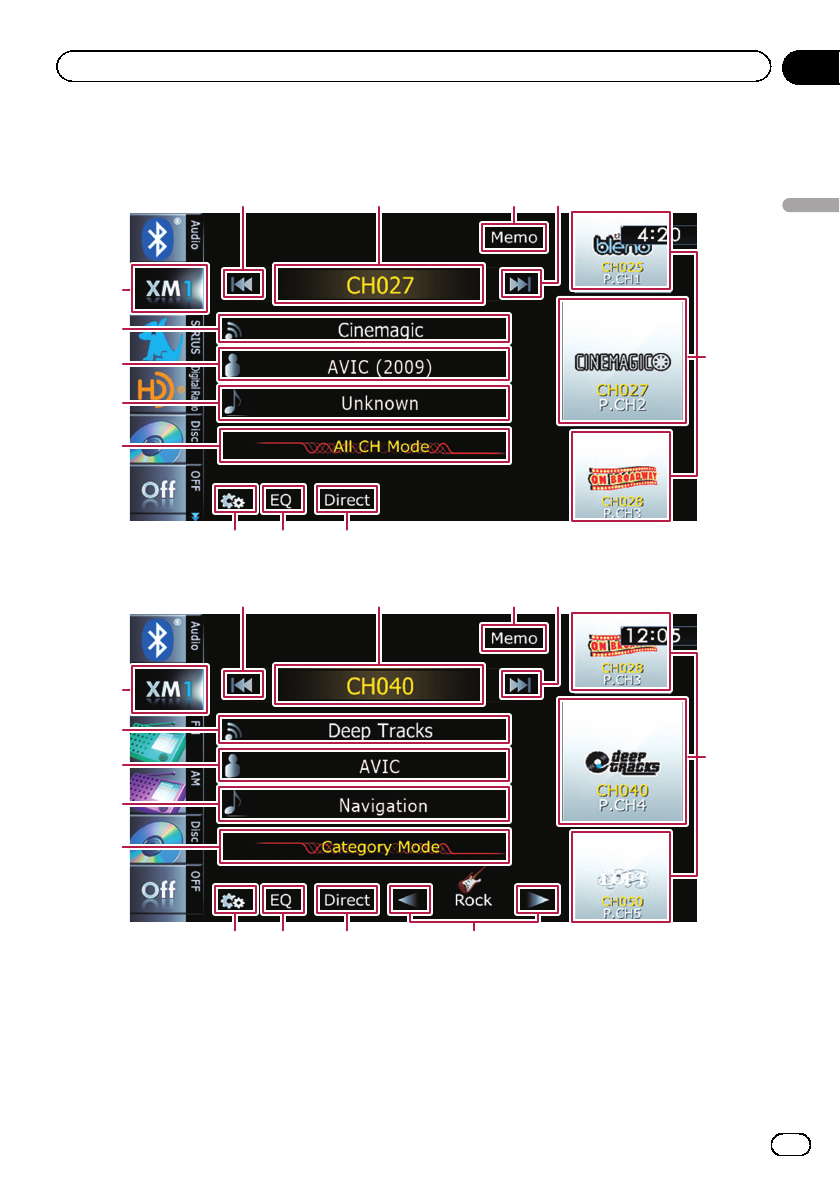
All CH Mode
1
2
7
3
4
5
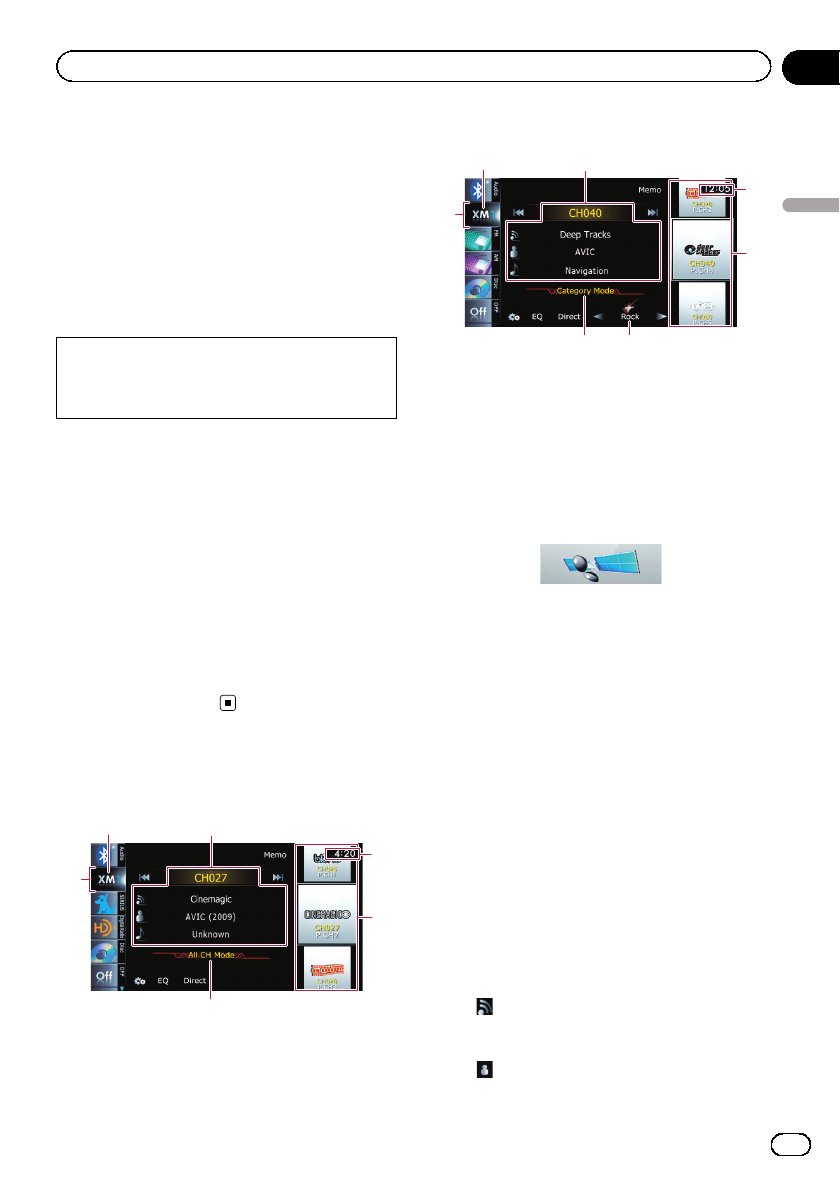
Category Mode
1
6
2
7
3
4
5
About the logo for channel name
Only the logo data that is contained in the na-
vigation system can be displayed for each
channel. The logo of a newly established chan-
nel that is not contained cannot be displayed.
When a logo is not available, the following
substitute icon is displayed.
Substitute icon
pThe icon of each broadcast station is con-
tained in the NAND flash memory based
on the data provided by XM Satellite Radio
as of September 2009.
pAny changes made by XM Satellite Radio
in the lineup or icon of the broadcast sta-
tion in the future may not be supported by
the navigation system, and may cause the
unit to display incorrect icons.
1Source icon
Shows which source has been selected.
2XM band indicator
Shows the XM band that has been selected.
3Current XM station information
Shows the detailed information of the broad-
cast channel currently being received.
!XM channel number
Shows the XM channel number the
tuner is currently tuned to.
!:XM station name
Shows the XM broadcast station name
the tuner is currently tuned in.
!:Artist (performer) name
En 133
Chapter
27
Using the XM tuner
Using the XM tuner

Shows the artist (performer) name cur-
rently playing (when available).
!:Song title (program name)
Shows the title of the current song (pro-
gram).
p“-------”is displayed if there is no corre-
sponding information.
4Current time
5XM station information
!XM station name logo
!XM channel number
!Preset number
Shows what preset item has been se-
lected.
6XM channel category
Shows the category of broadcast channel.
7XM channel select mode indicator
Shows what channel select mode has been
selected. You can select a channel from all
channels in All CH Mode, and select a chan-
nel from selected category in
Category Mode.
En
134
Chapter
27 Using the XM tuner
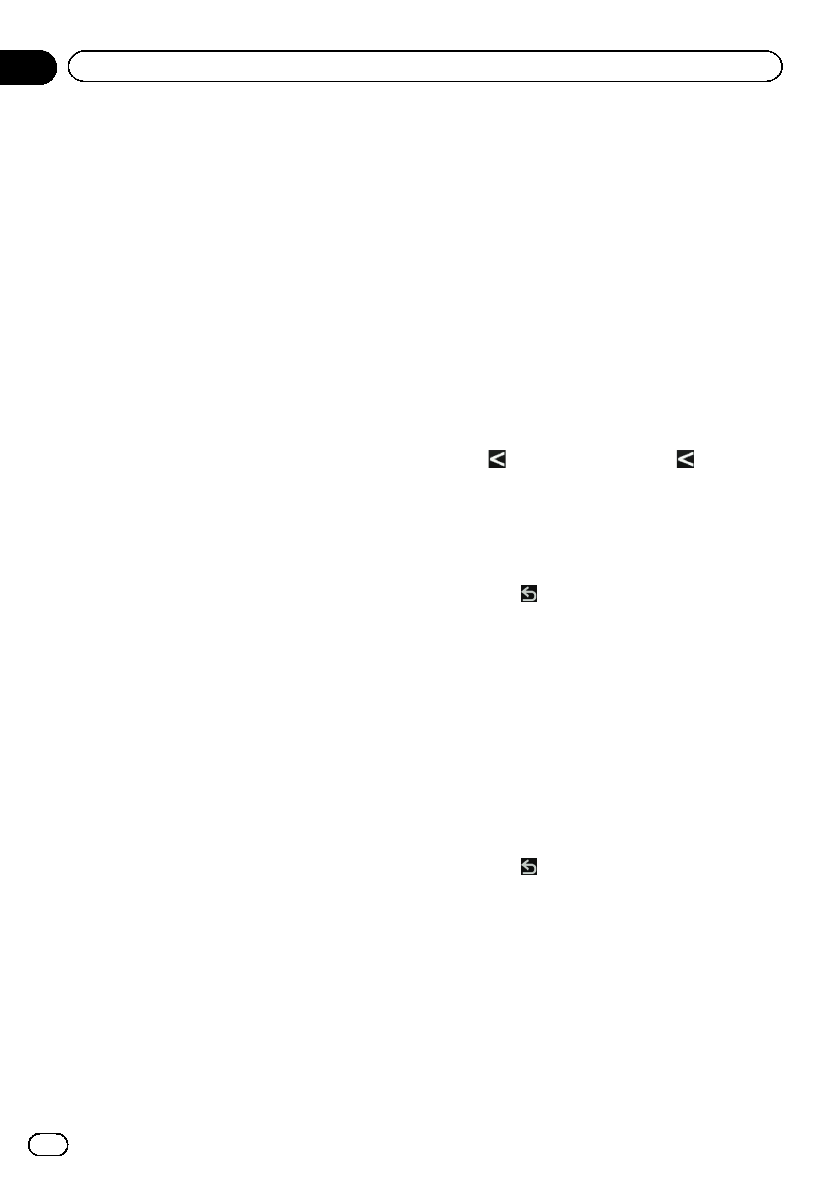
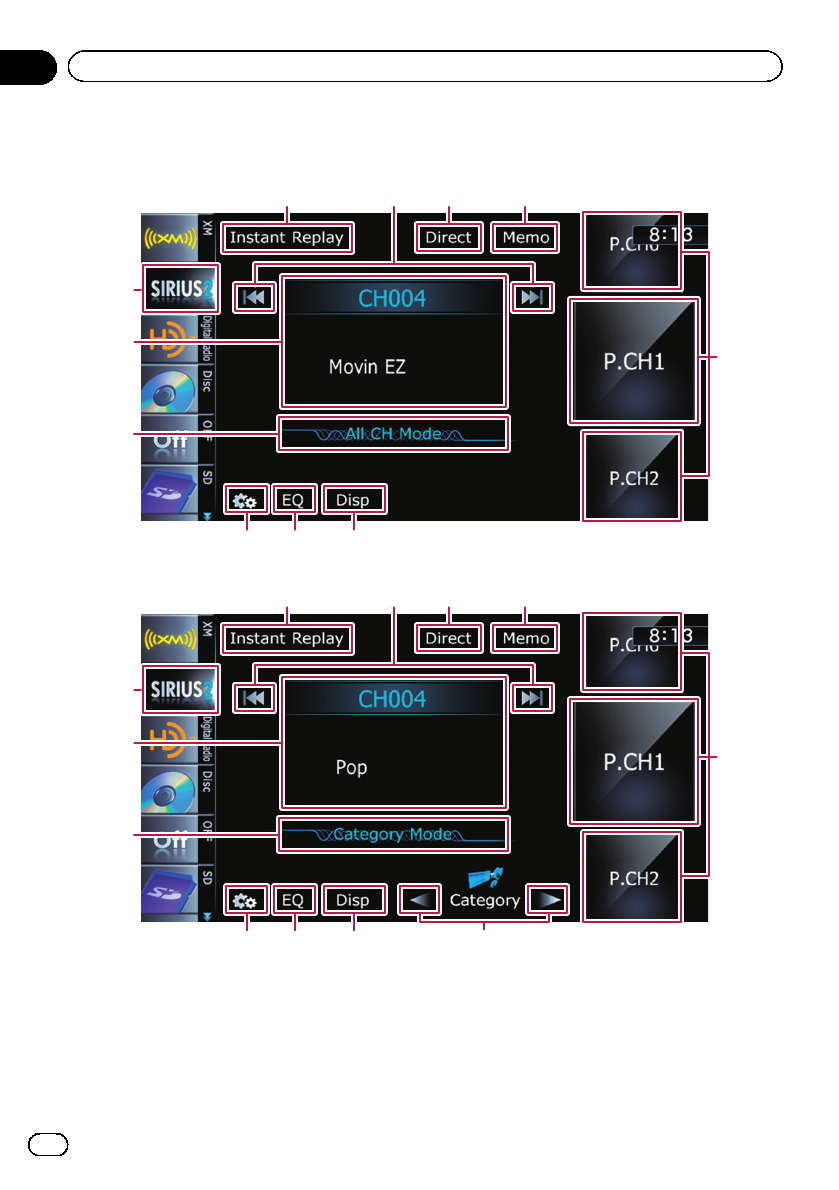
Using the touch panel keys
All CH Mode
c
a
b
9
8
67
4
5
3211
Category Mode
c
a
b
9
8
67
4
e5
32dd
1Performs manual tuning
The channels move up or down one at a time.
pIf you keep touching [o]or[p] you
can skip the broadcasting channels.
2Switches between the AV operation
screen and the preset list display
You can switch the screen display according
to your preference.
=For details of the operation, refer to
Switching between the AV operation
screen and the list screen on page 77.
3Memorizes the current song
En 135
Chapter
27
Using the XM tuner
Using the XM tuner
=For details, refer to Memorizing the song
on the next page.
4Recalls channels from the preset
Once you have stored broadcast channels,
you can easily recall preset channels from
memory with a tap of a key.
=For details, refer to Storing and recalling
broadcast stations on this page.
5Selects an XM channel directly
=For details, refer to Selecting an XM
channel directly on this page.
6Recalls equalizer curves
=For details, refer to Using the equalizer
on page 172.
7Displays the “Function”menu
=For details, refer to Using the
“Function”menu on page 138.
8Switches the XM channel select mode
You can switch the mode between the two
methods for selecting and listing the channel.
All CH Mode :
You can select a channel from all channels
when you operate this function.
Category Mode:
You can select a channel within a selected ca-
tegory that you operate this function.
9Switches to the list display of song titles
=For details, refer to Selecting a channel
from the list on the next page.
aSwitches to the list display of artist
names
=For details, refer to Selecting a channel
from the list on the next page.
bSwitches to the list display of XM station
names
=For details, refer to Selecting a channel
from the list on the next page.
cSelects an XM band
Tapping the key repeatedly switches between
the following XM bands: XM 1,XM 2,or
XM 3.
pThis function is convenient for preparing
different preset lists for each band.
dPerforms manual tuning
The channels move up or down one at a time
within a selected category.
pIf you keep touching [o]or[p] you
can skip the broadcasting channels.
eSwitches the channel category
Touch [c]or[d] to select the desired cate-
gory.
Selecting an XM channel directly
You can select an XM channel directly by en-
tering the desired channel number.
1 Touch [Direct].
2 Touch [0] to [9] to input the desired
channel number.
To cancel the input numbers one by one,
touch . Touching and holding allows you
to delete all input numbers.
3 While the input number is displayed,
touch [Enter].
The XM channel that was entered is selected.
4 Touch .
You return to the previous display.
Displaying the Radio ID
If you select CH: 000, the Radio ID is dis-
played.
1 Touch [Direct].
2 Input [000] and then touch [Enter].
pIf you select another channel, display of the
Radio ID is canceled.
3 Touch .
You return to the previous display.
4 Wait until the Radio ID is displayed.
Storing and recalling broadcast
stations
With a tap of any of the preset tuning keys
(“P1”to “P6”), you can easily store up to six
broadcast channels for later recall (also with
the tap of a key).
En
136
Chapter
27 Using the XM tuner
1 Select the channel that you want to
store in memory.
2 Display the preset channel list.
=For details, refer to Switches between the
AV operation screen and the preset list
display on page 135.
3 Keep touching a preset tuning key [P1]
to [P6].
The selected station has been stored in mem-
ory.
The next time you tap the same preset tuning
key “P1”to “P6”, the station is recalled from
memory.
pUp to 18 stations, six for each of three XM
bands can be stored in memory.
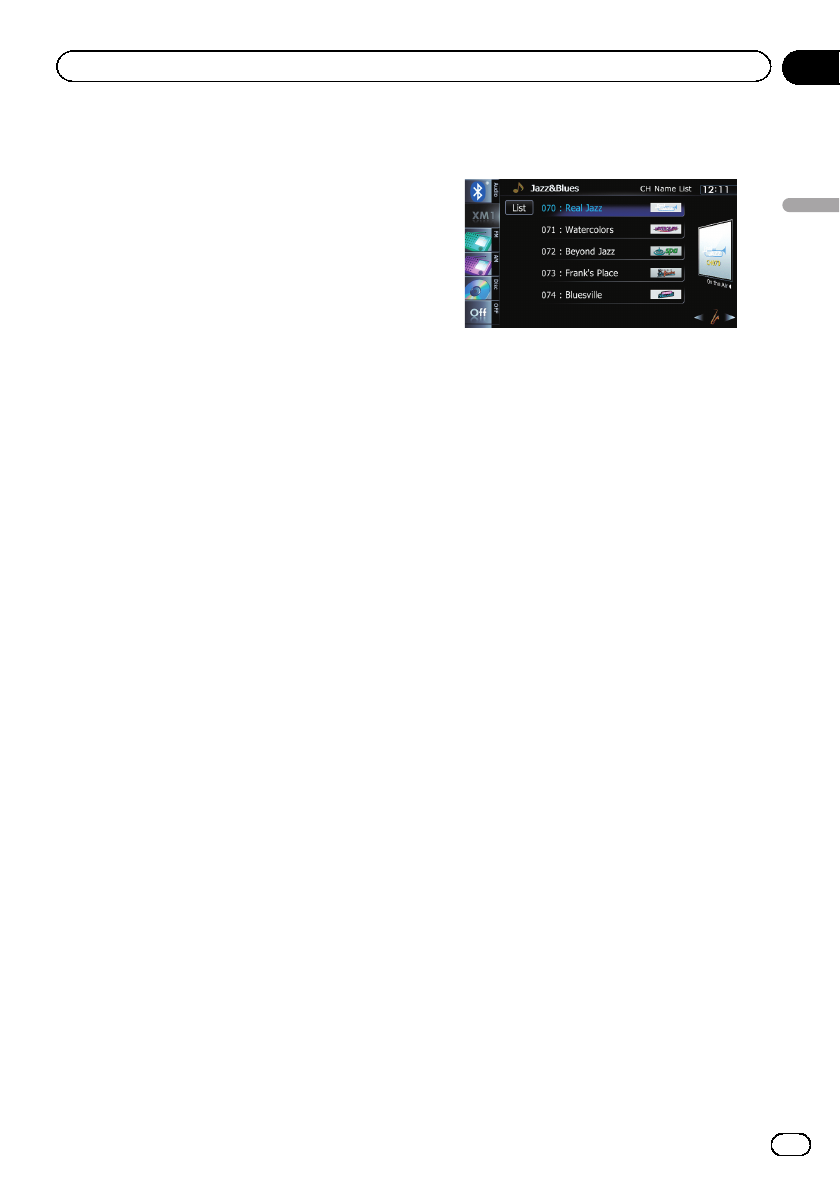
Selecting a channel from the list
The list content can be switched so you can
search for the song you want to listen to not
only by the channel name but also by the artist
name or song title.
pThe channel list shows all channels during
All CH Mode, and the channels included
in the selected category during
Category Mode.
1 Display a list screen.
=For details, refer to Switches to the list
display of song titles on the previous
page.
=For details, refer to Switches to the list
display of artist names on the previous
page.
=For details, refer to Switches to the list
display of XM station names on the pre-
vious page.
2 Touch [List].
XM channel list appears in the display.
Each touch of [List] changes the screen as fol-
lows:
CH Name List (Channel name) —
Song Title List (Song title) —
Artist Name List (Artist name)
3 Tap the desired channel that you want
to listen to.
=For details, refer to Operating list screens (e.
g. iPod list screen) on page 77.
pDuring Category Mode, touch [c]or[d]
to switch to another category.
Using “My Mix”function
“My Mix”function memorizes the song title
and artist name of the song currently being re-
ceived. When the song that matches the mem-
orized song title and artist name is being
broadcast on a station other than the one you
are listening to, you will be alerted, and you
can switch the station to listen to that song.
pA track itself is NOT downloaded. ONLY the
song title and the artist name are memor-
ized.
Memorizing the song
The song title and artist name of the song you
are listening to can be memorized to “My Mix”.
%Touch and hold [Memo].
The song title and artist name of current song
you are listening to are memorized, and a con-
firmation message appears.
pThe song title and artist name of up to 12
songs can be memorized. Trying to save
more than 12 songs will result in older ones
being overwritten.
pYou cannot memorize the song title or the
artist name when “––––––––”is dis-
played on the title information.
pThis function is invalid for the channel
“000”.
En 137
Chapter
27
Using the XM tuner
Using the XM tuner
pThe memorized title may not be displayed
correctly depending on the conditions.
pYou can customize the setting for the mem-
orized songs later.
=For more details concerning the opera-
tion, refer to Setting the memorized
songs on this page.
When the memorized song is broadcast
A beep sounds, and a message is displayed.
Touch [Yes] to switch to that station and listen
to that track.
pIf the memorized song is not checked or
when [Off] is selected on [Alert]on
“Memo Edit”screen, no alert will be pro-
vided.
=Refer to Setting the memorized songs on
this page.
pNotification may not be provided depend-
ing on the status of the navigation system.
pIf there is even a slight difference between
the memorized title and the title of the
song being broadcast, no notification will
be provided even though they are the same
song.
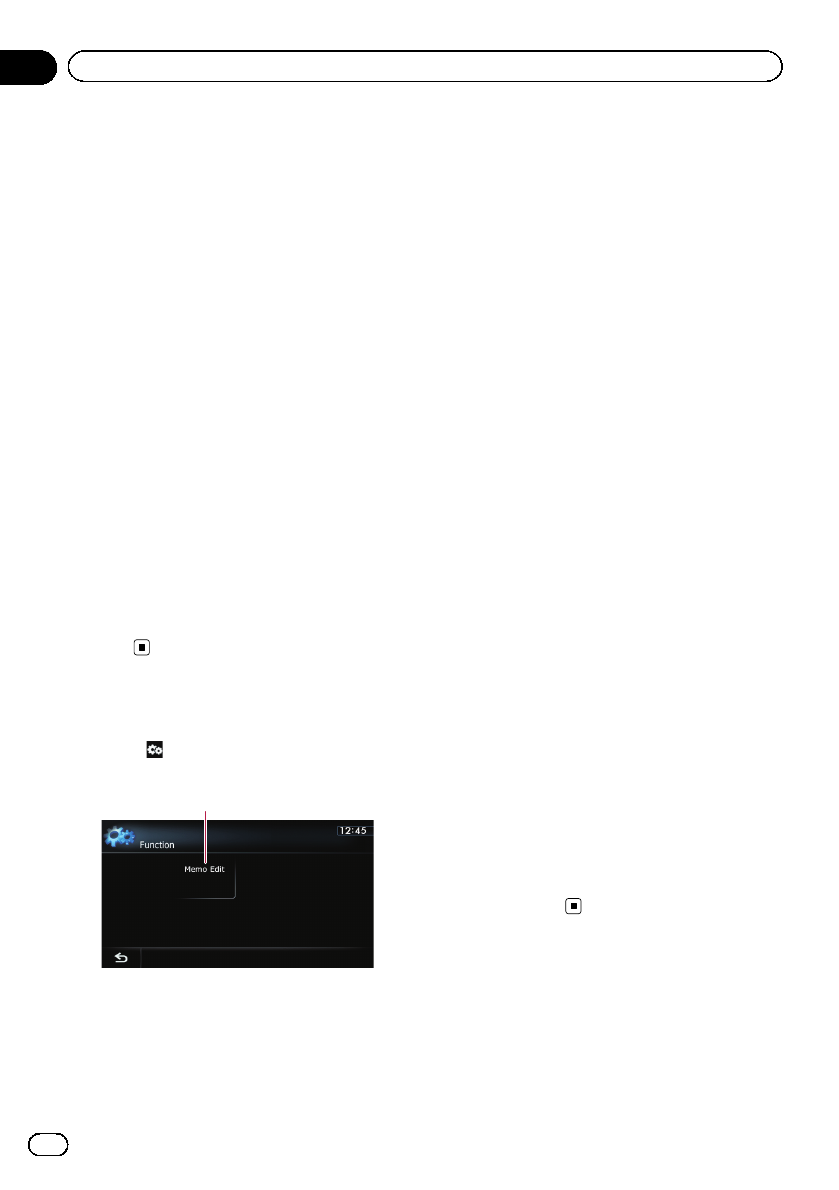
Using the “Function”menu
%Touch on the “XM”screen.
The “Function”menu appears.
1
1Sets the memorized songs
Setting the memorized songs
Selecting the songs to alert
The list of song titles memorized for the MyMix
Function (MyMix list) is displayed. You can
change the notification setting when the song
is broadcast again. You can enable or disable
notification for each song.
1 Touch [Memo Edit].
2 Touch the song title that you want to
disable notification for.
The check mark is removed, and the notifica-
tion setting of the song is deactivated.
Changing the alert setting
You can enable or disable alerts for all items at
the same time. This function is useful when
you want to turn alerts off temporarily without
changing each memorized song.
1 Touch [Memo Edit].
2 Touch [Alert].
Each touch of [Alert] turns it on or off.
Deleting the memorized songs
You can delete each one of the memorized
songs from the song title list.
1 Touch [Memo Edit].
2 Touch and hold the song you want to
delete.
pTo delete all songs that are memorized,
touch [Delete All].
3 Touch [Yes].
En
138
Chapter
27 Using the XM tuner
You can use the navigation system to control a
Pioneer Sirius Satellite Radio tuner, which is
sold separately.
For details concerning operation, refer to the
SIRIUS tuner’s operation manuals. This sec-
tion provides information on SIRIUS opera-
tions with navigation system which differs
from that described in the SIRIUS tuner’s op-
eration manual.
pWhen you use the SiriusConnect universal
tuner (sold separately) with this navigation
system, Pioneer SIRIUS BUS INTERFACE is
required. For details concerning operation,
refer to the owner’s manual of Pioneer SIR-
IUS BUS INTERFACE and SiriusConnect
universal tuner.
Starting procedure
1 Display the AV operation screen.
=For details of the operations, refer to Dis-
playing the AV operation screen on page 77.
2 Tap [SIRIUS] on the left edge of the
screen to display the “SIRIUS”screen.
3 Use the touch panel keys on the screen
to control the SIRIUS tuner.
=For details, refer to Using the touch panel
keys on the next page.
Reading the screen
All CH Mode
1
7
2
6
3
4
5
Category Mode
1
7
2
6
3
4
5
1Source icon
Shows which source has been selected.
2SIRIUS band indicator
Shows the SIRIUS band that has been se-
lected.
3SIRIUS channel number indicator
Shows the SIRIUS channel number that the
tuner is tuned to.
4Current time
5Preset number indicator
Shows what preset item has been selected.
6SIRIUS channel select mode indicator
Shows what channel select mode has been
selected. You can select a channel from all
channels in All CH Mode, and select a chan-
nel from the selected category in
Category Mode.
=For details concerning operations, refer
to Switches the SIRIUS channel se-
lect mode on page 141.
7Variable information area
Shows various information about the broad-
cast channel currently being received.
=For more details about the displayed in-
formation, refer to Switches the SIR-
IUS display on page 141.
En 139
Chapter
28
Using the SIRIUS tuner
Using the SIRIUS tuner
Using the touch panel keys
All CH Mode
b
a
9
78
5
6
42 31
Category Mode
b
a
9
78
5
c6
42 31
1Switches the SIRIUS Instant replay mode
=For details, refer to Using the “Instant
Replay”function on page 142.
2Performs manual tuning
The channels move up or down one at a time.
pIf you keep touching [o]or[p] you
can skip the broadcasting channels.
3Selects a SIRIUS channel directly
=For details, refer to Selecting a SIRIUS
channel directly on the next page.
4Memorizes the current song
En
140
Chapter
28 Using the SIRIUS tuner