Pioneer K031 Multi-Media AVN Navigation Server System with BT User Manual 11
Pioneer Corporation Multi-Media AVN Navigation Server System with BT 11
Pioneer >
Contents
User Manual 11

=For details, refer to Memorizing the song
on the next page.
5Recalls channels from the preset
Tap to recall the preset channel.
=For details, refer to Storing and recalling
broadcast stations on this page.
6Switches the SIRIUS display
Each touch of [Disp] changes the display in-
formation.
Channel number —Channel name —Chan-
nel category —Artist name/feature —Song/
program title —Composer
7Recalls equalizer curves
=For details, refer to Using the equalizer
on page 172.
8Displays the “Function”menu
=For details, refer to Using the
“Function”menu on page 143.
9Switches the SIRIUS channel select
mode
You can switch the mode between the two
methods for selecting and listing the channel.
All CH Mode:
You can select a channel from all channels
when you operate this function.
Category Mode:
You can select a channel within a selected ca-
tegory that you operate this function.
aSwitches between the AV operation
screen and the preset list display
You can switch the screen display according
to your preference.
=For details of the operation, refer to
Switching between the AV operation
screen and the list screen on page 77.
bSelects a SIRIUS band
Tapping the key repeatedly switches between
the following SIRIUS bands: SIRIUS1,
SIRIUS2,orSIRIUS3.
pThis function is convenient for preparing
different preset lists for each band.
cSwitches the channel category
Touch [c]or[d] to select the desired cate-
gory.
Selecting a SIRIUS channel directly
You can select a SIRIUS channel directly by
entering the desired channel number.
1 Touch [Direct].
2 Touch [0] to [9] to input the desired
channel number.
To cancel the input numbers one by one,
touch . Touching and holding allows you
to delete all input numbers.
3 While the input number is displayed,
touch [Enter].
The SIRIUS channel that was entered se-
lected.
4 Touch .
You return to the previous display.
Display the Radio ID
If you select CH: 000, the Radio ID is dis-
played.
1 Touch [Direct].
2 Input [000] and then touch [Enter].
If you select another channel, display of the
Radio ID is canceled.
3 Touch .
You return to the previous display.
4 Wait until the Radio ID is displayed.
Storing and recalling broadcast
stations
With a tap of any of the preset tuning keys
(“Preset 1”to “Preset 6”), you can easily store
up to six broadcast stations for later recall
(also with the tap of a key).
1 Select the channel that you want to
store in memory.
En 141
Chapter
28
Using the SIRIUS tuner
Using the SIRIUS tuner

2 Display the preset channel list.
=For details, refer to Switches between the
AV operation screen and the preset list
display on the previous page.
3 Keep touching a preset tuning key
[Preset 1] to [Preset 6].
The selected station has been stored in mem-
ory.
The next time you tap the same preset tuning
key “Preset 1”to “Preset 6”the station is re-
called from memory.
pUp to 18 stations, six for each of three SIR-
IUS bands can be stored in memory.
Using “My Mix”function
The MyMix function memorizes the song title
and artist name of the song currently being re-
ceived. When a track that matches the memor-
ized song title and artist name is being
broadcast on a station other than the one you
are listening to, you will be alerted, and you
can switch the station to listen to that song.
pThe track itself is NOT downloaded; only
the song title and the artist name are mem-
orized.
Memorizing the song
The song title and artist name of the song you
are listening to can be memorized.
%Touch and hold [Memo].
The song title and artist name of the song you
are listening to can be memorized.
pUp to 10 song titles and artist names can be
memorized.
pYou cannot memorize a song that does not
have song title and artist name information.
pYou cannot memorize the song title or the
artist name of channel “000”.
pThe memorized title may not be displayed
correctly.
When the memorized song is broadcast
A beep sounds, and a message is displayed.
Touch [Jump] to switch to that station, and
you can listen to that track. If you touch
[Stay], the channel does not switch.
pIf the alert for the song is “Off”or set
“Alert”to “Off”, no notification will be pro-
vided even when that song is broadcast.
=For details, refer to Setting the memor-
ized songs on the next page.
pNotification may not be provided depend-
ing on the situation of the Navigation Sys-
tem.
=For details, refer to Selecting the songs
to alert on the next page.
Using the “Instant Replay”function
The “Instant Replay”function allows you to
replay the stored broadcast on Pioneer SIRIUS
BUS INTERFACE (if Pioneer SIRIUS BUS IN-
TERFACE capable for this function). As soon
as you tune to a channel, Pioneer SIRIUS BUS
INTERFACE automatically begins storing the
broadcast. It can store approximately up to 44
minutes previous (depending on the selected
channel and the memory capacity of Pioneer
SIRIUS BUS INTERFACE).
1 Touch [Instant Replay] on the SIRIUS
screen to activate the “Instant Replay”
mode.
2 Touch keys for “Instant Replay”.
Touch panel
keys Action
[o]
Return to the start of the current
song or program. Touching again
will skip back to the previous song
or program.
[o] and hold Fast reverses.
[p]Forwards play to the next song or
program
[p] and hold Fast-forwards.
[f]Touching [f] switches between
playback and pause.
En
142
Chapter
28 Using the SIRIUS tuner
pDuring “Instant Replay”mode, each touch
of [Disp] changes the display information
as follows;
Time position —Channel number —Chan-
nel name —Channel category —Artist
name/feature —Song/program title —
Composer
pYou cannot replay the broadcast prior to the
beginning of stored data.
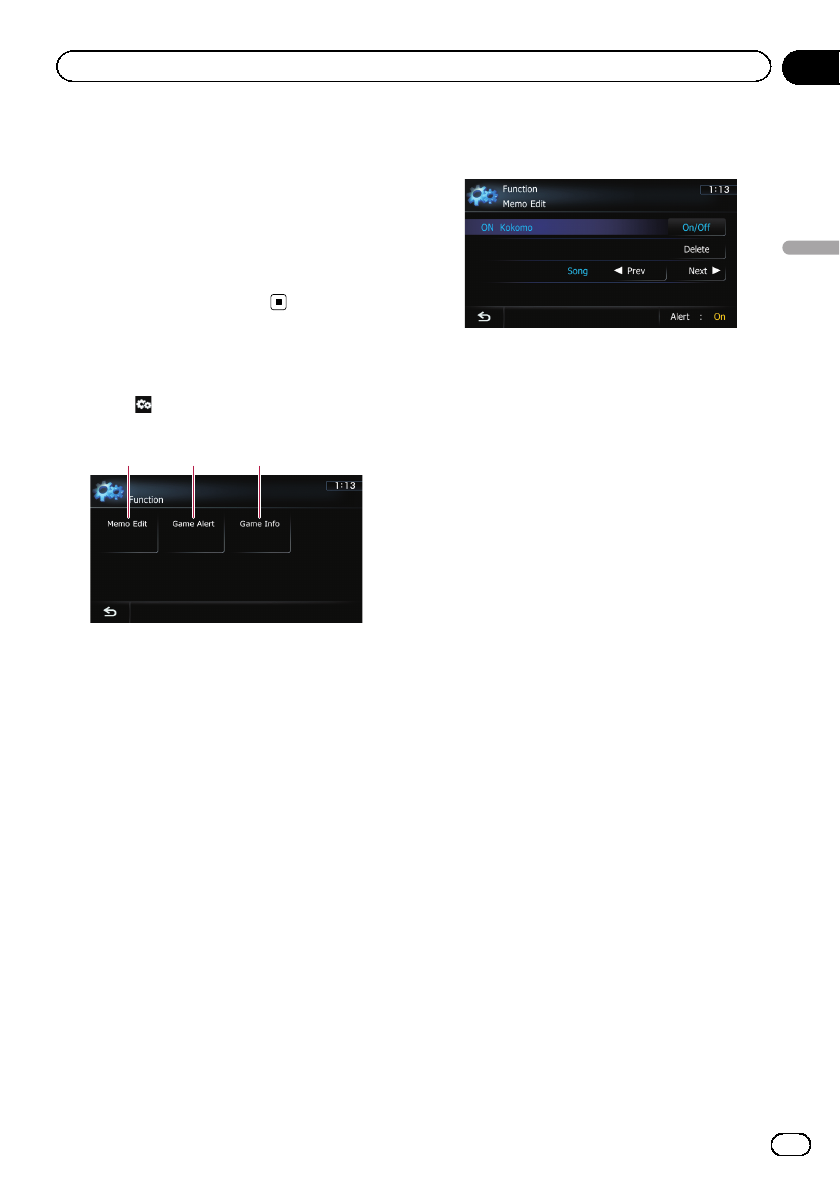
Using the “Function”menu
%Touch on the “SIRIUS”screen.
The “Function”menu appears.
123
1Sets the memorized songs
2Uses the Game Alert function
3Displays Game Information
=For details of each function, refer to sec-
tions below with the relative titles.
Setting the memorized songs
Selecting the songs to alert
You can change the setting of the alert when
the track is broadcast again. You can enable
or disable alert for each song.
1 Touch [Memo Edit].
2 Touch [cPrev] or [Next d] to select the
desired song.
3 Touch [On/Off] to turn the setting on.
When the alert for the song is activated, [On]
appears at the beginning of the selected title.
pTouch [On/Off] again to turn the setting off.
Changing the alert setting
You can enable or disable alerts for all items at
the same time. This function is useful when
you want to turn alerts off temporarily without
changing each memorized song.
1 Touch [Memo Edit].
2 Touch [Alert].
Each touch of [Alert] turns it on or off.
Deleting the memorized songs
You can delete each one of the memorized
tracks from the song title list.
1 Touch [Memo Edit].
2 Touch [cPrev] or [Next d] to select the
song title that you want to delete.
3 Touch [Delete] when the song you
want to delete is displayed.
A message will appear asking you to confirm
the deletion.
4 Touch [Yes].
En 143
Chapter
28
Using the SIRIUS tuner
Using the SIRIUS tuner
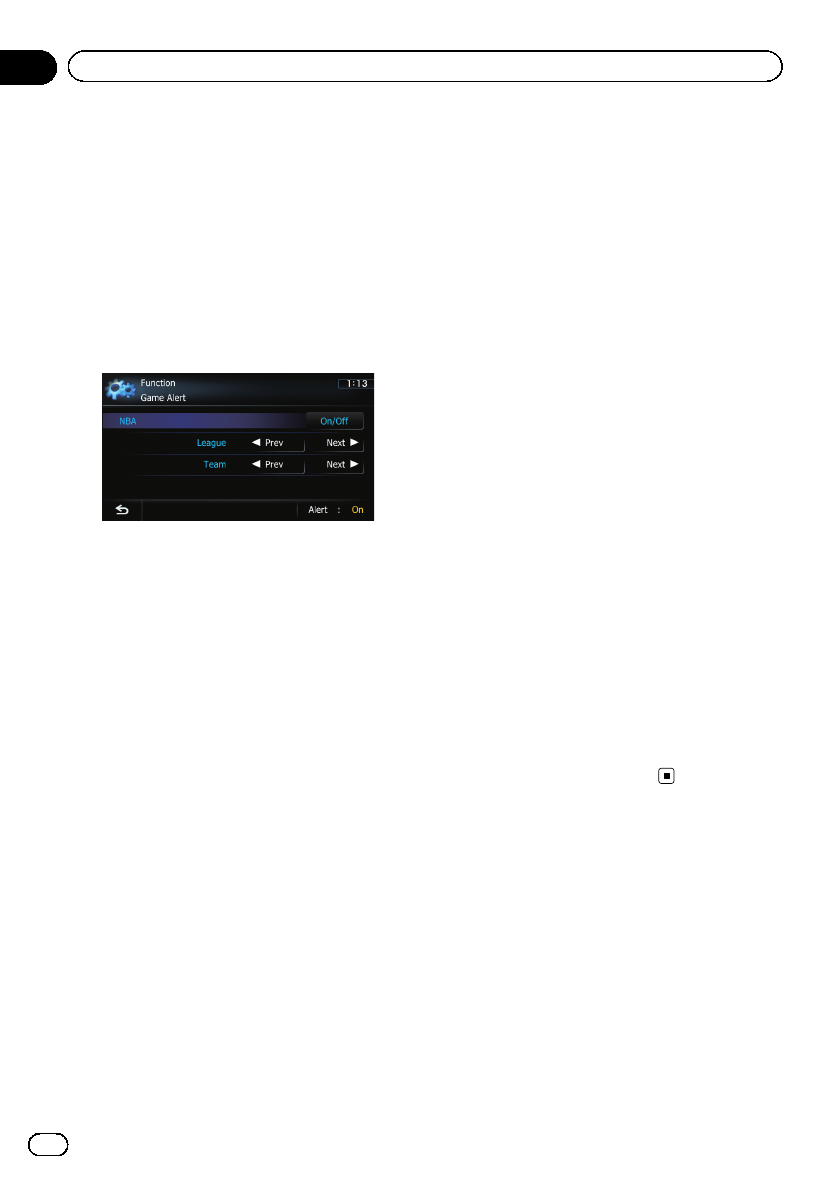
Using the Game Alert function
Selecting teams for Game Alert
This navigation system can alert you when
games involving your favorite sports teams are
about to start. To use this function you need to
store the teams you want to follow in advance.
1 Touch [Game Alert].
2 Touch [cPrev] or [Next d] to select the
league.
3 Touch [cPrev] or [Next d] to select the
team.
4 Touch [On/Off].
The team displayed as [On] is the alert target.
pWhen the selected team is excluded from
the alert target, the team is displayed as
[Off]. Up to 12 teams can be selected.
When you have already made 12 team se-
lections, “FULL”is displayed and additional
team selection is not possible. In this case,
first delete the team selection and then try
again.
Changing the alert setting
You can enable or disable the alert for selected
items. This function is useful when you want
to turn the alert off temporarily without chan-
ging the setting of each selected team.
1 Touch [Game Alert].
2 Touch [Alert].
Each touch of [Alert] turns it on or off.
When a game involving one of your
teams is broadcast
A message is displayed. Touch [Jump]to
switch the station, and you can view the game
information. If you touch [Stay], the channel
does not switch.
pAlerts may not be provided depending on
the status of the navigation system.
Displaying Game Information
An alert will be displayed when a game with
the team you selected is about to start (or is
currently under way). You can also display
game information and changes to the broad-
cast channel.
pThe Game Information function is available
when “Alert”is “On”in “Game Alert”.
1 Touch [Game Info].
2 Touch [Prev] or [Next] to view the game
score information which is registered.
pThe game score will be updated automati-
cally.
pTouch [Tune To] to switch to the channel
that broadcasts the displayed game.
pIf you have not made any team selections,
“Not Set”is displayed.
pWhen no games involving your favorite
teams are currently being played
“NO GAME”is displayed.
En
144
Chapter
28 Using the SIRIUS tuner
You can display the video image output by the
equipment connected to the navigation sys-
tem. For details of the connection method,
refer to Installation Manual.
CAUTION
For safety reasons, video images cannot be
viewed while your vehicle is in motion. To view
video images, you must stop in a safe place and
apply the parking brake.
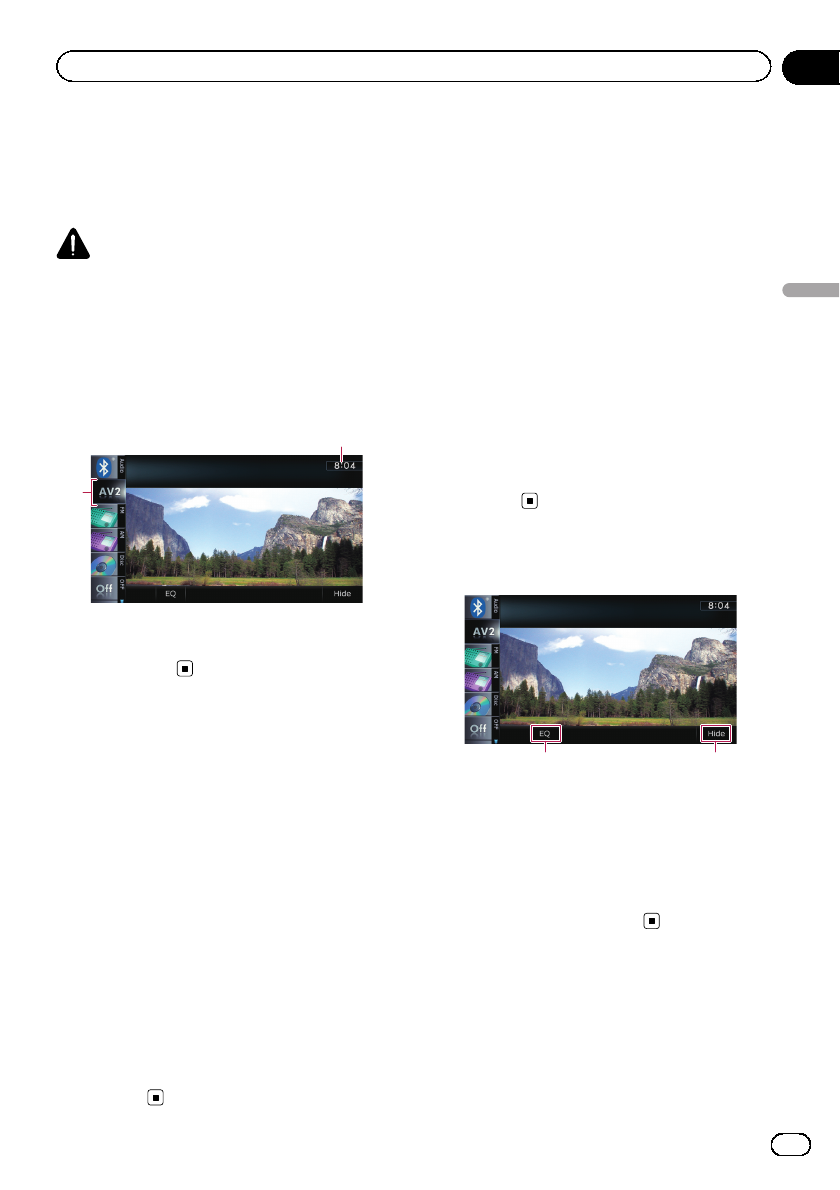
Reading the screen
1
2
1Source icon
Shows which source has been selected.
2Current time
Using AV1
You can display the video image output by the
equipment connected to video input 1.
1 Touch [AV1 Input] on the “AV System
Settings”menu.
=For details, refer to Setting video input 1
(AV1)on page 168.
2 Display the AV operation screen.
=For details of the operations, refer to Dis-
playing the AV operation screen on page 77.
3 Tap [AV1] on the left edge of the
screen.
The image is displayed on the screen.
4 Touch the screen to display the touch
panel keys.
Using AV2
You can display the video image output by the
equipment connected to video input 2.
1 Touch [AV2 Input] on the “AV System
Settings”menu.
=For details, refer to Setting video input 2
(AV2)on page 168.
2 Display the AV operation screen.
=For details of the operations, refer to Dis-
playing the AV operation screen on page 77.
3 Tap [AV2] on the left edge of the
screen.
The image is displayed on the screen.
4 Touch the screen to display the touch
panel keys.
Using the touch panel keys
12
1Recalls equalizer curves
=For details, refer to Using the equalizer
on page 172.
2Hides the touch panel keys
Touching [Hide] hides the touch panel keys.
Touch anywhere on the LCD screen to display
the touch panel keys again.
En 145
Chapter
29
Using AV input
Using AV input

The term “external unit”refers to future
Pioneer devices that are not currently planned
for, or to devices that allow control of basic
functions although they are not fully con-
trolled by the navigation system. Two external
units can be controlled by this navigation sys-
tem. When two external units are connected,
the navigation system allocates them as exter-
nal unit 1 or external unit 2.
For details of the connection method, refer to
Installation Manual.
For details of the operation, refer to the exter-
nal unit’s operation manual. This section pro-
vides information on external unit operations
with the navigation system that differ from
those described in the external unit’s opera-
tion manual.
pOperation varies depending on the external
unit connected. (In some cases, the exter-
nal unit may not respond.)
Starting procedure
1 Display the AV operation screen.
=For details of the operations, refer to Dis-
playing the AV operation screen on page 77.
2 Tap [EXT1] or [EXT2] on the left edge of
the screen to select the external unit.
3 Use the touch panel keys on the screen
to control the external unit.
=For details, refer to Using the touch panel
keys on the next page.
Reading the screen
1
2 3
4
1Source icon
Shows which source has been selected.
2External unit indicator
Displays the information that is sent by con-
nected external units.
3Current time
4Auto/Manual mode indicator
Shows the current mode.
En
146
Chapter
30 Using the external unit (EXT1,EXT2)
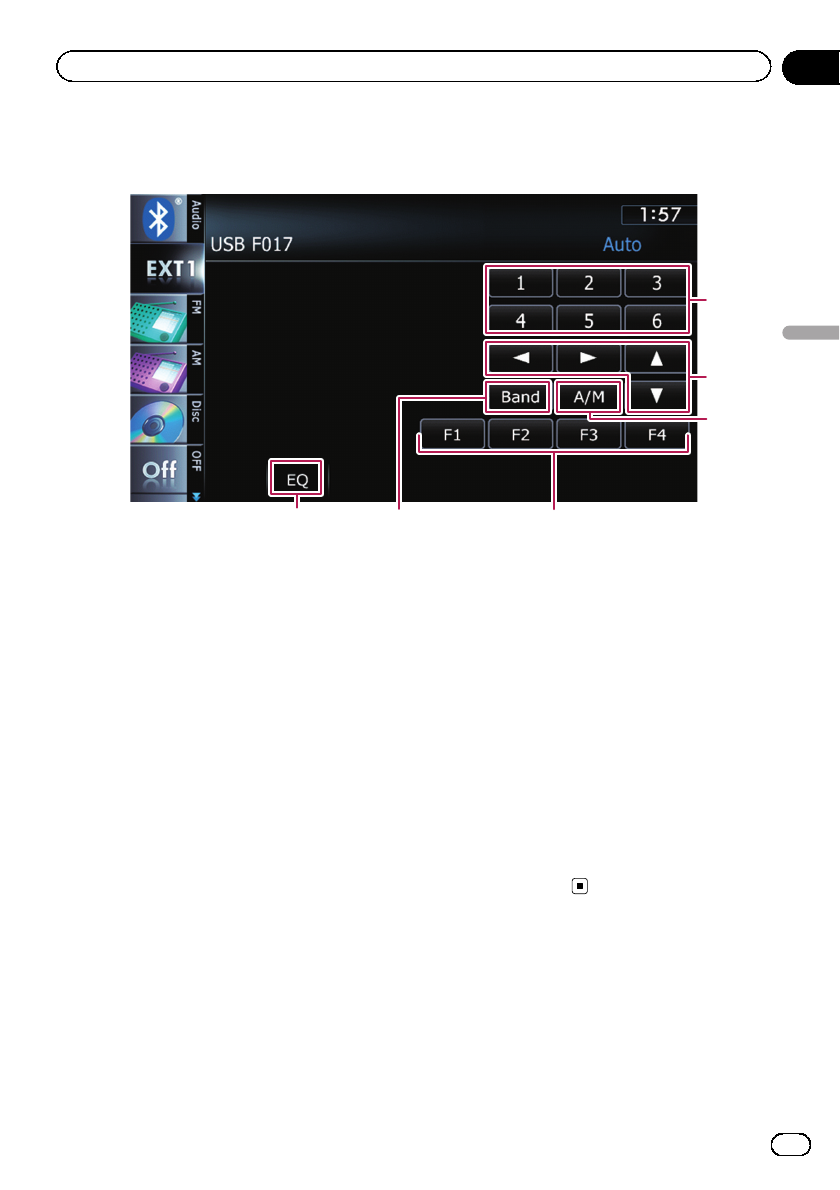
Using the touch panel keys
64
3
2
1
5
1Sends a 1key to 6key command
The external unit can be operated by transmit-
ting the operating commands set to 1key
through 6key.
pOperation varies depending on the ex-
ternal unit connected. (In some cases,
some functions may not be used until
you touch and hold the key.)
2Sends a command [a],[b],[c],or[d]
Touch to operate the external unit.
pOperation varies depending on the ex-
ternal unit connected. (In some cases,
some functions may not be used until
you touch and hold the key.)
3Switches between automatic and manual
function
You can turn automatic and manual function
on or off.
You can switch between Auto and Manual
functions of the external unit connected.
Initially, this function is set to Auto.
pOperating commands set for Auto and
Manual operations vary depending on
the external unit connected.
4Uses F1 through F4 to operate the external
unit
The external unit can be operated by transmit-
ting the operating commands set to F1
through F4.
pThe operating commands set to F1
through F4 vary depending on the exter-
nal unit.
pSome functions may not be used until
you touch and hold the key.
5Sends a band command
Touch to send a band command to the exter-
nal unit.
pOperation varies depending on the ex-
ternal unit connected. (In some cases,
the external unit may not respond.)
6Recalls equalizer curves
=For details, refer to Using the equalizer
on page 172.
En 147
Chapter
30
Using the external unit (EXT1,EXT2)
Using the external unit (EXT1,EXT2)
Displaying the “Navi
Settings”screen
1 Press the HOME button to display the
“Top Menu”screen.
2 Touch [Settings].
The “Settings Menu”screen appears.
pThis can also be operated using the “Short-
cut Menu”screen.
3 Touch [Navi Settings].
The “Navi Settings”menu appears.
4 Touch the item that you want to
change the setting.
#Touch .
Returns the previous screen.
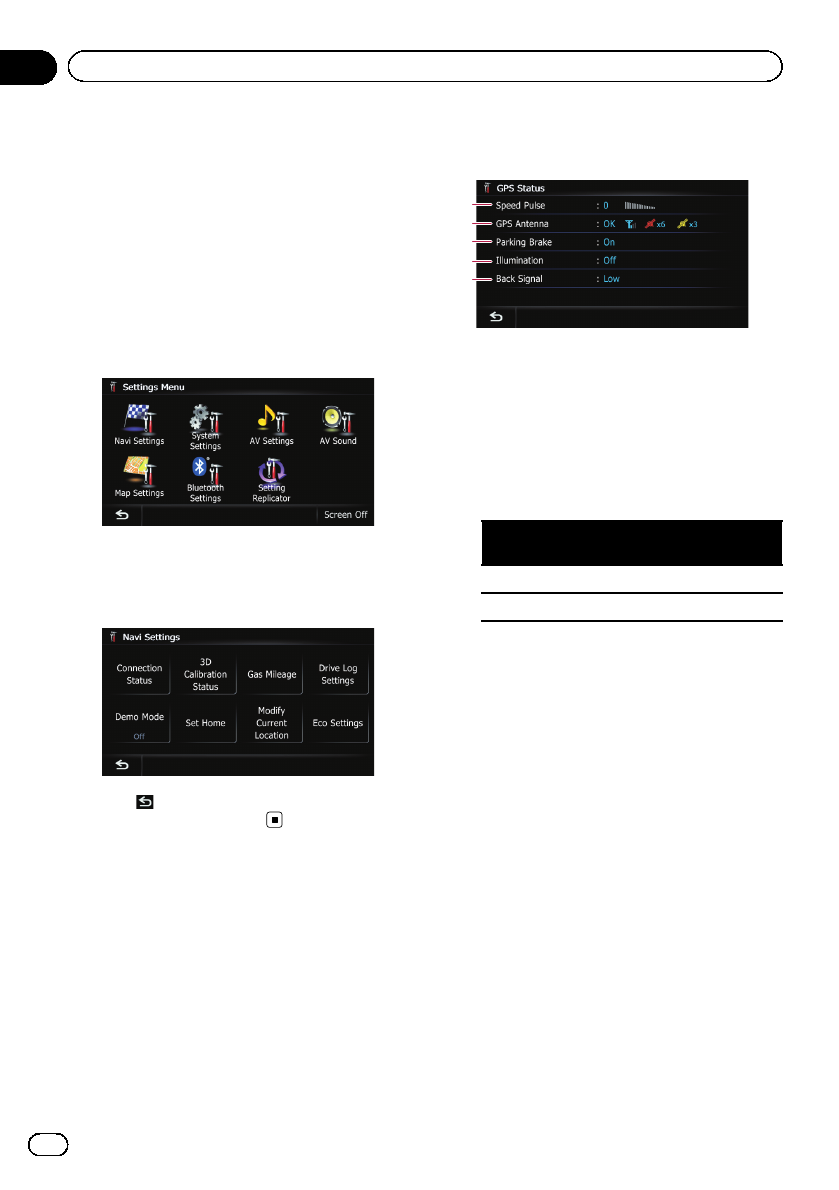
Checking the connections
of leads
Check that leads are properly connected be-
tween the navigation system and the vehicle.
Please also check whether they are connected
in the correct positions.
1 Display the “Navi Settings”screen.
=For details, refer to Displaying the “Navi
Settings”screen on this page.
2 Touch [Connection Status].
The “GPS Status”screen appears.
2
3
4
5
1
1Speed Pulse
The Speed Pulse value detected by the navi-
gation system is shown. “0”is shown while
the vehicle is stationary.
2GPS Antenna
Indicates the connection status of the GPS
antenna, the reception sensitivity, and from
how many satellites the signal is received.
Color Signal com-
munication
Used in posi-
tioning
Orange Yes Yes
Yellow Yes No
pWhen the GPS antenna is connected to
this navigation system, “OK”is dis-
played.
When the GPS antenna is not con-
nected to this navigation system, “NOK”
is displayed.
pIf reception is poor, please change the
installation position of the GPS antenna.
3Parking Brake
When the parking brake is applied, “On”is
displayed. When the parking brake is re-
leased, “Off”is displayed.
4Illumination
When the headlights or small lamps of a ve-
hicle are on, “On”is displayed. When the
small lamps of a vehicle are off, “Off”is dis-
played. (If the orange/white lead is not con-
nected, “Off”appears.)
5Back Signal
En
148
Chapter
31 Customizing preferences
When the gear lever is shifted to “R”, the
signal switches to “High”or “Low”. (One of
these is displayed depending on the
vehicle.)
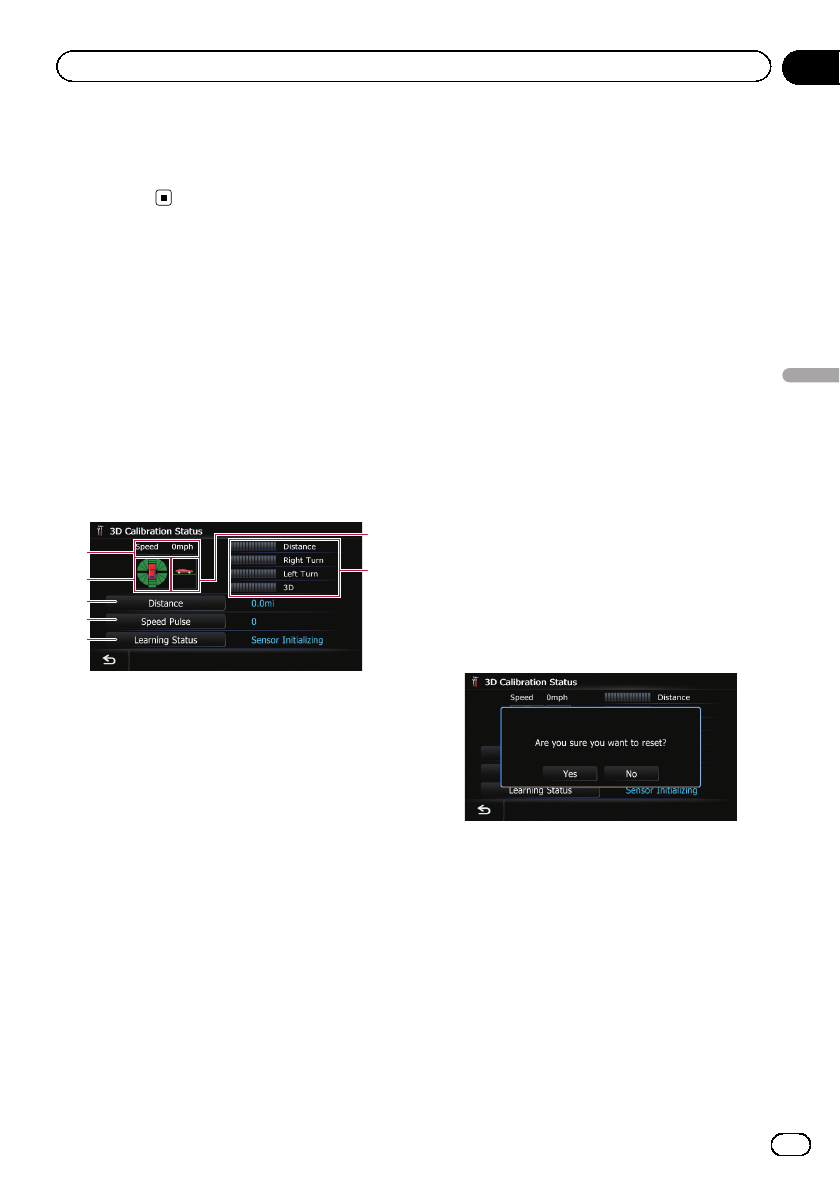
Checking sensor learning
status and driving status
pThe navigation system can automatically
use its sensor memory based on the outer
dimensions of the tires.
1 Display the “Navi Settings”screen.
=For details, refer to Displaying the “Navi
Settings”screen on the previous page.
2 Touch [3D Calibration Status].
The “3D Calibration Status”screen appears.
2
3
4
5
1
6
7
1Speed
Indicates the speed detected by the naviga-
tion system. (This indication may be differ-
ent from the actual speed of your vehicle,
so please do not use this instead of the
speedometer.)
2Acceleration or deceleration/Rotational
speed
Indicates acceleration or deceleration velo-
city of your vehicle. Also, rotational speed
when your vehicle turns to left or right is
shown.
3Distance
Indicates driving distance.
4Speed Pulse
Indicates the total number of speed pulses.
5Learning Status
Indicates the current driving mode.
6Inclination
Indicates the degree of slope of the street
that you are currently on.
7Degree of learning
Sensor learning situations for distance
(Distance), right turn (Right Turn), left turn
(Left Turn) and 3D detection (3D) are indi-
cated by the length of bars.
pWhen tires have been changed or
chains fitted, turning on the Speed
Pulse allows the system to detect the
fact that the tire diameter has changed,
and automatically replaces the value for
calculating distance.
pIf a separately sold speed pulse genera-
tor (ND-PG1) is connected, the distance
calculation value cannot be replaced
automatically.
Clearing status
You can delete the learned results stored in
[Distance], [Speed Pulse]or[Learning Sta-
tus].
1 Touch [Distance] or [Speed Pulse].
The following message appears.
2 Touch [Yes].
Clears the results stored in [Distance]or
[Speed Pulse].
3 Touch [Learning Status].
The following message appears.
En 149
Chapter
31
Customizing preferences
Customizing preferences
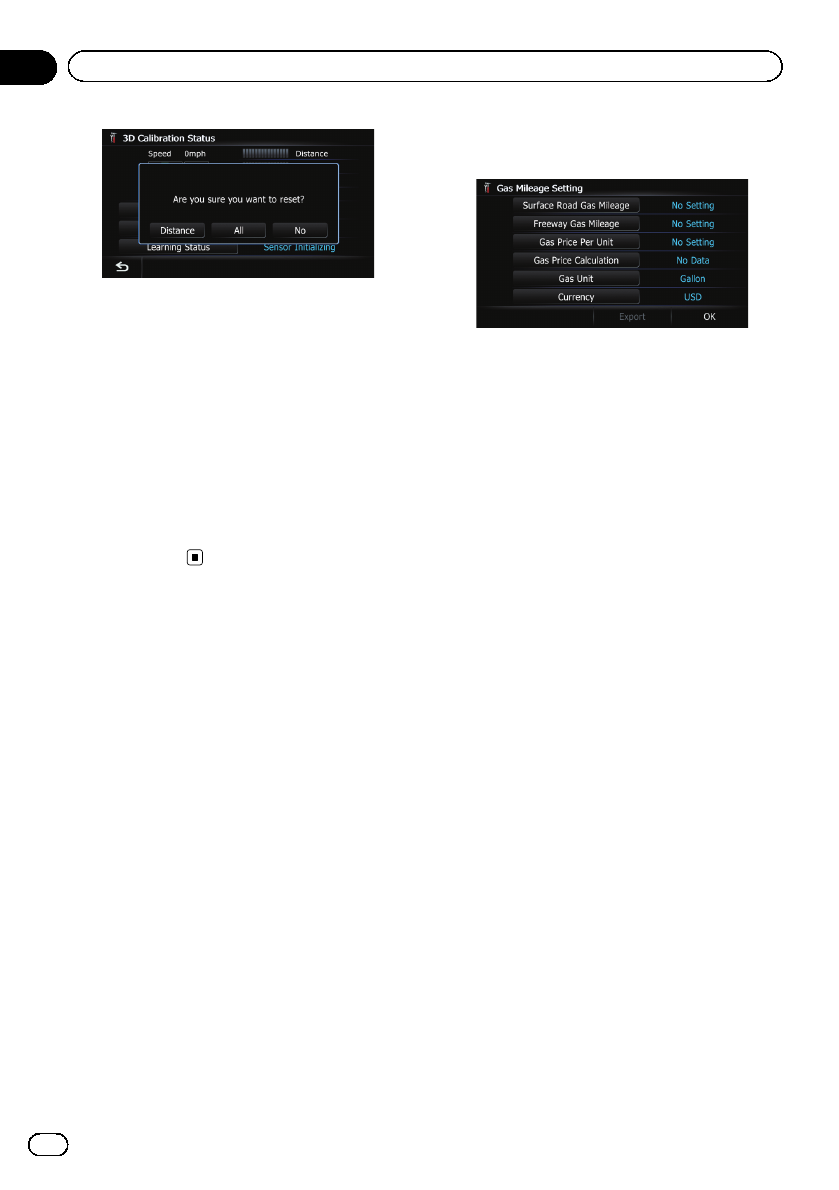
4 Touch [All].
Clears all learning statuses.
pTouch [All] for the following cases:
!After changing the installation position
of the navigation system
!After changing the installation angle of
the navigation system
!After moving the navigation system to
another vehicle
#Touch [Distance].
Clears the learned results stored in [Distance].
pWhen the distance accuracy is low, touch
[Distance].
Using the “Gas Mileage”
function
Inputting the fuel consumption
information for calculating the
fuel cost
You can estimate the fuel cost to your destina-
tion by entering the fuel consumption informa-
tion in the navigation system.
=For details, refer to Setting a route to your
destination on page 41.
1 Display the “Navi Settings”screen.
=For details, refer to Displaying the “Navi
Settings”screen on page 148.
2 Touch [Gas Mileage].
The “Gas Mileage Setting”screen appears.
3 Enter the fuel consumption informa-
tion.
Enter the following items:
!Surface Road Gas Mileage:
Enter the fuel cost when you drive on ordin-
ary roads.
pHow the fuel cost is entered depends on
the “Gas Unit”setting.
—When “Gas Unit”is set to “Liter”.
Enter how much fuel you need to tra-
vel 60 miles (100 kilometers).
—When “Gas Unit”is set to “Gallon”.
Enter how many kilometers (miles)
you get to a gallon.
!Freeway Gas Mileage:
Enter the fuel cost when you drive on the
freeway.
pHow the fuel cost is entered depends on
the “Gas Unit”setting.
—When “Gas Unit”is set to “Liter”.
Enter how much fuel you need to tra-
vel 60 miles (100 kilometers).
—When “Gas Unit”is set to “Gallon”.
Enter how many kilometers (miles)
you get to a gallon.
!Gas Price Per Unit:
Enter the fuel unit price.
!Gas Unit:
Set the fuel unit.
!Currency:
Set the unit of currency.
When all the items are entered, inputting the
fuel consumption information is complete.
En
150
Chapter
31 Customizing preferences