Pioneer K031 Multi-Media AVN Navigation Server System with BT User Manual 8
Pioneer Corporation Multi-Media AVN Navigation Server System with BT 8
Pioneer >
Contents
User Manual 8
1 Select a frequency that you want to
store in memory.
2 Display the preset channel list.
=For details, refer to Switches between the
AV operation screen and the preset list
display on the previous page.
3 Keep touching a preset tuning key [P1]
to [P6].
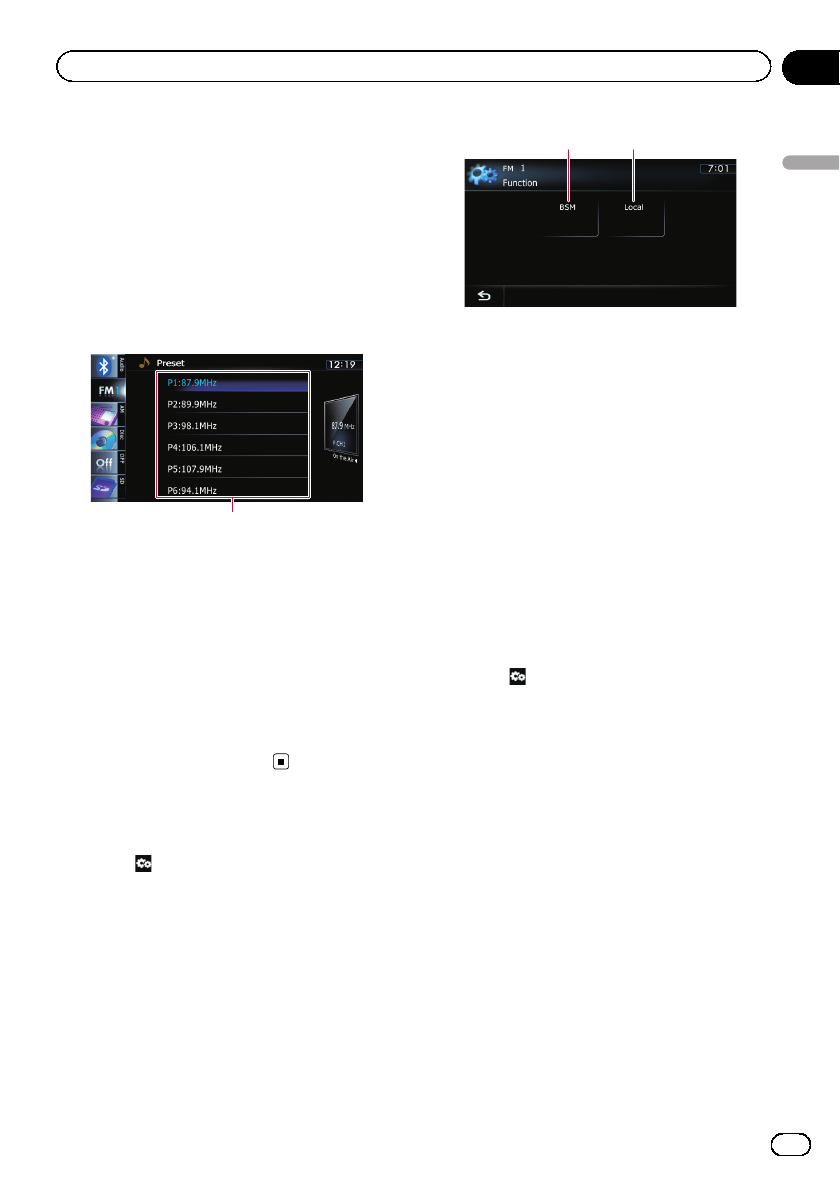
Preset list display
Preset tuning keys
=For details of the list operations, refer to Op-
erating list screens (e.g. iPod list screen) on
page 77.
The selected radio station has been stored in
memory.
The next time you tap the same preset tuning
key “P1”to “P6”, the radio station frequencies
are recalled from memory.
pUp to 18 FM stations, six for each of the
three FM bands, as well as six AM stations,
can be stored in memory.
Using the “Function”menu
%Touch on the “FM”screen.
The “Function”menu appears.
1 2
1Stores the strongest broadcast frequen-
cies
2Tunes in strong signals
=For details of each function, refer to sec-
tions below with the relative titles.
Storing the strongest broadcast
frequencies
BSM (best stations memory) lets you automa-
tically store the six strongest broadcast fre-
quencies under the preset tuning keys “P1”to
“P6”and, once stored there, you can tune in to
these frequencies with the touch of a key.
1 Touch on the “FM”screen.
2 Touch [BSM].
3 Touch [Start] to begin a search.
BSM begins to flash. While “BSM”is flashing,
the six strongest broadcast frequencies will be
stored under the preset tuning keys “P1”to
“P6”in order of their signal strength. When
this is complete, “BSM”stops flashing.
pTo cancel the storage process, touch
[Stop].
pStoring broadcast frequencies with BSM
may replace broadcast frequencies you
have already saved.
Tuning in strong signals
Local seek tuning allows you to tune in only
those radio stations with sufficiently strong
signals for good reception.
En 81
Chapter
14
Using the radio (FM)
Using the radio (FM)

1 Touch on the “FM”screen.
2 Touch [Local].
3 Touch [On] to turn local seek tuning on.
To turn local seek tuning off, touch [Off].
4 Touch [cPrev] or [Nextd] to set the sen-
sitivity.
There are four levels of sensitivity for FM.
Level: 1—2—3—4
pThe level “4”setting allows reception of only
the strongest stations, while lower settings
let you receive weaker stations.
En
82
Chapter
14 Using the radio (FM)
You can listen to the radio using this naviga-
tion system. This section describes operations
for radio (AM).
Starting procedure
1 Display the AV operation screen.
=For details of the operations, refer to Dis-
playing the AV operation screen on page 77.
2 Tap [AM] on the left edge of the screen
to display the “AM”screen.
3 Use the touch panel keys on the screen
to control the radio.
=For details, refer to Using the touch panel
keys on the next page.
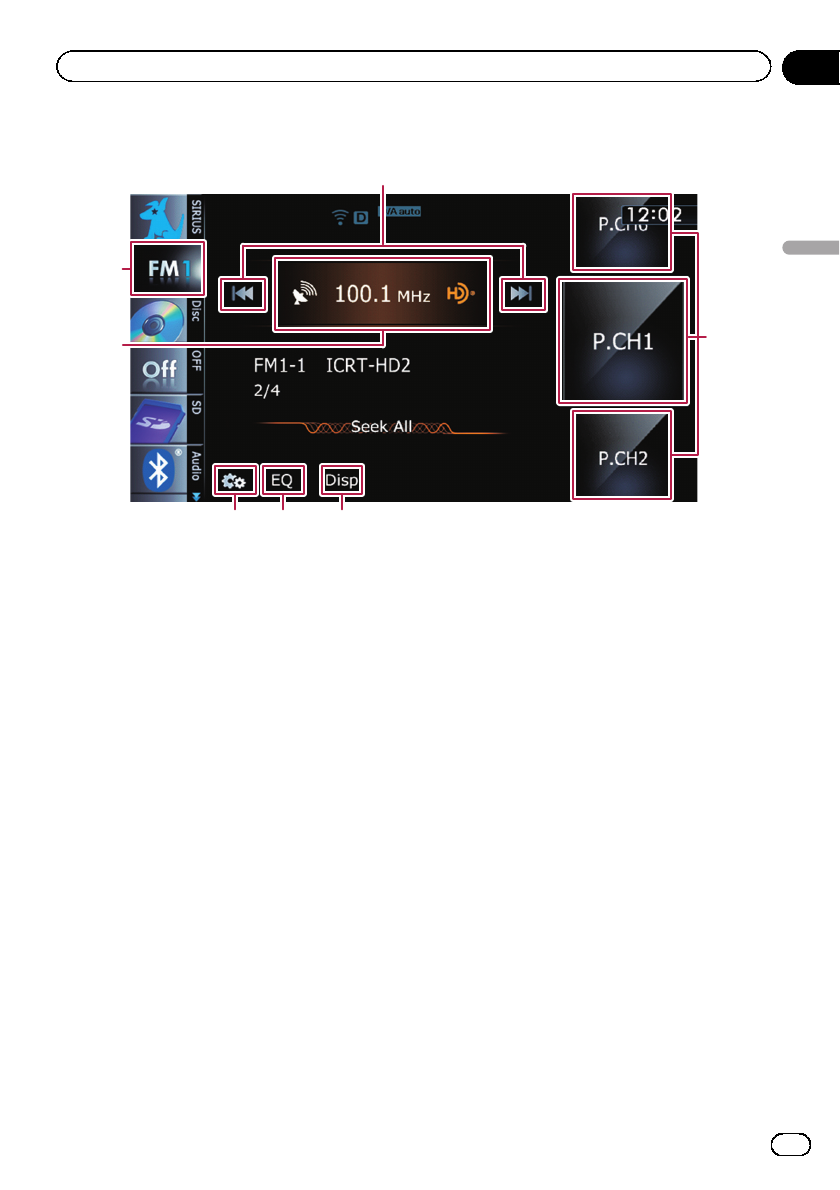
Reading the screen
1
32 4
5
6
1Source icon
Shows which source has been selected.
2Signal level indicator
3Frequency indicator
4Current time
5Frequency indicator
Shows the frequency of the preset item.
6Preset number indicator
Shows what preset item has been selected.
En 83
Chapter
15
Using the radio (AM)
Using the radio (AM)

Using the touch panel keys
5
1
34
2
1Performs manual tuning
To tune manually, touch [o]or[p] briefly.
The frequencies move up or down one step at
a time.
Performs seek tuning
To perform seek tuning, touch and hold [o]
or [p] for about one second and release.
The tuner will scan frequencies until a broad-
cast strong enough for good reception is
found.
pYou can cancel seek tuning by touching
either [o]or[p] briefly.
pIf you touch and hold [o]or[p],
you can skip broadcasting frequencies.
Seek tuning will start as soon as you re-
lease the keys.
pYou can also perform these operations
by using the TRK button.
2Selects a preset channel
The keys can be used to switch preset chan-
nels.
Scroll by dragging the keys up or down to dis-
play the preset channel you want to select,
and tap the channel.
pThe lower key and the upper key appear
only when the preset channel is se-
lected.
3Recalls equalizer curves
=For details, refer to Using the equalizer
on page 172.
4Displays the “Function”menu
=For details, refer to Using the
“Function”menu on the next page.
5Switches between the AV operation
screen and the preset list display
You can switch the screen display according
to your preference.
=For details of the operation, refer to
Switching between the AV operation
screen and the list screen on page 77.
Storing and recalling broadcast
frequencies
With a tap of any of the preset tuning keys
(“P1”to “P6”), you can easily store up to six
broadcast frequencies for later recall (also
with the tap of a key).
1 Select a frequency that you want to
store in memory.
En
84
Chapter
15 Using the radio (AM)
2 Display the preset channel list.
=For details, refer to Switches between the
AV operation screen and the preset list
display on the previous page.
3 Keep touching a preset tuning key [P1]
to [P6].
Preset list display
Preset tuning keys
=For details of the list operations, refer to Op-
erating list screens (e.g. iPod list screen) on
page 77.
The selected radio station has been stored in
memory.
The next time you tap the same preset tuning
key “P1”to “P6”, the radio station frequencies
are recalled from memory.
Using the “Function”menu
%Touch on the “AM”screen.
The “Function”menu appears.
1 2
1Stores the strongest broadcast frequen-
cies
2Tunes in strong signals
=For details of each function, refer to sec-
tions below with the relative titles.
Stores the strongest broadcast
frequencies
BSM (best stations memory) lets you automa-
tically store the six strongest broadcast fre-
quencies under the preset tuning keys “P1”to
“P6”and, once stored there, you can tune in to
these frequencies with the touch of a key.
1 Touch on the “AM”screen.
2 Touch [BSM].
3 Touch [Start] to begin a search.
BSM begins to flash. While “BSM”is flashing,
the six strongest broadcast frequencies will be
stored under the preset tuning keys “P1”to
“P6”in order of their signal strength. When
this is complete, “BSM”stops flashing.
pTo cancel the storage process, touch
[Stop].
pStoring broadcast frequencies with BSM
may replace broadcast frequencies you
have already saved.
Tunes in strong signals
Local seek tuning allows you to tune in only
those radio stations with sufficiently strong
signals for good reception.
1 Touch on the “AM”screen.
2 Touch [Local].
3 Touch [On] to turn local seek tuning on.
To turn local seek tuning off, touch [Off].
4 Touch [cPrev] or [Nextd] to set the sen-
sitivity.
There are two levels of sensitivity for AM.
Level: 1—2
pThe level “2”setting allows reception of only
the strongest stations, while lower settings
let you receive weaker stations.
En 85
Chapter
15
Using the radio (AM)
Using the radio (AM)
You can listen to the radio by using the naviga-
tion system. This section describes operations
for HD Radio reception.
pYou have to connect an HD Radio tuner (e.
g. GEX-P20HD) (sold separately) to enable
reception of HD Radio broadcasts on this
navigation system.
For details concerning operation, refer to
the HD Radio tuner’s operation manual.
Starting procedure
1 Display the AV operation screen.
=For details of the operations, refer to Dis-
playing the AV operation screen on page 77.
2 Tap [Digital Radio] on the left edge of
the screen to display the “Digital Radio”
screen.
3 Use the touch panel keys on the screen
to control the radio.
=For details, refer to Using the touch panel
keys on the next page.
Reading the screen
1
b
23 7
654 8
9
a
1Source icon
Shows which source has been selected.
2Band indicator
Shows which band the radio is tuned to: FM1,
FM2, FM3 or AM.
3Detailed information
=For details, refer to Switching the display
on page 88.
4Signal level indicator
5Frequency indicator
6Signal type indicator
Shows the type of signal currently being re-
ceived. If a digital broadcasting is received,
“D”appears. Otherwise, “A”appears.
7Blending mode indicator
=For details, refer to Switching the recep-
tion mode on page 89.
8Current time
9Preset number indicator
Shows what preset item has been selected.
aSeek type indicator
=For details, refer to Switching the seek
mode on page 89.
bMulticasting indicator
Shows the number of multicast channels in
the current frequency.
En
86
Chapter
16 HD Radioäreception
Using the touch panel keys
6
7
1
45
2
3
1Performs manual tuning
To tune manually, touch [o]or[p] briefly.
The frequencies move up or down one step at
a time.
Performs seek tuning
To perform seek tuning, touch and hold [o]
or [p] for about one second and release.
The tuner will scan frequencies until a broad-
cast strong enough for good reception is
found.
pYou can cancel seek tuning by touching
either [o]or[p] briefly.
pIf you touch and hold [o]or[p],
you can skip broadcasting frequencies.
Seek tuning will start as soon as you re-
lease the keys.
pYou can also perform these operations
by using the TRK button.
2Selects a preset channel
The keys can be used to switch preset chan-
nels.
Scroll by dragging the keys up or down to dis-
play the preset channel you want to select,
and tap the channel.
3Switches the display
=For details, refer to Switching the display
on the next page.
4Recalls equalizer curves
=For details, refer to Using the equalizer
on page 172.
5Displays the “Function”menu
=For details, refer to Using the
“Function”menu on the next page.
6Switches between the AV operation
screen and the preset list display
You can switch the screen display according
to your preference.
=For details of the operation, refer to
Switching between the AV operation
screen and the list screen on page 77.
7Selects a band
Tap the key repeatedly until the desired band
is displayed: FM1,FM2,FM3,orAM.
pThis function is convenient for preparing
different preset lists for each band.
Storing and recalling broadcast
frequencies
With a tap of any of the preset tuning keys
(“Preset 1”to “Preset 6”), you can easily store
up to six broadcast frequencies for later recall
(also with the tap of a key).
En 87
Chapter
16
HD Radioäreception
HD Radioäreception
1 Select a frequency that you want to
store in memory.
2 Display the preset channel list.
=For details, refer to Switches between the
AV operation screen and the preset list
display on the previous page.
3 Keep touching a preset tuning key [Pre-
set 1] to [Preset 6].
Preset list display
Preset tuning keys
=For details, refer to Operating list screens (e.
g. iPod list screen) on page 77.
The selected radio station has been stored in
memory.
The next time you tap the same preset tuning
key “Preset 1”to “Preset 6”, the radio station
frequencies are recalled from memory.
pUp to 18 FM stations, six for each of the
three FM bands, as well as six AM stations,
can be stored in memory.
Switching the display
Desired information can be displayed.
%Touch [Disp].
Touch [Disp] repeatedly to switch between the
following settings:
Channel name —Artist name —Song title —
Program type
pOnly when the tuner has been tuned in to
an HD Radio station, can the display be
changed.
pWhen the tuner has been tuned in to an HD
Radio station, default display is changed
into station name instead of frequency.
Scrolling the detailed information
You can turn the detailed information scroll
mode on and off.
%Touch and hold [Disp].
Using the “Function”menu
%Touch on the “Digital Radio”screen.
The “Function”menu appears.
1 2 3 4
1Stores the strongest broadcast frequen-
cies
2Switches the seek mode
3Tunes in strong signals
4Switches the reception mode
=For details of each function, refer to sec-
tions below with the relative titles.
Storing the strongest broadcast
frequencies
BSM (best stations memory) lets you automa-
tically store the six strongest broadcast fre-
quencies under the preset tuning keys “Preset
1”to “Preset 6”and, once stored there, you
can tune in to these frequencies with the
touch of a key.
1 Touch on the “Digital Radio”screen.
2 Touch [BSM].
En
88
Chapter
16 HD Radioäreception
3 Touch [Start] to begin a search.
BSM begins to flash. While “BSM”is flashing,
the six strongest broadcast frequencies will be
stored under the preset tuning keys “Preset 1”
to “Preset 6”in order of their signal strength.
When this is complete, “BSM”stops flashing.
pTo cancel the storage process, touch
[Stop].
pStoring broadcast frequencies with BSM
may replace broadcast frequencies you
have already saved.
Switching the seek mode
You can select the method of seek tuning.
1 Touch on the “Digital Radio”screen.
2 Touch [Seek] to select the desired set-
ting.
!All:
Seeks stations from both analog and digital
broadcasting.
!HD:
Seeks from digital broadcasting only.
pIf you select “HD”on this setting while
[Blending] is set to “Analog”, the setting
on [Blending] turns to “D/A Auto”automa-
tically.
Tuning in strong signals
Local seek tuning allows you to tune in only
those radio stations with sufficiently strong
signals for good reception.
1 Touch on the “Digital Radio”screen.
2 Touch [Local].
3 Touch [On] to turn local seek tuning on.
To turn local seek tuning off, touch [Off].
4 Touch [cPrev] or [Nextd] to set the sen-
sitivity.
There are four levels of sensitivity for FM and
two levels for AM:
FM: 1—2—3—4
AM: 1—2
pThe FM “4”(AM “2”) setting allows recep-
tion of only the strongest stations, while
lower settings let you receive weaker sta-
tions.
Switching the reception mode
If a digital broadcast reception condition gets
poor, the tuner automatically switches to the
analog broadcast of the same frequency level
in default. If you want to prevent a frequent
automatic switching, switch this setting to
[Analog].
1 Touch on the “Digital Radio”screen.
2 Touch [Blending] to switch the recep-
tion mode.
!Analog:
Receives analog broadcasting only.
!D/A Auto:
Automatically switches to the analog broad-
cast of the same frequency level as the digi-
tal broadcast.
pIf you select “Analog”on this setting while
[Seek] is set to “HD”, the setting on [Seek]
turns to “All”automatically.
En 89
Chapter
16
HD Radioäreception
HD Radioäreception

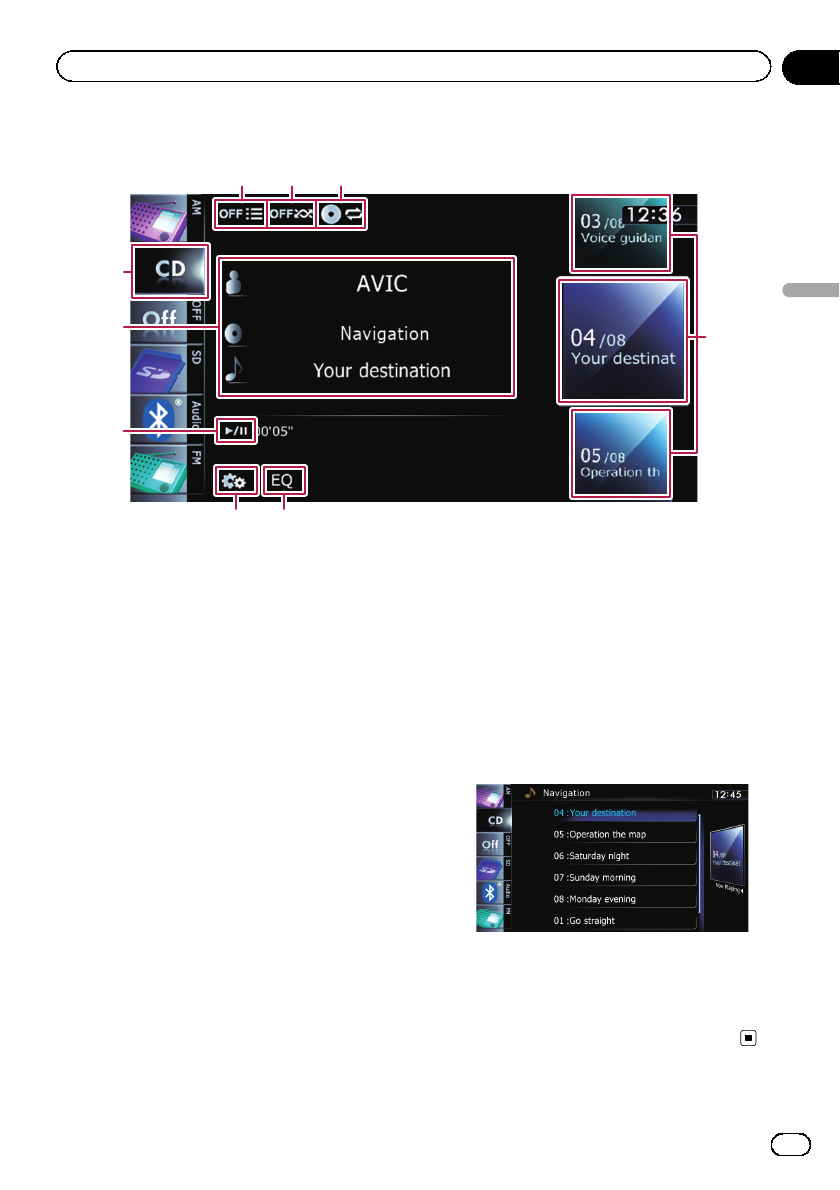
You can play a normal music CD using the
built-in drive of the navigation system. This
section describes how.
Starting procedure
1 Display the AV operation screen.
=For details of the operations, refer to Dis-
playing the AV operation screen on page 77.
2 Insert the disc you want to play into
disc-loading slot.
Playback starts from the first track of the CD.
=For details of the operation, refer to Insert-
ing and ejecting a disc on page 14.
pIf the disc is already set, tap [Disc] on the
left edge of the screen.
=For details, refer to Selecting a source on
page 77.
3 Use the touch panel keys on the screen
to control the disc.
=For details, refer to Using the touch panel
keys on the next page.
Reading the screen
5
12
3
4
1Playback condition indicator
Indicates the current playback condition.
!Scanning tracks of a CD
Indicator: Meaning
Cancels the scan play.
Plays the beginning of each
track in the current repeat
play range for about 10 sec-
onds.
!Playing tracks in random order
Indicator: Meaning
Does not play tracks in ran-
dom order.
Plays all tracks in the current
disc in random order.
!Setting a repeat play range
Indicator: Meaning
Repeats the current disc.
Repeats just the current
track.
2Current track information
!:Artist name
Shows the artist name of the track cur-
rently playing (when available).
!:Album title
Shows the title of the album for the cur-
rent track (when available).
!:Track title
Shows the title of the track currently
playing (when available).
!Play time
Shows the elapsed playing time within
the current track.
p“-------”is displayed if there is no corre-
sponding information.
3Current time
4Track information
!Track number indicator
Shows the track number and the total
number of tracks in the current repeat
range.
!Track title indicator
5Source icon
Shows which source has been selected.
En
90
Chapter
17 Playing audio CDs
Using the touch panel keys
9
8
7
123
56
4
1Scans tracks of a CD
Scan play is performed by touching only one
key.
=For details of the operation, refer to
Scans tracks of a CD on the next page.
2Plays tracks in random order
All of the tracks in the disc can be played at
random by touching only one key.
=For details of the operation, refer to
Plays tracks in random order on the
next page.
3Sets a repeat play range
The repeat play range can be changed by
touching only one key.
=For details, refer to Changes the repeat
range on the next page.
4Selects a track to play
Scrolling the keys up or down displays tracks,
and tapping a track starts playback.
Tapping the lower key during random play-
back skips to the next track. Tapping the
upper key jumps to the start of the current
track.
5Recalls equalizer curves
=For details, refer to Using the equalizer
on page 172.
6Displays the “Function”menu
=For details, refer to Using the
“Function”menu on the next page.
7Playback and Pause
Touching [f] switches between playback
and pause.
8Selects a track from the list
Touching the key displays the list which lets
you see the list of track titles on a disc. You
can play a track on the list by tapping it.
p“-------”is displayed if there is no corre-
sponding information.
=For details, refer to Operating list screens
(e.g. iPod list screen) on page 77.
9Switches the media file type played
=For details, refer to Switches the
media file type played on page 96.
En 91
Chapter
17
Playing audio CDs
Playing audio CDs
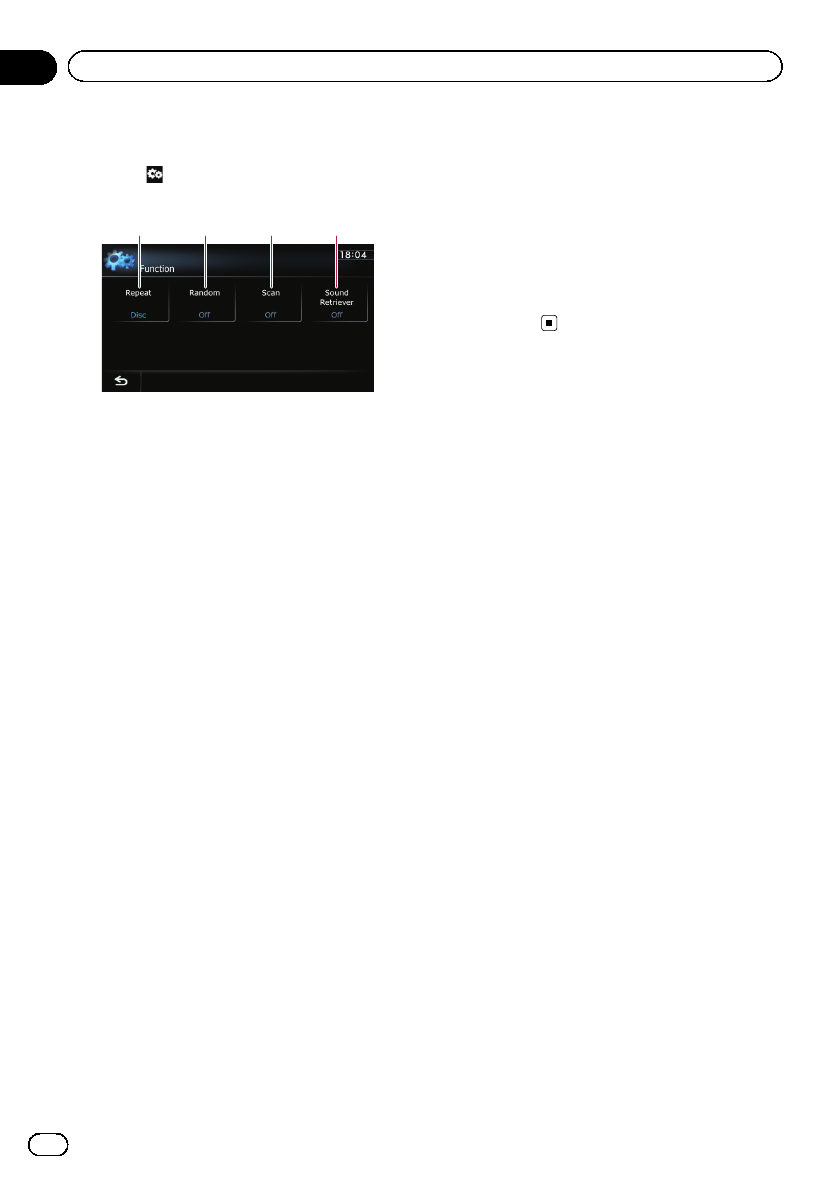
Using the “Function”menu
%Touch on the “CD”screen.
The “Function”menu appears.
1 2 3 4
1Changes the repeat range
Each touch of [Repeat] changes the setting
as follows:
!Disc: Repeats the current disc.
!Track: Repeats just the current track.
pIf you perform track search or fast for-
ward or reverse, track repeat playback is
automatically canceled.
2Plays tracks in random order
Each touch of [Random] turns it on or off.
pIf you turn the random play on when the
repeat play range is set to “Track”, the
repeat play range changes to “Disc”
automatically.
3Scans tracks of a CD
Each touch of [Scan] turns it on or off. Scan
play lets you hear the first 10 seconds of
each track on the CD. When you find the
track you want, touch [Scan] to turn scan
play off.
pAfter scanning is finished, normal play-
back of the tracks will begin again.
pIf you turn the scan play on when the re-
peat play range is set to “Track”, the re-
peat play range changes to “Disc”
automatically.
4Uses “Sound Retriever”function
“Sound Retriever”function automatically
enhances compressed audio and restores
rich sound.
Each touch of [Sound Retriever] changes
the setting as follows:
!MODE 1: Activates “Sound Retriever”
function.
!MODE 2: Activates “Sound Retriever”
function.
!Off: Deactivates “Sound Retriever”
function.
pMODE 2 has a stronger effect than
MODE 1 and is more effective when
playing back highly compressed audio
data.
En
92
Chapter
17 Playing audio CDs
You can play a disc that contains compressed
audio files using the built-in drive of the navi-
gation system. This section describes these
operations.
pIn the following description, the MP3,
WMA, AAC files are collectively referred to
as “Compressed audio file”.
Starting procedure
1 Display the AV operation screen.
=For details of the operations, refer to Dis-
playing the AV operation screen on page 77.
2 Insert the disc you want to play into
disc-loading slot.
Playback starts from the first file of the ROM.
=For details of the operation, refer to Insert-
ing and ejecting a disc on page 14.
pIf the disc is already set, tap [Disc] on the
left edge of the screen.
=For details, refer to Selecting a source on
page 77.
3 Use the touch panel keys on the screen
to control the disc.
=For details concerning operations, refer to
Using the touch panel keys on page 95.
Reading the screen
5
12
3
4
1Playback condition indicator
Indicates the current playback condition.
!Scanning folders and files
Indicator: Meaning
Cancels the scan play.
Plays the first audio files of
each folder for about 10 sec-
onds when the repeat range
is set to “Disc”.
Plays the beginning of each
audio file in the current folder
for about 10 seconds when
the repeat range is set to
“Folder”.
!Playing files in random order
Indicator: Meaning
Does not play tracks in ran-
dom order.
Plays all audio files in the cur-
rent repeat play range in ran-
dom order.
!Setting a repeat play range
Indicator: Meaning
Repeats all compressed
audio files.
Repeats just the current file.
Repeats the current folder.
2Current file information
!:Folder name
Shows the folder name currently play-
ing.
!:Artist name
Shows the artist name currently playing
(when available).
!:Album title
Shows the title of the album for the cur-
rent file (when available).
!:Track title
Shows the title of the track currently
playing (when available).
pIf the title of a track is not available,
the file name appears.
!Play time
Shows the elapsed playing time within
the current file.
En 93
Chapter
18
Playing music files on ROM
Playing music files on ROM

p“-------”is displayed if there is no corre-
sponding information.
3Current time
4File information
!File number indicator
!File name indicator
!File type indicator
Shows the type of audio file.
5Source icon
Shows which source has been selected.
En
94
Chapter
18 Playing music files on ROM
Using the touch panel keys
9
8
7
123
56
4
1Scans folders and files
Scan play is performed by touching only one
key.
=For details of the operation, refer to
Scans folders and files on the next
page.
2Plays files in random order
The files in the current repeat play range can
be played at random by touching only one key.
pIf the disc contains a mixture of various
media file types, all tracks or files within
the current part (“CD”or “ROM”) are
played randomly.
=For details, refer to Plays files in ran-
dom order on the next page.
3Sets a repeat play range
The repeat play range can be changed by
touching only one key.
=For details, refer to Changes the repeat
range on the next page.
4Selects a file to play
Scrolling the keys up or down displays files,
and tapping a file starts playback.
Tapping the lower key during random play-
back skips to the next file. Tapping the upper
key jumps to the start of the current file.
5Recalls equalizer curves
=For details, refer to Using the equalizer
on page 172.
6Displays the “Function”menu
=For details, refer to Using the
“Function”menu on the next page.
7Playback and Pause
Touching [f] switches between playback
and pause.
8Selects a file from the list
Touching the key displays the list which lets
you see the list of track titles or folder names
on a disc.
pIf the title of a track is not available, the
file name appears.
Tapping a folder on the list shows its content.
You can play a file on the list by tapping it.
=For details, refer to Operating list screens
(e.g. iPod list screen) on page 77.
En 95
Chapter
18
Playing music files on ROM
Playing music files on ROM
Touching displays the content of the upper
folder (parent folder). If the uppermost folder
is listed, cannot be used.
9Switches the media file type played
When playing a disc containing a mixture of
various media file types, you can switch be-
tween media file types to play.
Tap the key repeatedly to switch between the
following media file types:
CD (audio data (CD-DA)) —ROM (com-
pressed audio file) —DivX (DivX video
files)
Using the “Function”menu
%Touch on the “ROM”screen.
The “Function”menu appears.
1 2 3 4
1Changes the repeat range
Each touch of [Repeat] changes the setting
as follows:
!Disc: Repeats all compressed audio
files.
!Track: Repeats just the current file.
!Folder: Repeats the current folder.
pIf you select another folder during repeat
play, the repeat play range changes to
“Disc”.
pIf you perform fast reverse or fast for-
ward during “Track”, the repeat play
range changes to “Folder”.
pWhen “Folder”is selected, it is not pos-
sible to playback a subfolder of that
folder.
pWhen playing discs with compressed
audio files and audio data (CD-DA), re-
peat play is performed within the cur-
rently playing data session even if “Disc”
is selected.
2Plays files in random order
Each touch of [Random] turns it on or off.
When the random play is turned on, the
files in the current repeat play range are
randomly played.
pIf you turn the random play on when the
repeat play range is set to “Track”, the
repeat play range changes to “Folder”
automatically.
3Scans folders and files
Scan play lets you hear the first 10 seconds
of each file. Scan play is performed in the
current repeat play range.
Each touch of [Scan] turns it on or off.
When you find the track you want, touch
[Scan] to turn the scan play off.
pAfter completion of file or folder scan-
ning, normal playback of the files will
begin again.
pIf you turn the scan play on when the re-
peat play range is set to “Track”, the re-
peat play range changes to “Folder”
automatically.
pIf you turn the scan play on while the re-
peat play range is set to “Disc”, scan
play is performed for only the first tracks
of each folder.
4Uses “Sound Retriever”function
“Sound Retriever”function automatically
enhances compressed audio and restores
rich sound.
Each touch of [Sound Retriever] changes
the setting as follows:
!MODE 1: Activates “Sound Retriever”
function.
!MODE 2: Activates “Sound Retriever”
function.
!Off: Deactivates “Sound Retriever”
function.
pMODE 2 has a stronger effect than
MODE 1 and is more effective when
playing back highly compressed audio
data.
En
96
Chapter
18 Playing music files on ROM
You can play a DVD-Video using the built-in
drive of the navigation system. This section de-
scribes operations for playing a DVD-Video.
Starting procedure
1 Display the AV operation screen.
=For details of the operations, refer to Dis-
playing the AV operation screen on page 77.
2 Insert the disc you want to play into
disc-loading slot.
The source changes and then playback will
start.
=For details of the operation, refer to Insert-
ing and ejecting a disc on page 14.
pIf the disc is already set, tap [Disc] on the
left edge of the screen.
=For details, refer to Selecting a source on
page 77.
3 Use the touch panel keys on the screen
to control the disc.
=For details, refer to Using the touch panel
keys on the next page.
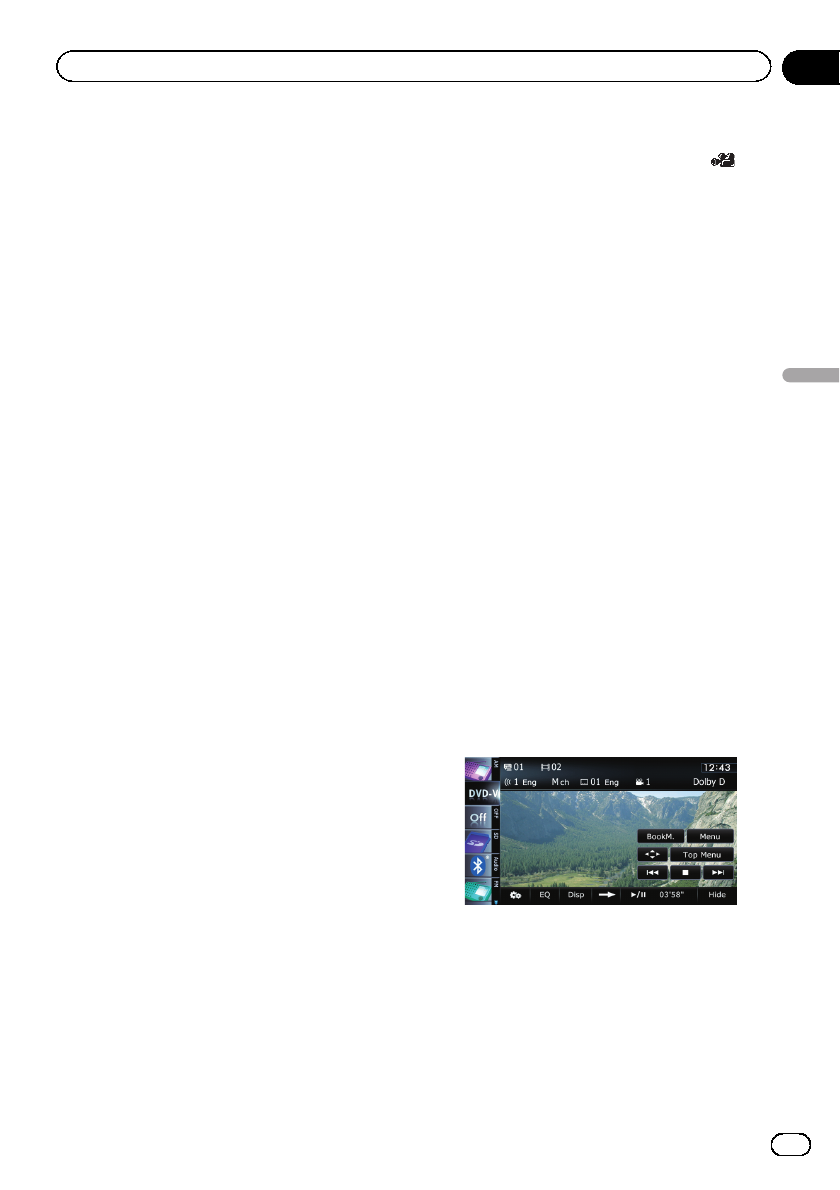
Reading the screen
b
61 52 3 4
a
78
9
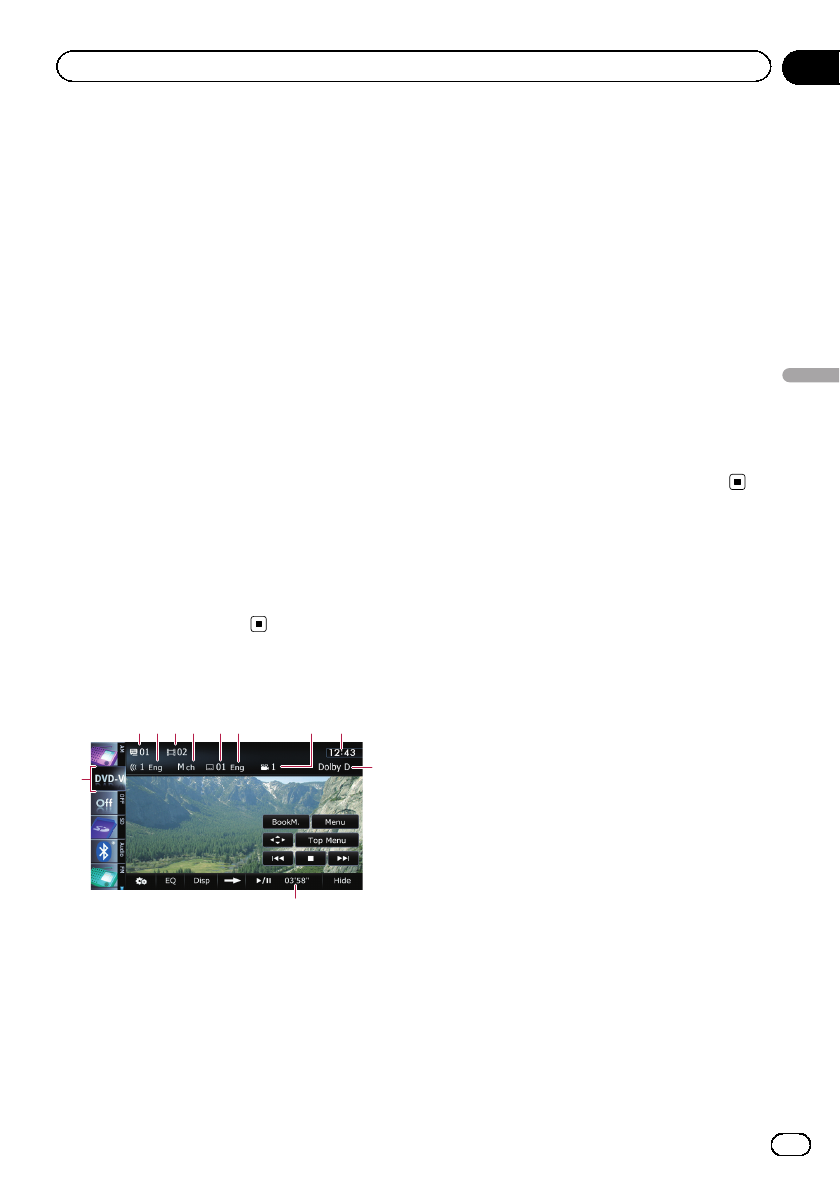
1Title number indicator
Shows the title number currently playing.
2Audio track indicator
Shows the audio track number and audio lan-
guage currently selected.
3Chapter number indicator
Shows the chapter number currently playing.
4Audio channel indicator
Shows the current audio channel type, such
as “Mch”(Multi-channel).
5Subtitle number indicator
Shows the subtitle number currently selected.
6Subtitle language indicator
Shows the subtitle language currently se-
lected.
7Viewing angle indicator
Shows what viewing angle has been selected.
8Current time
9Digital sound format indicator
Shows which digital sound format (surround
sound format) has been selected.
aPlay time indicator
Shows the elapsed playing time within the
current title.
bSource icon
Shows which source has been selected.
En 97
Chapter
19
Playing a DVD-Video
Playing a DVD-Video
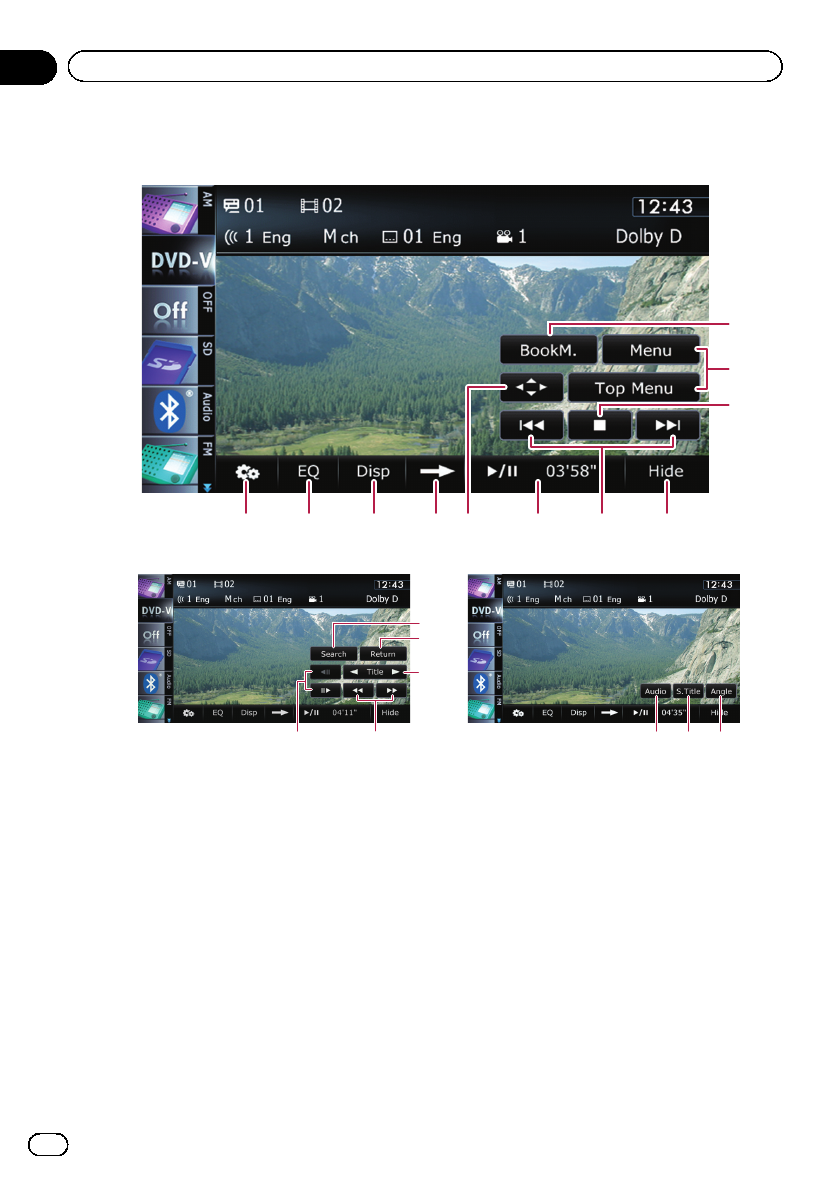
Using the touch panel keys
Playback screen (page 1)
4
2
3
1
5
6789ab
Playback screen (page 2) Playback screen (page 3)
c
d
e
fg hij
pWith some discs, the icon 9may be dis-
played, meaning that the operation is inva-
lid.
1Resumes playback (Bookmark)
=For details, refer to Resuming playback
(Bookmark) on the next page.
2Displays the DVD menu
You can display the menu by touching [Menu]
or [Top Menu] while a disc is playing. Touch-
ing either of these keys again lets you start
playback from the location selected from the
menu. For details, refer to the instructions pro-
vided with the disc.
3Stops playback
4Hides the touch panel keys and informa-
tion of the current video
Touching [Hide] shows only the current video.
To display the touch panel keys and informa-
tion of the current video, touch the screen.
5Skips forward or backward
Touching [p] skips to the start of the next
chapter. Touching [o] once skips to the
start of the current chapter. Touching it twice
quickly will skip to the previous chapter.
pYou can also perform these operations
by using the TRK button.
6Playback and Pause
Touching [f] switches between playback
and pause.
7Displays the DVD menu keypad
=For details, refer to Using DVD menu by
touch panel keys on page 100.
En
98
Chapter
19 Playing a DVD-Video
8Switches to the next page of touch panel
keys
9Switches the display
Touching [Disp] changes the indication on the
information plate as follows:
Disc information display —Repeat range and
L/R select display
aRecalls equalizer curves
=For details, refer to Using the equalizer
on page 172.
bDisplays the “Function”menu
=For details, refer to Using the
“Function”menu on page 101.
cSearches for a desired scene and starts
playback from a specified time
=For details, refer to Searching for a speci-
fic scene and starting playback from a
specified time on the next page.
dPerforms an operation (such as resuming)
that is stored on the disc
When using a DVD that has a point recorded
that indicates where to return to, the DVD re-
turns to the specified point and begins play-
back from that point.
eSkips the title forward or backward
Touching [d] skips to the start of the next title.
Touching [c] skips to the start of the previous
title.
fFast reverse or forward
Touch [m]or[n] to perform fast reverse or
forward.
If you touch and hold [m]or[n] for five
seconds, fast reverse/fast forward continues
even if you release either of these keys. To re-
sume playback at a desired point, touch
[f], [m]or[n] opposite to key pushed
for five seconds.
gFrame-by-frame playback (or slow-motion
playback)
=For details, refer to Frame-by-frame play-
back on page 101.
=For details, refer to Slow motion playback
on page 101.
hChanges the viewing angle (Multi-angle)
Each touch of [Angle] switches between view-
ing angles.
pDuring playback of a scene shot from
multiple angles, the angle icon is
displayed. Turn the angle icon display
on or off using the “DVD/DivX® Setup”
menu.
=For details, refer to Setting the angle icon
display on page 107.
iChanges the subtitle (Multi-subtitle)
Each touch of [S.Title] switches between the
subtitle languages recorded on the disc.
jChanges the audio track (Multi-audio)
Each touch of [Audio] switches between
audio tracks recorded in the disc.
pDTS audio format cannot be output, so
select an audio track other than DTS
audio format.
pDisplay indications such as MPEG-A
and Mch describe the audio track re-
corded on the DVD. This indication may
not be the same as the actual sound
currently output from the navigation sys-
tem.
Resuming playback (Bookmark)
The Bookmark function lets you resume play-
back from a selected scene the next time the
disc is loaded.
%Touch [BookM.].
You can bookmark one point for each of up to
five discs. If you try to memorize another point
for the same disc, the oldest bookmark will be
overwritten by the newer one.
pTo clear the bookmark on a disc, touch and
hold [BookM.].
En 99
Chapter
19
Playing a DVD-Video
Playing a DVD-Video
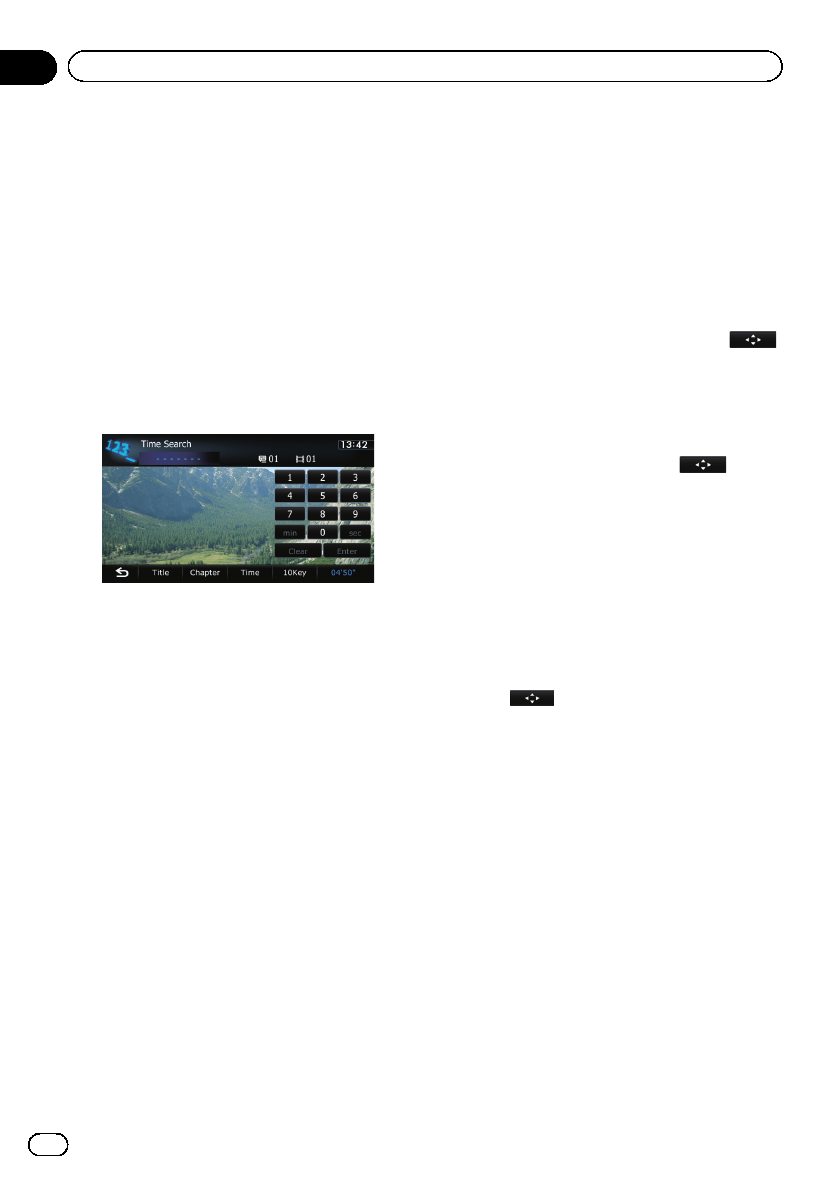
Searching for a specific scene
and starting playback from a
specified time
You can search for the scene you want by spe-
cifying a title or a chapter, and the time.
pChapter search and time search are not
available when disc playback has been
stopped.
1 Touch [Search] and then touch [Title]
(title), [Chapter] (chapter), [Time] (time).
2 Touch the keys to input the target num-
ber or time and then touch [Enter].
For titles, chapters
!To select 3, touch [3] and [Enter] in order.
!To select 10, touch [1] and [0] and [Enter]in
order.
For time (time search)
!To select 5 minutes 3 seconds, touch [5],
[min], [3], [sec] and [Enter] in order.
!To select 71 minutes 00 seconds, touch [7],
[1], [min] and [Enter] in order.
!To select 100 minutes 05 seconds, touch
[1], [0], [0], [5], [sec] and [Enter] in order.
pTo cancel an input number, touch [Clear].
To cancel the input numbers, touch and
hold [Clear].
Direct number search
You can use this function when you need to
enter a numerical command during DVD play-
back.
1 Touch [Search].
2 Touch [10Key].
3 Touch [0] to [9] to input the desired
number.
4 While the input number is displayed,
touch [Enter].
Operating the DVD menu
You can operate the DVD menu by touching
the menu item on the screen directly.
pThis function can be used when the
key is displayed on the lower right corner of
the LCD screen.
pThis function may not work properly with
some DVD disc content. In that case, use
touch panel keys to operate the DVD menu.
pIf you touch the screen while is dis-
played, the touch panel keys will not be dis-
played.
1 Touch the screen to display the touch
panel keys.
2 Touch [Top Menu] or [Menu] to display
touch panel keys to operate the DVD
menu.
3 Touch the desired menu item.
#Touch .
The touch panel keys to select the menu item are
displayed.
Using DVD menu by touch
panel keys
If items on the DVD menu appear, the touch
panel keys may overlay them. If so, select an
item using those touch panel keys.
En
100
Chapter
19 Playing a DVD-Video