Polygroup 1701 Remote controller User Manual TG76P4812L02 new
Polygroup Limited(Macao Commercial Offshore) Remote controller TG76P4812L02 new
Contents
- 1. User Manual
- 2. Users Manual
User Manual
ASSEMBLY INSTRUCTIONS MADE IN CHINA
GROW & STOW™
CHRISTMAS TREE
IMPORTANT SAFETY INSTRUCTIONS
When using electrical products, basic precautions should always be followed including the following:
a) READ AND FOLLOW ALL SAFETY INSTRUCTIONS.
b) Do not use seasonal products outdoors unless marked suitable for indoor and outdoor use. When
products are used in outdoor applications, connect the product to a Ground Fault Circuit
Interrupting (GFCI) outlet. If one is not provided, contact a qualified electrician for proper
installation.
c) This seasonal use product is not intended for permanent installation or use.
d) Do not mount or place near gas or electric heaters, fireplace, candles or other similar sources of
heat.
e) Do not secure the wiring of the product with staples or nails, or place on sharp hooks or nails.
f) Do not let lamps rest on the supply cord or on any wire.
g) Unplug the product when leaving the house, when retiring for the night, or if left unattended.
h) This is an electric product-not a toy! To avoid risk of fire burns, personal injury and electric shock it
should not be played with or placed where small children can reach it.
i) Do not use this product for other than its intended use.
j) Do not hang ornaments or other objects from cord, wire, or light string.
k) Do not close doors or windows on the product or extension cords as this may damage the wire
insulation.
l) Do not cover the product with cloth, paper or any material not part of the product when in use.
m) This product is equipped with push-in type lamps. Do not twist lamps.
n)
Read and follow all instructions that are on the product or provided with the product.
o) SAVE THESE INSTRUCTIONS
ASSEMBLY INSTRUCTIONS MADE IN CHINA
2
PRODUCT SPECIFICATION
Description
Accessories Included:
Grow and Stow tree is an indoor Christmas Tree provided with a electromechanical system for multiple
height adjustment. Powered by a switching power supply (adaptor), It can be control by a foot pedal and a
RF remote control unit. This controller commands the mechanism for stow and deploy, as well as the
lighting functions. The full lower section of the motorized tree is provided with quick set connectors, and
this entire tree easily storages within a compact bag for convenient storage.
Foot Pedal, Remote hand set, adaptor, power cord, owner manual
Switching Power Supply (adaptor):
Input AC110-240V, 50/60Hz, Output DC 29V/2A
7.5ft Tree Grow Range (Vertical Stroke):
Minimum: 6ft
Maximum: 7.5ft
Stroke: 1.5ft
9ft Tree Grow Range (Vertical Stroke):
Minimum: 7ft
Maximum 9ft
Stroke: 2ft
Tree Life Cycle:
3000 Cycles Max.
Remote Controller Range:
33 ft (10m)
Remote Controller Power
DC 3V
Operational Temperature:
0
o
C to 40
o
C, 85% Humidity, indoor use
Storage Temperature:
-5
o
C to 60
o
C, 85% Humidity
Use and Care Instructions
a) Before using or reusing, inspect product carefully. Discard any products that have cut, damaged, or
frayed wire insulation or cords, cracks in the lampholders or enclosures, loose connections or
exposed copper wire.
b) When storing the product, carefully remove the product from wherever it is placed, including trees,
branches, or bushes, to avoid any undue strain or stress on the product conductors, connections,
and wires.
c) When not in use, store neatly in a cool, dry location protected from sunlight.
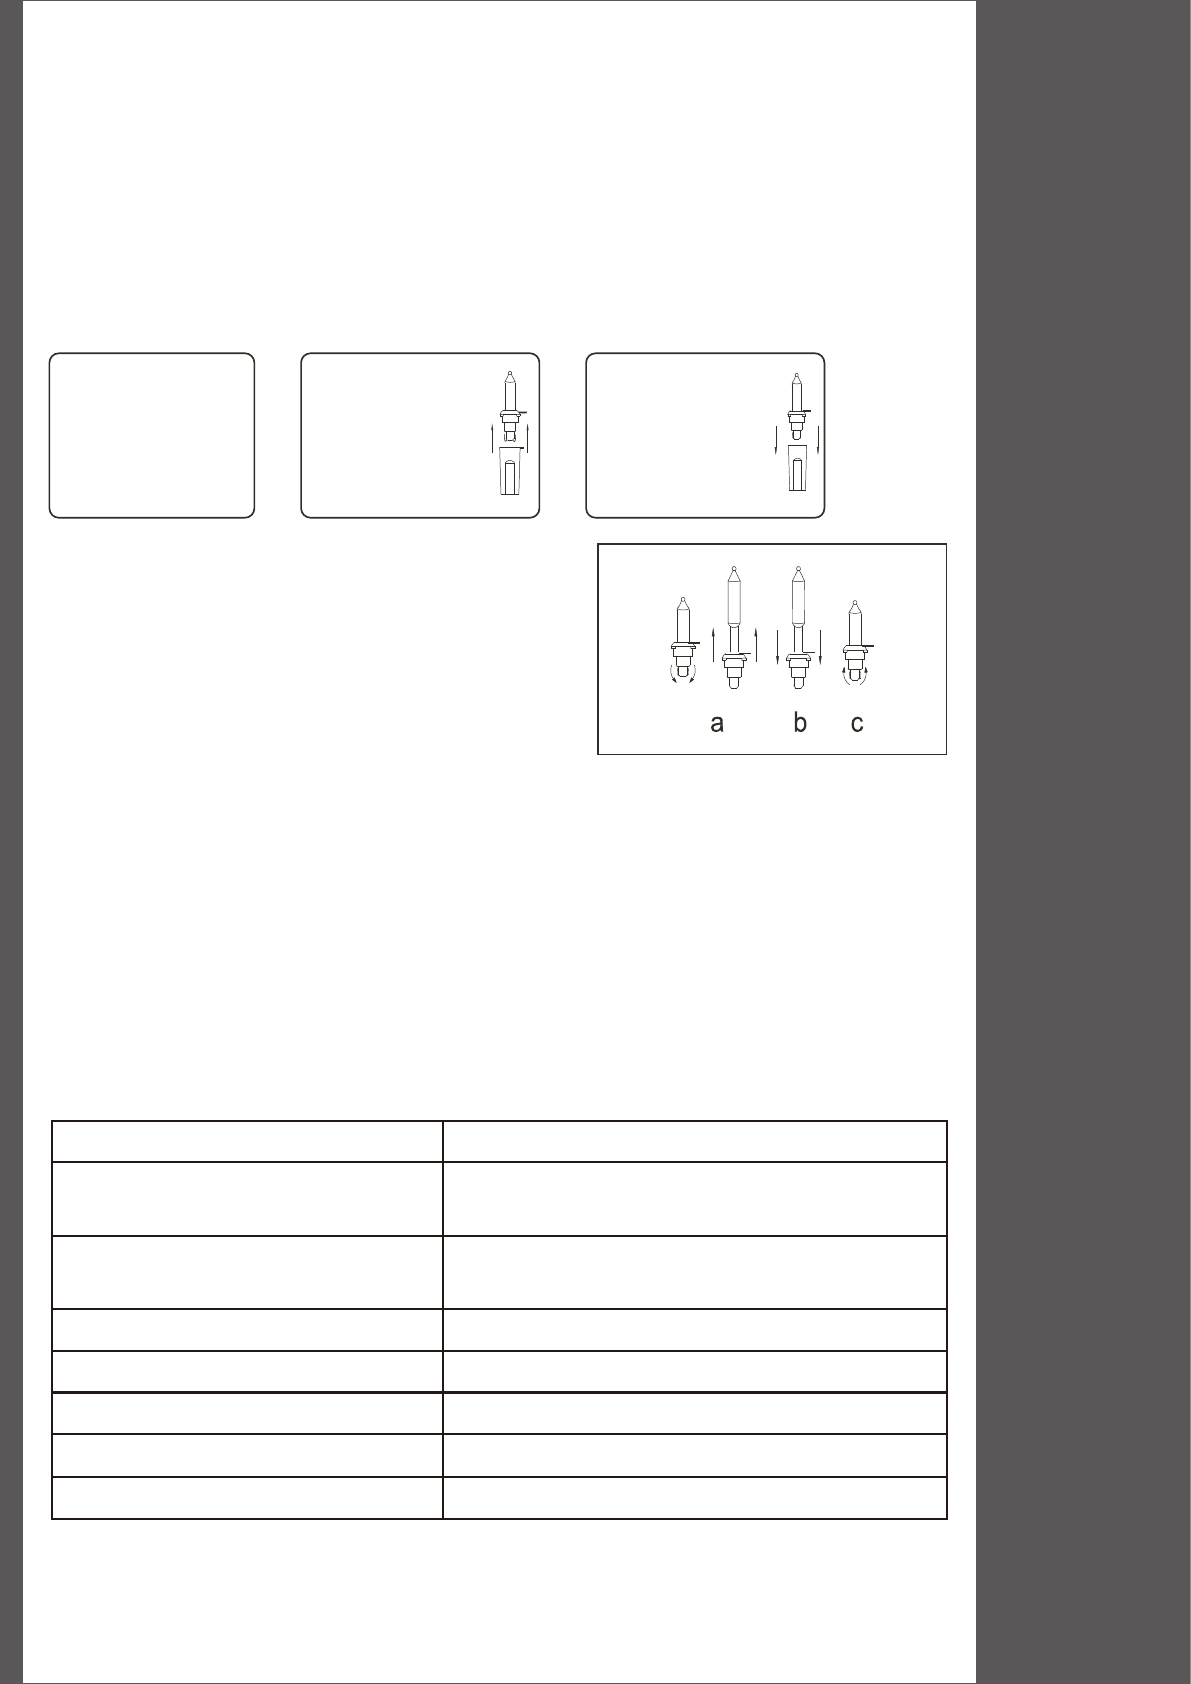
USER SERVICNG INSTRUCTIONS
Lamp Replacement:
Step 2: Lift up to
unsnap locking
tab, then pull lamp
and plastic base
straight out of
lampholder.
Step 1: Grasp plug
and remove from the
receptacle or other
outlet device. Do not
unplug by pulling on
cord.
Step 3: Replace lamp
with only 3.6 Volt,
0.072 watt or 2.4 Volt,
0.048 Watt LED type
lamps provided with
this product.
(Reference figure only)
If the new lamp base does not fit in lamp holder, follow
the step below before Step 3.
a) Remove the base or burned out lamp by straightening
lamp leads and gently pull lamp out.
b) Thread leads of new lamp through holes in old base
with one lead in each hole.
c) After lamp is fully inserted into base, bend each lead
up, like other lamps in the light set so that the leads
will touch the contacts inside the lampholder.
CAUTION:
1. Risk of fire. This product dose not contain lamp shunts, which allow the product to operate if one
lamp burns out.Replace lamps only with the spare lamps provided wiht this product.
2. To reduce the risk of fire and electric shock: a) Do not install on trees having needles, leaves or
branch coverings of metal or materials which look like metal, and b) Do not mount or support
strings in a manner that can cut or damage wire insulation .
ASSEMBLY INSTRUCTIONS MADE IN CHINA
3
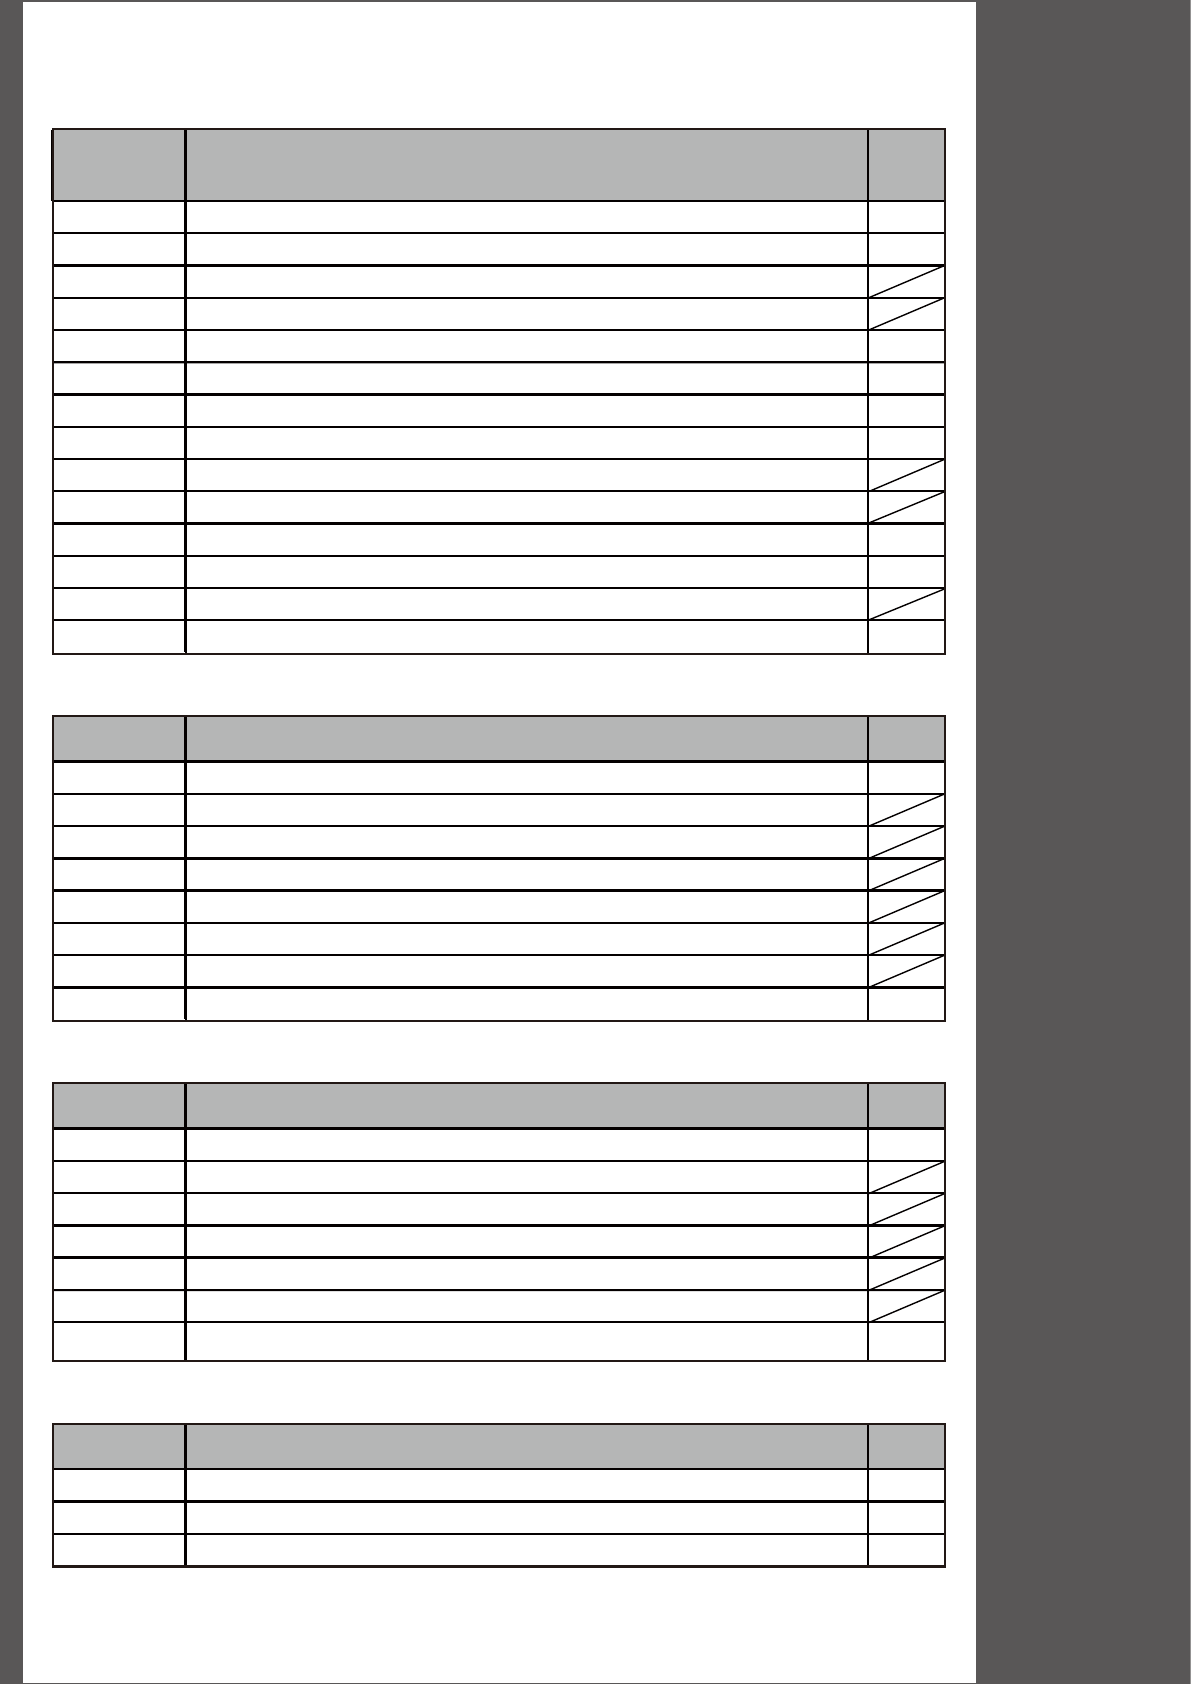
Grow And Stow Tree Part Table
Drawing
No. Description Qty
1 AC Power Cord 1
2 AC/DC Power Adaptor 1
3 Adaptor AC input jacks
4 Adaptor DC output jacks
5 Tree trunk base 1
6 Tree control male 4 pin connector, to foot pedal 1
7 Light string male 2 pin connector, to foot pedal 1
8 Tree stand with fixed wheels and swiveling casters 1
9 Caster locks
10 Tree foliage, lower section
11 Light strings connectors set 1
12 Quick set guide funnel and female socket 1
13 Quick set male connector
14 Tree top section 1
Key Description Qty
15 Foot Pedal unit 1
16 Foot pedal - Light Functions Push button
17 Foot pedal - Grow / Pause/ Stow Push button
18 Foot pedal - Safety Lock Switch
19 Foot pedal - 2pin male connector to power adaptor DC jack
20 Foot pedal - 4pin female connector to tree control
21 Foot pedal - 2pin female connector to light string
Key Description Qty
22 Remote Control handset 1
23 Remote LED indicator
24 Remote light functions button
25 Remote grow (Up and Pause) button
26 Remote stow (Down and Pause) button
27 Remote battery compartment and lid
Key Description Qty
Tree bag/pouch - Accessories (small) 1
Tree bag - tree head 1
Tree bag - tree Main 1
ASSEMBLY INSTRUCTIONS MADE IN CHINA
4
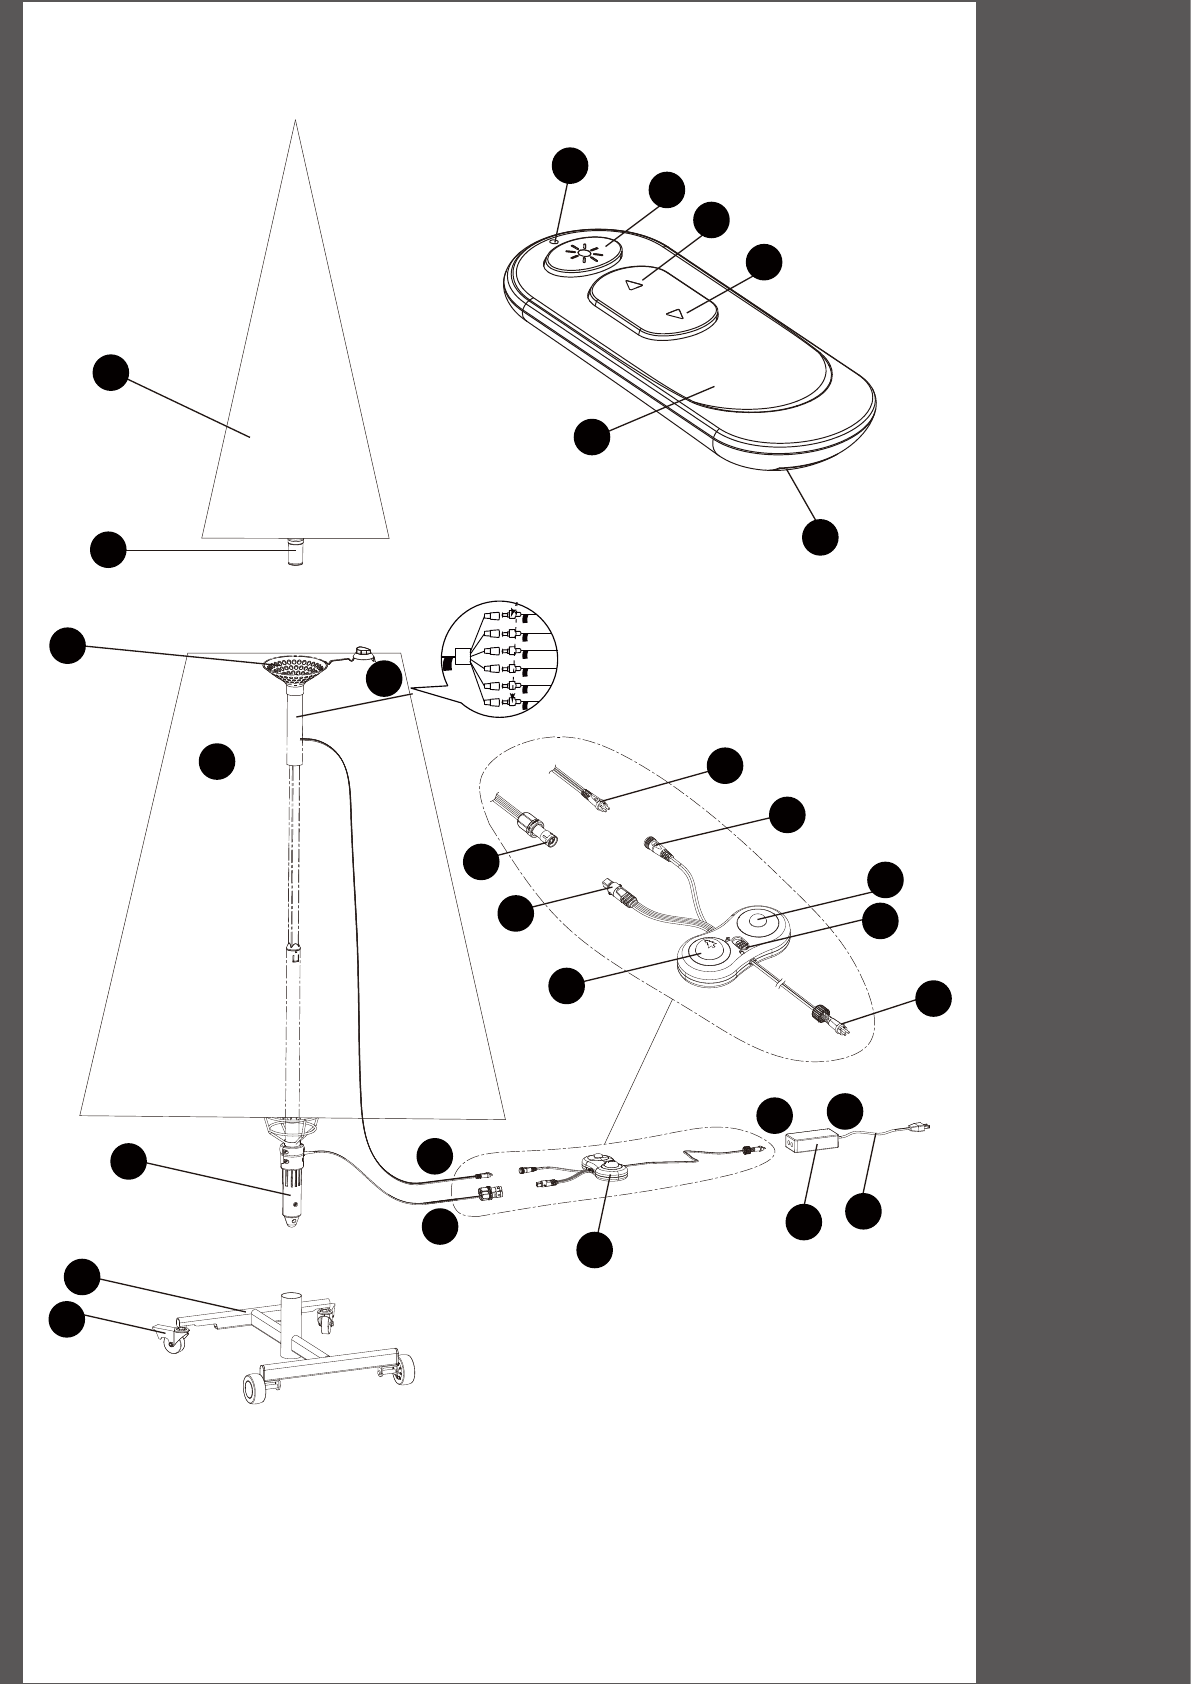
Main Diagram
14
13
12
10
20
21
21
3
4
17
16
18
19
15
11
57
7
6
6
8
9
23
24
25
26
22
27
ASSEMBLY INSTRUCTIONS MADE IN CHINA
5
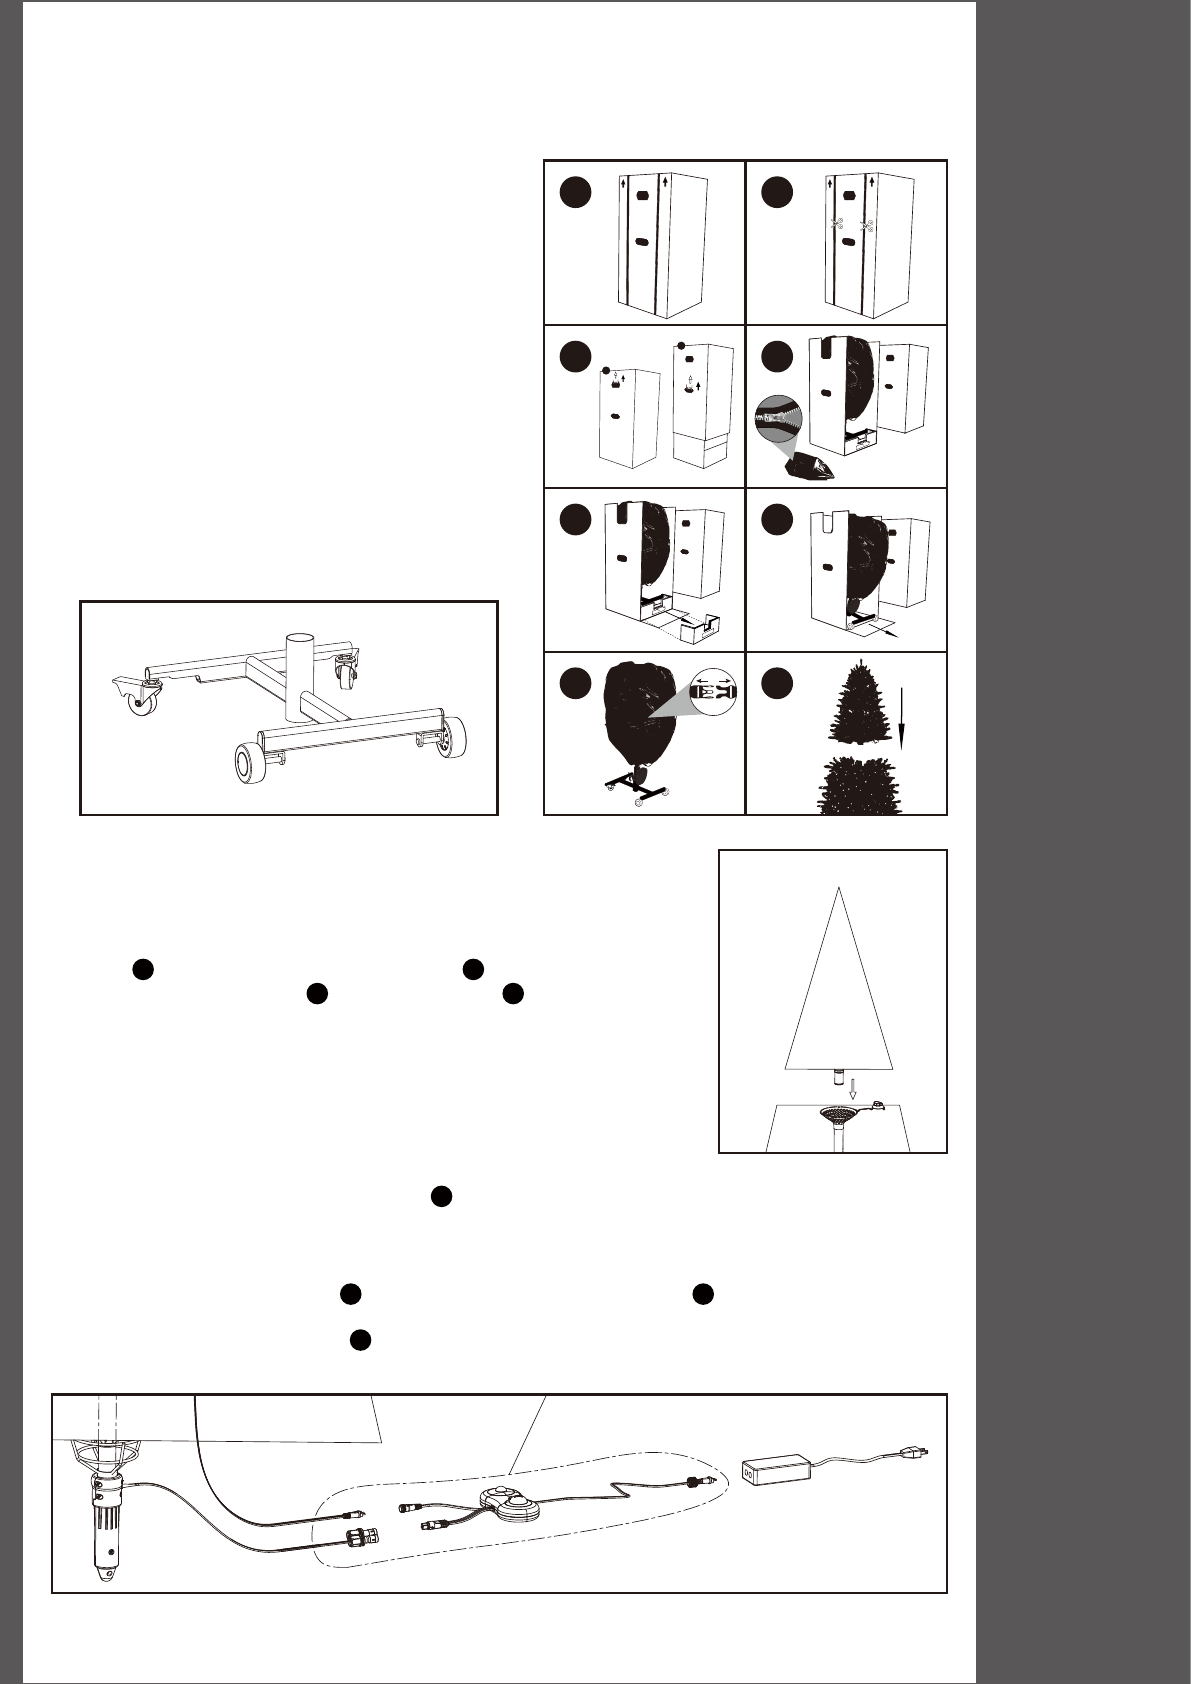
Unpack Carton box
Tree Assembly
1.1 Place the tree box on an upright position
(long side along the vertical direction).
See the arrows marked on the box for reference.
1.2 Untie the wrap string around the carton box,
knife or cutter may be required (not included).
1.3 Pull up the top carton cover by the side hole handles
(one on each side of carton box).
1.4 Remove the tree head section out of the box and
open the tree head bag.
1.5 Remove the foam pads under the front wheels of
the stand (swiveling casters Fig 1). The hard board
under the stand will tip down creating a slight slope.
1.6 Pull the tree out of the carton box carefully.
1.7 Unlock the buckles on the tree bag, and loose the
tree bag rope.
1.8 Open the tree bag wide and pull it up from the top
of the tree.
2.1 Open and remove the protective cap from the top of the funnel
guide before inserting the tree top section .
2.2 Inserts the tree top section into top funnel gide of main
section (see Fig 2)
Wire Connection
Fig 3
12 14
1214
3.1 All accessories are stored in a small pouch , attached near the tree wheel stand. Open the pouch and
put all accessories ready for use. (all wires display as seen on g 3)
3.2 Connect the 2pin and 4pin connectors coming from the base of the tree to their counterpart connectors
on the foot pedal (As shown on g. 3). Make sure to lock them by turning the sockets.
3.3 Plug the pedal 2 pin connector into the DC Power Adaptor output jack .Turn and lock
with the socket.
3.4 Plug the Power adaptor AC cord into an AC outlet.
3.5 The tree is energized and ready to be operated.
19 4
1
28
SET UP INSTRUCTION
1.1 1.2
1.3 1.4
1.5 1.6
1.7 1.8
PULL HERE
PULL HERE
PULL HERE
Fig 1
Fig 2
1
2
ASSEMBLY INSTRUCTIONS MADE IN CHINA
6
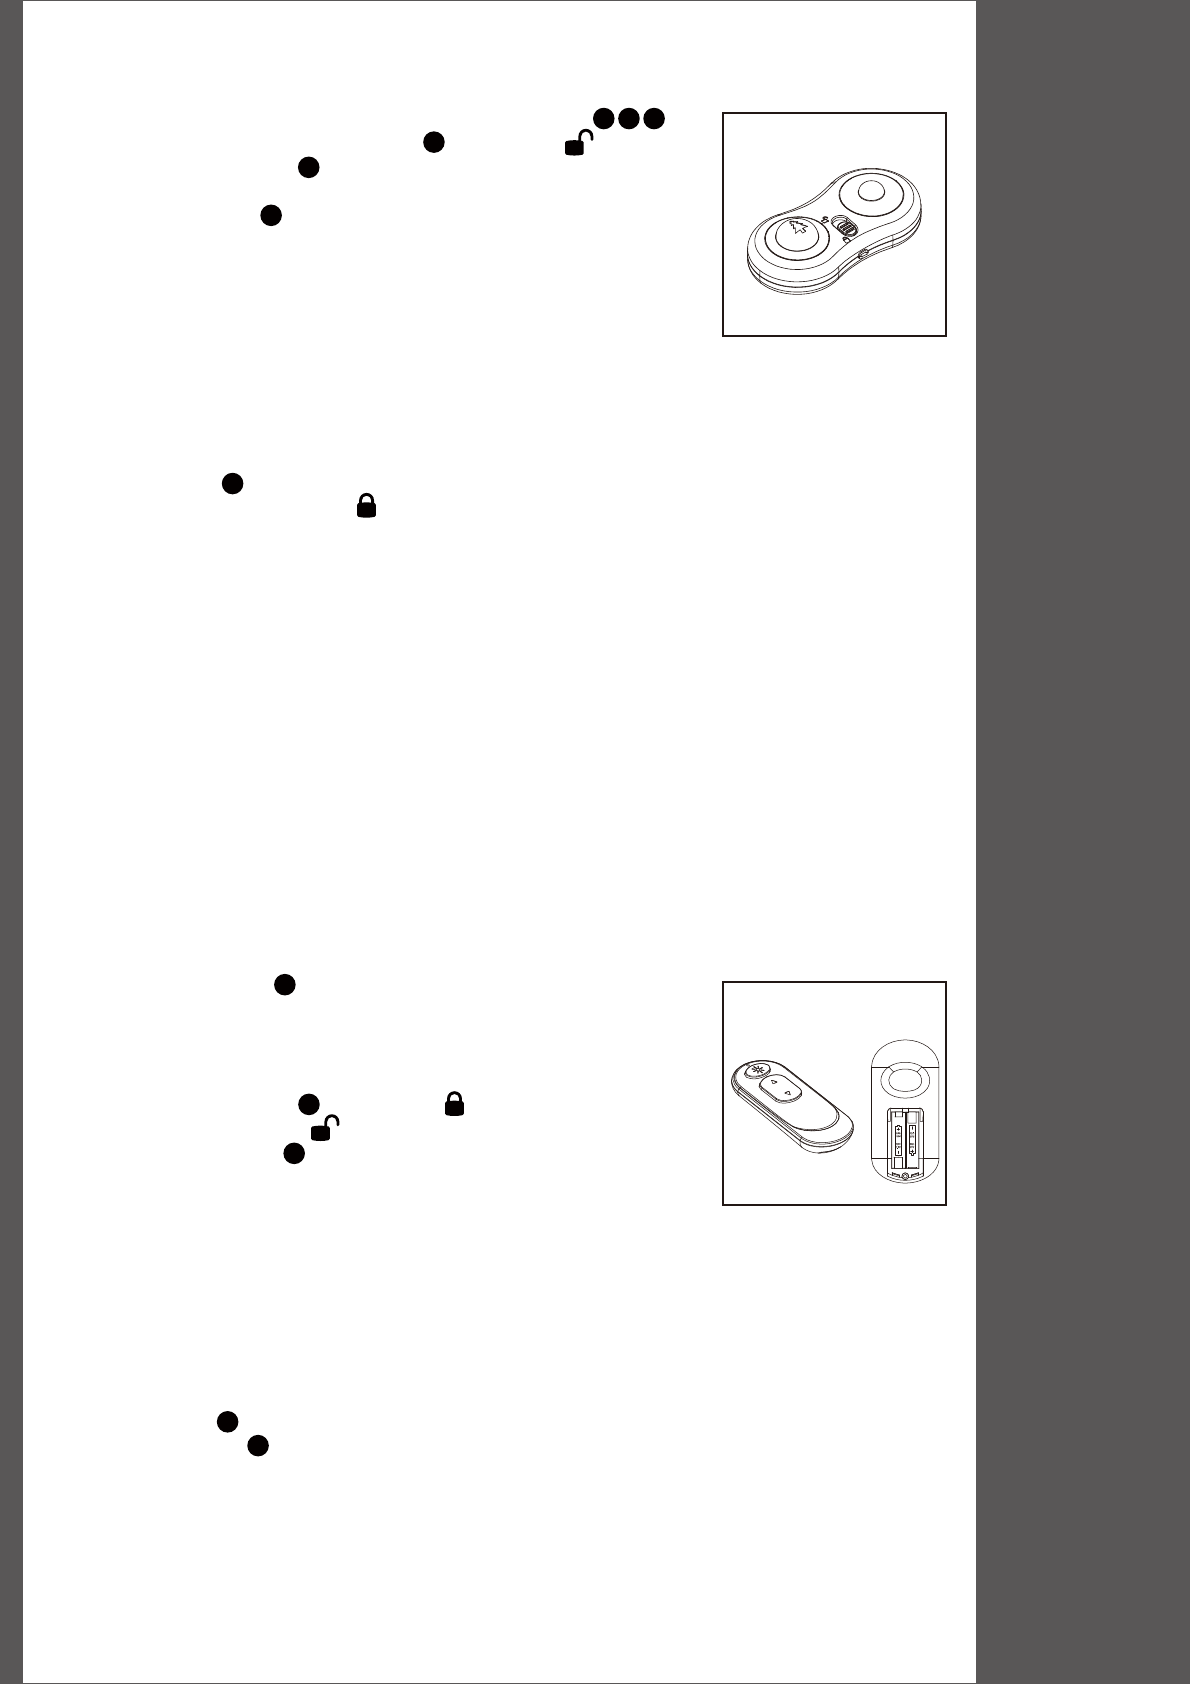
Tree Operation by Foot Pedal (Fig 4)
Fig 4
4.1 Double check all connections are properly and securely done
(see g 3), and make sure the lock switch is on "unlock" position .
4.2 Push the tree logo button on foot pedal to start toggling between
Grow, Pause, and Stow functions.
4.3 Push the light button on foot pedal to navigate the light string functions.
4.4 Note:
If your foot pedal is 3 ashing mode model, your remote handset can
control light ash with 3 kind modes (clear steady, multi steady , clear
multi alternating )
If your foot pedal is the 8 ashing modes model, your tree will cycle
between 8 ashing modes (clear multi fading, clear fading, clear multi
alternating, steady clear, clear multi slow fading, multi steady , multi fading, and combination )
If your foot pedal is the 10 ashing modes model, your tree will cycle between 10 ashing modes
(clear steady/ clear fading/ multi steady/ multi fading/ clear multi fading/ clear multi alternating /
pastel steady/ pastel fading/ clear pastel multi alternating/ clear pastel multi fading)
4.5 Slide lock switch on foot pedal to function lock or unlock. Grow and stow function is lock for foot
pedal and remote when in "lock" position.
Tree Shaping and Final Touches
5.1 After growing the tree to a desired height, allow all branches to fall into place. Additionally, gently pull
them up and out until in place. For aesthetical purposes, make sure that all branches are tilted down
and unfolded.
5.2 Continue to shape up the branches and tips working form the top down. Start with tips farthest from the
trunk, and move towards the inner ones.
5.3 After shaping the entire tree as previously recommended, slightly upsweep all branch tips for a uniform
look. Shift branches to ll any gaps. Your Christmas tree is now complete and ready to be decorated.
NOTE: It is highly recommended to operate the grow and stow functions ONLY when the tree is free of
any ornament or decoration.
19
18
18
17
16
20 21
Remote Hand Set Batteries Installation
6.1 Remove the battery lid at the back of remote control, install the two
AAA/UM4/LR03 batteries( not included) properly as indicated on the
battery compartment. Make sure to match the (+) and (-) ends of the
batteries . (see g 5)
6.2 Buttons on the remote handset buttons are non-functional when
the foot pedal lock switch is set to "lock" position. Make sure
the switch is set to "unlock" position. (see Fig 4)
6.3 Press light mode button to navigate the light functions.
Note:
If your foot pedal is 3 ashing mode model, your remote handset can
control light ash with 3 kind modes (clear steady, multi steady , clear
multi alternating )
If your foot pedal is the 8 ashing modes model, your tree will cycle between 8 ashing modes
(clear multi fading, clear fading, clear multi alternating, steady clear, clear multi slow fading, multi steady,
multi fading, and combination )
If your foot pedal is the 10 ashing modes model, your tree will cycle between 10 ashing modes
(clear steady/ clear fading/ multi steady/ multi fading/ clear multi fading/ clear multi alternating /
pastel steady/ pastel fading/ clear pastel multi alternating/ clear pastel multi fading)
6.4 Press UP button on remote hand set to control tree Grow or Pause functions (toggle).
6.5 Press DOWN button on remote to controls Stow or Pause functions (toggle).
Fig 5
27
24
25
26
18
ASSEMBLY INSTRUCTIONS MADE IN CHINA
7
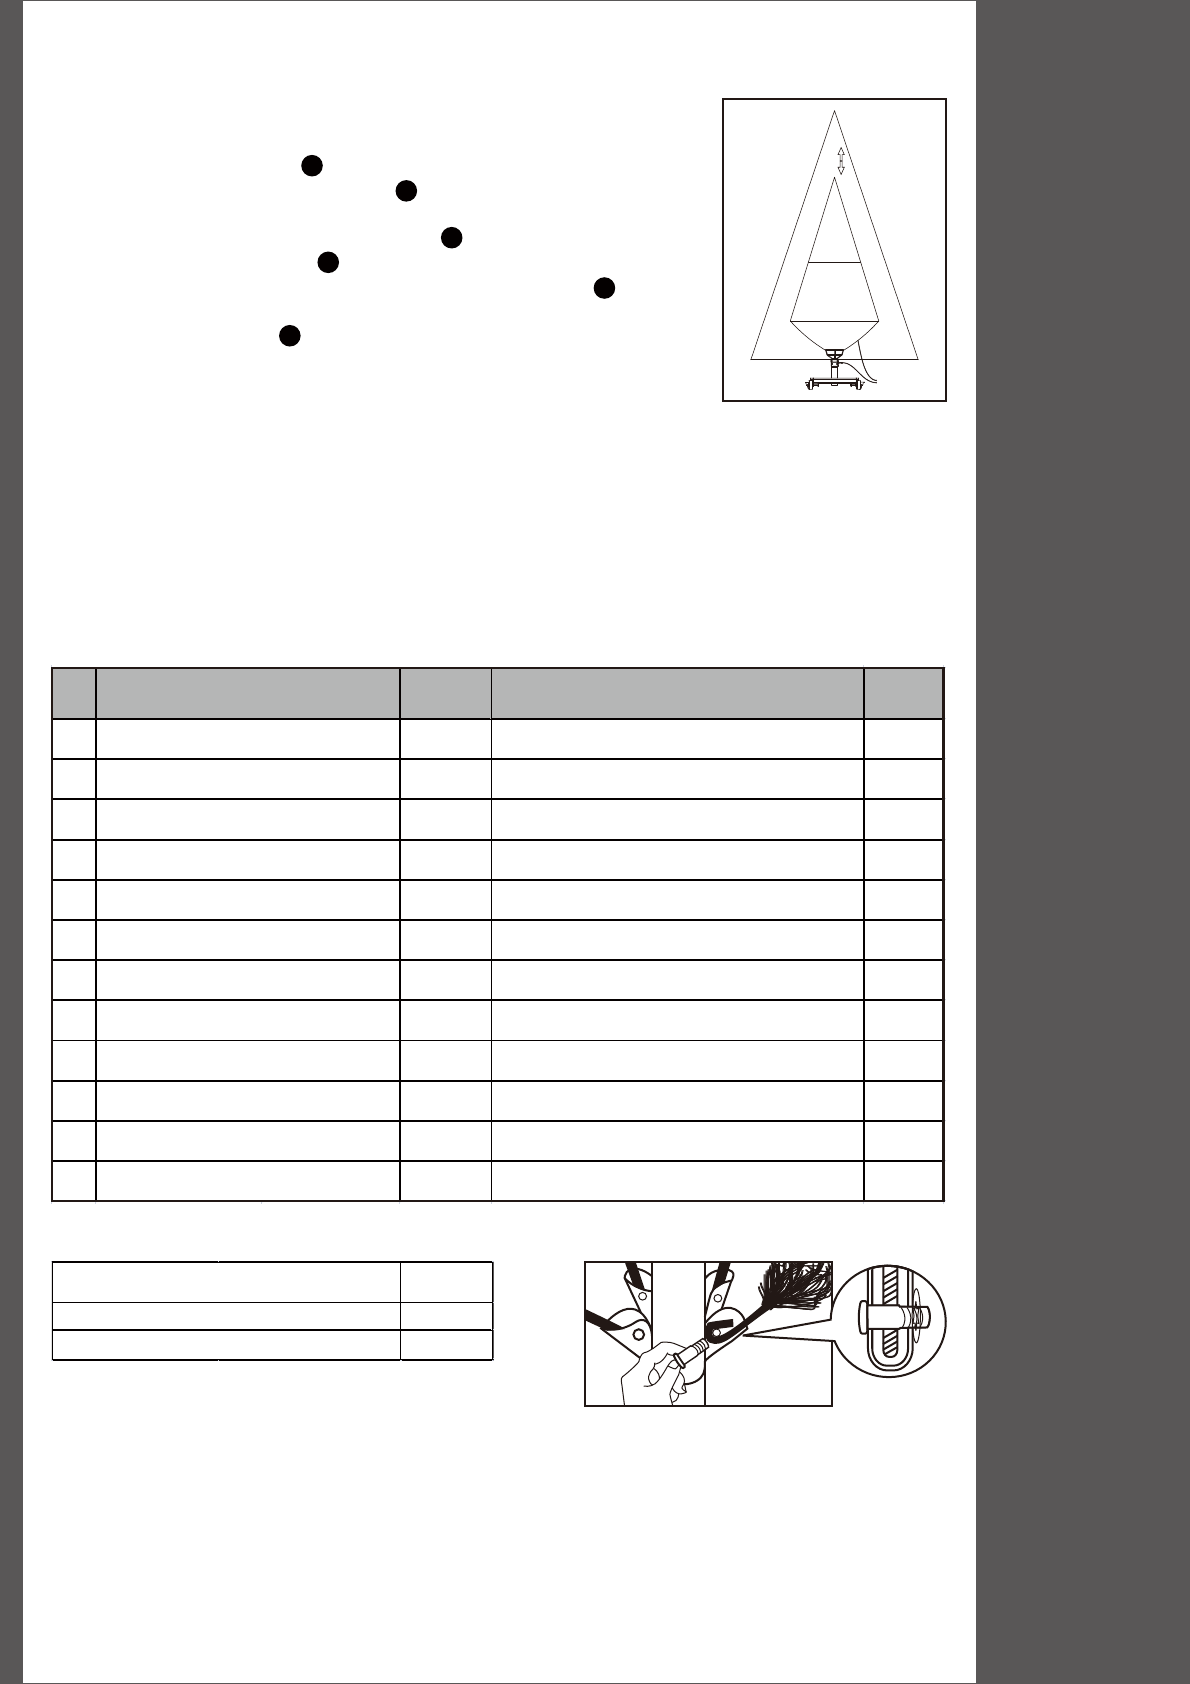
Storage Instructions
7.1 IMPORTANT: Remove all ornaments and decorations.
7.2 Set the Grow and Stow tree to its minimum size. (g 6)
7.3 Detach the AC power cord from AC outlet, and put all accessories
parts into the accessories stow pouch .
7.4 Collect all wires, controllers and accessories inside the stow pouch.
And attach it to the trunk near wheel stand . (Recommended)
7.5 Remove the tree top section from top funnel guide. Fold all
branches towards the pole and stow it inside the tree top bag .
7.6 Gently fold up main section branches if needed.
7.7 Place the main tree bag around the tree main section, warping
the tree from top to bottom. Zip it until fully closed.
7.8 Cinch tight the nylon rope on the bottom side of the main tree bag, the
strap will hold its position once you release the spring clamp.
7.9 Buckle the straps until you hear a rm click. Then cinch the straps tightly by pulling at the end of the
loose strap.
7.10 When not in use, store the tree in a cool, dry place away from sunlight. Exposing the tree to
excessive heat or humidity may damage the tree.
Fig 6
REPLACEMENT PARTS ORDERING INFORMATION
No DESCRIPTION
Drawing
No.
PART No. qty
1 AC power cord 1 x1
2 AC/DC adaptor 2 x1
3 Rolling wheel tree stand 8 x1
4 quick set funnel 12 x1
5 Tree head section 14 x1
6 Foot Pedal unit 15 x1
7 Remote control handset 22 x1
8 Tree bag - Accessories (small) 28 x1
9 Tree bag - tree head 29 x1
10 Tree bag - tree Main 30 x1
11 hinge pins and washers x1
12 LED light bulb ?
Fig. 7
SPARE PARTS ?
hinge pins and washers
LED light bulb
1
8
14
29
30
28

ASSEMBLY INSTRUCTIONS MADE IN CHINA
8
TROUBLESHOOTING GUIDE
WARNING: UNPLUG THE POWER CORD BEFORE TROUBLESHOOTING THE GROW & STOW TREE.
A. Adaptor must be plugged into an AC outlet.
B. Foot pedal wire must be plugged into a DC jack of
adaptor, and other wires to tree
C. Check line voltage - must be 105 to 240 AC volts.
A. Set the lock switch to "
UNLOCK
" position
B.
Make sure all wires are properly connected and
locked. (see fig.3)
A.
Replace a brand new AAA/UM4/LR03 batteries
B.
Check batteries polarity diagram inside the
batteries case. (see fig 5)
C. Ensure the remote is operated within the range
(10 meters)
A. Check all connectors of light string (plugs and jacks)
are connected on trunk (see main diagram point )
B. Extra LED light bulb are included for replace an spare
LED light bulb
C. Make sure the light string cord is connected to foot
paddle and lock with ring screw.
(see fig.3)
A. Adjust the whole tree to flat ground surface.
A. Adjust pull the branches and tips up and out direction.
Prevent they cross jam together.
B. Press the button again on remote or foot pedal to
release PAUSE (see fig. 4)
A. Extra hinge pins are included for repairing the hinges.
Insert a new hinge pin through the hold and secure
using the retainer washer (see fig. 7 )
A. Adaptor is not plugged In
B. Foot pedal wires not connected
C. Low voltage
A. Foot pedal set on "LOCK" position
B. wires no connected
A.
Batteries out of power
B. Batteries install wrong polarity
C. You may out of effective range
CAUSE
SOLUTION
5
SYMPTOM
1 No power on
Remote
control no
work
2
Tree
mechanism
does not
works
6
7
3
4
11
No light on
Tree tilts
The tree
not complete
up or down
Loose Hinge
Pin
A. LED light string connector no
connected
B. LED light bulb missing or damage
C. Light string cord no connected to
Foot pedal
A. Wheel stand set on unflat ground
A. Tree branches and Tips make jam
each other
B. remote or foot pedal was pressed
PAUSE function
FCC VERIFICATION USER MANUAL
This device complies with Part 15 of the FCC Rules. Operation is subject to the following two
conditions: (1) this device may not cause harmful interference, and (2) this device must accept any
interference received, including interference that may cause undesired operation.
WARNING: Changes or modifications to this unit not expressly approved by the party responsible for
compliance could void the user’s authority to operate the equipment.
NOTE: This equipment has been tested and found to comply with the limits for a Class B digital device,
pursuant to Part 15 of the FCC Rules. These limits are designed to provide reasonable protection
against harmful interference in a residential installation. This equipment generates, uses and can
radiate radio frequency energy and, if not installed and used in accordance with the instructions, may
cause harmful interference to radio communications.
However, there is no guarantee that interference will not occur in a particular installation. If this
equipment does cause harmful interference to radio or television reception, which can be determined
by turning the equipment off and on, the user is encouraged to try to correct the interference by one or
more of the following measures:
•Reorient or relocate the receiving antenna.
•Increase the separation between the equipment and receiver.
•Connect the equipment into an outlet on a circuit different from that to which the receiver is
connected.
•Consult the dealer or an experienced radio/TV technician for help.
The device has been evaluated to meet general RF exposure requirement. The device can be used
in portable exposure condition without restriction.

ASSEMBLY INSTRUCTIONS MADE IN CHINA
IC Caution.
RSS-Gen Issue 4 November 2014"&"CNR-Gen 4e éditionNovember 2014:
- English:
This device complies with Industry Canada licence-exempt RSS standard(s).
Operation is subject to the following two conditions: (1) This device may not
cause interference, and (2) This device must accept any interference, including
interference that may cause undesired operation of the device.
The device has been evaluated to meet general RF exposure requirement. The
device can be used in portable exposure condition without restriction.
- French:
Le présentappareilestconforme aux CNR d'Industrie Canada applicables aux
appareils radio exempts de licence. L'exploitationestautorisée aux deux
conditions suivantes:
(1) l'appareil ne doit pas produire de brouillage, et
(2) l'utilisateur de l'appareildoit accepter tout brouillageradioélectriquesubi,
mêmesi le brouillageest susceptible d'encompromettre le fonctionnement.
L'appareil a été évalué pour répondre aux exigences générales en matière
d'exposition aux radiofréquences. Le dispositif peut être utilisé en condition
d'exposition portable sans restriction.