Promethean 001 Wireless Data Transceiver User Manual Activslate
Promethean Ltd Wireless Data Transceiver Activslate
Contents
Activslate user manual

For The ACTIVBOARD +
Windows 95, 98, 2000 XP, Millenium or NT®
USER
MANUAL
Release 1.4
June 2002
English Edition
PROMETHEAN LTD.
TDS House, Lower Philips Road, Blackburn. BB1 5TH. United Kingdom
TP 1336 Issue 1.4
June 2002
ACTIVslate User guide
2
© Promethean Ltd 2001
ACTIVslate User Guide
3
© Promethean Ltd 2001
The ACTIVslate User Manual
Contents
1 The ACTIVslate
1.1 Concepts
1.2 Basic Operation
1.3 Changing ID of ACTIVslate
1.4 Mode Boxes
1.5 Recharging ACTIVslate
2 The ACTIVslate Control Program
2.1 Configuring Total ACTIVslates
2.2 Naming an ACTIVslate(s)
2.3 Enabling/Disabling ACTIVslate
This device complies with Part 15 of the FCC Rules. Operation is subject to the following
two conditions (1) this device may not cause harmful interference, and (2) this device
must accept any interference received, including interference that may cause undesired
operation.
ACTIVslate User guide
4
© Promethean Ltd 2001
Chapter 1 - The ACTIVslate
1.1 Concepts
The ACTIVslate provides remote control of your computer mouse pointer. By
simply moving the pen over the ACTIVslate surface, you may move the mouse
pointer around the desktop. Pressing the pen nib on the ACTIVslate surface
produces a left mouse click at the computer. Clicking the button on the pen barrel
produces a right mouse click. Pressing the pen nib on the ACTIVslate surface
twice in quick succession produces a mouse double click (left button).
The ACTIVslate is designed to be (and can ONLY be) used in conjunction with an
ACTIVboard. Communication between the two devices takes place via infrared
signals. When you use the pen on an ACTIVslate, the information is transmitted
from the ACTIVslate (via a transceiver along its top edge) to the ACTIVboard (via
the transceiver located at its top left corner). The data is then sent from the
ACTIVboard to the PC (via the serial cable) and converted into mouse data. For
this reason, both the ACTIVslate AND the ACTIVboard must be switched on.
Also, the ACTIVboard driver software must be installed and working correctly on
the computer. (See installation guide).
It is important that the ACTIVslate has a ‘line of sight’ connection to the
ACTIVboard, much in the same way as a TV remote control handset requires
visibility of the TV. In other words, when using the ACTIVslate, its top edge must
be pointing in the general direction of the ACTIVboard.
The ACTIVboard can be considered the ‘master’ device and it is the ACTIVboard
that dictates which ACTIVslate (if any) is enabled. NB. Only one ACTIVslate can
be enabled at any one time. The decision as to which ACTIVslate is enabled is at
the discretion of the user and is selected via the ACTIVslate Control software (see
Chapter 2).
ACTIVslate User Guide
5
© Promethean Ltd 2001
1.2 Basic Operation of the ACTIVslate
To turn on the ACTIVslate press one of the two buttons located at either side of
the top edge of the Slate case. Wait until you hear the ACTIVslate beep before
releasing. To turn off the ACTIVslate press and hold the same button until the
termination message appears on the LCD Panel.
NB. In order to save battery power, the ACTIVslate will automatically turn itself off
after two minutes of inactivity.
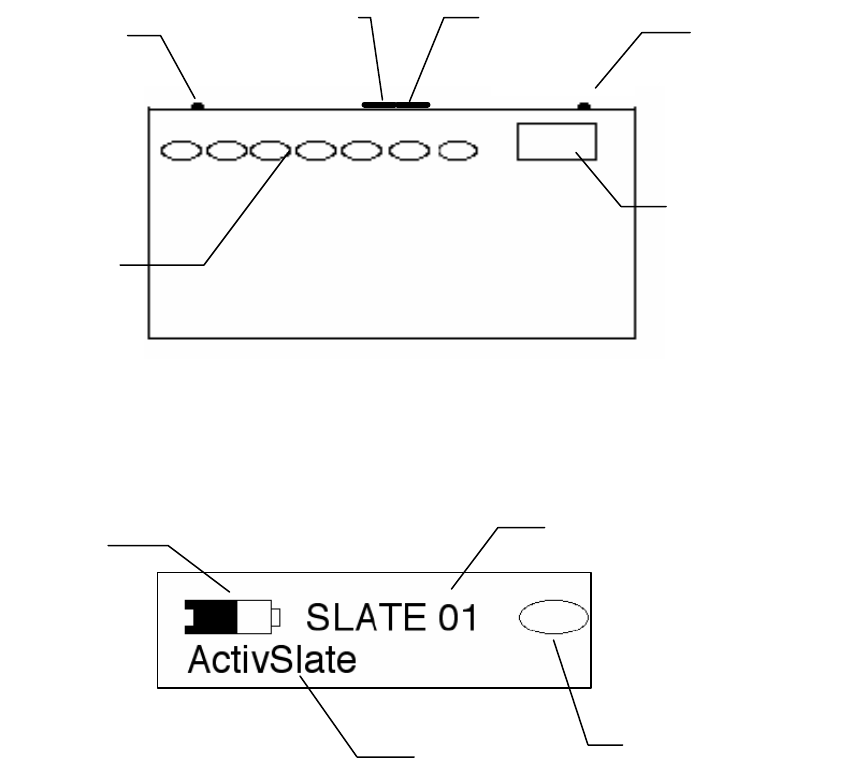
If the ACTIVslate is functioning correctly, the LCD should look like this:
The battery icon indicates the amount of power left. When the battery is empty OR
a recharge message appears on the LCD, it is time to recharge the ACTIVslate.
(See Recharging ACTIVslate).
The ID number is the means by which the ACTIVboard distinguishes one
ACTIVslate from another. If more than one ACTIVslate is being used in a room
they should have different ID’s. (See Changing ID of ACTIVslate).
The ACTIVslate name can be altered to any name comprising no more than 16
characters. It is altered using ACTIVstudio program (see Chapter two)
Battery
Icon
ID
Name
State
On/Off
button
(top edge)
LCD Panel
Mode
boxes
IR
Transceiver
(top edge)
On/Off
button
(top edge)
Charging
/update
socket
(top edge)
Drawing area
ACTIVslate User guide
6
© Promethean Ltd 2001
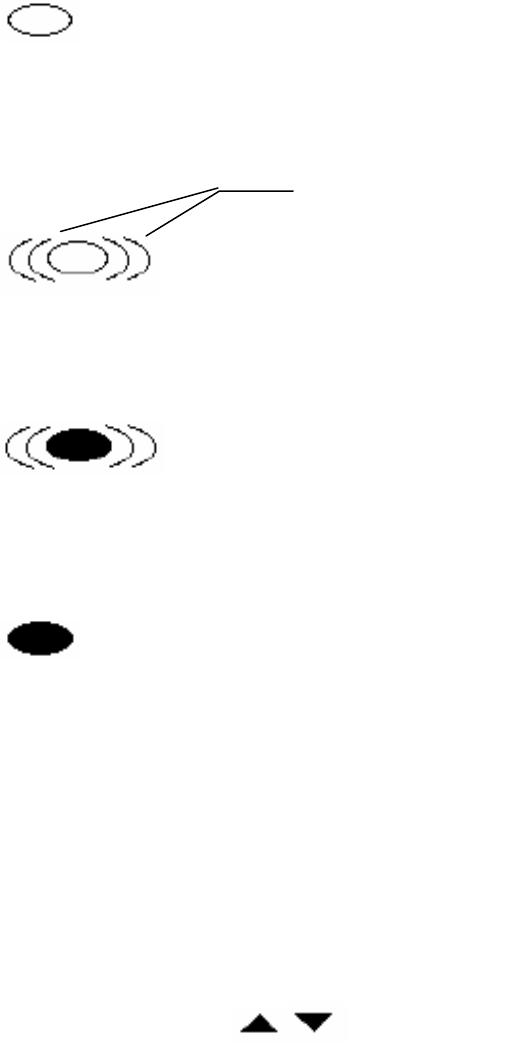
The oval icon (on the LCD panel) represents the current state of the ACTIVslate.
The four possible states are:
The ACTIVslate pen is not in proximity of the ACTIVslate (i.e. the pen is
not close to the drawing surface) and the Slate is not in communication
(i.e. no ‘line of sight’ connection) with an ACTIVboard. This can occur
when the ACTIVboard is not switched on OR when the ACTIVslate is facing away
from the ACTIVboard.
The ‘transmission ears’ indicate that the ACTIVslate has a ‘line
of sight’ connection to the ACTIVboard and is effectively
‘listening’ to the ACTIVboard. The hollow oval indicates the pen
is not yet on the ACTIVslate drawing surface.
When you bring the pen into proximity of ACTIVslate, the oval
will turn black. The ‘transmission ears’ then indicate that your
pen movements are successfully transmitting to the ACTIVboard
/ computer. This situation can ONLY occur if the ID of the ACTIVslate matches
that of the currently enabled Slate in the ACTIVslate Control program (see
Chapter 2).
If the transmission ears disappear when you bring the pen into
proximity, this indicates EITHER there is no ‘line of sight’ between the
ACTIVslate and the ACTIVboard OR the ID of the ACTIVslate does not match that
of the currently enabled slate in the ACTIVslate Control program (see Chapter 2)
1.3 Changing ID of ACTIVslate.
In order to change the ID of the ACTIVslate hold the pen directly over the ID on
the LCD panel and press down. The ID number will then start flashing and
display the following on the next line:
Alter ID:
Pressing the pen over the ‘UP’ triangle will increase the ID number. Pressing the
pen over the ‘DOWN’ triangle will decrease the ID number. The minimum ID the
ACTIVslate can have is 01 and the maximum ID is 63. To return to normal
operation press the pen over the flashing ID number.
The ID number will be stored permanently in the ACTIVslate.
When you first receive your ACTIVslate, the ID number will be automatically pre-
set to 01 (the factory default). If you only ever have one ACTIVslate, there will be
no reason to change this default. However, if you plan to use two or more
Transmission ears
ACTIVslate User Guide
7
© Promethean Ltd 2001
ACTIVslates in the same room, they MUST all have different ID numbers (ideally
01, 02, 03 … 0n).
1.4 Mode Boxes
There are seven ‘oval’ mode boxes situated in a row above the drawing surface.
These boxes have been configured to allow selection of certain functions in the
ACTIVstudio program. The mode box functions from left to right are:
? Black Pen
? Red Pen
? Blue Pen
? Highlight
? Eraser
? Thick Line
? Thin Line
To select one of the functions simply click the pen in the middle of the associated
mode box.
NB. Moving the pen over each mode box will cause the LCD panel to display its
associated ACTIVstudio function.
Certain mode boxes may be used in combination, e.g. You can select ‘Blue Pen’
followed by ‘Thick Line’ to produce a thick blue line.
1.5 Recharging the Battery
The ACTIVslate is powered by an internal battery, one full charge of which gives
approximately 8 hours continuous use (i.e. constant pen drawing). As the
ACTIVslate will not normally be used continuously, a full charge may well equate
to a number of weeks of use.
You may wish to adopt the policy of recharging the ACTIVslate once every week
(say over the weekend). NB. The ACTIVslate CANNOT be overcharged.
The ACTIVslate is supplied with a power supply and a cable. In order to recharge
the ACTIVslate, the power supply should be plugged into the mains and the other
end attached to the cable. The flat end of the cable should then be fitted into the
battery/update socket at the top edge of the ACTIVslate (see slate diagram
above).
If the cable is attached correctly, the ACTIVslate will power up (if not already on).
The battery icon on the LCD panel will become animated and the length of time
the ACTIVslate has been on charge will appear to the right of the icon. When
sufficient time has elapsed (approx. 5 hours), a message will appear on the LCD
stating 'Charge complete'. The cable should then be removed from the
ACTIVslate.
ACTIVslate User guide
8
© Promethean Ltd 2001
After charging, the ACTIVslate can be turned on in the normal manner. The
battery icon should appear full or nearly full. Also, the battery icon will always
indicate the current charge level whilst the ACTIVslate is in use.
WARNING. The ACTIVslate MUST be recharged at least once every 6 months
(regardless of use), otherwise the battery may become permanently
‘unchargeable’.
Promethean would like you to be aware of the following information regarding the
safe disposal of this product.
This product contains a Lithium-ion battery.
Please return to Promethean for safe disposal.
Do not incinerate.
ACTIVslate User Guide
9
© Promethean Ltd 2001
Chapter 2 - The ACTIVslate Control
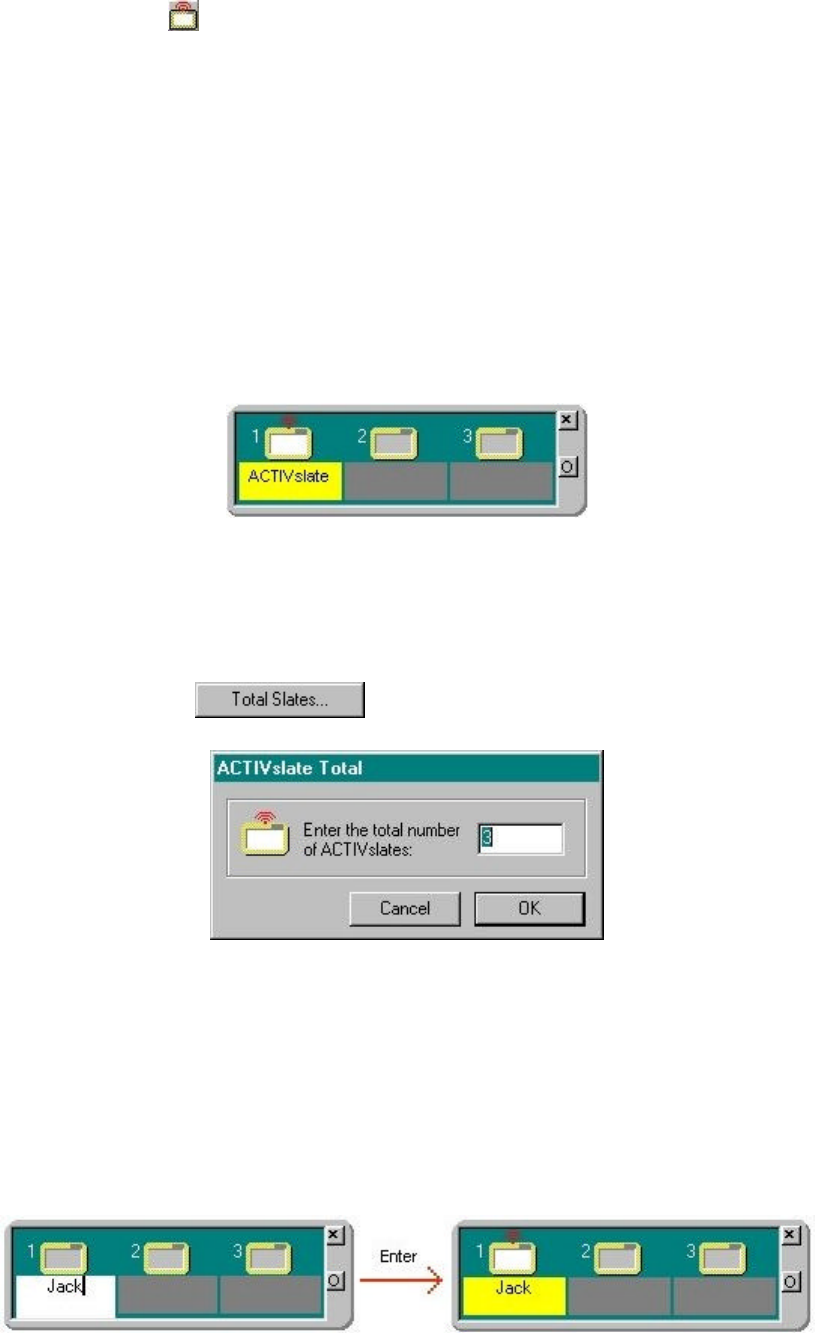
ACTIVslate Tool
This tool opens up the ACTIVslate control program that is used to configure any
ACTIVslates that may be present on your system.
The ACTIVslate tool opens up the ACTIVslate Control Program which gives you
the following functionality:
? Specifying the total number of ACTIVslates in the room.
? The ability to enable your ACTIVslate(s)
? The ability to disable your ACTIVslate(s)
? Providing a name for your ACTIVslate(s)
? Allowing ACTIVslate mode boxes to control the ACTIVstudio program
2.1 Configuring Total ACTIVslates
When run for the first time, the ACTIVslate Control program will appear as follows:
The ACTIVslate panel may be moved around the screen by 'clicking and dragging'
on any part of the surrounding grey border area.
The program initially assumes 3 ACTIVslates present. You can alter this number
to reflect the quantity of slates you have. This can be achieved by clicking on the
Options button (see above). You will then be presented with the following menu:
Click on Total Slates to reveal the following window:
Here you may enter the number of slates you require, up to a maximum of 64.
This number is recorded in a configuration file.
2.2 Naming ACTIVslate(s)
You can provide each of your ACTIVslates with a name of up to 16 characters. To
do this simply double click on the dark grey panel under the appropriate
ACTIVslate, then type the required name followed by the Enter key. In this
example we are renaming ACTIVslate 1 from 'ACTIVslate' (the default name) to
Jack:
ACTIVslate User guide
10
© Promethean Ltd 2001
The name of each ACTIVslate is shown on its LCD panel. When changing the
name of an ACTIVslate, the name on its LCD panel will only be updated when the
ACTIVslate is next used (i.e. when communication takes place between the
ACTIVslate and the ACTIVboard).
Note: Each ACTIVslate has a unique ID number that is displayed in the
ACTIVslate LCD panel. In the above example only ACTIVslate with ID No 1 will be
renamed 'Jack', the other two slates will ignore this 'name change' command.
Using this facility you may name any/all of your ACTIVslates. All names will be
retained by the application in a configuration file. Also, each ACTIVslate will
permanently store its own name on the Slate itself.
It is important to understand that the system will use the ACTIVslate ID to identify
Slates and NOT the ACTIVslate name. The Control program assumes your Slates
are numbered 1, 2, 3 … n, so you should ensure you number your slates
accordingly (see Chapter 1 of the ACTIVslate manual).
For reasons of clarity we recommend you give each of your ACTIVslates a
different name.
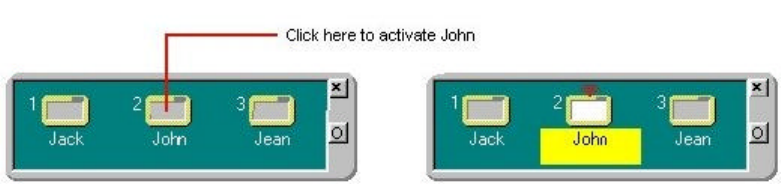
2.3 Enabling/Disabling an ACTIVslate
The default condition is that ACTIVslate No 1 is enabled. In order to enable an
ACTIVslate, simply click on the required Slate icon to enable it. In the following
example we have named all three Slates and are enabling ACTIVslate ID No 2:
Once enabled, the ACTIVslate can be used to control the computer mouse cursor.
In order to disable an ACTIVslate, simply click on the highlighted ACTIVslate icon
a second time, removing the highlight.
Note: You may enable and disable any ACTIVslate at any time but only one
ACTIVslate can be enabled at once.