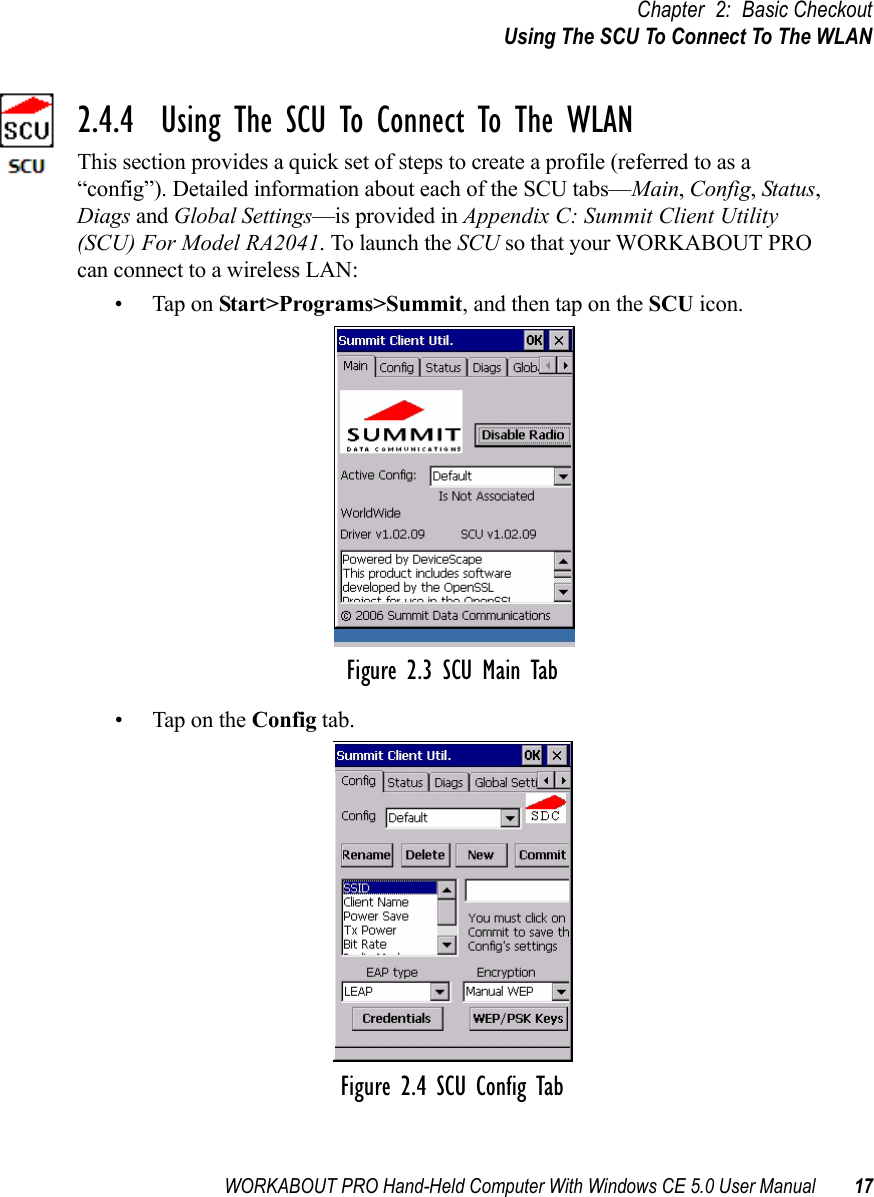
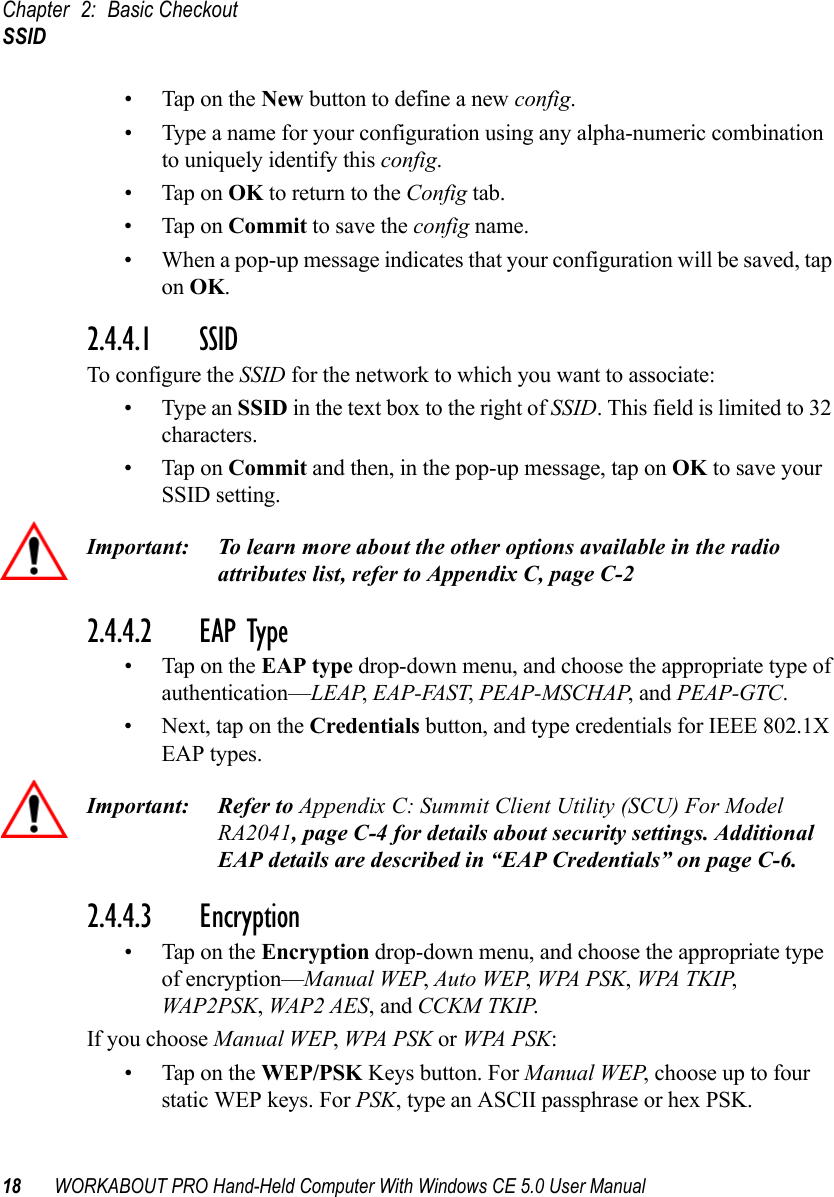
Psion 7527SBTRA2041M Workabout Pro G2 User Manual 7535 G2 Hand Held Computer
Psion Inc Workabout Pro G2 7535 G2 Hand Held Computer
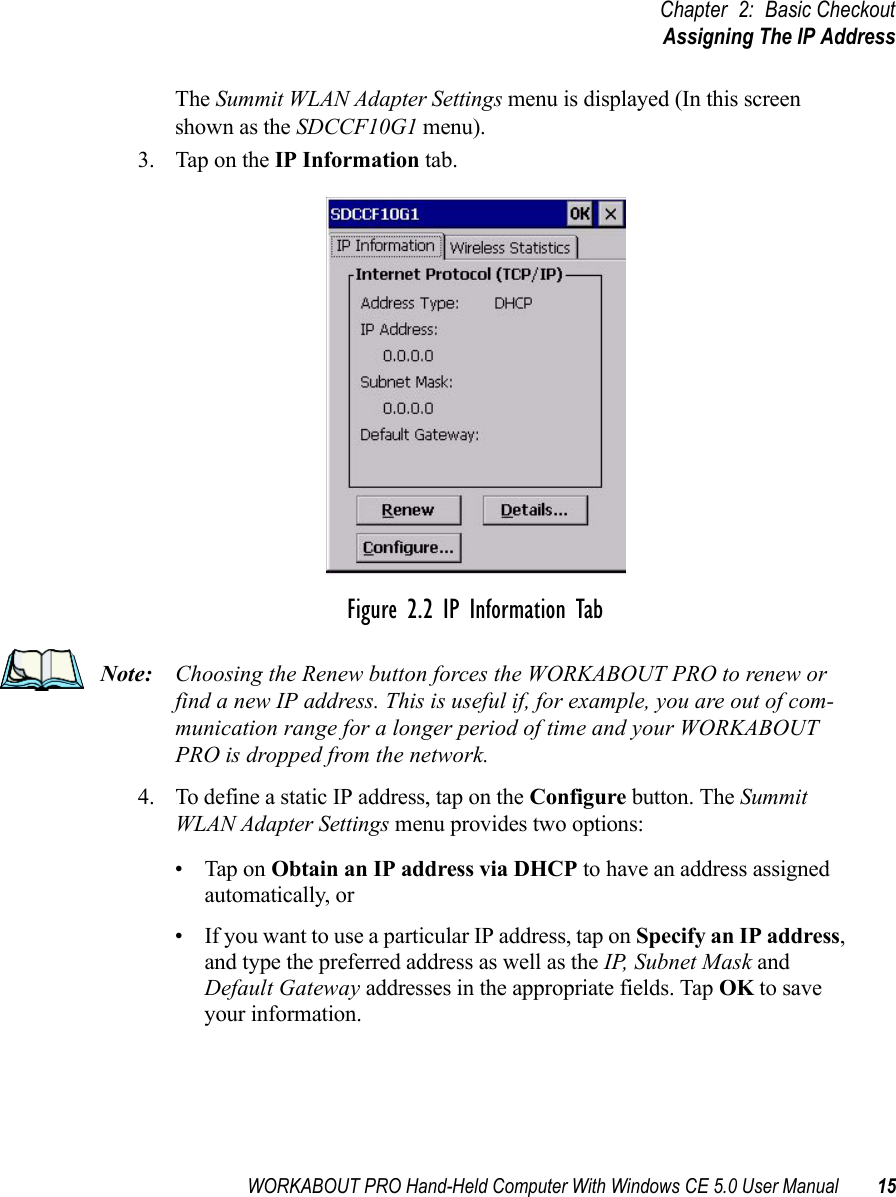
Psion >
Contents
- 1. Users Manual
- 2. User Manual Part 1
- 3. User Manual Part 2
- 4. User Manual Part 3
User Manual Part 1


![WORKABOUT PRO Hand-Held Computer With Windows CE 5.0 User Manual 11Chapter 2: Basic CheckoutPreparing The WORKABOUT PRO For Operation2.1 Preparing The WORKABOUT PRO For Operation2.1.1 The Main BatteryWarning: Before charging the battery, it is critical that you review the battery safety guidelines in the “WORKABOUT PRO Hand-Held Com-puter Warranty & Regulatory Guide”, PN 8000126. The WORKABOUT PRO C and WORKABOUT PRO S can be powered with one of the following lithium-ion battery packs:• High-Capacity – Model No. WA3006, and • Super High-Capacity – Model No. WA30102.1.1.1 Charging The Main BatteryImportant: Before opening the battery cover on your WORKABOUT PRO, press [FN/BLUE] [ENTER] to turn off the hand-held. When the battery cover is removed, a power-off switch is automatically acti-vated and the unit power is switched off; if the battery cover is opened while the hand-held is still powered on, the unit may reboot.Battery packs shipped from the factory are charged to approximately 40% and must be fully charged prior to use. Batteries can be charged using a variety of chargers and docking stations along with a WORKABOUT PRO internal charger. When using the internal charger, a suitable power source is required. All chargers and docking stations are described in Chapter 6: Peripheral Devices & Accessories beginning on page 205.Note: If you are powering up a new unit, a warning message may appear on the screen indicating that the backup battery capacity is low. To recharge the internal battery, you must fully charge the WORKABOUT PRO with the main battery installed in the unit.](https://usermanual.wiki/Psion/7527SBTRA2041M.User-Manual-Part-1/User-Guide-851396-Page-24.png)
![Chapter 2: Basic CheckoutThe Backup Battery12 WORKABOUT PRO Hand-Held Computer With Windows CE 5.0 User Manual2.1.2 The Backup BatteryTo preserve data stored in your WORKABOUT PRO while you swap the main battery, the unit is equipped with a backup battery–a replaceable, rechargeable Lithium-Ion backup battery that can be ordered through Psion Teklogix. The backup battery will supply 5 minutes of continuous power while you install a charged, main battery.The backup battery is trickle charged from the main battery. Provided that the main battery contains power, the backup battery will maintain a charge whether the WORKABOUT PRO is switched on or off, in a docking station or in a cradle. Even when the main battery reaches its Suspend Threshold (refer to “Suspend Threshold” on page 100) and the hand-held shuts down, the backup battery will continue to draw a trickle charge from the main battery to protect the data stored in the unit until a charged main battery is installed.Note: The backup battery takes approximately 3 to 4 hours to fully charge from a fully discharged (flat) state, generally the same amount of time it takes to fully charge the main battery. While you can continue to use the WORKABOUT PRO, replacing the main battery while the backup battery is not fully charged is not recommended because you risk losing the data stored on the unit.2.2 Turning The WORKABOUT PRO On And Off2.2.1 Installing The Battery And Switching The Unit OnImportant: Press [FN/BLUE] [ENTER] to turn off the hand-held before opening the battery cover on your WORKABOUT PRO. When the battery cover is removed, a power-off switch is automatically acti-vated switching the unit off; if the battery cover is opened while the hand-held is still powered on, the unit may reboot.• To unlock the battery cover, turn the left-hand battery fastener to the left, and turn the right-hand battery fastener to the right. • Remove the battery cover.• Ensure that the ON/OFF switch in the battery compartment is set to ON before inserting the battery.](https://usermanual.wiki/Psion/7527SBTRA2041M.User-Manual-Part-1/User-Guide-851396-Page-25.png)
![WORKABOUT PRO Hand-Held Computer With Windows CE 5.0 User Manual 13Chapter 2: Basic CheckoutSwitching The Unit Off (Suspend)• Snap the charged battery into the unit. Replace the battery cover, and lock the fasteners in place.Note: If you are using a docking station or an external power supply, you can insert an uncharged battery and switch it on. To switch on the WORKABOUT PRO:• Press and hold down the [ENTER] key for at least one second.• When the LED flashes green, release the [ENTER] button.The desktop screen is displayed.Note: If the unit was already in use–the unit may be off (suspend state)–press-ing [ENTER] ‘wakes’ the unit from this state. The screen in which you were working prior to the suspend state is displayed. describes how you can assign other ‘wakeup’ keys or enable a two-key ‘power on’ sequence.2.2.2 Switching The Unit Off (Suspend)• Press the [FN/BLUE] key, and then press [ENTER].2.3 Calibrating The TouchscreenNote: Keep in mind that the touchscreen function can be turned off (see “Touch” on page 104).The WORKABOUT PRO touchscreen is factory-calibrated and ready-to-go; however, over time the touchscreen operating parameters may change, and it may need to be recalibrated for correct operation. Refer to “Calibrating The Touchscreen” on page 41 for details.2.4 Configuring The Summit RA2041 802.11b/gPsion Teklogix supports an 802.11b/g Compact Flash (CF) wireless LAN radio card, model number RA2041. It is a Direct Sequence Spread Spectrum radio.If you’re unit is equipped with an RA2041 CF radio, follow the steps under “Summit Client Utility (SCU) For Model RA2041” to set up this type of radio for communication with a wireless LAN.](https://usermanual.wiki/Psion/7527SBTRA2041M.User-Manual-Part-1/User-Guide-851396-Page-26.png)
![Chapter 2: Basic CheckoutSummit Client Utility (SCU) For Model RA204114 WORKABOUT PRO Hand-Held Computer With Windows CE 5.0 User Manual2.4.1 Summit Client Utility (SCU) For Model RA2041This section describes the Summit Client Utility (SCU). The SCU provides the utilities you will need to configure the Summit 802.11b/g Compact Flash radio module, model number RA2041 so that it can communicate through a wireless LAN effectively and securely. 2.4.2 Assigning The IP AddressBefore launching the SCU, you need to configure how the IP address will be obtained. If your network is not using a DHCP server, you will need to assign anIP address.1. Tap on Start>Settings>Network and Dial-up Connections. (If the Start Menu isn’t displayed in the taskbar, press [FN/BLUE] [0] to display it.)If you’re using the keyboard, press [FN/BLUE] [0] to display the Start Menu. Use the [DOWN] arrow key to highlight Settings. Press the [RIGHT] arrow key to display the sub-menu. Highlight Network, and press [ENTER].2. Choose the Summit WLAN Adapter icon to open the 802.11b/g Wire-less LAN Settings window. In Figure 2.1, this icon is labelled SDCCF10G1.Figure 2.1 Summit WLAN Adapter Icon](https://usermanual.wiki/Psion/7527SBTRA2041M.User-Manual-Part-1/User-Guide-851396-Page-27.png)

![WORKABOUT PRO Hand-Held Computer With Windows CE 5.0 User Manual 27Chapter 2: Basic CheckoutPerforming A Cold ResetA warm reset closes open applications; any unsaved data are lost. Installed programs and saved data are preserved. Note: You do not need to reset your WORKABOUT PRO after configuring the radio.2.8.2 Performing A Cold Reset2.8.2.1 Cold Resetting To The BooSt Menu• Press and hold down the centre [SCAN] bar and then press the [FN/BLUE] and [ENTER] keys simultaneously for a minimum of six seconds.After a cold reset, the BooSt menu appears, listing possible BooSt commands.• To load the Windows CE 5.0 operating system, type 1.2.8.2.2 Cold Resetting To The Windows 5.0 OSTo perform a cold reset and launch the Windows 5.0 operating system (bypassing the BooSt menu):• Press and hold down the [FN/BLUE] [FN/ORANGE] and [ENTER] keys simultaneously for a minimum of six seconds.](https://usermanual.wiki/Psion/7527SBTRA2041M.User-Manual-Part-1/User-Guide-851396-Page-33.png)
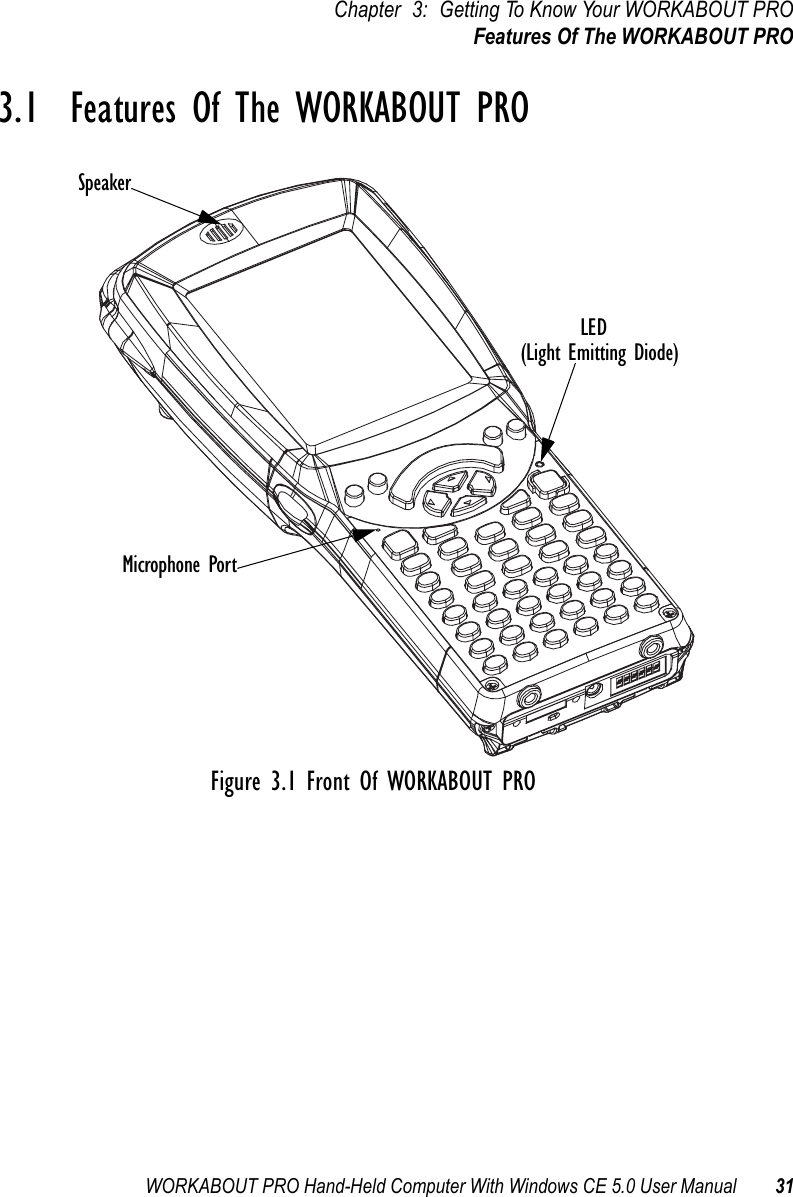
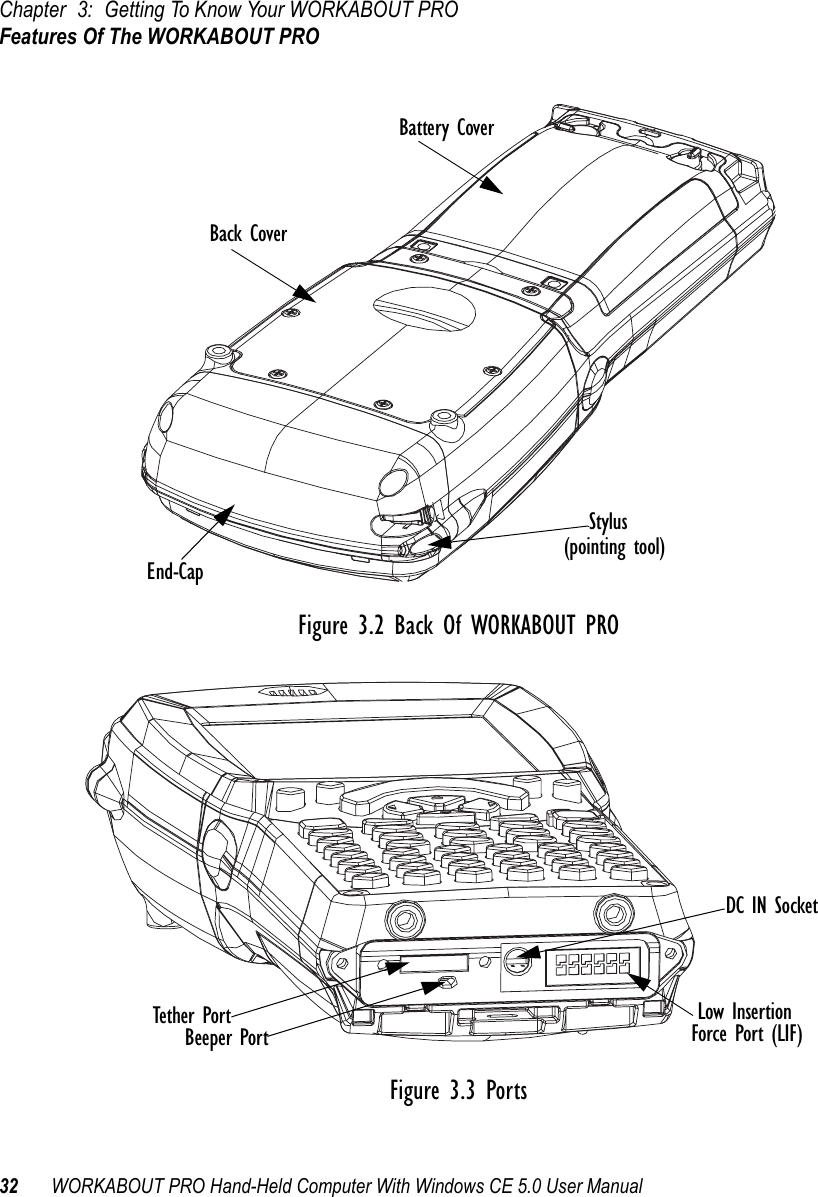
![WORKABOUT PRO Hand-Held Computer With Windows CE 5.0 User Manual 35Chapter 3: Getting To Know Your WORKABOUT PROSwitching The Hand-Held On And Off• Quad Docking Station — (Model # WA4204-G2 for WORKABOUT PRO C & Model # WA4304-G2 for WORKABOUT PRO S) can charge the battery of up to four WORKABOUT PROs inserted in the docking station.• Single Battery Charger (Model # WA3001-G1)—charges a single battery.• Quad Battery Charger (Model # WA3004-G1)—charges up to four spare High or Super-High Capacity WORKABOUT PRO battery packs.It can take up to 5 hours to charge a battery. The WORKABOUT PRO intelligent charging system protects the battery from over-charging by terminating the charge process when the battery is at maximum capacity.Note: Refer to “Monitoring The Battery And Maximizing Run Time” on page 47 for additional information about the battery.Important: To avoid damaging the battery, chargers will not begin the charge process until the battery temperature is between 0° C to 45 °C (32° F to 113° F).3.3 Switching The Hand-Held On And OffSwitching On The WORKABOUT PRONote: Whenever the battery cover is removed, an auto-shutoff switch is acti-vated. The battery cover must be installed before the unit can be switched on.• Press the [FN/BLUE] key and then, press and hold down the [ENTER] key for at least one second. • When the LED flashes green, release the [ENTER] button.If the unit does not power up, the power ON/OFF switch located in the battery compartment may be set to OFF. In this case, you’ll need to remove the battery cover and battery and slide the ON/OFF switch to ON.The startup screen is displayed.Note: If the WORKABOUT PRO is in suspend state, pressing [ENTER] ‘wakes’ the unit from this state. The screen in which you were working before the computer entered suspend state is displayed.“Wakeup” on page 102 describes how you can assign other ‘wakeup’ keys.](https://usermanual.wiki/Psion/7527SBTRA2041M.User-Manual-Part-1/User-Guide-851396-Page-41.png)
![Chapter 3: Getting To Know Your WORKABOUT PROThe Keyboard36 WORKABOUT PRO Hand-Held Computer With Windows CE 5.0 User ManualSwitching Off The WORKABOUT PRO (Suspend)Important: Keep in mind that turning off the WORKABOUT PRO does not result in a complete reboot; rather, the unit enters a power-saving, “suspend” state. When the unit is turned on from suspend state, operation resumes within a few seconds. To switch off the WORKABOUT PRO:• Press the [FN/BLUE] key, and then press the [ENTER] key.3.4 The KeyboardThe WORKABOUT PRO is available in two models, each with it’s own keyboard layout. The WORKABOUT PRO C model is equipped with a 52-key, alphanumeric keyboard; the WORKABOUT PRO S model is equipped with a 25-key numeric keyboard.Most of the keys on these keyboards operate much like a desktop computer. Where a key or key function is not consistent with the PC keyboard, the differences are noted.The [FN/BLUE] and [FN/ORANGE] modifier keys provide access to additional keys and system functions. These functions are colour coded in orange and blue print above the keyboard keys.3.4.1 Modifier KeysThe [SHIFT], [CTRL], [ALT], [FN/BLUE] and [FN/ORANGE] keys are modifier keys. Pressing a modifier key changes the function of the next key pressed. For example, on a WORKABOUT PRO C, 52-key keyboard, a square bracket is printed in orange print above the [4] key. Pressing the [FN/ORANGE] key followed by the [4] key displays a square bracket rather than the number 4. The [SHIFT], [CTRL] and [ALT] keys operate much like a desktop keyboard except that they are not chorded (two keys held down simultaneously). The modifier key must be pressed first followed by the key whose function you want modified.](https://usermanual.wiki/Psion/7527SBTRA2041M.User-Manual-Part-1/User-Guide-851396-Page-42.png)
![WORKABOUT PRO Hand-Held Computer With Windows CE 5.0 User Manual 37Chapter 3: Getting To Know Your WORKABOUT PROActivating Modifier Keys3.4.1.1 Activating Modifier KeysWhen a modifier key is pressed once, it is displayed in lowercase letters in the taskbar at the bottom of the hand-held screen. For example, if the [CTRL] key is pressed, ctrl key is displayed at the bottom of the unit screen. Once the next key is pressed, the modifier key becomes inactive and disappears from the taskbar. Keep in mind, however, that the ‘One Shot’ function allows you to determine how many key presses will lock a modifier key ‘on’ – one press or two. Refer to “Keyboard One Shot Modes” on page 89 for details.3.4.1.2 Locking Modifier KeysWhen a modifier key is pressed twice, it is ‘locked’ on. A ‘locked’ modifier key is displayed in uppercase letters in the taskbar. For example, pressing the [CTRL] key twice locks it on—it is displayed as CTRL KEY in the taskbar at the bottom of the computer screen.The locked modifier key will remain active until it is pressed a third time to unlock or turn it off. Once a modifier key is unlocked, the uppercase representation at the bottom of the screen is no longer displayed.3.4.2 The KeysThe [SHIFT] KeyThe [SHIFT] key is used to display uppercase alpha characters and provide access to the symbols above the numeric keys.The Arrow KeysThe Arrow keys move the cursor around the screen in the direction of the arrow: up, down, left and right. The cursor is the flashing box or underline character that indicates where the next character you type will appear.The [SPACE] KeyPressing this key inserts a blank space between characters. In a Windows dialog box, pressing the [SPACE] key enables or disables a checkbox. On WORKABOUT PRO S models, this key is accessed by key combination – [FN/ORANGE] [0] (zero).](https://usermanual.wiki/Psion/7527SBTRA2041M.User-Manual-Part-1/User-Guide-851396-Page-43.png)
![Chapter 3: Getting To Know Your WORKABOUT PROFunction Keys And Macro Keys38 WORKABOUT PRO Hand-Held Computer With Windows CE 5.0 User ManualThe [BKSP/DEL] KeyThe [BKSP] key (sometimes referred to as destructive backspace) moves the cursor one character to the left, erasing the incorrectly entered key stroke. The [DEL] key ([FN/BLUE] [BKSP]) erases the character at the cursor position.The [CTRL] And [ALT] KeyThe [CTRL] and [ALT] keys modify the function of the next key pressed and are application dependent. The [TAB] KeyTypically, the [TAB] key moves the cursor to the next field to the right or downward.The [ESC] KeyGenerally, this key is used as a keyboard shortcut to close the current menu, dialog box or activity and return to the previous one.The [SCAN] KeysAll units are equipped with three yellow [SCAN] keys – one on the left side and one on the right side of the unit along with a curved, yellow scan bar just below the WORKABOUT PRO display. For units that do not have internal scanners, this key can be re-mapped to another function.3.4.3 Function Keys And Macro KeysIn addition to the standard keyboard functions, the WORKABOUT PRO supports Function keys and Macro keys. All Function and Macro keys can be custom defined for each application. 3.4.3.1 Function KeysThe WORKABOUT PRO keyboard is equipped with a total of 14 function keys. Function keys [F1] to [F4] are located across the top of the keyboard next to the [TAB], [ALT], [CTRL] and [ESC] keys and are directly accessible – a key combination is not required. Ten additional function keys are colour coded in blue print on the unit body; these keys are accessed by executing a key combination, [FN/BLUE] followed by the appropriate numeric key.For example, to access function key [F7]:](https://usermanual.wiki/Psion/7527SBTRA2041M.User-Manual-Part-1/User-Guide-851396-Page-44.png)
![WORKABOUT PRO Hand-Held Computer With Windows CE 5.0 User Manual 39Chapter 3: Getting To Know Your WORKABOUT PROMacro Keys (WORKABOUT PRO C Only)• Press the [FN/BLUE] key followed by the [7] key – the numeric key to which function key [F7] is mapped.• To access function key [F8], press [FN/BLUE] [8], and so on.3.4.3.2 Macro Keys (WORKABOUT PRO C Only)Important: Refer to “Keyboard Macro Keys” on page 90 for details about creating macros. WORKABOUT PRO hand-helds are equipped with a series of macro keys that can be programmed to replace frequently used keystrokes, along with the function of executable keys like the [ENTER] key, the [BKSP] key, any function key and arrow key, and so on. Alphanumeric (52-keys) keyboards have three macro keys: [M1] to [M3]. These keys are colour coded in orange print above alpha keys [O], [P] and [Q].To access a macro key:• Press the [FN/ORANGE] key followed by the appropriate alpha key from [O] to [Q]. To access macro key [M1], press [FN/ORANGE] [O].To access macro key [M2], press [FN/ORANGE] [P], and so on.3.4.4 52-Key Keyboard – Accessing Alpha KeysThe alpha and numeric keys on WORKABOUT PRO C units are directly accessible from the keyboard – no key combination is required. 3.4.5 25-Key Keyboard – Accessing Alphanumeric KeysOn 25-key WORKABOUT PROs, while numeric keys are directly accessible, all alpha characters are printed on the unit plastic in orange typeface above the numeric keys. An indicator in the left corner of the taskbar displays the currently selected character. To access an alpha character, first press the [ORANGE] key and then press the numeric key above which the alpha character you want to type is printed. Choosing A Single Alpha CharacterThe examples below illustrate how to access, A, B and C, all of which are printed in orange characters above the numeric key [2].Important: The letters you choose appear in the taskbar, providing a visual indicator of which letter will be displayed on the screen.](https://usermanual.wiki/Psion/7527SBTRA2041M.User-Manual-Part-1/User-Guide-851396-Page-45.png)
![Chapter 3: Getting To Know Your WORKABOUT PRO25-Key Keyboard – Accessing Alphanumeric Keys40 WORKABOUT PRO Hand-Held Computer With Windows CE 5.0 User ManualTo choose the letter a:• Press the [FN/ORANGE] key, and press the numeric key [2].Note: To choose the second, third or fourth alpha character assigned to a numeric key, you may want to lock the [FN/ORANGE] key ‘on’. By default, the [FN/ORANGE] key is locked ‘on’ when pressed once. How-ever, depending on how your unit is set up in the ‘One Shots’ tab, you may find that you need to press the [FN/ORANGE] key twice to lock it ‘on’. Refer to “Keyboard One Shot Modes” on page 89for details.To choose the second letter in the sequence—in this example, the letter b:• Lock the [FN/ORANGE] key ‘on’. ‘ORG KEY is displayed in upper-case characters in the taskbar to indicate that this key is locked ‘on’.• Press numeric key [2] twice to display the letter b.To choose the third letter in the sequence—in this example, the letter c:• Lock the [FN/ORANGE] key ‘on’. • Press numeric key [2] three times to display the letter c.Note: Keep in mind that there is a timeout if you pause for one second between key presses when selecting the second, third or fourth letters on a key. For example, suppose you want to type the letter ‘c’–you’d need to press the [2] key three times. With the [FN/ORANGE] key locked ‘on’, if you press [2] twice and then pause between key presses for 1 second, the letter ‘b’ will be selected automatically.Creating Uppercase LettersTo display a capital letter:• Press the [FN/ORANGE] key and then the [SHIFT] key before typing the alpha character.Note: If you want to use uppercase characters at all times, press [FN/BLUE] [SHIFT]. An icon of an uppercase ‘A’ is displayed in the taskbar indicating that all letters will be displayed as uppercase characters.Choosing Multiple Alpha Characters• Lock the [FN/ORANGE] key ‘on’.](https://usermanual.wiki/Psion/7527SBTRA2041M.User-Manual-Part-1/User-Guide-851396-Page-46.png)
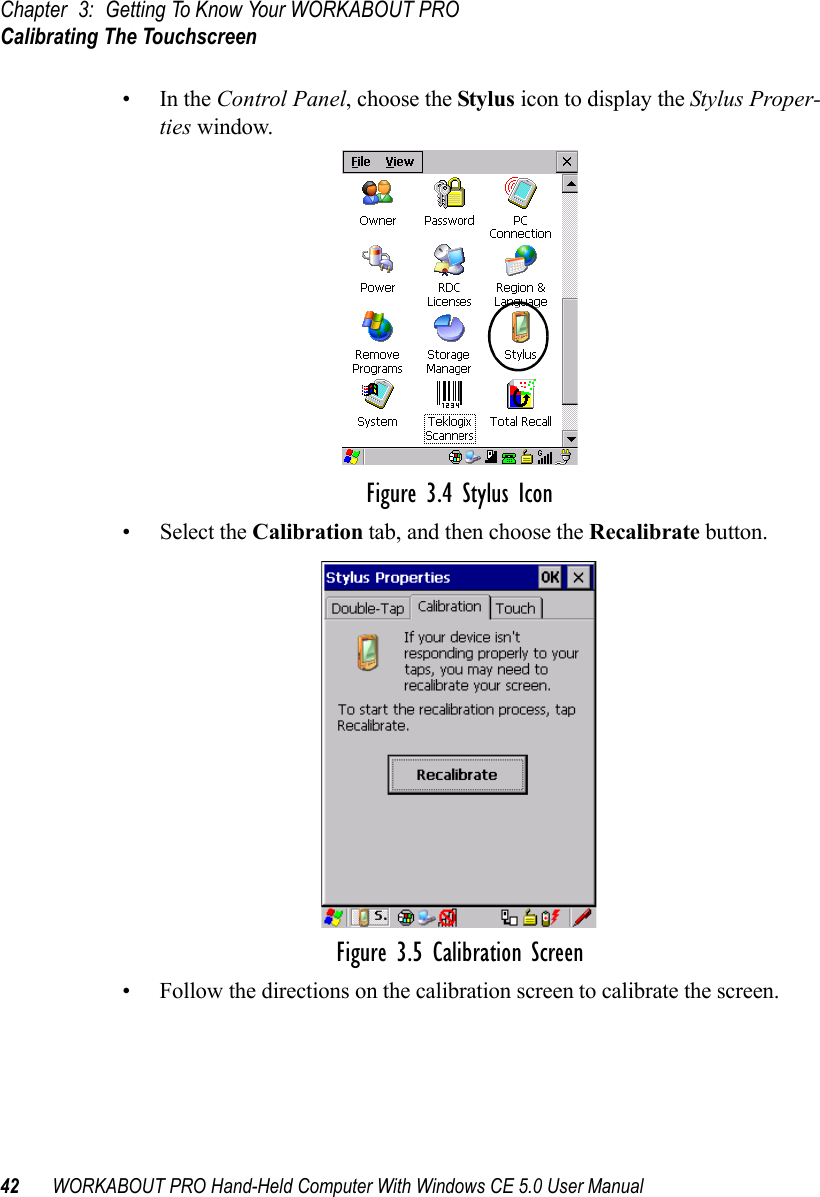
![WORKABOUT PRO Hand-Held Computer With Windows CE 5.0 User Manual 41Chapter 3: Getting To Know Your WORKABOUT PROThe Keypad BacklightEach time you press a numeric key from [2] through [9], an alpha character will be displayed on the screen. Remember that you can refer to the softkey bar for a visual indication of which alpha key will be displayed on the screen.Important: Once you have finished typing alpha characters, remember to turn off or unlock the [FN/ORANGE] key.3.4.6 The Keypad BacklightThe intensity of the keypad backlight and the conditions under which this backlight is activated can be configured using the Keyboard icon in the Windows CE 5.0 Control Panel. The behaviour of the keypad backlight is tailored in the Keyboard Properties dialog box. Refer to “Keyboard Backlight” on page 88 for details about this option.Note: Keep in mind that this option may be restricted to supervisory use only.3.5 The DisplayWORKABOUT PROs are equipped with display backlighting to improve character visibility in low light conditions. The backlight switches on when a key is pressed or the screen is tapped.3.5.1 Adjusting The Display BacklightThe Display Properties dialog box in the Control Panel allows you to determine the behaviour of the display backlight and its intensity. Refer to “Display Backlight” on page 85 for details about the Display Properties dialog box.3.5.2 Calibrating The TouchscreenIf your WORKABOUT PRO touchscreen has never been calibrated, or if you find that the stylus pointer is not accurate when you tap on an item, use the Stylus Properties dialog box in the Control Panel to recalibrate the screen.](https://usermanual.wiki/Psion/7527SBTRA2041M.User-Manual-Part-1/User-Guide-851396-Page-47.png)
![WORKABOUT PRO Hand-Held Computer With Windows CE 5.0 User Manual 43Chapter 3: Getting To Know Your WORKABOUT PROWORKABOUT PRO Indicators3.6 WORKABOUT PRO IndicatorsThe WORKABOUT PRO uses an LED (Light Emitting Diode), onscreen messages and audio tones to indicate the various conditions of the hand-held, the batteries, the scans and so on.3.6.1 LEDA single, two-coloured LED is located on the upper-right side of the keyboard, just above the [ENTER] key. When you press [ENTER], the LED flashes green to indicate that the unit has been powered up. The LED table following outlines the behaviour of the LED while the unit is docked in a charger.Keep in mind that the application running on the WORKABOUT PRO can dictate how the LED operates. Review the documentation provided with your application to determine LED behaviour. If the unit is attached to an external power supply, the hand-held LED reflects the battery charge status.3.6.2 Audio IndicatorsThe audio speaker provides a variety of sounds when a key is pressed, a keyboard character is rejected, scan input is accepted or rejected, an operator’s entry does not match in a match field or the battery is low. To specify how you want your WORKABOUT PRO to respond under various conditions, refer to “Volume And Sound Properties” on page 96.The volume keys are located above [UP ARROW] and [DOWN ARROW]. The increase volume key is labelled with a plus symbol and the decrease volume key is labelled with a minus symbol .LED Behaviour Charge StatusSolid Green Charge complete.Fast Blinking Green Charge in progress. Battery charged to less than 80% capacity.Slow Blinking Green Battery charged to greater than 80% of capacity.Solid Red Temperature outside charge range (0° C to 50° C).Blinking Red Battery is not charging. Battery fault.](https://usermanual.wiki/Psion/7527SBTRA2041M.User-Manual-Part-1/User-Guide-851396-Page-49.png)
![Chapter 3: Getting To Know Your WORKABOUT PROAdjusting WORKABOUT PRO Speaker Volume44 WORKABOUT PRO Hand-Held Computer With Windows CE 5.0 User Manual3.6.2.1 Adjusting WORKABOUT PRO Speaker Volume• Lock the [FN/BLUE] key ‘on’ and then, press [UP ARROW]—the increase volume key or [DOWN ARROW]—the decrease volume key until the volume meets your requirements.• Remember to press the [FN/BLUE] key again to turn it ‘off’.3.6.3 Onscreen IndicatorsThe taskbar at the bottom of the screen displays a variety of system status indicators.Figure 3.6 TaskbarThe taskbar changes dynamically, and only those icons that are applicable are displayed. For example, if a radio is not installed in your WORKABOUT PRO, the radio signal icon is not displayed in the taskbar.Windows® Start ButtonIf you are using the touchscreen, you can either tap the Windows icon at the bottom left of the screen, or press [FN/BLUE] [.] (period) to display the Start Menu, and then tap on the desired application.](https://usermanual.wiki/Psion/7527SBTRA2041M.User-Manual-Part-1/User-Guide-851396-Page-50.png)
![WORKABOUT PRO Hand-Held Computer With Windows CE 5.0 User Manual 45Chapter 3: Getting To Know Your WORKABOUT PROOnscreen IndicatorsModifier Key Indicators[SHIFT], [CTRL], [ALT], [FN/BLUE] and [FN/ORANGE] are modifier keys that when pressed, are displayed in the taskbar to indicate that they are active. If a modifier key is locked ‘on’, it is displayed in uppercase characters. For example, if the [FN/BLUE] key is locked on, it is displayed as BLUE KEY in the taskbar. A locked modifier key remains active until it is pressed again to unlock or turn it off. If a modifier key has been pressed but is not locked on, it is displayed in the taskbar in lowercase characters – for example, blue key. It will remain active only until the next key is pressed at which point, the modifier key is turned off.Note: The locking function of the modifier keys can be set up so that pressing one of these keys once will lock the key ‘on’. They can also be set up so that they must be pressed twice to be locked ‘on’. Refer to “Keyboard One Shot Modes” on page 89for details.Battery GaugeThe battery shaped icon displayed in the taskbar provides a visual indication of the remaining battery power. The icon acts as a meter that is either full, at three-quarter level, half, quarter level or empty.When the battery level is low—approximately 15 minutes from empty—a warning window pops up. When the battery power is completely depleted, a final warning window indicates that the WORKABOUT PRO will be powered down.If the WORKABOUT PRO is using external AC power, an AC icon is displayed in the taskbar.Battery ChargeThe battery charge icon is displayed in the taskbar when the hand-held battery is being charged.AC ConnectionFull75%50% 25% Empty](https://usermanual.wiki/Psion/7527SBTRA2041M.User-Manual-Part-1/User-Guide-851396-Page-51.png)
![Chapter 4: Working With Windows CE 5.0Working With Files, Folders And Programs56 WORKABOUT PRO Hand-Held Computer With Windows CE 5.0 User ManualTable 4.1 Keyboard NavigationKeep in mind that unlike a desktop computer, the WORKABOUT PRO does not support key chording (pressing two keys at the same time). You must press one key followed by the next in sequence. Refer to “Working With Files, Folders And Programs” for additional details about keyboard navigation.4.2 Working With Files, Folders And ProgramsFigure 4.1 Working With Windows IconsOperation Key or Key CombinationSwitch between active applications [ALT] [TAB]Open task manager [ALT] [ESC]Move the cursor Arrow keysOpen file, folder or icon [ENTER]Exit & Save [ENTER]Close/Exit & Do Not Save [ESC]Navigate Dialog Boxes[TAB]To move cursor up [SHIFT] [TAB]To display the contents of the next ‘tab’ in a dialog box [CTRL] [TAB]Select Radio Button/Press Button [SPACE]Go to Start Menu [FN/BLUE][0]FolderFileProgram Icon](https://usermanual.wiki/Psion/7527SBTRA2041M.User-Manual-Part-1/User-Guide-851396-Page-61.png)
![WORKABOUT PRO Hand-Held Computer With Windows CE 5.0 User Manual 57Chapter 4: Working With Windows CE 5.0The Startup Desktop• Double-tap on the appropriate icon—either a folder icon, a program icon or a file icon—to open or launch your selection.If you’re using the keyboard:• Use the arrow keys to highlight the icon you want to open or launch.• Press [ENTER].4.3 The Startup DesktopWhen the WORKABOUT PRO boots up, the startup desktop (shell) is displayed. Any applications stored in the Startup folder start up immediately.Note: The startup folder is located in \Windows\StartUp and \Flash Disk\StartUp.Figure 4.2 The WORKABOUT PRO Startup DesktopTo access desktop icons:• Double-tap on the icon to open a window or, in the case of an application icon, launch an application.On the keyboard:• Use the arrow keys to highlight the icon, and press [ENTER] to launch the highlighted icon.Note: If the arrow keys do not highlight the desktop icons, the desktop may not be selected. Press [FN/BLUE] [.] (period) to display the Start Menu, and](https://usermanual.wiki/Psion/7527SBTRA2041M.User-Manual-Part-1/User-Guide-851396-Page-62.png)
![WORKABOUT PRO Hand-Held Computer With Windows CE 5.0 User Manual 59Chapter 4: Working With Windows CE 5.0The Taskbar4.3.2 The TaskbarFigure 4.3 The TaskbarThe WORKABOUT PRO is equipped with a taskbar at the bottom of the screen. It displays icons through which you can view the battery capacity and radio signal quality of your unit. If the hand-held is attached to a charger, cradle, docking station or PDM, an associated icon is displayed. In addition, the taskbar displays the application(s) currently running on your unit and the security level assigned to your WORKABOUT PRO.The taskbar also displays active modifier keys: [SHIFT], [ALT], [CTRL], [FN/BLUE] and [FN/ORANGE]. Keys that have been locked “on” are displayed in uppercase letters. For example, if you have set the [CTRL] key Lock to “on” in the Keyboard menu and you press the key, it is displayed as CTRL KEY in the taskbar. (For detailed information on modifier keys and keyboard options, see “The Keyboard” on page 36).4.3.2.1 Using The TaskbarA tooltip is displayed as each taskbar icon is highlighted. The tooltip provides the status of each icon.If you’re using the touchscreen:• Tap and hold the stylus on an icon to display the icon's tooltip. Double-tap the icon to open the Control Panel dialog box associated with the icon. For example, double-tap the battery icon to display a dialog box listing the current battery capacity information.](https://usermanual.wiki/Psion/7527SBTRA2041M.User-Manual-Part-1/User-Guide-851396-Page-64.png)
![Chapter 4: Working With Windows CE 5.0The Taskbar60 WORKABOUT PRO Hand-Held Computer With Windows CE 5.0 User ManualOn the keyboard:• Press [FN/BLUE] [.] (period) to display the Start Menu.• Choose Shortcuts from the Start Menu, and then press the [RIGHT] arrow key to display the sub-menu.• Choose System Tray in the sub-menu. • Use the arrow keys to highlight the icon in the taskbar about which you’d like more information.• Press [ENTER] to display the appropriate dialog box.4.3.2.2 Customizing The TaskbarTo customize the taskbar so that it displays only those icons you require:•In the Start Menu, choose Settings>Taskbar.If you’re using the keyboard:• Press [FN/BLUE] [0] (zero) to display the Start Menu.• Highlight the Settings option, highlight Taskbar in the sub-menu, and press [ENTER]. The Taskbar and Start Menu dialog box is displayed. Taskbar General Tab• Tap the stylus on the items you want to activate or deactivate. The check mark indicates active items.If you’re using the keyboard:•Highlight the options you want to activate, and press the [SPACE] key to select them. A check mark indicates active items.](https://usermanual.wiki/Psion/7527SBTRA2041M.User-Manual-Part-1/User-Guide-851396-Page-65.png)
![WORKABOUT PRO Hand-Held Computer With Windows CE 5.0 User Manual 61Chapter 4: Working With Windows CE 5.0The TaskbarTaskbar Advanced Tab• Tap on the Clear button to empty the Documents folder.• To display Control Panel applets in menu form rather than in a window, tap in the checkbox next to Expand Control Panel.Taskbar Security TabIf you check Disable hot keys, the Application from Start menu field becomes enabled. Use this field to enter the name of the application you want to run when the user presses the Menu hot key – [FN/BLUE] [0].If you have disabled hot keys, hidden the Start Menu and have no application configured, the Menu hot key brings up the Security dialog box to allow authorized users to access the terminal configuration. Keep in mind that this dialog box is also displayed if an invalid application is entered in the Application from Start Menu field.](https://usermanual.wiki/Psion/7527SBTRA2041M.User-Manual-Part-1/User-Guide-851396-Page-66.png)
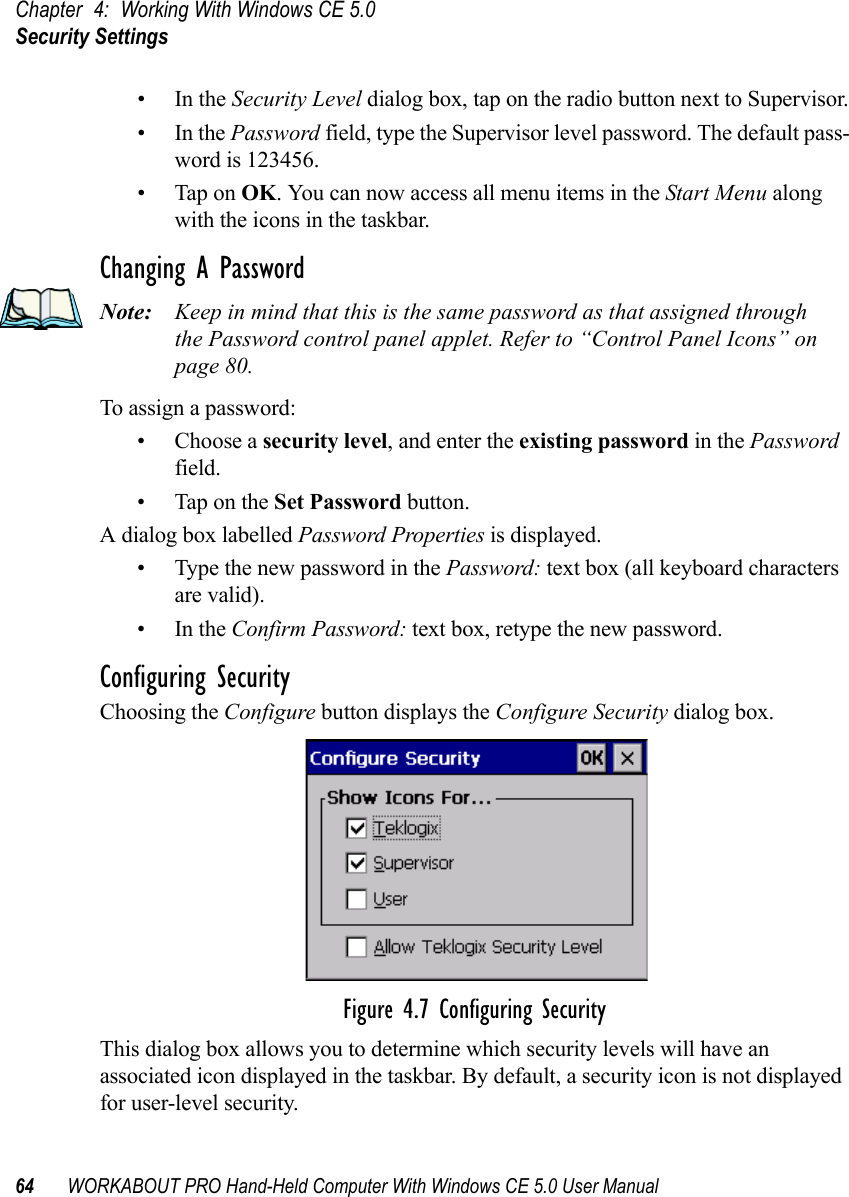
![Chapter 4: Working With Windows CE 5.0The Start Menu62 WORKABOUT PRO Hand-Held Computer With Windows CE 5.0 User Manual4.4 The Start MenuNote: Some of the Start Menu items may be disabled based on the current WORKABOUT PRO security settings.The Start Menu lists the operations you can access and work with. It is available from the startup desktop or from within any application.To display the menu:• Press [FN/BLUE] [.] (period).Note: Tap on the item in the menu with which you want to work.Figure 4.4 Start MenuIf you’re using the keyboard:• Use the arrow keys to highlight a menu item, and press [ENTER], or If the menu item has an underlined character:• Type the underlined alpha character. For example, to display the Security dialog box, type the letter ‘s’.](https://usermanual.wiki/Psion/7527SBTRA2041M.User-Manual-Part-1/User-Guide-851396-Page-67.png)

![WORKABOUT PRO Hand-Held Computer With Windows CE 5.0 User Manual 67Chapter 4: Working With Windows CE 5.0Shortcuts4.4.4 ShortcutsFigure 4.9 Shortcuts Sub-MenuSystem TrayIf your touchscreen is not enabled, you can use the System Tray option to access the icons in the taskbar at the bottom of the screen. The taskbar displays indicators such as a radio signal icon and the security level. These indicators are attached to dialog boxes that provide additional information.• Choose Shortcuts>System Tray.Using the icons in the taskbar, you can either display the Control Panel dialog box associated with an icon, or you can view a tooltip. A tooltip provides the status of each icon.• Tap and hold the stylus on an icon to display the icon’s tooltip. Double-tap on the icon to open the Control Panel dialog box associated with the icon.On the keyboard:• Press [FN/BLUE] [0] to display the Start Menu.• Choose Shortcuts from the Start Menu, and then press the [RIGHT] arrow key to display the sub-menu.• Choose System Tray in the sub-menu. • Use the arrow keys to highlight the icon in the taskbar about which you’d like more information. As each icon is highlighted, a tooltip is displayed.• To display the associated Control Panel dialog box, press [ENTER].](https://usermanual.wiki/Psion/7527SBTRA2041M.User-Manual-Part-1/User-Guide-851396-Page-72.png)
![Chapter 4: Working With Windows CE 5.0Shortcuts68 WORKABOUT PRO Hand-Held Computer With Windows CE 5.0 User ManualCycle TasksWhen Cycle Tasks is selected (and the Task Manager is not open), you can cycle through active applications. To cycle through your active applications:• Choose Shortcuts>Cycle Tasks, or Press [ALT] [TAB].Task ManagerThe Task Manager allows you to switch to another task or to end an active task. To display the task manager window:• Tap on Shortcuts>Task Manager, orPress [ALT] [ESC].Figure 4.10 Task Manager](https://usermanual.wiki/Psion/7527SBTRA2041M.User-Manual-Part-1/User-Guide-851396-Page-73.png)
![WORKABOUT PRO Hand-Held Computer With Windows CE 5.0 User Manual 71Chapter 4: Working With Windows CE 5.0Using A Dialog BoxWarm ResetThe Warm Reset option resets the WORKABOUT PRO, leaving all saved files and (registry) settings intact. Any unsaved data is lost.Cold ResetThe Cold Reset option resets the WORKABOUT PRO (see page 26). Any files not stored in permanent memory are lost; however, the registry settings are saved.4.5 Using A Dialog BoxA dialog box (like the samples in Figure 4.14) appears when you need to make selections and enter further information. You can move between dialog items by tapping on them with your stylus, or by pressing the arrow keys and the [TAB] key ([SHIFT] [TAB] moves the cursor backwards).Figure 4.14 Dialog BoxesNote: You can use the stylus to tap on an element in a dialog box to select or deselect it, display drop-down menus, save your selections, and so on.Dialog boxes contain one or more of the following elements:Tab: A tab separates different elements of a dialog box. Press the [TAB] key until a tab in the dialog box is highlighted. To display adjoining tabs, press the [RIGHT] or [LEFT] arrow key. To display the information in the next tab from anywhere in the window, press [CTRL] [TAB].CheckboxDrop-down MenuButtonTextboxRadioButtonTabs](https://usermanual.wiki/Psion/7527SBTRA2041M.User-Manual-Part-1/User-Guide-851396-Page-76.png)
![Chapter 4: Working With Windows CE 5.0Using A Dialog Box72 WORKABOUT PRO Hand-Held Computer With Windows CE 5.0 User ManualTex tbox: A textbox requires that you type information. Press the [TAB] key to highlight the textbox and then type the appropriate information.Drop-down: This type of menu is identified by up and down arrows next to the drop-down menu to indicate that additional options are available. Press the [TAB] key to highlight the menu, and use the arrow keys on your keyboard to cycle through the options. Checkbox: This box allows you to select or deselect an option. To select or deselect a checkbox, press the [TAB] key to highlight the checkbox, and press the [SPACE] key to select or deselect it.Radio buttons: These buttons allow you to choose from a number of options. For example, in the sample screen in Figure 4.14 on page 71 you can choose to Obtain an IP address via DHCP or Specify an IP address. Press the [TAB] key to highlight a radio button option, and then select a radio button by pressing the arrow keys to highlight the appropriate option.Buttons: This type of button allows you to Save, Delete and so on the options you’ve chosen in a dialog box. Use the [TAB] key to highlight the button you want to use. Press the [ENTER] key to activate it.Saving Your Choices: Once you’ve made all your changes, press the [ENTER] key to save your changes and exit the window.Note: A dialog box item that is displayed in grey text indicates that it is not cur-rently available.](https://usermanual.wiki/Psion/7527SBTRA2041M.User-Manual-Part-1/User-Guide-851396-Page-77.png)