Psion 7545MBWP GSM/GPRS/UMTS/HSPA Module User Manual Omnii Hand Held Computer
Psion Inc GSM/GPRS/UMTS/HSPA Module Omnii Hand Held Computer
UserManual.wiki
>
Psion
>
7545MBWP User Manual
>
user manual I
Contents
1.
user manual I
2.
user manual II
3.
user manual III
4.
user manual IV Regulatory Guide
5.
installation guide
user manual I
Navigation menu
Upload a User Manual
Namespaces
Wiki Guide
HTML
PDF
Info
Views
User Manual
Discussion / Help
Navigation


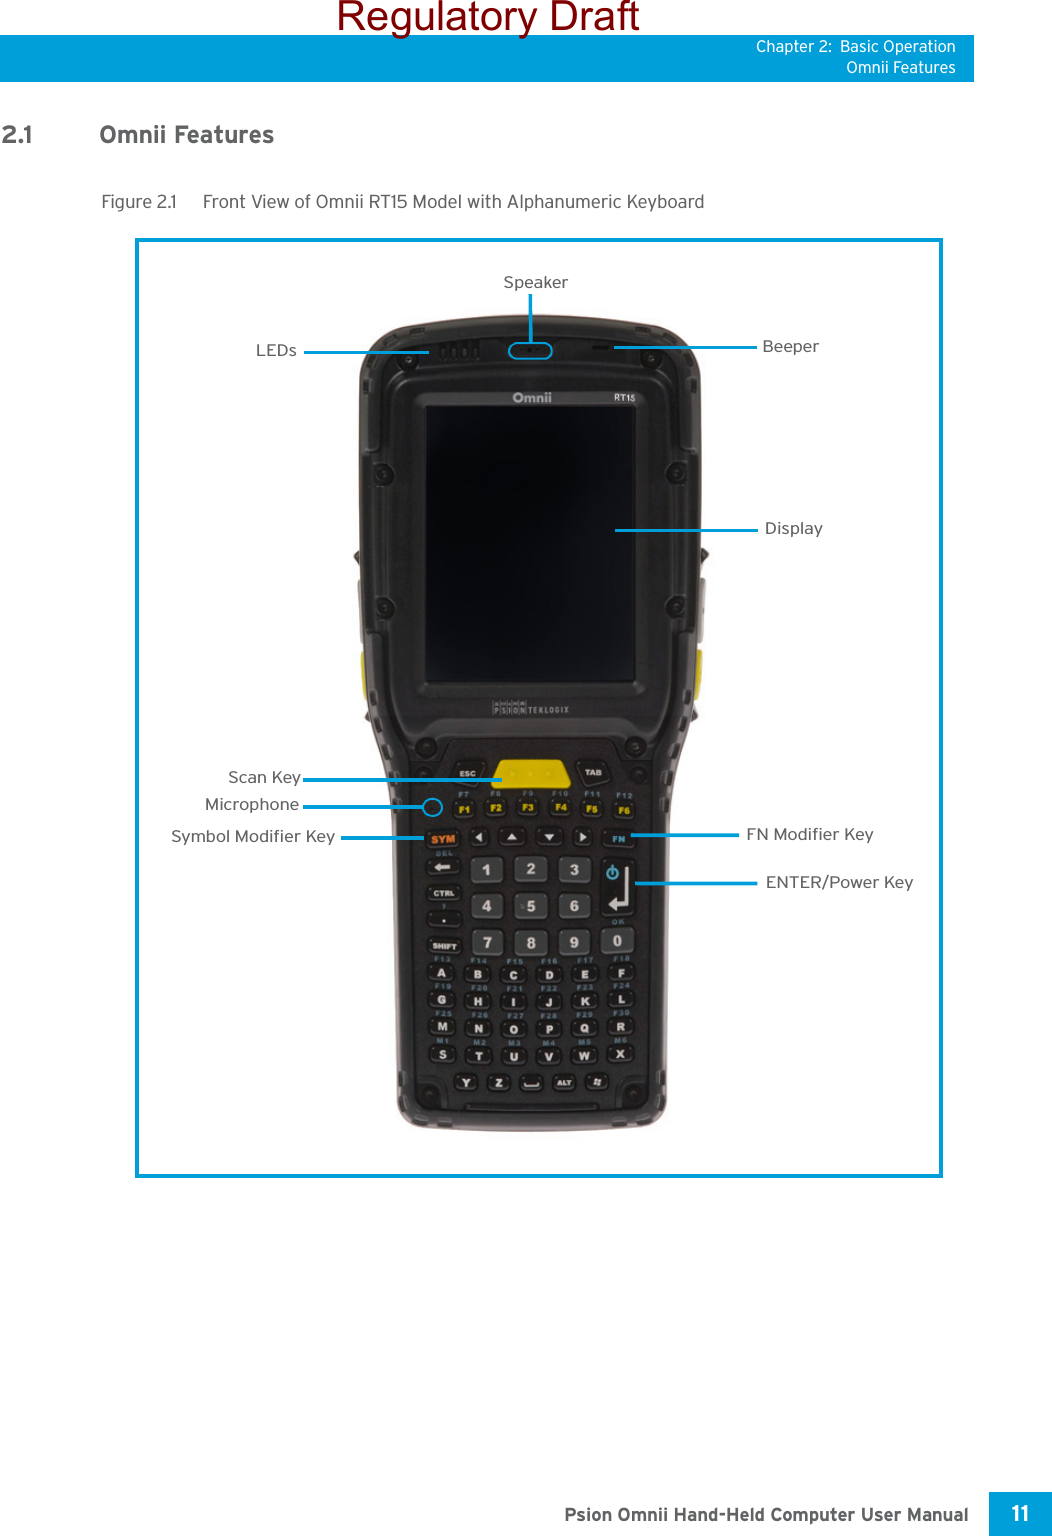
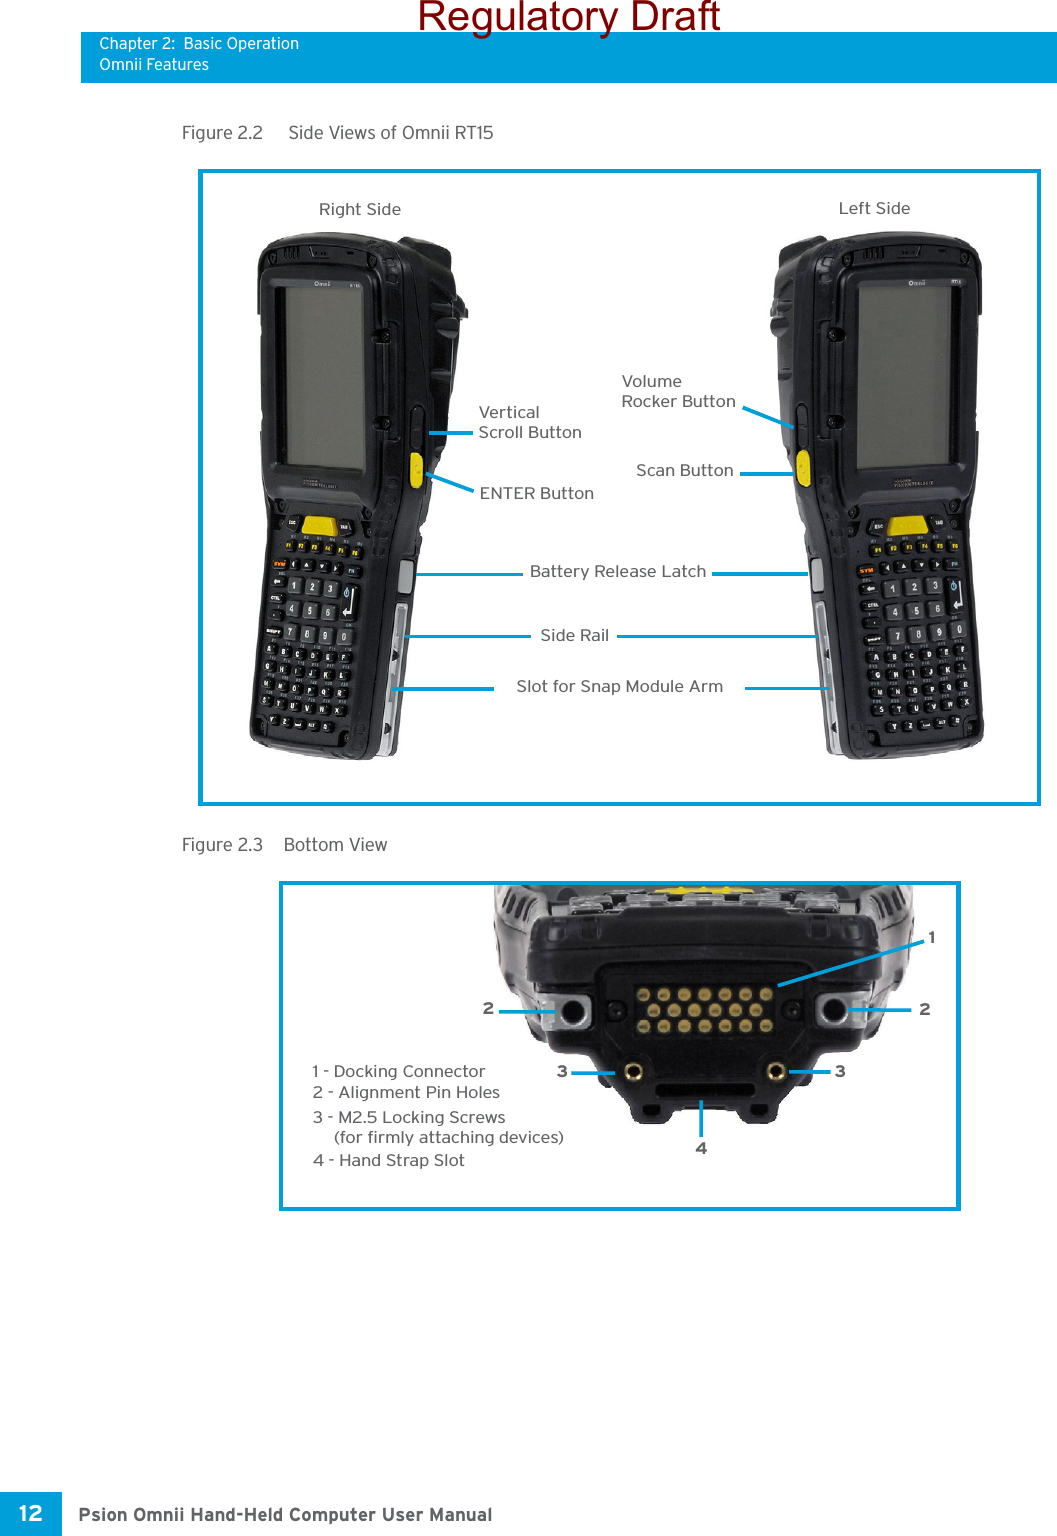
![Chapter 2: Basic OperationSwitching Omnii On and Off15 Psion Omnii Hand-Held Computer User Manual2.5 Switching Omnii On and OffFollow the instructions below for your Omnii.Switching Omnii On• Press and hold down the [ENTER/Power] key for at least one second. When the unit is turned off, normally it automatically enters a power-saving, “suspend” state. When Omnii is switched on from the suspend state, operation resumes within a few seconds in the screen in which you were working prior to turning the computer off.Switching Omnii Off• To switch off Omnii, press the [FN] key and then press and release the [ENTER/Power] button. Omnii will automatically enter the Suspend state.2.6 Resetting OmniiTo perform a warm or cold reset, you can access the menu by going to Start>Shutdown. Alternatively you can use the keyboard shortcuts described below.Important: If your Omnii fails to power up, consider the following troubleshooting options:The battery may be overheated (>60C°), a non-Psion battery may be installed, or the battery may have fallen below the configured Suspend Threshold. See “Sus-pend Threshold and Estimated Battery Backup” on page 87 for details.To switch on the hand-held, you will need to replace the overheated battery.However, if you supply AC power to Omnii with a battery that falls below the con-figured Suspend Threshold, the unit will switch on.Important: Turning off the hand-held does not result in a complete shutdown; rather, the unit enters a power-saving, “suspend” state. When Omnii is turned on from suspend state, operation resumes within a few seconds.Important: If the word ‘FN’ is displayed underlined in the taskbar area at the bottom of the screen, this key is locked “on” and Omnii will not switch off. Press the [FN] key twice followed by [ENTER/Power] to switch Omnii off.However, if you’ve set the mode to “Lock” (see “Keyboard One Shot Modes” on page 75), Omnii can be turned off even when the [FN] key is locked ‘on’.Note: If your Desktop is switched to the PsionVU Shell (refer to “The PsionVU Desktop Shell” on page 41), resetting the unit is done solely by use of the keyboard shortcuts.Regulatory Draft](https://usermanual.wiki/Psion/7545MBWP.user-manual-I/User-Guide-1680417-Page-29.png)
![Chapter 2: Basic OperationPerforming a Warm ResetPsion Omnii Hand-Held Computer User Manual16 2.6.1 Performing a Warm ResetDuring a warm reset, running programs are halted. The contents of the flash memory and the registry are preserved. Keep in mind, however, that RAM content is not preserved.• Press and hold down the [FN] key and the [ENTER/Power] key simultaneously for a minimum of four seconds.2.6.2 Performing a Cold ResetA cold reset reinitializes all hardware. All RAM including the RAM disk is erased. Non-volatile storage such as the Flash disk is preserved.To execute a cold reset:• Press and hold down the [SYM] key, the [FN] key, and the [ENTER/Power] key, simultaneously for a minimum of four seconds.2.6.3 Performing a Clean StartA clean start returns Omnii to factory settings, flushes the registry keys and deletes volatile storage. • Press and hold down the [FN] key, the [ENTER/Power] button and the [SCAN] key simultaneously for a minimum of six seconds.Omnii displays the Boot to BooSt menu.•On an alpha keyboard, type .clean.•On a numeric keyboard, type .25326.2.6.4 Boot to BooStIf you choose Boot to BooSt, the BooSt menu is loaded.• Press and hold down the [FN] key, the [ENTER/Power] button and the [SCAN] key for a minimum of four seconds.•Press [1] to launch the OS.2.6.5 Performing a Hard ResetTo execute a hard reset:• Remove the battery.• Using a coin, or other conductive item, connect pins 5 and 6 of the Omnii battery contacts for at least 6 seconds.• Replace the battery and power Omnii on. The terminal will boot as if from a cold reset.Note: You do not need to reset your Omnii after configuring the radio.Note: As part of the normal Windows Embedded CE cold boot process, the screen may go blank for a few seconds after the splash screen loading bar reaches the end. The desktop is displayed after a few moments.Important: This procedure is recommended as a last resort, when all other methods fail. Pin 6 Pin 5Regulatory Draft](https://usermanual.wiki/Psion/7545MBWP.user-manual-I/User-Guide-1680417-Page-30.png)


![Chapter 3: Getting To Know Your OmniiThe KeyboardPsion Omnii Hand-Held Computer User Manual22 Normally it takes 3 to 4 hours to charge a battery. The Omnii intelligent charging system protects the battery from over-charging by terminating the charge process when the battery is at maximum capacity.3.3 The KeyboardOmnii offers a wide variety of Alpha and Numeric keyboard layouts. See http://www.psion.com/us/prod-ucts/handheld/omniit10_accessories.htm for a list of available configurations. Most of the keys on these keyboards operate much like a desktop computer. Where a key or key function is not consistent with the PC keyboard, those differences are described in the following sections.Omnii is equipped with an [Enter/Power] key that allows you to switch the unit on and to shut down the unit to Suspend or Standby mode. For details refer to “Switching Omnii On and Off” on page 15.There are a number of modifier keys that provide access to additional keys and system functions, as de-scribed in “Modifier Keys” on page 23.Figure 3.1 Keyboard Layouts3.3.1 Regular KeysThe [ENTER/Power] KeyThe [ENTER/Power] key is used to execute the usual Enter keyboard functions as well as to power the unit on and off (for details refer to “Switching Omnii On and Off” on page 15).Table 3.1 Omnii Internal Battery Charging Times% Charge Completed During Sleep Mode While Operating100% 4 hrs. 8 hrs.75% 2 hrs. 6 hrs.Important: To avoid damaging the battery, chargers will not begin the charge process until the battery temperature is between 0°C to 45°C (32°F to 113°F).36-KEY Numeric 123 Keyboard 59-KEY Alpha ABC Keyboard[FN] Modifier Key[SYM] Modifier Key[SHIFT] Modifier Key[SCAN] Key[ENTER/Power] Key[Windows] KeyRegulatory Draft](https://usermanual.wiki/Psion/7545MBWP.user-manual-I/User-Guide-1680417-Page-36.png)
![Chapter 3: Getting To Know Your OmniiModifier Keys23 Psion Omnii Hand-Held Computer User ManualThe [SHIFT] KeyThe [SHIFT] key is used to display uppercase alpha characters and to provide access to other symbols and functions on the numeric keyboards. Press the [SHIFT] key to turn the shift state 'on' (it will be represented by an up arrow in the taskbar), then press another key to access the shifted function of that key.Press the [SHIFT] key twice to lock the shift state on (the up arrow in the taskbar will be underlined). Press [SHIFT] again to turn the shift state off.To access CAPS LOCK mode, press [FN] + [SHIFT]. In this state, if you press a numeric key, the number is displayed rather than the normal shifted function of that key. Press [FN] + [SHIFT] again to turn the CAPS LOCK mode off.The Arrow KeysThe [Arrow] keys are located near the top of the keyboard, and are represented on the keyboard as trian-gles pointing in different directions. The [Arrow] keys move the cursor around the screen in the direction of the arrow: up, down, left and right. The left arrow key should not be confused with the [BACKSPACE] key which is depicted as a left arrow. The cursor is the flashing box or underline character that indicates where the next character you type will appear.The [BACKSPACE/DEL] KeyThe [BACKSPACE] key (represented on the keyboard as an arrow pointing left) moves the cursor one char-acter to the left, erasing the previous key stroke.The [DEL] key ([FN] +[BACKSPACE]) erases the character at the current cursor position.The [CTRL] and [ALT] KeyThe [CTRL] and [ALT] keys modify the function of the next key pressed and are application dependent. Pressing either key twice locks it 'on' (it appears underlined on the Taskbar). Pressing the key once again unlocks it.The [TAB] KeyTypically, the [TAB] key moves the cursor to the next field to the right or downward.The [ESC] KeyGenerally, this key is used as a keyboard shortcut to close the current menu, dialog box, or activity.The [SPACE] KeyThe [SPACE] key is represented on the keyboard by a long, low horizontal line contained by a small vertical line on each side. Pressing this key inserts a blank space between characters. In a Windows dialog box, pressing the [SPACE] key enables or disables a checkbox.The [SCAN] KeyOmnii is equipped with a single [SCAN] key on the keyboard and an extra [SCAN] button located on the left side of the unit. [SCAN] keys activate the scanner beam. For units that do not have internal scanners, these keys can be remapped to serve other functions.3.3.2 Modifier KeysThe [SHIFT], [CTRL], [ALT], [FN] and [SYM] keys are modifier keys that change the function of the next key pressed. The [SHIFT], [CTRL] and [ALT] keys operate much like a desktop keyboard except that they are not chorded (two keys held down simultaneously). The modifier key must be pressed first followed by the key whose function you want modified.[SHIFT] and [FN]The [SHIFT] and [FN] modifier keys provide access to additional keys and system functions. The functions related to these modifier keys are colour-coded in white and blue print respectively above the keyboard keys, dependant on your keyboard format.Regulatory Draft](https://usermanual.wiki/Psion/7545MBWP.user-manual-I/User-Guide-1680417-Page-37.png)
![Chapter 3: Getting To Know Your OmniiModifier KeysPsion Omnii Hand-Held Computer User Manual24 [SYM] The Symbol [SYM] modifier key is represented on the keyboard by the characters ‘SYM’ and provides access to commonly used symbolic characters. Pressing the key brings up the Symbol soft input panel (SIP) onscreen keyboard, with symbols mapped to each key. If you wish to adjust the settings for the pop-up screen (e.g. time of delay before screen appears, etc.), modify the file softinputpanel.xml, located in the Windows folder.The onscreen keyboard corresponds to the specific keyboard on your Omnii—either numeric or alphanu-meric. Figure 3.2 Symbol Soft Input Panels3.3.2.1 Activating Modifier KeysWhen a modifier key is pressed, it is shown in the softkey bar at the bottom of the screen, making it easier to determine whether a modifier key is active. For example, if the [CTRL] key is pressed, Ctrl is displayed at the bottom of the unit screen. Once the next key is pressed, the modifier key becomes inactive and disap-pears from the taskbar.3.3.2.2 Locking Modifier KeysWhen a modifier key is pressed twice, it is ‘locked’ on. A ‘locked’ modifier key is displayed in underlined letters in the taskbar. For example, pressing the [FN] key twice locks it on—it is displayed as an underlined blue ‘FN’ in the taskbar at the bottom of the computer screen. The same is true of the [SYM] key, which is shown as an underlined orange ‘SYM’ in the taskbar.The locked modifier key will remain active until it is pressed a third time to unlock or turn it off. Once a mod-ifier key is unlocked, the underline representation at the bottom of the screen is no longer displayed.Note: When using the Mobile Devices SDK Developers' Guide (P/N 8100016), note that the [SYM] key is interchangeable with the [ORANGE] key.Note: Modifier keys are remapped in the Control Panel, and the Symbol SIP will automatically show and use the new mappings after the next reboot.36-KEY Numeric Keyboard 59-KEY Alpha Keyboard[SPACE] KeyInternet Browser KeysNote: The locking function of the modifier keys can be changed so that pressing a key once will lock the key ‘on’. If you disable the ‘One Shot’ function of the key, pressing it once will lock the key ‘on’. Press-ing the same key a second time will unlock or turn it ‘off’. Refer to “Keyboard One Shot Modes” on page 75 for details.Regulatory Draft](https://usermanual.wiki/Psion/7545MBWP.user-manual-I/User-Guide-1680417-Page-38.png)
![Chapter 3: Getting To Know Your OmniiFunction Keys and Macro Keys25 Psion Omnii Hand-Held Computer User Manual3.3.3 Function Keys and Macro KeysIn addition to the standard keyboard functions (see “The Keyboard” on page 22), Omnii supports function keys and macro keys.All function keys and macro keys can be custom defined for each application. The Open TekTerm applica-tion utilizes these keys (for detailed information, see the Open TekTerm Software User Manual, P/N 8000073). 3.3.3.1 Function KeysFunction keys perform special, custom-defined functions within an application. These keys are accessed by pressing one of the dedicated function keys on the keyboard, or through the appropriate [SHIFT] or [FN] key sequence, depending on the keyboard variant being used.Alphanumeric Keyboard Function KeysThe Alphanumeric keyboards are equipped with up to thirty function keys, including those function keys that are colour-coded in blue print above the alpha keys or function keys (depending on your keyboard).To access the blue function keys, press the [FN] key followed by the appropriate alpha or function key.Function keys [F1] through [F24] can be used with the Windows Embedded CE operating system or another application. The additional function keys, [F25] through [F30] along with the macros, are not used as part of the Windows Embedded CE operating system. Numeric Keyboard Function KeysThe Numeric keyboards are equipped with up to 24 function keys, including those function keys that are colour-coded in white print above the function keys. Function keys F25 through F30 can only be accessed by remapping another key to that function. To access the white function keys, press the [SHIFT] key followed by the appropriate function key. 3.3.3.2 Macro KeysSeveral of the Omnii keyboards are equipped with a series of macro keys that can be programmed to replace frequently used keystrokes, along with the function of executable keys like the [ENTER/Power] key, the [BACKSPACE] key, any function key and arrow key, etc. 59-Key Alphanumeric Keyboard Macro KeysThese keyboards have six macro keys: [M1] to [M6], located on the S to X keys (second-last row of keys).To access a macro key, press the [FN] key followed by the macro key.36-Key Numeric Keyboard Macro KeysThese keyboards are equipped with five macro keys: [M1] to [M5]. These keys are colour coded in blue print above function keys [F1] to [F5]. To access a macro key, press the [FN] key followed by the macro key.3.3.4 Numeric Keyboards—Accessing Alpha KeysOn the Numeric Omnii keyboards, all alphabetic characters are printed on the unit plastic in blue typeface above the keys. Alpha characters are accessed by pressing the [FN] modifier key, then pressing another key on the keyboard. The Alpha Modified Numeric 789 keyboard has each blue alphabetic character assigned as a single [FN]-shifted character on individual keys. An indicator in the left corner of the taskbar displays the currently se-lected character. The Numeric 123 keyboards have telephone-style alphabetic keys, with the blue alphabetic characters located in groups of 3 or 4 above each of the numeric keys. To access characters on these keyboards, a few extra steps are needed, as described below.Important: Refer to “Keyboard Macro Keys” on page 75 for details about creating macros.Regulatory Draft](https://usermanual.wiki/Psion/7545MBWP.user-manual-I/User-Guide-1680417-Page-39.png)
![Chapter 3: Getting To Know Your OmniiThe Keypad BacklightPsion Omnii Hand-Held Computer User Manual26 Choosing a Single Alpha CharacterThe examples below illustrate how to access A, B and C, all of which are printed in blue characters above the numeric key [2]. The letters you choose appear in the softkey bar as you press the numeric key, provid-ing a visual indicator of which letter will be displayed on the screen.To choose the letter ‘a’:• Press the [FN] key, and press the numeric key [2].• Press the [FN] key again to unlock or turn it off.To choose the letter ‘b’:• Press the [FN] key, and press [2] twice.• Press the [FN] key again to unlock or turn it off.To choose the letter ‘c’:• Press the [FN] key, and press [2] three times.• Press the [FN] key again to unlock or turn it off.Selecting Uppercase LettersTo display a single capital letter, press the [SHIFT] key first, then the letter you want. To access CAPS LOCK mode, press [FN] + [SHIFT]. In this state, if you press a numeric key, the number is displayed rather than the normal shifted function of that key. Press [FN] + [SHIFT] again to turn the CAPS LOCK mode off.3.3.5 The Keypad BacklightThe intensity of the keypad backlight and the conditions under which this backlight is activated can be con-figured using the Keyboard icon in the Windows Embedded CE Control Panel. The behaviour of the keypad backlight is tailored in the Keyboard Properties dialog box. Refer to “Keyboard Backlight” on page 74 for details about this option.3.4 The DisplayOmnii is equipped with display backlighting to improve character visibility in low light conditions. The back-light switches on when a key is pressed. 3.4.1 Adjusting the Display BacklightThe behaviour of the display backlight and the intensity of the backlight can be specified in the Display Properties dialog box in the Control Panel.3.4.2 Calibrating the TouchscreenIf your Omnii touchscreen has never been calibrated, or if you find that the stylus pointer is not accurate when you tap on an item, use the Stylus Properties dialog box in the Control Panel to recalibrate the screen.•In the Control Panel, choose the Stylus icon to display the Stylus Properties window.Note: The following examples assume that the [FN] key is enabled as ‘Lock’ mode in the ‘One Shot’ screen (accessible through the Control Panel Keyboard icon). In ‘Lock’ mode, pressing the [FN] key once locks it ‘on’. Refer to “Keyboard One Shot Modes” on page 75 for details.Note: Keep in mind that there is a timeout of one second between key presses when sequencing through the alphabetic characters on a key. If you pause longer than one second between key presses, the alphabetic character that is displayed at that time will be entered.Note: Keep in mind that this option may be restricted to supervisory use only.Note: Refer to “Backlight” on page 66 for details about the Display Properties dialog box.Regulatory Draft](https://usermanual.wiki/Psion/7545MBWP.user-manual-I/User-Guide-1680417-Page-40.png)

![Chapter 3: Getting To Know Your OmniiOnscreen Indicators29 Psion Omnii Hand-Held Computer User Manual3.5.2 Onscreen IndicatorsThe taskbar at the bottom of the screen displays a variety of system status indicators, including the Input Panel button if you have chosen to show that option in the Ta s kba r an d Sta r t Menu settings. Figure 3.4 TaskbarThe taskbar changes dynamically, and only those icons that are applicable are displayed. For example, if a radio is not installed in your Omnii, the radio signal icon is not displayed in the taskbar.Windows® Start ButtonIf you are using the touchscreen, you can either tap the Windows icon at the bottom left of the screen, or press the [Windows] key to display the Start Menu, and then tap on the desired application.Modifier Key Indicators[SHIFT], [CTRL], [ALT], [FN] and [SYM] are modifier keys that have onscreen indicators to show when a key is active or locked. If a modifier key is pressed once to activate it, the key is displayed in the taskbar, for ex-ample, pressing the [FN] key once displays ‘FN’ in the taskbar. If a modifier key is pressed twice, it is ‘locked on’ and the onscreen indicator is displayed with underlined letters in the taskbar, for example, pressing [FN] twice displays ‘FN’ in the taskbar.Power The battery shaped icon displayed in the taskbar provides quick access to the charge state of the battery. Tapping on the icon once will show the percentage charge left in the battery. Tapping on the icon twice opens the Power Properties menus (see “Power Properties” on page 85), where you can set the low battery warnings levels, and time to enter Suspend.If Omnii is using external AC power, an AC icon is displayed in the taskbar.802.11 Radio Signal QualityIncreasing radio signal quality is represented by longer, filled bars within this icon.Good No RadioReceptionWeakReception LinkRegulatory Draft](https://usermanual.wiki/Psion/7545MBWP.user-manual-I/User-Guide-1680417-Page-43.png)
![Chapter 3: Getting To Know Your OmniiScanners and Imagers31 Psion Omnii Hand-Held Computer User Manual• Slide the microSD card into the guides on the SD card door.• Close the microSD card door, and slide it to the right to lock it.For a SIM card:• Slide the SIM card metal door latch to the right to unlock it, then flip the door open.• Slide the card into the guides on the SIM card door. • Swing the hinged door back down into place, and slide the metal door latch to the left to lock it.3.7 Scanners and ImagersOmnii supports a wide range of scanner options to address a variety of user application requirements. Refer to the following sections for detailed information:• Scanner list and specifications: Appendix D: “Internal Imager & Scanner Specifications” .• Configuration: “Scanners” on page 98 and “Manage Triggers” on page 81.• “Scanning Techniques” on page 32 outlines the mechanics of a successful scan.• “Scanner Status LED, Sounds, and Vibrations” on page 32 details how to interpret whether or not a barcode has been successfully scanned. • Barcode Parameters: Appendix C: “Scanner Settings”.• Imager Settings: Appendix B: “Imager & Camera Settings”.• “Troubleshooting” on page 32 provides some helpful suggestions should the scan fail.Scanner types include:• Long Range: reads large 1D barcodes (55 mil) at long distances (up to 3m).• Standard Range/High Performance: reads damaged or low contrast regular 1D barcodes (5 - 55mil) at medium distances (up to 1m).• Extended Range: reads regular 1D barcodes (5 - 55mil) at short to medium distances (1m), as well as large 1D barcodes (e.g. 55 mil) at long distances.• Fuzzy Logic: reads damaged or low contrast regular 1D barcodes (5 - 55mil) at medium distances (up to 1m). icroMOPENLOCKImportant: It is critical that you review the “Laser Warnings” in the Omnii Hand-Held Compu-ter Regulatory & Warranty Guide (PN 8000191) before using any of the scanners described in this chapter. For detailed scanner specifications and decode zone tables, refer to Appendix D: “Internal Imager & Scanner Specifications” .Note: To enable a newly-installed imager or scanner, press and hold down the [FN] key and the [ENTER/Power] key simultaneously for a minimum of three seconds. Regulatory Draft](https://usermanual.wiki/Psion/7545MBWP.user-manual-I/User-Guide-1680417-Page-45.png)
![Chapter 3: Getting To Know Your OmniiThe Windows Classic Shell Startup DesktopPsion Omnii Hand-Held Computer User Manual34 screen tapping. In those applications that support it, you can also flick and pan your finger to scroll through screens.3.8.1.1 Navigating Using a TouchscreenOmnii comes equipped with a stylus—a pointing tool that looks like a pen. The stylus is used to select objects on the touchscreen. You can also use gestures with your fingers. You can use two gestures: pan and flick. Use left or right flicks to quickly move between tabs of a multi-tab control panel, or to scroll long lists of op-tions. Use panning by touching and dragging a page that has scrollbars.To choose an icon, open a file, launch an applet or open a folder:• Double-tap on the appropriate icon.3.8.1.2 Navigating Using the KeyboardIf you would like to use keyed input to choose icons and navigating dialog boxes, displaying the desktop you can refer to Table 3.6 for a description of the navigation keys.Keep in mind that unlike a desktop computer, Omnii does not support key chording (pressing two keys at the same time). You must press one key followed by the next in sequence. 3.8.2 The Windows Classic Shell Startup DesktopWhen Omnii boots up, the default startup desktop (Windows Classic Shell) is displayed. Any applications stored in the Startup folder start up immediately. Note: If the touchscreen is not registering your screen taps accurately, the touchscreen may need recalibration. Refer to “Calibrating the Touchscreen” on page 26.Note: To prevent damage to the touchscreen, use only a finger touch or the stylus (pen) supplied with your Omnii.Table 3.6 Keyboard NavigationOperation Key or Key CombinationSwitch between active applications [ALT] [TAB]Open task manager [ALT] [ESC]Move the cursor Arrow keysOpen file, folder or icon [ENTER]Exit & Save [ENTER]Close/Exit & Do Not Save [ESC]Navigate Dialog Boxes [TAB]To move cursor up [SHIFT] [TAB]To display the contents of the next ‘tab’ in a dialog box [CTRL] [TAB]Select Radio Button/Press Button [SPACE]Go to Start Menu [Windows]Note: The startup folder is located in \Windows\StartUp and \Flash Disk\StartUp.Regulatory Draft](https://usermanual.wiki/Psion/7545MBWP.user-manual-I/User-Guide-1680417-Page-48.png)
![Chapter 3: Getting To Know Your OmniiThe Windows Classic Shell Startup Desktop35 Psion Omnii Hand-Held Computer User ManualFigure 3.5 Omnii Windows Classic Shell Startup DesktopTo access desktop icons:• Double-tap on the icon to open a window or, in the case of an application icon, launch an application.On the keyboard:• Use the arrow keys to highlight the icon, and press [ENTER] to launch the highlighted icon.3.8.2.1 The TaskbarOmnii is equipped with a taskbar at the bottom of the screen. It displays icons through which you can view the battery capacity and radio signal quality of your unit. If the hand-held is attached to a charger, cradle, docking station, or Snap Module, an associated icon is displayed. In addition, the taskbar displays the appli-cation(s) currently running on your unit.The taskbar also displays active modifier keys: [SHIFT], [ALT], [CTRL], [FN] and [SYM]. Keys that have been locked “on” are displayed with underlined letters. For example, if you have set the [CTRL] key lock to “on” in Note: If the arrow keys do not highlight the desktop icons, the desktop may not be selected. Press [Windows] to display the Start Menu, and select Desktop. Now the desktop will be “in focus” and the arrow keys will highlight the icons.Regulatory Draft](https://usermanual.wiki/Psion/7545MBWP.user-manual-I/User-Guide-1680417-Page-49.png)
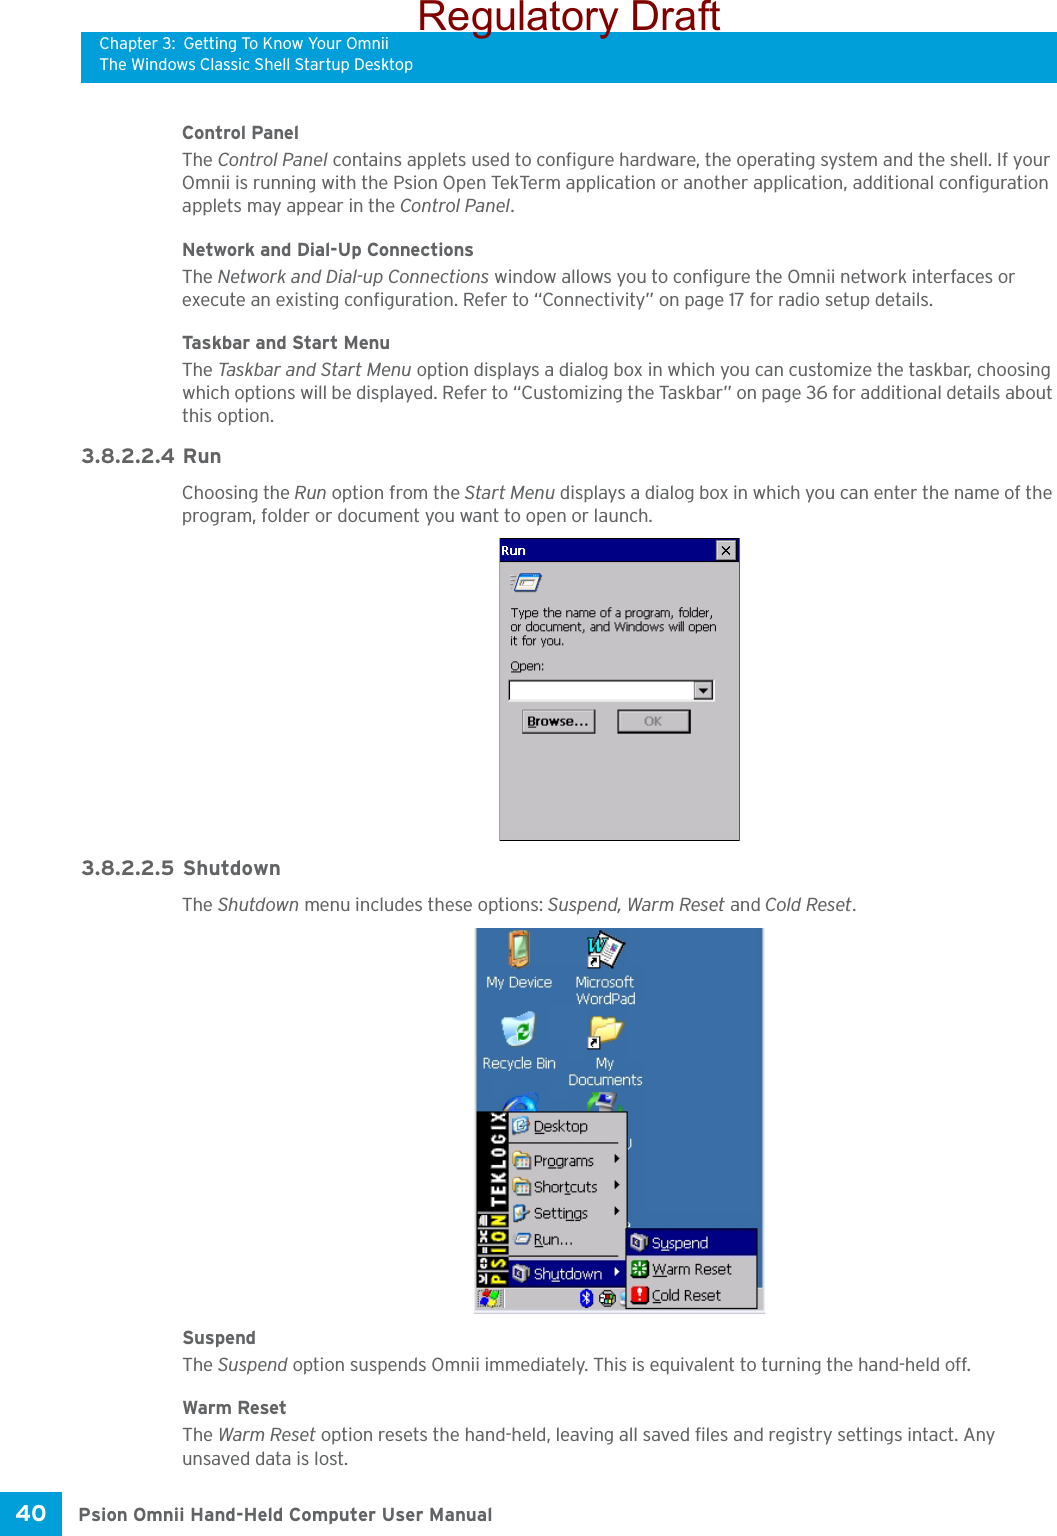
![Chapter 3: Getting To Know Your OmniiThe Windows Classic Shell Startup DesktopPsion Omnii Hand-Held Computer User Manual36 the Keyboard menu and you press the key, it is displayed as an underlined ‘Ctrl’ in the taskbar. (For detailed information on modifier keys and keyboard options, see “The Keyboard” on page 22).3.8.2.1.1 Using the TaskbarA tooltip is displayed as each taskbar icon is highlighted. The tooltip provides the status of each icon.If you’re using the touchscreen:• Tap and hold on an icon to display the icon's tooltip. Double-tap the icon to open the Control Panel dialog box associated with the icon. For example, double-tap the battery icon to display a dialog box listing the current battery capacity information.On the keyboard:•Press [Windows] to display the Start Menu.•Choose Shortcuts from the Start Menu, and then press the [RIGHT] arrow key to display the sub-menu.•Choose System Tray in the sub-menu. • Use the arrow keys to highlight the icon in the taskbar about which you’d like more information.•Press [ENTER] to display the appropriate dialog box.3.8.2.1.2 Customizing the TaskbarTo customize the taskbar so that it displays only those icons you require:•In the Start Menu, choose Settings, and then Ta s kb ar .If you’re using the keyboard:•Press [Windows] to display the Start Menu.• Highlight the Settings option, highlight Ta s kb a r in the sub-menu, and press [ENTER]. The Task bar a nd Start Men u dialog box is displayed.• Tap on the items you want to activate or deactivate. The check mark indicates active items.If you’re using the keyboard:• Highlight the options you want to activate, and press the [SPACE] key to select them. A check mark indicates active items.3.8.2.2 The Start MenuThe Start Menu lists the operations you can access and work with. It is available from the startup desktop or from within any application.• To display the menu, tap on the Start Menu.Regulatory Draft](https://usermanual.wiki/Psion/7545MBWP.user-manual-I/User-Guide-1680417-Page-50.png)
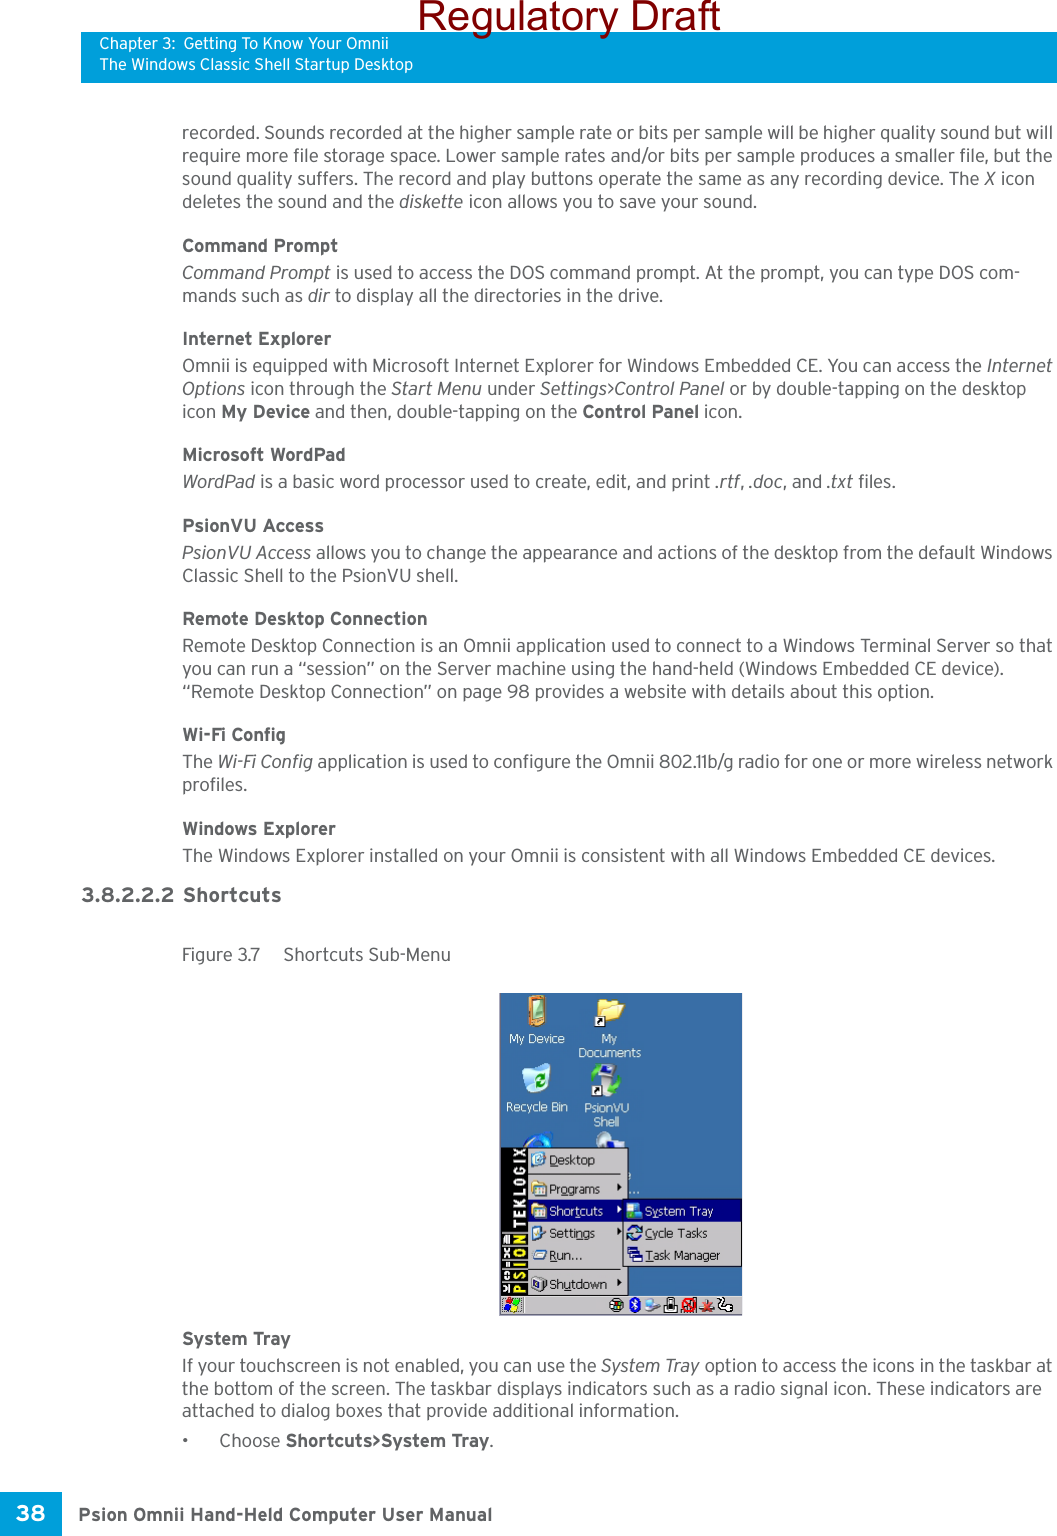
![Chapter 3: Getting To Know Your OmniiThe Windows Classic Shell Startup Desktop37 Psion Omnii Hand-Held Computer User ManualIf you’re using the keyboard:• Use the arrow keys to highlight a menu item, and press [ENTER], or If the menu item has an underlined character:• Type the underlined alpha character. For example, to display the Run dialog box, type the letter ‘r’.3.8.2.2.1 Programs•Choose Programs to display a sub-menu of options. The programs displayed will be those resident in the Windows\Programs folder of the computer.Figure 3.6 Program Sub-MenuThis sub-menu allows you to choose Command Prompt, Internet Explorer, installed applications (e.g., Micro-soft WordPad), PsionVU Access, Remote Desktop Connection, Wi-Fi Config, or Windows Explorer.DemoThis folder contains the Scanner Demo, Demo Signature and Demo Sound applications. Scanner Demo can be used to test how the hand-held reads and writes barcodes. Demo Signature allows you to capture a sig-nature written on the screen with your stylus and save it to a file. Demo Sound allows you to record and playback sound files. The ‘Sample Rate’ and the ‘Bits Per Sample’ are the rates at which the sound will be Note: Tap on the item in the menu with which you want to work.Regulatory Draft](https://usermanual.wiki/Psion/7545MBWP.user-manual-I/User-Guide-1680417-Page-51.png)
![Chapter 3: Getting To Know Your OmniiThe Windows Classic Shell Startup Desktop39 Psion Omnii Hand-Held Computer User ManualWhen System Tray is chosen, the taskbar icons become accessible. To display the dialog box attached to an icon:• Use the arrow keys to highlight an icon, for example, the Bluetooth icon.• Press [ENTER] to display the Bluetooth menus.Cycle TasksWhen Cycle Tasks is selected (and the Task Manager is not open), you can cycle through active applications. To cycle through your active applications:•Choose Shortcuts>Cycle Tasks, or • Press [ALT] [TAB].Task M ana g e rThe Task Man a g er allows you to switch to another task or to end an active task. To display the task manager window:•Tap on Shortcuts>Task Manager, or• Press [ALT] [ESC].3.8.2.2.3 SettingsThe Settings sub-menu includes the following settings: Control Panel, Network and Dial-up Connections and Taskbar and Start Menu.Figure 3.8 Settings Sub-MenuRegulatory Draft](https://usermanual.wiki/Psion/7545MBWP.user-manual-I/User-Guide-1680417-Page-53.png)