Psion 7545MBWP GSM/GPRS/UMTS/HSPA Module User Manual Omnii Hand Held Computer
Psion Inc GSM/GPRS/UMTS/HSPA Module Omnii Hand Held Computer
Psion >
Contents
user manual II

45
Psion Omnii Hand-Held Computer User Manual
4CONFIGURATION
CONFIGU RATION 4
4.1 Overview of Software.....................................................49
4.1.1 Psion Software Advantage.............................................49
4.1.2 Microsoft Software.................................................49
4.2 The Control Panel........................................................49
4.2.1 Control Panel Icons.................................................50
4.3 App Launch Keys........................................................53
4.4 Bluetooth® Setup .......................................................54
4.4.1 Paired.........................................................55
4.4.2 Device.........................................................56
4.4.2.1 Discovering and Removing Devices..................................56
4.4.2.2 Filtering By Class of Device (COD)...................................56
4.4.2.3 Device Pop-up Menu ..........................................57
4.4.2.4 Pairing a Device.............................................57
4.4.3 Servers........................................................59
4.4.4 Mode .........................................................59
4.4.5 About.........................................................60
4.4.6 The Bluetooth GPRS WAN Connection......................................60
4.5 Certificates ...........................................................63
4.6 Data Transfer between Omnii and a PC...........................................64
4.6.2 Using Microsoft ActiveSync............................................64
4.6.3 Using Windows Mobile Device Center......................................65
4.30.1 Wi-Fi Config: Status.................................................122
4.30.2Wi-Fi Config: Configure...............................................122
4.30.3Configuring TCP/IP.................................................126
4.30.4Wi-Fi Config: Advanced...............................................128
4.7 Display Properties.......................................................65
4.7.1 Background .....................................................65
4.7.2 Appearance .....................................................65
4.7.3 Backlight.......................................................66
4.8 Dr. Debug.............................................................66
4.8.1 Status.........................................................67
4.8.2 Settings........................................................67
4.8.3 Utilities . . ......................................................68
4.9 Error Reporting.........................................................68
4.10 GPS (Global Positioning System) Settings..........................................68
4.10.1 Power.........................................................69
4.10.2 Profiles........................................................69
4.10.3 Programs.......................................................69
4.10.4 AGPS.........................................................70
4.10.5 Info.......................................................... 71
4.11 Imager & Camera Settings .................................................. 71
4.12 Input Panel ...........................................................72
4.12.1 Keyboard Properties................................................73
4.12.1.1 Key Repeat................................................73
4.12.1.2 Keyboard Backlight...........................................74
Regulatory Draft

Psion Omnii Hand-Held Computer User Manual
46
4.12.1.3 Keyboard One Shot Modes.......................................75
4.12.1.4 Keyboard Macro Keys..........................................75
4.12.1.5 Unicode Mapping ............................................77
4.12.1.6 Scancode Remapping..........................................78
4.12.1.7 Lock Sequence..............................................80
4.13 Manage Triggers........................................................81
4.14 Microphone...........................................................83
4.15 Open TekTerm..........................................................84
4.16 PartnerUp............................................................84
4.17 Pocket PC Compatibility ....................................................85
4.18 Power Properties........................................................85
4.18.1 Battery Capacity...................................................85
4.18.2 Power Saving Suspend...............................................86
4.18.3 Suspend Threshold and Estimated Battery Backup..............................87
4.18.4Advanced.......................................................87
4.18.5 Built-in Devices ...................................................88
4.18.6Battery Health....................................................88
4.19 Psion Camera..........................................................90
4.19.1 Using the Camera..................................................90
4.19.2 Moving Photos to Omnii..............................................91
4.19.3 Opening a Photo...................................................91
4.19.4 Deleting a Photo...................................................92
4.19.5 Using the Video Recorder.............................................92
4.20 PsionVU Access.........................................................93
4.20.1 Administrator Password..............................................93
4.20.2Shell Settings ....................................................94
4.20.3Restrictions .....................................................96
4.20.4Control Panel Settings...............................................97
4.20.5Import/Export to File................................................97
4.21 Remote Desktop Connection.................................................98
4.22 Scanners.............................................................98
4.22.1 Barcodes.......................................................99
4.22.1.1 Scanner..................................................99
4.22.1.2 Restoring Default Settings.......................................99
4.22.2Options....................................................... 100
4.22.2.1 Double Click Parameters........................................101
4.22.2.2 Display Parameters...........................................101
4.22.2.3Data Handling..............................................102
4.22.3Translations.....................................................102
4.22.3.1 Case Rules............................................... 104
4.22.4Ports ........................................................ 104
4.22.4.1 Port Replicator Port A (COM5) and Port B (COM6)........................ 104
4.23 Storage Manager........................................................106
4.23.1 Formatting a Memory Card ............................................106
4.23.2Creating Partitions.................................................106
4.23.3Partition Management...............................................107
4.24 Stylus Properties........................................................109
4.24.1 Double-Tap......................................................109
4.24.2Calibration......................................................109
4.24.3Touch.........................................................110
Regulatory Draft

47
Psion Omnii Hand-Held Computer User Manual
4.25 System Properties.......................................................110
4.26 Total Recall ........................................................... 111
4.26.1 Creating a Backup Profile............................................. 111
4.26.2Restoring a Profile .................................................113
4.26.3Viewing a Profile ..................................................113
4.26.4Deleting a Profile..................................................114
4.13.1 Trigger Mappings.................................................. 81
4.13.2 Add and Edit Trigger Mapping...........................................82
4.27 TweakIt..............................................................114
4.27.1 Advanced.......................................................114
4.27.1.1 Advanced CE Services Settings....................................114
4.27.1.2 Advanced Interface and Network Settings..............................115
4.27.1.3 Advanced Services Settings......................................115
4.27.2User..........................................................116
4.27.2.1 User Display Settings..........................................116
4.27.3TweakIt........................................................116
4.28 Voice – Using the Phone Dialer................................................116
4.28.1 Dialing a Number..................................................117
4.28.2Voice Menu......................................................117
4.28.3File Menu – Phonebook Management ......................................119
4.29 Volume & Sounds Properties.................................................120
4.29.1 Volume Adjustments................................................121
4.29.2Sound Adjustments.................................................121
4.30 Wi-Fi Config...........................................................121
4.30.1 Wi-Fi Config: Status.................................................122
4.30.2Wi-Fi Config: Configure...............................................122
4.30.2.1 Authentication Mode..........................................123
4.30.2.2Encryption................................................124
4.30.2.3EAP....................................................124
4.30.2.4Verify Server Certificate........................................125
4.30.2.5Enable OPMK...............................................125
4.30.2.6Connecting the Wireless Network...................................125
4.30.3Configuring TCP/IP.................................................126
4.30.3.1 IP Address ................................................126
4.30.3.2Name Server...............................................128
4.30.4Wi-Fi Config: Advanced...............................................128
4.30.5Monitoring the Network Connection.......................................129
Regulatory Draft
Regulatory Draft

Chapter 4: Configuration
Overview of Software
49
Psion Omnii Hand-Held Computer User Manual
4.1 Overview of Software
4.1.1 Psion Software Advantage
Psion Software Advantage is a collection of applications and features designed to support system adminis-
trators and end users. These tools enable enterprises to customize the product to meet their needs and to
maximize productivity.
AGPS Psion Camera
App Launch Keys PsionVu
Battery Health TweakIt
Bluetooth Manager Scanner
Compass Total Recall
Dr. Debug Manage Triggers
PartnerUp WiFi Config
Psion A.R.C. Client
4.1.2 Microsoft Software
Windows CE 6.0 R3 is a 32-bit, real-time, multitasking Operating System. The OS features a small footprint,
with compatibility to port existing Win32 applications and Touch & Gesture support.
Some of the major WCE 6.0 R3 components are:
Flash Lite
Internet Explorer Embedded
Microsoft WordPad
Remote Desktop Connection
Windows Explorer
4.2 The Control Panel
The Windows Embedded CE Control Panel provides a group of applications through which you can set a
variety of system-wide properties, such as mouse sensitivity, network configuration and the desktop color
scheme.
When Omnii boots up, the startup desktop (Windows Classic Shell) is displayed, and any applications stored
in the Startup folder start up immediately.
To access the Control Panel:
• Press [Windows] to display the Start Menu.
•Tap on Settings>Control Panel.
If you’re using the keyboard:
• Press [Windows] to display the Start Menu.
• Highlight Settings in Start Menu, and press the [RIGHT] arrow key to highlight the Control Panel.
• Press the [ENTER] key.
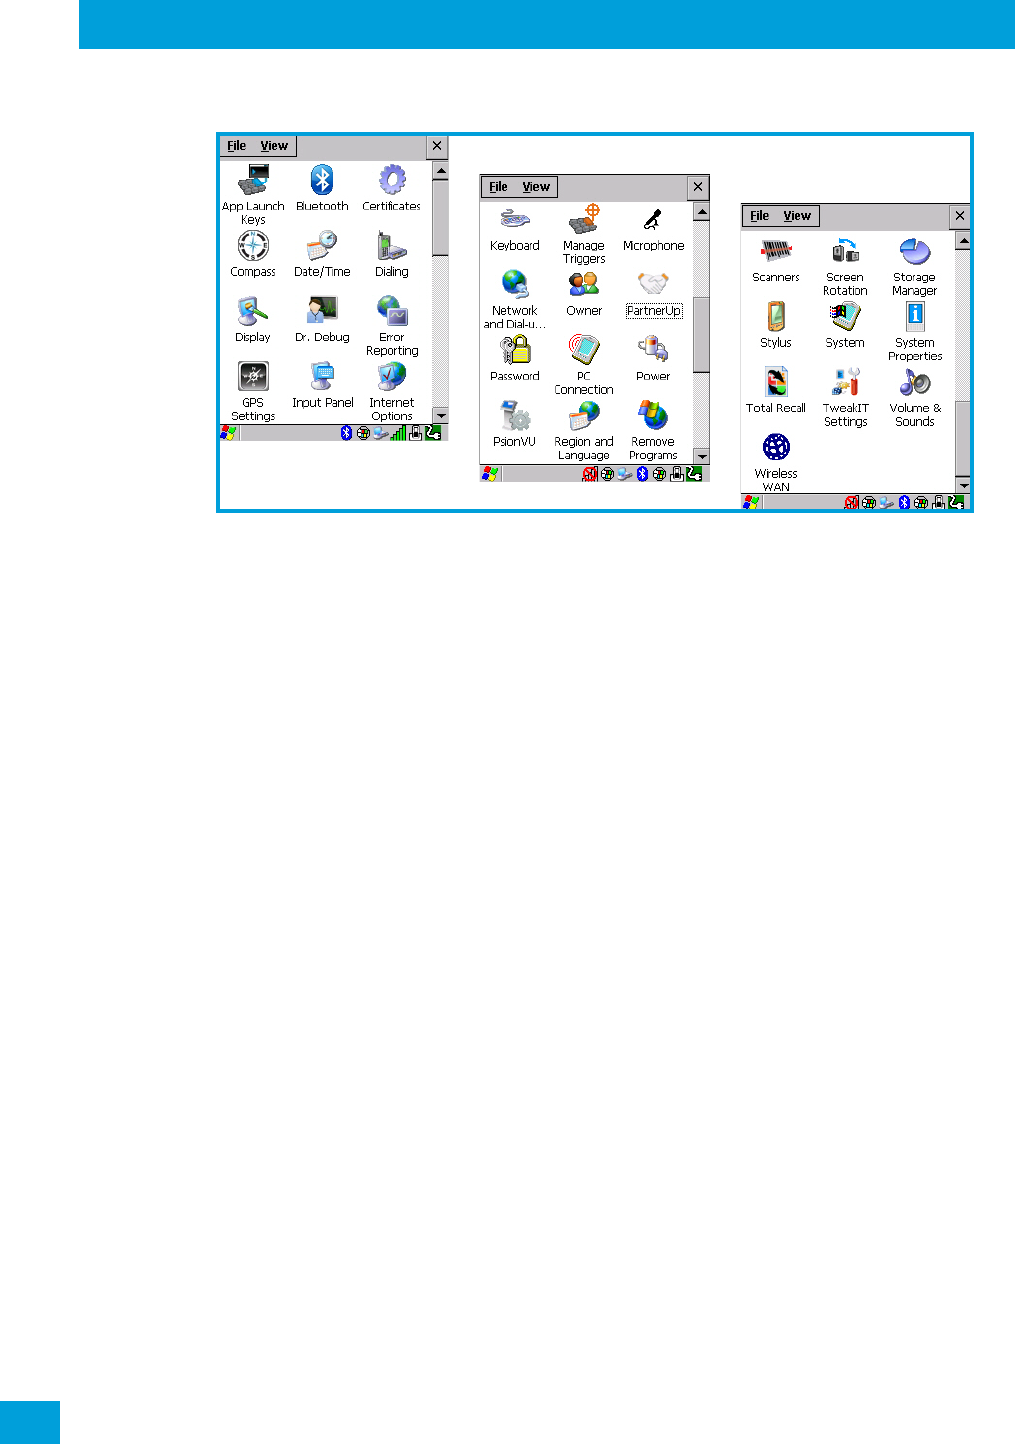
The Control Panel folder contains icons used in the setup of your Omnii.
Regulatory Draft
Chapter 4: Configuration
Control Panel Icons
Psion Omnii Hand-Held Computer User Manual
50
Figure 4.1 Control Panel Icons
4.2.1 Control Panel Icons
The Control Panel provides a group of applications that allow you to customize and adjust settings on your
Omnii. This section shows the related icons in the Control Panel and gives a brief description of each.
App Launch Keys
By mapping keys to applications using this program, you can then launch those applications from a single
key-press.
Bluetooth
Opens the Bluetooth Manager which provides options for configuring various Bluetooth peripherals. It also
provides the capability to use a Bluetooth-enabled cellular phone as a data modem to exchange informa-
tion with other Bluetooth devices and provide network access.
Certificates
This program provides access to the Certificates Manager and Stores. The Certificates Manager displays
the certificates in the Windows Certificates Store, and allows you to import, delete, and view these certifi-
cates. “Certificates” on page 63 directs you to the appropriate setup information.
Compass
This program provides you with a compass, and enables you to calibrate it.
Date/Time
Allows you to set the current Month, Date, Time, and Time Zone on your unit.
Dialing
Specifies dialing settings, including area code, country code, dial type and the code to disable call waiting.
You can store multiple patterns—for example, ‘Work’, ‘Home’, and so on using this dialog box.
Display
Changes the display backlight and the appearance (colour scheme) on the unit desktop.
Dr. Debug
Provides both error diagnostic and troubleshooting tools.
Regulatory Draft

Chapter 4: Configuration
Control Panel Icons
51
Psion Omnii Hand-Held Computer User Manual
Error Reporting
Allows you to enable or disable Microsoft error reporting prompts.
GPS Settings
Allows you to enable and configure GPS operation.
Imagers
The Imagers applet is used to create, modify, delete, and activate imager settings. This icon is only present
when the appropriate imager is installed. For detailed information, see Appendix B: “Imager & Camera Set-
tings”.
Input Panel
Provides the framework for a Microsoft Soft Input Panel (SIP) should you need to design your own SIP, or
change some soft keyboard options.
Internet Options
Provides options to configure your Internet browser. You can determine items such as the default and
search page that the browser applies when connecting to the Internet, the cache size, the Internet connec-
tion options, and the security level that is applied when browsing.
Keyboard
Toggles character repeat on and off and specifies delay and rate for repeated characters. It also allows you
to adjust the keyboard backlight threshold and intensity, and many other functions.
Manage Triggers
This utility allows you to define buttons as triggers for different devices. For example you would use this
utility to configure a button for the scanner, RFID reader, and camera.
Microphone
Enables you to adjust the gain for the specific microphones associated with your hand-held.
Network and Dial-up Connections
Displays network interfaces and allows new dial-up and VPN interfaces to be created. It also allows Windows
configuration of the interface. Refer to “Connectivity” on page 17 for details.
Owner
Provides fields in which you can specify owner information. A Notes tab allows additional information to be
entered and displayed when the unit is powered up. Network ID tab information is used to access network
resources. (This information should be provided by your System Administrator.)
PartnerUp
This app displays a number of pre-loaded applications. By tapping on an application in the list, you are
taken to the associated web site and allowed to install the application.
Password
Allows you to assign a password to restrict access to elements of the unit. Once assigned, password access
cannot be circumvented so it is important that you write down your password and keep it in a safe place.
PC Connection
Enables direct connection to a desktop computer (or through ActiveSync—see “Data Transfer” on page 17).
Selecting the Change Connection button allows you to change the type of direct connection to your PC.
Power
Displays battery pack power status. (Alternately, battery status can be accessed through the taskbar.) Addi-
tional tabs allow you to determine suspend states and specify a suspend threshold.
Regulatory Draft

Chapter 4: Configuration
Control Panel Icons
Psion Omnii Hand-Held Computer User Manual
52
PsionVU
PsionVU enables you to customize your computer settings, remove or add shortcuts to the desktop and
Control Panel, and lock down access to various different components on the computer and the system tray
icons for security. With PsionVU and PsionVU Shell (see “The PsionVU Desktop Shell” on page 41) you can
customize the entire look and feel of your User Experience.
Region and Language
Allows you to specify the local language that is to be displayed on the hand-held screen along with the
format of numbers, currency, time and date for your region.
Remove Programs
Lists the programs that can be removed from your unit. To remove a program, select it and then click on
the Remove button.
Scanners
Provides scanner parameters and the barcode symbologies that the Omnii barcode scanner will success-
fully read.
Screen Rotation
This feature enables you to change the screen rotatation between landscape or portrait.
Storage Manager
Allows you to view information about the storage devices that are present, such as SD-MMC flash cards. For
details, see page 106.
Stylus
Adjusts how Windows Embedded CE recognizes your double-tap (as slow or rapid successive taps). In the
Calibration tab, you can recalibrate your touchscreen by tapping on the Recalibrate button and following
the directions on the screen.
System
You can display the system and memory properties, as well as create your device name. In the Memory tab,
you can allocate memory between storage memory and program memory.
System Properties
Identifies the computer’s software and hardware components, indicating which components are installed,
their version or part numbers, and whether they are enabled or disabled.
Tota l Recal l
Provides access to a backup\restore and deployment utility to maintain applications and settings over cold
reboots and for multiple devices.
TweakIt
Allows you to change Advanced System Settings (interface, network, and servers), User System Settings
(display font size), and provides the Registry Editor.
Volume & Sounds
Allows you to adjust the volume of the sound emitted to indicate events like warnings, key clicks, and screen
taps. You can also configure system (Windows) sounds and .wav files.
Wireless WAN
Provides access to technology like GSM/GPRS, which allows wide area networking capability such as inter-
net browsing via GSM/GPRS. It also provides access to the Phone API. For detailed information, see
Appendix F: “Wireless Wide Area Network (WWAN) Settings”.
Regulatory Draft
Chapter 4: Configuration
App Launch Keys
53
Psion Omnii Hand-Held Computer User Manual
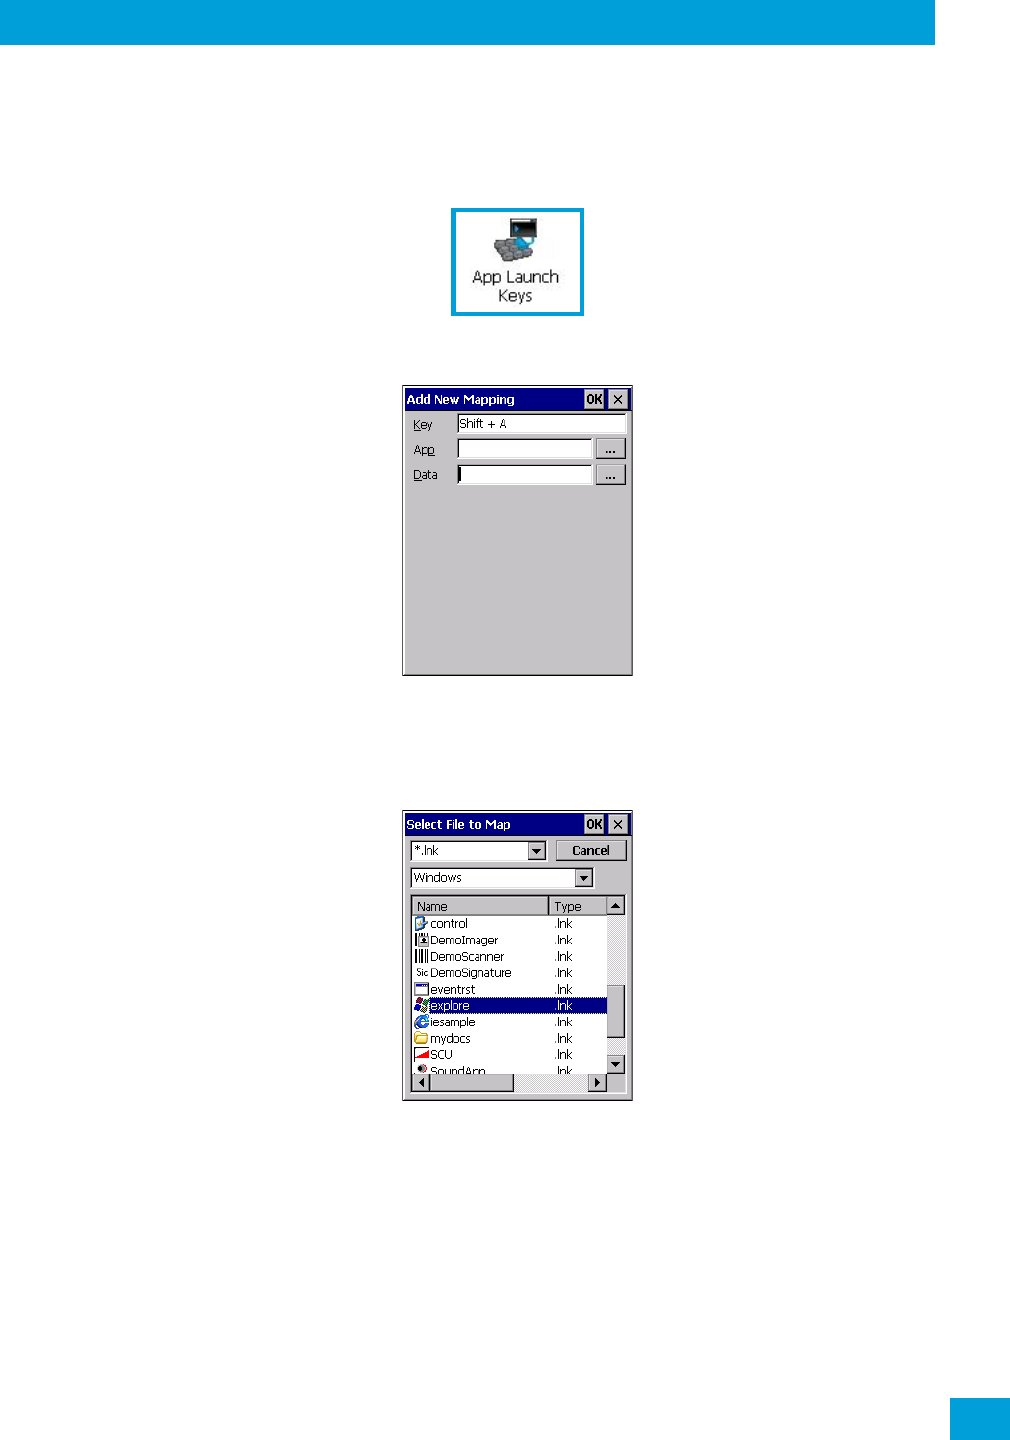
4.3 App Launch Keys
The App Launch Keys icon allows you to map a key to an application so that you can then launch the appli-
cation from a single key-press.
•In the Control Panel, choose the App Launch Keys icon.
To assign an application key:
•Tap the Add button.
• Press the key you want to use to launch an application. (If an unsupported key is pressed, a message
appears on this screen letting you know.)
The cursor moves to the App field and a new screen is displayed where you can choose the application to
which you want to assign the application key. If you need to, you can Browse through the information in
your Omnii until you locate the application you want to launch.
• Once you’ve selected the file you want to map, tap on OK.
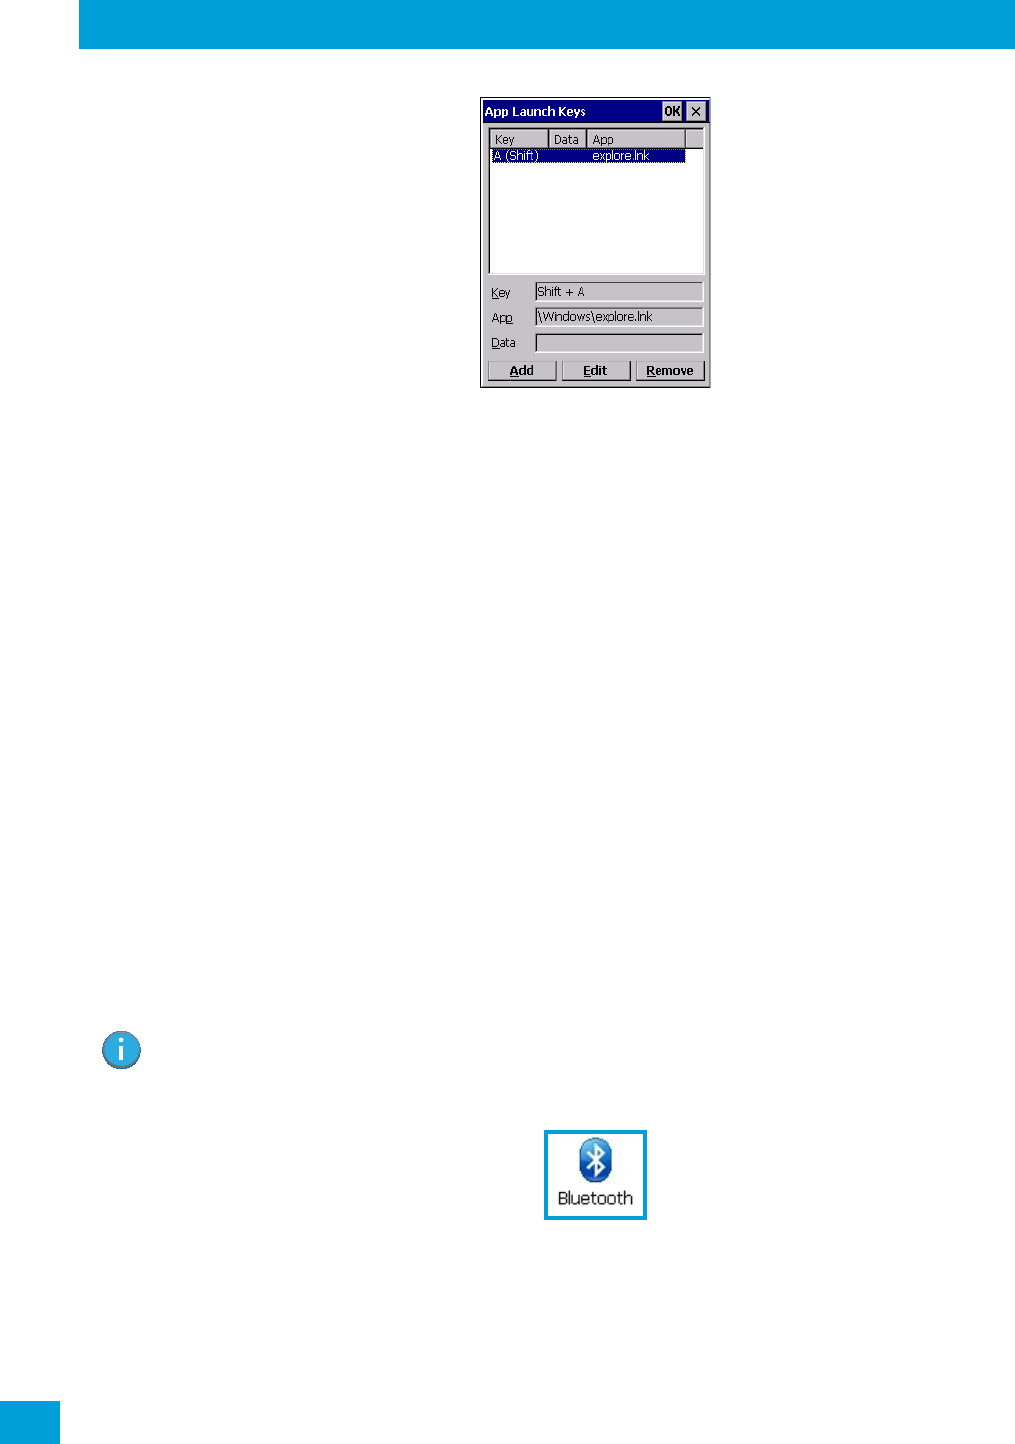
The cursor moves to the Data field. You can use this field if you need to need to define command line pa-
rameters for your application. If you don’t want to assign any parameters, you can leave the Data field
blank. If, for example, you want to assign an application launch key to launch the WordPad application, you
can leave this field blank. If you want to assign an application launch key that will open a specific document
in the WordPad application, you need to browse to and choose that document while the cursor is in the Data
field.
•Tap on OK.
Regulatory Draft
Chapter 4: Configuration
Bluetooth® Setup
Psion Omnii Hand-Held Computer User Manual
54
• If you need to Edit, Remove or Add another App Launch Key, you can do it from this final screen. Oth-
erwise, tap on OK to save your Application Launch Key.
• To launch the application you chose, press the application key you assigned.
4.4 Bluetooth® Setup
Bluetooth is a global standard for wireless connectivity for digital devices and is intended for Personal Area
Networks (PAN). The technology is based on a short-range radio link that operates in the ISM band at
2.4 GHz. When two Bluetooth-equipped devices come within a 10 metre (32 ft.) range of each other, they
can establish a connection. Because Bluetooth utilizes a radio-based link, it does not require a line-of-sight
connection in order to communicate.
It is possible to communicate with a variety of Bluetooth peripherals, including GSM/GPRS handsets, scan-
ners, printers, and so on.
Psion provides built-in support for:
• GSM/GPRS universal handset
•Bluetooth printer
•Bluetooth headset
Keep in mind that Bluetooth and IEEE 802.11g radios both operate in the 2.4GHz band. Although Omnii in-
cludes features to minimize interference, performance of the system will not be optimal if you use both
radios simultaneously. Typically, when both radios operate in the hand-held at the same time, they cannot
transmit simultaneously—this has a negative impact on overall system throughput. To minimize the impact
on the backbone 802.11 network, Psion recommends using Bluetooth peripherals that have low transaction
rates (such as printers and scanners).
Bluetooth peripherals are configured by choosing the Bluetooth icon in the Control Panel. In addition,
review the manual shipped with your Bluetooth device to determine the method used to associate with the
Omnii host.
•In the Control Panel, choose the Bluetooth icon to display the Bluetooth Manager screen.
The Bluetooth Manager allows users to search, pair and connect to other Bluetooth devices within their
personal area network.
The Bluetooth radio is disabled by default. Before you begin the setup process:
• Tap on the Mode tab, and tap in the checkbox next to Turn on Bluetooth. Tap on OK.
Note: The Bluetooth radio uses an internal antenna.
Regulatory Draft
Chapter 4: Configuration
Paired
55
Psion Omnii Hand-Held Computer User Manual
When the radio is enabled, a Bluetooth icon appears the taskbar at the bottom of the screen. It is ready
for setup.
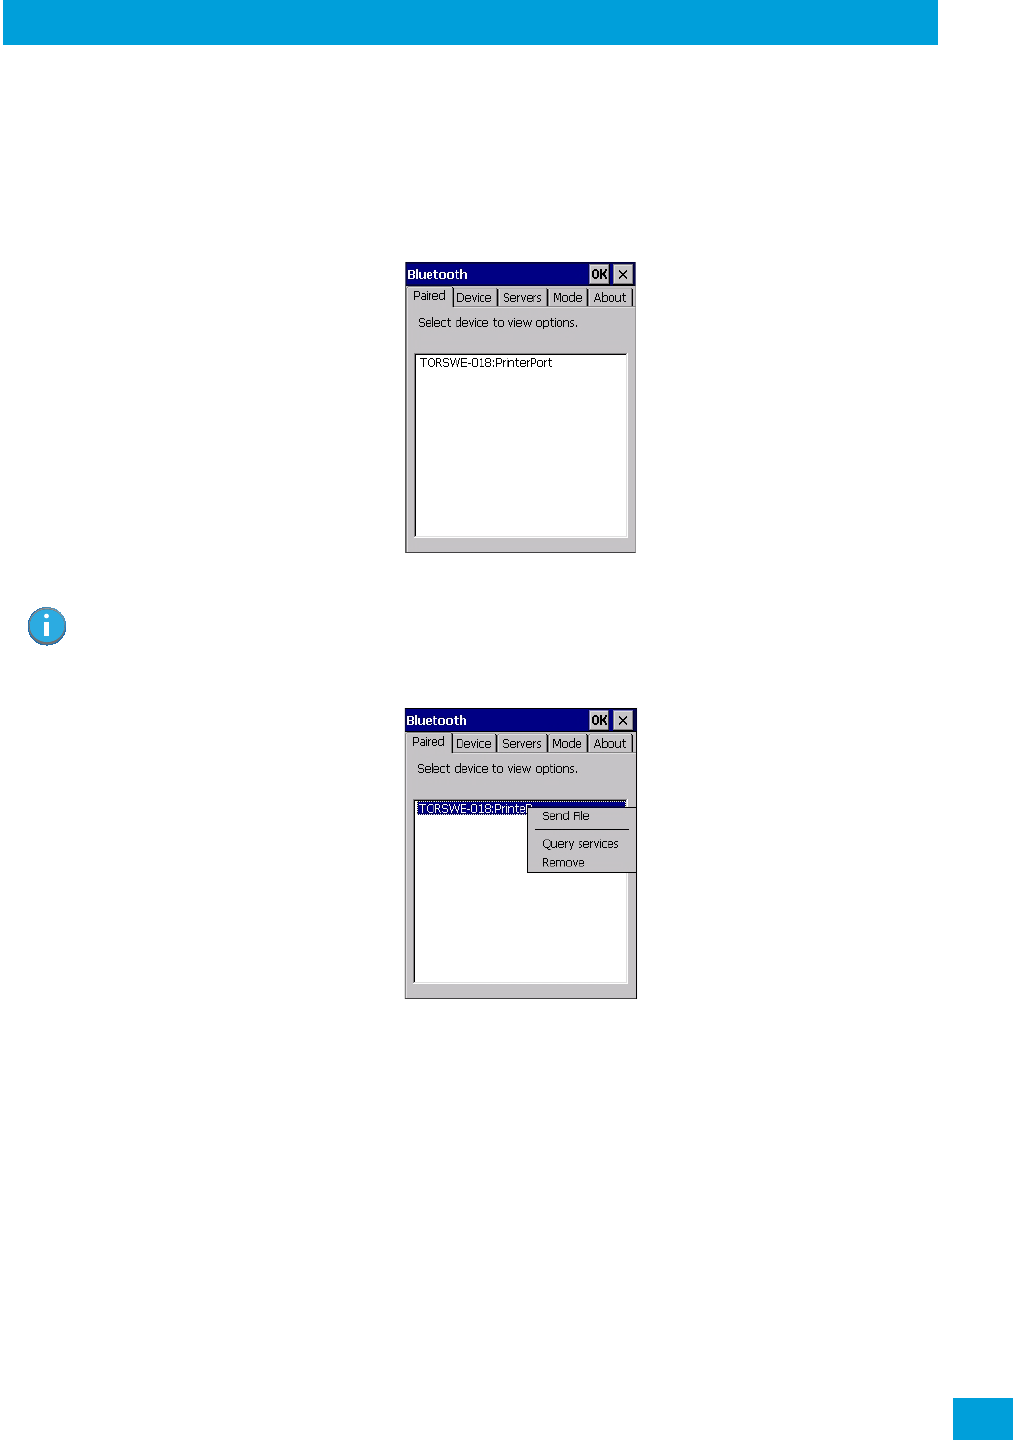
4.4.1 Paired
This tab lists all paired devices and their corresponding services. The format of the name is <Device
Name>:<Service Name>. Additional information may appear in this screen such as the Port Numbers for
Serial Profiles service.
To learn how to scan for devices to pair, review “Device” on page 56.
• Tap on an item in the Paired tab to display an associated pop-up menu.
The displayed menu depends on the type of the service chosen.
Query Services and Remove Commands
•Query Services displays a Services dialog box where a pairing service is chosen.
•Remove unpairs the highlighted service and deletes the entry from the tab.
OBEX OPP (Object Exchange-Object Push Profile) Commands
The OPP defines two roles—a Push Server and a Push Client. Push Server is the device that provides an
object exchange server. Push Client is the device that pushes and pulls objects to and from the Push Server.
OBEX OPP contains the following unique menu option:
•Send File displays an Open File dialog box where the file to be sent can be selected. When the transmis-
sion begins, another dialog box tracks the progress of the file transmission.
HSP/HFP (Headset Profile/Hands-Free Profile) Service Commands
The HSP (Headset Profile) allows users to connect their device to Bluetooth enabled headsets and other
audio devices.
Note: If a service is actively paired and connected, the device and its services are displayed in bold
typeface in this list.
Regulatory Draft
Chapter 4: Configuration
Device
Psion Omnii Hand-Held Computer User Manual
56
HSP/HFP services provide the following unique menu options:
•Connect Audio establishes an audio connection to the Bluetooth headset.
•Disconnect Audio disconnects the audio connection from the Bluetooth headset.
•Volume Control displays a dialog box where the headset and microphone volume can be adjusted.
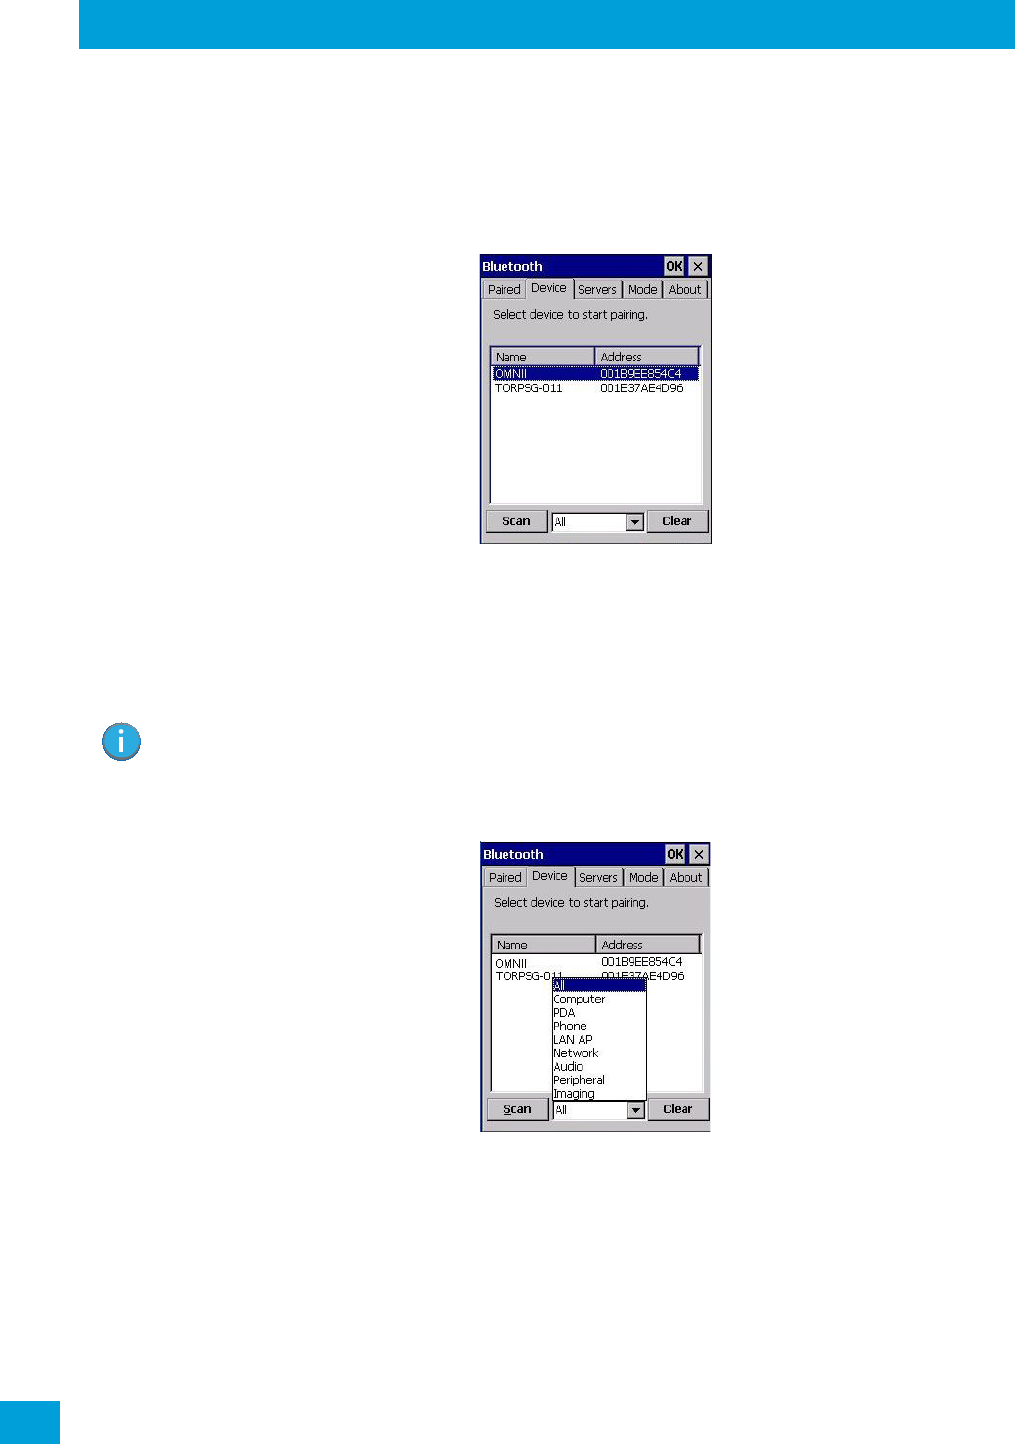
4.4.2 Device
In this tab, users can discover and display Bluetooth devices.
4.4.2.1 Discovering and Removing Devices
Scan discovers Bluetooth devices in range of Omnii and lists them in this tab. Any existing devices previ-
ously discovered and listed will also be displayed.
Clear removes all Bluetooth devices listed except those with currently paired and connected services.
4.4.2.2 Filtering By Class of Device (COD)
This menu allows you to filter the displayed devices by their COD. If, for example, you choose Computer
from this menu, only the devices that have the matching Computer COD value will be displayed. Choosing
All lists all detected devices.
Note: To limit the number of devices listed to a particular type of device, refer to “Filtering By Class
of Device (COD)”, next section.
Regulatory Draft
Chapter 4: Configuration
Device
57
Psion Omnii Hand-Held Computer User Manual
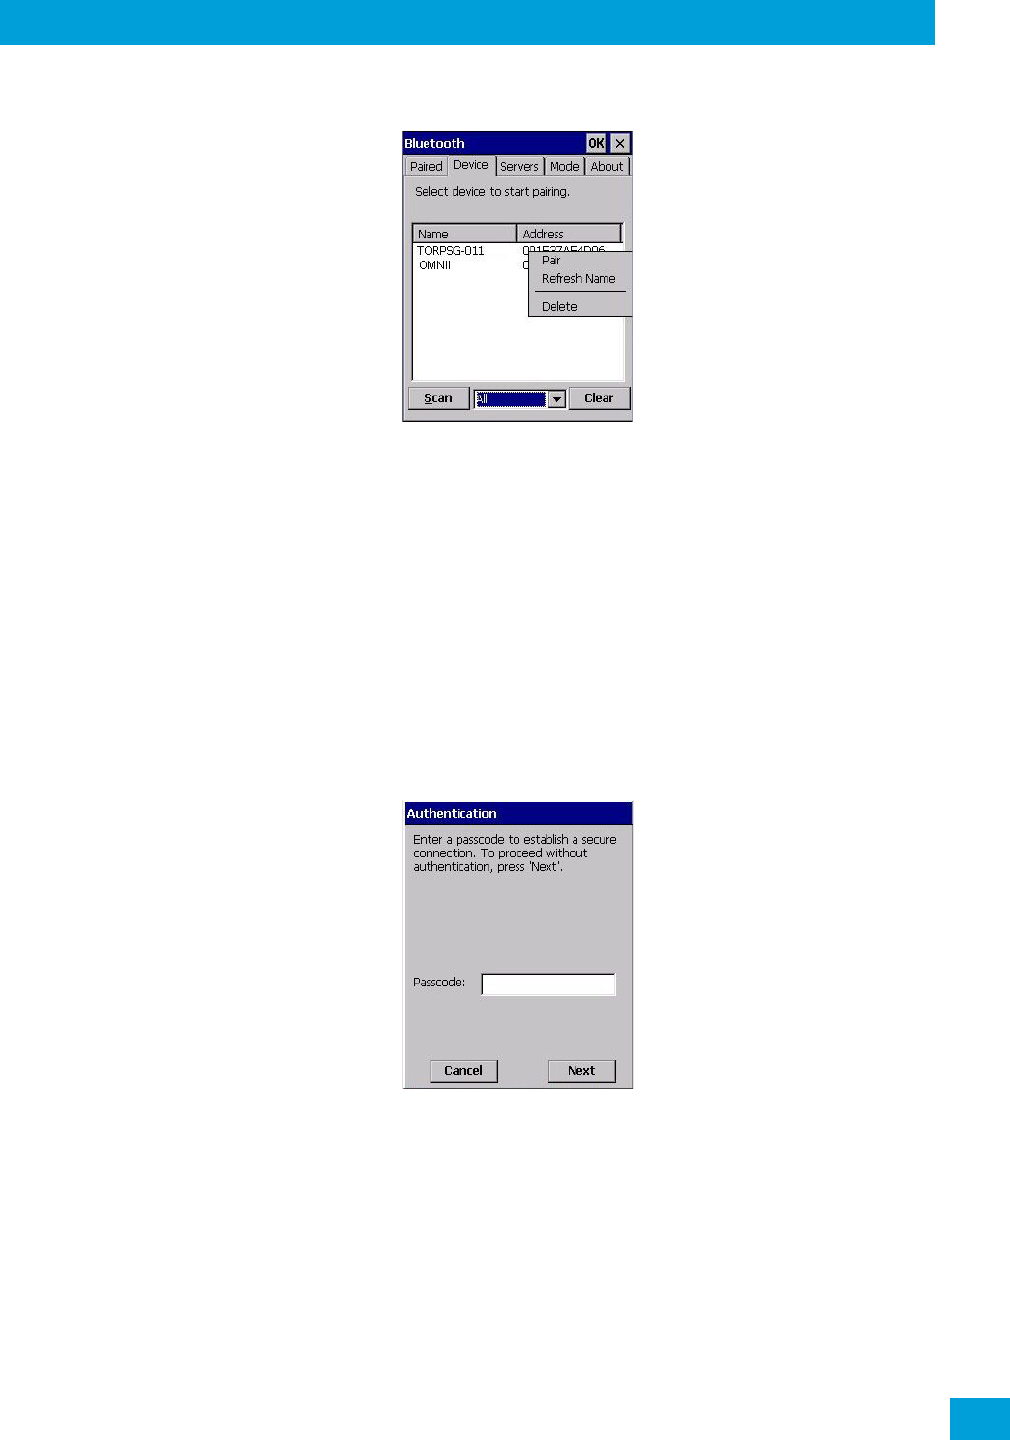
4.4.2.3 Device Pop-up Menu
The Device pop-up menu allows you to pair a device, update a device name or delete a device from the list.
Pair begins the pairing process by inquiring the services and profiles of the discovered device. An authenti-
cation dialog box is displayed the first time a Bluetooth device is paired.
Refresh Name repeats the device name inquiry, updating the name. This command is useful if a device is
listed without a name (unknown), or if a device name has been changed remotely.
Delete removes this device from the list.
4.4.2.4 Pairing a Device
To pa ir devices:
• Follow the manufacturer’s instructions to place the remote device in pairing mode.
• Choose the Devices tab and Scan for devices in your area.
• When the scan is complete, tap on the device to which you want to pair.
• In the pop-up Device menu, tap on Pair.
An Authentication dialog box is displayed.
• If the remote device has authentication enabled, type the PIN in this dialog box.
• To proceed without authentication, tap on Next.
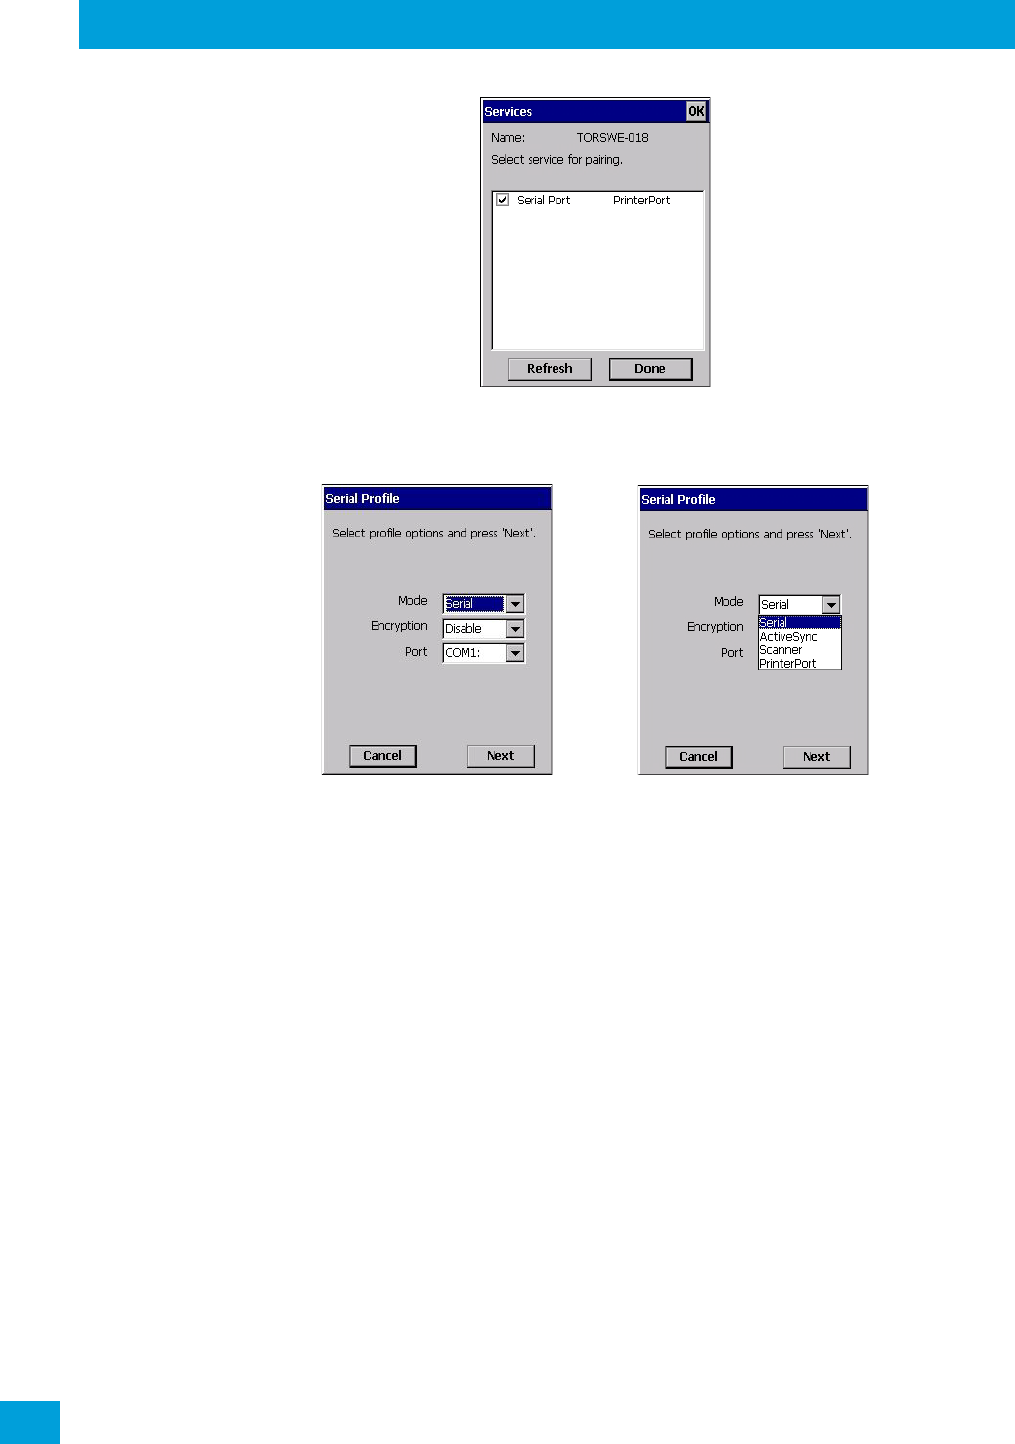
After entering the device PIN, the Services dialog appears with a list of services available for that device.
Regulatory Draft
Chapter 4: Configuration
Device
Psion Omnii Hand-Held Computer User Manual
58
• Click in the checkbox to the left of the service to activate it.
• Click on Done.
Services that require more information present a configuration dialog box. Serial Profile is an example.
This dialog box offers a number of additional options such as enabling Encryption and selecting four differ-
ent Modes: Serial, ActiveSync, Scanner, and Printer Port.
Serial is used for simple serial port communication.
ActiveSync is for ActiveSync-over-Bluetooth.
Scanner is used to create a connection to a barcode scanner. A serial connection is created, then the
Scanner Services is notified of the connection so that the incoming barcode scan will be forwarded to
Scanner Services directly.
Printer Port must be chosen here if you want to communicate with a paired Bluetooth printer. For further
details, see “Mode” on page 59.
Regulatory Draft
Chapter 4: Configuration
Servers
59
Psion Omnii Hand-Held Computer User Manual
• Once you’ve completed the information, tap on Next and then in the Services screen, click on Done.
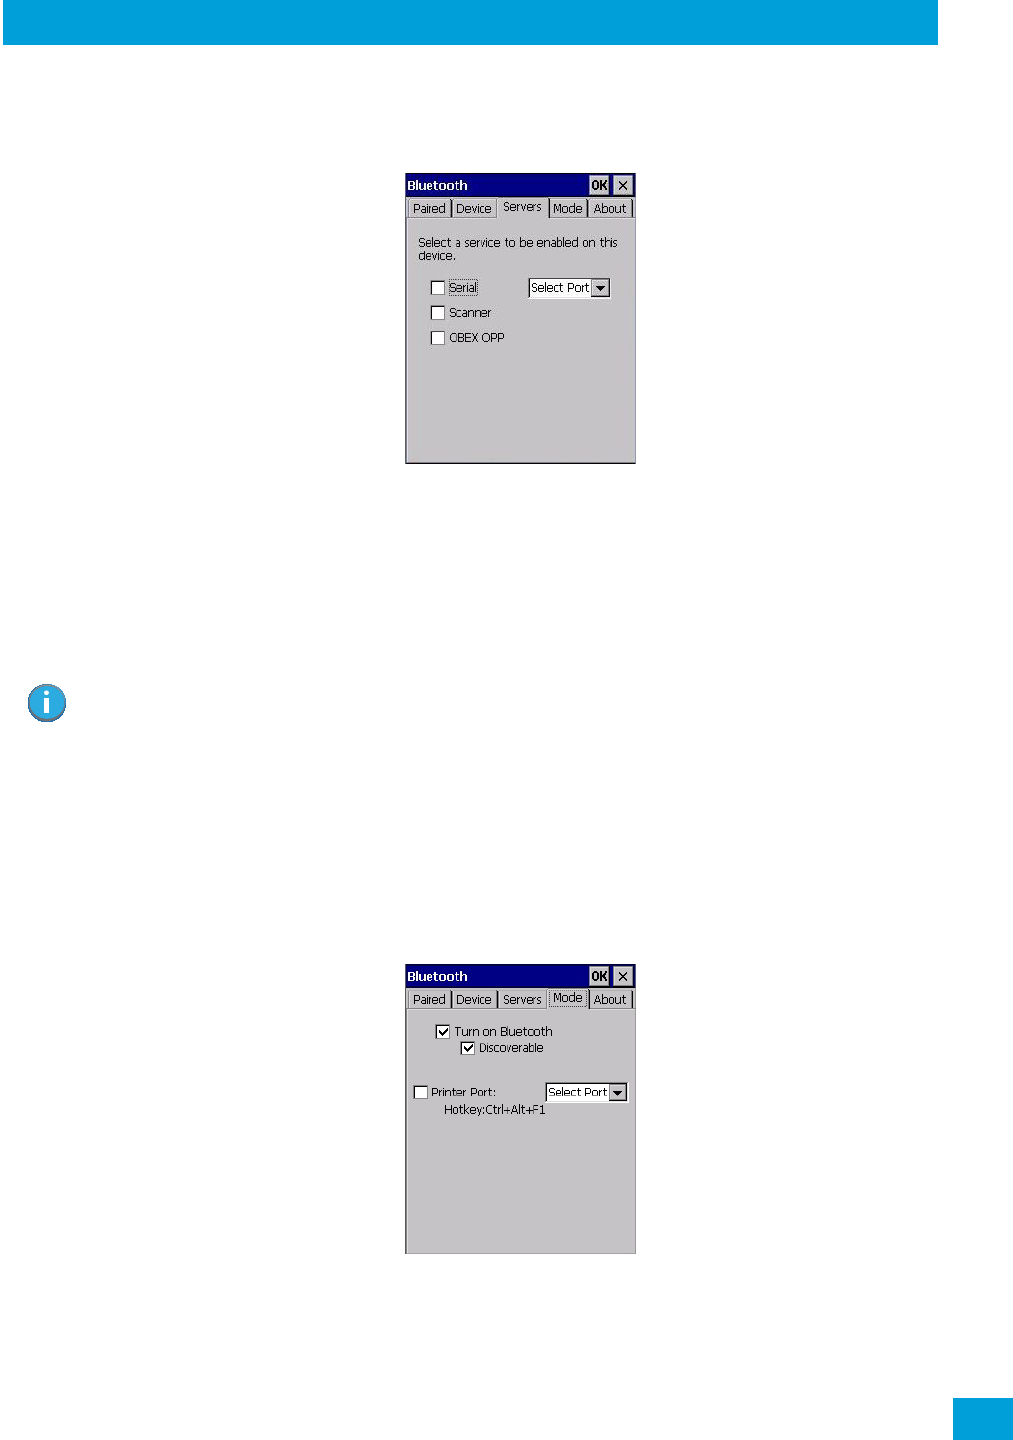
4.4.3 Servers
When a remote Bluetooth device initiates a Bluetooth connection to Omnii, the remote device is considered
the ‘Bluetooth master’ and the hand-held, the ‘Bluetooth slave’. In order for the remote device to connect to
the hand-held, Omnii must offer a service in the form of a server. The Servers tab allows these services to
be enabled and configured. There are three server services available: Serial, Scanner and OBEX OPP.
Serial server enables the Serial Port Profile server; a Serial Port can be selected from the drop-down menu.
You can assign either a BSP or a COM prefix from the drop-down menu. BSP (Bluetooth Serial Port) was
created by Microsoft to allow Bluetooth to have its own serial prefix in order to free up virtual COM prefixes
as these are limited and are widely used.
Scanner server enables a Serial Port Profile server and then relays it to the Scanner Service (SCS). This is
used for Bluetooth barcode scanners that operate in client mode. SCS opens the server port and handles
the scanner input.
OBEX OPP server enables the Object Push Profile server. A warm reset must be performed on Omnii after
a change is made to this option. The OPP Server allows other Bluetooth devices to send files to this device.
• Tap on the checkbox to activate the server.
4.4.4 Mode
Turn on Bluetooth activates the Bluetooth radio.
Discoverable determines whether Omnii is visible or invisible to other devices.
Note: Even after a Serial Port Profile server is created, an application must open the created port
before a remote device can connect.
Regulatory Draft
Chapter 4: Configuration
About
Psion Omnii Hand-Held Computer User Manual
60
Printer Port allows you to assign and enable a virtual outgoing COM port selected from the drop-down
menu to communicate with a paired Bluetooth printer. Keep in mind that when a port is chosen, the printer
must be on and connected to the chosen port for a remote device to be able to connect.
• Select a port within the Printer Port drop-down list, e.g. BSP1:
• Check the Printer Port check box.
•Open the Device tab and tap on Scan.
• Tap-and-hold each Bluetooth Printer device entry and then select Pair, key-in the Passcode (if needed)
and then tap Done. DO NOT select any services!
•Close the Bluetooth Manager.
• Select the Bluetooth device to print to—you will need to key-in (or programmatically raise) the following
key sequence [CTRL] [ALT] [F1].
• You can now select the Bluetooth device to which you wish to print.
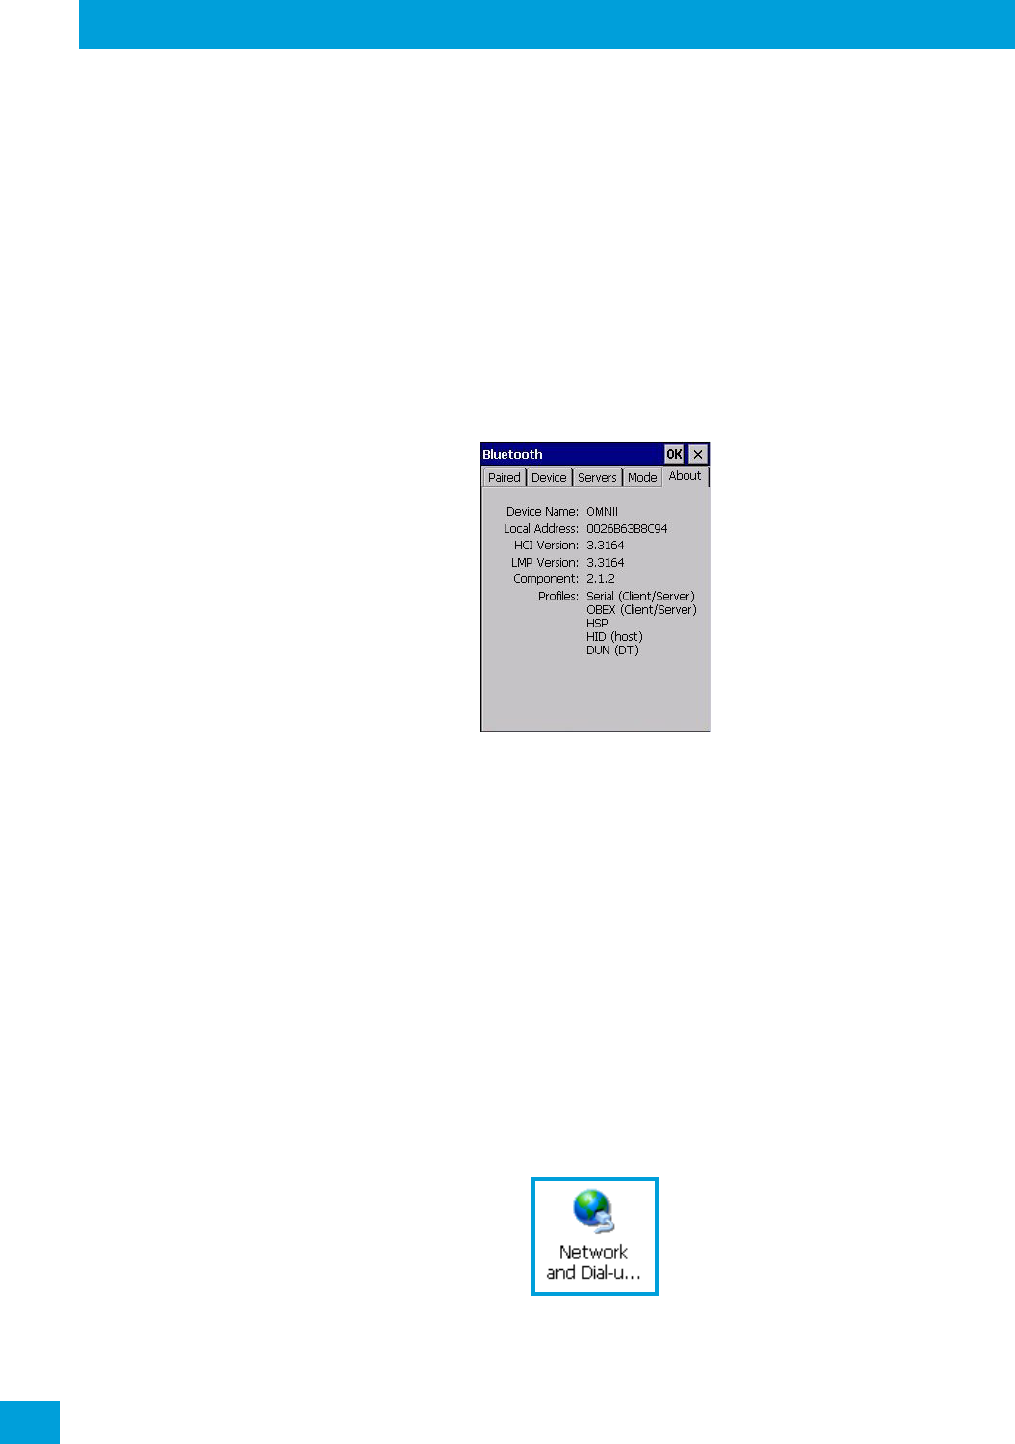
4.4.5 About
Device Name displays the broadcasted name of the hand-held. The name can be changed in the System
Properties applet: Start>Settings>Control Panel>System icon>Device Name tab.
Local Address displays the MAC address (BD_Addr) of the Bluetooth chip.
HCI Version & LMP Version display the version of the chip firmware.
Component indicates the version of the Psion Bluetooth Subsystem (the manager, drivers, etc).
Profiles lists the supported profiles on this specific Omnii.
4.4.6 The Bluetooth GPRS WAN Connection
The following steps describe how to set up an Internet data connection using a GSM cellular telephone with
Bluetooth. Omnii communicates via Bluetooth to the cell phone, which then accesses a WAN (Wide Area
Network) and transfers data using GPRS.
1. Enable the Dial-Up Networking service in the cell phone.
2. Make the phone discoverable.
3. Pair the phone service with the Omnii Dial-Up Networking service using the Bluetooth Manager.
(For instructions on pairing devices, refer to “Pairing a Device” on page 57.)
4. To set up the Internet parameters, choose the Network And Dial-up Connections icon from the
Control Panel.
5. Tap on Make New Connection.
Regulatory Draft

Chapter 4: Configuration
The Bluetooth GPRS WAN Connection
61
Psion Omnii Hand-Held Computer User Manual
6. In the Make New Connection dialog box, choose Dial-Up Connection. Enter a name for your GPRS
network connection.
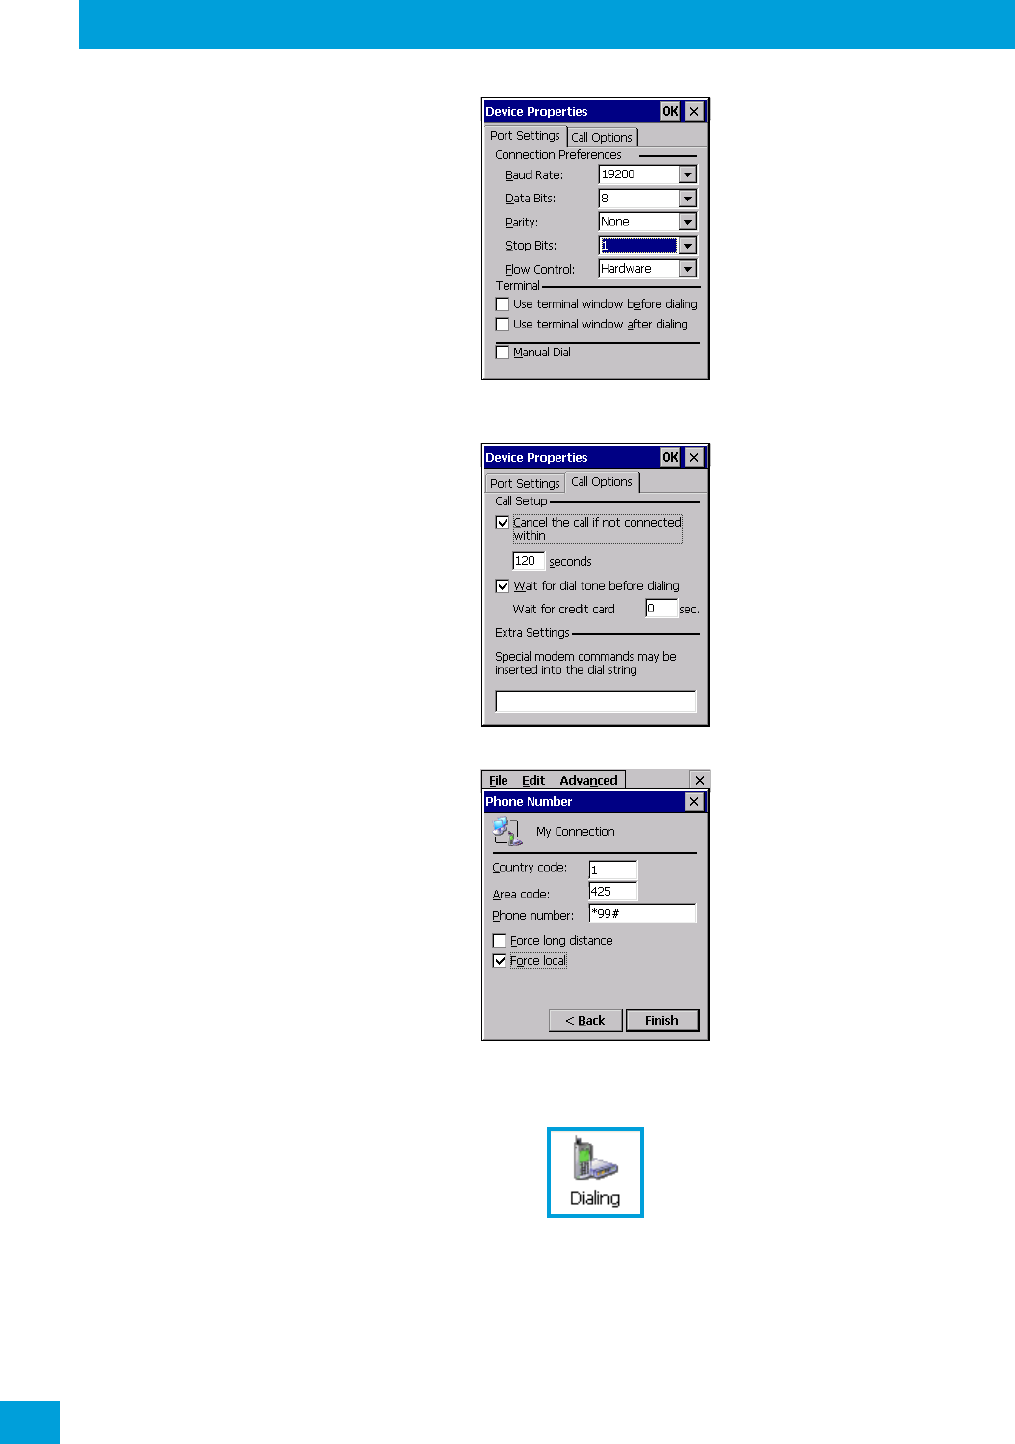
7. C h o ose t he Next button to display the Modem dialog box.
8. In the drop-down menu labelled Select a modem, choose the name of the modem with which you
want to connect, and then choose the Configure button to display the Device Properties dialog
box.
Omnii communicates via Bluetooth to your Bluetooth equipped cellular telephone and retrieves the
parameters for the Device Properties dialog box. Omnii then disconnects.
Regulatory Draft
Chapter 4: Configuration
The Bluetooth GPRS WAN Connection
Psion Omnii Hand-Held Computer User Manual
62
9. Under the Call Options tab, turn off Cancel the call if not connected within, and press [ENTER]
to save your changes.
10. In the Modem dialog box, choose the Next button to display the Phone Number dialog box.
The phone number you enter is network carrier dependent. Once you’ve specified all the necessary
information, choose the Finish button.
11. In the Control Panel, choose the Dialing icon.
12. The values in the Dialing Properties dialog box need to be edited according to your network carrier
specifications.
Regulatory Draft

Chapter 4: Configuration
Certificates
63
Psion Omnii Hand-Held Computer User Manual
Once you’ve edited this dialog box to reflect your network carrier requirements, press [ENTER] to
save your changes.
13. At this point, return to the Control Panel, and choose the Network and Dial-up Connections icon.
14. In the network connection window, the new network configuration—in this case, New Connection is
displayed. Tap on the new icon.
When you tap on your new connection, an onscreen message indicates the status of your connection: con-
nected, disconnected, error messages, and so on.
4.5 Certificates
This program provides access to the Certificate Manager and Stores. The Certificate Manager displays the
certificates in the Windows Certificate Store, and allows you to import, delete, and view these certificates.
Omnii checks that the certificate has been digitally signed by a certification authority that Omnii explicitly
trusts. This option is used in conjunction with 802.1x authentication to enhance Omnii security.
•In the Control Panel, choose the Certificates icon.
Your Omnii has certificates preinstalled in the computer. My Certificates is the repository for the device’s
personal certificate store, Other Authorities is the repository for the intermediate certificate store, and
Trusted Authorities is the repository for the Trusted Root certificate store.
Regulatory Draft

Chapter 4: Configuration
Data Transfer between Omnii and a PC
Psion Omnii Hand-Held Computer User Manual
64
You can import or remove certificates, and view certificate information for any listing, including names,
dates, serial numbers, etc.
For a detailed description about Certificate setup for both the server and client-side devices (Omnii Hand-
Held Computers), refer to the following website:
http://www.microsoft.com/windowsserver2003/techinfo/overview/security.mspx
4.6 Data Transfer between Omnii and a PC
Data transfer options vary slightly depending on the type of operating system installed in your PC.
For Windows XP SP2 operating systems or earlier, Microsoft® ActiveSync® connectivity software can be
used to connect your Omnii to PCs.
If the Windows Vista® , Windows 7 or later, operating system is installed in your PC, ActiveSync is not re-
quired to transfer data between your Omnii and your PC.
By using a Snap Module or Desktop Docking Station with your Omnii, you can connect to a PC with a cable
and:
• View Omnii files from Windows Explorer.
• Drag and drop files between Omnii and the PC in the same way that you would between PC drives.
• Back up Omnii files to the PC, restore them from the PC to the hand-held again, etc.
4.6.1 Uploading Data in a Docking Station
The Desktop Docking Stations allow your hand-held to upload transaction data to a server computer when
a radio link is not available. When Omnii is properly inserted in a docking station, a dock icon is displayed in
the taskbar at the bottom of the unit screen. For detailed information, refer to “Desktop Docking Stations -
Models ST4002 and ST4003” on page 141.
4.6.2 Using Microsoft ActiveSync
To install ActiveSync, follow the step-by-step instructions provided with the program’s setup wizard. For de-
tails, go to the following website and type the name into the search box:
Note: If you use a serial port to connect devices like Omnii to your desktop computer, the connec-
tion may not succeed because ActiveSync has trouble connecting at non-default baud rates.
To work around this problem, set the ActiveSync baud rate on the desktop to use the same
baud rate as the device. You can set the baud rate by editing the registry on the desktop host
computer, as detailed in the steps outlined at the following website:
http://support.microsoft.com/kb/324466
Regulatory Draft
Chapter 4: Configuration
Using Windows Mobile Device Center
65
Psion Omnii Hand-Held Computer User Manual
http://www.microsoft.com/downloads/en/default.aspx
4.6.3 Using Windows Mobile Device Center
If you are running Windows Vista, Windows 7, or later, your data transfers do not require ActiveSync.
Instead, you will need to download Windows Mobile Device Center. For instructions, go to the following
website and type the name into the search box:
http://www.microsoft.com/downloads/en/default.aspx
To transfer data between your PC and your hand-held:
•Tap on Start>Computer to display the drives. Omnii will be visible here.
• Open drives, files and folders as you would on your PC.
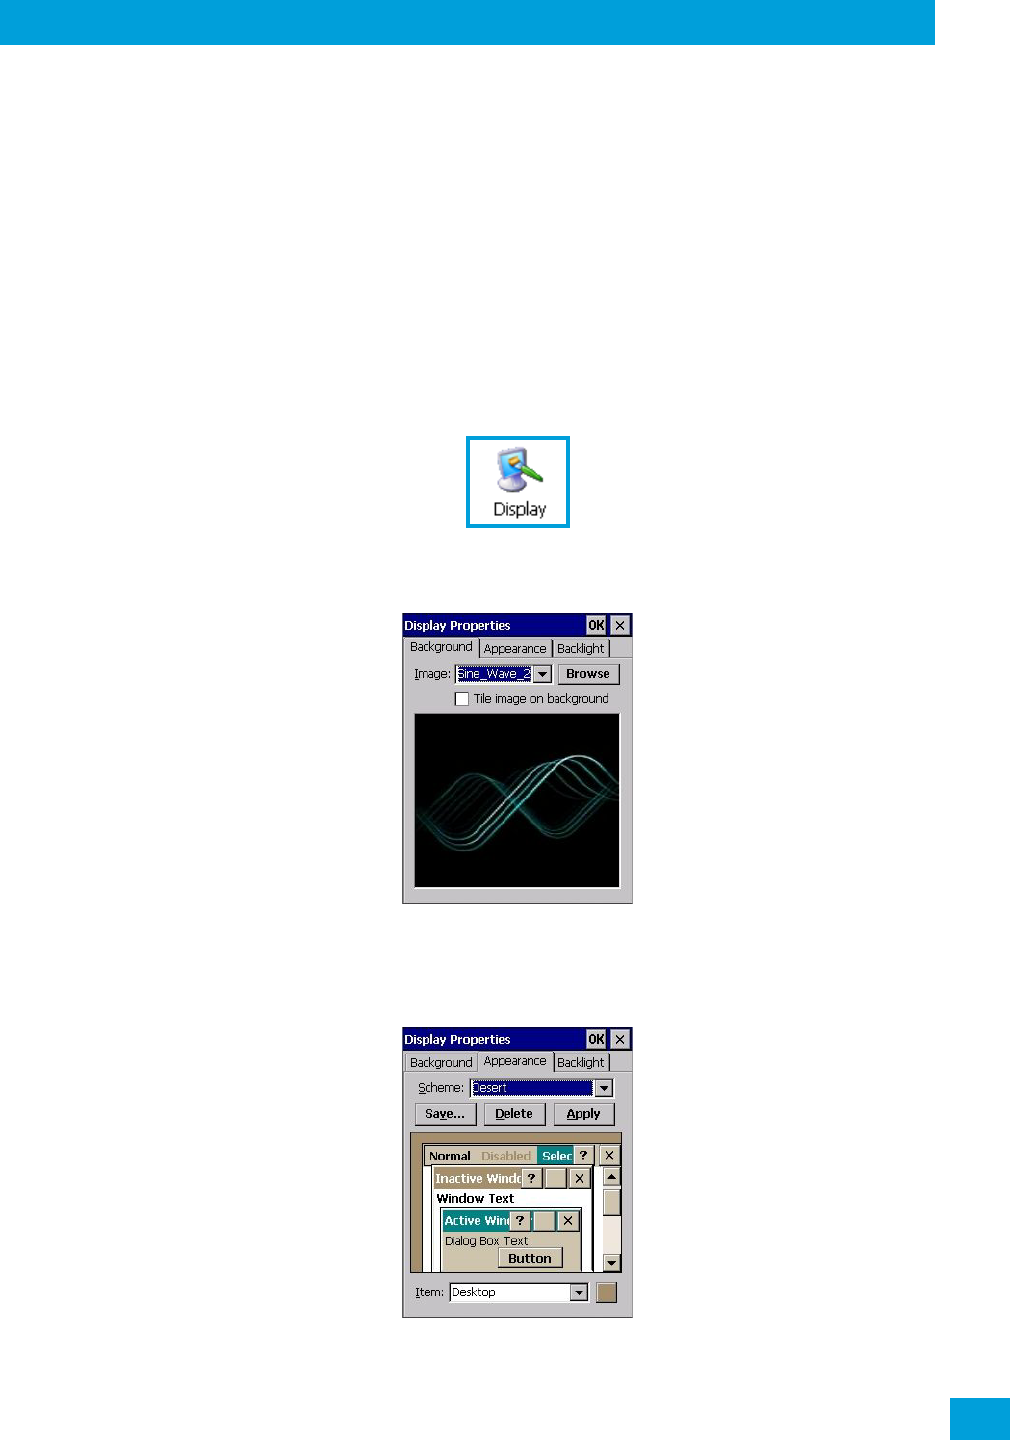
4.7 Display Properties
•In the Control Panel, choose the Display icon.
4.7.1 Background
•In the Display Properties dialog box, open the Background tab.
This dialog box allows you to customize your background image.
4.7.2 Appearance
•In the Display Properties dialog box, open the Appearance tab.
Regulatory Draft

Chapter 4: Configuration
Backlight
Psion Omnii Hand-Held Computer User Manual
66
This dialog box allows you to customize the display colour scheme.
4.7.3 Backlight
The backlight is activated for a configurable amount of time. The Display Properties dialog box in the
Control Panel allows you to specify the intensity of the backlight along with how long the backlight remains
on when the unit is not in use (no key press, scanner trigger, etc.).
•In the Display Properties dialog box, open the Backlight tab.
Intensity
This parameter is used to adjust the light intensity of the Omnii backlight. Sliding the bar to the left lowers
the light intensity, and sliding it to the right raises the intensity.
Bright For
The value chosen from this drop-down menu determines the duration of time that the backlight stays on at
the configured intensity after the last user action (keypress, scan trigger).
Dim For
The value chosen from this drop-down menu determines the duration of time that the backlight stays on at
half the configured intensity (dimmed backlight) after expiration of the Bright For delay and as long as no
user action takes place (such as a keypress or scan trigger). At the expiration of the Dim For duration, the
display backlight shuts off.
External Power Checkbox
When you select the checkbox next to When using external power keep the backlight always ON, the back-
light remains ON at the configured intensity when Omnii is operating with external power (not battery
power). If Omnii is drawing power from its battery, this option is ignored and the other parameters defined
in Display Properties dialog box take effect.
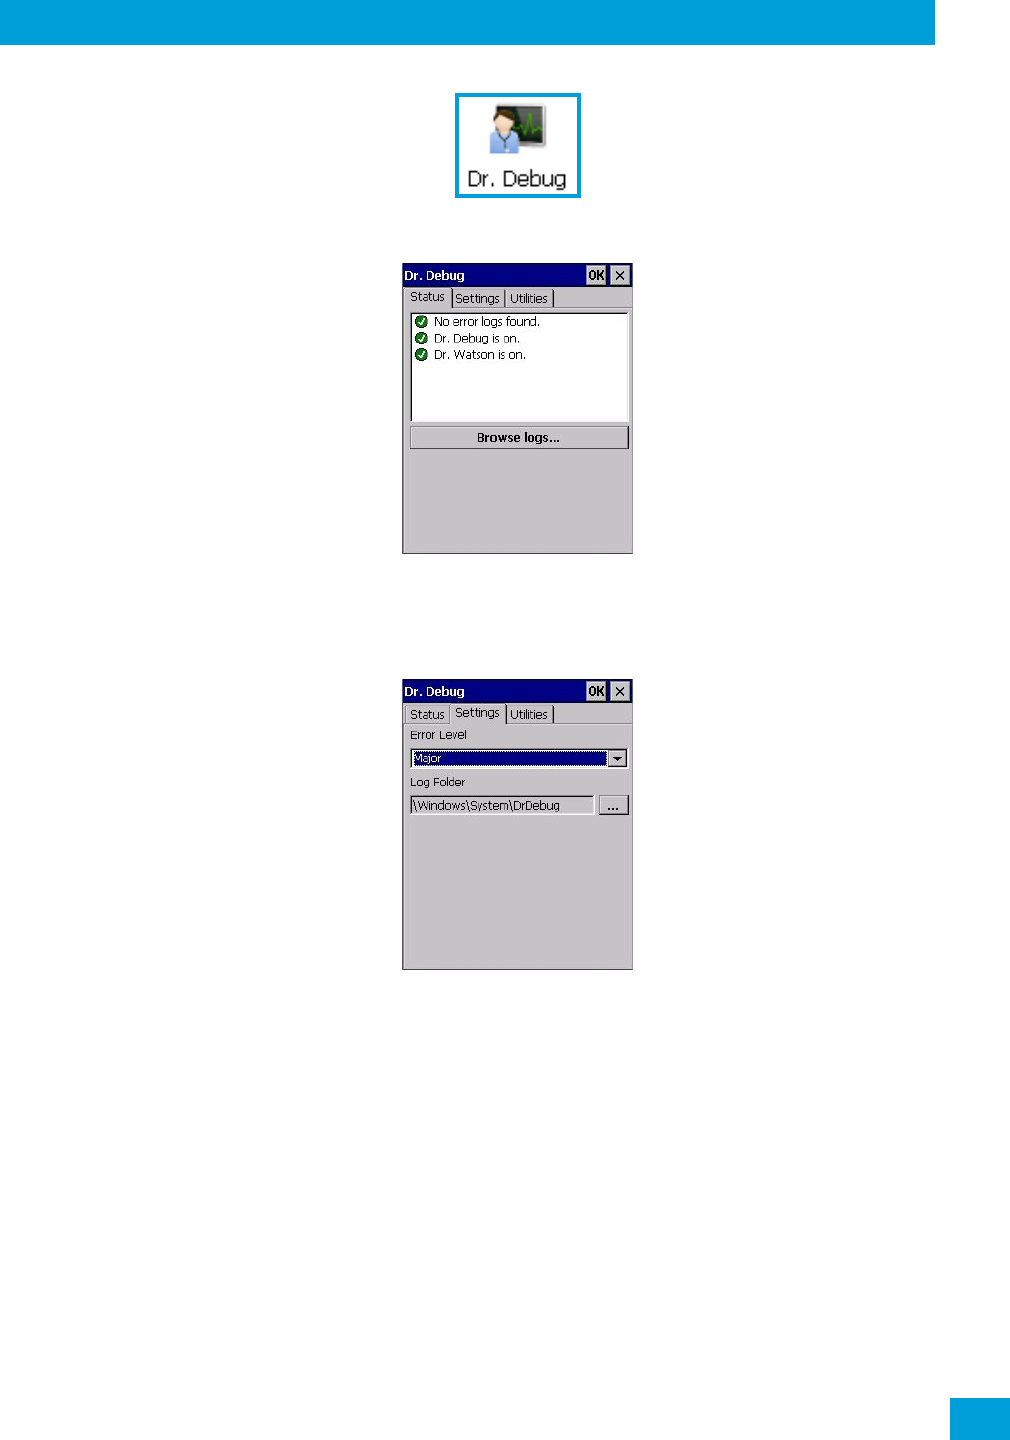
4.8 Dr. Debug
Dr. Debug is an error diagnostic and troubleshooting tool.
•Tap on Start>Settings>Control Panel. Tap on the Dr. Debug icon.
Note: Keep in mind that this option may be restricted to supervisory use only.
Note: Backlight changes take effect immediately. You do not need to reset the unit.
To maximize battery run time, keep the display backlight brightness and active durations as
low as possible.
Regulatory Draft
Chapter 4: Configuration
Status
67
Psion Omnii Hand-Held Computer User Manual
4.8.1 Status
This tab indicates the status (on/off) of the debug engines. Tapping on Browse logs displays error logs for
your review. The logs should be used as reference when working with Psion Technical Support personnel.
4.8.2 Settings
•Choose an Error Level from the drop-down menu.
Regulatory Draft

Chapter 4: Configuration
Utilities
Psion Omnii Hand-Held Computer User Manual
68
• To change the location where debug information will be stored, tap on the button to the right of the
Log Folder option.
4.8.3 Utilities
The Utilities tab is used to log network traffic. When you tap on the Start button, debug data is collected so
that, if necessary, it can be forwarded to a Psion technician for evaluation.
4.9 Error Reporting
Error Reporting allows you to enable or disable Microsoft error reporting prompts.
•Tap on Start>Settings>Control Panel>Error Reporting icon to access your options.
4.10 GPS (Global Positioning System) Settings
This applet allows you to define how the GPS module operates. You can determine when the GPS module is
powered and operating, and choose from a set of GPS profiles built into the modem. You can also set up the
AGPS Manager (an assisted GPS utility).
•Tap on Start>Settings>Control Panel>GPS Settings icon.
Regulatory Draft

Chapter 4: Configuration
Power
69
Psion Omnii Hand-Held Computer User Manual
4.10.1 Power
This tab allows you to dictate how the GPS module behaves. The GPS Power drop-down menu is used to
control when the GPS is powered on and off.
•Off – the GPS module is left off, always.
• Always on – the GPS module is powered on at all times regardless of the power state of the hand-held
(suspend or standby).
•On, and off in suspend – the GPS module is powered on, but if Omnii is in suspend mode, the GPS
module is turned off.
4.10.2 Profiles
Tapping on the GPS Profile Selection drop-down menu allows you to choose an appropriate profile: Default,
Automotive or Pedestrian.
•Default profile is a good general profile suitable for most uses.
•Automotive profile is designed for in-vehicle use, providing quick location updates as the vehicle
moves. When the GPS module is set to this profile and the vehicle enters an area such as a tunnel
where satellite coverage is interrupted, it will attempt to predict the vehicle position.
•Pedestrian profile is designed for those using the GPS module while walking. It takes into account the
slower pace of the pedestrian when mapping the location of the user. When the GPS module is set to
this profile and the operator moves into an area where satellite coverage is interrupted, the GPS
module will not attempt to predict the operator’s movement.
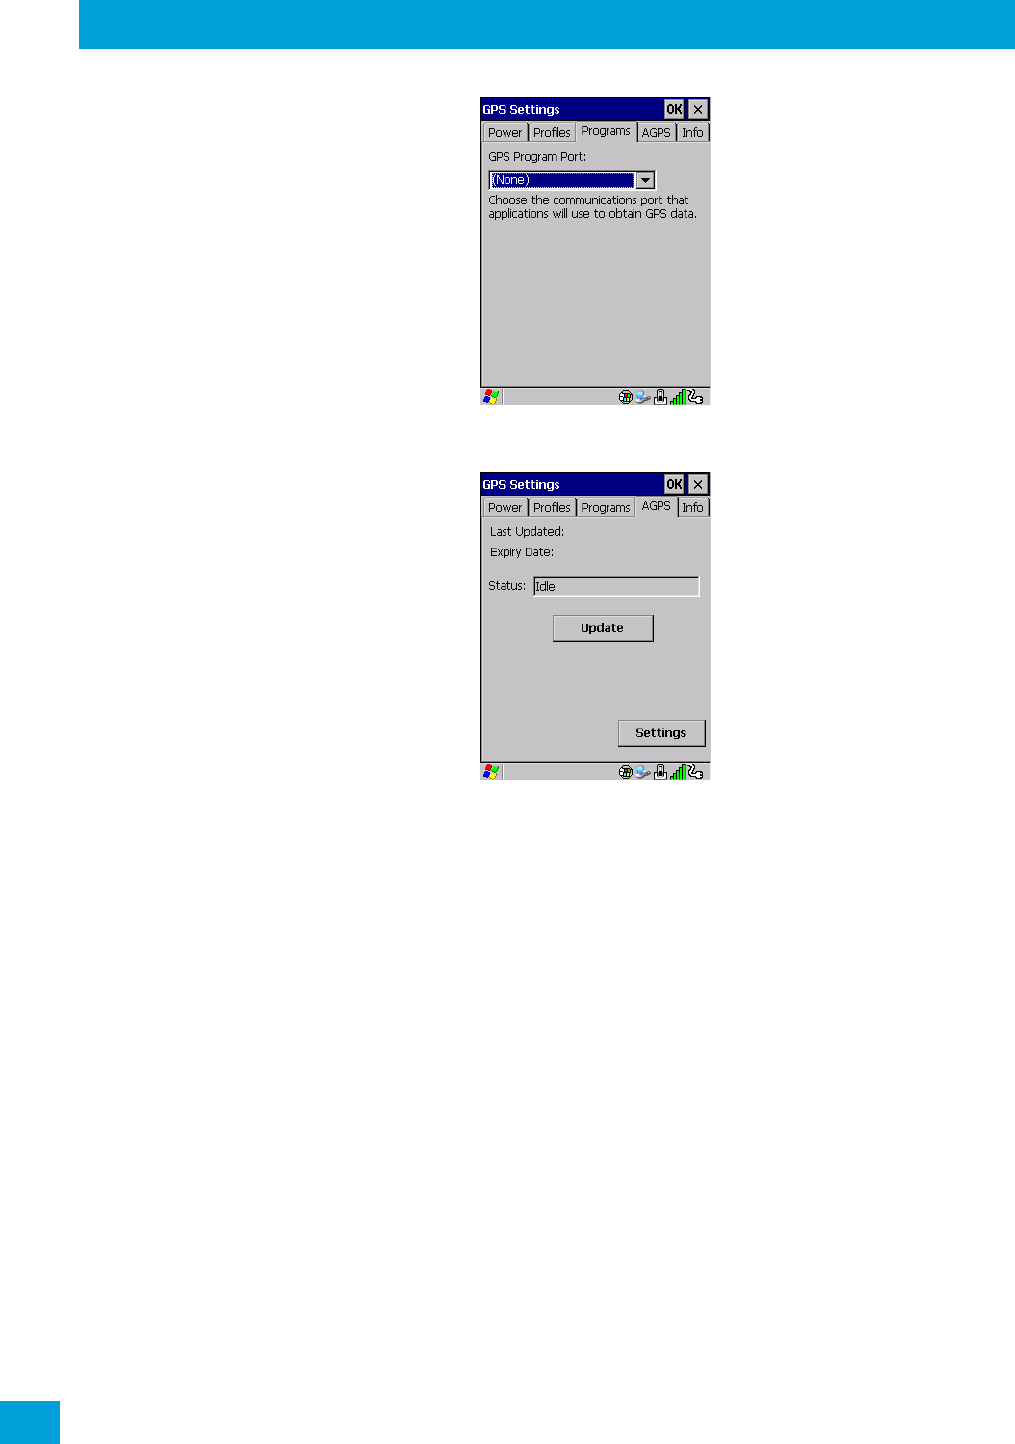
4.10.3 Programs
Tap on the GPS Program Port drop-down menu to choose the communication (COM)
port that the GPS software will use to communicate with the GPS receiver.
Regulatory Draft
Chapter 4: Configuration
AGPS
Psion Omnii Hand-Held Computer User Manual
70
4.10.4 AGPS
To determine your location, a GPS module receives data from three or more GPS satellites in fixed orbit
around the Earth. The GPS module triangulates your location based on the time it takes for signals to get to
and from the satellites. This works well in fairly clear areas, outdoors for example. However, if you’re at-
tempting to triangulate your location in city centres where signals bounce off tall concrete buildings or
from within a building, the GPS module will have greater difficulty calculating a fix.
AGPS reduces Time To First Fix (TTFF) and increases the likelihood of finding and keeping a fix in poor cov-
erage areas such as indoor sites. AGPS downloads satellite ephemeris (orbital) data to Omnii periodically
through Wi-Fi or WWAN. The downloaded data is used by the GPS module to speed the process of getting
afix.
Update
• Click on the Update button to download Extended Ephemeris (EE) files from a secure host on the Inter-
net using any interface that has an Internet connection. These files contain several days worth of
ephemeris (orbital) data that can be used if the satellite’s broadcast ephemeris is not available.
The Status field above the Update button displays the progress of the download, and once successfully
downloaded, the Status field will read Idle.
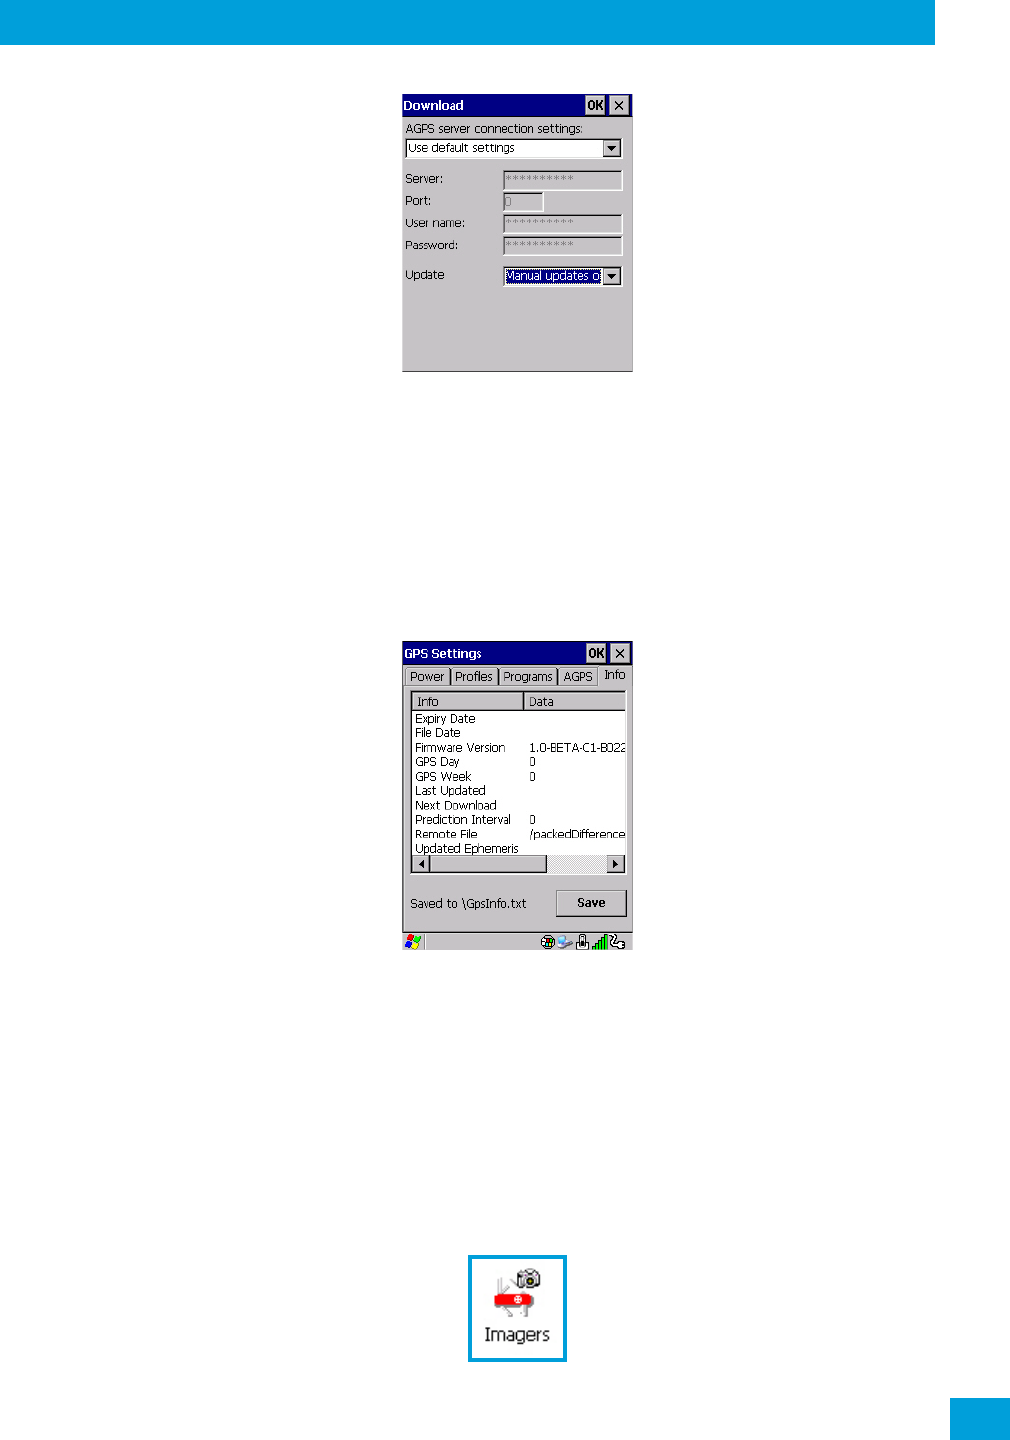
Settings
• Click on the Settings button to define the AGPS server connection settings.
Regulatory Draft
Chapter 4: Configuration
Info
71
Psion Omnii Hand-Held Computer User Manual
The AGPS server connection settings drop-down menu allows you to choose from two settings: Use default
settings and Use custom settings.
The Use default settings option is generally acceptable for most applications. Note that aside from the
Update field in which you can choose how long the fix is stored in your Omnii, the field values cannot be
edited.
The Use custom settings option is generally used to configure devices that will have access only to an in-
tranet rather than the Internet and should only be altered with the assistance of qualified Psion personnel.
They will be able to help you configure your Psion devices and web server to retrieve the ephemeris data.
4.10.5 Info
This tab provides general information about the GPS module such as the firmware version, the date on
which files were last updated, and so on. If GPS module support service is required, you may be asked to tap
on the Save button in this tab and forward the information to Psion support staff.
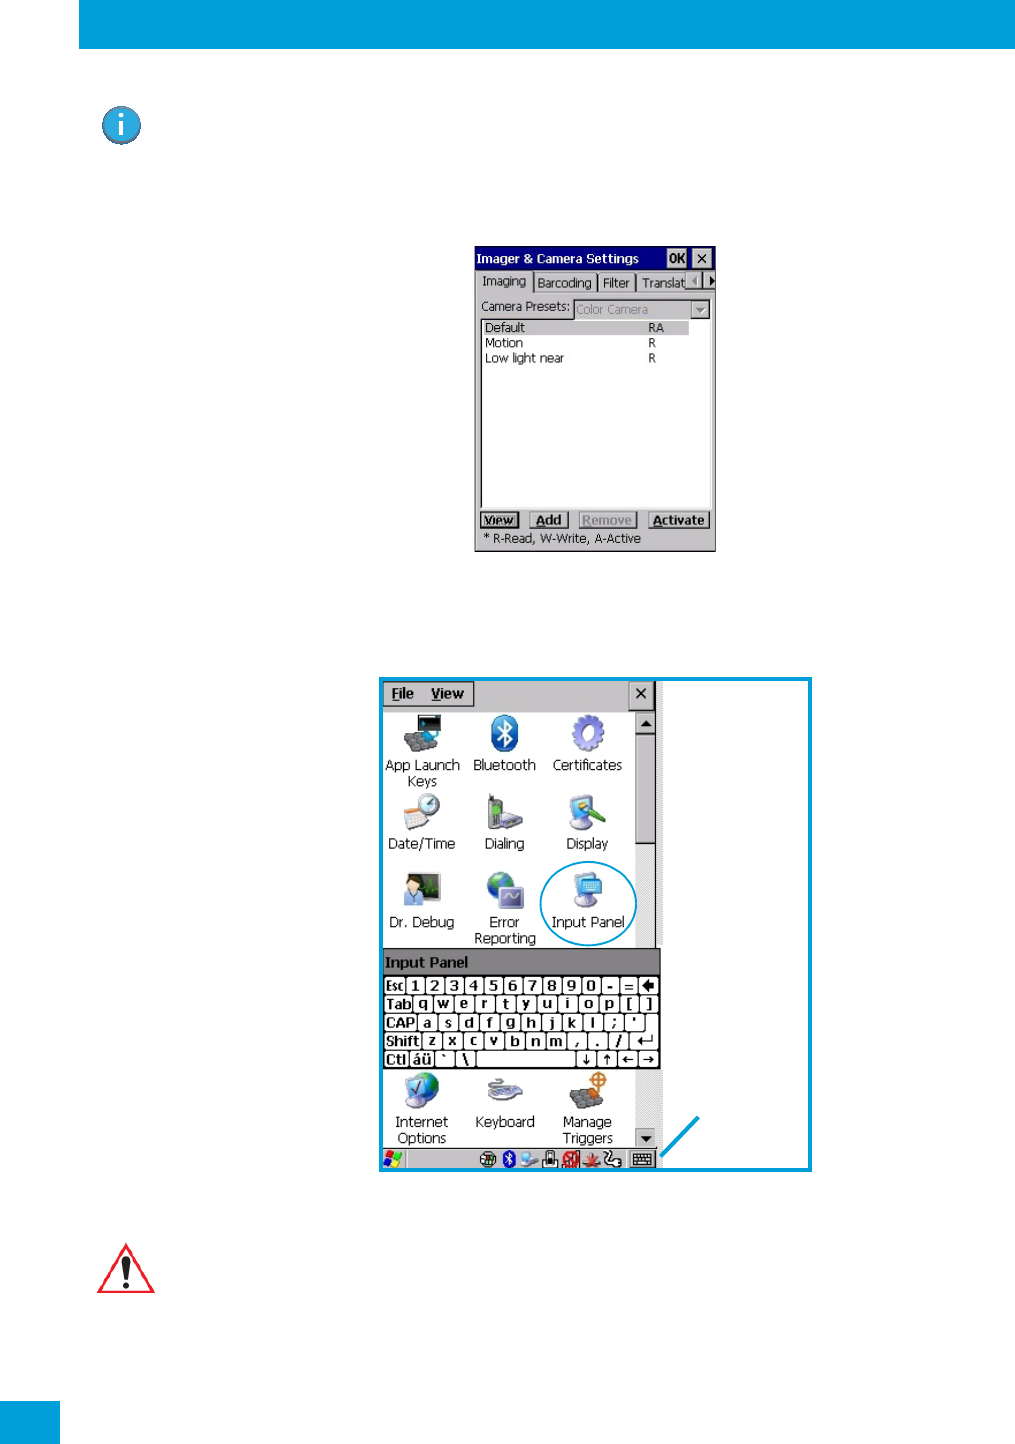
4.11 Imager & Camera Settings
The Imagers applet is used to create, modify, delete, and activate imager and camera settings. The principle
uses of the applet are to decode barcodes and to capture images. A Demonstration Application is provided
to demonstrate how the imager works. Refer to “Demo” on page 37 for details.
Refer to Appendix B: “Imager & Camera Settings” for configuration details.
To launch this applet:
•In the Control Panel, choose the Imagers icon.
Regulatory Draft
Chapter 4: Configuration
Input Panel
Psion Omnii Hand-Held Computer User Manual
72
4.12 Input Panel
Omnii is equipped with a Soft Input Panel (SIP). Shown below is the standard Microsoft SIP, accessed from
the Control Panel.
Tapping on the Input Panel button displays a soft input panel (soft keyboard) that can be customized using
the Input Panel dialog box.
Note: This icon is only displayed when the appropriate imager is installed in your Omnii. If there is
an imager installed but this icon is not present, additional software (ICS) may need to be
installed.
To enable a newly-installed imager, Press and hold down the [FN] key and the
[ENTER/Power] key simultaneously for a minimum of three seconds.
Soft Keyboard
Input Panel
Button Icon
Important: If the Input Panel button icon is not visible in the taskbar, from the ‘Start’ menu,
tap on Settings>Taskbar and Start Menu. Tap the checkbox next to ‘Show Input
Panel Button’. To remove this icon from the taskbar, tap in the checkbox to erase
the check mark.
Regulatory Draft
Chapter 4: Configuration
Keyboard Properties
73
Psion Omnii Hand-Held Computer User Manual
The soft keyboard operates just like a standard keyboard except that rather than pressing a key, you tap on
letters, numbers, modifier keys, etc. on the Omnii screen.
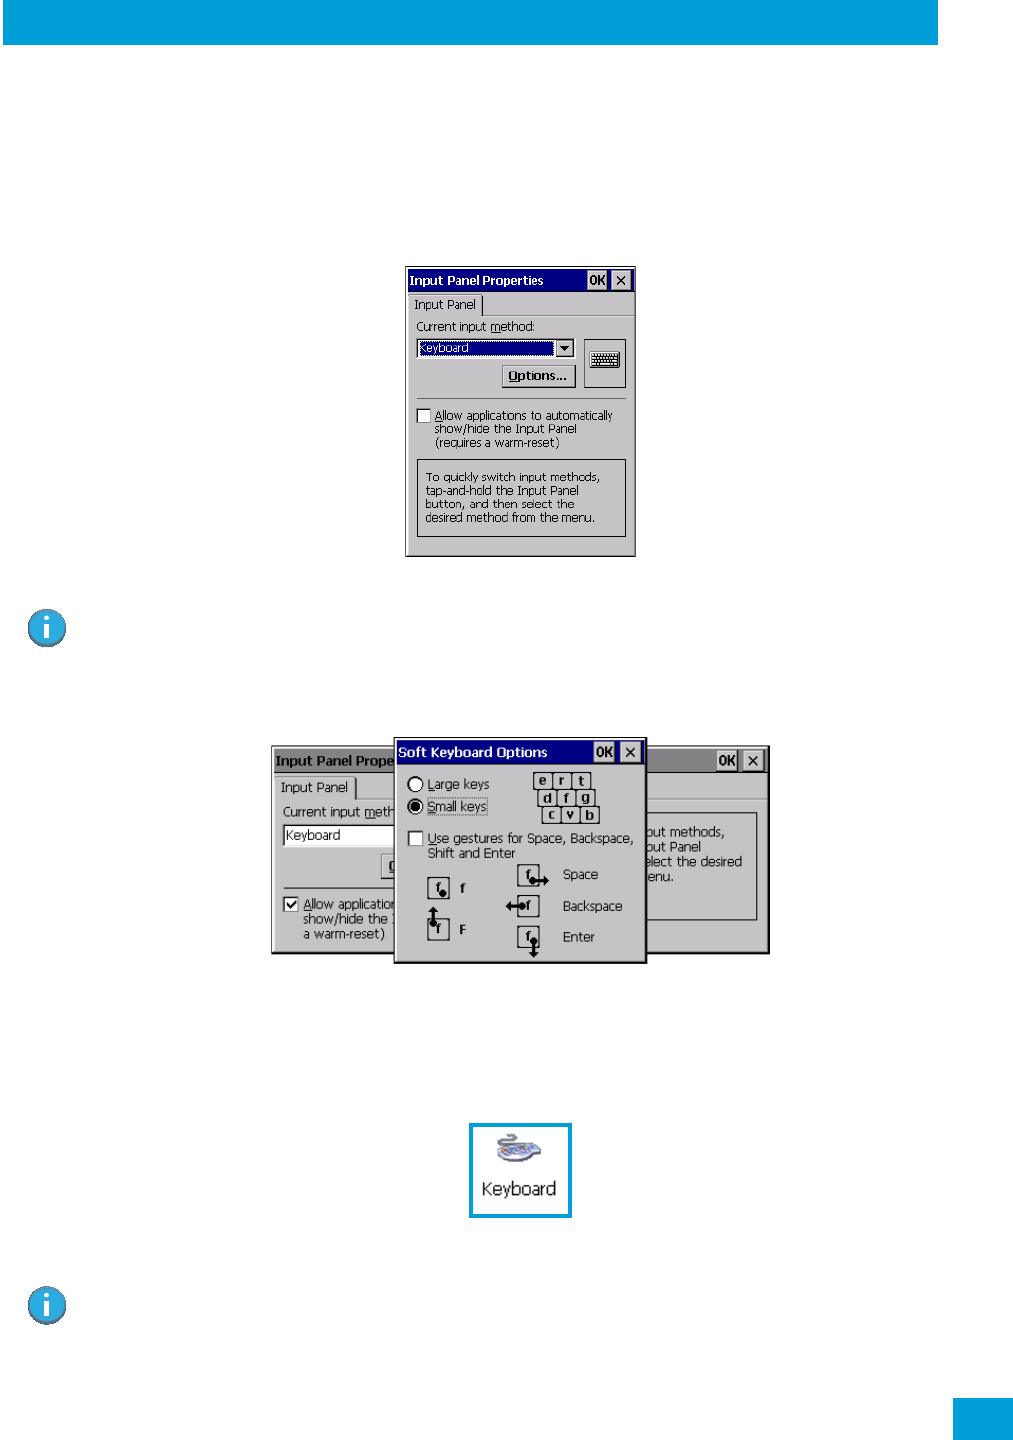
To customize the appearance and behaviour of the soft keyboard:
Tap o n the Input Panel icon in the Control Panel.
Figure 4.2 Input Panel Properties
• Tap on the Options button to change the appearance of your soft keyboard.
Figure 4.3 Soft Keyboard Options
4.12.1 Keyboard Properties
This icon displays the Keyboard Properties dialog box in which you can adjust the repeat rate of the keys,
the intensity of the keyboard backlight and the behaviour of the [FN] and [SYM] modifier keys. This dialog
box also allows you to define macro keys and Unicode characters.
•In the Control Panel, choose the Keyboard icon.
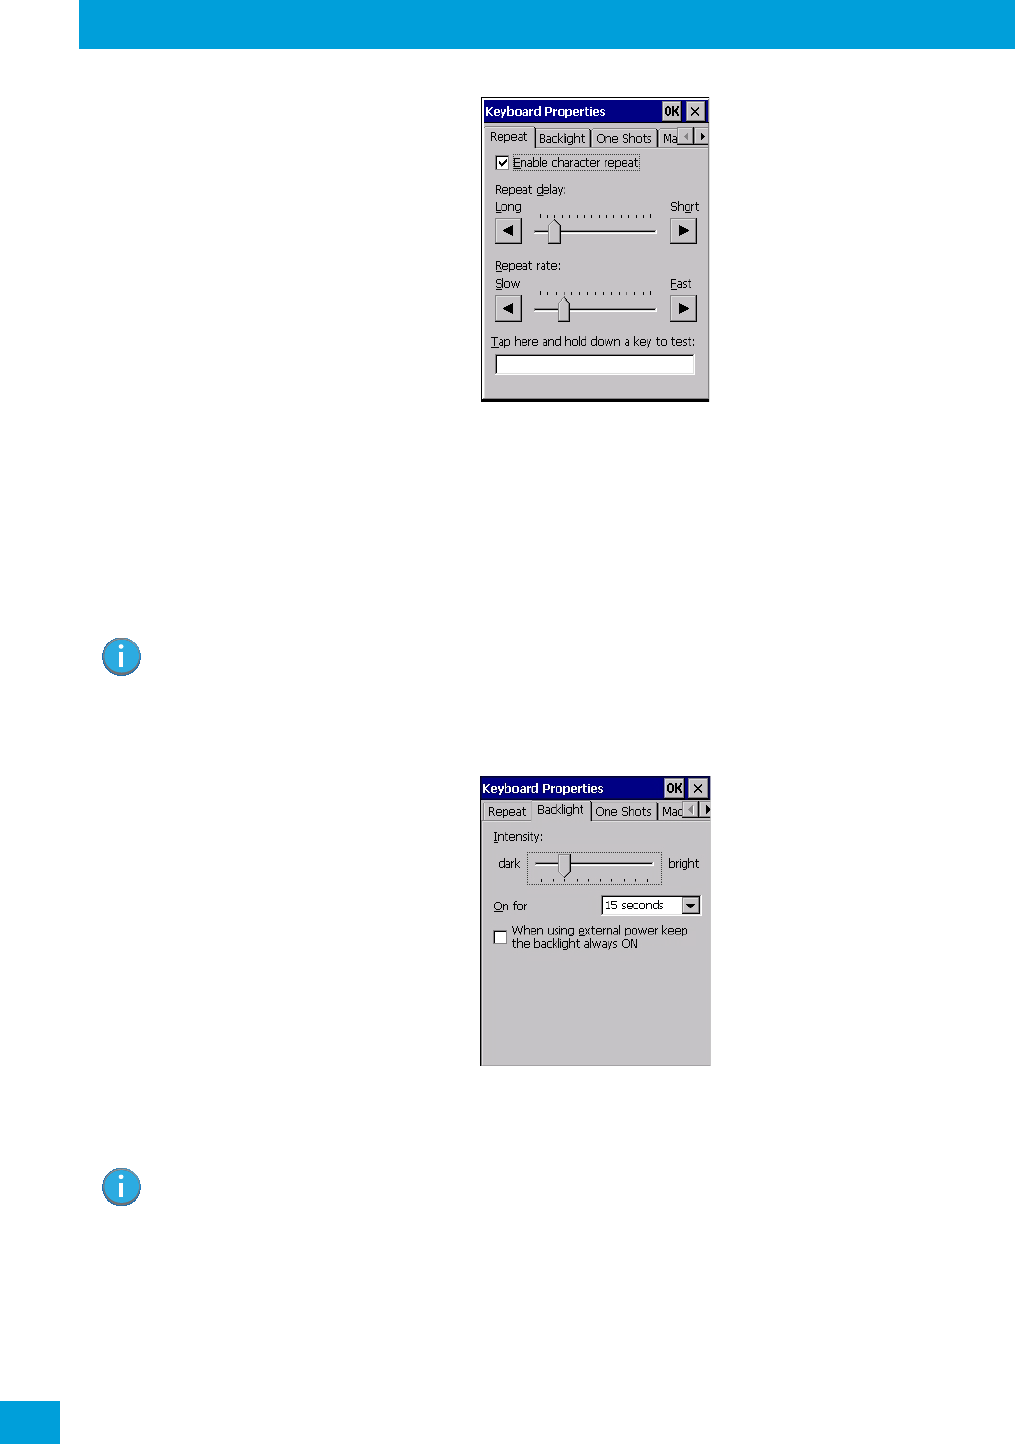
4.12.1.1 Key Repeat
•In the Keyboard Properties dialog box, open the Repeat tab.
Note: You can also display this dialog box by double-tapping on the Input icon in the far-right cor-
ner of the taskbar.
Note: These settings apply when a key is held down continuously.
Regulatory Draft
Chapter 4: Configuration
Keyboard Properties
Psion Omnii Hand-Held Computer User Manual
74
Repeat Delay
The value assigned for this parameter determines the delay in milliseconds between repeat characters.
Sliding the Repeat Delay bar to the left increases the delay between key repeats, and sliding the bar to the
right shortens the repeat delay time.
Repeat Rate
The value assigned for the Repeat Rate parameter determines how quickly the key you press repeats and is
measured in characters per second (cps). Sliding the bar to the left slows the repeat rate, and sliding the bar
to the right increases the repeat rate.
4.12.1.2 Keyboard Backlight
•In the Keyboard Properties dialog box, open the Backlight tab.
Intensity
This parameter is used to adjust the light intensity of the Omnii keyboard backlight. Sliding the bar to the
left darkens the keyboard backlight intensity, and sliding it to the right lightens the intensity.
ON For
The value chosen from this drop-down menu determines the duration of time that the keyboard backlight
stays on after the last user action (keypress or scan trigger).
Note: Use the field at the bottom of this dialog box to test the repeat delay and rate settings
you’ve chosen.
Note: The keypad backlight maximum brightness will decrease over time as it ages. Use mid-range
intensity settings when possible to extend the backlight lifespan. When the backlight starts
to dim, use this parameter to make it brighter.
Regulatory Draft
Chapter 4: Configuration
Keyboard Properties
75
Psion Omnii Hand-Held Computer User Manual
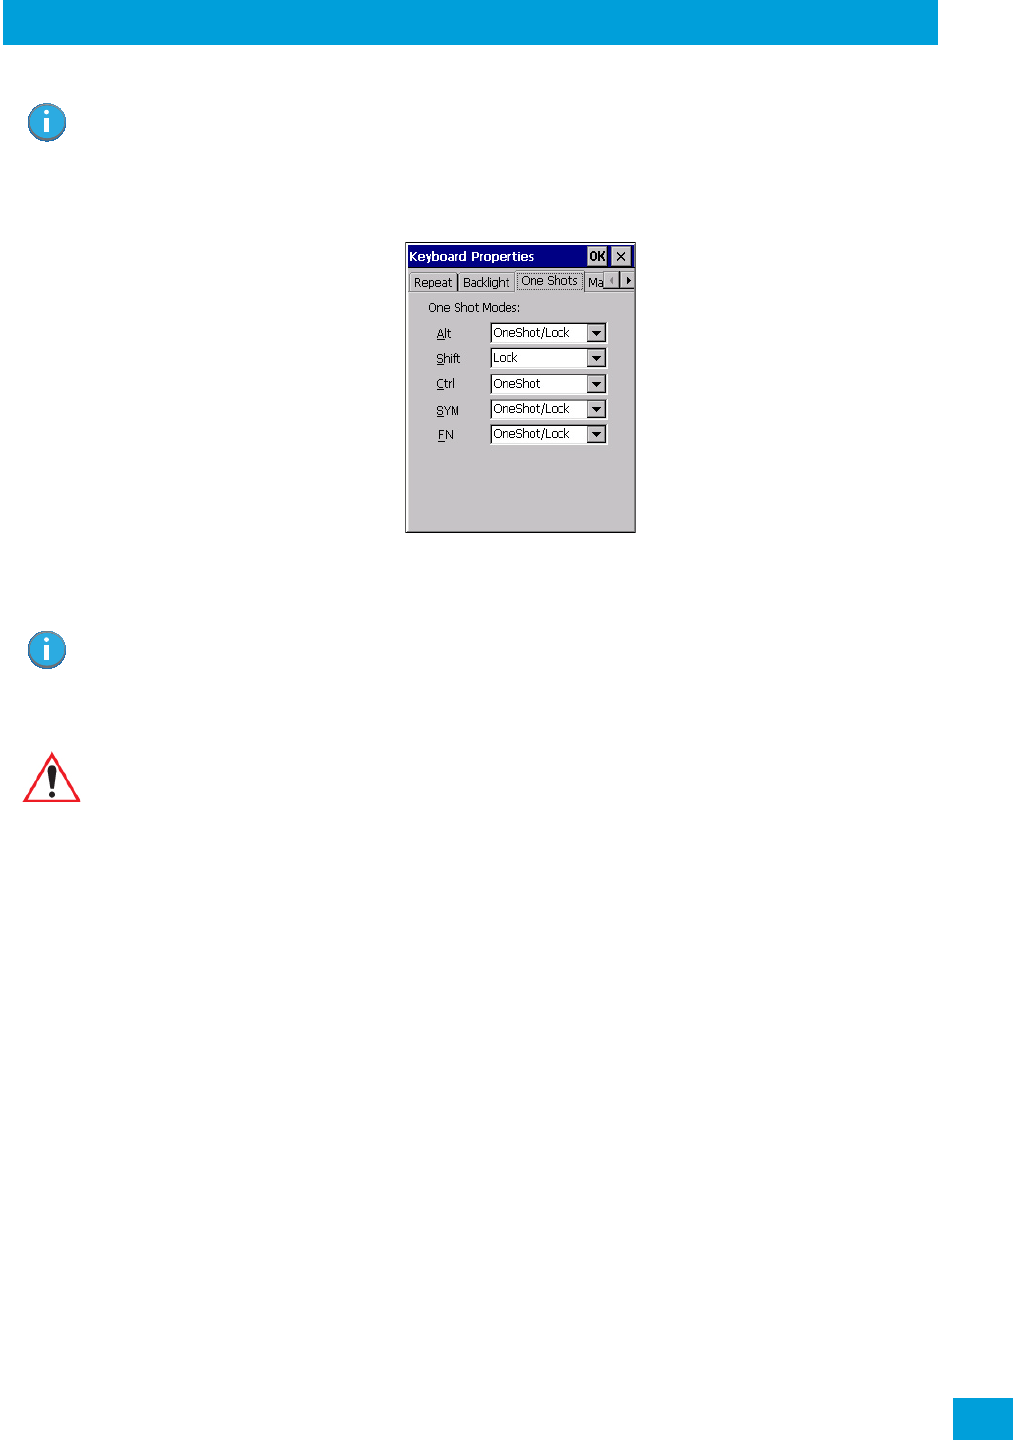
4.12.1.3 Keyboard One Shot Modes
•In the Keyboard Properties dialog box, open the One Shots tab.
The options in this tab allow you to determine how modifier keys on your Omnii behave. For each modifier
key—[ALT], [SHIFT], [CTRL], [FN], and [SYM]—you have the following options in the drop-down menu: Lock,
OneShot, and OneShot/Lock.
Lock
If you choose Lock from the drop-down menu, pressing a modifier key once locks it ‘on’ until you press the
modifier key a second time to unlock or turn it off.
OneShot
If you choose OneShot, the modifier key remains active only until the next key is pressed.
OneShot/Lock
OneShot/Lock allows you to combine these functions. When you choose this option and you press the mod-
ifier key once, it remains active only until the next key is pressed.
If you press the modifier key twice, it is locked ‘on’, remaining active until the modifier key is pressed a third
time to turn it ‘off’.
4.12.1.4 Keyboard Macro Keys
•In the Keyboard Properties dialog box, open the Macros tab.
Note: Tapping in the checkbox next to ‘When using external power, keep the backlight always
ON’ forces the keypad backlight to remain on when the unit is operating with external power.
Note: Keep in mind that checking the taskbar lets you know whether or not these keys are locked
on. For example, if the [FN] key is locked ‘on’, the taskbar at the bottom of the screen dis-
plays it underlined. If this key is displayed without the underline in the taskbar, you’ll know
that the key is not locked. It will become inactive following a key press.
Important: Once you’ve assigned a One Shot mode to a modifier key, you need to tap on the
OK button at the top of the tab to activate your selection.
Regulatory Draft

Chapter 4: Configuration
Keyboard Properties
Psion Omnii Hand-Held Computer User Manual
76
A macro has 200 programmable characters (or “positions”). The macro keys can be programmed to replace
frequently used keystrokes, along with the function of executable keys including [ENTER], [BACKSPACE]
and [DEL] ([FN]-[BACKSPACE]), function keys and arrow keys.
Recording and Saving a Macro
You can program up to 6 macro keys, depending on your keyboard layout. You can also increase the
number of virtual macro keys up to 15 using Scancode Remapping (for details, see “Scancode Remapping”
on page 78).
•In the Macro menu highlight a macro key number, for example macro 1, to assign a macro to macro key
[M1]. Choose the Record button.
A message screen is displayed instructing you to Enter Key Strokes to Record.
• Type the macro sequence you want to assign to the Macro key. You can type text and numbers, and you
can program the function of special keys into a macro.
• When you’ve finished recording your macro sequence, press the key sequence: [CTRL] [ALT] [ENTER],
or choose the Stop Recording button.
A new screen called ‘Verify Macro’ displays the macro sequence you created. The Save button is high-
lighted.
•Press [ENTER] to save your macro, or highlight CANCEL and press [ENTER] to discard it.
Executing a Macro
To execute a macro:
• Press the macro key to which you’ve assigned the macro. For example, if you created a macro for
macro key 1, press [M1] to execute the macro.
Regulatory Draft
Chapter 4: Configuration
Keyboard Properties
77
Psion Omnii Hand-Held Computer User Manual
Deleting a Macro
To delete a macro:
•In the Macros tab, highlight the macro number you want to delete.
• Choose the Delete button.
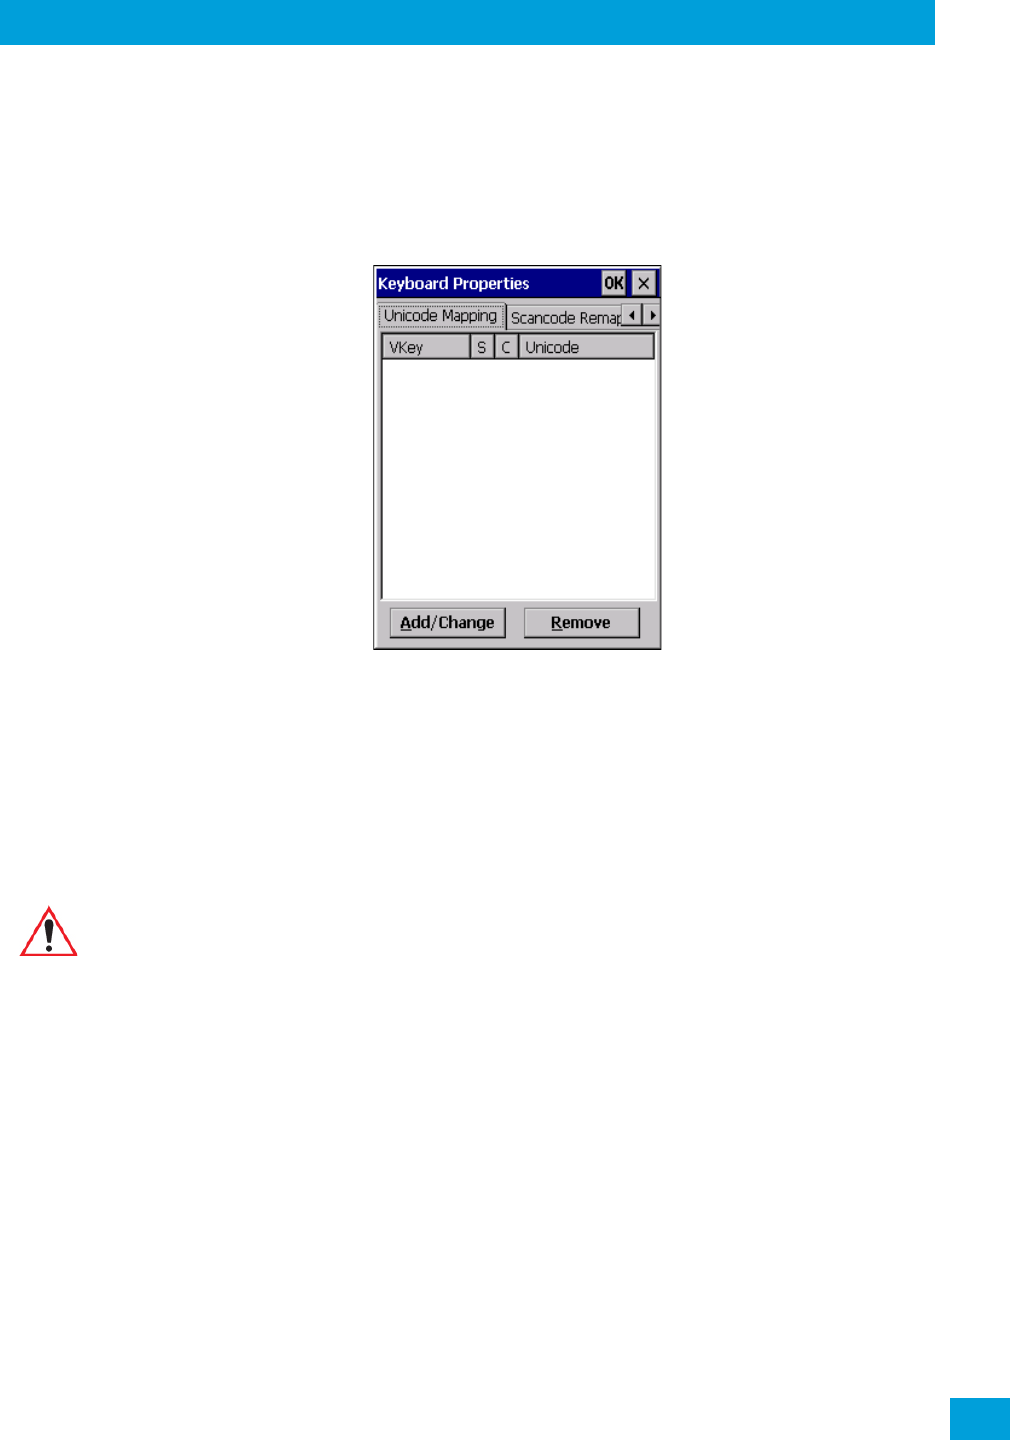
4.12.1.5 Unicode Mapping
•In the Keyboard Properties dialog box, open the Unicode Mapping tab.
The Unicode Mapping tab is used to map combinations of virtual key values and [CTRL] and [SHIFT] states
to Unicode™ values. This tab shows the configured Unicode character along with the Unicode value. For ex-
ample, the sample screen above shows “a (U+0061)” indicating that the character “a” is represented by the
Unicode value “0061”, and so on. Keep in mind that Unicode configurations are represented as hexadecimal
rather than decimal values.
All user-defined Unicode mappings are listed in the Unicode Mapping tab in order of virtual key value, and
then by order of the shift state. If a Unicode mapping is not listed, the Unicode mapping is mapped to the
default Unicode value.
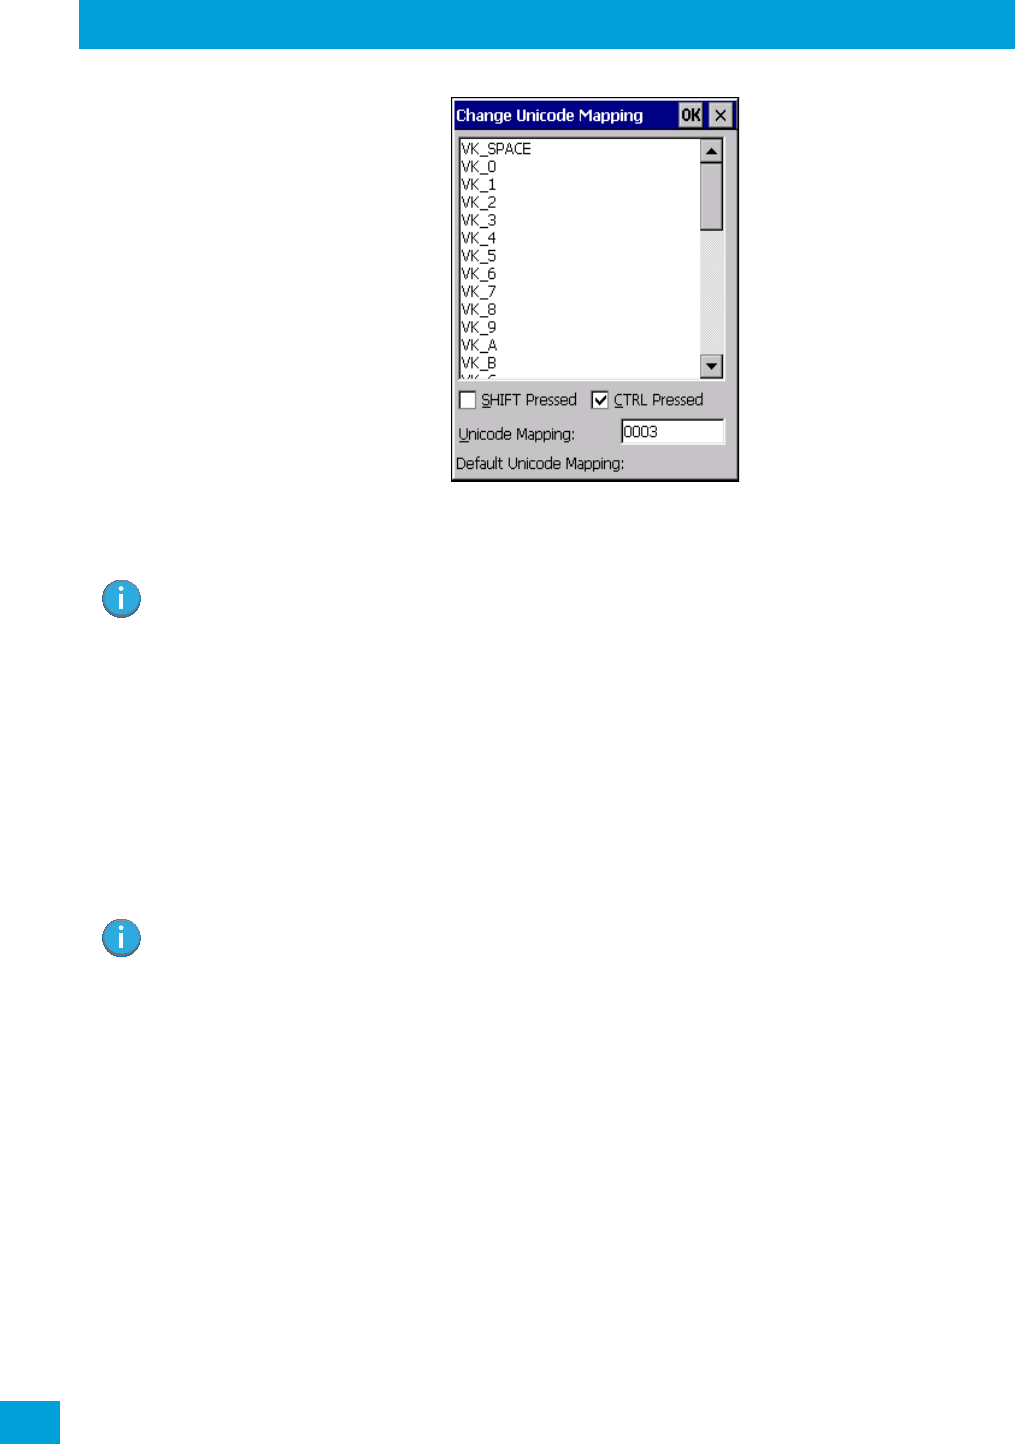
Adding and Changing Unicode Values
• Choose the Add/Change button.
Important: Changes to Unicode mappings are not saved until you exit the Keyboard Proper-
ties dialog box.
Regulatory Draft
Chapter 4: Configuration
Keyboard Properties
Psion Omnii Hand-Held Computer User Manual
78
• Highlight a value in the Unicode mapping list. In the sample screen above, a value will be assigned to
virtual key 0 (VK 0).
• Position the cursor in the Unicode Mapping field, and type a Unicode value for the highlighted key.
Removing Unicode Values
•In the Unicode Mapping tab, highlight the item you want to delete, and choose the Remove button.
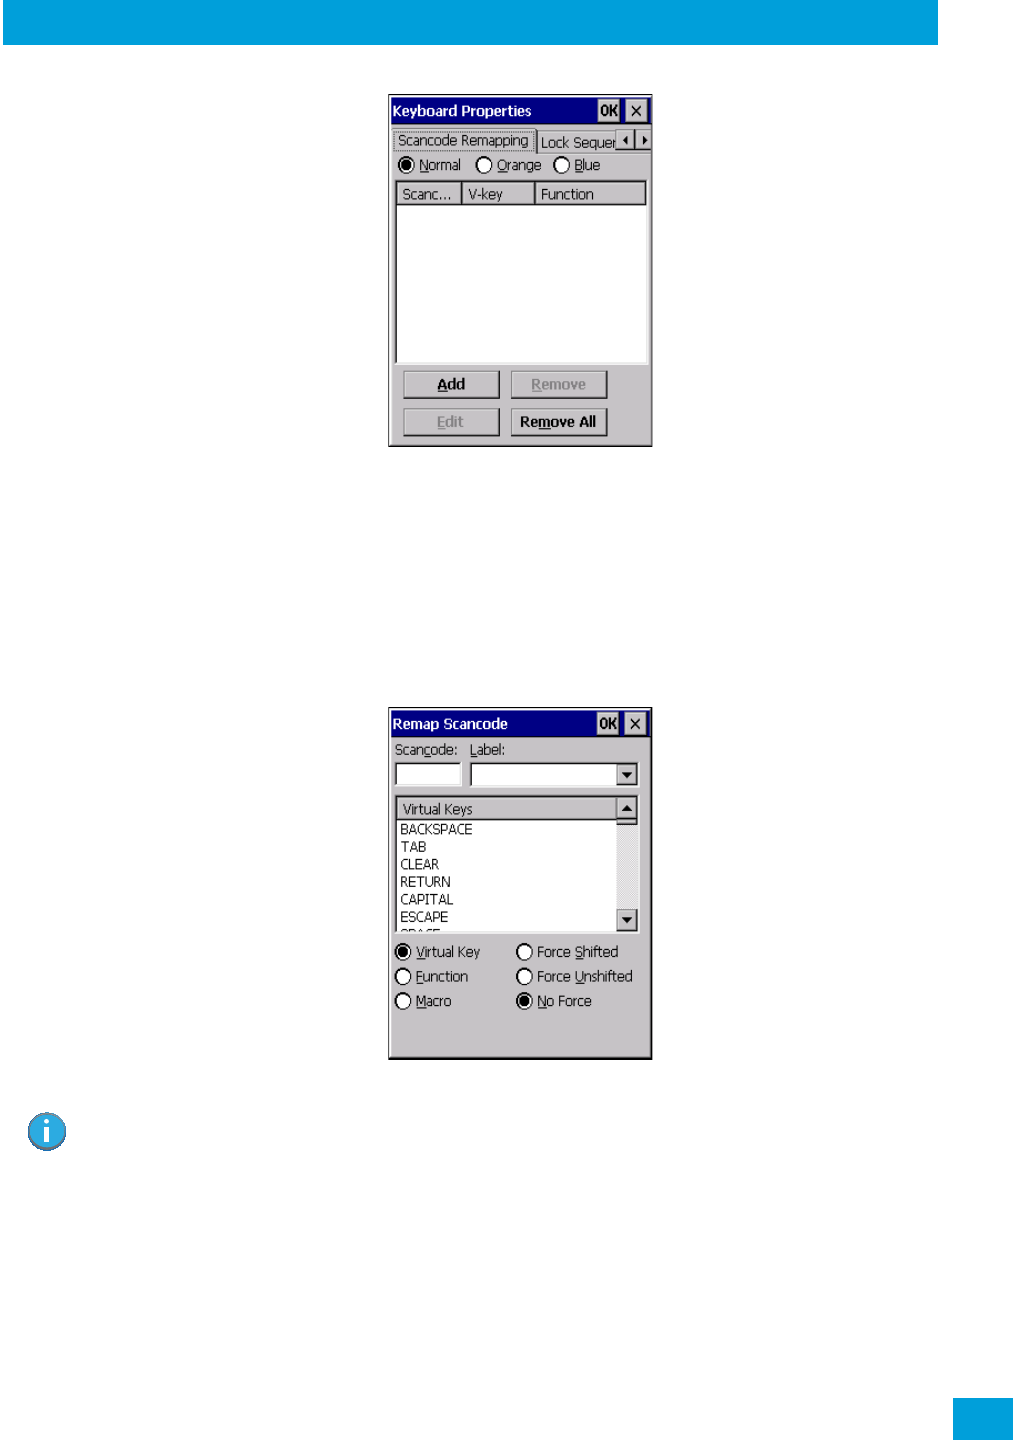
4.12.1.6 Scancode Remapping
A scancode is a number that is associated with a physical key on a keyboard. Every key has a unique scan-
code that is mapped to a virtual key, a function or a macro. Scancode Remapping allows you to change the
functionality of any key on the keyboard. A key can be remapped to send a virtual key (e.g. VK_F represents
the ‘F’ key; VK_RETURN represents the [ENTER/Power] key, etc.), perform a function (e.g. turn the scanner
on, change volume, etc.) or run a macro.
There are three different tables of scancode mappings: the Normal table, the FN table and the SYM table.
The Normal table defines unmodified key presses; the FN table defines key presses that occur when the
[FN] modifier is on; the SYM table defines key presses that occur when the [SYM] modifier is on. The default
mappings of these scancodes can be overwritten for each of these three tables using the Scancode Remap-
ping tab accessed from the Keyboard Properties dialog box.
Note: To add a shifted state, [SHIFT] and/or [CTRL], press [TAB] to position the cursor in the
checkbox next to ‘SHIFT Pressed’ and/or ‘CTRL Pressed’. Press [SPACE] to select the shift
state you want to assign.
Note: When using the Mobile Devices SDK Developers' Guide (P/N 8100016), note that the
[ORANGE] key is interchangeable with the [SYM] key. Similarly, in the context of the scan-
code mapping tables, ‘Orange’ is interchangeable with ‘SYM’.
Regulatory Draft
Chapter 4: Configuration
Keyboard Properties
79
Psion Omnii Hand-Held Computer User Manual
The first column in the Scancode Remapping tab displays the scancodes in hexadecimal. If the scancode is
remapped to a virtual key, that virtual key is displayed in the next column labelled ‘V-Key’. A virtual key that
is ‘Shifted’ or ‘Unshifted’ is displayed in the third column labelled ‘Function’.
If the scancode is remapped to a function or a macro, the first and second columns remain blank while the
third column contains the function name or macro key number (e.g., Macro 2).
Adding a Remap
To add a new remapping:
• Choose the Add button at the bottom of the dialog box.
The Remap Scancode dialog box is displayed.
• Type the scan code in hexadecimal in the field labelled Scancode.
Virtual Key, Function and Macro
The radio buttons at the bottom of the dialog box allow you to define to what the scan code will be rema-
pped: Virtual Key, Function or Macro.
When Virtual Key is selected, you can choose to force [SHIFT] to be on or off when the virtual key is sent. If
No Force is selected, the shift state is dependent on whether the shift state is on or off at the time the
virtual key is sent.
When Function is selected, a list of valid functions appears in the dialog box.
When Macro is selected, the macro keys available on your unit are listed in the dialog box.
Note: The Label field displays the default function of the scancode you are remapping.
Regulatory Draft
Chapter 4: Configuration
Keyboard Properties
Psion Omnii Hand-Held Computer User Manual
80
•Choose Virtual Key, Function or Macro.
• Choose a function from the Function list in the dialog box, and tap on OK.
Editing a Scancode Remap
To edit a scancode:
•In the Scancode Remapping tab, tap on the remap you want to edit.
• Tap on the Edit button, and make the appropriate changes.
•Tap on OK to save your changes.
Removing a Remap
To delete a remap:
•In the Scancode Remapping tab, highlight the scancode you want to delete, and tap on the Remove
button.
•Tap on OK.
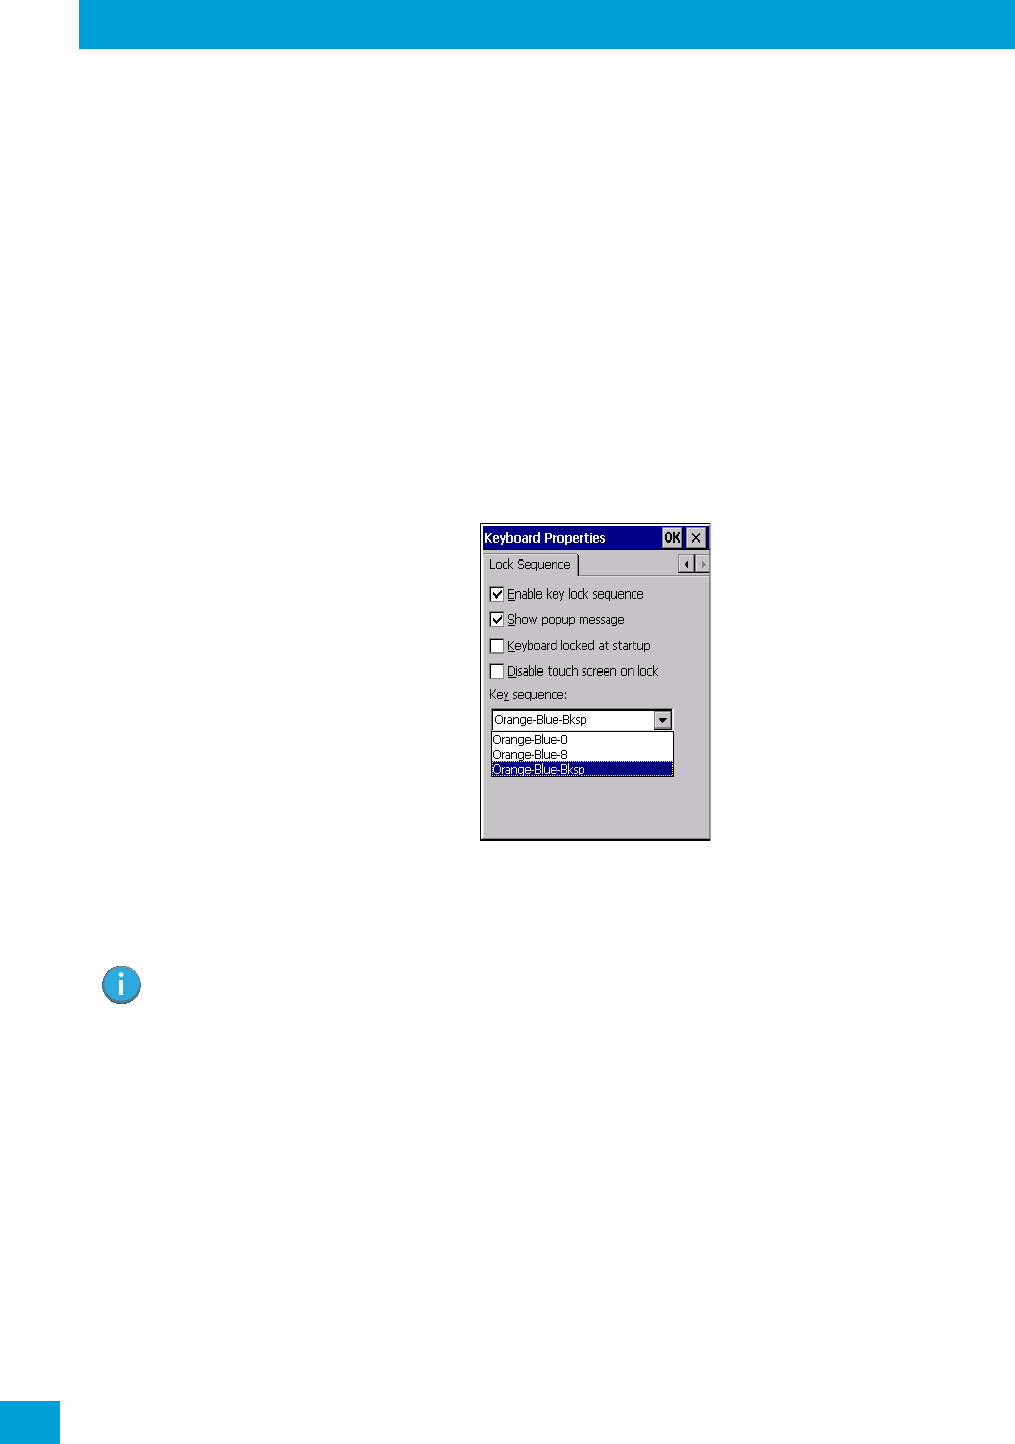
4.12.1.7 Lock Sequence
The Lock Sequence menu allows you to lock the Omnii keyboard to prevent keys from being pressed acci-
dentally when, for example, the unit is inserted in a holster.
• To lock the keyboard, tap in the checkbox next to Enable key lock sequence.
• Tap in the checkbox next to Keyboard locked at startup.
•In the Key sequence drop-down menu, choose the key sequence you will need to type to unlock the
keyboard.
A locked keyboard icon is displayed in the softkey bar when the keyboard is locked.
Note: It is useful to leave the ‘Show popup message’ enabled (default) so that anyone attempting to
use the keyboard will see the key sequence they will need to enter to unlock the keyboard dis-
played on the screen.
Regulatory Draft
Chapter 4: Configuration
Manage Triggers
81
Psion Omnii Hand-Held Computer User Manual
• Type the key sequence to unlock the keyboard.
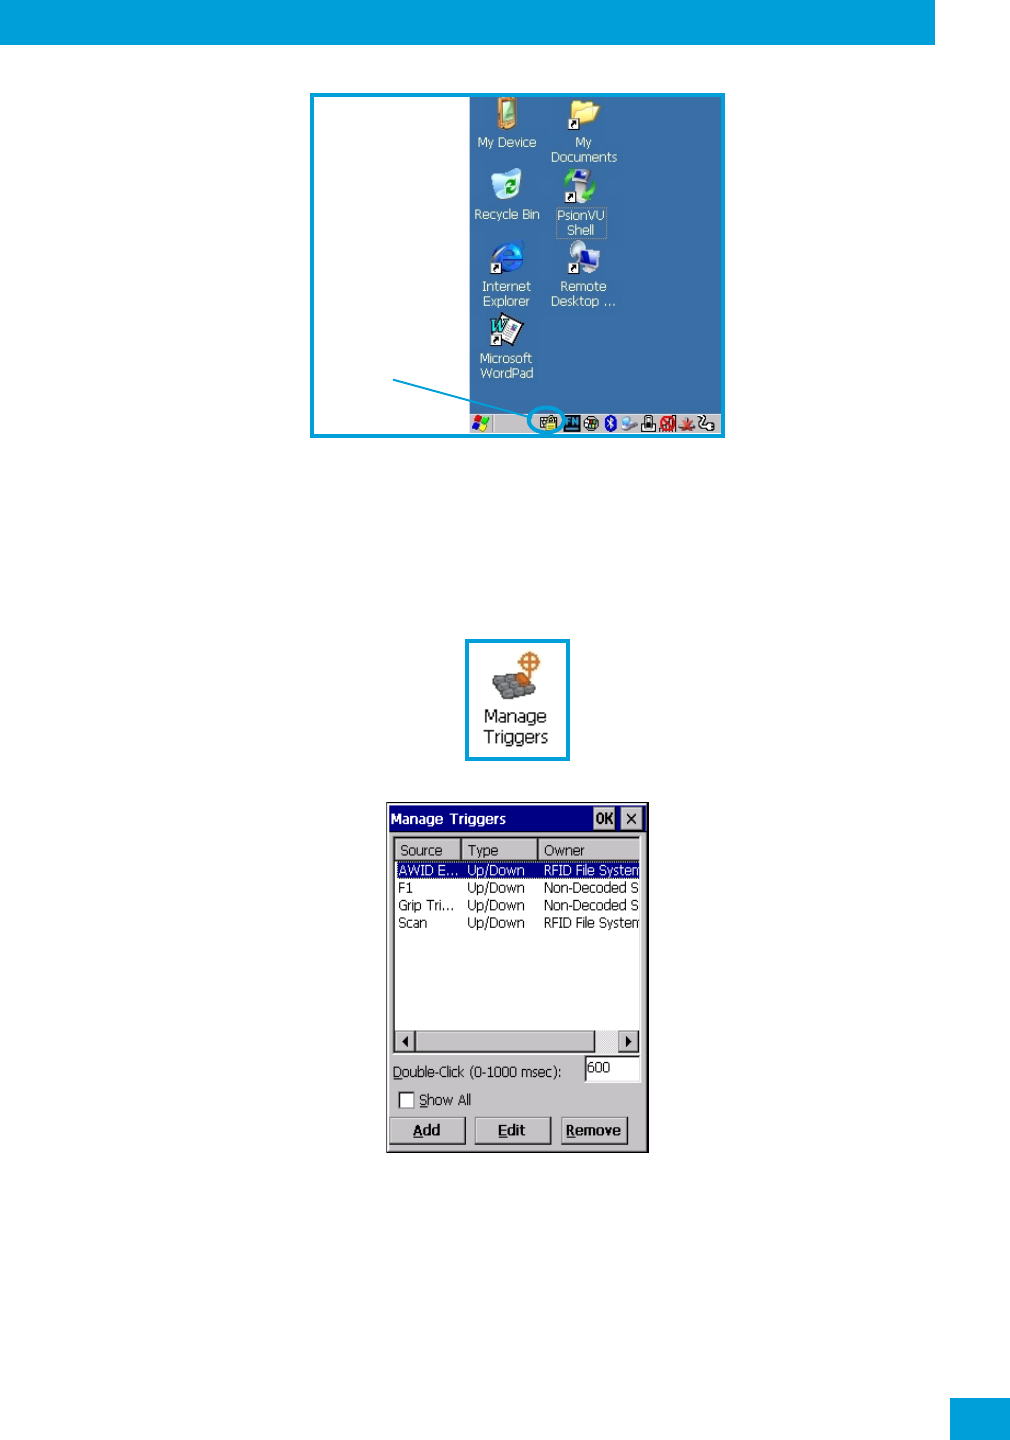
4.13 Manage Triggers
Allows users to configure how barcode scanners and other devices such as RFID readers are triggered. You
can configure the trigger ID for each trigger button for both single- and double-click, and the double-click
time.
•In the Control Panel, choose the Manage Triggers icon.
•In the Manage Triggers screen you’ll see a list of trigger mappings.
4.13.1 Trigger Mappings
A trigger mapping is an association between a particular key on the keyboard and a driver or application,
the module(s)—sometimes referred to as “trigger consumer(s)”—of the trigger source. Along with keyboard
keys, the external trigger (scan button) is software-based. When the specified key is pressed, the owner (for
example, a decoded scanner) is sent a message.
Locked Keyboard
Icon
Regulatory Draft
Chapter 4: Configuration
Add and Edit Trigger Mapping
Psion Omnii Hand-Held Computer User Manual
82
Double-Click
When a key is pressed and released, then pressed again within the configured time (between 0 to 1000 mil-
liseconds), a double-click occurs. See also “Trigger-Press Type” on page 83.
Show All Modules
By default, the trigger mapping list only shows active mappings. Mappings for drivers or applications that
are not currently active are not normally displayed. By checking this checkbox, all mappings, both active
and inactive, are displayed.
Add
Tapping this button brings up the Add Mapping dialog (see page 82), so that you can add new trigger map-
pings.
Edit
Tapping this button brings up the Edit Mapping dialog (see page 82), so that you can edit existing trigger
mappings.
Remove
Tapping this button removes an existing mapping.
OK
The OK button in the top right of the Manage Triggers screen saves all changes made. If the cancel button X
is tapped instead, or the [ESC] key is pressed, all changes made will be discarded.
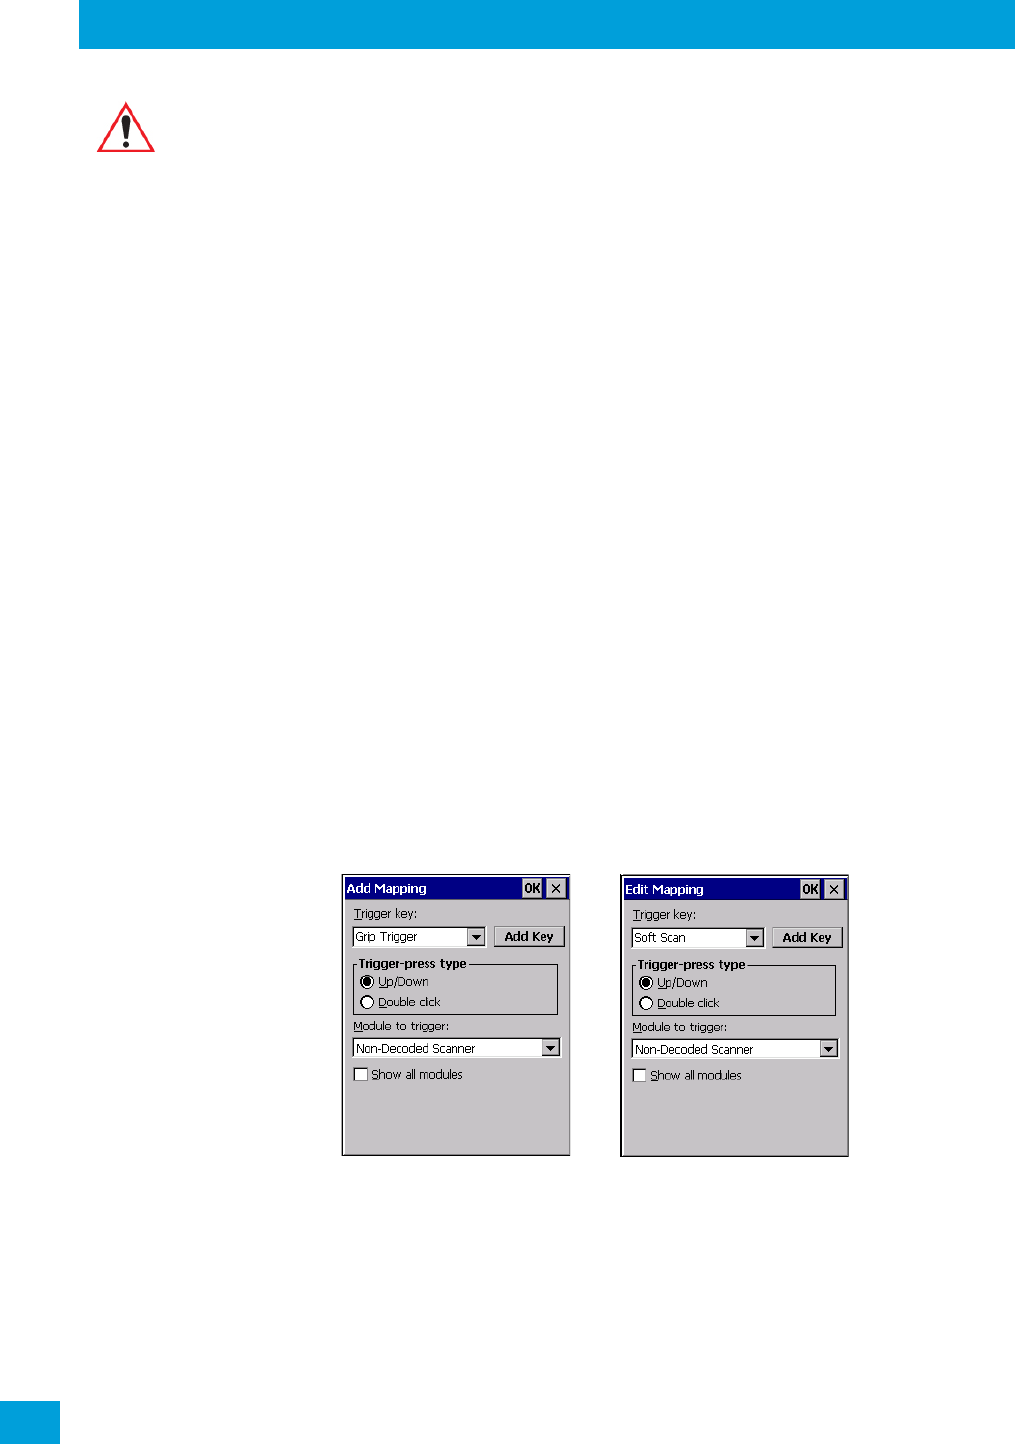
4.13.2 Add and Edit Trigger Mapping
These dialogs allow you to add and edit trigger mappings.
Trigger Key
This drop-down list allows you to specify the source of the trigger events, such as the Soft Scan, Left Scan,
etc., for the trigger module selected.
Important: It is not possible to have two or more identical mappings—for example [F1] cannot
be mapped to the Non-Decoded Scanner twice—even if the trigger type is
different.
A keyboard key that is used as a trigger source will no longer generate key data,
or perform its normal function. For example, if the space button is used as a
trigger source, it will not be able to send space characters to applications.
Regulatory Draft
Chapter 4: Configuration
Microphone
83
Psion Omnii Hand-Held Computer User Manual
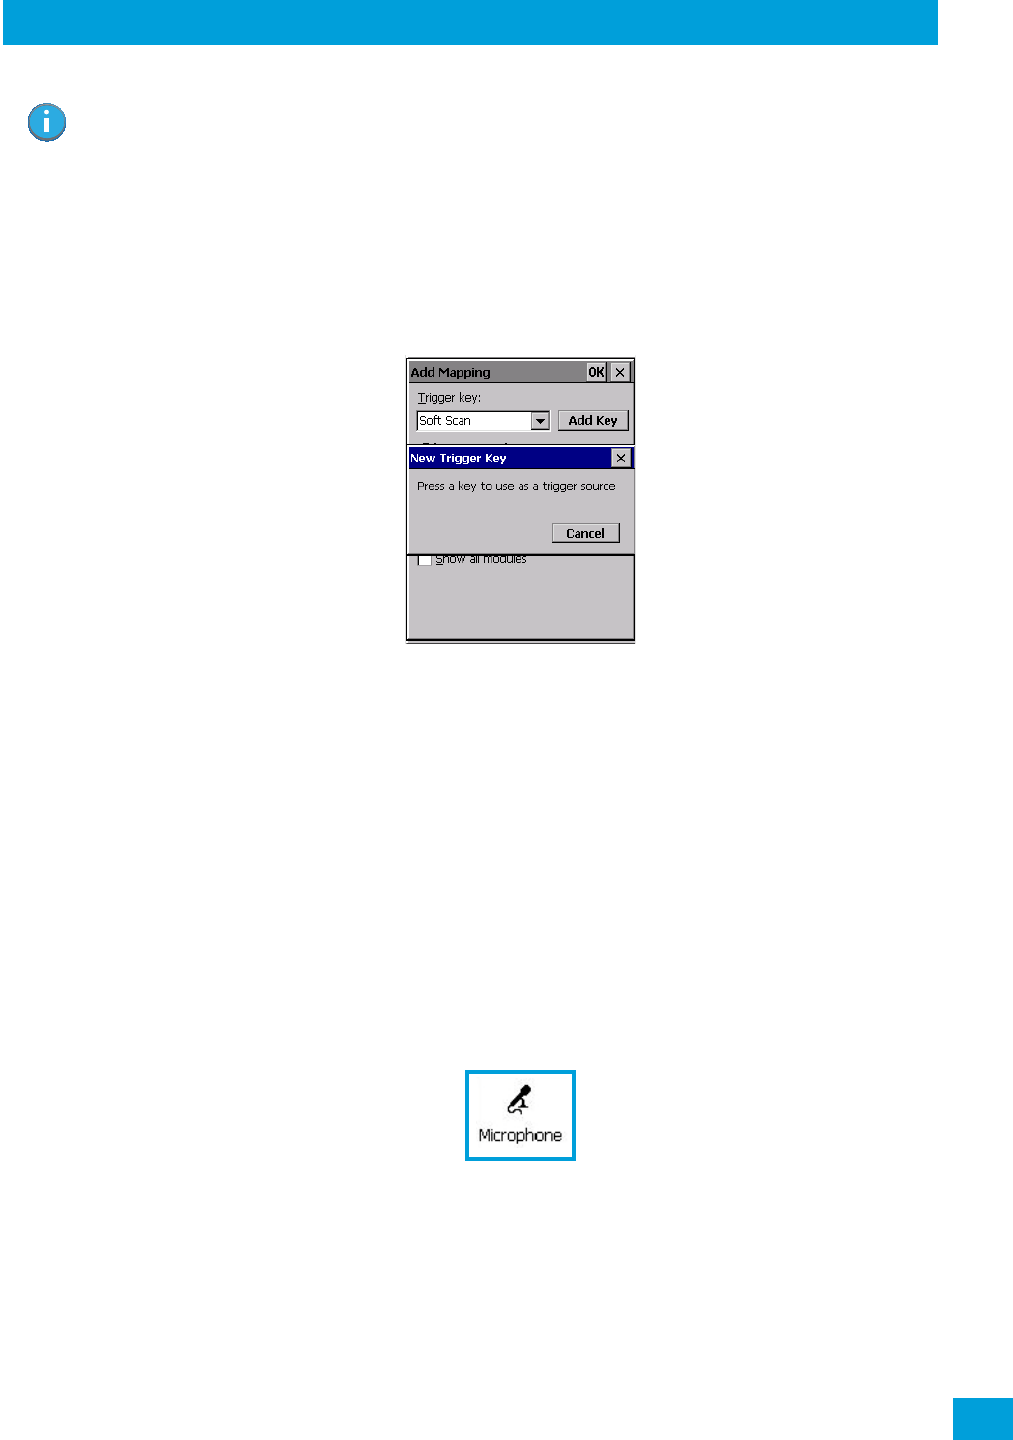
Add Key
Only existing trigger sources are shown in the Source combo-box. To add a new source to this list, tap on
the Add Key button. A dialog will pop up and allow you to select the keyboard key to use as a trigger
source.
Trigger-Press Type
You can enable either an Up/Down or Double Click response to a trigger press. Normally, when a trigger
(keyboard key, etc.) is pressed and released, a “trigger down” event is sent to the “owner”—that is, the appli-
cation receiving the trigger press information—followed by a “trigger up”. If Double Click is chosen in this
menu, when the trigger is pressed, released, and then pressed again, a “double-click” event will have oc-
curred. If a mapping with the type Up/Down has also been configured for the same source, it will only
receive the first set of trigger events.
Module Trigger
This identifies the driver or application receiving the trigger presses.
Show All Modules
By default, inactive owners are not shown. By checking this checkbox, all owners, both active and inactive,
are displayed.
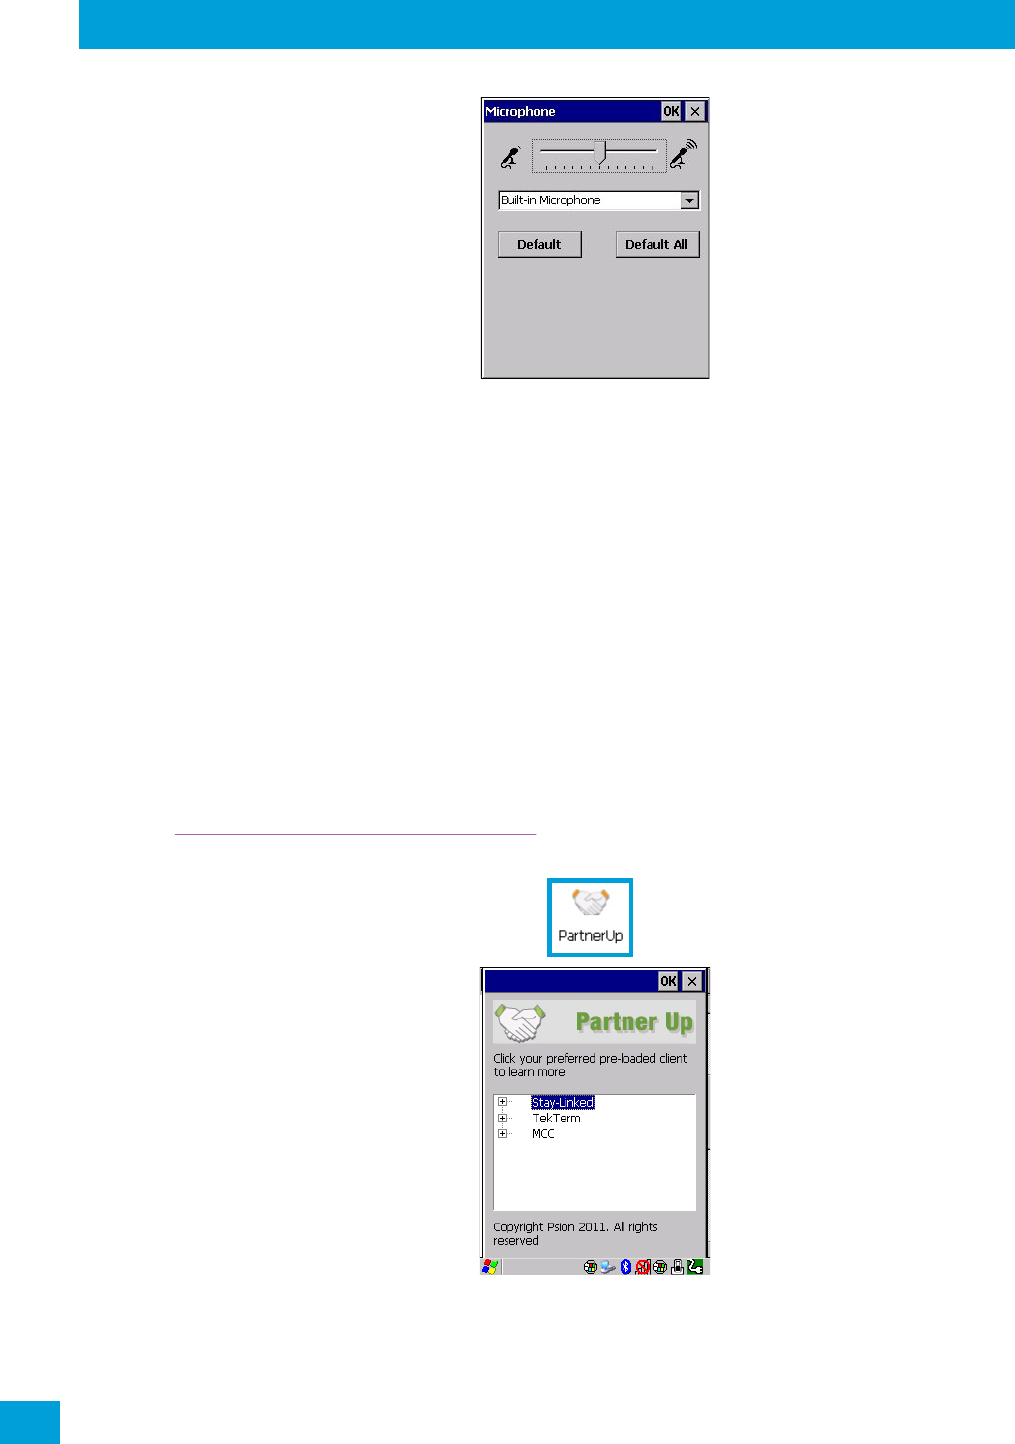
4.14 Microphone
•In the Control Panel, choose the Microphone icon.
Use this dialog box to adjust the gain for the specific microphones associated with your hand-held.
Note: It is possible to map the same source to different modules (trigger consumers)—for example,
to both the Imager and Non-Decoded Scanner. If so, both devices/operations will occur
simultaneously. This is not recommended in most cases, especially with devices such as
Imagers or RFID Readers.
It is also possible to map different sources to the same module (trigger consumer)—for
example, two different trigger keys can be mapped to the RFID File System.
Regulatory Draft
Chapter 4: Configuration
Open TekTerm
Psion Omnii Hand-Held Computer User Manual
84
• Tap on the drop-down menu, and choose the microphone for which you want to adjust the gain.
• Slide the microphone tab to the left to decrease the gain and to the right to increase the gain.
Tapping on the Default button sets the current microphone you’ve chosen to the default gain. Tapping on
Default All sets all microphones listed to their default gain.
4.15 Open TekTerm
Open TekTerm is a powerful emulation application ideally suited for real time data transaction applications
associated with mainframes and servers. Omnii includes unique features that support Open TekTerm, a
Psion application that has the ability to maintain multiple simultaneous sessions with a variety of host com-
puters. For detailed information, please refer to the Open TekTerm Software User Manual, P/N 8000073.
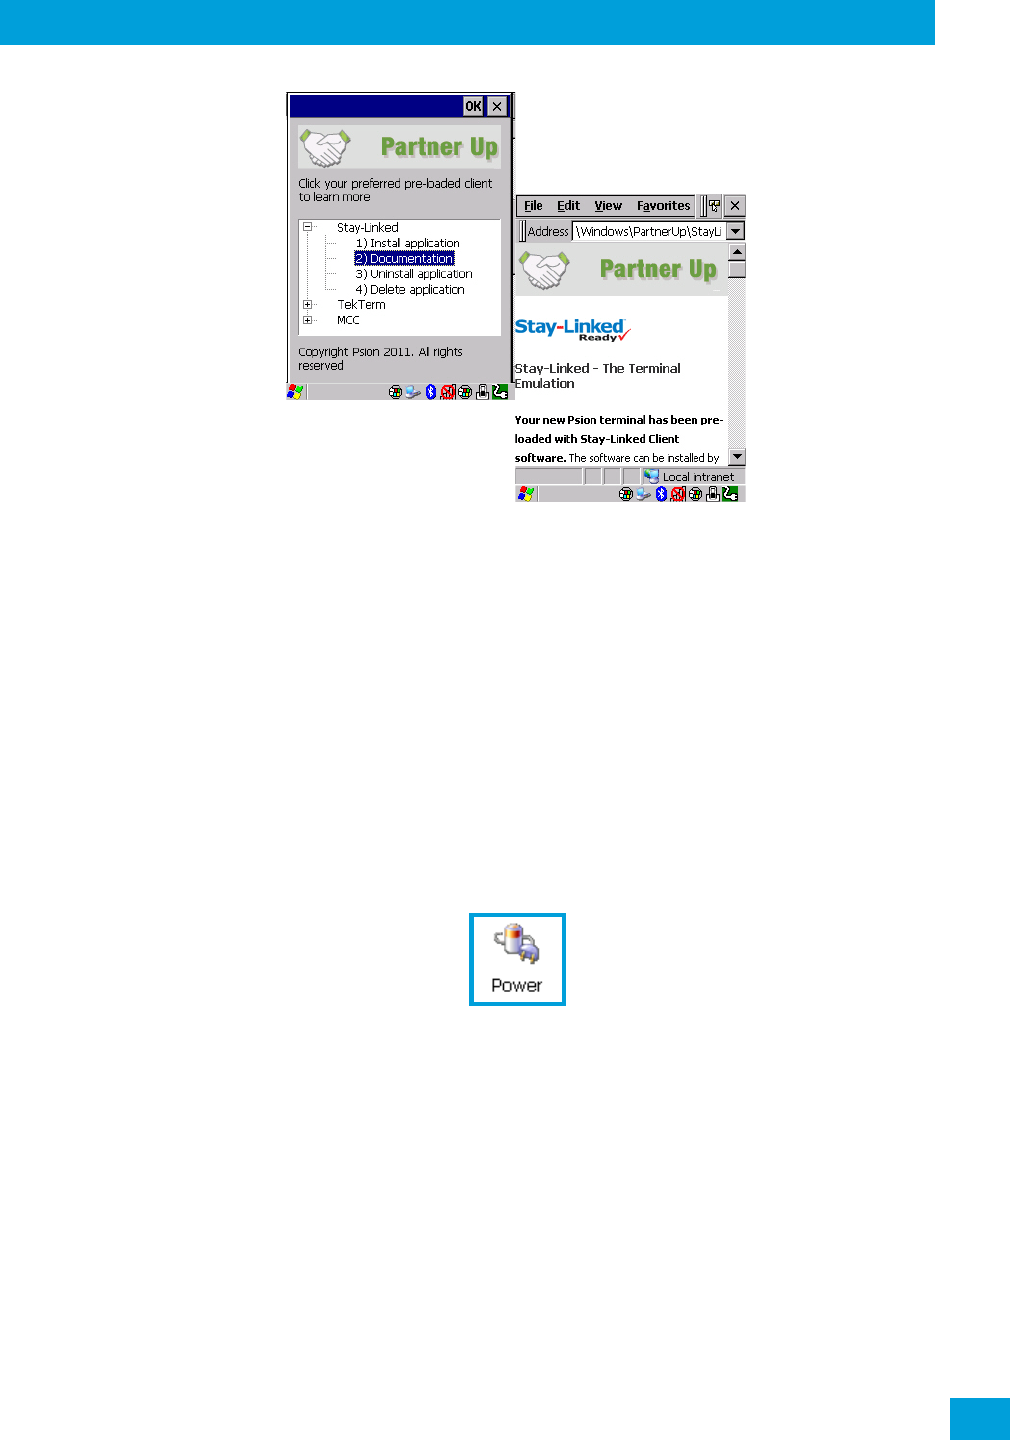
4.16 PartnerUp
This app displays a number of pre-loaded applications. Tapping on an app in the list takes you to an associ-
ated web site.
The operator can then install the application. If a license is required, it can be obtained by sending an e-mail
to the software license mailbox or by contacting a Sales Representative from the Psion contact web page.
www.psion.com/us/about/contact_psion-offices.htm
Additional pieces of software such as a server must be obtained through Psion.
Tapping on a preloaded client in this screen displays a drop-down menu from which the operator can
choose from an array of related options. In the example following, Stay-Linked Documentation was chosen.
Regulatory Draft
Chapter 4: Configuration
Pocket PC Compatibility
85
Psion Omnii Hand-Held Computer User Manual
4.17 Pocket PC Compatibility
Omnii supports the AYGShell API set that allows Pocket PC-compatible applications to run on the hand-
held. Windows Embedded CE includes application programming interface (API) compatibility support for
the Microsoft Windows Powered Pocket PC 2002 shell in units running Windows Embedded CE.
The website listed below describes the APIs exposed through AYGShell and the application compatibility
between Windows Powered Pocket PC 2002-based applications and Windows Embedded CE based devices:
http://msdn.microsoft.com/library/default.asp?url=/library/en-
us/dncenet/html/WINCENET_CEPCC_App.asp
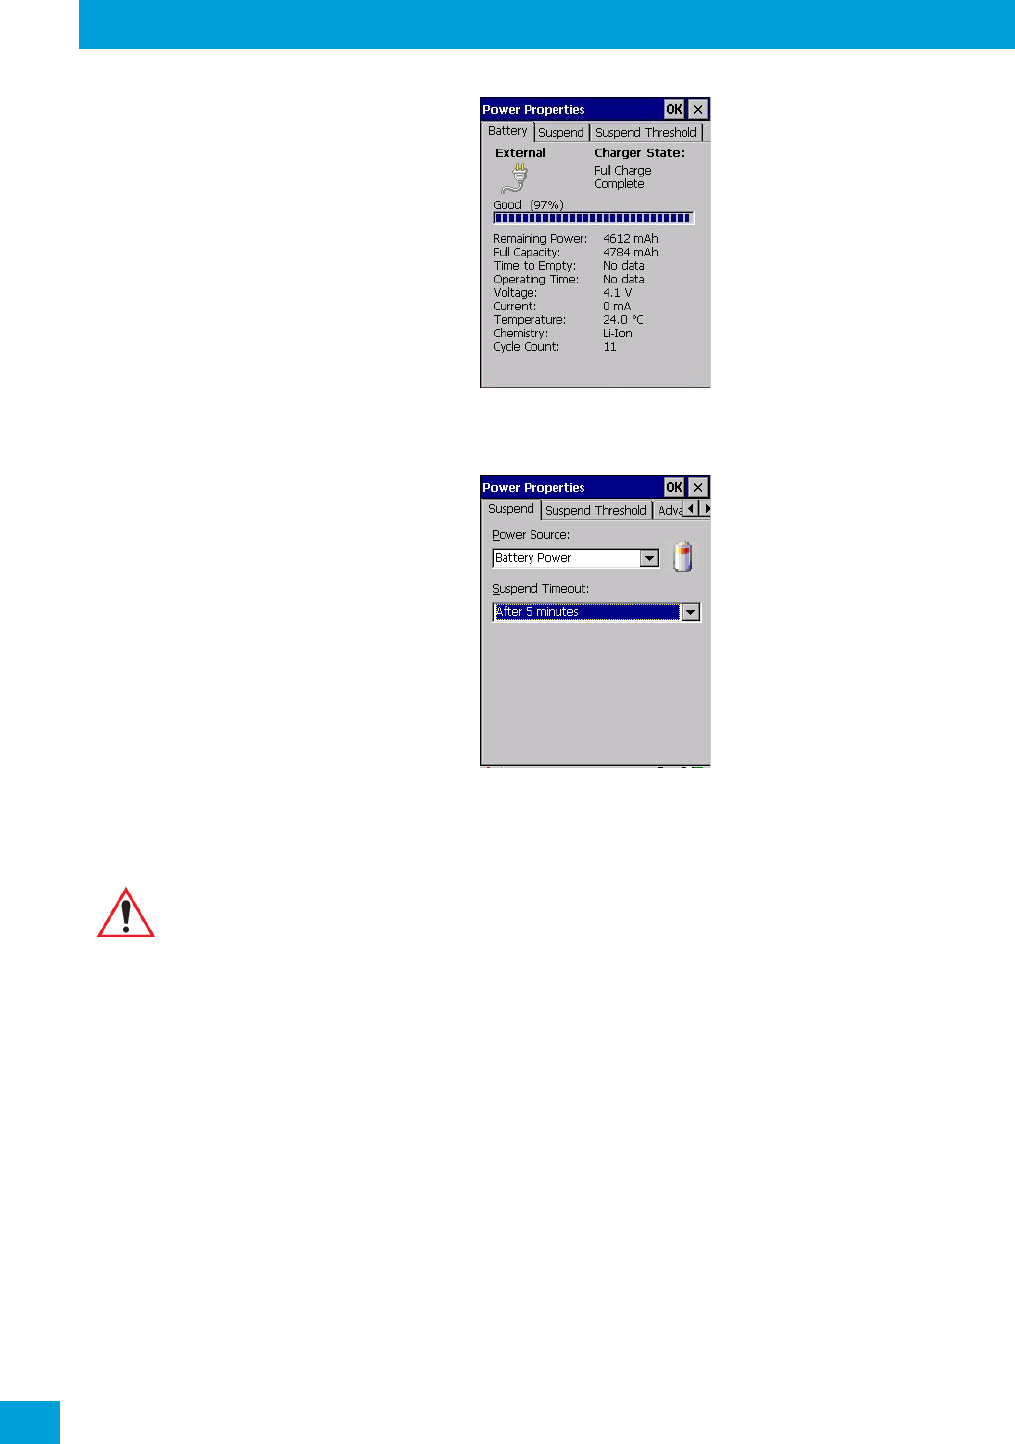
4.18 Power Properties
This icon displays a Power Properties dialog box that indicates the unit’s battery capacity and allows you to
manage battery use.
•In the Control Panel, choose the Power icon.
4.18.1 Battery Capacity
•In the Power Properties dialog box, open the Battery tab to view battery details.
Regulatory Draft
Chapter 4: Configuration
Power Saving Suspend
Psion Omnii Hand-Held Computer User Manual
86
4.18.2 Power Saving Suspend
•In the Power Properties dialog box, open the Suspend tab.
Power Source
This drop-down menu allows you to specify whether the unit is using AC Power or Battery Power.
Suspend Timeout
When Omnii is idle—not receiving any user input (a key touch, a scan, and so on) or system activity (serial
data, an activity initiated by an application, and so on)—the hand-held uses the value assigned in the
Suspend Timeout field to determine when the unit will go to sleep (appear to be off).
Important: Psion recommends setting the Suspend value to 3 minutes. To further reduce
power consumption, carefully consider the duration of time that the display back-
light is ‘on’ (see “Backlight” on page 66).
Regulatory Draft
Chapter 4: Configuration
Suspend Threshold and Estimated Battery Backup
87
Psion Omnii Hand-Held Computer User Manual
When the time in the Suspend Timeout field elapses without any activity, the unit enters suspend state. In
suspend state, the Omnii CPU enters a sleep state, and wireless communication is shut off. The state of the
device (RAM contents) is preserved. Pressing [ENTER] wakes the system from suspend state.
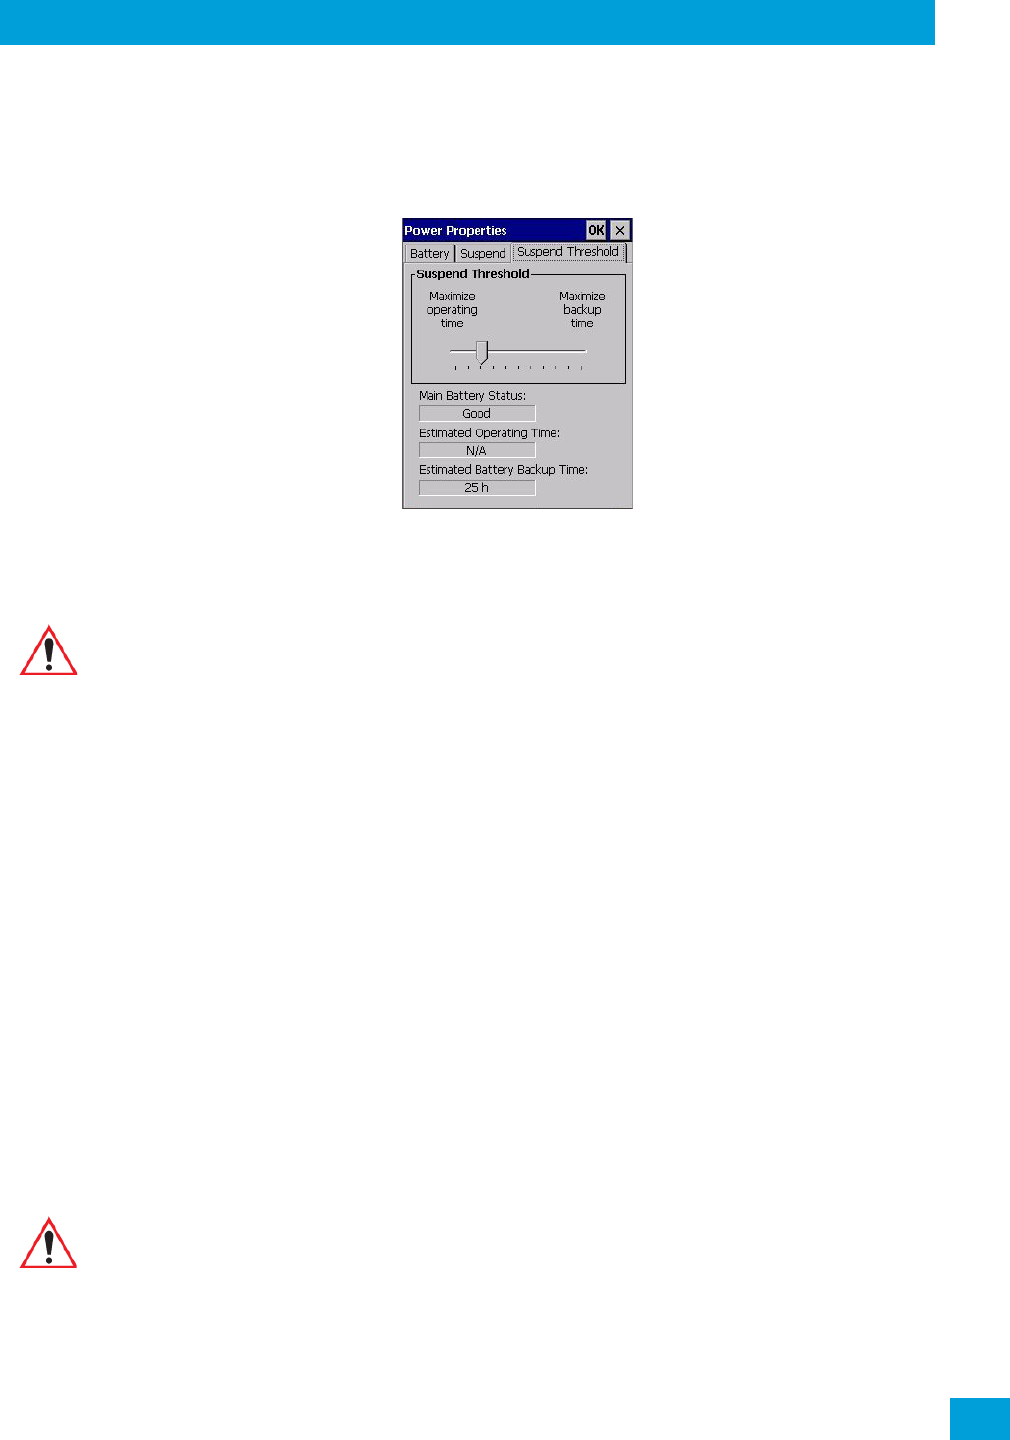
4.18.3 Suspend Threshold and Estimated Battery Backup
The Suspend Threshold adjustment tells the system when to shut down when the battery drains. If you
choose Maximum Operating Time, the unit will run until the battery is completely empty; the RAM is only
backed up for a short period of time. If you choose Maximum Backup Time, the hand-held shuts off with
more energy left in the battery so RAM can be backed up for a longer period of time.
The Estimated Battery Backup is the amount of battery power that has been reserved or set aside to
protect data until a charged battery can be installed in the hand-held. When the battery capacity is depleted
up to the Estimated Battery Backup reserve specified in the Suspend Threshold menu, Omnii shuts off auto-
matically and uses the reserve power to preserve the data stored on the computer. Once Omnii shuts down,
it cannot be switched on until a fresh battery is installed, or the unit is inserted in a docking station
or cradle.
• Slide the Suspend Threshold button to the right to increase the battery capacity reserved for backup
purposes. Data will be preserved to a maximum of 124 hours.
• Slide the Suspend Threshold button to the left to decrease the power reserved for backup purposes;
this increases the Omnii operating time—the amount of time the unit will operate before shutting
down—but reduces the power reserved for backup purposes to a minimum of 24 hours.
Internal super-capacitors will protect the data stored in the computer while the battery is swapped for a
fully charged one.
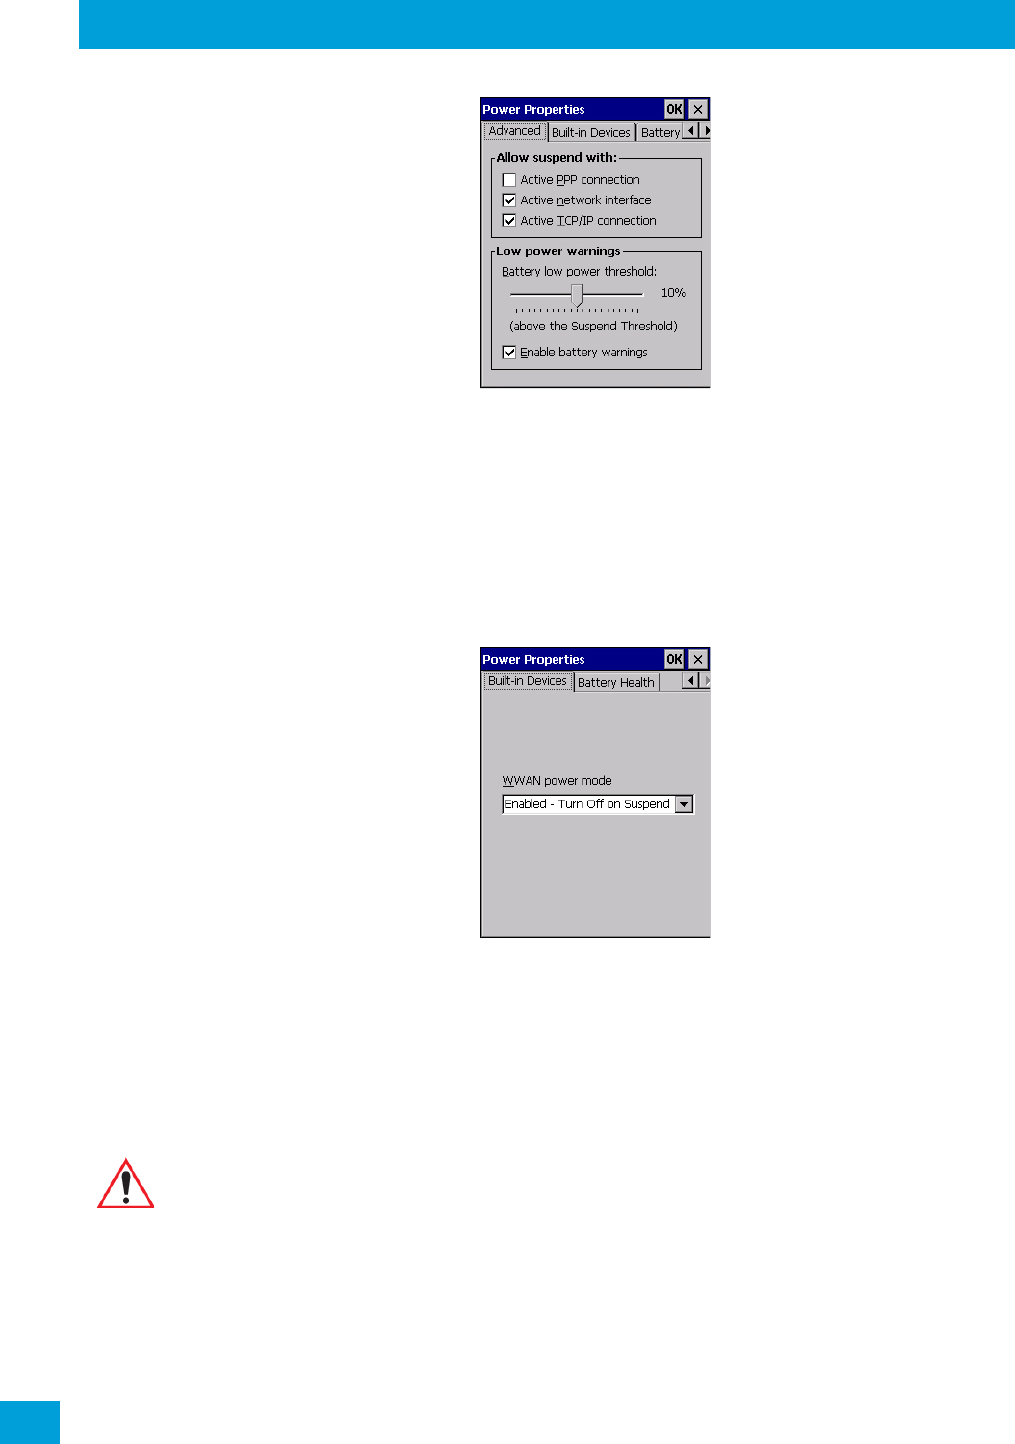
4.18.4 Advanced
•In the Power Properties dialog box, open the Advanced tab.
Important: Selecting Maximum backup time will reserve approximately 20% of the battery
capacity for memory backup. Once the battery is drained, the system RAM
memory is lost and the unit must cold boot.
In most real-time transaction environments this is not a problem (it only takes a
few seconds to cold boot). Batch transaction environments, where data is not
saved to a non-volatile memory (such as an SD FLASH card), may need to pay
particular attention to this parameter. Psion does not recommend the storage of
any valuable data in system RAM.
The Omnii Windows Embedded CE 6.0 environment does not store any critical
data in RAM (such as the registry or file system).
If your application does not save data to RAM, Psion recommends keeping the
Suspend Threshold setting as low as possible to maximize battery run time.
Important: Once the battery is removed, the super-capacitors will preserve the data stored on
Omnii for approximately 5 minutes. It is critical that you install a charged battery
before this time elapses.
Regulatory Draft
Chapter 4: Configuration
Built-in Devices
Psion Omnii Hand-Held Computer User Manual
88
Allow Suspend With
This menu allows you to specify whether or not your unit will enter Suspend Mode while it is operating with
an active PPP connection, network interface or active TCP/IP connection.
Low Power Warnings
The sliding scale at the bottom of this menu allows you to specify the remaining battery capacity at which a
warning message is displayed on the Omnii screen, from 0% to 20%.
4.18.5 Built-in Devices
•In the Power Properties dialog box, open the Built-in Devices tab.
WWAN Power Mode
This menu allows you to enable power to your WWAN radio, and whether or not the radio will turn off when
Omnii enters Suspend Mode. To configure the radio, please refer to Appendix F: “Wireless Wide Area
Network (WWAN) Settings”.
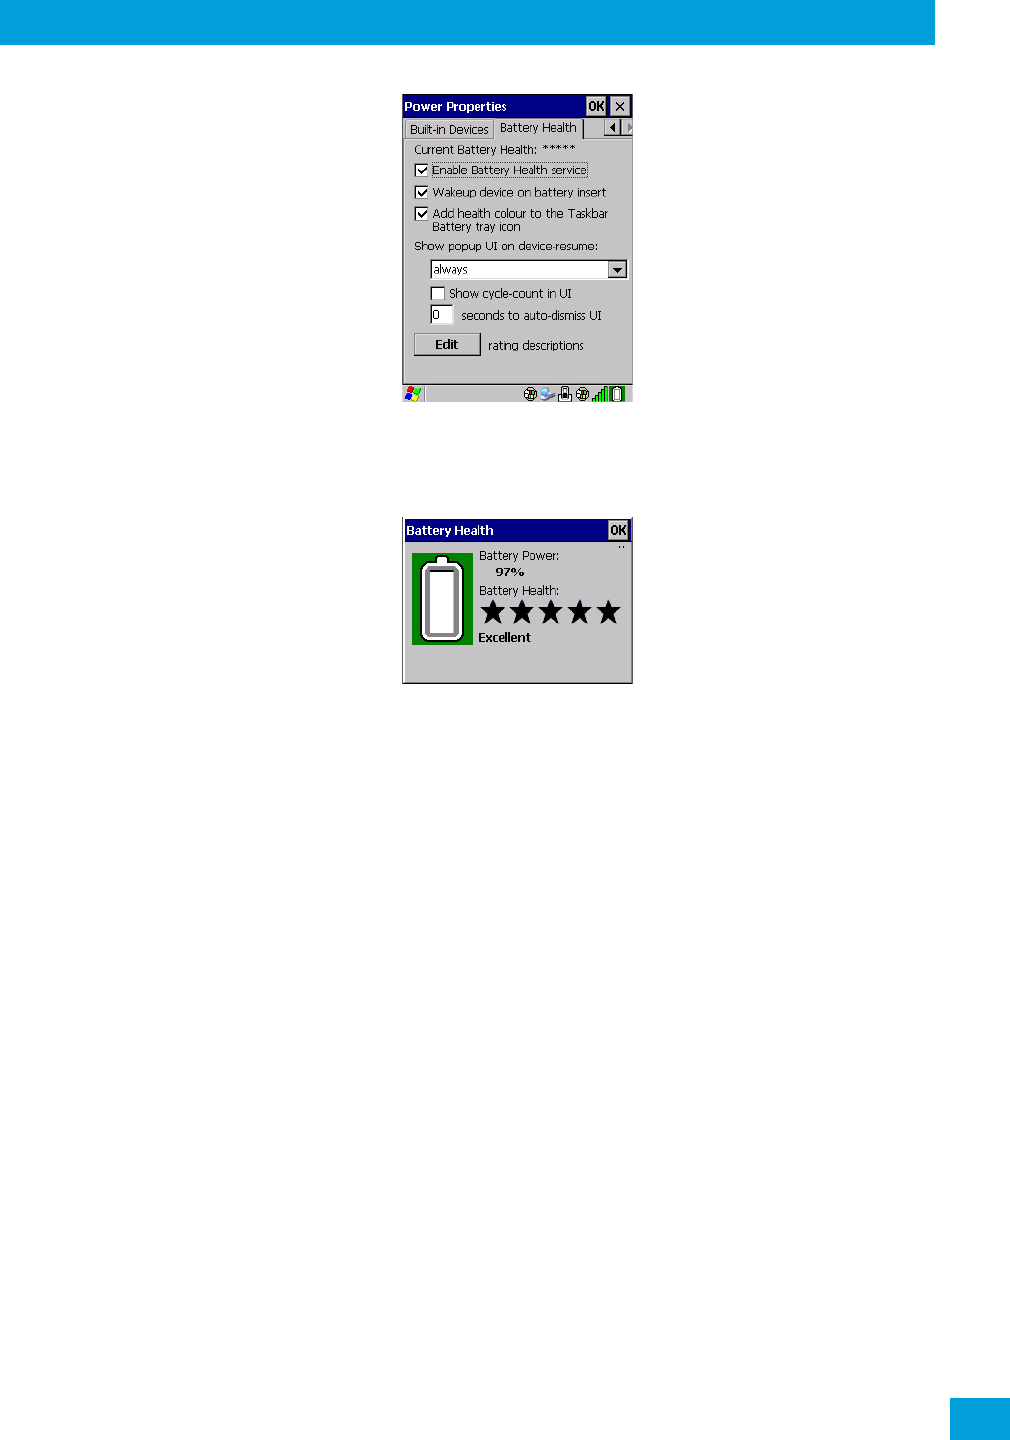
4.18.6 Battery Health
The Battery Health service provides an estimate of battery health based on a number of different measure-
ments, beyond just capacity.
•In the Power Properties dialog box, open the Battery Health tab.
Important: Battery Health is an estimate and should not be depended on to provide a 100%
account of battery condition.
Regulatory Draft
Chapter 4: Configuration
Battery Health
89
Psion Omnii Hand-Held Computer User Manual
Battery Health
The Battery Health default values are shown here as ***** (Excellent), *** (Used), and * (Battery should be
replaced). If you tap on the battery icon in the taskbar, a pop-up screen will show the state of the battery.
The image below shows the default Excellent status screen.
Enable Battery Health Service
This option allows you to enable the service. To access the menus after enabling the service, you will need
to either wait until a resume from Suspend or restart Omnii.
Wakeup Device on Battery Insert
When this option is enabled, whenever the battery is replaced Omnii is powered up from Suspend and the
current health of the battery is displayed.
Add Health Colour to the Taskbar Battery Tray Icon
Enabling this option changes the background colour for the battery icon in the Taskbar, based on battery
condition: Green (excellent), Yellow (used), and Red (battery should be replaced).
Show Popup UI on Device-Resume
You can decide when the battery status pop-up user interface (UI) will appear, for how many seconds, and
whether the battery cycle count is displayed (off by default).
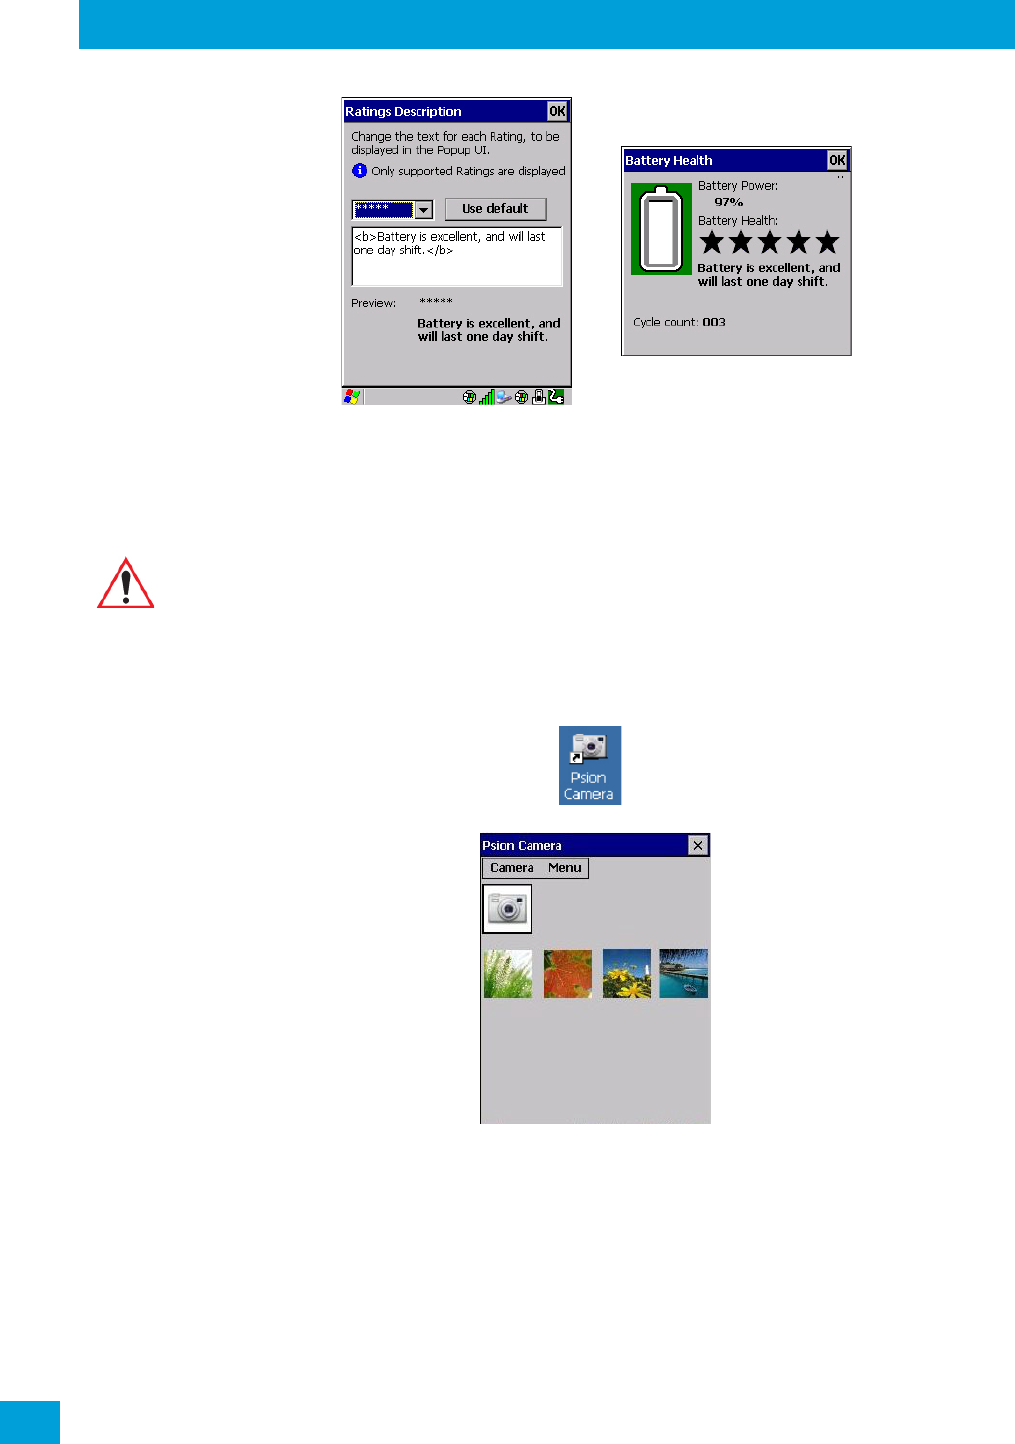
Edit
You can customize the ratings text with the Edit option. By enclosing your text within the html tag used for
Bold <b> (or removing the tag to unbold the text), you can change the text that will appear in the pop-up
battery status screen. For example, the default text “Excellent” can be changed to: “Battery is excellent,
and will last one day shift.”...
Regulatory Draft
Chapter 4: Configuration
Psion Camera
Psion Omnii Hand-Held Computer User Manual
90
4.19 Psion Camera
The Psion Camera applet allows you to snap photographs and record video footage. It is also a photo and
video viewing program.
4.19.1 Using the Camera
• Tap on the Desktop icon: Psion Camera.
Keep in mind that if there are no pictures stored on your Omnii as yet, you’ll only see the Camera icon in
this screen.
• Tap on the Camera icon to activate the camera.
The screen will display the image your camera is pointed at. (The camera is built into the back of Omnii.)
Important: The Psion Camera program can only display .bmp or .jpg formats. Photos in other
formats will need to be converted on your PC before they are transferred to
Omnii.
Regulatory Draft
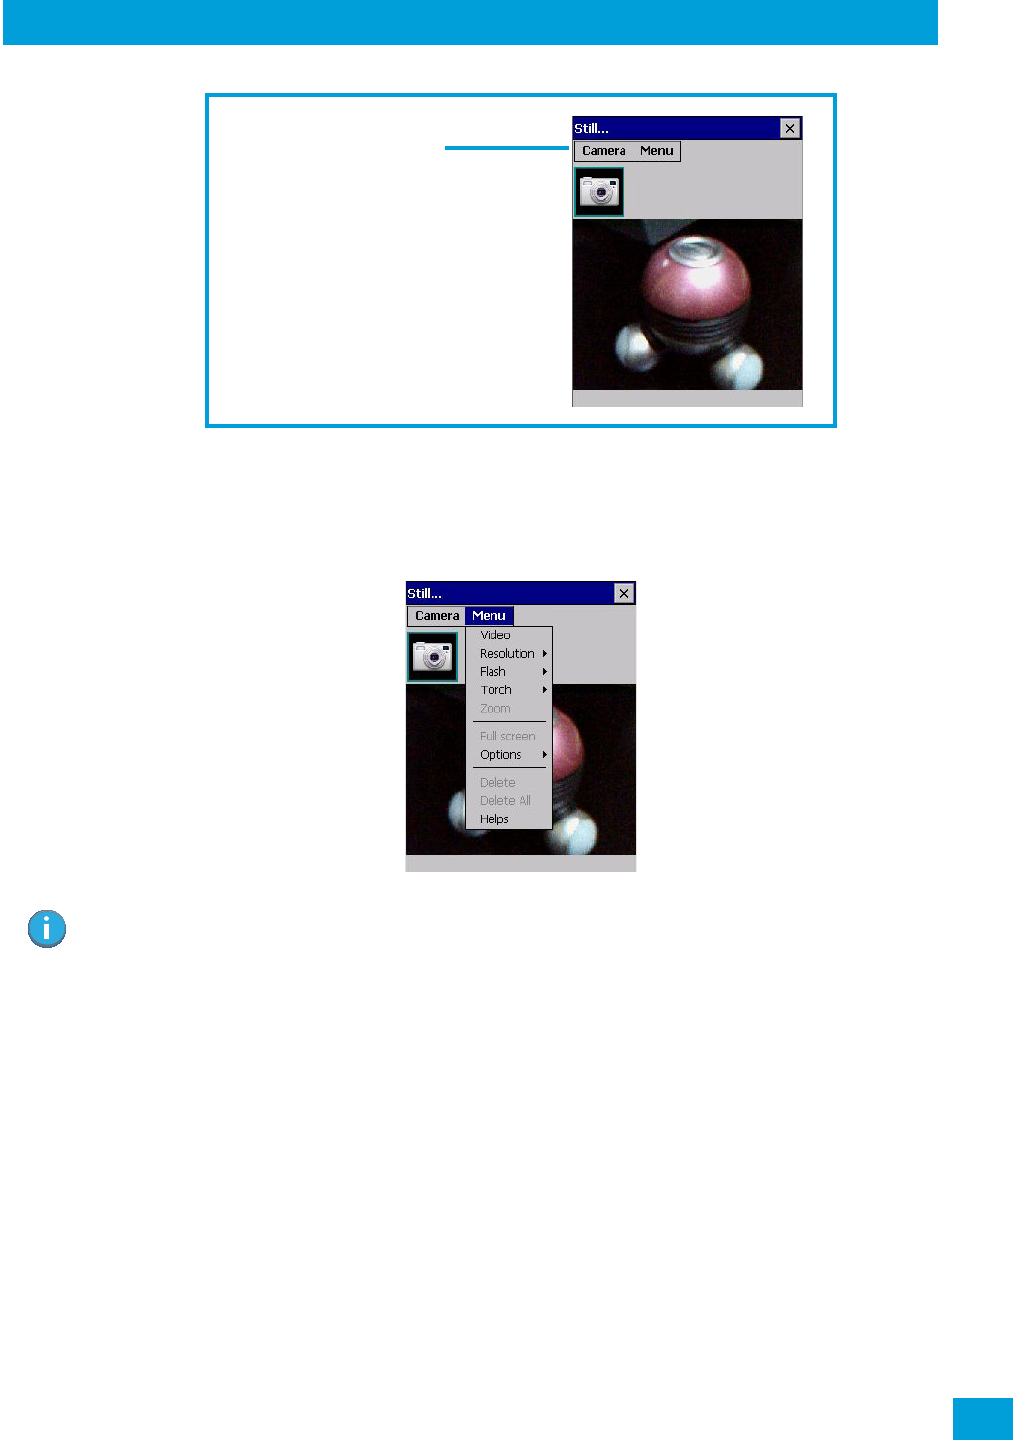
Chapter 4: Configuration
Moving Photos to Omnii
91
Psion Omnii Hand-Held Computer User Manual
• Frame the image in the Omnii screen. Press [ENTER] to snap the photograph.
Photo Menu
When the camera is activated, tapping on Menu displays a set of commands to help you modify how your
camera operates, the quality of the photos it takes, and so on. You can also use this menu to activate the
video recorder rather than the still camera.
4.19.2 Moving Photos to Omnii
• Connect your device to your PC with ActiveSync.
• Locate the pictures on your PC, and drag photos from their folder to the Mobile Device (Omnii). Omnii
can be found under Computer (My Computer on PCs running Windows XP).
4.19.3 Opening a Photo
• To open a photo, tap on Desktop icon: Psion Camera. You’ll see a thumbnail of your photos.
Tapping on the camera icon
or on Menu displays thumbnails of
photos stored on Omnii.
Note: ‘Video’ is a toggle command. When the ‘Still’ camera is activated, ‘Video’ is available in this
menu. When the video recorder is activated, ‘Still’ (camera) is available in this menu.
Regulatory Draft
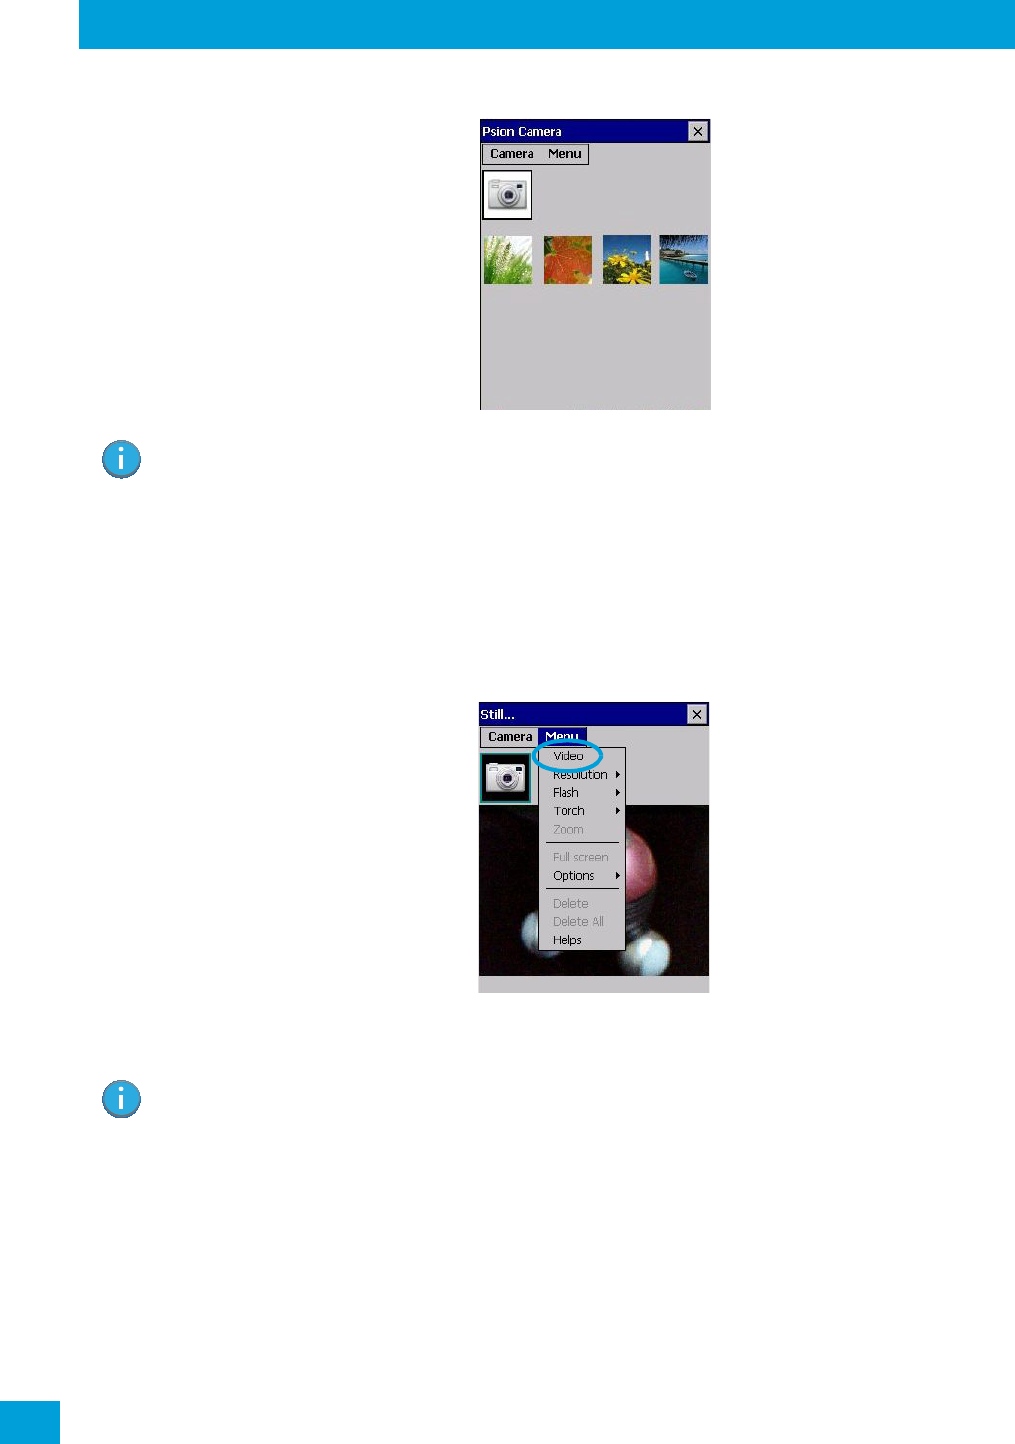
Chapter 4: Configuration
Deleting a Photo
Psion Omnii Hand-Held Computer User Manual
92
• Tap on a thumbnail to open the photo.
4.19.4 Deleting a Photo
• Press and hold the stylus on the thumbnail photo you want to delete to display a pop-up menu. Tap on
Delete.
• Confirm your choice when prompted.
4.19.5 Using the Video Recorder
• Tap on the Menu>Video.
•Press [ENTER] to begin recording.
• To end the video, press [ENTER] again, or tap on the Stop softkey.
Note: If you’ve stored your photos on a storage card, you’ll need to tap on the storage card icon to
display your photos.
Note: When the ‘Video’ recorder is activated, a Menu is available to tailor the operation of the
recorder, the quality of the recording, and so on.
Regulatory Draft
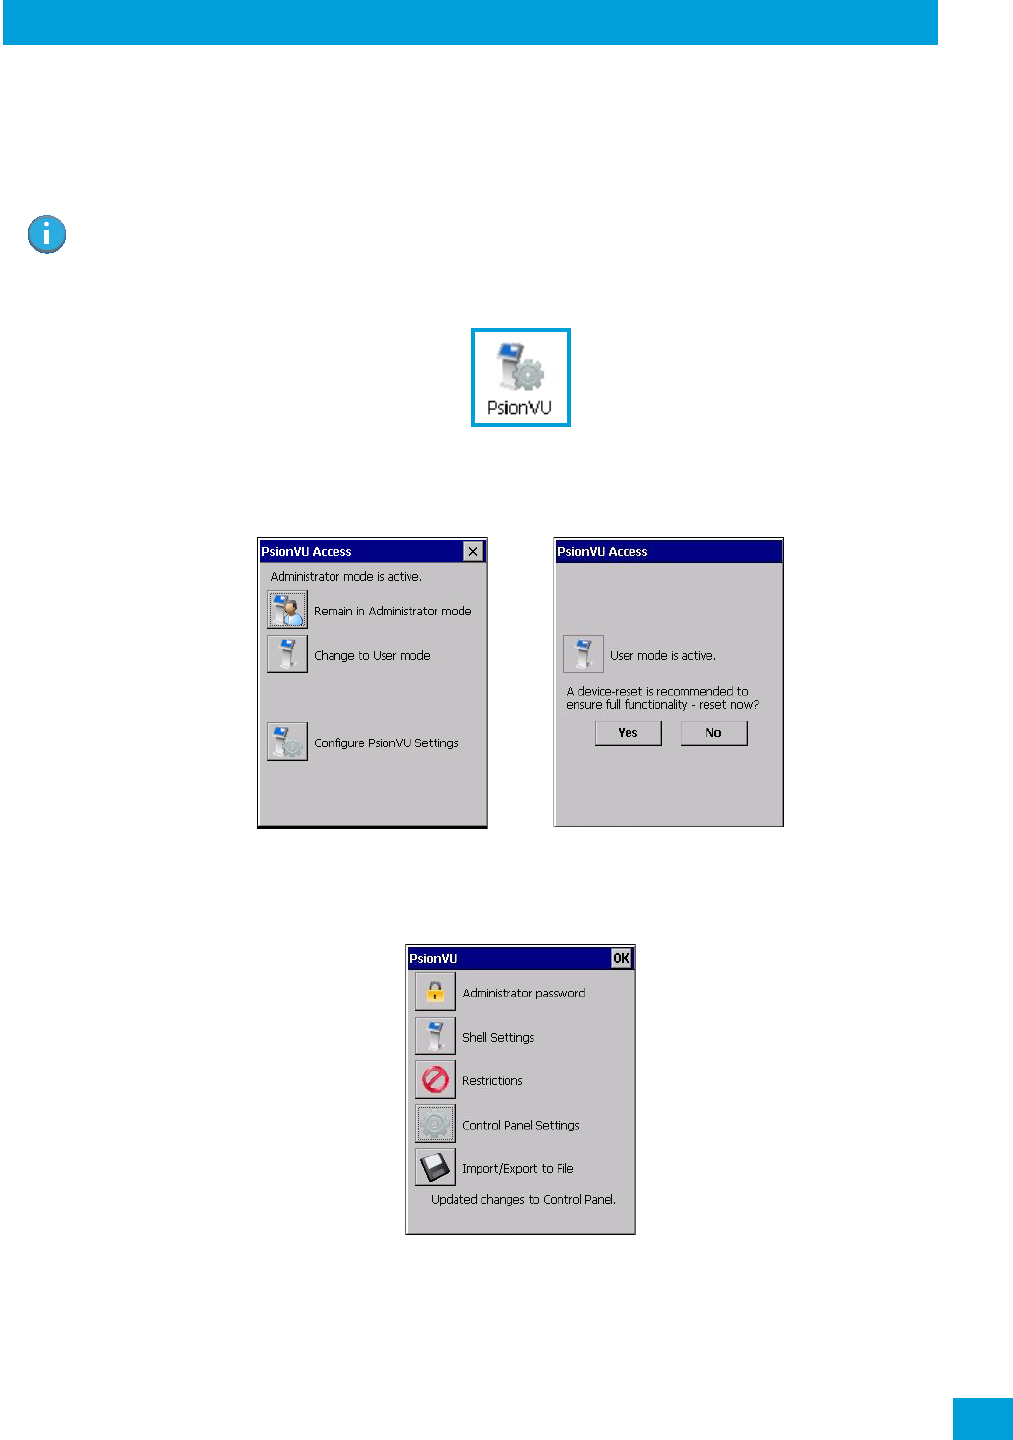
Chapter 4: Configuration
PsionVU Access
93
Psion Omnii Hand-Held Computer User Manual
4.20 PsionVU Access
PsionVU Access enables you to customize your computer settings, remove or add shortcuts to the desktop
and Control Panel, and limit access to various different components on the computer and the system tray
icons for security.
•In the Control Panel, choose the PsionVU icon.
When opening the PsionVU application, the PsionVU Access dialog will come up that enables you to either
proceed to the PsionVU Settings menus, or change from you current Access mode to the other (Administra-
tor or User). The computer must be reset following a change, and a confirmation will appear to enable you
to continue or dismiss the change.
When opening the PsionVu Settings option, the following menus will be available:
Figure 4.4 PsionVU Settings
4.20.1 Administrator Password
By setting an Administrator Password, you can limit access to various different components on the compu-
ter and the system tray icons for security. The default security setting allows User access to all options,
therefore restrictions and settings can be configured without setting a password.
Note: The Desktop theme can be changed from the default Windows Classic Shell to the PsionVU
Shell either in the PsionVU Access settings (see “Other Shell Themes” on page 96) or by
tapping on the Desktop icon PsionVU Shell (see “The PsionVU Desktop Shell” on page 41).
Regulatory Draft
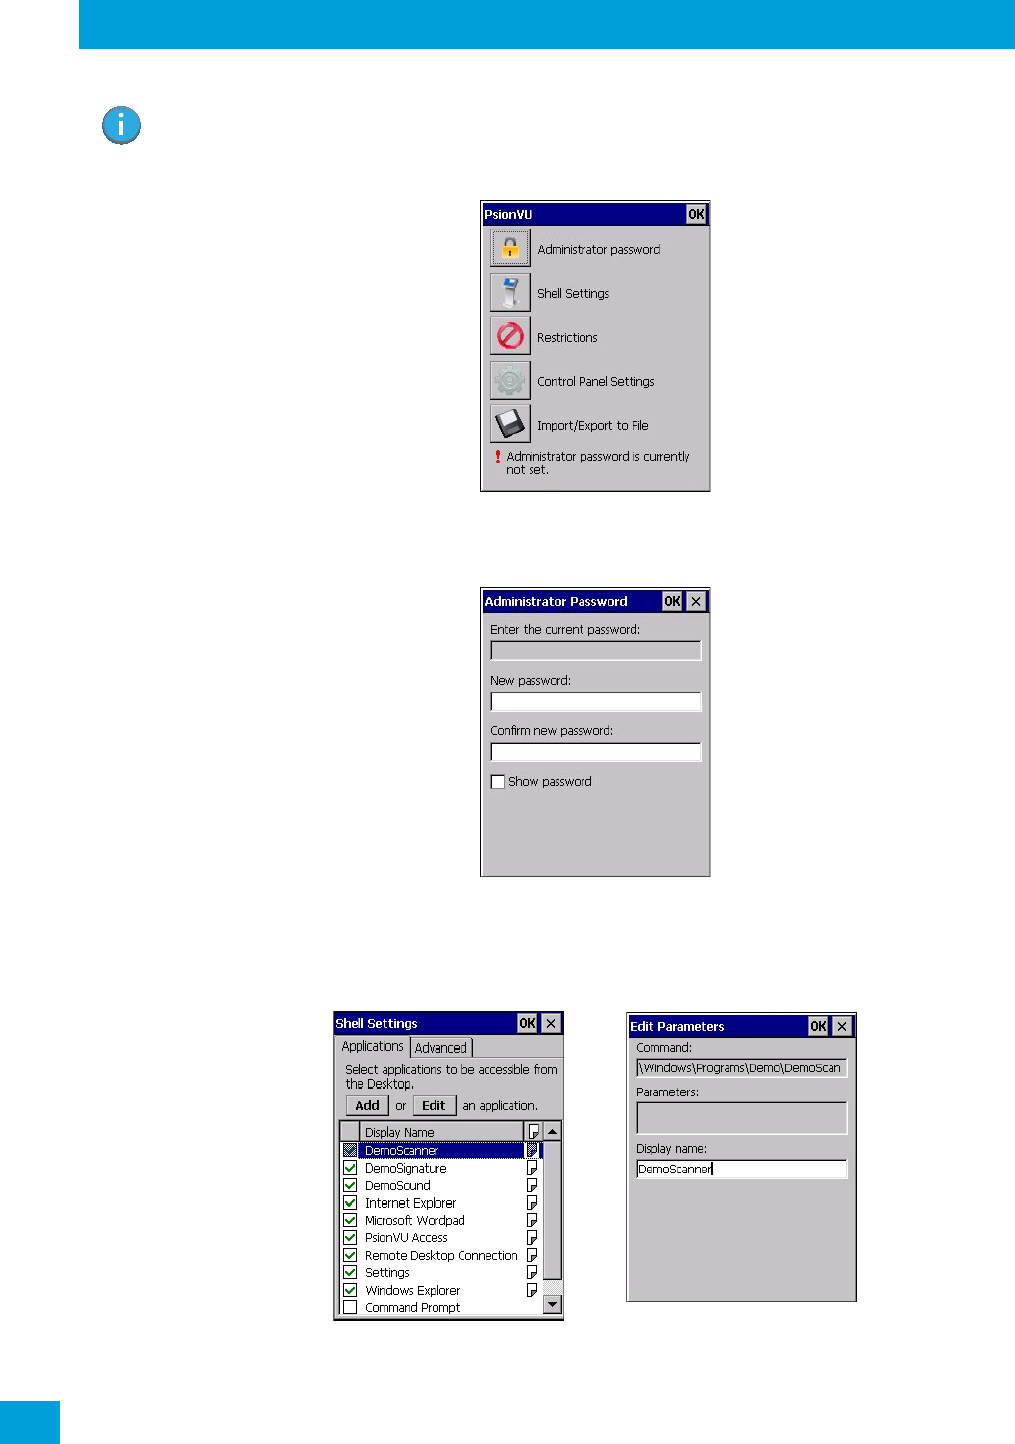
Chapter 4: Configuration
Shell Settings
Psion Omnii Hand-Held Computer User Manual
94
When an administrator password is set, the restricted options are accessed using a key combination. If a
password has been set, the user would be prompted for the password.
The option Show Password changes the displayed password from hidden (***) to readable.
4.20.2 Shell Settings
The Shell Settings application has two menus: Applications and Advanced.
Applications
The Applications menu lists all the applications installed on the computer, alphabetically. The items checked
in this view are shown on the Desktop.
Note: If a setting or restriction is configured without setting an Administrator password, the follow-
ing message is displayed: “!Administrator password is currently not set.” Once a password has
been set, the message will disappear.
Regulatory Draft

Chapter 4: Configuration
Shell Settings
95
Psion Omnii Hand-Held Computer User Manual
The Add and Edit buttons allow you to search for and add an application to the list of items in the selection
window. You can add a maximum of 18 applications, after which the Add option will be greyed out and the
following message is displayed: “!Maximum 18 entries reached.”
When you select an application and tap on Edit, you will see fields for Command, Parameters, and Display
Name.
•Command: The Command field is prefilled with the path and name of the executable (.exe) or corre-
sponding link (.lnk). If the selected file can’t be found (e.g. external memory card has been removed,
files have been deleted), a message will be displayed at the bottom of the screen: “These files
cannot be found.”
•Parameters: The Parameters option provides the option of adding extra parameters to the applica-
tion (for .exe files only, not .lnk). For example, if the Command field is running “pword.exe”
(Microsoft WordPad), the Parameters field could specify a document to open.
•Display name: This is an editable field which is prefilled with the name of the application.
Advanced
The Applications menu allows you to enable or disable some device functions.
Windows Classic Shell
The following options can be enabled or disabled in the Windows Classic Shell Desktop theme:
•Start Menu Bar: If disabled, access to both Start Menu and Notifications are disabled. The Notifica-
tion tooltips will still display. Any changes made will occur after a device reset.
•Start Button: If disabled, access to the Start Button and Notifications are disabled. The Notification
tooltips will still display.
•Notifications: If disabled, the Notifications tooltips will still display.
•PsionVU Access in Start Menu: When this box is checked, the PsionVU Access program will be
shown in the Start Menu>Programs list.
The following item is not optional:
•PsionVU Access Key Sequence: Sets the key sequence to open PsionVU Access.
Note: If “Disable access to the Start Button” is selected, but the “PsionVU Access by Key Sequence”
remains unchecked, you will see the following status-message “!A Key Sequence is required
when the Start Button is disabled.”, the checkbox will be auto-checked, and the focus will be
set to the key-sequence selection.
Regulatory Draft
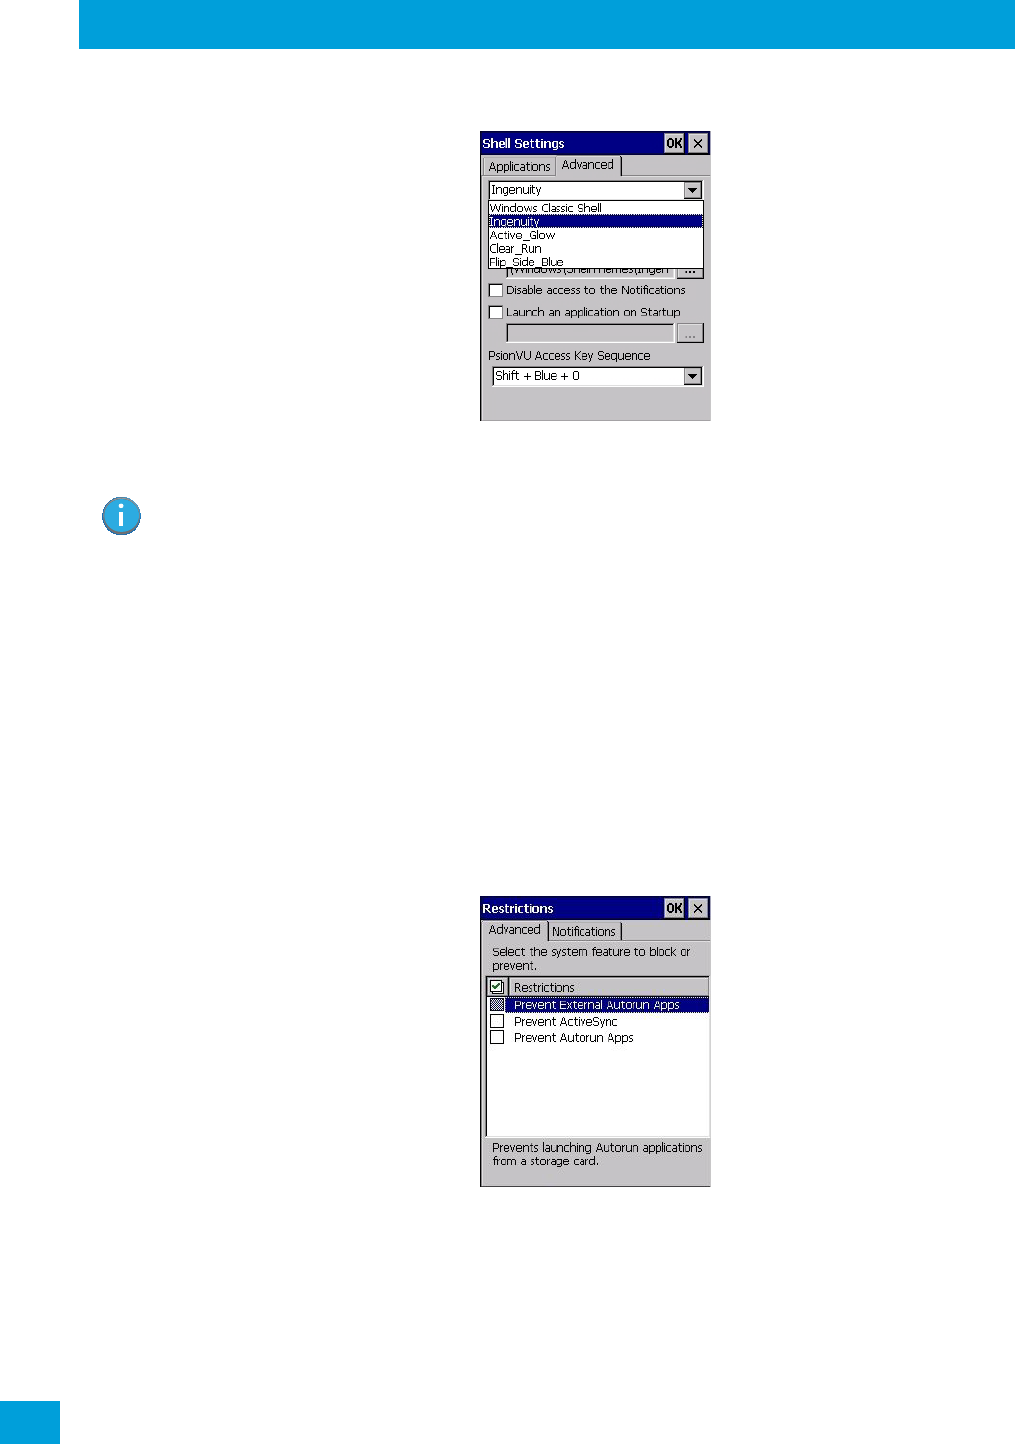
Chapter 4: Configuration
Restrictions
Psion Omnii Hand-Held Computer User Manual
96
Other Shell Themes
The following options can be enabled or disabled in the PsionVU Shell Desktop themes (shown in the drop-
down list as Ingenuity, Active_Glow, Clear_Run, and Flip_Side_Blue):
•Use this picture as the background: You can select a picture as the Desktop background.
•Notifications: If disabled, the Notifications tooltips will still display.
•Launch an application Startup: A window is displayed listing all of the installed and added applica-
tions. Any applications selected will startup after a reboot.
The following item is not optional:
•PsionVU Access Key Sequence: Sets the key sequence to open PsionVU Access.
4.20.3 Restrictions
This section deals with items that are by default available to users but can be restricted by an administrator.
Advanced
The Advanced menu lists the system features you can restrict or block.
Notifications
The Notifications menu allows you to block or disable notifications.
Note: The Desktop theme can be changed from the default Windows Classic Shell to one of the
PsionVU themes shown here—but by tapping on the Desktop icon PsionVU Shell (see “The
PsionVU Desktop Shell” on page 41), the “Ingenuity” theme is automatically loaded. The com-
puter must be reset in order for the shell to change.
Regulatory Draft
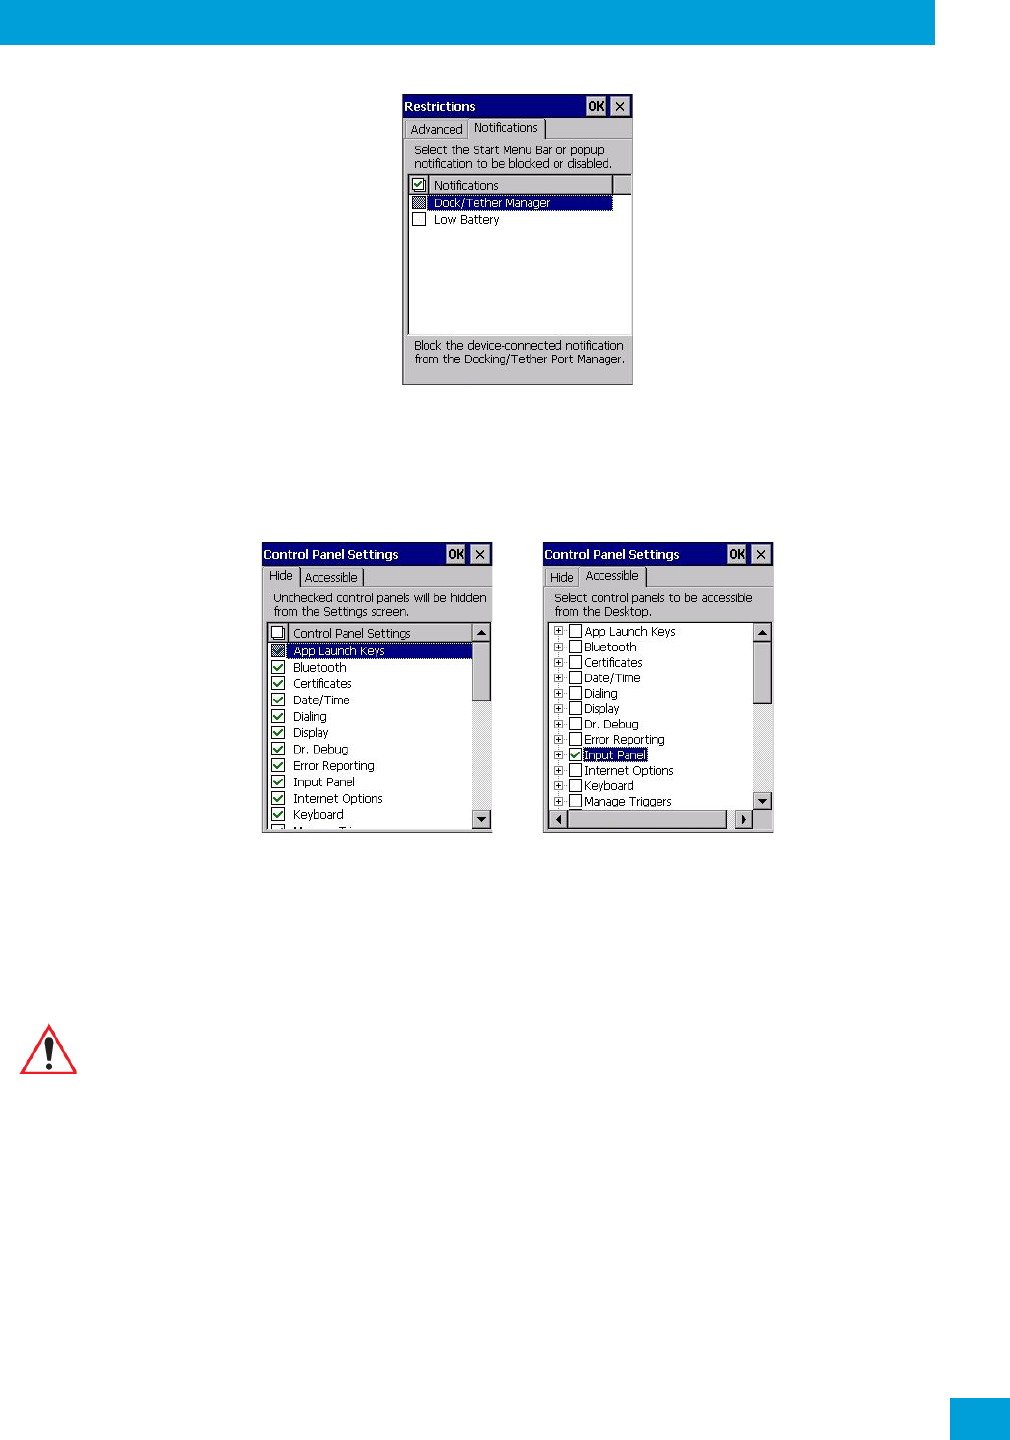
Chapter 4: Configuration
Control Panel Settings
97
Psion Omnii Hand-Held Computer User Manual
4.20.4 Control Panel Settings
In these menus you can set which applets and tabs you want to Hide in Control Panel, and which applets
and tabs will be Accessible as a shortcut icon from the Desktop.
• You have the option of setting the entire applet or specific tabs within the applet as hidden or accessi-
ble. Any applet that can’t be set is greyed out.
• You can add a maximum of 18 applications, after which the following message is displayed: “!Maximum
18 entries reached.”
4.20.5 Import/Export to File
This option enables you to Export your settings file (.xml), and save it in the location of your choice. In addi-
tion, an Administrator has the option to Import these settings from one device to multiple devices of the
same operating system.
Important: A copy of this file should also be saved in a central repository for all Psion .xml
files with a predefined name so that other Psion utilities can locate it.
Regulatory Draft
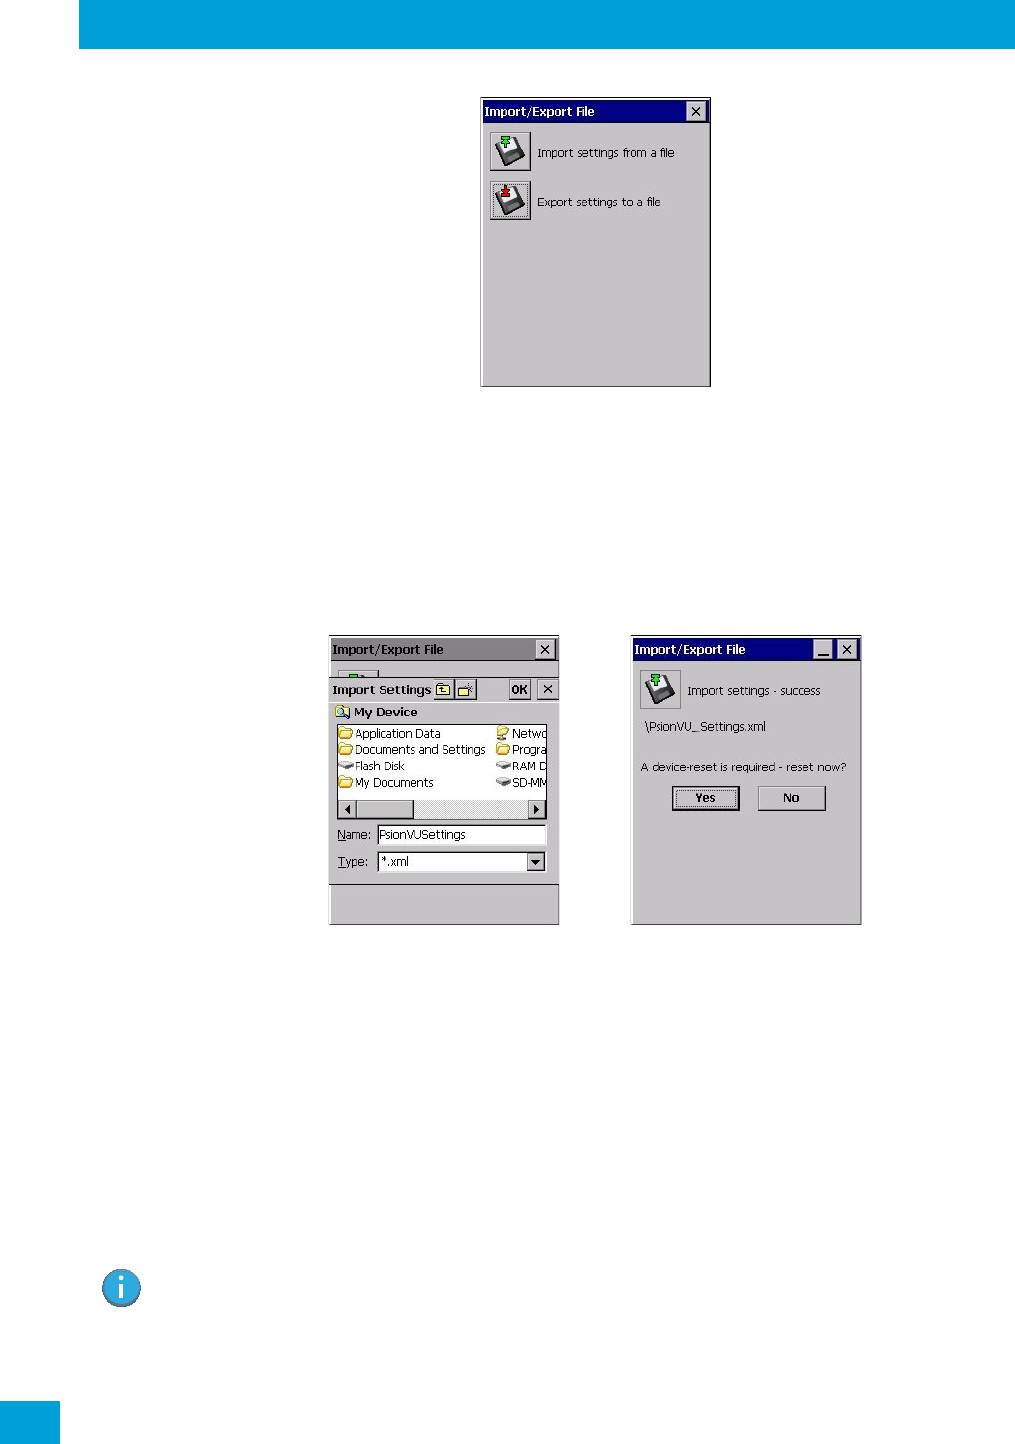
Chapter 4: Configuration
Remote Desktop Connection
Psion Omnii Hand-Held Computer User Manual
98
Tapping on the Export button will display a “Save As” Export Settings dialog, with the default name
PsionVU_Settings.xml, which the Administrator can change even after it has been saved.
The .xml file contains all of the PsionVU configured settings, including the Administrator Password. When
the file is imported to a device, the new password is applied immediately.
• Whether choosing to import or export files, the same file location options under My Device will be
listed. Following the action, a message stating the success of the operation and the location of the file
will be displayed.
• With the exception of the password, changes made to settings will take effect only after a warm reset.
If further changes to the configuration are made, they will overwrite the changes caused by the import
operation. After importing a file, a dialog will appear to enable you to reset now or later.
4.21 Remote Desktop Connection
Remote Desktop Connection is an Omnii application used to connect to a Windows Terminal Server so that
you can run a “session” on the Server machine, using Omnii (Windows Embedded CE device).
Refer to the following website for step-by-step information about setting up this connection: http://www.mi-
crosoft.com/windowsxp/using/mobility/getstarted/remoteintro.mspx or contact Psion support services.
Locate the office closest to you at: www.psion.com/service-and-support.htm
4.22 Scanners
The Scanners icon in the Control Panel provides dialog boxes in which you can tailor barcode scanner con-
figuration and choose the barcodes your scanner will recognize. The parameters are preset with the default
settings of the decoded scanner installed in the unit.
Important: To enable a newly-installed scanner, press and hold down the [FN] key and the
[ENTER/Power] key simultaneously for a minimum of three seconds.
Regulatory Draft
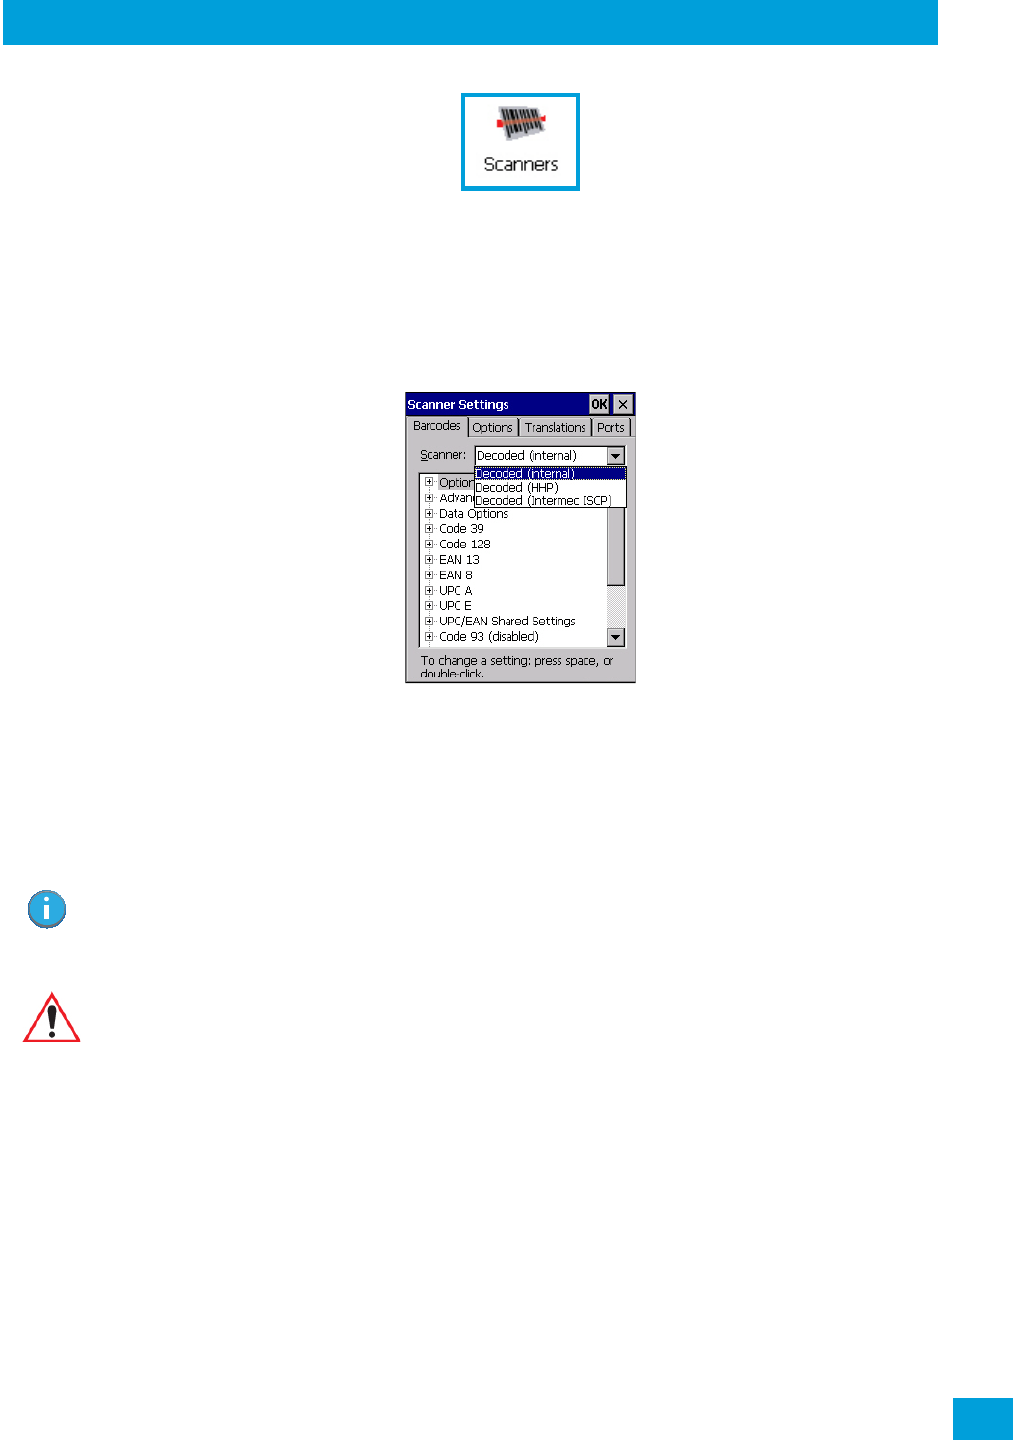
Chapter 4: Configuration
Barcodes
99
Psion Omnii Hand-Held Computer User Manual
You can test the scanner to ensure that it is operating properly by pointing the scanner window at a
barcode that your scanner was designed to decode —for example, a 1D UPC barcode or 2D barcode. Press
the SCAN key or pistol trigger, and check for a valid decode on the hand-held’s screen.
For a listing of available scanners and their specifications, please refer to Chapter E: “Omnii Specifications”.
4.22.1 Barcodes
4.22.1.1 Scanner
The drop-down menu to the right of the Scanner option allows you to choose configurations for one of the
following scanner types, depending on what is installed in/on your hand-held: Decoded (internal), Decoded
(Intermec ISCP), Imager and Non-decoded.
The symbologies listed in the Barcodes tab change to reflect the scanner you choose and the barcodes it
supports. Always defer to your barcode scanner’s programming manual when in doubt about the availabil-
ity or settings for any parameter.
Keep in mind that some barcode types are only available when an internal imaging scanner is installed. All
internal scanners can be configured using these dialog boxes.
4.22.1.2 Restoring Default Settings
If you want to restore the factory defaults after making changes, the defaults can be applied to a selected
parameter, sub-tree of parameters or all scanner parameters.
• Press and hold on a symbology (e.g., Code 128) to display a pop-up menu.
Note: Your Omnii comes preconfigured from the factory for internal scanner types. The type of
scanner installed can be determined from the System icon in the Control Panel, under the
System Properties tab.
Important: To improve the decode speed and performance, enable (set to ‘on’) only those
codes that are required by the application.
For information on configuring the barcode symbologies, see Appendix C: “Scan-
ner Settings”.
Regulatory Draft
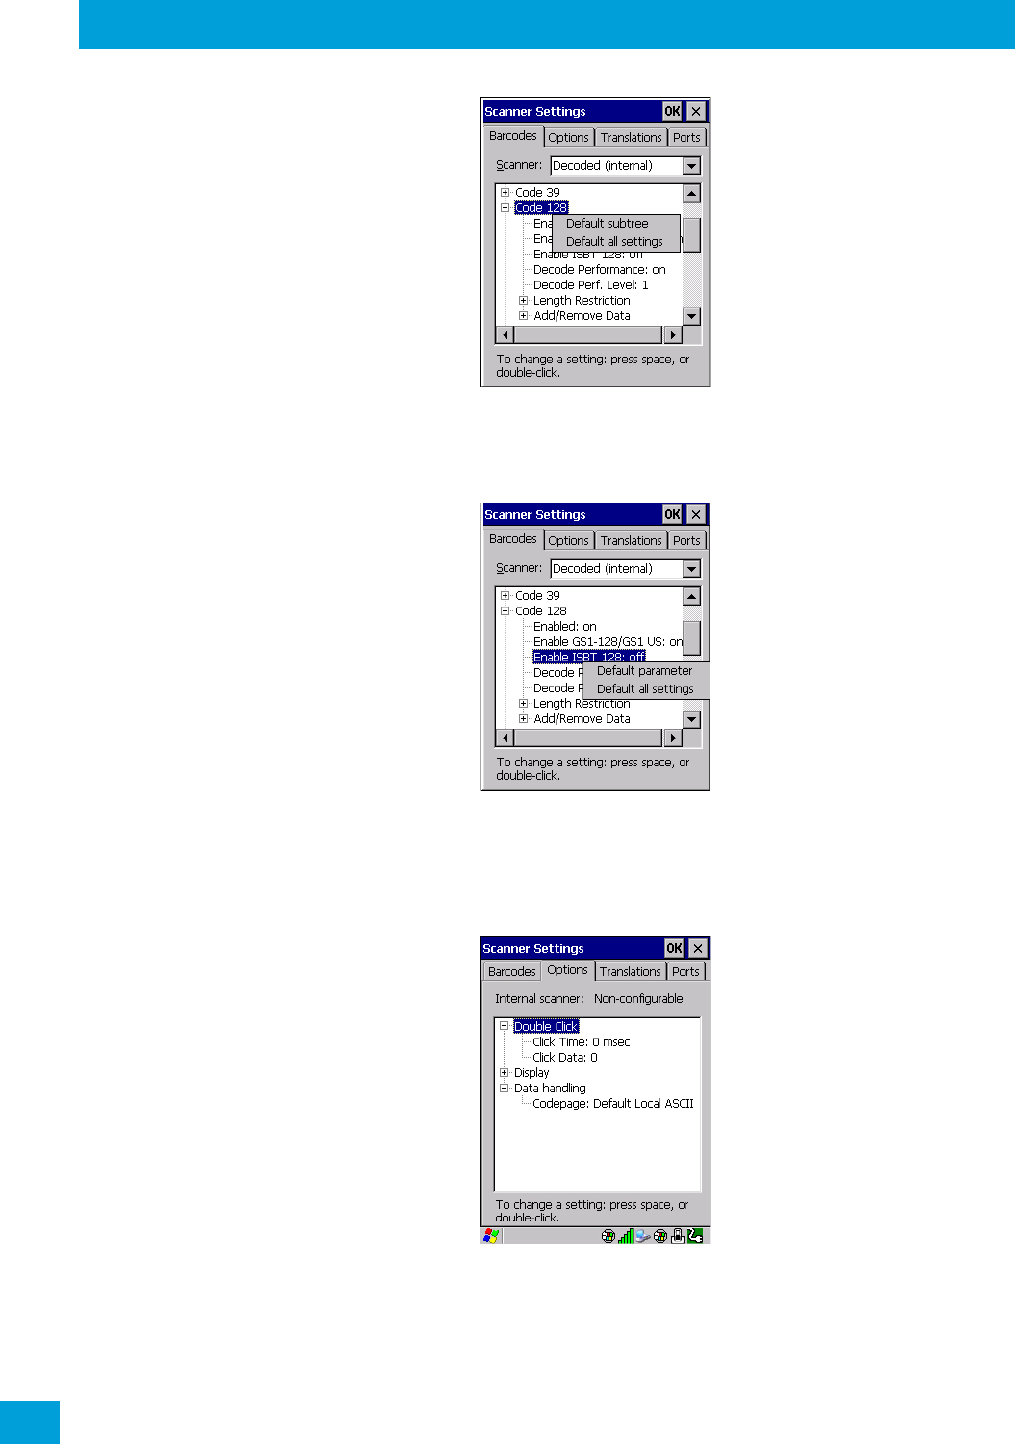
Chapter 4: Configuration
Options
Psion Omnii Hand-Held Computer User Manual
100
•Choose Default subtree to reset only the parameters in the symbology you selected, or choose
Default all settings to reset all scanner parameters to default settings.
To reset a single parameter to its default setting:
• Press and hold on the parameter you want to reset.
•Choose Default parameter to reset the parameter to the default setting.
4.22.2 Options
This tab allows you to tailor the double-click parameters, display, and data handling options associated with
your scanner.
Regulatory Draft

Chapter 4: Configuration
Options
101
Psion Omnii Hand-Held Computer User Manual
4.22.2.1 Double Click Parameters
Click Time (msec)
This parameter controls the maximum gap time (in milliseconds) for a double-click. If the time between the
first and second clicks of the scanner trigger is within this time, it is considered a double-click. The allowa-
ble range is 0 to 1000. A value of zero disables this feature.
A double-click produces different results depending on whether or not a value is assigned in the “Click
Data” parameter. When a value is not assigned for the “Click Data”, double-clicking the scanner trigger
overrides the target dot delay set in the “Dot Time” parameter and initiates a normal scan sweep. If a value
is assigned for the “Click Data” parameter, double-clicking the scanner trigger inserts the “Click Data”
value rather than initiating a scan.
Click Data
This parameter determines which character is sent to the application installed in your Omnii following a
double-click. A dialog box appears, asking that you press the key you want to insert. The ASCII/Unicode key
value of the keypress is displayed.
Pressing the [ESC] key in this dialog box resets the data to zero.
4.22.2.2 Display Parameters
Scan Result
When this parameter is enabled, the type of barcode and the result of the scan appear on the screen. Note
that this information is only displayed after a successful decode and is visible only while the scanner trigger
is pressed. When the trigger is released, this information is cleared from the screen.
Scan Indicator
When this parameter is enabled, the laser warning logo appears on the display whenever the scanner is ac-
tivated.
Scan Result Time (sec)
The value assigned to the Scan Result Time parameter determines how long the scan results of a successful
scan are displayed on the screen. Time is measured in seconds, and a value of 0 (zero) disables the param-
eter. When you choose this option, a dialog box appears where you can enter a value.
Good Scan Beep and Bad Scan Beep
These parameters determine whether or not Omnii emits an audible scanner ‘beep’ when a good (success-
ful) scan or a bad (unsuccessful) scan is performed. Set these parameters to either on to enable the beeper
or off to disable it.
Multiple Beep Tones
You can set the audible scanner ‘beep’ to emit a series of three beeps instead of one. Set this parameter to
on to enable the multiple beep tones.
Note: To remove the scan result from the screen before the “Result Time” has expired, point the
scanner away from the barcode and press the trigger.
Regulatory Draft
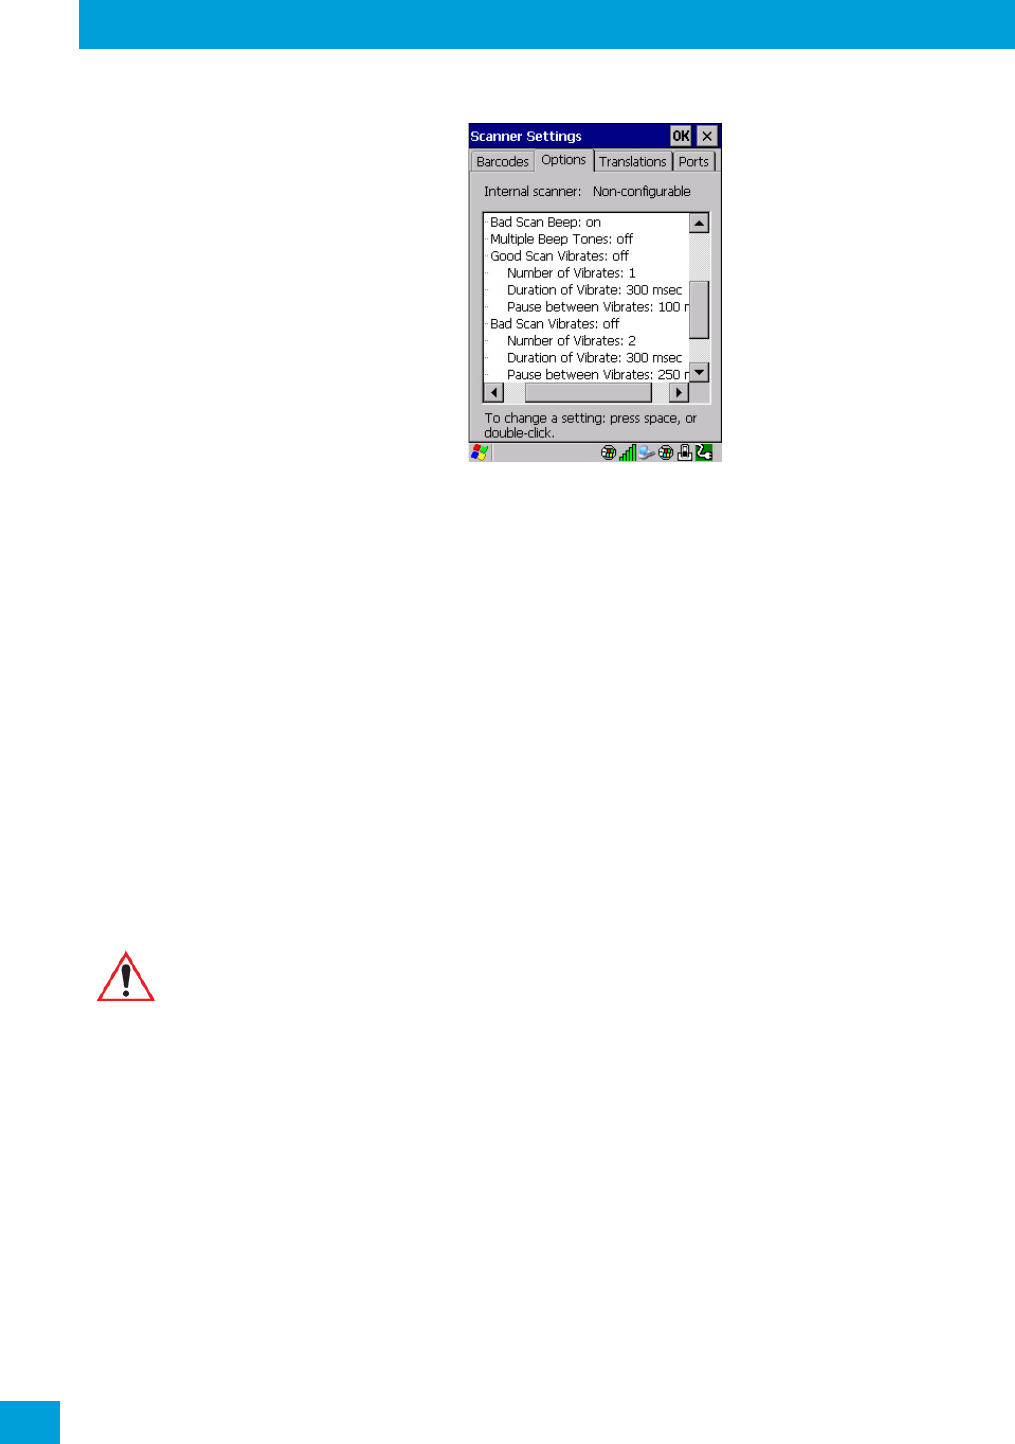
Chapter 4: Configuration
Translations
Psion Omnii Hand-Held Computer User Manual
102
Good Scan Vibrates and Bad Scan Vibrates
These parameters determine whether or not Omnii creates a vibration when a good (successful) scan or a
bad (unsuccessful) scan is performed. Set these parameters to on to enable the vibration. You can set the
Number and Duration of vibrations, as well as the Pause between vibrations. The screen above shows the
default settings.
Soft Scan Timeout
This parameter is used by the SDK “Scan” function (soft-scan: starting a scan session via the SDK function,
instead of a physical user trigger press). The value assigned to this parameter determines the soft-scan
timeout from 1 to 10 sec (default is 3 sec).
Scan Log File
If this parameter is enabled, the input barcode and the modified/translated output barcode are logged in
the file \Flash Disk\ScanLog.txt. Keep in mind that if Scan Log File is enabled, there is a slight performance
reduction when performing multiple scans since the log file is written to persistent storage.
4.22.2.3 Data Handling
Codepage
If you are encountering a scan failure because there is an unrecognized language character in the barcode,
the Codepage option may correct the problem by allowing the ISO-8859-1 Latin 1 codepage to be used. The
default value is Default Local ASCII.
4.22.3 Translations
The Translations menu allows you to define up to 10 cases, each consisting of up to 10 rules in sequential
order. Only one case will be applied to a barcode and a case will only be applied if all rules specified in the
case are successful—if a rule within a case fails, the entire case fails.
Important: Do not change this parameter from the default setting unless you are certain that
it will correct your scan problem.
Regulatory Draft
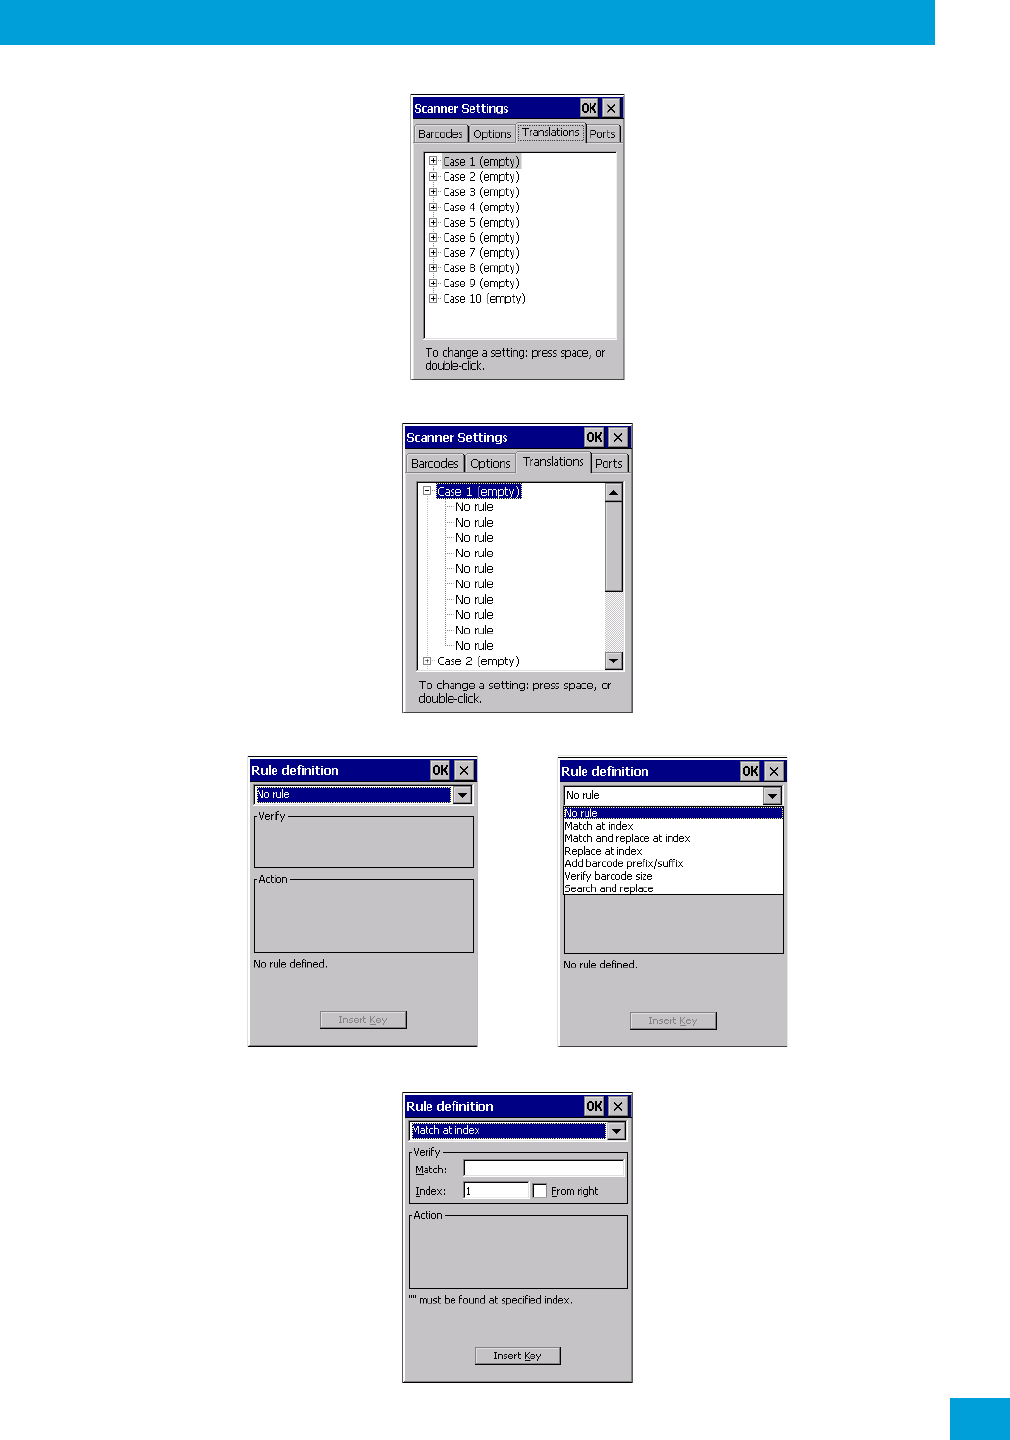
Chapter 4: Configuration
Translations
103
Psion Omnii Hand-Held Computer User Manual
•In the Translation menu, tap on the Case # to create rules.
•Tap on the No rule drop-down menu to display the rules.
When you choose a rule, an associated screen is displayed in which you can define the rule.
Regulatory Draft
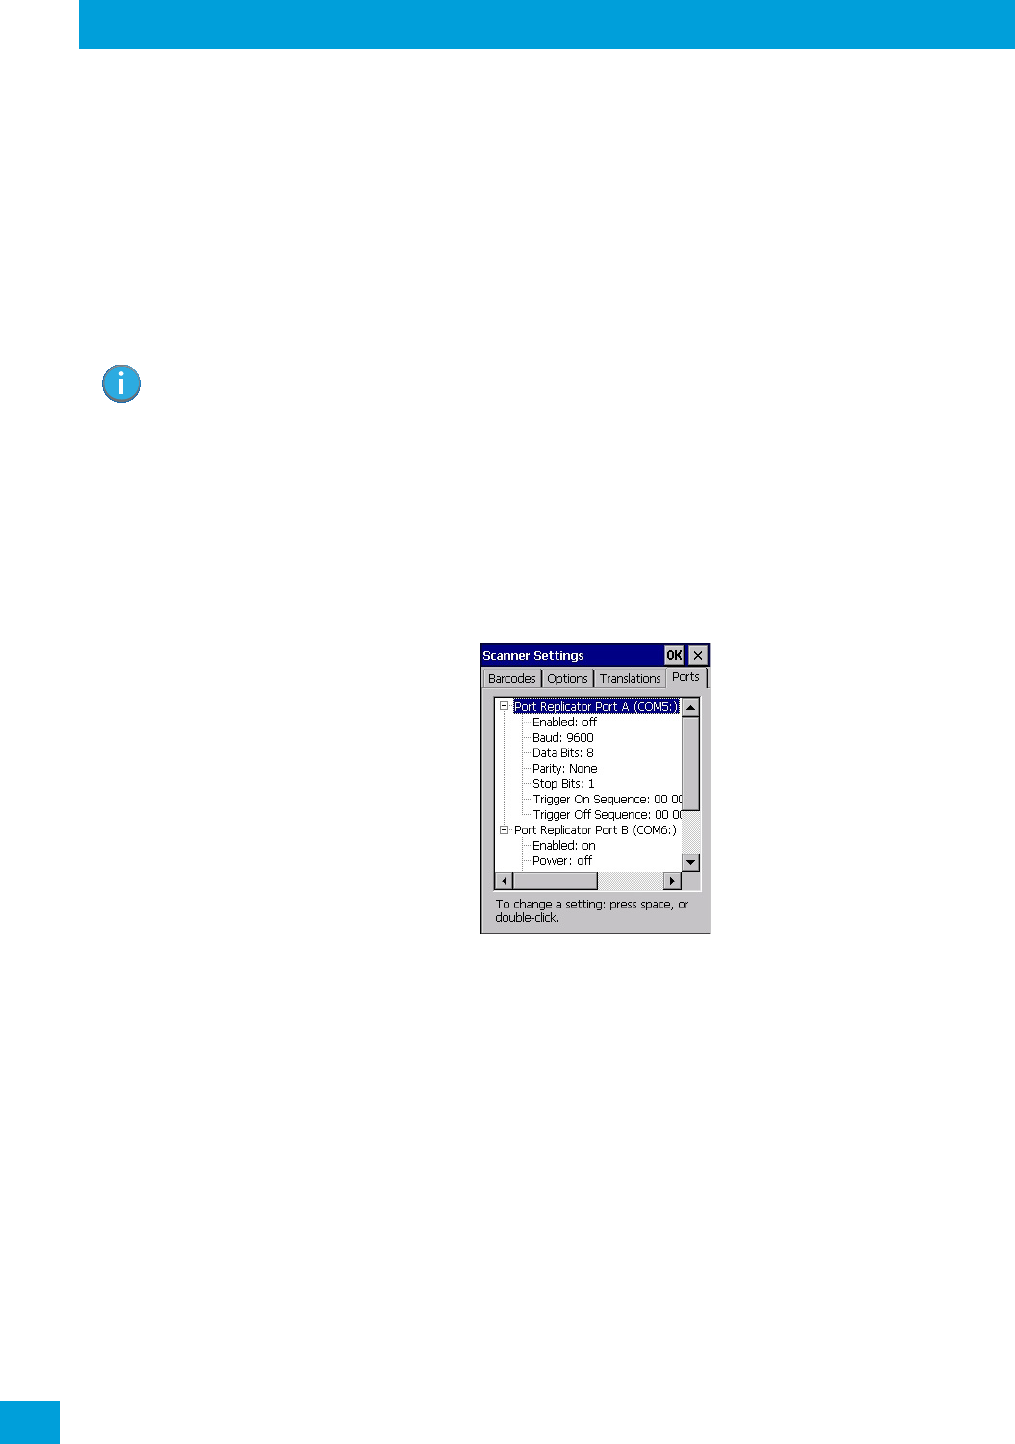
Chapter 4: Configuration
Ports
Psion Omnii Hand-Held Computer User Manual
104
4.22.3.1 Case Rules
The case rules are defined as follows:
•No rule—ignored.
•Search and replace—replaces all instances of the match string. (Note that this rule cannot fail.)
•Match at index—matches the match string at a specified index.
•Match and replace at index—matches the match string at a specified index and replaces/changes it.
•Replace at index—replaces/changes unspecified data in a given range.
•Add barcode prefix/suffix—adds a global prefix or suffix.
•Verify barcode size—verifies the barcode size. This rule should generally be assigned first, before cre-
ating subsequent rules.
Translation information about the status of each case/rule is displayed in the scan log file (see “Scan Log
File” on page 102) when enabled. This is useful if a case fails, and you are trying to determine why a rule
is failing.
4.22.4 Ports
Figure 4.5 Console and Port Replicator Port Settings
While you cannot configure the scanner, you can configure communications with a serial decoded scanner
using the options in this tab.
Use these settings to ensure that the communication ports on Omnii match the settings of the serial
devices to which they are connected. If the settings do not match exactly, the devices may not function.
Note that some devices can auto-detect serial port settings (such as baud rate), and in this case Omnii will
dictate the settings. Baud rates often have a direct impact on performance—they should be set as high as
possible while still ensuring reliable communication.
4.22.4.1 Port Replicator Port A (COM5) and Port B (COM6)
Port Replicator Port A (COM5) and Port B (COM6) are standard RS-232 DE-9 DTE ports on the Omnii port
replicator module, available on some snap modules and cradle types.
Enabled
This parameter must be set to ON in order for Omnii to recognize the device connected to the Port Replica-
tor 9-pin (COM5).
Power (COM6 only)
Pin 9 on Omnii COM6 is reserved for 5V power out and is defaulted to OFF. This parameter must be set to
ON to enable power to a Snap Module or Vehicle cradle.
Note: Keep in mind that the effects of previously applied rules must be taken into account when
creating subsequent rules. For example, if the barcode size is important, it should be
checked before any rules that might change the size are applied.
Regulatory Draft
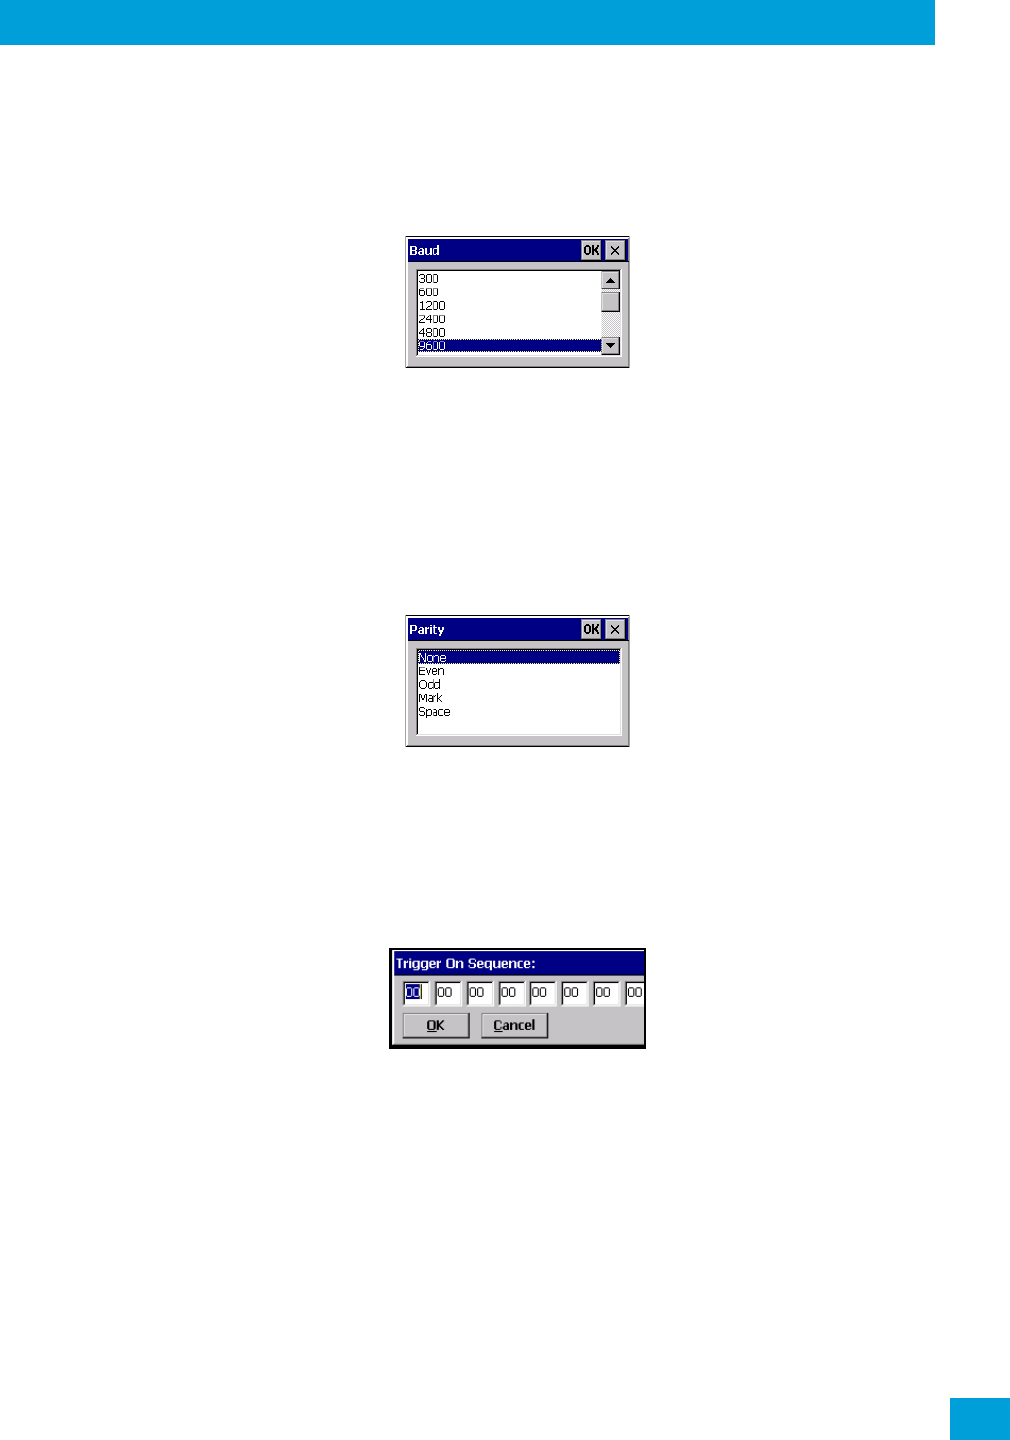
Chapter 4: Configuration
Ports
105
Psion Omnii Hand-Held Computer User Manual
Baud
Double-tapping on this parameter displays a pop-up window in which you can choose an appropriate rate of
data transfer.
Figure 4.6 Port Baud Rates
Data Bits
This parameter determines the number of data bits included in each asynchronous data byte. Most devices
use 8-bit data bytes. Double-tapping on this option displays a pop-up window in which you can choose
either 7 or 8 data bits.
Parity
This parameter determines the type of parity checking used on the data going through the port replicator
port. Double-tapping on this option displays a pop-up window in which you can choose the appropriate
parity.
Stop Bits
This parameter specifies the number of stop bits—1, 1.5 or 2—used for asynchronous communication.
Trigger On Sequence And Trigger Off Sequence
If a SICK scanner connected to an Omnii port requires a serial stream of data bytes to trigger the scanner
on and another to trigger the scanner off, the Trigger On Sequence and Trigger Off Sequence parameters
allow you to define these serial streams.
Double-tapping on Trigger On Sequence or Trigger Off Seq uence displays a screen with a hex array of 10 el-
ements.
These parameters work in conjunction with Manage Triggers sending on and off data streams to the trigger
module you assigned. For example, suppose you launch Manage Triggers and choose Decoded Scanner as
the ‘module to trigger’. Next, you assign a ‘trigger key’—for this example, . (period). To define the serial
stream of data bytes to control the on and off function of the ‘trigger key’, enter a hex value in the Trigger
On Sequence and the Trigger Off Sequence fields. When you press the trigger key, the Trigger On Sequence
is sent and when you release the trigger key, the Trigger Off Sequence is sent, turning the trigger key on
and off.
Regulatory Draft
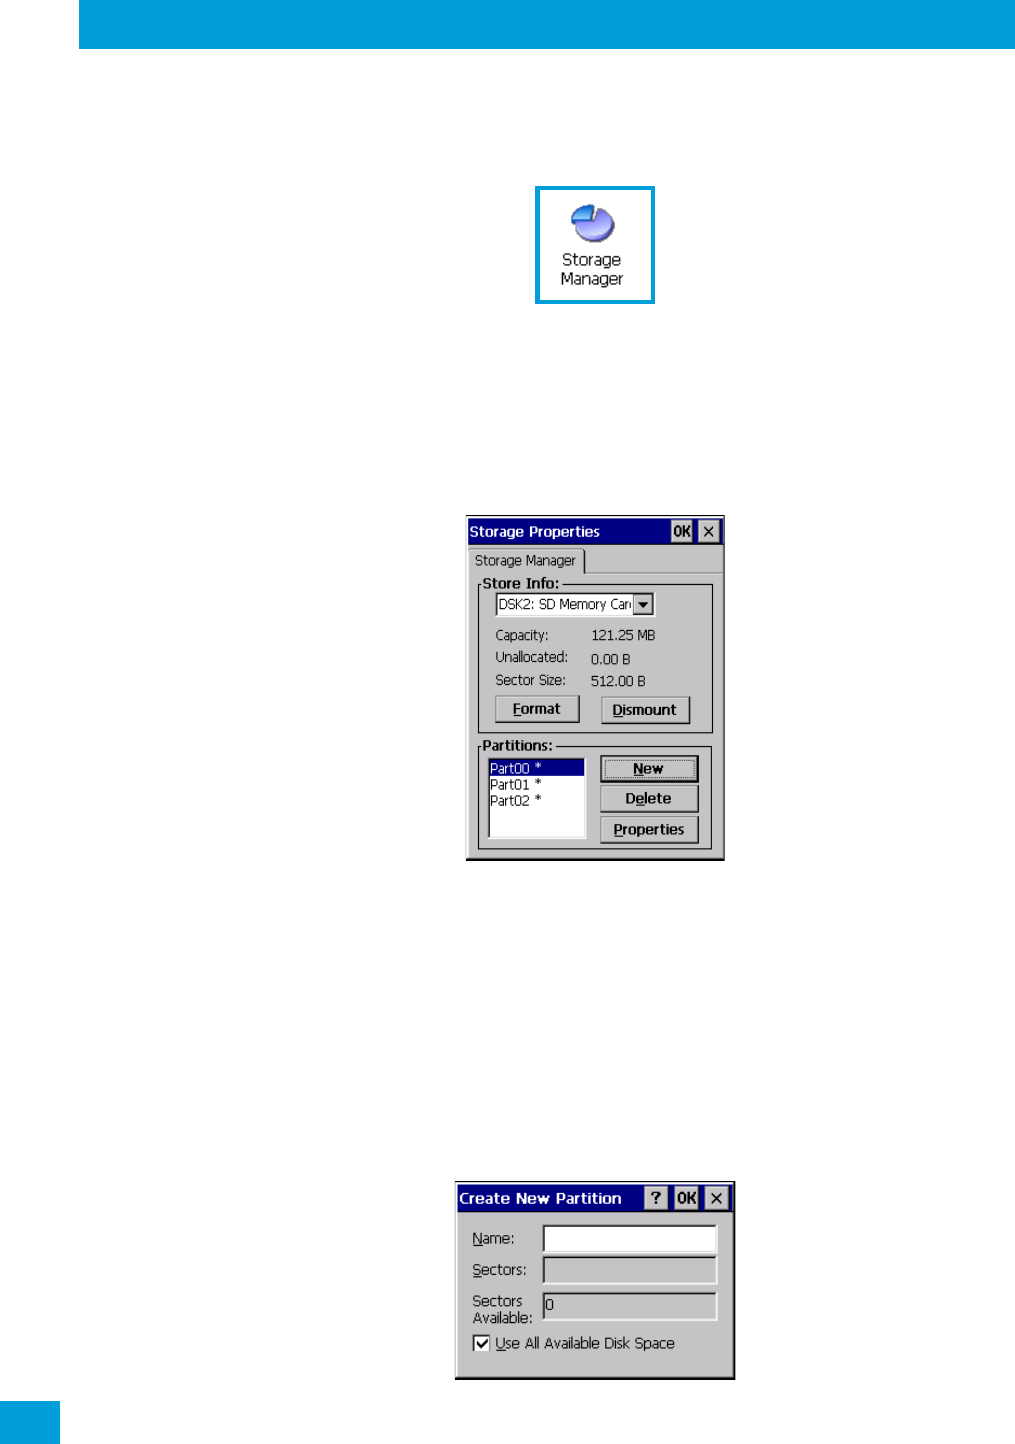
Chapter 4: Configuration
Storage Manager
Psion Omnii Hand-Held Computer User Manual
106
4.23 Storage Manager
The Storage Manager allows you to view information about the storage devices that are present in Omnii,
such as SD-MMC flash cards and Compact Flash cards.
4.23.1 Formatting a Memory Card
Formatting a memory card bulk-erases it. Once a card is erased, partitions may be created in it, similarly to
those on a hard drive. Memory-card devices are normally ‘mounted’ (made available to the system) auto-
matically when they are inserted. They must be dismounted before they can be formatted.
To format an entire memory card:
1. Select Start> Settings>Control Panel.
2. In Control Panel, double-click on the Storage Manager icon. The Storage Manager menu opens:
1. Select the memory card from the drop-down list.
2. Press the Dismount button to dismount the memory card. All partitions on the card will be
dismounted.
3. Press the Format button to format the memory card.
All partitions and information on the card will be erased during the formatting process.
4.23.2 Creating Partitions
Once the card is formatted, new partitions can be created in it. The default is to create one partition that
occupies the whole card, but a card can be divided into more than one partition if desired. Each partition
appears as a separate folder in Windows Explorer.
To create new partitions:
1. Press the New button next to the Partitions list box. The Create New Partition dialog box appears:
Regulatory Draft

Chapter 4: Configuration
Partition Management
107
Psion Omnii Hand-Held Computer User Manual
1. Type a name for the partition.
2. If more than one partition is desired, uncheck the Use All Available Diskspace checkbox, then
specify the desired number of sectors to be used by the partition.
1. Press OK. The new partition appears in the Partitions list.
The new partition is automatically mounted. This is indicated by an asterisk (*) next to its name in the parti-
tion list. Any unallocated space on the card is indicated at the left, and additional partitions can be created
in it.
4.23.3 Partition Management
Partitions can be individually dismounted, mounted, deleted, or formatted as well. These and additional
tasks are available from the Partition Properties dialog:
To dismount a partition:
1. Choose the desired partition.
2. Tap the Properties button. The Partition Properties dialog appears.
3. Tap the Dismount button. The partition is dismounted. The asterisk disappears next to its name in
the partitions list.
To delete a partition:
1. Select the desired partition.
2. Tap the Delete button. A warning dialog appears.
3. Tap the OK button. The partition is deleted.
To format a partition:
1. Choose the desired partition.
2. Tap the Properties button. The Partition Properties dialog appears.
3. Tap the Dismount button. The partition is dismounted. The asterisk disappears next to its name in
the partitions list.
4. Tap the Format button. The Format dialog appears:
Regulatory Draft

Chapter 4: Configuration
Partition Management
Psion Omnii Hand-Held Computer User Manual
108
5. Choose your format options. These options include:
• Version of file system (FAT-16, for devices holding up to 4 GB; or FAT-32, for devices containing up to
32 GB).
• Number of FATs (File-Allocation Tables).
• Number of entries allowed in the root directory.
• Cluster size (.5 KB to 64 KB).
There are also two checkboxes, which govern:
• Whether to use the transaction-safe FAT file system (TFAT). This file system keeps multiple copies of
the file-allocation table, changing one while maintaining another as a backup.
• Whether to perform a quick format. Quick formatting removes all reference to data in the partition
without erasing the actual partition. The partition will be treated as empty, and new data will over-
write it.
6. Tap Start. The partition is formatted.
To mount a partition:
1. Choose the desired partition.
2. Tap the Properties button. The Partition Properties dialog appears.
3. Tap the Mount button. The partition is mounted. The asterisk appears next to its name in the par-
titions list.
The Partition Properties dialog has buttons for additional functions. Partitions can be defragmented, and
their file structure can be scanned.
Regulatory Draft
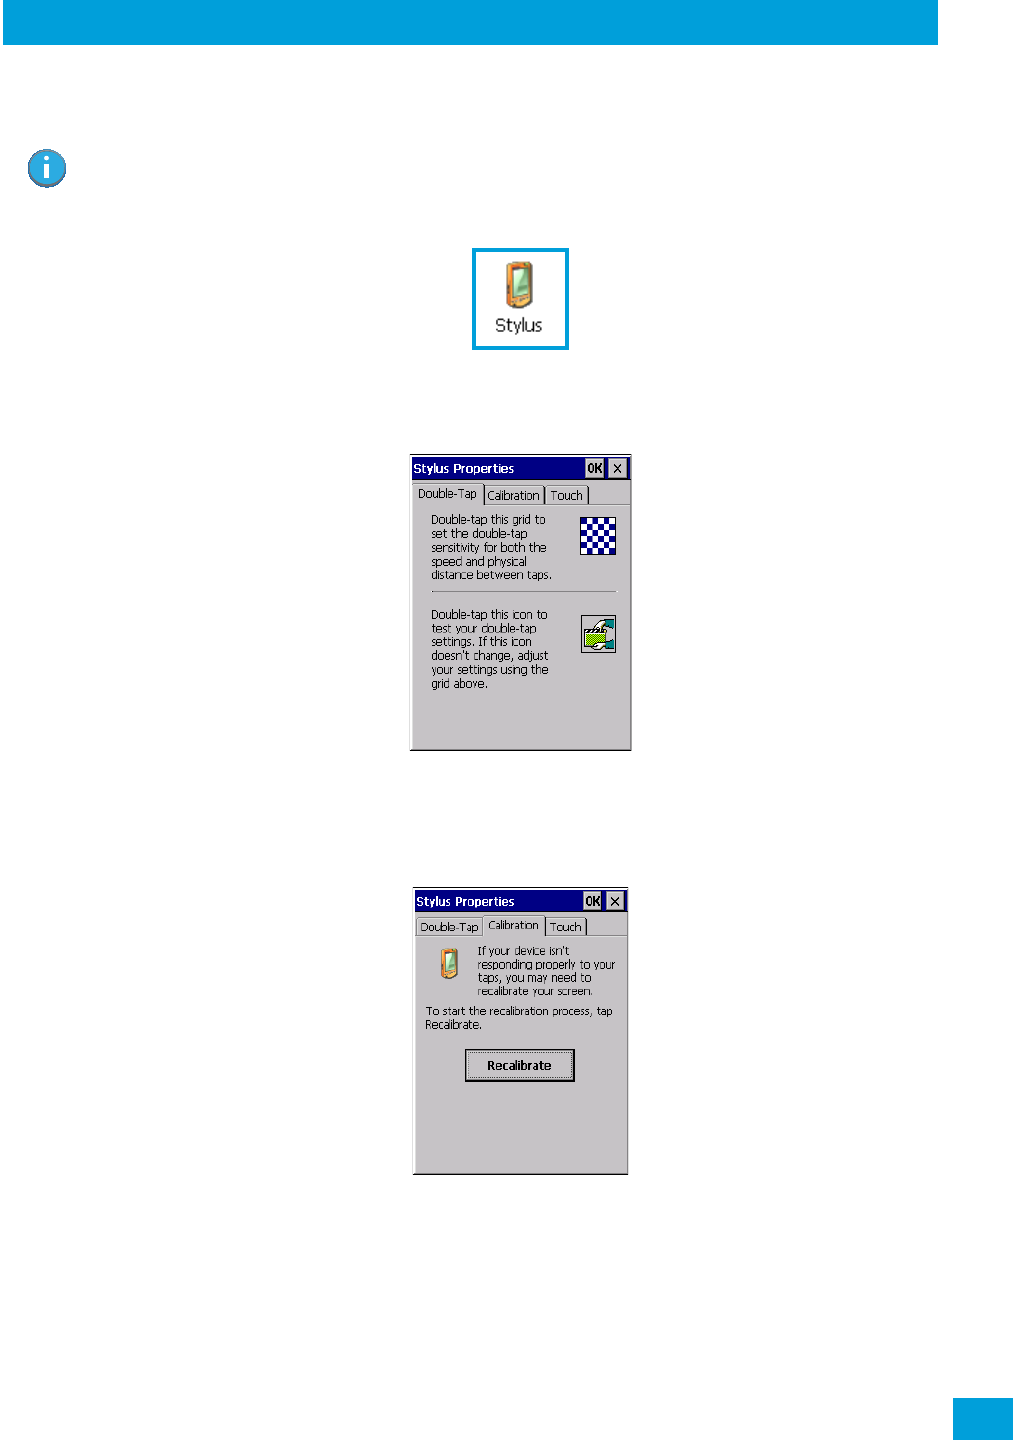
Chapter 4: Configuration
Stylus Properties
109
Psion Omnii Hand-Held Computer User Manual
4.24 Stylus Properties
•In the Control Panel, choose the Stylus icon.
4.24.1 Double-Tap
•In the Double-Tap menu, follow the directions to tailor the sensitivity of the stylus when you tap on the
touchscreen.
4.24.2 Calibration
Touchscreens rarely require recalibration. However, if your touchscreen has never been calibrated or if you
find that the stylus pointer is not accurate when you tap on an item, follow the directions below.
• Choose the Calibration tab, and then tap on the Recalibrate button.
• Follow the directions in the Calibration tab to recalibrate the screen You will be prompted to save the
calibration data.
Note: Touchscreen calibration may not be enabled on your unit. If your screen appears to require
recalibration, contact your supervisor.
Regulatory Draft
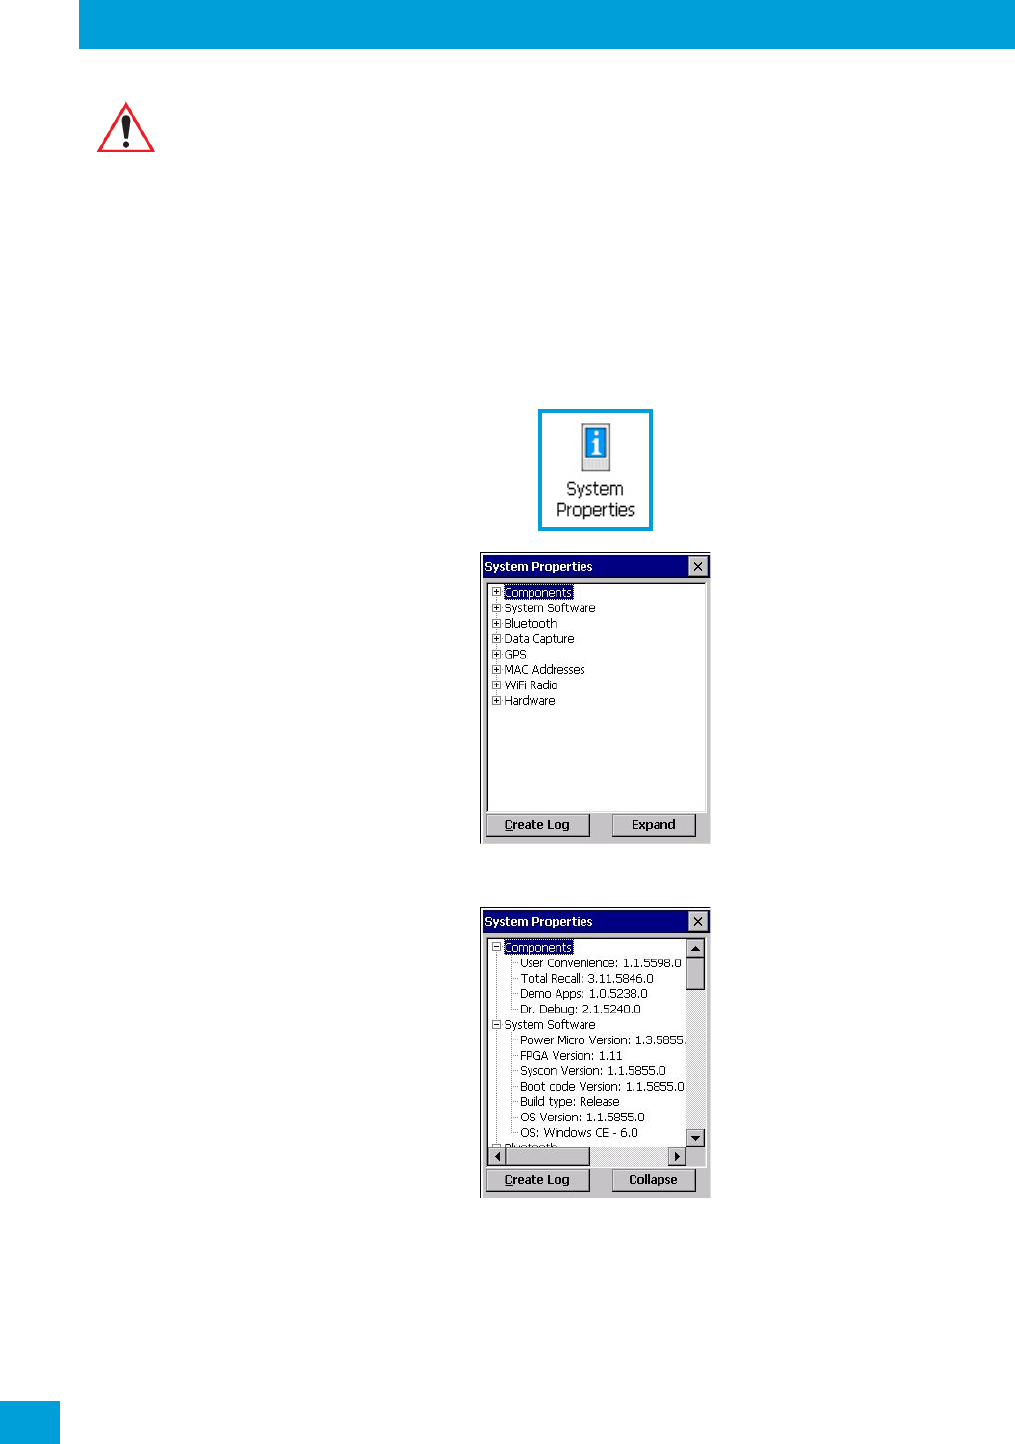
Chapter 4: Configuration
Touch
Psion Omnii Hand-Held Computer User Manual
110
4.24.3 Touch
This tab allows you to disable the touchscreen.
• Choose the Touc h tab. Select the checkbox next to Disable the touch panel.
4.25 System Properties
This program identifies the computer’s software and hardware components, indicating which components
are installed, their identification, version or part numbers, and whether they are enabled or disabled.
•In the Control Panel, choose the System Properties icon.
•You can create a log (SystemProperties.xml) of your current components, which will be placed in the
My Devices folder in Windows Explorer.
• Instead of expanding each section of items individually, you can also choose to open all the lists at once
by choosing the Expand button, which will then change to a Collapse button to enable you to collapse
all the sections as well.
Note: If you do not receive a prompt to save your data, there could be a problem with your touch-
screen hardware. Contact your Psion representative.
Regulatory Draft
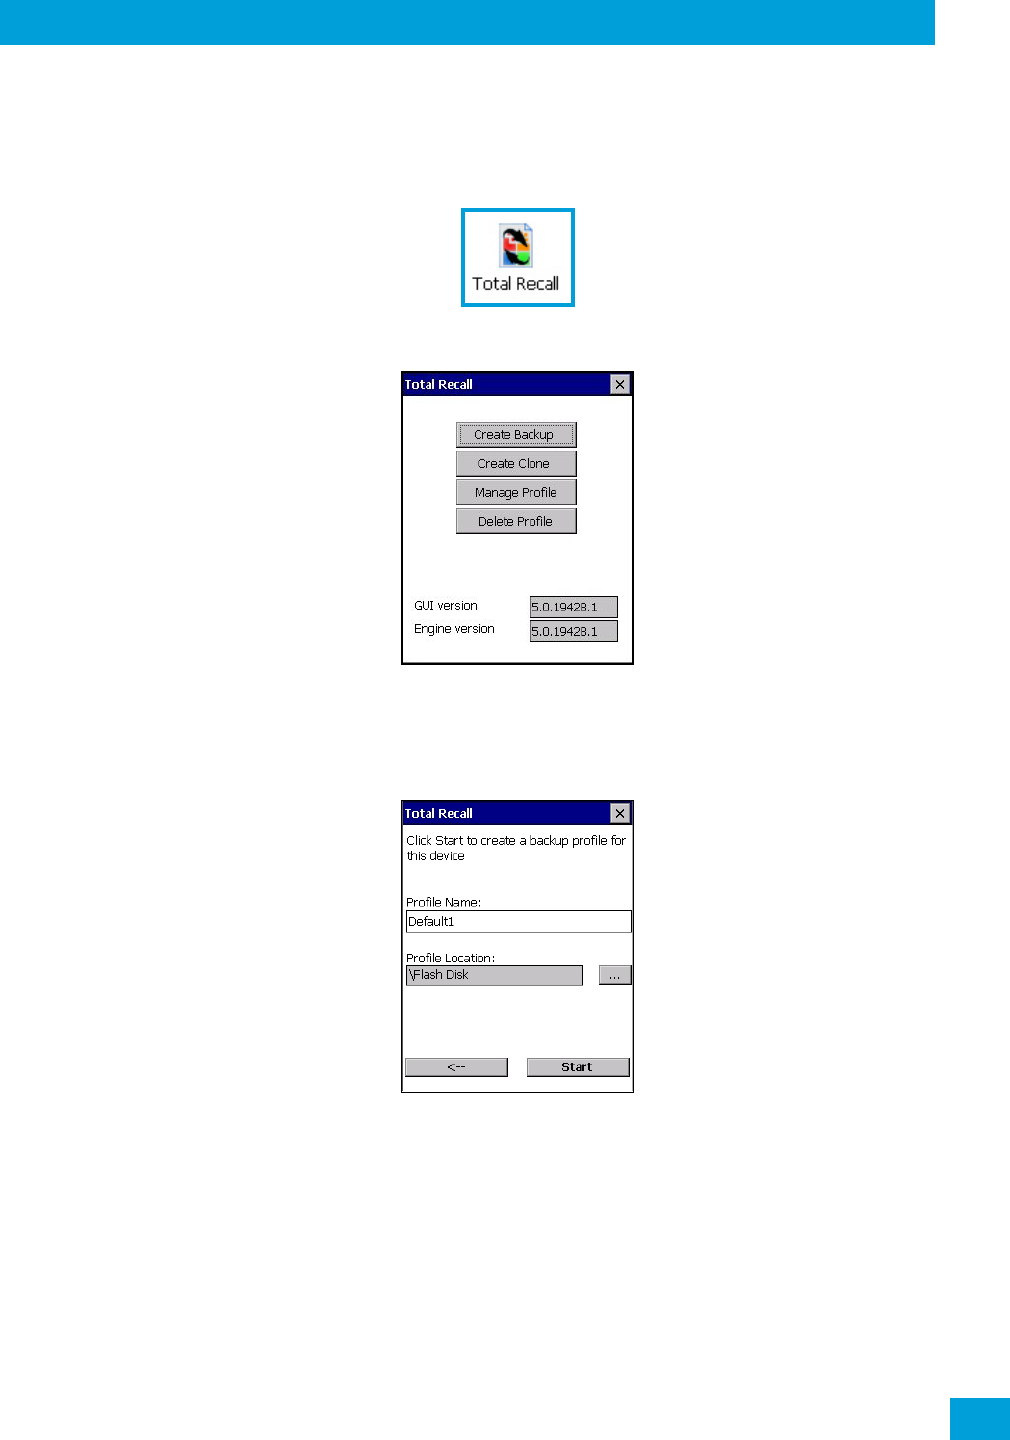
Chapter 4: Configuration
Total Recall
111
Psion Omnii Hand-Held Computer User Manual
4.26 Total Recall
Total Recall is a Psion utility developed to maintain applications and settings during a cold boot, and clone
settings to other devices. This utility is based on a backup and restore concept.
•In the Control Panel, choose the Total Recall icon.
4.26.1 Creating a Backup Profile
In the start up screen, you can choose from four options: Create Backup, Create Clone, Manage Profile and
Delete Profile.
•Tap on the Create Profile button to begin the process.
Create Backup
This dialog box displays the default profile name, the type of restore – AutoRestore or ManualRestore, and
the possible storage destination for the profile file.
•To change the Profile Name (optional), tap on the [...] button to the right of the Profile Location field.
•In the Name field, type a new name. (You may need to move the onscreen keyboard down to make the
Name field visible.)
•Tap on OK to save the new profile name.
• Next, choose the profile Type you want to create:
ManualRestore – creates a backup that is manually restored by the operator.
AutoRestore – creates a profile that automatically restores itself following a cold reset or a clean reset.
• Finally, if you want to choose another location for your backup file (optional), tap on the [...] button to
the right of the Profile Location field.
Regulatory Draft
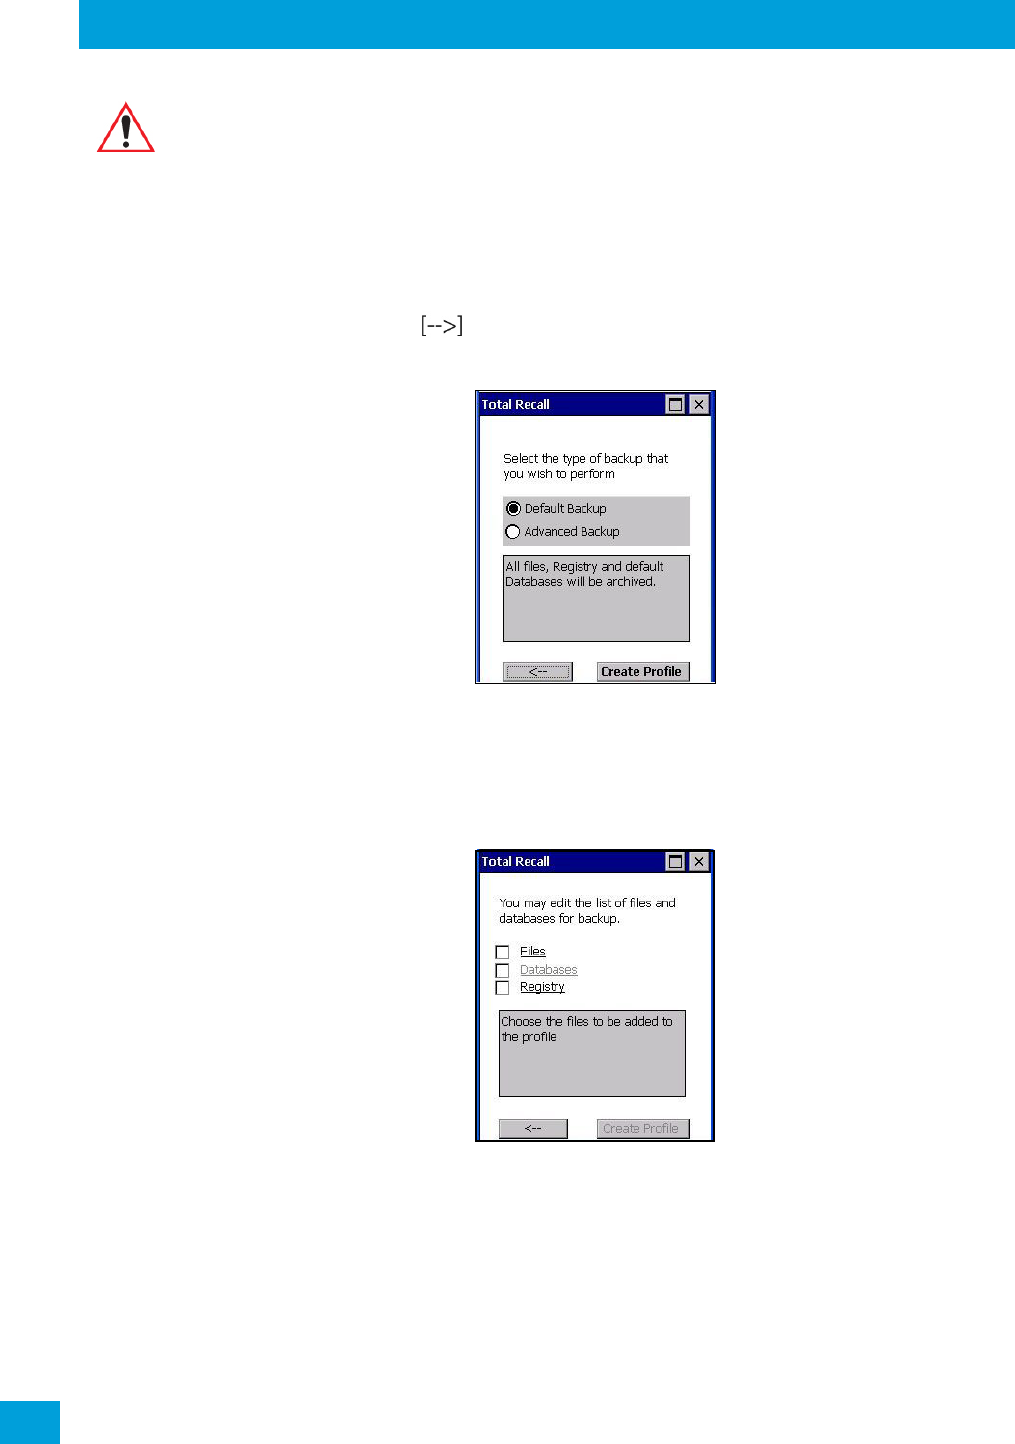
Chapter 4: Configuration
Creating a Backup Profile
Psion Omnii Hand-Held Computer User Manual
112
• Navigate to the new location, and tap on OK to save it.
• Tap on the (Next) button.
Defining the Type of Backup
Default Backup
Default Backup is selected so that all installed or copied files, database entries, and the Registry are saved.
Choose Advanced Backup if you want to tailor your backup.
Advanced Backup
Choosing Advanced Backup allows you to define what you would like to include in your backup profile.
• Tap in the checkbox next to the option(s) listed here to tailor what you want included in the backup.
Creating a Profile
Once you’ve defined the type of profile you want to create:
• Tap on the Create Profile button.
The options you chose to back up appear in your window as the backup progresses. When the backup is
complete, the last item in the list indicates the location and name of the backup profile.
Important: Any profile not stored in persistent memory (flash disk, external usb drive) will be
erased during a clean boot, therefore you should store profiles on a persistent
drive.
When performing an autorestore, the program only searches for profiles located in
the root folder of persistent drives. If you store your profile anywhere else it will
not be restored.
When there are multiple autorestore profiles found, only the latest is restored.
Regulatory Draft
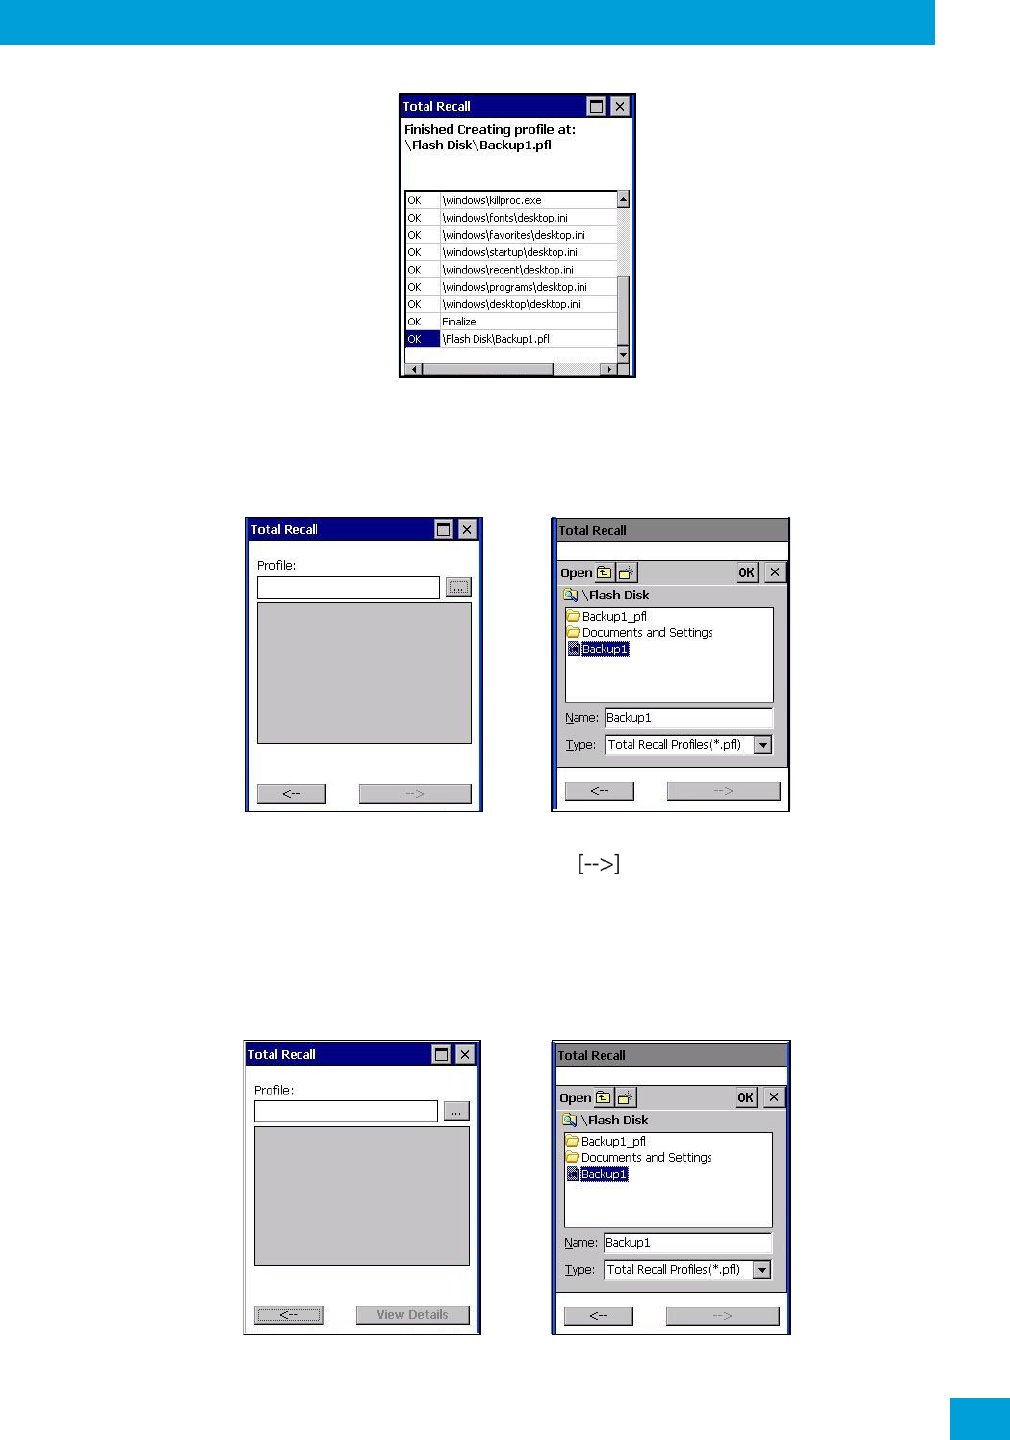
Chapter 4: Configuration
Restoring a Profile
113
Psion Omnii Hand-Held Computer User Manual
4.26.2 Restoring a Profile
To manually restore a profile:
•In the Total Recall home screen, tap on Restore Profile.
•Tap on the [...] button to the right of the Profile field and locate your backup file.
•Tap on OK.
•In the Profile restore screen, click on the (Next) button.
• Click on Restore Profile to restore the files to your Omnii.
4.26.3 Viewing a Profile
To view a profile:
•In the Total Recall home screen, tap on View Profile.
•Tap on the [...] button to the right of the Profile field, and locate your backup file.
•Tap on OK.
Regulatory Draft
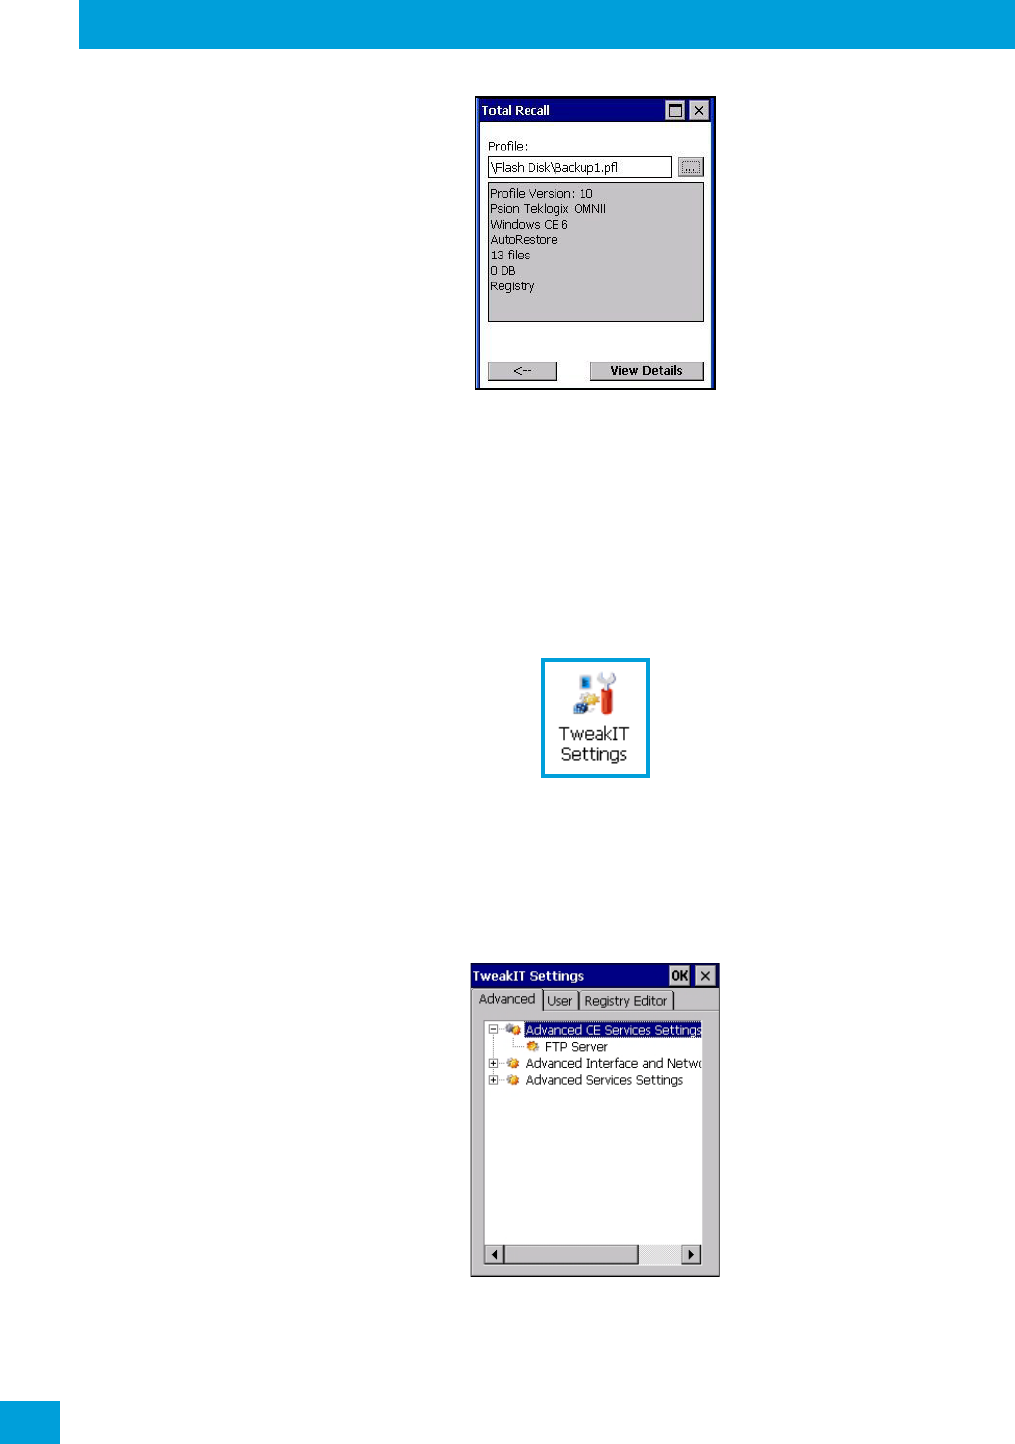
Chapter 4: Configuration
Deleting a Profile
Psion Omnii Hand-Held Computer User Manual
114
•Tap on View Details to review your backup files.
4.26.4 Deleting a Profile
•In the Total Recall home screen, tap on Delete Profile.
• In the next screen, locate your backup file, and tap on OK.
A warning pop-up screen appears asking if you’re certain that you want to delete this file.
•Tap on Ye s to delete the file.
4.27 TweakIt
This utility allows you to ‘tweak’ or adjust Advanced system settings (interface, network, servers, driver, and
radio), User settings (Internet Explorer settings, font size, and docking port message), and provides a
Registry Editor.
4.27.1 Advanced
4.27.1.1 Advanced CE Services Settings
FTP Server
This option is enabled by default to allow file transfers. Keep in mind that data transfer in either direction is
restricted to the Temp folder—that is, data are always loaded from the FTP Server to the Temp folder and
from the Temp folder to the FTP Server.
Regulatory Draft
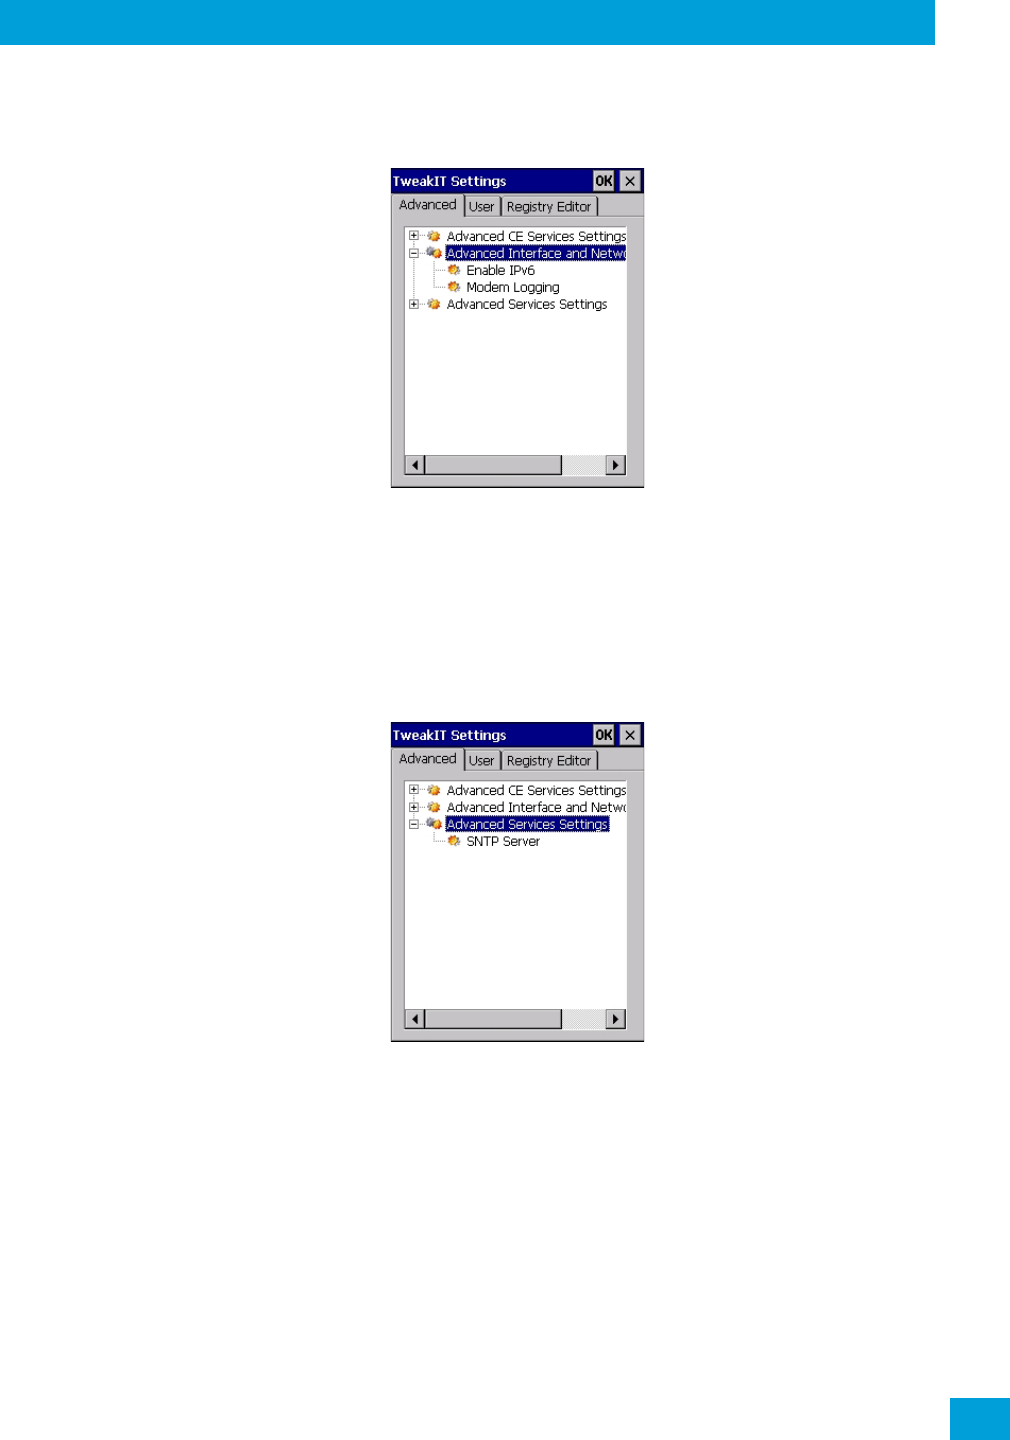
Chapter 4: Configuration
Advanced
115
Psion Omnii Hand-Held Computer User Manual
If this option is disabled, a warm reset must be performed to accept the change.
4.27.1.2 Advanced Interface and Network Settings
Enable IPv6
This option allows you to enabled Internet Protocol specification, version 6, that has been published to
enable 128-bit IP addresses (replacing version 4).
Modem Logging
When this option is enabled, Omnii logs AT commands (e.g., dial-out information, password string, etc.) that
the administrator can monitor for debugging purposes. Modem commands are stored in: \MdmLog.txt.
4.27.1.3 Advanced Services Settings
Regulatory Draft
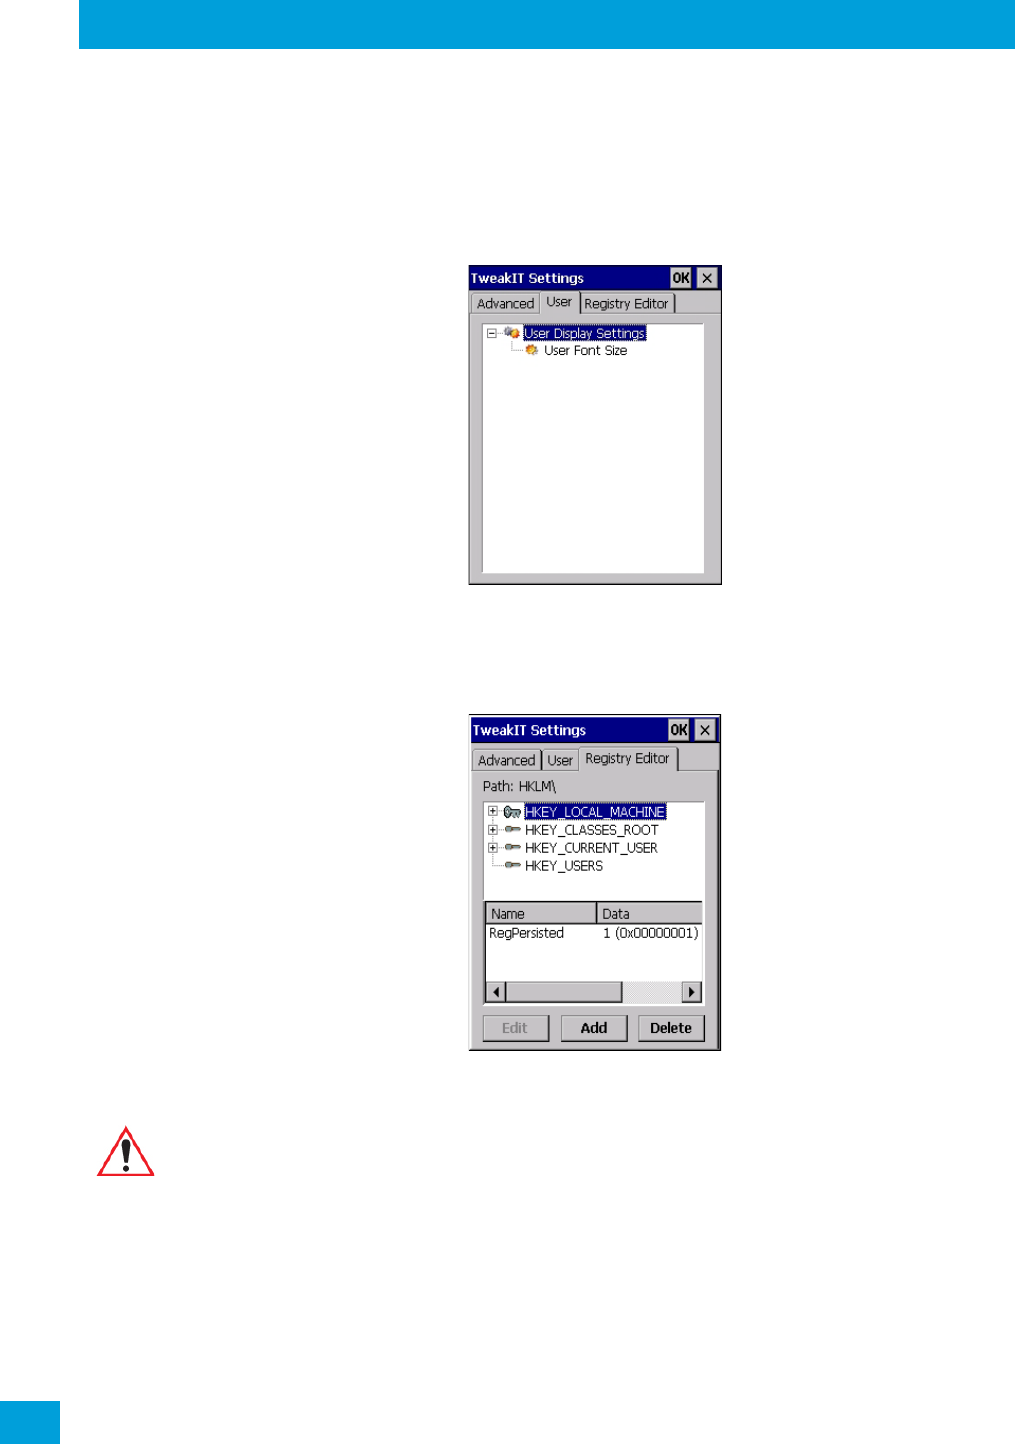
Chapter 4: Configuration
User
Psion Omnii Hand-Held Computer User Manual
116
SNTP (Simple Network Time Protocol) Server
The SNTP Server Name typed in this dialog box is used to synchronize Omnii time with the server time. A
warm reset must be performed once the server name as been entered.
4.27.2 User
4.27.2.1 User Display Settings
User Font Size
This option allows you to adjust the size of the font used in the Omnii display: Large, Normal, or Small.
4.27.3 TweakIt
This option is reserved for senior administrators who have a strong understanding of registry keys and
values.
4.28 Voice – Using the Phone Dialer
If the WWAN modem is installed and enabled, the Phone icon and the GSM signal strength icon will appear
automatically on the taskbar.
• Double click on the Phone icon to access the phone dialer.
You can also follow the steps below to access the phone dialer:
• To access the dialer, tap on Start>Settings>Control Panel.
Warning: Careless registry editing can cause irreversible damage to Omnii.
Regulatory Draft
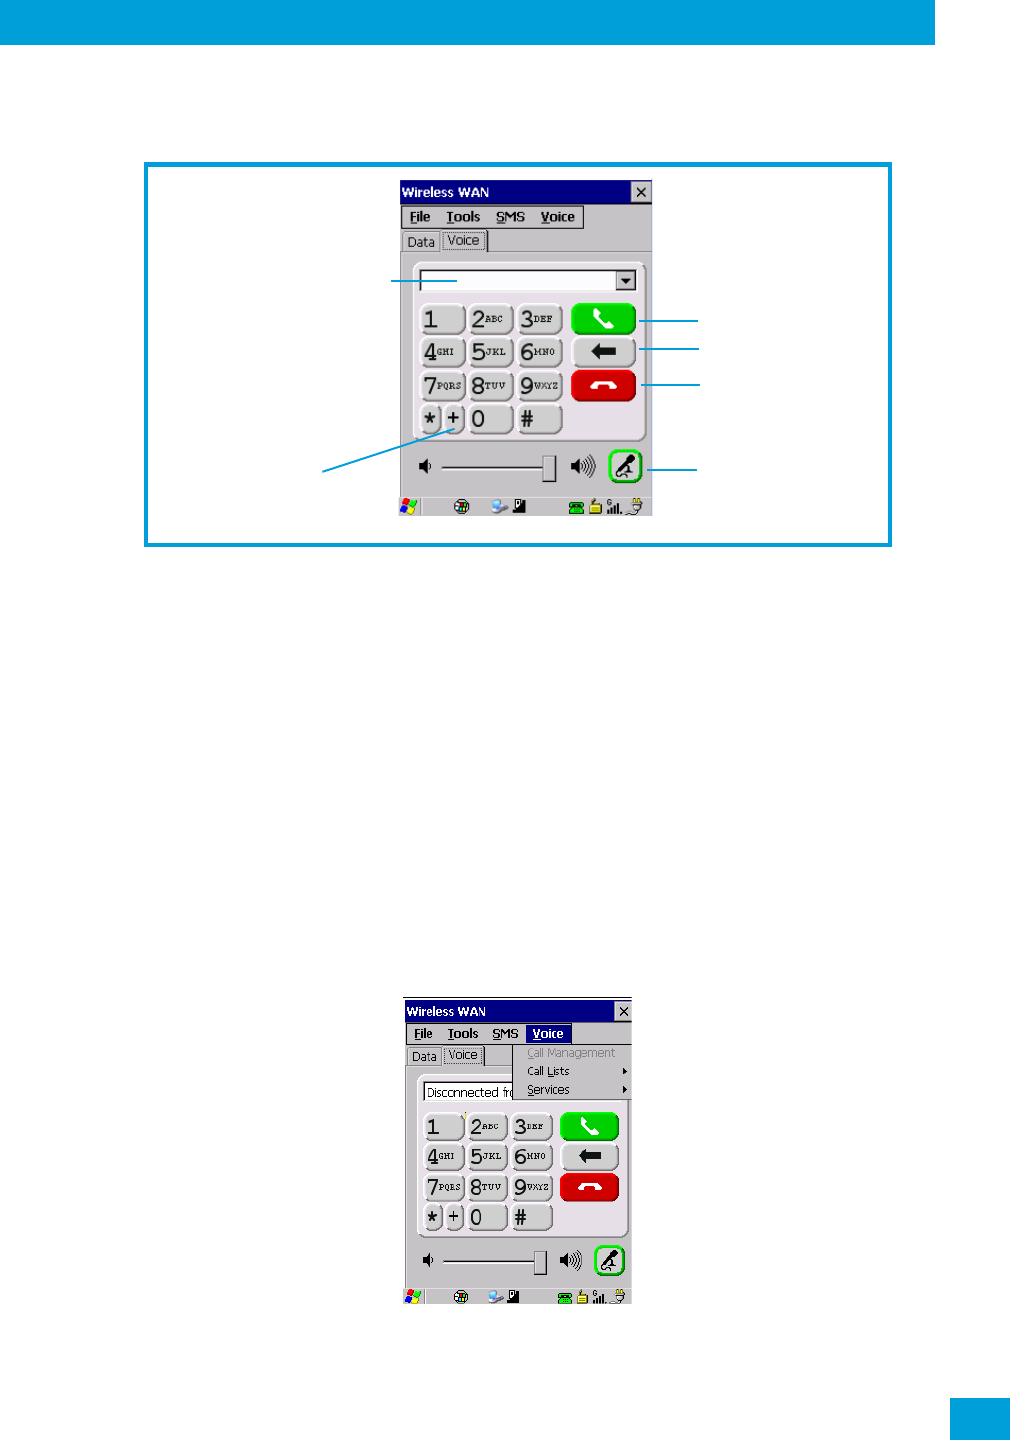
Chapter 4: Configuration
Dialing a Number
117
Psion Omnii Hand-Held Computer User Manual
•Tap on the Wireless WAN icon, and then tap on the Voice tab.
The Voice tab displays a phone dialer used to dial phone numbers. The Voice menu provides commands
which allow you to manage your phone contacts, view your phone history, and so on.
4.28.1 Dialing a Number
To make a phone call, all you need is the recipient’s phone number.
• Type the recipient’s phone number in the phone number entry field.
-Send button – tap to dial the number you typed.
-Backspace button – tap to erase characters in the phone number entry field.
-End button – tap to disconnect the phone call.
-Mute button – During a phone call, tap to mute sound transmission. Tap again to restore sound.
- + button – When making an international call, the + sign can be used as a universal substitute for
any international dialing prefix and is guaranteed to work worldwide. The entry sequence must be
as follows: + country code followed by phone number.
Example: A standard phone number: 011 36 30 275 28466 using the + substitution is typed as follows:
+36 30 275 28466
The + symbol replaces the universal dialing prefix 011.
4.28.2 Voice Menu
This menu allows you to manage calls, view your call history, and if required, assign a call forwarding
service to your hand-held.
Send Button
Backspace Button
End Button
Phone Number Entry Field
Universal
International
Dialing Prefix Mute Button
Regulatory Draft
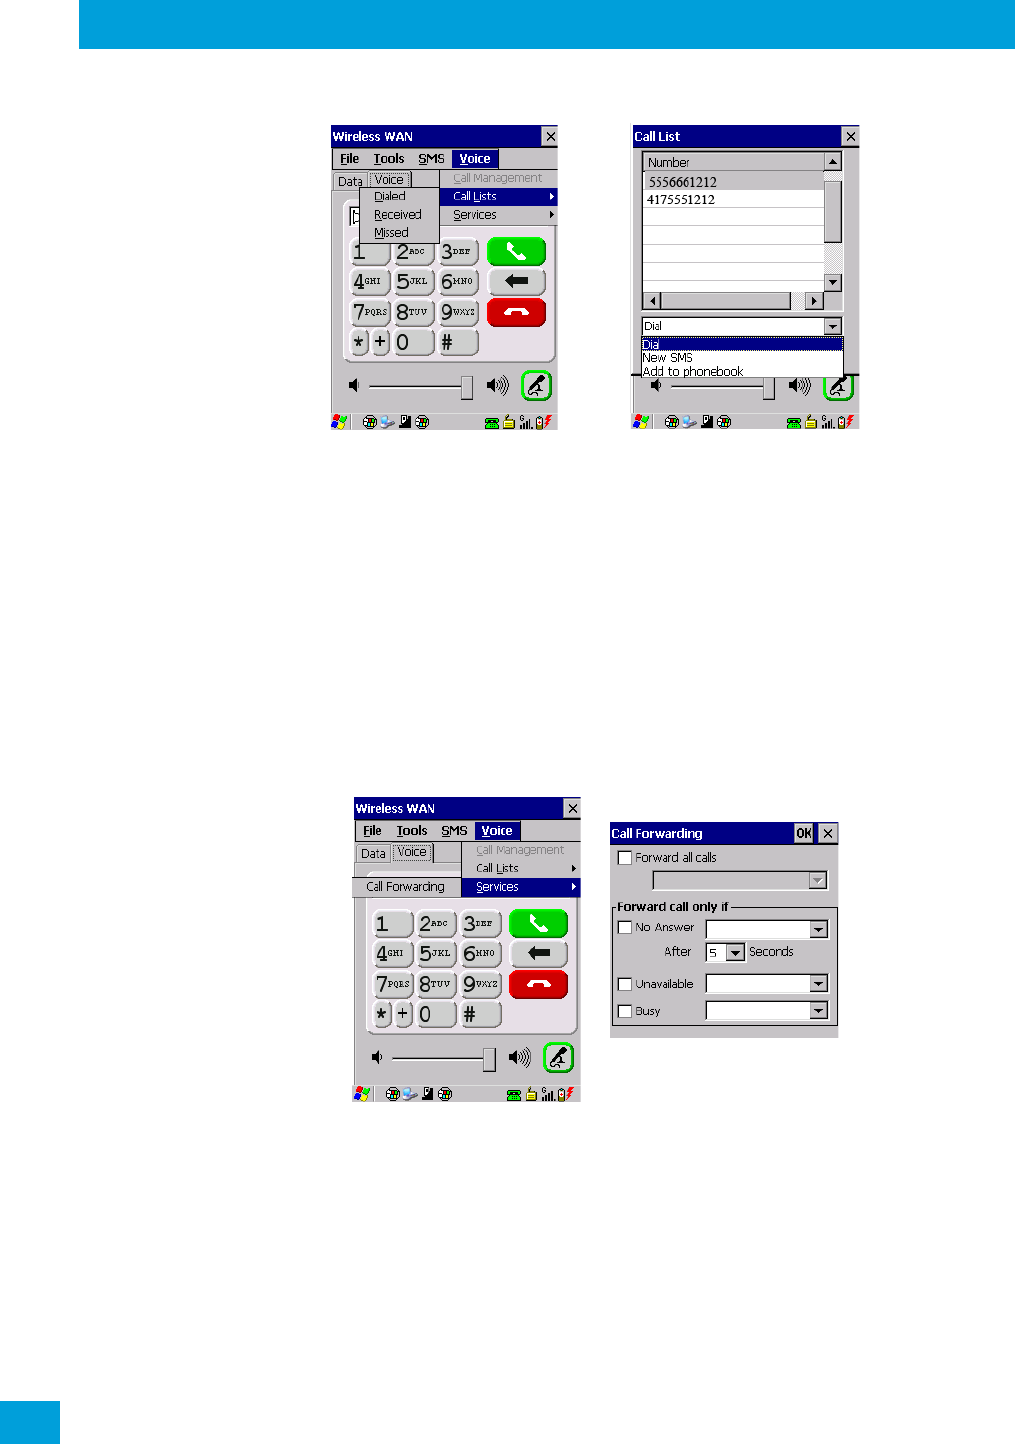
Chapter 4: Configuration
Voice Menu
Psion Omnii Hand-Held Computer User Manual
118
Call Lists
The Call List command manages your call history, listing calls you’ve Dialed, Received and Missed. When you
choose one of these commands, a dialog box lists the phone numbers.
A drop-down menu provides a list of commands you can execute on a phone number in the Call List. You
can choose to:
• Dial the number,
• Send a New SMS, or
• Add to phonebook to add the highlighted phone number to your phonebook. (Refer to “Phonebook” on
page 119 for details additional details about the Phonebook.)
In the Call List:
• Highlight the phone number with which you want to work.
• Choose a command in the drop-down menu.
• Tap on the Execute button to carry out the command.
Services
The Service menu offers a Call Forwarding option for your hand-held. If you choose this option, it may take
a number of seconds for your unit to read the network settings.
To forward all calls:
• Tap in the checkbox next to Forward all calls, and then type the phone number to which all incoming
phone calls will be routed.
To specify when a call will be forwarded, that is:
Forward the call only when it is not answered after a specified number of seconds,
Forward the call when you have identified yourself as ‘unavailable’, or
Forward the call when your unit is busy:
• Tap in the appropriate checkbox, and enter the phone number to which the call will be routed.
Regulatory Draft
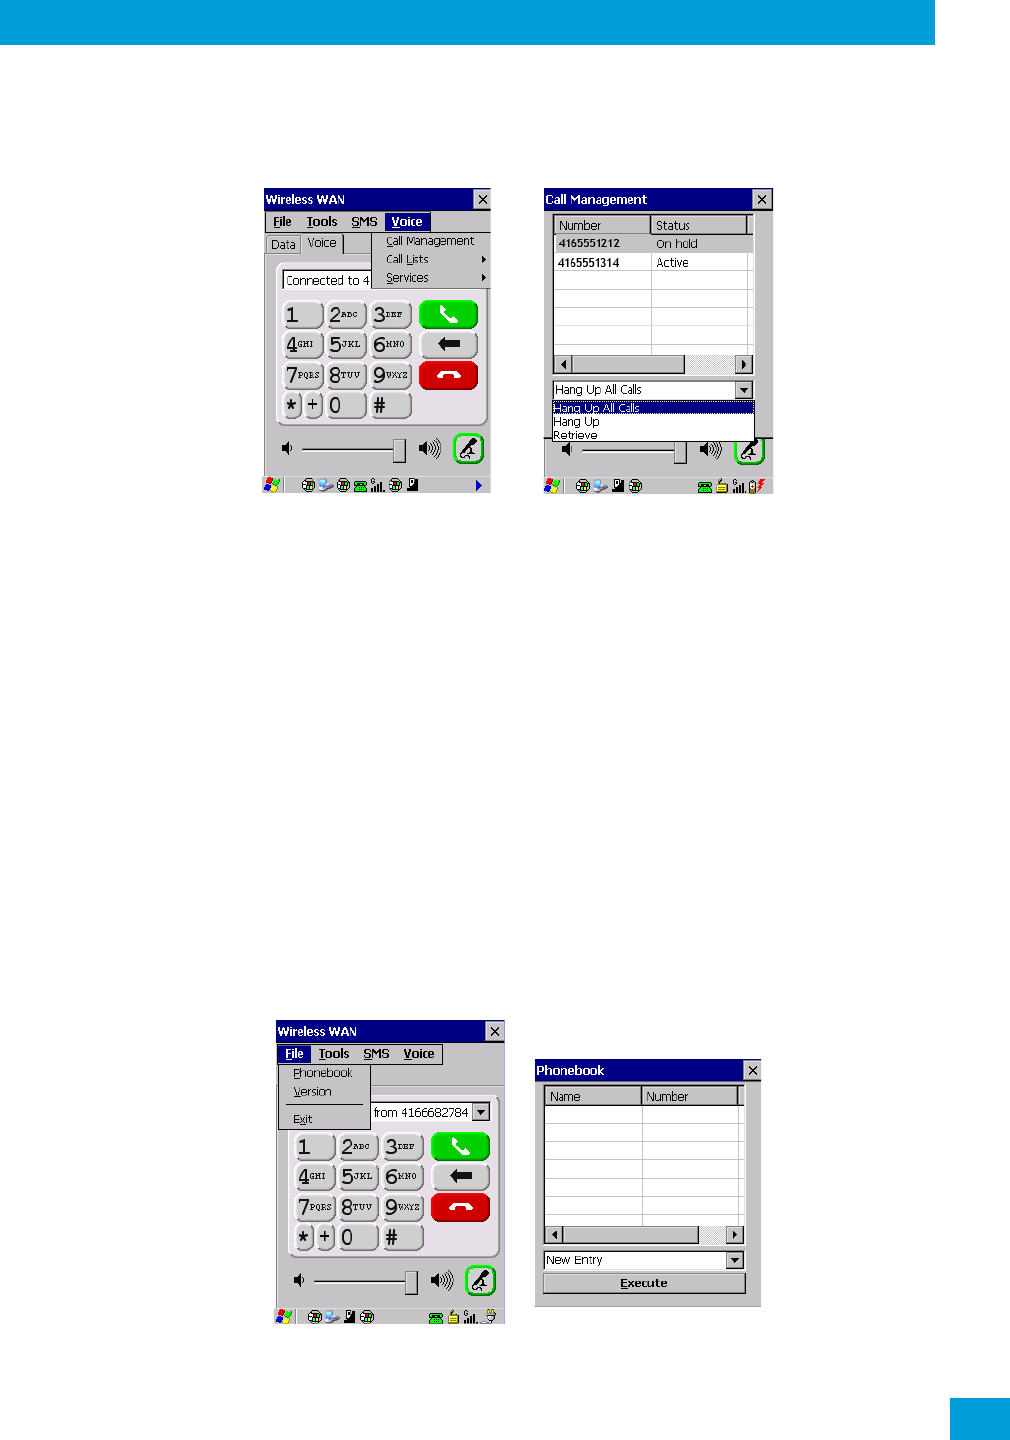
Chapter 4: Configuration
File Menu – Phonebook Management
119
Psion Omnii Hand-Held Computer User Manual
Call Management
The Call Management option only becomes available in the Voice menu when at least one phone call is
either On hold or Active. When you choose this command, the currently active phone call is listed in a dialog
box.
Using the drop-down menu, you can choose to:
Hang Up All Calls - This option only appears when more than one call is listed.
Hang Up - This option disconnects only the call you’ve highlighted in the list.
Hold - This option places the call you’ve highlighted on hold.
Retrieve - This option is only available when a call is on hold, and choosing it retrieves the call you
have highlighted from hold.
•In the Call Management list, highlight the phone number to which you’d like to apply a command.
• Choose a command from the drop-down menu, and tap on Execute to carry out the command on the
highlighted phone number.
If you have two active calls on your hand-held, one On Hold and one Active, you can set up a conference call
between yourself and the other callers. To set up a conference call:
• Highlight the phone number that is currently On Hold, and choose Retrieve. Tap on Execute.
Both calls will be listed as Active in the Call Management list. All calls are now conferenced so that you as
well as your callers can speak to one another.
4.28.3 File Menu – Phonebook Management
Tapping on the File menu provides access to your Phonebook.
Phonebook
The Phonebook allows you to store frequently used phone numbers. When no numbers have been added to
your phonebook, the only command available to you is New Entry.
To add a new phone number to your phonebook:
Regulatory Draft
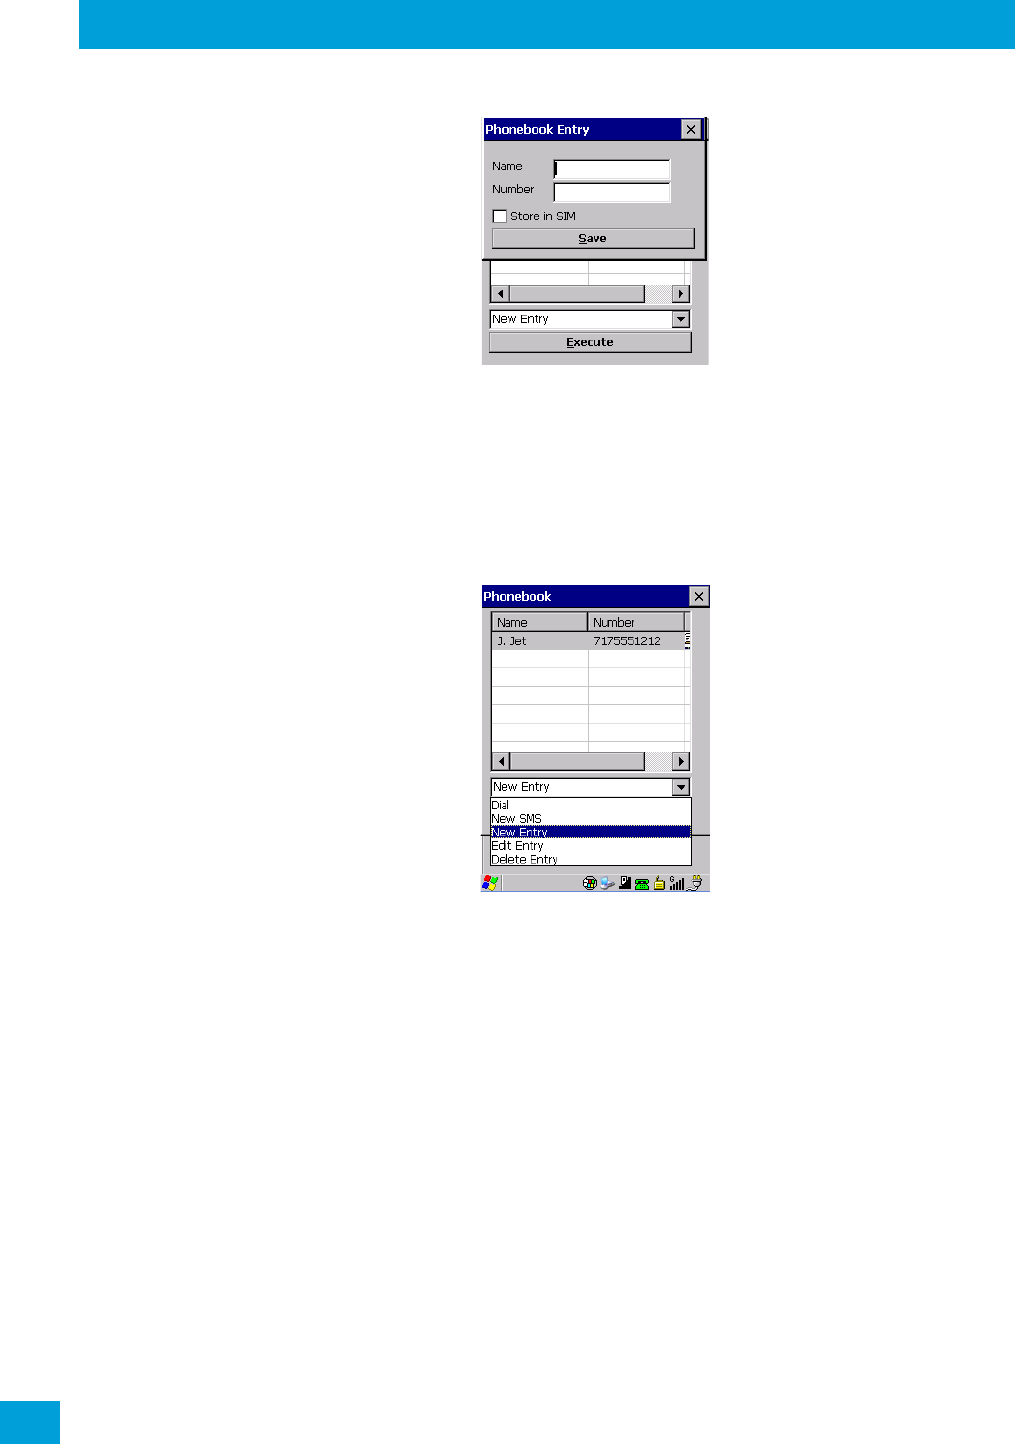
Chapter 4: Configuration
Volume & Sounds Properties
Psion Omnii Hand-Held Computer User Manual
120
•Choose New Entry in the drop-down menu, and tap on Execute.
• Type the name corresponding to the phone number you want to add.
•Press Tab and type the phone number you want to store.
• Tap in the checkbox next to Store in SIM to save the phone number there, or leave this checkbox blank
if you prefer not to store the number on the SIM card.
• Tap on the Execute button to save the phone number in your Phonebook.
Phonebook entries are saved even after you exit Wireless WAN.
Once you’ve added a phone number to the Phonebook, a list of new commands is available in the drop-
down menu.
You can choose one of the following:
•New Entry to add another phone number,
•New SMS (Short Message Service) to send a new SMS,
•Edit Entry to change an existing name and/or phone number, or
•Delete Entry to erase an existing phone entry.
In the Phonebook:
• Highlight the entry with which you want to work.
• Choose a command from the drop-down menu, and tap on Execute to carry out the command.
4.29 Volume & Sounds Properties
Omnii supports several audio options, including Bluetooth. The beeper is used for the standard sounds: key
clicks, screen taps, and scanning. The optional rear speaker can be used for system (Windows) sounds and
.wav files. When a rear speaker is absent, those sounds are routed to the front receiver.
•In the Control Panel, choose the Volume & Sounds icon.
Regulatory Draft
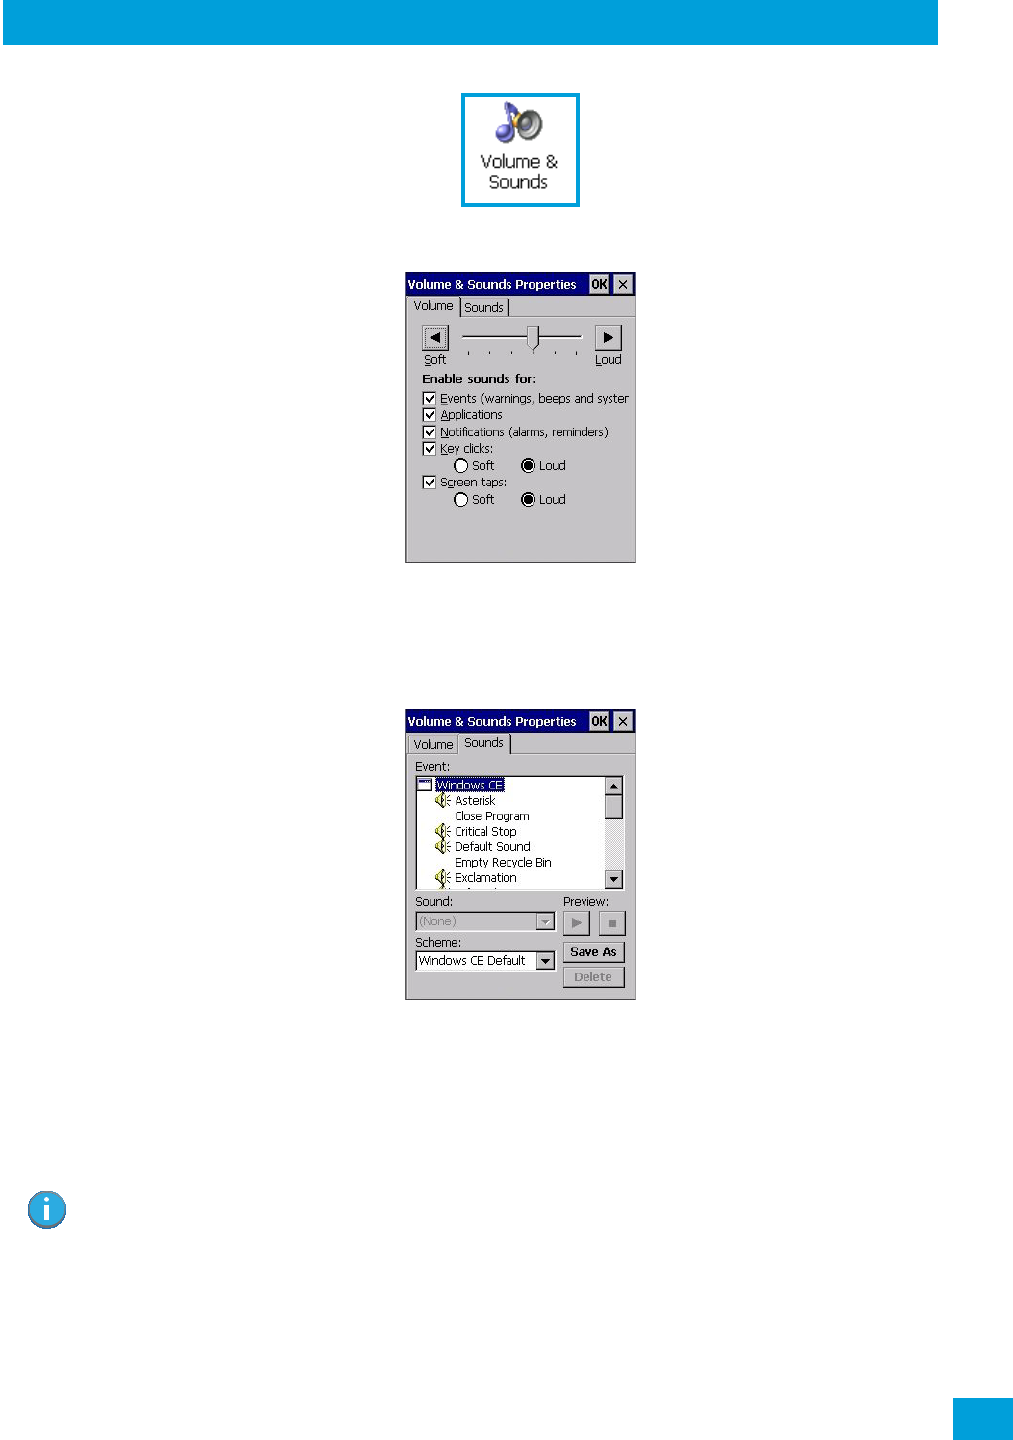
Chapter 4: Configuration
Volume Adjustments
121
Psion Omnii Hand-Held Computer User Manual
4.29.1 Volume Adjustments
• Slide the volume button to the left to lower the volume or to the right to increase the volume.
• Under the heading Enable sounds for, enable the conditions under which you want the hand-held to
emit a sound.
4.29.2 Sound Adjustments
This dialog box allows you to assign sounds to identify particular actions. For example, you can choose the
sound your hand-held will emit when you close a program and choose another sound for a failed scan, etc.
4.30 Wi-Fi Config
The Wi-Fi Config application is used to configure the Omnii 802.11b/g radio for one or more wireless network
profiles. A network profile contains settings for SSID (Service Set Identifier) and security options.
To launch th e Wi-Fi Config application:
•Tap on Start>Programs>Wi-Fi Config.
Note: In most situations, the configuration of your 802.11 radio will require parameter setting and
access keys from a network administrator.
Regulatory Draft
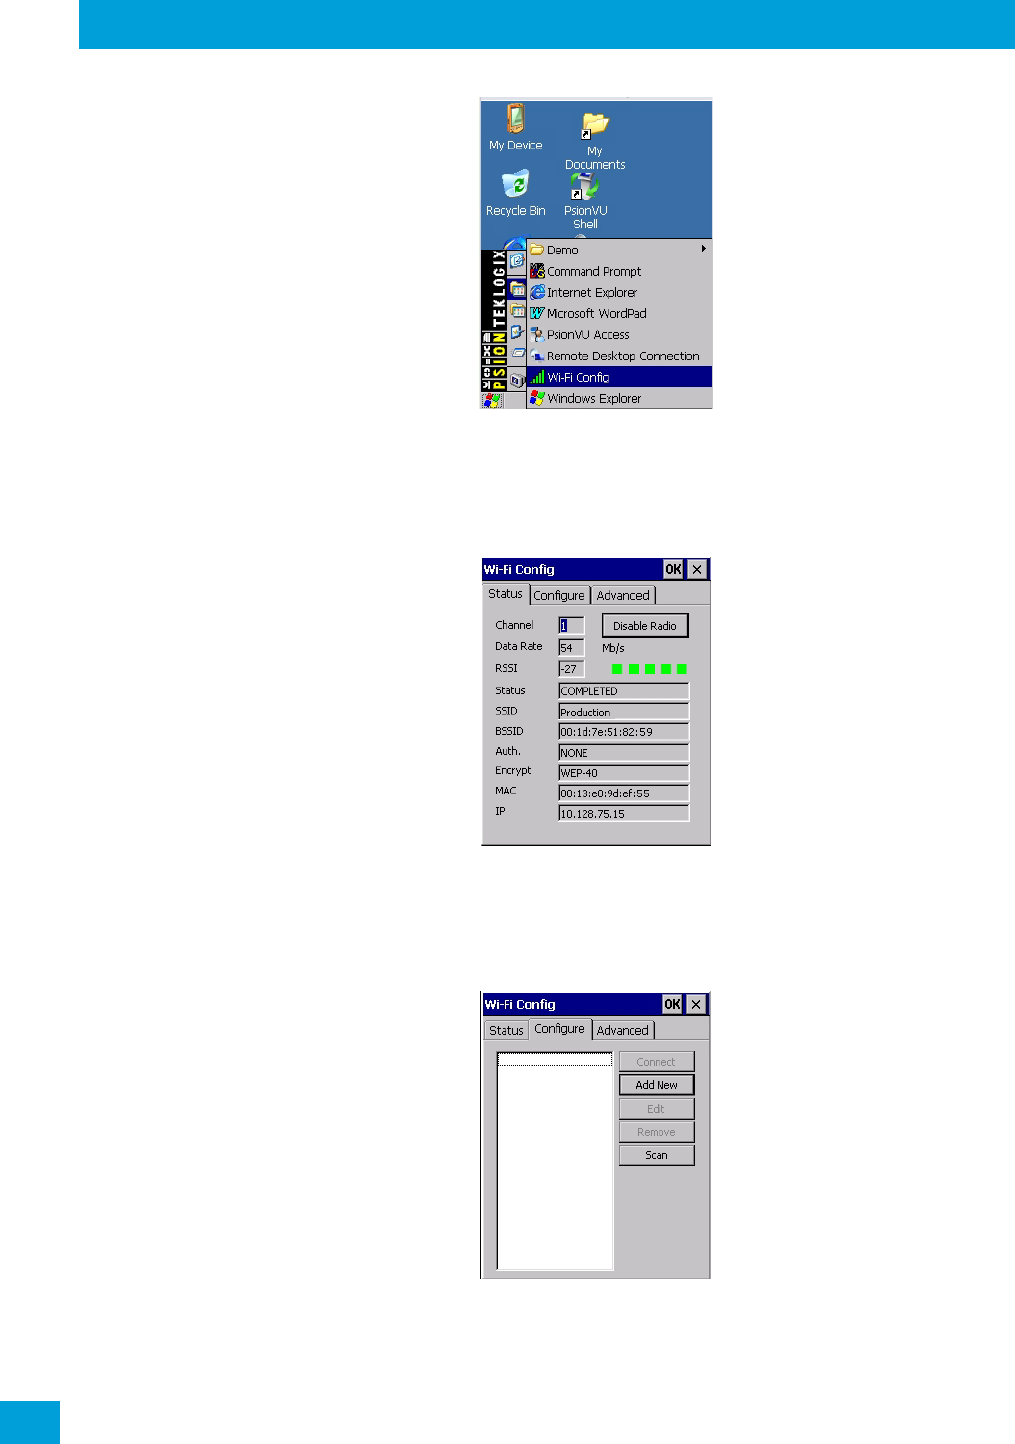
Chapter 4: Configuration
Wi-Fi Config: Status
Psion Omnii Hand-Held Computer User Manual
122
The Wi-Fi Config screen is displayed.
4.30.1 Wi-Fi Config: Status
The Status tab displays information about the wireless network to which Omnii is configured to connect.
When there are no network profiles configured, this tab is not populated.
Disable/Enable Radio: This button toggles between Disable Radio and Enable Radio depending on whether
the radio is turned off or on.
4.30.2 Wi-Fi Config: Configure
• To configure the radio for a wireless network, tap on the Configure tab.
Connect: Used to connect to an already existing wireless network configuration.
Add New: Used to create a new wireless network configuration.
Edit: Used to change values in an already existing wireless network configuration.
Regulatory Draft
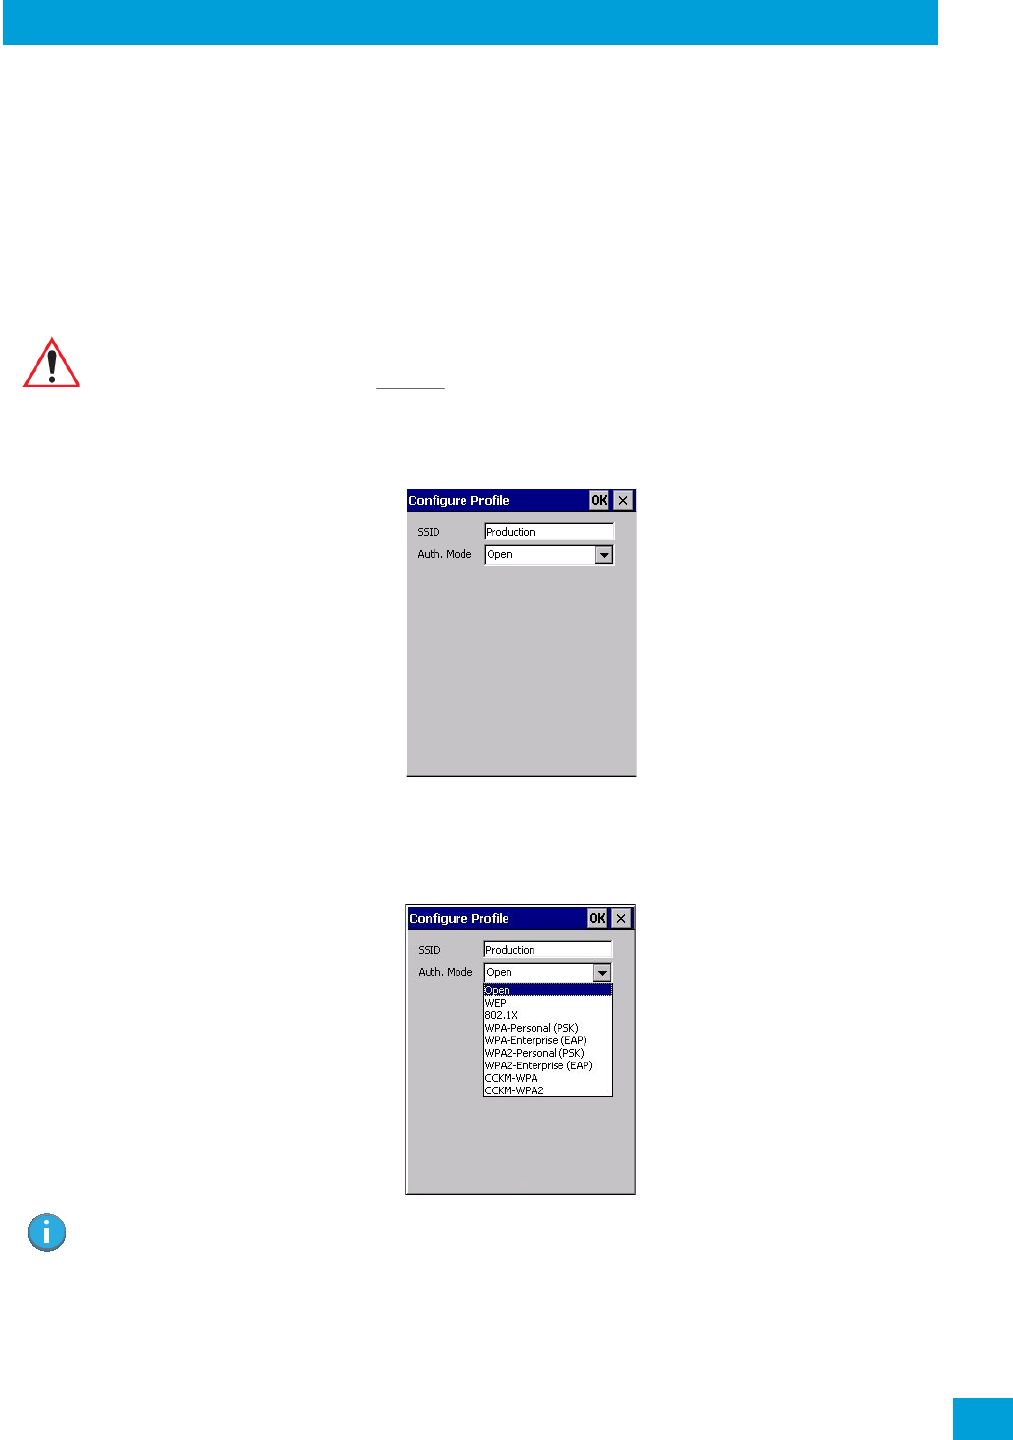
Chapter 4: Configuration
Wi-Fi Config: Configure
123
Psion Omnii Hand-Held Computer User Manual
Remove: Used to delete a wireless network configuration.
Scan: Used to detect and list available wireless networks. You can highlight a network in the list, and tap on
Add New to activate the network.
There are two methods available when configuring a radio network—you can either scan for an existing
network or manually create a network. If you tap on the Scan button, a list of networks detected by the
radio is displayed. Highlighting one of the listed networks and tapping on the Add New button creates a new
profile that is completed based on the security capabilities detected by the radio. You may need to add ad-
ditional information, depending on your network requirements.
If you tap on the Add New button rather than the Scan button, you can create a
network manually.
• Enter the SSID (Service Set Identifier) for your network.
4.30.2.1 Authentication Mode
Omnii supports several classes of authentication—Open, WEP, WPA/WPA2 (Personal PSK, Enterprise, CCKM-
WPA, CCKM-WPA2), and 802.1x with EAP. Tapping on the Auth. Mode menu displays your authentication op-
tions.
Open Authentication
Open authentication does not provide security. When this option is chosen, Omnii will connect to wireless
networks which do not use authentication or encryption.
Important: The steps below describe how to manually create a network. Keep in mind that this
is intended only as an example and may vary from your own network requirements.
If, for example, you are using a different type of security for your network, the
fields you complete may not match those described here.
Note: Each Auth. Mode has a unique Configure Profile screen attached to it with fields appropriate
to the authorization mode you’ve chosen.
Regulatory Draft
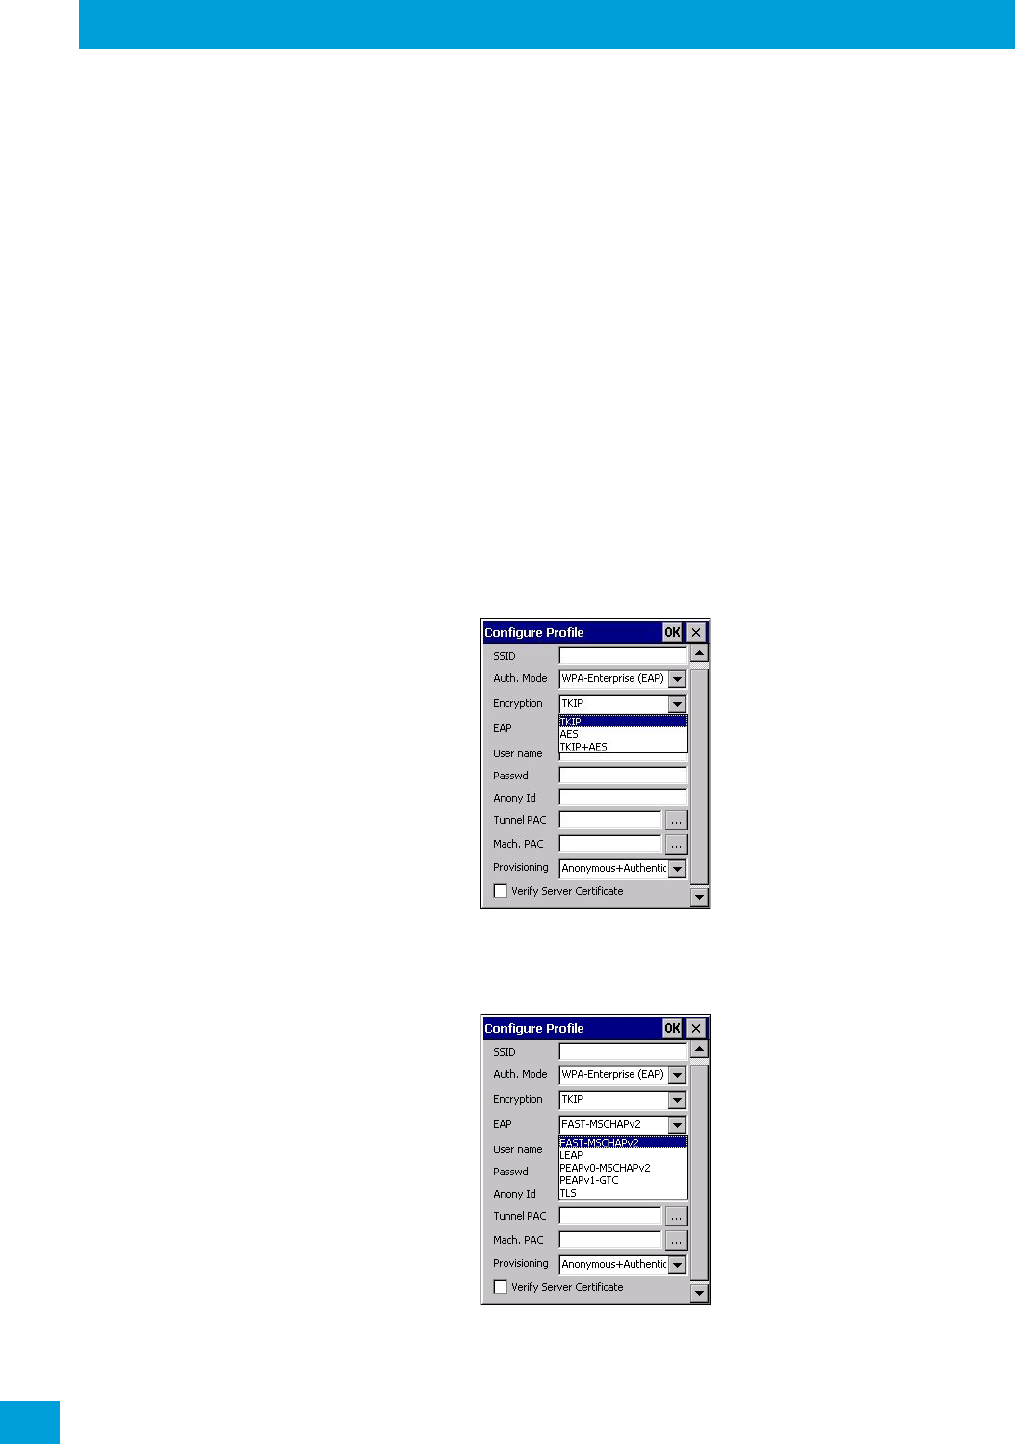
Chapter 4: Configuration
Wi-Fi Config: Configure
Psion Omnii Hand-Held Computer User Manual
124
WEP (Wired Equivalent Privacy)
WEP provides static security to prevent others from accidentally accessing your network. If you choose this
option, you can specify the type of WEP authentication—Open or Shared, the WEP security key length—64
bit or 128 bit and the key type—ASCII or Hex. WEP Key fields are also provided where you can specify a 5 or
13 ASCII character sequence or an equivalent 10 or 26 Hexadecimal digit sequence that matches the active
WEP key on the access point.
WPA & WPA2 Personal PSK (Pre-Shared Key)
When PSK is selected, either WPA Personal PSK or WPA2 Personal PSK—a shared key must be configured
on both the access point and the hand-held computer. One of the following can be chosen from the Encryp-
tion drop-down menu: TKIP, AES or TKIP+AES.
802.1X, WPA & WPA2 Enterprise, CCKM-WPA & CCKM-WPA2
These authentication modes use 802.1X with EAP authentication. When 802.1X is selected, Omnii uses WEP
encryption with automatic (as opposed to static) keying. For the others, the user may choose TKIP, AES or
TKIP+AES encryption.
4.30.2.2 Encryption
The Encryption menu allows you to choose the type of encryption that will be used to protect transmitted
data. Choose an Encryption method valid for your network from the drop-down menu. Only the Encryption
options that are compatible with the type of Auth. Mode you’ve chosen will be listed. In fact, in some cases,
this menu will not be available
at all.
4.30.2.3 EAP
This menu allows you to choose the EAP (Extensible Authentication Protocol) type used for 802.1x authen-
tication to an access point.
The following EAP types are supported by Wi-Fi Config:
•TLS: Provides strong security via the use of client certificates for user authentication.
Regulatory Draft
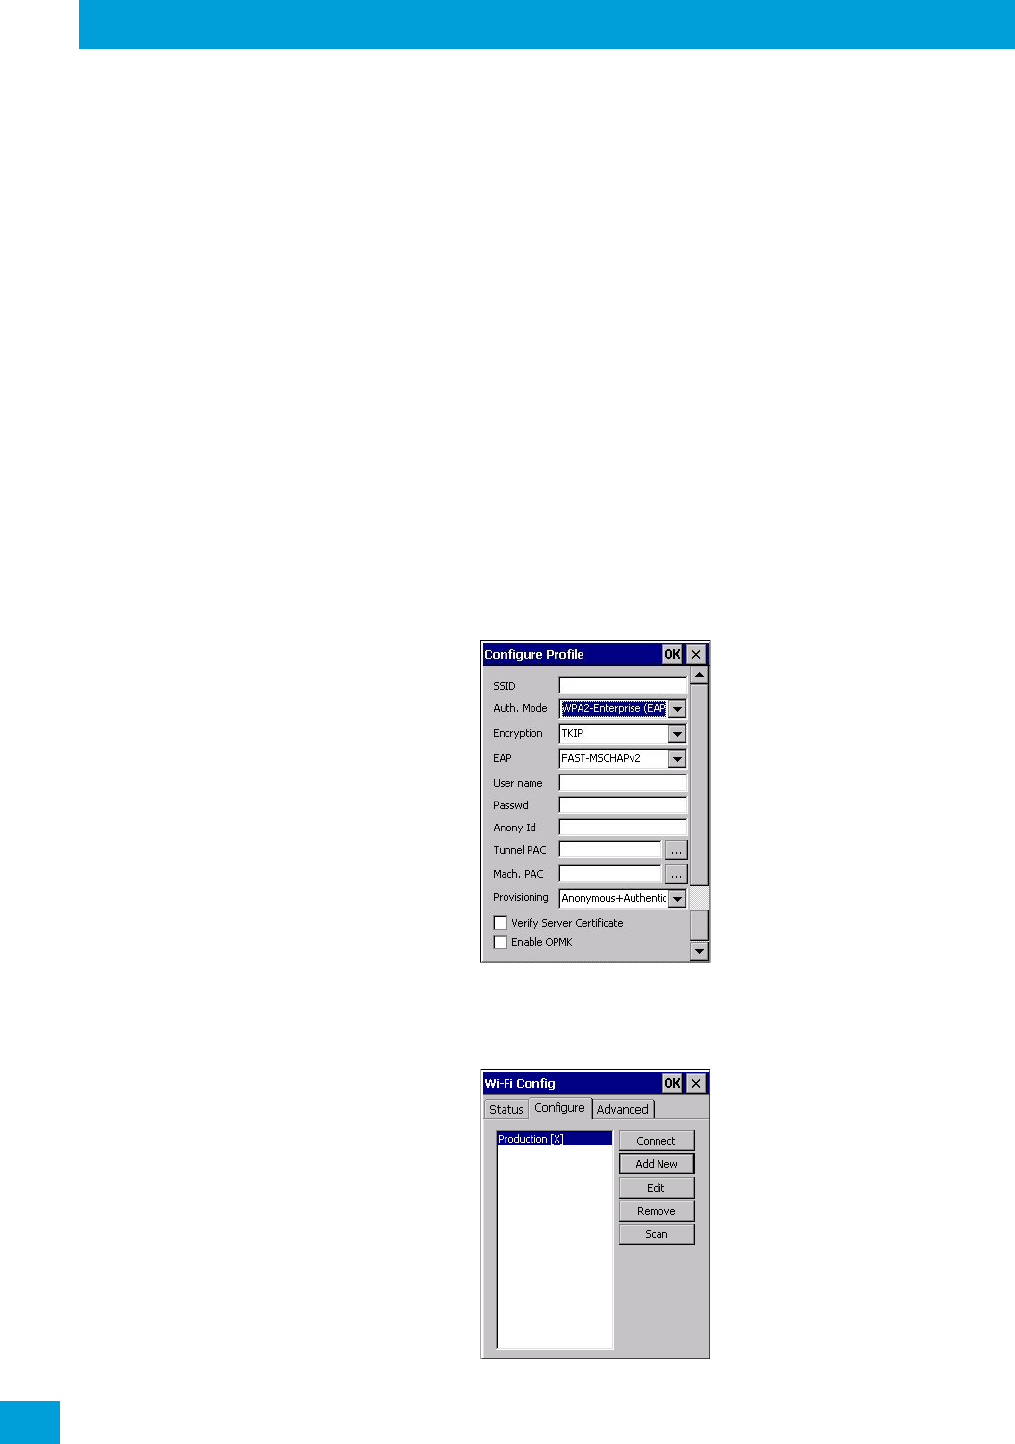
Chapter 4: Configuration
Wi-Fi Config: Configure
Psion Omnii Hand-Held Computer User Manual
125
•PEAPv0-MSCHAPv2: Provides secure user authentication by using a TLS tunnel to encrypt EAP traf-
fic. MSCHAPv2 is used as the inner authentication method. This is appropriate for use against Windows
Active Directory and domains.
•PEAPv1-GTC: PEAP authentication using GTC as the inner method which utilizes one time passwords
(OTPs) for authentication against OTP data bases such as SecureID.
•LEAP: Is an authentication method for use with Cisco WLAN access points. LEAP does not require the
use of server or client certificates. LEAP supports Windows Active Directory and domains but requires
the use of strong passwords to avoid vulnerability to off-line dictionary attacks.
•FAST-M SCH APv 2: Is a successor to LEAP and does not require strong passwords to protect against
off-line dictionary attacks. Like LEAP, EAP-FAST does not require the use of server or client certificates
and supports Windows Active Directory and domains.
• Complete the fields in the Configure Profile screen. If you’re uncertain about some of the options,
your system administrator will be able to provide the correct information for your wireless network.
• Once you’ve completed the necessary fields, tap on OK.
4.30.2.4 Verify Server Certificate
When the Verify Server Certificate box is checked, Omnii will verify the certificate provided by the authenti-
cation server during the authentication process. This requires that an appropriate certificate be manually
installed on Omnii for the verification.
4.30.2.5 Enable OPMK
When used with compatible wireless infrastructure, Opportunistic Key Caching (OPMK) reduces the number
of full authentications required when roaming. Only available with WPA2-Enterprise (EAP) authentication
mode.
4.30.2.6 Connecting the Wireless Network
Your configured network is listed in the Configure tab. An [X] next to a network indicates that this is the
network to which Omnii will connect.
Regulatory Draft
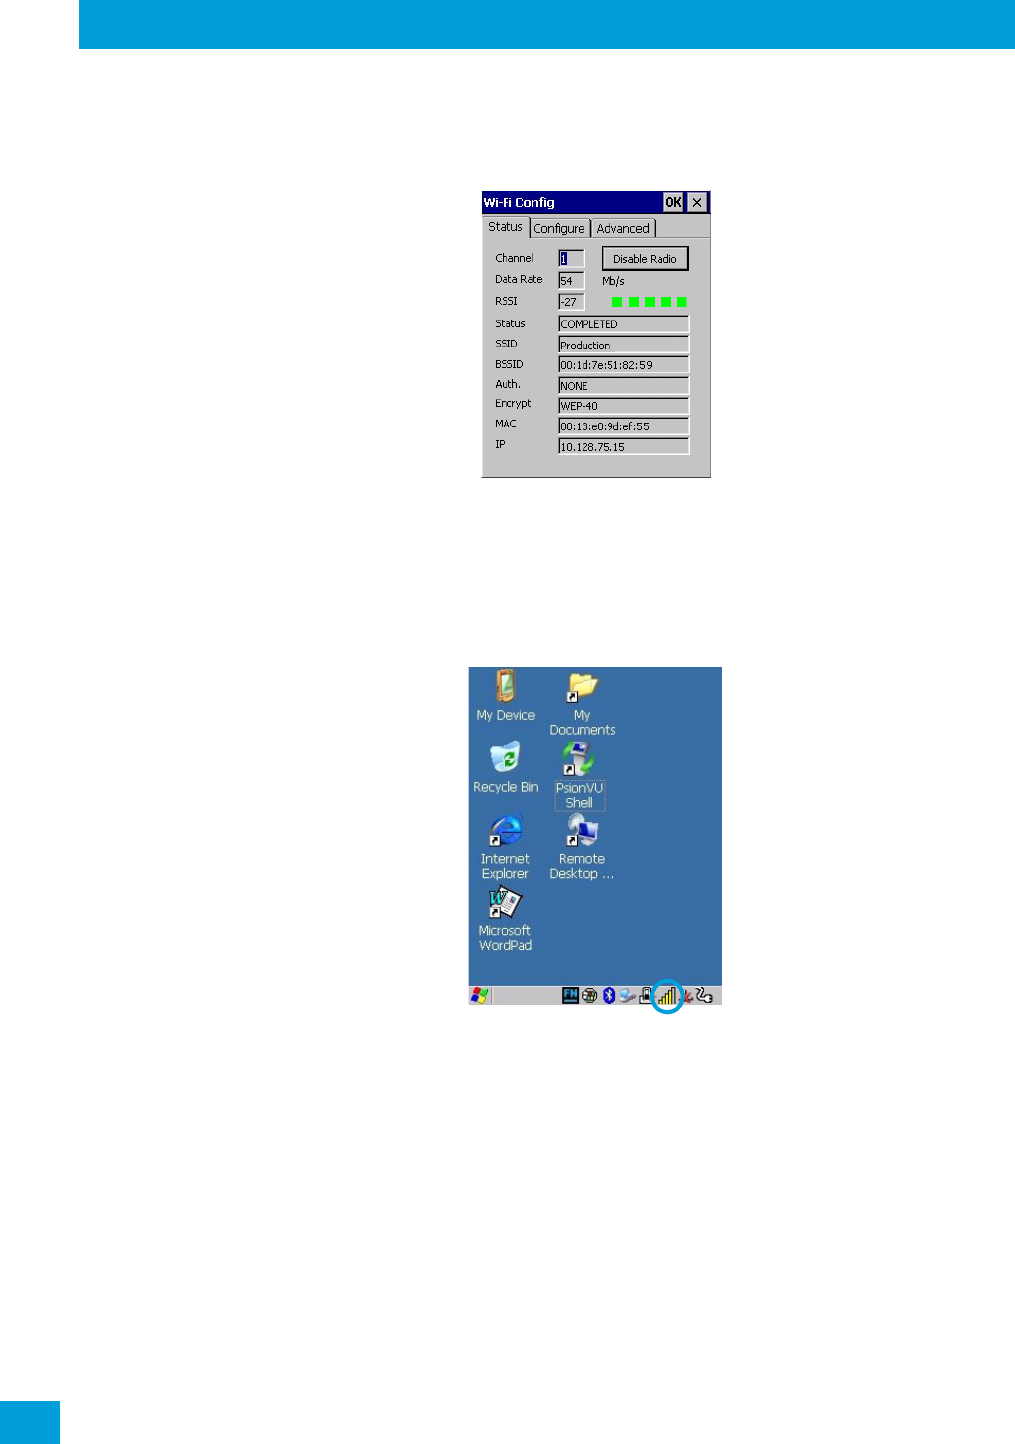
Chapter 4: Configuration
Configuring TCP/IP
Psion Omnii Hand-Held Computer User Manual
126
• Tap on the Connect button to activate your network.
The Status tab is displayed. The Status field displays ASSOCIATING while the 802.11b/g radio attempts to
connect to the network. Once the association is complete, the Status tab is populated with the appropriate
information about your network.
4.30.3 Configuring TCP/IP
If your network is not using a DHCP server, you will need to assign an IP address.
4.30.3.1 IP Address
To assign an IP address for your Omnii:
•Tap on the radio icon in the taskbar,
or
Tap on Start>Settings>Network and Dial-up Connections. Tap on the radio icon
for which you want to assign an IP address—in the sample screen below, the icon is labelled SDIO86861.
Regulatory Draft
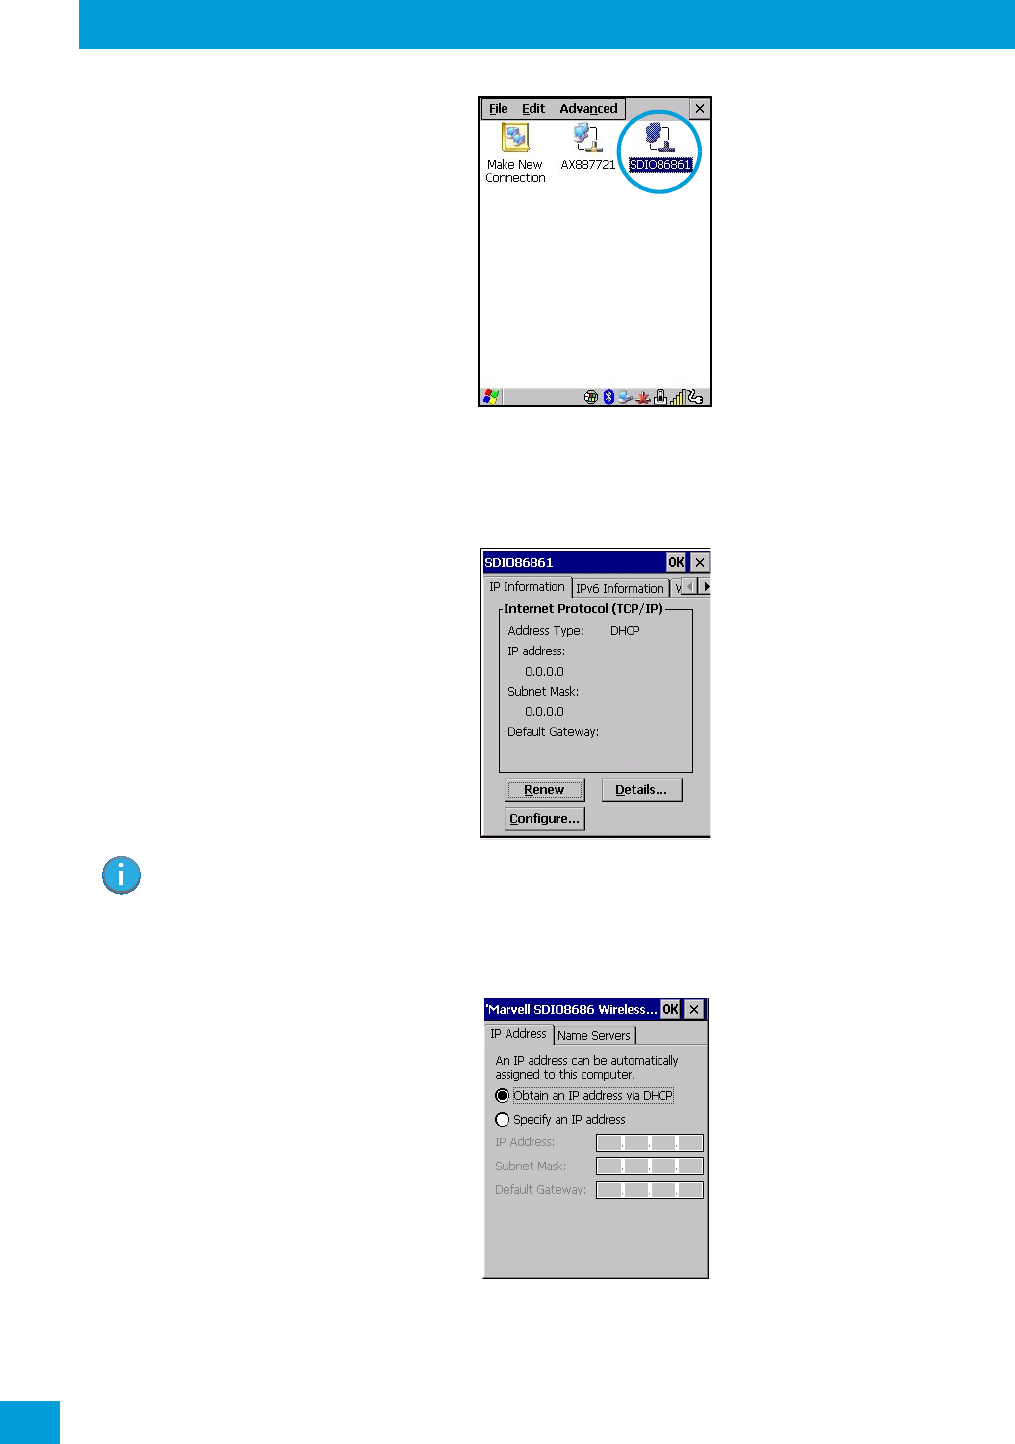
Chapter 4: Configuration
Configuring TCP/IP
Psion Omnii Hand-Held Computer User Manual
127
The Wireless Statistics screen is displayed.
• Tap on the IP Information tab.
Figure 4.7 SDIO86861 IP Information
To define a static IP address:
• Tap on the Configure button.
• Tap on the radio button next to Specify an IP address to select it.
•Type an IP, Subnet Mask and Default Gateway address in the appropriate fields. Press [ENTER] to
save your information.
Note: When DHCP is enabled, tapping the ‘Renew’ button forces Omnii to renew or find a new IP
address. This is useful if, for example, you are out of communication range for a longer period
of time and your hand-held is dropped from the network.
Regulatory Draft
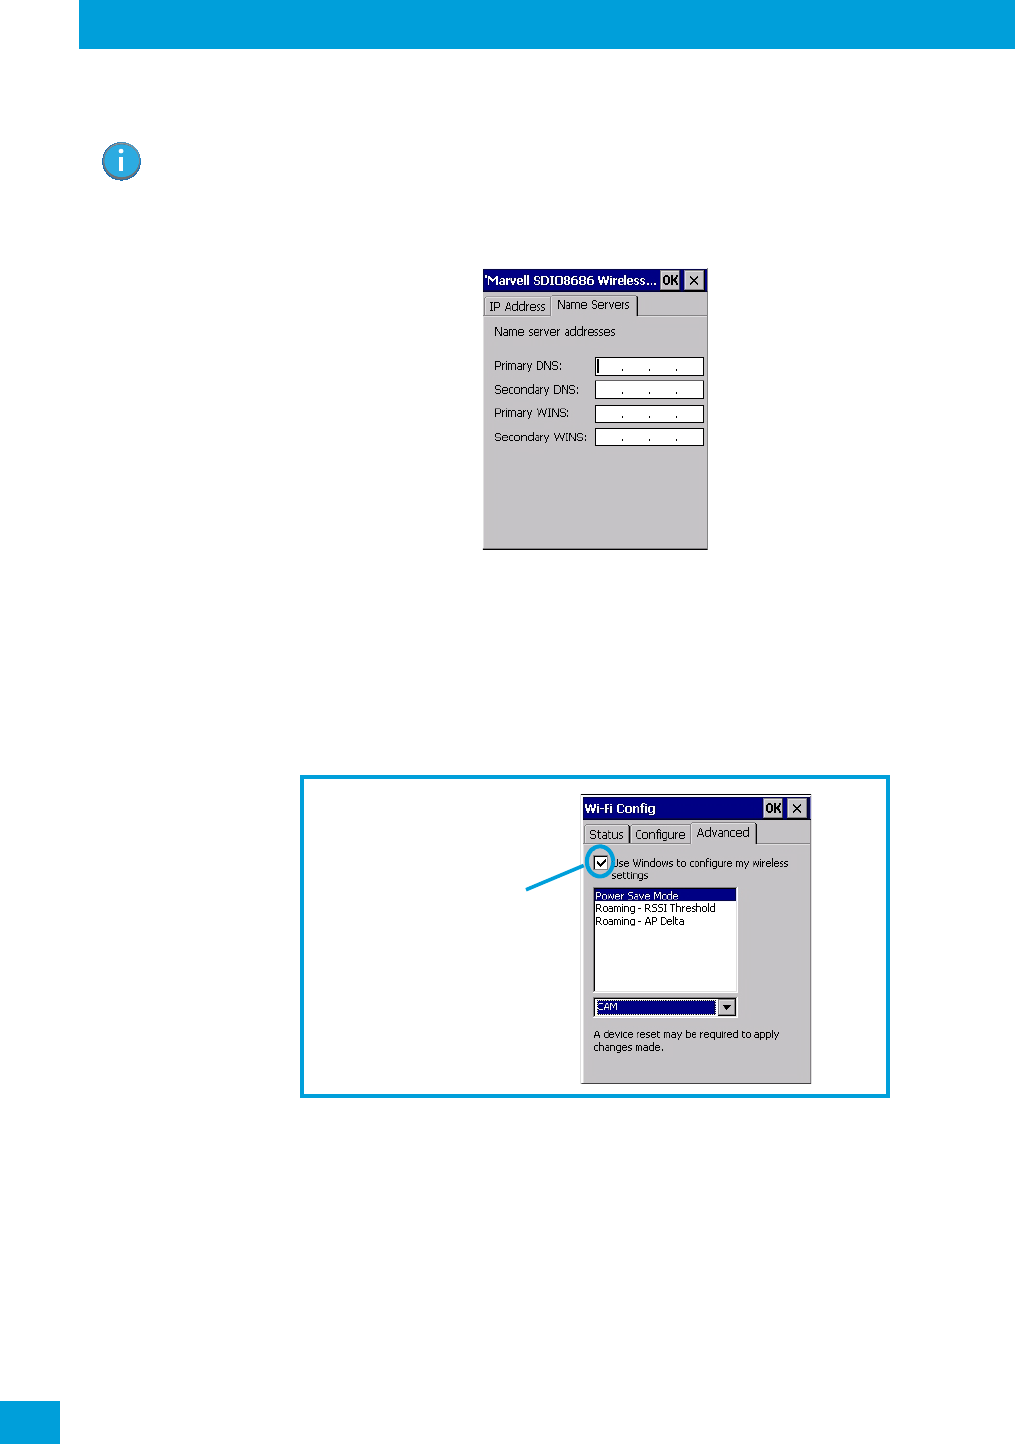
Chapter 4: Configuration
Wi-Fi Config: Advanced
Psion Omnii Hand-Held Computer User Manual
128
4.30.3.2 Name Server
•In the SDIO86861 IP Information tab (see Figure 4.7), tap on the Configure button.
• Tap on the Name Servers tab.
The DNS and WINS fields in the Name Servers tab allow you to specify additional WINS and DNS resolvers.
The format for these fields is ###.###.###.###.
4.30.4 Wi-Fi Config: Advanced
Use Windows to configure my wireless settings
In the Advanced tab you can set Windows to configure the radio, using Wireless Zero Config.
• Tap on the checkbox to the left of Use Windows to configure my wireless settings to enable this
option.
Power Save Mode
This allows you to set the 802.11 power saving mode of the radio to: CAM (continuous access—always on)
(recommended); or MAX_PSP (maximum power saving mode).
Roaming - RSSI Threshold
This sets the RSSI threshold value, below which the radio will start scanning for new access points when
roaming. Values range from -55 to -90 dBm.
Roaming - AP Delta
This sets how much greater (in dBm) the RSSI of a new access point must be than the RSSI of the currently
associated access point in order for the hand-held to initiate a roam. Values range from 5 to 30 dBm.
Note: If DHCP is enabled, name server addresses are assigned automatically.
Tap here to add a checkmark
to activate the Windows radio
configuration.
Regulatory Draft

Chapter 4: Configuration
Monitoring the Network Connection
129
Psion Omnii Hand-Held Computer User Manual
Concluding the Wi-Fi Configuration
If you’ve made changes in the Advanced menus, you will need to warm reset your Omnii.
•Choose Start>Shutdown>Warm Reset.
• A dialog box is displayed letting you know that you will lose all unsaved data. Tap on OK.
Once the reset is complete, if you checked the box next to Use Windows to configure my wireless set-
tings, the Wireless Zero Config screen is displayed on the hand-held. Refer to Appendix G: “Wireless Zero
Config Settings” for details.
4.30.5 Monitoring the Network Connection
The radio signal icon in the taskbar indicates the strength of the communication link with an 802.11 access
point.
To access the radio signal icon:
• Tap on the radio icon in the taskbar to display the wireless statistics dialog box.
To access the radio signal icon using the keyboard:
• Press the [Windows] key to display the Start Menu.
• Highlight Shortcuts and then choose System Tray from the sub-menu.
• Use the [LEFT] and [RIGHT] arrow keys to highlight the radio signal icon in the taskbar.
• Press [ENTER] to display the Wireless Statistics dialog box.
Note: Moving in and out of the radio coverage area can have varying effects on a network session.
At times, you may need to renew your connection by logging in again.
Regulatory Draft

Chapter 4: Configuration
Monitoring the Network Connection
Psion Omnii Hand-Held Computer User Manual
130
Regulatory Draft