Psion 7545MBWP GSM/GPRS/UMTS/HSPA Module User Manual installation guide
Psion Inc GSM/GPRS/UMTS/HSPA Module installation guide
Psion >
Contents
installation guide

Warning: The installation of any components must be performed using the appropriate anti-static devices. If unavail-
able, discharge static from your body by touching a grounded metallic object before opening any covers on
the hand-held.
This instruction sheet describes how to install the GPS/HSPA+ Radio Kit and an end-cap kit.
The GPS Radio Kit contains the following:
•GPS radio with frame
•Torx T6 screws (x 3)
• Regulatory label 1004434
The GPS End-cap Kit includes:
• GPS end-cap with antenna attached.
•Torx T10 screws (x 4)
The tools listed below are needed for this procedure:
•Torx T10 screwdriver
•Torx T6 screwdriver
• small needle-nose pliers
1. Getting the Omnii Ready for GPS/HSPA+ Installation
Warning: Always disconnect the Omnii from all power sources (battery & A/C power) before servicing components.
Figure 1
• Remove the battery.
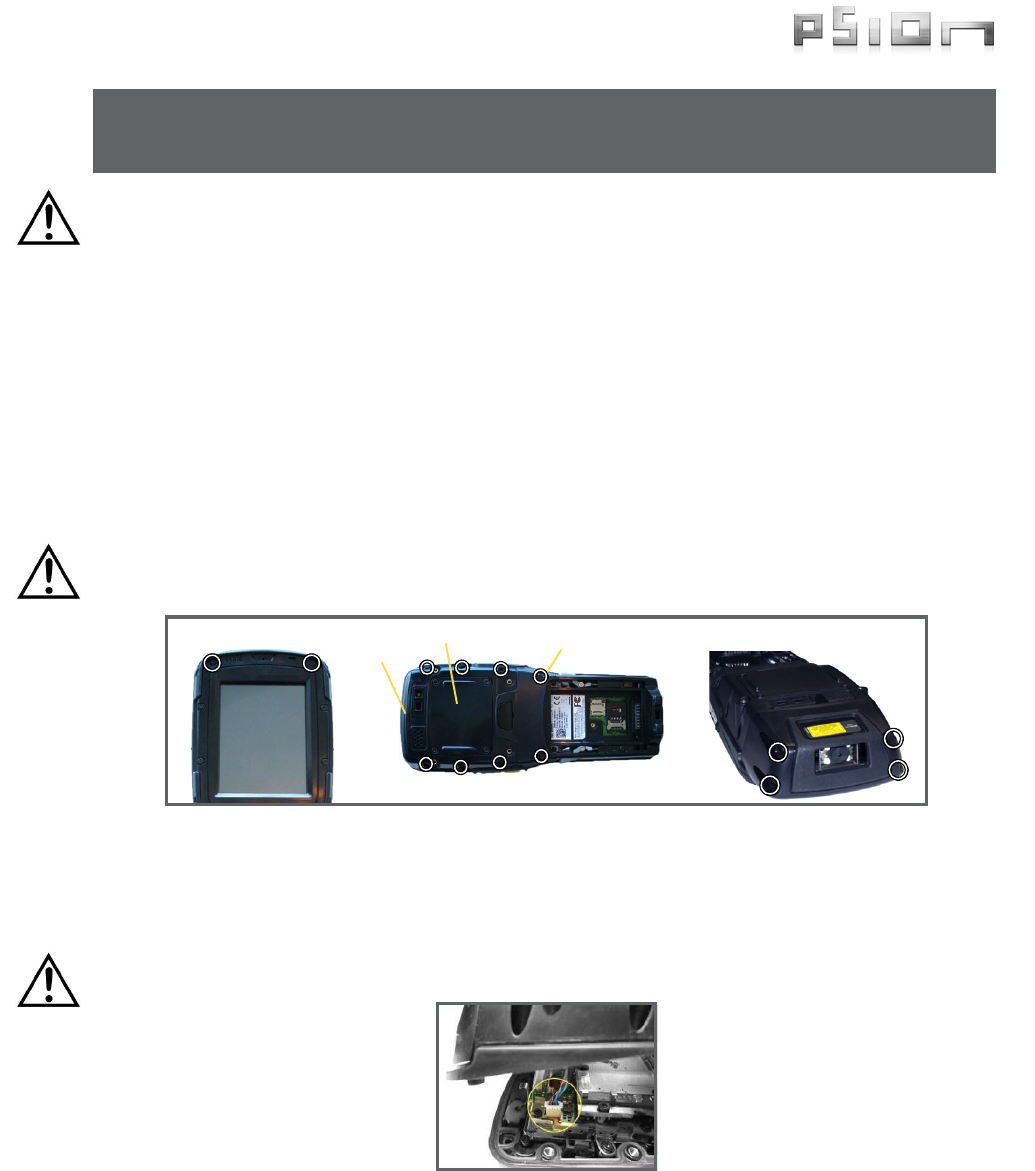
• Remove the blanking plate (four screws) using a Torx T10 screwdriver.
• Using a Torx T6 screwdriver, remove the two top-most screws on the front of the unit, just above the display.
• Remove the eight T10 screws holding the back cover to the main housing. The screws are illustrated in Figure 1.
• Carefully separate the back cover from the chassis without putting strain on the cables that are still connected.
• Locate the trigger/speaker cable at the top corner of unit. Grasp the wires in a bundle, and lift them straight
up to disconnect the harness from the socket on the main logic board. Carefully disconnect any other cables.
Warning: Do not try to pry the harness from the socket, or you may dislocate the socket from the main logic board.
• Remove the existing end-cap (four screws) using a Torx T10 screwdriver.
2. Installing the GPS/HSPA+ Radio Module
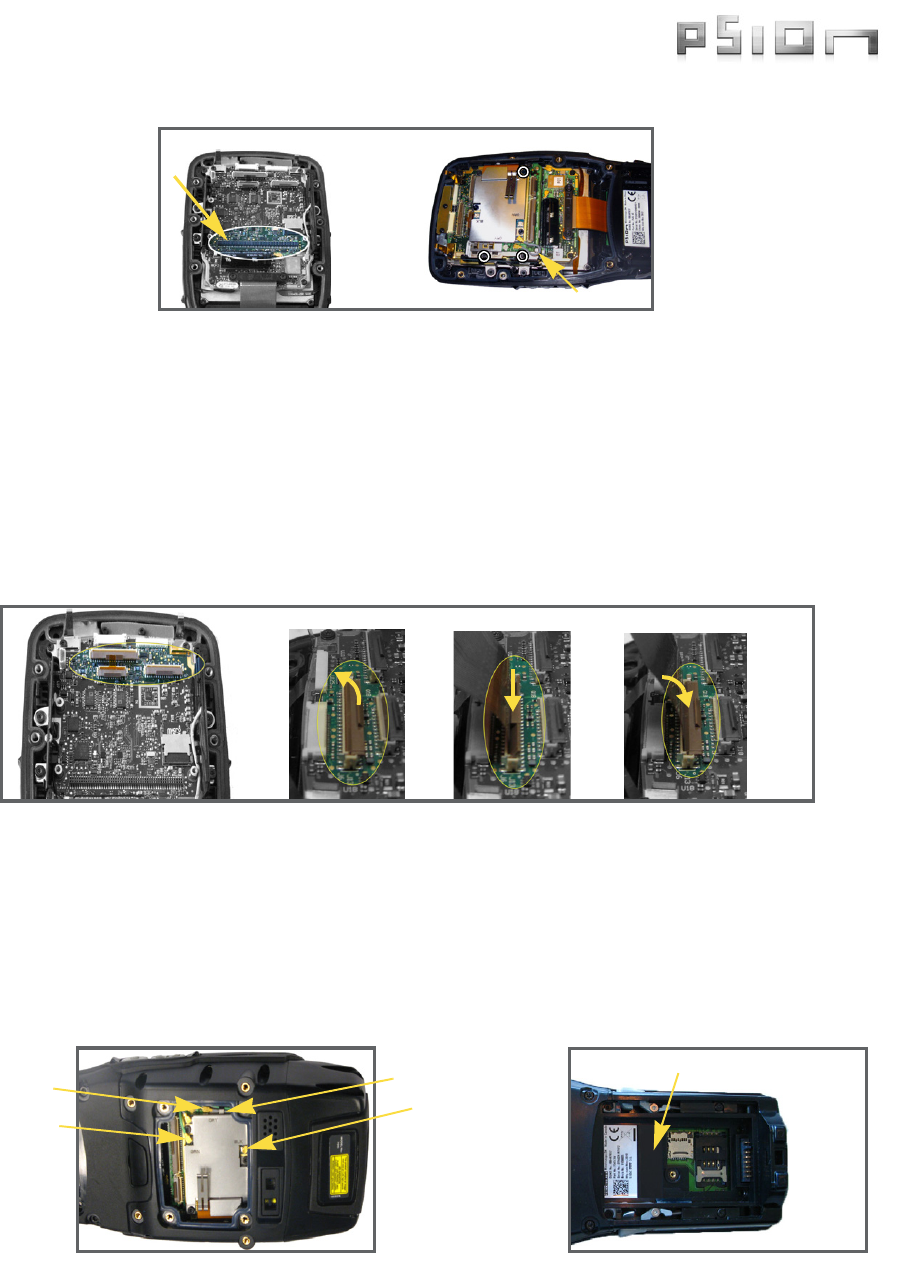
• Align the 100-pin connector on the GPS radio module with the connector on the main logic board, and press
down to attach it.
• Using a Torx T6 screwdriver, secure the GPS radio to the main logic board with 3 screws (M2x5 mm), torqued to
2.5 in-lb (0.28 N-m).
Blanking plate Torx T10 s c rews (x8)
18
5
4
2
6
Torx T 6 sc re ws (x2 )
End-Cap
Torx T10 E nd- ca p screws (x4)
Tighten screws in sequence indicated.
3
7
June 25, 2012
8000274.B Sheet 1 of 1
© Copyright 2012 by Psion Inc.
Psion, the Psion logo, and the names of other products and services provided by Psion are trademarks of
Psion Inc. All trademarks used herein are the property of their respective owners.
OMNII™ END-CAP WITH GPS & HSPA+ RADIO KIT
INSTALLATION

Figure 2
3. Attaching the GPS/HSPA+ End-Cap
• Run the cables (x3) and scanner/imager flex cable through the opening at the top of the expansion back cover.
• Using a Torx T10 screwdriver and the four screws provided (M3 x 6 mm), secure the GPS end-cap to the expansion
back cover. Torque to 5 in-lb (0.56 N-m).
4. Reassembling Omnii
• Before reattaching the back cover, connect the pistol grip trigger/speaker wire harness to socket J11 on the main
logic board. Connect the camera flex cable to socket J9 on the main logic board.
• If a scanner/imager flex cable is present in the end-cap, connect it to socket J13 on the main logic board as shown in
Figure 3. If no cable has previously been installed in this socket, there may be a piece of “dummy” stiffener that must
be removed before inserting the cable.
• Make certain the GPS bypass cable is connected (see Figure 2 on the previous page).
Figure 3
• Fit the back cover in place against the main housing, ensuring that no cables are caught in the seal.
• Using a Torx T10 screwdriver, tighten the eight screws (M3x6 mm) to a torque of 5 in-lb (0.56 N-m). Install the screws
in the sequence shown in Figure 1 on the previous page to ensure a consistent seal around the opening.
• Using a Torx T6 screwdriver, replace the two screws (M2x8 mm) above the display on the front of the unit. Torque to
2.5 in-lb (0.28 N-m).
• Through the scanner pod opening, use small needle-nose pliers to route the grey GPS antenna cable under the two
metal cable restraints on the left side of the GPS module.
• Press the grey GPS antenna connector into the socket labelled GRY on the left side of the unit. Snap it into place.
• Through the scanner pod opening, use small needle-nose pliers to route the black HSPA+ radio antenna cable under
the metal cable restraint at the top of the radio module.
• Press the black HSPA+ antenna connector into the socket labelled BLK on the radio module. Snap it into place.
•Press the green diversity cable connector into the socket labelled GRN.
• Affix regulatory label 1004434.
• Reattach the blanking plate using a Torx T10 screwdriver and four screws (M3x5 mm) to 5 in-lb (0.56 N-m).
• Install the battery.
100-pin connector Torx T6 screws (x3)
GPS bypass cable
J13
J9
J11
Flip latch open Insert cable Flip latch closed
GPS antenna
connector HSPA+ antenna
connector
Metal cable restraint
Diversity antenna
connector
Affix regulatory label here
COMPANY HEADQUARTERS SUPPORT SERVICES
Psion Inc. For local support services, go to:
2100 Meadowvale Boulevard, Mississauga http://www.psion.com/service-and-support.htm
Ontario, Canada L5N 7J9
Tel: +1 905 813 9900
Fax: +1 905 812 6300