Quanta Computer FL Notebook Computer User Manual 4067XXXX X 0 9 A Z or blank

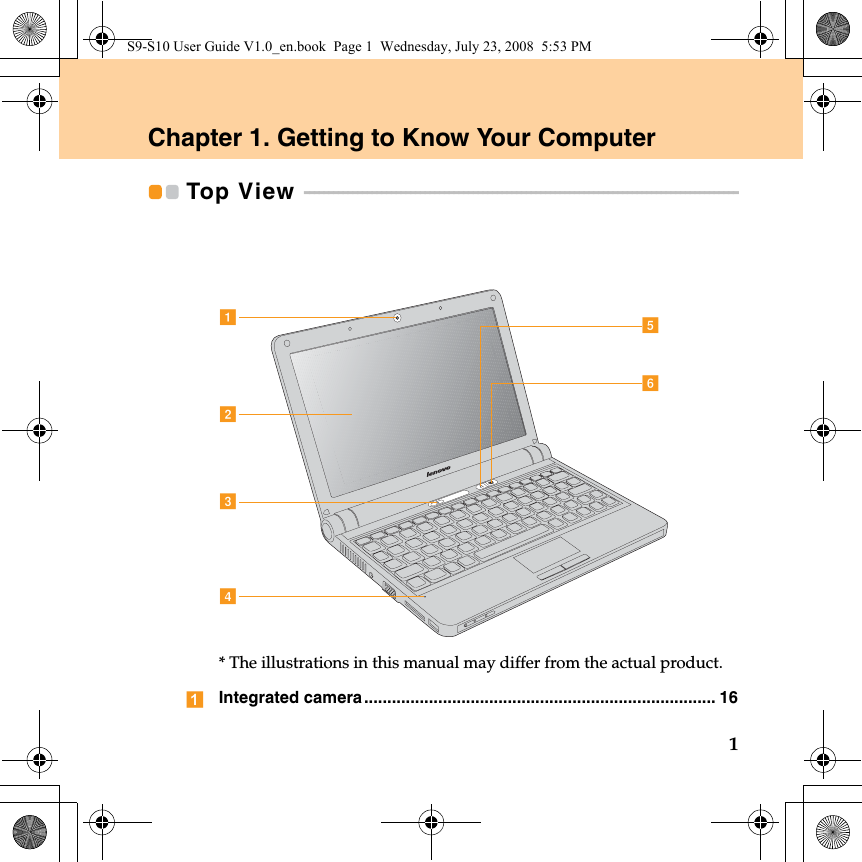
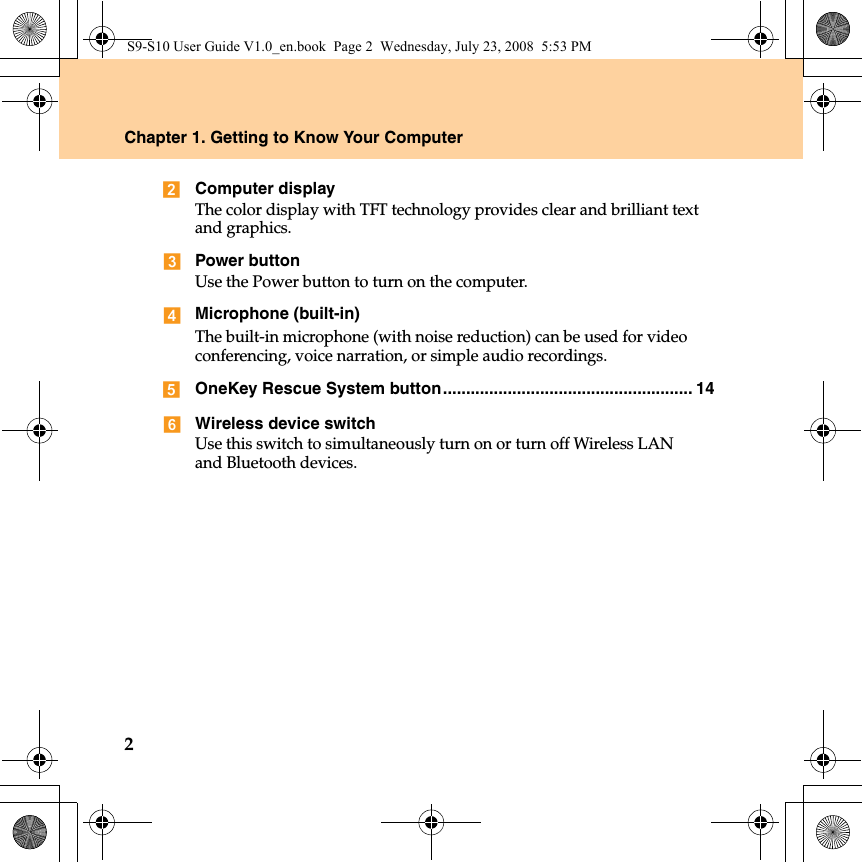
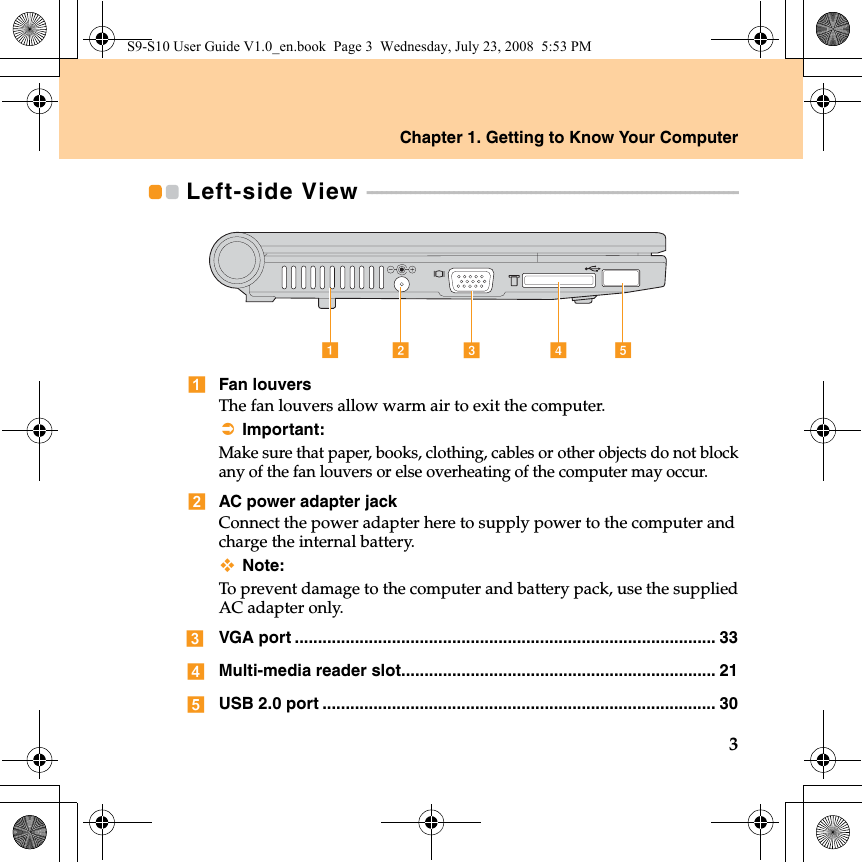
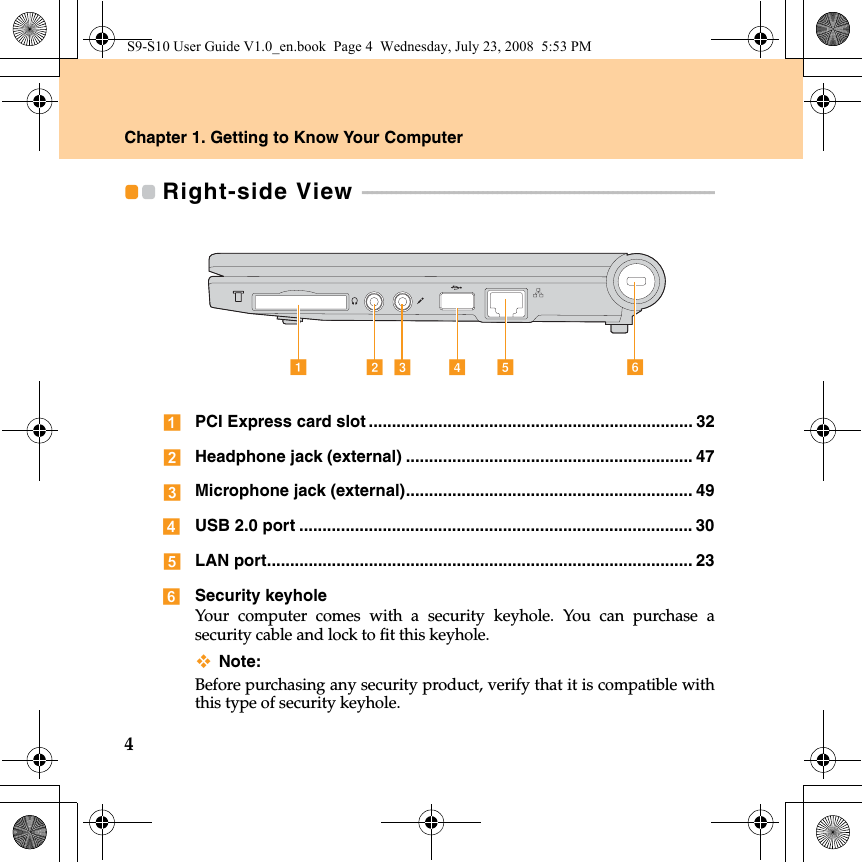
Quanta Computer Inc Notebook Computer 4067XXXX X 0 9 A Z or blank

Contents

User manual 1 of 2

S9/S10 User Guide V1.0 EN cover_1-4LenovoIdeaPadS9/S10User GuideUser Guide V1.0V1.0New World. New Thinking.TMwww.lenovo.com©Lenovo China 2007P/N:147001827Printed in ChinaMT:4067, 20013       4231, 20015       4187      4068, 20014
S9/S10 User Guide V1.0 EN cover_2-3First Edition (April 2008)Before using this information and the product it supports, be sure to read the following:• Chapter 6. Safety, Use, and Care Information on page 54.• Appendix D. Notices on page 102.•OneKey Rescue System User Guide included in the package with this publication.NoteU.S. GOVERNMENT USERS – RESTRICTED RIGHTS: Our products and/or services are provided with RESTRICTED RIGHTS. Use, duplication or disclosure by the Government is subject to the GSA ADP Schedule contract with Lenovo, if any, or the standard terms of this commercial license, or if the agency is unable to accept this Program under these terms, then we provide this Program under the provisions set forth in Commercial Computer Software–Restricted Rights at FAR 52.227-19, when applicable, or under Rights in Data-General, FAR 52.227.14 (Alternate III).© Copyright Lenovo 2008. All rights reserved.If your product is not working correctly,DO NOT RETURN IT TO THE STORE.For technical assistance, contact a Lenovo supportspecialist 24 hours a day by calling toll free 1-877-4LENOVO (1-877-453-6686).Additionally, you can find support information and updateson the Lenovo Web site located athttp://consumersupport.lenovo.com.* Only for the users from the United States.
ENERGY STAR model informationENERGY STAR® is a joint program of the U.S. Environmental ProtectionAgency and the U.S. Department of Energy aimed at saving money and protecting the environment through energy efficient products and practices.Lenovo® is proud to offer our customers products with an ENERGY STAR compliant designation. Lenovo computers of the following machine types, ifthe ENERGY STAR mark is affixed, have been designed and tested to conformto the ENERGY STAR 4.0 program requirements for computers.• 20013, 20015• 4067, 4231By using ENERGY STAR compliant products and taking advantage of thepower-management features of your computer, you reduce the consumption ofelectricity. Reduced electrical consumption contributes to potential financialsavings, a cleaner environment, and the reduction of greenhouse gas emissions.S9-S10 User Guide V1.0_en.book  Page 1  Wednesday, July 23, 2008  5:53 PM
For more information about ENERGY STAR, visithttp://www.energystar.gov.Lenovo encourages you to make efficient use of energy an integral part of your day-to-day operations. To help in this endeavor, Lenovo has preset the following power-management features to take effect when your computer has been inactive for a specified duration:To awaken your computer from a Sleep or System Standby mode, press anykey on your keyboard. For more information about these settings, refer toyour Windows Help and Support information system.Table 1. ENERGY STAR power-management features, by operating systemWindows XP•Turn off monitor: After 10 minutes•Turn off hard disks: After 30 minutes•System standby: After 20 minutes•System hibernates: After 2 hoursS9-S10 User Guide V1.0_en.book  Page 2  Wednesday, July 23, 2008  5:53 PM
Explanation of Hard Disk CapacityDear user,While using your computer, you may discover that the nominal hard diskcapacity indicated is somewhat different from the disk capacitydisplayed by the operating system. For example, a nominal 80GB harddisk will appear as less than 80GB in the operating system. Thisdiscrepancy is not an error in hard disk installation nor any otherproblem, but a normal phenomenon of computers. This phenomenon isprimarily due to the following reasons:I. Different standards used by the manufacturer and operatingsystem when calculating hard disk capacityHard disk manufacturers use a radix of 1000, i.e. 1G = 1,000MB, 1MB =1,000KB, 1KB = 1,000 bytes. However, when identifying hard disk capacity,operating systems use a radix of 1024, i.e. 1GB = 1,024MB, 1MB = 1,024KB,1KB = 1,024 bytes. The standard adopted by your computer is that of thehard disk manufacturers. Since the standards adopted by the hard diskmanufacturer and operating system are different, the hard disk capacitydisplayed by the operating system will be different from the nominal harddisk capacity.For example, if the hard disk is nominally X G, even when it is completelyempty, the capacity displayed by the operating system will be:X × 1000 × 1000 × 1000/ (1024 × 1024 × 1024) | X × 0.931 GS9-S10 User Guide V1.0_en.book  Page 3  Wednesday, July 23, 2008  5:53 PM
If a portion of the hard disk space has been used for some specific purpose,then the capacity indicated by the operating system will be even less thanX × 0.931 G.II. A portion of the hard disk space is used for specific purposesLenovo computers come with preinstalled OneKey Rescue System, so thehard disk has a special portion partitioned before delivery, which is used tostore hard disk mirror and OneKey Rescue System program files. The sizeof the reserved space for this partition varies according to the model,operating system and software of the computer. For the sake of safety, thispartition is not evident, which is commonly referred to as a “hiddenpartition”.In addition, after the hard disk is partitioned or formatted, the system willassign a certain amount of hard disk space for the system files.For the above reasons, the available hard disk space indicated by theoperating system is always less than the computer’s nominal hard diskcapacity.S9-S10 User Guide V1.0_en.book  Page 4  Wednesday, July 23, 2008  5:53 PM
iChapter 1. Getting to Know Your Computer ...................................... 1Top View .......................................1Left-side View ...............................3Right-side View ............................4Front View.....................................5Bottom View..................................6Chapter 2. Using Your Computer ...................................... 9Putting your computer to Stand by or Shutting It Down................9Using the Touch Pad..................10Using the Keyboard ...................11Using memory cards..................15Using the Integrated Camera....16Using the Internet.......................17Securing your computer............19Installing Device Drivers...........25Using battery and AC adapter .........................................25Chapter 3. Using external devices ........................................ 30Connecting a Universal Serial Bus (USB) device ................................30Connecting a PC card device....32Connecting an external display..........................................33Connecting a headphone and audio device ................................34Connecting an external microphone..................................35Connecting a Bluetooth device ...........................................36Chapter 4. Troubleshooting .......37Frequently Asked Questions ....37Troubleshooting..........................39Chapter 5. Getting Help and Service .........................................49Getting Help and Service ..........49Getting Help on the Web...........50Calling the Customer Support Center ...........................................50Getting Help around the World............................................53Chapter 6. Safety, Use, and Care Information ..................................54Important Safety Information..................................54Caring Your Computer..............71Accessibility and Comfort.........79Maintenance ................................82ContentsS9-S10 User Guide V1.0_en.book  Page i  Wednesday, July 23, 2008  5:53 PM
iiContentsAppendix A. Lenovo Limited Warranty...................................... 86Warranty Information ............... 94Lenovo Warranty Service Telephone Numbers .................. 97Appendix B. Customer Replaceable Units (CRUs) ......... 99Appendix C. Specifications ..... 100Specifications ............................ 100Appendix D. Notices ................ 102Notices ....................................... 102Wireless related information ............................... 105Electronic Emissions Notices ....................................... 107WEEE and Recycling Statements ................................. 113EU WEEE Statements .............. 114Japan Recycling Statements.... 115Notice for Users in the U.S.A. ......................................... 117Notice on Deleting Data from Your Hard Disk ........................ 117Trademarks ............................... 119Index.......................................... 120S9-S10 User Guide V1.0_en.book  Page ii  Wednesday, July 23, 2008  5:53 PM
1Chapter 1. Getting to Know Your ComputerTop View  - - - - - - - - - - - - - - - - - - - - - - - - - - - - - - - - - - - - - - - - - - - - - - - - - - - - - - - - - - - - - - - - - - - - - - - - - - - - - - - - - - - - - - - - - - * The illustrations in this manual may differ from the actual product.Integrated camera ............................................................................ 16efabcdS9-S10 User Guide V1.0_en.book  Page 1  Wednesday, July 23, 2008  5:53 PM
2Chapter 1. Getting to Know Your ComputerComputer displayThe color display with TFT technology provides clear and brilliant text and graphics.Power buttonUse the Power button to turn on the computer.Microphone (built-in)The built-in microphone (with noise reduction) can be used for video conferencing, voice narration, or simple audio recordings.OneKey Rescue System button...................................................... 14Wireless device switchUse this switch to simultaneously turn on or turn off Wireless LANand Bluetooth devices.S9-S10 User Guide V1.0_en.book  Page 2  Wednesday, July 23, 2008  5:53 PM
Chapter 1. Getting to Know Your Computer3Left-side View  - - - - - - - - - - - - - - - - - - - - - - - - - - - - - - - - - - - - - - - - - - - - - - - - - - - - - - - - - - - - - - - - - - - - - - - - - - - - - Fan louversThe fan louvers allow warm air to exit the computer.Important:Make sure that paper, books, clothing, cables or other objects do not blockany of the fan louvers or else overheating of the computer may occur.AC power adapter jackConnect the power adapter here to supply power to the computer andcharge the internal battery.Note:To prevent damage to the computer and battery pack, use the suppliedAC adapter only.VGA port ........................................................................................... 33Multi-media reader slot.................................................................... 21USB 2.0 port ..................................................................................... 30decabS9-S10 User Guide V1.0_en.book  Page 3  Wednesday, July 23, 2008  5:53 PM
4Chapter 1. Getting to Know Your ComputerRight-side View  - - - - - - - - - - - - - - - - - - - - - - - - - - - - - - - - - - - - - - - - - - - - - - - - - - - - - - - - - - - - - - - - - - - - - - - - - PCI Express card slot ...................................................................... 32Headphone jack (external) .............................................................. 47Microphone jack (external).............................................................. 49USB 2.0 port ..................................................................................... 30LAN port............................................................................................ 23Security keyholeYour computer comes with a security keyhole. You can purchase asecurity cable and lock to fit this keyhole.Note:Before purchasing any security product, verify that it is compatible withthis type of security keyhole.efdabcS9-S10 User Guide V1.0_en.book  Page 4  Wednesday, July 23, 2008  5:53 PM
Chapter 1. Getting to Know Your Computer5Front View  - - - - - - - - - - - - - - - - - - - - - - - - - - - - - - - - - - - - - - - - - - - - - - - - - - - - - - - - - - - - - - - - - - - - - - - - - - - - - - - - - - - - - - System status indicatorsThe system status indicators show the current status of your computer.SpeakersBuilt-in speakers for rich powerful sound.abS9-S10 User Guide V1.0_en.book  Page 5  Wednesday, July 23, 2008  5:53 PM
6Chapter 1. Getting to Know Your ComputerBottom View  - - - - - - - - - - - - - - - - - - - - - - - - - - - - - - - - - - - - - - - - - - - - - - - - - - - - - - - - - - - - - - - - - - - - - - - - - - - - - - - - - dba cS9-S10 User Guide V1.0_en.book  Page 6  Wednesday, July 23, 2008  5:53 PM
Chapter 1. Getting to Know Your Computer7Battery latch - spring loadedThe spring-loaded battery latch keeps the battery pack secured inplace. When you insert a battery pack, this latch automatically securesthe battery in place. To remove the battery, hold this latch in theunlocked position.Battery pack ..................................................................................... 28Battery latch - manualThe manual battery latch is used to keep the battery pack secured.Move the manual battery latch to the unlocked position to insert orremove the battery pack. Move the manual latch to the locked positionafter inserting the battery pack.S9-S10 User Guide V1.0_en.book  Page 7  Wednesday, July 23, 2008  5:53 PM
8Chapter 1. Getting to Know Your ComputerHard Disk Drive/Memory (RAM) compartmentHard Disk DriveThe hard disk drive is secured in a compartment.Important: Do not disassemble or replace the hard disk drive by yourself! Ifyou do need to, ask a Lenovo authorized service center or dealer todisassemble or replace it.Memory (RAM) compartmentThe memory compartment provides expansion capabilities foradditional memory. The BIOS automatically detects the amount ofmemory in the system and configures CMOS accordingly duringthe Power-On Self-Test (POST) process. There is no hardware orsoftware (including BIOS) setup required after the memory isinstalled.Note:Only purchase expansion modules from authorized retailers of thiscomputer to ensure maximum compatibility and reliability.S9-S10 User Guide V1.0_en.book  Page 8  Wednesday, July 23, 2008  5:53 PM
9Chapter 2. Using Your ComputerPutting your computer to Stand by or Shutting It Down - - - When you finish working with your computer, you can put it to stand by orshut it down.The computer with SSD hard disk drive do not support sleep mode function.Putting your computer to Stand ByIf you will be away from your computer for only a short time, put the computer to sleep.When the computer is in sleep, you can quickly wake it and bypass the startup process.To put the computer to sleep, do one of the following.Click Start and select Stand By from Turn Off Computer.Press Fn + F1.Warning: Wait until the power indicator light starts blinking (indicating that the computeris in Stand By) before you move your computer. Moving your computer whilethe hard disk is spinning can damage the hard disk, causing loss of data.To wake the computer, press the power button.Shutting Down Your computerIf you are not going to use your computer for a day or two, shut it down.To shut down your computer, click Start and select Tu rn Off from Turn Off  Computer.S9-S10 User Guide V1.0_en.book  Page 9  Wednesday, July 23, 2008  5:53 PM
10Chapter 2. Using Your ComputerUsing the Touch Pad  - - - - - - - - - - - - - - - - - - - - - - - - - - - - - - - - - - - - - - - - - - - - - - - - - - - - - - - - - - - - - - - - - - The touch pad consists of a pad   and two click buttons at the bottom ofthe keyboard. To move the cursor   on the screen, slide your fingertipover the pad in the direction in which you want the cursor to move. Thefunctions of the left   and right   click buttons correspond to those ofthe left and right mouse buttons on a conventional mouse.adcbS9-S10 User Guide V1.0_en.book  Page 10  Wednesday, July 23, 2008  5:53 PM
Chapter 2. Using Your Computer11Note:You can also attach and use a USB mouse through the USB connector.For details, see “Connecting a Universal Serial Bus (USB) device” onpage 30.Using the Keyboard - - - - - - - - - - - - - - - - - - - - - - - - - - - - - - - - - - - - - - - - - - - - - - - - - - - - - - - - - - - - - - - - - - - - - Your computer has a numeric keypad and function keys incorporated inthe standard keyboard. Numeric KeypadThe keyboard has keys that, when enabled, work as a 10-key numerickeypad.To enable or disable the numeric keypad, press Fn+F7.* The illustrations in this manual may differ from the actual product. S9-S10 User Guide V1.0_en.book  Page 11  Wednesday, July 23, 2008  5:53 PM
12Chapter 2. Using Your ComputerFunction Key CombinationsThrough the use of the function keys, you can change operational featuresinstantly. To use this function, press and hold the Fn key  ; then press oneof the function keys  .abS9-S10 User Guide V1.0_en.book  Page 12  Wednesday, July 23, 2008  5:53 PM
Chapter 2. Using Your Computer13The following describes the features of each function key.Fn + F1: Put your computer in sleep mode.Fn + F2: Turn off/on the LCD screen.Fn + F3: Shift to other connected display devices.Fn + F5: Enable/disable the built-in wireless device feature.Fn + F6: Enable/disable the touch pad.Fn + F7/NmLk: Enable/disable the Numeric keypad.Fn + F8/ScrLk: Enable/disable Scroll Lock.Fn + up/down arrow: Increase/decrease display brightness.Fn + right/left arrow: Increase/decrease computer volume.S9-S10 User Guide V1.0_en.book  Page 13  Wednesday, July 23, 2008  5:53 PM
14Chapter 2. Using Your ComputerOneKey Rescue System buttonPress the OneKey Rescue System button to enter the main interface ofOneKey Rescue System while the power is off.Attention: When you press OneKey Rescue System button to turn on the computer,please ensure that your computer is not connected with other peripherals(such as USB storage device, etc.), otherwise the system may not operateproperly.For details, see OneKey Rescue System User Guide.S9-S10 User Guide V1.0_en.book  Page 14  Wednesday, July 23, 2008  5:53 PM
Chapter 2. Using Your Computer15Using memory cards  - - - - - - - - - - - - - - - - - - - - - - - - - - - - - - - - - - - - - - - - - - - - - - - - - - - - - - - - - - - - - - - - - - Your computer comes with one Multi-media Reader slot used to insert amemory card, such as an SD Card, a Multi-media Card, a Memory Stick ora Memory Stick pro card.Note:Only use the memory card listed above; for more information about theusage, read the instructions shipped with the memory card.S9-S10 User Guide V1.0_en.book  Page 15  Wednesday, July 23, 2008  5:53 PM
16Chapter 2. Using Your ComputerInserting a memory cardGently slide the memory card with the arrow facing upward and pointingtoward the Multi-media reader slot. Slide until it clicks into place.Removing a memory card1Push the memory card until you hear a click.2Gently pull the memory card out of the Multi-media reader slot.Using the Integrated Camera  - - - - - - - - - - - - - - - - - - - - - - - - - - - - - - - - - - - - - - - - - - - - - - - - With the built-in camera, you can take photos or movies and use with variousapplications, such as EasyCapture, MSN or Yahoo! Messenger, and so on.S9-S10 User Guide V1.0_en.book  Page 16  Wednesday, July 23, 2008  5:53 PM
Chapter 2. Using Your Computer17Using the Internet - - - - - - - - - - - - - - - - - - - - - - - - - - - - - - - - - - - - - - - - - - - - - - - - - - - - - - - - - - - - - - - - - - - - Your computer comes with LAN port for high-speed DSL/cable modemconnection and local area network (LAN), wireless LAN for wirelessconnection.Using LAN portThe LAN port supports a standard RJ-45 connector, and allows you toconnect the computer to a high-speed DSL/cable modem connection andlocal area network (LAN).S9-S10 User Guide V1.0_en.book  Page 17  Wednesday, July 23, 2008  5:53 PM
18Chapter 2. Using Your ComputerAttention:As the voltage of a telephone connection is higher than that of a network,do not attempt to connect a telephone cable to the LAN port or else a shortcircuit of the computer might occur.Using wireless LANAn isotropic antenna system is built into the display for optimal reception,enabling wireless communication wherever you are.To enable wireless communications, do the following;1Press the Wireless device switch.2Press Fn + F5.S9-S10 User Guide V1.0_en.book  Page 18  Wednesday, July 23, 2008  5:53 PM
Chapter 2. Using Your Computer19Securing your computer  - - - - - - - - - - - - - - - - - - - - - - - - - - - - - - - - - - - - - - - - - - - - - - - - - - - - - - - - - - This section provides information about how to help protect yourcomputer from theft and unauthorized use.Attaching a Security Lock (Optional)You can attach a security lock to your computer to help prevent it frombeing removed without your permission.Attach a security lock to the keyhole of the computer; then secure the chainon the lock to a stationary object. Refer to the instructions shipped with thesecurity lock.Refer to the “Right-side View” on page 4 for the location of the securitykeyhole.Note:You are responsible for evaluating, selecting, and implementing the lockingdevices and security features. Lenovo makes no comments, judgements, orwarranties about the function, quality, or performance of locking devicesand security features.S9-S10 User Guide V1.0_en.book  Page 19  Wednesday, July 23, 2008  5:53 PM
20Chapter 2. Using Your ComputerUsing PasswordsUsing passwords helps prevent your computer from being used by others.Once you set a password and enable it, a prompt appears on the screeneach time you power on the computer. Enter your password at the prompt.The computer cannot be used unless you enter the correct password.Make sure that only authorized individuals access your computer.Establishing different kinds of passwords requires that other possible usersknow the proper passwords in order to access your computer or your data.Two passwords might be needed for your computer: the Supervisorpassword, and the User password. When the Supervisor password is set,only the Supervisor password entitles you full control of the computer.Supervisor passwordWith a Supervisor password, you can get full control of the computer. Italso can be used as a power-on password if Password on boot is set toEnabled. Also, when you enter the BIOS Setup Utility with a Supervisorpassword, you are entitled to set all of the options.User passwordIf a User password is set and Password on boot is set to Enabled, apassword prompt appears when you turn on the computer.Unauthorized users cannot get access to configuration data. You can alsouse the User password to enter the BIOS Setup Utility, but only a part ofthe options can be set. User password can not be set if Supervisorpassword is not set.S9-S10 User Guide V1.0_en.book  Page 20  Wednesday, July 23, 2008  5:53 PM
Chapter 2. Using Your Computer21Note:If you set passwords through the BIOS Setup Utility and put yourcomputer into sleep mode by pressing Fn + F1, the following describes thebehavior of the computer when you bring it out of sleep mode:You are prompted to enter the Windows log-on password rather than theUser password to resume operation.To set a Supervisor Password:Only a system administrator is able to perform this procedure.1Turn on your computer. Press F2, while the initial screen is displayed.The BIOS Setup Utility screen opens.2Select Security, using the cursor directional keys.3Select  Set Supervisor Password, and press the Enter key. The SetSupervisor Password window opens.4Choose your Supervisor password, which can be from one to eightalphanumeric characters in any combination. Type it in the Enter NewPassword field.5Press the Enter key once to move to the Confirm New Password field.Retype the password you just entered to verify it.6Commit your password to memory, and press the Enter key.7Press F10 to exit.8Select OK in the Setup Confirmation window.S9-S10 User Guide V1.0_en.book  Page 21  Wednesday, July 23, 2008  5:53 PM
22Chapter 2. Using Your ComputerChanging or Removing the Supervisor PasswordTo change the password, do the following:1Select  Set Supervisor Password, and press the Enter key. The SetSupervisor Password window opens.2Select Enter Current Password and type in the correct password. Thenpress Enter key once to move to Enter New Password field, type a newsupervisor password in.3Press the Enter key once to move to the Confirm New Password field.Retype the password you just entered to verify it.4Commit your password to memory, and press the Enter key.To remove password, do the following:1Select Set Supervisor Password, and press the Enter key. 2Select Enter Current Password and type in the correct password, andpress the Enter key thrice.Note:Make sure the Password on boot is set to Enabled if you need thepassword protection at power on.S9-S10 User Guide V1.0_en.book  Page 22  Wednesday, July 23, 2008  5:53 PM
Chapter 2. Using Your Computer23To set a User Password:1Turn on your computer. Press F2, while the initial screen is displayed.The BIOS Setup Utility screen opens.2Select Security, using the cursor directional keys.3Select  Set User Password, and press the Enter key. The Set UserPassword window opens.4Choose your user password, which can be from one to eightalphanumeric characters in any combination. Type it in the Enter NewPassword field.5Press the Enter key once to move to the Confirm New Password field.Retype the password you just entered to verify it.6Commit your password to memory, and press the Enter key.7Press F10 to exit.8Select OK in the Setup Confirmation window.Note:You can set the User Password only when the Supervisor Password hasbeen set.Changing or Removing the User PasswordTo change the password, do the following:1Select  Set User Password, and press the Enter key. The Set UserPassword window opens.S9-S10 User Guide V1.0_en.book  Page 23  Wednesday, July 23, 2008  5:53 PM
24Chapter 2. Using Your Computer2Type correct password in the Enter Current Password field. Thenpress Enter key once to move to the Enter New Password field, type anew user password in.3Press the Enter key once to move to the Confirm New Password field.Retype the password you just entered to verify it.4Commit your password to memory, and press the Enter key.To remove the password, do the following:1Select Set User Password, and press the Enter key. 2Type correct user password in Enter Current Password, and pressEnter key thrice.Note:Make sure the Password on boot is set to Enabled if you need thepassword protection at power on.S9-S10 User Guide V1.0_en.book  Page 24  Wednesday, July 23, 2008  5:53 PM
Chapter 2. Using Your Computer25Installing Device Drivers  - - - - - - - - - - - - - - - - - - - - - - - - - - - - - - - - - - - - - - - - - - - - - - - - - - - - - - - - - - A compatible device driver is a requirement to ensure correct operationand performance of each component in your computer. Lenovo providesall drivers that you need in your Disk “D:”.Notes:Most installations require a reboot to update the driver, otherwise thesystem’s stability and audio or video effect may be compromised, or youeven have to reinstall the operating system.Using battery and AC adapter - - - - - - - - - - - - - - - - - - - - - - - - - - - - - - - - - - - - - - - - - - - - - - - When you need to use your computer away from electrical outlets, youdepend on battery power to keep your computer running. Differentcomputer components consume power at different rates. The more you usethe power-intensive components, the faster you consume battery power.Your Computer BatteriesYour computer batteries enable you to do more, save more, and spendmore time unplugged. Mobility has revolutionized business by enablingyou to take your work wherever you go. With your computer batteries, youwill be able to work longer without being tied to an electrical outlet.Note:The operating system may run slower when using the battery mode.Attention:Any use of the battery other than the original or Lenovo battery will resultin“burning” or “fire”.Dispose of the used battery depending on the instructions.S9-S10 User Guide V1.0_en.book  Page 25  Wednesday, July 23, 2008  5:53 PM
26Chapter 2. Using Your ComputerChecking Battery StatusYou can determine the percentage of battery power remaining by usingWindows Power options.The rate at which you use battery power determines how long you can usethe battery of your computer between charges. As each computer user hasdifferent habits and needs, it is difficult to predict how long a batterycharge will last. There are two main factors:The amount of energy stored in the battery when you begin to work.The way you use your computer: for example, how often you access thehard disk drive and how bright you make the computer display.Using the AC AdapterThe power to run your computer can come either from the lithium-ion (Li-ion) battery pack provided with it, or from AC power through the ACadapter. While you use AC power, the battery charges automatically.The AC adapter that comes with your computer has two basic components:1The transformer pack that converts AC power for use with the computer.2The power cord that plugs into the AC outlet and into the transformer pack.Attention:Using an improper power cord could cause severe damage to your computer.To use the AC adapter, do the following. Be sure to take these steps in theorder in which they are given here.S9-S10 User Guide V1.0_en.book  Page 26  Wednesday, July 23, 2008  5:53 PM
Chapter 2. Using Your Computer271Connect the power cord to the transformer pack.2Plug the power cord into an electrical outlet.3Connect the AC adapter to the AC power adapter jack of the computer.You can check the status of your battery at any time by looking at thebattery meter at the bottom of your display.Notes:When you do not use the AC adapter, disconnect it from the electrical outlet.Do not wrap the power cord tightly around the AC power transformerpack when it is connected to the transformer.You can charge the battery when the AC adapter is connected to thecomputer and the battery is installed. You need to charge it in any of thefollowing conditions:When you purchase a new batteryIf the battery status indicator (amber) starts blinkingIf the battery has not been used for a long timeBefore you charge the battery, make sure that its temperature is at least 10degrees Celsius (50 degrees Fahrenheit).S9-S10 User Guide V1.0_en.book  Page 27  Wednesday, July 23, 2008  5:53 PM
28Chapter 2. Using Your ComputerCharging the BatteryWhen you check the battery status and find that the battery is low, youneed to charge the battery or replace it with a charged battery.If an AC outlet is convenient, first, connect the power cord to thetransformer pack; second, plug the power cord into an electrical outlet; andthen connect the AC adapter to the power jack of the computer.The charging time is affected by the physical environment.Note: To increase the life of the battery, the computer does not start rechargingthe battery if the remaining power is no less than 95 percent.Handling the BatteryDanger: Do not attempt to disassemble or modify the battery pack.Attempting to do so can cause an explosion, or liquid leakage from thebattery pack.A battery pack other than the one specified by Lenovo, or a disassembledor modified battery pack is not covered by the warranty.Danger: If the rechargeable battery pack is incorrectly replaced, there is danger of anexplosion. The battery pack contains a small amount of harmfulsubstances. To avoid possible injury:Replace only with a battery of the type recommended by Lenovo.S9-S10 User Guide V1.0_en.book  Page 28  Wednesday, July 23, 2008  5:53 PM
Chapter 2. Using Your Computer29Keep the battery pack away from fire.Do not expose the battery pack to water or rain.Do not attempt to disassemble the battery pack.Do not short-circuit the battery pack.Keep the battery pack away from children.Danger: Do not put the battery pack in trash that is disposed of in landfills. Whendisposing of the battery, comply with local ordinances or regulations andyour company’s safety standards.S9-S10 User Guide V1.0_en.book  Page 29  Wednesday, July 23, 2008  5:53 PM
30Chapter 3. Using external devicesYour computer has many built-in features and connection capabilities.Attention: Do not connect or disconnect any external device cables other than USB and1394 cables while the computer power is on; otherwise, you might damageyour computer. To avoid possible damage to attached devices, wait at leastfive seconds after the computer is shut down to disconnect external devices.Connecting a Universal Serial Bus (USB) device - - - - - - Your computer comes with two Universal Serial Bus compatible with USB 2.0 orUSB 1.1 devices such as a keyboard, mouse, camera, hard disk drive, printer, andscanner. USB allows devices to be connected and disconnected without rebootingthe computer (hot swapping), and allows specific classes of hardware to be usedwithout requiring individual device drivers to be installed.S9-S10 User Guide V1.0_en.book  Page 30  Wednesday, July 23, 2008  5:53 PM
Chapter 3. Using external devices31Attention: When using high power consumption USB device such as USB ODD, use external device power adapter. Otherwise, it will cause the device unable to be recognized and used, or system shut down.S9-S10 User Guide V1.0_en.book  Page 31  Wednesday, July 23, 2008  5:53 PM
32Chapter 3. Using external devicesConnecting a PC card device  - - - - - - - - - - - - - - - - - - - - - - - - - - - - - - - - - - - - - - - - - - - - - - - - Your computer comes with PCI Express card slot used for connecting PCcard devices that are compatible with the PCI Express card interface.S9-S10 User Guide V1.0_en.book  Page 32  Wednesday, July 23, 2008  5:53 PM
Chapter 3. Using external devices33Connecting an external display  - - - - - - - - - - - - - - - - - - - - - - - - - - - - - - - - - - - - - - - - - - - You can connect an external display to your computer, such as a VGAmonitor.Connecting a VGA monitorYou can connect a VGA monitor by using a VGA port. To connect a VGAmonitor, plug the display cable to VGA port on your computer. To shift toother connected display devices, press Fn + F3.S9-S10 User Guide V1.0_en.book  Page 33  Wednesday, July 23, 2008  5:53 PM
34Chapter 3. Using external devicesConnecting a headphone and audio device - - - - - - - - - - - - - - - - - Your computer comes with one headphone jack used for connectingheadphones, speakers, and audio devices.S9-S10 User Guide V1.0_en.book  Page 34  Wednesday, July 23, 2008  5:53 PM
Chapter 3. Using external devices35Connecting an external microphone  - - - - - - - - - - - - - - - - - - - - - - - - - - - - - - - - Your computer comes with one external microphone jack used forconnecting external microphone.S9-S10 User Guide V1.0_en.book  Page 35  Wednesday, July 23, 2008  5:53 PM
36Chapter 3. Using external devicesConnecting a Bluetooth device  - - - - - - - - - - - - - - - - - - - - - - - - - - - - - - - - - - - - - - - - - - - Your computer can connect to and transfer data wirelessly to Bluetoothdevices, such as computers, PDAs, and cell phones.Enabling Bluetooth communications1Press the Wireless device switch latch to the right.2Press Fn +F5.Note:When you do not need to use the Bluetooth function, turn it off to savebattery power.For details on connecting a Bluetooth device, please refer to Bluetoothdevice’s manual.S9-S10 User Guide V1.0_en.book  Page 36  Wednesday, July 23, 2008  5:53 PM
37Chapter 4. TroubleshootingFrequently Asked Questions - - - - - - - - - - - - - - - - - - - - - - - - - - - - - - - - - - - - - - - - - - - - - - - - - This section lists frequently asked questions and tells where you can find detailed answers. For details about each publication included in the package with your computer, see Lenovo IdeaPad S9/S10 Setup Poster.What safety precautions should I follow when using my computer?See “Chapter 6. Safety, Use, and Care Information“ for detailed information about safety.  How can I prevent problems with my computer?See “Chapter 6. Safety, Use, and Care Information” on page 54 of this guide. More tips can be found in Chapter 1 and 2.What are the main hardware features of my new computer?More information can be found in Chapter 1 and 2.Where can I find the detailed specifications for my computer?See http://consumersupport.lenovo.com.I need to upgrade a device or I need to replace one of the following: the hard disk drive, memory, or the keyboard.See “Appendix B. Customer Replaceable Units (CRUs)” on page 99 of this guide.My computer is not operating properly.Study the relevant information in Chapter 2.S9-S10 User Guide V1.0_en.book  Page 37  Wednesday, July 23, 2008  5:53 PM
38Chapter 4. TroubleshootingWhere are the recovery discs?Your computer did not come with a recovery disc. For an explanation of the alternative recovery methods offered by Lenovo, see OneKey Rescue System User Guide.How can I contact the Customer Support Center?See “Chapter 5. Getting Help and Service” on page 49 of this Guide. For the phone numbers of the Customer Support Center nearest to you, See “Lenovo Warranty Service Telephone Numbers” on page 97.Where can I find warranty information?For the warranty applicable to your computer, including the warranty period and type of warranty service, see “Appendix A. Lenovo Limited Warranty” on page 86.S9-S10 User Guide V1.0_en.book  Page 38  Wednesday, July 23, 2008  5:53 PM
Chapter 4. Troubleshooting39Troubleshooting  - - - - - - - - - - - - - - - - - - - - - - - - - - - - - - - - - - - - - - - - - - - - - - - - - - - - - - - - - - - - - - - - - - - - - - - - - - - - If you do not find your problem here, see Chapter 2. The following section only describes problems that might prevent you from accessing the comprehensive information in Chapter 2.Display ProblemsWhen I turn on the computer, nothing appears on the screen.Note:If you are using an external monitor, See “Computer Screen Problems” onpage 43.If a user password is set, enter the correct password and press Enter.If the user password prompt does not appear, the brightness levelmight be set to minimum brightness. Adjust the brightness level bypressing Fn +  .If the screen still remains blank, make sure that: - The battery is installed correctly. - The AC adapter is connected to the computer and the power cord isplugged into a working electrical outlet.- The computer power is on. (Press the power button again forconfirmation.)If these items are properly set, and the screen remains blank, have thecomputer serviced. S9-S10 User Guide V1.0_en.book  Page 39  Wednesday, July 23, 2008  5:53 PM
40Chapter 4. TroubleshootingWhen I turn on the computer, only a white cursor appears on a blankscreen. Restore backed-up files to your Windows environment or the entirecontents of your hard disk to the original factory contents using OneKeyRecovery. If you still see only the cursor on the screen, have the computerserviced.My screen goes blank while the computer is on.Your screen saver or power management may be enabled. Do one of thefollowing to exit from the screen saver or to resume from sleep orhibernation mode:Touch the touch pad.Press any key. Press the power button.S9-S10 User Guide V1.0_en.book  Page 40  Wednesday, July 23, 2008  5:53 PM
Chapter 4. Troubleshooting41A Password ProblemI forgot my password.If you forgot your user password, you must take your computer to aLenovo authorized servicer or a marketing representative to have thepassword canceled. If you forget your supervisor password, Lenovo authorized servicercannot reset your password. You must take your computer to a Lenovoauthorized servicer or a marketing representative to have the systemboard replaced. Proof of purchase is required, and a fee will be chargedfor parts and service.Keyboard ProblemsA number appears when you enter a letter.The numeric lock function is on. To disable it, press Fn + Insert.All or some of the keys on the external numeric keypad do not work.Make sure that the external numeric keypad is correctly connected to thecomputer.S9-S10 User Guide V1.0_en.book  Page 41  Wednesday, July 23, 2008  5:53 PM
42Chapter 4. TroubleshootingSleep or Hibernation ProblemsThe computer enters sleep mode unexpectedly.If the processor overheats, the computer automatically enters sleep modeto allow the computer to cool and to protect the processor and otherinternal components. Check the settings for sleep mode.The computer enters sleep mode (the sleep indicator turns on)immediately after Power-on self-test (POST). Make sure that: The battery is charged.The operating temperature is within the acceptable range. See“Specifications” on page 100.If the battery is charged and the temperature is within range, have thecomputer serviced.The critical low-battery error message appears, and the computerimmediately turns off.The battery power is getting low. Connect the AC adapter to thecomputer, or replace the battery with a fully charged one.The computer does not return from sleep mode and the computerdoes not work. If the computer does not return from sleep mode, it may have enteredhibernation mode automatically because the battery is depleted.S9-S10 User Guide V1.0_en.book  Page 42  Wednesday, July 23, 2008  5:53 PM
Chapter 4. Troubleshooting43If your computer is in sleep mode. Connect the AC adapter to thecomputer; then press any key or the power button.If the sleep indicator is off, your computer is in hibernation mode orpower-off state. Connect the AC adapter to the computer; then pressthe power button to resume operation.If the system still does not return from sleep mode, your system hasstopped responding, and you cannot turn off the computer; reset thecomputer. Unsaved data may be lost. To reset the computer, press andhold the Power button for 4 seconds or more. If the computer is still notreset, remove the AC adapter and the battery.Computer Screen ProblemsThe screen is blank. Do the following:If you are using the AC adapter, or using the battery, and the batterystatus indicator is on (is blue), press Fn +   to make the screenbrighter. If the Power indicator is in blinking blue, press any key or the Powerbutton to resume from the sleep mode. If you still have the problem, do the Solution in the following problem“The screen is unreadable or distorted.”S9-S10 User Guide V1.0_en.book  Page 43  Wednesday, July 23, 2008  5:53 PM
44Chapter 4. TroubleshootingThe screen is unreadable or distorted. Make sure that: The display device driver is installed correctly.The screen resolution and color quality are correctly set. The monitor type is correct.To check these settings, do as follows:1Right-click on the desktop, and select Personalize from the popupmenu. 2Click Display Settings and check whether the screen resolution andcolor quality are correctly set.3Click the Advanced Settings button.4Click the Adapter tab.5Make sure that the correct device driver name is shown in theadapter information window.Note:The device driver name depends on the video chip that has beeninstalled on your computer. 6Click the Properties button. If you are prompted for an administratorpassword or confirmation, enter the password or provideconfirmation. Check the “Device status” box and make sure thedevice is working properly. If not, click the Troubleshoot button.7Click the Monitor tab.8Make sure the information is correct. 9Click the Properties button or the Troubleshoot button.S9-S10 User Guide V1.0_en.book  Page 44  Wednesday, July 23, 2008  5:53 PM
Chapter 4. Troubleshooting45Incorrect characters appear on the screen.Did you install the operating system or application program correctly? Ifthey are installed and configured correctly, have the computer serviced.Missing, discolored, or bright dots appear on the screen every timeyou turn on your computer.This is an intrinsic characteristic of the TFT technology. Your computer’sdisplay contains multiple thin-film transistors (TFTs). A small number ofmissing, discolored, or bright dots on the screen might exist all the time. A message, “Unable to create overlay window,” appears when youtry to start DVD playback.-or-You get poor or no playback while running video playback, DVDplayback, or game applications.Do either of the following: If you are using 32-bit color mode, change the color depth to 16-bitmode. If you are using a desktop size of 1024×768 or larger, reduce thedesktop size and the color depth.S9-S10 User Guide V1.0_en.book  Page 45  Wednesday, July 23, 2008  5:53 PM
46Chapter 4. TroubleshootingSound ProblemsNo sound can be heard from the speaker even when the volume isturned up.Make sure that:The Mute function is off.The headphone jack is not used.Speakers is selected as a playback device.Battery ProblemsThe battery cannot be fully charged by the power-off method in thestandard charge time for your computer. For details, See “Checking Battery Status” in Chapter 2. Your computer shuts down before the battery status indicator showsempty.-or-Your computer operates after the battery status indicator showsempty.Discharge and recharge the battery.The operating time for a fully charged battery is short. For details, See “Handling the Battery” in Chapter 2. S9-S10 User Guide V1.0_en.book  Page 46  Wednesday, July 23, 2008  5:53 PM
Chapter 4. Troubleshooting47The computer does not operate with a fully charged battery.The surge protector in the battery might be active. Turn off the computerfor one minute to reset the protector; then turn on the computer again.The battery does not charge.For details, See “Handling the Battery” in Chapter 2.A Hard Disk Drive ProblemThe hard disk drive does not work.In the Boot menu in BIOS Setup Utility, make sure that the hard diskdrive is included in the Boot Order correctly.A Startup ProblemThe Microsoft® Windows operating system does not start.Use the OneKey Recovery to help solve or identify your problem. For detailsabout OneKey Recovery, see OneKey Rescue System User Guide.Other ProblemsYour computer does not respond.To turn off your computer, press and hold the power button for 4seconds or more. If the computer still does not respond, remove theAC adapter and the battery. S9-S10 User Guide V1.0_en.book  Page 47  Wednesday, July 23, 2008  5:53 PM
48Chapter 4. TroubleshootingYour computer might lock when it enters sleep mode during acommunication operation. Disable the sleep timer when you areworking on the network.The computer does not start from a device you want. See the Boot menu of the BIOS Setup Utility. Make sure that the startupsequence in the BIOS Setup Utility is set so that the computer starts fromthe device you want. Also make sure that the device from which the computer starts isenabled. In the Boot menu in the BIOS Setup Utility, make sure that thedevice is included in the “Boot Order” list.S9-S10 User Guide V1.0_en.book  Page 48  Wednesday, July 23, 2008  5:53 PM
49Chapter 5. Getting Help and ServiceGetting Help and Service  - - - - - - - - - - - - - - - - - - - - - - - - - - - - - - - - - - - - - - - - - - - - - - - - - - - - - - - - - If you need help, service, technical assistance, or just want moreinformation about Lenovo computers, you will find a wide variety ofsources available from Lenovo to assist you. This section containsinformation about where to go for additional information about Lenovocomputers, what to do if you experience a problem with your computer,and whom to call for service should it be necessary.Microsoft Service Packs are the latest software source for Windows productupdates. They are available by means of a Web download (connectioncharges may apply) or from a disc. For more specific information and links,go to the Microsoft Web site at http://www.microsoft.com. Lenovo offersUp and Running technical assistance with installation of, or questionsrelated to, Service Packs for your Lenovo-preinstalled Microsoft Windowsproduct.S9-S10 User Guide V1.0_en.book  Page 49  Wednesday, July 23, 2008  5:53 PM
50Chapter 5. Getting Help and ServiceGetting Help on the Web  - - - - - - - - - - - - - - - - - - - - - - - - - - - - - - - - - - - - - - - - - - - - - - - - - - - - - - - - - - The Lenovo Web site on the World Wide Web has up-to-date informationabout Lenovo computers and support. The address for the Lenovo homepage is http://consumersupport.lenovo.com.You can find support information for your Lenovo IdeaPadTM computer at http://consumersupport.lenovo.com. Research this Web site to learn howto solve problems, find new ways to use your computer, and learn aboutoptions that can make working with your Lenovo computer even easier.Calling the Customer Support Center  - - - - - - - - - - - - - - - - - - - - - - - - - - - - - If you have tried to correct the problem yourself and still need help, duringthe warranty period, you can get help and information by telephonethrough the Customer Support Center. The following services are availableduring the warranty period:Proble determination - Trained personnel are available to assist you withdetermining if you have a hardware problem and deciding what actionis necessary to fix the problem.Lenovo hardware repair - If the problem is determined to be caused byLenovo hardware under warranty, trained service personnel areavailable to provide the applicable level of service.S9-S10 User Guide V1.0_en.book  Page 50  Wednesday, July 23, 2008  5:53 PM
Chapter 5. Getting Help and Service51Engineering change management - Occasionally, there might be changesthat are required after a product has been sold. Lenovo or your reseller, ifauthorized by Lenovo, will make selected Engineering Changes (ECs)available that apply to your hardware.The following items are not covered:Replacement or use of parts not manufactured for or by Lenovo or nonwarranted partsIdentification of software problem sourcesConfiguration of BIOS as part of an installation or upgradeChanges, modifications, or upgrades to device driversInstallation and maintenance of network operating systems (NOS)Installation and maintenance of application programsTo determine if your Lenovo hardware product is under warranty andwhen the warranty expires, go to http://consumersupport.lenovo.com,and click Warranty, then follow the instructions on the screen.Refer to your Lenovo hardware warranty for a full explanation of Lenovowarranty terms. Be sure to retain your proof of purchase to obtain warrantyservice.If possible, be near your computer when you make your call in case thetechnical assistance representative needs to help you resolve a computerproblem. Please ensure that you have downloaded the most current driversand system updates, and recorded information before you call. Whencalling for technical assistance, please have the following informationavailable:S9-S10 User Guide V1.0_en.book  Page 51  Wednesday, July 23, 2008  5:53 PM
52Chapter 5. Getting Help and ServiceMachine Type and ModelSerial numbers of your computer, monitor, and other components, oryour proof of purchaseDescription of the problemHardware and software configuration information for your systemThe telephone numbers for your Customer Support Center location arelocated in “Appendix A. Lenovo Limited Warranty” on page 86.Note:Telephone numbers are subject to change without notice. For the latest listof Customer Support Center telephone numbers and hours of operation,visit the Support Web site at http://consumersupport.lenovo.com. If the number for your country orregion is not listed, contact your Lenovo reseller or Lenovo marketingrepresentative.S9-S10 User Guide V1.0_en.book  Page 52  Wednesday, July 23, 2008  5:53 PM
Chapter 5. Getting Help and Service53Getting Help around the World - - - - - - - - - - - - - - - - - - - - - - - - - - - - - - - - - - - - - - - - - - - - - If you travel with your computer or relocate it to a country where yourLenovo machine type is sold, your computer might be eligible forInternational Warranty Service, which automatically entitles you to obtainwarranty service throughout the warranty period. Service will beperformed by service providers authorized to perform warranty service.Service methods and procedures vary by country, and some services mightnot be available in all countries. Service centers in certain countries mightnot be able to service all models of a particular machine type. In somecountries, fees and restrictions might apply at the time of service.To determine whether your computer is eligible for International WarrantyService and to view a list of the countries where service is available, go to http://consumersupport.lenovo.com, click Warranty, and follow theinstructions on the screen.S9-S10 User Guide V1.0_en.book  Page 53  Wednesday, July 23, 2008  5:53 PM
54Chapter 6. Safety, Use, and Care InformationImportant Safety Information  - - - - - - - - - - - - - - - - - - - - - - - - - - - - - - - - - - - - - - - - This information can help you safely use your notebook personal computer. Follow and retain all information included with your computer. The information in this document does not alter the terms of your purchase agreement or the Lenovo Limited Warranty. For more information, See “Appendix A. Lenovo Limited Warranty” on page 86.Customer safety is important. Our products are developed to be safe and effective. However, personal computers are electronic devices. Power cords, power adapters, and other features can create potential safety risks that can result in physical injury or property damage, especially if misused. To reduce these risks, follow the instructions included with your product, observe all warnings on the product and in the operating instructions, and review the information included in this document carefully. By carefully following the information contained in this document and provided with your product, you can help protect yourself from hazards and create a safer computer work environment.Note:This information includes references to power adapters and batteries. In addition to notebook computers, some products (such as speakers and monitors) ship with external power adapters. If you have such a product, this information applies to your product. In addition, computer products contain a coin-sized internal battery that provides power to the system clock even when the computer is unplugged, so the battery safety information applies to all computer products.S9-S10 User Guide V1.0_en.book  Page 54  Wednesday, July 23, 2008  5:53 PM
Chapter 6. Safety, Use, and Care Information55Conditions That Require Immediate ActionProducts can become damaged due to misuse or neglect. Some productdamage is serious enough that the product should not be used again until ithas been inspected and, if necessary, repaired by an authorized servicer.As with any electronic device, pay close attention to the product when it isturned on. On very rare occasions, you might notice an odor or see a puff ofsmoke or sparks vent from your product. Or you might hear sounds likepopping, cracking, or hissing. These conditions might merely mean that aninternal electronic component has failed in a safe and controlled manner.Or, they might indicate a potential safety issue. However, do not take risksor attempt to diagnose the situation yourself. Contact the CustomerSupport Center for further guidance. For a list of Service and Supportphone numbers, see http://consumersupport.lenovo.com.Frequently inspect your computer and its components for damage or wearor signs of danger. If you have any question about the condition of acomponent, do not use the product. Contact the Customer Support Centeror the product manufacturer for instructions on how to inspect the productand have it repaired, if necessary.In the unlikely event that you notice any of the following conditions, or ifyou have any safety concerns with your product, stop using the productand unplug it from the power source and telecommunication lines untilyou can speak to the Customer Support Center for further guidance.Power cords, plugs, power adapters, extension cords, surge protectors,or power supplies that are cracked, broken, or damaged.Signs of overheating, smoke, sparks, or fire.S9-S10 User Guide V1.0_en.book  Page 55  Wednesday, July 23, 2008  5:53 PM
56Chapter 6. Safety, Use, and Care InformationDamage to a battery (such as cracks, dents, or creases), discharge from abattery, or a buildup of foreign substances on the battery.A cracking, hissing, or popping sound, or strong odor that comes fromthe product.Signs that liquid has been spilled or an object has fallen onto thecomputer product, the power cord, or power adapter.The computer product, power cord, or power adapter has been exposedto water.The product has been dropped or damaged in any way.The product does not operate normally when you follow the operatinginstructions.Note:If you notice these conditions with a product (such as an extensioncord) that is not manufactured for or by Lenovo, stop using thatproduct until you can contact the product manufacturer for furtherinstructions, or until you get a suitable replacement.Safety GuidelinesAlways observe the following precautions to reduce the risk of injuryand property damage.S9-S10 User Guide V1.0_en.book  Page 56  Wednesday, July 23, 2008  5:53 PM
Chapter 6. Safety, Use, and Care Information57Service and UpgradesAttention: Do not attempt to service a product yourself unless instructed to do soby the Customer Support Center or your documentation. Only use aservice provider who is approved to repair your particular product.Note:Some computer parts can be upgraded or replaced by the customer.Upgrades typically are referred to as options. Replacement partsapproved for customer installation are referred to as CustomerReplaceable Units, or CRUs. Lenovo provides documentation withinstructions when it is appropriate for customers to install options orreplace CRUs. You must closely follow all instructions when installingor replacing parts. The Off state of a power indicator does notnecessarily mean that voltage levels inside a product are zero. Beforeyou remove the covers from a product equipped with an ac powercord, always make sure that the power is turned off and that theproduct is unplugged from any power source. For more informationon CRUs, See “Appendix B. Customer Replaceable Units (CRUs)” onpage 99. If you have any questions or concerns, contact the CustomerSupport Center.Although there are no moving parts in your computer after the powercord has been disconnected, the following warnings are required foryour safety.S9-S10 User Guide V1.0_en.book  Page 57  Wednesday, July 23, 2008  5:53 PM

Navigation menu