RM Acquisition 01003A GPS navigation User Manual DES 1496 TND 765 User Manual 0106 061915 JS indd
RM Acquisition LLC GPS navigation DES 1496 TND 765 User Manual 0106 061915 JS indd
Contents
user manual part2
Table of Contents
Device Overview......................................................................................2
Getting Started .......................................................................................3
Registration ..........................................................................................3
Log On ................................................................................................4
Warning Screen ....................................................................................5
On-screen Keyboard ..............................................................................6
Status Bar ............................................................................................7
Screen Calibration ................................................................................8
Home Menu ....................................................................................9
Home Menu Safe-driving Screen .........................................................10
Mail...............................................................................................11
Inbox ..................................................................................................12
Attachments and Destinations .............................................................13
Open Message ...................................................................................14
Outbox ...............................................................................................15
Send Messages ...................................................................................16
Options ..............................................................................................17
Mail Safe-driving Screen .....................................................................17
IntelliRoute® ................................................................................18
Main Menu ........................................................................................18
Truck Info ...........................................................................................19
Warnings ...........................................................................................19
General and Route Preferences ..........................................................20
Map Preferences ................................................................................21
Timers ................................................................................................22
Trails ............................................................................................ 23-24
Route to Destination .................................................................... 25-26
POIs ...................................................................................................27
Hours of Service ...........................................................................28
Summary ...................................................................................... 29-31
Duty Status .........................................................................................32
HOS Safe-driving Screen .....................................................................33
Logs ...................................................................................................34
Options ..............................................................................................35
Company ............................................................................................36
Graph Sub-tab ....................................................................................37
List Sub-tab ........................................................................................38
Summary Sub-tab ...............................................................................39
Trip Info Sub-tab .................................................................................40
Anomalies Sub-tab .............................................................................41
HOS: A Day in the Life of a Driver .................................................. 42-51
SysInfo .......................................................................................... 52
Settings .............................................................................................53
Programs and Diagnostics ...................................................................54
SysInfo Safe-driving Screen .................................................................55
Stats .............................................................................................56
Driver Performance ............................................................................57
Fault Codes .......................................................................................58
Troubleshooting .....................................................................................59
Connect Web Portal ...............................................................................60
IntelliRoute®
SysInfo
Stats
Hours of Service
2
TND
™
765 Fleet Edition User Manual
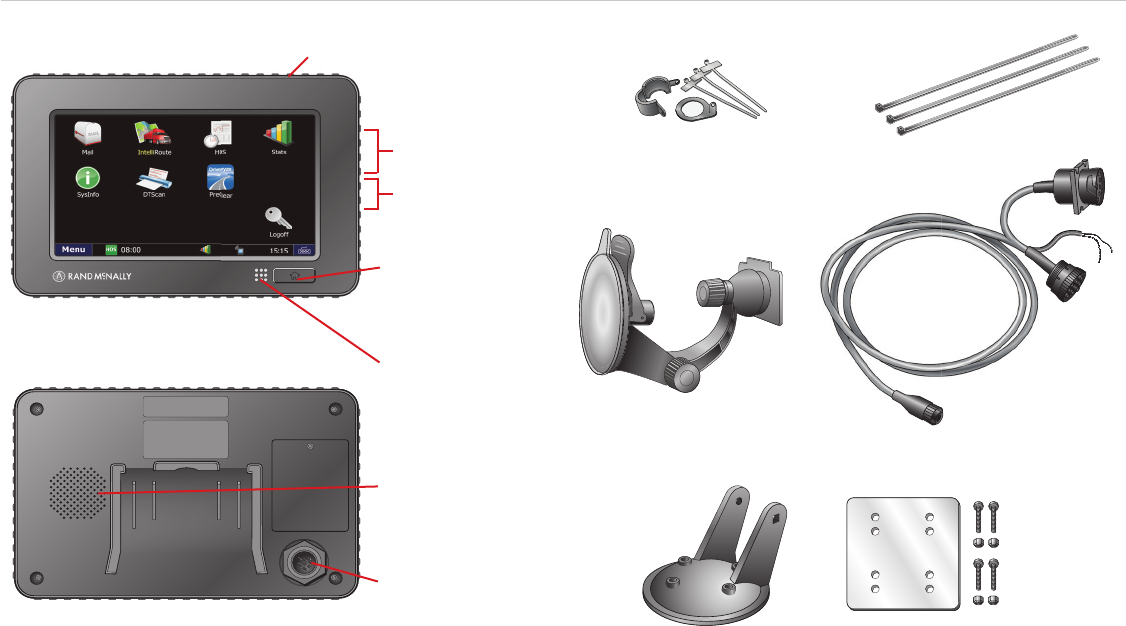
Device Overview
Front Display
Back of Device
Power Button
Type A 2.0
Mini USB*
*The USB port is used for data transmission only.
Home Button
Press to return to
Home Menu screen.
LED Light
Lights up when unit is
powered on.
Speaker
Power and
OBD Access
Cable Ties
Suction Cup Mount
Optional Screw Mount with Backing Plate
Locking Collar Kit
9-Pin Power Cable
3
TND
™
765 Fleet Edition User Manual
Getting Started
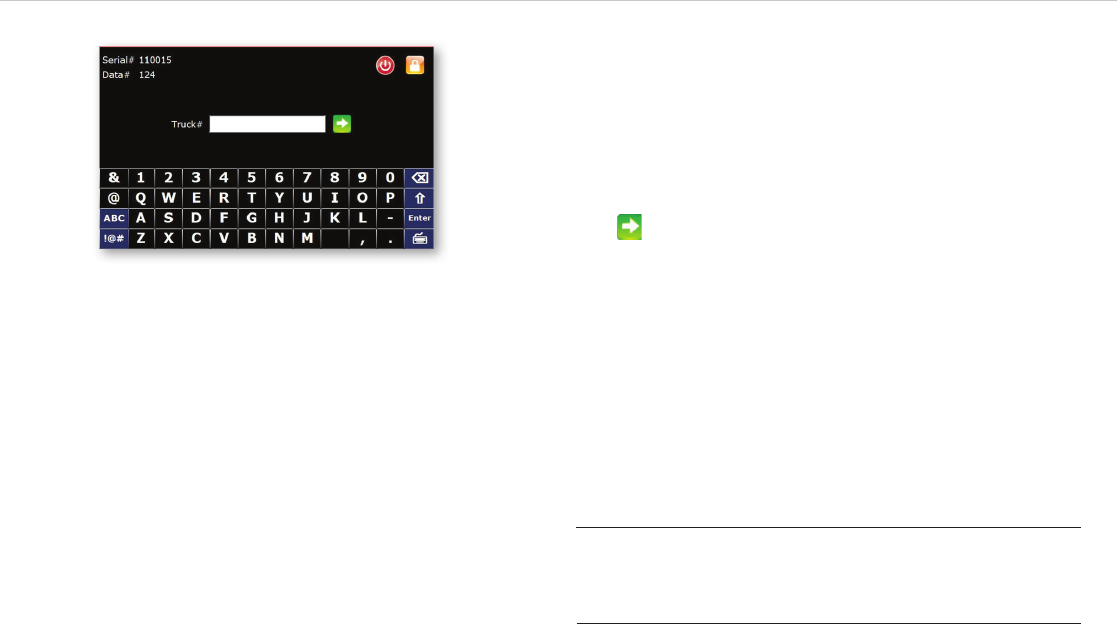
Device Registration Instructions
Once the unit has been activated and installed, please power the unit on.
The Registration screen will display (this process may take a few minutes).
Your
Data #
and
Serial #
will be pre-populated on the screen. At this
time, you will be asked to enter a
Truck #.
This is the unique identifi cation
number for the vehicle in which your TNDTM 765 is installed, and it can be
whatever number you want to assign. Once you’ve entered the Truck#,
press .
If your Data # shows up as “0” and you are unable to submit your Truck #,
either the device has not been activated properly or it has not yet connected
to the cellular network. If this occurs, please call 1-800-641-RAND (7263)
for assistance.
NOTE: Please write down your
Data #
and
Truck
#
in the spaces provided below for future reference.
Data # (pre-populated on your device):
Truck # (number of your choosing using only letters and
numbers, no dashes or spaces, and up to 12 characters):
4
TND
™
765 Fleet Edition User Manual
Getting Started
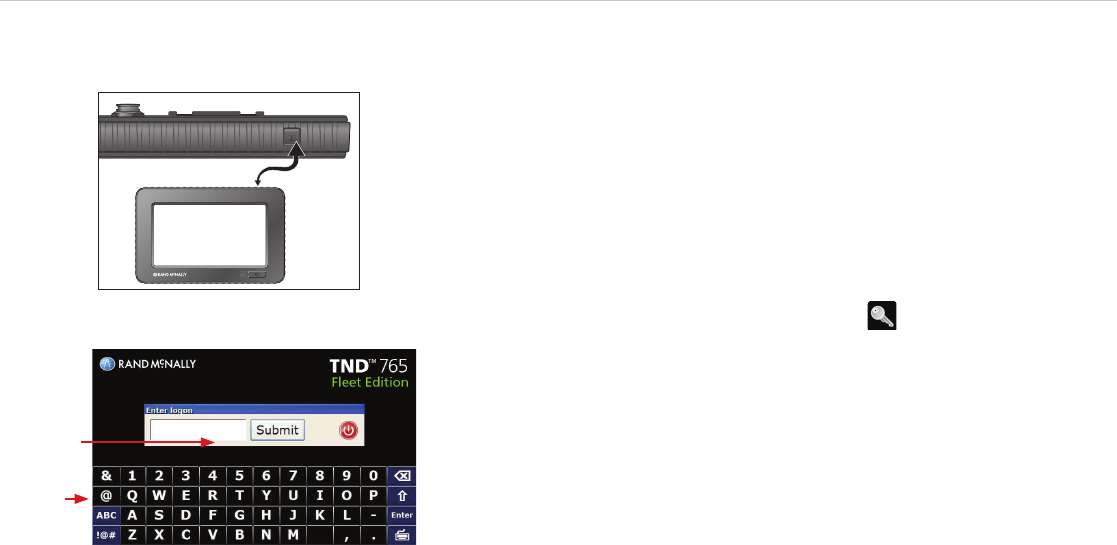
TND™ 765 Log On Screen
Power On
Press the Power button on the top right of the device.
Log On
The start-up screen displays a log on pop-up (a) and the on-screen
keyboard (b).
• Enter your
Driver ID
.
NOTE: To log off, select the Logoff icon on the Home Menu.
TND™ 765 Power Button
(a)
(b)

5
TND
™
765 Fleet Edition User Manual
Getting Started
Warning Screen
The Warning Screen reminds you that using the device while
driving can be distracting.
Be cautious.
• Tap Continue to complete the logon.
Communication Status
You must have a cellular or Wi-Fi connection to log on
for the first time.
• Locate the communication icon on the status bar. Icons and
their definitions are shown in the table to the left.
• Tap the keyboard button in the bottom right corner of the
keyboard if you cannot view the status bar.
NOTE: If you have a signal but still see errors (such as Invalid
Logon), contact Rand McNally Customer Support.
Warning Screen
Icon Definition
Wi-Fi
Cell

6
TND
™
765 Fleet Edition User Manual
Getting Started
On-screen Keyboard
To use the keyboard:
• Tap the keyboard button (e) on the
TND™ 765 status bar to display the keyboard.
• Tap the ABC or !@# buttons (a) to view alphanumeric characters and
symbols respectively. The arrow button (c) on the right and the ABC
screen on the left allow you to change between upper and
lower-case letters.
• Tap the Delete button (b) to erase a character.
• Tap the space bar button to insert a space (f).
• Tap
Enter (d) to type on the next line.
• Tap the keyboard button (e) again to
hide the keyboard.
On-screen Keyboard
(f)
7
TND
™
765 Fleet Edition User Manual
Getting Started
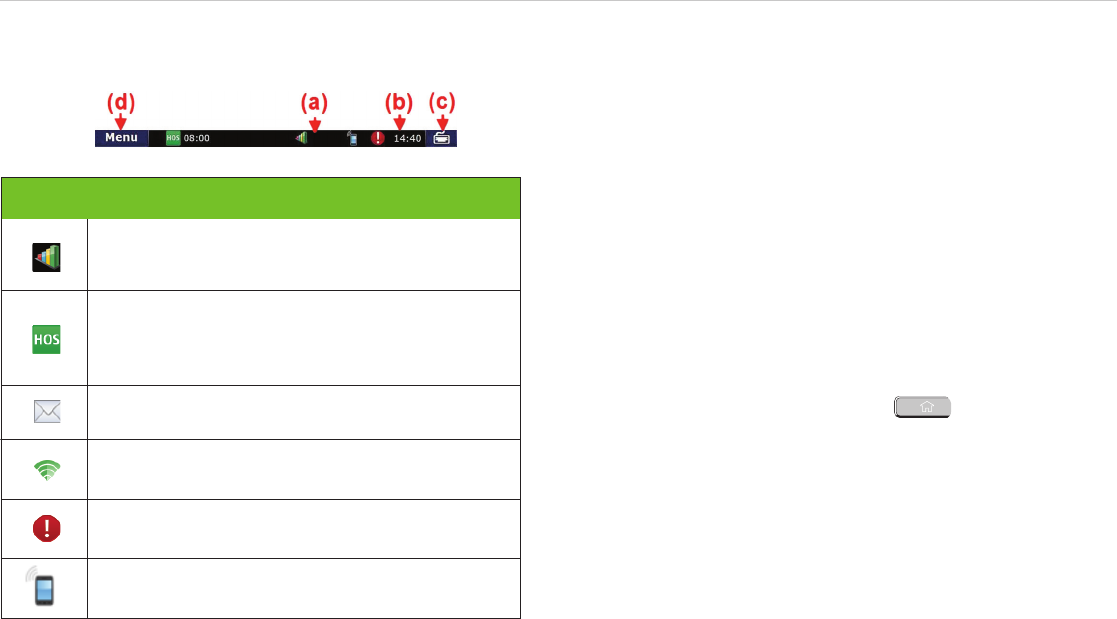
Status Bar
The status bar remains visible at the bottom of every screen and gives you
access to current information about the TND™ 765.
Any status or alert icons are found on the status bar (a). Icons and their
defi nitions are shown in the table to the left.
The status bar also allows you to:
• Check your terminal time (b).
• Pull up the on-screen keyboard (c).
• Return to the Home Menu (d).
NOTE: You can also tap the Home button on the
unit to return to the Home Menu.
Driver Peformance. Balloon messages appear over the icon to
help you manage your performance. Messages are related to metrics
such as over idling and speeding.
HOS. The icon changes color according to your HOS status. The
icon is green when you are within acceptable limits for each HOS
status. The icon changes to yellow when you are nearing violation
status and to red when you are in violation.
Mail. The icon appears on the status bar when you
have unopened mail.
Communications. The icon shows your communication status
(Wi-Fi, Cellular, No communication).
System message. System alerts appear in balloon messages
over the icon.
Cell. The icon indicates the connection status of the cellular modem
on the device.
Icon Definition
Status Bar
8
TND
™
765 Fleet Edition User Manual
Getting Started
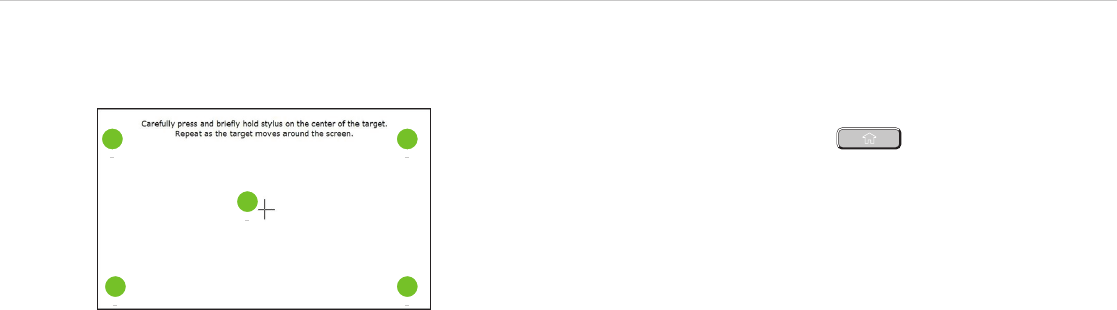
Calibrate Screen Screen Calibration
To calibrate your screen:
• Press and hold the Home button for 5 seconds.
Calibration starts once button is released.
• Tap the center of the crosshairs as they appear on the calibration screen.
There are five total.
-
Tap as close to the center of the crosshairs symbol (+) as possible.
- Use the same pressure you normally use when tapping the screen.
- If you receive an error, try again.
NOTE:
Do NOT press and hold finger on the center of the crosshairs.
Just tap.
1
2
3 4
5
9
TND
™
765 Fleet Edition User Manual
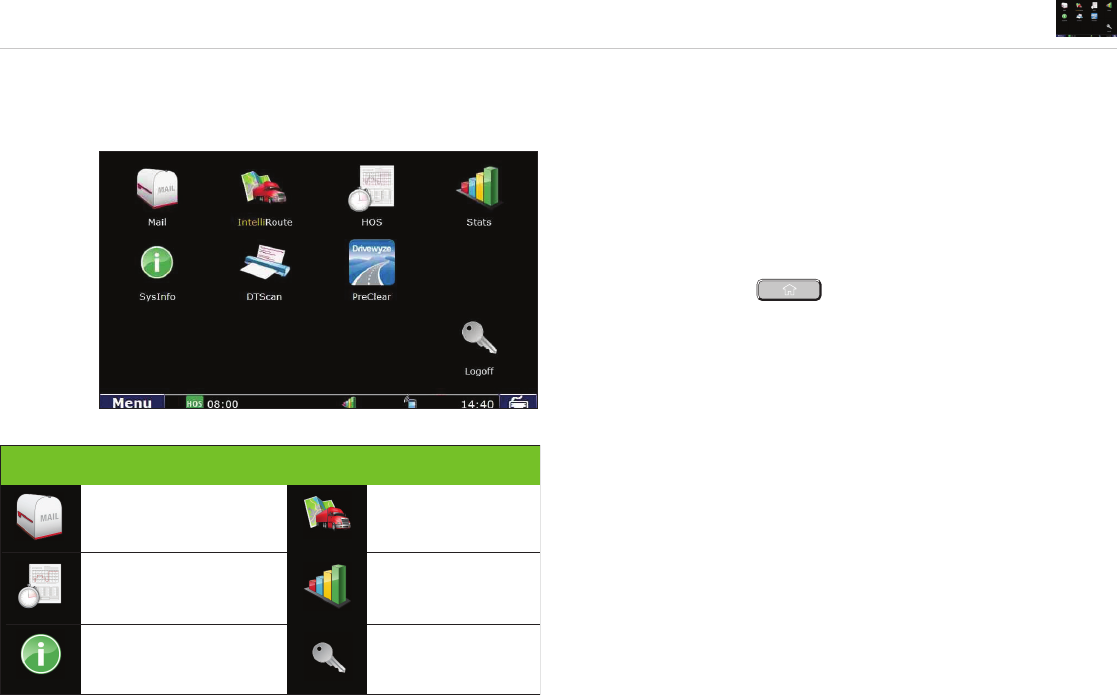
Home Menu
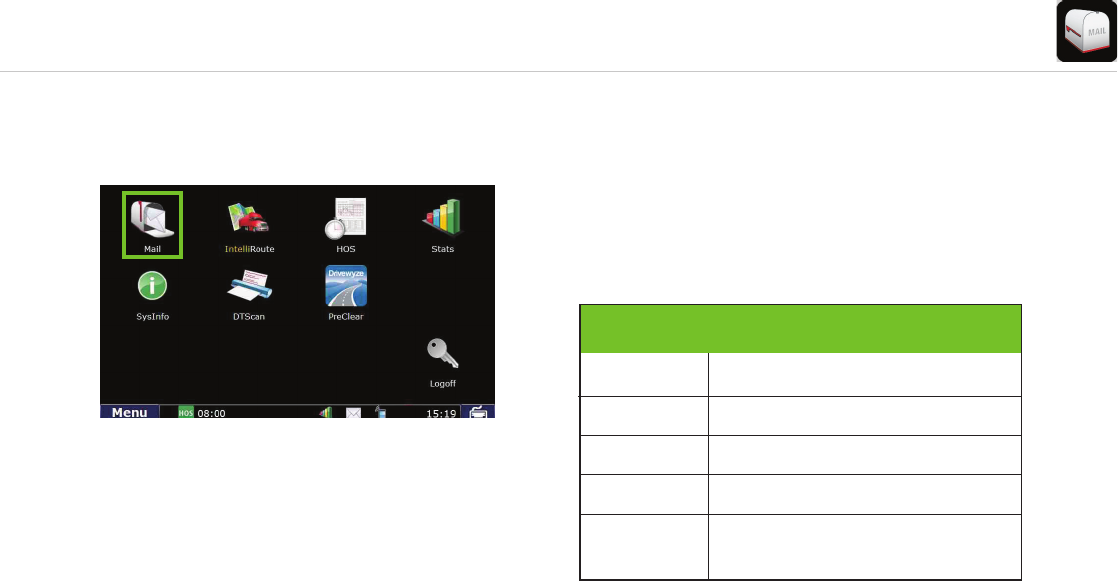
Home Menu
The Home Menu is the home screen of the TND™ 765.
The applications available to you on the TND™ 765 are
identifi ed by icons.
The icons on the Home Menu are explained in the table to the left.
• Press the Home button to return to the Home Menu screen.
Home Menu Screen
Icon Function Icon Function
View, listen and
respond to messages.
Pinpoint location
and find routes.
Manage settings, tasks
and communication.
Review, create and
send logs.
View driver
perfomance stats.
Log off the TND TM 760.
10
TND
™
765 Fleet Edition User Manual
Home Menu
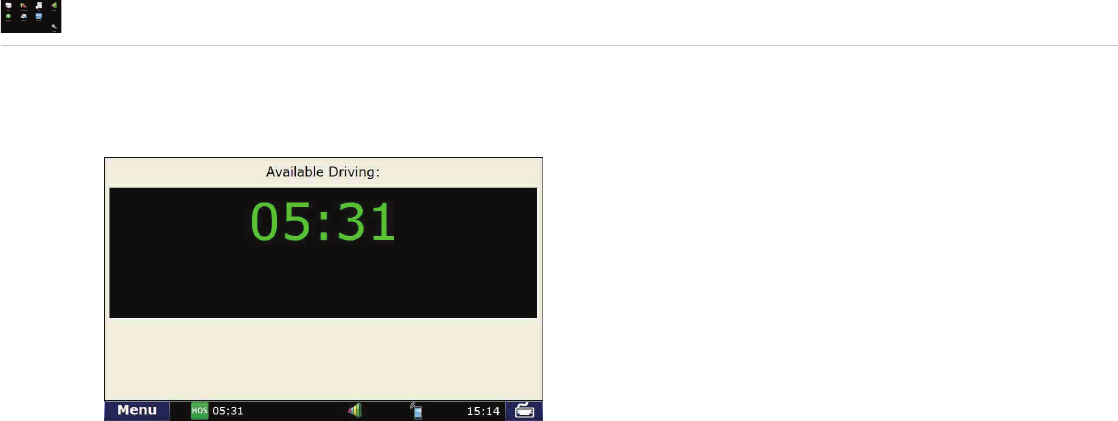
Home Menu Safe-driving Screen Home Menu Safe-driving Screen
Menu options are limited while you are driving. When your
truck is moving, the home menu safe-driving screen displays.
NOTE: Functionality within the Mail, HOS and SysInfo
applications is simplified while you are driving.
11
TND
™
765 Fleet Edition User Manual
Mail
Mail Icon on Home Menu Mail
Select the Mail icon on the Home Menu to access messages and
send emails.
Mail opens to the
Inbox
tab.
Inbox Holds incoming messages.
Outbox Holds outgoing messages.
Send Allows you to send messages.
Work Helps you process assignments.
Options Displays your e-mail address and allows you
to manage your e-mail contacts.
Tab Function
12
TND
™
765 Fleet Edition User Manual
Mail
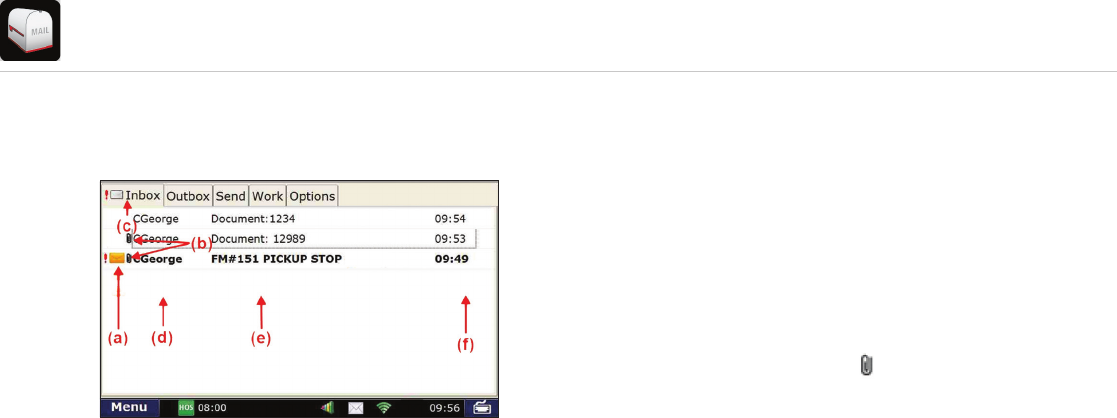
Inbox Tab Inbox
All incoming messages appear in your Inbox. Special features
of the Inbox tell you details about your messages.
Status information is clustered together (a), (b) and (c).
• (a). A blank space in this column means the message
has been opened. An envelope means it has not been opened.
• (b). A red exclamation point ( ! ) icon means the
message is important. A paperclip ( ) icon means the message
has an attachment.
• (c).
When you are working in another Mail tab, an
envelope icon appears on the tab indicating that you have
an unopened message.
Other columns in the Inbox tell you more about your messages (d),
(e) and (f).
• (d). This column tells you who sent the message.
• (e). This column tells you the subject of the message.
• (f). This column tells you when the message arrived.
-The time displays for messages that arrived on the current day
(based on your terminal time).
-The date displays for messages that arrived on previous days.
13
TND
™
765 Fleet Edition User Manual
Mail
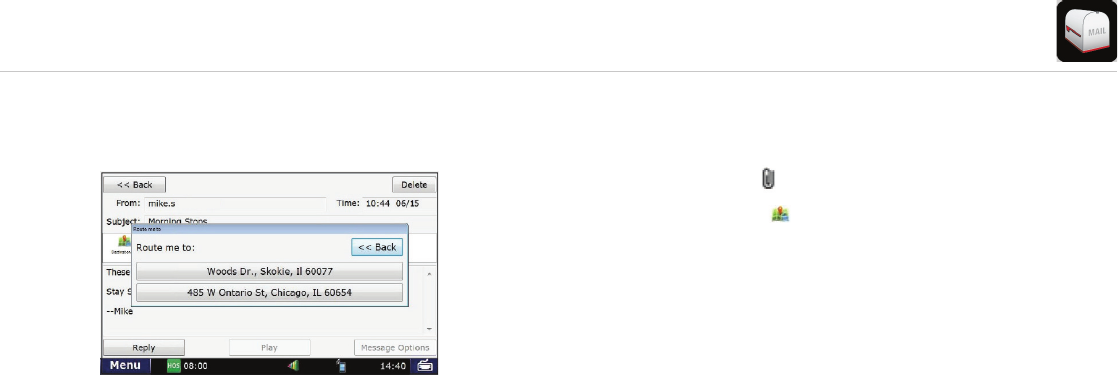
Attachments and Destinations
Click on the paper clip icon ( ) to view an attached document.
Click on the destination icon () to open a destination. A pop-up window will
appear. If there is more than one destination, click the fi rst one you want to
route to. The IntelliRoute® navigation application will then automatically open,
enabling you to begin your route.
Your Inbox holds 100 messages. When more messages arrive,
the oldest messages in your Inbox are automatically deleted.
Attachments and Destinations
14
TND
™
765 Fleet Edition User Manual
Mail
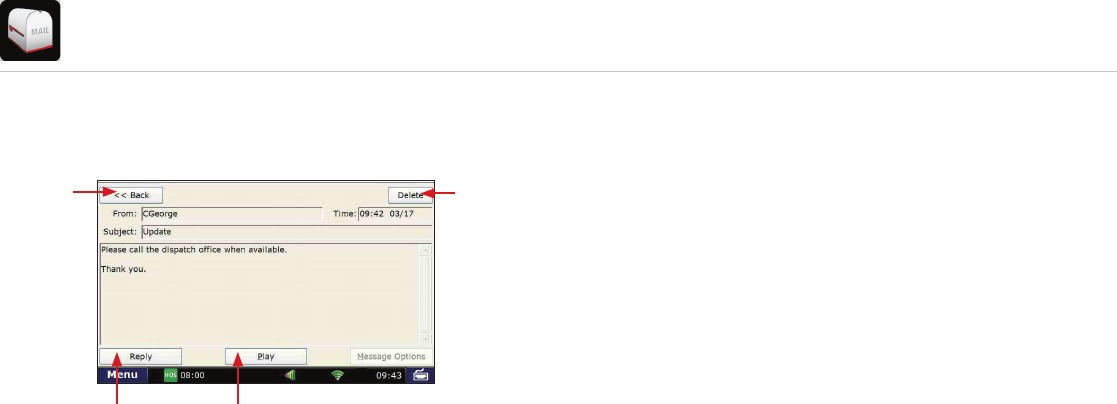
Open Message Screen Open Message
Select a message to open it.
Four action buttons are available once a message is open.
• (a). Back returns you to the Inbox.
• (b). Play lets you listen to the message.
• (c). Reply lets you send a response to the message.
• (d). Delete lets you delete the open message.
Your Inbox holds 100 messages. When more messages arrive,
the oldest messages in your Inbox are automatically deleted.
Personal Email Access
• If your driver settings are confi gured to enable personal
email access, you can save up to 25 personal email addresses
to communicate with while on the road.
• Personal emails are color-coded blue in your Inbox so you can identify
them quickly. The color coding remains after the email is read.
• You can view your assigned email address by selecting the Options
tab on the Mail screen and tapping the View Email Address button.
(a)
(c) (b)
(d)
15
TND
™
765 Fleet Edition User Manual
Mail
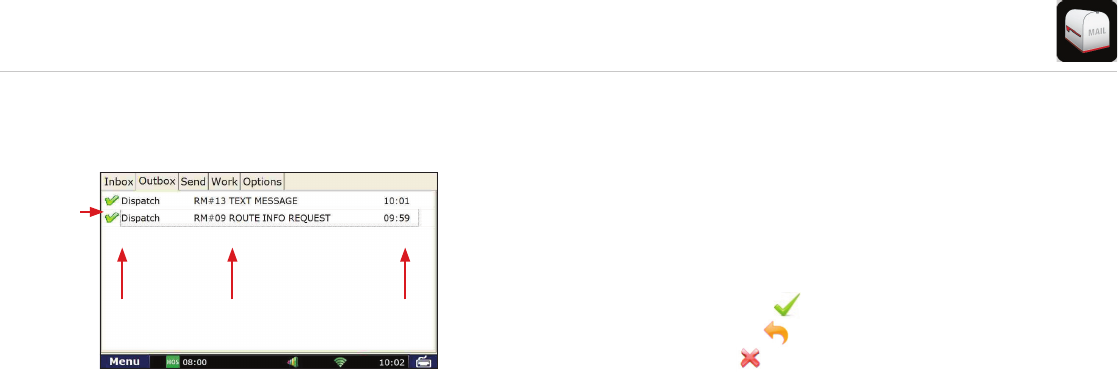
Outbox
All outgoing messages appear in your Outbox. Special features of
the Outbox tell you details about your messages.
Your Outbox holds 50 messages. When you have sent more than
that, the oldest messages in your Outbox are automatically deleted.
• (a). A green check mark ( ) icon means the message has been
sent. An orange arrow ( ) icon means the message is waiting
to be sent. A red X ( ) icon means the message has not yet
been sent.
Other columns in the Outbox tell you more about your messages
(b), (c) and (d).
• (b). This column tells you who received the message.
• (c). This column tells you the subject of the message.
• (d). This column tells you when the message arrived.
-The time displays messages that were sent on the current day
(based on your terminal time).
-The date displays for messages that arrived on previous days.
Outbox Tab
(b) (c) (d)
(a)
16
TND
™
765 Fleet Edition User Manual
Mail
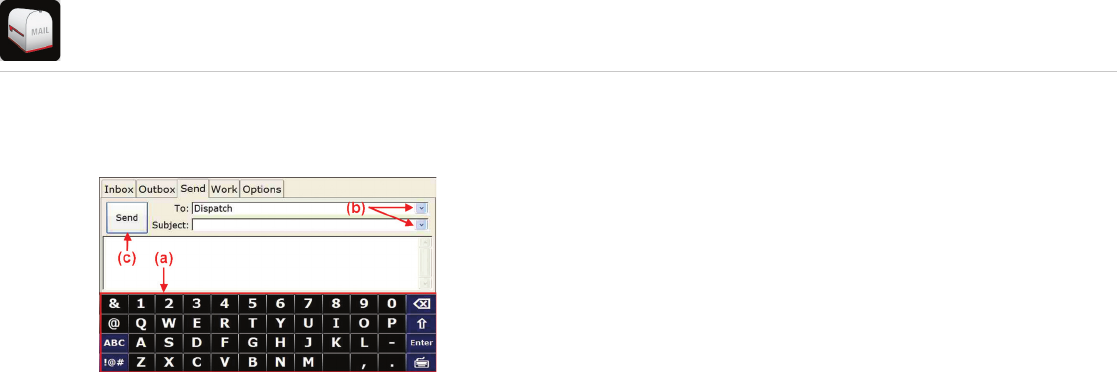
Send Tab Send Messages
You can send messages from the Send tab.
The on-screen keyboard (a) appears automatically when you select
the Send tab.
Drop-down boxes (b) make it easy for you to complete the To and
Subject fi elds.
• The To fi eld automatically selects Dispatch. The drop-down box
lists other saved contacts.
• You can fi ll in the Subject fi eld by using either the drop-down
list (if you want to send a form) or the on-screen keyboard
(if you want to send a message). If you choose a form from the
drop-down list, the screen displays the form in the message
fi eld (the body of the screen).
When you are done, tap Send (c).

17
TND
™
765 Fleet Edition User Manual
Mail
Options Tab Options
The
Options
tab has two buttons.
• Manage Contacts (a). This button lets you add contacts
(for
the list that displays in the To drop-down box on your Send
message screen)
, request your contact list when you enter a
new truck, and make changes to your contact list.
• View Email Address (b). This button
lets you review your TND™ 765 email address.
Mail Safe-driving Screen
When you select the Mail icon while vehicle is in motion, the mail
safe-driving screen will appear. With the mail safe-driving screen,
you can hear a message rather than read it.
• To hear a message, simply tap it to highlight it.
• To stop the message from playing, tap Cancel Playback on the
screen.
Mail Safe-driving Screen
(a) (b)
18
TND
™
765 Fleet Edition User Manual
IntelliRoute®
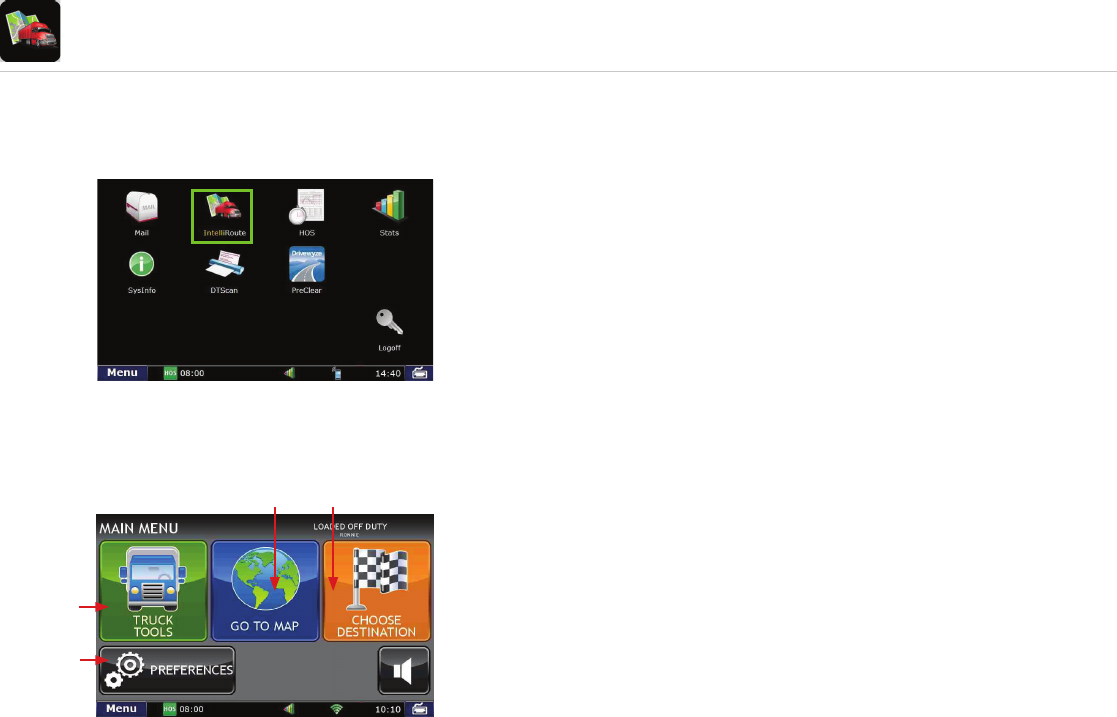
IntelliRoute® Icon on Home Menu IntelliRoute®
Select the IntelliRoute
®
icon on the Home Menu to access the
truck-specifi c routing application. IntelliRoute
®
will route you around
low bridges and truck-restricted roads, and help you fi nd
driver-specifi c Points of Interest (POIs).
Main Menu
(a.) Enter truck information and access truck-specifi c use tools.
(b.) Show location on the map and view navigation instructions.
(c.) Choose a destination.
(d.) Select general, route and map preferences.
IntelliRoute® Screen
(a)
(d)
(b) (c)
19
TND
™
765 Fleet Edition User Manual
IntelliRoute®
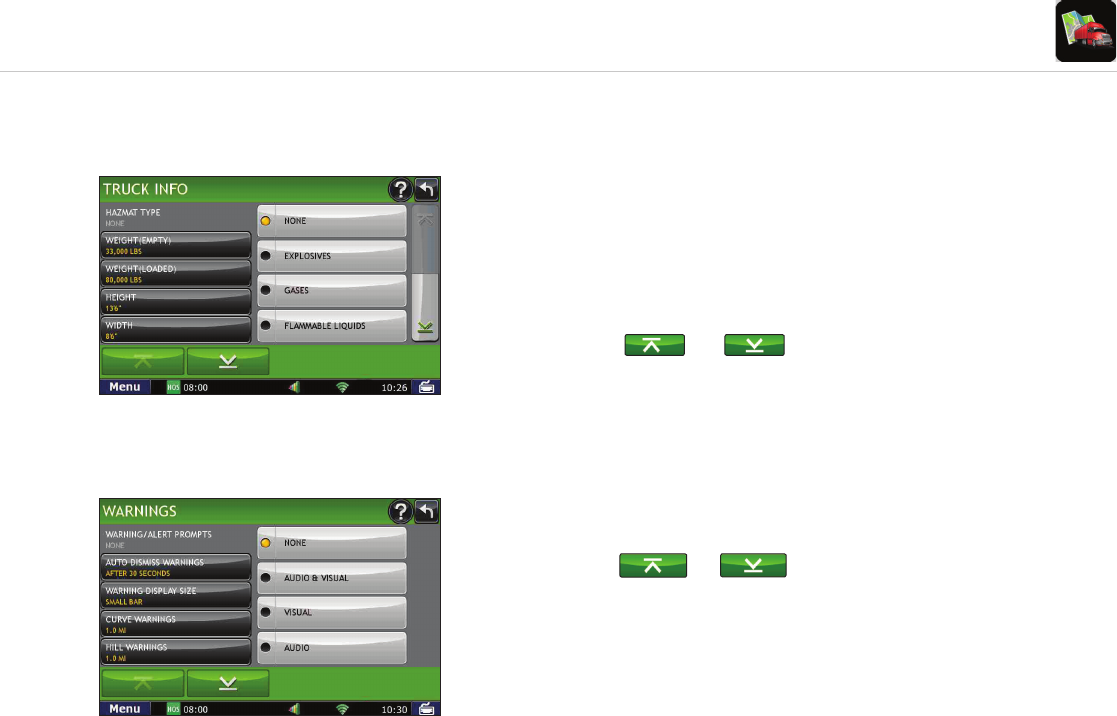
Truck Info Screen
Warnings Screen
Enter Truck Information
1. Tap Truck Tools > Truck Info.
2. Tap and to view all options.
3. Tap to select the options to be changed.
4. Enter new truck information settings.
5. Tap Back to save changes.
Note: Fleets can choose to confi gure Truck Info so that the information
can only be entered and edited by fl eet managers. If the icons on your
Truck Info screen appear grayed out, this means your fl eet has confi gured
the setting this way.
Set Warnings
1. Tap Truck Tools > Warnings.
2. Tap and to view all warning options.
3. Tap the option button to be changed.
4. Enter the new settings for the option.
5. Tap Back to save changes.
20
TND
™
765 Fleet Edition User Manual
IntelliRoute®
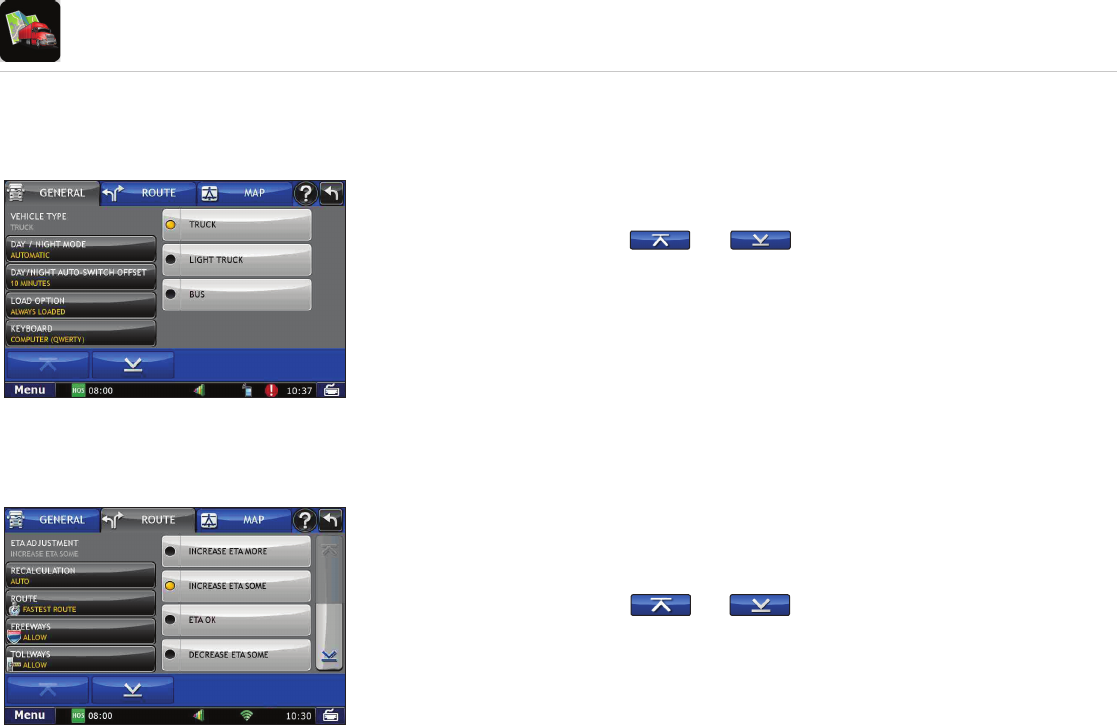
Set General Preferences
1. Tap Preferences.
2. Tap the General tab.
3. Tap and to view general device options.
4. Tap the option button to be changed.
5. Enter the new settings for the option.
6. Tap Back to save changes.
Set Route Preferences
1. Tap Preferences.
2. Tap the Route tab.
3. Tap and to view route options.
4. Tap the option button to be changed.
5. Enter the new settings for the option.
6. Tap Back to save changes.
Route Preferences Tab
General Preferences Tab
21
TND
™
765 Fleet Edition User Manual
IntelliRoute®
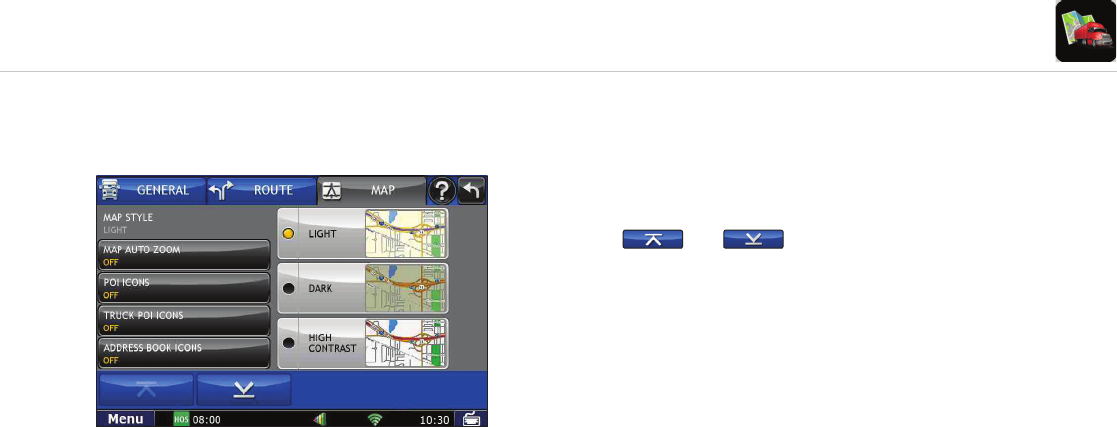
Set Map Preferences
1. Tap Preferences.
2. Tap the Map tab.
3. Tap and to view mapping options.
4. Tap the option button to be changed.
5. Enter the new settings for the option.
6. Tap Back to save changes.
Map Preferences Tab
22
TND
™
765 Fleet Edition User Manual
IntelliRoute®
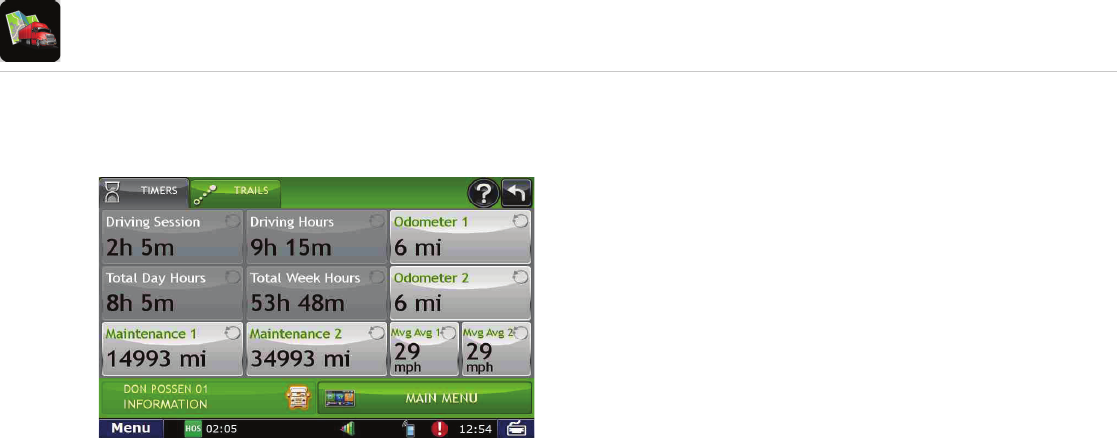
Timers
1. Tap Truck Tools.
2. Tap Timers, Trails.
3. Tap the Timers tab.
On the left, use the Change To fi eld to make adjustments to mileage or
hours. The mileage/hours continue to count down from the changed value.
1. Tap – to decrease the setting.
2. Tap + to increase the setting.
3. Tap the calculator to display a keyboard. Enter a number and tap Enter.
4. Tap Change.
On the right, use the Reset To fi eld to set the most common reset value,
normally zero. At the beginning of each day or run, tap Reset to set the
value back to zero for odometers and 15,000 or 35,000 for maintenance
odometers.
1. Tap – to decrease the setting.
2. Tap + to increase the setting.
3. Tap the calculator to display a keyboard. Enter a number and
tap Enter.
4. Tap Reset.
Note: Odometers count up and record the current mileage.
Maintenance counters count down. When a maintenance
timer counts down to 2,000 miles, a reminder displays each
time IntelliRoute® starts.
Note: To avoid timer warnings, set the timer limits to a very
high number.
Timers Tab
23
TND
™
765 Fleet Edition User Manual
IntelliRoute®
Trails Screen
Route Map Screen
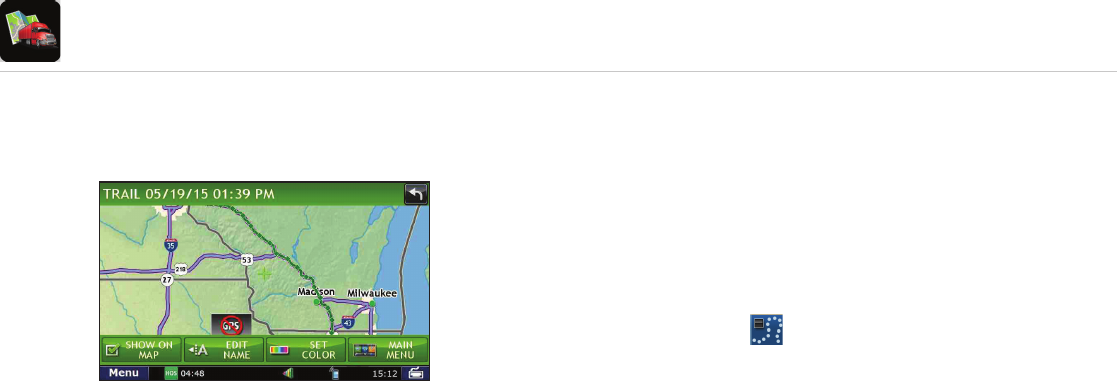
Trails
The Trails feature allows you to record and later view or follow route
information on the map. This capability is particularly useful when driving
off-road or through private facilities such as a terminal or distribution
center where road data is not available.
Record a New Trail
1. Tap Truck Tools > Timers Trails.
2. Tap Trails Tab.
3. Tap New Trail.
4. Tap OK. The Trail Icon displays on the map screen.
5. When you wish to stop recording, tap on the Trail icon.
6. Tap OK.
24
TND
™
765 Fleet Edition User Manual
IntelliRoute®
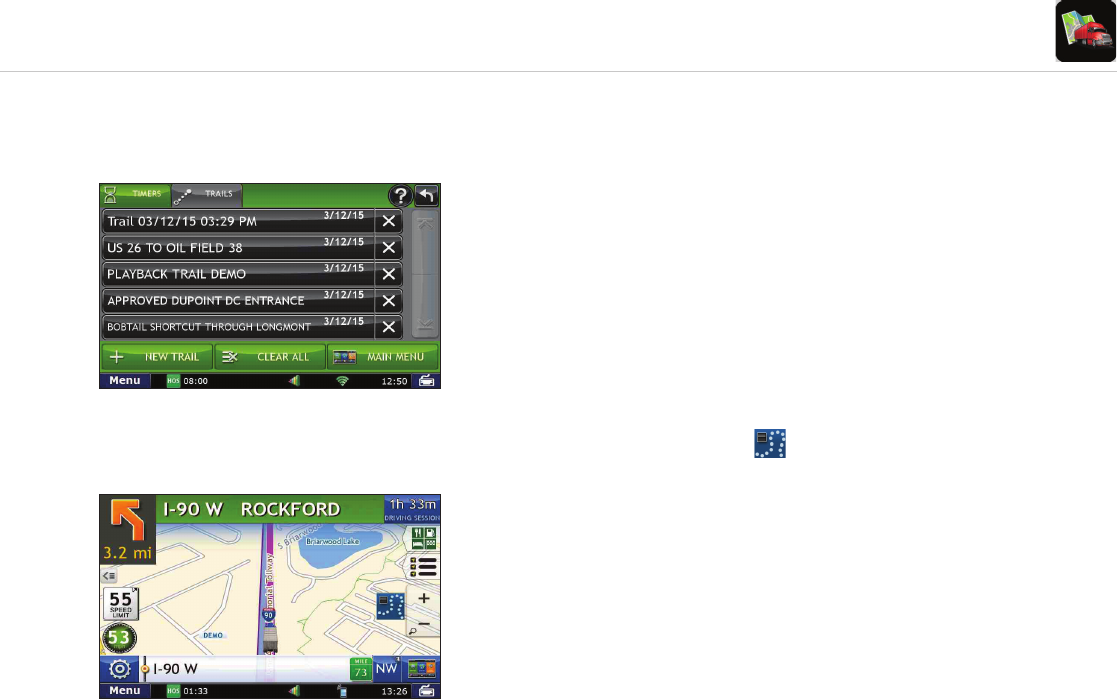
View Saved Trails
1. Tap Truck Tools > Timers Trails.
2. Tap Trails Tab.
3. Tap on the trail you want to run.
4. Tap on Show on Map.
5. Tap on the Trail icon.
6. Tap:
- Trail Only to show only the trail.
- Trail and Vehicle to show the trail and your current location.
- Hide Trail to not display the trail.
7. Visually follow the trail. The trail is denoted by green diamond icons.
NOTE:
- Because Trails mode may not contain roads, no voice
direction is available.
- You can also rename and delete recorded trails.
Trail Route Screen
25
TND
™
765 Fleet Edition User Manual
IntelliRoute®
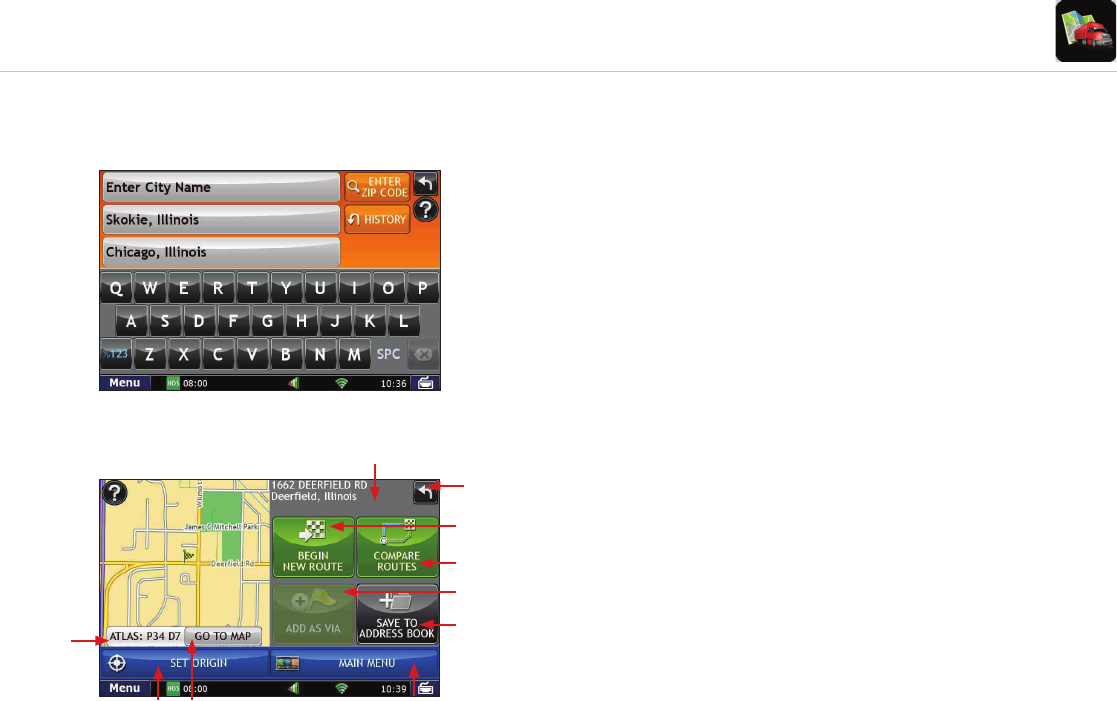
Enter City Name Route to New Destination
Find an Address
1. Tap Choose Destination > New Location.
2. Select a search type (Address, City Center, Intersection, or Lat/Long).
3. Use the keyboard to type location information.
4. Tap on the location in the displayed list.
5. Tap Begin New Route.
Confi rm Destination
a. Destination address.
b. Begin route to destination.
c. Cross reference to printed Rand McNally
Motor Carriers’ Road Atlas.
d. Return to previous window.
e. View the map.
f. Change the starting address for a route to the location displayed
on the map screen.
g. Return to Main Menu.
h. Add the location as an interim stop between the origin and destination.
i. Save location to the Address Book.
j. View a primary route and a reasonable alternative, allowing you to choose.
Both routes are presented on the map for a quick review.
Destination Screen
(d)
(a)
(e)
(f)
(j)
(c)
(g)
(h)
(i)
(b)
26
TND
™
765 Fleet Edition User Manual
IntelliRoute®
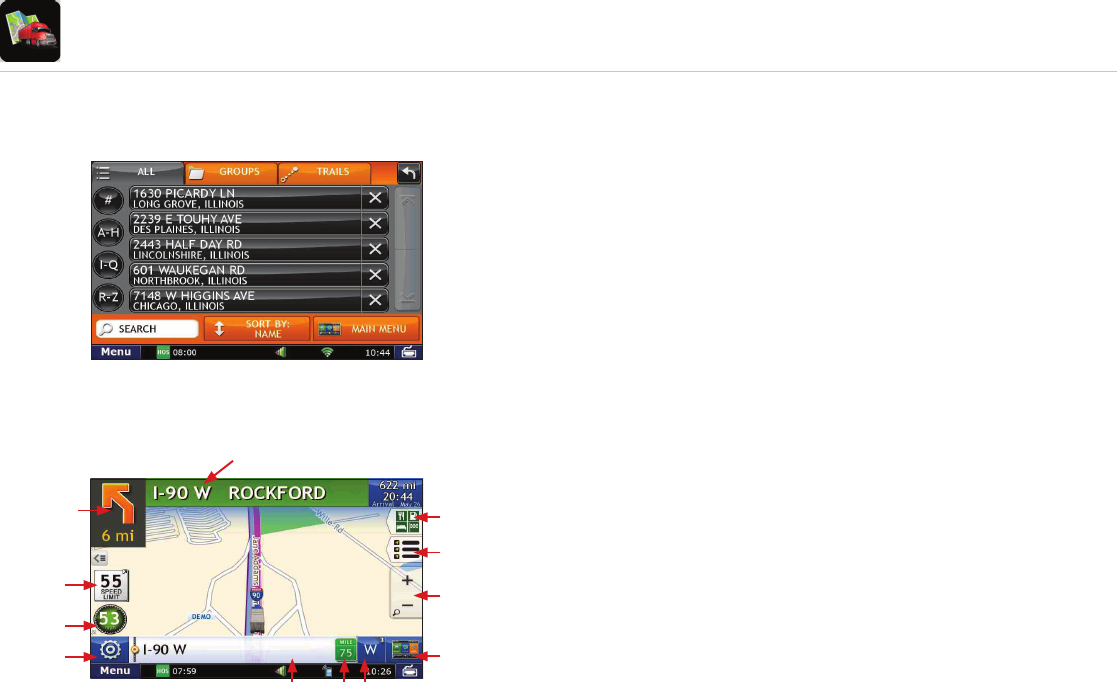
Address Book Tab Route to Saved Destination
1. Tap Choose Destination > History or Address Book.
2. Tap on the desired destination in the displayed list.
3. Tap Begin New Route.
Route Map Screen
a. Repeat spoken next-maneuver instructions.
b. Name of street you will turn onto next.
c. Information on upcoming exits.
d. Directions slide-out list.
e. Zoom in/zoom out.
f. Return to IntelliRoute® Main Menu.
g. Compass Direction. Tap to change map display: North (N),
Heading Up (arrow) or 3D View (3).
h. Current mile marker.
i. Tap to view current information by city, street, or upcoming intersection.
j. Tap to see current location information, change route settings,
detour, or cancel a route.
k. Current vehicle speed. Tap to view Virtual Dashboard.
l. Posted speed limit: orange for truck limit; white for general limit.
Route Map Screen
(a)
(b)
(c)
(d)
(e)
(f)
(g)(h)(i)
(j)
(k)
(l)
27
TND
™
765 Fleet Edition User Manual
IntelliRoute®
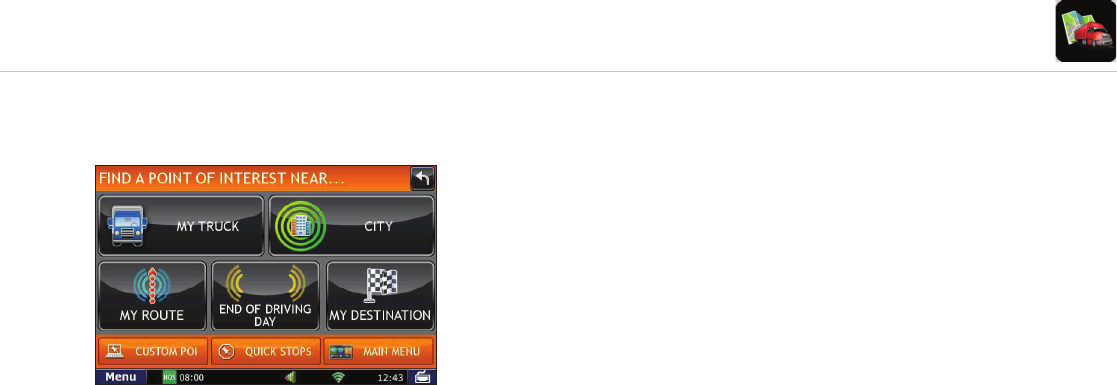
Point of Interest Screen Find a Point of Interest (POI)
1. Tap Choose Destination > Points of Interest.
2. Select a search type (My Truck, City, My Route,
End of Day, Destination, Custom POI, or Quick Stops).
3. Select a category and if necessary, a subcategory.
4. Tap on the Point of Interest in the displayed list.
28
TND
™
765 Fleet Edition User Manual
Hours of Service
This section provides an overview of features on each screen
of the HOS application.
Service Cycle
Hours of Service Feature Overview
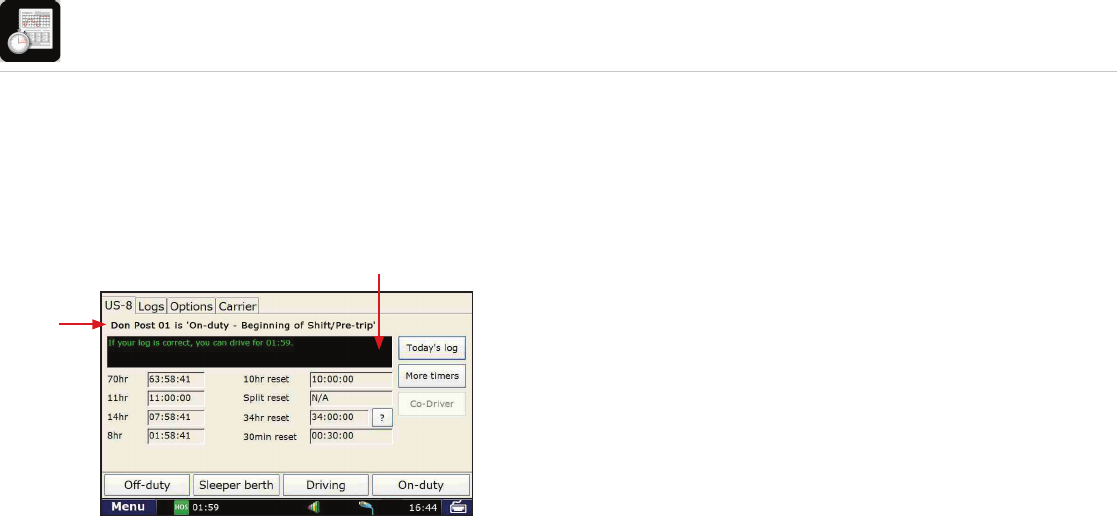
Summary: Current Duty Status & Timers
The Service Cycle tab displays your timers, duty status and the time before
you are in violation of each HOS rule.
a. Title displays your Driver ID and current duty status.
b. Status Box displays your effective remaining drive time.
The effective remaining drive time displayed is the lesser of the
times remaining in the current 8-hour On-Duty, 11-hour Driving,
14-hour On-Duty, and 70-hour On-Duty periods:
- Green text means more than 1 hour drive time available.
- Yellow text means 1 hour or less of drive time available.
- Red text means you are out of drive time and will be in
violation if you continue to drive.
(b)
(a)