Realtek Semiconductor RTL8192SE 802.11 b/g/n RTL8192SE miniCard User Manual UserMan TX2 RTL8192SE
Realtek Semiconductor Corp. 802.11 b/g/n RTL8192SE miniCard UserMan TX2 RTL8192SE
UserManual.wiki
>
Realtek Semiconductor
>
RTL8192SE User Manual
>
User Manual 2
Contents
1.
Manual
2.
User Manual 1
3.
User Manual 2
User Manual 2
Navigation menu
Upload a User Manual
Namespaces
Wiki Guide
HTML
PDF
Info
Views
User Manual
Discussion / Help
Navigation

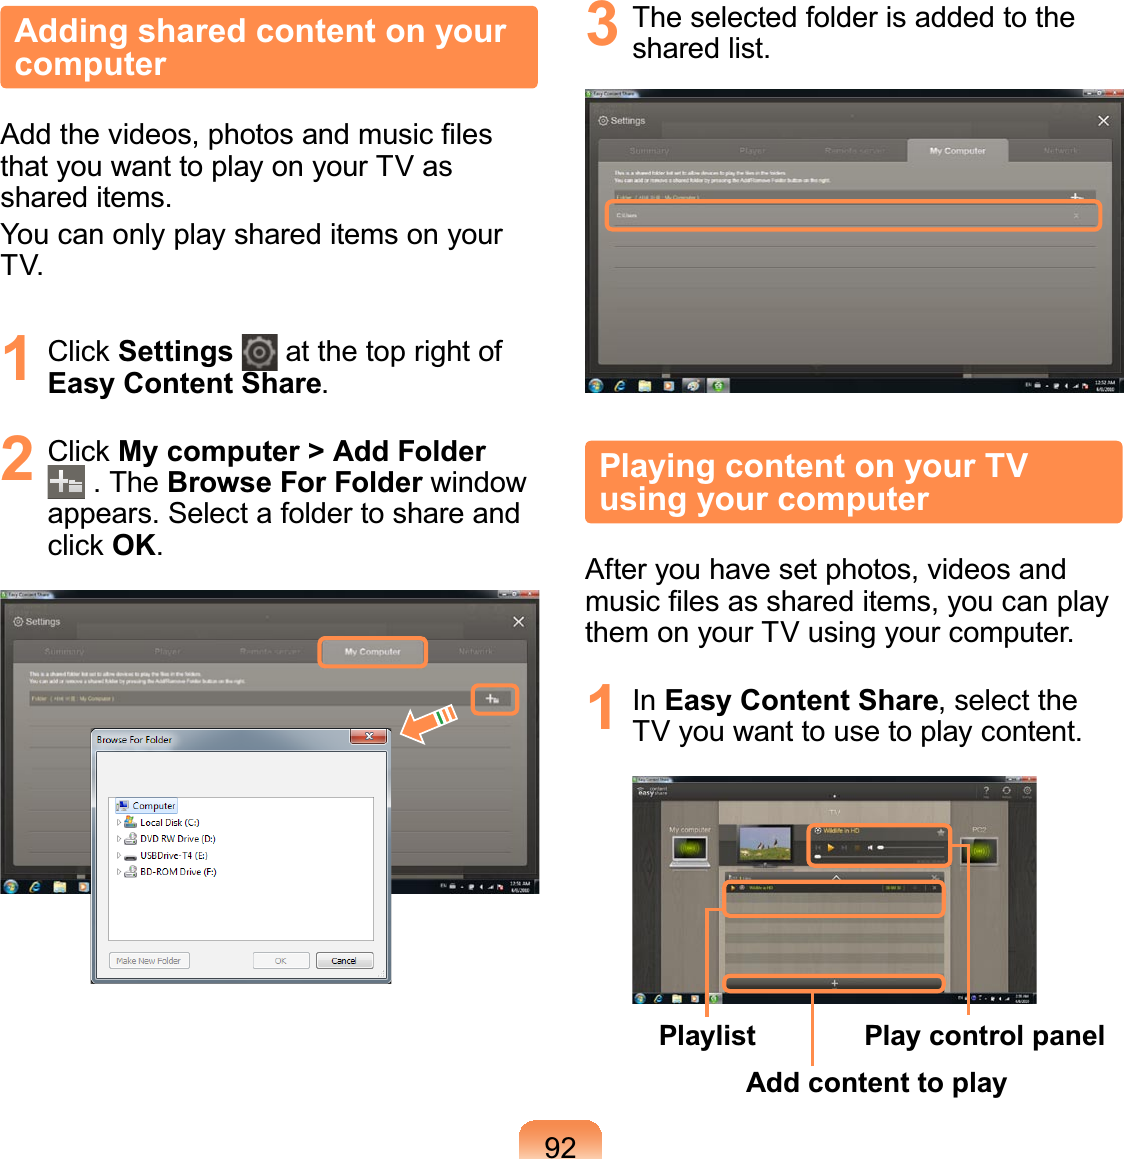
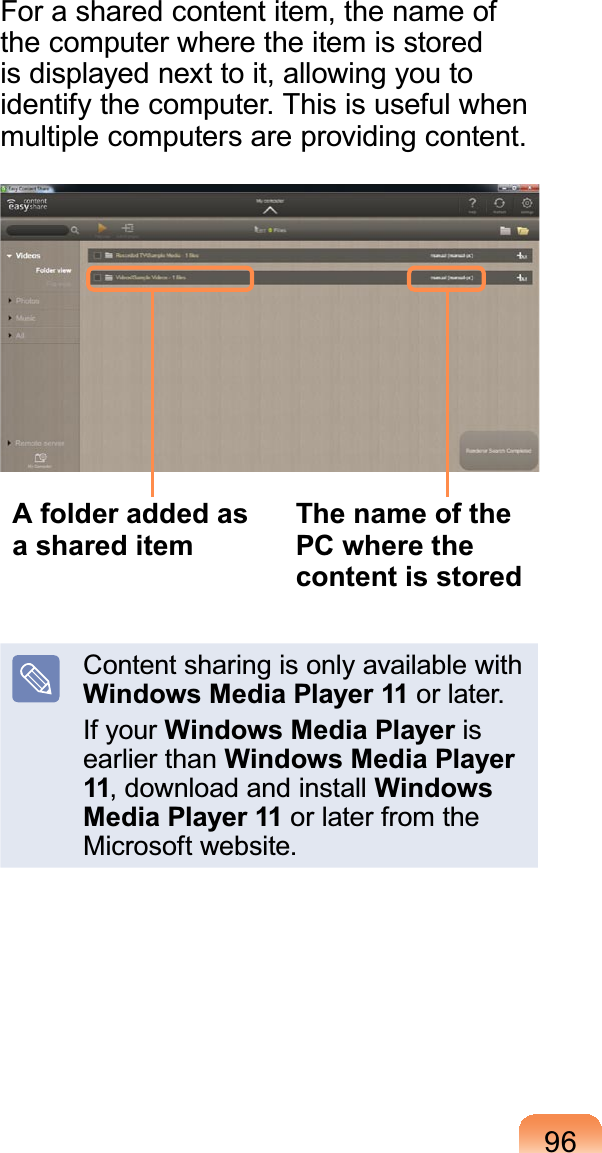
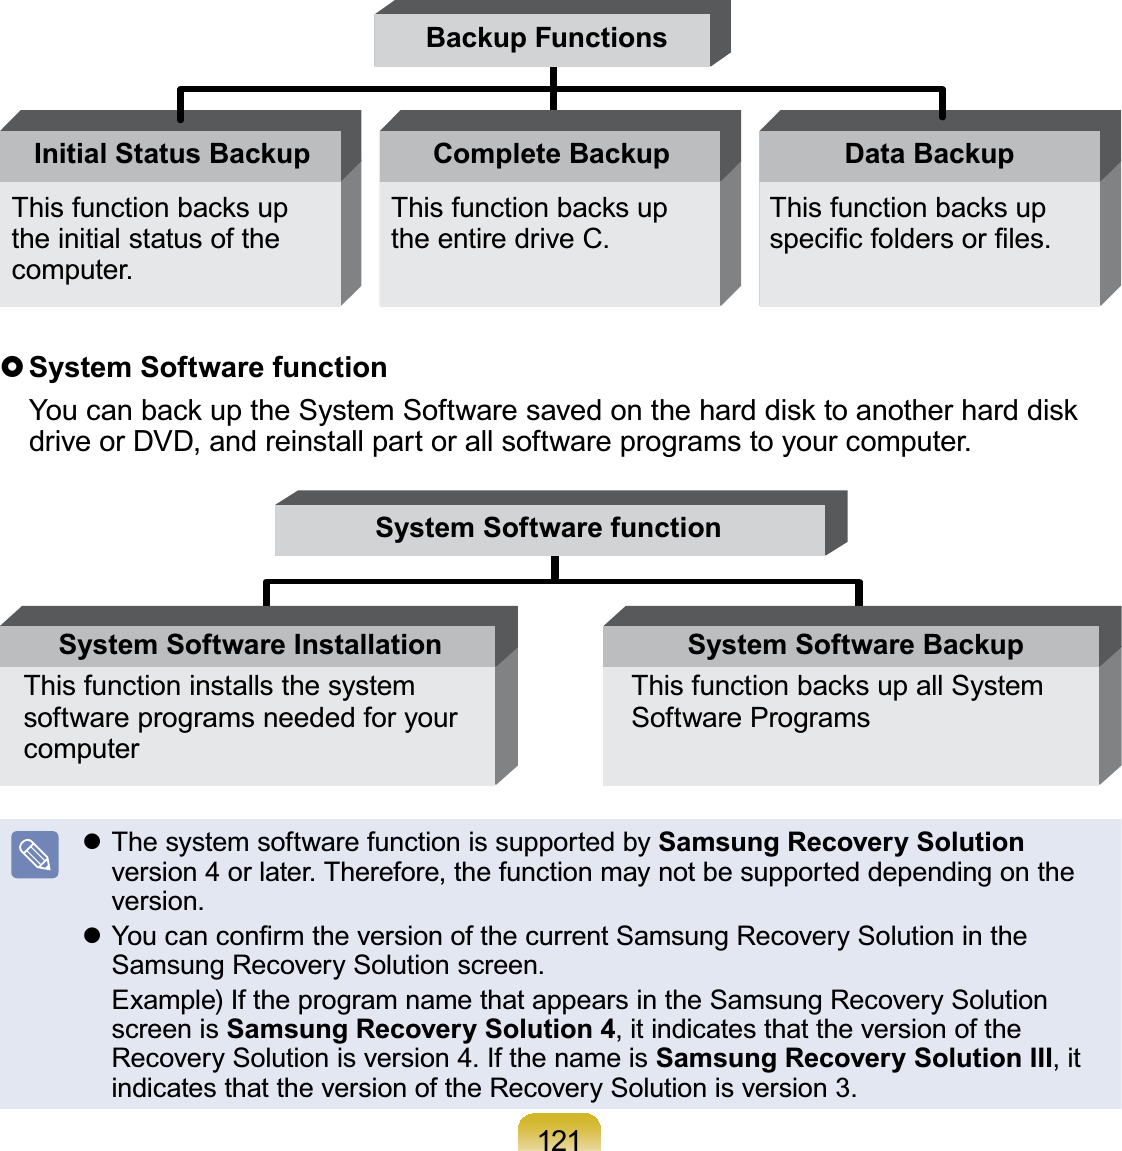
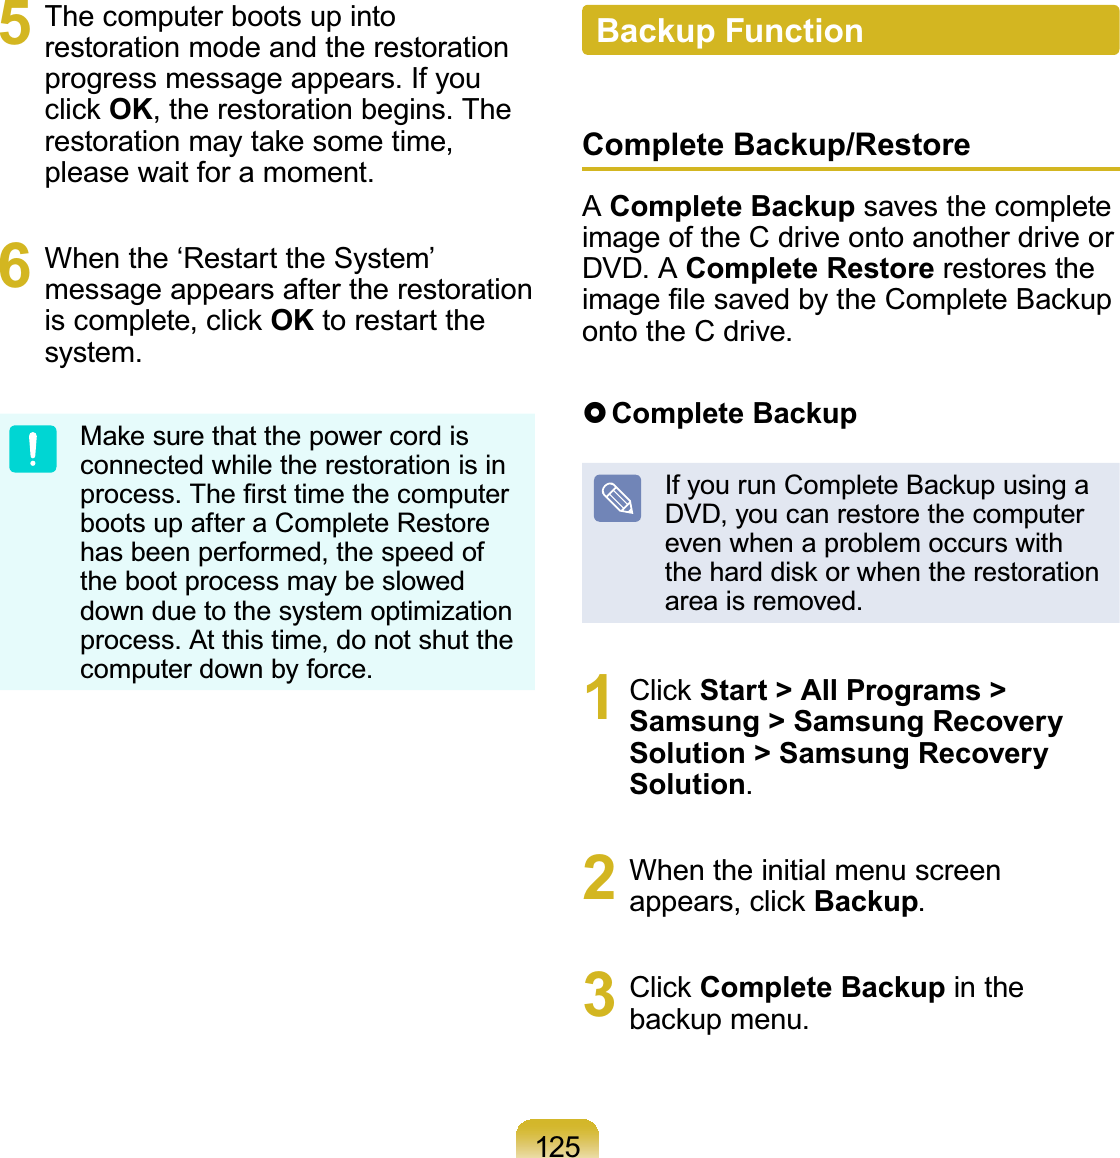
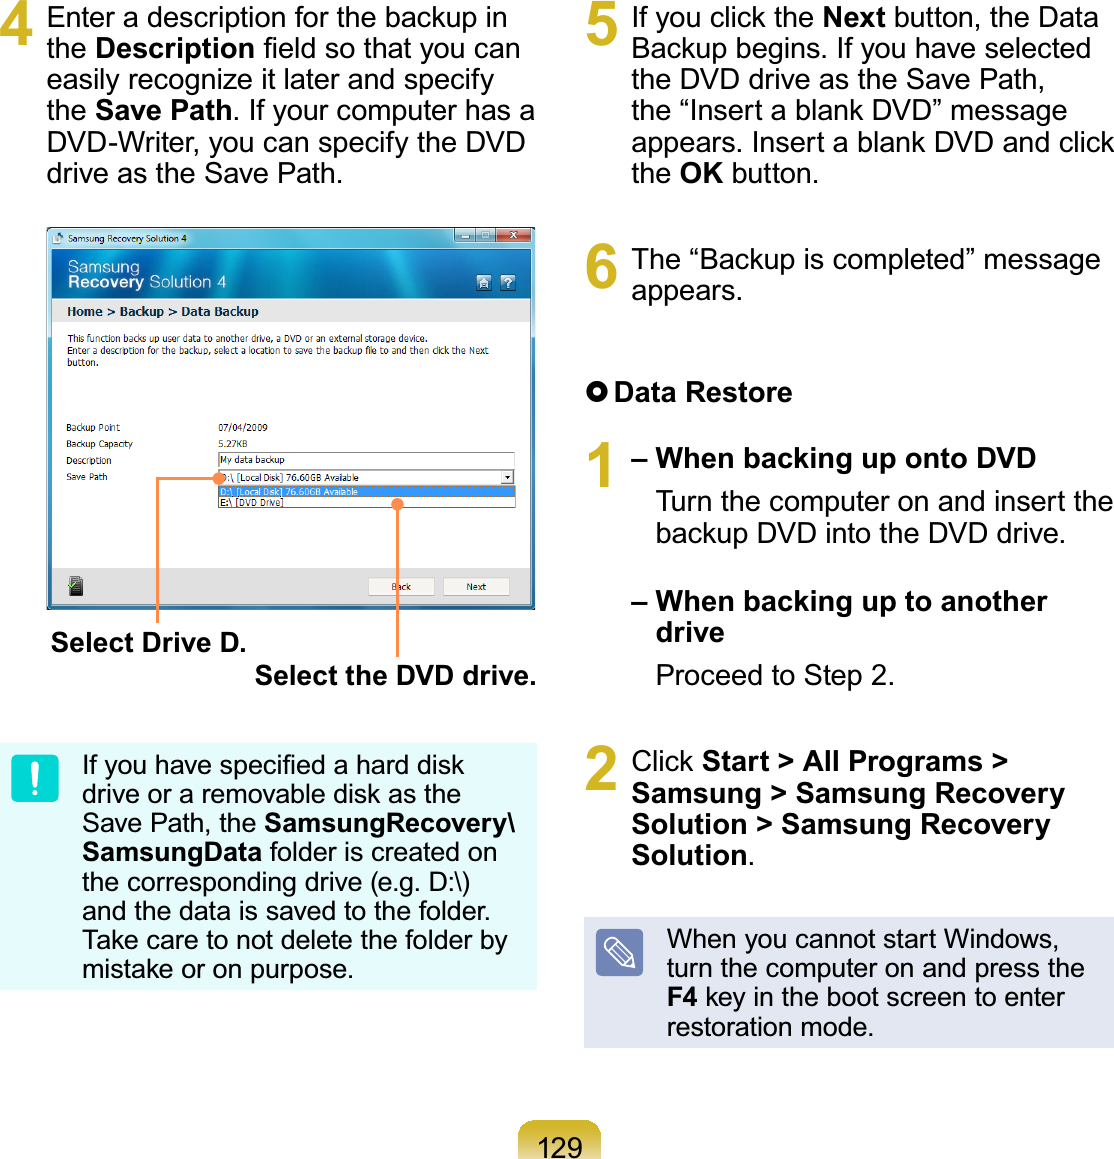
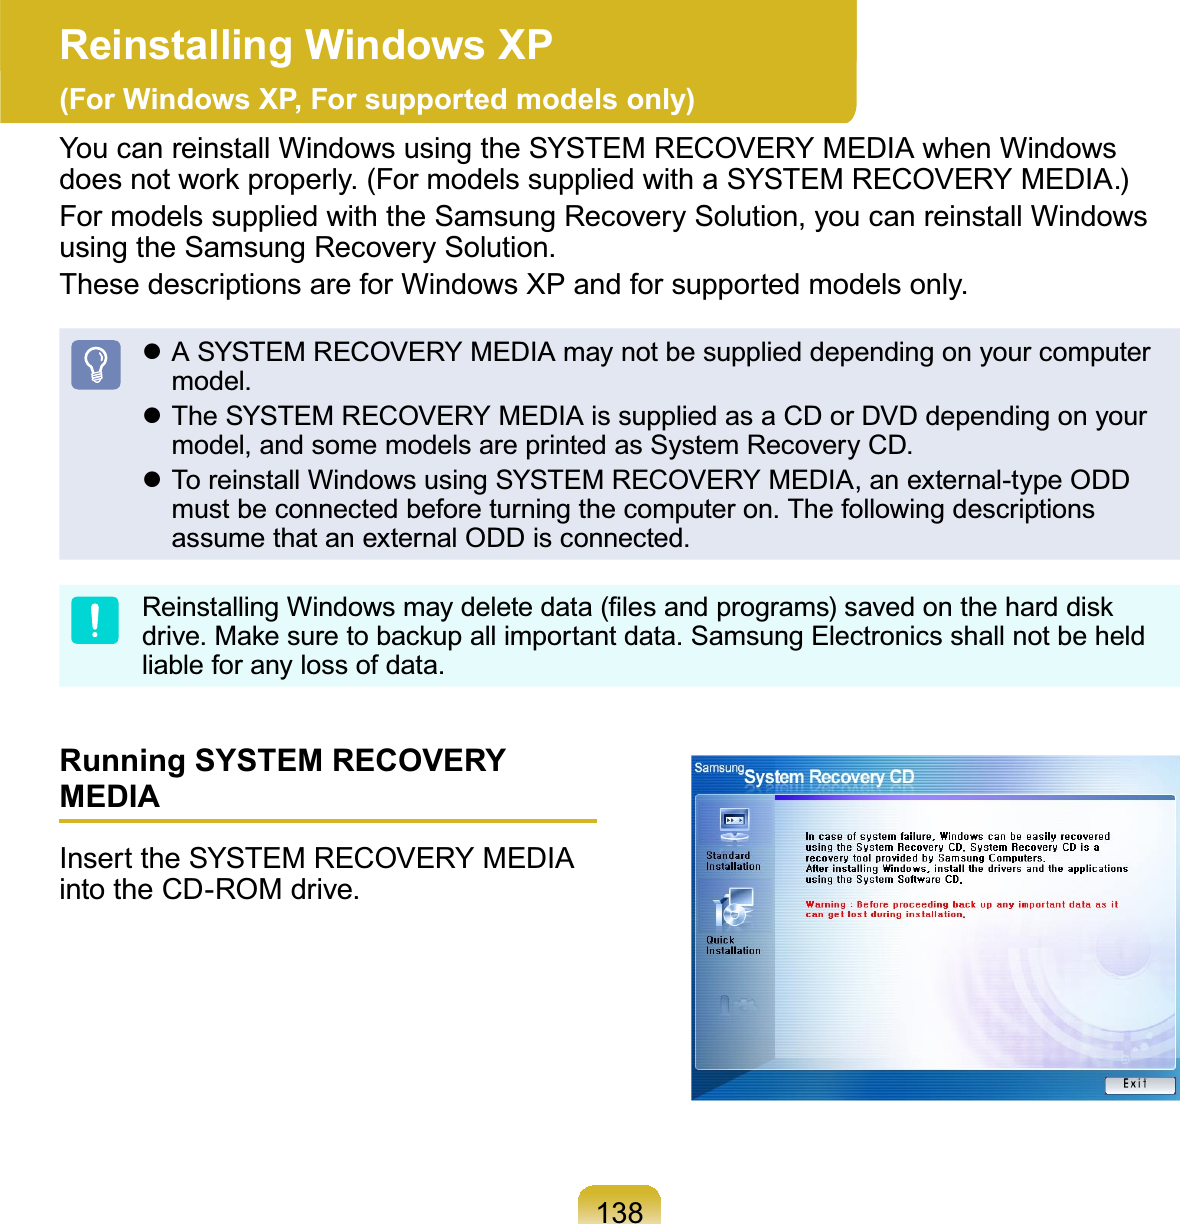
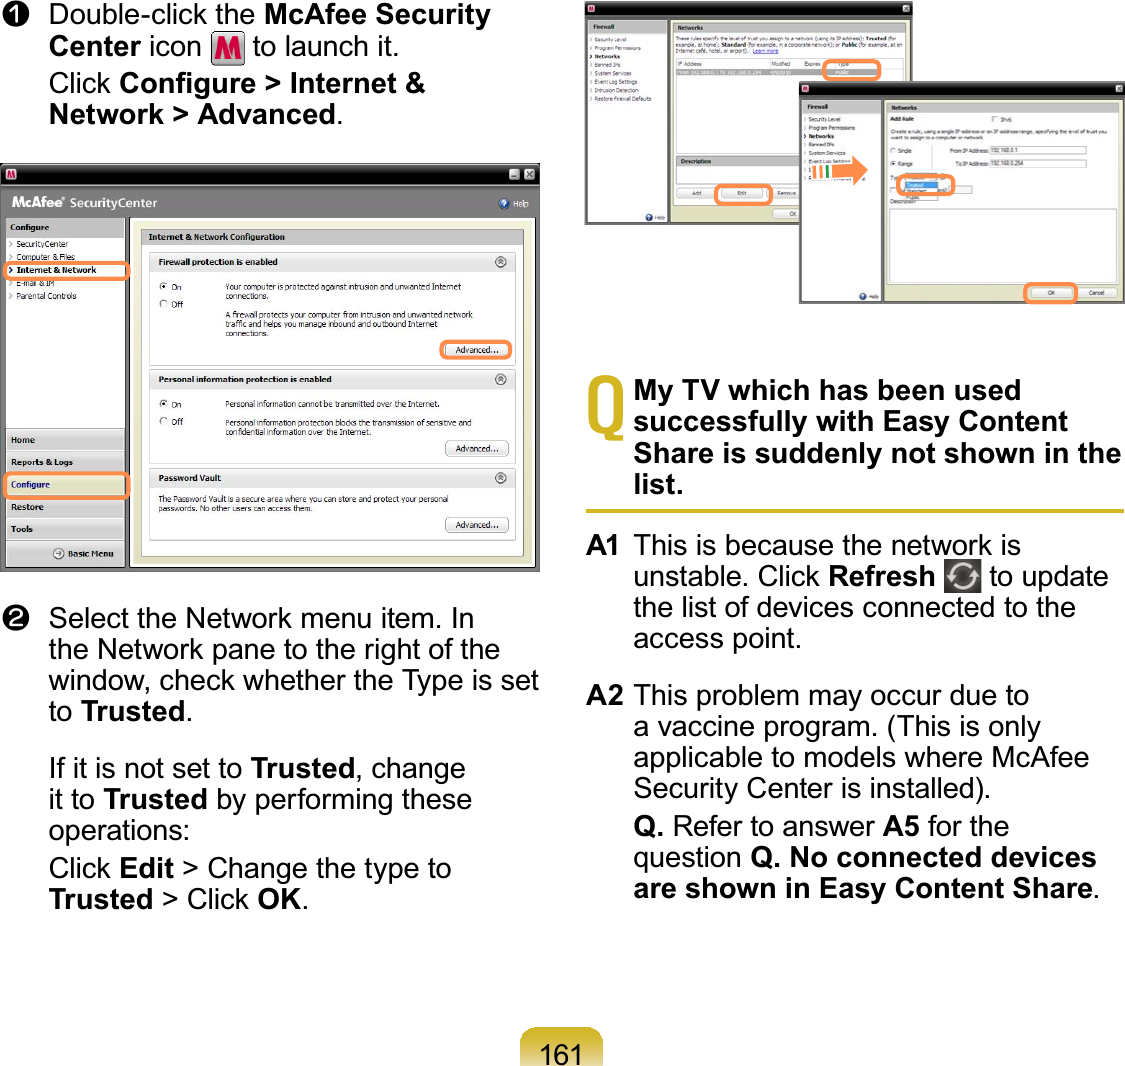
![91[Network connection diagram]2 &RQ¿JXUHWKH,3DGGUHVVVHWWLQJVIRU\RXUFRPSXWHUDQG79<RXPXVWFKHFNWKHObtain an IP address automatically'+&3FKHFNER[z)RUPRUHLQIRUPDWLRQRQKRZWRFRQ¿JXUHWKH,3DGGUHVVIRU\RXUFRPSXWHUUHIHUWRChapter 2. Using the Computer > Networkz)RUPRUHLQIRUPDWLRQRQKRZWRFRQ¿JXUHWKH,3DGGUHVVIRU\RXU79UHIHUWRWKHXVHUPDQXDORI\RXU793 7RFKHFNZKHWKHUWKHQHWZRUNVHWWLQJVKDYHEHHQFRQ¿JXUHGFRUUHFWO\GRXEOHFOLFNWKHEasy Content ShareLFRQRQWKH\RXUFRPSXWHU¶V'HVNWRSWRUXQWKHSURJUDP,IWKHSURJUDPLFRQGRHVH[LVWRQWKH:LQGRZV'HVNWRSVHOHFWWKHFRUUHVSRQGLQJSURJUDPIURPStart > All Programs > Samsung,IWKHFRQQHFWHGFRPSXWHUDQG79DUHVKRZQLQWKHSURJUDPZLQGRZWKHQHWZRUNVHWWLQJVKDYHEHHQFRQ¿JXUHGVXFFHVVIXOO\Devices that can share content,IDFRQQHFWHGGHYLFHLVQRWGLVSOD\HGUHIHUWRChapter 4. Troubleshooting > Q&A > Easy Content Share Related](https://usermanual.wiki/Realtek-Semiconductor/RTL8192SE.User-Manual-2/User-Guide-1302032-Page-11.png)
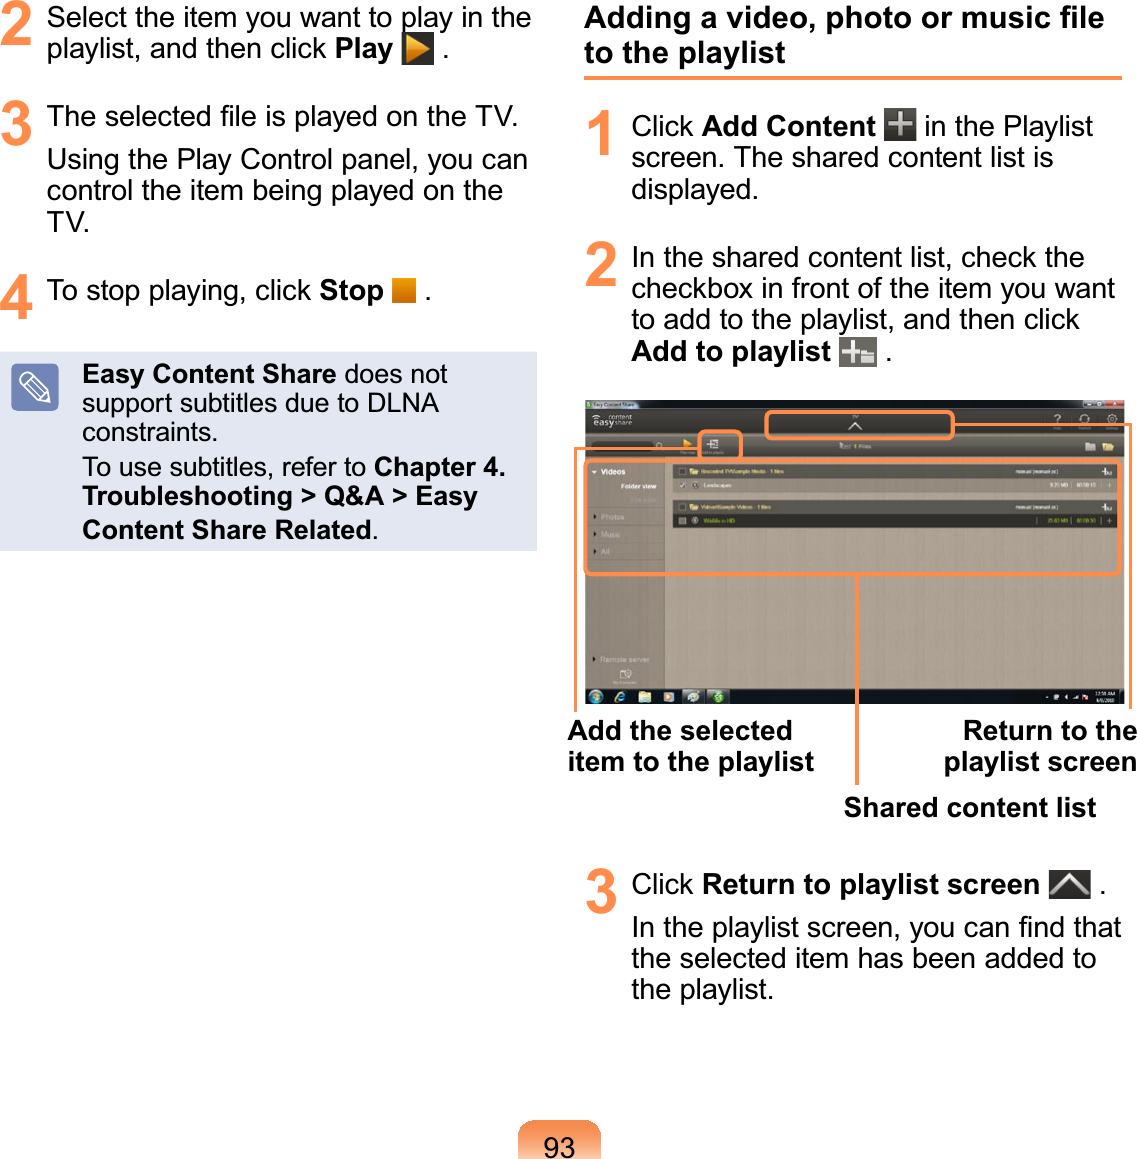
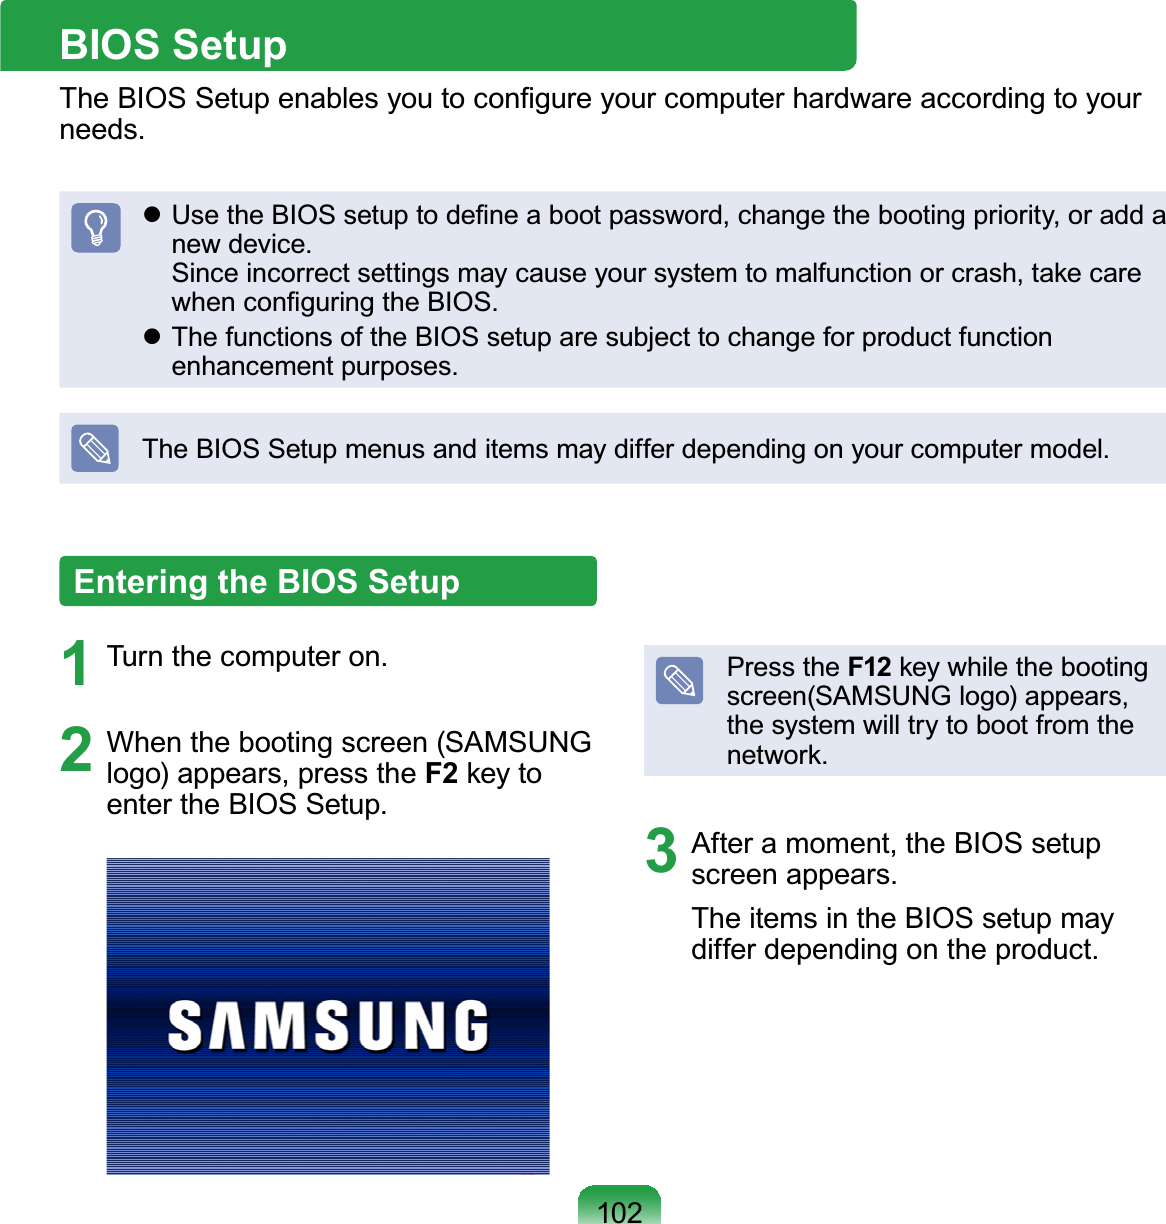
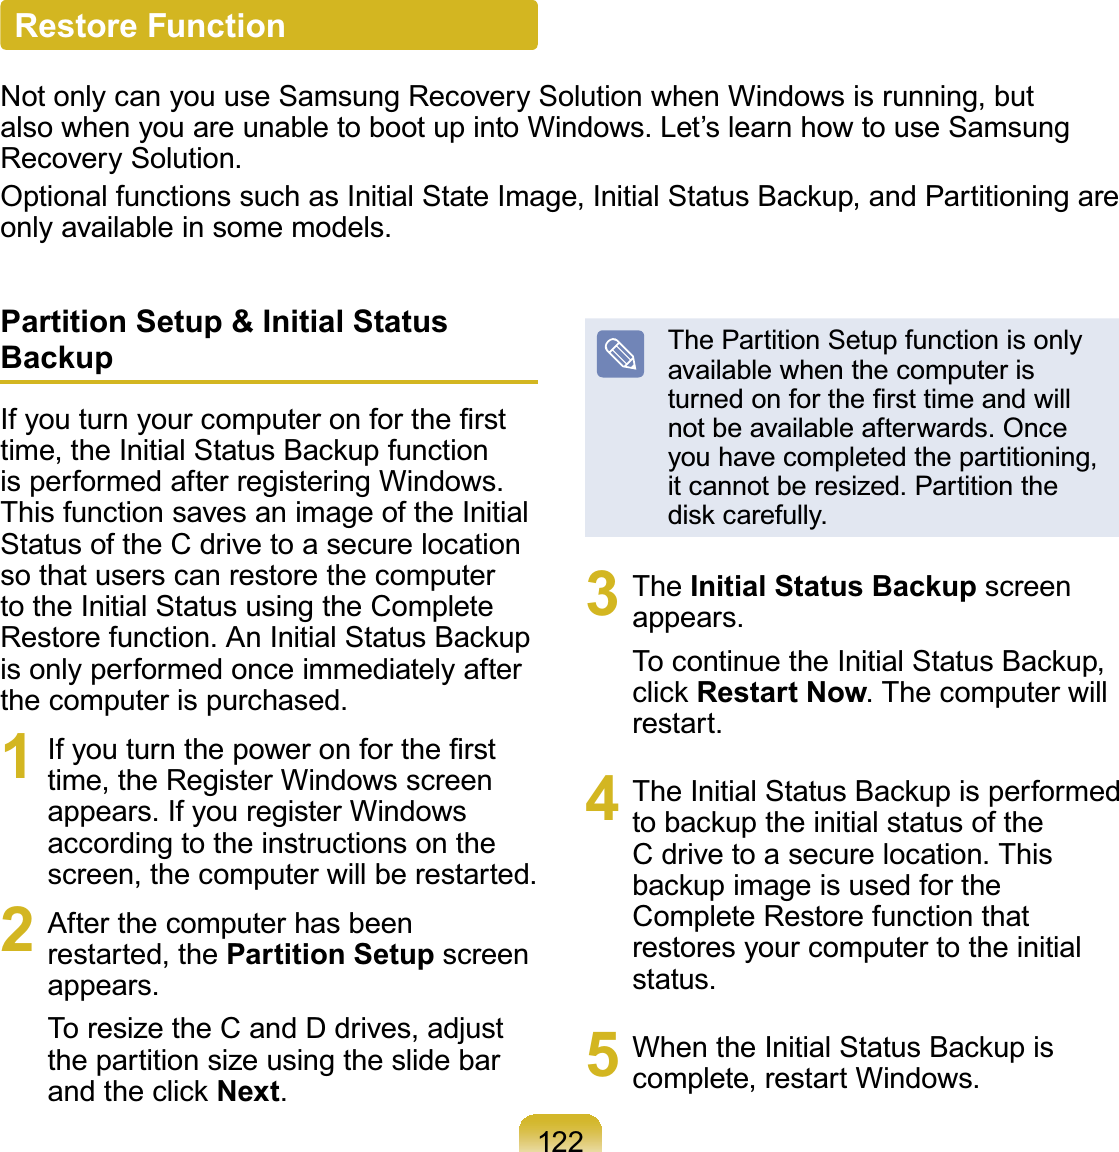
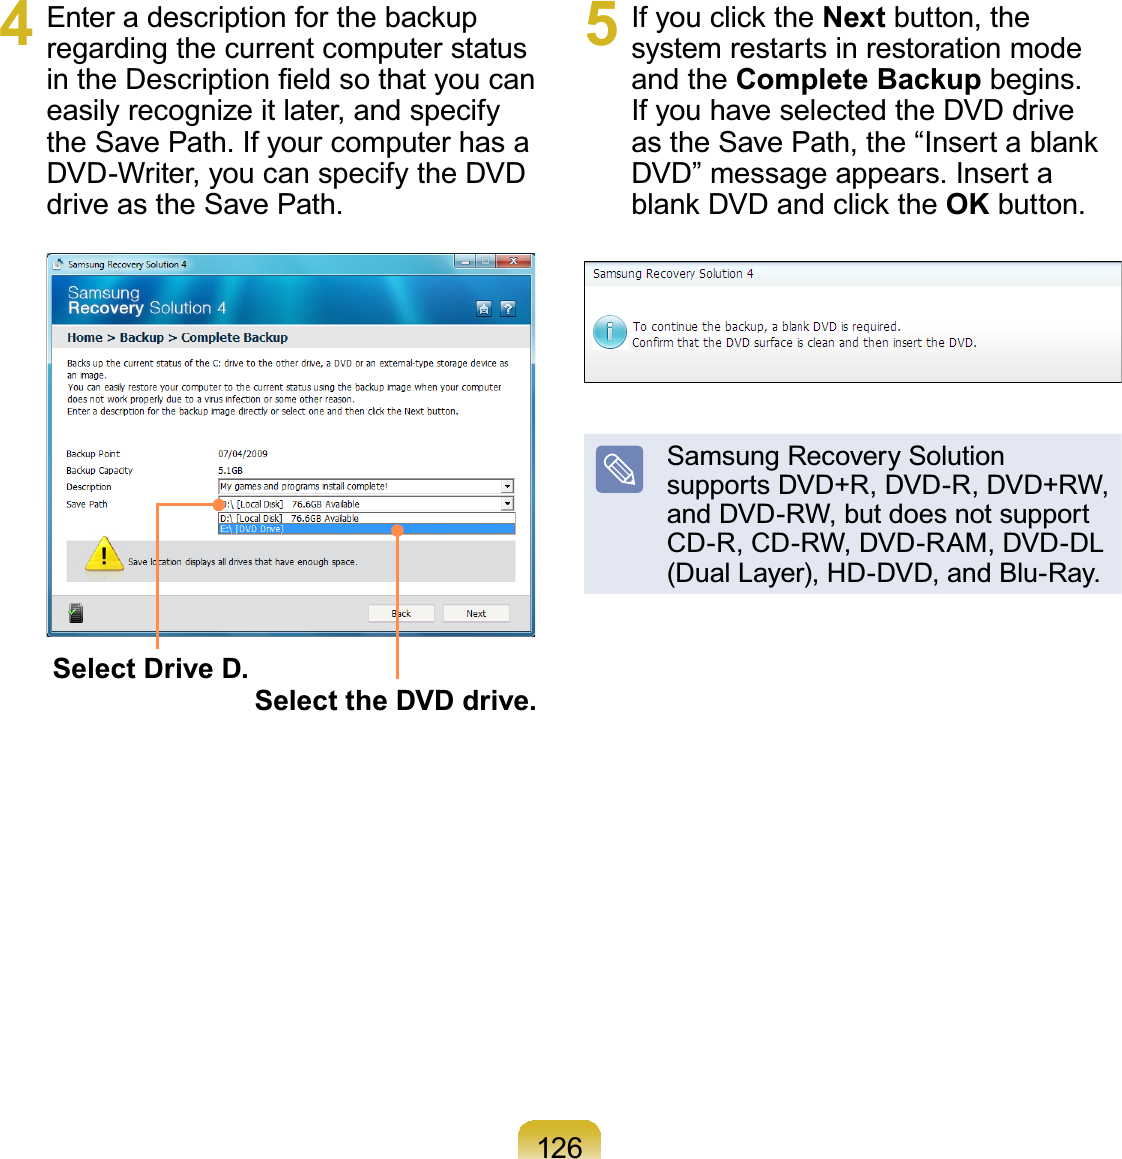
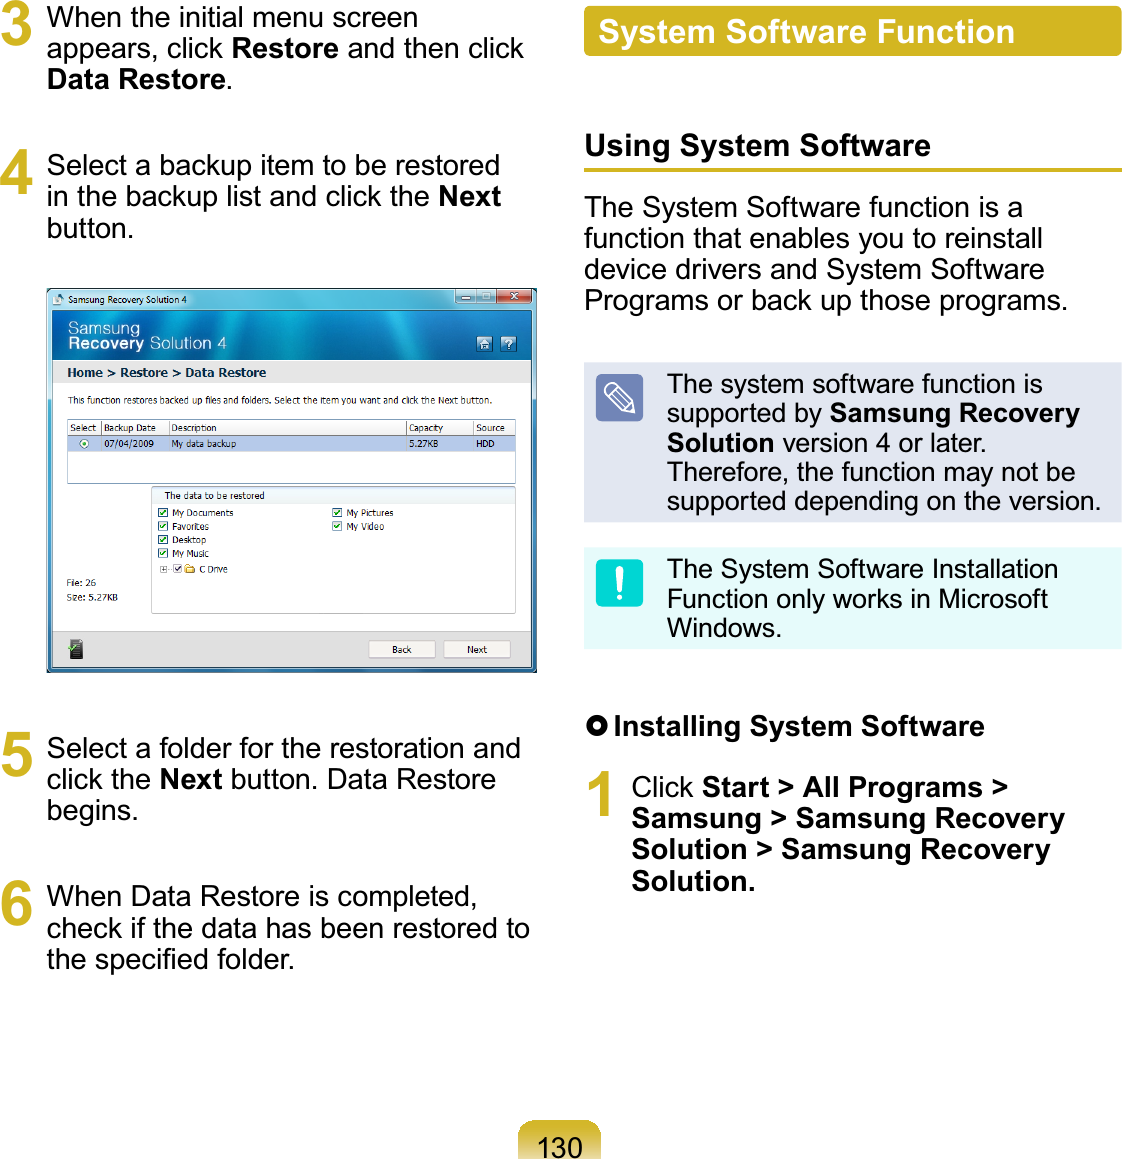
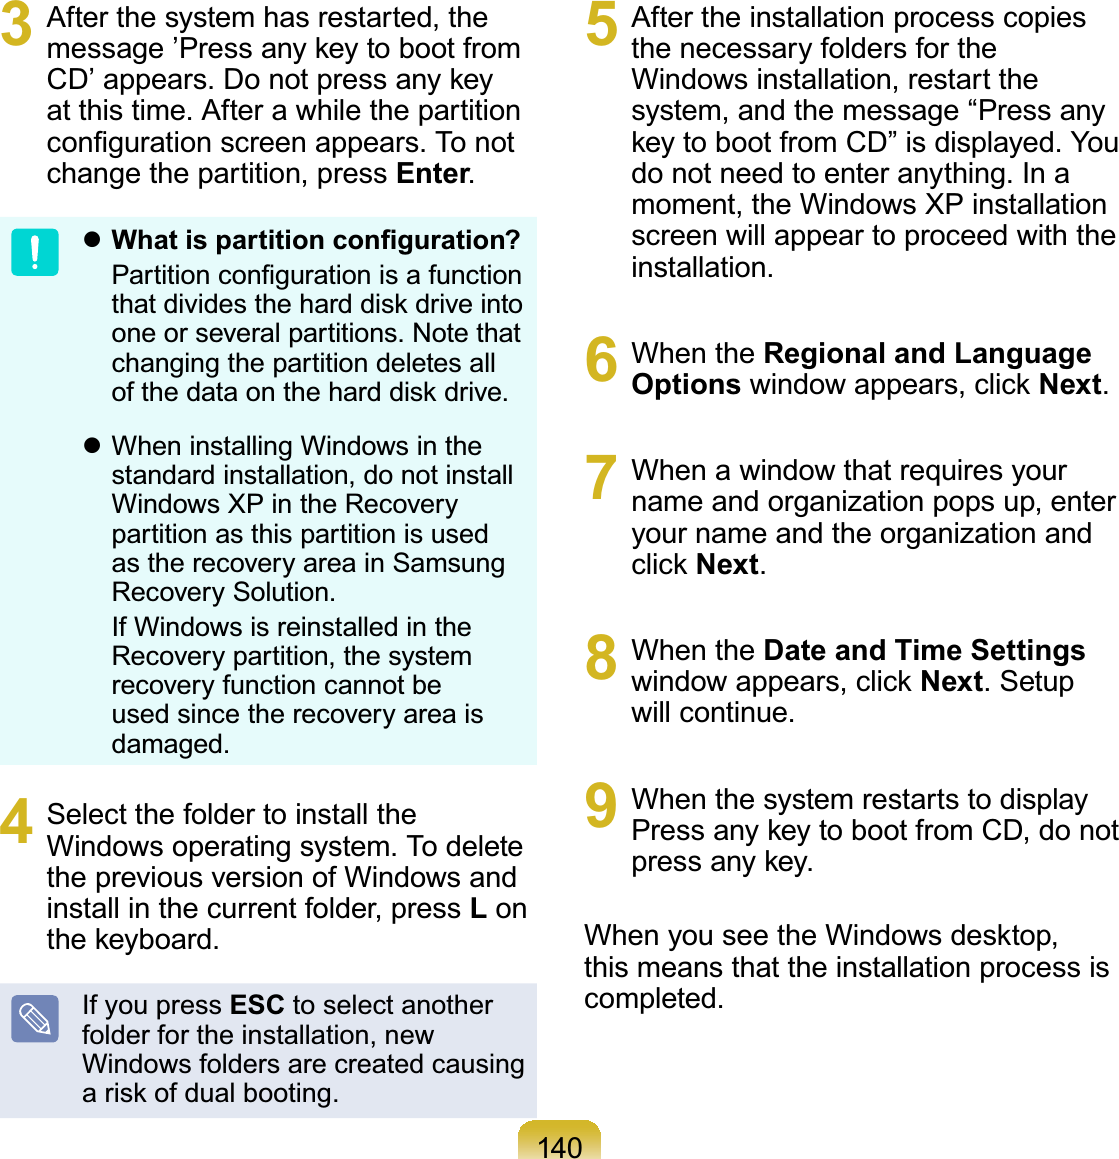
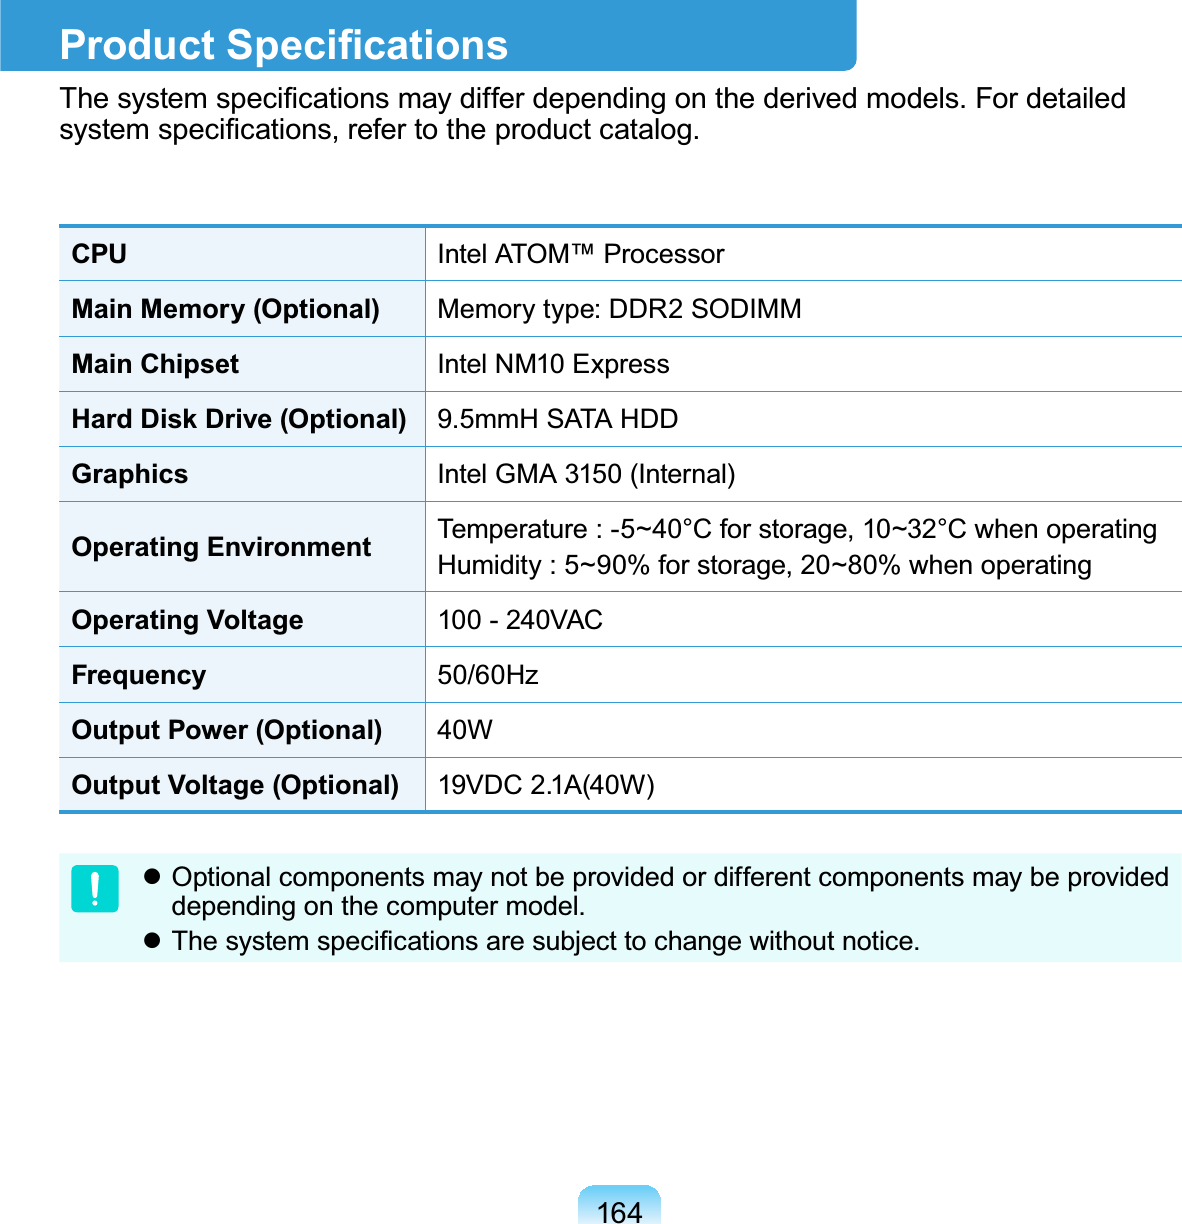
![103The BIOS Setup ScreenSystem Time [10:21:53]System Date [07/30/200X]SATA Port 1 XXXXXXXXCPU VendorCPU Type XXXXXXXXCPU Speed X.XX GHzTotal Memory XXX MBBIOS Version XXXXXXXXMICOM Version XXXXXXXXXXXXXXXXSetup MenuSetup ItemsHelpHelp for theselecteditem appearsautomatically.Setup Menu DescriptionMain Used to change the basic system and environment settings.Advanced 8VHGWRFRQ¿JXUHDGYDQFHGIXQFWLRQVRQ\RXUFRPSXWHUIRUGHYLFHVDQGchipsets.Security 8VHGWRFRQ¿JXUHVHFXULW\IXQFWLRQVLQFOXGLQJSDVVZRUGVBoot Used to set the boot priority and other boot optionsExit Used to exit the Setup either saving the changes or not.](https://usermanual.wiki/Realtek-Semiconductor/RTL8192SE.User-Manual-2/User-Guide-1302032-Page-23.png)
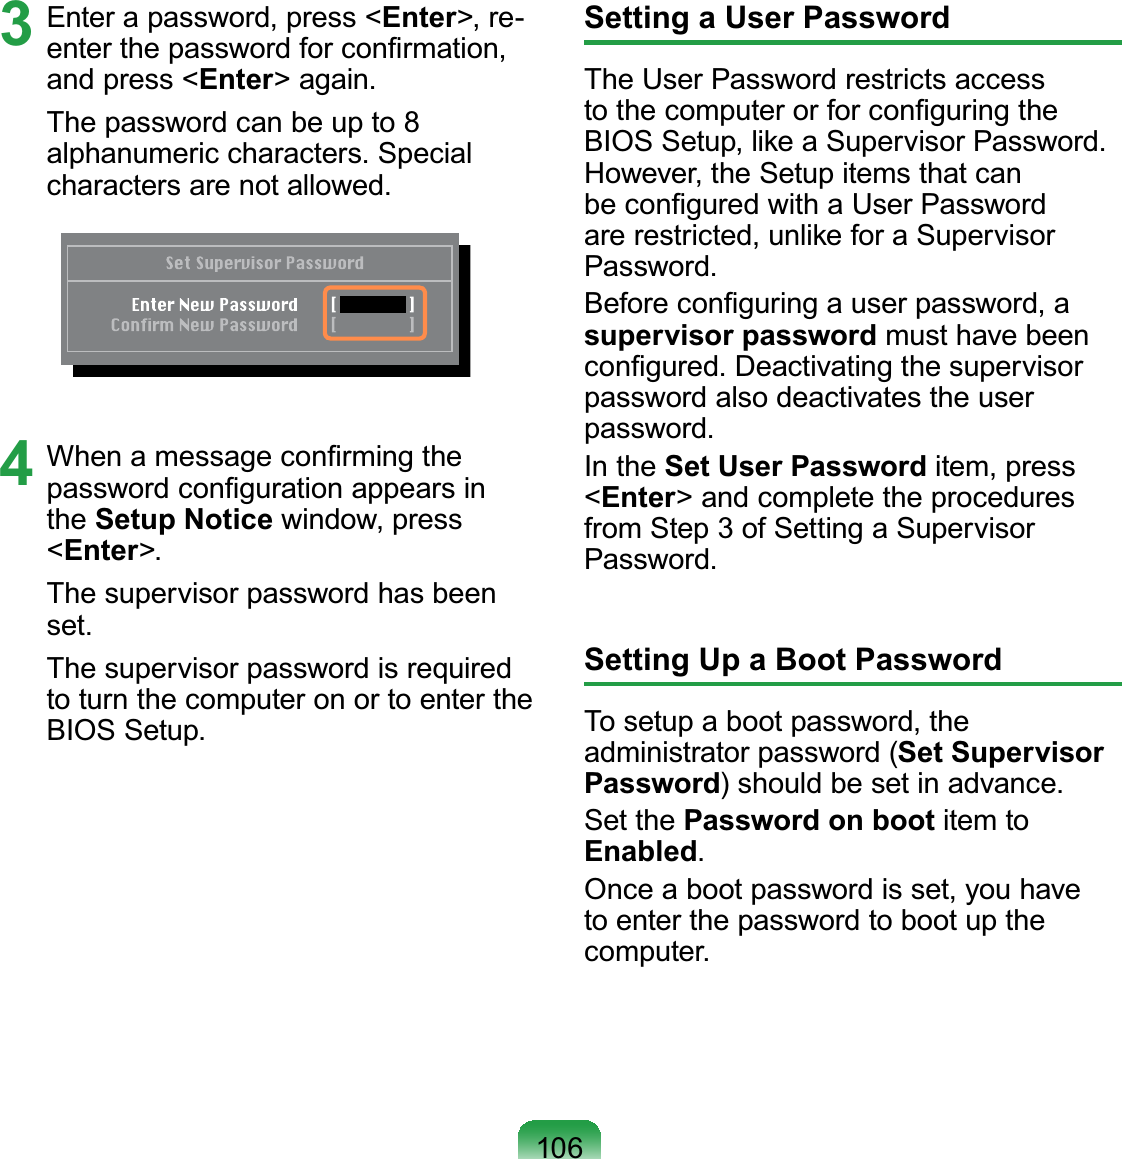
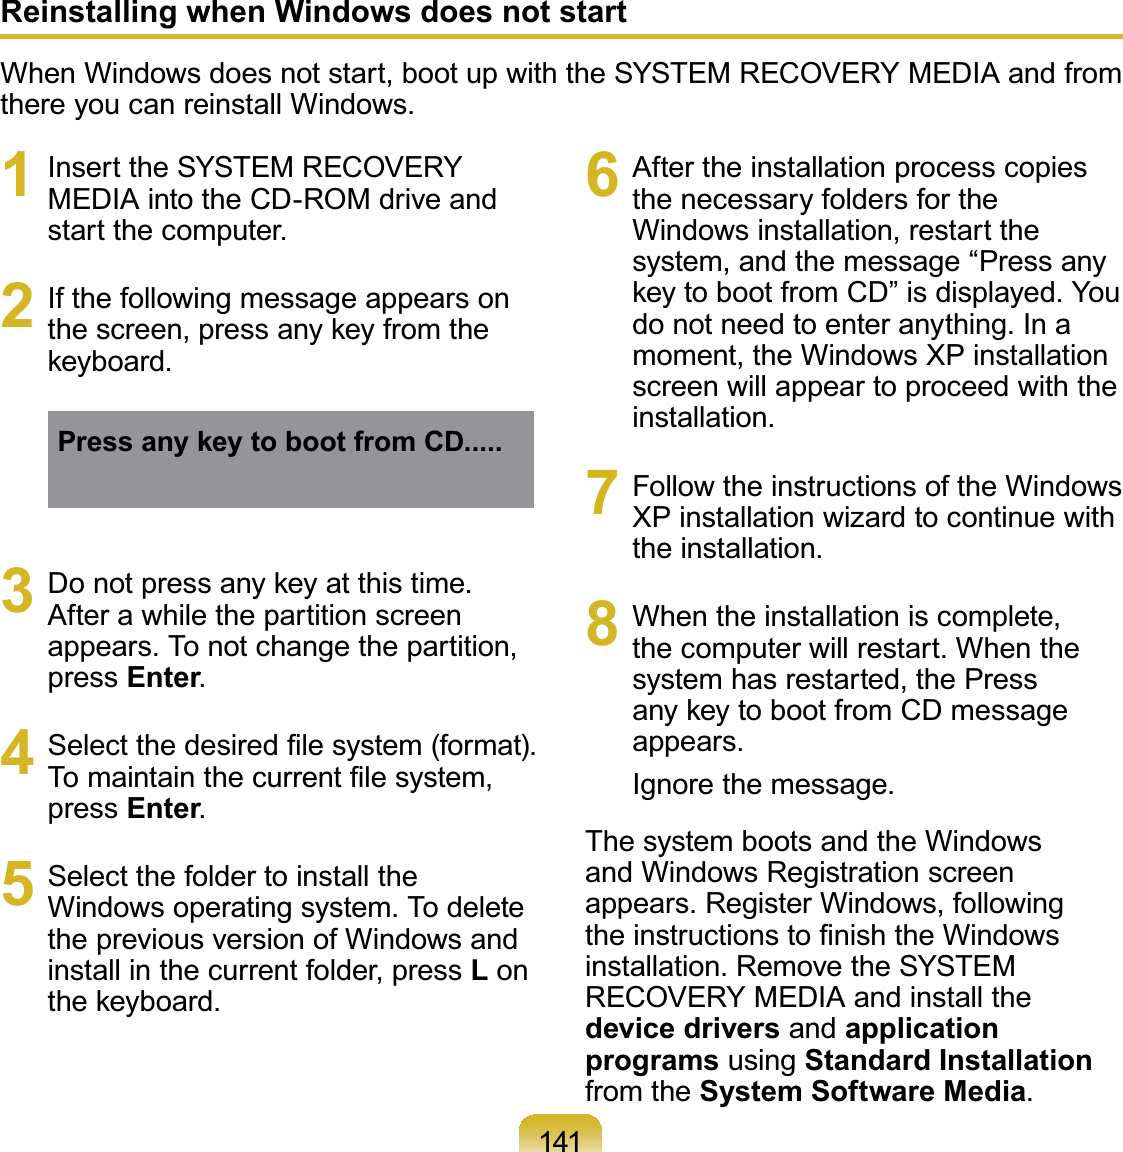
![105Setting a Supervisor PasswordASupervisorPasswordisrequiredtoturnthecomputeronortostarttheSystemSetup.WhensettingaSupervisorPassword,users other than supervisors cannot usethe computer.1 Select the Security menu in the BIOSSetup.2 In the Set Supervisor Passworditem, press <Enter>.XXXXXXXXSetting a Boot PasswordWhensettingapassword,youhavetoenterthepasswordtousethecomputerorentertheBIOSSetup.%\FRQ¿JXULQJDSDVVZRUG\RXFDQUHVWULFWV\VWHPDFFHVVWRDXWKRUL]HGXVHUVRQO\DQGSURWHFWGDWDDQG¿OHVVDYHGRQWKHFRPSXWHUDonotloseorforgetyourpassword.Ifyouhaveforgottenyourpassword,contactaSamsungservicecenter.Inthiscase,aservice fee will be charged.](https://usermanual.wiki/Realtek-Semiconductor/RTL8192SE.User-Manual-2/User-Guide-1302032-Page-25.png)
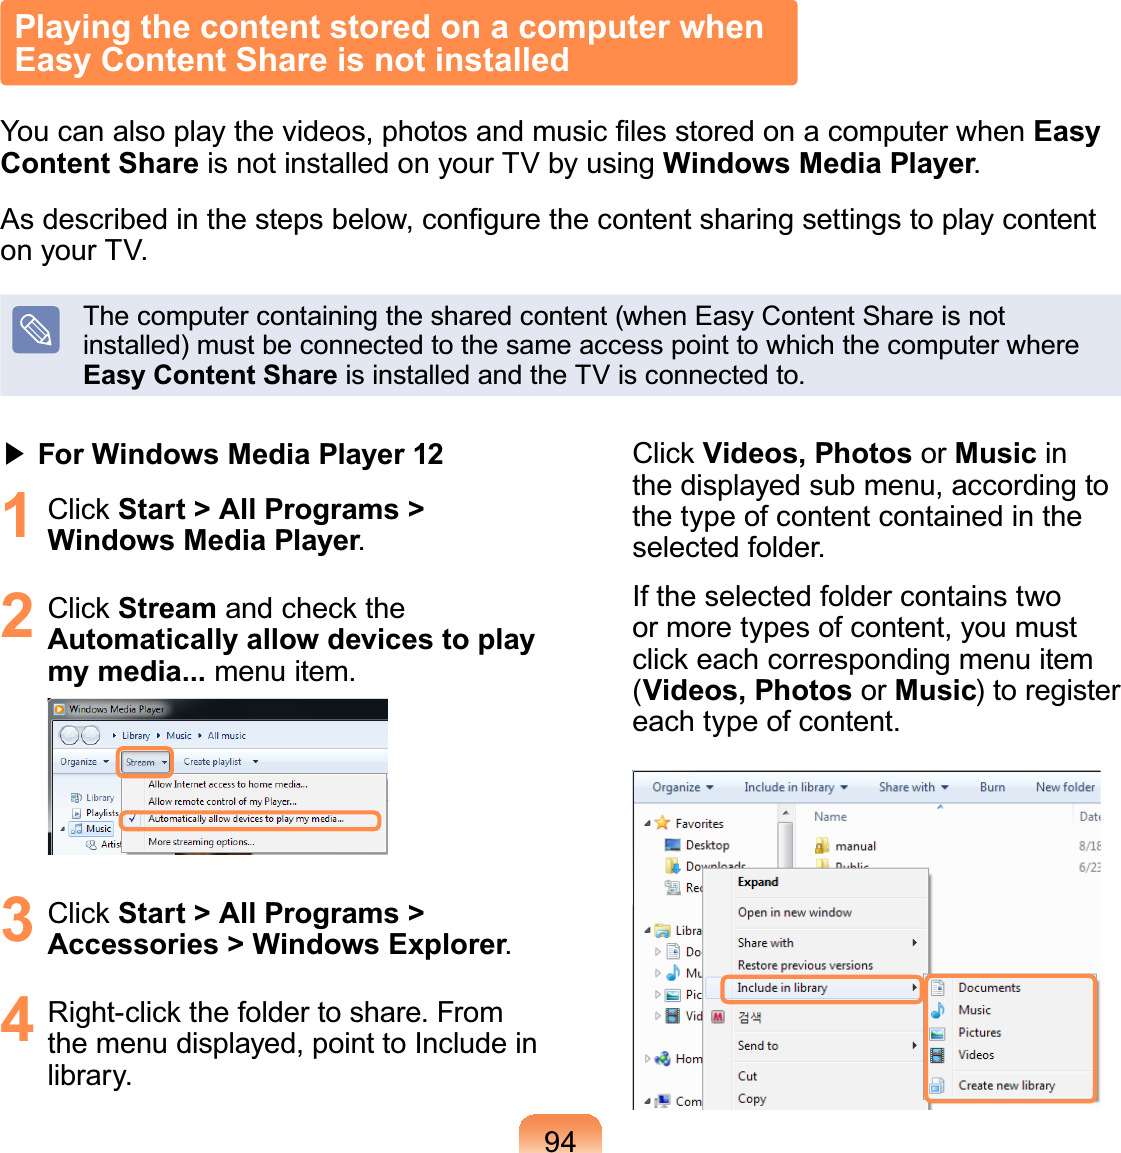
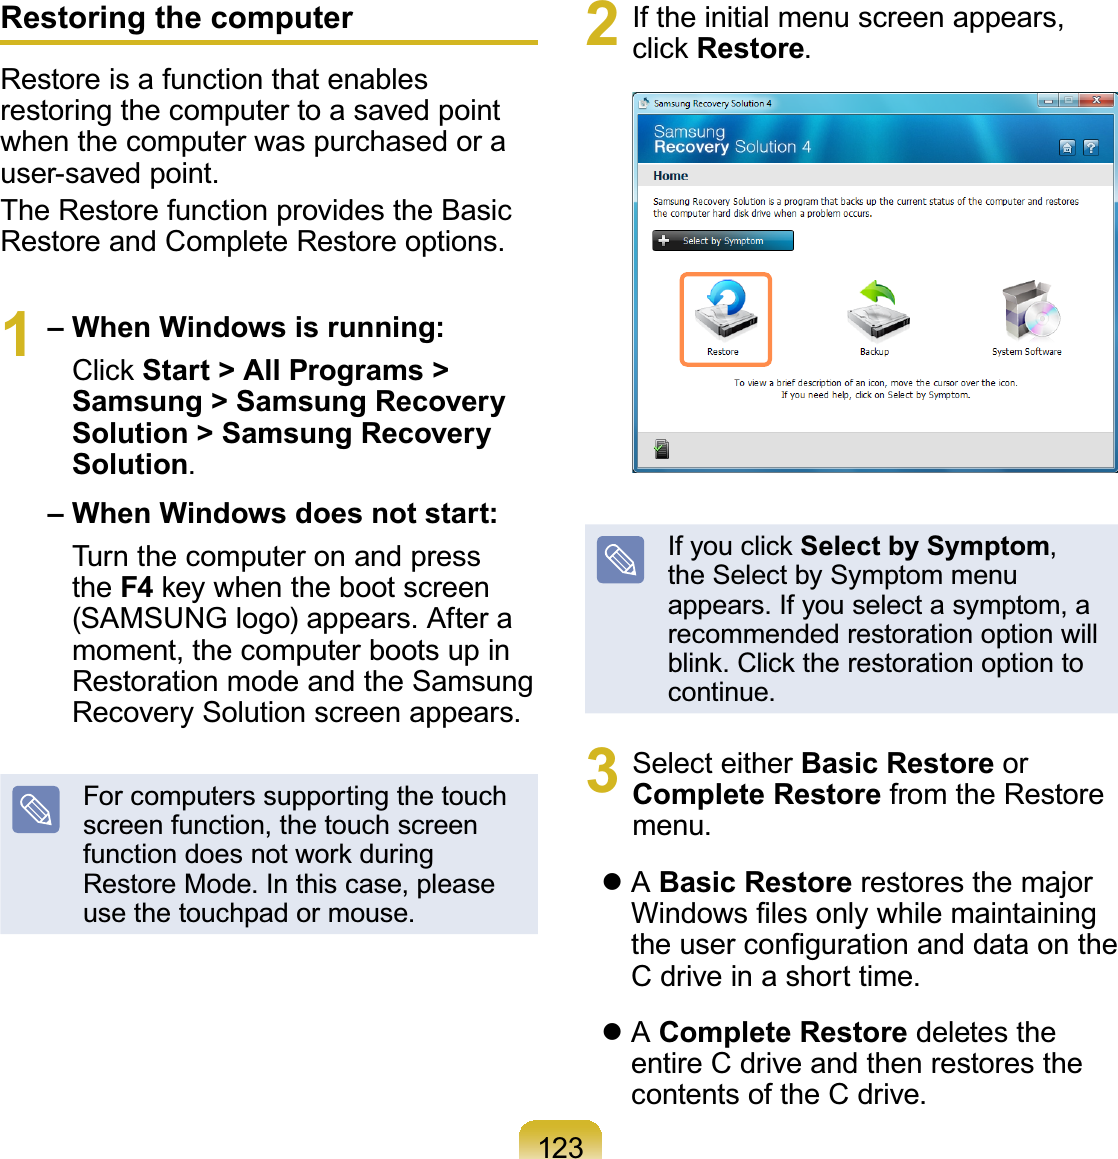
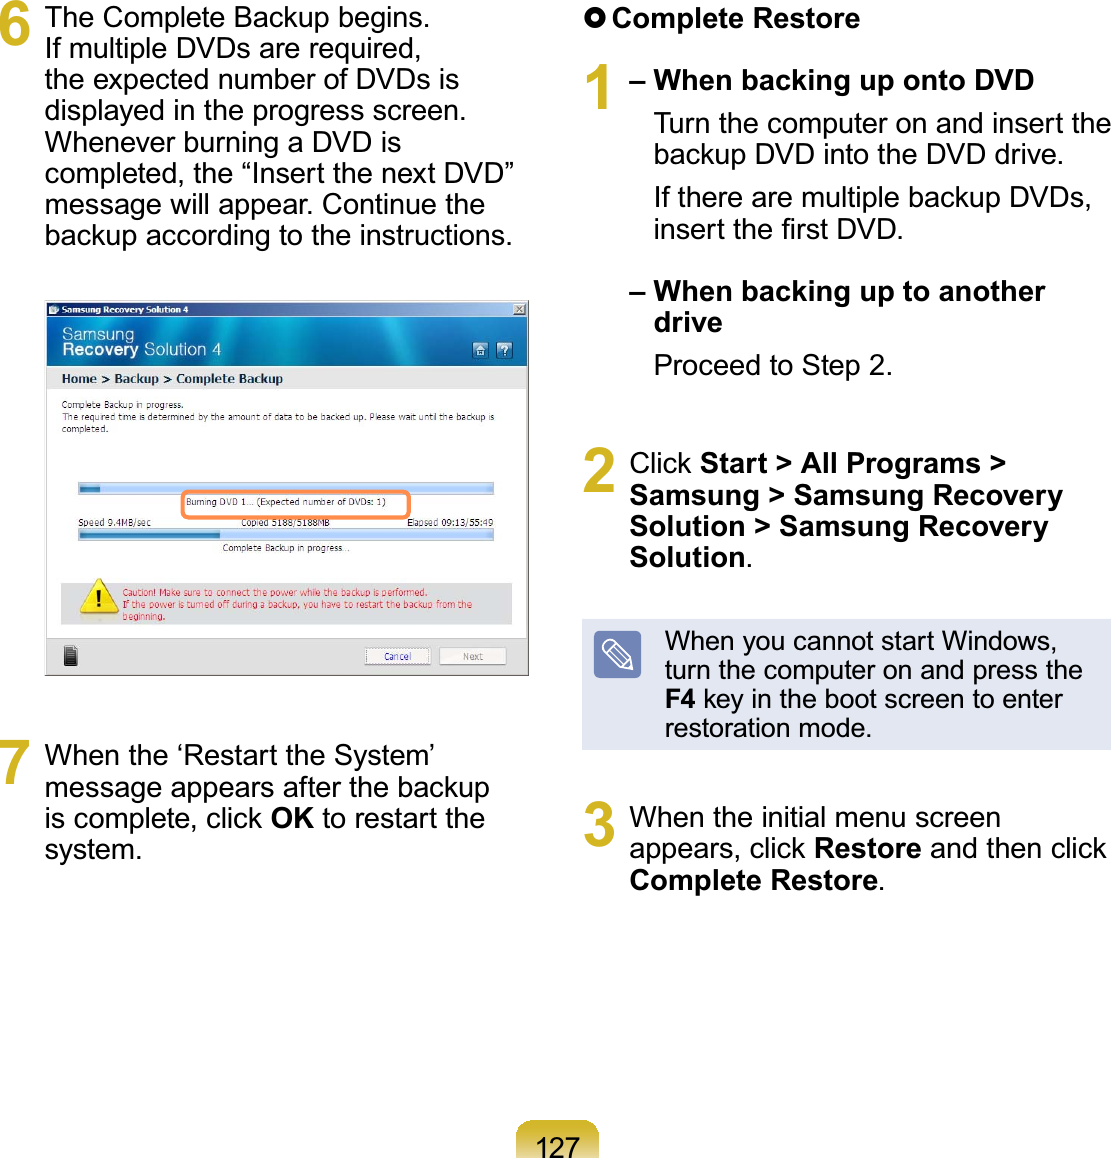
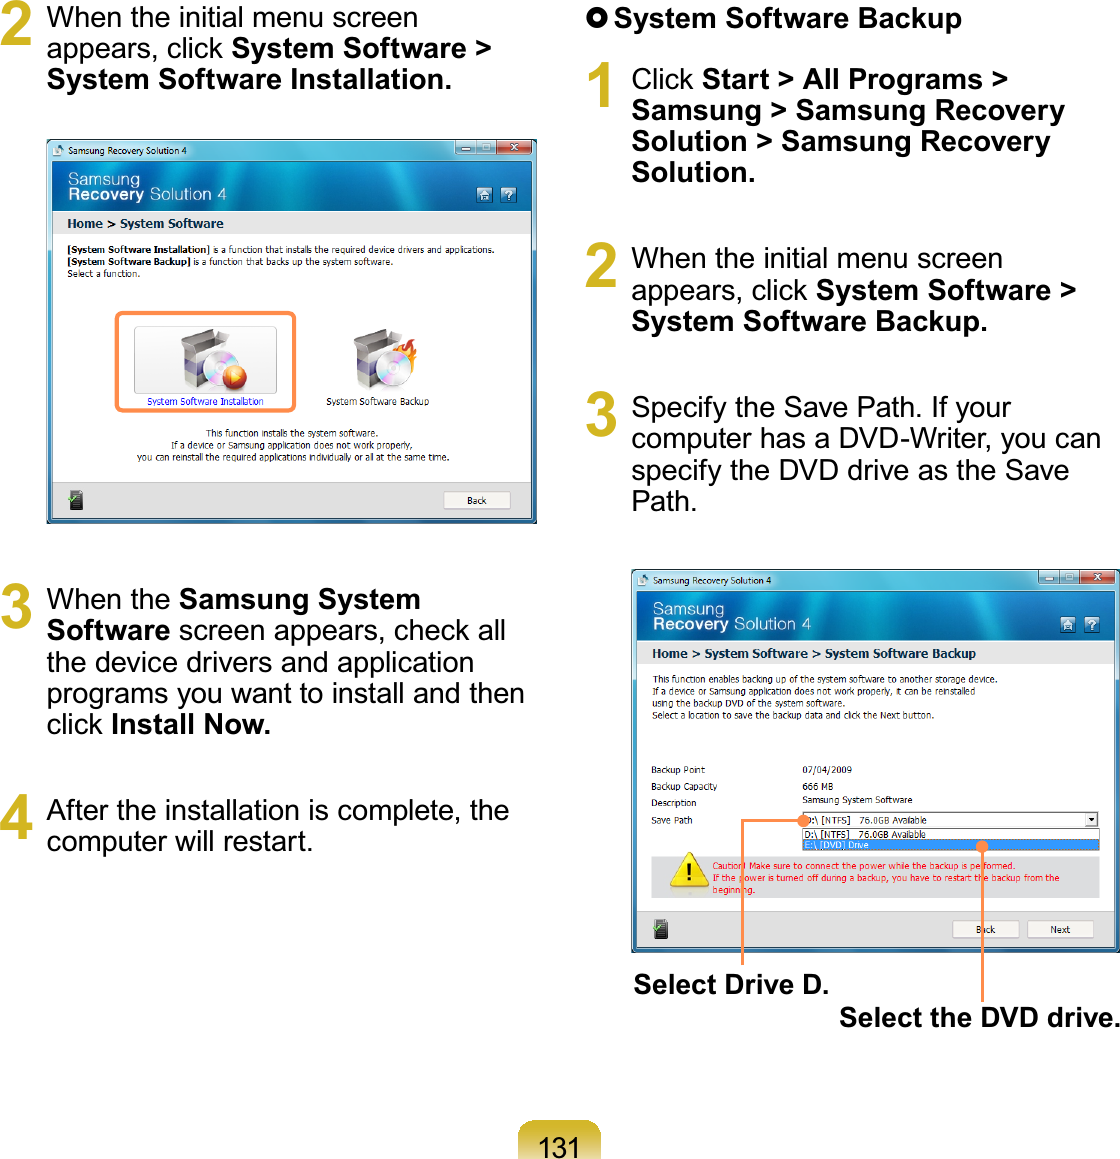
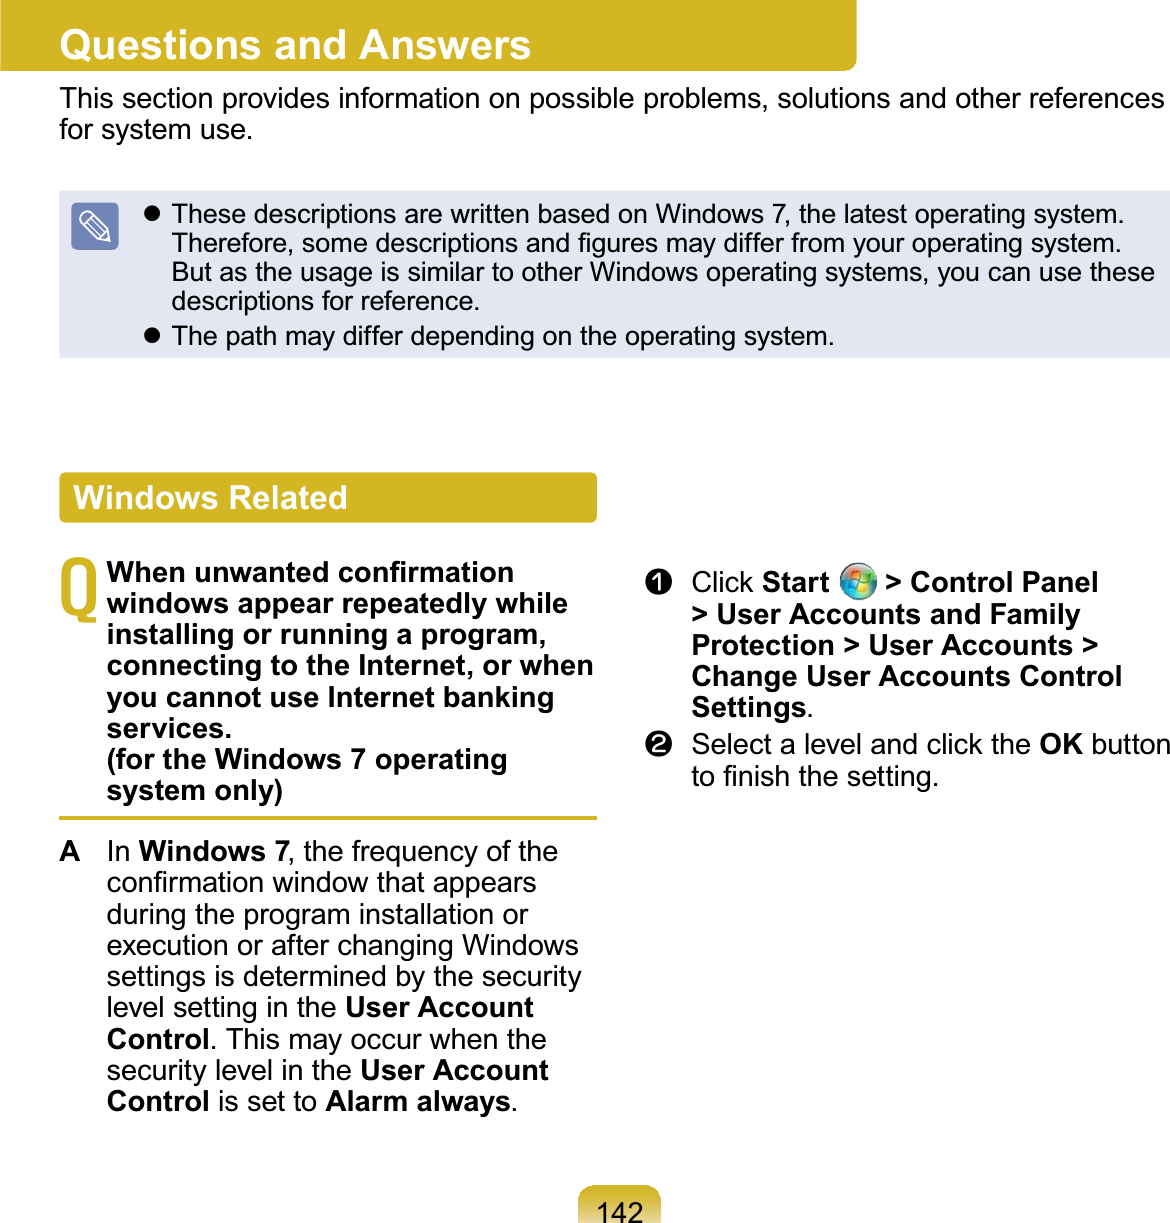
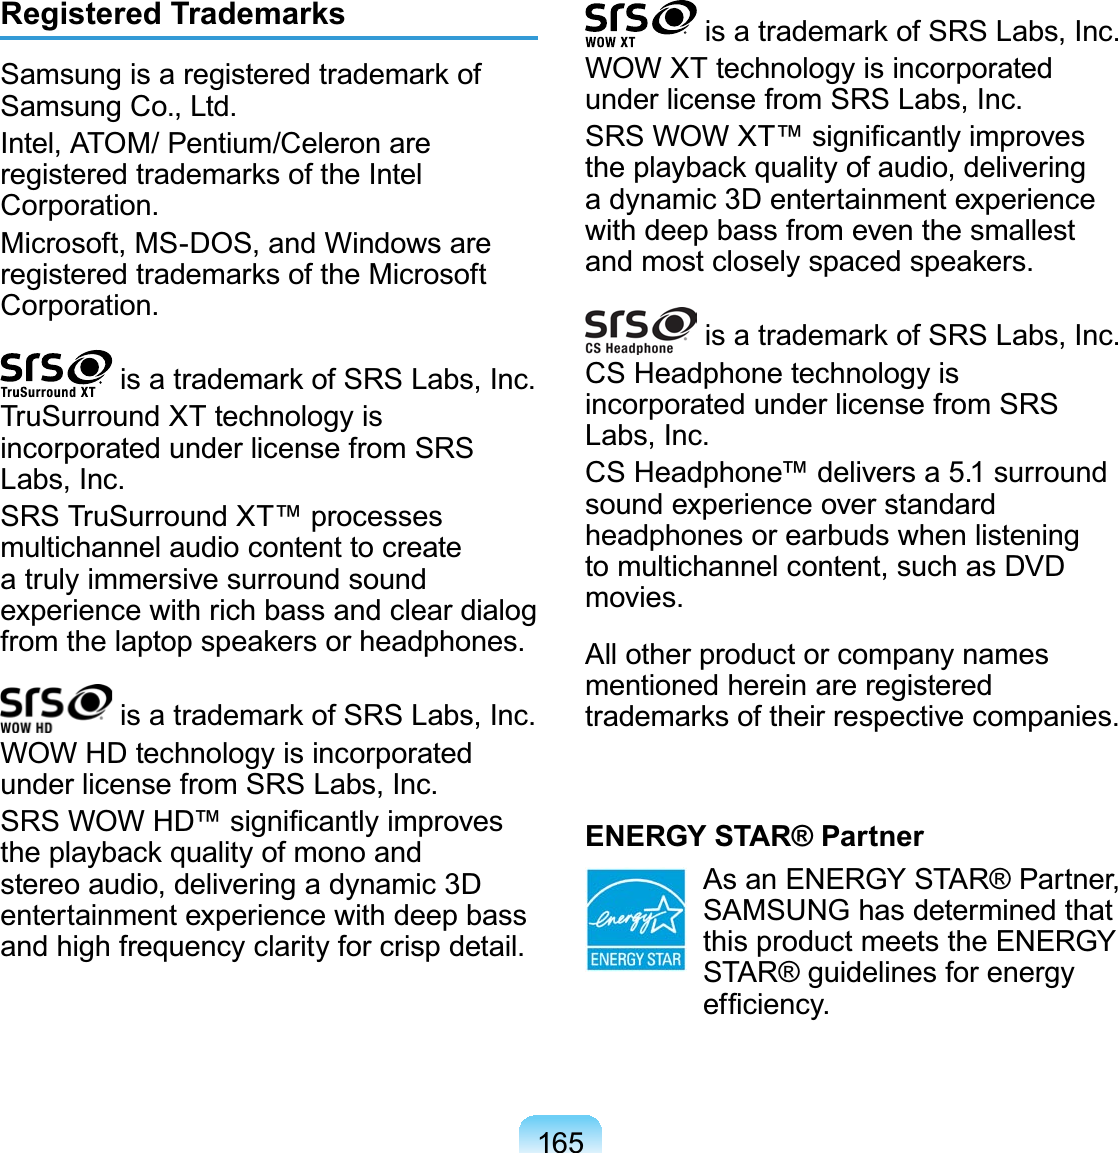
![1081 Select the Boot menu in the BIOSSetup.2 Press <Enter>ontheBoot Device Priority item.XXXXXXXXBoot Device PriorityNumLockEnable KeypadSummary ScreenBoot-time Diagnostic ScreenBrightness Mode Control Wireless Device ControlPowersave ModeSmart Battery Calibration[Off][By NumLock][Disabled][Disabled][Auto][Always On][Enabled]3 3UHVVWKHGRZQNH\ĻWRPRYHWRWKHIDE HDD item and press the F6NH\tomovetheitemtothetop.[Boot priority order] 1. USB CD : N/A 2. IDE HDD : XXXXXXXX 3. PCI BEV : N/A 4. USB FDD : N/A 5. USB KEY : N/A 6. USB HDD : XXXXXXXX 7. 8.[Excluded from boot order] - USB ZIP : N/A - USB LS120 : N/A - PCI SCSI : N/A - Other USB : N/A - PCI : N/ABoot Device Priority4 Press the F10NH\WRVDYHWKHVHWWLQJVandexitSetup.The highest boot priority device isnowsettotheHardDrive.Changing the Boot Priority7KLVFRPSXWHULVFRQ¿JXUHGWRERRWIURPDQH[WHUQDOW\SH2''¿UVWThischapterdescribeshowtochangethebootprioritysothatthecomputerbootsfromWKHKDUGGLVNGULYH¿UVW](https://usermanual.wiki/Realtek-Semiconductor/RTL8192SE.User-Manual-2/User-Guide-1302032-Page-28.png)
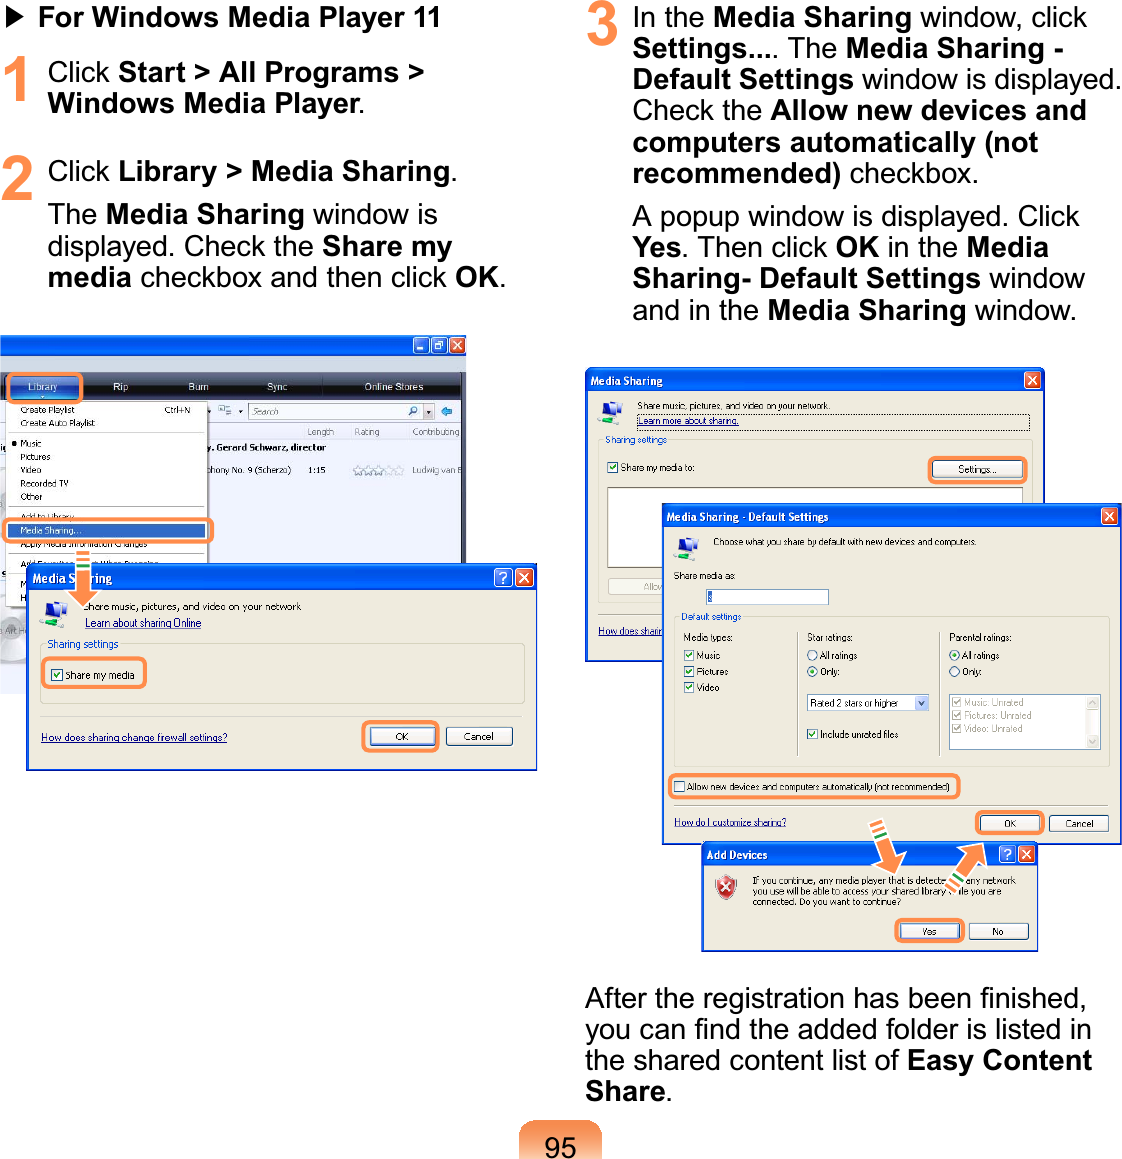
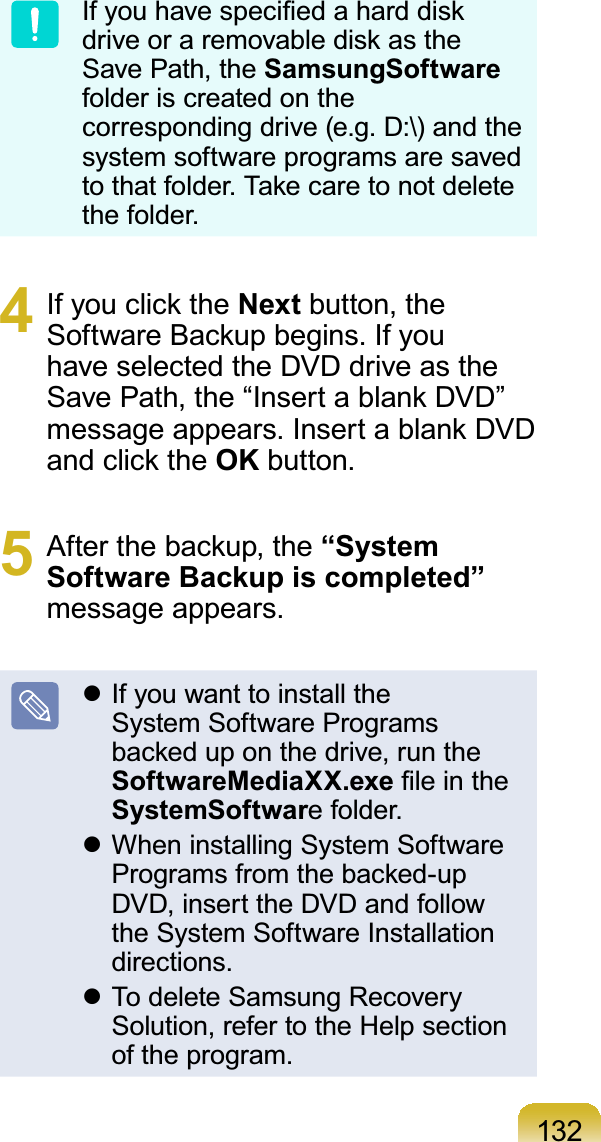
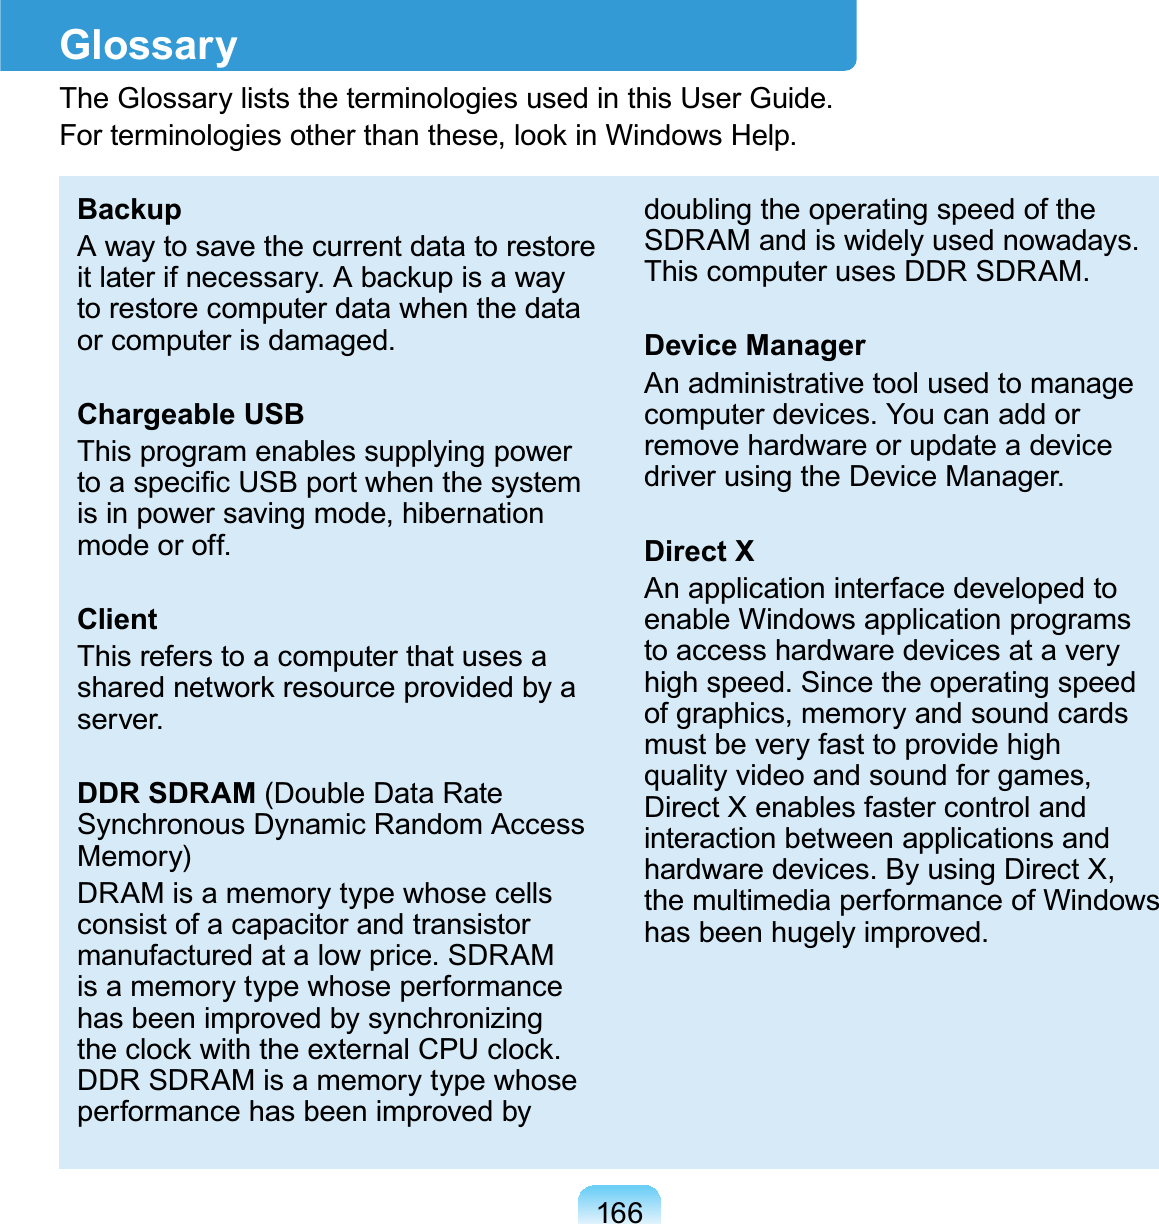
![1153 Move to the Boot > Smart Battery Calibration item using the directionNH\VDQGSUHVVEnter>.XXXXXXXXBoot Device PriorityNumLockEnable KeypadSummary ScreenBoot-time Diagnostic ScreenBrightness Mode Control Wireless Device ControlPowersave ModeSmart Battery Calibration[Off][By NumLock][Disabled][Disabled][Auto][Always On][Enabled]4 Highlight Yes in the Battery &DOLEUDWLRQ&RQ¿UPDWLRQ windowand press <Enter>.The Battery Calibration function isactivated and the battery is forcefullydischarged. To stop the operation,press the <Esc> button.This operation requires 3~5 hoursdepending on the battery capacityand the remaining battery charge.](https://usermanual.wiki/Realtek-Semiconductor/RTL8192SE.User-Manual-2/User-Guide-1302032-Page-35.png)

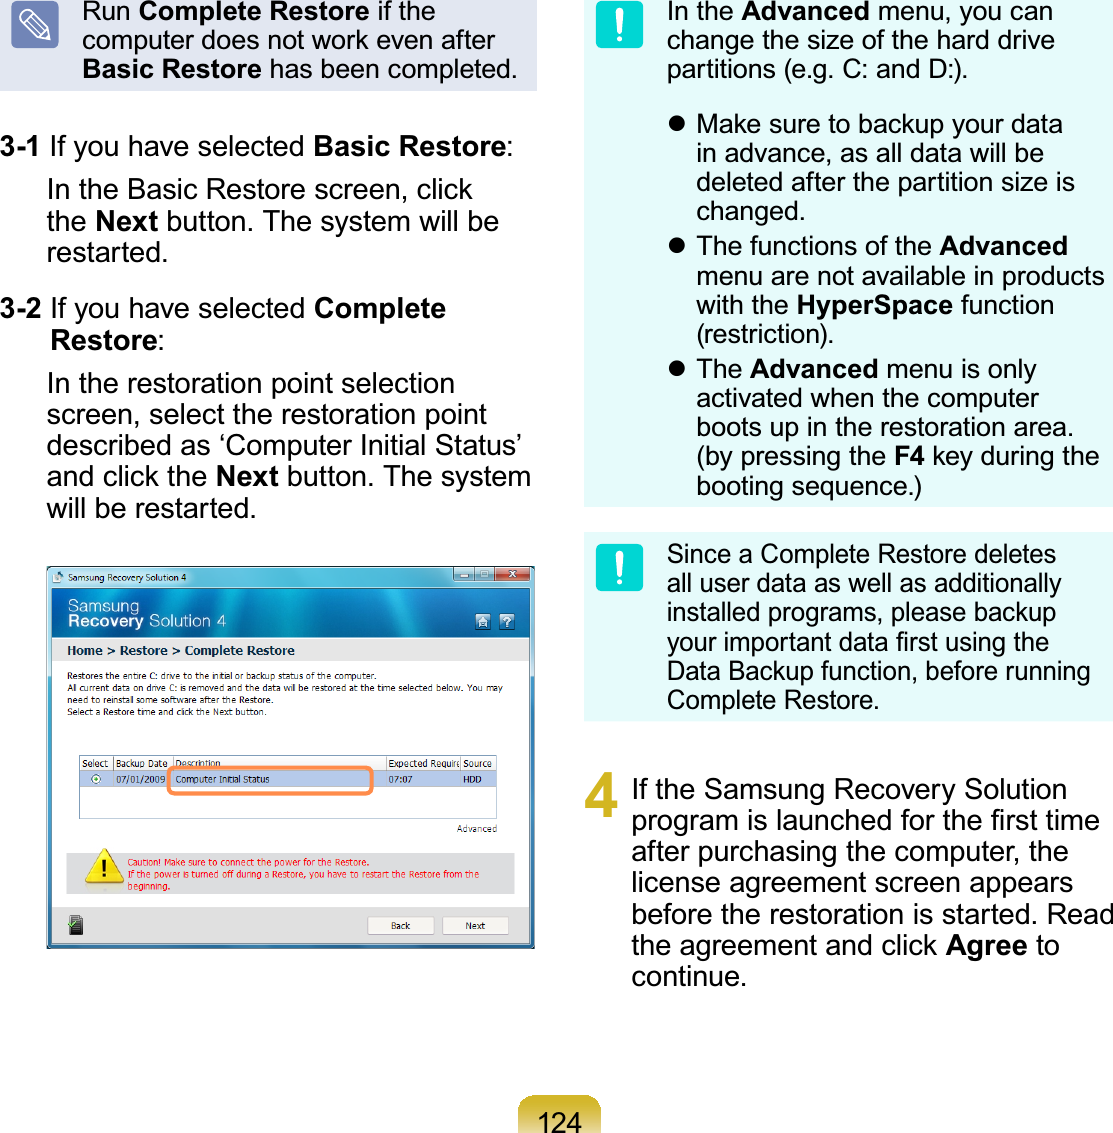
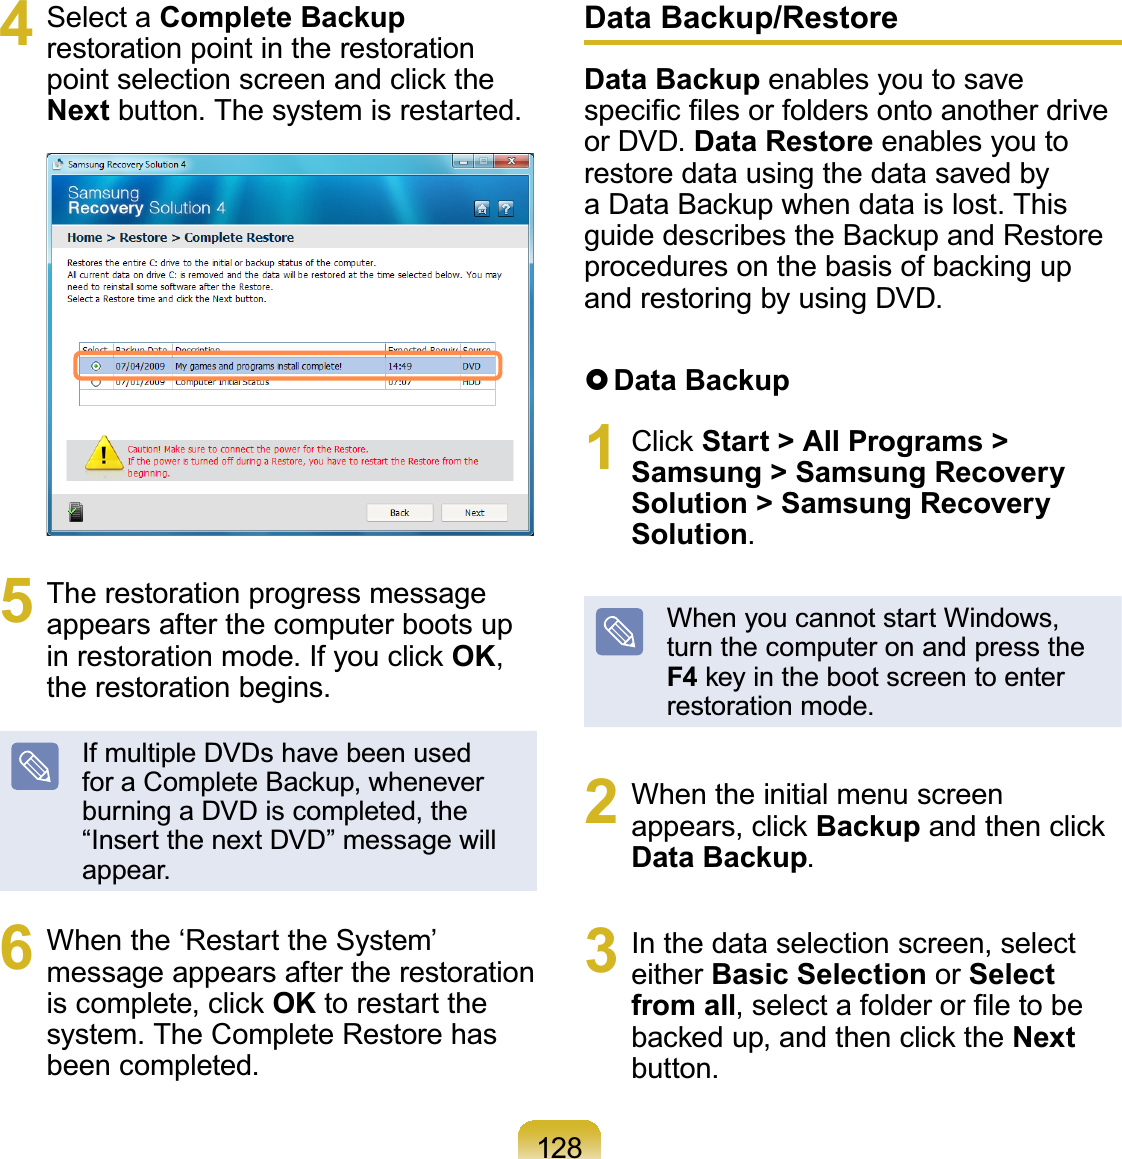
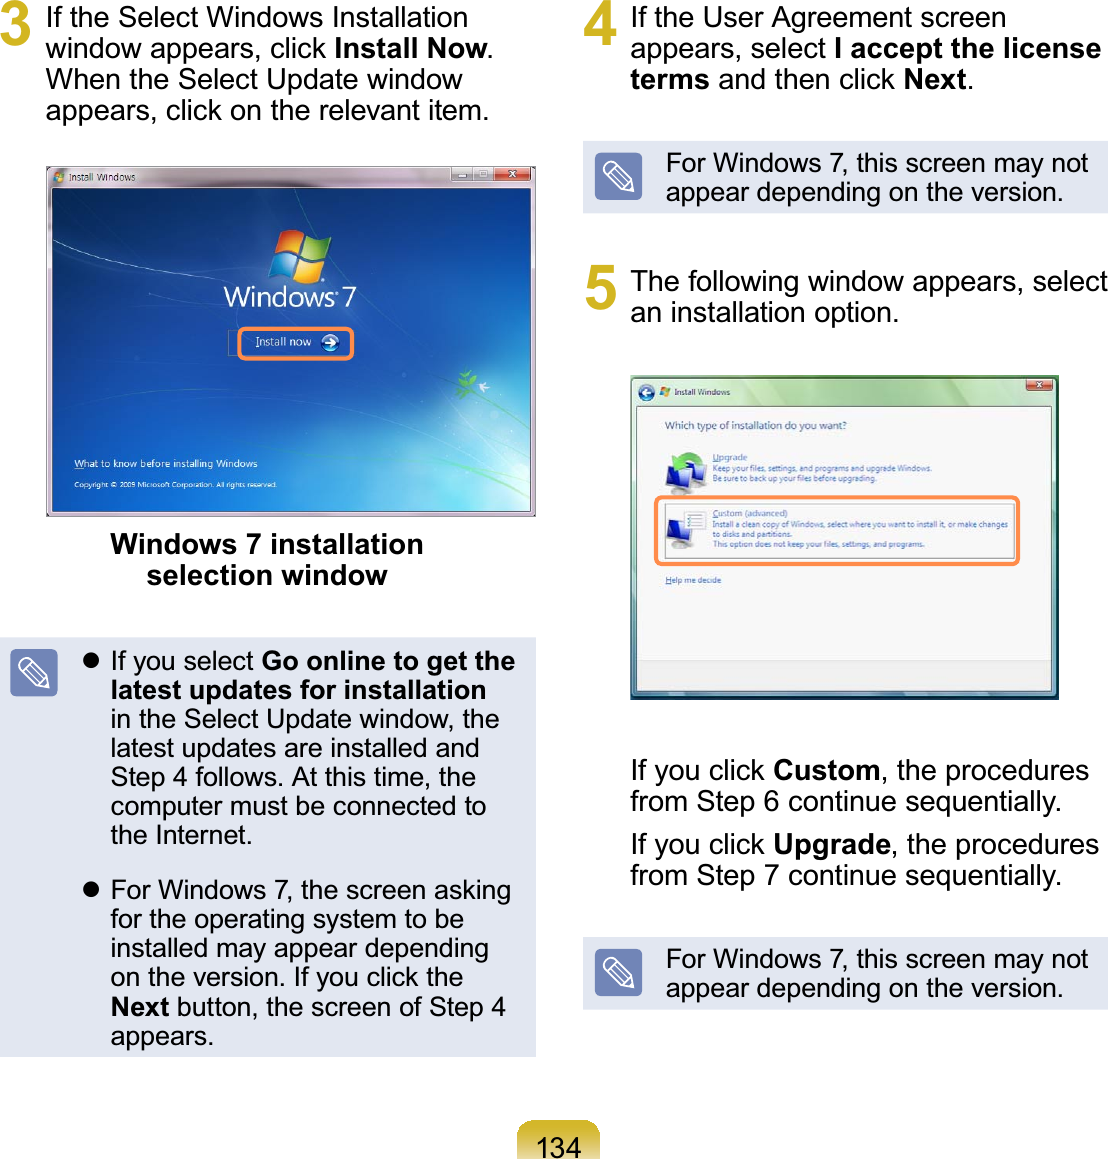
![133Reinstalling in Windows1 Insert the SYSTEM RECOVERY MEDIA into the DVD drive.2 When the AutoPlay window appears,select Run setup.exeDQGFOLFNAllow.This screen may not appeardependingonthesecuritylevel.Reinstalling Windows 7 (For Windows 7. For supported models only)You can reinstall Windows using the SYSTEM RECOVERY MEDIA for WindowsZKHQ:LQGRZVLVQRORQJHUZRUNLQJSURSHUO\)RUPRGHOVVXSSOLHGZLWKD6<67(0RECOVERY MEDIA.)For models supplied with the Samsung Recovery Solution, you can reinstall WindowsusingtheSamsungRecoverySolution.ThesedescriptionsareforWindows7andforsupportedmodelsonly.z A SYSTEM RECOVERY MEDIA maynotbesupplieddependingonyourcomputermodel.z IfyoucannotstartWindows,orifyouwanttodeleteallexistingdataandreinstallWindows, install Windows according to the descriptions in [Reinstalling when Windows does not start].z To reinstall Windows using SYSTEM RECOVERY MEDIA, an external-type ODDmust be connected before turning the computer on. The following descriptionsassume that an external ODD is connected.5HLQVWDOOLQJ:LQGRZVPD\GHOHWHGDWD¿OHVDQGSURJUDPVVDYHGRQWKHKDUGGLVNGULYH0DNHVXUHWREDFNXSDOOLPSRUWDQWGDWD6DPVXQJ(OHFWURQLFVVKDOOQRWEHKHOGliable for any loss of data.](https://usermanual.wiki/Realtek-Semiconductor/RTL8192SE.User-Manual-2/User-Guide-1302032-Page-53.png)

![146 5LJKWFOLFNRYHUWKH'HVNWRSVHOHFWProperties, select the Settings tab andchange the resolution to 800 x 600.TThe Taskbar on the bottom of the screen does not appear when a projector is used as the display device.AThis may happen, if the projectordoes not support LCD resolution. Inthis case change the resolution to800x 600(recommended)onyourcomputer.TSwitching the MS-DOS command prompt to full screen mode or Windows mode by pressing the <Alt>+<Enter> keys does not operate properly.APressing the <Alt>+<Enter>NH\VXVLQJDQ86%NH\ERDUGPD\FDXVHWKHNH\LQSXWWREHUHFRJQL]HGDVPXOWLSOHNH\LQSXWVGHSHQGLQJRQWKHNH\ERDUGLQSXWUHFRJQLWLRQWLPH,Qthis case, the MS-DOS commandpromptisrepeatedlyswitchedtofullscreen and then to Windows severaltimes. Please press the <Alt>+<Enter>NH\VPRUHTXLFNO\RUSUHVVWKH<Alt>+<Enter>NH\VXVLQJWKHV\VWHPNH\ERDUGTThe shortcut icons are not displayed on the screen even if I press the shortcut key.AThe shortcut icons only appear whenthe Easy Display Manager program isinstalled.TThe color is strange when the picture is displayed on the connected monitor (or projector).A&KHFNWKHPRQLWRUVLJQDOFDEOHconnection and reconnect the cable.](https://usermanual.wiki/Realtek-Semiconductor/RTL8192SE.User-Manual-2/User-Guide-1302032-Page-66.png)


![168LCD (Liquid Crystal Display)TherearePassiveMatrixandActiveMatrixLCDtypes.ThiscomputerusestheActiveMatrixtypeLCDcalledaTFTLCD.SinceanLCDisimplementedbytransistorsinsteadofacathode-raytubeXQOLNHD&57LWVVL]HFDQEHVOLP$QGEHFDXVHLWGRHVQRWEOLQNLWUHGXFHVH\Hstrain.NetworkAgroupofcomputersanddevices,suchas printers and scanners, connectedE\DFRPPXQLFDWLRQVOLQN$QHWZRUNcanbeeithersmallorlargeandcanbeconnected permanently through cablesor temporarily through telephone linesRUZLUHOHVVOLQNV7KHELJJHVWQHWZRUNLVWKH,QWHUQHWDZRUOGZLGHQHWZRUN1RWL¿FDWLRQ$UHDThis refers to the right area of the7DVNEDULQFOXGLQJSURJUDPLFRQVVXFKasthevolumecontrol,thepoweroptionsand the time.Power SchemesThis refers to a pre-determined powermanagement option group. For example,youcansetthetimethecomputerwaitsbefore entering Standby Mode, or beforethe monitor or hard drive turns off. Thesettingsaresavedasapowerscheme.Quick LaunchThisreferstoatoolbarthatcanbeFRQ¿JXUHGVRWKDW\RXFDQODXQFKDprogramsuchasInternetExplorerorGLVSOD\WKH:LQGRZV'HVNWRSZLWKRQHFOLFN<RXFDQDGGDQ\LFRQWRWKHTXLFNODXQFKDUHDRIWKH7DVNEDUDQGODXQFKIUHTXHQWO\XVHGSURJUDPE\FOLFNLQJWKDWicon.ServerIngeneral,aserverreferstoacomputerthat provides shared resources forQHWZRUNXVHUVShareThisreferstosettingaresourceofacomputersuchasafolderorprintersothat other users can also use it.](https://usermanual.wiki/Realtek-Semiconductor/RTL8192SE.User-Manual-2/User-Guide-1302032-Page-88.png)