Realtek Semiconductor RTL8192SE 802.11 b/g/n RTL8192SE miniCard User Manual UserMan TX2 RTL8192SE
Realtek Semiconductor Corp. 802.11 b/g/n RTL8192SE miniCard UserMan TX2 RTL8192SE
Contents
- 1. Manual
- 2. User Manual 1
- 3. User Manual 2
User Manual 2

81
君#For Windows 7
1 Connectamicrophonetothe
PLFURSKRQHMDFN
YoucanalsousetheinternalMIC.
2 5LJKWFOLFNRYHUWKHVolume icon
RQWKHWDVNEDUDQGVHOHFWRecording
Device.
3 &KHFNLIWKHPLFURSKRQHLVVHWDVWKH
default recording device.
If this is the case, it is already set as
WKHGHIDXOWGHYLFH,IQRWULJKWFOLFN
over the microphone and select Set
default.
4 &OLFNStart > All Programs >
Accessories > Sound Recorder
DQGFOLFNStart recording to start a
recording.
君#For Windows XP
1 Connectamicrophonetothe
PLFURSKRQHMDFN
YoucanalsousetheinternalMIC.
2 &OLFNStart > Control Panel >
Sounds, Speech, and Audio
Devices > Sounds and Audio
Devices.
3 &OLFNAdvanced from Volume and
WKHQFOLFNOptions >Properties.
Using Recorders
This section describes how to perform recording on a computer by using Windows
Recorder.
82
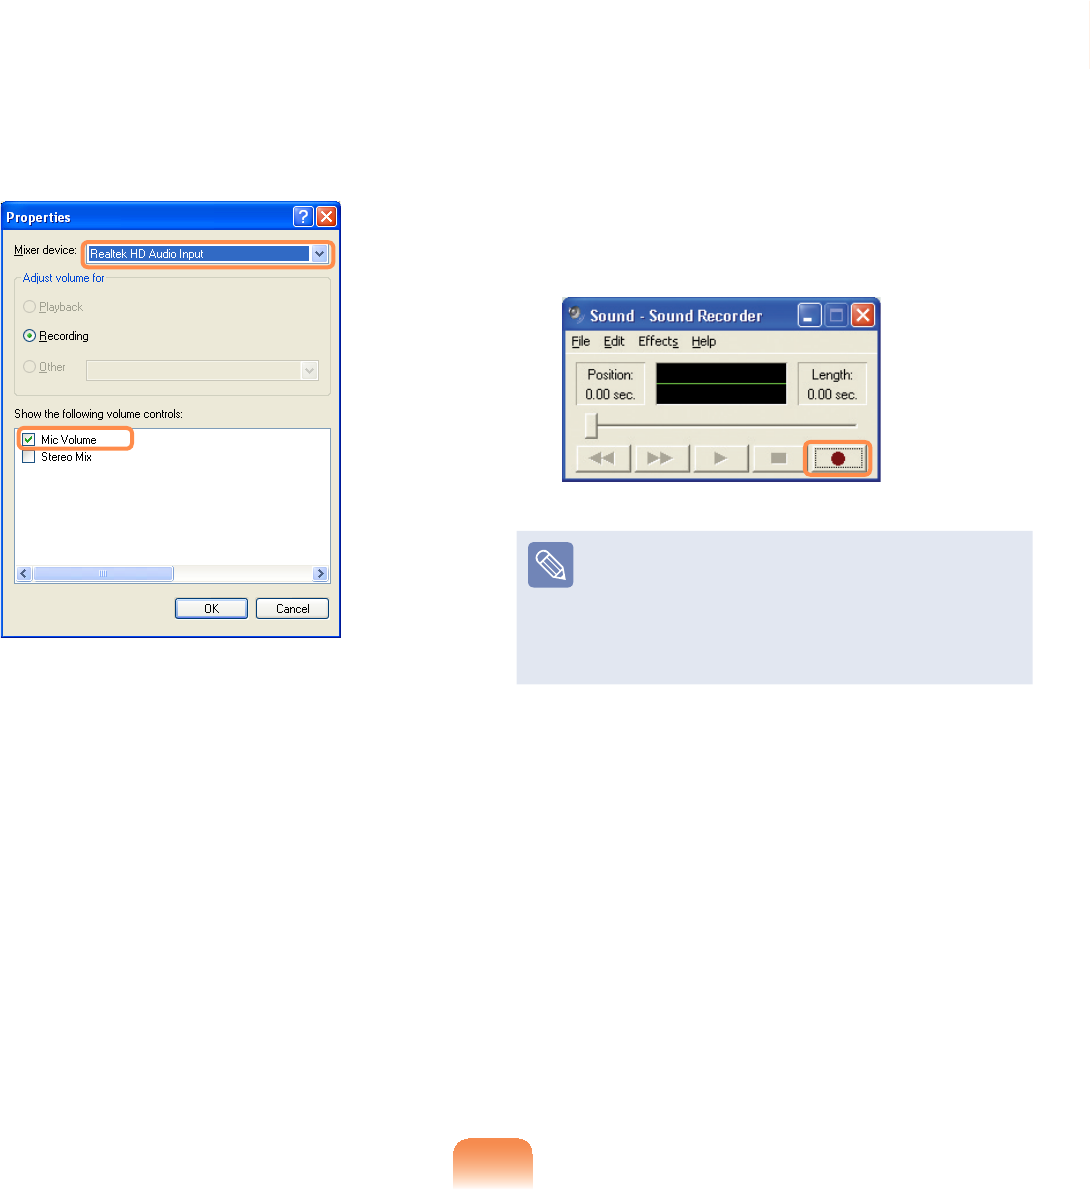
4 Select Realtek HD Audio input from
the mixer device to select Recording
from Adjust Volume for.
5 Select Mic Volume from Show the
following volume controlsDQGFOLFN
OK.
6 When Recording Control window
DSSHDUVFKHFNWKHSelectFKHFNER[
Increase the recording volume to
increase the recording sensitivity and
close the window.
7 &OLFNStart > All Programs >
Accessories > Entertainment >
Sound Recorder.
8 &OLFNWKHRecord button to perform
recording.
Thedefaultrecordingdurationof
Windows is 60 seconds. Download
a dedicated recording program from
theInternettorecordaudiodatafora
long time.
83
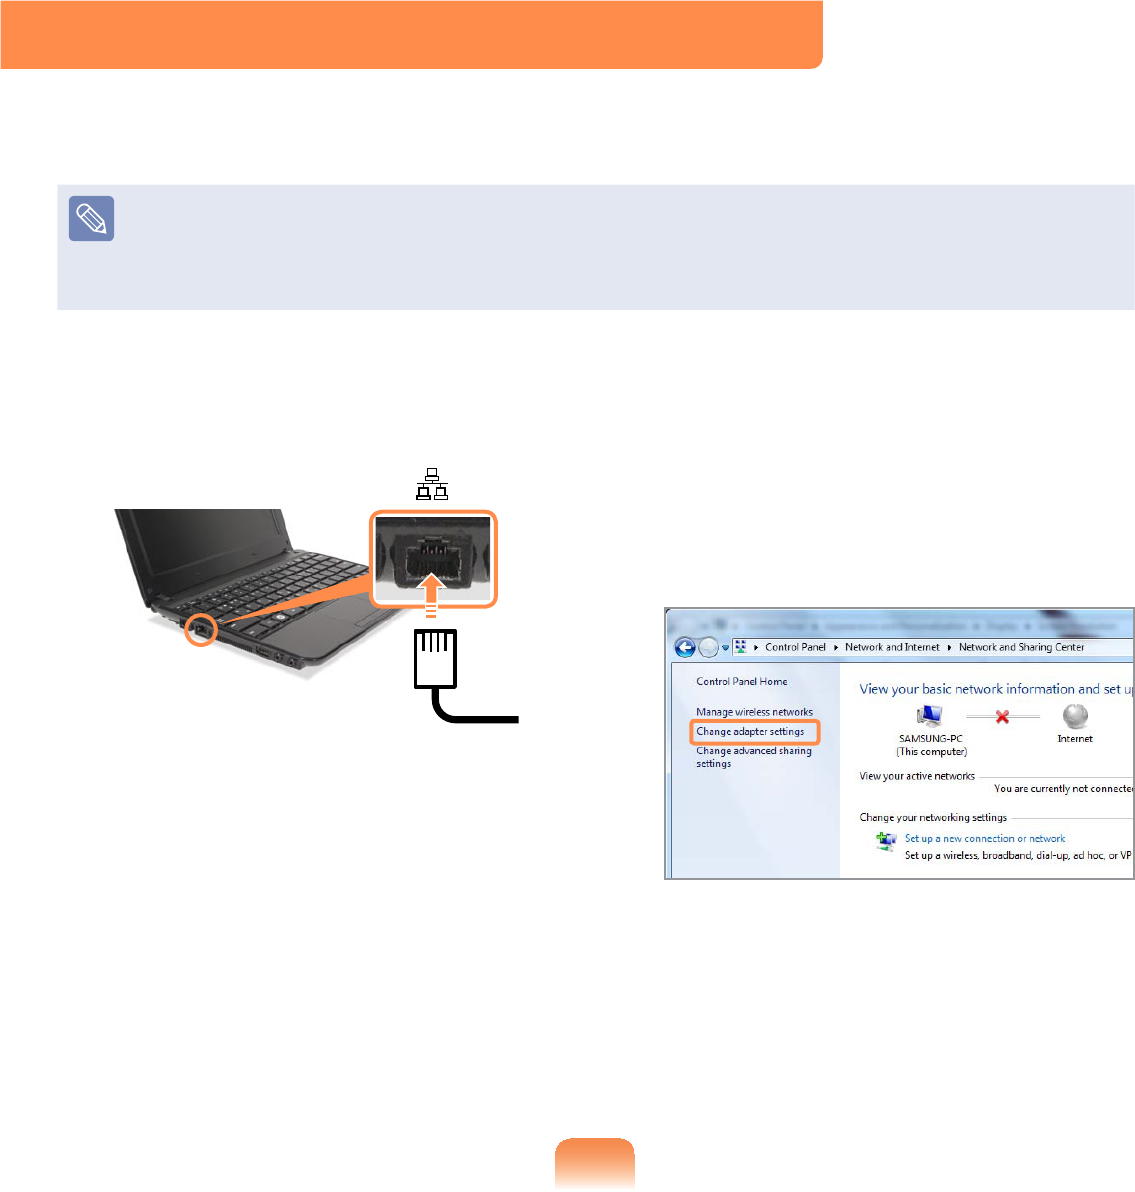
1 ConnectaLANcabletothe
computer’s LAN port. 2君#For Windows 7
&OLFNStart > control Panel >
Network and Internet > Network
and Sharing CenterDQGFOLFN
Change adapter settings in the
left menu pane.
#君#For Windows XP
&OLFNStart > Control Panel
> Network and Internet
Connections > Network
Connection.
Wired Network
$ZLUHGQHWZRUNLVDQHWZRUNHQYLURQPHQWXVHGIRUDFRPSDQ\QHWZRUNRUEURDGEDQG
internet connection at home.
Since these descriptions are written on the basis of the latest operating system,
:LQGRZVVRPHRIWKHFRQWHQWDQGWKH¿JXUHVRIWKHGHVFULSWLRQVPD\GLIIHU
depending on the operating system. Since the procedures for other Windows operating
systems are similar, use the computer referring to these descriptions.
84
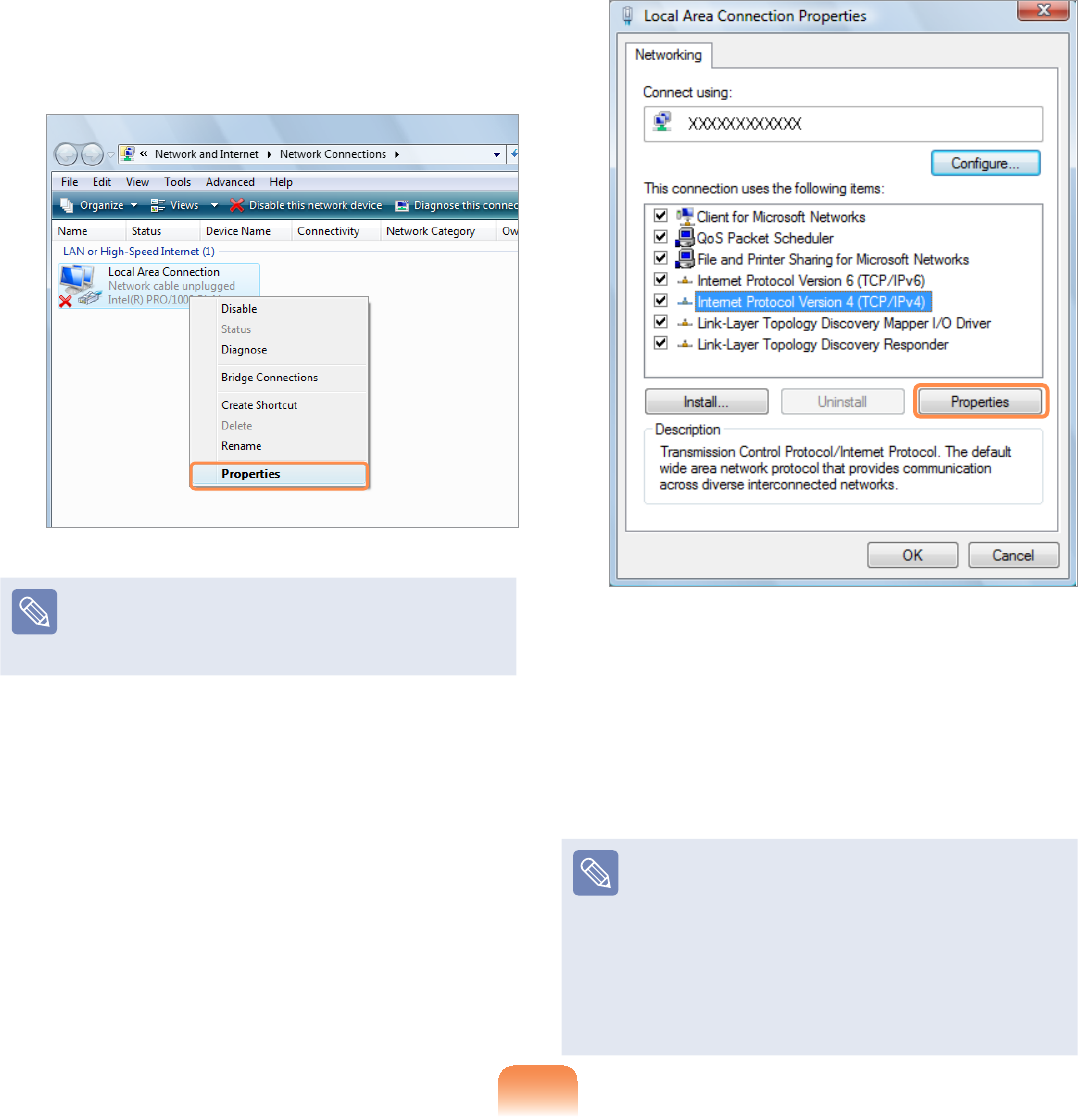
3 Select Local Area Connection and
FOLFNWKHULJKWEXWWRQRIWKHWRXFKSDG
and select Properties.
The LAN Device name may differ
dependingonyourcomputer’s
1HWZRUN'HYLFH
4君#For Windows 7
Select Internet Protocol Version
4 (TCP/IPv4) from the Networking
WDEDQGFOLFNProperties.
#君#For Windows XP
&OLFNGeneral tab and select a LAN
driver from Connect using:. Select
Internet Protocol(TCP/IP)DQGFOLFN
Properties.
z ThedisplayedLANdrivermay
vary depending on the LAN device
type.
z&OLFNInstallWRDGGDQHWZRUN
FRPSRQHQWDVVKRZQLQWKH¿JXUH
below: You can add a client, a
service, or a protocol.
85
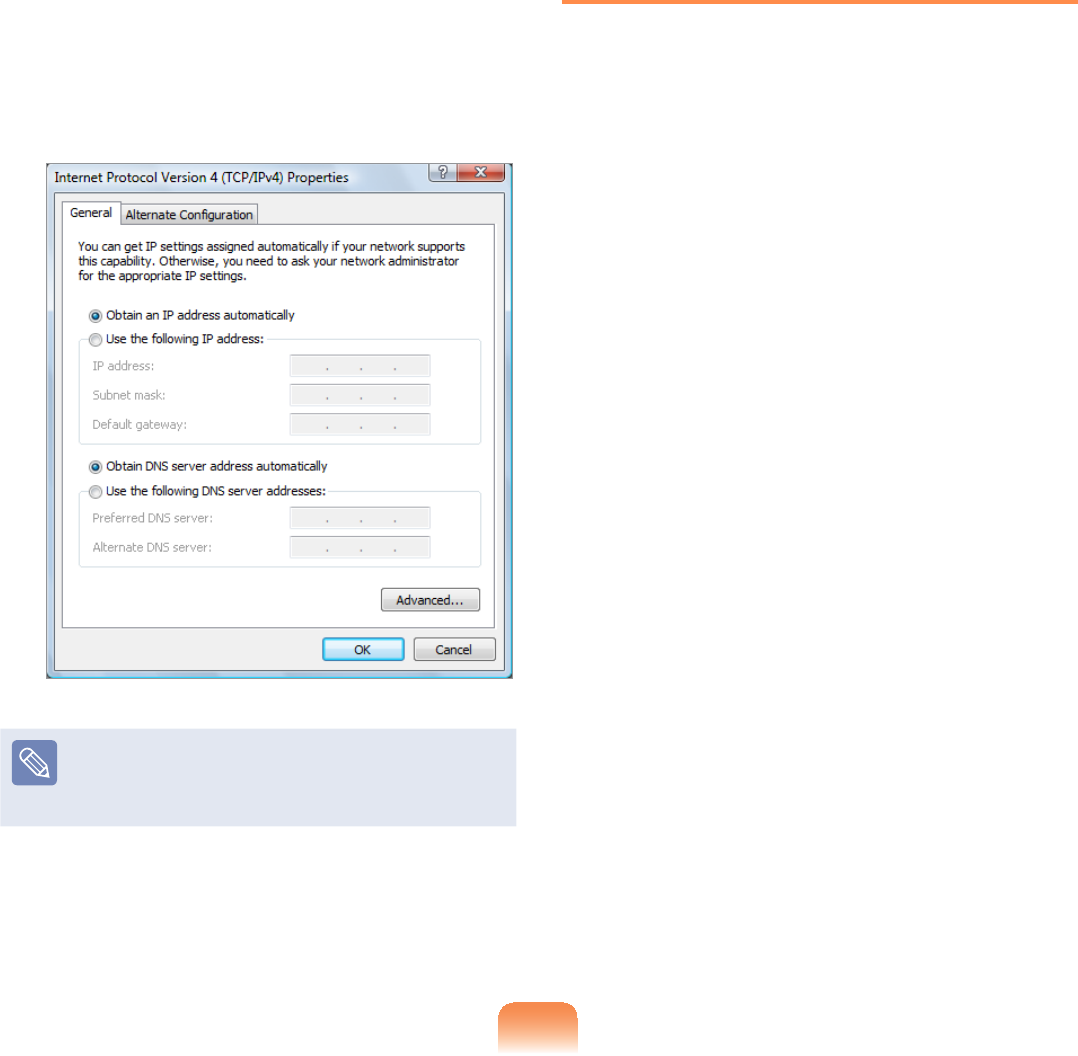
5 &RQ¿JXUH,3VHWWLQJV
Select Obtain an IP address
automatically when using DHCP. If
you use a static IP, select Use the
following IP address and enter the
values.
IftheIPofyourcomputerisnot
automaticallyassigned,contactthe
QHWZRUNDGPLQLVWUDWRU
6 ,IDOOVHWWLQJVDUHPDGHFOLFNOK.Now
WKHQHWZRUNFRQ¿JXUDWLRQLV¿QLVKHG
8VLQJERWK'+&3DQGD¿[HG,3
simultaneously
Using the $OWHUQDWH&RQ¿JXUDWLRQ
provided by Windows, you can set both
DXWRPDWLFDQG¿[HG,3DGGUHVVHVDQG
thenyoucanselecttouseeitherofthem
toconnecttotheInternet.
1君For Windows 7
&OLFNStart > Control Panel >
Network and Internet > Network
and Sharing CenterDQGFOLFNRQ
Change adapter settings in the
left menu pane.
君For Windows XP
&OLFNStart > Control Panel
> Network and Internet
Connections > Network
Connection > Local Area
Connection by using the right
EXWWRQRIWKHWRXFKSDGDQGFOLFN
Properties.
2 5LJKWFOLFNRYHUWKHLocal Area
Connection and select Properties.
86
3 For Windows 7, select Internet
Protocol Version 4 (TCP/IPv4)
from the Networking tab and select
Properties.
For Windows XP, select Internet
Protocol (TCP/IP)DQGFOLFN
Properties.
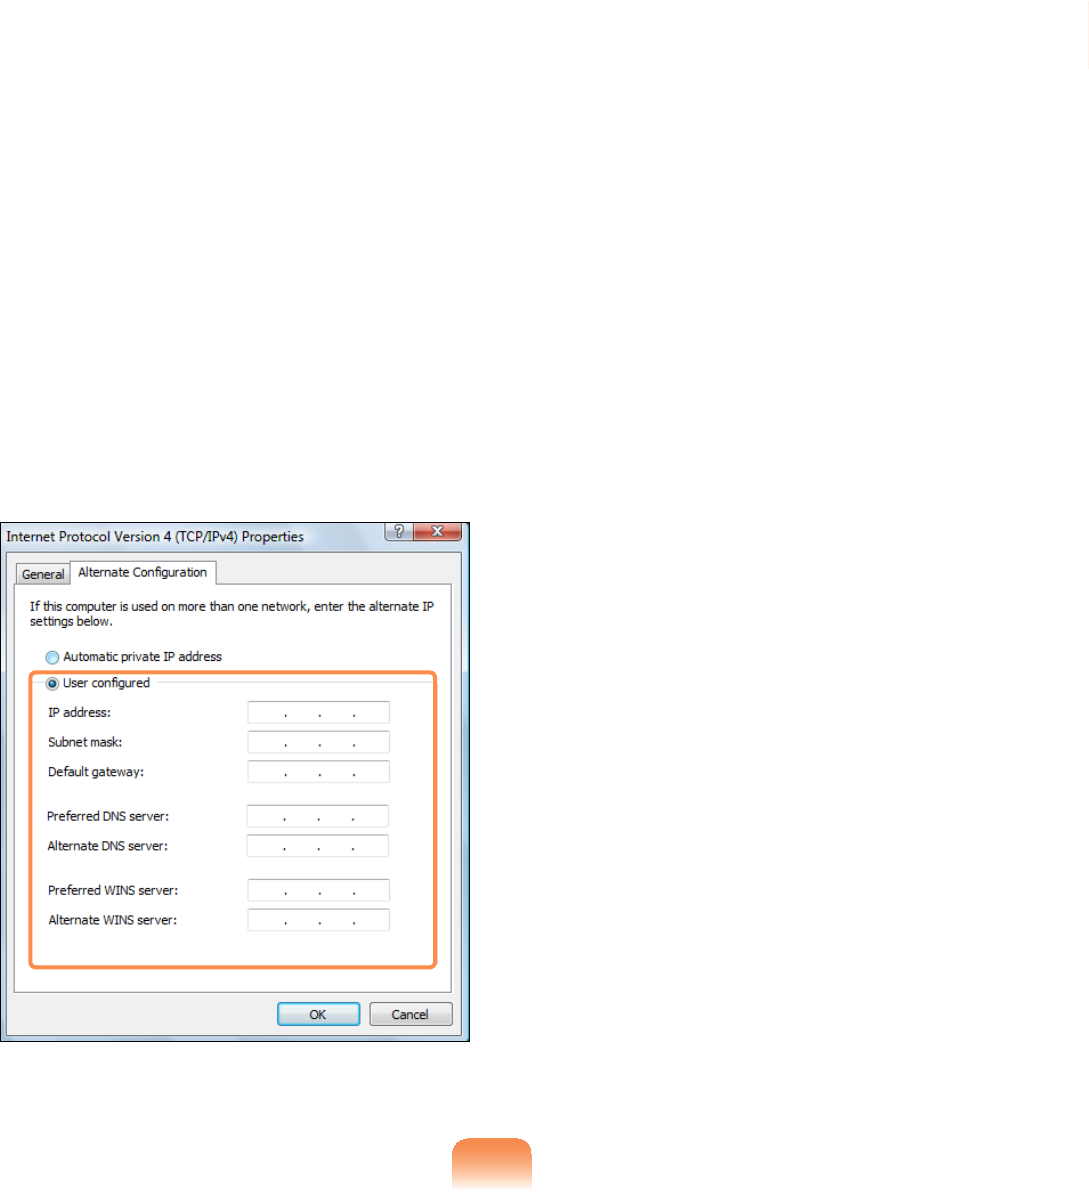
4 Select the $OWHUQDWH&RQ¿JXUDWLRQ
tab, select 8VHUFRQ¿JXUHG¿OOLQWKH
FRUUHVSRQGLQJ¿HOGVDQGFOLFNWKHOK
button.

87
Wireless Network (Optional)
$ZLUHOHVVQHWZRUNDOORZVFRPSXWHUVWRVKDUHUHVRXUFHVRUDQLQWHUQHWFRQQHFWLRQ
without using LAN cables between them.
z This description is applied only to the models equipped with wireless LAN cards or
devices.
z Some of the pictures shown in this descriptionmayvarydependingonthewireless
LAN device.
z To use wireless LAN, you have to turn the wireless LAN device on.
Press the Fn + NH\FRPELQDWLRQWRRSHQWKH:LUHOHVV2Q2IIZLQGRZDQGVHW
the Wireless LAN item to On.
What is Access Point (AP)?
$3LVDQHWZRUNGHYLFHWKDWFRQQHFWVZLUHG/$1WRZLUHOHVV/$1DQGFRUUHVSRQGVWR
WKHZLUHOHVVKXERIDZLUHGQHWZRUN$OVR$3DOORZV\RXWRFRQQHFWPRUHWKDQRQH
computer where wireless LAN is enabled.
Connecting to Wireless LAN
If there is an AP, you can connect to the Internet via the AP using the Wireless LAN
connection method provided by Windows.
Some processes may differ depending on the operating system version. Moreover, the
provided images may differ from the actual screen images.
88
君#For Windows 7
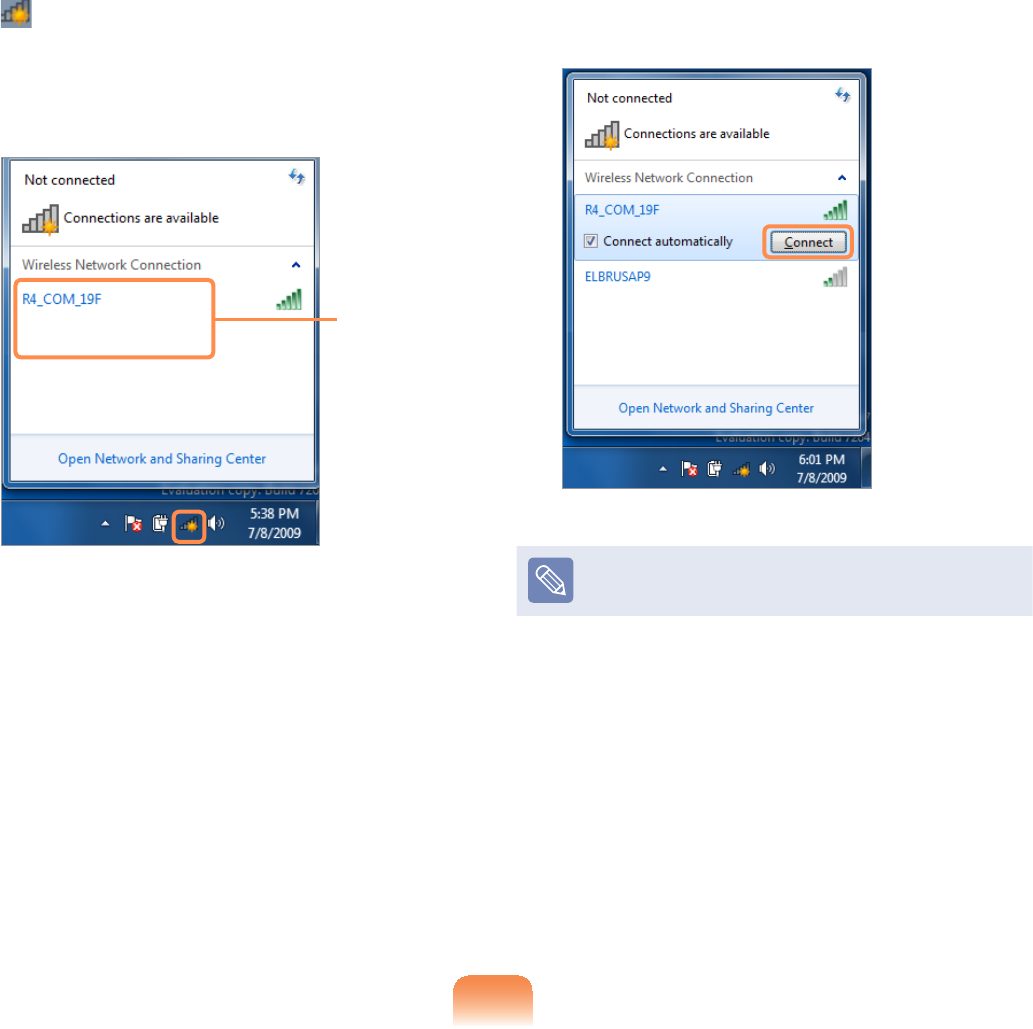
1 ,I\RXFOLFNWKHNetwork Connections
iconinthesystemtray,alistof
available APs appears. If you select
an AP to connect to, the Connect
button appears.
AP List
2 &OLFNConnect.
,IDQHWZRUNNH\LVVHWIRUWKH$3
HQWHUWKHQHWZRUNNH\DQGWKHQFOLFN
Connect.
)RUWKHQHWZRUNNH\SOHDVHDVN\RXU
QHWZRUNDGPLQLVWUDWRU
3 When Connected totheAPis
GLVSOD\HGFOLFNWKHClose button.
<RXFDQDFFHVVWKHQHWZRUN

89
君#For Windows XP
1 &OLFNWKHWireless Network
Connection icon IURPWKH7DVNEDU
using the right button of the touch
SDG7KHQFOLFNView Available
Wireless Networks.
2 Select an AP to be connected and
FOLFNConnect.
,IDQHWZRUNNH\LVVHWLQWKH$3WKH
QHWZRUNNH\LQSXWZLQGRZZLOODSSHDU
(QWHUWKHQHWZRUNNH\LQWKHLQSXW
ZLQGRZDQGFOLFNOK.
)RUDQHWZRUNNH\FRQWDFWWKH
QHWZRUNDGPLQLVWUDWRU
3 Once Connected to AP is displayed,
\RXFDQXVHDZLUHOHVVQHWZRUN
To check the network connections
Place the mouse over the Wireless
Network Connection icon (For
Windows XP, IURPWKH7DVNEDU7KHQ
thestatuswillappear.
Windows 7
Windows XP

90
Sharing Content in a Home Network (Easy Content Share)
(Optional)
Easy Content Share is a DLNA application that allows you to play photos, videos and
PXVLF¿OHVRQ\RXU79
z These descriptions are for Windows 7 and for supported models only.
z7KH'LJLWDO/LYLQJ1HWZRUN$OOLDQFH'/1$DOLJQVLQGXVWU\OHDGHUVLQWKH&(
PRELOHDQG3&LQGXVWULHVWKURXJKGLJLWDOLQWHURSHUDELOLW\DQG'/1$FHUWL¿HG
GHYLFHVDOORZXVHUVWRSOD\YLGHRVSKRWRVDQGPXVLF¿OHVVWRUHGRQDFRPSXWHURQ
aTV.
z ToplaycontentusingDLNAtechnology,bothyourcomputerandTVmustbeDLNA
FHUWL¿HG
ForinformationonwhetheraproductsupportsDLNA,refertotherespectiveuser
manuals.
7RSOD\YLGHRVSKRWRVDQGPXVLF¿OHVVWRUHGRQDFRPSXWHUFRQ¿JXUHWKHVHWWLQJVLQ
the order as shown below.
&RQ¿JXULQJWKHQHWZRUNVHWWLQJVIRU\RXUFRPSXWHUDQG79
2. Adding shared content on your computer
3. Playing content on your TV using your computer
&RQ¿JXULQJWKHQHWZRUNVHWWLQJVIRU\RXUFRPSXWHUDQG79
To share content, all shared devices must be connected to the same access point.
&RQ¿JXUHWKHQHWZRUNVHWWLQJVE\IROORZLQJWKHVWHSVEHORZ
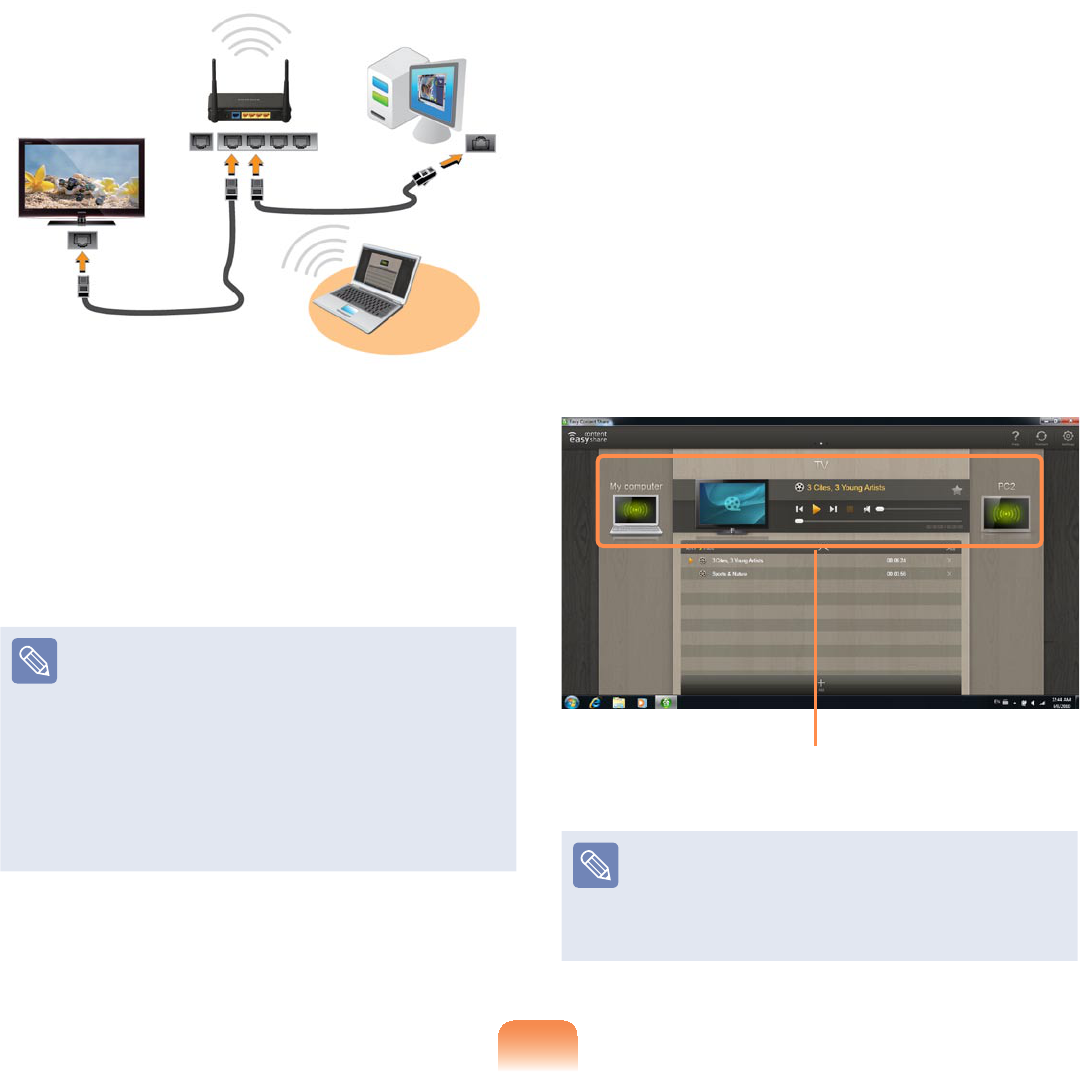
1 ConnectyourcomputerandTVtoanaccesspointthroughawiredorwirelessLAN
FRQQHFWLRQDVVKRZQLQWKH¿JXUHEHORZ
91
[Network connection diagram]
2 &RQ¿JXUHWKH,3DGGUHVVVHWWLQJVIRU
\RXUFRPSXWHUDQG79
<RXPXVWFKHFNWKHObtain an IP
address automatically'+&3
FKHFNER[
z)RUPRUHLQIRUPDWLRQRQKRZWR
FRQ¿JXUHWKH,3DGGUHVVIRU\RXU
FRPSXWHUUHIHUWRChapter 2.
Using the Computer > Network
z)RUPRUHLQIRUPDWLRQRQKRZWR
FRQ¿JXUHWKH,3DGGUHVVIRU\RXU
79UHIHUWRWKHXVHUPDQXDORI
\RXU79
3 7RFKHFNZKHWKHUWKHQHWZRUNVHWWLQJV
KDYHEHHQFRQ¿JXUHGFRUUHFWO\
GRXEOHFOLFNWKHEasy Content Share
LFRQRQWKH\RXUFRPSXWHU¶V'HVNWRS
WRUXQWKHSURJUDP
,IWKHSURJUDPLFRQGRHVH[LVWRQ
WKH:LQGRZV'HVNWRSVHOHFWWKH
FRUUHVSRQGLQJSURJUDPIURPStart >
All Programs > Samsung
,IWKHFRQQHFWHGFRPSXWHUDQG79
DUHVKRZQLQWKHSURJUDPZLQGRZ
WKHQHWZRUNVHWWLQJVKDYHEHHQ
FRQ¿JXUHGVXFFHVVIXOO\
Devices that can share content
,IDFRQQHFWHGGHYLFHLVQRW
GLVSOD\HGUHIHUWRChapter 4.
Troubleshooting > Q&A > Easy
Content Share Related
92
Adding shared content on your
computer
$GGWKHYLGHRVSKRWRVDQGPXVLF¿OHV
thatyouwanttoplayonyourTVas
shared items.
Youcanonlyplayshareditemsonyour
TV.
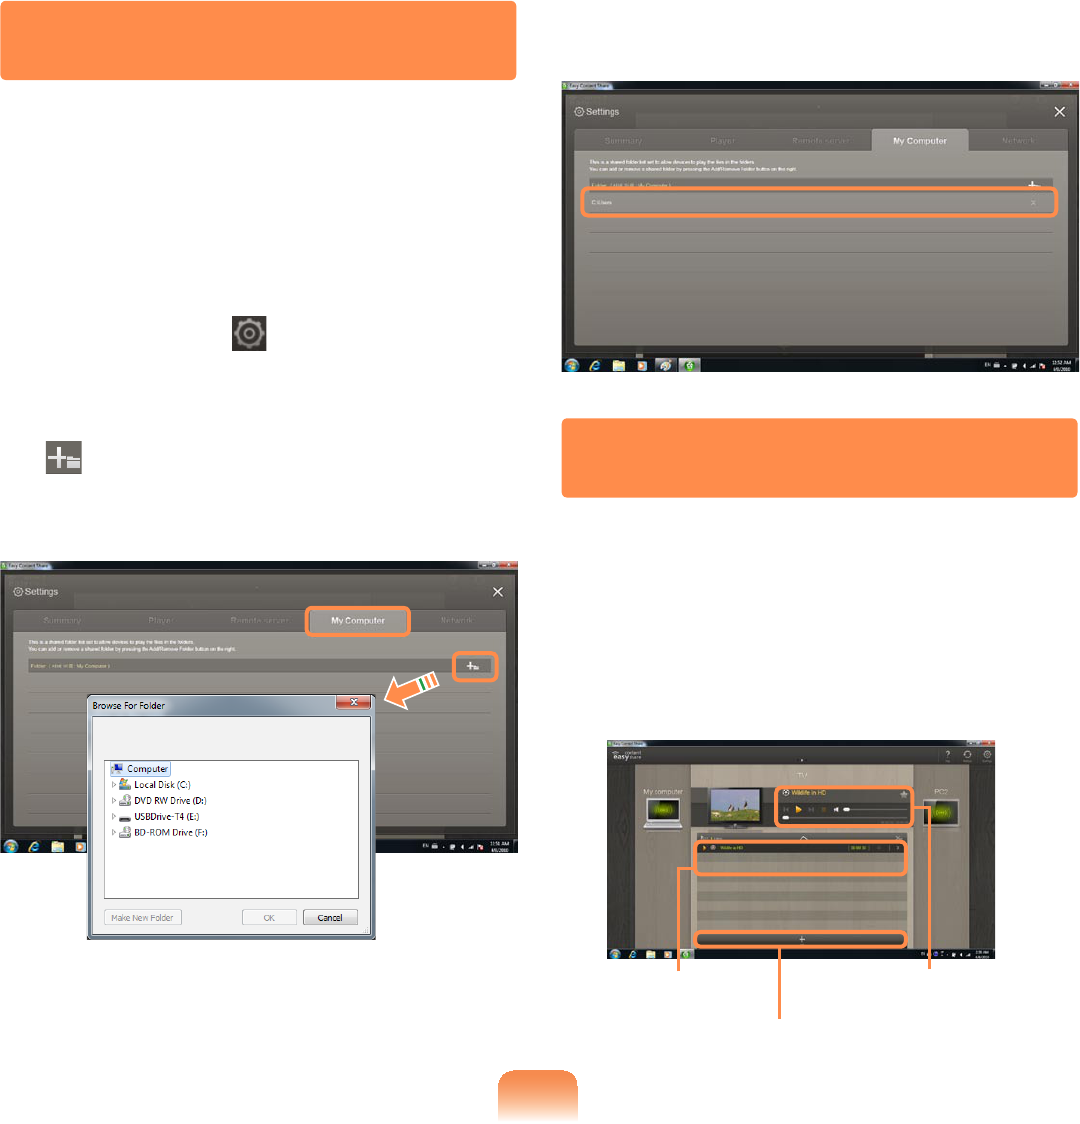
1 &OLFNSettings atthetoprightof
Easy Content Share.
2 &OLFNMy computer > Add Folder
.TheBrowse For Folder window
appears. Select a folder to share and
FOLFNOK.
3 The selected folder is added to the
shared list.
Playing content on your TV
using your computer
Afteryouhavesetphotos,videosand
PXVLF¿OHVDVVKDUHGLWHPV\RXFDQSOD\
them on your TV using your computer.
1 In Easy Content Share, select the
TVyouwanttousetoplaycontent.
Playlist
Add content to play
Play control panel

93
2 Select the item you want to play in the
SOD\OLVWDQGWKHQFOLFNPlay .
3 7KHVHOHFWHG¿OHLVSOD\HGRQWKH79
Using the Play Control panel, you can
controltheitembeingplayedonthe
TV.
4 7RVWRSSOD\LQJFOLFNStop .
Easy Content Share does not
support subtitles due to DLNA
constraints.
To use subtitles, refer to Chapter 4.
Troubleshooting > Q&A > Easy
Content Share Related.
$GGLQJDYLGHRSKRWRRUPXVLF¿OH
to the playlist
1 &OLFNAdd Content in the Playlist
screen. The shared content list is
displayed.
2 ,QWKHVKDUHGFRQWHQWOLVWFKHFNWKH
FKHFNER[LQIURQWRIWKHLWHP\RXZDQW
WRDGGWRWKHSOD\OLVWDQGWKHQFOLFN
Add to playlist .
Add the selected
item to the playlist
Shared content list
Return to the
playlist screen
3 &OLFNReturn to playlist screen .
,QWKHSOD\OLVWVFUHHQ\RXFDQ¿QGWKDW
the selected item has been added to
the playlist.
94
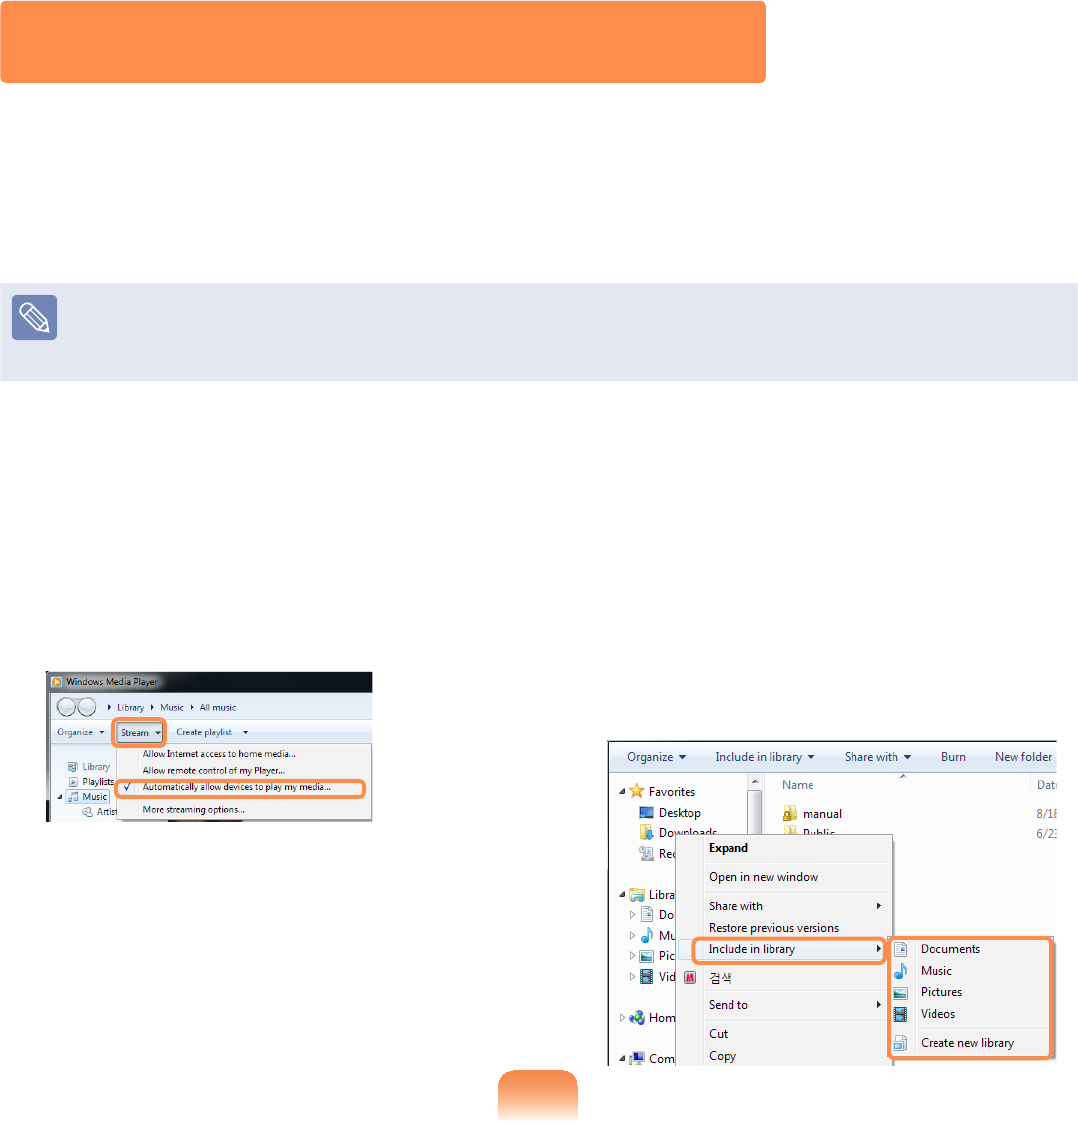
君 For Windows Media Player 12
1 &OLFNStart > All Programs >
Windows Media Player.
2 &OLFNStreamDQGFKHFNWKH
Automatically allow devices to play
my media... menu item.
3 &OLFNStart > All Programs >
Accessories > Windows Explorer.
4 5LJKWFOLFNWKHIROGHUWRVKDUH)URP
the menu displayed, point to Include in
library.
&OLFNVideos, Photos or Music in
the displayed sub menu, according to
the type of content contained in the
selected folder.
If the selected folder contains two
ormoretypesofcontent,youmust
FOLFNHDFKFRUUHVSRQGLQJPHQXLWHP
(Videos, Photos or Music)toregister
each type of content.
Playing the content stored on a computer when
Easy Content Share is not installed
<RXFDQDOVRSOD\WKHYLGHRVSKRWRVDQGPXVLF¿OHVVWRUHGRQDFRPSXWHUZKHQEasy
Content Share isnotinstalledonyourTVbyusingWindows Media Player.
$VGHVFULEHGLQWKHVWHSVEHORZFRQ¿JXUHWKHFRQWHQWVKDULQJVHWWLQJVWRSOD\FRQWHQW
on your TV.
Thecomputercontainingthesharedcontent(whenEasyContentShareisnot
installed)mustbeconnectedtothesameaccesspointtowhichthecomputerwhere
Easy Content Share isinstalledandtheTVisconnectedto.
95
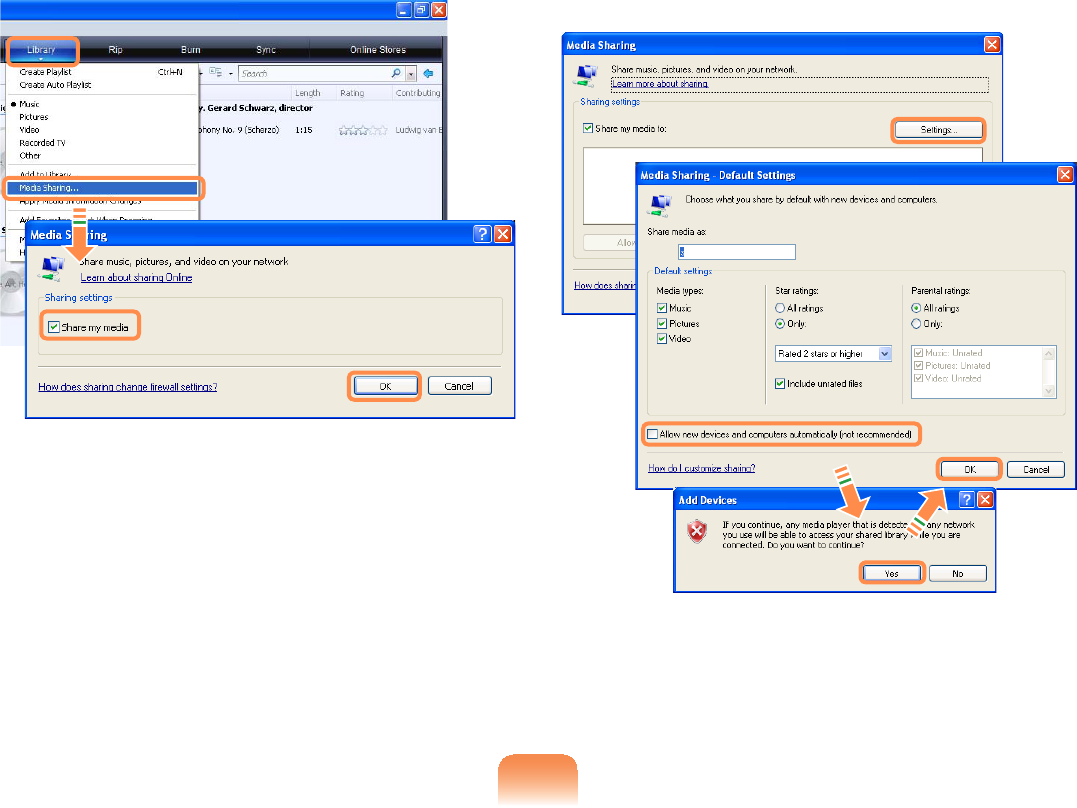
君 For Windows Media Player 11
1 &OLFNStart > All Programs >
Windows Media Player.
2 &OLFNLibrary > Media Sharing.
The Media Sharing window is
GLVSOD\HG&KHFNWKHShare my
mediaFKHFNER[DQGWKHQFOLFNOK.
3 In the Media SharingZLQGRZFOLFN
Settings....TheMedia Sharing -
Default Settings window is displayed.
&KHFNWKHAllow new devices and
computers automatically (not
recommended)FKHFNER[
$SRSXSZLQGRZLVGLVSOD\HG&OLFN
Yes7KHQFOLFNOK in the Media
Sharing- Default Settings window
and in the Media Sharing window.
$IWHUWKHUHJLVWUDWLRQKDVEHHQ¿QLVKHG
\RXFDQ¿QGWKHDGGHGIROGHULVOLVWHGLQ
thesharedcontentlistofEasy Content
Share.

96
Forasharedcontentitem,thenameof
thecomputerwheretheitemisstored
isdisplayednexttoit,allowingyouto
identify the computer. This is useful when
multiple computers are providing content.
A folder added as
a shared item The name of the
PC where the
content is stored
Contentsharingisonlyavailablewith
Windows Media Player 11 or later.
If your Windows Media Player is
earlier than Windows Media Player
11, download and install Windows
Media Player 11 or later from the
Microsoft website.

97
HDD Protection Function (Optional)
This function protects the HDD from external impacts while operating by using the 3-
axis sensor that detects inclinations, movement and vibrations.
Thisfunctionisonlyprovidedformodelsthatareshippedfromthefactorywiththis
function.
7KURXJKWKHLFRQFRORUVWKH+''SURWHFWLRQVWDWXVFDQEHLGHQWL¿HG<RXFDQDFWLYDWH
RUGHDFWLYDWHWKHIXQFWLRQE\ULJKWFOLFNLQJRYHUWKHLFRQ LQWKHWDVNEDU
Icon Color Operating Status
The HDD protection function is activated.
The HDD protection function is deactivated.
TheHDDhasreceivedanimpactandtheHDDprotectionfunctionis
currently running.
7RVHWWKHVHQVLWLYLW\RIWKHSURWHFWLRQIXQFWLRQULJKWFOLFNWKHLFRQ , and select Open
Control Panel.
Sensitivity Operating Status
High Select this option for operating environments with no possibility of
VKRFNVGHIDXOW
Medium Select this option for operating environments with the possibility of slight
VKRFNVHJLQDYHKLFOHRURQDODS
Low Select this option for operating environments with a possibility of severe
VKRFNVQRWUHFRPPHQGHG

98
z Ifexternalmovement(e.g.ifausermovesorthevehiclecarryingthecomputer
moves)isdetectedwhiletheHDDisinoperationsuchaswatchingavideoor
copyingdata,thecurrentoperationandtheHDDarestoppedaccordingly.
Iftheexternalmovementstops,thepausedoperationresumesafterapproximately
3 seconds.
z7KHKDUGGLVNGULYHGDPDJHSURWHFWLRQDQGGDWDSURWHFWLRQIXQFWLRQVDUHQRW
guaranteed for all circumstances.

Chapter 3.
Settings and Upgrade
LCD Brightness Control 100
BIOS Setup 102
Setting a Boot Password 105
Changing the Boot Priority 108
Upgrading Memory 109
Battery 111
Using the Security Lock Port 116

100
LCD Brightness Control
YoucanadjusttheLCDbrightnessin8levels.
Controlling the Brightness Using the Keyboard
Adjust the LCD brightness by pressing the Fn +NH\RUWKHFn +NH\
TheLCDbrightnesscanchangeupto8levelsandthebrightnessincreasesby1level
when pressing the Fn +NH\RQFH
zMaintaining the changed LCD brightness even after turning the computer on
again
7RPDLQWDLQWKH/&'EULJKWQHVVVHWE\XVLQJWKHEULJKWQHVVFRQWURONH\VRUWKURXJK
the Power Options, follow the procedures below.
1. TurnthecomputeronandpresstheF2NH\ZKHQWKH6$0681*ORJRDSSHDUV
onthescreentoentertheBIOSSetup.
2. Select the Boot menu and set the Brightness Mode Control item to User
Control.
3. Press the F10NH\WRVDYHWKHVHWWLQJVDQGH[LW6HWXS
zSaving battery power consumption
DecreasestheLCDbrightnesswhenthecomputerisrunningonbatterypowerto
save battery power consumption.
zLCD bad pixels principle of laptop computer
6DPVXQJREVHUYHVWKHVSHFL¿FDWLRQVUHJDUGLQJVWULFWTXDOLW\DQGUHOLDELOLW\RI/&'
Butinspiteofthat,itisinevitablethattheremightbeasmallnumberofbadpixels.
Alargenumberofbadpixelscancauseproblemsinappearance,butasmall
numberofpixelsdoesn’taffectthecomputerperformance.
Therefore Samsung observes and manages the following dot principles:
- Bright dot : 2 or less
%ODFNGRWRUOHVV
&RPELQDWLRQRI%ULJKWDQG'DUNRUOHVV

101
Instructions for Cleaning the LCD
CleantheLCDpanelwithasoftclothlightlymoistenedwithcomputercleansing
detergentmovinginonedirection.
CleaningtheLCDpanelwithexcessiveforcecandamagetheLCD.

102
BIOS Setup
7KH%,266HWXSHQDEOHV\RXWRFRQ¿JXUH\RXUFRPSXWHUKDUGZDUHDFFRUGLQJWR\RXU
needs.
z8VHWKH%,26VHWXSWRGH¿QHDERRWSDVVZRUGFKDQJHWKHERRWLQJSULRULW\RUDGGD
new device.
6LQFHLQFRUUHFWVHWWLQJVPD\FDXVH\RXUV\VWHPWRPDOIXQFWLRQRUFUDVKWDNHFDUH
ZKHQFRQ¿JXULQJWKH%,26
z ThefunctionsoftheBIOSsetuparesubjecttochangeforproductfunction
enhancement purposes.
TheBIOSSetupmenusanditemsmaydifferdependingonyourcomputermodel.
Entering the BIOS Setup
1 Turnthecomputeron.
2 When the booting screen (SAMSUNG
logo) appears, press the F2NH\WR
enter the BIOS Setup.
Press the F12NH\ZKLOHWKHERRWLQJ
screen(SAMSUNG logo) appears,
thesystemwilltrytobootfromthe
QHWZRUN
3 Afteramoment,theBIOSsetup
screen appears.
The items in the BIOS setup may
differ depending on the product.
103
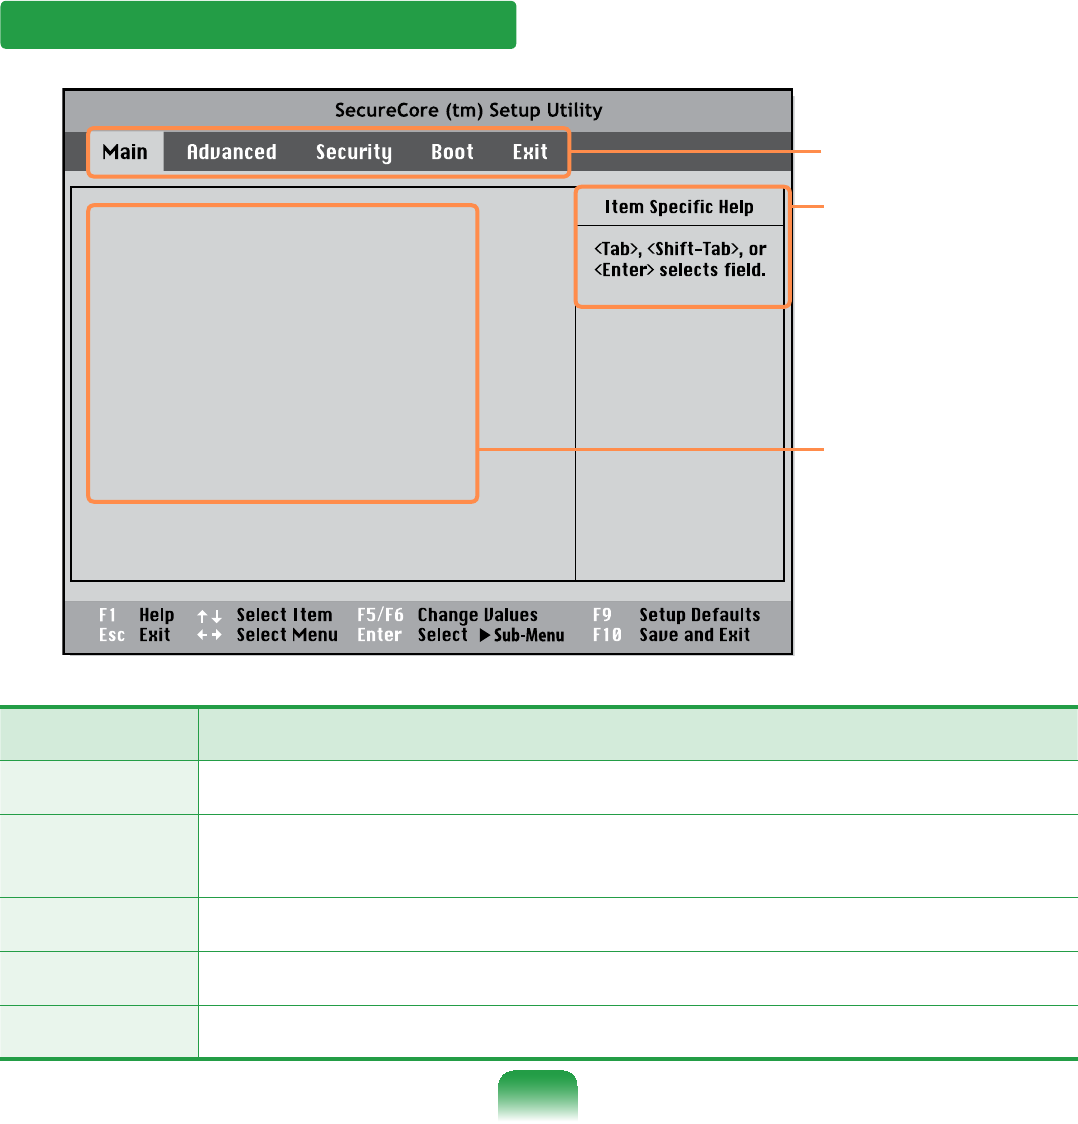
The BIOS Setup Screen
System Time [10:21:53]
System Date [07/30/200X]
SATA Port 1 XXXXXXXX
CPU Vendor
CPU Type XXXXXXXX
CPU Speed X.XX GHz
Total Memory XXX MB
BIOS Version XXXXXXXX
MICOM Version XXXXXXXX
XXXXXXXX
Setup Menu
Setup Items
Help
Help for the
selected
item appears
automatically.
Setup Menu Description
Main Used to change the basic system and environment settings.
Advanced 8VHGWRFRQ¿JXUHDGYDQFHGIXQFWLRQVRQ\RXUFRPSXWHUIRUGHYLFHVDQG
chipsets.
Security 8VHGWRFRQ¿JXUHVHFXULW\IXQFWLRQVLQFOXGLQJSDVVZRUGV
Boot Used to set the boot priority and other boot options
Exit Used to exit the Setup either saving the changes or not.

104
System Setup Keys
,QWKH6HWXS\RXKDYHWRXVHWKHNH\ERDUG
F1 PresstoviewtheSetupHelp.
Up & Down
Keys Presstomoveupanddown.
F5/F6 Presstochangetheitemvalue.
F9 PresstoloadthedefaultSetupsettings.
ESC Presstoreturntoahigherlevelmenuortomovetothe
Exit menu.
Left & Right
Keys Presstomovetoanothermenu.
Enter Presstoselectanitemortoenterasubmenu.
F10 PresstosavethechangesandexitSetup.
7KHNH\ERDUGLPDJHDQGFRORUPD\GLIIHUIURPWKHDFWXDONH\ERDUG
105
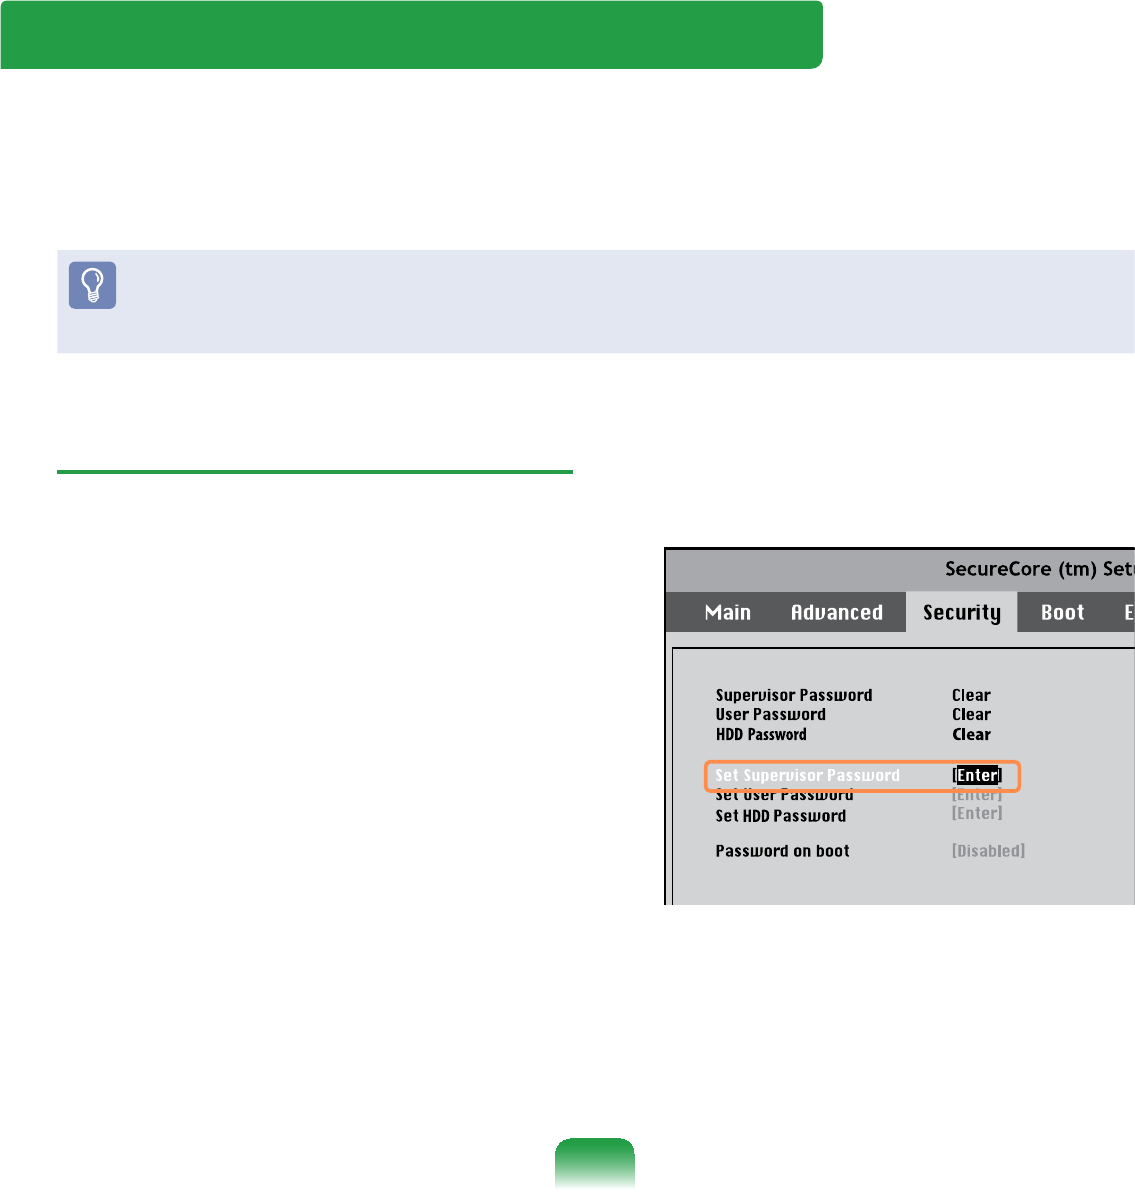
Setting a Supervisor Password
ASupervisorPasswordisrequiredtoturn
thecomputeronortostarttheSystem
Setup.
WhensettingaSupervisorPassword,
users other than supervisors cannot use
the computer.
1 Select the Security menu in the BIOS
Setup.
2 In the Set Supervisor Password
item, press <Enter>.
XXXXXXXX
Setting a Boot Password
Whensettingapassword,youhavetoenterthepasswordtousethecomputerorenter
theBIOSSetup.
%\FRQ¿JXULQJDSDVVZRUG\RXFDQUHVWULFWV\VWHPDFFHVVWRDXWKRUL]HGXVHUVRQO\DQG
SURWHFWGDWDDQG¿OHVVDYHGRQWKHFRPSXWHU
Donotloseorforgetyourpassword.
Ifyouhaveforgottenyourpassword,contactaSamsungservicecenter.Inthiscase,a
service fee will be charged.

106
3 Enter a password, press <Enter>, re-
HQWHUWKHSDVVZRUGIRUFRQ¿UPDWLRQ
and press <Enter> again.
The password can be up to 8
alphanumeric characters. Special
characters are not allowed.
4 :KHQDPHVVDJHFRQ¿UPLQJWKH
SDVVZRUGFRQ¿JXUDWLRQDSSHDUVLQ
the Setup Notice window, press
<Enter>.
The supervisor password has been
set.
Thesupervisorpasswordisrequired
toturnthecomputeronortoenterthe
BIOS Setup.
Setting a User Password
TheUserPasswordrestrictsaccess
WRWKHFRPSXWHURUIRUFRQ¿JXULQJWKH
%,266HWXSOLNHD6XSHUYLVRU3DVVZRUG
However,theSetupitemsthatcan
EHFRQ¿JXUHGZLWKD8VHU3DVVZRUG
DUHUHVWULFWHGXQOLNHIRUD6XSHUYLVRU
Password.
%HIRUHFRQ¿JXULQJDXVHUSDVVZRUGD
supervisor password must have been
FRQ¿JXUHG'HDFWLYDWLQJWKHVXSHUYLVRU
password also deactivates the user
password.
In the Set User Password item, press
<Enter> and complete the procedures
from Step 3 of Setting a Supervisor
Password.
Setting Up a Boot Password
Tosetupabootpassword,the
administrator password (Set Supervisor
Password)shouldbesetinadvance.
Set the Password on boot item to
Enabled.
Onceabootpasswordisset,youhave
to enter the password to boot up the
computer.

107
Setting up a Hard Disk Drive
Password (Optional)
Asupervisorpasswordmustbesetusing
the Set Supervisor Password menu.
,I\RXVHWDSDVVZRUGIRUDKDUGGLVN
drive, it cannot be accessed from another
computer.
Press <Enter>intheSet HDD
PasswordLWHPDQGGH¿QHDSDVVZRUGDV
describedinStep 3 oftheSettingupthe
Supervisor Password.
7KHKDUGGLVNGULYHSDVVZRUGVHWWLQJ
function is not provided for some
models.
Changing the hard disk drive
password
For security purposes, you can only
FKDQJHDKDUGGLVNGULYHSDVVZRUG
afterrestartingthecomputerby
pressing the computer Power button.
If you cannot change the hard
GLVNGULYHSDVVZRUGRUWKHHDD
Password Frozen message appears
when entering the BIOS Setup
and selecting Security > HDD
Password, press the Power button
toturnthecomputeronagain.
Deactivating the Password
1 Press <Enter>onthepassword
to be deactivated. For example, to
deactivateasupervisorpasswordin
the Set Supervisor Password item,
press <Enter>.
2 In the Enter Current Password
LWHPHQWHUWKHFXUUHQWO\FRQ¿JXUHG
password and press <Enter>.
3 Leave the Enter New Password item
¿HOGHPSW\DQGSUHVVEnter>.
4 Leave the &RQ¿UP1HZ3DVVZRUG
¿HOGHPSW\DQGSUHVVEnter>.
5 In the Setup Notice window, press
<Enter>.
Thepasswordisdeactivated.

108
1 Select the Boot menu in the BIOS
Setup.
2 Press <Enter>ontheBoot Device
Priority item.
XXXXXXXX
Boot Device Priority
NumLock
Enable Keypad
Summary Screen
Boot-time Diagnostic Screen
Brightness Mode Control
Wireless Device Control
Powersave Mode
Smart Battery Calibration
[Off]
[By NumLock]
[Disabled]
[Disabled]
[Auto]
[Always On]
[Enabled]
3 3UHVVWKHGRZQNH\ĻWRPRYHWRWKH
IDE HDD item and press the F6NH\
tomovetheitemtothetop.
[Boot priority order]
1. USB CD : N/A
2. IDE HDD : XXXXXXXX
3. PCI BEV : N/A
4. USB FDD : N/A
5. USB KEY : N/A
6. USB HDD : XXXXXXXX
7.
8.
[Excluded from boot order]
- USB ZIP : N/A
- USB LS120 : N/A
- PCI SCSI : N/A
- Other USB : N/A
- PCI : N/A
Boot Device Priority
4 Press the F10NH\WRVDYHWKHVHWWLQJV
andexitSetup.
The highest boot priority device is
nowsettotheHardDrive.
Changing the Boot Priority
7KLVFRPSXWHULVFRQ¿JXUHGWRERRWIURPDQH[WHUQDOW\SH2''¿UVW
Thischapterdescribeshowtochangethebootprioritysothatthecomputerbootsfrom
WKHKDUGGLVNGULYH¿UVW
109
Upgrading Memory
Amemoryisinstalledinthememoryslotatthebottomofthiscomputer.The
procedures to replace the memory are described below.
z Replacenewmemoryonlyaftershuttingthecomputerdowncompletely.Donot
replace memorywhenthecomputerisinSleepmode.
z Disconnect main power plug and remove the battery before continuing.
z2QO\XVHWKHVDPHW\SHRIPHPRU\DVVSHFL¿HGLQWKH3URGXFW6SHFL¿FDWLRQ
z7KHPHPRU\FRPSDUWPHQWFRYHUPD\GLIIHUIURPWKH¿JXUHEHORZ
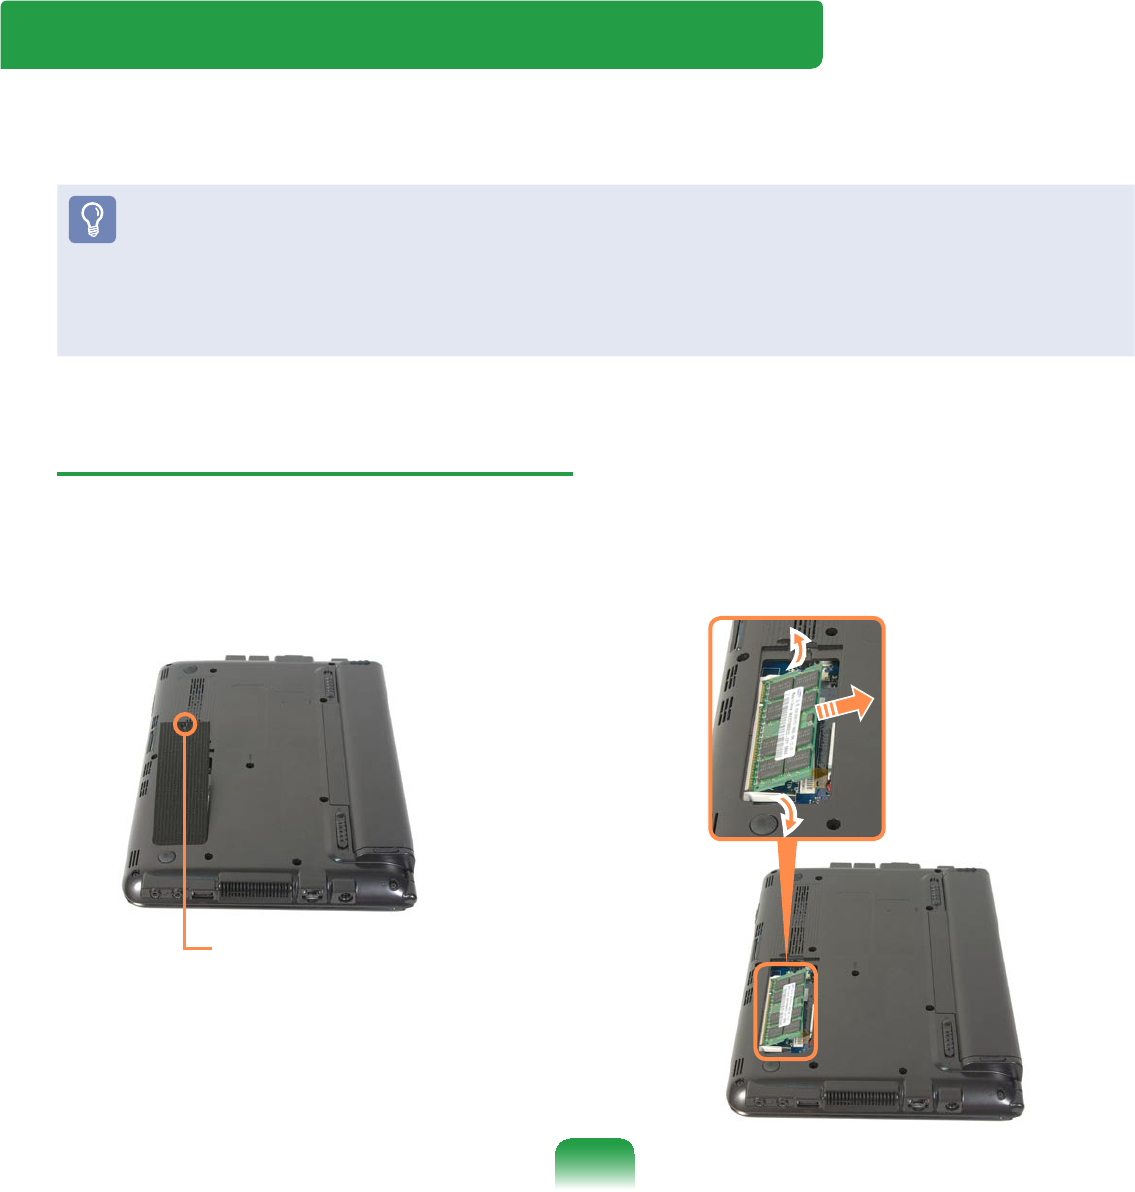
Replacing the Memory
1 Remove the screw on the memory
compartmentcoveratthebottomof
thecomputerusingascrewdriver.
Fixing Screw
2 Pull the memory module latches
outward.Thememorymodulewillpop
up.
Removethememorymoduleoutat
an angle of 30 degrees.
110
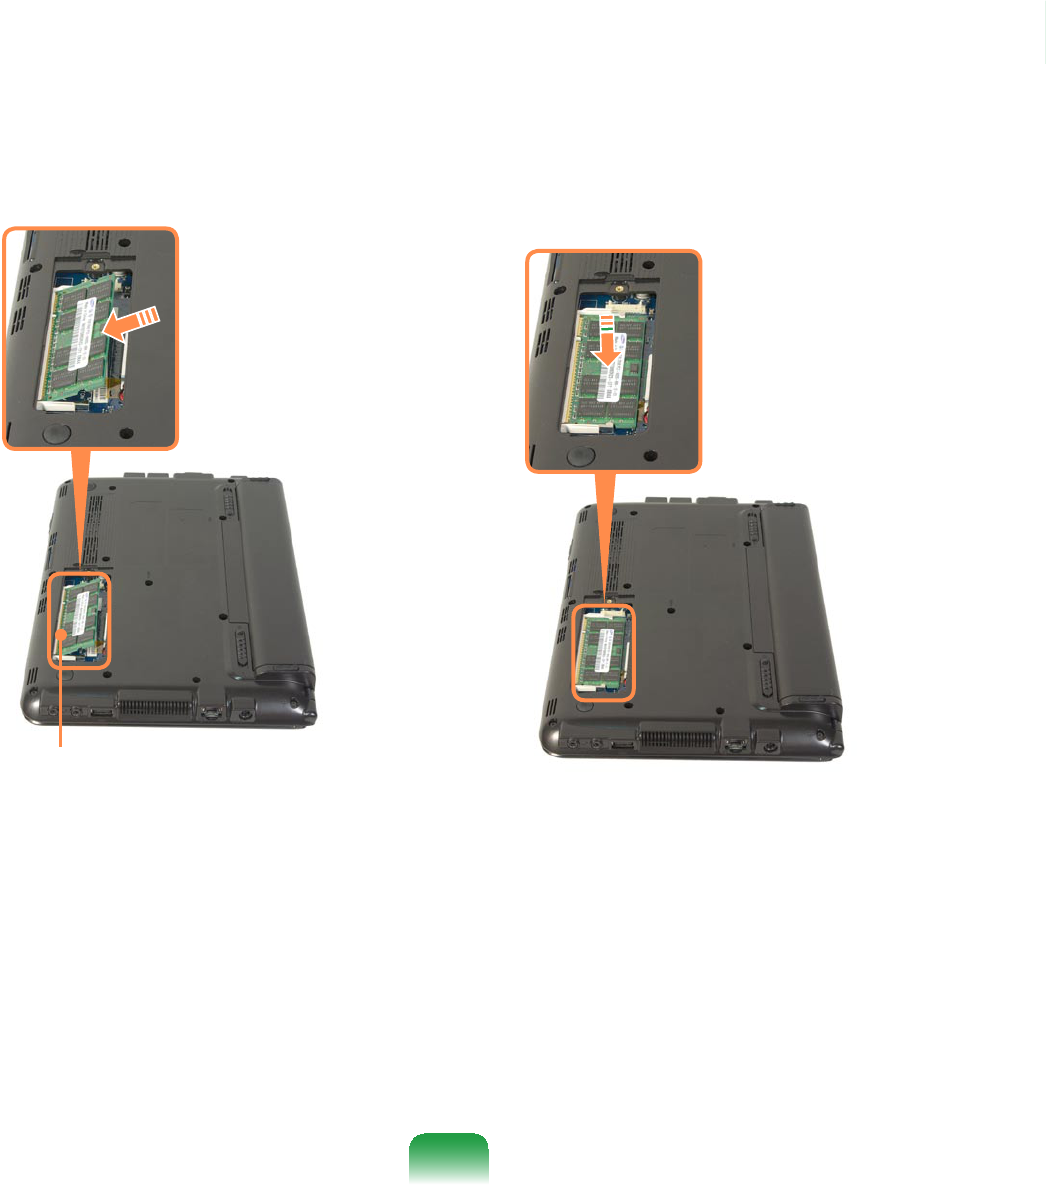
3 Insert a new memory module into
thememoryslotatanangleof
approximately 30 degrees aligning it
totheangleofthememoryslot.
Memory Slot
4 Pushthememorymoduledown
VRWKDWLWLVFRPSOHWHO\¿[HG,IWKH
PHPRU\GRHVQRW¿WHDVLO\SXVKWKH
memory module down while pulling
thememorymodulelatchesoutward.
5 Close the memory compartment
cover and fasten the screw.

111
Battery
Pleaserefertothefollowinginstructionswhenrunningthecomputeronbatterypower
withoutconnectingtheACpower.
ALithium-Ionsmartbatteryissuppliedwiththiscomputer.
Carefullyreadandfollowtheprecautionsprintedonthebatterybeforeusingthe
battery.
Precautions
z8VHRQO\FKDUJHUVVSHFL¿HGLQWKH8VHU0DQXDO
z1HYHUKHDWWKHEDWWHU\SDFNSXWLWQHDURULQD¿UHRUXVHDWDWHPSHUDWXUHKLJKHU
WKDQ&DVWKLVPD\FDXVH¿UH
z1HYHUFDXVHDVKRUWFLUFXLWEHWZHHQWKHEDWWHU\SDFNWHUPLQDOVRUGLVDVVHPEOHWKH
EDWWHU\SDFN
z Carefully read and follow the precautions printed on the battery and the safety
instructions in the User Manual before using the battery.
z Please refer to the system operation environment of this manual and operate and
store the battery at room temperature.
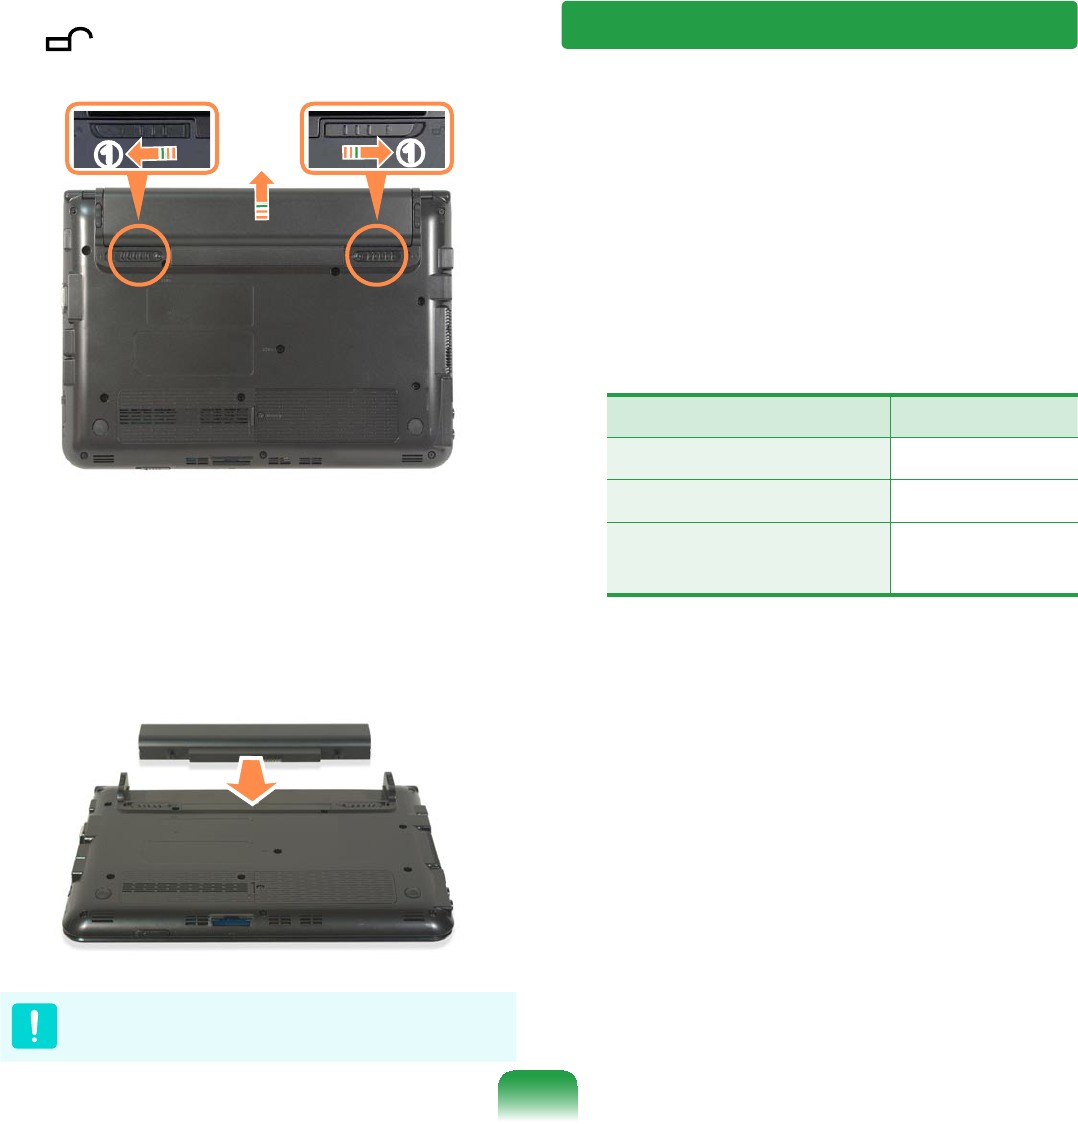
Installing/Removing the Battery
1 Shutdownthesystem,closetheLCDpanelandplacethecomputerupsidedownon
DÀDWVXUIDFH
112
2 Pull the two battery latches outwards
, then remove the battery.
l
nn
3 To install the battery again, slide the
batteryintothesystem.
Thebatterylatchesmoveinwardsand
¿[WKHEDWWHU\DXWRPDWLFDOO\
&KHFNLIWKHEDWWHU\ODWFKKDVEHHQ
moved inwards.
Charging the Battery
1 Attach the battery and connect the
$&DGDSWHUWRWKH'&LQMDFNRIWKH
computer.
The battery will then start charging.
2 When charging is complete, the
Charge LED turns green.
Status Charge LED
Charging Amber
Charging complete Green
AC adapter not
connected Off

113
Measuring the Remaining Battery Charge
You can view the battery charge status by completing the following procedures.
To use the shortcut key to view
Press the Fn +NH\VRQWKH
NH\ERDUG7KHUHPDLQLQJEDWWHU\FKDUJH
(%)willdisplayedforamoment.
Youcanonlyviewthechargestatusin
this way when Easy Display Manager is
installed on your computer.
Battery Warning
If the battery residual amount is
3~5%, the computer automatically
shutsdownaftersavingthedata.
The battery residual amount may
vary depending on the computer
model.
&RQ¿UPLQJWKHEDWWHU\FKDUJHLQ
the Taskbar
DisconnecttheACadapterandmovethe
mousecursoroverthebatteryiconinthe
V\VWHPWUD\RIWKH7DVNEDUWRFRQ¿UPWKH
remaining battery charge.
Battery Lifetime Information
A battery is an expendable supply,
sowhenusingitoveralongtime,the
capacity/battery life is shortened. If the
batterylifeisreducedtounderhalfofits
initial time, we recommend purchasing a
new battery.
When not using the battery for a long
time,storethebatteryafterchargingitto
30-40% of its capacity. This extends the
batterylifetime.

114
Extending the Battery Usage Time
Decreasing the LCD Brightness
Press the Fn +NH\VRQWKHNH\ERDUG
to decrease the LCD brightness to extend
the battery usage time.
Disabling Unused Devices
(Only for Windows XP)
Ifyouturnoffunuseddevices,battery
usage time will improve.
1 &OLFN'HYLFH0DQDJHUIURPStart
> Control Panel > Performance
and Maintenance > Systems >
Hardware tab.
2 5LJKWFOLFNWKHGHYLFHVWKDW\RXDUH
not using and select Disable.
Using the Battery Calibration
Function
When charging/discharging the battery
repeatedlyforashorttimeonly,the
battery usage time may be reduced by
thedifferencebetweentheactualbattery
charge and the remaining charge display.
In this case, the actual battery charge
and the remaining charge display will
be the same by discharging the battery
completely using the Battery Calibration
function, and then recharging it again.
1 Disconnect the AC power adapter
after turning off the computer.
2 Restartyourcomputerandpressthe
F2 button when the Samsung logo
appears, to start the BIOS Setup.

115
3 Move to the Boot > Smart Battery
Calibration item using the direction
NH\VDQGSUHVVEnter>.
XXXXXXXX
Boot Device Priority
NumLock
Enable Keypad
Summary Screen
Boot-time Diagnostic Screen
Brightness Mode Control
Wireless Device Control
Powersave Mode
Smart Battery Calibration
[Off]
[By NumLock]
[Disabled]
[Disabled]
[Auto]
[Always On]
[Enabled]
4 Highlight Yes in the Battery
&DOLEUDWLRQ&RQ¿UPDWLRQ window
and press <Enter>.
The Battery Calibration function is
activated and the battery is forcefully
discharged. To stop the operation,
press the <Esc> button.
This operation requires 3~5 hours
depending on the battery capacity
and the remaining battery charge.
116
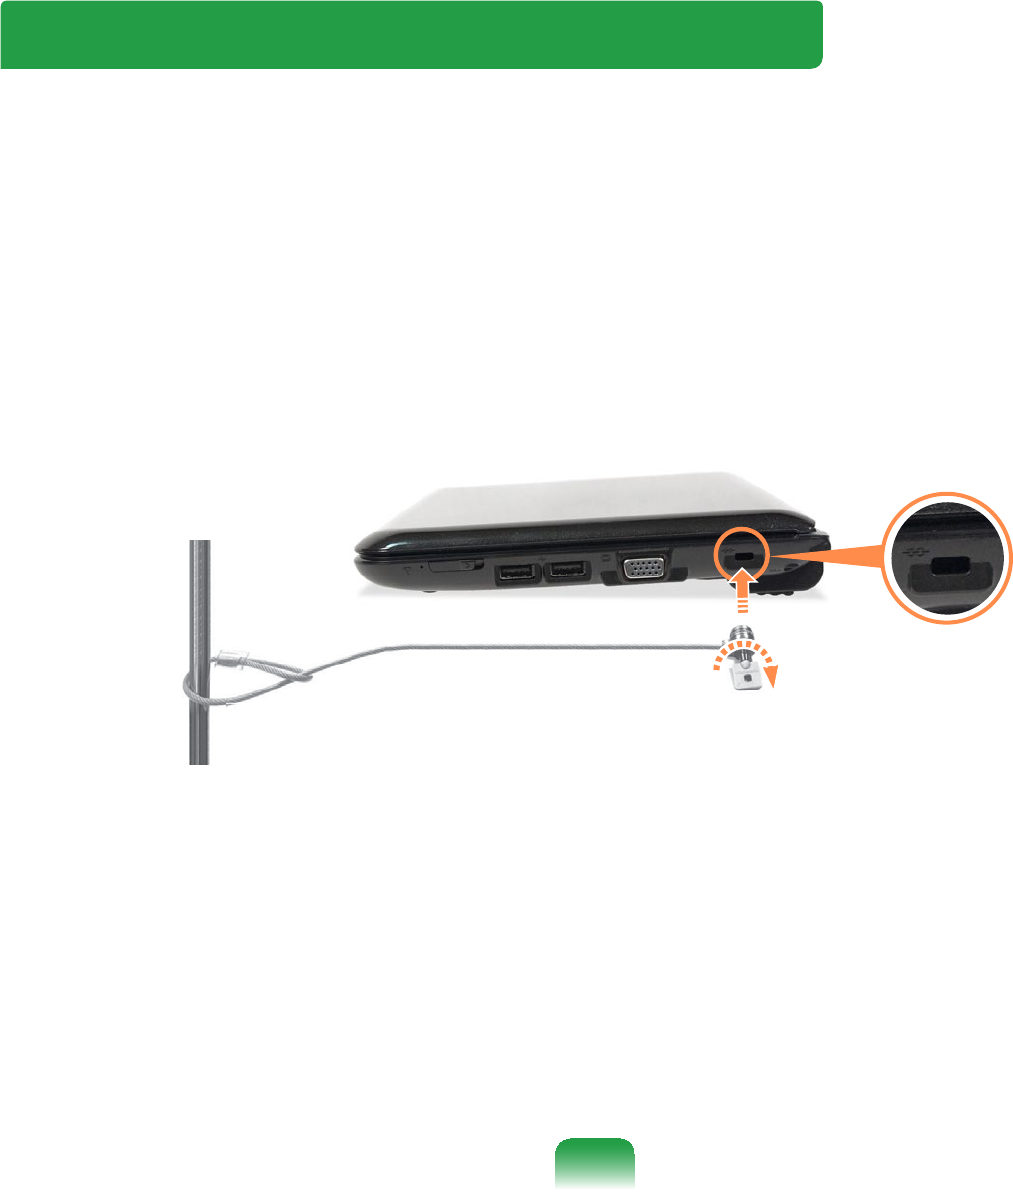
Using the Security Lock Port
<RXFDQFRQQHFWD.HQVLQJWRQORFNWRWKH6HFXULW\/RFNSRUWWRSUHYHQW\RXUFRPSXWHU
frombeingstolenwhenyouneedtousethecomputerinapublicplace.
7RXVHWKLVIHDWXUH\RXPXVWSXUFKDVHD.HQVLQJWRQORFNDGGLWLRQDOO\7RXVHWKH
.HQVLQJWRQORFNUHIHUWRWKHSURGXFWPDQXDO
7LHWKH.HQVLQJWRQORFNFDEOHWRD¿[HGREMHFWDQGLQVWDOOWKHRWKHUHQGRIWKHFDEOHWR
WKH6HFXULW\/RFNSRUW

Chapter 4.
Troubleshooting
Using Samsung Recovery Solution
(Optional) 118
Reinstalling Windows 7
(For Windows 7. For supported models only) 133
Reinstalling Windows XP
(For Windows XP, For supported models only) 138
Questions and Answers 142
Windows Related 142
Display Related 145
Sound Related 147
Wired LAN Related 149
Wireless LAN Related 151
Games and Programs Related 155
Bluetooth 158
EasyContentShareRelated 160

118
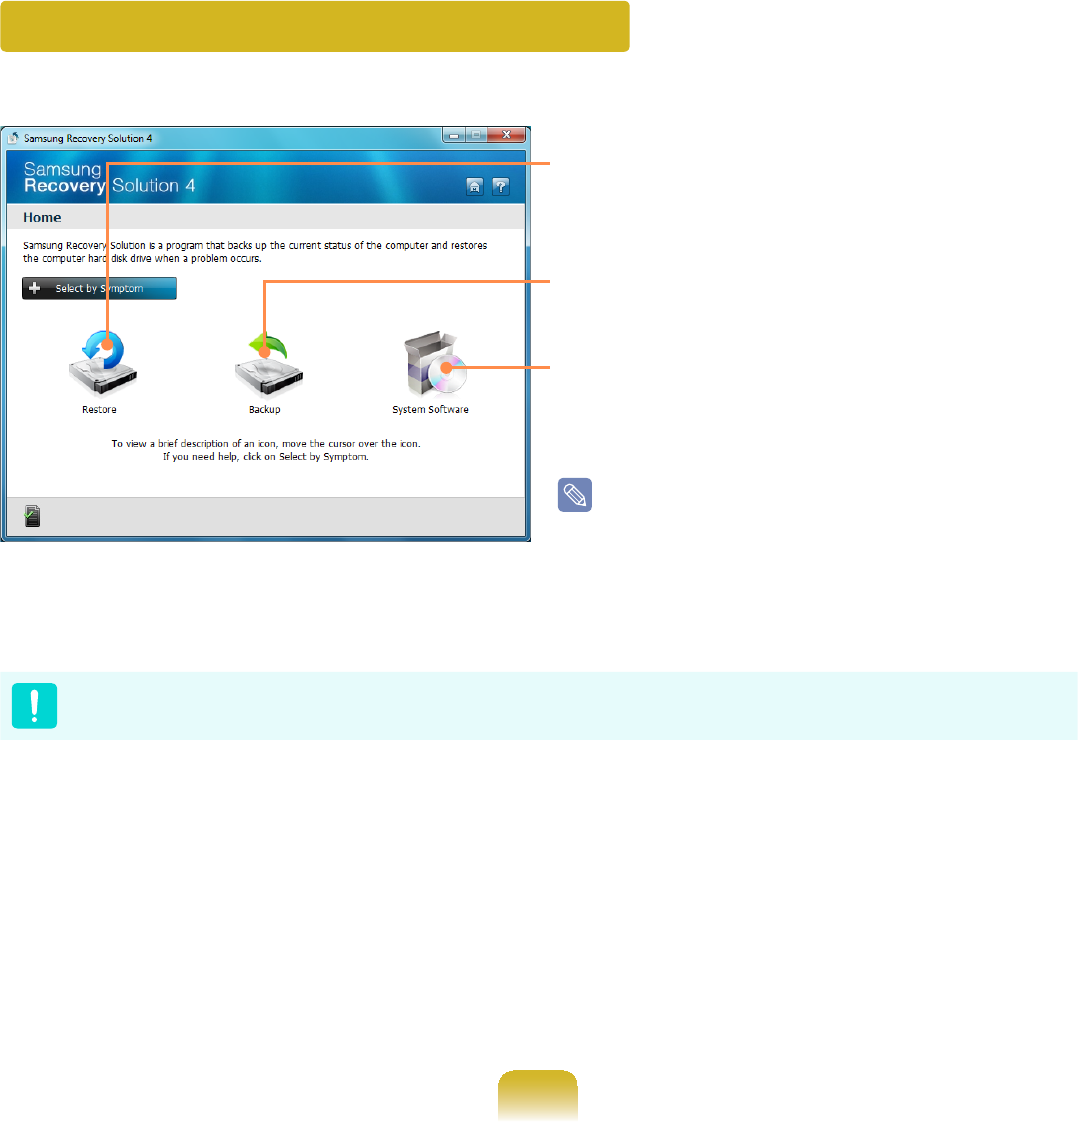
Using Samsung Recovery Solution (Optional)
Samsung Recovery Solution is a program that can backup\RXUKDUGGLVNDQG
restores itlaterwhenaproblemoccurswithyourcomputer.ItalsoprovidesaSystem
SoftwareIXQFWLRQWKDWHQDEOHV\RXWRLQVWDOORUEDFNXSGHYLFHGULYHUVDQGV\VWHP
software programs needed for your system to function properly.
zSamsung Recovery Solution may not be provided or the version may differ
dependingonthemodel.Inaddition,somefunctionsmaynotbeprovidedormay
differdependingontheversion.FormoreinformationonusingSamsungRecovery
Solution,pleaserefertotheonlinehelpoftheprogram.
z Thescreenimagesinthisdocumentmaydifferfromactualproduct.
z IfyourcomputerdoesnothaveaninternalODD,youneedanexternalODD
FRQQHFWHGWR\RXUFRPSXWHUWRXVHWKH%DFNXS)XQFWLRQRU5HVWRUH)XQFWLRQXVLQJ
DVDs.
z The System Software function may not be provided depending on the program
version.
119
Samsung Recovery Solution Functions
Restore: Afunctionthatrestoresthe
computertoapreviousstateafter
aproblemoccurs
Backup : $IXQFWLRQWKDWEDFNVXSWKHGDWD
on the computer
System Software: Afunctionthatreinstalls
RUEDFNVXSGHYLFHGULYHUVDQGDSSOLFDWLRQ
programs needed for the system
The system software function is
supported by Samsung Recovery
Solution version 4 or later. Therefore, the
function may not be supported depending
on the version.
3OHDVHEDFNXS\RXULPSRUWDQWGDWDDVGDWDORVVPD\RFFXUIRUWKH&GULYHZKLOH
UHVWRULQJEDFNLQJXSWKHFRPSXWHUWKURXJK6DPVXQJ5HFRYHU\6ROXWLRQ

120
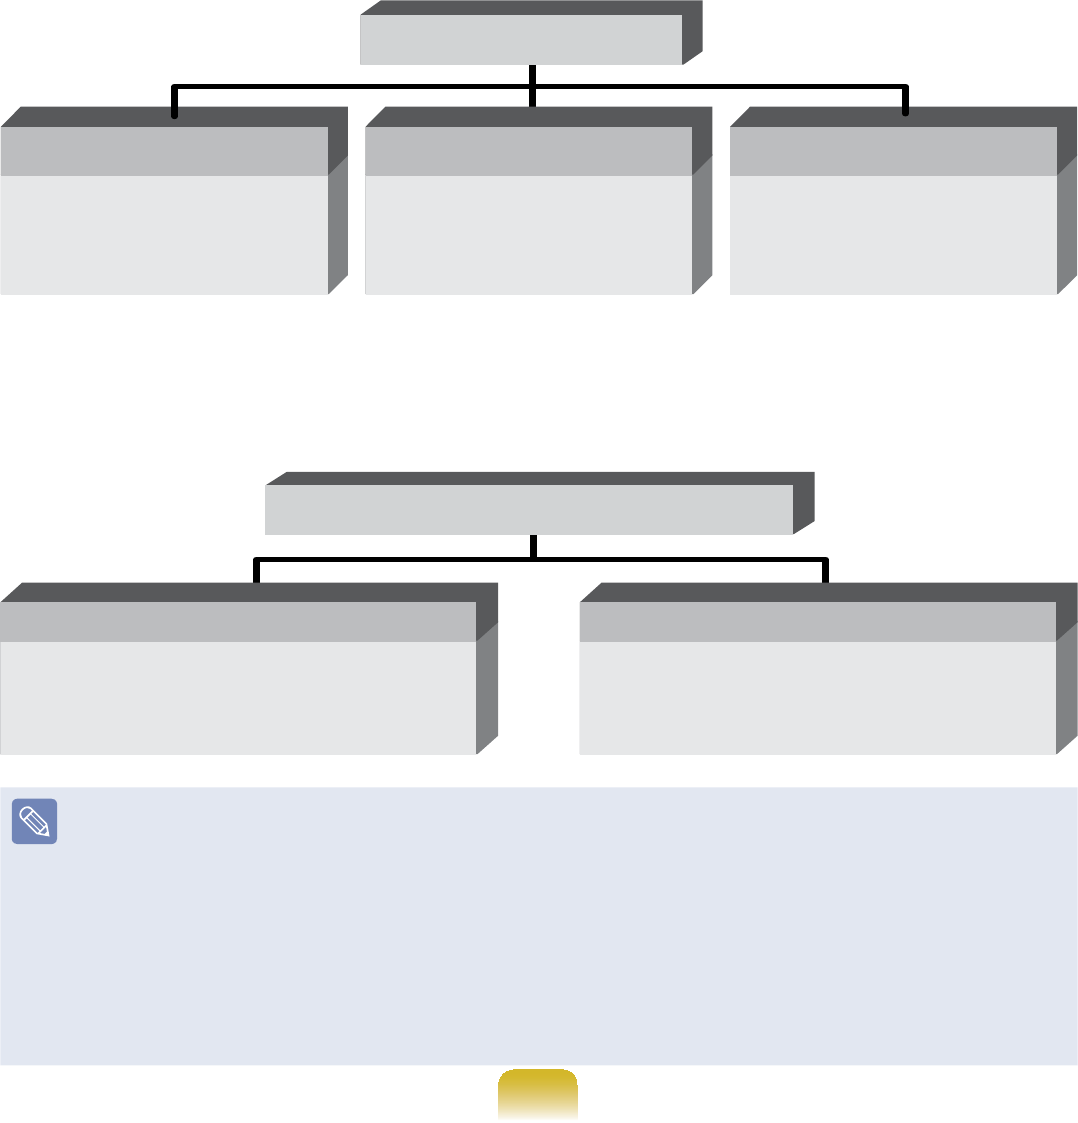
}Restore Function
Using this function, you can easily restore your computer to a previous, stable state
ZKHQ\RXUFRPSXWHUQRORQJHUZRUNVSURSHUO\RU\RXDUHXQDEOHWRERRWXS\RXU
FRPSXWHUGXHWRVRPHSUREOHP,I\RXKDYHEDFNHGXSGDWD\RXFDQUHVWRUHWKH
EDFNXSGDWD
Basic Restore Complete Restore Data Restore
7KLVIXQFWLRQTXLFNO\
restores major
:LQGRZV¿OHV&?
Windows) without
touching the user
FRQ¿JXUDWLRQDQG
dataontheCdrive.
This function deletes the entire C
driveandthenrestoresthecontents
of the C drive completely.
This function
restores the user
data if the user
SUHYLRXVO\EDFNHGXS
data.
zInitial Status Restore
This function restores the computer
to the initial status saved when the
FRPSXWHUZDVUXQIRUWKH¿UVWWLPH
afteritwaspurchased.
zComplete Backup Restore
This function restores the computer
to the point where the user
performed a Complete Backup.
Restore Functions
}Backup Function
<RXFDQEDFNXSWKHHQWLUH&GULYHRUDOO\RXUGDWDWRDQRWKHU hard disk drive or
DVD<RXFDQUHVWRUHWKHEDFNHGXSGULYHRUGDWDXVLQJWKH5HVWRUHIXQFWLRQ
121
Backup Functions
7KLVIXQFWLRQEDFNVXS
the initial status of the
computer.
Initial Status Backup
7KLVIXQFWLRQEDFNVXS
VSHFL¿FIROGHUVRU¿OHV
Data Backup
7KLVIXQFWLRQEDFNVXS
theentiredriveC.
Complete Backup
}System Software function
<RXFDQEDFNXSWKH6\VWHP6RIWZDUHVDYHGRQWKHKDUGGLVNWRDQRWKHUKDUGGLVN
driveorDVD,andreinstallpartorallsoftwareprogramstoyourcomputer.
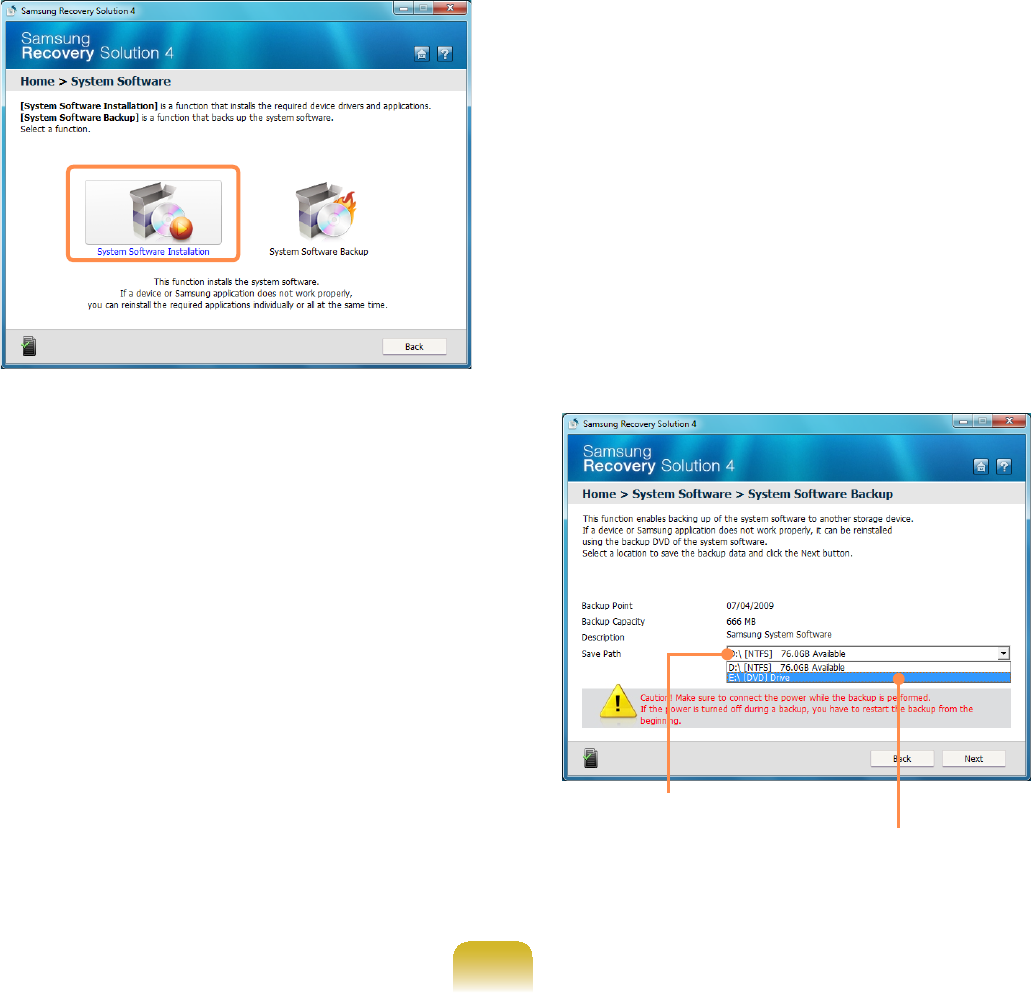
System Software function
This function installs the system
software programs needed for your
computer
System Software Installation
7KLVIXQFWLRQEDFNVXSDOO6\VWHP
Software Programs
System Software Backup
z The system software function is supported by Samsung Recovery Solution
version 4 orlater.Therefore,thefunctionmaynotbesupporteddependingonthe
version.
z<RXFDQFRQ¿UPWKHYHUVLRQRIWKHFXUUHQW6DPVXQJ5HFRYHU\6ROXWLRQLQWKH
Samsung Recovery Solution screen.
Example) If the program name that appears in the Samsung Recovery Solution
screen is Samsung Recovery Solution 4,itindicatesthattheversionofthe
Recovery Solution is version 4. If the name is Samsung Recovery Solution III,it
indicatesthattheversionoftheRecoverySolutionisversion 3.

122
Restore Function
NotonlycanyouuseSamsungRecoverySolutionwhenWindowsisrunning,but
also when you are unable to boot up into Windows. Let’s learn how to use Samsung
Recovery Solution.
2SWLRQDOIXQFWLRQVVXFKDV,QLWLDO6WDWH,PDJH,QLWLDO6WDWXV%DFNXSDQG3DUWLWLRQLQJDUH
only available in some models.
Partition Setup & Initial Status
Backup
,I\RXWXUQ\RXUFRPSXWHURQIRUWKH¿UVW
WLPHWKH,QLWLDO6WDWXV%DFNXSIXQFWLRQ
is performed after registering Windows.
This function saves an image of the Initial
StatusoftheCdrivetoasecurelocation
so that users can restore the computer
to the Initial Status using the Complete
5HVWRUHIXQFWLRQ$Q,QLWLDO6WDWXV%DFNXS
is only performed once immediately after
thecomputerispurchased.
1 ,I\RXWXUQWKHSRZHURQIRUWKH¿UVW
time, the Register Windows screen
appears. If you register Windows
according to the instructions on the
screen,thecomputerwillberestarted.
2 After the computer has been
restarted, the Partition Setup screen
appears.
ToresizetheCandDdrives,adjust
the partition size using the slide bar
DQGWKHFOLFNNext.
ThePartitionSetupfunctionisonly
available when the computer is
WXUQHGRQIRUWKH¿UVWWLPHDQGZLOO
not be available afterwards. Once
you have completed the partitioning,
it cannot be resized. Partition the
GLVNFDUHIXOO\
3 The Initial Status Backup screen
appears.
7RFRQWLQXHWKH,QLWLDO6WDWXV%DFNXS
FOLFNRestart Now.Thecomputerwill
restart.
4 7KH,QLWLDO6WDWXV%DFNXSLVSHUIRUPHG
WREDFNXSWKHLQLWLDOVWDWXVRIWKH
Cdrivetoasecurelocation.This
EDFNXSLPDJHLVXVHGIRUWKH
Complete Restore function that
restores your computer to the initial
status.
5 :KHQWKH,QLWLDO6WDWXV%DFNXSLV
complete, restart Windows.
123
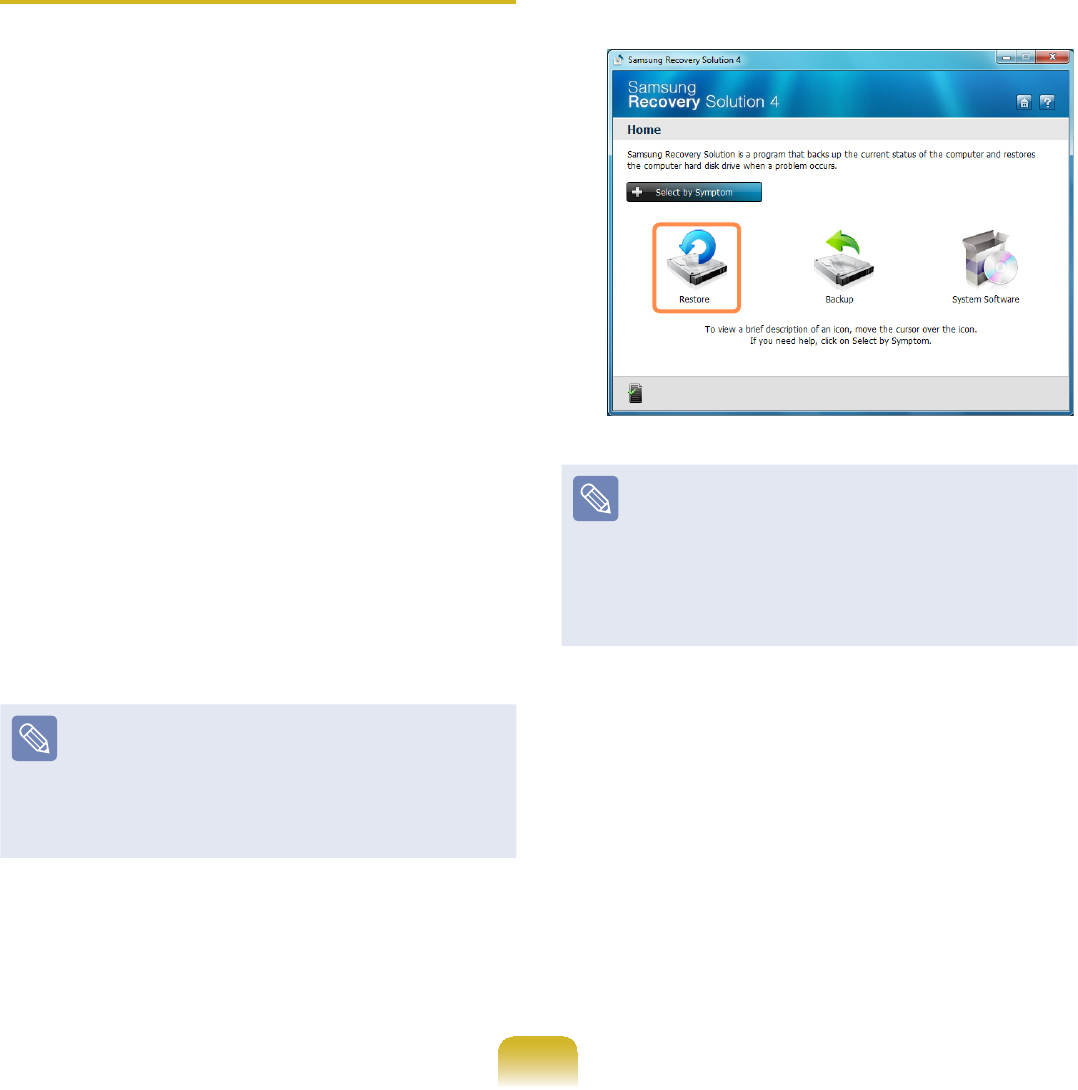
Restoring the computer
Restoreisafunctionthatenables
restoringthecomputertoasavedpoint
whenthecomputerwaspurchasedora
user-saved point.
The Restore function provides the Basic
Restore and Complete Restore options.
1– When Windows is running:
&OLFNStart > All Programs >
Samsung > Samsung Recovery
Solution > Samsung Recovery
Solution.
– When Windows does not start:
Turnthecomputeronandpress
the F4NH\ZKHQWKHERRWVFUHHQ
(SAMSUNG logo) appears. After a
moment,thecomputerbootsupin
RestorationmodeandtheSamsung
Recovery Solution screen appears.
For computers supporting the touch
screen function, the touch screen
IXQFWLRQGRHVQRWZRUNGXULQJ
RestoreMode.Inthiscase,please
use the touchpad or mouse.
2 If the initial menu screen appears,
FOLFNRestore.
,I\RXFOLFNSelect by Symptom,
theSelectbySymptommenu
appears.Ifyouselectasymptom,a
recommended restoration option will
EOLQN&OLFNWKHUHVWRUDWLRQRSWLRQWR
continue.
3 Select either Basic Restore or
Complete Restore from the Restore
menu.
zABasic Restore restores the major
:LQGRZV¿OHVRQO\ZKLOHPDLQWDLQLQJ
WKHXVHUFRQ¿JXUDWLRQDQGGDWDRQWKH
Cdriveinashorttime.
zAComplete Restore deletes the
entireCdriveandthenrestoresthe
contentsoftheCdrive.

124
Run Complete Restore if the
FRPSXWHUGRHVQRWZRUNHYHQDIWHU
Basic Restore has been completed.
3-1 IfyouhaveselectedBasic Restore:
,QWKH%DVLF5HVWRUHVFUHHQFOLFN
the Next button. The system will be
restarted.
3-2 IfyouhaveselectedComplete
Restore:
In the restoration point selection
screen, select the restoration point
describedas‘ComputerInitialStatus’
DQGFOLFNWKHNext button. The system
will be restarted.
In the Advanced menu, you can
changethesizeoftheharddrive
partitions(e.g.C:andD:).
z0DNHVXUHWREDFNXS\RXUGDWD
in advance, as all data will be
deleted after the partition size is
changed.
z The functions of the Advanced
menuarenotavailableinproducts
with the HyperSpace function
(restriction).
z The Advanced menu is only
activated when the computer
bootsupintherestorationarea.
(by pressing the F4NH\GXULQJWKH
booting sequence.)
Since a Complete Restore deletes
alluserdataaswellasadditionally
LQVWDOOHGSURJUDPVSOHDVHEDFNXS
\RXULPSRUWDQWGDWD¿UVWXVLQJWKH
'DWD%DFNXSIXQFWLRQEHIRUHUXQQLQJ
Complete Restore.
4 If the Samsung Recovery Solution
SURJUDPLVODXQFKHGIRUWKH¿UVWWLPH
after purchasing the computer, the
license agreement screen appears
before the restoration is started. Read
WKHDJUHHPHQWDQGFOLFNAgree to
continue.

125
5 Thecomputerbootsupinto
restorationmodeandtherestoration
progressmessageappears.Ifyou
FOLFNOK, the restoration begins. The
UHVWRUDWLRQPD\WDNHVRPHWLPH
please wait for a moment.
6 When the ‘Restart the System’
messageappearsaftertherestoration
LVFRPSOHWHFOLFNOK to restart the
system.
0DNHVXUHWKDWWKHSRZHUFRUGLV
connected while the restoration is in
SURFHVV7KH¿UVWWLPHWKHFRPSXWHU
bootsupafteraCompleteRestore
hasbeenperformed,thespeedof
thebootprocessmaybeslowed
down due to the system optimization
process. At this time, do not shut the
computerdownbyforce.
Backup Function
Complete Backup/Restore
AComplete Backup saves the complete
imageoftheCdriveontoanotherdriveor
DVD. A Complete Restore restores the
LPDJH¿OHVDYHGE\WKH&RPSOHWH%DFNXS
ontotheCdrive.
}Complete Backup
,I\RXUXQ&RPSOHWH%DFNXSXVLQJD
DVD, you can restore the computer
even when a problem occurs with
WKHKDUGGLVNRUZKHQWKHUHVWRUDWLRQ
area is removed.
1 &OLFNStart > All Programs >
Samsung > Samsung Recovery
Solution > Samsung Recovery
Solution.
2 When the initial menu screen
DSSHDUVFOLFNBackup.
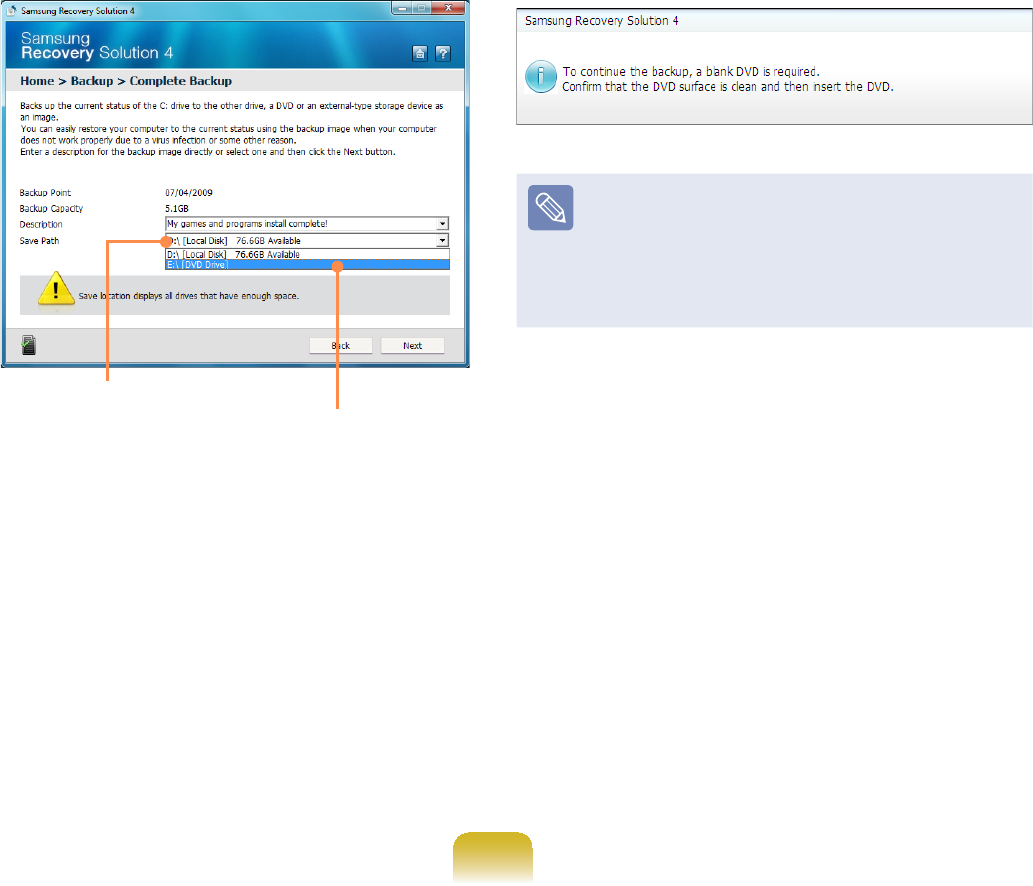
3 &OLFNComplete Backup in the
EDFNXSPHQX
126
4 (QWHUDGHVFULSWLRQIRUWKHEDFNXS
regarding the current computer status
LQWKH'HVFULSWLRQ¿HOGVRWKDW\RXFDQ
easily recognize it later, and specify
theSavePath.Ifyourcomputerhasa
DVD-Writer,youcanspecifytheDVD
driveastheSavePath.
Select Drive D. Select the DVD drive.
5 ,I\RXFOLFNWKHNext button, the
system restarts in restoration mode
and the Complete Backup begins.
IfyouhaveselectedtheDVDdrive
DVWKH6DYH3DWKWKH³,QVHUWDEODQN
DVD”messageappears.Inserta
EODQN'9'DQGFOLFNWKHOK button.
Samsung Recovery Solution
supports DVD+R, DVD-R, DVD+RW,
andDVD-RW,butdoesnotsupport
CD-R,CD-RW,DVD-RAM,DVD-DL
(Dual Layer), HD-DVD, and Blu-Ray.
127
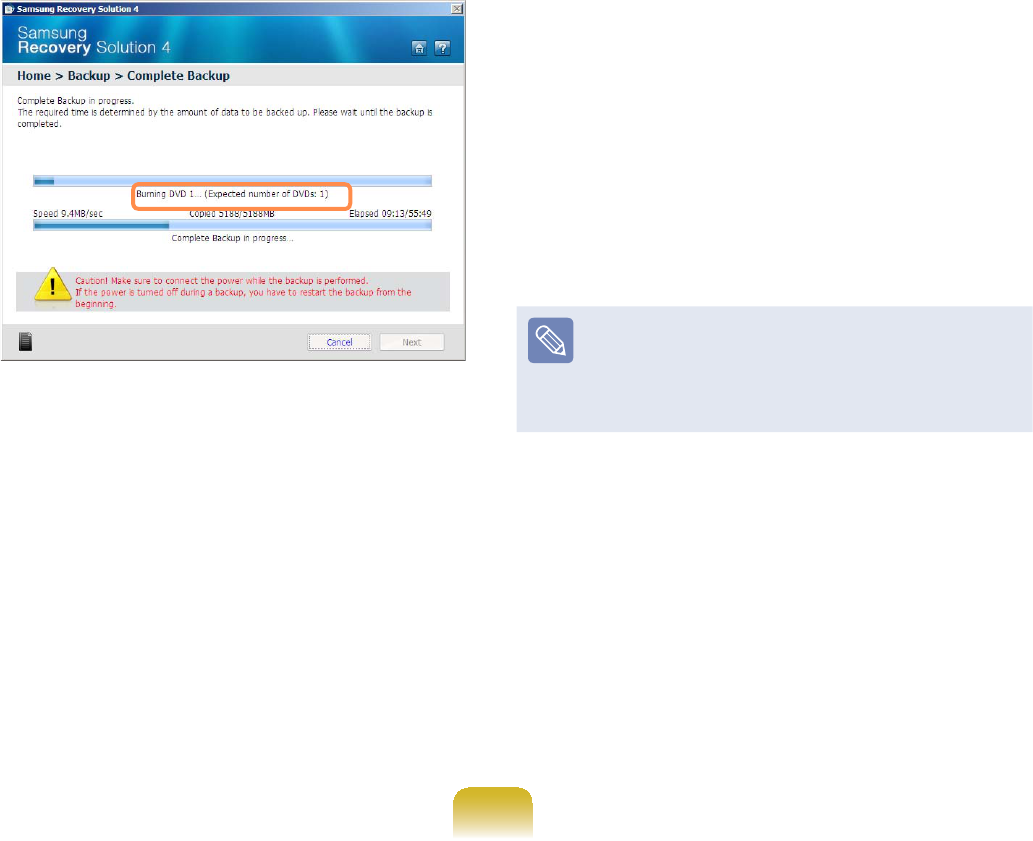
6 7KH&RPSOHWH%DFNXSEHJLQV
If multiple DVDs are required,
theexpectednumberofDVDsis
displayed in the progress screen.
Whenever burning a DVD is
completed,the“InsertthenextDVD”
messagewillappear.Continuethe
EDFNXSDFFRUGLQJWRWKHLQVWUXFWLRQV
7 When the ‘Restart the System’
PHVVDJHDSSHDUVDIWHUWKHEDFNXS
LVFRPSOHWHFOLFNOK to restart the
system.
}Complete Restore
1– When backing up onto DVD
Turnthecomputeronandinsertthe
EDFNXS'9'LQWRWKH'9'GULYH
,IWKHUHDUHPXOWLSOHEDFNXS'9'V
LQVHUWWKH¿UVW'9'
– When backing up to another
drive
ProceedtoStep 2.
2 &OLFNStart > All Programs >
Samsung > Samsung Recovery
Solution > Samsung Recovery
Solution.
When you cannot start Windows,
turnthecomputeronandpressthe
F4NH\LQWKHERRWVFUHHQWRHQWHU
restoration mode.
3 When the initial menu screen
DSSHDUVFOLFNRestoreDQGWKHQFOLFN
Complete Restore.
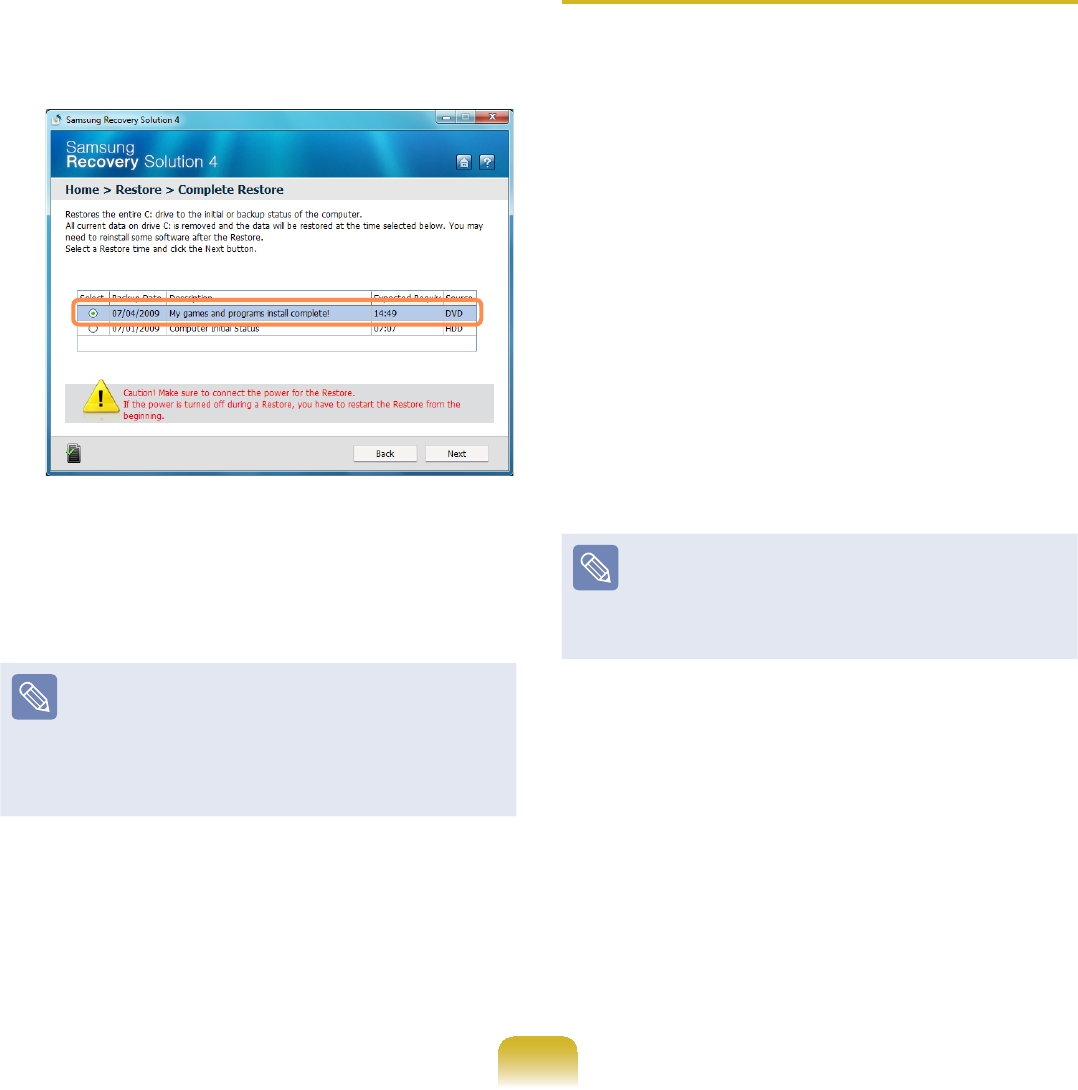
128
4 Select a Complete Backup
restoration point in the restoration
SRLQWVHOHFWLRQVFUHHQDQGFOLFNWKH
Next button. The system is restarted.
5 The restoration progress message
appearsafterthecomputerbootsup
LQUHVWRUDWLRQPRGH,I\RXFOLFNOK,
the restoration begins.
If multiple DVDs have been used
IRUD&RPSOHWH%DFNXSZKHQHYHU
burning a DVD is completed, the
“Insert the next DVD” message will
appear.
6 When the ‘Restart the System’
messageappearsaftertherestoration
LVFRPSOHWHFOLFNOK to restart the
system. The Complete Restore has
been completed.
Data Backup/Restore
Data Backup enables you to save
VSHFL¿F¿OHVRUIROGHUVRQWRDQRWKHUGULYH
or DVD. Data Restore enables you to
restoredatausingthedatasavedby
D'DWD%DFNXSZKHQGDWDLVORVW7KLV
JXLGHGHVFULEHVWKH%DFNXSDQG5HVWRUH
SURFHGXUHVRQWKHEDVLVRIEDFNLQJXS
and restoring by using DVD.
}Data Backup
1 &OLFNStart > All Programs >
Samsung > Samsung Recovery
Solution > Samsung Recovery
Solution.
When you cannot start Windows,
turnthecomputeronandpressthe
F4NH\LQWKHERRWVFUHHQWRHQWHU
restoration mode.
2 When the initial menu screen
DSSHDUVFOLFNBackupDQGWKHQFOLFN
Data Backup.
3 In the data selection screen, select
either Basic Selection or Select
from allVHOHFWDIROGHURU¿OHWREH
EDFNHGXSDQGWKHQFOLFNWKHNext
button.
129
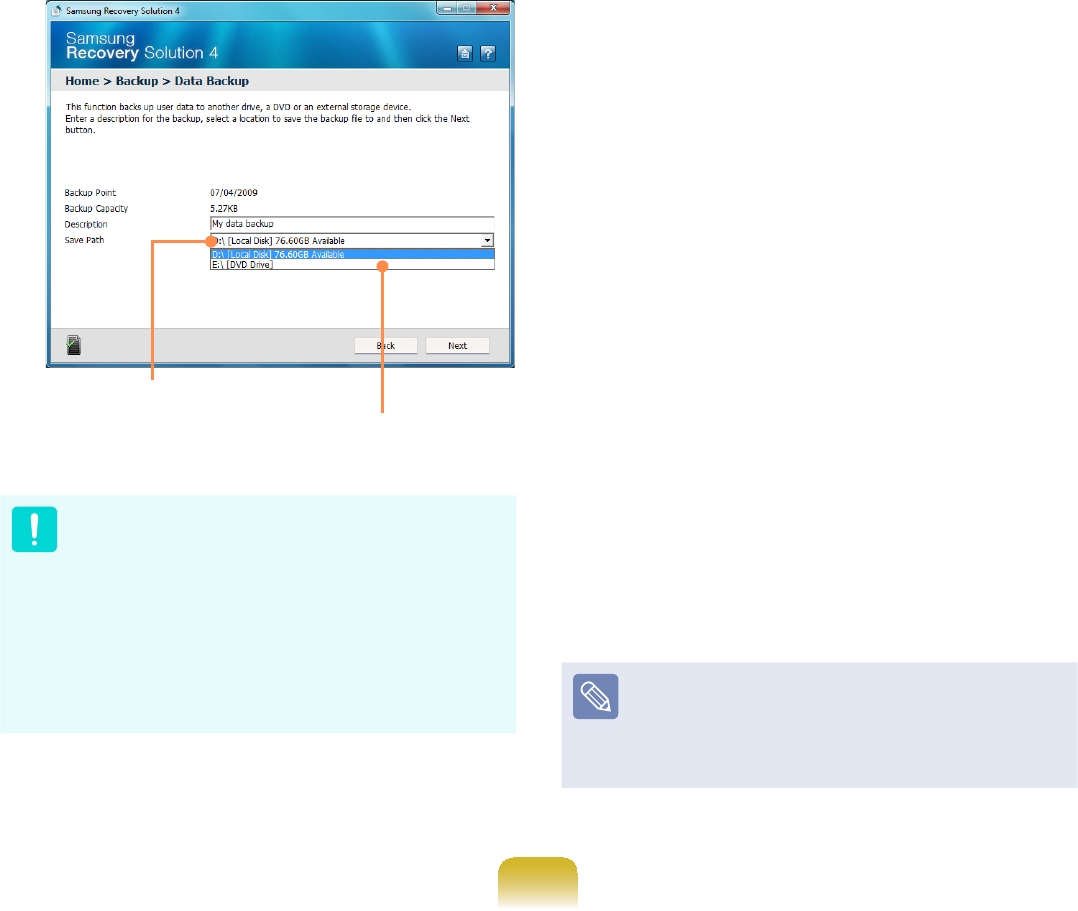
4 (QWHUDGHVFULSWLRQIRUWKHEDFNXSLQ
the Description¿HOGVRWKDW\RXFDQ
easily recognize it later and specify
the Save Path.Ifyourcomputerhasa
DVD-Writer,youcanspecifytheDVD
driveastheSavePath.
Select Drive D.
Select the DVD drive.
,I\RXKDYHVSHFL¿HGDKDUGGLVN
GULYHRUDUHPRYDEOHGLVNDVWKH
Save Path, the SamsungRecovery\
SamsungData folder is created on
WKHFRUUHVSRQGLQJGULYHHJ'?
andthedataissavedtothefolder.
7DNHFDUHWRQRWGHOHWHWKHIROGHUE\
PLVWDNHRURQSXUSRVH
5 ,I\RXFOLFNWKHNext button, the Data
%DFNXSEHJLQV,I\RXKDYHVHOHFWHG
theDVDdriveastheSavePath,
WKH³,QVHUWDEODQN'9'´PHVVDJH
DSSHDUV,QVHUWDEODQN'9'DQGFOLFN
the OK button.
6 7KH³%DFNXSLVFRPSOHWHG´PHVVDJH
appears.
}Data Restore
1– When backing up onto DVD
Turnthecomputeronandinsertthe
EDFNXS'9'LQWRWKH'9'GULYH
– When backing up to another
drive
ProceedtoStep 2.
2 &OLFNStart > All Programs >
Samsung > Samsung Recovery
Solution > Samsung Recovery
Solution.
When you cannot start Windows,
turnthecomputeronandpressthe
F4NH\LQWKHERRWVFUHHQWRHQWHU
restoration mode.
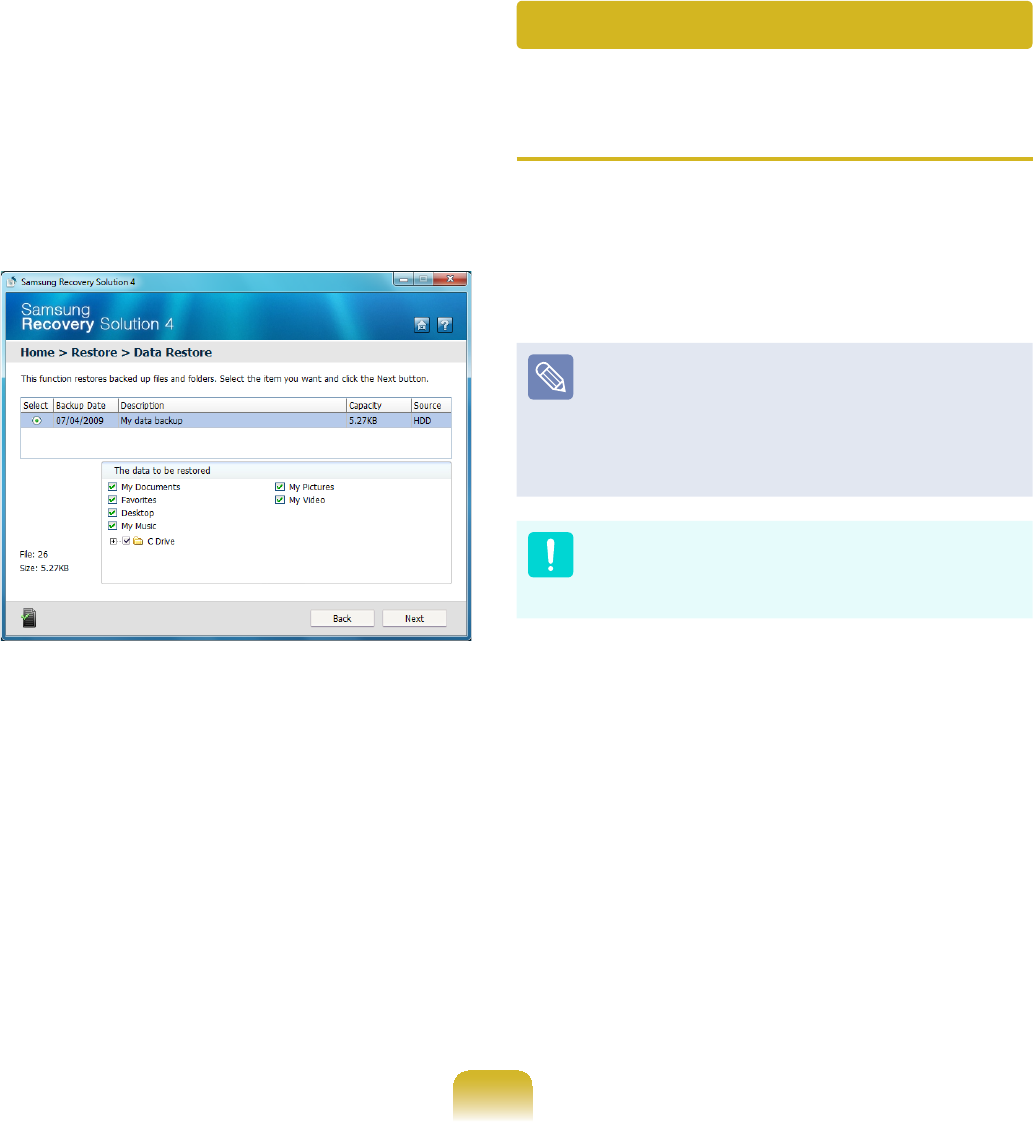
130
3 When the initial menu screen
DSSHDUVFOLFNRestoreDQGWKHQFOLFN
Data Restore.
4 6HOHFWDEDFNXSLWHPWREHUHVWRUHG
LQWKHEDFNXSOLVWDQGFOLFNWKHNext
button.
5 Select a folder for the restoration and
FOLFNWKHNext button. Data Restore
begins.
6 When Data Restore is completed,
FKHFNLIWKHGDWDKDVEHHQUHVWRUHGWR
WKHVSHFL¿HGIROGHU
System Software Function
Using System Software
The System Software function is a
function that enables you to reinstall
device drivers and System Software
3URJUDPVRUEDFNXSWKRVHSURJUDPV
The system software function is
supported by Samsung Recovery
Solution version 4 or later.
Therefore,thefunctionmaynotbe
supported depending on the version.
The System Software Installation
)XQFWLRQRQO\ZRUNVLQ0LFURVRIW
Windows.
}Installing System Software
1 &OLFNStart > All Programs >
Samsung > Samsung Recovery
Solution > Samsung Recovery
Solution.
131
2 When the initial menu screen
DSSHDUVFOLFNSystem Software >
System Software Installation.
3 When the Samsung System
SoftwareVFUHHQDSSHDUVFKHFNDOO
thedevicedriversandapplication
programsyouwanttoinstallandthen
FOLFNInstall Now.
4 After the installation is complete, the
computerwillrestart.
}System Software Backup
1 &OLFNStart > All Programs >
Samsung > Samsung Recovery
Solution > Samsung Recovery
Solution.
2 When the initial menu screen
DSSHDUVFOLFNSystem Software >
System Software Backup.
3 Specify the Save Path. If your
computerhasaDVD-Writer,youcan
specify the DVD drive as the Save
Path.
Select Drive D.
Select the DVD drive.

132
,I\RXKDYHVSHFL¿HGDKDUGGLVN
GULYHRUDUHPRYDEOHGLVNDVWKH
Save Path, the SamsungSoftware
folder is created on the
FRUUHVSRQGLQJGULYHHJ'?DQGWKH
system software programs are saved
WRWKDWIROGHU7DNHFDUHWRQRWGHOHWH
the folder.
4 ,I\RXFOLFNWKHNext button, the
6RIWZDUH%DFNXSEHJLQV,I\RX
haveselectedtheDVDdriveasthe
6DYH3DWKWKH³,QVHUWDEODQN'9'´
PHVVDJHDSSHDUV,QVHUWDEODQN'9'
DQGFOLFNWKHOK button.
5 $IWHUWKHEDFNXSWKH“System
Software Backup is completed”
message appears.
z Ifyouwanttoinstallthe
System Software Programs
EDFNHGXSRQWKHGULYHUXQWKH
SoftwareMediaXX.exe¿OHLQWKH
SystemSoftwarefolder.
z When installing System Software
3URJUDPVIURPWKHEDFNHGXS
DVD,inserttheDVDandfollow
the System Software Installation
directions.
z To delete Samsung Recovery
Solution, refer to the Help section
of the program.

133
Reinstalling in Windows
1 Insert the SYSTEM RECOVERY
MEDIA into the DVD drive.
2 When the AutoPlay window appears,
select Run setup.exeDQGFOLFN
Allow.
This screen may not appear
dependingonthesecuritylevel.
Reinstalling Windows 7
(For Windows 7. For supported models only)
You can reinstall Windows using the SYSTEM RECOVERY MEDIA for Windows
ZKHQ:LQGRZVLVQRORQJHUZRUNLQJSURSHUO\)RUPRGHOVVXSSOLHGZLWKD6<67(0
RECOVERY MEDIA.)
For models supplied with the Samsung Recovery Solution, you can reinstall Windows
usingtheSamsungRecoverySolution.
ThesedescriptionsareforWindows7andforsupportedmodelsonly.
z A SYSTEM RECOVERY MEDIA maynotbesupplieddependingonyourcomputer
model.
z IfyoucannotstartWindows,orifyouwanttodeleteallexistingdataandreinstall
Windows, install Windows according to the descriptions in [Reinstalling when
Windows does not start].
z To reinstall Windows using SYSTEM RECOVERY MEDIA, an external-type ODD
must be connected before turning the computer on. The following descriptions
assume that an external ODD is connected.
5HLQVWDOOLQJ:LQGRZVPD\GHOHWHGDWD¿OHVDQGSURJUDPVVDYHGRQWKHKDUGGLVN
GULYH0DNHVXUHWREDFNXSDOOLPSRUWDQWGDWD6DPVXQJ(OHFWURQLFVVKDOOQRWEHKHOG
liable for any loss of data.
134
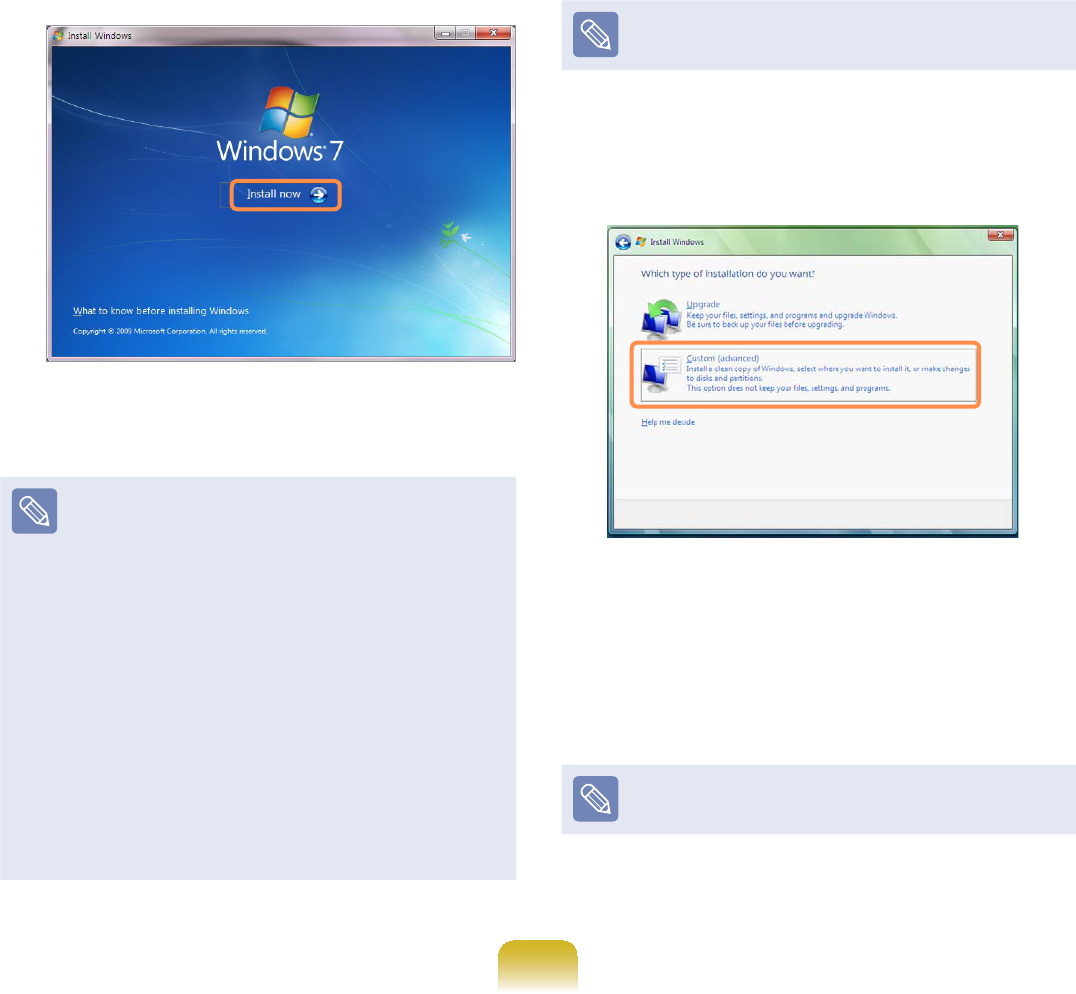
3 If the Select Windows Installation
ZLQGRZDSSHDUVFOLFNInstall Now.
When the Select Update window
DSSHDUVFOLFNRQWKHUHOHYDQWLWHP
Windows 7 installation
selection window
z If you select Go online to get the
latest updates for installation
intheSelectUpdatewindow,the
latest updates are installed and
Step 4 follows. At this time, the
computermustbeconnectedto
the Internet.
z)RU:LQGRZVWKHVFUHHQDVNLQJ
for the operating system to be
installed may appear depending
RQWKHYHUVLRQ,I\RXFOLFNWKH
Next button,thescreenofStep 4
appears.
4 If the User Agreement screen
appears, select I accept the license
termsDQGWKHQFOLFNNext.
For Windows 7, this screen may not
appear depending on the version.
5 The following window appears, select
an installation option.
,I\RXFOLFNCustom, the procedures
from Step 6 continue sequentially.
,I\RXFOLFNUpgrade, the procedures
from Step 7 continue sequentially.
For Windows 7, this screen may not
appear depending on the version.

135
zCustom
Select this option to Reinstall
Windows.Youhaveto
reinstall all necessary device
drivers and programs after the
Custom installation. In addition,
XQQHFHVVDU\IROGHUVDQG¿OHVPD\
UHPDLQRQWKHKDUGGLVNGULYHV
DIWHUWKHLQVWDOODWLRQHJ&?
Windows.old, etc.).
zUpgrade
Select this option to Upgrade
Windows while maintaining
FXUUHQW¿OHVFRQ¿JXUDWLRQVDQG
programs. Although you therefore
donotneedtoreinstallthedevice
drivers and programs, some
SURJUDPVPD\QRWZRUNSURSHUO\
after the upgrade.
6 :KHQDZLQGRZDSSHDUVDVNLQJIRU
the location to install the operating
V\VWHPWRVHOHFWDGLVNGULYHSDUWLWLRQ
DQGFOLFNWKHNext button.
DriveDincludesanareatosavethe
EDFNXSLPDJHXVHGE\6DPVXQJ
Recovery Solution. Installing
WindowstodriveCisrecommended.
When previous Windows installation
¿OHVDUHLQWKHVHOHFWHGSDUWLWLRQD
message appears informing you that
WKH¿OHVDQGIROGHUVZLOOEHPRYHGWR
WKH:LQGRZVROGIROGHU&OLFNWKHOK
button.
7 The Windows installation continues.
Thecomputerwillrestart 3 times
duringtheinstallation.IfthePress
any key to boot from CD or DVD...
messageappearsafterarestart,do
not press any button.
8 Registerauseraccordingtothe
instructions on the Windows screen.
9 When the registration is complete, the
:LQGRZV'HVNWRSVFUHHQDSSHDUV
Forasmoothcomputeroperation,
installing the necessary software
installation is recommended.

136
Reinstalling when Windows does
not start
WhenWindowsdoesnotstart,bootup
withtheSYSTEMRECOVERYMEDIA
andfromthereyoucanreinstallWindows.
1 Insert the SYSTEM RECOVERY
MEDIA into the DVD drive and restart
the computer.
2 If the Press any key to boot from
CD or DVD... message appears
ZKLOHERRWLQJSUHVVDQ\NH\RQWKH
NH\ERDUG
3 Afterawhile,theOptionswindows
such as Language, Time, Keyboard,
HWFDSSHDU&RQ¿UPWKHVHWWLQJVDQG
FOLFNWKHNext button.
4 If the Select Windows Installation
ZLQGRZDSSHDUVFOLFNInstall Now.
)RU:LQGRZVWKHVFUHHQDVNLQJIRU
the operating system to be installed
may appear depending on the
YHUVLRQ,I\RXFOLFNWKHNext button,
thescreenofStep 5 appears.
5 IftheUserAgreementscreen
appears, select I accept the license
terms andWKHQFOLFNNext.
For Windows 7, this screen may not
appear depending on the version.
6 :KHQWKHZLQGRZDVNLQJIRUWKH
LQVWDOODWLRQW\SHDSSHDUVFOLFN
Custom.
For Windows 7, this screen may not
appear depending on the version.
7 :KHQDZLQGRZDSSHDUVDVNLQJIRU
the location to install the operating
system to, select the partition of the
GLVNGULYHDQGWKHQFOLFNWKHNext
button.
DriveDincludesanareatosavethe
EDFNXSLPDJHXVHGE\6DPVXQJ
Recovery Solution. Installing
WindowstodriveCisrecommended.

137
z$,I\RXFOLFNDrive Options
(Advanced), you can delete,
format, create or expand a
SDUWLWLRQ&OLFNRQDIXQFWLRQ
andproceedaccordingtothe
instructions on the screen.
z When previous Windows
LQVWDOODWLRQ¿OHVDUHLQWKHVHOHFWHG
partition, a message appears
LQIRUPLQJ\RXWKDWWKH¿OHVDQG
folderswillbemovedtothe
:LQGRZVROGIROGHU&OLFNWKHOK
button.
8 Thesubsequentstepsarethesame
as those from Step 7 of Installing in
Windows.

138
Reinstalling Windows XP
(For Windows XP, For supported models only)
You can reinstall Windows using the SYSTEM RECOVERY MEDIA when Windows
GRHVQRWZRUNSURSHUO\)RUPRGHOVVXSSOLHGZLWKD6<67(05(&29(5<0(',$
For models supplied with the Samsung Recovery Solution, you can reinstall Windows
usingtheSamsungRecoverySolution.
ThesedescriptionsareforWindowsXPandforsupportedmodelsonly.
z ASYSTEMRECOVERYMEDIAmaynotbesupplieddependingonyourcomputer
model.
z TheSYSTEMRECOVERYMEDIAissuppliedasaCDorDVDdependingonyour
model,andsomemodelsareprintedasSystemRecoveryCD.
z To reinstall Windows using SYSTEM RECOVERY MEDIA, an external-type ODD
must be connected before turning the computer on. The following descriptions
assume that an external ODD is connected.
5HLQVWDOOLQJ:LQGRZVPD\GHOHWHGDWD¿OHVDQGSURJUDPVVDYHGRQWKHKDUGGLVN
GULYH0DNHVXUHWREDFNXSDOOLPSRUWDQWGDWD6DPVXQJ(OHFWURQLFVVKDOOQRWEHKHOG
liable for any loss of data.
Running SYSTEM RECOVERY
MEDIA
InserttheSYSTEMRECOVERYMEDIA
intotheCD-ROMdrive.
139
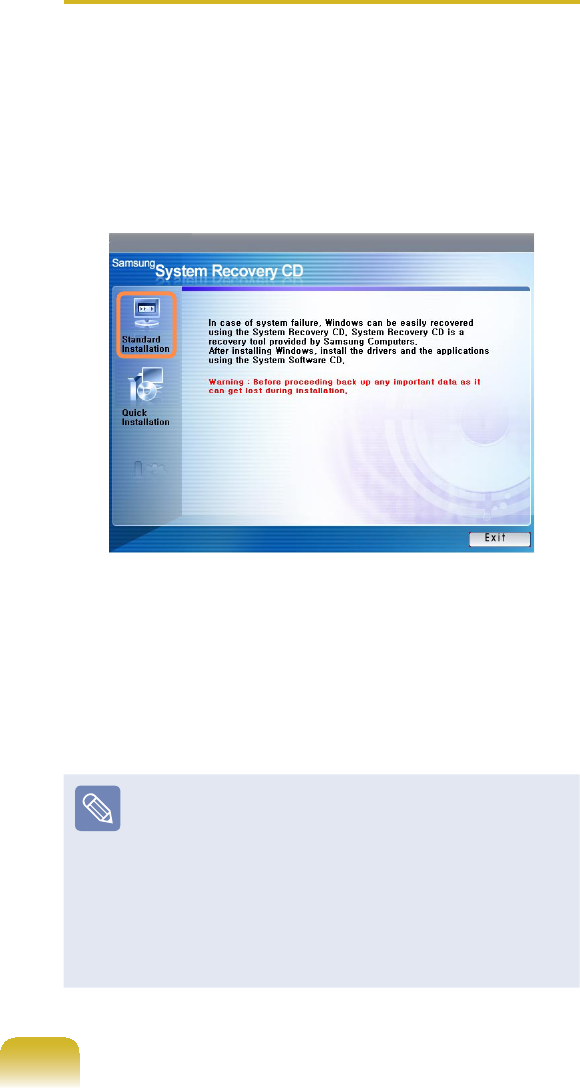
zStandard Installation
You can change the settings for
partitioning, the installation folder,
etc. during the Windows installation.
However, reinstalling Windows may
GHOHWHWKHGDWDRQWKHKDUGGLVNGULYH
VXFKDV¿OHVSURJUDPVHWF,QRUGHU
to minimize damage from data loss,
SOHDVHUHPHPEHUWRDOZD\VEDFNXS
data.
zQuick Installation
This re-installs Windows with the user
GDWDDQGWKHV\VWHPFRQ¿JXUDWLRQ
intact. The user data in the already
existing Windows folders may be
preserved as the existing Windows
folders are overwritten.
Standard Installation
Explain Standard Installation option as a
standard.
1 ,QWKHLQLWLDOVFUHHQFOLFNStandard
Installation.
2 The description for the Standard
,QVWDOODWLRQDSSHDUV&OLFNYes.The
installation starts, and the system will
berestartedafterawhile.
:KHQ4XLFN,QVWDOODWLRQLVVHOHFWHG
Setup proceeds with Step 3 before
automatically installing Windows.
4XLFN,QVWDOODWLRQRYHUZULWHVWKH
existing Windows version, so that
drivers or applications do not need to
be reinstalled.

140
3 Afterthesystemhasrestarted,the
PHVVDJH¶3UHVVDQ\NH\WRERRWIURP
&'¶DSSHDUV'RQRWSUHVVDQ\NH\
at this time. After a while the partition
FRQ¿JXUDWLRQVFUHHQDSSHDUV7RQRW
change the partition, press Enter.
z:KDWLVSDUWLWLRQFRQ¿JXUDWLRQ"
3DUWLWLRQFRQ¿JXUDWLRQLVDIXQFWLRQ
WKDWGLYLGHVWKHKDUGGLVNGULYHLQWR
oneorseveralpartitions.Notethat
changingthepartitiondeletesall
RIWKHGDWDRQWKHKDUGGLVNGULYH
z When installing Windows in the
standard installation, do not install
WindowsXPintheRecovery
partitionasthispartitionisused
as the recovery area in Samsung
Recovery Solution.
If Windows is reinstalled in the
Recovery partition, the system
recovery function cannot be
used since the recovery area is
damaged.
4 Select the folder to install the
Windows operating system. To delete
thepreviousversionofWindowsand
install in the current folder, press Lon
WKHNH\ERDUG
If you press ESC to select another
folder for the installation, new
Windows folders are created causing
DULVNRIGXDOERRWLQJ
5 After the installation process copies
the necessary folders for the
Windows installation, restart the
system, and the message “Press any
NH\WRERRWIURP&'´LVGLVSOD\HG<RX
donotneedtoenteranything.Ina
moment,theWindowsXPinstallation
screen will appear to proceed with the
installation.
6 When the Regional and Language
OptionsZLQGRZDSSHDUVFOLFNNext.
7 Whenawindowthatrequiresyour
name and organization pops up, enter
your name and the organization and
FOLFNNext.
8 When the Date and Time Settings
ZLQGRZDSSHDUVFOLFNNext.Setup
will continue.
9 When the system restarts to display
3UHVVDQ\NH\WRERRWIURP&'GRQRW
SUHVVDQ\NH\
:KHQ\RXVHHWKH:LQGRZVGHVNWRS
thismeansthattheinstallationprocessis
completed.

141
1 InserttheSYSTEMRECOVERY
MEDIAintotheCD-ROMdriveand
start the computer.
2 If the following message appears on
WKHVFUHHQSUHVVDQ\NH\IURPWKH
NH\ERDUG
Press any key to boot from CD.....
3 'RQRWSUHVVDQ\NH\DWWKLVWLPH
After a while the partition screen
appears. To not change the partition,
press Enter.
4 6HOHFWWKHGHVLUHG¿OHV\VWHPIRUPDW
7RPDLQWDLQWKHFXUUHQW¿OHV\VWHP
press Enter.
5 Select the folder to install the
Windows operating system. To delete
thepreviousversionofWindowsand
install in the current folder, press Lon
WKHNH\ERDUG
6 After the installation process copies
the necessary folders for the
Windows installation, restart the
system, and the message “Press any
NH\WRERRWIURP&'´LVGLVSOD\HG<RX
donotneedtoenteranything.Ina
moment,theWindowsXPinstallation
screen will appear to proceed with the
installation.
7 Follow the instructions of the Windows
XP installation wizard to continue with
the installation.
8 When the installation is complete,
thecomputerwillrestart.Whenthe
systemhasrestarted,thePress
DQ\NH\WRERRWIURP&'PHVVDJH
appears.
Ignore the message.
ThesystembootsandtheWindows
and Windows Registration screen
appears. Register Windows, following
WKHLQVWUXFWLRQVWR¿QLVKWKH:LQGRZV
installation. Remove the SYSTEM
RECOVERY MEDIA and install the
device drivers and application
programs using Standard Installation
from the System Software Media.
Reinstalling when Windows does not start
WhenWindowsdoesnotstart,bootupwiththeSYSTEMRECOVERYMEDIAandfrom
there you can reinstall Windows.

142
Questions and Answers
This section provides information on possible problems, solutions and other references
for system use.
z ThesedescriptionsarewrittenbasedonWindows7,thelatestoperatingsystem.
7KHUHIRUHVRPHGHVFULSWLRQVDQG¿JXUHVPD\GLIIHUIURP\RXURSHUDWLQJV\VWHP
ButastheusageissimilartootherWindowsoperatingsystems,youcanusethese
descriptions for reference.
z Thepathmaydifferdependingontheoperatingsystem.
T:KHQXQZDQWHGFRQ¿UPDWLRQ
windows appear repeatedly while
installing or running a program,
connecting to the Internet, or when
you cannot use Internet banking
services.
(for the Windows 7 operating
system only)
AIn Windows 7, the frequency of the
FRQ¿UPDWLRQZLQGRZWKDWDSSHDUV
during the program installation or
executionorafterchangingWindows
settings is determined by the security
level setting in the User Account
Control.Thismayoccurwhenthe
securitylevelintheUser Account
Control is set to Alarm always.
n &OLFNStart > Control Panel
> User Accounts and Family
Protection > User Accounts >
Change User Accounts Control
Settings.
l 6HOHFWDOHYHODQGFOLFNWKHOK button
WR¿QLVKWKHVHWWLQJ
Windows Related

143
TThe Windows Firewall setting
according to the network location
(for the Windows 7 operating
system only)
A Windows 7 allows different Windows
¿UHZDOOVHWWLQJVIRUHDFKQHWZRUN
location.
7KHIROORZLQJQHWZRUNORFDWLRQVDUH
available: Home Network,Company
Network and Common Network.
You can determine whether to use the
:LQGRZV)LUHZDOODQGVHOHFWD¿UHZDOO
security setting for each location.
n ,IWKHQHWZRUNVHWWLQJZLQGRZDSSHDUV
inWindows7aftersettinguptheIP
address, select a location.
l &OLFNStart > Control Panel >
System and Security > Windows
Firewall > Activate or Deactivate
Windows Firewall.
W 6HWXSD¿UHZDOOIRUWKHHome
and Company (Private) Network
Location Settings and the Common
Network Location Settings,and
FOLFNWKHOK button.
TWhat Is Virtual XP?
(For Windows 7 only,
For supported models only)
A Virtual XP refers to a virtual
operating system that allows you
to run Windows XP virtuallyinthe
Windows 7 environment. By using
Virtual XP,youcanuseapplications
that do not run on Windows 7.
君Requirements for Running Virtual
XP
nVirtual XP is only available on these
three operating systems: Windows
7 Professional,Ultimate,and
Enterprise.
l Thememorymustbe 2 GBormore
and the virtualization function of the
BIOS must exist and be activated by
the CPU.
For more information, refer to the
HelpsectionoftheOSorvisit
Microsoft’s website.

144
TWhat are the restrictions of
Windows 7 Starter?
AnTheDualViewfunctionisnot
supported when an external display
device is connected.
lTheAerofunctionofWindows7is
not supported.
WThe Set as Background function to
FKDQJHWKHZDOOSDSHURIWKH'HVNWRS
is not supported.
jFunctionsthatarenotsupportedby
theoperatingsystem,mayalsonot
besupportedbyrelatedprograms
such as Easy Display Manager, the
graphics driver and so on.
Formoreinformation,refertothe
HelpsectionoftheOSorvisit
Microsoft’s website.

145
TThe LCD screen is too dark or too
bright.
A7XUQRQWKH/&'EDFNOLJKWRUDGMXVW
thescreenbrightness.
Press Fn +#to turn on the LCD
EDFNOLJKWRUpress Fn +#,Fn +#
to adjust the screen brightness.
TThe screen saver disturbs screen
viewing during Media Player or
YLGHR¿OHRSHUDWLRQ
$Ź)RU:LQGRZV
Unselect Library > More Options
> Player > Allow screen saver
during playback in the Media
Player.
Ź)RU:LQGRZV;3
&OLFNTools >Options >Player and
then clear the Allow screen saver
during playback in the Media
CenterFKHFNER[
TIn the following cases, the screen
blinks or there is noise for a short
time.
}Click the Graphics Related tab,
Change Resolution, Change
Display Device, Remove the AC
Adapter, Restart the System,
Change Power Scheme.
AThis may happen while the video
driver is examining the connected
device. While the detection process is
busy, any connected display devices
PD\EOLQNRUVRPHQRLVHPD\RFFXU
TWhen I connect an external
display and change the settings
to display the screen image on
both the LCD and the external
display by pressing the Fn +
key combination, the screen is not
displayed properly.
APress Fn +#NH\FRPELQDWLRQ
again. If the screen is still not
displayedoronlypartofthescreen
is displayed by doing this, that means
theLCDresolutionistoolowortoo
wide and the external display does not
support the resolution.
Display Related

146
5LJKWFOLFNRYHUWKH'HVNWRSVHOHFW
Properties, select the Settings tab and
change the resolution to 800 x 600.
TThe Taskbar on the bottom of the
screen does not appear when a
projector is used as the display
device.
AThis may happen, if the projector
does not support LCD resolution. In
this case change the resolution to
800x 600(recommended)onyour
computer.
TSwitching the MS-DOS command
prompt to full screen mode or
Windows mode by pressing the
<Alt>+<Enter> keys does not
operate properly.
APressing the <Alt>+<Enter>NH\V
XVLQJDQ86%NH\ERDUGPD\FDXVH
WKHNH\LQSXWWREHUHFRJQL]HGDV
PXOWLSOHNH\LQSXWVGHSHQGLQJRQWKH
NH\ERDUGLQSXWUHFRJQLWLRQWLPH,Q
this case, the MS-DOS command
promptisrepeatedlyswitchedtofull
screen and then to Windows several
times.
Please press the <Alt>+<Enter>
NH\VPRUHTXLFNO\RUSUHVVWKH
<Alt>+<Enter>NH\VXVLQJWKHV\VWHP
NH\ERDUG
TThe shortcut icons are not
displayed on the screen even if I
press the shortcut key.
AThe shortcut icons only appear when
the Easy Display Manager program is
installed.
TThe color is strange when the
picture is displayed on the
connected monitor (or projector).
A&KHFNWKHPRQLWRUVLJQDOFDEOH
connection and reconnect the cable.

147
T+RZFDQ,FRQ¿JXUHWKHVRXQGIRU
video or audio chatting?
A1 &RQ¿JXULQJWKH5HDOWHN+'$XGLR
Manager
n Select Control Panel > Realtek HD
Audio Manager.
l Select the Mic tab.
W Select the Suppress noise and the
5HPRYHVRXQGHFKRLWHPVDQGFOLFN
the OK button.
Ź)RU:LQGRZV
When using the Remove sound
echo option, select the Play Device
> Speaker > Level tabandsetthe
Microphone to Mute.
Ź)RU:LQGRZV;3
Using Acoustic Echo Cancellation
RSWLRQNHHSVWKH0LFURSKRQH9ROXPH
PXWHGLQWKH3OD\EDFN0L[HU
A2 Playback Mixer Settings
n'RXEOHFOLFNWKHVolume icon in
WKH7DVNEDUDQGVHOHFWOptions >
Properties from the menu.
l Select Realtek HD Audio Input in
WKH0L[HUGHYLFH¿HOGFRQ¿UPWKDWWKH
Microphone is selected in the Show
the following volume controls¿HOG
DQGFOLFNWKHOK button.
WSelect the Microphone item in the
Record Control window and close
the window.
TI cannot hear my voice with the
internal microphone.
AThis is because the sound from the
internal microphone is removed so
that the sound is not delivered to the
VSHDNHUDQGFDXVHVIHHGEDFNIURP
the internal microphone. However,
you can record the sound from the
microphone normally.
Ź)RU:LQGRZV
When using an external microphone,
select the Play Device > Speaker
> Level tab and deselect Mute
for the Microphone. Then you can
listen to the sound from the external
PLFURSKRQHWKURXJKWKHVSHDNHUV
Ź)RU:LQGRZV;3
When using an external microphone,
if you disable the microphone channel
mute function of the play mixer, you
can hear the sound input into the
external microphone through the
VSHDNHU
Sound Related

148
TSound is recorded abnormally
when I select the Remove sound
echo option, connect an external
microphone, select the Play Device
> Speaker > Level tab and then
deselect Mute for the Microphone.
AThis occurs because the algorithm
used to remove the echo sound
regardssomeofthesoundasan
echo and removes this, as the
recordingisdonebyplayingthe
sound from the external microphone.
Ź)RU:LQGRZV
After selecting the Remove sound
echo option, please select the Play
Device > Speaker > Level tab and
select Mute for the Microphone for a
normal recording.
Ź)RU:LQGRZV;3
In this case, select Mute in the
0LFURSKRQH9ROXPHRIWKH3OD\EDFN
Mixer after selecting Acoustic Echo
Cancellation item.
T+RZFDQ,FRQ¿JXUHWKH5HFRUGLQJ
Mixer while broadcasting music
in WinAMP? (for the Windows XP
operating system only)
A1 Playback Mixer Settings
n'RXEOHFOLFNWKHVolume icon in
WKH7DVNEDUDQGVHOHFWOptions >
Properties from the menu.
l Select Realtek HD Audio Input in the
0L[HUGHYLFH¿HOGVHOHFWStereo Mix
in the Show the following volume
controls¿HOGDQGFOLFNWKHOK
button.
W Select the Stereo Mix item in the
Record Control window and close
the window.
A2 Realtek HD Sound Effect Manager
Settings
n&OLFNStart > Control Panel >
Sounds, Speech, and Audio
Devices > Realtek HD Sound Effect
Manager.
l&OLFNMicrophone tab.
W Unselect Noise Suppression and
Acoustic Echo Cancellation and
&OLFNOK.

149
TThe <Wake On LAN> function
A:DNH2Q/$1!LVDIXQFWLRQWKDW
activates the system from Sleep mode
whenasignal(suchasapingor
PDJLFSDFNHWFRPPDQGDUULYHVRYHU
WKHQHWZRUNZLUHG/$1
zUsing the <Wake On LAN>
Function
n Ź)RU:LQGRZV
&OLFNStart > Control Panel >
Network and Internet > Network
and Sharing CenterDQGFOLFNRQ
Change adapter settings in the
left menu pane.
Ź)RU:LQGRZV;3
&OLFNStart > Control Panel >
Performance and Maintenance
> System > Hardware > Device
Manager > Network Adapters.
l 5LJKWFOLFNRQWKH/RFDO$UHD
Connection and select Properties.
W &OLFN&RQ¿JXUH > Power
Management tab. Select Allow this
device to bring the computer out of
standbyWKHQFOLFNOK. Restart the
system.
,IWKHV\VWHPZDNHXSIURP6OHHS
mode even though there is no
received signal, use the system
DIWHUGLVDEOLQJWKH:DNH2Q/$1!
function.
- TheLANLEDmaynotbeturnedoffif
System is shutdown without disabling
WKH:2/:DNHRQ/$1!RSWLRQ
- Connecting a wired LAN while using
a wireless LAN may not activate the
:DNH2Q/$1!IXQFWLRQ6HWWKH
Wireless LAN to Disable to use the
:DNH2Q/$1!IXQFWLRQ
)RU:LQGRZV:DNH2Q/$1LVQRW
supported Ping.
TWhen I am connected to a
100Mbps/1Gbps wired LAN and the
computer exits Sleep/hibernation
mode, a message appears
informing you of a connection to a
10Mbps/100Mbps wired LAN.
AWhenthecomputerexitsstandby/
KLEHUQDWHPRGHUHVWRULQJWKHQHWZRUN
WDNHVDERXWVHFRQGV
:KHQWKHQHWZRUNLVUHVWRUHGLW
operates at 100Mbps/1Gbps.
Wired LAN Related

150
TThe Home Group function
(for the Windows 7 operating
system only)
A Home Group isafunctionthat
enablesconnectingallthecomputers
athomeallowinguserstoaccessthe
data on all computers as if accessing
thedataonthelocalcomputer.
,I\RXVHWWKH¿UVWFRPSXWHUWRXVHD
Home Group as a Home Network,
you can create a Home Group.A
second (and more) computer can
participate in the created Home
Group.Apasswordisrequiredfor
SDUWLFLSDWLRQDQG\RXFDQFRQ¿UPWKH
SDVVZRUGRQWKH¿UVWFRPSXWHU
This function is only available between
computers that have the Windows 7
operating system installed. If an older
operatingsystemthatWindows7is
installed on a computer, the computer
cannot create or participate in a
Home Group.
In addition, using the Home Group
function is restricted in the Windows
7 Starter version because of the
operating system properties.

151
T,FDQQRW¿QGDQ$3
AVerify whether the Wireless LAN LED
is on.
If it is turned off, turn it on by pressing
theWirelessLANOn/Offbutton
(Fn +#).
TThe Wireless LAN device is
operating properly, but I cannot
connect to the Internet or to
another computer.
This is due to an incorrect
FRQ¿JXUDWLRQRUDFRQ¿JXUDWLRQ
error. Check the following:
A1 When connecting to a wireless Ad-
+RFQHWZRUNFKHFNLIWKHQHWZRUN
name (SSID) is the same.
A2 ,IDQHWZRUNNH\HQFU\SWLRQNH\LV
used,theAP(AccessPoint)and
ZLUHOHVV$G+RFQHWZRUNNH\VPXVW
be the same.
7KH$3QHWZRUNNH\FDQEH
FRQ¿JXUHGXVLQJDQ$3PDQDJHPHQW
program.Formoredetailed
LQIRUPDWLRQDVN\RXUQHWZRUN
administrator or product provider.
A3 &KHFNWKDWWKHGHYLFHGULYHULV
installed properly. If the driver is
QRWSURSHUO\LQVWDOOHG\RXZLOO¿QG
D\HOORZH[FODPDWLRQPDUNRQWKH
QHWZRUNLFRQE\FOLFNLQJDevice
Manager > Network Adapter.
TThe signal strength is excellent,
but I cannot connect to the
network.
Even if the signal strength is
excellent, the network connection
may not operate properly if the
TCP/IP properties are not properly
FRQ¿JXUHGRUWKHQHWZRUNNH\
(encryption key) is incorrect.
A1 &KHFNWKDWWKH7&3,3SURSHUWLHV
DUHFRQ¿JXUHGSURSHUO\:KHQ
FRQQHFWLQJWRDQ$3ULJKWFOLFNWKH
Network Connections icon on
WKHWDVNEDUDQGVHOHFWNetwork and
Sharing Center,I\RXFOLFNWKHView
Status next to a connected wireless
QHWZRUNGHYLFHDQGWKHQFOLFNWKH
Detail button,youcanviewtheIP
information.
Wireless LAN Related

152
)RU:LQGRZV;3GRXEOHFOLFNWKH
LFRQDQGFKHFNLIWKH,3DGGUHVVLV
properly allocated on the Support
tab.
IftheIPisnotallocatedproperly,the
IP address will be displayed as follows
(e.g. 169.254.xxx.xxx).
,IWKHQHWZRUNGRHVQRWSURYLGH'+&3
youhavetospecifythecorrectIP
DGGUHVVE\DVNLQJ\RXUQHWZRUN
administrator.
(YHQLIWKHQHWZRUNSURYLGHV'+&3
theservermaynotallocateanIP
addresstotheclientproperly,andthe
clientstationcannotconnecttothe
QHWZRUN
}Check the AP Settings
FortheAPsettings,refertothe
UserGuideprovidedbytheAP
manufacturer.
A2 Verify whether the environment
is suitable for using a wireless
LAN.TheuseofawirelessLAN
mayberestrictedaccordingtothe
environment and distance. Obstacles
such as walls or doors affect the use
of a wireless LAN. Install the AP in a
high and open space, 50cm from the
wall and far removed from any other
radiosignalsources.
A3 Verify whether the AP is operating
properly.
z WhentheAPisnotoperating
normally,turnofftheAP,waitashort
while,andturnitonagain.
z 9HULI\ZKHWKHUWKH$3¶V¿UPZDUHLV
themostrecentversion.(Contactthe
AP manufacturer or the place where
you purchased the AP for details of
WKH$3¿UPZDUH
A4 Verify whether the AP has been
SURSHUO\FRQQHFWHGWRWKHQHWZRUN
9HULI\ZKHWKHUWKHQHWZRUNLV
operating normally by connecting
WKHZLUHGQHWZRUNFDEOHZKLFKKDV
been connected to the AP, to your
computer.
A5 &KHFNWKHQHWZRUNNH\VHWWLQJV
HQFU\SWLRQNH\DJDLQ:KHQ
automatic code conversion (a
passphrase function) has been
selected and data communication
is not functioning even with a
normal wireless connection, it is
UHFRPPHQGHGHQWHULQJWKHQHWZRUN
NH\HQFU\SWLRQNH\PDQXDOO\

153
A6 &KHFNWKH$3VHWWLQJVDVIROORZV
(The following is recommended for
astandardenvironmentandthus
PD\GLIIHUDFFRUGLQJWRWKHVSHFL¿F
ZLUHOHVVQHWZRUNHQYLURQPHQW
z WhenseveralAPsarepresent
VLPXOWDQHRXVO\FKHFNWKHFKDQQHO
settings for each AP. When different
APs are using nearby channels,
interference may occur between the
electronicwaves.SettheAPchannels
further apart from each other. (Ex:
Ch1, Ch5, Ch9, Ch13)
zWhen an AP’s SSID (Service Set ID)
option is set to “Hide”, you cannot
search for that AP on the computer.
We recommend unselecting the
“Hide” option for the AP. The SSID is
a name used for distinguishing one
wireless LAN from another wireless
LAN.
zIt is recommended using Long
Preamble. Preamble is a signal for
data transmission synchronization.
Short Preamble may be supported
by some types of APs but may cause
compatibility problems.
zIt is recommended using a static IP.
zSince static channel selection is more
reliable than auto channel selection,
it is recommended using a static
channel.
TI have set the same IP address
for both the wireless and wired
connections, but they do not work
properly.
AYoucannotusewirelessandwired
connections using the same IP
address. To sequentially use both the
wired and wireless connections with
the same IP address, you need to set
the currently not needed connection
WR'R1RW8VHLQWKH1HWZRUN
Connections of the Control Panel.

154
TThe wireless LAN does not
work properly when there is a
device operating on an adjacent
frequency in the vicinity of the
product.
A1 Channel interference may occur when
a wireless video transceiver or a
microwaveovenisbeingused.Ifyou
experience channel interference from
other equipment, we recommended
changing the channel for connecting
totheAP.Formoreinformationabout
APsettings,refertotheUserManual
supplied by the AP manufacturer.
A2 SinceIEEE802.11gequipment
operatesinhybridmodewhenthere
is active IEEE802.11b equipment, the
dataratemaybedegraded.

155
T3D game is not executed, or some
functions are not working.
AChangethegraphicsettingofthe
game to “2D” or “Software Renderer,”
then execute the program again.
TGame play is not displayed
smoothly on the screen.
AFor 3D games, the texture data
for the 3D screen display is saved
tothesystemmemory.Ifthereis
LQVXI¿FLHQWV\VWHPPHPRU\WKHGDWD
LVVDYHGWRWKHKDUGGLVNGULYHDQG
loaded to memory when required.
This operation may temporarily stop
displaying the picture on the screen.
In this case, lower the game
resolution or the screen settings.
TThe picture on the screen is
displayed as a broken image for
some games.
AApartofthepictureonthescreen
PD\EHEURNHQZKHQSOD\LQJ
somegamesthatrequireahigh-
VSHFL¿FDWLRQJUDSKLFVFDUG
In this case, set the 3D function
settingforthegametoalowervalue
or set the game resolution to a lower
value.
TI launched a game right after
installing it, and the game is not
executed.
AThis problem may occur when the
game is not compatible with Windows.
Launchthegameagain,anditwillbe
executed properly.
Games and Programs Related
Windows may not provide some functions properly when performing some applications
especially games, or may cause a problem due to a device driver compatibility issue.
)RUWKHODWHVWGHYLFHGULYHUVDQGEXJ¿[HVSOHDVHUHIHUWRWKHUHVSHFWLYHFRPSDQ\¶V
website.

156
TFn + Key combination does
not work.
AWhiledisplayingvideoofVCDor
MPEG,orthedisplaysettingisDual
View, you cannot toggle display
devices. Also the installation of
NetWare Client 32 program disables
thefunctionofFn +#.
TWhile playing a game, pressing
the Fn + keys does not work
or the screen is not properly
displayed.
ASome games and 3D application
programs may change the display
device control. Therefore, pressing
the Fn +#NH\VPD\WHUPLQDWHWKH
running program or may display an
abnormal screen.
Press the Fn +#NH\VEHIRUH
launchingaprogramanddonotpress
them while running the program.
TRunning speed of a game is too
slow or fast.
(for the Windows XP operating
system only)
AChange the setting of Power
Schemes to “Always On.”
&OLFNStart > Control Panel >
Performance and Maintenance >
Power Options > Power Schemes
WDEWKHQFRQ¿JXUHWKH3RZHU
VFKHPHV¿HOGWR³$OZD\V2Q´
TSome part of a game image is not
displayed or is displayed in black.
AThis may happen when running a
game designed for DirecX 8.1 or
which has 1024 x 768 as the default
resolution, such as NHL 2003, MVP
Baseball 2003, Special Forces,
Hangame, Pmang etc.

157
TThe picture is not displayed
properly for some games.
ASome games may not display the
pictureproperlywhenthescreen
resolutionissetto1024 × 600andthe
colorqualityissetto 32 bit.
For these games, set the screen
resolutionto1024 x 600or800x 600,
and the color quality to 16bit.

158
THow to view the Bluetooth help
information.
$Ź)RU:LQGRZV
Press the Windows +F1NH\
combinationtolaunchWindowsHelp
and search for Bluetooth related
itemsintheHelpsection.
Ź)RU:LQGRZV;3
'RXEOHFOLFNWKHMy Bluetooth
Environment shortcut icon on the
Desktop to launch the program, and
then press the F1NH\WRYLHZWKH
help information.
T,FDQQRW¿QGRUFRQQHFWWKH
headset.
A1 Iftheheadsetisconnectedtoanother
deviceandiscurrentlybeingused,
youwillnotbeabletolocateit.Inthis
case,evenifyoulocatetheheadset,
youwillnotbeabletoconnectit.
Disconnect the headset from the
device and then try again.
A2 Forsomeheadsetmodels,ifthe
headset is connected to the power
adapter, the headset cannot be
connected through the Bluetooth
wireless connection.
Disconnect the headset from the
poweradapterandtryagain.
A3 A Bluetooth headset generally
provides On/Off and Pairing modes.
Toconnecttheheadsettoanother
Bluetoothdevicesuchasacomputer
or cellphone, it must be in Pairing
mode. Switch the headset to Pairing
mode and try again.
In general, a Bluetooth headset
in Pairing mode is automatically
switchedtoOn/Offmodeafterapre-
determined period of time.
Bluetooth

159
Usage Instructions
z Generally, Bluetooth devices deliever
stable performance while connected
within a 3m(10 ft.) distance.
z For Bluetooth to operate smoothly, use
thecomputerinanopenenvironment
with no walls or obstacles in the way
andhavinglowradiointerference.
z Youcanconnecttoonlyone
Bluetoothdeviceatatimeforaphone
connection, data syncing, electronic
business card exchange, FAX
transmission/reception, sound related
functions, and serial port functions.
z It is recommended using only
oneBluetoothdeviceatatimeas
connecting multiple Bluetooth or other
wirelessdevicesatthesametime
mayslowordestabilizetheBluetooth
connection.
z Data communications via Bluetooth
maybepoorwhentheCPUloadisat
IXOOFDSDFLW\RUWKHUHDUHLQVXI¿FLHQW
system resources.
z The Bluetooth function of a Bluetooth
PDA, mobile phone, mouse or
NH\ERDUGPD\EHWXUQHGRII7RXVH
them in connection with a Samsung
computersupportingBluetooth,you
PXVWFKHFNLIWKH%OXHWRRWKIXQFWLRQRI
thedevicetoconnecttoisturnedon.
Fortheproceduresonturningonthe
Bluetoothfunctionofadevice,referto
the relevant device manual.
z TheservicesprovidedbyBluetooth
devicesmayvarydependingontheir
capabilities. For the services provided
by the Bluetooth device, refer to the
device manual.
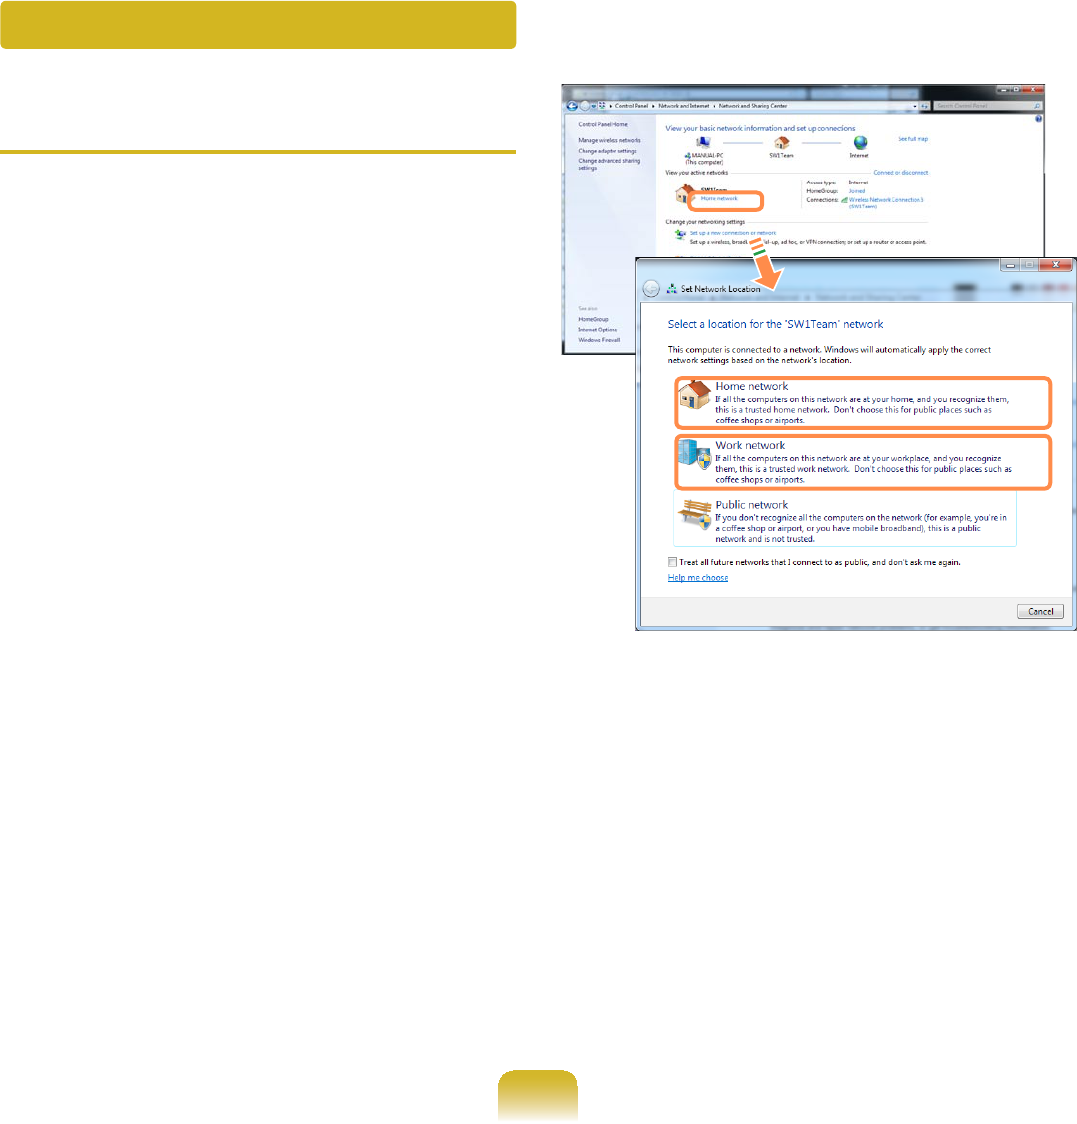
160
TNo connected device is shown in
Easy Content Share.
Ifnoconnecteddeviceisshown,
FKHFNWKHIROORZLQJ
A1 &KHFNZKHWKHU\RXU79VXSSRUWV
DLNA.Formoreinformationonthis,
refer to the User Manual of your TV.
A2&KHFNZKHWKHUDOOGHYLFHVFRQQHFWHG
totheaccesspointareturnedon.
A3&KHFNZKHWKHU\RXU3&DQG79
areconnectedtotheaccesspoint
correctly.
A4&KHFNZKHWKHUWKHQHWZRUNORFDWLRQ
of your PC is set to Home network or
Work network.
,IQRWFOLFNControl Panel > All
Control Panel Items > Network and
Sharing Center > Public Network.
&KDQJHWKHQHWZRUNORFDWLRQWRHome
network or Work network.
A5 This problem may occur due to
a vaccine program. (This is only
applicable to models where McAfee
Security Center is installed).
In this case, change the settings by
following the steps below.
Easy Content Share Related
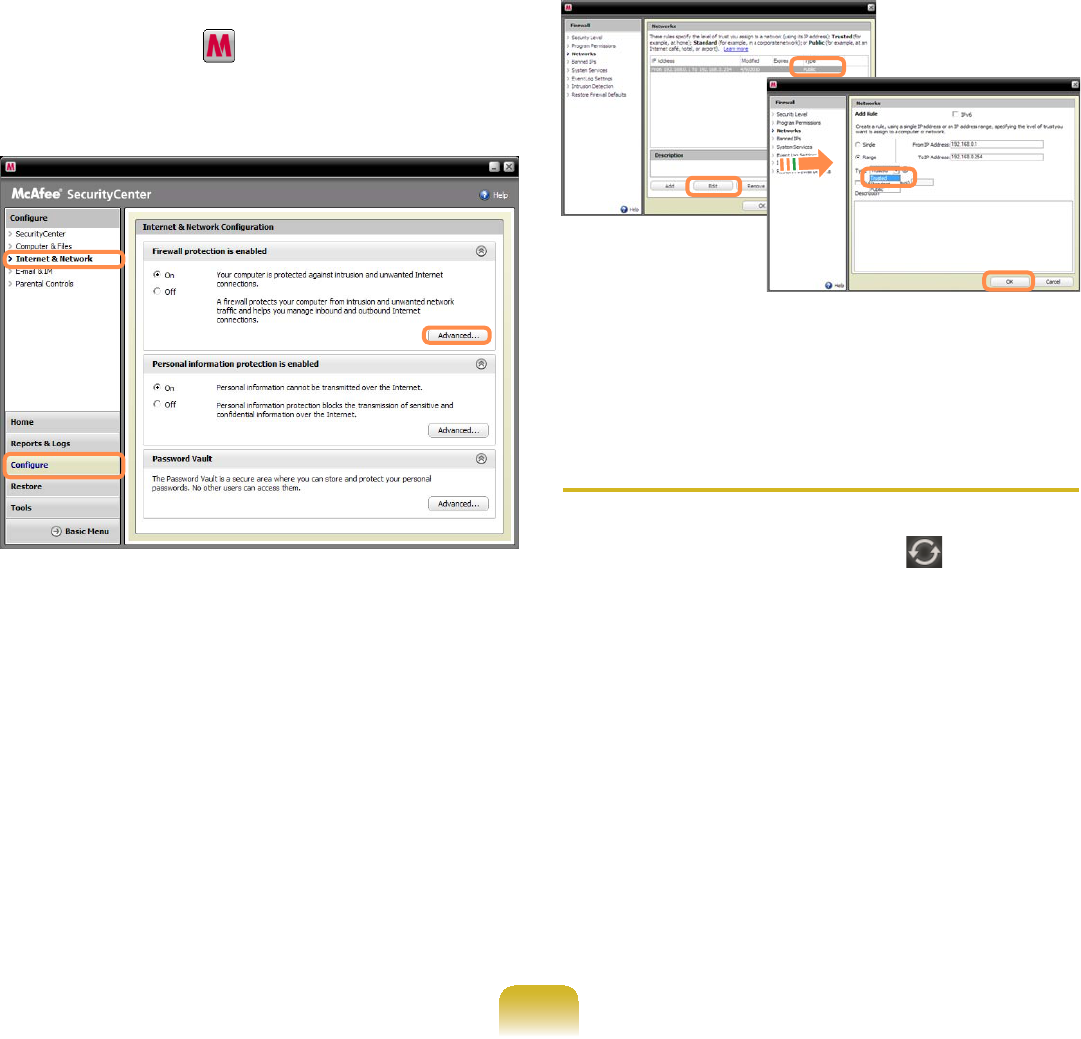
161
n 'RXEOHFOLFNWKHMcAfee Security
Center icon to launch it.
&OLFN&RQ¿JXUH!,QWHUQHW
Network > Advanced.
l 6HOHFWWKH1HWZRUNPHQXLWHP,Q
WKH1HWZRUNSDQHWRWKHULJKWRIWKH
ZLQGRZFKHFNZKHWKHUWKH7\SHLVVHW
to Trusted.
If it is not set to Trusted, change
it to Trusted by performing these
operations:
&OLFNEdit >Changethetypeto
Trusted!&OLFNOK.
TMy TV which has been used
successfully with Easy Content
Share is suddenly not shown in the
list.
A1 7KLVLVEHFDXVHWKHQHWZRUNLV
XQVWDEOH&OLFNRefresh to update
thelistofdevicesconnectedtothe
access point.
A2 This problem may occur due to
a vaccine program. (This is only
applicable to models where McAfee
Security Center is installed).
Q. RefertoanswerA5 for the
question Q. No connected devices
are shown in Easy Content Share.

162
TSubtitles are not displayed when
viewing videos on my TV.
A Easy Content Share does not
supportsubtitlesduetoDLNA
constraints. To enjoy videos with
subtitles, you should install Samsung
TV’s bundled DLNA S/W (applicable
to Samsung TVs only).
n Install the DLNA S/W bundled with
yourSamsungTVonyourcomputer.
l 6KDUHWKH¿OHV\RXZDQWWRSOD\XVLQJ
the Samsung TV’s bundled DLNA
S/W.
(Formoreinformationonhowtouse
Samsung TV’s bundled DLNA S/W,
refer to the User Manual of your TV.)
W Run Easy Content Share.Ifthe
Samsung TV’s bundled DLNA S/W
youinstalledislistedintheremote
server list of Easy Content Share,
the sharing settings have been
FRQ¿JXUHGVXFFHVVIXOO\
j In Easy Content Share, add the
sharedcontentoftheSamsungTV’s
bundledDLNAS/Wtotheplaylist.
Nowyoucanenjoysubtitles.
TNo screen is displayed when I try
to view a video on my TV.
A Iftheformatofthevideoisnot
supportedbyyourTV,noscreenwill
be output.
Thesamesymptomalsooccurswhen
RWKHUSOD\EDFNGHYLFHVH[FHSWIRU\RXU
TV do not support the video format.
TDo only the PC and TV have the
DLNA function?
A Some cell phones, printers, photo
framesandrefrigerators,etc.support
the DLNA function.
DevicessupportingtheDLNA
IXQFWLRQFDQVKDUH¿OHVZLWKHDFK
other.Dependingoneachproduct,
a product may only support sharing
SKRWRVRUPXVLF¿OHV)RUGHWDLOHG
information on the DLNA functions,
refer the user manual of each product.

Chapter 5.
Appendix
3URGXFW6SHFL¿FDWLRQV 4
Glossary 166
Index 171

164
3URGXFW6SHFL¿FDWLRQV
7KHV\VWHPVSHFL¿FDWLRQVPD\GLIIHUGHSHQGLQJRQWKHGHULYHGPRGHOV)RUGHWDLOHG
V\VWHPVSHFL¿FDWLRQVUHIHUWRWKHSURGXFWFDWDORJ
CPU Intel ATOM™ Processor
Main Memory (Optional) Memory type: DDR2 SODIMM
Main Chipset IntelNM10Express
Hard Disk Drive (Optional) 9.5mmH SATA HDD
Graphics Intel GMA 3150 (Internal)
Operating Environment Temperature:-5~40°Cforstorage,10~32°Cwhenoperating
Humidity: 5~90%forstorage, 20~80%whenoperating
Operating Voltage 100 - 240VAC
Frequency 50/60Hz
Output Power (Optional) 40W
Output Voltage (Optional) 19VDC 2.1A(40W)
z Optional components may not be provided or different components may be provided
depending on the computer model.
z7KHV\VWHPVSHFL¿FDWLRQVDUHVXEMHFWWRFKDQJHZLWKRXWQRWLFH

165
Registered Trademarks
6DPVXQJLVDUHJLVWHUHGWUDGHPDUNRI
SamsungCo.,Ltd.
Intel, ATOM/ Pentium/Celeron are
UHJLVWHUHGWUDGHPDUNVRIWKH,QWHO
Corporation.
Microsoft, MS-DOS, and Windows are
UHJLVWHUHGWUDGHPDUNVRIWKH0LFURVRIW
Corporation.
LVDWUDGHPDUNRI656/DEV,QF
TruSurround XT technology is
incorporatedunderlicensefromSRS
Labs, Inc.
SRS TruSurround XT™ processes
multichannel audio content to create
a truly immersive surround sound
experiencewithrichbassandcleardialog
IURPWKHODSWRSVSHDNHUVRUKHDGSKRQHV
LVDWUDGHPDUNRI656/DEV,QF
WOWHDtechnologyisincorporated
under license from SRS Labs, Inc.
656:2:+'VLJQL¿FDQWO\LPSURYHV
WKHSOD\EDFNTXDOLW\RIPRQRDQG
stereoaudio,deliveringadynamic 3D
entertainment experience with deep bass
and high frequency clarity for crisp detail.
LVDWUDGHPDUNRI656/DEV,QF
WOWXTtechnologyisincorporated
under license from SRS Labs, Inc.
656:2:;7VLJQL¿FDQWO\LPSURYHV
WKHSOD\EDFNTXDOLW\RIDXGLRGHOLYHULQJ
a dynamic 3D entertainment experience
with deep bass from even the smallest
DQGPRVWFORVHO\VSDFHGVSHDNHUV
LVDWUDGHPDUNRI656/DEV,QF
CS Headphone technology is
incorporatedunderlicensefromSRS
Labs, Inc.
CS Headphone™ delivers a 5.1 surround
soundexperienceoverstandard
headphones or earbuds when listening
to multichannel content, such as DVD
movies.
All other product or company names
mentioned herein are registered
WUDGHPDUNVRIWKHLUUHVSHFWLYHFRPSDQLHV
ENERGY STAR® Partner
As an ENERGY STAR® Partner,
SAMSUNG has determined that
this product meets the ENERGY
STAR® guidelines for energy
HI¿FLHQF\

166
Glossary
TheGlossaryliststheterminologiesusedinthisUserGuide.
)RUWHUPLQRORJLHVRWKHUWKDQWKHVHORRNLQ:LQGRZV+HOS
Backup
A way to save the current data to restore
LWODWHULIQHFHVVDU\$EDFNXSLVDZD\
torestorecomputerdatawhenthedata
orcomputerisdamaged.
Chargeable USB
This program enables supplying power
WRDVSHFL¿F86%SRUWZKHQWKHV\VWHP
is in power saving mode, hibernation
mode or off.
Client
Thisreferstoacomputerthatusesa
VKDUHGQHWZRUNUHVRXUFHSURYLGHGE\D
server.
DDR SDRAM (Double Data Rate
Synchronous Dynamic Random Access
Memory)
DRAMisamemorytypewhosecells
consistofacapacitorandtransistor
manufactured at a low price. SDRAM
isamemorytypewhoseperformance
hasbeenimprovedbysynchronizing
WKHFORFNZLWKWKHH[WHUQDO&38FORFN
DDRSDRAMisamemorytypewhose
performancehasbeenimprovedby
doubling the operating speed of the
SDRAM and is widely used nowadays.
ThiscomputerusesDDRSDRAM.
Device Manager
An administrative tool used to manage
computer devices. You can add or
removehardwareorupdateadevice
driver using the Device Manager.
Direct X
An application interface developed to
enable Windows application programs
toaccesshardwaredevicesatavery
high speed. Since the operating speed
ofgraphics,memoryandsoundcards
mustbeveryfasttoprovidehigh
quality video and sound for games,
DirectXenablesfastercontroland
interaction between applications and
hardware devices. By using Direct X,
the multimedia performance of Windows
has been hugely improved.

167
Driver
Software that interacts between the
hardware and the operating system. An
RSHUDWLQJV\VWHPNQRZVWKHKDUGZDUH
information and controls the hardware.
Ingeneral,adriverissuppliedwiththe
corresponding hardware device.
DVD 'LJLWDO9HUVDWLOH'LVN
DVDwasdevelopedtoreplaceCD
FRPSDFWGLVN$OWKRXJKWKHVKDSHDQG
size of the disc are the same as that of
aCD,thecapacityofaDVDisatleast
4.7GBwhilethecapacityofaCDis
0%'9'YLGHRLVGLJLWDOXQOLNH9+6
(analog) video and supports MPEG2
compressionanddigitalaudio.Toplaya
DVD,aDVDdriveisrequired.
Firewall
A security system used to protect an
LQWHUQDOQHWZRUNRULQWUDQHWIURPH[WHUQDO
QHWZRUNV
through an authentication procedure.
Hibernation Mode
A power mode that saves all data in
PHPRU\WRWKHKDUGGLVNDQGWXUQVWKH
&38DQGKDUGGLVNRII:KHQFDQFHOLQJ
Hibernation Mode, all application
programs that were running are restored
to their last state.
Icon
This refers to a small image that
UHSUHVHQWVD¿OHWKDWXVHUVFDQXVH
LAN/RFDO$UHD1HWZRUN
$FRPPXQLFDWLRQVQHWZRUNFRQQHFWLQJ
computers,printersandotherdevices
within a local area such as within a
building.ALANenablesallconnected
devicestointeractwithotherdevices
RQWKHQHWZRUN7KHFXUUHQW/$1XVHV
the Ethernet media access control
methoddevelopedintheearly1980s.
7RFRQQHFWWRDQ(WKHUQHWDQHWZRUN
cardcalledaLANcard,Ethernetcard
RUQHWZRUNLQWHUIDFHFDUGLVUHTXLUHG
To exchange data between computers,
aprotocolisrequiredbesidesthe
hardware equipment. Windows XP uses
TCP/IP as the default protocol.

168
LCD (Liquid Crystal Display)
TherearePassiveMatrixandActive
MatrixLCDtypes.Thiscomputeruses
theActiveMatrixtypeLCDcalledaTFT
LCD.SinceanLCDisimplementedby
transistorsinsteadofacathode-raytube
XQOLNHD&57LWVVL]HFDQEHVOLP$QG
EHFDXVHLWGRHVQRWEOLQNLWUHGXFHVH\H
strain.
Network
Agroupofcomputersanddevices,such
as printers and scanners, connected
E\DFRPPXQLFDWLRQVOLQN$QHWZRUN
canbeeithersmallorlargeandcanbe
connected permanently through cables
or temporarily through telephone lines
RUZLUHOHVVOLQNV7KHELJJHVWQHWZRUNLV
WKH,QWHUQHWDZRUOGZLGHQHWZRUN
1RWL¿FDWLRQ$UHD
This refers to the right area of the
7DVNEDULQFOXGLQJSURJUDPLFRQVVXFK
asthevolumecontrol,thepoweroptions
and the time.
Power Schemes
This refers to a pre-determined power
management option group. For example,
youcansetthetimethecomputerwaits
before entering Standby Mode, or before
the monitor or hard drive turns off. The
settingsaresavedasapowerscheme.
Quick Launch
Thisreferstoatoolbarthatcanbe
FRQ¿JXUHGVRWKDW\RXFDQODXQFKD
programsuchasInternetExploreror
GLVSOD\WKH:LQGRZV'HVNWRSZLWKRQH
FOLFN<RXFDQDGGDQ\LFRQWRWKHTXLFN
ODXQFKDUHDRIWKH7DVNEDUDQGODXQFK
IUHTXHQWO\XVHGSURJUDPE\FOLFNLQJWKDW
icon.
Server
Ingeneral,aserverreferstoacomputer
that provides shared resources for
QHWZRUNXVHUV
Share
Thisreferstosettingaresourceofa
computersuchasafolderorprinterso
that other users can also use it.

169
Shared Folder
Afolderthatcanbeusedbyotherusers
RQWKHQHWZRUN
SSD6ROLG6WDWH'LVN
Thisreferstoadevicethatsaves
LQIRUPDWLRQWRVHPLFRQGXFWRUVXQOLNHD
QRUPDOKDUGGLVNGULYH+''7KHUHDUH
two types of SSD. One saves data to
theDRAMandtheothersavesdatato
the Flash Memory. Since there are no
mechanical parts, an SSD provides a
much better performance than an HDD.
Especially, a Flash Memory-Type SSD
provides high reliability and durability.
Network Administrator
$XVHUZKRSODQVFRQ¿JXUHVDQG
PDQDJHVQHWZRUNRSHUDWLRQV
6RPHWLPHVDQHWZRUNDGPLQLVWUDWRULV
called a system administrator.
Sleep Mode
A power mode that enables computers
to save power consumption when they
arenotbeingused.Whenacomputer
isinSleepMode,thedataonthe
computermemoryisnotsavedtothe
KDUGGLVN,IWKHSRZHULVWXUQHGRIIWKH
data in memory will be lost.
System File
6\VWHP)LOHVUHIHUWR¿OHVWKDWDUHUHDG
andusedbytheWindowsoperating
V\VWHP,QJHQHUDOV\VWHP¿OHVPXVWQRW
bedeletedormoved.
USB (Universal Serial Bus)
This refers to a serial interface standard
developedtoreplacetheconventional
interface standards such as Serial and
PS/2. While USB 1.1 supports 12Mbps
(12 million bits per second), USB 2.0
supports a data rate that is 40 times
(480Mpbs)fasterthanthatofUSB1.1.
ThedatarateofUSB 2.0isequivalentto
that of IEEE1394. Therefore USB 2.0 is
used for A/V devices supported by IEEE
1394 anda 2ndHDDandCDRWthat
requireahighdatarate.

170
Virtual XP Mode
This is a virtual operating system that
enables running Windows XP programs
ontheWindows7operatingsystem.
Using this mode, you can run programs
that do not run on Windows 7.
Windows Media Player
A multimedia program included with
Windows. Using this program, you can
SOD\DPHGLD¿OHFUHDWHDQDXGLR&'
listen to a radio broadcast, search and
PDQDJHPHGLD¿OHVDQGFRS\¿OHVWRD
portable device, etc.

171
Index
PR2XX_N/KR2XX_N
BR1XX_N/LR1XX_N
B
Battery 111
Battery Calibration 114
BIOS Setup 102
Booting Priority 108
C
CD Drive / Recording 68
Charge 112
&OLFN 64
Connect / Output Monitor 73
D
Dual View 75
L
LCD Brightness 100
M
Memory 109
Multi Card Slot 70
P
Password 105
3URGXFW6SHFL¿FDWLRQV 164
R
Recorder 81
Remaining Battery Charge 113
S
Safety Precautions 8
6HFXULW\/RFN3RUW 116
Shortcut Keys 60
Status Indicators 51
T
Touchpad 63
V
Volume Control 78
W
:LUHG1HWZRUN 83
:LUHOHVV1HWZRUN 87