Realtek Semiconductor RTL8822BE 802.11a/b/g/n/acRTL8822BECombomodule User Manual Manual Quick Guide
Realtek Semiconductor Corp. 802.11a/b/g/n/acRTL8822BECombomodule Manual Quick Guide
Contents
Manual - Quick Guide

Navigating the Windows Start screen
The Windows Start screen provides a central location where you can access your information and email, browse the Web, stream
videos, view photos, and access your social media websites. Depending on your computer model, you can use a keyboard and
mouse, or a touch screen to navigate the Windows Start screen.
Find Settings
Select the Start button
, and then select the
Settings icon .
Shut down your computer
Select the Start button ,
select the Power icon ,
and then select Shut down.
Display the Start menu
Select the Start button
in the lower-left corner of
the taskbar.
Search
In the taskbar search box,
begin typing the name
of an app, setting, le, or
Internet topic.
Switch between open apps
Select the Task view icon
in the taskbar.
The features and appearance of the Windows
screen may vary, depending on the version
of the operating system and additional software
installed on your computer.
Contact support
To resolve a hardware or software
problem, go to http://www.hp.com/
support. Use this site to get more
information about your product,
including links to discussion forums and
instructions on troubleshooting. You can
also nd information on how to contact
HP and open a support case.
Locate system information
Depending on your product, a service
label is either aixed to the bottom of
the computer or is located inside the
battery bay or beneath the service door.
In Windows, briey press the fn+esc
key combination to display the System
Information screen.
Feedback on this document
To help us improve this document,
please send any suggestions,
comments, or errors to
doc.feedback@hp.com. Include the
document part number (located near
the bar code) when submitting your
feedback.
Go wireless
Select the network icon in the
lower-right corner of the taskbar, and
then connect to one of the available
networks.
To set up a WLAN and connect to the
Internet, you need a broadband modem
(either DSL or cable) (purchased separately), high-
speed Internet service purchased from an Internet
service provider, and a wireless router (purchased
separately).
WARNING: To reduce the risk of electric shock or
damage to the equipment:
• Plug the power cord into an AC outlet that is easily
accessible at all times.
• Disconnect power from the computer by unplugging the
power cord from the AC outlet.
• If provided with a 3-pin attachment plug on the power
cord, plug the cord into a grounded (earthed) 3-pin
outlet. Do not disable the power cord grounding pin, for
example, by attaching a 2-pin adapter. The grounding
pin is an important safety feature.
For more safety, regulatory, labeling and
battery disposal information, refer to the
Regulatory, Safety and Environmental Notices provided
with your user guides. To locate the user guides for your
computer, see the “Find more information” section of this
poster.
WARNING: To reduce the risk of serious injury, read
the Safety & Comfort Guide provided with your user
guides. It describes proper workstation setup, and proper
posture, health, and work habits for computer users. The
Safety & Comfort Guide also provides important electrical
and mechanical safety information. The Safety & Comfort
Guide is also available on the Web at http://www.hp.com/
ergo.
WARNING: To reduce the possibility of heat-related
injuries or of overheating the computer, do not place
the computer directly on your lap or obstruct the
computer air vents. Use the computer only on a hard, at
surface. Do not allow another hard surface, such as an
adjoining optional printer, or a soft surface, such as
pillows or rugs or clothing, to block airow. Also, do not
allow the AC adapter to contact the skin or a soft surface,
such as pillows or rugs or clothing, during operation. The
computer and the AC adapter comply with the
user-accessible surface temperature limits dened by the
International Standard for Safety of Information
Technology Equipment (IEC 60950-1).
REGULATORY MODEL NUMBER AND SIMPLIFIED
DECLARATION OF CONFORMITY
The Regulatory Model Number (RMN) for this
equipment is XXXXXXXXX. This RMN is located
XXXXXXXXXXXXXXXXXXXXXXXXXXX.
Hereby, HP declares that this equipment is in compliance
with the essential requirements and other relevant
provisions of Directive 1999/5/EC (products shipping
before 12 June 2017) and Directive 2014/53/EU
(products shipping on or after 12 June 2017). To view the
Declaration of Conformity for this equipment, go to www.
hp.eu/certicates and search using this equipment’s RMN.
SOFTWARE TERMS
By installing, copying, downloading, or otherwise using
any software product preinstalled on this computer,
you agree to be bound by the terms of the HP End User
License Agreement (EULA). If you do not accept these
license terms, your sole remedy is to return the entire
unused product (hardware and software) within 14 days
for a full refund subject to the refund policy of your seller.
For any further information or to request a full refund of
the price of the computer, please contact your seller.
LIMITED WARRANTY
You can nd your HP Limited Warranty located with the
user guides on your product and/or on the CD or DVD
provided in the box. In some countries or regions, HP
may provide a printed warranty in the box. For countries
or regions where the warranty is not provided in printed
format, you can request a copy from http://www.hp.com/
go/orderdocuments. For products purchased in Asia
Pacic, you can write to HP at POD, PO Box 161, Kitchener
Road Post Oice, Singapore 912006. Include your product
name, and your name, phone number, and postal address.
PRODUCT DESCRIPTION
This product is an All-in-One desktop computer, desktop
computer, thin client computer, or retail system and might
feature a thin-panel display, TouchPad, processor, RAM,
hard drive or solid-state drive, internal power supply,
and external AC adapter. Depending on your computer
model, the products have a rating of 100-240 V ac,
200-240 V ac, 220-240 V, or 100-127/200-240
V ac, 50-60 Hz or 50/60 Hz, 1.5 A, 1.8 A, 2 A, 2.5A, 3 A,
3.6 A, 4 A, 5 A, 5.2 A, 5.5 A, 6 A, 8 A, 6 / 3 A, 8 / 4 A, 8 - 4
A, 12 - 8 A or 4.5 - 2.25 A. The AC adapter has a rating of
100-240 V ac, 50-60 Hz, 0.5 A, 0.6 A, 0.8 A, 1 A, 1.2 A,
1.4 A, 1.5 A, 1.6 A, 1.7 A, 1.9 A, 2 A, 2.2 A, 2.25 A, 2.31 A,
2.4 A, 2.5 A, 2.7 A, 2.9 A, 3.5 A, 3.6 A, or 4 A. If you have
a wireless keyboard, mouse, and RF remote control, they
have a rating of 1.5 V dc, 3 V dc, 3.2 V dc, or 5 V dc, 5 mA,
10 mA, 20 mA, 25 mA, 30 mA, 40 mA, 50 mA, 60 mA, 80
mA, 100 mA, or 300 mA.
To access the latest user guides or manuals for your
product, go to http://www.hp.com/support. Select
Find your product, and then follow the on-screen
instructions.
© Copyright 2017 HP Development Company, L.P.
McAfee LiveSafe is a trademark of McAfee, Inc. in the
United States and other countries. Windows is either
a registered trademark or trademark of Microsoft
Corporation in the United States and/or other countries.
Not all features are available in all editions of Windows.
This computer may require upgraded and/or separately
purchased hardware, drivers, and/or software to take full
advantage of Windows functionality. See http://www.
microsoft.com for details.
The information contained herein is subject to change
without notice. The only warranties for HP products and
services are set forth in the express warranty statements
accompanying such products and services. Nothing
herein should be construed as constituting an additional
warranty. HP shall not be liable for technical or editorial
errors or omissions contained herein.
First Edition: July 2017
Find more information
Windows
products
To learn more about Windows and to access help topics, select
the Start button , and then select Tips or Get Help (requires a
network connection).
To access the user guides, select the Start button , select HP Help
and Support, and then select HP Documentation.
- or -
To access the user guides, select the Start button , select HP, and
then select HP Documentation.
Linux
products
To access the user guides, double-click the HP Documents icon on
the desktop.
FreeDOS
products
To access the user guides, select HP Documents on the Boot Menu.
You do not need to connect to the Internet to access the user guides. To view the user guides on the
Web, go to http://www.hp.com/support. Select Find your product, and then follow the on-screen
instructions.
A User Guides disc is included with some products.
*926603-001*
926603-001
Replace this box with PI statement as per spec.
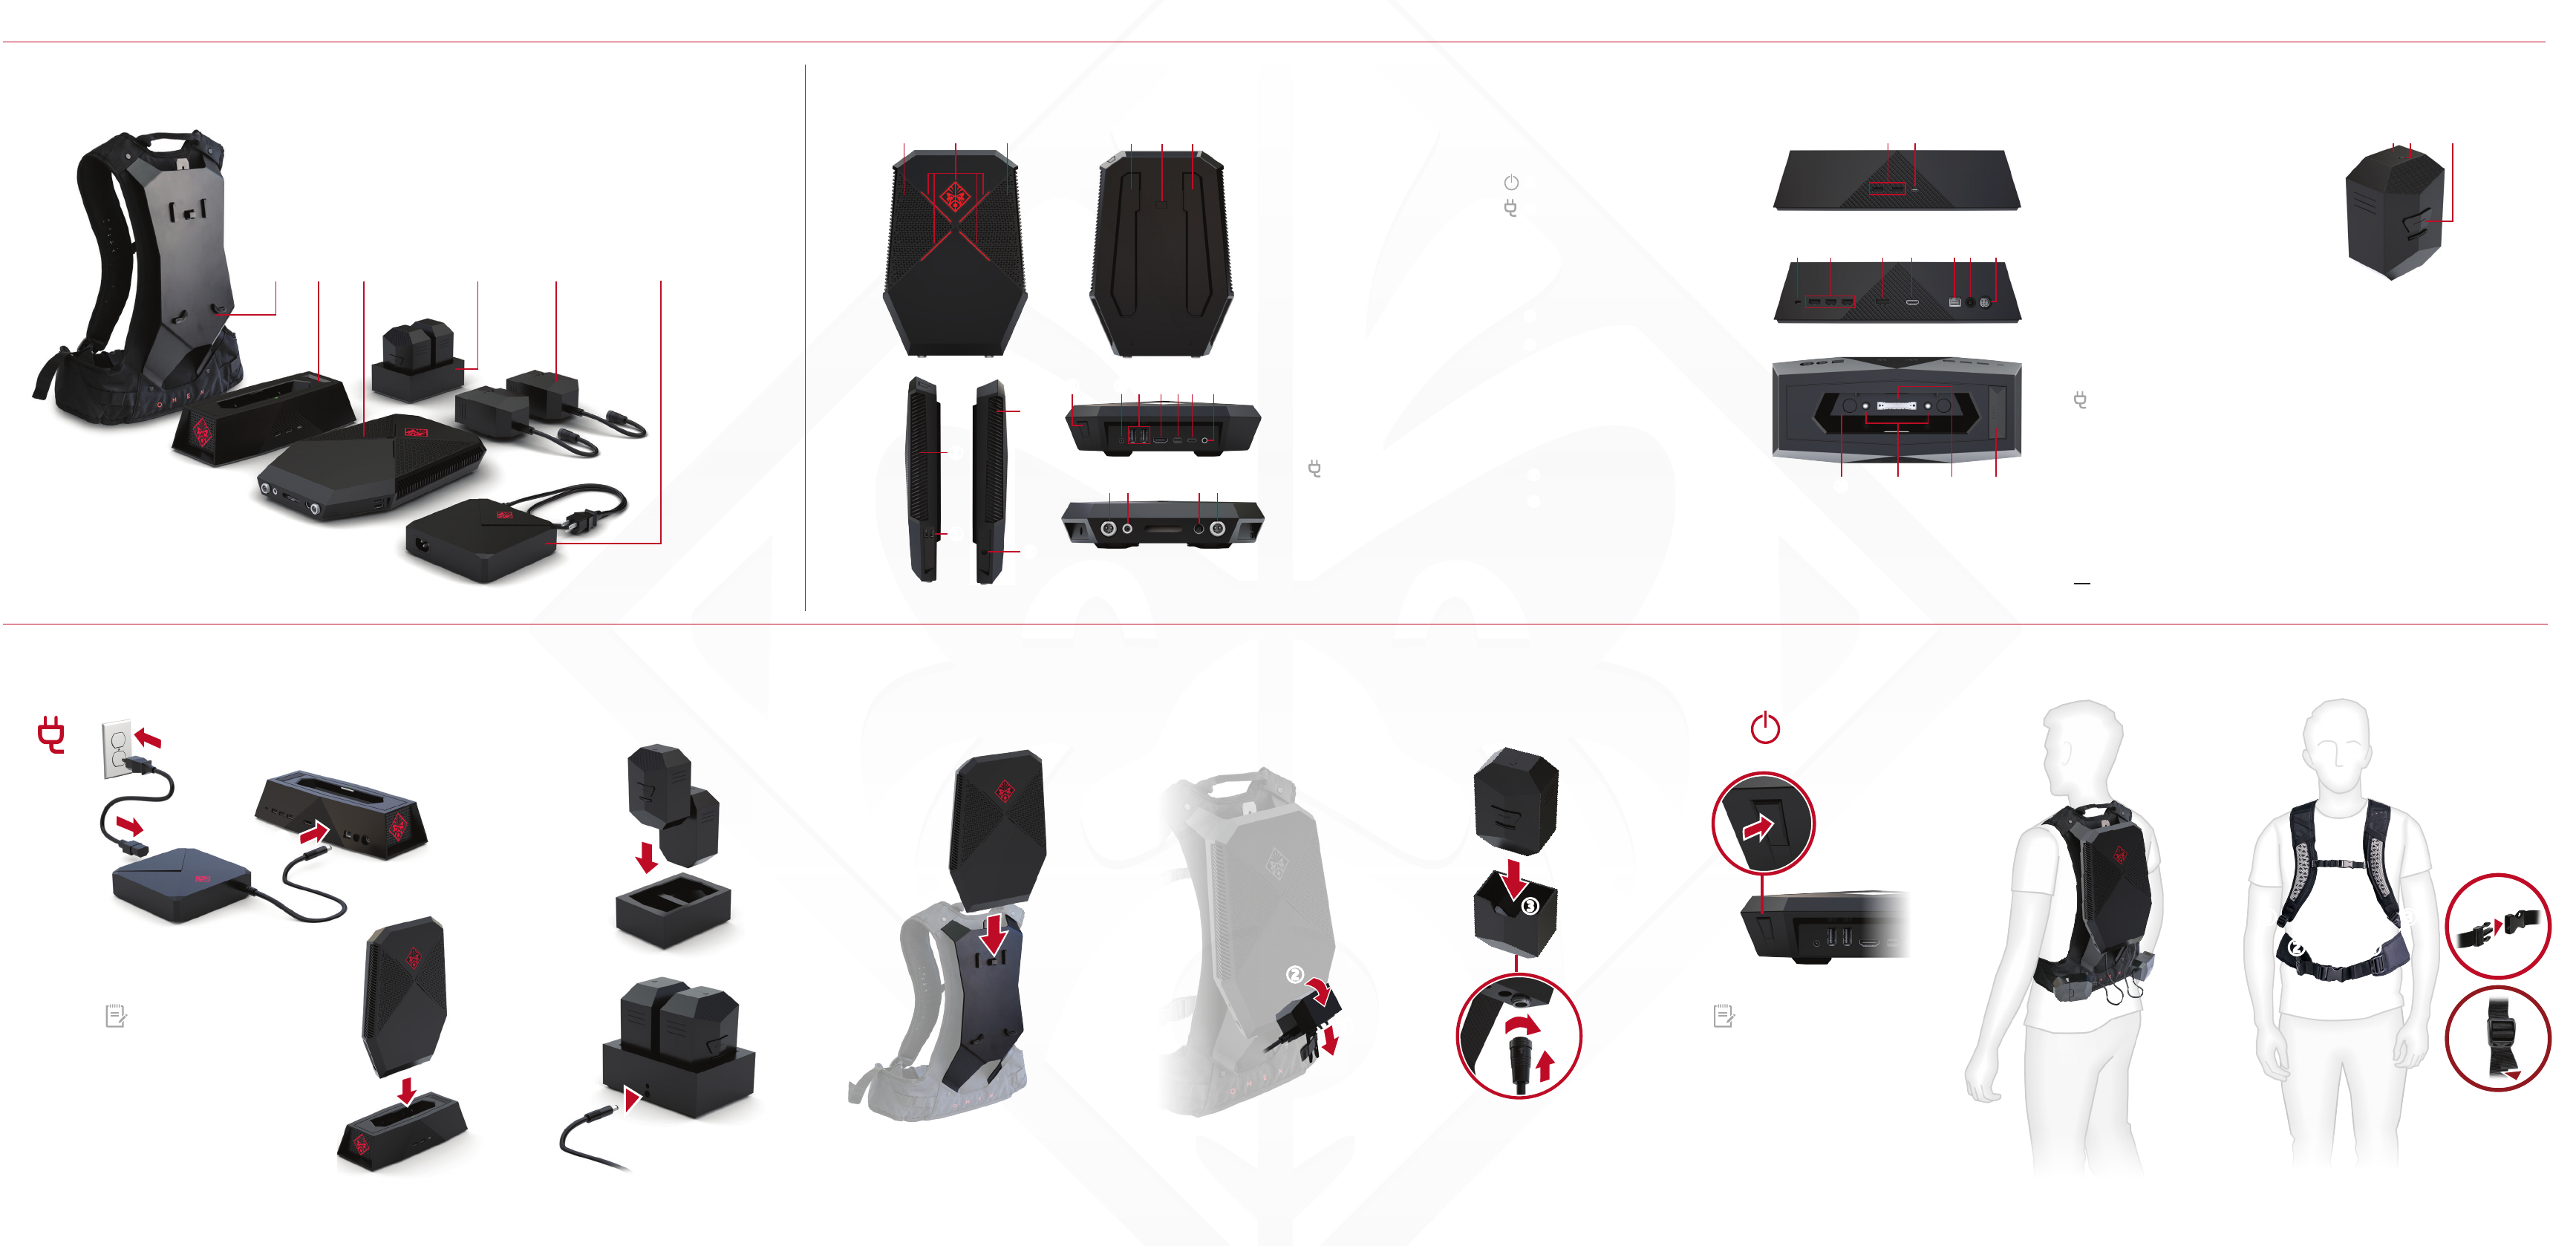
Docking station front
oUSB ports (2)
pUSB Type-C port
Docking station rear
aSecurity cable slot
sUSB ports (3)
dDisplayPort
fHDMI port
gRJ-45 (network) jack
hPower connectors
jPower connectors
Docking station top
kDocking connector
lAlignment pins
zCharge light
xEject button
Quick tour
Quick Setup
12
3 5 6
4
1 2
3 54
Before use your computer
for the rst time, make sure
that the computer and external
batteries are fully charged.
3
-9
4
q
3
w
y y
p
e
u i
o
r t
Contents
2
3
3
4
1
6
Computer front
1Vent
2Status lights (5)
Computer rear
3Alignment rails
4Hook
Computer right side
5Vent
6USB ports (2)
Computer left side
7Vent
8Power connector
Computer top
9Power button
-Power connector
qUSB ports (2)
wHDMI port
eMini DisplayPort
rUSB Type-C port
tAudio-out (headphone)/
Audio-in (microphone)
combo jack
Computer bottom
yExternal battery
connectors (2)
uDocking connector
iAlignment pins
1Harness
2Docking station
3Computer
4External batteries (2) and battery charger
5External battery holders (2)
6AC adapter
2
3
1
8
1
4
5
2
3
2
3
FPO
3
sf h ja d g
xz
vc b
k l
1 2 1
External batteries
cBattery status lights (4)
vBattery charge button
bRelease button
5
7
8
6
2
1
7
Before you put on the harness,
attach the virtual reality
headset (purchased separately).