Remotesolution RH60A Color LCD Touch Screen Universal Remote Control User Manual 01
Remote Solution Co., Ltd. Color LCD Touch Screen Universal Remote Control 01
Contents
- 1. Users Manual
- 2. Users Manual II
Users Manual II

01. HOME & BUTTONS ............................................................................................................... 2
02. OPERATING Mode & BUTTONS.......................................................................................... 3
03. SETTING MODE & BUTTONS.............................................................................................. 6
04. CONFIGURATION MODE..................................................................................................... 7
05. BRAND SET MODE................................................................................................................ 7
06. LABEL EDIT MODE............................................................................................................... 9
07. MYPICK SETTING MODE................................................................................................... 11
08. LEARNING MODE ............................................................................................................... 12
09. IR/RF SELECT MODE.......................................................................................................... 13
10. CALIBRATION MODE......................................................................................................... 13
11. BIORHYTHM ........................................................................................................................ 14
12. GAME..................................................................................................................................... 15
13. MEMO.................................................................................................................................... 16
14. ALARM.................................................................................................................................. 16
15. DEFAULT MODE.................................................................................................................. 18
16. USB MODE............................................................................................................................ 19
17. CRADLE MODE.................................................................................................................... 19
1
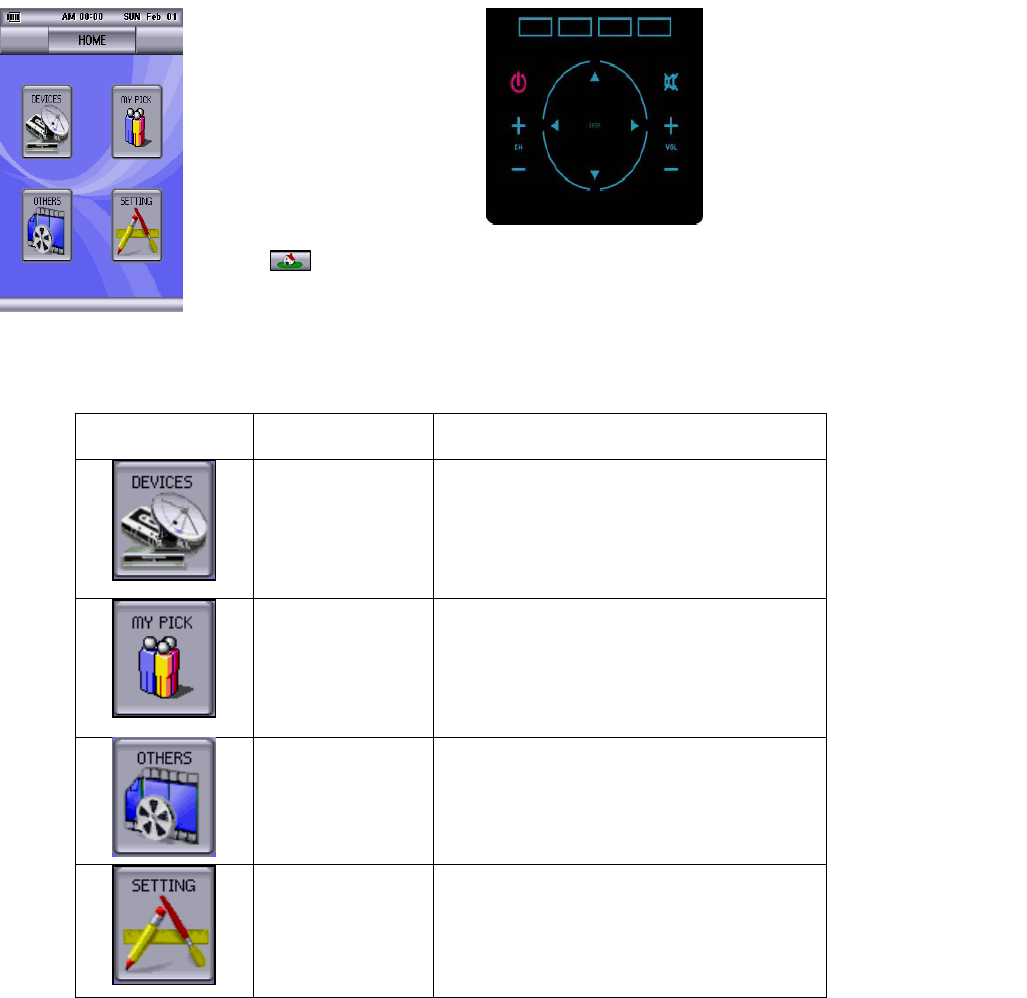
01. HOME & BUTTONS
The following section provides an overview of the button layout.
Simply touch the category you would like to explore.
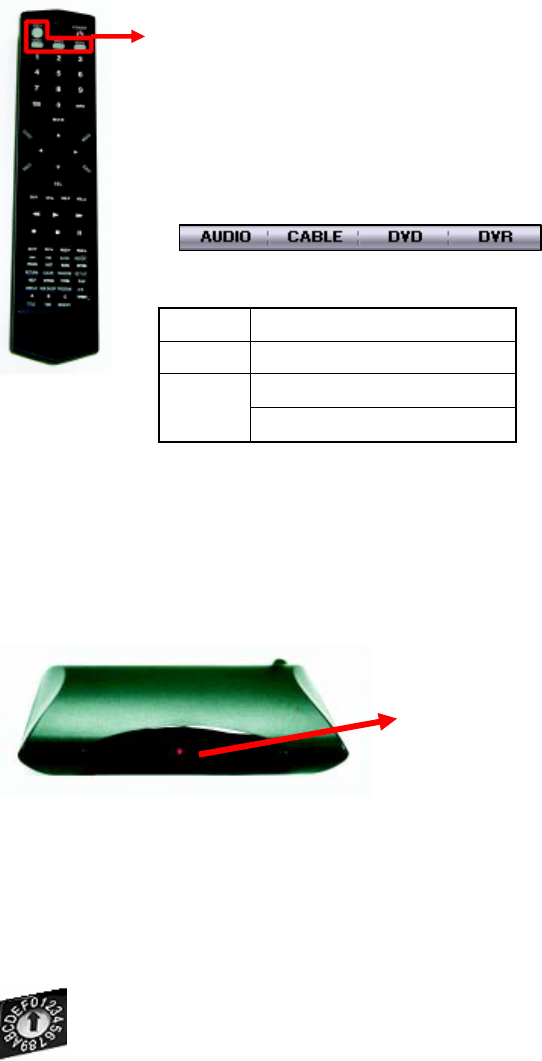
The remote’s functions This part of the remote has
the most common features
used such as power, channel
up/down, enter, volume
up/down and mute.
are grouped by categories.
From the home screen
you can access every
category. Tip: To access
home from any category,
simply press “Home” on
the bottom left hand side
of the remote, or press the
house icon on the top left
hand side of the remote.
The following chart gives an overview of the Home icons:
Icon Picture Icon Name Function
Devices Access TV, CABLE, DVD, DVR,
VCR, SAT, AUDIO, CD and TAPE
menus. This menu can have more
pages (i.e. Devices ½). To see more
pages use the scroll wheel.
My Pick My Pick allows a user to program
macros and configure the remote to
meet a his/her exact requirements;
This category includes all the My Pick
functions.
Others Here you can access GAME, MEMO,
ALARM and BIORHYTHM.
Setting Here you can access:
CONFIGURATION, MYPICK,
BRAND SET, IR/RF, LEARN,
LABEL, CALIBRATE, DEFAULT
2
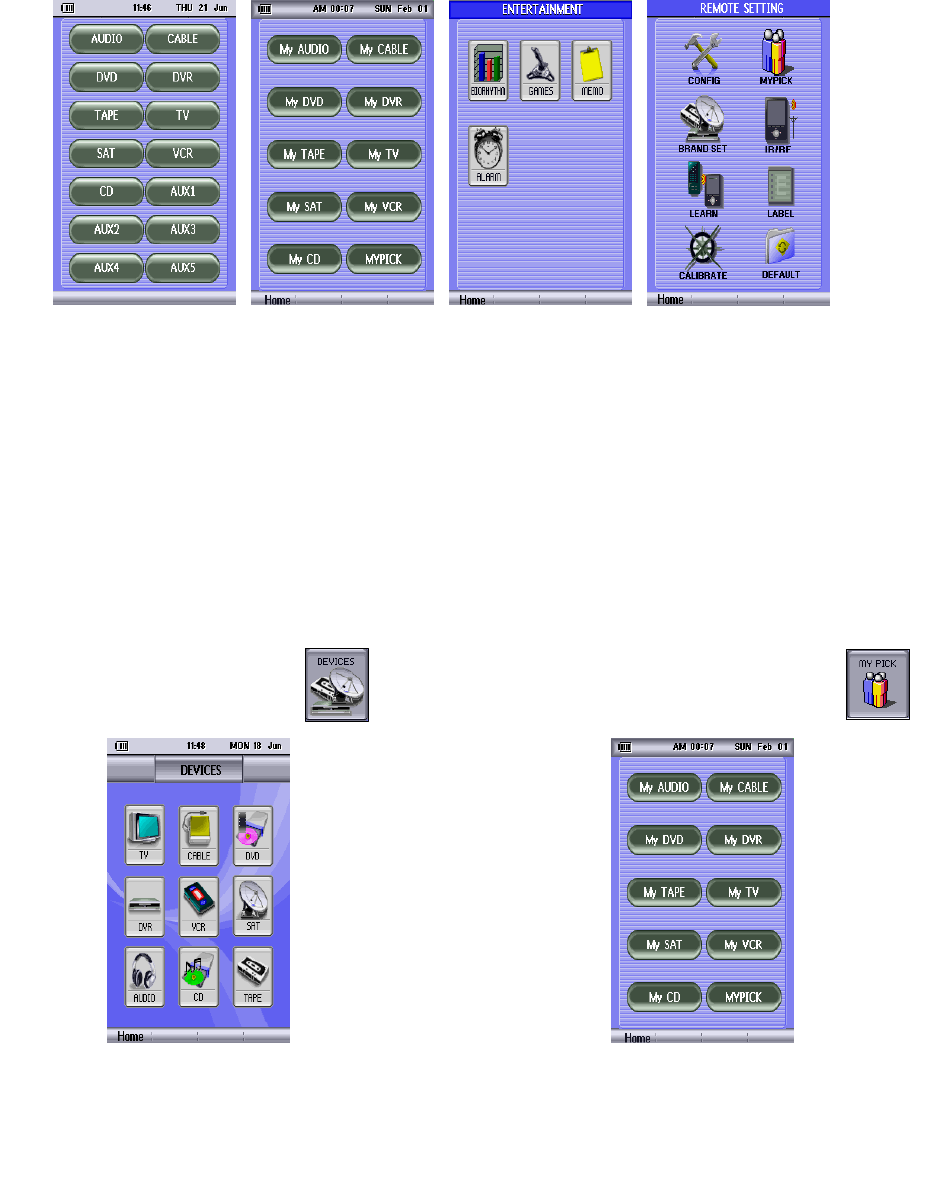
If you press Devices, My Pick, Others or Setting from the Home menu you will see:
Devices Se My pick Others tting
02. OPERATING Mode & BUTTONS
The color touch screen remote is very easy to use; this section will provide an overview of the
buttons available.
Example 1
From the Home menu press
And you will see the screen above.
You can now press the icon of the
device you wish to operate.
Example 2
From the Home menu press
And you will see the screen above.
You can now press the icon of the device
you wish to operate.
3
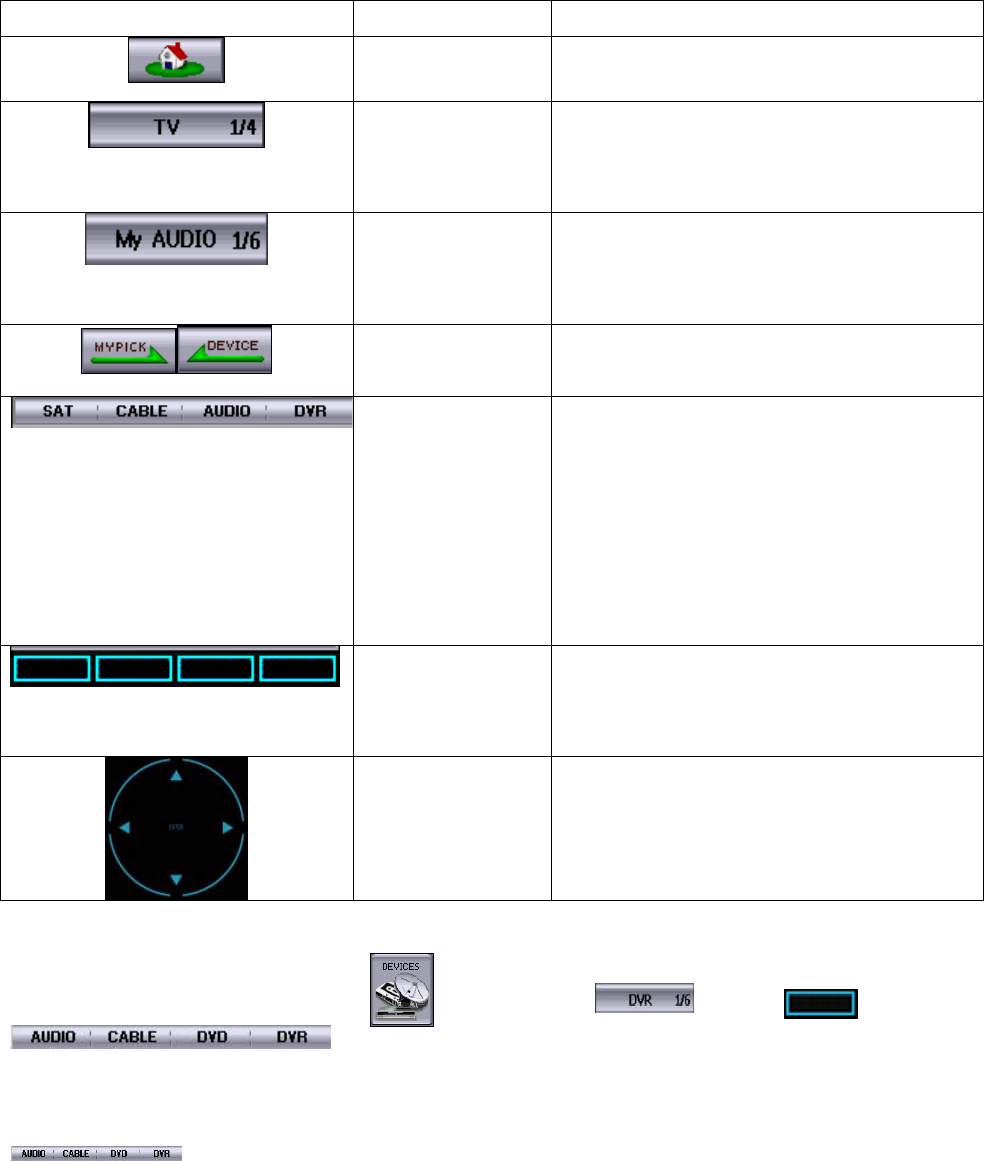
Icon Picture Icon Name Function
Home Access to home screen or IR output
Display.
Devices
(Device Selected) Device selected will be displayed. (i.e.
TV) you will also see the following info:
Device Name, Current page/Total page
(i.e. 1/4)
My Pick
(Device Selected) MYPICK device selected will be
displayed. (i.e. My AUDIO) you will also
see the following info: Device Name,
Current page/Total page (i.e. 1/6)
Mode Exchange My Pick or Device Transfer
Device Link
Press a button in this menu and you will
be able to link a device (by clicking the
desired device) to the device mode button.
The procedure is: 1.Press one of the four
buttons in the menu 2. Select the device
you want to link (i.e. My Audio) and press
its button. You will now see a change in
the device link menu to reflect the new
device selected.
Device Mode Once you have a device linked (max 4
using a unique button for each device),
use one of these 4 buttons to quickly
access that device.
Scroll-Wheel Use the scroll-wheel to move to a previous
page or next page while in operation
mode. In addition, use the scroll-wheel to
fill out numerical values.
To access a device:
Ex 1). From the Home menu, Press and then press or press button
under the device you wish to select. You can move to the next
or previous page of the device using the scroll-wheel.
If you want to change a device that is linked, press the button of the device you wish to change
and select the new device you wish link.
4

Ex2) How to change a device that is linked; in this example we will change the link from DVR
to SAT:
In this case we want to change DVR and our DVR screen looks like this:
1. To change a device that is linked, press the button of the device you wish to change
(in this case we are changing DVR)
2. Next press the desired device (in this case SAT)
3. Note the change in the device link menu. You can now quickly access that device by pressing
the button
5
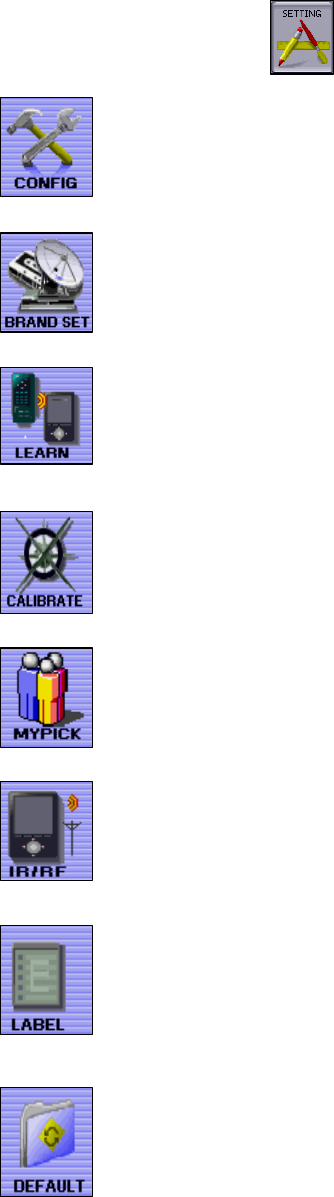
03. SETTING MODE & BUTTONS
From the Home menu press
Set-up: Date, time, contrast, backlight, LCD off time, RF ID code and Beep Sound
on/off.
Device Brand set-up. Use this mode to set-up the remote
(AUDIO,CABLE,DVD,DVR,TAPE,TV,SAT,VCR
CD,AUX1,AUX2,AUX3,AUX4,AUX5)
IR Signal Learn (Learn a device using its remote)
Calibrate: Touch Pad location and Wheel sensitivity
My Pick set-up
IR/RF select
Label Edit (Edit Group Button name)
Restore the remote to its factory default settings. You will lose all saved devices!
6
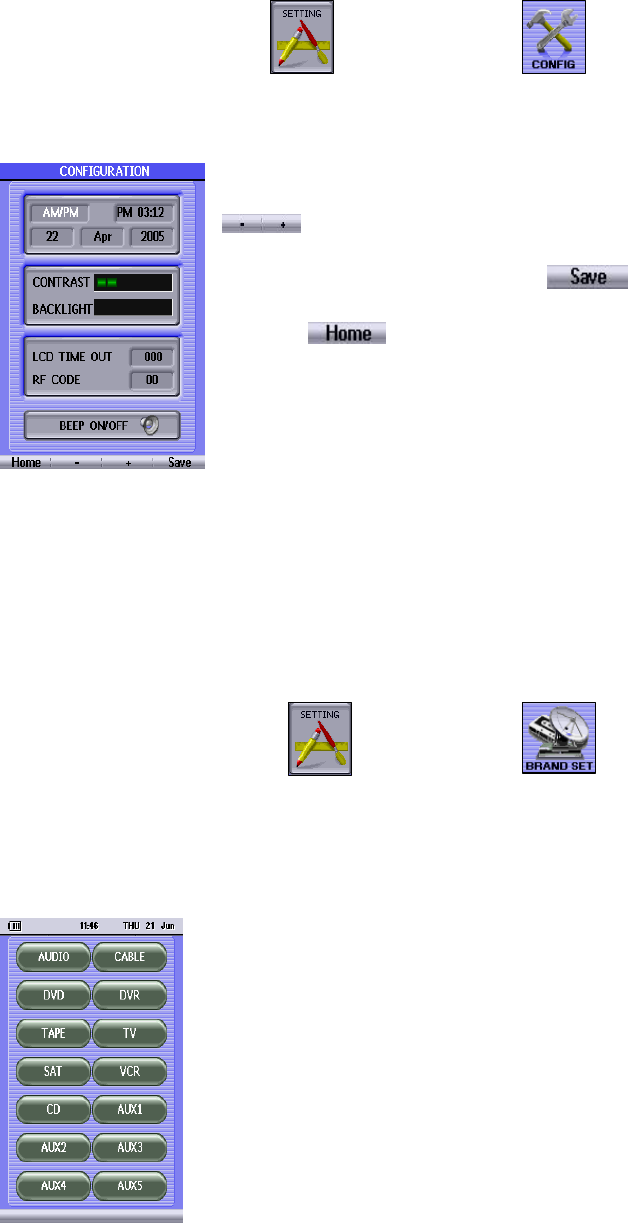
04. CONFIGURATION MODE
From the Home menu press and then press
You will see this screen:
2. Select (press) what you would want to change. Use the wheel or
buttons to change values.
3. Save your changes by pressing
4. Press to return to the main menu.
05. BRAND SET MODE
The Color Touch Screen remote is a universal remote with a built-in database with support for
many different devices. Use this mode to program a device.
1. From the Home menu press and then press
2. Select the type of device you would like to set-up. Note: AUX is designed to provide you with
more devices to suit your personal need. If you press AUX, you will need to select a device you
would like to set AUX to be.
7
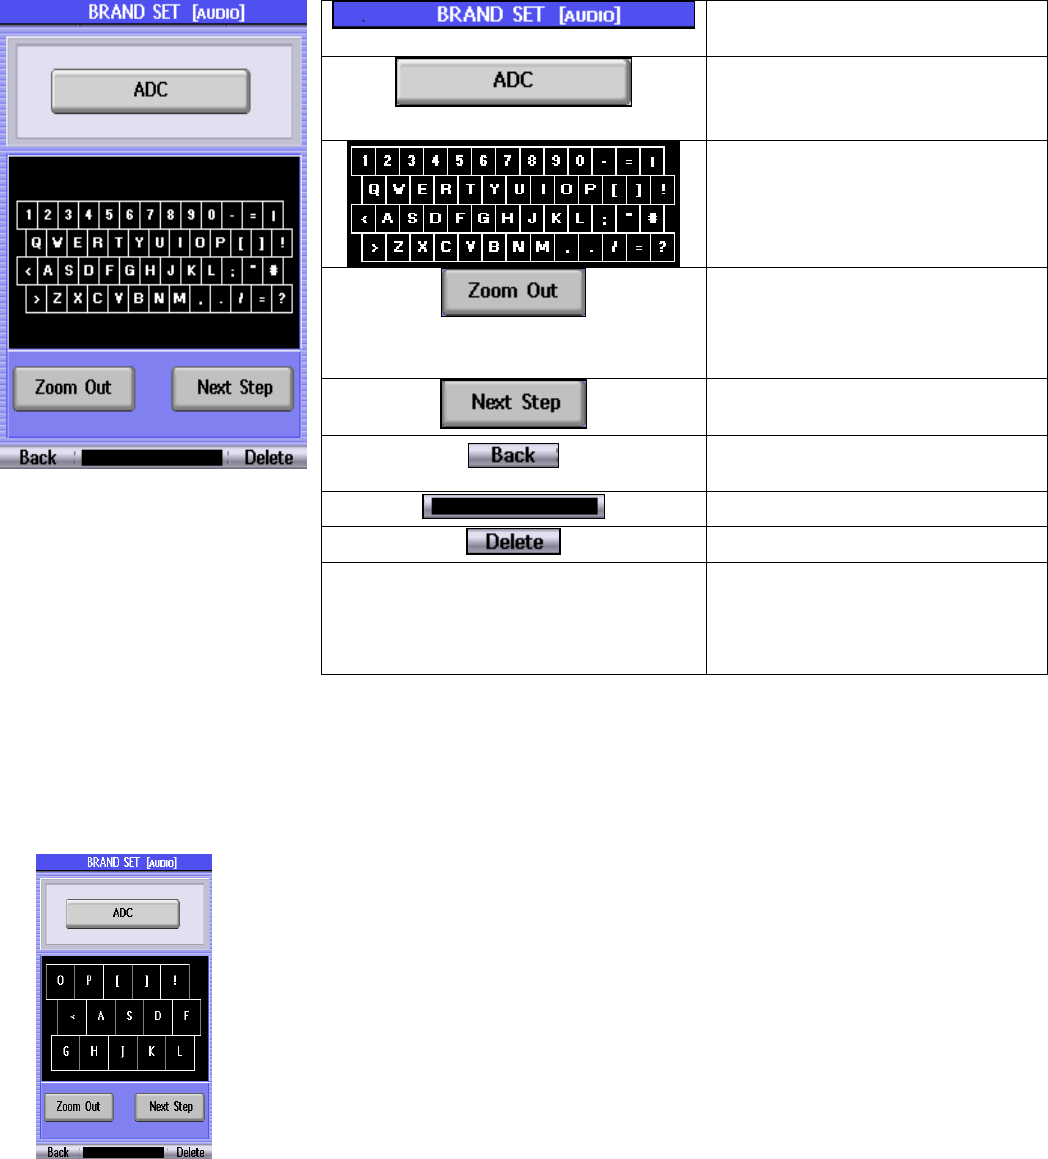
After you select a device, you will see the following screen.
Displays current mode and type
of selected device.
Displays the current brand name.
(Including the Next step button
Function)
This Key Pad is used to type the
brand of the device being
programmed.
Returns you back to an un-
zoomed keyboard use it if you
selected the wrong part of the
keyboard
If the brand name is correct,
press next to go to the next step.
Return to the device selection
screen.
Displays characters being typed.
Use to delete a typed letter
Wheel You can move through the list of
supported brands using the
scroll-wheel. Use this method if
you do not wish to type.
3. Input the brand using the keypad or use the scroll-wheel to browse through the available
brands. In this example, we will type the brand of our TV (Samsung).
If you touch the section where the S is located, you will see the keyboard zoom in.
As you type letters the remote will select the next available brand. In this
case if we type “SAMS”, SAMSUNG is displayed. Brands appear in the
alphabetical order of the brands that are supported (i.e. typing “SO” will
display SONY). You can also use the scroll-wheel to browse through the
available brands.
8
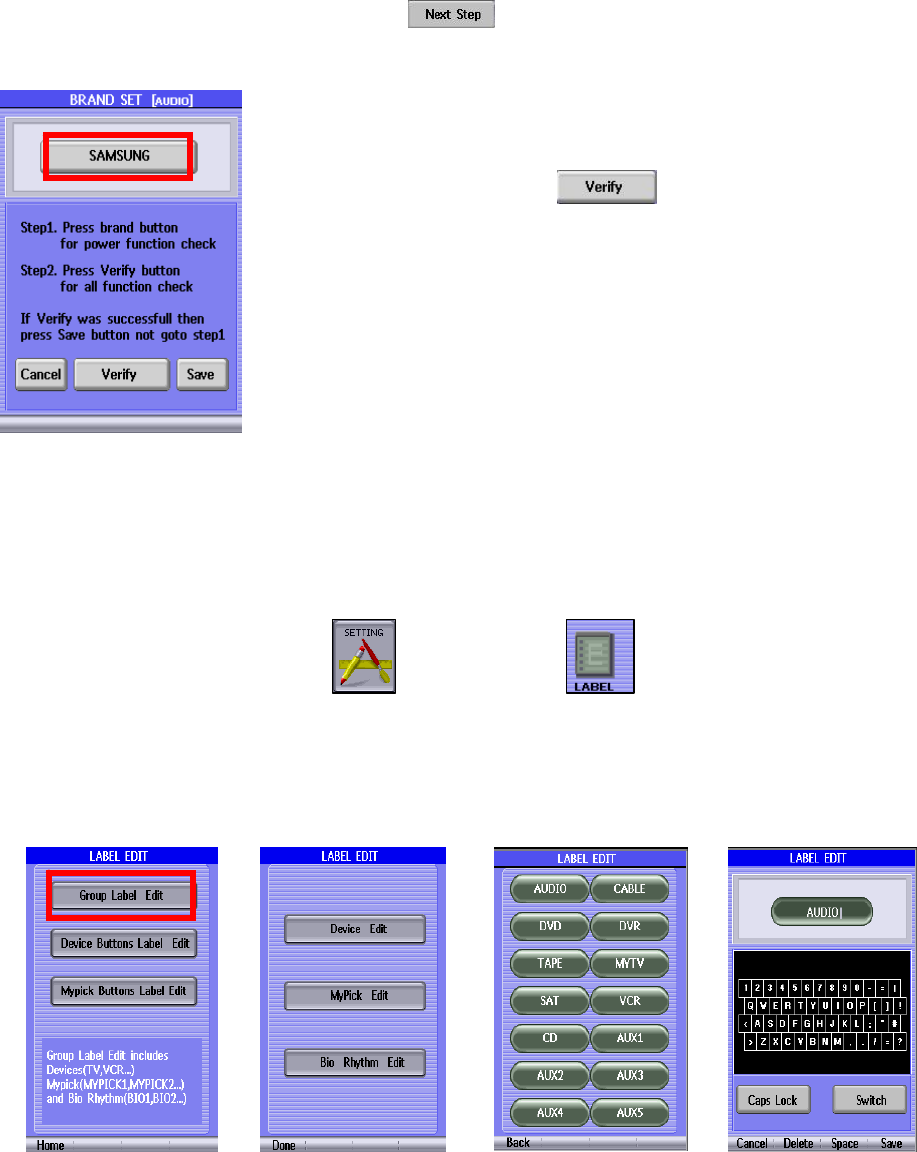
4. If the brand selected is correct, press and you will see the following screen
displaying the brand you selected.
5. Turn on the device you would like the remote to control, next press
the button of the device (Samsung) until your device turns off.
6. Now press the verify button to verify the code works
correctly. Because some manufactures have multiple codes for their
products, it is possible a code will power on the device but not perform
any other commands. This is why we must verify the code.
7. Check different remote keys on all the available pages (use scroll-
Wheel to navigate pages) when you are satisfied with the test, press the
BACK button and then press SAVE button. You will now return to the
Pre-Program screen (you can continue setting-up more devices) if you
wish to finish setting-up devices, press HOME.
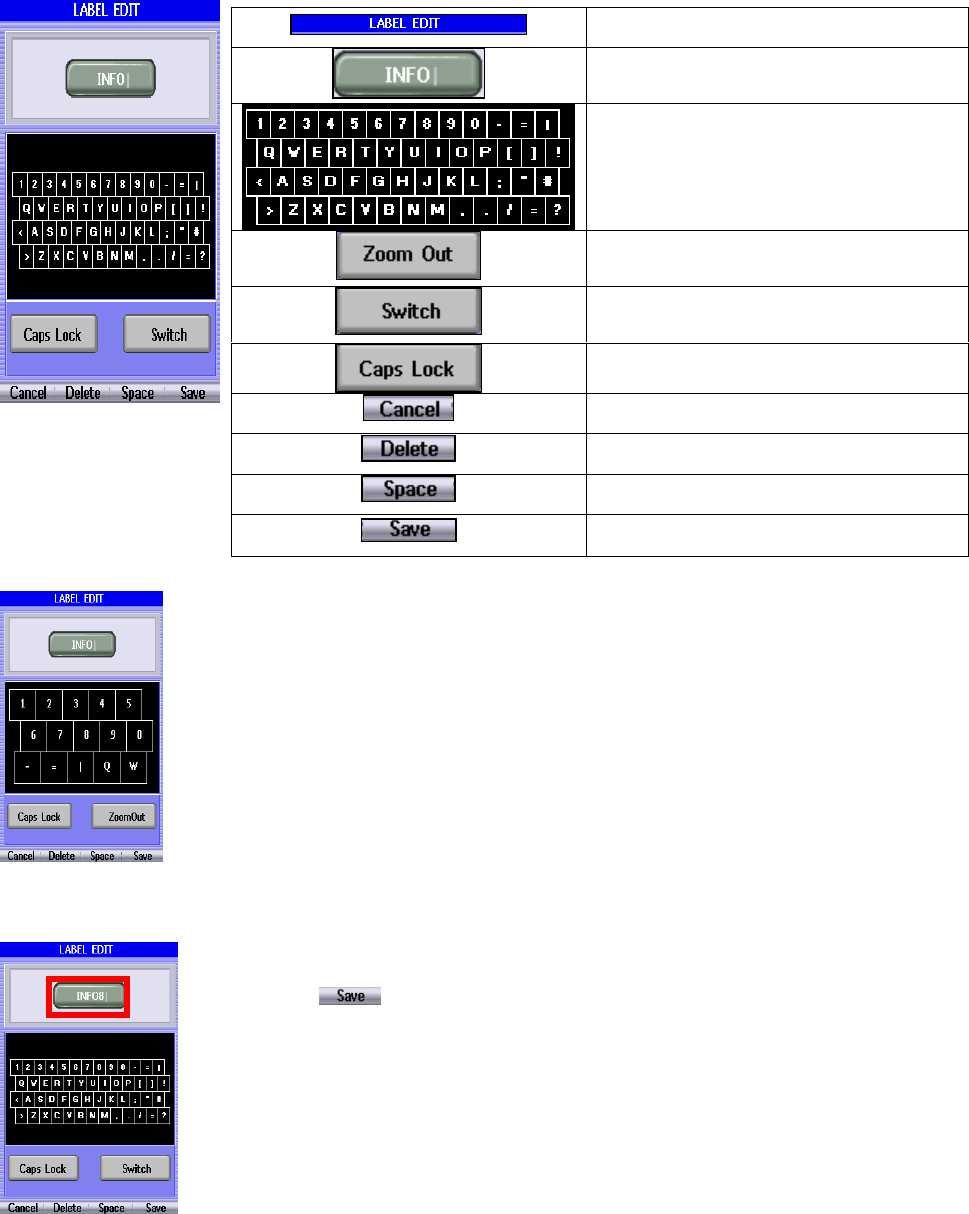
06. LABEL EDIT MODE
It is possible to edit the labels of your devices.
1. From the Home menu press and then press
2. If you press Group Label Edit, you will be able to edit the groups under My Pick, Devices or
Bio Rhythm. Next you will have to go through a 4 screen process making your desired
selections. Remember you can change groups under DEVICE, MY PICK or BIO RHYTHM.
You will see the following screens below:
Screen 1 Screen 2 Screen 3 Screen 4
3. Once you select your desired selection under screen 2, you will select the group you wish to
edit and edit its characters using the keyboard. For more information on the keyboard see pg 11.
9
Note: The process for Device Button label Edit and My Pick Buttons Label Edit is the same as
the one described above.
Keyboard Layout; when using the keyboard, you will see the following screen below.
Displays current operation.
You must zoom into a section of letters before being able to type any
characters. When you select any character, its corresponding section will
zoom in and you will be able to select the desired character. In this example,
we want to add the number 8 after “INFO”. The screen d
1. Touch around the character you wish to select (e.g. 8) and the keyboard will
zoom-in. Next select the desired character and the keyboard will zoom-out.
Zoom-in screen
2. The keyboard will zoom out. Note there is now an 8 after “INFO” now we
press SAVE to save our changes.
ing Displays the selected Icon be
changed.
Keyboard used to input characters.
Used to zoom out from the group of
letters selected.
the scroll-wheel. Same function as
Used to switch letters on the pad.
Used to turn on/off capital letters.
Cancel the Label Edit operation.
Delete the last character typed.
Create a space between characters.
Save typed changes.
10
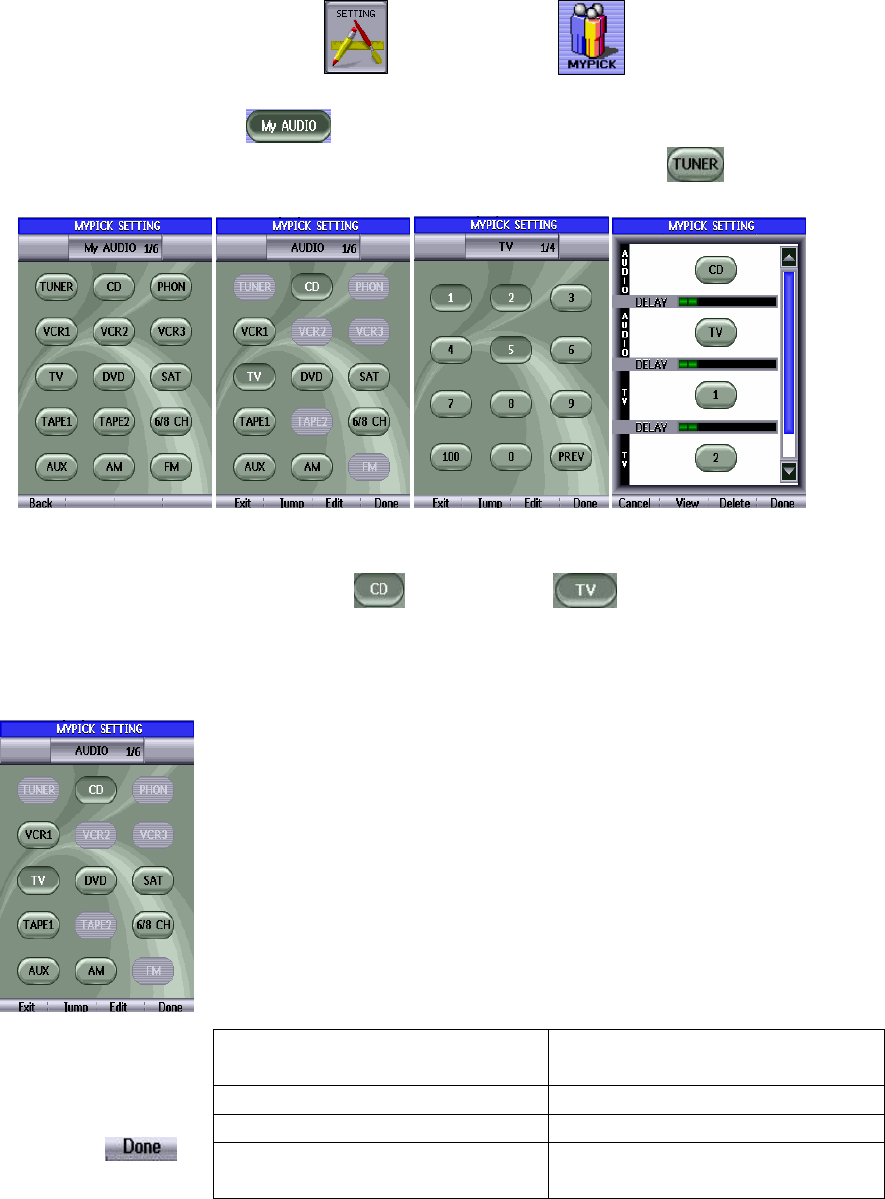
07. MYPICK SETTING MODE
/or personalize your remote.
ill see the following screen below:
2)
rayed out buttons will not work because the particular device hasn't been set-up yet.
e refer to
e chart below for a description of what each button does.
Ex) press m )
displayed.
6. Press
to save and exit to
label edit mode.
Jump Jump a screen setting.
ve to <Screen1 .
to the
previous mode without saving.
With MY PICK, you can program macros and
1. From the Home menu press and then press
In this example we will set-up a macro with Audio.
2. Press the My Audio button. And you w
3. Press any button to be p (in this example we will use the button)
gin set-u
<Screen1> <Screen2> <Screen3> <Screen4>
4. Press buttons to input (i.e. press and then press per screen 2)
Note: the buttons will look like they are pressed (just lik e picture screene in th
G
You may press Exit, Jump, Edit or Done during this process. Pleas
th
Exit Move to the previous mode<Screen1>.
Edit Move the buttons to <Screen4>.
Done Save, Label Edit and Mo >
ore buttons (i.e. for TV press 1, 2, 3 per screen 3
Cancel Cancel settings and move
5.Screen 4 is
The last screen
View View the allotted buttons.
Delete Delete the allotted buttons.
Done Save and move to the previous
mode <Screen3>.
11
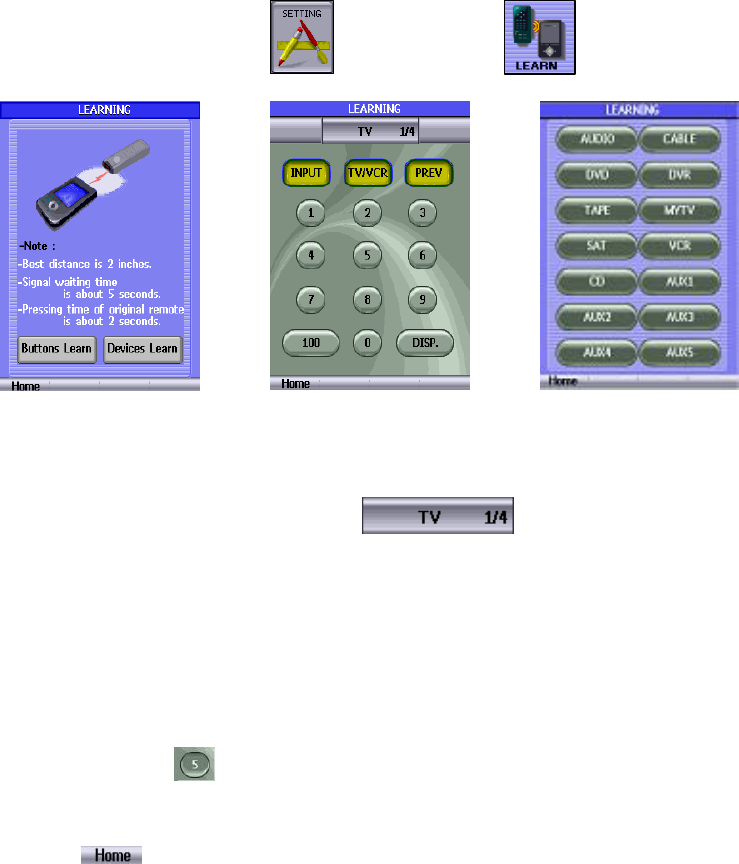
08. LEARNING MODE
e menu press and then press
your d sired selection ( or devices Scr
<Screen2- Button Learn> <Screen3- Devices Learn>
3. Use the wheel & device Select button(
you want to change.
Next press the button you want the RH60 to l
remote and the RH60 will learn that button. Repeat the st ns you
want to program manually. Note: .The unit will wait 5 second mitted
from the original remote. If no signal is transmitted during those 5 seconds, the unit will
d the RH60
as returned to its original state.
Hom1. From the
2. Choose e buttons een1).
<Screen1>
) to navigate to the page of the device
earn. Finally, press the button on the original
ep 2-3 for the rest of the butto
s for a signal to be trans
automatically turn off and beep a sound indication the button was not programmed an
h
ex) If you press the button in <Screen2> Next, press the (5) button on the original
Remote Control.
4. Press the button to finish and exit learning mode.
12
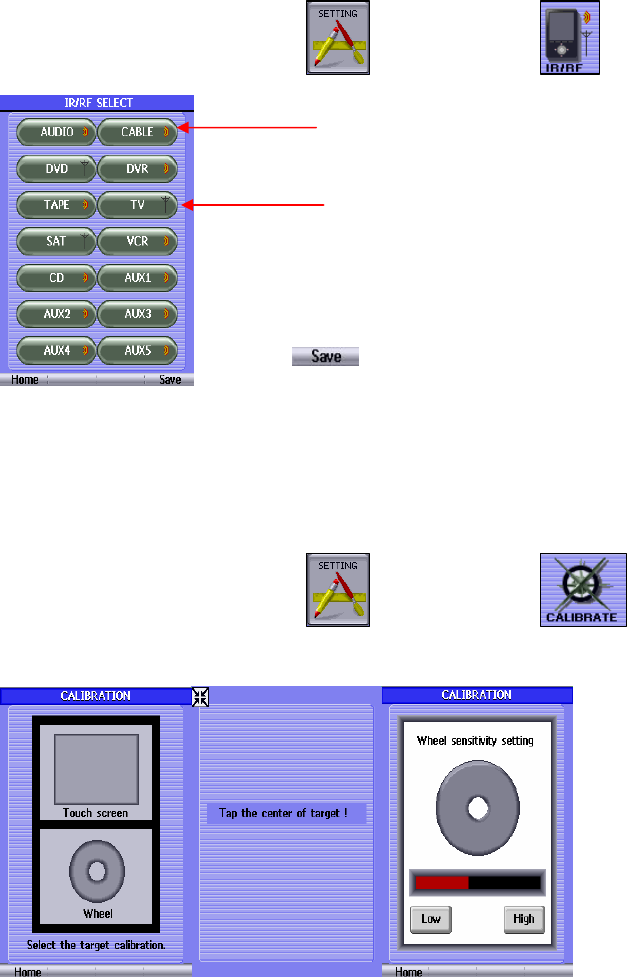
09. IR/RF SELECT MODE
. From the Home menu press and then press
IR Output Selected
2. Select the device you wish to change and press that button. Each time
e from an antenna (RF) to a signal
(IR).
you are finished.
T
1. From the Home me
re 1>, choose between the Touch pad or Wheel.
creen3 - Wheel>
een2>, touch the area(s) instructed.
ct the sensitivity you desire (Low makes the wheel less sensitive,
ore sensitive). Note: You can test the sensitivity in this mode by turning
1
RF Output Selected
you press the button, the icon will chang
3. Press when
<Screen1>
10. CALIBRA ION MODE
nu press and then press
2. You will see <Sc en
<Screen1> <Screen2 – Touch Screen> <S
3.1 If the touch pad is selected <Scr
3.2 If the Wheel is selected, sele
High makes the wheel m
the wheel.
13

11. BIORHYTHM
. From the Home menu press and then press BIORHYTHM.1
3. Input your birth date and touch (please refer to the biorhythm icon
chart for more information)
4. Press to end the BIORHTHM function.
2. Select the desired BIO from the available selections shown in screen 1
and you will see its status (screen 2)
<Screen1>
<Screen2>
14
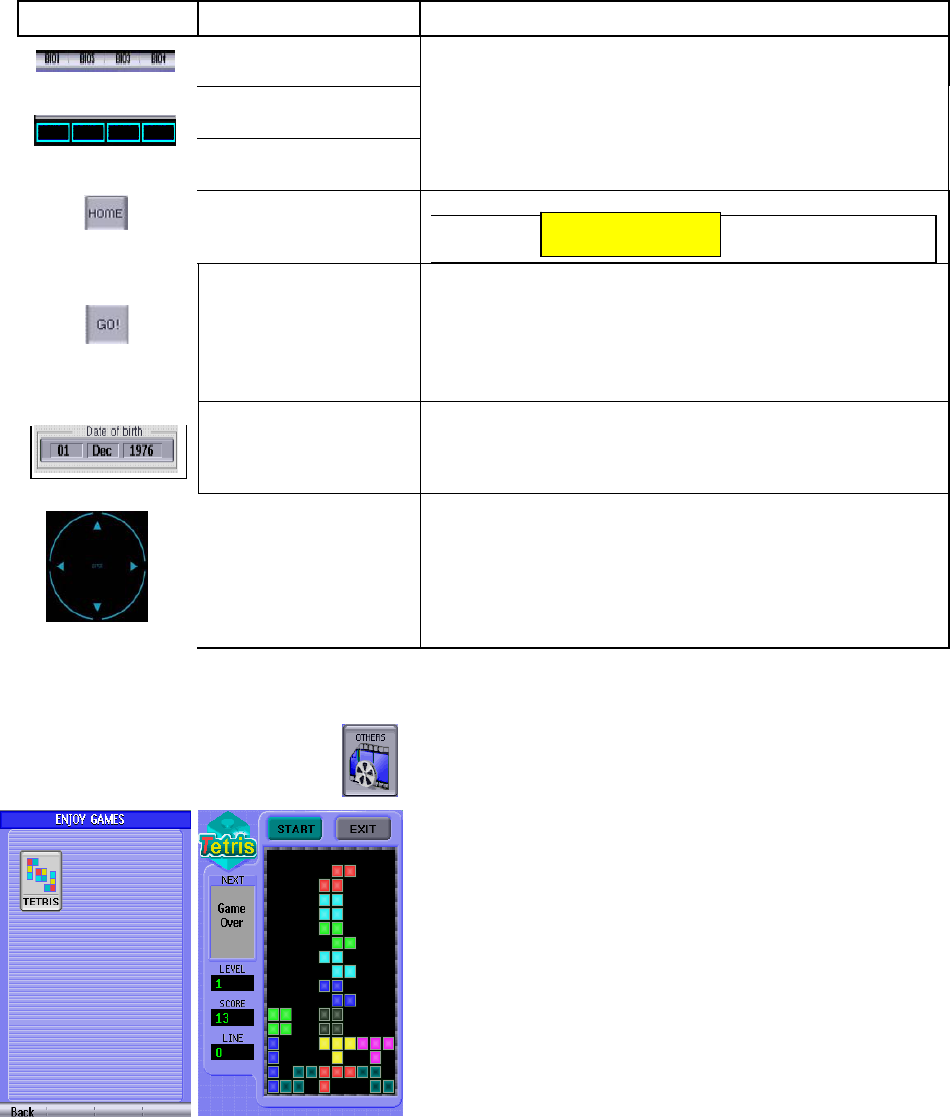
Biorhythm Chart
Icon Icon name Function
BIORHYTHM Link
BIORHYTHM
Selectors
BIORHYTHM
Change
Operated the same way as previously shown.
HOME
Move to .
GO
Used only when the date of birth is changed.
Pressing GO will auto-save the new DOB data
selected and a new BIORHTHM graphic will
display.
Date of birth Touch to change current D.O.B data.
Wheel e the wheel to change D.O.B. Us
12. GAME
e menu a
Down: Drop
Left: Move left
Right: Move right
* Can not exit game before game is over.
1. From the Hom press nd then press GAME.
H
OME screen
UP: Rotate
Restart function will not work.
15
1
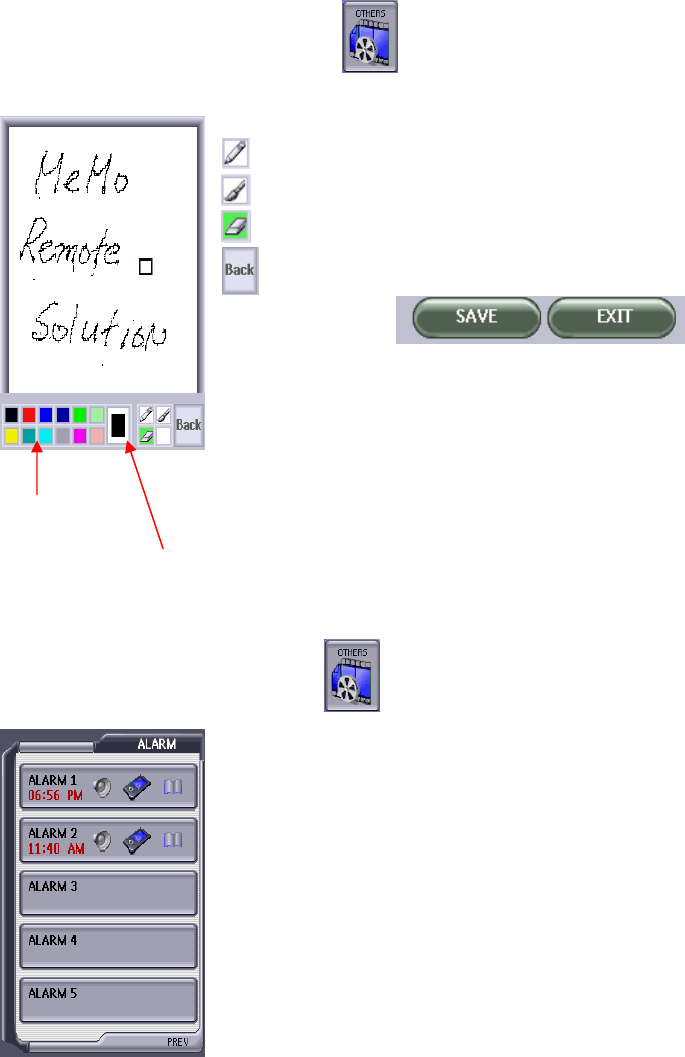
3. MEMO
. From the Home menu press and then press MEMO.
=Eraser
:
e Save & Exit Button appears, select Save and it will save the memo and
r
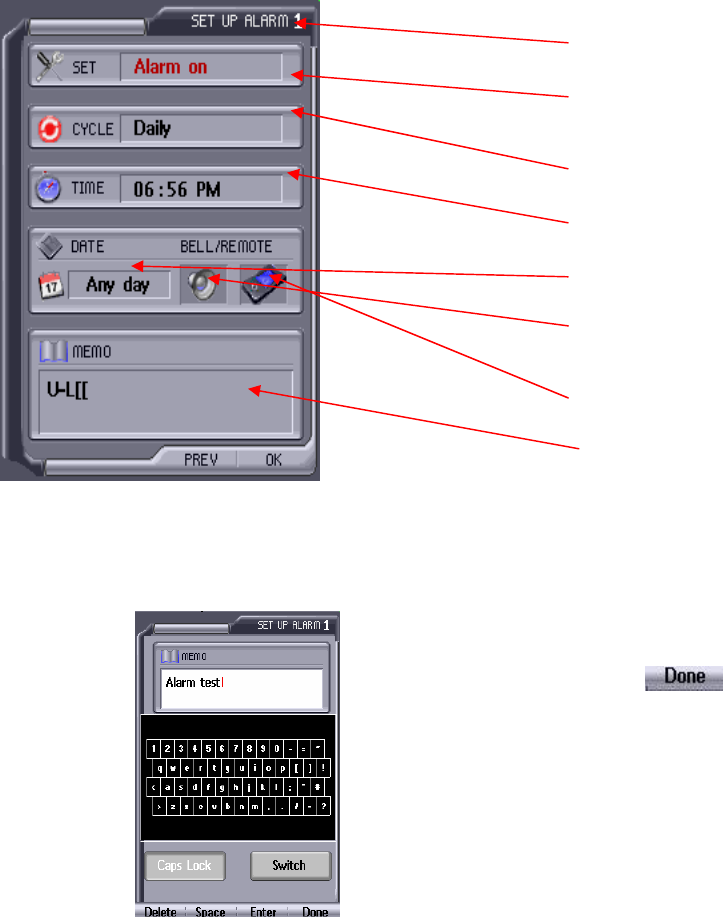
14. ALARM
. From the Home menu press and then press ALARM.
Alarm 1 shows 6:54PM /Alarm Sound On/Remote Function On/ Memo
n.
1
=Pen
=Brush
=Exit
Note: When th
exit
Pen Color
Selected Colo
1
O
Alarm 3 shows no functions are on.
<Screen1>
16
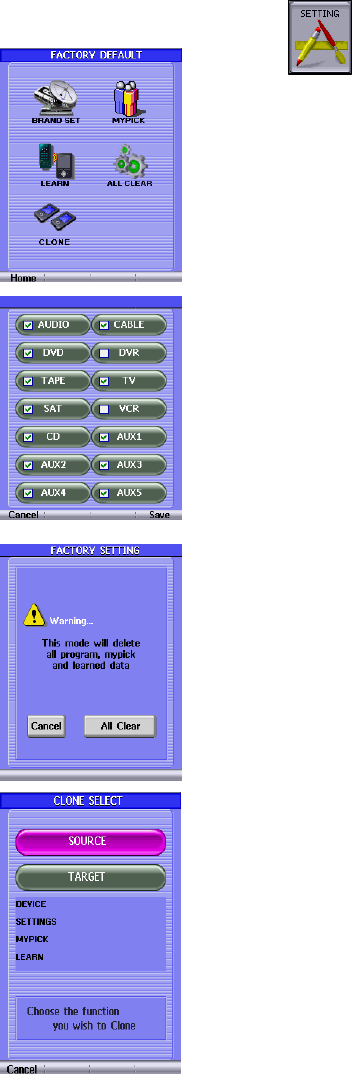
2. Choose function to select in <Screen1>.
Select the "Alarm 1" in <Screen1>.
Alarm on/off toggle
of Alarm
nd on/off
ame a Mypick setting)
Touch "memo" in <Screen2>.
<Message input> will be displayed.
Input message and Press the button to end input message.
Alarm terms
Alarm time
Set certain date
Alarm beep
toggle
sou
Remote function setting (s
s
Memo Message
<Screen2>
<Message Input>
17
15. DEFAULT MODE
rom the Home menu press and then press DEFAULT.
- Delete Brand setting.
lete Mypick setting.
RN.
LONE – Reproduce the setting of source remote to another unit.
.
want to
elete the device.
. Press the save button.
ou will see this screen.
ress ALL CLEAR to delete ALL YOUR DEVICES
ress CANCEL if you DO NOT wish to delete all your devices.
his function allows to reproduce the Source Remote to the Target Remote.
ource Remote : The unit has the Setting value transmitted to the Target
mote.
arget Remote : The unit receives the Setting value of the Source Remote.
F
BRAND SET
MYPICK- De
LEARN- Delete Learning date.
ALL CLEAR- Delete everything; BRAND SET, MYPICK, LEA
C
2. If you selected Brand Set, MY Pick or Learn, you will see this screen
Select the devices you wish to delete. Note a checkmark means you
d
3
If you select ALL Clear y
P
P
CLONE
T
S
re
T
18
16. USB MODE
.Remote Control and PC Connection
Connect the Remote Control to your PC using the supplied USB Cable.
The unit will connect automatically, if the 5X Manage program is operating on your PC.
ayed.
1
<Screen1> will be displ
2. Disconnection
The remote will return to the previous screen of the Connection, if the cable is disconnected or
the PC Program is closed. In addition, the remote will restart if a Firmware Update has been
performed.
ndar will be displayed if the Remote Control is on the cradle.
No function will be available in this mode; only the Sub Remote Control will work.
id2,vid3,vid4 with the Sub Remote Control is the same as using
lly, they will be connected as shown:
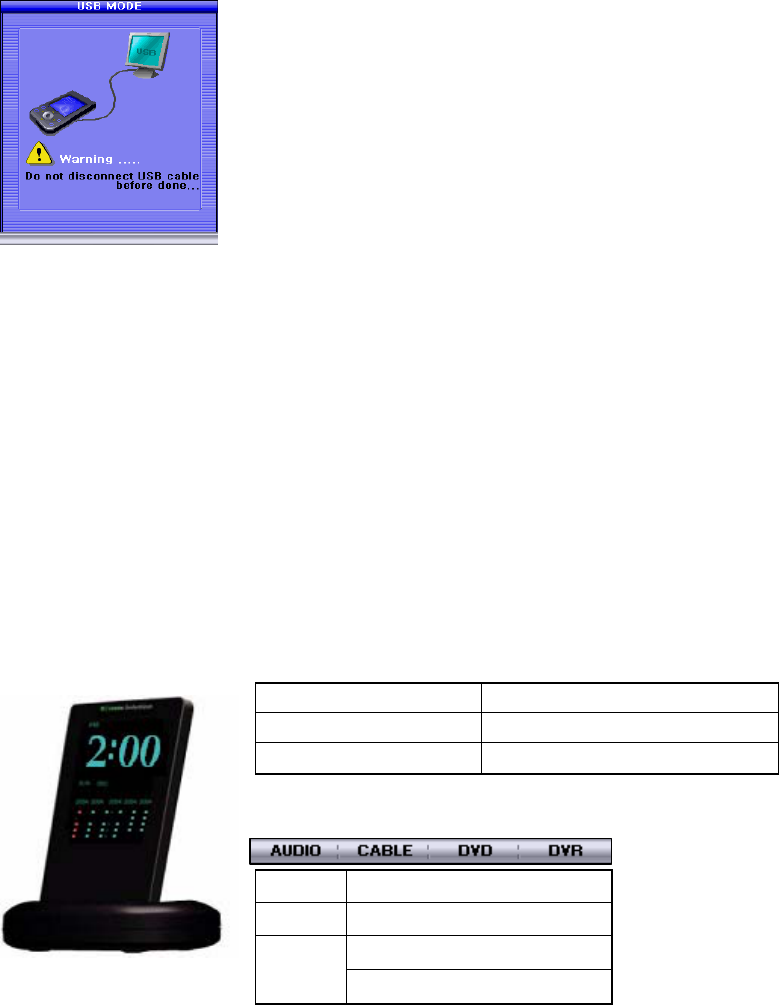
17. CRADLE MODE
When the remote is connected to the cradle:
.The clock or Cale1
2.
3. The procedure of using vid1,v
Device link with the RH60.
If both Remote Controls are linked successfu
Charging Red color
Charging completed Green color
Power On Orange blink (3-time)
DIO VID1 AU
VID2 CABLE
VID3 DVD
VID4 DVR
19
18. General Information
IMPORTANT INFORMATION ON SAFE AND EFFICIENT OPERATION
READ THIS INFORMATION BEFORE USING RH60
<<NOTICE>>
* Section 15.19 Labelling requirements
This device complies with part 15 of the FCC rules.
Operation is subject to the following two conditions:
(1) This device may not cause harmful interference and
(2) This device must accept any interference received, including interference that may cause
undesired operation.
* Section 15.21 Information to user
The changes or modifications not expressly approved by the party responsible for compliance
could void the user’s authority to operate the equipment.
* IMPORTANT NOTE: To comply with the FCC RF exposure compliance requirements, no
change to the antenna or the device is permitted. Any change to the
antenna or the device could result in the device exceeding the RF
exposure requirements and void user’s authority to operate the device.
20
19. SubRemote (Optional)
The SubRemote is used when the Main Remote is being recharged
SubRemote is available when the Main Remote is plugged into the Cradle, and the
Main Remote must be selected to RF mode
Buttons that are used to choose devices
The procedure of using vid1,vid2,vid3,vid4 with the Sub Remote Control is the
same as using Device link with the RH60.
ex)
Main Remote(RH60) Device link part
SubRemote Device Link
VID1 AUDIO
VID2 CABLE
VID3 DVD
VID4 DVR
20. RF Receiver & IR Converter (Optional)
Adaptor Spec : DC 9V , 400mA
Receives and changes a RF signal from the Main Remote or SubRemote to an IR signal
IR Signal Indicator. LED
When it is first turned on IR Signal Indicator LED will blink 4 times
If it does not blink 4 times, contact your distributor.
When the RF ID correctly corresponds with the RF Code, the IR Signal Indicator LED will turn
on and the IR code will be transmitted.
ack (side) Rotary Switch * The b
- RF ID Change
21
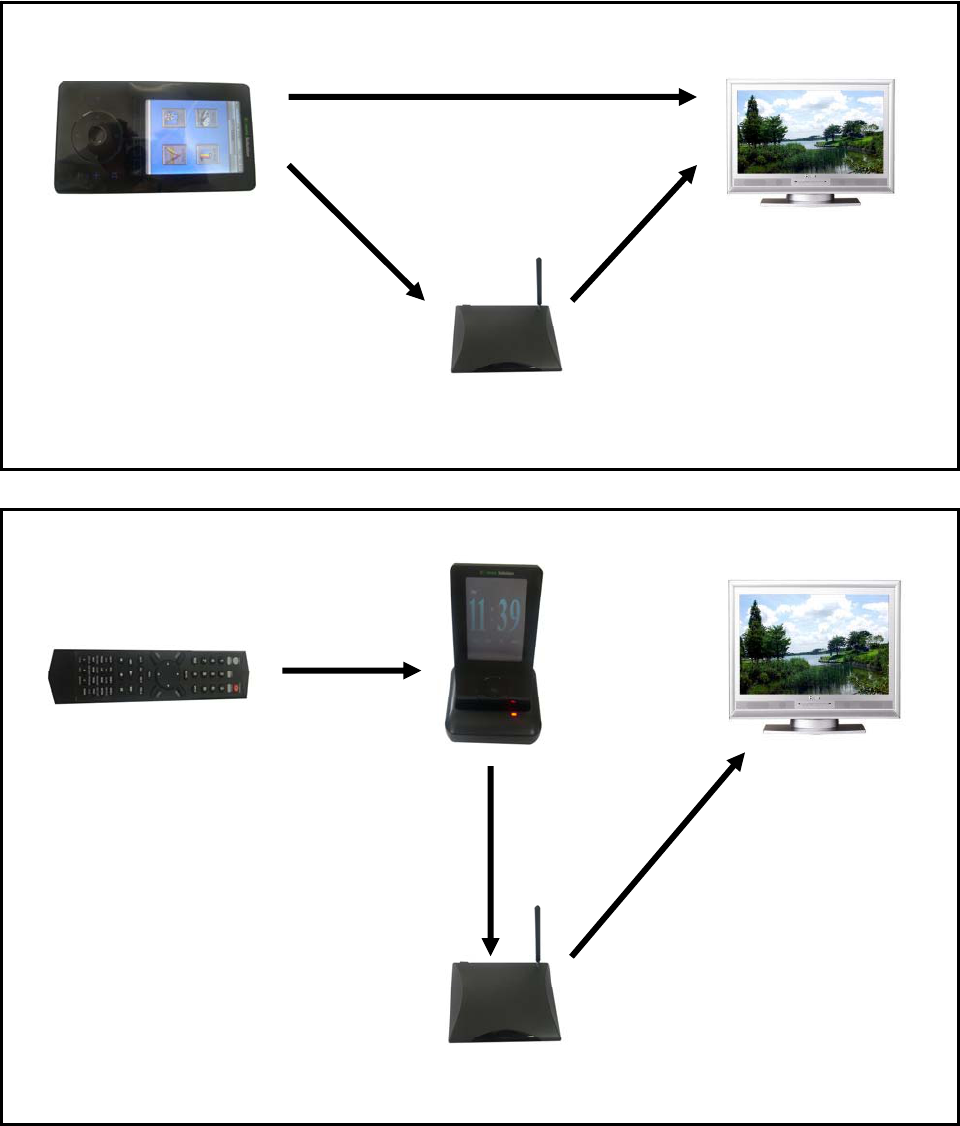
How To Use? ( Main Remote)
How To Use? ( Sub Remote)
IR Signal
Zigbee Signal
IR Signal
[Zigbee Converter]
[Main
Remote] 2.4 ㎓
IR Signal
2.4 ㎓
Zigbee Signal
Zigbee Signal 2.4 ㎓
[Sub Remote]
[Zigbee Converter]
22
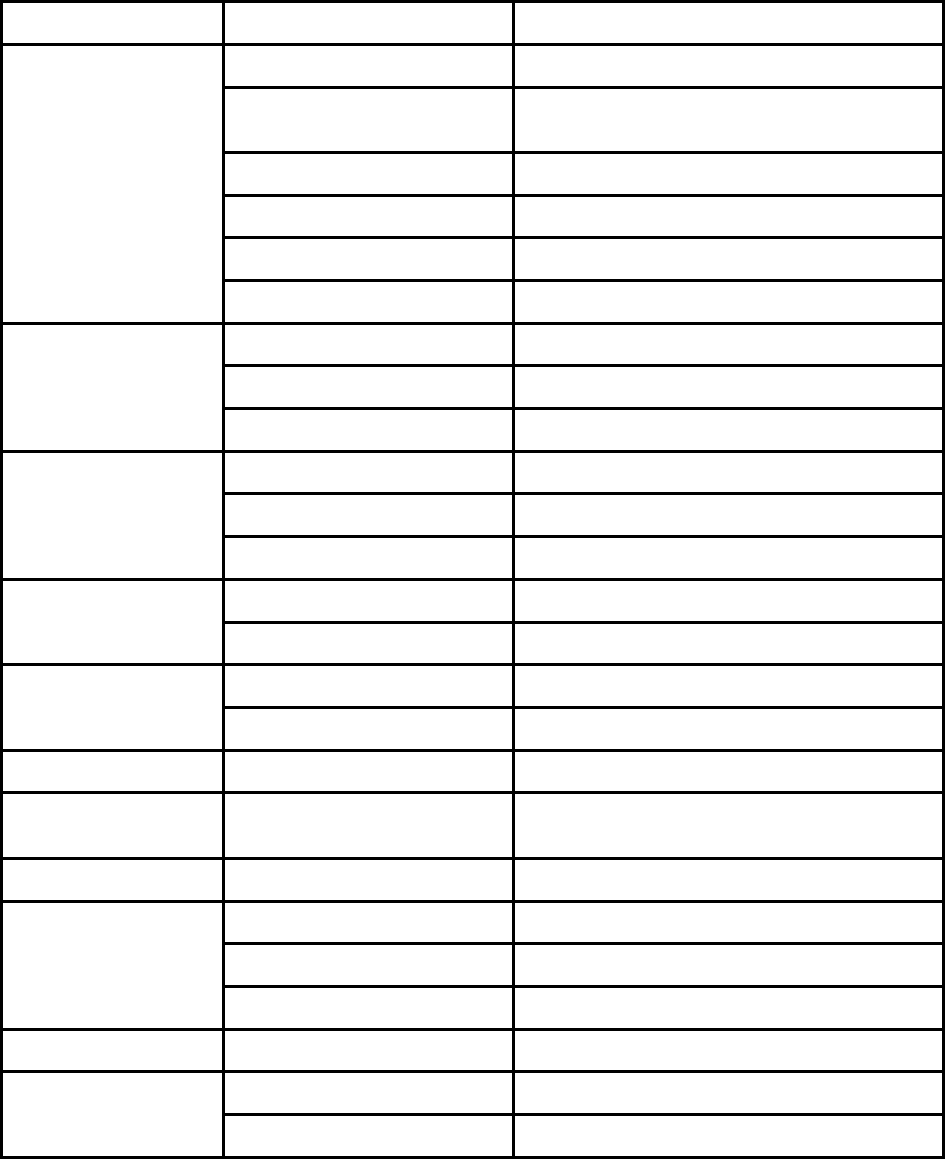
Main Remote Specification
Item
Processor type 256 QFP
Processor Hynix HMS30C7202 Processor
80MHz
CPU Core ARM720T
Memory controller 16&32 bit modes,
LCD Controller Mono/Color STN , TFT LCD
SoC
USB Controller USB (Slave) 1.1
Flash memory 64Mb x 16bit or 128Mb x 16bit
SDRAM 64Mb x 16bit
Memory
SRAM 8Mb x 16bit [JTAG Debug ]
Touch panel Touch panel controller ADS7843
Touch key Touch sensor controller QT1080
External keys
Touch wheel Touch slider controller QT510
LCD CCFL Controller MP1025
Backlight
Key EL. Controller ZSP4403
IR Infrared
Signal Transmitted
Zigbee (RF) 2.4GHz [ IEEE® 802.15.4 Standard ]
PC Interface USB Device USB 1.1 H/S
Battery Rechargeable
Li-Polymer 3.7V / 1600mA
LCD Color LCD 3.9'' STN Color LCD(320 x 240)
RUN MAX 500mA @ 3.7V
IDLE TYP. 300mA @ 3.7V
Operating current
SLEEP MAX. 5mA @ 3.7V
Operating voltage 3.0V ~ 6.0V
IR MIN. 10m
Operating Distance
ZIGBEE(RF)
MIN. 20m
23
www.remotesolution.co.kr
R & D Center
24