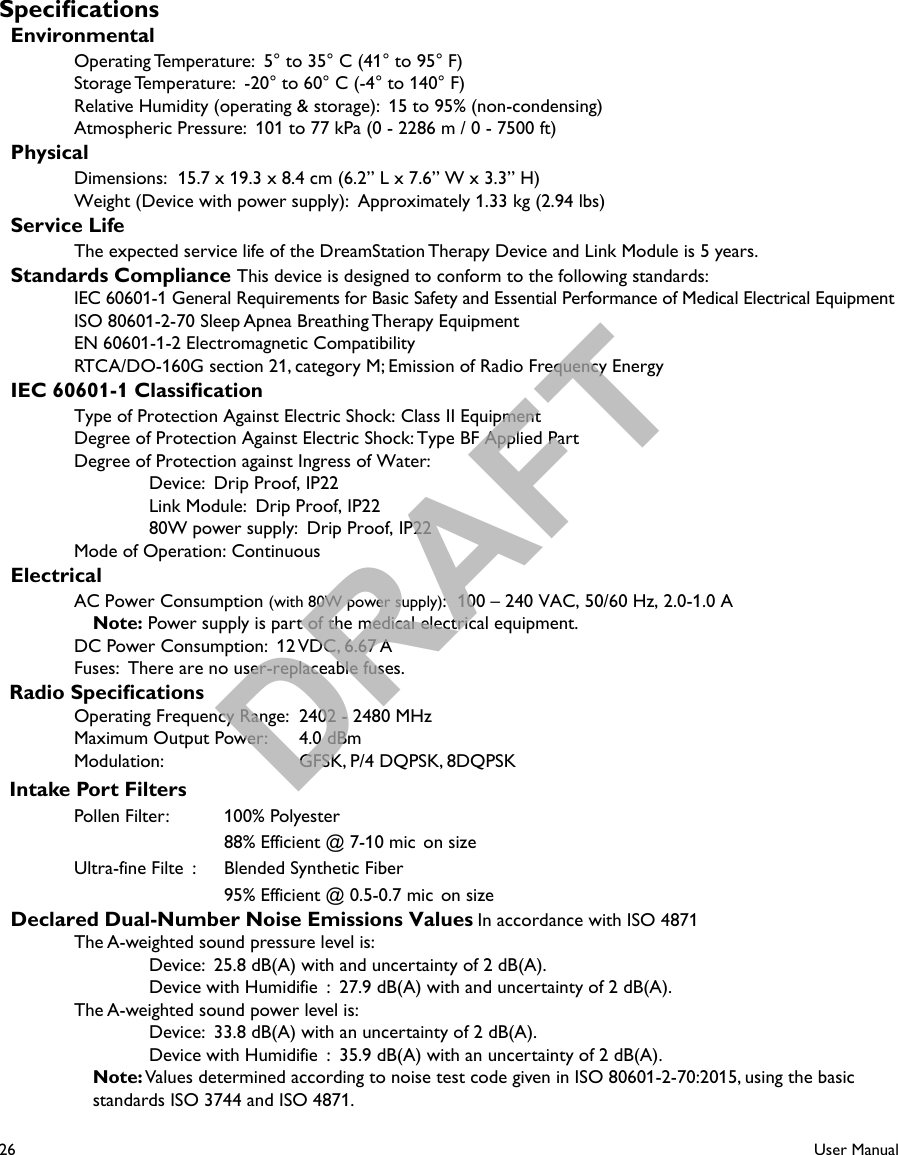
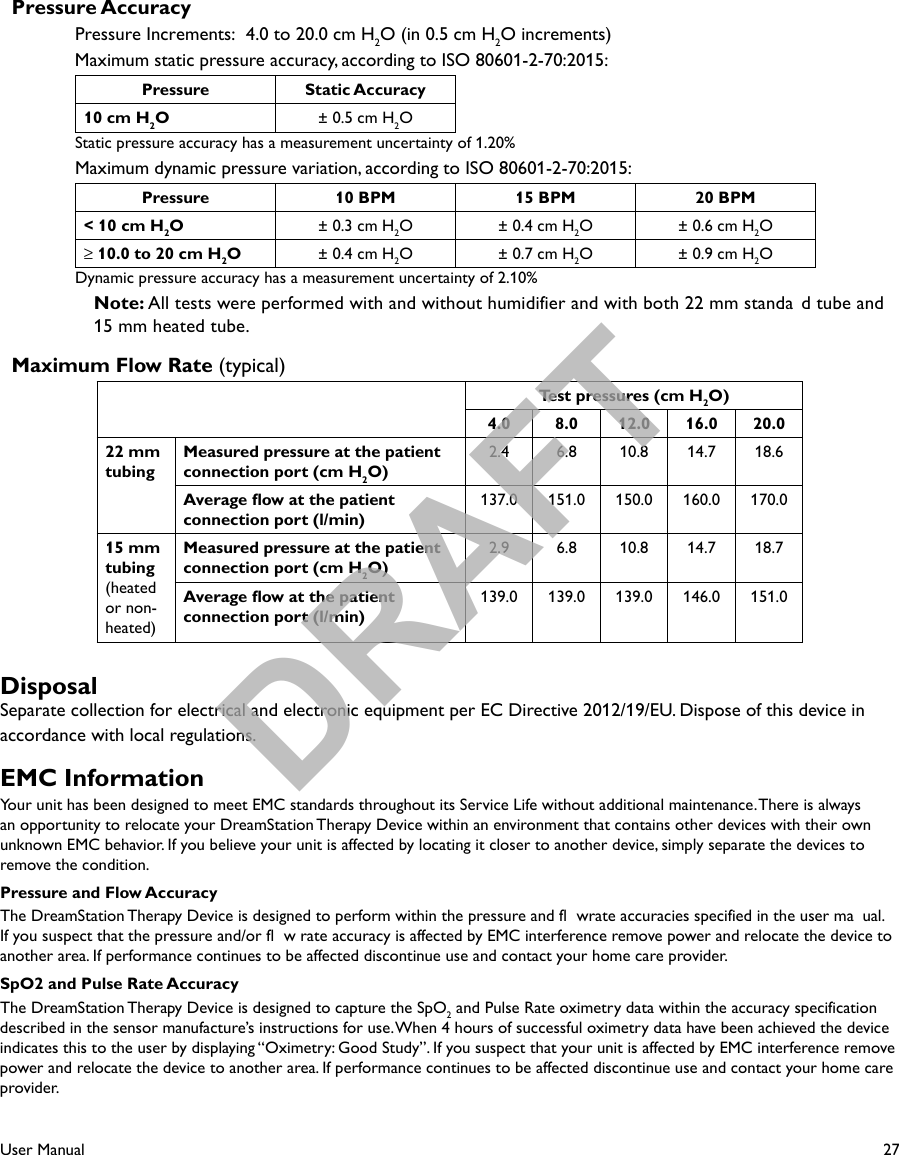
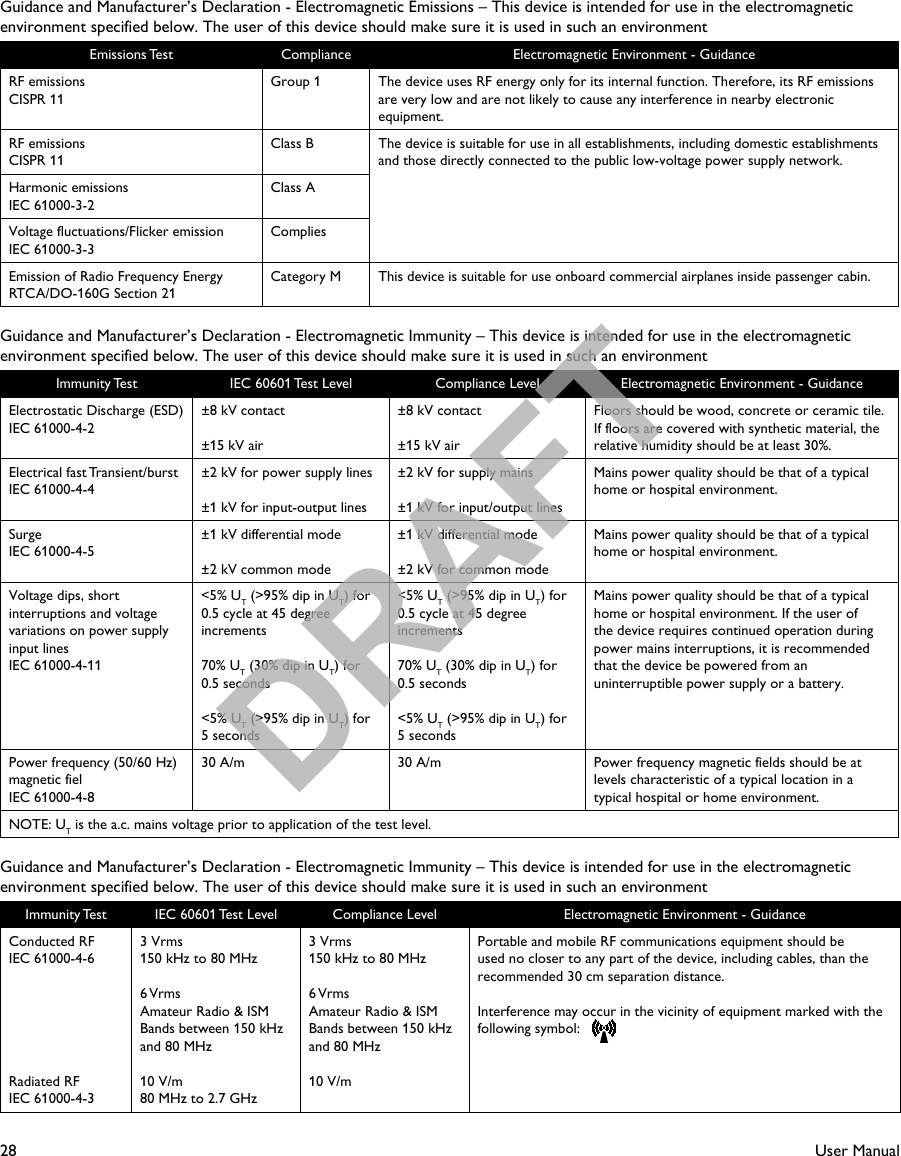
Respironics 1116426 Continuous Positive Airway Pressure Device User Manual user guide host

Respironics Inc. Continuous Positive Airway Pressure Device user guide host

user guide host

User manual DreamStation CPAP  DreamStation CPAP Pro  DreamStation Auto CPAPDRAFT
© 2015 Koninklijke Philips N.V.  All rights reserved.Table of ContentsIntended Use ........................................................................................................................................................... 1Important ................................................................................................................................................................. 1Warnings .................................................................................................................................................................. 1Cautions ................................................................................................................................................................... 2Contraindications .................................................................................................................................................. 2Symbol Key .............................................................................................................................................................. 3System Contents .................................................................................................................................................... 3How to Contact Philips Respironics ................................................................................................................. 3System Overview ...................................................................................................................................................4Installing/Replacing the Air Filters ......................................................................................................................5Where to Place the Device ................................................................................................................................. 6Supplying AC Power to the Device ....................................................................................................................6Connecting the Breathing Circuit ...................................................................................................................... 7Navigating the Device Screens ............................................................................................................................8Starting the Device ................................................................................................................................................ 8Menu Navigation (Therapy ON) and Optional Humidification Setting  ...................................................9Ramp Feature .......................................................................................................................................................... 9Menu Navigation (Therapy OFF) ......................................................................................................................10Bluetooth® Wireless Technology .........................................................................................................................14Check Mask Fit ..................................................................................................................................................... 15Sleep Progress ......................................................................................................................................................15Altitude Compensation ......................................................................................................................................15Device Alerts ........................................................................................................................................................16Troubleshooting ...................................................................................................................................................20Accessories ...........................................................................................................................................................22Traveling with the System ..................................................................................................................................23Cleaning the Device ............................................................................................................................................24Cleaning or Replacing the Filters .....................................................................................................................24Cleaning  the Tubing ..............................................................................................................................................24Service .................................................................................................................................................................... 24Additional Notices ...............................................................................................................................................25Specification  ........................................................................................................................................................26Disposal ..................................................................................................................................................................27EMC Information .................................................................................................................................................27Limited Warranty ...................................................................................................................................Back PageDRAFT
1User ManualCaution: U. S. federal law restricts this device to sale by or on the order of a physician.Intended UseThe Philips Respironics DreamStation systems deliver positive airway pressure therapy for the treatment of Obstructive Sleep Apnea in spontaneously breathing patients weighing over 30 kg (66 lbs). It is for use in the home or hospital/institutional environment.ImportantThe device is to be used only on the instruction of a licensed physician. Your home care provider will make the correct pressure settings and device configurations including accessories  according to your health care professional’s prescription.Several accessories are available to make your OSA treatment with the DreamStation system as convenient and comfortable as possible. To ensure that you receive the safe, effective therapy prescribed for you, use only Philips Respironics accessories.WarningsA warning indicates the possibility of injury to the user or the operator.•   This manual serves as a reference. The instructions in this manual are not intended to supersede the health care professional’s instructions regarding the use of the device.•   The operator should read and understand this entire manual before using the device.•  This device is not intended for life support.•   The device should be used only with masks and connectors recommended by Philips Respironics or with those recommended by the health care professional or respiratory therapist. A mask should not be used unless the device is turned on and operating properly. The exhalation port(s) associated with the mask should never be blocked. Explanation of the Warning: The device is intended to be used with special masks or connectors that have exhalation ports to allow continuous flow of air out of the mask. Whe  the device is turned on and functioning properly, new air from the device flushes the exhaled air out through the mask exhalat on port. However, when the device is not operating, enough fresh air will not be provided through the mask, and exhaled air may be rebreathed. Rebreathing of exhaled air for longer than several minutes can in some circumstances lead to suffocation.•   If you are using a full face mask (a mask covering both your mouth and your nose), the mask must be equipped with a safety (entrainment) valve.•   When using oxygen with this system, the oxygen supply must comply with local regulations for medical oxygen.•   Oxygen supports combustion. Oxygen should not be used while smoking or in the presence of an open flame•   When using oxygen with this system, turn the device on before turning on the oxygen. Turn the oxygen off before turning the device off. This will prevent oxygen accumulation in the device. Explanation of the Warning: When the device is not in operation and the oxygen flow is left on, oxygen delivered into the tubing may accumulate within the device’s enclosure. Oxygenaccumulated in the device enclosure will create a risk of fire•   When using oxygen with this system, a Philips Respironics Pressure Valve must be placed in-line with the patient circuit between the device and the oxygen source. The pressure valve helps prevent the backflow of oxygen from the patient circuit into thedevice when the unit is off. Failure to use the pressure valve could result in a fire hazard•   Do not connect the device to an unregulated or high pressure oxygen source.•   Do not use the device in the presence of a flammable anaesthetic mixture in combination with oxygen or air, or in the presenceof nitrous oxide.•   Do not use the device near a source of toxic or harmful vapors.•   Do not use this device if the room temperature is warmer than 35° C (95° F). If the device is used at room temperatures warmer than 35° C (95° F), the temperature of the airflow may exceed 4 ° C (109° F). This could cause irritation or injury to your airway.•   Do not operate the device in direct sunlight or near a heating appliance because these conditions can increase the temperature of the air coming out of the device.•   Contact your health care professional if symptoms of sleep apnea recur.•   If you notice any unexplained changes in the performance of this device, if it is making unusual or harsh sounds, if it has been dropped or mishandled, if water is spilled into the enclosure, or if the enclosure is broken, disconnect the power cord and discontinue use. Contact your home care provider.•   Repairs and adjustments must be performed by Philips Respironics-authorized service personnel only. Unauthorized service could cause injury, invalidate the warranty, or result in costly damage.•   Do not use any accessories, detachable parts, and materials not recommended by Philips Respironics. Incompatible parts or accessories can result in degraded performance.•   Use only approved cables and accessories. Misuse may affect EMC performance and should be avoided.•   The Health Industry Manufacturers Association recommends that a minimum separation of six inches be maintained between a wireless phone and a pacemaker to avoid potential interference with the pacemaker. The DreamStation on-board Bluetooth communication should be considered a wireless phone in this regard.•   Use only power cords supplied by Philips Respironics for this device. Use of power cords not supplied by Philips Respironics may cause overheating or damage to the device and may result in increased emissions or decreased immunity of the equipment or system.•   The device should not be used while stacked or in close approximation to other non-approved devices.•   Do not pull or stretch the tubing. This could result in circuit leaks.DRAFT
2User Manual•   Inspect the tubing for damage or wear. Discard and replace the tubing as necessary.•   Periodically inspect electrical cords and cables for damage or signs of wear.  Discontinue use and replace if damaged.•   To avoid electrical shock, always unplug the power cord from the wall outlet before cleaning the device. DO NOT immerse the device in any fluids.•   If the device is used by multiple persons (such as rental devices), a low-resistance, main flow bacteria filter should be installed iline between the device and the circuit tubing to prevent contamination.•   Be sure to route the power cord to the outlet in a way that will prevent the cord from being tripped over or interfered with by chairs or other furniture.•   This device is activated when the power cord is connected.•   For safe operation when using a humidifier, the humidifier must always be positioned below the breathing circuit connection athe mask. The humidifier must be level for proper operation Note: Please see the “Limited Warranty” section of this manual for information on warranty coverage.CautionsA Caution indicates the possibility of damage to the device.•  Medical electrical equipment needs special precautions regarding EMC and needs to be installed according to EMC information. Contact your home care provider regarding EMC installation information.•  Mobile RF communications equipment can affect medical electrical equipment.•  Pins of connectors marked with the ESD warning symbol shall not be touched and connections shall not be made without special precautions. Precautionary procedures include methods to prevent build-up of electrostatic charge (e.g., air conditioning, humidification, conductive floor coverings, non-synthetic clothing), discharging one’s body to the frame of the equipment osystem or to earth. It is recommended that all individuals that will handle this device understand these precautionary procedures at a minimum as part of their training. •  Before operating the device, ensure that the SD card/filter acc ss door and the modem access door are both closed whenever any of the accessories such as the Link Module or Modem are not installed. Refer to the instructions that came with your accessory.•   Condensation may damage the device. If this device has been exposed to either very hot or very cold temperatures, allow it to adjust to room temperature (operating temperature) before starting therapy. Do not operate the device outside of the operating temperature range shown in the Specifications•   Do not use extension cords with this device.•   Make sure the filter area on the side of the device is not blocked by bedding, curtains, or other items. Air must flow freely aroundthe device for the system to work properly.•   Do not place the device directly onto carpet, fabric, or other flammable materials•   Do not place the device in or on any container that can collect or hold water. •   A properly installed, undamaged Philips Respironics blue pollen filter is required for proper operation.•   Tobacco smoke may cause tar build-up within the device, which may result in the device malfunctioning.•   Dirty inlet filters may cause high operating temperatures that may affect device performance. Regularly examine the inlet filters aneeded for integrity and cleanliness.•   Never install a wet filter into the device. You must ensure sufficient drying time for the cleaned filt•   Always ensure that the DC power cord securely fits into your therapy device prior to use. Contact your home care provider orPhilips Respironics to determine if you have the appropriate DC cord for your specific therapy device•   When DC power is obtained from a vehicle battery, the device should not be used while the vehicle’s engine is running. Damage to the device may occur.•   Only use a Philips Respironics DC Power Cord and Battery Adapter Cable. Use of any other system may cause damage to the device.ContraindicationsWhen assessing the relative risks and benefits of using this equipment, the clinician should understand that this device can deliverpressures up to 20 cm H2O. In the event of certain fault conditions, a maximum pressure of 40 cm H2O is possible. Studies have shown that the following pre-existing conditions may contraindicate the use of CPAP therapy for some patients:•   Bullous Lung Disease•   Pathologically Low Blood Pressure•   Bypassed Upper Airway•   Pneumothorax•   Pneumocephalus has been reported in a patient using nasal Continuous Positive Airway Pressure. Caution should be used when prescribing CPAP for susceptible patients such as those with: cerebral spinal fluid (CSF) leaks, abnormalities of the cribriformplate, prior history of head trauma, and/or pneumocephalus. (Chest 1989; 96:1425-1426)The use of positive airway pressure therapy may be temporarily contraindicated if you exhibit signs of a sinus or middle ear infection. Not for use with patients whose upper airways are bypassed. Contact your health care professional if you have any questions concerning your therapy.DRAFT
3User ManualSymbol KeyThe following symbols may appear on the device, power supply and accessories:Symbol Definitio Symbol DefinitioConsult accompanying instructions for use.For Airline Use. Complies with RTCA/DO-160G section 21, category M.AC PowerSeparate collection for electrical and electronic equipment per EC Directive 2012/19/EU.DC Power Bluetooth® symbolIP22 Drip Proof Equipment This device contains an RF transmitter.Caution, consult accompanying documents. Oximeter ConnectionESD Warning symbol Serial ConnectionClass II (Double Insulated) Avoid ultraviolet radiationType BF Applied PartCaution: U. S. federal law restricts this device to sale by or on the order of a physician.For Indoor Use Only. Do not disassemble.System ContentsYour DreamStation system may include the following items:• Device  • SD card • User manual  • Flexible tubing• Carrying case  • Reusable blue pollen filte• Power cord  • Disposable light-blue ultra-fine filter (optiona• Power supply (   1118499)  • Humidifier (optional Note: If any of these items are missing, contact your home care provider.How to Contact Philips RespironicsShould you experience trouble with this equipment or require assistance setting up, using, or maintaining the device or accessories, please contact your home care provider. If you need to contact Philips Respironics directly, call the Philips Respironics Customer Service department at 1-800-345-6443 or 1-724-387-4000. You can also use the following address:Respironics, Inc.1001 Murry Ridge LaneMurrysville, PA  15668 DRAFT
4User ManualSystem OverviewThe DreamStation CPAP is a Continuous Positive Airway Pressure therapy device designed for the treatment of Obstructive Sleep Apnea (OSA). The DreamStation CPAP Pro can also deliver CPAP-check therapy, and the DreamStation Auto CPAP can also deliver CPAP-Check and Auto-CPAP therapy. Your home care provider will choose the appropriate pressure settings for you.When prescribed for you, the device provides several special features to help make your therapy more comfortable. The ramp function allows you to lower the pressure when you are trying to fall asleep. The air pressure will gradually increase until your prescription pressure is reached. Also, the Flex comfort feature provides you with pressure relief when you exhale during therapy.Several accessories are also available for use with your device. Contact your home care provider to purchase any accessories not included with your system.This gure illustrates some of the device features, described in the following table.# Device Feature Description1Therapy On/Off Button   Starts and stops the airow for therapy.2Ambient Light Sensor Detects room light levels and adjusts brightness of LCD Display Screen.3Ramp Button   Activates the ramp feature during therapy.4 Door, SD card & Filter Access This door lifts open for access to the SD card and lter area.5 LCD Display Screen This is the User Interface for the therapy device.6Control Dial Turn the dial to scroll between options on the screen. Press the dial to choose an option.7 Door, Accessory Access This door lifts open for access to the (optional) accessories.8Humidifi r Connector Humidier connects to the back of the therapy device. The humidier pin connector will attach here.9 Air Outlet Port Connect the tubing here.10 Power Inlet Connect the power cord here.DRAFT
5User ManualInstalling/Replacing the Air Filters Caution: A properly installed, undamaged Philips Respironics blue pollen filter is required for proper operationThe device uses a blue pollen filter that is washable and reusa le, and a light-blue ultra-fine filter that is disposabl  The reusable blue filter screens out normal household dust and  ollens, while the light-blue ultra-fine filter provid  more complete filtration of very fine particles. The reusable b e filter must be in place at all times when the device i  operating. The ultra-fine filter is recommended for people who  e sensitive to tobacco smoke or other small particles.The reusable blue filter is supplied with the device. A disposable light-blue ultra-fine filter may also be included. If yofilter is not already installed when you receive your device, you must at least install the reusable filter before using thdevice.This device has an automatic air filter  eminder. Every 30 days, the device will display a message reminding you to check your filters and  eplace them as directed. Note: This message is a reminder only.  The device does not detect the performance of the filters nor does itrecognize when a filter has been cleaned or  eplaced.1. Lift up on the filter access door and swing open. If replacing, pull out the old filter assembl2. If applicable, place a clean, reusable blue pollen filter (1) on top of a new  optional disposable light-blue ultra-finefilter (2) and fir y snap them together.3. Place the new filter assembly back in the side of the therapy device. Swing the door closed.DRAFT
6User ManualWhere to Place the DevicePlace the device on a firm, flat surface somewhere within easy reach of where you will use it at a level lower thayour sleeping position. Make sure the device is away from any heating or cooling equipment (e.g., forced air vents, radiators, air conditioners).Note: When positioning the device, make sure that the power cable is accessible because removing power is the only way to turn off the device. Caution: Make sure the filter a ea on the side of the device is not blocked by bedding, curtains, or other items. Air must flow freely around the device for the system to work properly Caution: Do not place the device directly onto carpet, fabric, or other flammable materials Caution: Do not place the device in or on any container that can collect or hold water.Supplying AC Power to the DeviceComplete the following steps to operate the device using AC power:1.  Plug the socket end of the AC power cord (included) into the power supply (also included).2. Plug the pronged end of the AC power cord into an electrical outlet that is not controlled by a wall switch.3. Plug the power supply cord’s connector into the power inlet on the side of the device.4. Verify that the plug at the side of the device, at the power supply, and at the electrical outlet are fully inserted. This will help to ensure that a secure, reliable electrical connection has been made.Note: If the following Incorrect Power Supply icon appears on the screen, please repeat step 4.   Important: To remove AC power, disconnect the power supply cord from the electrical outlet. Warning: Periodically inspect electrical cords and cables for damage or signs of wear. Discontinue use and replace if damaged. Caution: Do not use extension cords with this device.DRAFT
7User ManualConnecting the Breathing CircuitTo use the system, you will need the following accessories in order to assemble the recommended breathing circuit:•  Philips Respironics interface (nasal mask or full face mask) with integrated exhalation port, or Philips Respironics interface with a separate exhalation device (such as the Whisper Swivel II)•  Philips Respironics flexible tubing  1.83 m (6 ft.) •  Philips Respironics headgear (for the mask)To connect your breathing circuit to the device, complete the following steps: 1. Connect the flexible tubing to the air outlet on the back of the ther py device. Line up the connector (1) at the top of the heated tube to the top of the air outlet port on the back of the device.2. Press the tubing into place over the air outlet port until the tabs on the side of the tube click into place in the slots on the sides of the outlet port. Note: If you are using a standard tube (not shown) instead of a heated tube, simply slide the tubing over the air outlet port on the therapy device. Note: If required, connect a bacteria filter to the device air outlet, and then connect the flexible tubing to thoutlet of the bacteria filter. When using the bacteria filter, the device performance may be affected. However, thedevice will remain functional and deliver therapy.3. Connect the tubing to the mask. For proper placement and positioning, refer to the instructions that came with your mask. Warning: Do not pull or stretch the tubing. This could result in circuit leaks. Warning: Inspect the tubing for damage or wear. Discard and replace the tubing as necessary.4. Attach the headgear to the mask if necessary. Refer to the instructions that came with your headgear. Warning: If you are using a full face mask (a mask covering both your mouth and your nose), the mask must be equipped with a safety (entrainment) valve. Warning: If the device is used by multiple persons (such as rental devices), a low-resistance, main flow bacteria filt  should be installed in-line between the device and the circuit tubing to prevent contamination.DRAFT
8User ManualNavigating the Device ScreensThe User Interface (UI) on this device allows you to adjust the device settings and view information about your therapy. The UI is comprised of the display screen and the control dial. Rotate the control dial in either direction to scroll through the menu options on the display screen. Note: The display is not a touch screen. You must use the control dial to navigate the device menu.To adjust a setting:1. Rotate the control dial to your desired menu option.2. Press the control dial to select that setting.3. Rotate the control dial to change the setting.4. Press the control dial again to save the change. Note: The rotate dial icon   on any screen indicates to rotate the dial to perform an action. The click dial icon   on any screen indicates to press the dial to perform an action. Note: Pressing the dial when the down arrow   appears on any screen will take you to a sub-menu with more menu options. Pressing the dial when the up arrow   appears on any sub-menu will return you back to the main menu. Note: The screens shown throughout this manual are examples for reference only.  Actual screens may vary based upon device model and provider settings.Starting the Device1. Ensure power is supplied to the device. The first sc een to display will be the Philips Respironics logo, followed by the device model screen, and then the Home screen.      Home Screen  The first time the d vice is powered on, a pop-up will prompt you to set the time on the device. The default setting is Greenwich Mean Time, but you may adjust the time in 30 minute increments to match your local time zone. If you choose to skip this initial time setting, the time can always be adjusted under the “My Setup” menu.Note: This time setting is not displayed as a clock function on the device. It is only used to align your therapy data for your Provider’s data reports.2. Put on your mask assembly. Refer to the instructions supplied with the mask.3. Press the Therapy button (   ) on top of the device to turn on airfl w and begin therapy. The current delivered pressure will display on the screen. 4. Make sure that no air is leaking from your mask. If necessary, adjust the mask and headgear until the air leak stops. See the instructions provided with your mask for more information. Note: A small amount of mask leak is normal and acceptable. Correct large mask leaks or eye irritation from an air leak as soon as possible.5. If you are using the device in a bed with a headboard, try placing the tubing over the headboard. This may reduce tension on the mask.6. Press the Therapy button again to turn off therapy. Note: During therapy, it there is a mains interruption (i.e. power loss) the device will return to the Home screen once power is restored. You may resume therapy as needed.DRAFT
9User ManualMenu Navigation (Therapy ON) and Optional Humidication SettingsWhile the device is delivering therapy, you can adjust Tube Temperature or Humidifier Settings  Rotate the control dial to choose either setting. Press and rotate the dial to change the setting.Note: If you are using the Humidifier without the Heated Tube, simply just rotate the control dial to change the Humidifier settingTherapy Pressure Screen# Feature Description1Therapy Pressure Displays the current delivered pressure.2Adjustable Tube Temperature SettingYou can change this setting from 0 to 5. Only displays when optional heated tube is connected.3 Adjustable Humidier Setting You can change this setting from 0 to 5. Only displays when humidier is attached.4 Enabled Features Depending on setup, certain enabled therapy features will display here.Ramp FeatureThe device is equipped with an optional ramp feature that your home care provider can enable or disable. This feature reduces the air pressure when you are trying to fall asleep and then gradually increases (ramps) the pressure until your prescription setting is reached, allowing you to fall asleep more comfortably.If ramp is enabled on your device, after you turn on the airflow, press the Ramp (  ) button on the top of the device. You can use the Ramp button as often as you wish during the night.When you click the ramp button, the Therapy screen will change to reflect the Ramp p essure, and the green circle will reflect the gradual inc ease in pressure.Ramp Pressure ScreenYour device has two ramp modes. Your Provider will select the one that is most appropriate for you. The standard ramp mode increases pressure at a steady rate.  Alternately, the SmartRamp mode maintains a constant lower pressure until the device detects that you require more pressure.DRAFT
10User ManualMenu Navigation (Therapy OFF)From the Home screen, you can scroll between the following four options:   My Info   Preheat   My Provider   My SetupMy Info: This menu provides summary statistics of your therapy use.Preheat: This function lets you warm up your humidifier  or 30 minutes before starting a therapy session.My Provider: This menu contains information that your provider may direct you to read to them so they can better assist you over the phone.My Setup: This menu contains comfort settings that you can adjust as needed.My Info:When you select “My Info”, you will be able to view the following screens. You cannot change settings in the Info menu. These screens are only for reference. Your home care provider may periodically ask you for this information. Icon Text DescriptionTherapy Hours This screen displays the amount of time the user is actually receiving therapy on the device for the most recent 1 day time frame. It also displays the average amount of time the patient is actually receiving therapy over the last 7 days and 30 days.AHI AHI This screen displays the nightly Apnea/Hypopnea indices (AHI) value for the most recent 1 day time frame. It also displays the average of these individual nightly AHI values over a 7 day and a 30 day time frame. This screen only displays if your home care provider has enabled it. Only available on CPAP Pro and Auto CPAP devices.Mask Fit Displays the value “100% minus Large Leak”. Large Leak is the percentage of time that the mask leak was so high that it is no longer possible for the device to identify respiratory events with statistical accuracy. Displays the value for the most recent 1 day, as well as the values over last 7 days and 30 days. This screen only displays if your home care provider has enabled it. Only available on CPAP Pro and Auto CPAP devices.Periodic BreathingPeriodic BreathingDisplays the percentage of time that the user experienced periodic breathing. Displays the value for the most recent 1 day time frame, as well as values for the last 7 days and 30 days. If you observe a large increase in the percent of time in periodic breathing indicated her, contact your home care provider for assistance. This screen only displays if your home care provider has enabled it. Only available on CPAP Pro and Auto CPAP devices.DRAFT
11User ManualPreheat:  Preheat On Screen  Preheat Off ScreenWhen using a humidifie , the device can preheat the water tank for up to 30 minutes prior to starting therapy.In order to activate the preheat mode, the blower must be “off” and a humidifier  ust be attached. When “Preheat” is selected, you will be able to turn the control dial to choose between “on” or “off”. Press the control dial again to make your selection. During the 30 minute preheat, you will still be able to use the control dial to select other menu options from the Home screen.Note: This screen only displays when a humidifier is attachedMy Provider:When you select “My Provider”, you will be able to view the following screens. You cannot change settings in the Provider menu. These screens are only for reference. Your home care provider may periodically ask you for this information.Icon Text DescriptionDevice Info This screen displays your therapy device information: serial number, model and software version.Provider Contact InfoThis screen will display the contact information for your provider if it has been uploaded to your device.Phone-In This screen displays the total therapy hours for the device, the total blower hours, the total number of days used when the sessions were greater than 4 hours, and a compliance check number used by your home care provider to validate that the data provided by you is the data taken from this screen. Compliance This screen displays your start date, the total number of days used when the sessions were greater than 4 hours, and a check code number used by your home care provider.VIC90 VIC90 This Visual Inspection Check screen will display a check code number created from information gathered over the most recent 90 day period. This 15 digit number will display as: xxx.xxxx.xxxx.xxxx. Your home care provider may periodically ask you for this information.A-TRIAL A-Trial If Auto-Trial mode is available, this screen displays Days: xx/xx (where xx/xx is the number of accumulated trial days / number of selected trial days). Available on the Pro, Auto, BiPAP Pro, and BiPAP Auto models.DRAFT
12User ManualIcon Text Description90% Pressure90% Pressure This screen displays the nightly value of 90% Pressure for the most recent 1 day time frame. It also displays the average of these individual nightly values of 90% Pressure over a 7 day and a 30 day time frame. Available on the Auto model.Upload Allows user to initiate a modem call when an optional Cellular Modem or Wi-Fi Accessory is installed. After the modem upload has finished  the screen will either display a green checkmark with the text “Completed” to indicate a successful upload, or a red X with the text “Failed” to indicate an unsuccessful upload. If the upload fails, initiate an upload a second time, or contact your home care provider if the issue persists. This screen is locked if modem is off.Performance CheckYour device is equipped with a self-diagnostic tool called “Performance Check.” This tool can evaluate your device for certain errors. It also allows you to share key device settings with your home care provider. Use Performance Check when directed to by your home care provider. At conclusion of the scan, the screen displays a green checkmark with the text “Completed Successfully” if no issue is detected. If device displays a red  “X” with the text “Service Required”, please contact your home care provider for assistance.My Setup:When you select “My Setup”, you will be able to view the following screens. You can change the settings in the Setup menu. These screens will only display if they are available and enabled on your device. Icon Text DescriptionRamp This displays the ramp starting pressure. You can increase or decrease the ramp starting pressure in 0.5 cm H2O increments.Flex This allows you to adjust the level of air pressure relief that you feel when you exhale during therapy. Your home care provider can enable or disable this feature. When your provider enables Flex, a level will already be set for you on the device. You can increase or decrease the setting from 1 to 3. The setting of “1” provides a small amount of pressure relief, with higher numbers providing additional relief.Note: If a lock icon   is displayed on this screen, it indicates that your provider has locked this setting and you cannot change it.Humidificatio This displays the Humidification Mode being used. You can choose betweenFixed or Adaptive Humidification. If a heated tube is being used, the device willautomatically switch to Heated Tube Humidification Mode. A “lock” symbol willappear next to the mode setting indicating that so long as the heated tube is attached to the device, this mode cannot be changed. However, the heater plate and tube temperature settings can still be adjusted on the device Therapy screen as normal.DRAFT
13User ManualIcon Text DescriptionMask Type This setting allows you to adjust the level of air pressure relief based on the specific Philips Respironics mask. Each Philips Respironics mask may have a“System One” resistance control setting. Contact your home care provider if you cannot find this resistance setting for your maskNote: If a lock icon   is displayed on this screen, it indicates that your provider has locked this setting and you cannot change it.Tube Type This setting allows you to select the correct size diameter tubing that you are using with the device. You can choose either (22) for the Philips Respironics 22 mm tubing, or (15) for the Philips Respironics 15 mm tubing. When using Heated Tubing, the device will automatically change this setting to the appropriate tubing type (15H) and you will not be able to change it.Note: Tubing is identified on the cuff with the tubing identifier symbol: “15”“22” or “15H”.Note: If a lock icon   is displayed on this screen, it indicates that your provider has locked this setting and you cannot change it.Language This feature allows you to choose which language to display on the interface. You can choose English (EN) or Spanish (ES).Check Mask Fit This feature allows you to check the fit of your mask prior to starting therapy.This is done by measuring the amount of leak. Modem Allows you to turn modem off temporarily or turn it back on. When modem is turned off, it will automatically turn on again after 3 days. Only displays when modem is installed.Bluetooth Allows you to turn Bluetooth off and on. Also, it allows you to clear the pairing with a compatible Bluetooth device.Time Allows you to adjust the time. The default setting is Greenwich Mean Time, but you may adjust the time in 30 minute increments to match your local time zone.Note: This time setting is not displayed as a clock function on the device. It is only used to align your therapy data for your Provider’s data reports.DRAFT
14User ManualBluetooth Wireless TechnologyYour device has Bluetooth wireless technology. You can pair the therapy device to a mobile device that has the DreamMapper app installed. DreamMapper is a mobile and web-based system designed to help Obstructive Sleep Apnea (OSA) patients enhance their sleep therapy experience.Pairing to your Bluetooth enabled Mobile Device   Note: You can only pair your therapy device to one mobile device at any given time.   Note: Pairing works best when your therapy device and mobile device are in the same room.Follow the steps below to manually pair to your mobile phone or tablet.1. To pair to your mobile device, first ensure that the Bluetooth setting is turned ON on your mobile device. Refer to your mobile device’s instruction manual for more information. 2. If you need to select from a list of available Bluetooth devices, the therapy device will appear as “PR BT XXXX” (XXXX will be the last four digits of the serial number listed on your therapy device).3. When your therapy device is powered up but the blower is off, initiate pairing from your mobile device.4. If your mobile device is in range, one of the following two steps will apply:• Your mobile device has Bluetooth Secure Simple Pairing (SSP)  The following icon will pop-up on your therapy device screen with a 6 digit number and “Pair?”:      This number is a six digit passkey generated during SSP. Verify that the six digit SSP passkey is the same on both the mobile device and therapy device. Rotate the Control Dial between “yes” or “no”, and then press the Control Dial to choose. If “no” is selected, or the pop-up screen times out after 30 seconds, the device will reject the pair request. If “yes” is selected, the therapy device will acknowledge the six digit SSP passkey. If the mobile device also acknowledges the request, the two will now be paired and ready to connect using DreamMapper.• Your Bluetooth enabled mobile device does not support Bluetooth SSP  Your mobile device will prompt you to enter a pin code. Enter “1008” on your mobile device. The following icon will pop-up on your therapy device screen with the number “001008” and “Pair?”:      Rotate the Control Dial between “yes” or “no”, and then press the Control Dial to choose. If “no” is selected, or the pop-up screen times out after 30 seconds, the device will reject the pair request. If “yes” is selected, the therapy device will acknowledge the 001008 passkey. If the mobile device also acknowledges the request, the two will now be paired and ready to connect using DreamMapper. Note: Do NOT select “yes” on the pop-up screen unless you are currently trying to pair your devices. This will ensure that only your mobile device connects to your therapy device.DRAFT
15User ManualCheck Mask FitThe optional check mask fit  eature can be enabled or disabled by your home care provider. This feature allows you to check the fit of  our mask prior to starting therapy. This is done by measuring the amount of leak. Put on your mask assembly. Refer to your mask instructions if needed. Navigate to the Check Mask Fit screen under “My Setup” and press the control dial to initiate the check. The device will deliver a test pressure while the screen counts down 40 seconds. A green bar indicates good fit  while a red bar indicates improvement is needed.  After the test, normal therapy will start and the screen will either display a green checkmark or a red “X”. The green checkmark indicates that the leak found allows for optimal performance of the device. The red “X” indicates that the leak may affect device performance, however, the device will remain functional and deliver therapy.   Check Mask Fit ScreenNote: If you choose to try to improve your mask fit  you can stop therapy, adjust the fit of  our mask, and rerun the check mask fit  Please refer to the instructions that came with your mask and headgear for the proper fittingprocedure. Sleep ProgressYour device provides summary information about your therapy use each time the therapy is turned off.  The firstscreen displays your “Three Night Summary.” It shows your nightly usage for the last 3 sleep sessions (measured in 24 hour periods, ending at noon each day). The most recent session is displayed in the right hand bar, labeled with the number of hours slept.  A green bar indicates that you slept more than 4 hours, and a yellow bar indicates less than 4 hours of use.The second screen shows the total number of 4+ hour nights that you have slept in the last 30 days. It provides a goal of sleeping at least 4 hours per night for 70% of the last 30 nights. Therefore the goal is 21 “good nights” of use. This screen provides a simple way to track your progress. The screen will stop displaying when you reach the goal, or after the first 90 d ys of use has passed, whichever comes first    Three Night Summary Screen  Goal Progress ScreenAltitude CompensationThis device automatically compensates for altitude up to 7,500 feet. No manual adjustment is necessary.DRAFT
16User ManualDevice AlertsDevice alerts are pop-ups that show up on the UI screen. There are 5 types of alerts described here:•  Status: These alerts are just the pop-up screen. •  Notication: These alerts consist of the pop-up screen in addition to a blinking Power LED on top of the device.•  Alert 1: These alerts consist of the pop-up screen, a blinking Power LED and an audible beep when displayed. This alert will not occur during therapy.•  Alert 2: These alerts consist of the pop-up screen, a blinking Power LED and an audible beep when displayed. This alert can occur during therapy.•  Safe State: These alerts consist of the pop-up screen, a blinking Power LED and a repeating audible beep.  Note: Status alerts automatically time out after 30 seconds and their pop up screens disappear. All other alerts must be acknowledged to clear.Alert Summary Table: The following table summarizes the alerts.Alert Icon Type Description Possible Cause ActionData Activity: Do not remove SD card.Status SD card read/write underway.n/a No action needed.Change Accepted Status Confirms acceptanceof prescription change or device upgrade.n/a No action needed.EZ-Start Pressure Incremented to xx.xStatus Displays when EZ-Start mode is enabled and device is increasing therapy pressure setting for the next session.n/a No action needed.Oximetry: Good Connection(icon only)Status Displays on the therapy screen when the blower is on and 3 seconds of good connection is detected. Appears at the beginning of therapy. This  screen  will not display again if the fingerprobe is removed and reapplied unless therapy is stopped and restarted.n/a No action needed.Pair?: 123456Yes/NoStatus Prompts to accept or decline pairing to a Bluetooth compatible device.  This device can be identified  y the digits displayed.n/a Rotate control dial to accept pairing (Yes), or decline (No), then press control dial to confirm selectionDRAFT
17User ManualAlert Icon Type Description Possible Cause ActionSD Card Removed.Notificatioor Alert 2Indicates SD card has been removed from therapy device and not reinserted before the start of the current therapy session.SD card was not reinserted into device.Reinsert SD card, or click to clear alert.  Oximetry: Good Study (icon only)Notificatio Notifies that user hasa achieved at least 4 hours of therapy and oximetry use. Appears at the end of therapy.n/a Press Control Dial to acknowledge and clear the message.SD Card Error: Remove and ReinsertNotificatio SD card error detectedDevice cannot read the SD card.  A problem may exist with the SD card or it was ejected during a writing activity, or it was inserted incorrectly.Remove SD card and reinsert.  If alert continues to occur, replace with another card or contact your provider.SD Card Full. Notificatio SD card is full. SD card is full. Remove SD card and replace with a new card, or contact your provider for a new SD card.Patient Message(Refer to section)Notificatio Message from your Provider.n/a Press Control Dial to acknowledge and clear the message.Change Rejected Alert 1 A prescription or settings change was rejected.Change missing or incorrect.Contact your provider.HumidificationError. Contact support if the problem persists.Status Humidifier e ror (only when humidifier ispresent)Humidifier heaterplate error or humidifier notproperly connected to therapy deviceTurn off device and disconnect from power.  Detach the humidifie , visually check that electrical contacts are clear, then reconnect humidifier andpower cord.  If alert continues, contact your provider.DRAFT
18User ManualAlert Icon Type Description Possible Cause ActionHeated Tube  Error. Contact support if the problem persists.Status Heated tube error (only when heated tube is present)Heated tube may be overheated or damaged.Turn off device.  Detach heated tube from humidifie , make sure that tube is not covered or obstructed, and then reattach to humidifie . If alert continues, contact your provider.The attached power supply does not support humidificationAlert 2 Indicates that the attached power supply is not capable of supporting humidification orheated tube.Incorrect power supply.Switch to a Philips Respironics DreamStation power supply that is capable of supporting humidification   Or operate therapy device without humidifie .Service Required Safe State Indicates an error which enters device into “Safe State.”  This allows power to remain on but airfl w is disabled.Device error. Press Control Dial to silence alert.  Disconnect device from power.  Reattach power cord to restore power.  If the alert continues to occur, contact your home care provider.Incorrect Power SupplyNotificatio Indicates an incompatible power supply is attached.Incompatible power supply, or power cord is not fully inserted into device’s power inlet.Confirm p wer cord is fully inserted into device’s power inlet.  Confirm a compatiblePhilips Respironics power supply is attached.  Switch to compatible power supply if needed.Low Voltage Notificatio Low voltage. Incompatible power supply is attached.Confirm a compatiblePhilips Respironics power supply is attached.  Switch to compatible power supply if needed.  If battery is being used, ensure battery is adequately charged.DRAFT
19User ManualAlert Icon Type Description Possible Cause ActionAutomatic Off Status Displayed when therapy ends due to automatic off function.The mask has been removed.Put your mask back on, confirm  ood fit  and turn airfl w on to resume therapy.Inlet blocked. Check filte .Notificatio Blocked airway Blockage at device inlet.Check device air inlet is not obstructed.  Check air filter(s) a e installed properly and are clean; replace if needed.  Low Leak: Check Mask and TubeNotificatio Blocked airway Blockage at tube or mask.Check tube is not crushed or folded such that air fl w is restricted. Check mask is attached properly and without any obstruction.Check Mask Fit n/a Status Displayed when Check Mask Fit function is enabled from Patient Menu.n/a This alert can be cleared by pressing the Control Dial. Otherwise it will time out after 60 seconds.Loading Language and RebootingStatus Displayed when a new language is selected from the menu.n/a No action needed.  Times out when complete.Busy Status Displayed when the device is temporarily inaccessible due to data communication.n/a No action needed.“Sleep Progress” n/a Status Displays last 3 nights hourly use on firstscreen, and nights of use on second screen.n/a Press Control Dial to acknowledge and clear each screen.  Otherwise message times out after 30 seconds.DRAFT
20User ManualTroubleshootingYour device is equipped with a self-diagnostic tool call “Performance Check”. This tool can evaluate your device for certain errors. It also allows you to share key device settings with your Provider. Use Performance Check when directed by your provider.The table below lists some of the problems you may experience with your device and possible solutions to those problems.Problem Why It Happened What To DoNothing happens when you apply power to the device. The backlights on the buttons do not light.There’s no power at the outlet or the device is unplugged.If you are using AC power, check the outlet and verify that the device is properly plugged in. Make sure there is power available at the outlet. Make sure the AC power cord is connected correctly to the power supply and the power supply cord is securely connected to the device’s power inlet. If the problem continues to occur, contact your home care provider. Return both the device and power supply to your provider, so they can determine if the problem is with the device or power supply.If you are using DC power, make sure your DC power cord and battery adaptor cable connections are secure. Check your battery. It may need recharged or replaced. If the problem persists, check the DC cord’s fuse following the instructions supplied with your DC cord. The fuse may need to be replaced. If the problem still occurs, contact your home care provider. The airflow does notturn on.There may be a problem with the blower.Make sure the device is powered correctly. Make sure the Home screen appears on the user interface. Press the Therapy button on top of the device to start airflow.If the airflow does not turn on, there may be a problem with your device. Contactyour home care provider for assistance.The device’s display is erratic.The device has been dropped or mishandled, or the device is in an area with high Electromagnetic Interference (EMI) emissions. Unplug the device. Reapply power to the device. If the problem continues, relocate the device to an area with lower EMI emissions (away from electronic equipment such as cellular phones, cordless phones, computers, TVs, electronic games, hair dryers, etc.). If the problem still occurs, contact your home care provider for assistance.The Ramp feature does not work when you press the Ramp button.Your home care provider did not prescribe Ramp for you, or your therapy pressure is already set to the minimum setting.If Ramp has not been prescribed for you, discuss this feature with your home care provider to see if they will change your prescription. If your provider has enabled Ramp, but the feature still does not work, check the current pressure setting on the Therapy screen. If the therapy pressure is set to the minimum setting (4.0 cm H2O), or the Ramp starting pressure is the same as the therapy pressure, the Ramp feature will not work. Make sure that the ramp time setting is >0.The airflow ismuch warmer than usual. The air filters maybe dirty. The device may be operating in direct sunlight or near a heater. Clean or replace the air filtersThe temperature of the air may vary somewhat based on your room temperature. Make sure that the device is properly ventilated. Keep the device away from bedding or curtains that could block the flow of air around the device. Make surethe device is away from direct sunlight and heating equipment.If using the humidifier with the device, check the humidifier settings. Refer to thhumidifier instructions to make sure the humidifier is working properlIf the problem continues, contact your home care provider.The airflow pressurefeels too high or too low.The Tubing type setting may be incorrect.Make sure the Tubing type setting (22 or 15) matches the tubing that you are using (Philips Respironics 22 or 15 mm tubing).If you are using the Heated Tubing, this setting will be 15H and you cannot change it.DRAFT
21User ManualProblem Why It Happened What To DoTube Temperature is turned on in “Setup” screen but Heated Tubing is not warm.Incorrect power supply is being used.Make sure the 80W power supply is being used or a compatible battery or DC cable is being used.I’m having difficultyadjusting the heated humidifier settingor the heated tube temperature setting.The blower is not turned on, or the humidifier orheated tube is not fully connected.The humidifier setting and tube temperature settings can only be adjusted from theTherapy ON display screen. Confirm that the blower is turned on, and that thesettings are visible on the right side of the screen, then adjust to desired comfort. If the blower is on but the humidifier settings are not displayed on the Therapy ONscreen, then unplug the device. Confirm that the humidifier and/or heated tubelectrical contacts are not obstructed or damaged. Then reconnect the humidifierand/or heated tube, and reconnect the device’s power supply. Turn the blower on; if the settings are still not visible, contact your provider for assistance.The water in the water chamber runs out before morning.Water chamber was not full at start of session. Mask leak is excessively high.  The ambient conditions are very dry/cool.Under most conditions, a full water chamber should last for a typical sleep session. However, many factors impact water consumption, including: the ambient temperature and humidity in your bedroom, your humidifier or heated tubesettings, the level of mask leak, and the duration of your sleep session. First, make sure that the water chamber is filled to the maximum fill line at the starof your sleep session. Check that your mask is fitted properly, and adjust as neededto reduce mask leak to normal levels. You may use the Check Mask Fit function to evaluate your mask t. Also, conrm that the device, humidier, humidier seals and tube are connected properly and not leaking. You may also choose to lower your humidifier and/or heated tube settings or change the humidificatiomode from Fixed to Adaptive humidification mode to increase the time that yourhumidifier water will lastI hear a leak or whistling sound coming from my therapy device or humidifier (notrelated to mask leak).The therapy device air inlet may be obstructed. The humidifier ortube is not fully connected. The humidifier seals arenot fully seated or are missing.Check therapy device air inlet is not obstructed, and filters are clean and properlyinserted. Confirm that the device, humidifier, and tube are connected properly annot leaking. Confirm that the humidifier lid seal and dry box seal are present anproperly seated; if needed, gently press around the perimeter of the seals to reseat them.I accidentally spilled water into my humidifier basinThe water chamber has been filled beyond themaximum fill lineA small amount of water spilled in the basin of the humidifier will not harm yourdevice. A small spill in the humidifier will evaporate under normal humidifier useHowever, too much water in the humidifier basin could spill over the humidifier lihinge and might damage your furniture. Disconnect power from the device. Remove the water chamber, pour out any excess water until the water level is at or below the maximum fill line and set thechamber aside. Separate the humidifier from the therapy device, and pour out thespilled water. Once the heater plate has cooled, wipe the inside of the humidifierwith a paper towel or soft cloth. If needed, dry the underside of the humidifier andconfirm that your table top is dry. Reconnect the humidifier and power supply, anreinstall the water chamber.DRAFT
22User ManualAccessoriesThere are several accessories available for your DreamStation system such as a Humidifier  Cellular Modem, Wi-Fi Accessory or a Link Module. Contact your home care provider for additional information on the available accessories. When using optional accessories, always follow the instructions enclosed with the accessories.  Caution: Pins of connectors should not be touched. Connections should not be made to these connectors unless ESD precautionary procedures are used. Precautionary procedures include methods to prevent build-up of electrostatic charge (e.g., air conditioning, humidification, conductive floor coverings, non-synthetic clothing)discharging one’s body to the frame of the equipment or system or to earth or a large metal object, and bonding oneself by means of a wrist strap to the equipment or system or to earth.Adding a Humidier with or without Heated TubingYou can use the heated humidifier and the heated tube with your device. They are available from your home careprovider.  A humidifier may reduce nasal dryness and irritation by adding moisture to the airflow Warning: For safe operation, the humidifier must always be positioned below the breathing circuit connectionat the mask. The humidifier must be level for proper operationNote: Refer to the humidifier’s instructions for complete setup informationUsing the SD CardThe DreamStation system comes with an SD card inserted in the SD card slot on the side of the device to record information for the home care provider. Your home care provider may ask you to periodically remove the SD card and send it to them for evaluation.Using the DreamStation Link ModuleThe Link Module is able to receive oximetry data and transfer it to the therapy device for home use or in a laboratory setting. For use in a laboratory setting, the Link Module also includes an RS-232 (or “DB9”) port to allow remote control of the DreamStation Sleep Therapy Device by a personal computer.  Note: Please consult the instructions that accompany the Link Module for installation and removal. Note: There are no SpO2 alarms available. Note: Oximetry data is not displayed.To clean the module, remove the module from the therapy device. Wipe the outside of the device with a cloth slightly dampened with water and a mild detergent. Let the device dry completely before reinstalling into the therapy device.Dispose of the module following the same disposal instructions for your therapy device.Warnings:•  If you notice any unexplained changes in the performance of this device, if it has been dropped or mishandled, if water is spilled into the enclosure, or if the enclosure is broken, discontinue use. Contact your home care provider.•  Repairs and adjustments must be performed by Philips Respironics-authorized service personnel only. Unauthorized service could cause injury, invalidate the warranty, or result in costly damage.•  Do not use any accessories, detachable parts, and materials not recommended by Philips Respironics. Incompatible parts or accessories can result in degraded performance.DRAFT
23User ManualAdding Supplemental OxygenOxygen can be added to the patient circuit. Please note the warnings listed below when using oxygen with the device.Warnings:•  When using oxygen with this system, the oxygen supply must comply with local regulations for medical oxygen.•  Oxygen supports combustion. Oxygen should not be used while smoking or in the presence of an open flame•  When using oxygen with this system, a Philips Respironics Pressure Valve must be placed in-line with the patient circuit between the device and the oxygen source. The pressure valve helps prevent the backfl w of oxygen from the patient circuit into the device when the unit is off. Failure to use the pressure valve could result in a fi e hazard. Note: Refer to the pressure valve’s instructions for complete setup information.•  When using oxygen with this system, turn the device on before turning on the oxygen. Turn the oxygen off before turning the device off. This will prevent oxygen accumulation in the device.•  Do not connect the device to an unregulated or high pressure oxygen source.Supplying DC Power to the DeviceA Philips Respironics DC power cord can be used to operate this device in a stationary recreational vehicle, boat, or motor home. In addition, a Philips Respironics DC battery adapter cable, when used with a DC power cord, allows the device to be operated from a 12 VDC free-standing battery. Caution: Always ensure that the DC power cord securely fits into your therapy device prior to use. Contactyour home care provider or Philips Respironics to determine if you have the appropriate DC cord for your specific therapy deviceCaution: When DC power is obtained from a vehicle battery, the device should not be used while the vehicle’s engine is running. Damage to the device may occur.Caution: Only use a Philips Respironics DC Power Cord and Battery Adapter Cable. Use of any other system may cause damage to the device.Refer to the instructions supplied with the DC power cord and adapter cable for information on how to operate the device using DC power.Traveling with the SystemWhen traveling, the carrying case is for carry-on luggage only. The carrying case will not protect the system if it is put through checked baggage. If traveling with the optional humidifie , do not travel with water in the water tank.For your convenience at security stations, there is a note on the bottom of the device stating that it is medical equipment and is suitable for airline use. It may be helpful to bring this manual along with you to help security personnel understand the DreamStation device.If you are traveling to a country with a line voltage different than the one you are currently using, a different power cord or an international plug adaptor may be required to make your power cord compatible with the power outlets of the country to which you are traveling. Contact your home care provider for additional information.Airline TravelThe device is suitable for use on airlines when the device is operating from an AC or DC power source. Note: It is not suitable for airline use with any of the modems or humidifiers installed in the unitDRAFT
24User ManualCleaning the DeviceWarning: To avoid electrical shock, always unplug the power cord from the wall outlet before cleaning the device. DO NOT immerse the device in any fluids1. Unplug the device, and wipe the outside of the device with a cloth slightly dampened with water and a milddetergent. Let the device dry completely before plugging in the power cord.2. Inspect the device and all circuit parts for damage after cleaning. Replace any damaged parts.Cleaning or Replacing the FiltersUnder normal usage, you should clean the reusable blue pollen filter at least once every two weeks and replace itwith a new one every six months. The light-blue ultra-fine filter is disposable and should be replaced after 30 nights ouse or sooner if it appears dirty. DO NOT clean the ultra-fine filte Caution: Dirty inlet filters may cause high operating temperatures that may affect device performance. Regularlyexamine the inlet filters as needed for integrity and cleanlinessThis device has an automatic air filter  eminder. Every 30 days, the device will display a message reminding you to check your filters and  eplace them as directed.Note: This message is a reminder only.  The device does not detect the performance of the filters nor does itrecognize when a filter has been cleaned or  eplaced.1. If the device is operating, stop the airflow. Disconnect the device from the power source2. Remove the filter(s) from the device. Refer to the “Installing/Replacing the Air Filters” section of this manual3. Examine the filter(s) for cleanliness and integrity4. To clean the reusable blue pollen filter, first detach the light-blue ultra-fine filter  pplicable, and set aside ordispose of as needed. Then take the reusable filter to the sink, turn it upside down, and run warm tap watethrough the white filter media to rinse away any debris. Next, lightly shake the filter to remove as much water possible. Allow the filter to air dry completely before reinstalling it. If the  eusable blue pollen filter is torn, replacit. (Only Philips Respironics-supplied filters should be used as replacement filters5. If the light-blue ultra-fine filter is dirty or torn, replace i6. Reinstall the filters. Refer to the “Installing/Replacing the Air Filters” section of this manualCaution: Never install a wet filter into the device. You must ensure sufficient drying time for the cleaned filtCleaning the TubingClean the flexible tubing before first use and daily. Disconnec the flexible tubing from the device. For th  15 or 22 mm flexible tubing, gently wash the tubing in a soluti n of warm water and a mild detergent. Rinse thoroughly. Air dry. Inspect the tubing for damage or wear. Discard and replace if necessary.Note: Refer to the humidifier manual for the instructions on how to clean the heated tubeServiceThe device does not require routine servicing.  Warning: If you notice any unexplained changes in the performance of this device, if it is making unusual or harsh sounds, if it has been dropped or mishandled, if water is spilled into the enclosure, or if the enclosure is broken, disconnect the power cord and discontinue use. Contact your home care provider.DRAFT
25User ManualAdditional NoticesNotice: The Bluetooth® word mark and logos are registered trademarks owned by Bluetooth SIG, Inc. and any use of such marks by Philips Respironics is under license. Other trademarks and trade names are those of their respective owners. Notice:  The DreamStation Therapy Device transmits data between the therapy device and a mobile device, but it does not store any of your personal data. This connection between the therapy device and a mobile device is encrypted.This device contains a FCC certified Bluetooth radio module (located on the main board).Notice:  Use of non-original manufacturer-approved accessories may violate your local RF exposure guidelines and should be avoided.Notice:  This device complies with part 15 of the FCC Rules. Operation is subject to the following two conditions: (1) This device may not cause harmful interference, and (2) this device must accept any interference received, including interference that may cause undesired operation.This equipment has been tested and found to comply with the limits for a Class B digital device, pursuant to Part 15 of the FCC Rules. These limits are designed to provide reasonable protection against harmful interference in a residential installation. This equipment generates, uses, and can radiate radio frequency energy and, if not installed and used in accordance with the instructions, may cause harmful interference to radio communications. However, there is no guarantee that interference will not occur in a particular installation. If this equipment does cause harmful interference to radio, TV reception, or other devices which can be determined by turning the equipment on and off, the user is encouraged to try to correct the interference by one or more of the following measures:• Reorient or relocate the receiving antenna (on the radio, TV, or other device).• Increase the separation between the equipment and receiver.• Connect the equipment into an outlet on a circuit different from that to which the receiver isconnected.• Consult the dealer of the device for help.Any changes or modifications made to the device that are not expressly approved by Respironics may void the user’s authority to operate the equipment.Notice: Only  the  co-location  of  this  Bluetooth  radio  with  the  radio  transceivers  of  the  Dream Station Wi-Fi and Cellular Modem Accessory has been FCC approved and is permitted.For compliance with FCC RF exposure guidelines a minimum distance of 20cm between the Wi-Fi or the Cellular Modem Accessory and the users body should be maintained during operation of one of those accessories together with the Dream Station.Notice: Notice: THO1116426 is the FCC ID of the FCC certified Bluetooth module contained in this device.Notice: FCC ID: THO1116426DRAFT
26User ManualSpecications  EnvironmentalOperating Temperature:  5° to 35° C (41° to 95° F)Storage Temperature:  -20° to 60° C (-4° to 140° F)Relative Humidity (operating & storage):  15 to 95% (non-condensing)Atmospheric Pressure:  101 to 77 kPa (0 - 2286 m / 0 - 7500 ft)  PhysicalDimensions:  15.7 x 19.3 x 8.4 cm (6.2” L x 7.6” W x 3.3” H)Weight (Device with power supply):  Approximately 1.33 kg (2.94 lbs)  Service LifeThe expected service life of the DreamStation Therapy Device and Link Module is 5 years.  Standards Compliance This device is designed to conform to the following standards:IEC 60601-1 General Requirements for Basic Safety and Essential Performance of Medical Electrical EquipmentISO 80601-2-70 Sleep Apnea Breathing Therapy EquipmentEN 60601-1-2 Electromagnetic CompatibilityRTCA/DO-160G section 21, category M; Emission of Radio Frequency Energy  IEC 60601-1 ClassicationType of Protection Against Electric Shock: Class II EquipmentDegree of Protection Against Electric Shock: Type BF Applied PartDegree of Protection against Ingress of Water:Device:  Drip Proof, IP22Link Module:  Drip Proof, IP2280W power supply:  Drip Proof, IP22Mode of Operation: Continuous  ElectricalAC Power Consumption (with 80W power supply):  100 – 240 VAC, 50/60 Hz, 2.0-1.0 ANote: Power supply is part of the medical electrical equipment.DC Power Consumption:  12 VDC, 6.67 AFuses:  There are no user-replaceable fuses.  Radio SpecicationsOperating Frequency Range:  2402 - 2480 MHzMaximum Output Power:  4.0 dBmModulation:    GFSK, P/4 DQPSK, 8DQPSK  Intake Port FiltersPollen Filter:  100% Polyester88% Efficient @ 7-10 mic on sizeUltra-fine Filte :  Blended Synthetic Fiber95% Efficient @ 0.5-0.7 mic on size  Declared Dual-Number Noise Emissions Values In accordance with ISO 4871The A-weighted sound pressure level is:Device:  25.8 dB(A) with and uncertainty of 2 dB(A).Device with Humidifie :  27.9 dB(A) with and uncertainty of 2 dB(A).The A-weighted sound power level is:Device:  33.8 dB(A) with an uncertainty of 2 dB(A).Device with Humidifie :  35.9 dB(A) with an uncertainty of 2 dB(A).Note: Values determined according to noise test code given in ISO 80601-2-70:2015, using the basic standards ISO 3744 and ISO 4871.DRAFT
27User Manual  Pressure AccuracyPressure Increments:  4.0 to 20.0 cm H2O (in 0.5 cm H2O increments)Maximum static pressure accuracy, according to ISO 80601-2-70:2015: Pressure Static Accuracy10 cm H2O± 0.5 cm H2OStatic pressure accuracy has a measurement uncertainty of 1.20%Maximum dynamic pressure variation, according to ISO 80601-2-70:2015: Pressure 10 BPM 15 BPM 20 BPM< 10 cm H2O± 0.3 cm H2O ± 0.4 cm H2O ± 0.6 cm H2O≥ 10.0 to 20 cm H2O± 0.4 cm H2O ± 0.7 cm H2O ± 0.9 cm H2ODynamic pressure accuracy has a measurement uncertainty of 2.10%Note: All tests were performed with and without humidifier and with both 22 mm standa d tube and 15 mm heated tube.  Maximum Flow Rate (typical)Test pressures (cm H2O)4.0 8.0 12.0 16.0 20.022 mm tubingMeasured pressure at the patient connection port (cm H2O)2.4 6.8 10.8 14.7 18.6Average ow at the patient connection port (l/min)137.0 151.0 150.0 160.0 170.015 mm tubing (heated or non-heated)Measured pressure at the patient connection port (cm H2O)2.9 6.8 10.8 14.7 18.7Average ow at the patient connection port (l/min)139.0 139.0 139.0 146.0 151.0DisposalSeparate collection for electrical and electronic equipment per EC Directive 2012/19/EU. Dispose of this device in accordance with local regulations.EMC InformationYour unit has been designed to meet EMC standards throughout its Service Life without additional maintenance. There is always an opportunity to relocate your DreamStation Therapy Device within an environment that contains other devices with their own unknown EMC behavior. If you believe your unit is affected by locating it closer to another device, simply separate the devices to remove the condition.Pressure and Flow AccuracyThe DreamStation Therapy Device is designed to perform within the pressure and fl wrate accuracies specified in the user ma ual. If you suspect that the pressure and/or fl w rate accuracy is affected by EMC interference remove power and relocate the device to another area. If performance continues to be affected discontinue use and contact your home care provider.SpO2 and Pulse Rate AccuracyThe DreamStation Therapy Device is designed to capture the SpO2 and Pulse Rate oximetry data within the accuracy specificationdescribed in the sensor manufacture’s instructions for use. When 4 hours of successful oximetry data have been achieved the device indicates this to the user by displaying “Oximetry: Good Study”. If you suspect that your unit is affected by EMC interference remove power and relocate the device to another area. If performance continues to be affected discontinue use and contact your home care provider.DRAFT
28User ManualGuidance and Manufacturer’s Declaration - Electromagnetic Emissions – This device is intended for use in the electromagnetic environment specified below. The user of this device should make sure it is used in such an environmentEmissions Test Compliance Electromagnetic Environment - GuidanceRF emissionsCISPR 11Group 1 The device uses RF energy only for its internal function. Therefore, its RF emissions are very low and are not likely to cause any interference in nearby electronic equipment.RF emissionsCISPR 11Class B The device is suitable for use in all establishments, including domestic establishments and those directly connected to the public low-voltage power supply network.Harmonic emissionsIEC 61000-3-2Class AVoltage fluctuations/Flicker emissionIEC 61000-3-3CompliesEmission of Radio Frequency EnergyRTCA/DO-160G Section 21Category M This device is suitable for use onboard commercial airplanes inside passenger cabin.Guidance and Manufacturer’s Declaration - Electromagnetic Immunity – This device is intended for use in the electromagnetic environment specified below. The user of this device should make sure it is used in such an environmentImmunity Test IEC 60601 Test Level Compliance Level Electromagnetic Environment - GuidanceElectrostatic Discharge (ESD)IEC 61000-4-2±8 kV contact±15 kV air±8 kV contact±15 kV airFloors should be wood, concrete or ceramic tile. If floors are covered with synthetic material, therelative humidity should be at least 30%.Electrical fast Transient/burstIEC 61000-4-4±2 kV for power supply lines±1 kV for input-output lines±2 kV for supply mains±1 kV for input/output linesMains power quality should be that of a typical home or hospital environment.SurgeIEC 61000-4-5±1 kV differential mode±2 kV common mode±1 kV differential mode±2 kV for common modeMains power quality should be that of a typical home or hospital environment.Voltage dips, short interruptions and voltage variations on power supply input linesIEC 61000-4-11<5% UT (>95% dip in UT) for 0.5 cycle at 45 degree increments70% UT (30% dip in UT) for 0.5 seconds <5% UT (>95% dip in UT) for 5 seconds<5% UT (>95% dip in UT) for 0.5 cycle at 45 degree increments70% UT (30% dip in UT) for 0.5 seconds<5% UT (>95% dip in UT) for 5 secondsMains power quality should be that of a typical home or hospital environment. If the user of the device requires continued operation during power mains interruptions, it is recommended that the device be powered from an uninterruptible power supply or a battery.Power frequency (50/60 Hz) magnetic fielIEC 61000-4-830 A/m 30 A/m Power frequency magnetic fields should be atlevels characteristic of a typical location in a typical hospital or home environment.NOTE: UT is the a.c. mains voltage prior to application of the test level.Guidance and Manufacturer’s Declaration - Electromagnetic Immunity – This device is intended for use in the electromagnetic environment specified below. The user of this device should make sure it is used in such an environmentImmunity Test IEC 60601 Test Level Compliance Level Electromagnetic Environment - GuidanceConducted RFIEC 61000-4-6Radiated RFIEC 61000-4-33 Vrms150 kHz to 80 MHz6 VrmsAmateur Radio & ISM Bands between 150 kHz and 80 MHz10 V/m80 MHz to 2.7 GHz3 Vrms150 kHz to 80 MHz6 VrmsAmateur Radio & ISM Bands between 150 kHz and 80 MHz10 V/mPortable and mobile RF communications equipment should be used no closer to any part of the device, including cables, than the recommended 30 cm separation distance.Interference may occur in the vicinity of equipment marked with the following symbol:   DRAFT
Limited WarrantyRespironics, Inc. warrants that the system shall be free from defects of workmanship and materials and will perform in accordance with the product specifications for a period of two (2) years from the date of sale by Respironics  Inc. to the dealer. If the product fails to perform in accordance with the product specifications, Respironics  Inc. will repair or replace – at its option – the defective material or part. Respironics, Inc. will pay customary freight charges from Respironics, Inc. to the dealer location only. This warranty does not cover damage caused by accident, misuse, abuse, alteration, water ingress, and other defects not related to material or workmanship. The Respironics, Inc. Service department shall examine any devices returned for service, and Respironics, Inc. reserves the right to charge an evaluation fee for any returned device as to which no problem is found after investigation by Respironics, Inc. Service.This warranty is non-transferable by unauthorized distributors of Respironics, Inc. products and Respironics, Inc. reserves the right to charge dealers for warranty service of failed product not purchased directly from Respironics, Inc. or authorized distributors.Respironics, Inc. disclaims all liability for economic loss, loss of profits, overhead, or consequential damages whichmay be claimed to arise from any sale or use of this product. Some states do not allow the exclusion or limitation of incidental or consequential damages, so the above limitation or exclusion may not apply to you.This warranty is given in lieu of all other express warranties. In addition, any implied warranties – including any warranty of merchantability or fitness for the particular purpose – are limited to two years. Some states do not allowlimitations on how long an implied warranty lasts, so the above limitation may not apply to you. This warranty gives you specific legal rights, and you may also have other rights which vary from state to stateTo exercise your rights under this warranty, contact your local authorized Respironics, Inc. dealer or contact Respironics, Inc. at:1001 Murry Ridge LaneMurrysville, Pennsylvania 15668-85501-724-387-4000DRAFT
11208301120830 R03JJB 06/10/2015  EN-DOMDRAFT

Navigation menu