Restorative Therapies RT300-S Custom Controller w/Ipaq hx2100 PDA & Daughter PCB User Manual LB100108 RT300
Restorative Therapies Inc Custom Controller w/Ipaq hx2100 PDA & Daughter PCB LB100108 RT300
Contents
- 1. Users Manual 1 of 2
- 2. Users Manual 2 of 2
Users Manual 1 of 2

RT300-STM system
User Guide
Blank

RT300-S System
User Guide
Caution:
Federal law restricts this device to sale by or on the order of a
practitioner licensed by the law of the State in which he/she practices
to use or order the use of the device.
Part Number: LB100108 RV100608 Issue 7
[June 2005]
Restorative Therapies Inc
2363 Boston St
Baltimore, MD 21224
USA
Telephone: 1-800-609-9166
Fax: 1-410-534-6263
www.restorative-therapies.com
Copyright
2005 Restorative Therapies Inc
All rights reserved. No part of this document covered by the copyright herein may be reproduced or copied by any
means or in any form without the written consent of Restorative Therapies Inc. Any software furnished under the
license may be used or copied only in accordance with the terms set forth in the license agreement contract.
Restorative Therapies Inc reserves the right to amend, modify, or revise all or part of this document without notice and
shall not be responsible for any loss, cost, or damage, including but not limited to consequential damage, caused by
the reliance of the information contained herein.
Restorative Therapies Inc reserves the right to make changes in the product design without reservation and without
notification to its users.
All other products and company names herein may be trademarks of their respective owners.

Contents
2005 Restorative Therapies Inc RT300-S User Manual • iii
Contents
Introduction ...................................................................................................................5
About this Guide ...................................................................................................................... 5
What You Need to Know Before You Start ........................................................................... 5
Indications for Use................................................................................................................... 5
Contraindication....................................................................................................................... 5
Warnings, Precautions and Safety Measures...............................................................6
Warnings................................................................................................................................. 6
Precautions ............................................................................................................................. 6
Adverse Reactions................................................................................................................... 7
Safety Measures...................................................................................................................... 8
Electrical Safety .................................................................................................................. 8
Environment........................................................................................................................ 8
Parts and Operation ............................................................................................................ 8
Electrostatic Discharge........................................................................................................ 9
Electromagnetic Interference ............................................................................................... 9
RTI Technical Support ........................................................................................................... 11
Terms used in this guide ........................................................................................................ 11
RT300-S System ..........................................................................................................12
What is the RT300-S System used for? .................................................................................. 12
Parts of the RT300-S System .................................................................................................12
Surface Electrodes ............................................................................................................ 13
Setting Up the Equipment ...........................................................................................14
RT300-S System Overview .................................................................................................... 14
RT300-S System Overview .................................................................................................... 15
Standard RT300-S Equipment ........................................................................................... 15
Optional RT300-S Equipment ............................................................................................ 16
RT300-SP Ergometer for Pediatrics ................................................................................... 16
Assembling the RT300-S ....................................................................................................... 17
Checking the Parts............................................................................................................ 17
Fitting the safety handle mount and extension.................................................................... 17
Fitting the safety handle..................................................................................................... 18
Fitting the controller / stimulator ......................................................................................... 19
Adjusting the pedal crank radius ........................................................................................ 20
Adjusting pediatric pedals.................................................................................................. 21
Base of support................................................................................................................. 24
Fitting the wheelchair restraints.......................................................................................... 24
Connecting the Power ....................................................................................................... 24
Fitting the equipment ..................................................................................................26
Using Surface Electrodes....................................................................................................... 26
Surface Electrode Placement Precautions.......................................................................... 26
Caring for Surface Electrodes............................................................................................ 26
Fitting the Surface Electrodes.................................................................................................27
Where to Place Surface Electrodes.................................................................................... 28
Connecting the surface electrodes to the ergometer................................................................ 29
Stimulation Cable Set............................................................................................................. 29
Connecting the Surface Electrodes .................................................................................... 30
Using the RT300-S System..........................................................................................31
Initial setup ............................................................................................................................ 31
Calibrate the touch screen .................................................................................................31
Set the time and date ........................................................................................................ 32
Positioning on the Ergometer .................................................................................................33
Setting the distance........................................................................................................... 33
Using the Calf Rests and Footrests.................................................................................... 33
Using the wheelchair restraints .......................................................................................... 34

Contents
iv • RT300-S User Manual 2005 Restorative Therapies Inc
Using the Controller................................................................................................................35
Therapy Sessions...................................................................................................................37
How the therapy session progresses ..................................................................................37
Inbuilt Safety Measures......................................................................................................37
Handling Muscle Spasm.....................................................................................................38
Starting and Stopping a Therapy Session...........................................................................38
Data display graph.............................................................................................................40
Adjusting stimulation parameters........................................................................................41
Troubleshooting ..........................................................................................................44
Resetting the Controller..........................................................................................................44
Care of the RT300-S System .......................................................................................45
Cleaning and Maintenance .....................................................................................................45
Storing the RT300-S...............................................................................................................45
Moving the RT300-S System ..................................................................................................45
Shipping Instructions..................................................................................................46
Symbols .......................................................................................................................46
Technical Specifications .............................................................................................47
RT300-S Ergometer Limited Warranty (USA)...............................................48
Limited Warranty, Terms and Conditions ........................................................................48
A. Introduction ...............................................................................................................48
B. Enquiries and Warranty Service ..............................................................................48
C. Your Warranties and Rights .....................................................................................48
D. Warranty limitations .................................................................................................49
E. Restrictions on product use......................................................................................49
F. Keywords ....................................................................................................................49

Introduction
2005 Restorative Therapies Inc RT300-S User Guide • 5
Introduction
About this Guide
This guide explains how to use the RT300-S System in your own home. It contains information about
how to:
• apply proper safety measures when you use the system
• set up and use the equipment
• fix any basic problems that may occur
What You Need to Know Before You Start
Before you start using the RT300-S System:
• read this guide – in particular, check the Indications for Use, Contraindication, and Warnings,
Precautions and Safety Measures sections of this guide
• talk to your clinician who will provide training to help you get started and explain how the Warnings,
Precautions and Safety Measures relate to you.
Indications for Use
The RT300-S is indicated for:
1. Relaxation of muscle spasms
2. Prevention or retardation of disuse atrophy
3. Increasing local blood circulation
4. Maintaining or increasing range of motion
Powered muscle stimulators should only be used under medical supervision for adjunctive therapy for the
treatment of medical diseases and conditions.
Contraindication
Powered muscle stimulators should not be used on patients with other implanted devices (including
cardiac demand pacemakers or electronic baclofen pumps).

Warnings, Precautions and Safety Measures
6 • RT300-S User Manual 2005 Restorative Therapies Inc
Warnings, Precautions and Safety Measures
Read this section carefully so you understand how to use the RT300-S System safely.
Before you start using the RT300-S System, talk to your clinician about the information in this chapter.
The RT300-S generates currents sufficient to cause electrocution if
used improperly.
Warnings
If the patient’s blood pressure or heart rate reaches a level that the clinician considers to be a compromise to
safety, or if the patient feels faint or nauseated, the session should be stopped immediately and appropriate
medical action should be taken. If the patient begins to feel light-headed or nauseated, stop the treatment
immediately.
1. Some medical conditions can be aggravated by physical activity. If symptoms of a medical condition
occur during or after a therapy session, consult your clinician immediately.
2. If directed by the clinician, the patient’s blood pressure and heart rate should be monitored during
the therapy session.
3. The long-term effects of chronic electrical stimulation are unknown.
4. The long term effects of electrical stimulation on a pregnant individual (mother and baby) are
unknown.
5. Stimulation should not be applied over the carotid sinus nerves, particularly in patients with a known
sensitivity to the carotid sinus reflex.
6. Stimulation should not be applied over the neck or mouth. Severe spasm of the laryngeal and
pharyngeal muscles may occur and the contractions may be strong enough to close the airway or
cause difficulty in breathing.
7. Stimulation should not be applied trans-thoracically (across the upper body) in that the introduction
of electrical current into the heart may cause cardiac arrhythmias.
8. Stimulation should not be applied trans-cerebrally (to the head).
9. Stimulation should not be applied over swollen, infected, or inflamed areas or skin eruptions, e.g.
phlebitis, thrombophlebitis, varicose veins, etc.
10. Stimulation should not be applied over, or in proximity to, cancerous lesions.
Precautions
1. Safety of powered muscle stimulators for use during pregnancy has not been established.
2. Caution should be used for patients with suspected or diagnosed heart problems.
3. Caution should be used for patients with suspected or diagnosed epilepsy.
4. Caution should be used in the presence of the following:
a. when there is a tendency to hemorrhage following acute trauma or fracture;

Warnings, Precautions and Safety Measures
2005 Restorative Therapies Inc RT300-S User Guide • 7
b. following recent surgical procedures when muscle contraction may disrupt the healing process;
c. over the menstruating or pregnant uterus;
d. history of uncontrolled autonomic dysreflexia;
e. history of lower limb stress fractures and
f. history of severe spasticity or spastic response to application of electrical stimulation.
5. Some patients may experience skin irritation or hypersensitivity due to the electrical stimulation or
electrical conductive medium (gel). The irritation can usually be reduced by using a sensitive skin
electrode or an alternative electrode placement.
6. Some patients may be prone to thermal dysregulation. Episodes of thermal dysregulation are usually
less pronounced when exercising in an environment controlled for temperature and humidity.
Attention should be paid to hydration and limiting the duration and intensity of exercise in
intemperate environments.
7. Electrode placement and stimulation settings should be based on the guidance of the prescribing
practitioner.
8. Powered muscle stimulators should be kept out of the reach of children. Children should only use this
device under adult supervision. Never leave the RT300-S unattended when children are present.
9. Powered muscle stimulators should be used only with the leads and electrodes recommended for use
by the manufacturer.
Adverse Reactions
Autonomic Dysreflexia
Individuals with a spinal cord injury at or above the T6 level are prone to episodes of autonomic
dysreflexia. These episodes may be triggered by electrical stimulation. If you have a spinal cord injury, it
is important that you discuss this with your clinician and understand how autonomic dysreflexia may
impact you:
Ø know how to recognize the signs of autonomic dysreflexia
Ø know how to react if it occurs, including stopping electrical stimulation
To reduce the chances of experiencing autonomic dysreflexia the following precautions should be
followed:
Ø Empty bladder and bowels before commencing a therapy session with the RT300-S.
Ø Do NOT use the RT300-S if you have a bladder infection or fever.
IMPORTANT NOTE: Care in noting any symptoms of Autonomic Dysreflexia should be taken during every
therapy session. Autonomic Dysreflexia could occur during any session even if you have not
experienced it recently or in prior therapy sessions.
IMPORTANT NOTE TO PARENTS: The most common signs of dysreflexia in children include headache,
dizziness, blurred vision, redness of the face, neck, and/or ears, and feeling hot. Sometimes individuals
will also report goose bumps, an upset stomach, or tingling feelings. Consult your child’s physician for
more information on how to recognize these symptoms.
If any of these symptoms occur stop the therapy session immediately.

Warnings, Precautions and Safety Measures
8 • RT300-S User Manual 2005 Restorative Therapies Inc
Skin irritation and burns
Skin irritation and burns beneath the electrodes have been reported with the use of powered muscle
stimulators.
Safety Measures
Electrical Safety
• Avoid flammable anesthetics: Never use the equipment where there is a flammable anesthetic
mixture containing air, oxygen or nitrous oxide.
• Connecting the system: Connect the system parts only in the way described in this guide. Do not
try to connect or disconnect any parts while the system is turned on.
• Other equipment: Do not use the system with any equipment not supplied by Restorative Therapies
Inc as doing so could affect the electrical safety of the system.
• System parts: The system contains complex electronic parts. The casings must not be opened by
anyone other than qualified service personnel or the warranty will no longer apply. Also, if you
attempt to make repairs yourself, you might be seriously injured.
Environment
• Use a stable surface: Position the motorized ergometer on an even, anti-slip surface so the
equipment is stable and does not move during use.
• Use an anti-slip device: As an added precaution, you may wish to use an anti-slip device (e.g.
mat, etc) to make sure your wheelchair does not slip backwards during very active therapy.
• Avoid wet areas: Never use the RT300-S Cycle Ergometer in wet or damp areas.
• Avoid heat sources: Place the RT300-S Cycle Ergometer equipment away from heat sources such
as radiators, stoves, etc, or other objects that produce heat.
• Arrange the power cord carefully: Arrange the power cord so it will not be walked or tripped on,
or damaged by objects being placed on it.
• Use the correct line voltage: Make sure you connect the RT300-S Cycle Ergometer to a grounded
(earthed) power outlet that uses the voltage shown on the product label.
• Follow extension cord ratings: If you plan to use an extension cord, make sure the plug has three
pins (i.e. the plug includes a third, protective earth pin).
Parts and Operation
• Isolation from supply mains: The RT300-S Cycle Ergometer can be disconnected from the mains
power supply by disconnecting the power supply cord from the RT300-S
• Do not use the controller for other purposes: Do not use the controller for any other purposes –
for example, to store documents or images as it may alter how the controller works.
• Do not use other controllers: Do not use another person’s controller as each controller is
specifically programmed to suit an individual’s requirements. Using another person’s controller may
lead to incorrect or excessive stimulation.
• Before use: before using the RT300-S Cycle Ergometer for the first time or after it has been
transported over a long distance, allow it to stand for about 1 hour at room temperature.
• After a long absence: If you do not use the RT300-S Cycle Ergometer system for a prolonged
period (e.g. a few months), you may find your progress is affected. If this occurs, it is important to
see your clinician for re-evaluation and, perhaps, re-training before you start using the system again.

Warnings, Precautions and Safety Measures
2005 Restorative Therapies Inc RT300-S User Guide • 9
• Handle with care: Handle the various parts of the RT300-S Cycle Ergometer system with care to
reduce the risk of dropping and damaging the equipment. Do not stand on the footrests or the
device’s plastic motor covers.
• Check for wear and tear: Each time you use the RT300-S Cycle Ergometer, carefully inspect all the
parts first. If you notice any damage – such as cracks or breaks in the covering of a cable – stop
using the system and contact RTI Technical Support.
• Do not handle or adjust the pedals when the RT300-S Cycle Ergometer system is switched on.
• Moving parts: Keep hands well away from the pedals while the machine is in operation.
• Report changes: If you find any changes occur in how the RT300-S Cycle Ergometer operates, stop
using the system and contact your clinician or RTI Technical Support.
Ø Repairs to the RT300-S must only be carried out by properly trained specialists.
Ø If the RT300-S is damaged or faulty or if it produces abnormal noises or smells, stop the therapy session immediately,
unplug the power cord and contact your service technician.
• Clothing: Dress comfortably to allow for the appropriate range of motion in the legs and / or arms.
Avoid wearing clothing that may catch on the moving parts of the system.
Electrostatic Discharge
A discharge of static electricity could damage:
• electrical parts of the system
• software programs on the controller
If static electricity is present, touch a metal part of the ergometer before fitting any parts or touching the
controller. Examples of where static electricity might occur are:
• putting clothes on over your head
• in very low humidity
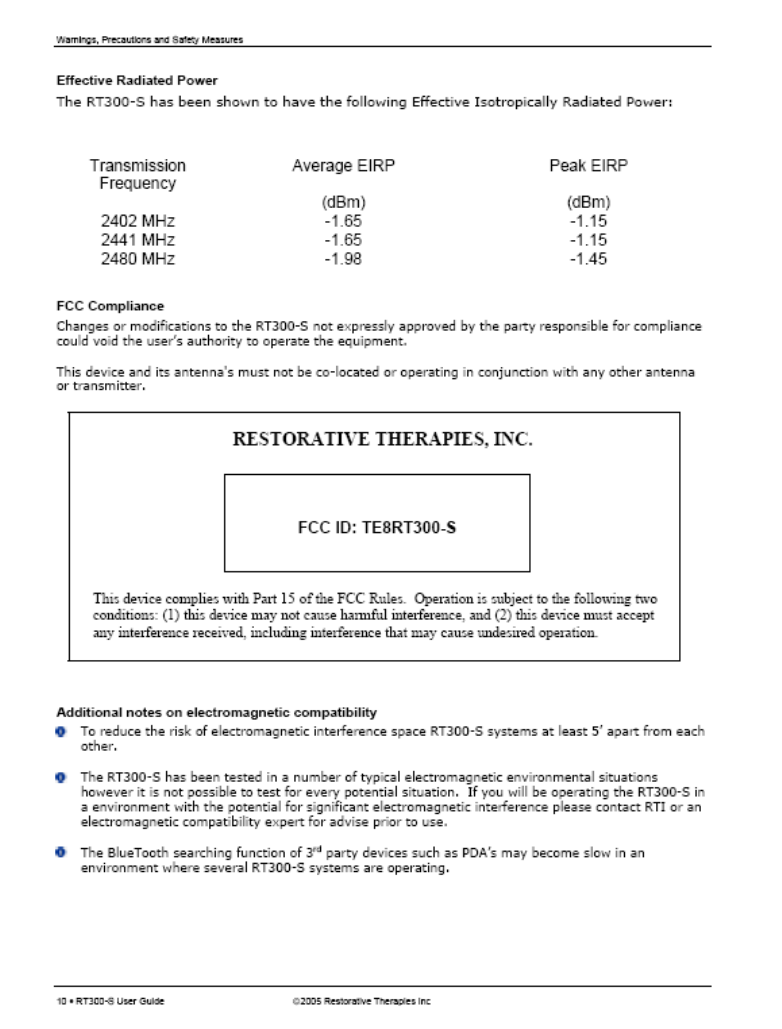
Electromagnetic Compatiility
The RT300-S needs special precautions regarding EMC and needs to be installed and put in
service according to the EMC information provided in the User Guide.
The use of accessories and cables other than those specified with the exception of accessories and cables
sold by the manufacturer of the RT300-S as replacement parts for internal components, may result in
increased emissions or decreased immunity of the RT300-S.
Electromagnetic interference (EMI) from sources such as radio and TV stations, amateur radio (HAM)
transmitters, two-way radios, and cellular phones can affect the RT300-S Cycle Ergometer.
a. Portable and mobile RF communications equipment can affect the RT300-S
b. Do not operate handheld transceivers such as citizens band (CB) radios while operating the RT300-S
c. Be aware of nearby transmitters, such as radio or TV stations
d. Keep the RT300-S at least 20ft away from microwave ovens

Warnings, Precautions and Safety Measures
2005 Restorative Therapies Inc RT300-S User Guide • 11
RTI Technical Support
Restorative Therapies Inc (RTI) offers a technical support service to provide troubleshooting help when:
• you have read this guide but are experiencing difficulties with the RT300-S System
• the system is due for a maintenance service
• you need to order replacement parts
Contact RTI Technical Support:
• via email to support@restorative-therapies.com
• by calling 1-800-609-9166
Terms used in this guide
Term What it Means
BlueTooth A wireless, automatic means by which electronic devices connect to each other. BlueTooth devices
communicate with each other on a standard band or range of radio frequency called the ISM
(industrial, scientific and medical) devices band.
controller A computerized panel used to control the RT300-S System.
FES Functional Electrical Stimulation
Important information or help.
RTI Restorative Therapies, Inc
Calf or leg The limb segment between the knee and ankle.
surface
electrode An electrode (adhesive pad) that is attached to the skin surface to stimulate a group of muscles. Each
surface electrode connects to the RT300-S System via the stimulation cable.
Thigh The limb segment between the hip and knee.
Torso The part of the body from the shoulders to the waist.
Type BF
Applied Part This term is used in the “IEC 60601-1” electrical safety standard. It applies to the parts of a medical
device that must physically touch a person to carry out the device’s intended function.
Applied Parts are Type B, or Type BF, or Type CF depending on the nature of the device and the type
of contact.
Each type has different requirements for protecting people against electrical shock.
Table 1: Terms used in this guide

RT300-S System
12 • RT300-S User Manual 2005 Restorative Therapies Inc
RT300-S System
What is the RT300-S System used for?
The RT300-S System is a motorized therapy system, which you use for:
• passive therapy – with motor power, and
• active therapy – with electrical stimulation applied to your muscles
The system is designed to provide a therapy routine prescribed by your clinician.
Parts of the RT300-S System
Table 2 shows a list of the RT300-S System’s parts:
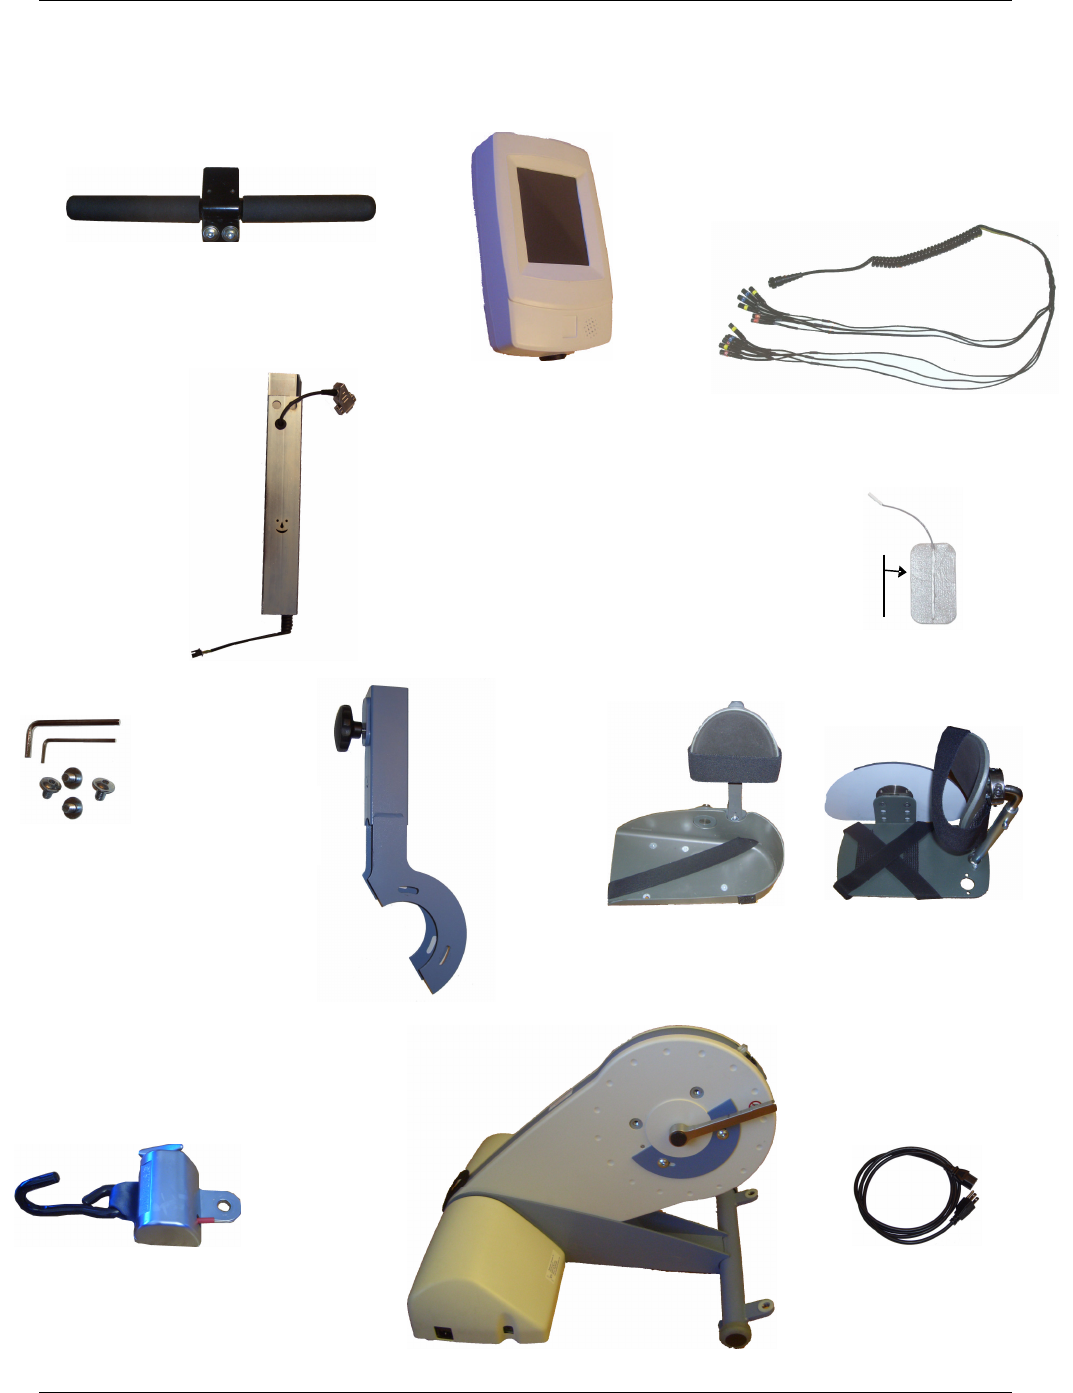
Part Part Number
RT300-S system RT300-S FA100052
RT300-SP (Pediatric) FA100053
Controller / Stimulator SA100090
Controller / Stimulator mounting plate PP100271
Controller / Stimulator power cable PP100206
Power cord (USA) SA100110
Stimulation cable SA100091
Rectangle surface electrodes 2”x3.5” Qty 4 FA100015
Velcro pedal straps PP100124
Velcro calf support straps PP100125
Wheelchair restraint strap PP100458
RT300-S System User Guide (this document) LB100108
Warranty card LB100109
Table 2: RT300-S System parts and part numbers
If a part is damaged or lost, use the part number to order a new one from Restorative Therapies Inc. Please call
or use our web store at www.restorative-therapies.com

RT300-S System
2005 Restorative Therapies Inc RT300-S User Guide • 13
Surface Electrodes
You should replace your surface electrodes after approximately 15 uses to ensure good adhesion and
connectivity. Be especially careful to monitor the condition of the electrodes that you use on
your gluteal muscles as these are subject to more wear and skin burns are reported to be more
likely here.
Table 3 shows the description and part number for ordering surface electrodes from RTI.
Contact RTI to order new electrodes or via the web at www.restorative-therapies.com.
Part RTI Part Number
Size: 2” x 2”
PP100418
Standard electrode:
Size: 2” x 3.5”
FA100015
Size: 3” x 4” PP100419
Size: 3” x 5” oval
PP100420
Size 2” x 2” (sensitive skin) PP100421
Table 3: Recommended surface electrode details
Selecting the right electrodes
Electrodes need to be selected that best fits the size of your muscles - your clinician will assist you in
selecting the correct electrodes for your body.
The quadriceps and hamstrings typically require larger electrodes than the gluteals. Usually your clinician
will try to cover a good portion of the muscle without allowing the electrodes to touch and without
covering other muscles that are not to be stimulated.
Setting Up the Equipment
14 • RT300-S User Manual 2005 Restorative Therapies Inc
Setting Up the Equipment
Surface
electrode
Power cord (USA)
Base unit
Toolkit
Safety handle
mount
Safety
handle
extension
with cable
Safety
handle
Controller / stimulator
Stimulation
cable
Wheelchair
restraint (1 of 2)
Adult pedal (1of 2) or Pediatric pedal (1 of 2)
Setting Up the Equipment
2005 Restorative Therapies Inc RT300-S User Guide • 15
RT300-S System Overview
Standard RT300-S Equipment
Standard RT300-S equipment is:
• motorized cycle ergometer
• controller / stimulator and mounting plate
• 12 skin surface electrodes
• stimulation cable for connecting the skin surface electrodes to the controller / stimulator
• wheelchair restraints for securing the wheelchair to the RT300-S
• power cord
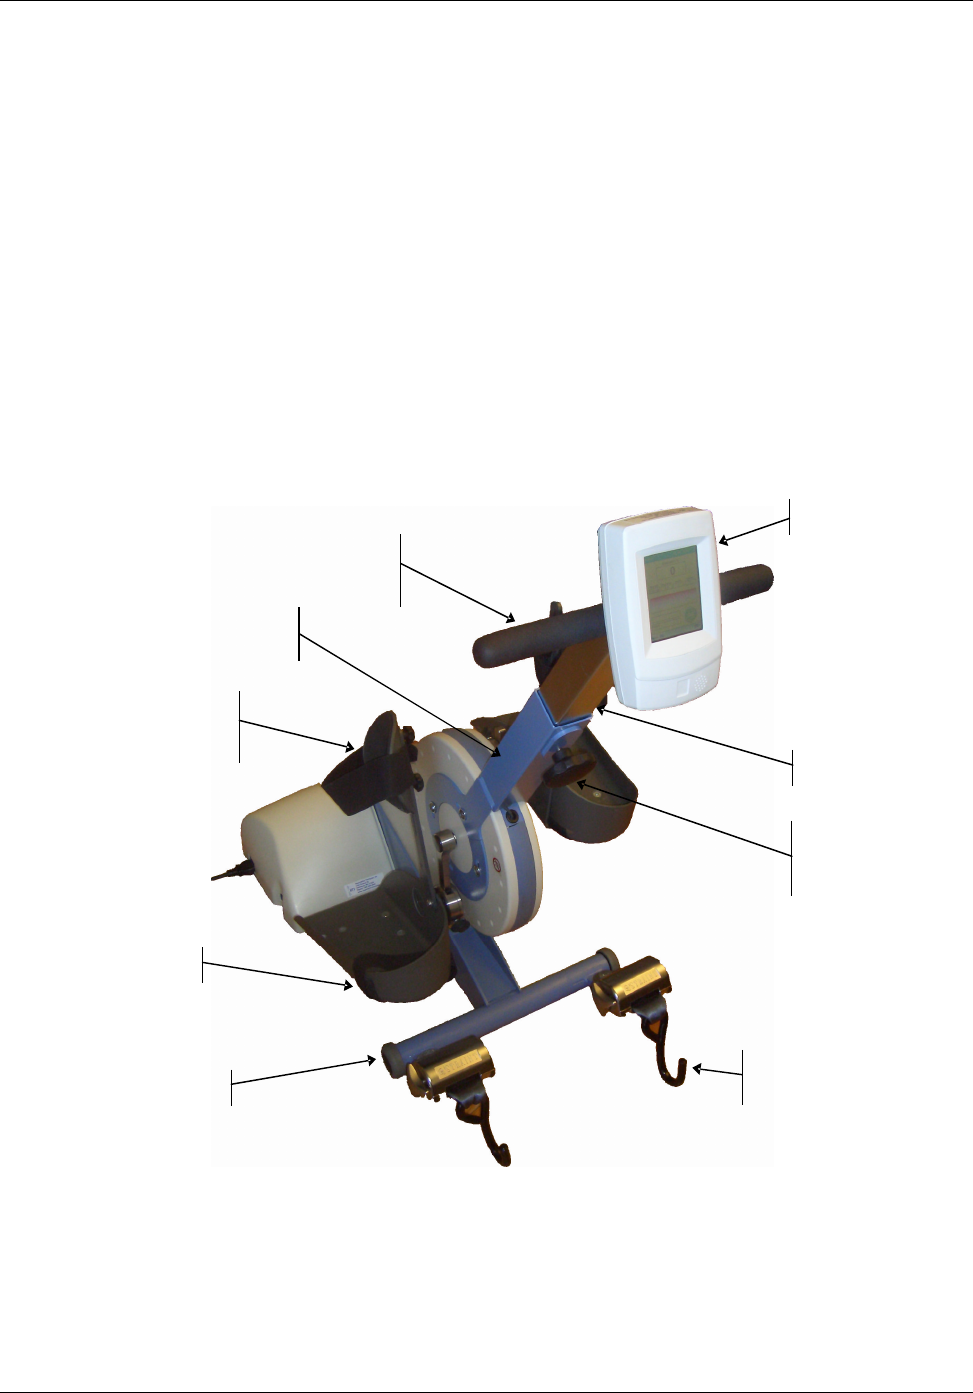
Figure 1 shows the standard equipment and features.
Figure 1: RT300-S system components
You use the RT300-S System from your wheelchair, with your feet secured in the pedals and your legs
supported by the calf rests.
Surface electrodes placed on your skin over particular muscle groups are connected to the ergometer by a
set of cables.
Controller / stimulator
Handle mount
Handles
Wheelchair
restraint
Pedal (adult)
Handle extension
Height
adjustment
knob
Rollers
Calf rests
attached to
pedals
Setting Up the Equipment
16 • RT300-S User Manual 2005 Restorative Therapies Inc
Software on the controller controls the stimulation patterns sent to your legs, producing a smooth
pedaling motion.
It is recommended you always wear shoes (e.g. running shoes) when using the RT300-S System.
Optional RT300-S Equipment
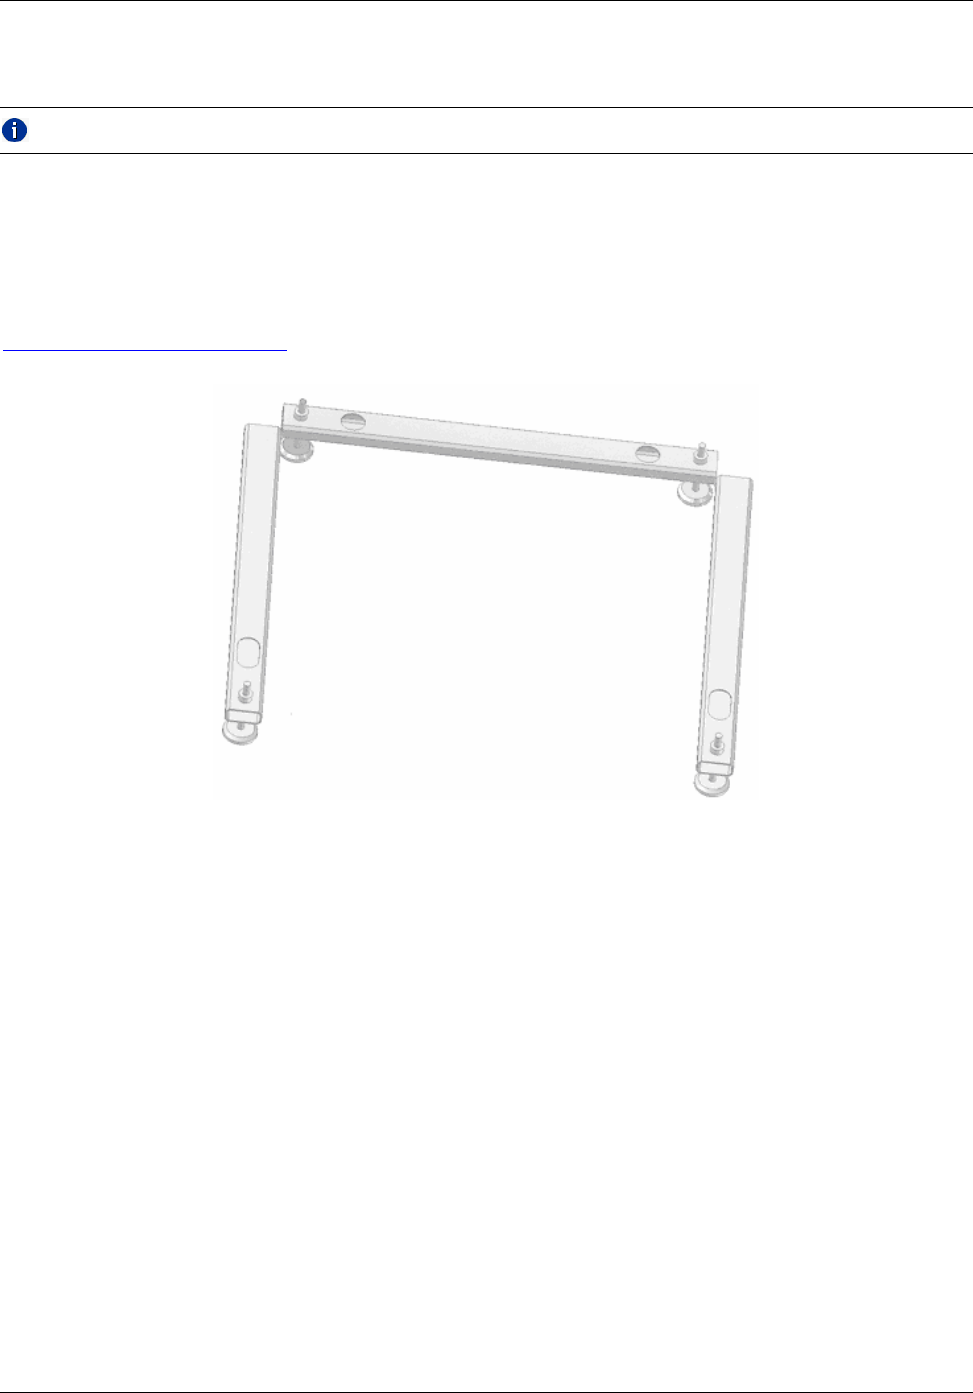
You can add the ergometer platform if you need to raise the height of the whole ergometer.
Contact RTI for more information on purchasing the ergometer platform or visit the store at
www.restorative-therapies.com.
Figure 2 Ergometer platform with adjustable height legs, FA 100019
RT300-SP Ergometer for Pediatrics
The RT300-SP is the pediatric version of the RT300-S. It includes as standard equipment:
• handles which can be adjusted to a lower height than the handles on the adult ergometer
• a different pedal system that is adjustable for smaller feet and limbs
This system is intended for children aged from 4 to 12 years old.
Setting Up the Equipment
2005 Restorative Therapies Inc RT300-S User Guide • 17
Assembling the RT300-S
Checking the Parts
Before you start assembling the ergometer, unpack all of the parts and:
1. Check to make sure none of the parts are damaged or missing. See page 12 for details on all parts.
If any of parts are damaged, missing contact RTI Technical Support immediately. Do not use the system.
Fitting the safety handle mount and extension
To fit the support arm:
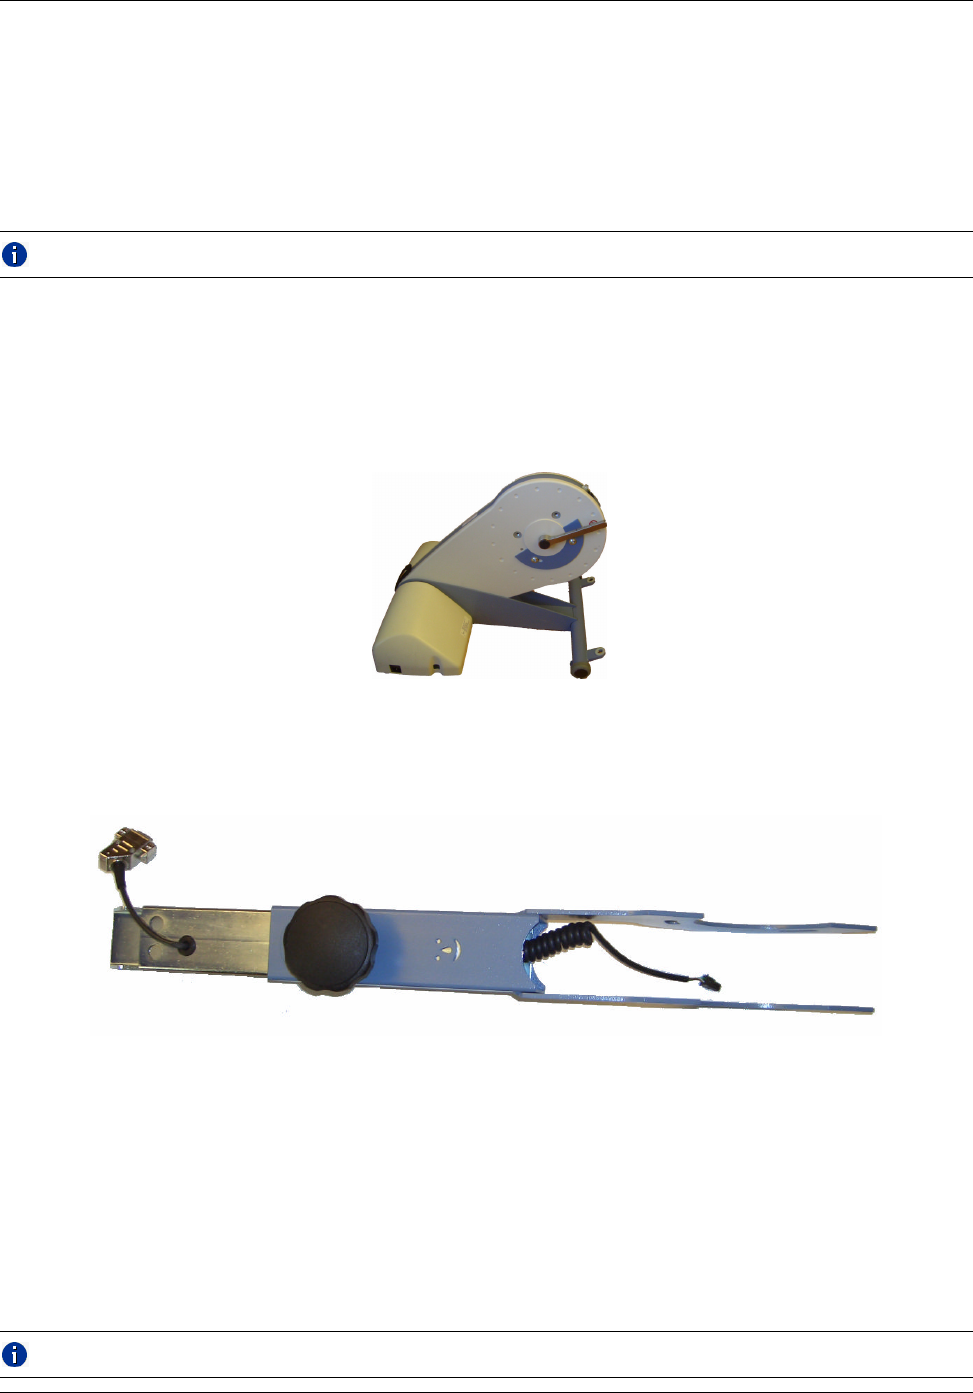
1. Place the base unit of the ergometer on a flat, even surface.
Figure 3: Base unit of the ergometer
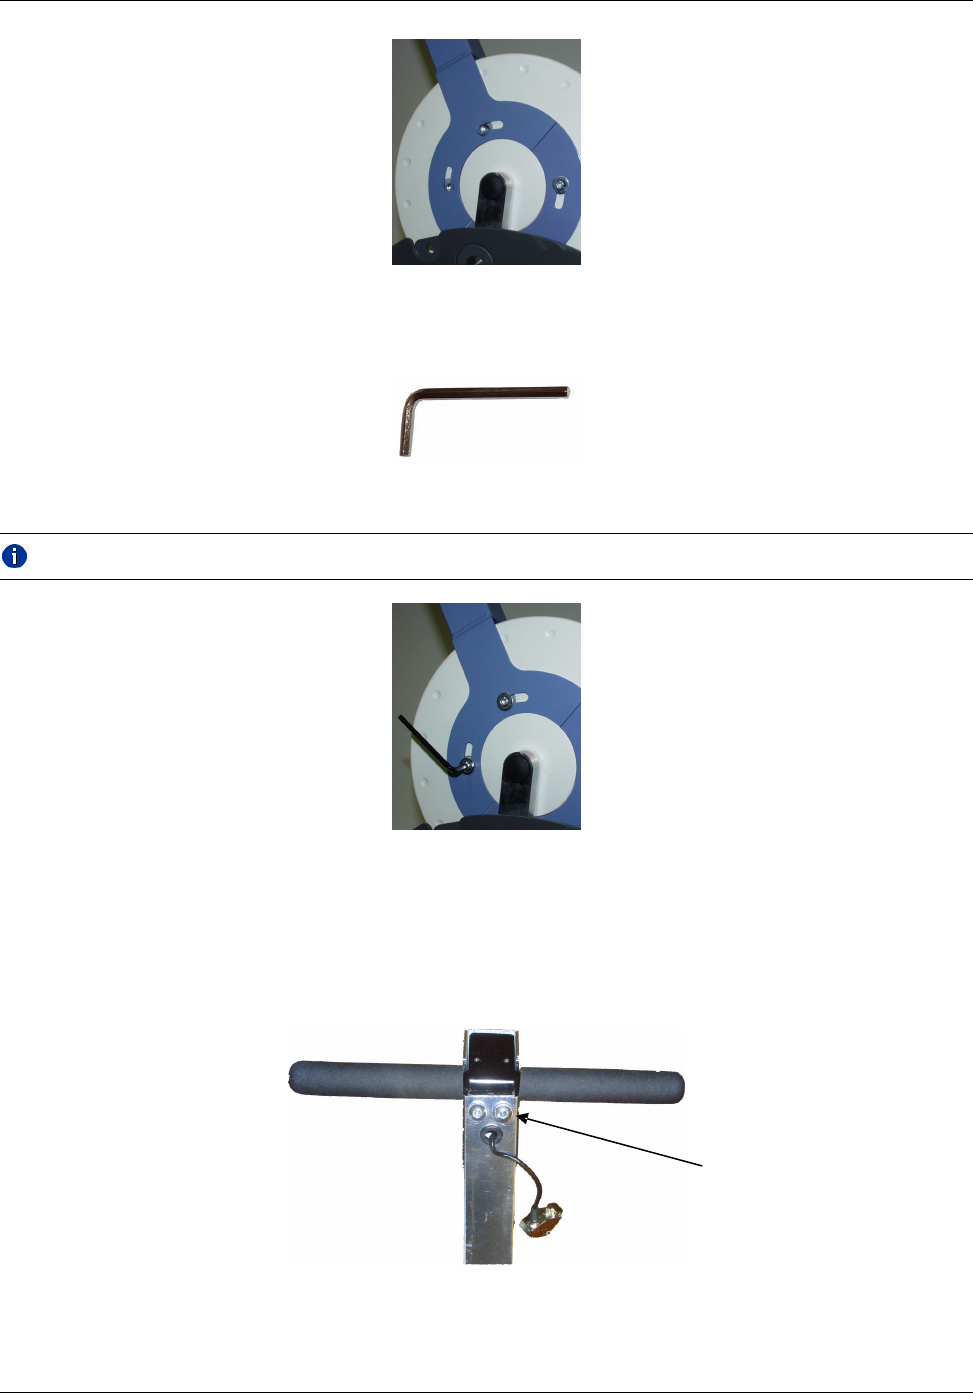
2. Slide the safety handle extension into the safety handle mount as shown in Figure 4. Ensure that the
Controller power cable also passes completely through.
Figure 4 Slide the safety handle extension into the safety handle mount
3. Hold the safety handle mount with the height adjustment knob facing you.
4. Slide the safety handle mount forks over the encased sheave being careful not to trap the Controller
power cable.
5. Connect the Controller power cable to the cable protruding from the base unit.
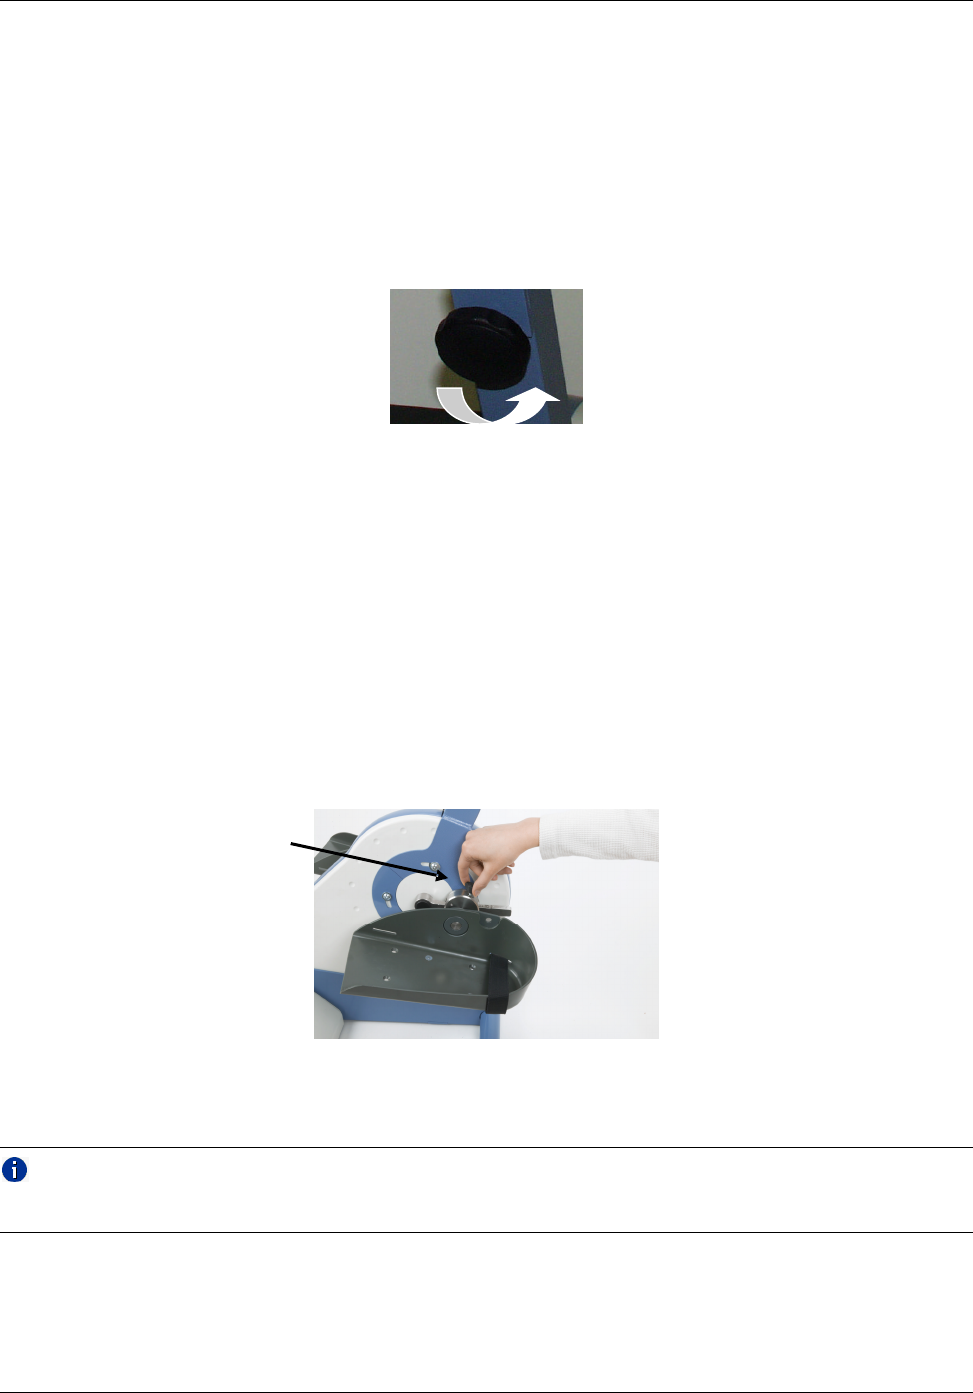
6. Slide the support arm down until the bolt holes on the forks align with the bolt holes on the sheave
casing being careful not to trap or cut the Controller power cable.
There are two bolt holes on each fork and two corresponding bolt holes on each side of the sheave casing.
Setting Up the Equipment
18 • RT300-S User Manual 2005 Restorative Therapies Inc
Figure 5: Bolt holes aligned
7. Screw the bolts into the bolt holes and tighten each bolt using the Allen (Hex) Key provided.
Figure 6 Allen (Hex) key
It may be necessary to loosen the lower bolts and rotate the whole assembly.
Figure 7: Tightening a bolt with the Allen (Hex) Key
Fitting the safety handle
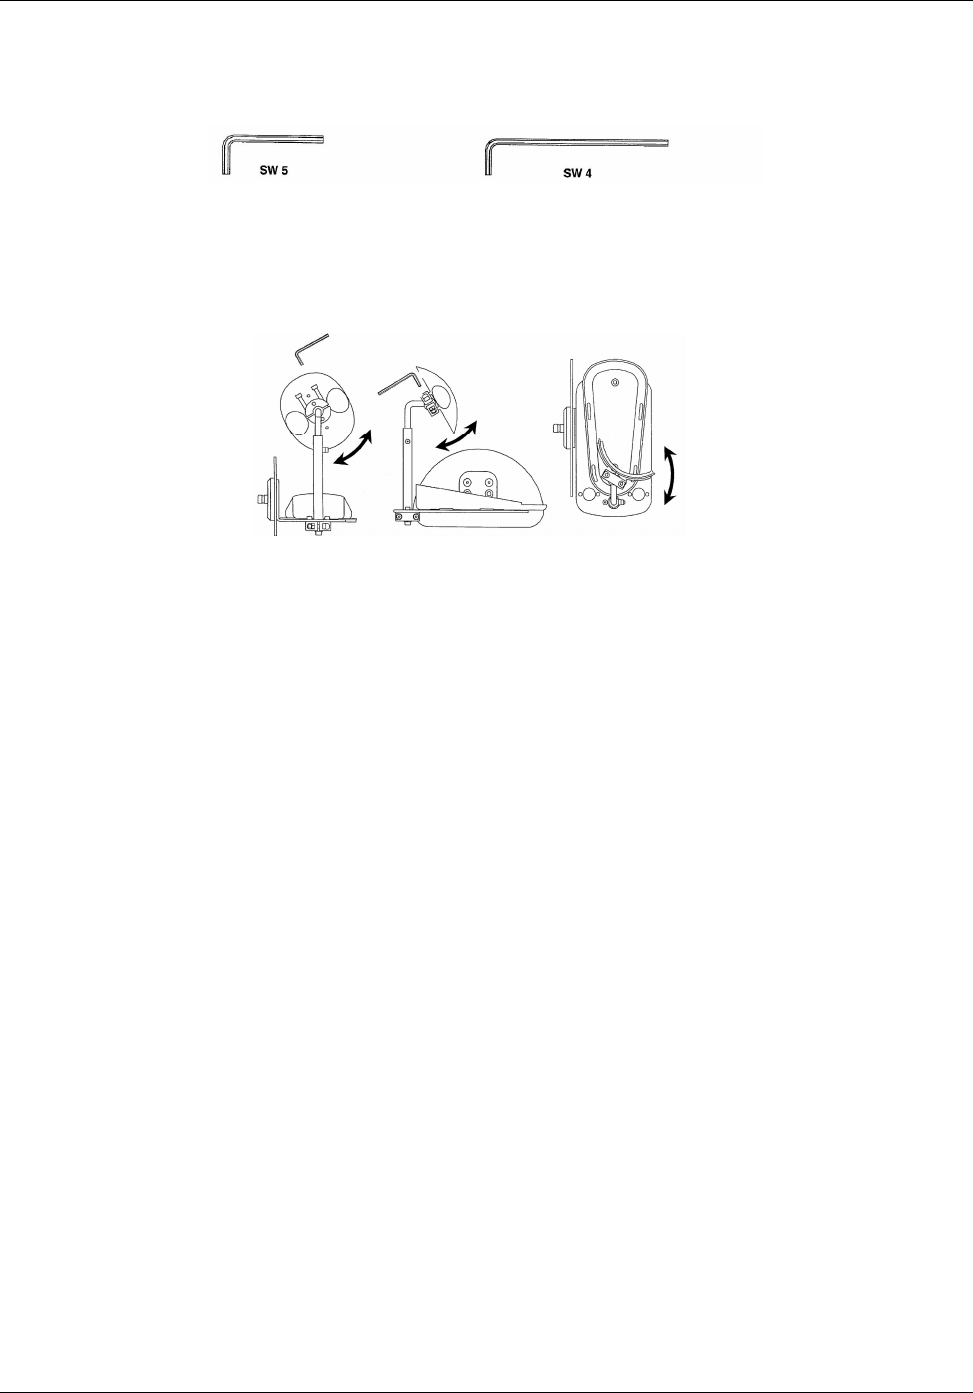
1. Fit the safety handle to the safety handle extension using the two bolts supplied.
Figure 8: Fitting the safety handle
Safety handle
retaining bolts (x 2)

Setting Up the Equipment
2005 Restorative Therapies Inc RT300-S User Guide • 19
Fitting the controller / stimulator
1. Fit the Controller mounting plate to the safety handle assembly using the hex bolts supplied as
shown in Figure 9.
Figure 9 Controller Mounting Plate
2. Fit the Controller to the Controller mounting plate using the three screws supplied.
3. Plug the Controller power cable into the back of the Controller.
Mounting plate hex
bolts
Setting Up the Equipment
20 • RT300-S User Manual 2005 Restorative Therapies Inc
Adjust the height of the safety handles
When you use the RT300-S System, you need to sit upright, and be able to comfortably reach and use
the handles and controller.
The safety handle’s extension section can be moved up or down to a height that suits you.
To adjust the height of the safety handles:
1. Turn the height adjustment knob counter-clockwise until the handle extension section is loose.
Figure 10: Adjusting the height
2. Slide the handle extension section to the height you require.
3. Turn the height adjustment knob clockwise until the handle extension section locks into place.
Adjusting the pedal crank radius
The pedal crank radius can be adjusted as shown in Figure 11
1. Open the locking pin
2. Move the footrest to the desired position on the crank and tighten the locking pin firmly!
3. Adjust the opposite pedal in the same way.
Figure 11 Pedal crank radius adjustment
Make sure that the crank lengths on both sides are equal. Depending on the nature of the patient’s condition,
asymmetrical crank lengths may sometimes be of benefit. With an amputated leg it can be necessary to remove
one pedal completely.
Locking pin
Setting Up the Equipment
2005 Restorative Therapies Inc RT300-S User Guide • 21
Adjusting pediatric pedals
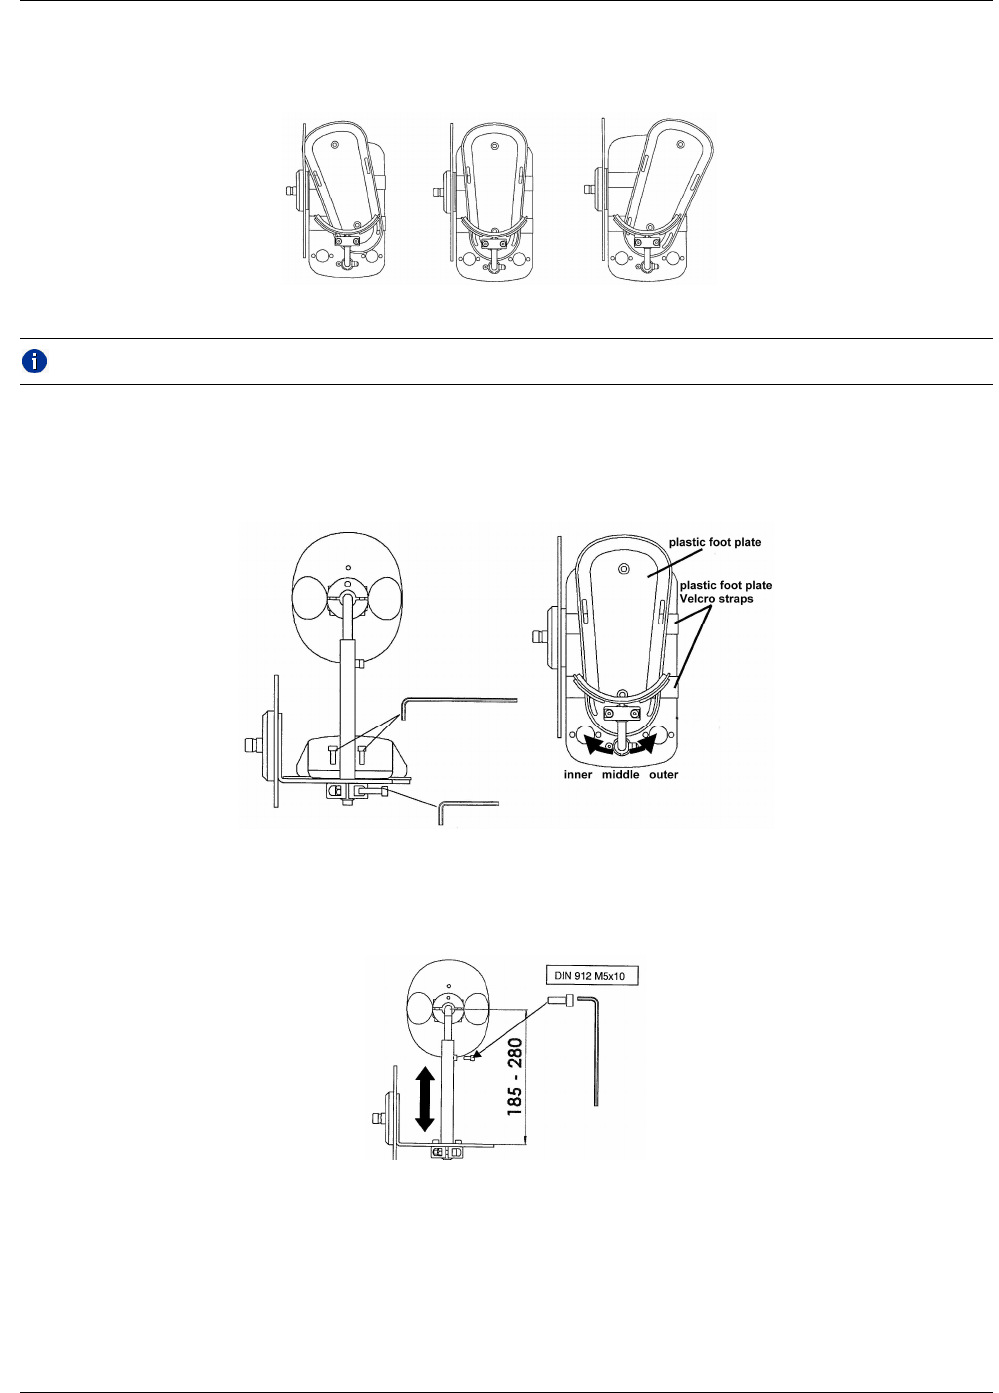
Two hex wrenches are provided for adjusting the pediatric pedals.
Figure 12 Pediatric pedal adjustment tools
The angle of the calf rest can be adjusted in three dimensions as shown in Figure 13.
Figure 13 Calf support angle adjustment
Setting Up the Equipment
22 • RT300-S User Manual 2005 Restorative Therapies Inc
The plastic foot plate can be removed by detaching it from the retaining Velcro. The angle of the plastic
foot plate can be adjusted by reattaching it at the required angle using the retaining Velcro provided.
Figure 14 Foot plate angle adjustment
Make sure that the plastic foot plate is firmly attached by the Velcro. Press firmly!
The position of the calf rest on the foot plate assembly can be adjusted as shown in Figure 15 (inner,
middle and outer positions).
Figure 15 Calf rest position adjustment
The height of the calf rest can be adjusted as shown in Figure 16.
Figure 16 Calf rest height adjustment
Setting Up the Equipment
2005 Restorative Therapies Inc RT300-S User Guide • 23
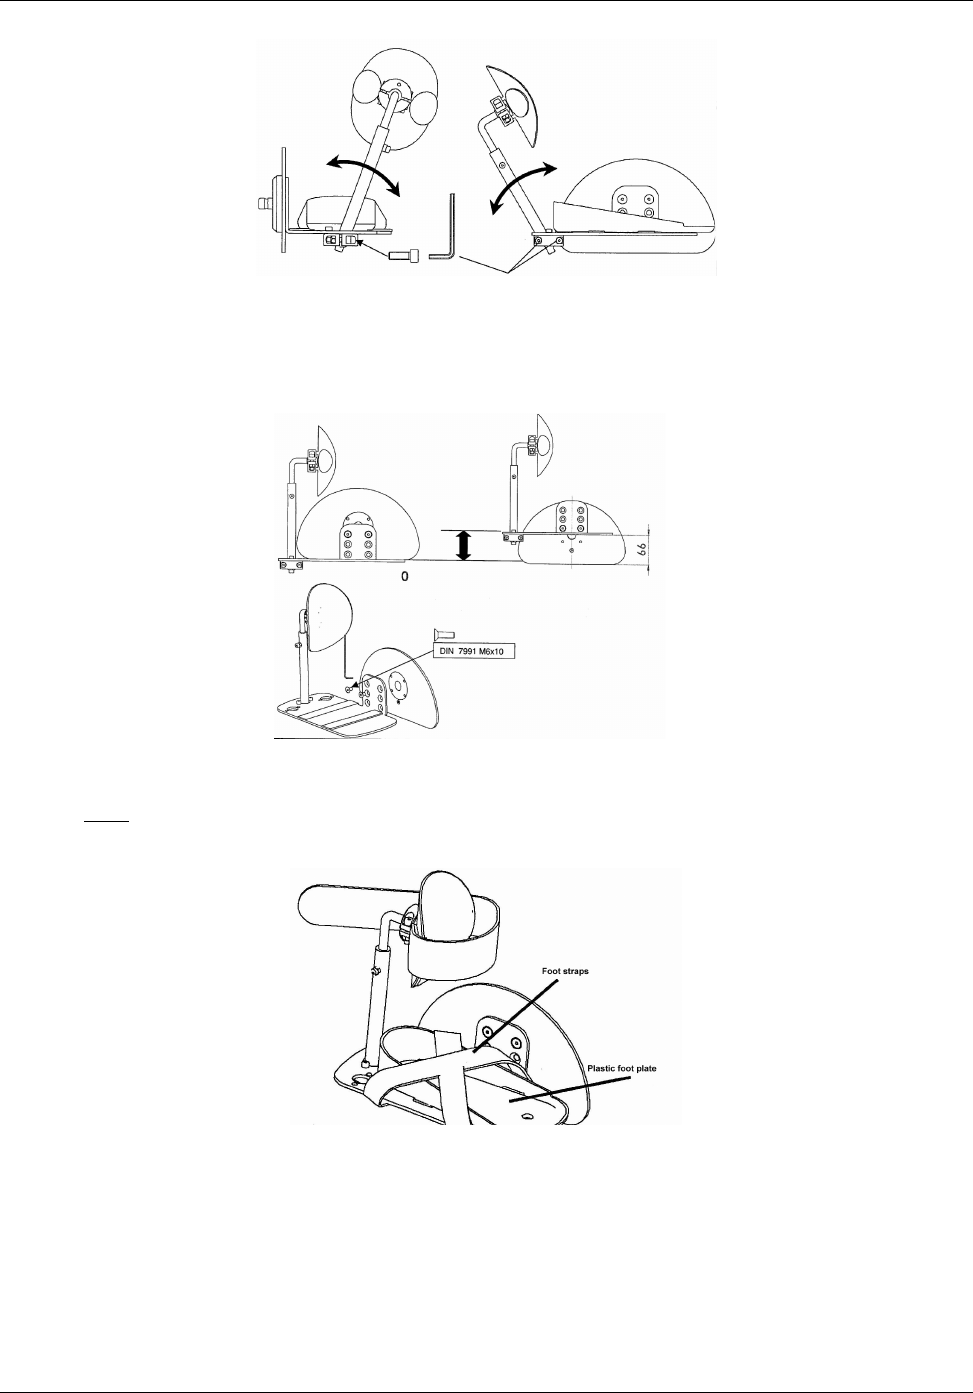
Figure 17 Calf rest angle adjustment
The height of the foot rest assembly can be adjusted as shown in Figure 18.
Figure 18 Foot plate assembly height adjustment
The feet must be strapped into place within the plastic foot rests using the Velcro straps shown in Figure
19.
Figure 19 Foot straps
Setting Up the Equipment
24 • RT300-S User Manual 2005 Restorative Therapies Inc
Base of support
The stability of the RT300-S can be increased by extending the base of support.
To extend the base of support:
1. Tip the RT300-S up over on its castors
2. Loosen the two hex bolts with the hex key provided
3. Pull out the cross bar as far as needed but do not extend it beyond the mark.
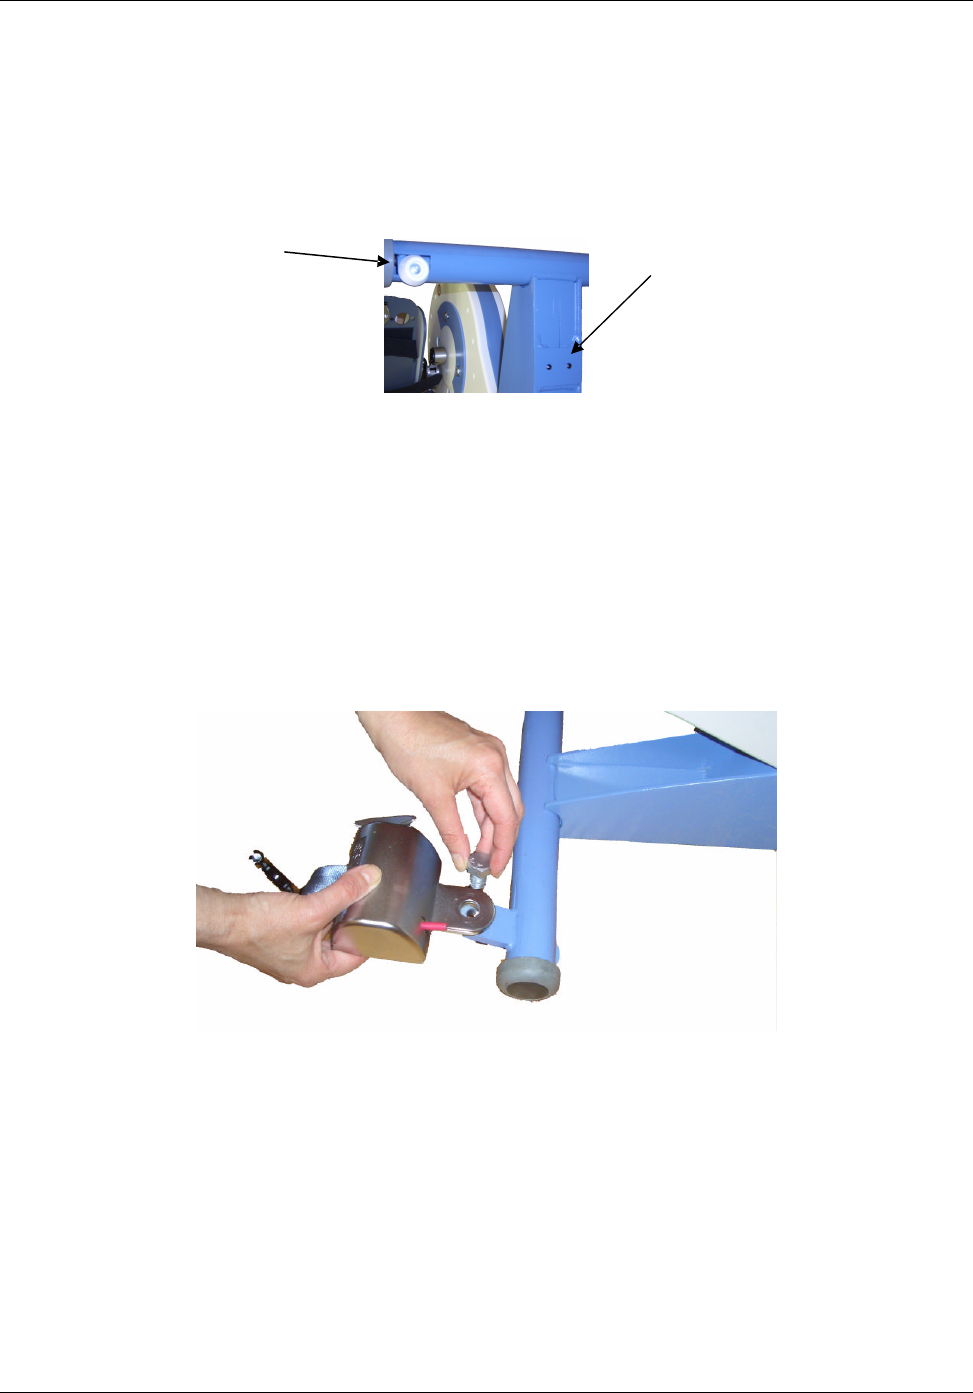
Figure 20 Hex bolts and cross bar for stability adjustment
Fitting the wheelchair restraints
To fit the wheelchair restraints:
1. Place nylon washer over wheelchair restraint attachment point on crossbar
2. Bolt the wheelchair restraint to the crossbar and tighten
3. Repeat for the other side of the crossbar
Figure 21 Fitting wheelchair restraint
Connecting the Power
To connect the power:
1. Use the power cord provided to connect the RT300-S System to a power outlet.
2. The system is intended to be left connected to a power outlet so that the Controller’s internal battery
remains charged. The system will automatically switch off shortly after a therapy session so it is not
necessary to disconnect the power.
Hex bolts
Cross bar

Setting Up the Equipment
2005 Restorative Therapies Inc RT300-S User Guide • 25
Figure 22: Power connection
Never pull on the power cord. Always grip and pull the plug to disconnect the power cord from the power outlet.