Ricoh PRSP34101 Laser Printer User Manual
Ricoh Company Ltd Laser Printer
UserManual.wiki
>
Ricoh
>
PRSP34101 User Manual
>
User manual
Contents
1.
User manual
2.
User manual statement ferrite core
3.
User manual warnings
User manual
Navigation menu
Upload a User Manual
Namespaces
Wiki Guide
HTML
PDF
Info
Views
User Manual
Discussion / Help
Navigation


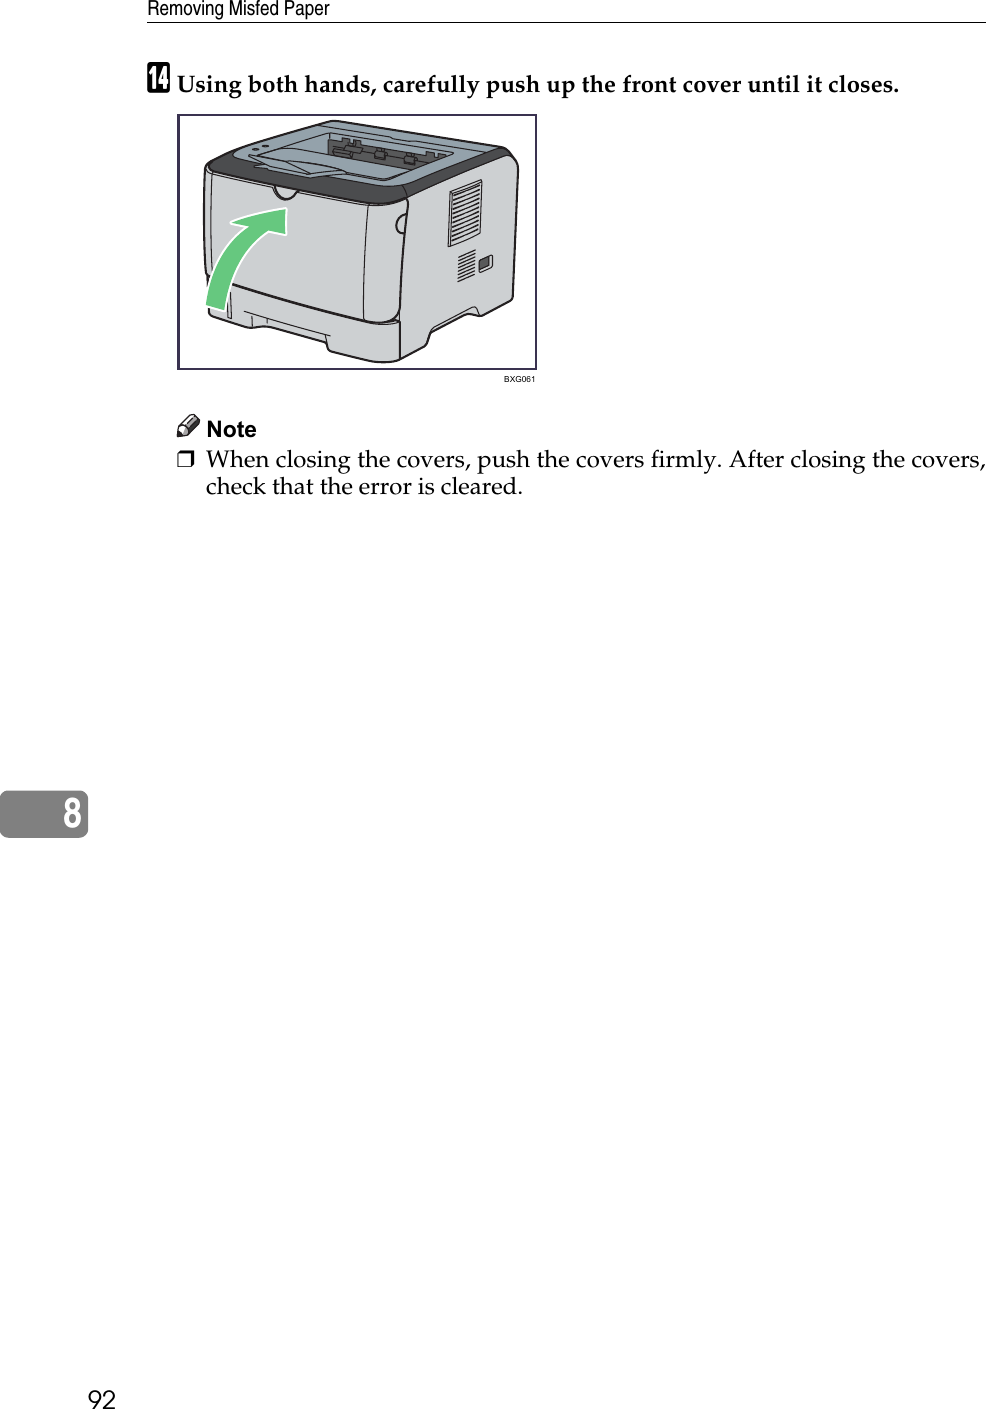
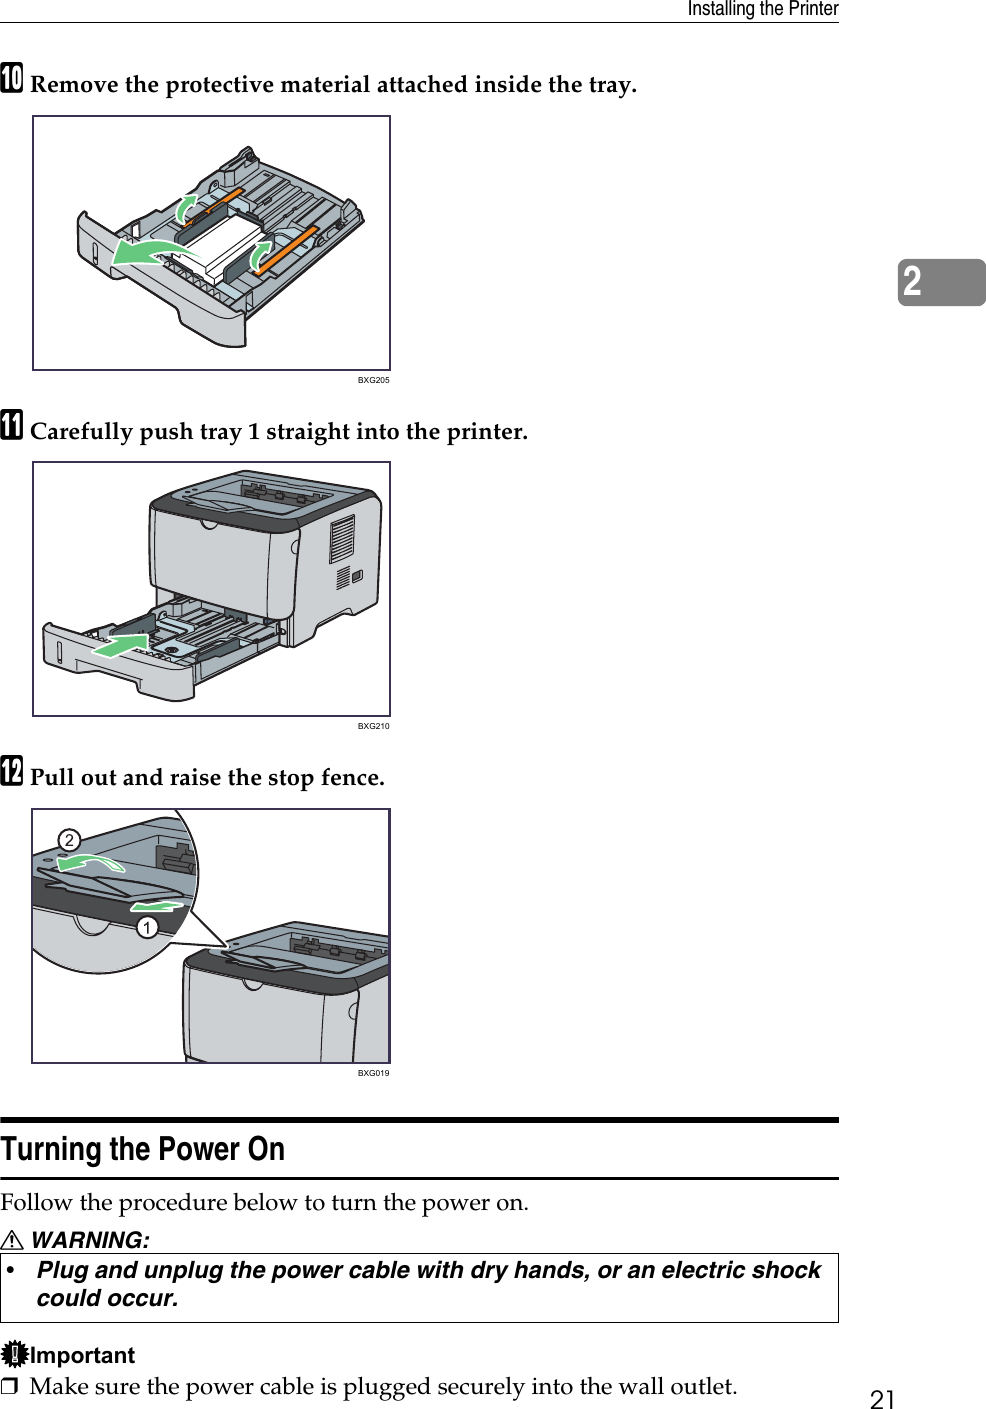
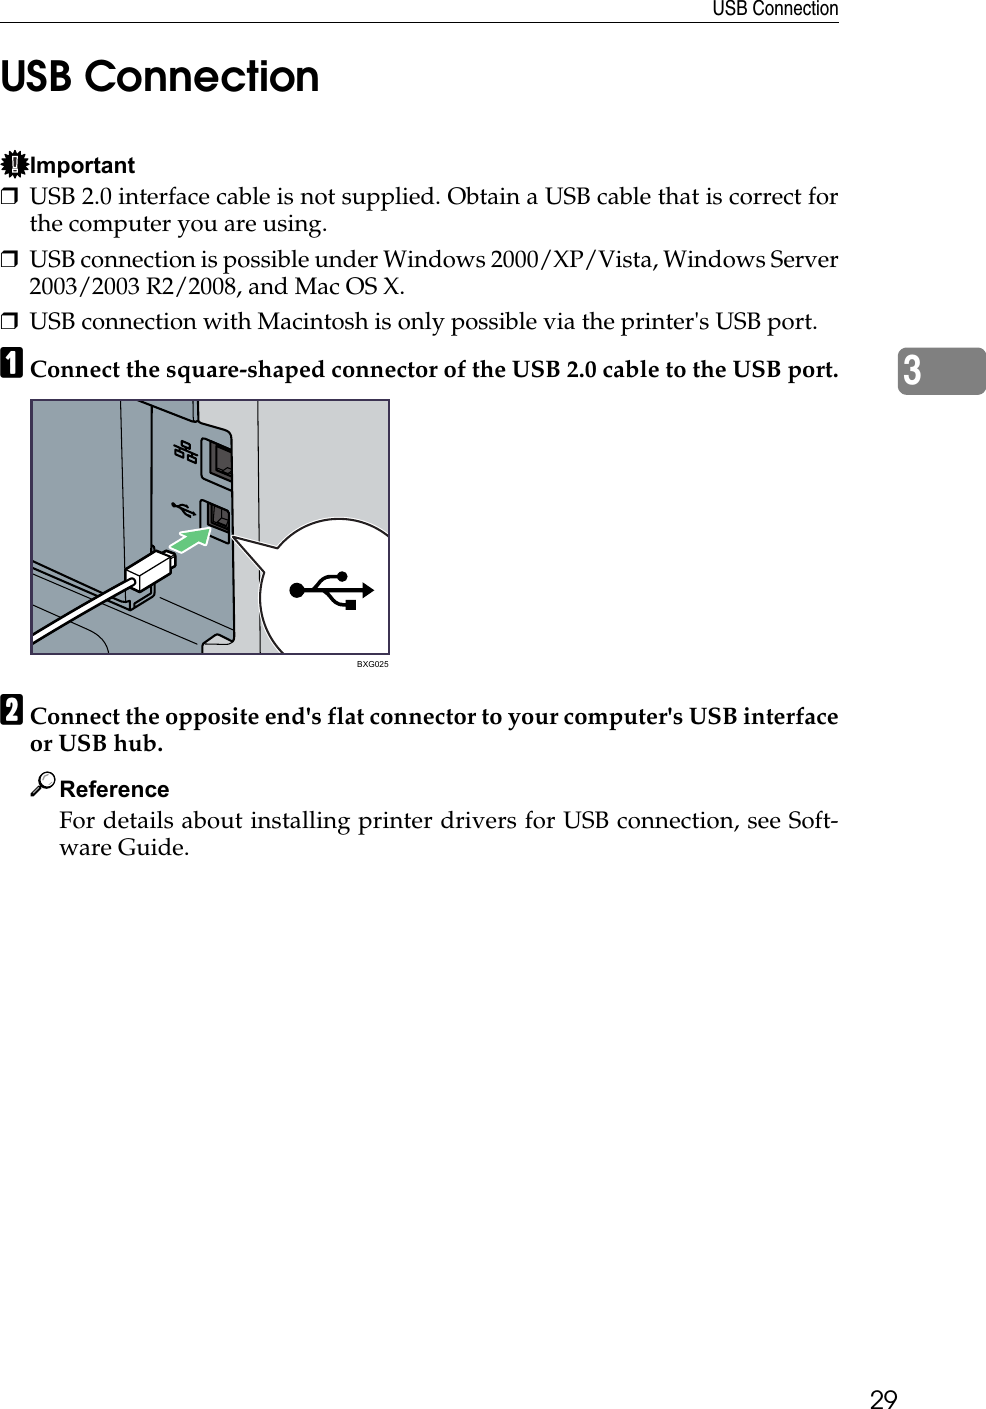
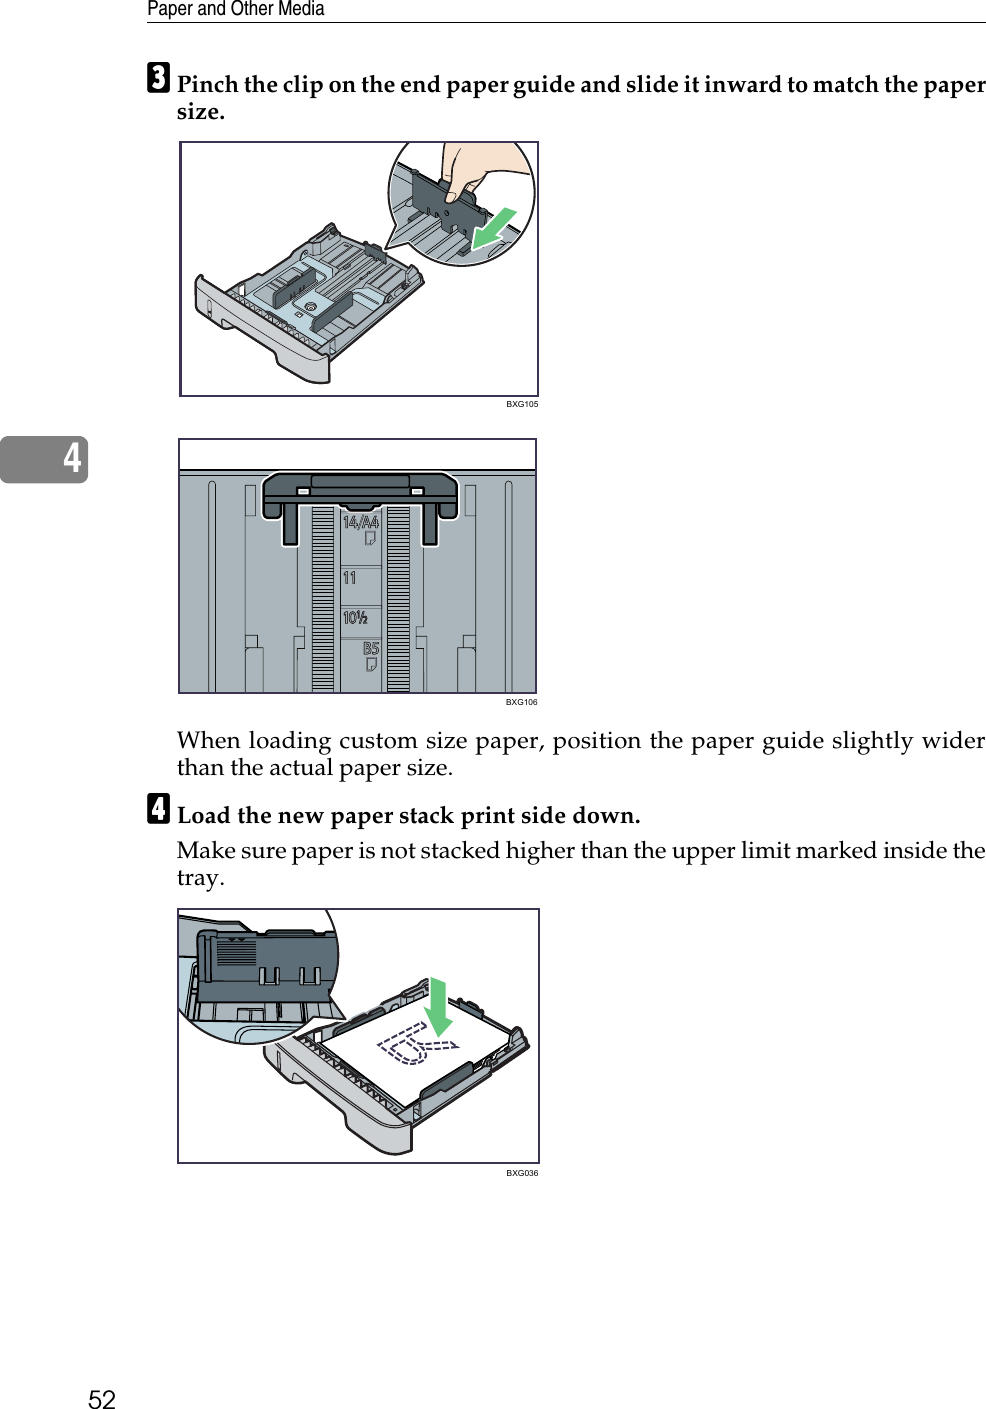
![4How to Read This ManualSymbolsThis manual uses the following symbols:ImportantIndicates points to pay attention to when using the machine, and explanationsof likely causes of paper misfeeds, damage to originals, or loss of data. Be sureto read these explanations.NoteIndicates supplementary explanations of the machine's functions, and instruc-tions on resolving user errors.ReferenceThis symbol is located at the end of sections. It indicates where you can find fur-ther relevant information.[ ]Indicates the names of keys and buttons.{ }Indicates the names of keys on the printer’s control panel.](https://usermanual.wiki/Ricoh/PRSP34101.User-manual/User-Guide-1182584-Page-10.png)
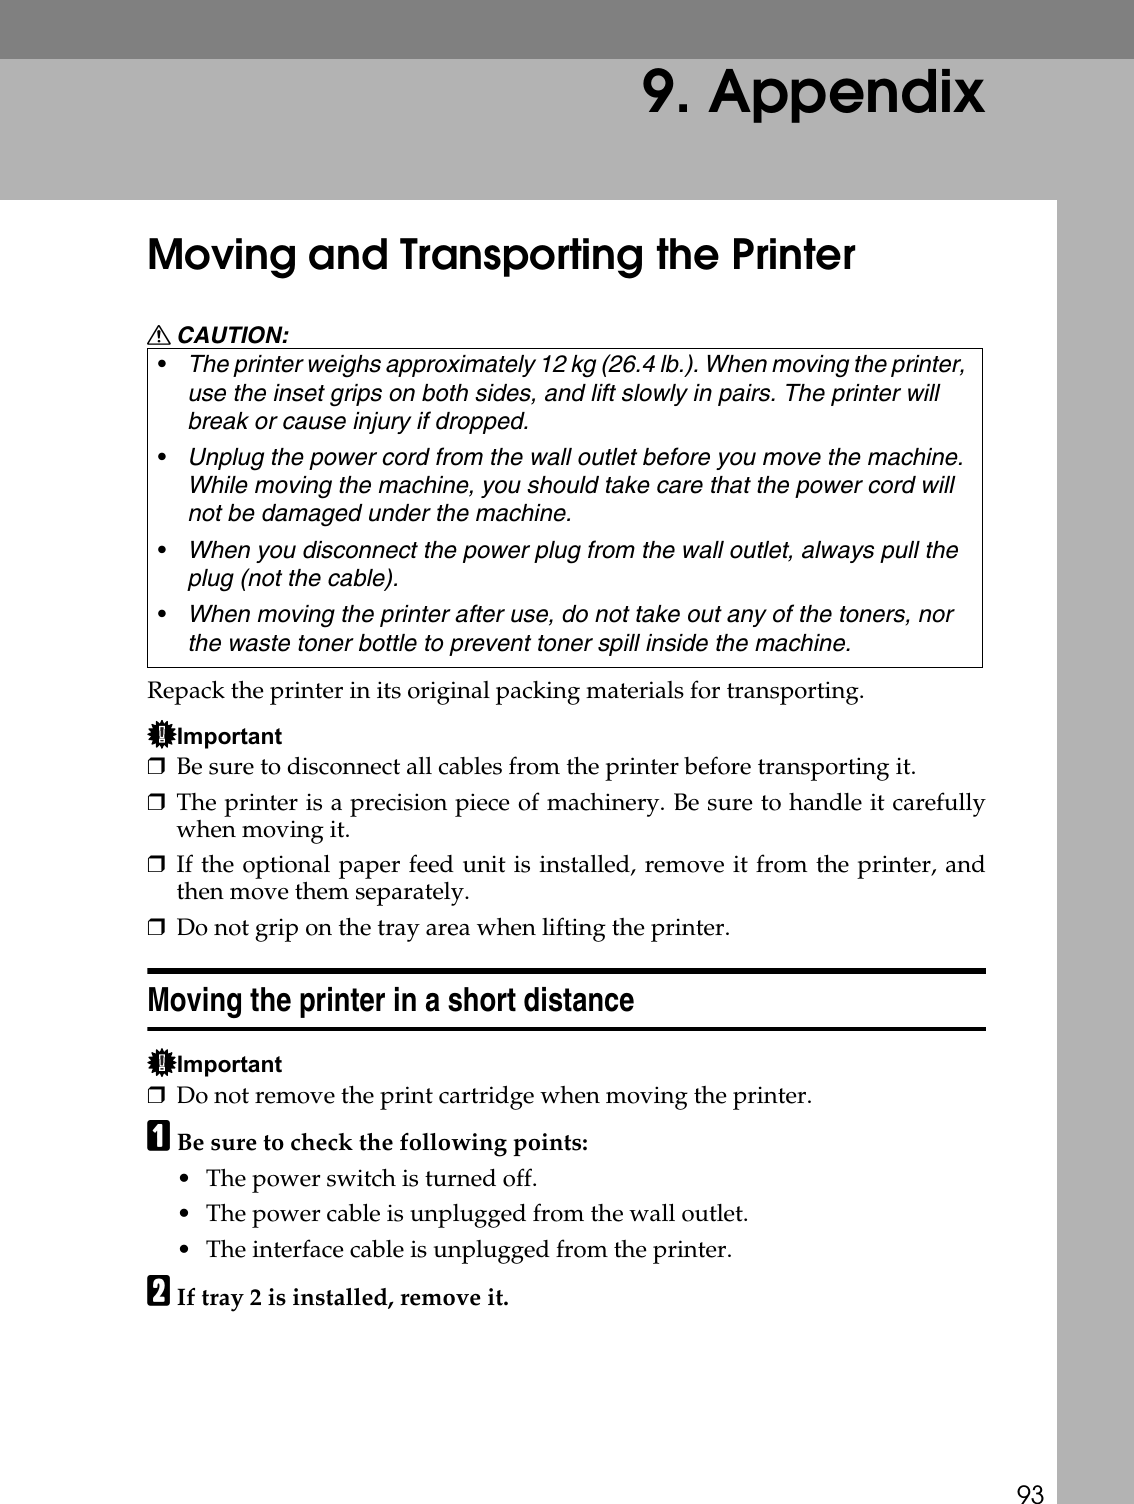
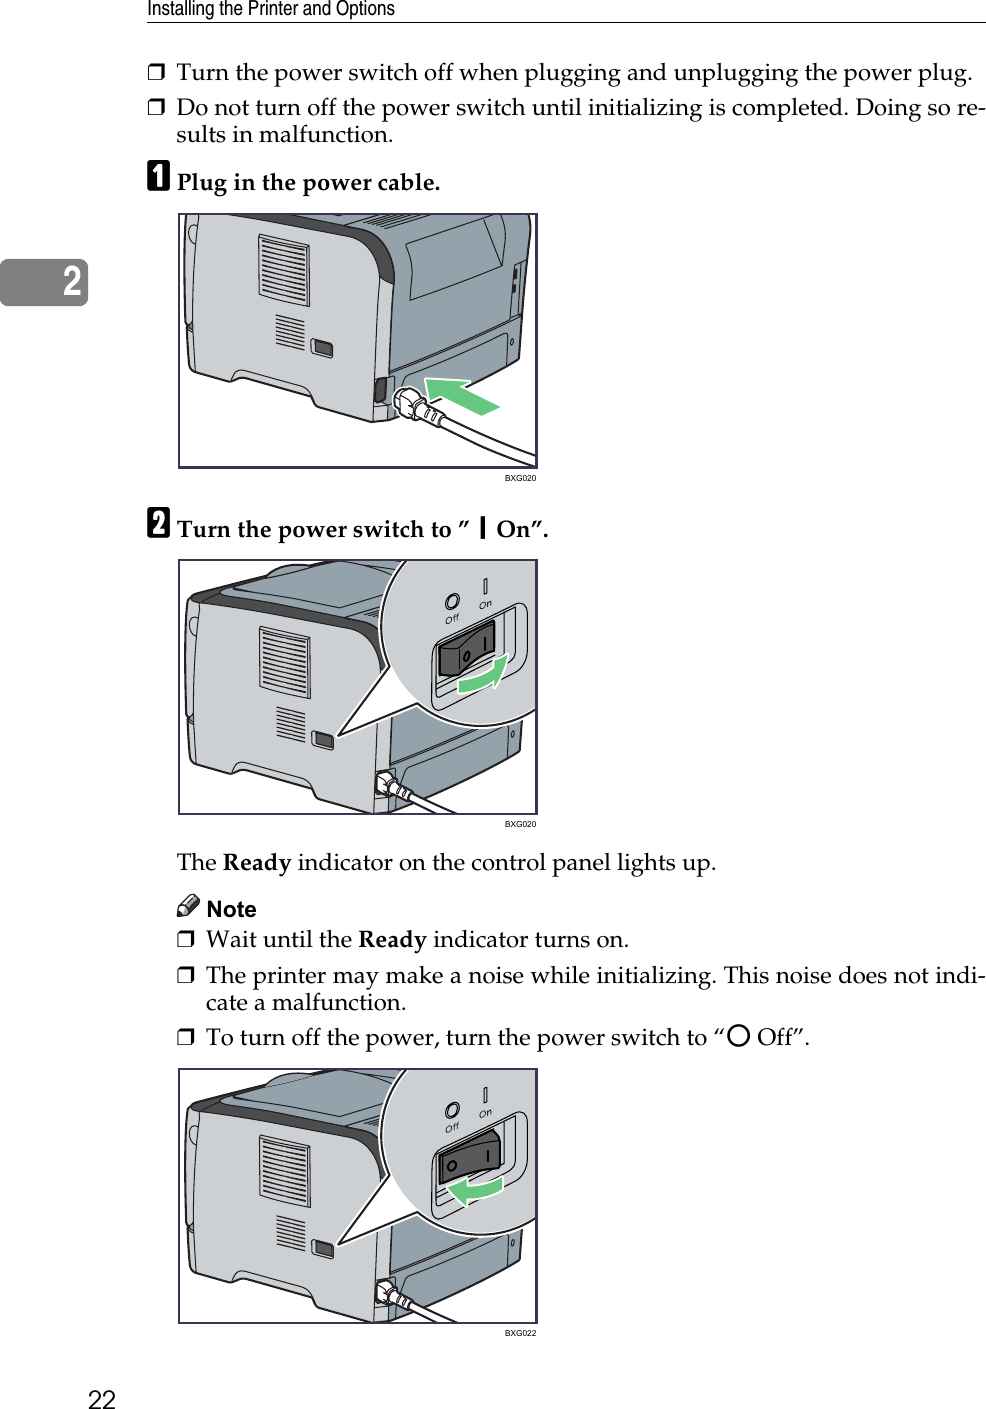
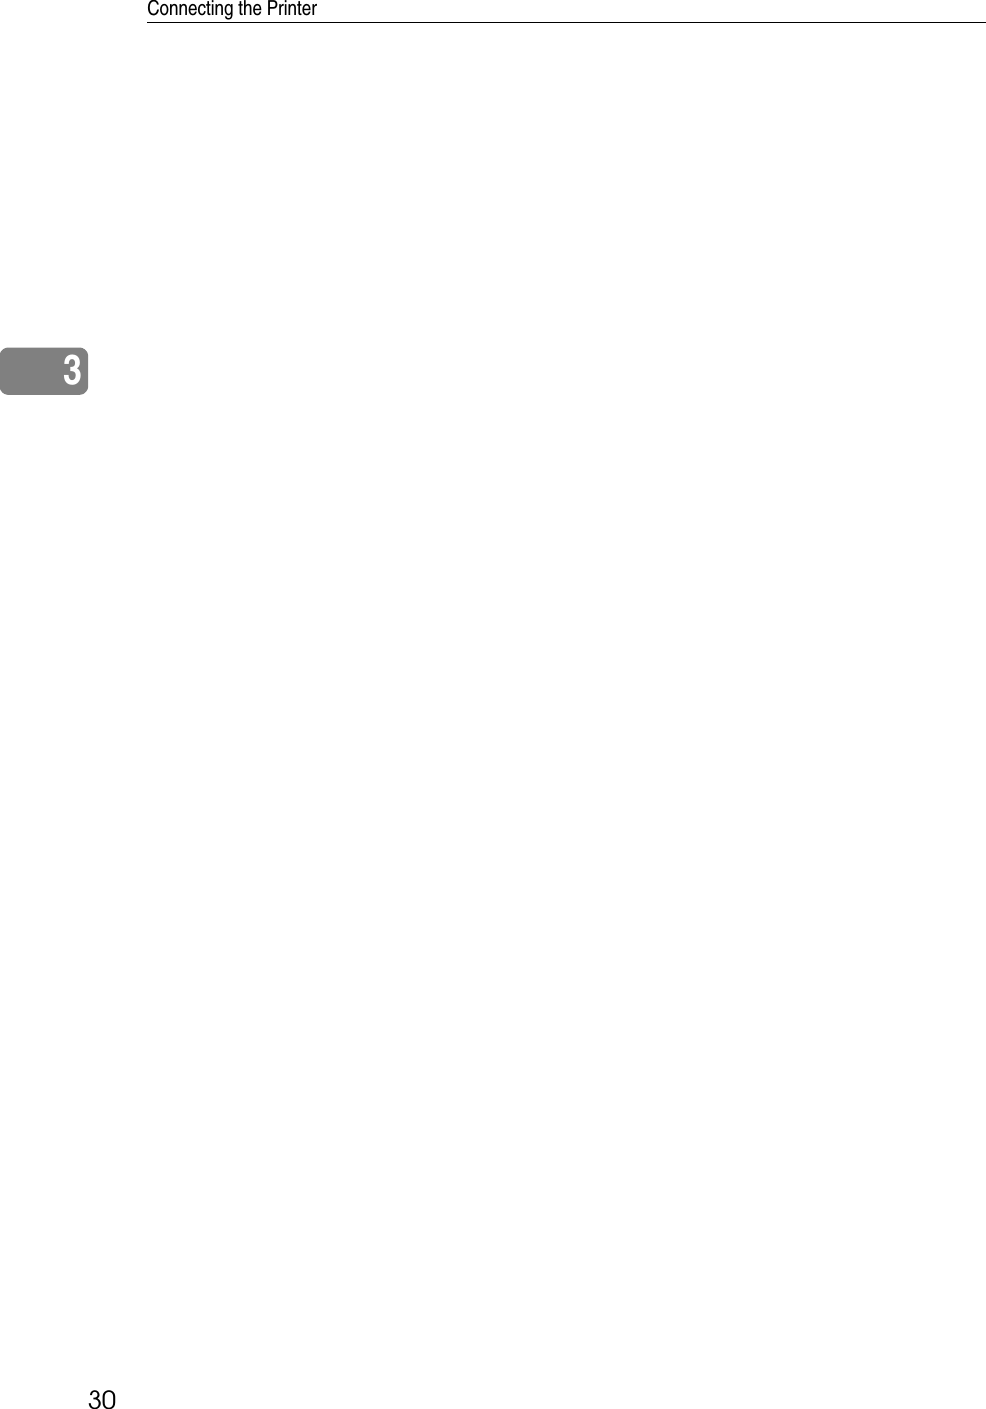
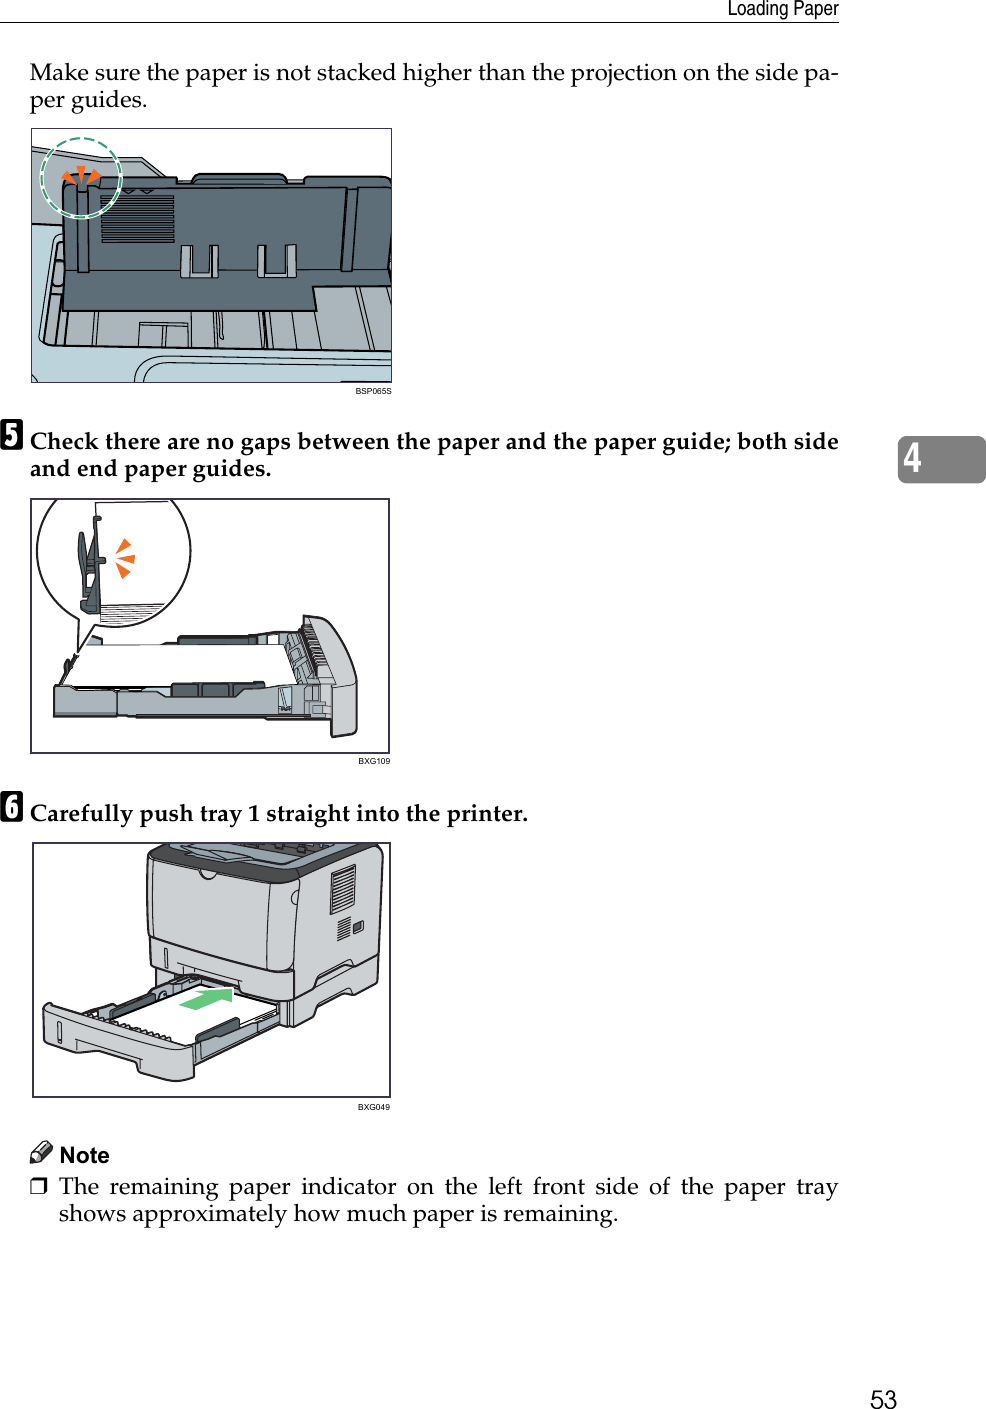
![6Using ManualsBe sure to read this section before any other part of this manual.• This manual uses procedures based on Windows XP as an example, unlessotherwise specified. Procedures and screens might vary depending on the op-erating system you are using.Installing Manuals on Your ComputerThe manuals for this printer are provided as HTML and/or PDF documents onthe included CD-ROM. The format of the manuals will vary depending on thecountry where the printer was bought.Use the following procedure to install the manuals from the CD-ROM.Important❒System requirements for viewing the HTML manual:• 800 × 600 pixel display resolution or greater❒Applications for viewing the HTML manual:•Microsoft® Internet Explorer 4.01 Service Pack 2 or higher• HTML manuals can also be viewed on a Macintosh❒Applications for viewing the PDF manuals:• Adobe Acrobat Reader or Adobe Reader❒Install the HTML manual along with Smart Organizing Monitor. When aprinter error occurs, Smart Organizing Monitor may make reference to theHTML manual to notify the user of the procedure to resolve the problem.AQuit all applications currently running.BInsert the CD-ROM into the CD-ROM drive.If you are using a computer running a Macintosh operating system, open“Manuals.htm” from the CD-ROM root directory.CSelect a language for the interface and a product, and then click [OK].DClick [Install manuals].EFollow the instructions on the screen to complete the installation.FClick [Finish] when the installation is completed.GClick [Exit].Note❒If you are using a computer running a Windows operating system, the CD-ROM opens automatically. However, AutoRun may not work under cer-tain operating system settings. If this is the case, launch “setup.exe” fromthe CD-ROM root directory.](https://usermanual.wiki/Ricoh/PRSP34101.User-manual/User-Guide-1182584-Page-12.png)
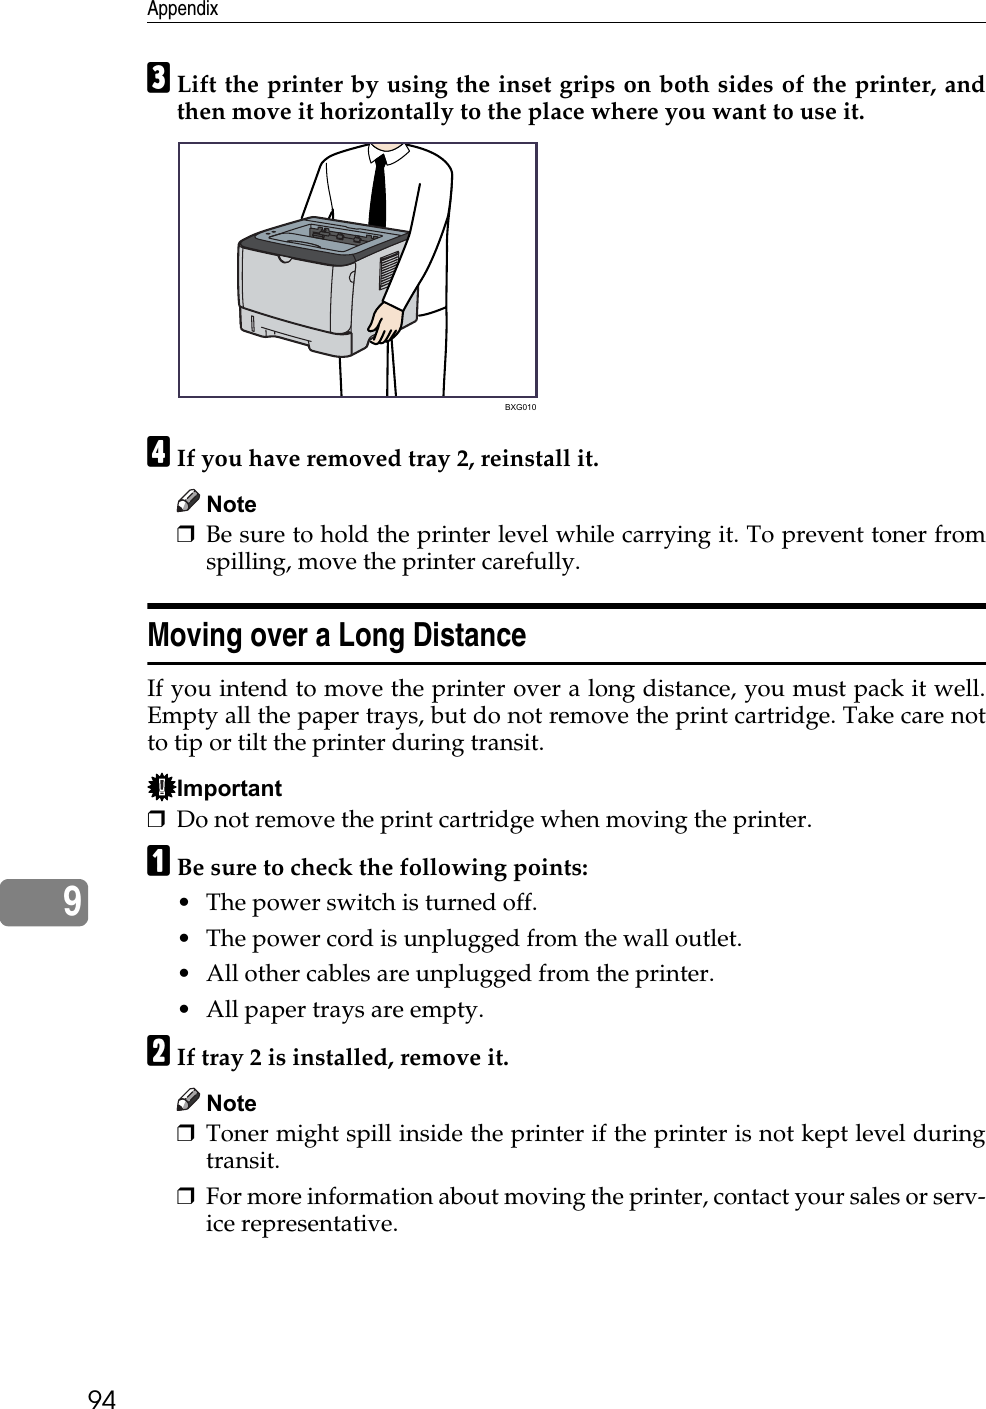
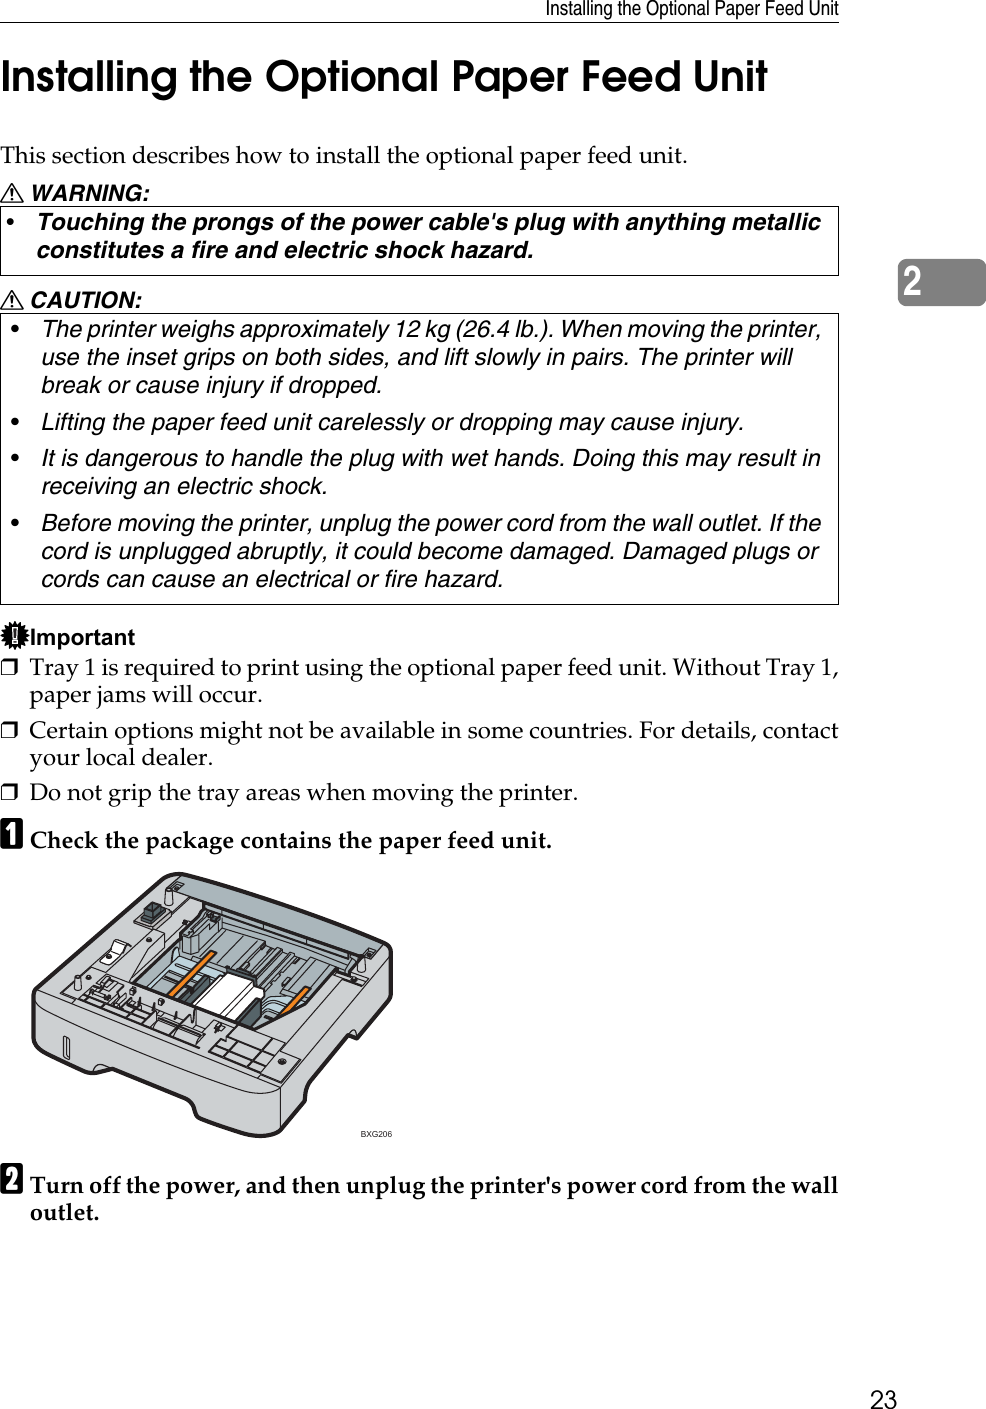
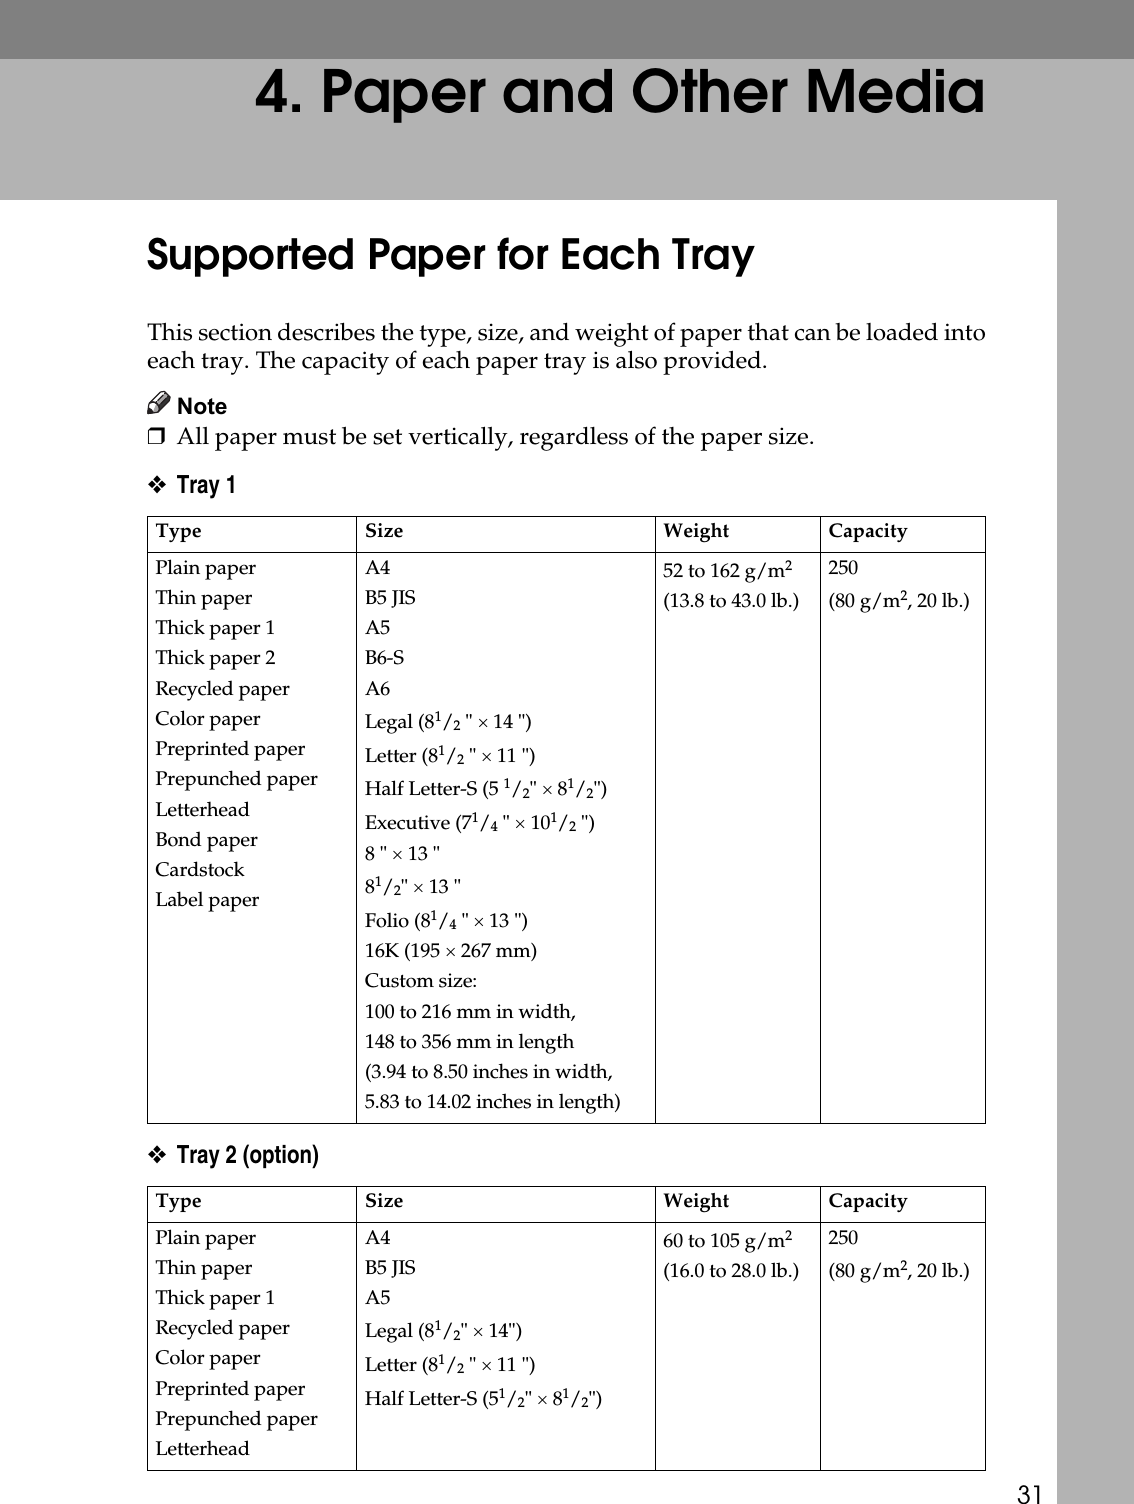
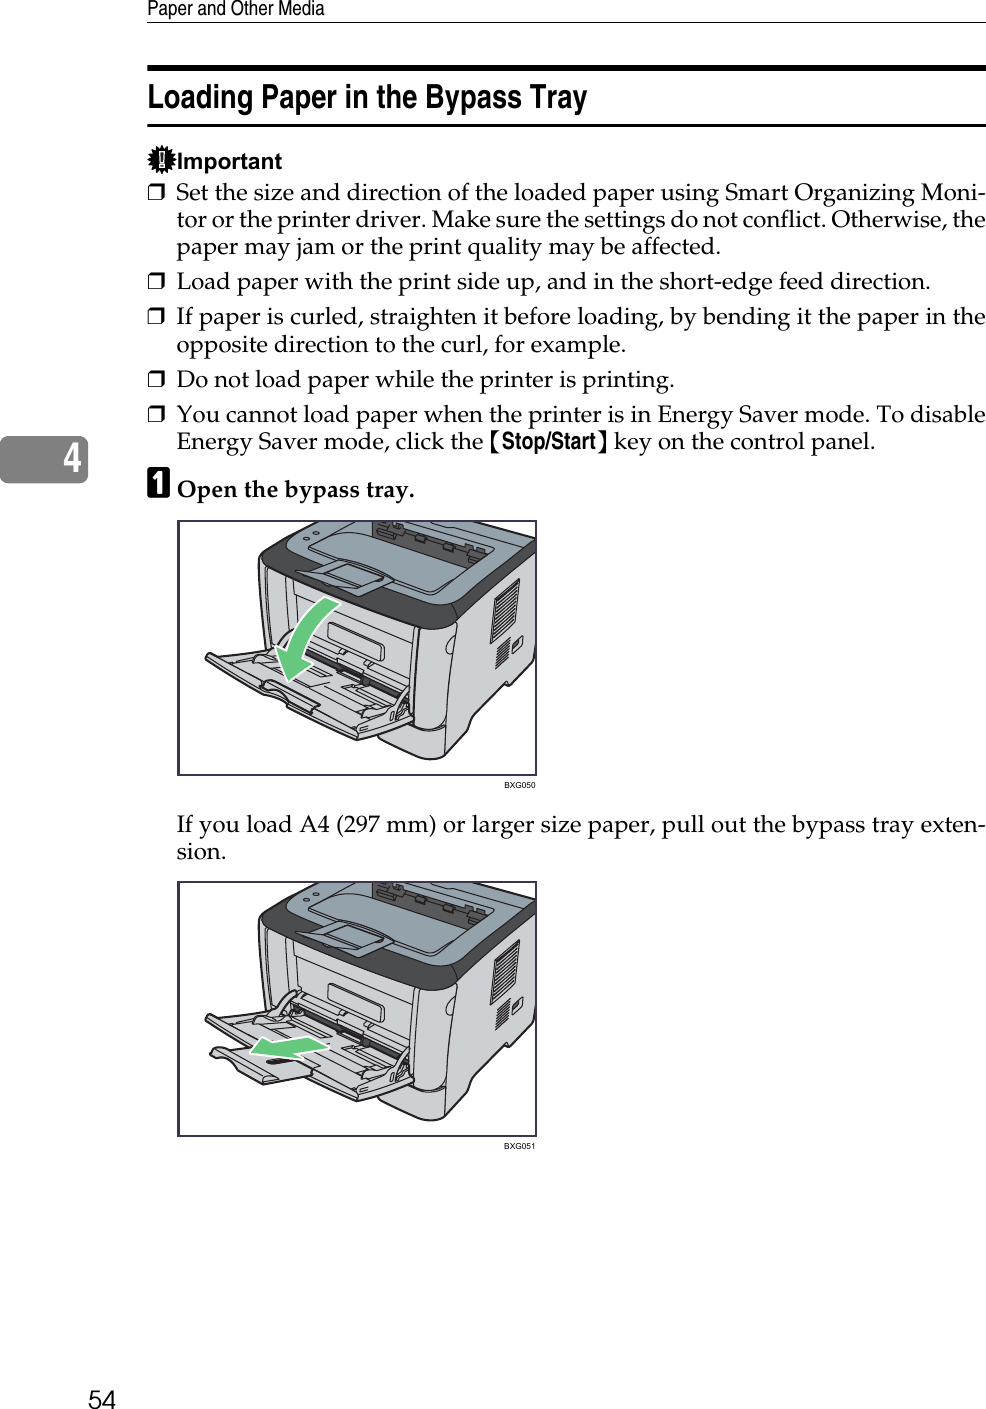
![7Opening ManualsThis section describes how to open the manuals. There are three ways to viewthe manuals.Opening from the desktop iconFollow the procedure below to open the manuals from the desktop icon.ADouble-click the manual icon on your desktop.The manual opens.Opening from the [Start] menuFollow the procedure below to open the manual from the [Start] menu.AOn the [Start] menu, point to [All Programs], point to [Product Name], and thenclick [Manual Name].The manual opens.Note❒The menu options may appear differently, depending on the options cho-sen during installation.Opening from the CD-ROMFollow the procedure below to open the manual from the CD-ROM.AInsert the CD-ROM into the CD-ROM drive.If you are using a computer running a Macintosh operating system, open“Manuals.htm” from the CD-ROM root directory.BSelect a language for the interface and a product, and then click [OK].CClick [Read HTML manuals] or [Read PDF manuals], and then select the manualyou want to read.If you want to read manuals from CD-ROM, click [Read HTML manuals].If you want to read manuals from CD-ROM, click [Read HTML manuals] or[Read PDF manuals]. The manual opens.](https://usermanual.wiki/Ricoh/PRSP34101.User-manual/User-Guide-1182584-Page-13.png)
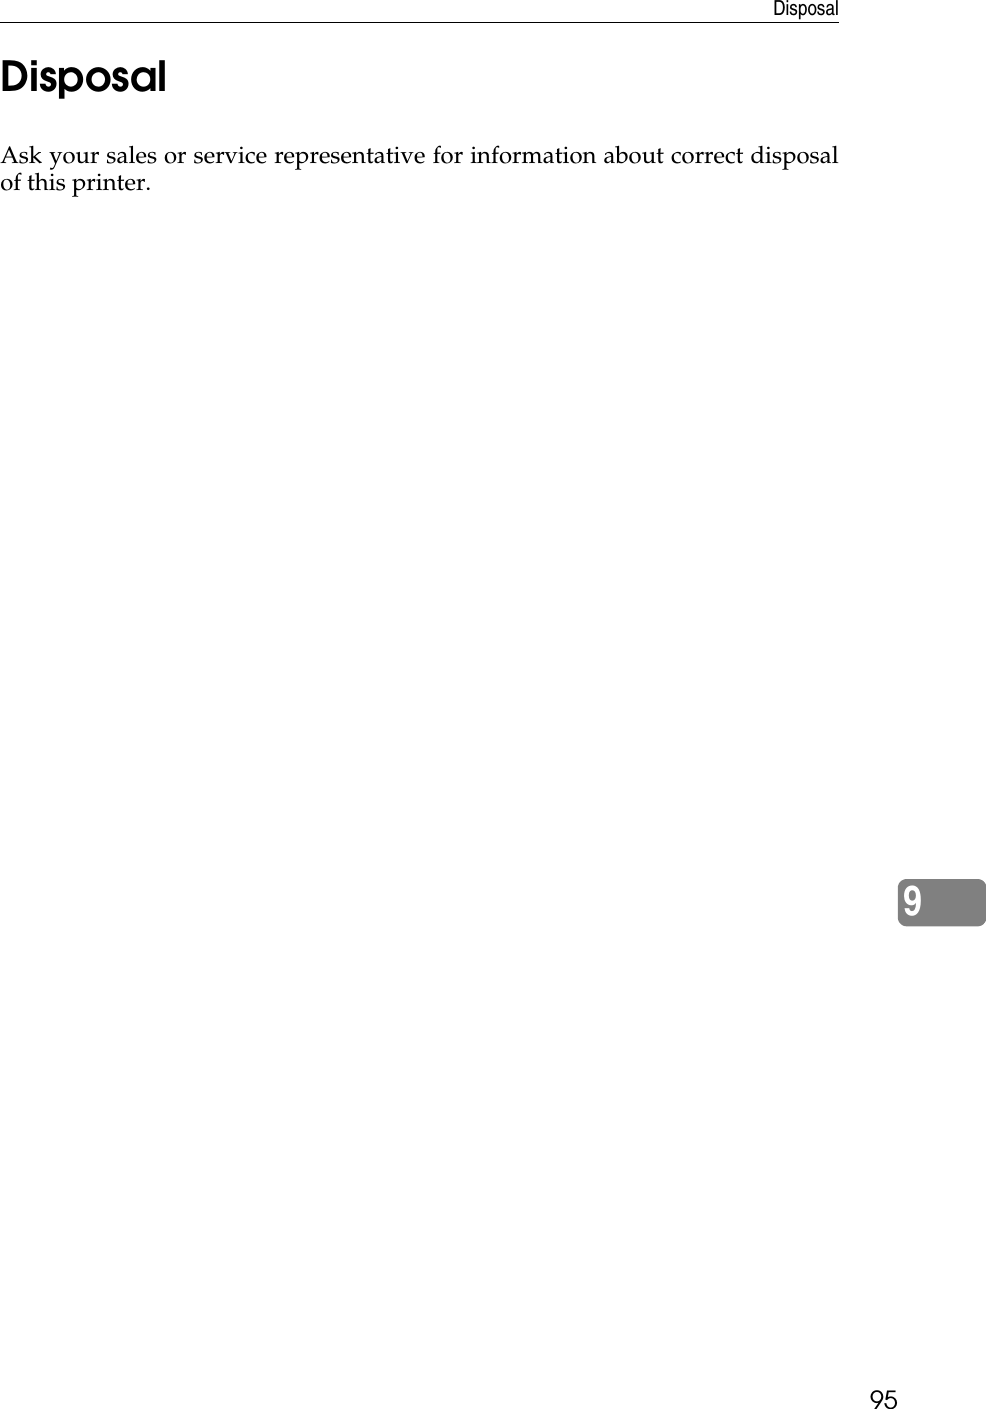
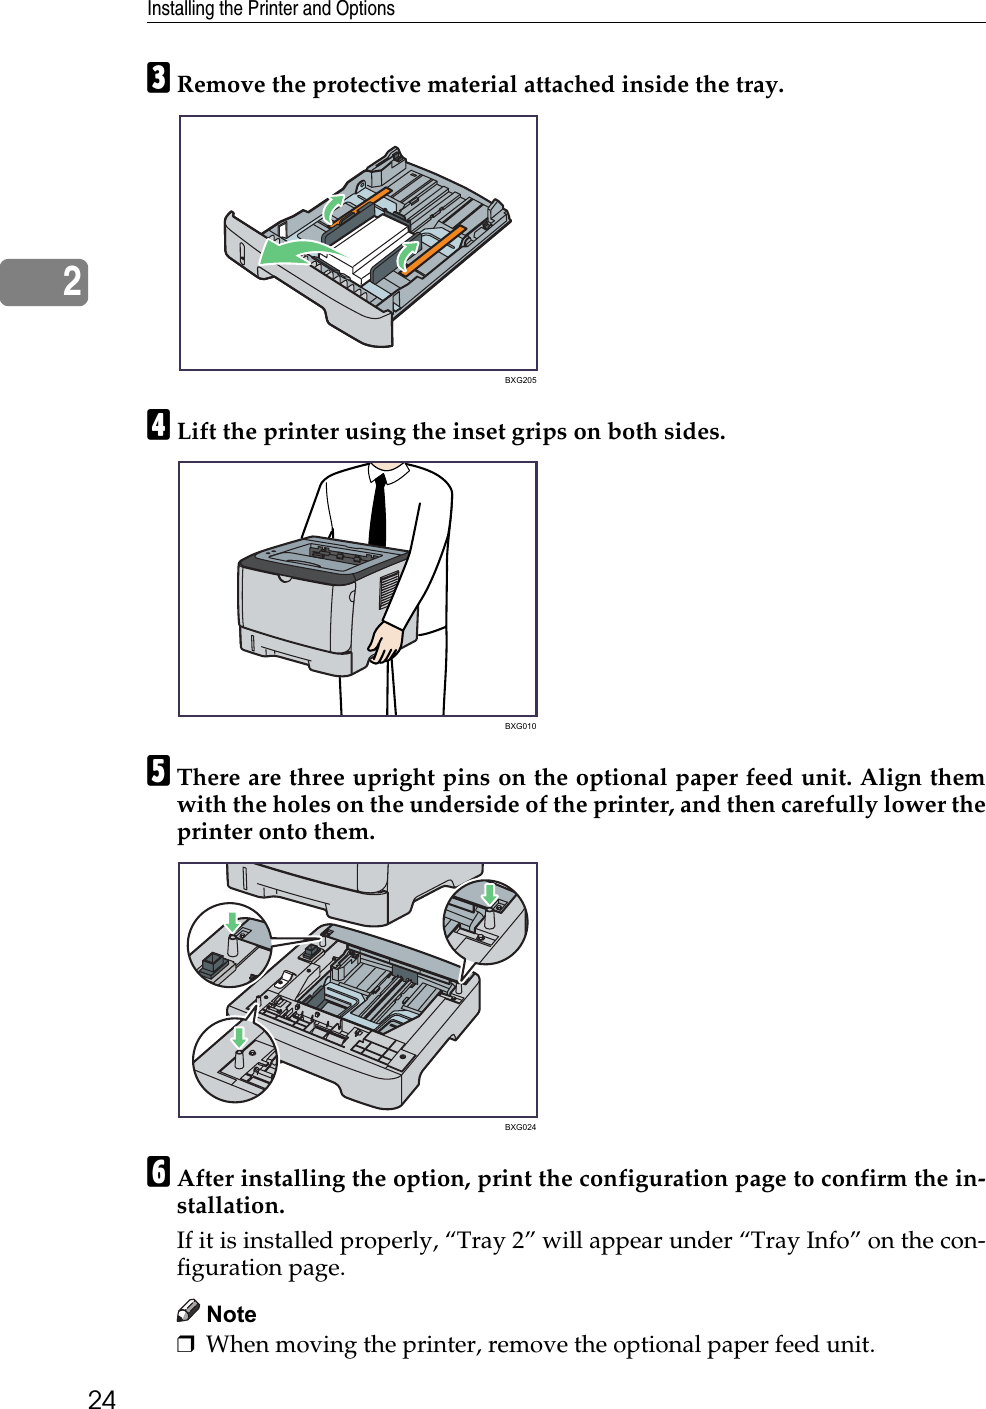
![8Note❒If you are using a computer running a Windows operating system, the CD-ROM opens automatically. However, AutoRun may not work under cer-tain operating system settings. If this is the case, launch “setup.exe” fromthe CD-ROM root directory.Removing Manuals from Your ComputerFollow the procedure below to remove manuals from your computer.AOn the [Start] menu, point to [All Programs], point to [Product Name], and thenclick [Uninstall].BFollow the instructions to remove the manual.CClick [Finish].Note❒The menu options may appear differently, depending on the options cho-sen during installation.](https://usermanual.wiki/Ricoh/PRSP34101.User-manual/User-Guide-1182584-Page-14.png)


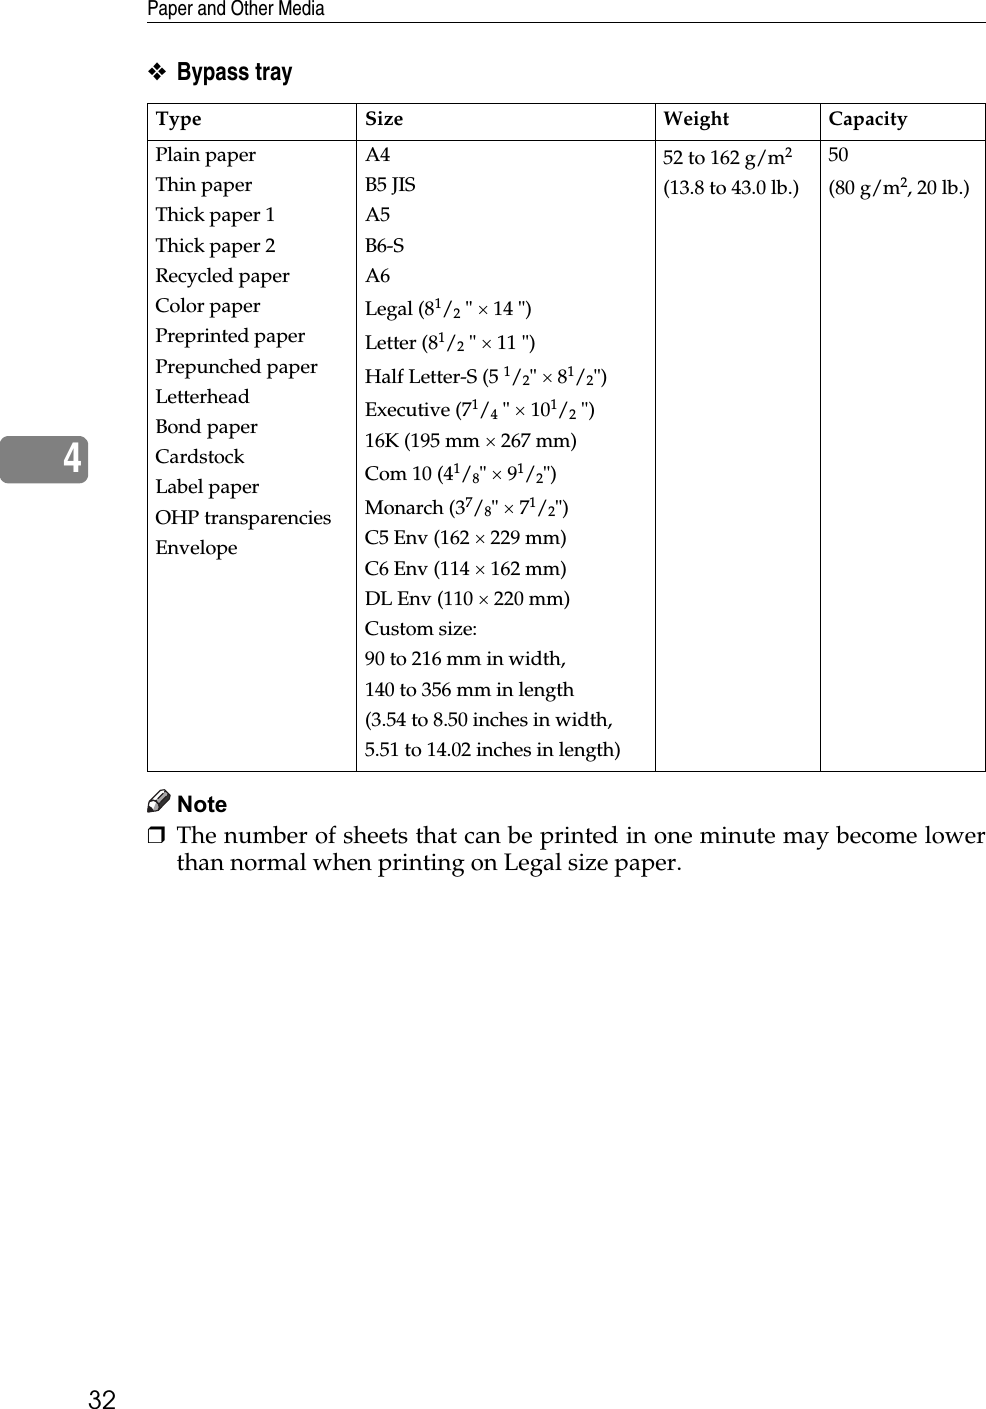
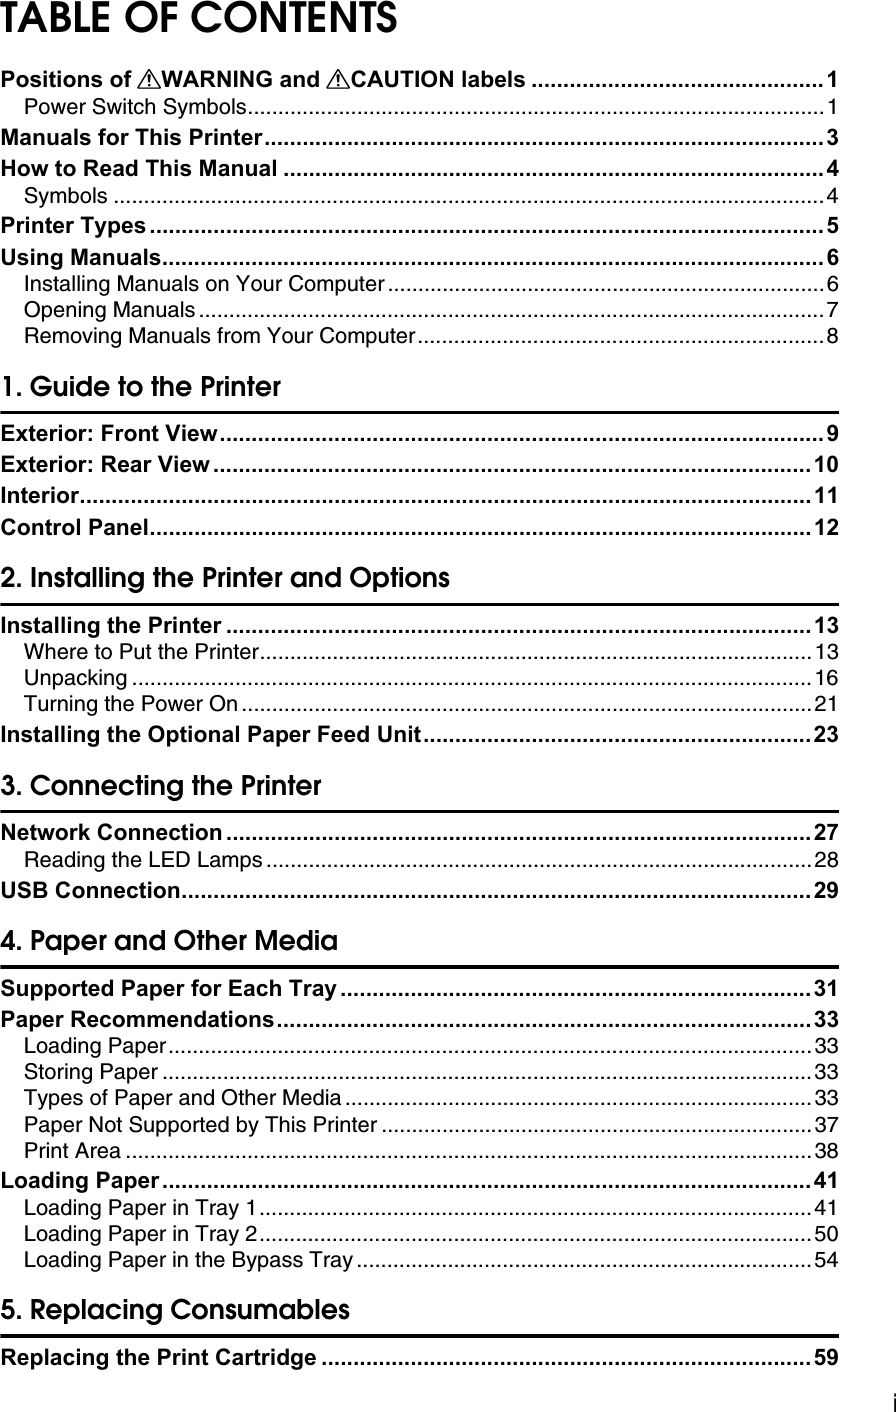
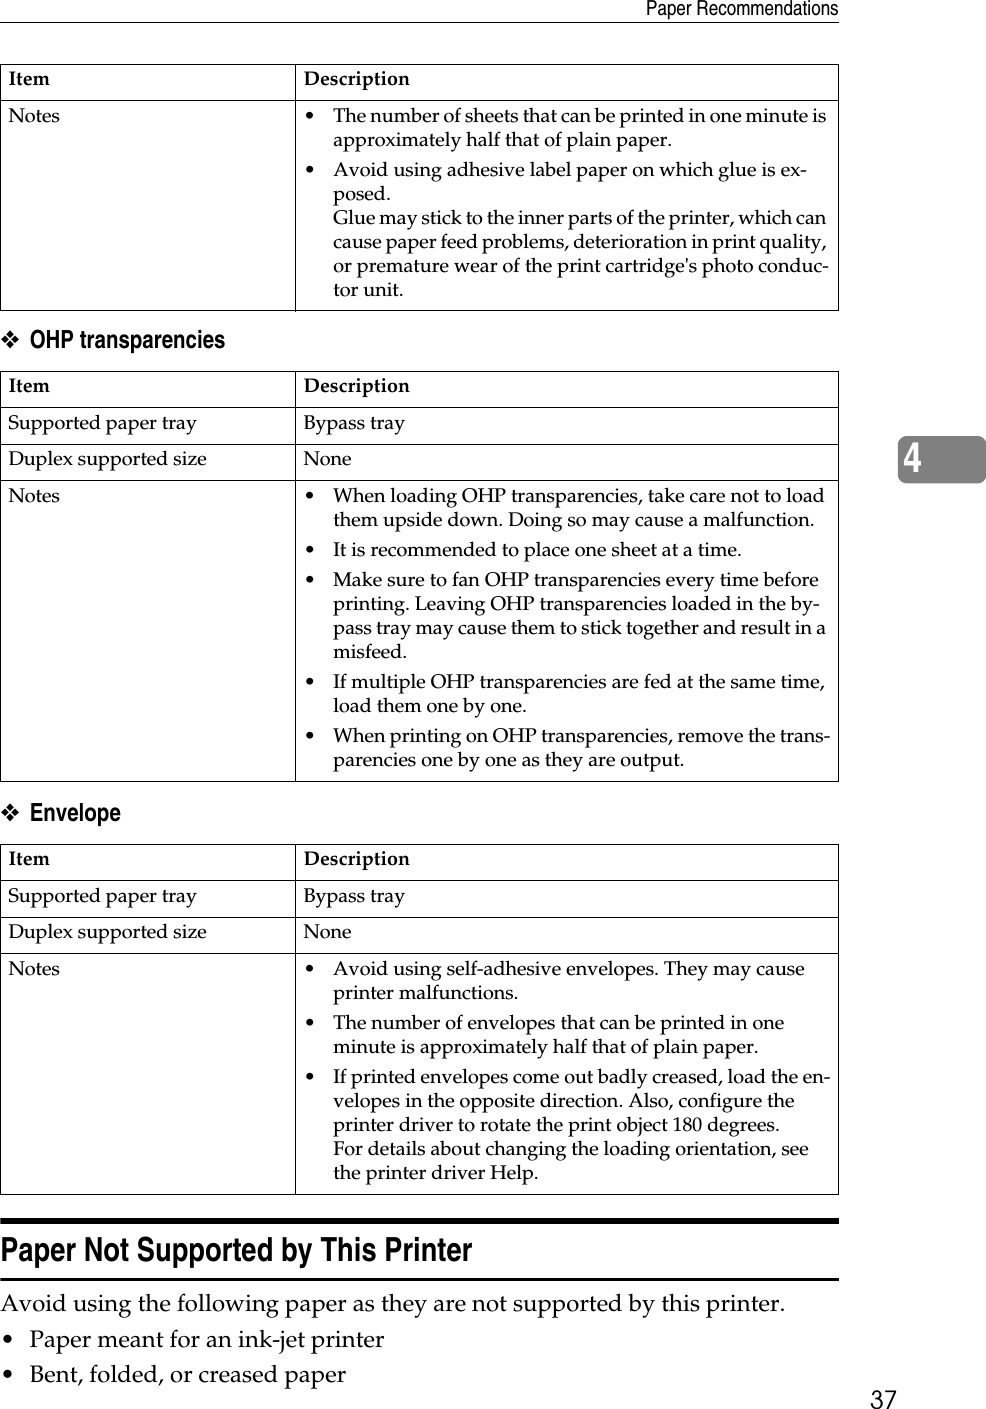
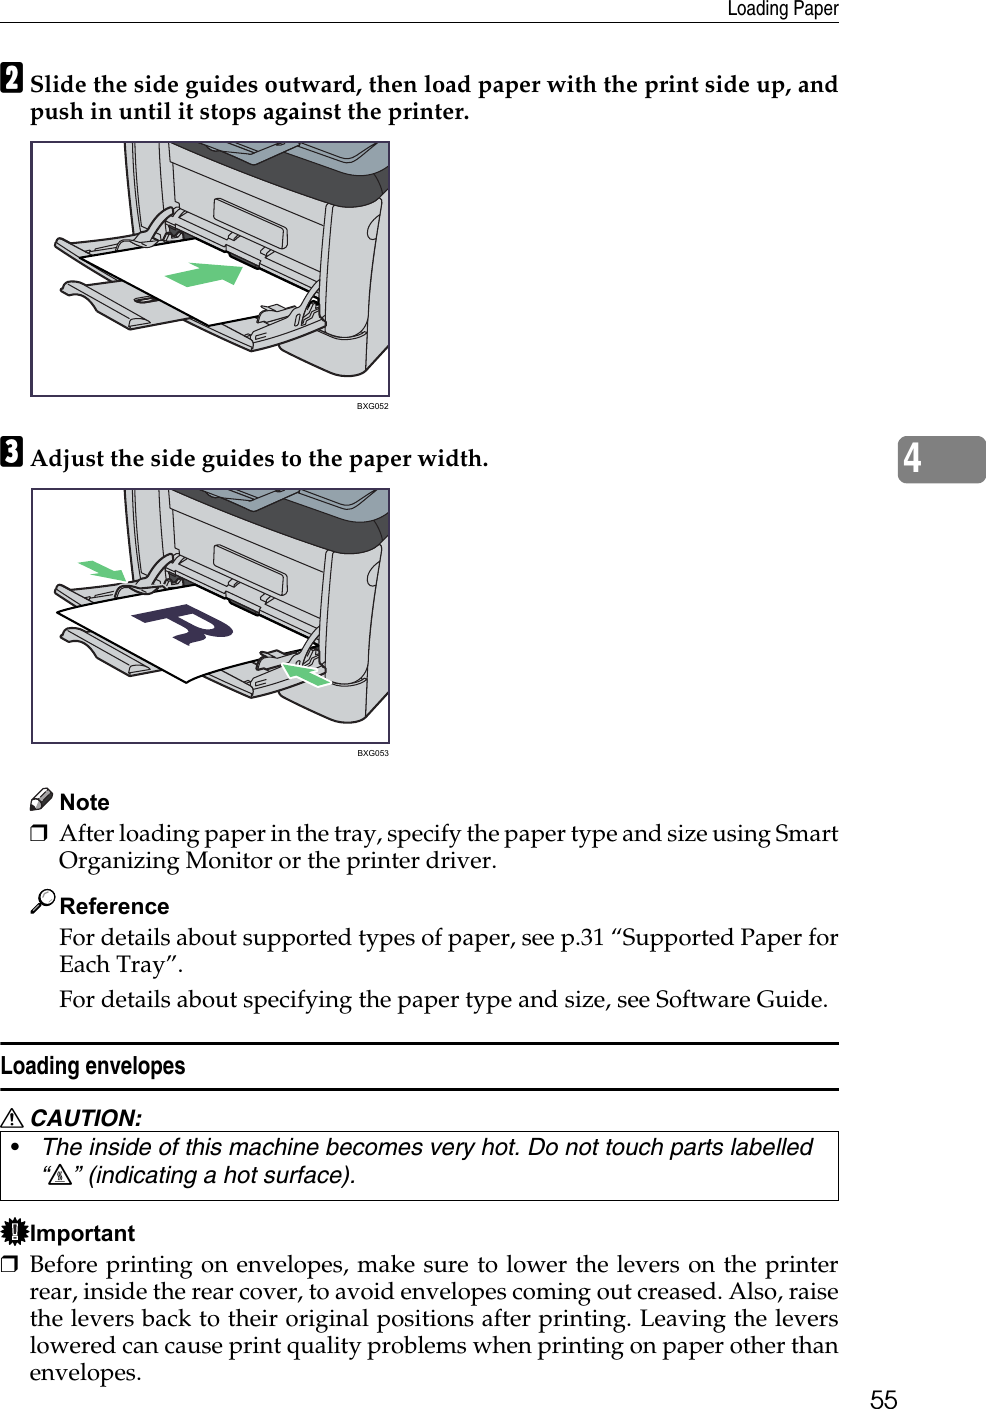
![Paper and Other Media344❖Printer driverOn the printer driver screen, click the [Paper] tab, and then select a paper typeunder [Paper Type:]. ❖Smart Organizing MonitorIn the Smart Organizing Monitor dialog box, click the [User Tools] tab, andthen click the [Printer Configuration] button. In the dialog box that appears, click the [Paper Input] tab, and then select thepaper type from the [Paper Type:] list for [Tray 1] and/or [Tray 2].Types of paper❖Plain paper❖Thick paper❖Thin paperItem DescriptionPaper thickness 65 to 99 g/m2 (17.1 to 26.5 lb.) Supported paper tray Any input tray can be used.Duplex supported size A4, Legal (81/2 " × 14 "), Letter (81/2" × 11 ")Item DescriptionPaper thickness 100 to 162 g/m2 (26.6 to 43.0 lb.)•[Thick Paper 1]: 100 to 130 g/m2 (26.6 to 34.6 lb.)•[Thick Paper 2]: 131 to 162 g/m2 (34.7 to 43.0 lb.)Supported paper tray • [Thick Paper 1]: Any input tray can be used (however, tray 2 only supports thick paper weighing 100 to 105 g/m2, 26.6 to 28.0 lb.).•[Thick Paper 2]: Tray 1 and bypass trayDuplex supported size •[Thick Paper 1] (thick paper weighing 100 to 105 g/m2, 26.6 to 28.0 lb., only): A4, Legal (81/2 " × 14 "), Letter (81/2 " × 11 ")•[Thick Paper 2]: NoneNotes • The number of sheets that can be printed in one minute is approximately half that of plain paper.• The number of sheets that can be printed in one minute may become lower than normal when printing on paper of the following sizes: A4, Legal (81/2 " × 14 "), Letter (81/2 " × 11 "), 8 " × 13 ", 81/2 " × 13 ", Folio (81/4 " × 13 "), or 16K (195 × 267 mm).• When using 135 g/m2 (35.9 lb.) or heavier paper, prints may be output with strong curls.• When using 135 g/m2 (35.9 lb.) or heavier paper, take prints from the output tray frequently.](https://usermanual.wiki/Ricoh/PRSP34101.User-manual/User-Guide-1182584-Page-40.png)
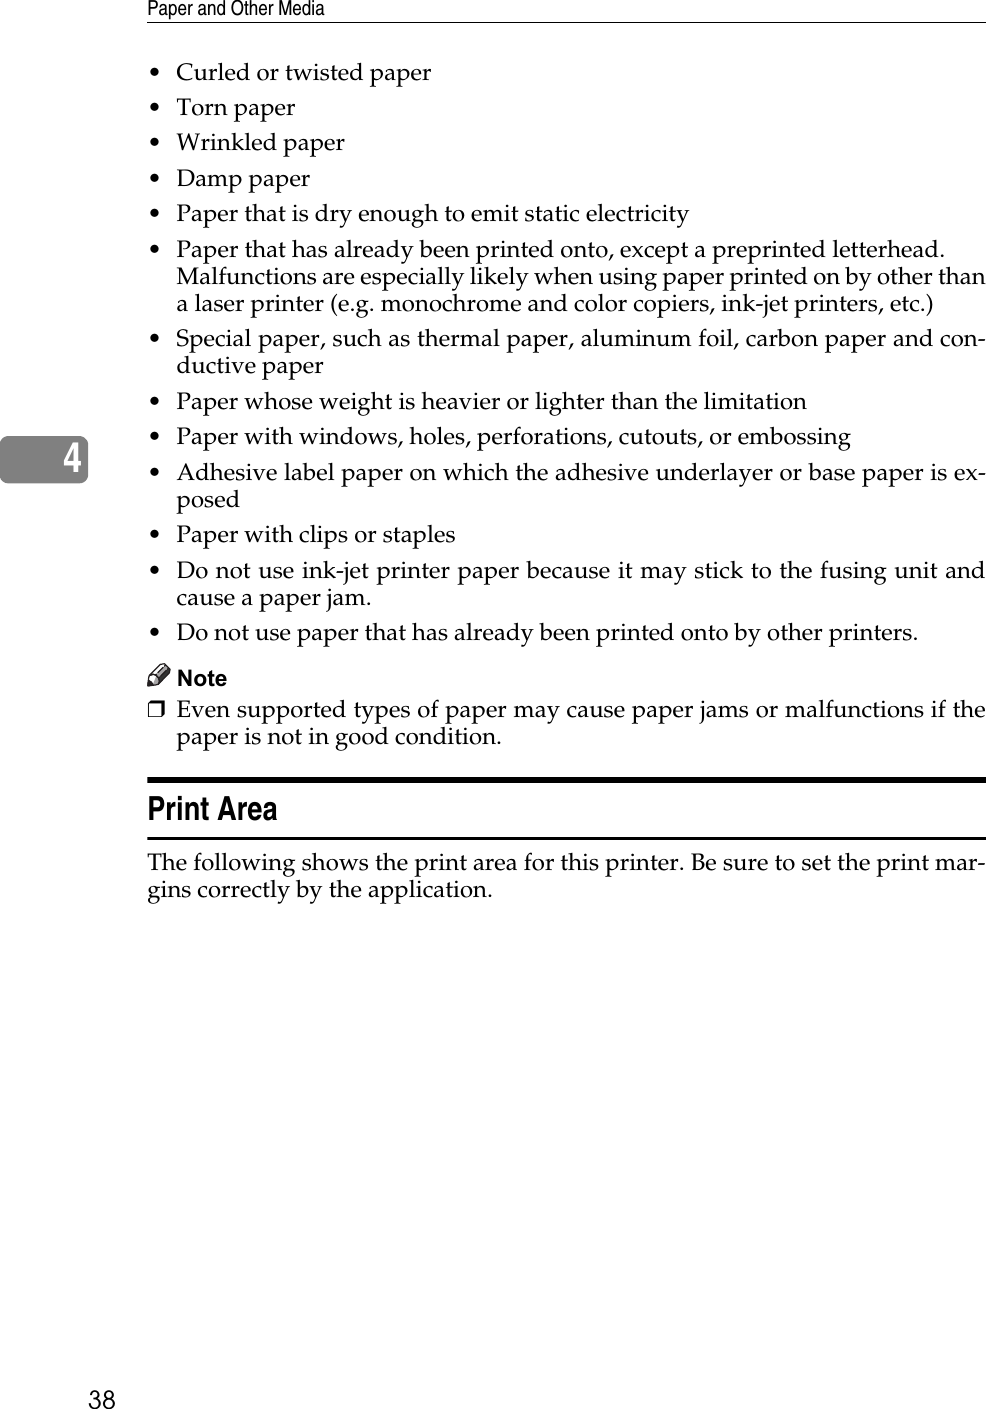
![Paper Recommendations354❖Recycled paper❖Color paper❖Preprinted paper❖Prepunched paper❖LetterheadItem DescriptionPaper thickness 52 to 64 g/m2 (13.8 to 17.0 lb.)Supported paper tray Any input tray can be used (however, tray 2 only supports thin paper weighing 60 to 64 g/m2, 16.0 to 17.0 lb.).Duplex supported size A4, Legal (81/2 " × 14 "), Letter (81/2 " × 11 ")Item DescriptionPaper thickness 75 to 90 g/m2 (20 to 24.0 lb.)Supported paper tray Any input tray can be used.Duplex supported size A4, Legal (81/2 " × 14 "), Letter (81/2 " × 11 ")Notes If the paper thickness is outside the specified range, select [Thin Paper], [Thick Paper 1] or [Thick Paper 2].Item DescriptionPaper thickness 75 to 90 g/m2 (20 to 24.0 lb.)Supported paper tray Any input tray can be used.Duplex supported size A4, Legal (81/2 " × 14 "), Letter (81/2 " × 11 ")Notes If the paper thickness is outside the specified range, select [Thin Paper], [Thick Paper 1] or [Thick Paper 2].Item DescriptionPaper thickness 75 to 90 g/m2 (20 to 24.0 lb.)Supported paper tray Any input tray can be used.Duplex supported size A4, Legal (81/2 " × 14 "), Letter (81/2 " × 11 ")Notes If the paper thickness is outside the specified range, select [Thin Paper], [Thick Paper 1] or [Thick Paper 2].Item DescriptionPaper thickness 75 to 90 g/m2 (20 to 24.0 lb.)Supported paper tray Any input tray can be used.Duplex supported size A4, Legal (81/2 " × 14 "), Letter (81/2 " × 11 ")Notes If the paper thickness is outside the specified range, select [Thin Paper], [Thick Paper 1] or [Thick Paper 2].](https://usermanual.wiki/Ricoh/PRSP34101.User-manual/User-Guide-1182584-Page-41.png)
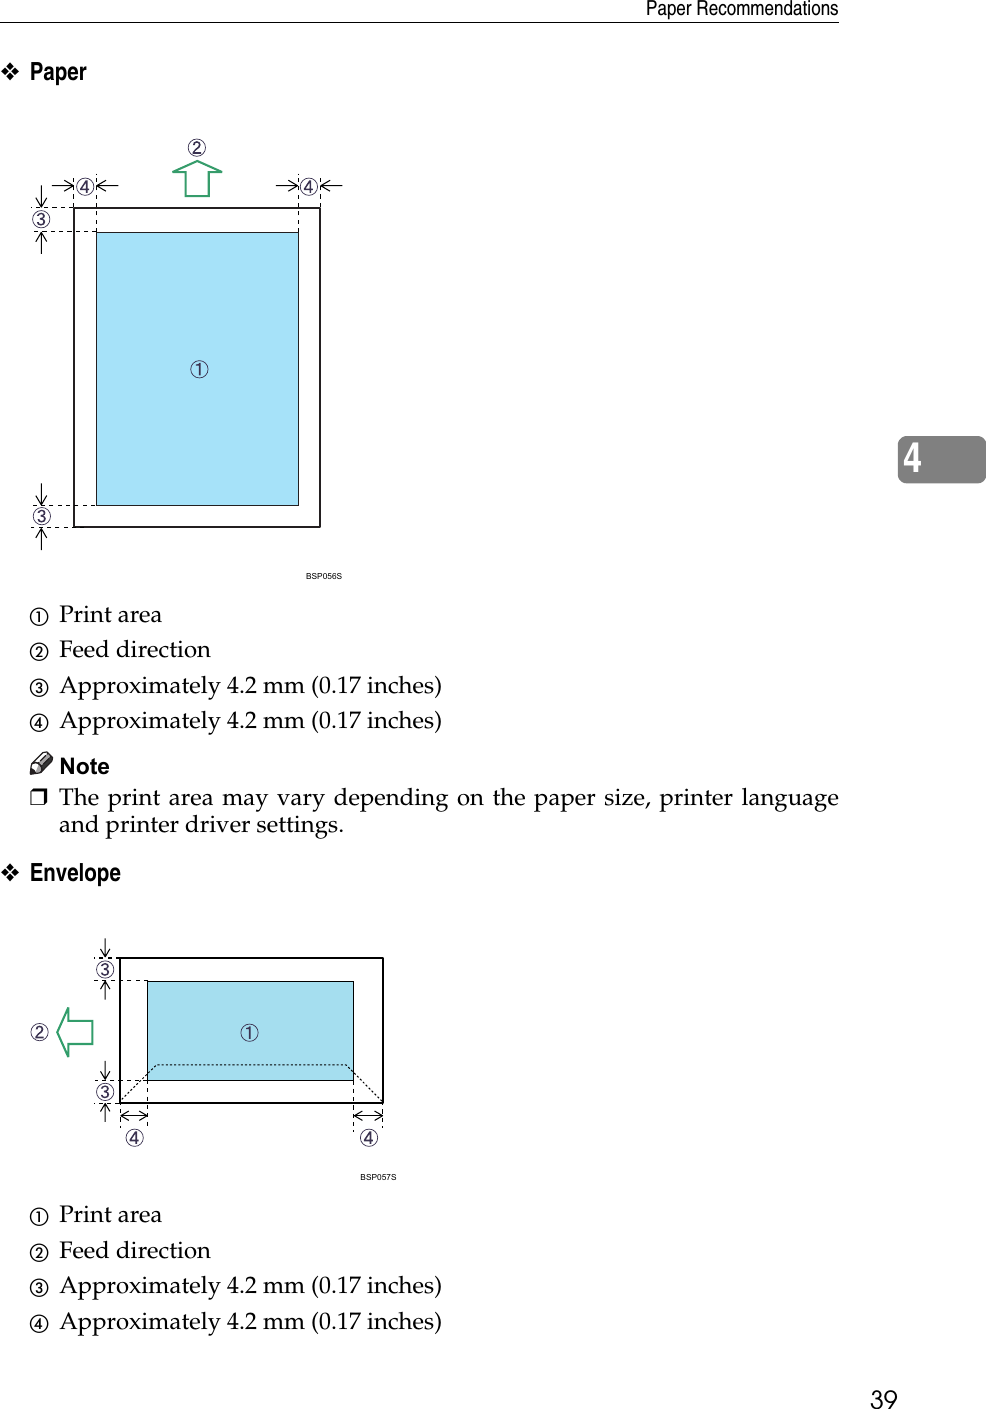
![Paper and Other Media364❖Bond paper❖Cardstock❖Label paperItem DescriptionPaper thickness 75 to 90 g/m2 (20 to 24.0 lb.)Supported paper tray Any input tray can be used.Duplex supported size A4, Legal (81/2 " × 14 "), Letter (81/2 " × 11 ")Notes Paper that has a thickness outside the specified range cannot be printed onto.Item DescriptionPaper thickness 105 to 160 g/m2 (28.0 to 42.6 lb.)Supported paper tray Tray 1 and bypass trayDuplex supported size NoneNotes • The number of sheets that can be printed in one minute is approximately half that of plain paper.• When using 135 g/m2 (35.9 lb.) or heavier paper, prints may be output with strong curls.• When using 135 g/m2 (35.9 lb.) or heavier paper, take prints from the output tray frequently.• If the paper thickness is outside the specified range, select [Plain Paper] or [Thick Paper 1].Item DescriptionPaper thickness 105 to 160 g/m2 (28.0 to 42.6 lb.)Supported paper tray Tray 1 and bypass trayDuplex supported size NoneNotes • The number of sheets that can be printed in one minute is approximately half that of plain paper.• When using 135 g/m2 (35.9 lb.) or heavier paper, prints may be output with strong curls.• When using 135 g/m2 (35.9 lb.) or heavier paper, take prints from the output tray frequently.• Paper thicker than 160 g/m2 cannot be printed onto.Item DescriptionSupported paper tray Tray 1 and bypass trayDuplex supported size None](https://usermanual.wiki/Ricoh/PRSP34101.User-manual/User-Guide-1182584-Page-42.png)


![697. TroubleshootingError & Status Messages on Smart Organizing MonitorThis section explains what the messages that appear on the Smart OrganizingMonitor dialog box mean and what to do when a particular message appears.Message Explanation Recommended ActionAn error has occurred with the network device.The printer detected the net-work device error.Turn off the power, and then turn it on again.If the error occurs again, con-tact your sales or service repre-sentative.An error has occurred with the USB device.The printer detected the USB device error.Turn off the power, and then turn it on again.If the error occurs again, con-tact your sales or service repre-sentative.Cover OpenClose the indicated cover.[Front or Rear Cover]The front cover or rear cover is open.Open and then close the front cover or rear cover.[Feed Roller] has reached to replacing period.The feed roller is no longer us-able, and must be replaced.Contact your sales or service representative.Functional problem within the printer.Turn power switch off, then on.If the error appears again, please call service.SCXXXA fatal hardware error has oc-curred, and the printer cannot function.Turn off the power, and then turn it on again.If the error occurs again, con-tact your sales or service repre-sentative.[Fusing Unit] has reached to replacing period.The fusing unit is no longer usable, and must be replaced.Contact your sales or service representative.Independent-supplier toner has been set.A non-supported print car-tridge is installed.Remove and replace it with a print cartridge specified by an authorized dealer.No PaperLoad paper in the indicated paper source tray.[Bypass Tray]The indicated tray is out of paper.Load paper into the indicated paper tray.No Response from I/O De-viceCheck the cable, power cord, and main switch.No information has been re-ceived from the printer.Check the main power switch is turned on and the power cord is securely connected. Check the USB or network cables are securely connected also.](https://usermanual.wiki/Ricoh/PRSP34101.User-manual/User-Guide-1182584-Page-75.png)
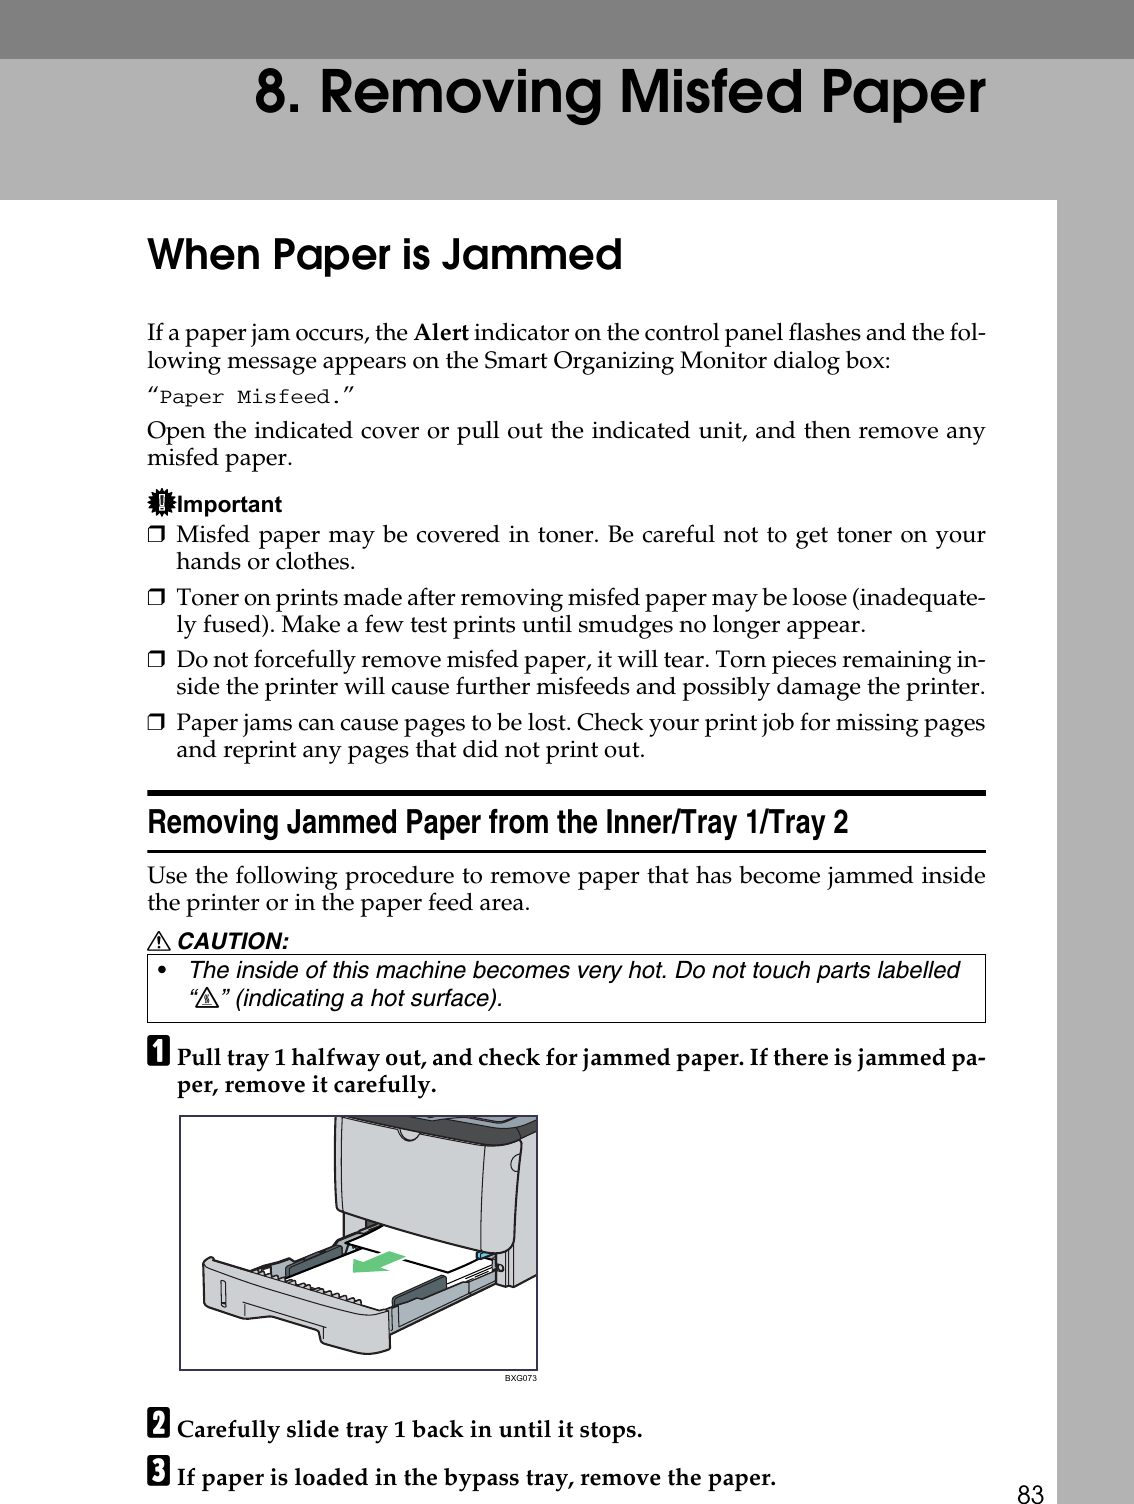
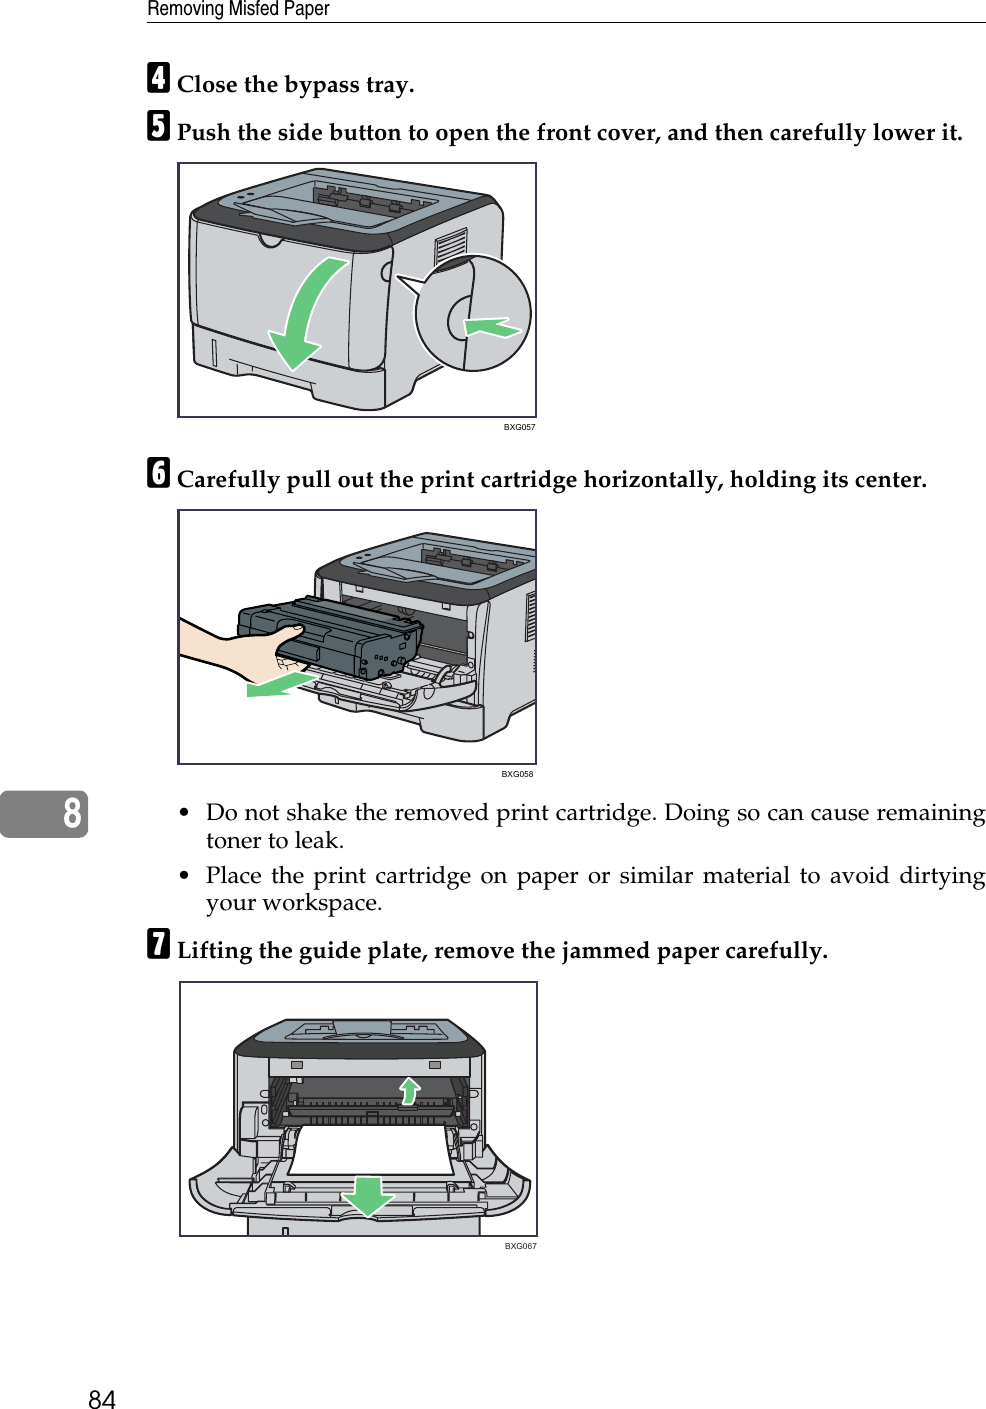
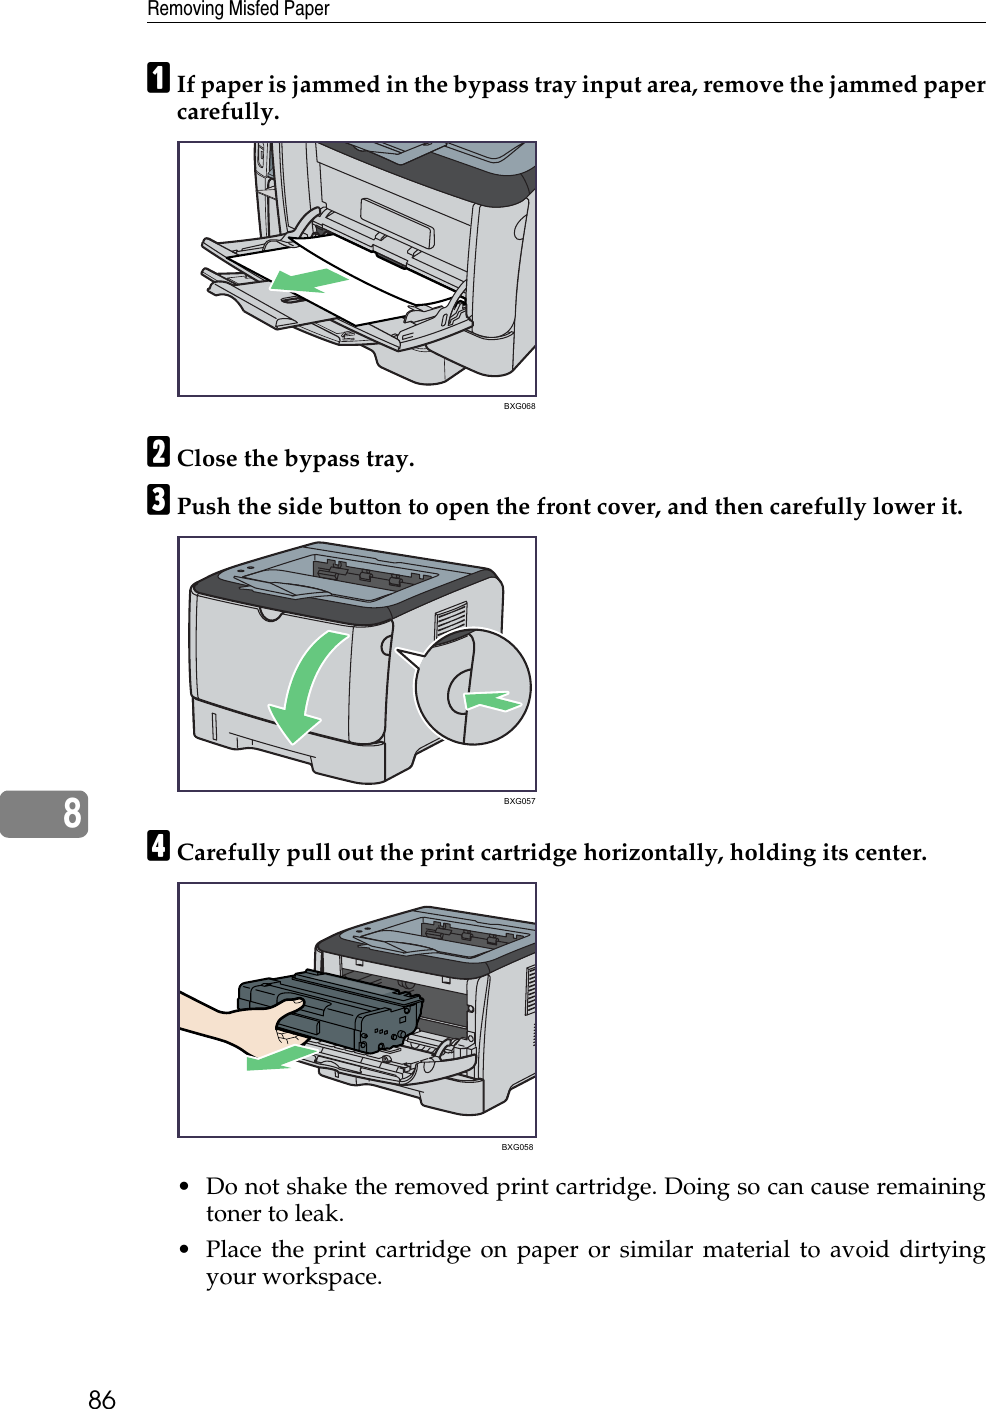
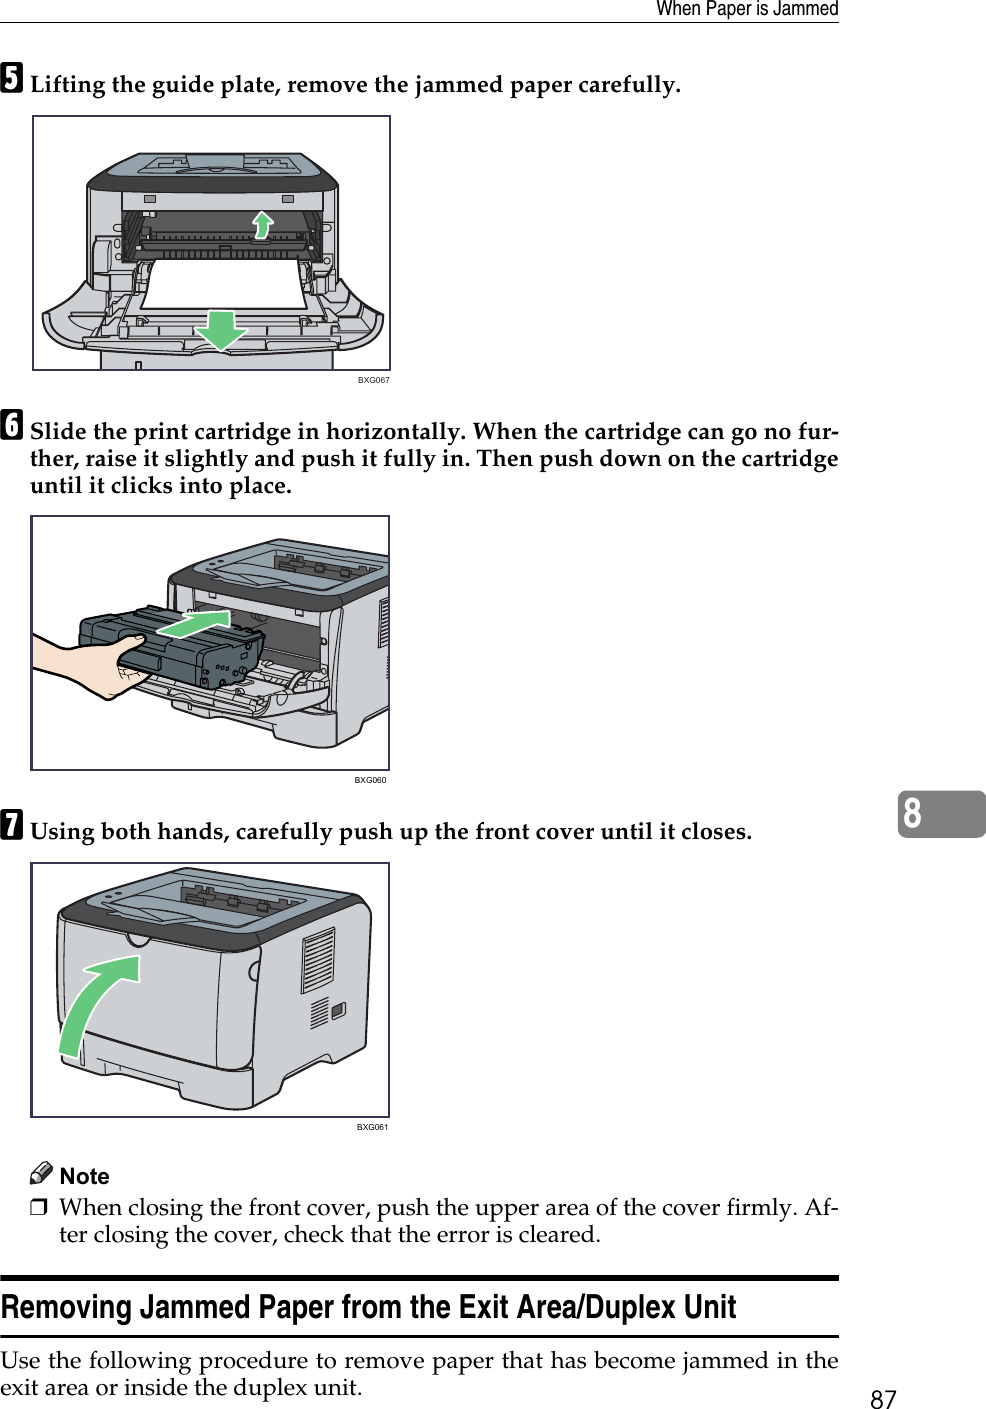
![Troubleshooting707No TonerToner has almost run out.Shortly printing becomes not available. Please keep Print Cartridge handy.The printer is out of toner. Replace the print cartridge.See p.59 “Replacing the Print Cartridge”.No Toner or Waste Toner fullNo printing is available.Open the indicated cover, and then replace Print Car-tridge.[Front Cover]The printer is out of toner. Replace the print cartridge.See p.59 “Replacing the Print Cartridge”.Paper MisfeedOpen the indicated cover, and pull out Print Cartridge. Then remove any misfed pa-per.[Front Cover]If no paper, pull out Tray 1, then remove any misfed pa-per.There is a misfeed in the printer.(Inner jam)(Tray 1 jam)Remove the misfed paper.See p.83 “Removing Jammed Paper from the Inner/Tray 1/Tray 2”.Paper MisfeedOpen the indicated cover, and then remove any misfed paper.[Rear Cover]If no paper, open Front Cover and pull out Print Cartridge, then remove any misfed pa-per.There is a misfeed in the printer(Outer jam).Remove the misfed paper.See p.87 “Removing Jammed Paper from the Exit Area/Du-plex Unit”.Paper MisfeedPull out the loaded paper from the indicated unit, and then remove any misfed pa-per.[Bypass Tray]If no paper, open Front Cover and pull out Print Cartridge, then remove any misfed pa-per.There is a misfeed in the printer.(Bypass tray jam)Remove the misfed paper.See p.85 “Removing Jammed Paper from the Bypass Tray”.Paper MisfeedPull out the indicated unit, and push Duplex Path Re-lease Lever away. Then re-move any misfed paper.[Tray 1]There is a misfeed in the printer.(Duplex jam)Remove the misfed paper.See p.87 “Removing Jammed Paper from the Exit Area/Du-plex Unit”.Message Explanation Recommended Action](https://usermanual.wiki/Ricoh/PRSP34101.User-manual/User-Guide-1182584-Page-76.png)
![Error & Status Messages on Smart Organizing Monitor717Paper MisfeedPull out the indicated unit, and then remove any misfed paper.[Tray 2]If no paper, open Front Cover and pull out Print Cartridge, then remove any misfed pa-per.There is a misfeed in the printer.(Tray 2 jam)Remove the misfed paper.See p.83 “Removing Jammed Paper from the Inner/Tray 1/Tray 2”.Paper Size MismatchPaper of the selected paper size is not loaded in the indi-cated paper source tray.Check the indicated tray.[Bypass Tray]The paper size setting in the tray differs from that of actual paper size in the tray.Load paper of the selected size in the tray, and then change the paper size setting with printer driver.Paper Size MismatchPaper of the selected paper size is not loaded in the indi-cated paper source tray.Check the indicated tray.[Tray 1] or [Tray 2]The paper size setting in the tray differs from that of actual paper size in the tray.Load paper of the selected size in the tray, and then change the paper size setting with Smart Organizing Monitor.Perform one of the following procedures if there is a print job queued for processing:• Cancel the print job by pressing the {Job Reset} key.• Apply form feed by press-ing the {Stop/Start} key.• Change the paper settings in Web Image Monitor and continue printing.For details, see “Form Feed”, Software Guide.Paper Size MismatchPaper of the selected paper size is not supported for the [Duplex] feature.2-sided printing could not be performed because the tray does not contain the valid size paper, which are A4, Letter or Legal.Specify the tray containing the A4, Letter or Legal size paper in the printer driver setting.See Software Guide.Paper Type MismatchPaper of the selected type is not loaded in the indicated paper source tray.Check the indicated tray.[Bypass Tray]The paper type setting in the tray differs from that of actual paper type in the tray.Load paper of the selected type in the tray, and then change the paper type setting with printer driver.Message Explanation Recommended Action](https://usermanual.wiki/Ricoh/PRSP34101.User-manual/User-Guide-1182584-Page-77.png)
![Troubleshooting727Paper Type MismatchPaper of the selected type is not loaded in the indicated paper source tray.Check the indicated tray.[Tray 1] or [Tray 2]The paper type setting in the tray differs from that of actual paper type in the tray.Load paper of the selected type in the tray, and then change the paper type setting with Smart Organizing Monitor.Perform one of the following procedures if there is a print job queued for processing:• Cancel the print job by pressing the {Job Reset} key.• Apply form feed by press-ing the {Stop/Start} key.• Change the paper settings in Web Image Monitor and continue printing.For details, see “Form Feed”, Software Guide.Paper Type MismatchPaper of the selected paper type is not supported for the [Duplex] feature.You cannot select duplex printing if the paper type is set to [Thick Paper 2], [Bond pa-per], [Cardstock], [Label paper], [OHP transparencies], or [Enve-lope].Select a paper type that allows duplex printing.See p.34 “Types of paper”.Print Cartridge is near emp-ty.The print cartridge is almost empty.Prepare a new print cartridge.Printing has been interrupt-ed because of the memory overflow.The data is too large or com-plex to print. Especially when performing printing on Legal size paper under certain print quality setting, print data be-comes large and the job may be canceled.If using the PCL 6 printer driv-er, set [Resolution] in [Print Quali-ty] to [600 x 600 dpi]. If using the PostScript 3 printer driver, set [Print Quality] in [Printer Features] to [600 x 600 dpi].[Transfer Roller] has reached to replacing period.The transfer roller is no longer usable, and must be replaced.Contact your sales or service representative.Tray Not DetectedThe selected paper source tray is not set, or is not set properly.Check the indicated tray.[Tray 1] or [Tray 2]The indicated paper input tray is not installed correctly, or not installed.Install the indicated paper in-put tray correctly.Tray Not Detected or No Pa-perThe indicated paper source tray is not set properly, or no paper loaded.Check the indicated tray.[Tray 1] or [Tray 2]• The indicated paper input tray is not installed cor-rectly, or not installed.• The indicated tray is out of paper.• Install the indicated paper input tray correctly.• Load paper into the indicat-ed paper tray.Message Explanation Recommended Action](https://usermanual.wiki/Ricoh/PRSP34101.User-manual/User-Guide-1182584-Page-78.png)
![Error & Status Messages on Smart Organizing Monitor737Unit Not DetectedOpen the indicated cover, and then check Print Car-tridge.[Front Cover]The print cartridge is not set correctly, or not set.Set the print cartridge correctly.See p.59 “Replacing the Print Cartridge”.Message Explanation Recommended Action](https://usermanual.wiki/Ricoh/PRSP34101.User-manual/User-Guide-1182584-Page-79.png)
![Troubleshooting767*1 (n) is the number of printers connected.Windows 2000AOn the [Start] menu, point to [Settings], and then click [Printers].BClick to select the icon of the printer. Next, on the [File] menu, click [Proper-ties].CClick the [Ports] tab.DCheck the [Print to the following port] box to confirm that the correct port is se-lected.If the port (such as LPT1) is not correct, reinstall the driver.ReferenceFor details about installation and port settings, see Software Guide.Windows XP Professional, and Windows Server 2003/2003 R2AOn the [Start] menu, click [Printers and Faxes].BClick to select the icon of the printer. Next, on the [File] menu, click [Proper-ties].CClick the [Ports] tab.DCheck the [Print to the following port(s).] box to confirm that the correct port isselected.If the port such as LPT1 is not correct, reinstall the driver.ReferenceFor details about installation and port setting, see Software Guide.Windows XP Home EditionAOn the [Start] menu, click [Control Panel].BClick [Printers and Other Hardware].CClick [Printers and Faxes].DClick to select the icon of the printer. Next, on the [File] menu, click [Proper-ties].EClick the [Ports] tab.FCheck the [Print to the following port(s).] box to confirm that the correct port isselected.](https://usermanual.wiki/Ricoh/PRSP34101.User-manual/User-Guide-1182584-Page-82.png)
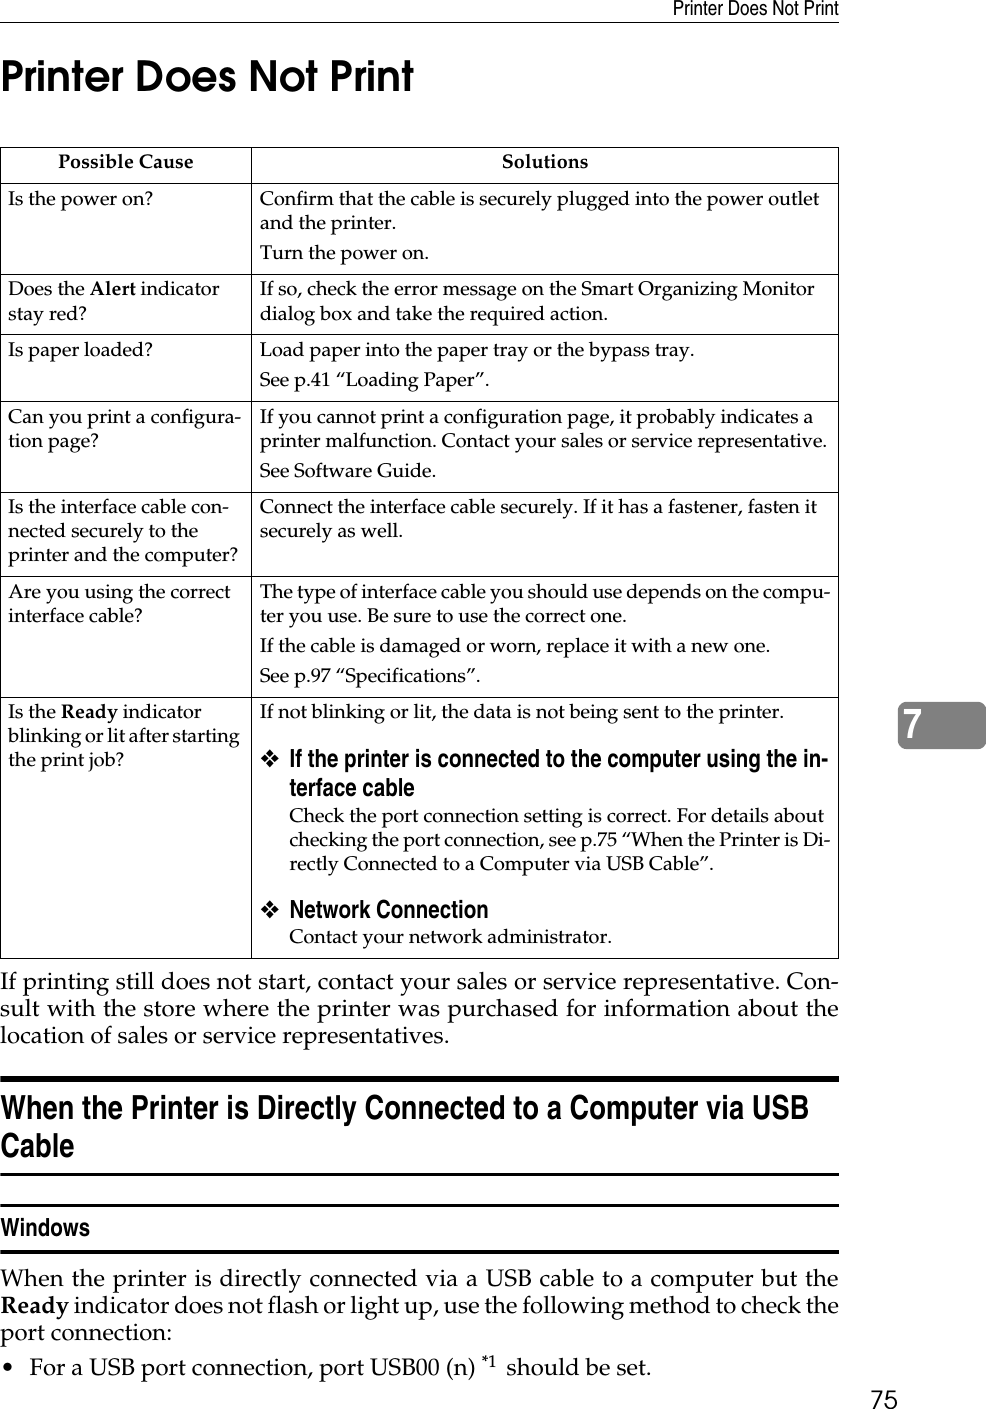
![Printer Does Not Print777If the port such as LPT1 is not correct, reinstall the driver.ReferenceFor details about installation and port setting, see Software Guide.Windows Vista, and Widows Server 2008AOn the [Start] menu, click [Control Panel], and then click [Printer] in the “Hard-ware and Sound”.BClick to select the icon of the printer. Next, on the [File] menu, click [Proper-ties].CClick the [Ports] tab.DCheck the [Print to the following port(s).] box to confirm that the correct port isselected.If the port such as LPT1 is not correct, reinstall the driver.ReferenceFor details about installation and port setting, see Software Guide.Mac OS XWhen the printer is connected to Mac OS X and the Ready indicator does notflash or light up, try the following procedures to check the port connection.•Use [About This Mac] to check the USB information.• Use the printer browser to check if the printer is displayed.Using [About This Mac] AClick Apple Menu, and then select [About This Mac].BClick [More Info].CUnder [Contents], for [Hardware], select [USB].Using the printer browserAIn the menu bar, click [Go], select [Application], and then select [Utilities].BDouble click [Printer Setup Utility].CClick [Add].The printer browser starts.Confirm the printer is displayed on the browser. If it is not, reinstall the driv-er.](https://usermanual.wiki/Ricoh/PRSP34101.User-manual/User-Guide-1182584-Page-83.png)
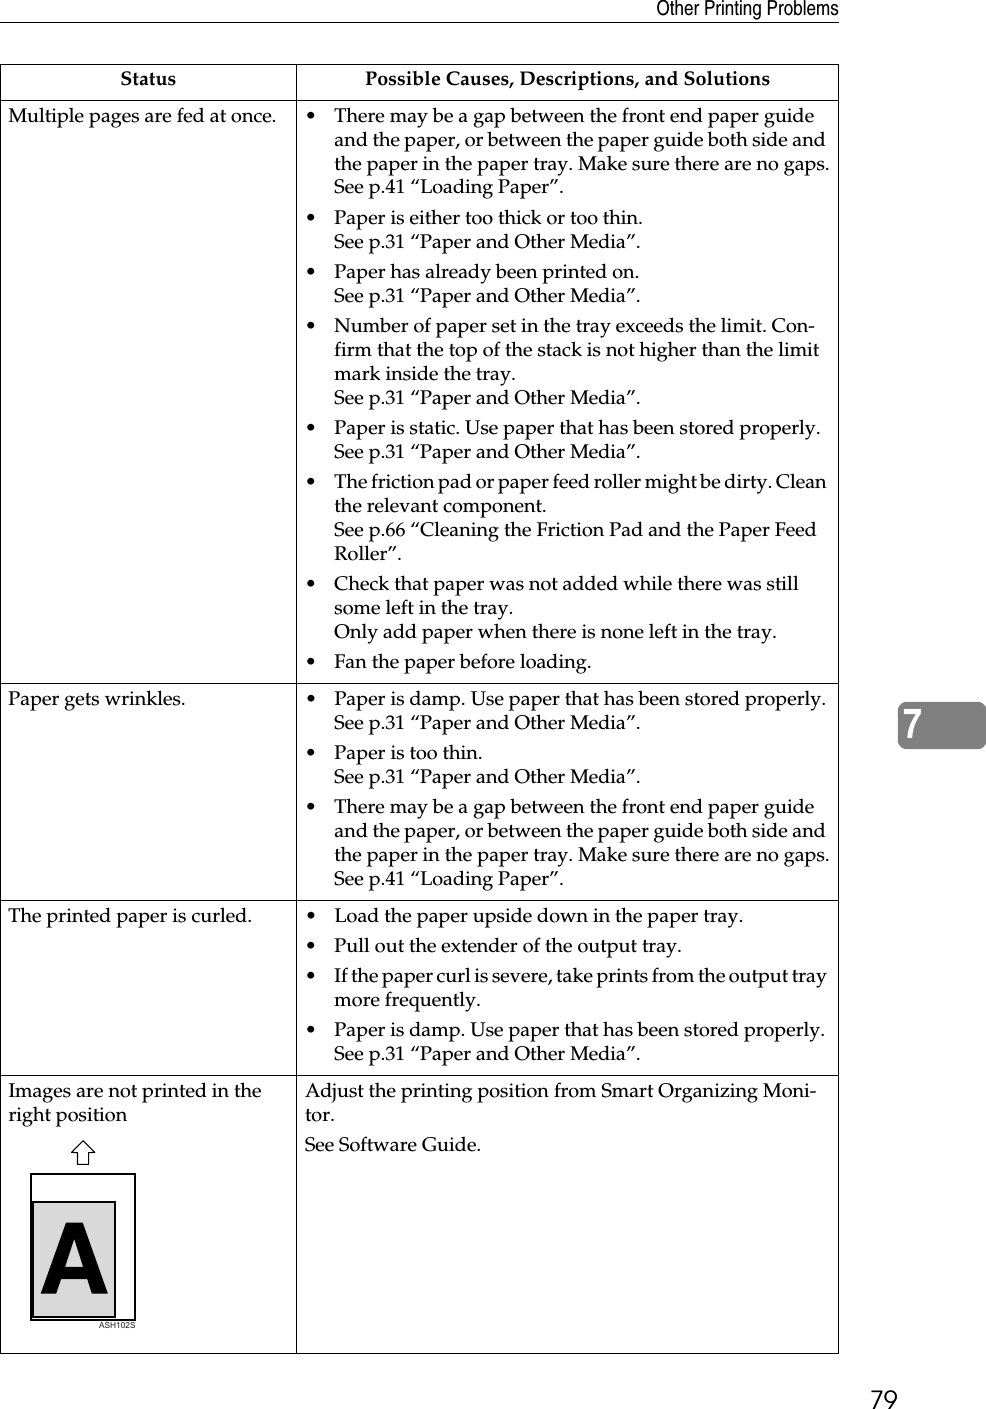
![Troubleshooting807Images are printed diagonally to the pagesAdjust the front end paper guide and both side paper guides to match the paper size. See p.41 “Loading Paper”.Horizontal lines appear on the printed paper. • Impact can cause lines to appear on printed paper and other malfunctions.Protect the printer from impact at all times, especially while it is printing.• If lines appear on prints, turn the printer off, wait a few moments, and then turn it back on again. Then, perform the print job again.Paper is not fed from the select-ed tray.When you are using the Windows operating system, the printer driver settings override those set using the control panel. Set the desired input tray using the printer driver.See the printer driver Help.A printed image is different from the image on the compu-ter's display.When you use some functions, such as enlargement and re-duction, the layout of the image might be different from that displayed in the computer display.It takes too much time to resume printing.• The data is so large or complex that it takes time to proc-ess it. If the Ready indicator is blinking, the data is being processed. Just wait until it resumes.• The printer was in the Energy Saver mode. To resume from the Energy Saver mode, the printer has to warm up, and this takes time until printing starts. To disable the En-ergy Saver mode, select [Off] for [Energy Saver Mode 2:] us-ing Smart Organizing Monitor.It takes too much time to com-plete the print job.• Photographs and other data intensive pages take a long time for the printer to process, so simply wait when print-ing such data.Changing the settings with printer driver may help to speed up printing.See the printer driver Help.• The data is so large or complex that takes time to process. If the Ready indicator is blinking, the data is being proc-essed. Just wait until it resumes.•If the Ready indicator on the control panel is flashing, the printer is warming up. Wait for a while.Images are cut off, or excess pages are printed.If you are using paper smaller than the paper size selected in the application, use the same size paper as that selected in the application. If you cannot load paper of the correct size, use the reduction function to reduce the image, and then print.See the printer driver Help.Status Possible Causes, Descriptions, and SolutionsASH103S](https://usermanual.wiki/Ricoh/PRSP34101.User-manual/User-Guide-1182584-Page-86.png)
![Other Printing Problems817If the problem cannot be solved, contact your sales or service representative.Photo images are coarse. Some applications lower the resolution for making prints.Fine dot pattern does not print. Change the [Dithering:] setting in the printer driver's dialog box.See the printer driver Help.Solid lines are printed as broken lines.Change the [Dithering:] setting in the printer driver's dialog box.See the printer driver Help.The whole printout is blurred. • Paper is damp. Use paper that has been stored properly.See p.31 “Paper and Other Media”.• If you select [Toner Saving] on the [Print Quality] tab in the printer properties dialog box, printing is generally less dense.See the printer driver Help.• Toner is almost depleted. If a toner indicator lights or flashes, or if an error message appears on the Smart Or-ganizing Monitor dialog box, replace the print cartridge.See p.59 “Replacing the Print Cartridge”.• Condensation may have collected. If rapid change in tem-perature or humidity occurs, use this printer only after it has acclimatized.White streaks appear. • Toner is almost depleted. If a toner indicator lights or flashes, or if an error message appears on the Smart Or-ganizing Monitor dialog box, replace the print cartridge.See p.59 “Replacing the Print Cartridge”.The backs of printed sheets are blemished.• When removing a jammed sheet, the inside of the printer may have become dirtied. Print several sheets until they come out clean.• If document size is larger than paper size, e.g. A4 docu-ment on B5 paper, the back of the next printed sheet may be dirtied.If rubbed with your finger, it smears out.The setting of the paper may not be correct. For example, al-though thick paper is used, the setting for thick paper may not be set.• Check the paper settings of this printer.See p.33 “Types of Paper and Other Media”.• Check the paper settings of the printer driver.See the printer driver Help.The toner has run out and print-ing has stopped.When the toner runs out, pressing the {Stop/Start} key allows you to print a few more pages, but the print quality of those pages cannot be guaranteed.Printed envelopes come out creased.Check if the green levers found inside the rear cover are properly set.Status Possible Causes, Descriptions, and Solutions](https://usermanual.wiki/Ricoh/PRSP34101.User-manual/User-Guide-1182584-Page-87.png)
![Troubleshooting827Additional TroubleshootingNote❒If the printer is still not operating satisfactorily, contact your sales or servicerepresentative. Consult with the store where the printer was purchased forinformation about the location of sales or service representatives.Problems SolutionsStrange noise is heard. If a supply was recently replaced or an option in the area the strange noise is coming from, check the supply or option is properly attached. If the strange noise persists, contact your sales or service representative.No e-mail is received when an Alert occurs, and after resolving an Alert.•Confirm the [Alert Messages] settings on Web Image Mon-itor or Smart Organizing Monitor.• When the power is turned off before the e-mail is trans-mitted, the e-mail will not be received.• Check the e-mail address set for the destination. If the e-mail was sent but not received, it is possible the destina-tion was incorrect. Also check error mail information from the e-mail server.The [Alert Messages] settings on Web Image Monitor or Smart Organizing Monitor are config-ured to send alert e-mail, but e-mail is not arriving.After changing the setting, turn the printer's power off and then back on again.When no date information is in-cluded in sent e-mail, the mail server has a malfunction.Make the setting for obtaining time information from the SMTP server. For details, see Software Guide.The printer is not detected after you click [Search Network Printer] in Smart Organizing Monitor.The SNMP community name is not correctly configured. Open Smart Organizing Monitor or Web Image Monitor and set [Get community:] to "public".](https://usermanual.wiki/Ricoh/PRSP34101.User-manual/User-Guide-1182584-Page-88.png)