Ricoh PRSPC342DN1 Part15 Subpart B-Printer User Manual BBP PRSPC342DN1 1
Ricoh Company Ltd Part15 Subpart B-Printer BBP PRSPC342DN1 1
Ricoh >
Contents
- 1. BBP-PRSPC342DN1_User Manual 1
- 2. BBP-PRSPC342DN1_User Manual 2
- 3. BBP-PRSPC342DN1_User Manual 3
- 4. BBP-PRSPC342DN1_User Manual 4
- 5. BBP-PRSPC342DN1_User Manual 5
BBP-PRSPC342DN1_User Manual 1
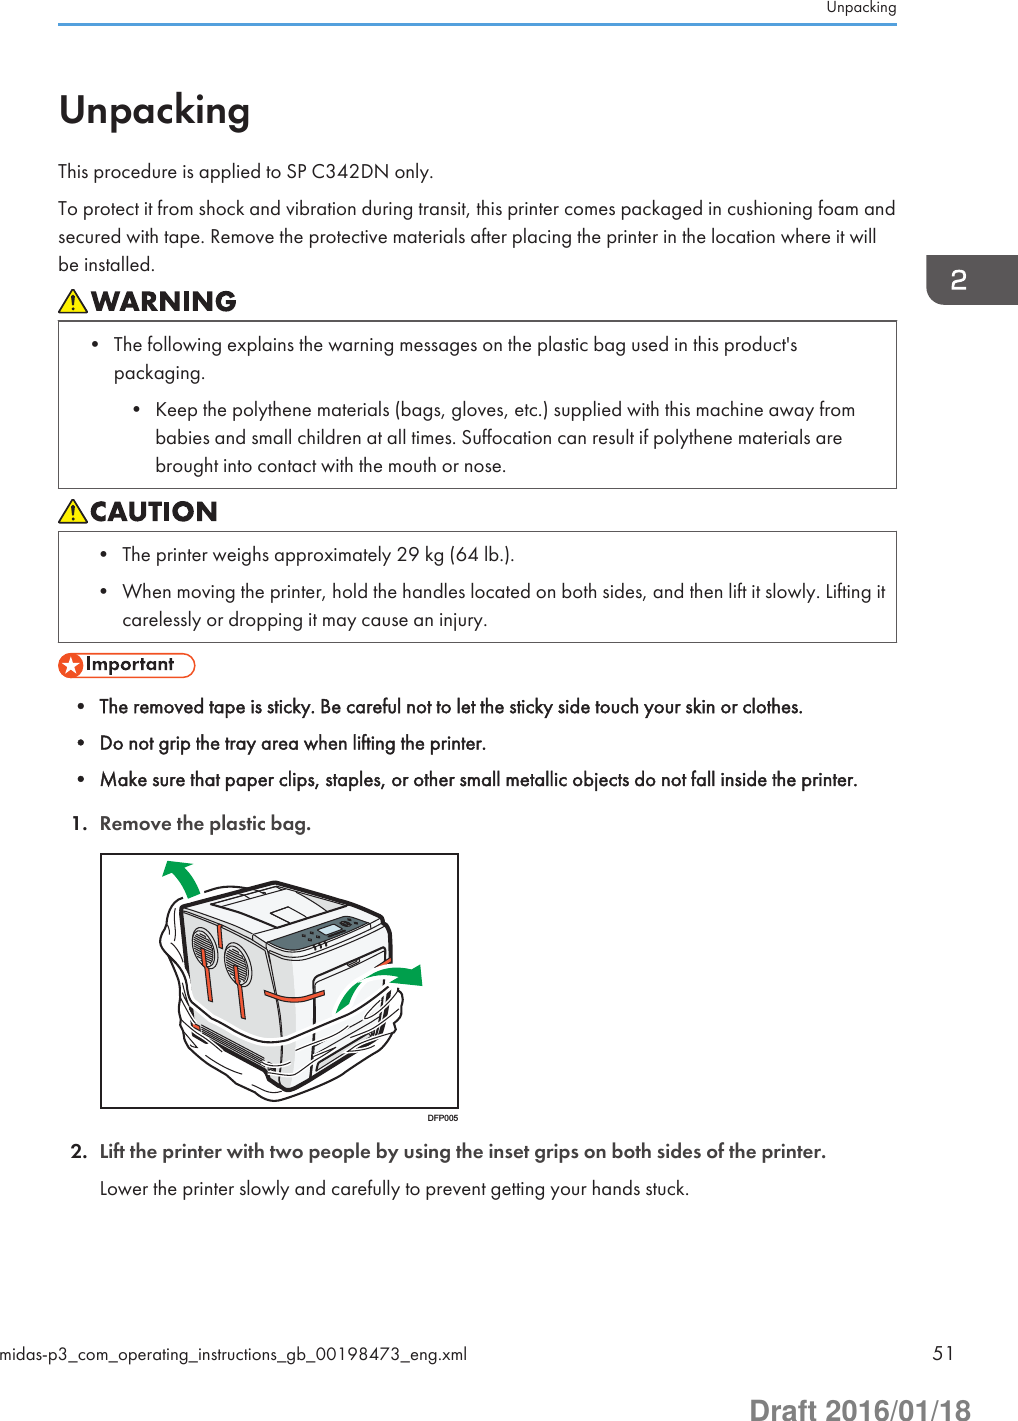
![TABLE OF CONTENTS1. Getting StartedBefore You Start..................................................................................................................................................9How to Read the Manuals.............................................................................................................................9Model-Specific Information........................................................................................................................ 10List of Options...............................................................................................................................................11Manuals for This Machine...............................................................................................................................12Guide to Names and Functions of Components............................................................................................14Guide to Components................................................................................................................................. 14Guide to the Names and Functions of the Control Panel......................................................................... 19Guide to the Names and Functions of the Control Panel Screen............................................................ 22Using the Screen on the Control Panel...........................................................................................................28Changing Modes by Pressing the Icons.....................................................................................................28Available Characters and How to Enter Them..........................................................................................29Customizing the [Home] Screen.................................................................................................................31Logging in to the Printer................................................................................................................................... 37User Code Authentication Using the Control Panel.................................................................................. 37User Code Authentication Using a Printer Driver...................................................................................... 37Logging In Using the Control Panel............................................................................................................38Logging Out Using the Control Panel.........................................................................................................38Logging In Using a Printer Driver................................................................................................................38Logging In Using Web Image Monitor......................................................................................................39Logging Out Using Web Image Monitor...................................................................................................40User Lockout Function..................................................................................................................................40Changing the Login Password.................................................................................................................... 40Downloading Utility Software......................................................................................................................... 43Device Manager NX Accounting/Device Manager NX Lite.................................................................. 432. Setting Up the PrinterPrinter Set Up Procedure..................................................................................................................................45Install Location..................................................................................................................................................47Checking the Contents of the Box...................................................................................................................50Unpacking........................................................................................................................................................ 51Installing Options............................................................................................................................................. 57Order of Option Installation........................................................................................................................571Draft 2016/01/18](https://usermanual.wiki/Ricoh/PRSPC342DN1.BBP-PRSPC342DN1-User-Manual-1/User-Guide-2978043-Page-1.png)

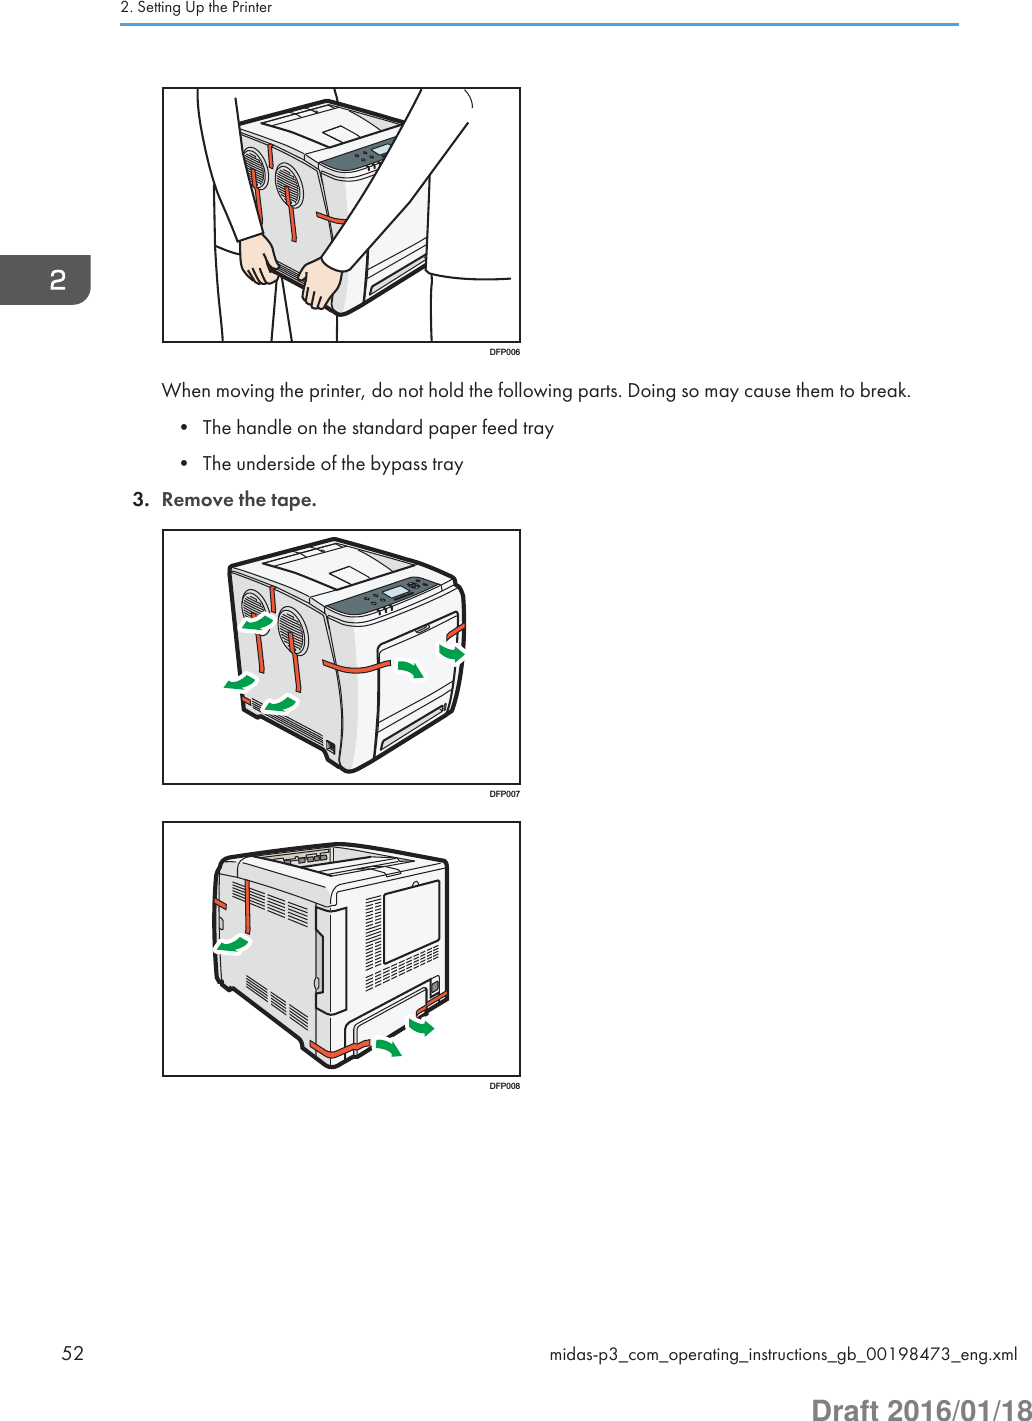
![Spool Printing.................................................................................................................................................169Displaying the Spooled Job List................................................................................................................169Specifying the Printer Behavior.....................................................................................................................171Applying the Settings Specified in the Printer Driver or Commands when Printing..............................171Preventing Documents from Being Left Unattended or Taken By Mistake............................................ 172Specifying How to Process Jobs with Errors............................................................................................172Printing Stored Documents............................................................................................................................ 176Storing a Document...................................................................................................................................177Printing Stored Documents........................................................................................................................179Deleting Stored Documents...................................................................................................................... 185Managing Jobs..............................................................................................................................................186Types of Screens to Manage Jobs...........................................................................................................186Checking Jobs in the Job List.....................................................................................................................187Changing the Order of the Jobs...............................................................................................................188Holding Jobs..............................................................................................................................................189Deleting Jobs..............................................................................................................................................189Checking the Job History.......................................................................................................................... 189Printing Files from a Memory Storage Device.............................................................................................191Direct Printing from a Memory Storage Device......................................................................................191Direct Printing from a Digital Camera......................................................................................................197Canceling a Print Job.....................................................................................................................................205Before Printing Starts................................................................................................................................. 205While Printing Is in Progress..................................................................................................................... 205If an Error Occurs with the Specified Paper Size and Type....................................................................... 207Printing from a Selected Tray....................................................................................................................207Changing the Paper Tray Settings............................................................................................................208Proceeding with Printing Using the Bypass Tray..................................................................................... 208Canceling a Print Job................................................................................................................................ 209Checking Error Logs...................................................................................................................................... 2105. Configuring and Managing the PrinterDisplaying the Printer Configuration Screens Using the Control Panel..................................................... 211Configuring Printer Settings from the [Menu] key...................................................................................211Configuring Printer Settings from the [User Tools] key........................................................................... 2124Draft 2016/01/18](https://usermanual.wiki/Ricoh/PRSPC342DN1.BBP-PRSPC342DN1-User-Manual-1/User-Guide-2978043-Page-4.png)

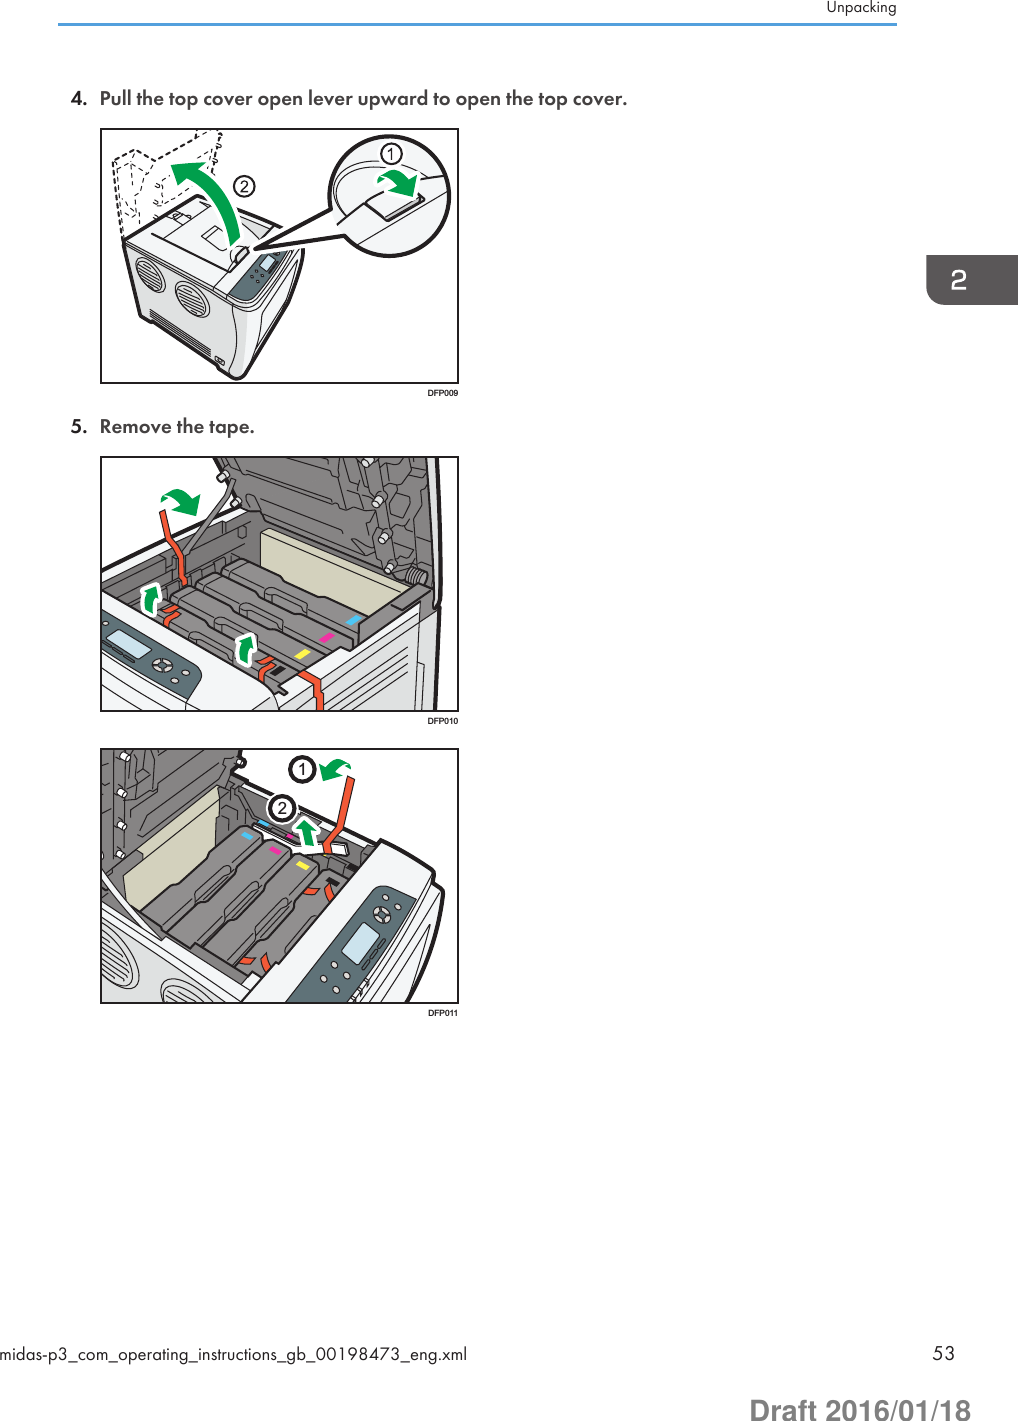
![Checking Printer Status and Settings........................................................................................................372When the Indicator Lamp for the [Check Status] Key Is Lit or Flashing.................................................373If USB Connection Fails.................................................................................................................................376When Messages Are Displayed.................................................................................................................. 377Status Messages........................................................................................................................................377Alert Messages (Displayed on the Control Panel)..................................................................................378Alert Messages (Printed on Error Logs and Reports)..............................................................................387When You Cannot Print.................................................................................................................................397When the Data In Indicator Does Not Light Up or Flash....................................................................... 400Other Printing Problems.................................................................................................................................401When You Cannot Print Properly............................................................................................................. 401Paper Misfeeds Occur Frequently........................................................................................................... 406Additional Troubleshooting...................................................................................................................... 410The Printed Image is Different from the Image on the Computer...........................................................414When Printer Is Not Functioning Properly............................................................................................... 417When PictBridge Printing Does Not Work...................................................................................................419Removing Jammed Paper..............................................................................................................................420Paper Misfeed Message (A).................................................................................................................... 420Misfeed Bypass Tray.................................................................................................................................422Paper Misfeed Message (B).....................................................................................................................423Paper Misfeed Message (Y).....................................................................................................................425Paper Misfeed Message (Z).....................................................................................................................4267. Maintenance and SpecificationsGeneral Requirements...................................................................................................................................427Precautions.................................................................................................................................................427Saving Printouts......................................................................................................................................... 428Backing Up Hard Disk Data..................................................................................................................... 428Moving the Printer..........................................................................................................................................430Cleaning the Printer....................................................................................................................................... 432Precautions When Cleaning the Printer...................................................................................................432Cleaning the Paper Tray, Friction Pad, and the Paper Feed Roller.......................................................432Cleaning the Registration Roller...............................................................................................................435Cleaning the Toner Density Sensor..........................................................................................................4367Draft 2016/01/18](https://usermanual.wiki/Ricoh/PRSPC342DN1.BBP-PRSPC342DN1-User-Manual-1/User-Guide-2978043-Page-7.png)

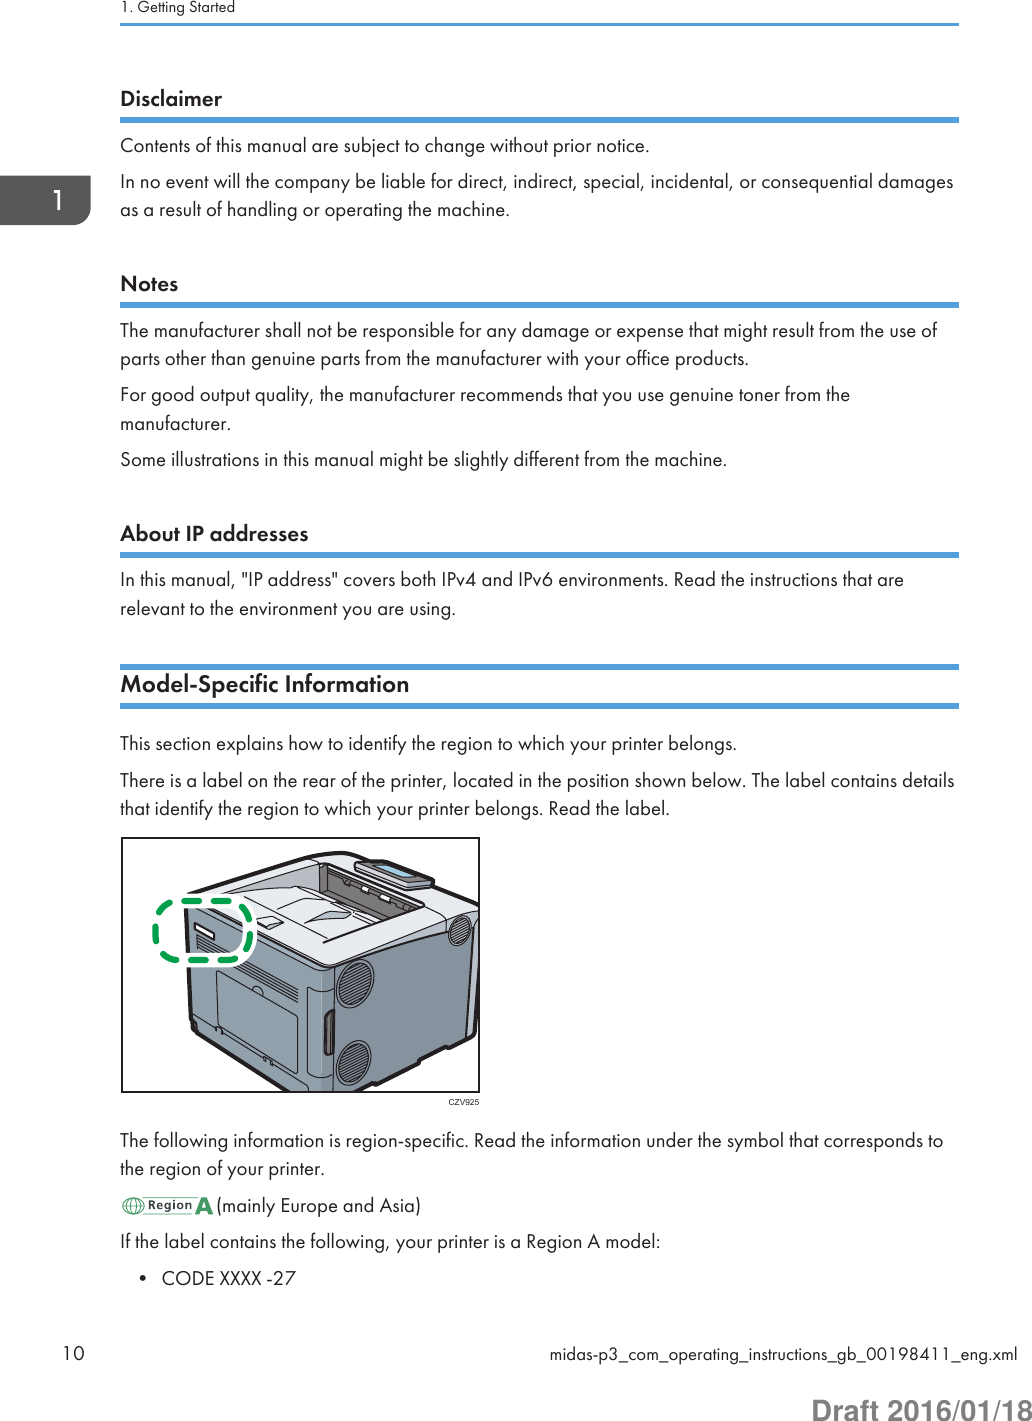
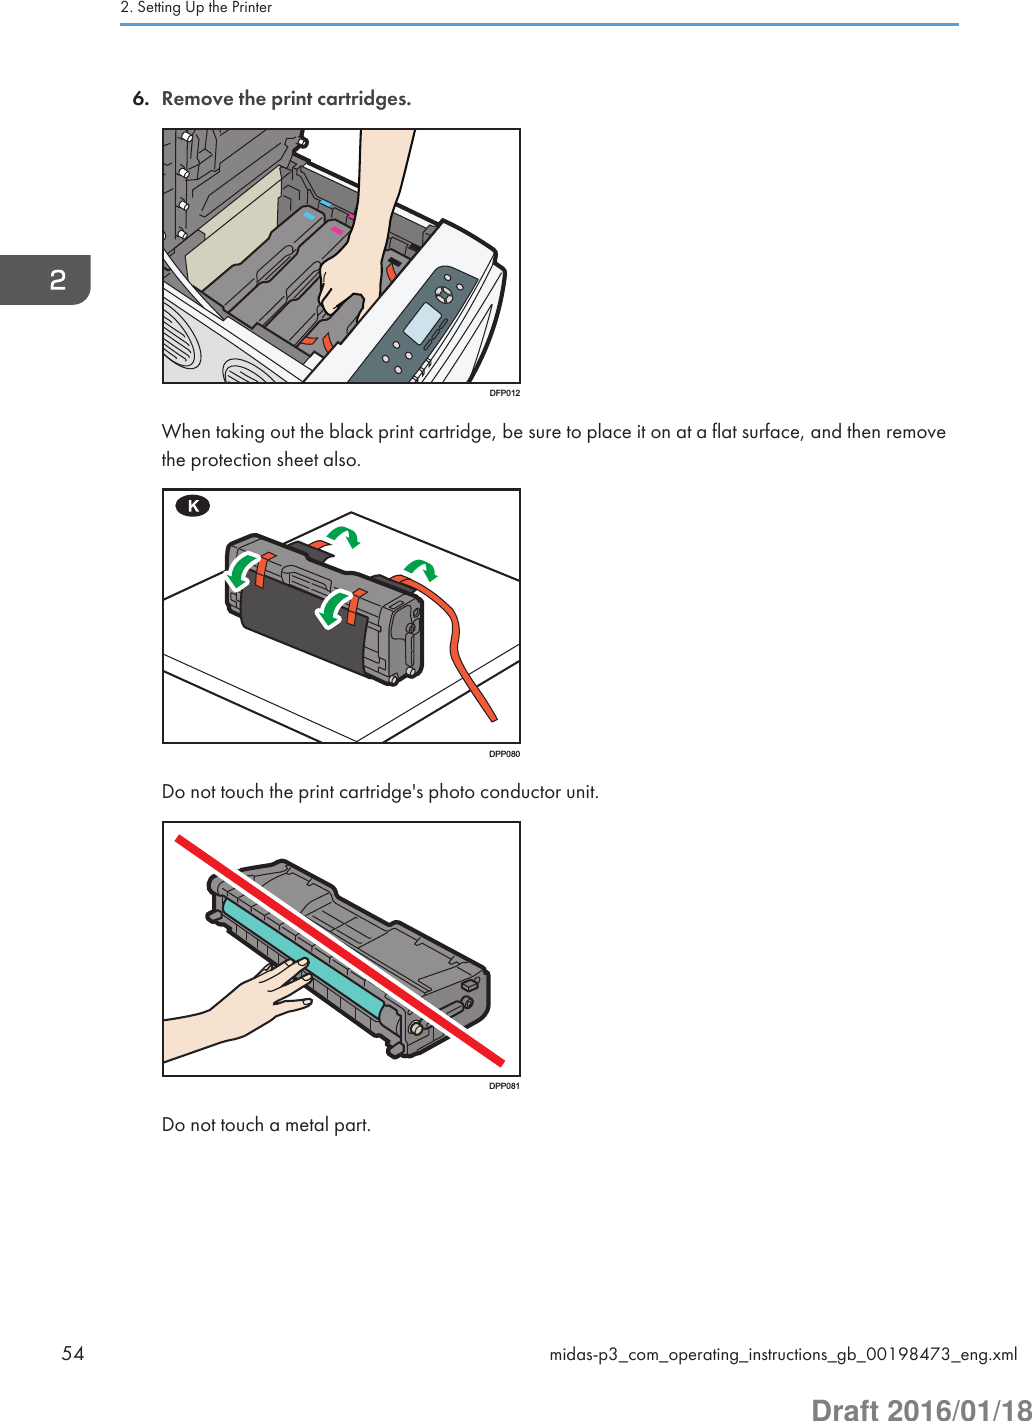
![1. Getting StartedThis section describes the symbols used in the manuals supplied with the printer, available options, andnames and functions of components.Before You StartHow to Read the ManualsSymbols used in the manualsThis manual uses the following symbols:Indicates points to pay attention to when using the machine, and explanations of likely causes of papermisfeeds, damage to originals, or loss of data. Be sure to read these explanations.Indicates supplementary explanations of the machine's functions, and instructions on resolving usererrors.This symbol is located at the end of sections. It indicates where you can find further relevant information.[ ]Indicates the names of keys on the machine's display or control panels.Indicates the key sequence order you should perform using the control panel.Example:Select [Host Interface] Press [OK](Select [Host Interface], and then press the [OK] key.)(mainly Europe and Asia)(mainly North America)Differences in the functions of Region A and Region B models are indicated by the two symbols. Readthe information indicated by the symbol that corresponds to the region of the model you are using. Fordetails about which symbol corresponds to the model you are using, see page 10 "Model-SpecificInformation".midas-p3_com_operating_instructions_gb_00198411_eng.xml 9Draft 2016/01/18](https://usermanual.wiki/Ricoh/PRSPC342DN1.BBP-PRSPC342DN1-User-Manual-1/User-Guide-2978043-Page-9.png)
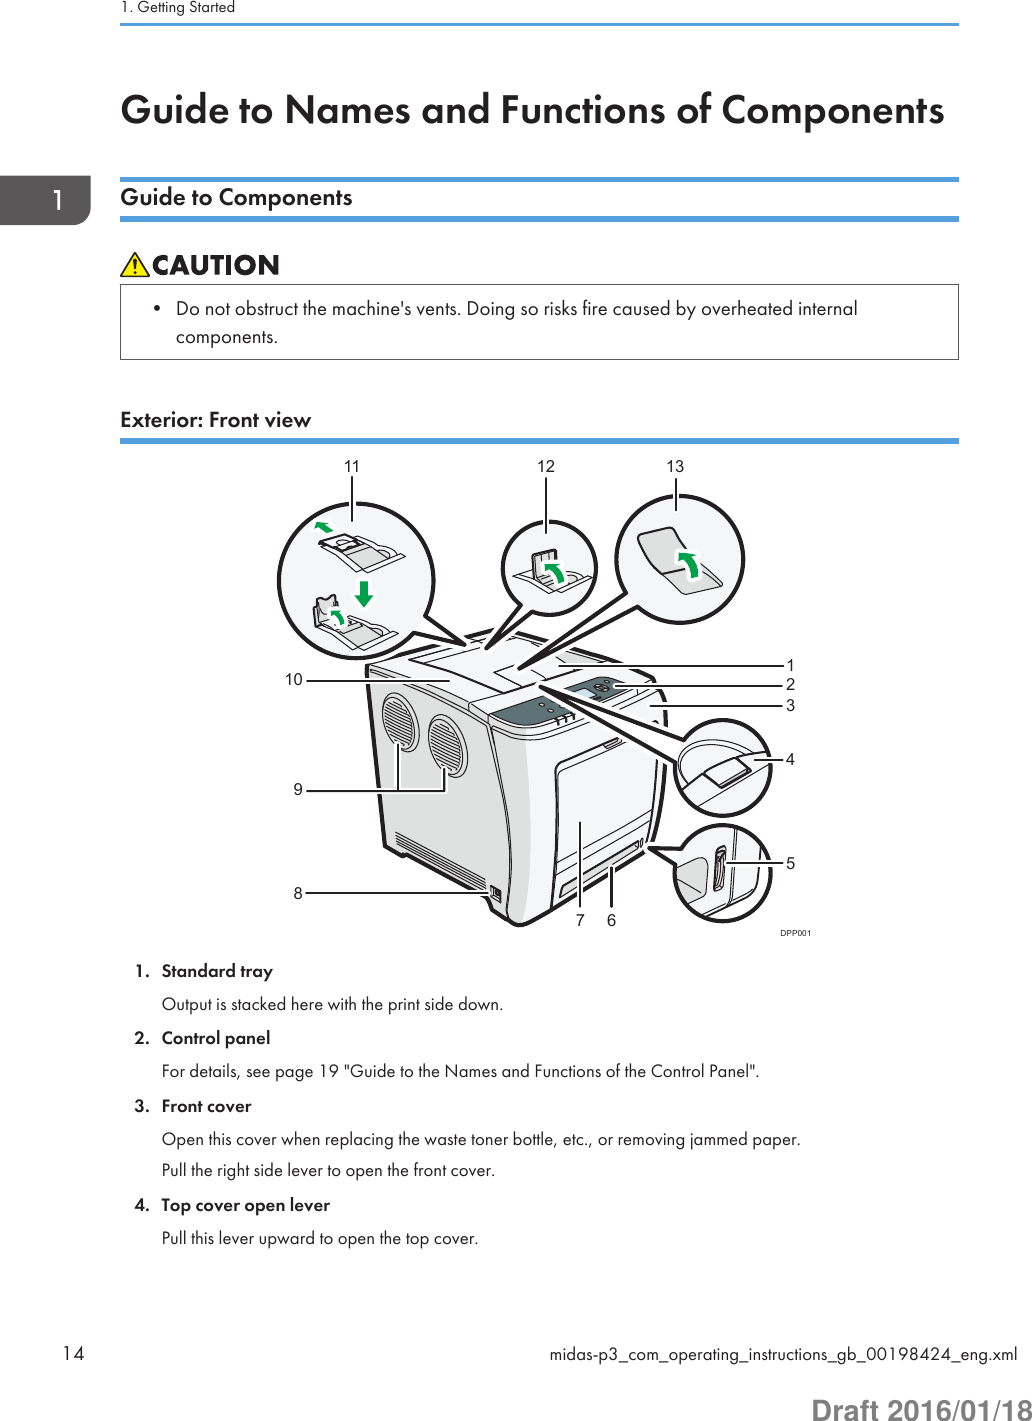
![To attach this option, see page 66 "Installing SD Card Options".3. Hard diskAllows you to store documents to be printed.To attach this option, see page 59 "Installing the Hard Disk".• If you want to use two or more SD cards that can be inserted in the same slot, contact your sales orservice representative.Guide to the Names and Functions of the Control PanelThis illustration shows the control panel of the printer.23413121110986 751DPP2991. [Job Reset] keyPress to cancel the current print job.2. [Switch Functions] keyPress this key to switch between the operation screen of the printer function and the function screens of theextended features currently in use.3. DisplayDisplays current printer status and error messages.Entering energy saver mode turns off the back light. For details about energy saver mode, see page 74"Saving Energy".4. Scroll keysPress these keys to move the cursor in each direction.Guide to Names and Functions of Componentsmidas-p3_com_operating_instructions_gb_00198424_eng.xml 19Draft 2016/01/18](https://usermanual.wiki/Ricoh/PRSPC342DN1.BBP-PRSPC342DN1-User-Manual-1/User-Guide-2978043-Page-19.png)
![When the [ ] [ ] [ ] [ ] keys appear in this manual, press the applicable key for the direction that you wantto move the cursor.5. [Escape] keyPress this key to cancel an operation or return to the previous display.6. [Suspend/Resume] keyPress this to suspend the print job currently being processed. The indicator remains lit as long as the job issuspended.To resume the job, press this key again. The suspended job will resume automatically when the time specifiedin [Auto Reset Timer] elapses (default: 60 seconds).For details about the [Auto Reset Timer] setting, see page 233 "Timer Settings (SP C340DN)".7. Power indicatorLights up when the printer is ready to receive data from a computer. Flashes when the printer is warming up orreceiving data. It is unlit when the power is off or when the printer is in energy saver mode.8. Alert indicatorLights up or flashes when a printer error occurs.Steady red: printing is not possible, or is possible but print quality cannot be ensured.Flashing yellow: the printer will soon require maintenance or a replacement consumable such as printcartridge.Follow the instructions that appear on the display.9. [Menu] keyPress this key to configure and check the current printer settings.Press to change the default settings to meet your requirements. See page 211 "Displaying the PrinterConfiguration Screens Using the Control Panel".10. Data in indicatorFlashes when the printer is receiving data from a computer. The data in indicator is lit if there is data to beprinted.11. Selection keysCorrespond to the function items at the bottom line on the display.Example: When this manual instructs you to press [Option], press the selection key on the left below the initialscreen.12. [OK] keyUse this key to confirm settings or setting values, or move to the next menu level.13. Light sensorThe sensor that detects the ambient light level when the ECO Night Sensor function is enabled.1. Getting Started20 midas-p3_com_operating_instructions_gb_00198424_eng.xmlDraft 2016/01/18](https://usermanual.wiki/Ricoh/PRSPC342DN1.BBP-PRSPC342DN1-User-Manual-1/User-Guide-2978043-Page-20.png)
![CZV00513 148910111212345671. Display panelDisplays function keys, operation status, and messages. See page 22 "Guide to the Names and Functions ofthe Control Panel Screen".2. Light SensorIndicates that the sensor that detects the ambient light level when the ECO Night Sensor function is enabled.3. [Home] keyPress to display the [Home] screen. For details, see page 24 "Using the [Home] screen".4. [Suspend] keyPress this key to suspend a print job. The key lights up while the job is suspended.5. [Check Status] keyPress to check the printer's system status, operational status of each function, and current jobs. You can alsodisplay the job history and the printer's maintenance information.6. Data In indicatorFlashes when the printer is receiving print jobs from a computer. The indicator lights up when there is data tobe printed.7. Check Status indicatorLights up or flashes when a printer error occurs.Steady red: Printing is not possible.Flashing yellow: The printer will soon require maintenance or a replacement consumable such as a printcartridge. Printing is possible, but print quality cannot be ensured.Follow the instructions that appear on the display.8. Power indicatorRemains lit while the power is on. It is not lit when the power is off or when the printer is in energy saver mode.Guide to Names and Functions of Componentsmidas-p3_com_operating_instructions_gb_00198424_eng.xml 21Draft 2016/01/18](https://usermanual.wiki/Ricoh/PRSPC342DN1.BBP-PRSPC342DN1-User-Manual-1/User-Guide-2978043-Page-21.png)
![9. [Energy Saver] keyPress to switch to and from Sleep mode. See page 74 "Saving Energy". When the printer is in Sleep mode,the [Energy Saver] key flashes slowly.10. [Login/Logout] keyPress to log in or log out.11. [User Tools] keyPress to change the default settings as needed. See page 212 "Configuring Printer Settings from the [UserTools] key".12. [Simple Screen] keyPress to switch to the simple screen. See page 28 "Switching screen patterns".13. Media slotsInsert an SD card or a USB flash memory device.14. Media access lampLights up when a memory storage device is inserted in the media slot or is being accessed.Guide to the Names and Functions of the Control Panel ScreenDPP0831. Operational Status or MessagesDisplays the printer status and messages.2. [Option]Press to display the following items:• Form Feed• Error Log3. [Supplies]Press to display the information about printer supplies.• By default, the remaining amount of toner is displayed. To avoid displaying the remaining amountof toner, set [Display Supply Info] to [Off] in [General Settings] under [Maintenance].1. Getting Started22 midas-p3_com_operating_instructions_gb_00198424_eng.xmlDraft 2016/01/18](https://usermanual.wiki/Ricoh/PRSPC342DN1.BBP-PRSPC342DN1-User-Manual-1/User-Guide-2978043-Page-22.png)
![123Touch the display panelPress the [Home] keyCZV3011. [Home] screenDisplays function and shortcut icons. For details, see page 24 "Using the [Home] screen".The [Home] screen is set as the default screen when the printer is turned on. You can change this defaultsetting under Function Priority. See page 286 "System Settings".2. [Printer] screenDisplays operation status, messages, and function menus. For details, see page 25 "Using the [Printer]screen".3. [Supplies Info] screenChecks the printer status, such as toner, paper, and waste toner levels.• After finishing a job, the printer waits a specified length of time, then restores its settings to thedefault values specified under Function Priority. This function is called "System Reset". For theprocedure for specifying default settings under Function Priority, see page 286 "System Settings".• To change the length of time that the printer waits before restoring its settings to their default values,use the Printer Auto Reset Timer setting. See page 286 "System Settings".Guide to Names and Functions of Componentsmidas-p3_com_operating_instructions_gb_00198424_eng.xml 23Draft 2016/01/18](https://usermanual.wiki/Ricoh/PRSPC342DN1.BBP-PRSPC342DN1-User-Manual-1/User-Guide-2978043-Page-23.png)
![Using the [Home] screenThis function is available for SP 342DN only.To display the [Home] screen, press the [Home] key.Each function has its own icon, and these icons are displayed on the [Home] screen.You can add shortcuts to frequently used embedded software applications to the [Home] screen. Theicons of added shortcuts appear on the [Home] screen. The embedded software applications can becalled easily by pressing the shortcut icons.• Do not apply strong impact or force to the screen. Doing so will damage the screen. Maximumforce allowable is approx. 30 N (approx. 3 kgf). (N = Newton, kgf = Kilogram force. 1 kgf = 9.8N.)CZV302512341. Supply Information iconPress to display the [Supplies Info] screen to check toner, paper, and waste toner levels.2. [Printer]Press to display the [Printer] screen.3. Shortcut icon areaYou can add shortcuts to embedded software applications to the [Home] screen. For details about registeringshortcuts, see page 32 "Adding icons to the [Home] screen".4. Home screen imageYou can display an image such as a corporate logo on the [Home] screen. To change the image, seepage 35 "Displaying the image on the [Home] screen".5. /Press to switch pages when icons are not displayed on one page.• When a software application to be embedded is installed, the function icon for the application isdisplayed on the [Home] screen.• You can change the order of the icons. For details, see page 33 "Changing the order of icons onthe [Home] screen".1. Getting Started24 midas-p3_com_operating_instructions_gb_00198424_eng.xmlDraft 2016/01/18](https://usermanual.wiki/Ricoh/PRSPC342DN1.BBP-PRSPC342DN1-User-Manual-1/User-Guide-2978043-Page-24.png)
![Using the [Printer] screenThis function is available for SP C342DN only.The display panel shows the operation status, messages, and function menus.The function items displayed serve as selector keys. You can select or specify an item by lightly pressingthese keys.When you select or specify an item on the display panel, it is highlighted such as . Keysappearing as cannot be used.• Do not apply strong impact or force to the screen. Doing so will damage the screen. Maximumforce allowable is approx. 30N (approx. 3 kgf). (N = Newton, kgf = Kilogram force. 1 kgf =9.8N.)The [Home] screen is set as the default screen when the printer is turned on.14285367CZV3031. Operational status or messagesDisplays the current printer status, such as "Ready", "Offline", and "Printing...". Information (user ID anddocument name) about the print job appears in this section.2. [Print Jobs]Press to display print jobs sent from a computer.3. Supply InformationYou can check the remaining toner. Press to display the [Supplies Info] screen.4. [Prt. From Dev.]Press to display the screen for directly printing files stored on memory storage devices.5. [Job Reset]Press to cancel the current print job.If you press it when the Hex Dump is selected, Hex Dump is canceled.Guide to Names and Functions of Componentsmidas-p3_com_operating_instructions_gb_00198424_eng.xml 25Draft 2016/01/18](https://usermanual.wiki/Ricoh/PRSPC342DN1.BBP-PRSPC342DN1-User-Manual-1/User-Guide-2978043-Page-25.png)
![6. [Job Operation]Press to suspend a job being processed.7. [Form Feed]Press to print all the data left in the printer's input buffer.8. [Other Functns.]Press to display the error logs and status of spooled jobs.Using the [Information] screenThis function is available for SP C342DN only.To raise environmental awareness, you can configure the printer to show users the amount of papersaved by using the various paper saving functions of the printer.The color utilization ratio is also displayed on the [Information] screen.When user authentication is enabled, the screen is displayed when you log in to the printer. When userauthentication is not enabled, the screen is displayed after the printer returns from Sleep mode or after asystem reset. The [Information] screen appears when the power is turned on, regardless of theauthentication settings.CZV3041234561. MessageDisplays messages from the administrator.2. Total Print PagesDisplays the total number of pages printed in the current count period and the previous count period.3. Eco-friendly Indicator• Paper Reduction:Shows the amount of paper saved by using the duplex and combine printing functions. The valueindicates the percentage of paper saved from the total of all the paper used. As the percentageincreases, the stack of paper decreases and the flower grows. When the ratio is 76% or more, theflower starts to bloom.• 2 sided Utilization:1. Getting Started26 midas-p3_com_operating_instructions_gb_00198424_eng.xmlDraft 2016/01/18](https://usermanual.wiki/Ricoh/PRSPC342DN1.BBP-PRSPC342DN1-User-Manual-1/User-Guide-2978043-Page-26.png)
![Displays the ratio of 2-sided prints to the total number of prints.• Combine Utilization:Displays the ratio of combined prints to the total number of prints.4. Count periodsDisplays the current and previous count periods.5. [Exit]Press this to close the [Information] screen and return to operation.6. Color UtilizationDisplays the ratio of color prints to the total number of prints.• Depending on the printer settings, the [Information] screen may not be displayed. For details, seeSecurity Guide.• You can also use Web Image Monitor to check the usage status. For further details, see WebImage Monitor Help.• Under [Eco-friendly Counter Period/Administrator Message] in [System Settings], you can check"Count Period", "Administrator Message", "Display Information Screen", and "Display Time". Onlythe administrator can change the settings. For details, see Security Guide.Guide to Names and Functions of Componentsmidas-p3_com_operating_instructions_gb_00198424_eng.xml 27Draft 2016/01/18](https://usermanual.wiki/Ricoh/PRSPC342DN1.BBP-PRSPC342DN1-User-Manual-1/User-Guide-2978043-Page-27.png)
![Using the Screen on the Control PanelThis function is available for SP C342DN only.This section explains how to use the screen on the control panel.Changing Modes by Pressing the IconsSwitching screen patternsThis section explains how to switch to the simple screen and the keys that are displayed.When you press the [Simple Screen] key, the screen changes from the initial display to the simplescreen.Only the main functions are shown on the simple screen.Larger letters and keys are displayed, making operations easier.1. Press the [Simple Screen] key.CZV007This illustration shows the simple display of the [Printer] screen.To increase the screen contrast, press the [Simple Screen] key again.• To return to the initial display from the high contrast screen, press the [Simple Screen] key again.1. Getting Started28 midas-p3_com_operating_instructions_gb_00198432_eng.xmlDraft 2016/01/18](https://usermanual.wiki/Ricoh/PRSPC342DN1.BBP-PRSPC342DN1-User-Manual-1/User-Guide-2978043-Page-28.png)
![• Certain keys do not appear on the simple screen.Available Characters and How to Enter ThemThis section explains how to enter text.When you enter a character, it appears at the position of the cursor. If there is a character already at thecursor position, a newly entered character appears next to the character.You can enter the following characters:• Alphabetic characters• Symbols• Numerals0123456789• User TextEntering letters1. Press the letters you want to enter.Press [Shift] to switch between uppercase and lowercase.Using the Screen on the Control Panelmidas-p3_com_operating_instructions_gb_00198432_eng.xml 29Draft 2016/01/18](https://usermanual.wiki/Ricoh/PRSPC342DN1.BBP-PRSPC342DN1-User-Manual-1/User-Guide-2978043-Page-29.png)
![CMR639Entering symbols1. Change the characters.[Entry Method] [Symbol] [OK]Entering numbers1. Change the characters.[Entry Method] [Number] [OK]Deleting characters1. Press [Backspace] or [Delete All] to delete characters.Entering User TextYou can select and use a user text that is registered to [Program/Change/Delete User Text]. Fordetails, see page 286 "General Features".1. Change the characters.[Entry Method] [User Text] [OK] Select the User Text you want to use [OK]1. Getting Started30 midas-p3_com_operating_instructions_gb_00198432_eng.xmlDraft 2016/01/18](https://usermanual.wiki/Ricoh/PRSPC342DN1.BBP-PRSPC342DN1-User-Manual-1/User-Guide-2978043-Page-30.png)
![• Greek text can be input for some areas. To enter Greek text, press [Greek] in [Entry Method]. Toreturn to alphabet input, press [Alphabet(QWERTY)] in [Entry Method].Keyboard LayoutGenerally, the QWERTY keyboard appears.The layout of the keyboard varies depending on the set display language. To use the QWERTYkeyboard, press the key displayed on the lower left of the screen, and change the layout of thekeyboard. For details about the display language, see page 77 "Selecting the Display Language".Customizing the [Home] ScreenYou can add shortcuts to frequently used embedded software applications in the [Home] screen. Theembedded software applications can be recalled easily by pressing the shortcut icons. You canrearrange the order of the function and shortcut icons.For details about the items on the [Home] screen, see page 22 "Guide to the Names and Functions ofthe Control Panel Screen".Depending on the authentication settings, there are two kinds of [Home] screens:• Default [Home] screenThis screen is displayed when the authentication function is not enabled or when the authenticationfunction is enabled and you are logged in as an administrator. The default [Home] screen is alsoused as the initial screen of a user's [Home] screen. When the default [Home] screen is customized,the initial screen of a user's [Home] screen is also changed.Using the Screen on the Control Panelmidas-p3_com_operating_instructions_gb_00198432_eng.xml 31Draft 2016/01/18](https://usermanual.wiki/Ricoh/PRSPC342DN1.BBP-PRSPC342DN1-User-Manual-1/User-Guide-2978043-Page-31.png)
![• User's [Home] screenThis screen is for each user. To use a user's [Home] screen, enable the authentication. The use of auser's [Home] screen can be limited. For details, see Security Guide.You can customize the [Home] screen to make it more accessible. The default [Home] screen and user's[Home] screen can be customized separately. When customizing the default [Home] screen, use UserTools or Web Image Monitor. When customizing a user's [Home] screen, use Web Image Monitor. Thefollowing contents can be customized:• Adding iconsWhen an embedded software application is installed, a function icon for the application isdisplayed on the [Home] screen.• Changing the icon orderYou can change the order of the function and shortcut icons. For details, see page 33 "Changingthe order of icons on the [Home] screen".• Registering the imageYou can display a favorite image on the upper right on the [Home] screen. For details, seepage 35 "Displaying the image on the [Home] screen".• Depending on the printer settings, a user's [Home] screen cannot be used. For details, see SecurityGuide.• When customizing a user's [Home] screen, the contents of the default [Home] screen are notchanged.• When customizing the default [Home] screen after making a user's [Home] screen, the settings forthe user's [Home] screen that have already been registered are not changed.• The following number of shortcut icons can be displayed on a page:• On the simple screen: three icons• On the standard screen (with supply information displayed): three icons• On the standard screen (without supply information displayed): six iconsAdding icons to the [Home] screenYou can also review icons of functions and embedded software applications that you deleted from the[Home] screen.• Shortcut names of up to 32 characters can be displayed in a standard screen.• You can register up to 72 function and shortcut icons. Delete unused icons if the limit is reached. Fordetails see page 34 "Deleting an icon on the [Home] screen".1. Getting Started32 midas-p3_com_operating_instructions_gb_00198432_eng.xmlDraft 2016/01/18](https://usermanual.wiki/Ricoh/PRSPC342DN1.BBP-PRSPC342DN1-User-Manual-1/User-Guide-2978043-Page-32.png)
![• You can change the position of icons. For details, see page 33 "Changing the order of icons onthe [Home] screen".In the following procedure, a shortcut to an embedded software application is registered to the [Home]screen.For using Web Image Monitor1. Log in to Web Image Monitor as an administrator.For details, see page 333 "Displaying the top page".2. Point to [Device Management], and then click [Device Home Management].3. Click [Edit Icons].4. Point to [+Icon can be added.] of the position that you want to add, and then click [+Add].5. Select the function or shortcut icon you want to add.6. Click [OK] four times.For using User Tools1. Press the [User Tools] key, and then select the icon you want to add.[Edit Home] [Add Icon] [Select Icon to Add] Select the type of the icon to be added Select the icon to be added2. Specify the position where the selected icon is added.[Select Destination] Specify the position where [Blank] is displayed• Press on the upper-right corner of the [Select Destination] screen to check the position on thesimple screen.Changing the order of icons on the [Home] screenYou can change the order of the function and shortcut icons on the [Home] screen to make them moreaccessible.The initial and simple screens are the same in order of icons.For using Web Image Monitor1. Log in to Web Image Monitor as an administrator.For details, see page 333 "Displaying the top page".2. Point to [Device Management], and then click [Device Home Management].3. Click [Edit Icons].Using the Screen on the Control Panelmidas-p3_com_operating_instructions_gb_00198432_eng.xml 33Draft 2016/01/18](https://usermanual.wiki/Ricoh/PRSPC342DN1.BBP-PRSPC342DN1-User-Manual-1/User-Guide-2978043-Page-33.png)
![4. Drag the icon that you want to move, and then drop it to the new position.The icon switches position if another icon is already registered in a destination.To move the icon to another page, drag it to the destination page on the thumbnail displayed onthe right of the screen. After the page is switched, drop the icon at the new position.5. Press [OK] three times.For using User Tools1. Press the [User Tools] key, and then select the icon you want to move.[Edit Home] [Move Icon] [Select Icon to Move] Select an icon that you want to move2. Specify the position where the selected icon is added.[Select Destination] Specify the position you want to move• Press on the upper-right corner of the screen to check the position on the simple screen.Deleting an icon on the [Home] screenDelete unused function or shortcut icons. You can display only the icons of functions and shortcuts thatyou use.• Even if a function icon or shortcut icon for an embedded software application on the [Home] screenis deleted, the application or function is not deleted.For using Web Image Monitor1. Log in to Web Image Monitor as an administrator.For details, see page 333 "Displaying the top page".2. Point to [Device Management], and then click [Device Home Management].3. Click [Edit Icons].4. Drag the icon that you want to delete, and then drop it in the trash box on the left of thescreen.5. Click [OK] three times.For using User Tools1. Press the [User Tools] key, and then select the icon you want to delete.[Edit Home] [Delete Icon] Select an icon that you want to delete [OK]1. Getting Started34 midas-p3_com_operating_instructions_gb_00198432_eng.xmlDraft 2016/01/18](https://usermanual.wiki/Ricoh/PRSPC342DN1.BBP-PRSPC342DN1-User-Manual-1/User-Guide-2978043-Page-34.png)
![Displaying the image on the [Home] screenYou can display an image such as a corporate logo on the [Home] screen.To load an image, store it in the following format:File format:JPEGNumber of pixels:180 × 40 pixelsMaximum file size:15 KBTo load an image using the User Tools, store it on an SD card. Specify a file path and name as follows:File path:(root):\custom_ui\imageFile name:insert• The image displayed on the default [Home] screen is also displayed on each user's [Home] screen.Different images cannot be displayed on individual user's [Home] screens.For using Web Image Monitor1. Log in to Web Image Monitor as an administrator.For details, see page 333 "Displaying the top page".2. Point to [Device Management], and then click [Device Home Management].3. Click [Home Screen Settings].4. Select [Insert Image] in the [Insert Image] box.To change the image, select [Select Another Image], and then select a new image.To delete the image, select [Delete Image], and then click [OK] twice.5. Click [Browse], and then select a file.6. Click [OK].For using User Tools1. Insert an SD card into the media slot.For details about the procedure for inserting an SD card, see page 192 "Inserting/removing amemory storage device".Using the Screen on the Control Panelmidas-p3_com_operating_instructions_gb_00198432_eng.xml 35Draft 2016/01/18](https://usermanual.wiki/Ricoh/PRSPC342DN1.BBP-PRSPC342DN1-User-Manual-1/User-Guide-2978043-Page-35.png)
![2. Press the [User Tools] key, and then register an image.[Edit Home] [Insert Image on Home Screen] [Insert Image on Home Screen] [OK]3. Remove the SD Card.For details about the procedure for removing an SD card, see page 192 "Inserting/removing amemory storage device".Restoring the [Home] screen defaultTo restore the default [Home] screen, use the User Tools. When the default [Home] screen is restored,the settings return to their factory defaults.To restore the user's initial [Home] screen, use Web Image Monitor. When the user's initial [Home]screen is restored, the setting returns to the default [Home] screen.• When embedded software applications are installed, the application icons are not deleted even ifthe default [Home] screen is restored.For using Web Image Monitor1. Log in to Web Image Monitor as an administrator.For details, see page 333 "Displaying the top page".2. Point to [Device Management], and then click [Device Home Management].3. Click [Restore Default Icon Display].4. Click [OK] twice.For using User Tools1. Press the [User Tools] key, and then restore the default icon display.[Edit Home] [Restore Default Icon Display] [OK]1. Getting Started36 midas-p3_com_operating_instructions_gb_00198432_eng.xmlDraft 2016/01/18](https://usermanual.wiki/Ricoh/PRSPC342DN1.BBP-PRSPC342DN1-User-Manual-1/User-Guide-2978043-Page-36.png)
![Logging in to the PrinterIf Basic Authentication, Windows Authentication, LDAP Authentication, or Integration ServerAuthentication is active, the authentication screen appears on the display. The printer only becomesoperable after entering your own login user name and login password.For SP C342DN, you need to enter your user code to use the printer if User Code Authentication isenabled.If you can use the printer, you can say that you are logged in. When you go out of the operable state,you can say that you are logged out. After logging in the printer, be sure to log out of it to preventunauthorized usage.• Ask the user administrator for the information you need to enter to be authenticated. For detailsabout user authentication, see Security Guide.• User Code to enter on User Code Authentication is the numerical value registered in the AddressBook as "User Code".User Code Authentication Using the Control PanelThis function is available for SP C342DN only.This section explains the procedure for logging in to the printer when User Code Authentication is set.1. Enter a user code to authenticate.[Enter] Enter a user code [OK] [OK]User Code Authentication Using a Printer DriverThis section explains the procedure for logging in to the printer using a printer driver while User CodeAuthentication is active.If User Code Authentication is active, specify the user code in the printer properties of the printer driver.For details, see the printer driver Help.• When you have logged in with User Code Authentication using the printer driver, you are loggedout automatically when printing is complete.Logging in to the Printermidas-p3_com_operating_instructions_gb_00198452_eng.xml 37Draft 2016/01/18](https://usermanual.wiki/Ricoh/PRSPC342DN1.BBP-PRSPC342DN1-User-Manual-1/User-Guide-2978043-Page-37.png)
![Logging In Using the Control PanelThis section explains the procedure for logging in to the printer when Basic Authentication, WindowsAuthentication, LDAP Authentication, or Integration Server Authentication is set.1. Press the [Menu] key.2. Press [Login] Enter a login user name Press [OK]3. Enter a login password Press [OK]When the user is authenticated, the screen for the function you are using appears.1. Enter user information to authenticate.[Login] Enter a login user name [OK] Enter a login password [OK]Logging Out Using the Control PanelThis section explains the procedure for logging out the printer when Basic Authentication, WindowsAuthentication, LDAP Authentication, or Integration Server Authentication is set.• To prevent use of the printer by unauthorized persons, always log out when you have finishedusing the printer.1. Press the [Menu] key.2. Press [Logout] Press [Yes]1. Press the [Login/Logout] key, and then press [Yes].Logging In Using a Printer DriverEnter your login user name and password as registered in the printer. You need only do this the first timeyou access the printer.The PCL printer driver supports User Code Authentication.The procedure is explained below using Windows 7 as an example:1. Getting Started38 midas-p3_com_operating_instructions_gb_00198452_eng.xmlDraft 2016/01/18](https://usermanual.wiki/Ricoh/PRSPC342DN1.BBP-PRSPC342DN1-User-Manual-1/User-Guide-2978043-Page-38.png)
![1. Open the printer properties dialog box, and then click the [Advanced Options] tab.For details about displaying printer driver properties dialog box, see page 131 "Displaying thePrinter Driver Properties with Windows".2. Select the [User Authentication] check box.3. Configure the following settings:• [Driver Encryption Key...]If you want to encrypt the login password, enter the driver encryption key already set on theprinter.4. Click [OK] to close the printer properties dialog box.5. Open the printing preferences dialog box.6. Specify the user authentication setting.PCL 5e/5cClick [Authentications...] in the [Valid Access] tab.PCL 6Click [Authentication...] in the [Job Setup] menu under the [Detailed Settings] tab.7. Enter a login user name and login password already set on the printer or the server foruser authentication.Be sure to enter the same login user name and login password that is registered on the printer orthe server.If you do not enter a valid login user name and login password, printing will not start.8. Click [OK] to close the [Authentication] dialog box.9. Click [OK] to close the printing preferences dialog box.• Depending on the application in use, the authentication settings specified in this procedure may nottake effect.Logging In Using Web Image MonitorThis section explains the procedure for logging in to the printer via Web Image Monitor.For details, see page 333 "Displaying the top page".• For User Code Authentication, enter a user code in the [Login User Name] box, and then click[Login].Logging in to the Printermidas-p3_com_operating_instructions_gb_00198452_eng.xml 39Draft 2016/01/18](https://usermanual.wiki/Ricoh/PRSPC342DN1.BBP-PRSPC342DN1-User-Manual-1/User-Guide-2978043-Page-39.png)
![• The procedure may differ depending on the Web browser used.Logging Out Using Web Image MonitorThis section explains the procedure for logging out the printer via Web Image Monitor.1. Click [Logout] to log out.• Delete the cache memory of a Web browser after logging out.User Lockout FunctionThis printer has the User Lockout function.If an incorrect password is entered the number of times specified by the administrator, the User Lockoutfunction prevents further login attempts under the same user name.If the User Lockout function is applied, authentication will fail even if the correct password is entered andit will not be possible to use the printer.For details about canceling the Lockout setting, see Security Guide.Changing the Login PasswordYou can use alphanumeric characters and symbols when registering a login user password.You can register up to 128 single-byte characters.The password is case-sensitive. Keep this in mind when registering the password.• Do not disclose the password to anyone else. Similarly, do not write the password down and leaveit where others can see it.• Change the password periodically.• Make the password difficult to guess.Password PolicyThis printer has a password policy.Only passwords meeting the specified criteria for level of complexity and minimum number ofcharacters can be registered. For details about the criteria, see Security Guide.Passwords can contain the following characters:• Upper case letters: A to Z (26 characters)• Lower case letters: a to z (26 characters)1. Getting Started40 midas-p3_com_operating_instructions_gb_00198452_eng.xmlDraft 2016/01/18](https://usermanual.wiki/Ricoh/PRSPC342DN1.BBP-PRSPC342DN1-User-Manual-1/User-Guide-2978043-Page-40.png)
![• Numbers: 0 to 9 (10 characters)• Symbols: (space) ! " # $ % & ' ( ) * + , - . / : ; < = > ? @ [ \ ] ^ _` { | } ~ (33 characters)Some characters are not available, regardless of whether they can be entered using the keyboardor the control panel.Changing the login password using the control panelThis function is available for SP C342DN only.1. Press the [User Tools] key.2. Press the [Login/Logout] key, and then log in to the printer.[Login] Enter a login user name [OK] Enter a login password [OK]3. Select the user whose password you want to change.[Address Book Mangmnt] [Change] [All Users] Select the user4. Change the login password.[Auth. Info] [Auth. Info at Login] [Change] for "Login Password" Enter a new loginpassword [OK] Enter the login password again [OK] [OK] [Exit] [OK]Changing the login password using Web Image Monitor1. Start Web Image Monitor.For details, see page 333 "Displaying the top page".2. Point to [Device Management], and then click [Address Book].3. Select the user or group.4. Click [Change].5. Select the [User Authentication] check box in the [Authentication Management] area.6. Click [Go to Next].7. Click [On] next to [Change Login Password].8. Enter the new password in the [Login Password] box.9. Enter the new password in the [Confirm Login Password] box.10. Click [Go to Next].11. Click [OK].12. Click [Logout].Logging in to the Printermidas-p3_com_operating_instructions_gb_00198452_eng.xml 41Draft 2016/01/18](https://usermanual.wiki/Ricoh/PRSPC342DN1.BBP-PRSPC342DN1-User-Manual-1/User-Guide-2978043-Page-41.png)
![Changing the login password for the printer driver1. Open the printing preferences dialog box.2. Specify the user authentication setting.PCL 5e/5cClick [Authentications...] in the [Valid Access] tab.PCL 6Click [Authentication...] in the [Job Setup] menu under the [Detailed Settings] tab.3. Enter a login password already set on the printer or the server for user authentication.Be sure to enter the same login password that is registered on the printer or the server.If you do not enter a valid login password, printing will not start.4. Click [OK] to close the [Authentication] dialog box.5. Click [OK] to close the printing preferences dialog box.1. Getting Started42 midas-p3_com_operating_instructions_gb_00198452_eng.xmlDraft 2016/01/18](https://usermanual.wiki/Ricoh/PRSPC342DN1.BBP-PRSPC342DN1-User-Manual-1/User-Guide-2978043-Page-42.png)


![• You can confirm that the SD card was installed correctly by checking the control panel menu orconfiguration page.• VM card: Make sure [JavaTM/X] appears when the [Switch Functions] key is pressed.• Camera direct print card: Printing the configuration page, if the camera direct print card isinstalled properly, "PictBridge" will appear for "Printer Language" in "System Reference". Fordetails about printing the configuration page, see page 100 "Test Printing".• XPS card: Printing the configuration page, if the XPS card is installed properly, "XPS" willappear for "Printer Language" in "System Reference". For details about printing theconfiguration page, see page 100 "Test Printing".• If the card is not installed properly, repeat the procedure from the beginning. If it cannot beinstalled correctly even after trying the installation a second time, contact your sales or servicerepresentative.• Do not touch the card while the printer is in use. It may come loose, even if pushed only slightly. Theslot cover must be reattached.Installing Optionsmidas-p3_com_operating_instructions_gb_00198474_eng.xml 69Draft 2016/01/18](https://usermanual.wiki/Ricoh/PRSPC342DN1.BBP-PRSPC342DN1-User-Manual-1/User-Guide-2978043-Page-69.png)

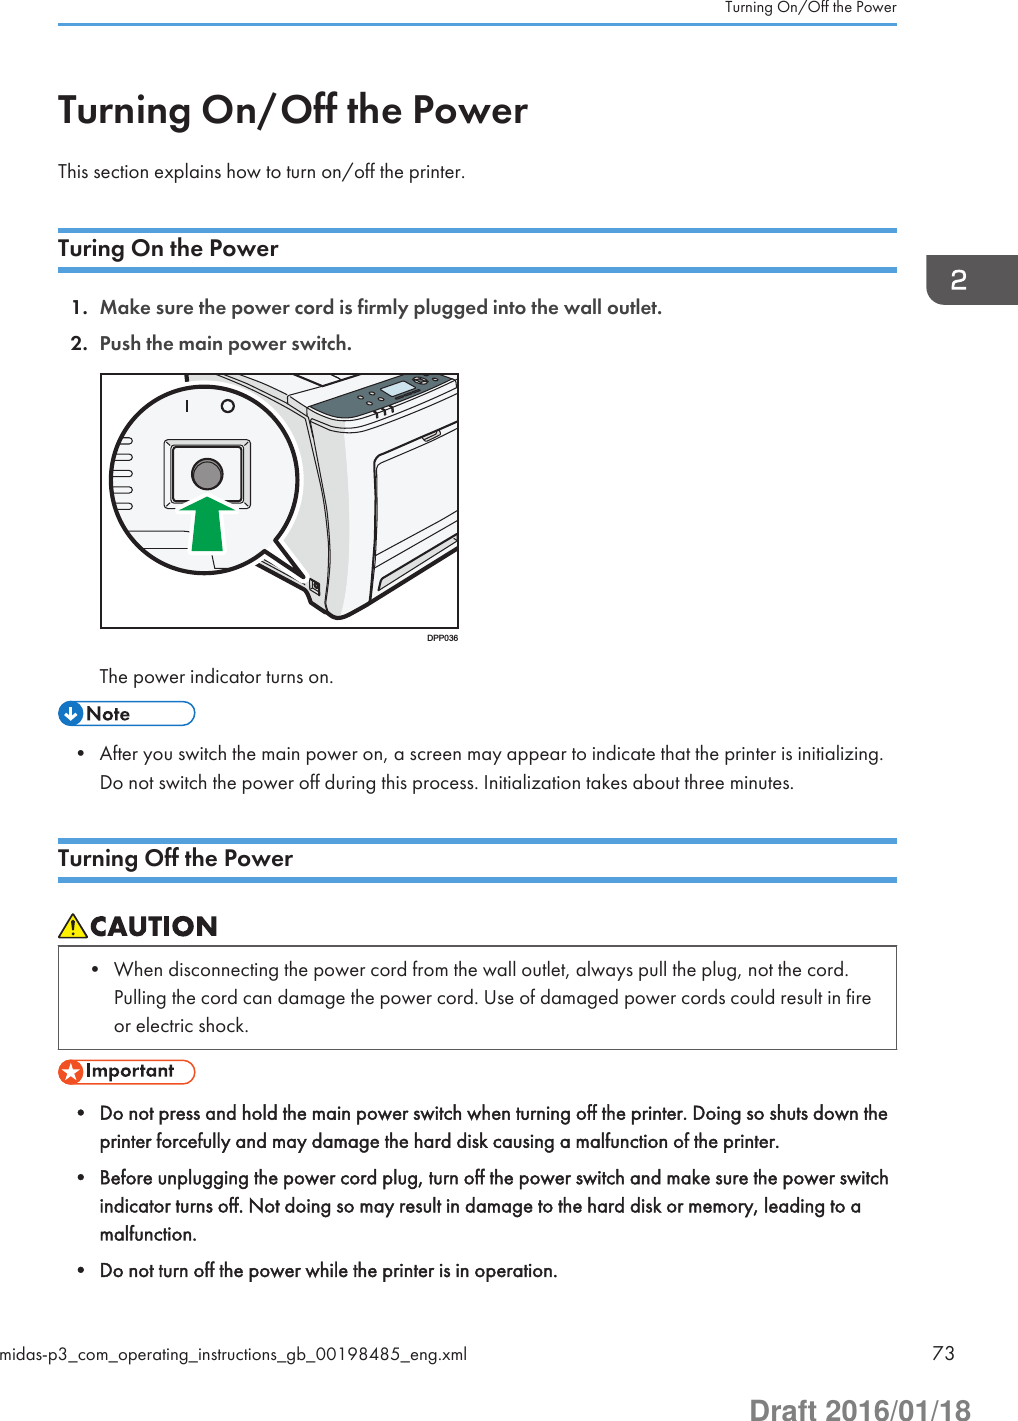
![1. Push the main power switch.DPP036The main power is turned off automatically when the shutdown process is complete.If the shutdown process is not complete within the period of time displayed on the screen, contactyour service representative.Saving EnergyThis printer has the following energy saving functions:Fusing Unit Off ModeIf you do not use the printer for a certain period after an operation, the display will turn off and theprinter goes into Fusing Unit Off mode. The printer uses less electricity in Fusing Unit Off mode.When the printer is in Fusing Unit Off mode, the display is on but the fusing unit heater is off to saveenergy. In this mode, you can change the printer settings on the control panel. However, the printermust exit this mode to print.You can change the amount of time that the printer waits before switching to Fusing Unit Off modeunder [Fusing Unit Off Mode Timer]. For details, see:• page 234 "System (SP C340DN)" (for SP C340DN)• page 288 "Timer Settings" (for SP C342DN)To exit Fusing Unit Off mode, do one of the following:• Display the [Maintenance] screen on the control panel (for SP C340DN)• Display the [Maintenance: Print] or [Maintenance: Image] screen on the control panel (for SPC342DN)• Operate the control panel when [Exit Fusing Unit Off Mode] is set to [On Operating ControlPanel]• Start print jobs2. Setting Up the Printer74 midas-p3_com_operating_instructions_gb_00198485_eng.xmlDraft 2016/01/18](https://usermanual.wiki/Ricoh/PRSPC342DN1.BBP-PRSPC342DN1-User-Manual-1/User-Guide-2978043-Page-74.png)
![Sleep modeIf the printer remains inactive for a specified period after entering Fusing Unit Off mode, it entersSleep mode to further reduce the power consumption. The printer also enters Sleep mode when:• The printer waits before entering Sleep mode is set in [Sleep Mode Timer]• It is the day and time specified in [Weekly Timer]When the printer is in Sleep mode, only the [Energy Saver] key and the [Check Status] key areusable. (for SP C342DN)The printer can print jobs from computers.You can change the amount of time that the printer waits before switching to Sleep mode.For details about setting [Sleep Mode Timer] and [Weekly Timer], see:• page 234 "System (SP C340DN)" (for SP C340DN)• page 288 "Timer Settings" (for SP C342DN)To exit Sleep mode, do one of the following:• Press one of the keys on the control panel (for SP C340DN)• Press the [Energy Saver] key or [Check Status] key (for SP C342DN)• Start print jobsECO Night SensorECO Night Sensor can detect darkness and automatically turn off this product's power.If ECO Night Sensor is enabled and detects darkness in a room after the lights are turned off, thesensor automatically turns the power off and reduces the power consumption of this product to 1Wor less.The default settings of ECO Night Sensor are enabled.To change the settings, see:• page 234 "System (SP C340DN)" (for SP C332DN)• page 300 "Administrator Tools" (for SP C333DN)• The ECO Night Sensor function's factory default is [Auto Power Off Only]. If the printer is located inan environment where the ambient light level is low (such as in a hallway or a location with motionsensor lighting), it is advisable that you either keep this function disabled or adjust its sensitivity.• You can configure the printer to automatically turn its power on when it detects an increase in theambient light level. The printer may also react to daylight and turn its power on. If the printer islocated in an environment where it is exposed to direct sunlight, it is advisable that you do notchange the factory default configuration and only enable [Auto Power Off Only].• When the printer is in Sleep mode, the [Energy Saver] key flashes slowly. (for SP C342DN)Turning On/Off the Powermidas-p3_com_operating_instructions_gb_00198485_eng.xml 75Draft 2016/01/18](https://usermanual.wiki/Ricoh/PRSPC342DN1.BBP-PRSPC342DN1-User-Manual-1/User-Guide-2978043-Page-75.png)
![Selecting the Display LanguageYou can change the language used on the display. English is set as the default language.Press the [Menu] key, and then select the setting items using the [ ] or [ ] key.1. Select [Language] Press [OK]2. Select the language you want to use Press [OK]1. Press the [User Tools] key, and then change the display language.["language name"] Press the button repeatedly until the language you want to use appearsSelecting the Display Languagemidas-p3_com_operating_instructions_gb_00198489_eng.xml 77Draft 2016/01/18](https://usermanual.wiki/Ricoh/PRSPC342DN1.BBP-PRSPC342DN1-User-Manual-1/User-Guide-2978043-Page-77.png)
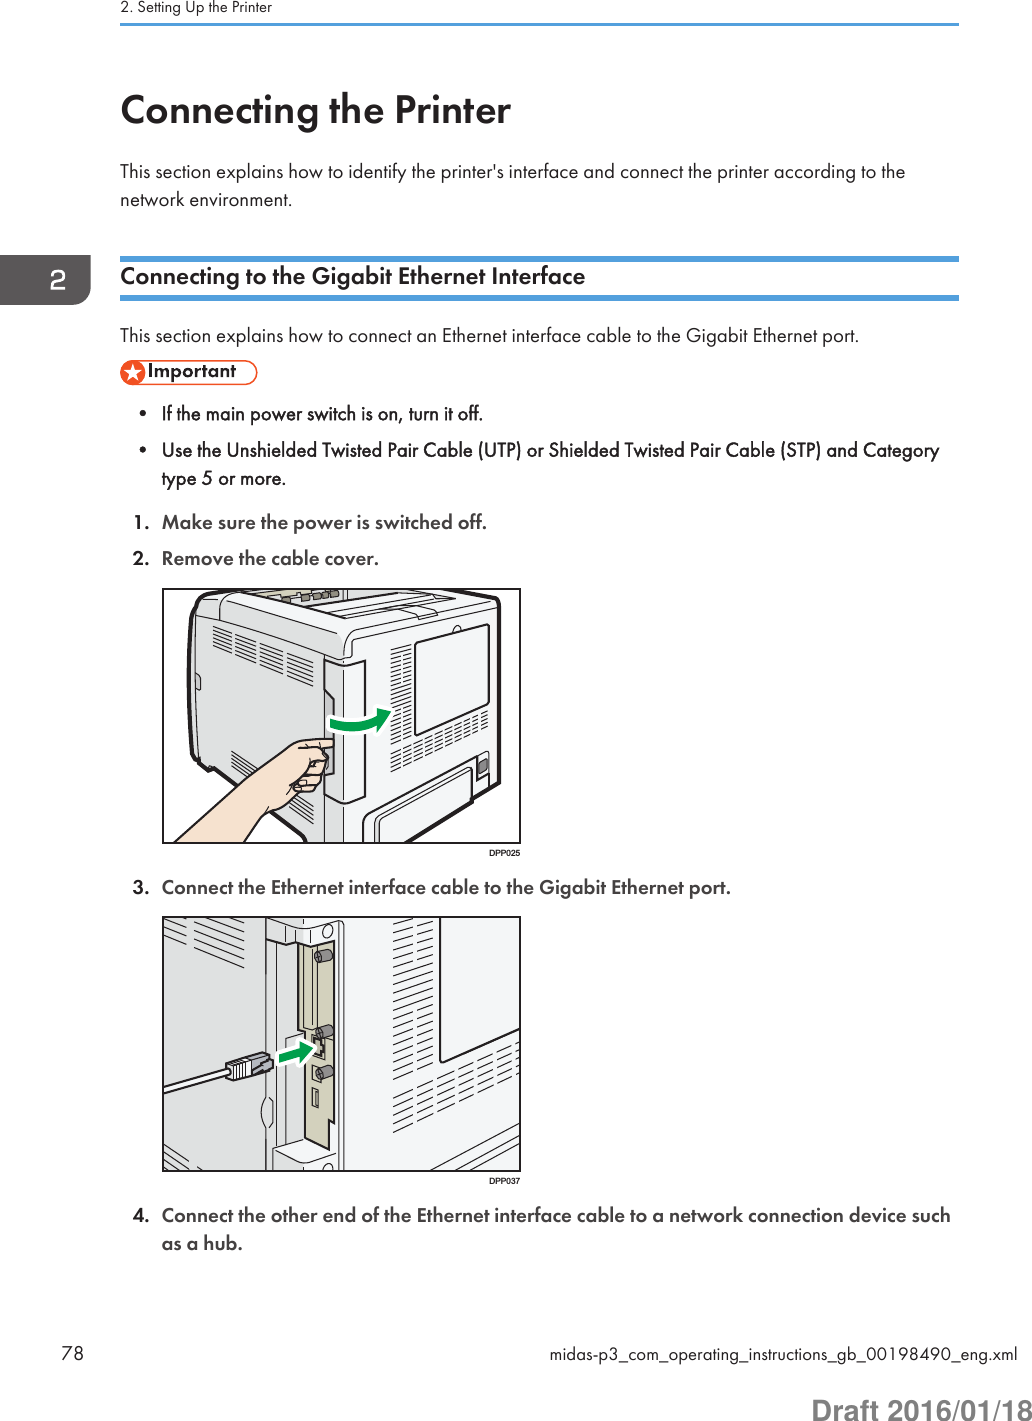
![5. Turn on the main power switch of the printer.123CSJ3041. Indicator (green)When 10BASE-T is operating, the LED is lit green. When 100BASE-TX is operating or the printer is notconnected to a network, it is turned off.2. Indicator (orange)When 100BASE-TX is operating, the LED is lit orange. When 10BASE-T is operating or the printer is notconnected to a network, it is turned off.3. Indicators (both orange and green)When 1000BASE-T is operating, both LEDs are lit.The LEDs turn off when the Ethernet cable is disconnected or the printer is in Sleep Mode.6. Attach the cable cover.DPP029• Use an Ethernet interface cable that supports the speed that you selected for "Ethernet Speed". Ifyou select [Auto Select: Enable 1Gbps] for "Ethernet Speed", use an Ethernet interface cable thatsupports 1000BASE-T.• Check the type of the plug before connecting.• Do not pull the connected cable forcefully. Make sure the cable is properly connected. Otherwise,it might become disconnected or somebody might trip on it.• Using a cable with some connectors or converters may result in an improper connection.Connecting the Printermidas-p3_com_operating_instructions_gb_00198490_eng.xml 79Draft 2016/01/18](https://usermanual.wiki/Ricoh/PRSPC342DN1.BBP-PRSPC342DN1-User-Manual-1/User-Guide-2978043-Page-79.png)

![8. Turn on the host computer.If Windows operating system is used, a printer driver installation screen might appear when thecomputer is turned on. If this happens, click [Cancel] on the screen.• This printer does not come with an IEEE 1284 interface cable. Make sure you purchase theappropriate cable for the printer (connector shape) and your computer.• Use a five meter (16.4 foot) or shorter IEEE 1284 compatible cable that is compatible with the hostcomputer.Connecting to the Wireless LAN InterfaceThis section describes how to connect to the wireless LAN interface.• Check the printer's IPv4 address and subnet mask, or the IPv6 address settings.• For details about how to specify the IPv4 address and subnet mask from the control panel of theprinter, see page 93 "Wireless LAN Configuration".• Before using this printer with a wireless LAN interface, you must select [Wireless LAN] in [LANType].Specifying Wireless LAN SettingsYou can specify wireless LAN settings either by directly connecting the printer to the computer in Ad Hocmode or by using a router or other wireless access point in Infrastructure mode.In Ad Hoc mode, it is necessary to manually specify the connection settings, such as SSID. InInfrastructure mode, the connection settings can be specified automatically if using a wireless accesspoint supporting Wi-Fi Protected Setup (WPS).802.11 Ad-hoc ModeDPP279For details about how to specify wireless LAN settings from the control panel on the printer, seepage 93 "Wireless LAN Configuration".Connecting the Printermidas-p3_com_operating_instructions_gb_00198490_eng.xml 85Draft 2016/01/18](https://usermanual.wiki/Ricoh/PRSPC342DN1.BBP-PRSPC342DN1-User-Manual-1/User-Guide-2978043-Page-85.png)
![Select Security TypeSelect the communication mode802.11 Ad-hoc ModeSet the SSIDSelect ad-hoc channelConfirm the connectionSelect Security TypeSelect the communication modeInfrastructure ModeSet the SSIDConfirm the connectionCQT650• When [802.11 Ad-hoc Mode] is selected in Communication Mode, select the channel for [Ad-hocChannel]. Set a channel that matches the type of wireless LAN being used. For details about settingthe Ad-hoc Channel, see page 93 "Wireless LAN Configuration".• For details about security type settings, see Security Guide.Checking the signalThis section explains how to check the printer's radio wave status.When using in infrastructure mode, you can check the printer's radio wave status using the control panel.Press the [Menu] key, and then select the setting items using the [ ] or [ ] key.1. Select [Host Interface] Press [OK]2. Select [Wireless LAN] Press [OK]3. Select [Wireless LAN Signal] Press [OK]The printer's radio wave status appears.1. Press the [User Tools] key, and then display the [Wireless LAN] screen.[System Settings] [Interface Settings] [Wireless LAN]Connecting the Printermidas-p3_com_operating_instructions_gb_00198490_eng.xml 87Draft 2016/01/18](https://usermanual.wiki/Ricoh/PRSPC342DN1.BBP-PRSPC342DN1-User-Manual-1/User-Guide-2978043-Page-87.png)
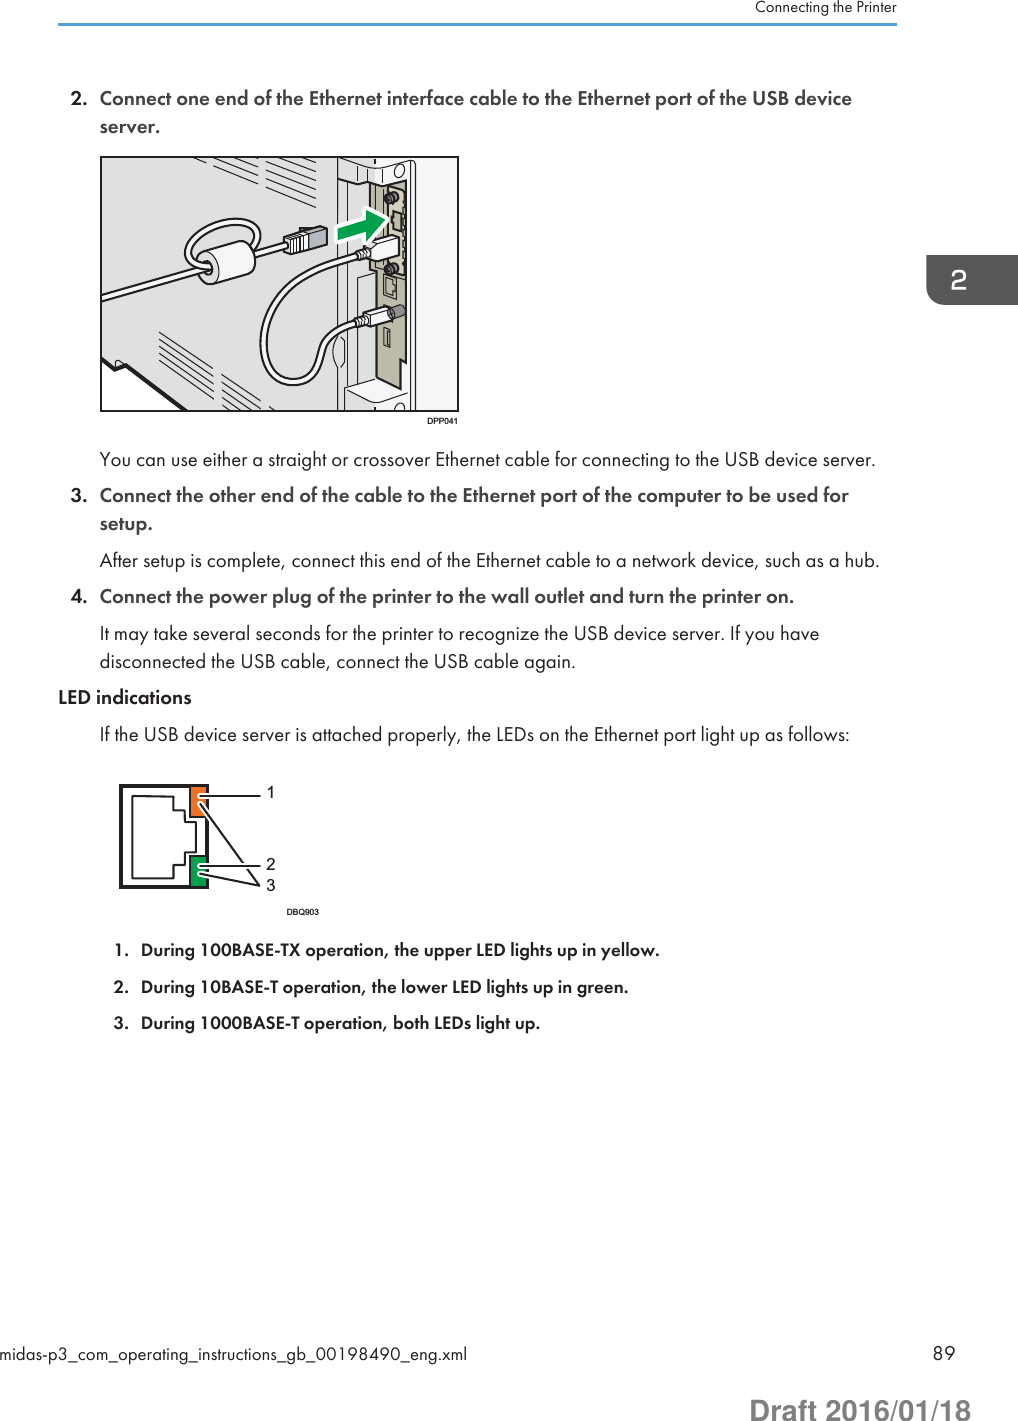
![2. Check the radio wave status.[Wireless LAN Signal] Check the radio wave status [Exit]Connecting to the USB Device ServerThis section explains how to connect an Ethernet interface cable to the USB device server.The network interface cable connected to the USB device server must use a ferrite core to prevent RFinterference.• Be sure to turn off the power switch of the printer before connecting or disconnecting the Ethernetinterface cable.1. Make a loop at a distance of a few centimeters (1) from each end of the Ethernet interfacecable, and then attach to each loop the ferrite core provided with the USB device server.11BZU0102. Setting Up the Printer88 midas-p3_com_operating_instructions_gb_00198490_eng.xmlDraft 2016/01/18](https://usermanual.wiki/Ricoh/PRSPC342DN1.BBP-PRSPC342DN1-User-Manual-1/User-Guide-2978043-Page-88.png)
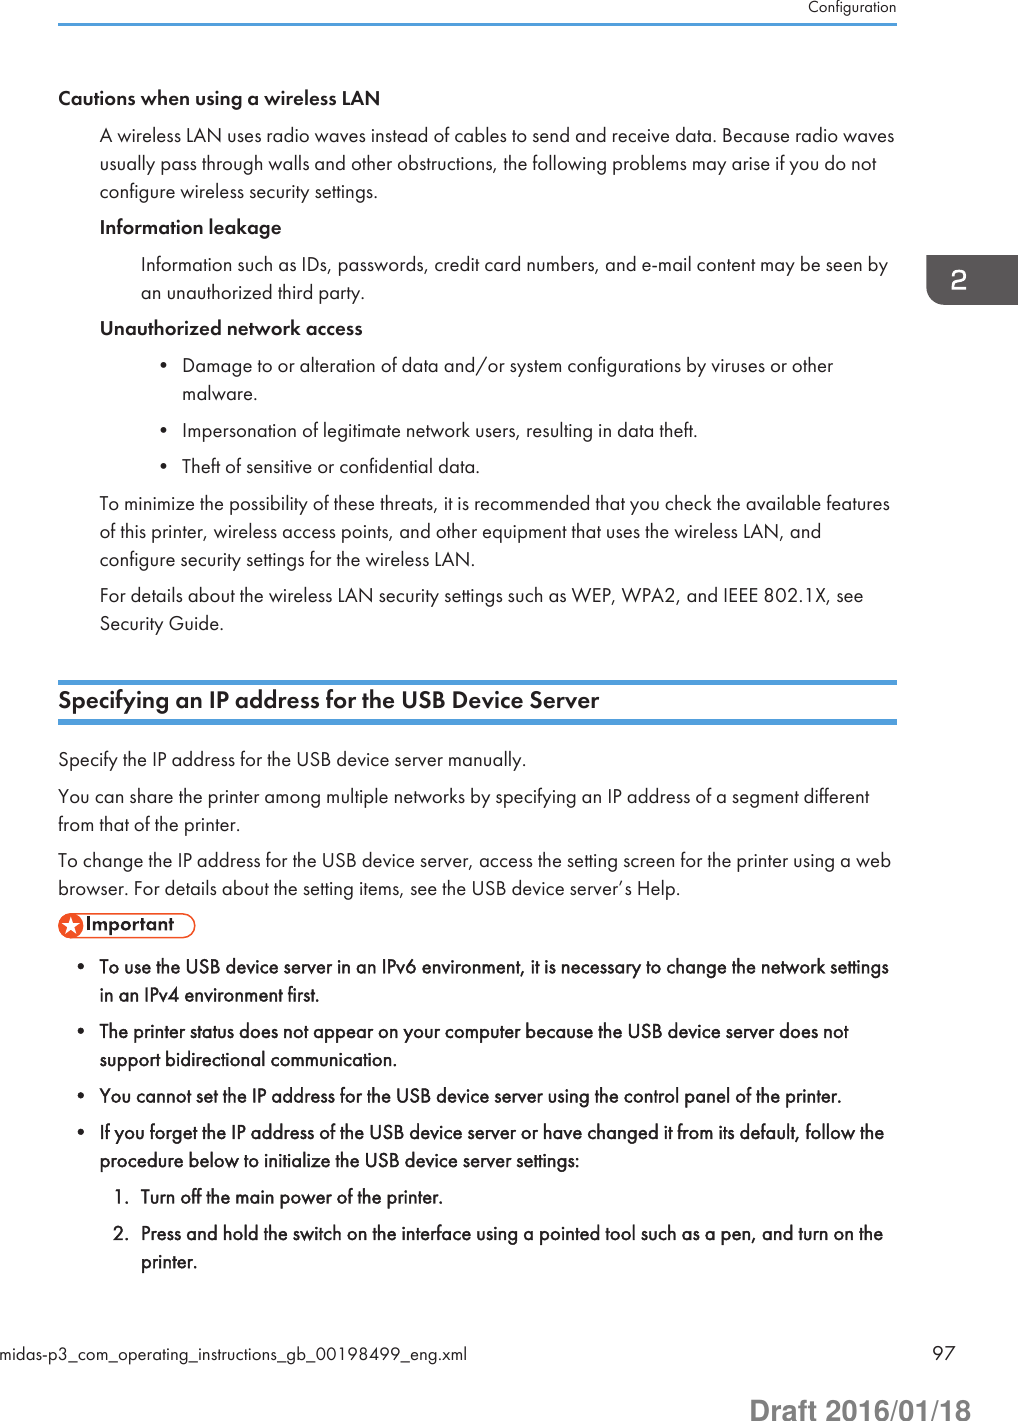
![ConfigurationThis section describes supported network connections and settings for IP addresses and wireless LANsecurity.Ethernet ConfigurationConfigure the printer for the network using the control panel.After configuring network settings, you can print the configuration page to confirm the settings. Fordetails, see page 100 "Test Printing".• Contact your network administrator for information about configuring network settings.• For details about setting items and their default values, see:• page 255 "Host Interface (SP C340DN)" (for SP C340DN)• page 291 "Interface Settings" (for SP C342DN)• You can also use Web Image Monitor to configure the IP address-related settings. For details, seeWeb Image Monitor Help.Specifying an IP address (no DHCP)If you want to use the printer on a network without using DHCP or want to use a static IP address, use thefollowing procedure to assign a specific IPv4 address to the printer. Before making any changes,contact your network administrator to obtain the IP address, subnet mask, and gateway address to bespecified on the printer.Press the [Menu] key, and then select the setting items using the [ ] or [ ] key.1. Select [Host Interface] Press [OK]2. Select [Network] Press [OK]3. Select [Effective Protocol] Press [OK]4. Select [IPv4] Press [OK]5. Select [Active] Press [OK] Press [Escape]Set other protocols you need to set in the same way.6. Select [Machine IPv4 Address] Press [OK]7. Select [Specify] Press [IP Add.] Specify the IPv4 address for the printer Press [OK]2. Setting Up the Printer90 midas-p3_com_operating_instructions_gb_00198499_eng.xmlDraft 2016/01/18](https://usermanual.wiki/Ricoh/PRSPC342DN1.BBP-PRSPC342DN1-User-Manual-1/User-Guide-2978043-Page-90.png)
![8. Press [Subnet M] and [Gateway] to specify the subnet mask and gateway address in thesame manner.9. Make sure [Specify] is selected Press [OK]1. Press the [User Tools] key, and then display the [Network] screen.[System Settings] [Interface Settings] [Network]2. Enable IPv4 protocol, and then specify the IPv4 address.• [Effective Protocol]Enable IPv4 protocol.Press [Active] under "IPv4" [OK]• [Machine IPv4 Address]Specify the printer's IPv4 address and subnet mask.[Specify] [Machine IPv4 Address] Enter the IP address [OK] [Subnet Mask] Enter the subnet mask [OK] [OK]• [IPv4 Gateway Address]Specify the IPv4 gateway address for the printer.Enter the gateway address [OK]Receiving an IP address automatically (DHCP)Follow the procedure below to set the printer to receive an IP address automatically using DHCP. TheDHCP feature is active by default, so this procedure is only required if you have changed the defaultsettings.• When [Auto-Obtain (DHCP)] is selected, you cannot configure the IP address, subnet mask, orgateway address.Press the [Menu] key, and then select the setting items using the [ ] or [ ] key.1. Select [Host Interface] Press [OK]2. Select [Network] Press [OK]3. Select [Machine IPv4 Address] Press [OK]Configurationmidas-p3_com_operating_instructions_gb_00198499_eng.xml 91Draft 2016/01/18](https://usermanual.wiki/Ricoh/PRSPC342DN1.BBP-PRSPC342DN1-User-Manual-1/User-Guide-2978043-Page-91.png)
![4. Select [Auto-Obtain (DHCP)] Press [OK]You can check the detected addresses by pressing [IP Add.], [Subnet M], and [Gateway].1. Press the [User Tools] key, and then display the [Network] screen.[System Settings] [Interface Settings] [Network]2. Enable IPv4 protocol, and then specify the IPv4 address.• [Effective Protocol]Enable IPv4 protocol.Press [Active] under "IPv4" [OK]• [Machine IPv4 Address]Specify the printer's IPv4 address.[Auto-Obtain (DHCP)] [OK]Setting Ethernet SpeedYou can set the speed that the printer will use for Ethernet communication. Usually, you should set theprinter to select the Ethernet speed automatically. This setting allows two interfaces to determine theoptimum speed when they are connected.• A connection cannot be established if the selected Ethernet speed does not match your network'stransmission speed.• To reduce the power consumption of network devices, the default Ethernet speed of the printerdoes not exceed 100BASE-TX (100 Mbps). To communicate using a higher speed, enable1000BASE-T (1Gbps) communication by selecting the following from [Ethernet Speed]:• [Auto Select: Enable 1Gbps] (for SP C340DN)• [AutoSelct:Enable 1Gbps] (for SP C342DN)Press the [Menu] key, and then select the setting items using the [ ] or [ ] key.1. Select [Host Interface] Press [OK]2. Select [Network] Press [OK]3. Select [Ethernet Speed] Press [OK]4. Select the Ethernet speed Press [OK]2. Setting Up the Printer92 midas-p3_com_operating_instructions_gb_00198499_eng.xmlDraft 2016/01/18](https://usermanual.wiki/Ricoh/PRSPC342DN1.BBP-PRSPC342DN1-User-Manual-1/User-Guide-2978043-Page-92.png)
![1. Press the [User Tools] key, and then display the [Network] screen.[System Settings] [Interface Settings] [Network]2. Select the Ethernet speed.[Ethernet Speed] Select the Ethernet speed [OK]Wireless LAN Configuration• This feature is available only when the optional wireless LAN interface board is installed.• Ethernet and wireless LAN cannot be used at the same time.• To use a wireless LAN, you must set the IP address, subnet mask, gateway address, DHCP, FrameType (NW), and active protocol. For details, see page 90 "Ethernet Configuration".• For details about setting items and their default values, see:• page 255 "Host Interface (SP C340DN)" (for SP C340DN)• page 291 "Interface Settings" (for SP C342DN)Configuring a Wireless LAN Using Easy Setup (When Using a Wireless Access PointSupporting WPS)If the wireless access point in use supports WPS, the wireless LAN connection settings and securitysettings can be automatically configured in Infrastructure mode.Press the [Menu] key, and then select the setting items using the [ ] or [ ] key.1. Select [Host Interface] Press [OK]2. Select [Network] Press [OK]3. Select [LAN Type] Press [OK]4. Select [Wireless LAN] Press [OK] Press [Escape]5. Select [Wireless LAN] Press [OK]6. Select [Wireless LAN Easy Setup] Press [OK]7. Select [Push Button Method] or [PIN Code Method] Press [OK]If you select [Push Button Method], press the WPS button on the wireless LAN access point.Configurationmidas-p3_com_operating_instructions_gb_00198499_eng.xml 93Draft 2016/01/18](https://usermanual.wiki/Ricoh/PRSPC342DN1.BBP-PRSPC342DN1-User-Manual-1/User-Guide-2978043-Page-93.png)
![If you select [PIN Code Method], enter the displayed PIN code in the Registrar.8. Press [Start]When Wireless LAN Easy Setup is complete, press [OK].1. Press the [User Tools] key, and then display the [Network] screen.[System Settings] [Interface Settings] [Network]2. Select Wireless LAN as the network interface to be used.[LAN Type] [Wireless LAN] [OK]3. Press [Exit].4. Display the [Wireless LAN Easy Setup] screen.[Wireless LAN] [Wireless LAN Easy Setup]5. Set up a Wireless LAN using WPS.• [Push Button]Press the WPS button on the wireless LAN access point Press [Connect] on the screen• [PIN Code]Enter the displayed PIN code in the Registrar on the wireless access point’s webpage,and then press [Connect] on the screen.Configuring a wireless LAN manuallyTo set up a wireless LAN manually, specify the transmission mode and SSID (Service Set Identifier) of thewireless access point that the printer will use for network access.Ask your network administrator for the SSID.Setting the communication modePress the [Menu] key, and then select the setting items using the [ ] or [ ] key.1. Select [Host Interface] Press [OK]2. Select [Network] Press [OK]3. Select [LAN Type] Press [OK]4. Select [Wireless LAN] Press [OK] Press [Escape]2. Setting Up the Printer94 midas-p3_com_operating_instructions_gb_00198499_eng.xmlDraft 2016/01/18](https://usermanual.wiki/Ricoh/PRSPC342DN1.BBP-PRSPC342DN1-User-Manual-1/User-Guide-2978043-Page-94.png)
![5. Select [Wireless LAN] Press [OK]6. Select [Communication Mode] Press [OK]7. Select the transmission mode of the wireless LAN Press [OK]8. If [802.11 Ad-hoc Mode] is selected for [Communication Mode], select [Ad-hocChannel] Press [OK]9. Select the Ad-hoc channel Press [OK]Select an Ad-hoc channel according to the IEEE 802.11 standard you are using.• When using IEEE 802.11 b/g:Channels 1–11• When using IEEE 802.11 a:Channels 36, 40, 44, and 48• When using IEEE 802.11 n:Channels 1–11, 36, 40, 44, and 48• The transmission mode of the wireless LAN can also be set using Web Image Monitor. Fordetails, see Web Image Monitor Help.Setting the SSIDPress the [Menu] key, and then select the setting items using the [ ] or [ ] key.1. Select [Host Interface] Press [OK]2. Select [Wireless LAN] Press [OK]3. Select [SSID Setting] Press [OK]4. [SSID] [Enter] Enter the SSID Press [OK]You can switch between lower/upper case letters and numeric characters by pressing[ab/AB/12].The characters that can be used are ASCII 0 × 20-0 × 7e (32 bytes).• The SSID can also be set using Web Image Monitor. For details, see Web Image MonitorHelp.Setting the communication mode1. Press the [User Tools] key, and then display the [Network] screen.[System Settings] [Interface Settings] [Network]Configurationmidas-p3_com_operating_instructions_gb_00198499_eng.xml 95Draft 2016/01/18](https://usermanual.wiki/Ricoh/PRSPC342DN1.BBP-PRSPC342DN1-User-Manual-1/User-Guide-2978043-Page-95.png)
![2. Select Wireless LAN as the network interface to be used.[LAN Type] [Wireless LAN] [OK]3. Press [Exit].4. Press [Wireless LAN], and then specify the transmission mode and the channel to beused for transmission.• [Communication Mode]Specify the transmission mode for the Wireless LAN.[802.11 Ad-hoc Mode] or [Infrastructure Mode] [OK]• [Ad-hoc Channel]Select an Ad-hoc channel.Select a channel [OK]Select an Ad-hoc channel according to the IEEE 802.11 standard you are using.• When using IEEE 802.11 b/g:Channels 1–11• When using IEEE 802.11 a:Channels 36, 40, 44, and 48• When using IEEE 802.11 n:Channels 1–11, 36, 40, 44, and 48• The transmission mode of the wireless LAN can also be set using Web Image Monitor. Fordetails, see Web Image Monitor HelpSetting the SSID1. Press the [User Tools] key, and then display the [Wireless LAN] screen.[System Settings] [Interface Settings] [Wireless LAN]2. Enter the SSID.[SSID Setting] [Enter SSID] Enter the SSID [OK] [OK]• The SSID can also be set using Web Image Monitor. For details, see Web Image MonitorHelp.2. Setting Up the Printer96 midas-p3_com_operating_instructions_gb_00198499_eng.xmlDraft 2016/01/18](https://usermanual.wiki/Ricoh/PRSPC342DN1.BBP-PRSPC342DN1-User-Manual-1/User-Guide-2978043-Page-96.png)
![CQS7043. Both the upper and lower LEDs of the Ethernet port light up. Be sure to check the upper LEDturns off and the lower LED lights up in yellow, and then release the switch.• Confirm the IP address of your computer before starting setup. The default IP address for the USBdevice server is "192.168.100.100", and the default subnet mask is "255.255.255.0". Toperform the initial setup of the USB device server, set the IP address for your computer to"192.168.100.XXX" (XXX: 0 to 255), and the subnet mask to "255.255.255.0". It isrecommended to make a note of the current IP address before changing it.1. Enter "http://192.168.100.100/" in the address bar of the Web to access the settingscreen of the printer.2. Click [Network Settings].3. Enter "root" as the user name, and then click [OK].4. Specify the IP address, Subnet Mask, and Default Gateway.When DHCP is enabled, the IP address can be obtained automatically from a network device withthe DHCP server function.5. Configure the other settings as necessary, and then click [Submit].6. Exit the web browser.7. Disconnect the Ethernet interface cable from the computer used for setup, and thenconnect the cable to a network device, such as a hub.8. Set the IP address of the USB device server in the printer driver used for printing.• The default administrator password is not specified. It is recommended that you specify theadministrator password on the [Maintenance Information] screen by using up to sevenalphanumeric characters.• The default network settings of the USB device server are as follows:• DHCP/BOOTP: Disable• IP Address: 192.168.100.100• Subnet Mask: 255.255.255.02. Setting Up the Printer98 midas-p3_com_operating_instructions_gb_00198499_eng.xmlDraft 2016/01/18](https://usermanual.wiki/Ricoh/PRSPC342DN1.BBP-PRSPC342DN1-User-Manual-1/User-Guide-2978043-Page-98.png)

![Test PrintingAfter configuring network settings, print the configuration page to confirm the settings. For details aboutnetwork settings, see page 90 "Configuration".• The configuration page is printed on A4 or Letter (81/2" × 11") size paper. If no A4 or Letter paperis loaded in the paper trays, the configuration page is printed on the paper fed from the tray withpriority.Press the [Menu] key, and then select the setting items using the [ ] or [ ] key.1. Select [List/Test Print] Press [OK]2. Select [Config. Page] Press [OK]1. Press the [User Tools] key, and then display the [List / Test Print] screen.[Printer Features] [List / Test Print]2. Print the configuration page.[Configuration Page]Interpreting the Configuration PageThis section describes the configuration page.System Reference• Machine IDDisplays the serial number assigned to the board by its manufacturer.• Total MemoryDisplays the total amount of memory (SDRAM) installed on the printer.• Total CounterDisplays the total number of pages printed by the printer to date.• Firmware Version• Printer2. Setting Up the Printer100 midas-p3_com_operating_instructions_gb_00198508_eng.xmlDraft 2016/01/18](https://usermanual.wiki/Ricoh/PRSPC342DN1.BBP-PRSPC342DN1-User-Manual-1/User-Guide-2978043-Page-100.png)