Ricoh PRSPC342DN1 Part15 Subpart B-Printer User Manual BBP PRSPC342DN1 2
Ricoh Company Ltd Part15 Subpart B-Printer BBP PRSPC342DN1 2
Ricoh >
Contents
- 1. BBP-PRSPC342DN1_User Manual 1
- 2. BBP-PRSPC342DN1_User Manual 2
- 3. BBP-PRSPC342DN1_User Manual 3
- 4. BBP-PRSPC342DN1_User Manual 4
- 5. BBP-PRSPC342DN1_User Manual 5
BBP-PRSPC342DN1_User Manual 2
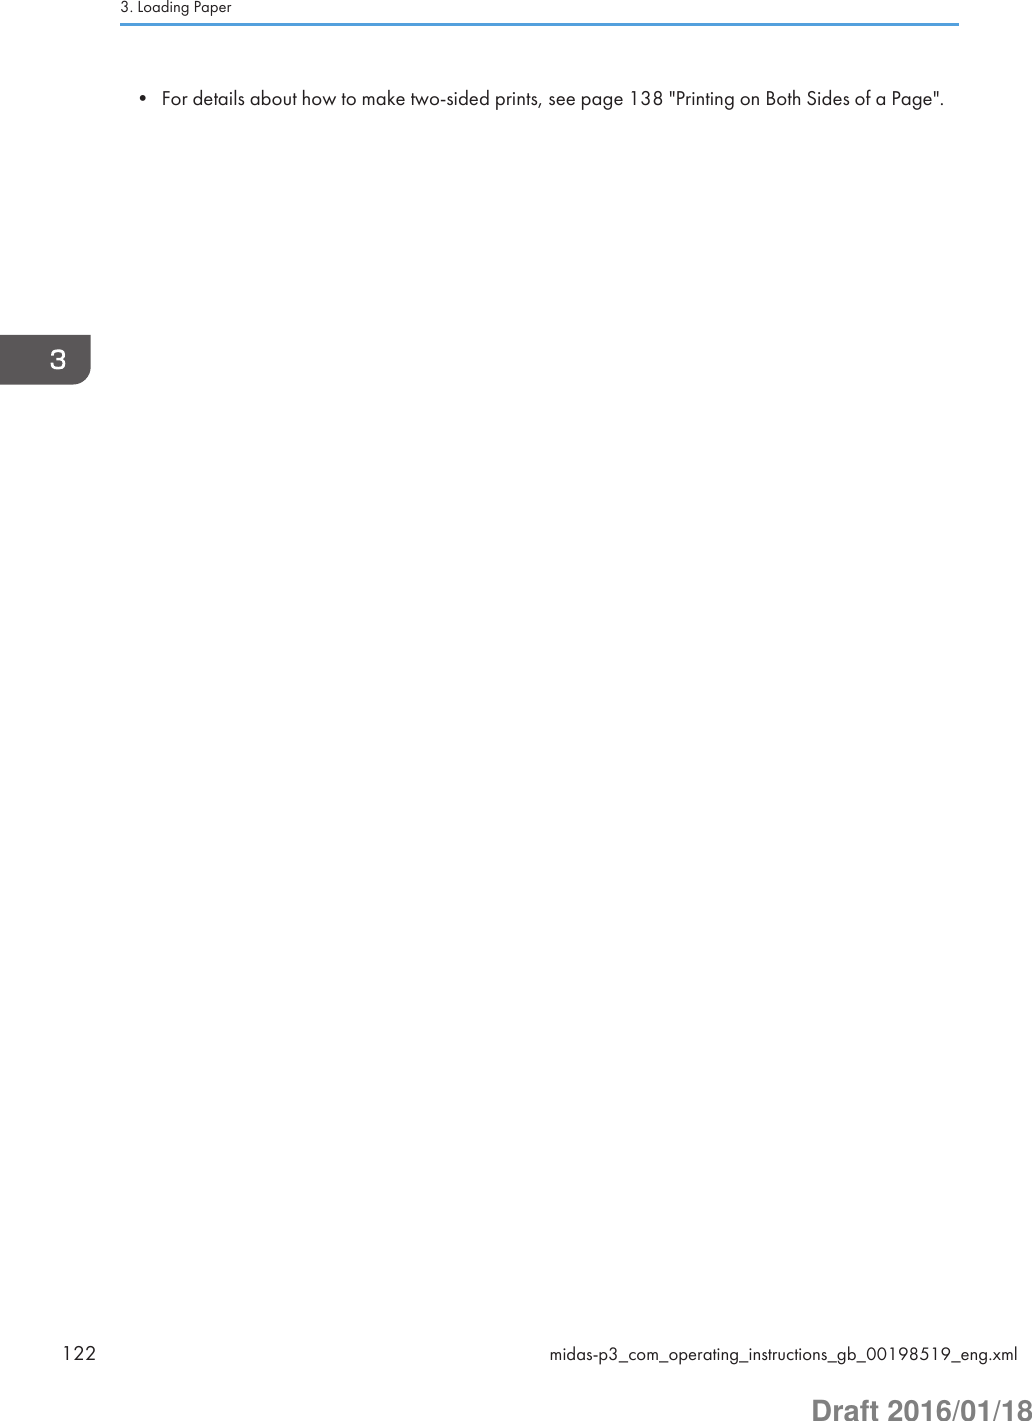
![Loading Orientation-Fixed Paper or Two-SidedPaperOrientation-fixed (top to bottom) or two-sided paper (for example, letterhead paper, punched paper, orcopied paper) might not print correctly, depending on how the paper is placed.Settings using the control panelSet [Letterhead Setting] to [Auto Detect] or [On (Always)], and then place the paper as shown inthe table below. For details about [Letterhead Setting], see:• page 244 "Machine Modes (SP C340DN)" (for SP C340DN)• page 314 "System" (for SP C342DN)Paper orientationThe meanings of the icons are as follows:Icon MeaningPlace or load paper printed side face up.Place or load paper printed side face down.Print side Trays 1–2 Bypass trayOne-sidedTwo-sided• To print on letterhead paper when [Letterhead Setting] is set to [Auto Detect], you must specify[Letterhead] for the paper type in the printer driver's settings.• If a print job is changed partway through printing from one-sided to two-sided printing, one-sidedoutput after the first copy may be printed facing a different direction. To ensure all paper is outputfacing the same direction, specify different input trays for one-sided and two-sided printing. Notealso that two-sided printing must be disabled for the tray specified for one-sided printing.Loading Orientation-Fixed Paper or Two-Sided Papermidas-p3_com_operating_instructions_gb_00198519_eng.xml 121Draft 2016/01/18](https://usermanual.wiki/Ricoh/PRSPC342DN1.BBP-PRSPC342DN1-User-Manual-2/User-Guide-2978044-Page-1.png)

![Paper SettingsThis section explains how to specify paper size and type using the control panel.• When [Tray Setting Priority] is set to [Machine Setting(s)], the paper settings configured using theprinter's control panel have priority over the settings specified in the printer driver or commands.For details, see:• page 244 "Machine Modes (SP C340DN)" (for SP C340DN)• page 314 "System" (for SP C342DN)Specifying a Paper Size• To use the paper size and feed direction other than those indicated on the paper size dial, set thedial to " ", and set the paper size using the control panel.• To use custom size paper, be sure to specify the paper size using the control panel and the printerdriver.• The printer cannot print on custom size paper if the application does not support custom size paper.Specifying Standard Size PaperPress the [Menu] key, and then select the setting items using the [ ] or [ ] key.1. Select [Paper Input] Press [OK]2. Select [Paper Size: (tray name)] Press [OK]3. Select the size of the paper set in the specified tray Press [OK]1. Press the [User Tools] key, and then display the [Tray Paper Settings] screen.[System Settings] [Tray Paper Settings]2. Specify the paper size and feed direction.[Tray Paper Size: (tray name)] Select the paper size and feed direction [OK]Paper Settingsmidas-p3_com_operating_instructions_gb_00198521_eng.xml 125Draft 2016/01/18](https://usermanual.wiki/Ricoh/PRSPC342DN1.BBP-PRSPC342DN1-User-Manual-2/User-Guide-2978044-Page-5.png)
![• For details about the available paper size, see page 106 "Paper Size Specifications".Specifying Custom Size PaperPress the [Menu] key, and then select the setting items using the [ ] or [ ] key.1. Select [Paper Input] Press [OK]2. Select [Paper Size: (tray name)] Press [OK]3. Select [Custom Size] Press [OK]4. Enter the horizontal value Press [OK]5. Enter the vertical value Press [OK]1. Press the [User Tools] key, and then display the [Tray Paper Settings] screen.[System Settings] [Tray Paper Settings]2. Specify the paper size and feed direction.[Tray Paper Size: (tray name)] [Custom Size] [Vertical] Enter the vertical dimension of thepaper [OK] [Horizontal] Enter the horizontal dimension of the paper [OK]3. Press [OK] twice.• For details about the available paper size, see page 106 "Paper Size Specifications".Specifying a Paper TypeYou can improve printer performance by selecting the optimum paper type for the tray.Press the [Menu] key, and then select the setting items using the [ ] or [ ] key.1. Select [Paper Input] Press [OK]2. Select [Paper Type: (tray name)] Press [OK]3. Select the type of the paper set in the specified tray Press [OK]The setting is complete when specifying the following types of paper:3. Loading Paper126 midas-p3_com_operating_instructions_gb_00198521_eng.xmlDraft 2016/01/18](https://usermanual.wiki/Ricoh/PRSPC342DN1.BBP-PRSPC342DN1-User-Manual-2/User-Guide-2978044-Page-6.png)
![Thin Paper, Plain Paper, Middle Thick, Thick Paper 1, Thick Paper 2, Thick Paper 3, Special Paper1, Special Paper 2, Special Paper 3, Glossy Paper4. If you have selected [Recycled Paper], [Color Paper], [Letterhead], [Label Paper],[Envelope], [Preprinted Paper], [Bond Paper], [Cardstock], or [Coated Paper] for thepaper type, press [Escape]5. Select [Maintenance] Press [OK]6. Select [General Settings] Press [OK]7. Select the paper thickness setting for the specified paper type Press [OK]8. Select the tray where the specified type of paper is loaded Press [OK]9. Select the paper thickness Press [OK]1. Press the [User Tools] key, and then display the [Tray Paper Settings] screen.[System Settings] [Tray Paper Settings]2. Press [Paper Type: (tray name)], and then specify the paper type and thickness.• [Paper Type]Select the paper type [OK]• [Paper Thickness]Select the paper thickness [OK]• For details about the available paper type, see page 108 "Paper Type Specifications".Registering Unique Names to Paper TypesYou can register a unique name to a paper type using Web Image Monitor. Registering a name whichrepresents paper type or usage allows you to easily specify the paper type appropriate for yourpurpose.• This function can be used when the printer is operating in a network and bidirectionalcommunication is enabled.• Paper types with unique names registered using this function can only be specified using the PCL5e/5c/6 printer drivers.• The printer logs do not record the names of user paper types.Paper Settingsmidas-p3_com_operating_instructions_gb_00198521_eng.xml 127Draft 2016/01/18](https://usermanual.wiki/Ricoh/PRSPC342DN1.BBP-PRSPC342DN1-User-Manual-2/User-Guide-2978044-Page-7.png)
![Registering names to paper types• The printer driver might not display the paper type name correctly if it is registered using anunsupported language.• The control panel might not display the paper type name correctly if it is registered using non-alphanumeric characters (i.e., characters that are not one of the following: a–z, A–Z, or 0–9).1. Log in to Web Image Monitor in administrator mode.For details, see page 333 "Displaying the top page".2. Click [Configuration] on the [Device Management] menu.3. Under "Device Settings", click [User Paper Type], and then change the settings asnecessary.4. Enter a descriptive name for easier recognition in "Paper Name".5. Select a suitable paper type from the "Paper Type" list.6. Click [OK].7. Click [Logout].8. Quit Web Image Monitor.• You can register up to eight user paper types.Setting user paper types to traysBefore printing, set the paper registered on the user paper type to the paper tray, and then set the papertype already registered. Paper types can be set either from Web Image Monitor or from the printer'scontrol panel.1. Log in to Web Image Monitor in administrator mode.For details, see page 333 "Displaying the top page".2. Click [Configuration] on the [Device Management] menu.3. Under "Device Settings", click [Paper], and then change the settings as necessary.4. Select [User Paper Type] for the paper tray you want to use, and then select theregistered paper type.5. Click [OK].6. Click [Logout].7. Quit Web Image Monitor.3. Loading Paper128 midas-p3_com_operating_instructions_gb_00198521_eng.xmlDraft 2016/01/18](https://usermanual.wiki/Ricoh/PRSPC342DN1.BBP-PRSPC342DN1-User-Manual-2/User-Guide-2978044-Page-8.png)
![Printing using registered paper types1. After creating a document, open the [Printing Preferences] dialog box in the document'snative application.2. Select a registered paper type in the "Paper Type:" list.3. Start printing from the application's [Print] dialog box.Configuring Envelope Settings Using the Control PanelWhen printing on envelopes, load envelopes in bypass tray or Tray 1, and then follow the procedurebelow to specify envelope type and thickness.Press the [Menu] key, and then select the setting items using the [ ] or [ ] key.1. Select [Paper Input] Press [OK]2. Select [Paper Size: Bypass Tray] Press [OK]3. Select the envelope type Press [OK]4. Select [Paper Type: Bypass Tray] Press [OK]5. Select [Envelope] Press [OK]6. Press [Escape]7. Select [Maintenance] Press [OK]8. Select [General Settings] Press [OK]9. Select [Envelope Setting] Press [OK]10. Select the source tray for which you want to change the paper thickness Press [OK]11. Select the paper thickness Press [OK]1. Press the [User Tools] key, and then display the [Tray Paper Settings] screen.[System Settings] [Tray Paper Settings]2. Press [Tray Paper Size: Bypass Tray], and then specify the paper size.Select the envelope size [OK]3. Press [Paper Type: Bypass Tray], and then specify the paper type and thickness.• [Paper Type]Paper Settingsmidas-p3_com_operating_instructions_gb_00198521_eng.xml 129Draft 2016/01/18](https://usermanual.wiki/Ricoh/PRSPC342DN1.BBP-PRSPC342DN1-User-Manual-2/User-Guide-2978044-Page-9.png)
![[Envelope] [OK]• [Paper Thickness][Plain Paper 66-74g/m2] [OK]• For details about the envelope types that can be loaded in each tray, see page 106 "Paper SizeSpecifications" and page 108 "Paper Type Specifications".• For details about how to load envelopes, see page 123 "Loading Envelopes".• Configure the paper settings appropriately using both the printer driver and the control panel. Fordetails about paper settings using the printer driver, see page 166 "Printing on Envelopes".3. Loading Paper130 midas-p3_com_operating_instructions_gb_00198521_eng.xmlDraft 2016/01/18](https://usermanual.wiki/Ricoh/PRSPC342DN1.BBP-PRSPC342DN1-User-Manual-2/User-Guide-2978044-Page-10.png)
![4. PrintingThis chapter explains how to setup the printer before using it, and how to print documents using varioususeful functions. Printing procedures using the printer drivers on Windows 7 and Mac OS X 10.6 areshown as examples.Displaying the Printer Driver Settings ScreenThis section explains how to display the configuration screen of the printer.Displaying the Printer Driver Properties with WindowsThis section explains how to open the printer driver properties from [Devices and Printers].• Manage Printers permission is required to change the printer settings. Log in as an Administratorsgroup member.• You cannot change the printer default settings for individual users. Settings made in the printerproperties dialog box are applied to all users.1. On the [Start] menu, click [Devices and Printers].2. Right-click the icon of the printer you want to use.3. Click [Printer properties].Displaying the Printing Preferences dialog box from the [Start] menuThis section explains how to open the [Printing Preferences] dialog box from [Devices and Printers].• When the printer driver is distributed from the print server, the setting values specified by the serverare displayed as the default for [Printing Defaults...].• You cannot configure different print settings for each user. The settings configured in this dialog boxare used as the default.1. On the [Start] menu, click [Devices and Printers].2. Right-click the icon of the printer you want to use.3. Click [Printing Preferences].midas-p3_com_operating_instructions_gb_00198533_eng.xml 131Draft 2016/01/18](https://usermanual.wiki/Ricoh/PRSPC342DN1.BBP-PRSPC342DN1-User-Manual-2/User-Guide-2978044-Page-11.png)
![Displaying the Printing Preferences dialog box in an applicationYou can make printer settings for a specific application. To make printer settings for a specificapplication, open the [Printing Preferences] dialog box from that application.The settings displayed in the [Printing Preference] dialog box opened from the [Devices and Printers]window are applied as the default in the [Printing Preference] dialog box opened in an application.When printing from an application, modify the settings as required.The screens displayed may differ depending on the application. The following procedure explains howto print documents from an application using WordPad in Windows 7 as an example.1. Click the WordPad menu button in the upper left corner of the window, and then click[Print].2. In the [Select Printer] list, select the printer you want to use.3. Click [Preferences].Using One Click PresetsSome of the frequently used functions are registered under "One Click Preset List:" on the [One ClickPresets] tab.You can apply the relevant setting simply by clicking on the one-click preset name. This preventsincorrect settings and misprints.One-click presets can be added, modified, and deleted as required. By using registered one-clickpresets, users without in-depth knowledge of the printer driver can utilize advanced printing functionseasily.Follow the procedure to register one-click presets.1. Open the printing preferences dialog box.2. Make the settings you require.3. Click [Register Current Settings...].4. Enter a name and comment that describe the setting, and then click [OK].• For details about modifying and deleting one-click presets, see the printer driver Help.Displaying the Printer Driver HelpDisplaying the printer driver HelpIf you click [Help] in the setting dialog box for the printer driver, the Help contents corresponding tothe displayed tab appear.4. Printing132 midas-p3_com_operating_instructions_gb_00198533_eng.xmlDraft 2016/01/18](https://usermanual.wiki/Ricoh/PRSPC342DN1.BBP-PRSPC342DN1-User-Manual-2/User-Guide-2978044-Page-12.png)
![Displaying the descriptions of the items on the printer driver's settings dialog boxIf you click the question mark button in the upper right corner of the setting dialog box for theprinter driver, the mouse pointer changes to a question mark. Move this question mark over the itemwhose Help information you want to view, and then left-click to display the Help information.Displaying the Printer Driver Properties in Mac OS XThis section explains how to display the printer driver settings screen in Mac OS X. Displayed screensmay differ from those indicated in the following steps depending on the application. In the procedurebelow, Text Edit provided with Mac OS X 10.6 is used as an example.1. Start System Preferences.2. Click [Print & Fax].3. Click the icon of the printer you want to use.Displaying the printing preferences screen from an applicationYou can make printer settings for a specific application. To make printer settings for a specificapplication, open the printing preferences screen from that application.1. Select [Print...] on the [File] menu.2. Select the printer you are using in the [Printer:] pop-up menu.Displaying the Printer Driver Settings Screenmidas-p3_com_operating_instructions_gb_00198533_eng.xml 133Draft 2016/01/18](https://usermanual.wiki/Ricoh/PRSPC342DN1.BBP-PRSPC342DN1-User-Manual-2/User-Guide-2978044-Page-13.png)
![Standard PrintingPrinting with Windows (PCL 6/PostScript 3)• Duplex printing is selected as the default setting.• If you send a print job via USB 2.0 while the printer is in Sleep mode, an error message mightappear when the print job is complete. In this case, check if the document was printed.1. After creating a document, open the [Printing Preferences] dialog box in the document'snative application.For details, see page 132 "Displaying the Printing Preferences dialog box in an application".2. Make sure the [One Click Presets] tab is selected.3. Configure the following settings:• Job Type:Select [Normal Print].• Document Size:Select the size of the document.• Orientation:Select the orientation of the document.• Input Tray:Select the paper tray that contains the paper you want to use for printing.If you select [Auto Tray Select], the paper tray is automatically selected according to thepaper size and type specified.• Paper Type:Select the type of paper that is loaded in the paper tray.• Color/ Black and White:Select [Color] for color printing, and [Black and White] for black-and-white printing.• Copies:Specify the number of copies.Change any other print settings as necessary. For details, see the printer driver Help.You can set convenient print functions on the [Detailed Settings] tab. For details, see page 138"Convenient Print Functions".4. Printing134 midas-p3_com_operating_instructions_gb_00198541_eng.xmlDraft 2016/01/18](https://usermanual.wiki/Ricoh/PRSPC342DN1.BBP-PRSPC342DN1-User-Manual-2/User-Guide-2978044-Page-14.png)
![4. Click [OK].5. Start printing from the application's [Print] dialog box.• If [Color] is selected in the "Color/ Black and White:" list, you can print using special color outputssuitable for color vision impaired users. To use this function, click the [Detailed Settings] tab. Clickthe [Print Quality] menu in the "Menu:" box, and then select [On] in the "Barrier-free ColorManagement:" list.Black-and-white printing precautionsSome applications may recognize grayscale or a black-and-white area of a document as a colorimage. Because of this, it may be printed in four colors (CMYK) and counted on the billing counter assuch. To ensure that documents are printed in black and white, select [User Setting] in the "Settings forImage:" list on the [Print Quality] menu, and then select [K (Black)] in the "Gray Reproduction:" list. Fordetails, see the printer driver Help.Printing with Windows (PCL 5e/5c)• Duplex printing is selected as the default setting.• If you send a print job via USB 2.0 while the printer is in Sleep mode, an error message mightappear when the print job is complete. In this case, check if the document was printed.1. After creating a document, open the [Printing Preferences] dialog box in the document'snative application.For details, see page 132 "Displaying the Printing Preferences dialog box in an application".2. Make sure the [Setup] tab is selected.3. Configure the following settings:• Job Type:Select [Normal Print].• Copies:Specify the number of copies.• Orientation:Select the orientation of the document.• Color/ Black and White:Select [Color] for color printing, or [Black and White] for black-and-white printing.Standard Printingmidas-p3_com_operating_instructions_gb_00198541_eng.xml 135Draft 2016/01/18](https://usermanual.wiki/Ricoh/PRSPC342DN1.BBP-PRSPC342DN1-User-Manual-2/User-Guide-2978044-Page-15.png)
![4. Click the [Paper] tab.5. Configure the following settings:• Document Size:Select the size of the document.• Input Tray:Select the paper tray that contains the paper you want to use for printing.If you select [Auto Tray Select], the paper tray is automatically selected according to thepaper size and type specified.• Type:Select the type of paper that is loaded in the paper tray.Change any other print settings as necessary. For details, see the printer driver Help.You can set convenient print functions on the tabs of the printer driver. For details, see page 138"Convenient Print Functions".6. Click [OK].7. Start printing from the application's [Print] dialog box.Printing with Mac OS XFollow the procedure below to print using the PostScript 3 printer driver for Mac OS X.1. After creating a document, open the printing preferences screen in the document's nativeapplication.For details, see page 133 "Displaying the Printer Driver Properties in Mac OS X".2. Configure the following settings:• Copies:Specify the number of copies.• Paper Size:Select the size of the document.• Orientation:Select the orientation of the document.• Collated (Collate pages:)Specify whether or not to collate output sheets.4. Printing136 midas-p3_com_operating_instructions_gb_00198541_eng.xmlDraft 2016/01/18](https://usermanual.wiki/Ricoh/PRSPC342DN1.BBP-PRSPC342DN1-User-Manual-2/User-Guide-2978044-Page-16.png)
![For some versions of Mac OS X, select [Paper Handling] or [Copies & Pages] in the pop-upmenu, and then select the [Collate:] check box.For details about the collate function, see page 142 "Collate".3. Select [Paper Feed] in the pop-up menu.4. Select the paper tray that contains the paper you want to print onto.If you select [Auto Select], the paper tray is automatically selected according to the paper size andtype specified.5. Select [Printer Features] in the pop-up menu.6. Switch the "Feature Sets:" menu to configure the following settings:• Paper Type:Select the type of paper that is loaded in the paper tray.• Color Mode:Select [Color] for color printing, and [Black and White] for black-and-white printing.7. Change any other print settings as necessary.You can set convenient print functions in the pop-up menus of the printer driver. For details, seepage 138 "Convenient Print Functions".8. Start printing from the application's printing preferences screen.• Disable the application's collate function to use the printer's collate function.Standard Printingmidas-p3_com_operating_instructions_gb_00198541_eng.xml 137Draft 2016/01/18](https://usermanual.wiki/Ricoh/PRSPC342DN1.BBP-PRSPC342DN1-User-Manual-2/User-Guide-2978044-Page-17.png)
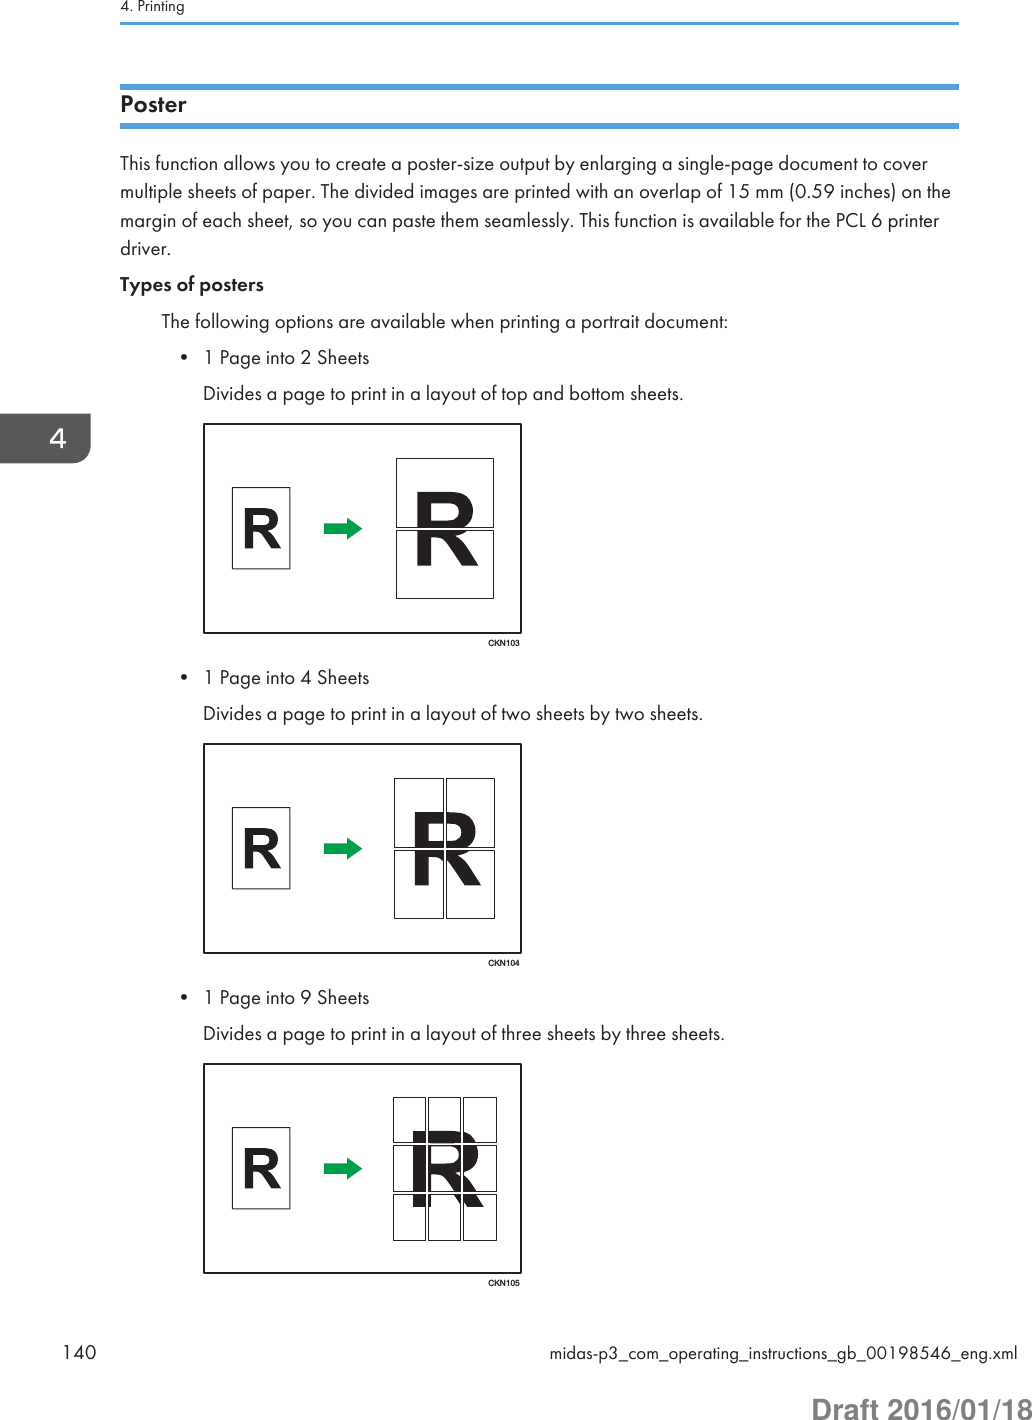
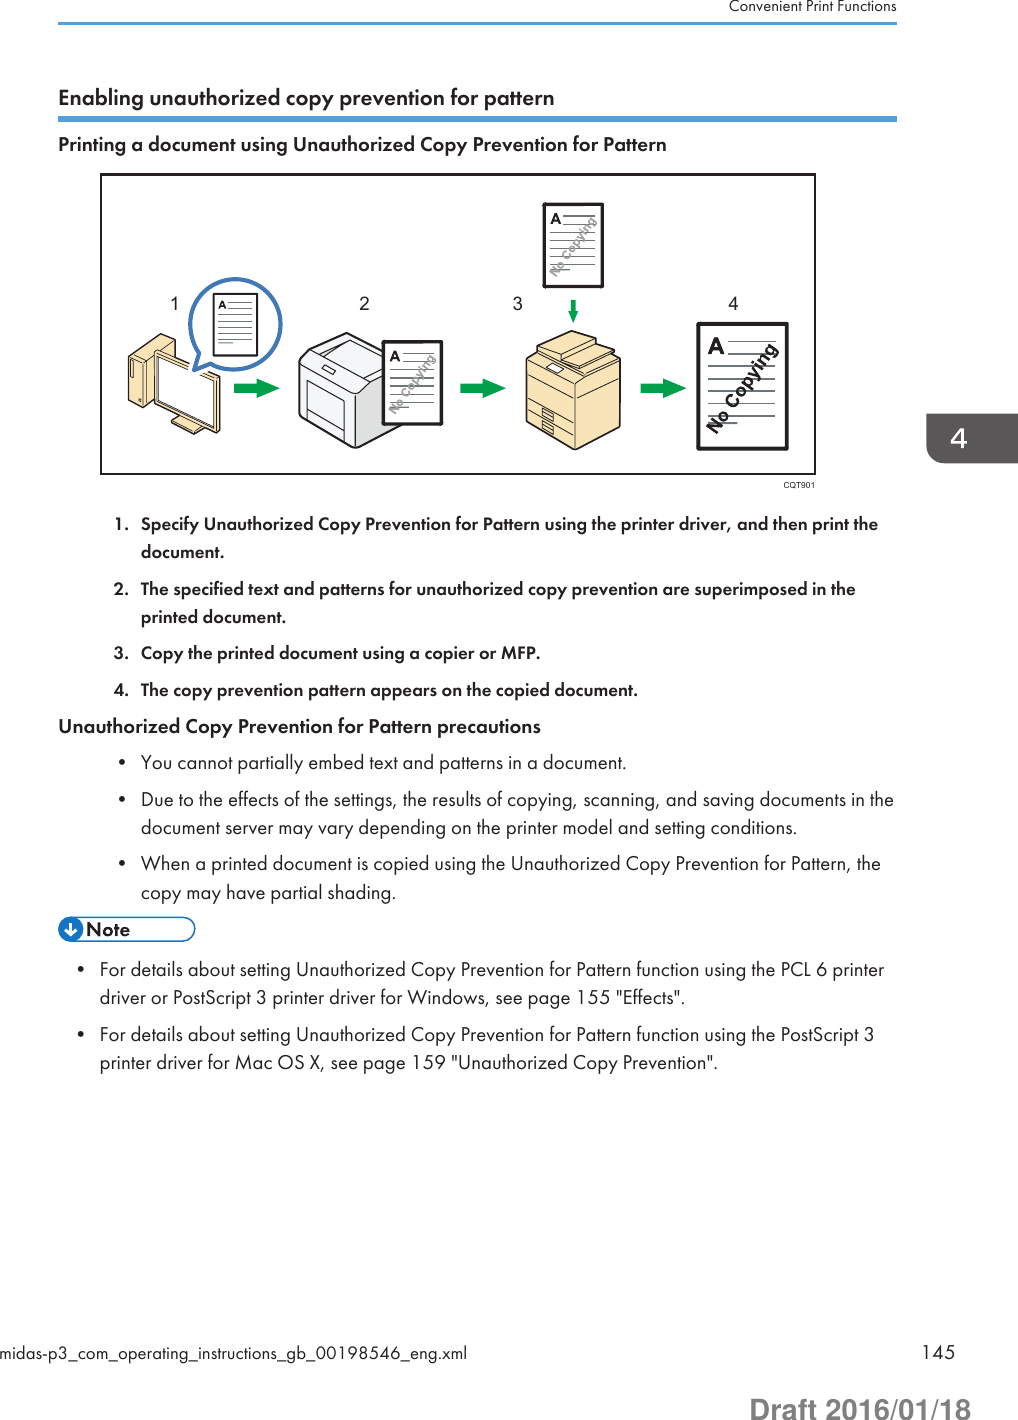
![CollateWhen printing multiple documents such as handouts for meetings, you can separate sets in sequentialorder. Collate stores data transmitted from a computer to the printer's memory or hard disk drive.• You can sort up to 1,000 pages and up to 999 copies when the optional hard disk is installed.• Without the hard disk, you can sort up to 50 pages in color or 200 pages in black and white.• If form feed is executed by [Auto Continue] for a print job whose processing is disrupted by errors,Collate will be canceled. For details about [Auto Continue], see page 172 "Executing form feedwhen an error occurs".Printed output is assembled as sets in sequential order.Types of Collate• CollatePrinted output is assembled as sets in sequential order.CKN0109• When collate is specified in the printer driver, make sure [Printer Collate] is selected for the PCL 6or PostScript 3 printer driver, or the [Ignore Application Collate] check box is selected for the PCL5e/5c printer driver. Otherwise, the output may not come out as desired.• For details about setting the collate function using the PCL 6 printer driver or PostScript 3 printerdriver for Windows, see page 154 "Finishing".• For details about setting the collate function using the PCL 5e/5c printer driver, see page 156"Setup".• For details about setting the collate function using the PostScript 3 printer driver for Mac OS X, seepage 136 "Printing with Mac OS X".4. Printing142 midas-p3_com_operating_instructions_gb_00198546_eng.xmlDraft 2016/01/18](https://usermanual.wiki/Ricoh/PRSPC342DN1.BBP-PRSPC342DN1-User-Manual-2/User-Guide-2978044-Page-22.png)
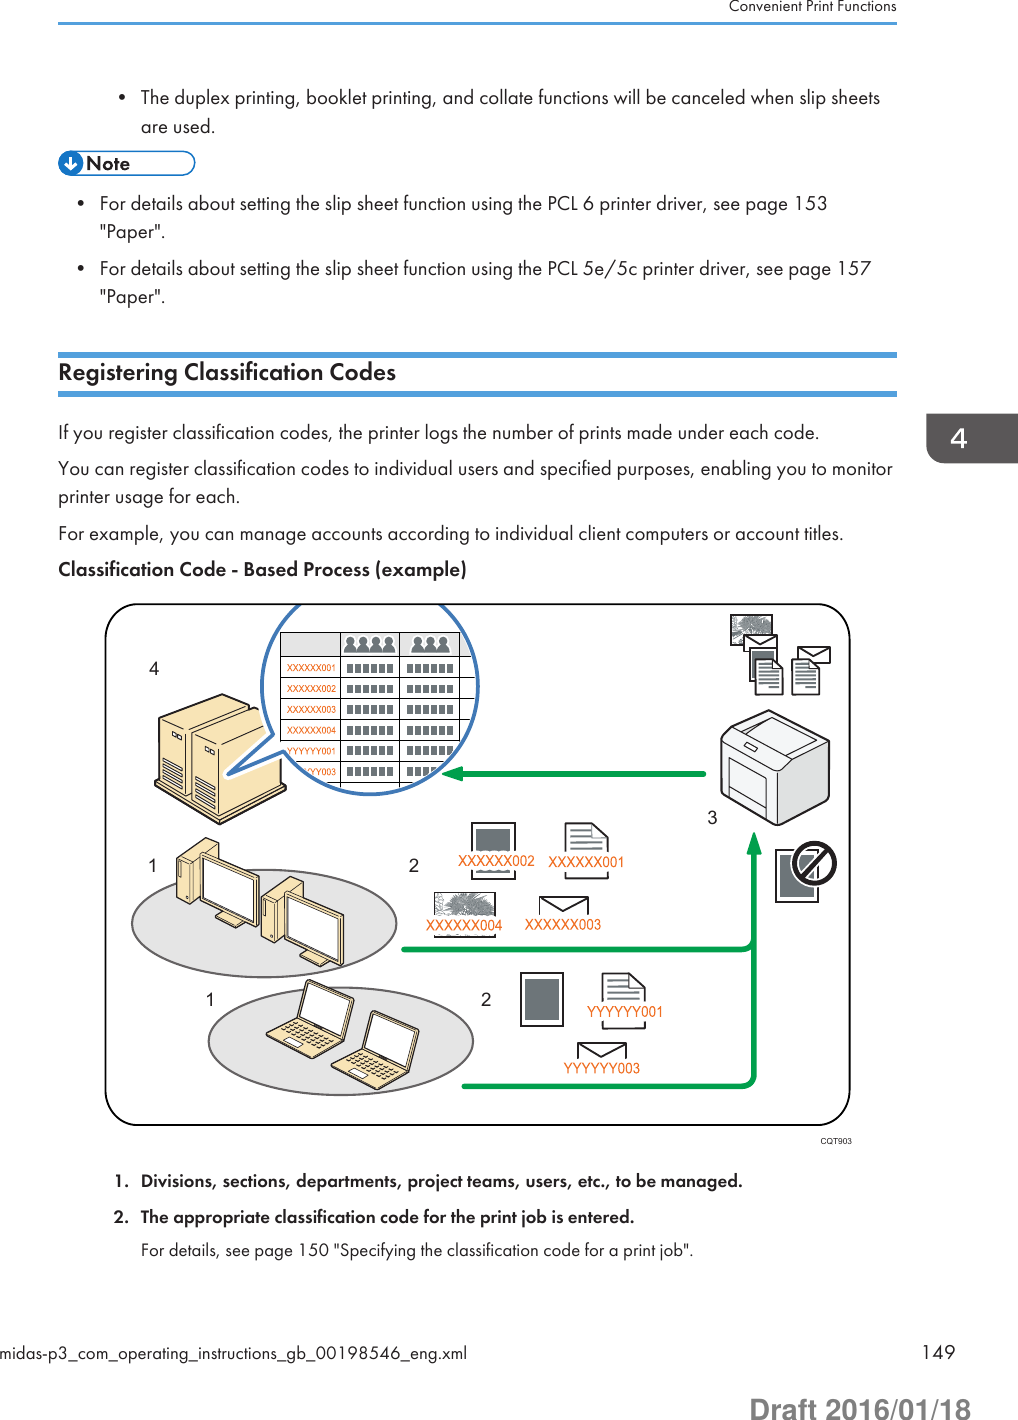
![3. The job is printed.Use Web Image Monitor to specify a classification required or optional.For details, see page 150 "Configuring classification codes".4. Classification codes are collected and managed by an external log management system.Configuring classification codesUse Web Image Monitor to specify whether or not to apply a classification code requirement to printjobs.• If [Required] is selected for the classification code requirement setting in Web Image Monitor, anyprint job without a classification code specified will not be printed.• The configuration page can be printed at any time.• The default setting for classification code requirement is [Optional].1. Log in to Web Image Monitor in administrator mode.For details, see page 333 "Displaying the top page".2. Click [Configuration] on the [Device Management] menu.3. Under "Device Settings", click [Logs].4. Check that [Required] or [Optional] is selected for "Classification Code" in the "CommonSettings for All Logs" column.5. Click [OK].6. Click [Logout].7. Quit Web Image Monitor.Specifying the classification code for a print jobWhen printing in an environment where classification codes are required, a classification code must bespecified for each print job. This function is available for the PCL 5e/5c/6 printer drivers.Classification code precautions• The specified classification code is stored in the printer driver.• To switch between different classification codes, install the printer driver under differentnames, and specify a different classification code for each driver.• For details about setting a classification code using the PCL 6 printer driver, see page 153 "JobSetup".4. Printing150 midas-p3_com_operating_instructions_gb_00198546_eng.xmlDraft 2016/01/18](https://usermanual.wiki/Ricoh/PRSPC342DN1.BBP-PRSPC342DN1-User-Manual-2/User-Guide-2978044-Page-30.png)
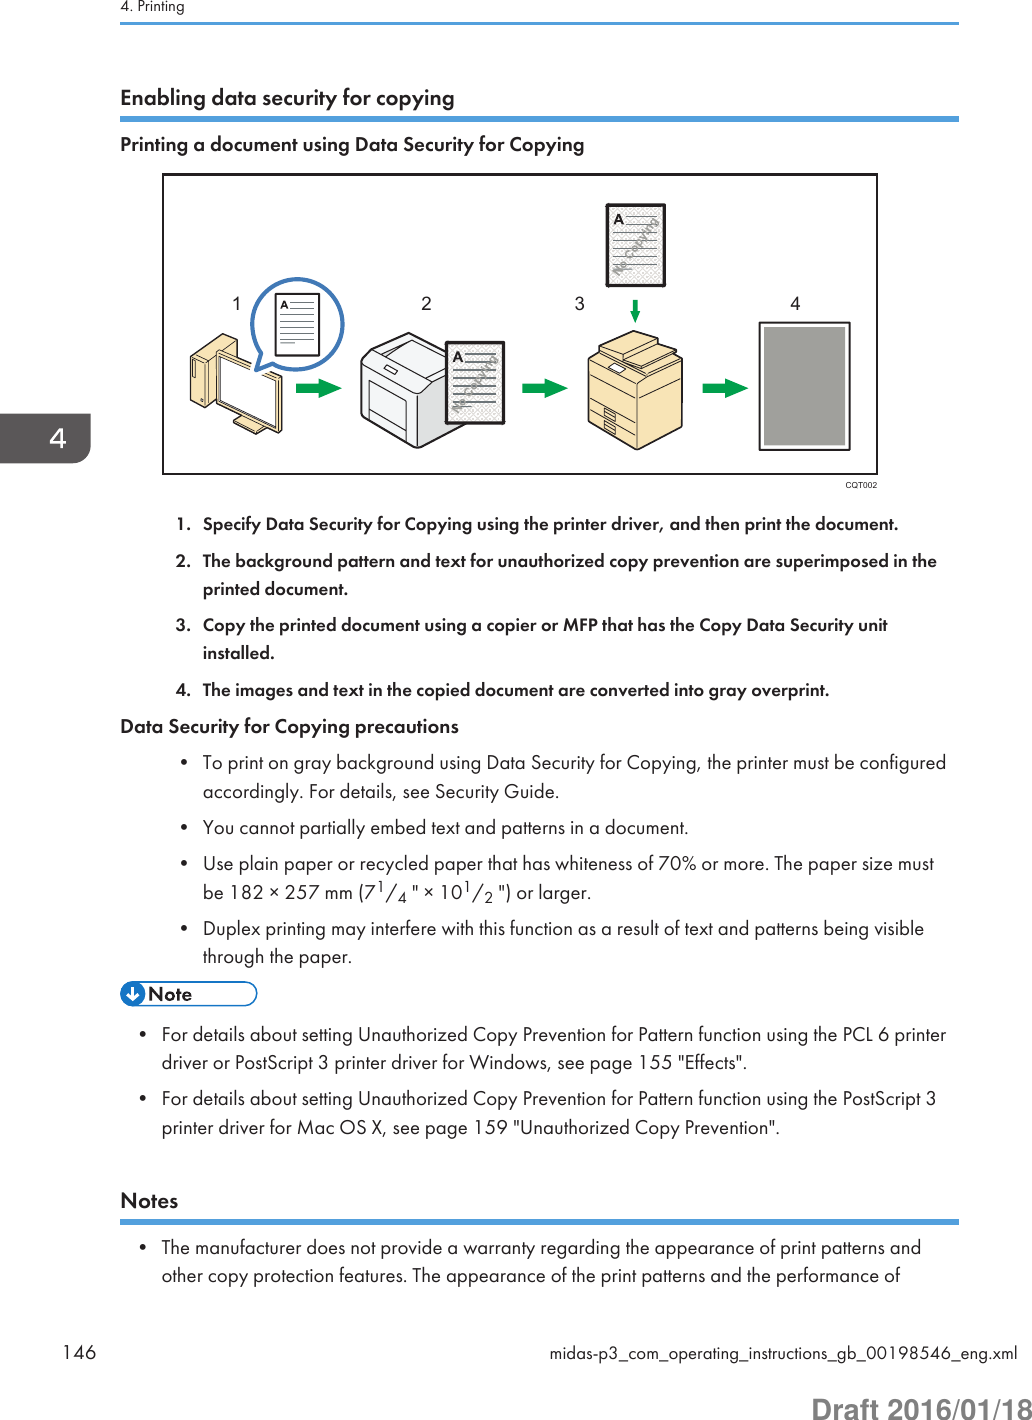
![• For details about setting a classification code using the PCL 5e/5c printer driver, see page 157"Valid Access".Banner PageYou can print banner pages on paper fed from the paper tray specified using the printer driver. Bannerpages are inserted before each print job to prevent other users from taking the document by mistake.The user name, job name, host name, and print date and time will be printed on the banner page.CLD004Banner page precautions• This function is available only if [Normal Print] is selected in the "Job Type:" list.• The date and time of the job printed on the banner page may differ from the date and timerecorded in the job log. The printed and actual print time may also differ if a print job waspaused due to reasons such as an error and later resumed.• Depending on the timing you cancel a print job, you may need to cancel printing of both thebanner page and the job itself.• When printing is complete, print logs are recorded separately for the banner page and theprint job.• Depending on the print settings, a banner page may be printed on paper whose size andtype are different from that of the print job.• If non-alphanumeric characters are used in the text string on the banner page, they may notbe printed properly.• Depending on the application being used, a banner page may be printed for each set ofcopies when multiple sets of copies are printed.• Depending on the application being used, a banner page may be printed every time thepaper size or orientation changes when the print job contains pages of different sizes ororientation.• Depending on the application being used, a banner page may be printed before each jobwhen the print job is composed of multiple jobs.Convenient Print Functionsmidas-p3_com_operating_instructions_gb_00198546_eng.xml 151Draft 2016/01/18](https://usermanual.wiki/Ricoh/PRSPC342DN1.BBP-PRSPC342DN1-User-Manual-2/User-Guide-2978044-Page-31.png)
![• For details about setting the banner page function using the PCL 6 printer driver or PostScript 3printer driver for Windows, see page 153 "Paper".• For details about setting the banner page function using the PCL 5e/5c printer driver, seepage 157 "Valid Access".• For details about setting the banner page function using the PostScript 3 printer driver for Mac OSX, see page 162 "Printer Features".Using Convenient Print Functions with Windows (PCL 6/PostScript 3)The convenient print functions available on the [Detailed Settings] tab of the PCL 6 and PostScript 3printer drivers are shown in the table below. Available functions vary depending on the printer driver.For details about other items that can be configured from each menu, see the printer driver Help.[Detailed Settings] tab menuitems Convenient print functions Printer driver typeJob Setup Classification code PCL 6Paper • Front cover sheet function*1• Slip sheet function*1• Banner page functionPCL 6, PostScript 3Edit • Combine printing function• Duplex printing function• Booklet printing function• Poster function*1PCL 6, PostScript 3Finishing Collate function PCL 6, PostScript 3Print Quality • Economy color function• Specific color printing function*2PCL 6, PostScript 3Effects • Watermark function• Unauthorized Copy PreventionfunctionPCL 6, PostScript 3*1 This function is available for the PCL 6 printer driver.*2 This function is available for the PostScript 3 printer driver.4. Printing152 midas-p3_com_operating_instructions_gb_00198546_eng.xmlDraft 2016/01/18](https://usermanual.wiki/Ricoh/PRSPC342DN1.BBP-PRSPC342DN1-User-Manual-2/User-Guide-2978044-Page-32.png)
![Job Setup1. After creating a document, open the [Printing Preferences] dialog box in the document'snative application.2. Click the [Detailed Settings] tab.3. In the "Menu:" box, click the [Job Setup] icon, and then configure the following settings:• Classification CodeEnter the classification code. For details, see page 149 "Registering Classification Codes".Change any other print settings as necessary. For details, see the printer driver's Help.4. Click [OK].5. Start printing from the application's [Print] dialog box.Paper1. After creating a document, open the [Printing Preferences] dialog box in the document'snative application.2. Click the [Detailed Settings] tab.3. In the "Menu:" box, click the [Paper] icon, and then configure the following settings:• Banner PageSpecify whether or not to print a banner page. For details, see page 151 "Banner Page".• Front CoverSpecify whether or not to insert a front cover sheet. For details, see page 147 "CoverSheet".• Insert Slip Sheet After Every PageSpecify whether or not to insert a slip sheet. For details, see page 148 "Slip Sheets".Change any other print settings as necessary. For details, see the printer driver's Help.4. Click [OK].5. Start printing from the application's [Print] dialog box.Edit1. After creating a document, open the [Printing Preferences] dialog box in the document'snative application.2. Click the [Detailed Settings] tab.Convenient Print Functionsmidas-p3_com_operating_instructions_gb_00198546_eng.xml 153Draft 2016/01/18](https://usermanual.wiki/Ricoh/PRSPC342DN1.BBP-PRSPC342DN1-User-Manual-2/User-Guide-2978044-Page-33.png)
![3. In the "Menu:" box, click the [Edit] icon, and then configure the following settings:• Layout:Select a combination pattern to set the combine printing function. Then, specify the methodfor combining pages in the "Page Order:" list. For details, see page 138 "CombiningMultiple Pages onto a Single Page".• 2 sided:Select a method for binding the output pages to set the duplex printing function. For details,see page 138 "Printing on Both Sides of a Page".• Booklet:To set the booklet printing function, select [Off] in the "2 sided:" list, and then select[Magazine] in the "Booklet:" list. For details, see page 141 "Booklet Printing".• Poster:Select a layout for poster printing. For details, see page 140 "Poster".Change any other print settings as necessary. For details, see the printer driver's Help.4. Click [OK].5. Start printing from the application's [Print] dialog box.Finishing1. After creating a document, open the [Printing Preferences] dialog box in the document'snative application.2. Click the [Detailed Settings] tab.3. In the "Menu:" box, click the [Finishing] icon, and then configure the following settings:• Collate:Select [Printer Collate] or [Application Collate]. For details, see page 142 "Collate".Change any other print settings as necessary. For details, see the printer driver's Help.4. Click [OK].5. Start printing from the application's [Print] dialog box.Print Quality1. After creating a document, open the [Printing Preferences] dialog box in the document'snative application.2. Click the [Detailed Settings] tab.4. Printing154 midas-p3_com_operating_instructions_gb_00198546_eng.xmlDraft 2016/01/18](https://usermanual.wiki/Ricoh/PRSPC342DN1.BBP-PRSPC342DN1-User-Manual-2/User-Guide-2978044-Page-34.png)
![3. In the "Menu:" box, click the [Print Quality] icon, and then configure the followingsettings:• Economy Color:Specify whether or not to use the economy color function. For details, see page 143"Conserving Toner when Printing".• Separate into CMYK, then Print in Designated Color OnlySpecify the colors to be used for printing. For details, see page 143 "Printing with specificcolors".Change any other print settings as necessary. For details, see the printer driver's Help.4. Click [OK].5. Start printing from the application's [Print] dialog box.Effects1. After creating a document, open the [Printing Preferences] dialog box in the document'snative application.2. Click the [Detailed Settings] tab.3. In the "Menu:" box, click the [Effects] icon, and then configure the following settings:• Print WatermarkSpecify whether or not to print a watermark. Then, select a watermark in the "Watermarks:"list. For details, see page 143 "Watermarks".For details about editing watermarks, see the printer driver Help.• Unauthorized Copy PreventionSpecify whether or not to use the Unauthorized Copy Prevention function. For details, seepage 144 "Printing Documents that Are Not Authorized for Duplication".Change any other print settings as necessary. For details, see the printer driver's Help.4. Click [OK].5. Start printing from the application's [Print] dialog box.Using Convenient Print Functions with Windows (PCL 5e/5c)The convenient print functions available on the tabs of the PCL 5e/5c printer drivers are shown in thetable below. For details about other items that can be configured from each menu, see the printerdriver's Help.Convenient Print Functionsmidas-p3_com_operating_instructions_gb_00198546_eng.xml 155Draft 2016/01/18](https://usermanual.wiki/Ricoh/PRSPC342DN1.BBP-PRSPC342DN1-User-Manual-2/User-Guide-2978044-Page-35.png)
![Tab menu items Convenient print functionsSetup • Combine printing function• Duplex printing function• Booklet printing function• Collate functionPaper • Front cover sheet function• Slip sheet functionValid Access • Classification code• Banner page functionWatermarks Watermark functionSetup1. After creating a document, open the [Printing Preferences] dialog box in the document'snative application.2. Click the [Setup] tab, and then configure the following settings:• Layout:Select a combination pattern to set the combine printing function. For details, see page 138"Combining Multiple Pages onto a Single Page".• Duplex:To set the duplex printing function, select [Open to Left] or [Open to Top]. For details, seepage 138 "Printing on Both Sides of a Page".To set the booklet printing function, select [Booklet]. For details, see page 141 "BookletPrinting".• Ignore Application CollateSpecify whether or not to use the collate function of the application. For details, seepage 142 "Collate".Change any other print settings as necessary. For details, see the printer driver's Help.3. Click [OK].4. Start printing from the application's [Print] dialog box.4. Printing156 midas-p3_com_operating_instructions_gb_00198546_eng.xmlDraft 2016/01/18](https://usermanual.wiki/Ricoh/PRSPC342DN1.BBP-PRSPC342DN1-User-Manual-2/User-Guide-2978044-Page-36.png)
![Paper1. After creating a document, open the [Printing Preferences] dialog box in the document'snative application.2. Click the [Paper] tab, and then configure the following settings in the "Paper Selection:"list:• Front CoverSets the cover sheet function. For details, see page 147 "Cover Sheet".• Insert Slip Sheet After Every PageSets the slip sheets function. For details, see page 148 "Slip Sheets".Change any other print settings as necessary. For details, see the printer driver's Help.3. Click [OK].4. Start printing from the application's [Print] dialog box.Valid Access1. After creating a document, open the [Printing Preferences] dialog box in the document'snative application.2. Click the [Valid Access] tab, and then configure the following settings:• Classification Code:Enter a classification code. For details, see page 149 "Registering Classification Codes".• Print Banner PageSpecify whether or not to print a banner page. For details, see page 151 "Banner Page".Change any other print settings as necessary. For details, see the printer driver's Help.3. Click [OK].4. Start printing from the application's [Print] dialog box.Watermarks1. After creating a document, open the [Printing Preferences] dialog box in the document'snative application.2. Click the [Watermarks] tab, and then configure the following settings:• WatermarkConvenient Print Functionsmidas-p3_com_operating_instructions_gb_00198546_eng.xml 157Draft 2016/01/18](https://usermanual.wiki/Ricoh/PRSPC342DN1.BBP-PRSPC342DN1-User-Manual-2/User-Guide-2978044-Page-37.png)
![Select a watermark to set the watermark function. For details, see page 143 "Watermarks".For details about editing watermarks, see the printer driver Help.Change any other print settings as necessary. For details, see the printer driver's Help.3. Click [OK].4. Start printing from the application's [Print] dialog box.Using Convenient Print Functions with Mac OS XThe convenient print functions available in the pop-up menu of the PostScript 3 printer driver for Mac OSX are shown in the table below.Pop-up menu items Convenient print functionsLayout • Duplex printing function• Combine printing functionUnauthorized Copy Prevention Unauthorized Copy Prevention functionPrinter Features • Economy color function• Specific color printing function• Watermark function• Banner page functionLayout1. After creating a document, open the printing preferences screen in the document's nativeapplication.2. Select [Layout] in the pop-up menu, and then configure the following settings:• Two-Sided:Select a method for binding the output pages to set the duplex printing function. For details,see page 138 "Printing on Both Sides of a Page".• Pages Per Sheet:Select a combination pattern to set the combine printing function. Then, specify the layout toplace the pages in the [Layout Direction:] pop-up menu. You can also specify whether todraw a border line on individual pages by selecting [Border:]. For details, see page 138"Combining Multiple Pages onto a Single Page".4. Printing158 midas-p3_com_operating_instructions_gb_00198546_eng.xmlDraft 2016/01/18](https://usermanual.wiki/Ricoh/PRSPC342DN1.BBP-PRSPC342DN1-User-Manual-2/User-Guide-2978044-Page-38.png)
![Change any other print settings as necessary.1. Start printing from the application's printing preferences screen.Unauthorized Copy Prevention1. After creating a document, open the printing preferences screen in the document's nativeapplication.2. Select [Unauthorized Copy Prevention] in the pop-up menu, and then configure thefollowing settings:• Prevention Type:Select [Unauthorized Copy Prevention for Pattern] or [Data Security for Copying].• [Text], [Color/Density], and [Pattern]Set the items in [Unauthorized Copy Prevention]. For setting items, see the following tablesbelow.For details about Unauthorized Copy Prevention function, see page 144 "Printing Documentsthat Are Not Authorized for Duplication".Change any other print settings as necessary.3. Start printing from the application's printing preferences screen.Setting items available in [Unauthorized Copy Prevention]• TextSetting items DescriptionText Type: Select the text type for the Prevention Text in the list.Enter User Text: If you select [User Text] in "Text Type:", enter a user text using up to64 single-byte characters. If you select a Latin font for "Font:", entersingle-byte alphanumeric characters.Font: Select a font style for the prevention text. Only TrueType fonts areavailable.Size: Specify a value to adjust the size of the prevention text.If you use a small font, it may not be effective for the preventioncopy pattern.A font size of over 50 points is effective and 70 to 80 points isrecommended.Convenient Print Functionsmidas-p3_com_operating_instructions_gb_00198546_eng.xml 159Draft 2016/01/18](https://usermanual.wiki/Ricoh/PRSPC342DN1.BBP-PRSPC342DN1-User-Manual-2/User-Guide-2978044-Page-39.png)
![Setting items DescriptionAngle: Specify a value in this spin box to rotate the prevention text about itscentral point.An angle of 30 to 40 degrees is effective for the prevention copypattern and is recommended.Text/Pattern Effects: Select the type of effects applied to copies or prints.Repeat: Print the prevention text string repeatedly from the top left of thepage."Position:" is not available.Line Space: Specify the line spacing.Position: Select a position to enter the prevention text in the list.• Color/DensitySetting items DescriptionColor: Select the color that the background text and pattern will print in.Density: Select the density of the prevention copy text/pattern.• PatternSetting items DescriptionMask Type: Select the mask type for the background pattern.Effects of patterns set in [Text/Pattern Effects:]• Unauthorized Copy Prevention for Pattern:Setting items Effects of Pattern:PrintEffects of Pattern:CopyText and Background4. Printing160 midas-p3_com_operating_instructions_gb_00198546_eng.xmlDraft 2016/01/18](https://usermanual.wiki/Ricoh/PRSPC342DN1.BBP-PRSPC342DN1-User-Manual-2/User-Guide-2978044-Page-40.png)
![Setting items Effects of Pattern:PrintEffects of Pattern:CopyReverse Patterns (Text/Background)Background OnlyText Only• Data Security for Copying:Setting items Effects of Pattern:PrintEffects of Pattern:Copy(without Copy DataSecurity Unit)Effects of Pattern:Copy(with Copy DataSecurity Unit)Text andBackgroundBackground OnlyAvailable mask types in [Mask Type:]Type 1 Type 2 Type 3 Type 4 Type 5Convenient Print Functionsmidas-p3_com_operating_instructions_gb_00198546_eng.xml 161Draft 2016/01/18](https://usermanual.wiki/Ricoh/PRSPC342DN1.BBP-PRSPC342DN1-User-Manual-2/User-Guide-2978044-Page-41.png)
![Type 6 Type 7 Type 8 Type 9 Type 10• The [Color/Density] and [Pattern] settings are not required to use Data Security for Copying.Printer Features1. After creating a document, open the printing preferences screen in the document's nativeapplication.2. Select [Printer Features] in the pop-up menu.3. In the "Feature Sets:" menu, select the appropriate set of features to display the items tobe set, and then configure the following settings:• Economy Color:Specify whether or not to use the economy color function. For details, see page 143"Conserving Toner when Printing".• Separate into CMYK:Select a combination of colors to separate the colors into CMYK and specify the colors tobe used for printing. This setting is available when [Color] is selected in the "Color Mode"• Watermark:Select a watermark to set the watermark function. In the "Watermark Text", "WatermarkFont", "Watermark Size", "Watermark Angle", and "Watermark Style" pop-up menus,select the text, font, size, angle, and style of the watermark as necessary. For details, seepage 143 "Watermarks".• Banner Page:Specify whether or not to use the banner page function. In the "Banner Page Input Tray"and "Banner Page Paper Type" pop-up menus, select the paper tray and paper type to beused for printing banner pages as necessary. For details, see page 151 "Banner Page".Change any other print settings as necessary.4. Start printing from the application's printing preferences screen.Other setting items in [Printer Features]The following setting items are available in addition to the convenient print features:4. Printing162 midas-p3_com_operating_instructions_gb_00198546_eng.xmlDraft 2016/01/18](https://usermanual.wiki/Ricoh/PRSPC342DN1.BBP-PRSPC342DN1-User-Manual-2/User-Guide-2978044-Page-42.png)
![Setting items DescriptionResolution: Select the output resolution setting.Image Smoothing: Specify whether or not to perform image smoothing, orspecify the threshold resolution to apply smoothing.Color Mode: Specify whether or not to print documents in color or blackand white.Gradation: Specify the print image quality.Color Setting: Select the compensation method to be used when convertingRGB data into CMYK.• OffColor settings are not modified.• FineSelect this setting to perform color matching and CMYKconversion based on the color profile pattern selectedfor "Color Profile:" Colors printed using this setting areequivalent to a monitor gamma setting of 1.8.• Super FineSelect this setting to perform color matching and CMYKconversion based on the color profile pattern selectedfor "Color Profile:". This setting is useful for emphasizingareas of light color. Colors printed using this setting areequivalent to a monitor gamma setting of 2.2.Color Profile: Select the color profile to be used when color matching RGBto CMYK.This function is available only if [Fine] or [Super Fine] isselected in the "Color Setting:" list.• AutoAutomatically configures the best color profile patterndepending on the appearance of the document to print.• PhotographicEnhances mid-tone colors similar to those seen inphotographs.• PresentationConvenient Print Functionsmidas-p3_com_operating_instructions_gb_00198546_eng.xml 163Draft 2016/01/18](https://usermanual.wiki/Ricoh/PRSPC342DN1.BBP-PRSPC342DN1-User-Manual-2/User-Guide-2978044-Page-43.png)
![Setting items DescriptionPerforms dithering using a pattern appropriate for thinlines and small fonts.Gray Reproduction (Text/LineArt):Select this setting when printing text and line art.• Black/Gray by KPrints black and gray text and graphics using blacktoner only.• Black by KPrints black text and graphics using black toner only.• CMY+KPrints black and gray text and graphics using all tonercolors.• Black/Gray by K (Text only)Prints black and gray text using black toner only.• Black by K (Text only)Prints black text using black toner only.Black Over Print: Specify whether or not to print black color over other colors.When this setting is set to [Off], the areas where black andother colors overlap become blank for each color separationother than black.CMYK Simulation Profile: This function simulates an offset printing color process. Selectthe appropriate ink profile to print the output colors so thatyou can check the colors of the draft document beforeperforming offset printing.Paper Type: Select the paper type to use.Rotate by 180 degrees: Specify whether or not to rotate the image by 180 degreeswhen printing.Orientation Override: Select this setting when paper orientation cannot be specifiedin some applications. If data is rotated in an unwanteddirection on the output page, use this setting to specify thedata orientation to be applied when printing.Convenient Print Functionsmidas-p3_com_operating_instructions_gb_00198546_eng.xml 165Draft 2016/01/18](https://usermanual.wiki/Ricoh/PRSPC342DN1.BBP-PRSPC342DN1-User-Manual-2/User-Guide-2978044-Page-45.png)
![Printing on EnvelopesPrinting on Envelopes with Windows (PCL 6/PostScript 3)1. After creating a document, open the [Printing Preferences] dialog box in the document'snative application.2. Click the [Detailed Settings] tab.3. In the "Menu:" box, click the [Basic] icon, and then configure the following settings:• Document Size:Select the envelope size.4. In the "Menu:" box, click the [Paper] icon, and then configure the following settings:• Input Tray:Select the bypass tray.• Paper Type:Select [Envelope].Change any other print settings as necessary. For details, see the printer driver's Help.5. Click [OK].6. Start printing from the application's [Print] dialog box.• Configure the paper settings appropriately using both the printer driver and the control panel. Fordetails about settings using the control panel, see page 129 "Configuring Envelope Settings Usingthe Control Panel".• Envelopes must be loaded in a specific orientation. For details, see page 123 "LoadingEnvelopes".Printing on Envelopes with Windows (PCL 5e/5c)1. After creating a document, open the [Printing Preferences] dialog box in the document'snative application.2. Click the [Paper] tab, and then configure the following settings:• Input Tray:Select the bypass tray.4. Printing166 midas-p3_com_operating_instructions_gb_00198582_eng.xmlDraft 2016/01/18](https://usermanual.wiki/Ricoh/PRSPC342DN1.BBP-PRSPC342DN1-User-Manual-2/User-Guide-2978044-Page-46.png)
![• Document Size:Select the envelope size.• Type:Select [Envelope].Change any other print settings as necessary. For details, see the printer driver's Help.3. Click [OK].4. Start printing from the application's [Print] dialog box.• Configure the paper settings appropriately using both the printer driver and the control panel. Fordetails about settings using the control panel, see page 129 "Configuring Envelope Settings Usingthe Control Panel".• Envelopes must be loaded in a specific orientation. For details, see page 123 "LoadingEnvelopes".Printing on Envelopes with Mac OS X1. After creating a document, open the printing preferences screen in the document's nativeapplication.2. Configure the following settings:• Two-Sided:Clear the check box.• Paper Size:Select the envelope size.• Orientation:Select the orientation of the envelope.3. Select [Paper Feed] in the pop-up menu.4. Select the paper tray where the envelopes are loaded.5. Select [Printer Features] in the pop-up menu.6. Switch the "Feature Sets:" menu to configure the following settings:• Paper Type:Select [Envelope].7. Change any other print settings as necessary.Printing on Envelopesmidas-p3_com_operating_instructions_gb_00198582_eng.xml 167Draft 2016/01/18](https://usermanual.wiki/Ricoh/PRSPC342DN1.BBP-PRSPC342DN1-User-Manual-2/User-Guide-2978044-Page-47.png)
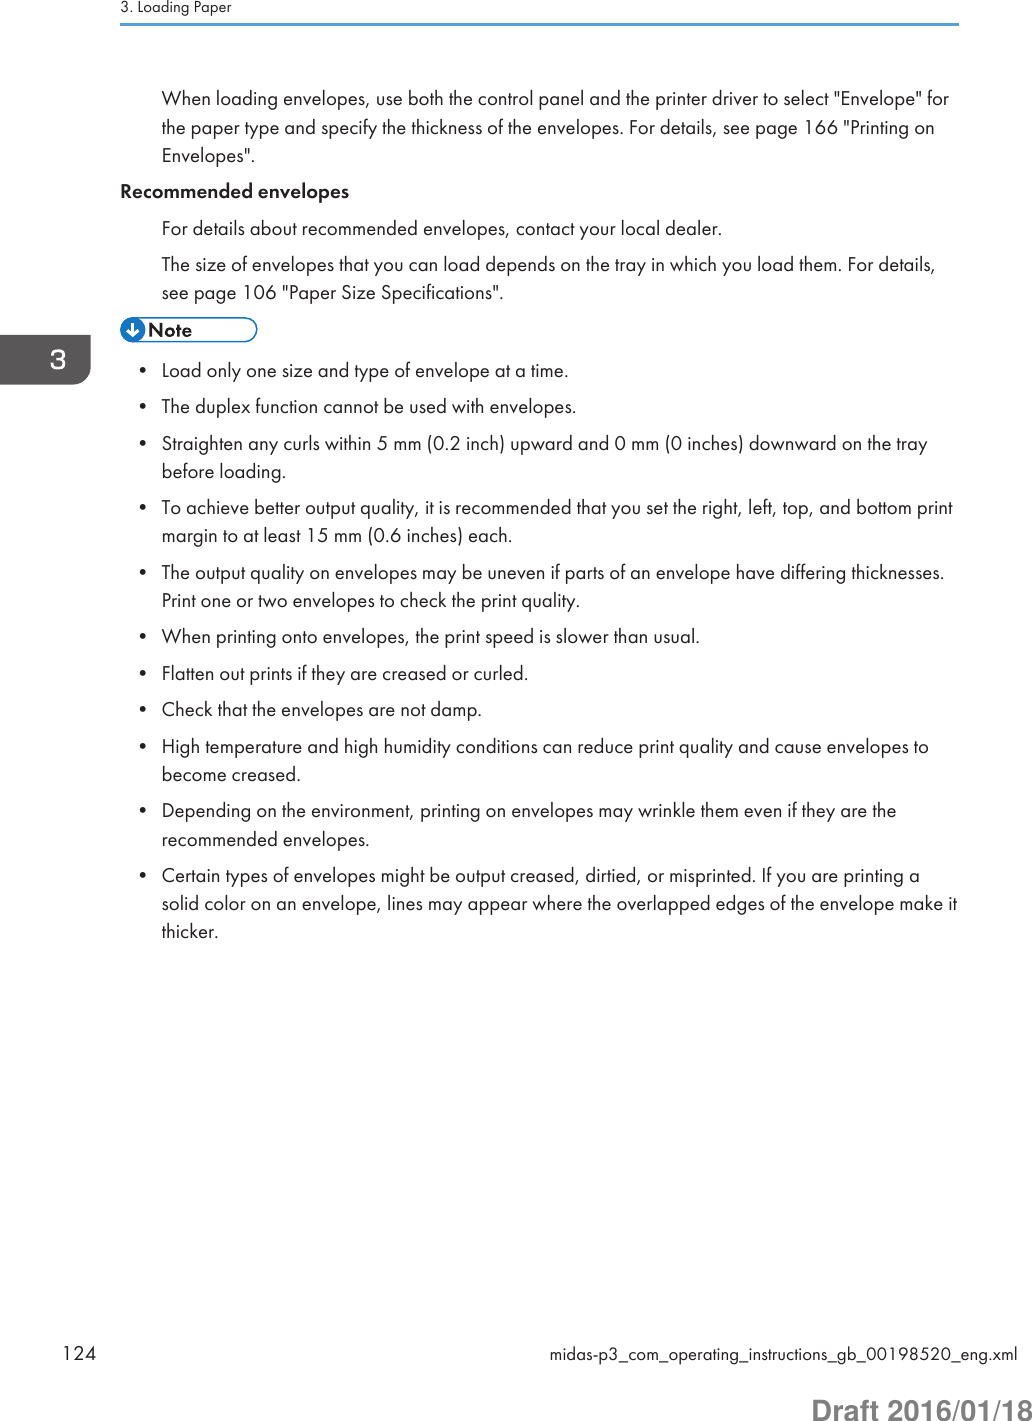
![Spool PrintingThis function is applied to SP C342DN only.Spool Printing allows print jobs be temporarily stored, and then prints them after they are transferred.This shortens printing time as it maximizes printer efficiency.• Spool Printing is available only when the optional hard disk is installed.• During Spool Printing, the hard disk is accessed and the Data In indicator flashes. Turning off thecomputer or printer during Spool Printing can damage the hard disk. Also, if the computer or printeris turned off during Spool Printing, spooled jobs will be deleted. Therefore, do not turn off thepower of the computer or printer during Spool Printing.• If data is sent to the printer using other protocols besides "diprint", "lpr", "ipp", "ftp", "sftp", "smb",and "wsd (printer)", Spool Printing cannot be performed.1. Press the [User Tools] key, and then display the [System] screen.[Printer Features] [System]2. Enable Spool Printing.[Spool Printing] [On] [OK]• Printing the first page with Spool Printing will be slow.• The computer requires less print processing time when large amounts of data are spooled.• Use Web Image Monitor to display and/or delete spooled print jobs stored in the printer. Todelete a spooled print job, log in to Web Image Monitor in the administrator mode. For details, seeWeb Image Monitor Help.Displaying the Spooled Job ListWhen Spool Printing is set, you can display on the control panel the spooled print jobs stored in theprinter. Use the following procedure to display the spooled print jobs.1. Press the [Printer] icon on the [Home] screen.2. Display the spooled job list.[Other Functns.] [Spooling Job List]Spool Printingmidas-p3_com_operating_instructions_gb_00198586_eng.xml 169Draft 2016/01/18](https://usermanual.wiki/Ricoh/PRSPC342DN1.BBP-PRSPC342DN1-User-Manual-2/User-Guide-2978044-Page-49.png)
![To delete a spooled print job stored in the printer, select the job you want to delete, and then press[Delete].4. Printing170 midas-p3_com_operating_instructions_gb_00198586_eng.xmlDraft 2016/01/18](https://usermanual.wiki/Ricoh/PRSPC342DN1.BBP-PRSPC342DN1-User-Manual-2/User-Guide-2978044-Page-50.png)
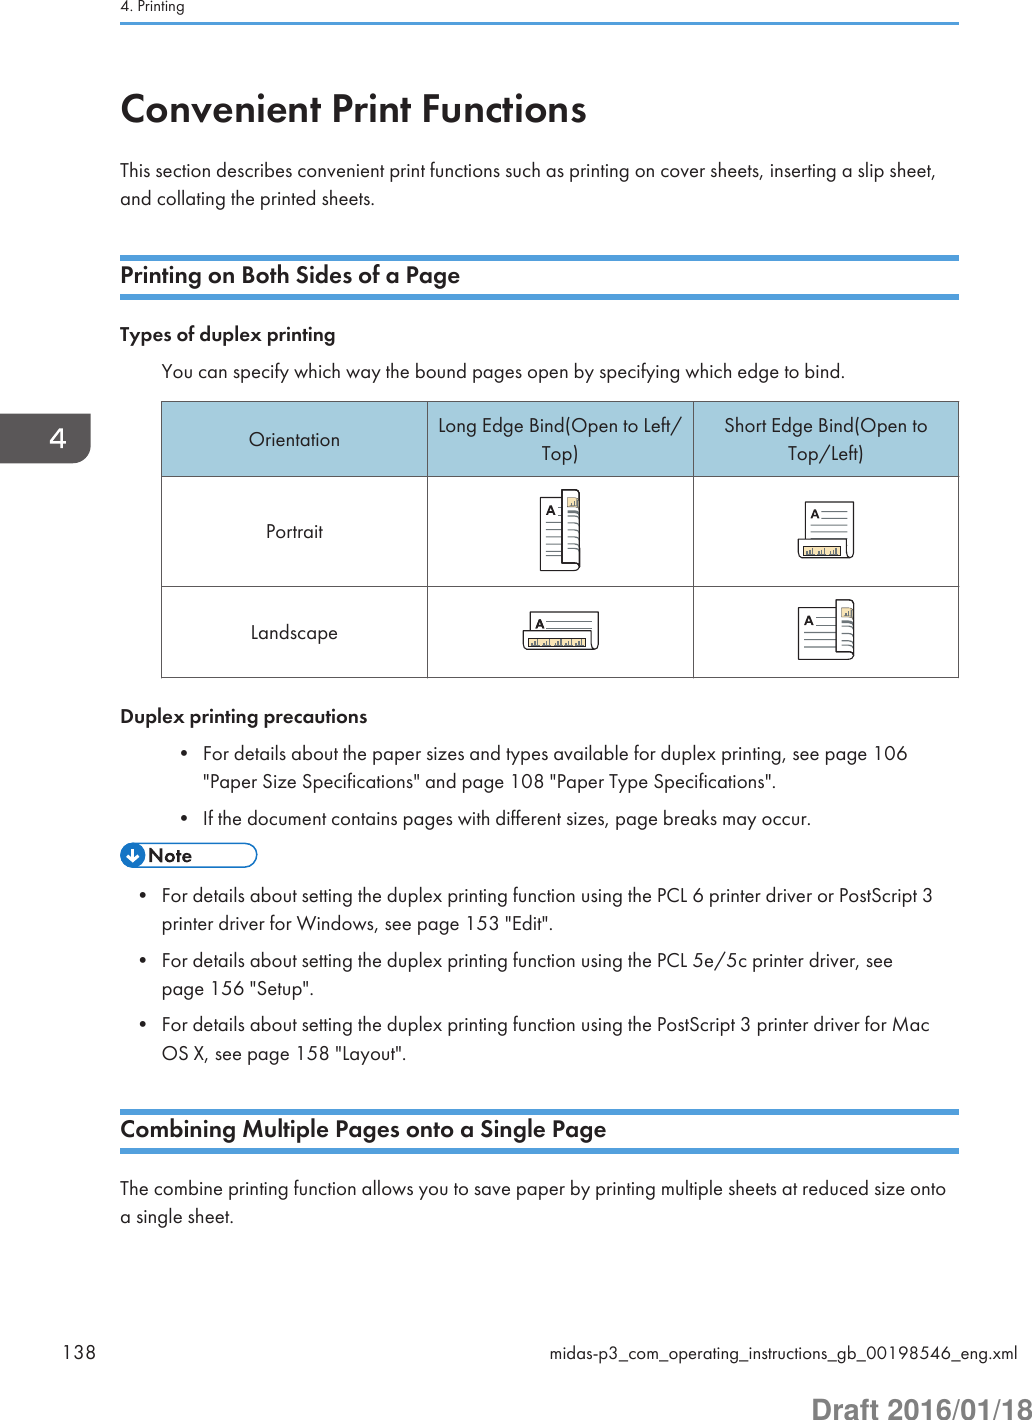
![Specifying the Printer BehaviorThis section explains procedures for preparing and configuring settings for useful printing functions.Applying the Settings Specified in the Printer Driver or Commands whenPrintingYou can specify whether to give priority to the settings configured in the printer driver or commands or tothe ones configured on the control panel for each tray when the printer receives print data.Errors may occur if the paper settings specified using the printer driver or commands conflict with thesettings specified using the control panel.To apply the paper settings including the size, type, and orientation specified using the printer driver orcommands regardless of the settings on the printer, set [Tray Setting Priority] to [Driver/Command].Press the [Menu] key, and then select the setting items using the [ ] or [ ] key.1. Select [Print Settings] Press [OK]2. Select [Machine Modes] Press [OK]3. Select [Tray Setting Priority] Press [OK]4. Select the source tray for which you want to change the priority setting Press [OK]5. Select [Driver/Command] Press [OK]1. Press the [User Tools] key, and then display the [System] screen.[Printer Features] [System]2. Change the priority setting.[Tray Setting Priority] Select the source tray for which you want to change the priority setting [Driver/Command] [OK]• For details about the items that can be configured, see:• page 244 "Machine Modes (SP C340DN)" (for SP C340DN)• page 314 "System" (for SP C342DN)Specifying the Printer Behaviormidas-p3_com_operating_instructions_gb_00198588_eng.xml 171Draft 2016/01/18](https://usermanual.wiki/Ricoh/PRSPC342DN1.BBP-PRSPC342DN1-User-Manual-2/User-Guide-2978044-Page-51.png)
![Preventing Documents from Being Left Unattended or Taken By MistakeThis function is available for SP C342DN only.When a print job is sent to the printer, you can specify whether to store the document in the printerwithout printing it or cancel the print job. To prevent documents being left on the tray unattended, thedocuments that have been stored automatically in the printer are not printed unless the control panel isused to print them.If a document is a Normal Print, Sample Print, or Stored Print file, it can be printed physically. The jobtype can be specified in the "Job Type:" list of the printer driver. For details, see page 176 "PrintingStored Documents".1. Press the [User Tools] key, and then display the [System] screen.[Printer Features] [System]2. Specify how the printer handles direct print jobs.[Restrict Direct Print Jobs] [Automatcly. Store Jobs] or [Cncl All Direct Prt Jobs] [OK]• For details about the items that can be configured, see page 314 "System".• If [Automatcly. Store Jobs] is selected, the storage method differs depending on the type of thespecified document.• If [Normal Print] is specified for a document using the printer driver, the document will bestored as a Hold Print file.• If [Sample Print] is specified for a document using the printer driver, the document itself and itsfirst page that is printed for confirmation will be stored.• If [Store and Print] is specified for a document using the printer driver, the document will bestored as a Stored Print file.• For details about printing documents automatically stored in the printer, see page 176 "PrintingStored Documents".Specifying How to Process Jobs with ErrorsExecuting form feed when an error occursIf the size or type of the paper loaded in the paper tray does not match the size or type of the paper traythat is specified using the printer driver, the printer automatically performs form feed so thatconfiguration errors will be cleared. If a print job is processed using a function that does not allow formfeed, printing will be canceled.4. Printing172 midas-p3_com_operating_instructions_gb_00198588_eng.xmlDraft 2016/01/18](https://usermanual.wiki/Ricoh/PRSPC342DN1.BBP-PRSPC342DN1-User-Manual-2/User-Guide-2978044-Page-52.png)
![Press the [Menu] key, and then select the setting items using the [ ] or [ ] key.1. Select [System] Press [OK]2. Select [Auto Continue] Press [OK]3. Specify the time the printer waits before performing form feed or canceling printing Press [OK]1. Press the [User Tools] key, and then display the [System] screen.[Printer Features] [System]2. Enable [Auto Continue].[Auto Continue] Specify the time the printer waits before performing form feed or cancelingprinting [OK]• For details about the items that can be configured, see:• page 234 "System (SP C340DN)" (for SP C340DN)• page 314 "System" (for SP C342DN)Automatically canceling printing of jobs with errorsWhen an error occurs, the printer cancels the print job with the error and the jobs received before theerror occurs.• This function is effective for print jobs using the following printer languages: PCL, PostScript 3, andPDF.• This function is not effective when:• Printing using RHPP or RC Gate• Spool printing is enabled• Printing using a protocol that cannot detect the end of job, such as via USB connection• Errors may occur when a print job is performed from a memory storage device or usingExtended Features or while a stored document or a list is printedPress the [Menu] key, and then select the setting items using the [ ] or [ ] key.Specifying the Printer Behaviormidas-p3_com_operating_instructions_gb_00198588_eng.xml 173Draft 2016/01/18](https://usermanual.wiki/Ricoh/PRSPC342DN1.BBP-PRSPC342DN1-User-Manual-2/User-Guide-2978044-Page-53.png)
![1. Select [System] Press [OK]2. Select [AutoCncl for Prt Job onErr] Press [OK]3. Select [On] Press [OK]1. Press the [User Tools] key, and then display the [System] screen.[Printer Features] [System]2. Set the printer to cancel a print job with an error and the jobs received before the erroroccurs.[Auto Cancel for Print Job(s) on Err.] [On] [OK]• For details about the items that can be configured, see:• page 234 "System (SP C340DN)" (for SP C340DN)• page 314 "System" (for SP C342DN)Storing jobs with errors automaticallyThis function is available for SP C342DN only.A document is automatically stored in the printer if a print job is suspended due to an error. Despite thiserror, the next document can be printed. This function can be used for Normal Print, Sample Print, andStored Print files. The job type can be specified in the "Job Type:" list of the printer driver. For details, seepage 176 "Printing Stored Documents".Printing of the document that is stored in the printer can be resumed by operating the control panel. Fordetails, see page 183 "Printing of documents stored when print configuration errors occur".• A document is automatically stored when a print job is canceled because of errors related to printsettings as follows:• The paper that matches the size and type specified when printing has run out.• The specified tray is not installed on the printer.• The paper size and type settings configured using the printer driver or commands do notmatch the settings of the printer's trays.• Up to 200 documents that total 1,000 pages each can be stored automatically in the printer.4. Printing174 midas-p3_com_operating_instructions_gb_00198588_eng.xmlDraft 2016/01/18](https://usermanual.wiki/Ricoh/PRSPC342DN1.BBP-PRSPC342DN1-User-Manual-2/User-Guide-2978044-Page-54.png)
![1. Press the [User Tools] key, and then display the [System] screen.[Printer Features] [System]2. Set the printer to store jobs with errors.[Store and Skip Errored Job] [On] Specify the number of pages to be checked for errors [OK]• For details about the items that can be configured, see page 314 "System".• The storage method differs depending on the type of the specified document.• If [Normal Print] is specified for a document using the printer driver, the document will bestored as a Hold Print file.• If [Sample Print] is specified for a document using the printer driver, the document itself and itsfirst page that is printed for confirmation will be stored.• If [Store and Print] is specified for a document using the printer driver, the document will bestored as a Stored Print file.• For details about printing documents automatically stored in the printer, see page 176 "PrintingStored Documents".Specifying the Printer Behaviormidas-p3_com_operating_instructions_gb_00198588_eng.xml 175Draft 2016/01/18](https://usermanual.wiki/Ricoh/PRSPC342DN1.BBP-PRSPC342DN1-User-Manual-2/User-Guide-2978044-Page-55.png)
![• The stored documents remain in the printer even after you turn off the printer. However, the [AutoDelete Temporary Jobs] or [Auto Delete Stored Jobs] settings are applied first. For details about theauto delete settings, see:• page 314 "Data Management"Storing a DocumentSending a print file with Windows1. After creating a document, open the [Printing Preferences] dialog box in the document'snative application.2. Configure the following settings:• Job Type:Select a job type.Select [Stored Print] to store the document in the printer and print it later using the controlpanel.Select [Store and Print] to store and print the document at the same time.3. Click [Details...], and then configure the following settings:• User ID:Enter a User ID.• Password:When storing a Locked Print file, enter a password.When storing a Stored Print file, specify a password as necessary.• File NameWhen storing a Hold Print or Stored Print file, specify a file name as necessary.• Set Print TimeWhen storing a Hold Print file, specify the time to start printing as necessary.4. Click [OK].5. Change any other print settings as necessary.6. Click [OK].7. Start printing from the application's [Print] dialog box.Printing Stored Documentsmidas-p3_com_operating_instructions_gb_00198595_eng.xml 177Draft 2016/01/18](https://usermanual.wiki/Ricoh/PRSPC342DN1.BBP-PRSPC342DN1-User-Manual-2/User-Guide-2978044-Page-57.png)
![• If [Stored Print (Shared)] or [Store and Print (Shared)] is selected when a Stored Print file is stored,the user who created the document and all users who have print privileges can print the documentusing the control panel. This setting is available when User Authentication is enabled using the PCL6 printer driver. For details, see Security Guide.• Even if you specify the time to print a Hold Print file in [Set Print Time], the printer does not print thefile at the specified time, but performs as follows:• When the specified print time is close to the time in the printer's built-in clock, printing maystart immediately.• When the main power of the printer is turned off, printing will not start when the specified printtime arrives. To print a document whose print time has been specified and the time hasalready passed, set [Jobs Not Printed As Machn. Was Off] to [On] in [System] under [PrinterFeatures]. For details, see page 314 "System".• If an error message is displayed on the control panel, printing will not start even if thespecified print time arrives.Sending a print file with Mac OS X1. After creating a document, open the printing preferences screen in the document's nativeapplication.2. Select [Job Log] in the pop-up menu, and then configure the following setting:• User ID:Enter a user ID.• Job Type:Select a job type.Select [Stored Print] to store the document in the printer and print it later using the controlpanel.Select [Store and Print] to store and print the document at the same time.• File Name:When storing a Hold Print or Stored Print file, specify a file name as necessary.• Password:When storing a Locked Print file, enter a password.When storing a Stored Print file, specify a password as necessary.• Set Print TimeWhen storing a Hold Print file, specify the time to start printing as necessary.4. Printing178 midas-p3_com_operating_instructions_gb_00198595_eng.xmlDraft 2016/01/18](https://usermanual.wiki/Ricoh/PRSPC342DN1.BBP-PRSPC342DN1-User-Manual-2/User-Guide-2978044-Page-58.png)
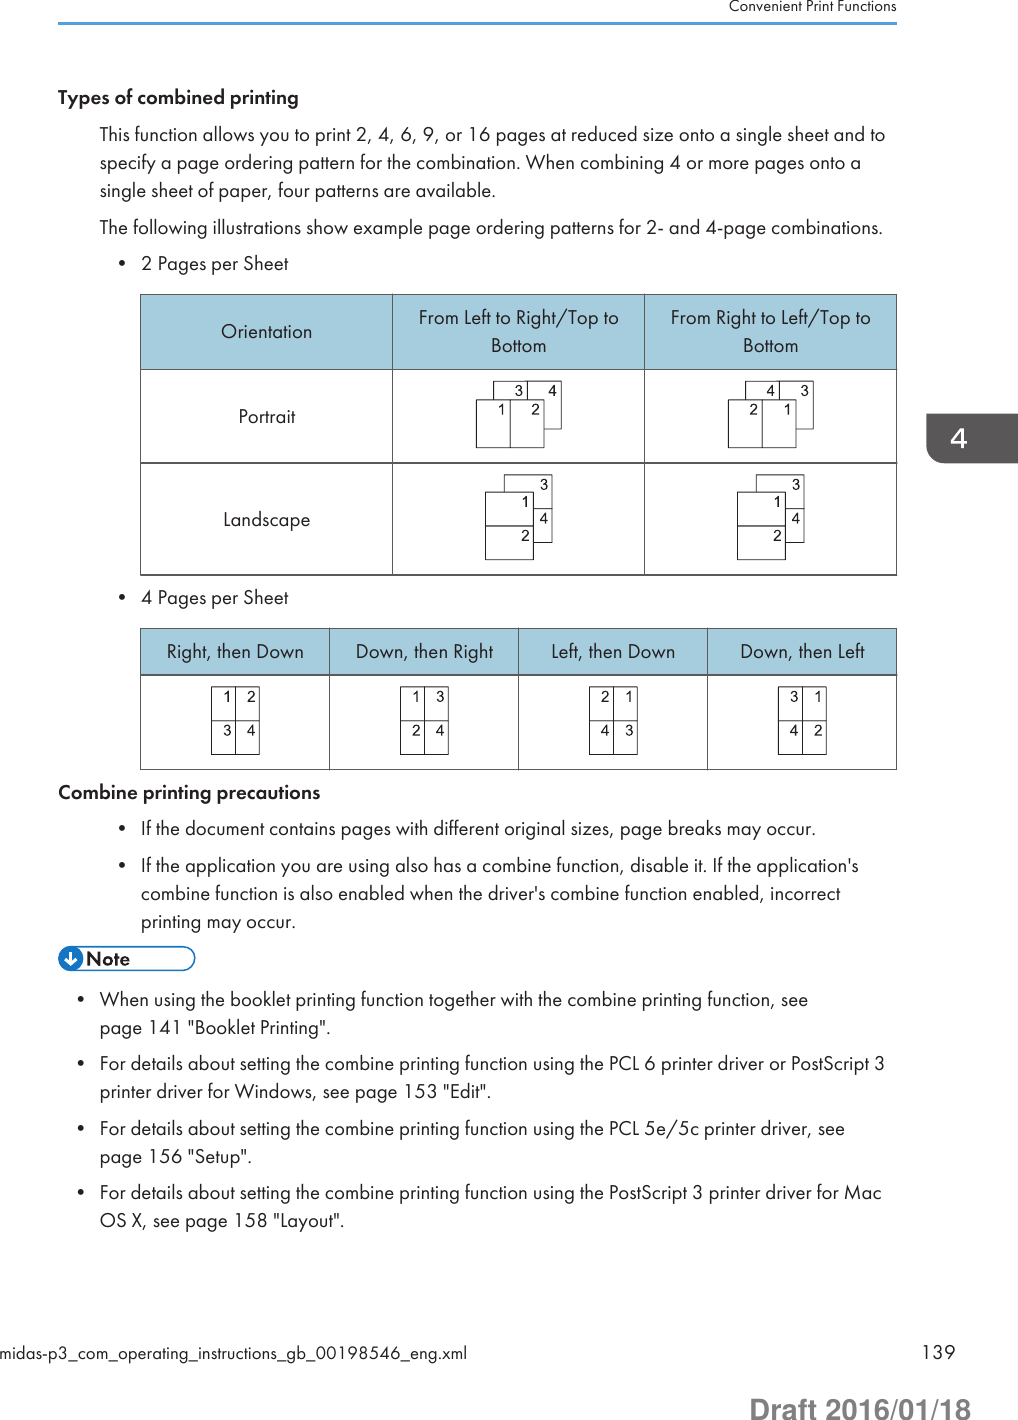
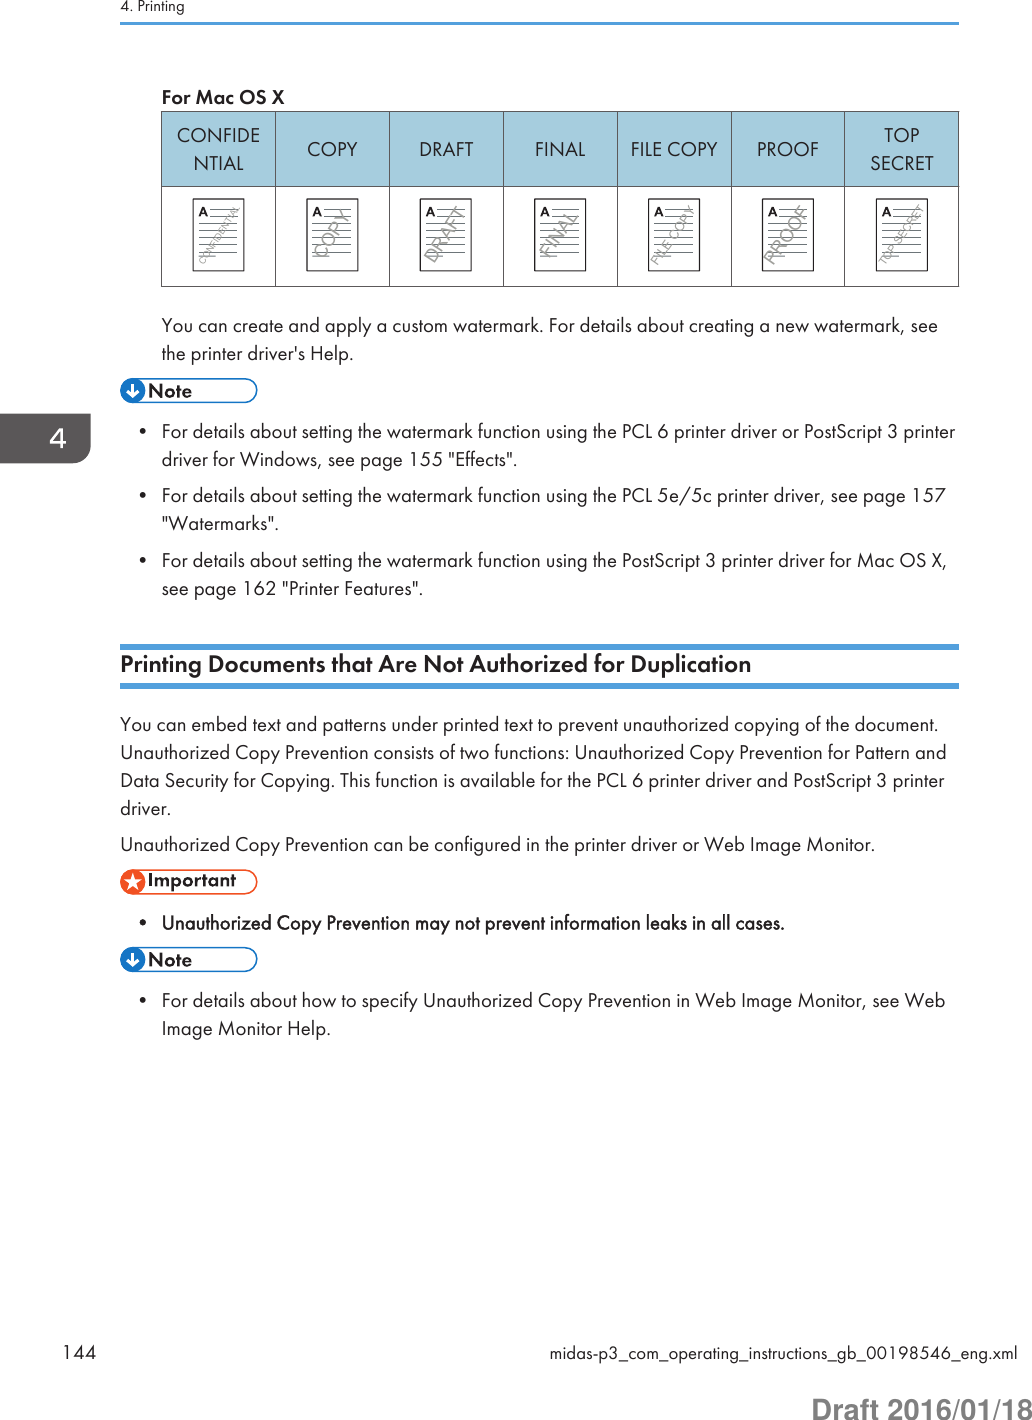
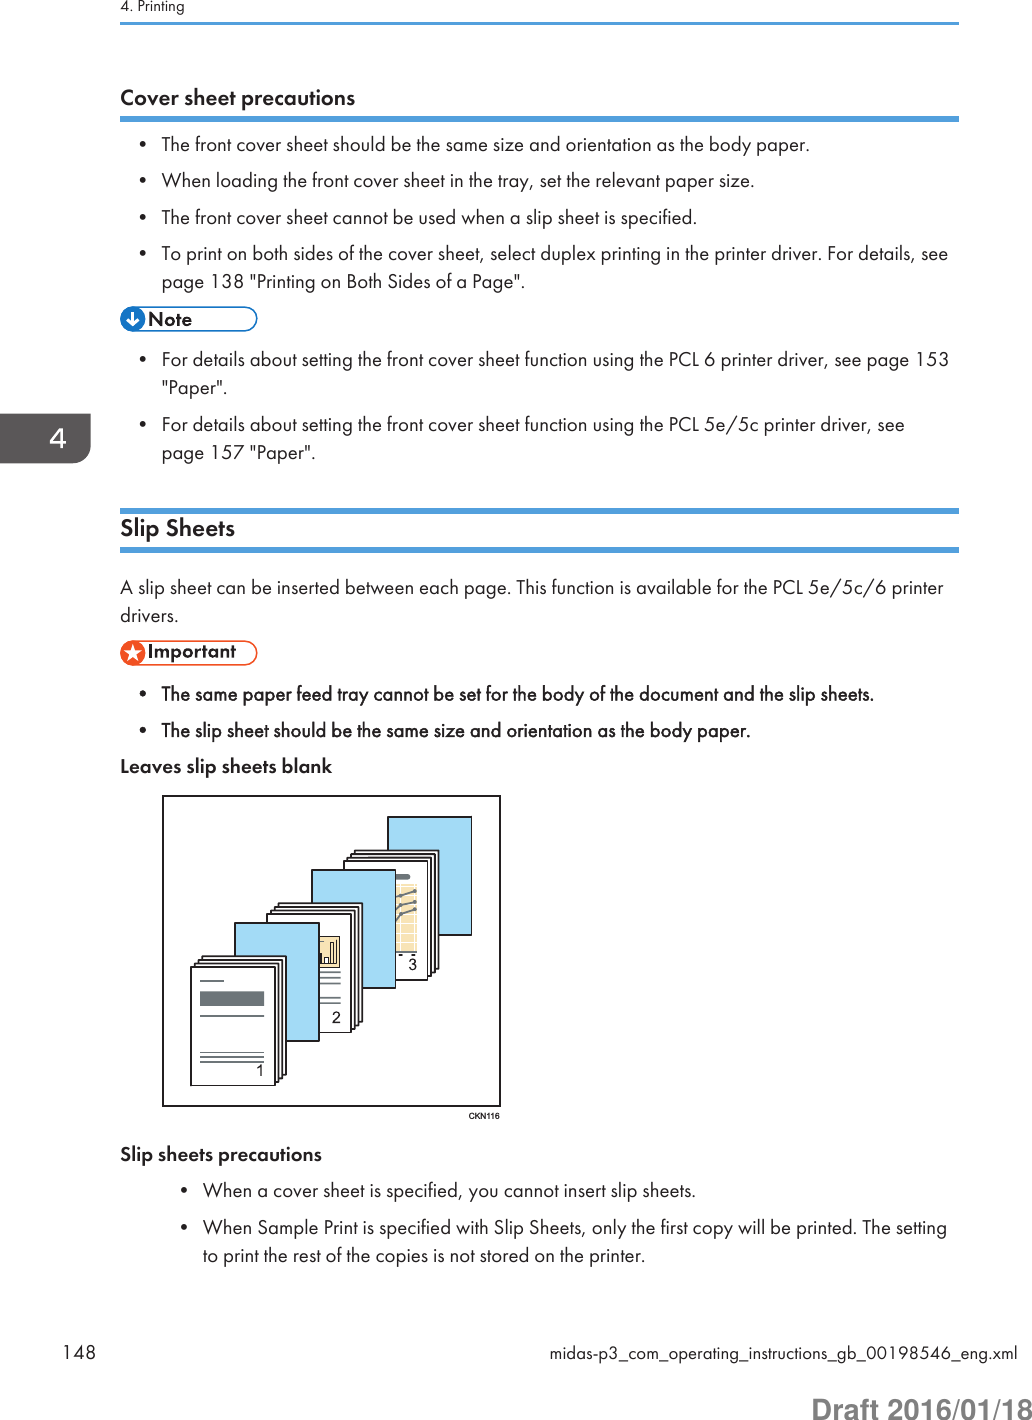
![3. Change any other print settings as necessary.4. Start printing from the application's printing preferences screen.• Even if you specify the time to print a Hold Print file in [Set Print Time], the printer does not print thefile at the specified time, but performs as follows:• When the specified print time is close to the time in the printer's built-in clock, printing maystart immediately.• When the main power of the printer is turned off, printing will not start even if it is the specifiedprint time. To print a document whose specified time has already passed, set [Jobs Not PrintedAs Machn. Was Off] to [On] on [System] under [Printer Features]. For details, see page 314"System".• If an error message is displayed on the control panel, printing will not start even if it is thespecified print time.Printing Stored DocumentsYou can print stored documents by selecting a job from the list by job type or by User ID.• Sample Print files, Locked Print files, and Hold Print files will be deleted after printing finishes.Stored Print files will not be deleted unless you delete them. For the procedure to delete Stored Printfiles, see page 185 "Deleting Stored Documents".• When [Auto Delete Stored Jobs] is enabled, Stored Print files are deleted automatically after theyare printed. For details about the [Auto Delete Stored Jobs] setting, see:• page 314 "Data Management"Print Job ScreenThis section explains the functions of the print job screen.Press the [Printer] icon on the [Home] screen, and then press the [Print Jobs] tab. The screen to select atype of print job and User ID appears.Printing Stored Documentsmidas-p3_com_operating_instructions_gb_00198595_eng.xml 179Draft 2016/01/18](https://usermanual.wiki/Ricoh/PRSPC342DN1.BBP-PRSPC342DN1-User-Manual-2/User-Guide-2978044-Page-59.png)
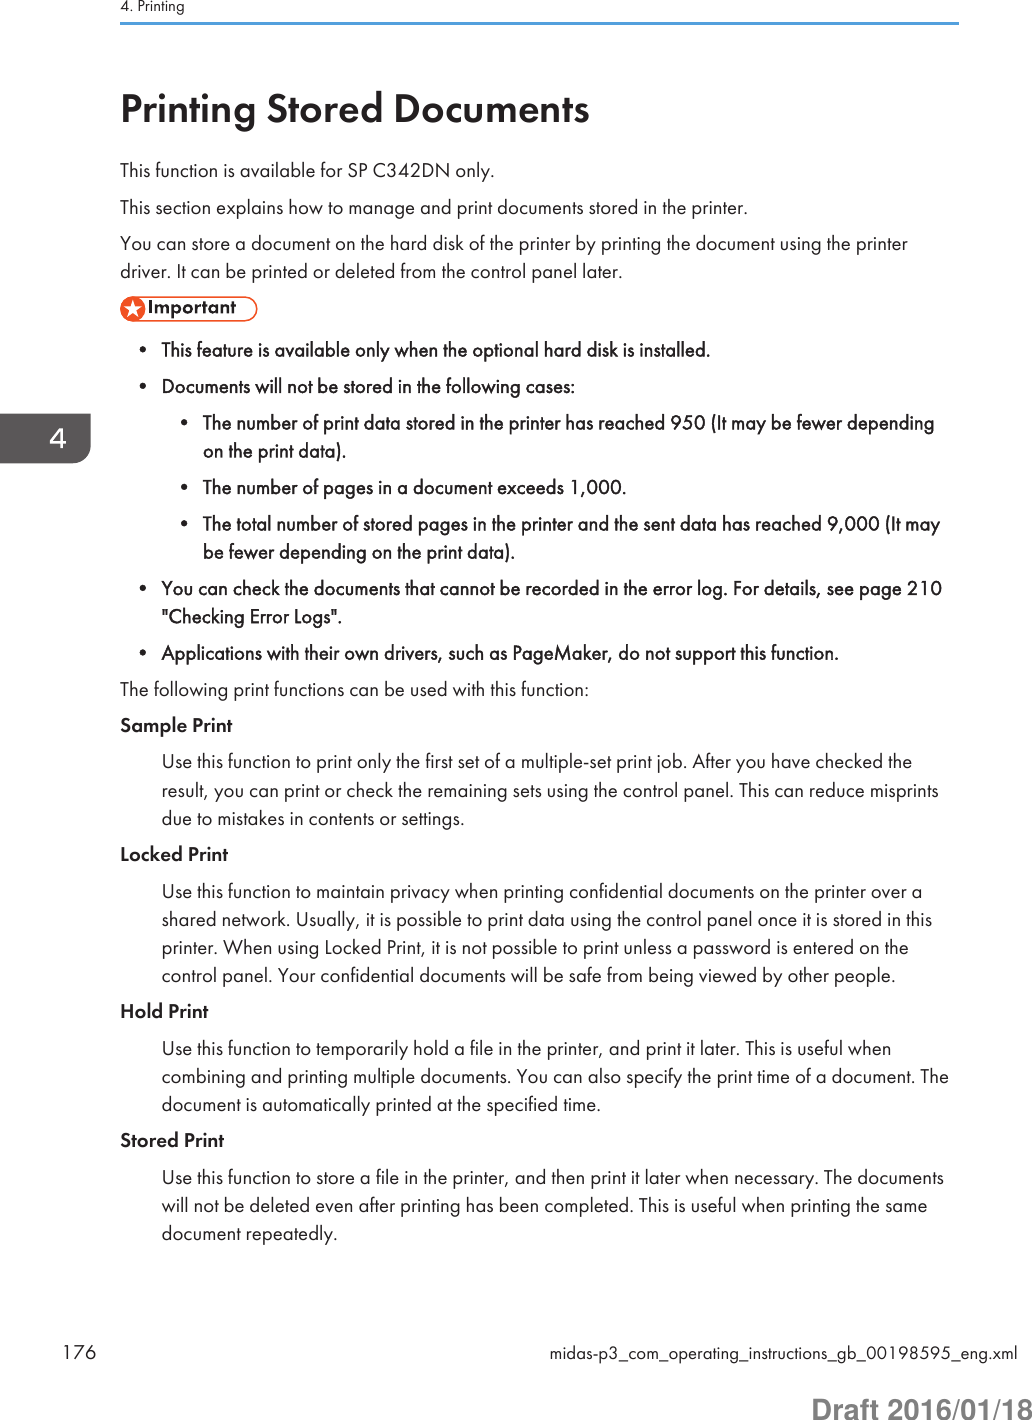
![Press a type of print job or User ID to display the list of print jobs.123456789CYN9081. Date&Time, User ID, and File Name display• Date and Time displays the time at which the print job was stored in the printer.• User ID displays the user's ID set by the printer driver.• File Name displays the name of the file. However, "****" is shown instead of the file name for a LockedPrint file.2. List/ThumbnailSwitches between list view and thumbnail view.3. [Refresh]Updates the contents of the screen.4. [All Jobs]Selects all jobs of the same type.5. [Other Settings]Use this to change the preset print time for a Hold Print job or the password to a Locked/Stored Print job.6. [Delete]Deletes the selected job.7. [Preview]Previews the first page of the selected job.8. [Print]Prints the selected job.9. [Details]Displays the detailed information of the selected job.• If a large number of print jobs are stored in the printer, processing may slow temporarily,• depending on which functions are used.4. Printing180 midas-p3_com_operating_instructions_gb_00198595_eng.xmlDraft 2016/01/18](https://usermanual.wiki/Ricoh/PRSPC342DN1.BBP-PRSPC342DN1-User-Manual-2/User-Guide-2978044-Page-60.png)