Ricoh RFAPL02 Full-Color MFP User Manual 1 of 3
Ricoh Company Ltd Full-Color MFP 1 of 3
UserManual.wiki
>
Ricoh
>
RFAPL02 User Manual
>
User Manual 1 of 3
Contents
1.
User Manual 1 of 3
2.
User Manual 2 of 3
3.
User Manual 3 of 3
User Manual 1 of 3
Navigation menu
Upload a User Manual
Namespaces
Wiki Guide
HTML
PDF
Info
Views
User Manual
Discussion / Help
Navigation
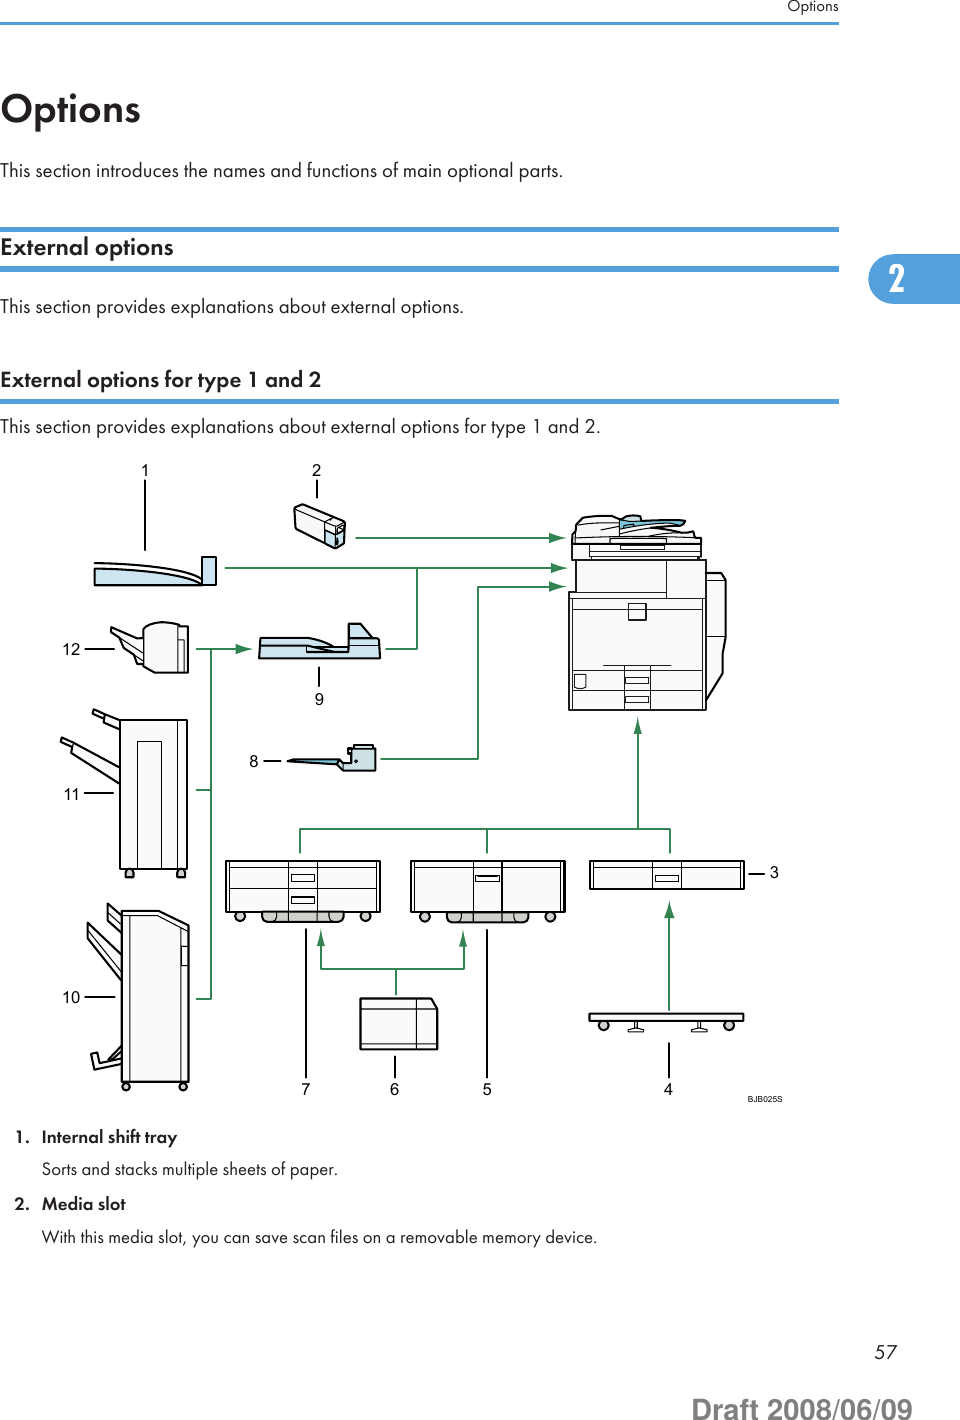
![Finisher SR3030........................................................................................................................................109Replacing the Stamp Cartridge....................................................................................................................111Replacing the Stamp Cartridge (Type 1, 2)............................................................................................111Replacing the Stamp Cartridge (Type 3, 4)............................................................................................1135. Entering TextEntering Text...................................................................................................................................................115Available Characters................................................................................................................................115Keys............................................................................................................................................................115How to Enter Text......................................................................................................................................1166. Operating InstructionsInstalling Operating Instructions...................................................................................................................119PDF Manuals..............................................................................................................................................120How to Use the Operating Instructions........................................................................................................121Opening from the Icon..............................................................................................................................121Opening from the [Start] Menu................................................................................................................121Opening from the CD-ROM.....................................................................................................................1227. Other User ToolsChanging the Display Language..................................................................................................................123Inquiry.............................................................................................................................................................125Changing Paper Thickness Settings..............................................................................................................127Counter...........................................................................................................................................................129Displaying the Total Counter....................................................................................................................1298. RemarksDos and Don'ts...............................................................................................................................................131Saving Color Copies.................................................................................................................................132Where to Put Your Machine.........................................................................................................................133Machine Environment...............................................................................................................................133Power Connection.....................................................................................................................................135Maintaining Your Machine...........................................................................................................................137Cleaning the Exposure Glass...................................................................................................................137Cleaning the Auto Document Feeder.......................................................................................................137Cleaning the Dustproof Glass..................................................................................................................1385Draft 2008/06/09](https://usermanual.wiki/Ricoh/RFAPL02.User-Manual-1-of-3/User-Guide-968955-Page-7.png)

![How to Read This ManualSymbolsThis manual uses the following symbols:Indicates points to pay attention to when using the machine, and explanations of likely causes of papermisfeeds, damage to originals, or loss of data. Be sure to read these explanations.Indicates supplementary explanations of the machine's functions, and instructions on resolving user errors.This symbol is located at the end of sections. It indicates where you can find further relevant information.[ ]Indicates the names of keys that appear on the machine's display panel.[ ]Indicates the names of keys on the machine's control panel.Indicates instructions in book form.Indicates instructions in sheet form.Indicates instructions stored in a file on a provided CD-ROM.Names of Major ItemsMajor items of this machine are referred to as follows in this manual:• Auto document feeder ADF• Large capacity tray LCT (optional)NotesContents of this manual are subject to change without prior notice.20Draft 2008/06/09](https://usermanual.wiki/Ricoh/RFAPL02.User-Manual-1-of-3/User-Guide-968955-Page-22.png)


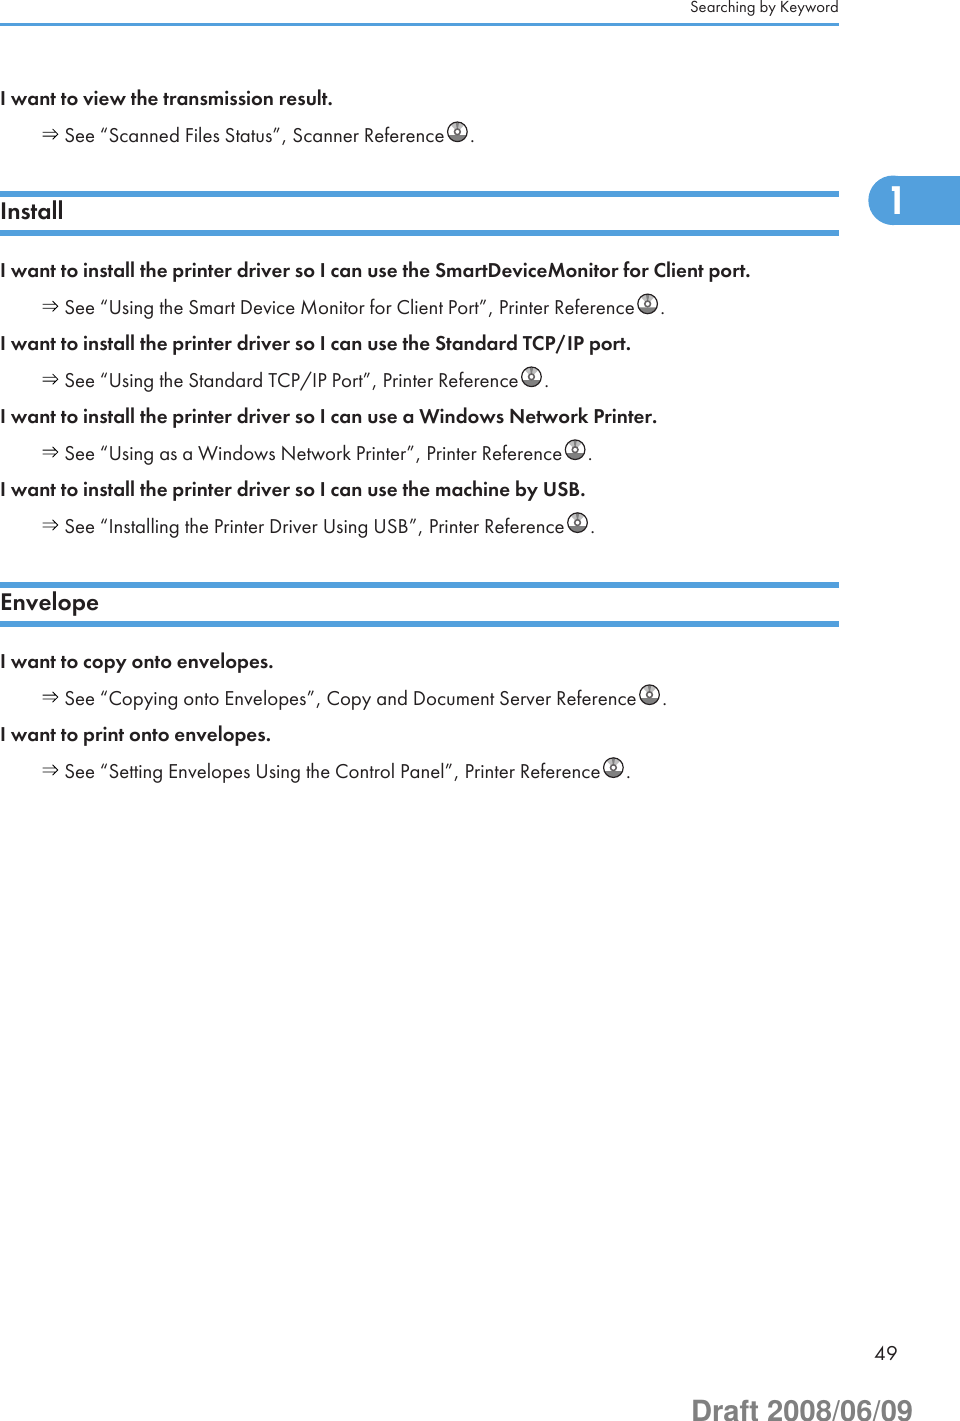

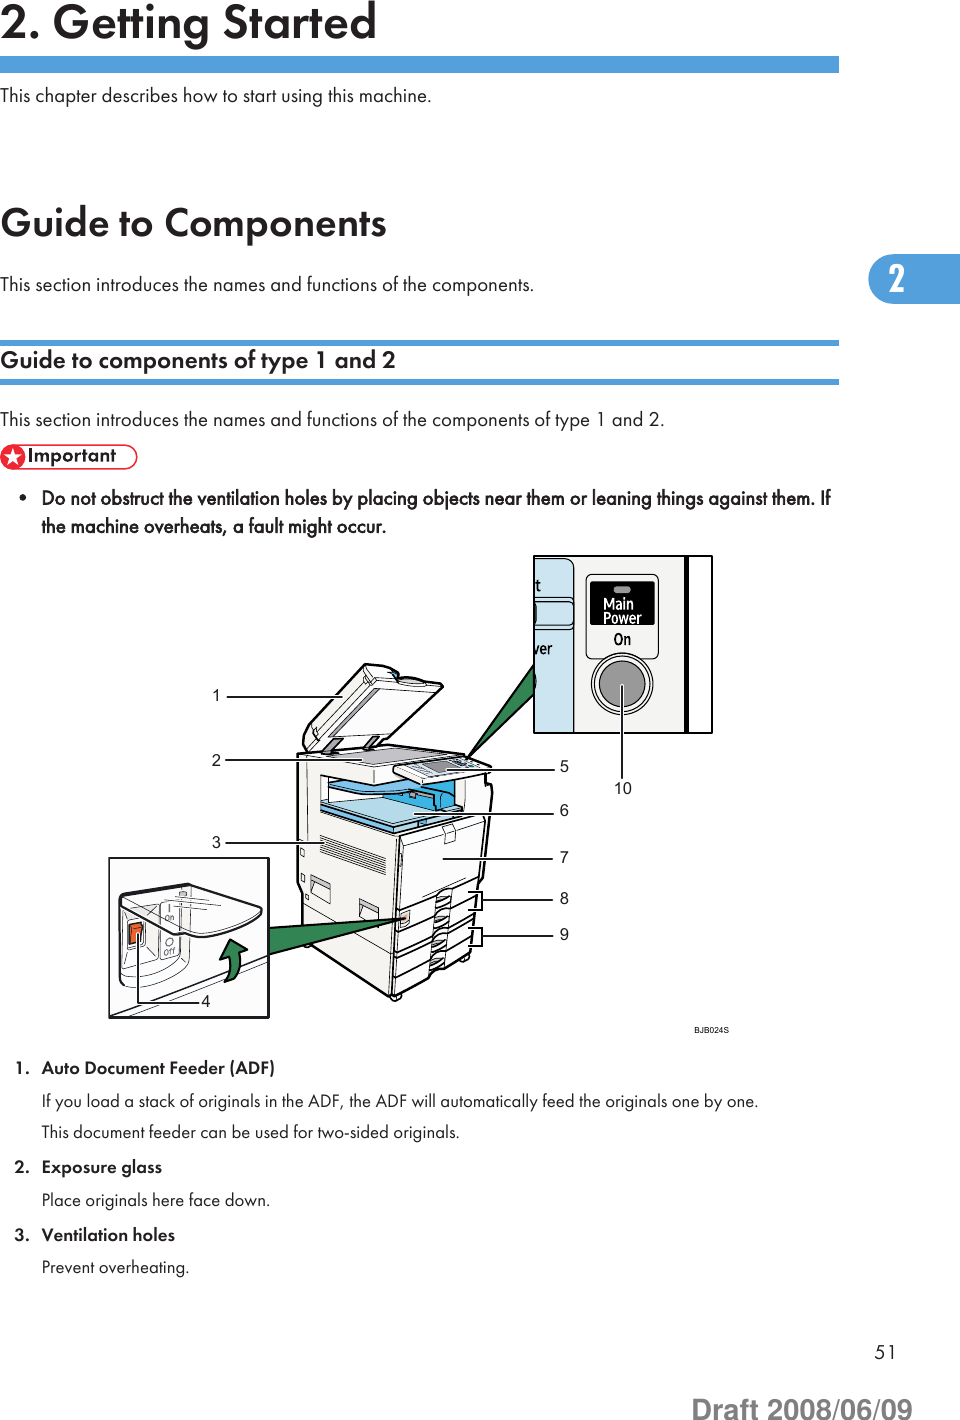
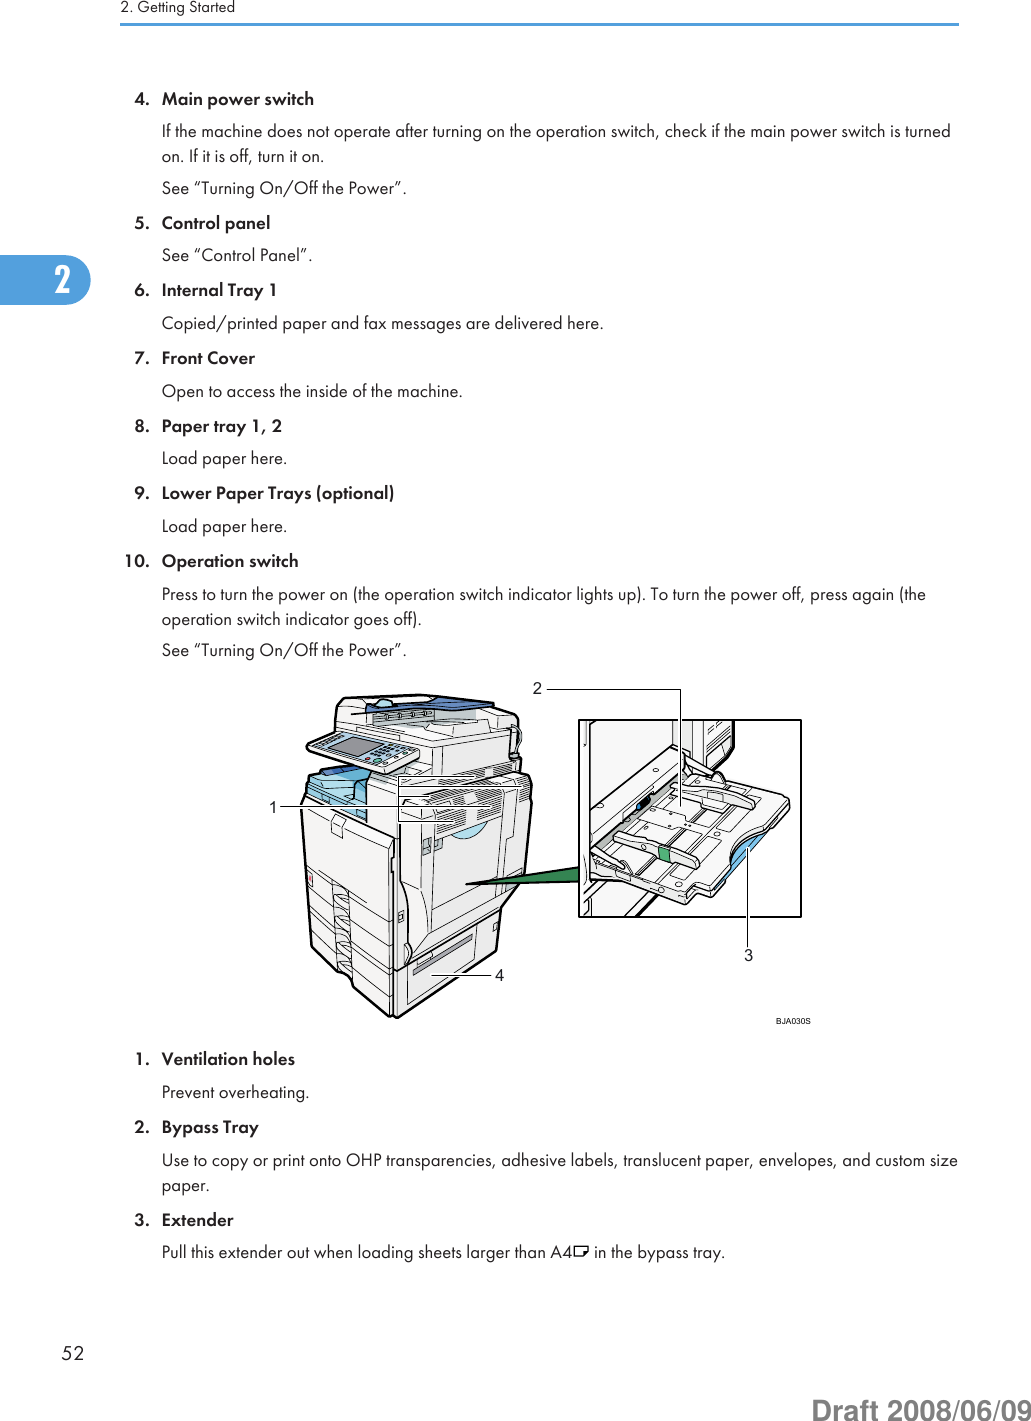


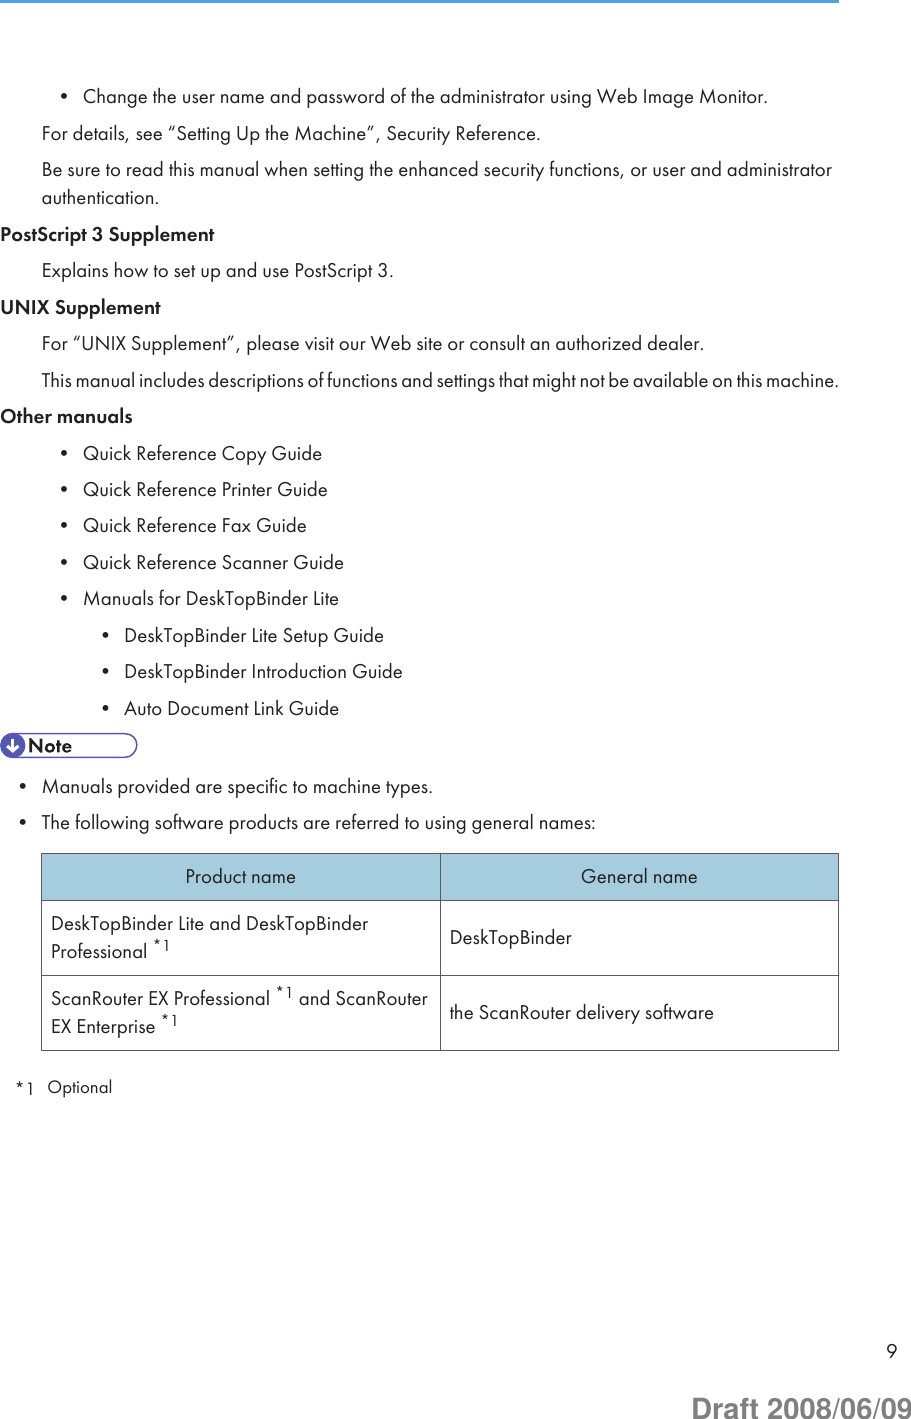
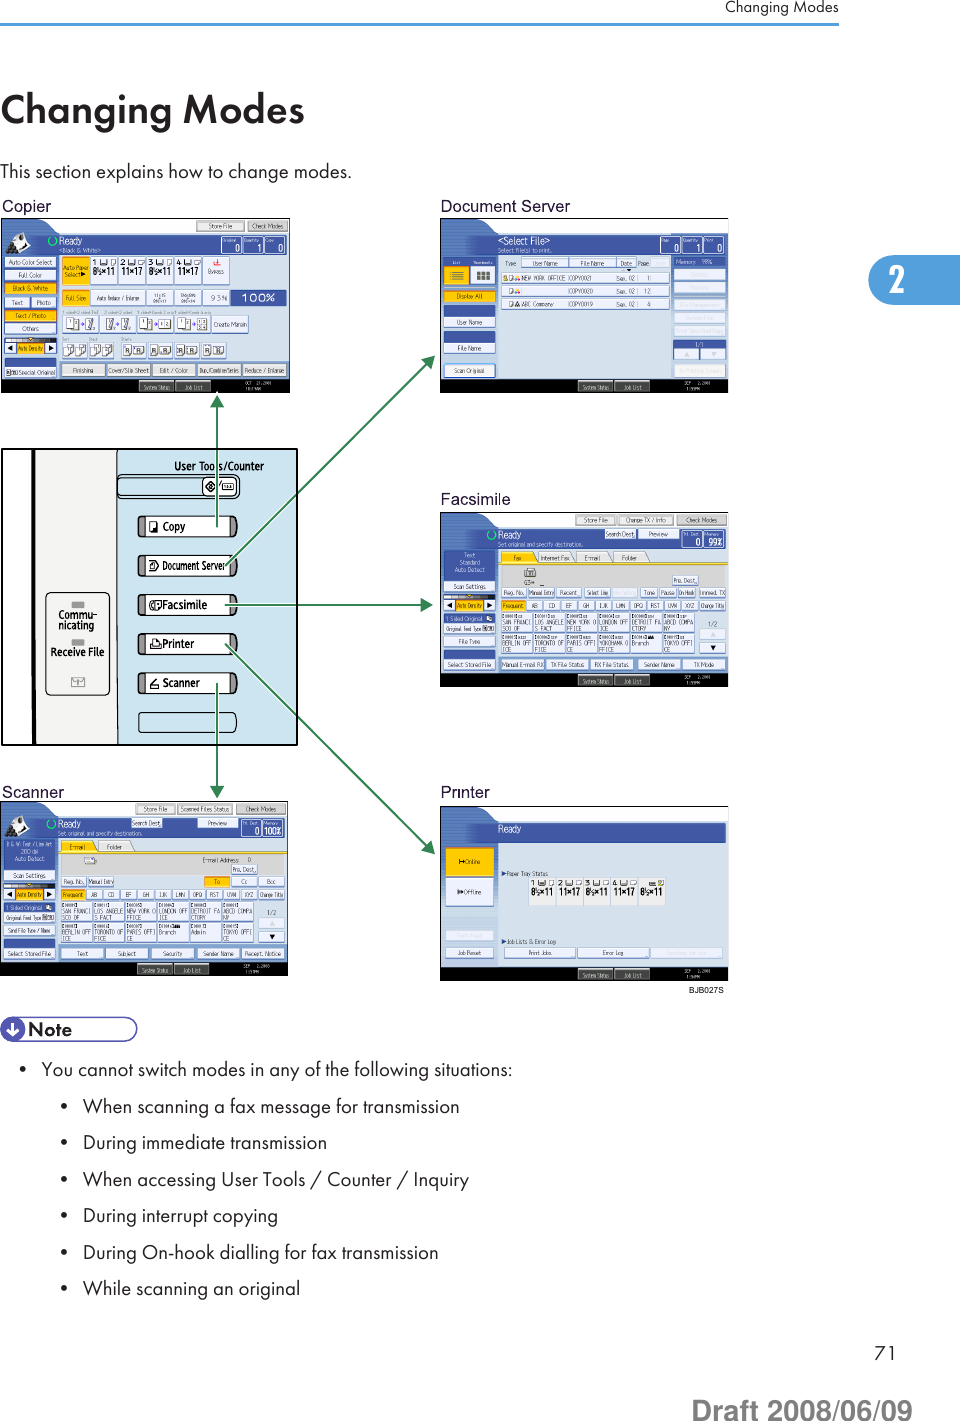
![Control PanelThis section introduces the names and functions of the components on the control panel.• Do not turn off the main power switch while the operation switch indicator is lit or blinking. Doing somay damage the hard disk.This illustration shows the control panel of the machine with options fully installed.BCT026S1. [User Tools/Counter] key• User ToolsPress to change the default and conditions to meet your requirements. See “Accessing User Tools”, Networkand System Settings Guide .• CounterPress to check or print the counter value. See “Counter”.• InquiryPress to find out where to order expendable supplies and where to call when a malfunction occurs. Youcan also print these details. See “Inquiry”.2. Function keysPress to display the operation screen of one of the following functions: copy, document server, facsimile, printer,or scanner.The indicator of the selected function goes on. See “Changing Modes”.3. Display panelDisplays keys for each function, operation status, or messages. See “Display Panel”.4. [Clear Modes] keyPress to clear the current settings.2. Getting Started622Draft 2008/06/09](https://usermanual.wiki/Ricoh/RFAPL02.User-Manual-1-of-3/User-Guide-968955-Page-64.png)
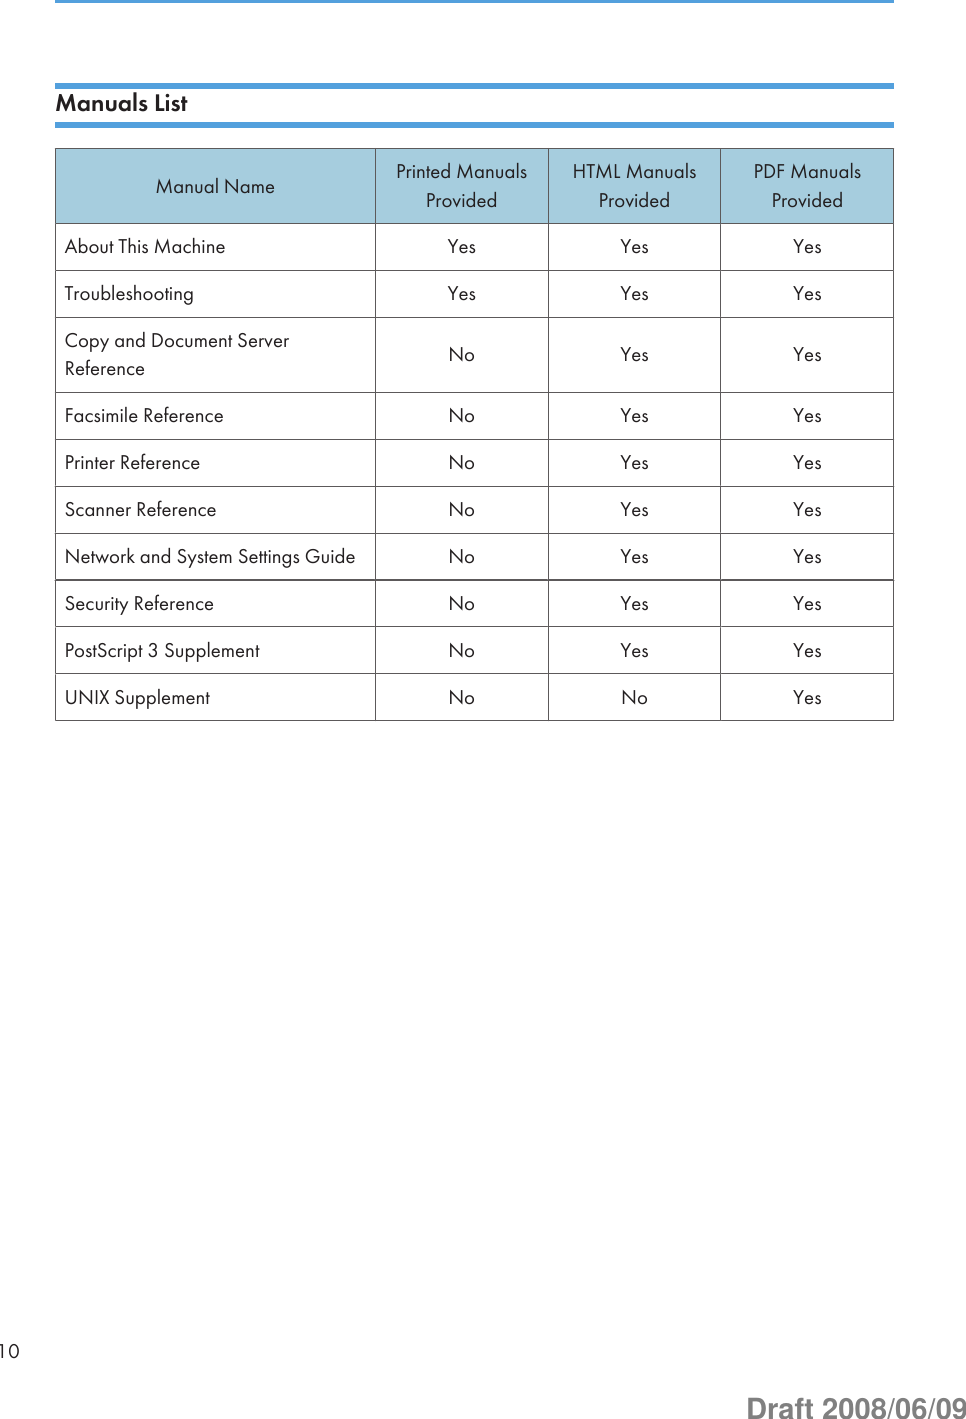
![5. [Program] key (copier, Document Server, facsimile, and scanner mode)• Press to register frequently used settings, or to recall registered settings (except Document Server mode).See “Registering Frequently Used Functions”, Copy and Document Server Reference , “Programs”,Facsimile Reference , and “Programs”, Scanner Reference .• Press to program defaults for the initial display when modes are cleared or reset, or immediately after theoperation switch is turned on. See “Registering the Initial Display's Default Functions”, Copy and DocumentServer Reference , “Setting Transmission Function Defaults”, Facsimile Reference , and “Registeringthe Default Values of the Scanner's Initial Display”, Scanner Reference .6. [Interrupt] keyPress to make interrupt copies. See “Interrupt Copy”, Copy and Document Server Reference .7. [Energy Saver] keyPress to switch to and from Energy Saver mode. See “Saving Energy”.8. Main power indicatorThe main power indicator goes on when you turn on the main power switch.9. Operation switchPress to turn the power on (the operation switch indicator goes on). To turn the power off, press again (theoperation switch indicator goes off). See “Turning On the Power”.10. Communicating indicator, Receiving File indicator, Confidential File indicator• Communicating indicatorLights continuously during data transmission and reception.• Receiving File indicatorLights continuously while data other than personal box or Memory Lock file is being received and storedin the fax memory.See “Substitute Reception”, Facsimile Reference .• Confidential File indicatorLights continuously while personal box data is being received.Blinks while Memory Lock file is being received.See “Personal Boxes”, Facsimile Reference and “Printing a File Received with Memory Lock”, FacsimileReference .11. Data In indicator (facsimile and printer mode)Flashes when the machine is receiving print jobs or LAN-Fax documents from a computer. See Facsimile Reference and Printer Reference .12. Alert indicatorLights continuously if an error has occurred.13. Number keysUse to enter the numbers for copies, fax numbers and data for the selected function.14. [Clear/Stop] key• ClearPress to delete a number entered.Control Panel632Draft 2008/06/09](https://usermanual.wiki/Ricoh/RFAPL02.User-Manual-1-of-3/User-Guide-968955-Page-65.png)
![• StopPress to stop a job in progress, such as copying, scanning, faxing, or printing.15. [ ] key (Enter key)Press to confirm values entered or items specified.16. [Start] keyPress to start copying, printing, scanning, or sending.17. [Sample Copy] keyPress to make a single set of copies or prints to check print quality before making multiple sets. See “SampleCopy”, Copy and Document Server Reference .18. [Simplified Display] keyPress this to switch to the Simplified Display.19. [Login/Logout] keyPress this to log in or log out.• p.65 "Display Panel"• p.65 "Simplified Display"• p.71 "Changing Modes"• p.73 "Turning On/Off the Power"• p.76 "Saving Energy"• p.125 "Inquiry"• p.129 "Counter"2. Getting Started642Draft 2008/06/09](https://usermanual.wiki/Ricoh/RFAPL02.User-Manual-1-of-3/User-Guide-968955-Page-66.png)
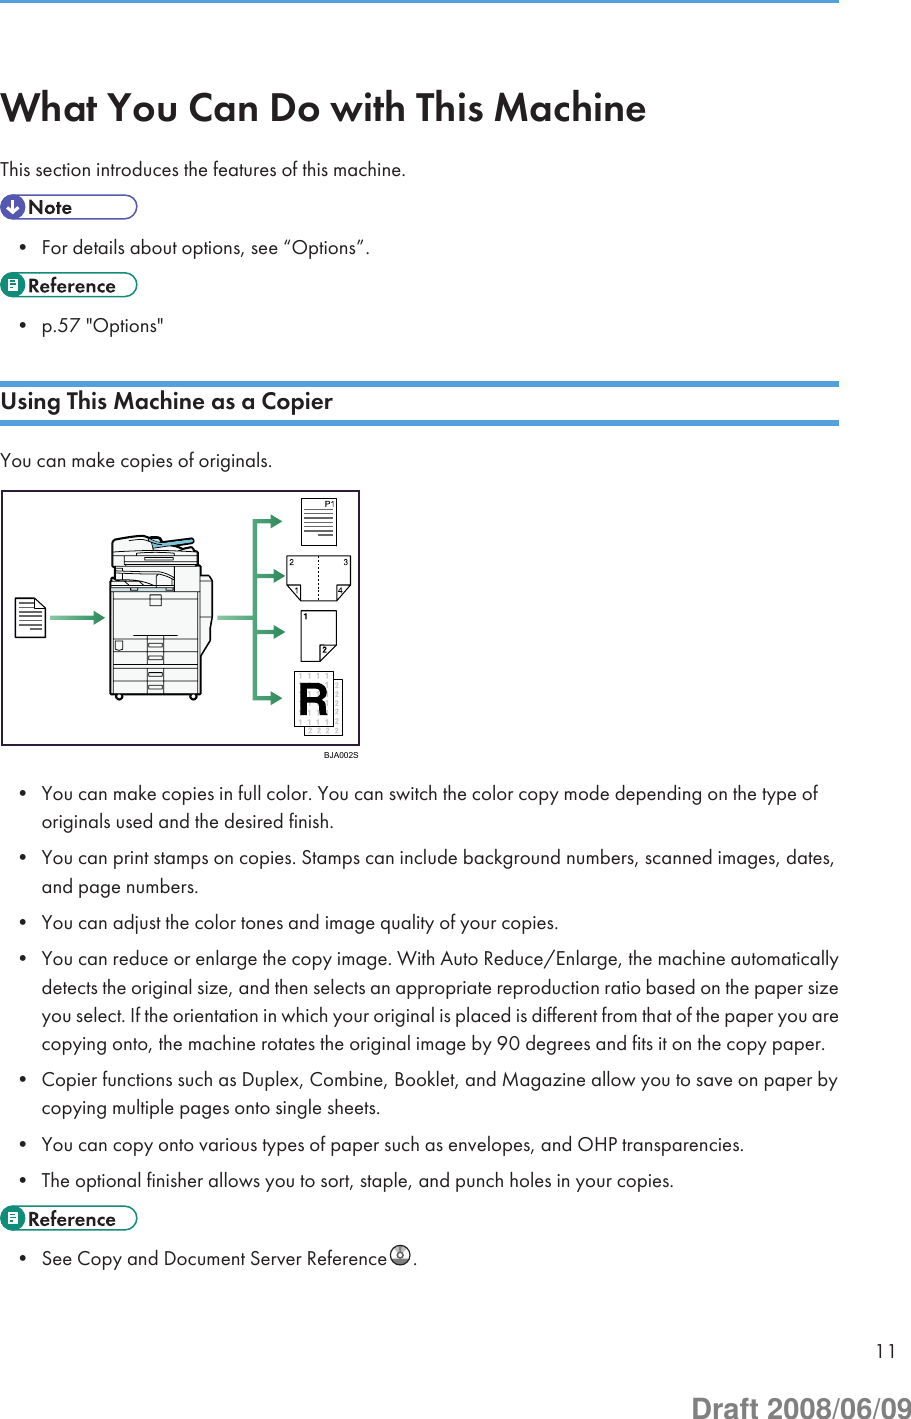
![Display PanelThe display panel shows machine status, error messages, and function menus.• Don't apply strong impact or force to the screen. Or it may be damaged. Maximum force allowableis approx. 30N (approx. 3 kgf). (N = Newton, kgf = Kilogram force. 1 kgf = 9.8N.)The function items displayed serve as selector keys. You can select or specify an item by lightly pressingthem.When you select or specify an item on the display panel, it is highlighted like . Keys appearing as cannot be used.The copy display is set as the default screen when the machine is turned on.• The display panels shown in this manual's illustrations are taken from a machine on which all optionsare installed.Simplified DisplayThis section explains how to switch to the simplified display.When you press the [Simplified Display] key, the screen changes from the initial display to the simplifieddisplay.Letters and keys are displayed at a larger size, making operations easier.Display Panel652Draft 2008/06/09](https://usermanual.wiki/Ricoh/RFAPL02.User-Manual-1-of-3/User-Guide-968955-Page-67.png)
![BCT030SExample of a simplified displayThis illustration shows the copier function's simplified display.BJB029S1. [Key Color]Press to increase screen contrast by changing the color of the keys.This is available only for the simplified display.• To return to the initial display, press the [Simplified Display] key again.• Certain keys do not appear on the simplified display.2. Getting Started662Draft 2008/06/09](https://usermanual.wiki/Ricoh/RFAPL02.User-Manual-1-of-3/User-Guide-968955-Page-68.png)
![When the Authentication Screen is DisplayedThis section explains the authentication screen.• Ask the user administrator for the login user name, login password, and user code. For details aboutuser authentication, contact your administrator.• User code to enter on User Code Authentication is the numerical value registered in the address bookas “login user name”.If Basic Authentication, Windows Authentication, LDAP Authentication, or Integration Server Authenticationis active, the authentication screen appears on the display. The machine only becomes operable afterentering your own login user name and login password. If User Code Authentication is active, you cannotuse the machine until you enter the user code.If you can use the machine, you can say that you are logged in. When you go out of the operable state,you can say that you are logged out. After logging in the machine, be sure to log out of it to preventunauthorized usage.• If authentication fails, the "Authentication has failed." message appears. Check that the login username and login password are correct.User Code Authentication (Using the Control Panel)This section explains the procedure for logging in to the machine using the control panel while User CodeAuthentication is active.If User Code Authentication is active, a screen prompting you to enter a user code appears.1. Enter a user code (up to eight digits), and then press [OK].• To log off, do one of the following:• Press the operation switch.When the Authentication Screen is Displayed672Draft 2008/06/09](https://usermanual.wiki/Ricoh/RFAPL02.User-Manual-1-of-3/User-Guide-968955-Page-69.png)
![• Press the [Energy Saver] key after jobs are completed.User Code Authentication (Using a Printer Driver)This section explains the procedure for logging in to the machine using a printer driver while User CodeAuthentication is active.If User Code Authentication is active, specify the user code in the printer properties of the printer driver.For details, see the printer driver Help.• When logged in through User Code Authentication, you do not have to log out.Login (Using the Control Panel)This section explains the procedure for logging in to the machine when Basic Authentication, WindowsAuthentication, LDAP Authentication, or Integration Server Authentication is set.1. Press [Login].2. Enter a login user name, and then press [OK].2. Getting Started682Draft 2008/06/09](https://usermanual.wiki/Ricoh/RFAPL02.User-Manual-1-of-3/User-Guide-968955-Page-70.png)
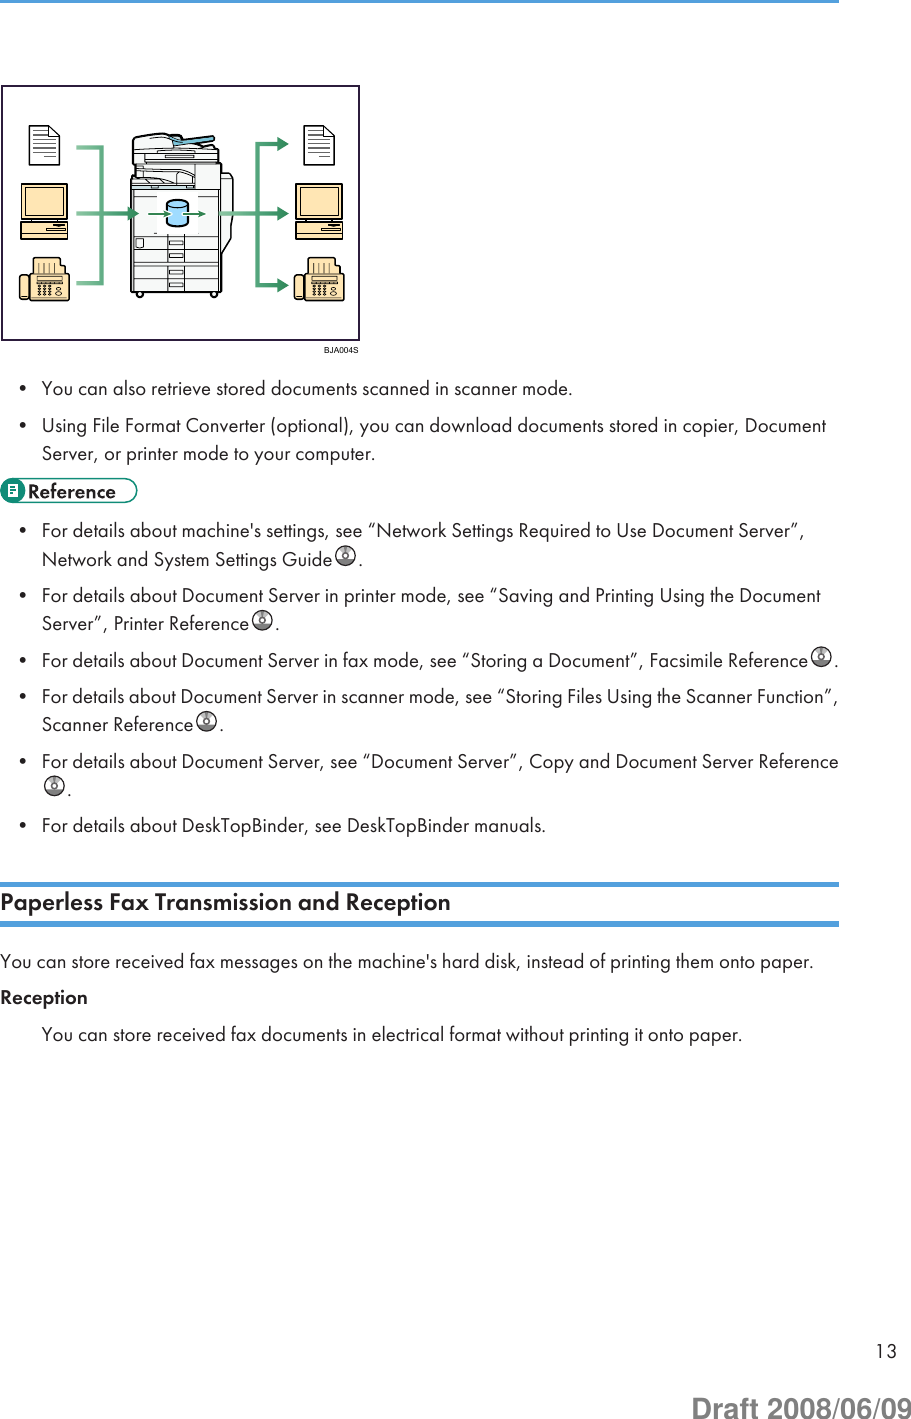
![3. Enter a login password, and then press [OK].When the user is authenticated, the screen for the function you are using appears.• If authentication fails, the "Authentication has failed." message appears. Check that the login username and login password are correct.Logout (Using the Control Panel)This section explains the procedure for logging out the machine when Basic Authentication, WindowsAuthentication, LDAP Authentication, or Integration Server Authentication is set.• To prevent use of the machine by unauthorized persons, always log out when you have finished usingthe machine.1. Press the [Login/Logout] key.BCT032SWhen the Authentication Screen is Displayed692Draft 2008/06/09](https://usermanual.wiki/Ricoh/RFAPL02.User-Manual-1-of-3/User-Guide-968955-Page-71.png)
![2. Press [Yes].Login (Using a Printer Driver)This section explains the procedure for logging in to the machine using a printer driver.If Basic Authentication, Windows Authentication, LDAP Authentication, or Integration Server Authenticationis active, make encryption settings in the printer properties of the printer driver, and then specify a loginuser name and password. For details, see the printer driver Help.• When logged in using a printer driver, you do not have to log out.Login (Using Web Image Monitor)This section explains the procedure for logging in to the machine via Web Image Monitor.1. Click [Login].2. Enter a login user name and password, and then click [Login].• For user code authentication, enter a user code in [User Name], and then click [OK].Logout (Using Web Image Monitor)This section explains the procedure for logging out the machine via Web Image Monitor.1. Click [Logout] to log out.• Delete the cache memory of a Web browser after logging out.2. Getting Started702Draft 2008/06/09](https://usermanual.wiki/Ricoh/RFAPL02.User-Manual-1-of-3/User-Guide-968955-Page-72.png)
![Saving EnergyThis section explains the machine's energy saving functions.This machine has the following energy saving functions.Energy SaverIf you do not use the machine for a certain period after an operation, or when you press the [EnergySaver] key, the display disappears and the machine goes into Energy Saver mode. When you pressthe [Energy Saver] key again, the machine returns to the ready condition. The machine uses lesselectricity in Energy Saver mode.You can change the amount of time the machine waits before switching to Energy Saver mode aftercopying has finished or the last operation is performed under Energy Saver Timer.Auto OffThe machine automatically turns itself off when the job is finished, after a certain period of time haselapsed. This function is called “Auto Off”.You can change the Auto Off time under Auto Off Timer.• See “System Settings”, Network and System Settings Guide .• The Energy Saver and Auto Off functions will not operate in the following cases:• When a warning message appears• When the service call message appears• When paper is jammed• When the cover is open• When the "Add Toner" message appears• When toner is being replenished• When the User Tools/Counter/Inquiry screen is displayed• When fixed warm-up is in progress• When data is being processed• When operations are suspended during printing• When the On-hook dialing function is in use• When a recipient is being registered in the address list or group dial list• When the Data In indicator is on or blinking• When the screen of stored document under the printer function is displayed• When the internal cooling fan is active2. Getting Started762Draft 2008/06/09](https://usermanual.wiki/Ricoh/RFAPL02.User-Manual-1-of-3/User-Guide-968955-Page-78.png)

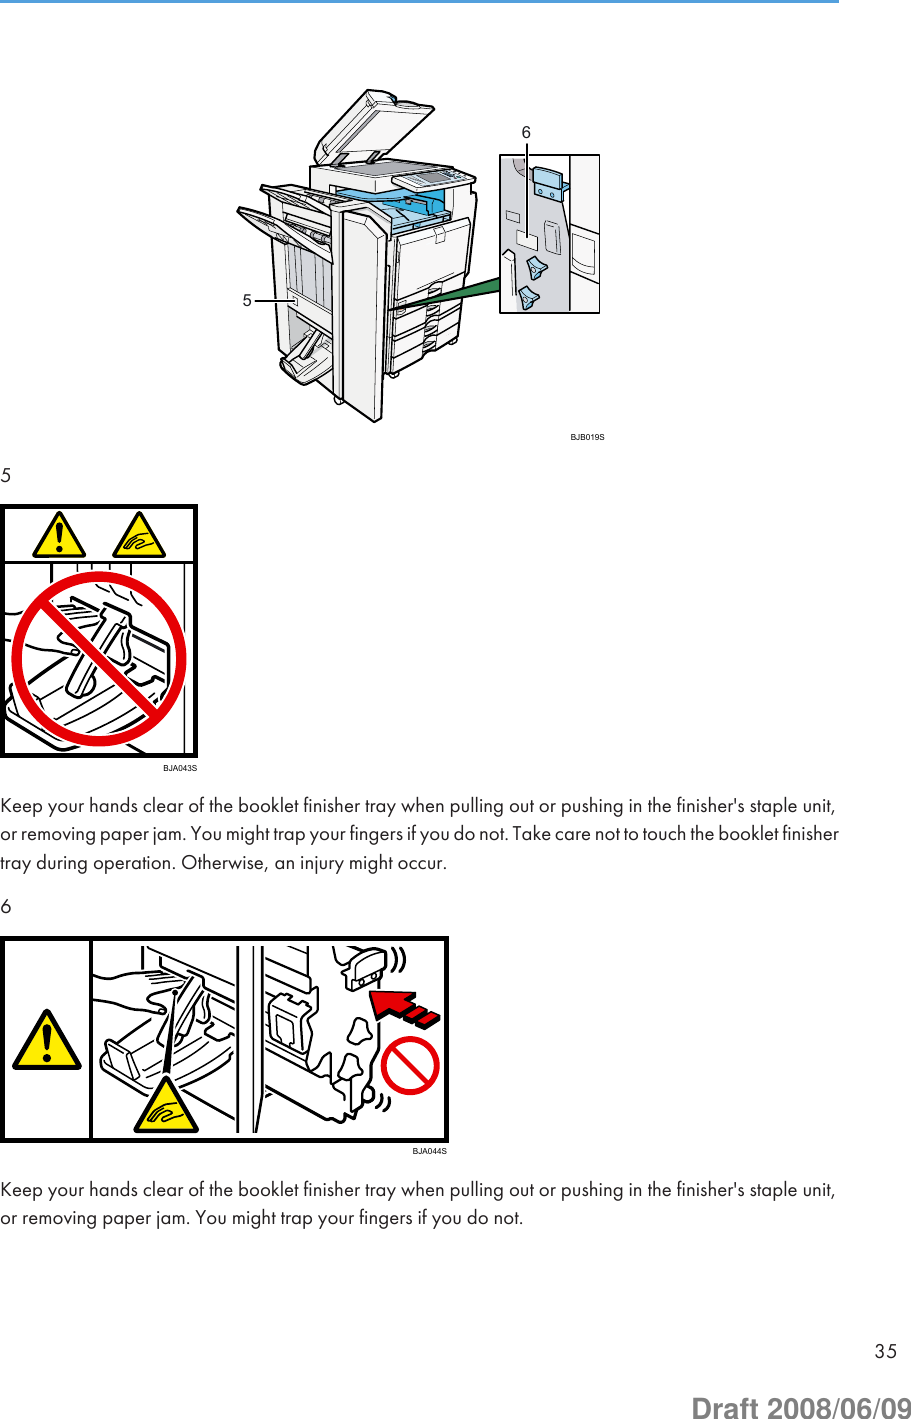
![1. Open the top cover of the large capacity tray (LCT).BJA032S2. Load the paper in the tray along the edge on the back.Load the paper print side down.BJA033S3. Press the [Down] key.The bottom plate is moving down.BJA034S4. Load paper by repeating steps 2 and 3.5. Close the cover of large capacity tray (LCT).3. Adding Paper803Draft 2008/06/09](https://usermanual.wiki/Ricoh/RFAPL02.User-Manual-1-of-3/User-Guide-968955-Page-82.png)
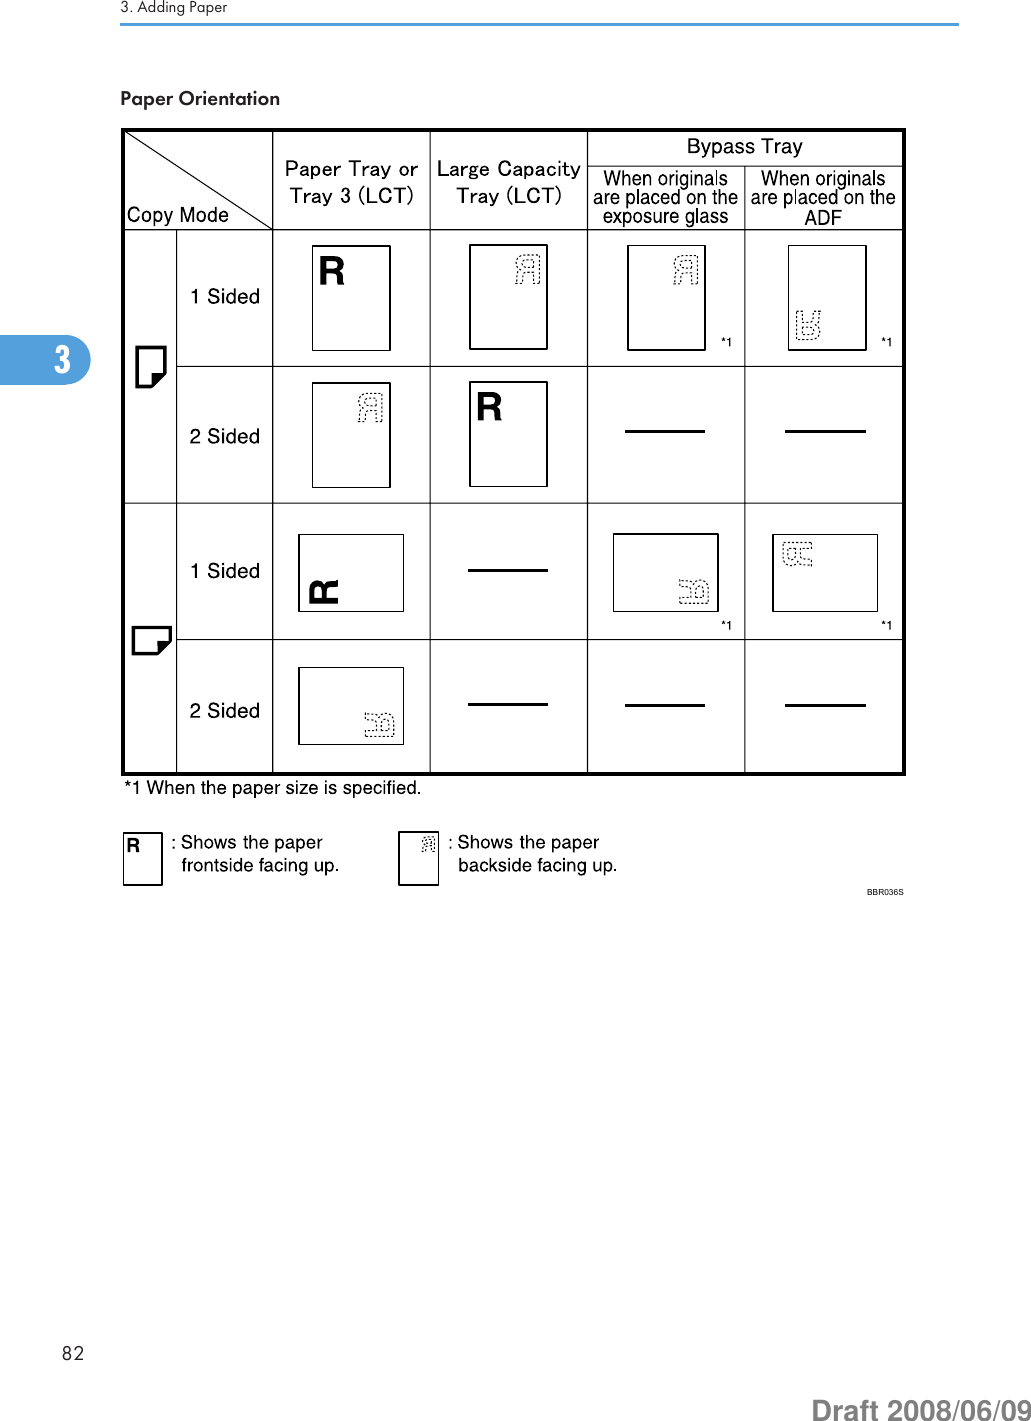
![Orientation-Fixed Paper or Two-Sided PaperThis section describes loading paper that has a specified orientation and printing side (such as letterheadpaper).Orientation-fixed (top to bottom) or two-sided paper (for example, letterhead paper, punched paper, orcopied paper) might not print correctly, depending on how the originals and paper are placed. Set[Letterhead Setting] to [Yes] in [Input / Output] under [Copier / Document Server Features], and then placethe original and paper as shown below. For details about Letterhead Setting, see “Copier/DocumentServer Features”, Copy and Document Server reference . For details about printing with the printerfunction, see “Printing on a Letterhead Paper”, Printer Reference .Original OrientationExposure glass ADF• copy• scannerLoading Paper813Draft 2008/06/09](https://usermanual.wiki/Ricoh/RFAPL02.User-Manual-1-of-3/User-Guide-968955-Page-83.png)
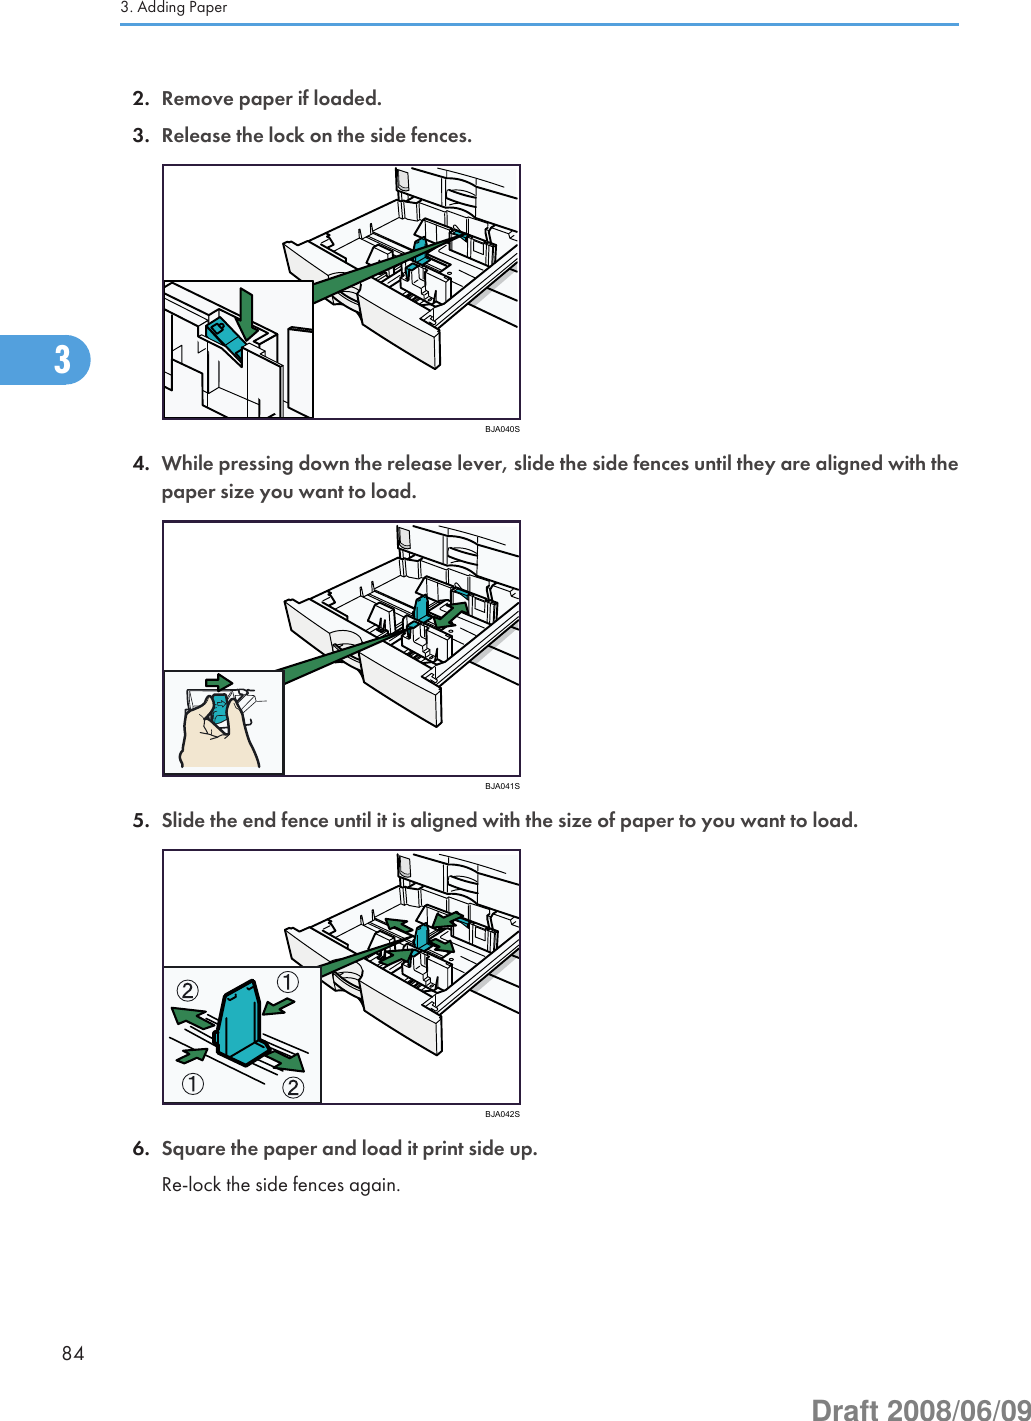
![BJA038S7. Carefully slide the paper tray fully in.8. Check the size on the display.Changing to a Size That Is Not Automatically DetectedIf you load a paper size that is not selected automatically, you need to specify the paper size with thecontrol panel. This section describes how to load such paper.1. Press the [User Tools / Counter] key.BBP015S2. Press [System Settings].Changing the Paper Size853Draft 2008/06/09](https://usermanual.wiki/Ricoh/RFAPL02.User-Manual-1-of-3/User-Guide-968955-Page-87.png)
![3. Press [Tray Paper Settings] tab.4. Select the tray for which you want to change the paper settings.5. Select the loaded paper size and feed direction, and then press [OK].The set paper size and feed direction is displayed.3. Adding Paper863Draft 2008/06/09](https://usermanual.wiki/Ricoh/RFAPL02.User-Manual-1-of-3/User-Guide-968955-Page-88.png)
![6. Press the [User Tools / Counter] key.The initial display is shown.• For details about paper sizes selected automatically, see “Recommended Paper Sizes and Types”.• If you want to print on paper that is selected automatically after printing on a paper size that is notselected automatically, you must return the setting to “Auto Detect”. Reload the paper, and select“Auto Detect” in step 5. The setting is returned to “Auto Detect”.• p.88 "Recommended Paper Sizes and Types"Changing the Paper Size873Draft 2008/06/09](https://usermanual.wiki/Ricoh/RFAPL02.User-Manual-1-of-3/User-Guide-968955-Page-89.png)
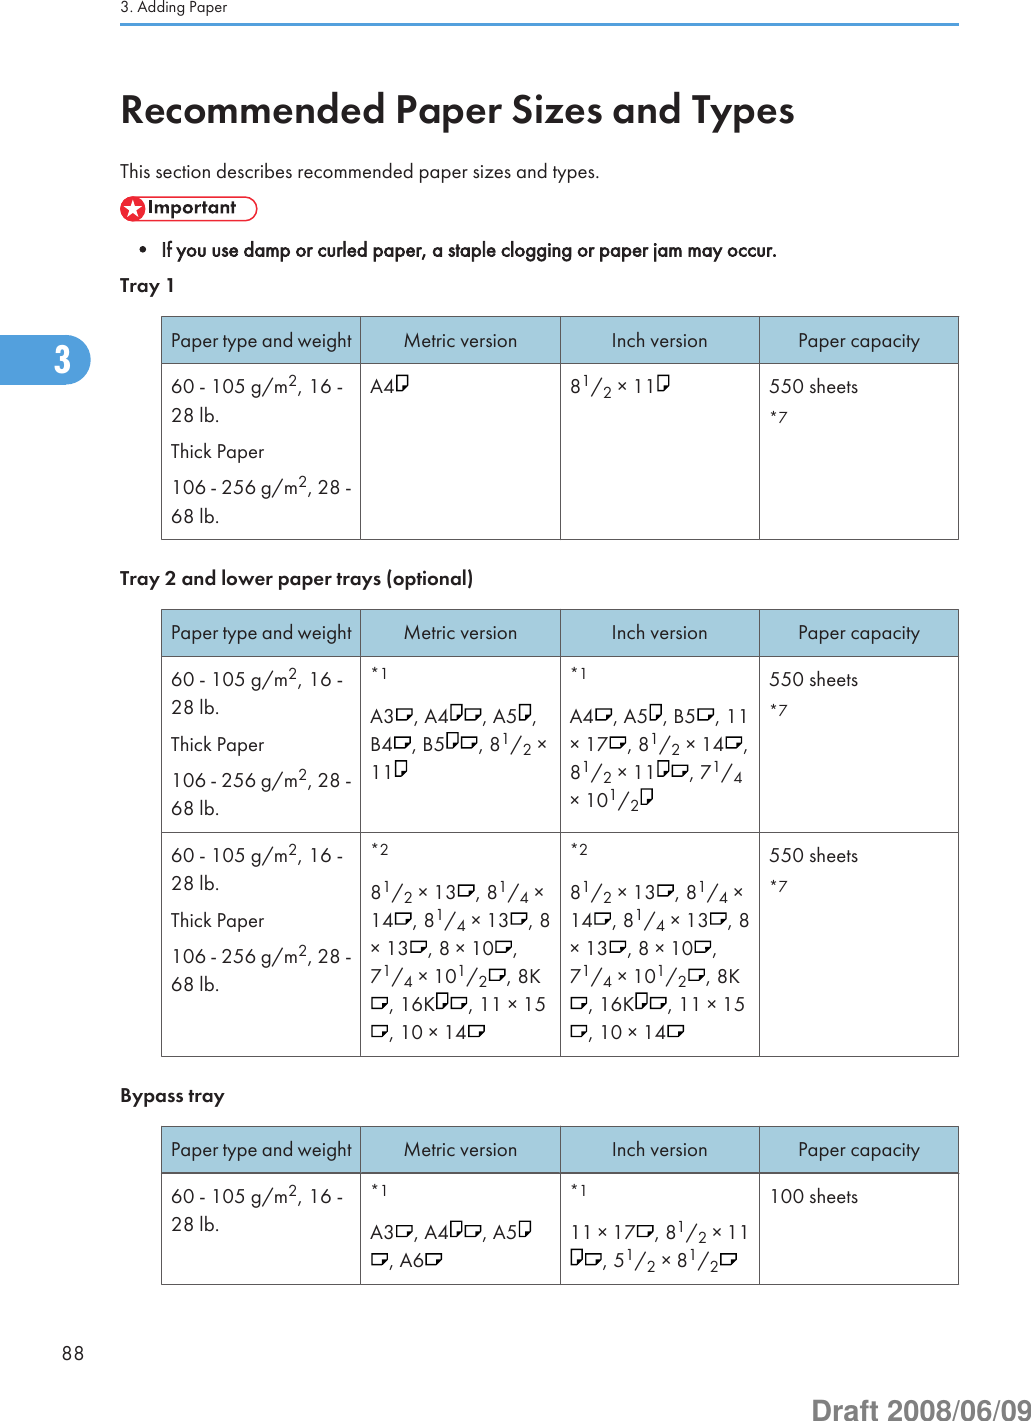
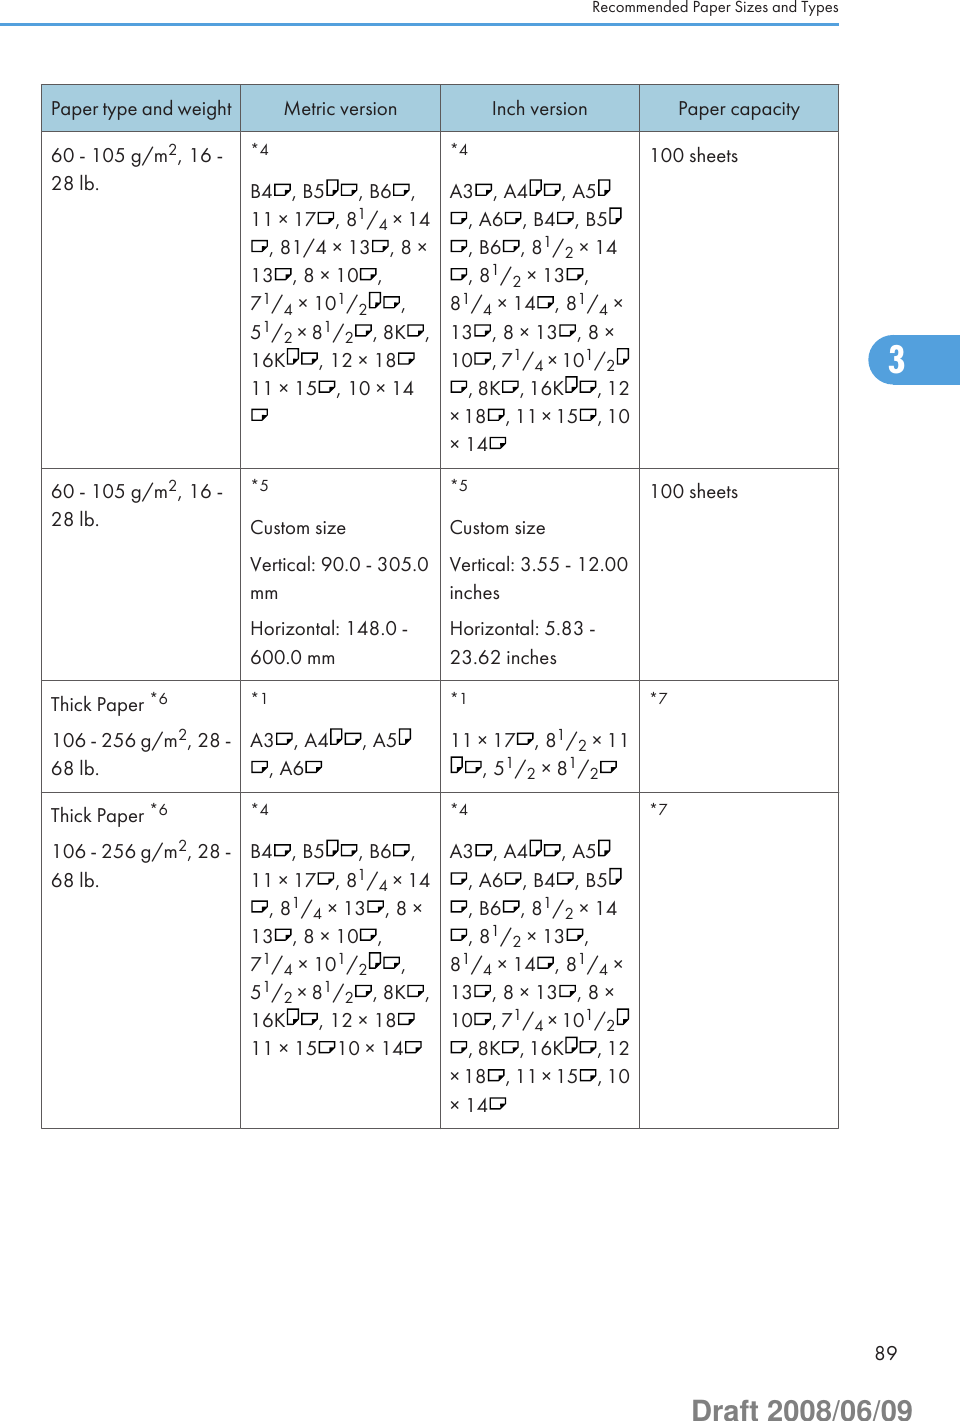

![*3 Enter the paper size using the number keys in System Settings. For details about Tray Paper Size: Tray 2-4, see“System Settings”, Network and System Settings Guide .*4 Press the [ ] key, and then select the paper size.*5 Press the [ ] key, and then enter the paper size using the number keys.*6 If you want to copy onto thick (105 g/m2, 28 lb. or heavier) paper, select [Thick Paper]. See “Copying fromthe Bypass Tray”, Copy and Document Server Reference .*7 When loading paper, make sure the stack height does not exceed the limit mark of the paper tray. See “LoadingPaper”.*8 If you wish to copy onto OHP transparencies, select [OHP (Transparency)].*9 It is recommended to place one sheet at a time.*10 The paper tray fence is fixed. If you wish to change the size of paper, contact your service representative.Paper ThicknessPaper Thickness Metric version Inch versionPlain Paper 1 60 - 74 g/m216 - 20 lb.Plain Paper 2 75 - 90 g/m220 - 24 lb.Middle Thick 91 - 105 g/m224 - 28 lb.Thick Paper 1 106 - 169 g/m228 - 45 lb.Thick Paper 2 170 - 220 g/m245 - 58.5 lb.Thick Paper 3 221 - 256 g/m259 - 68 lb.• Certain types of paper produce noise when delivered. This noise does not indicate a problem andprint quality is unaffected. (Glossy paper and OHP transparencies can produce noise whendelivered.)• When using translucent paper or label paper, make sure to select the appropriate paper type. Fordetails about Paper Type: Bypass Tray, see “System Settings”, Network and System Settings Guide.• When loading paper in the paper trays 1 - 2, the tray 3 (LCT), and the lower paper trays, place theprint side face up.• When loading paper in the bypass tray, and the large capacity tray, place the print side face down.• When you use the bypass tray, it is recommended to set the paper direction to .• Do not use paper designed for inkjet printers, as these may stick to the fusing unit and cause a misfeed.• Do not use color OHP transparencies with coatings that are easily melted by heat.Recommended Paper Sizes and Types913Draft 2008/06/09](https://usermanual.wiki/Ricoh/RFAPL02.User-Manual-1-of-3/User-Guide-968955-Page-93.png)
![• When printing on OHP transparencies, press [Bypass], and the [ ] key, and then select the papersize.• When you load OHP transparencies, check the front and back of the sheets, and place them correctly,or a misfeed might occur. Use A4 or 81/2 × 11 size transparencies, and specify their size. Fordetails, see Copy and Document Server Reference , and Printer Reference .• When you use OHP transparencies, fan them for each use.• Flatten out curled sheets before loading them.• We recommend that you use a 4000ANSI lumen or brighter overhead projector to project OHPtransparencies.• If multiple sheet feeding occurs, load sheets one by one.• When you load label paper, set the paper direction to .• To print on envelopes from the bypass tray: select System Settings, [Tray Paper Settings], and then,for each tray's [Paper Type], be sure to set [Paper Type] to [Envelope], and [Paper Thickness] to [ThickPaper 2].• To print on coated paper from the bypass tray, Tray 1, 2, 3, 4, Tray 3 (LCT), or the large capacitytray (LCT): select System Settings, [Tray Paper Settings], and then, for each tray's [Paper Type] besure to set [Paper Type] to [Coated Paper], and [Paper Thickness] to [Thick Paper 1].• To print on high-gloss coated paper from the bypass tray, Tray 1, 2, 3, 4, Tray 3 (LCT), or the largecapacity tray (LCT): select System Settings, [Tray Paper Settings], and then, for each tray's [PaperType], be sure to set [Paper Type] to [Coated Paper: Gloss].• Before loading coated or glossy sheets, be sure to fan them thoroughly. If sheets feed in together,become jammed, or produce strange noises when delivered, load them one by one from the bypasstray.• When copying or printing onto letterhead paper, the paper placing orientation is different dependson which function you are using. See “Orientation-fixed paper or two-sided paper”.• If you load paper of the same size in two or more trays, the machine automatically shifts to the othertray when the first tray in use runs out of paper. This function is called Auto Tray Switching. (However,if the paper type of one tray is recycled or special paper, the settings of the other trays must be thesame for the Auto Tray Switching function to work.) This saves interrupting a copy run to replenishpaper when making a large number of copies. You can set the paper type of the paper trays underPaper Type: Tray 1-4, and Paper Type: LCT. See “System Settings”, Network and System SettingsGuide . For the setting procedure of the Auto Tray Switching function, see “Copier/DocumentServer Features”, Copy and Document Server Reference .• When copying or printing onto prepunched paper, the copy/print speed is slower than usual.• The paper types you can select in System Settings are only general classifications. Copy quality forevery kind of paper in a classification is not guaranteed. See “Unusable Paper” for more information.• p.77 "Loading Paper"3. Adding Paper923Draft 2008/06/09](https://usermanual.wiki/Ricoh/RFAPL02.User-Manual-1-of-3/User-Guide-968955-Page-94.png)