Ricoh RFDIA01 Full-color MFP User Manual 2 of 4
Ricoh Company Ltd Full-color MFP 2 of 4
UserManual.wiki
>
Ricoh
>
RFDIA01 User Manual
>
User Manual 2 of 4
Contents
1.
User Manual 1 of 4
2.
User Manual 2 of 4
3.
User Manual 3 of 4
4.
User Manual 4 of 4
User Manual 2 of 4
Navigation menu
Upload a User Manual
Namespaces
Wiki Guide
HTML
PDF
Info
Views
User Manual
Discussion / Help
Navigation
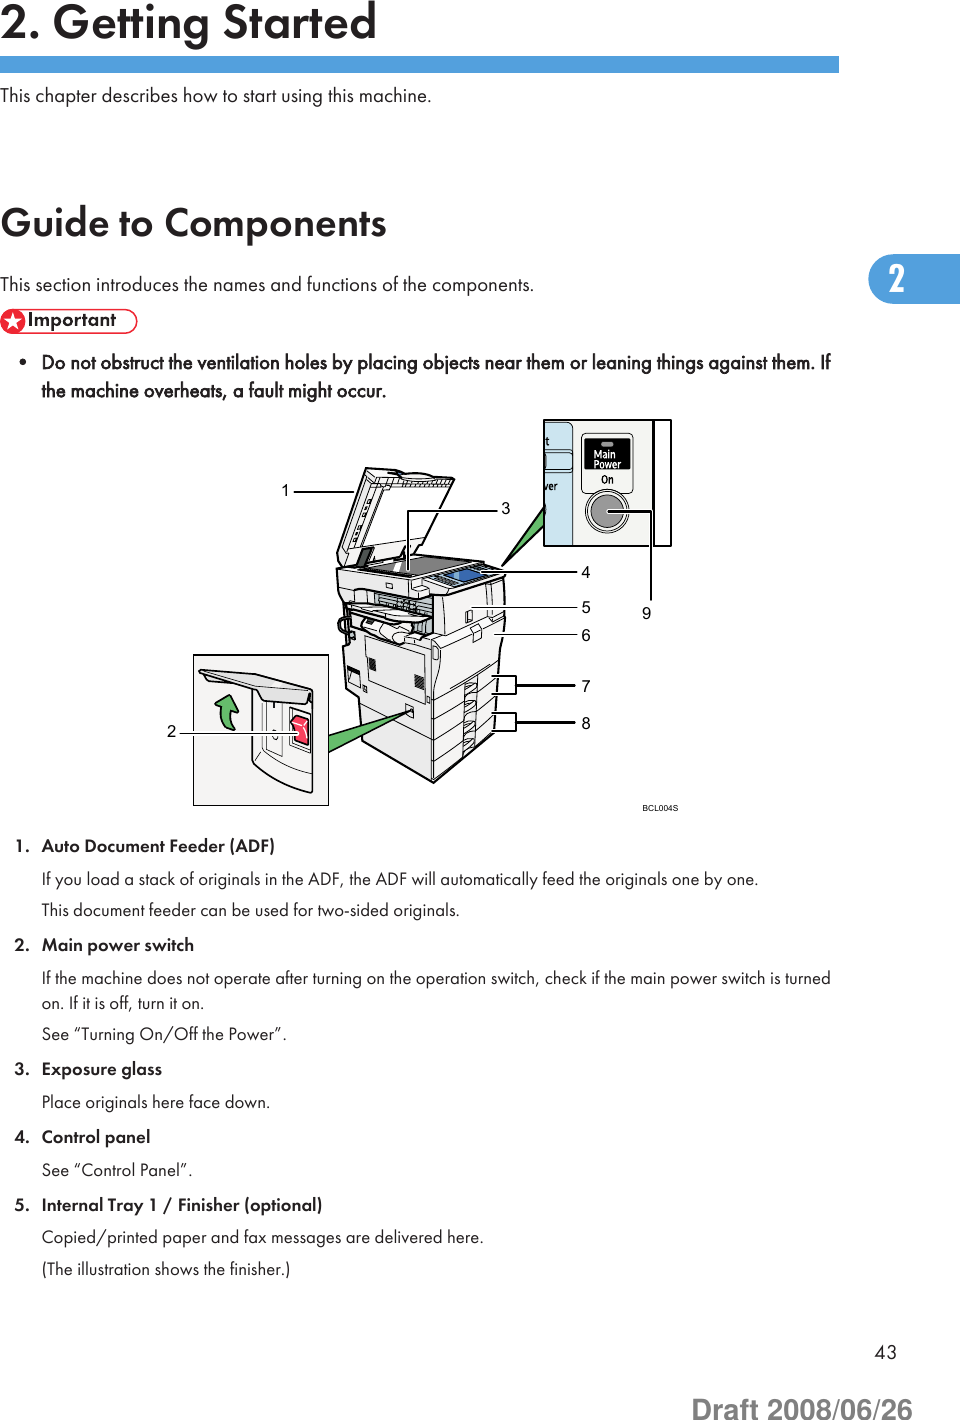
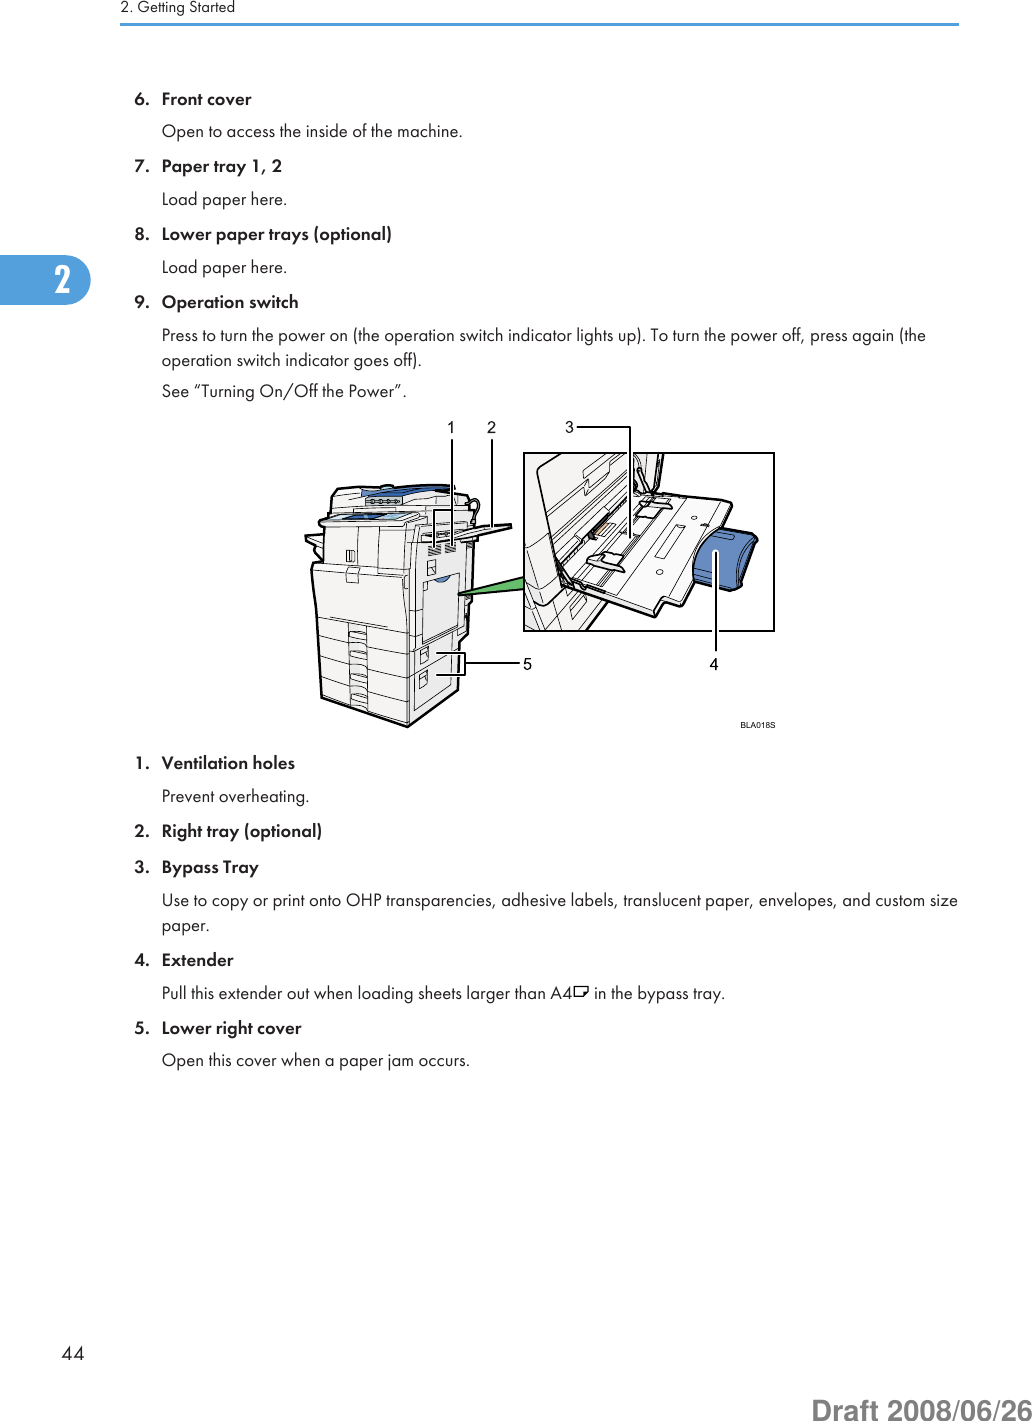
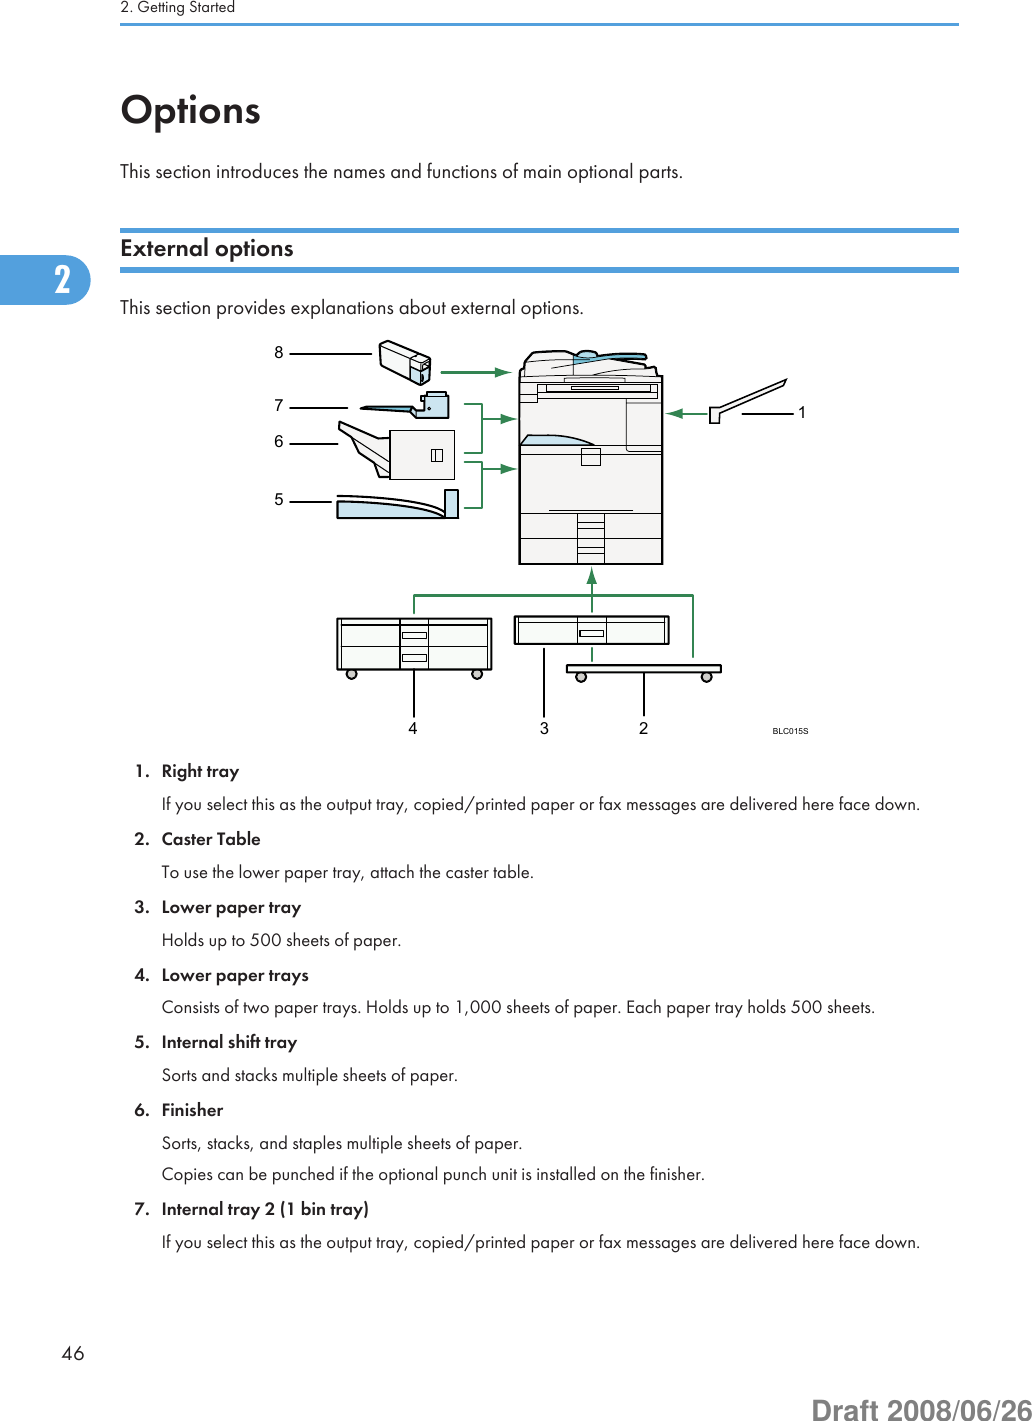
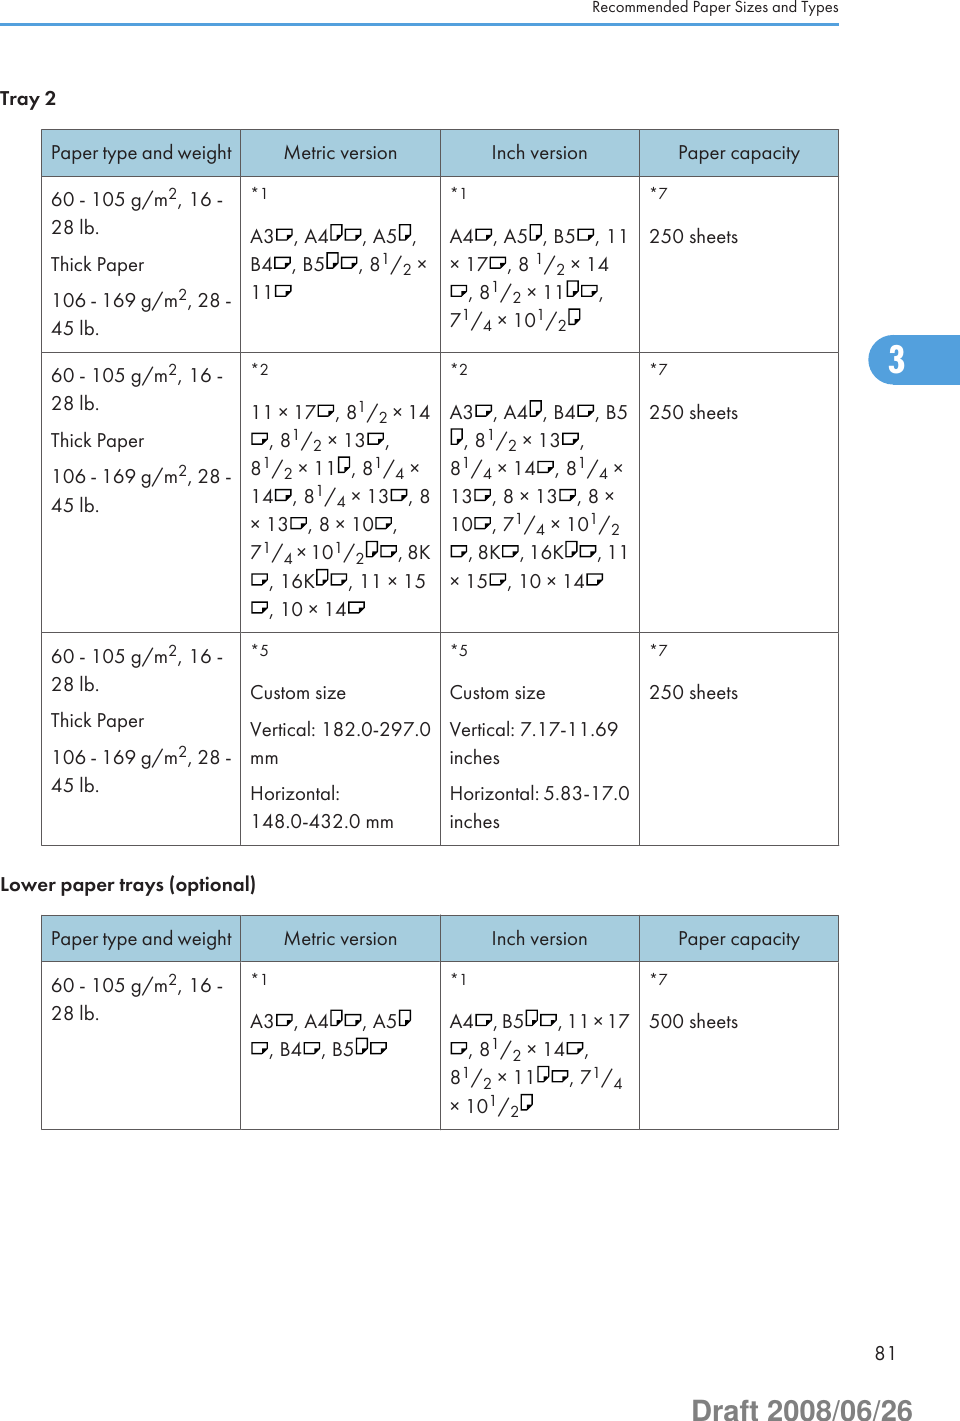
![Control PanelThis section introduces the names and functions of the components on the control panel.• Do not turn off the main power switch while the operation switch indicator is lit or blinking. Doing somay damage the hard disk.This illustration shows the control panel of the machine with options fully installed.BCT026S1. [User Tools/Counter] key• User ToolsPress to change the default and conditions to meet your requirements. See “Accessing User Tools”, Networkand System Settings Guide .• CounterPress to check or print the counter value. See “Counter”.• InquiryPress to find out where to order expendable supplies and where to call when a malfunction occurs. Youcan also print these details. See “Inquiry”.2. Function keysPress to display the operation screen of one of the following functions: copy, document server, facsimile, printer,or scanner.The indicator of the selected function goes on. See “Changing Modes”.3. Display panelDisplays keys for each function, operation status, or messages. See “Display Panel”.4. [Clear Modes] keyPress to clear the current settings.Control Panel492Draft 2008/06/26](https://usermanual.wiki/Ricoh/RFDIA01.User-Manual-2-of-4/User-Guide-981171-Page-7.png)
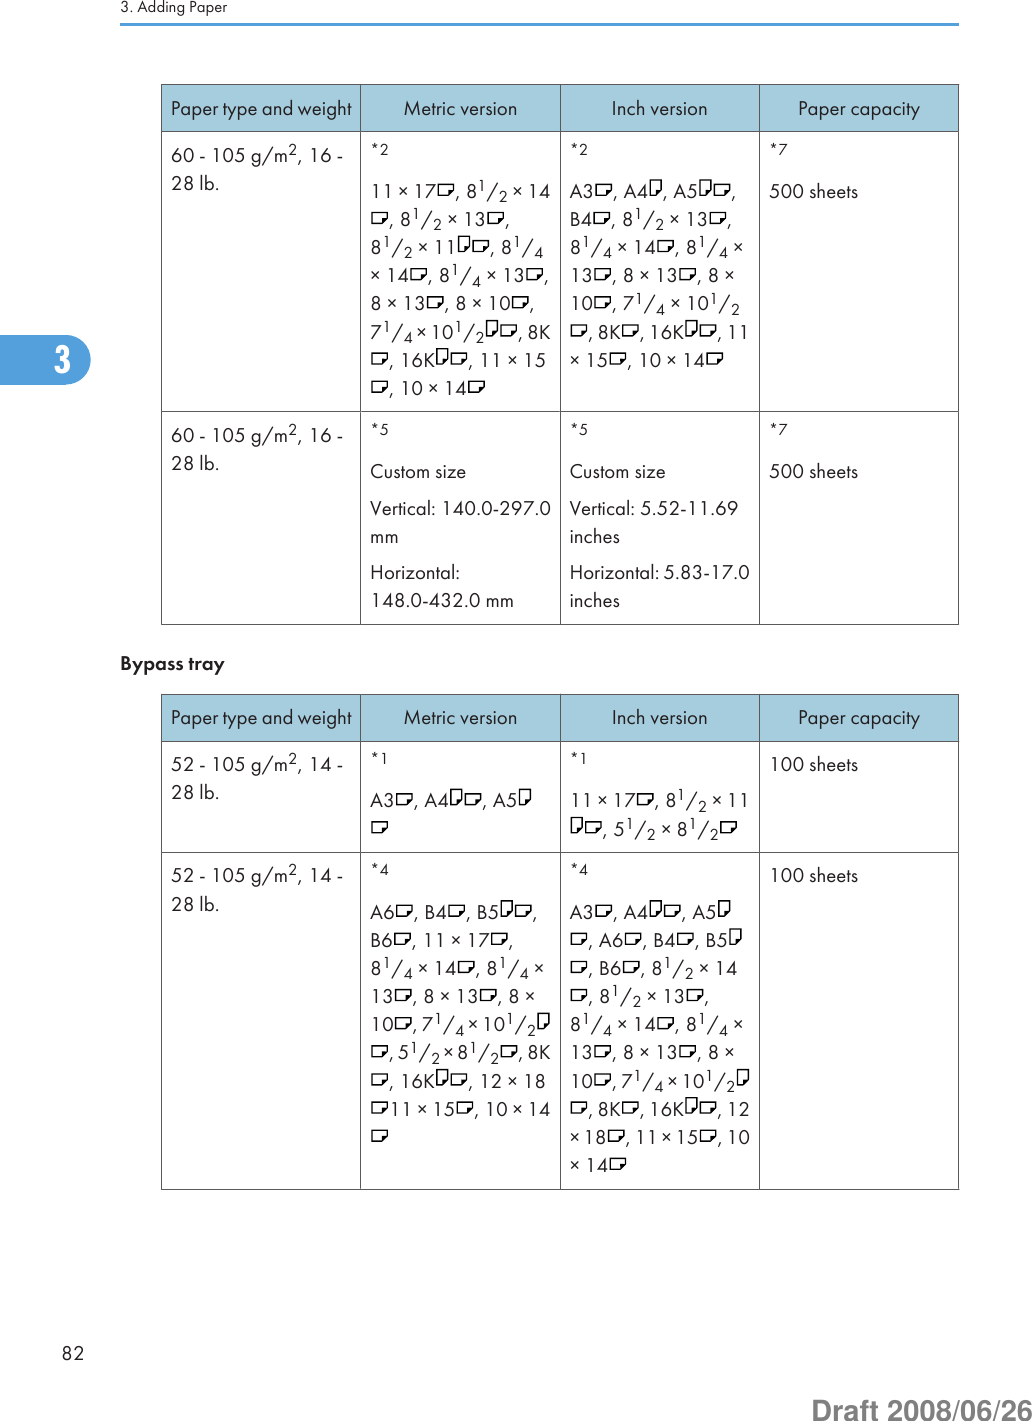
![5. [Program] key (copier, Document Server, facsimile, and scanner mode)• Press to register frequently used settings, or to recall registered settings (except Document Server mode).See “Registering Frequently Used Settings”, Copy and Document Server Reference , Facsimile Reference, and Scanner Reference .• Press to program defaults for the initial display when modes are cleared or reset, or immediately after theoperation switch is turned on.See “Changing the Default Functions of the Copy's Initial Display”, Copy and Document Server Reference.See “Changing the Default Functions of the Fax's Initial Display”, Facsimile Reference .See “Changing the Default Functions of the Scanner's Initial Display”, Scanner Reference .6. [Interrupt] keyPress to make interrupt copies. See “Interrupt Copy”, Copy and Document Server Reference .7. [Energy Saver] keyPress to switch to and from Energy Saver mode. See “Saving Energy”.8. Main power indicatorThe main power indicator goes on when you turn on the main power switch.9. Operation switchPress to turn the power on (the operation switch indicator goes on). To turn the power off, press again (theoperation switch indicator goes off). See “Turning On the Power”.10. Communicating indicator, Receiving File indicator, Confidential File indicator• Communicating indicatorLights continuously during data transmission and reception.• Receiving File indicatorLights continuously while data other than personal box or Memory Lock file is being received and storedin the fax memory.See “Substitute Reception”, Facsimile Reference .• Confidential File indicatorLights continuously while personal box data is being received.Blinks while Memory Lock file is being received.See “Personal Boxes”, Facsimile Reference and “Printing a File Received with Memory Lock”, FacsimileReference .11. Data In indicator (facsimile and printer mode)Flashes when the machine is receiving print jobs or LAN-Fax documents from a computer. See Facsimile Reference and Printer Reference .12. Alert indicatorLights continuously if an error has occurred.13. Number keysUse to enter the numbers for copies, fax numbers and data for the selected function.2. Getting Started502Draft 2008/06/26](https://usermanual.wiki/Ricoh/RFDIA01.User-Manual-2-of-4/User-Guide-981171-Page-8.png)
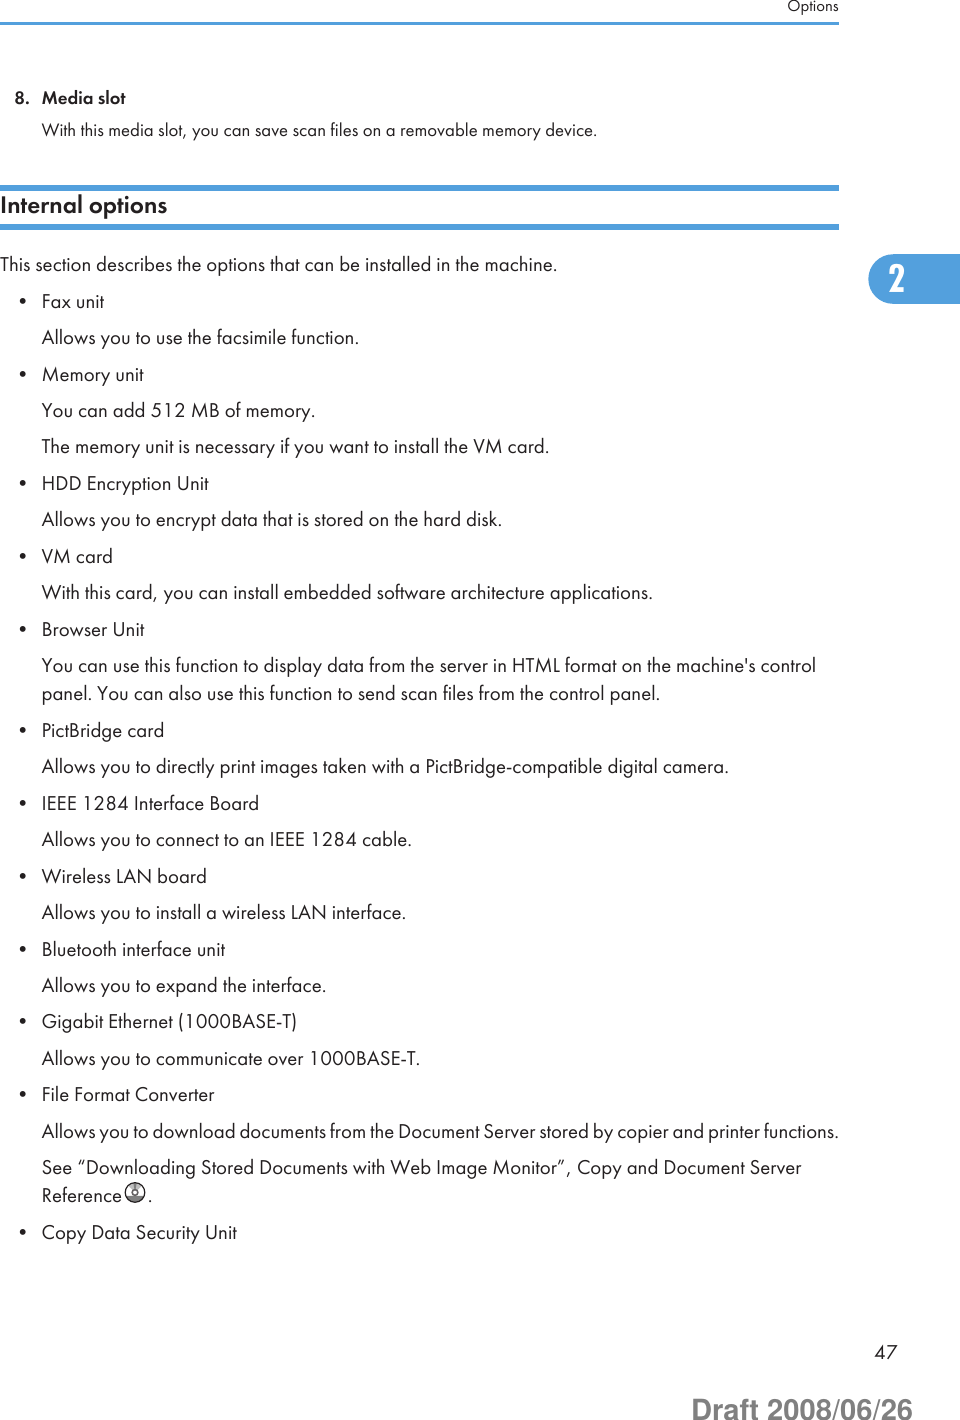
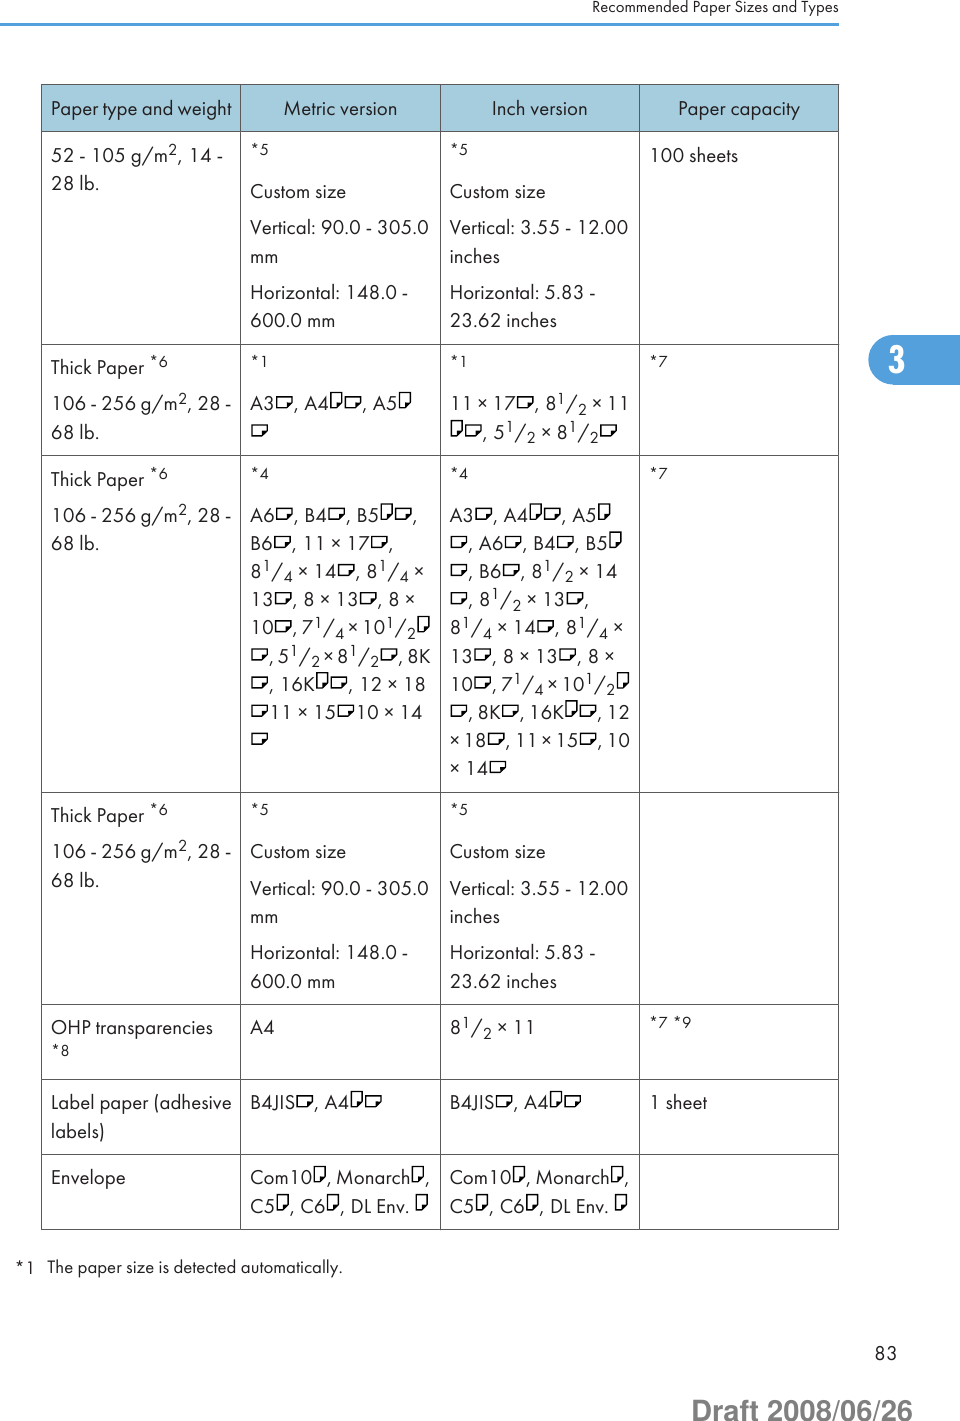
![14. [Clear/Stop] key• ClearPress to delete a number entered.• StopPress to stop a job in progress, such as copying, scanning, faxing, or printing.15. [ ] key (Enter key)Press to confirm values entered or items specified.16. [Start] keyPress to start copying, printing, scanning, or sending.17. [Sample Copy] keyPress to make a single set of copies or prints to check print quality before making multiple sets. See “SampleCopy”, Copy and Document Server Reference .18. [Simplified Display] keyPress this to switch to the Simplified Display.19. [Login/Logout] keyPress this to log in or log out.• p.52 "Display Panel"• p.52 "Simplified Display"• p.59 "Changing Modes"• p.61 "Turning On/Off the Power"• p.64 "Saving Energy"• p.116 "Counter"• p.118 "Inquiry"Control Panel512Draft 2008/06/26](https://usermanual.wiki/Ricoh/RFDIA01.User-Manual-2-of-4/User-Guide-981171-Page-9.png)
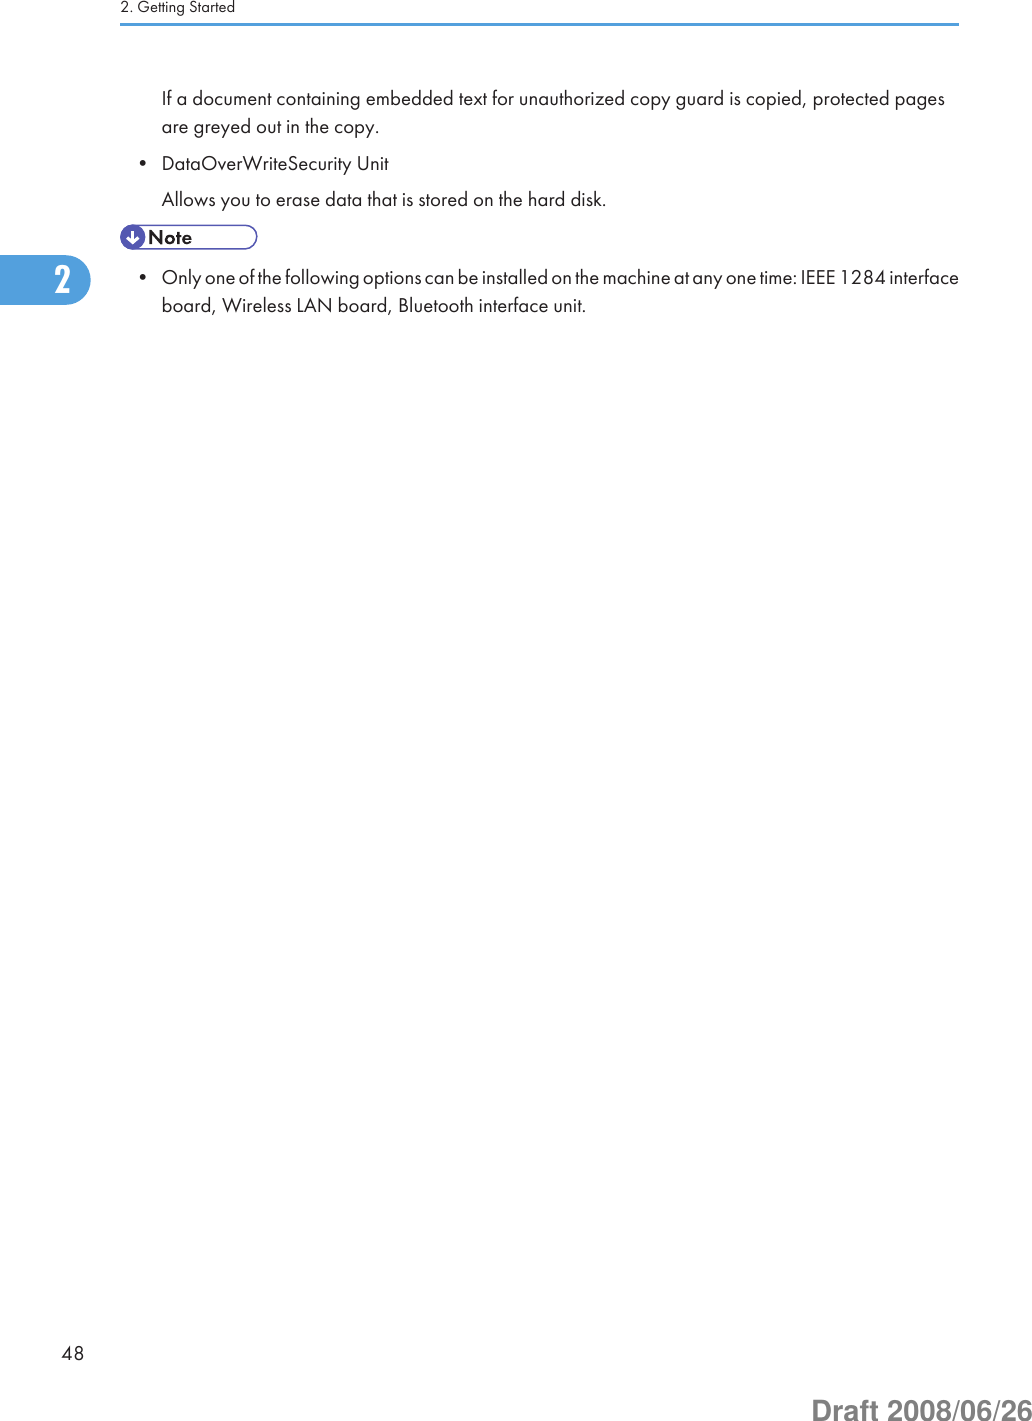
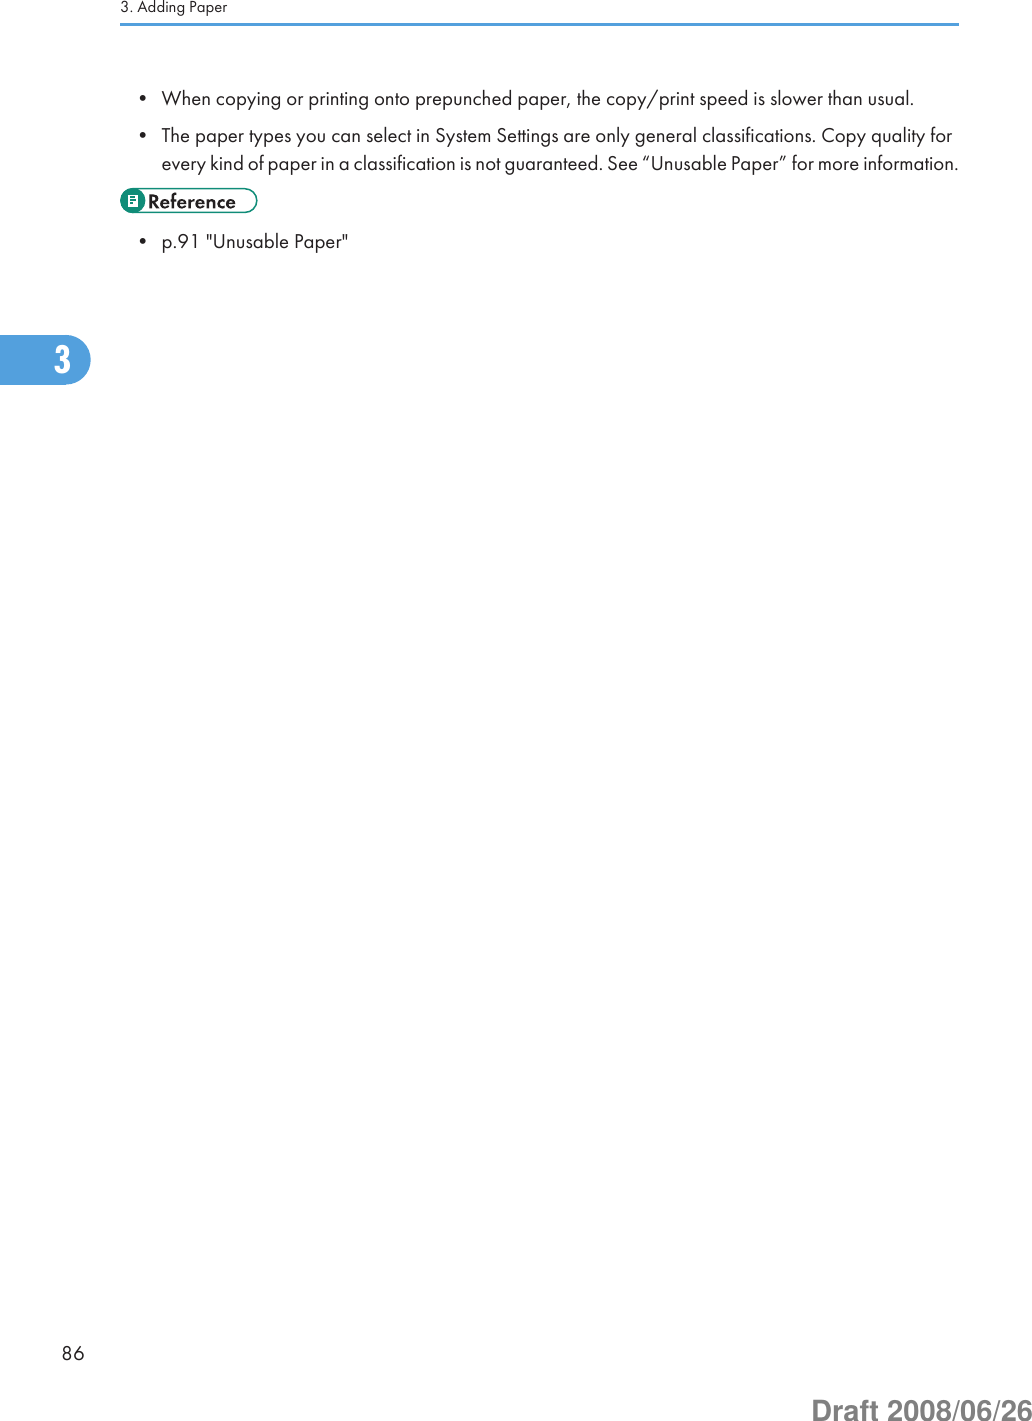
![Display PanelThe display panel shows machine status, error messages, and function menus.• Don't apply strong impact or force to the screen. Or it may be damaged. Maximum force allowableis approx. 30N (approx. 3 kgf). (N = Newton, kgf = Kilogram force. 1 kgf = 9.8N.)The function items displayed serve as selector keys. You can select or specify an item by lightly pressingthem.When you select or specify an item on the display panel, it is highlighted like . Keys appearing as cannot be used.The copy display is set as the default screen when the machine is turned on.• The display panels shown in this manual's illustrations are taken from a machine on which all optionsare installed.Simplified DisplayThis section explains how to switch to the simplified display.When you press the [Simplified Display] key, the screen changes from the initial display to the simplifieddisplay.Letters and keys are displayed at a larger size, making operations easier.2. Getting Started522Draft 2008/06/26](https://usermanual.wiki/Ricoh/RFDIA01.User-Manual-2-of-4/User-Guide-981171-Page-10.png)
![BCT030SExample of a simplified displayThis illustration shows the copier function's simplified display.BLC018S1. [Key Color]Press to increase screen contrast by changing the color of the keys.This is available only for the simplified display.• To return to the initial display, press the [Simplified Display] key again.• Certain keys do not appear on the simplified display.Changing the Display LanguageYou can change the language used on the display. English is set as default.The following procedure explains switching the language from English to Spanish.Display Panel532Draft 2008/06/26](https://usermanual.wiki/Ricoh/RFDIA01.User-Manual-2-of-4/User-Guide-981171-Page-11.png)
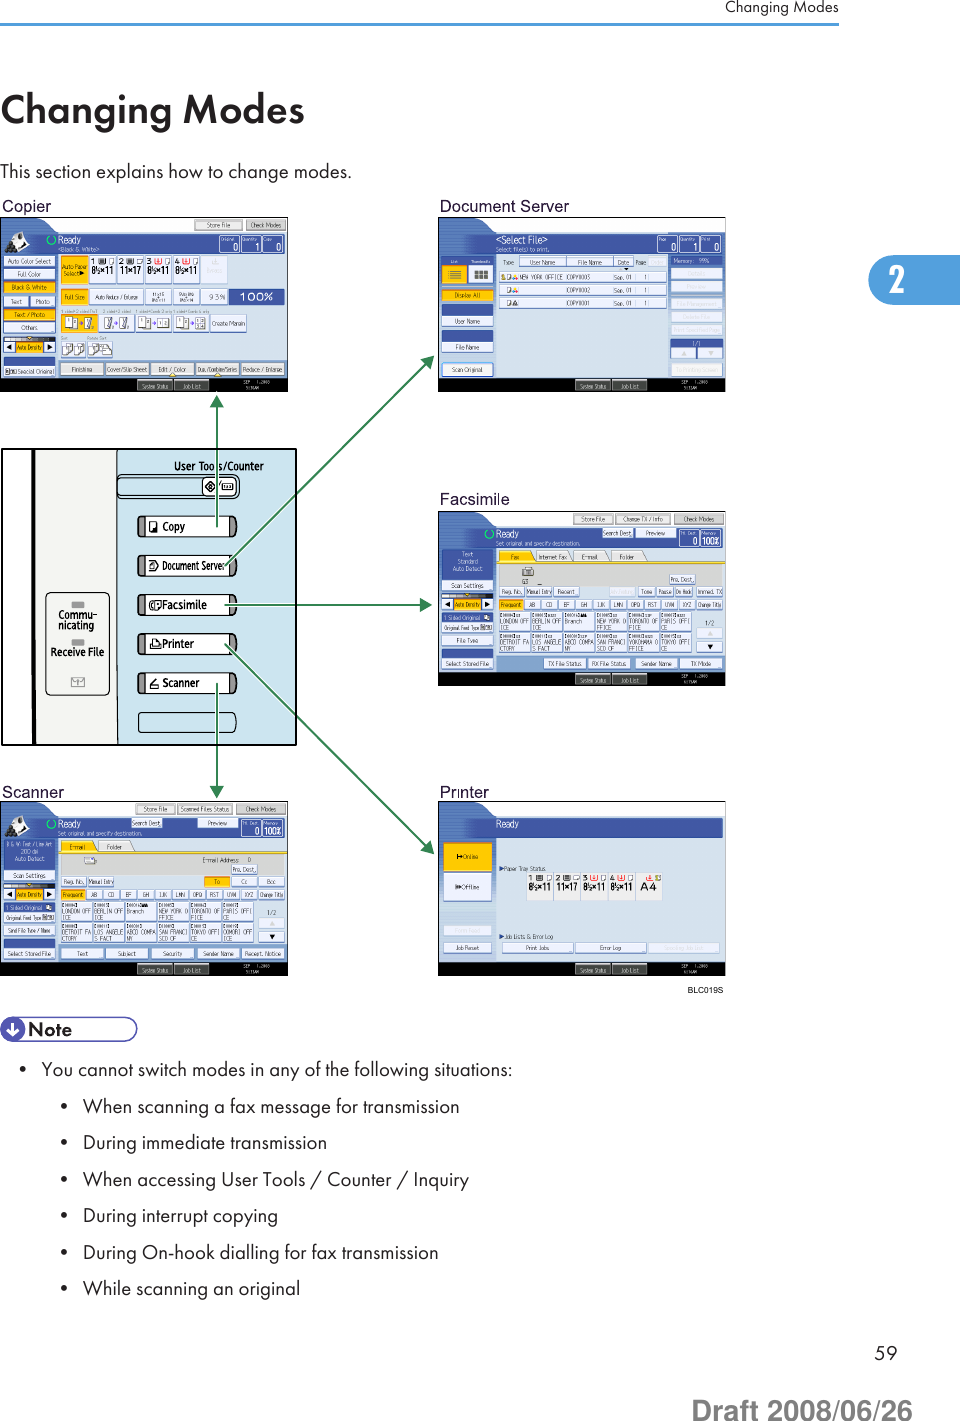
![1. Press the [User Tools/Counter] key.BBP015S2. Press [Español].The language is changed to Spanish.3. Press [Salir].The menu appears in Spanish.2. Getting Started542Draft 2008/06/26](https://usermanual.wiki/Ricoh/RFDIA01.User-Manual-2-of-4/User-Guide-981171-Page-12.png)
![When the Authentication Screen is DisplayedThis section explains the authentication screen.• Ask the user administrator for the login user name, login password, and user code. For details aboutuser authentication, contact your administrator.• User code to enter on User Code Authentication is the numerical value registered in the address bookas “login user name”.If Basic Authentication, Windows Authentication, LDAP Authentication, or Integration Server Authenticationis active, the authentication screen appears on the display. The machine only becomes operable afterentering your own login user name and login password. If User Code Authentication is active, you cannotuse the machine until you enter the user code.If you can use the machine, you can say that you are logged in. When you go out of the operable state,you can say that you are logged out. After logging in the machine, be sure to log out of it to preventunauthorized usage.• If authentication fails, the "Authentication has failed." message appears. Check that the login username and login password are correct.User Code Authentication (Using the Control Panel)This section explains the procedure for logging in to the machine using the control panel while User CodeAuthentication is active.If User Code Authentication is active, a screen prompting you to enter a user code appears.1. Enter a user code (up to eight digits), and then press [OK].• To log off, do one of the following:• Press the operation switch.When the Authentication Screen is Displayed552Draft 2008/06/26](https://usermanual.wiki/Ricoh/RFDIA01.User-Manual-2-of-4/User-Guide-981171-Page-13.png)
![• Press the [Energy Saver] key after jobs are completed.User Code Authentication (Using a Printer Driver)This section explains the procedure for logging in to the machine using a printer driver while User CodeAuthentication is active.If User Code Authentication is active, specify the user code in the printer properties of the printer driver.For details, see the printer driver Help.• When logged in through User Code Authentication, you do not have to log out.Login (Using the Control Panel)This section explains the procedure for logging in to the machine when Basic Authentication, WindowsAuthentication, LDAP Authentication, or Integration Server Authentication is set.1. Press [Login].2. Enter a login user name, and then press [OK].2. Getting Started562Draft 2008/06/26](https://usermanual.wiki/Ricoh/RFDIA01.User-Manual-2-of-4/User-Guide-981171-Page-14.png)
![3. Enter a login password, and then press [OK].When the user is authenticated, the screen for the function you are using appears.• If authentication fails, the "Authentication has failed." message appears. Check that the login username and login password are correct.Logout (Using the Control Panel)This section explains the procedure for logging out the machine when Basic Authentication, WindowsAuthentication, LDAP Authentication, or Integration Server Authentication is set.• To prevent use of the machine by unauthorized persons, always log out when you have finished usingthe machine.1. Press the [Login/Logout] key.BCT032SWhen the Authentication Screen is Displayed572Draft 2008/06/26](https://usermanual.wiki/Ricoh/RFDIA01.User-Manual-2-of-4/User-Guide-981171-Page-15.png)
![2. Press [Yes].Login (Using a Printer Driver)This section explains the procedure for logging in to the machine using a printer driver.If Basic Authentication, Windows Authentication, LDAP Authentication, or Integration Server Authenticationis active, make encryption settings in the printer properties of the printer driver, and then specify a loginuser name and password. For details, see the printer driver Help.• When logged in using a printer driver, you do not have to log out.Login (Using Web Image Monitor)This section explains the procedure for logging in to the machine via Web Image Monitor.1. Click [Login].2. Enter a login user name and password, and then click [Login].• For user code authentication, enter a user code in [User Name], and then click [OK].Logout (Using Web Image Monitor)This section explains the procedure for logging out the machine via Web Image Monitor.1. Click [Logout] to log out.• Delete the cache memory of a Web browser after logging out.2. Getting Started582Draft 2008/06/26](https://usermanual.wiki/Ricoh/RFDIA01.User-Manual-2-of-4/User-Guide-981171-Page-16.png)
![Saving EnergyThis section explains the machine's energy saving functions.This machine has the following energy saving functions.Energy SaverIf you do not use the machine for a certain period after an operation, or when you press the [EnergySaver] key, the display disappears and the machine goes into Energy Saver mode. When you pressthe [Energy Saver] key again, the machine returns to the ready condition. The machine uses lesselectricity in Energy Saver mode.You can change the amount of time the machine waits before switching to Energy Saver mode aftercopying has finished or the last operation is performed under Energy Saver Timer.Auto OffThe machine automatically turns itself off when the job is finished, after a certain period of time haselapsed. This function is called “Auto Off”.You can change the Auto Off time under Auto Off Timer.• See “System Settings”, Network and System Settings Guide .• The Energy Saver and Auto Off functions will not operate in the following cases:• When a warning message appears• When the service call message appears• When paper is jammed• When the cover is open• When the "Add Toner" message appears• When toner is being replenished• When the User Tools/Counter/Inquiry screen is displayed• When fixed warm-up is in progress• When data is being processed• When operations are suspended during printing• When the On-hook dialing function is in use• When a recipient is being registered in the address list or group dial list• When the Data In indicator is on or blinking• When the screen of stored document under the printer function is displayed2. Getting Started642Draft 2008/06/26](https://usermanual.wiki/Ricoh/RFDIA01.User-Manual-2-of-4/User-Guide-981171-Page-22.png)


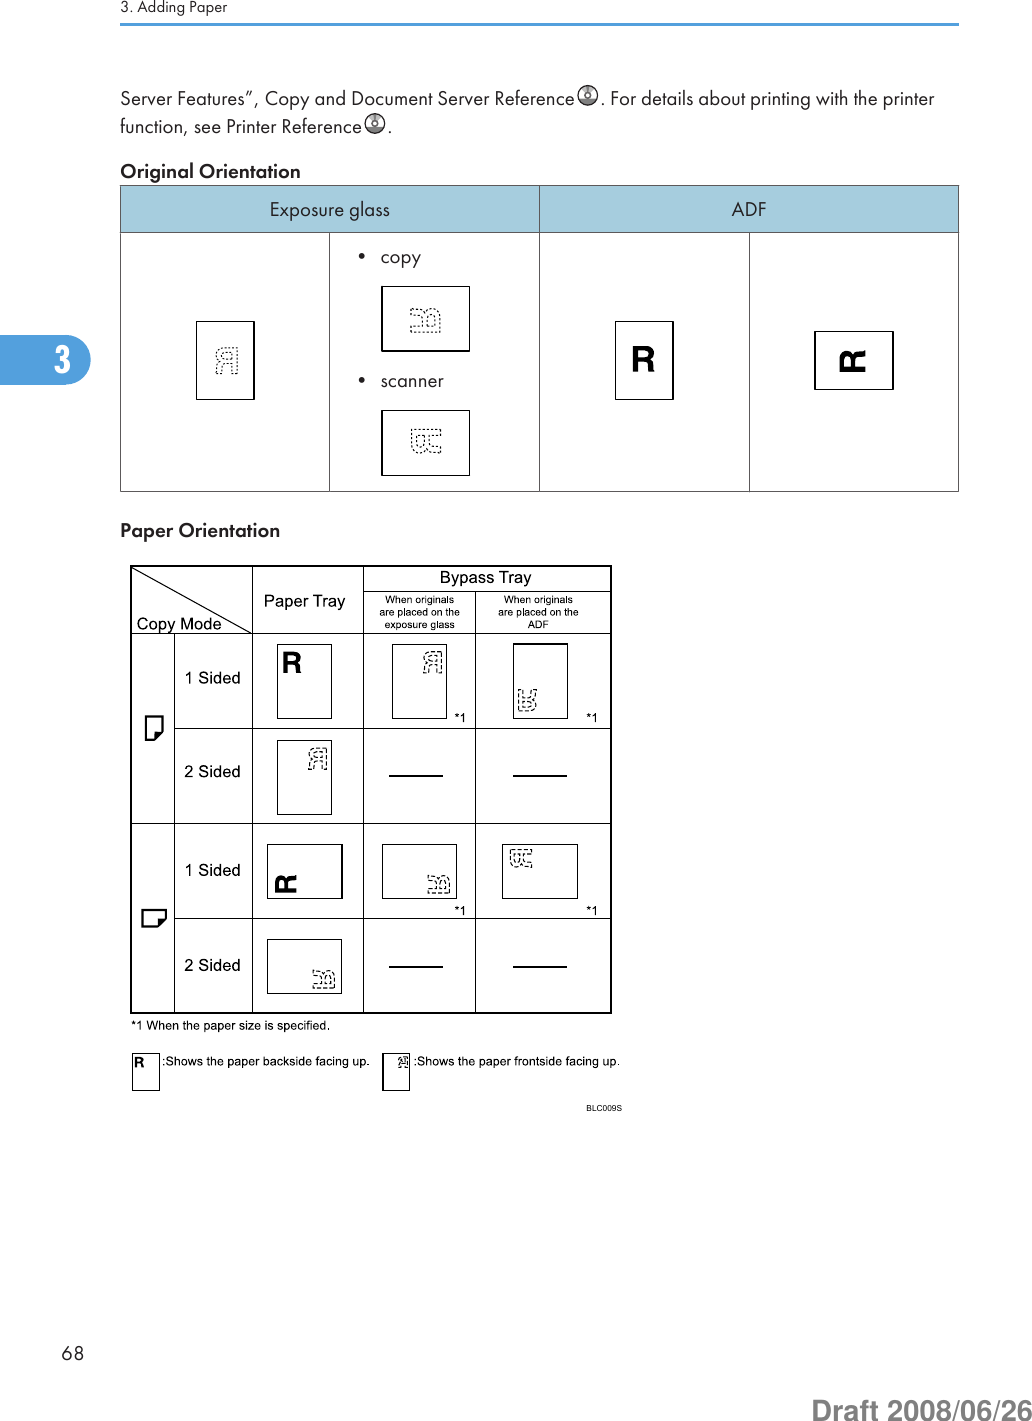
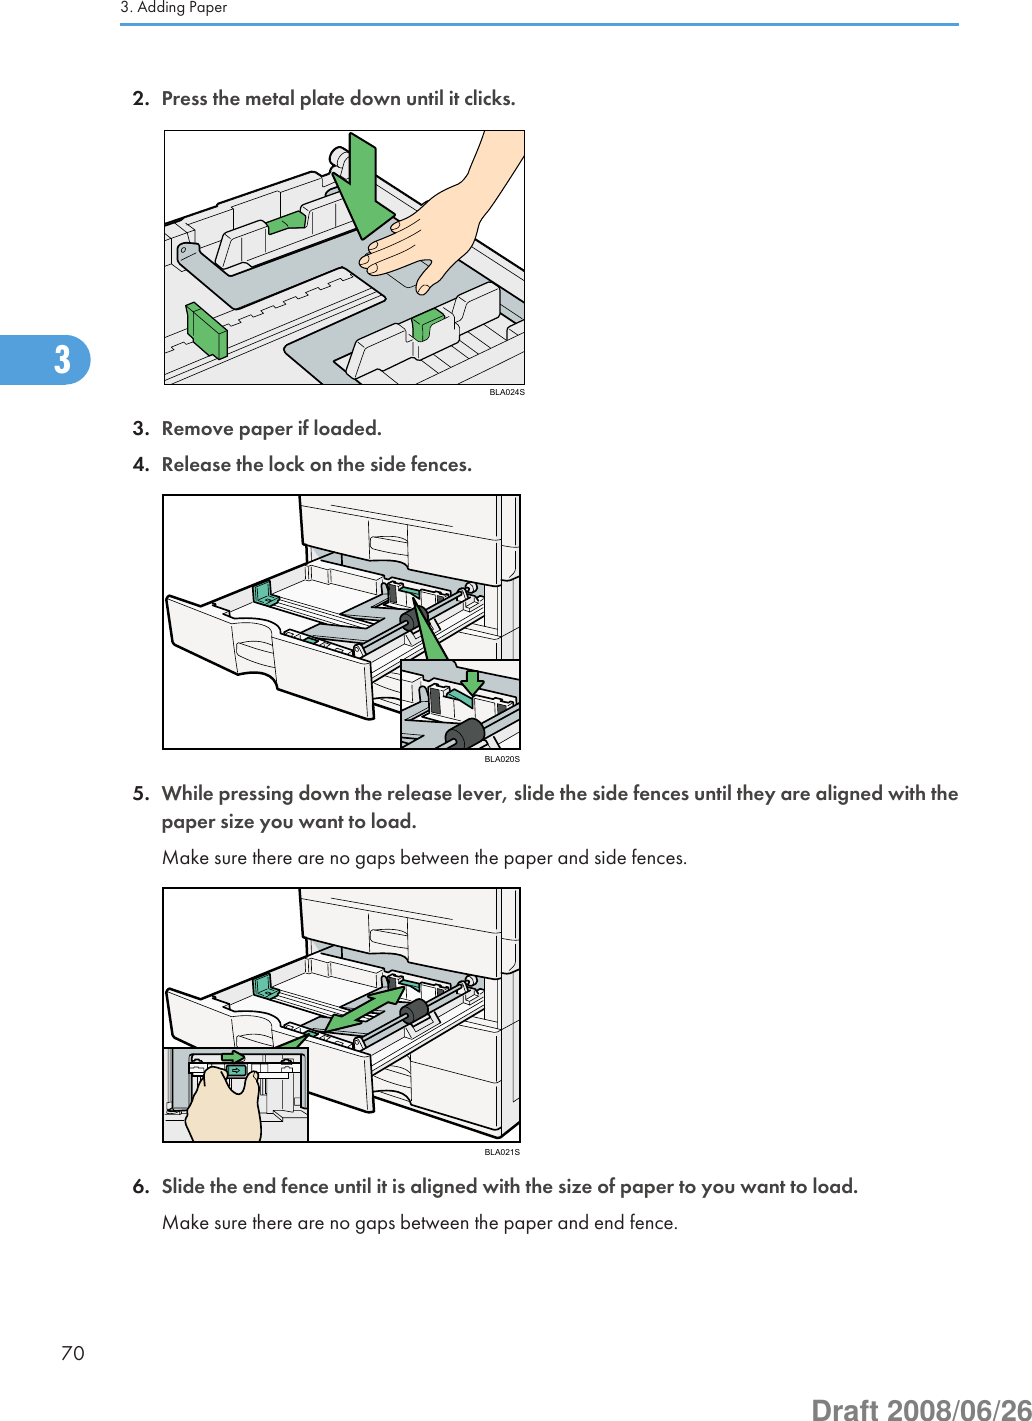
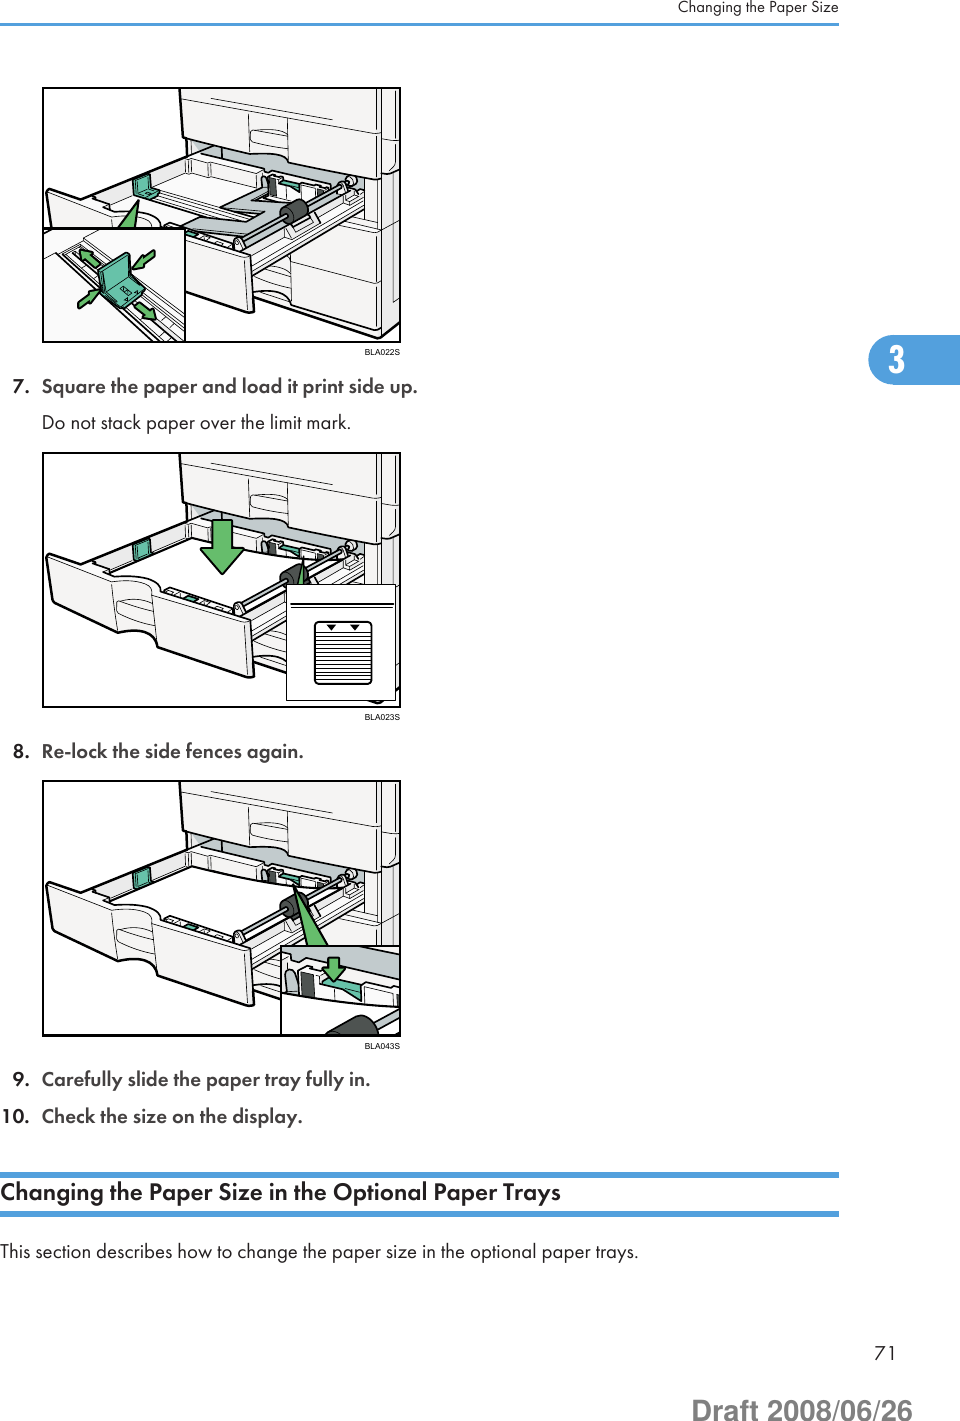
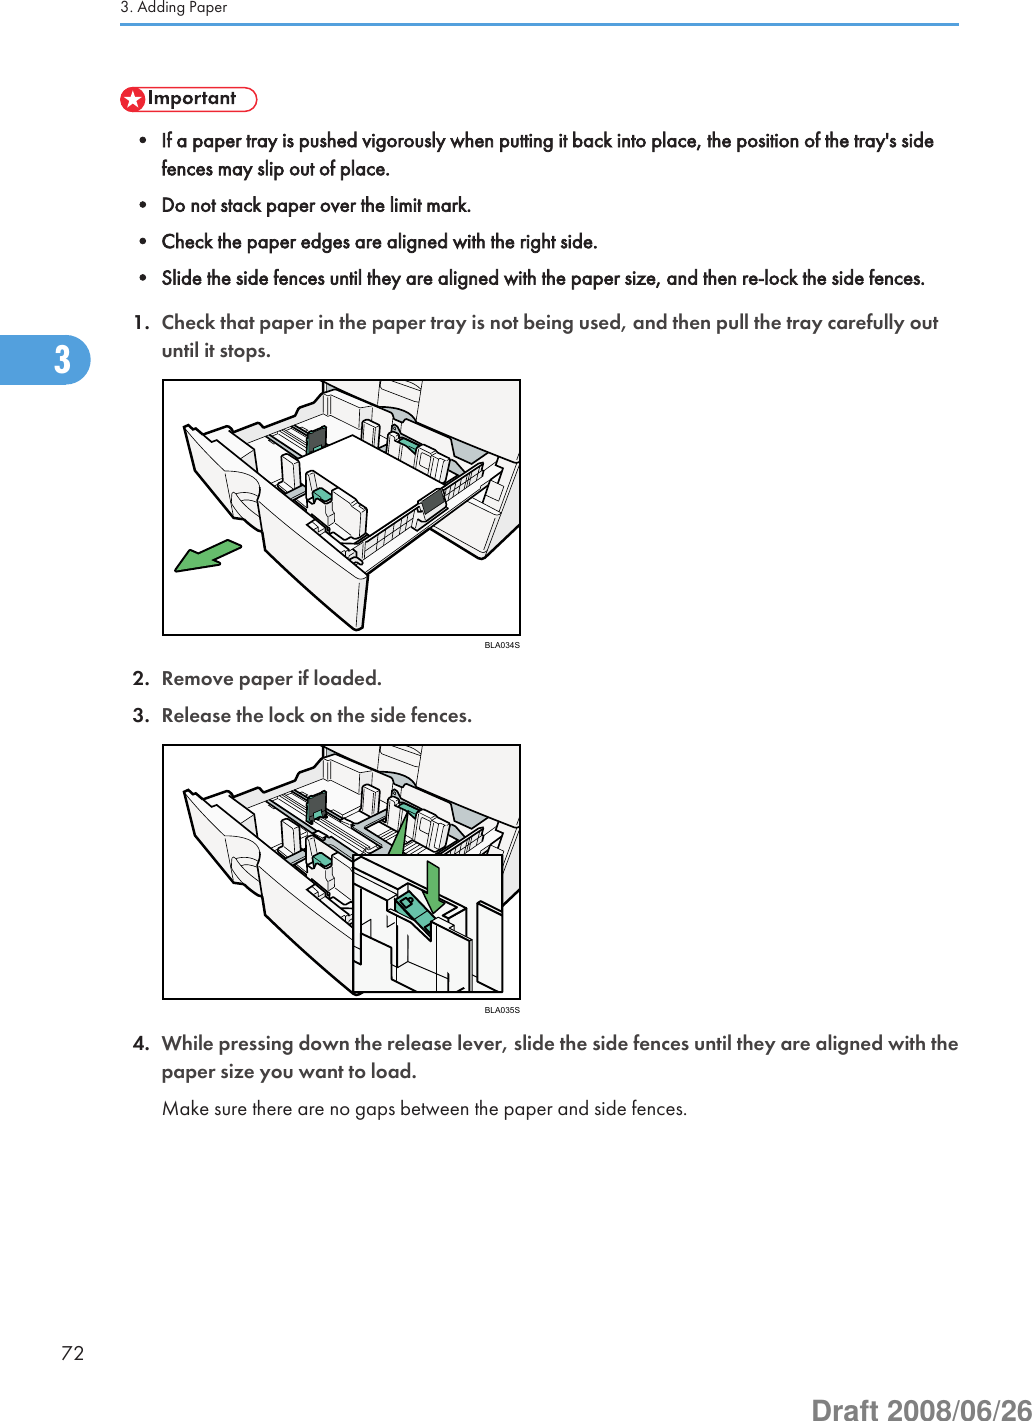
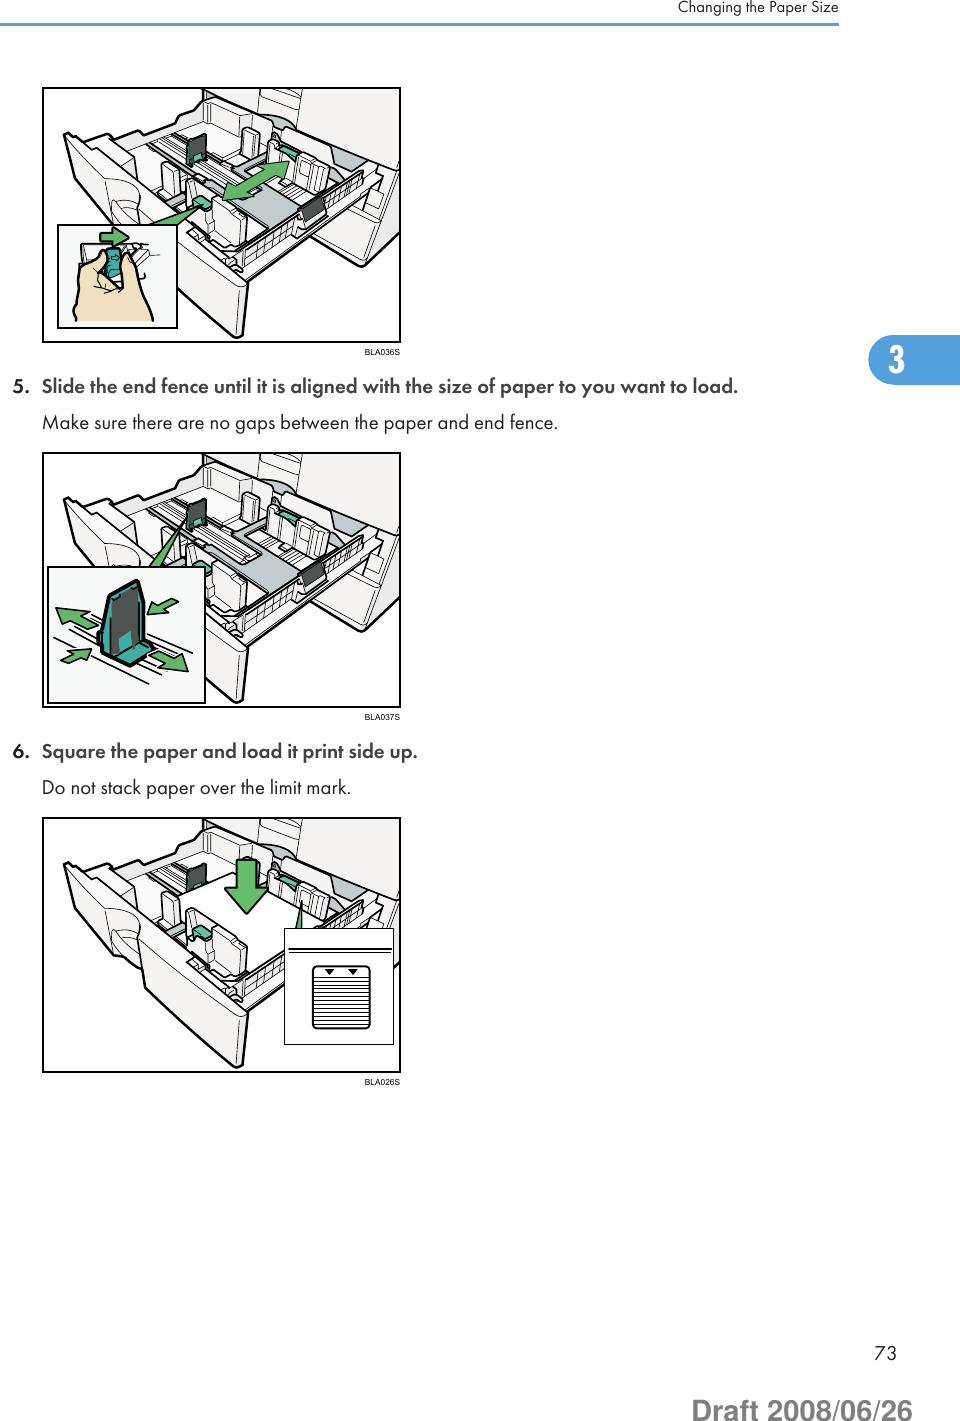
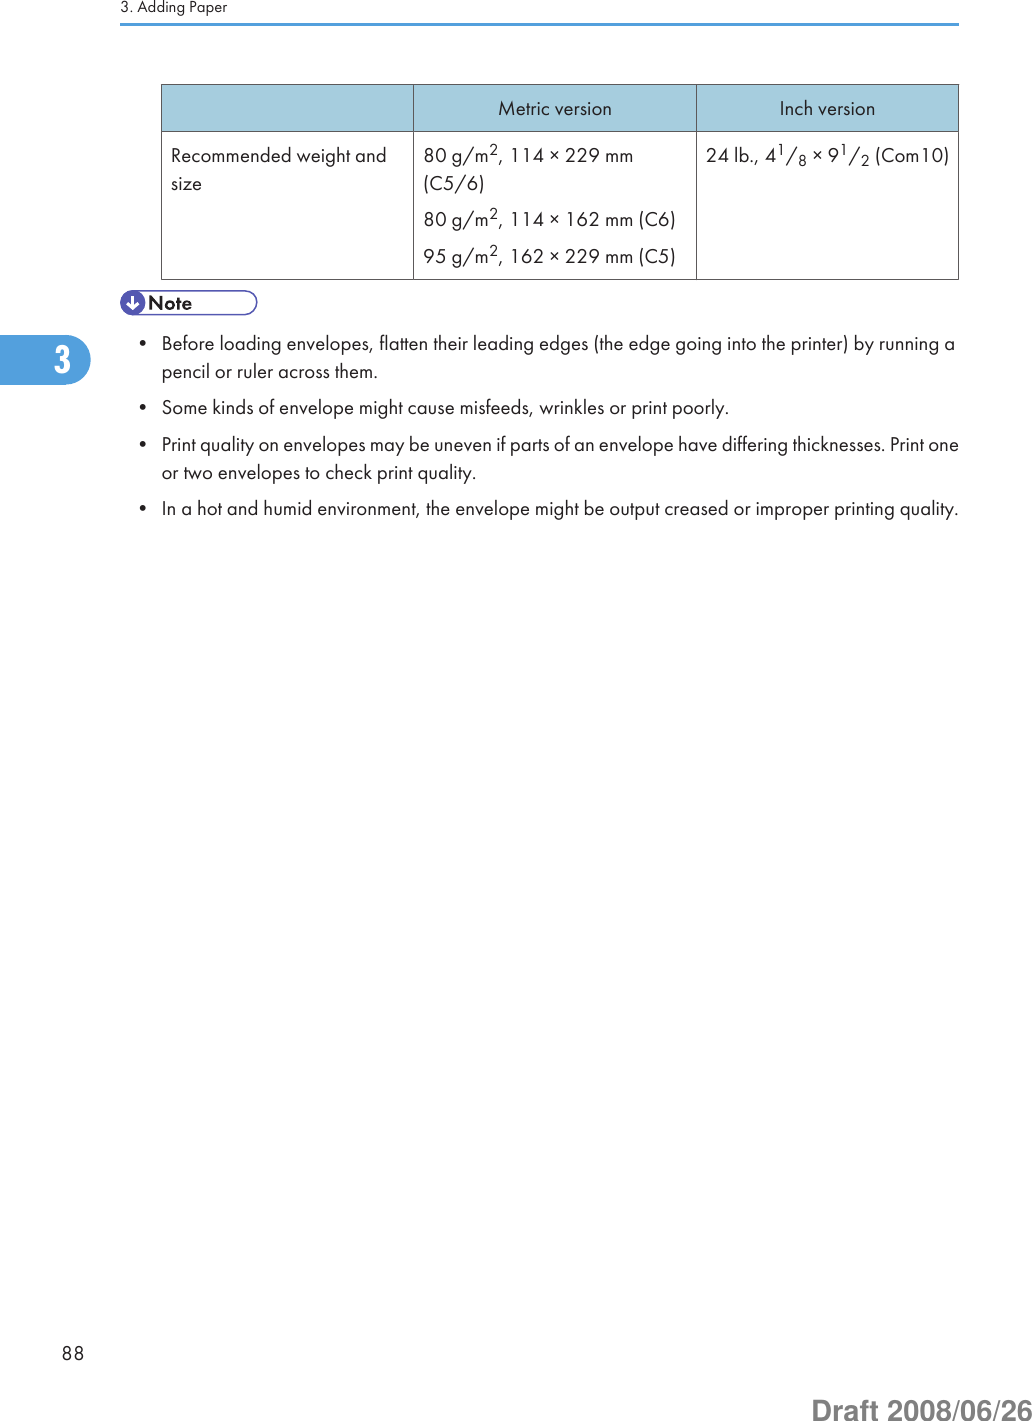
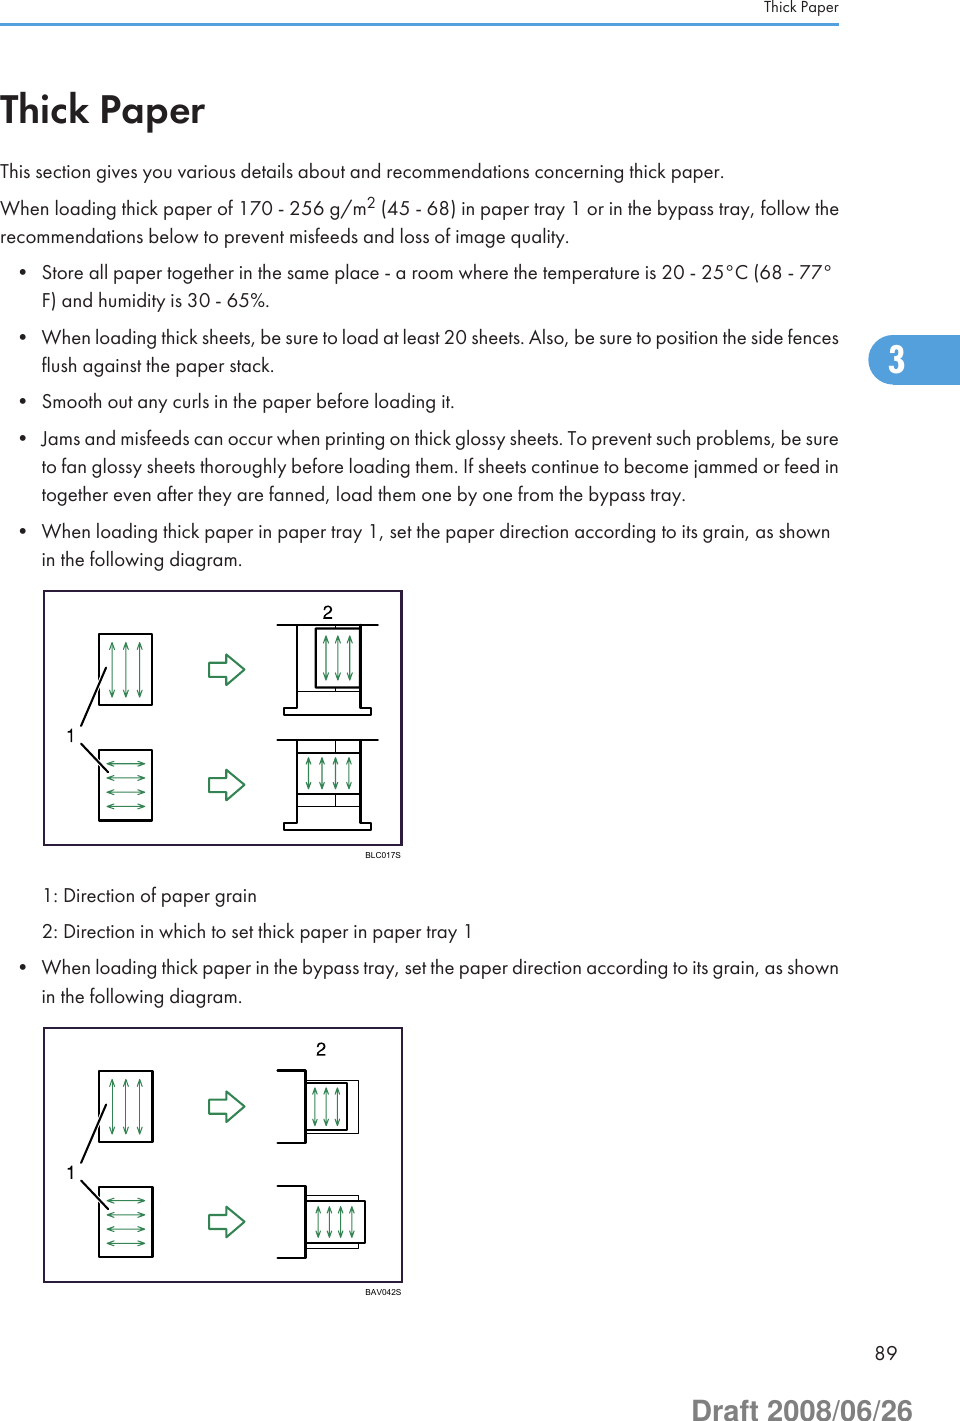
![• Various sizes of paper can be loaded in the paper trays by adjusting the positions of side fences andend fence.• Check the paper edges are aligned with the right side.• Each tray can hold up to 500 sheets of paper. Do not stack paper over the limit mark.1. Carefully pull out the paper tray until it stops.BLA025S2. Square the paper and load it print side up.Do not stack paper over the limit mark.BLA026S3. Carefully push the paper tray fully in.Orientation-Fixed Paper or Two-Sided PaperThis section describes loading paper that has a specified orientation and printing side (such as letterheadpaper).Orientation-fixed (top to bottom) or two-sided paper (for example, letterhead paper, punched paper, orcopied paper) might not print correctly, depending on how the originals and paper are placed. Set[Letterhead Setting] to [Yes] in [Input / Output] under [Copier / Document Server Features], and then placethe original and paper as shown below. For details about Letterhead Setting, see “Copier/DocumentLoading Paper673Draft 2008/06/26](https://usermanual.wiki/Ricoh/RFDIA01.User-Manual-2-of-4/User-Guide-981171-Page-25.png)
![7. Re-lock the side fences again.BLA044S8. Carefully slide the paper tray fully in.9. Check the size on the display.Changing to a Size That Is Not Automatically DetectedIf you load a paper size that is not selected automatically, you need to specify the paper size with thecontrol panel. This section describes how to load such paper.1. Press the [User Tools / Counter] key.BBP015S2. Press [System Settings].3. Adding Paper743Draft 2008/06/26](https://usermanual.wiki/Ricoh/RFDIA01.User-Manual-2-of-4/User-Guide-981171-Page-32.png)
![3. Press [Tray Paper Settings] tab.4. Select the tray for which you want to change the paper settings.5. Select the loaded paper size and feed direction, and then press [OK].The set paper size and feed direction is displayed.Changing the Paper Size753Draft 2008/06/26](https://usermanual.wiki/Ricoh/RFDIA01.User-Manual-2-of-4/User-Guide-981171-Page-33.png)
![6. Press the [User Tools / Counter] key.The initial display is shown.• For details about paper sizes selected automatically, see “Recommended Paper Sizes and Types”.• If you want to print on paper that is selected automatically after printing on a paper size that is notselected automatically, you must return the setting to “Auto Detect”. Reload the paper, and select“Auto Detect” in step 5. The setting is returned to “Auto Detect”.• p.80 "Recommended Paper Sizes and Types"3. Adding Paper763Draft 2008/06/26](https://usermanual.wiki/Ricoh/RFDIA01.User-Manual-2-of-4/User-Guide-981171-Page-34.png)
![Changing Paper Thickness SettingsSelect [Plain Paper 1] or [Plain Paper 2] depending on the type of plain paper.If in System Settings, [Tray Paper Settings], you set “Paper Thickness” to [Plain Paper] for each tray's [PaperType], you must then select [Maintenance], [Plain Paper Setting] and specify either [Plain Paper 1] or [PlainPaper 2], depending on the thickness of the loaded paper.The default setting is Plain Paper 2.• Select [Plain Paper 1] when paper weight is between 60 g/m2 (16 lb.) and 74 g/m2 (20 lb.).• Select [Plain Paper 2] when paper weight is between 74.1 g/m2 (20 lb.) and 90 g/m2 (24 lb.).1. Press the [User Tools/Counter] key.BBP015S2. Press [Maintenance].Changing Paper Thickness Settings773Draft 2008/06/26](https://usermanual.wiki/Ricoh/RFDIA01.User-Manual-2-of-4/User-Guide-981171-Page-35.png)
![3. Press [Plain Paper Setting].4. Select the plain paper type for each tray depending on the paper to be set and press [OK].5. Press [Exit].6. Press [Exit].• If in System Settings, [Tray Paper Settings], you set “Paper Thickness” to [Plain Paper] for each tray's[Paper Type], you must then select [Maintenance], [Plain Paper Setting] and specify either [Plain Paper1] or [Plain Paper 2], depending on the thickness of the loaded paper. In System Settings, [Tray PaperSettings], for each tray's [Paper Type] you can specify [Plain Paper], [Middle Thick], [Thick Paper 1],[Thick Paper 2], or [Thick Paper 3]. For details about paper thickness, see “Recommended PaperSizes and Types”.3. Adding Paper783Draft 2008/06/26](https://usermanual.wiki/Ricoh/RFDIA01.User-Manual-2-of-4/User-Guide-981171-Page-36.png)
![*2 Select the paper size in System Settings. For details about Tray Paper Size: Tray 2-4, see “System Settings”,Network and System Settings Guide .*3 Enter the paper size using the number keys in System Settings. For details about Tray Paper Size: Tray 2-4, see“System Settings”, Network and System Settings Guide .*4 Press the [ ] key, and then select the paper size.*5 Press the [ ] key, and then enter the paper size using the number keys.*6 If you want to copy onto thick (105 g/m2, 28 lb. or heavier) paper, select [Thick Paper]. See “Copying fromthe Bypass Tray”, Copy and Document Server Reference .*7 When loading paper, make sure the stack height does not exceed the limit mark of the paper tray. See “LoadingPaper”, Troubleshooting .*8 If you wish to copy onto OHP transparencies, select [OHP (Transparency)].*9 It is recommended to place one sheet at a time.Paper ThicknessPaper Thickness Metric version Inch versionThin Paper 52 - 59.9g/m214 - 15.9 lb.Plain Paper 1 60 - 74 g/m216 - 20 lb.Plain Paper 2 74.1 - 90 g/m220 - 24 lb.Middle Thick 90.1 - 105 g/m224 - 28 lb.Thick Paper 1 105.1 - 169 g/m228 - 45 lb.Thick Paper 2 169.1 - 210 g/m245 - 56 lb.Thick Paper 3 210.1 - 256 g/m256 - 68 lb.• Certain types of paper produce noise when delivered. This noise does not indicate a problem andprint quality is unaffected. (Glossy paper and OHP transparencies can produce noise whendelivered.)• When using translucent paper or label paper, make sure to select the appropriate paper type. Fordetails about Paper Type: Bypass Tray, see “System Settings”, Network and System Settings Guide.• When loading paper in the paper trays 1 - 2, and the lower paper trays, place the print side faceup.• When loading paper in the bypass tray, place the print side face down.• When you use the bypass tray, it is recommended to set the paper direction to .• Do not use paper designed for inkjet printers, as these may stick to the fusing unit and cause a misfeed.3. Adding Paper843Draft 2008/06/26](https://usermanual.wiki/Ricoh/RFDIA01.User-Manual-2-of-4/User-Guide-981171-Page-42.png)
![• To print on OHP transparencies, load OHP transparencies on the bypass tray, press the [ ] key, andthen set [Special Paper] to [OHP(Transparency)]. For details, see “Copying from the Bypass Tray” inCopy and Document Server Reference and “Setting Paper on the Bypass Tray” in Printer Reference.• When you load OHP transparencies, check the front and back of the sheets, and place them correctly,or a misfeed might occur. Use A4 or 81/2 × 11 size transparencies, and specify their size. Fordetails, see Copy and Document Server Reference and Printer Reference .• When you use OHP transparencies, fan them for each use.• We recommend you load OHP transparencies and sheets of label paper and translucent paper oneby one. This prevents them becoming jammed inside the machine.• Also, be sure to remove printed OHP transparencies and sheets of translucent paper one by one asthey are delivered. This prevents them sticking together.• We recommend that you use a 4000ANSI lumen or brighter overhead projector to project OHPtransparencies.• If multiple sheet feeding occurs, load sheets one by one.• When you load label paper, set the paper direction to .• Flatten out curled sheets before loading them.• To print on envelopes from the bypass tray: select System Settings, [Tray Paper Settings], and then,for each tray's [Paper Type], be sure to set [Paper Type] to [Envelope], and [Paper Thickness] to [ThickPaper 1].• To print on coated paper from the bypass tray, Tray 1, or 2: select System Settings, [Tray PaperSettings], and then, for each tray's [Paper Type] be sure to set [Paper Type] to [Coated Paper], and[Paper Thickness] to [Thick Paper 1].• To print on high-gloss coated paper from the bypass tray, Tray 1, or 2: select System Settings, [TrayPaper Settings], and then, for each tray's [Paper Type], be sure to set [Paper Type] to [Coated Paper:Gloss].• Before loading coated or glossy sheets, be sure to fan them thoroughly. If sheets feed in together,become jammed, or produce strange noises when delivered, load them one by one from the bypasstray.• When copying or printing onto letterhead paper, the paper placing orientation is different dependson which function you are using. See “Orientation-fixed paper or two-sided paper”.• If you load paper of the same size in two or more trays, the machine automatically shifts to the othertray when the first tray in use runs out of paper. This function is called Auto Tray Switching. (However,if the paper type of one tray is recycled or special paper, the settings of the other trays must be thesame for the Auto Tray Switching function to work.) This saves interrupting a copy run to replenishpaper when making a large number of copies. You can set the paper type of the paper trays underPaper Type: Tray 1-4. See “System Settings”, Network and System Settings Guide . For the settingprocedure of the Auto Tray Switching function, see “Copier/Document Server Features”, Copy andDocument Server Reference .Recommended Paper Sizes and Types853Draft 2008/06/26](https://usermanual.wiki/Ricoh/RFDIA01.User-Manual-2-of-4/User-Guide-981171-Page-43.png)

![• Always add toner when the machine instructs you.• Fault may occur if you use toner other than the recommended type.• When adding toner, do not turn off the operation switch. If you do, settings will be lost.• Do not repeatedly install and remove toner cartridges. This will result in toner leakage.• Do not shake the removed toner cartridge. Remaining toner might scatter.• If the message " Check toner cartridge replacement(s)." appears, the toner has almost run out. Havea replacement toner cartridge at hand.• You can check name of the required toner name and the replacement procedure using the " AddToner" screen.• Press [System Status] to check contact number where you can order supplies. See “Checking MachineStatus and Settings” Troubleshooting .• You can add all four color toners in the same way.Inserting TonerThis section describes how to insert toner.BLC011S4. Adding Toner and Staples944Draft 2008/06/26](https://usermanual.wiki/Ricoh/RFDIA01.User-Manual-2-of-4/User-Guide-981171-Page-52.png)
![Sending Faxes or Scanned Documents When Toner Has Run OutWhen the machine has run out of toner, the indicator on the display lights. Note that even if there is notoner left, you can still send faxes or scanned documents.• If number of communications executed after the toner has run out and not listed in the automaticallyoutput Journal exceeds 200, communication is not possible.1. Make sure the machine is in facsimile or scanner mode.2. Press [Exit], and then perform transmission operation.The error message disappears.• Any reports are not printed.• If the fax or scanner screen does not appear in step 1, press the [Facsimile] key or the [Scanner] key.Used TonerToner cannot be re-used.Bring the stored used container to your sales representative or service representative for recycling throughour recycling system. If you discard it on your own, treat it as general plastic waste material.Adding Toner954Draft 2008/06/26](https://usermanual.wiki/Ricoh/RFDIA01.User-Manual-2-of-4/User-Guide-981171-Page-53.png)
![BLC020S• When entering uppercase or lowercase letters continuously, use [Shift Lock] to lock the case.• You can also use the number keys to enter numbers, regardless of mode.How to Enter TextThis section explains text entry more specifically.Entering lettersThis section explains how to enter letters.1. Press [Shift] to switch between uppercase and lowercase.2. Press the letters you want to enter.Deleting charactersThis section explains how to delete characters.1. Press [Backspace] or [Delete All] to delete characters.5. Entering Text1005Draft 2008/06/26](https://usermanual.wiki/Ricoh/RFDIA01.User-Manual-2-of-4/User-Guide-981171-Page-58.png)
![Adding user textYou can select and use a User Text that is registered in [Program / Change / Delete User Text].For the registration procedure under Program / Change / Delete User Text, see “System Settings”, Networkand System Settings Guide .1. Press [User Text].2. Select the User Text you want to use.Entering Text1015Draft 2008/06/26](https://usermanual.wiki/Ricoh/RFDIA01.User-Manual-2-of-4/User-Guide-981171-Page-59.png)
![6. Operating InstructionsThis chapter describes the Operating Instructions of this machine.Installing Operating InstructionsThe supplied CD-ROMs contain HTML format manuals. For easy access, we recommend you install themanuals on a computer.• The “Manuals for Administrators” CD-ROM that includes Security Reference is for administrators ofthe machine.• The system requirements for installing the manuals are as follows:• Operating system: Windows 2000/XP/Vista, Windows Server 2003/2003 R2/2008• Minimum display resolution: 800 × 600 pixels• Recommended browsers:• Microsoft Internet Explorer 4.01 SP2 or later• Netscape 6.2 or later• Non-recommended browsers can display the simplified manual only.• HTML manuals can also be viewed on a Macintosh.• Hyperlinks might not work and referenced sections might not appear unless all the HTML manualshave been installed. To display referenced sections, be sure to install all the HTML manuals.1. Select a language and a product, and then click [OK].2. Click [Install manuals].If you want to read manuals from the CD-ROM, click [Read HTML manuals] or [Read PDF manuals].3. Install the manual you require according to the displayed instructions.4. When installation is complete, click [Finish].5. Click [Finish].• If you cannot install a manual, copy the “MANUAL_HTML” folder to your computer's hard drive, andthen run “Setup.exe”.• To delete an installed manual, on the [Start] menu, click [Programs], then [Product Name], and thenuninstall the data.• If you are installing the manuals on a Macintosh, open the “Manuals.htm” file on the CD-ROM.1036Draft 2008/06/26](https://usermanual.wiki/Ricoh/RFDIA01.User-Manual-2-of-4/User-Guide-981171-Page-61.png)
![How to Use the Operating InstructionsThis section explains how to use manuals.Opening from the IconThis section explains how to open a manual using its desktop icon.1. Double-click the icon on your desktop.The browser opens and the manual appears.Opening from the [Start] MenuThis section explains how to open a manual from the [Start] menu.1. On the [Start] menu, point to [Programs] (Windows XP: [All Programs]), then [ProductName], and then click the manual you want to view.The browser opens, and then the manual appears.• Depending on the settings made during installation, menu folder names may differ.How to Use the Operating Instructions1056Draft 2008/06/26](https://usermanual.wiki/Ricoh/RFDIA01.User-Manual-2-of-4/User-Guide-981171-Page-63.png)
![Opening from the CD-ROMThis section explains how to open a manual from the supplied CD-ROMs.1. Click [Read HTML manuals].2. Click the title of the manual you want to view.The browser opens, and then the manual appears.6. Operating Instructions1066Draft 2008/06/26](https://usermanual.wiki/Ricoh/RFDIA01.User-Manual-2-of-4/User-Guide-981171-Page-64.png)
![CounterDisplaying the Total CounterYou can display the total counter value used for all functions.1. Press the [User Tools/Counter] key.BBP015S2. Press [Counter].3. To print a counter list, press [Print Counter List].4. Press the [Start] key.A counter list prints out.7. Remarks1167Draft 2008/06/26](https://usermanual.wiki/Ricoh/RFDIA01.User-Manual-2-of-4/User-Guide-981171-Page-74.png)
![5. Press [Exit] twice.Counter1177Draft 2008/06/26](https://usermanual.wiki/Ricoh/RFDIA01.User-Manual-2-of-4/User-Guide-981171-Page-75.png)
![InquiryThe inquiry function lets you check the telephone numbers to contact for repairs, or ordering consumablessuch as toner. Be sure to contact your service engineer to verify the following:Consumables• Telephone No. to order• Toner• Staple• TX Stamp NameMachine Maintenance/Repair• Telephone No.• Serial No. of MachineSales Representative• Telephone No.1. Press the [User Tools/Counter] key.BBP015S2. Press [Inquiry].Inquiry information appears.7. Remarks1187Draft 2008/06/26](https://usermanual.wiki/Ricoh/RFDIA01.User-Manual-2-of-4/User-Guide-981171-Page-76.png)
![3. Press [Print Inquiry List].4. Press the [Start] key.Inquiry information prints out.5. Press [Exit] twice.Inquiry1197Draft 2008/06/26](https://usermanual.wiki/Ricoh/RFDIA01.User-Manual-2-of-4/User-Guide-981171-Page-77.png)

![8. AppendixThis chapter describes the provided software and utilities CD-ROMs, and specifications.Software and Utilities Included on the CD-ROMThis section explains the software and utilities CD-ROMs provided with this machine.Two CD-ROMs come with this machine: “Printer Drivers and Utilities”, and “Scanner Driver and Utilities”.The following are included in these CD-ROMs:Font ManagerFor installing new screen fonts, or organizing and managing fonts already in the system. For detailsabout Font Manager, see the manual on the CD-ROM labeled “Printer Drivers and Utilities”.SmartDeviceMonitor for AdminFor the system administrator to manage network printers.DeskTopBinder-SmartDeviceMonitor for ClientFor users to manage their network print status.Printer Utility for MacThis utility allows users to download and manage a variety of fonts as well as manage printers. Fordetails about this utility, see PostScript 3 Supplement .• Some documentation about using the machine is included on the CD-ROM in PDF format. For detailsabout using Adobe Acrobat Reader/Adobe Reader, see Adobe Acrobat Reader/Adobe Readeronline Help.Viewing the Contents of the CD-ROMThis section explains how to view the contents of the CD-ROMs.1. Insert the CD-ROM into the CD-ROM drive.The installer starts.2. Click [Browse This CD-ROM].Explorer starts and displays the contents of the CD-ROM.Printer Drivers for This MachineThis section explains printer drivers for this machine.1218Draft 2008/06/26](https://usermanual.wiki/Ricoh/RFDIA01.User-Manual-2-of-4/User-Guide-981171-Page-79.png)


![Network.................................................................14Network connection..............................................11Network delivery scanner....................................14Notice.....................................................................18Number keys..........................................................50OOff mode................................................................29OHP transparencies........................................10, 80Opening manuals from the [Start] menu...........105Opening manuals from the CD-ROM...............106Opening manuals from the icon........................105Operating instructions.........................................105Operation switch......................................44, 50, 61Optimum environmental conditions...................110Options...................................................46, 47, 147Orientation-fixed paper or two-sided paper......67PPaper................................................................39, 65Paper grain............................................................89Paper setting direction...........................................89Paper sizes.............................................................80Paper storage........................................................92Paper trays.......................................................44, 89Paper types............................................................80Paperless fax reception.........................................12Paperless fax transmission....................................12Password................................................................15PCL........................................................................121PDF manuals.............................................................9Positions of WARNING and CAUTION labels......................................................................................26PostScript.............................................................121Power...............................................................61, 62Power connection................................................111Power supply.........................................................61PPD.......................................................................121Preventing an unauthorized copy........................16Print speed..............................................................34Printed manuals........................................................9Printer...............................................................11, 59Printer driver............................................56, 58, 121Printer Drivers and Utilities........121, 123, 125, 126Printer Utility for Mac..........................................121Printing a PDF file directly.....................................11Printing with the finisher.........................................11Program key...........................................................50Punch................................................................10, 11Punch kit...............................................................137RReceiving File indicator.........................................50Recommended paper sizes and types.................80Reduce...................................................................10Register/Change/Delete.....................................39Replacing the stamp cartridge.............................97Right tray.................................................44, 46, 140RPCS.....................................................................121SSafety information.................................................21Safety precautions to be followed.......................21Sample Copy key..................................................51Sample Print...........................................................11Saving color copies............................................108Saving paper.........................................................10Scanner............................................................14, 59Scanner Driver and Utilities..............121, 123, 124ScanRouter.............................................................14Searching by Keyword.........................................39Searching by what you want to do......................35Security functions...................................................15Sending faxes or scanned documents when tonerhas run out..............................................................95Sending scan files by e-mail.................................14Sending scan files by Scan to Folder...................14Shift sort tray........................................................138Simplified Display..................................................52Simplified Display key....................................51, 52Sleep mode.....................................................29, 30SmartDeviceMonitor for Admin..........16, 121, 125SmartDeviceMonitor for Client..................124, 126Software included on the CD-ROM..................121Sort.........................................................................10Specifications.....................................128, 134, 147Specifications for auto document feeder..........134Specifications for Bluetooth interface unit.........145153Draft 2008/06/26](https://usermanual.wiki/Ricoh/RFDIA01.User-Manual-2-of-4/User-Guide-981171-Page-111.png)