Roland KR107 ELECTRONIC PIANO WITH USB PORT User Manual KR 107 e
Roland Corporation ELECTRONIC PIANO WITH USB PORT KR 107 e
UserManual.wiki
>
Roland
>
KR107 User Manual
>
USERS MANUAL 3
Contents
1.
USERS MANUAL 1
2.
USERS MANUAL 2
3.
USERS MANUAL 3
USERS MANUAL 3
Navigation menu
Upload a User Manual
Namespaces
Wiki Guide
HTML
PDF
Info
Views
User Manual
Discussion / Help
Navigation
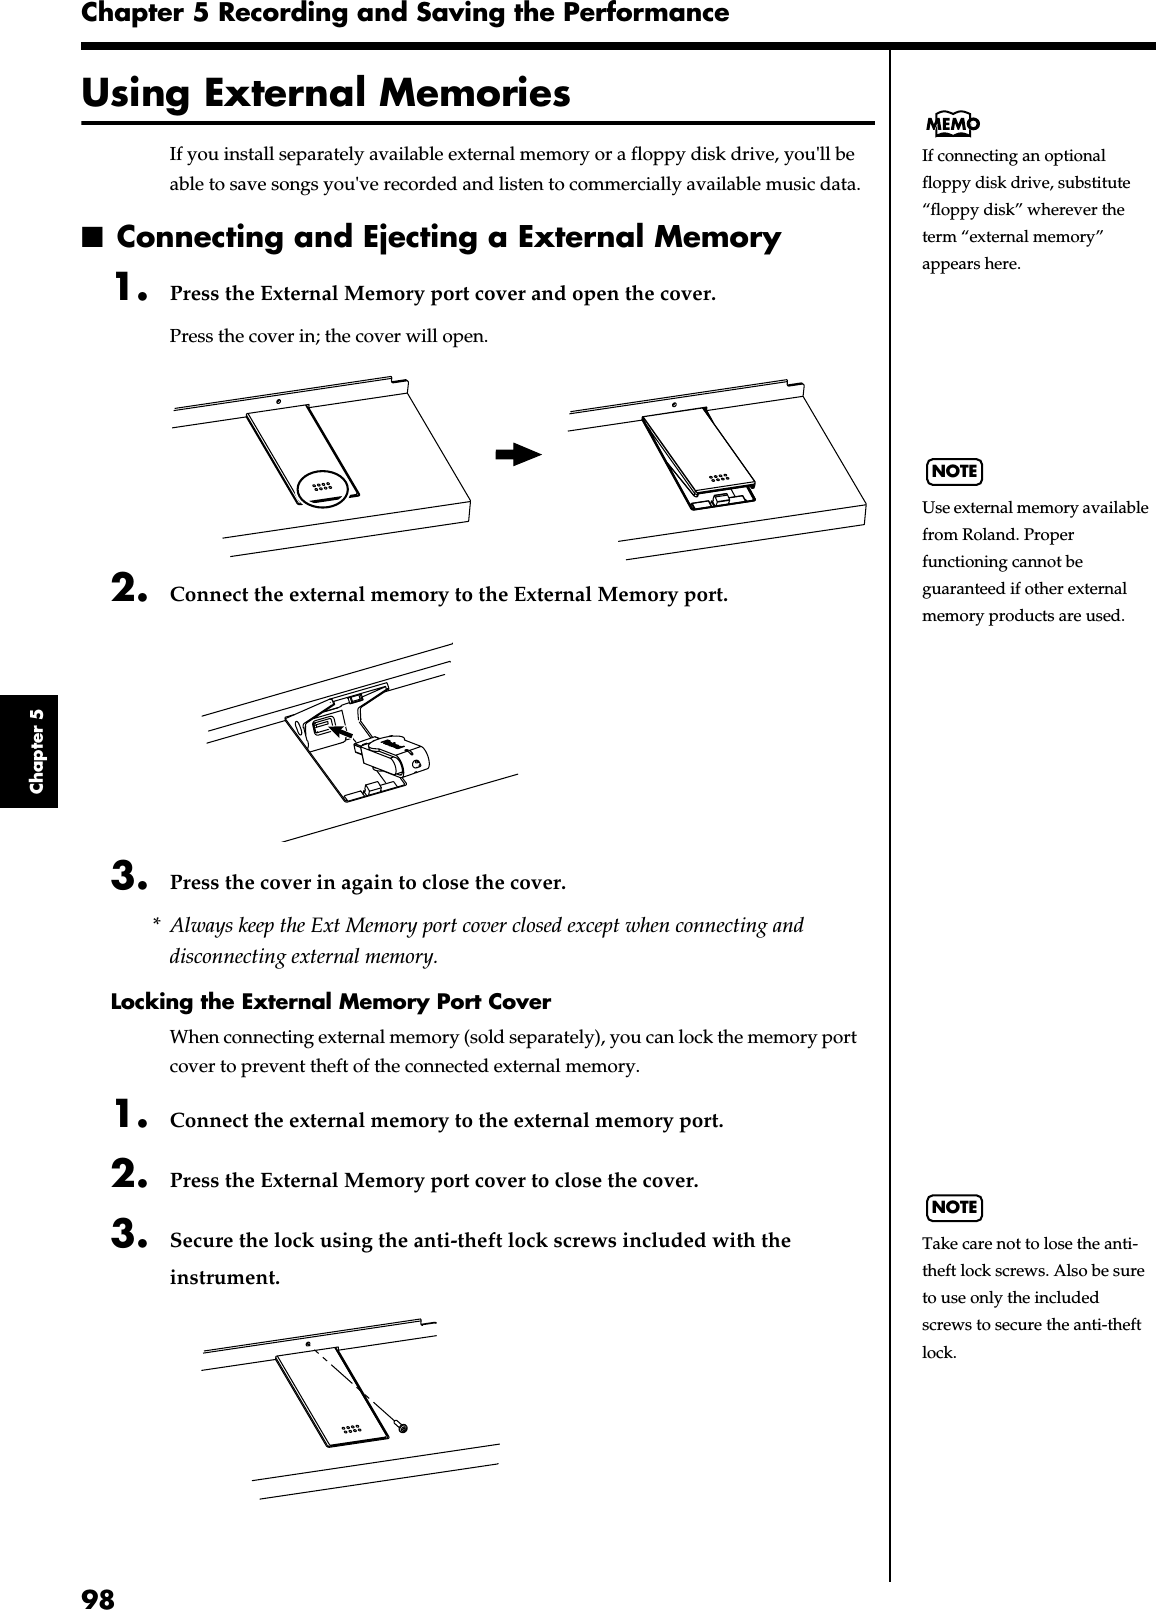
![99Chapter 5 Recording and Saving the Performance Chapter 5 ■ Formatting Media (Format) The process of preparing external memory or disks so that they can be used with the KR-107 is called “initialization” (formatting).In certain cases, particularly with floppy disks, the media is formatted for a specific type of device. If the media format does not match the KR-107's, you will not be able to use that media with the KR-107. fig.panel4-3 1. Connect the external memory to the external memory port. 2. Press the [Song/File] button. 3. Touch <File>. A “File screen” like the one below appears. fig.d-songfile.eps_60 4. Touch <Format>. The following screen appears.NOTEWhen a external memory is initialized, all of the data saved on the external memory is erased. If you’re formatting a used external memory for reuse, be sure to check first to make sure the external memory doesn’t contain any data you don’t want to lose.NOTEWhen initializing floppy disks, check to make sure that the disk's write protect tab is slid to the “write” position.NOTEDo not eject the floppy disk while data is being read from or written to the disk. This may scratch the disk's magnetic surface, rendering the disk unusable. (The disk drive's indicator lights brightly while data is being read from or written to the disk. At all other times, the indicator is lit more dimly, or is not lit at all.)](https://usermanual.wiki/Roland/KR107.USERS-MANUAL-3/User-Guide-520895-Page-2.png)
![100Chapter 5 Recording and Saving the Performance Chapter 5 fig.d-format.eps_60 Press the [Exit] button to go back to the previous screen. 5. Touch <Media> ** ** to select the storage media to be initialized. 6. Touch <Execute>. A confirmation screen appears. If you want to quit the initialization, touch <Cancel>. 7. Touch <OK>. Initialization of the external memory begins.When initialization is completed, you’re returned to the previous screen.NOTEDo not remove the storage media until the initialization is completed.NOTEIf “Error” appears on screen, take a look at “Error Messages” (p. 169).](https://usermanual.wiki/Roland/KR107.USERS-MANUAL-3/User-Guide-520895-Page-3.png)
![101Chapter 5 Recording and Saving the Performance Chapter 5 Saving Songs A recorded performance is discarded when you switch off the power or choose another song. Storing recorded performances and other data to external memories or the Favorites is called “saving.” Be sure to save important songs to external memories or Favorites. What are “Favorites?” You can register songs you are currently practicing or particularly like to “Favorites,” allowing you to select these songs easily (p. 68).When you register a song on a external memory to Favorites, you can then play back the song without connecting the external memory to the external memory connector.If a recorded performance is saved to Favorites, the performance won’t be erased when the power is turned off. Preparations for Saving Data When saving to external memories, connect the external memory to the external memory port. 1. Press the [Song/File] button. 2. Touch <File>. 3. Touch <Save>. The following “Save Song screen” appears. fig.d-songsave.eps_60Substitute the words “floppy disk drive” for “external memory” if using a separately purchased floppy disk drive.When using a new strage media, first initialize (format) the external memory on the KR. Take a look at “Formatting Media (Format)” (p. 99).NOTESome commercially available music files cannot be saved because they are copy protected.When saving to floppy disks, first check to make sure that the floppy disk’s protect tab is set to the “Write” position (p.*).If not handled with care, a floppy disk can be damaged, or the data on it become corrupted, making playback impossible. We recommend saving your songs on two different floppy disks.When you want to clear all of the content saved to the “Favorites” and restore the settings to the original factory condition on the KR, refer to “Formatting the User Memory” (p. 150).](https://usermanual.wiki/Roland/KR107.USERS-MANUAL-3/User-Guide-520895-Page-4.png)
![102Chapter 5 Recording and Saving the Performance Chapter 5 Determining the name of the song to be saved 4. Touch <Rename>. The following “Rename screen” appears. fig.d-songname.eps_60 When you touch , the cursor moves.When you touch the icon for the letter or character to be input, the character appears at the cursor location. For example touching <ABC> in succession cycles you through the available choices in that character group (“A” → ”B” → ”C”...).Each touch of <A-a-0-!> cycles the type of characters through “English (upper case),” “English (lower case),” “numerals,” “symbols,” then back to “English (upper case).”When you touch <Del>, the character at the cursor position is deleted.When you touch <Ins>, a space is inserted at the cursor position. 5. When you have finished with the name, press the [Exit] button. Determining the Save Destination 6. Touch <Media> to select the save-destination storage media. Touch <Disk> if you are saving to a external memory; touch <Favorites> if you are saving to Favorites. 7. Touch <File> to select the save-destination song number. If a song name is displayed with a number a song is already saved to that number.If you select a number with a previously saved song and then proceed to save a new song, the previously saved song will be erased. If you do not want to lose a saved song, select a number with no song name indicated in the save-destination column. Selecting the Save Setting (when saving to external memories) 8. Touch <Save Setting>. 9. Touch “Tone Compatibility” to select the tone compatibility format.](https://usermanual.wiki/Roland/KR107.USERS-MANUAL-3/User-Guide-520895-Page-5.png)
![103Chapter 5 Recording and Saving the Performance Chapter 5 Some Tones are unique to the KR. Data that is recorded using these tones may not play back correctly on other Roland Digital Pianos or Music Players. When you want to save data so that it can be played back on another devices, save the data with “MT” set as the Tone compatibility format. <Note> When data saved with “MT” as the Tone compatibility format is played back on this instrument, some of the nuances that were part of the performance at the time the data was recorded may be altered.Even with data saved with “MT” as the Tone compatibility format, an exact reproduction of the original performance may be unobtainable when using GS devices other than Roland Pianos and Music Players. 10. Touch <File Format> to select the file format. The resulting file format will be different depending on whether <Save> or <As SMF> is chosen, as described below. 11. Press the [Exit] button. Save 12. Touch <OK> to start saving. The time required for saving ranges from several seconds to half a minute or more.Don’t take the external memory out of the external memory port until the saving process is finished.Press the [Exit] button to return to the Song File screen. Display ExplanationTone CompatibilityKR The song is saved as data capable of reproducing performances with richness of expression using this unit’s special Tones. MT Data is saved in a form that can also be played on the Roland Digital Pianos or Music Players other than this unit.You can listen to songs saved in this format on the Roland HP-G/R series and KR series keyboards as well as on Roland MT series devices. Display ExplanationFile FormatSave Saves the song in this unit’s format. You can listen to songs saved in this format on the Roland HP-G/R series and KR series keyboards as well as on Roland MT series devices. This format is called “i-format”. Save As SMF Saves the song as an SMF (Standard MIDI Files). Songs saved in this SMF format can be listened to on many instruments that can play SMF music files (p. 183). A song recorded using commercial music files can’t be saved in “Save As SMF” format for reasons of copyright protection.NOTEDepending on the playback instrument, some notes may drop out or sound different.NOTENever turn off the power while the saving operation is in progress. Doing so will damage the KR’s internal memory, making it unusable. It’s a good idea to get into the habit of moving the write-protect tab on the floppy disk to the “Protect” position when you’ve finished saving your data. Keeping the tab at “Protect” prevents operations that could erase your songs by mistake.](https://usermanual.wiki/Roland/KR107.USERS-MANUAL-3/User-Guide-520895-Page-6.png)
![104Chapter 5 Recording and Saving the Performance Chapter 5 Deleting Saved Songs This deletes songs that have been saved on external memories, or to Favorites.To delete a song on a external memory, first connect the external memory to the external memory port. 1. Press the [Song/File] button. 2. Touch <File>. The “Song File screen” appears. 3. Touch <Delete>. A “Delete Song screen” appears. fig.d-songdel.eps_60 4. Touch <Media> to select the storage media. 5. Touch <File> to select the song to be deleted. 6. Touch <Execute>. The selected song is deleted.Do not eject the external memory from the external memory port until the operation is finished.Press the [Exit] button to return to the Song File screen.NOTENever turn off the power while the operation is in progress. Doing so will damage the KR’s internal memory, making it unusable.](https://usermanual.wiki/Roland/KR107.USERS-MANUAL-3/User-Guide-520895-Page-7.png)
![105Chapter 5 Recording and Saving the Performance Chapter 5 Copying Songs on External Memories to Favorites You can take songs saved on external memories and copy them to Favorites.You can also copy songs in Favorites to external memories. 1. Connect the external memory with the song to be copied to the external memory port. 2. Press the [Song/File] button.3. Touch <File>.4. Touch <Copy>.The following “Copy Song screen” appears.fig.d-songcopy.eps_60Specifying the Copy Source5. Touch the <Media> to select the copy source storage media.6. Touch the <File> to select the song you want to copy.When “Copy All” is selected, all of the songs on the external memory are copied to Favorites.Specifying the Copy Destination7. Touch <Favorites> to select the copy destination for the song.If a song name is displayed with a number, a song is already saved to that number.If you select a number with previously saved song data and proceed to copy to that location, the previously saved song will be erased. If you don’t want to erase a previously saved song, choose a number with no song name appears in the destination column.](https://usermanual.wiki/Roland/KR107.USERS-MANUAL-3/User-Guide-520895-Page-8.png)

![107Chapter 6Chapter 6 User Program RegistrationSaving Performance Settings (User Program)Any collection of settings, including those describing the current status of your data selections or settings Automatic Accompaniment, can be saved to the [User Program] button. You can then call up the stored settings by pressing the [User Program] button. Saving your preferred combinations of Music Styles and Tones, as well as other frequently used settings, makes it more convenient.You can register up to 36 User Programs to the KR.fig.panel_UPG→For more on what can be registered to a User Program, refer to “Parameters Stored in the User Program” (p. 182).1. Set the Music Style, Tone, and other data until the settings are the way you want them.2. Press the [User Program] button.A “User Program screen” like the one shown below appears.fig.d-upg.eps_503. Touch <Write>.A “Write User Program screen” like the following appears.fig.d-upgwrite.eps_50Determining the name of the User Programs4. Touch <Rename>.A “Rename screen” like the following appears.fig.d-upgname.eps_50When you touch , the cursor moves.When you touch the icon for the character to be input, the character appears of the cursor potion. For example, touching the <ABC> icon in succession cycles you through the available choices in that character group (A→B→C→A...).Each touch of <A-a-0-!> cycles the type of characters through “English (upper case),” “English (lower case),” “numerals,” “symbols,” then back to “English (upper case).”When you touch <Del>, the character at the cursor position is deleted.When you touch <Ins>, a space is inserted at the cursor position.5. When you have finished with the name, press the [Exit] button.You’re returned to the Write User Program screen.Determining the write destination6. Touch to select the write-destination number.7. Touch <Write>.The confirmation message appears.8. Touch <OK>. The current performance settings are saved to the [User Program] button.* Never turn off the power while the display indicates <Writing...>. Doing so will damage the KR’s internal memory, making it unusable.→You can restore the content registered to the [User Program] button to the original factory settings. Refer to “Restoring the Factory Settings (Factory Reset)” (p. 148).](https://usermanual.wiki/Roland/KR107.USERS-MANUAL-3/User-Guide-520895-Page-10.png)
![108Chapter 6 User Program RegistrationChapter 6Calling Up Saved User ProgramsYou can easily call up settings saved to the [User Program] button.1. Press the [User Program] button.The “User Program screen” appears.Touch the scroll bar and drag up or down to scroll through the screen and display other options.Touch the page icons to change pages. 2. Touch the name of the User Program you want to call up.When you touch the name of the User Program, the buttons or other performance settings instantly change to the previously saved settings.■Changing the Way User Programs Are Called UpWhen calling up User Programs, you can prevent the settings for Automatic Accompaniment from switching by not touching the touch screen for a few moments.1. Press the [User Program] button.2. Press the [Option] button in the lower part of the screen.A settings screen like the following appears.fig.d-upgopt.eps_503. Touch <Instant> or <Delayed> to select the setting.Press the [Exit] button to return to the User Program screen.Saving the User Program SetsYou can take the 36 User Programs saved to the [User Program] button and save them as a set to a floppy disk, or to user memory.When saving to an external memory, first connect an external memory to the external memory port.→For more on working with the disk drive, refer to “Using External Memories” (p. 98).1. Press the [User Program] button.2. Touch <File>.3. Touch <Save>.A “Save User Program screen” like the following appears.fig.d-upgsave.eps_50Giving a name to a set of User Programs4. Touch <Rename>.The Rename screen appears.When you touch , the cursor moves.When you touch the icon for the character to be input, the character appears at the cursor position. For example touching the <ABC> icon in succession cycles you through the available choices in that character group (A→B→C→A...).Each touch of <A-a-0-!> cycles the type of characters through “English (upper case),” “English (lower case),” “numerals,” “symbols,” then back to “English (upper case).”When you touch <Del>, the character at the cursor position is deleted.When you touch <Ins>, a space is inserted at the cursor position.5. When you have finished with the name, press the [Exit] button.Display ExplanationInstantImmediately after a User Program name is touched, the Automatic Accompaniment settings also switch.DelayedThe Automatic Accompaniment settings switch after you touch and road the User Program name for a few moments.](https://usermanual.wiki/Roland/KR107.USERS-MANUAL-3/User-Guide-520895-Page-11.png)
![109Chapter 6 User Program RegistrationChapter 6Determining the save destination6. Touch <MEdia> to select the save- destination strage media.Touch <Disk> if you are saving to a floppy disk; touch <User> if you are saving to user memory.7. Touch <File> to select the save-destination User Program number. If a User Program set name is displayed, a User Program set saved to that saved to that number is already.If you select a number with previously saved User Program set data, then save a new set of data to that same number, the older User Program set will be deleted. If you don’t want to lose any previously saved User Programs, select a number in the save-destination column that does not yet have a name. Save8. Touch <Save> to begin the save.Press the [Exit] button to return to the User Program File screen.* Never turn off the power or eject the external memory from the external memory port while the operation is in progress. Doing so will damage the KR’s internal memory, making it unusable.→When clearing the set of saved User Programs, refer to “Deleting Saved User Program Sets” (p. 110).■Loading Saved User Program SetsUser Programs that have been saved on floppy disks or in user memory can be called up, on an individual set basis, to the [User Program] button.* Note that calling up these User Programs results in the deletion of all User Programs currently recorded to the [User Program] button. When loading a set of User Programs from an external memory, first connect the external memory to the external memory port.→For more on working with the external memory, refer to “Using External Memories” (p. 98).1. Press the [User Program] button.2. Touch <File>.3. Touch <Load>.A “Load User Program screen” like the following appears.fig.d-upgload.eps_50Specifying the set of User Programs to be loaded4. Touch < > < > to select the storage media to be read from.5. Touch the name of User Program to load.6. Touch <Load>. The confirmation message appears.7. Touch <OK>.The selected User Programs are loaded to the [User Program] button.* Never turn off the power or eject the external memory from the external memory port while the operation is in progress. Doing so will damage the KR’s internal memory, making it unusable.](https://usermanual.wiki/Roland/KR107.USERS-MANUAL-3/User-Guide-520895-Page-12.png)
![110Chapter 6 User Program RegistrationChapter 6Deleting Saved User Program SetsYou can delete individual User Program sets saved to external memories or in user memory.When deleting a set of User Programs on an external memory, first connect the external memory to the external memory port.→For more on working with the external memory, refer to “Using External Memories” (p. 98).1. Press the [User Program] button.2. Touch <File>.3. Touch <Delete>.A “Delete User Program screen” like the following appears.fig.d-upgdel.eps_504. Touch <Media> to select the strage media. 5. Touch to select the set of User Programs to be deleted.6. Touch <Delete>.A screen like the one shown below appears.fig.msg_filedel7. Touch <OK>.The selected User Programs are deleted.Touching <Cancel> cancels deleting the file.* Never turn off the power or eject the external memory from the external memory port while the operation is in progress. Doing so will damage the KR’s internal memory, making it unusable.Copying Sets of User Programs on Floppy Disks to the User MemoryYou can copy sets of User Programs saved on external memories and to user memory.You can also copy sets of User Programs saved in user memory and to external memories.1. Insert the external memory with the settings to be copied in the disk drive.2. Touch the [User Program] button.3. Touch <File>. 4. Touch <Copy>.A “Copy User Programs screen” like the following appears.fig.d-upgcopy.eps_50Specifying the copy source5. Touch <Media> to select the strage media.6. Touch <File> to select the set of User Programs you want to copy.When “All” is selected, all of the sets of User Programs on the floppy disk are copied to user memory.Specifying the copy destination7. Touch <User> to select the copy destination for the set of User Programs.If a User Program name is displayed, already a User Program saved to that number is already.If you select a number with User Programs data, and then copy data to that number, the previously saved User Programs are deleted. If you do not want to delete the saved User Programs, select a number in the save-destination column for which no name is displayed.8. Touch <Execute>.The set of User Programs on the floppy disk is saved to user memory.](https://usermanual.wiki/Roland/KR107.USERS-MANUAL-3/User-Guide-520895-Page-13.png)
![111Chapter 6 User Program RegistrationChapter 6* Never turn off the power or eject the external memory from the external memory port while the operation is in progress. Doing so will damage the KR’s internal memory, making it unusable.■Coping Sets of User Programs Stored in the User Memory to Floppy DisksYou can take User Program sets saved in user memory and copy them to floppy disks.In this case, in the Copy User Programs screen in Step 4 above, touch the large arrow icon in the center to get the arrow to point up. This sets the KR to copy the User Program set in the user memory to the floppy disk.The rest of the procedure is identical to that used for copying sets of User Program set from external memories to user memory.Using the Pedal to Switch User ProgramsYou can assign the function of the sequential switching of the “User Programs” to the pedal. That way, each time you depress the pedal, the KR107 switches to the next User Program.Great for use in concerts and similar situations, this allows you to prepare and save your User Programs in the sequence they are to be used, and then call up User Programs in the appropriate order while you perform, simply by depressing the pedal.1. Press the [User Program] button.2. Touch <Pedal> in the lower part of the screen.A “Copy User Programs screen” like the following appears.fig.d-upgopt.eps_50■Selecting the Pedal Used for Switching Settings (Pedal Shift)3. Touch <Pedal Shift> to select the setting.Press the [Exit] button to return to the User Program screen.■Sequential Loading of User Program Sets Stored in External Memory (Load Next)When using the pedal to switch your User Programs, you can also call up sequential sets of User Programs as saved to external memory. This feature is called the “Load Next” function.3. Touch <Load Next> to select the setting.Press the [Exit] button to return to the User Program screen.Display ExplanationOff You can use a function assigned to the pedal.Left PedalThe left pedal is dedicated to switching User Programs.The function assigned to the left pedal cannot be used. Center PedalThe center pedal is dedicated to switching User Programs.The function assigned to the center pedal cannot be used.Display ExplanationOffSwitches Load Next off. The next press of the pedal after the 36th User Program is called up returns you to the first User Program of the same User Program set. OnSwitches Load Next on. The next press of the pedal after the 36th User Program has been called up takes you to the first User Program in the next User Program set.](https://usermanual.wiki/Roland/KR107.USERS-MANUAL-3/User-Guide-520895-Page-14.png)
![112Chapter 6 User Program RegistrationChapter 6Simultaneously Switching User Program and Transmitting PC NumbersYou can have PC (Program Change) numbers be transmitted to an external MIDI device when you switch the User Program on the KR.You can register PC number settings to each of the User Programs, just as you can with button settings and other settings preferences.Calling Up the Performance Settings to Be Set1. Press the [User Program] button, then touch the name of the performance setting you want to set.Setting the Transmission of the PC2. Touch <PC Set> in the User Program screen.The following type of screen appears.fig-upgPCset.eps_503. Touch for the parameter and make the settings.4. Press the [Exit] button.The User Program screen returns to the display.Touch <Write> to save the setting to the User Program. For more detailed information, refer to “Saving Performance Settings (User Program)” (p. 107).Display DescriptionTx PC ChannelThis prevents the PC number from being transmitted (Off), or sets the transmission channel (Channel 1–16).Bank Select MSB Sets the Bank Select MSB.Bank Select LSB Sets the Bank Select LSB.Program ChangeSets the Program Change messages (Program Numbers).](https://usermanual.wiki/Roland/KR107.USERS-MANUAL-3/User-Guide-520895-Page-15.png)
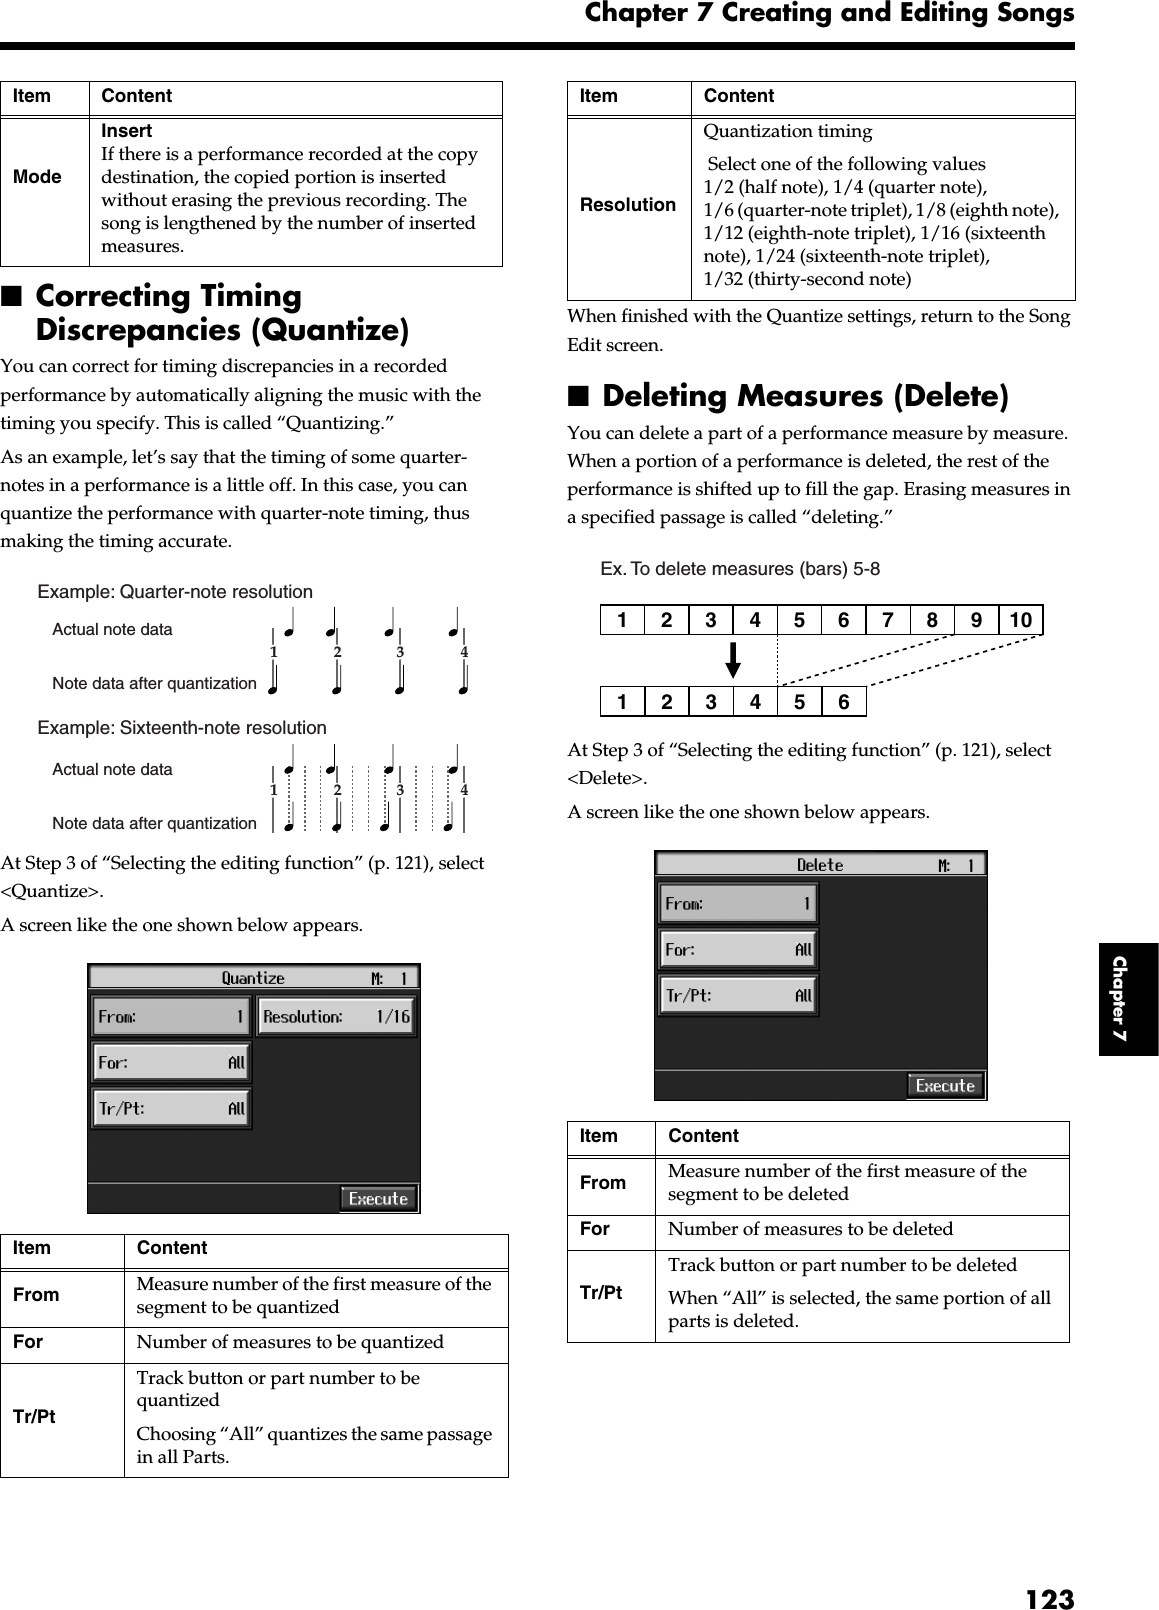
![113Chapter 7Chapter 7 Creating and Editing SongsMultitrack Recording with 16 Parts (16-Track Sequencer)Multitrack recording always you to listen to previously recorded material while continuing to add performances of other parts.The KR is capable of multitrack recording of up to sixteen parts. Since each part’s performance is recorded using one tone, you can layer performances, using up to sixteen tones for the data in one song. The function used to layer these sixteen parts, one at a time, is called the “16-Track Sequencer.”fig.16track.e16-Track Sequencer and Track ButtonsIn addition to the “16-Track Sequencer” function, the “Track Buttons” (p. 83) are another of the unit’s playing/recording functions.These five “Track buttons” are used for organizing the 16-Track Sequencer’s sixteen parts. This allows you to use the 16-Track Sequencer to add more sounds to performances recorded with the Track buttons, and make even more detailed edits of the songs.You can easily play back the original song data with the 16-Track Sequencer, mute parts by pressing the Track buttons, and more.The Track buttons correspond to 16-track sequencer parts as shown below.Since the 16-Track Sequencer records one tone to one part, you cannot use Layer performance (p. 25), Split performance (p. 26), or other such functions to record two or more tones simultaneously. Also, you can’t record the performance with Automatic Accompaniment.When you want to record with Automatic Accompaniment, then you should use the Track buttons for recording. (Refer to “Recording With Accompaniment” (p. 92))Commercially Available Music FilesCommercially available song file recorded in Roland’s SMF format is also composed of sixteen parts.By loading the song file from the floppy disk and using the 16-Track Sequencer, you can then also edit the song file.→Although with commercially available Roland SMF music data, Part 11 is included in the [2/Bass Accomp] track button, other tracks match to the corresponding Track buttons.* With some commercially available music files, you cannot edit the data.■The 16-Track Sequencer ScreenWhen recording with 16-track Sequencer, display the 16-track Sequencer screen.1. Press the [Menu] button.The Menu screen appears.2. Touch <16trk Sequencer>.A “16-track Sequencer screen” like the one shown below appears.fig.d-16tr.eps_50Track button Part[R/Rhythm] D (10), S (11)[1/Whole] 1[2/Bass Accomp] 2, 5–9, 12–16[3/Lower] 3[4/Upper] 4Part 16You can record performances for up to 16 parts,overlaying them part by part, to create a single song.16-Track SequencerPart 4Piano Part (right hand)•••Part 3Piano Part (left hand)Part 2Bass PartPart 1Flute PartIcon Explanation<1>–<16>Touch to select the part to be recorded, or the part whose settings are to be changed. The button for the selected part changes color.This Part to be played backThe Part not to be played back (Muted Part)Parts that do not have performance data recorded to them.Solo Only the selected Part is played back.Mute This allows you to prevent the sound for the selected part from playing.Clear The performance data for the selected part is deleted.OptionsThis displays the Part Settings screen, in which you can make detailed settings for each part. For details refer to p. 114.Tone Set The Tone Set screen appears. For details refer to p. 115.](https://usermanual.wiki/Roland/KR107.USERS-MANUAL-3/User-Guide-520895-Page-16.png)
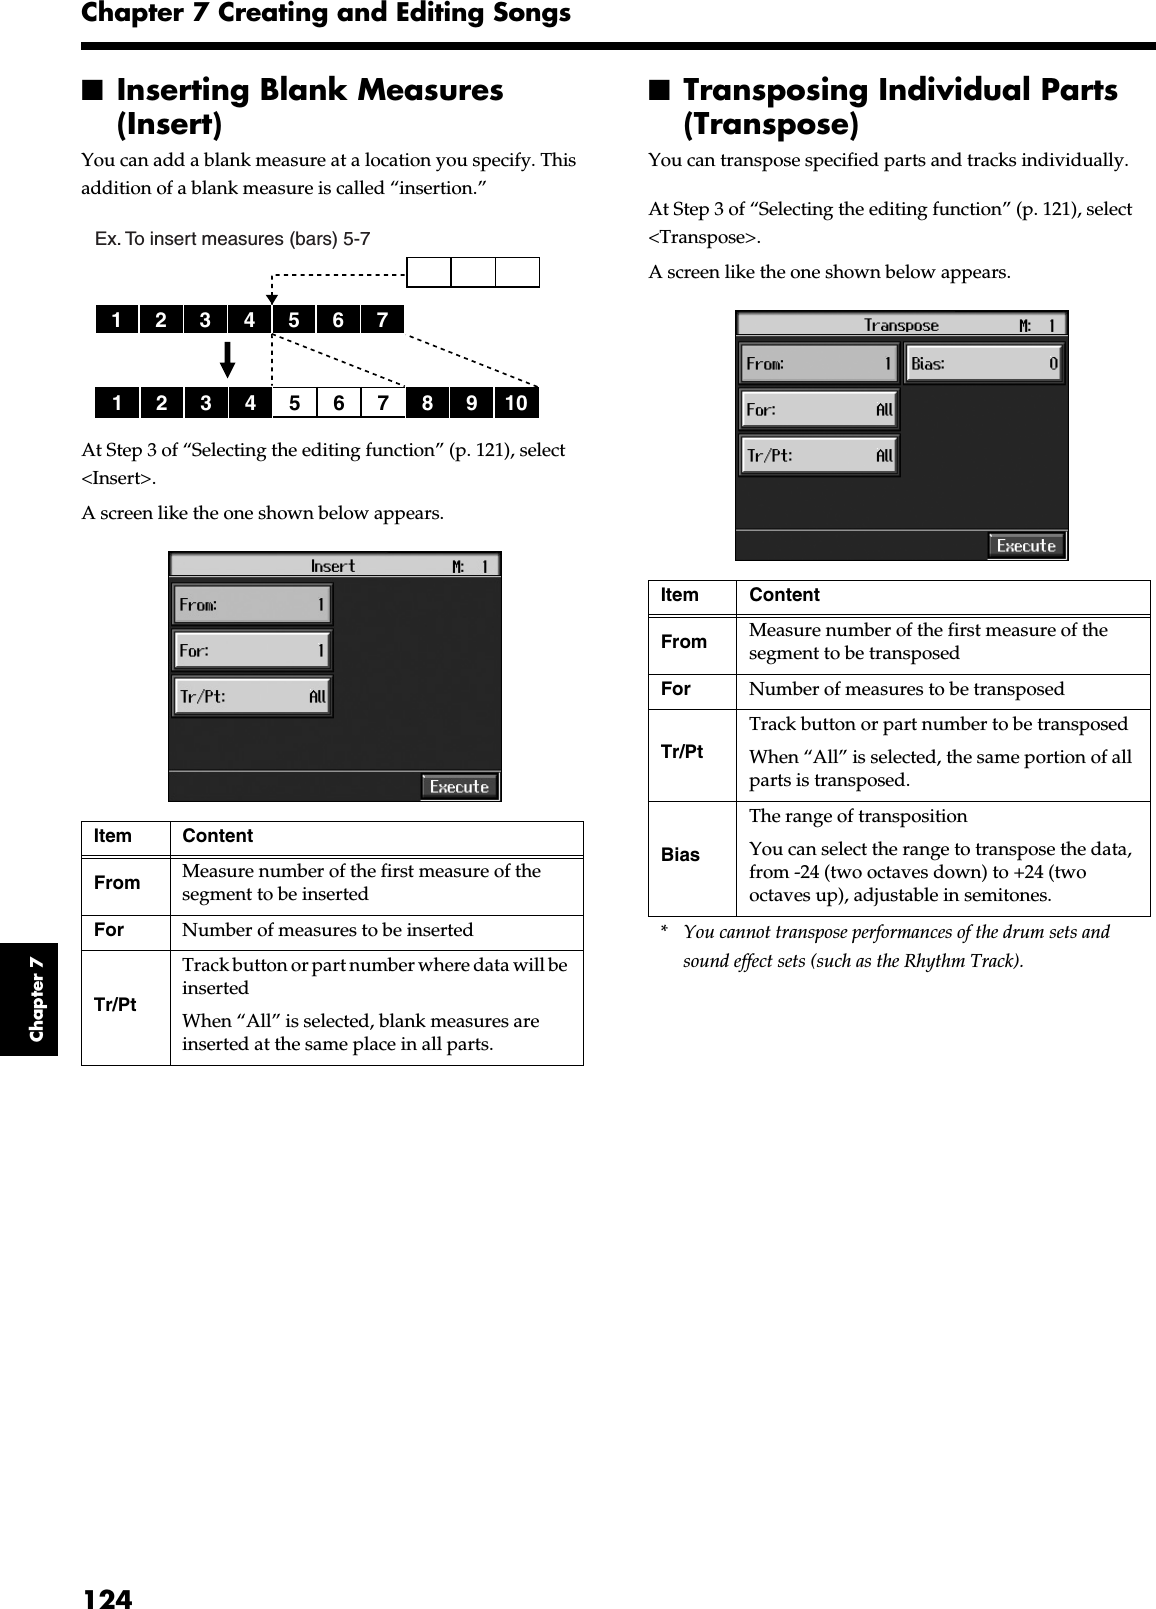
![114Chapter 7 Creating and Editing SongsChapter 7■Modifying the Settings of Each PartYou can change the Tones and volume, as well as mute the playback, for each individual part in songs recorded with the 16-track Sequencer and the internal songs.→Because commercially available Roland SMF music files are also made up of 16 Parts, you can change the settings for the individual Parts and play them back in the same way.First, select the song for which the settings are to be made (p. 64).1. Display the 16-track Sequencer screen (p. 113).2. Touch the screen to choose the Part for which you want to make settings.Change the settings for the selected Part.* When you touch <Clear>, a message asking you to confirm the deletion appears. To erase the recorded sound, touch <OK>. If you don’t want to erase the recorded sound, touch <Cancel>. Once a performance has been erased, it can’t be restored.* You cannot touch <Clear> during playback of the song.3. Touch <Options> to make more detailed settings for the selected part.A screen like the one shown below appears.fig.d-16trpart.eps_50You can change the Tone for the selected Part by pressing a Tone button while this screen is displayed. When selecting Part 10 or 11, you can touch <Drum Set> to select the drum set or effect sound. The Part name and tone name are displayed at the top of the screen.4. Touch for the corresponding item to change the setting.You can adjust the values by touching the desired parameter and turning the dial or by touching and dragging the slider. When you press the [ (Play/Stop)] button, you hear what the song sounds like as you change the settings. When you press the [ (Play/Stop)] button, playback of the song stops.5. Touch to make settings for other parts.The Part name appears at the upper part of the screen.Change the settings for other parts as needed.6. Hold down the [ (Rec)] button and press the [ (Reset)] button.This operation set the changes in the settings.The song can then be saved to a floppy disk or to user memory.If you do not want to delete a song after changing the settings for the individual parts, save the song to a floppy disk or to user memory (p. 101).* You cannot save the settings that determine whether sounds for each individual part are played or not (solo and mute).Display FunctionSolo Only the selected Part is played back.Mute Toggles playback of the selected Part to on or off.Clear The performance data for the selected part is deleted.Display ExplanationVolume Changes the volume level.Reverb Changes the amount of reverb effect applied to the sound.Chorus Changes the amount of chorus applied.PanpotShifts the direction from which the sound is heard between left and right. Touch to shift the sound to the right, or touch to shift it to the left.What’s Panpot?Panpot is the control that determines the placement of the sound in the stereo sound field between left and right speakers. By altering the Panpot setting, you can change the perceived location of the sound between the left and right speakers.](https://usermanual.wiki/Roland/KR107.USERS-MANUAL-3/User-Guide-520895-Page-17.png)
![115Chapter 7 Creating and Editing SongsChapter 7If the following message appearsIf you try to display another screen after you’ve changed the song’s settings for each Part, a message like the one below may appear.fig.m-songmod.epsTouch <OK> to change the song’s settings.Touch <Cancel> to discard the changes you’re made.■Getting the Most Suitable Part Tones for the Musical Genre (Tone Set)“Tone Set” is a function that automatically assigns the most suitable tones for the selected musical style.When you’re creating a song, you can assign Tone sets, then change the Tones to suit the ideas you have for your song.1. Display the 16-track Sequencer screen (p. 113).2. Touch <Tone Set> in the lower part of the screen.A screen like the one shown below appears.fig.d-16trtone.eps_503. Touch the screen to select a musical genre.4. Press the [Exit] button.The 16-track Sequencer screen appears.Tones for each part are assigned automatically.* In some genres, some parts may have no tone assigned.■Recording a Performance❍Step 1 Prepare for RecordingSelecting the song to record1. Hold down the [Song] button and press the [ (Rec)] button.The following screen is displayed if there is any previously recorded performance or any song with changed settings.fig.m-songmod.epsTouch <Yes> to delete the song.If you want to overwrite while recording, select a song.→If a song has already been recorded, or if the song’s settings have been changed, the “OK to delete Song?” confirmation prompt appears when you touch <0: (Song Name)>. For more information, take a look at “If the following screen appears” (p. 89).Determining the song’s beat and tempo2. Press the [Metronome] button to select the beat (p. 43).→You can’t change a song’s beat once it’s been recorded. If you want to compose a song whose beat changes partway through the song, take a look at “Changing the Beat in the Middle of a Song (Beat Map)” (p. 127).3. Press the Tempo [-] and [+] buttons to set the basic tempo of the song.If you do not need the metronome sound, press the [Metronome] button once more.→When using song data that has already been recorded, the recording is made using the source song’s basic tempo. To change the basic tempo of a song, please refer to “Changing the Tempo of Recorded Songs” (p. 127).](https://usermanual.wiki/Roland/KR107.USERS-MANUAL-3/User-Guide-520895-Page-18.png)
![116Chapter 7 Creating and Editing SongsChapter 7❍Step 2 Start RecordingIf necessary, choose a recording method.For more on how to record, refer to p. 116.If you record for the first time, there’s no need to select the recording method.Selecting the Part to Record1. Display the 16-track Sequencer screen (p. 113).2. Touch the number for the Part you want to record.The button for the touched part being set turns orange.You can only record drum sounds or effect sounds on Part D (10) or Part S (11). You can select drum sets or effect sounds by selecting Part D (10) or Part S (11) and touching <Drum Set>.Selecting the sound to play3. Use the Tone buttons to choose a Tone to play.After selecting a Tone, press the [Exit] button to call up the “16-Track Sequencer screen.”Recording the performance4. Press the [ (Reset)] button.Recording will start at the beginning of the song.If you want to record from a point other than the beginning, use the [ (Bwd)] and [ (Fwd)] buttons to select another measure to begin.5. Press the [ (Rec)] button and watch the indicator is light up.The KR is put in recording standby.6. Press the [ (Play/Stop)] button.A two-bar count-in sounds, then recording starts.* You cannot use the performance pads when recording with the 16-track sequencer.7. Press the [ (Play/Stop)] button.Recording stops.When one part is recorded, continue by selecting and recording another part. Continue layering parts to finish recording the song.→You only need to follow the procedure described in “Step 1 – Prepare for Recording” when you’re recording the first Part. For the second Part and after, you can skip step 1 and proceed from “Step 2 Start Recording.”* Any performance that has been recorded is deleted when the power to the KR is turned off. It is a good idea to save song data to a floppy disk or user memory. For more information, refer to “Saving Songs” (p. 101).Changing the Recording Method (Rec Mode)You can use any of the four methods below to record with the KR.Although you will normally be using “Replace Recording,” where previously recorded material is erased when new sounds are recorded, you’ll find that you can record songs easily by using this method in combination with other recording methods.Replace Recording (p. 117)This is the normal method for recording. New material is recorded as previously recorded material is erased.Mix Recording (p. 117)New notes are recorded on top of notes previously recorded.This convenient feature makes it easy for you to record melodies over prerecorded accompaniment.Loop Recording (p. 117)Specified measures are recorded repeatedly, while new notes are combined with existing music. A convenient feature for creating rhythm parts. Loop Recording allows you to record over and over within a selected segment, adding a different percussion sound with each pass.Punch-in Recording (p. 118)You can re-record only a specified passage as you listen to a recorded performance.→Immediately after the power is turned on, Replace Recording is selected.Changing the Recording Method1. Press the [Menu] button.The Menu screen appears.fig.d-menu1.eps_50](https://usermanual.wiki/Roland/KR107.USERS-MANUAL-3/User-Guide-520895-Page-19.png)
![117Chapter 7 Creating and Editing SongsChapter 72. Touch <Rec Mode>.A “Rec Mode screen” like the following appears.fig.d-recmode.eps_503. Touch <Rec Mode> to select the recording mode.4. Press the [Exit] button.Returns to the Menu screen.■Recording While Erasing the Previous Recording (Replace Recording)The recording process where previous material is erased as new material is recorded is called “replace recording.” This setting is in effect when you turn on the power.1. In the “Rec Mode screen” (p. 116), select <Replace>.Press the [Exit] button to return to the Menu screen.The KR is set to the replace recording mode.Record the performance using the procedures described in Chapter 4 (p. 89), “Multitrack Recording with 16 Parts (16-Track Sequencer)” (p. 113).■Layering a Recording Over Previously Recorded Sounds (Mix Recording)You can record a performance layered over a previously recorded performance. This method is called “Mix Recording.”1. In the “Rec Mode screen” (p. 116), select <Mix>.Press the [Exit] button to return to the Menu screen.Record the performance using the procedures described in “Recording While Selecting the Track Buttons (Redoing Recordings)” (p. 95), “Multitrack Recording with 16 Parts (16-Track Sequencer)” (p. 113), or other methods.* After you have finished with mix recording, return to the usual replace recording mode.■Repeated Recording at the Same Location (Loop Recording)You can record a specified passage over and over, layering sounds with each pass. This method is called “Loop Recording.” This is handy when recording a Rhythm Part.For example, use this method to make a Loop Recording of a four-measure segment. First record the bass drum, the snare drum next, then the hi-hat and so on, layering a different instrument onto the same four measures. After you have finished recording the four-measure rhythm pattern, you can then use the procedure in “Copying Measures (Copy)” (p. 122) to create as many copies of the four measures as you need to complete your Rhythm part.1. Place A and B markers at the beginning and end of the passage you want to record.Take a look at “Setting Markers for Repeated Practice (Marker)” (p. 84).If you haven’t recorded anything yet, then use “Blank Recording” to create the necessary number of measures before placing the markers.Display Recording MethodReplace Replace RecordingMix Mix RecordingLoop Loop RecordingAuto Punch-In/OutPunch-in recording of the interval between set markers.Manual Punch-In/OutPunch-in recording starting from the point at which the pedal, the Performance Pad or the [ (Rec)] button is pressed.For more about Punch In Recording, refer to p. 118. Tempo You can add tempo changes to a recorded composition. See p. 127.](https://usermanual.wiki/Roland/KR107.USERS-MANUAL-3/User-Guide-520895-Page-20.png)
![118Chapter 7 Creating and Editing SongsChapter 72. In the Rec Mode screen (p. 116), select <Loop>.Press the [Exit] button to return to the menu screen.The recording method changes to loop recording.3. Press the [ (Rec)] button.4. Press the Track button for the track to be recorded.The KR is put in recording standby.5. Press the [ (Play/Stop)] button to begin recording.Recording starts from Marker A.When the song reaches Marker B, it then returns to Marker A, where recording continues.Each time the recording is looped, the newest sounds are layered over previously recorded sounds.6. When you press the [ (Play/Stop)] button, recording stops.* After you have finished with loop recording, return to the usual replace recording mode (p. 116).■Re-Recording Part of Your Performance (Punch-in Recording)You can re-record part of a passage as you listen to a recorded performance. This recording method is called “Punch-in Recording.” This convenient function lets you record over a specified points in a part as you listen to a prerecorded performance in another section.User Punch-In Recording by the following two methods:Recording the Region Defined by Markers A and B (Auto Punch-In/Out)Before you start recording, place markers A and B to define the passage you want to re-record. Make the setting for punch-in recording, and re-record just the passage between markers A and B.Recording From the Point at Which the Pedal or Buttons Are Pressed (Manual Punch-In/Out)You can play back a performance and depress the pedal at the desired place to start re-recording. Depressing the pedal a second time cancels recording and returns you to playback.Instead of pressing the pedal, you can press a performance pad or the[ (Rec)] button to start and cancel recording.❍Recording a Passage Specified by Markers1. Before you start re-recording, place markers A and B to define the passage.Following the procedures described in “Setting Markers What is Blank Recording?Blank Recording is recording a number of silent measures with no content.1. Set the basic tempo and beat of the song.2. Hold down the [ (Rec)] button and press the [ (Play/Stop)] button.The indicators for the [ (Rec)] and [ (Play/Stop)] buttons both light up, then after two measures of the count sound, recording begins.3. Without performing anything, record only the required number of measures, then press the [ (Play/Stop)] button.The indicators for the [ (Rec)] and [ (Play/Stop)] buttons both go out, and recording stops.Loop Recording ShortcutYou can also use the method described below to set Loop Recording.1. Place A and B markers at the beginning and end of the passage you want to record.Take a look at “Setting Markers for Repeated Practice (Marker)” (p. 84).If you haven’t recorded anything yet, then perform “Blank Recording” for the necessary number of measures before placing the markers.2. Touch the <Repeat> icon in the Marker screen (p. 84).This sets the loop recording mode.Start a recording.* After you have finished with loop recording, touch the <Repeat> icon in the “Marker screen” once more to return to the usual replace recording mode.](https://usermanual.wiki/Roland/KR107.USERS-MANUAL-3/User-Guide-520895-Page-21.png)
![119Chapter 7 Creating and Editing SongsChapter 7for Repeated Practice (Marker)” (p. 84), use Markers A and B to specify the passage.2. In the Rec Mode screen (p. 116), select <Auto Punch-In/Out>.fig.d-rec-punch.eps_50This changes the recording mode to “Punch-In Recording.”Press the [Exit] button to return to the Menu screen.3. Begin recording.Begin recording using the procedures described in “Recording While Selecting the Track Buttons (Redoing Recordings)” (p. 95) or “Multitrack Recording with 16 Parts (16-Track Sequencer)” (p. 113).Up until the specified passage, the previously recorded performance plays back.When you reach the specified passage, sounds are erased as recording starts; begin playing now.When you reach the end of the specified passage, recording stops, and the KR returns to playback of the previously recorded performance.4. When you press the [ (Play/Stop)] button, the song stops.❍Starting Recording from the Measure Specified by Buttons and PedalsIf using the Performance Pads or pedals, you must first change the function of the pedals and Pads. Follow the procedures in “Assigning Functions to Pedals and Performance Pads (Pedal Setting/User Functions)” (p. 142), and assign <Auto Punch-In/Out> to the buttons or pedal.1. In the Rec Mode screen (p. 116), select <Manual Punch-In/Out>.This changes the recording mode to “Punch-In Recording.”Press the [Exit] button to return to the Menu screen.2. Begin recording.Begin recording using the procedures described in “Recording While Selecting the Track Buttons (Redoing Recordings)” (p. 95) or “Multitrack Recording with 16 Parts (16-Track Sequencer)” (p. 113).The previously recorded performance will be played back.Press the pedal to which Punch In/Out is assigned (p. 139), a performance pad, or the [[ (Rec)]] button to begin recording, then start your performance.Recording stops when you press the pedal, the Performance Pad, or the [ (Rec)] button again, and the previously recorded performance is played back.3. When you press the [ (Play/Stop)] button, the performance stops.* When you’re finished with Punch-In Recording, return to the ordinary Replace Recording mode. Take a look at “Changing the Recording Method” (p. 116).](https://usermanual.wiki/Roland/KR107.USERS-MANUAL-3/User-Guide-520895-Page-22.png)
![120Chapter 7 Creating and Editing SongsChapter 7Composing an Accompaniment By Entering Chords (Chord Sequencer)You can enter a chord progression and choose the places where the accompaniment pattern will change to create an accompaniment for a song. This feature is called “Chord Sequencer.”Thanks to the chord sequencer, you can create an accompaniment ahead of time and play along with your right hand.1. Press the [Menu] button and watch the indicator light up.The Menu screen appears. 2. Touch <Chord Sequencer>. The screen like the one shown below is called “Chord Sequencer screen.” fig.d-chordseq.eps_503. Press a Music Style button or the touch screen to select a Music Style (p. 50). 4. Press the [Exit] button. You are returned to the Chord Sequencer screen. 5. Enter the chord progression and the accompaniment pattern.Refer to “Inputting Chords with the Chord Sequencer.”6. When you have finished inputting all the data, touch <Execute>. The accompaniment you’ve composed is registered at “0: New Song.” When storage of the data is complete, return to the Menu screen.Now, press the [ (Play/Stop)] button, and try playing the melody along with the accompaniment you created.* Songs you’ve created are discarded as soon as you turn off the power. If you do not want to delete the song, save it to a floppy disk or to user memory. Refer to “Saving Songs” (p. 101).Inputting Chords with the Chord Sequencer1. Use the dial to move the cursor to the input position.Use the [ (Bwd)] and [ (Fwd)] buttons to move the cursor one measure at a time. 2. Enter the chord progression and the changes in the accompaniment pattern and arrangement.Just as when performing with Automatic Accompaniment, press the keys to specify a chord, and press a button to select the accompaniment pattern (p. 57). You can change the Style Orchestrator with the Performance Pads (p. 58).3. Touch <Ins> once to insert one measure before the measure where the cursor is currently positioned.If you touch <Del>, the measure where the cursor is currently positioned is deleted, while the measures that follow are moved forward.To remove what you have input, move the cursor to the position with input you want to delete, then touch <Clear>. This deletes the entered setting.→You can only insert an intro at the beginning of a song. When you add an intro, the number of bars corresponding to the length of the intro is inserted automatically.Display ExplanationIns One measure is inserted before the measure where the cursor is positioned.Del The measure in which the cursor is positioned is deleted.ChordsAllows input of chords without playing the keyboard. Refer to “Inputting Chords without Playing the Keyboard” (p. 121).All Clear Deletes all of the data that’s been input.Clear Deletes the data at the cursor position.ExecuteRecords the input chord progression. Touch this icon when you have finished inputting all of the chords.This is the end of the song. When continuing to add input, insert measures by touching <Ins>.This is the “cursor.” The cursor shows where the chord change or other information is input.This indicates the position where the accompaniment pattern (Division) or the Style Orchestrator changes.Change the accompaniment arrangements Move the cursorSelect the accompaniment pattern (Division)](https://usermanual.wiki/Roland/KR107.USERS-MANUAL-3/User-Guide-520895-Page-23.png)
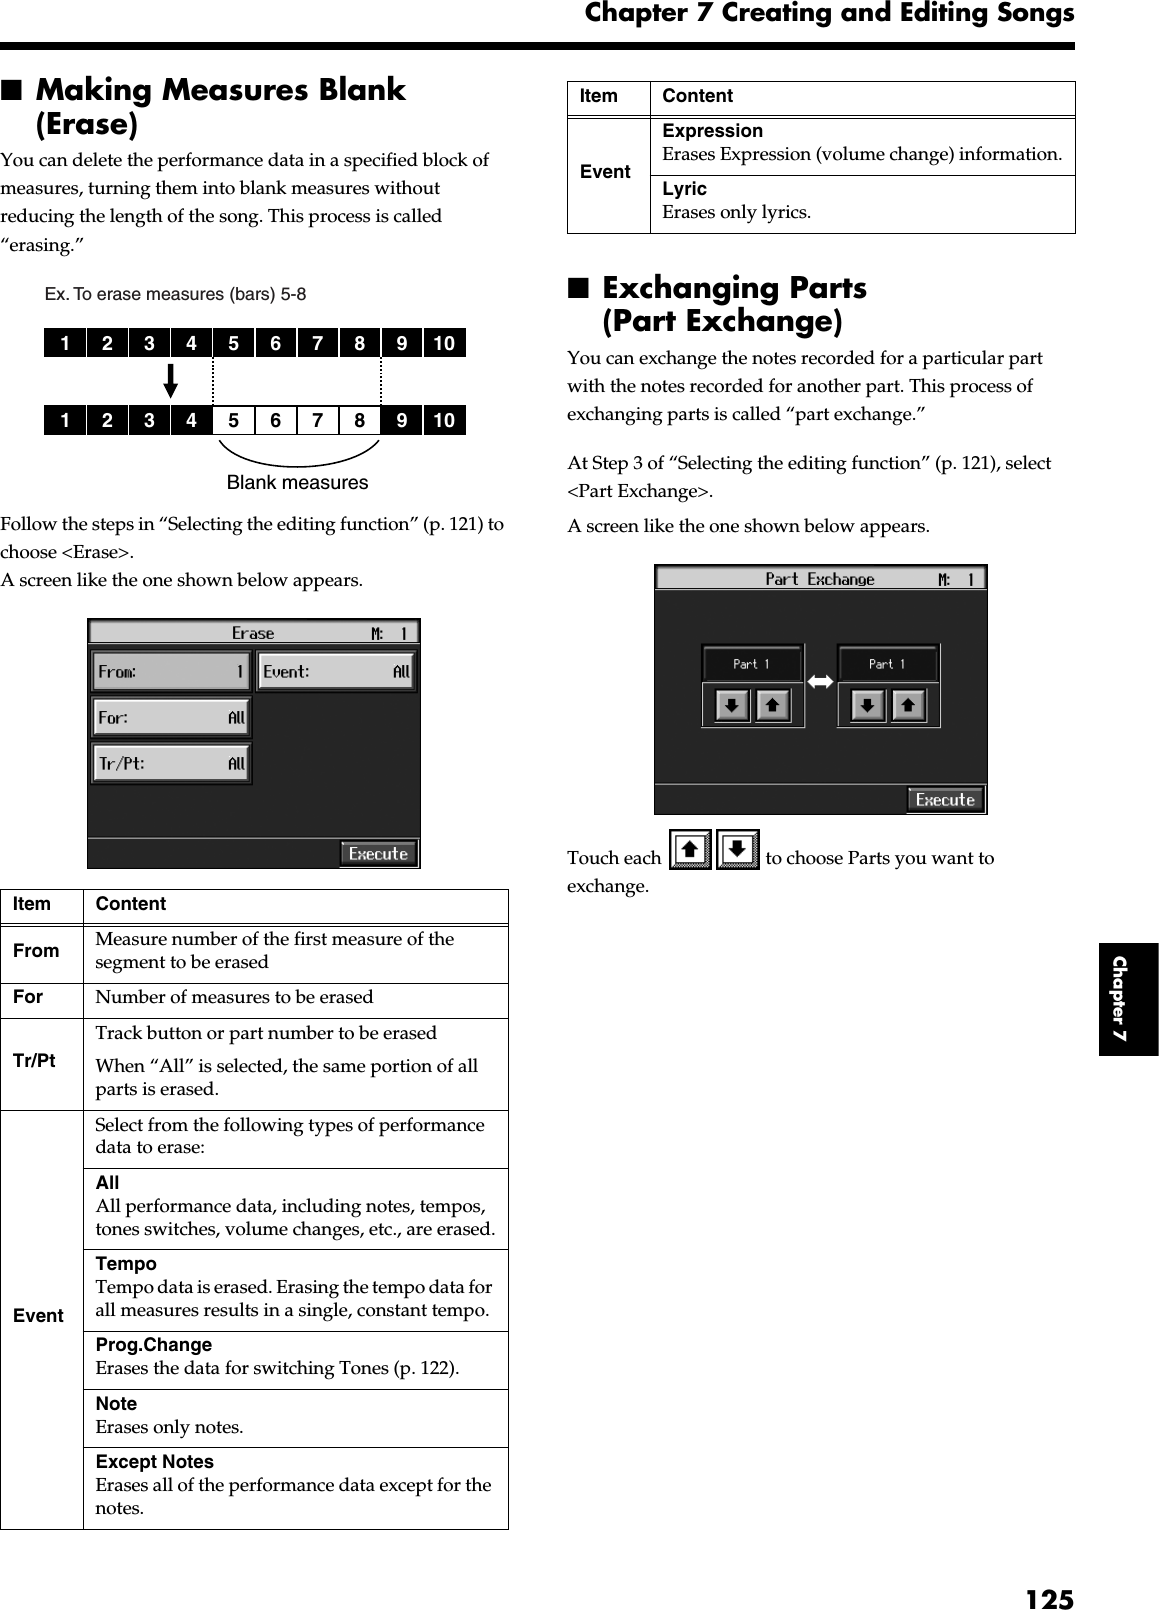
![121Chapter 7 Creating and Editing SongsChapter 7Functions That Can Be Assigned to the Pedals and the Performance Pads→For instructions on assigning functions, refer to “Assigning Functions to Pedals and Performance Pads (Pedal Setting/User Functions)” (p. 142).• Inputting a short Intro and EndingAssign “Intro 2/Ending 2" to a pedal or pad.• Inputting a “Variation” or “Original” without a Fill-InAssign “Original/Variation” to a pedal or pad.• Using the keyboard to input slash chords (such as Fm/C)Assign “Leading Bass” to a pedal or pad.• Inputting a break somewhere within the songAssign “Break” to a pedal or pad.• Insert half fill-ins (fill-ins lasting half a measure)Assign “Half Fill In” to a pedal or pad.Check the accompaniment you insertedHere’s how to play back as much of the accompaniment as you have input.1. Press the [ (Reset)] button to return to the beginning of the song.2. When you press the [ (Play/Stop)] button, the performance is played back.3. Playback stops when you press the [ (Play/Stop)] button once more.■Inputting Chords without Playing the Keyboard You can use <Chords> at the bottom right of the Chord Sequencer screen to specify chords on the screen. 1. At the Chord Sequencer screen, touch <Chords>. A screen like the one shown below appears. fig.d-chordinput.eps_502. Touch in each to specify the chords. 3. Touch <Execute> to enter the chord. You are returned to the Chord Sequencer screen. Editing SongsThere are many ways you can edit performances recorded using the KR Track button or 16-track sequencer.■Basic Operation of the Editing Functions* While songs are being loaded, the measure number in the upper right of the screen is highlighted (text and background are inverted). Start editing the song only after the measure number is no longer highlighted.Selecting the editing function1.Press the [Menu] button and watch the indicator light up.The Menu screen appears.2. Touch <Song Edit>.A “Song Edit screen” like the following appears.fig.d-edit1.eps_503. Touch an editing function to select that function.For more detailed information, refer to the corresponding page for each function.Function Explanation PageUndo Undoes editing operations that have been performed. p. 122Copy Copies measures and internal rhythm patterns.p. 122, p. 137Quantize Evens out sounds in recorded performances. p. 123Delete Deletes measures. p. 123Insert Inserts a blank measure. p. 124Transpose Transposes parts individually. p. 124Erase Erases data in measures, creating blank measures. p. 125Part Exchange Exchanges the sounds in parts. p. 125Note Edit Allows corrections to be made note by note. p. 126PC Edit Allows editing of the Tones changes that occur during a song. p. 126](https://usermanual.wiki/Roland/KR107.USERS-MANUAL-3/User-Guide-520895-Page-24.png)
![122Chapter 7 Creating and Editing SongsChapter 7→”PC” stands for “Program Change,” which is a command that tells an instrument to change the sound it’s using. With songs that rely on the use of a variety of sounds, a “PC” needs to be located at every point within the song where the Tone is to be changed* Some edits can’t be undone, not even by choosing “Undo.” We recommend saving songs to floppy disks or to user memory before editing. For more on how to save songs, refer to “Saving Songs” (p. 101).Editing4. Touch the item to be edited.The background of the item being set turns orange.5. Set the value with the [-] [+] buttons or the dial. To cancel the operation once it is underway, press the [Exit] button.6. When you’re done making all the settings, touch <Execute>.When you are finished editing the setting, return to the “Song Edit screen.”Press the [Exit] button to return to the Menu screen.→You can play back edited songs by pressing the [ (Play/Stop)] button in the “Song Edit screen.”■Undoing Edits (Undo)You can cancel an editing operation that you’ve just carried out. This is handy when you want to undo an edit and restore data to the way it was before.* There are some edits that can’t be restored.At Step 3 of “Selecting the editing function” (p. 121), select <Undo>.Editing functions that can be undone appear on screen.fig.d-e-undo.eps_50If you touch <Cancel>, the undo is cancelled, and you’re returned to the Song Edit screen.If you touch <OK>, the confirmation message appears on screen. Touch <OK> to undone the most recent edit.■Copying Measures (Copy)You can copy a portion of a performance to a different bar in the same Part or to a measure in another Part. This is handy when you’re composing a song that repeats a similar phrase.fig.e-copy.eAt Step 3 of “Selecting the editing function” (p. 121), select <Copy>.A screen like the one shown below appears.fig.d-e-copy.eps_50Item ContentFrom Measure number of the first measure of the segment to be copiedFor Number of measures to be copiedSrcCopy-source Track button or part number Choosing “All” copies all Parts. “- - -” appears in the <Dst> column. If you choose a Track button, you can only copy to the selected Track button. You cannot copy to the other Track buttons.ToCopy-destination measure numberWhen “End” is selected, the data is copied to the end of the song.Times Number of times the data is to be copiedDst Copy-destination part numberModeData can be copied in the following three ways:Replace If there is a performance recorded at the copy destination, this previous recording is erased, and the copied data is written in its place.Mix If there is a performance recorded at the copy destination, the copied data is layered over the previous recording. If the Tones used for the copy source and copy destination are different, the copy-destination Tone is used.123456712345678910Ex. To copy measures 5-7 to measure 8.](https://usermanual.wiki/Roland/KR107.USERS-MANUAL-3/User-Guide-520895-Page-25.png)
![126Chapter 7 Creating and Editing SongsChapter 7■Correcting Notes One by One (Note Edit)You can make corrections in a recorded performance one note at a time. This process of making changes in individual notes is called “note editing.”You can make these corrections by using note editing:• Deleting misplayed notes• Changing the scale of a single note• Changing the force used in playing a single key (velocity)• Change the fingeringAt Step 3 of “Selecting the editing function” (p. 121), select <Note Edit>.A screen like the one shown below appears.fig.e-note.eThe note-location display uses “Measure: Beat: Tick” as the format. A tick is a unit of time that’s shorter than a beat.Touch to select the part with the note to be corrected. The Part number appears at the top of the screen.Use the [ (Bwd)] button and the [ (Fwd)] button or use < > < > in the upper part of the screen to find the note to be corrected.When you’ve found the note you want to correct, touch “Pitch” or “Velocity” for the note.Use the [-] [+] buttons and the dial to correct the pitch or velocity. If you want to delete the note, touch <Delete>.When you’re done making all the settings, press the [Exit] button.Return to the Song Edit screen.■Modifying the Tone Changes in a Song (PC Edit)In some songs, the instrument sound changes during the course of the song (that is, the Tone changes in the middle of a Part). In such songs, an instruction to switch the Tone is inserted at the place where you want the sound to change. This instruction is called a “Program Change” (PC), and actions such as deleting program changes, or changing the selected Tone by them are called “PC editing.”* It is not possible to insert a program change into a measure or beat that does not contain a program change.At Step 3 of “Selecting the editing function” (p. 121), select <PC Edit>.A screen like the one shown below appears.fig.d-e-pc.eps_50The PC-location display uses “Measure: Beat: Tick” as the format. A tick is a unit of time that’s shorter than a beat.Touch to select the part with the program change to be edited.The Part number appears at the top of the screen.Use the [ (Bwd)] button and the [ (Fwd)] button or use < > < > in the upper part of the screen to find the program change to be edited.When you’ve found the Program Change you want to modify, touch “Tone Name” on the screen.Press a Tone button to select a Tone group, then select a Tone with the [-] [+] buttons and the dial. When selecting Part 10 or 11, select the drum set or effect sound.If you want to delete the Program Change, touch <Delete>.When you’re done making all the settings, press the [Exit] button.Location Pitch VelocityLocation Tone name](https://usermanual.wiki/Roland/KR107.USERS-MANUAL-3/User-Guide-520895-Page-29.png)
![127Chapter 7 Creating and Editing SongsChapter 7Changing the Beat in the Middle of a Song (Beat Map)You can create songs that have beat changes during the course of the song.* You can’t change a song’s beat once it’s been recorded. Before recording the performance, determine the beat to be used.1. Press the [Menu] button.The Menu screen appears.2. Touch <Beat Map>.A screen like the one shown below appears.fig.d-beatmap.eps_503. Use < >< > in the screen or the [ (Bwd)] and [ (Fwd)] buttons to move to the measure whose beat you want to change.The measure number appears in the top-right area of the screen.Touch < > to move to the beginning of the song.Touch < > to move to the end of the song.4. Touch in each to set the beat.5. Touch <Execute>.The beat change starts with the measure you selected.Repeat Steps 3–5 to make beat settings in other measures as needed.Recording the performance6. Press the [Exit] button twice.The screen displayed before you pressed the [Menu] button appears.7. Press the [ (Reset)] button to return the measure number to “1.”8. Start a recording.Record the performance using the procedures described in “Chapter 5 Recording and Saving the Performance” (p. 89). Specify the measure, then change the beat.Changing the Tempo of Recorded SongsYou can change the basic tempo of a composition. The basic tempo was initially set when the song was recorded.1. Press the Tempo [-] and [+] buttons to choose a tempo.2. Hold down the [ (Rec)] button and press the [ (Reset)] button.The song’s basic tempo changes.The change in basic tempo is discarded when you turn off the power or choose a different song. Save important song data to floppy disks or to user memory (p. 101).* If the song you’re working on has tempo changes, press the [ (Reset)] button to go back to the beginning of the song before you carry out this operation.Changing the Tempo Within the SongYou can add tempo changes to a recorded composition.The KR stores song tempo information and performance data separately. Therefore, when making changes to the tempo in a song, you must record the changes in the tempo information independently of the performance data.This recording of the tempo is called “Tempo Recording.”■Adjusting the Tempo While Listening to a SongYou can add ritardando and other such gradual tempo changes.Setting the Rec Mode to “Tempo”1. Press the [Menu] button.The Menu screen appears.2. Touch <Rec Mode>.A screen like the one shown below appears.fig.d-rec-tempo.eps_50](https://usermanual.wiki/Roland/KR107.USERS-MANUAL-3/User-Guide-520895-Page-30.png)
![128Chapter 7 Creating and Editing SongsChapter 73. Touch the <Rec Mode> to select <Tempo>.This makes the setting for tempo recording.Press the [Exit] button a number of times to switch to the screen where the measure number is indicated in the upper right of the screen.When the KR goes into Tempo Recording, the tempo indication is highlighted.Recording the Tempo4. Use the [ (Bwd)] and [ (Fwd)] buttons to move slightly before the measure where you want to change the tempo.5. Press the [ (Rec)] button and watch the indicator is flashing.The KR is put in recording standby.6. When you press the [ (Play/Stop)] button, recording begins.7. When you get to the place where you want to change the tempo, use the Tempo [-] and [+] buttons or the dial to vary the tempo as desired.8. When you press the [ (Play/Stop)] button, recording stops.The song’s tempo changes.* You cannot record performances while in Tempo Recording mode. When you’re finished tempo recording, go back to the ordinary Replace Recording. Take a look at “Changing the Recording Method (Rec Mode)” (p. 116).■Adjusting the Tempo at a Particular MeasureYou can create a tempo change at the beginning of a selected measure. This is handy when you want to make a sudden change in tempo.First, carry out Steps 1–3 of “Changing the Tempo Within the Song” (p. 127) to make the “Tempo Recording” settings.1. Use the [ (Bwd)] and [ (Fwd)] buttons to move to the measure where you want to change the tempo.The measure number appears in the top-right area of the Basic screen.2. Press the [ (Rec)] button and watch the indicator is flashing.The KR is put in recording standby.3. Use the [-] [+] buttons or the dial to change the tempo.4. Press the [ (Play/Stop)] button.The song’s tempo changes starts with the measure you selected.→While tempo recording is being used to write tempo, the tempo display in the screen will be highlighted.5. When you press the [ (Play/Stop)] button, the change in tempo stops.* You cannot record performances while in Tempo Recording mode. When you’re finished tempo recording, go back to the ordinary Replace Recording. Take a look at “Changing the Recording Method (Rec Mode)” (p. 116).→If you want to restore the previous tempo, delete the tempo data at the place where the tempo was recorded. For an explanation of how to delete the information of tempo settings, refer to “Making Measures Blank (Erase)” (p. 125).Tempo Recording ShortcutHold down the [ (Rec)] button and press one of the Tempo [-] [+] buttons to switch to the Tempo Recording settings. Record tempo information. In this case, tempo recording is canceled when recording ends.](https://usermanual.wiki/Roland/KR107.USERS-MANUAL-3/User-Guide-520895-Page-31.png)
![129Chapter 8Chapter 8 Creating Music StylesCreating Original Styles (User Styles)Although the KR features a variety of internal Music Styles, you can also create your own. These original Styles are called “User Styles.”You can use either of the two methods described below to create a User Style.Style ComposerWith this method, you combine internal Music Styles to create new Styles. You can create a new Style by selecting from among the Rhythm, Bass, Accompaniment 1, Accompaniment 2, Accompaniment 3, Accompaniment 4, Accompaniment 5, and Accompaniment 6 parts in different styles.Style Converter (p. 131)Create a new Style by extracting the portions you need from songs composed with the 16-track sequencer.When you’re composing a song, there’s no need to specify all the chords. You can specify just some of the chords, and the KR automatically chooses the other chords and arranges the Style.Style Converter features an “Auto mode” that allows you to easily create Styles from songs with a single chord, and a “Manual mode,” in which you create Styles from songs with three kinds of chords–major, minor, and seventh chords.■Creating New Styles by Combining Internal Music Styles (Style Composer)You can create a new style by selecting from among the Rhythm, Bass, Accompaniment 1, Accompaniment 2, Accompaniment 3, Accompaniment 4, Accompaniment 5,and Accompaniment 6 parts in different Styles. This function is called the “Style Composer.”* You can only combine the KR’s built-in Styles.Displaying the Style Composer Screen1. Press the [Menu] button.The Menu screen appears.fig.d-menu1.eps_502. Touch <Style Composer>.* If a User Style has already been recorded, a message like the one shown below appears.fig.m-styledel.epsTouch <Cancel> to return to the Menu screen. Save User Styles to floppy disks, or to user memory (p. 134).When you touch <OK>, the previously recorded User Style is deleted, and a new User Style is created.](https://usermanual.wiki/Roland/KR107.USERS-MANUAL-3/User-Guide-520895-Page-32.png)
![130Chapter 8 Creating Music StylesChapter 8A “Style Composer screen” like the one shown below appears.fig.d-stylecomp.eps_50Selecting the Styles assigned to each part3. Touch the part to be set.The button for the touched part being set turns orange.4. Press an Music Style button, then select a Style with the touch screen or the [-]/[+] buttons and the dial.When you have decided on a Style, press the [Exit] button to display the Style Composer screen.5. Repeat steps 3 and 4 to determine the Styles for each Part.Deciding on a Style6. Touch <Execute>.You have created a new Style.The User Style is recorded to the Music Style [User] button. Try playing with the new Style.* If you turn off the power or record a new User Style, any User Style you’ve previously recorded is lost. If you do not want to delete the Style, save it to a floppy disk or to user memory. Take a look at “Saving a User Style” (p. 134).❍Muting Parts for a particular divisionYou can mute the sound of particular Parts in specific Divisions.For example, all parts are played when you use a “Variation” accompaniment pattern, whereas if you select the “Original” accompaniment pattern, every part other than “Accompaniment 1" is muted. With this arrangement, when the accompaniment pattern changes from the original to the variation, it creates a more elaborate effect in the accompaniment.→For more on Divisions, refer to the “Style Arrangements” (p. 131).1. Touch the Style Composer screen to choose the Part you want to mute out.2. Press the Fill In [To Variation] or [To Original] button to switch to the division that you want to mute.3. Touch <Mute> on the screen.The Part you chose is only muted out in the Division you selected.If you want to hear the muted-out Part, touch <Mute> again.* To mute out a Division that changes after a few seconds (intro, ending, or fill-in), touch <Mute> immediately after switching to the Division.Display PartRRhythmBBassA1 Accompaniment 1A2 Accompaniment 2A3 Accompaniment 3A4 Accompaniment 4A5 Accompaniment 5A6 Accompaniment 6Icon FunctionAll Clear Deletes all of the settings.MuteYou can mute the sound of particular Parts in specific Divisions. For more information, take a look at “Muting Parts for a particular division” (p. 130).Clear Deletes the Styles in selected parts.OptionsThe Part Settings screen is displayed, allowing you to make detailed settings to each part. For more information, take a look at “Editing the volume and effect settings for each Part” (p. 131).ExecuteRecords the created Style to the Music Style [User] button. Touch this when you have finished creating the Style.](https://usermanual.wiki/Roland/KR107.USERS-MANUAL-3/User-Guide-520895-Page-33.png)
![131Chapter 8 Creating Music StylesChapter 8❍Editing the volume and effect settings for each PartDisplaying the Part settings screen1. At the Style Composer screen, touch <Part>.A screen like the one shown below appears.fig.d-scomp-part.eps_50Modifying the settings of each part2. Touch the to select the part with the settings to be changed.The part name and Tone name are indicated in the upper part of the screen.3. Touch for each parameter to change the value.You can also change the values by touching each parameter name and then using the dial. You can change the Tone for the selected Part by pressing a Tone button to change the Tone while this screen is displayed. When selecting Rhythm Part, you can touch <Drum Set> to select the drum set or effect sound.Finishing the settings4. Press the [Exit] button.The Style Composer screen appears.■Creating a Style from a Song You Composed Yourself (Style Converter)You can take a song you’ve composed yourself and extract the portions you need to create your own original Style. When you’re composing a song, there’s no need to specify all the chords. You can specify some of the chords, and the KR automatically chooses the other chords and arranges the style. This function is called the “Style Converter.”Style Converter features an “Auto mode” that allows you to easily create Styles from songs with a single chord, and a “Manual mode,” in which you create Styles from songs with three kinds of chords–major, minor, and seventh chords.When creating a song in order to create an music style, it’s good practice to consider the arrangement of the music style.Style ArrangementsMusic Styles created with the Style Converter function are composed of eight parts: “Rhythm,” “Bass,”“Accompaniment 1,“”Accompaniment 2,” “Accompaniment 3,””Accompaniment 4,“”Accompaniment 5,” “Accompaniment 6.”A song progresses in predictable a sequence, such as intro, melody A, melody B, bridge and ending.With the KR, such changes in songs are allocated to the following six performance states. We call these six parts of a song “Divisions.”You can make a song more lively or more restrained by increasing or reducing played parts by Divisions. You can also modify a song by changing the Tone of the parts in the Divisions.Display ExplanationVolume Adjusts the volume.Reverb Adjusts the amount of reverb effect applied to the sound.Chorus Adjusts the amount of chorus effect applied to the sound.PanpotChanges the left-right direction from which the sound appears to come. When you touch , the sound moves to the right; touch to move the sound to the left.Division Performance divisionIntro The intro is played at the start of a song.Ending This is played at the end of a song.Original This is a basic accompaniment pattern.Variation This is a developmental accompaniment pattern. It is a variation on an Original.Fill-In To VariationThis is a one-measure phrase inserted at a juncture where the mood changes. It is used to make a song more lively.Fill-In To OriginalThis is a one-measure phrase inserted at a juncture where the mood changes. It is used to make a song more sedate.](https://usermanual.wiki/Roland/KR107.USERS-MANUAL-3/User-Guide-520895-Page-34.png)
![132Chapter 8 Creating Music StylesChapter 8❍Creating Styles in Auto ModePoints to note when creating songs• Use one of the major, minor, or diminished seventh chords to create the song. We recommend using diminished seventh chords to compose the song.• It is convenient to record the sounds shown below for the Parts of the 16-track sequencer.→When using parts other than Part 2, 7, 8, 9, and D, refer to “Changing an Extracted Part” (p. 133).Creating songs1. Use the 16-track sequencer to record the song.Record the song after referring to “Multitrack Recording with 16 Parts (16-Track Sequencer)” (p. 113) and other related sections.When using music data, first select a song (p. 64).Displaying the Style Converter screen2. Press the [Menu] button.The Menu screen appears.3. Touch <Style Converter>.* If no song for use in creating a new Style is selected, the message “Please select a song” appears. Use the [Select/Listen to a Song] button to select a song (p. 64), then start the procedure again.* If a User Style has already been recorded, a message like the one shown below appears.fig.m-styledel.epsTouch <Cancel> to return to the Menu screen. Please save the User Style on a floppy disk or in the internal memory (p. 134).When you touch <OK>, the previously recorded User Style is deleted, and a new User Style is created.A “Style Converter screen” like the one shown appears.fig.d-styleconv.eps_50Making the settings4. Touch <Conv.Mode>, then use the [-] [+] buttons or the dial to switch the mode to “Auto.”This makes the setting for the Auto mode.5. Touch <Chord Root> and <Chord Type>, then use the dial to input the chord root and type for the segment to be extracted.6. Touch <Division>, then use the dial to select the Division.* Only one measure can be extracted when “Fill To Vari” or “Fill To Ori” is selected for the Division. The number of measures may also be limited in other Divisions.Rhythm Bass Accomp1Accomp2Accomp3D (10) 2 7 8 9 Parameter NameSettings ContentConv.Mode Switches the mode (Auto/Manual)Chord Root Chord root for the segment to be extractedChord Type Chord type for the segment to be extracted (major/minor/seventh)Division DivisionFrom Measure number of the first measure of the segment to be extractedFor Number of measures extractedDisplay Performance divisionIntro IntroOriginal Original accompaniment patternFill To Vari From the fill-in to the variationVariation Variation accompaniment patternFill To Ori From the fill-in to the originalEnding Ending](https://usermanual.wiki/Roland/KR107.USERS-MANUAL-3/User-Guide-520895-Page-35.png)
![133Chapter 8 Creating Music StylesChapter 87. Touch <From> and <For>, then use the [-] [+] buttons or the dial to select the measures to be extracted.Touching <Play> at the bottom of the screen, you can listen to performance of the portion which you chose.8. Repeat Steps 5–7 to create Styles for all of the Divisions.* If no setting is made for a Division, it uses a simple drum pattern.Deciding on a Style9. When you’re done making all the Division settings, touch <Execute>.The User Style is recorded to the [User] button.* If you turn off the power or record a new User Style, any User Style you’ve previously recorded is lost. If you do not want to delete the Style, save it to a floppy disk or to user memory. Take a look at “Saving a User Style” (p. 134).* The following data is saved to the User Style. If a song includes data other than this, the results you get might not be what was intended. • Keyboard performance data• Amount of Reverb effect applied• Amount of Chorus effect applied❍Creating a Style in Manual ModeWhen you create a Music Style in the Manual mode, you can clearly point up the differences in accompaniment for each individual chord.Points to note when creating songs• Record your performance with the three chord types of diminished seventh, major, and minor.• It is convenient to record the sounds shown below for the Parts of the 16-track sequencer.→The chords all share the same Rhythm Part.→If you want to use the performance of other part, check out “Changing an Extracted Part” (p. 133)Creating songs1. Use the 16-track sequencer to record the song.Record the song after referring to “Multitrack Recording with 16 Parts (16-Track Sequencer)” (p. 113) and other related sections.When using music data, first select a song (p. 64).Displaying the Style Converter screen2. Press the [Menu] button.3. Touch <Style Converter>.The “Style Converter screen” appears.4. Touch <Conv.Mode>, then use the dial to switch the mode to “Manual.”This makes the setting for the Manual mode.After that, the steps are the same as for “Creating Styles in Auto Mode” (p. 132).When you touch <Play> in the lower part of the screen, you can listen to the performance of the part selected with <Options>.❍Changing an Extracted PartYou can extract and change part of a song created with 16-track sequencer.1. At the Style Converter screen (p. 132), touch <Part>.A screen like the one shown below appears.fig.d-styleconv.eps_502. Touch the performance Part with settings you want to change.3. Use the dial to specify which 16-track Sequencer performance part you want to extract.→In the Manual mode, the type of chords appear at the bottom of the screen. Set the Parts for all chords.4. Press the [Exit] button to return to the Style Converter screen.The Style Converter screen appears.Chords Rhythm Bass Accomp 1Accomp 2Accomp 3Major D (10) 3 4 5 6Seventh - 2 7 8 9Minor - 12 13 14 15](https://usermanual.wiki/Roland/KR107.USERS-MANUAL-3/User-Guide-520895-Page-36.png)
![134Chapter 8 Creating Music StylesChapter 8Saving a User StyleYou can save the User Styles you create to floppy disks and the user memory. When saved to the user memory, User Styles are not deleted when the power is turned off. You can also select Styles saved to the user memory by pressing the Music Style [User] button.You can save up to 99 User Styles in user memory.What is the User Memory?The user memory is the area within the instrument where User Styles created with the KR, sets of User Programs, and other such data are stored.You can also copy User Styles and sets of User Programs saved on floppy disks.Data saved to the user memory is not deleted, even when the KR’s power is turned off.→When you want to clear all of the content saved to the user memory and restore the settings to the factory settings, refer to “Formatting the User Memory” (p. 150).Preparations for saving dataWhen saving to an external memory, first connect a external memory to the external memory port.1. Press the Music Style [User] button.A “User Style screen” like the following appears.fig.d-usrdisk.eps_50If the User Style screen is not displayed, touch <User> in the lower part of the screen.2. Touch <User>.3. Touch <File>.4. Touch <Save>.A “Save Style screen” like the following appears.NOTEThis function is not available with songs on CDs.fig.d-stylesave.eps_50Determining the name of the Style to be saved5. Touch <Rename>.A “Rename screen” like the following appears.fig.d-stylename.eps_50When you touch , the cursor moves.When you touch the icon for the character to be input, the character appears at the cursor position. For example, touching the <ABC> icon in succession cycles you through the available choices in that character group (A→B→C→A...).Each touch of <A-a-0-!> cycles the type of characters through “English (upper case),” “English (lower case),” “numerals,” “symbols,” then back to “English (upper case).”When you touch <Del>, the character at the cursor position is deleted.When you touch <Ins>, a space is inserted at the cursor position.6. When you have finished with the name, press the [Exit] button.Determining the save destination7. Touch <Media> to select the save-destination strage media.](https://usermanual.wiki/Roland/KR107.USERS-MANUAL-3/User-Guide-520895-Page-37.png)
![135Chapter 8 Creating Music StylesChapter 88. Touch to select the save-destination number.If a Style name is displayed, a style is already saved to that number.If you select a number with a previously saved User Style and then save to that number, the previously saved User Style is deleted. If you do not want to delete the User Style being saved, select a number in the save-destination column that does not yet have a name.9. Touch <Save>.The saving process starts.* Never turn off the power or eject the external memory from the external memory port while the operation is in progress. Doing so will damage the KR’s internal memory, making it unusable.■Deleting Saved User StylesThis deletes User Styles that have been saved to floppy disks or in user memory.When deleting a User Style on a floppy disk, first insert the floppy disk in the disk drive.1. Press the Music Style [User] button.A “User Style screen” appears.If the User Style screen is not displayed, touch <User> in the lower part of the screen.2. Touch <File>.3. Touch <Delete>.A “Delete Style screen” like the following appears.fig.d-styledel.eps_504. Touch <Media> to select the strage media.5. Touch or to select the Style to be deleted.6. Touch <Delete>.A screen like the one shown below appears.fig.m-filedel.eps7. Touch <OK>.The selected Style is deleted.If you touch <Cancel>, the Style won’t be deleted.* Never turn off the power or eject the external memory from the external memory port while the operation is in progress. Doing so will damage the KR’s internal memory, making it unusable.](https://usermanual.wiki/Roland/KR107.USERS-MANUAL-3/User-Guide-520895-Page-38.png)
![136Chapter 8 Creating Music StylesChapter 8Copying Styles on External Memories to the User MemoryYou can take User Styles saved on floppy disks and copy them to user memory.You can also take User Styles saved in user memory and copy them to floppy disks.1. Insert the floppy disk with the Style to be copied in the disk drive.2. Press the [User] button.A “User Style screen” like the following appears.fig.d-usrdisk.eps_50If the User Style screen is not displayed, touch <User> in the lower part of the screen.3. Touch <File>. 4. Touch <Copy>.A “Copy Style screen” like the following appears.fig.d-copystyle.eps_50Specifying the copy source5. Touch <Media> to select the copy source media.6. Touch <File> to select the Style you want to copy. When “All” is selected, all of the Styles on the floppy disk are copied to user memory.Specifying the Copy Destination7. Touch <User> to select the copy destination for the Style.If a Style name is displayed, a style is already saved to that number.If you select a number with a previously saved Style and then copy to that number, the previously saved Style is deleted. If you do not want to lose the Style being saved, select a number in the save-destination column that does not yet have a name.8. Touch <Execute>.The Style on the floppy disk is copied to user memory.* Never turn off the power or eject the external memory from the external memory port while the operation is in progress. Doing so will damage the KR’s internal memory, making it unusable.■Copying Styles Saved in the User Memory to External MemoriesYou can take Styles saved in user memory and copy them to floppy disks.In this case, touch the large arrow icon in the center of the “Copy Style screen” in Step 4 above so that the arrow points upwards. Turn the KR will copy user memory Styles to the floppy disk.The rest of the procedure is identical to that used for copying Styles from floppy disks to user memory.](https://usermanual.wiki/Roland/KR107.USERS-MANUAL-3/User-Guide-520895-Page-39.png)
![137Chapter 9Chapter 9 Various SettingsChanging the Settings for One-Touch Arranger■Procedure1. Press the One Touch Program [Arranger] button to display the Basic screen.fig.d-arrbasic.eps_502. Touch <Functions>.A screen like the one shown below appears.fig.d-funcmenu1.eps_50You set the tuning and make a variety of other settings for the KR107 starting with the second page of the settings screen.3. Touch the name of the parameter to be set.Refer to the corresponding page for each function.4. Press the [Exit] button to return to the Basic screen.■Adjusting the Keyboard Touch (Key Touch)You can vary the touch of the keyboard when you play the keys.At Step 3 in “Procedure” (p. 138), touch <Key Touch>. fig.d-p-key.eps_50Touch any of the icons <Fixed>, <Light>, <Medium>, or <Heavy>, to set the key touch for the keyboard.To make fine adjustments, touch the slider in the screen.Move the slider to the right to add resistance, and to the right to make the key touch lighter.You can also change the key touch by pressing the [Piano Designer] button. For more details, refer to the Quick Start.Parameter Name ExplanationKey Touch Refer to “Adjusting the Keyboard Touch (Key Touch)” (p. 137).One Touch SettingSelects the setting to be specified when the One Touch Program [Arranger] button is pressed (p. 138).Split Point Sets the key at which the keyboard is divided (the split point) (p. 138).Arranger Config.Sets the way the Automatic Accompaniment plays sounds (p. 138).Display ExplanationFixedNotes sound at an unchanging volume level, regardless of how lightly or forcefully you play the keyboard.LightThis sets the keyboard to a light touch. You can achieve fortissimo (ff) play with a less forceful touch than usual, so the keyboard feels lighter. This setting makes it easier for children, whose hands have less strength.MediumThis sets the keyboard to the standard touch. You can play with the most natural touch. This setting is closest to the response of an acoustic piano.HeavyThis sets the keyboard to a heavy touch. You have to play the keyboard more forcefully than usual in order to play fortissimo (ff), so the keyboard touch feels heavier. This setting allows you to add more expression when playing dynamically.](https://usermanual.wiki/Roland/KR107.USERS-MANUAL-3/User-Guide-520895-Page-40.png)

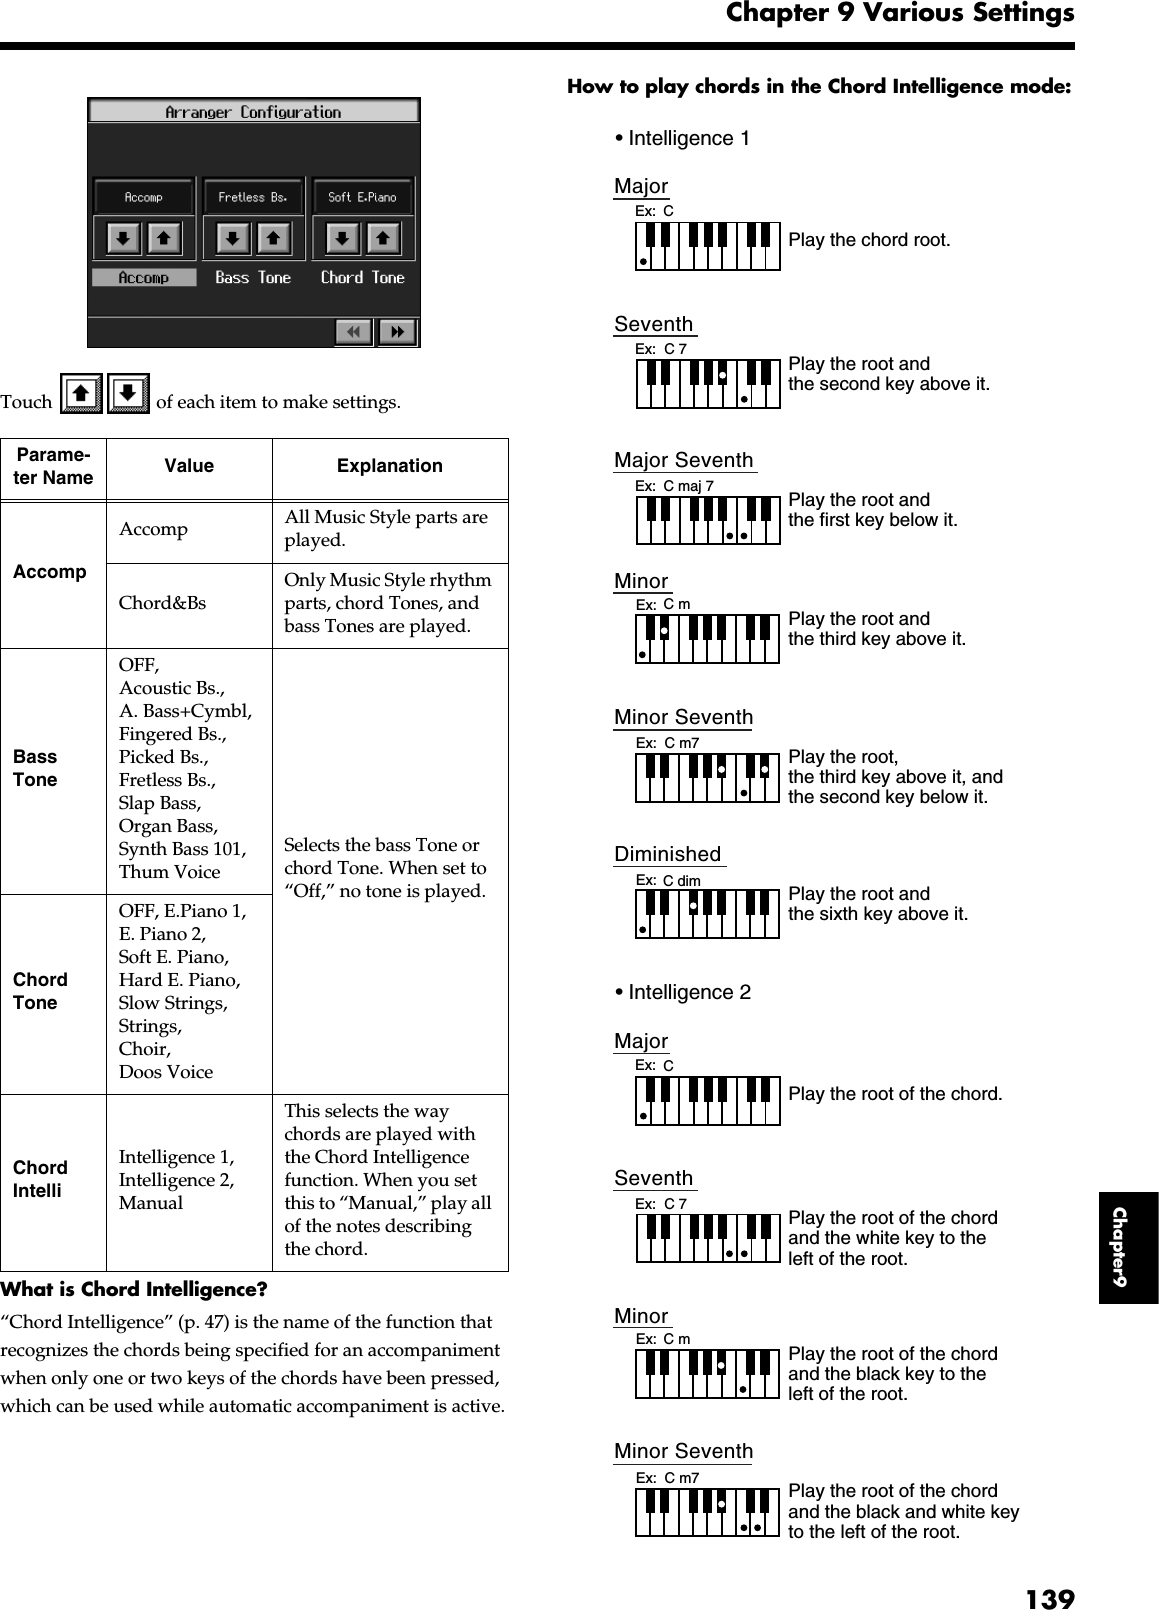
![140Chapter 9 Various SettingsChapter 9Placing a Marker in the Middle of a MeasureA marker is normally placed at the start of the selected measure, but you can also set it so that a marker is placed at a position partway through a measure.For detailed information about Marker, refer to “Setting Markers for Repeated Practice (Marker)” (p. 84).1. Press the [Count/Marker] button.The Count screen appears.2. Touch <Marker>.The Marker screen appears.fig.d-funcmenu2.eps_503. Touch <Resolution> to choose the marker setting.4. Press the [Exit] button to go back to the Marker screen.Changing the Settings for the CountFor detailed information about count, refer to “Match the Tempo Before You Begin Playing (Count)” (p. 82) and “Having a Count Sound Play at the End of the Intro (Countdown)” (p. 56).1. Press the [Count/Marker] button.The Count screen (p. 43) appears.2. Touch of each item to make settings.3. Press the [Exit] button to return to the Metronome screen.fig.d-funcmenu2.eps_50Indication ExplanationMeasure This lets you place a marker at the beginning of the measure.Beat This lets you place a marker at the beginning of the beat.Parameter Name ValueCount ModeSpecify what type of count will be added.Count In (add a count before the performance), Countdown (add a count only before you begin playing),Count In/down (add both a count-in and a countdown)Countdown SoundSpecify the countdown sound.Voice (JP), Voice (ENG)PartSpecify the track or part that will determine the beginning of the performance when added a countdown.Both TracksLower TrackUpper TrackPart 1–16Count-In SoundSpecify the count-in sound.Stick, Click, Electronic, Voice (JP), Voice (ENG), Wood Block, Triangle Castanets, HandclapAnimalMeasuresSpecify the length (number of measures) of the count-in.1, 2RepeatWhen “Repeat” is turned ON on the Marker screen (p. 86) this specified whether the count-in will sound each time the range between the markers is repeated, or only the first time.First, Every](https://usermanual.wiki/Roland/KR107.USERS-MANUAL-3/User-Guide-520895-Page-43.png)
![141Chapter 9 Various SettingsChapter9Other SettingsYou can change the tuning, the language shown on the display, and other settings to make the KR easier to use.■Procedure1. Switch to the Basic screen, or press the One Touch Program [Piano] button.2. Press the [Option] button.A “Functions screen” like the following appears.fig.d-funcmenu2.eps_50When you press the [Option] button on the Basic screen, the first page displayed shows the parameters for the Automatic Accompaniment settings (p. 137).When you press the [Option] button on the Piano screen, the parameters for the piano performance settings continue into the second page (p. 138).3. Touch the name of the parameter you want to set.Refer to the corresponding page for each function.4. Press the [Exit] button to return to the Functions screen.■Changing the Tuning (Tuning)❍Choosing the TuningYou can play classical styles such as Baroque using historic temperaments (tuning methods).Most modern songs are composed for and played in equal temperament, the most common tuning in use today. But at one time, there were a wide variety of other tuning systems in existence. By playing in the temperament that was in use when a composition was created, you can experience the sonorities of chords originally intended for that song.At Step 3 in “Procedure” (p. 138), touch <Tuning>. fig.d-p-temp.eps_50You can choose from among the eight tunings described below.Parameter ExplanationTuning Changing the tuning methods.Pedal SettingAssigns functions to the pedal and performance pad (p. 142).Master Tune Sets the KR’s standard pitch (p. 145).External Display Selects the content to be shown on the connected external display (p. 163).Language Selects the language used in the display (p. 145).User Image DisplaySelects the image data and display used (p. 146).Opening MessageSets the message that appears when the power is turned on (p. 147).MIDI Setting Refer to p. 159.Program Change Refer to p. 159.Memory Backup Stores edited settings and other data to the KR (p. 147).MIDI Ensemble Refer to p. 159.Factory ResetRestores the content stored with Memory Backup to the original factory settings (p. 148).V-LINK Refer to p. 157.Remote Control Changing the Functions of the Remote Control’s Buttons (p. 148).USB Driver Refer to p. 164.Remote Sensor Sets the remote sensor’s on or off(p. 149)Touch Screen Allows for calibration of the touch screen (p. 149).Tuning system CharacteristicsEqualThis temperament divides the octave into 12 equal parts. All intervals will be slightly out of tune by the same amount. This setting is in effect when you turn on the power.Just (Maj)This temperament makes the 5th and 3rd intervals pure. It is unsuited to playing melodies and cannot be transposed, but is capable of beautiful sonorities.Just (min)Just intonation differs between major and minor keys. The same results as major can be obtained in a minor key.Parameter Explanation](https://usermanual.wiki/Roland/KR107.USERS-MANUAL-3/User-Guide-520895-Page-44.png)
![142Chapter 9 Various SettingsChapter 9Touch any one of the icons to choose the tuning system.When playing in a temperament other than equal temperament, you must specify the tonic (the note corresponding to C for a major key, or to A for a minor key) of the key in which you will play.Touch <Key> to select the tonic.If you have selected equal temperament, it is not necessary to select the tonic.❍Setting the Tuning Curve (Stretch Tuning)Pianos are generally tuned so that the low range is flatter and the high range is sharper than equal tempered pitches. This method of tuning is unique to the piano, and is known as “stretched tuning.”A graph that shows the changes in pitch of actual tuning compared with the changes in equal temperament pitch is called a tuning curve. Changing the tuning curve produces subtle variations in the reverberations of the chords you play.Touch the Stretch Tuning <ON> or <OFF> icon to select the tuning curve.When set to “ON,” the tuning curve features extended low and high ranges (Stretch Tuning). It is suitable for piano solos. This setting is selected when the power is turned on.When set to “OFF,” the standard tuning curve is used. It is suitable when playing in an ensemble with other instruments.■Assigning Functions to Pedals and Performance Pads (Pedal Setting/User Functions)You can assign a variety of functions to the left and center pedals, the expression pedals, and the performance pads.You can call up the assigned functions just by pressing the corresponding pedal or pad.925NOTEUse only the specified expression pedal (EV-7/5; sold separately). By connecting any other expression pedals, you risk causing malfunction and/or damage to the unit.❍Assigning Functions to PedalsAt Step 3 “Procedure” (p. 137), touch <Pedal Setting>. fig.d-pedalset.eps_50Touch to assign functions to each of the pedals.NOTEPressing the One Touch Program [Piano] button restores the piano performance functions to the pedals (p. 18).❍Assigning Functions to Performance Pads1. Press the [User Function] button and watch the indicator light up.A screen like the one shown below appears.fig.d-usrfunc.eps_502. Touch to assign functions to each of the Performance Pads.Arabic This tuning is suitable for the music of Arabia.KirnbergerThis temperament is a modification of meantone temperament and just intonation, allowing more freedom of modulation. Performances are possible in all keys (III).PythagoreanThis temperament is based on the theories of the Greek philosopher Pythagoras, and has pure fourths and fifths. Chords containing a third will sound impure, but melodies will sound good.MeantoneThis temperament is a partial compromise of just intonation in order to allow modulation.WerkmeisterThis temperament is a combination of meantone and Pythagorean temperaments. It allows you to play in all keys. (First method, number three.)Tuning system Characteristics](https://usermanual.wiki/Roland/KR107.USERS-MANUAL-3/User-Guide-520895-Page-45.png)
![143Chapter 9 Various SettingsChapter9If you set the pedal as a dedicated switch for selecting User Programs, the function assigned to the pedal cannot be used. Refer to “Using the Pedal to Switch User Programs” (p. 111).❍Functions that can be assigned (Pedals, Performance Pads)* What is the leading bass function?The function that sounds the lowest note of a fingered chord as the bass tone is called “Leading Bass.” When this function is turned on, the Bass Tone changes when chord inversions are used. Usually the tonic of the chord you play sounds as the bass tone.* What is the rotary effect?This adds a sort of spinning effect to the organ sound, similar to the sound when a rotary speaker is used.Changing the speed increases or decreases the speed of this spinning effect.Function ExplanationLeading BassToggles the Leading Bass function* on or off. The function stays on as long as the pedal to which this is assigned is pressed. When assigned to a Performance Pad, this is alternately switched on and off each time the pad is pressed.No ChordOnly the Moving Keys Rhythm part is played. After No Chord is switched on, specifying a chord by playing the actual keys cancels the function, and all of the accompaniment parts are played.BreakDuring the performance of Automatic Accompaniment, the accompaniment stops for one measure only.Fill In to VariationPerforms the same function as the Fill In [To Variation] button (p. 57).Fill In to OriginalPerforms the same function as the Fill In [To Original] button (p. 57).Fill In A fill-in is inserted, but the accompaniment pattern after that doesn’t change.Half Fill In to VariationThis plays a fill-in half a measure long, then switches to the Variation accompaniment pattern.Half Fill In to OriginalThis plays a fill-in half a measure long, then switches to the Original accompaniment pattern.Original/VariationThis changes the accompaniment pattern without inserting a fill-in.Arranger ResetWhen this function is used during Automatic Accompaniment, the accompaniment returns to the beginning of the Division (p. 46).Intro 1/Ending 1Performs the same function as the [Intro/Ending] button (p. 54). Intro 1 and Ending 1 are played.Intro 2/Ending 2Performs the same function as the [Intro/Ending] button (p. 54). Intro 2 and Ending 2 are played.Arranger Start/StopPerforms the same function as the [Start/Stop] button (p. 54).Orchestrator UpThis changes the accompaniment to a more elavorate arrangement (p. 58).Orchestrator DownChanges the accompaniment to a simpler arrangement (p. 58).Melody IntelligenceTurns the Melody Intelligence function on and off (p. 59).Fade In/OutThis starts Automatic Accompaniment with a fade-in (where the volume gets progressively louder), ends it with a fade-out (where the volume gets progressively softer), then stops.Rotary Slow/FastThis switches the speed of the rotary effect* when you perform with an organ Tone.GlideWhile the pedal or Performance Pad is held down, the pitch of the sound drops temporarily, returning to the original pitch when the pedal or Pad is released. This can be effective for simulating the performance of instruments like a Hawaiian guitar.Composer Play/StopPerforms the same function as the [ (Play/Stop)] button (p. 64).PageFwd 1Press the pedal or the Pad turns the notation appearing on the KR display to the next page while the performance of a song is stopped.PageBwd 1Press the pedal or the Pad turns the notation appearing on the KR display to the preceding page while the performance of a song is stopped.PageFwd 2 Press the pedal or the Pad turns the notation appearing on the external display to the next page while the performance of a song is stopped.PageBwd 2Press the pedal or the Pad turns the notation appearing on the external display to the preceding page while the performance of a song is stopped.Punch In/OutDuring Punch-in Recording, this starts and stops recording (p. 118).Tap TempoYou can set the tempo according to the interval at which the pedal or pad is pressed (p. 81).Function Explanation](https://usermanual.wiki/Roland/KR107.USERS-MANUAL-3/User-Guide-520895-Page-46.png)
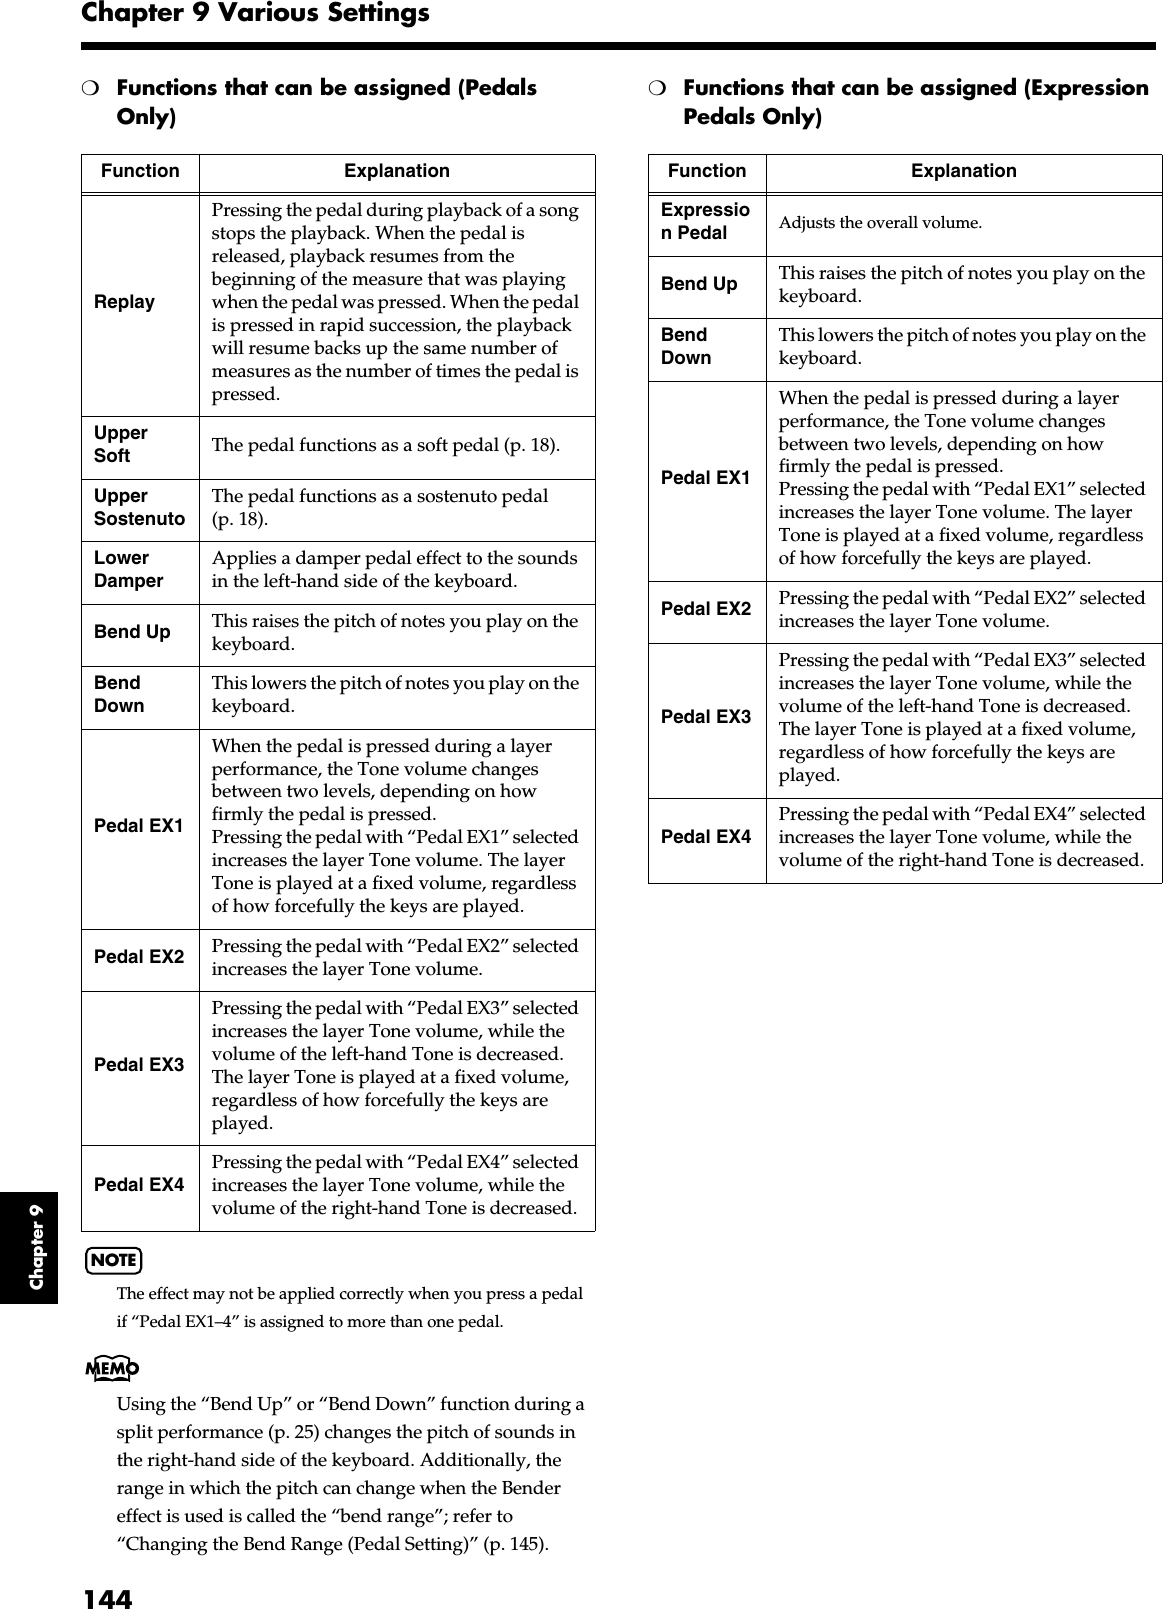
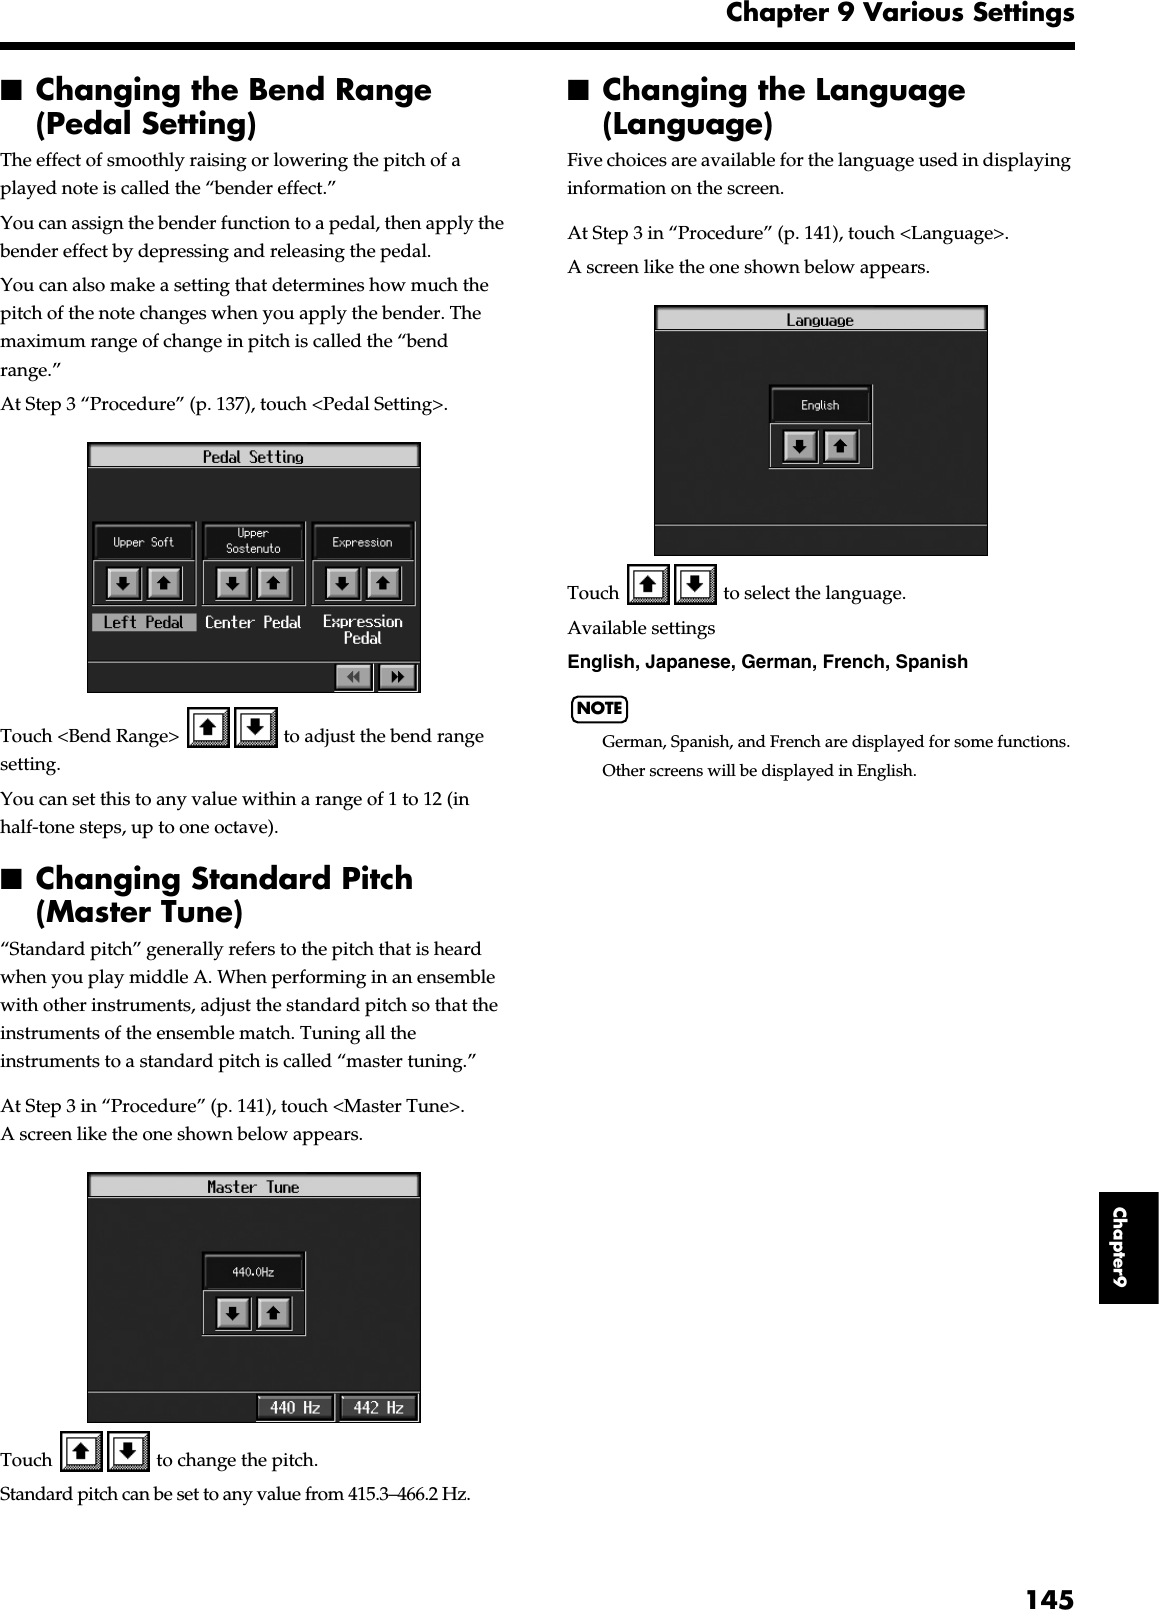
![146Chapter 9 Various SettingsChapter 9■Selecting Images To Be Shown on the KR and External Displays (User Image Display)You can have image data from computers and other devices shown on the onboard display, or on an external display you’ve connected. You can store two types of image data, “KR-display-use” data, and “external-display-use” data.“KR-display-use” images appear on the KR’s display when the instrument’s power is turned on. Refer to the procedure in “Changing the Settings for Showing Images with the External Display (External Display)” (p. 163) to set the instrument so the “external-display-use” image is displayed on the external display.At Step 3 in “Procedure” (p. 141), touch <User Image Display>.A screen like the one shown below appears.fig.d-usrimage.eps_50Selecting the display to be set1. Touch <KR Display> or <Ext. Display>.Select the setting either for “KR-display-use” or “external-display-use” images.Selecting the images to be displayedFirst, take a floppy disk to which the image data stored in the KR has been saved, and insert the floppy disk in the disk drive.2. Touch <File>.A screen like the one shown below appears.fig.d-usrimage2.eps_503. Touch the name of the stored image data.When you touch <Preview>, you can then show the selected image data on the display selected in Step 1.4. Touch <Save>.The selected image data is stored.5. Press the [Exit] button to return to the previous screen.To clear the stored image data, touch <Erase>.❍Image data that KR can displaySize 320 x 240 pixels (for KR display)640 x 480 pixels (for external display)Color 1/4/8 bit (2/16/256 colors)FormatBMP format* The KR cannot deal with compressed image data.Name1–8 characters in length (lowercase is ok). A filename extension of “.BMP” (uppercase characters) must be added after the name.The following characters can be used to name an image.A B C D E F G H I J K L M N O P Q R S T U V W X Y Z a b c d e f g h i j k l m n o p q r s t u v w x y z 0 1 2 3 4 5 6 7 8 9 # $ % & ‘ ( ) - @ ~ { } ^ _ !* If you use a character that cannot be used in a name, it will be replaced by another character when displayed.](https://usermanual.wiki/Roland/KR107.USERS-MANUAL-3/User-Guide-520895-Page-49.png)
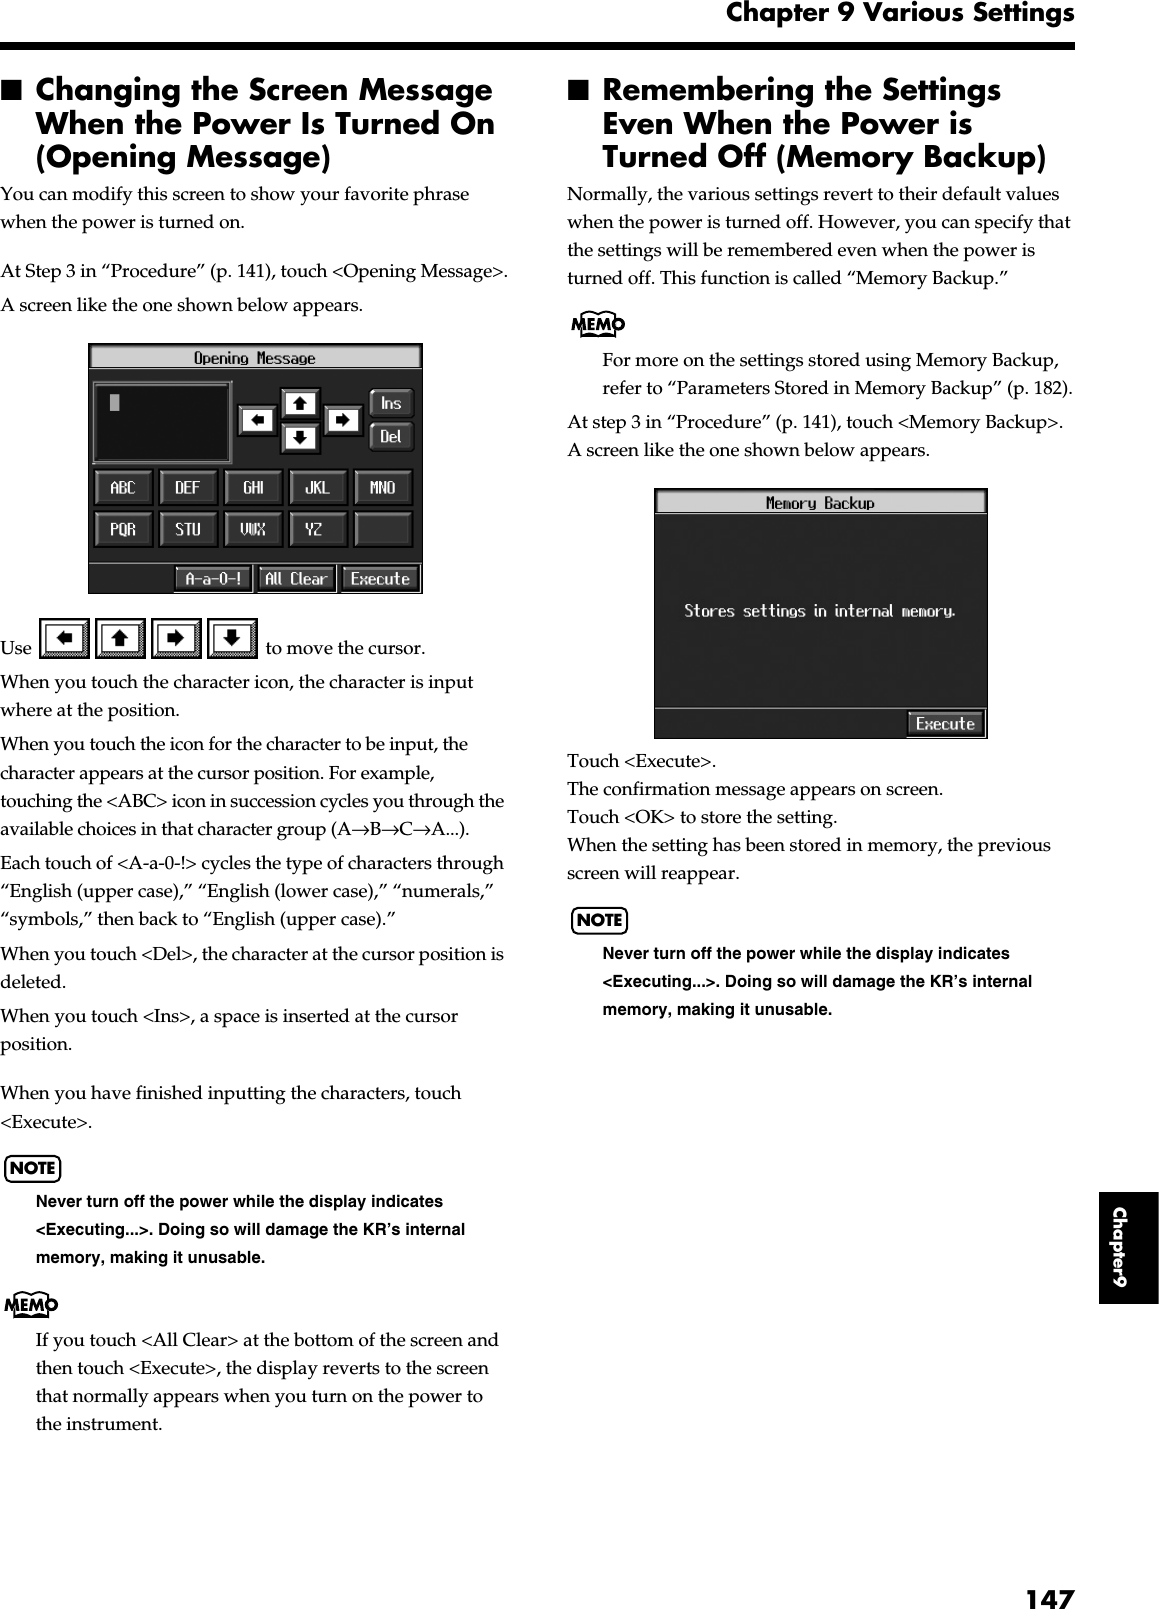
![148Chapter 9 Various SettingsChapter 9■Restoring the Factory Settings (Factory Reset)You can return the content stored with “Memory Backup” (p. 147) and the User Programs (p. 107) to their original factory settings. This operation is referred to as “Factory Reset.”NOTEWhen you perform a Factory Reset, all settings that have been stored in memory up to then are erased and reset to their factory defaults.This operation does not return the touch screen calibration settings to the original factory condition. To return the touch screen calibration settings to the original factory settings, refer to “Returning the touch screen calibration settings to the original factory settings” (p. 150)When you want to restore the content registered to the KR’s User memory to the factory condition, refer to “Formatting the User Memory” (p. 150).At step 3 in “Procedure” (p. 141), touch “Factory Reset.”A screen like the one shown below appears.fig.d-factory.eps_50Touch <Execute>.The confirmation message appears on screen.Touch <OK> to restore the original factory settings.When the setting is changed, the previous screen returns.When you touch <Cancel>, the settings are left untouched, and you’re returned to the previous screen.NOTENever turn off the power while the display indicates <Executing...>. Doing so will damage the KR’s internal memory, making it unusable.■Changing the Functions of the Remote Control’s Buttons You can change the functions assigned to the remote control’s buttons.At step 3 in “Procedure” (p. 141), touch <Remocon Setting>.A screen like the one shown below appears.Changing the [ ] (PLAY) Button Functions6. Touch <PLAY> to assign functions to [ ] (PLAY) button.7. Press the [Exit] button to return to the Functions screen.Display ExplanationAll SongSongs are played back continuously in sequence, starting from the currently selected song.Internal SongSongs in the selected genre are played back continuously.“Favorites” SongsSongs registered to the “Favorites” are played back in sequence.Songs on External MemoriesSongs within the selected folder are played back continuously.One Song Only the selected song is played back. Playback stops when the song is finished.RandomThe songs are played back in random order.Internal SongThe songs in all genres are played back in random order.“Favorites” SongsSongs registered to the “Favorites” are played back in random order.Songs on External MemoriesSongs within the selected folder are played back in random order.](https://usermanual.wiki/Roland/KR107.USERS-MANUAL-3/User-Guide-520895-Page-51.png)
![149Chapter 9 Various SettingsChapter9Changing the TEMPO [-] [+] Button and the TRANSPOSE [+] [-] Button Functions4. Touch <TEMPO> or <TRANSPOSE> to assign functions to TEMPO [-] [+] and TANSPOSE [-] [+] button.5. Press the [Exit] button to return to the Functions screen.Changing the [FUNC1] [FUNC2] Button Functions4. Touch <FUNC1> <FUNC2> to assign functions to [FUNC1] [FUNC2] button.5. Press the [Exit] button to return to the Functions screen.NOTEThe remote control buttons’ original function assignments are restored when the power is turned off. If you want to save the changed settings, carry out the memory backup (p. 147).■Switching the Remote Sensor On and Off (iR function)You set the Remote Sensor to On (active) or Off (disabled).When switched on, infrared transmission of song data and remote control information is received.At step 3 in “Procedure” (p. 141), touch “iR function.”A screen like the one shown below appears.Touch <ON> or <OFF>■Calibrating the Touch Screen (Touch Screen)If you’ve been using the touch screen for some time, the pointer may be shifted, making the KR react incorrectly. You should correct this displacement when necessary by performing calibration (repositioning).At step 3 in “Procedure” (p. 141), touch “Touch Screen.”A screen like the one shown below appears.fig.d-touchpanel.eps_50Touch <Execute>.Touch the points indicated. NOTEDo this carefully, because touching a location that’s different from the one indicated for the pointer may make the Display ExplanationTempoChanges the tempo. Pressing [-] slows the tempo down; pressing [+] speeds up the tempo.NotationScrolls the score in the external display. Press [-] to return to the previous page; press [+] to advance to the next page.TransposeTransposes the song. Pressing [-] lowers the pitch in semitone steps; pressing [+] raises the pitch in semitone steps.Bwd/FwdFast forwards and rewinds the song. When [-] is pressed, the song rewinds; when [+] is pressed, the song is fast forwarded.Display ExplanationTrack 3Each time the [FUNC] button is pressed, the left-hand track is switched on or off. When turned off, the sound from the left-hand track does not play.Track 4Each time the [FUNC] button is pressed, the right-hand track is switched on or off. When turned off, the sound from the right-hand track does not play.PedalPressing the button while the song is playing back stops the playback. When you release the button, playback resumes from the beginning of the measure being played when you pressed the button. Pressing the button a number of times in rapid succession moves the playback position back by the same the number of measures, after which playback resumes.Zoom Displays an enlarged notation.Repeat Playback repeats within the marked range.](https://usermanual.wiki/Roland/KR107.USERS-MANUAL-3/User-Guide-520895-Page-52.png)
![150Chapter 9 Various SettingsChapter 9displacement even worse. Be sure to touch the pointer accurately.When the calibration is finished, touch <Write> to store the settings.NOTEIf you don’t write them to memory, the calibration settings will be discarded as soon as the power is switched off.Returning the touch screen calibration settings to the original factory settingsIf you touch <Factory Reset> in the above screen, the touch screen calibration settings revert to the original factory settings.Selecting the Part to Which the Effect is Added (EffectsPart)You may find effects not being applied to certain parts when different effects are applied to the right-hand tone, layer tone, and left-hand tone. In such instances, you can select which effect is to have priority.1. Press any tone button, and select the tone (p.**).2. Touch <Effect>.3. Touch <Part>.4. Touch to select the part which the effect is added.The effect will be applied to the selected part and other parts to which the same effect has been applied.Formatting the User Memory The KR features an internal storage area where you can save recorded performances and User Styles. This space is called the “User Memory.”The following content is stored to the user memory.• Content registered to the “Favorites” (p. 68)• Sets of saved User Programs (p. 108)• User Styles saved on user memory (p. 134)• Image files set with the “User Image settings” (p. 146)To delete all of the content held in the user memory and restore the original factory settings, carry out the following procedure.1. Press the [Song/File] button.2. Touch <File>.3. Touch <Format>.4. Touch to select “User Memory.”5. Touch <Execute>.A screen like the one shown below appears.fig.d-touchpanel.eps_506. Touch <OK>.All of the content in the user memory is deleted.If you touch <Cancel>, the deletion is cancelled, and you’re returned to the previous screen. NOTENever turn off the power while the display indicates <Executing...>. Doing so will damage the KR’s internal memory, making it unusable.Carrying out this operation does not initialize any settings other than the user memory settings. To restore settings other than those for the user memory to the original factory settings, carry out Factory Reset (p. 148).](https://usermanual.wiki/Roland/KR107.USERS-MANUAL-3/User-Guide-520895-Page-53.png)
![151Chapter 9 Various SettingsChapter9Automatically Starting the Quick TourYou can set the instrument so that the Quick Tour starts automatically with no operation required.1. Hold down the [Transpose] button and press the [Ambience/Reverb] button.The Quick Tour screen appears.2. Press the [Option] button.A screen like the one shown below appears.fig.d-touchpanel.eps_503. Touch of each parameter to make settings.When Auto Start is set to “On,” the demo starts playing automatically when the KR-107's power is switched on. The demo stops playing if the instrument is operated in any way. After operation has ceased, and a period of five to ten minutes passes without the instrument being touched, the demo automatically starts again. When Auto Start is set to “Off,” the demo does not start unless you touch the icon in the Demo screen.4. Press the [Exit] button to return to the Quick Tour screen.→This setting is saved even after the power is turned off.* For more information about Quick Tour, refer to the Quick Start.Adjusting the Piano Designer ResonanceYou can made precise changes to the Piano Designer “Resonance” setting. More of the resonance effect is applied as the value is increased.1. Press the [Piano Designer] button.2. Press the [Option] button.A screen like the one shown below appears.fig.d-touchpanel.eps_503. Touch of each item to make settings.Item Display ExplanationAuto Start ON, OFFThis setting determines whether or not Auto Demo starts when no adjustment or other operation is performed within a fixed period of time.BGM ON, OFFThis setting determines whether or not background music is added when Auto Demo begins.Item ExplanationString resonanceWith an acoustic piano, playing a note causes the strings for other keys already being pressed to resonate. The function that reproduces this resonant sound is called “String Resonance.”Damper Reso-nanceWhen the damper pedal on an acoustic piano is pressed, the sound of the key that is played causes other strings to resonate, adding rich reverberation and breadth to the sound. This function reproduces the resonant sound created by pressing the damper pedal (Damper Resonance).Key-off Reso-nanceThis reproduces the “key off” sound (the subtle sound made when the keys are released) produced when playing an acoustic piano.](https://usermanual.wiki/Roland/KR107.USERS-MANUAL-3/User-Guide-520895-Page-54.png)
![152Chapter 9 Various SettingsChapter 9Registor Music Assistant1.2.3.4.Disabling Functions Other Than Piano Performance (Panel Lock)The “Panel Lock” function locks the KR in a state where only piano performance can be used, and all buttons will be disabled. This prevents the settings from being inadvertently modified even if children press the buttons accidentally.* In the Panel Lock state, only the grand piano sound can be played.1. Turn down the volume all the way.2. Press the [Power] switch to turn off the power.3. While holding down the [Wonderland/Game] button, press the [Power] switch and turn on the power.Then, continue to hold down the button for a few seconds.All buttons except for piano play are disabled.Adjust the volume. When you play the keyboard, the grand piano sound will be heard.To undo the Panel Lock function, turn the volume down to the minimum, and turn on the power once again.Detailed Song Playback Settings■Changing the Tone Settings When Playing Back Songs (Play Mode)With the normal setting, GS tones (sounds that are compatible with other GS instruments) will normally be used to play back song data. By changing this setting, you can play back song using KR-specific tones for certain portions of the data. For detailed information about GS, refer to “About the KR Sound Generator” (p. 183).1. Press the [Menu] button.The Menu screen appears.Touch to switch the screens.2. Touch <Play Mode>.A screen like the one shown below appears.fig.d-plymode.eps_603. Touch the icon to choose the setting.4. Press the [Exit] button to go back to the Menu screen.5. After changing this setting, try selecting the song once again.For more detailed information about selecting a song, refer to “Playing a Song” (p. 64).Icon ExplanationGSPlayback uses GS-compatible tones for performances that sound like other GS instruments.KRPlayback uses KR tones for greater expressiveness. However, differences may appear when playing back using devices other than the KR.](https://usermanual.wiki/Roland/KR107.USERS-MANUAL-3/User-Guide-520895-Page-55.png)
![153Chapter 9 Various SettingsChapter9■ Viewing Song Information (Information)You can view file names and other information concerning songs.1. Press the [Song/File] button.2. Touch <File>.3. Touch <Information>.A song information is displayed.■Hiding the Lyrics (Lyrics)Some commercially available music files for use in karaoke, as well as some of the internal songs include lyrics data. When you play such music files, the lyrics automatically appear in the screen. If you do not want lyrics to appear automatically, set this to “OFF.”1. Press the [Menu] button.The Menu screen appears.Touch to switch the screens.2. Touch <Lyrics>.A screen like the one shown below appears.fig.d-lyric.eps_603. Touch to select the setting.4. Press the [Exit] button to return to the Menu screen.Even when this is set to “OFF,” you can still have the lyrics be displayed by touching <lyrics> when it appears in the Piano or Basic screen (p. 20).The screen may be switched when you press the button while the Lyrics screen is displayed. To have the lyrics displayed again, touch <**~lyrics~**> on the Piano or Basic screen, or stop playback of the song, then press the [ (Play/Stop)] button.■Changing the Parts Assigned to the Track Buttons During SMF Playback (Track Assign)Normally, when playing back Roland Piano Digital-compatible SMFs (p. 183), the left-hand part is assigned to the [3/Lower] button, and the right-hand part is assigned to the [4/Upper] button. However, assignment of the right-hand and left-hand parts may differ with some SMF data.If you cannot get the right-hand and left-hand parts to work well set on “Auto,” then change the setting to “2/1 Part” or “3/4 Part.”This setting is effective with SMF format song data.This is not effective with the internal songs.1. Press the [Menu] button.The Menu screen appears.Touch to switch the screens.2. Touch <Track Assign>.A screen like the one shown below appears.fig.d-trkasgn.eps_603. Touch to select the setting.Display ExplanationONLyrics are displayed automatically (when performance data containing lyrics is played back).OFF Lyrics are not displayed, even if the song data being played back contains lyrics data.Display ExplanationAutoThe part assigned to each track will be determined automatically, depending on the song data.2/1 PartPart 1 will be assigned to the right-hand track, part 2 to the left-hand track, and part 3 to the user track.3/4 PartPart 4 will be assigned to the right-hand track, part 3 to the left-hand track, and part 1 to the user track.](https://usermanual.wiki/Roland/KR107.USERS-MANUAL-3/User-Guide-520895-Page-56.png)
![154Chapter 9 Various SettingsChapter 94. Press the [Exit] button to return to the Menu screen.After changing this setting, try selecting the song once again.For more detailed information about selecting a song, refer to “Playing a Song” (p. 64).](https://usermanual.wiki/Roland/KR107.USERS-MANUAL-3/User-Guide-520895-Page-57.png)
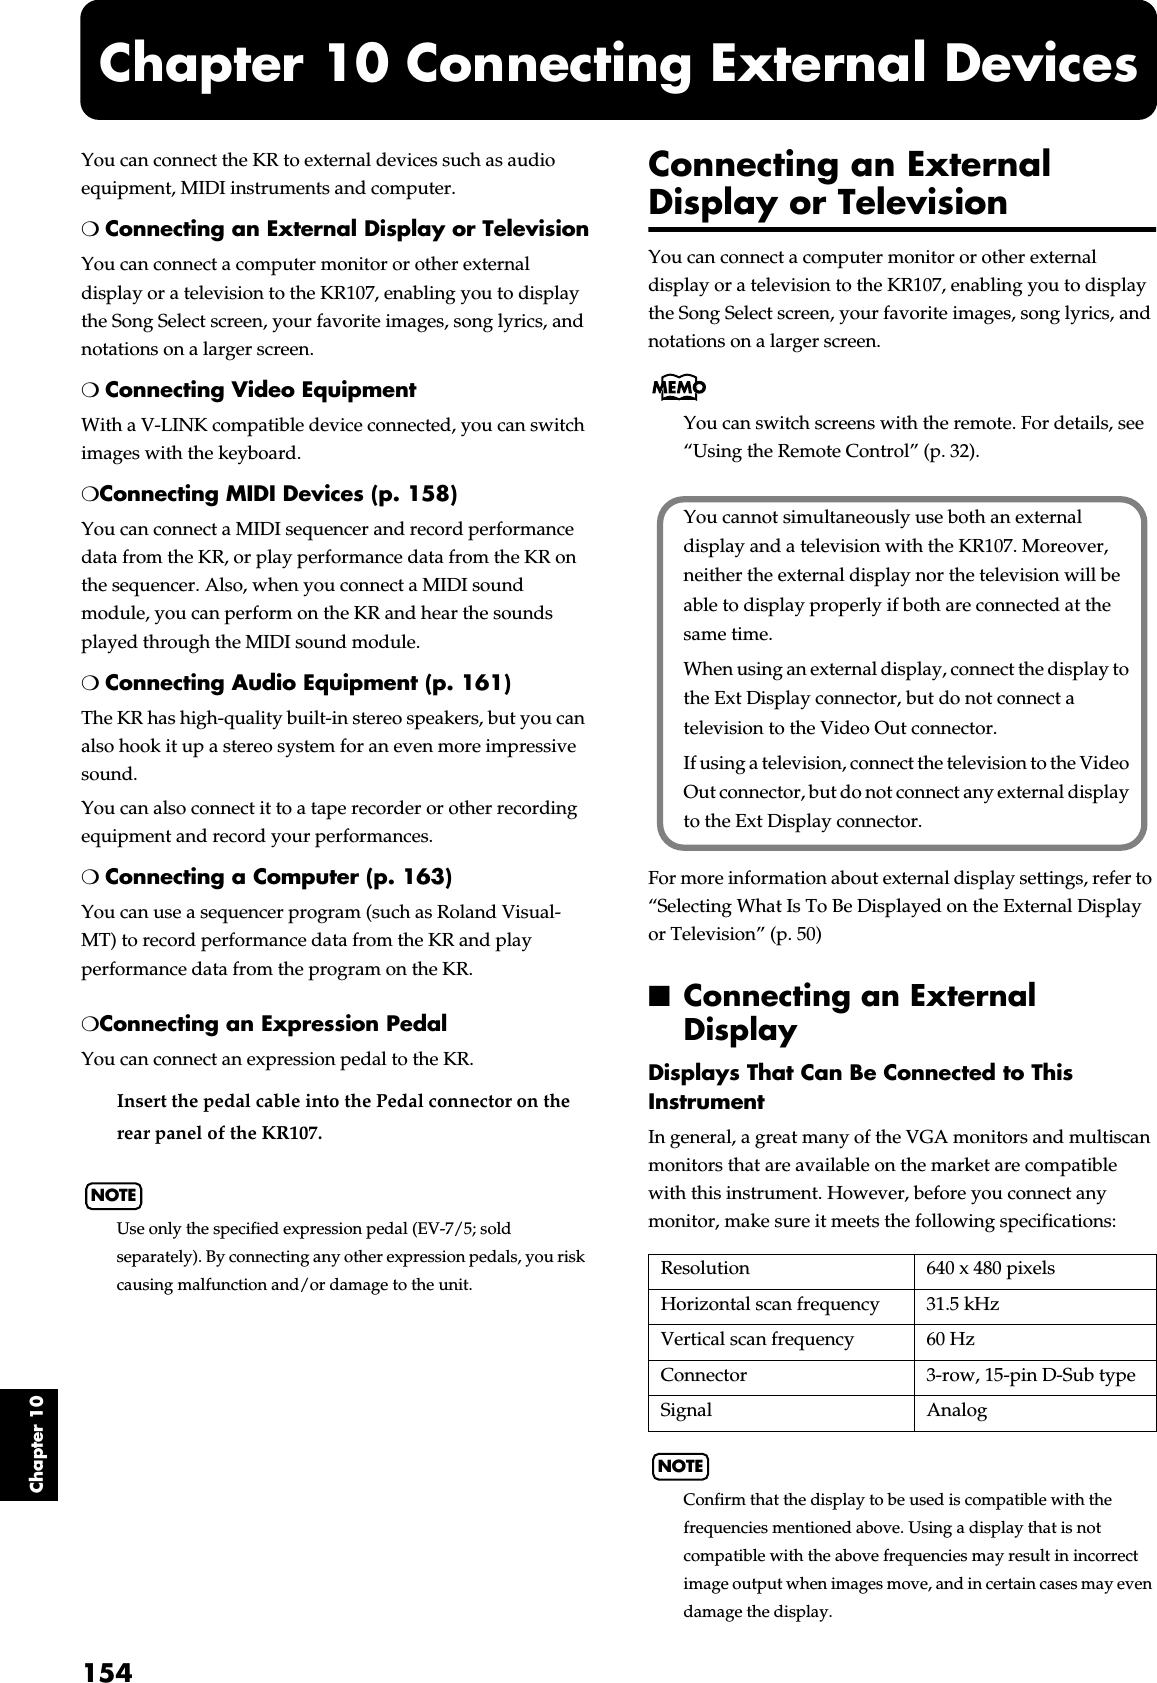
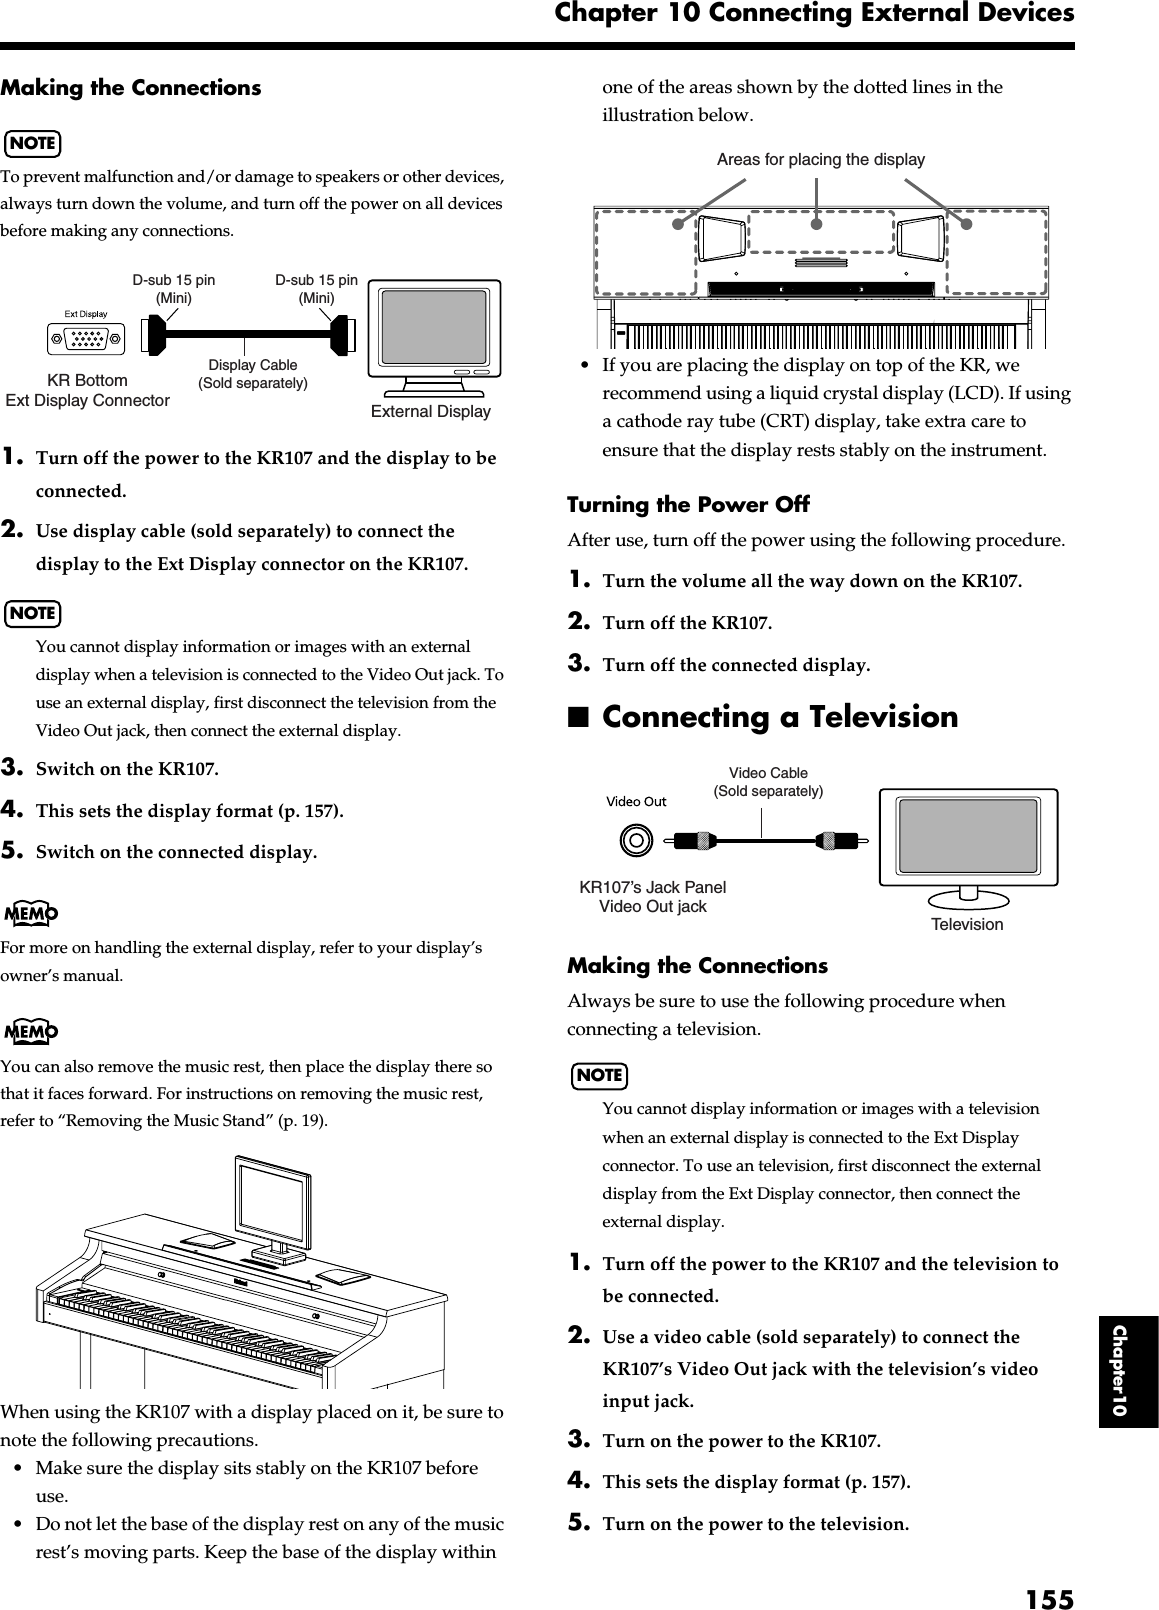
![156Chapter 10 Connecting External DevicesChapter 10■Changing the Settings for Showing Images with the External Display and the Television (External Display)This selects the content shown on the external display or the television connected to the KR.1. Switch to the Basic screen, or press the One Touch Program [Piano] button.2. Press the [Option] button.3. Touch <Ext Display>.A screen like the following appears.fig.d-extdisp.eps_504. Touch the parameter to make the settings.5. Press the [Exit] button to return to the Function screen.■Explanation of Each ItemsModeNotes When Switching the Display on External Displays and Televisions• Lyrics are not displayed with audio CDs.• You cannot display any lyrics screen when playing back music data that does not include lyrics data.• The internal songs include a number of jazz pieces that are played in an improvised fashion, and you may find notes not conforming to measure lines, odd divisions of the parts played in the left and right hand, and other such features that do not match what is shown in the notation.Lyric ColorSelects the color used for lyric in the display.Value: White, Black, Red, Yellow, Green, Blue, Cyan, MagentaDeviceIf you find that the image quality of the television is poor, try switching the television format.Value: VGA, PAL, NTSCSettings Value ExplanationAutoThe display of notations, lyrics, notation + keyboard, and image data are switched automatically.Song List The Song select screen is normally displayed.LyricsThe Lyrics screen is normally displayed. However, lyrics are displayed only when playing back music files that contains lyrics data.Notation The Notation screen is normally displayed.Notation andKeyboard The notation and keyboard are displayed.Panel Screens are shown the same way they appear in the KR107's display.User Image Display The User Image is normally displayed](https://usermanual.wiki/Roland/KR107.USERS-MANUAL-3/User-Guide-520895-Page-60.png)
![157Chapter 10 Connecting External DevicesChapter10Connecting Video Equipment (V-LINK)Connecting the KR107 to a V-LINK compatible image device allows you to control the images with the KR107.V-LINK ( ) is functionality promoted by Roland that allows linked performance of music and visual material. By using V-LINK-compatible video equipment, visual effects can be easily liked to, and made part of the expressive elements of a performance.921NOTETo prevent malfunction and/or damage to speakers or other devices, always turn down the volume, and turn off the power on all devices before making any connections.Connection Examples: fig.02- ■ Using the V-LINK function 1. Switch to the Basic screen, or press the One Touch Program [Piano] button. 2. Press the [Option] button. 3. Touch <V-LINK>. 4. Touch <ON>. Switches to Image Control mode.You can control images using the twelve keys at the left end of the keyboard. fig.V-LINKkey While V-LINK is switched on, no sound is produced when you press any of the twelve keys at the left end of the keyboard. 5. Touch <OFF> to cancel the V-LINK function.External DisplayKR BottomExt Display ConnectorD-sub 15 pin(Mini)D-sub 15 pin(Mini)Display Cable(Sold separately)KR107V-LINK compatible image deviceUSB MIDI InterfaceMIDI OUTC1 D1 E1 F1 G1A0A0 – G1#B0](https://usermanual.wiki/Roland/KR107.USERS-MANUAL-3/User-Guide-520895-Page-61.png)
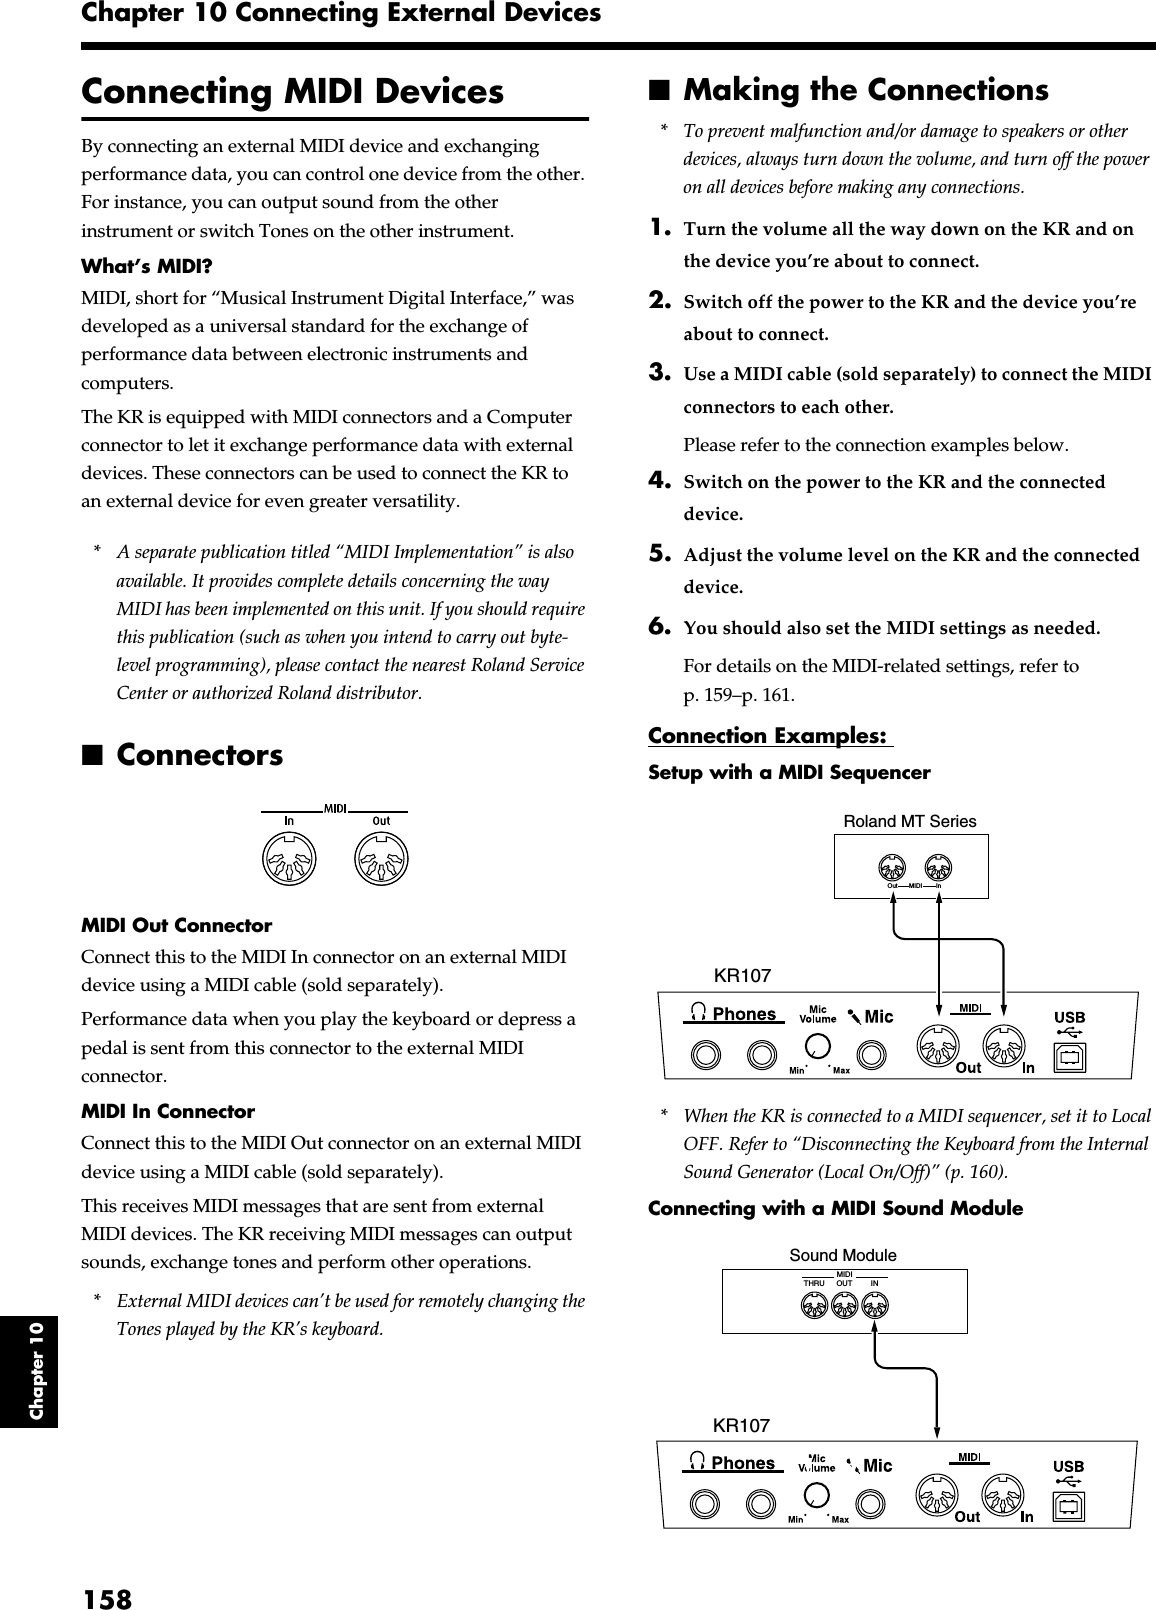
![159Chapter 10 Connecting External Devices Chapter10 Performing in Ensemble with MIDI Instruments (MIDI Ensemble) You can connect an electronic percussion device or other MIDI instrument to the KR’s MIDI In connector for ensemble playing. Making the MIDI settings for the instrument connected to the MIDI In connector is easy. The sounds from the connected MIDI instrument are played from the KR’s speaker. 1. Switch to the Basic screen, or press the One Touch Program [Piano] button. 2. Press the [Option] button. 3. Touch <MIDI Ensemble>. A screen like the following appears. fig.09-04.eps 4. Select the method for using the MIDI In connector. 5. When “Keyboard” is selected in Step 4 above, use to select the Tone. The connected keyboard plays using the selected Tone. MIDI Settings You can make MIDI settings like those described below. “MIDI Setting Screen” fig.09-04.eps “Program Change Screen” fig.09-04.eps Displayed MeaningNormal Normal setting. Make changes in Tone and other settings from the connected device. Pad Select this when you have percussion pads (such as Roland’s SPD-20 Total Percussion Pad) connected to the KR’s MIDI In connector. You do not need to make any MIDI settings on the KR. Select pad Tones and make other settings from the connected pads (for further details, refer to the Owner’s Manual provided with the pads). Keyboard Select this when you have a keyboard (such as a Roland A-37 or AX-7 MIDI Keyboard Controller) connected to the KR’s MIDI In connector. You can select tones for the connected keyboard from the KR. No MIDI settings need be made on the KR. Display ExplanationTx Channel Chooses the MIDI send channel (p. 160). Local Control Switches Local Control on or off (p. 160). Display ExplanationBank Select MSB Sends Bank Select MSB messages (p. 161). Bank Select LSB Sends Bank Select LSB messages (p. 161). Program Change Sends Program Change messages (Program Numbers) (p. 161).](https://usermanual.wiki/Roland/KR107.USERS-MANUAL-3/User-Guide-520895-Page-63.png)
![160Chapter 10 Connecting External Devices Chapter 10 Making the Settings 1. Switch to the Basic screen, or press the One Touch Program [Piano] button. 2. Press the [Option] button. 3. Touch <MIDI Setting> or <Program Change>. 4. Touch to make the setting for each item. Press the [Exit] button to return to the Functions screen. ■ Selecting the Transmit Channel (Tx Channel) MIDI organizes things into “channels,” which are numbered from 1 through 16. Simply connecting a cable is not enough for communication to take place. The connected devices must be set to use the same MIDI channels. Otherwise, no sound will be produced, and no sounds can be selected.Select the transmit channel (1–16) of the KR.The channel setting is at “1” when the KR is powered up.If the keyboard has been split into right-hand and left-hand sections, messages from the left-hand section are fixed at “3.”The KR receives messages on all channels from 1 through 16. ■ Disconnecting the Internal Sound Generator and Keyboard (Local Control) When connecting a MIDI sequencer, set Local Control to “OFF.” The setting is at “Local Control ON” when the KR is powered up.As illustrated, information describing what has been played on the keyboard is passed to the sound module over two different routes, (1) and (2). As a result, you hear overlapping or intermittent sounds. To prevent this from happening, route (1) must be disabled, by setting the unit to what is known as “Local Off.” fig.09- Local On : The keyboard and internal sound generator are connected. fig.09- Local Off : The keyboard and internal sound generator are separated. No sound will be produced by the keyboard when it is played. fig.09- → When connecting a unit in the Roland MT series, you don’t need to switch off Local Control. MT units transmit Local Off messages when their power is switched on. First turn on the power to the KR-107, then after a few moments, play a note on the KR-107; when you turn on the power to the MT Series device, Local Off is automatically enabled for the KR-107.(1)MIDIMIDIMIDIMIDI(2)ININ OUTOUTSequencerMemorySoundGeneratorEach note played is sounded twice Soft Tru OnLocal OnLocal OnSound is emittedSound GeneratorLocal OffNo sound producedSound Generator](https://usermanual.wiki/Roland/KR107.USERS-MANUAL-3/User-Guide-520895-Page-64.png)
![161Chapter 10 Connecting External Devices Chapter10 ■ Sending Tone Change Messages (Program Change/Bank Select MSB/Bank Select LSB) A Program Change is a message that means “change to the Tone of the specified number.” The device that receives this changes to the Tone of the corresponding number.When you choose a Program Change message (Program Number), the Program Number will be transmitted to the MIDI device connected to the KR. The MIDI device that receives the Program Number changes the tone to the corresponding Program Number.Normally, the Tone is selected from the 128 Tones available. Some MIDI devices, however, have more than 128 Tones. With such devices, the Tone is selected through a combination of Program Change messages and Bank Select messages. There are two parts of a Bank Select message: the MSB (Controller 0, with a value of 0–127) and the LSB (Controller 32, with a value of 0–127). * Some MIDI instruments can’t handle Bank Select messages. Others can handle Bank Selects, but do not recognize the LSB part. ■ Sending Recorded Performance Data to a MIDI Device (Composer MIDI Out) When Composer Out is active, you can send performance data recorded with the KR to a connected MIDI device or computer.When you turn on the power, this is set to “OFF” (data is not sent). 1. Press the [Menu] button. 2. Touch <Composer MIDI Out>. fig.09-04.eps 3. Touch to set ON or OFF. 4. Press the [Exit] button to return to the Menu screen. Connecting to Audio Equipment When you connect the KR to audio equipment, you can play the sounds from the KR through the speakers on the audio equipment or record your performances on a tape recorder or other recording device.When connecting, please use audio cables (sold separately) with standard phone plugs. ■ Connectors fig.09- Output (Main) Jacks You can connect audio equipment using audio cables (sold separately) and play the sounds from the KR through the speakers on the connected equipment, or record your performances on a tape recorder or other recording device.If the input of the connected device is monaural, you must use the L (Mono) jack. Input Jacks You can connect another sound source, such as audio equipment or an electronic instrument, using audio cables (sold separately). Play the sounds from the connected device through the speakers on the KR.If the input of the connected device is monaural, you must use the L (Mono) jack. * You cannot use the KR to adjust the volume of the connected sound generating device. 926a * When connection cables with resistors are used, the volume level of equipment connected to the inputs jacks may be low. If this happens, use connection cables that do not contain resistors, such as those from the Roland PCS series.](https://usermanual.wiki/Roland/KR107.USERS-MANUAL-3/User-Guide-520895-Page-65.png)
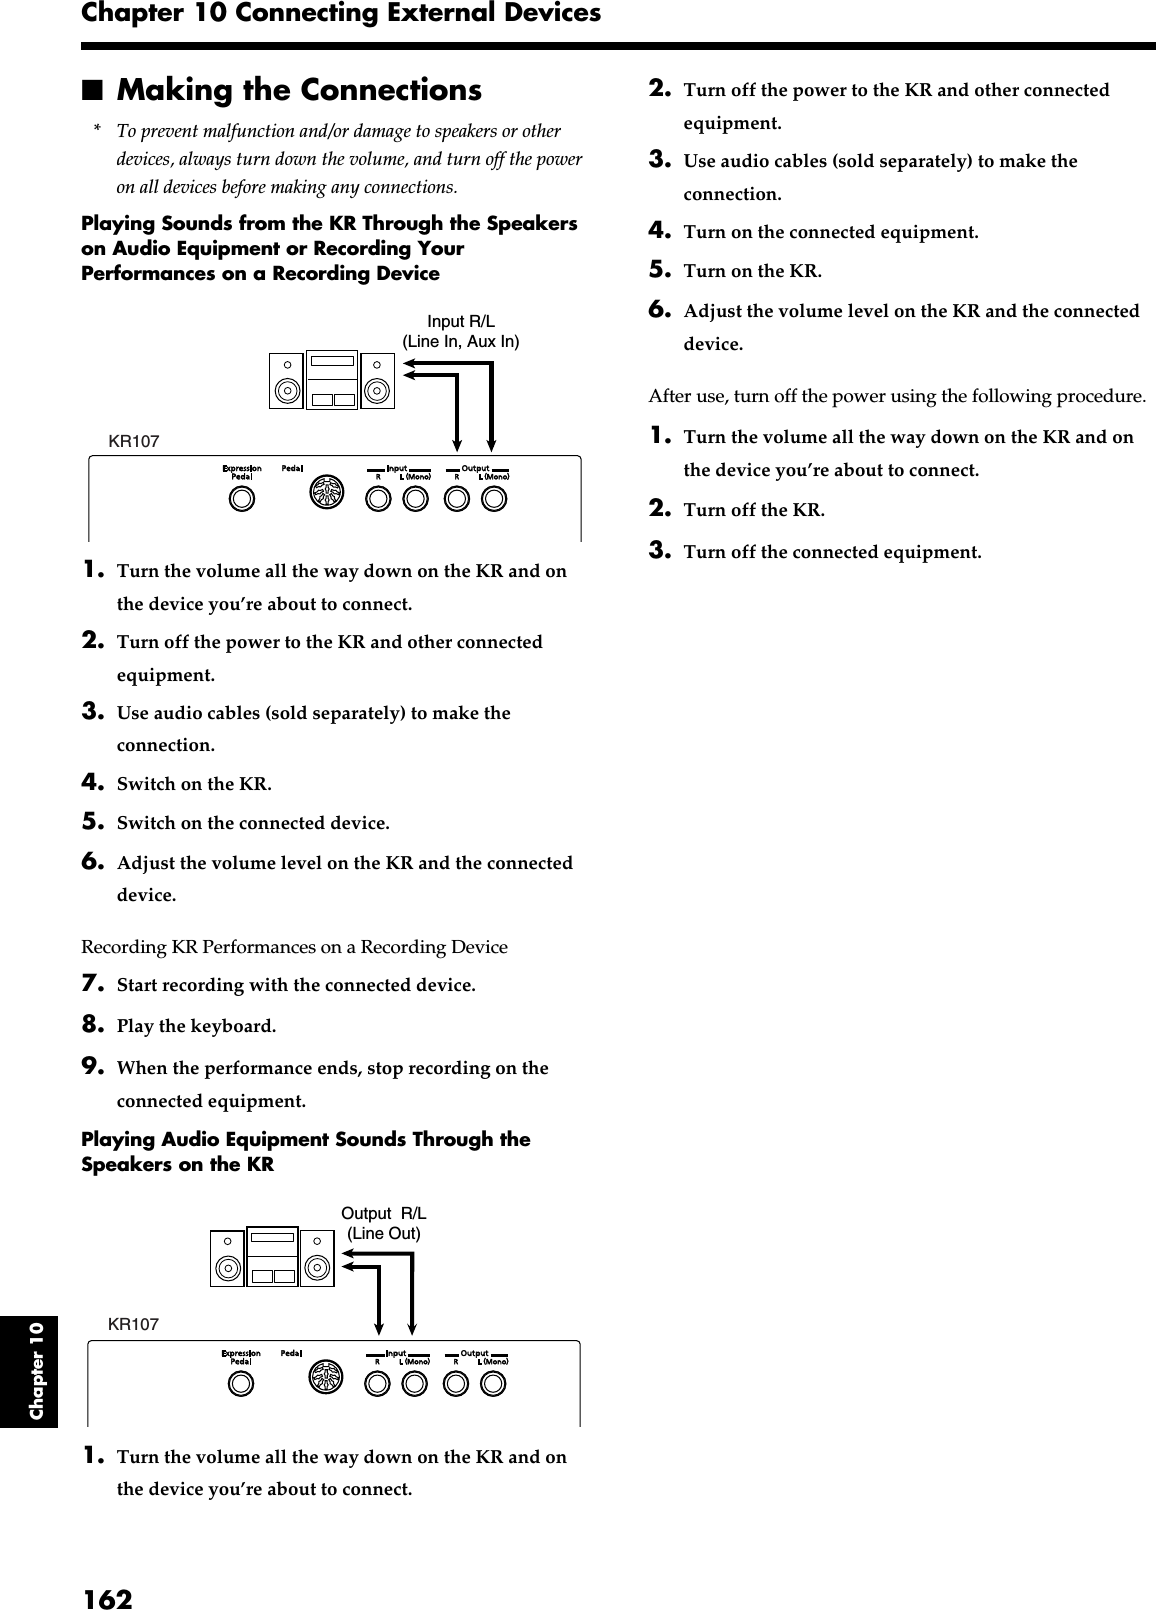
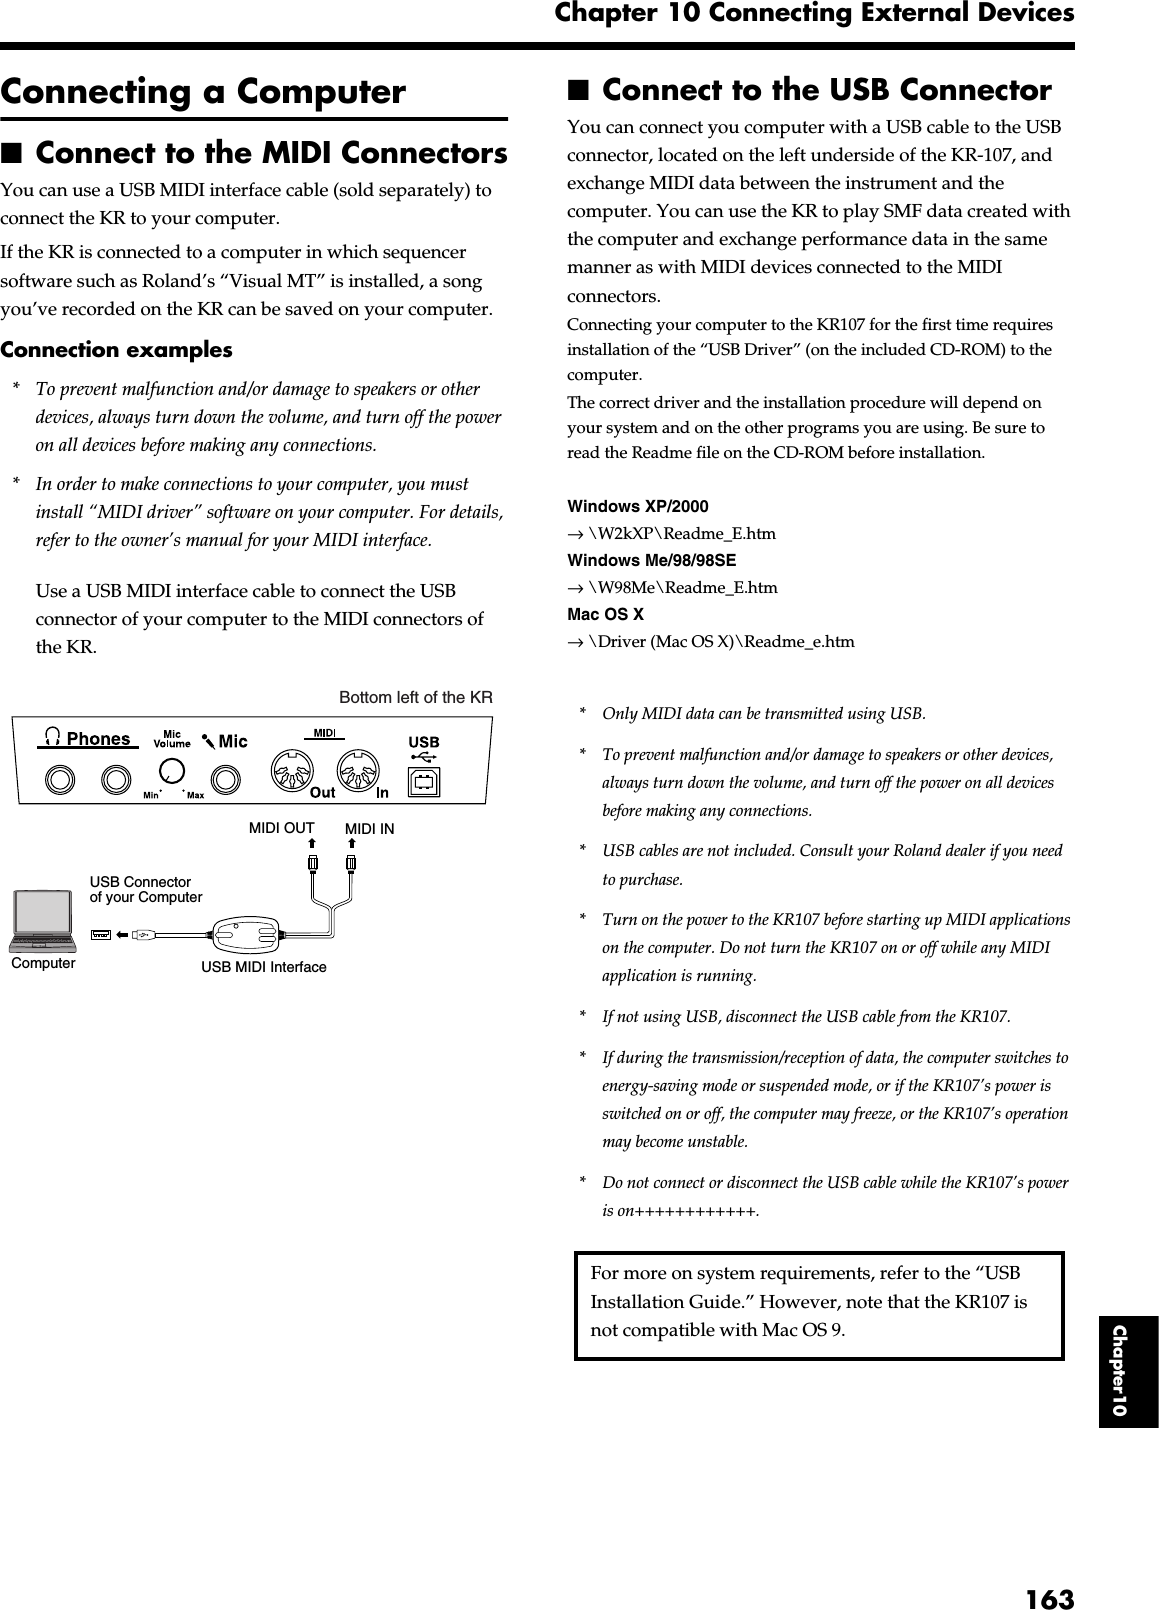
![164Chapter 10 Connecting External DevicesChapter 10Connection examplesfig.comp.e1. Turn off the power to the KR107 and the computer.2. Start up the computer.3. Connect the KR-107 and the computer with a USB cable.4. Turn on the power to the KR-107.→ Refer to the owner's manual that came with your computer■Making the Settings for the USB DriverThis sets the USB driver used when you have a computer connected to the USB connector.1. Open the Basic screen or press the One Touch [Piano] button.2. Touch the [Setting] button.3. Touch <USB Driver>.4. Touch to select the driver type.5. After changing the settings, turn the power off, then on again.Indication DescriptionUSB DriverOriginalSelect this when using the supplied driver with a USB connection.Under ordinary circumstances, use this mode.Original 2 This is an auxiliary mode.It is not normally used.GenericSelect this when using a generic USB driver included with the OS with a USB connection.ComputerUSB connectorUSB Connectorof your ComputerBottom left of the KR](https://usermanual.wiki/Roland/KR107.USERS-MANUAL-3/User-Guide-520895-Page-68.png)
![165AppendicesTroubleshootingCase Cause/RemedyThe power doesn’t come onIs the power cord connected and plugged in correctly? (p. 16)The button doesn’t workIs the panel locked? (p. 152) Turn the power off, then back on.Nothing appears on screenThe KR uses a liquid-crystal screen, so text may not be displayed when the ambient temperature is below freezing.Vertical lines appear in the screen/Color is “washed out” at the edges of the screenThese occur due to the nature of a liquid crystal display, and do not indicate a malfunction. They can be minimized by adjusting the brightness of the screen (p. 19).The touch screen doesn’t respond correctlyThe positioning of the touch screen may become displaced if some time has passed since it was last used. Take a look at “Calibrating the Touch Screen (Touch Screen)” (p. 149) to correct the positioning.Depressing a pedal has no effect, or the pedal effect doesn’t stopIs the pedal connected correctly? Make sure the pedal cord extending from the stand is securely connected to the pedal connector on the rear of the unit (p. 16).Has a different function been assigned to the pedal? See “Assigning Functions to Pedals and Performance Pads (Pedal Setting/User Functions)” (p. 142). Normal pedal operation is automatically enabled when the One Touch Program [Piano] button is pressed (p. 18).The volume level of the instrument connected to Input jacks is too lowCould you be using a connection cable that contains a resistor? Use a connection cable that does not contain a resistor.926bexternal memory+++++ ++++++++++++Low hum coming from external deviceDo you have different external devices plugged into different power outlets?When connecting external devices, always draw power from the same outlet.Mic volume has changed+++++ Vocal Effect++++++++++++Remocon is not affected+++++ +++++++++++++++++++++++Images not shown on external display when external display is connectedIs the external display properly connected (p. 154)?Is the external display’s power turned on?Are you using a display that is compatible with the KR?Refer to “Displays That Can Be Connected to This Instrument” (p. 154).Do you have a television and external display connected at the same time? Connect only one of these.Are the KR’s settings correct?Follow the instructions in “Selecting Images To Be Shown on the KR and External Displays (User Image Display)” (p. 146) to set the “External Display” image. Also refer to “Changing the Settings for Showing Images with the External Display and the Television (External Display)” (p. 156).yokosen+++++ ++++++++++++television+++++ ++++++++++++No sound is heardNo sound is heardIs the volume level of the KR (p. 18) or connected device turned all the way down?Are headphones plugged in? (p. 18)+++++++++++Has the Balance knob been moved all the way to the right or left?Has the volume been set to “0” using the Part Balance? (p. 62)Are all sliders in the Equalizer screen at the minimum level? (p. 33)Has the footage been adjusted so that all frequency components aren’t sounded? (p. 15 in the Quick Start)Is the speaker cable connected and plugged in correctly?V-LINK++++++++++++No sound is heard (when a MIDI instrument is connected)Have all devices been switched on?Are the MIDI cables connected correctly? (p. 158)Does the MIDI channel match the connected instrument? (p. 160)Case Cause/RemedyAppendicesIf you think there’s a problem, read this first.](https://usermanual.wiki/Roland/KR107.USERS-MANUAL-3/User-Guide-520895-Page-69.png)
![166TroubleshootingAppendicesNo sound is heard when the keyboard is playedHas Local Control been set to “Off”?When Local Control is set to Off, no sound is produced by playing the keyboard. Set Local Control to On (p. 160).Not all played notes are soundedThe maximum number of notes can play simultaneously is 128. Frequent use of the damper pedal during automatic accompaniment or when playing along with a song on floppy disk may result in performance data with too many notes, causing some notes to drop out.The sound is strangeSounds are heard twice (doubled) when the keyboard is playedIs the KR in layer play? (p. 25)When the KR is connected to an external sequencer, set it to the Local OFF mode (p. 160). Alternatively, the sequencer could be set so its Soft Thru feature is OFF.The tuning or pitch of the keyboard or song is off Have you set transpose? (p. 87)Are the settings for the “Temperament” and “Stretch Tuning” correct? (p. 141)Is the setting for the “Master Tune” correct? (p. 145)Effects cannot be applied to TonesIf different effects have been selected for the right-hand, left-hand, Layer, and other Tones, and the effects for the Parts don't match, only one of the effects is applied. It’s not possible to apply more than one effect at the same time, so when a performance has been recorded on multiple tracks or when playing along with a song as it’s played back, the desired effect may not be applied.+++++Are the settings for the part to which the effect is applied assigned to any part other than the one to which you want to have the effect applied?A note doesn’t stop playingHave the Chord Tone and Bass Tone been changed? (p. 138)Some Chord Tone and Bass Tone notes may be sounded continuously.Case Cause/RemedyThe Tone has changedDuring automatic accompaniment, changing the Music Style automatically changes the Tones and tempo of the upper part of the keyboard to match the new Music Style. If you want to change only the Music Style without also altering the tempo and Tone, check out “Changing Music Styles Without Changing the Tone or Tempo (One Touch Setting)” (p. 138).When a performance made along with a Music Files tune has been recorded, recording the performance to button [1/Whole] may make the Tones for buttons [3/Lower] and [4/Upper] change as well.Reverberation still audible even with Reverb turned offSince the KR’s piano sounds faithfully reproduce the sense of spaciousness and reverberation of an actual acoustic piano’s sound, a certain amount of reverberation is still perceptible, even with the reverb effect deactivated.Sound from the Output jacks is not rightHave you made the correct Advanced 3D settings for use with headphones?Changing the Advanced 3D “Mode” to “Headphones” or “Auto” and connecting a pair of headphones configures the settings for use with headphones.In the upper range, the sound changes abruptly beyond a certain keyOn an acoustic piano, notes in the upper one and a half octaves of the keyboard continue to sound until they decay naturally, regardless of the damper pedal. There is a difference in the timbre as well. Roland pianos faithfully simulate such characteristics of the acoustic piano. The range that is unaffected by the damper pedal will change depending on the Key Transpose setting.A High-pitched whine is producedWhen listening through headphones: Some of the more flamboyant and effervescent piano tones feature an ample high-end component, which may make the sound appear to have metallic reverberation added. Since this reverberation becomes particularly audible when supplemented by heavy reverb, you may be able to diminish the problem by reducing the amount of reverb applied to the sound.When listening through speakers: Here, a different cause (such as resonance produced by the KR) would be suspect. Consult your Roland dealer or nearest Roland Service Center.Case Cause/Remedy](https://usermanual.wiki/Roland/KR107.USERS-MANUAL-3/User-Guide-520895-Page-70.png)
![167TroubleshootingAppendicesThe bass range sounds odd, or there is a vibrating resonanceWhen listening through speakers: Playing at loud volumes may cause instruments near the KR to resonate. Resonation can also occur with fluorescent light tubes, glass doors, and other objects. In particular, this problem occurs more easily when the bass component is increased, and when the sound is played at higher volumes. Use the following measures to suppress such resonance. • Place speakers so they are 10–15 cm from walls and other surfaces. • Reduce the volume. • Move the speakers away from any resonating objects. When listening through headphones: Here, a different cause (such as resonance produced by the KR) would be suspect. Consult your Roland dealer or nearest Roland Service Center.The automatic accompaniment doesn’t play correctlyCan’t select a tone or Music StylePress the [Exit] button several times to return to the Basic screen (p. 20), and then select a tone or Music Style.Automatic accompaniment is not heardHas the Balance knob been moved all the way to the right? (p. 62)Have you pressed the One Touch Program [Arranger] button?If the One Touch Program [Arranger] button has not been pressed, only the rhythm pattern is played (p. 53).Is the 16-track Sequencer screen displayed? (p. 113)Chord Intelligence can’t be usedHas Chord Intelligence been switched off? (p. 138)Is the setting for “Piano Style Arranger” active? (p. 61)Accompaniment tempo becomes unstableIn certain cases, such as when playing Music Styles on floppy disks, the accompaniment may lag when excessive amounts of performance data are used.Song doesn’t play back correctlySong doesn’t play backDoes the screen indicate message, like “OK to delete song?” (p. 89) The internal songs cannot be played back while recorded performance data remains in the KR’s memory. Try playing back the song after deleting the performance data.Case Cause/RemedyOnly the sound of a particular instrument in a song does not playIs the light for the Track button extinguished? (p. 83) If the button light is out, the music on that track is not heard. Press the track button so the light is illuminated.Have song settings been changed for each Part on the 16-Track sequencer screen (p. 114)?Pressing the [ (Reset)] button doesn’t return to the beginning of the songSome music files may contain settings that stop play at a point partway through the song. Press the [ (Reset)] button several times more to return to the beginning of the tune.Has a Marker placed in the song? (p. 84)The [ (Fwd)] and [ (Bwd)] buttons don’t workThe fast-forward and reverse buttons are ignored while music files is being read in. Wait until processing finishes.If you attempt to play back performance data that contains more data than the entire capacity of the KR’s memory, you may find that operations other than playback (such as rewind or fast forward) become unavailable. There is a slight delay before playback of a song on external memory startsThere are two types of SMF music files: format 0 and format 1. If the song uses SMF format 1 data, there will be a slight delay until playback starts. Refer to the booklet that came with the music files you’re using to determine the format type.Lyrics are not indicated properly in the displayWith some music files, the lyrics cannot be displayed correctly.If you press a button while the lyrics are being shown in the display, the lyrics will disappear. To recall them, touch <lyrics> in the Piano or Basic screen, or press the [ (Play/Stop)] button.In the notation screen, some lyrics or notes could extend beyond the edges of the screen, and not be displayed.Notation is not indicated properly in the displayIf you select a part that does not contain performance data, notes will not be displayed in the notation. Change the part that is displayed (p. 75).The notation screen feature is particularly unsuitable for the display of difficult, complex musical works that demand accurate notation. Refer to “Notes Regarding the Notation Display” (p. 73).In the notation screen, some lyrics or notes could extend beyond the edges of the screen, and not be displayed.Case Cause/Remedy](https://usermanual.wiki/Roland/KR107.USERS-MANUAL-3/User-Guide-520895-Page-71.png)
![168TroubleshootingAppendicesSong becomes unstableIn certain cases, such as when playing songs on floppy disks, the song may lag when excessive amounts of performance data are used.internal song cannot +++++ remocon [MUTE]++++++++++++Unable to play back audio filesThe KR107 can play back audio files in the following format.• “.WAV” extension• 16bit linear• Sampling rate of “44.2 kHz”• StereoCan’t recordCan’t recordHas one of the track buttons for recording been selected? (p. 95)Has the setting for “Punch-in Recording” (p. 118) or “Tempo Recording” (p. 127) been made?Select the replace recording method (p. 117).It is not possible to record while the notation is being generated. Once the unit has finished generating the notation (i.e., when the measure number in the screen is no longer highlighted), try the operation once again.Audio file You cannot include audio files in recordings.Tempo of recorded song or metronome is offIf you select an internal song in which the tempo changes during the song, and then record, the tempo will change in the same way for the performances that are recorded on the other tracks. The tempo of the metronome will also change in the same way.If you record additional material without erasing the previously recorded song, the song will be recorded at the first-recorded tempo. Please erase the previously recorded song before you re-record (p. 96).The recorded performance has disappeared Any performance that has been recorded is deleted when the power to the KR is turned off or a song is selected. A performance cannot be restored once it’s been deleted. Be sure to save it on a floppy disk or User Memory before you turn off the power (p. 101).Case Cause/Remedy](https://usermanual.wiki/Roland/KR107.USERS-MANUAL-3/User-Guide-520895-Page-72.png)
![169AppendicesError MessagesIndication MeaningError 01: You can only read the music file. It can not be saved.Error 02: An error occurred during writing. The storage media’s protect tab may be in the “Protect” (writing prohibited) position, or the storage media may not yet be initialized.Error 10: No storage media is inserted.Insert the storage media and try again.Error 11: There is not sufficient free memory in the save destination.Either insert other storage media or delete unneeded files and try again.Error 14: An error occurred during writing. The storage media may be corrupted.Insert other storage media and try again. Alternatively, you can initialize the storage media.Error 15: The file is unreadable. The data format is not compatible with the RG-7.Error 16: Data was not called up in time for playback of the song.After waiting several seconds, you may be able to play back the song by pressing the [ ] button again.Error 17: The selected image data cannot be displayed.Prepare image data that can be used with the RG-7 (p. **).Error 30: The internal memory capacity of the RG-7 is full.Error 40: The RG-7 cannot deal with the excessive MIDI data sent from the external MIDI device.Reduce the amount of MIDI data sent to the RG-7.Error 41: A MIDI cable has been disconnected. Connect it properly and securely.Error 43: A MIDI transmission error has occurred.Check the MIDI cable and connected MIDI device.Error 51:There may be a problem with the system. Repeat the procedure from the beginning. If it is not solved after you have tried several times, contact the Roland service center.Error 65: The Ext Memory port was subjected to excessive current.Check the storage media to confirm that no damage has occurred to it.](https://usermanual.wiki/Roland/KR107.USERS-MANUAL-3/User-Guide-520895-Page-73.png)
![170AppendicesTone List[Piano]NaturalGrandVintage EPFM E.PianoNatural Hps.VibraphoneAriel PianoNatural Gnd2Honky-tonk'60sE.Piano1Phase Clav.2Morning LiteJazzy Vib+GtPiano Str2Piano OohsRock PianoNaturalMelloStage EPStage PhazerVibrationsCelestaMarimbaXylophoneNaturalC.HpsClav.Music BoxGlockenspielGrand Piano1Grand Piano2MellowPiano1PianoStringsBright PianoDetunedPianoHonky-tonk 2MellowPiano2PianoKidsChoAir GrandBallad PianoUprightPianoMono PianoFM+SA EPMIDI Piano1EG+E.Piano 1EG+E.Piano 2Bell PianoE. GrandMild E.GrandSoft E.PianoPhase EPE.Piano 1Pop E.PianoTremolo EP'60sE.Piano2E.Piano 2EP PhaseSt.FM EPEP LegendHarpsichordCoupled Hps.Harpsichord2Comp Clav.Reso Clav.Phase Clav.Pulse ClavCelesta 2Soft MarimbaVibe Tr.Marimba Tr.KalimbaMusic Box 2Music BellMusic Bell 2Tubular-bellChurch BellBallad BellsBell MonitorTimelineVibra Bells[Organ]ChurchOrgan1Combo Jz.OrgBallad OrganGerman Acco.Blues HarpL-OrganJazz Organ1Masked OperaGrand PipeTheater Org.La SeineParisRomanceMellow BarsOrgan 1Organ 2Lower Organ1Trem. Organ'70s E.Organ'60s OrganJazz Organ2Jazz Organ3Jazz Organ4Chorus OrganPerc. OrganRock Organ1Rotary OrganRotary Org.SRotary Org.FChurchOrgan2Pipe OrganTrem.FluteOrgan FluteNason flt 8'Organ BassPipe Org. BsDigi ChurchVS OrganMetalic Org.CheeseOrganAccordion FrAccordionFr2Accordion ItBright Acco.Soft Acco.BandoneonHarmonica[Guitar / Bass]EX Nylon GtrEX Steel Gt.Jazz Guitar2Fl.Gtr RollMandolinJC Chorus GtTC Clean ffOverdrive GtDistortionGtAmore StoryEX A.Guitar2Uncle MartinFlamenco GtrJazz GuitarWild Ac.BsA.Bass+CymblAcoustic Bs.Fingered Bs.Picked BassFretless Bs.Nylon GuitarRequint GtrEX Ac.GuitarSteel-str.Gt12-str.GtSteel + BodyNylon+SteelEX A.Guitar3Steel VoxUkuleleHawaiian GtClean Gt.JC Clean Gt.Mid Tone GTRTC Rear PickAcid GuitarOpen HardFeedback Gt.Power GuitarGuitar PinchMystic GtrFunk Gt.Funk Gt.2Muted Gt.Muted Dis.GtRock RhythmDist Rtm GTRWah Brush GtWood BassW.Bass+RideRockabillyFinger SlapMr.SmoothSlap Bass 1Slap Bass 2Synth Bass 1Jungle BassHammerSynthBass101ResoSH BassAcid BassClavi BassSynth Bass 2Beef FM BassAttack PulseRubber BassSitarSitar 2BanjoShamisenKotoTaisho Koto[Strings]DolceStringsVelo StringsDolce QrtLunar StrngsR&B SoftPadWind & StrAerial HarpViolinCelloHarp StringsMellow StrEX OrchestraSlow ViolinPizzicatoStrStringsOct StringsStrings 2DecayStringsBright StrSlow StringsSlowStrings2Legato StrWarm StringsSahara StrDecay Str2Tremolo StrOrchestraOrchestra 2FarewellChoir StrBell StringsPearly HarpHarpSt. HarpViolaContrabassSanturYang QinYang Qin 2Er HuSoft PadSoft Pad 2Syn.Strings1Syn.Strings2Syn.Slow StrOB StringsJP Saw StrTimpaniWarm JP StrOrchestraHitGood Old HitEuro Hit6th HitBass HitPhilly HitPhilly Hit 2Mix Hit 1Mix Hit 2[Sax/Brass] BlowAltoVibPowerBrass 2Sax SectionFluteGood Old DayBrass Sect 2EX Tp&ShakeSuper TenorAltoSax SoftSoprano SaxClarinetOboeEX TrumpetFlugel HornPan FluteQu DiSuperF.HornsAngel PipesTrumpetTp ShakeBright Tp.Warm Tp.Dark TrumpetRomantic TpTromboneTrombone 2Twin bonesBones Sect.Bright Tb.TubaMutedTrumpetMuteTrumpet2MuteTrumpet3French HornsFrench Horn2OrchestraBrsBrass 1Brass 2BrassSectionPowerBrassPop OrchContemp'OrchBrass sfzBrass FallTrumpet FallEX Alto SaxAltoSax + TpAlto SaxGrow SaxBreathyTenorTenor SaxTenor Sax 2Tenor Sax fTenor Sax BBaritone SaxEnglish HornBassoonPiccoloFlute 2RecorderBottle BlowShakuhachiWhistleOcarinaBagpipeLochscapeAndes MoodHimalayaPipeWide SynBrssDeepSynBrassJump BrassSaw Brass1Saw Brass2Synth Brass1Synth Brass2DetuneSawBrsPro BrassSynBrass sfz[Voice]Aerial ChoirJazz ScatKid's ChoirDreaming BoxRich ChoirAngels ChoirBoys ChoirOpera VoiceMellow ChoirHoly VoicesMystic StrTrancy XHPF SlicerSide Band XGlasswavesChurch ChoirVoice OohsVoice Oohs 2Choir HahsDecay ChoirDoos VoiceDoot AccentDat AccentBap AccentThum VoiceHummingSynVox](https://usermanual.wiki/Roland/KR107.USERS-MANUAL-3/User-Guide-520895-Page-74.png)
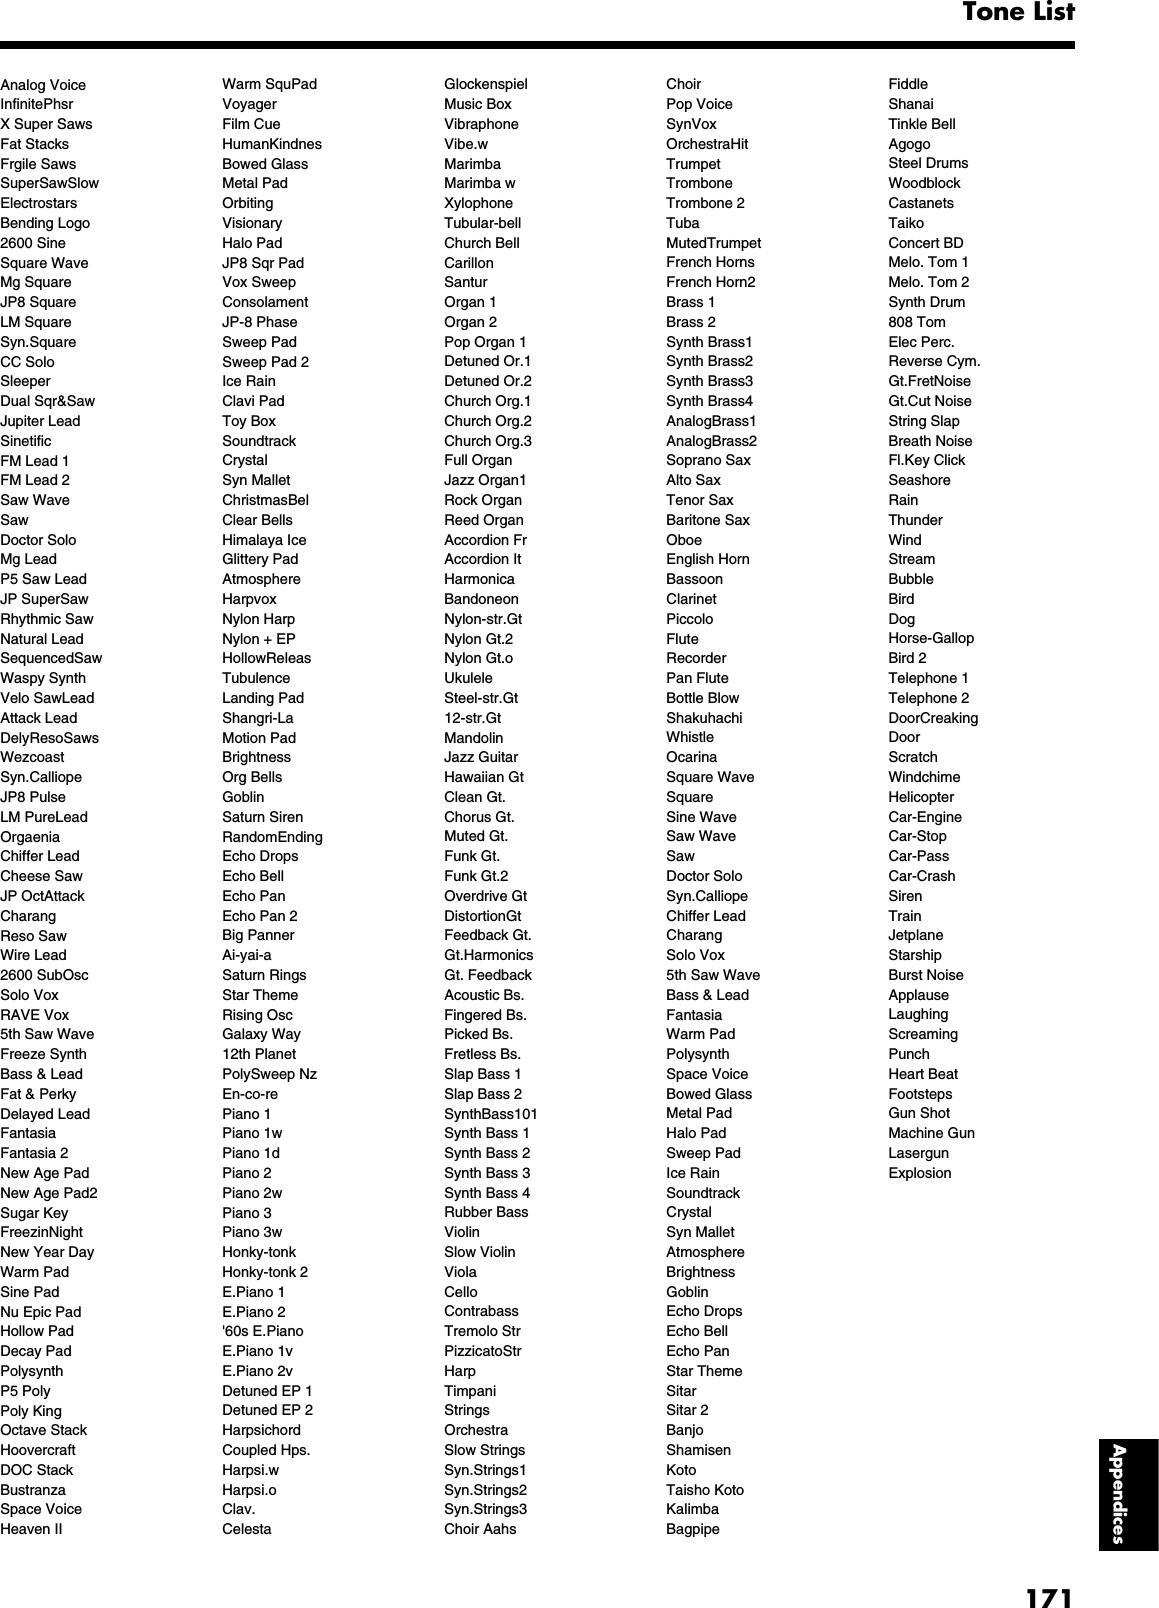
![172AppendicesDrum Set List* -----: No sound.* [EXC]: will not sound simultaneously with other percussion instruments of the same number.R&B Snare Rock Snare m 1 Rock Snare m 2 Pop Snare m 1 Pop Snare Ghost Pop Snare m 1 Finger Snap TR-707 Claps Hand Clap [EXC7]Hand Clap 2 [EXC7]Hand Clap Pop Pedal HH [EXC1]Gospel Hand Clap Snare Roll Pop Kick 2 Pop Kick 1 Pop Side Stick Pop Snare s 1 Pop Snare Ghost Pop Snare s 2 Pop Low Tom f Pop CHH 1 [EXC1]Pop Low Tom Pop CHH 2 [EXC1]Pop Mid Tom f Pop OHH [EXC1]Pop Mid Tom Pop High Tom f Pop Crash Cymbal 1 Pop High Tom Pop Ride Cymbal 1 Pop Chinees Cymbal Pop Ride Bell Tambourine 2 Splash Cymbal Cha Cha CowBell Pop Crash Cymbal 2 Vibra-slap Pop Ride Cymbal 2 High Bongo 1 Low Bongo 1 Mute High Conga 1 Open High Conga 1 Low Conga 1 High Timbale Low Timbale High Agogo Low Agogo Shaker 3 Shaker 4 Short Hi Whistle [EXC2]Long Low Whistle [EXC2]Short Guiro [EXC3]Long Guiro [EXC3]Claves High Wood Block Low Wood Block Mute Cuica [EXC4]Open Cuica [EXC4]Mute Triangle1 [EXC5]Open Triangle 1 [EXC5]Shaker Jingle Bell Bell Tree Castanets Mute Surdo [EXC6]Open Surdo [EXC6]Cana Hi-Timbale Flam Lo-Timbale Flam Timbale Phrase Shekere 1 Shekere 2 Low Bongo Mute High Bongo Mute ---- ---- ---- ---- Flamenco Hand Clap Flamenco Hand Clap Bongo CowBell ---- Bongo CowBell ---- ---- ---- ---- R&B Snare Pop Snare m 2 Pop Snare m 1 Pop Snare m 1 Pop Snare Ghost Pop Snare m 2 Finger Snap 2 TR-707 Claps Hand Clap [EXC7]Hand Clap 2 [EXC7]Hand Clap Pop Pedal HH [EXC1]Gospel Hand Clap Snare Roll Rock Kick 2 Rock Kick 1 Rock Side Stick Rock Snare s 1 Pop Snare Ghost Rock Snare s 2 Rock Low Tom f Rock CHH 1 [EXC1]Rock Low Tom Rock CHH 2 [EXC1]Rock Mid Tom f Rock OHH [EXC1]Rock Mid Tom Rock High Tom f Rock Crash Cymbal Rock High Tom Rock Ride Cymbal 1 Pop Chinees Cymbal Pop Ride Bell Tambourine 2 Splash Cymbal Cha Cha CowBell Chinees Cymbal Vibra-slap Pop Ride Cymbal 3 High Bongo 1 Low Bongo 1 Mute High Conga 1 Open High Conga 1 Low Conga 1 High Timbale Low Timbale High Agogo Low Agogo Shaker 3 Shaker 4 Short Hi Whistle [EXC2]Long Low Whistle [EXC2]Short Guiro [EXC3]Long Guiro [EXC3]Claves High Wood Block Low Wood Block Mute Cuica [EXC4]Open Cuica [EXC4]Mute Triangle1 [EXC5]Open Triangle 1 [EXC5]Shaker Jingle Bell Bell Tree Castanets Mute Surdo [EXC6]Open Surdo [EXC6]Cana Hi-Timbale Flam Lo-Timbale Flam Timbale Phrase Shekere 1 Shekere 2 Low Bongo Mute High Bongo Mute ---- ---- ---- ---- Flamenco Hand Clap Flamenco Hand Clap Bongo CowBell ---- Bongo CowBell ---- ---- ---- ---- Jungle BD 2 Metronome E.Click Metronome Pi Concert SD Snare Roll Finger Snap High Q Slap Scratch Push [EXC7]Scratch Pull [EXC7]Sticks Square Click Metronome Click Metronome Bell Jungle BD 2 HipHop BD1 TR-808 Rimshot Power Snare 1A TR-707 Clap Power Snare 2A Low Tom 2 Pop CHH 1 [EXC1]Low Tom 1 Pedal Hi-hat 3 [EXC1]Mid Tom 2 Pop OHH [EXC1]Mid Tom 1 High Tom 2 Crash Cymbal 3 High Tom 1 Ride Cymbal 1 Reverse Cymbal Ride Bell Shake Tambourine Splash Cymbal TR-808 Cowbell Crash Cymbal 2 Vibra-slap Ride Cymbal 2 High Bongo 2 Low Bongo 2 Mute High Conga 2 Open High Conga 2 Low Conga 2 High Timbale Low Timbale High Agogo Low Agogo Cabasa Maracas Short Hi Whistle [EXC2]Long Low Whistle [EXC2]Short Guiro [EXC3]HipVibraslap [EXC3]TR-808 Claves High Wood Block Low Wood Block High Hoo [EXC4]Low Hoo [EXC4]Mute Triangle2 [EXC5]Open Triangle 2 [EXC5]Shaker Jingle Bell Bell Tree Castanets Mute Surdo [EXC6]Open Surdo [EXC6]Applause 2 HipHop SD 2 LoFi SD Rim TR-808 Clap Room Snare 1 Standard 1 Snare 2A Room Snare 2 Standard 1 Snare 1 Standard 1 Snare 2B ---- ---- ---- ---- ---- ---- Tape Rewind Phono Noise Room Snare 1 Room Snare 2A Elec Snare 4A Elec Snare 4B R&B Snare Rock Snare m 1 Rock Snare m 2 Pop Snare m 1 Pop Snare Ghost Pop Snare m 1 Finger Snap TR-707 Claps Hand Clap [EXC7]Hand Clap 2 [EXC7]Hand Clap Pop Pedal HH Gospel Hand Clap Vox Dut Vox Dom Vox Tuush Vox Hehho Vox Doyear Vox Thu! Vox That Vox Aahhh Vox Tu Vox Dooh Vox Ptu Vox Down Vox Pa Vox Bom Vox Toear Vox Aahhu Vox Toya Vox Thu Vox Cheey Vox Cymm Vox Tub Vox Pruru Vox Tut Vox Tyun Vox Tdum Vox Afahhhh High Bongo 1 Low Bongo 1 Mute High Conga 1 Open High Conga 1 Low Conga 1 High Timbale Low Timbale High Agogo Low Agogo Shaker 3 Shaker 4 Short Hi Whistle [EXC2]Long Low Whistle [EXC2]Short Guiro [EXC3]Long Guiro [EXC3]Claves High Wood Block Low Wood Block Mute Cuica [EXC4]Open Cuica [EXC4]Mute Triangle1 [EXC5]Open Triangle 1 [EXC5]Shaker Jingle Bell Bell Tree Castanets Mute Surdo [EXC6]Open Surdo [EXC6]Cana Hi-Timbale Flam Lo-Timbale Flam Timbale Phrase Shekere 1 Shekere 2 Low Bongo Mute High Bongo Mute ---- ---- ---- ----Flamenco Hand Clap Flamenco Hand Clap Bongo CowBell ---- Bongo CowBell ---- ---- ---- ---- 2728293133353032342123223940414345474244463638378788848685515253555759545658485049636465676971666870606261757677798183788082727473C2C3C4C5C6 262425POP ROCK HIP HOP VOX DRUMR&B Snare Pop Snare m 1 Pop Snare m 2 Pop Snare m 1 Pop Snare Ghost Pop Snare m 1 Finger Snap 2 TR-707 Claps Hand Clap [EXC7]Hand Clap 2 [EXC7]Hand Clap Pop Pedal HH [EXC1]Gospel Hand Clap Snare Roll Jazz Kick 2 Jazz Kick 1 Jazz Snare Swing 1 Jazz Snare 1 Jazz Snare Swing 2 Jazz Snare 2 Jazz Low Tom f Pop CHH 1 [EXC1]Jazz Low Tom Pop CHH 2 [EXC1]Jazz Mid Tom f Pop OHH [EXC1]Jazz Mid Tom Jazz High Tom f Jazz Crash Cymbal 1 Jazz High Tom Jazz Ride Cymbal 1 Jazz Chinees Cymbal Jazz Ride Cymbal 2 Tambourine 2 Splash Cymbal Cha Cha CowBell Jazz Crash Cymbal 2 Vibra-slap Jazz Ride Cymbal 3 High Bongo 1 Low Bongo 1 Mute High Conga 1 Open High Conga 1 Low Conga 1 High Timbale Low Timbale High Agogo Low Agogo Shaker 3 Shaker 4 Short Hi Whistle [EXC2]Long Low Whistle [EXC2]Short Guiro [EXC3]Long Guiro [EXC3]Claves High Wood Block Low Wood Block Mute Cuica [EXC4]Open Cuica [EXC4]Mute Triangle1 [EXC5]Open Triangle 1 [EXC5]Shaker Jingle Bell Bell Tree Castanets Mute Surdo [EXC6]Open Surdo [EXC6]Cana Hi-Timbale Flam Lo-Timbale Flam Timbale Phrase Shekere 1 Shekere 2 Low Bongo Mute High Bongo Mute ---- ---- ---- ---- Flamenco Hand Clap Flamenco Hand Clap Bongo CowBell ---- Bongo CowBell ---- ---- ---- ---- JAZZBRUSH8991939590929410710810699100101103105102104969897C7C8](https://usermanual.wiki/Roland/KR107.USERS-MANUAL-3/User-Guide-520895-Page-76.png)
![173Drum Set ListAppendices* -----: No sound.* [EXC]: will not sound simultaneously with other percussion instruments of the same number.---- ---- ---- Bar Chime Snare Roll Finger Snap High Q Slap Scratch Push [EXC7]Scratch Pull [EXC7]Sticks Square Click Metronome Click Metronome Bell Standard 1 Kick 1 Standard 1 Kick 2 Side Stick 1 Standard 1 Snare 1 TR-909 Clap Standard 1 Snare 2 Low Tom 2 Close Hi-hat1 [EXC1]Low Tom 1 Pedal Hi-hat 1 [EXC1]Mid Tom 2 Open Hi-hat 1 [EXC1]Mid Tom 1 High Tom 2 Crash Cymbal 1 High Tom 1 Ride Cymbal 1 Chinese Cymbal Ride Bell Tambourine Splash Cymbal Cowbell Crash Cymbal 2 Vibra-slap Ride Cymbal 2 ---- ---- ---- Cana Ban Gu 1 Taiko 1 Nao Bo [EXC8]Taiko 2 Xiao Bo 1 [EXC8]Taiko 3 Open High HuYinLuo 2 [EXC8]Taiko 4 Taiko 5 Open High HuYinLuo 1 Taiko 6 Shou Luo 1 Mute Low HuYinLuo 2 Shou Luo 2 Xiao Bo 2 Ban Gu 2 Xiao Bo 3 Open High HuYinLuo 3 Mute High HuYinLuo Mute Low HuYinLuo 1 ---- ---- ---- ---- ---- ---- ---- ---- ---- ---- ---- ---- ---- Open Sagat Close Sagat Ban Gu 1 Ban Gu 3 ---- ---- ---- ---- Bar Chime Snare Roll Finger Snap High Q Slap Scratch Push [EXC7]Scratch Pull [EXC7]Sticks Square Click Metronome Click Metronome Bell Standard 1 Kick 1 Standard 1 Kick 2 Side Stick 1 Standard 1 Snare 1 TR-909 Clap Standard 1 Snare 2 Low Tom 2 Close Hi-hat1 [EXC1]Low Tom 1 Pedal Hi-hat 1 [EXC1]Mid Tom 2 Open Hi-hat 1 [EXC1]Mid Tom 1 High Tom 2 Crash Cymbal 1 High Tom 1 Ride Cymbal 1 Chinese Cymbal Ride Bell Tambourine Splash Cymbal Cowbell Crash Cymbal 2 Vibra-slap Ride Cymbal 2 High Bongo 1 Low Bongo 1 Mute High Conga 1 Open High Conga 1 Low Conga 1 High Timbale Low Timbale High Agogo Low Agogo Cabasa Maracas Short Hi Whistle [EXC2]Long Low Whistle [EXC2]Short Guiro [EXC3]Long Guiro [EXC3]Claves High Wood Block Low Wood Block Mute Cuica [EXC4]Open Cuica [EXC4]Mute Triangle1 [EXC5]Open Triangle 1 [EXC5]Shaker Jingle Bell Bell Tree Castanets Mute Surdo [EXC6]Open Surdo [EXC6]---- ---- ---- ---- ---- ---- ---- ---- ---- ---- ---- ---- ---- ---- ---- ---- ---- Bar Chime Snare Roll Finger Snap High Q Slap Scratch Push [EXC7]Scratch Pull [EXC7]Sticks Square Click Metronome Click Metronome Bell Standard 2 Kick 2 Standard 2 Kick 1 Side Stick 2 Standard 2 Snare 1 TR-808 Clap Standard 2 Snare 2 Low Tom 2 Closed Hi-hat 2 [EXC1]Low Tom 1 Pedal Hi-hat 2 [EXC1]Mid Tom 2 Open Hi-hat 2 [EXC1]Mid Tom 1 High Tom 2 Crash Cymbal 1 High Tom 1 Ride Cymbal 1 Chinese Cymbal Ride Bell Tambourine Splash Cymbal Cowbell Crash Cymbal 2 Vibra-slap Ride Cymbal 2 High Bongo 1 Low Bongo 1 Mute High Conga 1 Open High Conga 1 Low Conga 1 High Timbale Low Timbale High Agogo Low Agogo Cabasa Maracas Short Hi Whistle [EXC2]Long Low Whistle [EXC2]Short Guiro [EXC3]Long Guiro [EXC3]Claves High Wood Block Low Wood Block Mute Cuica [EXC4]Open Cuica [EXC4]Mute Triangle1 [EXC5]Open Triangle 1 [EXC5]Shaker Jingle Bell Bell Tree Castanets Mute Surdo [EXC6]Open Surdo [EXC6]---- ---- ---- ---- ---- ---- ---- ---- ---- ---- ---- ---- ---- ---- ---- ---- ---- Bar Chime Snare Roll Finger Snap High Q Slap Scratch Push [EXC7]Scratch Pull [EXC7]Sticks Square Click Metronome Click Metronome Bell Standard 3 Kick 2 Standard 3 Kick 1 Side Stick 2 Standard 3 Snare 1 TR-808 Clap Standard 3 Snare 2 Low Tom 2 Closed Hi-hat 3 [EXC1]Low Tom 1 Pedal Hi-hat 2 [EXC1]Mid Tom 2 Open Hi-hat 3 [EXC1]Mid Tom 1 High Tom 2 Crash Cymbal 1 High Tom 1 Ride Cymbal 1 Chinese Cymbal Ride Bell Tambourine Splash Cymbal Cowbell Crash Cymbal 2 Vibra-slap Ride Cymbal 2 High Bongo 1 Low Bongo 1 Mute High Conga 1 Open High Conga 1 Low Conga 1 High Timbale Low Timbale High Agogo Low Agogo Cabasa Maracas Short Hi Whistle [EXC2]Long Low Whistle [EXC2]Short Guiro [EXC3]Long Guiro [EXC3]Claves High Wood Block Low Wood Block Mute Cuica [EXC4]Open Cuica [EXC4]Mute Triangle1 [EXC5]Open Triangle 1 [EXC5]Shaker Jingle Bell Bar Chime Castanets Mute Surdo [EXC6]Open Surdo [EXC6]---- ---- ---- ---- ---- ---- ---- ---- ---- ---- ---- ---- ---- ---- STD CHINA STANDARD 1 STANDARD 2 STANDARD 3 ROOM---- ---- ---- Bar Chime Snare Roll Finger Snap High Q Slap Scratch Push [EXC7]Scratch Pull [EXC7]Sticks Square Click Metronome Click Metronome Bell Room Kick 2 Room Kick 1 Side Stick 2 Room Snare 1 TR-808 Clap Room Snare 2 Room Low Tom 2 Closed Hi-hat 4 [EXC1]Room Low Tom 1 Pedal Hi-hat 2 [EXC1]Room Mid Tom 2 Open Hi-hat 4 [EXC1]Room Mid Tom 1 Room High Tom 2 Crash Cymbal 1 Room High Tom 1 Ride Cymbal 1 Chinese Cymbal Ride Bell Tambourine Splash Cymbal Cowbell Crash Cymbal 2 Vibra-slap Ride Cymbal 2 High Bongo 1 Low Bongo 1 Mute High Conga 1 Open High Conga 1 Low Conga 1 High Timbale Low Timbale High Agogo Low Agogo Cabasa Maracas Short Hi Whistle [EXC2]Long Low Whistle [EXC2]Short Guiro [EXC3]Long Guiro [EXC3]Claves High Wood Block Low Wood Block Mute Cuica [EXC4]Open Cuica [EXC4]Mute Triangle1 [EXC5]Open Triangle 1 [EXC5]Shaker Jingle Bell Bell Tree Castanets Mute Surdo [EXC6]Open Surdo [EXC6]-------- ---- ---- ---- ---- ---- ---- ---- ---- ---- ---- ---- ---- 2728293133353032342123223940414345474244463638378788848685515253555759545658485049636465676971666870606261757677798183788082727473C2C3C4C5C6 2624258991939590929499100101969897C7](https://usermanual.wiki/Roland/KR107.USERS-MANUAL-3/User-Guide-520895-Page-77.png)
![174Drum Set ListAppendices* -----: No sound.* [EXC]: will not sound simultaneously with other percussion instruments of the same number.---- ---- ---- Bar Chime Snare Roll Finger Snap High Q Slap Scratch Push [EXC7]Scratch Pull [EXC7]Sticks Square Click Metronome Click Metronome Bell Power Kick2 Power Kick1 Side Stick 2 Dance Snare1 TR-808 Clap Power Snare 1 Power Low Tom 2 Closed Hi-hat 4 [EXC1]Power Low Tom 1 Pedal Hi-hat 2 [EXC1]Power Mid Tom 2 Open Hi-hat 4 [EXC1]Power Mid Tom 1 Power High Tom 2 Crash Cymbal 1 Power High Tom 1 Ride Cymbal 1 Chinese Cymbal Ride Bell Tambourine Splash Cymbal Cowbell Crash Cymbal 2 Vibra-slap Ride Cymbal 2 High Bongo 1 Low Bongo 1 Mute High Conga 1 Open High Conga 1 Low Conga 1 High Timbale Low Timbale High Agogo Low Agogo Cabasa Maracas Short Hi Whistle [EXC2]Long Low Whistle [EXC2]Short Guiro [EXC3]Long Guiro [EXC3]Claves High Wood Block Low Wood Block Mute Cuica [EXC4]Open Cuica [EXC4]Mute Triangle1 [EXC5]Open Triangle 1 [EXC5]Shaker Jingle Bell Bell Tree Castanets Mute Surdo [EXC6]Open Surdo [EXC6]---- ---- ---- ---- Bar Chime Snare Roll Finger Snap High Q Slap Scratch Push 2 [EXC7]Scratch Pull 2 [EXC7]Sticks Square Click Metronome Click Metronome Bell Elec Kick 2 Elec Kick 1 Side Stick 2 Elec Snare 1 TR-808 Clap Elec Snare 2 Elec Low Tom 2 Closed Hi-hat 3 [EXC1]Elec Low Tom 1 Pedal Hi-hat 2 [EXC1]Elec Mid Tom 2 Open Hi-hat 3 [EXC1]Elec Mid Tom 1 Elec High Tom 2 Crash Cymbal 1 Elec High Tom 1 Ride Cymbal 1 Reverse Cymbal Ride Bell Tambourine Splash Cymbal Cowbell Crash Cymbal 2 Vibra-slap Ride Cymbal 2 High Bongo 1 Low Bongo 1 Mute High Conga 1 Open High Conga 1 Low Conga 1 High Timbale Low Timbale High Agogo Low Agogo Cabasa Maracas Short Hi Whistle [EXC2]Long Low Whistle [EXC2]Short Guiro [EXC3]Long Guiro [EXC3]Claves High Wood Block Low Wood Block Mute Cuica [EXC4]Open Cuica [EXC4]Mute Triangle1 [EXC5]Open Triangle 1 [EXC5]Shaker Jingle Bell Bell Tree Castanets Mute Surdo [EXC6]Open Surdo [EXC6]---- ---- ---- ---- Bar Chime Snare Roll Finger Snap High Q Slap Scratch Push 2 [EXC7]Scratch Pull 2 [EXC7]Sticks Square Click Metronome Click Metronome Bell TR-909 Kick TR-808 Kick TR-808 Rimshot TR-808 Snare 1 TR-808 Clap TR-909 Snare 1 TR-808 Low Tom 2 TR-808 CHH [EXC1]TR-808 Low Tom 1 TR-808 CHH [EXC1]TR-808 Mid Tom 2 TR-808 OHH [EXC1]TR-808 Mid Tom 1 TR-808 High Tom 2 TR-808 Cymbal TR-808 High Tom 1 Ride Cymbal 1 Chinese Cymbal Ride Bell Tambourine Splash Cymbal TR-808 Cowbell Crash Cymbal 2 Vibra-slap Ride Cymbal 2 High Bongo 1 Low Bongo 1 TR-808 High Conga TR-808 Mid Conga TR-808 Low Conga High Timbale Low Timbale High Agogo Low Agogo Cabasa TR-808 Maracas Short Hi Whistle [EXC2]Long Low Whistle [EXC2]Short Guiro [EXC3]Long Guiro [EXC3]TR-808 Claves High Wood Block Low Wood Block Mute Cuica [EXC4]Open Cuica [EXC4]Mute Triangle1 [EXC5]Open Triangle 1 [EXC5]Shaker Jingle Bell Bell Tree Castanets Mute Surdo [EXC6]Open Surdo [EXC6]---- POWER ELECTRONIC TR-808/909---- ---- ---- Bar Chime Snare Roll Finger Snap High Q Slap Scratch Push 2 [EXC7]Scratch Pull 2 [EXC7]Sticks Square Click Metronome Click Metronome Bell TR-808 Kick 2 HipHop BD1 Side Stick 2 Power Snare 2 TR-808 Clap Elec Snare 3 Elec Low Tom 2 CR-78 CHH [EXC1]Elec Low Tom 1 TR-808 CHH [EXC1]Elec Mid Tom 2 CR-78 OHH [EXC1]Elec Mid Tom 1 Elec High Tom 2 Crash Cymbal 1 Elec High Tom 1 Ride Cymbal 1 Reverse Cymbal Ride Bell Tambourine Splash Cymbal TR-808 Cowbell Crash Cymbal 2 Vibra-slap Ride Cymbal 2 High Bongo 1 Low Bongo 1 Mute High Conga 1 Open High Conga 1 Low Conga 1 High Timbale Low Timbale High Agogo Low Agogo Cabasa TR-808 Maracas Short Hi Whistle [EXC2]Long Low Whistle [EXC2]Short Guiro [EXC3]Long Guiro [EXC3]TR-808 Claves High Wood Block Low Wood Block High Hoo [EXC4]Low Hoo [EXC4]Mute Triangle1 [EXC5]Open Triangle 1 [EXC5]Shaker Jingle Bell Bell Tree Castanets Mute Surdo [EXC6]Open Surdo [EXC6]---- DANCE2728293133353032342123223940414345474244463638378788848685515253555759545658485049636465676971666870606261757677798183788082727473C2C3C4C5C6 262425](https://usermanual.wiki/Roland/KR107.USERS-MANUAL-3/User-Guide-520895-Page-78.png)
![175Drum Set ListAppendices* -----: No sound.* [EXC]: will not sound simultaneously with other percussion instruments of the same number.■SFX Set----- ----- ----- Bar Chime Snare Roll Finger Snap High Q Slap Scratch Push [EXC7]Scratch Pull [EXC7]Sticks Square Click Metronome Click Metronome Bell Jazz Kick 2 Jazz Kick 1 Side Stick 2 Jazz Snare 1 Hand Clap 3 Standard 2 Snare 2 Low Tom 2 Closed Hi-hat 3 [EXC1]Low Tom 1 Pedal Hi-hat 2 [EXC1]Mid Tom 2 Open Hi-hat 3 [EXC1]Mid Tom 1 High Tom 2 Crash Cymbal 1 High Tom 1 Ride Cymbal 1 Chinese Cymbal Ride Bell Tambourine Splash Cymbal Cowbell Crash Cymbal 2 Vibra-slap Ride Cymbal 2 High Bongo 1 Low Bongo 1 Mute High Conga 1 Open High Conga 1 Low Conga 1 High Timbale Low Timbale High Agogo Low Agogo Cabasa Maracas Short Hi Whistle [EXC2]Long Low Whistle [EXC2]Short Guiro [EXC3]Long Guiro [EXC3]Claves High Wood Block Low Wood Block Mute Cuica [EXC4]Open Cuica [EXC4]Mute Triangle1 [EXC5]Open Triangle 1 [EXC5]Shaker Jingle Bell Bell Tree Castanets Mute Surdo [EXC6]Open Surdo [EXC6]----------------------------------------------------------------------------------------------- ----- ----- Bar Chime Snare Roll Finger Snap High Q Slap Scratch Push [EXC7]Scratch Pull [EXC7]Sticks Square Click Metronome Click Metronome Bell Jazz Kick 2 Jazz Kick 1 Side Stick 2 Brush Tap Brush Slap Brush Swirl Brush Low Tom 2 Brush Closed Hi-hat [EXC1]Brush Low Tom 1 Pedal Hi-hat 2 [EXC1]Brush Mid Tom 2 Brush Open Hi-hat [EXC1]Brush Mid Tom 1 Brush High Tom 2 Brush Crash Cymbal Brush High Tom 1 Brush Ride Cymbal Chinese Cymbal Brush Ride Bell Tambourine Splash Cymbal Cowbell Crash Cymbal 2 Vibra-slap Ride Cymbal 2 High Bongo 1 Low Bongo 1 Mute High Conga 1 Open High Conga 1 Low Conga 1 High Timbale Low Timbale High Agogo Low Agogo Cabasa Maracas Short Hi Whistle [EXC2]Long Low Whistle [EXC2]Short Guiro [EXC3]Long Guiro [EXC3]Claves High Wood Block Low Wood Block Mute Cuica [EXC4]Open Cuica [EXC4]Mute Triangle1 [EXC5]Open Triangle 1 [EXC5]Shaker Jingle Bell Bell Tree Castanets Mute Surdo [EXC6]Open Surdo [EXC6]------------------------------------------------------------------------------------------ JAZZ BRUSH----- ----- ----- Bar Chime Snare Roll Finger Snap Closed Hi-hat 3 [EXC1]Pedal Hi-hat 2 [EXC1]Open Hi-hat 3 [EXC1]Ride Cymbal 1 Sticks Square Click Metronome Click Metronome Bell Jazz Kick 1 Concert BD Side Stick 2 Concert SD Castanets Concert SD Timpani F Timpani F# Timpani G Timpani G# Timpani A Timpani A# Timpani B Timpani c Timpani c# Timpani d Timpani d# Timpani e Timpani f Tambourine Splash Cymbal Cowbell Concert Cymbal 2 Vibra-slap Concert Cymbal 1 High Bongo 1 Low Bongo 1 Mute High Conga 1 Open High Conga 1 Low Conga 1 High Timbale Low Timbale High Agogo Low Agogo Cabasa Maracas Short Hi Whistle [EXC2]Long Low Whistle [EXC2]Short Guiro [EXC3]Long Guiro [EXC3]Claves High Wood Block Low Wood Block Mute Cuica [EXC4]Open Cuica [EXC4]Mute Triangle1 [EXC5]Open Triangle 1 [EXC5]Shaker Jingle Bell Bell Tree Castanets Mute Surdo [EXC6]Open Surdo [EXC6]Applause-------------------------------------------------------------------------------------ORCHESTRA----- ----- ----- ---------------------------------------------------------------------------High QSlapScratch Push [EXC7]Scratch Pull [EXC7]SticksSquare ClickMetronome ClickMetronome BellGuitar sliding FingerGuitar cutting noise (up)Guitar cutting noise (down)String slap of double bassFl.Key ClickLaughingScreamingPunchHeart BeatFootsteps1Footsteps2ApplauseDoor CreakingDoorScratchWind ChimesCar-EngineCar-StopCar-PassCar-CrashSirenTrainJetplaneHelicopterStarshipGun ShotMachine GunLasergunExplosionDogHorse-GallopBirdsRainThunderWindSeashoreStreamBubbleCatBirdBabyLaughingBoeeeenSFX SetGlass & GlamIce RingCrack BottlePour BottleCar HornR.CrossingSL 1SL 2SealFancy AnimalElephantBike-----Small Club---------------2728293133353032342123223940414345474244463638378788848685515253555759545658485049636465676971666870606261757677798183788082727473C2C3C4C5C6 2624258991939590929499100101103105102104969897C7](https://usermanual.wiki/Roland/KR107.USERS-MANUAL-3/User-Guide-520895-Page-79.png)
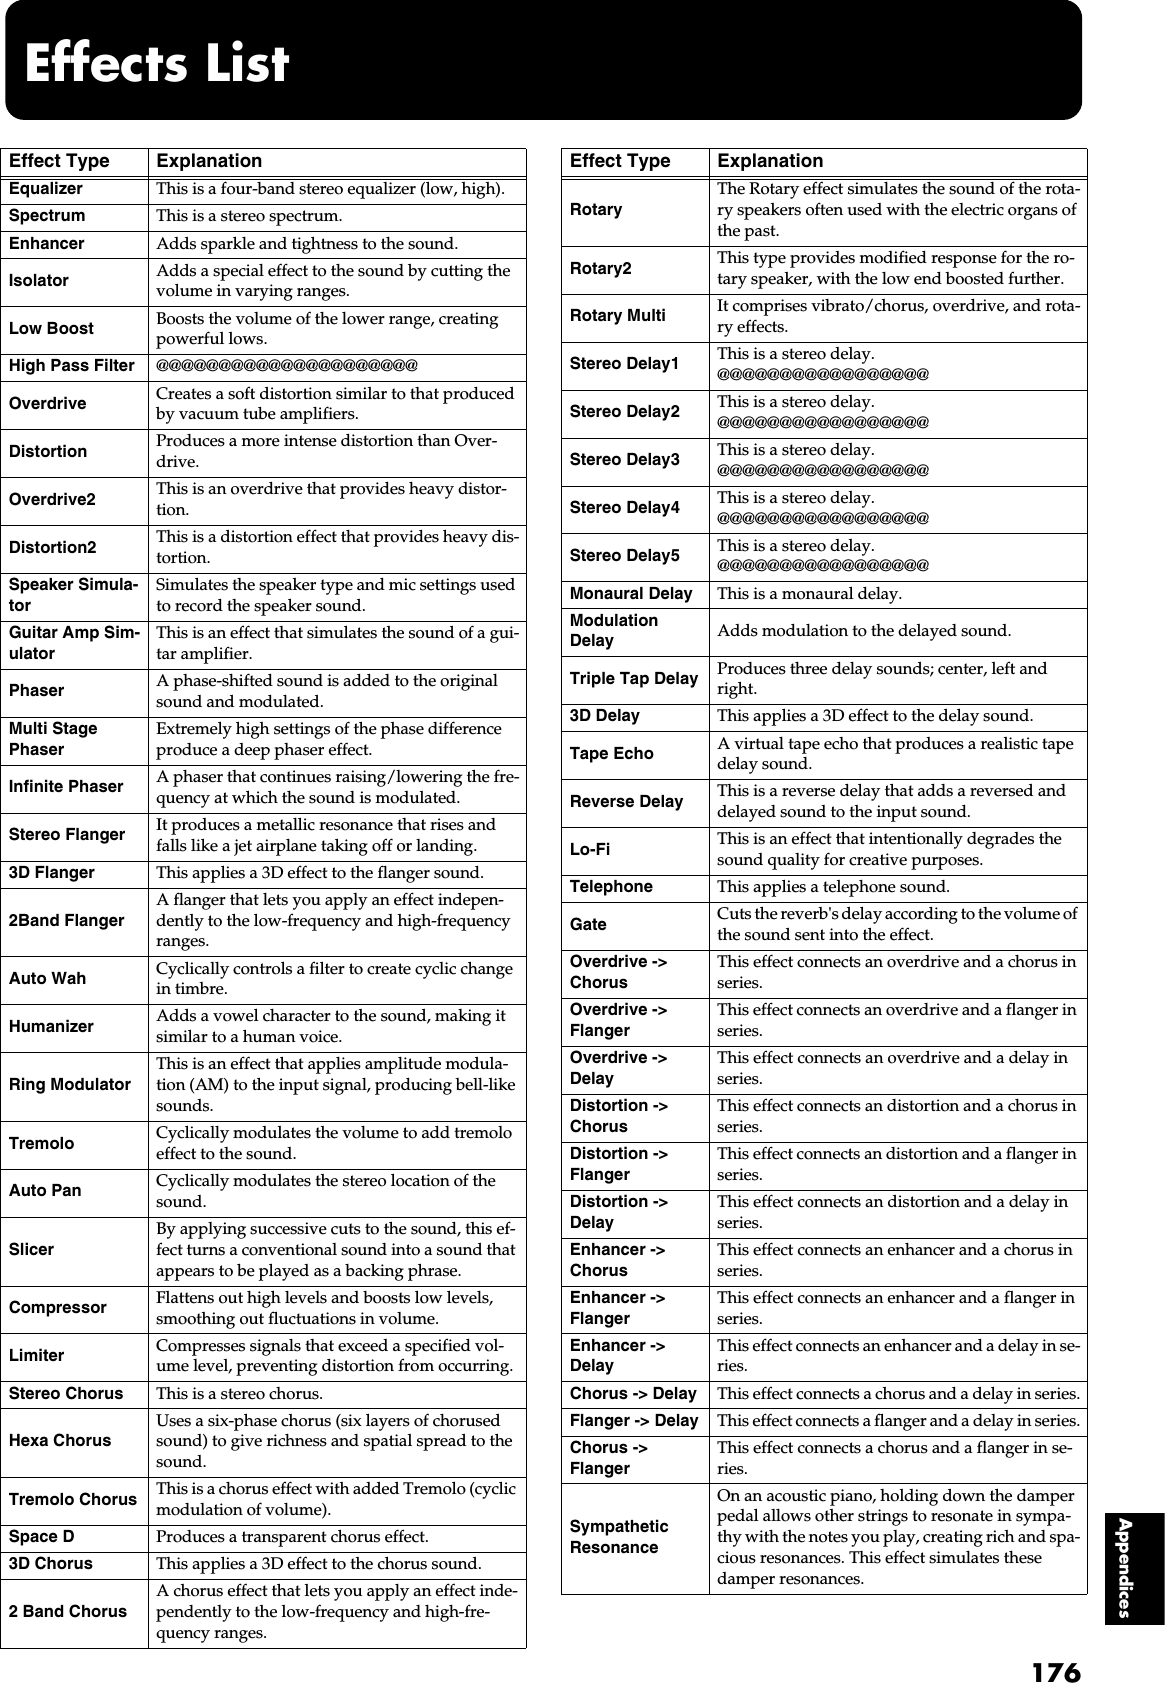
![177AppendicesMusic Style List [Pop/Rock]Pop'80s Pop 1Funky DiscoAdultContempUptown RockEZ ListeningStrumin'Away'70s Disco 1SmoothContmpSimple Rock'60s Feelin'16Beat PopLight PopBright PopHeart BeatEasy Pop'80s Pop 2'80s Pop 3Cute PopLovelyShuffl'70s Disco 2'70s DanceFever DanceEuro DanceHard TeknoBig House'90s HouseHouse PopIbiza DanceCool RapNow Hip HopTwostep HipHop BeatHip'n HopEasy HopMorningShfflGroovy PopSmile PopWarm PopSunny PopFeel GoodUS GrooveSteady RockShuffle RockDyno RockPower RockHeavy RockThump RockAsian Pop[Ballad/Acoustic]ModernBallad'80s BalladAcoustBalladAcoustEzLstnUnpluggedPopUnplugBalladAdult Pop 1Adult Pop 26/8 BalladLove BeatUnplugShufflCoolLiveBandNight BalladGuitarShufflEuro BalladGuitar TrioMidnightBaldPop BalladPiano PopLove Songs12/8 BalladScat Ballad'60s BalladTorch Song 1Torch Song 2Strings8BeatBallad18BeatBallad2FiresidePiano BalladStory BalladSimpleBalladClassicBaladSymph BalladR.8-Beat 1R.8-Beat 2R.16-Beat 1R.16-Beat 2R.16-Beat 3R.16-Beat 4R.Afro&SwingR.5BeatSwingR.Shuffle 1R.Waltz 1R.March 1R.5-BeatR.7-BeatP.Pop 1P.Classic 1P.NightP.Bossa NovaP.RagtimeP.Classic 2P.Ballad 2P.Swing PopP.Rock'nRollP.Concerto 1P.Concerto 2P.SwingP.ShuffleP.BoogieP.'50s RockP.Latin[Oldies/Country]Detroit Pop'60s Rock'nDreamSloRockCountryRock1CountryBald1Groovin R&BOldies 1Clock Rock'nCountryPop 1SwinginCntrySoulRock'n SlowOldies 2CountryBald2CountrySwingRock'n FeverCountry BeatSlow CountryCountryRock2Country FoxBluesR&BSlow DanceTwist'60s BeachSlow OldiesEarly RockGo Go RockMersey BeatCountryPop 2CajunCountryCntry DreamsCharlestonBluegrassDeep Country[Big Band/Swing]MidnitSloSwgBigBand SlowBig BandBigBand MedBigBand FastMedium SwingJiveSlow SwingQuick StepStringsSwingFoxtrotSwing FoxFox BandGipsy SwingFast SwingJzGuitrSwingJazz WaltzBlue BoogieBigBandBalad'30s BigBandBig Band 2Jazz BalladLooseBigBandSmooth JazzA CappellaScat SwingOrgan SwingDixielandHawaiianHula[Gospel/Latin]Latin Pop 1Orch BossaRhumbaGospelShufflContPraise 1ContPraise 2GospelSambaModernChaChaSalsaSoft GospelGospel ShoutAcoustRhumbaAcoust SambaTrad RhumbaGospel PopGospelBalladLatin DanceCha ChaTrad TangoSunshineBosaJazz BossaMerengueGuitarRhumbaMamboFast SambaFast BossaBig SambaLuv BossaMid BossaLatin Pop 2ReggaeTangoBeguineOye SonRevivalGospel PianoAsian Rhumba[Trad/World]MusicalPub BoogieVienna WaltzKids ShuffleMovie MarchMusic HallOrch BoleroOrch WaltzHoliday 1ClassicJing JuMarchingBandMarchSlow WaltzFast WaltzParisQuiet WaltzHoliday 2Holiday 32 BeatLager PolkaSlow PolkaAustrianPolkAustrianWalzIrishTejanoCelticMusetteScotlandJapanIrelandPaso DobleChina PopJiang NanXi BeiSchlagerBeatPartySchlagr'70sSchlagerDisco FoxParty PolkaRockSchlagerShufflSchlgrSimpleMarch1SimpleMarch2Simple WaltzKids 4/4Kids 6/8KidsKids Dance](https://usermanual.wiki/Roland/KR107.USERS-MANUAL-3/User-Guide-520895-Page-81.png)
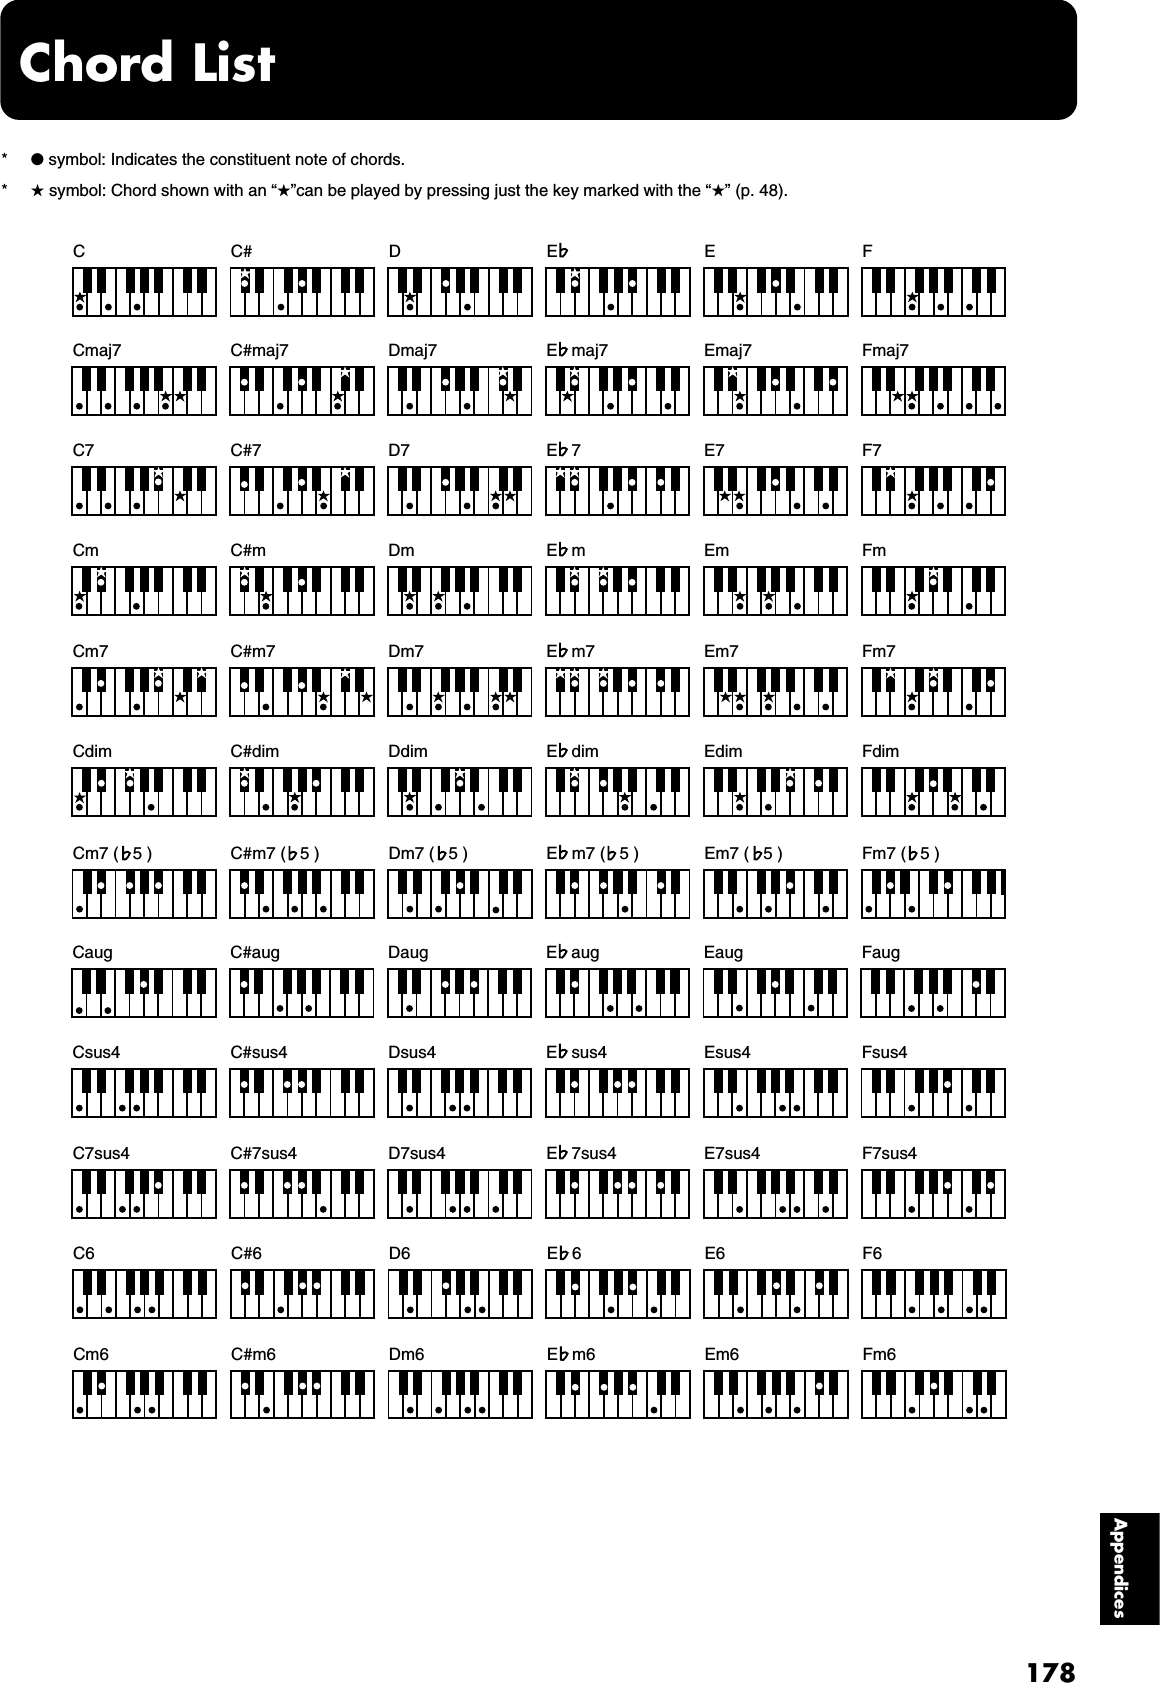
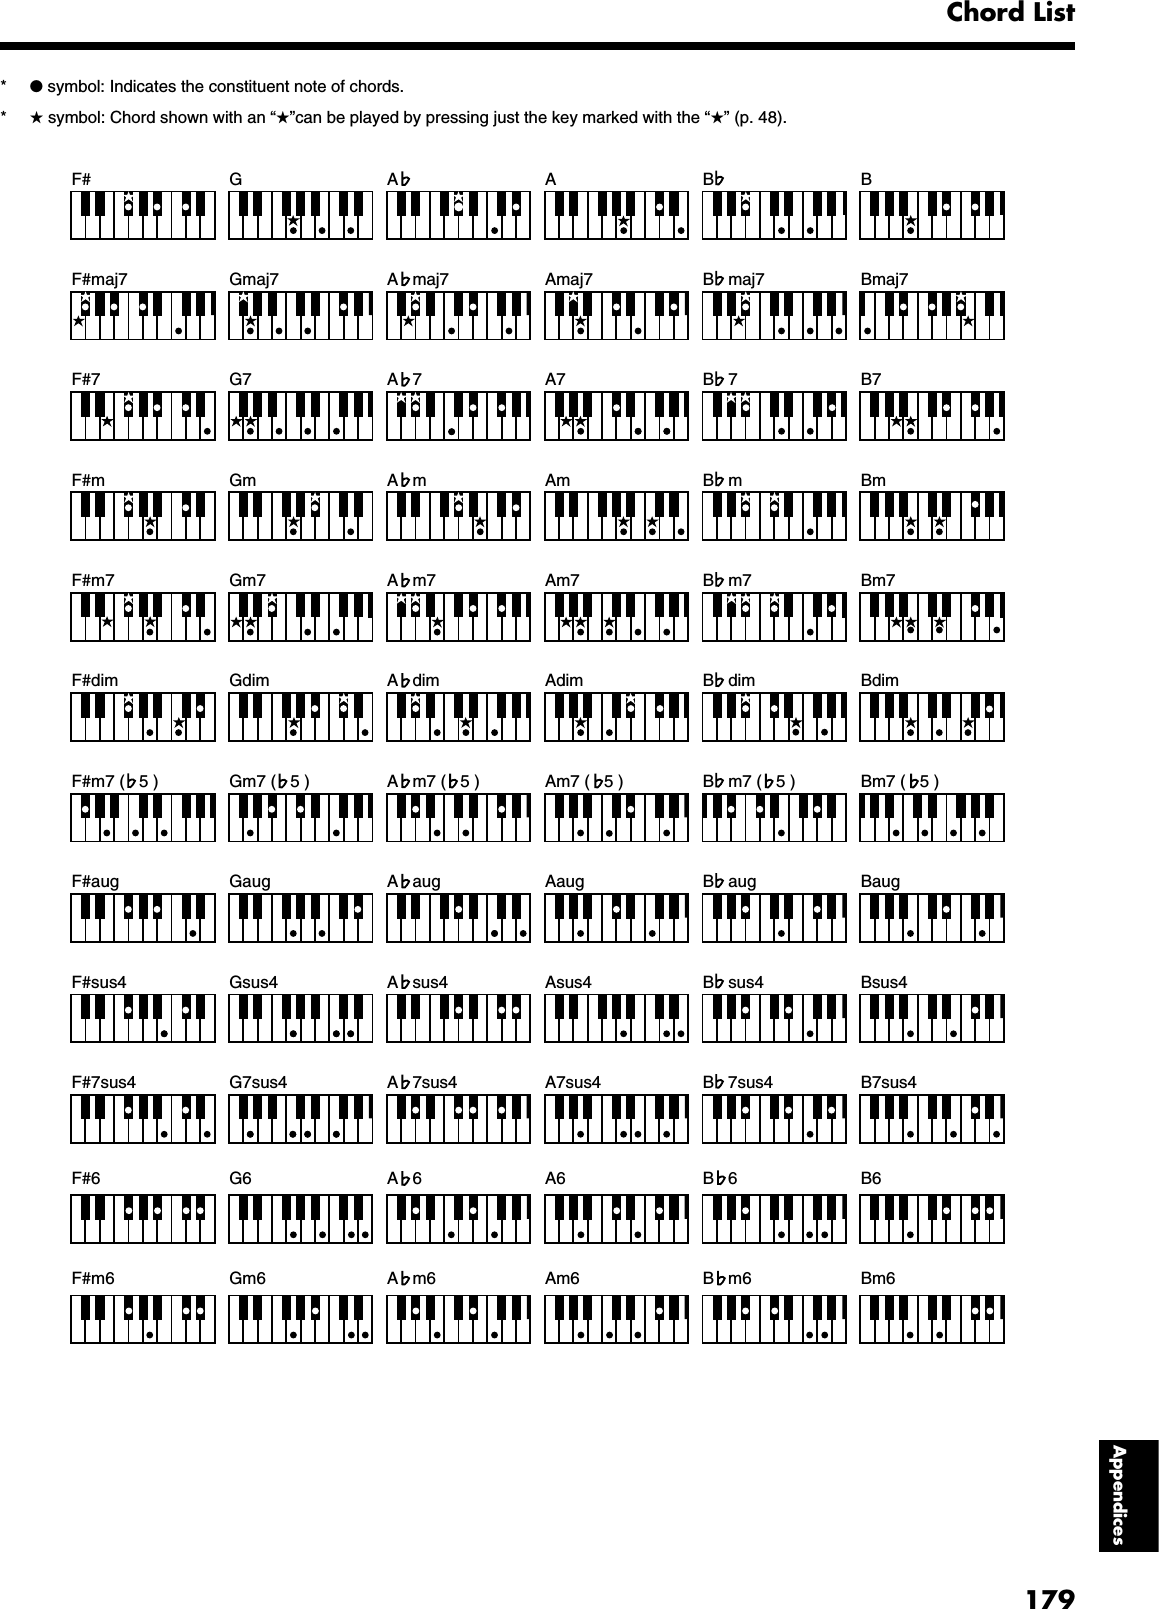
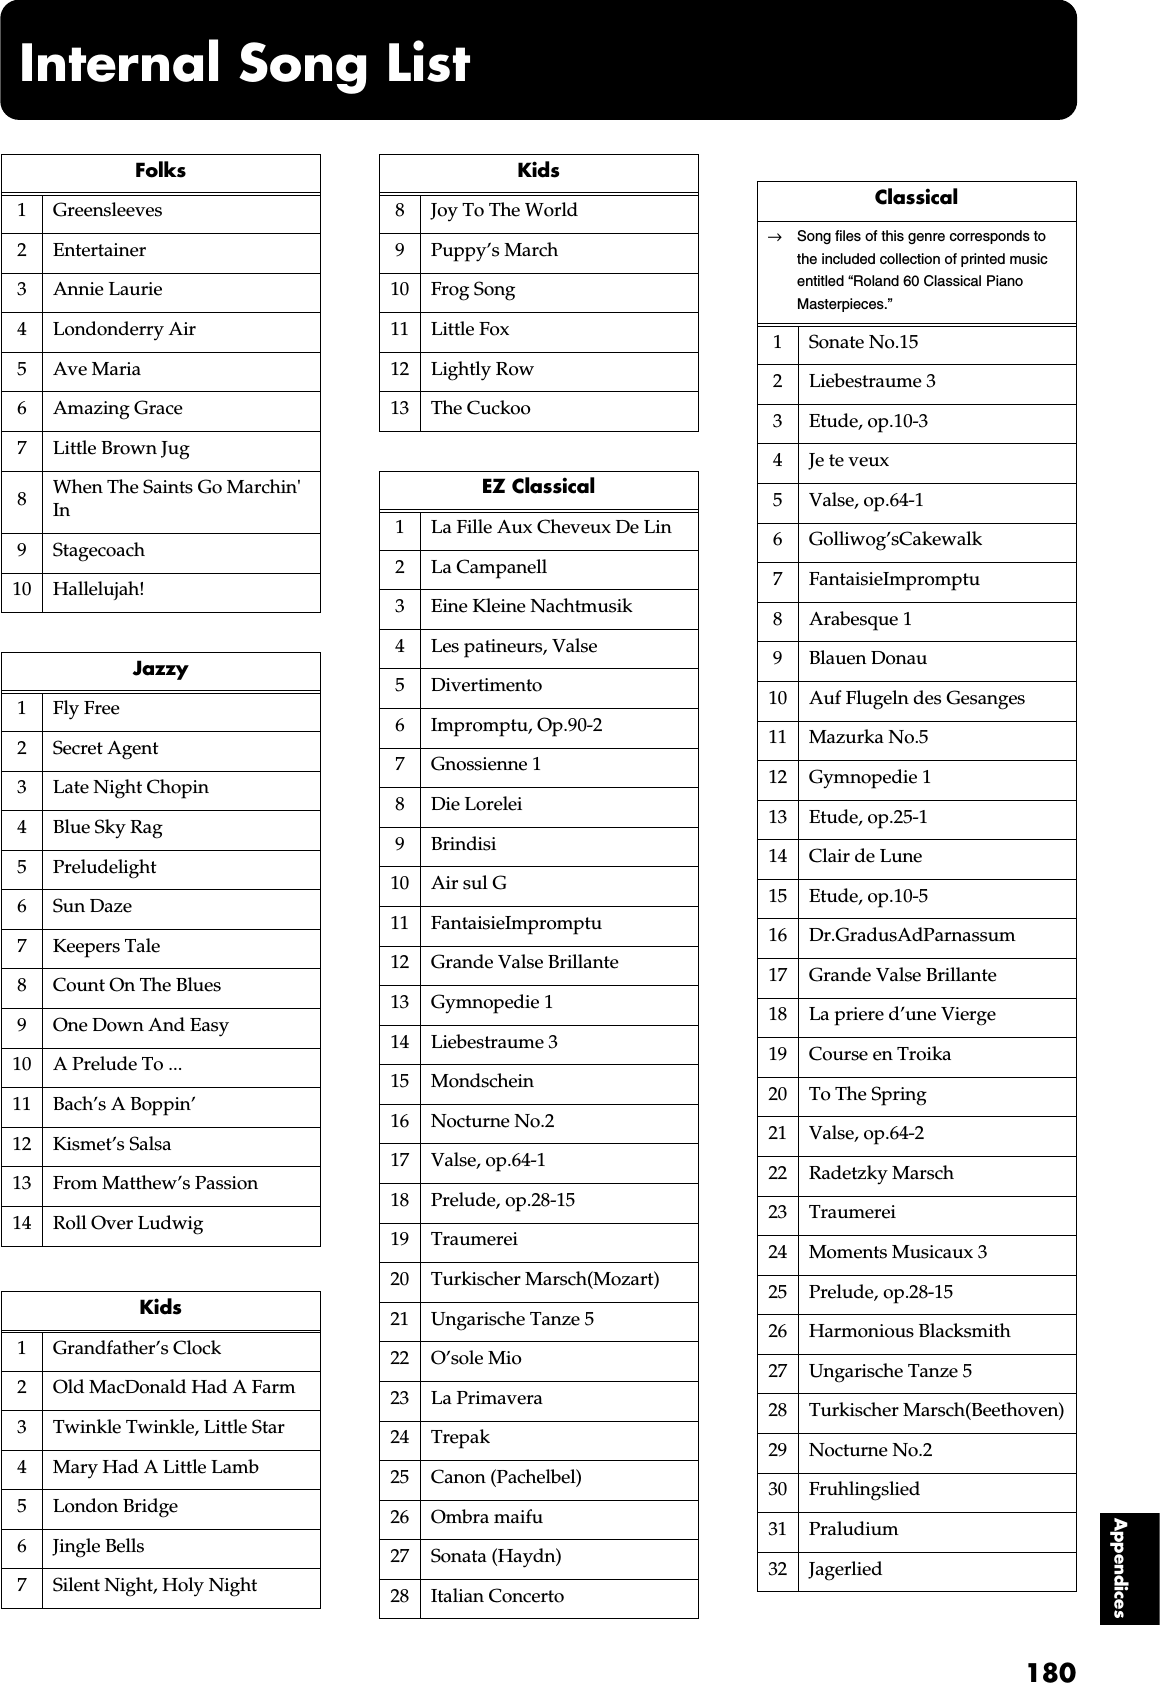
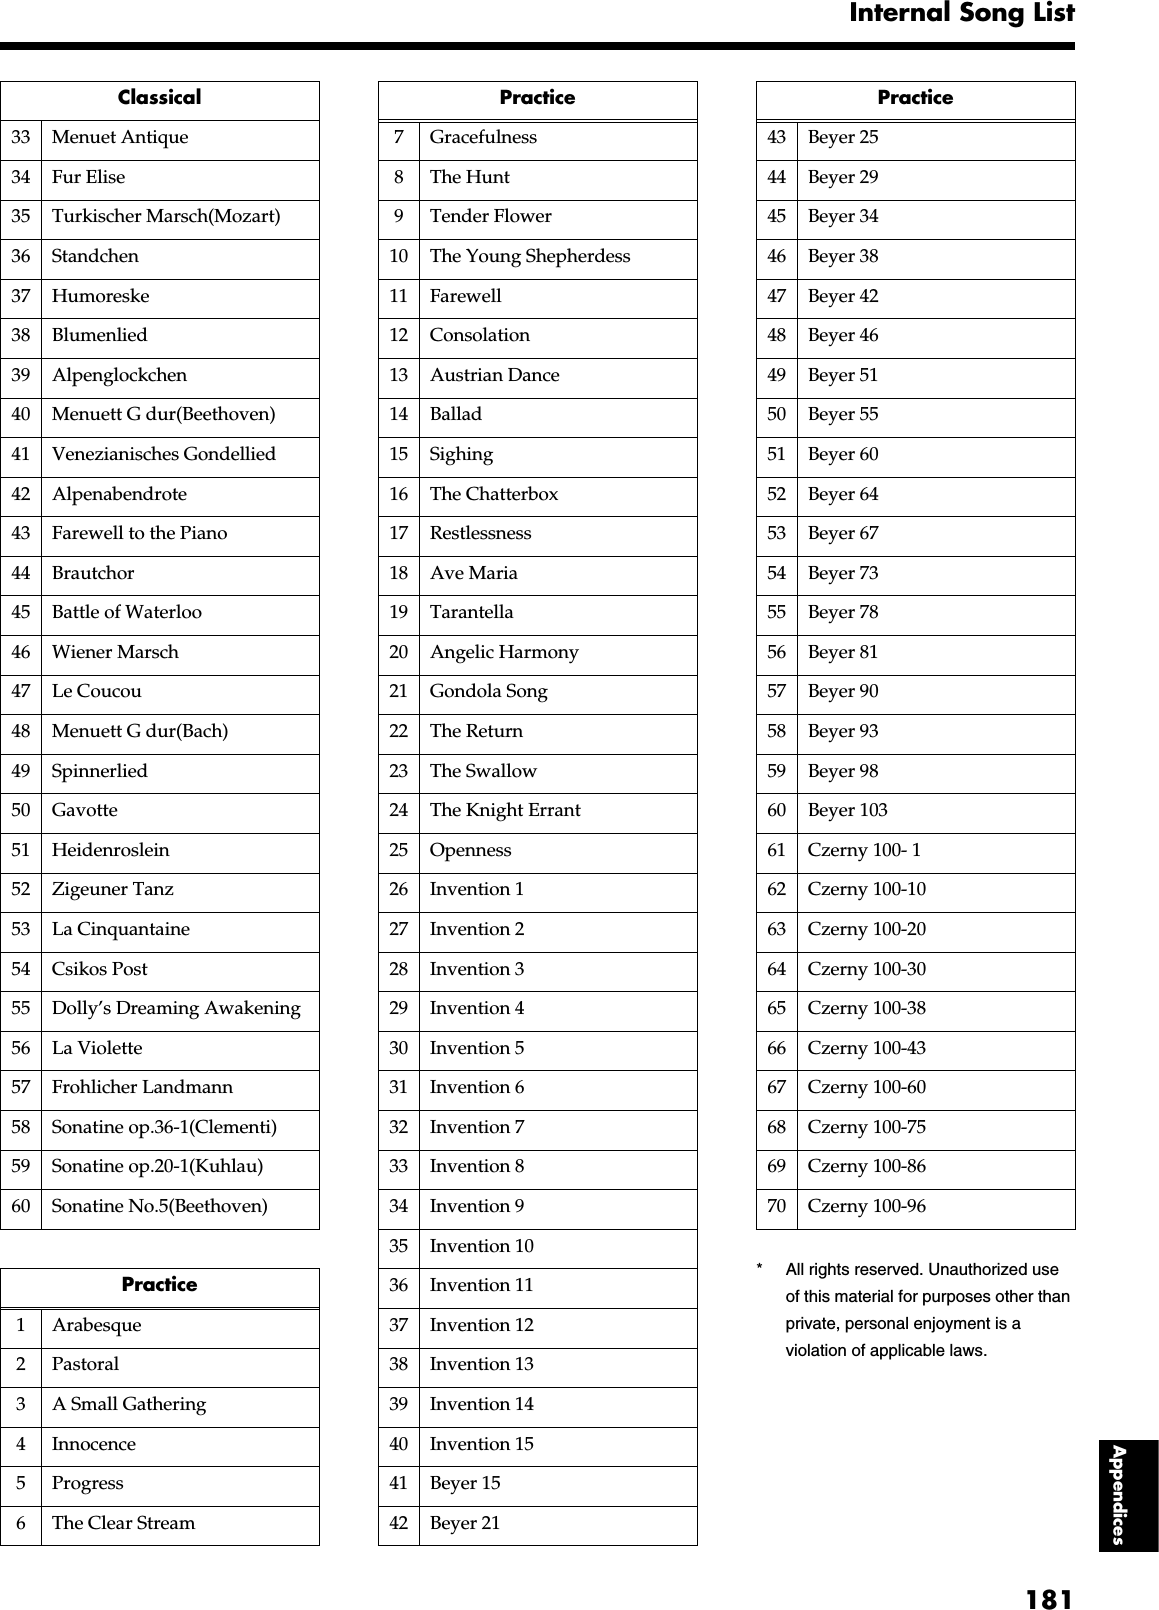
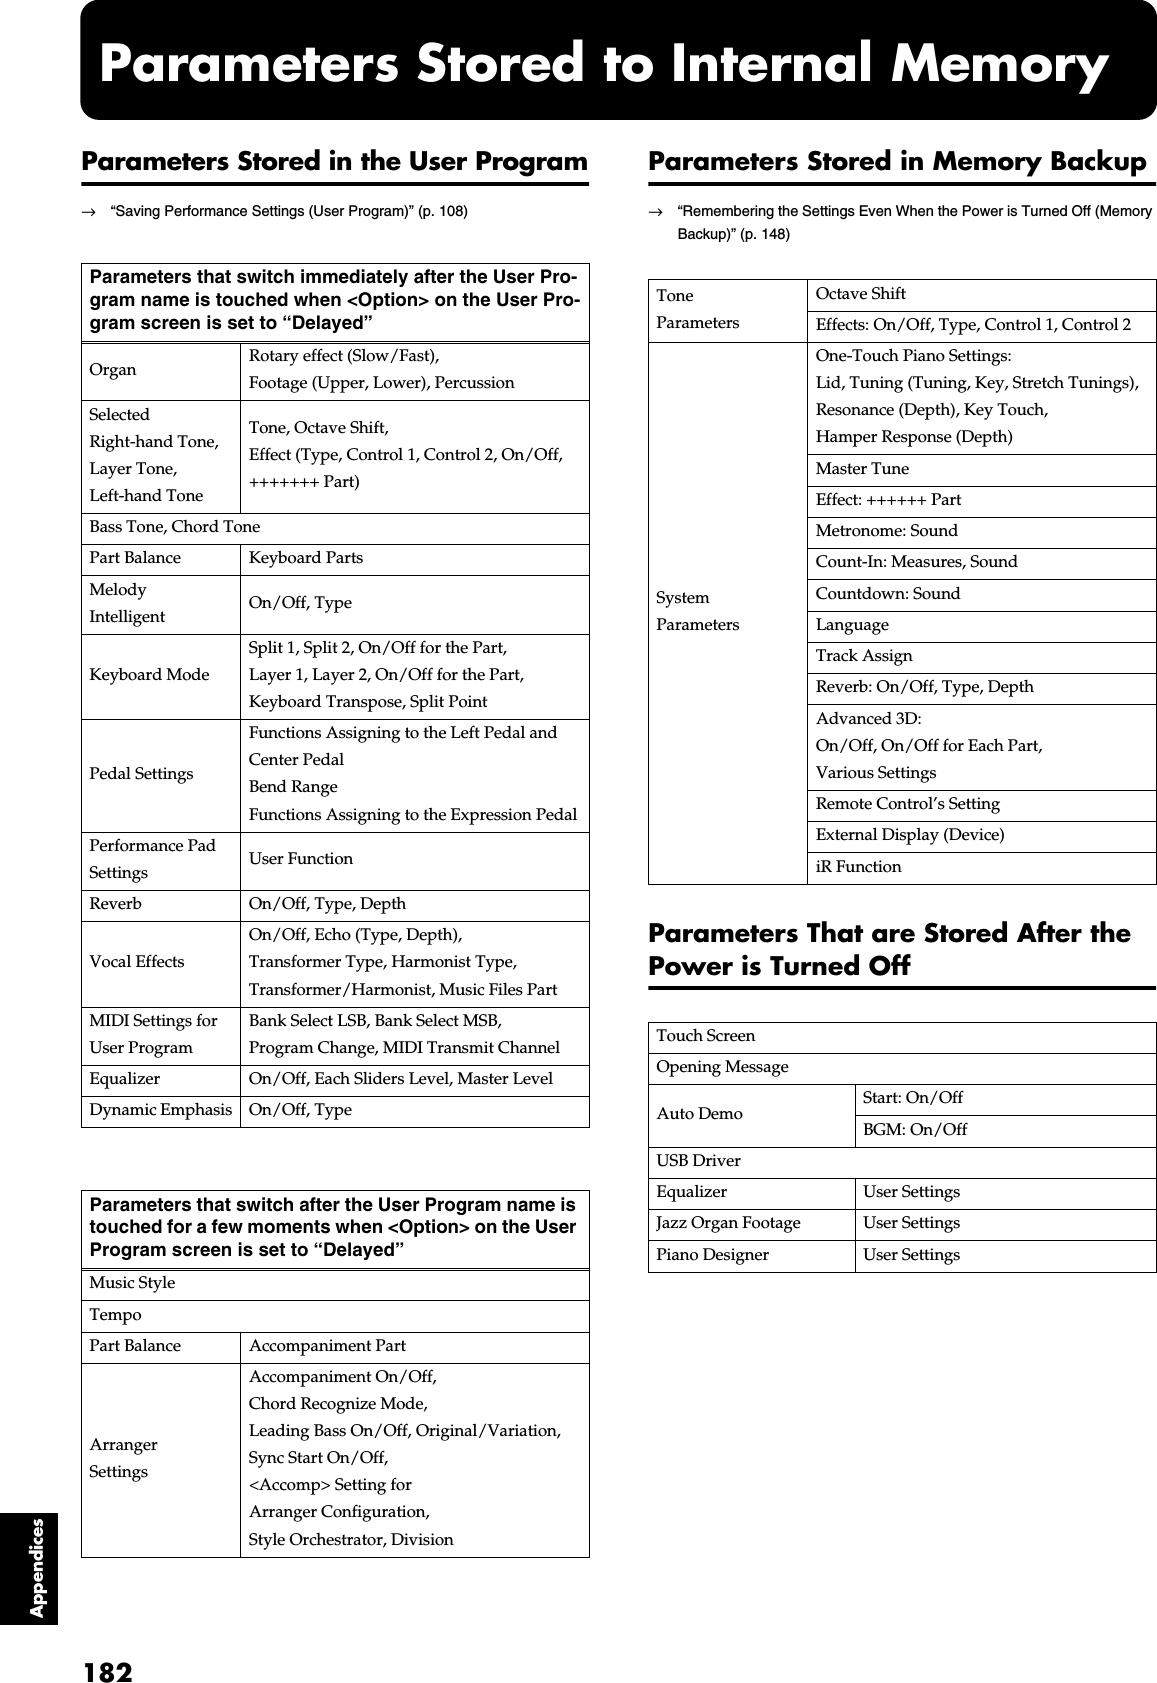
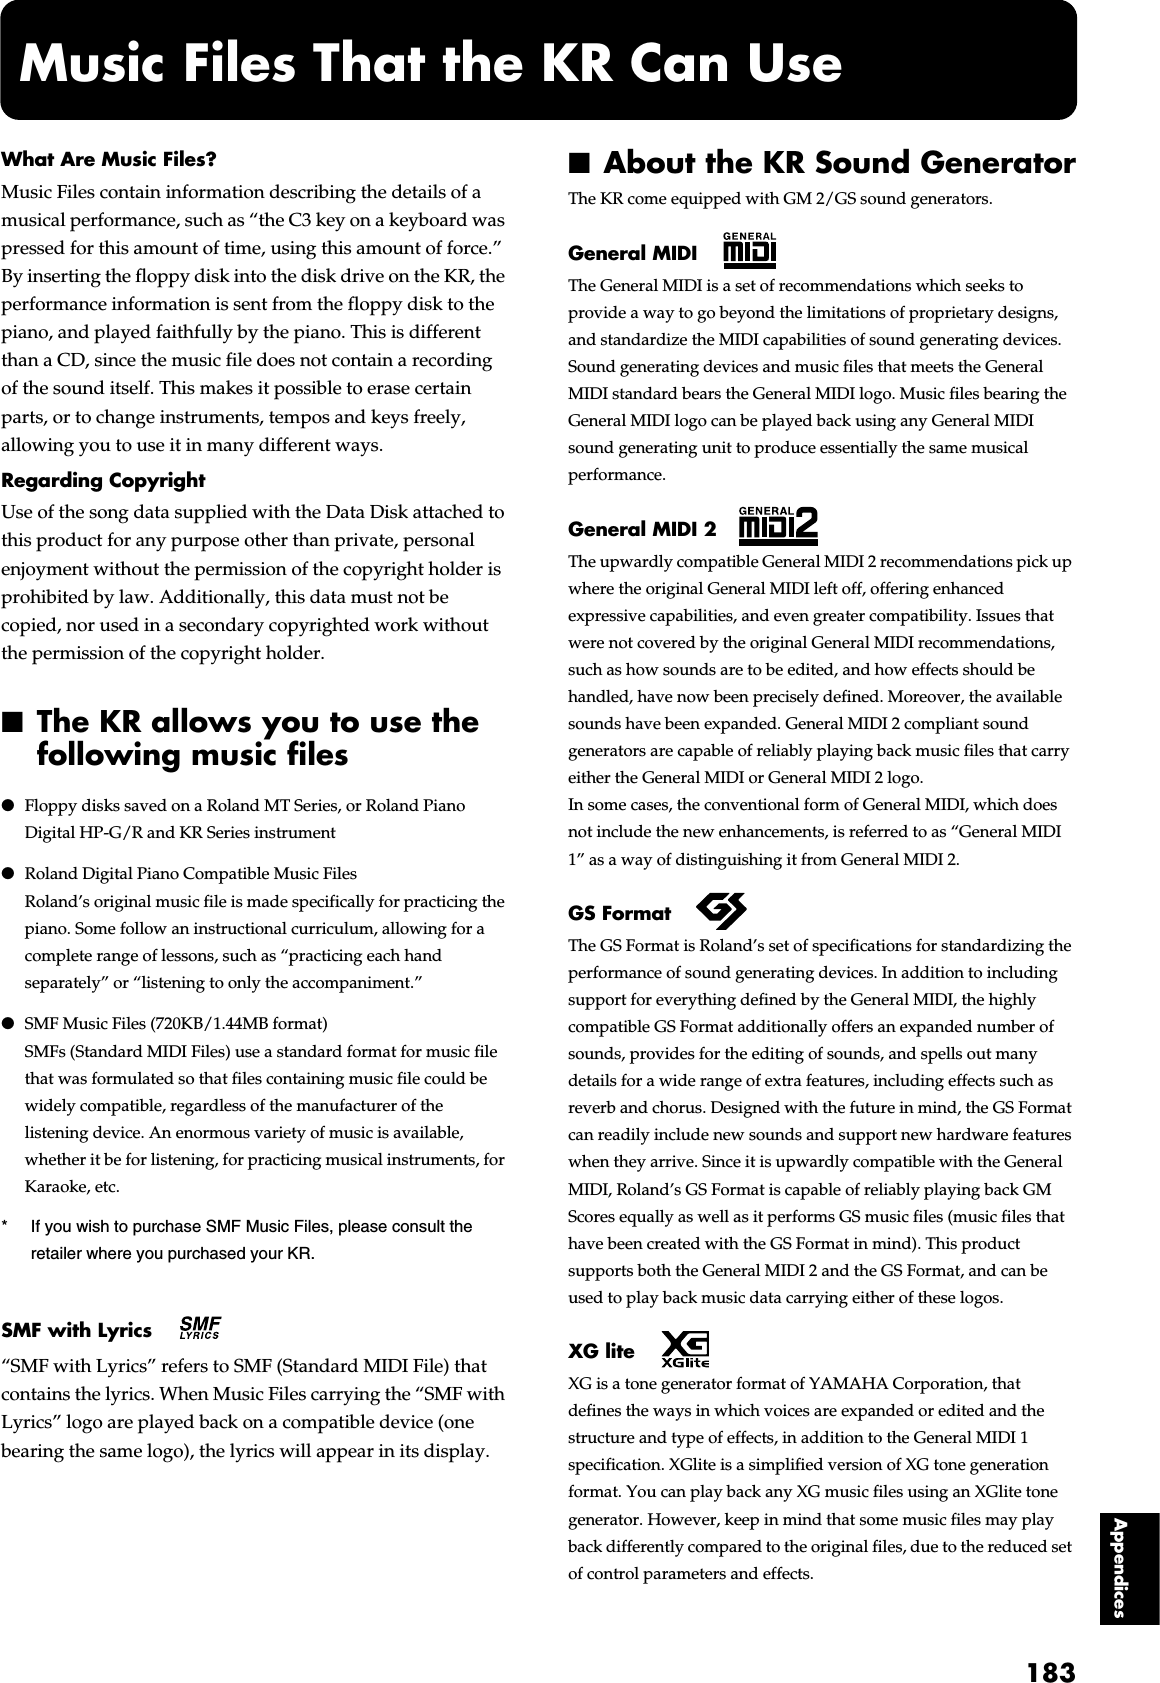
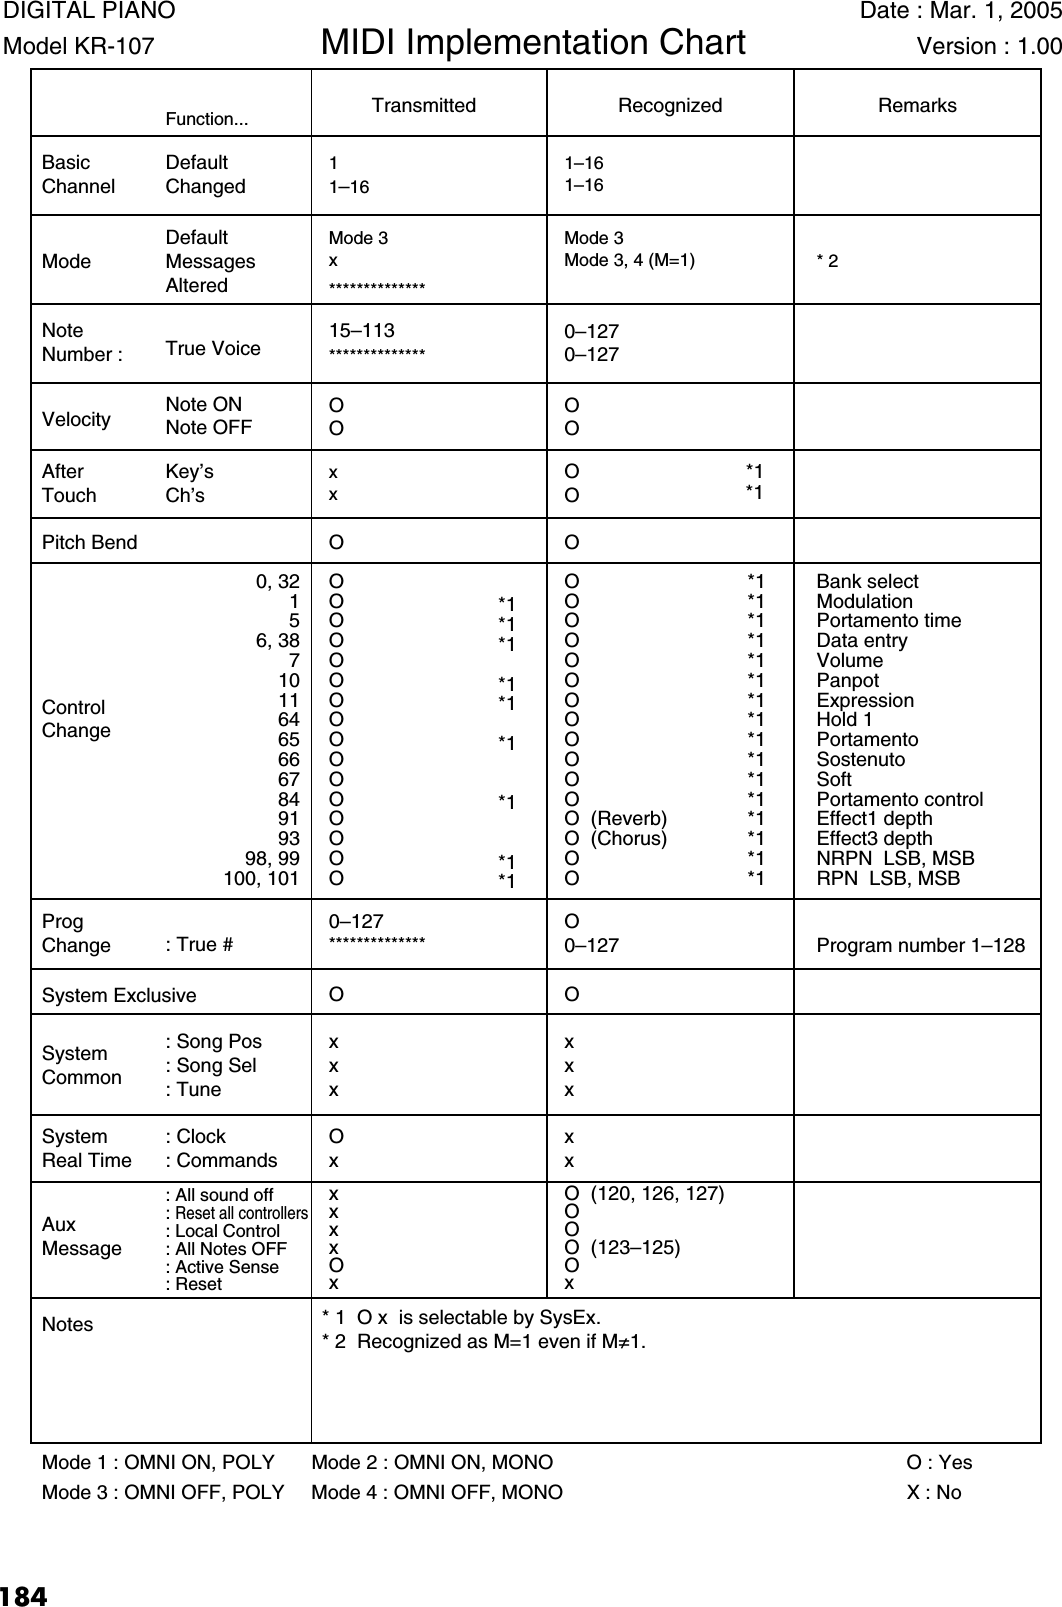

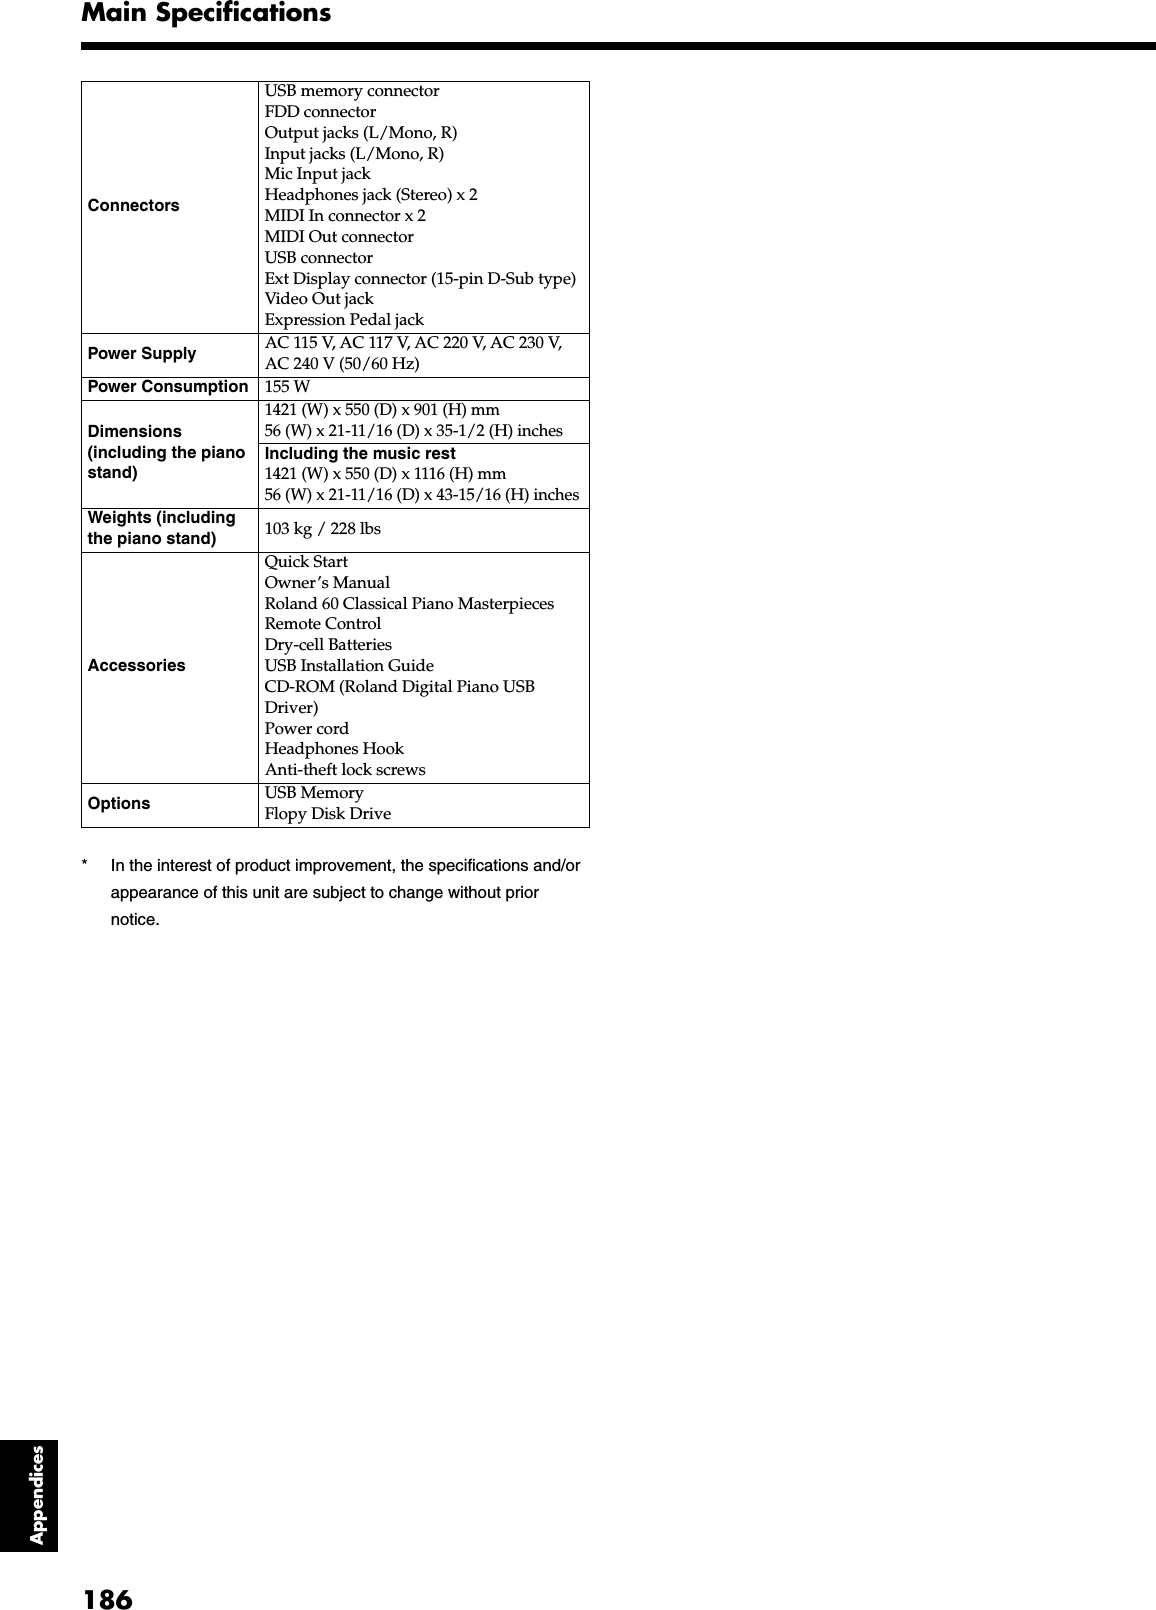
![187“QS **” refers to the page number in Quick Start.IndexNumerics16-Track Sequencer ..........................................................113AAC inlet .............................................................................16AccompanimentStart and Stop ...............................................................54Sync Start .....................................................................54Adjuster .............................................................................18Advanced 3D .....................................................................30[Ambience/Reverb] button ...............................................30Arranger Config ..............................................................138Audio Equipment ............................................................161Auto Punch-In/Out .........................................................119Automatic Accompaniment ...............................................46BBalance ..............................................................................62Balance Knob .....................................................................62Bank Select LSB ...............................................................160Bank Select MSB ..............................................................160Basic Screen .......................................................................20Basic tempo .....................................................................127Bass Tone ................................................................... 55, 138BeatMetronome ..................................................................44Beat Map ..........................................................................127Bend Range ......................................................................144Blank Recording ..............................................................118[Brilliance] knob ................................................................18[Song] button .....................................................................64[Bwd] button .....................................................................65CCalibration .......................................................................148Chord Finder .....................................................................49Chord Intelligence .............................................................48Chord List ........................................................................178Chord Sequencer .............................................................120Chord Tone ................................................................ 55, 138Chord type .........................................................................48Chords .........................................................................48, 77Clef L .................................................................................77Clef R .................................................................................77Compatibility ...................................................................103Composer MIDI Out ........................................................161Computer ........................................................................163ConnectedExpression Pedal ........................................................154ConnectingAudio Equipment ......................................................161Computer ...................................................................163MIDI device ...............................................................158Contrast .............................................................................19Contrast knob ....................................................................19Copy (Song Edit) .............................................................122CopyingSongs ..........................................................................105User Program .............................................................110User Styles .................................................................136Count In .............................................................................82Countdown ........................................................................56DDamper pedal ....................................................................18Delete (Song Edit) ............................................................123DeletingA song ........................................................................104User Style ...................................................................135Divisions ............................................................................46Drum Set List ...................................................................172Drums ................................................................................23Dynamic Emphasis ............................................................32EEcho ...................................................................................37Editing .............................................................................121Effects ................................................................................35Effects List .......................................................................176Ending .........................................................................46, 55Equalizer ............................................................................33Erase (Song Edit) .............................................................124ErasingPerformance on specific tracks .....................................96Recorded performance .................................................96Error Messages ................................................................169Export ................................................................................78Expression Pedal ..............................................................154Ext Display connector ......................................................155External Display ......................................................154, 156External Memory ...............................................................98FFactory Reset ...................................................................147Factory SettingTouch Screen ..............................................................149User Memory .............................................................149Favorites ....................................................................68, 101](https://usermanual.wiki/Roland/KR107.USERS-MANUAL-3/User-Guide-520895-Page-91.png)
![188Index“QS **” refers to the page number in Quick Start.Registering ...................................................................68Removing .....................................................................69Fill In .................................................................................57Fill In To Original ..............................................................46Fill In To Variation ............................................................46Finger Numbers .................................................................77FormatFloppy disk ..................................................................99Functions .........................................................................137[Fwd] button ......................................................................65GGeneral MIDI ...................................................................183General MIDI 2 ................................................................183GS ....................................................................................183GS Format ........................................................................183HHarmonist ..........................................................................38Harmony ...........................................................................59Headphones ......................................................................18IIcon ....................................................................................20i-format ............................................................................103Insert (Song Edit) .............................................................124Internal Song List ............................................................180Intro .............................................................................46, 54[Intro/Ending] button .......................................................54KKaraoke .............................................................................42Key ....................................................................................77Key Touch .......................................................................137LLanguage .........................................................................145Layer ..................................................................................25Layer tone ..........................................................................25Leading bass ....................................................................143Lid .....................................................................................17Local Control ...................................................................160Loop Recording ...............................................................118Lower Tone ........................................................................60Lyrics .........................................................................77, 152lyrics ..................................................................................20MManual Punch-In/Out .....................................................119Marker .......................................................................84, 140Erasing .........................................................................85Moving .........................................................................85Placing .........................................................................84Repeat ..........................................................................86Master Tuning .................................................................145Melody Intelligence ...........................................................59[Melody Intelligence] button .............................................59Memory Backup ..............................................................146Metronome ........................................................................43Beat ..............................................................................44Pattern ..........................................................................45Sound ...........................................................................44Volume .........................................................................44[Metronome] button ..........................................................43Mic In jack .........................................................................19[Mic Volume] knob ............................................................19Microphone .......................................................................19MIDI ................................................................................158MIDI Connector ...............................................................158MIDI Devices ...................................................................158MIDI Ensemble ................................................................159MIDI Settings ...................................................................159Minus One .........................................................................83Mix Recording .................................................................117Multitrack Recording .......................................................113Music Files .........................................................................41Music Holder .....................................................................16Music Style ........................................................................46On Disk ........................................................................51Rhythm Pattern ............................................................53Music Style Buttons ...........................................................50Music Style List ................................................................177Mute ..........................................................................83, 114NNew Song ..........................................................................90NotaionSaving as image data ....................................................78Notation .............................................................................73Settings .........................................................................75Note Edit (Song Edit) .......................................................126OOctave Shift .......................................................................27One Touch Program [Arranger] button .............................47One Touch Program [Piano] button ...................................21One Touch Settings ..........................................................138One-Touch Arranger .........................................................47](https://usermanual.wiki/Roland/KR107.USERS-MANUAL-3/User-Guide-520895-Page-92.png)
![189Index“QS **” refers to the page number in Quick Start.Settings ......................................................................137One-Touch Piano ...............................................................21Opening Message ............................................................146Original .............................................................................46[Original] button ................................................................57Output Jacks ....................................................................161PPanel Lock .......................................................................151Part Balance .......................................................................62[Part Balance] button .........................................................62Part Exchange (Song Edit) ...............................................125PC Edit (Song Edit) ..........................................................126Pedal ..................................................................................18Pedal Cable ........................................................................16Pedal connector .........................................................16, 154Pedal Settings ..................................................................142Percussion .........................................................................23Performance Pad .......................................................58, 142Phones jack ........................................................................18Piano ..................................................................................21Piano Screen ......................................................................20Pickup ................................................................................97Pitches ...............................................................................77Play Mode ........................................................................151[Play/Stop] button ............................................................65Playing ...............................................................................64All of the internal songs ...............................................64At a fixed tempo (Tempo Mute) ..................................81In random ....................................................................64Repeat ..........................................................................86Power Cord .......................................................................16Power On and Off .............................................................17[Power] switch ...................................................................17Preset .................................................................................50Program Change ..............................................................160PU (Pickup) .......................................................................97Punch-in Recording .........................................................119QQuantize (Song Edit) .......................................................123Quick TourAutomatically starting ...............................................150RRec Mode ................................................................... 96, 116Record/Playback Buttons ..................................................65Recording ..........................................................................8916-Track Sequencer ....................................................115A new song ..................................................................90Along with a Song ........................................................94Redoing recordings ......................................................95Track buttons ...............................................................95With Accompaniment ..................................................92Remote Control .................................................... 70–71, 147Repeat ................................................................................86Replace Recording ...........................................................117[Reset] button ....................................................................65Restoring the Factory Settings .........................................147Reverb ................................................................................28Right-hand tone .................................................................25Root note ............................................................................48Rotary effect .....................................................................143SSaving ..............................................................................101Compatibility .............................................................103User Style ...................................................................134[Score Display] button .......................................................73Screens16-track Sequencer screen ..........................................113Advanced 3D screen ....................................................30Basic screen ............................................................20, 47Chord Sequencer screen .............................................120Copy Song screen .......................................................105Copy Style screen .......................................................136Copy User Programs screen ...............................110–111Count In settings screen ...............................................82Countdown settings screen ..........................................56Delete Song screen .....................................................104Delete Style screen .....................................................135Delete User Program screen .......................................110Effect screen .................................................................35Equalizer screen .....................................................33–34File screen ....................................................................99Functions screen .........................................................141Load User Program screen .........................................109Marker screen ..............................................................84Melody Intelligence screen ..........................................59Metronome screen ........................................................43MIDI Setting Screen ...................................................159Notation screen ............................................................73Part Balance screen ......................................................62Piano screen ...........................................................20–21Program Change Screen .............................................159Rec Mode screen ........................................................117Rename screen ........................................... 102, 107, 134](https://usermanual.wiki/Roland/KR107.USERS-MANUAL-3/User-Guide-520895-Page-93.png)
![190Index“QS **” refers to the page number in Quick Start.Reverb screen ...............................................................28Save Song screen ........................................................101Save Style screen ........................................................134Save User Program screen .........................................108Song Edit screen .........................................................121Song Search screen .......................................................67Song Selection screen ...................................................64Style Composer screen ...............................................130Style Converter screen ...............................................132Style Search screen .......................................................52Style Selection screen ...................................................50Tone search screen .......................................................24Tone selection screen ...................................................22Transpose screen ..........................................................87User Program screen ..................................................107Vocal Effects screen ......................................................36Write User Program screen ........................................107SearchMusic Style ...................................................................52Song .............................................................................67Tone .............................................................................24SMF .................................................................................183SMF Music files ...............................................................183Soft pedal ...........................................................................18Solo ..................................................................................114Song Search .......................................................................67Sostenuto pedal .................................................................18[Sound Control] button .....................................................33Sound Effects .....................................................................23Sound Generator .............................................................183Speaker Cable ....................................................................16Split ...................................................................................61Split Point ........................................................................138[Start/Stop] button ............................................................54Stretch Tuning .................................................................142Style Composer ...............................................................129Style Converter ................................................................131Style Orchestrator ..............................................................58[Style Orchestrator] button ................................................58Style Search .......................................................................52Sync ...................................................................................54TTap Tempo ........................................................................80Temperament ..................................................................141Tempo ................................................................... 44, 53, 80Tempo [-] [+] buttons .........................................................80Tempo Mute ......................................................................81Tempo Recording ............................................................127Tone Buttons ......................................................................22Tone List ..........................................................................170Tone Search .......................................................................24Tone Set ...........................................................................115Touch Screen .............................................................19, 148Touch the Notes .................................................................74Track Assign ....................................................................152Track Buttons ......................................................... 83, 91, 93Transformer .......................................................................37Transpose ..........................................................................87Transpose (Song Edit) ......................................................124[Transpose] button .............................................................87Troubleshooting ..............................................................165Tuning .............................................................................141Tuning Curve ..................................................................142Tx Channel .......................................................................160UUndo (Song Edit) .............................................................122USB Driver .......................................................................164User Functions .................................................................142User Image Display .........................................................145User Memory ...................................................................134Formatting .................................................................149User Program ...................................................................107Calling up ..................................................................108Copying .....................................................................110Deleting ......................................................................110Loading ......................................................................109Registering .................................................................107Saving ........................................................................108Transmitting PC Numbers .........................................111User Style ...................................................................51, 129Copying .....................................................................136Deleting ......................................................................135Saving ........................................................................134VVariation ............................................................................46[Variation] button ..............................................................57V-LINK ............................................................................157Vocal Count-In ...................................................................39Vocal Effect ........................................................................36[Vocal Effect] button ..........................................................36Vocal Keyboard .................................................................40VolumeCD ................................................................................72](https://usermanual.wiki/Roland/KR107.USERS-MANUAL-3/User-Guide-520895-Page-94.png)
![191Index“QS **” refers to the page number in Quick Start.Metronome ..................................................................44Microphone ..................................................................19Overall .........................................................................18[Volume] knob ...................................................................18XXG lite ..............................................................................183](https://usermanual.wiki/Roland/KR107.USERS-MANUAL-3/User-Guide-520895-Page-95.png)