Royqueen Audio Technology BASSONIX Bluetooth Speaker User Manual PROOF ISOUND 6770 BASSONIX UG
Shenzhen Royqueen Audio Technology Co., Ltd. Bluetooth Speaker PROOF ISOUND 6770 BASSONIX UG
15_ISOUND-6770 UserMan

User guide
Guide de l'utilisateur
Guía de usuario
www.isound.com
FCC ID:2ADORBASSONIX
ISOUND-6770
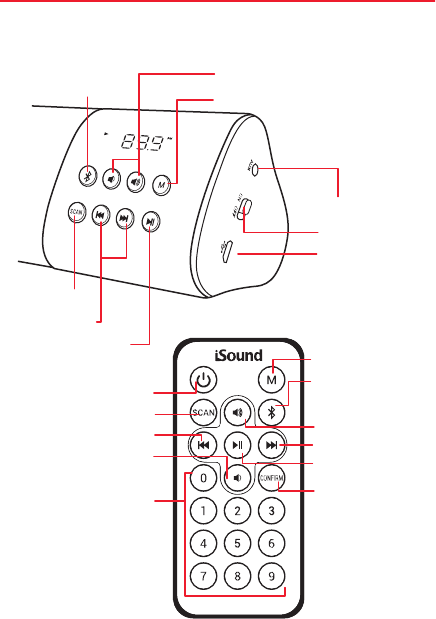
AUX IN
Power switch
Charge port
Scan buon
Track buons
Play/pause buon
Volume buons
Mode buon
Bluetooth® buon
Mode buon
Bluetooth® buon
Volume up
Track forward
Play/pause buon
Conrm buon
Power buon
Scan buon
Track back
Volume down
Digital keypad buons
ENGLISH
Includes
Bassonix, remote, charge cable, audio cable, and user guide
Specications
Driver size: 52mm x 2
Output power: 8W (4W x 2)
Bluetooth® v4.0, up to 30 foot transmission range
Baery: 2,600mAh
Play time: Up to 8 hours at 70% volume
Charge time: 4 hours
Frequency response: 100 Hz - 20 kHz
Impedance: 4Ω
Speaker buon functions
Bluetooth buon
• Press and release to go into Bluetooth mode.
• Press and hold for 3 seconds to disconnect om Bluetooth
pairing (to allow another user to connect).
NOTE: You can only disconnect a device om Bluetooth while
in Bluetooth mode.
Mode buon
• Press and release to cycle through the dierent modes.
Modes include:
• Bluetooth mode – To play wireless via Bluetooth
The screen panel will display “bL” when connected.
• AUX IN mode – To play via audio cable
The screen panel will display volume level and “AUX”.
• PC/speaker mode – To play music om your PC
(when plugged into a PC)
The screen panel will display “PC”.
• FM mode – To play music om FM radio
The screen panel will display the current FM radio station.
Scan buon
• Press and hold for 3 seconds to enable the scan/channel
save function.
NOTE: The scan buon only functions while in FM mode.
Track buons
In Bluetooth/AUX IN mode:
• Press and release the track forward buon to go to the next track.
• Press and release the track back buon to go to the
beginning of the current track.
• Press and release the track back buon twice to go to
the previous song.
In PC/speaker mode:
• Press and release the track forward buon to go to the next track.
• Press and release the track back buon to go to the
beginning of the current track.
In FM mode:
• Press and release/hold the track forward/previous track
buons to search through FM radio stations.
Play/pause buon
In Bluetooth/PC/speaker mode:
• Press and release to pause the current track.
• Press and release to play the current track.
In AUX IN/FM mode:
• Press and release to mute the current track.
• Press and release to play the current track.
NOTE: When listening to the radio in FM mode or playing music
via audio cable in AUX IN mode the play/pause buon only
serves as a mute buon. The track will still continue to play but
will remain muted until the play/pause buon is pressed again.
Remote buon functions
Power buon
• Press and hold for 3 seconds to turn on the speaker.
• Press and hold for 3 seconds to turn o the speaker.
NOTE: The power buon only sets the speaker to standby
mode. You must still use the power switch to completely turn
o the speaker.
Mode buon
• Press and release to cycle through the dierent modes.
Modes include:
• Bluetooth mode – To play wireless via Bluetooth
The screen panel will display “bL” when connected.
• AUX IN mode – To play via audio cable
The screen panel will display volume level and “AUX”.
• PC/speaker mode – To play music om your PC
(when plugged into a PC)
The screen panel will display “PC”.
• FM mode – To play music om FM radio
The screen panel will display the current FM
radio station.
Scan buon
• Press and hold for 3 seconds to enable the
scan/channel save function.
NOTE: The scan buon only functions while in FM Mode.
Volume buons
• Press and release/hold the volume up buon to raise
the volume.
• Press and release/hold the volume down buon to lower
the volume.
NOTE: The volume buons only control the volume of the
Bassonix. Device volume should be adjusted separately.
Bluetooth buon
• Press and release to go into Bluetooth mode.
• Press and hold for 3 seconds to disconnect om Bluetooth
pairing (to allow another user to connect).
NOTE: You can only disconnect a device om Bluetooth while
in Bluetooth mode.
Track buons
In Bluetooth/AUX IN mode:
• Press and release the track forward buon to go to the next track.
• Press and release the track back buon to go to the
beginning of the current track.
• Press and release the track back buon twice to go to the
previous song.
In PC/speaker mode:
• Press and release the track forward buon to go to the next track.
• Press and release the track back buon to go to the
beginning of the current track.
In FM mode:
• Press and release/hold the next/previous track buons to
search through FM radio stations.
Play/pause buon
In Bluetooth/PC/speaker mode:
• Press and release to pause the current track.
• Press and release to play the current track.
In AUX IN/FM mode:
• Press and release to mute the current track.
• Press and release to play the current track.

NOTE: When listening to the radio in FM mode or playing music
via audio cable in AUX IN mode the play/pause buon only
serves as a mute buon. The track will still continue to play but
will remain muted until the play/pause buon is pressed again.
Digital keypad buons
• Press numbers for specic FM radio stations while in FM mode.
NOTE: The digital keypad buons only function while in
FM mode.
Conrm buon
• Press the conrm buon aer you select a FM radio station
when using the digital keypad buons in FM mode.
NOTE: The conrm buon only functions while in FM mode.
Charging your Bassonix
NOTE: Make sure the Bassonix is fully charged before using it
the rst time.
1. Carefully insert the Micro-USB end of the included charge
cable into the charge port labeled .
2. Plug the USB A end of the cable into a powered USB port,
such as a computer, laptop or USB AC adapter (not included).
3. The LED indicator light located on the ont of the speaker
will turn orange. Once the speaker is fully charged, the LED
indicator light will turn o.
NOTES:
• When the baery level is below 20%, you will hear a voice
saying “Baery level low” and the orange LED indicator light
on the ont of the speaker will ash. Charge your Bassonix
with the included charge cable.
Connecting via Bluetooth® (rst time set-up)
1. Move the power switch on the right side of the Bassonix to
the “ON” position and the speaker will say what mode it is in. If
the speaker is not in Bluetooth mode, press the mode buon
until the speaker says “Bluetooth mode” and the screen panel
will ash red dash lines.
2. Open the seings on your Bluetooth device (Bluetooth must
be enabled).
3. Select Bassonix om the list of Bluetooth devices.
4. Once paired, you will hear “Bluetooth paired” and the screen
panel will show the leers “bL” and the Bluetooth symbol.
5. Volume can be adjusted separately om your device or
the speaker.
NOTES:
• Your device will automatically nd and pair with the Bassonix
aer the initial pairing. If your device does not automatically
pair, turn o the speaker and repeat steps 1-4.
• Sound will not play via audio cable if the speaker is in
Bluetooth mode.
• The volume buons only control the volume of the Bassonix.
Device volume should be adjusted separately.
Connecting via audio cable
1. Move the power switch on the right side of the Bassonix to
the “ON” position and the speaker will say what mode it is in. If
the speaker is not in AUX IN mode, press the mode buon until
the speaker says “AUX IN mode” and the screen panel shows
the volume level number and the word “AUX”.
2. Plug one end of the included audio cable into the AUX port
located next to the power switch.

3. Plug the other end of the cable into your audio device.
4. Volume can be adjusted separately om your device or
the speaker.
NOTES:
• Sound will not play via audio cable if the speaker is in
Bluetooth mode.
• When playing via audio cable in AUX IN mode the play/pause
buon only serves as a mute buon. The track will still
continue to play but will remain muted until the play/pause
buon is pressed again.
• The volume buons only control the volume of the Bassonix.
Device volume should be adjusted separately.
Connecting a computer or laptop via charge cable
1. Move the power switch on the right side of the Bassonix to
the “ON” position and the speaker will say what mode it is in. If
the speaker is not in PC/speaker mode, press the mode buon
until the speaker says “PC/speaker mode” and the screen
panel shows the leers “PC”.
2. Carefully insert the Micro-USB end of the included charge
cable into the charge port labeled .
3. Plug the USB A end of the cable into a PC computer or
laptop. The LED indicator will light up orange.
4. Volume can be adjusted om your speaker or computer.
NOTES:
• The speaker will also charge while plugged into a PC
computer or laptop.
• When you disconnect the Micro-USB cable om the speaker
when connected to a computer the speaker will automatically
go into Bluetooth mode.
• The volume buons only control the volume of the Bassonix.
PC volume should be adjusted separately.
Using the FM radio (First time set up)
1. Move the power switch on the right side of the Bassonix to
the “ON” position and the speaker will say what mode it is in. If
the speaker is not in FM mode, press the mode buon until
the speaker says “FM mode” and the screen panel shows an
FM radio station.
2. Press and hold the scan buon on the speaker or remote for
three seconds and release for the speaker to begin the
scan/channel save function. The speaker will scan and save the
FM radio stations with the strongest equency. Once it is
complete with the scan/channel save function the FM radio
will start on channel 01.
NOTE: You must allow the speaker to scan all FM radio stations
until complete.
3. Short press the track forward or back buon on the speaker
or remote to browse through the saved channels.
4. Long press the track forward or track back buon on the
speaker or remote to semi-auto scan FM channels. This allows
you to go to a FM radio station that was not saved in the
scan/channel save function.
5. You can also use the remotes digital keypad to type in the FM
radio station of your choice. For example, press numbers “8”, “7”,
and “8” and hit the conrm buon to go to FM radio station 87.8.
NOTE: While playing in FM mode the play/pause buon only
serves as a mute buon. The FM radio station will still continue
to play but will remain muted until the play/pause buon is
pressed again.
Troubleshooting
Issue: My speaker doesn’t turn on.
Solution: Try the following:
• Make sure that you fully charge your speaker before use.
• Turn the speaker o and then back on until you hear a voice.
• If you are using the remote, conrm the power switch on the
speaker is set to the “ON” position and the baery in the
remote is still in working condition.
Issue: My speaker isn’t charging.
Solution: Try the following:
• Make sure that the charge port on the speaker is ee om
dust and debris.
• Make sure that you are using the charge cable that was
included with your speaker.
• Make sure there is power coming om the power source.
Issue: My speaker isn’t syncing to Bluetooth.
Solution: Try the following:
• Make sure you are on Bluetooth mode.
• Make sure that the Bluetooth seing is turned “ON” on
your device.
• Check to see if another user is connected to the speaker.
• Refer to the user guide of your device for Bluetooth syncing
instructions.
Issue: My speaker will not go to the FM radio station I selected.
Solution: Try the following:
• Make sure you are on FM mode.
• Make sure you have allowed the scan/channel save function
to complete before use of the FM mode.
• If you are using the remote, conrm the baeries are still in
working condition.
Issue: I selected my saved FM radio channel with the digital
keypad buons, but it is not going to the channel I selected.
Solution: Make sure you are using the track forward/backward
buons to nd your saved FM radio channels. The digital
keypad buons and conrm buon can only be used to nd a
specic FM radio station.
Issue: I brought my speaker on vacation but my FM radio
channels are not saved.
Solution: Make sure you fully run the scan/channel save
function before each use of the FM radio. FM radio equencies
may change depending on location and each channel may vary.
Important safety precautions
• Incorrect use or incompatibility with your device may result
in reduced baery performance or damage to your device.
• Do not aempt to disassemble product.
• Tampering or removing the baery can result in damage to
your product, void of warranty, and could cause injuries.
• Store and operate between 32°F – 113°F.
• Do not allow this product to have contact with liquids.
• Do not place this product near a heat source or ame.
• Do not throw or shake.
• Do not operate if it has been subjected to shock or damage.
• Do not crush or puncture the baery.
• Recharge the internal baery every 3 months when not in
use to keep the baery in best condition.
• Use so cloth to clean the exterior. Do not use harsh
chemicals or strong cleaning solvents.
• The internal baery must be recycled or disposed of
properly. Contact your local waste management oce for
information on the proper disposal or recycling.
FCC information
This equipment has been tested and found to comply with the
limits for a Class B Digital Device, pursuant to Part 15 of the FCC
Rules. These limits are designed to provide reasonable protection
against harmful interference in a residential installation. This
equipment generates, uses, and can radiate radio equency
energy and, if not installed and used in accordance with the
instructions, may cause harmful interference to radio
communications. However, there is no guarantee that
interference will not occur in a particular installation.
If this equipment does cause harmful interference to radio or
television reception, which can be determined by turning the
equipment o and on, the user is encouraged to try to correct
the interference by one or more of the following measures:
• Reorient or relocate the receiving antenna.
• Increase the distance between the equipment and receiver.
• Connect the equipment to an outlet on a circuit dierent
om that to which the receiver is connected.
• Consult the dealer or an experienced radio/TV technician
for help.
This equipment complies with Part 15 of the FCC Rules.
Operation is subject to the following two conditions:
1. This equipment may not cause harmful interference.
2. This equipment must accept any interference received,
including interference that may cause undesired operation.
Modications not authorized by the manufacturer may void
the user’s authority to operate this device. This equipment
complies with FCC RF radiation exposure limits set forth for an
uncontrolled environment. This transmier must not be
co-located or operating in conjunction with any other antenna
or transmier.
Warranty information
All dreamGEAR/i.Sound products come with a limited warranty
and have been subjected to a thorough series of tests to
ensure the highest level of dependability and compatibility. It
is unlikely that you will experience any problem, but if a defect
should become apparent during the use of this product,
dreamGEAR warrants to the original consumer purchaser that
this product will be ee om defects in material and
workmanship for a period of 120 days om the date of your
original purchase. If a defect covered by this warranty occurs,
dreamGEAR, at its option, will repair or replace the product
purchased at no charge. If a replacement is necessary and
your product is no longer available, a comparable product may
be substituted at the sole discretion of dreamGEAR.
This warranty does not cover normal wear and tear, abusive
use or misuse, modication, tampering or by any other cause
not related to either materials or workmanship. This warranty
does not apply to products used for any industrial,
professional or commercial purposes.
Service information
For service on any defective product under the 120-day warranty
policy, please contact Consumer Support to obtain a Return
Authorization Number. NOTE: dreamGEAR will not process any
defective claims without a Return Authorization Number.
Consumer support hotline
877-999-DREAM (3732) (U.S. and Canada only)
or 310-222-1045 (International)
Consumer support email
support@dreamgear.net
Websites
www.isound.com | www.dreamgear.com
Save a tree, register online
dreamGEAR/i.Sound is making the eco-iendly choice to have
all products registered online. This saves the printing of
physical paper registration cards. All the information you need
to register your recent dreamGEAR/i.Sound purchase is
available at: www.dreamgear.com/product-registration

www.isound.com