RuggON MC7354 Single Modular User Manual PM 521 UM
RuggON Corporation Single Modular PM 521 UM
RuggON >
Contents
Users Manual-2

37
Using BIOS Setup Utility
Chapter 4. Using BIOS Setup Utility
Your ruggedized tablet has a BIOS setup utility which allows you to configure important system
settings, including settings for the Boot and AP menus as well as the device’s basic settings--the
system reads the basic settings during initialization in order to boot correctly
When to Use the BIOS Setup Utility
You need to run the BIOS Setup utility when:
Restoring to BIOS settings to factory default
Modifying specific hardware settings
Modifying specific settings to optimize system performance
Installing Windows 7 operating system
Accessing the BIOS Setup Utility
The BIOS Setup Utility screens shown in this chapter are for your reference only. The
actual images or settings on your tablet computer may differ.
The BIOS Setup Utility program may have been updated after the publication of this
manual.
To run the BIOS Setup Utility, use the following procedures:
1. Perform one of the following:
If the PM-521 is powered off
Press the Power button to start up the device. The power LED lights.
Quickly press and hold the Windows Home key until the BIOS Post screen displays.
If the PM-521 is powered on
Press the Power button to shut down the device.
Quickly press and hold the Windows Home Key until the BIOS Post screen displays.
The BIOS POST screen appears as shown.
2. From the BIOS POST screen select App Menu to open the BIOS Setup Utility.
Figure 50. BIOS POST Screen
38
Using BIOS Setup Utility
Due to the device’s fast boot up and boot down time, there is only a small time frame of a few
seconds between the release of the Power button and the opportunity to press the Windows Home
key.
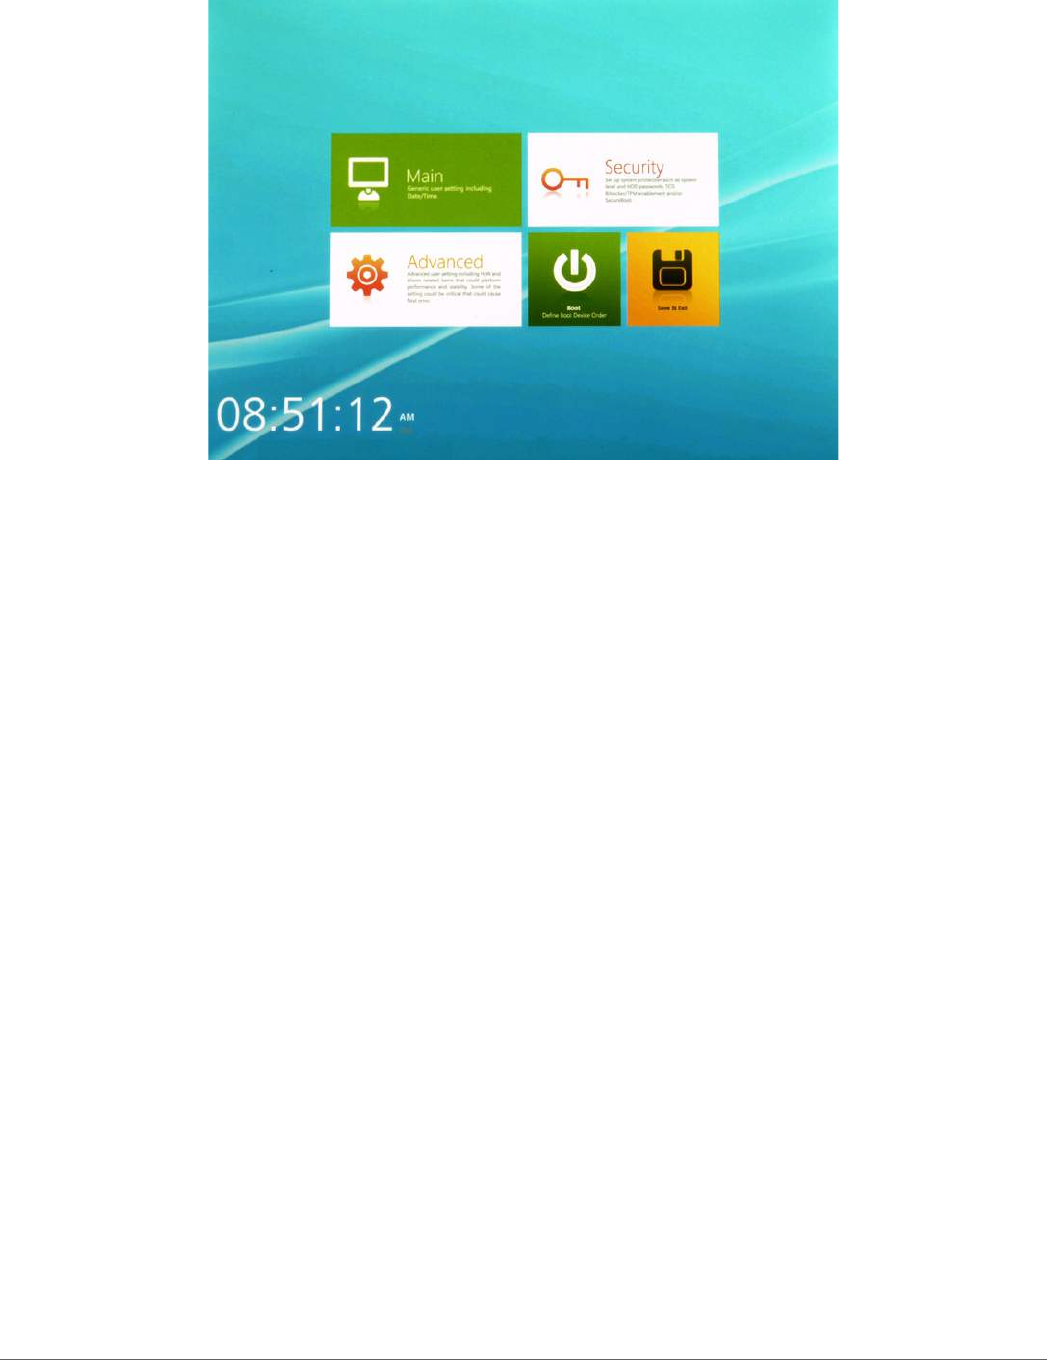
The App Menu displays.
Figure 51. BIOS Setup Utility: App Menu Screen
Installation an Operating System
Setting Up a Windows 7 Installation Environment
There are several settings in BIOS that must be modified before you can install a Windows 7
operating system.
Use the following guidelines to prepare the BIOS environment:
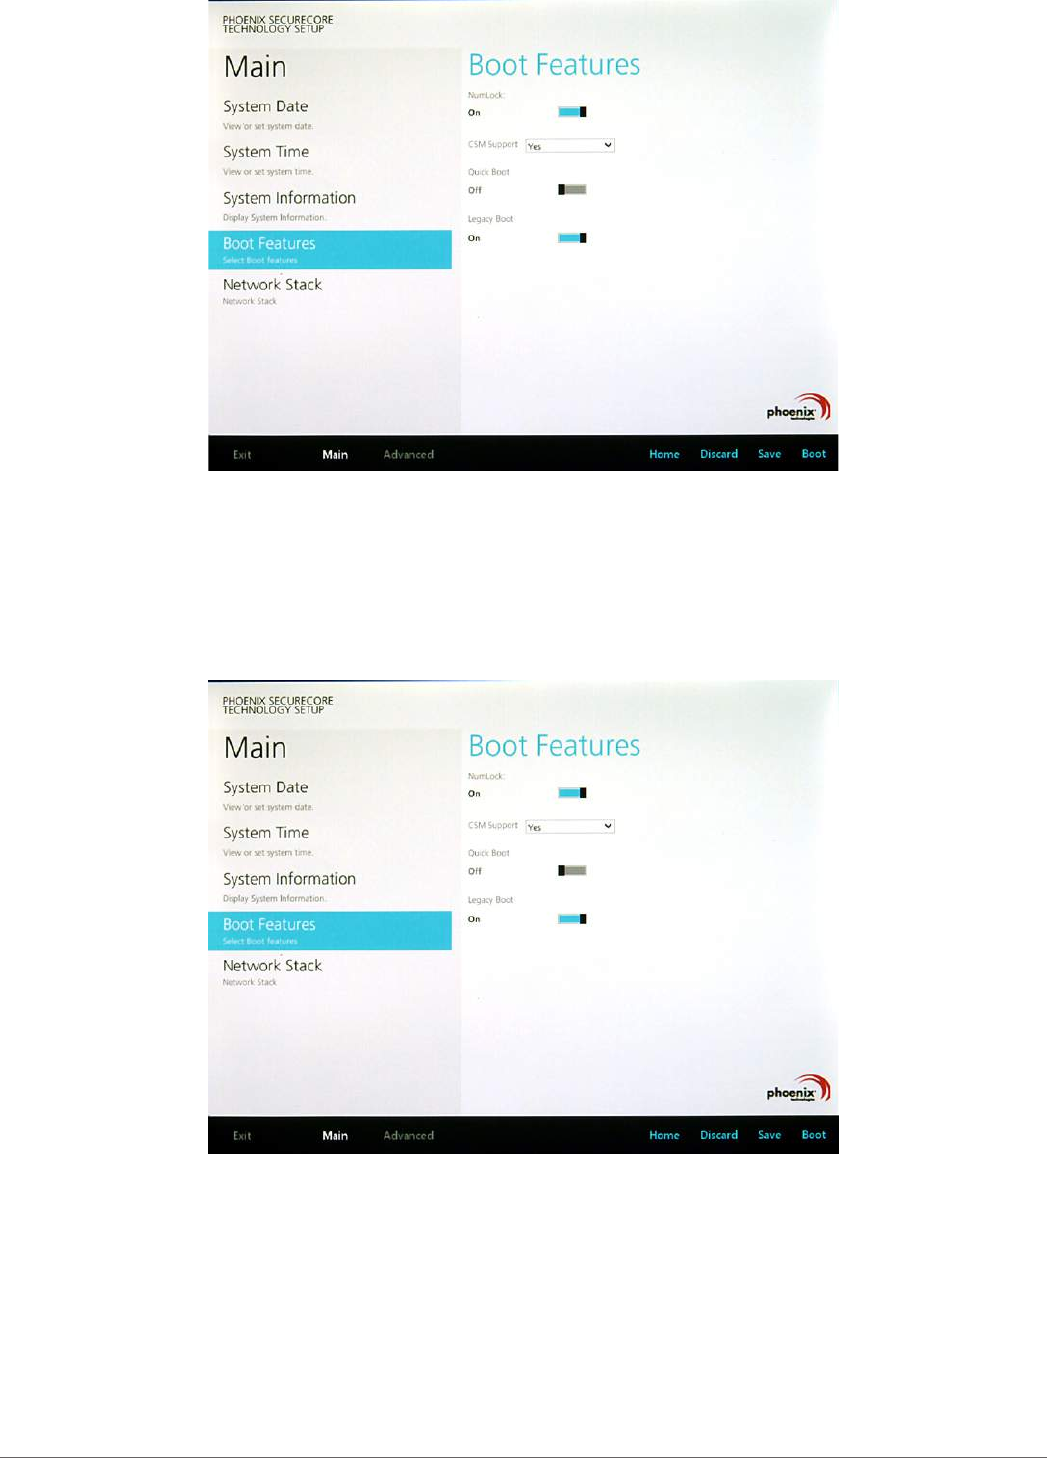
Step 1: Enable CSM Support
1. Access the BIOS Setup Utility, see “Accessing the BIOS Setup Utility” on page 37.
2. Navigate to APP Menu > Main > Boot Features.
3. Locate the CSM Support setting and tap the drop-down menu to display the options.
39
Using BIOS Setup Utility
4. Tap Yes to enable CSM support.
Figure 52. Main > Boot Features
Step 2 Enable Legacy Boot
1. Access the BIOS Setup Utility, see “Accessing the BIOS Setup Utility” on page 37.
2. Navigate to APP Menu > Main > Boot Features.
3. Locate the Legacy Boot setting and tap on the menu to select On enable legacy boot.
Figure 53. Main > Boot Features
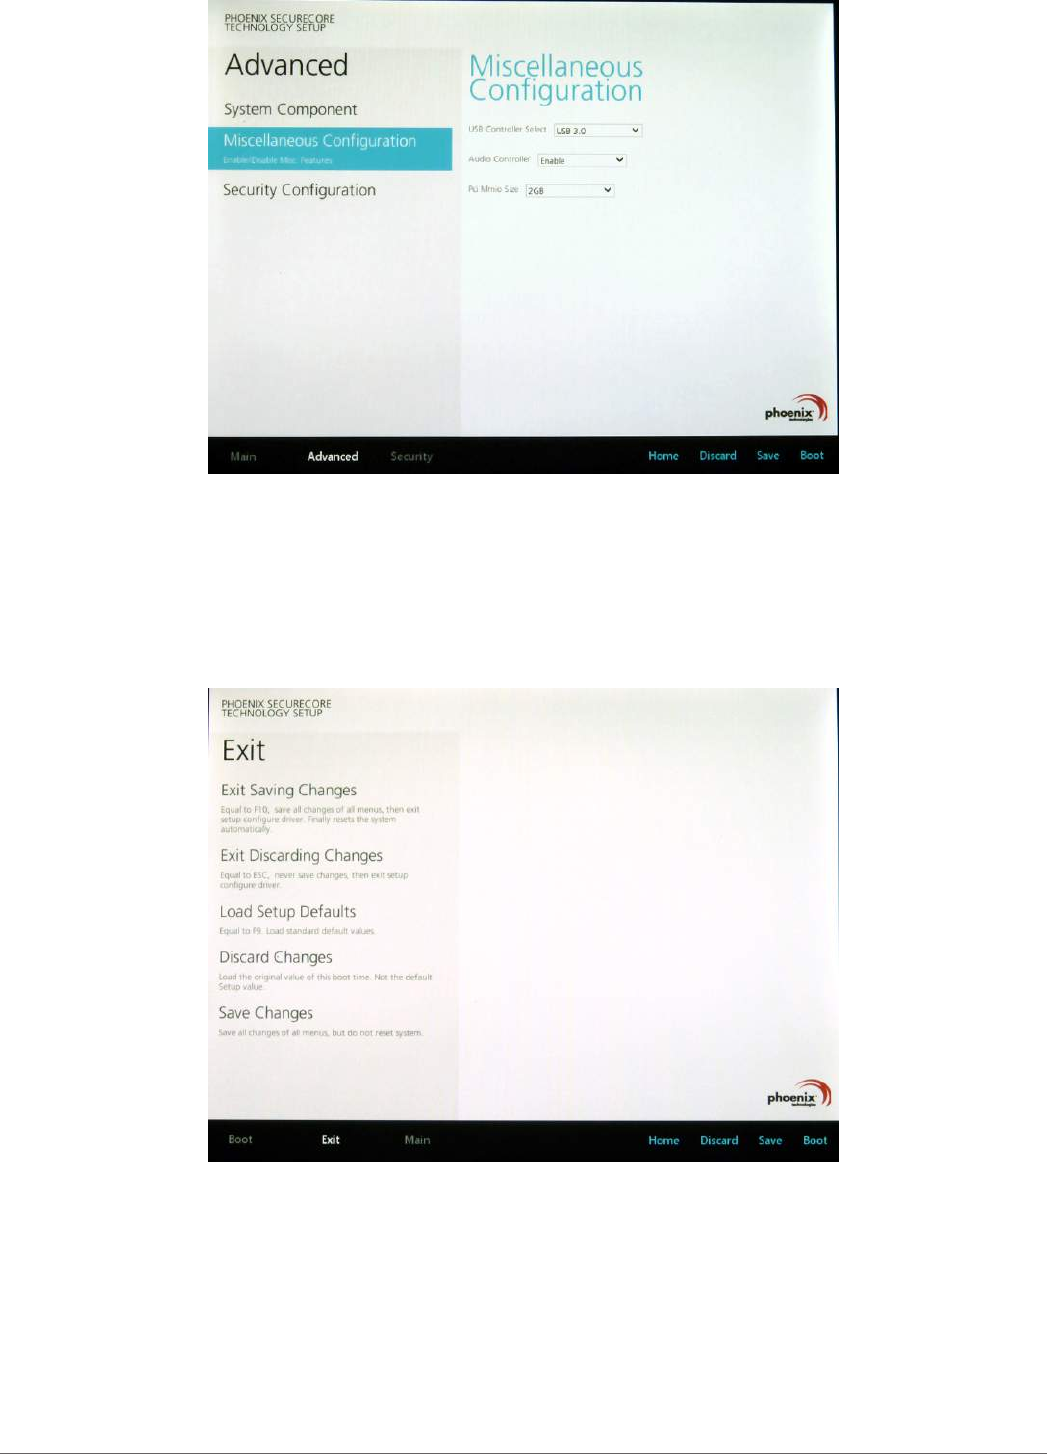
Step 3: Enable USB 2.0 Support
1. Access the BIOS Setup Utility, see “Accessing the BIOS Setup Utility” on page 37.
2. Navigate to APP Menu > Advanced > Miscellaneous Configuration.
3. Locate the USB Controller Select drop-down menu and tap on it.
40
Using BIOS Setup Utility
4. Tap USB 2.0 from the menu list. USB 2.0 is now enabled for the device.
Figure 54. Advanced > Miscellaneous Conguration
Step 4: Advanced > Miscellaneous Configuration
Save the Settings
After you configure BIOS, you will need to save the settings.
1. Navigate to APP Menu > Exit and tap Exit Saving Changes.
Figure 55. Exit the BIOS Utility
2. A prompt display, tap Yes to save the configuration.
The BIOS settings are configured and the Windows 7 operating system can be installed.
41
Using BIOS Setup Utility
BIOS Passwords
Setting Up a Supervisor Password
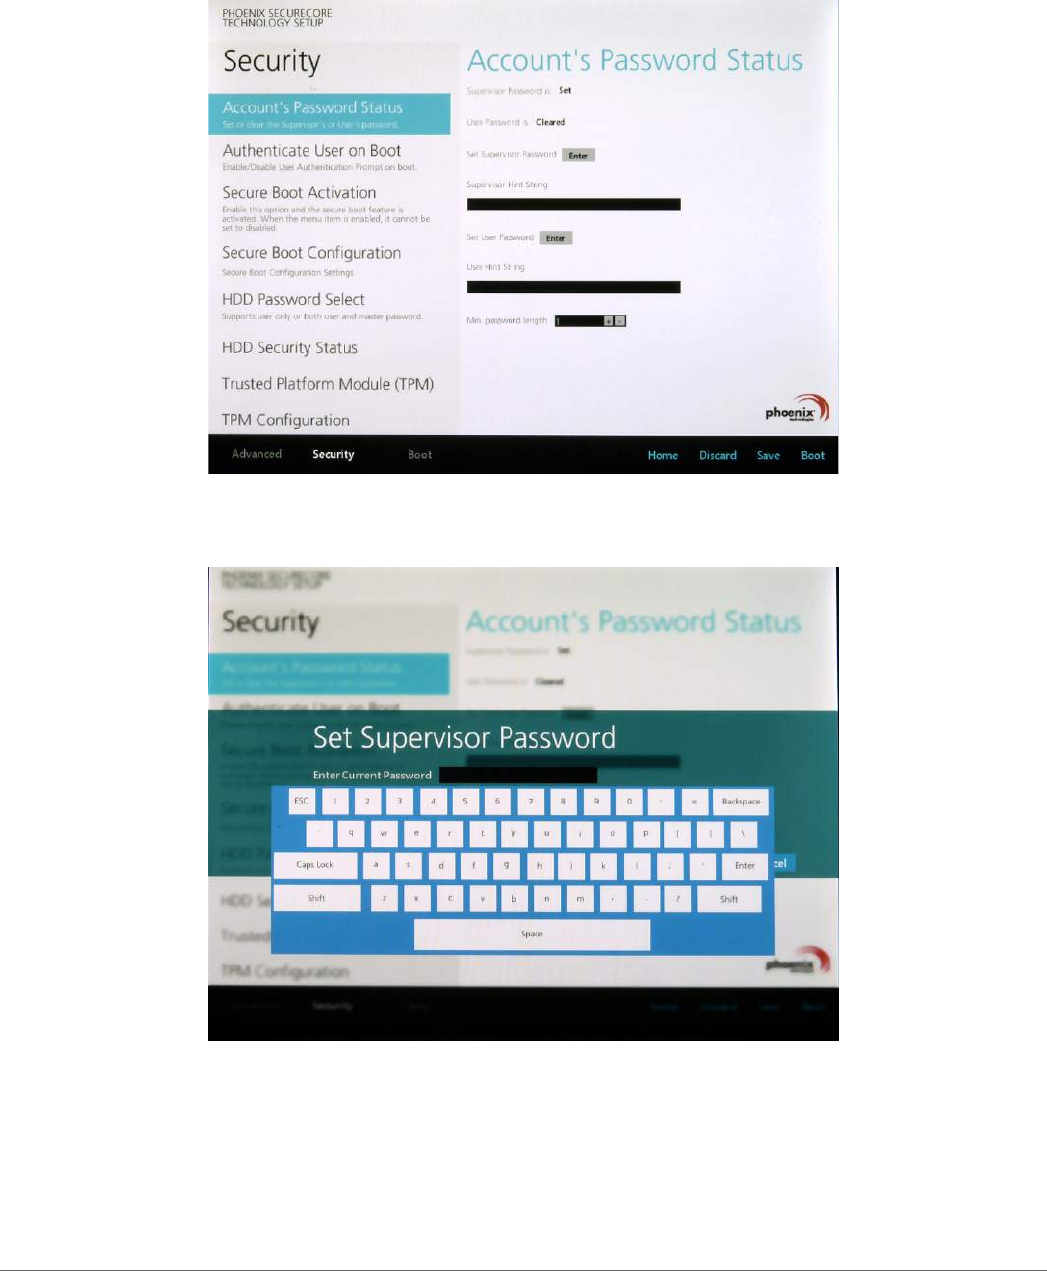
To setup a supervisor password, follow the procedure as described:
1. Go to APP Menu > Security > Account’s Password Status.
2. Tap the Enter icon next to Setup the Supervisor Password to access the virtual keyboard.
Figure 56. Security > Account’s Password Status
3. Tap the password to use for the Supervisor profile and tap Enter.
Figure 57. Set Supervisor Password

42
Using BIOS Setup Utility
4. Verification of the password is required. Tap the same password again and tap Enter to
confirm the new password.
5. Navigate to APP Menu > Exit.
Figure 58. Exit Screen
6. Tap Exit Saving Changes to display the confirmation screen.
7. Tap Yes to save the new configuration settings.
After setting the Supervisor password, the password is required to access the BIOS Setup Utility.
Changing a Supervisor Password
1. Navigate to APP Menu > Security > Account’s Password Status.
2. Tap the Enter icon next to Setup Supervisor Password.
3. Enter the current supervisor password.
4. Enter a new password.
5. Enter the new password again to confirm.
6. Go to APP Menu > Exit.
7. Tap Exit Saving Changes and tap Yes to save the configuration.
Resetting a Supervisor Password
A supervisor password can not be reset. In the event that you forget the supervisory password,
you will need to reflash the BIOS to enter the BIOS menus. Refer to “Updating BIOS” on page
43 to reflash the BIOS.

43
Using BIOS Setup Utility
EC and BIOS
Updating BIOS
This procedure allows you to update and reflash the system BIOS. Both procedures follow the
same steps as described in the following.
Make sure to protect your device from power loss during the BIOS update procedure to prevent
irreparable damage to your system’s mainboard.
For this procedure, it is highly recommended to connect the device to the AC adapter to prevent a
sudden loss of power during the BIOS updating process.
1. Contact your technical sales or technical representative to obtain the correct BIOS file.
2. Copy the BIOS file on to the USB device.
3. Connect the USB device to one of the device’s USB ports and power on the PM-521.
A USB keyboard is required for entering command.
4. Once the device is on and the Windows 8 Home screen displays, open the Charms bar by
sliding your finger inward from the screen’s right edge. The Charms bar displays.
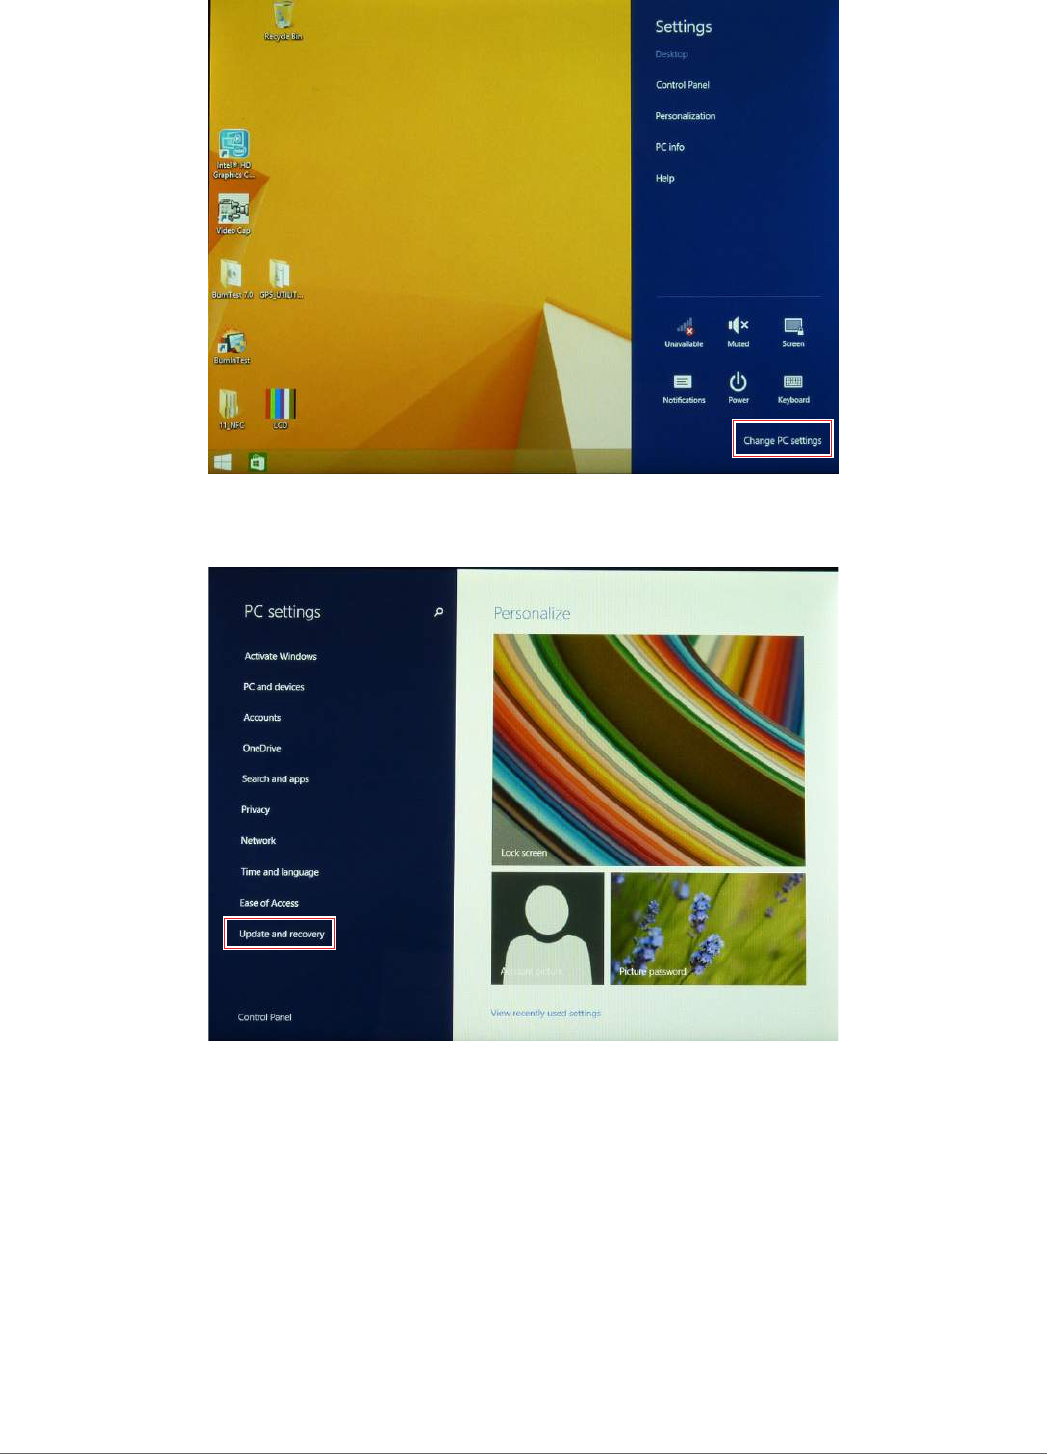
5. Tap Settings from the displayed menus.
Figure 59. Charms Bar > Settings
44
Using BIOS Setup Utility
6. Tap Change PC settings.
Figure 60. Change PC Settings
7. From the PC settings menu, tap Update and recovery to continue.
Figure 61. Update and Recovery
45
Using BIOS Setup Utility
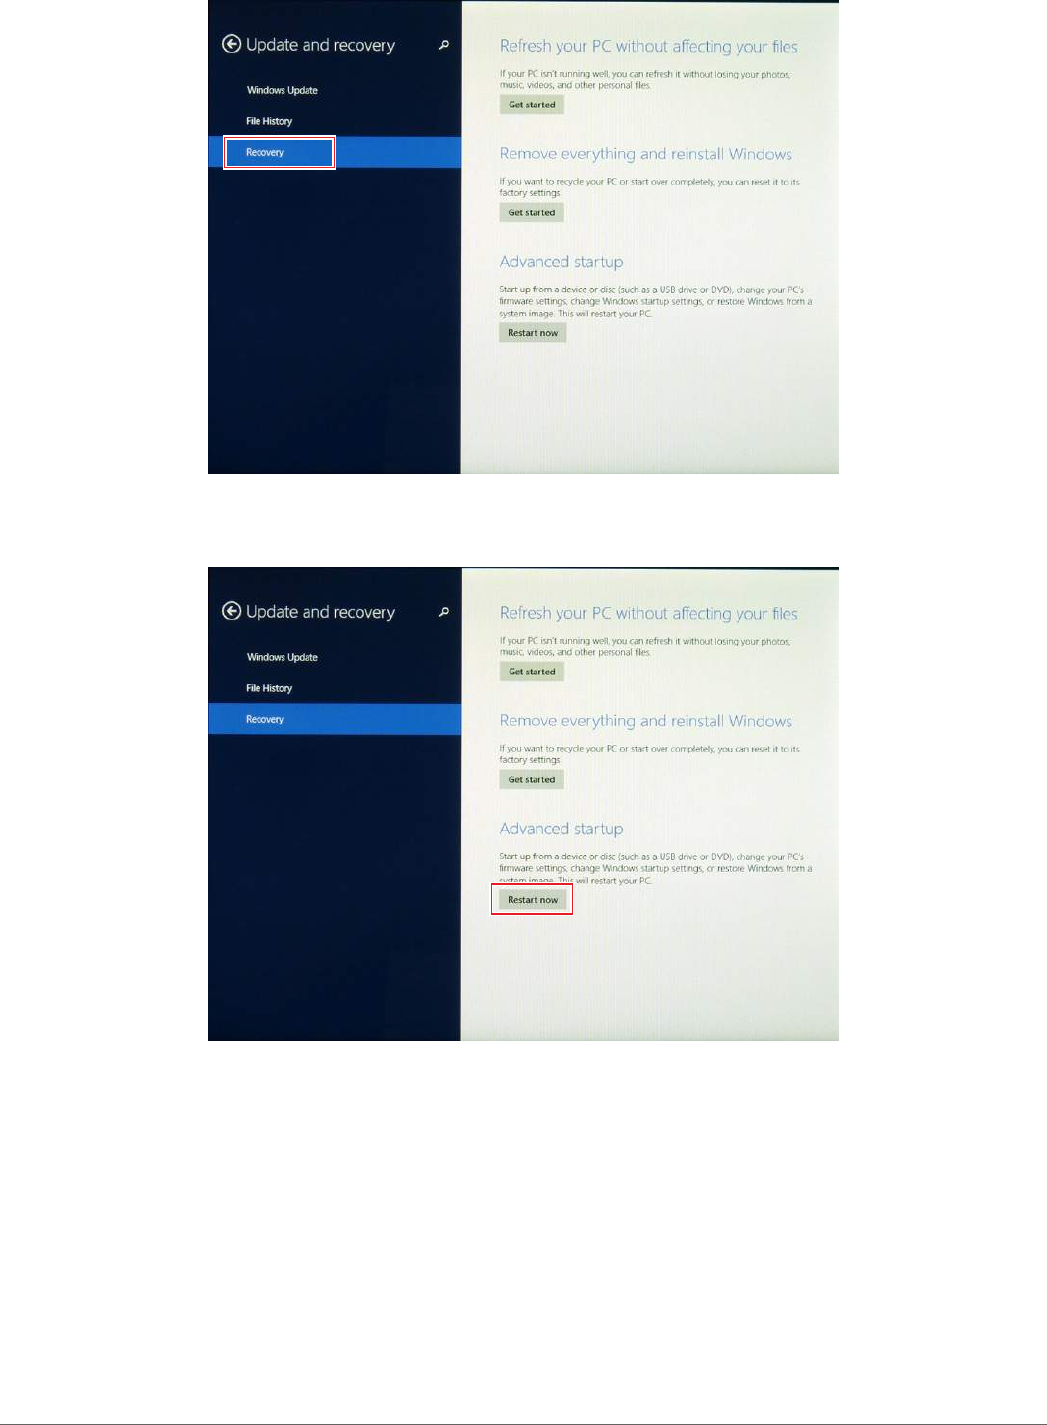
8. From the Update and recovery screen, tap Recovery.
The Advanced startup option displays.
Figure 62. Recovery
9. Under Advanced startup, tap Restart now.
Figure 63. Restart Now
46
Using BIOS Setup Utility
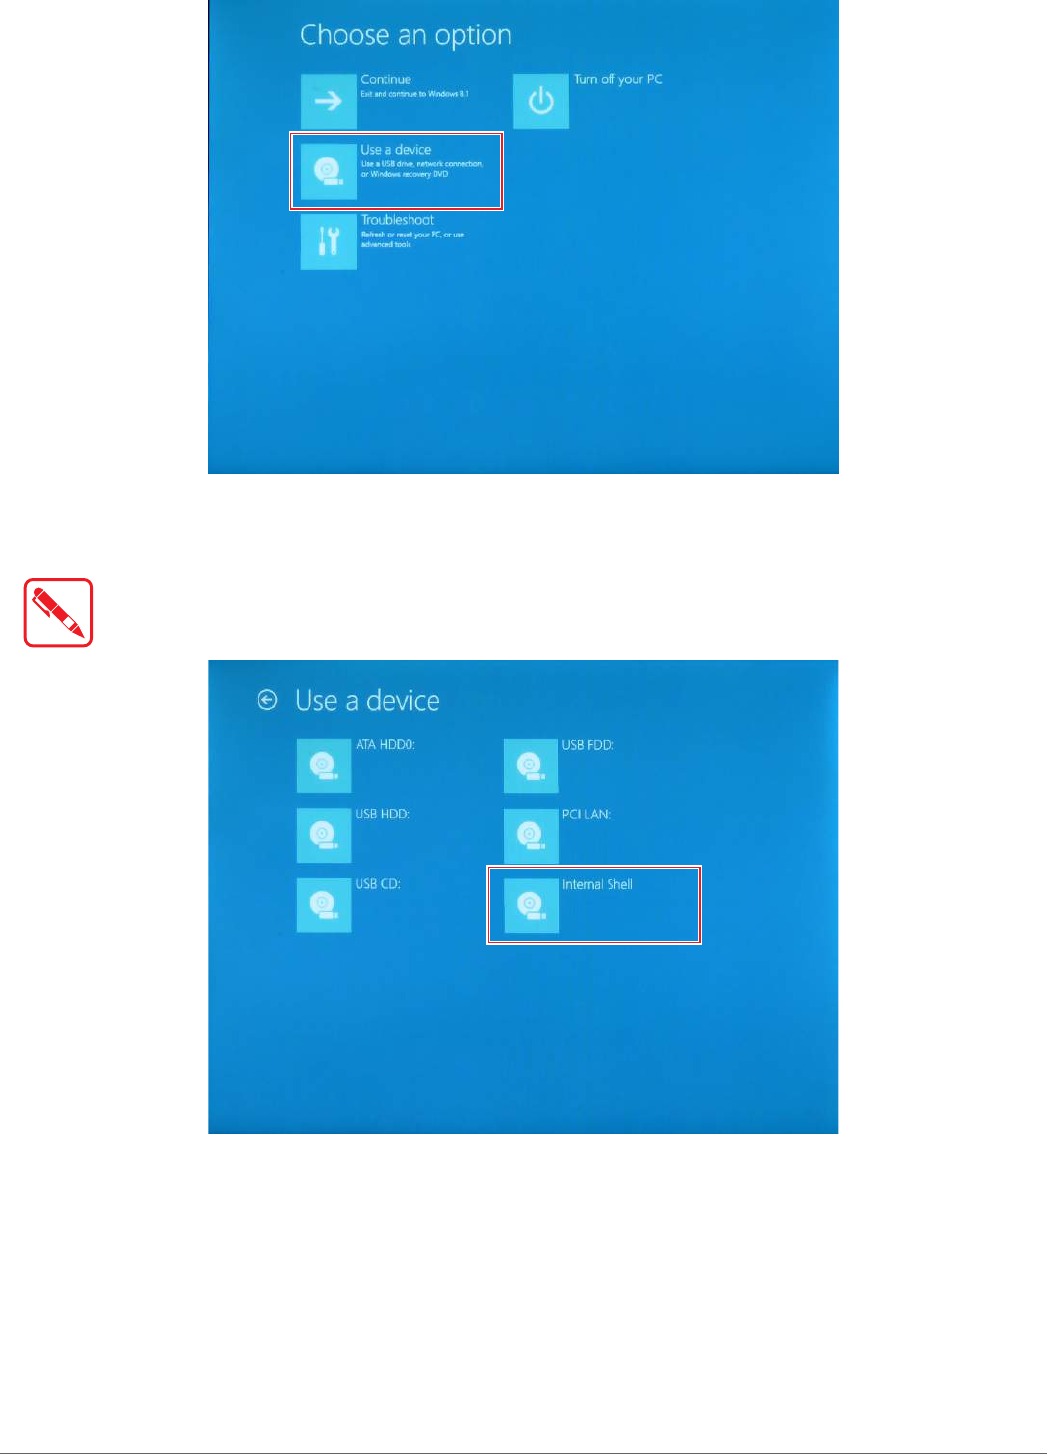
10. Tap Use a device to select a boot up preference.
Figure 64. Use a Device
11. From the Use a device menu, tap Internal Shell to open the command screen.
Make sure connect the PM-521 to the AC adapter to prevent a sudden loss of power.
Figure 65. Internal Shell
47
Using BIOS Setup Utility
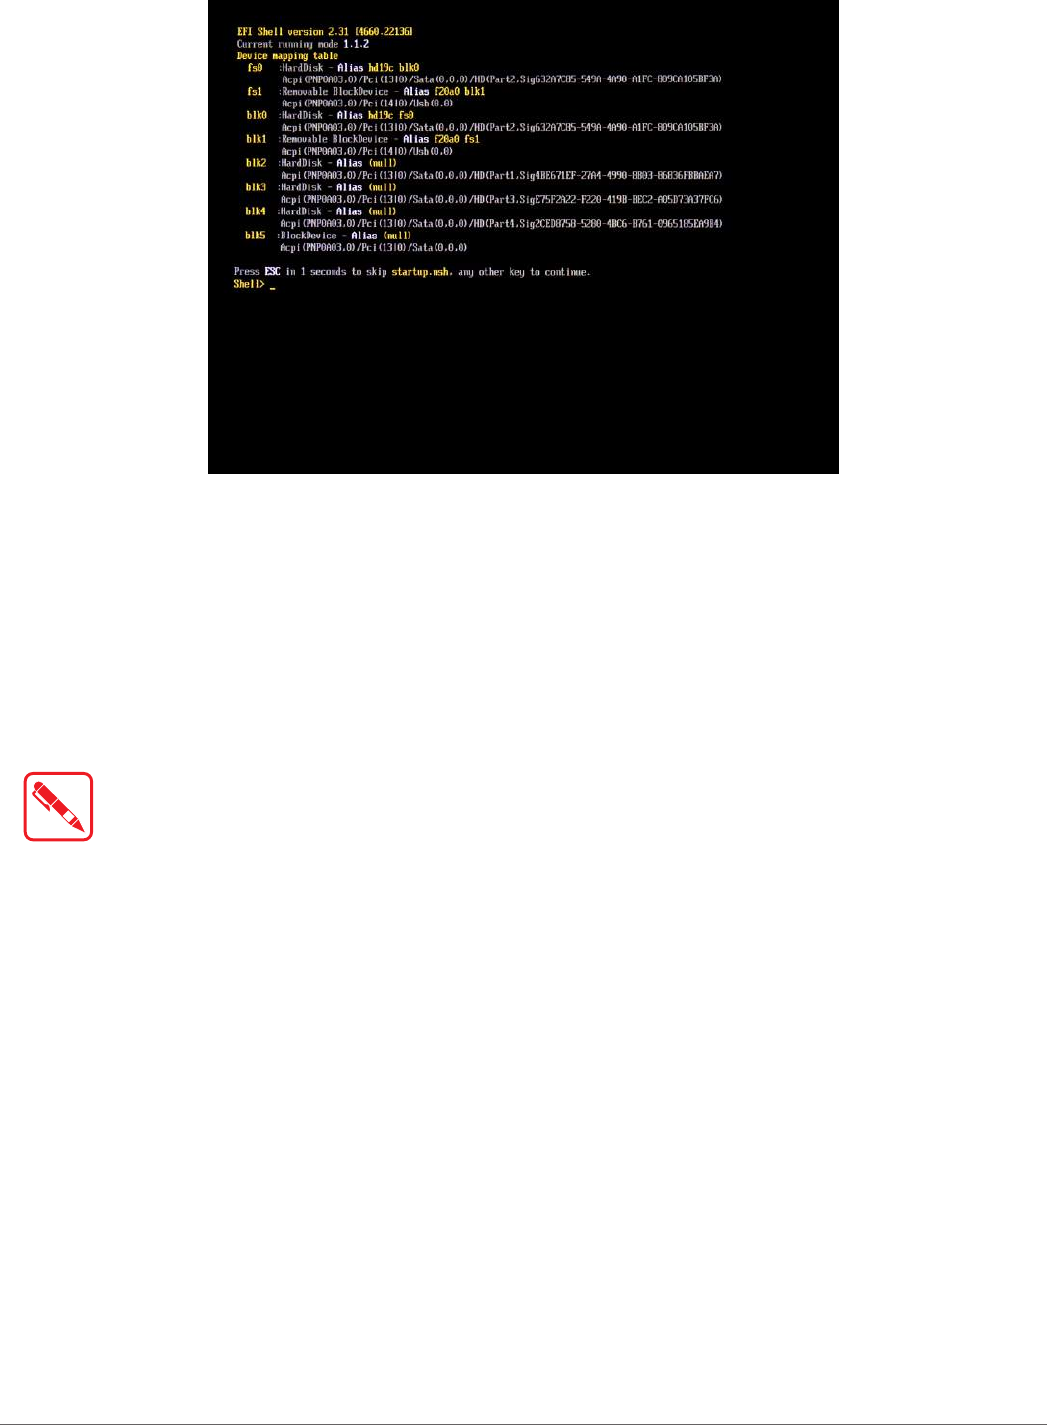
12. In the command screen, enter fs1: to select the USB device already connected to the
device. The command directs you to the USB device’s root menu.
Figure 66. Internal Shell Command Screen
13. If the BIOS file is in a folder and not in the root directory, navigate to the target folder.
14. Type wf (.nsh) and tap Enter. wf is the designated BIOS file.
Do not turn off your device or interfere with the reflash process until the process is complete.
15. Reboot the PM-521.
The BIOS is now updated.
Updating EC
Connect the PM-521 to the AC adapter to prevent a sudden loss of power.
1. Updating EC requires the use of the Internal Shell Command menu, refer to steps 1 to 12 of
“Updating BIOS”.
2. Enter the EC source file folder.
3. In the source folder, enter f.
4. Do not turn off your device or interfere with the reflash process until the process is complete.
The system reboots once the process is completed.

48
Troubleshooting
Chapter 5. Troubleshooting
Use the troubleshooting tables in this section to fix problems with the Wi-Fi connection, 802.1x
security, or general problems with operating the computer.
If you send the computer in for service, it is your responsibility to save the computer
data and configuration. RuggON is responsible only for ensuring that the hardware
matches the original configuration when repairing or replacing the computer.
Troubleshoot the Wi-Fi Connection
Use this troubleshooting table to help solve problems with your 802.11 radio connection.
Q. When you turn on the computer after it was suspended for a while (10 to 15 minutes or
longer), it can no longer send or receive messages over the network.
A. Host may have deactivated or lost current terminal emulation session. In a TCP/IP direct
connect network, turn off the “Keep Alive” message from host to maintain the TCP session
while the computer is suspended.
Q. The computer is connected to the network and you move to a new site to collect data. Your
computer now shows you are not connected to the network.
A. Move closer to an access point or to a different location to reestablish communications until
you reconnect with the network.
Q. The computer appears to be connected to the network, but you cannot establish a terminal
emulation session with the host computer.
A. There may be a problem with the host computer, or with the connection between the access
point and the host computer. Check with the network administrator to make sure the host is
running and allowing users to log in to the system.
Q. The computer appears to be connected to the network, but the host computer is not receiving
any information from the computer.
A. There may be a problem with the connection between the access point and the host
computer. Check with the network administrator or use your access point user’s manual.
Q. A network connection icon appears in the toolbar, but then disappears.
A. The computer may not be communicating with the intended access point. Make sure the
network name matches the access point network name.
The access point may not be communicating with the server. Ensure the access point is
turned on, properly configured, and has 802.1x security enabled.

49
Troubleshooting
Troubleshoot Operating the Computer
Use this section to troubleshoot problems that may prevent you from being able to operate the
computer.
Q. You press the Power button and nothing happens.
A. Make sure that power is connected to the computer.
Q. The computer appears to be locked and you cannot enter data.
A. Restart the computer.
Call Product Support
Simple instructions please contact the dealer, contact ruggon representative, or leave a message
visit the RuggON website at www.ruggon.com.
To better assist you have the following information ready:
Configuration number
Serial number
Operating system, BIOS, and MCU versions
Service pack version
System component versions
If you are using security, know the type and the full set of parameters

50
Maintenance
Chapter 6. Maintenance
Cleaning the Device
Danger to electric shock when cleaning or maintaining the PM-521.
To avoid electric shock, turn the PM-521 off and disconnect it from the power supply before cleaning or
maintaining it.
Housing
The housing of the PM-521 is best cleaned with a damp cloth.
Use compressed air, a high-pressure cleaner or vacuum cleaner may damage the surface.
Use a high-pressure cleaner, the additional risk of water entering the PM-521 may damage
the electronics or touch screen.
Touch Screen
Use neutral detergent or isopropyl alcohol on a clean soft cloth to clean the panel surface.
Prevent using any kind of chemical solvent, acidic or alkali solution.
Returning the Device
Please put the contents in the original package gently when you need to return the PM-521.
Contacting RuggON
If you experience technical difficulties, please consult your distributor or contact the technical
services department:
www.ruggon.com