SKYPINE ELECTRONICS CNE8115BCL Car Navigation Entertainment System User Manual II
SKYPINE ELECTRONICS (SHEN ZHEN) CO., LTD. Car Navigation Entertainment System II
Contents
- 1. User Manual I
- 2. User Manual II
- 3. User Manual IV
User Manual II
English
NX500/NZ50016
Discs
Playable discs
This DVD video player can play the following
discs.
About CD Extra discs
A CD Extra disc is a disc in which a total of two
sessions have been recorded. The first session
is Audio session and the second session is Data
session.
Your personally-created CDs with more than
second data sessions recorded cannot be
played on this DVD video player.
Note:
• When you play a CD Extra disc, only the
first session will be recognized.
About playing a CD-R/CD-RWdisc
(MP3, WMA)
This player can play CD-R/CD-RW discs
previously recorded in music CD format (MP3,
WMA) or video CD format.
About playing a DVD-R/RW or DVD+R/RW
disc
This player cannot play DVD-R/RW and DVD~R/
RW discs previously recorded in video CD
format.
However, MP3/WMA files recorded on DVD-R/
RW and DVD+R/RW discs can be played.
Discs that cannot be played back
This DVD video player cannot play back DVD-
Audio, DVD-RAM, Photo CDs, etc.
Note:
• It may also not be possible to play back CDs
recorded on a CD-R unit and CD-RW unit.
(Cause: disc characteristics, cracks, dust/dirt,
dust/dirt on player’s lens, etc.)
• If a CD-R or CD-RW disc that has not
been finalized is played, it will take a long
time to start playing. Also, it may not be
possible to play depending on its recording
conditions.
• You cannot play SuperAudio CDs. Playback of
the CD player is not supported even if it is a
hybrid disc.
About MP3/WMA playback
This unit can play back CD-R/CD-RW, DVD-R/
RW and DVD~R/RW discs on which MP3/WMA
music data have been recorded.
For a detailed information, see the section
entitled “Listening to MP3/WMA”.
Note on region numbers
The DVD video system assigns a region number
to DVD video players and DVD discs by sales
area. DVD video players sold in the United
States can play back DVD discs with the region
number
“ALL”, “1” or any combination of numbers that
also incorporate a “1”.
The DVD video region number is marked on the
disc jacket as shown below.
• This product incorporates copyright protection
technology that is protected by U.S. patents and other
intellectual property rights. Use of this copyright
protection technology must be authorized by Macrovision,
and is intended for home and other limited viewing uses
only unless otherwise authorized by Macrovision.
Reverse engineering or disassembly is prohibited.
• Windows Media
TM
, and the Windows
®
logo are trademarks,
or registered trademarks of Microsoft Corporation in the
United States and/ or other countries.
• Manufactured under license from Dolby Laboratories.
• “Dolby”, “Pro Logic” and the double-D symbol are
trademarks of Dolby Laboratories.
• “Made for iPod” means that an electronic accessory has
been designed to connect specifically to iPod and has
been certified by the developer to meet Apple performance
standards.
“Works with iPhone” means that an electronic accessory
has been designed to connect specifically to iPhone
and has been certified by the developer to meet Apple
performance standards.
Apple is not responsible for the operation of this device or
its compliance with safety and regulatory standards.
iPod and iTunes
®
are trademarks of Apple Inc., registered
in the U.S. and other countries.
iPhone is a trademark of Apple Inc.
DVD video discs
Audio CDs
MP3 ID3 TAG
WMA
Playable discs
ALL
146
1
About the registered marks, etc.
NX_NZ500 0608.indd 16 6/16/2009 8:05:38 AM
English
NX500/NZ500 17
6. OPERATIONS
Basic Operations
Note:
• Be sure to read this chapter referring to the
chapter “3. CONTROLS”
When the unit is turned on, starting and
stopping the engine with its volume raised to
the maximum level may harm your hearings.
Be careful about adjusting the volume.
Turning ON and OFF the Power
Note:
• Start the engine before using this unit.
• Be careful about using this unit for a long time
without running the engine. If you drain the
car’s battery too far, you may not be able to
start the engine and this can reduce the
service life of the battery.
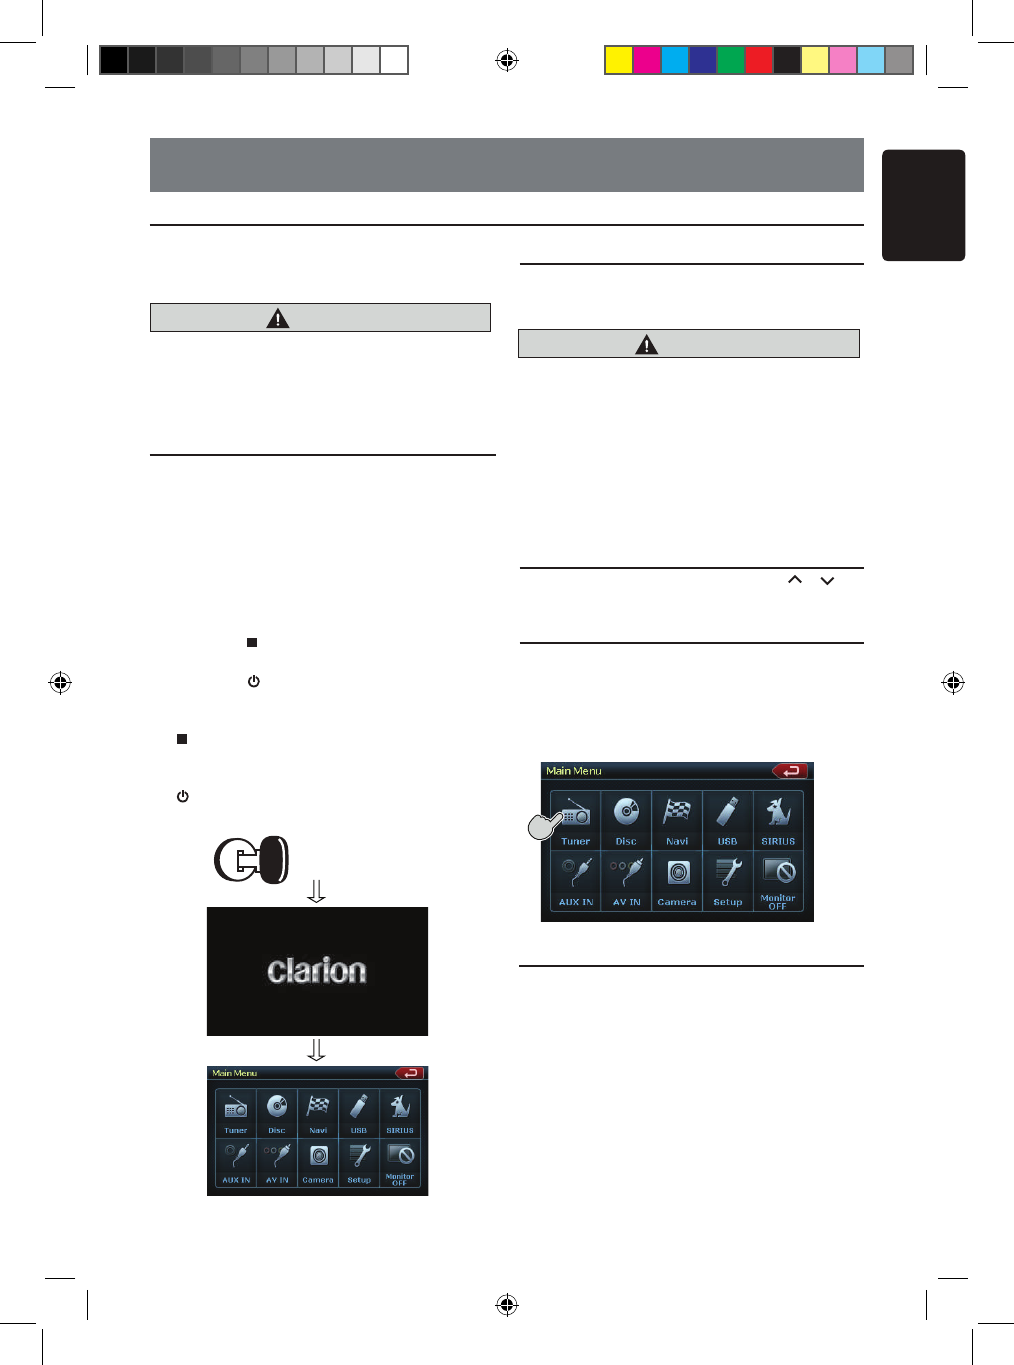
1. Start the engine. The power button / knob
illumination on the unit will light up.
2. Press the [ PWR] button on the tuner to turn
ON the power.
3. Press the [ ] power button on the remote
control to turn ON the power.
4. To turn OFF the power, press and hold the
[ PWR] power button on the tuner for more
than 2 seconds.
5. To turn OFF the power, press and hold the
[ ] power button on the remote control for
more than 2 seconds.
Opening and Closing Operational Panel
Press [OPEN] button on the unit (NZ500).
The operational panel will be open.
Press the same button again to close the panel.
• Do not move the operation panel forcibly or
do not apply strong force to the operation
panel.
• When the operation panel is operating, be
careful not to get your hand or finger caught
between the operation panel and main unit
or its mechanical parts.
• The driver should not operate the operation
panel while driving.
Adjusting the Angle of the Operational Panel
Adjust the desired angle by pressing [ ] [ ]
tfiflt buttons on the unfit (NZ500).
Selecting a Mode
1. Touch the screen button on the Main Menu to
enter the desired mode: Tuner, Disc, NAVI,
USB, Sirius, AUX IN, AV IN, etc., iPod/iPhone.
*External equipment not connected to this unit
is not displayed.
Turning Monitor ON or OFF
1. Touch the screen button Monitor OFF on the
Main Menu to turn Off the screen.
2. Touch the screen again to turn monitor
screen On.
CAUTION
Engine ON
position
CAUTION
NX_NZ500 0608.indd 17 6/16/2009 8:05:39 AM
English
NX500/NZ50018
Basic Operations
Adjusting the volume
Turn the volume knob to adjust the volume.
Clockwise : Increases the volume.
Counter- clockwise : Decreases the volume.
• The volume level indicated in the display is
in a range from 0 (min.) to 40 (max.).
While driving, keep the volume level at which
external sounds can be heard.
Mute
Press the [MUTE] [PWR] button to turn mute On
and Off.
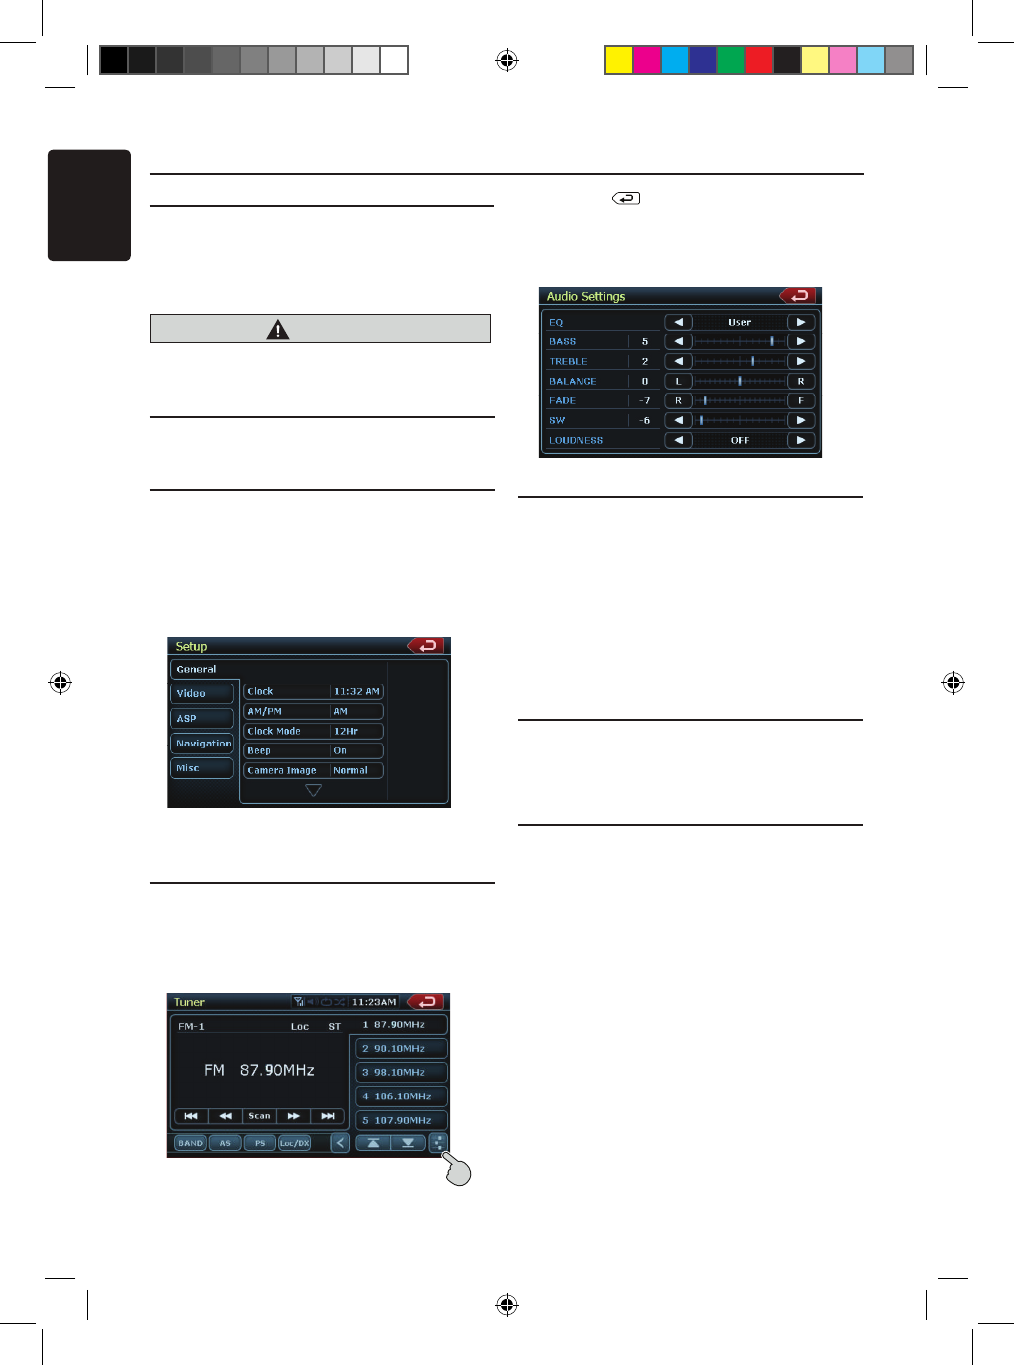
Adjusting the Settings
1. Press [Setup] to enter setting menu mode.
2. Press the desired mode button.
Modes come in the following order:
• General, including Clock settings, Beep,
Camera Image, Radio Field, Tel Mute, Tel
SP, Auxin Input SW, Version.
• Video, ASP, Navigation, Misc.
3. Perform the adjustment for the desired item.
See the following sections fo details.
Adjusting the Audio
1. Press the [EQ] button on the screen or
the [SEL] button on the remote control.
2. Touch the item key to adjust.
3. Perform the adjustment.
See the following sections for detail.
4.Touch the [ ] key to return to the previous
screen.
* In the following sections, only the details
regarding adjustments are described,
procedures to select items are skipped.
Adjusting the Balance/Fade
1. Touch the BALANCE or FADE in the
Audio Settings.
2. Touch the [F] or [R] key to adjust to the
fader level.
• The factory default setting is “0”.
(Adjustment range: front 9 to rear -9)
3. Touch the [L] or [R] key to adjust to the
balance level.
• The factory default setting is “0”.
(Adjustment range: left -9 to right 9)
Adjusting the Bass
The bass gain and bass frequency can
be adjusted as follows.
1. Touch [-] or [+] key to set the
desirable level.
Adjusting the Treble
The treble gain and treble frequency can
be adjusted as follows.
1. Touch [-] or [+] key to set the desirable
level.
2. To set the treble center frequency, enter
the ASP adjustment in the SETUP menu.
CAUTION
NX_NZ500 0608.indd 18 6/16/2009 8:05:43 AM
English
NX500/NZ500 19
Basic Operations
Adjusting the clock
Press the [Setup] button. The Setup menu will
be displayed. Touch “Clock” in General sub
menu.
2. Set up the time by touching the digital
numbers on the screen.
3. Touch the [Clock Mode] to change time
settings to 12Hr or 24Hr. Select 12Hr, than
you can choose AM or PM mode.
Adjusting the Radio region
1. Touch the [Radio Field] button in the Setup
menu.
2. A region selection menu will appear. Scroll
down using the arrow at the bottom of the
menu. Scroll up using the arrow at the
bottom of the menu. Select the area’s radio
region that you are in. If the region selected is
incorrect, radio reception will be poor.
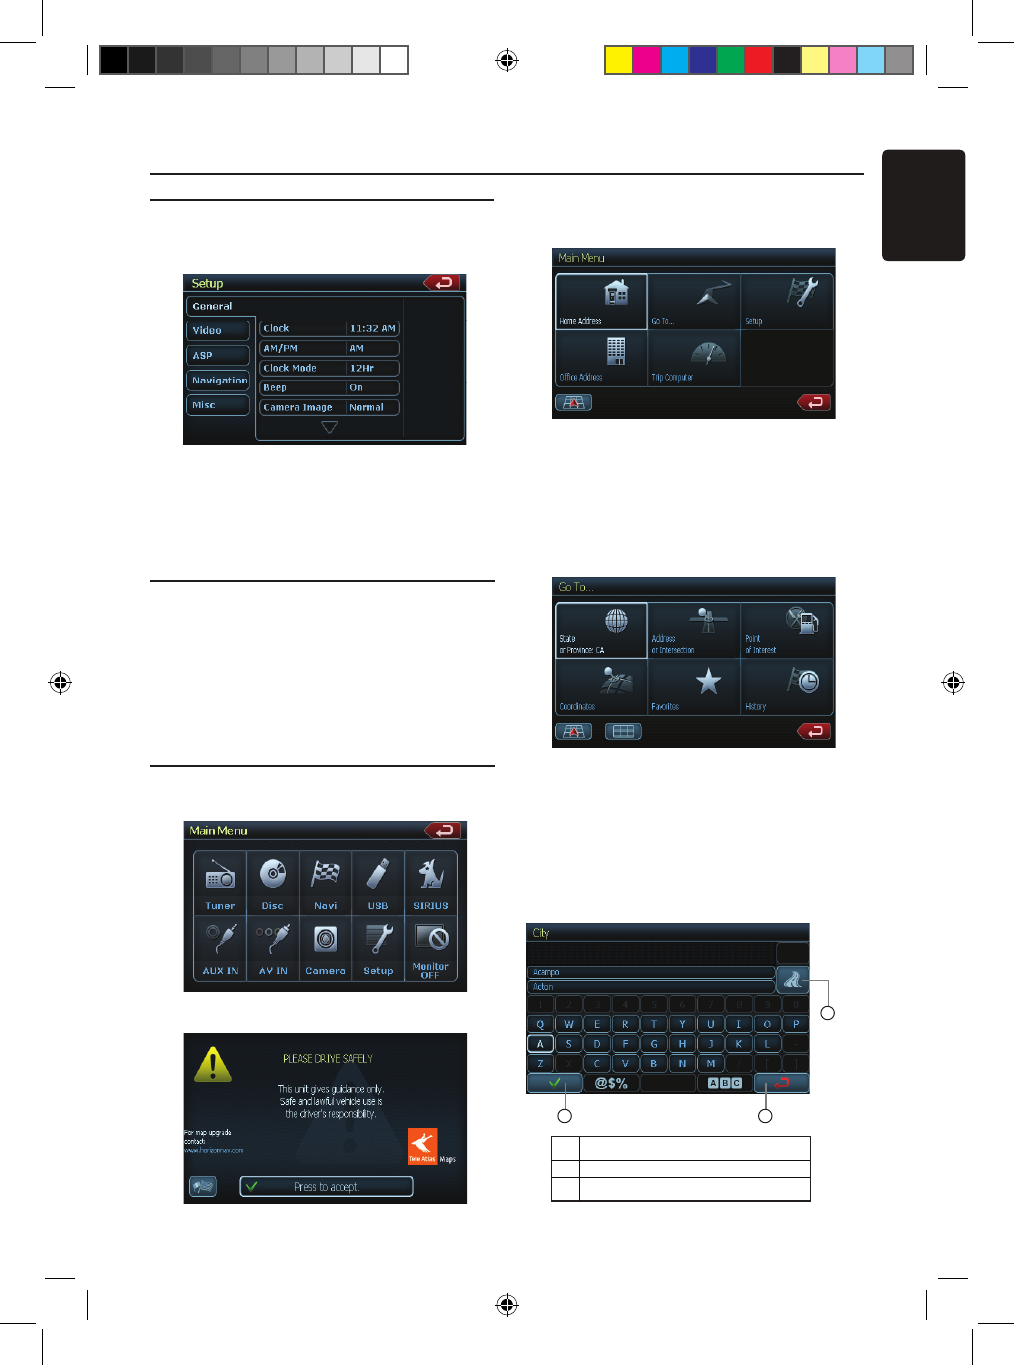
Displaying the Navigation Map
1. Touch the [Navi] button on the Main Menu
screen.
The warning screen will be displayed.
2. Press the highlighted check mark (Accept).
The Main Menu will be displayed. Select your
destination.
3. Select one of the options dispalyed on the
screen.
• Go To...
• Point of Interest
• State or Province: CA (The software
remembers the last State/Province)
• History (The adresses you navigate before)
4. The navigation system will calculate a route to
the selected destination by using the criteria
set in Setup Mode.
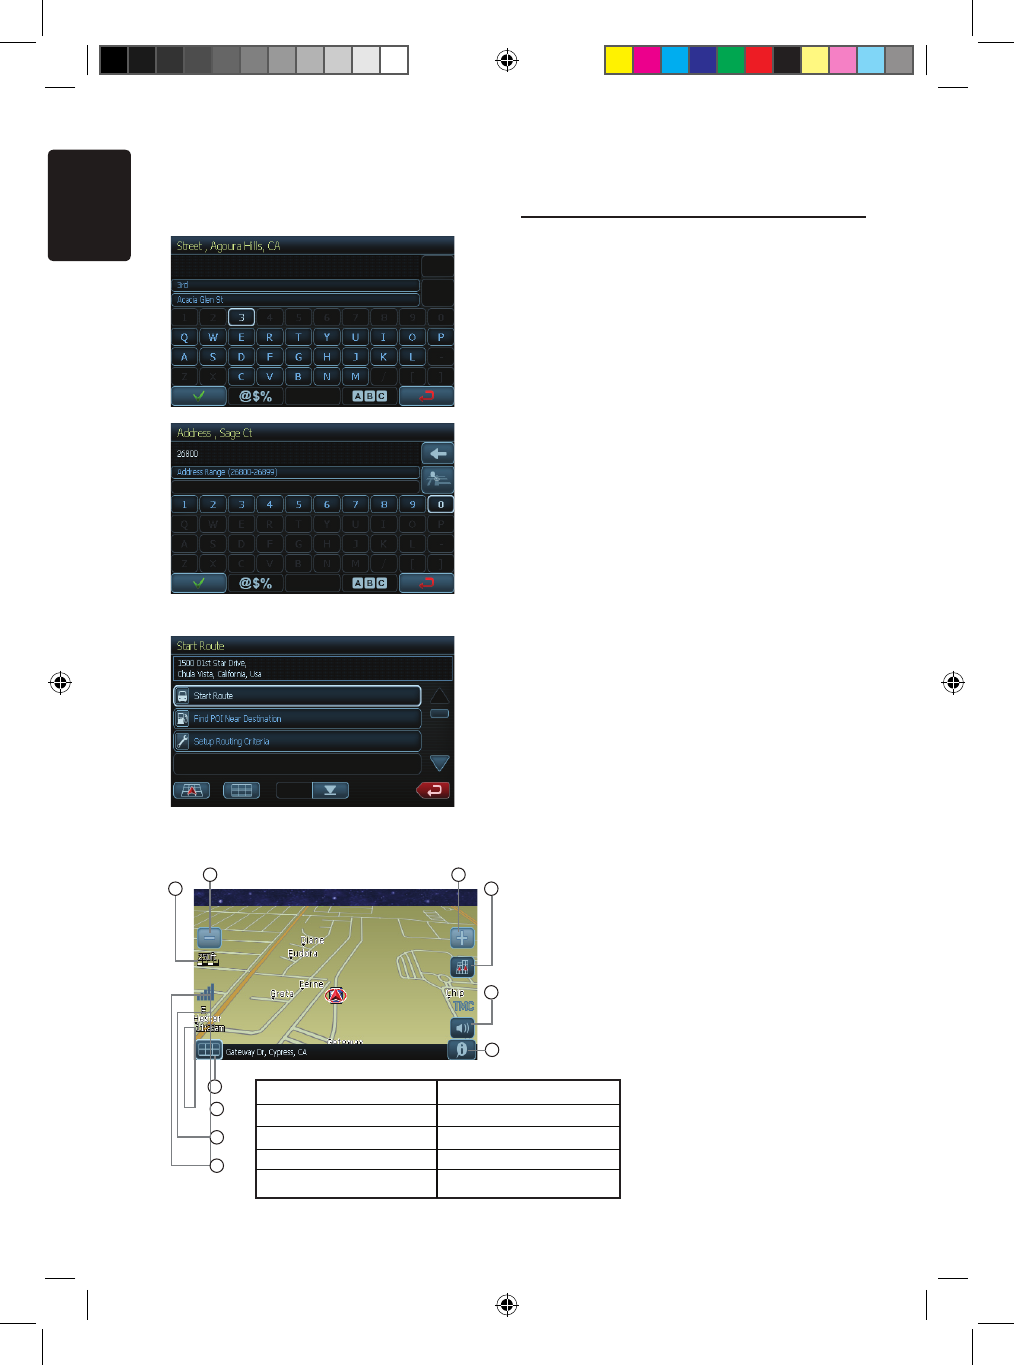
5. Touch the State or Province button.
The “City” keyboard screen will be displayed.
Press the “Check” (1) button to choose the city
from the list, or spell the City name on
keyboard. Than press Enter (2) button.
1
2
3
1
. Check button
2. Enter button
3. Return to previous screen (menu)
NX_NZ500 0608.indd 19 6/16/2009 8:05:46 AM
English
NX500/NZ50020
6. Enter the required information on the screens
displayed in the order shown below.
In order to proceed to the next sreen,
press the “Check” button.
7. Press the highlighted “Start Route” button.
8. Route map will be displayed. The navigation to
your destination will start.
9. To set up navigation menu, see “Navigation
set up “ in “Setup Operations” chapter.
Reset to Factory Defaults
1. Press Setup to enter setting menu mode.
2. Press the Misc button.
3. Press Load Factory button.
Select [YES] to restore your unit to factory
default settings. This function will erase all
memory from the unit and you must reset all
personalized items such as tuner presets.
NOTE: You will be asked once to confirm that
you would like to reset the unit. The unit will
power down and restart with factory defaults.
2
1
10
9
8
7
6
5
4
3
1. Zoom Out
2. Map Scale
3. GPS Status
4. Compass Position
5. Current Time
6. Back to Menu
7. Local Information
8. Mute
9. Change View
10. Zoom In
NX_NZ500 0608.findd 0 6/16/2009 8:05:48 AM
English
NX500/NZ500 21
Seek Tuning
1. Press the [BAND] button to select the radio
band (FM or AM).
2. Touch the [ ] or [ ] key to automatically
seek a station.
• When touching the [ ] key, the station is
sought in the direction of higher frequencies.
• When touching the [ ] key, the station is
sought in the direction of lower frequencies.
Manual Tuning
1. Press the [BAND] button to select the radio
band (FM or AM).
2. Touch the [ ] or [ ] key to automatically
seek a station.
• When touching the [ ] key, the station is
sought in the direction of higher frequencies.
• When touching the [ ] key, the station is
sought in the direction of lower frequencies.
Recalling a preset station
There are 2 ways to recall the preset station.
• Using the remote control:
1. Press the [BAND] button to select the
desire band (FM or AM) on the remote
control.
2. Press the preset number (1 to 6) on
numeric pad.
• Using the tuner unit:
1. Press the [BAND] button to select the
desire band (FM or AM) on the tuner.
2. Press the preset station (1 to 5) on tuner
display.
3. Press [ ] or [ ] to select next station up
or down the preset list.
4. Press [AS] button to auto search and store
the stations.
Auto Store
The Auto Store is a function for storing up to 12
stations that are automatically tuned in
sequentially. If 12 receivable stations cannot be
received, a previously stored station remains
unoverwritten at the memory position.
1. Touch the [Band] key to select the desired
band. (FM or AM)
2. Touch the [AS] key momentarily to start
the Auto Store function.
A beep sounds and the stations with good
reception are stored automatically to the
preset channels.
Listening to the Radio
1. Touch the Tuner button on the Main menu
display. The tuner mode screen is displayed.
2. Press the [BAND] button or touch the [Band]
key on remote control to select the radio
band. Each time the button is pressed, the
radio reception band changes in the following
order: FM1 FM2 FM3 AM FM1...
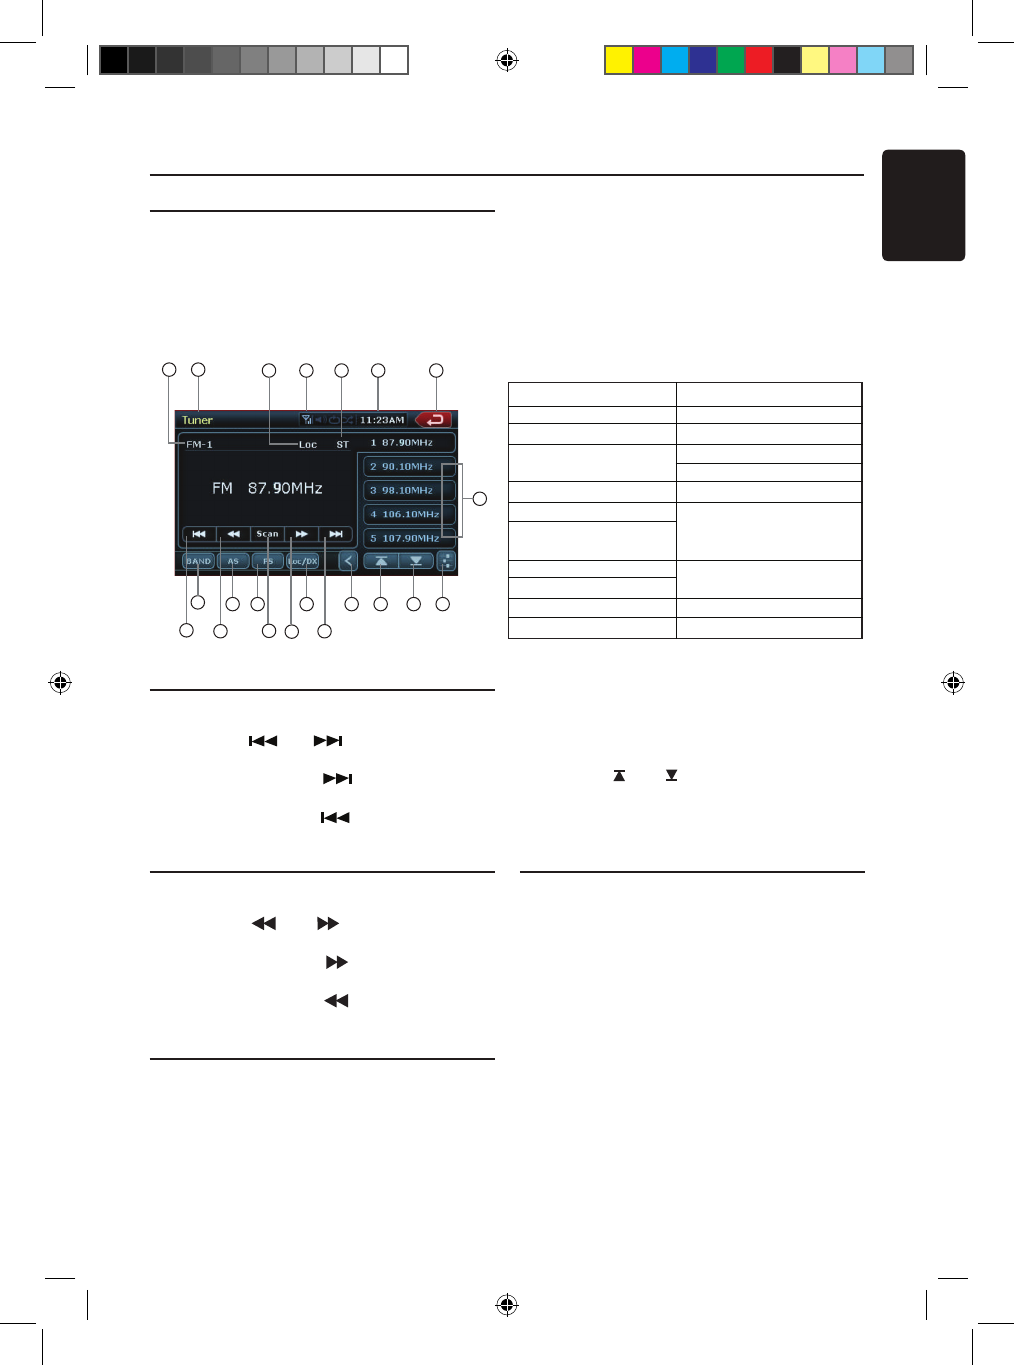
Radio Operations
15
14
13
12
11
10
9
8
76
16 17 18 19 20 21
5 1 3 42
1
. Tuner display
2. Signal intensity
3. Time display
4. Return to previous
screen
5. Band display
6. Loc/DX display
7. Stereo/Mono
signal mode
8. Preset list
9. Seek down
10. Tune down
11. Scan button
12. Tune Up
13. Seek Up
14. Band button
15. AS button
16. PS button
17. LOC/DX Button
18. Slide Bar (Use it
to hide some
function buttons)
19. Previous page
button
20. Next page button
21. EQ mode button
NX_NZ500 0608.findd 1 6/16/2009 8:05:49 AM
English
NX500/NZ50022
Radio Operations
Preset Scan
The Preset Scan receives the stations stored in
the preset memory in order. This function is
useful when searching for the desired station in
memory.
1. Touch the [Band] key to select the desired
band. (FM or AM)
2. Touch the [PS] key to start the Preset Scan.
The unit starts scanning each station for 10
seconds sequentially.
3. When the desired station is tuned in, touch
the [PS] key again to continue receiving that
station.
LOC/DX Setting
The DX / LOC setting changes the tuner
sensitivity in order to seperate closely spaced
stations. This feature is useful in areas that
have many radio stations in close proximity.
1. Touch the [DX] key to switch to LOCAL
tuner sensitivity.
2. Touch the [LOC] key to switch to DX tuner
sensitivity.
DVD Video Player Operations
Change DVD System Settings
Note:
If the set up operation is performed in
the middle of DVD video play, the disc
will restart from the beginning.
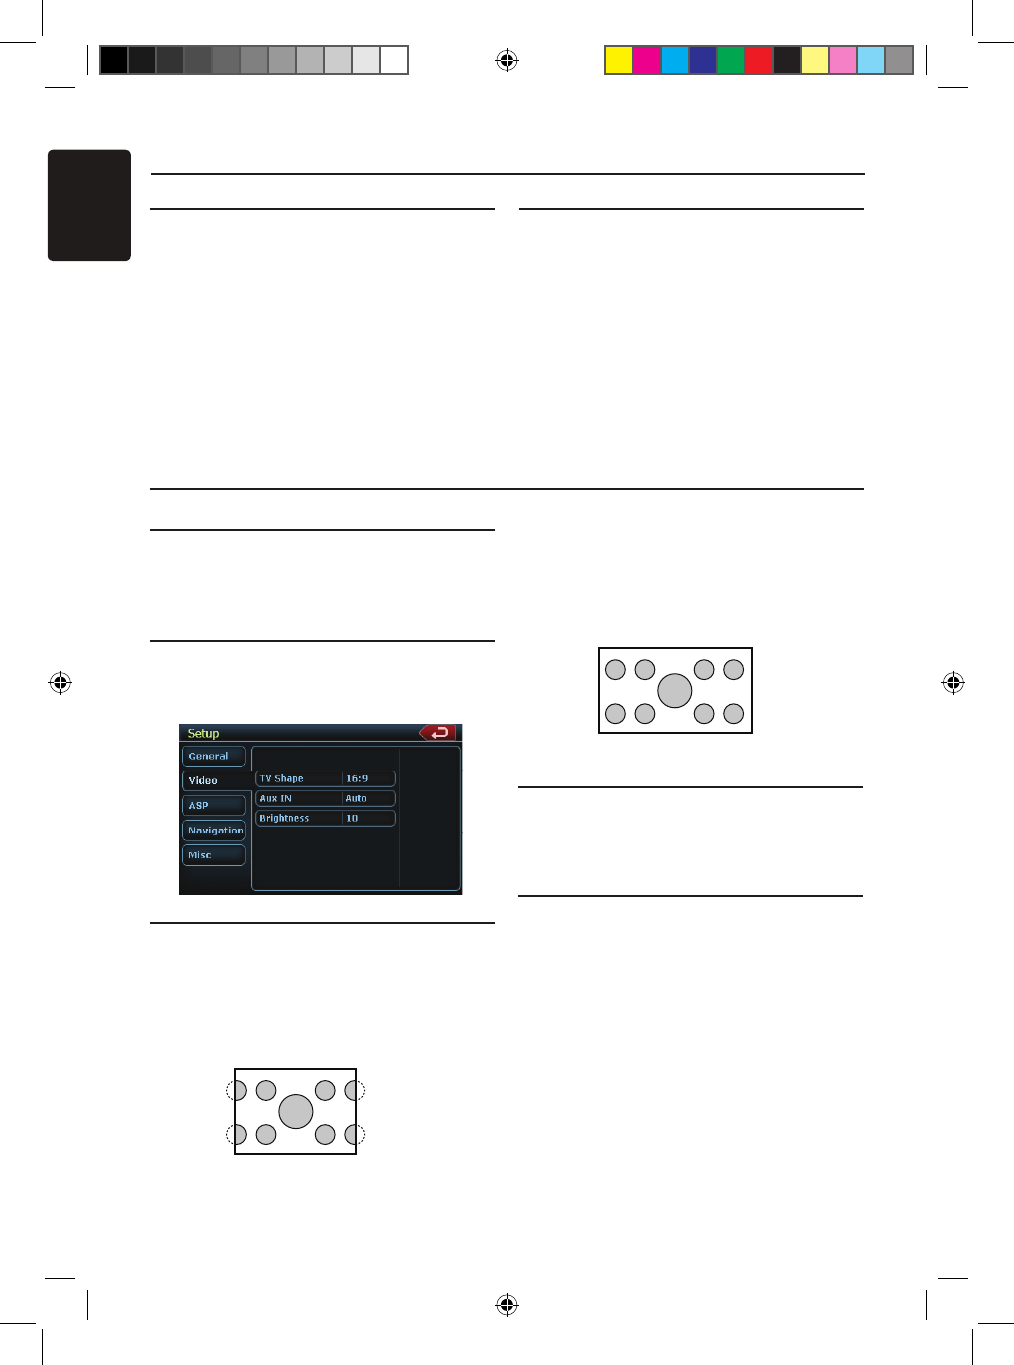
Selecting DVD Set Up Menu
1. Press the [SETUP] button on the Main Menu
to access the Video set up menu.
2. Press the [Video]. The video menu is
displayed.
Setting up the Screen Size
Press the [TV Shape] button on the display in
to change the sceen size 4:3 or 16:9.
The factory default setting is “ 16:9 ”.
• When watching a wide type through a
conventional type of the rear view monitor
(4:3), the leftmost and rightmost areas of the
screen are cut off.
This function allows displaying the important
part of image fully on the screen. In some
cases, image is displayed while being panned
(scrolled).
• When watching a wide type through a wide
type of the rear view monitor (16:9),
the leftmost and rightmost areas of the screen
are not cut off.
Setting up the Video System Format
Press the Aux IN button on the display to set up
the video system format : Auto, PAL or NTSC.
The default setting is Auto.
Touch the required system format on the screen.
Setting up the Video Brightness
Press the brightness button. Touch the desired
video brightness displayed, on scale from 0 to
20.
NX_NZ500 0608.findd 6/16/2009 8:05:49 AM
English
NX409/NZ409 23
DVD Video Player Operations
CAUTION
For your safety, the driver should not insert
or eject a disc, or operate the controls
while driving.
Setting up the password for parental level
control
The factory default setting is “0000”.
1. In Main Menu press Setup button. Press
Misc button on the dispaly. Touch the
Set Password ---- and a numerical key pad
will appear.
Input a new password. The password is set.
Note: When a disc with view restrictions is
inserted, you will be prompted to input
a password. The disc will not be
viewable until the correctpassword is
entered.
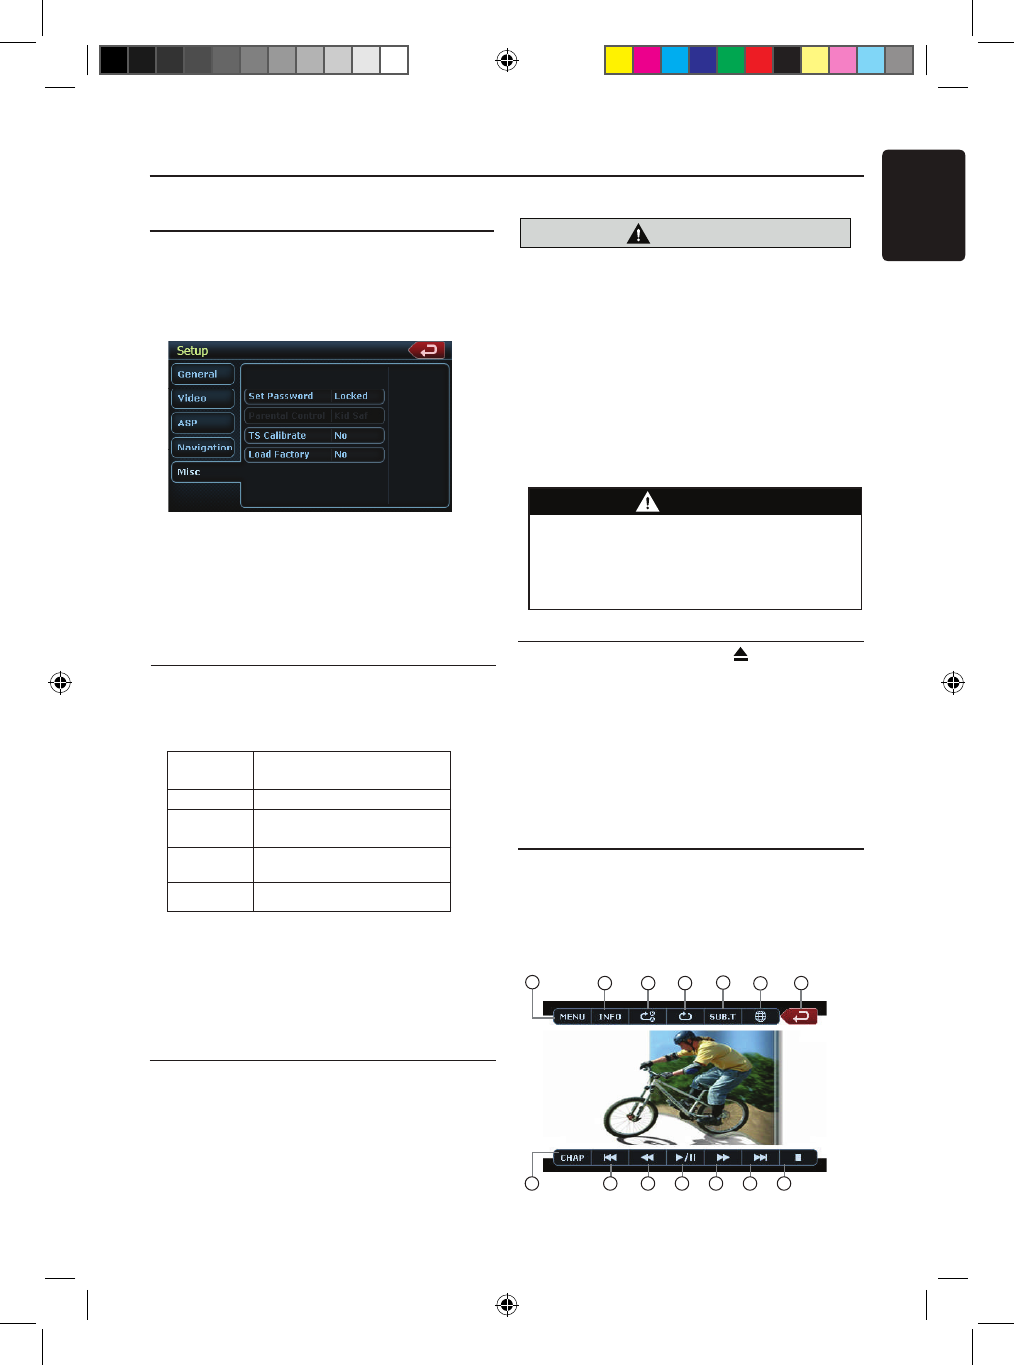
Set rating for parental level control
1. Select MISC screen while in
SETUP mode. Press Kid Saf button.
Press the desired rating for level control.
Use this table to set the parental level.
• The contents that the parental level restricts
vary with the country code.
Note: The rating can be selected only under
the password unlocked status, and the
limits can be set only under the password
locked status.
Watching/Listening to a disc
Note: Refer to the diagram in “CONTROLS”
chapter.
1. To load a disc:
Press the [OPEN] button to flip down
the front panefl. (NZ500 onfly)
Insert the disc into the center of the insertion
slot the label side facing up.
Note:
• Never insert foreign objects into the disc
insertion slot.
• If the disc is not inserted easily, there maybe
another disc in the mechanism or the unit may
require service.
• 8cm (single play) discs cannot be used.
2. Disc starts playing automatically.
Ejecting a disc
1. To eject a disc press eject [ ] button.
The play mode than switches to the Tuner
mode.
*If the disc is left in the ejected position for
15 seconds, the disc is automatically
reloaded. In this case, the play mode will
remain set to the Tuner mode.
Note: If you force a disc into before auto
reloading, it will damage a disc.
Showing DVD Player mode screen
After disc is loaded, the play mode is
automatically engaged.
Touch the screen of the playing disc to display
DVD Video menu. The display will return to the
playback screen, if you do not touch the screen
for 5 seconds.
NC-17 NO ONE 17 AND
UNDER ADMITTED
R RESTRICTED
PG13 PARENTS STRONGLY
CAUTIONED
PG PARENTAL GUIDANCE
SUGGESTED
G GENERAL AUDIENCES
WARNING
Some videos may be recorded at higher
than desired volume levels. Increase the
volume gradually from the minimal
setting after the video has started.
7
6
5
13 42
8 9
10 11 12 13 14
NX_NZ500 0608.findd 6/16/2009 8:05:50 AM
English
NX500/NZ50024
Operate the DVD Player menu
You can select the button items displayed in the
DVD menu by directly touching it.
If the button items are hard to select correctly,
you can also operate them by using the remote
control directional buttons.
Stop Playback
1. Touch the [ ] key. Playback is stopped.
2. To resume playback, press the [ ] button.
Playback resumes from the scene where
playback is stopped.
Play/Pause Playback
1. Touch the [ ] key to pause during
playback.
2. Touch the [ ] key again to resume
playback.
Skip(Search) a Chapter
1. Press the [ ] or [ ] button during
playback.
2. Press the [ ] or [ ] button during
pflayback. (NZ500)
Chapters are skipped down or up from cur-
rent locations, as many times as the button is
pressed, and playback starts.
Fast Forward Fast Backward
1. Press the [ ] or [ ] button to start your
fast backward or fast forward during playback.
The playback speed starts at 2x, then will
increase to 4x,8x, and 1 6x with each
additional press.
*No audio is reproduced during fast forward
and fast backward operation.
*The fast forward and fast backward speed
may differ depending on the disc.
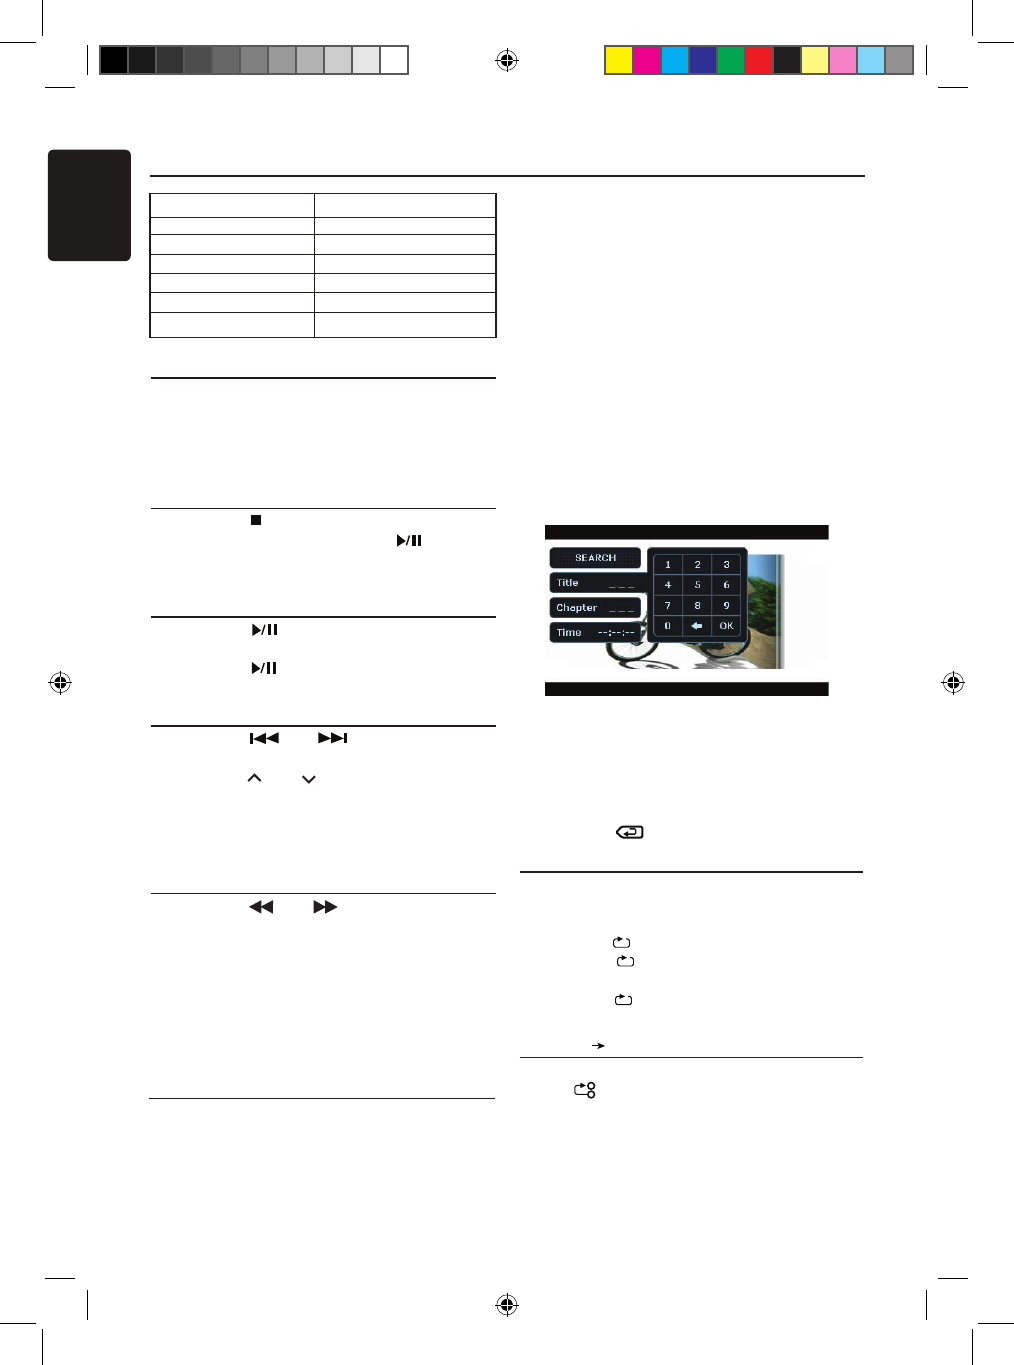
Search with a Chapter/Title Number
You can locate the beginning of a scene using
the chapter numbers or title numbers recorded
on the DVD Video disc.
1. Showing the DVD PLAYER mode screen,
touch the [CHAP] key.
The Key Pad screen appears with the chapter
number input mode. Touching the [Title] key
turns the Key Pad to the title number input
mode. Touching the [Time] key turns the Key
Pad to the time number input mode.
• Title
A large segment to divide the data area of
the disc.
• Chapter
A small segment to divide the data area of
the disc.
• Time
A specific time on the disc.
2. Input the number of the title/chapter/time that
you want to play back with the [0] to [9] key.
3. Touch the [OK] key.
Playback starts from the scene of the input
title number, time or chapter number.
*If the input title/chapter/time number does
not exist or searching with a title/chapter
number is not allowed, the screen image will
not change.
4. Touch the [ ] Back key.
Repeat Playback
This operation plays back chapters recorded on
the DVD-Video repeatedly.
1. Showing the DVD Player mode screen,
touch the [ ] Repeat key.
2. Touch the [ ] key once for Chapter
Repeat, again for Title Repeat.
3. Press the [ ] button again to turn off
the repeat playback.
Repeat A B
Select the desired passage to play back.
Touch [ ] repeat A to B button.
Selected passage starts play again.
Touch this button again to stop replay.
1. MENU Button
2. INFO Button
3. A-B Repeat Button
4. Repeat Button
5. Subtitle Button
6. Channel Button
7. Back Button
8. Chap Button
9. Previous Track Button
10. Fast Backward Button
11. Play/Pause Button
12. Fast Forward Button
13. Next Track Button
14. Stop Button
DVD Video Player Operations
B
A
NX_NZ500 0608.findd 4 6/16/2009 8:05:50 AM

English
NX500/NZ500 25
8
DVD Video Player Operations
Using the Title Menu
On DVD discs containing two or more titles, you
can select from the title menu for playback.
1. Showing the DVD PLAYER mode screen,
touch the [CHAP] key during playback.
The title menu screen appears.
*Depending on the disc, the title menu cannot
be called.
2. Select the button items displayed in the title
menu screen by the same way of the DVD
menu operation.
*Depending on the disc, items cannot be
selected with the ten-key buttons.
Using the Title Menu
On discs in which two or more audios or audio
languages have been recorded, you can switch
among the audio languages during playback.
1. Touch the [ ] audio key during playback.
• Each time you touch the key, you can switch
among audio languages.
• It may take time to switch among audios.
* Depending on the disc, up to 8 audios may
be recorded. For details, see the mark of the
disc: ( Indicates that 8 audios have
been recorded).
* When the power is turned on and when the
disc is changed to a new one, the language
set as the factory default is selected. If that
language has not been recorded, the
language specified on the disc.
* Depending on the disc, switching may be
completely impossible or impossible on
some scenes.
2. The DVD PLAYER mode screen will hide in
5 seconds after your selection is made.
Switching Subtitles
On DVD discs in which two or more subtitle
languages have been recorded, you can switch
among the subtitle languages during playback.
1. Touch the [Sub T.] key during playback.
Each time you touch the key, you can switch
among subtitles.
• It may take time to switch among subtitles.
* Depending on the disc, up to 32 kinds of
subtitles may be recorded. For details, see
the mark of the disc: ( Indicates that 8
kinds of 8 subtitles have been recorded).
* Depending on the disc, switching may be
completely impossible or impossible on
some scenes.
2. The DVD Player mode screen will hide in
5 seconds after your selection is made.
3. To turn off subtitles, repeat touching [Sub T.]
key until subtitles are turned off.
Switching angles
On DVD discs in which video images have been
recorded in two or more angles, you can switch
among the angles during playback.
1. Touch the [Angle] button on the remote
control during playback. Each time you
touch the key, you can switch among angles.
* It may take time to switch among angles.
* Depending on the disc, up to 9 angles may
be recorded. For details, see the mark of the
disc: ( Indicates multi-angle).
* Depending on the disc, angles may switch
smoothly or switch with a momentary still
image.
* Depending on the disc, switching may be
completely impossible or impossible on
some scenes.
* Depending on the disc, scenes recorded in
two or more angles may be played back.
Displaying the playback status
Touch the [INFO] key on the DVD Player
mode screen, or remote control.
Playback status is displayed on the screen.
8
NX_NZ500 0608.findd 5 6/16/2009 8:05:51 AM
English
NX500/NZ50026
DVD Video Player Operations
Pausing Playback
1. Touch the [ ] button to pause playback.
2. To resume playback, touch the same button
again.
Skipping a Track (searching)
Touch the [ ] button during playback.
Tracks are skipped, as many as the times the
button is pressed, and playback starts.
• Pressing the [ ] button starts playback
from the beginning of the next track.
• Pressing the [ ] button starts playback
from the beginning of the current track.
When this button is pressed again within
about 2 seconds, playback starts from the
beginning of the previous track.
Fast Forward and Fast Backward
1. Press and hold the [ ] or [ ] button
during playback.
Press again to advance to higherspeed
reversing or forwarding such as 2x,4x, 8x
and 1 6x. Press once more to resume
normal speed playback.
Scanning the Tracks
1. Touch the [Scan] button during playback.
Touch again to advance to higher speed
reversing or forwarding such as 2x,4x, 8x
and 16x. Press once more to resume
normal speed playback.
Searching with the Track Number
This operation allows searching using the track
numbers recorded on the CDs.
1. Touch the [ ] keyboard button on a display.
The numerical keypad will appear on the
screen.
2. Input the track number that you want to play
back with [0] to [9] key.
Playback starts from the track of the input
track number.
• If the input track number does not exist or
searching with a track number is not
allowed, the screen image will not change.
Selecting a track on the Track List Screen
This function allows you to select tracks from a
displayed list.
1. Touch the trak title on the display list.
The selected track will start playing.
2. When the desired track is not displayed, touch
the [ ] or [ ] key to scroll the track list.
3. Touch the desired track title key.
The corresponding track is started playback.
4. Press the [ ] key to return to the previous
screen.
Other various play functions
Touch the touch key of the function you want
to play.
Repeat [ ]: Press once to start a single track
repeat. Press again to activate a repeat all.
To turn repeat off, press same button again.
• Repeat symbols are displayed in the info
window in the upper right area of the screen.
Shuffle [ ]: Touch this button to shuffle the
tracks during playback.
Touch this button again to turn off the feature.
• A shuffle symbol is displayed in the info
window in the upper right area of the screen.
Stop Playing [ ]: Stop play all the tracks.
Set up [ ] Audio: Touch this button to enter
Audio Settings menu.
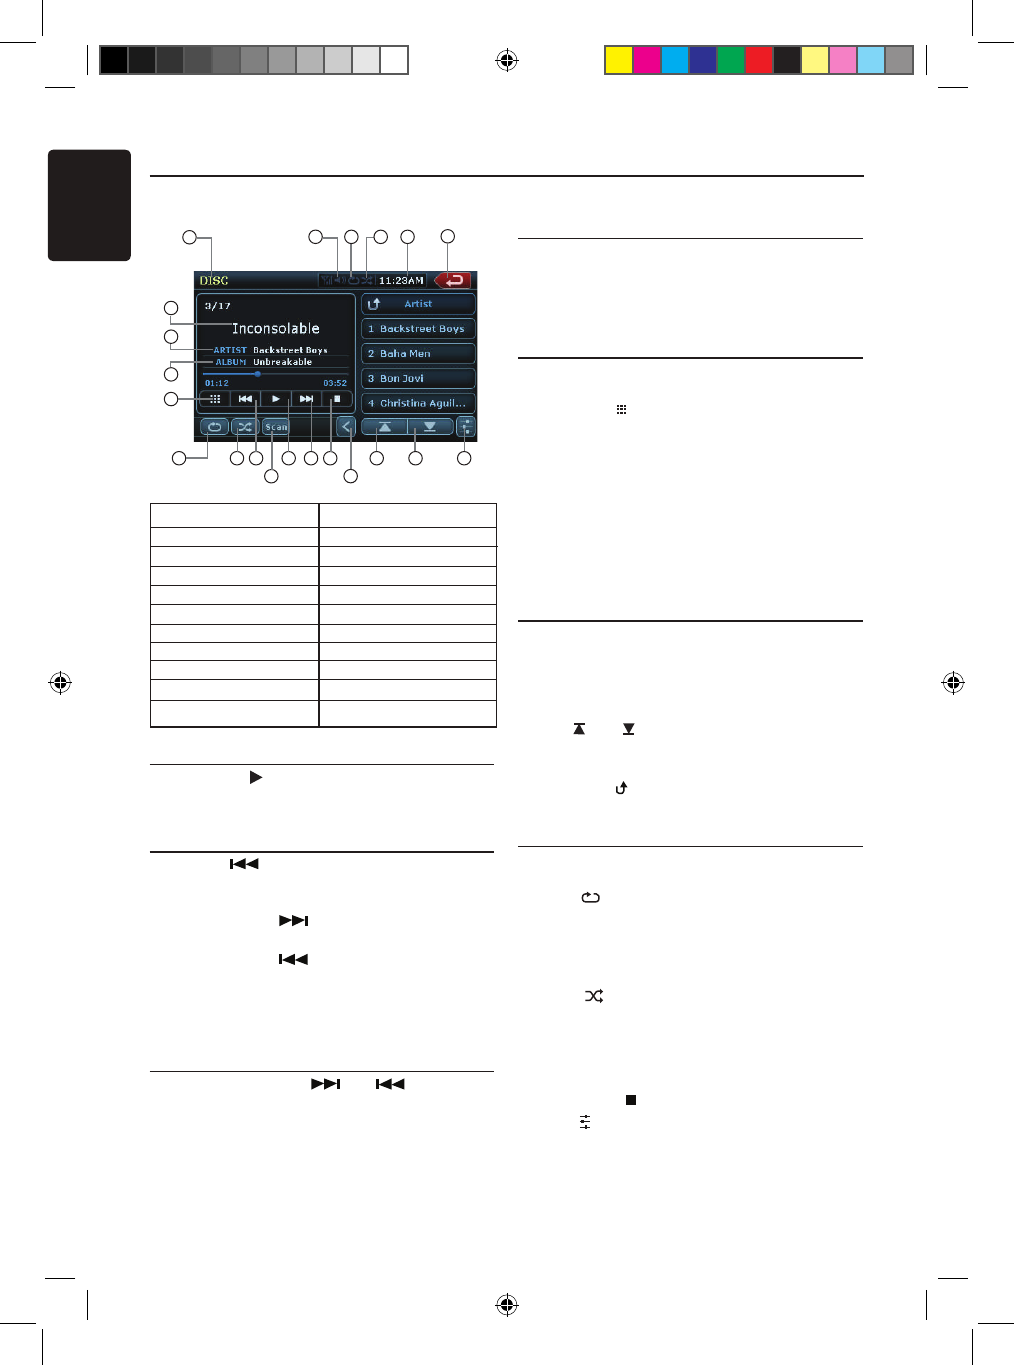
LISTENING TO a CD
1.
Mute Display
2. Repeat Display
3. Shuffle Display
4. Time Display
5. Back Button
6. Keyboard Button
7. Repeat Button
8. Shuffle Button
9. Previous Track Button
10. Play/Pause Button
11. Next Track Button
12. Stop Button
13. Previous Page Button
14. Next Page Button
15. EQ Button
16. Source Display
17. Song Title
18. Artist Information
19. Album Information
20. Scan Button
21. Slide Bar
7
16
5
13 42
8 9
10 11 12 13 14
17
18
19
6
20 21
15
NX_NZ500 0608.findd 6 6/16/2009 8:05:51 AM

English
NX500/NZ500 27
DVD Video Player Operations
Listening to MP3/WMA
This unit is an ID3 Tag compatible model.
This unit supports the ID3 TAGs of the Version
2.4, 2.3, 1.1 and 1.0.
In displaying, this unit gives priority to the
Version 2.3 and 2.4 TAGs.
After USB device inserted into USB slot, or
disc is loaded, the play mode is automaticlly
engaged.
What is MP3/WMA?
MP3 is an audio compression method and
classified into audio layer 3 of MPEG standards.
WMA is an audio compression method
developed by Microsoft Corporation.
These audio compression methods have
penetrated into PC users and become a
standard format.
These features compress the original audio data
to about 10 percent of its initial size with a high
sound quality. This means that about 10 music
CDs can be recorded on a CD-R disc or CD-RW
disc to allow a long listening time without having
to change CDs.
Note:
• Some CDs recorded on CD-R/RW mode may
not be usable.
Displaying MP3/WMA TAG titles
Tag information such as title, artist and album
title can be displayed for MP3/WMA file
containing Tag information.
Precautions when creating an MP3 disc
• File extensions
1. Always add a file extension “.MP3” or “.mp3”
to an MP3 file, and “.WMA” or “.wma” to a
WMA file by using single byte letters. If you
add a file extension other than specified or
forget to add these file extension, the file
cannot be played. In addition, if you use upper
case and lower case letters (capital and small
letters) mixedly for file extensions, normal
play may not be possible.
2. Files other than MP3/WMA data cannot be
played.
Playing files with a format not supported will
be skipped, and the scan, random and repeat
playback mode may be canceled.
• File and Disc Not Supported
Files and discs with following extensions are
not supported: *.AAC, *.DLF, *.M3U, *.PLS,
MP3 PRO files, files with DRM, open session
discs.
• Logical format (File system)
1. When writing an MP3/WMA file on a disc,
please select “ISO9660 level 1 or level 2
(without including expansion format)” as
the writing software format. Normal playback
may not be possible if the disc is recorded on
another format.
2. The folder name and file name can be
displayed as the title during MP3/WMA play
but the title must be within 31 single byte
alphabetical letters and numerals for the
folder name and file name (including an
extension). Entering more letters or numerals
than specified may cause an incorrect
display.
• Entering File and Folder Names
Names using the code list characters are the
only file names and folder names that can be
entered and displayed. Using any other
character will cause the file and folder names
to be displayed incorrectly.
• Electronic Shock Protection
10 seconds for CD-DA (CDA)
45 seconds for MP3 recorded at 44.1 kHz,
128kbps
90 seconds for WMA recorded at 44.1 kHz,
128kbps
• Folder structure
1. A disc with a folder having more than 8
hierarchical levels will conflict with the
ISO9660 and playback will be impossible.
• Number of files or folders
1. The maximum allowable number of folders is
255 (including root directory); the maximum
allowable number of files is 512 (max. 255 per
folder). This represents the maximum number
of tracks that can be played back.
2. Tracks are played in the order that they were
recorded onto a disc. (Tracks might not
always be played in the order displayed on
the PC).
• Some noise may occur depending on the
type of encoder software used while
recording.
• In case of a track recorded at VBR (variable
bit rate), the display for the play time of the
track may be slightly different from the
actual play time. Also, the recommended
value of VBR ranges from 32 kbps to
320 kbps.
• After disc selection, the play mode is
automatically engaged.
NX_NZ500 0608.findd 7 6/16/2009 8:05:51 AM