SKYPINE ELECTRONICS CNE8213FA Car DVD entertainment center User Manual Contents
SKYPINE ELECTRONICS (SHEN ZHEN) CO., LTD. Car DVD entertainment center Contents
Users Manual
VER:7-9820-8319-00-00
注意:
红色虚线为刀模线 This device complies with Part 15 of the FCC Rules. Operation is subject to
the following two conditions:
(1) this device may not cause harmful interference, and
(2) this device must accept any interference received, including
interference that may cause undesired operation.
Warning:Changes or modifications to this unit not expressly approved by
the party responsible for compliance could void the user's authority to
operate the equipment.
FCC ID:V8VCNE8213FA
This equipment complies with FCC RF radiation exposure limits set forth
for an uncontrolled environment.This equipment should be installed and
operated with a minimum distance of 20 centimeters between the radiator
and your body.

1
Contents
Thankyouforyourchoosingourproduct.Wehopeyouwillfindtheinstructionsinthisuser
manualclearandeasytofollow.Ifyoutakeafewminutestolookthroughit,you’lllearnhowto
useallthefeaturesofyournewunitformaximumenjoyment.
Afteryouhavefinishedreadingtheinstructions,pleasekeepthismanualinasafeplaceforfuture
reference.
Precautions
Precautions
Precautions
Precautions
3-4
3-4
3-4
3-4
Onsafety
3
Moisturecondensation
3
Tomaintainhighsoundquality
3
Playablediscs
3
DVDRegionManagement
4
Preparation
Preparation
Preparation
Preparation
5
5
5
5
Features
5
ToolsandSupplies
5
WARNING
5
DisconnectingtheBattery
5
C
C
C
Controls
o ntrols
ontrols
ontrolsa
a
a
and
n d
nd
ndIndicators
I ndicators
Indicators
Indicators
6-7
6-7
6-7
6-7
ButtonOperation
6
TheKeyAreasOfTouchScreen
7
Remote
Remote
Remote
RemoteControl
C ontrol
Control
Control
8-9
8-9
8-9
8-9
FrontZoneRemoteControl
8
T
T
T
TFT
F T
FT
FTMonitor
M onitor
Monitor
MonitorOperation
O peration
Operation
Operation
10
10
10
10
RearCameraMode
10
ImageSettings
10
ParkingBrakeInterlock
10
Operating
Operating
Operating
OperatingInstructions
I nstructions
Instructions
Instructions
11-12
11-12
11-12
11-12
PowerOn/Off
11
PlayingSourceSelection
11
VolumeAdjustment
11
AudioControlMenu
11
Five-ChannelAudioControl
12
RearZone
12
SystemReset
12
Mute
12
Standby
12
System
System
System
SystemSetup
S etup
Setup
SetupMenu
M enu
Menu
Menu
13-17
13-17
13-17
13-17
MAINMenu
13
RearzoneMenu
13
ScreenSetting
13
GeneralSetupMenu
14
Video
15
ASP(AudioSignalProcessing)ConfigurationMenu
16
LanguageMenu
17
Tuner
Tuner
Tuner
TunerOperation
O peration
Operation
Operation
18-19
18-19
18-19
18-19
TunerTFTDisplay
18
SwitchtoRadiosource
18
SelectFM/AMBand
18
AutoTuning
18
ManualTuning
19
UsingPresetStations
19
AutoStore(AS)
19
ProgramScan(PS)
19
LocalRadioStationsSeeking(LOC)
19

2
NOTE
NOTE
NOTE
NOTE:1.certaindescriptioninthebookmaydifferfromtheactualunit.
2.Somepictures
or
iconsinthebookmaydifferfromactualdisplay.
3.Specificationssubjecttochangewithoutnotice.
DVD
DVD
DVD
DVDPlayer
P layer
Player
PlayerOperation
O peration
Operation
Operation
20-25
20-25
20-25
20-25
Insert/EjectDisc
20
ResettheLoadingMechanism
20
AccessingDVDMode
20
UsingtheTouch-ScreenControls
20
ControllingPlayback
21
AccessingtheDVDMenu
21
MovingThroughChapters
21
FastForward/FastReverse
21
Selecting2-Channelor6-ChannelAudioPlayback
22
GOTOSearch
22
DirectChapter/TrackSelection
23
ViewinganAlternatePictureAngle(DVDOnly)
23
Zooming
23
Multi-LanguageDiscs(DVDOnly)
23
PlaybackInformation
23
GeneralDiscInformation
25
CD/MP3/WMA/JPEG
CD/MP3/WMA/JPEG
CD/MP3/WMA/JPEG
CD/MP3/WMA/JPEGOperation
O peration
Operation
Operation
26-28
26-28
26-28
26-28
CDPlayerUserInterface
26
MP3/WMADiscs
27
JPEGDiscs
28
iPod
iPod
iPod
iPodO
O
O
Operation
p eration
peration
peration
29
29
29
29
AccessingiPodMode
29
iPodInstructions
29
PlaybackofvideooniPod
29
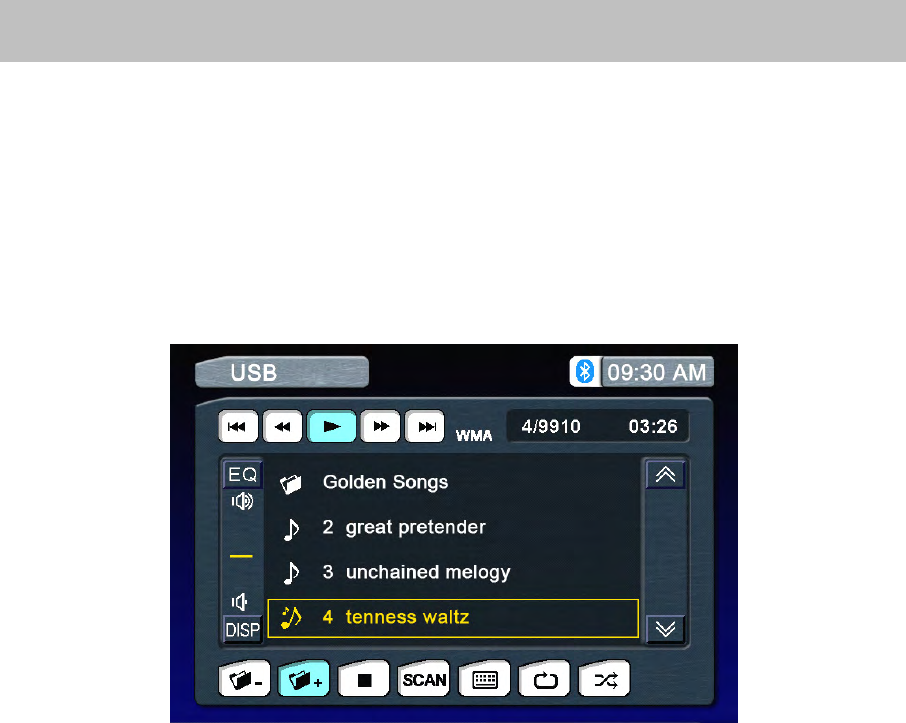
USB
USB
USB
USBO
O
O
Operation
p eration
peration
peration
30
30
30
30
SD
SD
SD
SD Operation
Operation
Operation
Operation
31
31
31
31
Navigation
Navigation
Navigation
NavigationOperation
O peration
Operation
Operation
32
32
32
32
HowtoaccesstheNavigationmode
32
HowtoListentoAudioWhileUsingNavigation
32
Bluetooth
Bluetooth
Bluetooth
BluetoothOperation
O peration
Operation
Operation
33-36
33-36
33-36
33-36
AccessingBluetoothMode
33
BluetoothUserInterface
33
Troubleshooting
Troubleshooting
Troubleshooting
Troubleshooting
37-40
37-40
37-40
37-40
Specifications
Specifications
Specifications
Specifications
41
41
41
41

3
To
avoidtheriskofinjury
or
accident,readthefollowingprecautionsbeforeinstallingand
operatingtheunit.
On
On
On
Onsafety
s afety
safety
safety
Complywithyourlocaltrafficrulesandregulations.
Whiledriving
You
mustnotwatch
or
operatethemonitor.
It
mayleadtodistractionandcauseanaccident.
Parkyourcarinasafeplacetowatchthemonitorandoperatetheunit.
Whileoperating
Donotinsertyourhands,fingers
or
foreignobjectintotheunitwhilethemonitor
is
functioning.
It
maycauseinjury
or
damagetotheunit.
Keepsmallarticlesoutofthereachofchildren.
Ifyourcarwasparkedindirectsunlightresultinginaconsiderableriseintemperatureinside
the
car,
allowtheunittocooloffbeforeoperatingit.
Preventingaccidents
Thevideopicturesappearonlyafteryouparkthecarandsettheparkingbrake.
Whenthecarstartsmoving,thevideopicturesautomaticallydisappearforsafety
reasons,afterdisplayingthefollowingcaution.
Donotwatchthemonitorwhiledriving.
You
maycauseatrafficaccidentifyourattention
isdistractedbythemonitor.
DonotusetheSystemSetupfeaturewhiledriving,
or
performanyotherfunctionwhichcould
divertyourattentionfromtheroad.
Whenyouconnectthebackcamera:
Whenyoudrive,watchthesurroundingscarefullyforyoursafety.Donotdependontheback
cameraexclusively.
Whenbackingupyou
car,
besuretolookbackforyoursafety.
DonottouchtheliquidcrystalfluidiftheLCD
is
damaged
or
broken.Theliquidcrystalfluidmay
behazardoustoyourhealth
or
fatal.IftheliquidcrystalfluidfromtheLCDcontactsyourbody
or
clothing,wash
it
offwithsoapimmediately.
Moisture
Moisture
Moisture
Moisturecondensation
c ondensation
condensation
condensation
Whenthetemperatureoftheunitfalls(asinwinter),theliquidcrystalinsidethescreenwillbecome
darkerthanusual.Normalbrightnesswillreturnafterusingthemonitorforawhile.
To
To
To
Tomaintain
m aintain
maintain
maintainhigh
h igh
high
highsound
s ound
sound
soundquality
q uality
quality
quality
Becarefulnottosplashjuice
or
othersoftdrinksontotheunit
or
discs.
Playable
Playable
Playable
Playablediscs
d iscs
discs
discs
Thefollowingtypesofdiscs/filesarecompatible:
CD-ROM(ISO),CD-R,CD-RW,DVD+R/RW,DVD-R/RW
CD-DA,DVDVideo
MP3data
WMAdata
JPGimages
WMVformat
Precautions
CAUTION!!!
IT'SUNLAWFULTOOPERATEAVEHICLEWHILEVIDEOISDISPLAYEDIN
THEDRIVERSVIEWINGAREA.
ENGAGEEMERGENCYBRAKETOENJOYVIDEO

4
DivXformat
AVI
format
MPGformat
Thefollowingtypesofdiscs/filesarenotcompatible:
WMAfilesthatareprotectedbyDRM(DigitalRightsManagement)
WMAlosslessformat
DiscsrecordedwithTrack
At
Once
or
packetwriting
MP3PROformat
MP3playlists
WAVformat
SomerecordableDVDsandCDsmaybeincompatiblewiththisunit,dependingonmediatypeand
recordingmethod.
DVD
DVD
DVD
DVDRegion
R egion
Region
RegionManagement
M anagement
Management
Management
SomeDVDdiscscanbeplayedonlyincertainplaybackmodesaccordingtotheintentionsofthe
software.Astheunitplaysdiscsaccordingtotheirintentions,somefunctionsmaynotwork
as
intended.Pleasebesuretoreadtheinstructionsprovidedwitheachdisc.Thisplayerhasbeen
designedtoplaybackDVDsoftwarethathasbeenencodedforspecificregionareas.
It
cannot
playbackDVDsoftwareencodedforotherregionareasthantheregionareasforwhich
it
hasbeen
designed.
Theunitwillplaydiscslabeled“All”.
DVDregioncodes:
1-USA,Canada
2-Japan,Europe,SouthAfrica,MiddleEast
3-Rep.ofKorea,Taiwan,HongKong,PartsofSoutheastAsia
4-Australia,NewZealand,Mexico,SouthAmerica
5-EasternEurope,Russia,India,Africa
6–China

5
Preparation
Pleasereadalloftheinstructionsbelowbeforebeginningyourinstallation.Werecommendthat
youhaveyourunitinstalledbyanexperiencedcarnavigationsysteminstaller
.
Features
Features
Features
Features
DoubleDINsize,all-in-onehighlyintegratedentertainmentsystem
Built-inDVDPlayer,automotivespecificationslo
t
loadingmechanism
Built-inFM/AMTuner,
Highresolution6.2”(16:9)TFTcolormonitor,contrastandbrightnessadjustment
Built-in40W
X
4outputamplifier,4.1channelsurroundsoundoutput.
Dualzonefunctionwitheasyoperation.
SmartTouch-screenoperation
Allfunction
s
canbeoperatedbytouchscreen,includedRemoteControls
Built-iniPodControl,Navigationsystem
PowerfulGraphicUserInterfaceandsoftwareupdateability.
Tools
Tools
Tools
Toolsand
a nd
and
andSupplies
S upplies
Supplies
Supplies
Wesuggestusingthesetoolsandsuppliestoinstalltheunit.
•Torxtype,flat-headandPhilipsscrewdrivers
•Wirecuttersandstrippers
•Toolstoremoveexistingradio(screwdriver,socketwrenchsetorothertools)
•Electricaltape
•Crimpingtool
•Voltmeter/testlight
•Crimpconnections
•18gaugewireforpowerconnections
•16–18gaugespeakerwire
•Heatshrinktubing
•Solderingironandsolder
WARNING!
WARNING!
WARNING!
WARNING!
1.Onlyconnecttheunittoa12-voltnegativegroundsystem.
2.Neverinstallthisunitwhereoperationandviewingcouldinterferewithsafedrivingconditions.
3.Toreducetheriskofatrafficaccident(exceptwhenusingforrearviewvideocamera)never
usethevideodisplayfunctionwhiledrivingthevehicle.Thismaybeinviolationoflocallaws.
4.Neverdisassembleoradjusttheunitwithouttheassistanceofaprofessional.Fordetails,
pleaseconsultyourlocalcarstereospecialtyshop.
5.Topreventinjuryfromshockorfire,neverexposethisunittomoistureorwater.
6.Neveruseirregulardiscs,theonlyrecommendeddiscsizeisa12cmrounddisc.
7.Topreventdamagetothemechanisminsidethisunit,avoidimpacttotheTFTmonitor.
8.Donotchangethefuseonthepowerwirewithoutprofessionalguidance.Usinganimproper
fusemaycausedamagetotheunitandresultinafire.
9.Themonitoremploysanautomaticmotorizedmechanism.Topreventdamagetothecore
mechanism,pleasedonotpush,pullorswivelthemonitormanually.
Disconnecting
Disconnecting
Disconnecting
Disconnectingthe
t he
the
theBattery
B attery
Battery
Battery
Topreventashortcircuit,turnofftheignitionandremovethenegative(-)batterycablepriorto
startingtheinstallation.
NOTE
NOTE
NOTE
NOTE:Iftheunitistobeinstalledinacarequippedwithanon-boarddriveornavigation
computer,donotdisconnectthebatterycable.Ifthecableisdisconnected,thecomputermemory
maybelost.Undertheseconditions,useextracautionduringinstallationtoavoidcausingashort
circuit.
NOTE
NOTE
NOTE
NOTE:
It
is
especiallyimportantthatyoureadtheWARNING
W ARNING
WARNING
WARNINGS
S
S
SandNOTE
N OTE
NOTE
NOTES
S
S
Sinthismanual
6
ControlsandIndicators
Button
Button
Button
ButtonOperation
O peration
Operation
Operation
1
1
1
1、EJECT
E JECT
EJECT
EJECT
Pressfordiscinsertion/ejection.
2
2
2
2、POWER
POWER
POWER
POWEROFF/VOL/Smart
O FF/VOL/Smart
OFF/VOL/Smart
OFF/VOL/Smartdial
d ial
dial
dial
Rotaryencodervolumecontrol.
Presstopoweronwhenthemachineisinpoweroffestate.
Pressandholdtopoweroffwhileunitison.
ShortpresswhileunitofftoenterEQsetting
Rotaryencodertobrowsemodewhileinmainmenu,andpresstoenterchosedmode
RotaryencodertobrowsemodewhileinNAVImode,andpresstoenterchosedmode
3
3
3
3、Menu
Menu
Menu
Menu
Presstoentermainmenu,pressagainbacktopreviousmode
4
4
4
4、Navi
Navi
Navi
Navi
Presstoenternavigationmode,PressagainbacktopreviousmodewhileinNavimode
5
5
5
5、SD
SD
SD
SDSLOT
S LOT
SLOT
SLOT.
6
6
6
6、USB
USB
USB
USBPORT
P ORT
PORT
PORT
7
7
7
7、Microphone
Microphone
Microphone
Microphone
8
8
8
8、Touch
Touch
Touch
Touchscreen
s creen
screen
screenTFT
T FT
TFT
TFT
9
9
9
9、Front
Front
Front
FrontAUX-IN
A UX-IN
AUX-IN
AUX-INJack
J ack
Jack
Jack
10
10
10
10、Disc
D isc
Disc
Discslot
s lot
slot
slot
11
11
11
11、Disc
D isc
Disc
Discindicative
i ndicative
indicative
indicativeLED
L ED
LED
LED
Rediswithdisc
Blueiswithoutdisc
12
12
12
12、Remote
R emote
Remote
Remotesensor
s ensor
sensor
sensor
13
13
13
13、RESET
R ESET
RESET
RESET

7
The
The
The
Thekey
k ey
key
keyareas
a reas
areas
areasof
o f
of
oftouch
t ouch
touch
touchscreen
s creen
screen
screen
Thetouchkeyareasareoutlinedbelow,forDVD,VCDplaybackmodeandsoforth.
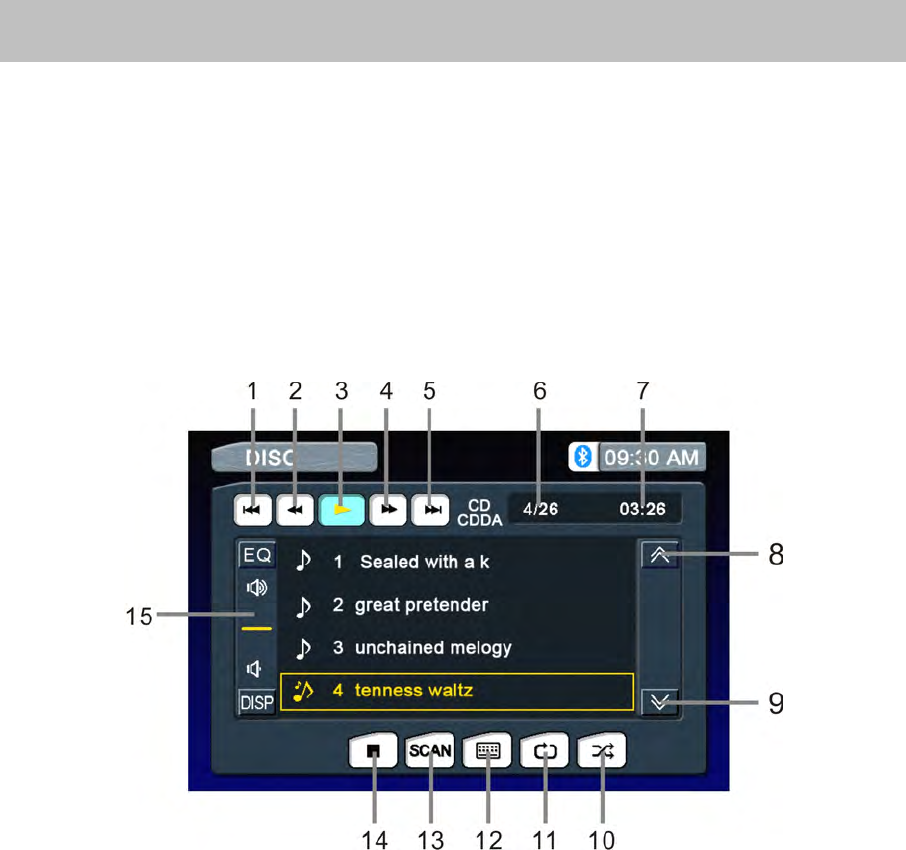
A—ReturntoMAINMENU
B—Displayplayinginformation
C—Selectpreviouschapter
D—Selectnextchapter
E—Displaytheon-screencontrols,anddifferentmodedisplaysdifferentmenu.
F—OnDVD/VCDmode,displaytheGOTOsearchmenuonthescreendirectly.
A
A
A
Area
r ea
rea
reaA
A
A
A
A
A
A
Area
r ea
rea
reaB
B
B
B
Area
Area
Area
AreaF
F
F
F
A
A
A
Area
r ea
rea
reaC
C
C
C
A
A
A
Area
r ea
rea
reaD
D
D
D
A
A
A
Area
r ea
rea
reaE
E
E
E
8
RemoteControl
F
F
F
Front
r ont
ront
rontZone
Z one
Zone
ZoneRemote
R emote
Remote
RemoteControl
C ontrol
Control
Control
Name
Name
Name
Name
Ref
Ref
Ref
Ref#
#
#
#
Signal
Signal
Signal
Signal
Function
Function
Function
Function
Power
1
Turnthepoweron/off
Open
2
discinsertion/ejection.
Mute
3
Toggleon/offaudiooutput
SRC
4
Selectplayingmode
Numeric
button
5
1.2.3.4.5.
6.7.8.9.0
Directlyaccesscertainchapter/track/presetstationin
currentband
VOLup
6
Increasethevolume
VOLdown
7
Decreasethevolume
Information
8
Displayplayinginformation
GOTOsearch
9
PositionsearchfunctiononVCD/DVDmode
Stop/Band
10
SelectFM/AMbandonTunermode
Stopplayback
Select
11
Entertheaudiosettings
ESC
12
Exitthecurrentmenu
Menu
13
Enterthemainmenuofsystem
Picture
14
AdjusttheparameterofTFTsettings
RepeatAB
15
SetstartpointAandendpointBtorepeatcontinually
OK
16
Startorpauseplayback,confirmthesettings
Direction
buttons
17
Up/down/left/righttoselectitemsforsetting
1○
2○
6○
7○
8○
10
○
11
○
13
○
14
○
15
○
19
○
20
○
23
○
24
○
27
○
28
○
9○
3○
4○
5○
12
○
16
○
18
○
21
○
22
○
25
○
26
○
17
○

9
Title
18
AlsocanactivateanddisableSCANmodewhileplaying
CD
Root
19
Enterthemainmenuofthedisc
TurnonPBCwhileplayingVCD
Repeat
20
Repeatplaybackforcurrentchapter
Next
21
Selectthenextchapter/trackforplayback
Searchanavailableradiostationbyincreasingtuning
frequencyontunermode
Previous
22
Selectthepreviouschapter/trackforplayback
Searchanavailableradiostationbydecreasingtuning
frequencyontunermode
FastReverse
23
Fastreversethedisccontent
FastForward
24
Fastforwardthedisccontent
Audio
25
Changetheaudiolanguagefordiscplayback
Zoom
26
Zoomingin/outonanimage
Angle
27
Playindifferentangleforascene(ifitisapplicable)
SUBTitle
28
Languageselectionforsubtitle
10
TFTMonitorOperation
Rear
Rear
Rear
RearCamera
C amera
Camera
CameraMode
M ode
Mode
Mode
Whenthevehicleisplacedin"Reverse",andanoptionalrearcameraisconnectedtotheunit,
theTFTmonitorwillautomaticallyswitchtothecamerainputsource.
Image
Image
Image
ImageSetting
S etting
Setting
Setting
Video
Video
Video
VideoOutput
O utput
Output
OutputFormat
F ormat
Format
Format
Thetablebelowshowsthevideooutputformatforeachsource.
Video
V ideo
Video
VideoOutput
O utput
Output
OutputFormat
F ormat
Format
Format
*CVBS--CompositeVideoBasebandSignal
Adjustable
Adjustable
Adjustable
AdjustableParameters
P arameters
Parameters
Parameters
WhileinRGBmode,theonlyparameterthatcanbeadjustedisbrightness(BRIGHT).Toaccess
“SHARPNESS”“COLOR”“CONTRAST”“BRIGHTNESS”and“TINT”youmustbeinCVBSmode.
Parameter
Parameter
Parameter
ParameterAdjustment
A djustment
Adjustment
AdjustmentProcedure
P rocedure
Procedure
Procedure
1.Enter
Enter
Enter
EnterPicture
P icture
Picture
PictureQuality
Q uality
Quality
QualitySetting
S etting
Setting
Settingmode:
m ode:
mode:
mode:
PressthePIC
PIC
PIC
PICbuttonontheremote
2.Set
Set
Set
SetParameters:
P arameters:
Parameters:
Parameters:
Pressthe(/)buttonsontheremoteorrotatetheSMART
S MART
SMART
SMARTDIAL
D IAL
DIAL
DIALclockwise/counterclockwiseto
adjusttheselectedfeaturetothedesiredsetting.
3.Exit
E xit
Exit
ExitPicture
P icture
Picture
PictureQuality
Q uality
Quality
QualitySetting
S etting
Setting
SettingMode:
M ode:
Mode:
Mode:
PressthePIC
PIC
PIC
PICbuttonontheremote
NOTE:
NOTE:
NOTE:
NOTE:TheremustbeavideosignalpresentontheAUXorCAMERAinputtoadjusttheabove
settings.
Parking
Parking
Parking
ParkingBrake
B rake
Brake
BrakeInhibit
I nhibit
Inhibit
Inhibit
1.Whenthe“PARKING”cableisconnectedtothebrakeswitch,thedisplayontheTFTmonitor
willdisplayvideoonly
only
only
onlywhenthevehicleisstoppedandtheparkingbrakeisapplied.
2.ParkingbrakefunctionisoverriddenwhenthevideosourceissettoCAMERA.
3.Whenthe“parkingbrakeinhibit”isactive,thefrontmonitordisplays“Caution”withblue
background,preventingthedriverfromwatchingvideowhiledrivingtoreducetheriskofatraffic
accident.Rearvideoscreensarenotaffected.
Pleasesee“INSTALLATIONSECTION”forinstallation.
P
P
P
Playing
l aying
laying
layingSource
S ource
Source
Source
Video
Video
Video
VideoOutput
O utput
Output
OutputFormat
F ormat
Format
Format
FM/AMTuner
RGBMode
DVD
RGBMode
NAVI
RGBMode
AUXIN
CVBSMode
CAMERA
CVBSMode
iPod(video)
CVBSMode

11
OperationInstructions
Power
Power
Power
PowerOn
O n
On
On/
/
/
/Off
O ff
Off
Off
PressthePOWER
POWER
POWER
POWER/VOL
/ VOL
/VOL
/VOLbuttontoturntheuniton.Youcanalsoturnontheunitbypressingthe
button()ontheremote.
PressandholdthePOWER/VOL
P OWER/VOL
POWER/VOL
POWER/VOLbuttononthefrontpanelorpressthePOWER
P OWER
POWER
POWERbutton()on
theremotetopowerofftheunit.
Playing
Playing
Playing
PlayingSource
S ource
Source
SourceSelection
S election
Selection
Selection
PresstheMENU
MENU
MENU
MENUButtononthefrontpanelanduseSmartdial;orthe(SRC
S RC
SRC
SRC)
)
)
)buttonontheremote
tochangeamongavailableplayingsources:TUNER,Disc,iPod,AUXIN1,AUX-IN2,CAMERA
(rearviewvideocamera),NAVI,Bluetooth,USBandSDCard.Theplayingmodeisdisplayedon
theTFTdisplay.
AUX
AUX
AUX
AUXIN
I N
IN
INMode
M ode
Mode
Mode
Anexternalaudio/videodevicecanbeconnectedtothisunitviaRCAcables(Frontjackorrear
RCAconnector)tothe“AUX-IN”.
CAMERA
CAMERA
CAMERA
CAMERAMode
M ode
Mode
Mode
“CAMERA”modeisonlyavailablewhenthecameraisconnectedandwhenbackingup.Toinstall
arearviewvideocamera,connecttheCAMERAvideoinputcabletotherearviewcameraoutput
cable.
NOTE:Ifyouhavenotconnectedadevicetotheunit,thesourcecannotbeselected.
Example:IfyouhavenotconnectedaniPodtotheunit,theiPodsourcewillnotbeavailable.
Volume
Volume
Volume
VolumeAdjustment
A djustment
Adjustment
Adjustment
Toincreaseordecreasethevolumelevel,turnthePOWER/VOL
P OWER/VOL
POWER/VOL
POWER/VOLonthefrontpanelorpressthe
VOL+/
VOL+/
VOL+/
VOL+/VOL-
V OL-
VOL-
VOL-buttonsontheremotecontrol.Thevolumerangesfrom“0”to“40”.
Audio
Audio
Audio
AudioControl
C ontrol
Control
ControlMenu
M enu
Menu
Menu
TheAudioControlfeatureallowsyoutoeasilyadjustyouraudiosystemtomeettheacoustical
characteristicsofyourvehicle,whichvarydependingonthetypeofvehicleanditsmeasurements.
Togetthebestpossiblesoundqualityfromyournewsystem,besuretoadjustthesettingsfor
thespeakersaswell.PropersettingoftheFaderandBalancebooststheeffectsofthecabin
equalizer.
Accessing
Accessing
Accessing
Accessingthe
t he
the
theAudio
A udio
Audio
AudioControl
C ontrol
Control
ControlMenu
M enu
Menu
Menu
PressthePOWER/VOL
POWER/VOL
POWER/VOL
POWER/VOLbuttononthefrontpanelorpressthe(SEL
S EL
SEL
SEL)
)
)
)buttonontheremote
controltodisplaythe“Audio”menu.
Selecting
Selecting
Selecting
Selectingan
a n
an
anAudio
A udio
Audio
AudioFeature
F eature
Feature
Featurefor
f or
for
forAdjustment
A djustment
Adjustment
Adjustment
Pressthe(/)buttonsontheremoteorpressthePOWER/VOL
P OWER/VOL
POWER/VOL
POWER/VOLbuttononthefrontpanelonce
toselectaaudiofeaturetobeadjusted.
Adjusting
Adjusting
Adjusting
Adjustingan
a n
an
anAudio
A udio
Audio
AudioFeature
F eature
Feature
Feature
Pressthe(/)buttonsontheremoteorrotatethePOWER/VOL
P OWER/VOL
POWER/VOL
POWER/VOLclockwise/counterclockwiseto
adjusttheselectedfeaturetothedesiredsetting.

12
Audio
Audio
Audio
AudioAdjustments
A djustments
Adjustments
Adjustments
NOTE
NOTE
NOTE
NOTE:TheBassandTreblelevelsareonlyadjustablewhenEQison“User”mode.
TheLoudnessfunctioncompensatesfordeficienciesinsoundrangesatlowlevels.
Exiting
Exiting
Exiting
Exitingthe
t he
the
theAudio
A udio
Audio
AudioControl
C ontrol
Control
ControlMenu
M enu
Menu
Menu
PressandholdthePOWER/VOL
POWER/VOL
POWER/VOL
POWER/VOLbuttononthefrontpaneltoexittheaudiocontrolmenu,or
touchthereturnarrowonthetoprightofthedisplay.
Pressthe(ESC)
ESC)
ESC)
ESC)buttonontheremotecontroltoexittheaudiocontrolmenu.
Five
Five
Five
Five-Channel
- Channel
-Channel
-ChannelAudio
A udio
Audio
AudioControl
C ontrol
Control
Control
5
5
5
5-Channel
-Channel
-Channel
-ChannelAudio
A udio
Audio
AudioAdjustments
A djustments
Adjustments
Adjustments
Rear
Rear
Rear
RearZone
Z one
Zone
Zone
IfamonitorisinstalledintherearzoneandconnectedtotherearzoneAVoutput,passengersin
thebackseatcancontroltheDVDoutputusingtherearzoneremotecontrol.Only
O nly
Only
Onlythe
t he
the
thefront
f ront
front
front
zone
zone
zone
zoneis
i s
is
isin
i n
in
inDVD
D VD
DVD
DVDmode,then
m ode,then
mode,then
mode,thenRear
R ear
Rear
Rearzone
z one
zone
zoneDVD
D VD
DVD
DVDcan
c an
can
canbe
b e
be
beactivated.Rear
a ctivated.Rear
activated.Rear
activated.RearUSB
U SB
USB
USBand
a nd
and
andSD
S D
SD
SDis
i s
is
isthe
t he
the
thesame.
s ame.
same.
same.
System
System
System
SystemReset
R eset
Reset
Reset
Tocorrectasystemhaltorotherunusualoperation,usethetipofapentopresstheRESET
R ESET
RESET
RESET
buttonlocatedonthefronttop-leftcorneroftheunit.Afterasystemreset,theunitrestoresthe
settingsbeforelastpoweroff.
Mute
Mute
Mute
Mute
Thevolumewillbemutedwhenthefollowingcasesoccur:
•Manual:PresstheMUTE
M UTE
MUTE
MUTEbutton()ontheremotetomutethevolumefromtheunit.
Orrotarytheknobofsmartdialandreducethevolueto"0"
NOTE
NOTE
NOTE
NOTE:PresstheMUTE
M UTE
MUTE
MUTEbuttonontheremoteagaintorestorethevolume.
Adjustingthevolumeorusinganyoftheaudioset-upfeatureswillcancelthemutefunction.
Standby
Standby
Standby
Standby
1.SetupStandbymodeonsetupmenudirectly.
2.Inthestandbymode,theLCDisoffwithaudiooutputonly.
3.Inthestandbymode,thescreenwillreturntonormalthroughanyoperation.
Audio
Audio
Audio
AudioFunction
F unction
Function
Function
Adjustable
Adjustable
Adjustable
AdjustableRange
R ange
Range
Range
EQ
User
Flat
Jazz
Pop
Classical
BASS
-7to+7
TREBLE
-7to+7
FADE
-7to+7
BAL
-7to+7
SW
-7to+7
Loudness
Off,orON
Item
Item
Item
Item
Adjustable
Adjustable
Adjustable
AdjustableRange
R ange
Range
Range
MasterVolume
00to40
FrontLeftChannelVolume
-10to+10
FrontRightChannelVolume
-10to+10
RearLeftChannelVolume
-10to+10
RearRightChannelVolume
-10to+10
SubwooferVolume
-10to+10
13
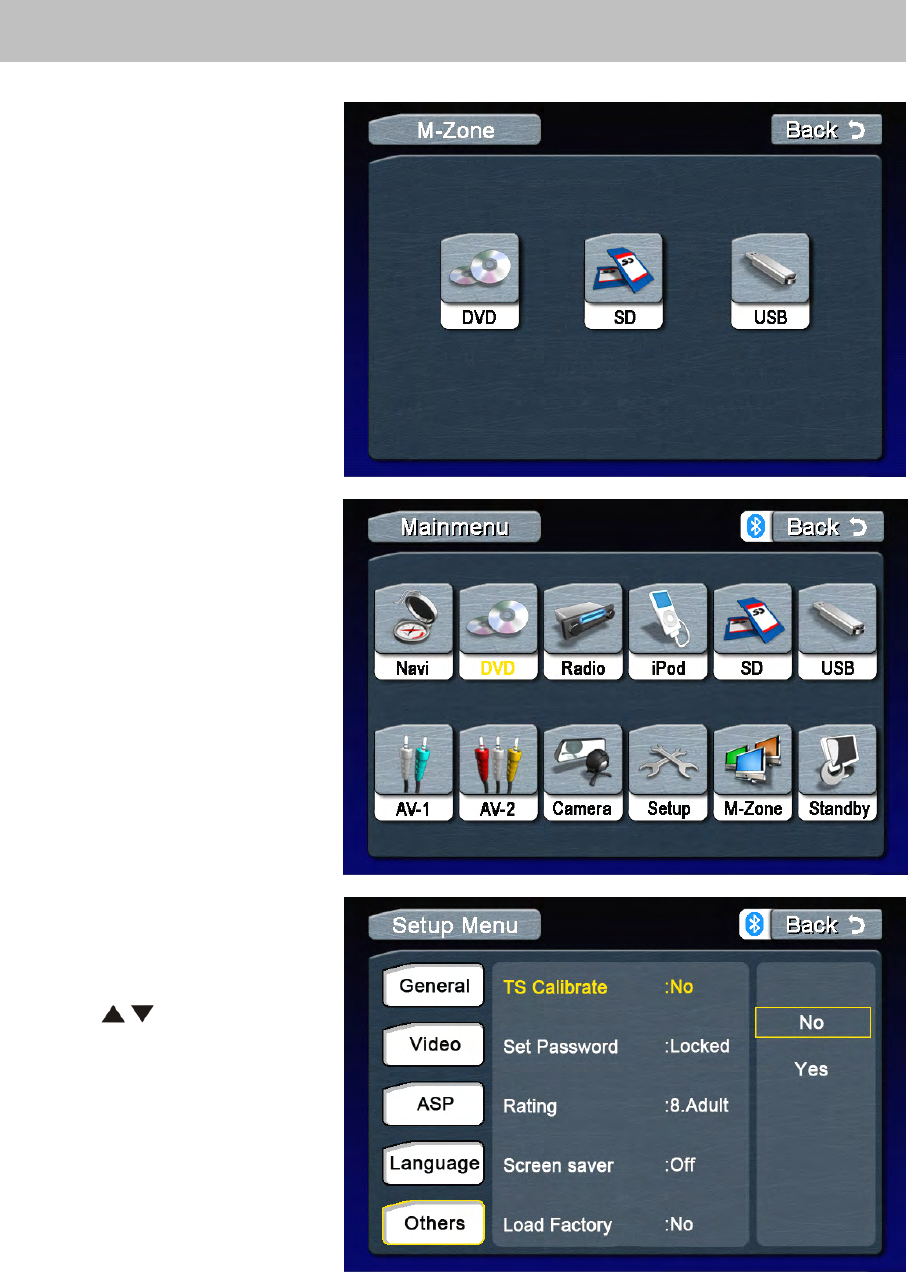
SystemSetupMenu
MAIN
MAIN
MAIN
MAINMenu
M enu
Menu
Menu
Therearethreemethodstoaccess
theMAIN
MAIN
MAIN
MAINmenu.
·PresstheMENU
M ENU
MENU
MENUbuttononthe
frontpanel.
·PresstheMENU
MENU
MENU
MENUbuttononthe
remotecontrol.
·
TouchtheA
A
A
Aarea
a rea
area
areaonthetouch-
screen.
Note:Remote,Smartdial,touch
screenoperationsandbuttonson
frontpanelarealluseabletoselect
menuandadjustsettings.The
followinginstructionswillshowthe
differentwaystoaccessmenus
andadjustments.
Rear
Rear
Rear
Rearzone
z one
zone
zoneMenu
M enu
Menu
Menu
PressM-zoneicontoenterrear
zonemenu
Note:
Note:
Note:
Note:Only
O nly
Only
Onlythe
t he
the
thefront
f ront
front
frontzone
z one
zone
zoneis
i s
is
isin
i n
in
in
DVD
DVD
DVD
DVDmode,then
m ode,then
mode,then
mode,thenRear
R ear
Rear
Rearzone
z one
zone
zoneDVD
D VD
DVD
DVD
can
can
can
canbe
b e
be
beactivated.Rear
a ctivated.Rear
activated.Rear
activated.RearUSB
U SB
USB
USBand
a nd
and
and
SD
SD
SD
SDis
i s
is
isthe
t he
the
thesame.
s ame.
same.
same.
Screen
Screen
Screen
ScreenSetting
S etting
Setting
Setting
Accessing
Accessing
Accessing
Accessingthe
t he
the
theScreen
S creen
Screen
ScreenSetup
S etup
Setup
Setup
Menu
Menu
Menu
Menu
PresstheSetup
S etup
Setup
Setuponthe
screen.
Selectthe"Other"Icononthe
screentoaccesstheScreen
setup.
Selecting
Selecting
Selecting
Selectinga
a
a
aFeature
F eature
Feature
Featurefor
f or
for
for
Adjustment
Adjustment
Adjustment
Adjustment
Pressthe(/)buttonsonthe
remotetoselectafeaturetobe
adjusted.
RotateSMART
S MART
SMART
SMARTDIAL
D IAL
DIAL
DIAL
clockwise/anticlockwisetoselecta
featuretobeadjusted.
Touchdirectlytheoptionsonthe
screentoselectafeature
tobeadjusted.

14
Adjusting
Adjusting
Adjusting
Adjustinga
a
a
aFeatur
F eatur
Featur
Featur
General
General
General
Generalsetup
s etup
setup
setupMenu
M enu
Menu
Menu
Accessing
Accessing
Accessing
Accessingthe
t he
the
theGeneral
G eneral
General
GeneralSetup
S etup
Setup
SetupMenu
M enu
Menu
Menu
·SelecttheGeneral
General
General
GeneralIcononthescreentoaccesstheGeneralsetup.
Selecting
Selecting
Selecting
Selectinga
a
a
aFeature
F eature
Feature
Featurefor
f or
for
forAdjustment
A djustment
Adjustment
Adjustment
Pressthedirectionbuttonsontheremotecontrolortouchtheoptiondirectlyonthescreento
selectthefeaturetobeadjusted.
Adjusting
Adjusting
Adjusting
Adjustinga
a
a
aFeature
F eature
Feature
Feature
1.Entertheoptionfieldforthefeatureyouwanttoadjustbypressingthe(OK)
O K)
OK)
OK)buttononthe
remoteorbypressingtheSMART
SMART
SMART
SMARTDIAL
D IAL
DIAL
DIALbutton.Asubmenuappearsinasecondrowwiththe
selectedoption.
2.Selectanewvaluebypressingthedirectionbutton.
3.Confirmyourselectionbypressing(OK)
O K)
OK)
OK)buttonorpressingtheSMART
S MART
SMART
SMARTDIAL
D IAL
DIAL
DIALbutton.Thenew
valuesetupiscomplete.
Adjusting
Adjusting
Adjusting
Adjustingthe
t he
the
theClock
C lock
Clock
Clock
1.Accessthe“Clock”settingundertheGeneralSetupmenu.
2.Pressthedirectionbuttonontheremotetomovethecursortothe“Hour”or“Min”position,and
pressthe(OK)
OK)
OK)
OK)button.youalsocantouchthe“Hour”or“Min”positiondirectly.
3.Thenumerickeypadwillpopup.
4.Pressthenumericbuttonontheremotecontrolortouchthenumerickeypadonthescreento
adjustthehourorminutes.
5.Pressthe(OK)
O K)
OK)
OK)buttonontheremotecontroloronthekeypadofthescreentoconfirmsetup.
Setting
Setting
Setting
Setting
Options
Options
Options
Options
Function
Function
Function
Function
TSCalibrate
No/Yes
Touch“Yes”toenterthetouchscreencalibration
mode.
Setpassword
----
Enterapasswordofatleastfourcharactersto
activatetheparentalcontrolfunction.Alock
symbolisusedtoindicatetheparentalcontrol
status
Rating
1.2.3.4.5.6.7.8
Choosedifferentratings
ScreenSaver
On/Off
Touchtoactivate/deactivatetheScreenSaver.
Bluetooth
On/Off
Activation/deactivationoftheintegratedBluetooth
function.
Antenna
On/Off
Select“On”toturnontunningantenna.
Loadfactory
Yes/No
Select“Yes”torestorethefactorysettingsofthe
multimediasystem(exceptforpasswordand
parentalcontrol).
15
Return
Return
Return
Returnto
t o
to
tonormal
n ormal
normal
normalplayback
p layback
playback
playback
Thesystemwillautomaticallyreturnthepreviousplaybackmodethatitwasinbeforeaccessing
thesetupmenu20secondsafterthelastoperation.
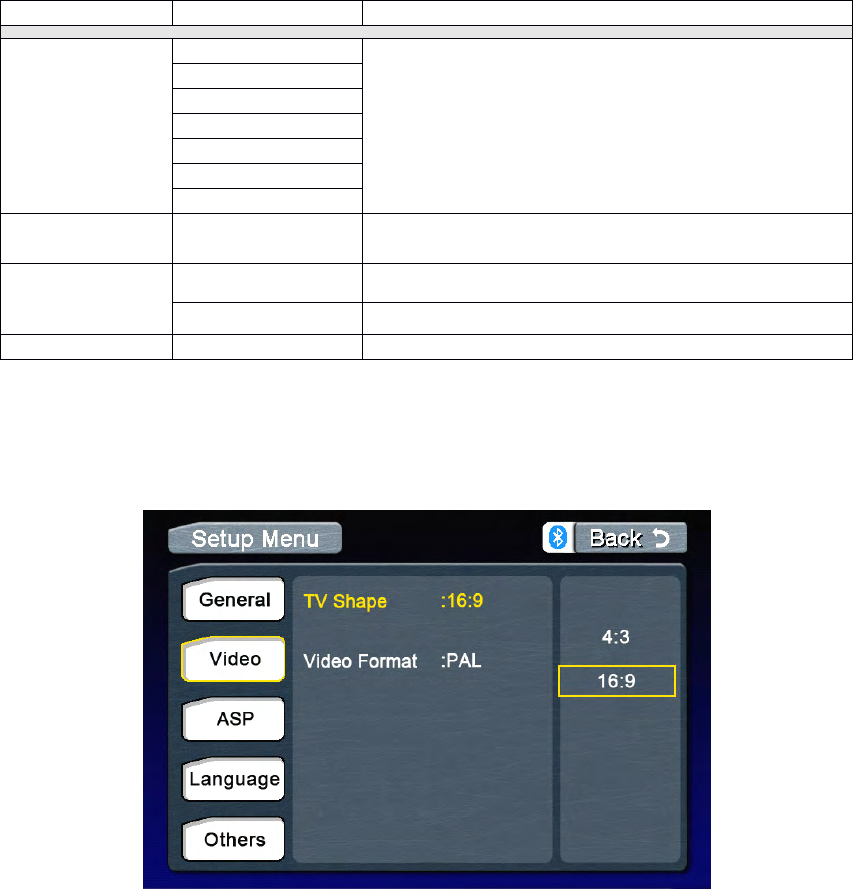
Video
Video
Video
Video
Accessing
Accessing
Accessing
Accessingthe
t he
the
theVideo
V ideo
Video
VideoSetup
S etup
Setup
SetupMenu
M enu
Menu
Menu
·Selectthevideo
video
video
videoIcononthescreentoaccessthevideo
v ideo
video
videosetup.
Selecting
Selecting
Selecting
Selectinga
a
a
aFeature
F eature
Feature
Featurefor
f or
for
forAdjustment
A djustment
Adjustment
Adjustment
Pressthedirectionbuttonsontheremotecontrolortouchtheoptiondirectlyonthescreento
selectafeaturetobeadjusted.
Adjusting
Adjusting
Adjusting
Adjustinga
a
a
aFeature
F eature
Feature
Feature
1.Entertheoptionfieldforthefeatureyouwanttoadjustbypressingthe(OK)
O K)
OK)
OK)buttononthe
remoteorbypressingtheSMART
SMART
SMART
SMARTDIAL
D IAL
DIAL
DIAL.Asubmenuappearsinasecondrowwiththeselected
option.
2.Selectanewvaluebypressingthedirectionbutton.
3.Confirmyourselectionbypressing(OK)
O K)
OK)
OK)buttonontheremotecontrolorpressingtheSMART
S MART
SMART
SMART
DIAL
DIAL
DIAL
DIALonthefrontpanel.Thenewsetupiscomplete.
Return
Return
Return
Returnto
t o
to
tonormal
n ormal
normal
normalplayback
p layback
playback
playback
Thesystemwillautomaticallyreturnthepreviousplaybackmodethatitwasinbeforeaccessing
thesetupmenu20secondsafterthelastoperation.
Setting
Setting
Setting
Setting
Options
Options
Options
Options
Function
Function
Function
Function
Radio
USA
Selecttheappropriatesettingbasedonthe
countryinwhichyoureside.
S-America1
S-America2
Europe
Korea
China
Arabia
Clock
(HH:MM)
See“Adjustingtheclock”tolearnhowtosetthe
clock.
ClockMode
12Hr
Clockdisplays12hourtimeusingAMandPM.
24Hr
Clockdisplays24hourtimeupto23:59
Version
Versiondisplay
16
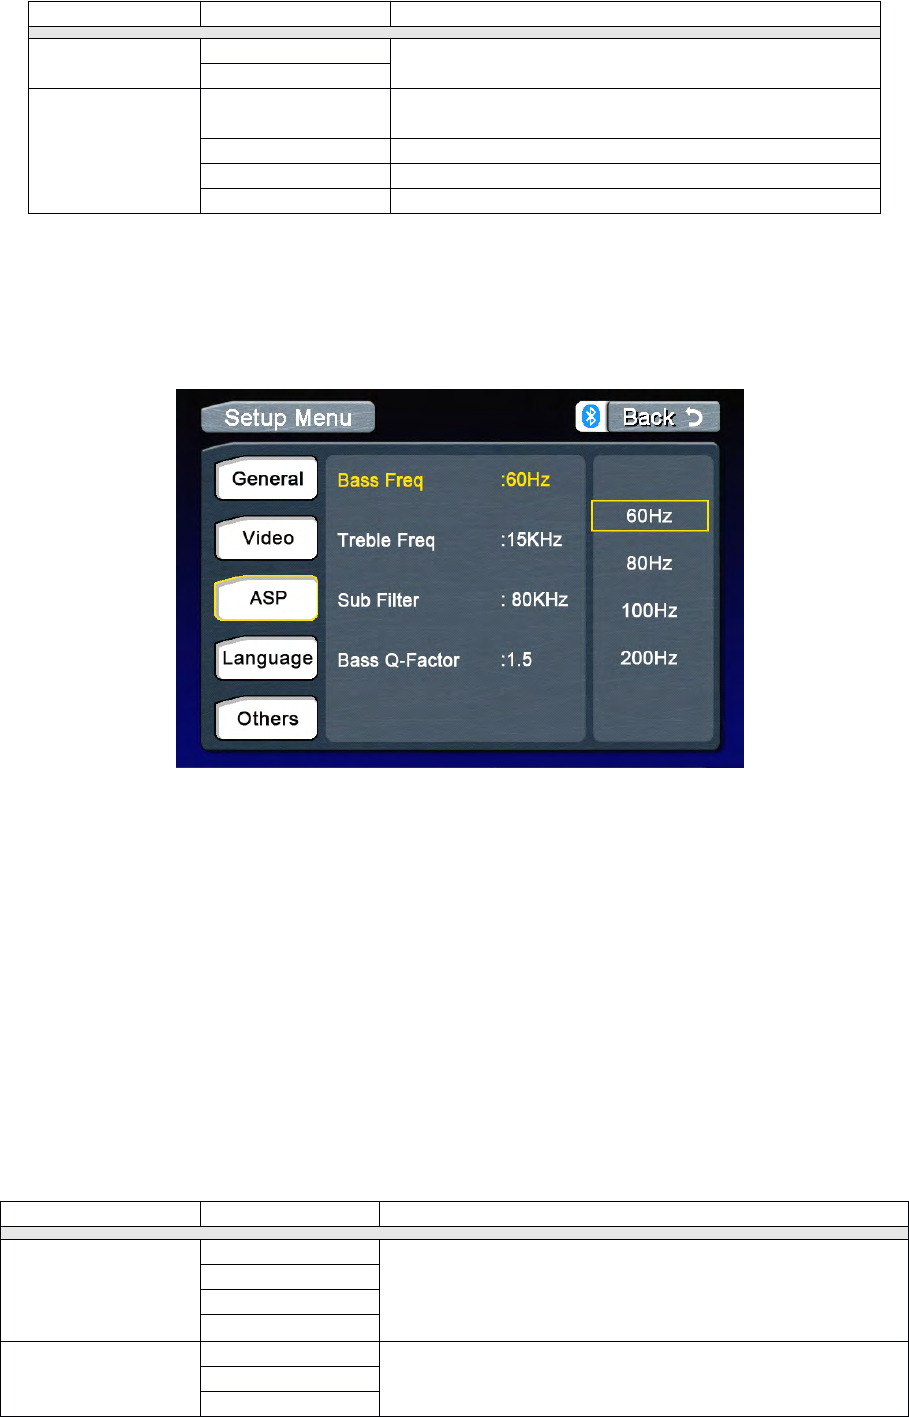
ASP(Audio
ASP(Audio
ASP(Audio
ASP(AudioSignal
S ignal
Signal
SignalProcessing)
P rocessing)
Processing)
Processing)Config
C onfig
Config
Configuration
u ration
uration
urationMenu
M enu
Menu
Menu
TheASPConfigurationmenuallowsyoutomakefineaudioadjustment.
Accessing
Accessing
Accessing
Accessingthe
t he
the
theASP
A SP
ASP
ASPConfig
C onfig
Config
Configuration
u ration
uration
urationMenu
M enu
Menu
Menu
PresstheMENU
MENU
MENU
MENUonthefrontpanelorpressthe(MENU)
M ENU)
MENU)
MENU)buttonontheremotecontrolto
accessMAIN
MAIN
MAIN
MAINmenu.
.
.
.
Selecting
Selecting
Selecting
Selectinga
a
a
aFeature
F eature
Feature
Featurefor
f or
for
forAdjustment
A djustment
Adjustment
Adjustment
Pressthedirectionbuttonsontheremotecontrolortouchtheoptiondirectlyonthescreento
selectafeaturetobeadjusted.
Adjusting
Adjusting
Adjusting
Adjustinga
a
a
aFeature
F eature
Feature
Feature
1.Entertheoptionfieldforthefeatureyouwanttoadjustbypressingthe(OK)
O K)
OK)
OK)buttononthe
remoteorbypressingtheSMART
SMART
SMART
SMARTDIAL
D IAL
DIAL
DIAL.Asubmenuappearsinasecondrowwiththeselected
option.
2.Selectanewvaluebypressingthedirectionbutton.
3.Confirmyourselectionbypressing(OK)
O K)
OK)
OK)buttonontheremotecontrolorpressingtheSMART
S MART
SMART
SMART
DIAL
DIAL
DIAL
DIALonthefrontpanel.Thenewsetupiscomplete.
Return
Return
Return
Returnto
t o
to
tonormal
n ormal
normal
normalplayback
p layback
playback
playback
Thesystemwillautomaticallyreturnthepreviousplaybackmodethatitwasinbeforeaccessing
thesetupmenu20secondsafterthelastoperation.
Setting
Setting
Setting
Setting
Options
Options
Options
Options
Function
Function
Function
Function
TVShape
16:9
Selecttheappropriatesettingbasedonthe
countryinwhichyoureside.
4:3
Videoformat
Auto
Thevideooutputisswitchedautomaticallybased
onthecurrentdisc.
NTSC
ThevideooutputisinthestandardNTSCformat
PAL
ThevideooutputisinthestandardPALformat
SECAM
ThevideooutputisinthestandardSECAMformat
Setting
Setting
Setting
Setting
Options
Options
Options
Options
Function
Function
Function
Function
BassFreq
60Hz
Dependingontheaudiosource,selecttheBass
CenterFrequencytoachievethebestBasseffect.
80Hz
100Hz
200Hz
TrebleFreq
10KHz
Dependingontheaudiosource,selecttheTreble
CenterFrequencytoachievethebestTrebleeffect.
12.5KHz
15KHz
17
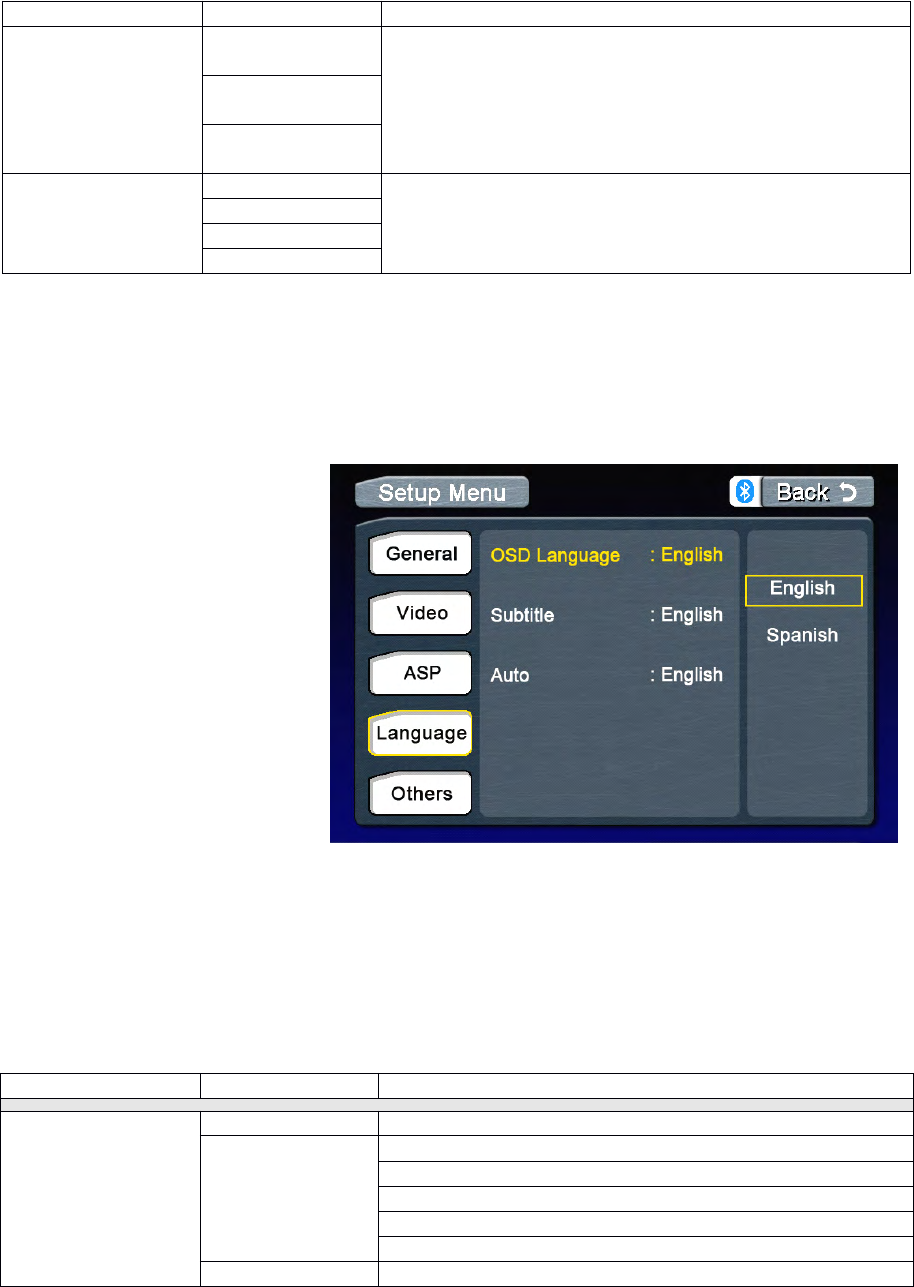
Language
Language
Language
LanguageMenu
M enu
Menu
Menu
Accessing
Accessing
Accessing
Accessingthe
t he
the
theASP
A SP
ASP
ASPConfig
C onfig
Config
Configuration
u ration
uration
urationMenu
M enu
Menu
Menu
PresstheMENU
MENU
MENU
MENUonthefrontpanelorpressthe(MENU)
M ENU)
MENU)
MENU)buttonontheremotecontroltoaccess
MAIN
MAIN
MAIN
MAINmenu.
.
.
.
Selecting
Selecting
Selecting
Selectinga
a
a
aFeature
F eature
Feature
Featurefor
f or
for
for
Adjustment
Adjustment
Adjustment
Adjustment
Pressthedirectionbuttonson
theremotecontrolortouchthe
optiondirectlyonthescreento
selectafeaturetobeadjusted.
Adjusting
Adjusting
Adjusting
Adjustinga
a
a
aFeature
F eature
Feature
Feature
1.Entertheoptionfieldforthe
featureyouwanttoadjustby
pressingthe(OK)
O K)
OK)
OK)buttononthe
remoteorbypressingthe
SMART
SMART
SMART
SMARTDIAL
D IAL
DIAL
DIAL.Asubmenu
appearsinasecondrowwiththe
selectedoption.
2.Selectanewvalueby
pressingthedirectionbutton.
3.Confirmyourselectionbypressing(OK)
O K)
OK)
OK)buttonontheremotecontrolorpressingtheSMART
S MART
SMART
SMART
DIAL
DIAL
DIAL
DIALonthefrontpanel.Thenewsetupiscomplete.
Return
Return
Return
Returnto
t o
to
tonormal
n ormal
normal
normalplayback
p layback
playback
playback
Thesystemwillautomaticallyreturnthepreviousplaybackmodethatitwasinbeforeaccessing
thesetupmenu20secondsafterthelastoperation.
17KHz
SubFilter
80Hz
Selectingacrossoverfrequencysetsacut-off
frequencyofthesubwoofer’sLPF(low-passfilter)and
the“SMALL”speakers’HPF(high-passfilter).The
Crossoverfrequencysettinghasnoeffectifthe
subwooferissetto“Off”andanyotherspeakerisset
to“Large”.
120Hz
160Hz
BassQ-Factor
1.0
WhentheBassCenterFrequencyisselected,
adjustingtheBassQ-Factoraltersthesharpnessof
theBassoutput.
1.25
1.5
2.0
Setting
Setting
Setting
Setting
Options
Options
Options
Options
Function
Function
Function
Function
Language
OSDlanguage
English/Russian
Subtitle
English
Spanish
Russian
Auto
Off
Audio
English/Russian
18
Tuner(FM/AM)Operation
Tuner
Tuner
Tuner
TunerTFT
T FT
TFT
TFTDisplay
D isplay
Display
Display
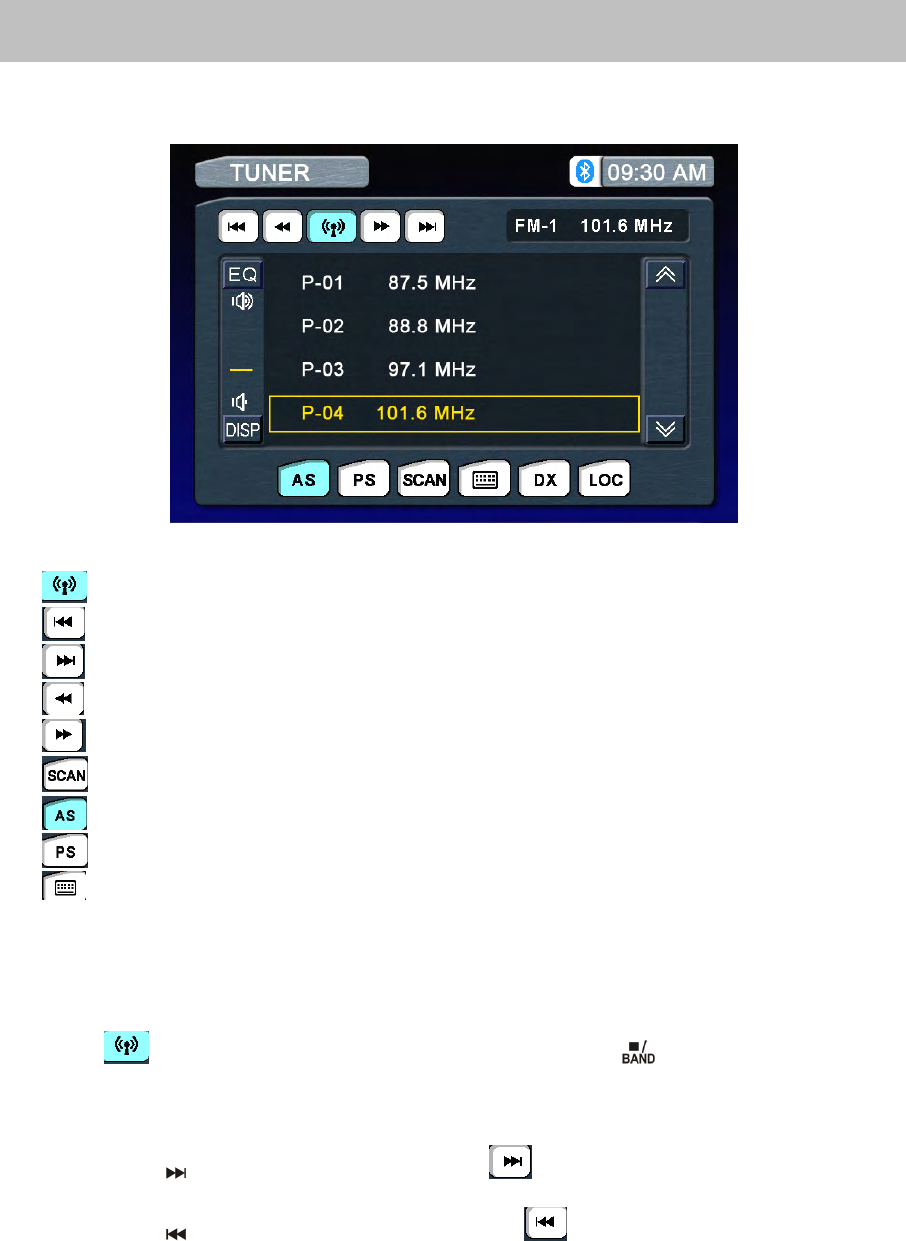
1.:Touchtochangeamongthefollowingbands:FM-1,FM-2,FM-3andAM.
2.:Touchtoseekdown.
3.:Touchtoseekup.
4.:Touchtotunedownonceastep.
5.:Touchtotuneuponceastep.
6.:Touchtoactivate/deactivateScanMode
7.:Autostore
8.:Programscan
9.:Touchtodisplaythenumerickeypadonthescreen
Switch
Switch
Switch
Switchto
t o
to
toRadio
R adio
Radio
RadioTuner
T uner
Tuner
Tunersource
s ource
source
source
PresstheremotecontroltoswitchtotheTuner
T uner
Tuner
Tunersource.
Select
Select
Select
SelectFM/AM
F M/AM
FM/AM
FM/AMBand
B and
Band
Band
Touchthebuttononthescreen,orpresstheBANDbutton()ontheremotecontrolto
changeamongthefollowingbands:FM-1,FM-2,FM-3andAM.
Auto
Auto
Auto
AutoTuning
T uning
Tuning
Tuning
Pressthebutton()onremotecontrolortouchthebuttononthescreentoseekthenext
availablechannelbyincreasingthetuningfrequency.Pressthebuttonagaintostopsearching.
Pressthebutton()ontheremotecontrolortouchthebuttononthescreentoseekthe
nextavailablechannelbydecreasingthetuningfrequency.Pressthebuttonagaintostop
searching.
19
Manual
Manual
Manual
ManualTuning
T uning
Tuning
Tuning
Pressthebuttonontheremotecontrolortouchthebuttontoincreasethetuning
frequencyonestepatatime.
Pressthebuttonontheremotecontrolortouchthebuttontodecreasethetuning
frequencyonestepatatime.
Using
Using
Using
UsingPreset
P reset
Preset
PresetStations
S tations
Stations
Stations
12numberedpresetbuttonsstoreandrecallstationsforeachband.Front6storedstations(P1-
P6)forthecurrentbandappearonthescreen,touchthechanneldirectlyforuse.
Youcantouchthearrowbuttons
or
onthescreentoseetheother6stations.
Storing
Storing
Storing
Storinga
a
a
aStation
S tation
Station
Station
1.Selectaband(ifneeded),thenselectastation.
2.Touchandholdanonscreenpresetbutton(6)forthreeseconds.Thepresetnumberappears
atthetopofthescreen.
Recalling
Recalling
Recalling
Recallinga
a
a
aStation
S tation
Station
Station
1.Selectaband(ifneeded).
2.Touchanon-screenpresetbutton(6)toselectthecorrespondingstoredstation.
Auto
Auto
Auto
AutoStore
S tore
Store
Store(AS)
( AS)
(AS)
(AS)
PressASbuttononthescreentoautomaticallyscanandstoreallstationsincurrentband.
Program
Program
Program
ProgramScan
S can
Scan
Scan(PS)
( PS)
(PS)
(PS)
1.pressthePSbuttononthescreen.scanthestationsinthe12presetchannelsinthecurrent
band.
2.Touchthebuttononthescreentoautomaticallyscanallstationsincurrentbandto
previewstations.
3.Pressanybuttontostopscanningandlistentotheselectedstation.
DX
DX
DX
DXand
a nd
and
andLoc
L oc
Loc
LocStations
S tations
Stations
StationsSeeking
S eeking
Seeking
Seeking(LOC)
( LOC)
(LOC)
(LOC)
WhentheLocalfunctionison,onlyradiostationswithastrongsignalaretuned.WhentheLocal
functionisactive,“LOC”appearsonthescreenandanindicatorisilluminated.
ToactivatetheLocalfunctioninAM/FMtunermode,touchthebuttononthescreen.
TouchthetoActivatetheDXfunction
20
DVDPlayerOperation
NOTE
NOTE
NOTE
NOTE:Whenproperlyinstalled,DVDvideocannotbedisplayedonthemainTFTscreenunless
theparkingbrakeisapplied.IfyouattempttoplayaDVDwhilethevehicleismoving,theTFT
screendisplayscautioninformationwithabluebackground.Rearvideoscreens,ifapplicable,will
operatenormally.
Insert/Eject
Insert/Eject
Insert/Eject
Insert/EjectDisc
D isc
Disc
Disc
Inser
Inser
Inser
Inserting
t ing
ting
tinga
a
a
aDisc
D isc
Disc
Disc
WheninsertingaDVDdisc,DVDmodeisenteredanddiscplaybegins.
NOTE
NOTE
NOTE
NOTE:IfParentalLock(Rating)isactivatedandthediscinsertedisnotauthorized,the4-digit
codemustbeenteredand/orthediscmustbeauthorized(see“RATING(ParentalLock)Menu”).
Youcannotinsertadiscifthereisalreadyadiscintheunitorifthepowerisoff.
NOTE
NOTE
NOTE
NOTE:CD-R/RW,DVD-R/RW,DVD+R/RWswillnotplayunlesstherecordingsessionisclosed.
Ejecting
Ejecting
Ejecting
Ejectinga
a
a
aDisc
D isc
Disc
Disc
Pressthebuttonontheunittoejectthedisc.TheunitautomaticallyrevertstoTunermodeat
thesametime.
Reset
Reset
Reset
Resetthe
t he
the
theLoading
L oading
Loading
LoadingMechanism
M echanism
Mechanism
Mechanism
Ifthediscloadsabnormallyordoesnotplayproperly,pressandholdthebuttonontheunit
toresettheloadingmechanism.Thediscisejectedandnormaloperationresumes.
Accessing
Accessing
Accessing
AccessingDVD
D VD
DVD
DVDMode
M ode
Mode
Mode
ToswitchtoDVDmodewhenadiscisalreadyinserted,presstheSRC
S RC
SRC
SRCbuttononthefrontpanel
orontheremotecontroltillDVDappearsatthetopofthescreen.
Using
Using
Using
Usingthe
t he
the
theTouch-Screen
T ouch-Screen
Touch-Screen
Touch-ScreenControls
C ontrols
Controls
Controls
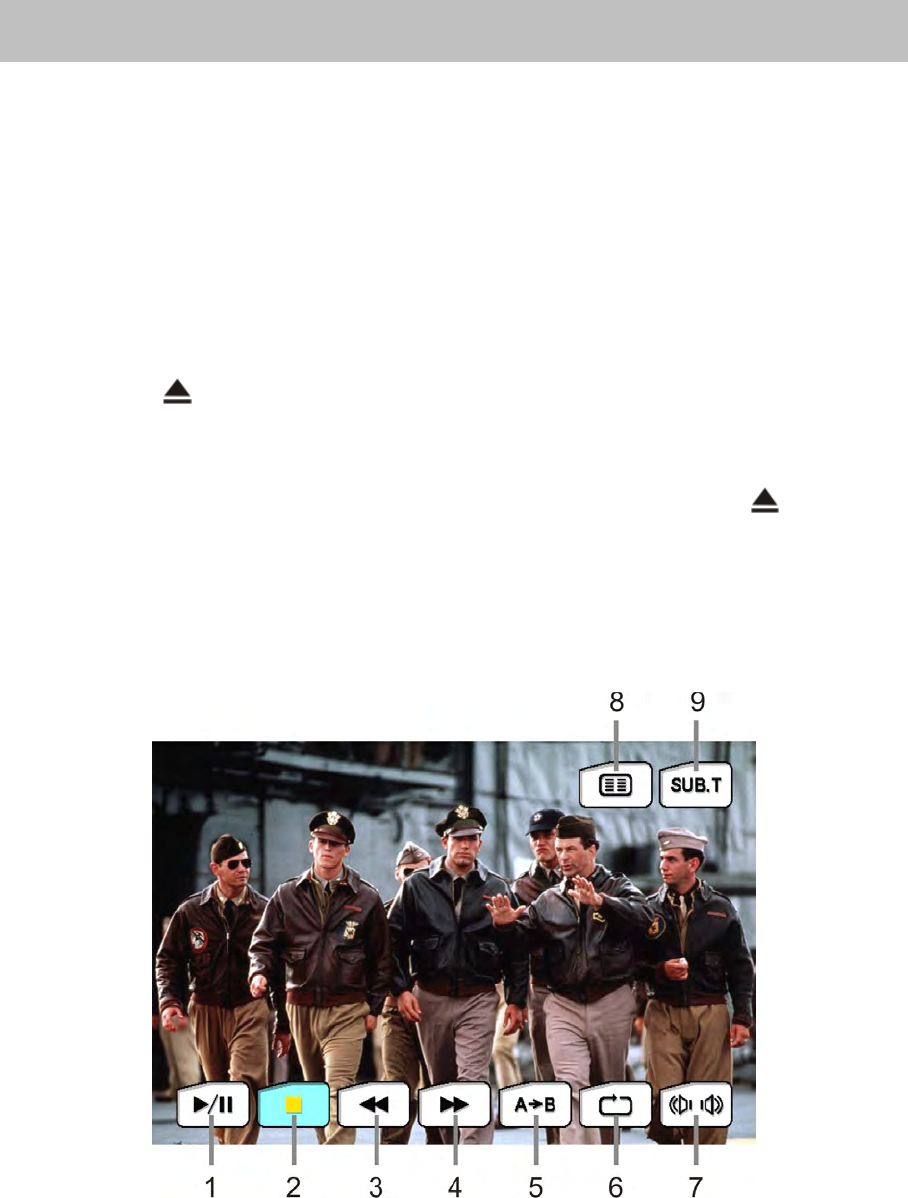
1.TouchtoPlay/Pause
2.Touchtostop
3.Touchtofastreverse
4.Touchtofastforward
5.Touchtorepeatplayback
6.TouchtorepeatfromAtoB.SelecttherepeatpointAwhereveryouwanttostartandthe
pointBwhereveryouwanttoend,then,DVDdisplaysfromAtoBcontinually.
7.TouchtoswitchamongLEFT,RIGHTandSTEREO.
21
8.TouchtoreturntoDVDmainmenu
9.TouchtodisplaySub-title
Controlling
Controlling
Controlling
ControllingPlayback
P layback
Playback
Playback
Stopping
Stopping
Stopping
StoppingPlayback
P layback
Playback
Playback
Touchthestopbuttononthescreenorpressthe(
(
(
()buttonontheremotecontrolto
stopDVDplay;touchtheplay/pausebuttononthescreenorthe(OK)
O K)
OK)
OK)buttononthe
remotecontroltoresumediskplay.
Pausing
Pausing
Pausing
PausingPlayback
P layback
Playback
Playback
Touchtheplay/pausebuttononthescreentosuspendorresumediscplay.
Repeat
Repeat
Repeat
RepeatPlayback
P layback
Playback
Playback
PresstheRepeat
R epeat
Repeat
Repeatbuttononthescreenorontheremotecontroltoalterrepeatmode
accordingtothefollowing:
•DVD:RepeatTitle,RepeatChapter,RepeatOff
•VCD(PBCOff):RepeatSingle,RepeatOff
•MP3:RepeatSingle,RepeatFolder,RepeatAll,RepeatOff
NOTE
NOTE
NOTE
NOTE:ForVCDplay,therepeatfunctionisnotavailableifPBCison.
PBC
PBC
PBC
PBC(Play
( Play
(Play
(Playback
b ack
back
backControl)
C ontrol)
Control)
Control)(VCD
( VCD
(VCD
(VCDOnly)
O nly)
Only)
Only)
ForVCDwithplaybackfunctionality,playbackcontrol(PBC)providesadditionalcontrolsfor
VCDplayback.
Pressthe(ROOT)
ROOT)
ROOT)
ROOT)buttonontheremotecontroltotogglethePBCfunction“On”/”Off”.OncePBC
ison,playbackstartsfromtrackoneoftheplaylist.
NOTE
NOTE
NOTE
NOTE:WhenPBCisactivated,fastforward,slowplayback,andprevious/nexttrackareavailable.
Repeatanddirecttrackselectionarenotavailable.WhenPBCisactivated,selectingrandom,
scan,orsearchplaybackautomaticallydeactivatesPBC.
Sectional
Sectional
Sectional
SectionalRepeat
R epeat
Repeat
RepeatFunction
F unction
Function
Function(A-B)
( A-B)
(A-B)
(A-B)
UsetheA-Bfunctiontodefineaspecificareaofadisctorepeat.
•PresstheRepeat
Repeat
Repeat
RepeatA-B
A -B
A-B
A-Bbutton()onthescreenorontheremotecontroltosetthestartpoint
(A)oftherepeatedsection.
•PresstheRepeat
R epeat
Repeat
RepeatA-B
A -B
A-B
A-Bbutton()againonceyoureachthedesiredendpoint(B)ofthe
repeatedsection.TheselectedportionoftheDVDwillnowrepeatcontinuously.
•PresstheRepeat
R epeat
Repeat
RepeatA-B
A -B
A-B
A-Bbutton()againtocanceltheA-Bsectionsettingandstoprepeatplay.
Accessing
Accessing
Accessing
Accessingthe
t he
the
theDVD
D VD
DVD
DVDMenu
M enu
Menu
Menu
1.YoucantouchtheareaF,andthentouchthebuttontorecallthemainDVDmenu.
2.Usethearrowbuttonsontheremotetoselectatitlefromthemenu.
3.Pressthe(TITLE
T ITLE
TITLE
TITLE)
)
)
)buttonontheremotecontroltoselectadifferenttitleforplayback.
4.Pressthe(OK)
OK)
OK)
OK)buttonontheremotecontrolortouchtheitemdirectlytoconfirmyour
selectionandbeginplayback.
Moving
Moving
Moving
MovingThrough
T hrough
Through
ThroughChapters
C hapters
Chapters
Chapters
Pressthe()buttonontheremotecontroltoadvancetothenextchapterontheDVD.
Pressthe()buttonontheremotecontroltomovetothepreviouschapterontheDVD.
Touchtherightsideofthescreentoadvancetothenextchapter,ortouchtheleftsideofthe
screentomovetothepreviouschapter.
Fast
Fast
Fast
FastForward/Fast
F orward/Fast
Forward/Fast
Forward/FastReverse
R everse
Reverse
Reverse
Pressthe()buttonontheremotecontrolortouchtheofareaEonthescreentofast
forward.Keeppressingortouchingandreleasingthebuttontoincreasetheratefrom“X2”to“X
4”,“X8”,and“X16”.
Pressthe()buttonontheremotecontrolortouchtheofareaEonthescreentofast
reverse.Keeppressingortouchingandreleasingthebuttontoincreasetheratefrom“X2”to“X
4”,“X8”,and“X16”.
22
Selecting
Selecting
Selecting
Selecting2-Channel
2 -Channel
2-Channel
2-Channeland
a nd
and
and5
5
5
5-Channel
- Channel
-Channel
-ChannelAudio
A udio
Audio
AudioPlayback
P layback
Playback
Playback
2-Channel
2-Channel
2-Channel
2-ChannelAudio
A udio
Audio
Audio(Down
( Down
(Down
(DownMix)
M ix)
Mix)
Mix)Support
S upport
Support
Supportfor
f or
for
forCD,
C D,
CD,
CD,SD
S D
SD
SDCard
C ard
Card
Cardand
a nd
and
andDVD
D VD
DVD
DVD
Linearpulsecodemodulation(LPCM)andpulsecodemodulation(PCM)supportisavailablefor
CD,SDCardandDVDdiscswhen2-channelaudioisselected.
5
5
5
5-
-
-
-Channel
Channel
Channel
ChannelAudio
A udio
Audio
AudioSupport
S upport
Support
Supportfor
f or
for
forCD,
C D,
CD,
CD,SD
S D
SD
SDCard
C ard
Card
Cardand
a nd
and
andDVD
D VD
DVD
DVD
SurroundIisavailablefordecodinganalogordigital2-channeldownmixedsources.SurroundII
isavailablefordecodingdigitalbit-streamsources.
NOTE
NOTE
NOTE
NOTE:Only2-ChannelaudiosupportisavailableforAM/FMtuner,TVtunerandAuxiliaryinput.
Table
Table
Table
Table8:
8 :
8:
8:Speaker
S peaker
Speaker
SpeakerOutput
O utput
Output
OutputOptions
O ptions
Options
Options
G
G
G
GOTO
OTO
OTO
OTOSearch
S earch
Search
Search
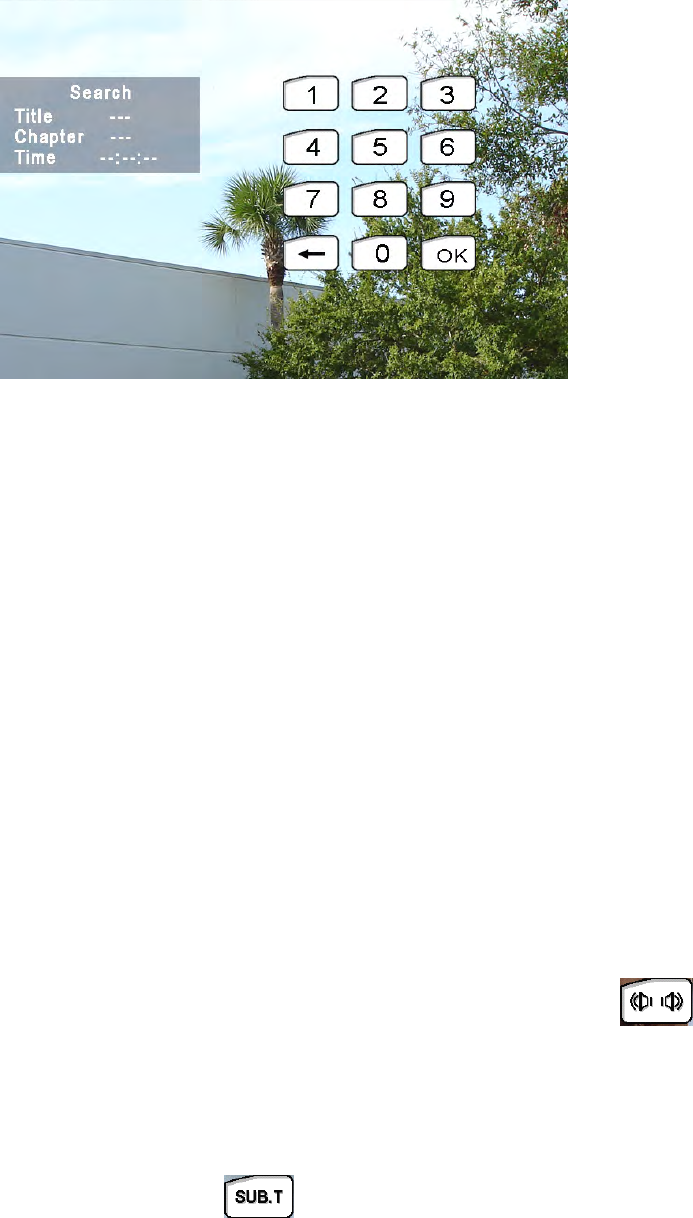
DuringDVDorVCDplayback,performthefollowingstepstousetheGOTOfeaturetoaccessa
specificlocationonadisc:
1.Pressthe(-/--)buttononremotecontrolortouchAreaFonthescreentoenter“GOTO”mode.
2.Pressthe(/)buttonsontheremotecontroltoselectacategory.
•ForDVDmode,youcanchooseTimeorTitle/Chaptersearch.
•ForVCDmode,pressthe(-/--)buttontochoosebetweenTrackSearch,DiscSearchandExit.
DVD
D VD
DVD
DVDSearch
S earch
Search
Search
Time
Time
Time
Time–Gotospecifictimeincurrenttitle
Title/Chapter
Title/Chapter
Title/Chapter
Title/Chapter–Gotospecifictimeinachapter
VCD
VCD
VCD
VCDTrack
T rack
Track
TrackSearch
S earch
Search
Search
Time
Time
Time
Time–Gotospecifictimeinthecurrenttrack
Track
Track
Track
Track–Gotospecifictrack
VCD
VCD
VCD
VCDDisc
D isc
Disc
DiscSearch
S earch
Search
Search
Time
Time
Time
Time–Gotospecifictimeondisc
Track
Track
Track
Track–Gotospecifictrack
3.Touchthe())/(----/--)areaonthescreen
todisplayanumerickeypadonthetouchscreen.
Speaker
Speaker
Speaker
SpeakerSetup
S etup
Setup
Setup
Front
Front
Front
Front
speaker
speaker
speaker
speaker
Rear
Rear
Rear
Rear
Speaker
Speaker
Speaker
Speaker
Center
Center
Center
Center
Speaker
Speaker
Speaker
Speaker
Sub-
Sub-
Sub-
Sub-
Woofer
Woofer
Woofer
Woofer
2CHmode
*
*
*
Play2CHaudioin
5CHmodewith
surround“off”
*
Play2-channel
(DownMix)audioin
5-channelmodewith
surround“on”
*
*
*
*
Play6-channel
audioin5-channel
modewithsurround
“on”
*
*
*
*
Search
Title____
Chapter__/__
Time_:_:_
TrackSearch
Time
Track---/---
DiskSearch
Time
Track----/--
--:--:--
--:--:--
--:--:--
23
4.Enteratime/Tracknumberintothefieldusingthenumerickeypadontheremotecontroloron
thescreen.
5.PresstheOK
O K
OK
OKbuttonontheremotecontroloronthetouchscreentogotothespecified
locationonthedisc.
6.Pressthe(-/--)buttonontheremotecontrolortouchtheFAreaonthescreenagaintoexit.
Direct
Direct
Direct
DirectChapter
C hapter
Chapter
Chapter/
/
/
/Track
T rack
Track
TrackSelection
S election
Selection
Selection
DuringDVD,VCDandCDplayback,youcanusethenumerickeypadontheremotecontrolto
accessatrackdirectly.
Viewing
Viewing
Viewing
Viewingan
a n
an
anAlternate
A lternate
Alternate
AlternatePicture
P icture
Picture
PictureAngle
A ngle
Angle
Angle(DVD
( DVD
(DVD
(DVDOnly)
O nly)
Only)
Only)
SomeDVDscontainscenesthathavebeenshotsimultaneouslyfromdifferentangles.Fordiscs
recordedwithmultipleangles,pressthe(ANGLE
ANGLE
ANGLE
ANGLE)
)
)
)buttonontheremotecontroltotoggleavailable
anglesoftheon-screenimage.
Zooming
Zooming
Zooming
Zooming
PresstheZOOM
Z OOM
ZOOM
ZOOMbuttonontheremotecontroltoenlargeandpanthroughthevideoimageusing
thefollowingoptions:“Q1”,“Q2”,“Q3”,and“OFF”.
Multi-Language
Multi-Language
Multi-Language
Multi-LanguageDiscs
D iscs
Discs
Discs(DVD
( DVD
(DVD
(DVDOnly)
O nly)
Only)
Only)
Changing
Changing
Changing
ChangingAudio
A udio
Audio
AudioLanguage
L anguage
Language
Language
Ifyouarewatchingadiscrecordedinmultiplelanguages,pressthe(AUDIO
A UDIO
AUDIO
AUDIO)
)
)
)buttononthe
remotecontroltochoosealanguage.YoualsocantouchareaE,andthentouchthe
button.
NOTE
NOTE
NOTE
NOTE:DuringVCDplayback,pressthe(AUDIO
A UDIO
AUDIO
AUDIO)
)
)
)buttonontheremotecontroltochoosebetween
LeftChannel,RightChannel,andStereo.
Changing
Changing
Changing
ChangingSubtitle
S ubtitle
Subtitle
SubtitleLanguage
L anguage
Language
Language
Ifyouarewatchingadiscrecordedinmultiplelanguageswithsubtitles,pressthe(SUBT
S UBT
SUBT
SUBT)
)
)
)button
ontheremotecontroltochoosethelanguageinwhichyouwouldlikethesubtitlestoappear.You
alsocantouchareaE,andthentouchthebutton.
Playback
Playback
Playback
PlaybackInformation
I nformation
Information
Information
DuringDVDandVCDplayback,pressthe(INFO
I NFO
INFO
INFO)buttonontheremotecontrolortouchareaBto
displayplaybackinformationonthescreen,includingthemediaplayingandcurrentplayback
time.
DVD
DVD
DVD
DVDPlayback
P layback
Playback
PlaybackInformation
I nformation
Information
Information
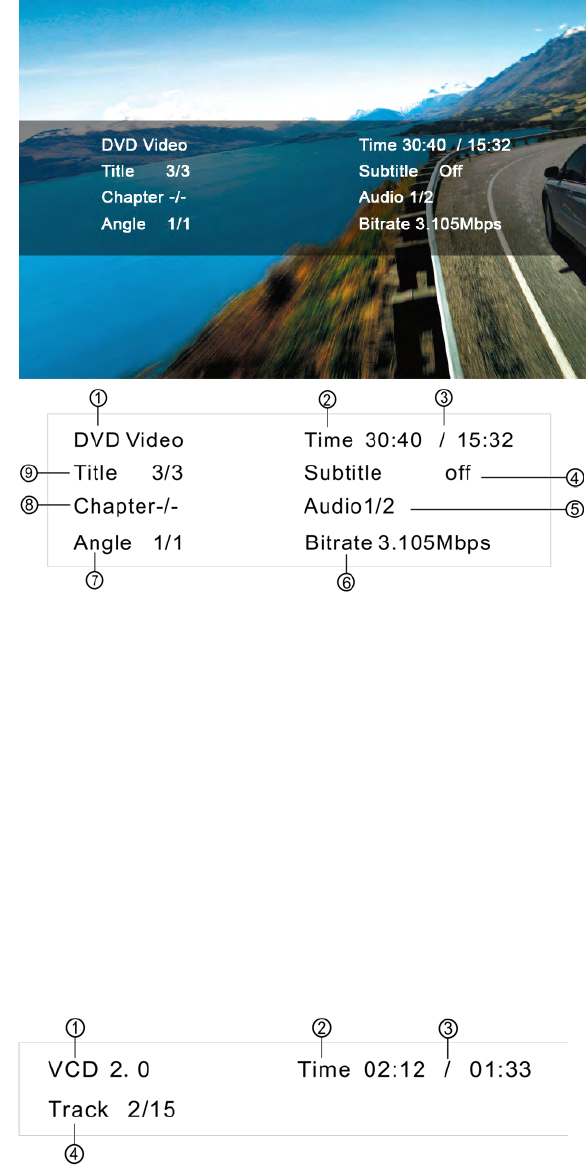
ThefollowinginformationisdisplayedatthemiddleofthescreenduringDVDplayback:
24
1
○indicatesCurrentplayingsource.
2
○3
○Indicatestheplaybacktimeofthecurrenttitle.
4
○Indicatesthestatusofsubtitle
5
○Indicatestheaudiochannel
6
○Indicatesvelocity
7
○Indicatesangle
8
○IndicateschaptersontheDVDiscurrentlyplaying.
9
○Indicatesthethirdof3titlesontheDVDiscurrentlyplaying.
VCD
VCD
VCD
VCDPlayback
P layback
Playback
PlaybackInformation
I nformation
Information
Information
ThefollowinginformationisdisplayedatthemiddleofthescreenduringVCDplayback:
1
○indicatesCurrentplayingsource.
2
○,3
○Indicatestheplaybacktimeofthecurrenttitle.
4
○Indicatesthesecondof15tracksontheDVDiscurrentlyplaying.
25
General
General
General
GeneralDisc
D isc
Disc
DiscInformation
I nformation
Information
Information
Disc
Disc
Disc
DiscSymbols
S ymbols
Symbols
Symbols
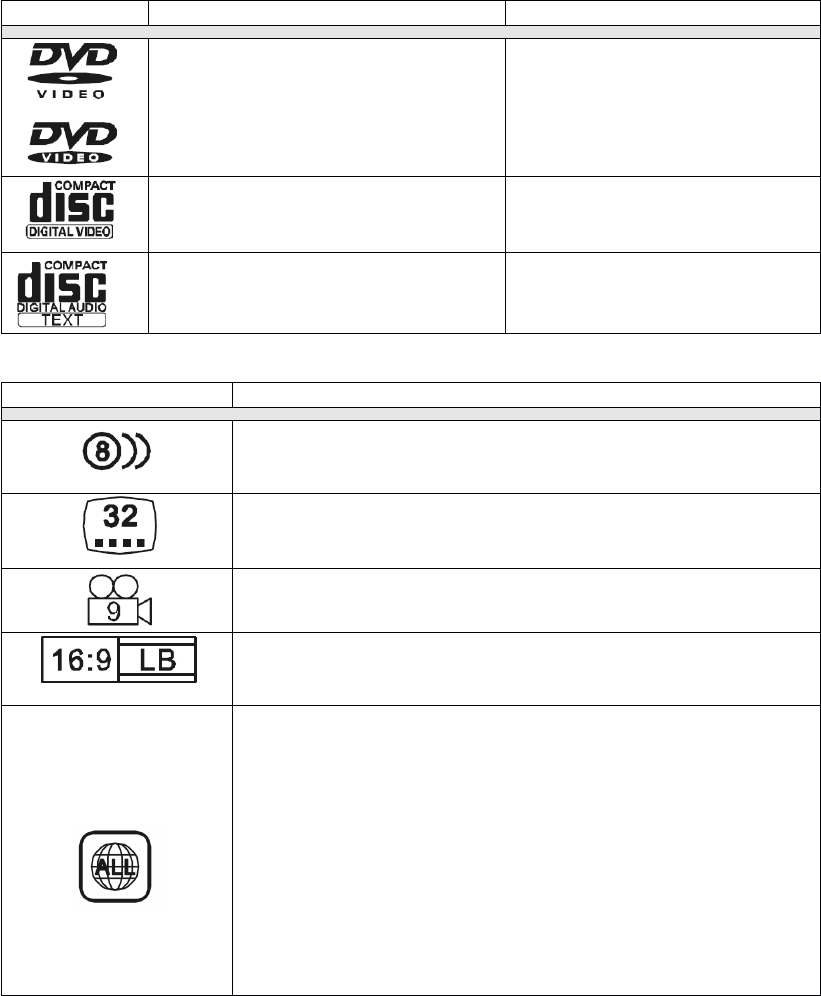
Symbol
Symbol
Symbol
Symbol
12cm
12cm
12cm
12cmDisc
D isc
Disc
DiscProperties
P roperties
Properties
Properties
Max
Max
Max
MaxPlay
P lay
Play
PlayTime
T ime
Time
Time
Singlesidesinglelayer(DVD-5)
Singlesidedoublelayer(DVD-9)
Doublesidesinglelayer(DVD-10)
Doublesidedoublelayer(DVD-18)
(MPEG2Method)
133minutes
242minutes
266minutes
484minutes
Singlesidesinglelayer(VCD)
(MPEG1Method)
74minutes
Singlesidesinglelayer
74minutes
Symbol
Symbol
Symbol
Symbol
Meaning
Meaning
Meaning
Meaning
Numberofvoicelanguagesrecorded.Thenumberinsidethe
iconindicatesthenumberlanguagesonthedisc(maximum
of8).
Numberofsubtitlelanguagesavailableonthedisc
(maximumof32).
Numberofanglesprovided(maximumof9).
Aspectratiosavailable.“LB”standsforLetterBoxand“PS”
standsforPan/Scan.Intheexampleontheleft,the16:9
videocanbeconvertedtoLetterBoxvideo.
Indicatestheregioncodewherethedisccanbeplayed.
•Region1:USA,Canada,EastPacificOceanIslands
•Region2:Japan,WesternEurope,NorthernEurope,Egypt,
SouthAfrica,MiddleEast
•Region3:Taiwan,HongKong,SouthKorea,Thailand,
Indonesia,South-EastAsia
•Region4:Australia,NewZealand,MiddleandSouth
America,SouthPacificOceanIslands/Oceania
•Region5:Russia,Mongolia,India,MiddleAsia,Eastern
Europe,NorthKorea,NorthAfrica,North-WestAsia
•Region6:MainlandChina
•ALL:Allregions
26
CD/MP3/WMA/JPEGOperation
InstructionsforInsert/Eject,Play/Pause,StoppingPlayback,TrackSelection,FastForward/Fast
Reverse,Scan,andRandomPlayarethesameforDVD,CDandMP3operation.Pleaseseethe
DVDPlayerOperationsectionforinformationaboutthesetopics.
Thefilenamingformatslistedbelowarecompatiblewiththisunit:
•ISO9660–filename:12characters,fileextension:3characters
•ISO9660–filename:31characters,fileextension:3characters
•Joliet–64characters
IfthefileorfoldernamedoesnotconformtoISO9660filesystemstandards,itmaynotbe
displayedorplayedbackcorrectly.
CD
CD
CD
CDPlayer
P layer
Player
PlayerUser
U ser
User
UserInterface
I nterface
Interface
Interface
1:Previoustrack
2:Touchtofastbackwardcurrenttrack
3:Play
4:Touchtofastforwardcurrenttrack
5:Nexttrack
6:Currenttrackandtotalnumberoftracksondisk
7:Elapsedplayingtime
8:PreviouspagedisplayofTFT
9:NextpagedisplayofTFT
10:Touchtoactivate/deactivateRandomMode
11:Touchtoactivate/deactivateRepeatSingleMode
12:Touchtodisplaythenumerickeypadonthescreenandthenyoucanusethenumeric
keypadtoaccessatrackdirectly.
13:Touchtoactivate/deactivateScanAndyoucanpressthe(Title)buttonontheremote
controltotogglethescanfunction“on/off”
14:Touchtostopdiscplayback
15:Volumeindicator
27
Playing
Playing
Playing
PlayingCD
C D
CD
CDFiles
F iles
Files
Files
AfterinsertingaCDdisc,fileswillplayinthesequenceofthedirectory.Inplayingback,youcan
pressthenumericbuttonontheremotecontrolortouchatrackontheonscreendirectlytoplay.
F
F
F
Fast
ast
ast
astbackward/fast
b ackward/fast
backward/fast
backward/fastforward
f orward
forward
forward
TouchtheoronthescreentoFastbackwardorfastforwardplay.
MP3/WMA
MP3/WMA
MP3/WMA
MP3/WMADiscs
D iscs
Discs
Discs
ThisplayerallowsyoutoplaybackMP3/WMAfilesrecordedonCDROM,CD-R,CD-RW,
DVD+R/RWandDVD-R/RW.ForCD-RWdiscs,pleasemakesuretheyareformattedusingthe
fullmethodandnotthequickmethodtopreventimproperdiscoperation.Usethefollowing
settingswhencompressingaudiodataforyourMP3disc:
•TransferBitRate:320kbps
•SamplingFrequency:48kHz
WhenrecordingMP3uptothemaximumdisccapacity,disableadditionalwriting.Forrecording
onanemptydiscuptomaximumdisccapacity,usethe"Discatonce"setting.
ThetouchkeysforMP3/WMACD/DVDplaybackaredescribedbelow.
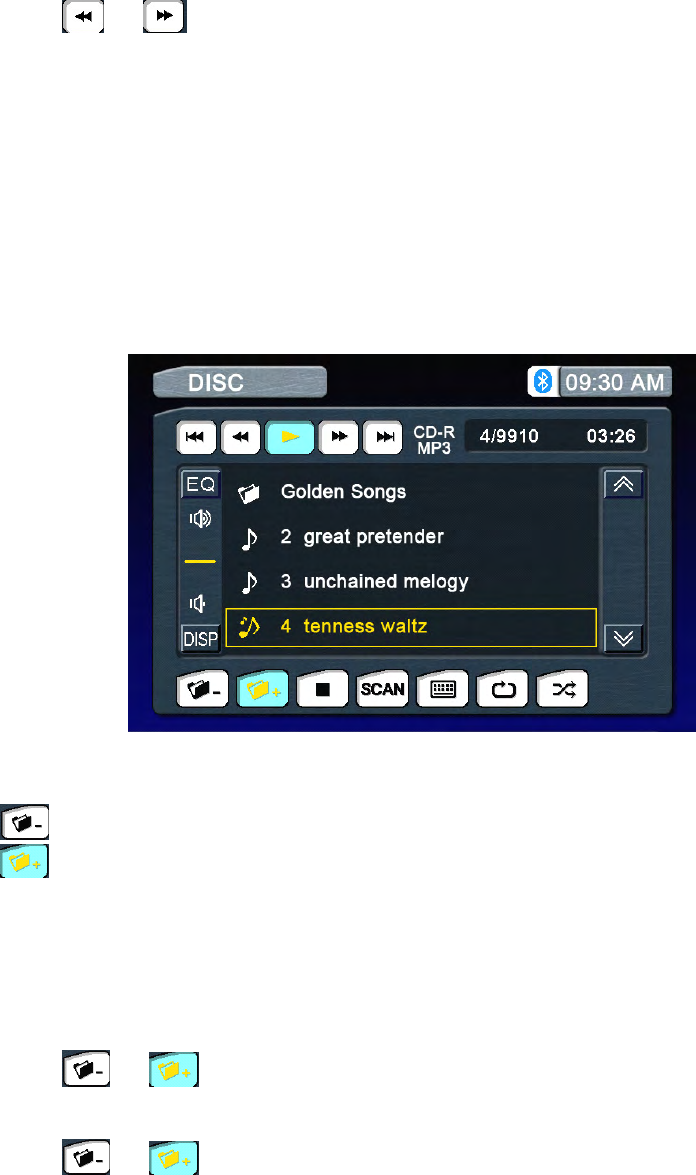
1.:Touchtodisplaypreviousfolder
2.:Touchtodisplaynextfolder
Playing
Playing
Playing
PlayingMP3/WMA
M P3/WMA
MP3/WMA
MP3/WMAFiles
F iles
Files
Files
AfterinsertingaMP3/WMAdisc,fileswillplayinthesequenceofthedirectories/folders.In
playingback,youcanpressthenumericbuttonontheremotecontrolortouchtheatrackdirectly
toplay.
Change
Change
Change
ChangeDirectory/Folder
D irectory/Folder
Directory/Folder
Directory/Folder
Touchtheoronthescreentonavigatethroughthedirectories/folders.
Previous/Next
Previous/Next
Previous/Next
Previous/NextPage
P age
Page
Page
Touchtheoronthescreentonavigatethroughthepages/files.
28
JPEG
JPEG
JPEG
JPEGpicture
p icture
picture
picture
1.BrowsepictureviaAnti-clockwise
2.BrowsepictureviaClockwise
29
iPodOperation
Accessing
Accessing
Accessing
AccessingiPod
i Pod
iPod
iPodMode
M ode
Mode
Mode
1.ToswitchtoiPodmode,presstheMenu
M enu
Menu
Menubuttononthefrontpanelorthe(SRC)
S RC)
SRC)
SRC)buttononthe
remotecontrolrepeatedlyuntiliPodappearsatthetopleftcornerofthescreen.
2.SelecttheMainmenu,thentouchtheiPodicontoselectiPodasyoursource.
iPod
iPod
iPod
iPodInstructions
I nstructions
Instructions
Instructions
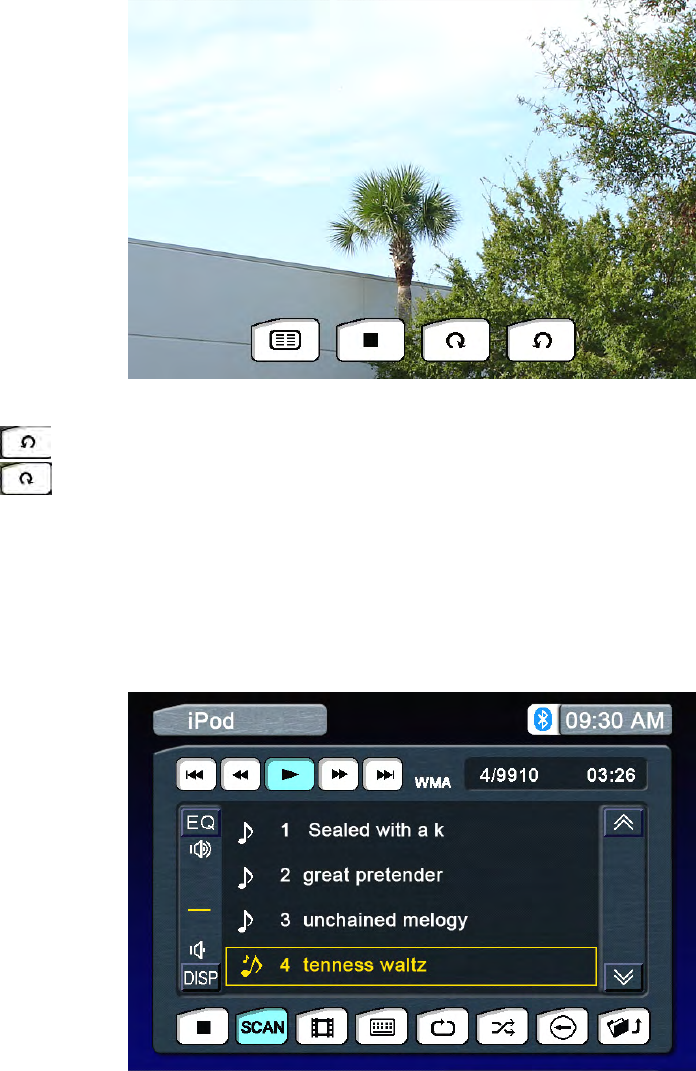
ThetouchkeysonthescreenforiPodplaybackaredescribedbelow.
1.:Backtopreviousdirectory
2.:Gotorootdirectory
3.:EnteriPODVedio(OnlyforoldcertainiPodmodel)
Playback
Playback
Playback
Playbackof
o f
of
ofvideo
v ideo
video
videoon
o n
on
oniPod
i Pod
iPod
iPod
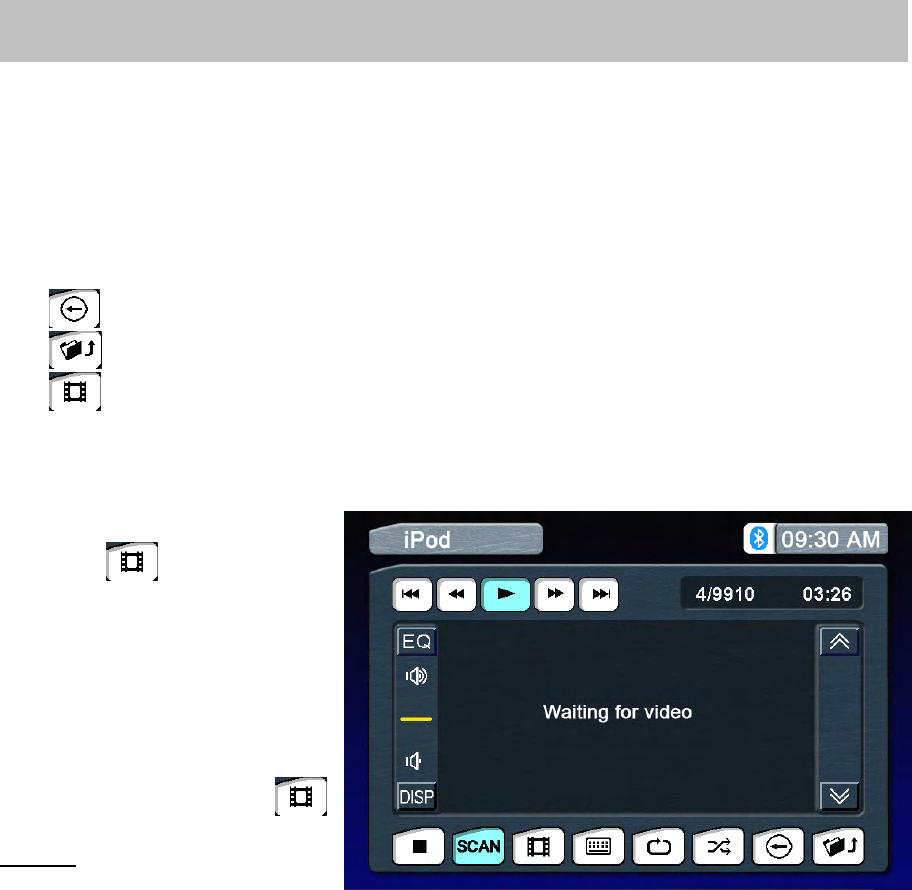
ForplaybackofvideooniPod,
pressthebuttontoenter
,
thetouchscreenwilldisplaythe
following.
IftherearevideosoniPodandyou
selectthemoniPod,theywillstart
toplay,otherwisetherewillbe
nothingonthedisplay.However,
youcanreturntolistentoyour
musicbypressingthe
buttonagain.
NOTE:
NOTE:
NOTE:
NOTE:All videocontrolfunctions
aredoneontheiPODvideo,the
touchscreenonlycontrolsaudioportionsofiPODfunctionality.
30
USBoperation
Accessing
Accessing
Accessing
AccessingUSB
U SB
USB
USBMode
M ode
Mode
Mode
1.ToswitchtoUSB
USB
USB
USBmode,presstheMenu
M enu
Menu
Menubuttononthefrontpanelorthe(SRC)
S RC)
SRC)
SRC)buttononthe
remotecontrolrepeatedlyuntilUSB
USB
USB
USBappearsatthetopleftcornerofthescreen.
2.SelecttheMainmenu,thentouchtheUSB
U SB
USB
USBicontoselectUSB
U SB
USB
USBasyoursource.
USB
USB
USB
USBInstructions
I nstructions
Instructions
Instructions
ThetouchkeysonthescreenforUSB
U SB
USB
USBplaybackaredescribedbelow,Iconsdefinationseeother
modes.
31
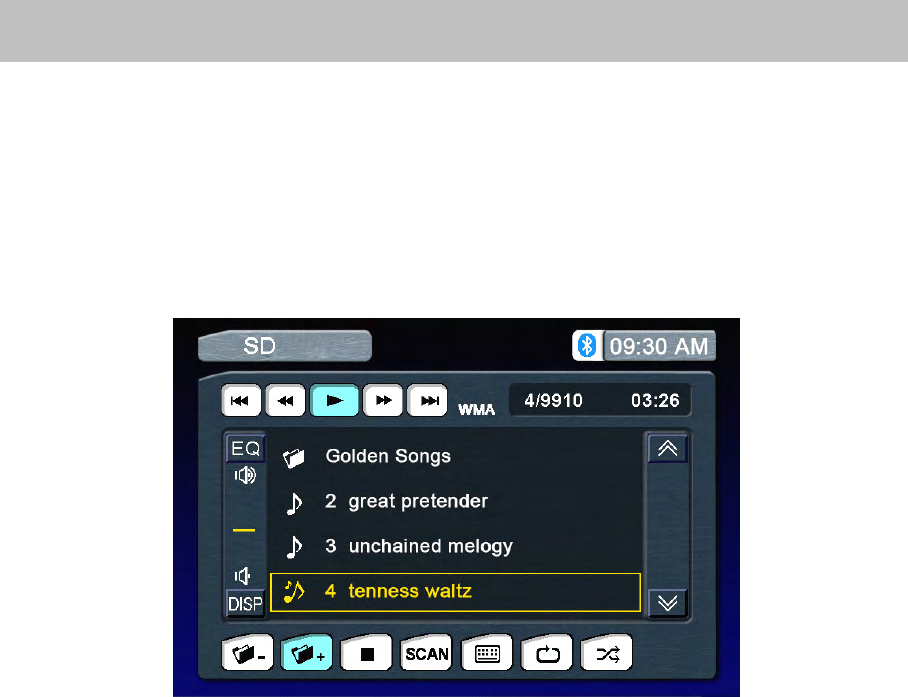
SDoperation
Accessing
Accessing
Accessing
AccessingSD
S D
SD
SDMode
M ode
Mode
Mode
1.ToswitchtoSD
SD
SD
SDmode,presstheMenu
M enu
Menu
Menubuttononthefrontpanelorthe(SRC)
S RC)
SRC)
SRC)buttononthe
remotecontrolrepeatedlyuntilSD
SD
SD
SDappearsatthetopleftcornerofthescreen.
2.SelecttheMainmenu,thentouchtheSD
S D
SD
SDicontoselectSD
S D
SD
SDasyoursource.
USB
USB
USB
USBInstructions
I nstructions
Instructions
Instructions
ThetouchkeysonthescreenforSD
S D
SD
SDplaybackaredescribedbelow,Iconsdefinationseeother
modes.

32
NavigationOperation
Accessing
Accessing
Accessing
AccessingNavigation
N avigation
Navigation
Navigation
1.AccesstheMAIN
M AIN
MAIN
MAINmenuandselecttheNAVI
N AVI
NAVI
NAVIbuttononthetouch-screentoenterthe
NavigationOperationinterface.
2.PresstheremotecontroltoswitchthesourcetoNavigation.
3.PressNAVI
NAVI
NAVI
NAVIbuttononthefrontpaneloftheunit.
Navigation
Navigation
Navigation
NavigationOperation
O peration
Operation
Operation
PleasereadtheNavigation
N avigation
Navigation
NavigationSoftware
S oftware
Software
SoftwareUser
U ser
User
UserManual
M anual
Manual
Manual
FollowtheinstructionsonloadingmappinginformationfromtheDVD-ROMtotheSDCardin
i n
in
inthe
t he
the
the
Navigation
Navigation
Navigation
NavigationSoftware
S oftware
Software
SoftwareUser
U ser
User
UserManual.
M anual.
Manual.
Manual.ThismustbedonepriortoloadingtheSDCardintothe
NavigationUnit.
Listening
Listening
Listening
Listeningto
t o
to
toan
a n
an
anAudio
A udio
Audio
Audioprogram
p rogram
program
programwhile
w hile
while
whileusing/viewing
u sing/viewing
using/viewing
using/viewingthe
t he
the
theNavigation
N avigation
Navigation
Navigation
You
canlistentoanaudioprogramwhileusingNavigation.
To
doso,dothefollowing:
Selecttheaudiosource.ThesourcecanbetheTuner,SatelliteRadio,iPod
or
theaudiofromthe
AUXinput.
TouchtheNAVI
NAVI
NAVI
NAVIbuttononthefrontpaneltoselectNavigation.ThemapwillbeshownontheTFT
display,andaudiowillcontinuetoplaywhileyouareintheNavigationmode.
Navigationvoicepromptswillmutetheaudiosource,givetheinstruction,andthenreturntothe
audiosource
To
adjustaparameteroftheaudiosource(i.e.,selectadifferentradiostation),touchtheNAVI
N AVI
NAVI
NAVI
button.Thiswillreturnyoutotheaudiosourcescreen.Makeyouradjustments,andthenpressthe
NAVI
NAVI
NAVI
NAVIbuttontoreturntheNavigationfunction.Navigationwillcontinuewhileyouareinanaudio
sourcescreen,andvoicepromptswillcontinuewhileyoumakeadjustments.

33
BluetoothOperation
Before
Before
Before
Beforeusing
u sing
using
usingthe
t he
the
theBluetooth
B luetooth
Bluetooth
Bluetooth
BeforeusingtheBluetooth,it’snecessarytoperformthefollowingsteps.Formoreoperating
details,refertoeachsectionbelow.
1.Selectthe“Bluetooth”optionintheGeneralsetupandselectthe“On”optiontoactivatethe
Bluetoothfeature.
2.Pairyourmobilephonetothisunit(refertothe“Pairing”operation).
It
is
necessarytopairyour
phonetotheunit.Withoutpairing,Bluetooth
is
notavailable.
The
The
The
TheBluetooth
B luetooth
Bluetooth
BluetoothIndicator
I ndicator
Indicator
Indicator
ThereisaBluetoothindicatoratthetopofthetouchscreen.
WhentheBluetoothfunctionis“Off”,theindicatorisgrey.
WhentheBluetoothfunctionis“On”andnophoneisconnectedtotheunit,theindicatorwillblink.
Ifaphonehasbeenconnectedtotheunit,theindicatorisonsolid.
Accessing
Accessing
Accessing
AccessingBluetooth
B luetooth
Bluetooth
BluetoothMode
M ode
Mode
Mode
Touchthebutton
at
thetopofthetouchscreentoaccessBluetoothmodedirectly.
Bluetooth
Bluetooth
Bluetooth
BluetoothUser
U ser
User
UserInterface
I nterface
Interface
Interface
Dial
Dial
Dial
DialInterface
I nterface
Interface
Interface
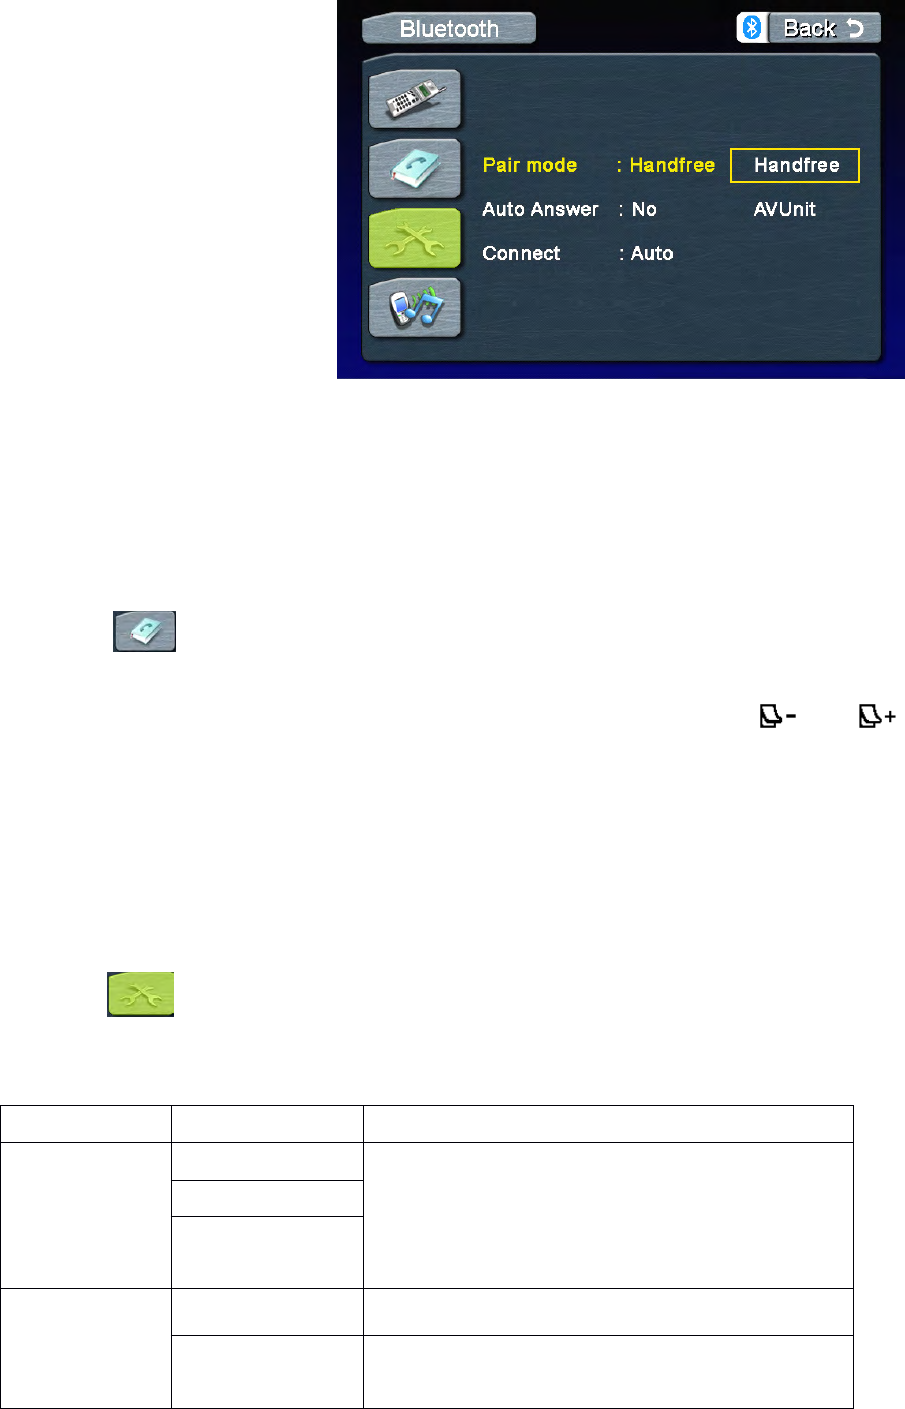
34
1
○Currentsourceindicator。
2
○Touchtoreturntothe
previousmenu.
3
○Touchtoaccessthedial
interface.
4
○TouchtoaccessthePhone
book.
5
○TouchtoaccessA2DPcontrol
menu.
6
○TouchtoaccessBluetoothsetup.
Phone
Phone
Phone
PhoneBook
B ook
Book
Book
PressthebuttontoaccessthePhoneBook.
You
canseephonebooklist,SIMbooklist,dialedcalllist,receivedcalllist,missedcalllist.
IfthenumberhasbeenstoredinthePhonebook,
it
canbeaccessedbytouchingor
onthescreentonavigatethroughthePhoneBookentries.
Then,touchthenumbertoinitiatethephonecall
NOTE:
NOTE:
NOTE:
NOTE:NotallBluetoothenabledphonessupportthisfeature
Bluetooth
Bluetooth
Bluetooth
Bluetoothsetup
s etup
setup
setup
SelectthebuttontoaccesstheBluetoothsetup.
LANGUAGE
LANGUAGE
LANGUAGE
LANGUAGEMenu
M enu
Menu
MenuFeatures
F eatures
Features
Features
Setting
Setting
Setting
Setting
Options
Options
Options
Options
Function
Function
Function
Function
Pairing
Off
Pressthe“Handsfree”buttontostarttowaitfor
pairingwithonephonewithoutA2DP.
Pressthe“AVUnit”buttontostarttowaitfor
pairingwithonephonewithinA2DP.
Handsfree
AVUnit
AutoAnswer
Off
Answeranincomingcallmanually.
On
Theunitwillautomaticallyansweranincoming
call(basedonthecellphoneBluetoothfunctions)

35
Pairing
Pairing
Pairing
Pairing
AccesstheBluetoothsetupandpress“Handsfree”or“AVUnit”optiononthescreen,then“Wait
pairing”displaysonthescreen.Nowyoucanpairaphonewiththeunit.
Thisunitcanpairwith5mobilephonesinall,butjustonecanbeactive
at
atime.
TheDefaultphonewillberetainedonlyifallotherpairedphonesaredeleted.(DefaultPhone:The
phonethatwasfirstpairedwiththeunit.)
Whenmaximumpairinghasbeencompleted,thatis,fourmobilephoneshavebeenconnected
withtheunit,andyouwanttostillpairanewone,thenthesystemwillretainthedefaultphoneand
lastusedphoneused.Thephoneleastused(exceptthedefaultphone)willbedeletedandthe
newpairedphonewillbecomethelastusedphone.(LastUsedPhone:Thephoneconnectedwith
theunitthatwasusedlast.)
Ifyouwantpairyourphonewiththeunit,thepassword1234
is
usedtocompletethepairing.When
asked,enterthispasswordinthephoneyouarepairingwiththisunit.
Note:whenyoupress“handsfree”
,
theunitwon’
t
activateA2DPfunction.
Auto
Auto
Auto
AutoConnect
C onnect
Connect
Connect
Iftheunithasbeensettoautoconnect,
it
willattempttoconnecttothelastusedphonefirst.IfAuto
Connect
is
notactivated,theunitwillreturntothepreviousoperatingmode.
Whenthephoneconnectstotheunitsuccessfully,allofthecellphone’
s
Bluetoothenabledoptions
willbeactive.
Making
Making
Making
Makinga
a
a
aphone
p hone
phone
phonecall
c all
call
call
Therearefourwaystomakeaphonecallfromthisunit:
1.MakeuseoftheNumberdialonthescreentomakeacall.
2.
You
canenterthephonenumberusingthenumerickeypadandpresstheOK
O K
OK
OKbuttononthe
remotecontroltomakeacall.(mustbeintheBluetoothmode)
3.
You
canopenthephonebookandselectonetomakeacalldirectly.
(Your
cellphonemust
supportthisoption)
4.Ifyourphonesupportsvoicedial,accessthismodeonyourphoneinsteadofusingthe
Phonebook
Answering
Answering
Answering
Answeringan
a n
an
anincoming
i ncoming
incoming
incomingcall
c all
call
call
You
canansweranincomingcallevenifthesourceotherthanthetelephone
is
selected.
You
canansweranincomingcallautomatically
or
manually(refertoBluetoothsetupandthe
ControlsandIndicatorstitle(ButtonOperation)forexactinstructions)
Whenacallcomesin,thisinterfacewilldisplayonthescreen:
Connect
Manual
IfthisfunctionissettoAuto,connectionbetween
theLastUsedphoneandthisunitwilltakeplace
automaticallyassoonasthedevicesarelessthan
afewmetersapart.
Auto
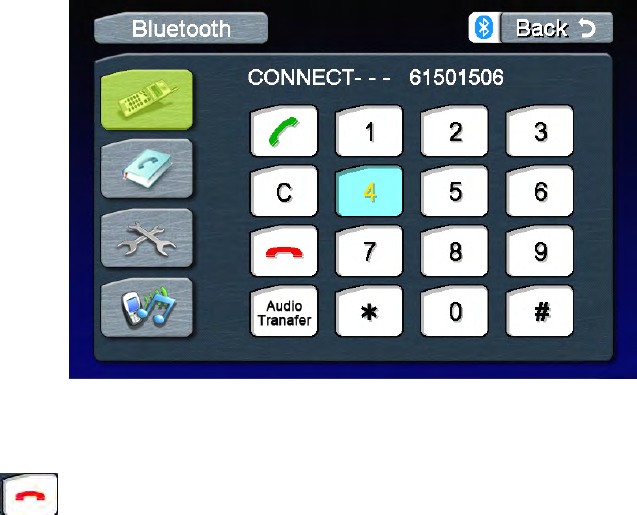
36
End
End
End
Enda
a
a
acall
c all
call
call
Touchthebuttontoendacall.

37
Troubleshooting
Problem
Problem
Problem
Problem
Cause
Cause
Cause
Cause
Corrective
Corrective
Corrective
CorrectiveAction
A ction
Action
Action
GENERAL
GENERAL
GENERAL
GENERAL
Unitwillnot
poweron
RadioFuseblown
Installnewfusewithcorrectrating
Carbatteryfuseblown
Installnewfusewithcorrectrating
Illegaloperation
PresstheRESETbuttonlocatedinthe
bottomrightcornerofthefrontpanel
Remotecontrol
doesnotfunction
Batterydepleted
Replacebatterywithnewone
Batteryinstalledincorrectly
Removebatteryandinstallcorrectly
No/lowaudio
output
Improperaudiooutput
connection
Checkwiringandcorrect
Volumesettoolow
Increasevolumelevel
Improper“MUTE”connection
Reviewwiringdiagramandcheck
“MUTE”connection
Speakersdamaged
Replacespeakers
Heavilybiasedvolumebalance
Adjustthechannelbalancetothe
centerposition
Speakerwiringisincontactwith
metalpartofcar
Insulateallspeakerwiringconnections
Poorsound
qualityor
distortion
Unauthorizeddiscisinuse
Useoriginalcopy
Speakerpowerratingnot
compatiblewithunit
Connectproperspeakers
Speakerisshorted
Checkspeakerconnections
Unitresetsitself
whenengineis
off
Incorrectconnectionbetween
yellowmemorywireandpositive
batterywire
Checkwiringandcorrect
TFT
TFT
TFT
TFTMONITOR
M ONITOR
MONITOR
MONITOR
Noimage
Incorrectconnectiontoparking
brakewire
Checkwiringandcorrect
PRKSWisactivatedandparking
brakeisnotengaged
Stopvehicleinsafeplaceandapply
parkingbrake
Flashingimage
orinterference
appearson
screen
DVDisnotcompatiblewith
currentTVsystemsettings
Changesetuptoaccommodatedisc
Impropervideosignal
connections
Checkwiringandcorrect
Prolongedimage
orimproper
height/widthratio
display
Improperaspectratiosetup
Usecorrectaspectratiosetting
TUNER
TUNER
TUNER
TUNER
Weakstation
searching
Autoantennaisnotfully
extended
Connecttheautoantennacontrolcable
properly
Autoantennanotproperly
connected
Connecttheautoantennacontrolcable
properly
LOCALfunctionisactivated
TurnLOCALfunctionoff
DISC
DISC
DISC
DISC
Cannotinsert
disc
Discalreadyinsideunit
Ejectcurrentdiscandinsertnewone
Discdoesnot
playback
Disciswarpedorscratched
Usediscingoodcondition
Discisdirtyorwet
Cleandiscwithsoftcloth
Incompatiblediscisused
Usecompatibledisc
DiscratingexceedsParental
Lockratinglimit
ChangeParentalLocksettingstolower
restriction
Discregioncodeisnot
compatiblewithunit
Usediscwithproperregioncod

38
Error
Error
Error
ErrorMessages
M essages
Messages
Messages
Discisinsertedupsidedown
Insertdiscwithlabelsideup
Imageblurred,
distorted,ordark
Discisillegallycopied
Useoriginaldisc
PBCcannotbe
usedduringVCD
playback
PCBisnotavailableonthedisc
Norepeator
searchingwhile
playingVCD
PCBison
TurnPCBoff
MP3
MP3
MP3
MP3
Interruption
occurredduring
playback
Discisdirtyorscratched
Cleandiscorreplace
Fileisdamaged/badrecording
Recreatediscwithgoodfiles
Incorrect
playback
message
displayed
MessageislongerthanLCDcan
display
Message
Message
Message
Message
Displayed
Displayed
Displayed
Displayed
Cause
Cause
Cause
Cause
Corrective
Corrective
Corrective
CorrectiveAction
A ction
Action
Action
Loading
Discisbeingread
NoDisc
Discisdirty
Cleandiscwithsoftcloth
Discisupsidedown
Insertdiscwithlabelsideup
Discnotpresentinloading
compartment
Insertdisc
BadDisc
Discisdirty
Cleandiscwithsoftcloth
Discisupsidedown
Insertdiscwithlabelsideup
Unknowndisc
Discformatisnotcompatiblewith
thisunit
RegionError
DVDisnotcompatiblewithregion
codeofunit
Error
illegalmechanismoperation
PressEJECTkeyfor5secondstoreset
loadingmechanism
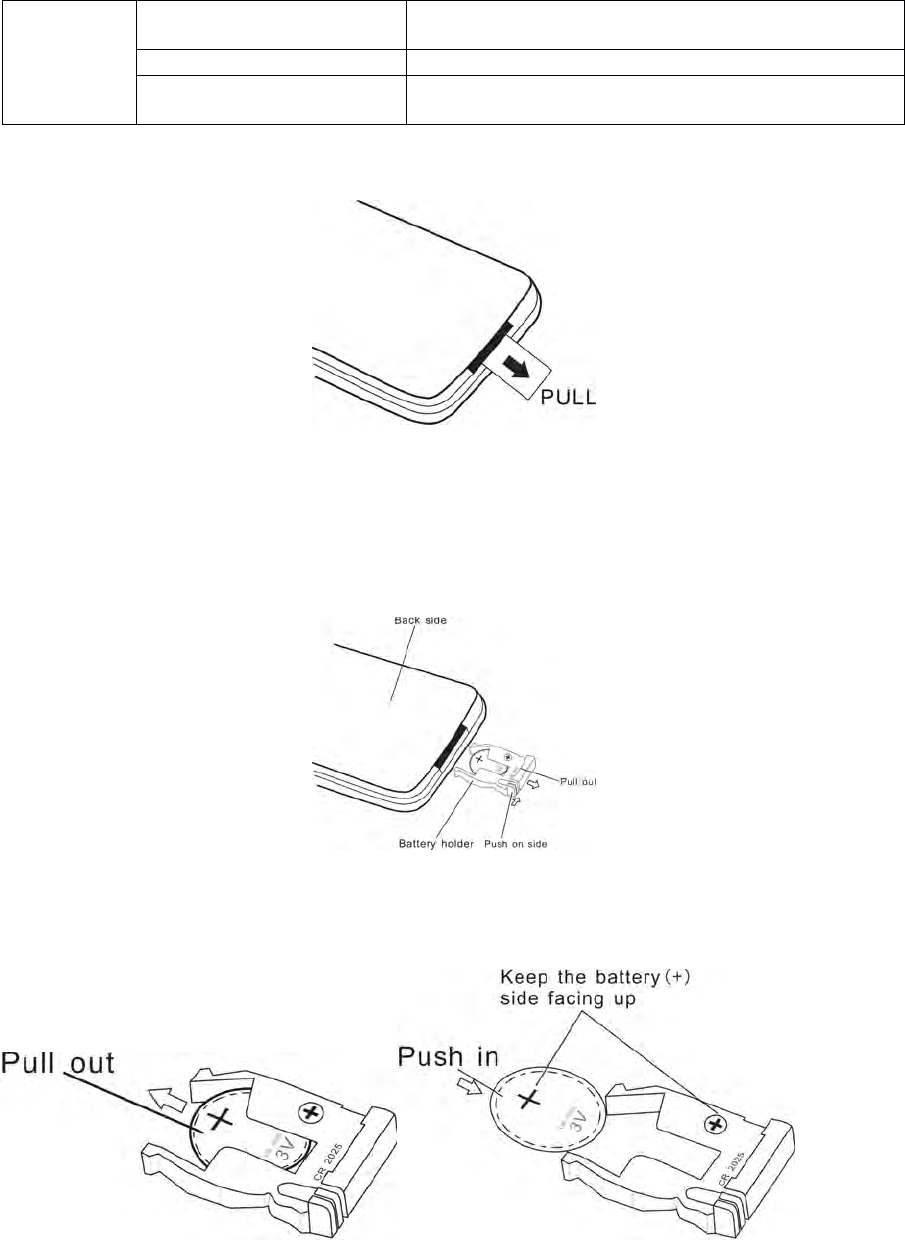
39
Remote
Remote
Remote
Remotecontrol
c ontrol
control
control
1.Whenusingtheremoteforthefirsttime,youmustpullouttheinsulationtape.
2.Removethebatteryiftheremotecontrol
is
notusedforamonth
or
longer.
Removeanddisposeoftheoldbatteryimmediately.
Donotstorethebatterywithmetallicmaterials.
3.Inserting/ReplacingtheBattery:
Removethebatteryholder
Removethebatteryfromthebatteryholder
Remote
control
doesnot
function
Batteryiscoveredwith
insulationtape
Pullouttheinsulationtape
Batterydepleted
Replacebatterywithnewone
Batteryinstalled
incorrectly
Removebatteryandinstallcorrectly
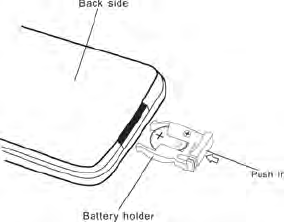
40
Installthebattery
Insertthebatteryholder
NOTE:UseonlyoneCR2025(3V)lithiumbattery.
Dangerofexplosionifbattery
is
incorrectlyreplaced.Replaceonlywiththesame
or
equivalent
type.
Donotrecharge,disassemble,heat
or
disposeofthebatteryinfire.
Keepbatteriesawayfromchildrentoavoidtheriskofaccident.
S
S
S
Suggestions
uggestions
uggestions
uggestions
1.Onlyuseapieceofcleansiliconeclothandneutraldetergenttocleanthefrontpanelor
monitor.Aroughclothandnonneutraldetergent(suchasalcohol)mayresultinscratchingor
discoloration.
2.Keepoffwaterandotherliquidthings.
3.Ifthetemperatureinsidetheplayergetstoohigh,aprotectivecircuitautomaticallystops
playingthedisc.Andthen,pleasewaitfortheunittocooldownbeforeoperatingtheplayeragain.
4.Neverinsertanythingotherthana5”(12cm)compactdiscintotheplayerasthemechanism
canbedamagedbyforeignobjects.
5.Donotattempttousea3”(8cm)CD-Singlediscinthisunit,eitherwithorwithoutanadaptor,
asitwilldamagetheplayeranddisc.SuchdamagesarenotcoveredbytheWarrantyonthis
product.
6.Whenthevehiclewarmsupduringcoldweatherorunderdampconditions,condensationmay
appearontheLCDpanel.Ifthisoccurs,thescreenwillnotoperateproperlyuntilthemoisture
hasevaporated.
7.Wesuggestthatyoushouldcleanthediscsusedinthisunitmorefrequentlythanusedinyour
home,becauseoftheenvironmentalconditionsofthevehicle.

41
Specifications
CEA
CEA
CEA
CEAPower
P ower
Power
PowerRatings
R atings
Ratings
Ratings
Main
Main
Main
MainAmplifier
A mplifier
Amplifier
Amplifier
PowerOutput:20wattsRMSX4channelsinto4-ohms@<10%THD+N
SignaltoNoiseRatio:70dBAbelowreference.(Reference:1watt,4-ohms)
MAXPower:40X4wattsinto4-ohms,allchannelsdriven
FrequencyResponse:20Hzto20kHz,-3dB.Auxinputusedassourcereference
ReferenceSupplyVoltage:14.4VDC
DVD/CD
DVD/CD
DVD/CD
DVD/CDPlayer
P layer
Player
Player
Compatibleformats:DVD-R,DVD-RW,DVD+R,DVD+RW,CD-R,CD-RW,CD-DA,MP3,WMA,
HDCD,SVCD,VCD,MPEG,JPEG,MP3/WMAfilesburnedontoaDVD+R/WorDVD-R/Wand
CD-R/RW
SignaltoNoiseRatio:85dBA
DynamicRange:>95dB
FrequencyResponse:20Hzto20kHz,-3dB
ChannelSeparation:>60dB@1kHz
D/AConverter(s):6-channelhighperformance24-bit,192kHz,multi-bitSigmaDeltamodulation.
DACsupportssampleratesfrom8~192kHz.
ElectronicSkipProtection(ESP):DVD:2-3sec,CD-DA:10sec,MP3:100sec,WMA:200sec
(ESPtimeisapproximate)
Mechanicalantivibrationability:10~200Hz,X/Y/Zdirection:1.0G
Video
Video
Video
VideoSection
S ection
Section
Section
Format:NTSC,PAL(auto-detection)
Output:1Vp-p(75-ohm),buffered
Input:1Vp-p(75-ohm)
FM
FM
FM
FMTuner
T uner
Tuner
TunerSection
S ection
Section
Section
TuningRange:87.5MHz-107.9MHz
MonoSensitivity(-30dB):10dBu
QuietingSensitivity(-50dB):15dBu
AlternateChannelSelectivity:70dB
SignaltoNoiseRatio@1kHz:58dB
ImageRejection:60dB
StereoSeparation@1kHz:30dB
FrequencyResponse:30Hz-15kHz,-3dB
AM
AM
AM
AMTuner
T uner
Tuner
TunerSection
S ection
Section
Section
TuningRange:530kHz-1710kHz
Sensitivity(-20dB):20dBu
SignaltoNoiseRatio@1kHz:50dB
ImageRejection:60dB
FrequencyResponse:50Hz-2kHz,-3dB
IntegratedSDCardReader
Monitor
Monitor
Monitor
MonitorSection
S ection
Section
Section
ScreenSize:6.5"(Measureddiagonally).
ScreenType:TFTLiquidCrystalDisplay(LCD)activematrix
ResponseTime:30mSecrisetime,50mSecfalltime
Resolution,DVD/CompositeVideoin:280,280subpixels,
1200(W)X234(H)
Viewingangle:
•60degreesleftorright
•30degreesup
•60degreesdown
General
General
General
General
AuxiliaryInputimpedance:10k
PowerSupply:10.5to16VDC,negativeground
Fuse:10-amp,miniATMtype
DINchassisdimensions:7"X7"X2"(178mmx178mmx100mm)
*
*
*
*Specifications
S pecifications
Specifications
Specificationssubject
s ubject
subject
subjectto
t o
to
tochange
c hange
change
changewithout
w ithout
without
withoutnotice.
n otice.
notice.
notice.