SZ DJI TECHNOLOGY PV3311402 PHANTOM 2 VISION + User Manual PHANTOM 2 VISION
SZ DJI TECHNOLOGY CO., LTD PHANTOM 2 VISION + PHANTOM 2 VISION
UserManual.wiki
>
SZ DJI TECHNOLOGY
>
PV3311402 User Manual
>
User Manual Part 1
Contents
1.
User Manual Part 1
2.
User Manual Part 2
3.
User Manual Part 3
User Manual Part 1
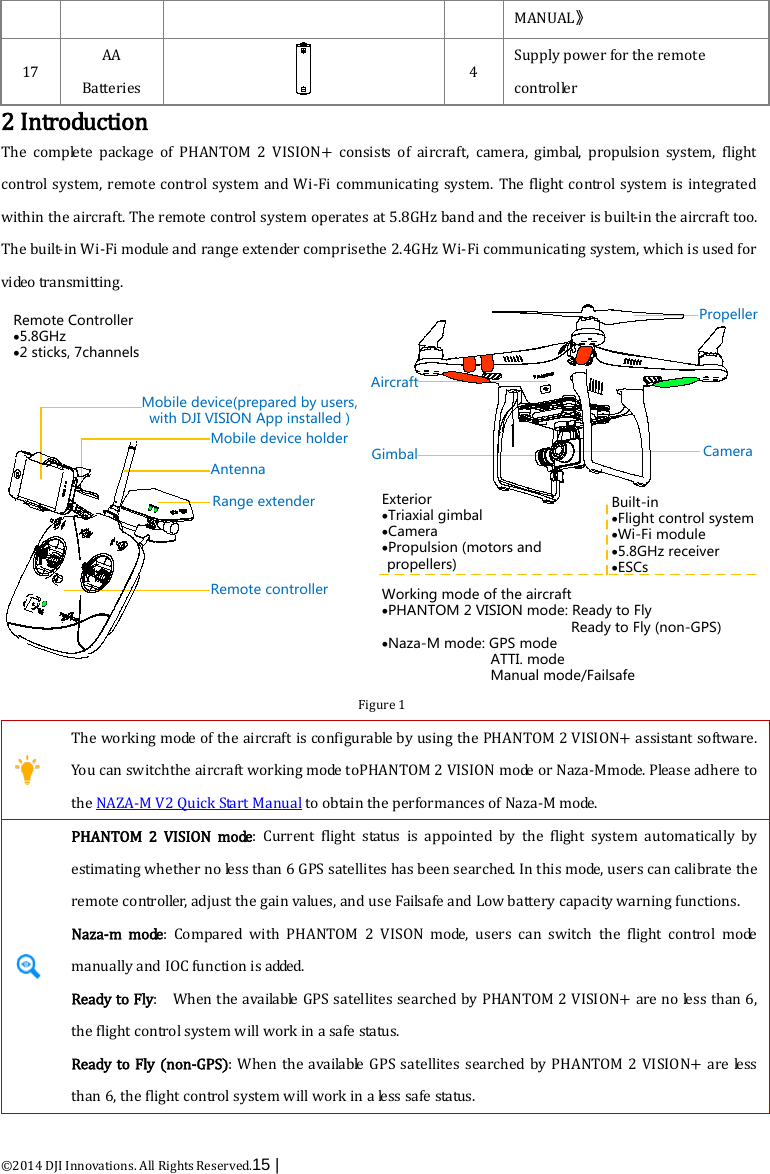
Navigation menu
Upload a User Manual
Namespaces
Wiki Guide
HTML
PDF
Info
Views
User Manual
Discussion / Help
Navigation


![©2014 DJI Innovations. All Rights Reserved.10 | 3.1 INTRODUCTION ........................................................................................................................................................................................... 223.2 BUILT-IN FLIGHT CONTROL SYSTEM INSTRUCTIONS ............................................................................................................................. 22Assistant Software Port .......................................................................................................................................................................... 233.3 LED FLIGHT INDICATORS DESCRIPTION ................................................................................................................................................. 23Front LEDs .................................................................................................................................................................................................. 233.4 CAMERA ....................................................................................................................................................................................................... 24Removing the camera lens cap ........................................................................................................................................................... 25Camera function button ......................................................................................................................................................................... 25Camera Data Port ..................................................................................................................................................................................... 25Camera Indicator ..................................................................................................................................................................................... 253.5 TRIAXIAL GIMBAL ....................................................................................................................................................................................... 26Gimbal specifications ............................................................................................................................................................................. 26Micro-SD Slot ............................................................................................................................................................................................. 26Gimbal Motor Error Warning .............................................................................................................................................................. 264 ATTACHING THE PROPELLERS ................................................................................................................................................................. 284.1 INTRODUCTION ........................................................................................................................................................................................... 284.2 ASSEMBLY .................................................................................................................................................................................................... 284.3 REMOVING THE PROPELLERS .................................................................................................................................................................... 284.4 NOTES .......................................................................................................................................................................................................... 295 PREPARING THE REMOTE CONTROLLER ............................................................................................................................................ 305.1 THE REMOTE CONTROLLER ...................................................................................................................................................................... 305.2 POWER ON THE REMOTE CONTROLLER .................................................................................................................................................. 305.3 REMOTE CONTROLLER POWER INDICATOR STATUS INFORMATION .................................................................................................... 315.4 ANTENNA ORIENTATION ........................................................................................................................................................................... 325.5 REMOTE CONTROLLER OPERATION ......................................................................................................................................................... 325.6 LINK BETWEEN THE REMOTE CONTROLLER AND RECEIVER ................................................................................................................ 34Link Procedures ........................................................................................................................................................................................ 34Link Indicator ............................................................................................................................................................................................ 345.7 COMPLIANCE VERSION CONFIGURATION ................................................................................................................................................. 346 PREPARING THE RANGE EXTENDER ..................................................................................................................................................... 366.1 THE RANGE EXTENDER ............................................................................................................................................................................. 36SYSTEM Indicator .................................................................................................................................................................................... 36Power Indicator (POWER) ................................................................................................................................................................... 36Reset Button ............................................................................................................................................................................................... 376.2 USAGE ........................................................................................................................................................................................................... 37Charging the Range Extender .............................................................................................................................................................. 37Powering on the Range Extender ...................................................................................................................................................... 37Battery capacity level display ............................................................................................................................................................... 37Low battery capacity warning ............................................................................................................................................................ 386.3 RENAME SSID OF RANGE EXTENDER ...................................................................................................................................................... 386.4 BINDING THE CAMERA & RANGE EXTENDER ......................................................................................................................................... 387 DOWNLOADING AND INSTALLING THE DJI VISION APP ................................................................................................................ 417.1 DOWNLOAD AND INSTALL ......................................................................................................................................................................... 417.2 REGISTER & LOGIN ..................................................................................................................................................................................... 41[1] Register ................................................................................................................................................................................................. 41](https://usermanual.wiki/SZ-DJI-TECHNOLOGY/PV3311402.User-Manual-Part-1/User-Guide-2214438-Page-11.png)
![©2014 DJI Innovations. All Rights Reserved.11 | [2] Login ...................................................................................................................................................................................................... 42[3] Usage tips ............................................................................................................................................................................................. 428 CONNECTING THE CAMERA ...................................................................................................................................................................... 448.1 CONNECTING PROCEDURES ....................................................................................................................................................................... 44FLIGHT ................................................................................................................................................................................................................... 46Flight Environment Requirement ..................................................................................................................................................... 461 CALIBRATING THE COMPASS .................................................................................................................................................................... 461.1 CALIBRATION PROCEDURES ...................................................................................................................................................................... 461.2 RECALIBRATION SCENARIOS ..................................................................................................................................................................... 472 STARTING THE MOTORS ............................................................................................................................................................................. 483 TAKEOFF/LANDING PROCEDURES ......................................................................................................................................................... 484 FAILSAFE FUNCTION .................................................................................................................................................................................... 494.1 POSSIBLE FAILSAFE SCENARIO ................................................................................................................................................................. 494.2 FAILSAFE PROCEDURE ................................................................................................................................................................................ 49Failsafe on the DJI VISION App ........................................................................................................................................................... 504.3 REGAINING CONTROL DURING FAILSAFE PROCEDURE .......................................................................................................................... 505 LOW BATTERY CAPACITY WARNING FUNCTION ........................................................................................................................................ 52First Level Battery Low Warning ....................................................................................................................................................... 52Second Level Battery Low Warning ................................................................................................................................................. 52DJI VISION App Low Battery Capacity Warning .......................................................................................................................... 52DJI VISION APP USAGE .................................................................................................................................................................................... 531 DJI VISION APP MAIN MENU ..................................................................................................................................................................... 532 CAMERA PAGE ................................................................................................................................................................................................. 54[1] RETURN ........................................................................................................................................................................................................ 54[2] CAMERA PITCH CONTROL .......................................................................................................................................................................... 54Normal Mode ............................................................................................................................................................................................. 54Accelerometer Sensor Mode ................................................................................................................................................................ 54[3]FLIGHT ATTITUDE AND RADAR FUNCTION .............................................................................................................................................. 56[4] FLIGHT PARAMETERS ................................................................................................................................................................................. 56[5] WI-FI SIGNAL INTENSITY .......................................................................................................................................................................... 57[6] AIRCRAFT BATTERY LEVEL ....................................................................................................................................................................... 57[7]AIRCRAFT GPS STATUS ............................................................................................................................................................................... 57[8] MICRO-SD CARD STATUS ........................................................................................................................................................................... 57[9] REMAINING SHOTS ..................................................................................................................................................................................... 57[10] SHUTTER BUTTON ................................................................................................................................................................................... 58[11] VIDEO RECORDING BUTTON ................................................................................................................................................................... 58[12] CAMERA SETTINGS ................................................................................................................................................................................... 58[13] HIDE OR SHOW FLIGHT PARAMETERS. .................................................................................................................................................. 583 CAMERA SETTINGS ....................................................................................................................................................................................... 59[1] CAPTURE MODE .......................................................................................................................................................................................... 59[2] PHOTO SIZE ................................................................................................................................................................................................. 59](https://usermanual.wiki/SZ-DJI-TECHNOLOGY/PV3311402.User-Manual-Part-1/User-Guide-2214438-Page-12.png)
![©2014 DJI Innovations. All Rights Reserved.12 | [3] VIDEO RESOLUTION .................................................................................................................................................................................... 59[4] PHOTO FORMAT .......................................................................................................................................................................................... 60[5] SELECTABLE ISO ......................................................................................................................................................................................... 60[6] WHITE BALANCE ........................................................................................................................................................................................ 60[7] EXPOSURE METERING ................................................................................................................................................................................ 60[8] EXPOSURE COMPENSATION ....................................................................................................................................................................... 61[9] SHARPNESS .................................................................................................................................................................................................. 61[10] ANTI-FLICKER ........................................................................................................................................................................................... 61[11] RESTORE DEFAULT SETTINGS ................................................................................................................................................................. 61[12] FORMAT MICRO-SD CARD ...................................................................................................................................................................... 614 ALBUM PAGE .................................................................................................................................................................................................... 62SD CARD ALBUM ............................................................................................................................................................................................. 62MOBILE DEVICE ALBUM ................................................................................................................................................................................... 645 NEWS PAGE ...................................................................................................................................................................................................... 666 SETTINGS PAGE .............................................................................................................................................................................................. 67[1] TOOLBAR AUTO HIDE ................................................................................................................................................................................. 67[2] WHEN CONNECTION LOST ........................................................................................................................................................................ 67[17] Stop Recording: ............................................................................................................................................................................... 67[3] CAMERA SETTINGS DISPLAY ...................................................................................................................................................................... 68[4] PREVIEW QUALITY ..................................................................................................................................................................................... 68[5] PARAMETER UNIT ....................................................................................................................................................................................... 68[6] YAW AXIAL CONTROL ................................................................................................................................................................................ 69[7] AUTO FLIPS .................................................................................................................................................................................................. 69[8] BATTERY LOW WARNING .......................................................................................................................................................................... 69[9] TUTORIAL .................................................................................................................................................................................................... 69[10] CLEAR NEWS CACHE ................................................................................................................................................................................ 69[11] BINDING .................................................................................................................................................................................................... 69[12] RENAME SSID OF RANGE EXTENDER ................................................................................................................................................... 69[13] FIND MY PHANTOM 2 VISION+ ...................................................................................................................................................... 70[14] ACCOUNT ................................................................................................................................................................................................... 70[15] RATE .......................................................................................................................................................................................................... 70[16] ABOUT ....................................................................................................................................................................................................... 70ASSISTANT SOFTWARE ................................................................................................................................................................................... 711 INSTALLING DRIVER AND PHANTOM 2 VISION+ ASSISTANT SOFTWARE ............................................................................. 71INSTALLING AND RUNNING ON WINDOWS ...................................................................................................................................................... 71INSTALLING AND RUNNING ON MAC OS X ...................................................................................................................................................... 712 USING THE ASSISTANT SOFTWARE ........................................................................................................................................................ 732.1 USING THE PHANTOM 2 VISION+ ASSISTANT SOFTWARE ............................................................................................................. 73Firmware upgrade of the PHANTOM 2 VISION+ ........................................................................................................................ 732.2 PHANTOM RC ASSISTANT SOFTWARE USAGE ..................................................................................................................................... 74APPENDIX ............................................................................................................................................................................................................. 761 LED FLIGHT INDICATOR STATUS ............................................................................................................................................................. 762 SPECIFICATIONS ............................................................................................................................................................................................ 77](https://usermanual.wiki/SZ-DJI-TECHNOLOGY/PV3311402.User-Manual-Part-1/User-Guide-2214438-Page-13.png)
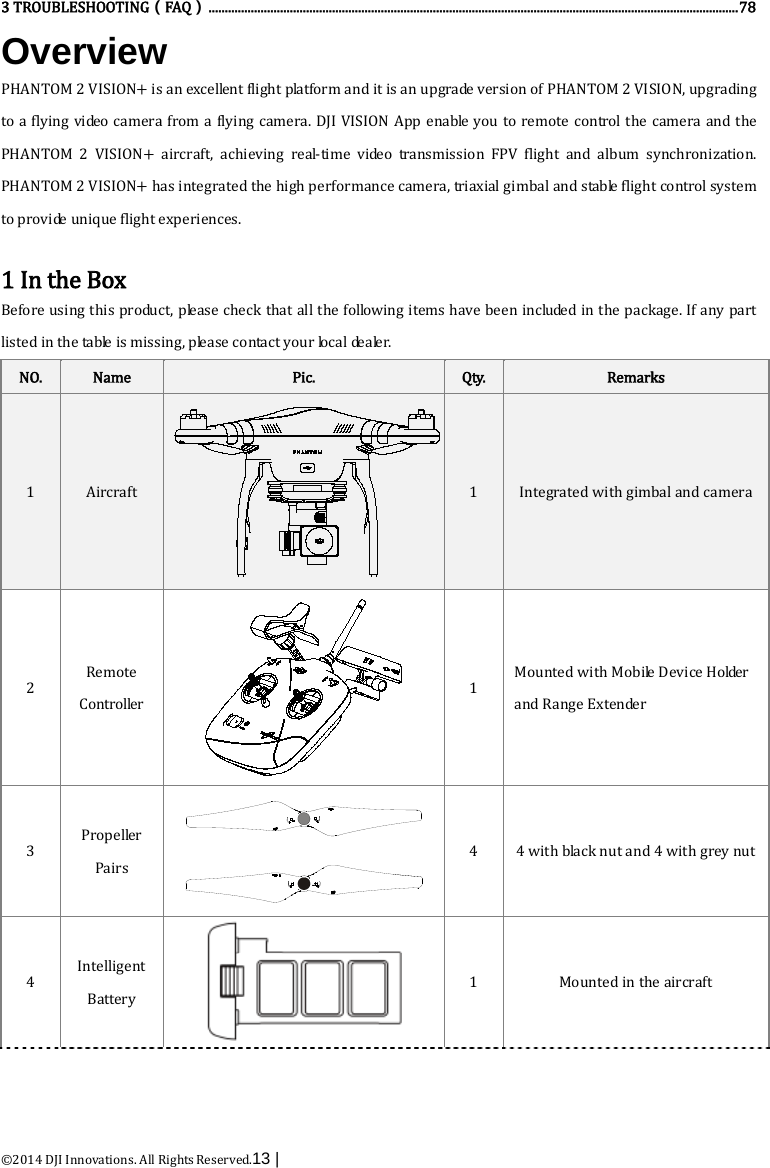

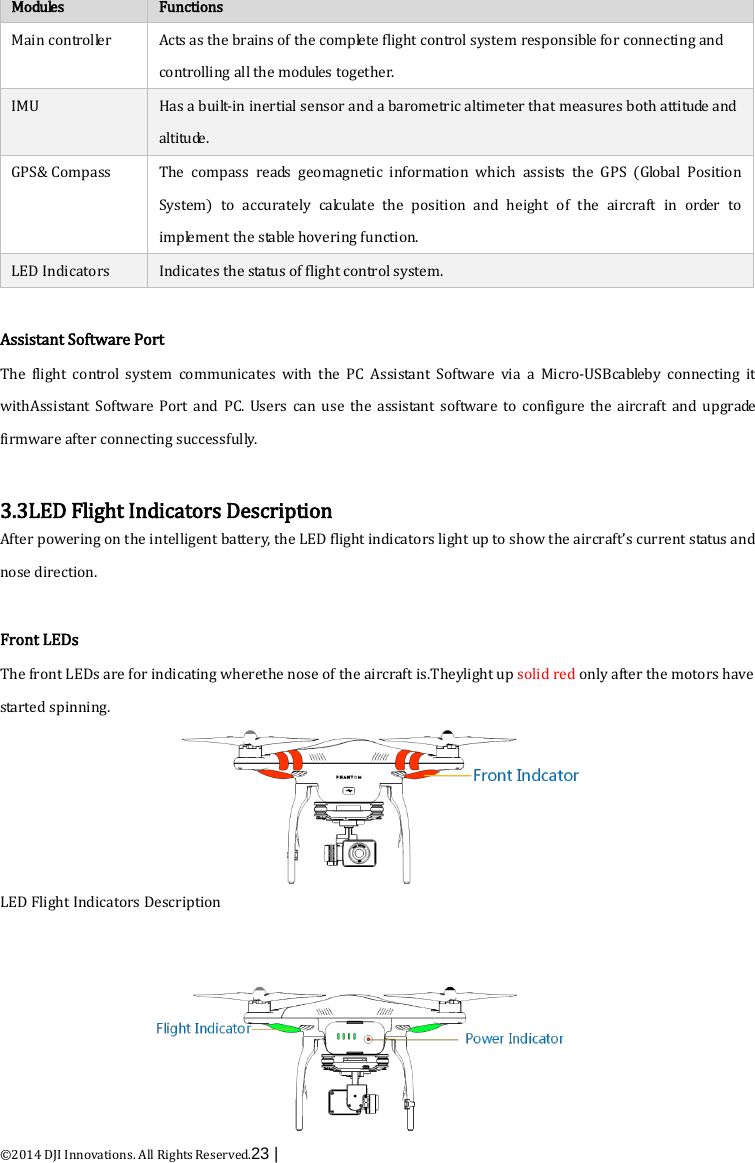
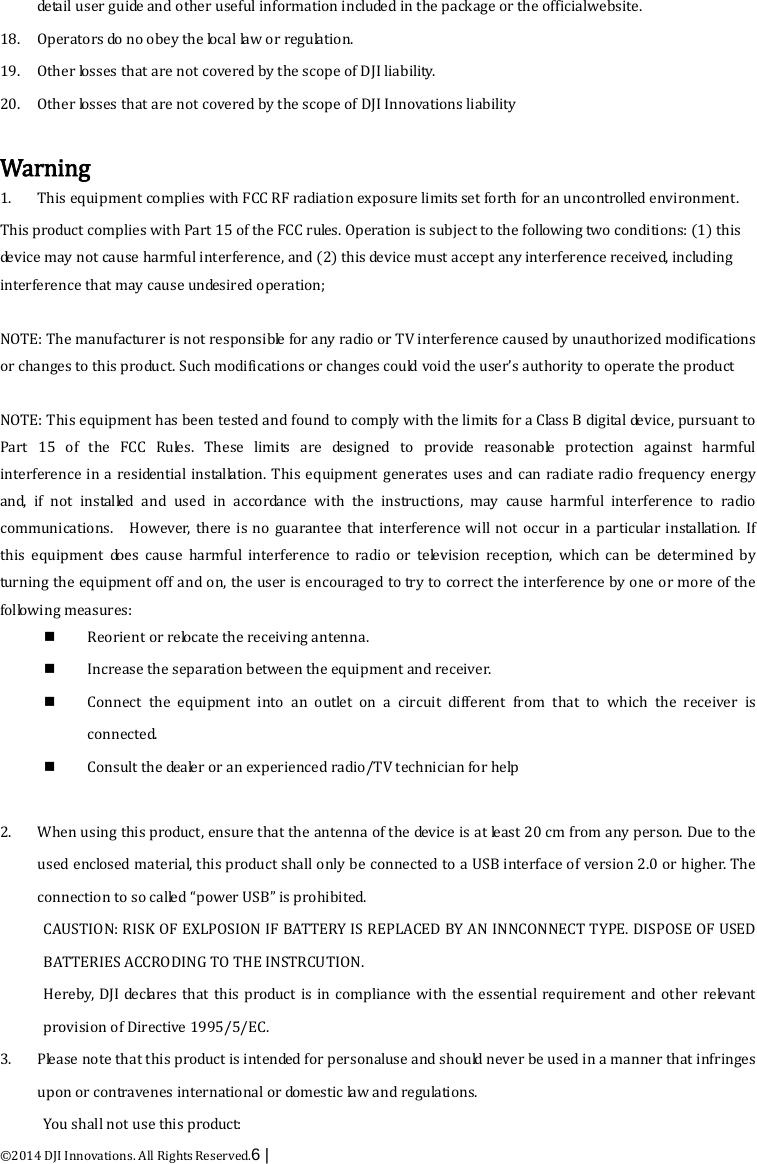
![©2014 DJI Innovations. All Rights Reserved.22 | 3Preparing PHANTOM 2 VISION+ Aircraft PHANTOM 2 VISION+ aircraft is a quadrotor with built-in flight control system and has integrated with gimbal and camera, it also has a Micro-USB port on the aircraft for connecting to Assistant Software and anotherMicro-USB port on the gimbal for connectingMicro-SD cardof camera. The aircraft has battery compartment specialized for the intelligent battery, it also has LED flight indicators for status indicating. All these features make the PHANTOM 2 VISION+ easy to assemble and configure. 3.1Introduction [1][2][7][3][4][5][6][8] [9][10] [11][12][14][13][15][16] [17] [1] [2] [3] [4] [5] [6] [7] [8] [9] [10] [11] [12] [13] [14] [15] [16] [17] Propeller Motor Nose Sticker Nose LED FC Assistant Port(Micro-USB port) Vibration Absorber Camera LED Indicator Camera Function Button Triaxial Gimbal Camera Lens Rear LED DJISmart Battery Receiver Antenna Landing Gear Camera Data Port(Micro-USB port) Compass Micro-SD Slo t 3.2 Built-in Flight Control System Instructions PHANTOM 2 VISION+ is equipped with DJI Naza-M V2 flight control system which helps to improve operability and stability. With the flight control system, users can control the entire aircraft’s functions in flight such as Pitch (forwards and backwards), Roll (left and right), Elevator (up and down) and Yaw (turn left or right). When the aircraft enters the IOC, failsafe or low battery capacitym o de , the flight control system will navigate the aircraft to ensure flight stability and safe.](https://usermanual.wiki/SZ-DJI-TECHNOLOGY/PV3311402.User-Manual-Part-1/User-Guide-2214438-Page-23.png)