SZ DJI TECHNOLOGY PV3311402 PHANTOM 2 VISION + User Manual PHANTOM 2 VISION
SZ DJI TECHNOLOGY CO., LTD PHANTOM 2 VISION + PHANTOM 2 VISION
Contents
- 1. User Manual Part 1
- 2. User Manual Part 2
- 3. User Manual Part 3
User Manual Part 1

PHANTOM 2 VISION+
User Manual

©2014 DJI Innovations. All Rights Reserved.1 |
PHANTOM 2 VISION+User Manual V1.0
February 14, 2014 Revised
Congratulations on purchasing your new DJI product. Please thoroughly read the entire contents of this manual to
fully use and understand the product.
It is advised that you regularly check the PHANTOM 2 VISION+’s product pageat www.dji.comwhich is
updated on a regular basis. This will provide services such as product information, technical updates and manual
corrections. Due to any unforeseen changes or product upgrades, the information contained within this manual is
subject to change without notice.
If you have any questions or concerns regarding your product, please contact your DJI authorized dealer or DJI
Customer Service.

©2014 DJI Innovations. All Rights Reserved.2 |
Before Use
Disclaimer &Warning
Please read this disclaimer carefully before using this product. This product is not suitable for people under age of
18. By using this product, you hereby agree to this disclaimer and signify that you have read them fully. You agree
that you are responsible for your own conduct and content while using this product, and for any consequence
thereof. You agree to use this product only for the purposes that are proper and in accordance with the terms and
any applicable polices and guidelines DJI may make available.
Instructions
This product is an excellent flight platform offering an excellent flight experience in low attitude outdoor or larger
indoor space, only if it is powered normally and in a good working condition.
1. This product is designed to achieve excellent performance when used with genuine DJI accessories. DJI shall
not be liable for any damages to this product and/ or accidents by the malfunctions of non-genuine DJI
accessories.
2. Despite this product having a built-in autopilot system and out efforts in making the operation of the
controller as safe as possible when the main power battery is connected, we strongly recommended users to
remove all propellers when calibrating and setting the parameters.
3. Make sure all connections are good, and keep children and animals way during firmware upgrade, system
calibration and parameter setup.
Cautions for Aircraft User
Please check the following steps carefully every time before flight.
1. Always fly the multi-rotor in the safe condition and keep your multi-rotor away from the obstacles, crowds
and high-voltage lines, etc.
2. Do not overload the multi-ro tor.
3. Check whether the propeller and the motor are install correctly and firmly before flight. Make sure the
rotation direction of each propeller is correct. Do not get close to or even touch the working motors or
propellers to avoid serious injury.
4. Try to avoid interference between the remote control transmitter and other wireless equipment.
5. Make sure that the R/C battery and flight battery are fully charged.
6. Make sure to switch on the transmitter first, then power on the multi-rotor before takeoff. Power off the
multi-rotor first, then switch off the transmitter after landing.
7. Check whether all parts of the multi-rotor are in good condition before flight. Do not flight with aging or

©2014 DJI Innovations. All Rights Reserved.3 |
damaged parts.
8. Do not use in the magnetic interference area, radio interference area. This will lead to communication or
other failures.
9. Do not use in the server weather condition such as rainy day, snow, windy (more than moderated breeze),
hail, lighting, tornadoes and hurricanes etc.
10. Before flying, please read all instruction on the quick start guide and detail user guide and other useful
information included in the package or the official website.
Cautions for Airborne Camera Use
1. Do not allow the camera into contact with, or become immersed in, water or other liquids. If the exterior
comes into contact with liquids or moisture air, wipe it dry with a soft, absorbent cloth
2. Do not use substance containing alcohol, benzene, thinners or other flammable substances to clean or
maintain the camera.
3. Do not store the camera in humid or dusty area.
4. Avoid using, placing or storing the camera in the places subject to strong sunlight or high temperatures.
5. Stop operating the camera immediately if it emits smoke or noxious fumes.
6. Shoot several trail images to verify that the camera is operating and being operated correctly before you try
to photograph or shoot important pictures.
Using Lithium Polymer (LiPo) Batteries
LiPo batteries can be extremely hazardous and requires special attention when you are handling them. Observe
the following recommendations for the use of these batteries.
1. LiPo batteries must be charged with a LiPo charger. Never attempt to charge LiPo batteries with a charger
that is not specifically designed for charging LiPo batteries.
2. Never overcharge LiPo batteries. Overcharging may result in an explosion or fire. Do not charge above 4.2V
per cell. When the battery is fully charge, disconnect it from the charger.
3. Ensure the chargers are properly set when using the selectable or adjustable charger.
4. Never leave the battery charger unattended during charging.
5. Do not charge the batter (i) while still connect to the aircraft, (ii) inside a vehicle, and (iii) near flammable
materials or on a flammable surface such as carpet or wood.
6. Never charge a swollen battery, a leaky battery or one which has been damaged.
7. It is recommended that batteries be charged and store in a fireproof container.
8. Examine the charger regularly for damage to the cord, plug, enclosure or other parts. Never use a damaged
charger.
9. Disconnect the charger when not in use.

©2014 DJI Innovations. All Rights Reserved.4 |
10. Do not clean the charger with a solvent denatured alcohol or other flammable solvents.
Usage and Storage
Keep the batteries out of the reach of children and pets.
Never discharge batteries below 3V per cell.
Do not heat the battery.
Do not insert or remove the batteries if the plastic cover had been torn or compromised in any way.
Do not insert or remove the batteries in the charger or the craft while the power is on.
Do not expose the batteries to excessive physical shock.
Never use a swollen battery or a leaky battery, or one which is damaged or giving off an unusual odor.
Clean the battery terminals with a dry and clean cloth.
Do not expose batteries to extreme temperatures including excessive heat. Do not leave the batteries inside of the
vehicle on hot days.
Do not allow batteries to come into contact with any kind of liquid. Do not leave batteries out in rain or near a
source of moisture.
Do not le a ve batteries in a microwave oven or in a pressurized container.
Do not attempt to dismantle, pierce or cut a battery and do not attempt to repair the batteries by yourself.
Do not place loose battery cells on any conductive surface, such as metal-toppled table. Do not put the loose cell in
pocket, bag or drawer where they may short-circuit against other items or the battery terminals could be pressed
against each other.
Do not place or use the batteries in strong electrostatic or electromagnetic surface or surrounding area which may
result in battery damage.
Do not place any heavy object on the batteries or charger. Avoid dropping the batteries to the ground.
Avoid direct contact with the electrolyte contained within the batteries as the electrolyte and electrolysis vapors is
harmful to your health.
Remove batteries when finish using the craft.
Battery Disposal
Discarding the batteries in your general household wastes impacts the environment. Please dispose the batteries
in an environmental-friendly manner.
Do not dispose of batteries in the fire.
Damaged or unusable batteries must be disposed of in a container specially reserved for this special purpose.
When disposing of the batteries, follow appropriate local guideline and regulations. For further information contact
your local solid waste authority or your battery store.
Make sure flight battery is firmly installed before flying.

©2014 DJI Innovations. All Rights Reserved.5 |
Always use DJI approved battery.
Always use DJI approved charger to recharge the flight battery.
Limitation of Liability
DJI accepts no liability for damage(s) or injuries incurred directly or indirectly from the use of this product in the
following conditions:
1. Damage(s) or injuries incurred when users are drunk, taking drugs, drug anesthesia, dizziness, fatigue,
nausea and any other conditions no matter physically or mentally that could impair your ability.
2. Damage(s) or injuries caused by subjective intentional operations. Any mental damage compensation caused
by accident.
3. Any mental damage compensation caused by accident.
4. Failure to follow the guidance of the manual to assemble or operate.
5. Malfunctions caused by refit or replacement with non-DJI accessories and parts.
6. Damage(s) or injuries caused by using third party products or fake DJI products.
7. Damage(s) or injuries caused by mis-operation or subjective mis-judgment.
8. Damage(s) or injuries caused by mechanical failures due to erosion, aging.
9. Damage(s) or injuries caused by continued flying after low voltage protection alarm is triggered.
10. Damage(s) or injuries caused by knowingly flying the aircraft in abnormal condition (such as water, oil, soil,
sand and other unknown material ingress into the aircraft or the assembly is not completed, the main
components have obvious faults, obvious defect or missing accessories).
11. Damage(s) or injuries caused by flying in the following situations such as the aircraft in magnetic
interference area, radio interference area, government regulated no-fly zones or the pilot is in backlight,
blocked, fuzzy sight, and poor eyesight is not suitable for operating and other conditions not suitable for
operating.
12. Damage(s) or injuries caused by using in bad weather, such as a rainy day or windy (more than moderate
breeze), snow, hail, lightning, tornadoes, hurricanes etc.
13. Damage(s) or injuries caused when the aircraft is in the following situations: collision, fire, explosion, floods,
tsunamis, subsidence, ice trapped, avalanche, debris flow, landslide, earthquake, etc.
14. Damage(s) or injuries caused by infringement such as any data, audio or video material recorded by the use
of aircraft.
15. Damage(s) or injuries caused by the misuse of the battery, protection circuit, RC model and battery chargers.
16. Consequential damages caused by any malfunction of an equipment or accessory, including memory cards,
that result in the failure on an image or video to be recorded or to be recorded in a way that machine
readable.
17. Any consequential damages caused by operations that do not follow all instruction in the quick start guide,

©2014 DJI Innovations. All Rights Reserved.6 |
detail user guide and other useful information included in the package or the officialwebsite.
18. Operators do no obey the local law or regulation.
19. Other losses that are not covered by the scope of DJI liability.
20. Other losses that are not covered by the scope of DJI Innovations liability
Warning
1. This equipment complies with FCC RF radiation exposure limits set forth for an uncontrolled environment.
This product complies with Part 15 of the FCC rules. Operation is subject to the following two conditions: (1) this
de v i c e may not cause harmful interference, and (2) this de v i c e must accept any interference received, including
interference that may cause undesired operation;
NOTE: The manufacturer is not responsible for any radio or TV interference caused by unauthorized modifications
or changes to this product. Such modifications or changes could void the user’s authority to operate the product
NOTE: This equipment has been tested and found to comply with the limits for a Class B digital device, pursuant to
Part 15 of the FCC Rules. These limits are designed to provide reasonable protection against harmful
interference in a residential installation. This equipment generates uses and can radiate radio frequency energy
and, if not installed and used in accordance with the instructions, may cause harmful interference to radio
communications. However, there is no guarantee that interference will not occur in a particular installation. If
this equipment does cause harmful interference to radio or television reception, which can be determined by
turning the equipment off and on, the user is encouraged to try to correct the interference by one or more of the
following measures:
Reorient or relocate the receiving antenna.
Increase the separation between the equipment and receiver.
Connect the equipment into an outlet on a circuit different from that to which the receiver is
connected.
Consult the dealer or an experienced radio/TV technician for help
2. When using this product, ensure that the antenna of the device is at least 20 cm from any person. Due to the
used enclosed material, this product shall only be connected to a USB interface of version 2.0 or higher. The
connection to so called “power USB” is prohibited.
CAUSTION: RISK OF EXLPOSION IF BATTERY IS REPLACED BY AN INNCONNECT TYPE. DISPOSE OF USED
BATTERIES ACCRODING TO THE INSTRCUTION.
Hereby, DJI declares that this product is in compliance with the essential requirement and other relevant
provision of Directive 1995/5/EC.
3. Please note that this product is intended for personaluse and should never be used in a manner that infringes
upon or contravenes international or domestic law and regulations.
You shall not use this product:
©2014 DJI Innovations. All Rights Reserved.7 |
a) Defame, abuse, harass, stalk, threaten or otherwiseviolate the legal rights (such as right of privacy
and publicity) of others;
b) Photograph people or their privacy area without their consent or photograph any non-photograph
area with the prior authorizations;
c) Use this product for any illegal or inappropriate purpose other than general personal use (such as
spy, unauthorized investigation and unauthorized detection);
d) Violate or disregard any other applicable local laws, administrative rules and social habits.
Please be advise that in certain area that copying of images and videos from shooting, performances,
exhibitions, or commercial properties by mean of a camera of other devices may contravene copyright or
other legal right even if the image or video was shot for personal use.
If you have any problem you cannot solve during installation, please contact the DJI authorized dealers.
Name of the products, brand, etc. appearing in this manual are trademarks or registered trademarks of their
respective owner companies. This product and manual are copyrighted by DJI with all right reserved. No part of this
product or manual shall be reproduced in any form without the prior written consent or authorization of DJI. No
patent liability is assumed with respect to the use of product or information contained herein.
Using this manual
Symbol in this manual
Forbidden operations
Important notes
Tips
References or definitions
Convention
Except specific explain, all the descriptions of PHANTOM 2 VISION+ in this manual assume that the working mode
is PHANTOM 2 VISION m o de rather than Naza-M mode.
Using Suggestions
DJI has produced tutorials and printed manuals to help you take full use of PHANTOM 2 VISION+.
(1) PHANTOM PILOT TRAINING GUIDE
(2)PHANTOM 2 VISION+ QUICK START GUIDE
(3)PHANTOM 2 VISION+ USER MANUAL
It’s suggested to watch tutorial videos in first, and conduct your first flight according to PHANTOM 2 VISION+
QUICK START GUIDE. It’s practical if you refer to PHANTOM PILOT TRAINING GUIDE to enhance your flight skills,
©2014 DJI Innovations. All Rights Reserved.8 |
and you can obtain the most comprehensive details in PHANTOM 2 VISION+ MANUAL. For experienced users,
especially who controls DJI PHANTOM 2 VISION well; you can refer to PHANTOM PILOT TRAINING GUIDE to take
off your aircraft quickly as well.
WatchingTutorial V i de o s
This user manual contains detailed installation and usage procedures of the product. In addition to this manual, we
p r o v i de a range of quick start videos. It is advised that you watch them fully before attempting to use the product.
Approach1
Direct link.
http://www.dji.com/phantom2visionplus/training
Approach 2
Scan the QR code to get the
quick start video link.
Preparingfor flight.
Downloading the DJI VISION App
Before attempting to use the product, please download and install theDJI VISION App.Download the DJI VISION
Appby the approaches listed below:
Approach 1
Download from the App
tore or Google Play.
iOS user
Search “DJI VISION” from App Store.
Android user
Search “DJI VISION” from Google Play.
Approach 2
Scan the QR code to ob tain
the
download link.
Scan the QR code and download.

©2014 DJI Innovations. All Rights Reserved.9 |
Table of Contents
BEFORE USE .......................................................................................................................................................................................................... 2
DISCLAIMER & WARNING ................................................................................................................................................................................ 2
INSTRUCTIONS ..................................................................................................................................................................................................... 2
CAUTIONS FOR AIRCRAFT USER ................................................................................................................................................................... 2
CAUTIONS FOR AIRBORNE CAMERA USE .................................................................................................................................................. 3
USING LITHIUM POLYMER (LIPO) BATTERIES ........................................................................................................................................ 3
USAGE AND STORAGE ........................................................................................................................................................................................ 4
BATTERY DISPOSAL ............................................................................................................................................................................................ 4
LIMITATION OF LIABILITY ............................................................................................................................................................................... 5
WARNING ................................................................................................................................................................................................................ 6
USING THIS MANUAL ......................................................................................................................................................................................... 7
SYMBOL IN THIS MANUAL ................................................................................................................................................................................... 7
CONVENTION ........................................................................................................................................................................................................ 7
USING SUGGESTIONS ........................................................................................................................................................................................... 7
WATCHING TUTORIAL VIDEOS ........................................................................................................................................................................... 8
DOWNLOADING THE DJI VISION APP ............................................................................................................................................................. 8
TABLE OF CONTENTS ......................................................................................................................................................................................... 9
OVERVIEW ............................................................................................................................................................................................................ 13
1 IN THE BOX ....................................................................................................................................................................................................... 13
2 INTRODUCTION .............................................................................................................................................................................................. 15
3 QUICK START GUIDE ..................................................................................................................................................................................... 16
ASSEMBLIES AND USAGES ............................................................................................................................................................................. 17
1 REMOVING THE GIMBAL CLAMP ............................................................................................................................................................. 17
2 PREPARING BATTERY .................................................................................................................................................................................. 17
2.1 DJI INTELLIGENT BATTERY ....................................................................................................................................................................... 17
2.2 USAGES ......................................................................................................................................................................................................... 18
Powering on/off
....................................................................................................................................................................................... 18
Checking the battery level
.................................................................................................................................................................... 19
Checking the battery life
....................................................................................................................................................................... 19
2.3 CHARGING THE INTELLIGENT BATTERY .................................................................................................................................................. 20
2.4 INSTALL THE BATTERY ............................................................................................................................................................................... 20
2.5 CORRECT BATTERY USAGE NOTES ........................................................................................................................................................... 21
3 PREPARING PHANTOM 2 VISION+ AIRCRAFT ................................................................................................................................... 22

©2014 DJI Innovations. All Rights Reserved.10 |
3.1 INTRODUCTION ........................................................................................................................................................................................... 22
3.2 BUILT-IN FLIGHT CONTROL SYSTEM INSTRUCTIONS ............................................................................................................................. 22
Assistant Software Port
.......................................................................................................................................................................... 23
3.3 LED FLIGHT INDICATORS DESCRIPTION ................................................................................................................................................. 23
Front LEDs
.................................................................................................................................................................................................. 23
3.4 CAMERA ....................................................................................................................................................................................................... 24
Removing the camera lens cap
........................................................................................................................................................... 25
Camera function button
......................................................................................................................................................................... 25
Camera Data Port
..................................................................................................................................................................................... 25
Camera Indicator
..................................................................................................................................................................................... 25
3.5 TRIAXIAL GIMBAL ....................................................................................................................................................................................... 26
Gimbal specifications
............................................................................................................................................................................. 26
Micro-SD Slot
............................................................................................................................................................................................. 26
Gimbal Motor Error Warning
.............................................................................................................................................................. 26
4 ATTACHING THE PROPELLERS ................................................................................................................................................................. 28
4.1 INTRODUCTION ........................................................................................................................................................................................... 28
4.2 ASSEMBLY .................................................................................................................................................................................................... 28
4.3 REMOVING THE PROPELLERS .................................................................................................................................................................... 28
4.4 NOTES .......................................................................................................................................................................................................... 29
5 PREPARING THE REMOTE CONTROLLER ............................................................................................................................................ 30
5.1 THE REMOTE CONTROLLER ...................................................................................................................................................................... 30
5.2 POWER ON THE REMOTE CONTROLLER .................................................................................................................................................. 30
5.3 REMOTE CONTROLLER POWER INDICATOR STATUS INFORMATION .................................................................................................... 31
5.4 ANTENNA ORIENTATION ........................................................................................................................................................................... 32
5.5 REMOTE CONTROLLER OPERATION ......................................................................................................................................................... 32
5.6 LINK BETWEEN THE REMOTE CONTROLLER AND RECEIVER ................................................................................................................ 34
Link Procedures
........................................................................................................................................................................................ 34
Link Indicator
............................................................................................................................................................................................ 34
5.7 COMPLIANCE VERSION CONFIGURATION ................................................................................................................................................. 34
6 PREPARING THE RANGE EXTENDER ..................................................................................................................................................... 36
6.1 THE RANGE EXTENDER ............................................................................................................................................................................. 36
SYSTEM Indicator
.................................................................................................................................................................................... 36
Power Indicator (POWER)
................................................................................................................................................................... 36
Reset Button
............................................................................................................................................................................................... 37
6.2 USAGE ........................................................................................................................................................................................................... 37
Charging the Range Extender
.............................................................................................................................................................. 37
Powering on the Range Extender
...................................................................................................................................................... 37
Battery capacity level display
............................................................................................................................................................... 37
Low battery capacity warning
............................................................................................................................................................ 38
6.3 RENAME SSID OF RANGE EXTENDER ...................................................................................................................................................... 38
6.4 BINDING THE CAMERA & RANGE EXTENDER ......................................................................................................................................... 38
7 DOWNLOADING AND INSTALLING THE DJI VISION APP ................................................................................................................ 41
7.1 DOWNLOAD AND INSTALL ......................................................................................................................................................................... 41
7.2 REGISTER & LOGIN ..................................................................................................................................................................................... 41
[1] Register
................................................................................................................................................................................................. 41

©2014 DJI Innovations. All Rights Reserved.11 |
[2] Login
...................................................................................................................................................................................................... 42
[3] Usage tips
............................................................................................................................................................................................. 42
8 CONNECTING THE CAMERA ...................................................................................................................................................................... 44
8.1 CONNECTING PROCEDURES ....................................................................................................................................................................... 44
FLIGHT ................................................................................................................................................................................................................... 46
Flight Environment Requirement
..................................................................................................................................................... 46
1 CALIBRATING THE COMPASS .................................................................................................................................................................... 46
1.1 CALIBRATION PROCEDURES ...................................................................................................................................................................... 46
1.2 RECALIBRATION SCENARIOS ..................................................................................................................................................................... 47
2 STARTING THE MOTORS ............................................................................................................................................................................. 48
3 TAKEOFF/LANDING PROCEDURES ......................................................................................................................................................... 48
4 FAILSAFE FUNCTION .................................................................................................................................................................................... 49
4.1 POSSIBLE FAILSAFE SCENARIO ................................................................................................................................................................. 49
4.2 FAILSAFE PROCEDURE ................................................................................................................................................................................ 49
Failsafe on the DJI VISION App
........................................................................................................................................................... 50
4.3 REGAINING CONTROL DURING FAILSAFE PROCEDURE .......................................................................................................................... 50
5 LOW BATTERY CAPACITY WARNING FUNCTION ........................................................................................................................................ 52
First Level Battery Low Warning
....................................................................................................................................................... 52
Second Level Battery Low Warning
................................................................................................................................................. 52
DJI VISION App Low Battery Capacity Warning
.......................................................................................................................... 52
DJI VISION APP USAGE .................................................................................................................................................................................... 53
1 DJI VISION APP MAIN MENU ..................................................................................................................................................................... 53
2 CAMERA PAGE ................................................................................................................................................................................................. 54
[1] RETURN ........................................................................................................................................................................................................ 54
[2] CAMERA PITCH CONTROL .......................................................................................................................................................................... 54
Normal Mode
............................................................................................................................................................................................. 54
Accelerometer Sensor Mode
................................................................................................................................................................ 54
[3]FLIGHT ATTITUDE AND RADAR FUNCTION .............................................................................................................................................. 56
[4] FLIGHT PARAMETERS ................................................................................................................................................................................. 56
[5] WI-FI SIGNAL INTENSITY .......................................................................................................................................................................... 57
[6] AIRCRAFT BATTERY LEVEL ....................................................................................................................................................................... 57
[7]AIRCRAFT GPS STATUS ............................................................................................................................................................................... 57
[8] MICRO-SD CARD STATUS ........................................................................................................................................................................... 57
[9] REMAINING SHOTS ..................................................................................................................................................................................... 57
[10] SHUTTER BUTTON ................................................................................................................................................................................... 58
[11] VIDEO RECORDING BUTTON ................................................................................................................................................................... 58
[12] CAMERA SETTINGS ................................................................................................................................................................................... 58
[13] HIDE OR SHOW FLIGHT PARAMETERS. .................................................................................................................................................. 58
3 CAMERA SETTINGS ....................................................................................................................................................................................... 59
[1] CAPTURE MODE .......................................................................................................................................................................................... 59
[2] PHOTO SIZE ................................................................................................................................................................................................. 59

©2014 DJI Innovations. All Rights Reserved.12 |
[3] VIDEO RESOLUTION .................................................................................................................................................................................... 59
[4] PHOTO FORMAT .......................................................................................................................................................................................... 60
[5] SELECTABLE ISO ......................................................................................................................................................................................... 60
[6] WHITE BALANCE ........................................................................................................................................................................................ 60
[7] EXPOSURE METERING ................................................................................................................................................................................ 60
[8] EXPOSURE COMPENSATION ....................................................................................................................................................................... 61
[9] SHARPNESS .................................................................................................................................................................................................. 61
[10] ANTI-FLICKER ........................................................................................................................................................................................... 61
[11] RESTORE DEFAULT SETTINGS ................................................................................................................................................................. 61
[12] FORMAT MICRO-SD CARD ...................................................................................................................................................................... 61
4 ALBUM PAGE .................................................................................................................................................................................................... 62
SD CARD ALBUM ............................................................................................................................................................................................. 62
MOBILE DEVICE ALBUM ................................................................................................................................................................................... 64
5 NEWS PAGE ...................................................................................................................................................................................................... 66
6 SETTINGS PAGE .............................................................................................................................................................................................. 67
[1] TOOLBAR AUTO HIDE ................................................................................................................................................................................. 67
[2] WHEN CONNECTION LOST ........................................................................................................................................................................ 67
[17] Stop Recording:
............................................................................................................................................................................... 67
[3] CAMERA SETTINGS DISPLAY ...................................................................................................................................................................... 68
[4] PREVIEW QUALITY ..................................................................................................................................................................................... 68
[5] PARAMETER UNIT ....................................................................................................................................................................................... 68
[6] YAW AXIAL CONTROL ................................................................................................................................................................................ 69
[7] AUTO FLIPS .................................................................................................................................................................................................. 69
[8] BATTERY LOW WARNING .......................................................................................................................................................................... 69
[9] TUTORIAL .................................................................................................................................................................................................... 69
[10] CLEAR NEWS CACHE ................................................................................................................................................................................ 69
[11] BINDING .................................................................................................................................................................................................... 69
[12] RENAME SSID OF RANGE EXTENDER ................................................................................................................................................... 69
[13] FIND MY PHANTOM 2 VISION+ ...................................................................................................................................................... 70
[14] ACCOUNT ................................................................................................................................................................................................... 70
[15] RATE .......................................................................................................................................................................................................... 70
[16] ABOUT ....................................................................................................................................................................................................... 70
ASSISTANT SOFTWARE ................................................................................................................................................................................... 71
1 INSTALLING DRIVER AND PHANTOM 2 VISION+ ASSISTANT SOFTWARE ............................................................................. 71
INSTALLING AND RUNNING ON WINDOWS ...................................................................................................................................................... 71
INSTALLING AND RUNNING ON MAC OS X ...................................................................................................................................................... 71
2 USING THE ASSISTANT SOFTWARE ........................................................................................................................................................ 73
2.1 USING THE PHANTOM 2 VISION+ ASSISTANT SOFTWARE ............................................................................................................. 73
Firmware upgrade of the PHANTOM 2 VISION+
........................................................................................................................ 73
2.2 PHANTOM RC ASSISTANT SOFTWARE USAGE ..................................................................................................................................... 74
APPENDIX ............................................................................................................................................................................................................. 76
1 LED FLIGHT INDICATOR STATUS ............................................................................................................................................................. 76
2 SPECIFICATIONS ............................................................................................................................................................................................ 77
©2014 DJI Innovations. All Rights Reserved.13 |
3 TROUBLESHOOTING(FAQ) ................................................................................................................................................................... 78
Overview
PHANTOM 2 VISION+ is an excellent flight platform and it is an upgrade version of PHANTOM 2 VISION, upgrading
to a flying video camera from a flying camera. DJI VISION App enable you to remote control the camera and the
PHANTOM 2 VISION+ aircraft, achieving real-time video transmission FPV flight and album synchronization.
PHANTOM 2 VISION+ has integrated the high performance camera, triaxial gimbal and stable flight control system
to provide unique flight experiences.
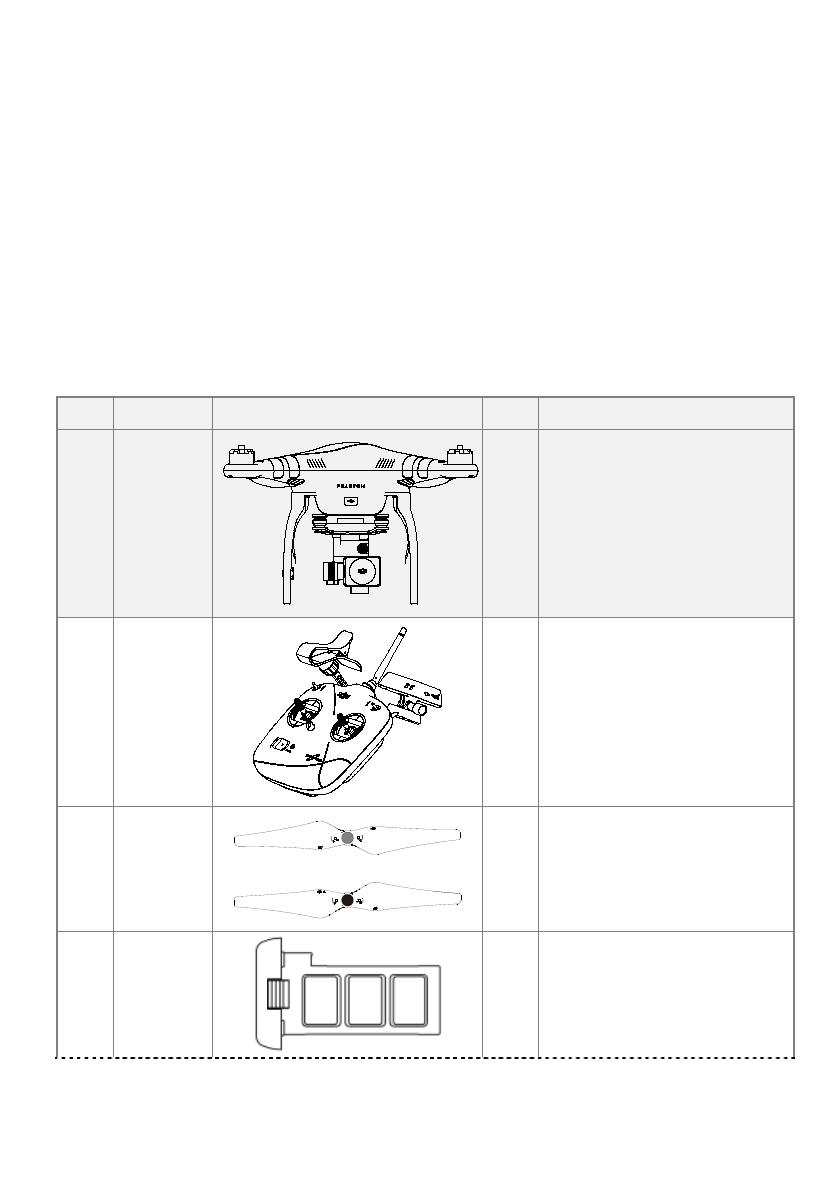
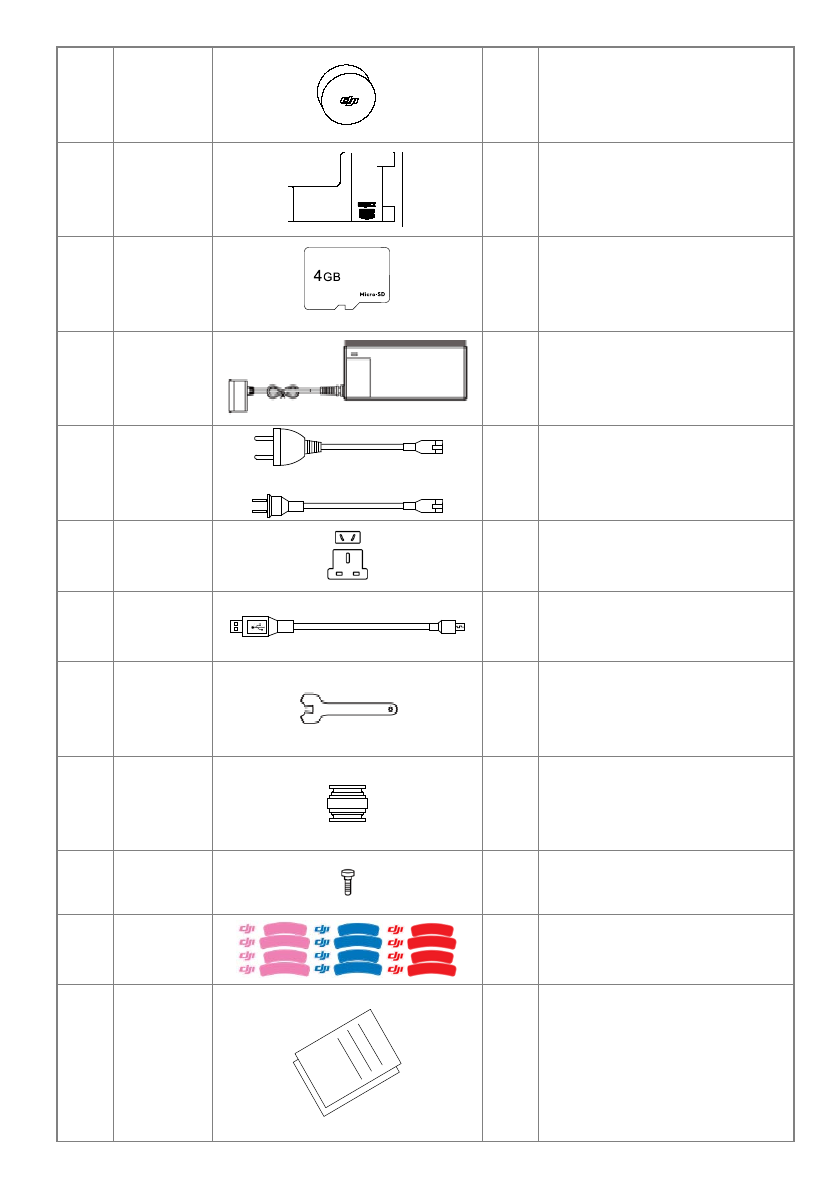
1 In the Box
Before using this product, please check that all the following items have been included in the package. If any part
listed in the table is missing, p le ase contact your lo c a l dealer.
NO.
Name
Pic.
Qty.
Remarks
1 Aircraft
1 Integrated with gimbal and camera
2
Remote
Controller
1
Mounted with Mobile Device Holder
and Range Extender
3
Prop e l le r
Pairs
4 4 with black nut and 4 with grey nut
4
Intelligent
Battery
1 Mounted in the aircraft
©2014 DJI Innovations. All Rights Reserved.14 |
5 Lens Cap
1 Mounted in the aircraft
6
Gimbal
Clamp
1 Mounted in the aircraft
7
Micro-SD
Card
1 Mounted in the aircraft
8 Charger
1
9
Power
Cables
1 GB&CE
10
Plug Set
1
SAA&ANSI
11
Micro-USB
C a b le
1
12
Prop e l le r
Detaching
Wrench
1
13
Spared
Damping
Absorbers
4
14
Spared
Screws
11
M3X5(6pcs)
M3X8(5pcs)
15
Stickers
1
16 Manuals
4
《
DISCLAIMER
》
《PHANTOM PILOT TRAIN GUIDE》
《PHANTOM 2 VISION+ QUICK
START GUIDE》
《
PHANTOM 2 VISION+ USER
©2014 DJI Innovations. All Rights Reserved.15 |
MANUAL
》
17
AA
Batteries
4
Supply power for the remote
controller
2 Introduction
The complete package of PHANTOM 2 VISION+ consists of aircraft, camera, gimbal, propulsion system, flight
control system, remote control system and Wi-Fi communicating system. The flight control system is integrated
within the aircraft. The remote control system operates at 5.8GHz band and the receiver is built-in the aircraft too.
The built-in Wi-Fi module and range extender comprisethe 2.4GHz Wi-Fi communicating system, which is used for
video transmitting.
Propeller
Aircraft
Gimbal Camera
Range extender
Antenna
Remote controller
Mobile device holder
Mobile device(prepared by users,
with DJI VISION App installed )
Built-in
•Flight control system
•Wi-Fi module
•5.8GHz receiver
•ESCs
Working mode of the aircraft
•PHANTOM 2 VISION mode: Ready to Fly
Ready to Fly (non-GPS)
•Naza-M mode: GPS mode
ATTI. mode
Manual mode/Failsafe
Remote Controller
•5.8GHz
•2 sticks, 7channels
Exterior
•Triaxial gimbal
•Camera
•Propulsion (motors and
propellers)
Figure 1
The working mode of the aircraft is configurable by using the PHANTOM 2 VISION+ assistant software.
You can switchthe aircraft working mode toPHANTOM 2 VISION mode or Naza-Mmode. Please adhere to
the NAZA-M V2 Quick Start Manual to obtain the performances of Naza-M m ode .
PHANTOM 2 VISION mode: Current flight status is appointed by the flight system automatically by
estimating whether no less than 6 GPS satellites has been searched. In this mode, users can calibrate the
remote controller, adjust the gain values, and use Failsafe and Low battery capacity warning functions.
Naza-m mode
:
Compared with PHANTOM 2 VISON mode, users can switch the flight control mode
manually and IOC function is added.
Ready to Fly
: When the available GPS satellites searched by PHANTOM 2 VISION+ are no less than 6,
the flight control system will work in a safe status.
Ready to Fly (non-GPS)
: When the available GPS satellites searched by PHANTOM 2 VISION+ are less
than 6, the flight control system will work in a less safe status.

©2014 DJI Innovations. All Rights Reserved.16 |
3 Quick Start Guide
1.
Watch tutorial videos and read manuals.
2. Open the box and check.
3. Remove gimbal clamp.
4.
Prepare remote controller batteries, and get intelligent battery, range extender and mobile device
charged.
5. Download DJI VISION App via your mobile device, register and login.
6. Install Micro-SD card and attach propellers to aircraft.
7. Install remote controller batteries. Set control mode and compliance version for remote controller using
PHANTOM RC Assistant Software if required.
8. Install intelligent battery into aircraft.
9. Power on remote controller, range extender and aircraft.
10. Run DJI VISION App; connect Wi-Fi named Phantom_XXXXXX.
11. After the mobile device has connected to camera, a tta ch your mobile device to mobile device holder.
12. Execute CSC to start and stop motors, ensure they are normally working.
13. Finish compass calibration outdoors.
14. Flight and FPV experience, including control the aircraft
by remote controller and carry out App
function.
15.
Fly back and land aircraft when low battery capacity warning.
©2014 DJI Innovations. All Rights Reserved.17 |
Assemblies and Usages
Please adhere to following assemblies and usages to prepare for flight.
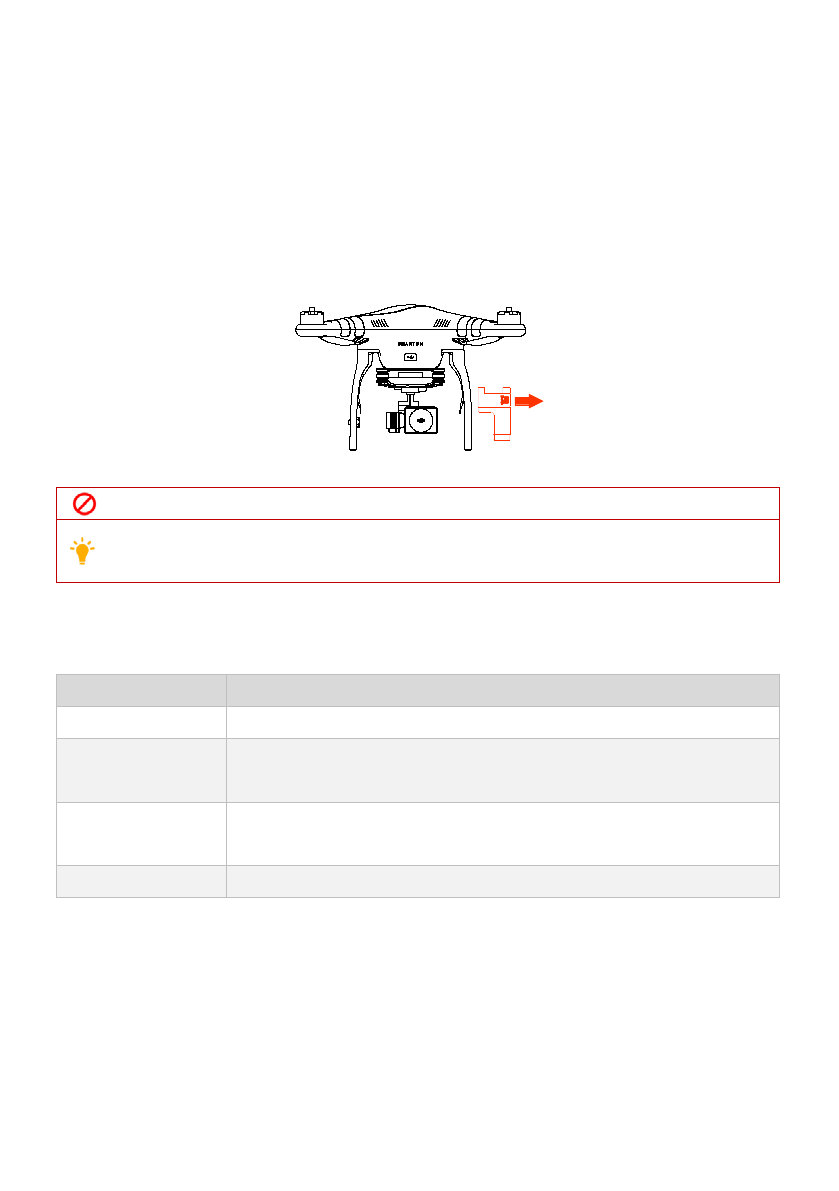
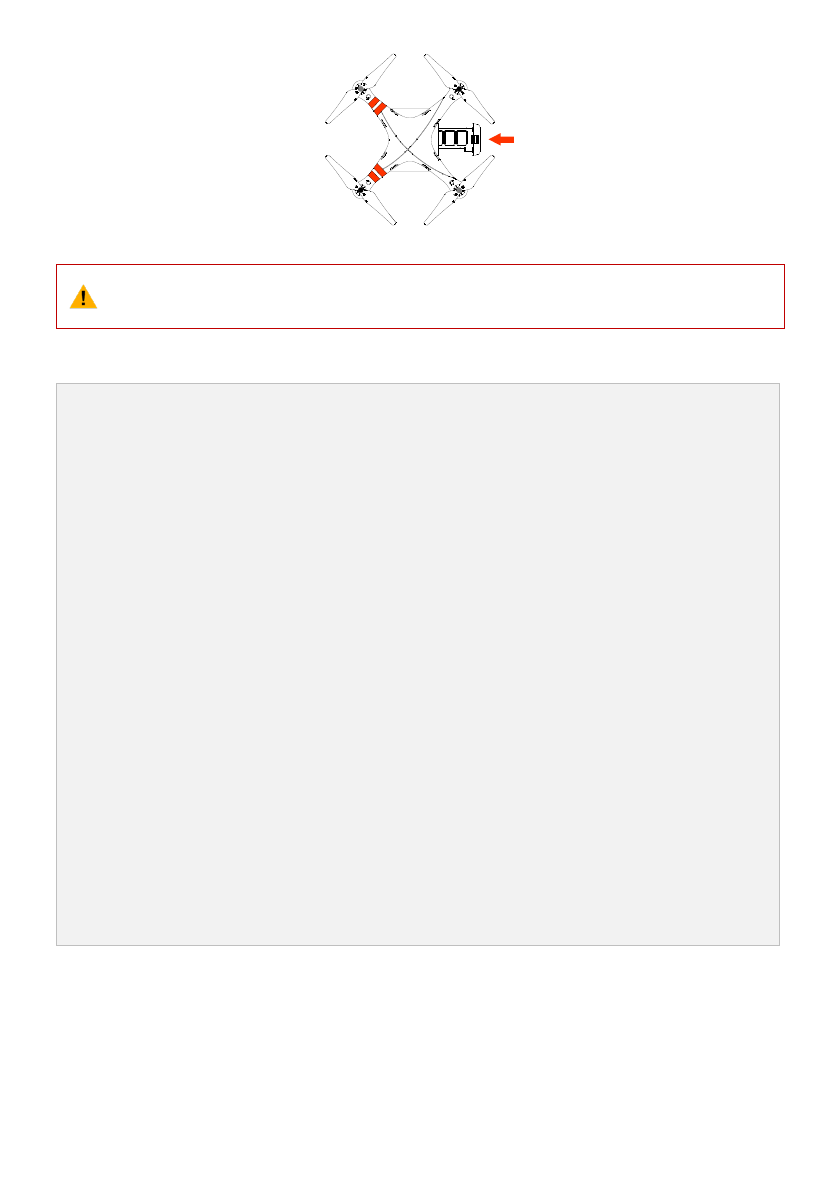
1 Removing the Gimbal Clamp
Do remove the gimbal clamp prior to the assembly. As the figure below to pull out the clamp along the unlock
direction.
Figure 2
Do not power on the aircraft when the gimbal clamp is attached, otherwise may damage the gimbal.
Please attach the gimbal clamp to protect the gimbal and camera during delivery or long time
preservation.
2 Preparing Battery
Before using the PHANTOM 2 VISION+, make sure the following devices have enough power battery.
Devices
Power supply
Remote controller
Install 4 AA batteries.
Range extender
Ensure fully charged via charging port (Micro-USB port), please adhere to the
charging method of range extender in this manual.
Aircraft(including
gimbal and camera)
Get power from the DJI intelligent battery
Mobile device
Make sure your mobile device has enough power if using DJI VISION App
Be low are the introduction and usages of DJI intelligent battery.
2.1 DJI Intelligent Battery
The intelligent battery is specially designed for the PHANTOM 2 VISION+, with a battery capacity of 5200mAh,
voltage of 11.1V and charge-discharge management functionality. The battery should only be charged with the DJI
charger specified by DJI.
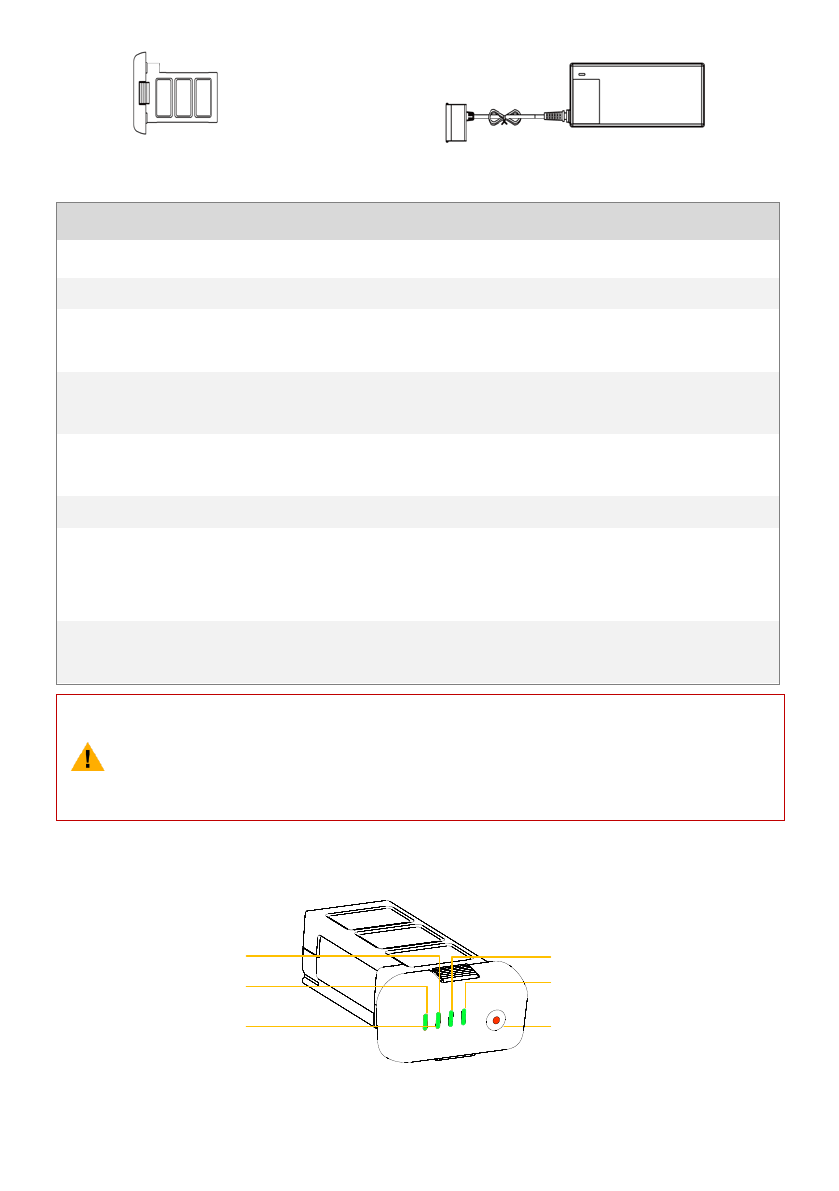
©2014 DJI Innovations. All Rights Reserved.18 |
Intelligent Battery C harger
DJI Intelligent Battery Functions
(
1
)
Balance Charging
Automatically balance the voltage of each battery cell during charging.
(
2
)
Capacity Display
Display the current batteryle ve l.
(
3
)
Communicating
The main controller communicateswith the battery via communication
ports for battery voltage, capacity, current and other information.
(
4
)
Overcharging Protection
Charging stops automatically when the battery voltage reaches 12.8V to
prevent overcharging damage.
(
5
)
Over Discharging
Protection
Discharging stops automatically when the battery voltage reaches 8.4V to
prevent over discharging damage.
(
6
)
Short Circuit Protection
Automatically cuts off the power supply when a short circuit is detected.
(7) Sleep Protection
The battery will enter sleep modeafter 10 minutesof inactivity to save
power.The static current is 10nA in sleep mode when the battery is
powered on without connecting to other devices.
(
8
)
Charging Temperature
Detection
The battery will charge only when its temperature is within 0
℃
~55
℃
. If
the batterytemperature is out of this range, the battery will stop charging.
(
1
)
Before use, please read and follow the user manual, disclaimer, and the warnings on the battery.
Users take full responsibility for all operations and usage.
(2) The battery
should only be charged with the charger provided by DJI. DJI does not take any
responsibility for operation ofany charger from a third party.
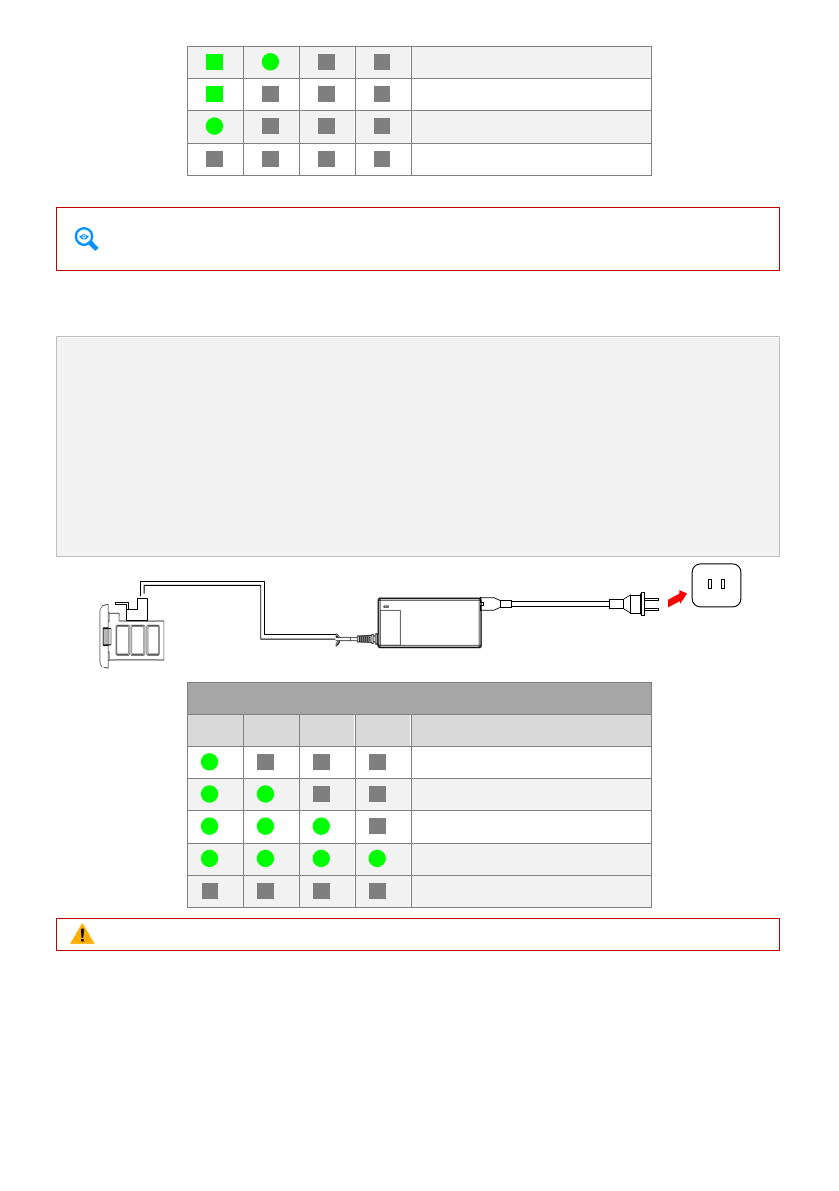
2.2 Usages
Battery Level
In d ic a t o r s
P o w e r B u tto n ( B u ilt-
in Pow er Indicator)
LED 1
LED 2LED 3
LED 4
Powering on/off
Powering on: When the battery is powered off; press the battery power button once and then press and hold for 2
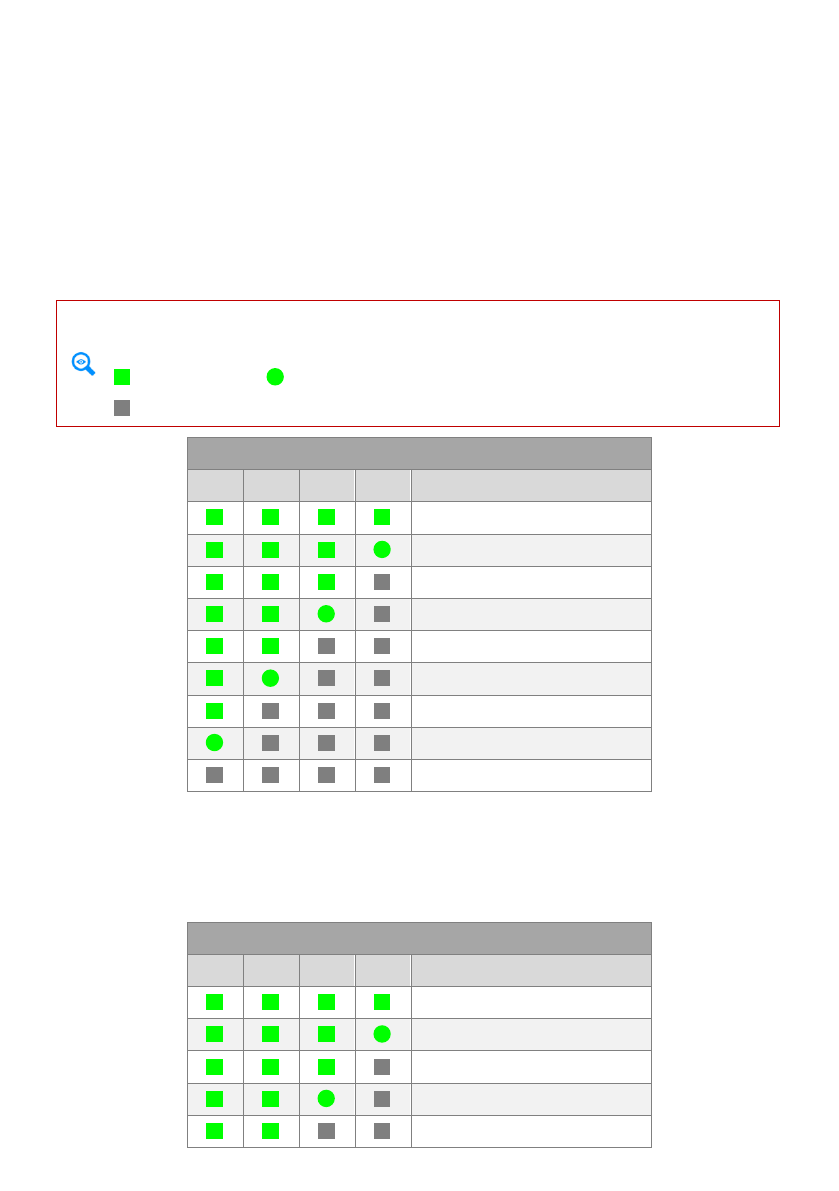
©2014 DJI Innovations. All Rights Reserved.19 |
seconds to turn on the intelligent battery. The battery power indicator will be solid red and the battery level
indicator will indicate current battery capacity level after power on.
Powering off: When the battery is powered on, press the battery power button once and then press and hold for 2
seconds to turn off the intelligent battery. The LED indicators all go out after power off.
Checking the battery level
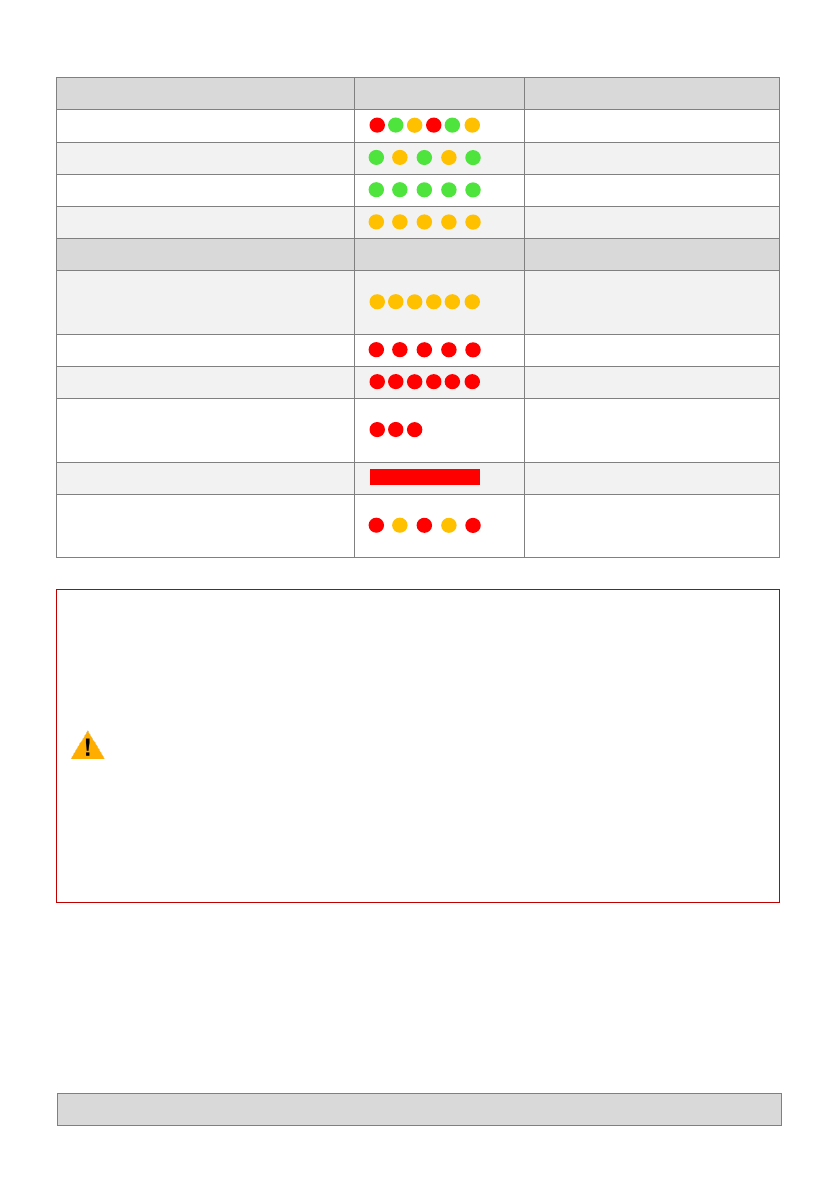
When the battery is powered off; pressing the battery power button once will indicate the current battery level.
Refer to the table below for details.
The battery level indicators will show the current battery level during both the charging and
discharging process as well as battery life. The indicators are defined below.
: The LED is solid on : The LED will blink regularly
: The LED is light off
Battery level during discharging process
LED1
LED2
LED3
LED4
Current battery level
87.5%~100%
75%~87.5%
62.5%~75%
50%~62.5%
37.5%~50%
25%~37.5%
12.5%~25%
0%~12.5%
<0%
Checking the battery life
When the battery is powered off;press and hold the battery power button for 5 seconds to check the battery life.
The battery level indicators will show the life and the battery power indicator will blink for 10 seconds, then all
LEDs will light out andthe intelligent battery will turn off.
Battery life
LED1
LED2
LED3
LED4
Current battery life
90%~100%
80%~90%
70%~80%
60%~70%
50%~60%
©2014 DJI Innovations. All Rights Reserved.20 |
40%~50%
30%~40%
20%~30%
Less than 20%
More battery information is available in the battery tab of the PHANTOM 2 VISION+Assistant
Software.
2.3 Charging the Intelligent Battery
1.
Connect the charger to a wall socket (Use the plug set if necessary).
2. Connect the battery to the charger. If the current capacity of the battery is over 75%, you should power on
the battery to begin charging.
3. The Battery Level indicators display current capacity level as the battery charges. Please refer to battery
level indicator description for details.
4. The battery is fully charged when the Battery Level indicator lights are off. Please disconnect the charger
and battery when the charging is completed.
Socket
Charging process
LED1
LED2
LED3
LED4
Current battery level
0%~25%
25%~50%
50%~75%
75%~100%
Fully charged
If current battery level is over 75%, the battery should be powered on to charge.
2.4Install the Battery
Push the battery into the battery compartment correctly as the following diagram shows. Make sure to s l i de the
battery into the compartment until you hear a ‘click’ sound to confirm the battery is installed correctly
©2014 DJI Innovations. All Rights Reserved.21 |
An incorrectly installed battery may cause one of the following to occur: (1) Bad contact. (2)
Unavailable battery information. (3) Unsafe for flight. (4) Unable to take off.
2.5 Correct Battery Usage Notes
1.
Never plug or unplug the battery into the aircraft when it is powered on.
2. The battery should be charged in an environment that is between 0℃ to 40℃, and be discharged in an
environment that is between -20 ℃ to 50 ℃. B
oth charging and discharging should be in an
environmentwherethe relative humidity is lower than 80%.
3. It’s recommended to charge and discharge the battery thoroughly once every 20 charge/discharge cycles.
Users should discharge the battery until there is less than 8% power left or until the battery can no longer
be turned on. Users
should then fully recharge the battery to maximum capacity. This power cycling
procedure will ensure the battery is working at its optimal level.
4. For long term storage please place the batterywithonly a 40~50% capacity in a strong battery box securely.
We recommend discharging and charging the battery completely once every 3 months to keep it in good
condition. The capacity should be varied in such a cycle(40%~50%)—0%—100%—(40%~50%).
5. It’s suggested you purchase a new battery after you have discharged your current battery over 300 times.
Please completely dischargea batteryprior to disposal.
6. It’s suggested that you purchase a new battery if the current battery is swollen or damaged in any way.
7. Never try to recharge or fly with a battery that is swollen or damaged in any way.
8. Never charge the battery unattended.Always charge the battery on a non-flammable surface such as
concrete and never near any flammable materials.
9.
Safety is extremely important and users can get more information in the DISCLAIMER.
©2014 DJI Innovations. All Rights Reserved.22 |
3Preparing PHANTOM 2 VISION+ Aircraft
PHANTOM 2 VISION+ aircraft is a quadrotor with built-in flight control system and has integrated with gimbal
and camera, it also has a Micro-USB port on the aircraft for connecting to Assistant Software and
anotherMicro-USB port on the gimbal for connectingMicro-SD cardof camera. The aircraft has battery
compartment specialized for the intelligent battery, it also has LED flight indicators for status indicating. All these
features make the PHANTOM 2 VISION+ easy to assemble and configure.
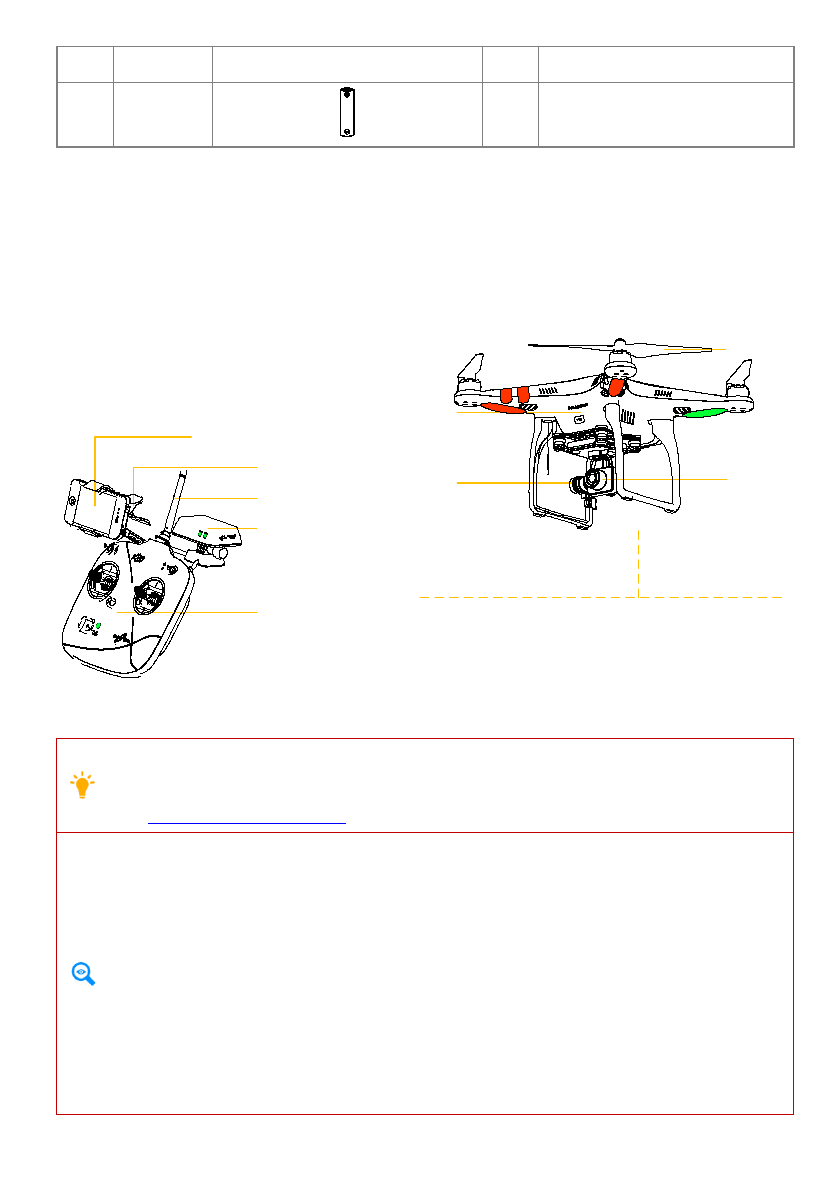
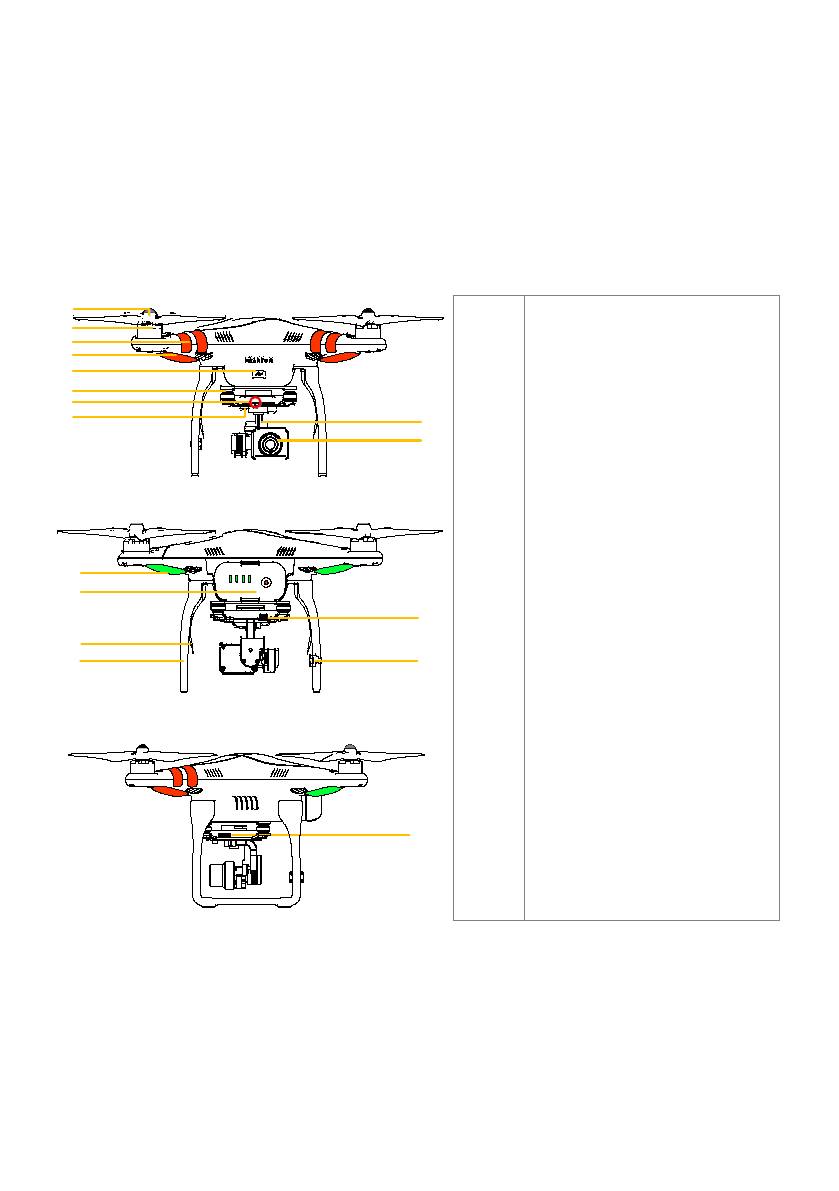
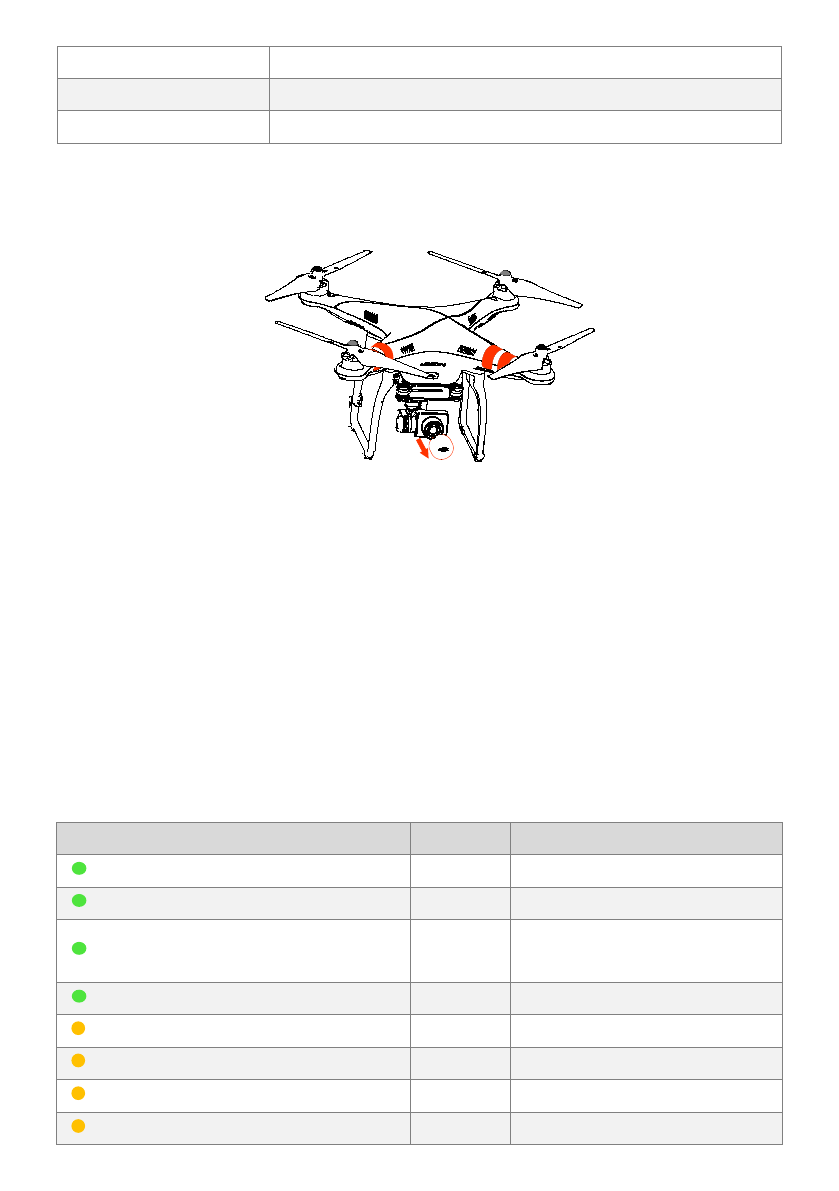
3.1Introduction
[1]
[2]
[7]
[3]
[4]
[5]
[6]
[8] [9]
[10]
[11]
[12]
[14]
[13]
[15]
[16]
[17]
[1]
[2]
[3]
[4]
[5]
[6]
[7]
[8]
[9]
[10]
[11]
[12]
[13]
[14]
[15]
[16]
[17]
Propeller
Motor
Nose Sticker
Nose LED
FC Assistant Port(Micro-USB port)
Vibration Absorber
Camera LED Indicator
Camera Function Button
Triaxial Gimbal
Camera Lens
Rear LED
DJISmart Battery
Receiver Antenna
Landing Gear
Camera Data Port(Micro-USB port)
Compass
Micro-SD Slo t
3.2 Built-in Flight Control System Instructions
PHANTOM 2 VISION+ is equipped with DJI Naza-M V2 flight control system which helps to improve operability
and stability. With the flight control system, users can control the entire aircraft’s functions in flight such as Pitch
(forwards and backwards), Roll (left and right), Elevator (up and down) and Yaw (turn left or right). When the
aircraft enters the IOC, failsafe or low battery capacitym o de , the flight control system will navigate the aircraft to
ensure flight stability and safe.
©2014 DJI Innovations. All Rights Reserved.23 |
Modules
Functions
Main controller
Acts as the brains of the complete flight control system responsible for connecting and
controlling all the modules together.
IMU
Has a built-in inertial sensor and a barometric altimeter that measures both attitude and
altitude.
GPS& Compass
The compass reads geomagnetic information which assists the GPS (Global Position
System) to accurately calculate the position and height of the aircraft in order to
implement the stable hovering function.
LED Indicators
Indicates the status of flight control system.
Assistant Software Port
The flight control system communicates with the PC Assistant Software via a Micro-USBcableby connecting it
withAssistant Software Port and PC. Users can use the assistant software to configure the aircraft and upgrade
firmware after connecting successfully.
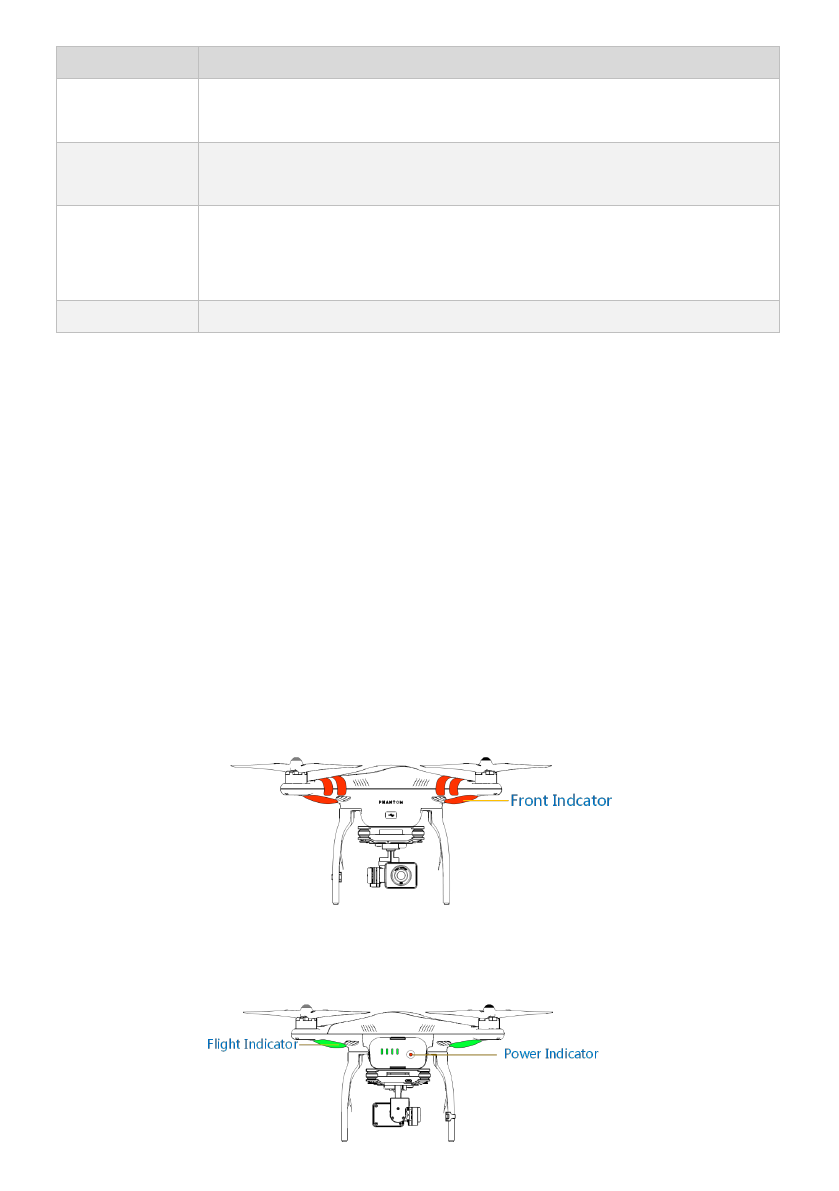
3.3LED Flight Indicators Description
After powering on the intelligent battery, the LED flight indicators light up to show the aircraft’s current sta tu s and
nose direction.
Front LEDs
The front LEDs are for indicating wherethe nose of the aircraft is.Theylight up solid red only after the motors have
sta rted spinning.
LED Flight Indicators Description
©2014 DJI Innovations. All Rights Reserved.24 |
Normal status
LED flight indicators
Notes
Power On Self-Test
----
Warming Up
Aircraft cannot take off.
Ready to Fly
Slow blinking green.
Ready to Fly (non-GPS)
Slow blinking ye l lo w.
Abnormal status
LED flight indicators
Remote Controller Signal Lost
Fast blinking yellow. Refer to <Failsafe
Function>.
1st Level Low Battery Capacity Warning
Slow blinking red.
2ndLevel Low Battery Capacity Warning
Fast blinking red.
Not Stationary or Sensor Bias is too big
Keep aircraftstationary or
performIMU calibration.
Error*
Cannot fly.
Compass Needs Calibration
Refer to <Calibrating the
Compass>.
(
1
)
The aircraft should be kept stationary on level open ground before takeoff.
(2) Make sure the aircraft’s status is in Ready to Fly or Ready to Fly (non-GPS) m o de before
takeoff.
(3) If an error occurs (LED is solid red), please connect to the PHANTOM 2 VISION+ Assistant
Software for more de ta i led information.
1) IMU calibration is required: Recalibrate IMU using the Assistant Software.
2) IMU is abnormal: Should be repaired.
3) Compass is abnormal: Should be repaired.
4) Remote controller’s mid-point is set abnormally: Refer to < How to solve large margin(s) mid
point error?>.
3.4 Camera
The camera of PHANTOM 2 VISION+ will be powered on once the intelligent battery installed in the aircraft is
powered on. Capture the videos or photos either by pressing the camera function button or using the DJI VISION
App.The camera supports multi-capture, continuous capture and timed capture,supports both RAW and JPEG
photo formats, supports HD Recording (1080p30/1080i60).
Cameraspecifications
©2014 DJI Innovations. All Rights Reserved.25 |
Resolution
14 Megapixe ls
FOV
140°/ 120° / 90°
Sensor size
1/2.3”
Removing the camera lens cap
Remove the lens cap before usingthe camera. Put the lens cap back on when you finish using the camera.
Camera function button
Capture function: Press the button once(hold less than 2 se co nds)to tak e a single capture.
Record function: Press the button once(hold no less than 2 seconds) to begin recording.Press once again to stop.
Camera Data Port
Connect the camera data port to PC via a Micro-USBcable; users can copy the photos or videos from the Micro-SD
card to your PC conveniently.
Camera Indicator
The Camera Indicatorprovides the information on the working status of the camera and Wi-Fi module.
Camera indicator
Wi-Fi status
Camera status
Solid
OFF
Power On; Idle State
Slow Blink (0.2s on, 1.8s off)
ON
I dle Sta t e
Blink (0.1s on, 0.3s off, 0.1s on, 1.8s off)
ON
The Micro-SD card is connected to the
PC via camera data portsuccessfully
Fast Blink (0.1s on, 0.3s off)
ON
Synchronizing photos orvideos
Solid
OFF
Recording
Blink Once(0.2s on, 0.3s off)
ON/OFF
Taking a single picture.
Blink 3 Times(0.1s on, 0.1s off)
ON/OFF
Taking 3 or 5 photos per shot
Fast Blink(0.1s on, 0.3s off)
ON/OFF
Firmware Upgrading

©2014 DJI Innovations. All Rights Reserved.26 |
(0.2s green, 1.8s y e l lo w )
ON
Recording
Solid
ON/OFF
Critical error
Slow Blink (0.2s on, 1.8s off)
ON/OFF
CMOS sensor error
Blink Once(0.2s on, 0.3s off)
ON/OFF
Operation failed
Blink 3 Times(0.1s on, 0.1s off)
ON/OFF
Micro-SD card error
Fast Blink(0.1s on, 0.3s off)
ON/OFF
Upgrade error
(0.5s green, 0.5s yellow, 0.5s red, 0.5s
Off)
ON/OFF
Overheated Camera
3.5 Triaxial Gimbal
The gimbal of PHANTOM 2 VISION+ will be powered on and self-check once the intelligent battery installed in the
aircraft is powered on. The pitch motion of the gimbal can be controlled by the DJI VISION App, the roll and yaw
motion is controlled by the flight control system automatically, to achieve real time adjustment of gimbal gesture
and automatic stability during flight.
Gimbal specifications
Control accuracy
±
0.03
°
Controllable range
Pitch : -90
°
~+15
°
Maximum angular velocity
Pitch : 90
°
/s
Micro-SD Slot
Make sure that the Micro-SD card is inserted before you take any photos or record any videos. PHANTOM 2
VISION+ has a standard 4GB Micro-SD card, maximum supported Micro-SD cardcapacity is 32GB.The DJI VISION
App may not be able to read the Micro-SD card prepared by the user. It is suggested that you use the DJI VISION
App to format the Micro-SD cardwhen using the card for the first time.
Refer to <Camera Settings> for details on how to format the Micro-SD card.
Gimbal Motor Error Warning
Before the aircraft taking off, if agimbal motor error is detected, there will be gimbal motor error warning
prompted in the camera GUI of DJI VISION App. The warning will disappear after the trouble res olved.
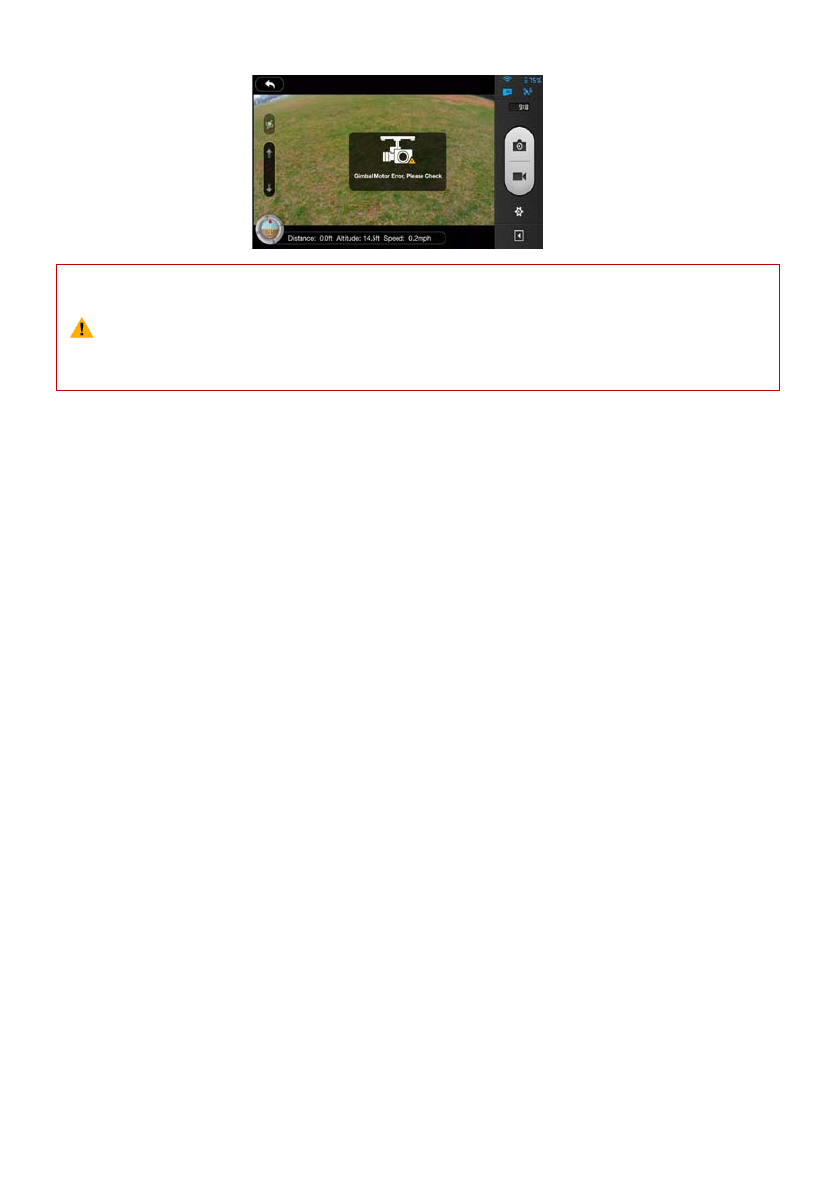
©2014 DJI Innovations. All Rights Reserved.27 |
Below two cases may cause the gimbal motor error.
1) Forget removing the gimbal clamp: make sure the clamp is removed before power on the aircraft.
2) The gimbal receives excessiveexternal force(collision or artificial reason): please take care of the
gimbal after power on.
©2014 DJI Innovations. All Rights Reserved.28 |
4 Attaching the Propellers
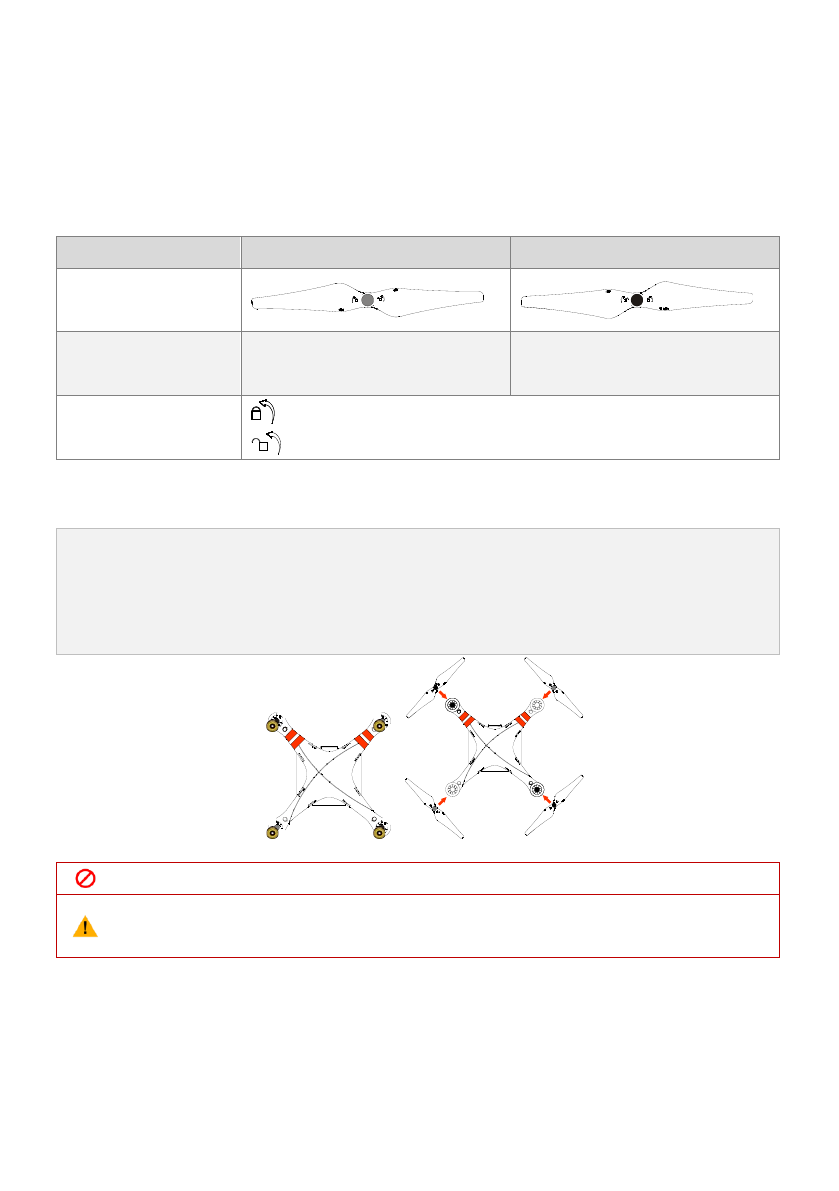
Please use the original 9-inch propellers which are classified by the color of each central nut. Damaged pr o p e l lers
can be replaced by purchasing new ones if necessary.
4.1 Introduction
Propellers
Grey Nut (9443)
Black Nut (9443 R)
Diagram
Assembly Location
Atta ch to the motor thread that doe s
not havea black dot.
Atta ch to the motor thread that has
abla c k do t .
Fastening/Un-fastening
Instructions
Lock: Tighten the propeller in this direction.
Unlock: Remove the propellerin this direction.
4.2Assembly
1.
(Fig.1) Remove the four warning cards from the motors after you read them.
2. (Fig.2) Prepare the two grey nut propellers and two black nut propellers. Make sure to match the black
nut propellers with the correctly marked black dot motors. Tighten the propellers according to the
fastening instructions.
Fig.1 Fig.2
Propellers areself tightening during flight. DO NOT use any thread locker on the threads.
(
1
)
Make sure to match the propeller nut colors with the corresponding motors.
(
2
)
It is advised to wear protectivegloves during propeller assembly and removal.
4.3 Removing the Propellers
(Fig.3)Keep the motor deadlocked in placewith the assistant wrench (or one hand) and remove the propeller
according to the un-fastening instructions.

©2014 DJI Innovations. All Rights Reserved.29 |
Fig.3
4.4 Notes
1.
Check that the propellers and motors are installed correctly and firmly before every flight.
2. Ensure that all propellers are in good condition before each flight. DO NOT use any ageing, chipped, or
broken pr o p e l le r s .
3. To avoid injury, STAND CLEAR ofand DO NOT touch the propellers ormotors when they are spinning.
4.
ONLY use original DJI propellers for a better and safer flight experience.