SZ DJI TECHNOLOGY PV3311402 PHANTOM 2 VISION + User Manual PHANTOM 2 VISION
SZ DJI TECHNOLOGY CO., LTD PHANTOM 2 VISION + PHANTOM 2 VISION
Contents
- 1. User Manual Part 1
- 2. User Manual Part 2
- 3. User Manual Part 3
User Manual Part 2
©2014 DJI Innovations. All Rights Reserved.30 |
5Preparing the Remote Controller
The PHANTOM 2 VISION+ remote controlleris a wireless communication device that uses the 5.8GHz frequency
band. The link between the remote controller and aircraft isalready established before delivery.
The remote controller default is set to Mode 2 and CE compliance before de l i ve r y. Both the operating mode and
compliance version can be configuredin PHANTOM RC Assistant Software. Please referto <PHANTOM
RCAssistant> and <ComplianceConfiguration> for details.
Compliance Version: The PHANTOM 2 VISION+ remote controlleris compliant with CE and FCC (see the
FCC ID) regulations.
Operating Mode
: The remote controller is d iv i de d to Mode 1 and Mode 2 according to different channel
mappings.
Mo de 1
: The left stick is mapped to throttle channel.
Mo de 2 : The right stick is mapped to throttle channel.
The range extender and mobile device holder is already mounted on the remote controller. Twist mobile
device holder to face outwards and fix in position to prepare for mobile device installation.
It is recommended not to use oversized mobile devices (e.g. iPad), which cannot be placed into the
Mobile Device Holder.
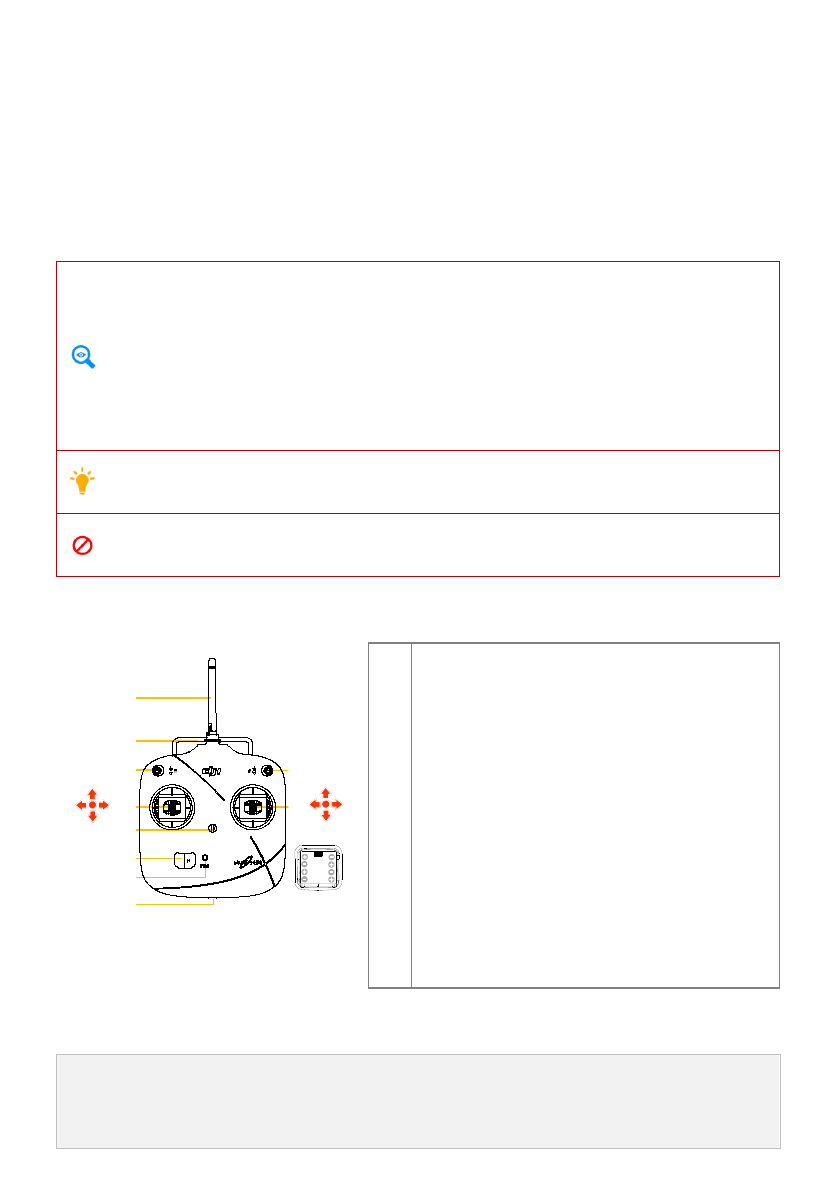
5.1The Remote Controller
[1]
[2]
[4] [3]
[8]
[9] [11]
J2
J1
J3
J4 [6]
[7]
[5]
[10]
[1]
[2]
[3]
[4]
[5]
[6]
[7]
[8]
[9]
[10]
[11]
Antenna
Carrying Handle
SwitchS1
Switch S2 (Reserved)
Joystick(J1: Roll [left&right], J2: Pitch [front&back])
Joystick(J3: Throttle [up&down], J4: Yaw [rotation])
Neck Strap Attachment
Power Switch
Power Indicator
RC Assistant Port(Micro-USB Port)
Battery Compartment (On the back)
5.2 Power on the Remote Controller
1.
Install the four AA Batteries into the battery compartment on the back of the remote controller
according to the negative andpositive p o le s .
2.
Set the S1 and S2 switches to the upper most position and all sticks at mid-point.
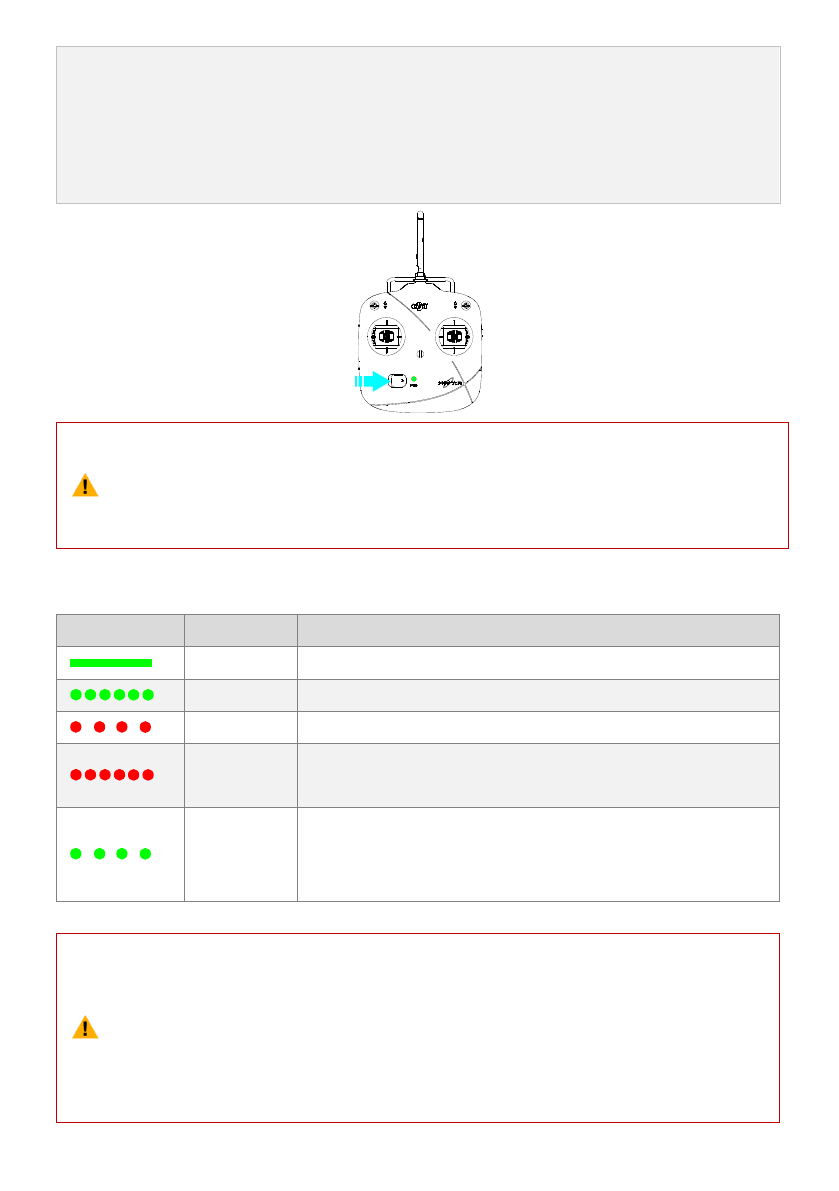
©2014 DJI Innovations. All Rights Reserved.31 |
3.
Toggle the power switch to right end to switch on the power.
4. There is a power on indicator beep. If the remote controller is set to be CE compliant, then there will be
one beep while the FCCcompliant version will emit 2 beeps. The power indicator blinks greenquickly
indicating the remote controller and receiver are binding. Once binding is completed, the power
indicator will change to a solid green.
(
1
)
If the low voltage warning alert sounds(refer to the <Remote Controller Power Indicator Status
Information>), please replace batteries as soon as possible.
(2) For long term storage, be sure to remove the batteries from the remote controller.
(
3
)
Dispose the depleted batteries safely.
5.3 Remote Controller Power Indicator Status Information
Power indicator
Sound
Remote Controller Sta te
None
Functioning normally.
None
Establishing a link between the remote controller and the receiver.
B-B-B……
Low voltage (at 3.9V-4.5V), should replace the batteries immediately.
BBBB
Low voltage (lower than 3.9V). The remote controller will automatically
power off. Replace the batteries immediately.
B-B-B……
The remote controllerwill give a visual indication of an alarm after 15
minutesof non-operation. The alarm status will go awayonce you start
operating of the remote controller.
The remote controllerwill blink the LED and sound an alert when the voltage drops below3.9V and
automatically power off after 3 seconds. This process will repeat even if you power cycle the remote
controller. If this low voltage warning occurs during flight, the remote controllerwill automatically
power off causing the aircraft to enter Failsafe mode which cannot be interrupted (refer to <Failsafe
Function> section for details). It is strongly recommended to replace batteries immediatelyif the low
voltage warning(3.9V-4.5V) occurs.
©2014 DJI Innovations. All Rights Reserved.32 |
5.4 AntennaOrientation
Try to keep the antenna pointingskyward, perpendicular to the ground, in order to achieve the maximum
communication range during flight.
The rem ote controller’s
antenna should be pointing
skyw ard w ith no obstacles in
the w ay. O therw ise, the
F a ils a f e fu n c tio n m a y in it ia liz e
prem aturely during flight.
The M obile D evice and Range
Extender should not block
the antenna.
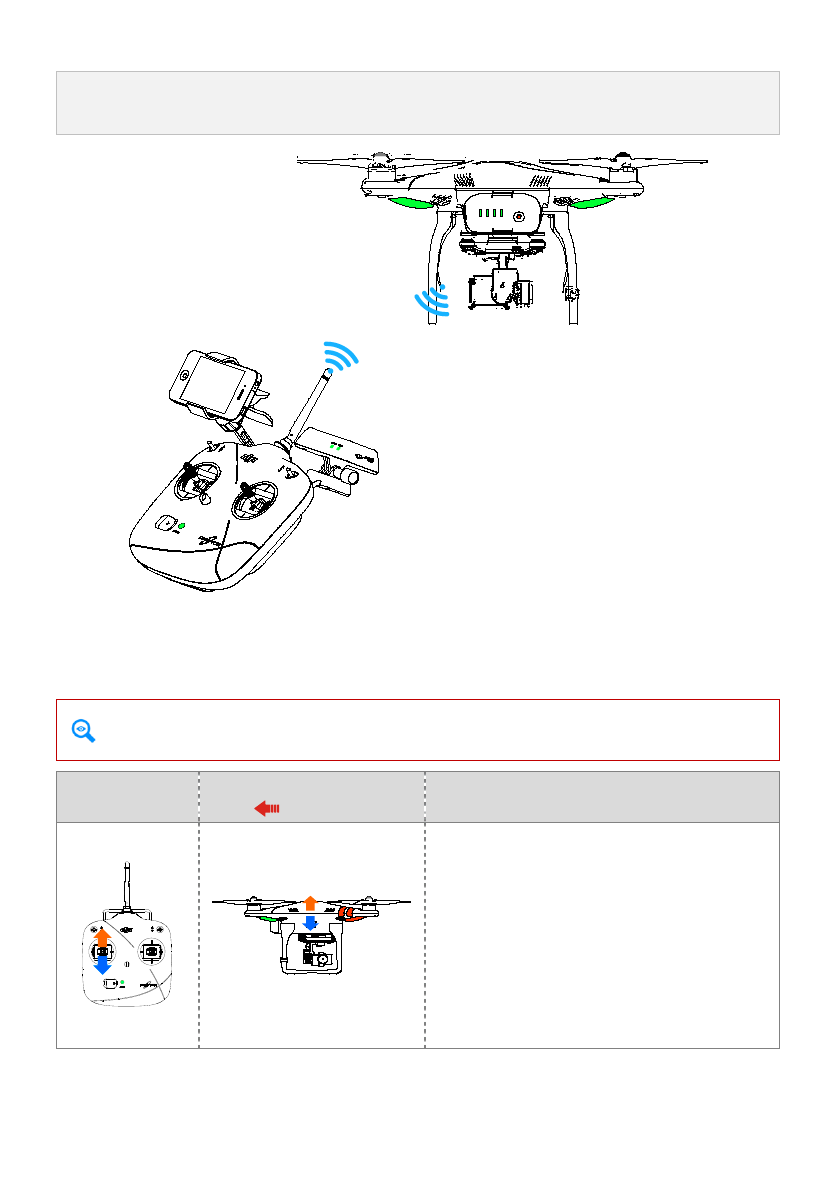
5.5 Remote Controller Operation
The remote controller default is set to Mode 2 before delivery, follow descriptions takes Mode 2 for example.
Stick Neutral/ mid point:Control sticks of theremote controller are placedatthe central position.
Move the Stick:The stick of remote controller is pushed away from the central position.
Remote Co n tr o l le r
(Mode 2 )
Aircraft
(
nose direction
)
Operation de ta i ls
The throttle stickcontrolsthe aircraft elevation.
Push the stickup and the aircraft will ascend.
Pullthe stickdown and the aircraft will descend.
The aircraft will automatically hover and hold i ts
height when bothsticksare centered.
Push the throttle stickupward beyondthe centered
(neutral) position to take off the aircraft. We suggest
that you push the throttle stickgently to prevent the
aircraft from sudden and unexpectedelevation.
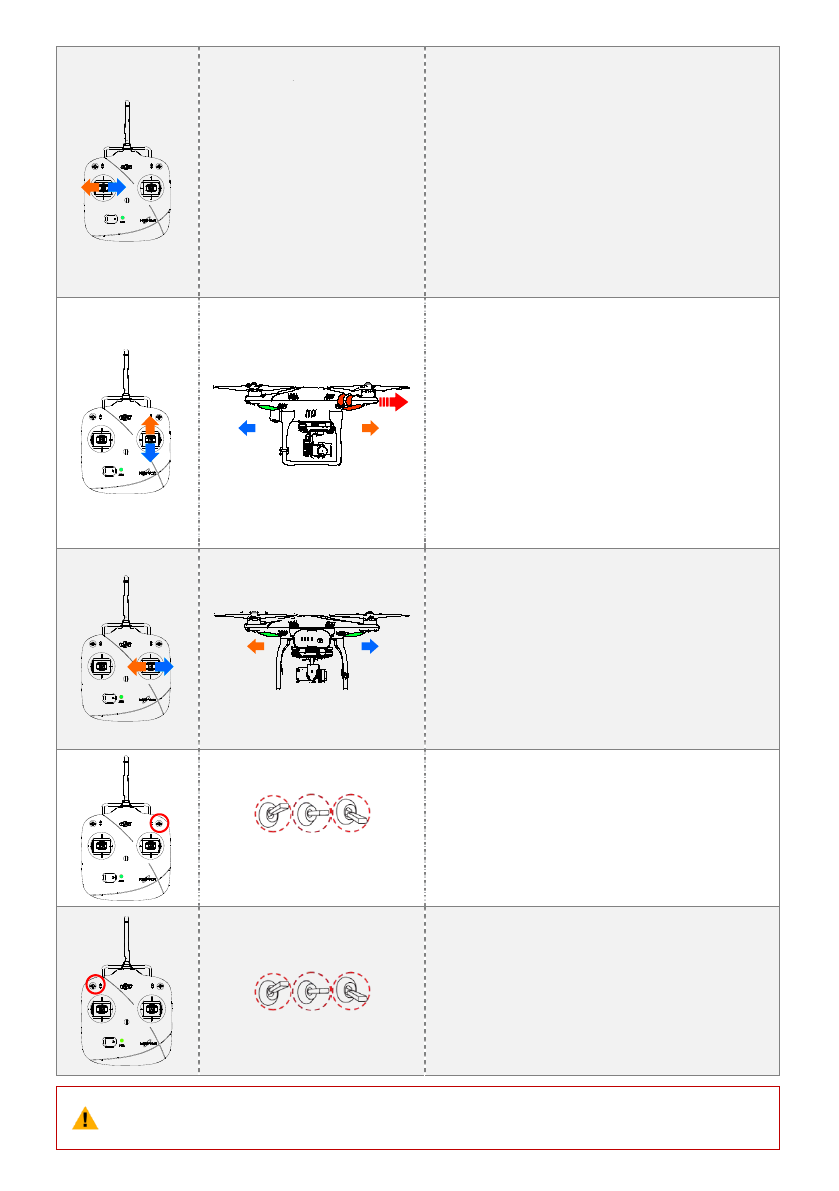
©2014 DJI Innovations. All Rights Reserved.33 |
The yaw stickcontrols the ai r cr a f t r u dde r.
Push the stickleft and the aircraft will rotate counter
clock-wise.
Push the stickright and the aircraft willro ta te
clock-wise.If the stick is centered, the aircraft will
always fly in the same direction.
The command stick controls the rotating angular
velocity of the aircraft. Increasing movement of the
command stick results in fasteraircraft rotation
v e lo c i ty.
The pitchstickcontrols the aircraft’sfront & back
pitch.
Push the stick up and the aircraft willpitchand fly
forward.
Pullthe stickdown and the aircraft willpitchand
flybackward.The aircraft will kee p leve l and straight
if the stick is centered.
Increasing movement of the command stick will
result in a largerpitch angle (maximum is 35˚) and
faster flight velocity.
The rollstick controls the aircraft le f t &rightpitch.
Push the stickleft and the aircraft will pitchand fly
le f t .Pushthe stick right and the aircraft willpitch and
flyright.The aircraft will keep level and straight if the
stick is centered.
Increasing movement of the command stick will
result in a largerpitch angle (maximum is 35˚) and
faster flight velocity.
Position-1 Position-2 Position-3
S1 is for compass calibration. Toggle the S1 from
position-1 to position-3 and back to position-1
about 6 to 10 times which will force the aircraft to
enter into compass calibration mode.
In Naza-M mode, the S1 switch is used to switch
control mode and compass calibration.
Position-1 Position-2 Position-3
S2 is used to record Home point manually. After a
Home point is automatically recorded, quickly
flipping the S2 switch of the remote controller from
upper most to lower most positions 5 times or more
will reset the current aircraft position as a new
home point of PHANTOM 2 VISION+.
InNaza-M m o de , S2 is involved in IOC function.
(1)
For ‘Ready to Fly’ the aircraft will hover (hold a stable horizontal position) when all sticks are
released.
©2014 DJI Innovations. All Rights Reserved.34 |
(2)
For ‘Ready to Fly (non-GPS)’ the aircraft will keep the aircraft level without horizontal
positioning when all sticks are released.
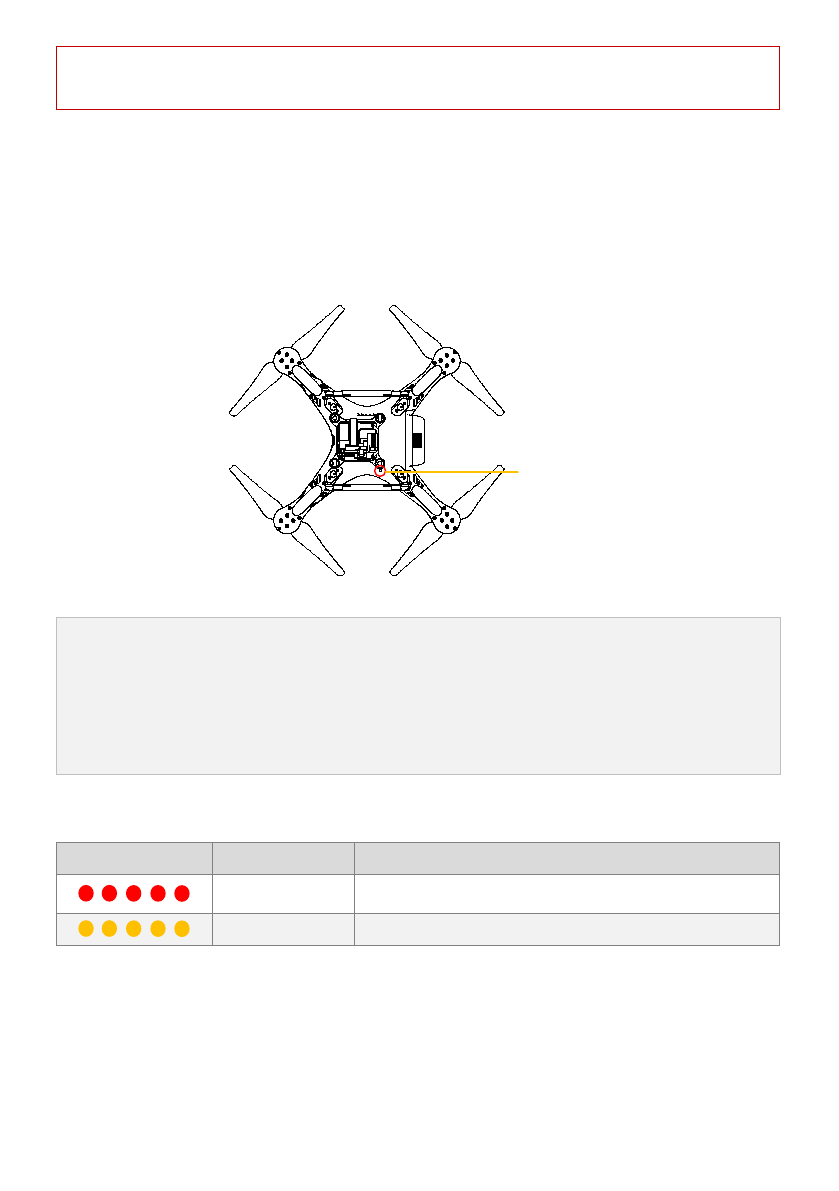
5.6 Link between the Remote Controller and Receiver
A5.8G receiver is built-in PHANTOM 2 VISION+, its link button and indicator lo c a t e do n the bottom of the aircraft as
illustrated in the following diagram.
The link between the remote controller andreceiver isalready established before delivery. Only re-establish the link
when you try to replace the old remote controller or receiver with a new one.
L in k B u tto n &
L in k In d ic a to r
Link Procedures
1.
2.
3.
Power off the remote controller, power on the aircraft.You will see the link indicator blinking red.
Press the linkbutton with a thin object and hold until the link indicator blinks yellow.Release the
linkbutton.
Power on the remote controller and the link indicator shouldswitch off. This indicates that the link has
been successfully established.
Link Indicator
Link Indicator
Description
Next Operation
No signal received.
Switch on the remote controller or perform a link procedure.
In link status.
Switch on the remote controller.
5.7 Compliance Version Configuration
The compliance version can be reconfigured by twisting the potentiometer knob (See the following diagram) on
the back of the remote controller using a flathead screwdriver. For CE compliance, set the remote controller to CE
compliance by carefullyturning the potentiometer knob to the full counter clock-wise position.For FCC compliance,
set the remote controllerto FCC compliance by carefully turning the potentiometer knob to the full clock-wise
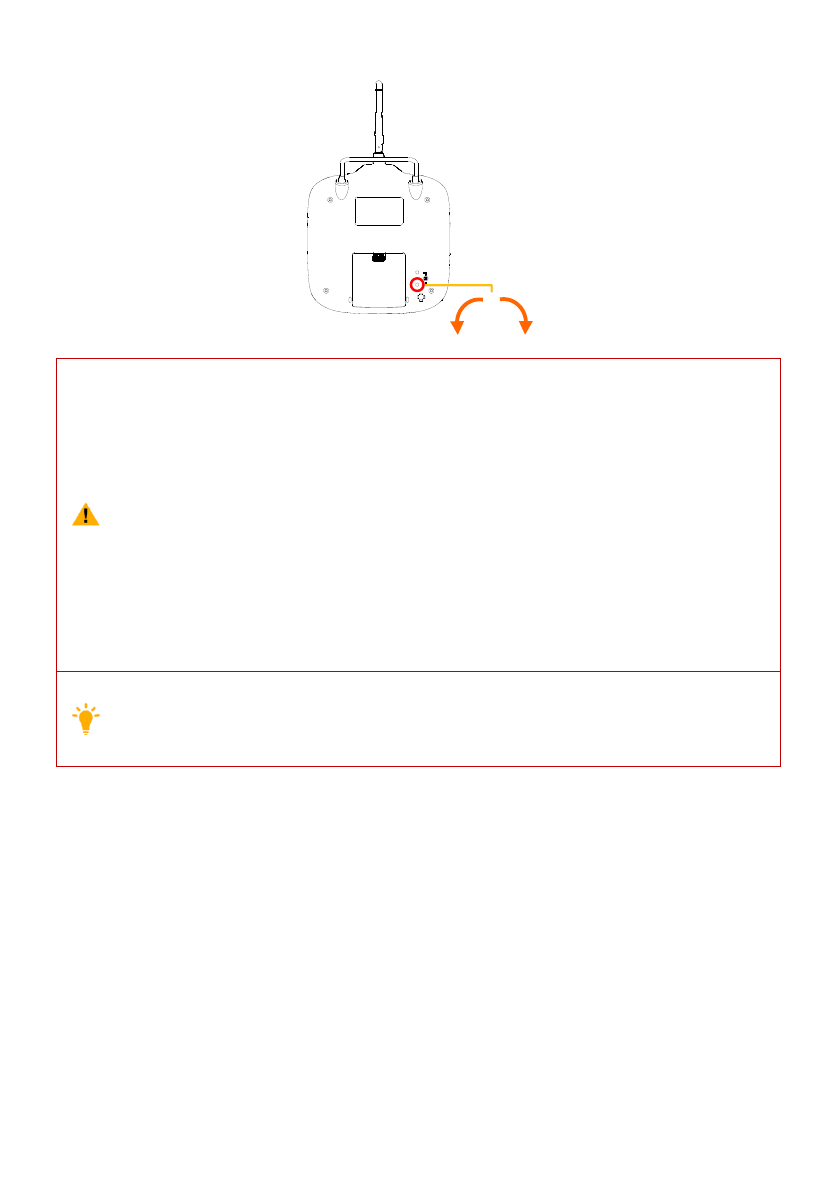
©2014 DJI Innovations. All Rights Reserved.35 |
position. Users should follow their loc a l regulations accordingly.
FCCCE
(
1
)
When adjusting the potentiometer knob to its limit position, be very careful to prevent
damaging the potentiometer knob. Do not apply too much force during this adjustment. Also be
sure to use the correct sized screwdriver.
(2) CE compliant devices have an effective communication range of 300 meters in open spaces due
to power limitations. Be sure to watch your fight distance as the PHANTOM 2 VISION+will
enter Failsafe mode (auto-landing or go home and land) if it fliesbeyond this range.
(3) FCC compliant devices have an effective range of 500 meters in open spaces. Be sure to watch
your fight distance as the PHANTOM 2 VISION+will enter Failsafe mode (auto-landing or go
home and land) if it fliesbeyond this range.
(
4
)
Pay attention to and follow local laws and regulations.
(
1
)
The remote controller comes set for CE compliance up delivery as the default setting.
(2) It is recommended to use a flathead screwdriver of Φ2.4mm for adjustment.
(
3
)
There is another potentiometer reserved.

©2014 DJI Innovations. All Rights Reserved.36 |
6Preparing the Range Extender
The PHANTOM 2 VISION+ range extender is a wireless communication device that operates within the 2.4 GHz
frequency band and is used for extending the effective range of communication between a mobile device
(Smartphone) and the PHANTOM 2 VISION+. In an open unobstructed area, the transmission distance can reach
up to 500 meters, but is usually affected by the surrounding environment, such as trees, buildings and other
sources of the same frequency. Before every flight, it is suggested that you ensure the range extender functions
properly. Otherwise you may experience a communication issue with the mobile device and the PHANTOM 2
VISION+.
Each range extender has a unique MAC address and network name (SSID), details of which are printed on the label
as ‘Phantom_XXXXXX’. The ‘XXXXXX’ represents the last 6 letters or numbers of the MAC address for the range
extender, users can rename the “XXXXXX” part in DJI VISION App.
6.1 The Range Extender
[1]
[2]
[3]
[7]
[6]
[5]
[4]
Front View Right View
[1]
[2]
[3]
[4]
[5]
[6]
[7]
SYSTEM Indicator
POWER Indicator
Lock-screw
Reset Button
Power Switch
Charging Port(Micro-USB port)
Mounting Bracket
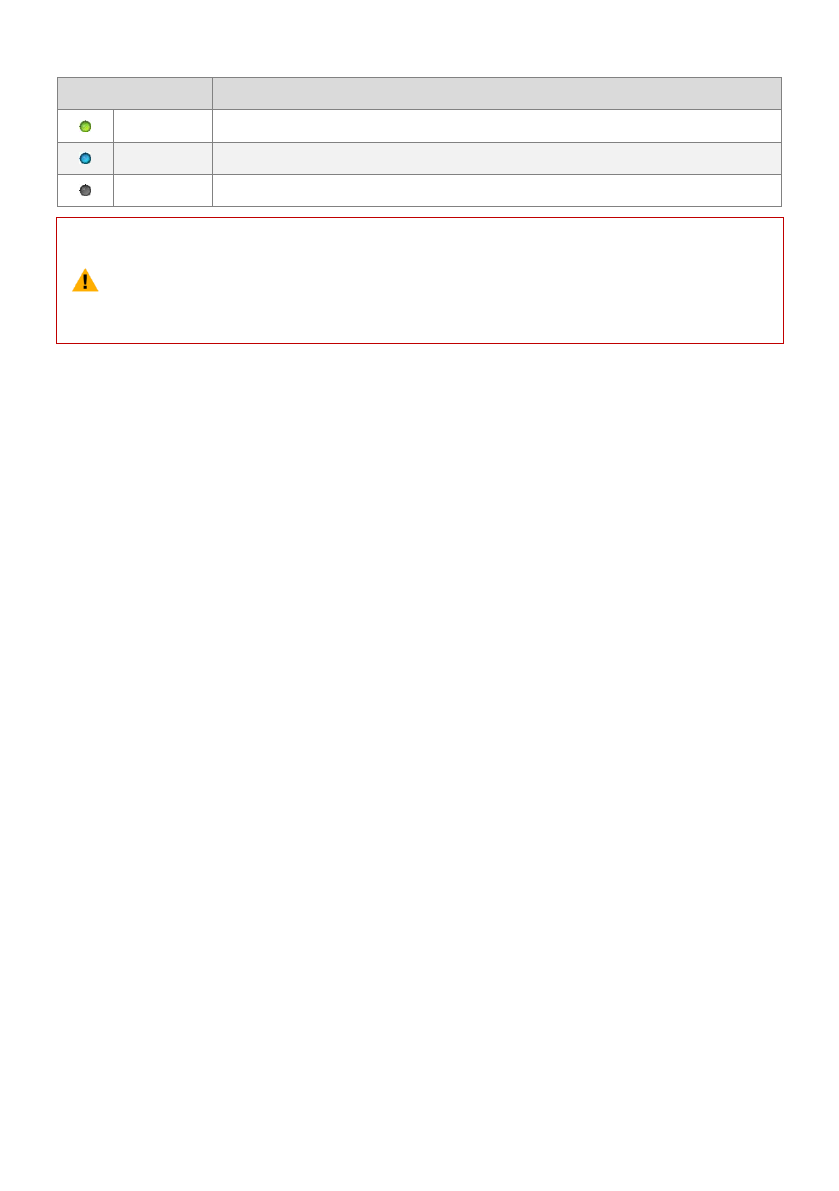
SYSTEM Indicator
Tells you the Wi-Fistatus of range extender.
SYSTEM Indicator
Description
The Wi-Finetwork is functioning normally.
Off
The Wi-Fi network is functioning abnormally.
Power Indicator (POWER)
Tells you the power status of range extender.
POWER Indicator
Description
The range extender is working normally or completely charged.
Low voltage alert, a re-charge is required.
The range extender is charging
©2014 DJI Innovations. All Rights Reserved.37 |
If the power indicator is a solid red light, the ranger extender may stop working at any
moment.Recharge it as soon as possible.
Reset Button
Every time press the reset button once will reset the range extender, and the range extender will restart. Users
have to bind the range extender with a PHANTOM 2 VISON+ again to rebuild a Wi-Fi network; otherwise the DJI
VISION App will be failed to connect.
6.2 Usage
Charging the Range Extender
Charging the range extender by connecting the charging port of it to a power supply device (such as PC and
Micro-USB charger) via a Micro-USB cable. Make sure to charge the range extender completely before using it
for the first time. It takes 3~4 hours (depending on USB power output) to be fully charged.
Make sure the range extender has enough power battery before each use.
Powering on the Range Extender
1.
Toggle the power switch of range extender to ON position.
2. Wait for approximately 30 seconds. The Wi-Fi signal indicator should blink green indicatingthe range
extender is communicating properly.
3.
Keep the range extender facing the aircraft during flight for the best communication link.
It is advised that you power off the range extender after every flight to avoid discharging the battery.
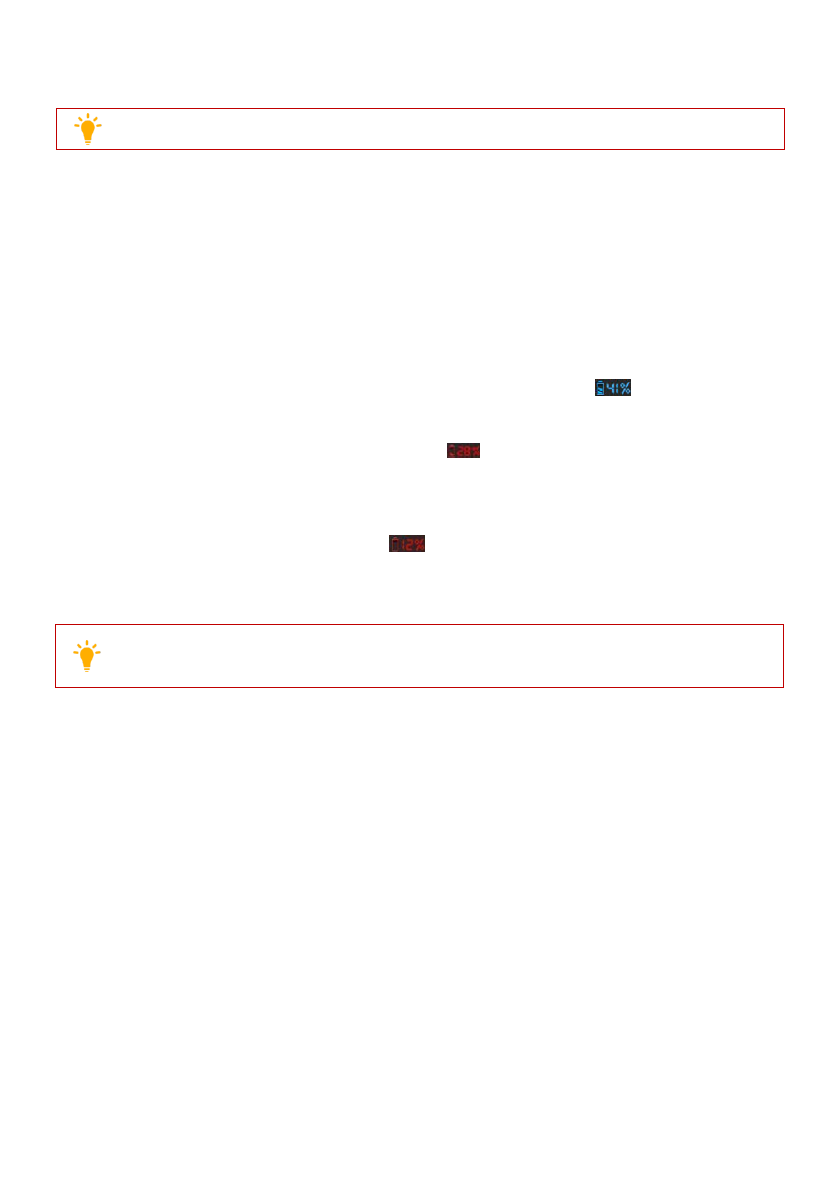
Battery capacity level display
In the main page of DJI VISION App, a progress bar will display the battery capacity level and SSID of current
connecting range extender. The percentage of the progress indicates the percentage of current capacity level. The
progress bar is green when the percentage is no less than 30%, and it’s red when the percentage is less than
30%.When the progress bar turns red, please charge the range extender as soon as possible.
©2014 DJI Innovations. All Rights Reserved.38 |
Low battery capacity warning
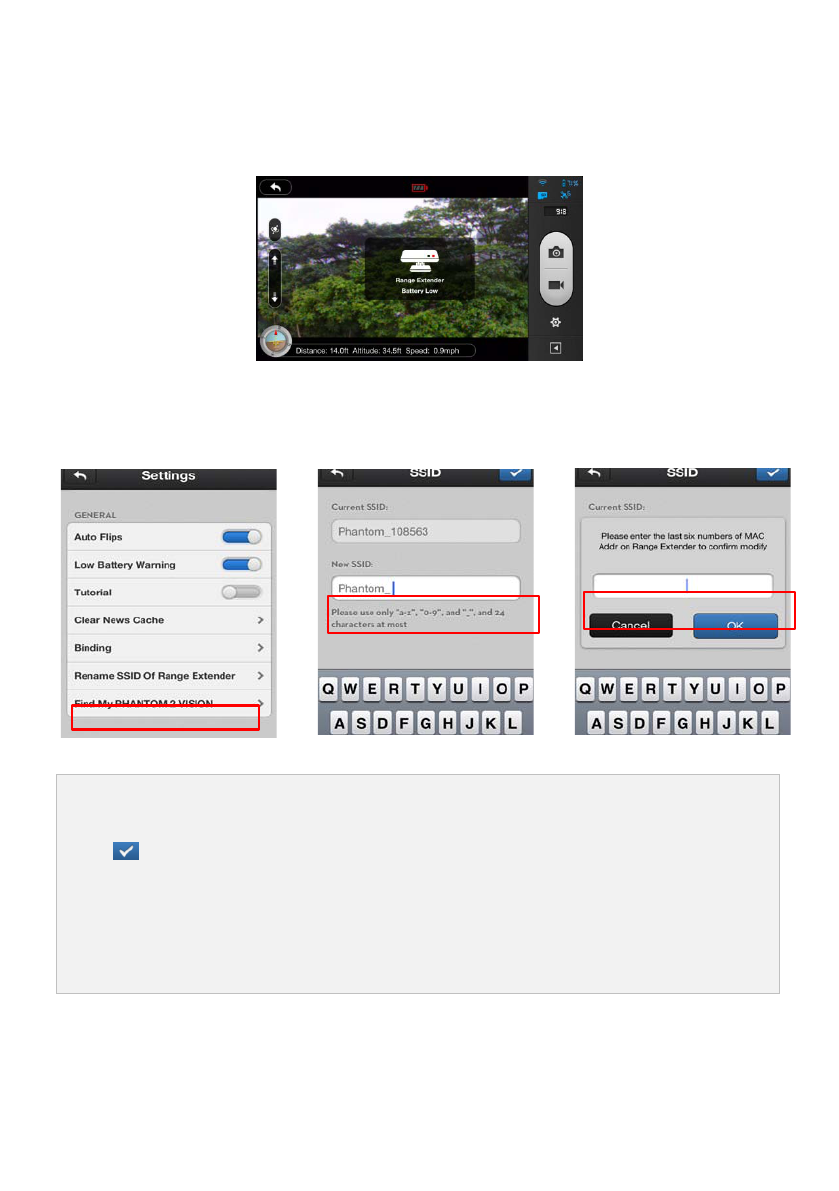
During flight, when the range extender is low battery capacity, a warning will appear in the camera page of DJI
VISION App.
6.3Rename SSID of Range Extender
For easier acknowledge the SSID of your range extender, users can rename SSID of range extender.
1.
Tap “Rename SSID of Range Extender” in the Settings page. Enter a new name SSID name (e.g. Phantom_2
VISION+) in the textbox.
2. Tap
,and users will be asked to enter the last six numbers of MAC address on range extender to confirm
the modification.
3. Tap“OK” to confirm and the range extendershould automatically restart. Approximately 30 seconds later,
the network named of Phantom_2 VISION PLUS can be searched in theWi-Fi list of your mobile device.
Select and connect the renamed network, DJI VISION App can be used.
6.4 Binding theCamera &Range Extender
If the connection of PHANTOM 2 VISION+ and range extender is lost, or one of them needs to be repaired or
replaced, a camera and range extender binding will need to be performed via the DJI VISIONApp.
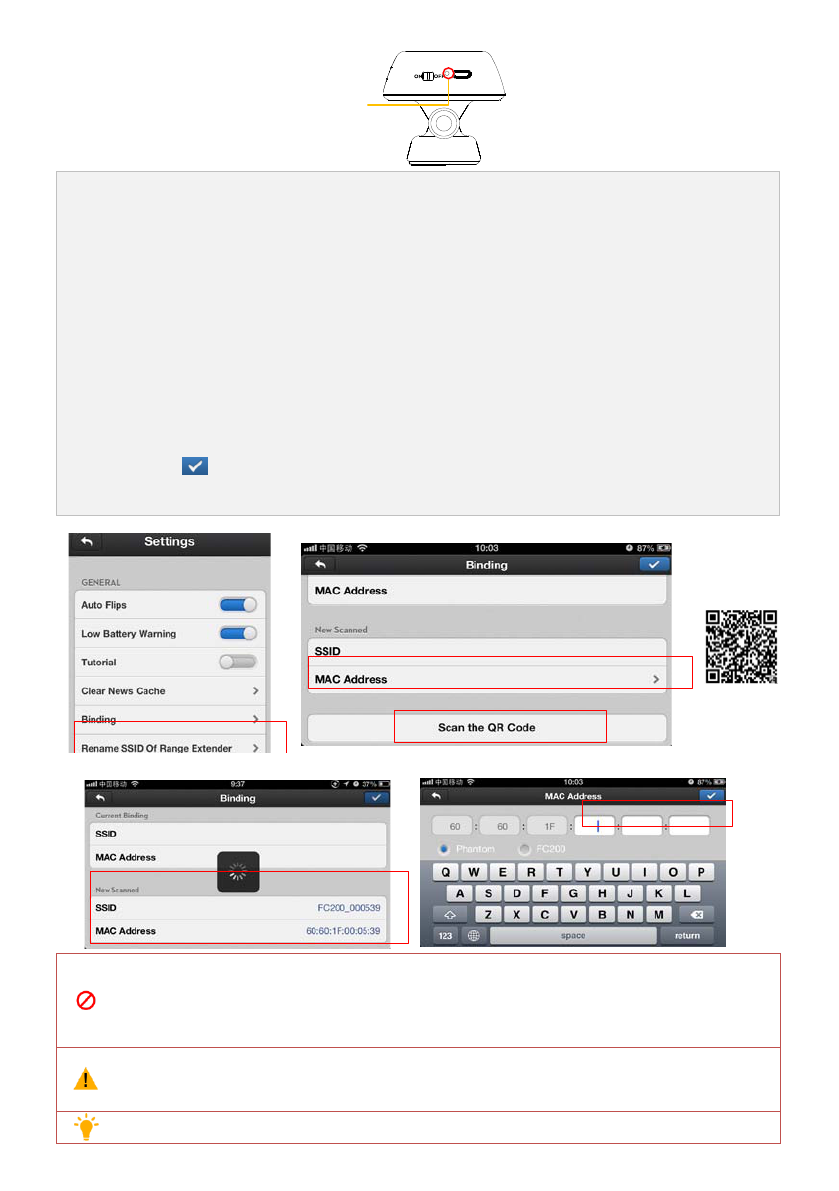
©2014 DJI Innovations. All Rights Reserved.39 |
Reset
B u tto n
1.
Power on the camera and range extender.
2. Approximately 30 seconds later, press the resetbutton on the range extender with a thin object until the
SYSTEM Indicator turn off.The range extenderwill then restart automatically.
3. Approximately 30 seconds later, the SYSTEM Indicator should start to blink green, which indicates the
range extender is now ready to be bound.
4. (Fig.1)Run the DJI VISION App->Settings->General->Binding. (Fig.2) Select’Scan the QR Code’ to scan the
camera QR c o de on the product packaging. (Fig.3) Get the camera SSID (E.g. FC200_0xxxxx) and the MAC
address. Users can also skip the scan and enter the camera MAC address directly (Fig.4, Fig.5), the MAC
address can be found on the label on camera.
5. Select the tickon the top right corner. The range extendershould automatically restart. The binding
procedure is now c o m p le t e d.
二维码
示例
DO NOT push the reset button of the range extender unless you are ready to rebind the range
extender and the camera! This will unbind your camera and you must follow the steps above to
rebind.
If both the PHANTOM 2 VISION+ aircraft and range extender are powered on and working normally,
you will be able to find the SSID on the Wi-Fi list of the mobile device.
(
1
)
The QR code is located on the packaging of the PHANTOM 2 VISION+. If you cannot find the QR

©2014 DJI Innovations. All Rights Reserved.40 |
code, please contact DJI customer service to receive the QR code related to your camera’sserial
number which is printed on the label of camera.
(2) It’
s suggested to capture the QR code and reserved the picture in your mobile device or PC, in
case of lost the QR code on the package.
©2014 DJI Innovations. All Rights Reserved.41 |
7Downloading and Installingthe DJI VISION App
7.1 Download and Install
Download and install approaches
Approach1
Scan the QR code to get the download link. Download and install the DJI VISION App
on your mobile device. You can find the QR code on the‘Quick Start Guide
’ as well
ason the packaging of the PHANTOM 2 VISION+.
Approach 2
iOS user
Search “DJI VISION” from App Store, download and install on your mobile device.
Android user
Search “DJI VISION” from Google Play, download and install on your mobile device.
Supported mobile devices
iOS (iOS6.1 or above)
Recommended: iPhone4s, iPhone5, iPhone5s, iPhone5c, iPod Touch4, iPod
Touch5; Available but not recommended:iPad3, iPad4, iPad mini, iPad Air.
Android (System 4.0 or above)
SamsungGalaxy S3, S4, Note2, Note3 or mobile devices of similar configuration.
DJI continues to support many mobile devices and any information from users are welcome. Please
send any questions or queries to the following mailbox: phantom2vision@dji.com.
Be aware that the DJI website regularly updates so make sure you visit often as well as theApp Store
or Google Play i n o r de r to download the latest version of the DJI VISION App.
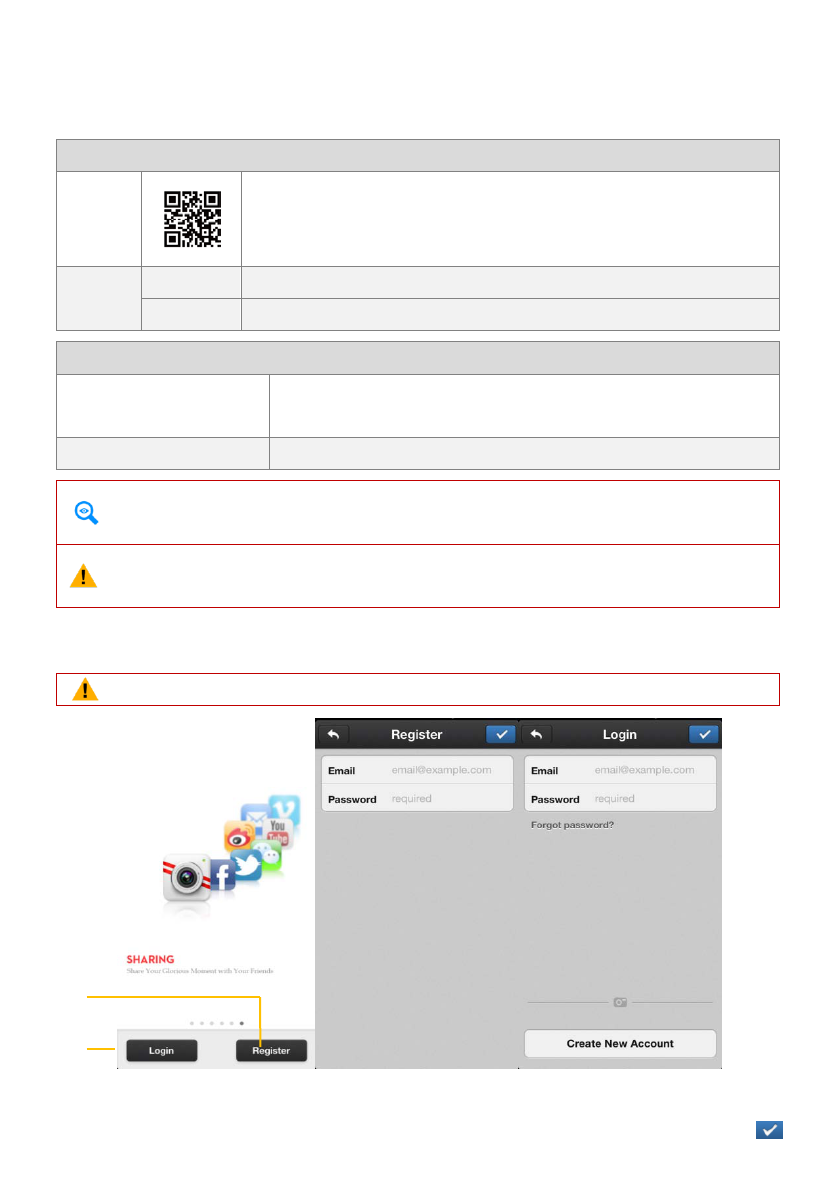
7.2 Register & Login
Access the Internet to register and login.
[1] Register
Select ‘Register’ to enter the registration page. Fill in your Email and Password information and then tap
[1]
[2]
©2014 DJI Innovations. All Rights Reserved.42 |
to create a new account.
A DJI account is available for all DJI assistant software and app.
[2] Login
Select ‘Login’ to enter the login page. Fill in your registered Email and Passwordand then tap to login.
You should login to your account the first time you use the DJI VISIONApp.
If you do have an account, but forgot the password, se le c t the “Forgot password”to retrieve it.
[3] Usage tips
Useful tips will display when you enter the welcome page.Tap the screen to display the next useful tip.
Enable “Tutorial” switch in Settings page, the usage tips will display as the first time you login the App,
which can help you quickly acquire the usage of DJI VISION App.
[3]

©2014 DJI Innovations. All Rights Reserved.43 |

©2014 DJI Innovations. All Rights Reserved.44 |
8Connecting the Camera
It’s important to using the mobile device connect the Wi-Fi network built by range extender and Wi-Fi module, the
users can use DJI VISION App connect the camera and establish a live camera preview.
8.1 Connecting Procedures
Please carry out the following procedures to connect a mobile device to thecamera of PHANTOM 2 VISION+.
1.
Power on the remote controller and the range extender.
2. Turn on the power of PHANTOM 2 VISION+.
3. (Fig.1)Enable the Wi-Fi on your mobile device; wait for about 30 seconds, and then s e le ct
“Phantom_XXXXXX”from theWi-Fi network list.
4. (Fig.2)Run the DJI VISION App on your mobile device, current Wi-Fi connection status will be indicated
on the main menu. The Wi-Fi connection indicatorturnssolid greenthatmeans the connection is good.
5. Tap the “CAMERA” icon and the DJI VISION Appwill establish a live camera preview (Fig.3). This means
everything is now functioning.
Fig.3
Wi-Fi Connection
Indicator
Enable the Wi-Fi
Select Phantom_XXXXXX
©2014 DJI Innovations. All Rights Reserved.45 |
Wi-Fi Connection Indicator Description
Icon
Description
Solid green
Wi-Fi is now connected to the PHANTOM 2 VISION+.
Solid blue
Wi-Fi is connected to another Wi-Fi network and NOT to the PHANTOM 2 VISION+.
Off
No Wi-Fi connection.
(
1
)
The SSID is unique for each PHANTOM 2 VISION+which should appear in your Wi-Fi list as
Phantom_XXXXXX.
(2) Android users can tap the SSID button on the main page to enter Wi-Fi settings of the mobile
device directly.
©2014 DJI Innovations. All Rights Reserved.46 |
Flight
After the installation is completed,it’s recommended to take flight trainings refer to PHANTOM PILOT TRAINING
GUIDE to enhance your flight skills or take adequate flight trainingsessions (such as running simulation or
coaching by the experienced user) before you use the aircraft for the first time. Ensure that you have selected a
proper location and environment for your flight.
Flight Environment Requirement
(
1
)
Do not use the aircraft in the severe weather conditions, which include gale force winds (wind speed
exceeds category 4), snowy, rainy and smog day.
(2) Chose an open filed as the flight field, where no high building may block the flight route. Also the building
with significant amount of steel structures may affect the accuracy of the compass on the aircraft.
(3)
Keep your aircraft away from any obstacles, crowds, high voltage power lines, trees or the surface of the
water at all time when your aircraft is in the air.
(4) To eliminate the
electromagneticinterferences to the remote controller, ensure that your aircraft is not
operating in the complex electromagnetic environment (such as staying close the base station or radio
transmitting tower).
(5) The aircraft cannot operate within the polar cycles.
(
6
)
Do not flight the aircraft in the no-fly zone specified by the local laws or regulations.
1 Calibrating the Compass
IMPORTANT: Make sure to perform the Compass Calibration procedures prior to the first flight.The compass is very
sensitive to electromagnetic interferencewhich causes abnormal compass dataand leads topoorflight performance
or even flight failure. Regular calibration of the compass enables the compass to perform at its optimal le ve l.
(1)
(2)
DO NOT calibrate your compass where there is a possibility for the existence of strong magnetic
interference such as magnetite, parking structures, and steel reinforcement underground.
DO NOT carry ferromagnetic materials with you during calibration such as keys or cellu lar
phones
1.1 Calibration Procedures
Choose an open space to carry out the following procedures. Please watch the quick start video of the PHANTOM 2
VISION+for more details on the compass calibration.
©2014 DJI Innovations. All Rights Reserved.47 |
N o r m a l L E D
Q u ic k ly flip t h e s w itc h S1 360
o
R o tate th e a irc ra ft
h o riz o n t a lly
360
o
R o tate th e a irc ra ft
v e r tic a lly (N ose dow nw ard)
P o s itio n -1
S ta rt h o rizo n tal c a lib ra tion S ta rt v e rtic a l c a lib ra tio n Succeed F a il
P o s itio n -1
->
P o s itio n -3
->
P o s itio n -1
F lip 5 tim e s or above
S ta rt
c a li
L E D F lig h t In d ic a t o r
P o s itio n -1
->
P o s itio n -3
->
P o s itio n -1
F lip once
P o s itio n -3
L E D F lig h t In d ic a t o r
L E D F lig h t
In d ic a t o r
Re-calibrate
P o s itio n -1
P o s itio n -3
1.2 Recalibration Scenarios
(
1
)
When CompassData is abnormal,the LED flight indicator will blink alternating between red and yellow.
(2) Last compass calibration was performed at a completely different flying field/location.
(3) The mechanical structure of the aircraft has changed, i.e. changed mounting position of the compass.
(
4
)
Severe drifting occurs in flight, i.e. the aircraft does not fly in straight lines.
©2014 DJI Innovations. All Rights Reserved.48 |
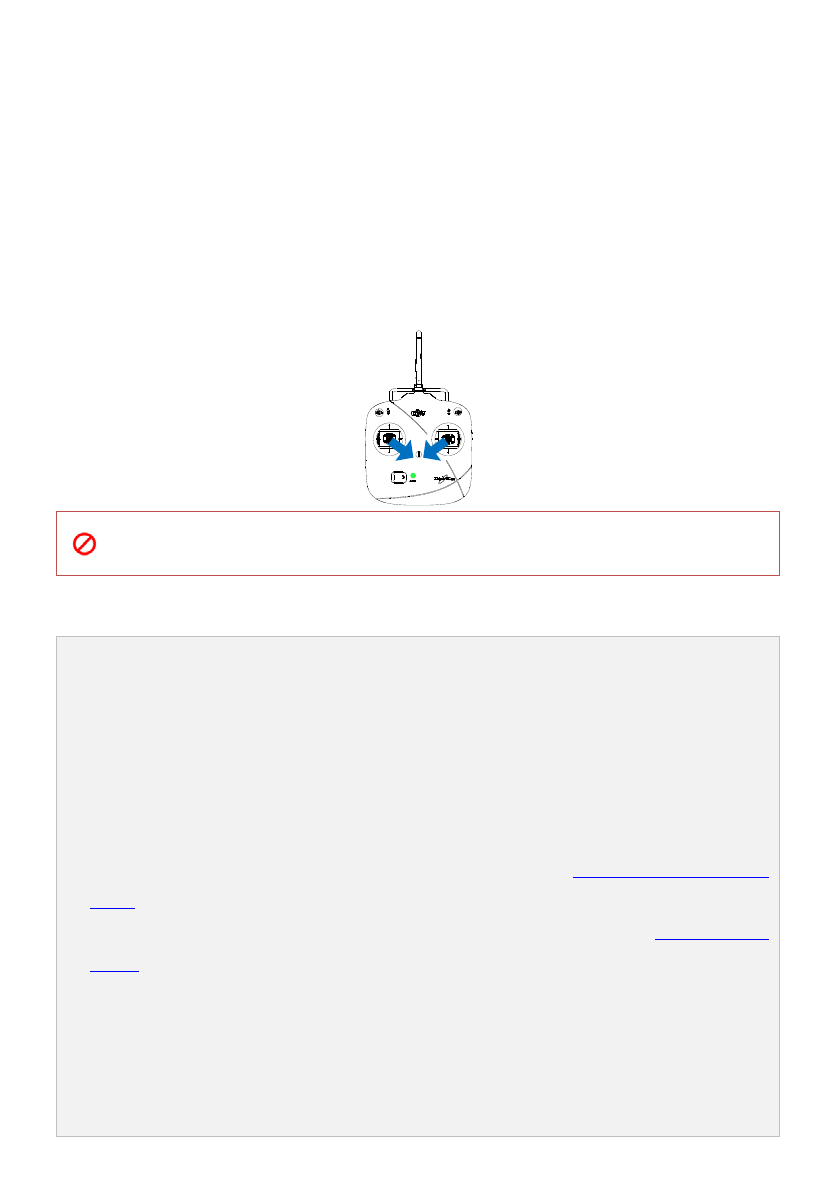
2 Starting the Motors
A Combination Stick Command (CSC) is used to start the motors instead of simply pushing the throttle stick up.
Push both sticks to their bottom corners as indicated in the diagram below to start the motors. Once the motors
have spun up, release both sticks simultaneously.
There are two methods to stop motors.
Method 1: Conduct CSC again and motors will stop immediately.
Method 2: When the aircraft has descended to the ground, push the throttle stick to its lowest position and hold,
motors will stop 3 seconds later.
You SHOULD NOTexecute the CSC during normal flight! This will stop the motors and cause the aircraft
to descend rapidly and drop without any type of control.
3Takeoff/Landing Procedures
1.
Place the PHANTOM 2 VISION+ on an o p e n flat ground with battery indicators are facingtowards you.
2. Power on the remote controller and the range extender, then the intelligent battery.
3. Launch the DJI VISION APP and start the bindingprocess between the mobile device and the PHANTOM 2
VISION+. After the binding is completed, enter the camera preview page.
4. Wait until the LED flight indicator starts to slowly blink green/yellow. This means the aircraft is initializing
and entering the “Ready to Fly”/“Ready to Fly (non-GPS).” s ta te. Then proceed to execute the CSC
command to start motors.
5. Push the throttle stick up slow ly to lift the aircraft off the ground. Refer to <Remote Controller Operation
M o de > for more details.
6. Enjoy your flight while capturing and recording with the DJI VISION App. Refer to the<DJI VISION App
Usage> for more details.
7. Be sure you are hovering over a level surface. Pull down on the throttle stick gently t o de scend and land.
8. After landing the aircraft on the ground, keep the throttle stick at its lowest position for about 3 to 5 seconds
which will automatically stop the motors.
9. After landing the aircraft on the ground, keep the throttle stick at its lowest position for about 3seconds
which will automatically stop the motors.
©2014 DJI Innovations. All Rights Reserved.49 |
(1)
(2)
(3)
When the LED flight indicator blinks yellow rapidly during flight, the aircraft has entered into
Failsafe m o de , refer to <Failsafe Function>for details.
A low battery capacity warning is indicated by the LED flight indicator blinking red slowly or
rapidly during flight. Refer to the<Low Battery Capacity Warning Function> for details.
Watch the quick start video about flight for more flight
information:www.dji.com/phantom2visionplus/training.
4 Failsafe Function
The aircraft will enter Failsafe m o de when the connection from the remote controller is lost. The flight control
system will automatically control the aircraft toreturn to home and land to reduce injuries or damage.
Home Point:When the aircraft enters into the “Ready to Fly” statusfrom the“Ready to Fly status
(non-GPS)”, the aircraft will record the current GPS coordinates as the home point.
1) When remote controller signal is lost, PHANTOM 2 VISION will use the recorded the home
point coordinates as the home point for landing.
2)
Home point coordinates will be used to calculate the horizontally distance of the aircraft
(shown as “D” on the GUI of the DJI VISION app).
3) After successfully record the home point, you can see a fast blink of LED flight indicators on
the aircraft.
4.1 Possible Failsafe Scenario
(
1
)
The remote controller is powered off.
(2) The aircraft has flown out of the effective communication range of the remote controller.
(3) There is an obstacle obstructing the signal between the
remote controller and the aircraft, essentially
reducing thedistance the signal can travel.
(
4
)
There is interferencecausing a signal problem with the remote controller.
4.2Failsafe Procedure
Initiating the Failsafe mode from different flying statuses will results in the different landing process. There are two
types flying status that may affect the Failsafe landing process, one is “Ready to Fly” status and the other is “Ready
to Fly (non-GPS)” status. The differences between these two statuses are shown as below:
Ready to Fly(non-GPS) ----Automatic landing
The flight control system will try to keep the aircraft level during descent and landing. Note that the aircraft
may be drifting during descent and landing process.
Ready to Fly ----Automatic go home and land
©2014 DJI Innovations. All Rights Reserved.50 |
The flight control system will automatically control the aircraft to fly back to the home point and land.
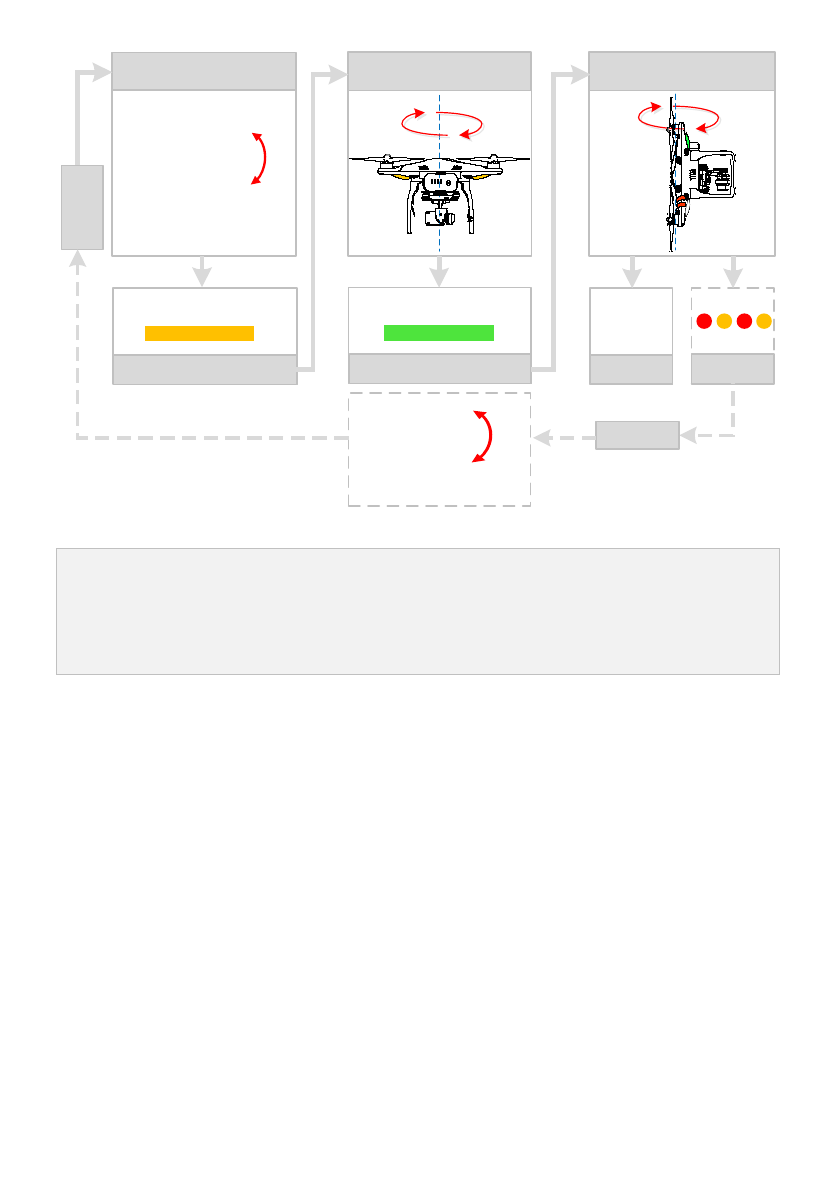
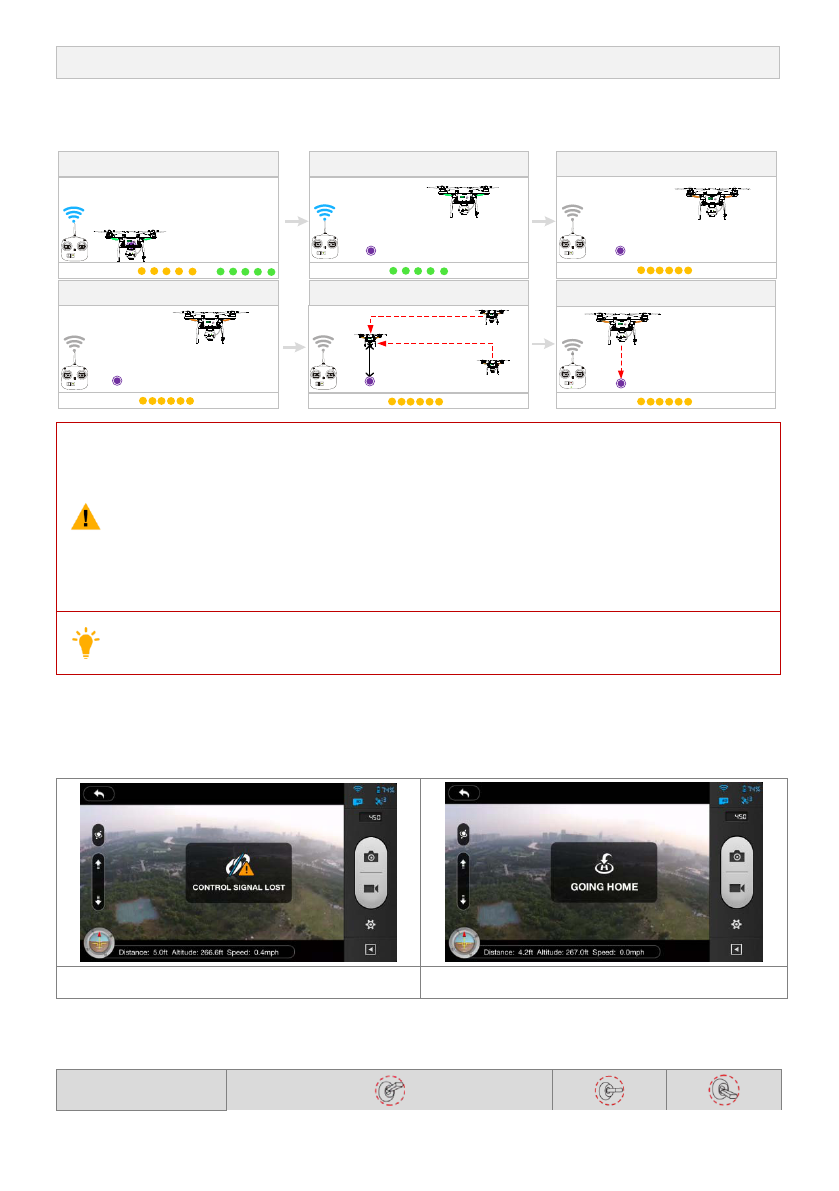
The figure below demonstrates the complete Failsafe landing process when the aircraft entered the Failsafe from
the “Ready to Fly” status.
1
Record H om e Point.
2
F ly in g .3 Rem ote controller signal lost.
5 Fly back to hom e point.4 S ig n a l lo s t la s t s 3s, begin to go hom e.6 Landing after hovering 15 s.
LED Flight Indicator
à
OFF CAM ON WIFI ON
MICRO SD
OFF CAM ON WIFI ON
MICRO SD
OFF CAM ON WIFI ON
MICRO SD
OFF CAM ON WIFI ON
MICRO SD
OFF CAM ON WIFI ON
MICRO SD
OFF CAM ON WIFI ON
MICRO SD
OFF CAM ON WIFI ON
MICRO SD
LED Flight Indicator LED Flight Indicator
LED Flight Indicator LED Flight Indicator LED Flight Indicator
H eight over hom e point<=20m
H eight over hom e point>20m
20m
E le va te to 20 m
1)
To ensure the aircraft can successfully return to the home point in the Failsafe mode after it
lost the connection from the remote controller, only takeoff the aircraft when it is in the “Read
to Fly” status.
2)
The aircraft will automatically descent during the Failsafe process, if there are less than 6 GPS
satellites are detected for more than 20 seconds.
3)
The aircraft cannot avoid obstacle during Failsafe.
Quickly flipping the S2 switch of the remote controller from upper most to lower most positions 5
times or more will reset the current aircraft position as a new home point of PHANTOM 2 VISION
+
.
Failsafe on the DJI VISION App
The DJI VISION App will provide information during Failsafe.
Control Signal Lost Indicator
Going Home Indicator
4.3 Regaining Control During Failsafe Procedure
Position of Switch S1

©2014 DJI Innovations. All Rights Reserved.51 |
Position-1
Position-2
Position-3
How to regain control
When the S1 switch is switched to Position-1,
t o g g le the S1 switch to any other position once to
regain control. If remote controller’s signal is
recovered, control is returned back to the pilot.
Regain control as soon as signal
is recovered.
©2014 DJI Innovations. All Rights Reserved.52 |
5Low Battery Capacity Warning Function
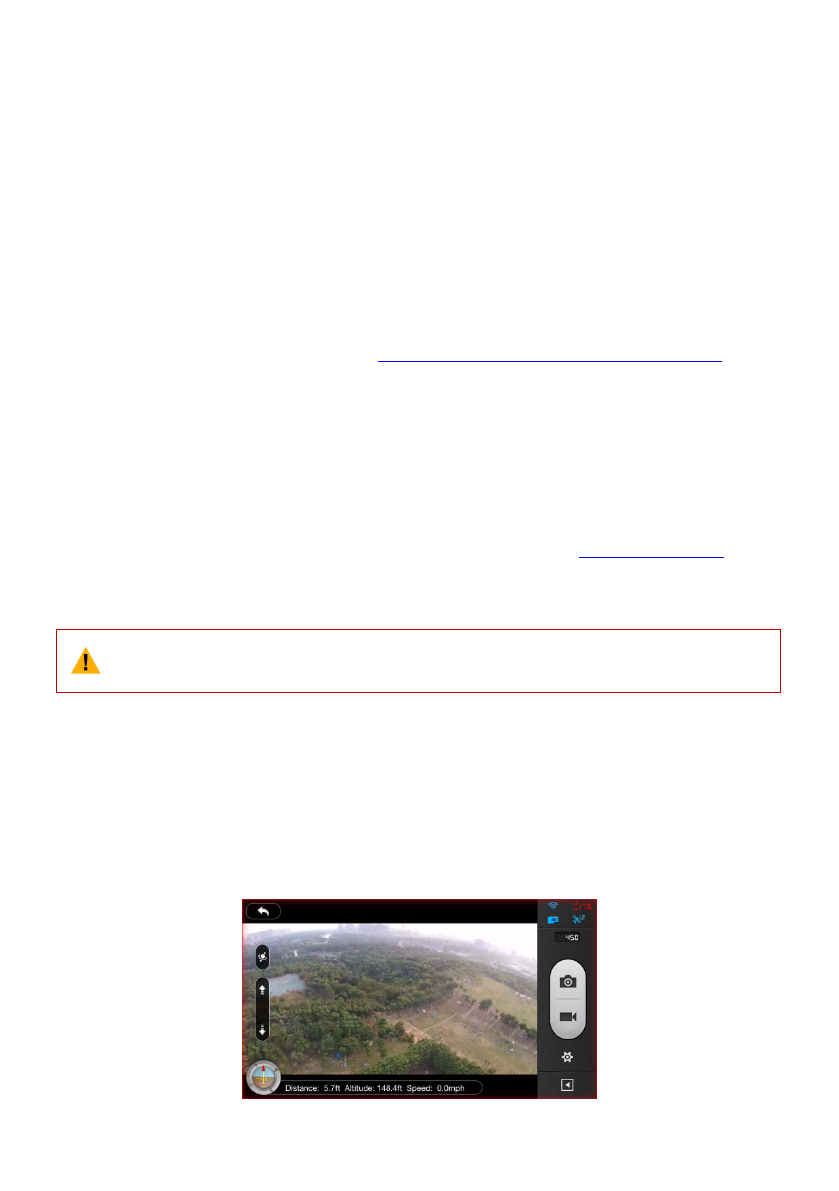
The low battery capacity warning alerts users when the battery is close to depletion during flight. When it appears,
users should promptly fly back and land to avoid accidental damage. The PHANTOM 2 VISION+ has two levels of
low battery capacity warning. The default warning low battery threshold are 30% (first level warning) and 15%
(second level warning) respectively.
First Level Battery Low Warning
When battery level drops below 30%, the LED indicators will blink red slowly and the DJI VISION app will
produce the alarm to notify the user. Refer to<DJI VISION app Low Battery Capacity Warning>for more
information.
Second Level Battery Low Warning
When the battery level drops below 15%, the LED indicators will blink red rapidly. At the meantime, the aircraft
will gently descent to the ground. The PHANTOM 2 VISION+ will also begin to descend and land automatically.
After it has landed, keep the throttle stick at its lowest point or execute CSC; refer to<Starting the Motors> for more
information about how to execute the CSC. The other option is to push the throttle upward to hover the aircraft
and navigate it to a more appropriate location for landing.
When battery low warning is triggered, you must bring the aircraft back to the home point to avoid
losing the power for the aircraft.
DJI VISION App Low Battery Capacity Warning
DJI VISION App will show low battery capacity warnings.
(1) A red rectangle will blink on the camera screen.
(2) Aud i b le alarm. Make sure the sound is turned on and volume is turned up on your mobile device.
(3) The aircraft battery icon will turn red.
Low Battery Capacity Warning

©2014 DJI Innovations. All Rights Reserved.53 |
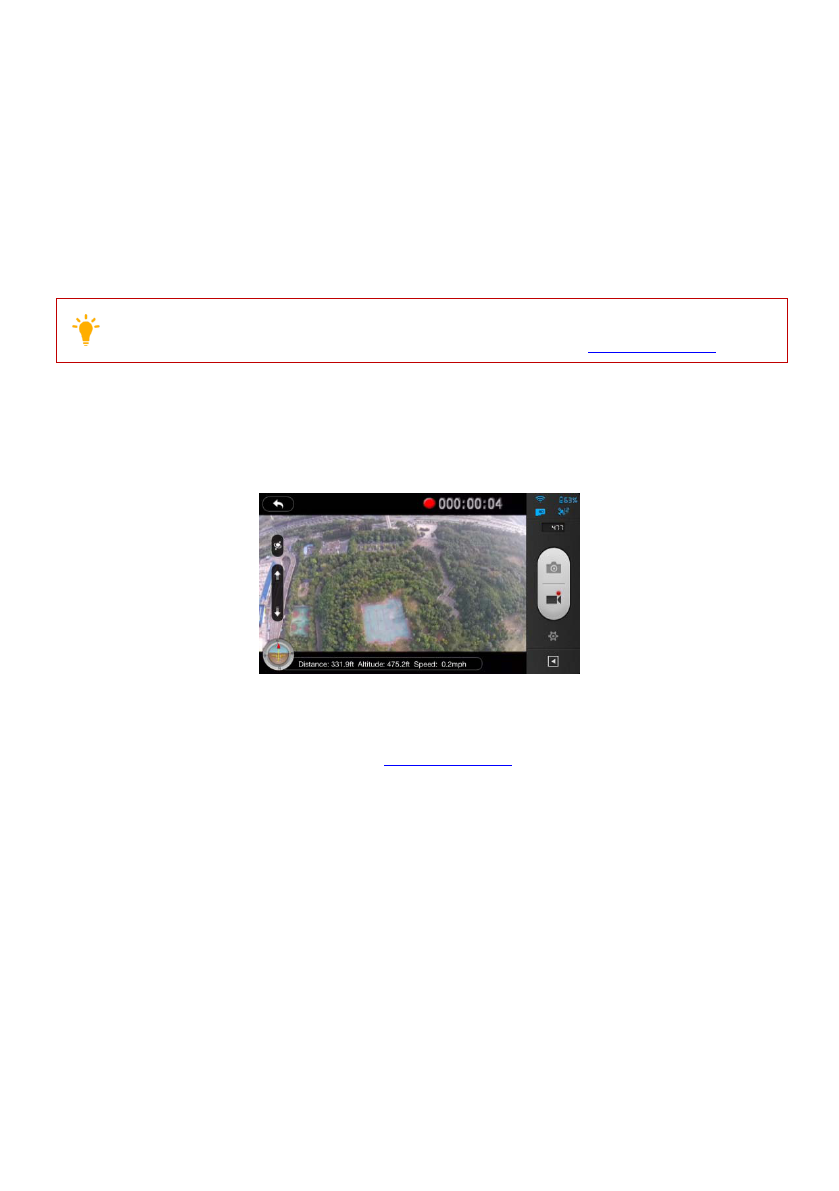
DJI VISION App Usage
The DJI VISION App controls the PHANTOM 2 VISION+ camera including capture and recording, settings, pitch
angle adjustments,and displays essential status including flight parameters andbattery le ve l.
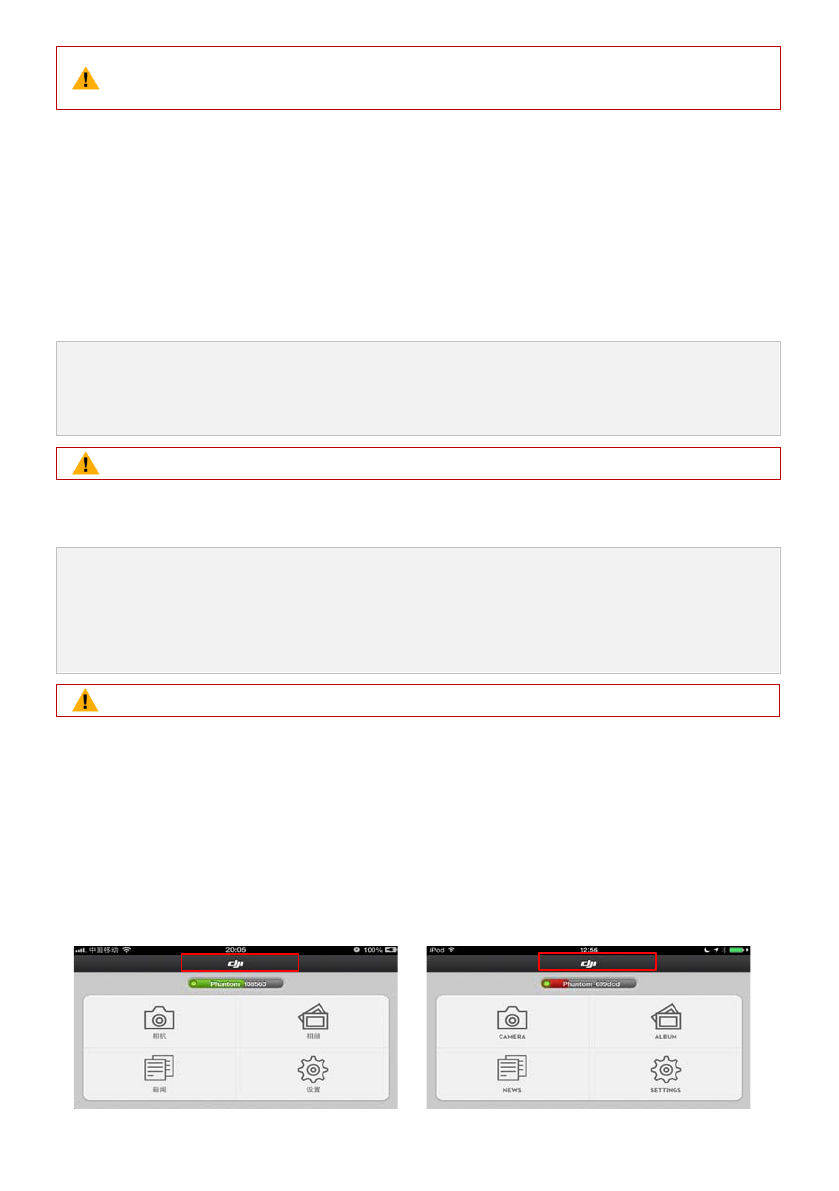
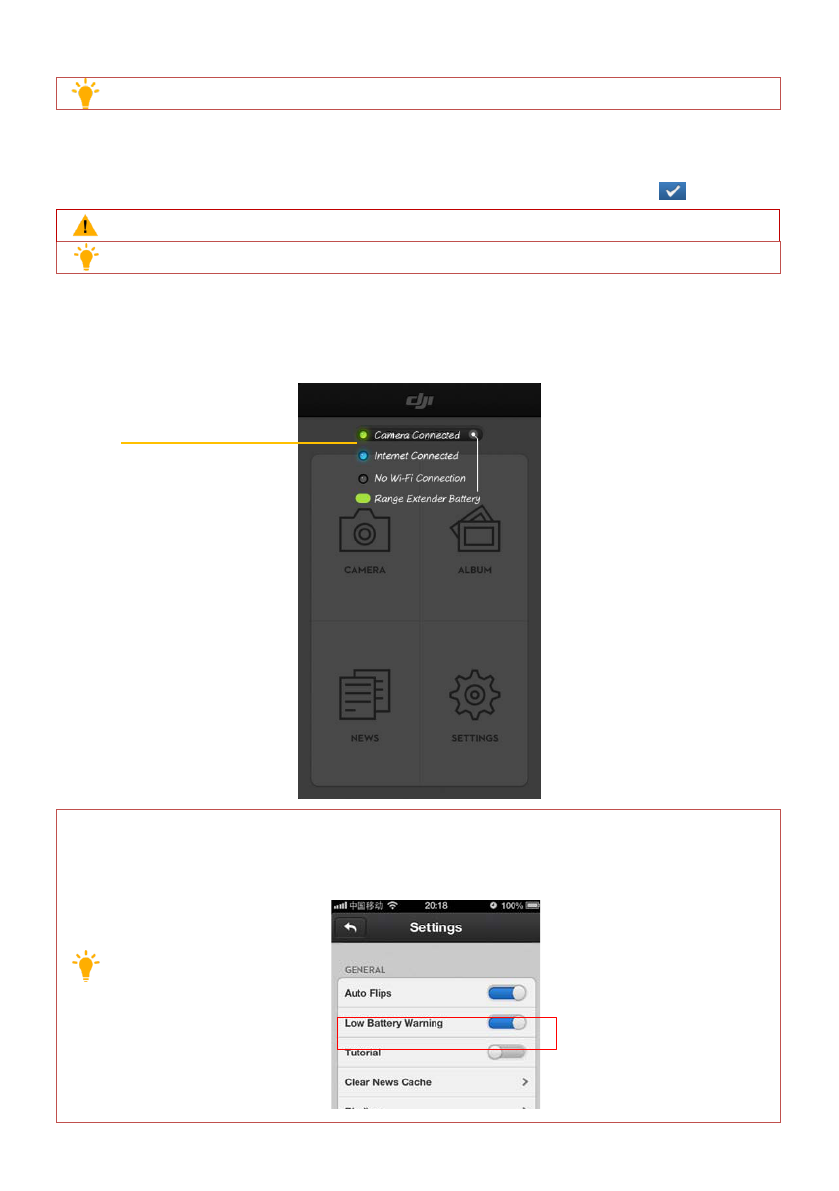
1 DJI VISION App Main Menu
After login you can see the GUI as shown below. The GUI shows the current Wi-Fi connection status and four main
features of the App.
Icons
Description
Camera
Tap to enter camera preview
Album
Tap to enter Album
News
Tap to enter DJI news
Settings
Tap to enter App settings
1)
When using the camera and the SD card album, you need to connect your mobile device to the
PHANTOM 2 VISION+Wi-Fi network.
2) Access to internet is necessary (mobile or Wi-Fi) to share photos,videosandread DJI news.
3) If you receive a phone call during flight, the live camera preview screen may be interrupted. It's
recommended to ignore the call and pay full attention to your flight.
©2014 DJI Innovations. All Rights Reserved.54 |
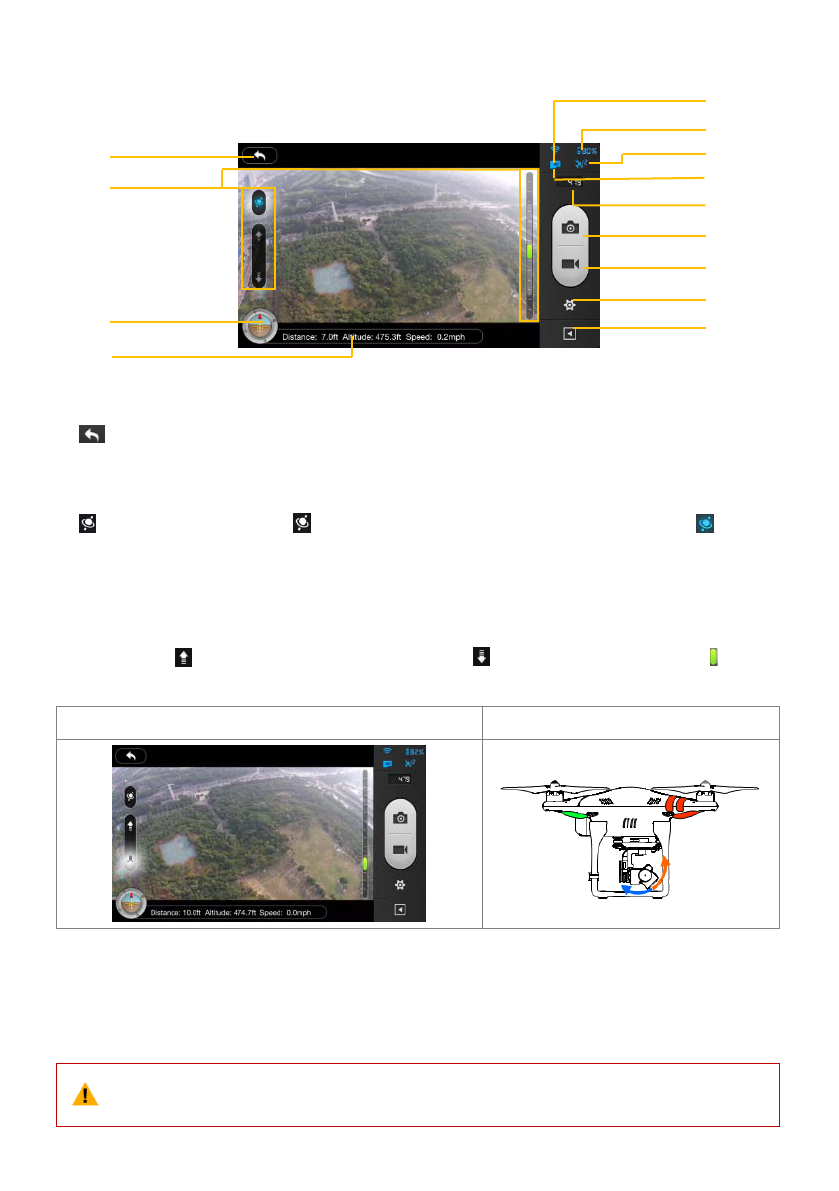
2Camera Page
[1] Return
- Return to the preview page
[2]Camera Pitch Control
- Pitch Control switch is white whenin normal mode, tap once the switch will be highlight and enter
into the Accelerometer Sensor Mo de .Tap once again to return to normal mode.
Normal Mode
Tap up arrow to pitch camera upwards and down arrow to pitch downwards. Green slider indicates
current camera pitch.
Gimbal pitch control (Normal M o de )
Gimbal pitch movement
Accelerometer Sensor Mode
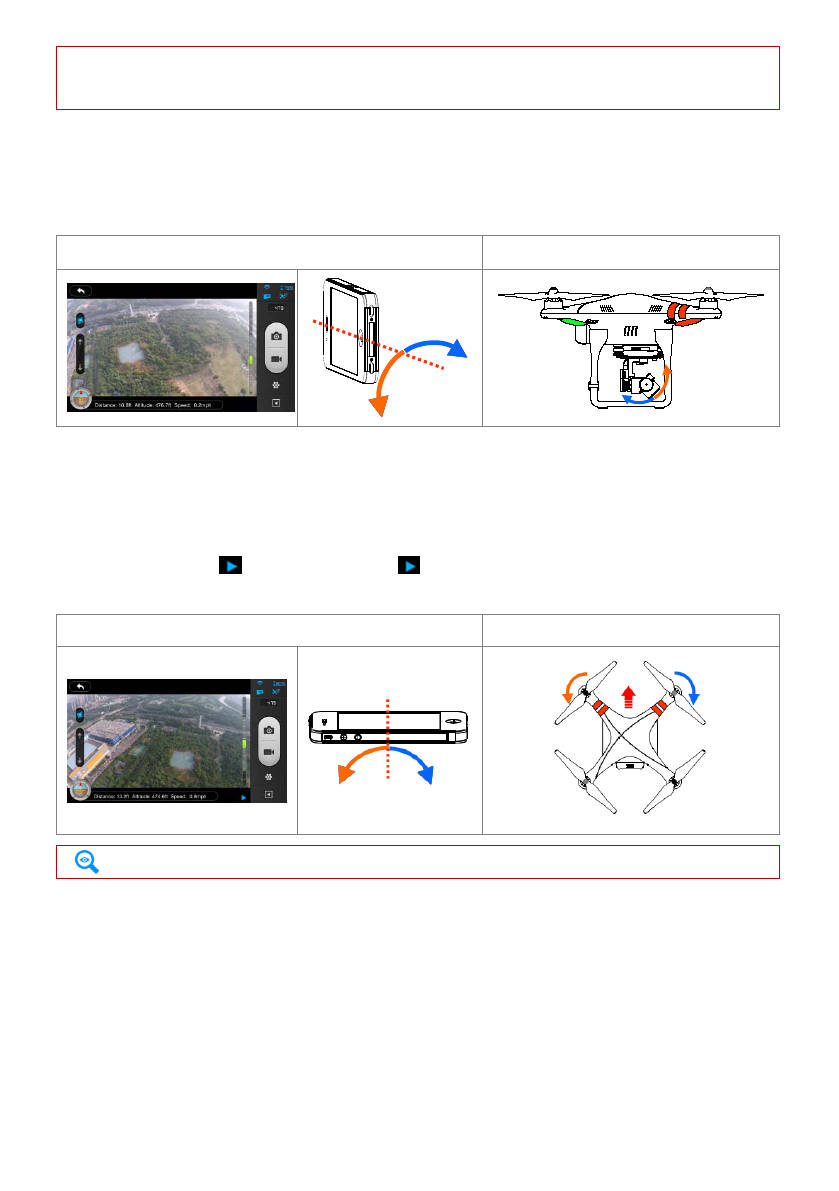
Tap the camera pitchswitch once to enter into Accelerometer Sensor Mode. The gimbal pitch movement and
aircraft yaw movement will be controlledby moving your mobile device.
(
1
)
Hold your mobile device carefully in Accelerometer Sensor Mode as any movement of it will
change the gimbal pitch angle and aircraft azimutha n g le real timely.
[1]
[2]
[3]
[4]
[5]
[6]
[7]
[8]
[9]
[10]
[11]
[12]
[13]
©2014 DJI Innovations. All Rights Reserved.55 |
(
2
)
Compared with the control of mobile device movement in Accelerometer Sensor Mode, the
control of remote controller is prior.
1) Camera Pitch Angle Control
Pitch the mobile device forward to pitch down the camera. Pitch the mobile device inward to pitch up the
camera.
Gimbal pitch control (Accelerometer Sensor Mode)
Gimbal pitch movement
2) Aircraft Yaw AxialControl
If you wish to use the mobile device to control the Yaw movement of the aircraft, you need to enable this
function in the setting page of the DJI VISION App. After this function is enabled, Lean the mobile device
left to rotate le f t and right to rotate right .
Aircraft yaw Control (Accelerometer Sensor Mode)
Aircraft yaw Movement
Yaw axial control can be enabled and disabled from the setting page of the DJI VISION App.

©2014 DJI Innovations. All Rights Reserved.56 |
[3]Flight Att i tu de and Radar Function
Flight attitude is indicated by the flight attitude icon.
(1) The red arrow shows which direction the PHANTOM 2 VISION+ is facing.
(2) Blue and brown areas indicate its pitch.
(3) Pitching of the brown and blue area shows roll angle.
Tap the flight attitude icon to turn on the radar function. Home is located in the center of the radar and the red
icon indicates thePHANTOM 2 VISION+’s current heading, direction, and approximate distance from home.
Tap the flight attitude icon again to disable the radar.
(1)
(2)
By default, the center of the radar indicates the home point that has been recorded by the
PHANTOM 2 VISION+. Tap the center of the radar to switch the center to your mobile device's
current location.
If your mobile device contains a compass, the top portion of the Radar is the direction you are
pointing. If not, the radar will be oriented due north.
[4]Flight Parameters
Distance: Horizontal distance from home point.
Aircraft
Mobile Device Location
Distance
Home Point
©2014 DJI Innovations. All Rights Reserved.57 |
Altitude: Vertical distance from home point.
Speed: Horizontal flying speed.
Distance value will show as N/A if the PHANTOM 2 VISION+is not in“Ready to Fly” status.
[5]Wi-Fi Signal Intensity
Indicates camera is connected to your mobile device and Wi-Fi is working normally.
The connection between the camera and mobile device may fail if Wi-Fi signal strength is low. Refer to the
<PHANTOM 2 VISION+CONNECTION BROKEN> for more information.
[6]Aircraft Battery Level
(1) When available power is more than 30%, the battery icon is blue (e.g. ). This battery leve l is
appropriate for flight.
(2) When below 30%, the battery icon will turn red (e.g. ) and the LED flight indicator will slowly blink
red. This battery level is low for flight.It is recommended that fly the aircraft back and land it as soon as
possible.
(3) After available power drops below 15%(e.g. ), there is no longer enough power for flight. The LED
flight indicator will begin to flash red rapidly and the PHANTOM 2 VISION+ will begin an automatic
descent and land.
The threshold for the first and second level batter low warning can be set in the PHANTOM 2
VISION+Assistant Software.
[7]Aircraft GPS Status
GPS status icon display the number of satellites searched by the aircraft. The icon is highlighted when more
than 6 satellites are found that allow the aircraft to enter the “Ready to Fly” m o de .
[8] Micro-SDCard Status
DisplaysMicro-SD Card Status. The icon is highlighted when a valid Micro-SD card is inserted. If there is no
Micro-SD card present, it is grayed out.
[9]RemainingShots
Displays estimated shots remaining, based on the current Photo Sizesetting of camera and the storage capacity
of the Micro-SD card. This shows ‘0’ if:
(1) Micro-SD card is not inserted.
(2) Micro-SD card is full.
©2014 DJI Innovations. All Rights Reserved.58 |
(3) Micro-SD card is damaged.
(4) Connection between the DJI VISION App and camera is broken.
[10]Shutter Button
Tap to take photos.
Single capture: press once for a single capture.
Continuous capture: press once for 3 or 5 captures.
Timed capture: press once to begin a timed capture, press again to stop.
(1)
(2)
Shutter button is disabled during video recording.
Capture modes can be reconfigured in camera settings; refer to the<Camera Settings>.
[11]V i de o RecordingButton
Start and stop video recording. Tap once to start recording. Ared do t will blink to indicate recording is in
progress and a time c o de will appear in the top right corner of the preview screen. Press again to
stoprecording.
[12] Camera Settings
Tap to open the camera settings menu, refer to <Camera Settings>.
[13]Hide or Show Flight Parameters.
Tap to h i de the flight parameters. Tap again to show.
©2014 DJI Innovations. All Rights Reserved.59 |
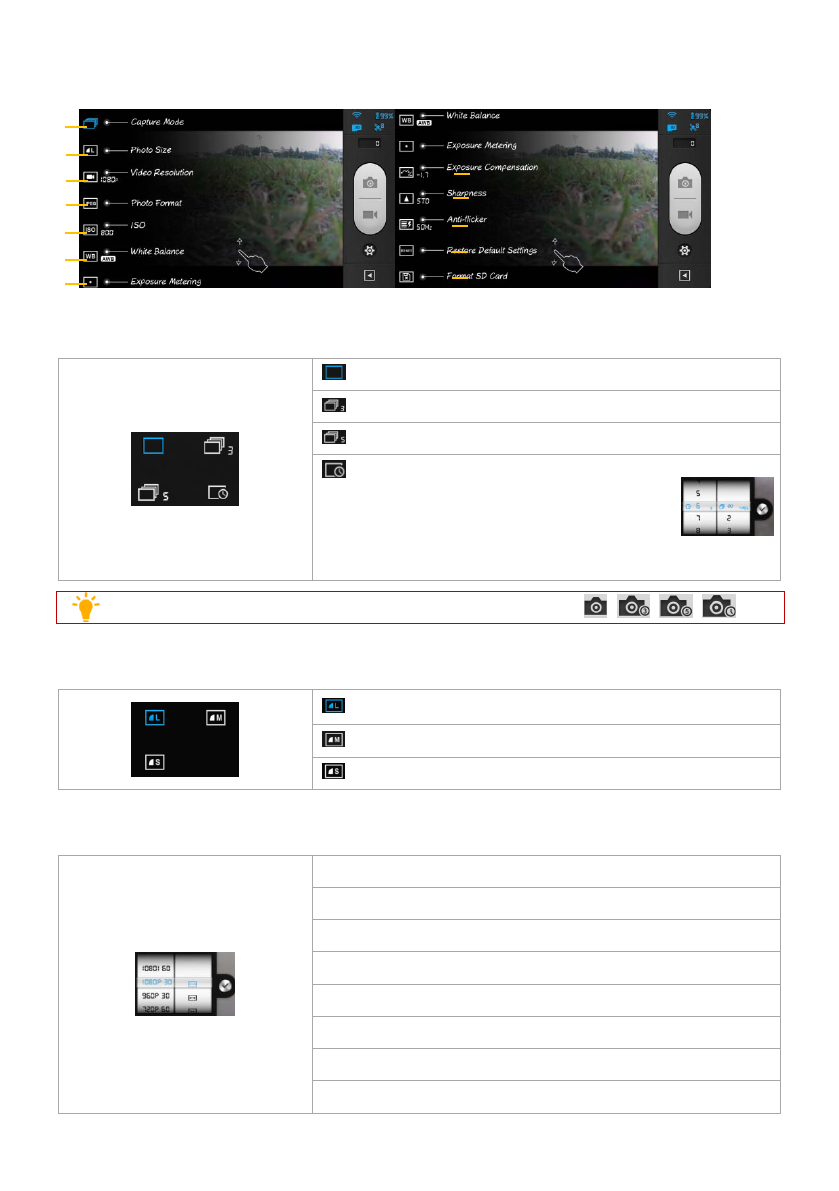
3 Camera Settings
[1]Capture Mode
Single capture.
3 captures.
5 captures.
Timed capture. Als o s e le c ta b le :
a) Intervals between two shots (3~60 s)
b) Number of shots (2~254, or number of
picture is subject to the capacity of the memory card.)
Capture Button will change according to the selected capture mode , , , .
[2]Photo Size
Large: 4384 x 3288, 4:3, 14.4MP
Medium: 4384 x 2922, 3:2, 12.8MP
Small: 4384 x 2466, 16:9, 10.8MP
[3]Video Resolution
1920x1080 60i,
16:9
1920x1080 30p,
16:9
1920x1080 25p,
16:9
1280x960 30p,
4:3
1280x960 25p,
4:3
1280x720 60p,
16:9
1280x720 30p,
16:9
640x480 30p,
4:3
(
VGA
)
[1]
[2]
[3]
[4]
[5]
[6]
[7]
[8]
[9]
[10]
[11]
[12]