SZ DJI TECHNOLOGY RMTX11510 RONIN-M User Manual UnEncrypted
SZ DJI TECHNOLOGY CO., LTD RONIN-M UnEncrypted
Contents
- 1. User Manual Part 1
- 2. User Manual Part 2
User Manual Part 1
RONIN-M
2015.8
V1.4
User Manual

2
© 2015 DJI. All Rights Reserved.
Disclaimers and Warnings
Congratulations on purchasing your new DJI product. Please read this manual and disclaimer carefully
before using this product. By using this product, you hereby agree to this disclaimer and signify
that you have read it fully. You agree that you are responsible for your own conduct and any content
created while using this product, and for any consequences thereof. You agree to use this product
only for purposes that are proper and in accordance with local regulations, terms and any applicable
policies and guidelines.
By reading this disclaimer, you also agree:
1. Any part of this disclaimer is subject to change without prior notice, refer to www.dji.com for the
latest version.
Do not modify or adjust the Ronin-M.
The Ronin-M has been calibrated before it leaves the factory. No adjusting or amending to the Ronin-M
is allowed. Make sure to use the original battery, otherwise performance may be hindered, and
internal malfunctions and damage to the gimbal may be caused. Please download the corresponding
Assistant software.
As DJI has no control over use, setup, final assembly, modification or misuse, no liability shall be
assumed or accepted for any resulting damage or injury. By the using, setting up, or assembling of the
product, the user accepts all resulting liability. DJI assumes no liability for damages or injuries incurred
directly or indirectly from the use of this product.
DJI and Ronin-M are registered trademarks of DJI. All names of products, brands, etc., appearing
in this manual are trademarks or registered trademarks of their respective owner companies. This
product and manual are copyrighted by DJI, with all rights reserved. No part of this product or manual
shall be reproduced in any form without the prior written consent or authorization of DJI. No patent
liability is assumed with respect to the use of the product or information contained herein.
FCC Compliance
Ronin-M complies with part 15 of the FCC rules. Operation is subject to the following two conditions:
(1) This device may not cause harmful interference, and (2) This device accepts any interference
received, including interference that may cause undesired operation.
Required Notices to Use in Taiwan
This device has been granted a designation number by the National Communications Commission
users are not allowed to change to frequency, increase the power or change the characteristics of the
original design and function.
Article 14 The use of low-power radio-frequency electronics shall not affect aviation safety and interfere
with legal communications.
© 2015 DJI. All Rights Reserved.
3
Using the Manual
Legend
Important Hints and Tips
Download the DJI Ronin-M Assistant App
Download and install the DJI Assistant app.
Search for "DJI Assistant" on the App Store and then follow the instructions for iOS installation.
Search "DJI Ronin" on the Google Play and then follow the instructions for Android installation.
http://m.dji.net/dji-ronin
Android 4.3 or above

4
© 2015 DJI. All Rights Reserved.
Contents
Disclaimers and Warnings 2
FCC Compliance 2
Required Notices to Use in Taiwan 2
Using the Manual 3
Legend 3
Download the DJI Ronin-M Assistant App 3
Introduction 5
In the Box 5
Ronin-M Diagram 7
Getting Started 7
Assembling the Handle Bar 10
Installing the Handle Bar onto the Gimbal 10
DJI Intelligent Battery Installation 10
Mounting the Camera 11
Balancing 13
Advanced Roll Adjustment 15
DJI Ronin-M Assistant App Tuning 16
Download and Install 16
DJI PC / MAC Assistant Tuning 22
Install DJI PC / MAC Assistant 22
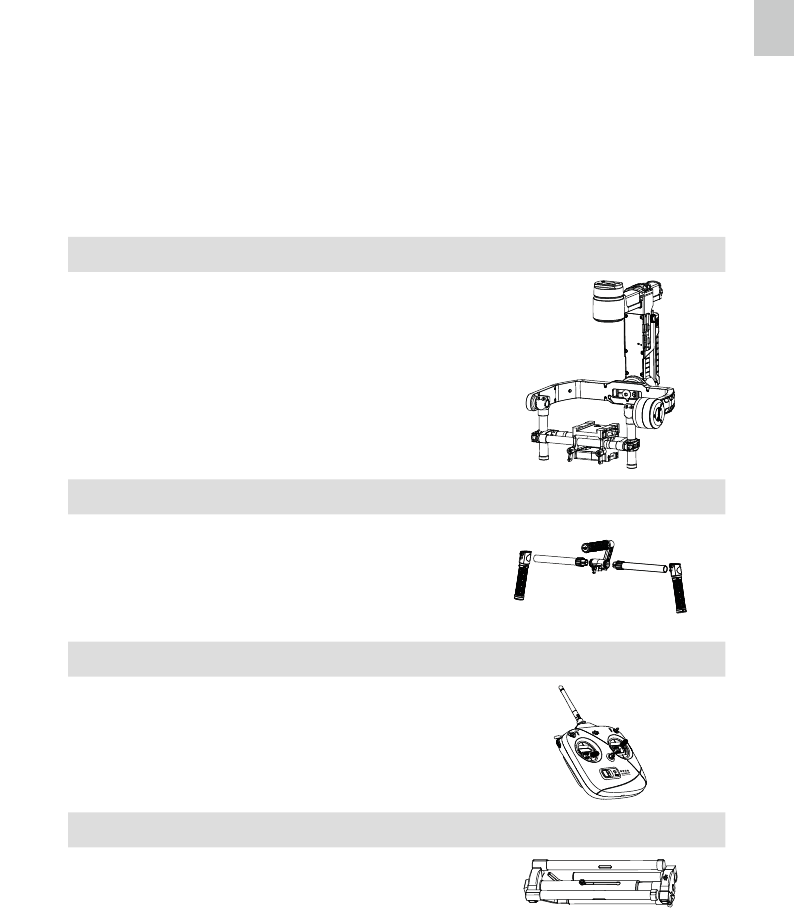
Remote Control 28
Connecting the Remote Control to the Ronin-M 28
Remote Control Features 30
Adding a Third-Party Transmitter/Receiver 31
Operation Modes 31
Underslung Mode 31
Upright Mode 31
Briefcase Mode 32
Maintenance 32
Troubleshooting 33
© 2015 DJI. All Rights Reserved.
5
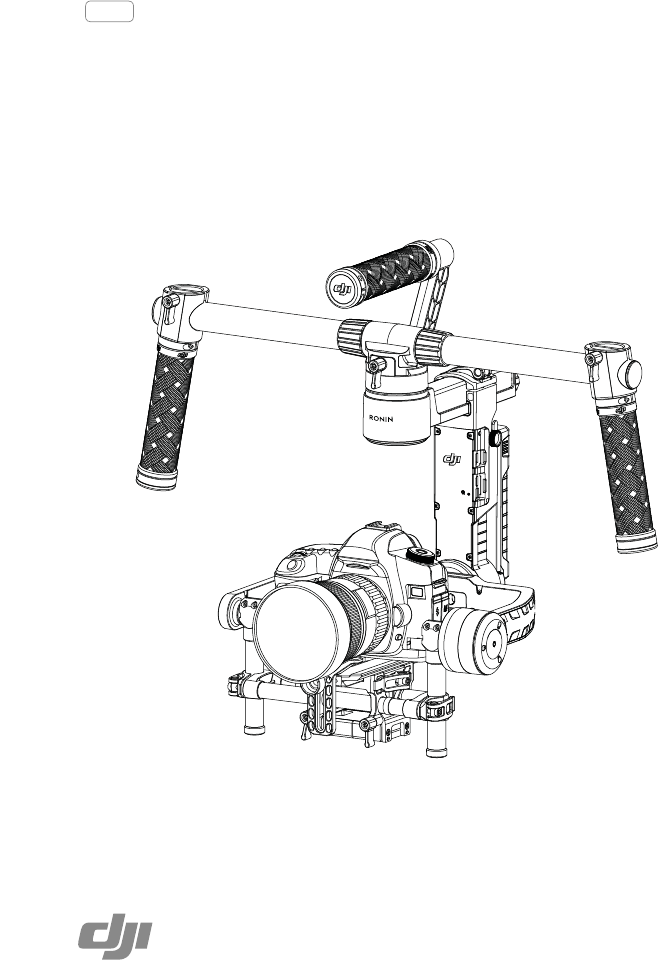
Introduction
stabilization technology. The technology built into the DJI Ronin-M allows a broad spectrum of cameras,
Ronin Handheld Gimbal, the DJI Ronin-M is lighter, smaller, and more convenient to use.
motors work with position feedback and the IMU (Inertial Measurement Unit) to communicate with DJI’s
custom 32-bit processor, which processes movement calculations in milliseconds. This reduces angular
steady. The Ronin-M can be used in three different operation modes: Underslung Mode, Upright Mode,
and Briefcase Mode.
In the Box
Gimbal ×1
The gimbal includes built-in DJI motor drive modules, an
supply module, a Bluetooth module, a transmitter/receiver
Handle Bar ×1
Customizable handle bar for the gimbal. The handle bar
is assembled from five parts, including a top handle, two
handle bars and two grips.
Control the gimbal’s movements, switch work modes, and
select gimbal speed.
Tuning Stand ×1
For suspending or storing the gimbal.
Ronin-M User Manual
6
© 2015 DJI. All Rights Reserved.
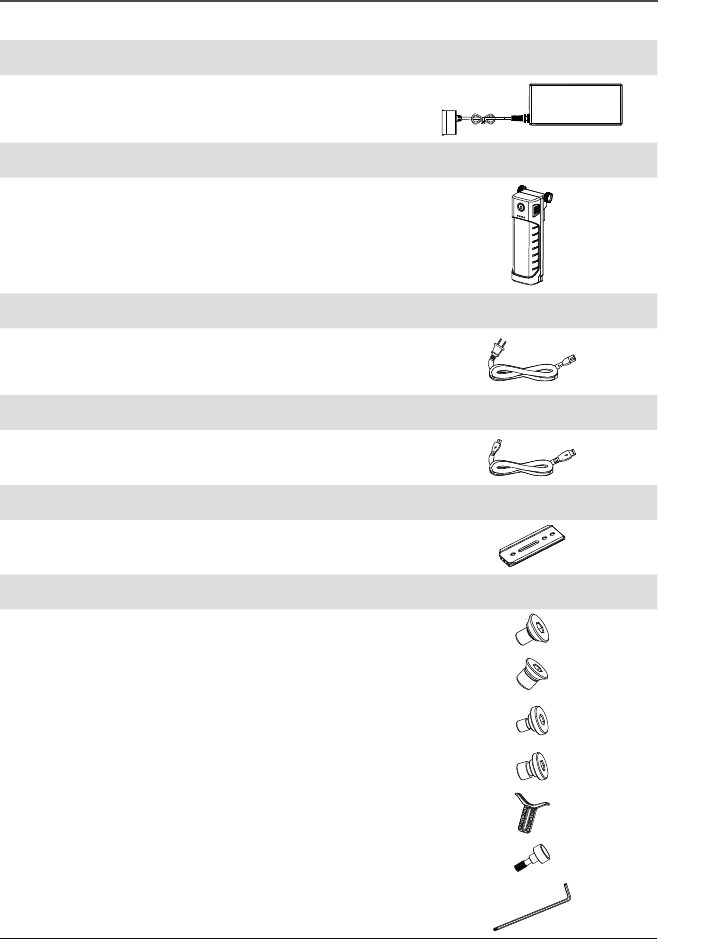
Charger ×1
Automatic switching charger 110-240V
DJI Intelligent Battery ×2
Power source for the gimbal.
Cable Pack ×1
Micro-USB Cable×1
Camera Mounting Plate ×1
For mounting your camera onto the gimbal.
Accessories Package
© 2015 DJI. All Rights Reserved.
7
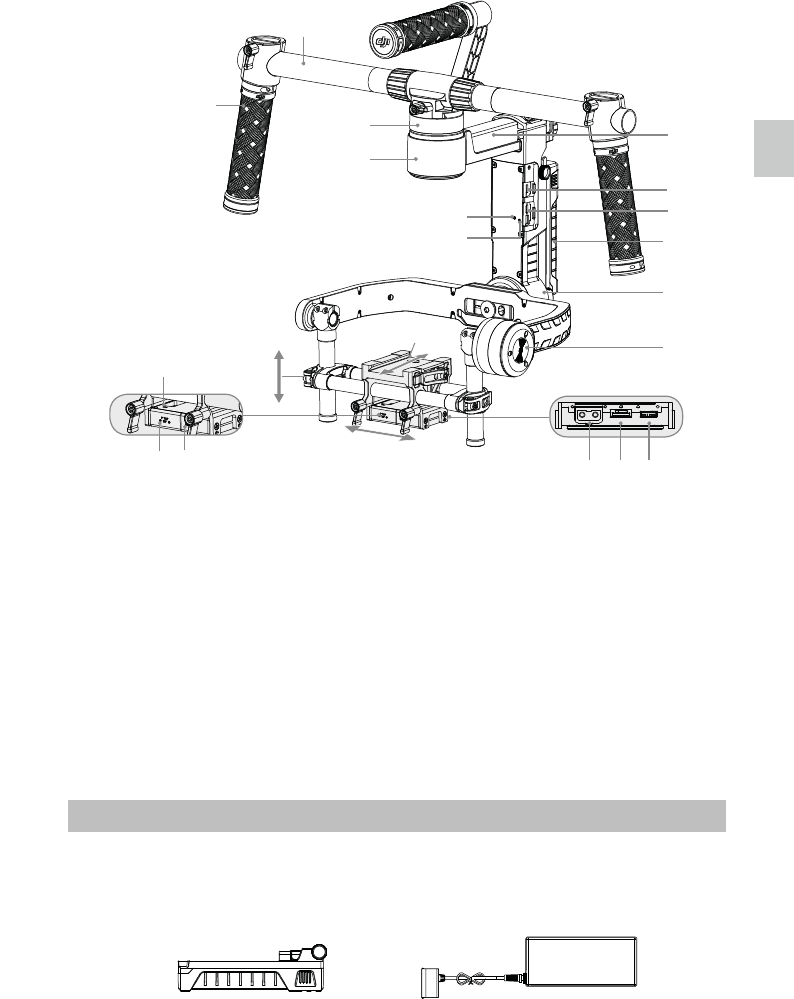
Ronin-M Diagram
Getting Started
DJI Intelligent Battery
Before you start using your Ronin-M, be sure to charge the battery. The DJI Intelligent Battery was
specially designed for the Ronin-M. It has a capacity of 1580mAh, a voltage of 14.4V, and a variety of
three hours.
DJI Intelligent Battery Charger
[1] Top Handle Bar
[3] Quick Release Mount
[4] Pan Motor
[8] Bind Button
[10] DJI Intelligent Battery
[11] Roll Motor
[12] Tilt Motor
[13] Fore and Aft Adjustment
[14] Tilt Vertical Adjustment
[15] Roll Adjustment
[16] IMU Port
[20] DJI Lightbridge Port (rear side)
[21] GCU Port (rear side)
[1]
[2]
[4]
[3]
[8]
[]
[5]
[6]
[]
[10]
[11]
[12]
[14]
[15]
[13]
[16]
[][18][][
20][21]
Ronin-M User Manual
8
© 2015 DJI. All Rights Reserved.
DJI Intelligent Battery Functions
Balanced Charging Automatically balances the voltage of each battery cell during charging
Capacity Display Displays current battery levels
Overcharge Protection Charging stops automatically when the battery voltage reaches 16.8V,
preventing overcharge damage
Over-Discharge Protection Discharging stops automatically when battery voltage reaches 12V,
preventing over-discharge damage
Automatically cuts power supply when a short circuit is detected
Charging Temperature
Detection
!#$
Type LiPo
Capacity 14.4V, 1580mAh
᷂80%
Read the user manual, disclaimer, and battery safety guidelines before use. Users take full
responsibility for all operations and usage.
Always use DJI approved chargers. DJI takes no responsibility for any consequences
resulting from the use of non-DJI approved chargers.
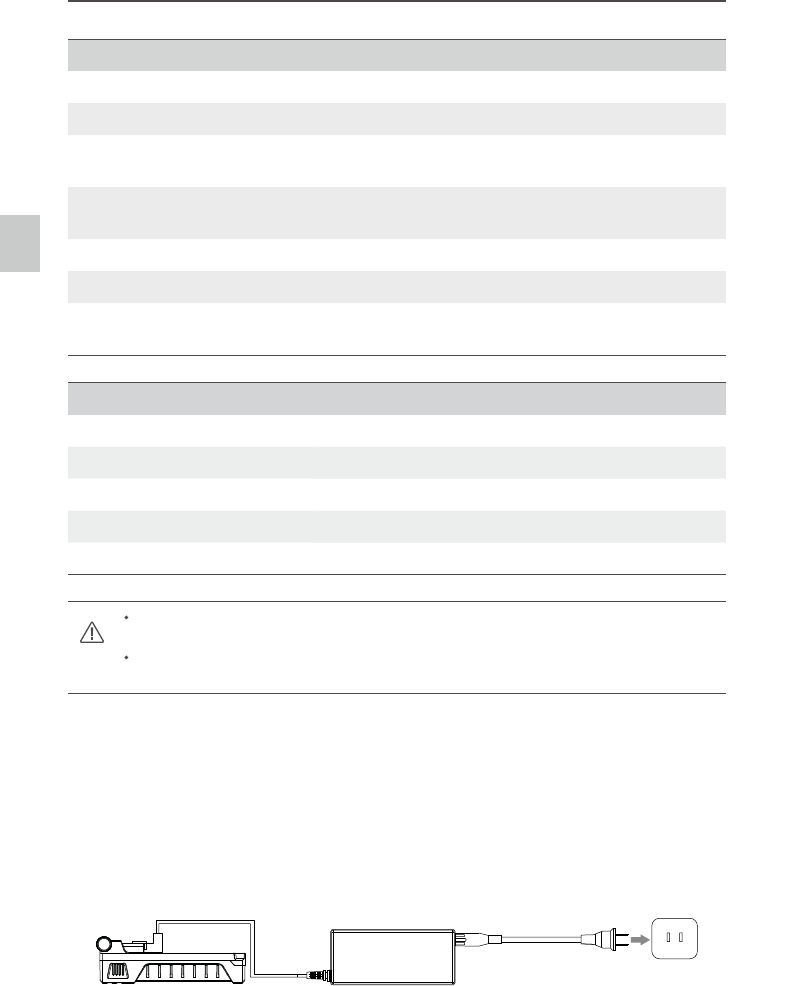
Charging the DJI Intelligent Battery
1. Connect the charger to a wall socket (100-240V, 50/60Hz).
2. Connect the DJI Intelligent Battery to the charger.
3. The battery level indicator lights display the current charge level as the DJI Intelligent Battery
charges.
4. The DJI Intelligent Battery is fully charged when the battery level indicator lights turn off.
Disconnect the battery from the charger when charging is complete.
Ronin-M User Manual
© 2015 DJI. All Rights Reserved.
9
Using the DJI Intelligent Battery
[1] Battery Level Indicators
Checking the battery level: When the DJI Intelligent Battery is turned off, pressing the battery power
button once will display the current battery level.
Powering on: When the DJI Intelligent Battery is turned off, press and hold the power button for 1 second
to turn on the DJI Intelligent Battery.
Powering off: When the DJI Intelligent Battery is turned on, press and hold the power button for 1 second
to turn off the DJI Intelligent Battery.
Tuning Stand
You can use the tuning stand during setup, or to store the gimbal. The following steps show how to use
the tuning stand.
1. Hold the stand in the upright position as shown in the picture below.
2. Press the buttons [1] on the outsides of the lower legs and rotate the legs downwards, away from the
stand. Then press the buttons [2] on the outsides of the upper support arms and pull them upwards,
as shown.
3. The upper half of this tuning stand can be removed by loosening the knob on the rear of the stand [4].
When mounting this section to a C-stand, always be sure to check the balance of the stand so that
[1]
[2]
[5]
[4]
[3]
[3]
[1][2]
)JHI
-PX #BUUFSZ-FWFM
Ronin-M User Manual
10
© 2015 DJI. All Rights Reserved.
Assembling the Handle Bar
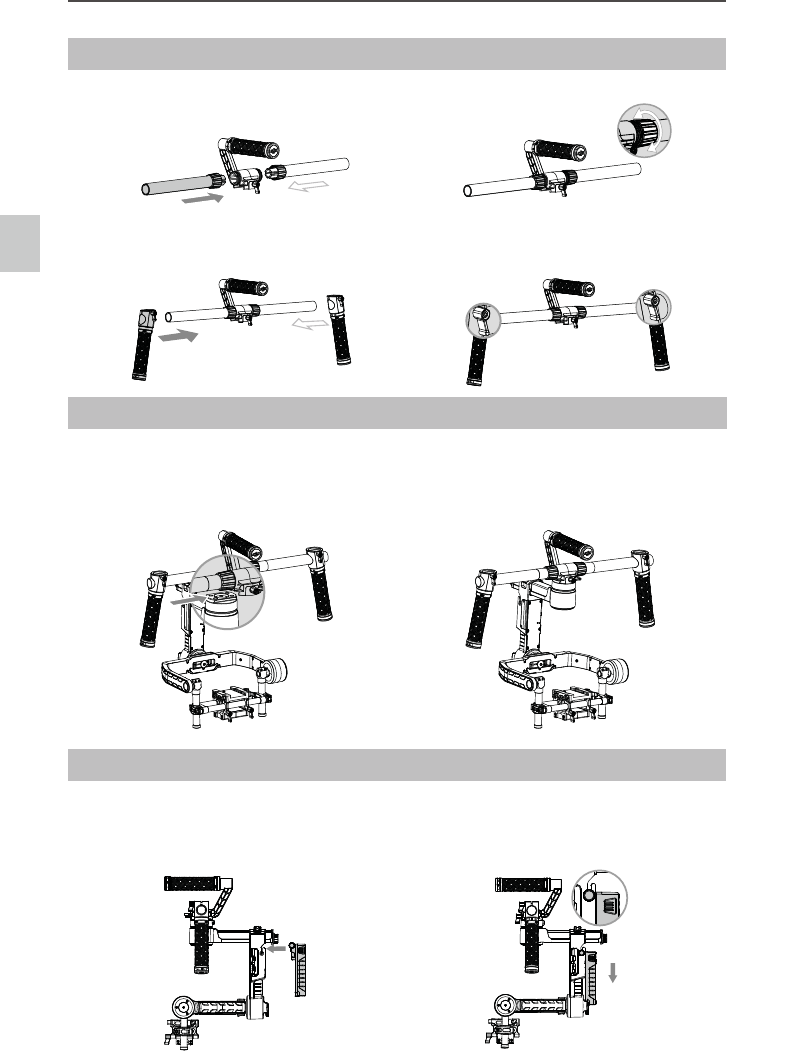
1. Attach the handle bars to both sides of the top handle and tighten the grip screws.
2. Attach the grips to the handle bar and lock them in the preferred position.
Installing the Handle Bar onto the Gimbal
1. Place the handle bar in position, as shown below, then slide it horizontally into the gimbal and
tighten the lock-knob.
2. Holding the gimbal by the grips, make sure that the gimbal is not obstructed during a 360 degrees
pan. The installation is complete.
DJI Intelligent Battery Installation
locating slots, so that the DJI Intelligent Battery makes full contact with the gimbal’s electrical leads.
2. Tighten the screws on the DJI Intelligent Battery to lock it in place.
Ronin-M User Manual
© 2015 DJI. All Rights Reserved.
11
Make sure the DJI Intelligent Battery is turned off during installation.
An incorrectly installed battery may lead to (1) Poor battery connection, or (2) Unavailable
battery information.
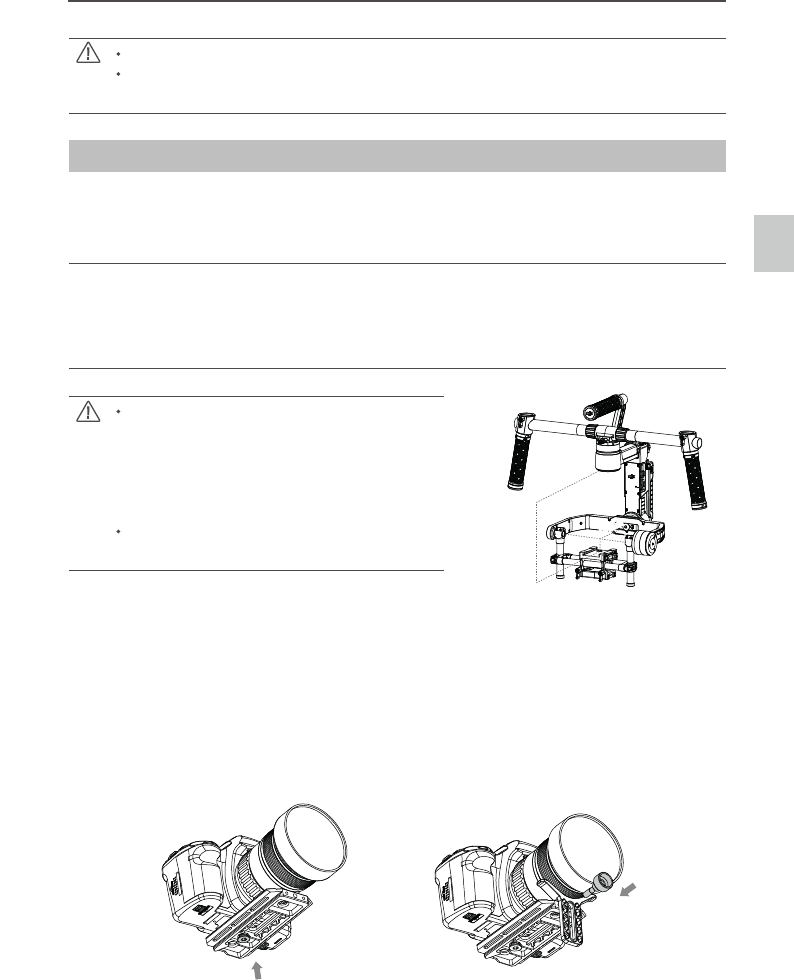
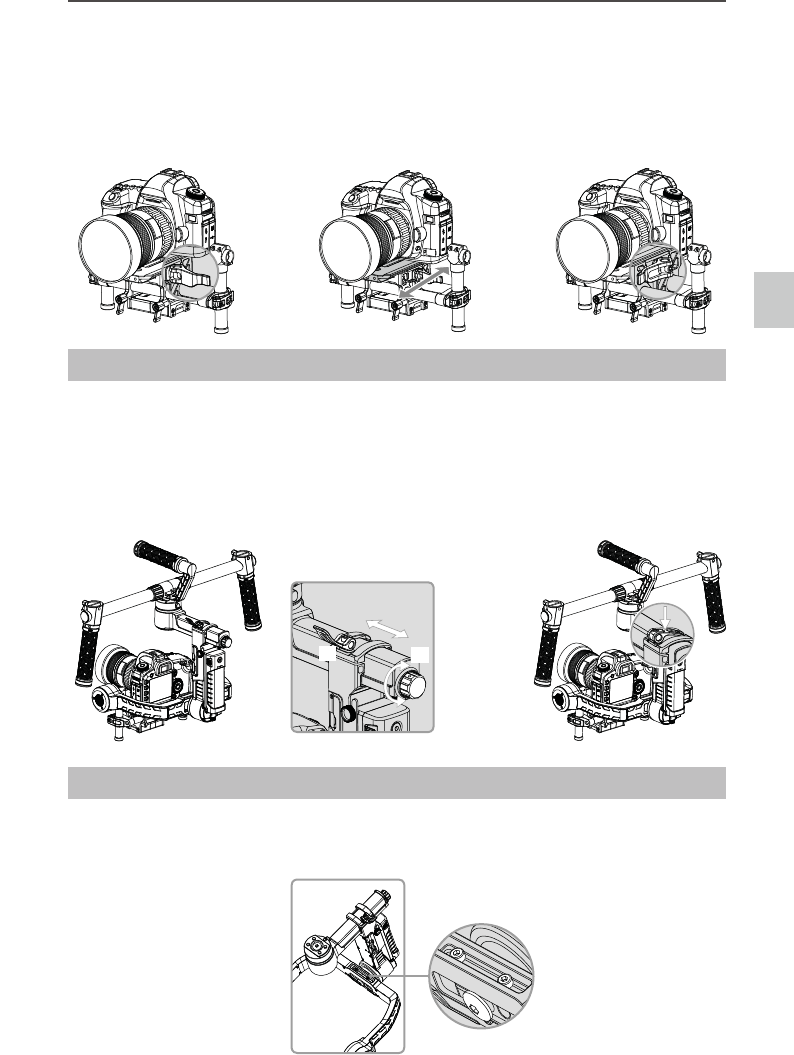
Mounting the Camera
The Ronin-M uses an adjustable camera mounting plate that allows you to easily balance, install, and
remove the camera. The Ronin-M has been tested with the following types of cameras. Other cameras
similar in size and weight may also be compatible.
Black Magic Cinema Camera Canon 5DMKIII Nikon D800
Black Magic Pocket Cinema Camera Canon 6D Panasonic GH3
Canon 1Dc Panasonic GH4
Canon 5DMKII Canon C100
depth from the center of gravity on the camera
measured from the top of the camera base plate,
shown in the image to the right.
To avoid obstructing camera movement, the
use of soft connection cables is recommended.
1. Attach the camera mounting plate to your camera using the provided camera screws A, B, C or
holes are available on your camera, use them both. Choose the correct screw holes, according
2. Install the lens support by gently pushing it up, so that it is applying light pressure to the lens.
Then tighten the thumbscrew.
195mm
160mm
140mm
120mm
Ronin-M User Manual
12
© 2015 DJI. All Rights Reserved.
Why do you need to use a lens support?
Certain cameras have a very tight lens securing system, and some cameras such as the
Canon 5D MK II and MK III have very loose lens securing systems. The Ronin-M balances
the camera as one solid unit. If the mounted camera has a loose lens securing system, the
lens support must be used. This is because a loose connection between the lens and the
camera body may allow vibrations that travel through to the camera but not directly to the
lens, resulting in the two masses shaking at different frequencies. The resulting oscillations
best to use it at all times.
The lens support can be installed facing outward or inward to accommodate different lens
types.
tightening the lens support.
3. With the gimbal facing outward on the tuning stand, slide the mounting plate into the receiver
until the safety lock engages. Make sure the gimbal is not turned on when balancing the camera.
4. When the camera achieves a rough balance, tighten the camera base side clamp. You can
adjust the tightness of the clamp with an M3 Allen wrench.
Ronin-M User Manual
© 2015 DJI. All Rights Reserved.
13
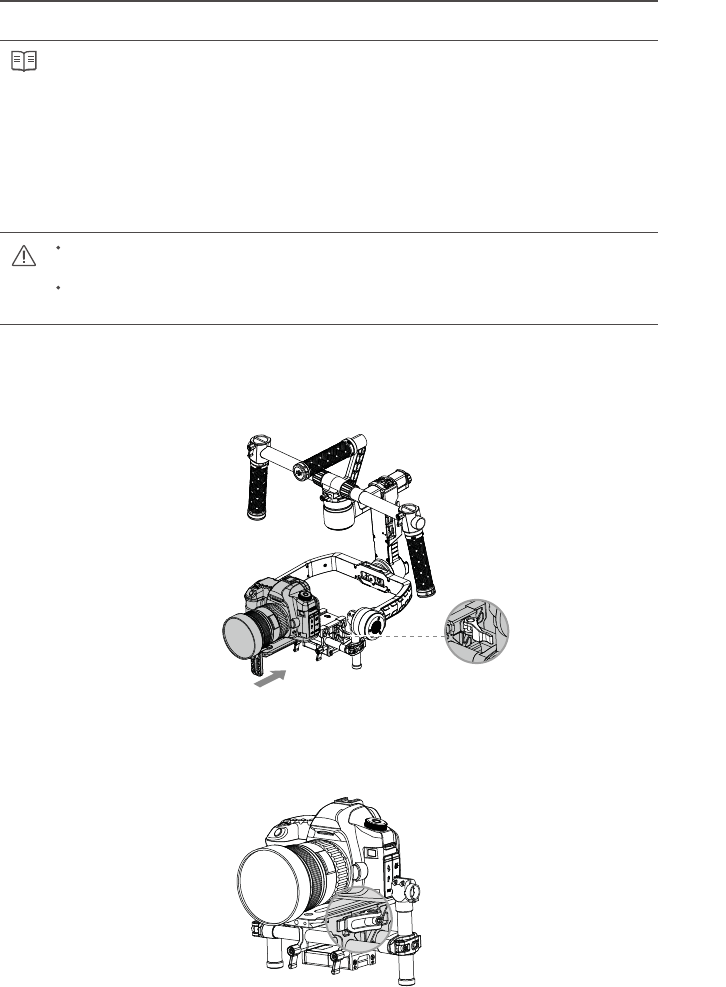
!%!&'#
The customizable handle bar of the Ronin-M can be removed, if necessary, by following the steps
below.
1. Loosen the two grip screws where the handle bar meets the gimbal, as shown.
2. Remove the grips from the handle bar.
3. You can remove one or both sides of the handle bar.
Balancing
To obtain the best performance from the Ronin-M, proper balancing is a must. Accurate balance is
horseback riding, biking, car mounts, helicopters, etc.). Proper balance will also offer a longer battery
setting up the software.
The camera needs to be fully configured, with all accessories, prior to installing and
balancing the camera on the gimbal. If the camera has a lens cap, be sure to remove it prior
to balancing. Be sure that the Ronin-M’s power is turned off while balancing the camera.
Balancing
Ronin-M User Manual
14
© 2015 DJI. All Rights Reserved.
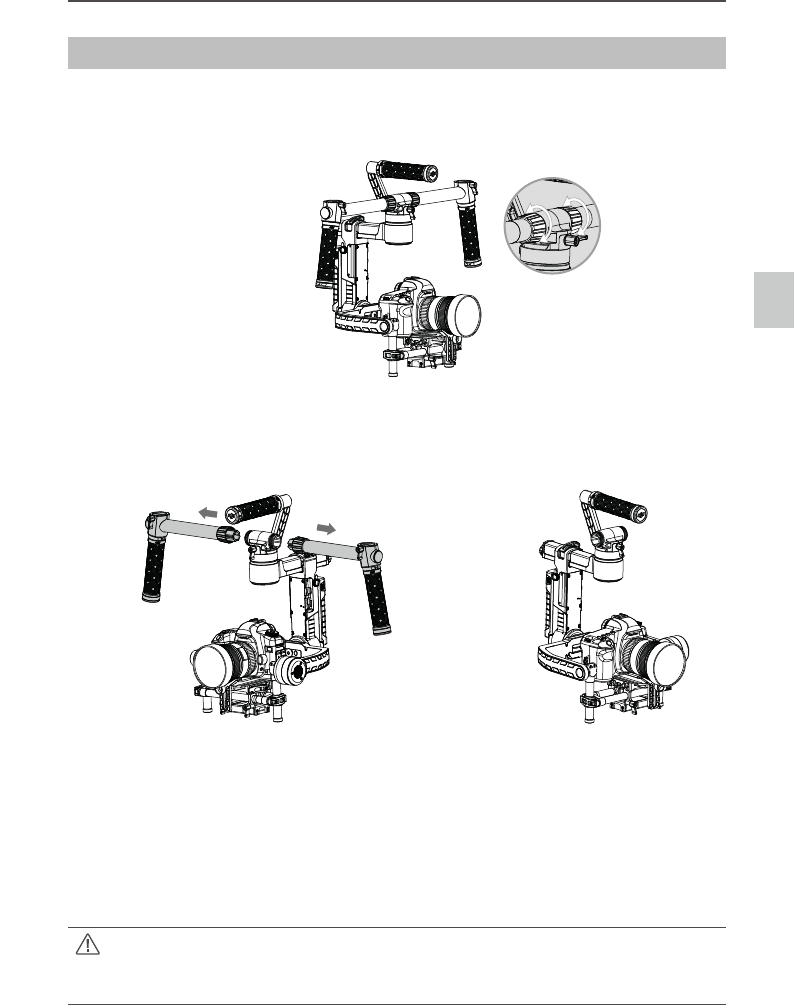
Step 1: Balancing the Vertical Tilt
To adjust the vertical balance, you will need to change the camera’s vertical position. Adjust the height
of the crossbar to achieve vertical tilt balance.
adjustment tabs.
2. Gently slide the camera mount crossbar forwards or backwards until the camera points upwards
when released.
3. Tighten the tabs and manually rotate the assembly, simulating tilt, to ensure there is no binding in
the tilt motor. When proper balance is achieved, you can rotate the camera to any tilt angle, and it
will stay in that position.
Balancing
match up, the assembly could possibly be skewed higher or lower on one side, which would
cause the tilt motor to bind.
Step 2: Balancing the Roll Axis
balance is achieved, the camera will stay level.
1. Loosen the two lock-knobs to allow the camera and mounting plate to slide left and right.
3. Tighten the two lock-knobs to lock the camera mounting plate in position.
When adjusting the roll balancing position of the camera, only loosen the two lock-knobs a
Step 3: Balancing the Tilt Axis
Ronin-M User Manual
© 2015 DJI. All Rights Reserved.
15
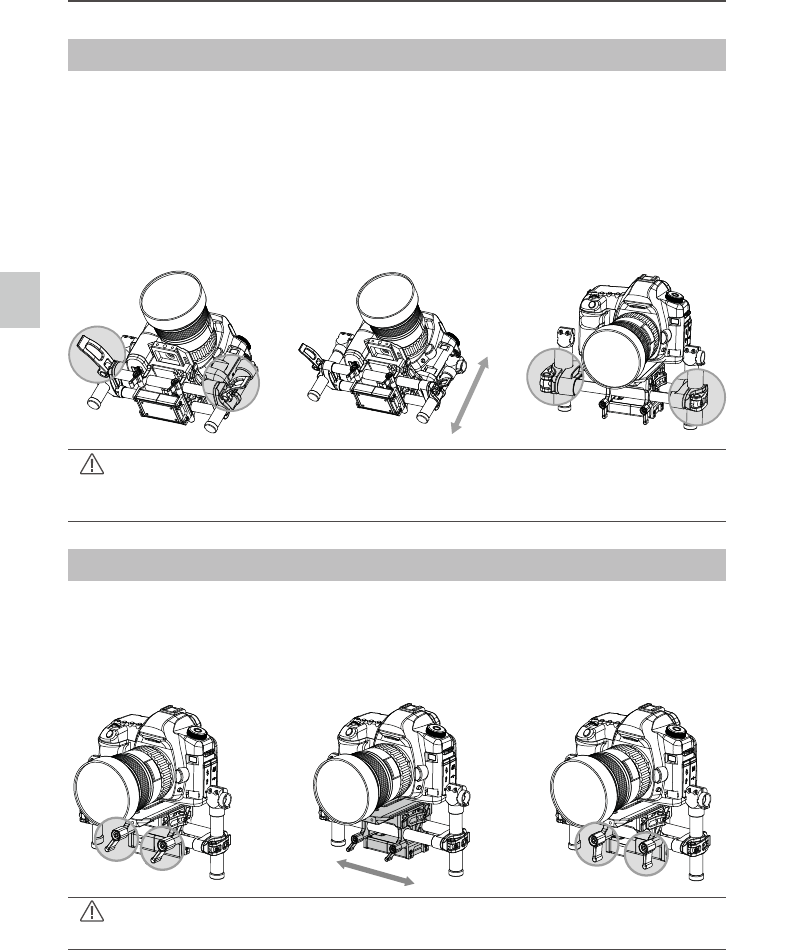
Advanced Roll Adjustment
If additional roll adjustment is needed in cases where the camera itself is too light in comparison to the
tilt motor assembly, advanced roll adjustment can be achieved by loosening the indicated screws and
pushing the assembly to the right or left.
[1] [2]
Balancing
and backwards.
adjustments are required to achieve the proper balance.
3. Tighten the side clamp to lock the camera and mounting plate in position. If properly balanced,
the camera should be able to remain steady at any given tilt angle.
(#!&)*+
Ronin-M is front heavy or rear heavy.
Tighten the clamp after balancing is completed.
16
© 2015 DJI. All Rights Reserved.
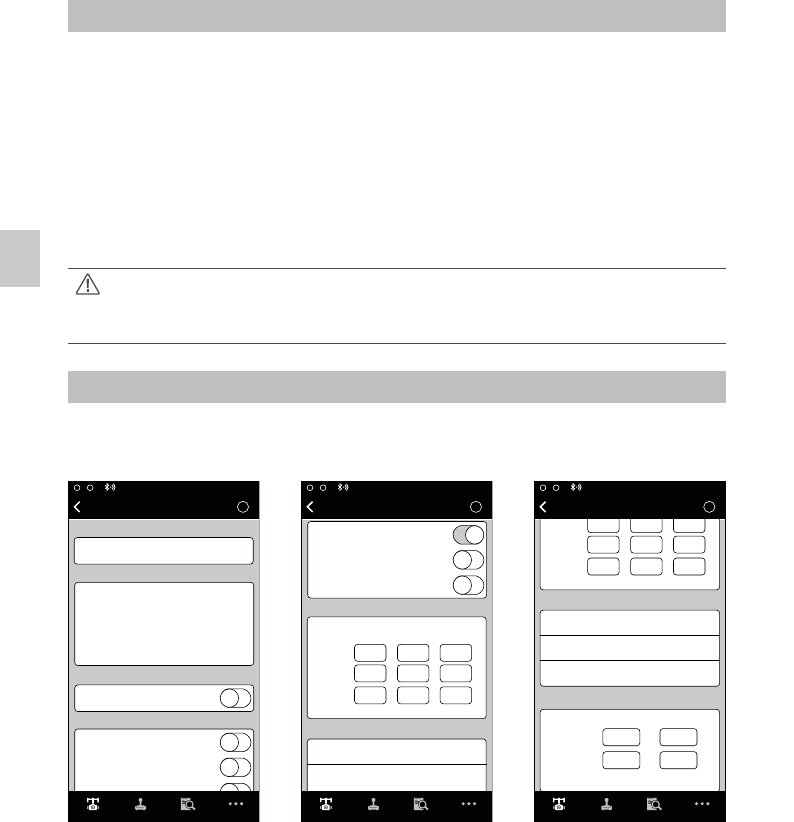
DJI Ronin-M Assistant App Tuning
DJI Assistant App.
Download and Install
1. Download the DJI Assistant app:
operating position (facing forwards). Turn on your Ronin-M, then open the DJI Assistant App.
e-mail address.
4. Connect your device to the Ronin-M by following the step-by-step instructions in the DJI
Assistant App. After connecting to the gimbal’s main control, you will see the Wizard menu.
When the indicator at the top of the screen displays solid green and the blue light is blinking, the
After enabling Bluetooth on your mobile device, return to the DJI Assistant App to connect to the
Ronin-M. The Ronin-M will not appear in the mobile device’s Bluetooth device list. It can only be
connected via the DJI Assistant App.
Basic Settings
The functions accessible in the Wizard are the most basic functions you may want to adjust upon
receiving your Ronin-M. These options are also the most frequently used functions during standard
operation. You can adjust all of these settings in the Wizard menu.
N/A
Gimbal
ModeὉ
Wizard
Pan SmoothTrack
Tilt SmoothTrack
Roll SmoothTrack
Speed
Pan Axis
Tilt Axis
Deadband Accel
SmoothTrack Adjustments
Roll Axis
Test Pan Speed
SmoothTrack Test
Test Tilt Speed
Gimbal Control Viewer More
N/A
Gimbal
ModeὉ
Wizard
Auto Tune Stability
Briefcase Mode
Pan SmoothTrack
Live Data
Calibrate
Briefcase Mode
SmoothTrack Mode
Power
Pan
Tilt
Roll
Angle
Tilt SmoothTrack
Roll SmoothTrack
Gimbal Control Viewer More
Gimbal Control Viewer More
Pan
Thumb
Controller
Remote
Operator
Tilt
Control Speed Adjustment
Speed
Pan Axis
Tilt Axis
Deadband Accel
Roll Axis
Test Pan Speed
SmoothTrack Test
Test Tilt Speed
Test Roll Speed
Gimbal Wizard
1. Calibrate
mounted or whenever the lens or accessories are changed. This will ensure stability and provide ideal
calibrated settings.
DJI Ronin-M Assistant App Tuning

Ronin-M User Manual
© 2015 DJI. All Rights Reserved.
17
DJI Ronin-M Assistant App Tuning
Wizard Gimbal
Motor
Mode:N/A
SmoothTrack
Gimbal Control Viewer More
Gimbal Control Viewer More
Mode:N/A
Motor
Gimbal
Pan Axis
Stiffness
Power Angle
Trim
Tilt Axis
Roll Axis
Pan
Tilt
Roll
Auto Tune Stability
Live Data
Configuration
Gimbal
Test Pan Speed
Test Tilt Speed
SmoothTrack
SmoothTrack Adjustments
Test
Speed Deadband Accel
Pan Axis
Tilt Axis
Roll Axis
Gimbal Control Viewer More
Pan SmoothTrack
SmoothTrack Mode
Tilt SmoothTrack
Roll SmoothTrack
2. Live Data
reading greater than 10, this often means the mechanical balancing of the camera hasn’t been properly
3. Briefcase Mode
When Briefcase Mode is switched on, the Ronin-M will be able to seamlessly transform into this
operation mode. With Briefcase Mode turned off, the Ronin-M will allow the camera to roll when the
&,04'
deadband will determine how much movement the gimbal will tolerate prior to translating the camera’s pan.
deadband will determine how much movement the gimbal will tolerate prior to translating the camera’s roll.
deadband will determine how much movement the gimbal will tolerate prior to translating the camera’s tilt.
before tapping the test button.
5. Control Speed Adjustment
Advanced Settings
There are more advanced functions you can adjust through the Assistant to meet your requirements.
Gimbal Menu