Samsung Electronics Co 05DRAGON Digital Video Camcorder User Manual Dragon eng 1 25
Samsung Electronics Co Ltd Digital Video Camcorder Dragon eng 1 25
UserManual.wiki
>
Samsung Electronics Co
>
05DRAGON User Manual
>
Users Manual 1
Contents
1.
Users Manual 1
2.
Users Manual 2
Users Manual 1
Navigation menu
Upload a User Manual
Namespaces
Wiki Guide
HTML
PDF
Info
Views
User Manual
Discussion / Help
Navigation


![ENGLISHPreparation1919✤The Lithium battery maintains the clock function and preset contents of the memory; even if the Battery pack or AC Poweradapter is removed.✤The Lithium battery for the Camcorder lasts about 6 months under normal operation from the time of installation.✤When the Lithium battery becomes weak or dead, the date/time indicator will display --- when you set the Date/Time to on.When this occurs, replace the Lithium battery with CR2025 type.1. Remove the Lithium-ion battery from the backside of the Camcorder.2. Open the Lithium battery cover on the rear of the Camcorder.3. Position the Lithium battery in the Lithium battery cover, with the negative ( ) terminal face down.4. Close the Lithium battery cover.✤You need to insert or replace the Lithium battery when: -You purchase the Camcorder.-The remote control doesn’t work.✤Ensure that you insert the Lithium battery correctly, following the + and - markings.✤Be careful not to reverse the polarity of the battery.[ Note ]The Lithium battery must be inserted in the correct direction.Warning: Keep the Lithium battery out of the reach of the children.Should any battery be swallowed, consult a doctor immediately.Lithium Battery InstallationBattery Installation for the Remote Control (SCD354/D355 only)Battery Installation for the Internal ClockDragon_eng_1~25 12/13/04 3:23 PM Page 19](https://usermanual.wiki/Samsung-Electronics-Co/05DRAGON.Users-Manual-1/User-Guide-501867-Page-23.png)
![ENGLISHPreparation2020Connecting a Power SourceThere are two types of power source that can be connected to your Camcorder.-The AC Power adapter and AC Cord: used for indoor recording.-The Battery pack: used for outdoor recording.1. Connect the AC Power adapter to the AC Cord.2. Connect the AC Cord to a wall socket.[ Notes ] ■You must use the AC Power adapter of AA-E8 TYPE.■The plug and wall socket type may differ according to your resident country.3. Connect the DC cable to the DC jack socket of theCamcorder. 4. Set the Camcorder to each mode by holding down the tab on the Power switch and turning it to the CAMERA orPLAYER mode.✤If you want to use this unit as a Camcorder, set the Modeswitch to TAPE.✤If you want to use this unit as a DSC (Digital Still Camera), set the Mode switch to MEMORY CARD.Power SwitchTo use the AC Power Adapter and DC CableTo Select the Camcorder Mode (SCD353/D354/D355 only)<CAMERA mode> <PLAYER mode>Dragon_eng_1~25 12/13/04 3:23 PM Page 20](https://usermanual.wiki/Samsung-Electronics-Co/05DRAGON.Users-Manual-1/User-Guide-501867-Page-24.png)
![ENGLISHPreparation2121Using the Lithium Ion Battery Pack✤The amount of continuous recording time available depends on-The type and capacity of the Battery pack you are using.-How often the zoom function is used.It is recommended that you have several batteries available.1. Attach the Battery pack to the Camcorder.2. Connect the AC Power adapter to an AC Cord and connect the AC Cord toa wall socket.3. Connect the DC cable to the DC jack socket on the Camcorder.4. Turn the Power switch to Off, and the charging indicator will start to flash,showing that the battery is charging.5. When the battery is fully charged, disconnect the Battery pack and the AC Power adapter fromthe Camcorder.Even with the Power switched Off, the Battery pack will still discharge.[ Notes ]■The Battery pack may be charged a little at the time of purchase.■To prevent reduction in the life and capacity of the Battery pack, always remove it from the Camcorder after it is fully charged.■The amount of continuous recording time available depends on:-The type and capacity of the Battery pack you are using. How often the zoom is used.-Type of use (Camcorder/Camera/With LCD screen etc.). Ambient temperature.It is recommended to have additional battery packs available.■Even when the Power switched Off, the Battery pack will still discharge if it is left attached to the device.Blinking time Charging rateOnce per second Less than 50%Twice per second 50% ~ 75% Three times per second 75% ~ 90%Blinking stops and stays on 90 ~ 100%On for a second and Error - Reset the Battery pack and off for a second the DC cable Power SwitchCharging the Lithium Ion Battery Pack4Dragon_eng_1~25 12/13/04 3:23 PM Page 21](https://usermanual.wiki/Samsung-Electronics-Co/05DRAGON.Users-Manual-1/User-Guide-501867-Page-25.png)
![ENGLISHPreparation2222Table of continuous Recording Time based on Model and Battery Type.✤If you close the LCD screen, it switches off and the Viewfinder switches on automatically.✤The continuous recording time given in the table below are approximations. Actual recording time depends on usage.[ Notes ]■The Battery pack should be recharged in an environment between 32 °F (0 °C)and 104 °F (40 °C).■The Battery pack should never be charged in a room with a temperature that is below 32 °F (0 °C).■The life and capacity of the Battery pack will be reduced if it is used in temperatures below 32 °F (0 °C) or left in temperaturesabove 104 °F (40 °C)for a long period of time, even when it is fully recharged.■Do not put the Battery pack near any heat source (i.e.fire or a heater).■Do not disassemble, apply pressure to or heat the Battery pack.■Do not allow the +and –terminals of the Battery pack to be short-circuited.It may cause leakage, heat generation, induce overheating or fire.■Use SB-LSM80 or SB-LSM160 Battery pack only.■Use only an approved Battery pack to replace a Battery pack.Battery SB-LSM80SB-LSM160ChargingtimeApprox. 1hr 20minApprox. 3hrLCD ON VIEWFINDER ONContinuous recording timeTimeApprox. 1hr 20minApprox. 2hr 40minApprox. 1hr 30minApprox. 3hrDragon_eng_1~25 12/13/04 3:23 PM Page 22](https://usermanual.wiki/Samsung-Electronics-Co/05DRAGON.Users-Manual-1/User-Guide-501867-Page-26.png)
![ENGLISHPreparation2323The battery level display indicates the amount of power remaining in the Battery pack.a. Fully chargedb. 20~40% usedc. 40~80% usedd. 80~95% used e. Completely used (flickers) (The Camcorder will turn off soon, change the battery as soon as possible)[ Notes ]■Please refer to the Table on page 22 for approximate continuous recording time.■The recording time is affected by temperature and environmental conditions.■The recording time shortens dramatically in a cold environment.The continuous recording times in the operating instructions are measured using a fully charged Battery pack at 77 °F (25 °C). As the environmental temperature and conditions may differ from your actual use of the Camcorder, the remaining battery time maydiffer from the approximate continuous recording times given in the instructions.Battery Level Display(Blinking)Dragon_eng_1~25 12/13/04 3:23 PM Page 23](https://usermanual.wiki/Samsung-Electronics-Co/05DRAGON.Users-Manual-1/User-Guide-501867-Page-27.png)
![14minSound[2]0:00:00:1012:00 AM JAN.01,2005†…SP√[05]AV In16BIt14min10Sec0:00:1112:00 AM JAN.01,2005 Color N.1/30[29]SPMSTBYAV InArt16BItW TS. 1/60†…†…ENGLISHPreparation2424OSD (On Screen Display in Camera/Play Modes) 1. Battery level (see page 23)2. Digital effects mode (see page 65)3. DIS (see page 61)4. Program AE (see page 63)5. White balance mode(see page 59)6. Shutter speed (see page 57)7. Exposure (see page 57) 8. Manual focus (see page 58) 9. Date/Time (see page 33)10. Zoom position (see page 44)11. NITE PIX (see page 49) (SCD352/D354/D355 only)12. Color nite (see page 48)13. USB (SCD352/D353/D354/D355only)14. Remote (see page 28)(SCD354/D355 only)15. Wind cut (see page 56)16. BLC (Back Light Compensation)(see page 46)17. LED LIGHT (SCD352/D354/D355 only) (see page 48)18. AV IN (SCD355 only)19. Audio recording mode (see page 55)20. Remaining tape (measured in minutes) 21. Tape counter 22. Zero memory (SCD354/D355 only) (see page 42)23. Record speed mode24. Operating mode25. Self timer (SCD354/D355 only)26. Photo image27. Tele MACRO (see page 44)28. Audio playback29. Volume control (see page 70)30. DV IN (DV data transfer mode)(see page 80)31. Audio dubbing (SCD354/D355 only)(see page 77)OSD in Camera ModeOSD in Player ModeNite PixNo Tape!S. 1/60No Tape![29]1234567891067292811131230151416171819202123 222426 252731Dragon_eng_1~25 12/13/04 3:23 PM Page 24](https://usermanual.wiki/Samsung-Electronics-Co/05DRAGON.Users-Manual-1/User-Guide-501867-Page-28.png)
![ENGLISHPreparation25251. Photo quality2. Movie screen size3. CARD (Memory Card) indicator4. Image counterCurrent still image/Total number of recordable still images.5. Image recording and loading indicator6. Erase protection indicator (see page 94)7. Print mark (see page 107)8. Folder number-file number (see page 86)9. Slide show■Turning OSD on/off Press the DISPLAY button on the left side panel.-Each press of the button toggles the OSD function on and off.-When you turn the OSD off, In CAMERA Mode: The STBY, REC modes are always displayed on the OSD, evenwhen the OSD is turned off and the key input is displayed for 3 secondsthen turned off. In PLAYER Mode: When you press any function button, the function is displayed on the OSD for 3 seconds before it turns off. ■Turning the Date/Time on/off -The Date/Time is not affected when the OSD function is switched on or off.-To turn the Date/Time on or off, access the menu and change the Date/Time mode. (see page 33)OSD (On Screen Display in M.Cam/M.Player Modes) (SCD353/D354/D355 only)Turning the OSD On/Off (On Screen Display)OSD in M.Cam ModeOSD in M.Play Mode0002/0046Slide12:00 AM JAN.01,2005 100-0001W T[0002/0046]12:00 AM JAN.01,2005[29][29]†…60 min720001167452389No Memory Card!No Memory Card!Nite PixDragon_eng_1~25 12/13/04 3:23 PM Page 25](https://usermanual.wiki/Samsung-Electronics-Co/05DRAGON.Users-Manual-1/User-Guide-501867-Page-29.png)
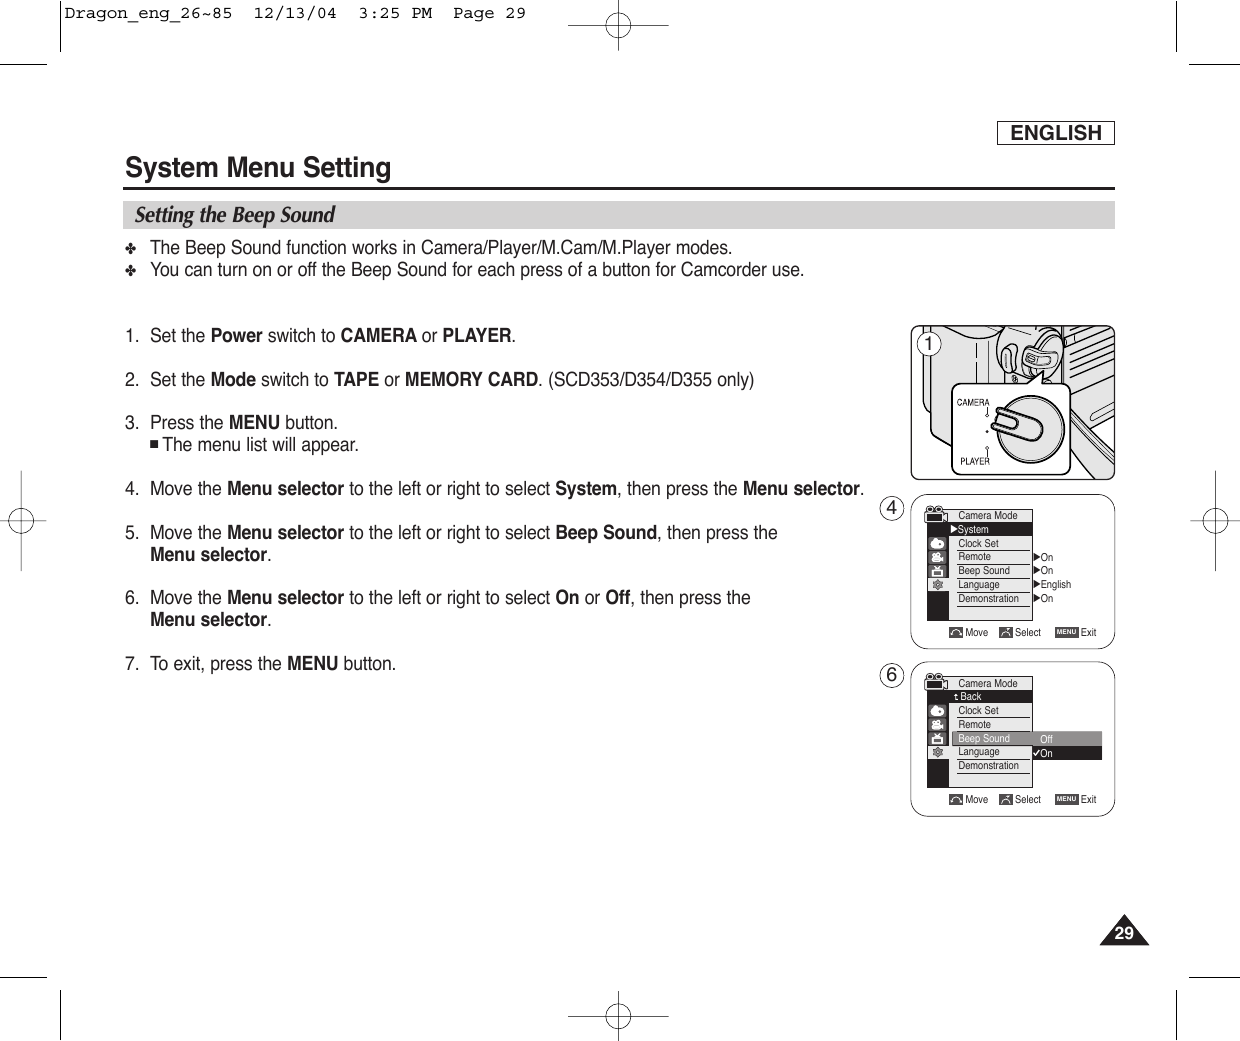
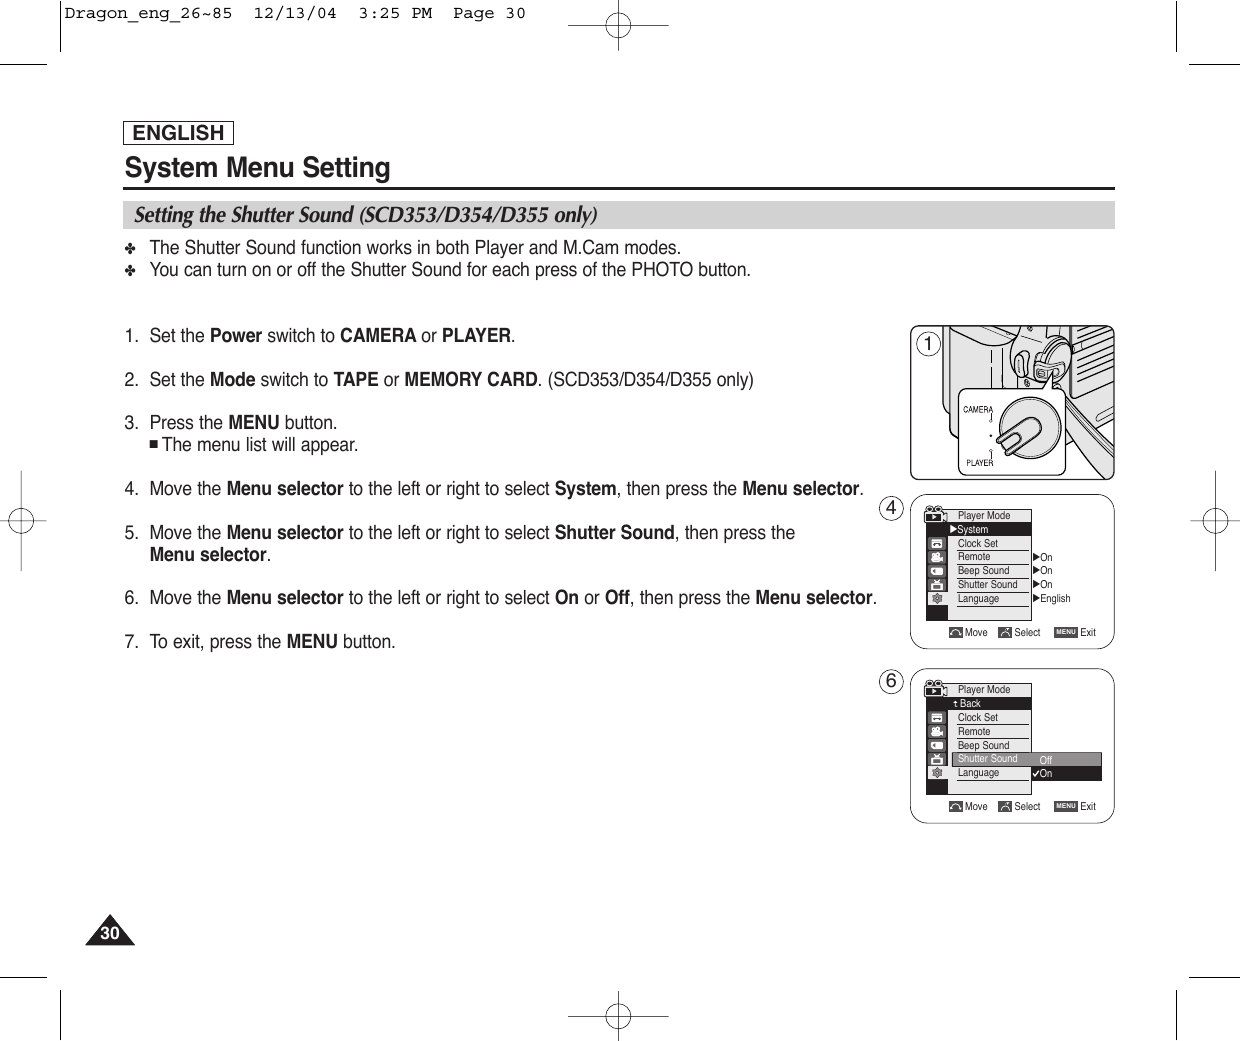
![ENGLISH26262626System Menu SettingSelecting OSD Language✤Select the appropriate OSD Language among English, French, Spanish, German, Italian, Portuguese, Polish and Dutch.✤The Language function works in Camera/Player/M.Cam/M.Player modes.1. Set the Power switch to CAMERA or PLAYER.2. Set the Mode switch to TAPE or MEMORY CARD.(SCD353/D354/355 only)3. Press the MENU button.■The menu list will appear.4. Move the Menu selector to the left or right to select System, then press the Menu selector.5. Move the Menu selector to the left or right to select Language, then press the Menu selector.■The available language options are listed.6. Move the Menu selector to the left or right to select desired OSD language,then press the Menu selector.■The OSD language is refreshed in selected language.7. To exit, press the MENU button.[ Note ]The “Language” is always indicated in English.Camera Mode√SystemClock SetRemoteBeep SoundLanguageDemonstration√On√On√English√OnMove Select ExitMENUMove Select ExitMENUCamera ModeBackClock SetRemoteBeep SoundLanguageDemonstrationEnglishFrançaisDeutschEspañolItalianoPortuguês†461Dragon_eng_26~85 12/13/04 3:25 PM Page 26](https://usermanual.wiki/Samsung-Electronics-Co/05DRAGON.Users-Manual-1/User-Guide-501867-Page-30.png)
![ENGLISHSystem Menu Setting2727✤Clock setup works in Camera/Player/M.Cam/M.Player modes.✤The Date/Time is automatically recorded onto a tape.Before recording, please set the Date/Time.1. Set the Power switch to CAMERA or PLAYER.2. Set the Mode switch to TAPE or MEMORY CARD. (SCD353/D354/D355 only)3. Press the MENU button.■The menu list will appear.4. Move the Menu selector to the left or right to select System, then press the Menu selector.5. Move the Menu selector to the left or right to select Clock Set, then press the Menu selector.■The year will highlight first.6. Move the Menu selector to the left or right to set current Year, then press the Menu selector.■The month will highlight.7. You can set the month, day, hour and minute following the same producedure for settingthe year.(Select the Year, Month, Day, Hour or Min by pressing the Menu selector, then move the Menu selector to the left or right to set current value.) 8. Press the Menu selector after setting the minutes.■The message Complete! will be displayed.9. To exit, press the MENU button.[ Notes ]■After the Lithium battery is exhausted (about 6 months) the clock will be reset.■You can set the year up to 2038.■If the Lithium battery is not installed, any input data will not be backed up.Setting the ClockMove Select ExitMENUCamera ModeBackClock SetRemoteBeep SoundLanguageDemonstrationJan 01 200512 : 00 AM…†Move Select ExitMENUCamera ModeBackClock SetRemoteBeep SoundLanguageDemonstration…†Jan 01 200512 : 00 AMCamera Mode√SystemClock SetRemoteBeep SoundLanguageDemonstration√On√On√English√OnMove Select ExitMENU457Dragon_eng_26~85 12/13/04 3:25 PM Page 27](https://usermanual.wiki/Samsung-Electronics-Co/05DRAGON.Users-Manual-1/User-Guide-501867-Page-31.png)
![✤The Remote function works in Camera/Player/M.Cam/M.Player modes.✤The Remote option allows you to enable or disable the remote control for use with the Camcorder.1. Set the Power switch to CAMERA or PLAYER.2. Set the Mode switch to TAPE or MEMORY CARD. (SCD353/D354/D355 only)3. Press the MENU button.■The menu list will appear.4. Move the Menu selector to the left or right to select System, then press the Menu selector.5. Move the Menu selector to the left or right to select Remote, then press the Menu selector. 6. Move the Menu selector to the left or right to select On or Off, then press the Menu selector.7. To exit, press the MENU button.[ Note ]If you set the Remote to Off in the menu and try to use it,the remote control icon( )will blink for 3 seconds on the LCD screen and then disappear.ENGLISHSystem Menu Setting2828Setting the Wireless Remote Control Acceptance (Remote) (SCD354/D355 only)Camera Mode√SystemClock SetRemoteBeep SoundLanguageDemonstration√On√On√English√OnMove Select ExitMENU41Move Select ExitMENUCamera ModeBackClock SetRemoteBeep SoundLanguageDemonstrationOffOn 6Dragon_eng_26~85 12/13/04 3:25 PM Page 28](https://usermanual.wiki/Samsung-Electronics-Co/05DRAGON.Users-Manual-1/User-Guide-501867-Page-32.png)
![✤Before you begin : Make Sure that there is no tape inserted in the Camcorder. (see page 36)✤Demonstration automatically shows you the major functions that are included with your Camcorder so that you may use them more easily.✤The Demonstration function may only be used in the camera mode without a tape inserted in theCamcorder. ✤The Demonstration operates repeatedly until the Demonstration mode switched Off.1. Set the Power switch to CAMERA.2. Set the Mode switch to TAPE. (SCD353/D354/D355 only)3. Press the MENU button.■The menu list will appear.4. Move the Menu selector to the left or right to select System, then press the Menu selector.5. Move the Menu selector to the left or right to select Demonstration, then press the Menuselector. 6. Move the Menu selector to the left or right to select On, then press the Menu selector.■The Demonstration will begin. 7. To quit the Demonstration, press the MENU button.[ Notes ]■The Demonstration function only works without a tape inserted.■The Demonstration mode is automatically activated when the Camcorder is left idle for more than 10minutes after switching to the Camera mode (no tape is inserted in the Camcorder). ■If you press other buttons (FADE, BLC, PHOTO, EASY Q) during the Demonstration mode, the demonstration stops temporarily and resumes 10 minutes later if you do not operate any other functions.■While setting the NITE PIX to ON, the Demonstration function does not work. (SCD352/D354/D355 only)ENGLISHSystem Menu Setting3131Viewing the DemonstrationMove Select ExitMENUCamera ModeBackClock SetRemoteBeep SoundLanguageDemonstration OffOn Camera Mode√SystemClock SetRemoteBeep SoundLanguageDemonstration√On√On√English√OnMove Select ExitMENU146Dragon_eng_26~85 12/13/04 3:25 PM Page 31](https://usermanual.wiki/Samsung-Electronics-Co/05DRAGON.Users-Manual-1/User-Guide-501867-Page-35.png)
![✤Your Camcorder is equipped with a 2.5 inch color Liquid Crystal Display(LCD) screen, which enables you to view what youare recording or playing back directly.✤This function works in Camera/Player/M.Cam/M.Player modes.✤Depending on the conditions under where you are using the Camcorder (indoors or outdoors for example), you can adjust;-LCD Bright-LCD Color1. Set the Power switch to CAMERA or PLAYER.2. Set the Mode switch to TAPE or MEMORY CARD. (SCD353/D354/D355 only)3. Open the LCD screen, and the LCD screen switches on.4. Press the MENU button.■The menu list will appear.5. Move the Menu selector to the left or right to select Display, then press the Menu selector.6. Move the Menu selector to the left or right to select the item you want to adjust(LCD Bright orLCD Color), then press the Menu selector.7. Move the Menu selector to the left or right to adjust the value of the selected item(LCDBright or LCD Color), then press the Menu selector.■You can set values for LCD Bright and LCD Color between 0~35.8. To exit, press the MENU button.Move Select ExitMENU7√Off√On3232ENGLISHDisplay Menu SettingAdjusting the LCD screen[18]1Move Select ExitMENUCamera Mode√DisplayLCD BrightLCD ColorDate/TimeTV Display5√Off√OnCamera ModeBackLCD BrightLCD ColorDate/TimeTV DisplayDragon_eng_26~85 12/13/04 3:25 PM Page 32](https://usermanual.wiki/Samsung-Electronics-Co/05DRAGON.Users-Manual-1/User-Guide-501867-Page-36.png)
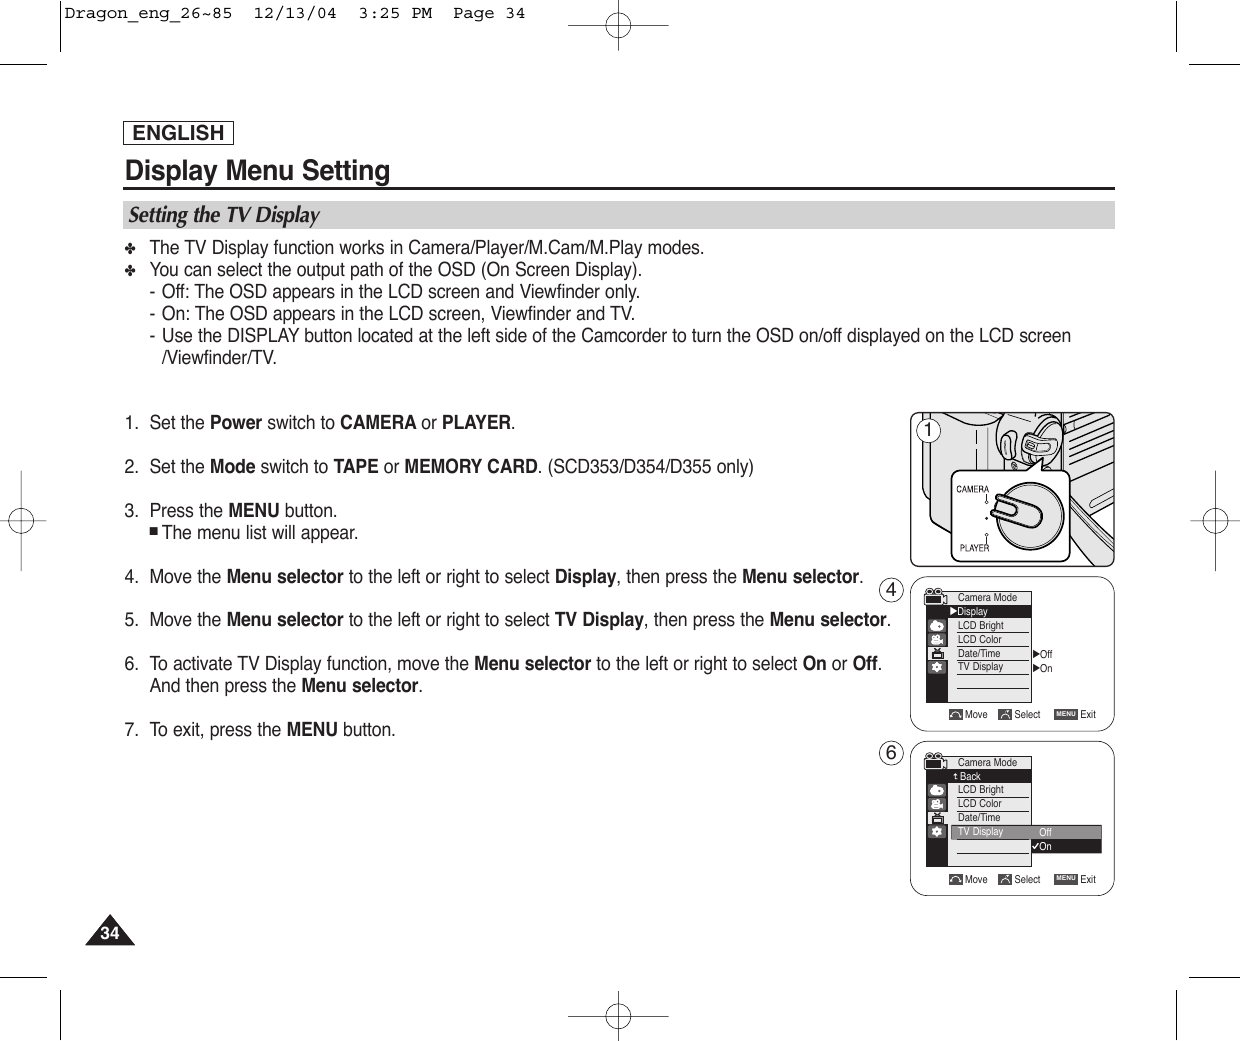
![✤The Date/Time function works in Camera/Player/M.Cam/M.Play modes.✤The date and time are automatically recorded on a special data area of the tape.1. Set the Power switch to CAMERA or PLAYER.2. Set the Mode switch to TAPE or MEMORY CARD. (SCD353/D354/D355 only)3. Press the MENU button.■The menu list will appear.4. Move the Menu selector to the left or right to select Display, then press the Menu selector.5. Move the Menu selector to the left or right to select Date/Time, then press the Menu selector.6. Move the Menu selector to the left or right to select the display type of the Date/Time, then press the Menu selector.■Display type of the Date/Time: Off, Date, Time, Date/Time.7. To exit, press the MENU button.[ Notes ]■The Date/Time is not affected by the DISPLAY(OSD on/off) button.■The Date/Time will read - - - in the following conditions.-During playback of a blank section of a tape.-If the tape was recorded before setting the Date/Time in the camera’s memory.-When the Lithium battery becomes weak or dead.■Before you use the Date/Time function, you must set the clock. See Setting the Clock on page 27.Move Select ExitMENUCamera Mode√DisplayLCD BrightLCD ColorDate/TimeTV Display43333ENGLISHDisplay Menu SettingDisplaying the Date/TimeMove Select ExitMENUCamera ModeBackLCD BrightLCD ColorDate/TimeTV DisplayOffDateTimeDate/Time1√Off√On6Dragon_eng_26~85 12/13/04 3:25 PM Page 33](https://usermanual.wiki/Samsung-Electronics-Co/05DRAGON.Users-Manual-1/User-Guide-501867-Page-37.png)
![ENGLISHBasic Recording3535✤In the PLAYER mode, the Viewfinder will work when the LCD screen is closed.✤In the CAMERA mode, the Viewfinder will work when the LCD screen is closed or rotated counterclockwise 180°.The focus adjustment knob of the Viewfinder enables individuals with vision problems to see clearerimages.1. Close the LCD screen and pull out the Viewfinder.2. Use the focus adjustment knob of the Viewfinder to focus the picture.[ Notes ]■Viewing the sun or any strong light source through the Viewfinder for a prolonged periods may be harmful, or cause temporaryimpairment.■The Viewfinder will work either in play mode with LCD screen closed or in camera mode with LCD screen closed or facing the front.Adjusting the FocusUsing the ViewfinderDragon_eng_26~85 12/13/04 3:25 PM Page 35](https://usermanual.wiki/Samsung-Electronics-Co/05DRAGON.Users-Manual-1/User-Guide-501867-Page-39.png)
![3636ENGLISHBasic RecordingInserting and Ejecting a Cassette✤When inserting a tape or closing a cassette holder, do not apply excessive force. This may cause a malfunction. ✤Do not use any tape other than Mini DV cassettes.1. Connect a power source and slide the TAPE EJECT switch.■The cassette door opens automatically. 2. Insert a tape into the cassette holder with the tape window facing outward and the protection tab toward the top. (Inserting a Cassette)■Remove the cassette tape, which is automatically ejected by pulling the cassette out. (Ejecting a Cassette)3. Press the area marked PUSH on the cassette door until it clicks into place.The cassette is loaded automatically.[ Note ] When you have recorded something that you wish to keep, you can protect it so that it will not be accidentallyerased.a. Protecting a tape: Push the safety tab on the cassette so that the hole is uncovered.b. Removing the tape protection: If you no longer wish to keep the recording on the cassette, push the safety tab back so that it covers thehole.How to store a tape a. Avoid places with magnets or magnetic interference.b. Avoid humidity and dust prone places. c. Keep the tape in an upright position and avoid storing it in direct sunlight.d. Avoid dropping or knocking your tapes.SAVEPUSH1 23 4aRECbDragon_eng_26~85 12/13/04 3:25 PM Page 36](https://usermanual.wiki/Samsung-Electronics-Co/05DRAGON.Users-Manual-1/User-Guide-501867-Page-40.png)
![3838ENGLISHBasic Recording✤In some situations different recording techniques may be required for more dramatic results.1. General recording.2. Downward recording.Making a recording with a top view of the LCD screen.3. Upward recording.Making a recording viewing the LCD screen from below.4. Self recording.Making a recording viewing the LCD screen from the front.5. Recording with the Viewfinder.In circumstances where it is difficult to use the LCD screen, the Viewfinder can be used as a convenient alternative.[ Note ]Please rotate the LCD screen carefully as excessive rotation may cause damage to theinside of the hinge that connects the LCD screen to the Camcorder.Various Recording Techniques1 2354Dragon_eng_26~85 12/13/04 3:25 PM Page 38](https://usermanual.wiki/Samsung-Electronics-Co/05DRAGON.Users-Manual-1/User-Guide-501867-Page-42.png)
![ENGLISHBasic Recording3939Making your First Recording1. Connect a power source to the Camcorder. (see page 20)(A Battery pack or a AC Power adapter) Insert a cassette. (see page 36)2. Remove the Lens cover.3. Set the Power switch to the CAMERA.■Open the LCD screen. ■Set the Mode switch to the TAPE. Make sure that STBY is displayed. ■If the write protection tab of the cassette is open(set to save),STOP and Protection! will be displayed. Release the write protection tab to record.■Make sure the image you want to record appears on the LCDscreen or Viewfinder.■Make sure the battery level indicates that there is enough remaining power for your expected recording time.4. To start recording, press the Start/Stop button.■The REC ●is displayed on the LCD screen.To stop recording, press the Start/Stop button again.■The STBY is displayed on the LCD screen.[ Note ]Detach the Battery pack when you are finished recording to prevent unnecessary battery power consumption.4132√√Dragon_eng_26~85 12/13/04 3:25 PM Page 39](https://usermanual.wiki/Samsung-Electronics-Co/05DRAGON.Users-Manual-1/User-Guide-501867-Page-43.png)
![Basic Recording✤The EASY Q mode works only in Camera mode.✤The EASY Q mode allows a beginner to easily make good recordings.1. Set the Power switch to CAMERA.2. Set the Mode switch to TAPE. (SCD353/D354/D355 only)3. By pressing the EASY Q button, all functions on the camera will be set to off and the recordingsettings will be set to the following basic modes:■Battery level, recording mode, counter, date/time, and DIS ( ) will be displayed.■The word EASY Q will appear on the LCD screen at the same time. However, the Date/Time will only be seen if it has been previously set. (see page 33)4. Press the Start/Stop button to start recording.Recording will begin using the basic automatic settings.5. Press the EASY Q button again in the STBY mode and then turn the EASY Q mode off. ■The EASY Q function will not turn off while you are recording.■The camera will return to the settings that were set prior to activating EASY Q mode.[ Notes ]■In EASY Q mode, certain functions are not available, such as Menu, BLC, AF/MF.If you want to use these functions, you must first switch the EASY Q mode off.■The EASY Q mode settings are deleted when the Battery pack is uninstalled from the Camcorder andtherefore, they must be reset when a Battery pack has been replaced. ■EASY Q mode will not turn off during a recording.Using EASY Q Mode (for Beginners)14min0:00:1012:00 AM JAN.01,2005SPSTBY4040ENGLISH31Dragon_eng_26~85 12/13/04 3:25 PM Page 40](https://usermanual.wiki/Samsung-Electronics-Co/05DRAGON.Users-Manual-1/User-Guide-501867-Page-44.png)
![ENGLISH4141Basic RecordingRecord Search (REC SEARCH)When a cassette is loaded and the Camcorder is left in the STBY mode for more than 5 minutes without being used, it will switch off automatically. To use it again, press the Start/Stop button or set the Power switch to Off and then back to CAMERA. This auto power off feature is designed to save battery power.■You can view a recording using the REC SEARCH +, - function in STBY mode. REC SEARCH - enables you to play the recording backwards and REC SEARCH + enables you to play it forwards, for as long as you keep each button presseddown.■If you press the REC SEARCH - button in STBY mode, your Camcorder will play in reverse for 3 seconds and return to the original position automatically.[ Note ] Mosaic shaped distortion may appear on the screen while in Record Search mode.Dragon_eng_26~85 12/13/04 3:25 PM Page 41](https://usermanual.wiki/Samsung-Electronics-Co/05DRAGON.Users-Manual-1/User-Guide-501867-Page-45.png)
![4242ENGLISHBasic Recording✤The ZERO MEMORY function works in both Camera and Player modes.✤You can mark a point on a tape that you want to return to following playback.1. Set the Power switch to CAMERA or PLAYER.2. Set the Mode switch to TAPE. (SCD353/D354/D355 only)3. Press the ZERO MEMORY button on the remote control before the recording or during playbackat the point you wish to return. ■The time code is changed to a tape counter that is set to zero memory with the 0:00:00(Zero memory indicator).■If you want to cancel the zero memory function, press the ZERO MEMORY button again.4. Finding the zero position.■When you have finished playback, fast forward or rewind the tape.The tape stops automatically when it reaches the zero position.■When you have finished recording, press the Power switch on the PLAYER andpress the (REW) button.The tape stops automatically when it reaches the zero position.5. The tape counter with the (Zero memory indicator) disappears from the display and thetape counter is changed to the time code.[ Notes ]■In the following situations, ZERO MEMORY mode may be canceled automatically:-At the end of the section marked with the ZERO MEMORY function.-When the tape is ejected.-When you remove the Battery pack or power supply.■The ZERO MEMORY may not function correctly where there is a break between recordings on the tape.MMSetting the Zero Memory (SCD354/D355 only)œ1Dragon_eng_26~85 12/13/04 3:25 PM Page 42](https://usermanual.wiki/Samsung-Electronics-Co/05DRAGON.Users-Manual-1/User-Guide-501867-Page-46.png)
![ENGLISHBasic Recording4343When you use the Self Timer function on the remote control, the recording begins automatically in 10 seconds.1. Set the Power switch to CAMERA.2. Set the Mode switch to TAPE or MEMORY CARD.3. Press the SELF TIMER button until the appropriate indicator is displayed in the LCD screen.4. Press the Start/Stop button to start the timer.-Self Timer starts counting down from 10 with a beep sound.-In the last one second of the countdown, the beep sound gets faster, then recording startsautomatically.-If you want to cancel the Self Timer function before recording, press the SELF TIMER button.5. Press the Start/Stop button again when you wish to stop recording.[ Notes ] ■Do not obstruct the remote control sensor by putting obstacles between the remote control andCamcorder.■The remote control range is 4 ~5m (13 ~17 ft).■The effective remote control angle is up to 30 degrees left /right from the center line.■Using a tripod is recommended for delayed recording.Self Record using the Remote Control (SCD354/D355 only)œ134œDragon_eng_26~85 12/13/04 3:25 PM Page 43](https://usermanual.wiki/Samsung-Electronics-Co/05DRAGON.Users-Manual-1/User-Guide-501867-Page-47.png)
![4444ENGLISHBasic Recording✤The Zoom function works in both Camera and M.Cam modes.✤Zooming is a recording technique that lets you change the size of the subject in a scene.For more professional looking recordings, do not use the Zoom function too often.✤You can zoom using variable zoom speeds.✤Use these features for different shots. Please note that over-use of the Zoom feature can lead to unprofessional lookingresults and a reduction of battery usage time.1. Move the Zoom lever slightly for a gradual zoom, move it further for a high-speed zoom. ■Your zooming is monitored on the OSD.2. T(Telephoto) side: Subject appears closer.3. W(Wide angle) side: Subject appears farther away.■You can record a subject that is about 10mm (about 0.5 inch)away from the lens surface in the Wide position.✤Tele Macro Function works in both Camera and M.Cam mode.✤Effective focal distance in tele macro mode is 50 Cm (19.7 inches) ~ 100 Cm (39.4 inches).1. Press the MACRO button. ■Tele Macro Icon ( ) will be displayed.2. If you want to cancel the Tele Macro function, press the MACRO button again.[ Notes ]■When recording in Tele Macro mode, the focus speed may be slow.■When you operate the Zoom function in the Tele Macro mode, then the recording subject maybe out of focus.■Use a tripod to prevent hand shake in the Tele Macro mode.■Avoid shadows when recording in the Tele Macro mode.■As the distance to the subject decreases, focusing area narrows.■When you can not get proper focus, use the Zoom lever.Zooming In and OutUsing the Tele MacroTELEWIDESP25min0:39:40STBYœDragon_eng_26~85 12/13/04 3:25 PM Page 44](https://usermanual.wiki/Samsung-Electronics-Co/05DRAGON.Users-Manual-1/User-Guide-501867-Page-48.png)
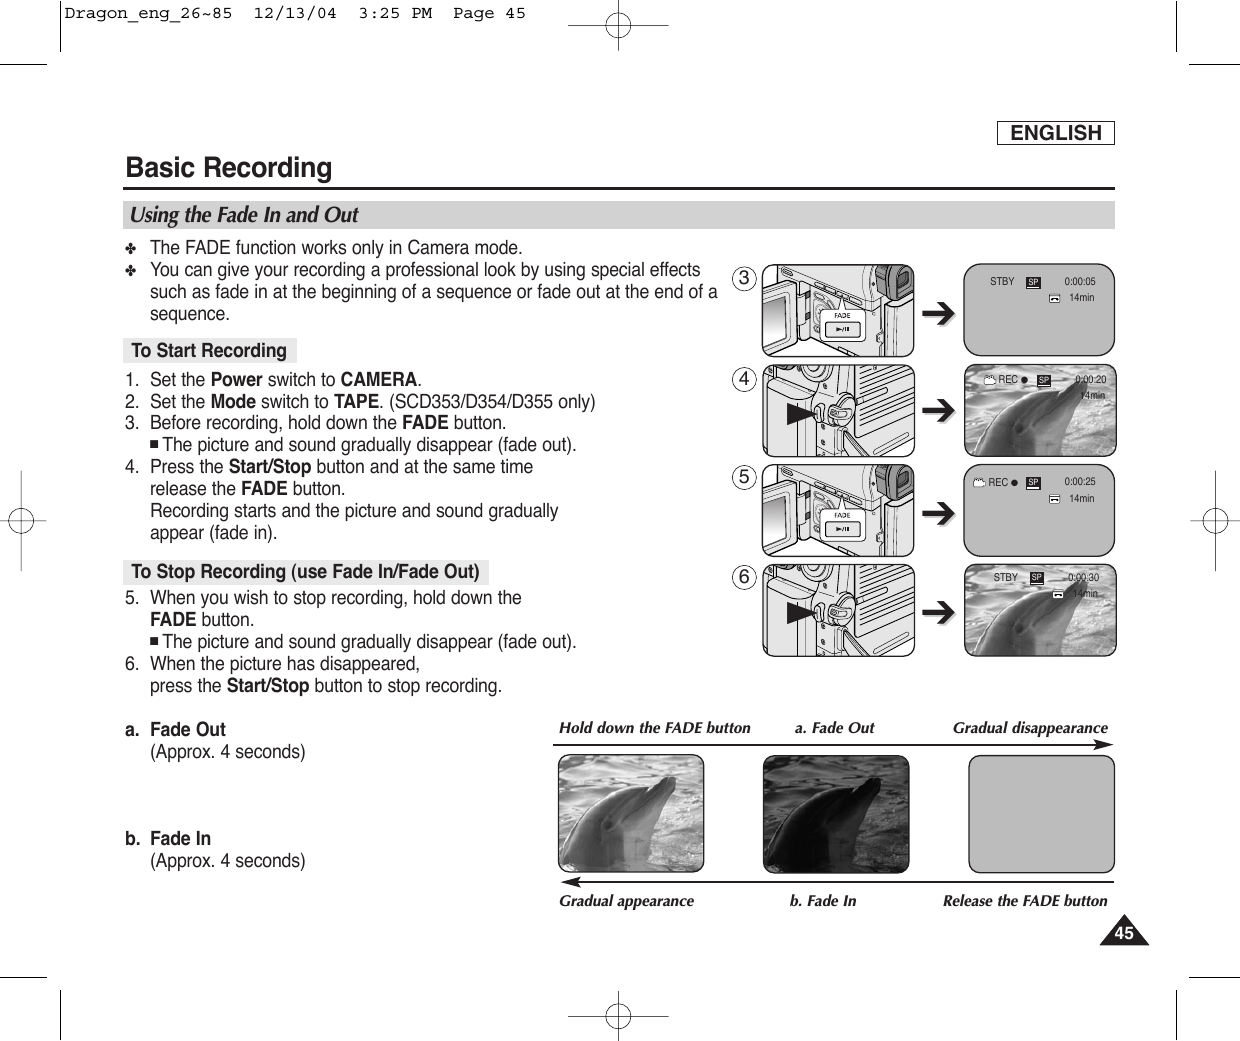
![4646ENGLISHBasic Recording✤BLC works in both Camera and M.Cam modes.✤Back lighting exists when the subject is darker than the background:-The subject is in front of a window.-The person to be recorded is wearing white or shiny clothes and is placed against a bright background; the person’s face is too dark todistinguish his/her features.-The subject is outdoors and the background is overcast.-The light sources are too bright.-The subject is against a snowy background.1. Set the Power switch to CAMERA.2. Set the Mode switch to TAPE or MEMORY CARD. (SCD353/D354/D355 only)3. Press the BLC button.■BLC icon ( ) will be displayed.4. To exit BLC mode, press the BLC button again.■Each press of the BLC button toggles: Normal ➝ BLC ➝ Normal.[ Notes ]■When NITE PIX to set to ON, the BLC function does not work. (SCD352/D354/D355 only)■The BLC function will not operate in EASY Q mode.<BLC on><BLC off>Using Back Light Compensation Mode (BLC)14min0:00:1012:00 AM JAN.01,2005SPSTBY34œDragon_eng_26~85 12/13/04 3:25 PM Page 46](https://usermanual.wiki/Samsung-Electronics-Co/05DRAGON.Users-Manual-1/User-Guide-501867-Page-50.png)
![ENGLISHBasic Recording4747✤COLOR NITE SHUTTER function works only in Camera mode.✤Shutter speed can be controlled, allowing you to record slow moving objects.✤COLOR NITE SHUTTER function may product a brighter image.1. Set the Power switch to CAMERA.2. Set the Mode switch to TAPE. (SCD353/D354/D355 only)3. Press the COLOR NITE SHUTTER button.4. Each time you press the COLOR NITE SHUTTER button, shutter speed is changed to Color N. 1/30, Color N. 1/15, Color N. 1/15() (SCD352/D354/D355 only) and off.[ Notes ]■When using COLOR NITE SHUTTER the image takes on a slow motion like effect.■The COLOR NITE SHUTTER function will not operate in EASY Q mode.■While using the COLOR NITE SHUTTER function, you cannot use the following functions:Program AE, DIS, Digital Zoom, Shutter Speed, Exposure, 16:9 wide (among of theDigital Effect function).■When using the COLOR NITE SHUTTER function, the focus is adjusted slowly and sometimes the white dots will appear onthe screen, this is not a fault.Using the Color Nite Shutter14min0:00:1012:00 AM JAN.01,2005SPSTBYColor N.1/30123œDragon_eng_26~85 12/13/04 3:25 PM Page 47](https://usermanual.wiki/Samsung-Electronics-Co/05DRAGON.Users-Manual-1/User-Guide-501867-Page-51.png)
![4848ENGLISHBasic Recording✤LED light enables you to record a subject in dark places without sacrificing color.✤The LED light can be used with COLOR NITE SHUTTER function only.1. Set the Power switch to CAMERA. 2. Set the Mode switch to TAPE. (SCD353/D354/D355 only)3. Press the COLOR NITE/LED LIGHT button until Color N. 1/15 () appears on the display.[ Note ]The range of the LED light is limited (up to 6.6ft (2m))■The LED light can become extremely hot.■Do not touch it while in operation or soon after turning it off, otherwise serious injury may result.■Do not place the Camcorder into the carrying case immediately after using the LED light,since it remains extremely hot for some time.■Do not use near flammable or explosive materials.Using the Color Nite Shutter with LED Light (SCD352/D354/D355 only)Danger14min0:00:1012:00 AM JAN.01,2005 Color N. 1/15SPSTBY12œDragon_eng_26~85 12/13/04 3:25 PM Page 48](https://usermanual.wiki/Samsung-Electronics-Co/05DRAGON.Users-Manual-1/User-Guide-501867-Page-52.png)
![ENGLISH4949Basic Recording✤The Nite Pix function works in both Camera and M.Cam modes.✤The Nite Pix function enables you to record a subject in darkness.1. Set the Power switch to CAMERA. 2. Set the Mode switch to TAPE or MEMORY CARD. (SCD353/D354/D355 only)3. Slide the NITE PIX switch to ON.■Nite Pix indicator ( ) appears on the LCD screen.■The infrared(invisible rays) light is turned on automatically.4. To cancel the Nite Pix function, slide the NITE PIX switch to OFF.[ Notes ]■The maximum recording distance using the infrared light is about 3 m (about 10 feet).■If you use the Nite Pix function in normal recording situations (ex. outdoors by day), the recorded picture may be tinted green.■In the Nite Pix mode, certain functions are not available, such as Exposure, White Balance, Program AE, Digital Effect and BLC.■If focusing is difficult with the auto focus mode when using the Nite Pix function, focus manually.■Do not cover the Infrared Light with the hand.■Do not set the NITE PIX to ON in bright lighting. It might damage the CCD (Charge Coupled Device).Nite Pix (0 lux recording) (SCD352/D354/D355 only)14minNite Pix0:00:1012:00 AM JAN.01,2005SPSTBY13œDragon_eng_26~85 12/13/04 3:25 PM Page 49](https://usermanual.wiki/Samsung-Electronics-Co/05DRAGON.Users-Manual-1/User-Guide-501867-Page-53.png)
![5050ENGLISHBasic Recording✤The Power Nite Pix function works only in Camera mode. ✤The Power Nite Pix function can record a subject more brightly in darkness than the Nite Pix function.✤The Power Nite Pix is displayed for three seconds by LCD screen if you press the COLOR NITE SHUTTER button in statethat a NITE PIX switch is turned ON.✤When you work in Power Nite Pix mode, Power Nite Pix icon appears on the LCD screen continuously.1. Set the Power switch to CAMERA. 2. Set the Mode switch to TAPE. (SCD353/D354/D355 only)3. Turn on the NITE PIX switch, and then press the COLOR NITE SHUTTER button.4. Press the COLOR NITE SHUTTER button to set shutter speed. ■The slow shutter function enables you to record a subject more brightly.5. When using Power Nite Pix the image takes on a slow motion like effect.6. To cancel the Power Nite Pix function, press the COLOR NITE SHUTTER button to set to off and then turn off the NITE PIX switch. [ Notes ]■The maximum recording distance using the infrared light is about 3 m (about 10 feet).■If you use the Power Nite Pix function in normal recording situations (ex. outdoors by day), the recorded picture may contain unnatural colors.■In the Power Nite Pix mode, certain functions are not available, such as Exposure White Balance,Program AE, Digital Effect and BLC.■When the subject is too bright, press the COLOR NITE SHUTTER button (Color N.1/30 ➝Color N.1/15)to obtain better quality recordings. Power Nite Pix (SCD352/D354/D355 only)14minPower Nite PixColor N.1/150:00:1012:00 AM JAN.01,2005SPSTBY134œDragon_eng_26~85 12/13/04 3:25 PM Page 50](https://usermanual.wiki/Samsung-Electronics-Co/05DRAGON.Users-Manual-1/User-Guide-501867-Page-54.png)
![ENGLISH5353Advanced RecordingAvailability of functions in each modeO: The requested mode will work in this operating mode.✕: You can not change the requested mode.: The operating mode will be released and the requested mode will work.*: The operating mode will be released and the requested mode will work. (operating mode data will be backed up.)(✩): This Function works on models SCD352/D354/D355 only.[ Notes ]■When a menu item on the LCD screen is marked with an , that item cannot be activated. ■When you select an item that cannot be changed, an error message will be displayed. DISDigital ZoomPHOTODigital EffectsNITE PIX (✩)Digital functionsRequestedModeOperatingModeDISOOOOO✕✕OOODigital ZoomPHOTO(TAPE) SLOWSHUTTERDigital Effects NITE PIXOOOOOOO✕✕OO✕*Dragon_eng_26~85 12/13/04 3:25 PM Page 53](https://usermanual.wiki/Samsung-Electronics-Co/05DRAGON.Users-Manual-1/User-Guide-501867-Page-57.png)
![5454ENGLISHAdvanced Recording✤The Rec Mode function works in both Camera and Player(DV IN) modes.✤This Camcorder records and plays back in SP (standard play) mode and in LP (long play) mode.-SP(standard play): This mode permits 60 minutes of recording time with a DVM60 tape.-LP(long play): This mode permits 90 minutes of recording time with a DVM60 tape.1. Set the Power switch to CAMERA or PLAYER.2. Set the Mode switch to TAPE. (SCD353/D354/D355 only)3. Press the MENU button.■The menu list will appear.4. Move the Menu selector to the left or right to select Record, then press the Menu selector.5. Move the Menu selector to the left or right to select Rec Mode, then press the Menuselector. 6. Move the Menu selector to the left or right to select desired record mode(SP or LP), then pressthe Menu selector.7. To exit, press the MENU button.[ Notes ]■We recommend that you use this Camcorder to play back any tapes recorded on this Camcorder.Playing back a tape recorded in other equipments may produce mosaic shaped distortion.■When you record a tape in SP and LP modes, or LP mode only, the playback picture may be distortedor the time code may not be written properly between scenes.■Record using SP mode for best picture and sound quality.Selecting the Record ModeMove Select ExitMENUCamera ModeBackRec ModeAudio ModeWind CutCamera Mode√RecordRec ModeAudio ModeWind Cut√SP√12Bit√OffMove Select ExitMENUSPLP46œ14min0:00:1012:00 AM JAN.01,2005SPSTBY7œDragon_eng_26~85 12/13/04 3:25 PM Page 54](https://usermanual.wiki/Samsung-Electronics-Co/05DRAGON.Users-Manual-1/User-Guide-501867-Page-58.png)
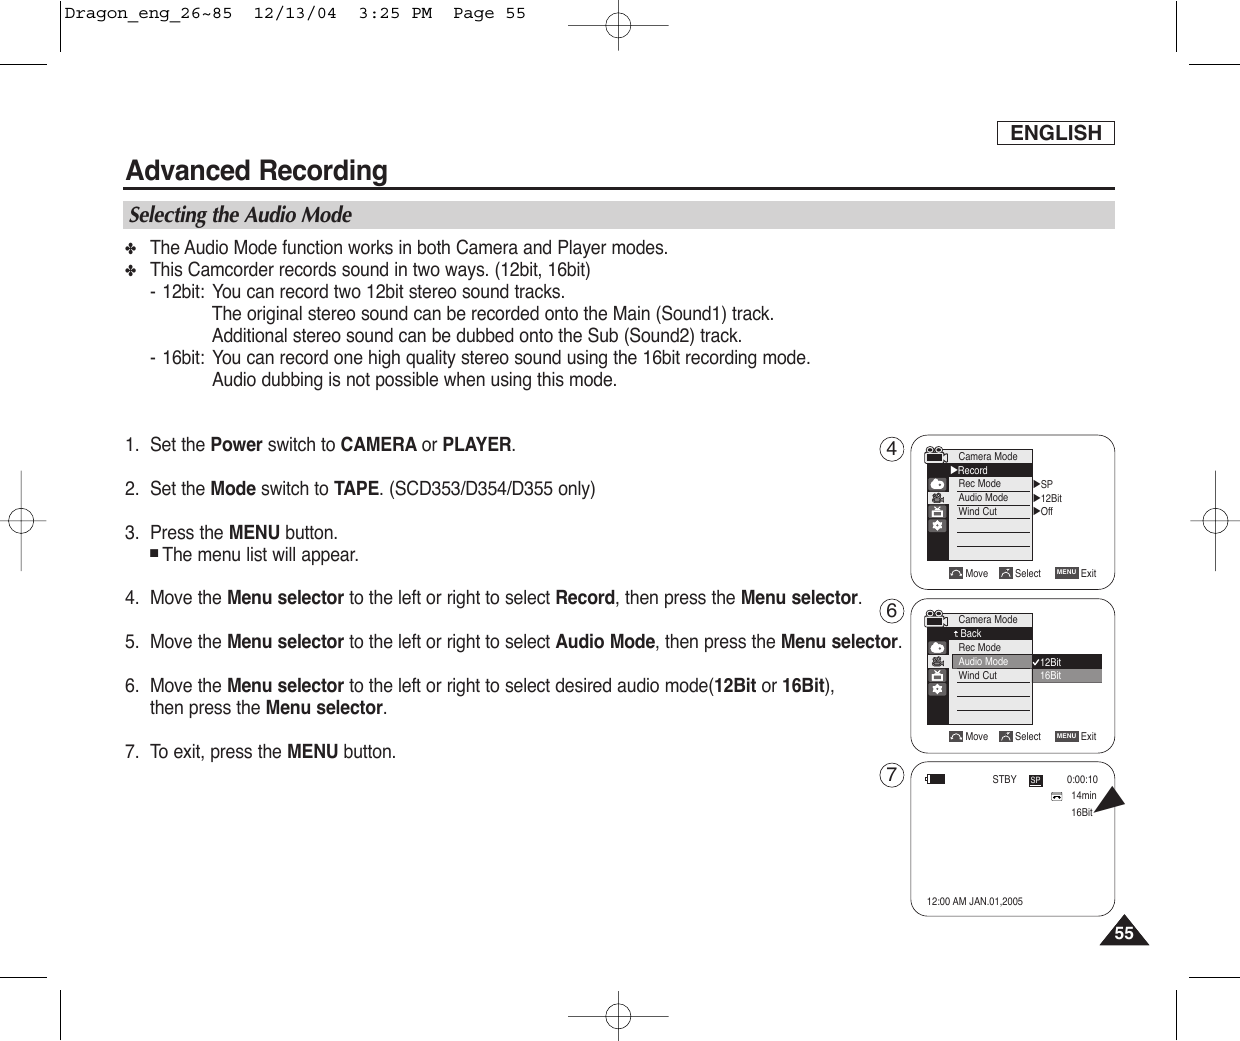
![5656ENGLISHAdvanced Recording✤The Wind Cut function works in both Camera and Player (Audio dubbing) modes.Use the Wind Cut when recording in windy places such as the beach or near buildings.✤The Wind Cut function minimizes wind noise or other noise while recording.-When the wind cut is on, some low sounds are eliminated along with the sound of the wind.1. Set the Power switch to CAMERA or PLAYER.2. Set the Mode switch to TAPE. (SCD353/D354/D355 only)3. Press the MENU button.■The menu list will appear.4. Move the Menu selector to the left or right to select Record, then press the Menu selector.5. Move the Menu selector to the left or right to select Wind Cut, then press the Menuselector. 6. To activate the Wind Cut function, move the Menu selector to the left or right to select On. And then press the Menu selector.■is shown in the LCD screen when you turn the Wind Cut On.7. To exit, press the MENU button.[ Notes ]■Make sure Wind Cut is set to off when you want the microphone to be as sensitive as possible.■When the Wind Cut function is set to On, low pitched tones might be eliminated along with the windnoise.Cutting Off Wind Noise (Wind Cut)Move Select ExitMENUCamera ModeBackRec ModeAudio ModeWind CutCamera Mode√RecordRec ModeAudio ModeWind Cut√SP√12Bit√OffMove Select ExitMENUOffOn 4614min0:00:1012:00 AM JAN.01,2005SPSTBY7œDragon_eng_26~85 12/13/04 3:25 PM Page 56](https://usermanual.wiki/Samsung-Electronics-Co/05DRAGON.Users-Manual-1/User-Guide-501867-Page-60.png)
![ENGLISH5757Advanced Recording✤You can set Shutter Speed only in Camera mode.✤The Exposure function works in both Camera and M.Cam modes.✤Shutter Speed and Exposure values can only be set in the Quick Menu.1. Set the Power switch to CAMERA.2. Set the Mode switch to TAPE. (SCD353/D354/D355 only)3. Press the Menu selector.■Quick menu list will appear.4. Move the Menu selector to the left or right to select Shutter or Exposure, then press the Menu selector.5. Move the Menu selector to the left or right to select Manual, then press the Menu selector. 6. Move the Menu selector to the left or right to select desired shutter speed or exposure,then press the Menu selector.■Shutter speed can be set to 1/60, 1/100, 1/250, 1/500, 1/1000, 1/2000, 1/4000 or 1/10000.■Exposure value can be set between 00 and 29.7. To exit, press the MENU button.✤Outdoor sports such as golf or tennis: 1/2000 or 1/4000.✤Moving cars or trains or other rapidly moving vehicles such as roller coasters: 1/1000, 1/500or 1/250 ✤Indoor sports such as basketball: 1/100[ Notes ]■If you want to use the selected Shutter Speed and Exposure value, you should begin the recording withthe Shutter Speed and the Exposure adjustment screens displayed on the LCD screen.■If you manually change the Shutter Speed and the Exposure value when Auto-exposure option is selected, manual changes areapplied first.■The image may not seem as smooth when a high Shutter Speed is set.■The Camcorder returns to the auto shutter setting and auto exposure setting when you set the NITE PIX to ON, or change to theEASY Q modes. (SCD352/D354/D355 only)■When recording with a Shutter Speed of 1/1000 or higher, make sure the sun is not shining into the lens. Setting the Shutter Speed & ExposureRecommended Shutter Speeds when Recording14min0:00:10SPSTBY†…14min0:00:10SPSTBYExitMENUDISProgram AEWhite BalanceShutterExposureManual Focus…†Manual14min0:00:10SPSTBYExitMENUOffDISProgram AEWhite BalanceShutterExposureManual FocusS. 1/60356Dragon_eng_26~85 12/13/04 3:25 PM Page 57](https://usermanual.wiki/Samsung-Electronics-Co/05DRAGON.Users-Manual-1/User-Guide-501867-Page-61.png)
![✤The Auto Focus/Manual Focus function works in both Camera and M.Cam mode.✤In most situations, it is better to use the automatic focus feature, as it enables you to concentrate on the creative side of your recording.✤Manual focusing may be necessary under certain conditions that make automatic focusing difficult and/or unreliable.Manual Focus can be set in the Quick Menu.✤If you are inexperienced in the use of Camcorders, we recommend that you make useof Auto Focus.✤In the following situations, you may obtain better results by adjusting the focus manually.a. A picture containing several objects, some close to the Camcorder, others further away.b. A person enveloped in fog or surrounded by snow.c. Very shiny or glossy surfaces like a car.d. People or objects moving constantly or quickly like an athlete or a crowd.1. Set the Power switch to CAMERA.2. Set the Mode switch to TAPE or MEMORY CARD. (SCD353/D354/D355 only)3. Press the Menu selector.4. Move the Menu selector to the left or right to select Manual Focus, then press the Menuselector.5. Move the Menu selector to the left or right to select On, then press the Menu selector.M.Focus( ) will display.6. Move the Menu selector to the left or right until the object is in focus.[ Note ]Manual Focus is not available in the EASY Q mode.ENGLISH5858Advanced RecordingManual FocusingAuto FocusingAuto Focus/Manual Focusacbd14min0:00:10SPSTBYExitMENUDISProgram AEWhite BalanceShutterExposureManual Focus…†On14min0:00:1012:00 AM JAN.01,2005SPSTBY45œDragon_eng_26~85 12/13/04 3:25 PM Page 58](https://usermanual.wiki/Samsung-Electronics-Co/05DRAGON.Users-Manual-1/User-Guide-501867-Page-62.png)
![ENGLISH6060Advanced Recording✤Quick menu is used to access Camcorder functions by simply using the Menu selector.✤Quick menu provides easier access to the frequently used menus without using the Menu button.1. Press the Menu selector.2. Move the Menu selector to the left or right to select White Balance, then press the Menu selector.3. Move the Menu selector to the left or right to select desired mode(Auto, Hold, Indoor orOutdoor), then press the Menu selector.[ Notes ]■When NITE PIX is set to ON, the White Balance function does not work. (SCD352/D354/D355 only)■The White Balance function will not operate in EASY Q mode.■Turn the Digital Zoom off (if necessary) to set a more accurate white balance.■Reset the white balance if lighting conditions change. ■During normal outdoor recording, setting to Auto may provide better results.Using Quick Menu: White Balance14min0:00:10SPSTBYExitMENUDISProgram AEWhite BalanceShutterExposureManual Focus…†Auto14min0:00:10SPSTBYExitMENUOffDISProgram AEWhite BalanceShutterExposureManual FocusA1314min0:00:1012:00 AM JAN.01,2005SPSTBYœDragon_eng_26~85 12/13/04 3:25 PM Page 60](https://usermanual.wiki/Samsung-Electronics-Co/05DRAGON.Users-Manual-1/User-Guide-501867-Page-64.png)